
SEP-C1 - Media remote PIONEER - Free user manual and instructions
Find the device manual for free SEP-C1 PIONEER in PDF.
| Product type | DJ mixing software controller |
| Brand | Pioneer |
| Model | SEP-C1 |
| Dimensions (W x H x D) | 482.6 mm x 133.0 mm x 83.5 mm |
| Weight | 1.7 kg |
| Power supply | USB bus power via USB auxiliary power cable |
| Operating temperature | +5 °C to +35 °C |
| Operating humidity | 5% to 85% RH (non-condensing) |
| PC connector | USB type B port |
| Video output | RCA jack, 1 Vp-p (75 Ω) |
| Central display | Active matrix TFT LCD 4.3" (color) |
| Controller A/B display | Organic EL (OEL) segment display |
| Jog dial | 80 mm, scratch function |
| Included software | DJS (60-day trial version) |
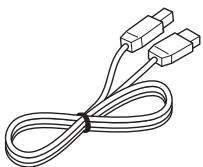
| Included accessories | USB cable, USB auxiliary power cable, DJS CD-ROM, DJS installation sticker, instruction manual, warranty card |
| Maintenance | Clean with a soft, dry cloth; diluted mild detergent if needed. Do not use benzene, thinner, or alcohol. |
| Safety | Do not expose to water or moisture; do not obstruct ventilation openings; do not place open flames on the unit. |
| Spare parts and repairability | No user-serviceable parts inside. Refer all servicing to qualified personnel. |
| General information | Complies with Low Voltage and EMC directives. Operating temperature and humidity: +5 to +35°C, <85% RH. |
Frequently Asked Questions - SEP-C1 PIONEER
User questions about SEP-C1 PIONEER
0 question about this device. Answer the ones you know or ask your own.
Ask a new question about this device
Download the instructions for your Media remote in PDF format for free! Find your manual SEP-C1 - PIONEER and take your electronic device back in hand. On this page are published all the documents necessary for the use of your device. SEP-C1 by PIONEER.
USER MANUAL SEP-C1 PIONEER
Operating Instructions
Mode d'emploi
Bedienungsanleitung
Thank you for buying this Pioneer product.
Please read through these operating instructions so you will know how to operate your model properly. After you have finished reading the instructions, put them away in a safe place for future reference.
In some countries or regions, the shape of the power plug and power outlet may sometimes differ from that shown in the explanatory drawings. However the method of connecting and operating the unit is the same.
IMPORTANT

The lightning flash with arrowhead symbol, within an equilateral triangle, is intended to alert the user to the presence of uninsulated "dangerous voltage" within the product's enclosure that may be of sufficient magnitude to constitute a risk of electric shock to persons.
CAUTION
RISK OF ELECTRIC SHOCK
DO NOT OPEN
CAUTION:
TO PREVENT THE RISK OF ELECTRIC SHOCK,DO NOT REMOVE COVER (OR BACK).NO USER-SERVICEABLE PARTS INSIDE.REFER SERVICING TO QUALIFIED SERVICE PERSONNEL.

The exclamation point within an equilateral triangle is intended to alert the user to the presence of important operating and maintenance (servicing) instructions in the literature accompanying the appliance.
D3-4-2-1_En-A
IMPORTANT SAFETY INSTRUCTIONS
1) Read these instructions.
2) Keep these instructions.
3) Heed all warnings.
4) Follow all instructions.
5) Do not use this apparatus near water.
6) Clean only with dry cloth.
7) Do not block any ventilation openings. Install in accordance with the manufacturer's instructions.
8) Do not install near any heat sources such as radiators, heat registers, stoves, or other apparatus (including amplifiers) that produce heat.
9) Do not defeat the safety purpose of the polarized or grounding-type plug. A polarized plug has two blades with one wider than the other. A grounding type plug has two blades and a third grounding prong. The wide blade or the third prong are provided for your safety. If the provided plug does not fit into your outlet, consult an electrician for replacement of the obsolete outlet.
10) Protect the power cord from being walked on or pinched particularly at plugs, convenience receptacles, and the point where they exit from the apparatus.
11) Only use attachments/accessories specified by the manufacturer.
12) Use only with the cart, stand, tripod, bracket, or table specified by the manufacturer, or sold with the apparatus. When a cart is used, use caution when moving the cart/apparatus combination to avoid injury from tip-over.

13) Unplug this apparatus during lightning storms or when unused for long periods of time.
14) Refer all servicing to qualified service personnel. Servicing is required when the apparatus has been damaged in any way, such as power-supply cord or plug is damaged, liquid has been spilled or objects have fallen into the apparatus, the apparatus has been exposed to rain or moisture, does not operate normally, or has been dropped. P1-4-2-2_En
NOTE: This equipment has been tested and found to comply with the limits for a Class B digital device, pursuant to Part 15 of the FCC Rules. These limits are designed to provide reasonable protection against harmful interference in a residential installation. This equipment generates, uses, and can radiate radio frequency energy and, if not installed and used in accordance with the instructions, may cause harmful interference to radio communications. However, there is no guarantee that interference will not occur in a particular installation. If this equipment does cause harmful interference to radio or television reception, which can be determined by turning the equipment off and on, the user is encouraged to try to correct the interference by one or more of the following measures:
- Reorient or relocate the receiving antenna.
- Increase the separation between the equipment and receiver.
- Connect the equipment into an outlet on a circuit different from that to which the receiver is connected.
- Consult the dealer or an experienced radio/TV technician for help.

If you want to dispose this product, do not mix it with general household waste. There is a separate collection system for used electronic products in accordance with legislation that requires proper treatment, recovery and recycling.
Private households in the member states of the EU, in Switzerland and Norway may return their used electronic products free of charge to designated collection facilities or to a retailer (if you purchase a similar new one).
For countries not mentioned above, please contact your local authorities for the correct method of disposal.
By doing so you will ensure that your disposed product undergoes the necessary treatment, recovery and recycling and thus prevent potential negative effects on the environment and human health. K058
K058_A_En
WARNING
This equipment is not waterproof. To prevent a fire or shock hazard, do not place any container filled with liquid near this equipment (such as a vase or flower pot) or expose it to dripping, splashing, rain or moisture. D3-4-2-1-3_B_En
IMPORTANT NOTICE - THE SERIAL NUMBER FOR THIS EQUIPMENT IS LOCATED ON THE BOTTOM. PLEASE WRITE THIS SERIAL NUMBER ON YOUR ENCLOSED WARRANTY CARD AND KEEP IN A SECURE AREA. THIS IS FOR YOUR SECURITY.
D1-4-2-6-1_En
Information to User
Alteration or modifications carried out without appropriate authorization may invalidate the user's right to operate the equipment. D8-10-2
D8-10-2_En
CAUTION: This product satisfies FCC regulations when shielded cables and connectors are used to connect the unit to other equipment. To prevent electromagnetic interference with electric appliances such as radios and televisions, use shielded cables and connectors for connections. D8-10-3a.En
This Class B digital apparatus complies with Canadian ICES-003.
WARNING: Handling the cord on this product or cords associated with accessories sold with the product will expose you to chemicals listed on proposition 65 known to the State of California and other governmental entities to cause cancer and birth defect or other reproductive harm.
Wash hands after handling
D36-P4_A_En
WARNING
To prevent a fire hazard, do not place any naked flame sources (such as a lighted candle) on the equipment. D3-4-2-1-7a_A_En
VENTILATION CAUTION
When installing this unit, make sure to leave space around the unit for ventilation to improve heat radiation (at least 5cm at rear, and 3cm at each side).
WARNING
Slots and openings in the cabinet are provided for ventilation to ensure reliable operation of the product, and to protect it from overheating. To prevent fire hazard, the openings should never be blocked or covered with items (such as newspapers, table-cloths, curtains) or by operating the equipment on thick carpet or a bed. D3-4-2-1-7b_A_En
This product complies with the Low Voltage Directive 2006/95/EC and EMC Directive 2004/108/EC.
D3-4-2-1-9a_A_En
Dear Customer:
Selecting fine audio equipment such as the unit you've just purchased is only the start of your musical enjoyment. Now it's time to consider how you can maximize the fun and excitement your equipment offers. This manufacturer and the Electronic Industries Association's Consumer Electronics Group want you to get the most out of your equipment by playing it at a safe level. One that lets the sound come through loud and clear without annoying blaring or distortion-and, most importantly, without affecting your sensitive hearing.
Sound can be deceiving. Over time your hearing "comfort level" adapts to higher volumes of sound. So what sounds "normal" can actually be loud and harmful to your hearing. Guard against this by setting your equipment at a safe level BEFORE your hearing adapts.
To establish a safe level:
- Start your volume control at a low setting.
- Slowly increase the sound until you can hear it comfortably and clearly, and without distortion.
Once you have established a comfortable sound level:
- Set the dial and leave it there.
Taking a minute to do this now will help to prevent hearing damage or loss in the future. After all, we want you listening for a lifetime.
We Want You Listening For A Lifetime
Used wisely, your new sound equipment will provide a lifetime of fun and enjoyment. Since hearing damage from loud noise is often undetectable until it is too late, this manufacturer and the Electronic Industries Association's Consumer Electronics Group recommend you avoid prolonged exposure to excessive noise. This list of sound levels is included for your protection.
Decibel
Level Example
30 Quiet library, soft whispers
40 Living room, refrigerator, bedroom away from traffic
50 Light traffic, normal conversation, quiet office
60 Air conditioner at 20 feet, sewing machine 70
70Vacuum cleaner, hair dryer, noisy restaurant
80 Average city traffic, garbage disposals, alarm clock at two feet.
THE FOLLOWING NOISES CAN BE DANGEROUS UNDER CONSTANT EXPOSURE
90 Subway, motorcycle, truck traffic, lawn mower
100 Garbage truck, chain saw, pneumatic drill
120 Rock band concert in front of speakers,
hunderclap
140 Gunshot blast, jet plane
180 Rocket launching pad
Information courtesy of the Deafness Research Foundation.


S001_En
FEDERAL COMMUNICATIONS COMMISSION DECLARATION OF CONFORMITY
This device complies with part 15 of the FCC Rules. Operation is subject to the following two conditions: (1) This device may not cause harmful interference, and (2) this device must accept any interference received, including interference that may cause undesired operation.
Product Name: SOFTWARE ENTERTAINMENT CONTROLLER
Model Number: SEP-C1
Responsible Party Name: PIONEER ELECTRONICS SERVICE, INC.
Address: 1925 E. DOMINGUEZ ST. LONG BEACH, CA 90801-1760, U.S.A.
Phone: 1-800-421-1404
When using this product follow the instructions written on the underside of the unit, which concern rated voltage, etc. D3-4-2-2-4. En
CONTENTS
FEATURES 5
SPECIFICATIONS 7
COMFIRM ACCESSORIES 7
INSTALLATION GUIDELINES 8
CONNECTIONS 9
PARTS AND THEIR FUNCTIONS. 10
FRONT PANEL 10
REAR PANEL 12
ABOUT DJS SOFTWARE 13
SOFTWARE END USER LICENSE AGREEMENT 13
COPYRIGHT WARNING 14
SYSTEM REQUIREMENTS (Minimum Operating
Environment) 14
INSTALLING DJS SOFTWARE 15
NOTES REGARDING TRIAL PERIOD AND USER
REGISTRATION 15
REGARDING ONLINE SUPPORT. 16
DISCLAIMER 16
ABOUT THE DRIVER PROGRAM 17
SOFTWARE END USER LICENSE AGREEMENT 17
DRIVER INSTALLATION 17
USING DJ SOFTWARE 20
PREPARING YOUR DJ SOFTWARE PROGRAM 21
CONTROLLING YOUR COMPUTER USING THE DEDICATED
COMMUNICATIONS PROTOCOL 21
USING MIDI FOR COMPUTER CONTROL 22
MIDIMESSAGE TABLE 23
USING THE UTILITY 25
SETTING METHOD 25
SETTINGSS 25
TO PERFORM A FACTORY RESET 26
TROUBLESHOOTING 27
ABOUT THE LCD SCREEN 27
ABOUT OEL (ORGANIC EL) SCREENS 27
SEP-C1 UPDATES 27
DISCLAIMER 28
http://www.prodjnet.com/support/
The Pioneer website listed above provides answers to frequently asked questions, information about software, and other up-to-date data of assistance to our customers.
FEATURES
This unit is a professional mobile DJ software entertainment controller featuring a wide range of the performance functions demanded at parties and events, together with superb operational characteristics.
Continuing the tradition of Pioneer's CDJ series of players in its panel layout, functions, and operations, the unit can be connected to a computer using USB bus power, allowing genuine DJ play of music tracks loaded in the accessory DJS software program without the need to operate mouse or keyboard.
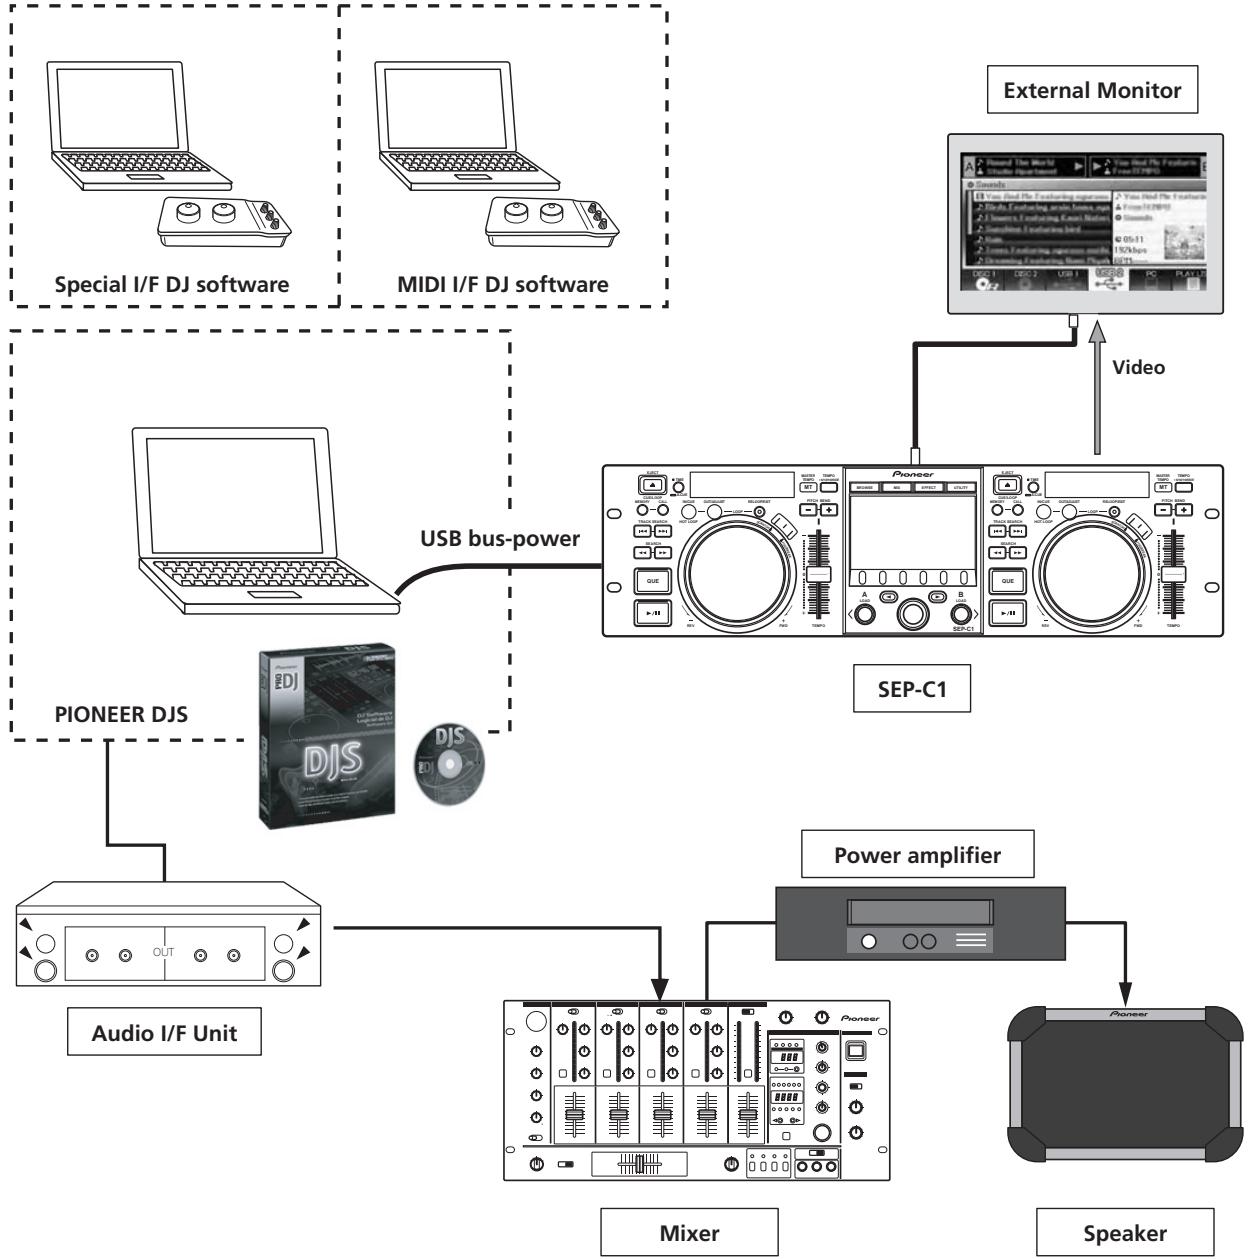
VARIOUS DJ SOFTWARE CONTROL
The accessory Pioneer DJS software program as well as other DJ programs can be operated freely without the need for a control disc. MIDI-type DJ programs are also supported.

MEMO
- Most of the data regarding button and TEMPO adjust slider operations on this unit can be output to external devices using USB MIDI or dedicated formats. In order to use this unit to control DJ software, it is necessary to install a driver program.
HIGH FUNCTION DISPLAY
Center Display
Features a wide 4.3" color LCD display with high luminance for easy visibility. The intelligent GUI and rotary selector dial allows for no-stress track selection.
Controller Display A/B
The elapsed time and tempo display feature top-quality, area-color full-segment OEL displays with high response and terrific visibility. In concert with the center display, these displays and indicators encourage no-stress DJ play in a wide variety of lighting environments.
JOG DIAL
Furnished with large 80 mm jog dial with scratch function, allowing operations with the same sense of touch as an analog turntable.
MONITOR OUT
By outputting the center display's BROWSE screen to a larger external monitor, operations can be performed with greater ease.
DJS FUNCTION SUPPORT
Using the accessory DJS software program allows not only DJ play, but a wide variety of other control operations as well, including track selection and mixing using the center display.
DJ CONTROL
In addition to basic functions like tempo control, cue operations, and loop play, most DJ play functions of DJS are supported by the unit including scratch and pitch bend using the jog dial.
TRACK INFORMATION
When playing tracks using DJS, time, title, artist name and other track information can be shown on the display.
BROWSE CONTROL
The unit can control DJS track lists or play lists. Lists can also be viewed on the center display and track selection performed without looking at the computer screen.
MIX CONTROL
The DJS mixer function can be controlled. A single button can be used to perform mixing, selecting from four mix modes.
EFFECT CONTROL
DJS effects can be controlled. Selection of effects and effect beat switching, level/tempo adjustment can all be performed using the unit's rotary selector and buttons.

MEMO
- When controlling other (non-DJS) brands of DJ software, consult the individual program's operating instructions for information regarding function support.
SPECIFICATIONS
1 General
Model . SEP-C1
Name . Software entertainment controller
Power voltage. DC 5 V (USB bus-power)
Current consumption 600 mA
Power consumption 3 W
Operating temperature . . . . . . +5 °C to +35 °C (+41 °F to +95 °F)
Operating humidity . . . . . . 5 % to 85 % RH (without condensation)
Mass (Weight) 1.7 kg (3.75 lb.)
Maximum external dimensions 482.6 mm (W) x 133.0 mm (H) x 83.5 mm (D) 19.0 in (W) x 5.24 in (H) 3.29 in (D)
2 USB Upstream Section
Connector.. USB B-type port (PC connector)
3 Video Output Section
Output connector .RCA jack
Composite output level. 1 Vp-p (75 Ω)
4 Center Display Section
Type . TFT LCD active matrix display
Size 4.3" (WIDE)
Supported languages. 9 languages including English,
Japanese, and Chinese (simplified Mandarin)
5 Controller Display A/B Section
Type . OEL (Organic EL) Full segment
6 Other Connectors
5 V connector . DC jack
Specifications and appearance are subject to change without notice.
COMFIRM ACCESSORIES
Confirm that all furnished accessories are present.
USB cable
USB auxiliary power cable
DJS: 1 Set
CD-ROM

DJS installation key sticker
Operating Instructions (this manual)
Warranty card

MEMO
-
Three instruction manuals are furnished (including the one you are reading). Please study these manuals in accord with your manner of use:
-
SEP-C1 Operating Instructions (this manual)
Read this first.
- SEP-C1 DJS Control Guide (PDF file recorded on accessory CD-ROM)
Basic operation instructions when using DJS together with the SEP-C1.
- DJS User's Manual (PDF file recorded on accessory CD-ROM)
Full functional explanation and operation manual for DJS software.
INSTALLATION GUIDELINES
- Placing and using the unit for long periods on heat-generating sources such as amplifiers or near spotlights, etc. will affect product performance. Avoid placing the unit on heat-generating sources.
- Install this unit as far as possible away from tuners and TV sets. A unit installed in close proximity to such equipment may cause noise or degradation of the picture. Noise may be noticeable when an indoor antenna is used. In such cases, make use of an outdoor antenna or turn off power to the unit.
- When the unit is used in a loud-sound environment, e.g., near a speaker, sound skip may occur. Install the unit away from the speaker or reduce the listening volume.
- Place this unit on a level surface and a stable platform.
- Do not place heavy objects on top of the unit.
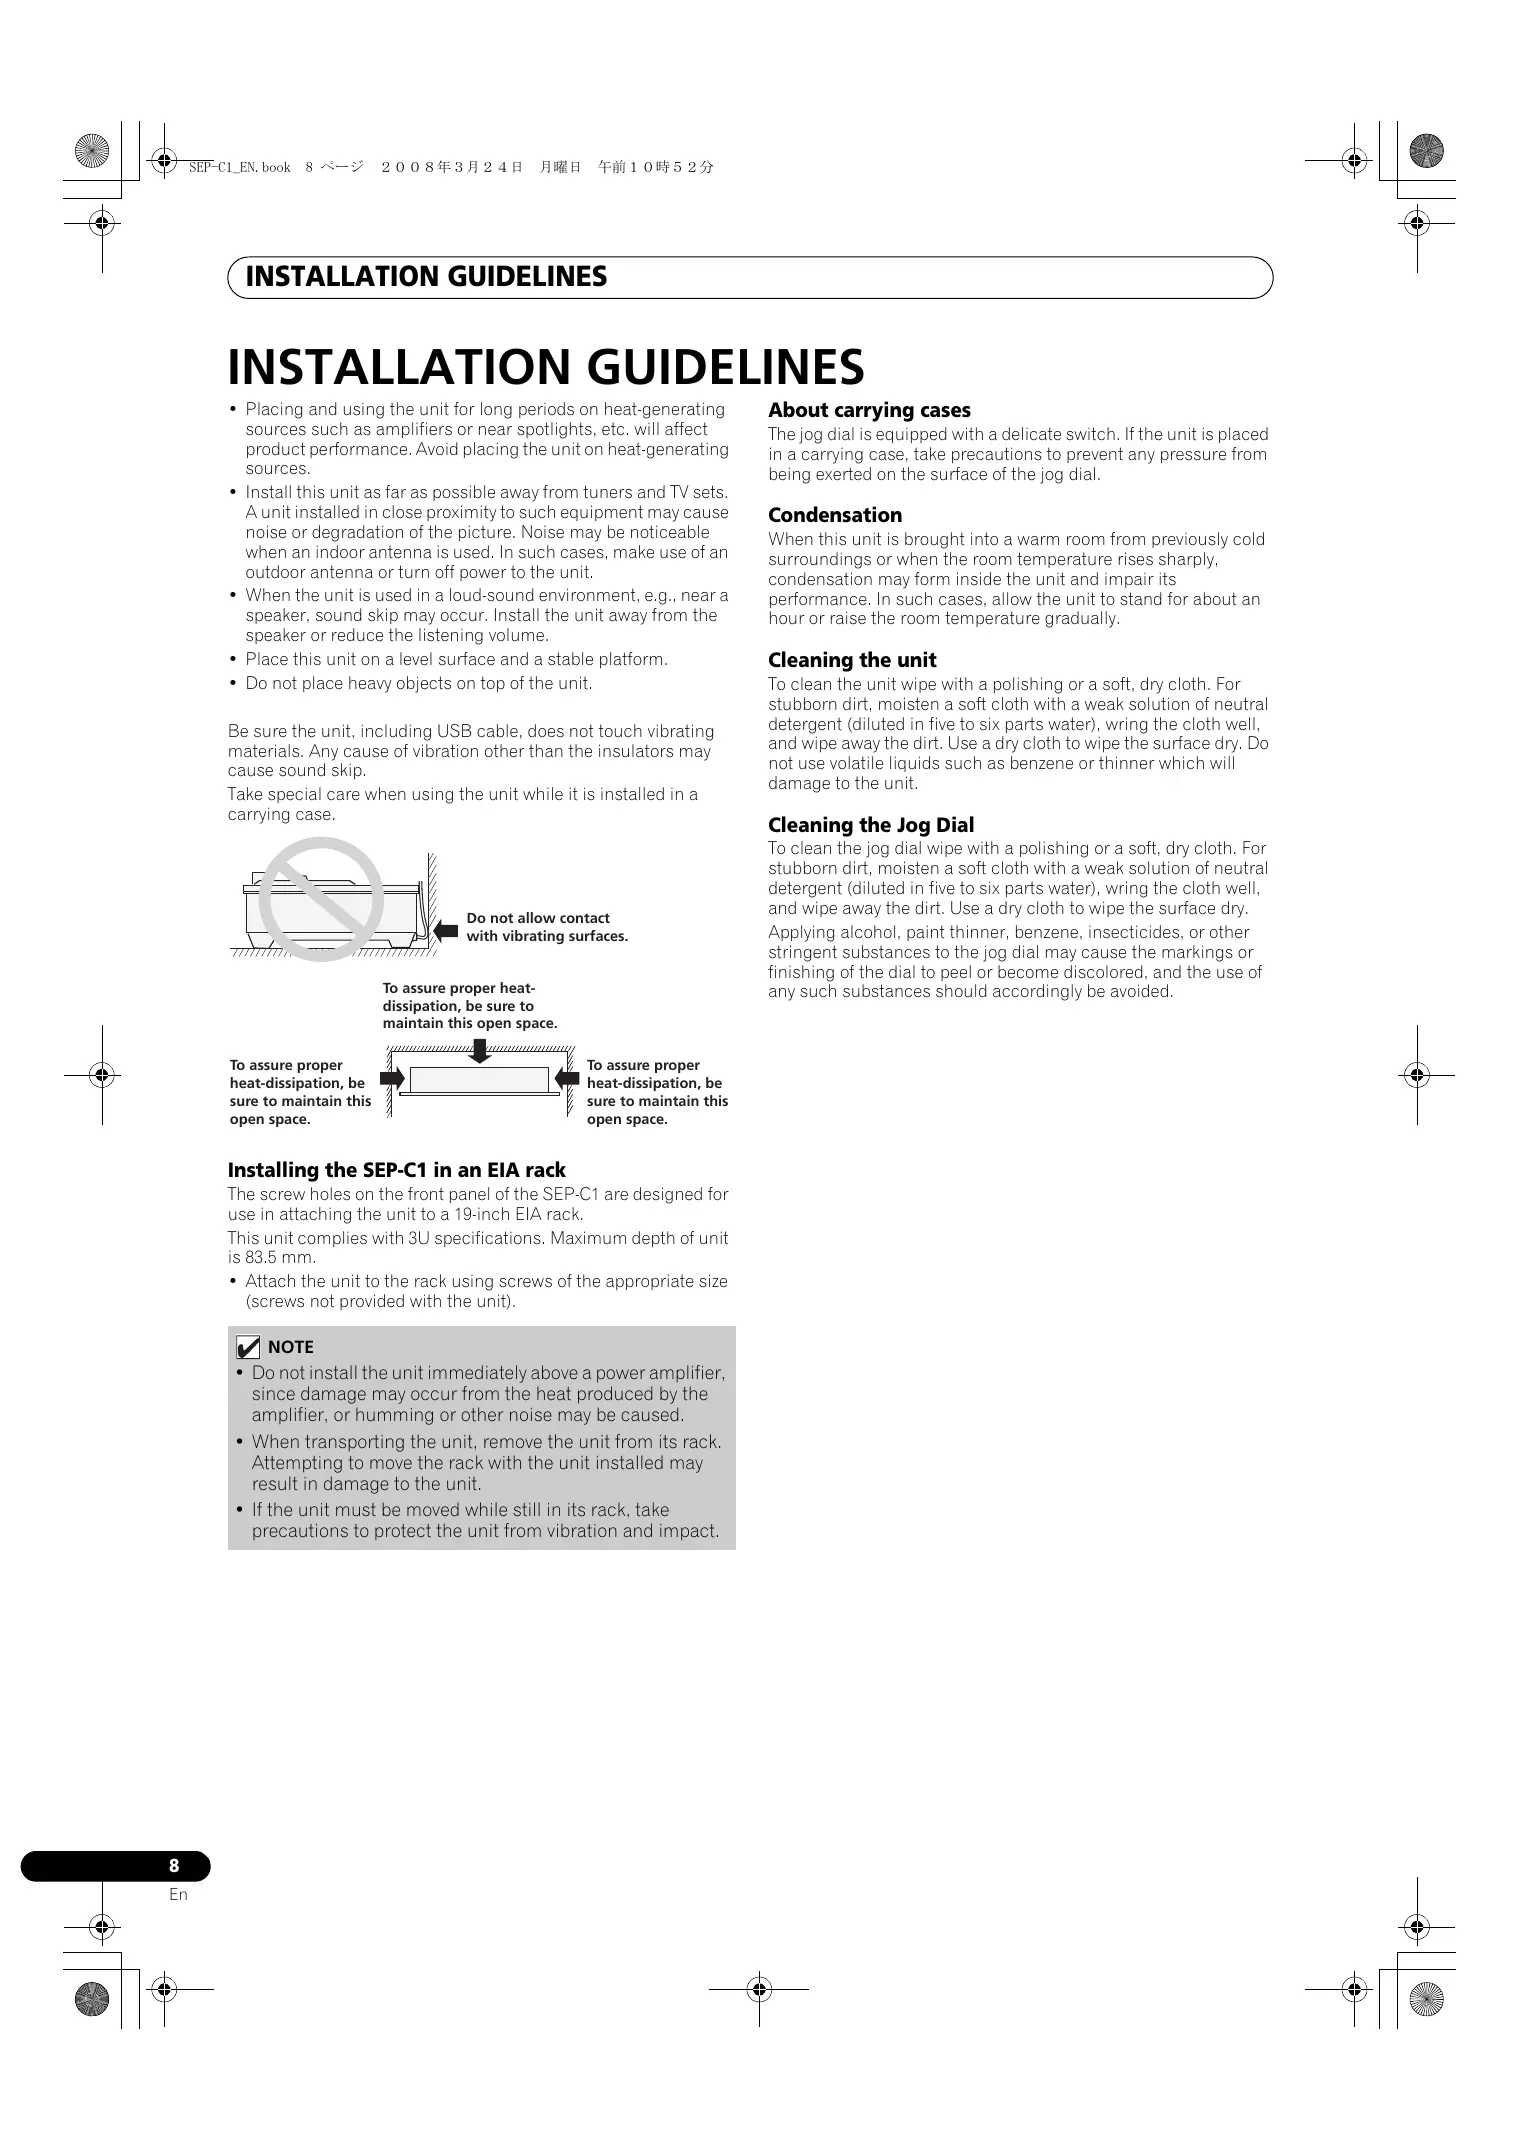
Be sure the unit, including USB cable, does not touch vibrating materials. Any cause of vibration other than the insulators may cause sound skip.
Take special care when using the unit while it is installed in a carrying case.
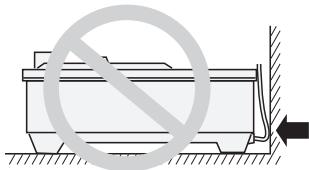
Do not allow contact with vibrating surfaces.
To assure proper heat-dissipation, be sure to maintain this open space.
To assure proper heat-dissipation, be sure to maintain this open space.
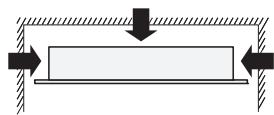
To assure proper heat-dissipation, be sure to maintain this open space.
Installing the SEP-C1 in an EIA rack
The screw holes on the front panel of the SEP-C1 are designed for use in attaching the unit to a 19-inch EIA rack.
This unit complies with 3U specifications. Maximum depth of unit is 83.5mm
- Attach the unit to the rack using screws of the appropriate size (screws not provided with the unit).

NOTE
- Do not install the unit immediately above a power amplifier, since damage may occur from the heat produced by the amplifier, or humming or other noise may be caused.
- When transporting the unit, remove the unit from its rack. Attempting to move the rack with the unit installed may result in damage to the unit.
- If the unit must be moved while still in its rack, take precautions to protect the unit from vibration and impact.
About carrying cases
The jog dial is equipped with a delicate switch. If the unit is placed in a carrying case, take precautions to prevent any pressure from being exerted on the surface of the jog dial.
Condensation
When this unit is brought into a warm room from previously cold surroundings or when the room temperature rises sharply, condensation may form inside the unit and impair its performance. In such cases, allow the unit to stand for about an hour or raise the room temperature gradually.
Cleaning the unit
To clean the unit wipe with a polishing or a soft, dry cloth. For stubborn dirt, moisten a soft cloth with a weak solution of neutral detergent (diluted in five to six parts water), wring the cloth well, and wipe away the dirt. Use a dry cloth to wipe the surface dry. Do not use volatile liquids such as benzene or thinner which will damage to the unit.
Cleaning the Jog Dial
To clean the jog dial wipe with a polishing or a soft, dry cloth. For stubborn dirt, moisten a soft cloth with a weak solution of neutral detergent (diluted in five to six parts water), wring the cloth well, and wipe away the dirt. Use a dry cloth to wipe the surface dry. Applying alcohol, paint thinner, benzene, insecticides, or other stringent substances to the jog dial may cause the markings or finishing of the dial to peel or become discolored, and the use of any such substances should accordingly be avoided.
CONNECTIONS
Use the accessory USB auxiliary power cable and the normal USB cable to connect the unit to the computer (connect the USB auxiliary power cable first).

NOTE
- Do not connect anything to the 5 V connector other than the accessory USB auxiliary power cable.
- Always use the accessory USB auxiliary power cable and USB cable only.
- Always connect the accessory USB auxiliary power cable and USB cable to one and the same computer.
- Do not connect this unit to a computer through a USB hub.
- Do not connect this unit to a computer through a CardBus-supported USB interface card.
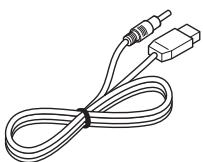
Connection to external monitor (pin-jack connector)
Use these connections when you wish to output the center display images to a large screen. After connecting this unit to the external monitor, the unit's settings must be changed (see the item "MONITOR OUT" in the topic "[1] DISPLAY" under the section "USING THE UTILITY" on P. 25).
External monitor
PARTS AND THEIR FUNCTIONS
FRONT PANEL
This section explains the use of the unit when controlling DJS. Depending on the DJ software program used, some functions may not be supported or may require different operations than those described in this manual.
1 EJECT () button
Not used during DJS control.
2 Loop control buttons
Loop-in button (IN/CUE)
Use to set loop-in points. When this button is pressed during loop playback, playback returns to the loop-in point and recommences.
Loop-out button (OUT/ADJUST)
Use to set loop-out points. If this button is pressed during loop playback, the jog dial or SEARCH buttons can be used to adjust the position of the out point.
RELOOP/EXIT button
Press this button during loop playback to cancel loop play. When the unit is not in loop play mode, pressing the button will cause loop play to begin from the previously set loop-in point.
3 TEMPO control section
TEMPO control range button (± 6 / 10 / 16 / WIDE)
Each time the button is pressed, the variable range of the TEMPO adjust slider changes.
MASTER TEMPO button and indicator (MT):
Each time the button is pressed, the master tempo function alternates ON/OFF.
TEMPO adjust slider:
From the center detent position, pull the slider towards you (+) to increase the tempo, and push the slider away from you (-) to slow down the tempo.
PITCH BEND + / - buttons:
When pressed during play, the pitch bend function is enabled. Pressing the "+" button accelerates the pitch bend speed, and pressing the "-" button decelerates the pitch bend speed.
The speed of the pitch change can be modified by holding the button depressed while rotating the jog dial.
4 TRACK SEARCH (I<,▶) buttons
Use to perform track search.
5 SEARCH (, ) buttons
Use to perform fast forward and reverse.
6 CUE button and indicator
Use to set cue points. Also when a cue point has been set, pressing the CUE button sets the unit to the cue standby mode.
7 Play/pause (/) button and indicator
Use to start and pause playback.
8 Time mode/auto cue button (TIME/A.CUE)
TIME:
Each time the button is pressed, the display's time display alternates between the current track's elapsed playing time, and the remaining time (REMAIN).
A.CUE:
When held depressed for one second or more, the AUTO CUE function alternates ON/OFF.
AUTO CUE function
Whenever a track is set or track search is performed, this function automatically sets a cue point and cue standby immediately before the point where music starts.
9 SCRATCH button
Press to set the scratch mode ON/OFF.
10 JOG BREAK button
Not used during DJS control.
11 BROWSE button
Use to switch to the BROWSE screen.
12 MIX button
Use to switch to the MIX screen.
13 EFFECT button
Use to switch to the EFFECT screen.
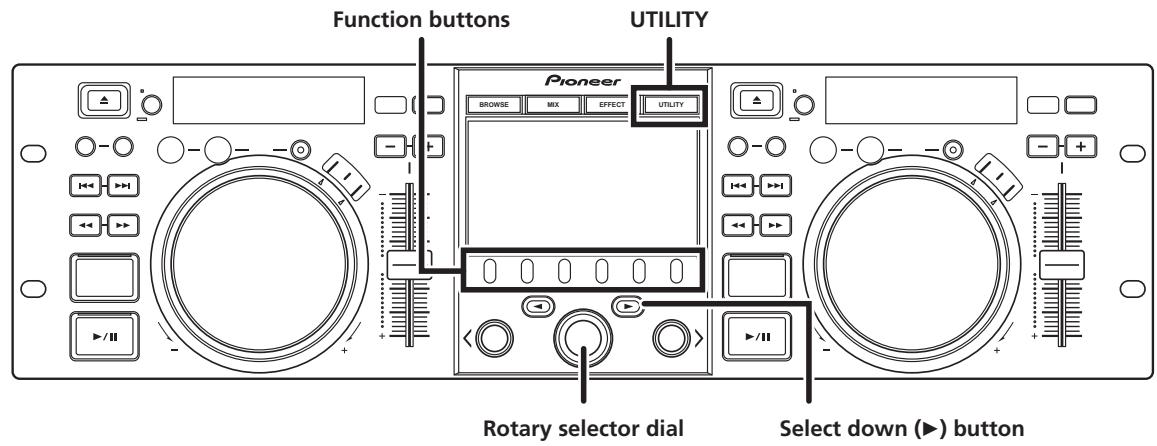
14 UTILITY button
Use to switch to the UTILITY screen (P. 25).
15 Rotary selector dial
When in the BROWSE and UTILITY screens, rotating the dial allows track selection and movement of the cursor between selection items. Press the dial to confirm the selection. For operations in the MIX and EFFECT screens, consult the DJS Control Guide.
16 CUE/LOOP MEMORY button
Not used during DJS control.
17 CUE/LOOP CALL button
Not used during DJS control.
18 Function buttons (F1 to F6, from left)
Use to select modes and categories.
Selectable items differ depending on the screen or menu.
For details, consult the DJS Control Guide.
19 LOAD A/B buttons
When in the BROWSE screen, press to set selected track in controller A/B.
For operations in the MIX and EFFECT screens, consult the DJS Control Guide.
20 Select up (↓) button
When in the BROWSE and UTILITY screens, each time the button is pressed the menu moves up (to left) one level in the current menu hierarchy.
For operations in the MIX and EFFECT screens, consult the DJS Control Guide.
21 Select down (▶) button
When in the BROWSE and UTILITY screens, each time the button is pressed the menu moves down (to right) one level in the current menu hierarchy.
For operations in the MIX and EFFECT screens, consult the DJS Control Guide.
22 Center display (P. 11)
23 Display A / Display B (P. 12)
24 Jog dial (+FWD / -REV)
When scratch mode is ON:
Touch the surface of the dial and rotate to perform scratch play.
When scratch mode is OFF:
Use to perform pitch bend. Acceleration (+FWD) and deceleration (-REV) are performed in proportion to the amount of dial rotation. When rotation of the dial is stopped, playback returns to its previous speed.
Center Display
1 Main menu display
The center display's menus are changed by using the BROWSE button, MIX button, EFFECT button, and UTILITY button. The function buttons, select up (▲)/down(▶) buttons, LOAD A/B buttons, and the rotary selector dial are used to manipulate the contents of each menu.
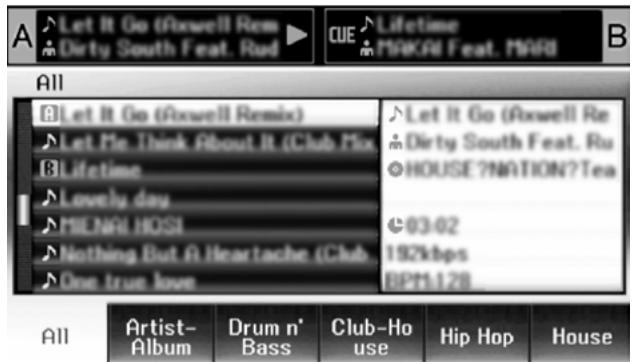
BROWSE screen
Use to display DJS track lists or playlists and to select tracks. For details, consult the DJS Control Guide's "Using DJS Lists."
MIX screen
Use to perform DJS mixer operations. For details, consult the DJS Control Guide's "DJS Mixer Operations."
EFFECT screen
Use to perform DJS effector operations. For details, consult the DJS Control Guide's "DJS Effector Operations."
UTILITY screen
Use to make unit settings (P. 25).
2 Function tab
Displays items that can be changed using the six function buttons. Items displayed differ depending on the contents shown on the main menu display.
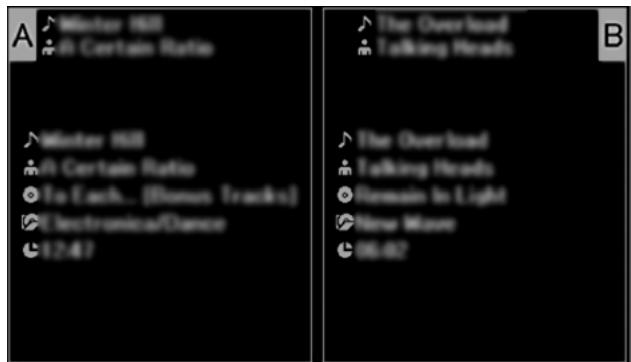
3 A/B track information display
Displays track information and current status for tracks playing on controller A/B.
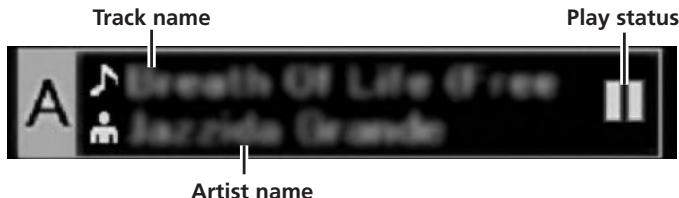
Play status
| Indicates track is currently playing. | |
| Indicates track is currently paused. | |
| Indicates track is currently in cue standby condition. |
MEMO
- This unit can display names of titles and artists in Western European languages, Russian, Simplified Mandarin Chinese, and Japanese, but some languages may not be supported, depending on the DJ software program used. Consult the operating instructions for your DJ software program for more information about supported languages.
Display A/Display B
1 Track number display
"DJS" is displayed during DJS control.
2 TEMPO control range display (± 6, ± 10, ± 16, WIDE)
Displays the selected variable range mode of the TEMPO adjust slider.
3 TEMPO change ratio display
Displays the change in tempo produced by the operation of the TEMPO adjust slider.
4 A.CUE indicator
Lights when the Auto Cue function is ON.
5 Time display
Displays the current track's elapsed time ([REMAIN] indicator is off), or remaining time ([REMAIN] indicator is lighted), in minutes [M], seconds [S], and frames [F].
6 Playing address display
To provide a quick intuitive grasp of the relative progress of a track's playback (either elapsed time or remaining time), a bar graph is used to represent the full length of the track.
- Elapsed time display: Starts with all segments off, then gradually lights from left to right.
- Remaining time display: Starts with all segments on, then gradually goes off from left to right.
- When 30 seconds of remaining playing time is reached, the graph begins to flash slowly.
- When 15 seconds of remaining playing time is reached, the graph begins to flash quickly.
7 BPM display
Shows the currently playing track's BPM (Beats Per Minute)
8 MEMO indicator
Not displayed during DJS control.
9 REMAIN indicator
Lights when the time display is set for remaining time.
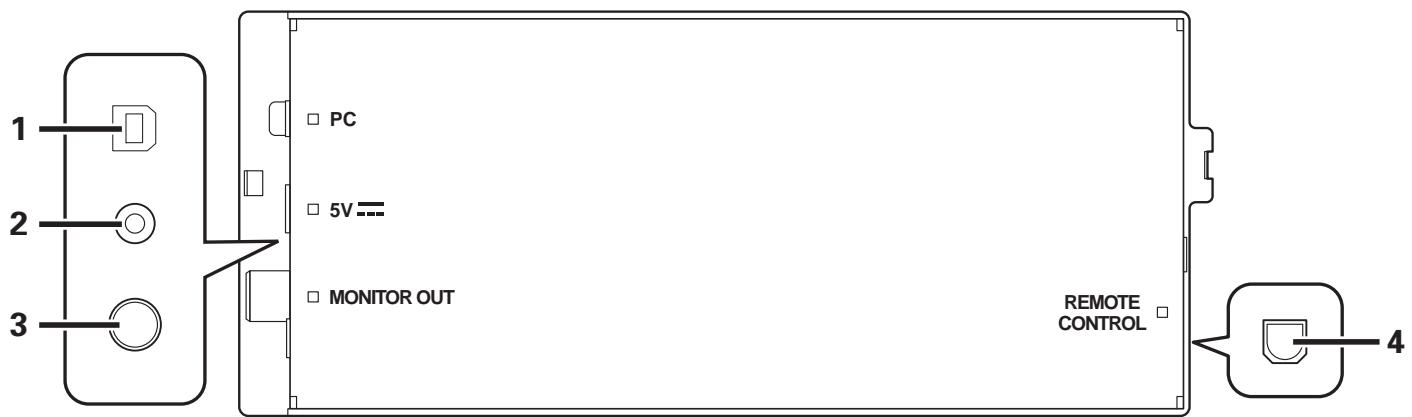
REAR PANEL
1 PC connector: USB port (type B)
Use the accessory USB cable to connect this port to a computer.
2 5V connector
Use the accessory USB auxiliary power cable to connect to a computer.
3 Video output connector (MONITOR OUT)
Use a video cable to connect to an external display.
4 Remote control connector (REMOTE CONTROL)
Not used with this unit.
ABOUT DJS SOFTWARE
Pioneer DJS is a software program that allows the use of MP3 files to control DJ play from a computer. Load the program into your computer from the supplied CD-ROM disc.

MEMO
- DJS is not equipped with functions for recording DJ play.
SOFTWARE END USER LICENSE AGREEMENT
This Software End User License Agreement ("Agreement") is between you (both the individual installing the Program and any single legal entity for which the individual is acting) ("You" or "Your") and PIONEER CORPORATION ("Pioneer"). TAKING ANY STEP TO SET UP OR INSTALL THE PROGRAM MEANS THAT YOU ACCEPT ALL OF THE TERMS OF THIS LICENSE AGREEMENT. PERMISSION TO DOWNLOAD AND/OR USE THE PROGRAM IS EXPRESSLY CONDITIONED ON YOUR FOLLOWING THESE TERMS. WRITTEN OR ELECTRONIC APPROVAL IS NOT REQUIRED TO MAKE THIS AGREEMENT VALID AND ENFORCEABLE. IF YOU DO NOT AGREE TO ALL OF THE TERMS OF THIS AGREEMENT, YOU ARE NOT AUTHORIZED TO USE THE PROGRAM AND MUST STOP INSTALLING IT OR UNINSTALL IT, AS APPLICABLE.
1 DEFINITIONS
1.1 "Documentation" means written documentation, specifications and help content made generally available by Pioneer to aid in installing and using the Program.
1.2 "Program" means all or any part of Pioneer's software licensed to You by Pioneer under this Agreement.
2 PROGRAM LICENSE
2.1 Limited License. Subject to this Agreement's restrictions, Pioneer grants to You a limited, non-exclusive, non-transferable, license (without the right to sublicense):
(a) To install a single copy of the Program on the hard disk drive of Your computer, to use the Program only for Your personal purpose complying with this Agreement and the Documentation ("Authorized Use");
(b) To use the Documentation in support of Your Authorized Use; and
(c) To make one copy of the Program solely for backup purposes, provided that all titles and trademark, copyright and restricted rights notices are reproduced on the copy.
2.2 Restrictions. You will not copy or use the Program or Documentation except as expressly permitted by this Agreement. You will not transfer, sublicense, rent, lease or lend the Program, or use it for third-party training, commercial time-sharing or service bureau use. You will not Yourself or through any third party modify, reverse engineer, disassemble or decompile the Program, except to the extent expressly permitted by applicable law, and then only after You have notified Pioneer in writing of Your intended activities. You will not use the Program on multiple processors without Pioneer's prior written consent.
2.3 Ownership. Pioneer or its licensor retains all right, title and interest in and to all patent, copyright, trademark, trade secret and other intellectual property rights in the Program and Documentation, and any derivative works thereof. You do not acquire any other rights, express or implied, beyond the limited license set forth in this Agreement.
2.4 No Support. Pioneer has no obligation to provide support, maintenance, upgrades, modifications or new releases for the Program or Documentation under this Agreement.
3 WARRANTY DISCLAIMER
THE PROGRAM AND DOCUMENTATION ARE PROVIDED "AS IS" WITHOUT ANY REPRESENTATIONS OR WARRANTYES, AND YOU AGREE TO USE THEM AT YOUR SOLE RISK. TO THE FULLEST EXTENT PERMISSIBLE BY LAW, PIONEER EXPRESSLY DISCLAIMS ALL WARRANTYIES OF ANY KIND WITH RESPECT TO THE PROGRAM AND DOCUMENTATION, WHETHER EXPRESS, IMPLIED, STATUTORY, OR ARISING OUT OF COURSE OF PERFORMANCE, COURSE OF DEALING OR USAGE OF TRADE, INCLUDING ANY WARRANTYES OF MERCHANTABILITY, FITNESS FOR A PARTICULAR PURPOSE, SATISFACTORY QUALITY, ACCURACY, TITLE OR NON-INFRINGEMENT.
4 DAMAGES AND REMEDIES FOR BREACH
You agree that any breach of this Agreement's restrictions would cause Pioneer irreparable harm for which money damages alone would be inadequate. In addition to damages and any other remedies to which Pioneer may be entitled, You agree that Pioneer may seek injunctive relief to prevent the actual, threatened or continued breach of this Agreement.
5 TERMINATION
Pioneer may terminate this Agreement at any time upon Your breach of any provision. If this Agreement is terminated, You will stop using the Program, permanently delete it from the computer where it resides, and destroy all copies of the Program and Documentation in Your possession, confirming to Pioneer in writing that You have done so. Sections 2.2, 2.3, 2.4, 3, 4, 5 and 6 will continue in effect after this Agreement's termination.
6 GENERAL TERMS
6.1 Limitation of Liability. In no event will Pioneer or its subsidiaries be liable in connection with this Agreement or its subject matter, under any theory of liability, for any indirect, incidental, special, consequential or punitive damages, or damages for lost profits, revenue, business, savings, data, use, or cost of substitute procurement, even if advised of the possibility of such damages or if such damages are foreseeable. In no event will Pioneer's liability for all damages exceed the amounts actually paid by You to Pioneer or its subsidiaries for the Program. The parties acknowledge that the liability limits and risk allocation in this Agreement are reflected in the Program price and are essential elements of the bargain between the parties, without which Pioneer would not have provided the Program or entered into this Agreement.
6.2 The limitations or exclusions of warranties and liability contained in this Agreement do not affect or prejudice Your statutory rights as consumer and shall apply to You only to the extent such limitations or exclusions are permitted under the laws of the jurisdiction where You are located.
6.3 Severability and Waiver. If any provision of this Agreement is held to be illegal, invalid or otherwise unenforceable, that provision will be enforced to the extent possible or, if incapable of enforcement, deemed to be severed and deleted from this Agreement, and the remainder will continue in full force and effect. The waiver by either party of any default or breach of this Agreement will not waive any other or subsequent default or breach.
6.4 No Assignment. You may not assign, sell, transfer, delegate or otherwise dispose of this Agreement or any rights or obligations under it, whether voluntarily or involuntarily, by operation of law or otherwise, without Pioneer's prior written consent. Any purported assignment, transfer or delegation by You will be null and void. Subject to the foregoing, this Agreement will be binding upon and will inure to the benefit of the parties and their respective successors and assigns.
6.5 Entire Agreement. This Agreement constitutes the entire agreement between the parties and supersedes all prior or contemporaneous agreements or representations, whether written or oral, concerning its subject matter. This Agreement may not be modified or amended without Pioneer's prior and express written consent, and no other act, document, usage or custom will be deemed to amend or modify this Agreement.
6.6 You agree that this Agreement shall be governed and construed by and under the laws of Japan.
COPYRIGHT WARNING
The use of DJS is restricted with regard to the playing and copying of copy-protected music contents.
- The program may not operate properly if copy-protect encryption data is embedded in recorded media.
- Ripping, playback, and other operations may stop if copy-protect encryption data is detected to be embedded in recorded media.
- Due to copy-protection technology for recorded media (CPRM), writing ("check-out") to SD memory cards is limited to three times for each music content.
- To write ("check-out") music contents to SD memory cards, the reader/writer used must support the SD memory card's "copy-protection for recorded media" technology. For details, consult the operating instructions for the reader/writer you intend to use.
- The music contents that you write ("check-out") to SD memory cards can be played back only on players supporting the "SD-audio standard." For details, consult the operating instructions for the player you intend to use.
The materials you record are for your own listening enjoyment, and cannot be used for other purposes without permission from the copyright owner.
- Music recorded from CDs and other media may be protected by the copyright laws of individual countries as well as by international convention. You are solely responsible for the lawful use of the recordings you make.
SYSTEM REQUIREMENTS (Minimum Operating Environment)
Use of DJS requires a PC/AT computer fulfilling the following minimum operating conditions:
CPU: 1.5 GHz or more Intel® Pentium M® (or compatible) processor.
However, in the case of Windows Vista®, the processor must be a 1.5 GHz or above Intel Core™2 Duo (or compatible).
Memory:
512 MB or more RAM
However, when running Windows Vista®, 1 GB or more RAM
Hard disc:
250 MB of free HD space (excluding space necessary for storing MP3 and other music files)
Optical drive:
Disc drive capable of reading CD-ROM, and playing music CD (CD-DA)
Display:
XGA (1024x768) or above, with HighColor (16-bit) or greater video adapter and monitor.
Sound:
2-channel or more audio output (internal or external sound card or audio unit).
Input device:
Keyboard, mouse (or equivalent pointing device)
Internet connection:
Connection speed 56 kbps or above recommended. Microsoft® Internet Explorer 5.5 or above, or other web browser supporting 128-bit SSL.
- When this unit is connected to a computer and used in conjunction with the DJS software, the computer must be equipped with two USB ports complying with USB 1.1 or later. For details, consult the section "CONNECTIONS" (P. 9).

NOTE
- Even if your computer is equipped with the memory capacity specified in the operating environment noted above, other software and services running in the computer at the time may cause insufficient memory that can result in degradation of the program's functions or performance. In this case, close any other services or programs running so as to free up more of your computer's memory, or increase the amount of memory installed in your computer.
- DJS operation may not function properly when combined with other software programs installed on your computer.
- Full functionality is not guaranteed with all computers even when the above operating environment conditions are fulfilled.
- The DJS software program is not supported by Macintosh computers (including those equipped with Intel CPUs).
INSTALLING DJS SOFTWARE
Precautions regarding installation
- Before installing DJS, please read the "SOFTWARE END USER LICENSE AGREEMENT" and "SYSTEM REQUIREMENTS (Minimum Operating Environment)".
- DJS is supported by the following Microsoft® Windows® versions:
- Windows Vista® Home Basic
- Windows Vista® Home Premium
- Windows Vista® Ultimate
- Windows Vista® Business
- Windows® XP Home Edition
- Windows® XP Professional
- Windows® 2000 Professional (SP4)
- DJS is not supported by Microsoft's 64-bit operating systems (Windows® XP Professional x64 edition and Windows Vista® 64-bit editions).
- The accessory CD-ROM includes installation programs and user's manuals in the following eight languages: English, French, German, Italian, Dutch, Spanish, Chinese (simplified Mandarin), Japanese.
- When using DJS on a computer whose Windows® display language is other than one of those listed above, follow the menu instructions to select [English].
- Installation and uninstallation of DJS require administrator's rights on the computer concerned. You must log on as administrator before installing the software.
Installation Procedure
1 When the accessory CD-ROM installation disc is loaded in your computer's DVD/CD drive, the installation menu will automatically appear. Follow the menu instructions to install the DJS software.
- If the installation menu does not automatically appear, click on [START] → [My Computer (or Computer)] and select the optical disc drive, and double click on the [Install] icon.
2 When the installation menu appears, click on the [Install DJS] button.
![PIONEER SEP-C1 - When the installation menu appears, click on the [Install DJS] button. - 1](/content/2025/01/118694/images/0fb67998594060b0bf62c4ec707f49ef2d642cb6e60d8b184cbb1544a11632db.jpg)
- If a trial version of DJS is currently installed on the computer, in place of the [Install DJS] button, the [Uninstall DJS trial version of DJS] button will appear. Click on that button to uninstall the trial version, then once again click on the [Install DJS] button.
- To display the user's manual, click on the [Display DJS User's Manual] button. Adobe Reader® is required to display the user's manual.
- To install Adobe Reader®, click on the [Install Adobe Reader] button. If your computer already has an older version of Adobe Reader® installed, uninstall the older version of Adobe Reader® before clicking on the [Install Adobe Reader] button.
- To close the installation menu, click on the [Exit] button.
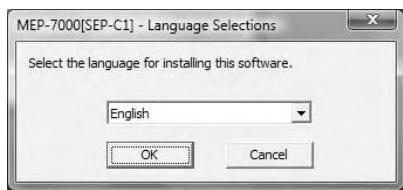
3 When the screen for selecting the language appears, select [English], then click on [OK].
![PIONEER SEP-C1 - When the screen for selecting the language appears, select [English], then click on [OK]. - 1](/content/2025/01/118694/images/0e800f59b3f6dcd107842ed2b5ef524fbf35b43b470a3e4d553b1c86f6cd344f.jpg)
- Depending on your computer operating environment, more than one language may be available.
- When you click on the [OK] button, the [Preparing to install DJS...] message will appear.
When preparations are completed, the [Commencing installation of DJS...] message will appear. Follow the instructions in the message to complete DJS installation.
- To cancel installation, click on the [Cancel] button.
4 When DJS installation is completed, reboot the computer in accord with the instructions that appear on the screen.
MEMO
- When using this unit in conjunction with the DJS software program, the software driver must be installed in the computer before connecting the computer to the SEP-C1. For details, see P. 17
DJS User's Manual (PDF)
When installation of DJS is completed, the user's manual can be viewed from the Windows [START] menu if desired. Click on
[ \text{START} \rightarrow \text{[View All Programs]} \rightarrow \text{[DJS]} \rightarrow \text{[User's Manual]}. ]
It is recommended to read the user's manual in order to gain a basic understanding of DJS features before actually starting the program.
NOTES REGARDING TRIAL PERIOD AND USER REGISTRATION
DJS can be used without registration for a 60-day trial period after installation.
This period represents the time you can use DJS without officially registering it. When the trial period is over, DJS can no longer be used, so be sure to complete user registration before that period has elapsed.
■ Online registration can be completed for users connected to the Internet. For details regarding user registration procedures, consult the DJS user's manual contained on the accessory CD-ROM disc.
The Pioneer Group collects personal user information for the following purposes:
- To provide after service for the product.
- To inform users via email of important information and events regarding the product.
- To collect survey data from customers and reflect those results into product development.
- Personal information collected from customers is handled and managed in accordance with our personal information privacy policy.
-
For more information regarding Pioneer's personal information privacy policy, see the following Pioneer website: http://www.prodjnet.com/privacy.html
-
Users without Internet connections should enter the necessary information on the "User registration card" and return it via mail to Pioneer. After the completed "User registration card" is received, we will send the "Registration ID" (installation key) necessary for unlocking the software beyond the trial period. For detailed instructions regarding the user registration procedure, please consult the DJS user's manual included in the accessory CD-ROM.

NOTE
- An installation key (Registration ID) can be used on the DJS software installed on a single computer. In the event you replace your computer or otherwise need to reinstall the DJS software, a new user's registration and "Registration ID" must be issued to unlock the software beyond the trial period. Also, the initial "Registration ID" issued by Pioneer will be needed in the event of reregistration or after-service enquiries, so be sure to store the registration information in a safe place even after completion of the registration procedure.
The address on the "User registration card" is as follows. The address may differ depending on your location of residence, however, so please be careful to send the card to the correct location:
North America
PIONEER ELECTRONICS (USA) INC.
BUSINESS SOLUTIONS DIVISION, PRO AUDIO GROUP
2265 East 220th Street, Long Beach, CA 90810, U.S.A
Europe
PIONEER EUROPE NV
MULTIMEDIA DIVISION
Pioneer House, Hollybush Hill, Stoke Poges, Slough SL2 4QP U.K.
South Asia, Southeast Asia
PIONEER ELECTRONICS ASIACENTRE PTE. LTD.
MULTIMEDIA DEPARTMENT
253 Alexandra Road, #04-01, Singapore 159936
HongKong
PIONEER (HK) LIMITED
SALES AND MARKETING DEPARTMENT
Suite 901-906, 9th Floor World Commerce Centre, Harbour City 11
Canton Road, Tsim Sha Tsui Kowloon, Hong Kong
Taiwan
PIONEER HIGH FIDELITY TAIWAN CO., LTD.
SALES DIVISION, INDUSTRIAL ELECTRONIC SECTION
13F, No. 44, Sec. 2, Jhongshan N. Road, Taipei City, Taiwan
Oceania
PIONEER ELECTRONICS AUSTRALIA PTY. LTD.
178-184 Boundary Road, Braeside, Victoria 3195, Australia
Middle East, Africa
PIONEER GULF, FZE.
Lob 11-017, Jabel Ali Free Zone, P.O.Box 61226, Jabel Ali, Dubai, U.A.E.
Central & South America
PIONEER INTERNATIONAL LATIN AMERICA, S.A.
SALES DEPARTMENT
Plaza Credicorp Bank Panama, 50 Street, #120, 14th Floor
P.O. Box 0816-01361, Panama, Rep of Panama
Mexico
PIONEER ELECTRONICS DE MEXICO, S.A. DE C.V.
Blvd. Manuel Avila Camacho No. 138, Piso 10, Col. Lomas de
Chapultepec, Mexico, D.F. C.P. 111000 Deleg. Miguel Hidalgo
REGARDING ONLINE SUPPORT
Before making direct enquiries regarding DJS operating procedures and other technical matters, please read the DJS user's manual furnished on the accessory CD-ROM, together with the FAQ section on the DJS support website.
See the DJS user's manual for information regarding how to access the DJS support website. To access the support site, you will need the "Login name" and "Password" which you specified at the time of user registration.
■ When making an enquiry to the DJS support website regarding malfunctions, please furnish your name, product name, registration ID (install key), computer type and specifications (CPU, installed memory, other connected peripherals, etc.), the operating system and version used, and concrete information regarding the symptoms observed.
Support is furnished only to customers who have completed the user registration process. Please take care to safely preserve the "Login name" and "Password" you specified during registration, as well as your "Registration ID."
If you experience problems with installation or user registration, please consult the following website:

NOTE
- For technical information regarding use of this unit with your computer, peripheral components, or other non-Pioneer products, please consult your sales dealer or the manufacturers of the respective components.
Further version updates are anticipated to improve the functionality and performance of DJS.
Officially registering this product allows you to access Pioneer's support website, as well as to download updated versions of the program. We encourage users to take advantage of this update service to constantly utilize the latest version of the program.
DISCLAIMER
■ Pioneer shall not be held responsible for reissuing license keys or registration IDs in the event of loss. Be sure to store your registration information and passwords safely in a separate location for future access.
■ Note that the SD memory card transmission function (check-out/check-in) is not supported by Windows Vista®.
The music CD ripping function of this software program is not supported for music CD that do not display one of these logo marks.


ABOUT THE DRIVER PROGRAM
This unit is designed to control Pioneer DJS and other DJ software when connected to a computer. When connecting this unit to a Windows computer for use with DJ software, the software driver program must first be loaded into the computer.

MEMO
- Drivers for Macintosh OS as well as updated information regarding other manufacturers' DJ software can be found on the following website: http://www.prodjnet.com/support/
SOFTWARE END USER LICENSE AGREEMENT
When installing or using the driver software, be sure to first read the "SOFTWARE END USER LICENSE AGREEMENT" (P. 13). By installing and using the software, you agree to be bound by the terms of the Agreement.
DRIVER INSTALLATION
Before installing (IMPORTANT)
- Before installing this driver, be sure to read the "SOFTWARE END USER LICENSE AGREEMENT".
- This unit can be connected to a computer running one of the following operating system environments:
Windows Vista® Home Basic, Windows Vista® Home Premium, Windows Vista® Ultimate, Windows Vista® Business, Windows XP Home Edition, Windows XP Professional, or Windows 2000 Professional.
It may be necessary to use the Windows update facility in order to install the most recent Service Pack.
- The driver installation program is provided in 10 languages (English, French, German, Italian, Dutch, Spanish, Russian, Chinese (simplified), Chinese (traditional), and Japanese). If using a version of Windows in another language, follow the onscreen instructions to select [English] as the language.
- You must have administrator privileges on your computer in order to install the driver software. Log on as the user set as the computer's administrator before attempting driver installation.
- If any other Windows programs are running, close them before beginning driver installation.

NOTE
- Before installing the driver software, disconnect the USB auxiliary power cable and USB cable connecting this unit to the computer.
- If this unit is connected to a computer without first installing the driver, errors may occur on the computer, depending on the computer environment involved.
- In the event the driver installation is interrupted midway through, follow the procedures below to reinstall the driver from the beginning.
Using the accessory CD-ROM to install the application
1 Boot the computer and log in with administrator's privileges.
2 Load the accessory CD-ROM in the computer's CD/DVD drive.
3 Open the computer's [START] [My Computer (or Computer)] menu, then access the CD-ROM and double-click on the folder [SEP-C1].
4 After opening the [SEP-C1] folder, double click on the driver installation program [MEP-7000[SEP-C1]_#.###.exe].
(#.### indicates the driver version.)
5 When the [Language Selections] menu appears, select [English], then click on [OK].
- To interrupt the installation process, click on the [Cancel] button.
6 When the [License] screen appears, read the "Software End User License Agreement", click on the [I agree.] box, then click on [OK].
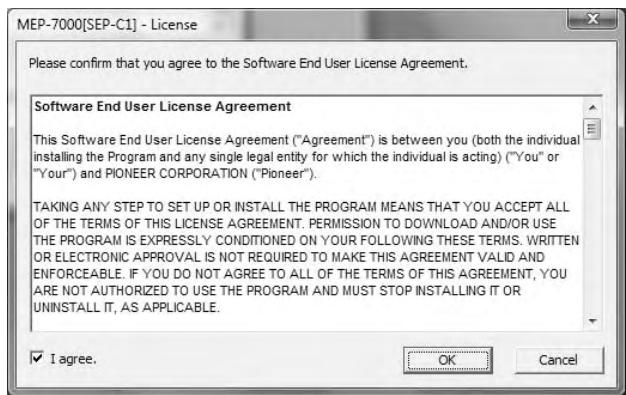
- If you do not agree with the terms of the "Software End User License Agreement", click on the [Cancel] button to terminate the installation.
7 Follow the instructions that appear on the screen.
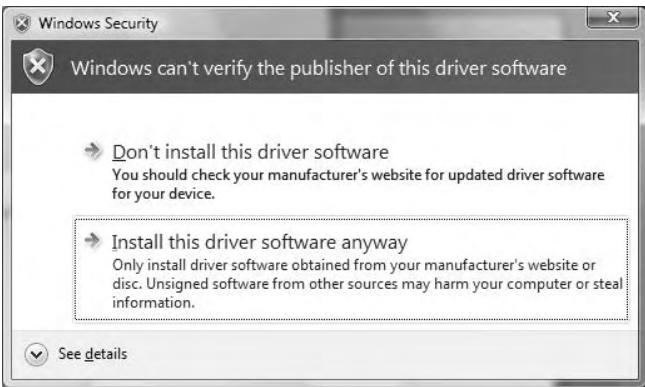
- If the [Windows Security] screen appears during installation, click on [Install this driver software anyway] to continue the installation process.
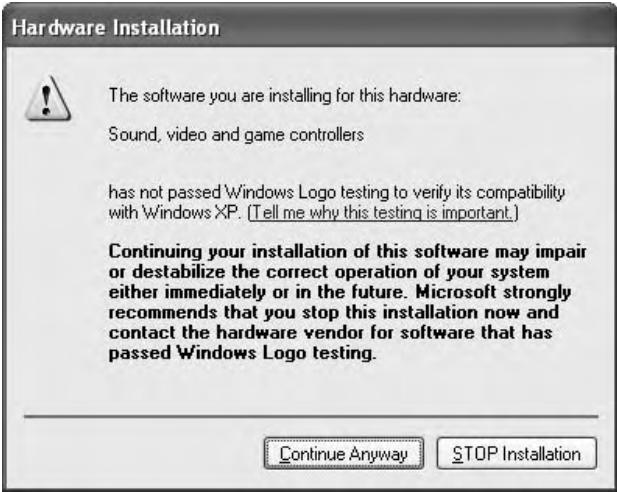
- If the [Hardware Installation] screen appears during installation, click on [Continue Anyway] to continue the installation process.
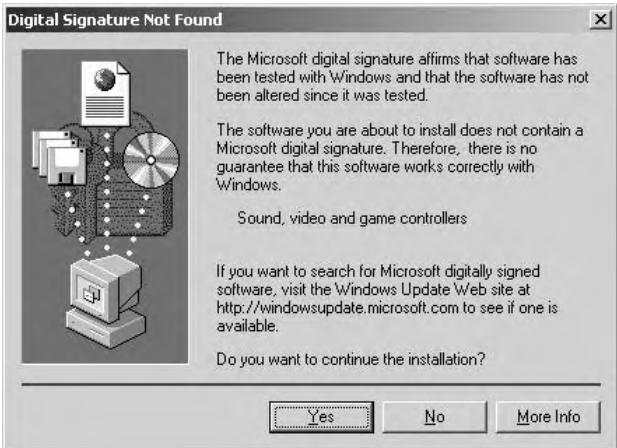
- If the [Digital Signature Not Found] screen appears during installation, click on the [Yes] button to continue the installation process.
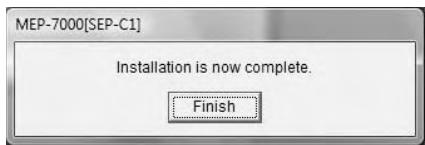
8 When installation is completed, the [Installation is now complete.] message will appear. Click on the [Finish] button to complete the process.
Connecting this unit to the computer
1 Connect the USB auxiliary power cable to this unit and the computer.
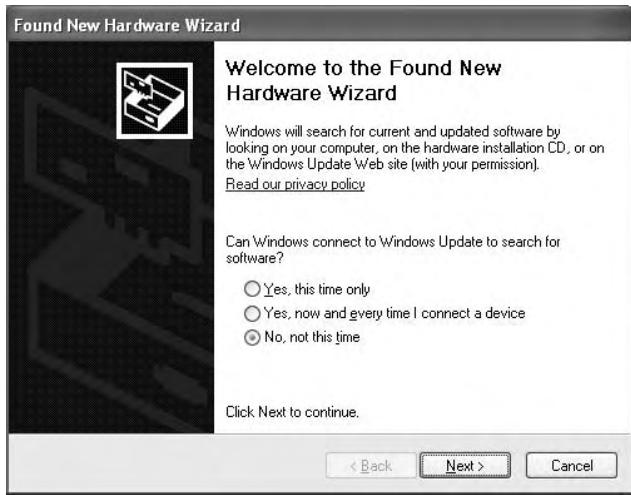
2 Connect the USB cable to this unit and the computer. When first connecting this unit to the computer, and when disconnecting and reconnecting the computer USB port, the computer may display the message [Installing device driver software]. In this case, wait until the computer displays the message [Your devices are ready to use].
- During the installation process, if the computer displays the message [Can Windows connect to Windows Update to search for software?] select [No, not this time], then click on the [Next] button to continue the installation process.
- During installation, if the computer displays the message [What do you want the wizard to do?] select [Install the software automatically (Recommended)], then click on the [Next] button to continue the installation process.
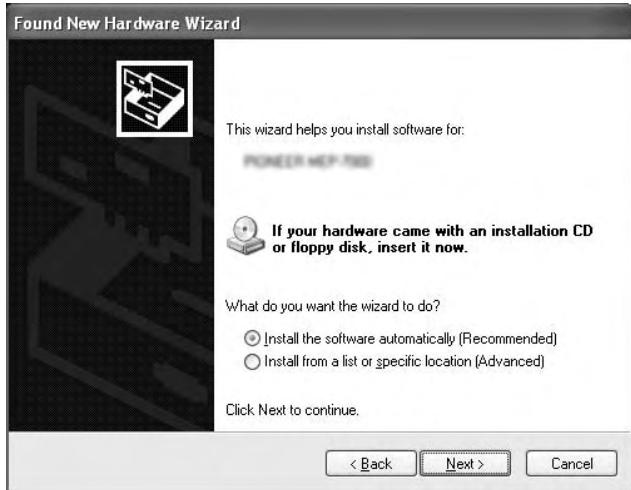
- If the [Hardware Installation] screen appears during installation, click on [Continue Anyway] to continue the installation process.
Hardware Installation

The software you are installing for this hardware:
Sound, video and game controllers
has not passed Windows Logo testing to verify its compatibility with Windows XP. (Tell me why this testing is important.)
Continuing your installation of this software may impair or destabilize the correct operation of your system either immediately or in the future. Microsoft strongly recommends that you stop this installation now and contact the hardware vendor for software that has passed Windows Logo testing.
Continue Anyway
STOP Installation
- If the [Digital Signature Not Found] screen appears during installation, click on the [Yes] button to continue the installation process.
Digital Signature Not Found
The Microsoft digital signature affirms that software has been tested with Windows and that the software has not been altered since it was tested.
The software you are about to install does not contain a Microsoft digital signature. Therefore, there is no guarantee that this software works correctly with Windows.
Sound, video and game controllers
If you want to search for Microsoft digitally signed software, visit the Windows Update Web site at http://windowsupdate.microsoft.com to see if one is available.
Do you want to continue the installation?
Yes
No
More Info
Confirming the driver version
To confirm the version of the loaded driver, click on Windows [START] [View All Programs] [Pioneer] [MEP-7000[SEP-C1]] [MEP-7000[SEP-C1] Version Display Utility].
MEP-7000 [SEP-C1] Version
Driver
Windows Driver Pack
Ver1.000
Firmware
SEP-C1
OK
![PIONEER SEP-C1 - MEP-7000 [SEP-C1] Version - 1](/content/2025/01/118694/images/7de11c505bcc67e5a3f466fa3b3673742c37aaea78c0b92862abe86d574ea0fd.jpg)
MEMO
- This screen also allows you to confirm the version of the firmware currently installed. Note, however, that the firmware version will not be displayed if the SEP-C1 is not connected to a computer, or if the computer is not communicating properly with the SEP-C1.
Most recent version of driver
Consult the following website regarding the latest driver versions. http://www.prodjnet.com/support/
When using this unit to control DJS software
Please read the sections "USING DJ SOFTWARE" (P. 20) and the "DJS Control Guide" (PDF file) before attempting to actually use this unit to operate DJS. The "DJS Control Guide" can be found under the name [manual_SEP-C1_control_en.pdf] in the [SEP-C1\English] folder of the accessory CD-ROM.
USING DJ SOFTWARE
By loading the accessory DJS software or another DJ software to a computer connected to this unit via USB cable, the unit can be used to operate the DJ software program.
Supported DJ softwares
| DJS | Included as an accessory with the SEP-C1, the all-in-one DJ software program “DJS” allows immediate use of DJ software. |
| Communication-supported DJ software | Commercially available DJ softwares supporting the SEP-C1's dedicated communications protocol can be operated even without the use of a control disc. For latest information regarding supported DJ software, please consult the following Pioneer website: http://www.prodjnet.com/support/ |
| MIDI-supported DJ software | The SEP-C1 outputs data regarding button and TEMPO adjust slider status in universal MIDI format, so DJ softwares with MIDI support can be used to assign the unit's MIDI messages, thus using the MIDI communication for control. |
Style of Play
The unit can be made to operate as a DJ software manipulator. When the SEP-C1 is used as a manipulator, you can control your DJ software without need for either mouse or keyboard, using the same layout, functions, and ease of operation transmitted from the Pioneer CDJ series.

PREPARING YOUR DJ SOFTWARE PROGRAM
Before using your DJ software program, you must prepare your computer and the DJ software. Do not connect the SEP-C1 to your computer until you have loaded the software driver!
| Step | DJS | Dedicated communication-supported DJ software | MIDI-supported DJ software | |
| ① | Confirm computer's setup and operating environment. | See P.13 of this manual ("ABOUT DJS SOFTWARE"). Computer operating system support is limited to Windows Vista, Windows XP, Windows 2000 or later version. DJS supports only the Microsoft Windows OS. | Consult the instruction manual for your DJ software. Computer operating system support is limited to Windows Vista, Windows XP, Windows 2000 or Mac OS version 10.3.9 or later. | |
| ② | Turn on computer power. | Consult the instruction manual for your DJ software. | ||
| ③ | Install the driver. | See P.17 of this manual ("ABOUT THE DRIVER PROGRAM"). | ||
| ④ | Bus-power connection between this unit and computer. | See P.9 of this manual ("CONNECTIONS"). | ||
| ⑤ | Confirm "Correct USB connection to computer?" | See P.19 of this manual ("ABOUT THE DRIVER PROGRAM, ■ Confirming the driver version"). | ||
| ⑥ | Install the DJ software program. | See P.13 of this manual ("ABOUT DJS SOFTWARE") | Consult the instruction manual for your DJ software. | |
| ⑦ | Startup the DJ software. | See the DJS User's Manual (PDF file on accessory CD-ROM). | ||
| ⑧ | Operate for DJ play. | See the DJS Control Guide for basic operating techniques. | ||

MEMO
- Installation of a special software driver is necessary in order to use a DJ software program (a driver for Windows computers is included on the accessory CD-ROM). Updated versions of drivers and drivers for MAC OS can be found on Pioneer's website. http://www.prodjnet.com/support/
CONTROLLING YOUR COMPUTER USING THE DEDICATED COMMUNICATIONS PROTOCOL
The SEP-C1 can be used to control not only the accessory DJS software, but other DJ software programs supporting the SEP-C1's dedicated communications protocol.
1 Connect to the computer.
The center display will show the [PRO DJ] logo.

2 Start the DJ software program.
When communication is established with the DJ software, the buttons, jog dial, and TEMPO adjust slider can be used to control operation, and the SEP-C1's center display, and displays A/B will show the currently playing track's time data and title, together with the name of artist.

- Some DJ software programs do not support the aforementioned track information displays.
For DJS:
Control can be performed while viewing the center display's BROWSE, EFFECT, and MIX screens. For details of actual operation, consult the chapter on "Manipulator Style" operation of the SEP-C1 DJS Control Guide (PDF file on accessory CD-ROM).

MEMO
- While the UTILITY screen is being displayed on the center display, the center display's buttons and rotary selector dial cannot be used to control DJ software.
USING MIDI FOR COMPUTER CONTROL
MIDI (Musical Instrument Digital Interface) is a standardized protocol used to govern data transmission between electronic musical instruments and computers.
The SEP-C1 uses the MIDI message format to output its operating data and status to a computer connected by USB cable. By using a DJ software program with USB MIDI support to assign the MIDI messages output by the SEP-C1, the SEP-C1 can be used to control the DJ software.
For more information regarding messages output by the SEP-C1, consult the section "MIDIMESSAGE TABLE" (P. 23).
1 Connect to the computer.
The center display will show the [PRO DJ] logo.

2 Start the DJ software program.
When communication is established with the DJ program, the SEP-C1 operates as a MIDI controller, and the status of controller A/B and center display section's buttons and controls are output as MIDI messages.

MEMO
- While the UTILITY screen is being displayed on the center display, the center display's MIDI messages are not output.
Setting a MIDI channel
MIDI channel setting can be performed from the UTILITY screen.
1 Press the UTILITY button.
2 Press the [PC] function button.
The center display will show the MIDI channel setting menu. Controller A uses the same channel as the center display, while controller B uses a different channel. (Factory defaults are for Controller A and center display to be set to Channel 1, and Controller B set to Channel 2).
![PIONEER SEP-C1 - Press the [PC] function button. - 1](/content/2025/01/118694/images/e17877289caa1d4e228d7336fdf94ccc3caff4d9c5819f449a2e8ceb4673c6e6.jpg)
3 Either press the rotary selector dial, or press the select down () button.
The icon will move to the right.
4 Turn the rotary selector dial to change the value.
Values between 1 and 16 can be set.
5 Press the rotary selector dial to confirm the value selected.
- Press the select up (▲) button to cancel the selection and return to the UTILITY screen.
MIDIMESSAGE TABLE
| Interface Name | Interface Type | Message | Comments | |||
| MSB | ||||||
| Controller A | JOG DIAL | General Purpose Controller | Bn | 10 | dd | Linear value with respect to speeds from stop to 4x, 64 at stop; FWD direction: 65 (0.06x) to 127 (x4); REV direction: 63 (0.06x) to 0 (4x). |
| TEMPO ADJUST SLIDER | VR | Bn | 1D | dd | 0 to 127 0 at - side, 127 at + side | |
| PLAY/PAUSE | SW | 9n | 00 | dd | OFF=0, ON=127 | |
| CUE | SW | 9n | 01 | dd | OFF=0, ON=127 | |
| SEARCH FWD | SW | 9n | 02 | dd | OFF=0, ON=127 | |
| SEARCH REV | SW | 9n | 03 | dd | OFF=0, ON=127 | |
| TRACK SEARCH Next | SW | 9n | 04 | dd | OFF=0, ON=127 | |
| TRACK SEARCH Prev | SW | 9n | 05 | dd | OFF=0, ON=127 | |
| LOOP IN | SW | 9n | 06 | dd | OFF=0, ON=127 | |
| LOOP OUT | SW | 9n | 07 | dd | OFF=0, ON=127 | |
| RELOOP | SW | 9n | 08 | dd | OFF=0, ON=127 | |
| MEMORY | SW | 9n | 0A | dd | OFF=0, ON=127 | |
| CALL | SW | 9n | 0B | dd | OFF=0, ON=127 | |
| TIME/A.CUE | SW | 9n | 0E | dd | OFF=0, ON=127 | |
| TEMPO RANGE | SW | 9n | 10 | dd | OFF=0, ON=127 | |
| MT | SW | 9n | 11 | dd | OFF=0, ON=127 | |
| SCRATCH | SW | 9n | 12 | dd | OFF=0, ON=127 | |
| JOG BREAK | SW | 9n | 13 | dd | OFF=0, ON=127 | |
| PITCH BEND + | SW | 9n | 14 | dd | OFF=0, ON=127 | |
| PITCH BEND - | SW | 9n | 15 | dd | OFF=0, ON=127 | |
| JOG TOUCH | SW | 9n | 20 | dd | OFF=0, ON=127 | |
| Controller B | JOG DIAL | General Purpose Controller | Bn+1 | 10 | dd | Linear value with respect to speeds from stop to 4x, 64 at stop; FWD direction: 65 (0.06x) to 127 (x4); REV direction: 63 (0.06x) to 0 (4x). |
| TEMPO ADJUST SLIDER | VR | Bn+1 | 1D | dd | 0 to 127 0 at - side, 127 at + side | |
| PLAY/PAUSE | SW | 9n+1 | 00 | dd | OFF=0, ON=127 | |
| CUE | SW | 9n+1 | 01 | dd | OFF=0, ON=127 | |
| SEARCH FWD | SW | 9n+1 | 02 | dd | OFF=0, ON=127 | |
| SEARCH REV | SW | 9n+1 | 03 | dd | OFF=0, ON=127 | |
| TRACK SEARCH Next | SW | 9n+1 | 04 | dd | OFF=0, ON=127 | |
| TRACK SEARCH Prev | SW | 9n+1 | 05 | dd | OFF=0, ON=127 | |
| LOOP IN | SW | 9n+1 | 06 | dd | OFF=0, ON=127 | |
| LOOP OUT | SW | 9n+1 | 07 | dd | OFF=0, ON=127 | |
| RELOOP | SW | 9n+1 | 08 | dd | OFF=0, ON=127 | |
| MEMORY | SW | 9n+1 | 0A | dd | OFF=0, ON=127 | |
| CALL | SW | 9n+1 | 0B | dd | OFF=0, ON=127 | |
| TIME/A.CUE | SW | 9n+1 | 0E | dd | OFF=0, ON=127 | |
| TEMPO RANGE | SW | 9n+1 | 10 | dd | OFF=0, ON=127 | |
| MT | SW | 9n+1 | 11 | dd | OFF=0, ON=127 | |
| SCRATCH | SW | 9n+1 | 12 | dd | OFF=0, ON=127 | |
| JOG BREAK | SW | 9n+1 | 13 | dd | OFF=0, ON=127 | |
| PITCH BEND + | SW | 9n+1 | 14 | dd | OFF=0, ON=127 | |
| PITCH BEND - | SW | 9n+1 | 15 | dd | OFF=0, ON=127 | |
| JOG TOUCH | SW | 9n+1 | 20 | dd | OFF=0, ON=127 | |
| Center display section | ROTARY SELECTOR DIAL | General Purpose Controller | Bn | 4F | dd | 98 to 127, 1 to 30 (± 1 to ± 30), transmits count value difference from previous time. When ± 30 or more, becomes ± 30. |
| SELECT DOWN (> ) | SW | 9n | 31 | dd | OFF=0, ON=127 | |
| SELECT UP (< ) | SW | 9n | 32 | dd | OFF=0, ON=127 | |
| ROTARY SELECTOR DIAL PUSH | SW | 9n | 33 | dd | OFF=0, ON=127 | |
| LOAD A | SW | 9n | 34 | dd | OFF=0, ON=127 | |
| LOAD B | SW | 9n | 35 | dd | OFF=0, ON=127 | |
| BROWSE | SW | 9n | 36 | dd | OFF=0, ON=127 | |
| MIX | SW | 9n | 37 | dd | OFF=0, ON=127 | |
| EFFECT | SW | 9n | 38 | dd | OFF=0, ON=127 | |
| F1 | SW | 9n | 39 | dd | OFF=0, ON=127 | |
| F2 | SW | 9n | 3A | dd | OFF=0, ON=127 | |
| F3 | SW | 9n | 3B | dd | OFF=0, ON=127 | |
| F4 | SW | 9n | 3C | dd | OFF=0, ON=127 | |
| F5 | SW | 9n | 3D | dd | OFF=0, ON=127 | |
| F6 | SW | 9n | 3E | dd | OFF=0, ON=127 | |
- n = channel number
- Grayed-out portions are not output during display of the UTILITY screen.
USING THE UTILITY
Press the UTILITY button to display the UTILITY screen and make unit settings.
SETTING METHOD
1 Use the function buttons to select the item you wish to set [DISPLAY/PC/LANGUAGE/GENERAL].
2 Rotate the rotary selector dial to align the cursor with the desired setting item.
3 Press either the select down (▶) button or the rotary selector dial to move the icon to the right side.
4 Turn the rotary selector dial to select the desired setting value.
5 Press the rotary selector dial to confirm the new setting value.
Also, to reset a setting to its default value, press the select up (▲) button.

MEMO
- Grayed-out CD-G and BROWSE cannot be set on this unit.
SETTINGS
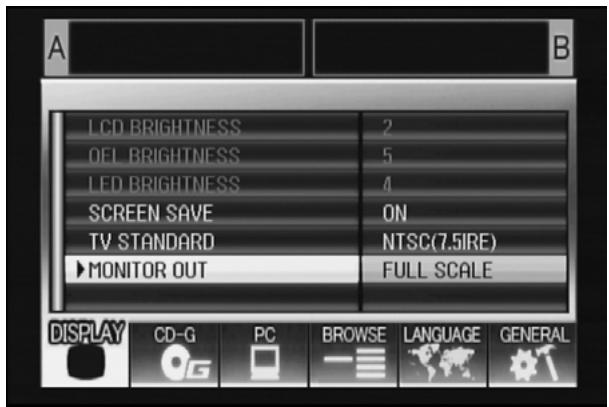
[1] DISPLAY
Use to perform settings for center display and external output.
| Factory default setting | ||
| LCD BRIGHTNESS | Displays brightness of center display. | |
| OEL BRIGHTNESS | Displays brightness of display A/B. | |
| LED BRIGHTNESS | Displays brightness of LEDs. | |
| SCREEN SAVE *1 | After the set time without user operation, the LCD and OEL screens are dimmed in order to preserve the displays. | ON |
| TV STANDARD | Sets signal format for monitor output (PAL, NTSC (7.5 IRE), NTSC (0 IRE)). | NTSC (7.5 IRE) |
| MONITOR OUT | Sets center display aspect ratio to letterbox, full-screen, or OFF. | OFF |
*1 Screen saver operation
- The screenshot operates when five minutes have passed without a track being loaded in either controller.
- The screenshot also operates after 100 minutes passes without any button input when either one or both of the controllers is in pause mode (including cue standby or END display).
- The screen saver is disabled when a track is set with DJ software other than DJS.
- During operation of the screenshot, pressing a button or performing any other command operation will cancel the screenshot.
[2] PC
The MIDI channel can be set (P. 22).
[3] LANGUAGE
Set the language to be used.
| Factory default setting | ||
| LANGUAGE | Select display language from nine available (English, French, German, Italian, Spanish, Dutch, Russian, Simplified Chinese, Japanese). | English |
[4] GENERAL
Use to confirm LOAD LOCK settings and unit version.
| Factory default setting | ||
| LOAD LOCK *2 | Locks the LOAD button so that it is disabled during playback. | OFF |
| VERSION INFO | Displays SEP-C1 version information. | |
*2 The LOAD LOCK function is disabled when a track is set with DJ software other than DJS.
TO PERFORM A FACTORY RESET
All unit settings can be restored to their factory default values by using the UTILITY screen (P. 25).
1 While holding the UTILITY button depressed, connect the unit to the computer (turn power ON).
The button must be depressed for five seconds or more.
2 Confirm message.
After the boot-up screen appears, a message will be displayed:
[The settings have been reset to factory defaults]
3 Disconnect from computer and reconnect.
TROUBLESHOOTING
If you believe the unit is failing to work properly, check the following troubleshooting table for tips. Sometimes simple mistakes in setup or operation may appear like serious problems. There are also times when the problem in question may be caused by something else other than the unit, and at times like these you should check any other electronic devices being used at the same time.
If the problem in question continues to persist even after checking the troubleshooting table below and taking whatever corrective action is recommended, contact your nearest Pioneer Service Station or contact the store from which you purchased the unit for further assistance.
| Description of problem | Possible cause of problem | Recommended action |
| Unit is not recognized even when connected to computer. | Driver software is not installed properly. If the unit is not connected properly to the computer the version display utility cannot be used to display the firmware version. To confirm the firmware version, see the section “ABOUT THE DRIVER PROGRAM, Confirm the driver version” (P. 19). | Install the driver software. If it has already been installed, uninstall it, then install it again. |
| The USB auxiliary power cable is not connected. | Connect the USB auxiliary power cable to the computer first, followed by the USB cable. | |
| During playback, tracks cannot be loaded. | LOAD LOCK is set to ON. | Use UTILITY screen to set LOAD LOCK to OFF. |
| Track information characters are garbled. | A non-supported language font has been used. | Use a supported language font to input information. Supported languages include western European languages, Russian, Simplified Mandarin Chinese, and Japanese. |
| This unit's track information function cannot be displayed by DJ software. | Consult the operating instructions for your DJ software program for more information about languages supported by the program. | |
| Television screen is disrupted, or noise is heard during FM broadcasts. | Adverse influence from the unit. | Either turn the unit's power OFF, or separate farther from the television. |
ABOUT THE LCD SCREEN
- Some LCD monitors may display so-called "hot pixels" or "dead pixels" (constantly bright pixels or pixels that are permanently off). This is a phenomenon characteristic of LCD displays and is not considered a malfunction.
- When used in cold regions, the screen may appear dark for a while after the power is first turned on. As the unit warms up with time, the screen will return to normal brightness.
- Avoid viewing the LCD screen in direct sunlight, since the light reflected off the screen may make the image difficult to view.
ABOUT OEL (ORGANIC EL) SCREENS
- The two screens (displays A/B) may display slightly different color characteristics, but this is not a malfunction.
SEP-C1 UPDATES
Software for this unit may be updated to improve operation or functionality. For details consult the following support website: http://www.prodjnet.com/support/
DISCLAIMER
- Pioneer and DJS are trademarks or registered trademarks of the Pioneer Corporation.
- Microsoft and Windows are registered trademarks of Microsoft Corporation, registered in the U.S. and other countries. Windows' official name is "Microsoft Windows Operating System".
- Pentium is a registered trademark of Intel Corporation, U.S.A.
- Adobe and Reader are registered trademarks or trademarks of Adobe Systems Incorporated, registered in the United States of America and other countries.
- Apple, Macintosh and Mac OS are trademarks of Apple Inc., registered in the U.S. and other countries.
All other brand, product and company names are the trademarks or registered trademarks of their respective owners.
Supply of this product only conveys a license for private, non-commercial use and does not convey a license nor imply any right to use this product in any commercial (i.e. revenue-generating) real time broadcasting (terrestrial, satellite, cable and/or any other media), broadcasting/streaming via internet, intranets and/or other networks or in other electronic content distribution systems, such as pay-audio or audio-on-demand applications. An independent license for such use is required. For details, please visit http://www.mp3licensing.com.

Fraunhofer
MPEG Layer-3 audio coding technology licensed from Fraunhofer IIS and Thomson multimedia.

NOTE
- The DJ software program "DJS" not covered by the terms of free repair on the unit Warranty. When installing or using the DJS program, be sure to read and understand the terms of the End User License Agreement (P. 13).
Published by Pioneer Corporation.
Copyright © 2008 Pioneer Corporation.
All rights reserved.
2 Section USB Upstream
11 Bouton BROWSE (Navigation)
PIONEER ELECTRONICS (USA) INC.
BUSINESS SOLUTIONS DIVISION, PRO AUDIO GROUP
2265 East 220th Street, Long Beach, CA 90810, U.S.A
Europe
PIONEER EUROPE NV
MULTIMEDIA DIVISION
Pioneer House, Hollybush Hill, Stoke Poges, Slough SL2 4QP U.K. (Royaume-Uni)
MULTIMEDIA DEPARTMENT
253 Alexandra Road, #04-01, Singapore 159936
Hong Kong
PIONEER (HK) LIMITED
SALES AND MARKETING DEPARTMENT
Suite 901-906, 9th Floor World Commerce Centre, Harbour City 11
Canton Road, Tsim Sha Tsui Kowloon, Hong Kong
Taiwan
PIONEER HIGH FIDELITY TAIWAN CO., LTD.
SALES DIVISION, INDUSTRIAL ELECTRONIC SECTION
13F, No. 44, Sec. 2, Jhongshan N. Road, Taipei City, Taiwan
Océanie
PIONEER ELECTRONICS AUSTRALIA PTY. LTD.
178-184 Boundary Road, Braeside, Victoria 3195, Australia
Moyen-Orient, Afrique
PIONEER GULF, FZE.
Lob 11-017, Jabel Ali Free Zone, P.O.Box 61226, Jabel Ali, Dubai, U.A.E.
Plaza Credicorp Bank Panama, 50 Street, #120, 14th Floor
P.O. Box 0816-01361, Panama, Rep of Panama
Mexique
PIONEER ELCTRONICS DE MEXICO, S.A. DE C.V.
Blvd. Manuel Avila Camacho No. 138, Piso 10, Col. Lomas de
Chapultepec, Mexico, D.F. C.P. 111000 Deleg. Miguel Hidalgo
http://www.pro djnet.com/djs/support/
REMARQUE
Publication de Pioneer Corporation.
© 2008 Pioneer Corporation.
PIONEER ELECTRONICS (USA) INC.
BUSINESS SOLUTIONS DIVISION, PRO AUDIO GROUP
2265 East 220th Street, Long Beach, CA 90810, U.S.A
Europa
PIONEER EUROPE NV
MULTIMEDIA DIVISION
Pioneer House, Hollybush Hill, Stoke Poges, Slough SL2 4QP U.K.
482,6 mm (L) × 133,0 mm (A) × 83,5 mm (P)
2 Sezione USB in su
PIONEER ELECTRONICS (USA) INC.
BUSINESS SOLUTIONS DIVISION, PRO AUDIO GROUP
2265 East 220th Street, Long Beach, CA 90810, U.S.A (Stati Uniti)
Europa
PIONEER EUROPE NV
MULTIMEDIA DIVISION
Pioneer House, Hollybush Hill, Stoke Poges, Slough SL2 4QP U.K. (Regno Unito)
IL SUPPORTO IN LINEA
http://www.pro djnet.com/djs/support/

NOTE
Copyright © 2008 Pioneer Corporation.
COPYRIGHT WAARSCHUWING 14
SYSTEEMVEREISTEN
3 BEPERKING GARANTIE
HET PROGRAMMA EN DE DOCUMENTATIE WORDEN
GELEVERD IN HUN HUIDIGE STAAT ("AS IS") ZONDER ENIGE
AANSPRAAK OF GARANTIE, EN U GAAT ERMEE AKKOORD
DEZE GEHEEL OP EIGEN RISICO TE GEBRUIKEN.
VOORZOVER RECHTENS TOEGESTAAN WIJST PIONEER
ELKE GARANTIE AANGAANDE HET PROGRAMMA EN DE
DOCUMENTATIE IN WELKE VORM DAN OOK AF, EXPLICIET
OF IMPLICIET, STATUTAIR, OF TEN GEVOLGE VAN DE
PRESTATIES, TEN GEVOLGE VAN DE DISTRIBUTIE OF
VERHANDELING ERVAN, MET INBEGRIP VAN ENIGE
GARANTIE VAN VERHANDELBAARHEID, GESCHIKTHEID
VOOR EEN BEPAALD DOEL, VOLDOENDE KWALITEIT,
ACCURATESSE, TITEL OF NIET MAKEN VAN INBREUK.
COPYRIGHT WAARSCHUWING
PIONEER ELECTRONICS (USA) INC.
BUSINESS SOLUTIONS DIVISION, PRO AUDIO GROUP
2265 East 220th Street, Long Beach, CA 90810, U.S.A. (Verenigde Staten)
Europa
PIONEER EUROPE NV
MULTIMEDIA DIVISION
Pioneer House, Hollybush Hill, Stoke Poges, Slough SL2 4QP U.K. (Groot-Brittanniè)
Copyright © 2008 Pioneer Corporation.
Usted accepts that each of the four countries has a present contract with the U.S. and Canada. The U.S. has a present contract with the Chilean government, which includes the U.S. and Chilean governments. The Chilean government has a present contract with the U.S. and Chilean governments.
5 FINALIZACION
PIONEER ELECTRONICS (USA) INC.
BUSINESS SOLUTIONS DIVISION, PRO AUDIO GROUP
2265 East 220th Street, Long Beach, CA 90810, EE.UU.
Europa
PIONEER EUROPE NV
MULTIMEDIA DIVISION
Pioneer House, Hollybush Hill, Stoke Poges, Slough SL2 4QP U.K. (Gran Bretaña).
Asia del Sur, Asia del Sudeste
PIONEER ELECTRONICS ASIA CENTRE PTE. LTD.
MULTIMEDIA DEPARTMENT
253 Alexandra Road, #04-01, Singapur 159936
Hong Kong
PIONEER (HK) LIMITED
SALES AND MARKETING DEPARTMENT
Suite 901-906, 9th Floor World Commerce Centre, Harbour City 11
Canton Road, Tsim Sha Tsui Kowloon, Hong Kong
Taiwan
PIONEER HIGH FIDELITY TAIWAN CO., LTD.
SALES DIVISION, INDUSTRIAL ELECTRONIC SECTION
13F, No. 44, Sec. 2, Jhongshan N. Road, Taipei, Taiwan
Oceania
PIONEER ELECTRONICS AUSTRALIA PTY. LTD.
178-184 Boundary Road, Braeside, Victoria 3195, Australia
Oriente Medio, Africa
PIONEER GULF, FZE.
Lob 11-017, Jabel Ali Free Zone, P.O.Box 61226, Jabel Ali, Dubai, Emiratos Árabes Unidos.
http://www.pro djnet.com/djs/support/

NOTA
Copyright © 2008 Pioneer Corporation.
TEXHUNECKNE XAPAKTEPNUCTUKN 7
TEXHINUeCKNE XAPAKTEPNCNIKNI
1 O6une
MoJeIb .SEP-C1
Ha3BaHHe. .IporpaMMbI pa3BJIeKaTeJIbHbI IyJIbT yIpaBJIeHHa
HaipjkeHne IHTaHH. 5BIOCTOHHORTOKA
OTHOCTeJIbHOB BJIaJXHOCTH (6e3 KOHJeHcaIIHH)
Macca (Bec) 1,7 KI
MaKcHMaJIbHbIe rəbapHTbIe pa3MepbI
482,6 MM (IIIInpHa) x 133,0 MM (BbICota) x 83,5 MM (JLy6Ha)
.
2 USB-B
Pa3beM. Iopr TnIa USB-B (Pa3beM PC)
3 BbIXoHoi BnDeocnHaI
BbIXoJHoi pa3bem Pa3bEm RCA
YpOBeHb BbIXoIHOr KOMIO3HTHOr CnHaJa .1 Vp-p (75 Ω)
4 LcHTpaIbHbI dIscnIeI
TII .AKTHBHMA MatpHa TFTLCD
Pa3mep. 4,3" (IHHPnHa)
IopJepKHBaEMbIe 3bIKN .93bIKOB,BKJIIOUa aHfJIHcKnH,
JIIOHCKN IN KHTaHCKN (yIPOIeHHbI) 33bIKN
5 Dincnnei konTpponnepa A/B
TnI . . . OEL (OJJI - opraHHueckn 3JIeKtpoJIHmHHeCteHTbI)
IIOJIHO-ceMentHbI (Full segment)
6 Dpyrme KOHTaKTHbIe pa3beMbI
KoHTaKTbIpa3bem5V Pa3bEmIOCTOHHORTOKa
TexHHueckHe xapaKtepHCTHKn H n3aH yctpoIcTBa MoryT
H3MeHЯTbC6e3IpeBapHTeJbHOrOyBeOMJIeHn.

HaKJIeIka c KJIIOHOM yCTaHOBKN DJS
Hnctpykunno3knnyataunn (HaCToJuee pykoBOdCTBO)
TapaHTnHbI TaLoH
HA 3AMETKY
- IIpnlaeraetcTn pykoBOcCTBa IIO 3KCIJIyataiHn (BkIIOuHa HAcToaIIee). IIOxAJyIcTa, I3yUHTe 3TN pyKOBoOCTBa B COOTBeTCTBHN C MToIOm 3KCIJIyataiHn:
HnCKOBbI peRyJIaTOp OcHaIIeH BbICOKOuYCbTBeJIbHbIM IpeEJIIOUaTeJIeM. EcJIn ycTpoIHCTBO IOMeIeHO B IpeHocHO YexOI, IIpHMHTe Mepbl IpeIOCTOpOxHOCTH, YTO6bl He IOnyCTHTb IIpHIOXeHHN IaBJIeHHa HIOBepxHOCTb INCKOBOro peRyJIaTopa.
KoHdEhcaln
Khonka HaayabHoi ToyKn neTIn (IN/CUE)
HcIOJIb3yeTcIaIHaIIHnHaauJIbHbIX KHOIOK PeTeJIb. IPrn HaKaTHN 3ToI KHOIIKN BO BpEm BAocIpOu3BeJeHn IeTIJIN BOCIpOu3BeJeHne Bo3BpaIIaETCsRa HaauJIbHyTOUky IeTIJIN HauHHaETc CHOBA.
KhoNka KOHeuHOToUckn neTJIn (OUT/ADJUST)
HcIOJIb3yETcI J3aJdAHN KOHeYbIX KHOIIOK IeTeJIb. HaKaTne 3ToI KHOIIKN BO BpEm RA BOCIIPOH3BeDEHH NIEJIIN IO3BOJIaER THaCtpaINBaTb IO3NIuHO KOHeUHO TOKHN IeTJIN C IOMOIIbIO INCKOBOro peYJIaTOPa HJIN KHOIIOK SEARCH.
Khonka RELOOP/EXIT (NOBTOP NETJIN/BbIXOД)
HaKaTHe 3ToI KHOIIK IN BO BpeMBAocIpOn3BeDeHnIe IeTIN OTMHeT BOCIpOn3BeDeHne IeTIN.HaKaTHe 3ToI KHOIIKN, KOrJa Ha yCtpoiCTBe He BKJIIOueH peKHM BOCIpOn3BeDeHnIe IeTJIN, HauHHaET BOCIpOn3BeDeHnE PeTJIN C ppeDbapHTeJIbHO 3aDaHHo HauaJIbHOI TOUKN IeTJIN.
3 CekzynyynpaBJIeHnTeMnOm TEMPO
Khonka dana30ha ynpablenna noJ3ykoBbIM peryIaTOpom TEMPO (TEM) (± 6 / 10 / 16 / WIDE)
Пи Кадом Нажати NTон KhoNTКИп ПОнСхODHT ПЕркIIOчЕНДИАПAZHAОHIIpeDEЛБHbIX 3нauЧЕНРeуЛнрOBKNIПЛ3YHKOBbIMpeyJIITOPOM TemIIa TEMPO.
KhoNka n HndnKaTOp MASTER TEMPO (MT) (ГЛАВНБИ TEMП):
При Кадом Накати NGToI KHOIIKN IIPOHcXOДNT BKJIIOUeHHe/ BbIKJIOUeHHe ΦyHKIINI rIaBHorO TemHa.
Полунковы ретулар TOP TEMPO (TEM):
H3 ΣeHTpaJIbHOrO ΦHKChpyEmoTOIIOJKeHNr TAHnTe IOL3yHOK Ha ce68 (+), YTO6bI yBEJIHcHTb TEMII, H OTOOBHraIte IOL3yHOK OT ce68 (-), YTO6bI 3aMeJIHTb TEMII.
KhoNkI PITCH BEND + / - (IOdROH CKOPOCTN)
HaKaTHe KHOIOK BO BpEma BOCIpOuH3BeIeHHB KJIIOuae TpyHKIIIOH 3MeHeHH ToHaJIbHOCTH (IOIROHKN cKOpocTH). HaKaTHe KHOIIKN “+” yBEJIuHbAeT cKOpocTb, a HaKaTHe KHOIIKN “-” 3aMeJIJeT cKOpocTb.
IpeKJIIOUeHHe cKOpocTH N3MeHeHHaTOHaJIbHOCTN MOJHO H3MeHnTb, yJePKNBaA KHOIIky B HaKaTOM IIOJOKeHHN IIpH 3TOM BpaIaIa IINCKOBbl peYJIaTOp.
4 KhoNkTRACK SEARCH (IOnCK DOPOXKN) (1-<,▶>1)
HcnoIb3yIOTcIJI BbIIOJIHeHHI IOHcKa IOpOJKN.
5 KhoNk SEARCH (NONCK) (A<,
HcnoJIb3yIOTcIJIy BbIIIOJIHeHH6bICTporo IepexOJa BnpeJn Ha3aJ.
6 KhoNka N HndnKaTOp CUE (METKA)
HcnoIb3yetyc IJIa 3aJAHn MeTOK. Kpome TOrO, KOgJa HMeetc 3aJAHHa ToUka MeTKn, HauKaTHe KHOIIKN CUE IIpeKJIIOuaeT yCTpoiCTBO B peKHM OKNJdAHn Ha MeTke.
7 Khonka n HndnkaTop Bocnpon3BeDeHna/ny3bl (▶/III)
HcIIOJIb3yETcR JIIB BKJIIOUeHHN BOCIIPOHN3BeJeHHN IIOCTaHOBKN BOCIIPOHN3BeJeHHN Ha IIay3y.
8 Khonka peKIma HnDnKaunn BpeMeHn/abTOMaTnuecko MeTKn (TIME/A.CUE)
TIME:
9 KhoNka SCRATCH (CKPETU)
HaKMHTe, TTO6bI BKJIOHHTb HJIH BBIKJIOHHTb peKHM cKpeTua.
10 KhoNka JOG BREAK (BOCnPOn3BEdHne C INPEPbIBAHHEM)
BoBpemy yipabJIeHnI IpoIpaMMoDJS He nIIOJIb3yeTc.
11 Khonka BROWSE (OB3OP)
HcnoIb3yetyraI IpeKJIIOUeHnB 3KpaH BROWSE (OB3OP).
12 KhoNka MIX (MKNKUNPOBAHNE)
HcIOJIb3yeTcIJIIpeKeJIHOueHENB 3KpaH MIX (MKNIIINPOBAHNE).
13 Khonka EFFECT (3ΦΦEKT)
HcnoIb3yeTcIJIpeKeKIOUeHENB 3KpaH EFFECT (3ΦΦEKT).
14 Khonka UTILITY (YTNJNTA)
ИспьзуетсдлпіреклоченьЗкран UTILITY (YTHJIHTA) (cM. cTp. 25).
15 NobopOTbIc eJIeKToPbI dNcK
KorДа OTO6paKaetcЯКран BROWSE HJIN UTILITY, IOBOPaHbAЯ IOBOPOTbIйСК,MOJHO BbIIOJIHЯТБ bI6Op IopOJKN И ПepeДВИrTaT bKypCOp MEJdY 3JIeMeHTaMn, IocTyIIHbIMn ДЯ bI6opa.ЧTO6ы ПОДТВерДNTb bI6Op,HaЖМTe Ha IOBOPOTbIйСК.
3a HnΦopMaIIeH o6 OIepaIIHx B kPaHax MIX H EFFECT oBaIIaIteCb K PykoBOdCTBy IIO yIipabJIeHHO DJS.
16 Khonka CUE/LOOP MEMORY (PAMrTb METOK/NETEJIb)
BoBpemyIppaBJIeHnIpoIpaMMoDJSHeNcIOJIb3yeTc.
17 Khonka CUE/LOOP CALL (Bbl3OB METKNIETJIN)
Bo Bpemy uipabJIeHHI nporpaMMo DJS He nCIOJIb3yeTc.
MaHHTOONTHUeCKN DnCKOBoD:
IинскOBOD,сIOО6HbI cHTbIBaT b HΦopMaIIH c IиСКOB CD-ROM I BOCIIpOHN3BOIDTH My3bIkaJIbHbIe KOMIIaKT-ДИСКИ (CD-DA).
Ducnnnei:
BnIeOaIaIITeP H MoHITop XGA (1024x768) H BbIe c peKHMOM HighColor (16-bit) HJIN JIyIe.
3Byk:
2-KaHaJIbHbI N BbIIe ayIDHObIXoI (BCTpoEHHa HJIN yCTaHOBJIeHHa 3ByKOBa KaTAp Ta HJIN ayIOHycTpoiCTBO).
UcTpoIcTBoBbOa:
KJIaBHaIpya,MbIIb (HIN 3KBBaJIeHTHOe KOOpJINHaTHO-yKa3aTeJIbHOe yCTpoJIcTBO)
Iopknioyehne K cetn INHTepHET:
PekomeHnyetcckopoctbc coeHHHeHH56 K6HT/c H BbIIe Microsoft Internet Explorer 5.5 HIN 601ee P03dHeB cepHH, JIN6O npyroB Be6-6pay3ep, P0IDepKHNBaIOHn 128-6HT SSL.
Длгплклоченя Данногу устpoи CB K KOMПьOTepy H NcПОЛьЗOBаHHN B COUeTaHHN C ПОгрмMHbIM OбecпeЧeHem DJS KOMПьOTepdoJIkeH6bTb OCHaIIeH DByMa IOPtAmn USB, COOTBeTCTBHyOIIHMn USB 1.1 ИИн 6ОЛee ПОЗДЕМу CTaHДapTy.3a 6OJIee ПОДрОБНИнФОрмАИЕОБpaIaIteCbК pa3ДeЛY “ПОДКЛIOΥEHNÉ” (cM. cTp.9).

ПОНМЕЧАНЕ
JaKe ecJIN BaII KOMIbIOTep OshaieH O3Y ykaaHHoB bIIe B Tpe6obAHnIX K OIIepaIHOnHO CpeJe EMKocTH, OJHOBPemEHnA paOta npyTOrO IporpamMHoro ObecIeHnHa cIyXb Ha KOMIbIOTep MoKet BblIBaTB HexBaTKy IaMHTN, YTO MOKeT IIpNBecTH K IOHNKeHHO fYHKUHOHaJIbHOCTN HIN 6bICTPOeIECTBn IporpAMMbI. B 3TOM cIyuae 3akpoTe IpyTne AKTHBHeI cIyXbIbI INI IporpAMMbI, YTObI TaKHM o6pa3OM BbICBOODITb BOJIbIIe IaMHTN KOMIbIOTepa, HIN yBeJIHyte EMKOCTb IaMTh, yCTaHOBJeHHo HA BaIIeM KOMIbIOTepe.
Pa6oTa IpoIpaMMbI DJS MoKeT He BbIIIOJIHrTBcHaJIeKaIIM M o6pa3OM, KOrJa OHa HcIIIOJIb3yETcB KOM6HHaIIN C IpyrHM IpoIpaMMhBIM O6ecIpeHHEm, yCTaHOBJeHHbIM Ha BaIeM KOMIIbIOTpe.
Плная Функиональноctь Н rapаHTnpyeTс CO BCEMN KOMПИБОТерамн,Дже ecJIN OHH yIOBJIeTbOPaIOT yKa3aHHbIM BbIIIE Tpe6OBaHHM KОпepaIOnHONcpeIe.
- IpoIpaMa DJS He IIOJIepeKJHBAeTcR KOMIIbIOTepaMn Macintosh (BKJIIOUaY KOMIIbIOTepb, OCHaIeHHbIe IITY IIPOIN3BOIDCTBa Intel).
YCTAHOBKA ПОГРAMMHOO OBECEPUEHЯ DJS
Mepbl npedoctopoxhoctn npu yctaHOBe
- Ipepe yctaHOBKO IIpOgpaMMbDJS IOKaJyIcTa IIpoQHTHe "JIINIEH3NOHHOE COJIAIIIEHNE C KOHEUHbIM IIOJIb3OBATEJIEM" N "CNCCTEMHbIE TPEBOBAHnA (MHHMaJIbHbIe pa6oOHe Tpe6OBAHnA)".
- Погамma DJS Идзержвается TOЛько следуюшн Всрсamy OC Microsoft® Windows®:
Windows Vista® Home Basic
Windows Vista® Home Premium
Windows Vista® Ultimate
Windows Vista® Business
Windows XP Home Edition
Windows XP Professional
Windows 2000 Professional (SP)
- Погамma DJS He IOДдержИBaeТС 64-pa3рДиБIMN OпетацIHнБIMсСтЕмamM Microsoft (Версн Windows XP Professional x64 edition И Windows Vista® 64-bit editions).
-Пинлагаembl CD-ROM coIepKHT IporpaMMbI yctaHOBKn H pykoBOcCTBa IOJIb3OBAteJIHa cJIeIyHOIIHX BOCbMnЯ3bIkaX: aHIJIINckN, fpaHnY3ckN, HemeIKN, HTaJIbHcKn, HnDEpJIaHdckN, hCnAHCkN, KNTaIckN (yIpoIeHHbI), JIOHC - KorДа IIporpamma DJS ИСПОЛБ3уЕТСЯ КOMПьОТеР,ЯЗВИК
ДИСПЛЕЯ Windows® Ha KOTOPOM OTЛИЧАЕТСЯ OTпЕЧИСПЕHБIX
ВБИПЕ,СLEДУ RA HNCTPyKIIHM B MEHNO, ВБИБЕРNTe [English
(AHRПИСКИ)].
-Дя установский и удайен尼亚 рогаммого обесенья DJS Heo6xOДнМОобладь праим Аdmннстраю ДАнго KOMПьOTepa.пегд Вьллгенем установский погаммого обесенья Heo6xOДнМО BOITN BСнсTeMyВКачecтBE ПЛьЗOBATEЯ с праим Аdmннстраю.
Ipoueedya yctaHOBKn
1 ПиЗагуЗкппилarameMOrO yctaHOBHOrO дSCKa CD-ROMВпивODДИСКOB DVD/CD BaшeroКOMТьОтepа abTomatUcheCKN OTOбраЖаETcMa MEHIO yCTaHOBKN. CJeDyIte ИнстуркIJm B MeHIO, YTOБы yCTaHOBtB nporpamMHoe obecneueHne DJS.
- Ecln MeHIO yCTaHOBKN He oTOOpa3NIOb abTOMaTHuecKn, BblIOJIHTHe IeJUOK Ha [Iyck] [Moi KOMpbIotep (NJIN KomnbIoptep)] H BbIePHTe MaTHHTOOITHEeCKH JINCKOBOD, 3aTEM BblIOJIHTne IBOHOH IeJUOK Ha 3HaJYe [Install].
2 Korda oTo6pa3ntcMa MeHObyCTaHOBKn, BbINOJIHnTe IeJIyOK Ha Khonke [Install DJS].
![PIONEER SEP-C1 - Korda oTo6pa3ntcMa MeHObyCTaHOBKn, BbINOJIHnTe IeJIyOK Ha Khonke [Install DJS]. - 1](/content/2025/01/118694/images/98051ad9da9fcd6722ec100b0e2ea010d042e5490e00c3ababdf10fbd2210841.jpg)
- Ecln Ha KOMIbIOTpe B HAcToIIM MOMeHT IMeETcYctaHOBJIeHHa IIpo6Haa BepCna IIporpaMMbDJS, BmecTO KHOIIKN [Install DJS] OTO6pKaJaaTcKHOIIKa [Uninstall DJS trial version of DJS]. BbIOJIHnte IIeJIyOK Ha 3TOI KHOIIKe, YTO6bI ydaJIHTb Ipo6HyO BepCno, a 3aTeM CHOBA bIIOJIHnte IIeJIyOK Ha KHOIIKe [Install DJS].
- Д��посмOTpa pykoBOДСТВа ПОЛьЗОВATEЯ BыПОЛИНITE сELJOK на КНОПК [Display DJS User's Manual]. Д��посмOTpa
pykoBoCTBa IIOJIb3OBaTeIa Tpe6yeTcI pIporpaMMA Adobe Reader
- YuTo6bI yCTaHOBHT bIPOrpaMMy Adobe Reader®, BbIIOJIHNTE IIeJIYOK HA KHOIIKe [Install Adobe Reader]. EcJIn Ha BaIIHem KOMtIbIyTepe yJke MHeETc yCTaHOBJIENHЯ IPOrpaMMa Adobe Reader® 6oJIepe paHHeB BepIN. IpeEi TEM KAc BbIIOJIHNrTb IIeJIYOK HA KHOIIKe[Install Adobe Reader], yJaJIHte IPOrpaMMy Adobe Reader® 6oJIepe paHHeB BepIN.
- YuTo6bI 3aKpbItb MeHIO yCTaHOBKN, BbIIIOJIHNTe IIeJIYOK Ha KHOIIKe [Exit].
3 Korda oTo6pa3ntc8Kpah IJIy Bb6opa Ra3bIka, Bbl6epnTe [English], 3aTeM BblonHnTe uenqok Ha [OK].
![PIONEER SEP-C1 - Korda oTo6pa3ntc8Kpah IJIy Bb6opa Ra3bIka, Bbl6epnTe [English], 3aTeM BblonHnTe uenqok Ha [OK]. - 1](/content/2025/01/118694/images/a2889d3d9ba9b62c295543103f7897fab98f9a4436a649dad94a8ca29e1f2233.jpg)
B 3aBnCHMOCTN OT OIEpaIHOHHO CpeIb BAIIeRO KOMIbIOTePa, BO3MOJKeH BbI6Op 6OJIee ODHOro I3bIka.
Korda BbI BbIIIOJIHnTe IIeJIyOK Ha KHOJnke [OK], oTo6pa3HTc coo6IeHne [Preparing to install DJS...]. Korda IIOIroTOBkA K yctaHOBKe 3aBePHTC8, IIOBHTc coo6IeHne [Commencing installation of DJS...]. CJeIyIte HnCTpyKIIHM B COo6IeHHN, YTO6bl 3aBePHTb yctaHOBKy IPOrpaMMbI DJS.
- To6bI OTMeHHtB yCTaHOBKY, IIeJIKHHTe Ha KHOIIKe [Cancel].
4 Korda yctaHOBka nporpaMMb1 DJS 3aBepuNTcna, nepe3arpy3nte KOMnbIOTep, cneDyra HnCtpyKzma, oTo6paxKaembIM Ha 3kpaHe.
HA 3AMETKY
-ДянсIOЛьЗОВАнгДаHHOrOуcTpOиСТВaВcoYeTaHINПогрamMHbIMобecпeчEHemDJS,IpeJIПОДоeДИнEHemKOMПьOTepaКSEP-C1HaKOMПьOTep Heo6xOДМоуcTahOBHTBПограмMHoeобecпeчEHneДраьЕр.ПдрбHeecm.cTp.17.
PykoBoDcTBo noIb3OBaTeJra DJS (PDF)
Korla yctaHOBka IporpaMMbDJS 3aBepHITcra,ipocmoTp pyKOBOIDCTBa IIJIb3OBAHN8 6yIeT IOCTUIIeH N3 MeHIO Windows [Nyc]. BbIIOJIHInTe IIeJIYOK Ha [Nyc] [Bce nporpamMbI] [DJS] [User's Manual].
PekomeHnyetc03NaKOMHTbc8c cykoBOCTBOM IOJIb3OBeTJI, YTO6blIOJIyHTb 06IeE IIpeCTabJIeHNe O yHKIInx IporpamMbDJS IpeDeHIIocpeCTBeHHoPa6OToC pIporpamMoH.
3AMEUHNA OTHOCHTIELBO CPOKA ДЕИCTBЯ ПОБ"HOBBEPCN N ПОЛБ3OBATEЛБСКОPENTPAÇN
IporpammaDJS MoKET HcIIb3ObaTbc6e3peHCTpaHHB TeueHHe 60-1HEBHO cPoka DeHCTBn IPO6HOB BepCHN IOcJIe ycTaHOBKN.
3TOT cPOK IIpeIcTaBJIaET CO60I IepHO BVPeMeHN, B TeueHHe KOTOPORo Bb MOKeTe IOJIb3OBaBtCBy IpoIgpaMMo DJS 6e3 OfIIuHaJIbHO ee perHCTpaUHH. KoJda cPOK IeIcTBNIA Ipo6HO BepCNH HCTeHT, Bb He CMOKeTe 6OJIbIIe IOJIb3OBaBtCBy IpoIgpaMMo DJS, IO3TOMy 6O3aTeJIbHO BbIOJIHHTe IOJIb3OBaTeJIbCKyIO peHCTpAUNO IpeEi HCTeUHEm 3TOTO cPoka.
PIONEER ELECTRONICS (USA) INC.
BUSINESS SOLUTIONS DIVISION, PRO AUDIO GROUP
2265 East 220th Street, Long Beach, CA 90810, U.S.A
Ebpona
PIONEER EUROPE NV
MULTIMEDIA DIVISION
Pioneer House, Hollybush Hill, Stoke Poges, Slough SL2 4QP U.K.
OTHOCHTeJIbHO IODIePJKN YEPE3 INHTEPHET
IpeiO6paHHeHcM cIpyMbIM 3aIPOcAMN OTHOJbHO IIOpRAk a pa6OtblcIPOrpaMMbIM o6ecIeHHeHcEM DJS HINIO pIyHM TExHHuecknM BOIIPOcAM, POKaJIyIcTa, IPOOTHTe pyKOBoCTBO IOJIb3OBaTeJI DJS, coIepKaaIeeecsHa IIpiJIaRaemOM IncKe CD-ROM, a TaKke pa3JeI qacto 3aIaBaembIX BOIIPOcoB (FAQ) Ha Be6-caIte IIOJIepKKH DJS.
3a HnHΦopMaHnei O TOM, KAK IIOIaCTb Ha Be6-caIT NIOJIePJKN DJS, o6paIaIaTeCb K ykoBOJCTBy IIOJIb3OBAteJIa DJS. JIa IIOJIyueHIn IOCTyIIa Ha Be6-caIT NIOJIePJKN, BAM IIOHaIObHTcB BBeCTn IMr IIOJIb3OBAteJIa ("Login name") I IapOIb ("Password"), KOToPbIe Bly kya3aIIIN IIpH bblIOJIHeHn IIOJIb3OBAteJIbckO perHCTpaIIHN.
Ipn6paHcEHnC3aipocom CBe6-caTtaoJIepKKnDJS OTHOCHTeJbHO HeIOJIaIOK,IOKaJIyIcTa,YkaKHte BaIIe Hm, Ha3BaHHe IpoJyKta,peHCTpaIIOHHbI HeHTNkHaIOHHbI HOMep (KJIIOU yCTaHOBKN),TNI KOMIIbOTepaI hero XapaKTepHCTHKn (IIIV,yCTaHOBJEHHbO6bEm O3V,IpyrHe IIOJKIOueHHbe IepHfepHHbIyeYcTOIcTBaH.T.I.).HCIOJIb3yEmyIOOC h ee BercHIO,a TaKke KOHKPeTHyIO HHΦOpMaIHIo H a6JIIOJaEMbIX IIpH3HaKaX HEOJIaIKN.
IIOJIepKka IpeIOCTaIBJeTcraTOJIbKO KJIHeHTAM, IPOIIeIINM IIOJIb3OBAteJIbCKyIO peHCTpaIHN. IIOKaJIyIcTa, 6yIbTe BHNMaTEJIbHi, YTObIe He IIOTePApTb BAIIH NMa IIOJIb3OBAteJI H IapOJIb, KOtOpBle Bbl yKa3aJIN IIpH peHCTpaIHN, a TAKKe BAII peHCTpaIHHOHHN HdENTHΦHKaIHHOHHH HOMep."
Ecln y Bac Bo3HNKHyT Ipo6JIeMbI C yctAHOBKOI HIN IIOJIb3OBAteJIbCKoI perHcTaIHeI, IIOkaJyIcTa, O6paHTecb Ha cJIeJyIOIIH Be6-caIT:
<3anpocbI OTHOCHTeJIbHO yCTaHOBKN INoJIb3OBaTeJIbCKO perNCtpaun>
http://www.prodjnet.com/djs/support/
PIMMEUAHNE
3aTexHHuecko HnHΦopMaIne OTHOCHTeJIbHO HCIOJIb3OBAHHa IaHHoro yCTPOIcTBa C KOMIIbIOTepOM, IepHΦepHIbIMN KOMIOHEHTAMH HIN DpyHMN H3JeJIHMAH, He ABJIAIOIHMMc IpoJyKlnei KOMIIaHHN Pioneer, IoxKaIyIcTa, 0paIaIITecb K IpoJdABUY HIN IIPOH3BOIDTEJIIO COOTBETCTBYIOIeRO KOMIOHEHTA.
IpeIIIOJIaIaeTcYTOHOBbIEoHOBIIeHnBepCn yIyUHAt yHKIIHOHaJIbHOCTb I pOHO3BOJHTeJIbHOCTb IpOgPAMMHO oecneHnDJS.
OfHnHaJIbHaPeRHeCTpaIINaDHHOro IpoDyKTA OTKpoTe IOCTUHa Be6-caIT IIOJIePJKN Pioneer, a TaKKe IIO3BOJInr 3aIpyKaTb O6HOBJIeHHbE Bercn HpOgPaMMbI. PeKOMeHNyEM IIOJIb3OBaTeJIaM BOCIIb3OBaTbCpENMyIeCTBaMm 3TOI cIyKbI O6HOBJIeHHN, YTO6bI HMeTB BO3MOxHocTb BCErJa pa6OraTb c CamOI IOcJIeHHe BepChE IIPOgPaMMbI.
ПЕДУПЕЖДЕНЕ OS OTBETCTBEHHOCTN
■ Kompanhna Pioneer He Hecet o63aTeJIbCTB OTOHHeHH IOBtopHO BbIaun JINHe3HONHbIX KJIIOuee HJIN peHCTpaHOOHHO INeHTnHkaHOnHHbIX HOMeOB B CUYae IH yTEPH. O63aTeJIbHO XpaHNTe BAIIy peHCTpaIHooHHUo IHΦOpMaHIO H IapOJIIN OTJeJIbHO B HAIDekHOM MecTe DIA O6paIIeHHK HMM B 6yDyIeM.
O6paTHTE BHNMaHHe, YTO ΦyHKIINI Iepeaun IaHHbIX c KapTbI IaMaTH SD (check-out/check-in) He IIOJIepKINBaETcI OIIepaIHHOH CNCTeMOI Windows Vista®.
yH I H KOIIHOBAHnMy3bIKN C My3bIaJIbHBIX KOMIIaKT-ⅡNCKOB DaHHORIO IPOrpaMMHOrO OecneueHHn He IIOJIepKJBaeTcI JIA My3bIKAJIbHBIX KOMIIaKT-ⅡNCKOB, HA KOTOpbIX He yKa3aH OJINH H3 IIpNBeDEHHbIX 3JeCb JIOROTNIOB.
ОПРОГРAMMHOM OБЕСПЕЧENДРАВЕРА
JaHHOyeyctBOIpeHa3haeHNOIJIyIpaBHeHHPioneerDJSIpyHMINJIXeckHMIpOgrpAMMbIMObecneHEm,KOJaOHOIOKJIIOHOKOMIIbOtepy.IprNIOKJIIOUeHHN DaHHORO yctPOCTBAKOMIIbOtepyIOIyipABHeHEMWindows IINIOJIb3OBAHnCINJIXeckHM IpOgrpAMMbIM ObecneHEm,IpeBaHPteJIbHO Heo6XODHMO 3aRpy3HTB KOMIIbOtep IpOgrpAMMHOe ObecneHnIpaIBepa

HA 3AMETKY
- Ecln Bbl He corIaChbI c ycIOBmN "JIHHe3HOHOro CorIaIIeHnIc KOHeuHbIM IOJIb3ObATEJEM", cJeJaIte IeJIyOK Ha KhoIIke [OTMeHa], YTO6bl IpepBaTb yctAHOBky.
7 CJeDyIe IINCTpyKcIaM Ha 3kpaHe.
- EcJIN BO BpemY yCTaHOBKN IIOBHTc3 3KpaH [Ee3ONaCHOCb Windows ], cIeJIaTe IeJIuK Ha [Bce paBHO yCTaHOBtB 3TOT dpaBep], YTO6bI IIPOJOJIKHTb IIPOUeCC yCTaHOBKn.
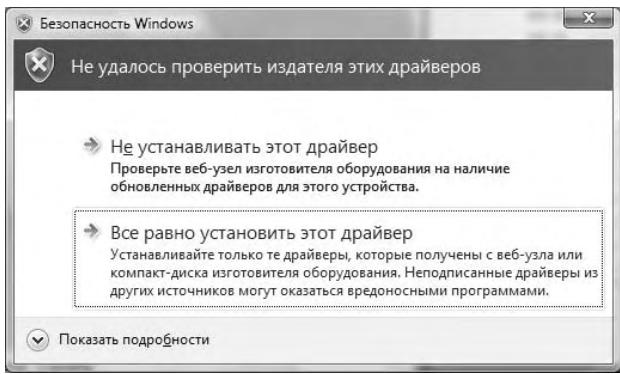
- EcINBBOBpEmyycTaHOBKNIOBbNTc3KpaH[nCTaHOBkaObOpyDoBaHn],CJIaIteIeJIYOKHa[nCe paBHo npoDoJXHTb],TTO6bIPiPOIOJXHTbPiOeCCyCTaHOBKn.
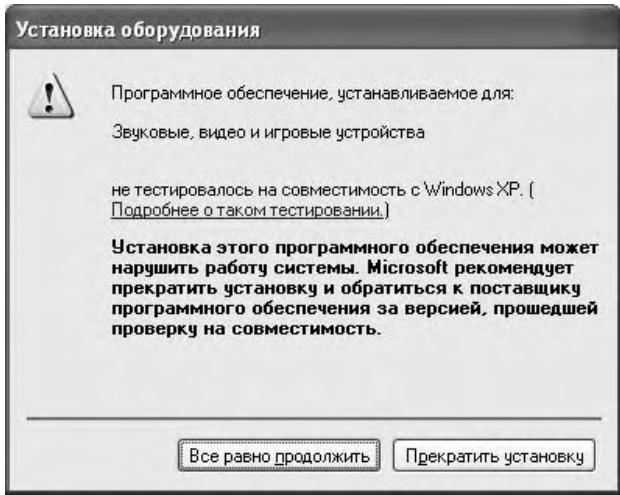
- EcINBovBpeM yCTaHOBKn IIOBHTC3 3KpaH [UΦpOBAI noPnncb He HaJdeHa], cJIeJIaIte IIeJIyOK Ha [Ja], YTObI IIPOJOJIKTHI pIoIeCC yCTaHOBKN
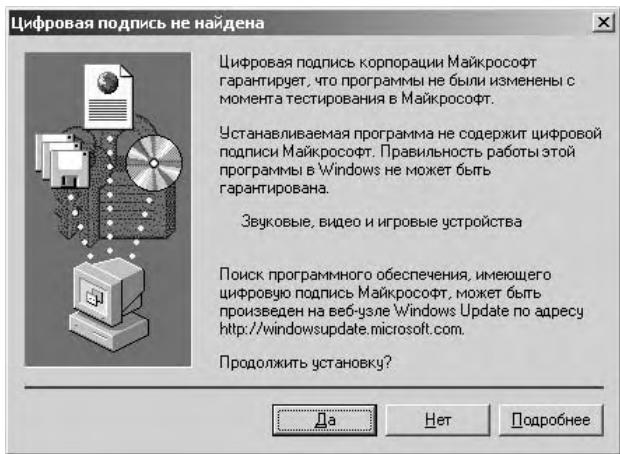
8 Korda yctahOBka 3aBepuNTcra, noBHTc coo6eHne [YctahOBka 3aBepueHa]. CdeNaTe ueyok Ha Khonke [3akpyb], yTO6bl 3aBepuNTb npoucc yCTAHOBKn.
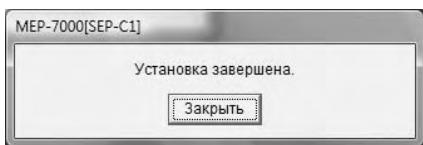
IopKJIouHeHne ycTpoiCTBa K KOMNbIOTepy
1 PoiocoeHHnTe Ka6eIb DoONHHTeHBOrO nITaHnO T USB K daHHOMy ycTpoCTBy n KomnbIoTepy.
2 ПдсоeINHITe Ka6eNB USB K dAnHOMy ycTpoiCTBy n KOMNbIOTepy.
KOrIa yCTpoIcTBO IOIOcoEINHnEETC K KOMIIbIOTep BIIeBbIE HIN IIOcJIe OTcoeIDINHEnH INOBTOHPORo IOIOcoEINHEnH N IIOPTy USB KOMIIbIOTepa, KOMIIbIOTep MOKeT OTObpaKaTb COO6IeHne [YctaHOBa nPoRpAMMHorO oEcecNeHnA dpaIBepa yCTPOIcTBa].B 3tOM cIpyae IIOcTo IOIOJXInTe, IOKa Ha KOMIIbIOTepe He OTO6pa3HTc coOO6IeHne [YCTPOIcTBO rOTOBOK N CNOJIb3OBaHHIO].
- EcJIN BO BpeM IpoIecca yctaHOBKN KOMIIbIOTep OTo6pa3HT coo6uHHe [Pa3peWntb IopKnIOUeHne K y3ny Windows Update dIЯ nonka IpoPamMHorO oIpecNeHne?], Bb6epHtte [Het, He b 3TOT pa3], a 3aTeM cJeJIaIe IeJIyOK Ha KHOJIke [DaJeE, YTO6bI IpoIOJIKHTb IpoIeCC yCTaHOBKN.

- EcJIN BO BVPemRA IIPOIecca yCTaHOBKN KOMIIbIOTep OTO6pa3HT COo6IeHNHe [BbIeBPrrte DeIcTBn, KOtOpoe CneIyET BByIOJIHNbTb.], BIbOeHrTe [ABOMATNaeeckar yCTaHOBkA [peKOMeHdyTeC]a 3aTeM cJeJIaIe TJeIuOH Ka KHONKe [Jaane], YTO6bI IIPOJOJIKnTH bPoiEeCC yCTaHOBKN.
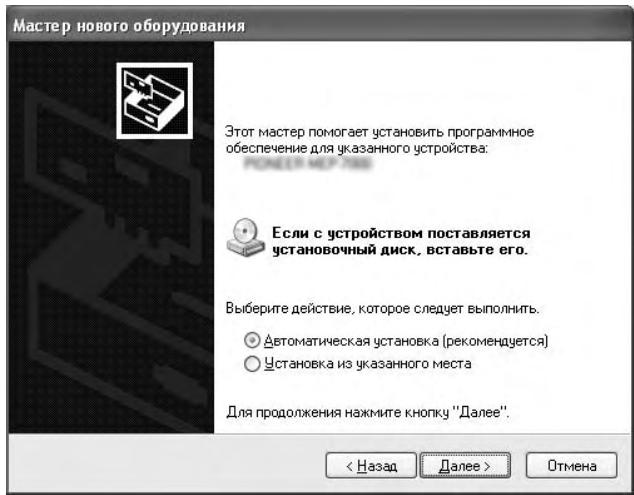
- EcINBovBpeM yCTaHOBKn IIOBbTc3KpaH [YCTaHOBKa o6OpyOBoHn] ,CJIaIte IIeJIyOK Ha [Bce paBHO npoJOnkntb], YTObI IIpoJOJKeTH IIPOeCC yCTaHOBKn.
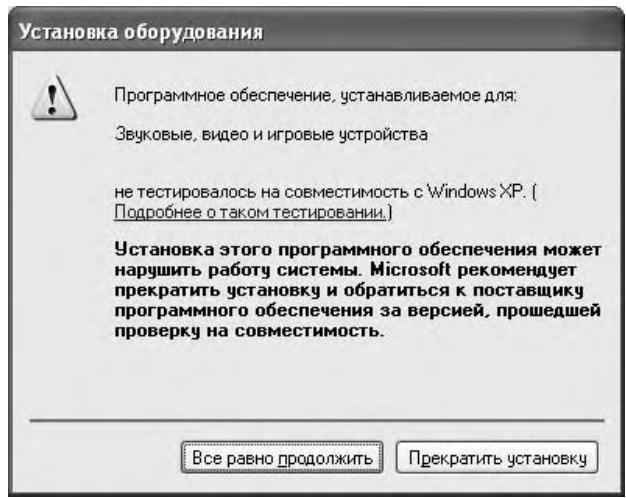
- EcINBBOBpemYyCTaHOBKNIOBHTC3KpaH[UΦpoBaIPOINCbHeHaNdeHa],cJIaJIteIeJIuOKHa[Ja],YTObIIIPOJOJIKHTbPiOIECCyCTaHOBKN.
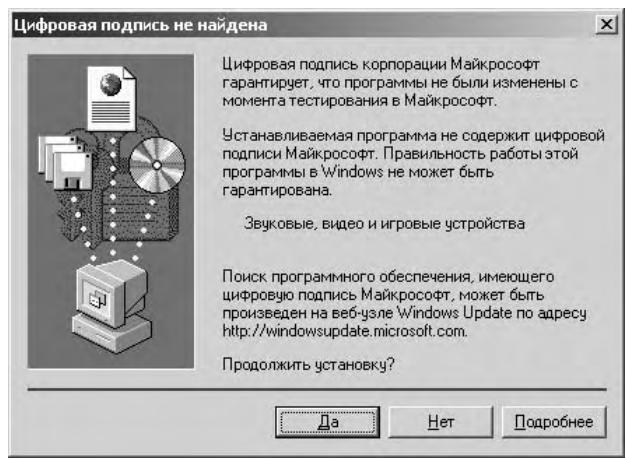
IpoBepka Bepcn npaBepa
YTo6bI pIOBepHTB BepcHNO 3aIpyKeHHOrO IpaIbEpa, CJIeJIaIte IIeJIyOK Ha Windows [PycK] [Bce nporpaMMbl] [Pioneer] [MEP-7000[SEP-C1]] [BepcnM MEP-7000 [SEP-C1]].
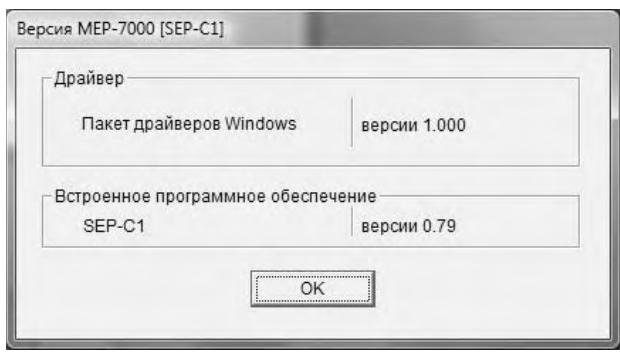
HA 3AMETKY
- TOT kpaT Takke II03BoJIeT IIPOBepHTB BepCHIO yCTaHOBJeHHOROB aHHbIM MOMENT BCtPoEHHOrO IIPOrpaMMHOrO o6ecIIeHHe. OHaKo, 6paTHte BHNMaHHe Ha To, YTO BepChN BcTpoEHHOIIPOrpaMMHOrO o6ecIIeHHe He OTobpaKaTeC, eJIIN SEP-C1 He IIOKJIIOUeH K KOMIbIOTepy HIn ecJIIN o6MeH HHΦOpMaIIHe MeKJyKOMIbIOTepom HSEP-C1 He ocUIIeCTBJIeTc DOJIJKHbIM o6pa3OM.
IocJIeHnHa HnΦOpMaunO OpaBVepe
3a HhΦopMaIneH OTHoCHTeJIbHO IocJIeIHNx BepcN IpaIbepa o6paIaIteCb Ha cJIeIyIOIIu Be6-caI.
http://www.prodjnet.com/support/
PnncnoJIb3OBAHHaHHO yCTpOcTbA nIynpabJIeHnI pOrpaMMbIM oBecepeHem DJS
1 PoiocoeHNHTe K KOMNbHTopey.
IeHTpaJIbHbI dIcIJIeI OTO6pa3IT JIoROTIN [PRO DJ].

2 3anycntte nnjkeckkyo nporpammy.
KorJa yctahOBHTcBcBbC dNJKeckHM IIpOpaMMHbIM o6ecneueHem,SEP-C1 6yIeT pa6oTaB b KaueCTBe MIDI-KOHTPoJIlepa,HaAHbIe O coCToAHHH KOHTPOJIlepa A/B,a TaKKe KHOIOK I opraHOB ynpabJIeHn B cekHII neHTpaJIbHO rHcIIIE 6yUyt BbBOIDHTbcB KaueCTBe MIDI-coo6IeHn.

HA 3AMETKY
KoIaHaIeHTpaJIbHOMIHCIIJIeOTo6paKaTc3KpaH UTILITY (YTHJINTA),MIDI-coo6IeHnCteHTpaJIbHOrO IHCIIJIe He BbIOJrTC.
Hactrpoika MIDI-kaHaJa
HacpoiKa MIDI-kaHaJa MoKeT BbIIOJIHaTbc8 H3 9KpaHa UTILITY (YTHJINTA).
1 HaxMMTe KhoNky UTILITY.
2 Haxmnte yHKnHOHaJIbHyo KOnKy [PC].
IeHTpaJIbHbI DnCIIeI OTO6pa3HT MeHIO HAcTpoiKN MIDIKAHaJa.
- KOHTpOJIIEp A HcIIOJIb3yeT OINHaKOBbI KaHJI c IeHTpaJIbHbIM IINCIJIeEM, B TO BpeM aK KOHTpOJIIEp B HcIIOJIb3yeT dpyToI KAHaJI. (B 3aBOIDCKHX HAcTpoIkAX IO yMOJIuaHNIO dIIa KOTpOJIIEpa A H IeHTpaJIbHOrO IINCIJIe 3aJdAn KaHaJI 1, a JIa KOTpOJIIEpa B 3aJdAN KaHaJI 2).
![PIONEER SEP-C1 - Haxmnte yHKnHOHaJIbHyo KOnKy [PC]. - 1](/content/2025/01/118694/images/ac7eb8ee91ac563b01db941de59b565b97c07b71b1e06a41b40819ad7fc6d85b.jpg)
3 HaxMnte NOBOPOTbI CEneKTopHbI DnCK Nn HaxMnte KhoNky BbIbopa BHN3 ()
HkoHa IpeBvHHeTcBIIpaBO.
4 NObepHnTe NOBOPOTbI CEJIeKTOpHbI INCK, YTo6bl 3MeHHTb 3HaueHne.
MoJHo 3aIaTb 3HaueHnO T 1 IO 16.
5 HaxMMTe NOBOPOTbI CEJIeKTopHbI DNCK, YTO6bl NOITBepnTb BbIbpaHHoe 3HaueHne.
[4] GENERAL (OBSUEE)
HcnoJIb3yeTcIJI npOBepKn HAcTpoiKn yHKnHn LOAD LOCK (BJIOKHIPOBKA 3AΓPY3KN) n BεpCn ycTpoiCTBa.
KAK BbIIOJIHHTb CBPOC HACTPOEK HA 3ABODCKNE
BbMoKeTe BOCCTaHOBHTb 3aBOJcKHe 3HaueHnI IO yMOJIaHnIO JILBceX hAcTpoE K Ha 3KpaHe UTILITY (YTHJNTA) (cm. cTp. 25).
1 YdepKbBary KhoNky UTILITY B HaxaTOM NonoXeHn, NOdCoEduHnTe yCTpOoiCTBO K KomIbIoTepy (BKnIOuHTe nITaHne).
KHOIIKa IOJIgKHa yIepJKBaTbC8 B HJaKaTOM IIOJIOKeHHN B TeueHHe IyTH N 6OJIeceKyuH.
2 PoiTBePnte coo6eHHe.
IocJIe toro kak oTo6pa3ntcA kcpaH 3arpy3KN, oTo6pa3nTc8 cJeIyoIee coo6IeHne: [BbIOJIHeH c6poc HAcTpoE KHa 3aBOIDcKNe 3NaueHnno yMOJUaHnO.] (BbIOJIHeH c6poc HAcTpoE K3 aBOIDcKNe 3NaueHnno yMOJUaHnO).
3 OtcoeHNHTe OT KOMNbOTepa N IOdcoeHNHTe ChOba.
ПОИСК И YYSTPAHEHNE HENСПAPBHOCTЕN
EcJIN BbI IIOJIaRaTe, YTO yCTpoiCTBO pa6OtaeT HeIIpaBnJIbHO, BbIIOJIHITe IIPOBepKBy COOTBeTCTBN C IIPIHBeDEHHoN HIXe Ta6JIHcIe IIOIcKa H yCTpAHeHH NHeIOJaOK. IHOrJa IIPOCTbE OIIbIKN B HAcTPOIkax HII IN OIEPAUHX MOYr IIPIHHMaTbC3 a cepbe3HbE IIPO6JIembl. Kpome TOrO IHOrJa IIPO6JIema MoKET Bb3bBaTbC4 npyHMn fakTopamH, He3aBNCsIMMn OT yCTpoiCTBa; B 3THX cIyuaX cJIeDyET IIPOBepHTB BCE IpyTne HCIOJIb3YeMbIe 3JIeKtPOHHbIe yCTpoiCTBa.
EcJIN Ipo6JIeMa coXpaHЯETcI dJaKe IIOJIe BbIIOJIHeHnI IPOBepKn B COOTBeTCTBHN C Ta6JIuIeI IIONcKa H yCTpaHeHnI HeIIOJIaIOK N BbIIOJIHeHnI BCEx peKOMeHnyEmbIX DeIcTBn IJIe ee peIeHnI, O6paTHTeCb 3a IOMoIbU B 6JIInKaIIHnI IeHTp TEXHnueCKOrO 06cJIyKHBaHnI KOMIIaHHN Pioneer HJIN IpoDAbIy, y KoTOpORO Bb I pHNo6peJIH yCTpoIcTBO.
H3daHo Pioneer Corporation.
© 2008 Pioneer Corporation.
Bce npaba coxphaHeHbI.
重要

PIONEER ELECTRONICS (USA) INC.
BUSINESS SOLUTIONS DIVISION, PRO AUDIO GROUP
2265 East 220th Street, Long Beach, CA 90810, U.S.A
Europe
PIONEER EUROPE NV
MULTIMEDIA DIVISION
Pioneer House, Hollybush Hill, Stoke Poges, Slough SL2 4QP U.K.
South Asia, Southeast Asia
PIONEER ELECTRONICS ASIACENTRE PTE. LTD.
MULTIMEDIA DEPARTMENT
253 Alexandra Road, #04-01, Singapore 159936
HongKong
PIONEER (HK) LIMITED
SALES AND MARKETING DEPARTMENT
Suite 901-906, 9th Floor World Commerce Centre, Harbour City 11
Canton Road, Tsim Sha Tsui Kowloon, Hong Kong
Taiwan
PIONEER HIGH FIDELITY TAIWAN CO., LTD.
SALES DIVISION, INDUSTRIAL ELECTRONIC SECTION
13F, No. 44, Sec. 2, Jhongshan N. Road, Taipei City, Taiwan
Oceania
PIONEER ELECTRONICS AUSTRALIA PTY. LTD.
178-184 Boundary Road, Braeside, Victoria 3195, Australia
Middle East, Africa
PIONEER GULF, FZE.
Lob 11-017, Jabel Ali Free Zone, P.O.Box 61226, Jabel Ali, Dubai, U.A.E.
Central & South America
PIONEER INTERNATIONAL LATIN AMERICA, S.A.
SALES DEPARTMENT
Plaza Credicorp Bank Panama, 50 Street, #120, 14th Floor
P.O. Box 0816-01361, Panama, Rep of Panama
Mexico
PIONEER ELCTRONICS DE MEXICO, S.A. DE C.V.
Blvd. Manuel Avila Camacho No. 138, Piso 10, Col. Lomas de Chapultepec, Mexico, D.F. C.P. 111000 Deleg. Miguel Hidalgo
關於線上支援
FUNCTIONABLE DISPLAY
SETTLE
http://www.pro djnet.com/djs/support/
注意
Published by Pioneer Corporation.
Copyright © 2008 Pioneer Corporation.
All rights reserved.
Publication de Pioneer Corporation.
© 2008 Pioneer Corporation.
- IMPORTANT
- CAUTION
- RISK OF ELECTRIC SHOCK
- DO NOT OPEN
- CAUTION:
- IMPORTANT SAFETY INSTRUCTIONS
- WARNING
- Information to User
- VENTILATION CAUTION
- Dear Customer:
- To establish a safe level:
- Once you have established a comfortable sound level:
- We Want You Listening For A Lifetime
- Decibel
- Level Example
- THE FOLLOWING NOISES CAN BE DANGEROUS UNDER CONSTANT EXPOSURE
- FEDERAL COMMUNICATIONS COMMISSION DECLARATION OF CONFORMITY
- CONTENTS
- FEATURES
- VARIOUS DJ SOFTWARE CONTROL
- MEMO
- HIGH FUNCTION DISPLAY
- Center Display
- Controller Display A/B
- JOG DIAL
- MONITOR OUT
- DJS FUNCTION SUPPORT
- DJ CONTROL
- TRACK INFORMATION
- BROWSE CONTROL
- MIX CONTROL
- EFFECT CONTROL
- SPECIFICATIONS
- General
- USB Upstream Section
- Video Output Section
- Center Display Section
- Controller Display A/B Section
- Other Connectors
- COMFIRM ACCESSORIES
- USB cable
- USB auxiliary power cable
- DJS: 1 Set
- Operating Instructions (this manual)
- Warranty card
- INSTALLATION GUIDELINES
- Installing the SEP-C1 in an EIA rack
- NOTE
- About carrying cases
- Condensation
- Cleaning the unit
- Cleaning the Jog Dial
- CONNECTIONS
- Connection to external monitor (pin-jack connector)
- PARTS AND THEIR FUNCTIONS
- FRONT PANEL
- EJECT () button
- Loop control buttons
- Loop-in button (IN/CUE)
- Loop-out button (OUT/ADJUST)
- RELOOP/EXIT button
- TEMPO control section
- TEMPO control range button (± 6 / 10 / 16 / WIDE)
- MASTER TEMPO button and indicator (MT):
- TEMPO adjust slider:
- PITCH BEND + / - buttons:
- TRACK SEARCH (I<,▶) buttons
- SEARCH (, ) buttons
- CUE button and indicator
- Play/pause (/) button and indicator
- Time mode/auto cue button (TIME/A.CUE)
- TIME:
- A.CUE:
- AUTO CUE function
- SCRATCH button
- JOG BREAK button
- BROWSE button
- MIX button
- EFFECT button
- UTILITY button
- Rotary selector dial
- CUE/LOOP MEMORY button
- CUE/LOOP CALL button
- Function buttons (F1 to F6, from left)
- LOAD A/B buttons
- Select up (↓) button
- Select down (▶) button
- Center display (P. 11)
- Display A / Display B (P. 12)
- Jog dial (+FWD / -REV)
- When scratch mode is ON:
- When scratch mode is OFF:
- Main menu display
- BROWSE screen
- MIX screen
- EFFECT screen
- UTILITY screen
- Function tab
- A/B track information display
- Track number display
- TEMPO control range display (± 6, ± 10, ± 16, WIDE)
- TEMPO change ratio display
- A.CUE indicator
- Time display
- Playing address display
- BPM display
- MEMO indicator
- REMAIN indicator
- PC connector: USB port (type B)
- 5V connector
- Video output connector (MONITOR OUT)
- Remote control connector (REMOTE CONTROL)
- ABOUT DJS SOFTWARE
- SOFTWARE END USER LICENSE AGREEMENT
- DEFINITIONS
- PROGRAM LICENSE
- WARRANTY DISCLAIMER
- DAMAGES AND REMEDIES FOR BREACH
- TERMINATION
- GENERAL TERMS
- COPYRIGHT WARNING
- SYSTEM REQUIREMENTS (Minimum Operating Environment)
- Memory:
- Hard disc:
- Optical drive:
- Display:
- Sound:
- Input device:
- Internet connection:
- INSTALLING DJS SOFTWARE
- Precautions regarding installation
- Installation Procedure
- When the accessory CD-ROM installation disc is loaded in your computer's DVD/CD drive, the installation menu will automatically appear. Follow the menu instructions to install the DJS software.
- When the installation menu appears, click on the [Install DJS] button.
- When the screen for selecting the language appears, select [English], then click on [OK].
- When DJS installation is completed, reboot the computer in accord with the instructions that appear on the screen.
- DJS User's Manual (PDF)
- NOTES REGARDING TRIAL PERIOD AND USER REGISTRATION
- REGARDING ONLINE SUPPORT
- DISCLAIMER
- ABOUT THE DRIVER PROGRAM
- DRIVER INSTALLATION
- Before installing (IMPORTANT)
- Using the accessory CD-ROM to install the application
- Follow the instructions that appear on the screen.
- Connecting this unit to the computer
- Hardware Installation
- Digital Signature Not Found
- Confirming the driver version
- MEP-7000 [SEP-C1] Version
- Most recent version of driver
- When using this unit to control DJS software
- USING DJ SOFTWARE
- Style of Play
- PREPARING YOUR DJ SOFTWARE PROGRAM
- CONTROLLING YOUR COMPUTER USING THE DEDICATED COMMUNICATIONS PROTOCOL
- Connect to the computer.
- Start the DJ software program.
- For DJS:
- USING MIDI FOR COMPUTER CONTROL
- Setting a MIDI channel
- Press the UTILITY button.
- Press the [PC] function button.
- Either press the rotary selector dial, or press the select down () button.
- Turn the rotary selector dial to change the value.
- Press the rotary selector dial to confirm the value selected.
- USING THE UTILITY
- SETTING METHOD
- SETTINGS
- [1] DISPLAY
- [2] PC
- [3] LANGUAGE
- [4] GENERAL
- TO PERFORM A FACTORY RESET
- TROUBLESHOOTING
- ABOUT THE LCD SCREEN
- ABOUT OEL (ORGANIC EL) SCREENS
- SEP-C1 UPDATES
- Fraunhofer
- Section USB Upstream
- Bouton BROWSE (Navigation)
- REMARQUE
- Sezione USB in su
- IL SUPPORTO IN LINEA
- BEPERKING GARANTIE
- COPYRIGHT WAARSCHUWING
- FINALIZACION
- NOTA
- TEXHINUeCKNE XAPAKTEPNCNIKNI
- O6une
- USB-B
- BbIXoHoi BnDeocnHaI
- LcHTpaIbHbI dIscnIeI
- Dincnnei konTpponnepa A/B
- Dpyrme KOHTaKTHbIe pa3beMbI
- Hnctpykunno3knnyataunn (HaCToJuee pykoBOdCTBO)
- TapaHTnHbI TaLoH
- HA 3AMETKY
- KoHdEhcaln
- Khonka HaayabHoi ToyKn neTIn (IN/CUE)
- KhoNka KOHeuHOToUckn neTJIn (OUT/ADJUST)
- Khonka RELOOP/EXIT (NOBTOP NETJIN/BbIXOД)
- CekzynyynpaBJIeHnTeMnOm TEMPO
- Khonka dana30ha ynpablenna noJ3ykoBbIM peryIaTOpom TEMPO (TEM) (± 6 / 10 / 16 / WIDE)
- KhoNka n HndnKaTOp MASTER TEMPO (MT) (ГЛАВНБИ TEMП):
- Полунковы ретулар TOP TEMPO (TEM):
- KhoNkI PITCH BEND + / - (IOdROH CKOPOCTN)
- KhoNkTRACK SEARCH (IOnCK DOPOXKN) (1-<,▶>1)
- KhoNk SEARCH (NONCK) (A<,
- KhoNka N HndnKaTOp CUE (METKA)
- Khonka n HndnkaTop Bocnpon3BeDeHna/ny3bl (▶/III)
- Khonka peKIma HnDnKaunn BpeMeHn/abTOMaTnuecko MeTKn (TIME/A.CUE)
- KhoNka SCRATCH (CKPETU)
- KhoNka JOG BREAK (BOCnPOn3BEdHne C INPEPbIBAHHEM)
- Khonka BROWSE (OB3OP)
- KhoNka MIX (MKNKUNPOBAHNE)
- Khonka EFFECT (3ΦΦEKT)
- Khonka UTILITY (YTNJNTA)
- NobopOTbIc eJIeKToPbI dNcK
- Khonka CUE/LOOP MEMORY (PAMrTb METOK/NETEJIb)
- Khonka CUE/LOOP CALL (Bbl3OB METKNIETJIN)
- MaHHTOONTHUeCKN DnCKOBoD:
- Ducnnnei:
- 3Byk:
- UcTpoIcTBoBbOa:
- Iopknioyehne K cetn INHTepHET:
- ПОНМЕЧАНЕ
- YCTAHOBKA ПОГРAMMHOO OBECEPUEHЯ DJS
- Mepbl npedoctopoxhoctn npu yctaHOBe
- Ipoueedya yctaHOBKn
- ПиЗагуЗкппилarameMOrO yctaHOBHOrO дSCKa CD-ROMВпивODДИСКOB DVD/CD BaшeroКOMТьОтepа abTomatUcheCKN OTOбраЖаETcMa MEHIO yCTaHOBKN. CJeDyIte ИнстуркIJm B MeHIO, YTOБы yCTaHOBtB nporpamMHoe obecneueHne DJS.
- Korda oTo6pa3ntcMa MeHObyCTaHOBKn, BbINOJIHnTe IeJIyOK Ha Khonke [Install DJS].
- Korda oTo6pa3ntc8Kpah IJIy Bb6opa Ra3bIka, Bbl6epnTe [English], 3aTeM BblonHnTe uenqok Ha [OK].
- Korda yctaHOBka nporpaMMb1 DJS 3aBepuNTcna, nepe3arpy3nte KOMnbIOTep, cneDyra HnCtpyKzma, oTo6paxKaembIM Ha 3kpaHe.
- PykoBoDcTBo noIb3OBaTeJra DJS (PDF)
- 3AMEUHNA OTHOCHTIELBO CPOKA ДЕИCTBЯ ПОБ"HOBBEPCN N ПОЛБ3OBATEЛБСКОPENTPAÇN
- OTHOCHTeJIbHO IODIePJKN YEPE3 INHTEPHET
- <3anpocbI OTHOCHTeJIbHO yCTaHOBKN INoJIb3OBaTeJIbCKO perNCtpaun>
- PIMMEUAHNE
- ПЕДУПЕЖДЕНЕ OS OTBETCTBEHHOCTN
- ОПРОГРAMMHOM OБЕСПЕЧENДРАВЕРА
- CJeDyIe IINCTpyKcIaM Ha 3kpaHe.
- IopKJIouHeHne ycTpoiCTBa K KOMNbIOTepy
- IpoBepka Bepcn npaBepa
- IocJIeHnHa HnΦOpMaunO OpaBVepe
- PnncnoJIb3OBAHHaHHO yCTpOcTbA nIynpabJIeHnI pOrpaMMbIM oBecepeHem DJS
- PoiocoeHNHTe K KOMNbHTopey.
- 3anycntte nnjkeckkyo nporpammy.
- Hactrpoika MIDI-kaHaJa
- HaxMMTe KhoNky UTILITY.
- Haxmnte yHKnHOHaJIbHyo KOnKy [PC].
- HaxMnte NOBOPOTbI CEneKTopHbI DnCK Nn HaxMnte KhoNky BbIbopa BHN3 ()
- NObepHnTe NOBOPOTbI CEJIeKTOpHbI INCK, YTo6bl 3MeHHTb 3HaueHne.
- HaxMMTe NOBOPOTbI CEJIeKTopHbI DNCK, YTO6bl NOITBepnTb BbIbpaHHoe 3HaueHne.
- [4] GENERAL (OBSUEE)
- KAK BbIIOJIHHTb CBPOC HACTPOEK HA 3ABODCKNE
- ПОИСК И YYSTPAHEHNE HENСПAPBHOCTЕN
- 重要
- 關於線上支援
- FUNCTIONABLE DISPLAY
- SETTLE
- 注意
Brand : PIONEER
Model : SEP-C1
Category : Media remote