
LED CINEMA DISPLAY - Monitor APPLE - Free user manual and instructions
Find the device manual for free LED CINEMA DISPLAY APPLE in PDF.
| Product type | LED Monitor |
| Brand | APPLE |
| Model | LED CINEMA DISPLAY |
| Screen size | 24 inches (60.96 cm) |
| Resolution | 1920 x 1200 pixels |
| Display technology | LED backlight |
| Weight | 9.49 kg |
| Dimensions (H x W x D) | 478.38 x 573.22 x 197.10 mm |
| Power | Mains power with grounding |
| Connectivity | Mini DisplayPort, 3x USB 2.0, MagSafe |
| Audio | Built-in 2.1 speakers (12 W) |
| Webcam | Built-in iSight camera |
| Microphone | Built-in microphone |
| Module number | A1267 |
| Operating temperature | 10°C to 35°C |
| Operating humidity | 20% to 80% (non-condensing) |
| Maximum altitude | 0 to 3,048 m |
| Cleaning | Soft dry cloth (no harsh chemicals) |
| Safety | Do not open, use grounded outlet |
| VESA mount | Compatible (adapter sold separately) |
| Compliance | ICES-003 Class B, NMB-003 |
Frequently Asked Questions - LED CINEMA DISPLAY APPLE
User questions about LED CINEMA DISPLAY APPLE
0 question about this device. Answer the ones you know or ask your own.
Ask a new question about this device
Download the instructions for your Monitor in PDF format for free! Find your manual LED CINEMA DISPLAY - APPLE and take your electronic device back in hand. On this page are published all the documents necessary for the use of your device. LED CINEMA DISPLAY by APPLE.
USER MANUAL LED CINEMA DISPLAY APPLE
© 2008 Apple Inc. All rights reserved.
Under the copyright laws, this manual may not be copied, in whole or in part, without the written consent of Apple.
The Apple logo is a trademark of Apple Inc., registered in the U.S. and other countries. Use of the "keyboard" Apple logo (Option-Shift-K) for commercial purposes without the prior written consent of Apple may constitute trademark infringement and unfair competition in violation of federal and state laws.
Every effort has been made to ensure that the information in this manual is accurate. Apple is not responsible for printing or clerical errors.
Apple
1 Infinite Loop
Cupertino, CA 95014-2084
408-996-1010
www.apple.com
Apple, the Apple logo, Apple Cinema Display, iChat, iMovie, iPod, iSight, Mac, MacBook, MagSafe, and Photo Booth are trademarks of Apple Inc., registered in the U.S. and other countries.
iPhone is a trademark of Apple Inc.
Apple Store is a service mark of Apple Inc., registered in the U.S. and other countries.
The Bluetooth® word mark and logos are registered trademarks owned by Bluetooth SIG, Inc. and any use of such marks by Apple is under license.
ENERGY STAR is a U.S. registered trademark.
Other company and product names mentioned herein may be trademarks of their respective companies. Mention of third-party products is for informational purposes only and constitutes neither an endorsement nor a recommendation. Apple assumes no responsibility with regard to the performance or use of these products.
Contents
7 Getting Started
8 Setting Up Your Display
10 Using Your Display
14 Care and Safety
15 Ergonomics
17 Troubleshooting Your Display
18 Learning More, Service, and Support
19 Specifications
21 Premiers contacts
22 Installation du moniteur
24 Utilisation du moniteur
28 Entretien et sécurité
29 Ergonomie
31 Dépannage du moniteur
32 Informations, services et assistance
33 Specifications
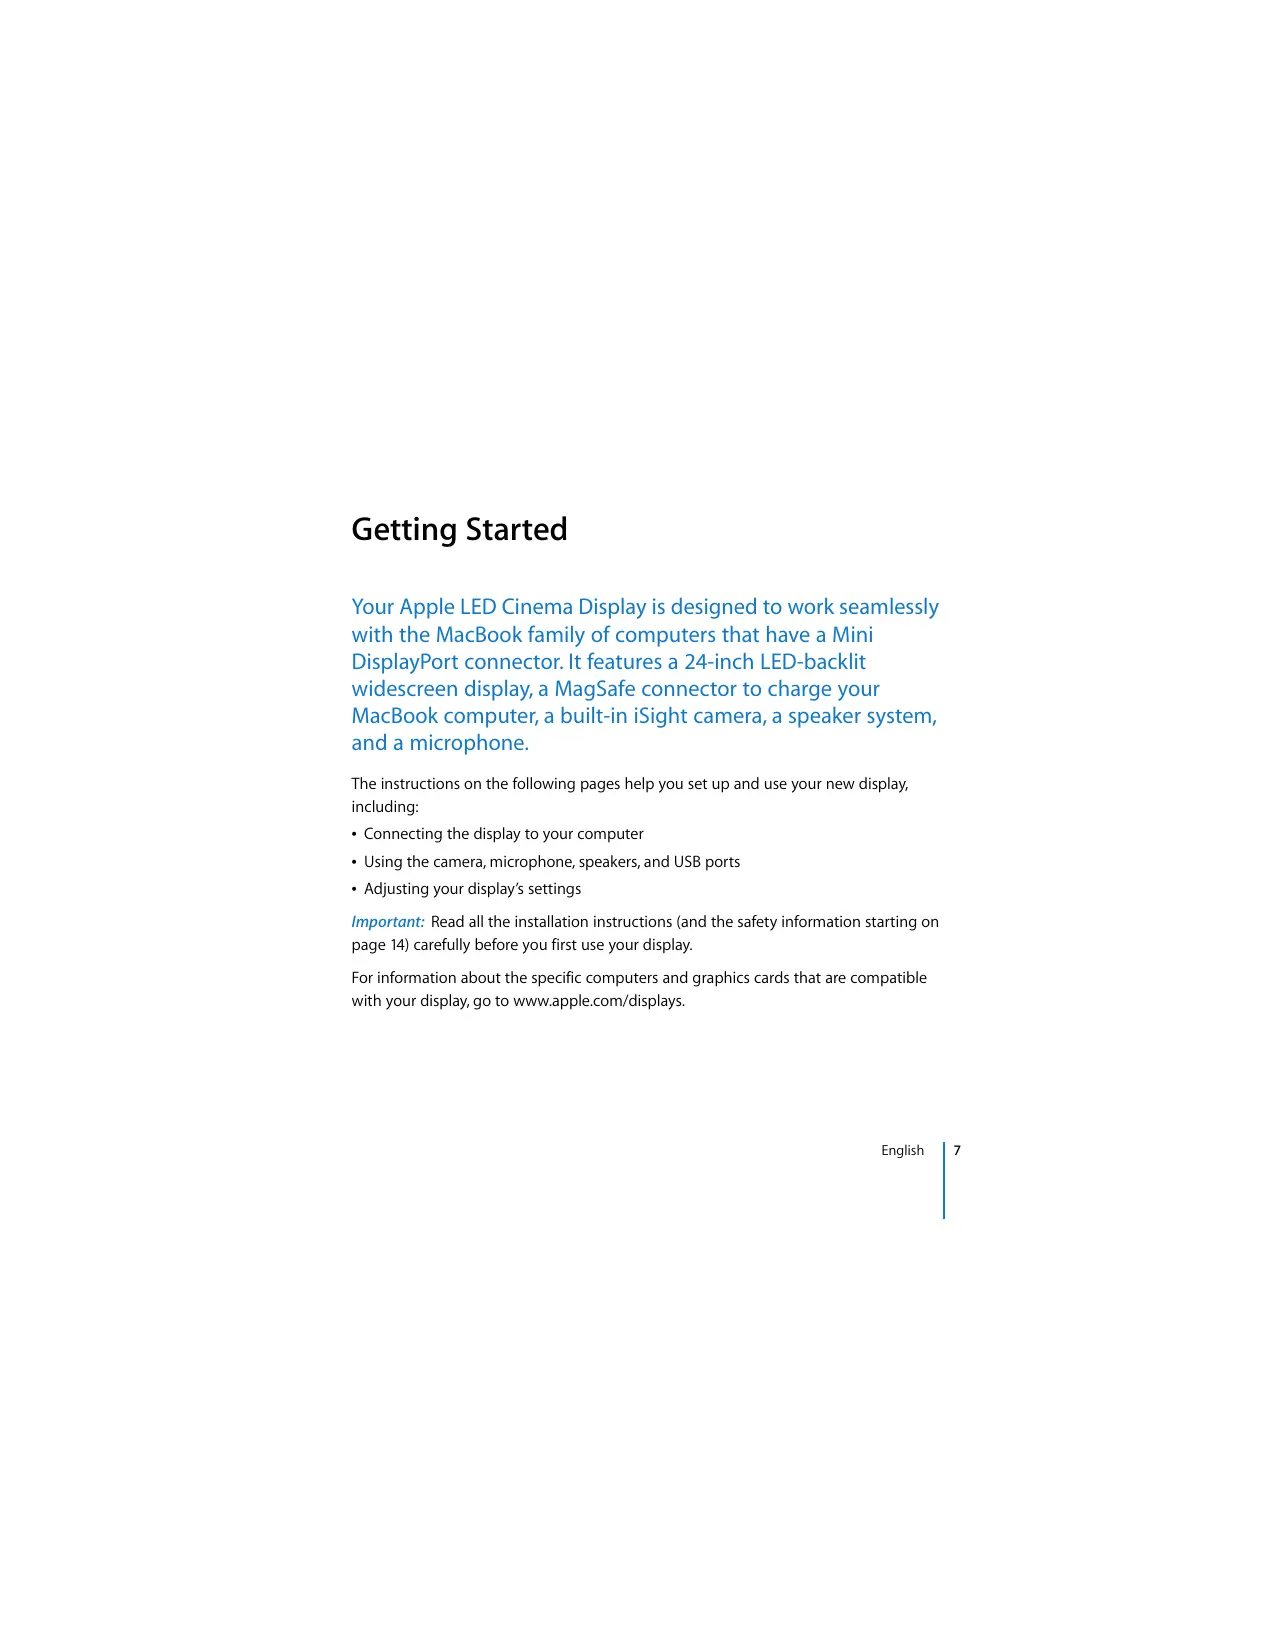
Your Apple LED Cinema Display is designed to work seamlessly with the MacBook family of computers that have a Mini DisplayPort connector. It features a 24-inch LED-backlit widenscreen display, a MagSafe connector to charge your MacBook computer, a built-in iSight camera, a speaker system, and a microphone.
The instructions on the following pages help you set up and use your new display, including:
- Connecting the display to your computer
- Using the camera, microphone, speakers, and USB ports
- Adjusting your display's settings
Important: Read all the installation instructions (and the safety information starting on page 14) carefully before you first use your display.
For information about the specific computers and graphics cards that are compatible with your display, go to www.apple.com/displays.
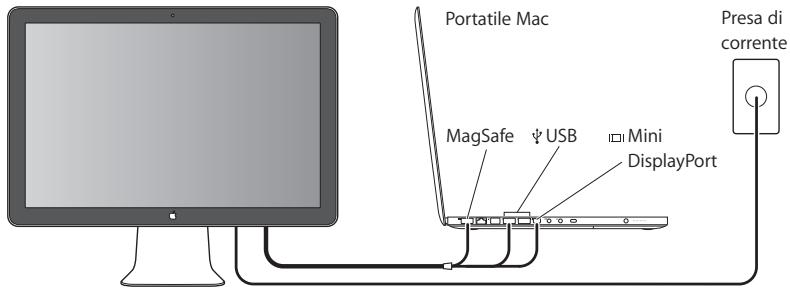
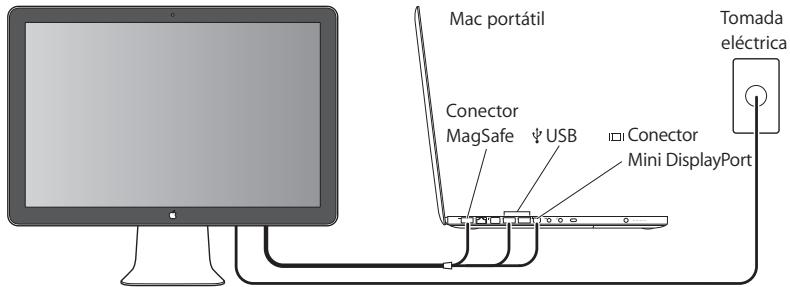
Setting Up Your Display
Follow these steps to set up your Apple LED Cinema Display:
1 Remove the protective film from the display and cables.
2 Insert the power cord into the display, and then insert the AC plug into a grounded power outlet.
3 Connect the Mini DisplayPort cable to your computer, as shown below.

Apple LED Cinema Display
4 Connect the USB cable to your computer to use the display's built-in iSight camera, speakers, microphone, and USB ports.
5 Plug the MagSafe connector into the MagSafe power port on your computer to charge the battery and provide power to your computer.
6 Press the power button on your computer to start it up. The display turns on automatically when you start up your computer.
Setting Up Your Computer with the Lid Closed
You can close the lid of your computer and use just your Apple LED Cinema Display. Follow the setup instructions on the previous page and make sure the MagSafe connector from the display is plugged into the MagSafe power port on your computer.
To use your Apple LED Cinema Display with your computer's display closed:
1 Connect an external USB keyboard and mouse to the USB port on your display or use the Bluetooth® Setup Assistant to set up a wireless keyboard and mouse.
2 Make sure your computer is turned on.
3 Close the display on your computer to put it to sleep.
4 Wait a few seconds, and then press any key on the external keyboard or move the mouse to wake your computer.
Using Your Display
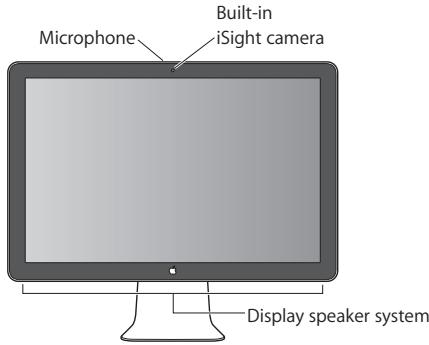
Your Apple LED Cinema Display has a built-in iSight camera, microphone, and display speaker system. The USB connection between the display and your computer enables these features.
Setting Up Sound Input and Output
You can listen to music, movies, games, and multimedia files through the speaker system on your display. You can use the microphone to record sounds, or talk with friends using iChat. Use Sound preferences to manage sound input and output.
To set up sound input:
1 Choose Apple () > System Preferences, and then click Sound.
2 Click the Input tab in Sound preferences.
3 Choose Display Audio to input sound through your display's microphone.
To set up sound output:
1 Click the Output tab.
2 Choose Display Audio to hear sound through your display's speaker system.
These sound settings are used whenever your computer is connected to your display. They remain in effect until you change them.
Using the Built-in iSight
You can use the built-in iSight camera and microphone to capture still images, video, and audio with applications such as iChat, iMovie, and Photo Booth.
To set up the camera and microphone with iChat:
1 Click the iChat icon in the Dock to open the iChat application.
2 Choose iChat > Preferences, and then click Audio/Video.
3 Choose Display iSight from the Camera pop-up menu.
4 Choose Display Audio from the Microphone pop-up menu.
Setting Up Your Apple LED Cinema Display as an Additional Display
When you leave your computer's display open, you can mirror the same image on both displays or use the displays as an extension of your desktop. Use Displays preferences to set up video mirroring or extended desktop.
To set video mirroring or extended desktop:
1 Choose Apple (C) > System Preferences, and then click Displays.
2 Click Arrangement and follow the onscreen instructions.
Adjusting the Color and Brightness
You can use your Apple Keyboard to increase (光) or decrease (光) the brightness of your display. You can also use System Preferences to adjust the resolution, brightness, and color settings.
To adjust the resolution, the number of colors, or the brightness of your display:
1 Choose Apple () > System Preferences, and then click Displays.
2 Click the Display tab.
3 Choose a resolution or color setting, or drag the Brightness slider to adjust the brightness.
To change the display profile or calibrate your display:
1 Click the Color tab in Displays preferences.
2 Choose a display profile, or click Calibrate to open the Display Calibrator Assistant.
For more information about calibrating your display, choose Help > Mac Help in the menu bar, and search for "calibrate."
Using the USB Ports and Security Slot
Your display has three powered USB ports on the back. Use these ports to connect a mouse, keyboard, iPhone, iPod, or other USB peripheral. Make sure the display's USB cable is connected to your computer.
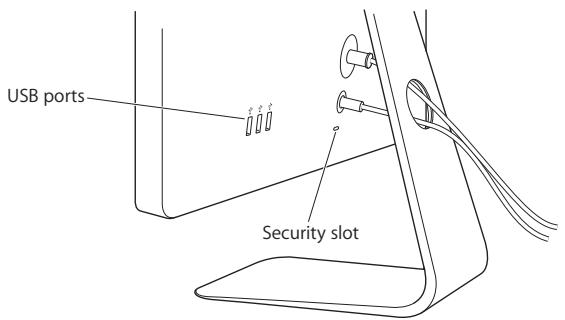
To secure your display, use the security slot to attach a locking cable.
Using a VESA Mounting Solution with Your Display
You can attach your display to an alternative mounting solution, using the VESA Mount Adapter kit available from the Apple Online Store at www.apple.com/store. Use the kit to attach your display to any available VESA-compatible mounting solution. Simply follow the instructions included with the kit.
Care and Safety
Before you lift or reposition your display, you may need to disconnect the cables and power cord. Use correct lifting techniques when positioning the display. When lifting or carrying the display, hold it by the edges. Don't lift the display by the stand or the cord.
To clean the screen on your display:
1 Disconnect the power cord.
2 Use the cloth that came with your display or another soft, dry cloth to wipe dust from the screen.
WARNING: Don't clean the screen with a cleaner containing alcohol or acetone. Use a cleaner intended for use with a screen or display. Never spray cleaner directly on the screen. It may drip inside the display and cause damage.
Follow these safety guidelines for using your display:
- The only way to completely disconnect power is to unplug the power cord. Be sure to pull the plug, not the cord.
- Disconnect power immediately if the power cord is frayed or damaged, if you spill something on the display, or if the display falls or is damaged in some other way.
WARNING: Use only the power cord that came with your display. The power cord has a three-wire grounding plug (a plug that has a third grounding pin) that fits only a grounded AC outlet. If you are unable to insert the plug into an outlet because the outlet is not grounded, contact a licensed electrician to replace the outlet with a properly grounded outlet.
WARNING: Your display is a high-voltage component and should not be opened for any reason, even when it's unplugged. If your display needs service, see "Learning More, Service, and Support" on page 18.
Ergonomics
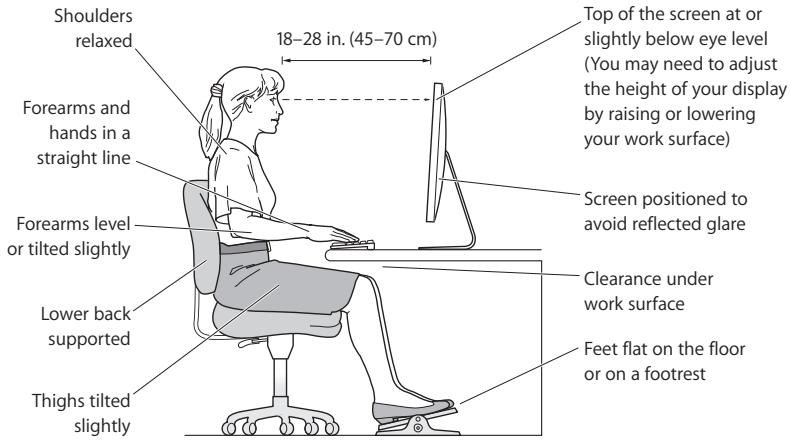
Here are some guidelines for adjusting your display to reduce glare and to accommodate your physical size and shape.
-
Arrange the display so that the top of the screen is slightly below your eye level when you're sitting at the keyboard. The best distance from your eyes to the screen is up to you, although most people tend to prefer 18 to 28 inches (45 to 70 cm).
-
Position the display by tilting it up or down to minimize glare and reflections from overhead lights and nearby windows.
For more information about health, safety, and maintenance, go to the Apple ergonomic website at www.apple.com/about/ergonomics.
Troubleshooting Your Display
Before performing any of these steps, make sure your computer is turned on, the display is plugged into an outlet, all the cables are connected properly to your computer and display, and your computer is not in sleep mode.
If the screen doesn't have an image:
- Check the cables and connectors again to make sure they are connected properly to your computer and the display.
- Make sure your computer is turned on and is not in sleep mode. If your computer's display is closed, use the external keyboard or mouse to wake the computer from sleep.
- Reset the PRAM by restarting your computer while holding down the Command (§), Option, P, and R keys until you hear the startup sound a second time.
If the screen is dim:
- Make sure the display brightness controls are set properly. Choose Apple (▶) > System Preferences and click Displays. Drag the Brightness slider to adjust the brightness.
- If the colors on the display are too saturated or not correct, you may need to calibrate your display. Open Displays preferences, click Color, click Calibrate, and follow the instructions.
If your portable computer isn't charging:
Make sure the MagSafe connector from your display is seated properly in the MagSafe power port on your computer.
If the built-in iSight camera, microphone, speakers, or USB ports on the display aren't working:
Make sure the USB cable from the display is firmly plugged into the USB port on your computer. The display's camera, microphone, speakers, and USB ports work only when this cable is attached to your computer.
More Troubleshooting Information
You can find more troubleshooting information on the Displays support website at: www.apple.com/support/displays
Learning More, Service, and Support
You can find more information about your display on the Apple website and in Mac Help.
| To learn about | Do this |
| Using your display | Choose Help > Mac Help in the menu bar, and search for "displays." |
| Displays service, support, discussions, troubleshooting, and software downloads | Go to: www.apple.com/support/displays |
| The latest information about displays | Go to: www.apple.com/displays |
| Registering your display | Go to: www.apple.com/register |
Specifications
Model number: A1267
Resolution: 1920 × 1200 @ 60Hz
- Ports: Three USB 2.0 ports on the back
- Camera and microphone: Built-in iSight camera with microphone
- Speakers: Built-in 2.1 speakers with 12 W output
Dimensions:
Weight: 20.92 lb. (9.49 kg)
- Height: 18.84 inches (478.38 mm)
- Width: 22.57 inches (573.22 mm)
- Depth (with stand): 7.76 inches (197.10 mm)
Viewable: 24 inches (609.60 mm) diagonal
Operating environment:
- Operating temperature: 50^ to 95^ F( 10^ to35^ C)
- Relative humidity: 20% to 80% (noncondensing)
- Altitude: 0 to 10,000 feet (0 to 3048 meters)
Premiers contacts
Informations, services et assistance
Monitor Apple LED Cinema Display
Monitor Apple LED Cinema Display
Regulatory Compliance Information
FCC Compliance Statement
This equipment has been tested and found to comply with the limits for a Class B digital device, pursuant to part 15 of the FCC Rules. These limits are designed to provide reasonable protection against harmful interference in a residential installation.
This equipment generates, uses, and can radiate radio frequency energy and, if not installed and used in accordance with the instructions, may cause harmful interference to radio communications. However, there is no guarantee that interference will not occur in a particular installation. If this equipment does cause harmful interference to radio or television reception, which can be determined by turning the equipment off and on, the user is encouraged to try to correct the interference by one or more of the following measures:
- Reorient or relocate the receiving antenna.
- Increase the separation between the equipment and receiver.
- Connect the equipment into an outlet on a circuit different from that to which the receiver is connected.
- Consult the dealer or an experienced radio/TV technician for help.
If necessary, consult an Apple Authorized Service Provider or Apple. See the service and support information that came with your Apple product. Or, consult an experienced radio/television technician for additional suggestions.
Important: Changes or modifications to this product not authorized by Apple Inc. could void the EMC compliance and negate your authority to operate the product.
This product has demonstrated EMC compliance under conditions that included the use of compliant peripheral devices and shielded cables between system components. It is important that you use compliant peripheral devices and shielded cables between system components to reduce the possibility of causing interference to radios, television sets, and other electronic devices.
Responsible party (contact for FCC matters only):
Apple Inc. Corporate Compliance
1 Infinite Loop, MS 26-A
Cupertino, CA 95014 USA
Industry Canada Statement
VCCI Class B Statement
情報處理裝置等電波障害自主規制にて
Korea Class B Statement
B国吉(告
Europe-EU Declaration of Conformity
See www.apple.com/euro/compliance.
High-Risk Activities Warning
This display is not intended for use in the operation of nuclear facilities, aircraft navigation or communications systems, or air traffic control machines, or for any other uses where the failure of the computer system could lead to death, personal injury or severe environmental damage.
Apple and the Environment
Apple Inc. recognizes its responsibility to minimize the environmental impacts of its operations and products. More information is available on the web: www.apple.com/environment
中国
As an ENERGY STAR® partner, Apple has determined that standard configurations of this product meet the ENERGY STAR® guidelines for energy efficiency. The ENERGY STAR® program is a partnership with electronic equipment manufacturers to promote energy-efficient products. Reducing energy consumption of products saves money and helps conserve valuable resources. For more information about ENERGY STAR®, visit: www.energystar.gov
Disposal and Recycling Information

This symbol indicates that your product must be disposed of properly according to local laws and regulations. When your product reaches its end of life, contact Apple or your local authorities to learn about recycling options.
For information about Apple's recycling program, go to www.apple.com/environment/recycling.
European Union—Disposal Information

The symbol above means that according to local laws and regulations your product should be disposed of separately from household waste. When this product reaches its end of life, take it to a collection point designated by local authorities. Some collection points accept products for free. The separate collection and recycling of your product at the time of disposal will help conserve natural resources and ensure that it is recycled in a manner that protects human health and the environment.

- Contents
- Setting Up Your Display
- Setting Up Your Computer with the Lid Closed
- To use your Apple LED Cinema Display with your computer's display closed:
- Using Your Display
- Setting Up Sound Input and Output
- To set up sound input:
- To set up sound output:
- Using the Built-in iSight
- To set up the camera and microphone with iChat:
- Setting Up Your Apple LED Cinema Display as an Additional Display
- To set video mirroring or extended desktop:
- Adjusting the Color and Brightness
- Using the USB Ports and Security Slot
- Using a VESA Mounting Solution with Your Display
- Care and Safety
- To clean the screen on your display:
- Follow these safety guidelines for using your display:
- Ergonomics
- Troubleshooting Your Display
- If the screen doesn't have an image:
- If the screen is dim:
- If your portable computer isn't charging:
- More Troubleshooting Information
- Learning More, Service, and Support
- Specifications
- Dimensions:
- Operating environment:
- Premiers contacts
- Informations, services et assistance
- Regulatory Compliance Information
- FCC Compliance Statement
- Industry Canada Statement
- VCCI Class B Statement
- Korea Class B Statement
- B国吉(告
- Europe-EU Declaration of Conformity
- High-Risk Activities Warning
- Apple and the Environment
- Disposal and Recycling Information
- European Union—Disposal Information
Brand : APPLE
Model : LED CINEMA DISPLAY
Category : Monitor