
RO400C - Vacuum Cleaner AEG-ELECTROLUX - Free user manual and instructions
Find the device manual for free RO400C AEG-ELECTROLUX in PDF.
| Product type | Reverse osmosis water purifier |
| Brand | AEG-ELECTROLUX |
| Model | RO400C |
| Height | 466 mm |
| Depth | 395 mm (without hoses), 460 mm (with hoses) |
| Width | 225 mm |
| Dry weight | 29 kg |
| Weight with water | 33 kg |
| Electrical supply | 230 V, 50 Hz, 10 A, grounded socket |
| Total energy consumption | 530 W |
| Production capacity | 2.5 L/min (max. 500 L/day at 15 °C) |
| Operating pressure | On: 3 bar, Off: 4.5 bar |
| Noise level | <60 dB(A) (under sink) |
| Ambient temperature | 2 to 43 °C |
| Feed water pressure | 1.5 to 10 bar (dynamic) |
| Feed water temperature | 2 to 30 °C |
| Main functions | Production of purified water, automatic rinse every 15 min, calibration |
| Periodic maintenance | Replacement of filters (I and II), descaling, disinfection, cleaning of the inlet strainer |
| Safety | Emergency stop, visual alarms, anti-leak system |
| Spare parts | Particulate filter (9192400-82), carbon filter (9192400-83), membrane, descaler (1507207-01) |
| Warranty | Manufacturer warranty (refer to manual) |
| Compliance | Recycling symbols, plastics identification |
Frequently Asked Questions - RO400C AEG-ELECTROLUX
User questions about RO400C AEG-ELECTROLUX
0 question about this device. Answer the ones you know or ask your own.
Ask a new question about this device
Download the instructions for your Vacuum Cleaner in PDF format for free! Find your manual RO400C - AEG-ELECTROLUX and take your electronic device back in hand. On this page are published all the documents necessary for the use of your device. RO400C by AEG-ELECTROLUX.
USER MANUAL RO400C AEG-ELECTROLUX
natural_image
Simple line drawing of a server or server cabinet (no text or symbols)Confidence RO 400C
WATER PURIFIER
REVERSE OSMOSIS
EN
DE
NL
FR
ES
SE
8229016-27
Type WP05
PRODUCT DESCRIPTION
EN
1 Bracket for reject water hose
2 Reject water hose
3 Hose clips (2)
4 Hose for feed water
5 Angle bracket for purified water hose
6 Filter spanner
7 Information decal
8 Purified water hose
9 Purified water tap*
10 Indicator lights*
11 Filter container I
12 Base plate
13 Filter container II
14 Control panel
DE
YOUR NEW WATER PURIFIER
EN THANK YOU for entrusting us to supply your new water purifier, which we hope will provide you with many years of trouble-free use.
To avoid problems, it is important for you to read through the user instructions and carefully to follow the “Safety information” and the “Installation” instructions. Everybody using the water purifier should be familiar with how to operate it and its safety features.
The manual should be kept and stay with the water purifier if it is ever moved or changes owners, so that everyone who uses the appliance can read about the various functions and safety instructions.
The manual's English instructions begin on page 5.
Safety information 6-7
- Installation 6
- Child safety 6
- Use 6
Information 7
- Old and damaged water purifiers 7
- Symbol identification 7
- Consumables 7
- Extra accessories 7
- Basic facts about reverse osmosis 7
Using the water purifier 8
- Production of purified water 8
- Automatic flushing 8
Regular care of the water purifier 8
Maintenance 9-14
- Replacing the filters 9
- Cleaning/Descaling 10
- Disinfection 12
- Storage 13
- Cleaning the grid 14
If your water purifier stops working 14-15
- Trouble-shooting table 14
- Service and spare parts 15
For the installer
Technical facts 16
Installation 17-20
- Unpacking 17
- Positioning the water purifier 17
- Affixing the information decal 17
- Water connection 17
- Electrical connection 18
- Connecting the water purifier 18
- Flushing 19
- Calibration 20
- Moving the water purifier 20
Guidelines for using the user instructions
The following symbols in the text will help you to read the user instructions:

Safety information

Environment information

Step by step instructions

Tips and information

SAFETY INFORMATION
Carefully read through the user instructions, which contain directions and warnings, before installing and starting to use the water purifier. It will then work in a proper manner and provide the greatest benefit. Everybody using the water purifier should be familiar with how to operate it and its safety features.
Installation
- Check that the water you want to clean satisfies the requirements in “Technical facts”.
- The water purifier should be connected to an earthed electrical supply. As some operations require the power supply to be temporarily interrupted, it is best to connect using a plug that is also easily accessible after installation. Permanent wiring to the electrical supply may only be carried out by a qualified electrician and should be performed with a safety switch. Incorrect installation can result in personal injury and/or damage to property which are not covered by any warranty.
- Plumbing work should be performed by a qualified plumber. If you do the installation yourself, you must acquaint yourself with the applicable standards and adhere to them.
- It is important for the purifier to be installed upright on a horizontal surface, and that hoses and cables are neither tensioned nor get jammed when moving the purifier, e.g. during installation and cleaning.
- If the feed water is classed as unfit, have the purified water checked after installation. After this, test the purified water once a year or if there is any change in the taste or odour. Do not drink/use the water if the results are unsatisfactory. Contact your dealer.
- When the water purifier is new, the purified water may not be used until flushing and calibration have been completed.
-
Calibration of the water purifier may only be carried out:
-
the first time the water purifier is taken into use.
- if the water quality changes (e.g. when moving).
- after replacing the membrane.
- The reverse osmosis technique reduces most substances extremely effectively. For this reason, the content of those substances that normally protect pipes, tanks, valves, etc., are very low in the purified water from the water purifier. Consider the risk of corrosion and elution when choose materials in peripheral equipment for the water purifier.
Child safety
- Do not let children play with the water purifier.
- Never leave packaging material lying around so that children can play with it.
Use
- The water purifier is intended to produce water for applications that require purified water.
- Purified water should only be used when the control panel's lights II or III (purification levels) are lit. It can take up to 60 seconds before the water purifier indicates good water quality.
- The water purifier must be connected to water and electricity in order for the automatic flushing system to work. Automatic flushing takes place approximately every 12 hours.
- Every time after drawing water, or every 15 minutes in each operating cycle and when connecting the plug, automatic flushing takes place.
- The upper side of the water purifier may not be used to stand items on.
- Do not use purified water in aluminium vessels. There is a risk of corrosion of the vessel and a higher concentration of aluminium in the purified water.
- Do not change or modify the water purifier in any way. This can result in personal injury and/or damage to property which is not covered by any warranty.
- If the water purifier is to be disconnected from water and electricity for an extended period (several days), it should be stored as described in “Storage”. This also provides protection against freezing.
- The water purifier may not be used without a filter (except during cleaning and storage). It could be seriously damaged.
- If the water purifier contains preserving agents or detergents, it must be flushed in accordance with "Flushing" before the purified water may be used.
- Once a month, check that the connections are watertight. Leaks outside the appliance cannot be detected by the internal safety system. If leakage occurs, immediately switch off the water supply and break the current to the appliance by pulling the plug out of the wall socket or unscrewing the fuse in the electrical distribution board.
- If the mains lead has been damaged in some way, it must be replaced by a qualified person to avoid damage or injury.

Waste management

Old and damaged water purifiers
- At the end of the water purifier's useful life, disconnect the plug from the electrical supply and cut the lead at the point where it enters the appliance. Make sure that children do not play with the severed lead. Contact your dealer for information about where the water purifier can be left.
- Break the current to a damaged water purifier by pulling out the plug. Otherwise remove the water purifier's fuse (the plug) from the electrical distribution board.
Symbol identification
- 80% of the plastic and rubber components in the appliance and its packaging are identified with symbols to assist the process of recycling and disposal of the water purifier.
- This labelling is carried out in accordance with international standards.
- The cardboard parts are made from recyclable paper and can be deposited at collection points for recycling.
Consumables
| Particle filter | item no. 919 24 00-82 |
| Carbon filter | item no. 919 24 00-83 |
| Detergent | item no. 150 72 07-01 |
| Preserving agent | item no. 150 72 06-02 |
Extra accessories
| Purified water tap | item no. 150 70 59-81 |
| Indicator lights | item no. 150 72 89-00 |
| Sound insulation mat | item no. 919 24 09-03 |
| Installation kit | item no. 919 24 09-04 |
| Connection to level | |
| controlled dishwasher | item no. 919 24 09-02 |
(Consumables and extra accessories can be ordered through your dealer. Specify the parts' item numbers as listed above.)
Basic facts about reverse osmosis
Water
“Purified water” is pleasant tasting, good water without harmful, unhealthy or undesirable quantities of organic and inorganic substances. Water purification means the separation of these particles and substances. Traditional cleaning is characterised by certain substances being separated from the water. Reverse osmosis is a superior filtration whereby extremely small molecules and particles can also be separated. The technique involves the unpurified water being separated into two streams, the purified water and a concentrate containing all the substances cleaned from the water.
Osmosis – Reverse osmosis
In the natural world, for example in our bodies, water is transported by means of osmosis. The cell walls are a natural osmotic membrane, which separates impurities from pure water. With the reverse osmosis water purification technique, water is forced under high pressure through a semi-permeable, synthetic membrane. The result is pure water, the osmosis water. The membrane is only permeable to water. Other substances with molecules just a little larger than the water molecule cannot pass through the membrane, but are separated off. One major advantage of reverse osmosis is that no chemicals are used during treatment.
USING THE WATER PURIFIER
When the water purifier has been installed, flushed and calibrated according to the instructions, it is ready to be used. The water purifier has an electronic control system that makes it easy to use. Remember the following:
- Change the filter when filter replacement is indicated on the control panel (2–3 times/year).
- Clean the water purifier when the flow is reduced and/or at least every 6 months.
Production of purified water
The water purifier starts production of purified water when a tap, valve or pressure tank releases the pressure in the purified water hose (i.e. when the tap or valve is opened or when the pressure in the tank falls) that is connected to the water purifier.

Only use the water from the water purifier when purification level II or III is indicated.

If the water purifier has not been used for a while, it can take up to 60 seconds before good water quality is achieved.
Automatic flushing
- Every time after drawing water, or every 15 minutes in each operating cycle, automatic flushing takes place. The length of the flushing process varies between 5-90 seconds, depending on how long the previous drawing of water lasted.
- When the water purifier is connected to water and electricity, flushing is automatically performed every 12 hours. Flushing takes place regardless of when purified water was last produced.
REGULAR CARE OF THE WATER PURIFIER
Listed below are things you need to remember in the regular care of your water purifier. The points are listed according how often they need to be performed:
- Every day, check that the indicator lights are not indicating that something is calling for remedial action.
- Keep the water purifier clean. Externally, the appliance may only be cleaned with a damp cloth. Do not use a wet cloth and do not pour water over the appliance. Do not use detergents.
- Once a month, check that all the connections are in place and are watertight. Wipe off any condensation that has collected on the base plate.
- Make sure that you always replace filters in time. The lifetime of the pre-filters depends on your feed water.

After replacing a filter, stand the filter so that most of the water runs out over a few minutes. The filters can be discarded with normal
household rubbish, as they do not contain any environmentally hazardous substances.
- Depending primarily on the hardness of the feed water and its content of microorganisms, the water purifier should be cleaned when the flow is reduced or at least every 6 months and disinfected if the water smells or tastes bad.
- When the capacity of the purifier is reduced even after filter replacement and cleaning, contact your dealer for membrane replacement.
- If the feed water has been classed as unfit, the water from the water purifier should be tested once a year by an approved laboratory.
- If the water purifier will not be used for a period of more than four months, or if it is to be disconnected from the water and electricity for an extended period (several days), it should be put into storage.
Replacing the filters
It is important to pay attention to filter replacement, as the filters' primary job is to protect the membrane. Check that the containers are not leaking after filter replacement, and perform follow-up checks.
Replacing filter I
When the light for filter I is lit, it is time to replace filter I. First eliminate other possible fault cases in accordance with the “Trouble-shooting table” in the section “If your water purifier stops working”. See fig. 1-10 on page 101.

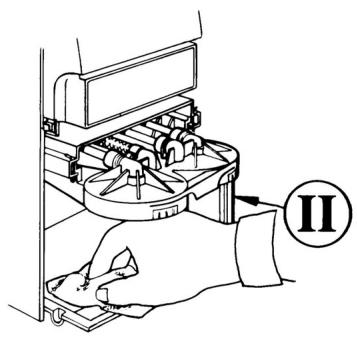
- Ensure that the appliance has stopped and then pull out the plug. Open the front cover situated in front of the two pre-filters using the manoeuvre as illustrated.
- Pull the filter containers out towards you as far as possible.
- Use the filter spanner to unscrew the container to the left marked I. Remember that the container is full of water and that it can overflow!
- Wipe up any water on the base plate.
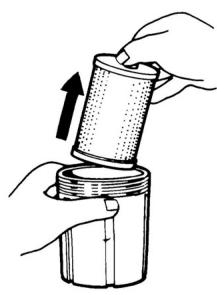
- Remove the old filter.
- Clean the filter container with a brush and water.
- Insert the new filter with the label I pointing up. Ensure that the sealing ring is in the filter container's groove.
- Screw the container into place using the filter spanner. Tighten the filter container so that the dot is somewhere between the two outermost white lines.
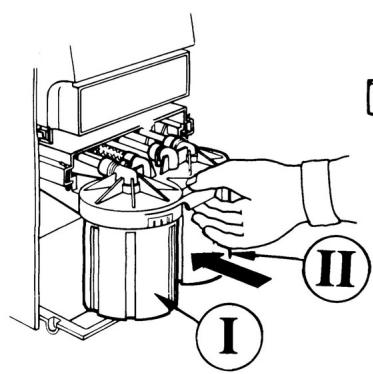
- Push the filter containers into the water purifier.
- Close the front cover and connect the plug. The water purifier flushes automatically.
The replacement of filter I is now complete and the water purifier is ready to be used as normal.
Replacing filter II
When the light for filter II is lit, it is time to replace filter II. See fig. 1-11 on page 101.

1-10. Follow the 10 points (1-10) in the instruction for replacing filter I. Now replacing filter II instead, which is situated in the container to the right.
- Purified water production should have stopped and the appliance should be connected to the wall socket. To reset the appliance's integral counting mechanism for filter replacement, hold the button (calibration) depressed for approximately 5 seconds until the light for filter II has gone out.
The replacement of filter II is now complete and the water purifier is ready to be used as normal.
MAINTENANCE
Cleaning/Descaling
When the flow is reduced (due to clogging), the water purifier should be cleaned to extend its lifetime. When the flow cannot be restored despite cleaning and filter replacement, contact your dealer for possible membrane replacement. Cleaning/Descaling the water purifier is performed:
- when the flow from the water purifier has reduced
• at least every 6 months
Detergents can be ordered from your dealer (see "Consumables").

The detergent must be kept out of the reach of children! Wash your hands after cleaning.

Water containing detergent will be produced. This water must not be drunk or routed into peripheral equipment or another product.
There are 2 methods for cleaning/descaling the water purifier. Method A takes 10 hours and method B takes 30 minutes.
Method A
During the cleaning procedure, which takes approximately 10 hours in total, you cannot use the water purifier.

-
If the purified water tap is not installed, a valve should be installed on the purified water hose so that the water purifier can be controlled via this. Also ensure that the purified water from the water purifier can be flushed to the reject water outlet by disconnecting the purified water hose from another product or peripheral equipment and leading it to the reject water outlet via the gap.
-
Pull out the plug and connect it again so that the water purifier flushes.
- Ensure that purified water production has stopped. Keep the water purifier connected to the mains.
- Unscrew filter container II in accordance with "Replacing the filters" and place the filter to one side.
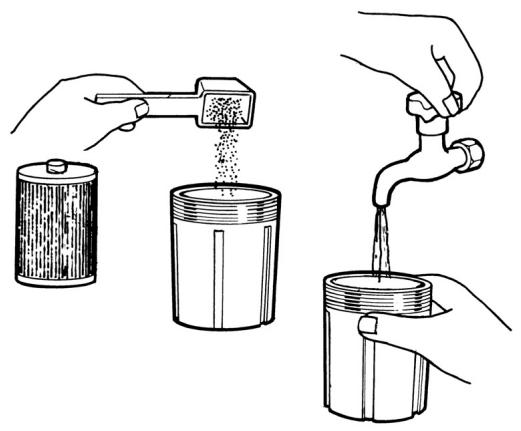
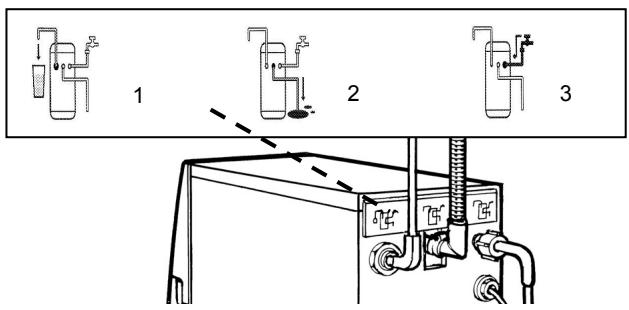
- Add approximately 2.5 dl detergent (equivalent to 200 grams) in the filter container. Fill with lukewarm water (20 – 40 °C) almost up to the edge. Stir until the powder has dissolved, see fig. A.
- Screw the filled container into place using the filter spanner.
- Open the purified water tap/valve and allow the water purifier to flush water to the reject water outlet for 45 seconds.
-
With the tap/valve still open, pull out the plug, see fig. B. Close the tap/valve and allow the water purifier to stand for approximately 10 hours (e.g. overnight).
-
Remove the filter container after this resting period. Pour away the content and rinse out with water.
- Replace the filter in the container in accordance with "Replacing the filters", except that the previously used filter is used here.
- Flush the water purifier according to section "Flushing".
- Reset the equipment.
Cleaning/Descaling is now completed. The water purifier is ready to be used as normal.
A
natural_image
Illustration showing three hands pouring liquid into cylindrical containers, illustrating a mechanical process (no text or symbols)B

Method B
During the cleaning procedure, which takes approximately 30 minutes, you cannot use the water purifier.

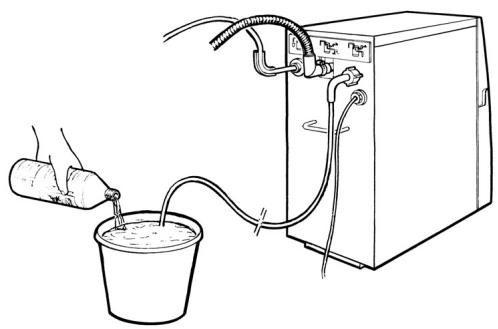
- Mix approximately 2.5 dl of detergent (equivalent to 200 grams) with 2 litres of lukewarm water in a bucket. Stir until the powder has dissolved.
- Pull out the plug. Remove both filter I and filter II from the containers in accordance with "Replacing the filters" and screw in the empty containers again. (Do not discard the filters. They can be reused.)
- If the purified water tap is not installed, ensure that the purified water from the water purifier can be flushed to the reject water outlet by disconnecting the purified water hose from another product or peripheral equipment and leading it to the reject water outlet via the gap.
- Close the shut-off valve at the water connection. Disconnect the feed water hose from the water connection and the reject water hose from the reject water outlet.
- Insert the ends of the feed water and reject water hoses into the bucket. Ensure that the ends remain below the surface throughout the cleaning procedure.
- Connect the plug and allow the water purifier to flush automatically. Pull out the plug after approximately 30 seconds. (During flushing, the water purifier draws in the mixture from the bucket. The volume in the bucket reduces by the same volume that was in the pre-filter containers, but consequently does not disappear completely.)
- Wait 1 minute and then repeat point 6 again.
- Now allow the detergent to act for 2 minutes, and then repeat point 6 again.
- Wait for 2 minutes and then repeat point 6 once more.
- Reconnect the feed water hose to the water connection and the reject water hose to the reject water outlet.
- Connect the plug and allow the water purifier to perform a complete automatic flush. Then produce purified water to the reject water outlet for 30 seconds before pulling out the plug.
- Flush the water purifier according to section "Flushing". Reset the equipment and reconnect the purified water hose to another product or peripheral equipment.
Cleaning/Descaling is now completed. The water purifier is ready to be used as normal.

The detergent must be kept out of the reach of children! Wash your hands after cleaning.

Water containing detergent will be produced. This water must not be drunk or routed into peripheral equipment or another product.
MAINTENANCE
Disinfection
If the feed water has a high content of microorganisms, the water might develop an odour if the water purifier is not used for an extended period of time (1 week). It is then necessary to disinfect it and replace the filter.
The disinfectant, sodium hypochlorite (concentration approx. 3.5 %, odourless), can be purchased from supermarkets or chemists.

This product must be kept out of the reach of children! Wash your hands after use.

Water containing disinfectant will be produced. This water must not be routed into peripheral equipment or another product.

- Pull out the plug.
-
If the purified water tap is not installed, ensure that the purified water from the water purifier can be flushed to the reject water outlet during the first 10 minutes of the operating cycle, e.g. by disconnecting the purified water hose from another product or peripheral equipment and leading it to the reject water outlet via the gap. Connect a manual valve to the purified water hose so that the water purifier can be controlled with this.
-
Connect the plug and allow the water purifier to perform an automatic flush. Ensure that purified water production has stopped.
-
Unscrew filter container II in accordance with "Replacing the filters" and remove filter II. (Filter II should be discarded.)
-
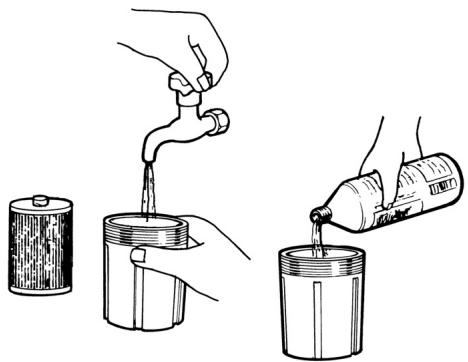
Fill the container to 3/4 with lukewarm water. Pour in 25 ml of disinfectant and mix. See fig. C.
-
Screw the filter container holding the mixture back onto the water purifier.
-
Open the tap/valve so that the water purifier starts, and allow it to produce purified water for 45 seconds.
-
Pull out the plug after 45 seconds, without first closing the tap/valve. See fig. D.
-
Allow the water purifier to stand still and the disinfectant to act for 30 minutes. During this time, insert a new filter in filter container II and change to a new filter in filter container I in accordance with “Replacing the filters”.
-
Close the tap/valve and connect the plug. Allow the water purifier to flush automatically. Perform a complete flush according to the section "Flushing". The water should be odourless after flushing.
-
If there is any odour left from the detergent, open the tap/valve and produce water until the odour has disappeared.
-
Reset the equipment. Reconnect the purified water hose to another product or peripheral equipment.
The disinfection process is now completed. The water purifier is ready to be used as normal.
C
natural_image
Illustration of a hand pouring liquid into two containers using a faucet (no text or symbols)D
Storage
The water purifier should be put into storage if it:
• is going to be disconnected from water and electricity for an extended period (several days)
- is not going to be used to produce purified water for a period of longer than 4 months.
Dosage:
- 2 litres preserving agent + 4 litres water provides protection against freezing down to -15^ .
- 3 litres preserving agent + 3 litres water provides protection against freezing down to -30^ .
Preserving agents can be ordered from your dealer (see “Consumables”).

This product must be kept out of the reach of children. Wash your hands after use!

- Pull out the plug.
- Mix preserving agent and water in a bucket, see fig. E. Dosage, see above.
- Unscrew both filter containers according to the section "Replacing the filters". Remove the two filters and discard them (do not save), empty the containers of water.
- Reinstall the empty filter containers. Ensure that the gasket is in the filter container's groove.
- Close the shut-off valve on the water connection and disconnect the feed water hose from this.
- Disconnect the purified water hose from another product or peripheral equipment. If the purified water tap is installed, you do not need to disconnect this.
- Insert the feed water hose in the mixture, making sure that its mouth is constantly below the surface level of the liquid until the bucket is empty, see fig. E.
- Connect the plug. The water purifier now draws in the mixture. Pull out the plug after 40 seconds, before the production of purified water starts.
- Repeat point 8 until all the liquid has been used. Pull out the plug.
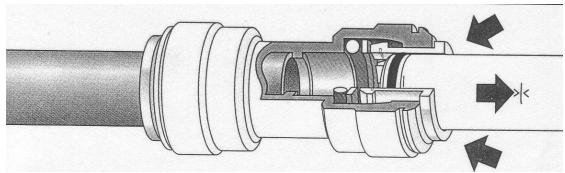
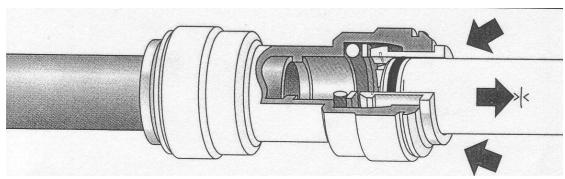
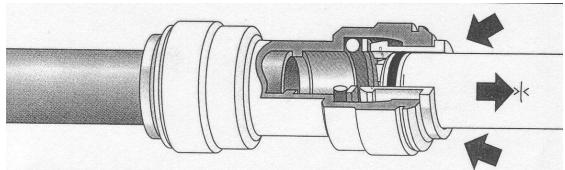
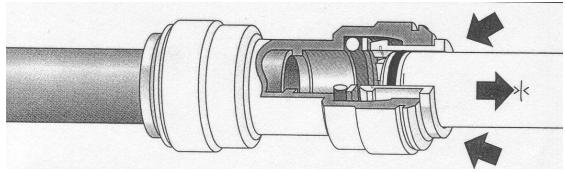
- Disconnect purified water hose from the water purifier by pressing in the grey ring on the connection and pulling the hose out, see fig. F.
The water purifier is now put into storage and can be kept in this way without the risk of freezing. Leave the purified water hose disconnected from the water purifier. Do not connect water and electricity until the water purifier is to be reinstalled.
On reinstallation, the water purifier should:
- be stored at a temperature above 5^ C for at least 48 hours.
- be flushed of preserving agent in accordance with "Flushing".
- be supplied with new filters, see “Replacing the filters”.
E
natural_image
Line drawing of a water purifier system with a bucket and pump, no text or symbols presentF

natural_image
Cross-sectional diagram of a mechanical assembly showing internal components and directional arrows (no text or labels)MAINTENANCE
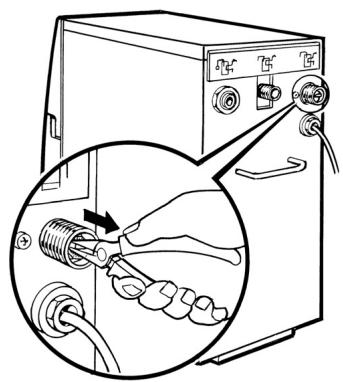
Cleaning the grid
The grid blocks larger particles and is situated by the feed connection. If the “filter I” light for blocked filter or low inlet pressure is lit, the grid may be blocked.

- Pull out the plug.
- Close the shut-off valve at the water connection.
- Disconnect the feed water hose from the water purifier.
- Using pliers or similar, grip and pull out the grid in accordance with fig. G.
- Clean out and rinse before replacing the grid in the inlet (turn the mounting for the pliers outwards), see fig. G.
- Screw on the feed water hose.
- Open the shut-off valve and check that no water leaks.
- Connect the plug and the water purifier will flush.
G
IF THE WATER PURIFIER IS NOT WORKING
Trouble-shooting table
To protect the user and the water purifier from incorrect use, there are several different built-in alarms, which cause the purifier to give an indication and stop. The table below gives probable causes of warnings given by the water purifier.
The lights can appear in the following three ways:

| INDICATION | FAULT CAUSE | REMEDIAL ACTION |
 ○○○ ○○○ | Time to replace filter or clean the grid. | ·There is time before the water purifier experiences an emergency stop. Prepare to replace filter I and to clean the grid. |
| The feed water's pressure is too low, i.e. less than 1.5 bar (150 kPa). | ·Check the feed pressure. If necessary, increase the pressure to 1.5–10 bar (150–1000 kPa) | |
 ○○○ ○○○ | Alarm for blocked filter I or II. | ·Check that there is nothing in the filter containers that is obstructing the water flow. ·If necessary, replace filter I or II. |
| Alarm for dirt in the grid. | ·Check the grid according to “Cleaning the grid”. | |
| Alarm for water leak/condensation on the base plate under the pre-filters. | ·Check that all the connections are watertight. ·If there is water on the base plate, lean the appliance forward and wipe it up. | |
| The feed water's pressure is too low, i.e. less than 1.5 bar (150 kPa). | ·A pressure increase pump for the feed water can alleviate this. ·Check the parts that can affect the feed water's pressure (water line, coarse filter, extra pre-filter). | |
 ○○○ ○○○ | Warning about used filter. | ·Change filter II in accordance with “Replacing the filters”. |
 🌐○○ 🌐○○ | Alarm for poorer water quality. | ·If the water purifier is new and not yet calibrated, rectify according to the section “Calibration”. ·Pull out and reconnect the plug so that the water purifier flushes. Repeat this procedure two or more times. |
IF THE WATER PURIFIER IS NOT WORKING
| INDICATION | FAULT CAUSE | REMEDIAL ACTION |
| Alarm indicating that calibration has been commenced, but not carried out correctly (probably due to the tap having been closed before 10 minutes had elapsed). | · Restart the water purifier by pulling out and reconnecting the plug so that flushing is performed. Recalibrate the water purifier according to the section “Calibration”. | |
| Alarm for fault in the water quality meter. | · Restart the water purifier by pulling out and reconnecting the plug so that flushing is performed. Wait for 2 hours then use the water purifier as normal. | |
| Low water flow | The membrane may have become blocked. | · Clean the water purifier in accordance with “Cleaning/Descaling”. |
| The appliance false starts (short starts) | The water pressure between the water purifier and e.g. tap, valve or tank has dropped below the water purifier's starting pressure level. | · Check the connections. · Check that the ends of the water purified water hose are flat, circular and with no burrs. · Check that taps and valves are watertight in their closed position. |
| Unpleasant odour | When the water purifier is stationary (without power supply) and there is microbiological growth in the water, the water can smell “bad”. | · Try flushing the water purifier according to the section “Flushing”. · Clean the water purifier in accordance with “Disinfection”. |
If the water purifier has experienced an emergency stop, it must be restarted by pulling out the plug, waiting for at least one minute and then reconnecting the plug again. If problems remain with the water purifier after having read and tried to implement remedial measures in accordance with the trouble-shooting table, contact your dealer.
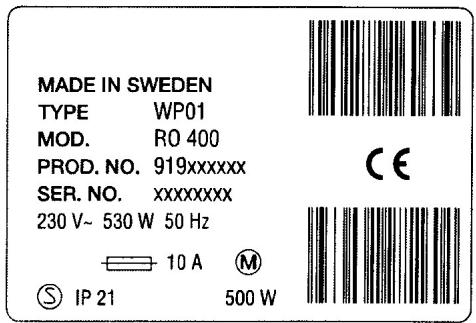
Service and spare parts
Use the trouble-shooting table to make sure that you cannot remedy the fault yourself. If you have been unable to get your water purifier to work, despite implementing the measures described in the checklist, it is time to call for service. By going through your dealer, you will receive service with genuine spare parts for your water purifier.
Before calling for service, it is worth noting a few details. Look at the data plate, see fig. A, which is located on the rear of the appliance. All the required information that the service department needs to know about your water purifier can be found here. You can record these details here:
TYPE:
MODEL:
PROD. NO.:
SER. NO.:
A
TECHNICAL FACTS
| Data | Requirements on feed water to water purifier: | ||
| height | 466 mm | water flow | >10 l/minute |
| depth | 395 mm | water pipe pressure | 1.5 - 10 bar(150 - 1000 kPa) |
| depth with hoses | 460 mm | ||
| width | 225 mm | ||
| weight (on delivery) | 29 kg | water temperature | 2 - 30 °C |
| weight (filled with water) | 33 kg | ||
| capacity(water temp. 15 °C) | 2.5 (±0.4) l/min | Chemical conductivity | <200 mS/m |
| max 500 l/day | /salt | <1500 mg/l | |
| /chloride Cl - | <900 mg/l | ||
| electrical connection | 230 V, 50 Hz, | cloudiness | slight / distinct* |
| 10 A, earthed supply | turbidity | < 1 FNU* | |
| total output | 530 W | pH value | 4 -10 |
| operating cycle | unlimited | calcium: Ca^2+ and magnesium: Mg^2+ | <140 mg/l |
| (automatic flushing every 15 minutes in the operating cycle) | /hardness | <20 °d | |
| Starting pressure level | 3 bar (300 kPa) | iron: Fe^2+ | <1.5 mg/l* |
| Stopping pressure level | 4.5 bar (450 kPa) | iron: Fe^3+ | <0.3 mg/l* |
| noise level when installing in undersink cupboard | < 60 dB(A) | manganese: Mn | <0.3 mg/l* |
| COD Mn: O_2 | <5 mg/l | ||
| * in the event of higher values, extra filter required | |||
| Water efficiency- during operation | approx. 50% | Microbiological heterotrophic bacteria | |
| Working range | 48 hours | 1,000/1 ml | |
| air temperature | 2 - 43 °C | coliform bacteria | 1,000/100 ml |
| relative humidity (RH) | 25 - 95 % | e.coli | 100/100 ml |
Example of rejection for substances which may be present in water
| INORGANIC SUBSTANCES | % | ORGANIC SUBSTANCES | % |
| turbidity (cloudiness) | >99 | Hydrocarbons | |
| colour rating | >99 | heptane, octane, decane, etc. | >98 |
| benzene, toluene, xylene, ethyl benzene, etc. | >99 | ||
| Cations/Metals | diesel oil | >99 | |
| sodium | >96 | ||
| potassium | >97 | ||
| calcium (hardness) | >99 | Polyaromatic hydrocarbons | |
| aluminium | >99 | PAH | >99 |
| iron | >99 | ||
| manganese | >99 | Chlorinated hydrocarbons | |
| compounds that can be formed when water is chlorinated | >99 | ||
| Cations/Heavy metals | |||
| copper | >99 | ||
| lead | >99 | Trihalomethanes (THM) | |
| zinc | >99 | trichloromethane | >60 |
| mercury | >99 | bromodichloromethane, dibromochloromethane, tribromomethane | >99 |
| cadmium | >99 | ||
| chrome | >98 | ||
| nickel | >99 | Pesticides | |
| PCB | >99 | ||
| Anions | |||
| fluoride | >99 | MICRO-ORGANISMS | |
| chloride | >98 | heterotrophic bacteria | >99 |
| nitrate | >97 | coliform bacteria/e.coli | >99 |
| sulphate | >97 |
Unpacking
- If the appliance has been damaged during transportation, you should immediately notify the company responsible for delivering it.
- Carefully lift out the water purifier by taking hold of the rear handle and the front edge. The water purifier can be damaged if it is lifted in any other way.
- Check the purifier for any signs of damage and check that no accessories are missing. Any damage, faults or missing parts should be notified to the supplier immediately.
- Do not leave packaging material lying around so that children can play with it.
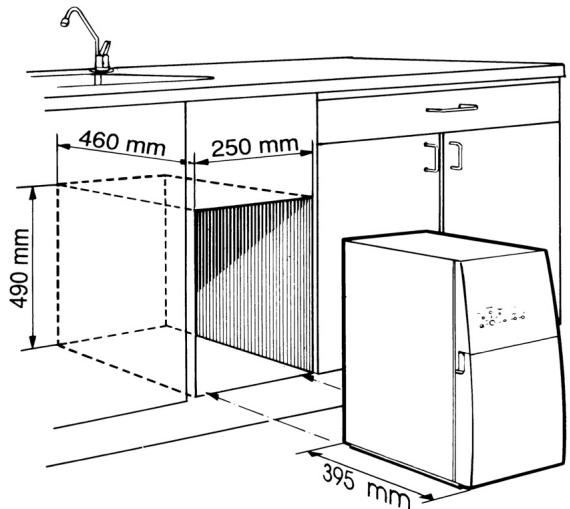
Positioning the water purifier
Remember the following when installing the water purifier:
- The purifier is installed upright, without support, on a horizontal surface that can take the load.
- The installation space should be close to cold water supply, drainage and an earthed electrical supply.
- It should be easy to inspect the control panel.
- It should be possible to open the front cover so that the filter containers can be accessed.
- The water purifier should be installed with a 2 cm gap to any adjacent fittings or walls to ensure good ventilation around the appliance.
- Connections can be routed in any direction from the connection point. Make sure no connections are crushed or damaged. Hoses and cables must not be tensioned. The dimensions of the area required for the water purifier are specified in fig. A.
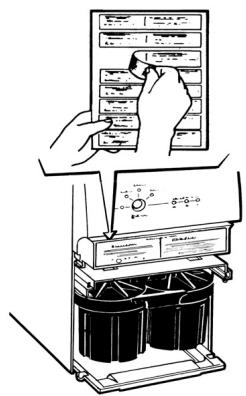
Affixing the information decal

The accessory box contains an adhesive sheet with information decals in various languages. Select the required language and affix the decal at the indicated place, see fig. B.
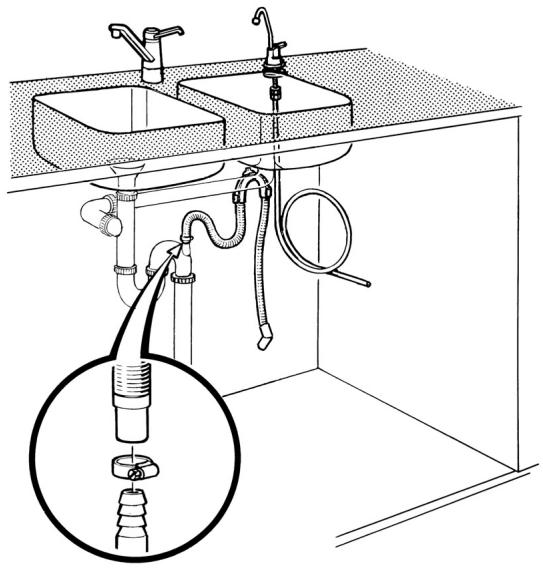
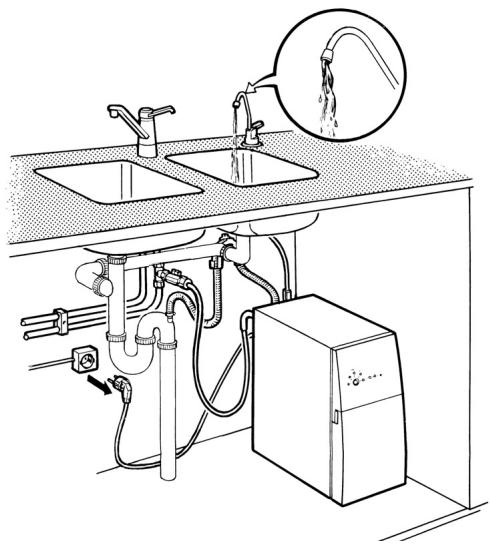
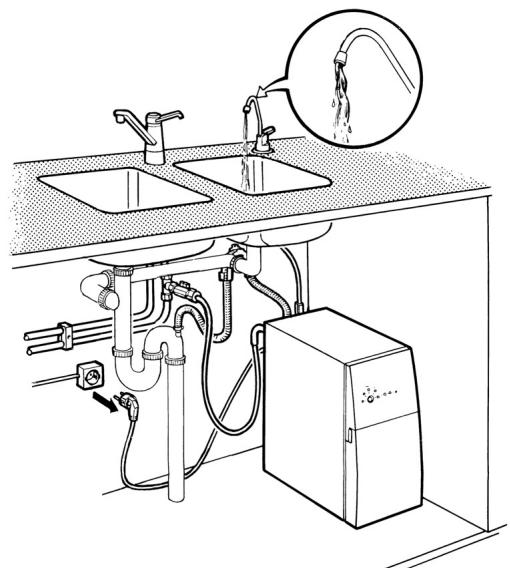
Water connection
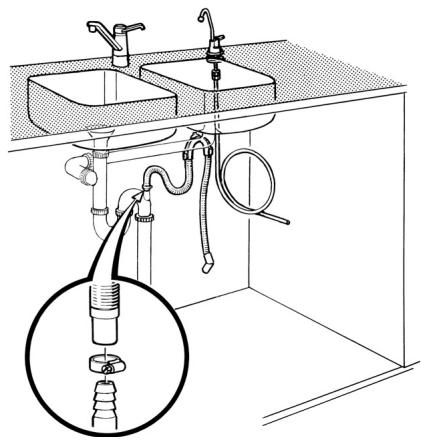
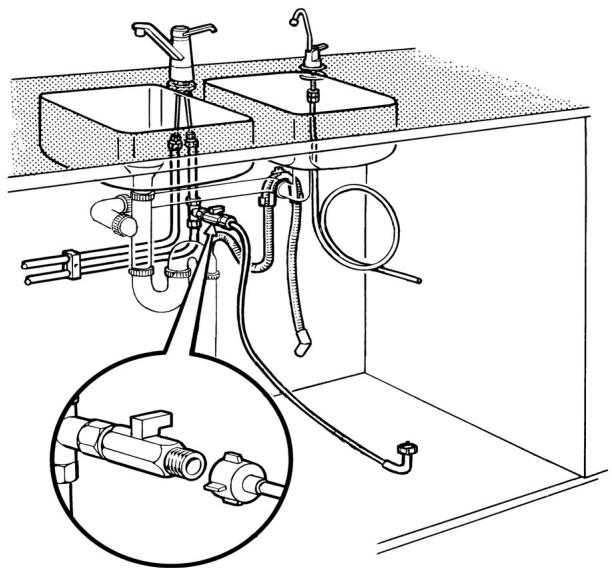
Feed connection: The water purifier is connected to cold water (2 - 40 °C) via the feed water hose, see fig. C(3). The connection should be supplied with an easily accessible shut-off valve, see fig. D. If the connection is with new pipes or pipes that have not been in use for an extended period, the water should be allowed to run for a while before the hose is connected. Any sand and rust are then flushed out.

- Check that the black seals are in place in the feed water hose's two connections.
- Screw the feed water hose's straight end onto the shut-off valve as shown in fig. D. If the 3/4" hose connection does not fit, it can be changed to a 1/2" connection using the adapter supplied. Put the black washer in the adapter and screw the adapter onto the shut-off valve for feed water. Screw the feed water hose onto the adapter.
A
B
C
D

natural_image
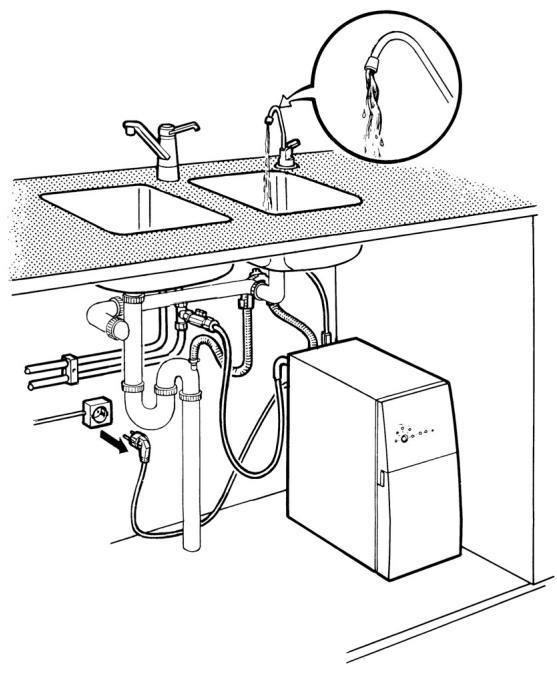
Technical line drawing of a bathroom sink with pipes, fixtures, and an inset showing a pipe fitting (no text or labels)INSTALLATION
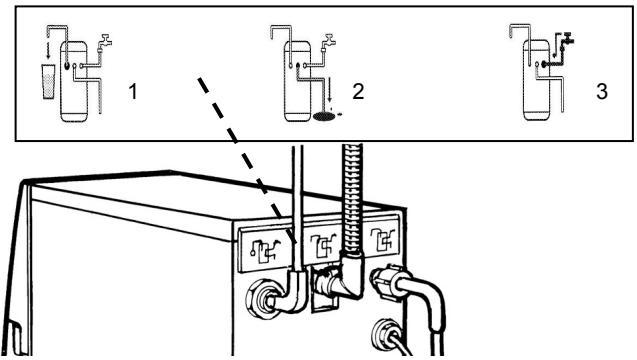
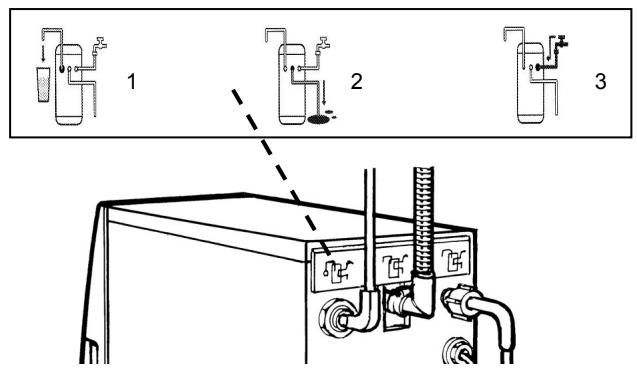
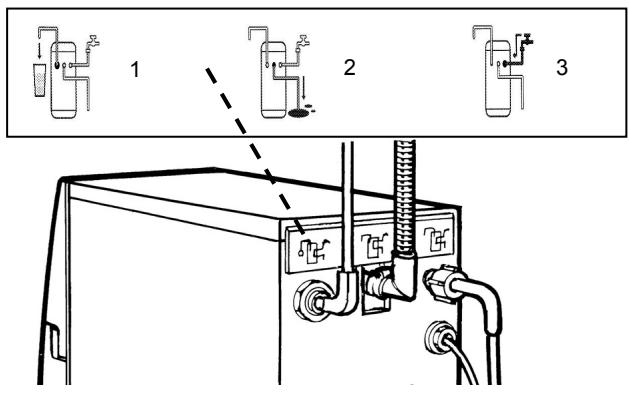
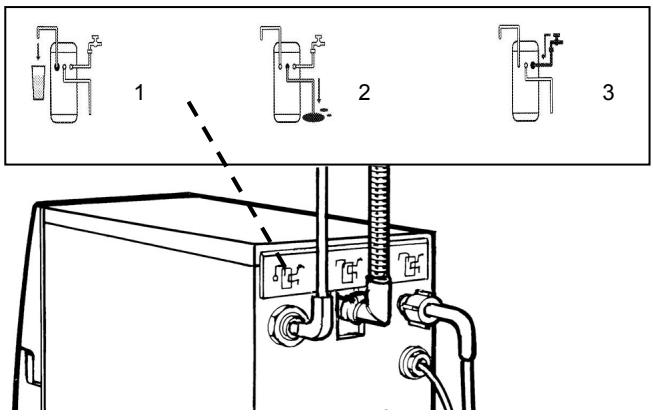
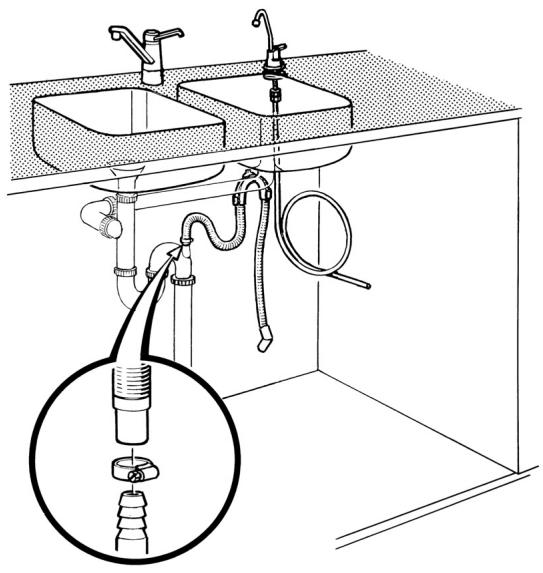
Reject water outlet connection: The reject water is routed via the reject water hose, see fig. C(2), to the reject water outlet. The hose may be extended up to 4 m, and the minimum internal diameter is 13 mm.

The connection is made to the water trap via the dishwasher drain. If there is only a reject water outlet spigot and this is already connected, the intermediate section should be changed to one with two spigots. The reject water outlet spigot is placed before the water trap. Affix the hose as shown in fig. E, securely with the aid of one hose clip and the bracket for the reject water hose.

The reject water hose should be placed in a loop at least 50 mm and at most 500 mm above the top of the water purifier and existing water trap using the enclosed bracket.
Electrical connection
The water purifier should be connected to an earthed electrical supply (230V, 50Hz and 10A). We recommend connection using a plug, as some operations require the power supply to be temporarily interrupted. The plug should also be easily accessible after installation.
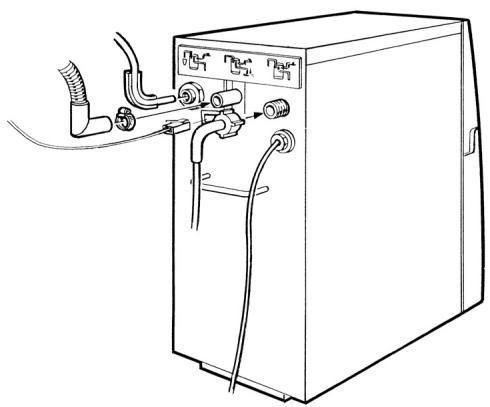
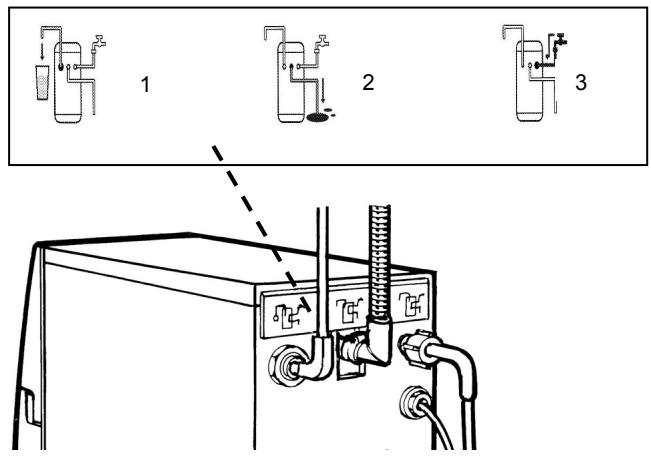
Connecting the water purifier
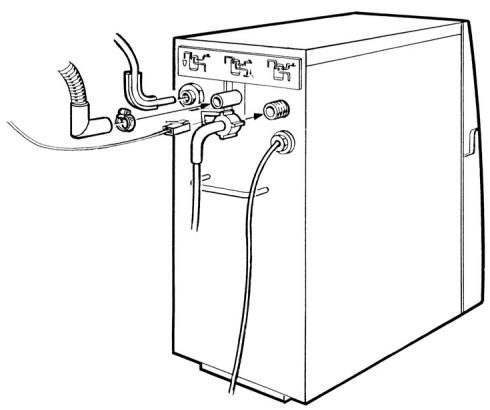
Before the water purifier is placed in its intended position, remove the three protective sleeves from the water purifier's connections and the transport protection under the pre-filter containers.
Feed water

- Screw the feed water hose's bent end onto the water purifier's connection. See fig. F.
- Open the shut-off valve on the feed and check that there is no leakage at the feed water hose.
Purified water

Connect the purified water hose from the peripheral equipment to the water purifier. See fig. F. Push the hose into the bottom position, up to the mark (approx. 17 mm). Use the angle bracket for the purified water hose if the space behind the appliance is limited.
Wastewater

The bent end of the reject water hose is secured to the water purifier's reject water connection using a hose clip. See fig. F.
E
natural_image
Line drawing of a kitchen sink with piping and a close-up inset showing a valve assembly (no text or symbols)F

natural_image
Line drawing of a server rack with connectors and cables (no text or symbols)INSTALLATION
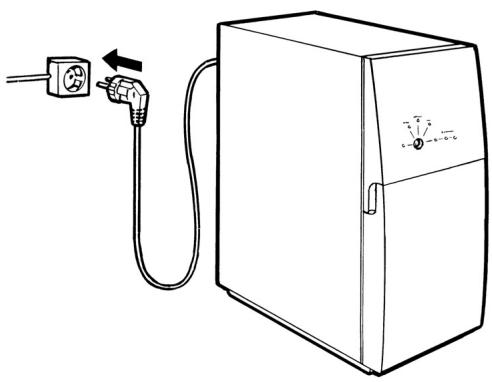
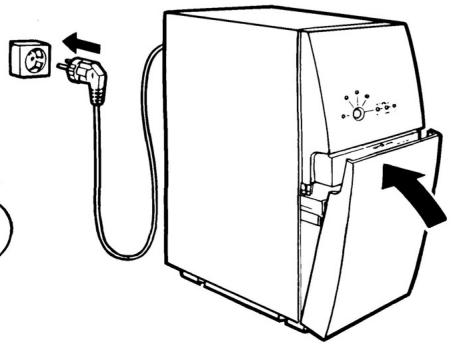
Electrical connection

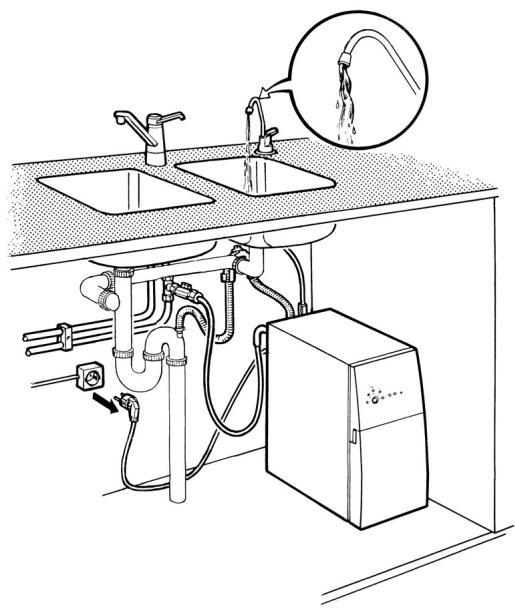
- Connect the plug to the wall socket, see fig. G.
- The water purifier starts and flushes. The water purifier conducts this flushing operation every time the plug is connected.

The water may not be used until the flushing procedure as described in the section “Flushing” has been completed.
- Start purified water production and check that the connections are watertight following installation. If any of the connections leak, pull out the plug and further tighten the hose clip or nut. Connect the plug.
- Post-tighten the reject water and feed water hoses after one week's use.

A few drops of leakage at either end of the purified water hose is sufficient for the water purifier to start (involuntarily). Leakage outside the water purifier cannot be discovered by its safety system. Unless otherwise indicated, the shut-off valve must always be open for the water purifier's safety system to work.
G
natural_image
Line drawing of an electrical outlet connected to a cabinet with a power plug (no text or symbols)Flushing
Flushing is performed when the water purifier:
• Is new and has never been used before.
• Is reinstalled after having been in storage.
- Has been cleaned, in order to rinse out the detergent.
- Has been supplied with a new membrane.

Purified water may not be drunk/used before or while flushing is in progress.

First check that:
• Purified water production has stopped.
- The purified water hose is disconnected from any peripheral equipment and routed to the reject water outlet.
- The shut-off valve on the feed water pipe is open.
- There are no leaks at the feed water connection.
- The reject water and purified water connections are watertight.
• The pre-filters are properly tightened.
- Pull the plug out of the wall socket.
- Connect the plug to the wall socket again. The water purifier flushes automatically.
- Restart the water purifier so that it flushes automatically by pulling out and reconnecting the plug again.
-
Restart the water purifier one more time.
-
New installation or membrane replacement
Perform calibration according to the section "Calibration".
- Just flushing
Allow the water purifier to flush purified water to the reject water outlet via the purified water hose. If no tap is installed, this takes place automatically. Pull out the plug after 10 minutes and connect the purified water hose to any peripheral equipment. If the tap is installed, open the tap and allow the water purifier to produce purified water for 10 minutes. Close the tap.
The water purifier is now ready to produce purified water.
INSTALLATION
Calibration
To achieve a starting position for the degree of purification based specifically on your water, the water purifier must be calibrated (reset).
Calibration may only be performed if:
- The water purifier is new and has never been used before.
- The incoming water quality changes for some reason, such as moving the water purifier.
- Membrane replacement has recently been carried out.

Do not drink or use the water that is produced during the calibration procedure!
To calibrate the water purifier:

-
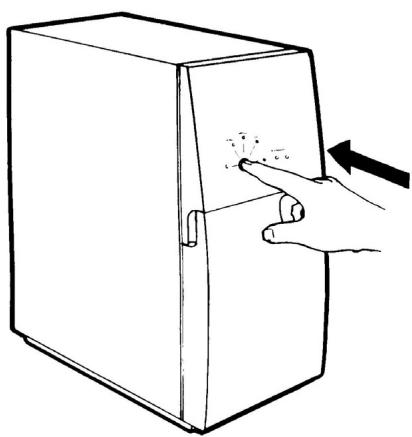
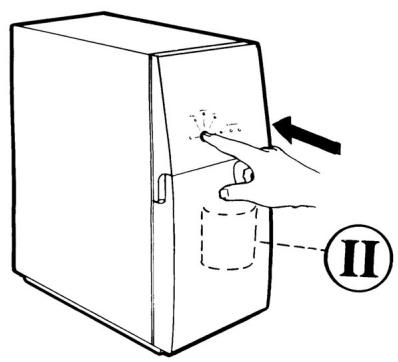
With tap installed: Open the purified water tap. Within 10 seconds (with the tap still open), you must press the calibration button, see fig. H, and then hold it depressed until the lights for purification levels I and II come on and then go out. When only the On/Off light is lit, the button can be released.
-
Without tap connected: After the third automatic flushing in the flushing procedure, which takes 30 seconds, the water purifier stops for a second and then starts producing purified water to the reject water outlet. Once the production of purified water has started, the calibration button must be pressed within 10 seconds, see fig. H, and then kept depressed until the lights for purification levels I and II come on and then go out. When only the On/Off light is lit, the button can be released.
If any of the lights for purification levels I-III does not go out, go through the Checkpoints under "Flushing" again and restart calibration.
-
Allow the water purifier to produce purified water for at least 10 minutes. The lights for purification levels I and II flash once. The current water quality level is displayed by the lamp for level III starting to shine continuously, indicating the maximum degree of purity.
-
If a wandering flashing light appears between the lights for levels I - III, the calibration has been carried out
incorrectly. In this case, repeat the calibration from the beginning.
-
With tap installed: Close the purified water tap and allow the water purifier to flush automatically. Allow the flushing to stop.
-
Without tap installed: Pull out the plug, wait for one minute and then reconnect it. The water purifier flushes. Pull out the plug after the automatic flushing. Connect the purified water hose to the peripheral equipment.
The water purifier is now ready to produce purified water.
H
natural_image
Line drawing of a hand pressing down on a rectangular cabinet with a pointer (no text or symbols)Moving the water purifier
If you move the purifier from one place to another, you should remember the following points:
- Close the shut-off valve for the feed water.
- Pull out the plug.
• Always transport the appliance upright. - Installation takes place according to the installation instructions.
- New calibration should only be performed if the quality of the feed water has changed, or if the membrane has been replaced.

The appliance must be put in storage if it is not going to be used for a period of more than 4 months, see the section "Storage".
Für den Benutzer
natural_image
Illustration of three hands pouring liquid into cylindrical containers using different methods (no text or symbols)B

natural_image
Line drawing of a kitchen sink with water supply and piping (no text or symbols)Methode B
natural_image
Illustration showing a hand pouring liquid from a faucet into two containers (no text or symbols present)D

Konservierung
natural_image
Line drawing of a water pump system with a bucket and control panel (no text or symbols)F
natural_image
Cross-sectional diagram of a mechanical assembly showing internal components and directional arrows (no text or labels)WARTUNG
TECHNISCHE DATEN
Daten
Trihalomethane (THM)
| Trichlormethan | >60 |
| Bromdichlormethan, Dibromchlormethan, Tribrommethan | >99 |
Pestizide
| PCB | >99 |
MIKROORGANISMEN
| Heterotrophe Bakterien | >99 |
| Coliforme Bakterien/E.coli | >99 |
INSTALLATION
C
INSTALLATION

natural_image
Line drawing of a kitchen sink with pipes and fixtures, showing an inset close-up of a pipe fitting (no text or symbols)E
natural_image
Line drawing of a kitchen sink and bathtub with tubing and a magnified inset showing a mechanical component (no text or symbols)F
natural_image
Line drawing of a server unit with attached tubing and connectors (no text or symbols)INSTALLATION
Reinwasser

natural_image
Line drawing of a box connected to a power outlet with an arrow indicating direction (no text or symbols)Spülen
natural_image
Line drawing of a hand pressing a button on a rectangular cabinet (no text or symbols)natural_image
Illustration showing hands pouring granular material into cylindrical containers and a tap, illustrating mechanical process (no text or symbols)B

natural_image
Line drawing of a kitchen sink with water spray and piping system (no text or symbols)Methode B
natural_image
Illustration showing three steps of a hand pouring liquid into different containers: a water tap, a piston, and a bottle (no text or symbols present)D

natural_image
Line drawing of a kitchen sink with water supply and piping (no text or symbols)Opbergen
natural_image
Line drawing of a water pump system with a bucket and control panel (no text or symbols)F

natural_image
Cross-sectional diagram of a mechanical assembly showing internal components and directional arrows (no text or labels)ONDERHOUD
WANNEER DE WATERZUIVERAAR NIET WERKT
Trihalomethaan (THM)
| trichloromethaan | >60 |
| broomdichloromethaan, dibroomchloromethaan,tribroommethaan | >99 |
Anionen
| fluoride | >99 |
| chloride | >98 |
| nitraat | >97 |
| sulfaat | >97 |
Pesticiden
| PCB | >99 |
MICRO-ORGANISMEN
| heterotrofe bacteriën | >99 |
| coliforme bacteriën/e.coli | >99 |
Uit de verpakking halen
C
INSTALLATIE

natural_image
Technical line drawing of a subway station with hoses, pipes, and a magnified inset showing internal components (no text or labels)E

natural_image
Line drawing of a kitchen sink and sink with tubing and a magnified inset showing a pipe fitting (no text or symbols)F

natural_image
Line drawing of a server unit with attached tubing and connectors (no text or symbols)INSTALLATIE
Gezuiverd water

natural_image
Line drawing of a portable electrical outlet connected to a box with a power plug (no text or symbols)Spoelen
natural_image
Line drawing of a hand pressing a button on a rectangular cabinet (no text or symbols)natural_image
Illustration of three hands pouring liquid into cylindrical containers, illustrating a mechanical process (no text or symbols)B
natural_image
Line drawing of a kitchen sink with faucet, pipe fittings, and a control unit (no text or symbols)Méthode B
natural_image
Illustration of three steps of a hand pouring liquid into cylindrical containers (no text or symbols)D

natural_image
Line drawing of a kitchen sink with water circulation and piping (no text or symbols)natural_image
Line drawing of a water purifier system with a bucket being inserted into a container via tubing (no text or symbols)F
natural_image
Cross-sectional diagram of a mechanical device showing internal components and directional arrows (no text or labels)ENTRETIEN
SI LE PURIFICATEUR D'EAU NE FONCTIONNE PAS
C
INSTALLATION

natural_image
Technical line drawing of a subway station with hoses, pipes, and a magnified inset showing internal components (no text or labels)E

natural_image
Line drawing of a kitchen sink and sink with tubing and a magnified inset showing a pipe fitting (no text or symbols)F

natural_image
Line drawing of a server unit with attached tubing and connectors (no text or symbols)INSTALLATION
Eau purifiée

natural_image
Line drawing of an electrical outlet connected to a box with a power plug (no text or symbols)Procédure de lavage
natural_image
Line drawing of a hand pressing a button on a rectangular cabinet (no text or symbols)natural_image
Illustration showing three steps of pouring liquid into cylindrical containers, with a hand pouring water from a faucet (no text or symbols)B

Método B
natural_image
Illustration of three steps of a hand pouring liquid into cylindrical containers (no text or symbols)D
Almacenamiento
natural_image
Line drawing of a water purifier system with a bucket and pump, no text or symbols presentF
natural_image
Cross-sectional diagram of a mechanical assembly showing internal components and directional arrows (no text or labels)MANTENIMIENTO
Trihalometanos (THM)
| triclorometano | >60 |
| bromodiclorometano, dibromoclorometano, tribromometano | >99 |
Pesticidas
| PCB | >99 |
MICROORGANISMOS
| bacteria heterotrófica | >99 |
| bacteria coliforme/e. coli | >99 |
Desembalaje
C
INSTALACIÓN

natural_image
Technical line drawing of a subway station with hoses, pipes, and a magnified inset showing a pipe fitting (no text or labels)E
F
natural_image
Line drawing of a server rack with attached cables and connectors (no text or symbols)Agua purificada

natural_image
Line drawing of a box connected to a power outlet with a cable (no text or symbols)Purga
natural_image
Line drawing of a hand pressing down on a box with an arrow indicating motion (no text or symbols)natural_image
Illustration showing three steps of a hand pouring liquid into cylindrical containers, with no text or symbols present.B
Metod B
natural_image
Illustration of a hand pouring liquid into two containers: a water tap and a bottle, both without any text or symbols.D

natural_image
Line drawing of a kitchen sink with plumbing pipes and a water dispenser, showing no text or symbolsKonservering
Vattenrenaren ska konserveras om den:
natural_image
Line drawing of a water purifier system with a bucket and pump, no text or symbols presentF
natural_image
Cross-sectional diagram of a mechanical assembly showing internal components and directional arrows (no text or labels)UNDERHÅLL
OM VATTENRENAREN INTE FUNGERAR
Felsökningstabell
TEKNISKA FAKTA
C
D
natural_image
Technical line drawing of a shared sink with pipes, hoses, and a close-up inset showing a pipe fitting (no text or symbols present)INSTALLATION
natural_image
Line drawing of a kitchen sink with piping and a close-up inset showing a valve assembly (no text or symbols)F

natural_image
Line drawing of a server rack with attached cables and connectors (no text or symbols)INSTALLATION
El-anslutning

natural_image
Line drawing of an electrical outlet connected to a cabinet with a power plug (no text or symbols)Renspolning
natural_image
Line drawing of a hand pressing down on a rectangular cabinet with a pointer (no text or symbols)4
5
natural_image
Illustration of hands holding a cylindrical object with an upward arrow, no text or symbols present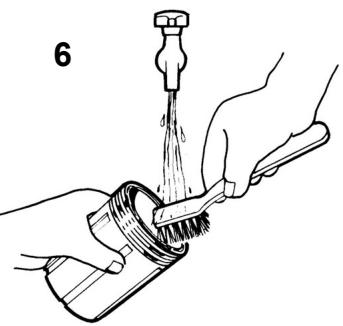
natural_image
Illustration of hands using a tool to clean or brush a pipe (no text or symbols present)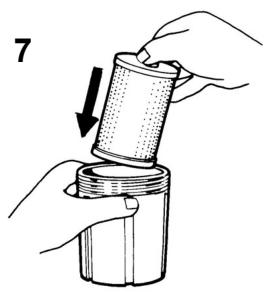
natural_image
Illustration of hands holding a cylindrical mechanical component with an arrow indicating motion (no text or symbols)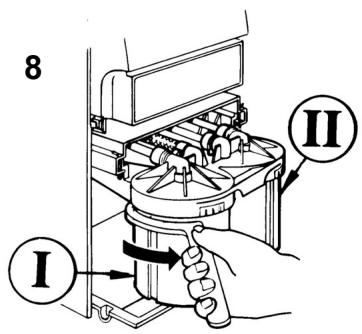
9
10
natural_image
Line drawing of a refrigerator with an outlet and power plug, showing no text or symbols11
WASTE MANAGEMENT
natural_image
Pure electrical circuit lines without any symbolsEN
Appliances bearing this symbol must be deposited at the designated local reception point for the disposal of electrical and electronic equipment.
It is not permitted that this product be disposed of by way of the normal household refuse collection system.
DE
- PRODUCT DESCRIPTION
- EN
- DE
- YOUR NEW WATER PURIFIER
- Safety information 6-7
- Information 7
- Using the water purifier 8
- Regular care of the water purifier 8
- Maintenance 9-14
- If your water purifier stops working 14-15
- For the installer
- Technical facts 16
- Installation 17-20
- Guidelines for using the user instructions
- SAFETY INFORMATION
- Installation
- Child safety
- Use
- Waste management
- Old and damaged water purifiers
- Symbol identification
- Basic facts about reverse osmosis
- Water
- Osmosis – Reverse osmosis
- USING THE WATER PURIFIER
- Production of purified water
- Automatic flushing
- REGULAR CARE OF THE WATER PURIFIER
- Replacing the filters
- Replacing filter I
- Replacing filter II
- MAINTENANCE
- Cleaning/Descaling
- Method A
- Method B
- Disinfection
- Storage
- This product must be kept out of the reach of children. Wash your hands after use!
- On reinstallation, the water purifier should:
- Cleaning the grid
- IF THE WATER PURIFIER IS NOT WORKING
- Trouble-shooting table
- Service and spare parts
- Unpacking
- Positioning the water purifier
- Affixing the information decal
- Water connection
- Electrical connection
- Connecting the water purifier
- Feed water
- Purified water
- Wastewater
- Flushing
- First check that:
- Calibration
- Do not drink or use the water that is produced during the calibration procedure!
- Moving the water purifier
- Für den Benutzer
- Methode B
- Konservierung
- WARTUNG
- TECHNISCHE DATEN
- Reinwasser
- Spülen
- Opbergen
- ONDERHOUD
- WANNEER DE WATERZUIVERAAR NIET WERKT
- Uit de verpakking halen
- INSTALLATIE
- Gezuiverd water
- Spoelen
- Méthode B
- ENTRETIEN
- SI LE PURIFICATEUR D'EAU NE FONCTIONNE PAS
- Eau purifiée
- Procédure de lavage
- Método B
- Almacenamiento
- MANTENIMIENTO
- Desembalaje
- INSTALACIÓN
- Agua purificada
- Purga
- Metod B
- Konservering
- UNDERHÅLL
- OM VATTENRENAREN INTE FUNGERAR
- Felsökningstabell
- El-anslutning
- Renspolning
Brand : AEG-ELECTROLUX
Model : RO400C
Category : Vacuum Cleaner