
SV4028 - Vacuum Cleaner AEG-ELECTROLUX - Free user manual and instructions
Find the device manual for free SV4028 AEG-ELECTROLUX in PDF.
| Product type | Spin dryer |
| Brand | AEG-ELECTROLUX |
| Model | SV4028 |
| Type | C-5000S |
| Power supply | 230 V ~ 50 Hz |
| Rated power | 300 W |
| Dry laundry capacity | 4.0 kg (13.6 litres) |
| Maximum rotation speed | 2,800 rpm |
| Height | 614 mm |
| Diameter | 347 mm |
| Net weight | 9.6 kg |
| Protection class | Class I (earthing required) |
| Safety device | Automatic brake; lid lock until drum has completely stopped |
| Braking function | Braking system that rapidly reduces rotation |
| Cleaning and maintenance | Clean the drum with a soft dry or damp cloth; use a mild detergent, no abrasive products |
| Supplied accessories | Retaining disk, cable storage hook |
| Required accessories not supplied | Water collection container to be placed under the drain nozzle |
| Intended use | Domestic use only – suitable for spinning damp laundry |
| Manufacturing standards | EN 60335-1, EN 60335-2-4, EN 55014-1, EN 55014-2, EN 61000-3-2, EN 61000-3-3, EN 50366 |
| Repairability | Contact an authorized after-sales service; use only original spare parts |
Frequently Asked Questions - SV4028 AEG-ELECTROLUX
User questions about SV4028 AEG-ELECTROLUX
0 question about this device. Answer the ones you know or ask your own.
Ask a new question about this device
Download the instructions for your Vacuum Cleaner in PDF format for free! Find your manual SV4028 - AEG-ELECTROLUX and take your electronic device back in hand. On this page are published all the documents necessary for the use of your device. SV4028 by AEG-ELECTROLUX.
USER MANUAL SV4028 AEG-ELECTROLUX
Thank you for choosing one of our high-quality products.
With this appliance you will experience the perfect combination of functional design and cutting edge technology.
Convince yourself that our appliances are engineered to deliver the best performance and control – indeed we are setting the highest standards of excellence.
In addition to this you find environmental and energy saving aspects as an integral part of our products.
To ensure optimal and regular performance of your appliance please read this instruction manual carefully. It will enable you to navigate all processes perfectly and most efficiently. To refer to this manual any time you need to, we recommend you to keep it in a safe place. And please pass it to any future owner of the appliance.
We wish you much joy with your new appliance.
The following symbols are used in this user manual:

Important information concerning your personal safety and information on how to avoid damaging the appliance.

General information and tips.

Environmental information.
Contents
Operating instructions 4
Safety information 5
Correct use 5
General safety 5
Child safety 5
Installation 6
Product description 6
First use 7
Spin drying time 7
Daily Use 7
8
Turning the spin dryer on 10
Turning the spin dryer off 11
Cleaning and care 12
What to do if... 13
The spin dryer does not reach the maximum turning speed
or shakes rather strongly while spinning 13
The motor does not run 13
No water comes out through the exhaust nozzle 13
Technical data 14
Installation instructions 15
Installation 15
Electrical connection 15
Environment concerns 16
Packaging material 16
Warranty information 16
Key word index 17
Operating Instructions
Safety information

In the interest of your safety and to ensure the correct use, before installing and first using the appliance, read this user manual carefully, including its hints and warnings. To avoid unnecessary mistakes and accidents, it is important to ensure that all people using the appliance are thoroughly familiar with its operation and safety features. Save these instructions and make sure that they remain with the appliance if it is moved or sold, so that everyone using it through its life will be properly informed on appliance use and safety.
Correct use
- The spin dryer is intended only for household use and for spin drying damp laundry.
- This appliance was not designed for commercial or industrial use.
- This product should be serviced only by authorized service personnel, and only genuine spare parts should be used.
- Never remove the plug from the socket outlet by tugging on the mains cable. Do it directly from the plug.
- Avoid exposing the spin dryer to atmospheric influences, such as sun, rain, etc.
- In no case fill in the drum with water.
- Do not sit or stand over the spin dryer. Do not place heavy objects on top of it.
- Do not use the appliance next to sinks, bathtubs, showers or to other containers filled with water.
- It is not recommended to use multiple socket connectors, cable extensions, or plug adaptors.
-
The plug must be pulled out in the following situations:
-
In case of a malfunction.
- Before care and maintenance.
-
After using the spin dryer.
-
Do not lift, transport, tightly grasp, shove relocate, or tip the spin dryer while it is running.
- Never use excessive force when operating the lever and the lid.
- Do not place rolled-up pieces of laundry inside the drum. Never place solid objects, toys, any kind of shoes or food inside the drum.
-
Switch off the appliance before unplugging it from the socket outlet.
-
Never leave the spin dryer unattended while operating.
This appliance does not switch off automatically, it is advisable to supervise the operation and switch off the appliance. - Do not use the spin dryer without locating the retainer disc into the drum onto the clothes.
- Do not use the spin dryer without putting the water collecting bowl (not supplied) under the exhaust nozzle.
- When lifting and transporting the spin dryer, always use only the carrying handles provided for this purpose.
- Cut off the mains cable before recycling or disposing of the spin dryer. Make sure that the spin dryer is disposed of in compliance with local regulations.
General safety
- Improper operation use may damage the appliance and cause damages to the user.
- Do not use the spin dryer if it or the mains cable are damaged. In case of any damages, contact your local authorized service centre for checking it and to avoid any hazard.
- For safety reasons it is dangerous to alter the specifications or attempt to modify this product in any way.
- Do not use the appliance in corrosive and explosive environment, next to solvents and paints, in order to avoid electrical circuit breakage explosions.
- Never place the mains cable on sharp edges and keep it away from heat sources and fire.
- If the mains cable has been damaged, call an authorized service centre for replacing it.
- Do not touch the spin dryer with wet hands or when you are standing barefoot on a wet surface.
- Do not use your spin dryer with laundry which is soiled by wax, paint or combustible fluids. There is danger of fire or explosion!!
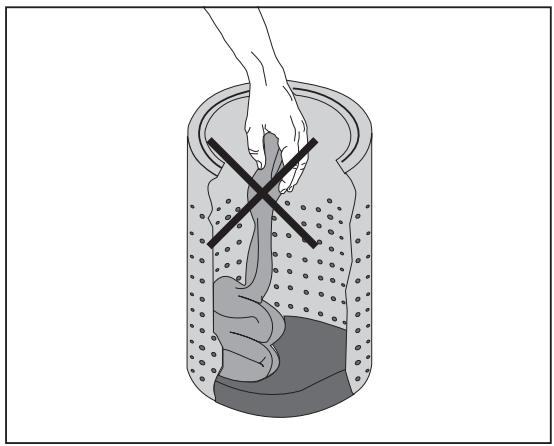
- Do not introduce your hands into the drum while it is still turning.
- Do not touch the plug or the socket outlet with wet hands.
- Do not immerse the spin dryer or its plug into water or any other liquids. If the appliance gets wet or falls into water accidentally, please unplug it immediately and call your nearest authorized service centre. In no case immerse your hands into water to recover the appliance without having first unplugged it. An electric shock may be caused by not following the above safety rules.
Child safety
- This appliance is designed to be operated by adults. Do not allow children or unable people to use the spin dryer unsupervised.
- Keep all packaging well away from children. There is risk of suffocation.
Installation
- Before using the spin dryer for the first time, remove all the packing material, internal and external, and dispose of it according to local regulations.
- Check your spin dryer for any transport damage. Never connect a damaged appliance. If your spin dryer is damaged contact your supplier.
- Before connecting the spin dryer to the socket outlet, please make sure that the requirements on the rating plate are met by the values of the building where the spin dryer is installed.
- Do not place the spin dryer near hot stoves or heating units.
- Place the appliance only on flat, dry, heat resistant floors, which do not get damaged with humidity or water. Do not place the spin dryer on delicate floors or parquets.
- Place the spin dryer at a suitable distance away from walls or other objects.
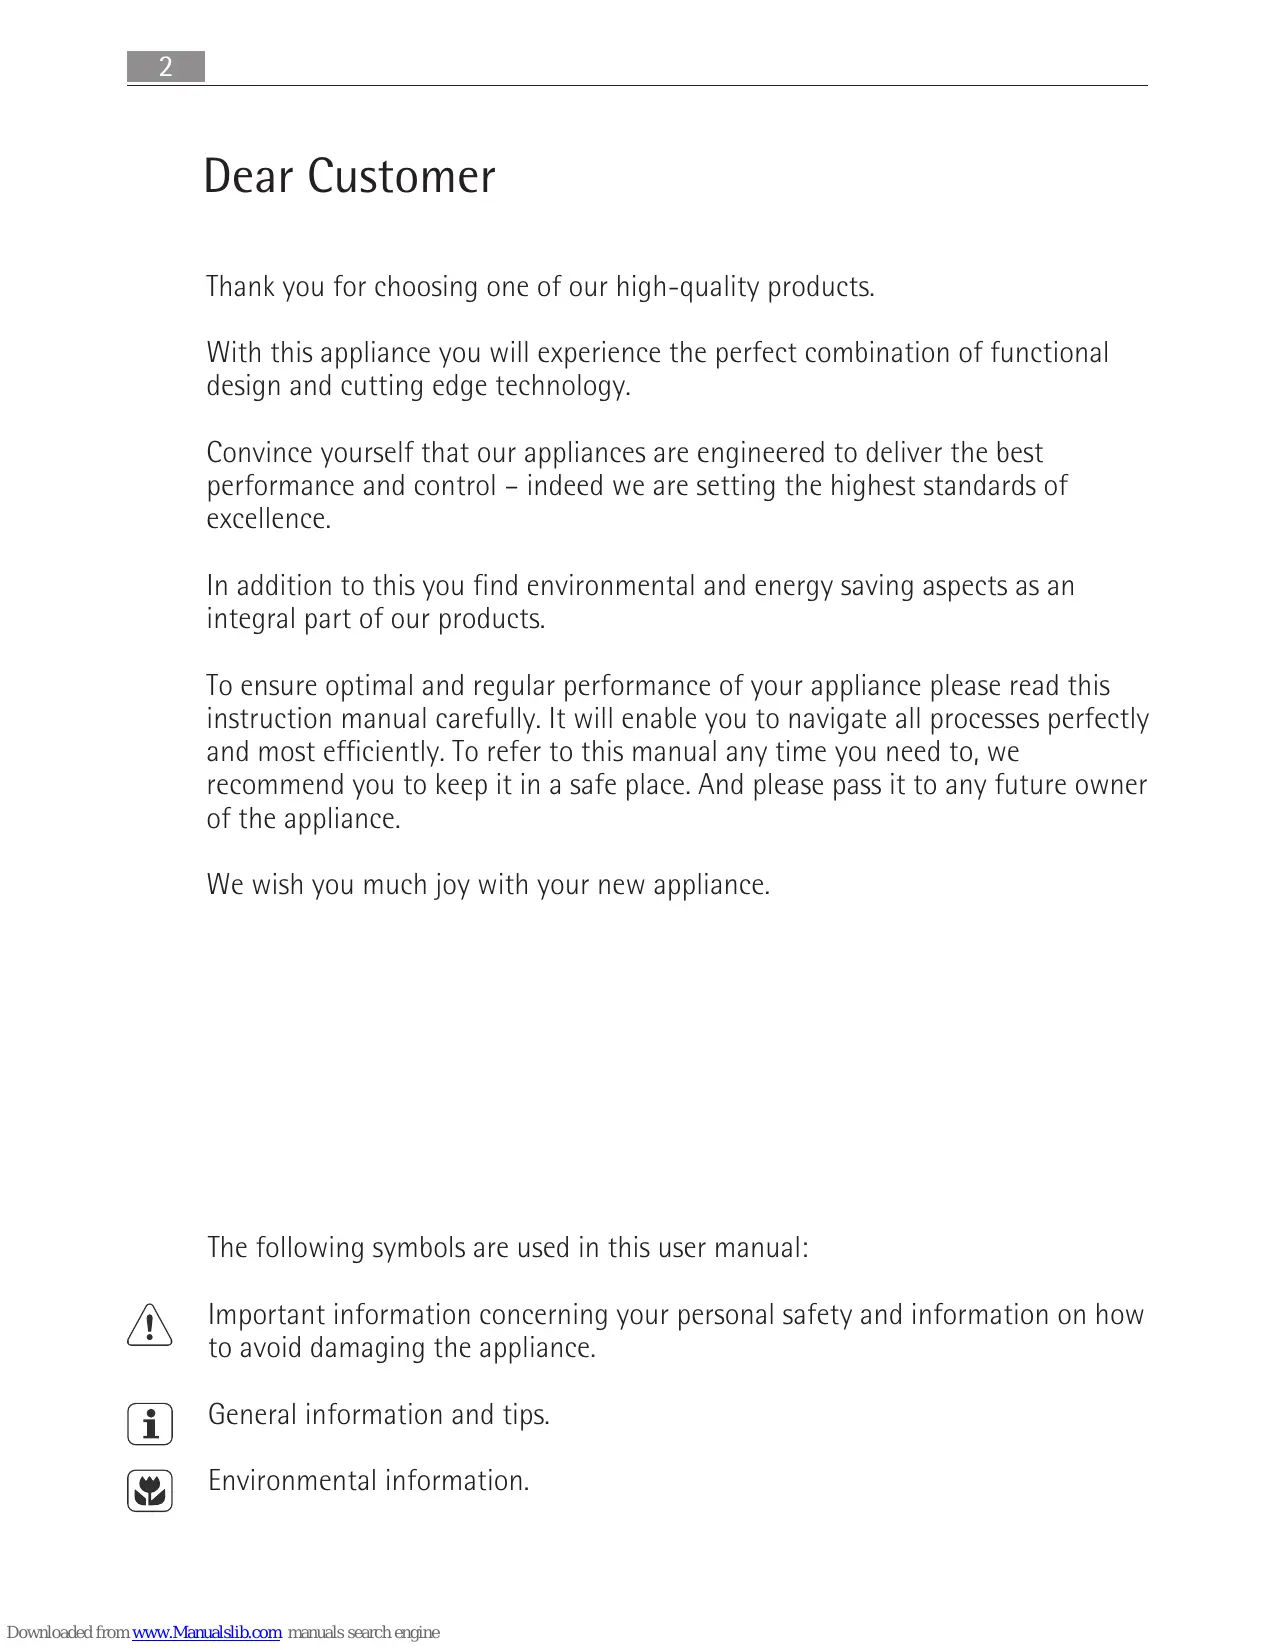
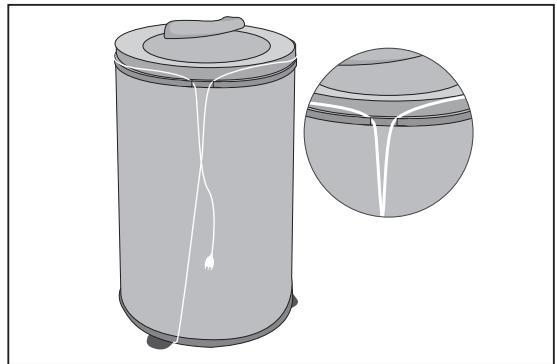
Product description
1 Cable storage fixture
2 Lid
3 Carrying handle
4 Plug
5 Mains cable
6 Foot
7 Exhaust Nozzle
Body
9 Lever
10 Drum
11 Retainer disc
First use
Before using your spin dryer for the first time:
- Ensure that the electrical connections comply with the installation instructions.
- Remove all packaging from inside the appliance. Take off the shipping brace which is inside the drum.
- Clean inside the drum with a dampened cotton cloth using a soft detergent. Do not use abrasive detergents or solvents.
Spin drying time
Here is a guide for the spin drying time depending on the kind of clothes.
| Kind of clothes | Spin drying time |
| Wool | 3 min |
| Synthetics | 3 min |
| Cotton | 5 min |
Daily use
Use the spin dryer only for drying wet clothes which are suitable for this kind of treatment.
Make sure that your clothes are suitable and do not get damaged or affected by the treatment of centrifugal drying at 2,800 turns per minute.
Placing the laundry in the spin dryer
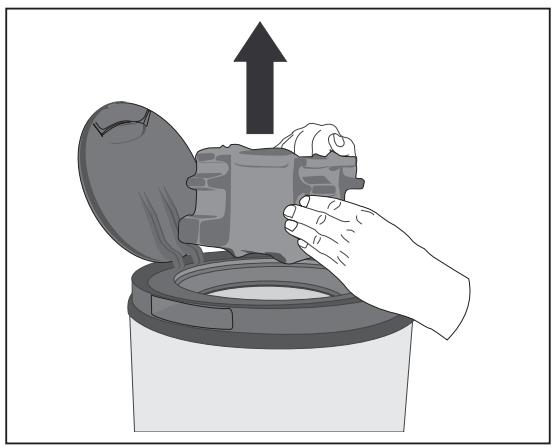
- Ensure that the lever is in "0" - OFF position.
- Place the damp pieces of laundry inside the drum, taking good care of arranging them in a tidy way, in order to distribute homogeneously the weight.
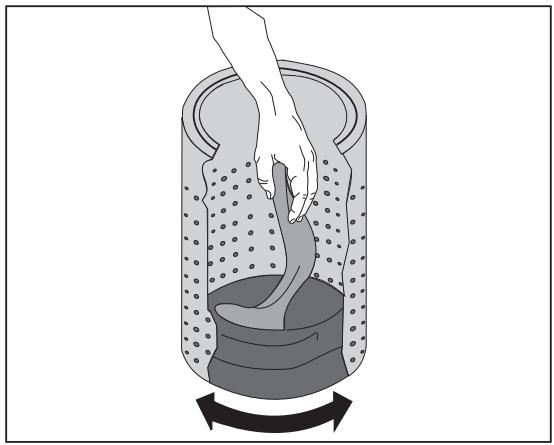
Important!
Do not gather the laundry only in one side of the drum.
Important!
When introducing the laundry, do not create empty spaces inside the drum.

Caution!
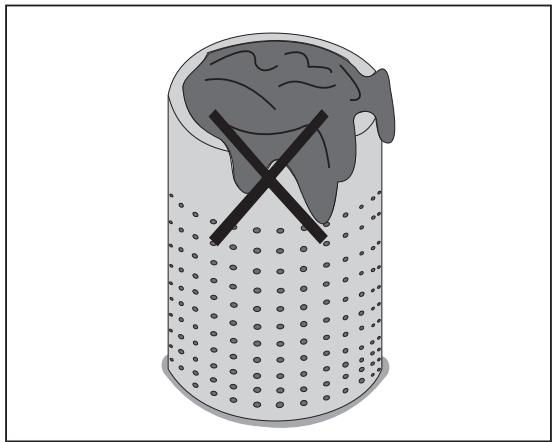
Do not place rolled-up pieces of laundry inside the drum.

Caution!
Do not place solid objects, toys such as teddy bears, any kind of shoes or food inside the drum. There is risk to damage the spin dryer.
- After filling the drum, slightly push the laundry downwards with the hands, in order to gently compact them.
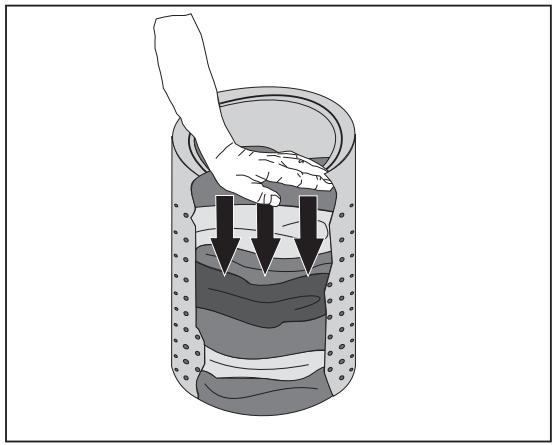
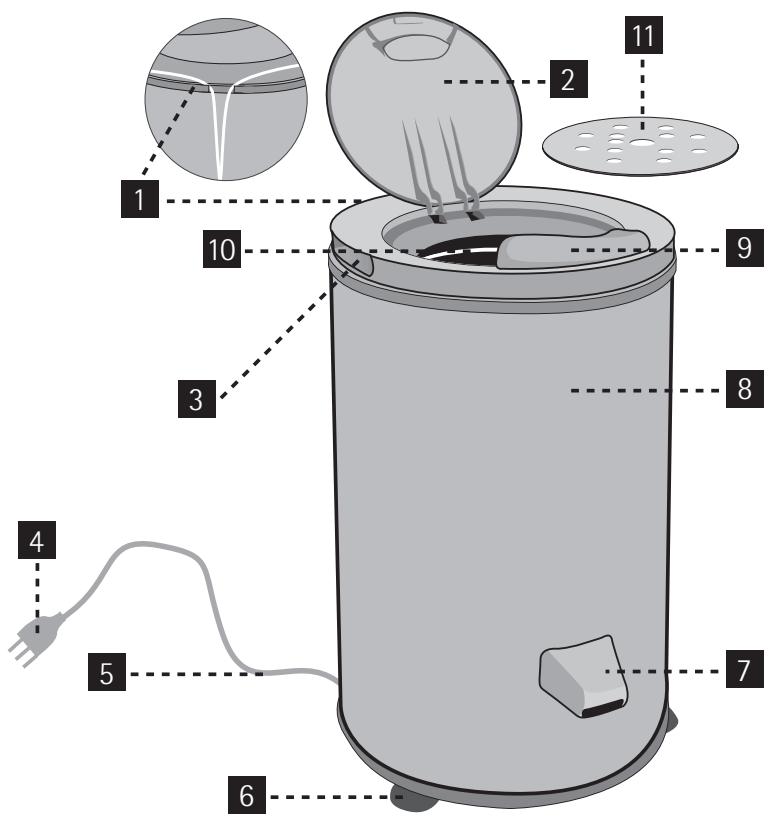
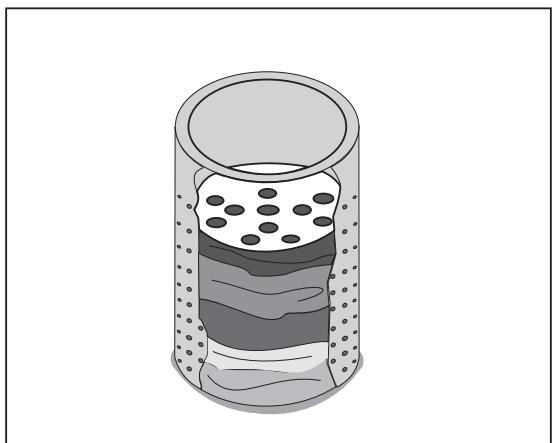
- Always place the retainer disc into the drum.
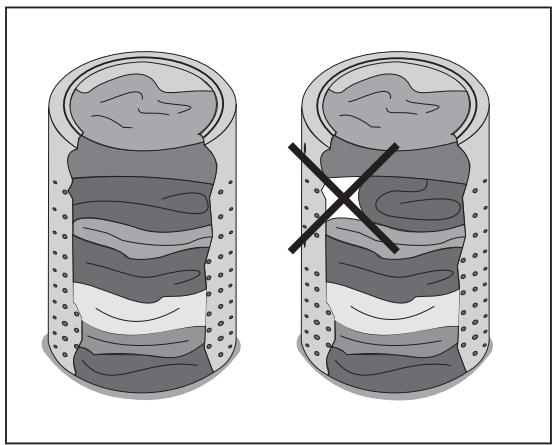
Correct laundry filling will avoid excessive vibration.
- Close the lid.
Important!
- Do not fill too much into the drum.
- Do not exceed the laundry capacity specified for the product.
- Leave around 3 ~cm of free space between the retainer disc and the upper rim of the drum.
Turning the spin dryer on
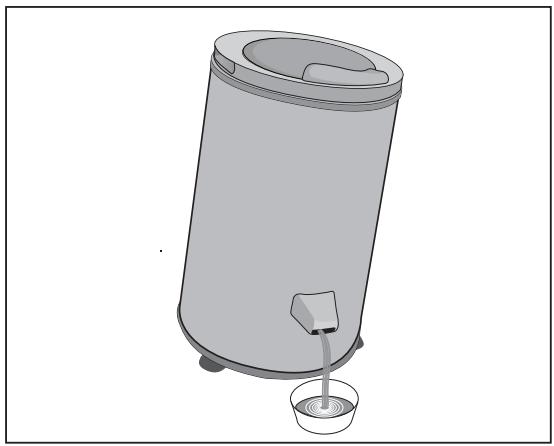
- Put an adequately large water collecting bowl (not supplied) under the exhaust nozzle.
- Insert the plug into the socket outlet.
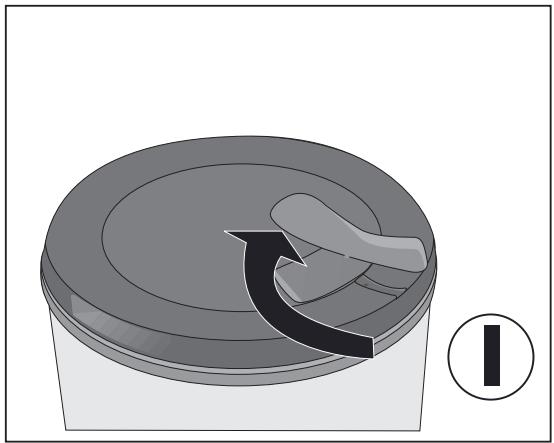
- Close the lid and move the lever to the "I" - ON position. The spin dryer will begin to run and the water will flow through the exhaust nozzle.

An initial loss of balance or oscillation is normal. The spin dryer will tend to stabilize after operating for some seconds.
Important!
Constantly check the coming out of water into the collecting bowl located under the exhaust nozzle. If the bowl gets full:
- Move the lever to OFF position.
- Empty the water collecting bowl.
- Relocate the water collecting bowl under the exhaust nozzle.
- Restart the spin drying cycle by moving the lever to ON position.

Caution!
If the spin dryer:
- Does not reach the maximum turning speed
- Shakes rather strongly while spinning
Stop it immediately!
- Open the lid.
- Re-load the laundry completely in an even way, distributing homogeneously the weight, such it was described in, placing the laundry in the spin dryer, or re-load evenly, but with less laundry load.
- Put the retainer disc and close the lid.
- Move the lever to the ON position and see the results.
Turning the spin dryer off
When no more water runs out through the exhaust nozzle:
- Move the lever to the "0"- OFF position.

- Wait until the drum is completely stopped.
- Open the lid, take out the retainer disc and then, take out the laundry.
- Incline the spin dryer a little, towards the water collecting bowl, in order to discharge the remaining water from inside the drum.
- Unplug the spin dryer from the socket outlet.

The spin dryer has a brake system, which decreases the rotation of the drum in a very short time after moving the lever to OFF position.
Important!
A special safety device prevents the lid from opening until the drum is completely stopped.

Caution!
Do not try to open the lid by force. There is risk to damage the spin dryer.

The laundry may still be a bit damp to the touch. They will not result to be entirely dry, this is normal. So, it is advisable to lay them for a short period of time over a traditional drying rack, before treating them with an iron.

When the appliance is switched off with the lever at OFF position, the lid will not be completely closed, this is normal.
Cleaning and care

Warning!
Always unplug the spin dryer before performing any kind of cleaning and maintenance to the appliance.
- Clean the drum with a dry soft cloth once finished the last spin drying cycle.
- If the water comes out dirty in a spin drying cycle, it will be necessary to clean the drum with a wet soft cloth, in order to avoid that the next laundry load of the spin dryer, gets dirty too.
- To clean the drum and the external surfaces use a damp soft cloth with soft detergents.
- Do not use neither abrasive products nor solvents to clean both internal and external surfaces.
- Store the spin dryer in a dry and clean place.
- Roll the mains cable around the cover and fasten it in the cable storage fixture, that is located
in the back of this part.
What to do if …
Certain problems are due to the lack of simple maintenance or oversights, which can be solved with the help of the indications described below, without calling any authorized service centre.
Switch off the spin dryer and carry out the following suggested actions.
The spin dryer does not reach the maximum turning speed or shakes rather strongly while spinning
Stop it immediately!
- Open the lid.
- Re-load the laundry completely in an even way, distributing homogeneously the weight, such it was described in, placing the laundry in the spin dryer, or re-load evenly, but with less laundry load.
- Put the retainer disc and close the lid.
- Move the lever to the ON position and see the results.
The motor does not run
- Check if there is power supply in your house.
- Check if the mains cable or its plug shows visible damage. In such case, you must call the authorized service centre for replacing it.
No water comes out through the exhaust nozzle
- Check if the exhaust nozzle is being obstructed by any kind of laundry or other element. Try to solve this situation by yourself, if the object can be easily removed.
Technical data
| Model | SV4028 | SV5028 |
| Type | C-5000S | C-6100S |
| Rated Voltage | 230 V~ | 230 V~ |
| Rated Frequency | 50 Hz | 50 Hz |
| Rated Power | 300 W | 300 W |
| Dry clothes capacity | 4.0 kg / 13.6 LT | 5.0 kg / 16.2 LT |
| Turning speed | 2800 rpm | 2800 rpm |
| Net weight | 9.6 kg | 10.3 kg |
| Height | 614 mm | 660 mm |
| Diameter | 347 mm | 347 mm |
| Protection against electric shock | Class I | Class I |
| Manufacturing standards | EN 60335-1 | EN 60335-1 |
| EN 60335-2-4 | EN 60335-2-4 | |
| EN 55014-1 | EN 55014-1 | |
| EN 55014-2 | EN 55014-2 | |
| EN 61000-3-2 | EN 61000-3-2 | |
| EN 61000-3-3 | EN 61000-3-3 | |
| EN 50366 | EN 50366 |
Installation instructions
Installation
- Remove all packaging, external and internal, before positioning the spin dryer.
- Place the appliance only on flat, dry, heat resistant floors, which do not get damaged with humidity or water. Do not place the spin dryer on delicate floors or parquets.
- Place the spin dryer at a suitable distance away from walls or other objects.
Electrical connection

Warning!
The spin dryer requires that the electrical installation of the building where the appliance is to be installed, be provided of earth connection.
if you have doubts about this subject, make check your electric circuit by an authorized electric technician.
Under no circumstances connect your spin dryer if your electric circuit is not provided with earth connection. There is risk for the user.
- Prior to using the appliance for the first time, ensure that the rated voltage and type of supply on the rating plate match that of the supply where the appliance is to be connected.

Warning!
Always connect the plug into a correctly installed shockproof socket. Multi-way plugs, connectors and extension cables must not be used. This could constitute a fire hazard through overheating.
- The plug must be accessible after the spin dryer has been installed.
- Never unplug the spin dryer by pulling on the mains cable. Always pull the plug.
- Do not use the spin dryer if the mains cable is damaged. In case of any damages, contact your local authorized service centre for checking it and to avoid any hazard.
- The manufacturer accepts no liability for failure to observe the above safety precautions.
Environment concerns
Packaging material
The packaging materials are environmentally friendly and can be recycled. Please dispose of the packaging materials in the appropriate container at the community waste disposal facilities.

Warning!
When a unit is no longer being used:
- Pull the plug out of the socket outlet.
- Cut off the mains cable and plug and dispose of them.
- Dispose of the lid or lid catch. This prevents children from trapping themselves inside and endangering their lives.

The symbol on the product or on its packaging indicates that this product may not be treated as household waste. Instead it should be taken to the appropriate collection point for the recycling of electrical and electronic equipment. By ensuring this product is disposed of correctly, you will help prevent potential negative consequences for the environment and human health, which could otherwise be caused by inappropriate waste handling of this product. For more detailed information about recycling of this product, please contact your local council, your household waste disposal service or the shop you purchased the product.
Warranty information
Warranty does NOT cover:
- Incorrect use of the product;
- Disobedience of local electrical regulations;
- Improper switch protection in the electrical source;
- Repairs and/or replacement of components by non-authorized technicians;
- Use of illegitimate spare parts;
- Disobedience of the instructions stated in the instructions manual;
- Use of the product for commercial use;
- Manipulations, alterations and/or modifications made by a third party to the product.
Key word index
| B | |
| Brake system | 12 |
| Body | 6 |
| C | |
| Cable storage fixture | 6, 12 |
| Carrying handle | 5, 6 |
| Clothes | 5, 7, 14 |
| Cotton | 7 |
| Cover | 12 |
| D | |
| Diameter | 14 |
| Drum | 4, 5, 6, 7, 8, 9, 10, 11, 12 |
| E | |
| Earth connection | 15 |
| Electric circuit | 5, 15 |
| Electric shock | 5, 14 |
| Exhaust nozzle | 5, 6, 10, 11, 13 |
| F | |
| Foot | 6 |
| H | |
| Height | 14 |
| L | |
| Laundry | 4, 8, 9, 10, 11, 12, 13 |
| Lever | 4, 6, 8, 10, 11, 12, 13 |
| Lid | 4, 6, 9, 10, 11, 12, 13, 16 |
| M | |
| Mains cable | 4, 5, 6, 12, 13, 15, 16 |
| Motor | 13 |
| N | |
| Net weight | 14 |
| P | |
| Packaging | 6, 7, 15, 16 |
| Plug | 4, 5, 6, 10, 13, 15, 16 |
| R | |
| Rated frequency | 14 |
| Rated power | 14 |
| Rated voltage | 14, 15 |
| Rating plate | 6, 15 |
| Retainer disc | 5, 6, 9, 10, 11, 13 |
| S | |
| Service centre | 5, 13, 15 |
| Shipping brace | 7 |
| Spare parts | 4, 16 |
| Standards | 14 |
| Socket outlet | 4, 5, 6, 10, 11, 16 |
| Synthetics | 7 |
| T | |
| Turning speed | 11, 13, 14 |
| W | |
| Water collecting bowl | 5, 10, 11 |
| Wool | 7 |
Sehr geehrter Kunde
Auslaufduse 21, 22, 26, 27, 29
B
Baumwolle 23
Bremssystem 28
D
Deckel 20, 22, 25, 26, 27, 28, 29, 32
Haltplatte 21, 22, 25, 26, 27, 29
Höhe 30
K
Netzkabel 20, 21, 22, 28, 29, 31, 32
Netzstecker 20, 21, 22, 27, 29, 31, 32
Normen 30
S
Schalthebel 20, 22, 24, 26, 27, 28, 29, 32
Schleudergehause 22
Steckdose 20, 21, 26, 27, 28, 29, 31, 32
Synthetik 23
T
Tragegriff 20, 22
Trommel 20, 21, 22, 23, 24, 25, 26, 27, 28, 29
V
Verpackungsmaterial 22,23,31,32
W
Wäsche 21, 24, 26, 27, 28, 29
Wäschestücke 21, 23, 24, 25, 27, 28, 29
Manilla 36, 38, 40, 42, 43, 44, 45
Motor 45
N
Normas 46
P
Peso neto 46
Placadecaracteristicas 38,47
Potencia nominal 46
Protector de embarque 39
R
Recipiente recolector 37,42,43
Repuestos 36,48
Ropa 37, 39, 46
Ropa lavada 36,40,41,42,43,44,45
S
Sintéticos 39
Tambor 36, 37, 38, 39, 40, 41, 42, 43, 44
Tapa 36,38,41,42,43,44,45,48
Tomacorrientes 36, 37, 38, 42, 43, 48
V
Cestello 52, 53, 54, 55, 56, 57, 58, 59, 60
Coperchio 52, 54, 57, 58, 59, 60, 61, 64
Copertura 60
Corpo 54
Cotone 55
D
Diametro 62
Disco del fermo 53, 54, 57, 58, 59, 61
Leva 52, 54, 56, 58, 59, 60, 61