425-439 - Lighting Anslut - Free user manual and instructions
Find the device manual for free 425-439 Anslut in PDF.

User questions about 425-439 Anslut
0 question about this device. Answer the ones you know or ask your own.
Ask a new question about this device
Download the instructions for your Lighting in PDF format for free! Find your manual 425-439 - Anslut and take your electronic device back in hand. On this page are published all the documents necessary for the use of your device. 425-439 by Anslut.
USER MANUAL 425-439 Anslut
natural_image
Close-up of a black and white wall-mounted night light fixture with spherical glass head and central hub (no text or symbols visible)SE Bruksanvisning för väggarmatur med sensor
NO Bruksanvisning for veggarmatur med sensor
PL Instrukcja obsługi oprawy ściennej z czujnikiem ruchu
EN Operating instructions for wall lamp with sensor
SE - Bruksanvisning i original
EN - Operating instructions (Translation of the original instructions)
Jula reserves the right to make changes. In the event of problems, please contact our service department.
www.jula.com
Tillverkare/ Produsent / Produenci/ Manufacturer
Jula AB, Box 363, 532 24 SKARA
Importör/ Importør/ Importer/ Importer
Care for the environment!
Must not be discarded with household waste! This product contains electrical or electronic components that should be recycled. Leave the product for recycling at the designated station e.g. the local authority's recycling station.
SVENSKA....5
SÄKERHETSANVISNINGAR....5
TEKNISKA DATA....5
MONTERING....5
HANDHAVANDE 6
UNDERHÅLL 7
NORSK 8
SIKKERHETSANVISNINGER 8
TEKNISKE DATA 8
MONTERING 8
BRUK....9
VEDLIKEHOLD 10
POLSKI 11
ZASADY BEZPIECZEŃSTWA 11
DANE TECHNICZNE 11
MONTAŻ 11
OBSŁUGA 12
KONSERWACJA 13
ENGLISH 14
SAFETY INSTRUCTIONS....14
TECHNICAL DATA....14
INSTALLATION....14
USE....15
MAINTENANCE 16
SÄKERHETSANVISNINGAR
natural_image
Pure geometric lines forming a fan-like pattern without any text, numbers, or symbolsnatural_image
Pure geometric diagram of a right triangle with internal lines, no text or symbols presentnatural_image
Pure geometric lines forming a fan-like pattern without any text, numbers, or symbolsRead the operating instructions carefully before use.
Save them for future reference.
Do not mount the lamp against a flammable surface.
- Disconnect from the mains before installation or maintenance.
- Check that the total voltage in the power circuit, including this lamp, does not exceed the maximum permitted value.
ELECTRICAL SAFETY
New installations and extensions to existing installations should always be carried out by an authorised electrician. If you have the necessary experience and knowledge (otherwise contact electrician), you may replace switches and power points, fit plugs, extension cords and light sockets. Incorrect installation can result in fatal injury and the risk of fire.
TECHNICAL DATA
| Rated voltage 230 V | ~ 50 Hz |
| Output | 60 W |
| Socket | E27 |
| Protection rating IP33 | |
| Timing 5 s – 7 min | |
| Detection angle 140° | |
| Detection area, length 7 m |
INSTALLATION
The motion detector will not work properly if it is:
– installed near the outlet of a central boiler
- installed near an air conditioning unit
- pointed towards vehicular traffic
– pointed towards reflecting surfaces
- installed where it is exposed to light from other lamps.
NOTE: To ensure the correct functionality of the sensor the lamp must be installed so that movements go across the detector.
Remove the junction box on the back of the lamp. Adjust the position so that it fits the detector. Fasten the junction box on the wall. The best installation height is from 2–3 metres. A lower height can reduce functionality.
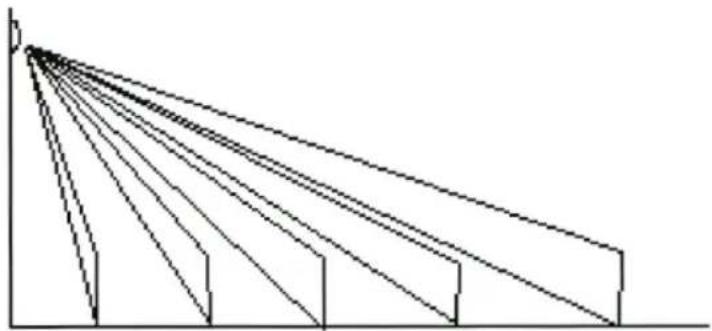
natural_image
Pure geometric line drawing of a staircase with five vertical supports (no text or symbols)- Insert the power cord through the grommet in the junction box.
- Connect the brown wire to the L terminal and the blue wire to the N terminal.
- Check that the terminals are properly connected and tightened. Incorrect connection will damage the detector.
- Refit the junction box on the lamp.
- Undo the plastic dome on the lamp and screw in a light source.
- Refit the plastic dome.
IMPORTANT: Make sure the mains supply is disconnected when replacing the light source.
USE
Timing
The timer is located on the bottom of the sensor unit. The timing controls how long the lamp is to remain switched on (from 5 seconds to 7 minutes) after it has been activated by the motion detector.
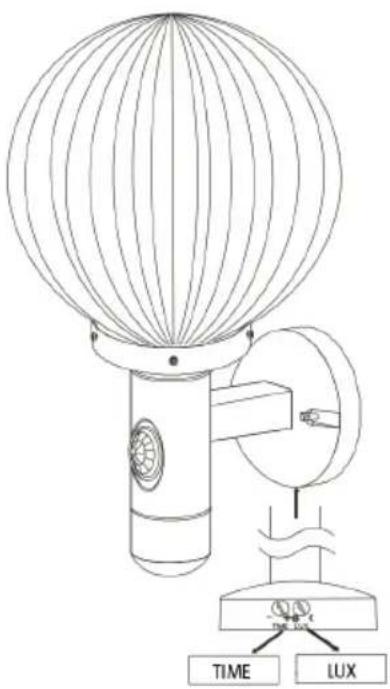
LUX setting
- *all day mode. The unit will function all day long. The lamp will light up every time a movement is detected.
- D = night mode The unit will only work during the night. The lamp will only go on when it is dark.
NOTE: When installed for the first time turn the "TIME" control to "-" to set the delay to about 5 seconds and then turn the "LUX" control to the required setting.
Function
When the lamp has been installed correctly the white LED will go on at dusk and go off at dawn. The lamp will also switch on and off automatically when the motion detector reacts to someone passing within the detection area.
Operation
- Set the power switch to ON. It takes three minutes after the power switch has been switched on before the lamp is ready.
- Pass through the detection area.
- The lamp goes on.
- The lamp switches off after the set delay.
MAINTENANCE
Replacing the light source
- Disconnect from the mains supply.
- Undo the dome on the lamp.
- Unscrew the old light source.
- Screw in a new light source.
- Fasten the dome on the lamp.