423-922 - Lighting Anslut - Free user manual and instructions
Find the device manual for free 423-922 Anslut in PDF.

User questions about 423-922 Anslut
0 question about this device. Answer the ones you know or ask your own.
Ask a new question about this device
Download the instructions for your Lighting in PDF format for free! Find your manual 423-922 - Anslut and take your electronic device back in hand. On this page are published all the documents necessary for the use of your device. 423-922 by Anslut.
USER MANUAL 423-922 Anslut
natural_image
Modern wall-mounted square panel with a central illuminated fixture (no text or symbols visible)SE Bruksanvisning för väggarmatur
NO Bruksanvisning for veggarmatur
PL Instrukcja obsługi oprawy ściennej
EN Operating instructions for wall lamp
SE - Bruksanvisning i original
EN - Operating instructions (Translation of the original instructions)
Jula reserves the right to make changes. In the event of problems, please contact our service department.
www.jula.com
Tillverkare/ Produsent / Produenci/ Manufacturer
Jula AB, Box 363, 532 24 SKARA
Importör/ Importør/ Importer/ Importer
Care for the environment!
Must not be discarded with household waste! This product contains electrical or electronic components that should be recycled. Leave the product for recycling at the designated station e.g. the local authority's recycling station.
SVENSKA....5
SÄKERHETSANVISNINGAR....5
TEKNISKA DATA....5
MONTERING 6
UNDERHÅLL 7
NORSK 8
SIKKERHETSANVISNINGER 8
TEKNISKE DATA 8
MONTERING 9
VEDLIKEHOLD 10
POLSKI 11
ZASADY BEZPIECZEŃSTWA 11
DANE TECHNICZNE 11
MONTAŽ 12
KONSERWACJA 13
ENGLISH 14
SAFETY INSTRUCTIONS....14
TECHNICAL DATA....14
INSTALLATION 15
MAINTENANCE 16
SÄKERHETSANVISNINGAR
Read the operating instructions carefully before use.
Save them for future reference.
- For outdoor use.
- The electrical installation must comply with local regulations. Consult an authorised electrician if in doubt.
• Always disconnect the power supply before installation, connection and service. - Never modify the lamp, this could result in serious personal injury and will invalidate the warranty.
ELECTRICAL SAFETY
New installations and extensions to existing installations should always be carried out by an authorised electrician. If you have the necessary experience and knowledge (otherwise contact electrician), you may replace switches and power points, fit plugs, extension cords and light sockets. Incorrect installation can result in fatal injury and the risk of fire.
TECHNICAL DATA
| Rated voltage 230 V | ~ 50 Hz |
| Output Max 40 W | |
| Socket | G9 |
| Protection rating IP44 | |
| Dimensions 280 x 280 x 100 mm |
INSTALLATION
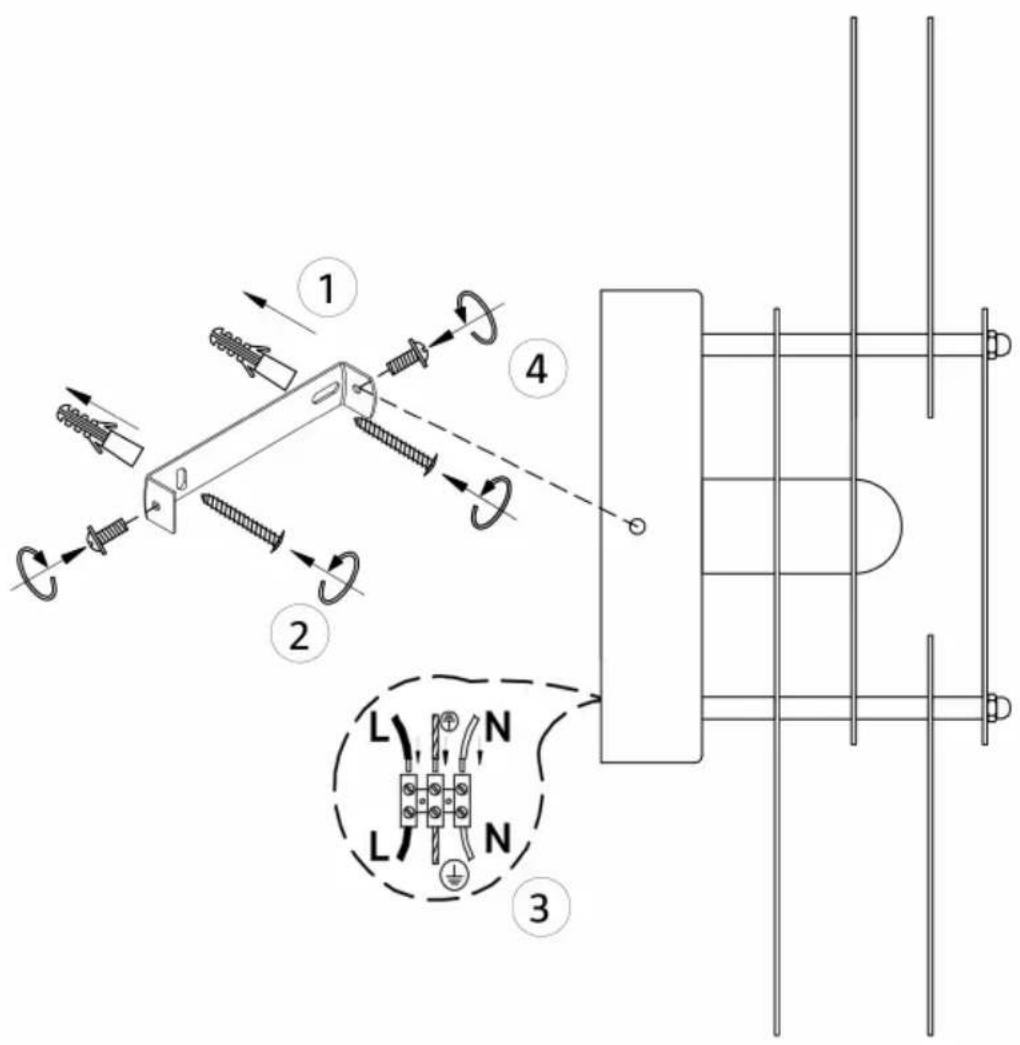
IMPORTANT: Make sure the power supply is disconnected before installation.
- Release the lamp bracket by unscrewing the two screws that hold the lamp.
- Measure out where the lamp is to be fitted.
- Drill holes in the wall for the lamp bracket.
- Insert plugs in the drilled holes (1).
- Insert two self-threading screws through the lamp bracket.
- Screw on the lamp bracket by screwing the screws into the plugs (2).
- Connect the brown wire to the terminal L, the blue wire to the terminal N, and the yellow-green wire to the earth terminal Ⓤ3).
- Fasten the lamp on the bracket with the screws (4).
MAINTENANCE
Replacing the light source
- Disconnect the power supply.
- Unscrew the light source. Do not touch the light source with your bare hands.
- Carefully screw in the new light source.
- Connect the power supply.