423-916 - Lighting Anslut - Free user manual and instructions
Find the device manual for free 423-916 Anslut in PDF.

User questions about 423-916 Anslut
0 question about this device. Answer the ones you know or ask your own.
Ask a new question about this device
Download the instructions for your Lighting in PDF format for free! Find your manual 423-916 - Anslut and take your electronic device back in hand. On this page are published all the documents necessary for the use of your device. 423-916 by Anslut.
USER MANUAL 423-916 Anslut
natural_image
Modern street lamp with a glowing incandescent bulb mounted on a wall-mounted base (no text or symbols visible)SE Bruksanvisning för vägglykta
NO Bruksanvisning for vegglampe
PL Instrukcja obsługi latarni ściennej
EN Operating instructions for wall lamp
SE - Bruksanvisning i original
EN - Operating instructions (Translation of the original instructions)
Jula reserves the right to make changes. In the event of problems, please contact our service department.
www.jula.com
Tillverkare/ Produsent / Produenci/ Manufacturer
Jula AB, Box 363, 532 24 SKARA
Importör/ Importør/ Importer/ Importer
Care for the environment!
Must not be discarded with household waste! This product contains electrical or electronic components that should be recycled. Leave the product for recycling at the designated station e.g. the local authority's recycling station.
SVENSKA....5
SÄKERHETSANVISNINGAR....5
TEKNISKA DATA....5
MoNTERING 6
UNDERHÅLL 8
NoRSK 9
SIKKERHETSANVISNINGER 9
TEKNISKE DATA 9
MoNTERING....10
VEDLIKEHoLD 12
PoLSKI 13
ZASADY BEZPIECZEŃSTWA 13
DANE TECHNICZNE 13
MoNTAZ 14
KoNSERWACJA 16
ENGLISH 17
SAFETY INSTRUCTIONS....17
TECHNICAL DATA....17
INSTALLATION 18
MAINTENANCE 20
SÄKERHETSANVISNINGAR
natural_image
Diagram of a mechanical device with rotating components and a dome-shaped top (no text or symbols)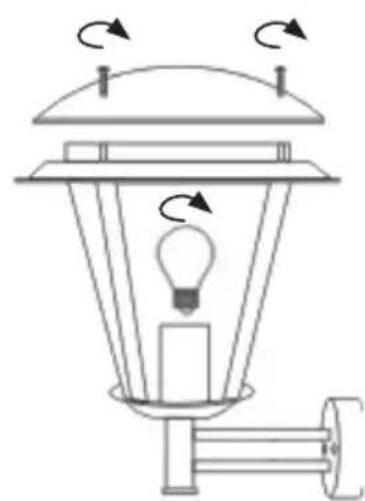
natural_image
Diagram of a light bulb mounted on a base with rotating arrows indicating rotation (no text or symbols)SIKKERHETSANVISNINGER
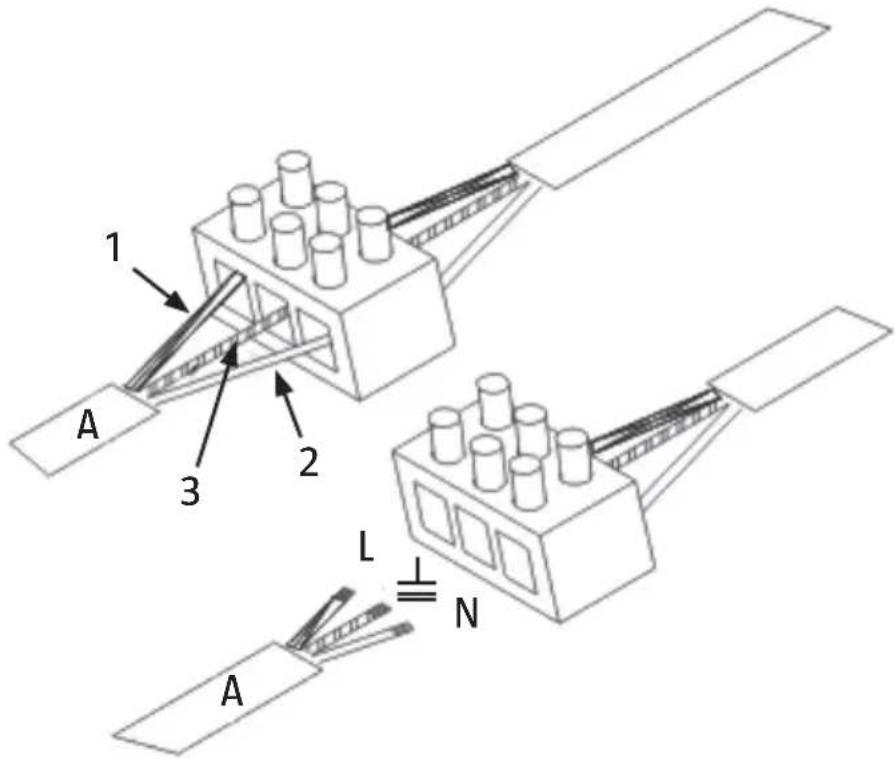
- Koble den brune lederen (1) til plinten (L), den blå lederen (2) til plinten (N) og den grønngule lederen (3) til jordplinten (⊥).

- Sett sukkerbiten i plastfestet.
- Sett armaturen på festet og skru den fast med de to mutrene med rundt hode.
- Sett en lyspære i sokkelen (se avsnittet Skifte pære). Pass på at pærens effekt ikke overskrider maksimal effekt som er angitt på typeskiltet og i avsnittet Tekniske data.
VEDLIKEHOLD
natural_image
Diagram of two identical mechanical device setups with rotating components and a light bulb inside (no text or symbols)ZASADY BEZPIECZEŃSTWA
natural_image
Diagram of a mechanical device with rotating components and a dome-shaped top (no text or symbols)
natural_image
Diagram of a light bulb mounted on a vertical structure with rotating arrows indicating rotation (no text or symbols)SAFETY INSTRUCTIONS
Read the operating instructions carefully before use.
Save them for future reference.
- Switch off the power supply before installation, dismantling or any other work.
• The earth wire must always be connected.
• Use wires with a cross-sectional area of at least 1 mm^2 .
• Use a 2-pin power switch. - The bulb gets hot when it is switched on. Do not touch the bulb until it has cooled.
- Disconnect the power supply and allow the bulb to cool before replacing.
- Never use bulbs with a higher output than specified on the type plate and in Technical data.
- Never use the product if the cover (top part) is damaged. Replace the cover as soon as possible.
• Do not look directly at the light source.
TECHNICAL DATA
| Rated voltage 230 V | ~ 50 Hz |
| Protection rating IP44 | |
| Socket | E27 |
| Max output (light source) 60 W | |
| Dimensions 25.5 x 24 x 34 cm |
INSTALLATION
WARNING: Carefully read the safety instructions and make sure the power supply is disconnected before installation. Follow the instructions below. Contact an electrician if you are unsure.
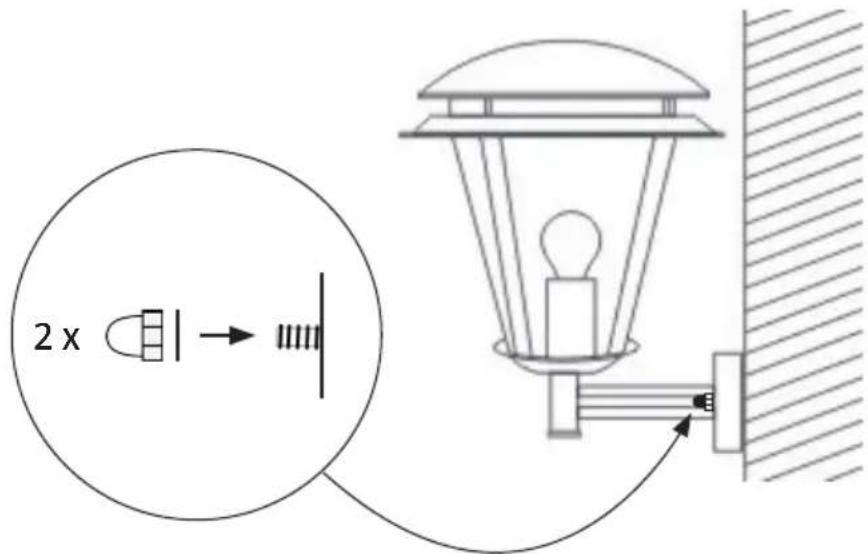
- Drill holes in the wall and insert plugs.
- Insert two self-threading screws through the plastic bracket as shown in the figure below.
- Screw on the plastic bracket.
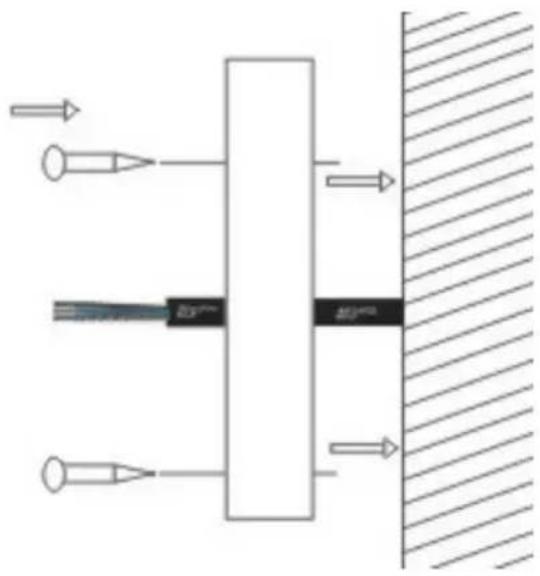
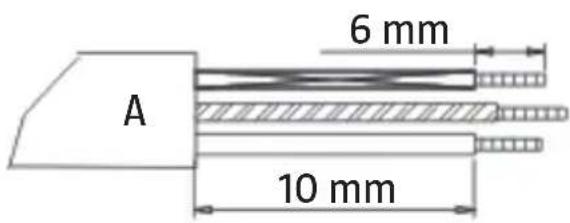
- Strip off 6 mm of the insulation and leave 10 mm of insulated wire as shown in the diagram below.
- Connect the brown wire (1) to the terminal (L), the blue wire (2) to the terminal (N) and the green-yellow wire (3) to the earth terminal (⊥).
- Put the coupler plug in the plastic bracket.
- Put the lamp on the bracket and screw tight with the two nuts with round heads.

- Fit a bulb in in the bulb holder (see section Replacing bulb). Check that the bulb does not exceed the maximum output specified on the type plate and in the section Technical data.
mAINTENANCE
Treat with acid-free oil, for example WD-40, 3-4 times a year. We do not recommend using stainless lamps in exposed and corrosive environments.
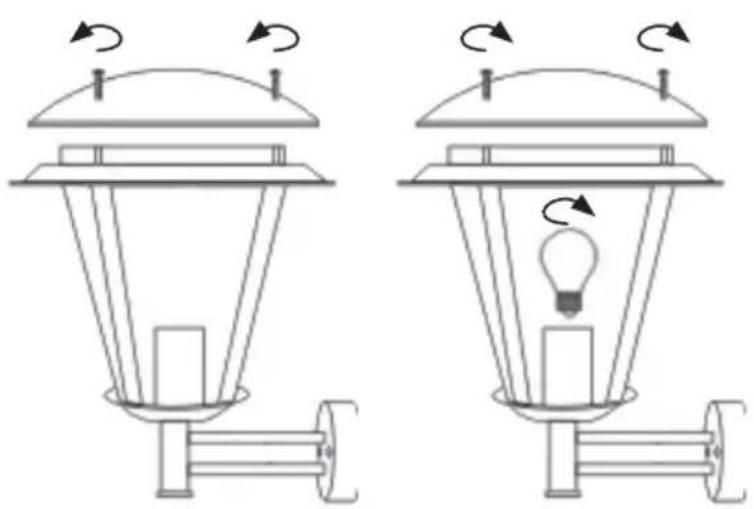
Replacing bulb
ImPORTANT: Disconnect the power supply before replacing the bulb.
- Remove the top cover.
- Allow the bulb to cool and carefully unscrew it (do not touch the bulb with bare hands).
- Carefully screw in the new bulb.
- Fit the top cover before reconnecting the power supply.