
AF-S NIKKOR 300MM F-4D IF-ED - Camera lens NIKON - Free user manual and instructions
Find the device manual for free AF-S NIKKOR 300MM F-4D IF-ED NIKON in PDF.
Download the instructions for your Camera lens in PDF format for free! Find your manual AF-S NIKKOR 300MM F-4D IF-ED - NIKON and take your electronic device back in hand. On this page are published all the documents necessary for the use of your device. AF-S NIKKOR 300MM F-4D IF-ED by NIKON.
USER MANUAL AF-S NIKKOR 300MM F-4D IF-ED NIKON
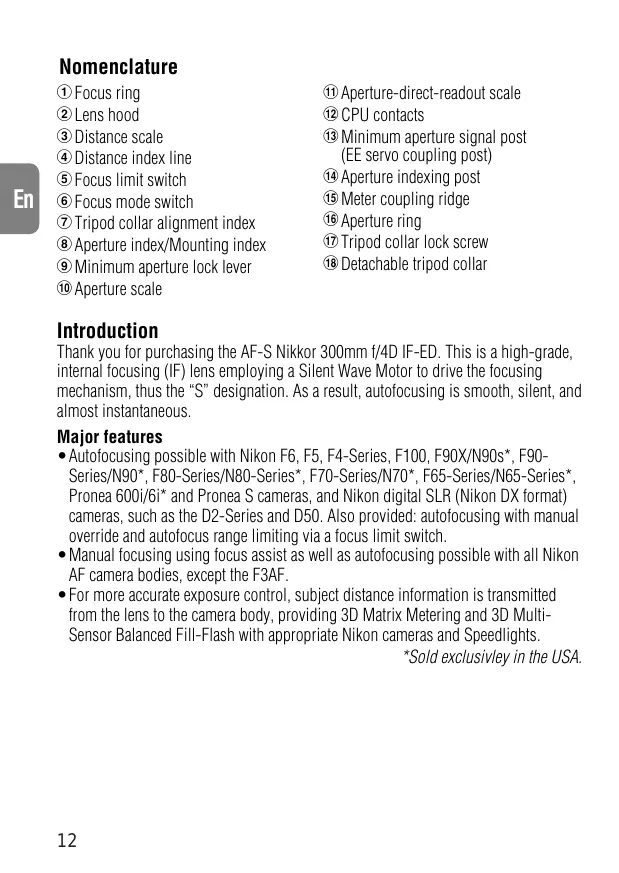
① Aperture-direct-readout scale
CPU contacts
⑬ Minimum aperture signal post (EE servo coupling post)
14 Aperture indexing post
15 Meter coupling ridge
16 Aperture ring
⑰ Tripod collar lock screw
18 Detachable tripod collar
Introduction
Thank you for purchasing the AF-S Nikkor 300mm f/4D IF-ED. This is a high-grade, internal focusing (IF) lens employing a Silent Wave Motor to drive the focusing mechanism, thus the "S" designation. As a result, autofocusing is smooth, silent, and almost instantaneous.
Major features
- Autofocusing possible with Nikon F6, F5, F4-Series, F100, F90X/N90s, F90-Series/N90, F80-Series/N80-Series, F70-Series/N70, F65-Series/N65-Series, Pronea 600i/6i and Pronea S cameras, and Nikon digital SLR (Nikon DX format) cameras, such as the D2-Series and D50. Also provided: autofocus using manual override and autofocus range limiting via a focus limit switch.
- Manual focusing using focus assist as well as autofocusing possible with all Nikon AF camera bodies, except the F3AF.
- For more accurate exposure control, subject distance information is transmitted from the lens to the camera body, providing 3D Matrix Metering and 3D Multi-Sensor Balanced Fill-Flash with appropriate Nikon cameras and Speedlights.
*Sold exclusively in the USA.
Important!
- Be careful not to soil or damage the CPU contacts.
- Do not attach the following accessories to the lens, as they might damage the lens CPU contacts: Auto Extension Ring PK-1, PK-11/11A, Auto Ring BR-4, and K1 Ring. Other accessories may not be suitable when this lens is used with certain camera bodies. For details, refer to instruction manual for each product.
- This lens is not compatible when used with a Nikon F3AF camera with the AF Finder DX-1 attached.
Focusing
Set your camera's focus mode selector according to this chart:
| Camera's focus mode | Lens' focus mode | ||
| Cameras | M/A | M | |
| F6, F5, F4-Series, F100 F90X/N90s*, F90-Series/N90*. F80-Series/N80-Series*, F70-Series/N70*. F65-Series/N65-Series*, Pronea 600i/6i*, Pronea S, D2-Series, D1-Series, D100, D70-Series, D50 | C S AF | Autofocus with manual priority | Manual focus (Focus assist is available.) |
| M | Manual focus (Focus assist is available.) | ||
| Nikon AF cameras (except for F3AF) | C S AF M | Manual focus (Focus assist is available.) | |
| Other Nikon cameras (except for F3AF) | Manual focus | ||
- Sold exclusively in the USA.
- Autofocus with manual override
Set the focus mode switch (Fig. 1) to M/A. Autofocus is provided, but you can manually override the focus by operating the separate manual focus ring while lightly depressing the shutter release button or the AF start (AF-ON) button on the camera body of cameras so equipped. To cancel manual override, remove your finger from the shutter release button or the AF start button.
- To limit the range of autofocus (for M/A mode usable cameras only)
Move the focus limit switch (Fig. 2) from FULL to -3m to reduce autofocus time. This is useful when shooting subjects farther away than 3m (9.8 ft.). Set the switch to FULL when your subjects are closer than 3m .
Depth of Field
If your camera has a depth of field preview (stop-down) button or lever, depth of field can be observed while looking through the camera viewfinder.
Minimum Aperture Lock (Fig. 3)
For programmed auto or shutter-priority auto exposure shooting, use the minimum aperture lock lever to lock the lens aperture at f/32.
1 Set the lens to its minimum aperture (f/32) by aligning it with the aperture index.
2 Slide the lock lever toward the aperture ring, so the two orange dots are aligned.
To release the lock, slide the lever in the opposite direction.
Recommended Focusing Screens
Various interchangeable focusing screens are available for certain Nikon SLR cameras to suit any picture-taking situation. The ones recommended for use with this lens are:
| Screen Camera | A | B | C | D | E | EC-B EC-E | F | G1 G2 | G3 | G4 | H1 H2 | H3 H4 | J | K | L | M | P | R S T | U |
| F6 | ◎ | ◎ | — | — | ◎ | — | — | — | — | — | — | — | ◎ | — | ◎ | — | — | ◎ | |
| F5+DP-30 | ◎ | ◎ | ○ | — | ◎ | ◎ | — | — | ○ (+0.5) | ○ (+0.5) | — | — | ◎ | — | ◎ | — | — | ◎ (+0.5) | |
| F5+DA-30 | ◎ | ◎ | ○ | — | ◎ | ◎ | — | — | ○ (-1.0) | ○ | — | — | ◎ | — | ◎ | — | — | ◎ | |
| F4+DP-20 | — | ◎ | ○ (+0.5) | — | ◎ | — | — | — | ○ (-1.0) | ○ | — | — | ◎ (+0.5) | ◎ (+0.5) | — | — | ◎ (+0.5) | — | ◎ |
| F4+DA-20 | — | ◎ | ○ (-1.0) | — | ◎ | — | — | — | ○ (-1.0) | ○ (-1.5) | — | — | ◎ | ◎ | — | — | ◎ | — | ◎ |
| F3 | ◎ | ◎ | ○ | ○ | ◎ | — | — | — | ○ | ○ | — | ○ | ◎ | ◎ | ◎ | ◎ | ◎ | ◎ |
Excellent focusing
Acceptable focusing
Slight vignetting or moiré patterns appear in the viewfinder, but not on the film.
Not available.
( ) Indicates degree of exposure compensation needed (Center-Weighted metering only). For F6 cameras, compensate by selecting "Other screen" in Custom Setting "b6: Screen comp." and setting the EV level to -2.0 to +2.0 in 0.5 EV steps. When using screens other than type B or E, "Other screen" must be selected even when the required compensation value is "0" (no compensation required). For F5 cameras, compensate using Custom Setting #18 on the camera body. For F4-Series cameras, compensate using the Exposure Compensation Dial for the focusing screen.
See instruction manual of the camera body for more details.
Blank box means not applicable. Since type M screen can be used for both macrophotography at a 1:1 magnification ratio and for photomicrography, it has different applications than other screens.
When using the B/B2/B3, E/E2/E3, and K/K2/K3 focusing screens in cameras other than those listed above, refer to the columns on the F4 + DP-20's B, E and K screens, respectively.
Taking Flash Pictures with Cameras having Built-in flash
All Nikon cameras having built-in flash are usable and no vignetting occurs.
Using a Tripod (Fig. 4)
This lens is equipped with a detachable rotating tripod collar. When using a tripod, attach it to the lens' tripod collar instead of the camera. To attach the tripod collar to the lens, follow these steps:
1 Loosen the tripod collar lock screw ① slightly.
2 Insert the lens by aligning the tripod collar alignment index on the lens with the mark on the tripod collar. ②
3 Turn the lens to an appropriate position index (three indexes are provided every 90^ ) on the tripod collar by aligning the tripod collar alignment index on the lens, then tighten the screw. (If the screw is not tight, the lens may accidentally come off the tripod collar.)
When holding your camera by its handgrip and rotating the camera in its tripod collar, your hand may bump into the tripod, depending on the tripod in use.
Lens Hood
Pull out the lens hood by rotating it slowly until the click-stop position is released and the hood moves smoothly. Then, turn it counterclockwise (as viewed from the front) to secure it in the extended position. Because the lens hood is not detachable, slide it back to its click-stop position when not in use. Never lift the lens by its hood. This may cause the lens to drop, due to its own weight, and become damaged, if it hits something hard.
Lens Care
- Clean the lens surface with a blower brush. To remove dirt and smudges, use a soft, clean cotton cloth or lens tissue moistened with ethanol (alcohol) or lens cleaner. Wipe in a circular motion from center to outer edge, taking care not to leave traces or touch other parts.
- Never use thinner or benzene to clean the lens as this might damage the lens, result in a fire, or cause health problems.
- To protect the front lens element, an NC filter is recommended at all times. A lens hood also helps protect the front of the lens.
- When storing the lens in the lens case, attach both front and rear caps.
- When the lens will not be used for a long time, store it in a cool, dry place to prevent mold. Also store the lens away from direct sunlight or chemicals such as camphor or naphthalene.
- Do not get water on the lens or drop it in water as this will cause it to rust and malfunction.
- Reinforced plastic is used for some parts of the lens. To avoid damage, never leave the lens in an excessively hot place.
- Never use an air blower to clean the inside rear portion of the lens. Because the diaphragm blades are exposed, they may be damaged by a strong burst of air. Also be sure to attach the rear lens cap LF-1 when the lens is not in use to protect the lens and diaphragm blades from foreign matter and fingerprints.
Supplied Accessories
77mm snap-on front lens cap
Rear lens cap LF-1
Semi-soft case CL-M2
Optional Accessories
77mm screw-in filters, including circular polarizing filter II
Teleconverters TC-14B, TC-301, AF-S Teleconverters TC-14EII, TC-17EII, TC-20EII
(Do not use the TC-17Ell and TC-20Ell for autofocus operation.)
Specifications
Type of lens:
Focal length:
Maximum aperture:
Lens construction:
Picture angle:
Distance information:
Focusing:
Shooting distance scale:
Aperture scale:
Minimum aperture lock:
Diaphragm:
Exposure measurement:
Focus limit switch:
Tripod mounting:
Attachment size:
Dimensions:
Weight:
D-type AF-S Nikkor lens having built-in CPU and Nikon bayonet mount
300mm
f/4
10 elements in 6 groups (2 ED elements)
8^10' [5°20' with Nikon digital cameras (Nikon DX format); 6°40' with IX240 system cameras]
Output to camera body
Nikon Internal Focusing (IF) system (utilizing an internal Silent Wave Motor); manually via separate focus ring
Graduated in meters and feet from 1.45m (5 ft.) to infinity ()
f/4- f/32 on both standard and aperture-direct-readout scales
Provided
Fully automatic
Via full-aperture method with AI cameras or cameras with CPU interface system; via stop-down method for other cameras
Provided; two ranges available: FULL (infinity to 1.45m [4.8 ft.]) or - 3m (9.8 ft.)
Detachable tripod mounting collar; rotatable through 360^ , indices every 90^
77mm (P = 0.75mm)
Approx. 90mm dia. x 222.5mm extension from the camera's lens mounting flange; overall length is approx. 230.5mm
Approx. 1440g (50.8 oz.) with tripod collar; approx. 1300g (45.9 oz.) for lens only
Nomenklatur
Sac semi-souple CL-M2
Accssoires en option
The first values are for the PK-12 ring used alone and the other ones for the PK-11A-PK-13, PK-11-PK-13, or PK-1-PK-3 rings together. However the PK-11/11A and PK-1 rings cannot be attached directly to the lens.
No reproduction in any form of this manual, in whole or in part (except for brief quotation in critical articles or reviews), may be made without written authorization from NIKON CORPORATION.