
AF-S NIKKOR 300MM F-2.8G ED VR II - Camera lens NIKON - Free user manual and instructions
Find the device manual for free AF-S NIKKOR 300MM F-2.8G ED VR II NIKON in PDF.
Download the instructions for your Camera lens in PDF format for free! Find your manual AF-S NIKKOR 300MM F-2.8G ED VR II - NIKON and take your electronic device back in hand. On this page are published all the documents necessary for the use of your device. AF-S NIKKOR 300MM F-2.8G ED VR II by NIKON.
USER MANUAL AF-S NIKKOR 300MM F-2.8G ED VR II NIKON
| スケルーナ カメラ | A | B | C | E | EC-B EC-E | F | G1 G2 | G3 | G4 | J | K | L | M | P | U |
| F6 | ◎ | ◎ | - | ◎ | - | - | - | - | - | ◎ | - | ◎ | - | ◎ | |
| F5+DP-30 | ◎ | ◎ | ○ | ◎ | ◎ | - | ○ (+0.5) | ◎ | - | ◎ | - | ◎ | |||
| F5+DA-30 | ◎ (+0.5) | ◎ | ○ | ◎ | ◎ | - | ○ (+0.5) | ◎ | - | ◎ (+0.5) | - | ◎ |
Jp
構圖の決定やビント綜合せの目的には
Touching the internal parts of the camera or lens could result in injury. Repairs should be performed only by qualified technicians. Should the camera or lens break open as the result of a fall or other accident, take the product to a Nikonauthorized service representative for inspection after unplugging the product and/or removing the battery.
Turn off immediately in the event of malfunction
Should you notice smoke or an unusual smell coming from the camera or lens, remove the battery immediately, taking care to avoid burns. Continued operation could result in injury.
After removing or disconnecting the power source, take the product to a Nikonauthorized service representative for inspection.
Do not use the camera or lens in the presence of flammable gas
Operating electronic equipment in the presence of flammable gas could result in an explosion or fire.
Do not look at the sun through the lens or viewfinder
Viewing the sun or other strong light sources through the lens or viewfinder could cause permanent visual impairment.
Keep out of reach of children
Particular care should be taken to prevent infants from putting the batteries or other small parts into their mouths.
Observe the following precautions when handling the camera and lens
- Keep the camera and lens unit dry. Failure to do so could result in fire or electric shock.
- Do not handle or touch the camera or lens unit with wet hands. Failure to do so could result in electric shock.
- When shooting with back-lighting, do not point the lens at the sun or allow sunlight to pass directly down the lens as this may cause the camera to overheat and possibly cause a fire.
- When the lens will not be used for an extended period of time, attach both front and rear lens caps and store the lens away from direct sunlight. Failure to do so could result in a fire, as the lens may focus sunlight onto a flammable object.
Thank you for purchasing the AF-S NIKKOR 300mm f/2.8G ED VR II lens. Before using this lens, please read these instructions and refer to your camera's user's manual.
Nomenclature

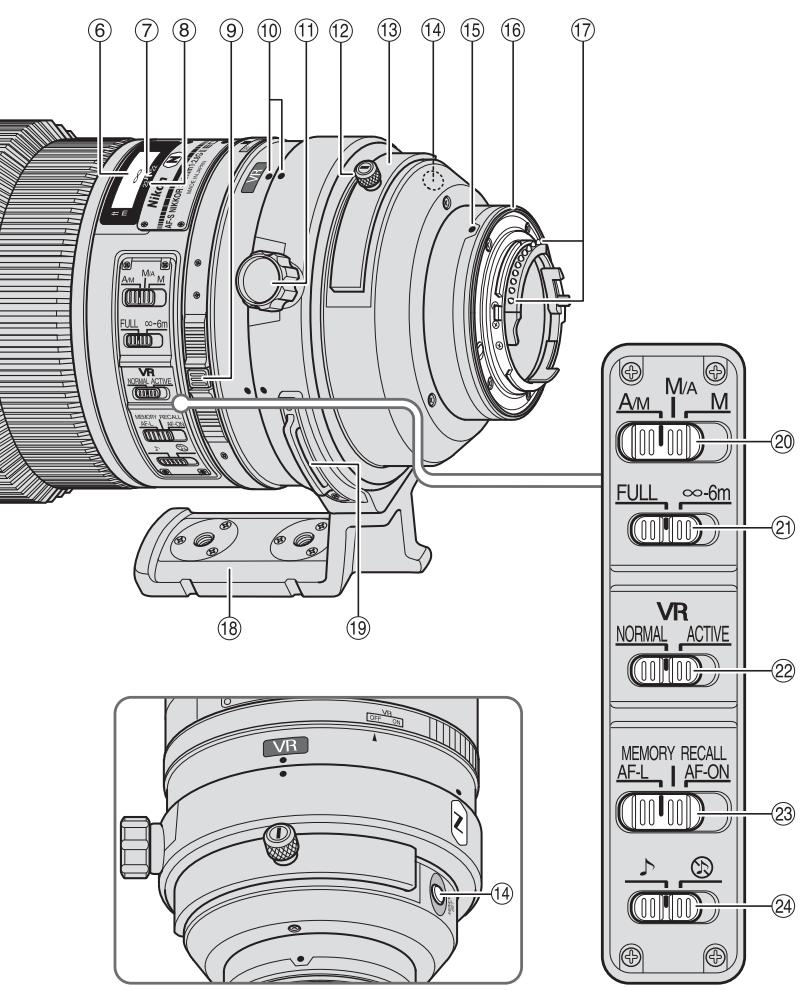
① Lens hood (P. 26)
(2) Lens hood screw (P. 26)
③ Rubber grip
④ Focus operation button (Focus Lock/Memory recall/AF Start) (P. 22)
⑤ Focus ring (P. 21)
⑥ Distance scale (P. 25)
⑦ Distance index line (P. 25)
⑧ Depth-of-field indicators (P. 25)
⑨ Vibration reduction ON/OFF ring switch (P. 24)
10 Lens rotating position index (P. 25)
⑪ Tripod collar lock screw (P. 25)
⑫ Slip-in filter holder knob (P. 26)
⑬ Slip-in filter holder (P. 26)
⑭ Memory set button (P. 22)
⑤ Mounting index
16 Lens mount rubber gasket (P. 28)
CPU contacts (P. 28)
18 Built-in rotating tripod collar (P. 25)
⑲ Strap eyelet
20 Focus mode switch (P. 21)
② Focusing limit switch (P. 21)
② Vibration reduction mode switch (P.24)
Focus operation selection switch (AF-L/MEMORY RECALL/AF-ON) (P. 22)
24Sound monitor switch (P. 22)
( ) : reference page
En
Major features
- The Nano Crystal Coat deposited on some of the lens elements ensures that fine, clear images can be reproduced under various shooting conditions, from the sunny outdoors to spotlighted interior scenes.
- This lens features AF-L, which locks focus during autofocus, AF-ON, which activates autofocus, and MEMORY RECALL, which saves and recalls selected focus distances.
- By enabling vibration reduction (VR II), slower shutter speeds (approximately four stops) can be used, thus increasing the range of usable shutter speeds, particularly when handholding the camera. (Based on results achieved under Nikon measurement conditions. The effects of vibration reduction may vary according to shooting conditions and use.)
- AF-I/AF-S Teleconverters TC-14E/TC-14E II/TC-17E II/TC-20E/TC-20E III are usable.
Important
- When mounted on Nikon DX format digital SLR cameras, such as the D300-Series and D90, the lens' picture angle becomes 5^20' and its 35mm equivalent focal length is approx. 450mm.
Usable cameras and available functions
There may be some restrictions or limitation for available functions. Refer to camera's user's manual for details.
| Cameras | Function | Exposure mode | |||||||
| VR | AF | Focus lock | Memory recall | AF start on the lens | P*1 | S | A | M | |
| Nikon digital SLR (Nikon FX/DX format) cameras, F6, F5, F100, F80-Series/N80-Series*, F75-Series/N75-Series*, F65-Series/N65-Series* | ✓ | ✓ | ✓ | ✓ | ✓ | ✓ | ✓ | ✓ | ✓ |
| Pronea 600i/6i*, Pronea S*2 | — | ✓ | ✓ | ✓ | ✓ | ✓ | ✓ | ✓ | ✓ |
| F4-Series, F90X/N90s*, F90-Series/N90*, F70-Series/N70* | — | ✓*3 | ✓ | ✓*4 | ✓*3*5 | ✓ | ✓ | — | — |
| F60-Series/N60*, F55-Series/N55-Series*, F50-Series/N50*, F-401x/N5005*, F-401s/N4004s*, F-401/N4004* | — | — | — | — | — | ✓ | ✓ | ✓ | ✓ |
| F-801s/N8008s*, F-801/N8008*, F-601M/N6000* | — | — | — | — | — | ✓ | ✓ | — | — |
| F3AF, F-601/N6006*, F-501/N2020**, Nikon MF cameras (except F-601M/N6000*) | — | — | — | — | — | — | — | — | — |
Possible —: Not possible VR: Vibration reduction AF: Autofocus
- Sold exclusively in the USA
Sold exclusively in the USA and Canada
1: P includes AUTO and Vari-Program System.
2: Manual (M) is not available.
3: When the focus operation selection switch is set to AF-ON, autofocus begins as soon as the focus operation button is pressed while the shutter-release button pressed halfway.
4: Press the memory set button or a focus operation button while pressing the shutter release button halfway.
*5: Possible, with limited restrictions
Focusing
Set your camera's focus-mode selector according to the chart below:
| Cameras | Camera focus mode | Lens' focus mode switch | ||
| A/M | M/A | M | ||
| Nikon digital SLR (Nikon FX/DX format) cameras, F6, F5, F4-Series, F100, F90X/N90s*, F90-Series/N90*, F80-Series/N80-Series*, F75-Series/N75-Series*, F70-Series/N70*, F65-Series/N65-Series*, Pronea 600i/6i*, Pronea S | AF (C/S) | Autofocus with manual override (AF priority) | Autofocus with manual override (MF priority) | Manual focus (Electronic rangefinder can be used.) |
| MF | Manual focus (Electronic rangefinder can be used.) | |||
| F60-Series/N60*, F55-Series/N55-Series*, F50-Series/N50*, F-801s/N8008s*, F-801/N8008*, F-601M/N6000*, F-401x/N5005*, F-401s/N4004s*, F-401/N4004* | AF (C/S) MF | Manual focus (Electronic rangefinder can be used, except with the F-601M/N6000.*) | ||
- Sold exclusively in the USA AF: Autofocus MF: Manual focus
A/M (Autofocus with manual override. AF priority) mode and M/A (Autofocus with manual override. MF priority) mode
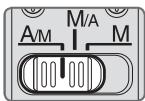
M/A: Autofocus can be overridden by manually focusing with the focus ring.
A/M: Autofocus can be overridden by manually focusing with the focus ring, but focus ring detection sensitivity is lower than in M/A mode. Use this mode to avoid canceling the AF setting by unintentionally moving the focus ring.
1 Set the focus mode switch to A/M or M/A.
2 Autofocus can be manually overridden by rotating the focus ring while pressing the shutter release button halfway, pressing the AF-ON button on the camera or pressing a focus operation button (with focus operation set to AF-ON) on the lens.
3 Pressing the shutter release button halfway, pressing the AF-ON button on the camera again or pressing a focus operation button on the lens again will cancel manual override and return the lens to autofocus mode.
To limit the range of autofocus
This function is only available with autofocus.
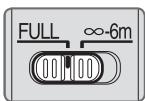
FULL: If the subject is sometimes closer than 6 m (19.7 ft.), set the switch to FULL.
- 6m : If the subject is always 6m (19.7 ft.) or more away, set the switch to - 6m to reduce focusing time.
Focus operation selection switch and focus operation button (See p. 20 for compatible cameras.)
Use the focus operation selection switch to choose a function of the focus operation buttons.

| Position of focus operation selection switch | Focus operation button function |
| AF-L | Focus lock |
| MEMORY RECALL | Memory recall |
| AF-ON | AF start (AF-ON) on the lens |
- Press one of four focus operation buttons to activate each function.
- The focus operation button positions can be changed to suit individual user preferences. For more details on this, contact your nearest Nikon service center or representative office.
Focus lock (AF-L)
This function is only compatible with autofocus.
1 Set the focus mode switch to A/M or M/A.
2 Set the focus operation selection switch to AF-L.
3 During autofocus mode, focus can be locked by pressing one of the focus operation buttons.
Focus remains locked while a focus operation button is pressed and held down.
- The AF-L function can be engaged either from the camera or from the lens.
Memory recall (MEMORY RECALL)
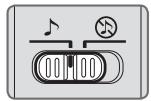
: The lens beeps when memory recall is operated.
: Memory recall operates without the beep sound.
The following operation is with the sound monitor switch set to
Focus on a subject and press the memory set button to save the focus distance.
- The lens will beep when the focused distance is correctly saved.
-
When the focus distance is not correctly saved, the distance revolve back and forth some 10 times, while the lens will emit three long beeps. In this case, repeat procedure to save focus
-
Memory set is possible regardless of the setting of the focus mode or focus operation selection switch.
- The focus distance is saved even when the camera is turned off or the lens is detached from the camera.
2 Set the focus operation selection switch to MEMORY RECALL.
Press a focus operation button. After the lens beeps twice, fully press the shutter release button to take the picture.
- The saved focus distance is recalled when a focus operation button is pressed even when the shutter release button is pressed halfway.
- To take pictures at the saved focus distance, hold the focus operation button down and fully press the shutter release button.
- The lens reverts from memory recall to autofocus or manual focus when the focus operation button is released.
Autofocus (AF) start on the lens (AF-ON)
1 Set the focus mode switch to A/M or M/A.
2 Set the focus operation selection switch to AF-ON.
3 Press a focus operation button to take pictures.
- Autofocus is activated while a focus operation button is pressed and held down.
- The AF-ON function can be engaged either from the camera or from the lens.
Vibration reduction mode (VRII)
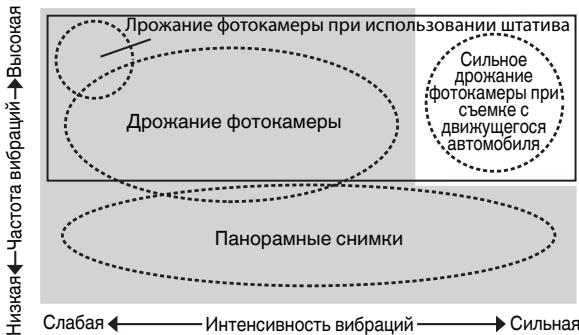
Basic concept of vibration reduction
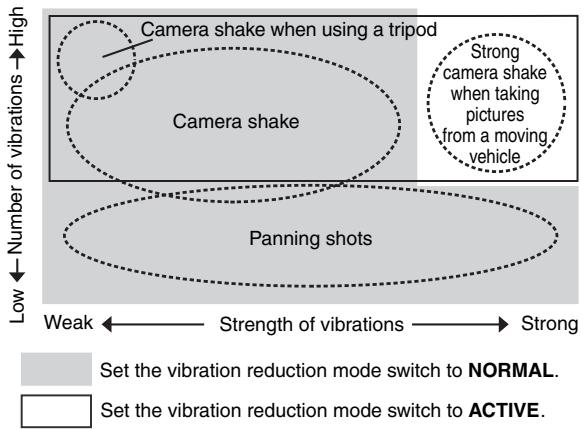
| When taking pictures | Set the vibration reduction mode switch to either NORMAL or ACTIVE. |
| When taking panning shots | Set the vibration reduction mode switch to NORMAL. |
| When taking pictures from a moving vehicle | Set the vibration reduction mode switch to ACTIVE. |
| When taking pictures using a tripod | Set the vibration reduction mode switch to either NORMAL or ACTIVE. |
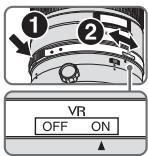
Setting the vibration reduction ON/OFF ring switch
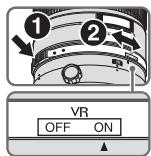
ON: The effects of camera shake are reduced while the shutter-release button is pressed halfway and also at the instant the shutter is released. Because vibration is reduced in the viewfinder, auto/manual focusing and exact framing of the subject are easier.
OFF: The effects of camera shake are not reduced.
Setting the vibration reduction mode switch
Set the vibration reduction ON/OFF ring switch to ON and choose a vibration reduction mode with the vibration reduction mode switch.
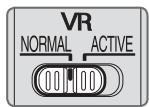
NORMAL: The vibration reduction mechanism primarily reduces the effects of camera shake. The effects of camera shake are also reduced with horizontal and vertical panning.
ACTIVE: The vibration reduction mechanism reduces the effects of camera shake, such as that which occurs when taking pictures from a moving vehicle, whether it be normal or more intense camera shake. In this mode, camera shake is not automatically distinguished from panning motion.
Notes on using vibration reduction
- If this lens is used with cameras that do not have the vibration reduction function (p. 20), set the vibration reduction ON/OFF ring switch to OFF. With the Pronea 600i/6i camera, in particular, battery power may become quickly depleted if this switch is left ON.
- After pressing the shutter-release button halfway, wait until the image in the viewfinder stabilizes before pressing the shutter-release button the rest of the way down.
- Due to the characteristics of the vibration reduction mechanism, the image in the viewfinder may be blurred after the shutter is released. This is not a malfunction.
- When taking panning shots, be sure to set the vibration reduction mode switch to NORMAL. If the camera is panned in a wide arc, compensation for camera shake in the panning direction is not performed. For example, only the effects of vertical camera shake is reduced with horizontal panning.
- Do not turn the camera off or remove the lens from the camera while vibration reduction is operating. Failure to observe this note could result in the lens sounding and feeling as if an internal component is loose or broken when it is shaken. This is not a malfunction. Turn the camera on again to correct this.
-
With cameras featuring a built-in flash, vibration reduction does not function while the built-in flash is charging.
-
When using a tripod, set the vibration reduction ON/OFF ring switch to ON to reduce the effect of camera shake. Nikon recommends the switch be set to ON when using the camera on an unsecured tripod head or with a monopod. But when camera shake is very slight, the vibration reduction function may conversely increase the effect of camera shake by the movement of the system. In such a case, set the vibration reduction ON/OFF ring switch to OFF.
-
Vibration reduction does not function when the AF-ON button on the camera or a focus operation button on the lens is pressed.
Depth of field
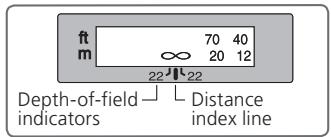
Approximate depth of field can be determined by checking the depth-of-field indicators. If your camera has a depth-of field preview (stop-down) button or lever, depth of field can be previewed through the camera viewfinder.
- This lens is equipped with the Internal Focusing (IF) system. As the shooting distance decreases, the focal length also decreases.
- The distance scale does not indicate the precise distance between the subject and the camera. Values are approximate and should be used only as a general guide. When shooting distant landscapes, depth of field may influence operation and the subject may appear in focus at a position that is closer than infinity.
- For more information, see p. 198.
Setting the aperture
Use the camera to adjust the aperture setting.
Using a built-in rotating tripod collar
When using a tripod, attach it to the lens' tripod collar instead of the camera.
- When holding the camera by its handgrip and rotating the camera with the lens in its tripod collar, your hand may bump into the tripod, depending on the tripod in use.
- It's possible to detach the tripod collar by removing the tripod collar lock screw. For details on this procedure, contact your nearest Nikon service center or representative office.
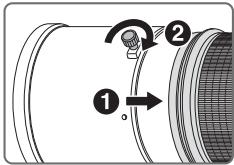
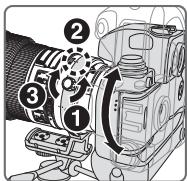
Changing the camera position
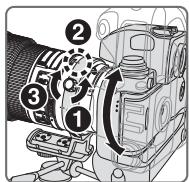
Loosen the tripod collar lock screw (1). Depending on camera position (vertical or horizontal), turn the lens to an appropriate lens rotating position index (2) and tighten the screw (3).
The built-in flash and vignetting
To prevent vignetting, do not use the lens hood.
Cameras
F65-Series/N65-Series, F60-Series/N60, F55-Series/N55-Series, F50-Series/N50, F-601/N6006, F-401x/N5005, F-401s/N4004s, F-401/N4004, Pronea 600i/6i*, Pronea S
Vignetting occurs at any shooting distance.
- Sold exclusively in the USA
Using the lens hood
Lens hoods minimise stray light and protect the lens.
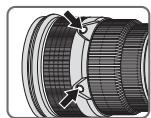
Attaching the hood
- Fully tighten the lens hood screw (2).
- If the lens hood is not correctly attached, vignetting may occur.
- To store the lens hood, attach it in the reverse position.
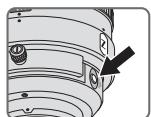
Slip-in filter holder
Always use a (52mm screw-on) filter. A 52mm Screw-on NC Filter is attached to the filter holder when shipped from the factory.
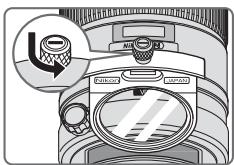
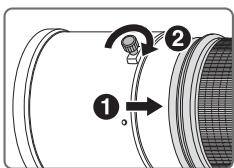
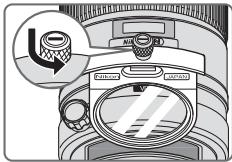
1 Press down on the slip-in filter holder knob, and turn counterclockwise until the white line on the knob is at a right angle to the axis of the lens.
Pull the slip-in filter holder from the lens body
3 Detach the attached filter from the filter holder.
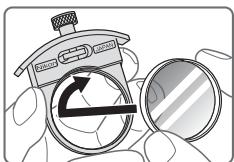
4 Screw a filter onto the side of the filter holder marked with the words "Nikon" and "JAPAN".
- The slip-in filter holder can be attached either facing lens or camera side without having any effect on your pictures.
Slip-in Circular Polarizing Filter C-PL1L (optional)
- Blocks reflections from nonmetallic surfaces such as glass and water.
- The focus point of a Slip-in Circular Polarizing Filter C-PL1L differs from that of a 52mm screw-on filter. The distance scale is shifted from the correct position. The closest focused distance is extended slightly.
- The memory set position may change slightly when using focus preset. Attach the C-PL1L filter before using the memory set function.
Recommended focusing screens
Various interchangeable focusing screens are available for certain Nikon SLR cameras to suit any picture-taking situation. The ones recommended for use with this lens are:
| Screen Camera | A | B | C | E | EC-B EC-E | F | G1 G2 | G3 | G4 | J | K | L | M | P | U |
| F6 | ◎ | ◎ | — | ◎ | — | — | — | — | — | ◎ | — | ◎ | — | ◎ | |
| F5+DP-30 | ◎ | ◎ | ○ | ◎ | ◎ | — | ◎ (+0.5) | ◎ | — | ◎ | — | ◎ | |||
| F5+DA-30 | ◎ (+0.5) | ◎ | ○ | ◎ | ◎ | — | ◎ (+0.5) | ◎ | — | ◎ (+0.5) | — | ◎ |
:Excellent focusing
O:Acceptable focusing
Slight vignetting or moiré patterns appear in the viewfinder, but not on the film.
Not available
( ) : Indicates degree of exposure compensation needed (center-weighted metering only). For F6 cameras, compensate by selecting "Other screen" in Custom Setting "b6: Screen comp." and setting the EV level to -2.0 to +2.0 in 0.5 EV steps. When using screens other than type B or E, "Other screen" must be selected even when the required compensation value is "0" (no compensation required). For F5 cameras, compensate using Custom Setting #18 on the camera body. See user's manual of the camera body for more details.
Blank box means not applicable. Since type M screen can be used for both macrophotography at a magnification ratio of 1:1 or above and for photomicrography, it has different applications than other screens.
Important
- For F5 cameras, only EC-B, EC-E, B, E, J, A, L focusing screens are usable in Matrix Metering.
Lens care
- Be careful not to hold the camera body when the lens is attached, as this may cause damage to the camera (lens mount). Be sure to hold both the lens and camera when carrying.
- Be careful not to allow the CPU contacts to become dirty or damaged.
- If the lens mount rubber gasket is damaged, be sure to visit the nearest Nikonauthorized service representative for repair.
- Clean lens surfaces with a blower brush. To remove dirt and smudges, use a soft, clean cotton cloth or lens tissue moistened with ethanol (alcohol) or lens cleaner. Wipe in a circular motion from the center to outer edge, taking care not to leave traces or touch other parts of the lens.
- Never use organic solvent such as thinner or benzene to clean the lens.
- When storing the lens in its case, attach both the front and rear lens caps.
- When the lens is mounted on a camera, do not pick up or hold the camera and lens by the lens hood.
- When the lens will not be used for an extended period of time, store it in a cool, dry place to prevent mold and rust. Be sure to store the lens away from direct sunlight or chemicals such as camphor or naphthalene.
- Do not get water on the lens or drop it in water as this will cause it to rust and malfunction.
- Reinforced plastic is used for certain parts of the lens. To avoid damage, never leave the lens in an excessively hot place.
Standard accessories
- Slip-on front lens cap
Rear Lens Cap - Lens Hood HK-30
- Semi-soft Case CL-L1
- Dedicated filter holder
- 52mm Screw-on NC Filter
- Strap LN-1
Important
- The slip-in filter holder, with a 52mm screw-on filter attached, should be inserted in the lens at all times.
Optional accessories
- 52mm screw-on filters (except circular polarizing filter II)
- Slip-in Circular Polarizing Filter C-PL1L
- AF-S Teleconverters (TC-14E II/TC-17E II/TC-20E III)
Specifications
| Type of lens: | G-type AF-S NIKKOR lens with built-in CPU and Nikon bayonet mount |
| Focal length: | 300mm |
| Maximum aperture: | f/2.8 |
| Lens construction: | 11 elements in 8 groups (3 ED and some Nano Crystal Coat-deposited lens elements), as well as 1 protective glass |
| Picture angle: | 8°10' with 35mm (135) format Nikon film SLR cameras and Nikon FX format digital SLR cameras 5°20' with Nikon DX format digital SLR cameras 6°40' with IX240 system cameras |
| Distance information: | Output to camera |
| Focusing: | Nikon Internal Focusing (IF) system, autofocus using a Silent Wave Motor; manually via separate focus ring |
| Vibration reduction: | Lens-shift method using voice coil motors (VCMs) |
| Shooting distance scale: | Graduated in meters and feet from 2.2 m (8 ft) to infinity (∞) |
| Closest focusing distance: | 2.3 m (7.5 ft.) with autofocus 2.2 m (7.2 ft.) with manual focus |
| No. of diaphragm blades: | 9 pcs. (rounded) |
| Diaphragm: | Fully automatic |
| Aperture range: | f/2.8 to f/22 |
| Exposure measurement: | Via full-aperture method with cameras with CPU interface system |
| Focusing limit switch: | Provided; two ranges available: FULL (∞–2.3m), or ∞–6m |
| Tripod collar: | Rotatable through 360°, lens rotating position index at 90°, only tripod collar detachable |
| Dimensions: | Approx. 124 mm dia. x 267.5 mm extension from the camera's lens-mount flange |
| Weight: | Approx. 2,900 g (6.4 lbs) |
Specifications and designs are subject to change without any notice or obligation on the part of the manufacturer.
ACHTUNG
Keinesfalls zerlegen.
He noIb3yIteCb foTohAmepo nHn o6BeHTNBOM npn HauHnB BO3dyXe IerKOBocnIaMeHraUOxxCra3OB
Pa60Ta C 3JIeKToHbIM O6OpUdoBaHnEm Pn HauuN B Bo3dYx
JIeRKOBCPNaMeHJUOxxCra3OB MoKeT PnBecTn K B3pyBy NIN NOHApy.
He cmotpnte ha coJIHc uepe3 obbentnB nIn BnOchataIb
EcIn CMOTpeTb Ha coJIHnce HINI dpyrHe NCTOCHNKe IpKOrO CBeTa chepe3 O6beKTnB INI BVIOHcAteJIb, TO 3TO MOKeT Bbl3BaTb Heo6paTHMOe yxudHne 3peHnI.
XpaHnte B HeOCTyINHom IaIeTe MeCTe
Ipnmte oocbIe MepbI npedocTopoHocTH BO n36eHaHne nonaHaHn 6atapei ndpynx He60JIbuxnpedMeTOB dETM B pot.
Co6IouaTe CneIyUoIe MepbI IpeOcTOpOXHOCTN BO BpMa 3KcnLyatauHn FOToHaMepbI N O6BeHTNuBa
- Hedonyckaite nonadaHnBaOblHa foTOkAmepy nObbeKTHB. HecobJeHne 3TOro Tpe6oBaHnMoKeT npINBeCTn K IOnkapy nI npaKeHnIO 3JIeKTPnueCkM TOKOM.
- He πηκαςατεβκ Κ φοτοκαμερε έπινόθκτυγ ΜοκρβίΜι ργαΜι. Hecobλίουδηνε ἡΤΟτΟ ΠρεδοΒαήση Μόχει πρινεκτι Κ ποραχεύνι ΘλεκτριψεκχμΜΤΟΚΜ.
- Письемпс Задимocб ueшнem He HappaBЯTe OБьeHTNB Ha coJIHnce, a TAKHe He Дonyckaite NonaDaHnЯ COJIneHOrO CBeta B OБьeHTNB, TaK KaK 3TO MoJKeT npIbECTN K nepeRpeBy FOtOKaMepbl n ee Bo3ropaHnIO.
- Ecln obteNB He 6ydt NcnoJIb3OBAIbC B TeueHne IInTeJIbHOBVPeHn, npNKpeHnTE nepeHIO n 3aHIO KpbIshKo obteNBaN He octabJrTe oBeKTHB NOI pRmblIM COJIHeHbIMN LyamN. HecobJeHne 3TOrO ycIOBm MOKeT pINBeCTN K Bo3rOpAHIO, POckOJIbHy obteNB MoKeT COpeDToOTuHb CoJIHeUHbIe JLyH Na KaKOM-JIbO JeKOBocPiAmehHOUeMCM PpeMeTe.
OCHOBHbIE BO3MOHHOCTN
HaohokpctaJIInuecheKHe NOKpbItHe, HaHecEHHOe Ha HeKOTOpbIe 3JIeMeHTbI O6BeKtNBA, rapaHTnpyET nOlyuyeHne YeTKnX CHMmHOB OTNIuHOrO KaHeCTBa B JIObIx yCJOBnax -OT cBEmKN pRn COJIHeYHom OCBeUeHIN Do CbEMKN B IOMeUeHnAx pRn CBTe npOxekTOpOB.
B DaHHOM o6bEHTNBHe hCIOJIb3yeTcA TEleHOHBepTOF AP-L, HnKcnpyHJnH OOKy CBO BpEma aBTOfoHcyncPOBHN, yfYNKJnA F-ON, aHTNbHpyOuJnA aBTOfoHcyncPOBHy, n MEMORY RECALL, coXpaHJouaA n aHTNbHpyUoJuaA n3bpaHhIe FOHycHbIe pacCTOHH.
- Ppi BkIbUeHnN FyHKuN NpOaBLeHnBn6paun (VR II) MoKHO nCpOJIb3ObaTb 6oJIee dIInTeJbHbIe bIbIepJHKn (Pn6IbnHtJIbHO h TpN cTyNEH), TEM cAMbIM yBeJIuHbAa DnAa30N 3aHeHn BblEpeJHKn (OC6eHNo npPyHOn cBemKe). (*OChOBaHO Ha pe3yIbTatax, noJIyueHHbX BcYcOBHX N3MepeHn KOMaHn Nikon. Pe3yIbTaTbI NpOaBHeHn Bn6paun MOryt 3aBncTeB o CInTu aun y cLobn BcEMKn.)
C 3TtHM O6bEeKTHBOM COBMeCTHMBI TeLEeKoHBePToPbI AF-I/AF-S MoJeNe TC-14E/TC-14E II/TC-17E II/TC-20E/TC-20E II/TC-20E III.
BHHMaHHe
■ PeHHM NOJaBLeHnBn6paqn (VRII) OCHOBHOe NOHaTne NOaBJeHnBn6paqn

YCTaHOBHTe NpeHIOHuaTeIb peKIMa IoDaBLeHnRA B6paunB NOLOJKeHne NORMAL.
UCTAHOBHTe NpeHJIIOHTeJIb peKIMa IOnaBJIeHnRA B6paunB NOLOJKeHne ACTIVE.
HactpoHa KoIbcapeyInpOBn noaBneHn Bn6paun ON/OFF
BcTpoEHHa BCbIiKa N BnHbETnpOBaHne
Bo n36eKaHHe BnHbETnpOBaHn He nCNoJb3yIte 6JIeHdy o6BeKTNaBa.
IcnoJb3OBAHnE 6JeHdbI
BleHda MmHMn3npyet pacceaHbI CBET n 3aunaaT o6beKTHB.
PpncoeHHHeHne 6JIeHdbI
-Дуynopa3aTЯнiteBиNT6JIeHdIObBeKTHBa(2).
- Ecnn 6IeHnDa yctaHOBLeHa Ha o6bKeTINB HeHaJIeKaUIM O6pa3OM, MoKET BO3HNKHyTb 3ΦΦEKNHbEtNPOBaHnA.
ДяхраненьбileныпсocoинайTe ee B o6paTHOM nolokhen.
BbIDBNHHOJ depHaTeIb 0JIbTpa
BceTgA nCnoJb3yIte fHJIbTp (52-MM BBnHcNBAIOUeecr KpeIeHne).52- MM BvHcNBAIOUncr FHJIbTp NC Ha MOMENT OTRpy3Kn Ipon3BOInTeJeM KpeINTCr K depKaTeIIO fHJIbTpra.
1 HaKMTpe pyKoRTka BbIDBnHoro DeepKaTeIa
ФильТра И NOBepHITe erO npOTNb YacOBa
CTpeJIKN TAK, YTOBJIb 6eBAЯИнЯ H paYke
OKa3aJnacb PoD HUkHbIM yrIOM K OcN OBeKtNbA.
2 CHINMITE BbIDBnKHOI depKaTeJIb ΦIbTpca KOpnyCa 06BeKeTnBa.
3 CHNIMITE 3aKpeIJIeHHbI Ha IepKaTeJe fHnbTpap HJIbTp.
43aKpeINITEΦnIbTpcoCTOPOHbI BvIDBnHHoH DePkaTeNΦIbTpa, NOMEeHNHO CIOBaMNI «Nikon» n «JAPAN».
-Дернать BCTabHOrO ФильТpa MoHET КрелNTbCЯ NOBepHyTbIM ЛбОК объektY, ЛбОК Камеpe, УTO НИнak He NOВлЯЕт Ha COЗдABAЕМБЕ BAMN CHIMКИ.
BctabHNo zhpKyIrpHbI nolpnaOnHHbI φnIbTp C-PL1L (dOonHnteHbHO)
-Блokириет оразжени OT HeMeTaJIInuecknx NOBepxHocTei,HaNPIMep, cTeKla IINI BObl.
ToKaΦokCnPOBKN BCTaBHO TcNpKyIaPHO NOJapn3aUHOHOro FbTpa C-PL1L OTInuAeTcR OT ToKnΦokCnPOBKN 52-MM BBnHuBaIOUeOcof NbTpA. ShkaJa pacCToHn CMeuaeTcR no CpabHeHnC npabNbHmNoLOXHeHem. BInkaiWeeΦokChoe pacCToHn CJIerKa yBeINuHBAeTcR.
| 对焦屏 相机 | A | B | C | E | EC-B EC-E | F | G1 G2 | G3 | G4 | J | K | L | M | P | U |
| F6 | ◎ | ◎ | - | ◎ | - | - | - | - | - | ◎ | - | ◎ | - | ◎ | |
| F5+DP-30 | ◎ | ◎ | ○ | ◎ | ◎ | - | (±0.5) | ◎ | - | ◎ | - | ◎ | |||
| F5+DA-30 | ◎ (+0.5) | ◎ | ○ | ◎ | ◎ | - | (±0.5) | ◎ | - | ◎ (+0.5) | - | ◎ |
⑤:对焦效果良好
○: 对焦效果一般
ACTIVE: 登 rise is the state where the occurrence of an occurrence of an occurrence of an occurrence of an occurrence of an occurrence of an occurrence of an occurrence of an occurrence of an occurrence of an occurrence of an occurrence of an occurrence of an occurrence of an occurrence of an occurrence of an occurrence of an occurrence of an occurrence of an occurrence of an occurrence of an occurrence of an occurrence of an occurrence of an occurrence of an occurrence of an occurrence of an occurrence of an occurrence of an occurrence of an occurrence of an occurrence of an occurrence of an occurrence of an
说的,是说的。
<|im_start|>assistant
-
-
-
-
-
-
-
-
-
-
-
-
-
-
-
卡耶拉瓦奇节
② )
##
BnEeHtBtBtBtBtBtBtBtBtBtBtBtBtBtBtBtBtBtBtBtBtBtBtBtBtBtBtBtBtBtBtBtBtBtBtBtBtBtBtBtBtBtBtBtBtBtBtBtBtBtBt
52mm StkRicN T 52mm StKRIcN NC PTLT

| 스크리 가에라 | A | B | C | E | EC-B EC-E | F | G1 G2 | G3 | G4 | J | K | L | M | P | U |
| F6 | ◎ | ◎ | — | ◎ | — | — | — | — | — | ◎ | — | ◎ | — | ◎ | |
| F5+DP-30 | ◎ | ◎ | ○ | ◎ | ◎ | — | (+0.5) | ◎ | — | ◎ | — | ◎ | |||
| F5+DA-30 | (+0.5) | ◎ | ○ | ◎ | ◎ | — | (+0.5) | ◎ | — | (+0.5) | — | ◎ |
@:默默默默默默默默默默默默默默默默默默默默默默默默默默默默默
O: 速度快 托壳心
(ft.)
Depth of field
| Shooting distance | Depth of field | Reproduction ratio | |||||
| f/2.8 | f/4 | f/5.6 | f/8 | f/11 | f/16 | f/22 | |
| 8 | 7 ft. 11-12/16 in. | 7 ft. 11-12/16 in. | 7 ft. 11-10/16 in. | 7 ft. 11-6/16 in. | 7 ft. 11-3/16 in. | 7 ft. 10-15/16 in. | 7 ft. 10-7/16 in. |
| 8 ft. 4/16 in. | 8 ft. 4/16 in. | 8 ft. 6/16 in. | 8 ft. 10/16 in. | 8 ft. 13/16 in. | 8 ft. 1-3/16 in. | 8 ft. 1-11/16 in. | |
| 9 | 8 ft. 11-12/16 in. | 8 ft. 11-10/16 in. | 8 ft. 11-8/16 in. | 8 ft. 11-4/16 in. | 8 ft. 10-15/16 in. | 8 ft. 10-9/16 in. | 8 ft. 9-15/16 in. |
| 9 ft. 4/16 in. | 9 ft. 6/16 in. | 9 ft. 8/16 in. | 9 ft. 12/16 in. | 9 ft. 1-1/16 in. | 9 ft. 1-7/16 in. | 9 ft. 2-3/16 in. | |
| 10 | 9 ft. 11-10/16 in. | 9 ft. 11-8/16 in. | 9 ft. 11-6/16 in. | 9 ft. 11-1/16 in. | 9 ft. 10-11/16 in. | 9 ft. 10-3/16 in. | 9 ft. 9-8/16 in. |
| 10 ft. 6/16 in. | 10 ft. 8/16 in. | 10 ft. 10/16 in. | 10 ft. 15/16 in. | 10 ft. 1-5/16 in. | 10 ft. 1-15/16 in. | 10 ft. 2-10/16 in. | |
| 12 | 11 ft. 11-8/16 in. | 11 ft. 11-4/16 in. | 11 ft. 11-1/16 in. | 11 ft. 10-11/16 in. | 11 ft. 10-1/16 in. | 11 ft. 9-6/16 in. | 11 ft. 8-3/16 in. |
| 12 ft. 8/16 in. | 12 ft. 12/16 in. | 12 ft. 15/16 in. | 12 ft. 1-7/16 in. | 12 ft. 2-1/16 in. | 12 ft. 2-14/16 in. | 12 ft. 4-1/16 in. | |
| 15 | 14 ft. 11-3/16 in. | 14 ft. 10-15/16 in. | 14 ft. 10-7/16 in. | 14 ft. 9-13/16 in. | 14 ft. 8-14/16 in. | 14 ft. 7-11/16 in. | 14 ft. 6 in. |
| 15 ft. 13/16 in. | 15 ft. 1-1/16 in. | 15 ft. 1-9/16 in. | 15 ft. 2-4/16 in. | 15 ft. 3-4/16 in. | 15 ft. 4-9/16 in. | 15 ft. 6-10/16 in. | |
| 20 | 19 ft. 10-9/16 in. | 19 ft. 9-15/16 in. | 19 ft. 9-2/16 in. | 19 ft. 8-1/16 in. | 19 ft. 6-6/16 in. | 19 ft. 4-1/16 in. | 19 ft. 1-1/16 in. |
| 20 ft. 1-7/16 in. | 20 ft. 2-1/16 in. | 20 ft. 2-14/16 in. | 20 ft. 4-3/16 in. | 20 ft. 5-14/16 in. | 20 ft. 8-8/16 in. | 21 ft. 4/16 in. | |
| f/2.8 | f/4 | f/5.6 | f/8 | f/11 | f/16 | f/22 | ||
| 25 | 24 ft. 9-10/16 in. —25 ft. 2-6/16 in. | 24 ft. 8-12/16 in. —25 ft. 3-4/16 in. | 24 ft. 7-7/16 in. —25 ft. 4-11/16 in. | 24 ft. 5-10/16 in. —25 ft. 6-10/16 in. | 24 ft. 3-2/16 in. —25 ft. 9-8/16 in. | 23 ft. 11-8/16 in. —26 ft. 1-11/16 in. | 23 ft. 6-12/16 in. —26 ft. 7-11/16 in. | 1/24.5 |
| 40 | 39 ft. 5-14/16 in. —40 ft. 6-6/16 in. | 39 ft. 3-10/16 in. —40 ft. 8-12/16 in. | 39 ft. 4/16 in. —41 ft. 8/16 in. | 38 ft. 7-7/16 in. —41 ft. 5-12/16 in. | 38 ft. 15/16 in. —42 ft. 1-9/16 in. | 37 ft. 4-1/16 in. —43 ft. 15/16 in. | 36 ft. 4-3/16 in. —44 ft. 6-2/16 in. | 1/40.1 |
| 70 | 68 ft. 5-1/16 in. —71 ft. 7-15/16 in. | 67 ft. 10-1/16 in. —72 ft. 3-10/16 in. | 66 ft. 11-14/16 in. —73 ft. 3-10/16 in. | 65 ft. 9-13/16 in. —74 ft. 9-2/16 in. | 64 ft. 2-12/16 in. —76 ft. 11-4/16 in. | 62 ft. 1-7/16 in. —80 ft. 2-14/16 in. | 59 ft. 4-5/16 in. —85 ft. 5-4/16 in. | 1/71.2 |
| ∞ | 2952 ft. 9-13/16 in. —∞ | 2147 ft. —∞ | 1518 ft. 8-6/16 in. —∞ | 1074 ft. 3-8/16 in. —∞ | 760 ft. 1-11/16 in. —∞ | 537 ft. 11-8/16 in. —∞ | 380 ft. 10-3/16 in. —∞ | 1/∞ |
- With the Nikon Internal Focusing (IF) system, as the shooting distance decreases, the focal length also decreases.
No reproduction in any form of this manual, in whole or in part (except for brief quotation in critical articles or reviews), may be made without written authorization from NIKON CORPORATION.