Shadow - Electric bike Jetson - Free user manual and instructions
Find the device manual for free Shadow Jetson in PDF.

User questions about Shadow Jetson
0 question about this device. Answer the ones you know or ask your own.
Ask a new question about this device
Download the instructions for your Electric bike in PDF format for free! Find your manual Shadow - Jetson and take your electronic device back in hand. On this page are published all the documents necessary for the use of your device. Shadow by Jetson.
USER MANUAL Shadow Jetson
A GUIDE FOR YOUR RIDE.
IMPORTANT:
Read carefully and retain
for future reference.

FEATURING The RackIt
Smart Cargo System
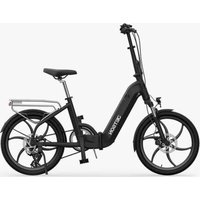
JETSON
SHADOW
Fat Tire Electric Bike.
MODEL SKU(S): JSHDW-GRY

natural_image
Abstract geometric pattern with interlocking gray shapes and a central dark blue shape (no text or symbols)JETSON'S TOP TWO RIDING RULES:
BE SAFE. HAVE FUN!
Contents
Safety Warnings 3
1. About Your Product
1.1 Product Overview 6
1.2 What's in the Box 8
1.3 Product Specs 9
1.4 Online Resources 9
2. Installation Instructions
2.1 Starting Notes 10
2.2 Rider Suitability 10
2.3 Unfolding & Folding the Handlebar .....11
2.4 Attaching the Seat 13
2.5 Attaching the Pedals 14
2.6 Securing the Bell ..... 15
2.7 Securing the Front Reflector 15
2.8 Charging the Battery 16
3. Preparing to Ride
3.1 Pre-Ride Safety Checks 18
3.2 Tire Inflation & Pressure 19
3.3 Checking & Adjusting the Brakes ..... 20
3.4 Adjusting the Handlebar Rotation ..... 22
3.5 Repositioning the Seat 23
4. Operating Instructions
4.1 Powering On & Off 24
4.2 Checking Battery Charge Level 25
4.3 Using the Headlight 25
4.4 Using the Bell 25
4.5 Using the RackIt Smart Cargo System Rack ..26
4.6 Using the Kickstand ..... 28
4.7 Folding & Unfolding the Pedals 28
5. Moving And Storage Instructions
5.1 Riding Your E-Bike 30
5.2 Using Electronic Pedal Assistance .....30
5.3 Traditional Biking 30
5.4 Using the Throttle 31
5.5 Activating Cruise Control 31
5.6 Using the Brakes 31
5.7 Helmet Safety 32
5.8 Maximizing Speed & Riding Range .....33
User Maintenance Instructions. 34
Warranty Coverage 36
SAFETY WARNINGS.
KEEP THESE INSTRUCTIONS.
INSTRUCTIONS ON THE RISK OF FIRE OR INJURY TO PERSONS AND IMPORTANT SAFETY INSTRUCTIONS
- Before use, please read the user manual and safety warnings carefully, and make sure you understand and accept all the safety instructions. The user will be responsible for any loss or damage caused by improper use.
- Failure to use correct charger can result in fire and explosion, resulting in property damage, injury, and death.
- Before each cycle of operation, the operator shall perform the preoperation checks specified by the manufacturer: That all guards and pads originally supplied by the manufacturer are in proper place and in serviceable condition; That the braking system is functioning properly; That any and all axle guards, chain guards, or other covers or guards supplied by the manufacturer are in place and in serviceable condition; That tires are in good condition, inflated properly, and have sufficient tread remaining; The area that the product is to be operated should be safe and suitable for safe operation.
- Components shall be maintained and repaired in accordance with the manufacturer's specifications and using only the manufacturer's authorized replacement parts with installation performed by dealers or other skilled persons.
- Warning against recharging non-rechargeable batteries.
- Don't allow hands, feet, hair, body parts, clothing, or similar articles to come in contact with moving parts, wheels, or drive train, while the motor is running.
- This product should not be used by children or persons with reduced physical, sensory or mental capabilities, or lack of experience and knowledge, unless they have been given supervision or instruction (IEC 60335-1/A2:2006).
- Unsupervised children should not play with the product (IEC 60335-1/A2:2006).
• Adult supervision is required.
- Units shall not be operated to perform racing, stunt riding, or other maneuvers, which may cause loss of control, or may cause uncontrolled operator/passenger actions or reactions.
- Never use near motor vehicles.
- Avoid sharp bumps, drainage grates, and sudden surface changes. Product may suddenly stop.
- Avoid streets and surfaces with water, sand, gravel, dirt, leaves, and other debris. Wet weatherimpairs traction, braking, and visibility.
- Avoid riding around flammable gas, steam, liquid, or dust that could cause fire.
- Operators shall adhere to all of the manufacturer's recommendations and instructions, as well as comply with all laws and ordinances: Units without headlights shall be operated only with adequate daylight conditions of visibility, and; Owners shall be encouraged to highlight (for conspicuity) using lighting, reflectors, and for low-riding units, signal flags on flexible poles.
- Persons with the following conditions shall be cautioned not to operate: Those with heart conditions; Pregnant women; Persons with head, back, or neck ailments, or prior surgeries to those areas of the body; and persons with any mental or physical conditions that may make them susceptible to injury or impair their physical dexterity or mental capabilities to recognize, understand, and perform all of the safety instructions and to be able to assume the hazards inherent in unit use.
EN
- Do not ride at night.
- Do not ride after drinking or taking prescription medication.
- Do not carry items when riding.
- Never operate the product barefooted.
• Always wear shoes and keep shoelaces tied. - Make sure your feet are always placed securely on the pedals.
Operators always shall use appropriate protective clothing, including but not limited to a helmet, with appropriate certification, and any other equipment recommended by the manufacturer: Always wear protective equipment such as helmet, knee pads, and elbow pads. - Always give way to pedestrians.
- Be alert to things in front and far away from you.
Do not allow distractions when riding, such as answering the phone or engaging in any other activities. - The product cannot be ridden by more than one person.
- When you ride the product along with other riders, always keep a safe distance to avoid a collision.
- When turning, be sure to maintain your balance.
- Riding with improperly adjusted brakes is dangerous and can result in serious injury or death.
The brake may become hot while operating, do not touch the brake with your bare skin.
Applying brakes too hard or too suddenly can lock up a wheel, which could cause you to lose control and fall. Sudden or excessive application of the brake may result in injury or death.
If the brake loosens, please adjust with a hexagon wrench, screwdriver, or other applicable tool, or please contact the Jetson Care Team. - Replace worn or broken parts immediately.
Check whether all safety labels are in place and understood before riding.
The owner shall allow the use and operation of the unit after a demonstration that such operators can understand and operate all components of the unit before use.
Do not ride without proper training. Do not ride at high speeds, on uneven terrain, or on slopes. Do not perform stunts or turn abruptly. - Recommended for indoor charge.
- Recommended for outdoor use.
- Prolonged exposure to UV rays, rain and the elements may damage the enclosure materials, store indoors when not in use.
The eBikes not intended for use in high altitude locations, which may require increased electrical spacings in electrical circuits, shall indicate that they are not intended for use at elevations greater than 2000 m above sea level. -
Only use the battery(ies) specified by the manufacturer.
STORE INDOORS WHEN NOT IN USE. LEAVE IT INDOOR WHEN CHARGING OR NOT RIDING. -
AVERTISSEMENT - Risque d'incendie - Aucune des pieces ne peut être réparée par l'utilisateur.
- WARNING - Riskof Fire - No User Serviceable Parts.
• The rider should not exceed 220 lb (100 kg).
MODIFICATIONS
Do not attempt to disassemble, modify, repair, or replace the unit or any components of the unit without instruction from the Jetson Care Team. This will void any warranty, and can lead to malfunctions which may cause injury.
ADDITIONAL OPERATION PRECAUTIONS
Do not lift the product off the ground while it is on and the wheels are in motion. This can result in freely spinning wheels, which may cause injury to yourself or others nearby. Do not jump on or off the product, and do not jump while using it. Always keep your feet firmly planted on the foot rest while in operation. Always check the battery charge before using.
DISPOSAL OF USED BATTERY

Battery may contain hazardous substances which could endanger the environment and human health. This symbol marked on the battery and/or packaging indicates that used battery shall not be treated as
municipal waste. Batteries should be disposed of at an appropriate collection point for recycling. By ensuring the used batteries are disposed of correctly, you will help preventing potential negative consequences for the environment and human health. The recycling of materials will help to conserve natural resources. For more information about recycling of used batteries, please contact your local municipality waste disposal service.
NOTICE OF COMPLIANCE
This device complies with Part 15 of the FCC Rules. Operation is subject to the following two conditions: (1) this device may not cause harmful interference, and (2) this device must accept any interference received, including interference that may cause undesired operation. Warning: Changes or modifications to this unit not expressly approved by the party responsible for compliance could void the user's authority to operate the equipment.
NOTE: This equipment has been tested and found to comply with the limits for a Class B digital device, pursuant to Part 15 of the FCC Rules. These limits are designed to provide reasonable protection against harmful interference in a residential installation. This equipment generates, uses and can radiate radio frequency energy and, if not installed and used in accordance with the instructions, may cause harmful interference to radio communications. However, there is no guarantee that interference will not occur in a particular installation. If this equipment does cause harmful interference to radio or television reception, which can be determined by turning the equipment off and on, the user is encouraged to try to correct the interference by one or more of the following measures:
- Reorient or relocate the receiving antenna.
- Increase the separation between the equipment and receiver.
Connect the equipment into an outlet on a circuit different from that to which the receiver is connected. - Consult the dealer or an experienced radio/TV technician for help.
Shielded cables must be used with this unit to ensure compliance with the Class B FCC limits.

WARNING:
Failure to comply with the following instructions may result in injury to the child or others.
- Keep small parts away from children during assembly.
- Accessory must be assembled and removed by an adult.
- Frequently inspect the product for damage.
* ADULT ASSEMBLY IS REQUIRED.

WARNING:
To reduct the risk of injury, adult supervision is required. Never use in roadways, near motor vehicles, on or near steep inclines or steps, swimming pools or other bodies of water; always wear shoes, and never allow more than 1 rider.
IMPORTANT SAFETY INSTRUCTIONS
WARNING - When using this product, basic precautions should always be followed, including the following:
(A) Read all the instructions before using the product.
(B) To reduce the risk of injury, close supervision is necessary when the product is used near children.
(C) Do not put fingers or hands into the product.
(D) Do not use this product if the flexible power cord or output cable is frayed, has broken insulation, or any other signs of damage.
(E) For all equipment, the instructions shall indicate:
This equipment is not intended to be used at ambient temperatures less than 0^ C ( 32^ F) or above ambient temperatures of 40^ C ( 104^ F).
(F) For all equipment, the instructions shall indicate: The battery is intended to be charged when the ambient temperature is between 0°C (32°F) and 40°C (104°F). Never charge the battery when ambient temperatures are outside this range.
CALIFORNIA PROPOSITION 65

WARNING:
THIS PRODUCT CAN EXPOSE YOU TO CHEMICALS INCLUDING CADMIUM, WHICH IS KNOWN TO THE STATE OF CALIFORNIA TO CAUSE CANCER AND BIRTH DEFECTS OR OTHER REPRODUCTIVE HARM. FOR MORE INFORMATION GO TO: WWW.P65WARNINGS.CA.GOV.
EN
1. ABOUT YOUR PRODUCT.
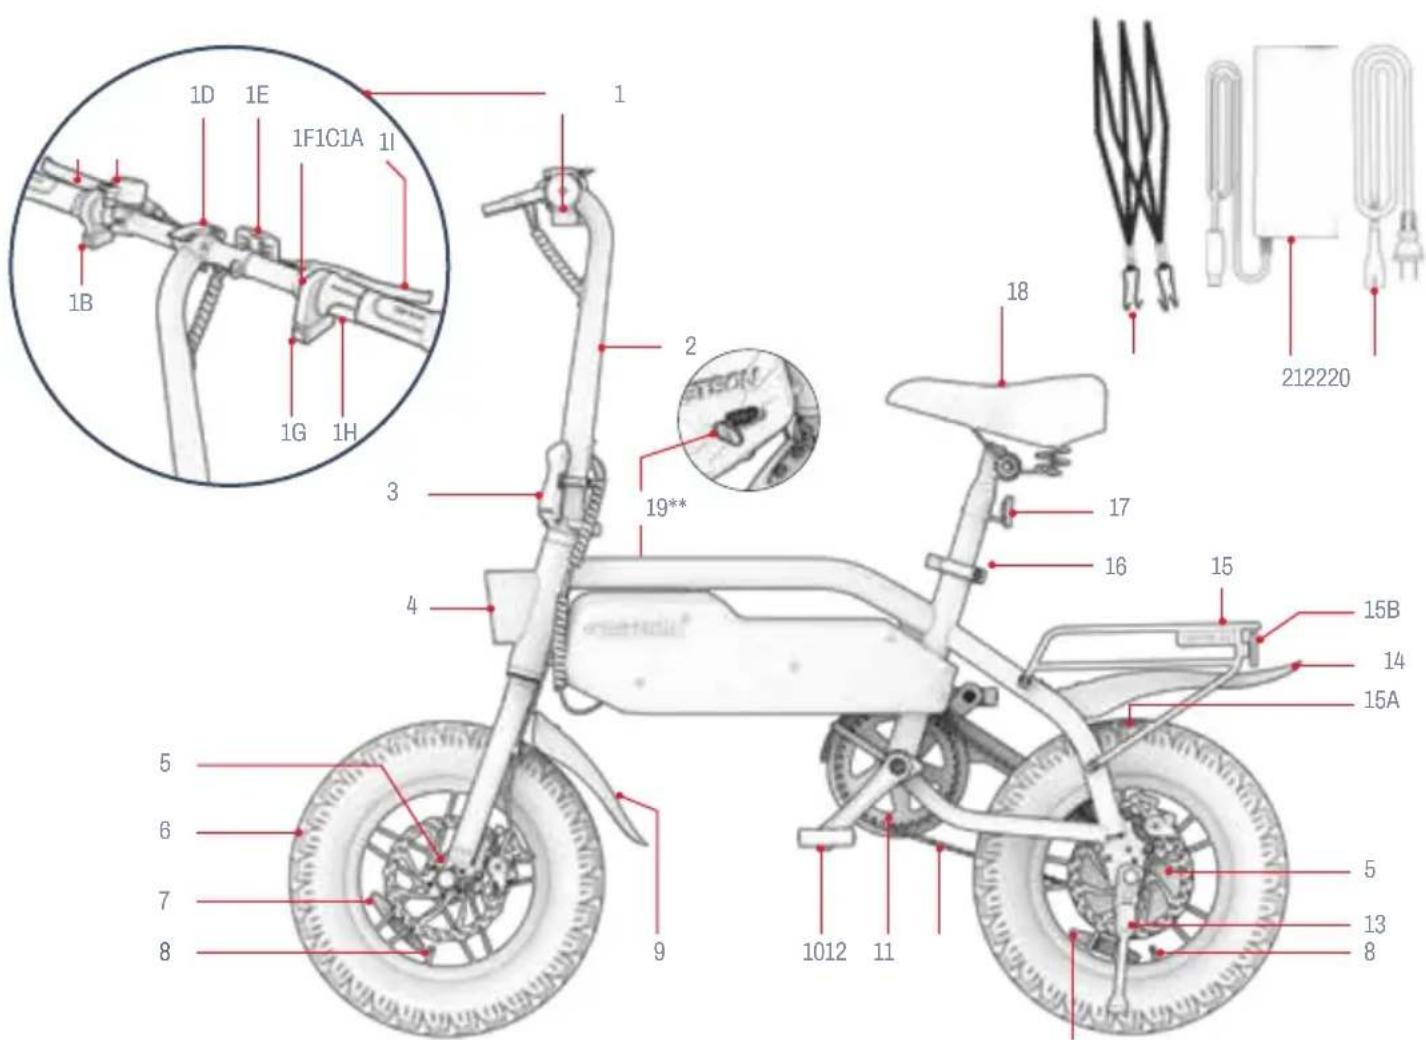
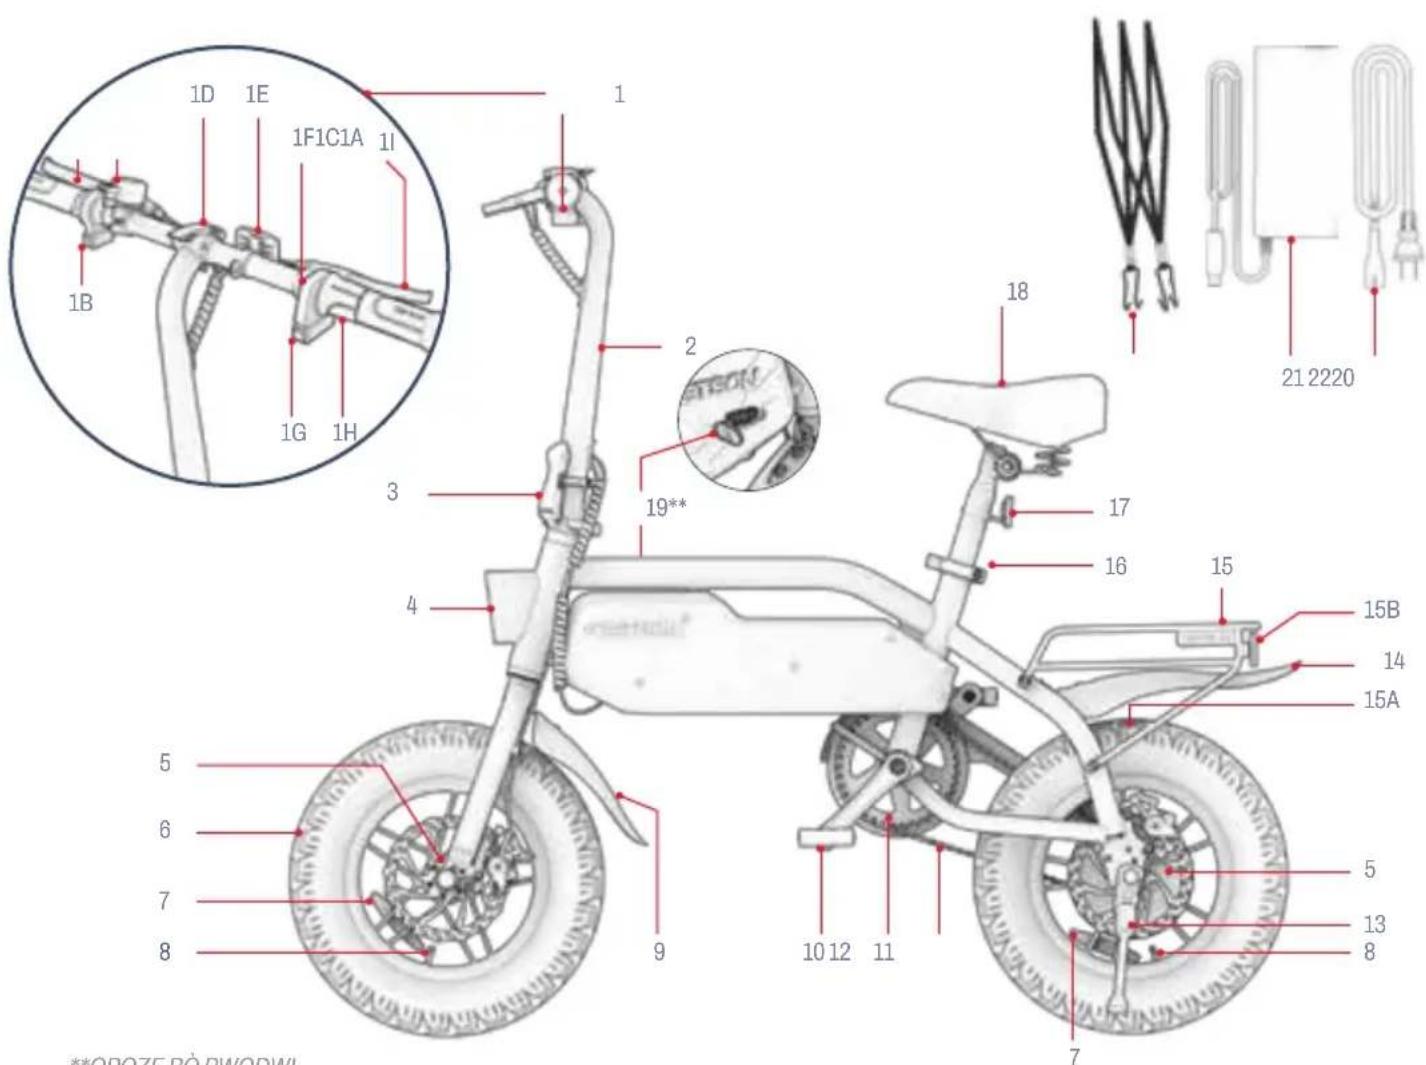
1.1 Product Overview
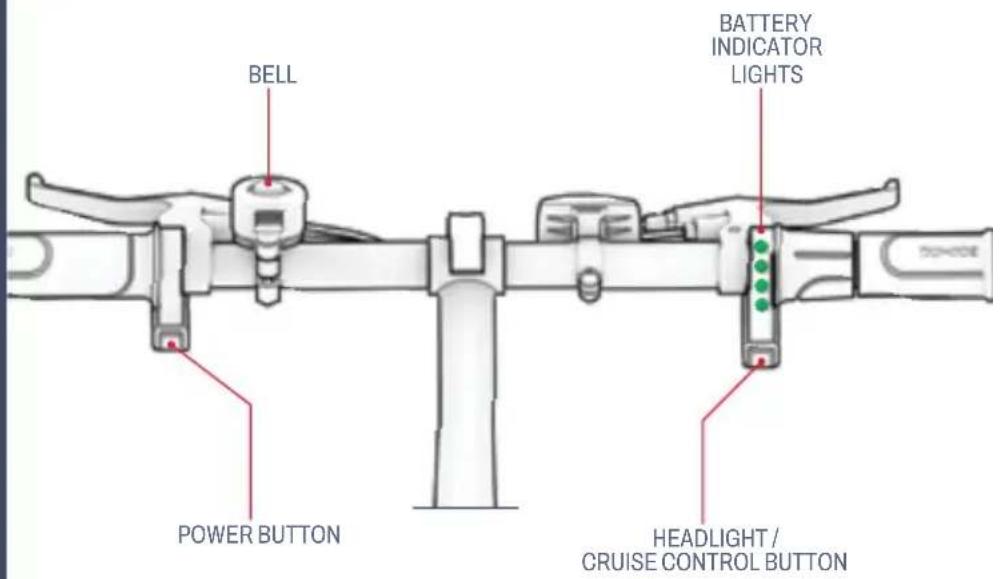
- HANDLEBAR
A. LEFT HANDBRAKE
B. POWER BUTTON
C. BELL
D. HANDLEBAR CLAMP
E. FRONT REFLECTOR
F. BATTERY INDICATOR LIGHTS
G. HEADLIGHT / CRUISE CONTROL BUTTON
H. TWIST THROTTLE
I. RIGHT HANDBRAKE
-
HANDLEBAR STEM
-
FOLDING LATCH WITH LOCKING RING
-
HEADLIGHT
-
DISC BRAKE (×2; FRONT AND REAR)
-
WHEEL (×2; FRONT AND REAR)
-
WHEEL REFLECTOR
(×2; FRONT AND REAR)
- TIRE VALVE WITH DUST CAP
(×2; FRONT AND REAR)
-
FRONT FENDER
-
PEDAL* (×2; LEFT AND RIGHT)
-
CRANKSET
-
CHAIN
-
KICKSTAND
-
REAR FENDER
-
RACKIT SMART CARGO SYSTEM RACK
A. BUNGEE ATTACHMENT LOOP (×2)
B. REFLECTOR
-
SEAT CLAMP
-
REAR REFLECTOR
-
SEAT*
-
CHARGING PORT WITH COVER
-
BUNGEE STRAP
-
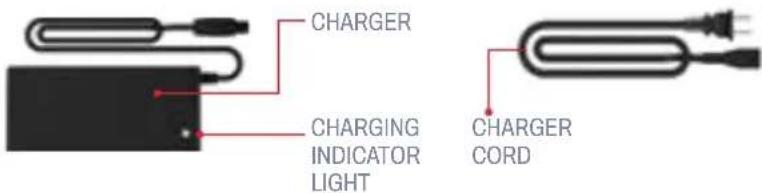
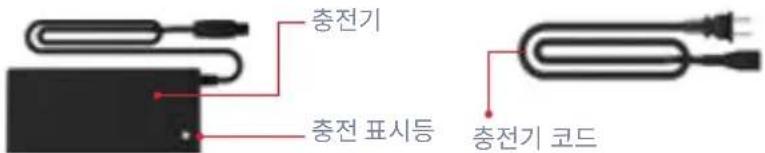
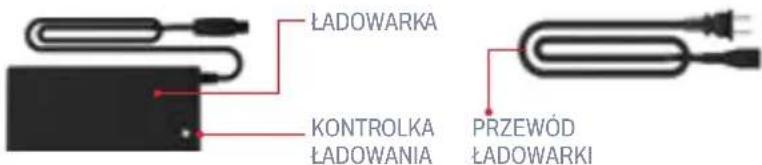
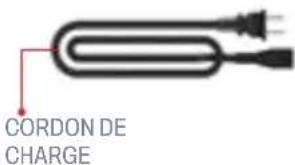
CHARGER
-
CHARGING CABLE

**OPPOSITE SIDE OF PRODUCT
NOTE: IMAGES MAY NOT REFLECT EXACT APPEARANCE OF ACTUAL PRODUCT.
EN
1.2 What's in the Box
TOOLS INCLUDED FOR ASSEMBLY, ADJUSTMENT, AND MAINTENANCE:
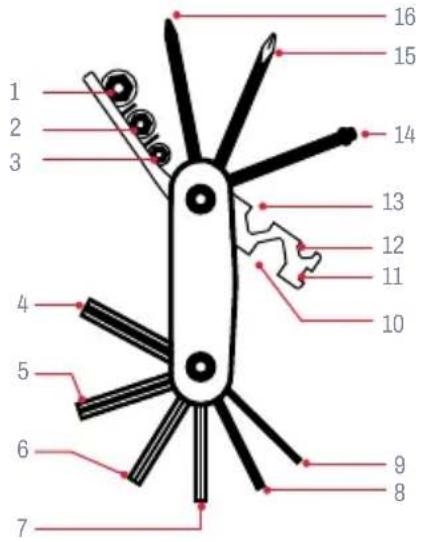
- Multi-tool
MULTI-TOOL TIP IDENTIFICATION:
| 1. 10MM SOCKET | 9. 2MM ALLEN KEY |
| 2. 9MM SOCKET | 10. 15MM HEX WRENCH |
| 3. 8MM SOCKET | 11. 14 GAUGE SPOKE WRENCH |
| 4. 6MM ALLEN KEY | 12. 8MM HEX WRENCH |
| 5. 5MM ALLEN KEY | 13. 10MM HEX WRENCH |
| 6. 4MM ALLEN KEY | 14. SOCKET SCREW |
| 7. 3MM ALLEN KEY | 15. PHILLIPS-HEAD SCREWDRIVER |
| 8. 2.5MM ALLEN KEY | 16. FLAT-HEAD SCREWDRIVER |
natural_image
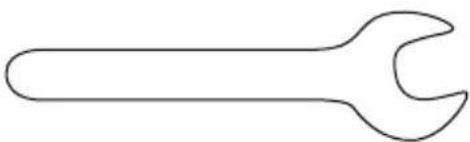
Simple line drawing of a wrench (no text or symbols)- 15 mm spanner wrench
• WEIGHT LIMIT: 220 LB | 100 KG
• MINIMUM RIDER WEIGHT: 100 LB | 45.4 KG
• PRODUCT WEIGHT: 49.2 LB | 22.3 KG
• PRODUCT DIMENSIONS, UNFOLDED:
49.6 IN (L) × 20.7 IN (W) × 44.3 IN (H) | 126.0 CM (L) × 52.5 CM (W) × 112.5 CM (H)
• PRODUCT DIMENSIONS, FOLDED:
49.6 IN (L) × 15.8 IN (W) × 30.3 IN (H) | 126.0 CM (L) × 40.0 CM (W) × 77.0 CM (H)
• TIRE SIZE: 14 IN (H) × 3 IN (W) | 35.5 CM (H) × 7.6 CM (W)
* PRODUCT RANGE, SPEED, BATTERY LIFE, AND OTHER SPECIFICATIONS MAY VARY BASED ON RIDER AND RIDING CONDITIONS. SEE SECTION 5.8 FOR MORE DETAILS ON CONDITIONS THAT CAN AFFECT PERFORMANCE.
1.4 Online Resources1.3 Product Specs

Scan for our most updated product onboarding materials and support resources.
Find this user manual online at https://cdn.shopify.com/s/files/1/2530/6734/files/SHADOW-MANUAL_WEB-1742430167217.pdf
Find our collection of user manuals at https://ridejetson.com/pages/product-manuals
EN
2. INSTALLATION INSTRUCTIONS.
2.1 Starting Notes
- KICK OFF YOUR ADVENTURE RIGHT. PRIOR TO USE OF THIS PRODUCT, CAREFULLY READ THE ENTIRE USER MANUAL, INCLUDING SAFETY WARNINGS. MAKE SURE YOU UNDERSTAND, ACCEPT, AND ADHERE TO ALL:
• MANUFACTURER'S RECOMMENDATIONS.
- SAFETY INSTRUCTIONS AND WARNINGS.
- LOCAL RIDING AND OPERATIONAL LAWS AND ORDINANCES.
- TAKE CARE WHEN UNBOXING, REMOVING ALL PACKAGING MATERIALS, AND PROP THE E-BIKE UPRIGHT ON ITS KICKSTAND PRIOR TO ASSEMBLY. (REFER TO SECTION 4.6)
- THE DIRECTIONS GIVEN IN THIS MANUAL—RIGHT, LEFT, FRONT/FORWARD, AND REAR/BACK—ARE ORIENTED AS THE RIDER WOULD SEE THEM WHEN SEATED ON THE E-BIKE. THE "RIGHT SIDE" OF THE E-BIKE, FOR EXAMPLE, IS THE SIDE WHERE THE RIDER'S RIGHT HAND WILL BE.
2.2 Rider Suitability
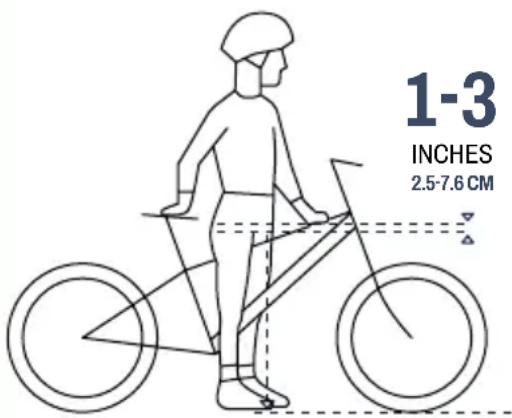
For safe and comfortable riding, there should be a clearance of at least 1-3 inches (2.5-7.6 cm) between the crotch and the top tube of the bike frame when the rider straddles the bike with both feet flat on the ground.
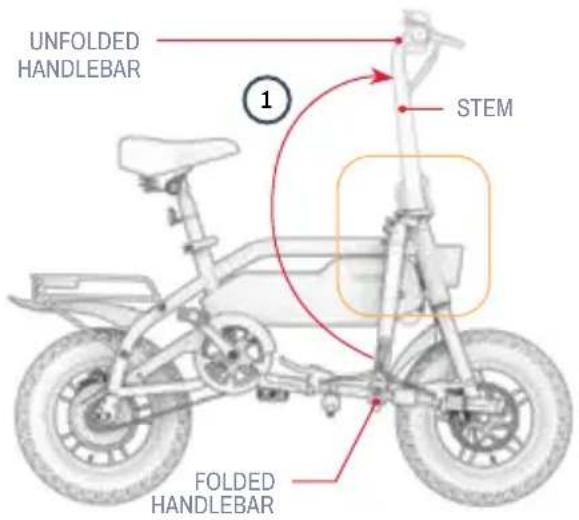
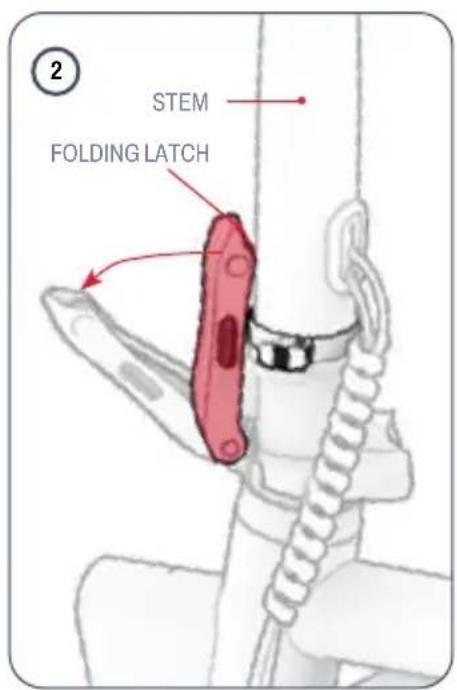
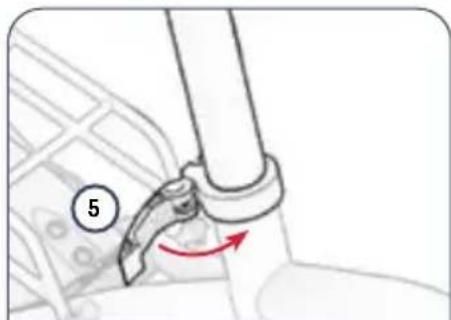
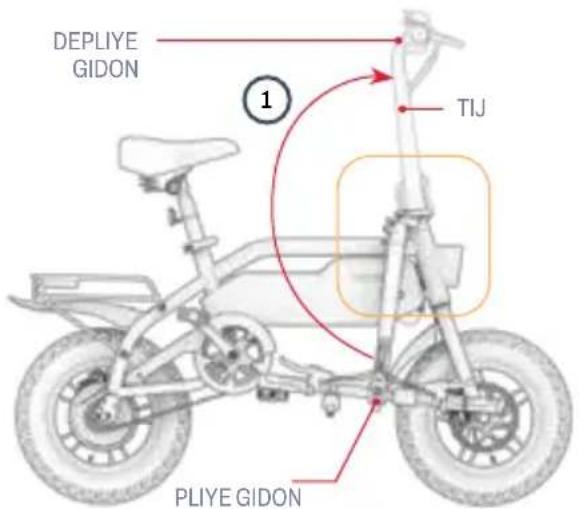
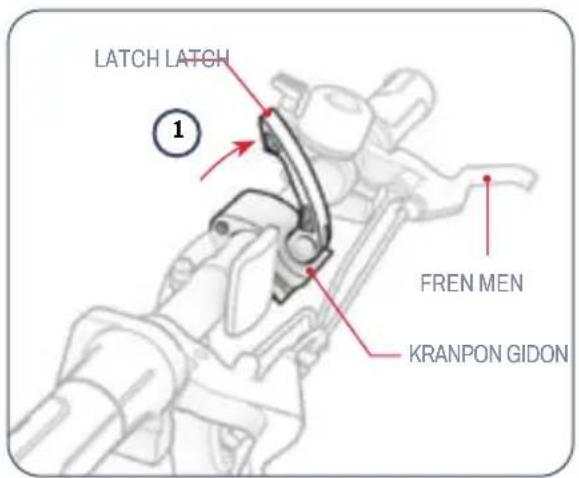
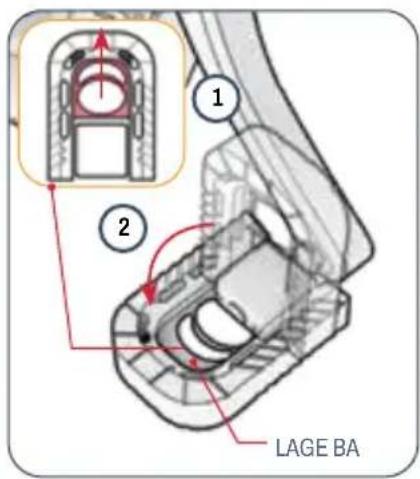
2.3 Unfolding & Folding the Handlebar
WHEN TO UNFOLD: FOR SETUP AND RIDING WHEN TO FOLD: FOR STORAGE AND TRANSPORT
To Unfold:
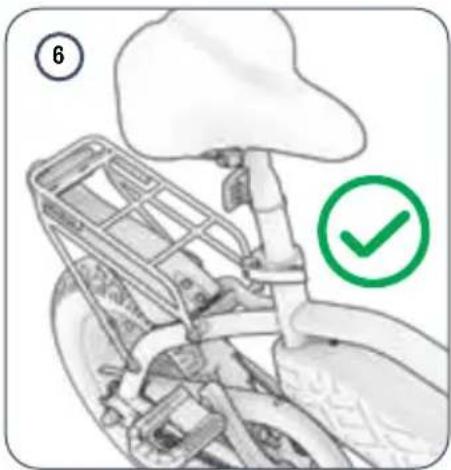
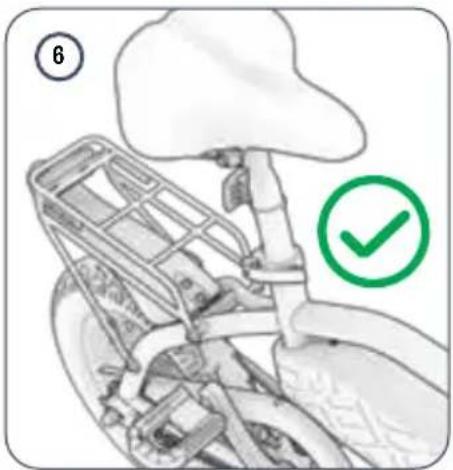
- GENTLY RAISE THE HANDLEBAR UNTIL THE STEM IS RESTING VERTICALLY ON THE FRAME.
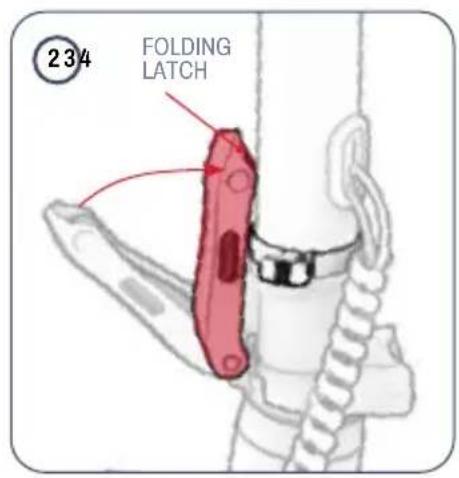
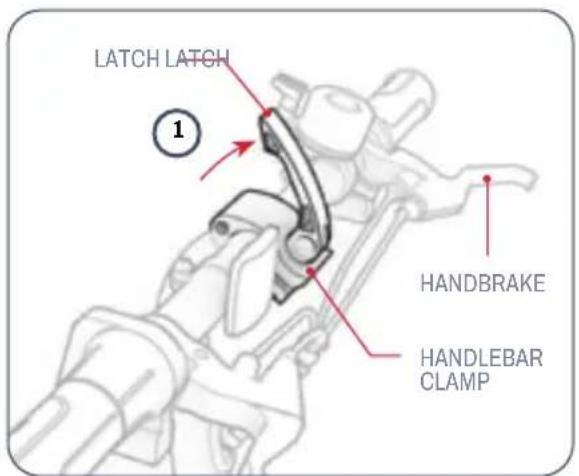
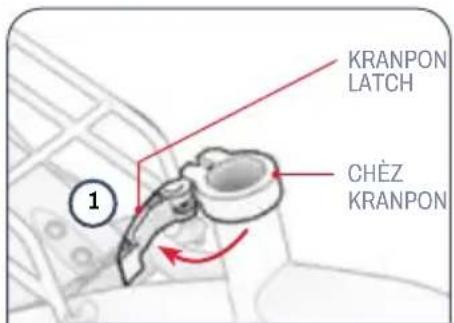
- PUSH THE FOLDING LATCH IN UNTIL IT CLICKS INTO THE CLOSED (LATCHED) POSITION.
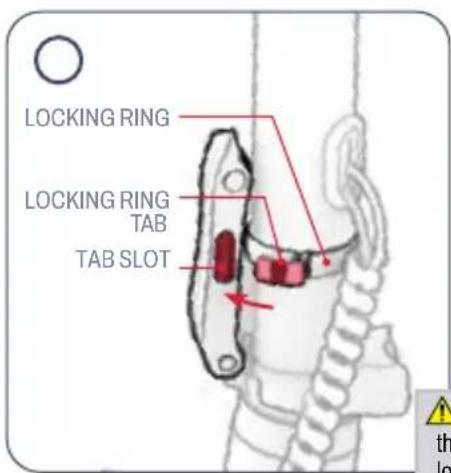
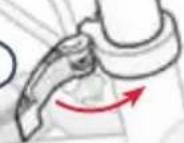
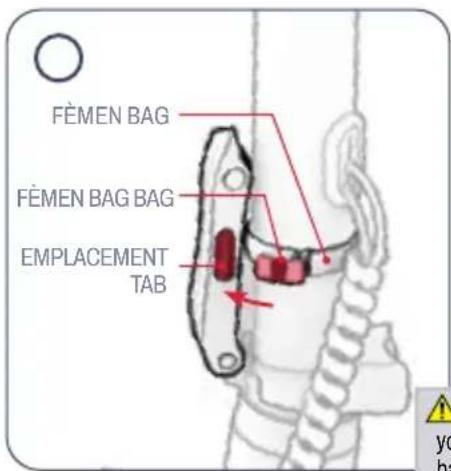
- SECURE THE LATCH WITH THE LOCKING RING: ROTATE THE RING CLOCKWISE AROUND THE STEM UNTIL THE TAB ON THE RING SLIDES INTO THE TAB SLOT ON THE LATCH.
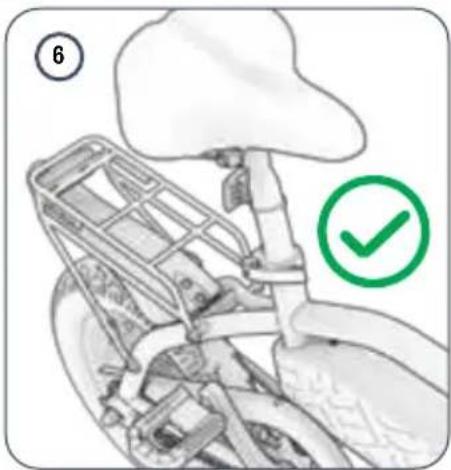
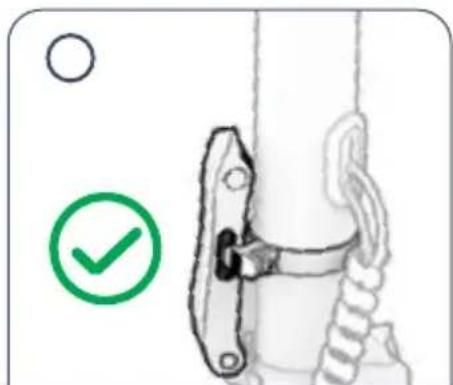
- CHECK THAT THE LATCH IS SECURED BY ENSURING THAT IT CANNOT BE PULLED OPEN.

natural_image
Diagram showing a rope knot with a green checkmark indicating the correct direction (no text or symbols present)IMPORTANT: Never ride the e-bike without the folding latch closed and secured by the locking ring.
EN
To Fold:
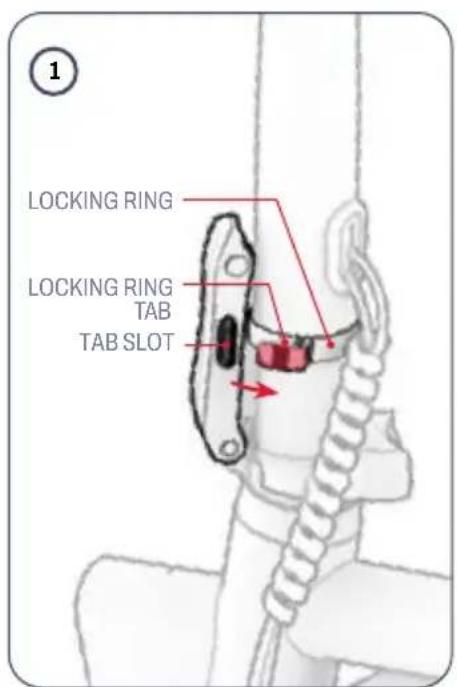
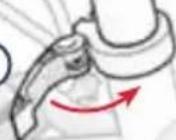
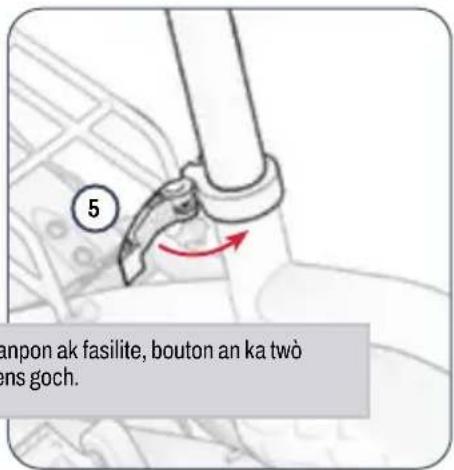
- ROTATE THE LOCKING RING COUNTERCLOCKWISE AROUND THE STEM UNTIL THE TAB CLEARS FROM THE TAB SLOT ON THE FOLDING LATCH.
- WHILE HOLDING THE STEM STEADY WITH ONE HAND, USE THE OTHER HAND TO PULL THE FOLDING LATCH OPEN (UNLATCHED).
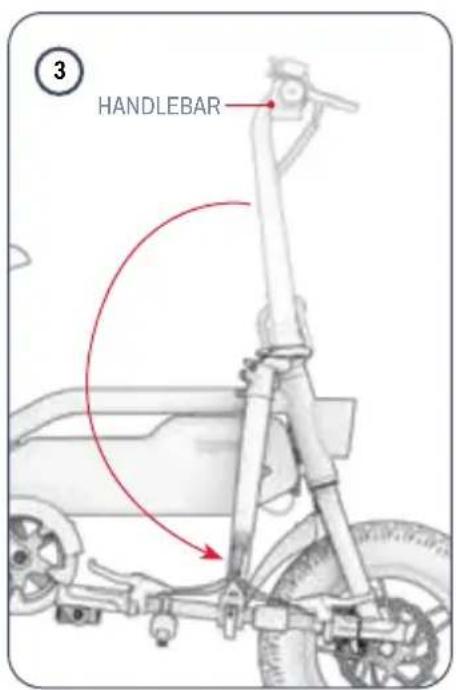
- GENTLY LOWER THE HANDLE BAR DOWN TOWARDS THE SIDE OF THE BIKE OPPOSITE THE FOLDING LATCH.
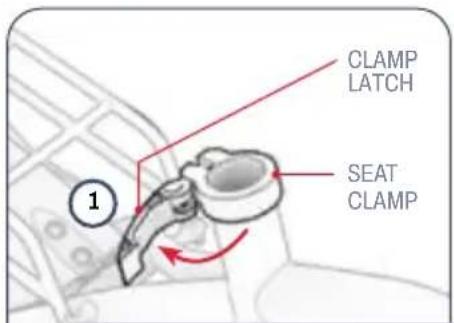
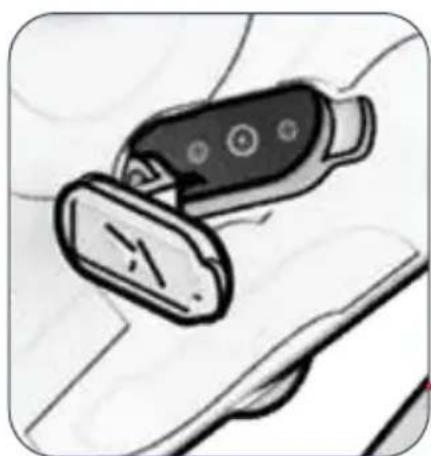
2.4 Attaching the Seat
- PULL OPEN THE LATCH ON THE SEAT CLAMP.
- LOCATE THE "MINIMUM INSERTION" MARK ENGRAVED NEAR THE BOTTOM OF THE SEAT POST.
- HOLD THE SEAT IN POSITION ABOVE THE BIKE.
- LOWER THE SEAT POST THROUGH THE CLAMP AND INTO THE SEAT TUBE UNTIL THE "MINIMUM INSERTION" MARK IS BELOW THE CLAMP. NOTE: IF THE CLAMP OPENING IS TOO NARROW TO RECEIVE THE POST, YOU CAN WIDEN IT BY TURNING THE KNOB ON THE CLAMP COUNTERCLOCKWISE WHILE HOLDING THE LATCH STEADY.
- WHILE HOLDING THE SEAT AT THE DESIRED HEIGHT, CLOSE THE LATCH ON THE CLAMP.
- CHECK THAT THE SEAT IS SECURE: USE YOUR HAND TO PUT DOWNWARD PRESSURE ON THE SEAT. IF THE SEAT POST SLIPS FURTHER DOWN INTO THE TUBE, BRING IT BACK TO POSITION AND TIGHTEN THE CLAMP BY TURNING THE KNOB CLOCKWISE.
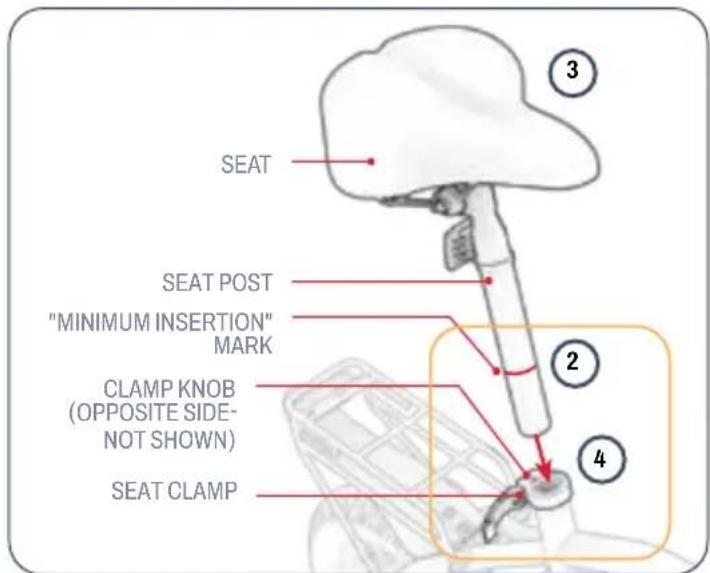

TROUBLESHOOTING: If you cannot open the clamp latch with ease, the knob may be too tight. Loosen the knob by turning it counterclockwise.
natural_image
Mechanical component diagram showing a lever and curved arm with a red rotation arrow (no text or symbols)

EN
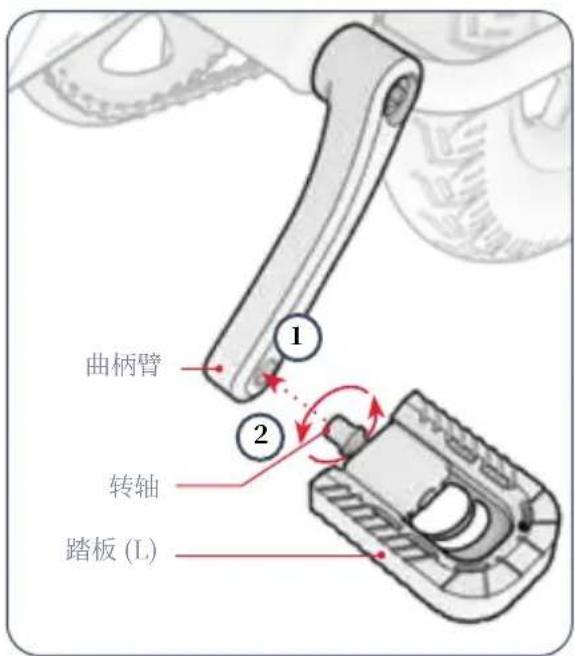
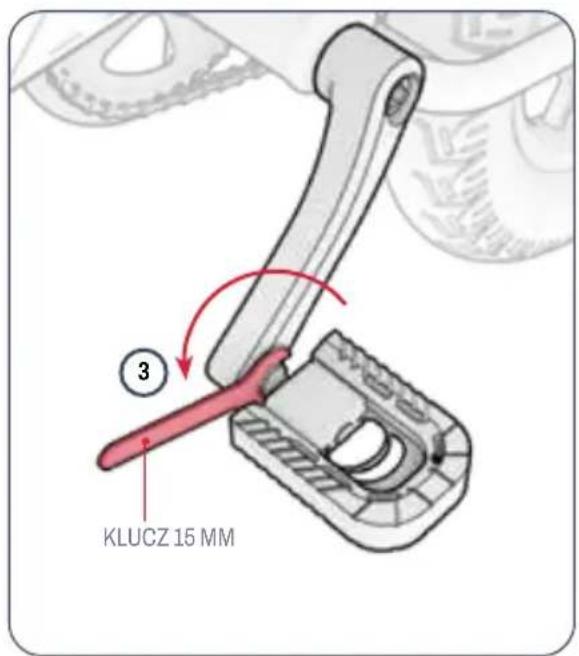
2.5 Attaching the Pedals
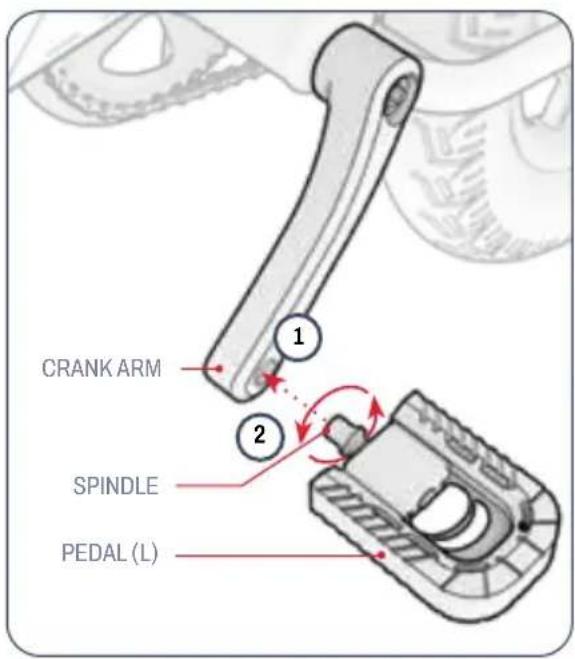
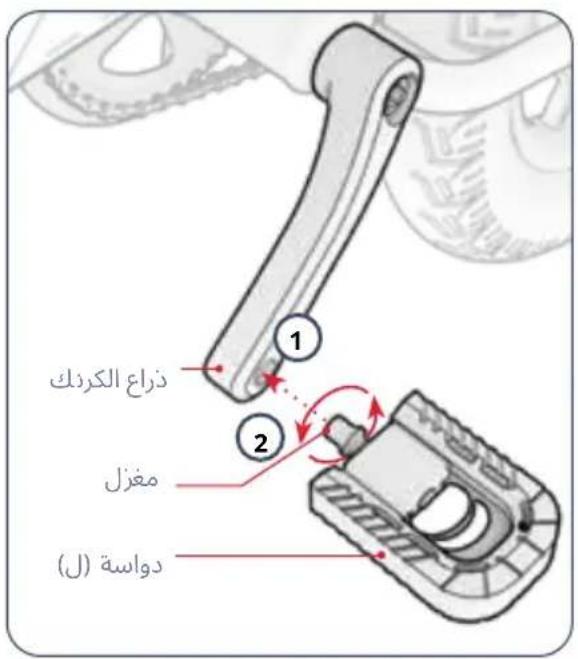
YOU WILL NEED THE 15MM WRENCH.
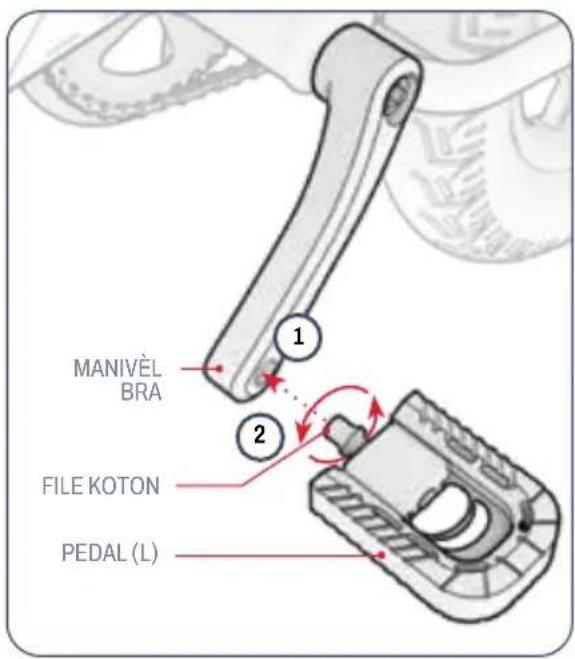
- ALIGN THE SPINDLE ON PEDAL MARKED "L" WITH THE HOLE AT THE END OF THE CRANK ARM ON THE LEFT SIDE OF THE BIKE.
- HOLD THE PEDAL BASE STEADY AND, TAKING CARE THAT THE SPINDLE ENTERS THE HOLE STRAIGHT, USE YOUR OTHER HAND TO TWIST THE SPINDLE COUNTERCLOCKWISE INTO THE HOLE FOR A FEW ROTATIONS.

- USE THE WRENCH TO FINISH INSERTING AND THEN TIGHTENING THE SPINDLE INTO THE CRANK ARM.
- CHECK THAT THE RIGHT PEDAL IS SECURE.
- REPEAT STEPS 2-5 WITH THE RIGHT ("R") PEDAL.
IMPORTANT: The spindle on the right pedal is reverse threaded and needs to be inserted and tightened with clockwise turns.
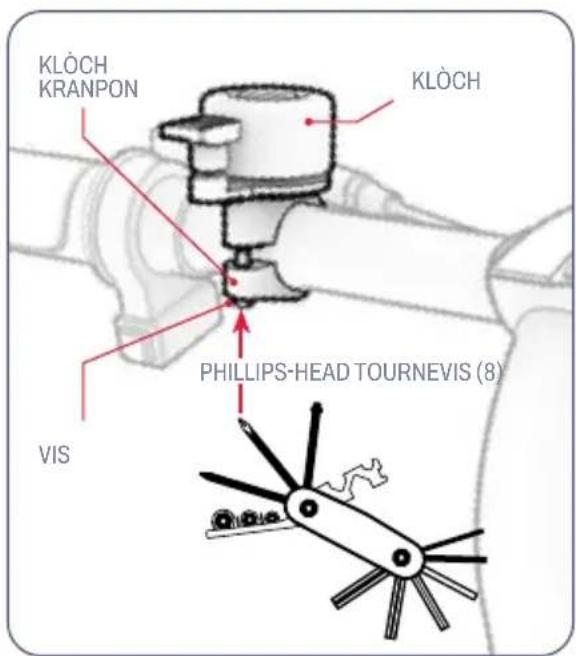
2.6 Securing the Bell 2.7 Securing the Front Reflector
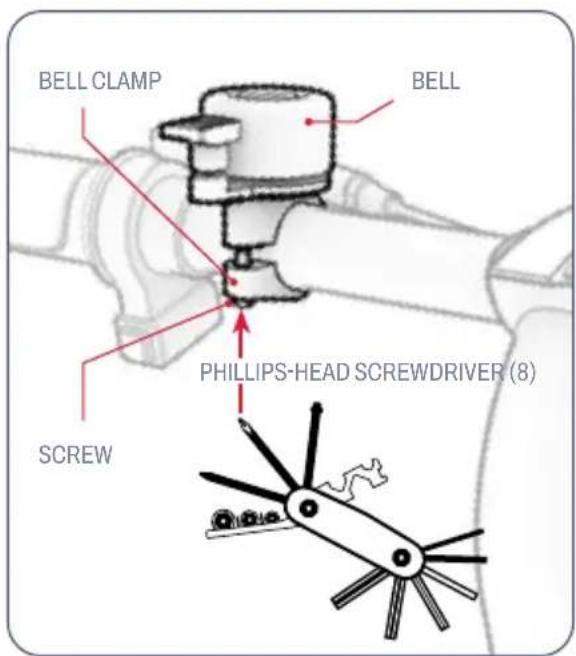
YOU WILL NEED THE PHILLIPS-HEAD SCREWDRIVER (8) TIP OF THE MULTI-TOOL.
- LOOSEN (BUT DO NOT REMOVE) THE SCREW ON THE BELL CLAMP BY TURNING IT COUNTERCLOCKWISE FOR 1-2 ROTATIONS WITH THE PHILLIPS-HEAD SCREWDRIVER TIP (8) OF THE MULTI-TOOL.
- ROTATE THE BELL AROUND THE HANDLEBAR UNTIL IT IS IN A PLACE THAT CAN EASILY BE REACHED BY THE RIDER'S LEFT-HAND THUMB WHILE HOLDING ONTO THE HANDLEBAR.
- WHILE HOLDING THE BELL IN THAT POSITION, TIGHTEN THE CLAMP BY TURNING THE SCREW CLOCKWISE WITH THE SCREWDRIVER.
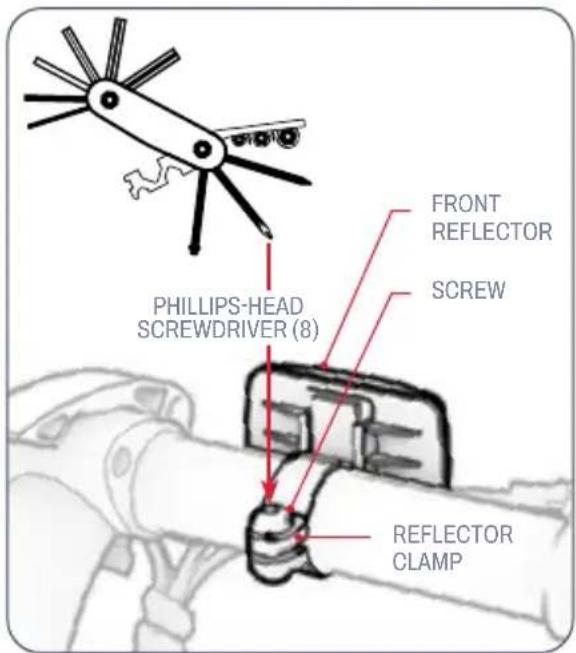
YOU WILL NEED THE PHILLIPS-HEAD SCREWDRIVER (8) TIP OF THE MULTI-TOOL.
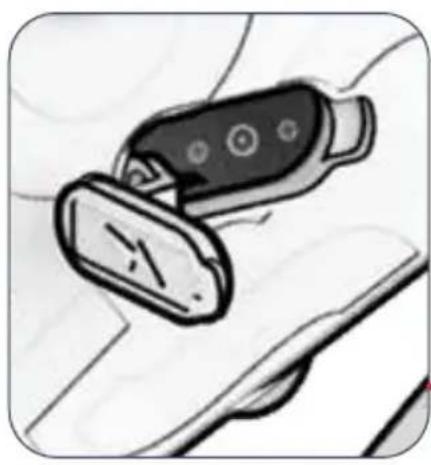
- ROTATE THE FRONT REFLECTOR CLAMP AROUND THE HANDLEBAR UNTIL THE REFLECTOR IS FACING THE FRONT OF THE BIKE.
- SLIDE THE REFLECTOR TOWARDS THE CENTER OF THE HANDLEBAR UNTIL THE REFLECTOR CLAMP FEELS SNUG ON THE THICKER PART OF THE HANDLEBAR.
- IF NECESSARY, TIGHTEN THE CLAMP ON THE HANDLEBAR FURTHER BY TURN THE SCREW CLOCKWISE WITH THE PHILLIPS-HEAD SCREWDRIVER TIP (8) OF THE MULTI-TOOL.

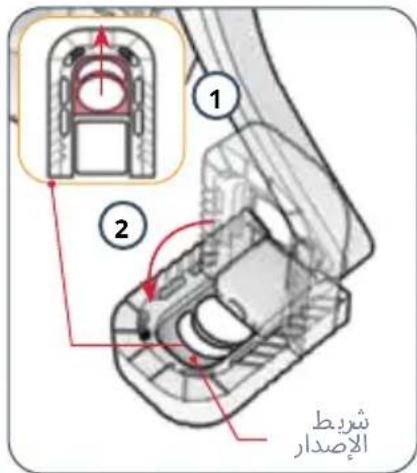
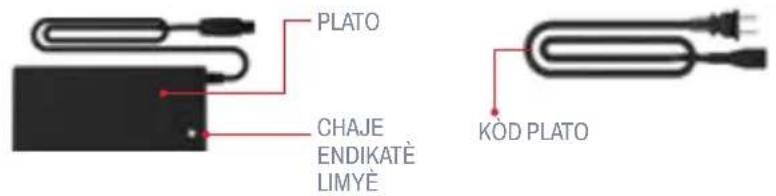
2.8 Charging the Battery
- CONNECT THE CHARGING CABLE WITH THE CHARGER.
- PULL OPEN THE CHARGING PORT COVER ON YOUR E-BIKE.
- PLUG THE CHARGING CABLE INTO THE WALL, AND THEN PLUG THE CHARGER INTO THE CHARGING PORT.
- WHEN THE INDICATOR LIGHT ON THE CHARGER TURNS FROM RED TO GREEN, YOUR BATTERY HAS REACHED FULL CHARGE. REMOVE THE CHARGER FROM THE CHARGING PORT AND UNPLUG THE CABLE FROM THE WALL OUTLET.
- CLOSE THE CHARGING PORT COVER.
NOTE: It can take approximately 5 hours to bring the battery to full charge. Fully charge the battery prior to first use.
natural_image
Illustration of a hand holding a VR headset and a tablet device (no text or symbols visible)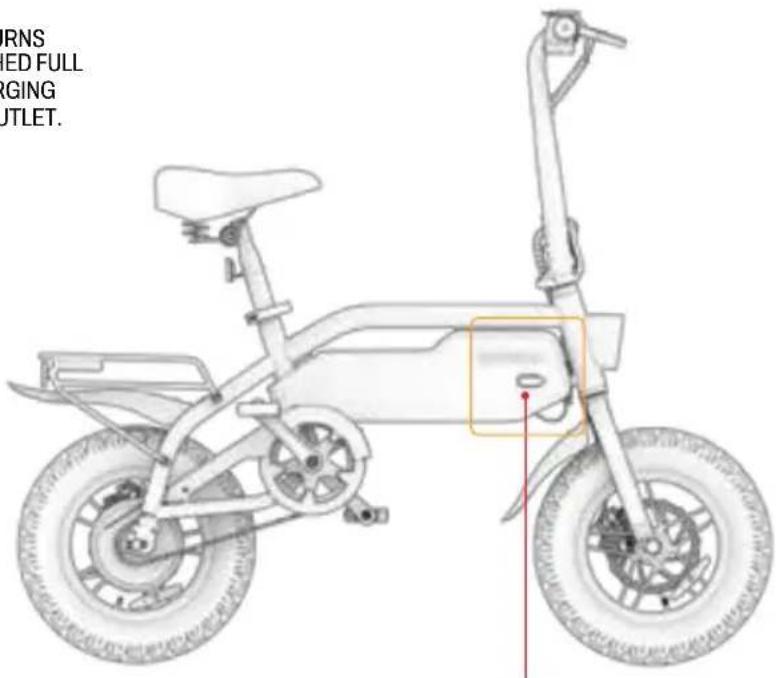
CHARGING PORT WITH COVER
EN
CHARGING INDICATOR LIGHT ON THE CHARGER:
RED ILLUMINATION CHARGING
GREEN ILLUMINATION CHARGING COMPLETE
Important Charging Notes:
- ALWAYS KEEP THE CHARGING PORT CLOSED WHEN NOT ACTIVELY CHARGING THE BATTERY.
- NEVER TURN ON THE PRODUCT WHILE IT IS CHARGING.
• DO NOT USE RELOCATABLE POWER TAPS.
• FOR BEST BATTERY HEALTH, CHARGE THE BATTERY FULLY DURING EACH CHARGING SESSION—ABOUT 5 HOURS. - NEVER LEAVE YOUR PRODUCT CHARGING OVERNIGHT OR FOR EXTENDED PERIODS OF TIME.
• DO NOT ATTEMPT TO REMOVE OR DISASSEMBLE THE BATTERY. - CHARGING AMBIENT TEMPERATURE RANGE: 32°F (0°C) - 104°F (40°C)
• OPERATING AMBIENT TEMPERATURE RANGE: 32°F(0°C)-104°F(40°C) - ALWAYS KEEP THE CHARGING PORT COVER CLOSED WHEN NOT ACTIVELY CHARGING THE PRODUCT.
- DO NOT USE THIS PRODUCT IF THE FLEXIBLE POWER CORD OF OUTPUT CABLE IS FRAYED, HAS BROKEN INSULATION, OR ANY OTHER SIGNS OF DAMAGE.
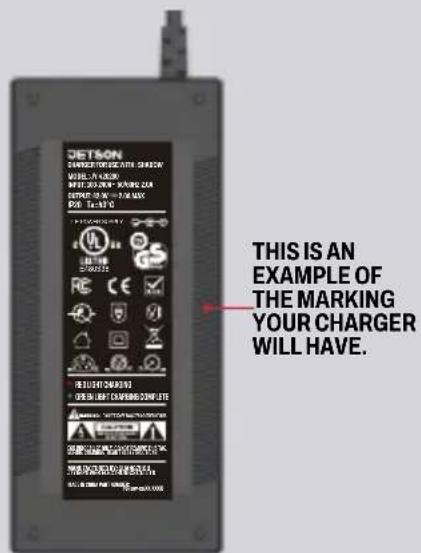
- CHECK THAT THE CHARGER MODEL NUMBER ON THE CHARGER LABEL MATCHES THE CHARGER MODEL NUMBER LISTED ABOVE.
- CHECK THAT THE CHARGER LABEL IDENTIFIES THE CHARGER AS COMPATIBLE WITH YOUR JETSON MODEL. YOU CAN FIND YOUR JETSON MODEL'S NAME AND SKU ON A LABEL ADHERED TO THE TOP, SIDE, OR UNDERSIDE OF THE PRODUCT'S FRAME OR STANDING DECK.
IMPORTANT:
ONLY USE THE INCLUDED CHARGER OR ONE OBTAINED DIRECTLY THROUGH JETSON LABELED WITH JY-420200 MADE BY GUANGZHOU JI YIN POWER ELECTRONICS CO LTD. (JETSON MODEL NO. PJSHDW-CH).
⚠️ FAILURE TO USE CORRECT CHARGER CAN RESULT IN FIRE AND EXPLOSION.
EN
3. PREPARING TO RIDE.
3.1 Pre-Ride Safety Checks
CONDUCT THESE IMPORTANT SAFETY CHECKS BEFORE EVERY JOURNEY:
Brake:
- MAKE SURE THE BRAKE WORKS PROPERLY SUCH THAT THE HANDBRAKE LEVERS ARE SECURED TO THE HANDLEBAR AND LUBRICATED SO THEY COMPRESS EASILY.
- THE BRAKE PADS ARE NOT WORN, AND ARE CENTERED AND ALIGNED WITH THE ROTOR.
Frame:
- CHECK THAT THE BIKE FRAME AND THE FORK ARE NOT DAMAGED, BENT, OR BROKEN.
- ENSURE THAT THE STEM-TO-FORK BOLT IS NOT OVERTIGHTENED. AN OVERTIGHTENED
BOLT CAN LEAD TO A MALFUNCTION THAT PUTS RIDER SAFETY AT RISK. - CHECK THAT THE DRIVE SYSTEM IS IN WORKING ORDER AND SECURELY ATTACHED TO THE FRAME.
Cranks & Pedals:
- CHECK THAT THE PEDALS ARE SECURELY TIGHTENED TO THE CRANKS.
- CHECK THAT THE CRANKS AND DRIVE SYSTEM ARE SECURELY TIGHTENED TO THE FRAME OF THE BIKE.
Steering:
- CHECK THAT THE STEM IS SECURED, WITH THE QUICK STEM RELEASE CLOSED AND FORTIFIED BY THE LOCKING RING.
- CHECK THAT THE HANDLEBAR IS SECURED IN POSITION BY THE HANDLEBAR CLAMP.
Wheels:
- CHECK THAT TIRES DO NOT SHOW SIGNS OF EXCESSIVE WEAR OR DAMAGE.
- MAKE SURE THAT THE TIRES ARE INFLATED TO WITHIN THE RECOMMENDED PRESSURE OF 35 - 45 PSI.
- CHECK THAT THE WHEEL SPOKES ARE NOT BROKEN.
- CHECK THE WHEEL RIMS ARE NOT DAMAGED OR BENT.
- CHECK THAT THE AXLE NUTS ARE TIGHT.
3.2 Tire Inflation & Pressure
BEFORE YOUR FIRST RIDE, YOU WILL NEED TO ADD AIR TO THE TIRES TO BRING THEM TO WITHIN THE RECOMMENDED PRESSURE OF 35 - 45 PSI (POUNDS PER SQUARE INCH). USE A GAUGE TO CHECK THAT THE TIRE PRESSURE FALLS WITHIN THIS RANGE PRIOR TO EVERY RIDE.
To Add Air:
- REMOVE THE DUST CAP FROM THE TIRE VALVE ON ONE WHEEL BY TWISTING IT COUNTERCLOCKWISE. SET ASIDE.
- FOLLOW THE MANUFACTURER'S INSTRUCTIONS ON YOUR AIR PUMP TO INSERT AIR INTO THE TIRE. CHECK PERIODICALLY WITH A GAUGE AND CONTINUE ADDING AIR UNTIL YOU REACH 35 - 45 PSI.
- REMOVE THE AIR PUMP AND REPLACE THE DUST VALVE BY TWISTING IT ON CLOCKWISE.
- REPEAT WITH THE OTHER TIRE.

IMPORTANT: Only use a manual air pump to inflate the tires on your e-bike. Never use an air compressor; doing so may cause the tire tubes to pop.
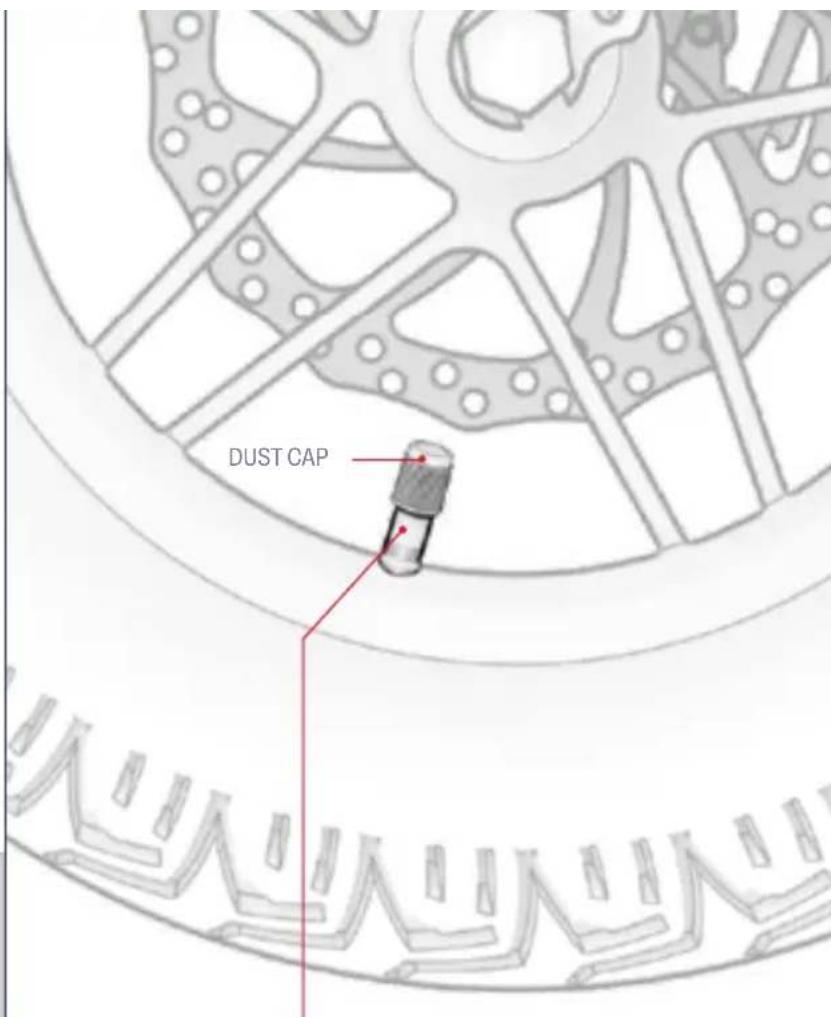
TIRE VALVE
EN
3.3 Checking & Adjusting the Brakes
Brake Safety & Functionality Check:
AFTER ASSEMBLY AND PRIOR TO EVERY RIDE, CHECK THAT THE BRAKES ARE FUNCTIONING PROPERLY AND SAFELY TO SLOW THE WHEEL DOWN AND BRING IT TO A STOP BY PERFORMING THE FOLLOWING STEPS:
- WALK WITH YOUR BIKE AND GENTLY PULL THE LEFT HANDBRAKE.
- CHECK THAT THE FRONT CALIPER CLOSES PROPERLY ON THE DISC AND SLOWS THE WHEEL ROTATION DOWN.
- REPEAT, PULLING THE LEFT HANDBRAKE WITH MORE PRESSURE AND CHECKING THAT THE FRONT WHEEL IS BROUGHT TO A STOP.
- REPEAT STEPS 1-3 WITH THE RIGHT HANDBRAKE AND THE REAR WHEEL.
Brake Safety & Functionality Check:
YOU MAY NEED THE 5MM ALLEN KEY TIP (5) OF THE MULTI-TOOL.
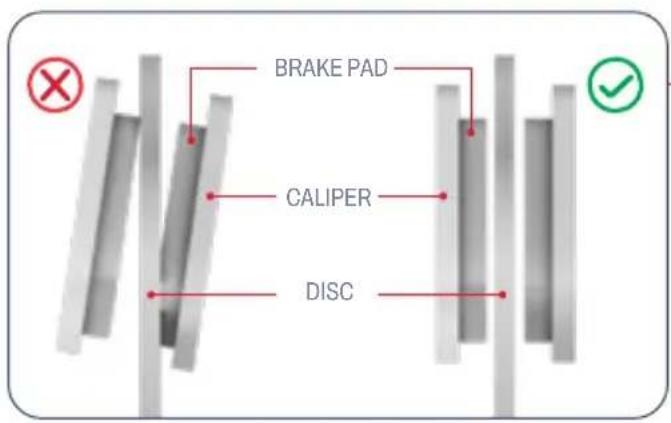
BIKE BRAKES REQUIRE ALL ELEMENTS TO BE IN EXACT ALIGNMENT AND PLACEMENT IN ORDER TO FUNCTION PROPERLY. A RUBBING OR SQUEAKING SOUND COMING FROM A BRAKE AREA (EITHER CONSTANT OR INTERMITTENT) IS A GOOD INDICATOR THAT SOMETHING IS OUT OF ALIGNMENT AND NEEDS TO BE ADJUSTED.
THE CAUSE OF THE NOISE IS LIKELY A MISALIGNED CALIPER, CAUSING THE BRAKE PADS INSIDE OF THEM TO RUB AGAINST THE DISC EVEN WHEN THE CALIPER IS OPEN. THE PADS SHOULD ONLY COME IN CONTACT WITH THE DISC WHEN THE CALIPER IS CLOSED BECAUSE THE HANDBRAKE HAS BEEN PULLED.

natural_image
Mechanical assembly diagram showing a motor and gear components with highlighted red and orange features (no text or labels)Adjusting the Brake Caliper:
CALIPER
CALIPER
ADJUSTMENT
BOLTS
BRAKE PADS (INTERIOR OF
CALIPER; NOT SHOWN)
DISC
-
ON THE BRAKE THAT NEEDS ADJUSTING, LOCATE THE CALIPER, BRAKE PADS, AND DISC.
-
LIFT THAT WHEEL OF THE BIKE AND GIVE IT A SPIN. WATCH THE DISC REVOLVE BETWEEN THE BRAKE PADS, AND NOTICE WHICH PAD IS RUBBING AGAINST THE DISC.
-
REST THE BIKE ON THE KICKSTAND. (SEE SECTION 4.5).
-
WHEN LOOKING AT THE CALIPER FROM THE BACK OF THE WHEEL, LOCATE THE BOLT ABOVE AND THE BOLT BELOW THE CALIPER. USE THE 5MM ALLEN KEY TO EACH BOLT BY TURNING IT COUNTERCLOCKWISE FOR 4 - 5 ROTATIONS.
-
MOVE THE CALIPER OUT OF ALIGNMENT UNTIL THE FOLLOWING CONDITIONS ARE MET: · THE TOP OF THE PADS ARE ALIGNED WITH THE EDGE OF THE DISC.
3.4 Adjusting the Handlebar Rotation
THE HANDLEBAR CAN BE ROTATED SLIGHTLY FORWARD OR BACKWARDS SO THAT ALL OF THE FEATURES AND FUNCTIONS ON IT ARE IN THE IDEAL POSITION. THEY SHOULD BE EASILY REACHABLE WHILE RIDING AND ANGLED IDEALLY IN THE LINE OF SIGHT FOR EACH USER. THE HANDBRAKES, ESPECIALLY, SHOULD SIT AT AN ANGLE AT WHICH THEY ARE EASY TO GRIP.
- PULL UP THE LATCH ON THE HANDLEBAR CLAMP SO THAT IT IS IN THE OPEN (UNLATCHED) POSITION.
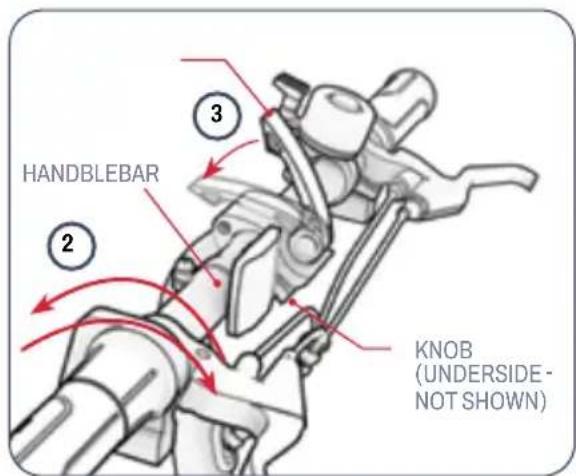
- ROTATE THE HANDLEBAR FORWARD OR BACKWARD TO REPOSITION IT.
- WHILE HOLDING THE HANDLEBAR IN THE NEW POSITION WITH ONE HAND, USE THE OTHER HAND TO PUSH THE LATCH DOWN AND BACK INTO THE CLOSED (LATCHED) POSITION.
TROUBLESHOOTING: If the handlebar does not stay secure with the clamp closed, you may need to tighten the clamp. First, pull the clamp latch open. Then, finger tighten the knob by turning it clockwise for a few rotations, and re-close the clamp latch. If you cannot close the latch with ease, the knob may be too tight. Loosen the knob slightly by turning it counterclockwise for 12 rotation.
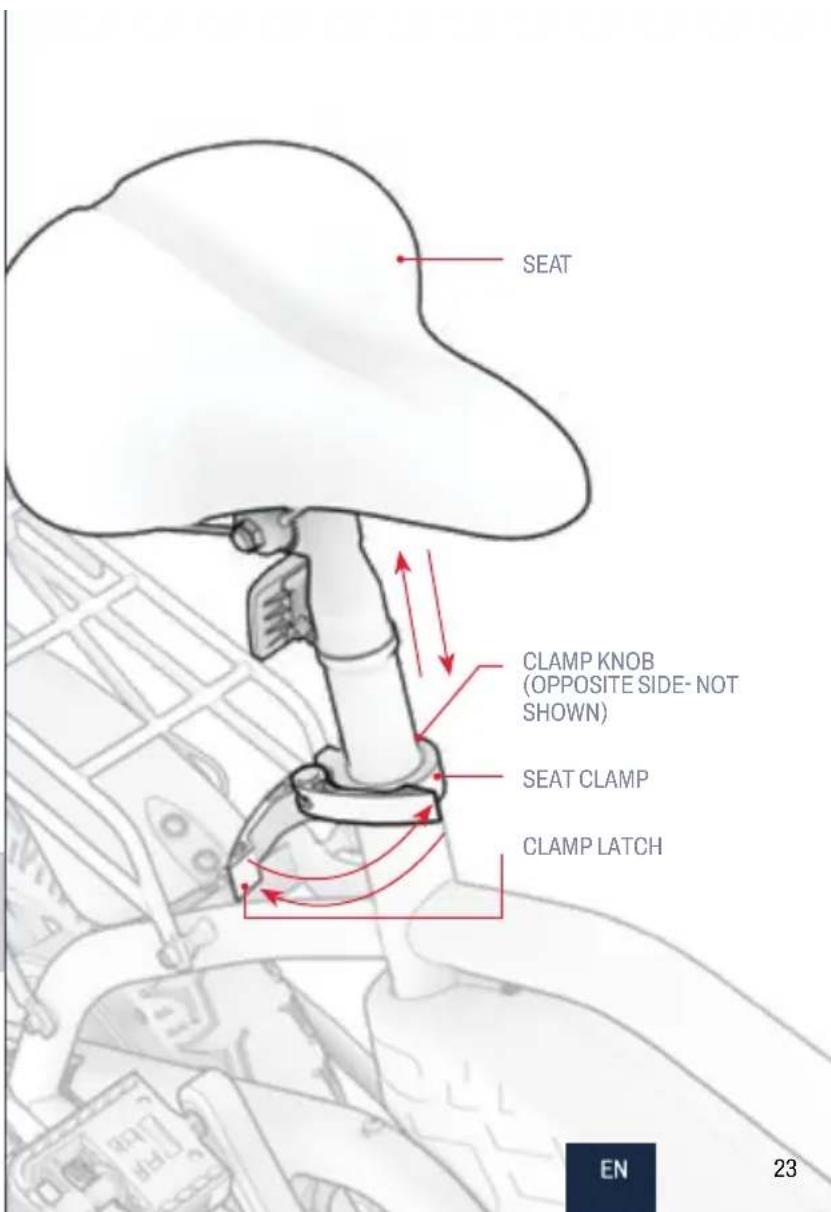
3.5 Repositioning the Seat
WHEN A RIDER IS SITTING ON THE SEAT AND HAS A FOOT ON THE PEDAL AT THE LOWEST PEDAL ROTATION POINT, THERE SHOULD BE A SMALL BEND IN THE KNEE. LEGS SHOULD NEVER BE FULLY EXTENDED DURING PEDALING.
- PULL OPEN THE LATCH ON THE SEAT CLAMP.
- RAISE OR LOWER THE SEAT TO THE DESIRED POSITION, MAKING SURE NOT TO RAISE THE SEAT HIGH ENOUGH THAT THE "MINIMUM INSERTION" MARK COMES INTO VIEW ABOVE THE CLAMP. (IF THE SEAT CLAMP IS TOO TIGHT FOR THE POST TO SLIDE UP AND DOWN EASILY, WIDEN THE CLAMP OPENING BY TURNING THE CLAMP KNOB COUNTERCLOCKWISE.)
- WHILE HOLDING THE SEAT IN PLACE, CLOSE THE CLAMP LATCH AND, IF NECESSARY, RE-TIGHTEN THE CLAMP KNOB BY TURNING IT CLOCKWISE.

IMPORTANT: Never ride with the "minimum insertion" mark visible above the seat clamp.
4. OPERATING INSTRUCTIONS.
4.1 Powering On & Off
QUICK-PRESS THE POWER BUTTON TO TURN YOUR E-BIKE ON OR OFF.
IMPORTANT:
- To preserve battery power, always remember to power your bike off when making a pit stop or putting it away for the night.
- Power off your bike when walking with it so as not to engage the motor by inadvertently twisting the acceleration throttle.
4.2 Checking Battery Charge Level
YOU CAN KEEP TABS ON YOUR BATTERY'S CHARGE LEVEL BY LOOKING AT THE BATTERY CHARGE INDICATOR LIGHTS.
| BATTERY INDICATOR LIGHTS | APPROXIMATE REMAINING CHARGE PERCENTAGE* |
| 4 GREEN LIGHTS ○○○○ | 76% - 100% |
| 3 GREEN LIGHTS ○○○ | 51% - 75% |
| 2 GREEN LIGHTS ○○ | 26% - 50% |
| 1 GREEN LIGHT ○ | <25% Charge your Jetson NOW! |
IMPORTANT: Your bike's ability to reach top speed can be affected by the battery charge level. You may notice a reduction in speed when battery charge dips below 25%.
IMPORTANT: When the battery charge depletes to 0%, the e-bike will power off. Charge to full power (see section 2.8) prior to your next ride.
4.3 Using the Headlight
IF RIDING IN LOW LIGHT CONDITIONS, TURN ON THE HEADLIGHT SO YOU CAN BETTER SEE THE ROAD AHEAD AND ONCOMING RIDERS CAN BETTER SEE YOU. THE HEADLIGHT WILL ONLY POWER ON WHEN THE MOTOR IS ALSO TURNED ON.
TO TURN ON OR OFF THE HEADLIGHT: HOLD DOWN THE HEADLIGHT / CRUISE CONTROL BUTTON FOR 4 SECONDS.
4.4 Using the Bell
USE THE BELL AS AN ALERT TO OTHER RIDERS AND PEDESTRIANS.
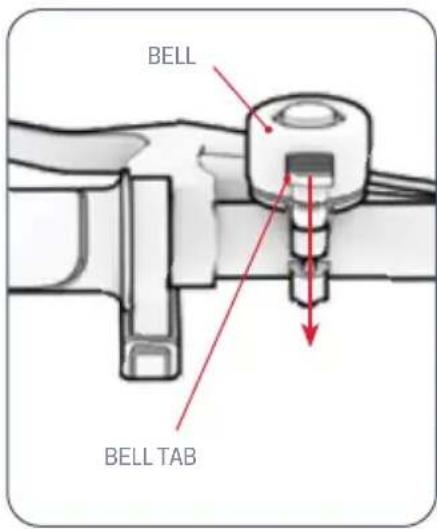
TO SOUND THE BELL: FLICK DOWN ON THE BELL TAB QUICKLY AND FORCEFULLY WITH YOUR LEFT-HAND THUMB.
*APPROXIMATION ONLY. MAY VARY BASED ON USE.
EN

Customize your e-bike for your carrying needs.
4.5 Using the RackIt Smart Cargo System Rack
YOUR E-BIKE IS EQUIPPED WITH THE JETSON RACKIT SMART CARGO SYSTEM RACK.
To Secure Your Cargo with the Included Bungee Strap:
- PLACE YOUR CARGO ON THE RACK.
- SLIP 1 HOOK OF A BUNGEE STRAP INTO ONE BUNGEE ATTACHMENT LOOP ON THE RACK.
- STRETCH THE BUNGEE STRAP OVER THE CARGO AND AROUND THE RACK UNTIL IT IS TAUT.
- SECURE THE OTHER HOOK OF THE BUNGEE STRAP INTO THE OTHER BUNGEE ATTACHMENT LOOP.
- CHECK THAT THE BUNGEE STRAP AND YOUR CARGO ARE SECURE.
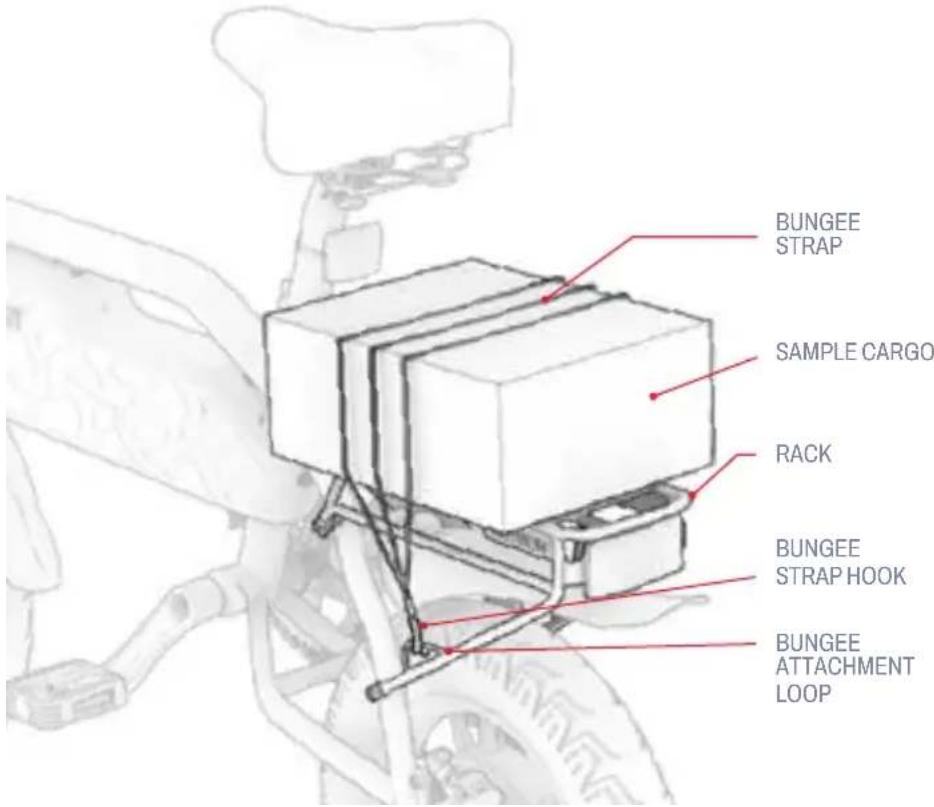
IMPORTANT: The bungee strap should always be snug over your cargo. Depending on the size of your cargo and the length of the bungee strap, it may be necessary to wrap the strap under the rack and over your cargo before securing the 2nd hook in a bungee attachment loop.
FOR SAFETY AND SECURITY:
- Always secure cargo to the rack with a bungee strap. Never ride with unsecured cargo.
- Limit carrying contents on the rack to 25 LB (11.3kg).
- Ensure that the total carrying weight (rider plus cargo) does not exceed 220 LB (100 kg).
- Do not overflow the rack.
• Always ensure that no parts of the cargo are in the way of wheel, brake, pedal, chain or other bike movement or mechanisms.
IMPORTANT:
- The addition of cargo with significant weight may affect the performance of your e-bike. For more details on conditions that can affect performance, see section 5.8.
- Never leave cargo unattended on the e-bike.
EN
4.6 Using the Kickstand

TO USE THE KICKSTAND: PIVOT IT DOWN AND GENTLY TILT YOUR E-BIKE ONTO IT TO STAND.
TO RAISE THE KICKSTAND: PIVOT IT BACK UP.
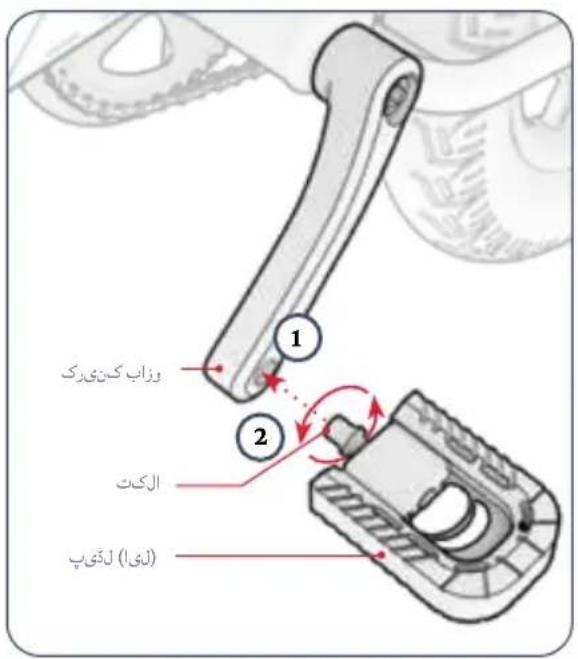
4.7 Folding & Unfolding the Pedals
To Fold: To Unfold:
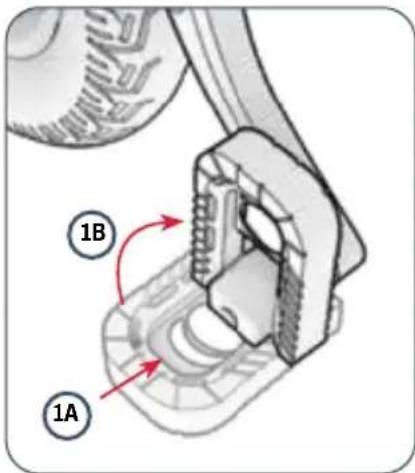
- PUSH THE PEDAL IN TOWARDS THE CRANK ARM (A) AND UPWARDS (B) UNTIL IT IS FOLDED AWAY.
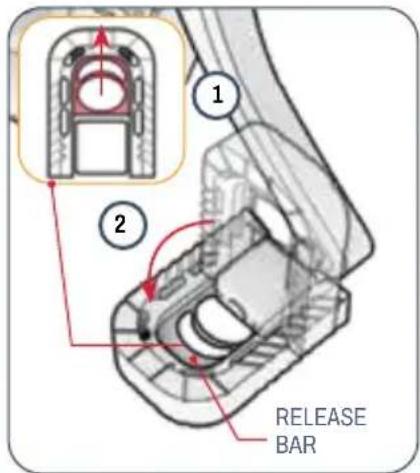
- PLACE YOUR FINGERS AROUND THE RELEASE BAR INSIDE THE PEDAL.
- PULL OUTWARDS AND DOWN UNTIL THE PEDAL SNAPS INTO PLACE.

IMPORTANT: Always raise the kickstand before riding.

5. MOVING AND STORAGE INSTRUCTIONS.
5.1 Riding Your E-Bike
JET OFF ON YOUR JETSON IN 3 DIFFERENT WAYS:
- WITH ASSISTED PEDALING (SECTION 5.2)
- USING ONLY PEDAL POWER (SECTION 5.3)
- USING THE THROTTLE FOR ALL-MOTOR POWER (SECTION 5.4)
- CLICKED INTO CRUISE CONTROL (SECTION 5.5)
5.2 Using Electronic Pedal Assistance
WHEN YOU PEDAL WITH THE POWER TURNED ON, THE MOTOR WILL GIVE BOOSTS OF POWER TO THE PEDALS TO SUPPLEMENT YOUR EXERTION. WITH "PEDAL ASSIST," YOU CAN GO FARTHER AND FASTER ON LESS EFFORT.
TO KEEP YOU IN CONTROL OF SPEED, PEDAL ASSIST BOOSTS WILL BE PROPORTIONAL TO YOUR EFFORT.
- GENTLER PEDALING → SMALLER BOOSTS OF MOTOR ASSISTANCE SO THAT YOU CAN MAINTAIN A MODERATE SPEED.
- HARDER PEDALING → LARGER BOOSTS OF MOTOR ASSISTANCE SO THAT YOU CAN RIDE AT A FASTER PACE.
5.3 Traditional Biking
YOU CAN RIDE YOUR E-BIKE LIKE A TRADITIONAL BIKE—USING ONLY PEDAL POWER. JUST RIDE AS YOU WOULD A TRADITIONAL BIKE, WITHOUT POWERING THE MOTOR ON.
NOTE: Without the bike powered on, you cannot make use of the headlight.
5.4 Using the Throttle
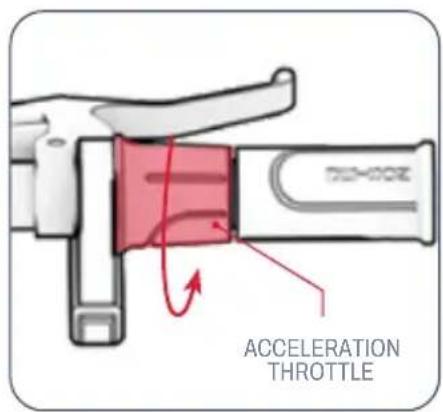
TO RIDE THE E-BIKE LIKE A MOTOR BIKE STOP PEDALING AND KEEP YOUR FEET RESTING ON THE PEDALS. TO ACCELERATE, SLOWLY ROTATE THE ACCELERATION THROTTLE TOWARDS YOU WITH YOUR RIGHT HAND.
• THE MORE YOU ROTATE THE THROTTLE, THE MORE THE MOTOR WILL ENGAGE — AND THE FASTER YOU WILL TRAVEL.
• TO AVOID SUDDEN BURSTS OF SPEED, ALWAYS ROTATE THE THROTTLE GRADUALLY.
TO SLOW DOWN: GENTLY EASE UP ON THE THROTTLE.

IMPORTANT: Always rest your feet
on the pedals, even when you are not
pedaling. Never ride with them dangling off the side of the bike.
5.5 Activating Cruise Control 5.6 Using the Brakes
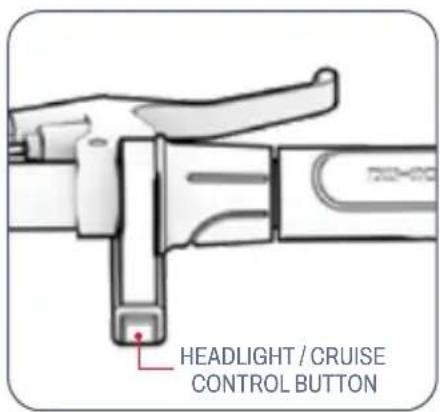
CRUISE CONTROL LOCKS THE BIKE IN AT A CERTAIN PACE. ONCE YOU SET CRUISE CONTROL, THE MOTOR WILL DO THE WORK TO KEEP THE PACE — NO THROTTLE OR PEDALING REQUIRED.
- USE THE THROTTLE TO REACH AND MAINTAIN YOUR DESIRED SPEED.
- QUICK-PRESS THE HEADLIGHT / CRUISE CONTROL BUTTON WITH YOUR RIGHT-HAND THUMB.
- LET GO OF THE THROTTLE, KEEP YOUR FEET STILL ON THE PEDALS, AND ENJOY THE RIDE.
TO DEACTIVATE CRUISE CONTROL: GENTLY TWIST THE THROTTLE, SQUEEZE ONE OF THE HANDBRAKES, OR QUICK-PRESS THE CRUISE CONTROL BUTTON.
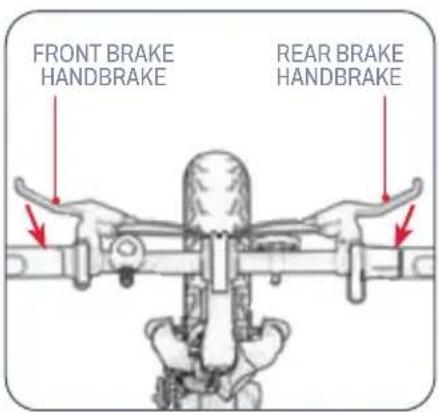
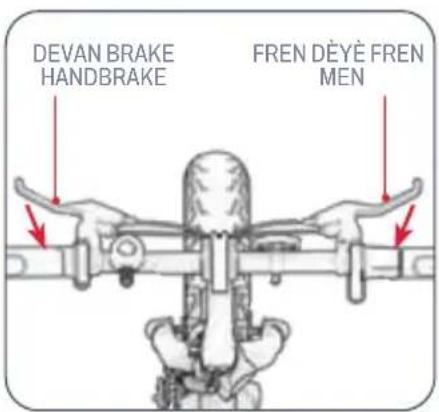
- SQUEEZE ONE OR BOTH HANDBRAKES TO SLOW DOWN.
- SQUEEZE MORE FORCEFULLY TO COME TO A COMPLETE STOP.
• TO AVOID ABRUPT MOVEMENTS, TRY TO SQUEEZE THE HANDBRAKE(S) GRADUALLY.
natural_image
Silhouette of a human head with a triangular highlight and red cross marks (no text or symbols)IMPROPER POSITIONING:
THE FOREHEAD IS EXPOSED.
A FALL COULD RESULT
IN SERIOUS INJURY.

natural_image
Silhouette of a person wearing a helmet and headgear (no text or symbols)PROPER POSITIONING:
THE FOREHEAD IS COVERED
BY THE HELMET.
*WEAR A HELMET, APPROPRIATE CLOTHING, SHOES, AND SAFETY GEAR. AVOID CLOTHING THAT CAN GET CAUGHT INTO OR UNDER THE WHEELS. CLOSED-TOE, FLAT SHOES ARE RECOMMENDED. WEAR AN ASTM F1492 APPROVED HELMET AND PROTECTIVE GEAR TO PREVENT INJURY IN THE EVENT OF AN ACCIDENT.
5.8 Maximizing Speed & Riding Range
IN IDEAL CONDITIONS, THE MAXIMUM MILEAGE THAT CAN BE ACHIEVED PER FULLY CHARGED BATTERY IS 19 MILES (30.6 KM) IF EXCLUSIVELY USING THE THROTTLE. THE MAXIMUM SPEED IS 15.5 MPH (25 KM/H). THE HARDER THE MOTOR NEEDS TO WORK, THE FASTER YOUR BATTERY WILL DRAIN. THE FOLLOWING FACTORS WILL ALSO AFFECT SPEED AND RIDING RANGE.
Riding Surface:
TRAVELING OVER A ROUGH SURFACE REQUIRES MOTOR POWER THAN RIDING ON A SMOOTH ONE.
Carrying Weight:
- MORE WEIGHT (RIDER PLUS CARGO) DECREASES ACHIEVABLE RANGE.
• MAXIMUM RANGE AND SPEED CAN BE ACHIEVED WITH CARRYING WEIGHT OF 220 LB (100 KG) OR LESS.
Riding Style:
- FREQUENT STARTING AND STOPPING WILL REDUCE RIDING RANGE.
• USING YOUR OWN EFFORT TO PEDAL WILL EASE THE DEMAND ON THE MOTOR AND INCREASE YOUR RIDING RANGE.
Air Temperature:
THE IDEAL TEMPERATURE FOR RIDING AND STORING THE E-BIKE IS BETWEEN 50°F - 95°F (10°C - 35°C).
Incline:
THE MOTOR HAS TO WORK HARDER TRAVELING UPHILL THAN ON FLAT STRETCHES OR DOWNHILL.
Battery Maintenance:
TIMELY BATTERY CHARGING AFTER EVERY RIDE HELPS MAINTAIN BATTERY CAPACITY AND STRENGTH.
EN
USER MAINTENANCE INSTRUCTIONS.
Take good care of your Jetson to keep it riding smoothly and safely. Here's how:
Handling Your Jetson:
- AVOID EXPOSING YOUR-E-BIKE TO SEVERE VIBRATION OR INTENSE PHYSICAL IMPACT.
- NEVER DISASSEMBLE THE BATTERY.
- KEEP YOUR E-BIKE AWAY FROM WATER AND MOISTURE.
- RIDE ON SMOOTH, FLAT SURFACES TO AVOID BREAKAGE.
- NEVER CARRY YOURE-BIKE BY THE WHEELS, SEAT, AND/OR HANDLEBAR.
- TAKE CARE NOT TO PULL OR SNAG THE WIRING CONNECTING THE MOTOR WITH THE HANDLEBAR COMPONENTS.
Storage Instructions:
- FULLY CHARGE THE BATTERY BEFORE STORING THE PRODUCT FOR EXTENDED PERIODS OF TIME.
- WHEN IN STORAGE FOR EXTENDED PERIODS OF TIME, FULLY CHARGE THE BATTERY ONCE A MONTH.
• COVER THE PRODUCT TO PROTECT IT AGAINST DUST. - STORE THE PRODUCT INDOORS AND IN A DRY PLACE AT A TEMPERATURE BETWEEN 50°F - 95°F (10°C - 35°C).
Cleaning Your Jetson:
- SEAT AND FRAME - WIPE WITH A DAMP DUST-FREE CLOTH OR ONE DIPPED IN RUBBING ALCOHOL. FOLLOW WITH A DRY DUST-FREE CLOTH.
- HANDLEBAR - WIPE DOWN WITH MILD SOAP USING A DAMP DUST-FREE CLOTH. REMOVE EXCESS SOAP WITH A SEPARATE DAMP CLOTH.
- WHEEL COMPONENTS - WIPE WITH A DAMP DUST-FREE CLOTH.
- TIRES - WIPE WITH A DAMP DUST-FREE CLOTH. A TIRE FINISHER OR CLEANER CAN ALSO BE USED.
WARNING: Do not spray or apply water directly onto to the product. Water can cause damage to the wiring, battery compartment, and lights, as well as deterioration of the frame—all of which could cause a malfunction that puts rider safety at risk.

Battery Precautions:
YOUR PRODUCT HAS A LITHIUM-ION BATTERY. TAKE CARE WHEN HANDLING.
- KEEP PRODUCT AWAY FROM FIRE AND EXCESSIVE HEAT.
- AVOID INTENSE PHYSICAL SHOCK, SEVERE VIBRATION, OR IMPACT.
• PROTECT PRODUCT FROM WATER OR MOISTURE.
• DO NOT PLACE OR STORE PRODUCT IN A PILE ON TOP OF OR UNDERNEATH OTHER OBJECTS.
• DO NOT DISASSEMBLE THE PRODUCT OR ITS BATTERY. - DO NOT DISPOSE OF PRODUCT WITH EVERYDAY TRASH. BRING PRODUCT TO A DEDICATED E-WASTE FACILITY OR BATTERY RECYCLING CENTER. FOR MORE INFORMATION ON DISPOSAL SITES NEAR YOU. CONTACT YOUR LOCAL MUNICIPALITY OR WASTE HAULER.
- SHOULD THE PRODUCT'S BATTERY FEEL HOT OR EXHIBIT SIGNS OF OVERHEATING, EMIT AN ODOR OR UNUSUAL SOUND, LEAK FLUID OR GAS, OR CHANGE IN SHAPE OR COLOR, IMMEDIATELY:
- IF IN USE, STOP USING THE PRODUCT IMMEDIATELY. REMOVE THE CHARGING CABLE FROM THE PRODUCT IF IT IS PLUGGED IN.
- DISCONTINUE USE OF THE PRODUCT.
- IF SAFE TO DO SO, MOVE THE PRODUCT INTO A CLEAR SPACE AND AWAY FROM ANYTHING FLAMMABLE.
- CALL YOUR LOCAL EMERGENCY SERVICES FOR ASSISTANCE.
- THOROUGHLY WASH EYES OR AREAS OF SKIN THAT HAVE COME IN CONTACT WITH LEAKING BATTERY ELECTROLYTE FLUID WITH CLEAN RUNNING WATER AND SEEK ADDITIONAL MEDICAL ATTENTION.
- IF THERE ARE ANY ISSUES WITH THE BATTERY, CONTACT THE JETSON CARE TEAM.
EN
WARRANTY COVERAGE.
GENERAL LIMITED WARRANTY
YOUR NEW JETSON PRODUCT IS WARRANTED AGAINST DEFECTS IN MATERIALS AND WORKMANSHIP AS INDICATED ON RIDEJETSON.COM/WARRANTY FOR A PERIOD OF TIME FROM THE DATE OF ORIGINAL RETAIL PURCHASE WHEN USED IN ACCORDANCE WITH JETSON'S USER MANUALS (REFER TO RIDEJETSON.COM/SUPPORT). UNDER THIS WARRANTY, YOU WILL BE ABLE TO DIRECT YOUR CLAIMS TO JETSON EVEN IN SITUATIONS WHERE YOU PURCHASED THE JETSON PRODUCT FROM ONE OF OUR AUTHORIZED RETAILERS. TO READ THE FULL TERMS OF OUR WARRANTY, VISIT RIDEJETSON.COM/WARRANTY.
KEEP IN TOUCH.
Be sure to follow @ridejetson on social media to learn about fantastic offers, giveaways, and all the latest Jetson news.
JETSON
LOVING YOUR RIDE?
Leave a review at
ridejetson.com/reviews.
We can't wait to hear from you!
MakeMoves
QUESTIONS? LET US HELP.
RIDEJETSON.COM/SUPPORT RIDEJETSON.COM/CHAT
1-844-585-7462
To exercise your product's warranty or inquire about warranty coverage, contact us directly.
www.ridejetson.com
JETSON


© 2025, TRURIDE TECH. ALL RIGHTS RESERVED. MANUFACTURED FOR TRURIDE TECH LLC.
JETSON® IS A REGISTERED TRADEMARK USED UNDER LICENSE FROM JETSTREAM BRANDS LLC. NO PORTION OF THIS DOCUMENT, INCLUDING SHAPE, GRAPHICS, AND DESIGN, MAY BE REPRODUCED OR TRANSMITTED IN ANY FORM OR BY ANY MEANS.
MANUFACTURED IN YUEYANG, CHINA
IMPORTED BY TRURIDE TECH LLC.
PO BOX 461, JERSEY CITY, NJ 07302-9998
DATE CODE: 05/2025
DOCUMENT EDITION: V1.0
MADE IN CHINA
UNA GUÍA PARA TU VIAJE.
IMPORTANTE:
Lea atentamente y conserve
natural_image
Abstract geometric pattern with interlocking gray shapes and a central dark blue shape (no text or symbols)LA PARTE SUPERIOR
DE JETSON
DOS MONTANDO
NORMAS:
natural_image
Simple line drawing of a wrench (no text or symbols)49.6 IN (L) × 20.7 IN (A) × 44.3 IN (A) | 126.0 CM (L) × 52.5 CM (A) × 112.5 CM (A)
• DIMENSIONES DEL PRODUCTO, PLEGADO:
49.6 IN (L) × 15.8 IN (A) × 30.3 IN (A) | 126.0 CM (L) × 40.0 CM (A) × 77.0 CM (A)
• TAMANO DE LA LLANTA: 14 IN (A) × 3 IN (A) | 35,5 CM (A) × 7,6 CM (A)
natural_image
Diagram showing a rope knot with a green checkmark indicating the correct direction (no text or symbols present)
- MIENTRAS MANTIENE EL VÁSTAGO FIJO CON UNA MANO, UTILICE LA OTRA PARA ABRIR (DESENGANCHAR) EL PESTILLO ABATIBLE.

- BAJE SUAVEMENTE EL MANILLAR HACIA EL LADO DE LA BICICLETA OPUESTO AL PESTILLO DE PLEGADO.
natural_image
Illustration of a bicycle's front view with a green checkmark indicating approval (no text or symbols present)ES
natural_image
Illustration of a hand holding a smartwatch and a tablet device (no text or symbols visible)natural_image
Mechanical assembly diagram showing a motor and gear components with highlighted red and orange features (no text or labels)natural_image
Silhouette of a human head with a triangular highlight and red cross marks (no text or symbols)POSICIONAMIENTO INCORRECTO: LA FRENTE ESTÁ EXPUESTA. PODRÍA PRODUCIRSE UNA CAÍDA EN LESIONES GRAVES.

natural_image
Silhouette of a person wearing a helmet and headgear (no text or symbols)POSICIONAMIENTO ADECUADO: LA FRENTE ESTÁ CUBIERTA POR EL CASCO.
ridejetson.com/reviews.
natural_image
Abstract geometric pattern with interlocking gray shapes and a central dark blue shape (no text or symbols)НАШИ ДВА
ГЛАВНЫХ ПРАВИЛА:
natural_image
Simple line drawing of a wrench (no text or symbols)•гаечный ключ 15 мм
126,0 CM (Д) × 40,0 CM (Ш) × 77,0 CM (В)
Сканируйте, чтобы
https://ridejetson.com/pages/product-manuals
RU
2. ИНСТРУКЦИИ ПО УСТАНОВКЕ.
natural_image
Diagram of a rope knot with a green checkmark indicating the correct direction (no text or symbols present)natural_image
Illustration of a hand holding a smartwatch and a tablet device (no text or symbols visible)natural_image
Mechanical assembly diagram showing a motor and gear components with highlighted red and orange features (no text or labels)natural_image
Silhouette of a human head with a triangular highlight and red cross marks (no text or symbols)natural_image
Silhouette of a person wearing a helmet and headgear (no text or symbols)ridejetson.com/reviews.
natural_image
Abstract geometric pattern with interlocking gray shapes and a central dark blue shape (no text or symbols)JETSON 的两个最重要准则:
注意安全玩得开心
目录
安全警告 3
1. 关于您的产品
natural_image
Simple line drawing of a wrench (no text or symbols)· 15 毫米扳手
扫描我们的最
更新产品
入职材料
和支持资源。
Find this user manual online at https://cdn.shopify.com/s/
files/1/2530/6734/files/SHADOW-
MANUAL_WEB-1742430167217.pdf
请访问
natural_image
Diagram of a rope knot with a green checkmark indicating the correct direction (no text or symbols present)
natural_image
Mechanical component diagram showing a lever and curved arm with a red rotation arrow (no text or symbols)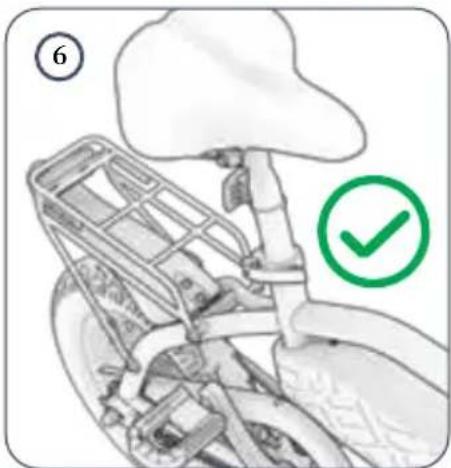
CN
2.5 安装踏板
natural_image
Illustration of a hand holding a smartwatch and a tablet device (no text or symbols visible)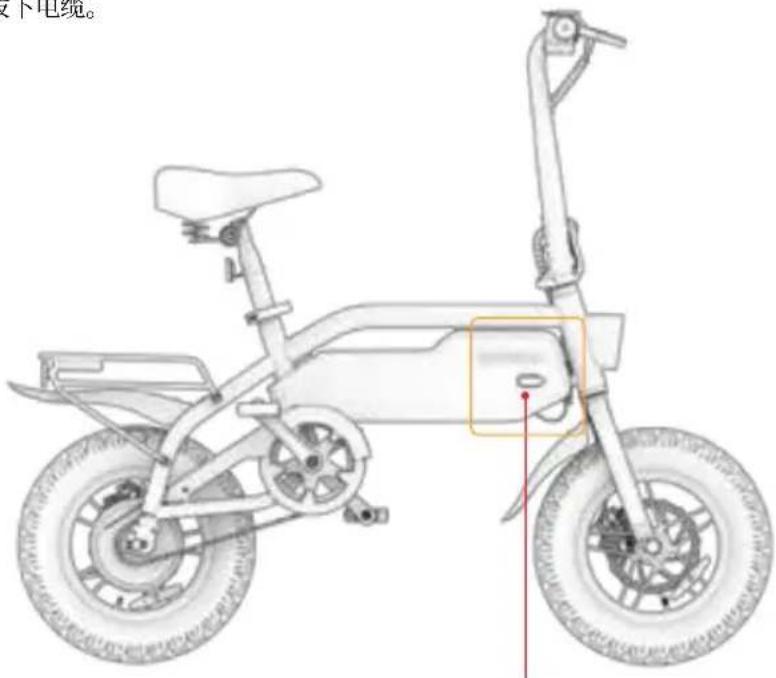
充电端口带盖
充电器上的充电指示灯:
红色指示灯 绿色指示灯
充电中
充电完成

natural_image
Mechanical assembly diagram showing a motor and gear components with highlighted red and orange features (no text or labels)调整制动钳:
卡钳
卡钳调整
螺栓
刹车片(内部卡钳;未显示)
碟盘
natural_image
Silhouette of a human head with a triangular highlight and red cross marks (no text or symbols)natural_image
Silhouette of a person wearing a helmet and headgear (no text or symbols)正确定位:
前额被覆盖
头盔。
natural_image
Abstract geometric pattern with interlocking gray shapes and a central dark blue shape (no text or symbols)JETSON의 최고
두 대의 라이딩
규칙:
안전하세요. 즐거운 시간 보내세요!
콘텐츠
안전 경고 3
1.제품 정보
natural_image
Simple line drawing of a wrench (no text or symbols)·15mm 스패너 렌치
가장 많이 검색한
제품 업데이트
온보딩 자료
및 지원 리소스를
참조하세요.
이 사용 설명서는 온라인(
https://cdn.shopify.com/s/
files/1/2530/6734/files/SHADOW-
MANUAL_WEB-1742430167217.pdf)에서
확인할 수 있습니다
사용자 설명서 모음은
https://ridejetson.com/pages/product-
manuals에서 확인하세요
2.
설치 지침을 확인하세요.
2.1 시작 노트
natural_image
Diagram of a rope knot with a green checkmark indicating the correct direction (no text or symbols present)natural_image
Illustration of a hand holding a smartwatch and a tablet device (no text or symbols visible)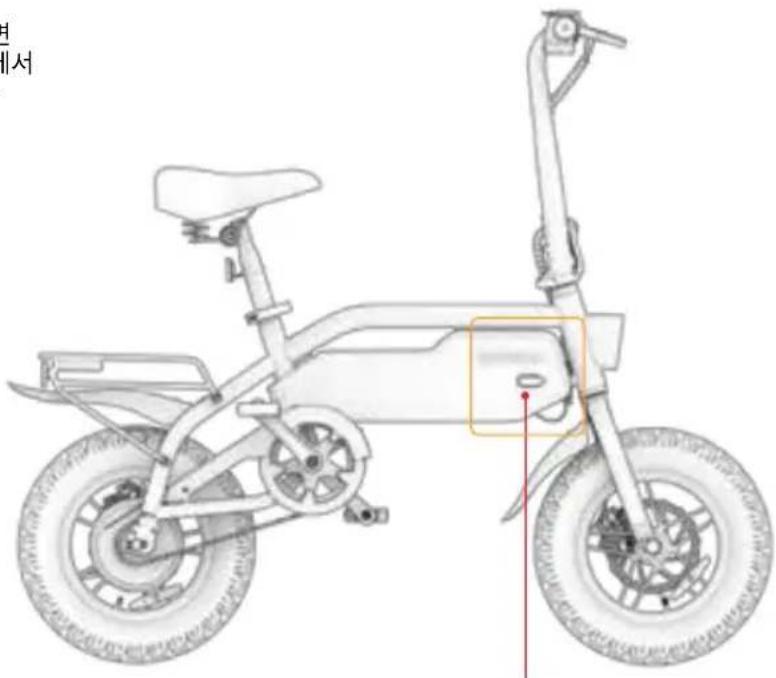
충전 포트 커버 포함
충전기의 총전 표시등이 켜집니다:
빨간색 조명 충전 충전
녹색 조명
완료
natural_image
Mechanical assembly diagram showing a motor and gear components with highlighted red and orange features (no text or labels)브레이크 캘리퍼 조정하기:
캘리퍼
캘리퍼
조정
볼트
브레이크 패드(내부
캘리퍼;표시되지 않음)
디스크
- 조정이 필요한
브레이크에서 캘리퍼,
브레이크 패드 및
디스크를 찾습니다.
2.자전거의 바퀴를 들어
올려 한 바퀴 돌립니다.
디스크가 브레이크 패드
사이에서 회전하는 것을
관찰하고 어느 패드가
디스크에 마찰되는지
확인합니다.
natural_image
Silhouette of a human head with red X-shaped markers overlay, no text or symbols present위치가 부적절합니다:
이마가 노출됩니다.
넘어지면 다음과 같은 결과가
발생할 수 있습니다
심각한 부상을 입었습니다.

natural_image
Silhouette of a person wearing a helmet and headgear (no text or symbols)올바른 위치 지정:
이마가 가려짐
헬raphic을 쓰고 있습니다.
ridejetson.com/reviews.
여러분의 의견을 기다리겠습니다!
MakeMoves
natural_image
Abstract geometric pattern with interlocking gray shapes and a central dark blue shape (no text or symbols)TOP JETSONA DWIE JAZDY ZASADY:
BĄDŹ BEZPIECZNY. BAW SIĘ DOBRZE!
Zawartość
-
PRZEDNI BŁOTNIK
-
PEDAL*(×2; LEWY I PRAWY)
-
MECHANIZM KORBOWY
-
ŁAŃCUCH
-
PODPORKA
-
TYLNY BŁOTNIK
-
STOJAK RACKIT SMART CARGO SYSTEM
A. PĘTLA MOCUJĄCA BUNGEE (×2)
B. REFLEKTOR
-
ZACISK SIODEŁKA
-
TYLNY REFLEKTOR
-
MIEJSCE*
-
PORT LADOWANIA Z OSŁONA
-
PASEK BUNGEE
-
LADOWARKA
-
KABEL DO LADOWANIA
* NIE JEST WSTĘPNIE PRZYMOCOWANY; WYMAGA KONFIGURACJI
PLK
**PRZECIWNA STRONA PRODUKTU UWAGA: ZDJĘCIA MOGA NIE ODZWIERCIEDLAĆ DOKŁADNEGO WYGLĄDU RZECZYWISTEGO PRODUKTU.
PLK
natural_image
Simple line drawing of a wrench (no text or symbols)- klucz płaski 15 mm
natural_image
Diagram showing a rope knot with a green checkmark indicating the correct direction (no text or symbols present)natural_image
Mechanical component diagram showing a lever and curved arm with a red arrow indicating motion (no text or symbols)
PLK
POTRZEBNY BĘDZIE KLUCZ 15 MM. 3. UŻYJ KLUCZA, ABY DOKOŃCZYĆ WKŁADANIE, A NASTĘPNIE
- WYRÓWNAJ TRZPIEŃ PEDALU OZNACZONY LITERA "L" Z OTWOREM NA KONCU RAMIENIA KORBY PO LEWEJ STRONIE ROWERU.
- PRZYTRZYMAJ STABILNIE PODSTAWĘ PEDALU I UWAZAJĄC, ABY TRZPIEN WSZEDŁ PROSTO DO OTWORU, UŻYJ DRUGIEJ RĘKI, ABY PRZEKREĆIĆ TRZPIEN W KIERUNKU PRZĘCIWNYM DO RUCHU WSKAZÓWEK ZEGARA DO OTWORU NA KILKA OBROTÓW.
DOKRECANIE TRZPIENIA DO RAMIENIA KORBY.
- SPRAWDZ, CZY PRAWY PEDAL JEST DOBRZE ZAMOCOWANY.
- POWTÓRZ KROKI 2-5 Z PRAWYM PEDALEM ("R").
natural_image
Illustration of a hand holding a smartwatch and a tablet device (no text or symbols visible)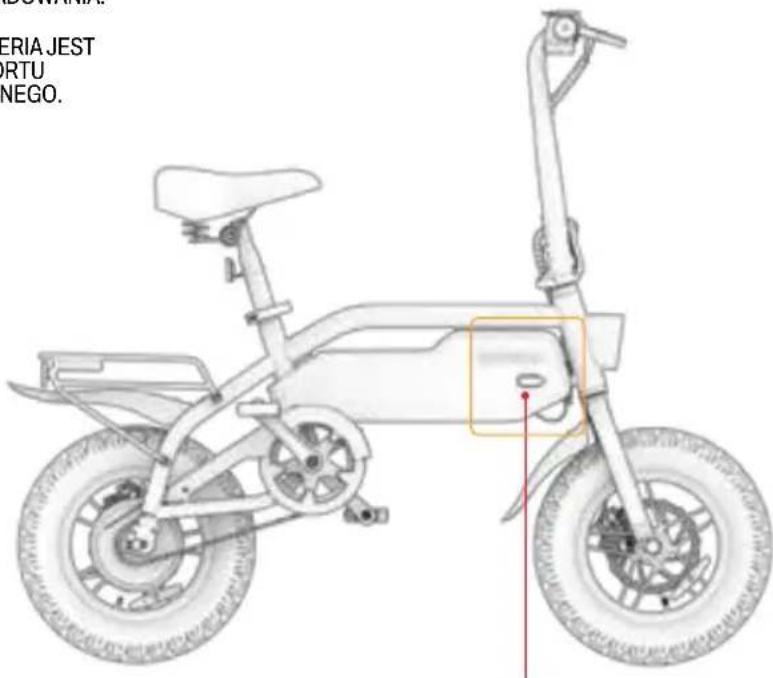
PORT LADOWANIA Z POKRYWA
KONTROLKA ŁADOWANIA NA ŁADOWARCE:
CZERWONY OŚWIETLENIE ŁADOWANIE

ZIELONE PODŚWIETLENIE ŁADOWANIE ZAKOŃCZONE
natural_image
Mechanical assembly diagram showing a motor and gear components with highlighted red and orange features (no text or labels)KLOCKI HAMULCOWE I TARCZE.
- PODNIES KOŁO ROWERU I
ZAKREĆ NIM. OBSERWUJ,
JAK TARCZA OBRACA
SIĘ MIĘDZY KLOCKAMI
HAMULCOWYMI I ZAUWAŻ,
KTÓRY KLOCEK OCIERA SIE
O TARCZE.
natural_image
Silhouette of a human head with a triangular highlight and red cross marks (no text or symbols)NIEPRAWIDŁOWE
POZYCJONOWANIE:
CZOŁO JEST ODSŁONIETE.
UPADEK MOŻE SPOWODOWAĆ
POWAŻNE OBRAŻENIA.

natural_image
Silhouette of a person wearing a helmet and headgear (no text or symbols)PRAWIDŁOWE POZYCJONOWANIE:
CZOŁO JEST ZAKRYTE
PRZEZ KASK.
*NALEŻY NOSIĆ KASK, ODPOWIEDNIA ODZIEŻ, OBUWIE I SPRZĘT OCHRONNY. NALEŻY UNIKAĆ UBRAŃ, KTÓRE MOGA ZACZEPIĆ SIĘ O KOŁA LUB DOSTĄC ŚIE POD NIE. ZALECANE SĄ PŁASKIE BUTY Z ZAMKNIETYMI PALCAMI. ABY ZAPOBIEC OBRAZENIÓM W RAZIE WYPADKU, NALEŻY NOSIĆ KASK I SPRZĘT OCHRONNY ZATWIERDZONY PRZEZ NORMĘ ASTM F1492.
ridejetson.com/reviews.
© 2025, TRURIDE TECH. WSZELKIE PRAWA ZASTRZEŻONE.
WYPRODUKOWANO DLA TRURIDE TECH LLC.
JETSON® JEST ZASTRZEŻONYM ZNAKIEM TOWAROWYM UŻYWANYM NA LICENCJI JETSTREAM BRANDS LLC. ŻADNA CZĘŚĆ NINIEJSZEGO
DOKUMENTU, W TYM KSZTAŁT, GRAFIKA I PROJEKT, NIE MOŻE BYĆ POWIELANA ANI PRZESYŁANA W JAKIEJKOLWIEK FORMIE LUB W JAKIKOLWIEK SPOSÓB.
WYPRODUKOWANO W YUEYANG, CHINY
IMPORTOWANE PRZEZ TRURIDE TECH LLC.
PO BOX 461, JERSEY CITY, NJ 07302-9998
KOD DATY: 05/2025
DOCUMENT EDITION: V1.0
WYPRODUKOWANO W CHINACH
UN GUIDE POUR VOTRE VOYAGE.
IMPORTANT :
natural_image
Abstract geometric pattern with interlocking gray shapes and a central dark blue shape (no text or symbols)LE HAUT DE JETSON DEUX CHEVAUX RÈGLES:
SOYEZ PRUDENTS. AMUSEZ-VOUS!
Contenu
natural_image
Simple line drawing of a wrench (no text or symbols)- clé de 15 mm
• LIMITE DE POIDS : 220 LB | 100 KG
♦ POIDS MINIMUM DU CAVALIER : 100 LB | 45,4 KG
• POIDS DU PRODUIT : 49.2 LB | 22.3 KG
- ÂGE RECOMMANDÉ : 14+
• VITESSE MAXIMALE : 15.5 MPH* | 25 KM/H*
• PORTÉE MAXIMALE : 19 MILES* | 30,6 KM*
• BATTERIE : 36V, 7.8AH
• TYPE DE BATTERIE : LITHIUM-ION
• MOTEUR : 350W
• CHARGEUR : UL 100 - 240V
• DIMENSIONS DU PRODUIT, DÉPLIÉ :
49.6 IN (L) × 20.7 IN (L) × 44.3 IN (H) | 126.0 CM (L) × 52.5 CM (L) × 112.5 CM (H)
• DIMENSIONS DU PRODUIT, PLIE
49.6 IN (L) × 15.8 IN (L) × 30.3 IN (H) | 126.0 CM (L) × 40.0 CM (L) × 77.0 CM (H)
natural_image
Diagram of a rope knot with a green checkmark indicating the correct direction (no text or symbols present)
natural_image
Mechanical component diagram showing a lever and curved arm with a red rotation arrow (no text or symbols)FRA
natural_image
Illustration of a bicycle's seatbelt mechanism with a green checkmark indicating selection (no text or symbols present)natural_image
Illustration of a hand holding a smartwatch and a tablet device (no text or symbols visible)
PORT DE CHARGE AVEC COUVERCLE
INDICATEUR DE CHARGE VOYANT DU CHARGEUR :
ROUGE ÉCLAIRAGE CHARGEMENT
ÉCLAIRAGE VERT CHARGEMENT TERMINÉ

natural_image
Mechanical assembly diagram showing a motor and gear components with highlighted red and orange features (no text or labels)natural_image
Silhouette of a human head with a triangular highlight and red cross marks (no text or symbols)MAUVAIS POSITIONNEMENT : LE FRONT EST EXPOSÉ. UNE CHUTE PEUT EN RÉSULTER DES BLESSURES GRAVES.

natural_image
Silhouette of a person wearing a helmet and headgear (no text or symbols)POSITIONNEMENT CORRECT : LE FRONT EST COUVERT PAR LE CASQUE.
*PORTEZ UN CASQUE, DES VÊTEMENTS, DES CHAUSSURES ET DES ÉQUIPEMENTS DE SÉCURITÉ APPROPRIÉS. ÉVITEZ LES VÊTEMENTS QUI PEUVENT SE COINCER DANS OU SOUS LES ROUES. IL EST RECOMMANDE DE PORTER DES CHAUSSURES PLATES ET FERMÉES. PORTEZ UN CASQUE ET UN ÉQUIPEMENT DE PROTECTION HOMOLOGUES ASTM F1492 POUR ÉVITER LES BLESSURES EN CAS D'ACCIDENT.
ridejetson.com/reviews.
natural_image
Abstract geometric pattern with interlocking gray shapes and a central dark blue shape (no text or symbols)IL TOP DI JETSON DUE CAVALCATE REGOLE:
SIATE SICURI. DIVERTITEVI!
Contenuti
natural_image
Simple line drawing of a wrench (no text or symbols)natural_image
Diagram showing a rope knot with a green checkmark indicating the correct direction (no text or symbols present)- ABBASSARE DELICATAMENTE IL MANUBRIO VERSO IL LATO DELLA BICICLETTA OPPOSTO ALLA CHIUSURA A LIBRO.
natural_image
Illustration of a hand holding a smartwatch and a tablet device (no text or symbols visible)
PORTA DI RICARICA CON COPERTURA
INDICATORE DI CARICA SPIA SUL CARICATORE:
natural_image
Mechanical assembly diagram showing a motor and gear components with highlighted red and orange features (no text or labels)natural_image
Silhouette of a human head with a triangular highlight and red cross marks (no text or symbols)natural_image
Silhouette of a person wearing a helmet and headgear (no text or symbols)دليل لرحتك.
مهم
اقراً بعناية واحتفظ
natural_image
Abstract geometric pattern with interlocking gray shapes and a central dark blue shape (no text or symbols)natural_image
Simple line drawing of a wrench (no text or symbols). مفتاح 15 pm
1.2 ما في الصندوق
natural_image
Diagram of a rope knot with a green checkmark indicating the correct direction (no text or symbols present)2.4 retirement المqed
2.5 retirement attitudes
natural_image
Illustration of a hand holding a smartwatch and a tablet device (no text or symbols visible)
3. التحضر لركوب
natural_image
Mechanical assembly diagram showing a motor and gear components with highlighted red and orange features (no text or labels)الفر Har
الفر Har
تعداد
مسا mic
natural_image
Silhouette of a human head with a triangular warning symbol, crossed by red diagonal lines (no text or symbols)natural_image
Silhouette of a person wearing a helmet and headgear (no text or symbols).ridejetson.com/reviews
natural_image
Abstract geometric pattern with interlocking gray shapes and a central dark blue shape (no text or symbols)γισυο JETSON
תְרָה בַרִי אַשׁ
:D#77D
- Poplar, Among, Among, Among, Among, Among
בְרָה בִיַעֹת
- cannot be to be excitedly and let the natural form is crucial: if the case is not possible;
CEKON LUN KESKEL KETLUL
natural_image
Simple line drawing of a wrench (no text or symbols)-הכלה 15 ·
7007 17 17 17 0.11 1.2
(II) 77.0 × (III) 40.0
7.6 × (n) 35.5 | (11) 3 × (n) 14 :
https://cdn.shopify.com/s/
files/1/2530/6734/files/SHADOW-
MANUAL_WEB-1742430167217.pdf
https://ridejetson.com/pages/product-
manuals
.2
natural_image
Diagram showing a rope knot with a green checkmark indicating the correct direction (no text or symbols present)- "4" men who are in the U.S. and is the same as it is the same.
4160 100 611 117.
9 17 107XN
natural_image
Illustration of a hand holding a smartwatch and a tablet device (no text or symbols visible)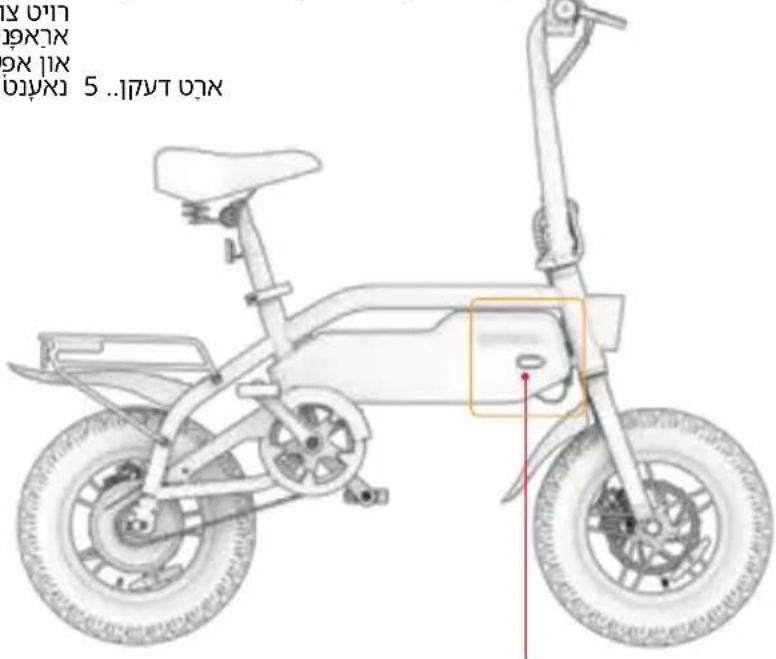
• ακὶ τὸ κὶ τὸ κὶ κὶ κὶ κὶ κὶ κὶ κὶ κὶ κὶ κὶ κὶ κὶ κὶ κὶ κὶ κὶ κὶ κὶ κὶ κὶ κὶ κὶ κὶ κὶ κὶ κὶ κὶ κὶ κὶ κὶ κὶ κὶ κὶ κὶ κὶ κὶ κὶ κὶ κὶ κὶ κὶ κὶ κὶ κὶ κὶ κὶ κὶ κὶ κὶ κὶ κι
• Sei teronil teronil teronil, conkullar, teronil teronil
)32°F (0°C) -104°F (40°C: 7-10-17-10-17-10-17-10-17-10-17-10-17-10-17-10-17-10-17-10-17-10-17-10
• Among all the world's country being United States
•但仍 ini 및 no cancel NFL car.

natural_image
Mechanical assembly diagram showing a motor and gear components with highlighted red and orange features (no text or labels)II.1001: Let consider what is all

natural_image
Silhouette of a human head with a red triangular highlight, crossed by two pink diagonal lines (no text or symbols)natural_image
Silhouette of a person wearing a helmet and headgear (no text or symbols)- Take the following to consider no direct action.
ال Fiscal Yield (in %)
.ridejetson.com/reviews
natural_image
Abstract geometric pattern with interlocking gray shapes and a central dark blue shape (no text or symbols)natural_image
Simple line drawing of a wrench (no text or symbols)https://ridejetson.com/pages/product-manuals
natural_image
Diagram showing a rope knot with a green checkmark indicating the correct direction (no text or symbols present)natural_image
Illustration of a hand holding a smartwatch and a tablet device (no text or symbols visible)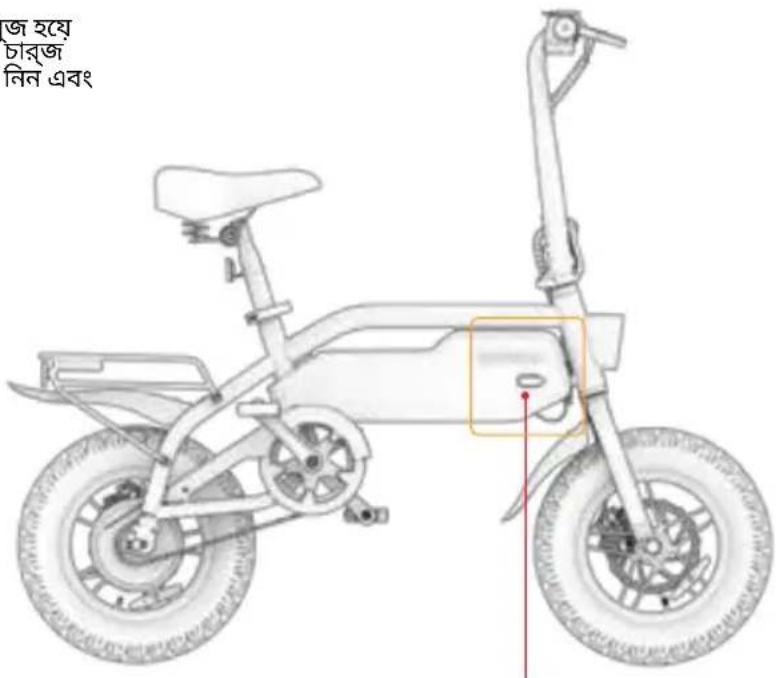
natural_image
Mechanical assembly diagram showing a motor and gear components with red highlighted parts (no text or labels)natural_image
Silhouette of a human head with a triangular highlight and red cross marks (no text or symbols)অনুপযুক্ত অবস্থান:
কপাল উনমকত।
পতন হতে পীরে
natural_image
Silhouette of a person wearing a helmet and headgear (no text or symbols)সঠিক অবসথান:
কপাল.ঢাকা।
হেলমেট দ্বারা।
ridejetson.com/reviews.
natural_image
Abstract geometric pattern with interlocking gray shapes and a central dark blue shape (no text or symbols)TÈT JETSON A DE MONTE RÈG:
FÈ SEKIRITE. PRAN PLEZI!
Kontni
Avètisman Sekirite 3
1. sou pwodwi ou
1.1 Apèsi sou pwodwi a 6
1.2 Ki sa ki nan bwat la 8
1.3 Espesifikasyon pwodwi 9
1.4 Resous sou Entènèt 9
2. Enstriksyon Enstalasyon
2.1 Kòmanse Nòt 10
2.2 Konvnab kavalye 10
2.3 Dewoulman & Pliye Guidon la 11
2.4 Tache Syèj la 13
2.5 Tache Pedal yo 14
2.6 Sekirize klòch la 15
2.7 Sekirize reflektè devan an 15
2.8 Chaje batri a 16
3. Preparasyon pou monte
3.1 Tèks sekirite anvan woulib la 18
3.2 Enflasyon kawotchou ak presyon .....19
3.3 Tcheke ak Ajiste Fren yo 20
3.4 Ajiste wotasyon gidon an 22
3.5 Repozisyon Syèj la 23
- VALV KAWOTCHOU AK BOUCHON POUSYÈ
( × 2; DEVAN AK DÈYÈ)
-
DEVAN DEVAN
-
PEDAL* ( × 2; GOCH AK DWA)
-
MANIVÉL
-
CHÊN
-
KICKSTAND
-
DEFANS DÉYÈ
-
RACKIT SMART KAGO SISTÈM ETAJÈ
A. BOUK ATACHMAN BUNGEE (×2)
B. REFLEKTÈ
-
KRANPON CHÉZ
-
CATADIOPTRE DÈYÈ
-
CHÈZ*
-
PÒ CHAJE AK KOUVÈTI
-
SENTI BUNGEE
-
PLATO
-
CHAJE KAB
**OPOZE BÓ PWODWI
REMAK: IMAJ YO KA PA REFLETE APARANS EGZAK PWODWI AKTYËL LA.
natural_image
Simple line drawing of a wrench (no text or symbols)- 15 mm kle kle
• LIMIT PWA: 220 LB | 100 KG
• PWA MINIMÒM KAVALYE: 100 LB | 45.4 KG
• PWA PWODWI: 49.2 LB | 22.3 KG
• LAJ REKÒMANDE: 14+
• VITÈS MAX: 15.5 KILOMÈT ALÈ* | 25 KM/H*
• MAX RANJE: 19 MIL* | 30.6 KM*
• BATRI: 36V, 7.8AH
• KALITE BATRI: LITYÒM-ION
• MOTÈ: 350W
• CHARGEUR: UL 100 - 240V
• TAN CHAJE: JISKA 5 ÉDTAN
• MAX KAP GRENPE ANG: 15°
• KALITE FREN: DEVAN AK DÉYÈ DISK
• PRESYON KAWOTCHOU REKÒMANDE: 35 - 45 PSI
• DIMANSYON PWODWI, DEPLIYE:
49.6 POUS (L) × 20.7 POUS (L) × 44.3 POUS (H)
126.0 CM (L) × 52.5 CM (W) × 112.5 CM (H)
• DIMANSYON PWODWI, KI PLWAYE:
49.6 POUS (L) × 15.8 POUS (L) × 30.3 POUS (H)
126.0 CM (L) × 40.0 CM (W) × 77.0 CM (H)
• GWOSÈ KAWOTCHOU: 14 POUS (H) × 3 POUS (W) | 35.5 CM (H) × 7.6 CM (W)
* GAMME PWODWI, VITÈS, LAVI BATRI, AK LÔT ESPESIFIKASYON KA VARYE SELON KÀVALYE AK KONDISYON MONTE. GAĐE SEKSYON 5.8 POU PLIS DETAY SOU KONDISYON KI KAPAB AFEKTE PÉFOMANS.
1.4 Resous sou Entènèt1.3 Espesifikasy

Eskane pou plis nou pwodwi mete ajou materyèl onboarding ak resous sipò yo.
Jwenn manyèl utilizatè sa a sou entènèt nan https://cdn.shopify.com/s/files/1/2530/6734/files/SHADOW-MANUAL_WEB-1742430167217.pdf
Jwenn koleksyon manyèl utilizatè nou an nan https://ridejetson.com/pages/product-manuals
2. ENSTRIKSYON ENSTALASYON.
2.1 Kòmanse Nòt
- KOUTE AVANTI OU DWAT. ANVAN OU SÈVI AK PWODUI SA A, LI AK ANPIL ATANSYON TOUT MANYËL ITILIZATË A, KI GEN LADAN AVËTISMAN SEKIRITE. ASIRE W KE OU KONPRANN, AKSEPTE AK RESPEKTE TOUT BAGAY:
- REKÒMANDASYON MANIFAKTI A.
• ENSTRIKSYON SEKIRITE AK AVÊTISMAN.
• LWA AK ÓDONANS LOKAL AK OPERASYON YO.
- PRAN PREKOSYON LÈ W DEKONEKTE, RETIRE TOUT MATERYÈL ANBALAJ, EPI METE BISIKLÈT ELEKTRIK LA DWAT SOU SIPÒ LI ANVAN ASANBLE A. (AL GADE NAN SEKSYON 4.6)
- ENSTRIKSYON YO BAY NAN MANYÈL SA A—DWAT, AGOCH, DEVAN/DEVAN, AK DÈYÈ/DÈYÈ—YO ORYANTE JAN KAVALYE A TA WÈ YO LÈ LI CHITA SOU E-BISIKLÈT LA. "BÒ DWAT" BISIKLÈT ELEKTRIK LA, POU EGZANP, SE BÒ KOTE MEN DWAT KAVALYE A PRAL YE.
2.2 Konvnab kavalye
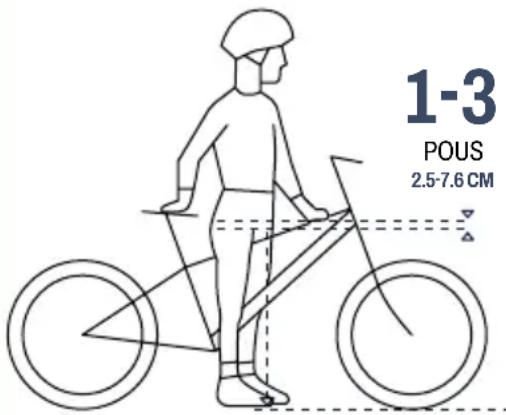
Pou monte san danje epi konfòtab, ta dwe gen yon distans omwen 1-3 pous (2.5-7.6 cm) ant bò rad la ak tib an tèt ankadreman bisiklèt la lè kavalye a monte bisiklèt la ak tou de pye plat sou tè a.
HC
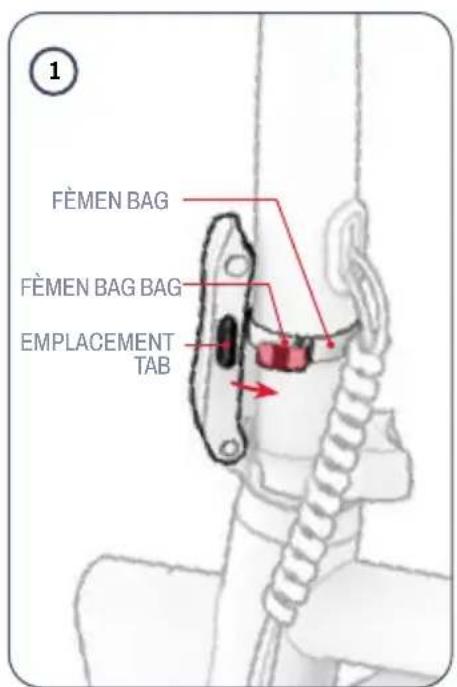
2.3 Dewoulman & Pliye Guidon la
LÈ POU DEWOULE: POU KONFIGIRASYON AK MONTE LÈ YO PLIYE: POU DEPO AK TRANSPÒ
Pou dewoule:
- DOUSMAN LEVE GIDON AN JISKASKE TIJ LA REPOZE VÈTIKAL SOU ANKADREMAN AN.
- POUSE LOTCH PLISMAN AN JISKASKE LI KLIKE NAN POZISYON FÈMEN (BLOKE).
- SEKIRIZE SERI A AK BAG LA FÈMEN: WOTASYON BAG LA NAN DIREKSYON GOCH ALANTOU TIJ LA JISKASKE TAB LA SOU BAG LA GLISE NAN FANT TAB LA SOU LOTCH LA.
- TCHEKE KE SERE A SEKIRIZE PA ASIRE KE LI PA KA RALE LOUVRI.

HC
natural_image
Diagram of a rope knot with a green checkmark indicating the correct direction (no text or symbols present)
ENPÔTAN: Pa janm monte e-bisiklèt la san
pa fèmen pliyan an fèmen epi an sekirite pa
g la fèmen.
Pou pliye:
- VIRE BAG LA FÈMEN NAN DIREKSYON GOCH ALANTOU TIJ LA JISKASKE TAB LA EFASE NAN FANT TAB LA SOU LOTCH LA PLISMAN.
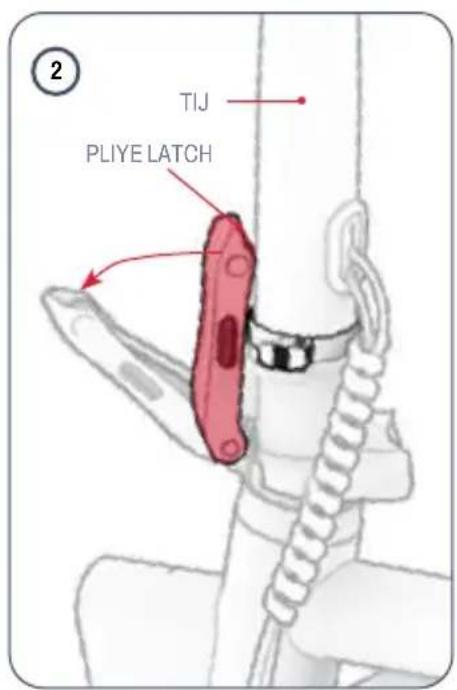
- PANDAN W AP KENBE TIJ LA FIKS AK YON SÉL MEN, SÉVI AK LÔT MEN AN POU RALE LATCH PLISMAN AN LOUVRI (NON).
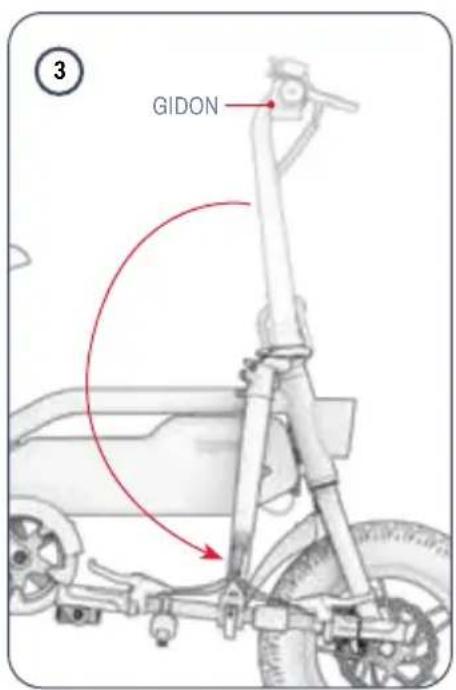
- DOUSMAN BESE GIDON AN DESANN NAN DIREKSYON BÔ BISIKLÊT LA ANFAS LATCH PLISMAN AN.
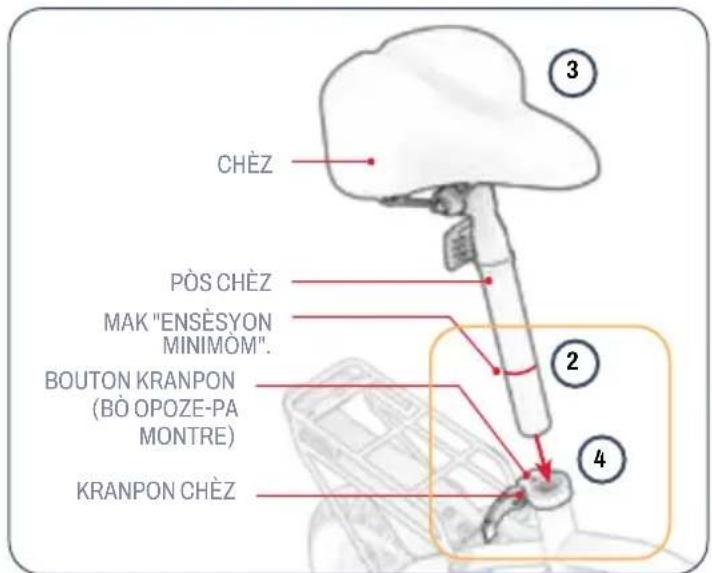
2.4 Tache Syèj la
- RALE LOUVRI SERI A SOU KRANPON CHÉZ LA.
- JWENN MAK "MINIMÒM ENSÈSYON" KI GRAVE TOU PRE PATI ANBA A NAN PÒS CHÈZ LA.
- KENBE CHÈZ LA NAN POZISYON ANLÈ BISIKLÈT LA.
- BESE PÔS CHÉZ LA NAN KRANPON AN EPI ANTRE NAN TIB CHÉZ LA JISKASKE MAK "ENSÈSYON MINIMÒM" LA ANBA KRANPON AN. NÔT: SI OUVÊTI KRANPON AN TWÒ ETWAT POU RESEVWA PÔS LA, OU KA ELAJI LI LÈ W VIRE BOUTON AN SOU KRANPON AN NAN DIREKSYON GOCH PANDAN W AP KENBE FÈMEN AN FIKS.
- PANDAN W KENBE CHÈZ LA NAN WOTÈ OU VLE A, FÈMEN SERI A SOU KRANPON AN.
- TCHEKE CHÈZ LA AN SEKIRITE: SÈVI AK MEN OU POU METE PRESYON ANBA SOU CHÈZ LA. SI PÔS CHÈZ LA GLISE PI LWEN DESANN NAN TIB LA, POTE L TOUNEN NAN POZISYON EPI SERE BOULON KRANPON AN PA VIRE BOUTON AN NAN DIREKSYON GOCH.

DEPANAJ: Si ou pa ka louvri seri a kranpon ak fasilite, bouton an ka twò sere. Dekole bouton an pa vire l nan sens goch.


HC
2.5 Tache Pedal yo
OU PRAL BEZWEN KLE A 15MM.
- ALIMAN FILE KOTON AN SOU PEDAL KI MAKE "L" AK TWOU A NAN FEN BRA MANIVÊL LA SOU BÒ GÒCH BISIKLÈT LA.
- KENBE BAZ PEDAL LA FIKS EPI, PRAN SWEN KE FILE KOTON LA ANTRE NAN TWOU A DWAT, SÈVI AK LÔT MEN OU POU TÔDE FILE KOTON AN. ENVERS NAN TWOU A POU KÊK WOTASYON.

- SÈVI AK KLE A POU FINI METE AK LÈ SA A, SERE BOULON FILE KOTON AN NAN BRA MANIVÈL LA.
- TCHEKE KE PEDAL DWAT LA AN SEKIRITE.
- REPETE ETAP 2-5 AK PEDAL DWAT ("R").
ENPÒTAN: Koton an sou pedal dwat la se ranvèse threaded epi li bezwen yo dwe mete ak sere boulon ak nan sens goch vire.
2.6 Sekirize klòch la 2.7 Sekirize reflektè devan an
W AP BEZWEN PWENT TOURNEVIS PHILLIPS-HEAD (8) MILTI-ZOUTI A.
- DEKOLE (MEN PA RETIRE) VIS KI SOU KRANPON KLÔCH LA LÊ W VIRE L NAN SENS GOCH POU 1 - 2 WOTASYON AK PWENT TOURNEVIS PHILLIPS-HEAD (8) MILTI-ZOUTI A.
- WOTASYON KLÒCH LA ALANTOU GIDON AN JISKASKE LI NAN YON KOTE KI KA FASIL POU JWENN AK GWO POUS KAVALYE NAN MEN GÒCH LA PANDAN Y AP KENBE SOU GIDON AN.
- PANDAN W KENBE KLÖCH LA NAN POZISYON SA A, SERE BOULON KRANPON AN LÈ W VIRE VIS LA NAN DIREKSYON GOCH AK TOUNVIS LA.
HC

W AP BEZWEN PWENT TOURNEVIS PHILLIPS-HEAD (8) MILTI-ZOUTI A.
- VIRE KRANPON REFLEKTÈ DEVAN AN ALANTOU GIDON AN JISKASKE REFLEKTÈ A AP FÈ FAS A DEVAN BISIKLÈT LA.
- GLISE REFLEKTÉ A NAN DIREKSYON SANT GIDON AN JISKASKE KRANPON REFLEKTÉ A SANTI L BYEN BYEN SOU PATI KI PI EPÉ NAN GIDON AN.
- SI SA NESESÈ, SERE BOULON KRANPON AN SOU GIDON AN PI LWEN PA VIRE VIS LA NAN DIREKSYON GOCH AK PWENT TOURNEVIS PHILLIPS-TÊT LA (8) NAN MILTI-ZOUTI A.
2.8 Chaje batri a
- KONEKTE KAB CHAJE A AK PLATO A.
- RALE LOUVRI KOUVÊTI PÔ CHAJ LA SOU LI E-BISIKLÊT OU A.
- PLOGE KAB LA CHAJE NAN MIRAY LA, AK LÈ SA A, PLOGE PLATO A NAN PÒ A CHAJE.
- LÈ LIMYÈ ENDIKATÈ A SOU PLATO A VIRE SOTI NAN WOUJ AK VÈT, BATRI OU A TE RIVE NAN CHAJ KONPLÈ. RETIRE PLATO A NAN PÒ CHAJE A EPI DEPLOGE KAB LA SOTI NAN PRIZ MIRAY LA.
- FÈMEN KOUVÊTI PÔ CHAJ LA.
NÔT: Li ka pran apeprè 5 èdtan pou pote batri a plen chaj. Chaje batri a konplètman anvan premye itilize.
natural_image
Illustration of a hand holding a smartwatch and a device on a surface (no text or symbols)
PÒ CHAJE AK KOUVÈTI

natural_image
Mechanical assembly diagram showing a motor and gear components with highlighted red and orange features (no text or symbols)Ajiste étrier fren an:
KALIB
KALIB
AJISTEMAN
BOULONS
KOUSINEN FREN
(ENTERYÈ NAN
KALIB; PA MONTRE)
DISK
-
SOU FREN AN KI BEZWEN AJISTE, LOKALIZE KONPA A, KOUSINEN FREN, AK DISK.
-
LEVE WOU BISIKLÈT LA EPI BAY LI YON VIRE. GADE DISK LA VIRE ANT PLAK FREN YO, EPI REMAKE KI PAD AP FWOTE KONT DISK LA.
-
REPOZE BISIKLÈT LA SOU KICKSTAND LA. (GADE SEKSYON 4.5).
-
LÈ W AP GADE KASYE A SOTI NAN DO WOU A, LOKALIZE BOULON AN PI WO A AK BOULON KI PI BA A KONPA A. SÈVI AK KLE ALLEN 5MM NAN CHAK BOULON LÈ W VIRE L NAN DIREKSYON GOCH POU 4 - 5 WOTASYON.
-
DEPLASE KALIB LA SOTI NAN ALIYMAN JISKASKE KONDISYON SA YO SATISFÈ:
· TÈT KOUSINEN YO ALIYEN AK KWEN DISK LA.
- PA GEN OKENN PATI NAN NENPÔT PAD KI MANYEN DISK LA.
• KOUSINEN YO PARALÈL AK DISK LA.
-
AVÈK KONPA A NAN POZISYON OU VLE A, SERE BOULON YON SÈL AK LÔT LA LÈ W VIRE L NAN SENS GOCH AK KLE ALLEN.
-
TCHEKE KE ETRIYE A AN SEKIRITE EPI FÈ TCHEKE SEKIRITE FREN AK FONKSYONALITE (KÒMANSE SEKSYON 3.3) ANKÒ.
3.4 Ajiste wotasyon gidon an
KA GIDON AN AP VIRE YON TI KRAS PI DEVAN OSWA BAK POU KE TOUT KARAKTERISTIK YO AK FONKSYON SOU LI YO NAN POZISYON IDEYAL LA. YO TA DWE FASIL POU JWENN PANDAN Y AP MONTE AK ANGLE DEPREFERANS NAN LIY LAN NAN JE POU CHAK ITILIZATÉ. FREN MEN YO, ESPESYALMAN, TA DWE CHITA NAN YON ANG KOTE YO FASIL POU GRIP.
- RALE LATCH LA SOU KRANPON GIDON AN POU LI NAN POZISYON OUVÈ (DETACHE).
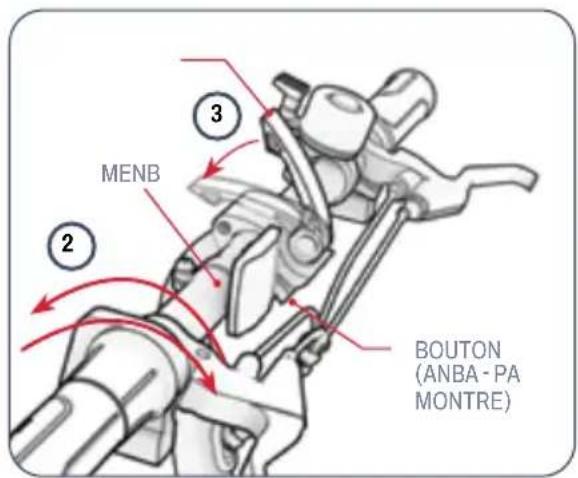
- VIRE GIDON AN POU PI DEVAN OSWA DÉYÈ POU REPOZISYON LI.
- PANDAN W KENBE GIDON AN NAN NOUVO POZISYON AN AK YON SÈL MEN, SÈVI AK LÔT MEN AN POU POUSE LATCH LA DESANN EPI TOUNEN NAN POZISYON FÈMEN (LATCHED).
DEPANAJ: Si gidon an pa rete an sekirite ak kranpon an fèmen, ou ka bezwen sere boulon kranpon an. Premyèman, rale seri a kranpon louvri. Lè sa a, dwèt sere boulon bouton an pa vire l nan direksyon goch pou kèk wotasyon, epi re-fèmen lotch la kranpon. Si ou pa ka fèmen latch la avèk fasilite, bouton an ka twò sere. Dekole bouton an yon ti kras lè w vire l nan sens goch pou ½ wotasyon.
POU SONNEN KLÒCH LA: GLISE DESANN SOU ONGLET KLÒCH LA BYEN VIT AK FÒS AK GWO POUS MEN GÒCH OU.

Customize e-bisiklèt ou pou bezwen pote ou yo.
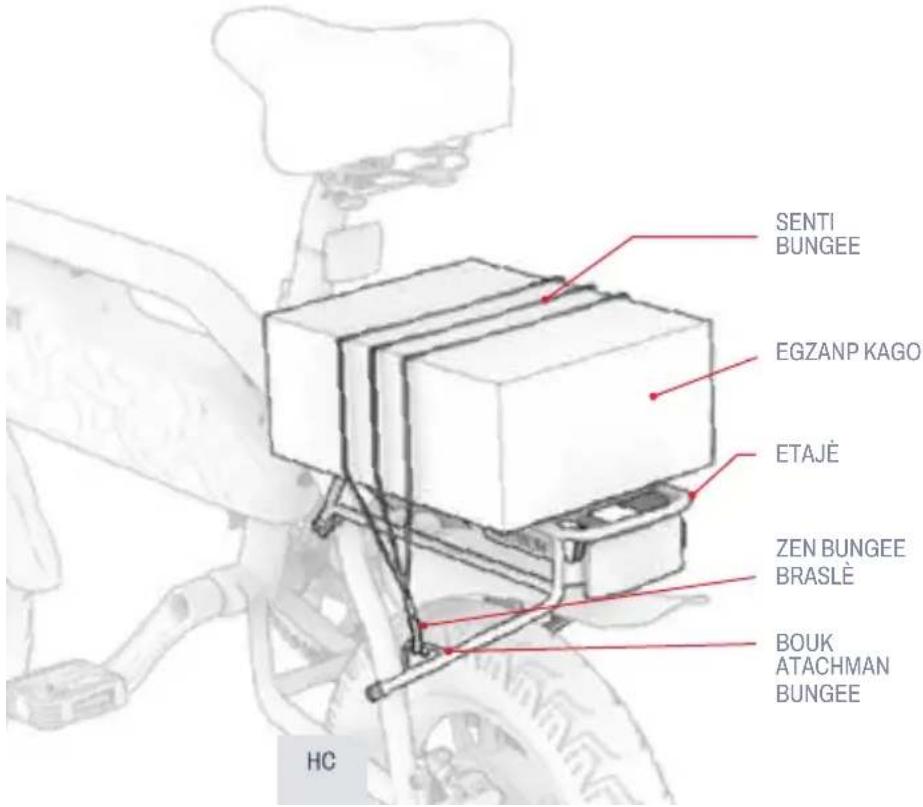
4.5 Sèvi ak Racklt Smart Cargo System Rack la
E-BISIKLÈT OU A EKIPE AK ETAJÈ SISTÈM KAGO ENTELIJAN JETSON RACKIT.
Pou Sekirize Kago w la avèk senti Bungee ki enkli:
- METE KAGO OU SOU ETAJÈ A.
- GLISE 1 ZEN NAN YON ESPAGET! BUNGEE NAN YON SÈL BOUK ATACHMAN BUNGEE SOU ETAJÈ A.
- DETIRE BRASLÈ BUNGEE LA SOU KAGO A AK ALANTOU ETAJÈ A JISKASKE LI TACHE.
- TACHE LÔT ZEN AN NAN BRASLÈ BUNGEE LA NAN LÔT BOUK ATACHMAN BUNGEE LA.
- TCHEKE KE BRASLÈ BUNGEE A AK KAGO OU AN SEKIRITE.

ENPÔTAN: Braj bungee a ta dwe byen byen byen sou kago w la. Tou depan de gwosè kago
w la ak longè braslè bungee a, li ka nesesè pou vlope braslè a anba etajè a ak sou kago w la anvan w sere 2yèm zen an nan yon bouk atachman bungee.
POU SEKIRITE AK SEKIRITE:
- Toujou sekirize kago nan etajè a ak yon braslè bungee. Pa janm monte ak kago ki pa an sekirite.
- Limite sa ki pote sou etajè a a 25 LB (11.3kg).
- Asire w ke pwa total pote (kavalye plis kago) pa depase 220 LB (100 kg).
• Pa debòde etajè a. - Toujou asire ke pa gen okenn pati nan kago a ki nan chemen an nan wou, fren, pedal, chèn oswa lòt mouvman bisiklèt oswa mekanis.
ENPÒTAN:
- Anplis de sa nan kago ak pwa enpòtan ka afekte pèfòmans nan e-bisiklèt ou. Pou plis detay sou kondisyon ki kapab afekte pèfòmans, gade seksyon 5.8.
- Pa janm kite kago poukont li sou e-bisiklèt la.
4.6 Sèvi ak Kickstand la
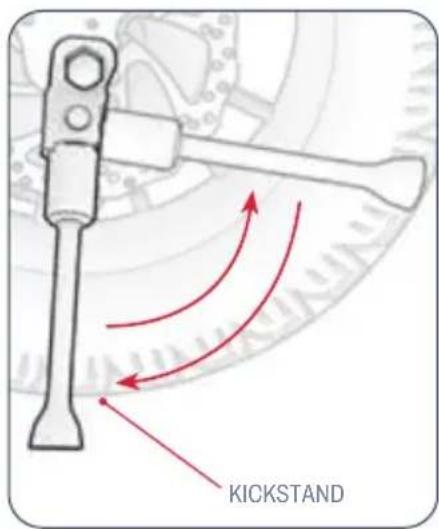
POU ITILIZE KICKSTAND LA: PIVOTE LI DESANN EPI DOUSMAN PANCHE E-BISIKLÈT OU SOU LI POU KANPE.
POU MONTE KICKSTAND LA: PIVOTE LI TOUNEN MOUTE.
4.7 Pliye & Dewoulman Pedal yo
Pou pliye: Pou dewoule:
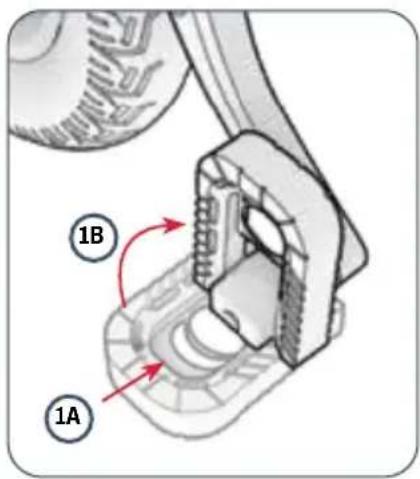
- POUSE PEDAL LA NAN DIREKSYON POU BRA MANIVÈL LA (A) AK ANLÈ (B) JISKASKE LI PLIYE ALE.
- METE DWÊT OU ALANTOU BA LAGE ANDEDAN PEDAL LA.
- RALE DEYÒ EPI DESANN JISKASKE PEDAL LA SNAPS AN PLAS.

ENPÔTAN: Toujou leve kickstand la anvan monte.

5. ENSTRIKSYON POU DEPLAJE AK DEPO.
5.1 Monte E-Bike ou
AVIZE SOU JETSON OU A NAN 3 FASON DIFERAN:
- AK PEDAL ASISTANS (SEKSYON 5.2)
- ITILIZE SÉLMAN POUVWA PEDAL (SEKSYON 5.3)
- LÈ L SÈVI AVÈK GAZ LA POU TOUT-MOTÈ POUVWA (SEKSYON 5.4)
- KLIKE NAN CRUISE CONTROL (SEKSYON 5.5)
5.2 Sèvi ak Asistans Pedal Elektwonik
LÈ W AP PEDALE AK POUVWA A LIMEN, MOTÈ A PRAL BAY PEDAL YO OGMANTE POUVWA POU KONPLETE EFÒ W. AVÈK "PEDAL ASISTANS", OU KA ALE PI LWEN AK PI VIT SOU MWENS EFÒ.
POU KENBE OU NAN KONTWÒL VITÈS, OGMANTASYON ASISTANS PEDAL YO PRAL PWOPÒSYONÈL AK EFÒ OU.
- PI DOU PEDALE → PI PITI OGMANTASYON NAN ASISTANS MOTÈ POU OU KA KENBE YON VITÈS MODERE.
- PEDALE PI DIFISIL → PI GWO OGMANTASYON NAN ASISTANS MOTÈ POU OU KA MONTE NAN YON VITÈS PI VIT.
- POU EVITE PETE TOUDENKOU NAN VITÈS, TOUJOU THORNE GAZ LA PITI PITI.
POU RALANTI: DOUSMAN FASILITE MOUTE SOU GAZ LA.

ENPÔTAN: Toujou repoze pye ou sou pedal yo, menm lè ou pa pedale. Pa janm e ak yo pandye sou bò bisiklèt la.
5.5 Aktive Kontwòl Cruise 5.6 Sèvi ak fren yo

KONTWÓL KWAZYÈ FÉMEN BISIKLÈT LA NAN YON VITÈS SÈTEN. YON FWA OU METE KONTWÓL KWAZYÈ, MOTÈ A PRAL FÈ TRAVAY LA POU KENBE VITÈS LA - PA GEN OKENN GAZ OSWA PEDALE OBLIGATWA.
- SÈVI AK GAZ LA POU RIVE EPI KENBE VITÈS OU VLE.
- PEZE RAPID LIMYÈ DEVAN / BOUTON KONTWÒL KWAZYÈ A AK GWO POUS DWAT OU.
- KITE GAZ LA, KENBE PYE OU TOUJOU SOU PEDAL YO, EPI JWI WOULIB LA.
POU DEZAKTIVE KONTWÓL KWAZYÈ: DOUSMAN TÓDE GAZ LA, PEZE YOUN NAN FREN MEN YO, OSWA RAPID-PEZE BOUTON KONTWÓL KWAZYÈ A.
• PEZE YOUN OSWA TOUDE FREN MEN
POU RALANTI.
• PEZE PLIS FÔS POU YO SISPANN NÊT.
- POU EVITE MOUVMAN BRID SOU KOU, ESEYE PEZE FRENN LAN (YO) PITI PITI.
· FREN MEN GÒCH → FREN WOU DEVAN
· FREN MEN DWAT → FREN WOU DÉYÈ
5.7 Sekirite Kas
KAVALYE A TADWE METE YON KAS TOUT TAN.

natural_image
Silhouette of a human head with red X-shaped markers overlaying the profile (no text or symbols)MOVE POZISYON: FWON AN EKSPOZE. YON TONBE KA LAKÓZ NAN BLESI GRAV.

natural_image
Silhouette of a person wearing a helmet and headgear (no text or symbols)BON POZISYON: FWON AN KOUVRI PA KAS LA.
*METE YON KAS, RAD APWOPRIYE, SOULYE, AK EKIPMAN SEKIRITE. EVITE RAD KI KA PRAN NAN OSWA ANBA WOU YO. FÈMEN-ZÒTÈY, SOULYE PLAT YO REKOMANDE. MÉTE YON KAS APWOUVE ASTM F1492 AK EKIPMAN PWOTEKSYON POU ANPECHE AKSIDAN SI TA GEN YON AKSIDAN.
5.8 Maksimize vitès & Riding Range
NAN KONDISYON IDEYAL YO, KANTITE MIL MAKSIMÒM KI KAREYALIZE POU CHAK BATRIFYÈ CHAJ LA SE 19MIL (30.6 KM) SI SÈLMAN LÈ W APITILIZE GAZ LA. VITÈS MAKSIMÒM LAN SE 15.5 MPH (25 KM/H). PLIS MOTÈ A BEZWEN TRAVAY, SE PI VITBATRI A APVIDE. FAKTÈ SA YO PRAL AFEKTE TOU VITÈS AK RANJE MONTE.
Sifas monte:
VWAYAJE SOU YON SIFAS KI GRAJ MANDE POUVWA MOTÈ PASE MONTE SOU YON LIS.
Pote pwa:
• PLIS PWA (KAVALYE PLIS KAGO) DIMINYE RANJE POSIB.
- MAKSIMÒM RANJE AK VITÈS KA REYALIZE AK PWA POTE NAN 220 LB (100 KG) OSWA MWENS.
Estil monte:
- SOUVAN KÒMANSE AK KANPE AP DIMINYE RANJE MONTE.
- SÈVI AKEFÒ PWÒPOU A POU PEDALE AP FASILITE DEMANN LAN SOU MOTÈ A EPI OGMANTE RANJE MONTE OU.
Tanperati lè a:
TANPERATI IDEYAL POU MONTE AK ESTOKE E-BISIKLÈT LA SE ANT 50 °F - 95 °F (10 °C - 35 °C).
Incline:
MOTÈ A DWE TRAVAY PI DI POU VWAYAJE MONTE PASE SOU DETIRE PLAT OSWA DESANN.
Antretyen batri:
CHAJE BATRI ALÈ APRE CHAK WOULIB EDE KENBE KAPASITE BATRI AK FÒS.
ENSTRIKSYON ENTRETYEN ITILIZATE YO.
Pran bon swen Jetson ou a pou kenbe li monte san pwoblèm ak san danje. Men ki jan:
Manyen Jetson ou a:
• EVITE EKSPOZE E-BISIKLÈT OU A GWOVIBRASYON OSWA ENPAKFIZIK ENTANS.
• PA JANM DEMONTE BATRIA.
• KENBE E-BISIKLÈT OU LWEN DLO AK IMIDITE.
• MONTE SOU SIFAS KI LIS AK PLAT POU EVITE KRAZE.
· PA JANM POTE E-BISIKLÈT OU PA WOU, CHÈZ, AK/OSWA GIDON.
- FÈ ATANSYON POU PA RALEOSWA DECHIRE FIL ELEKTRIK KI KONEKTE MOTÈ A AK KONPOZAN GIDON YO.
Enstriksyon Depo:
- CHAJE BATRI A KONPLETMAN ANVAN OU ESTOKE PWODWI A POU PERYÒD TAN KI PWOLONJE.
- LÈ W NAN DEPO POU PERYÒD TAN KI PWOLONJE, CHAJE BATRI A KONPLEÒTMANYON FWA PA MWA.
• KOUVRI PWODWI A POU PWOTEJE LI KONT POUSYÈ TÈ. - SERE PWODWI AANDEDAN KAY LAAK NAN YON KOTEKI SÉK NAN YON TANPERATI ANT 50 °F - 95 °F (10 °C - 35 °C).
ridejetson.com/reviews.
Nou pa ka tann tande pale de ou!
MakeMoves
KESYON? SE POU NOU EDE.
RIDEJETSON.COM/SUPPORT RIDEJETSON.COM/CHAT
1-844-585-7462
Pou fè egzèsis pwodwi ou a garanti oswa mande enfòmasyon sou garanti garanti, kontakte nou dirèkteman.
www.ridejetson.com
JETSON


© 2025, TRURIDE TECH. TOUT DWA REZÈVE. PREFABRIKE POU TRURIDE TECH LLC.
JETSON® SE YON MAK KI ANREJISTRE KI ITILIZE ANBA LISANS JETSTREAM BRANDS LLC. OKENN PATI NAN DOKIMAN SA A, KI GEN LADAN FÔM, GRAFIK, AK KONSEPSYON, PA KA REPWODUI OSWA TRANSMÈT NAN NENPÔT FÔM OSWA PA NENPÔT MWAYEN.
MANIFAKTIRE NAN YUEYANG, LACHIN
ENPÔTE PA TRURIDE TECH LLC.
PO BOX 461, JERSEY CITY, NJ 07302-9998
DAT KÓD: 05/2025
EDISYON DOKIMAN: V1.0
TE FÈ NAN PEYI LACHIN
natural_image
Abstract geometric pattern with interlocking gray shapes and a central dark blue shape (no text or symbols)جیئسن کا سب سے اوپر
دو سواری
قوانین:
natural_image
Simple line drawing of a wrench (no text or symbols)natural_image
Diagram of a rope knot with a green checkmark indicating the correct direction (no text or symbols present)natural_image
Illustration of a bicycle's front wheel assembly with a green checkmark indicating inspection (no text or symbols present)UR
2.5 پیلکو جوزنا
natural_image
Mechanical assembly diagram showing a motor and gear components with highlighted red and orange features (no text or labels)رپیلیک
ربیلی ک
تنمکسجذیا
اللوب
natural_image
Silhouette of a human head with red X-shaped markers overlay, no text or symbols presentغلط پوزیشننگ:
پیشانی کهل جاتی بے.
natural_image
Silhouette of a person wearing a helmet and headgear (no text or symbols)مناسب پوزیشتنگ:
m = 311
ridejetson.com/reviews.