
DMA-1000 - Power amplifier YAMAHA - Free user manual and instructions
Find the device manual for free DMA-1000 YAMAHA in PDF.

| Product type | Multimedia power amplifier |
| Brand | YAMAHA |
| Model | DMA-1000 |
| Power supply | Supplied AC adapter |
| Connectivity | HDMI, S-Video, S/PDIF coaxial, RCA (L/R), Ethernet (LAN), USB |
| Supported audio formats | Dolby Digital, MPEG-1/2/3, MPEG-2/4 AAC, WMA9 |
| Supported video formats | MPEG-1/2/4, WMV9 |
| Supported photo formats | JPEG, JPEG2000, BMP, GIF, PNG, TIFF |
| Main features | Playback of audio, video and photo files from network or USB key; interface via remote control; integrated media server |
| Weight | Approx. 1.5 kg (estimated) |
| Dimensions (W x D x H) | Approx. 280 x 200 x 60 mm (estimated) |
| Operating temperature | 0 °C to 40 °C |
| Operating humidity | 20% to 80% (non-condensing) |
| Care and cleaning | Wipe with a soft dry cloth. Do not use solvents. |
| Safety | Use only the supplied adapter. Do not expose to moisture. Turn off before connecting/disconnecting. |
| Spare parts and repairability | Spare parts are not listed. Contact YAMAHA customer service for repairs. |
| Package contents | DMA-1000, AC adapter, HDMI cable, remote control, batteries, CD-ROM with media server software, user guide |
Frequently Asked Questions - DMA-1000 YAMAHA
User questions about DMA-1000 YAMAHA
0 question about this device. Answer the ones you know or ask your own.
Ask a new question about this device
Download the instructions for your Power amplifier in PDF format for free! Find your manual DMA-1000 - YAMAHA and take your electronic device back in hand. On this page are published all the documents necessary for the use of your device. DMA-1000 by YAMAHA.
USER MANUAL DMA-1000 YAMAHA
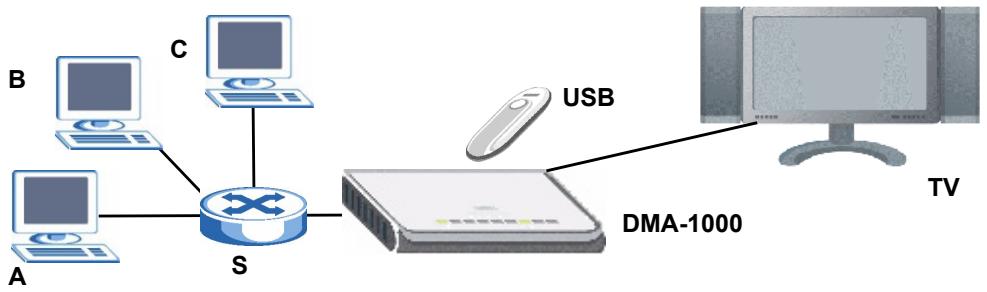
Use your DMA-1000 to play audio, video and photo files on your TV instead of your computer monitor. The files can be on computers or a USB memory stick or hard drive.
The following figure shows the DMA-1000 connected to an Ethernet switch (S) and a TV. Computers A\~C are connected to the Ethernet switch.
flowchart
graph TD
    A["Computer"] --> S["Switch"]
    B["Computer"] --> S
    C["Computer"] --> S
    D["Computer"] --> S
    E["Computer"] --> S
    F["USB"] --> DMA-1000
    DMA-1000 --> TV
    style S fill:#f9f,stroke:#333
    style DMA-1000 fill:#ccf,stroke:#333
    style TV fill:#cfc,stroke:#333
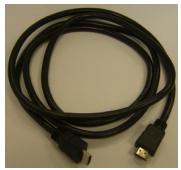
You need an HDMI cable if you will connect the DMA-1000 to a HDMI connector on your TV.
natural_image
Coiled black cable with two connectors, no visible text or symbols
If you are using Windows Vista, see the Windows Vista Media Server appendix in the Users Guide (on the included CD) to let the DMA-1000 play files stored on your computer.
Install the included media server software to let the DMA-1000 play files stored on your computer. This software requires Windows XP. If you do not have Windows XP or do not want to install software, you can put your files on a USB stick. The USB stick connects directly to the DMA-1000 without need of the media server software or a computer.
Use the following sections in this guide (in the listed order) to view files on computers or on a USB stick.
Viewing Files on Computers
1 Install the Media Server Software
2 Connect Your DMA-1000
3 Share Your Files
4 Play Your Files
Viewing Files on a USB Stick
2 Connect Your DMA-1000
4 Play Your Files
1 Install the Media Server Software
You must install the media server software on each computer that you will use to share files with the DMA-1000.

You can only install the media server software on a Windows XP computer. See Requirements for more details.
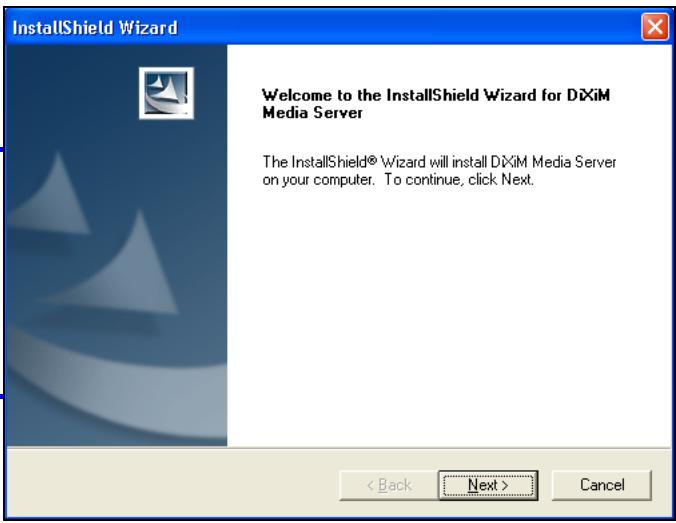
1 Put the CD into your CD-ROM. Click Setup in the following screen.

If this screen does not display, locate and double-click setup.exe.
2 The installation wizard appears. Follow the directions to install the software.

See the requirements section if you have trouble installing or using the media server.
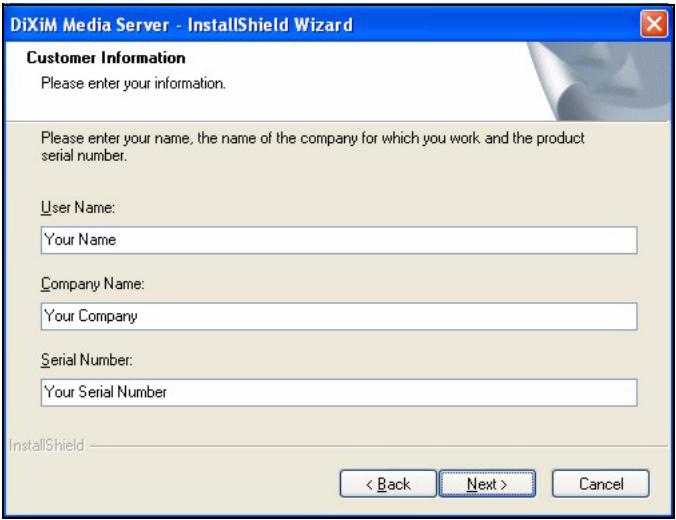
3 Enter your information in this screen. Enter a user name (up to 64 ASCII
characters recommended). The company name is optional (up to 64 ASCII characters recommended). Click Registration in the screen that opened when you inserted the CD-ROM (see page 3). Then click Media Server Serial Number to open a text file with a serial number. Copy and paste the serial number into the Serial Number field in the screen shown here.
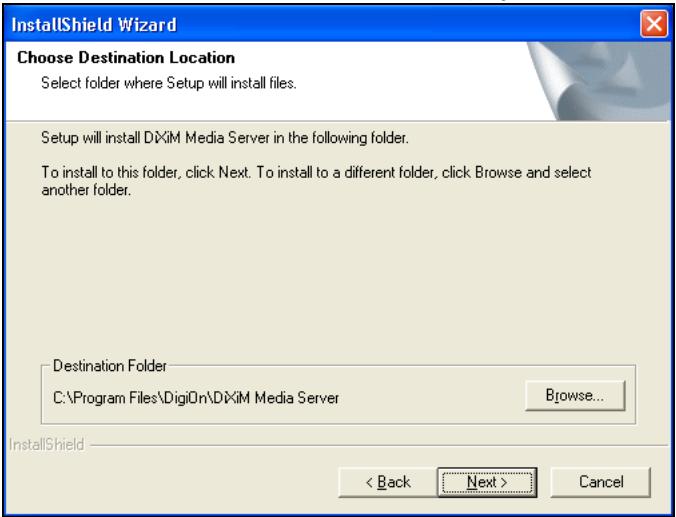
4 Select a destination for the software (or just leave the default).
5 You can specify a name for the media server that the DMA-1000 displays on your TV. It is helpful to use unique names if you install the media server on multiple computers. Up to 34 ASCII characters recommended.
![DiMiM Media Server - InstallShield Wizard Enter Text Please enter information in the field below. Enter the Media Server name. 'When nothing is specified, the Media Server will be named 'computer-name [DiMiM Media Server]'. InstallShield < Back Next > Cancel](/content/2024/12/114818/images/bae5d62cc0c48f4528c9d47134c79afb86d67e408d955814e537e2dec5fa8ab0.jpg)
6 If you see a screen asking about configuring the Windows XP firewall, click Yes. This allows the DMA-1000 to access the files on your computer that you share.
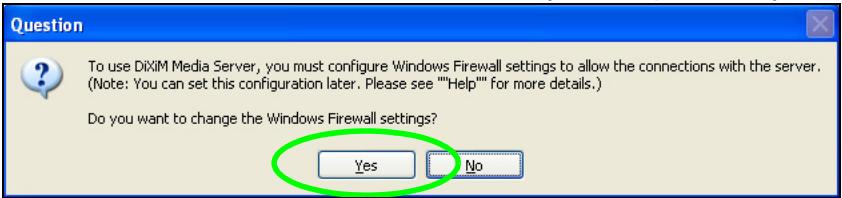

Refer to the User's Guide if your computer has another software firewall (like ZoneAlarm for example) that you need to configure.
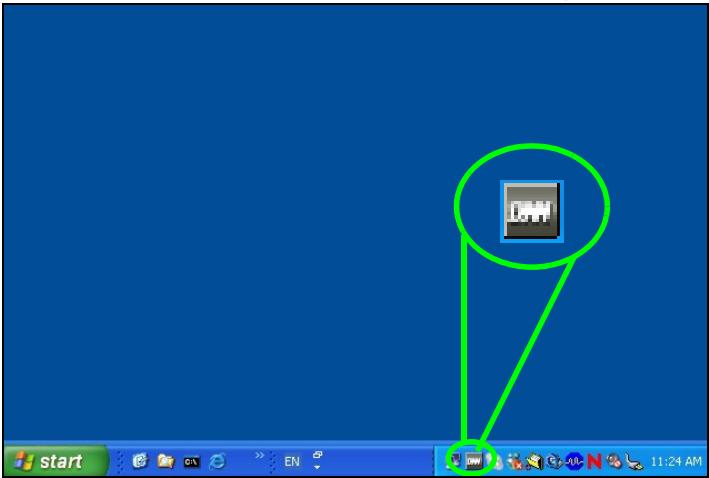
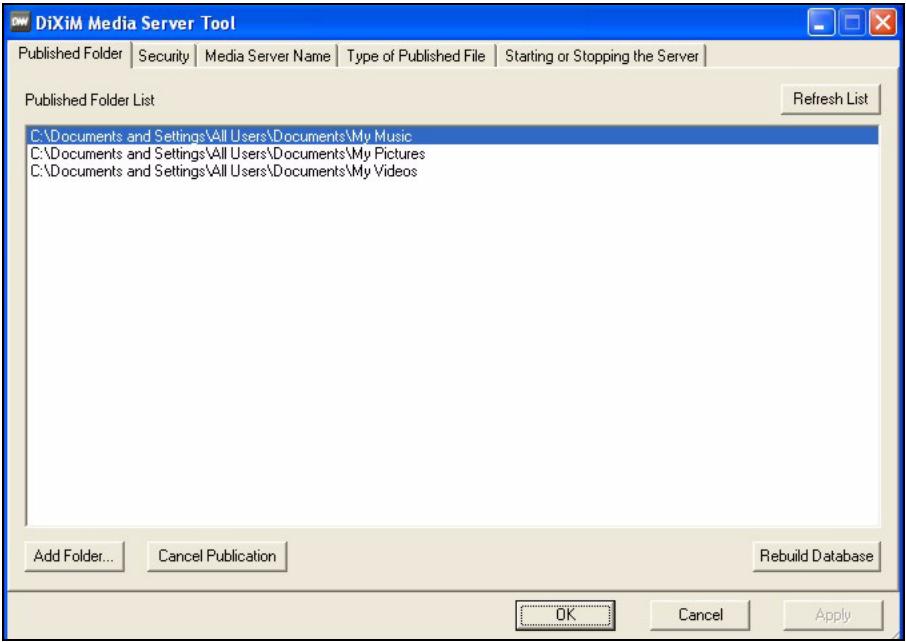
7 This icon displays in the system tray (usually in the bottom right corner) after the installation is done. Double-click the icon to open the server configuration screens.
8 The Published Folder List lists folders of files that your computer will share with the DMA-1000.
- Your My Music, My Pictures and My Videos folders are included by default.
- To share other files, click the Add Folder button and browse to select a folder that you want to share.
- To remove a folder from the list, click it and then click Cancel Publication.
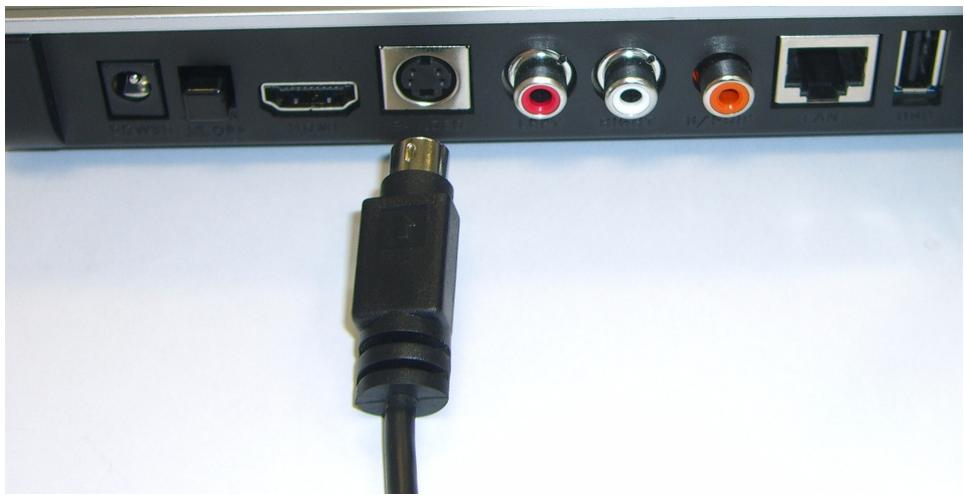
2 Connect Your DMA-1000
Turn off your TV before you connect the DMA-1000.
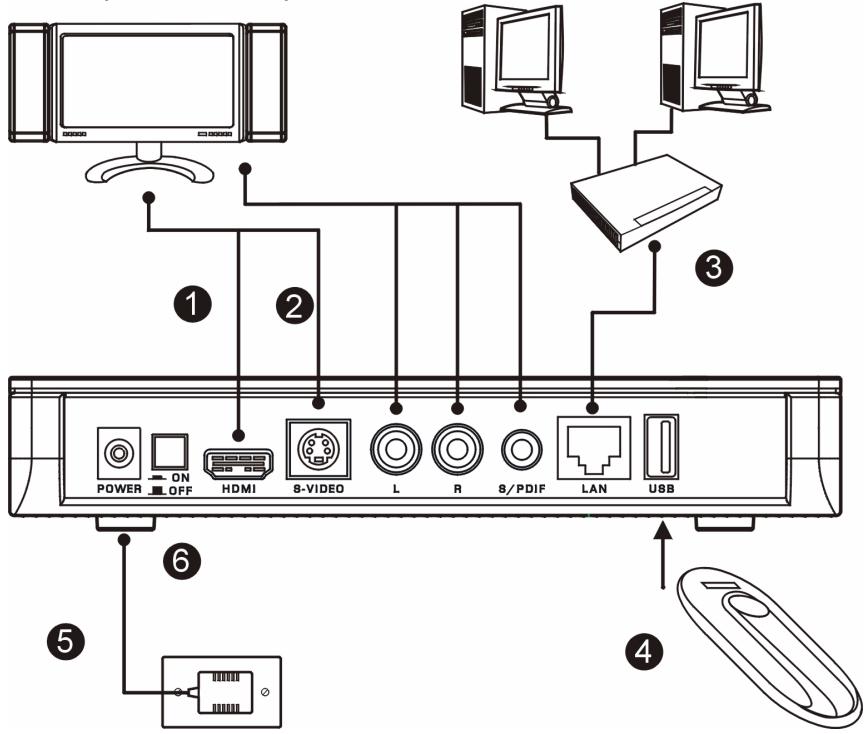
1 If your TV has a HDMI connector, use an HDMI cable to connect the DMA-1000's HDMI connector (shown) to the TV.
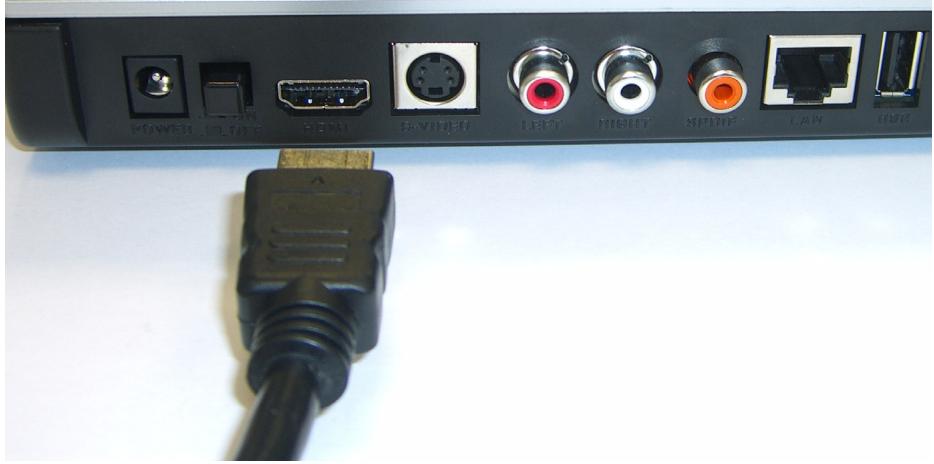
2 If your TV does not have an HDMI connector:
A Use an S-video cable to connect the DMA-1000's S-VIDEO connector (shown) to the TV.
natural_image
Close-up of a black USB cable connector with various ports and connectors (no visible text or symbols)B If your TV or audio system has a coaxial S/PDIF jack, use an RCA cable to connect it to the DMA-1000's S/PDIF jack (shown).
C If your TV or audio system does not have a coaxial S/PDIF jack, use RCA cables to connect it to the DMA-1000's LEFT and RIGHT jacks (shown).

natural_image
Close-up of a red audio amplifier cable with ports and connectors (no visible text or symbols)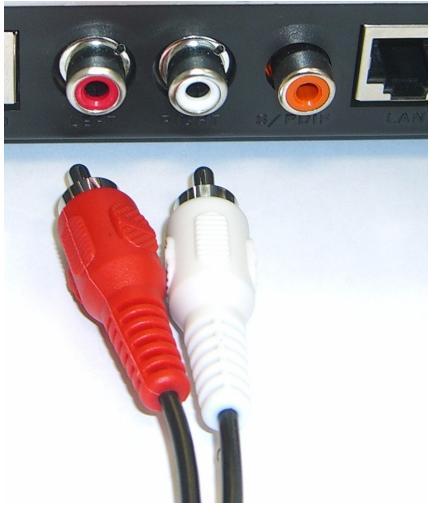
natural_image
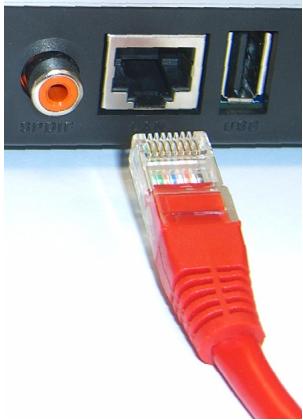
Close-up of three connected audio equipment cables (red, white, orange) with ports labeled 'LAN' and 'S/PUH', no readable text beyond labels.3 Connect the DMA-1000's LAN port if your content files are on your computer. The media server software should already be installed. Skip to the next step if you will only play files from a USB stick.
- Use the straight-through Ethernet cable (gray at the time of writing) to connect to an Ethernet switch, router or hub.
- Use the cross-over Ethernet cable (red at the time of writing) to connect directly to your computer.
4 If you want to play files from a USB memory stick, connect it to the DMA-1000's USB port. (This is optional if you connected the LAN port.)
natural_image
Close-up of a red RJ4 network adapter with ports and connectors (no visible text or symbols)5 Connect the POWER socket to a power source using only the included power adaptor.
6 Your computer should already be turned on. Turn on the TV and the DMA-1000.

natural_image
Close-up of a black cable with a connector inserted into a black socket, showing port labels (no readable text or symbols)2.1 Check the LEDs (Lights)
Look at the front of the device.

1 The STATUS LED comes on.
2 The LAN light and/or the USB light turn on.

Check your connections if the lights do not come on.
3 Share Your Files
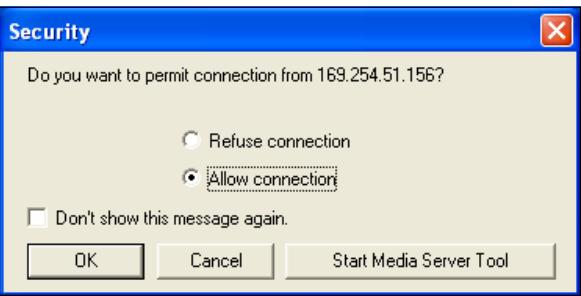
1 Look at your computer screen. Wait for the media server to detect the DMA-1000 and open a pop-up window with the DMA-1000's IP address. If the DMA-1000 does not get an IP address automatically, it uses Auto-IP to assign

DiXiM Media Server Helper

169.254.51.156
Click here to allow or refuse connection from this client.
itself an IP address. If your computer is also set to get an IP address automatically, the computer and the DMA-1000 will be able to communicate. See the User's Guide if you need to configure the DMA-1000 with a static IP address. Click anywhere in this window.

You may need to wait for two or three minutes. If the window still does not display, check the DMA-1000's LEDs and connections and use the power button to restart the DMA-1000.
2 Select Allow Connection and click OK.
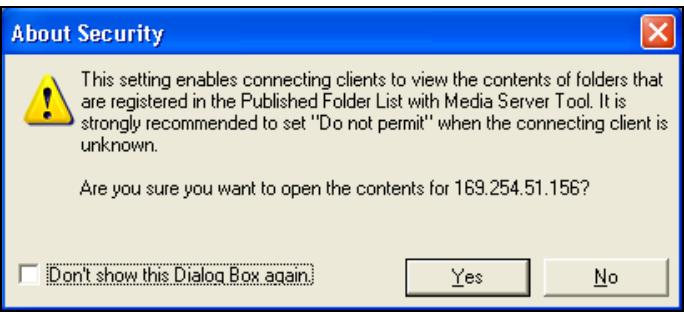
3 Click Yes to allow the DMA-1000 to access your published (shared) files.
4 Play Your Files

Set your TV's input to the DMA-1000's
connection (either HDMI or S-Video). Remember to change it when you want to use other input.
1 Look at your TV. The DMA-1000 automatically sorts the files on the server into the MUSIC, VIDEO and PHOTO menus. Files on a USB stick are in the USB menu.
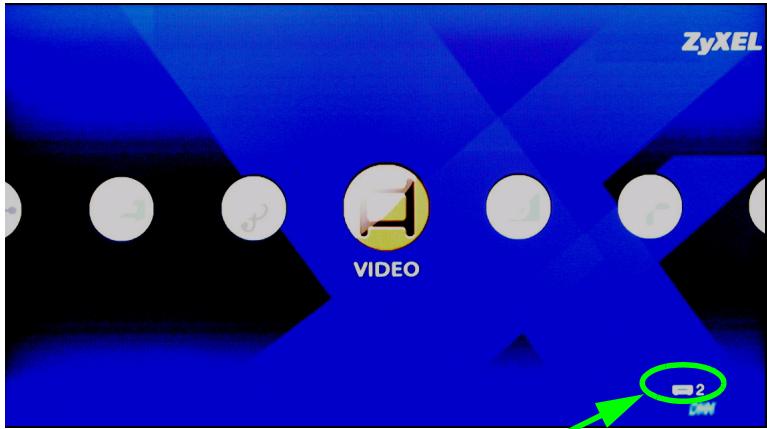
Number of media servers the DMA-1000 detected.
2 Install the remote control's batteries.
3 Point the remote control at the front of the DMA-1000.
4 Use the remote control to navigate the menus and play files.
Power switches between standby and operation modes.
Use the 0\~9, CLEAR and INPUT keys to input numbers (like for individual scenes or times).
PAGE up/down scroll up or down a list to the previous or next page.
AUDIO switches audio output between left, right and stereo speakers.
A-B lets you select start and stop times to repeat an interval.
REPEAT keeps playing (loops) the file.
INFO displays details about the playing file.
SERVER opens a menu where you select a media server.
ROTATE turns a photo 90° clockwise.
SHUFFLE plays your playlist (favorites) files in random order.
OPTION opens the menu where you configure the DMA-1000's settings.
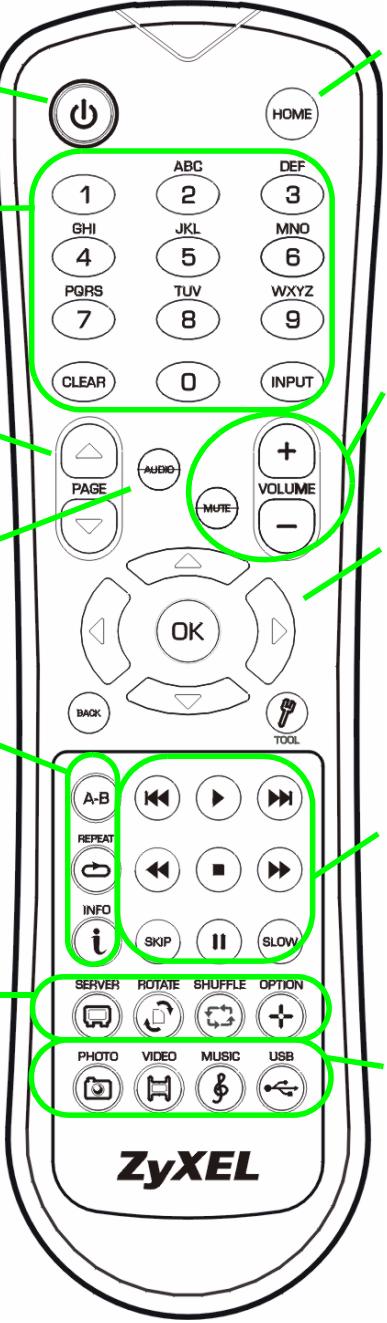
Return to the main menu.
MUTE turns off the sound.
VOLUME up/down adjust the volume.
Use the OK, BACK and arrow buttons to go through the menus and play your files.
TOOL opens the TOOL menu for additional options (see the User's Guide).
These buttons perform the previous, play, next, reverse, stop, fast forward, skip, pause and slow motion functions during file playback.
PHOTO opens a menu of picture files to view.
VIDEO opens a menu of video files to play.
MUSIC opens a menu of music files to play.
USB opens a menu of files on your USB device.
Example of Playing Video Files
1 Press the remote's VIDEO button to enter the VIDEO menu.
2 The video files are arranged in folders.
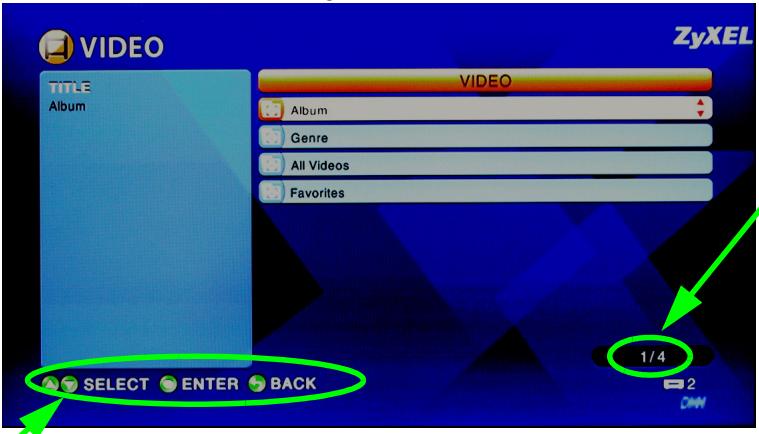
The number of the item currently selected followed by the total number of items in the menu.
Navigation instructions for the menu. In this example, use the arrow and OK buttons to select a folder to see the video files sorted by that criteria. Or use the BACK button to go up in the menu structure.
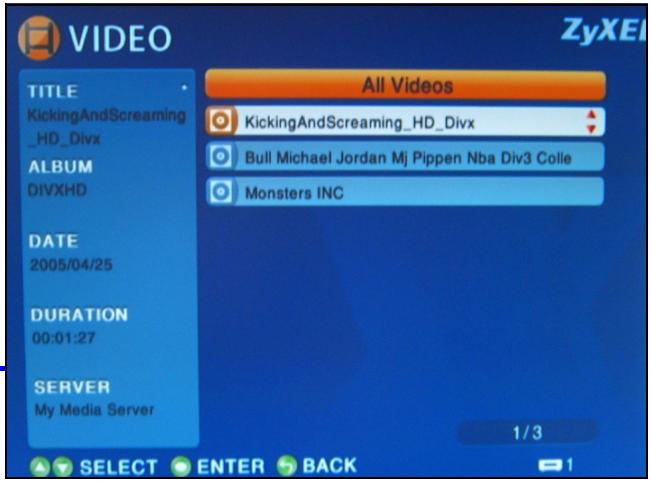
3 In this example, use the remote's arrow and OK buttons to select the All Videos folder. A list of all the video files displays on the right. Information about the currently selected file displays on the left.
4 Use the remote's arrow and OK buttons to select and play a video file.

Files with unsupported formats or codecs may not display properly.
The DMA-1000 supports the following file formats. See the User's Guide for more details.
| Audio | Dolby Digital, DVD-Audio, MPEG-1 and MPEG-2 Layers I, II and III(MP3), MPEG-2 BC multi-channel Layers I, II and III, MPEG-2 and MPEG-4 AAC-LC, WMA9. |
| Video | MPEG-1, MPEG-2 MP@ML, MPEG-4 simple and advanced simple profile, MPEG-4 AVI files and WMV version 9. |
| Photo | TIFF, PNG, GIF, BMP, JPEG and JPEG2000. |
Requirements

If you have trouble installing the media server software, make sure your computer meets the following requirements.
| Microsoft Windows XP Home Edition Service Pack 1 or above, Professional Service Pack 1 or above, or Media Center Edition 2005 Update Rollup or above.*You must be logged in as the administrator to install and use the media server. | |
| Software | Windows Media Player 9 or aboveMicrosoft DirectX 9.0 or above |
| CPU | Celeron 1GHz or above, Pentium III or above (Pentium III 1GHz or above recommended) or compatible |
| Memory | 256MB or above recommended |
| Peripherals | CD-ROM drive |
| Hard Disk | 300MB or above. |
Procedure to View a Product's Certification(s)
1 Go to www.zyxel.com.
2 Select your product from the drop-down list box on the ZyXEL home page to go to that product's page.
3 Select the certification you wish to view from this page.
natural_image
Coiled black cable with two connectors, no visible text or symbols


natural_image
Back panel of a computer interface showing ports and connectors, with a black USB cable inserted at the bottom (no visible text or symbols on components)natural_image
Back panel of a network device showing ports and connectors (no readable text or symbols)natural_image
Close-up of a red audio amplifier plug with attached network ports (no visible text or symbols)natural_image
Close-up of three connected audio equipment ports (red, white, orange) with no visible text or symbols on the device surface.natural_image
Close-up of a red network interface socket connected to a black RJ4 port, showing ports labeled NPPB, USB, and network ports (no text beyond labels)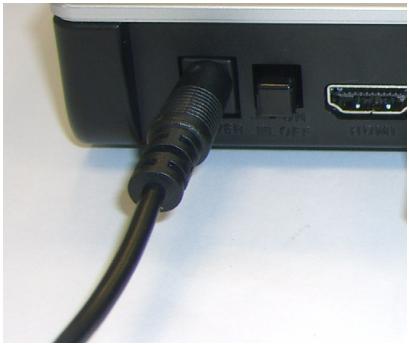
natural_image
Close-up of a black USB cable inserted into a black terminal block with an orange port (no visible text or symbols)Click here to allow or refuse connection from this client.
natural_image
Coiled black cable with two connectors, no visible text or symbols


2 Conectar su DMA-1000
natural_image
Back panel of a computer interface showing ports and connectors (no readable text or symbols)natural_image
Close-up of a red audio amplifier plug with attached network ports (no visible text or symbols)
natural_image
Close-up of a black electronic device with three connected audio ports (red, white, orange) and a separate LAN panel, showing no visible text or symbols.natural_image
Close-up of a red network interface socket connected to a black RJ4 port, showing ports labeled NPNP, USB, and network ports (no text beyond labels)
natural_image
Close-up of a black cable with a connector inserted into a black rectangular device (no visible text or symbols)2.1 Compruebe los LEDs (luces)
Click here to allow or refuse connection from this client.
natural_image
Coiled black cable with two connectors, no visible text or symbols


natural_image
Back panel of a network device showing ports and connectors (no readable text or symbols)natural_image
Close-up of a red audio amplifier plug with attached network ports (no visible text or symbols)natural_image
Close-up of three connected audio equipment ports (red, white, orange) with no visible text or symbols on the device surface.natural_image
Close-up of a red network interface socket connected to a black RJ4 port, showing ports labeled NPPB, USB, and network ports (no text beyond labels)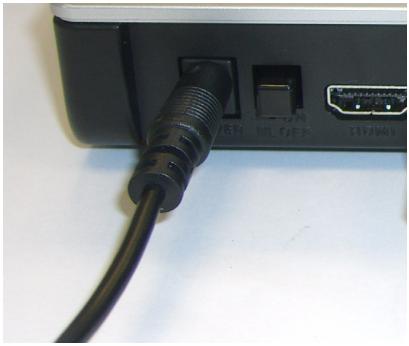
natural_image
Close-up of a black cable with a threaded connector inserted into a black rectangular socket, next to an orange port (no visible text or symbols)Click here to allow or refuse connection from this client.

4 Lire vos fichiers

natural_image
Coiled black cable with two connectors, no visible text or symbols
natural_image
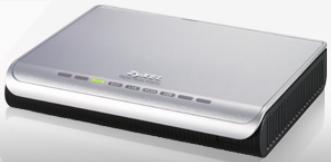
Exterior view of a silver and black electronic device (no visible text or symbols)DMA-1000
Digital Media Adapter
(C) Copyright 2006 ZyXEL Communications Crop.

Browse CD

Exit
Home


natural_image
Back panel of a computer interface showing ports and connectors (no readable text or symbols)natural_image
Close-up of a red audio amplifier plug with attached ports (no visible text or symbols)natural_image
Close-up of three connected audio equipment ports (red, white, orange) with no visible text or symbols on the cables.natural_image
Close-up of a red network interface socket connected to a black RJ4 port, showing ports labeled NPPB, USB, and network ports (no text beyond labels)
natural_image
Close-up of a black cable with a threaded connector inserted into a black rectangular socket, next to an orange port (no visible text or symbols)2.1 Controllare i LED (spie)
Click here to allow or refuse connection from this client.
natural_image
Coiled black cable with two connectors, no visible text or symbols
natural_image
Exterior view of a silver and black electronic device (no visible text or symbols)DMA-1000
Digital Media Adapter
(C) Copyright 2006 ZyXEL Communications Crop.

Browse CD

Exit
Home


natural_image
Back panel of a network device showing ports and connectors (no readable text or symbols)natural_image
Close-up of a red audio amplifier cable with ports and connectors (no visible text or symbols)natural_image
Close-up of three connected audio equipment ports (red, white, orange) with no visible text or symbols on the cables.natural_image
Close-up of a red RJ4 network connector with ports and connectors (no visible text or symbols)natural_image
Close-up of a black USB cable inserted into a black rectangular device with an external port (no visible text or symbols)Click here to allow or refuse connection from this client.