GO EarAir - Mp3 player Zipy - Free user manual and instructions
Find the device manual for free GO EarAir Zipy in PDF.

User questions about GO EarAir Zipy
0 question about this device. Answer the ones you know or ask your own.
Ask a new question about this device
Download the instructions for your Mp3 player in PDF format for free! Find your manual GO EarAir - Zipy and take your electronic device back in hand. On this page are published all the documents necessary for the use of your device. GO EarAir by Zipy.
USER MANUAL GO EarAir Zipy
natural_image
Close-up of a black and silver S baby earband device (no text or symbols visible)Contents
■ Brief introduction....2
- Bluetooth wireless communication technology....2
- About EARAIR....2
■ Before use....3 - Overview....3
- Charging the headset....3
■ Using the headset....5 - Switching on/off the headset....5
- Pairing the headset with Bluetooth devices....5
How to enter pairing mode....5
Pairing the headset with Bluetooth mobile phone....5
Pairing the headset with Bluetooth transmitter....6
Multi-pair....6
- Wearing the headset....7
- Making calls with the headset....8
- Playing music....9
- Re-connecting to a Bluetooth device....9
- Restoring to factory defaults and resetting....10
- LED indicator....10
- Indication tone....11
■ Care and maintenance....11
■ FAQs....11
■ Specifications....12
Welcome to use this Bluetooth stereo headset, EARAIR. Please read this user's manual carefully before use.
■ Brief introduction
1. Bluetooth wireless communication technology
Bluetooth is a standard of close range radio-communication technology that was drawn up by Ericsson, IBM, Intel, Nokia and Toshiba. With Bluetooth technology, we can achieve the highest transmission rate among cell phones, computers, printers, PDAs and other devices. The max transmission range of class II is 10 meters while the max radio-communication ranges of class I can reach up to 100 meters.
2. About EARAIR
EARAIR is a Bluetooth stereo headset. It supports the following Bluetooth profiles:
HSP —— Headset Profile
HFP — Hands-free Profile
A2DP—— Advanced Audio Distribution Profile
AVRCP——Audio/Video Remote Control Profile
You can enjoy music wirelessly by using the EARAIR. Features as following:
1) Pairing with the Bluetooth mobile phone and PDA which support HFP.
◆ Answer, end and reject call from the headset
◆ Redial last number
◆ Voice dial
◆ Adjust the volume
◆ Switch the conversation between the headset and the mobile phone
◆ Microphone mute
2) Pairing with Bluetooth music devices and Bluetooth transmitter which support A2DP.
◆ Enjoy music wirelessly
◆ Adjust the volume
◆ Remote control pause/ play
◆ Remote control last/next song
3) Easy to switch between conversation and music, you will not miss the
incoming call during listening to music.
4) Every time the headset is switched on, it will automatically connect to the last paired device.
Note: Even though the paired device and headset support the same Bluetooth profiles, the functions may be different due to the specification difference of the paired devices.
Before use
1. Overview
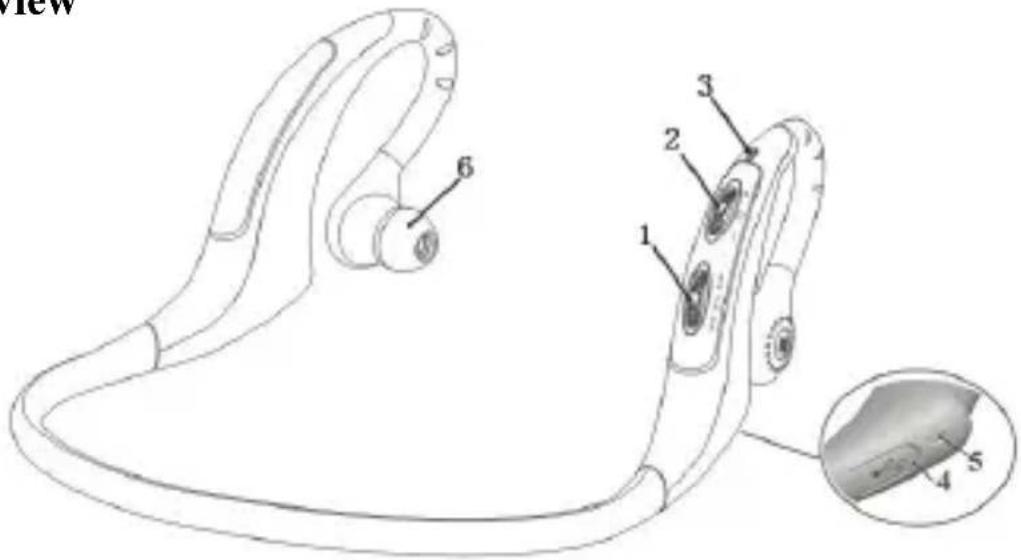
1) Switch one
←: Next song
▶: Pause/microphone mute
▶: Last song
2) Switch two
- : Volume down
: Multi-function button (switch on/off, answer/end/reject a call, voice dial/voice transfer/redial)
+: Volume up
3) LED indicator
4) Charging port (covered by rubber cover)
5) Built-in microphone
6) Loudspeaker
2. Charging the headset
First time charging
Before you use this Bluetooth headset, please charge the battery of EARAIR fully.
Next time
When you hear three “DONG” tones every 20 seconds, at the same time, the red LED blinks twice. It means the battery is low power and need to be charged.
The charging steps are as follows:
1) Pull up the rubber cover of charging port ;
2) Plug the travel charger into standard AC power socket (or plug USB cable into USB port of PC);
3) Plug the other end of charger (or charging cable) into charging port of the headset.;
When the red LED is on, the headset is charging.
When the red LED is off, the headset is charged fully.
4) It will take about 2.5 hours to charge the headset fully.
5) Take out the charger from power socket and headset, and cover the rubber cover.
Note: Choosing travel charger or USB cable depends on different countries or areas and actual demands.

Warning:
1) The battery is recyclable.
2) Do not dispose of the battery in fire, as it may cause explosion.
■ Using the headset
1. Switching on/off the headset
| Function Operation LED | indicator | Indication tone | |
| Switch on the headset | Press button for 3-5 seconds, and release it till the blue LED is on | Blue LED is on for 1 second | A long “DI” tone |
| Switch off the headset | Press button for 3-5 seconds, and release it till the red LED is on | Red LED is on for 1 second | A long “DI” tone |
Note: In order to save power, the headset will automatically switch off if no devices can be connected within 5 minutes after switching on.
2. Pairing the headset with Bluetooth devices How to enter pairing mode
| Function | Operation LED | indicator | Indication tone |
| Enter into pairing mode | Make sure the headset is off firstly. Press ⏻ button for 7-9 seconds, and release it till the red and blue LEDs blink alternately | Red and blue LEDs blink alternately. | Two “Du” tones |
Note: The pairing mode will last 2 minutes, if the headset still can't pair with any Bluetooth devices after 2 minutes, it will switch into standby mode automatically.
Pairing the headset with Bluetooth mobile phone
Prior to using the headset for the first time, you have to pair it with a Bluetooth-enabled cell phone. The pairing procedures are subject to different models of cell phones. Please refer to your cell phone user's manual for further information. The general pairing procedures are as follows:
1) Please keep the headset and mobile phone within 1 meter when pairing;
2) Make the headset enter into pairing mode.(Please refer to “how to enter pairing mode”);
3) Activate your mobile phone's Bluetooth function and set your mobile phone to search for Bluetooth devices within range, and select
“EARAIR” from the list of devices shown;
4) According to the indication, enter password or PIN No: "0000";
5) If prompted by your mobile phone to connect, select "Yes" (this will vary among mobile phone models);
6) After successful connecting, blue LED of the headset quickly blinks twice or three times every 4 seconds.
Notes:
◆ If the pairing is not successful, please switch off headset firstly, and then re-pair according to the steps 1-6 mentioned above.
◆ After pairing is successful, the headset and the mobile phone will remember each other, they will no need to re-pair next time.
◆ The headset can remember 8 paired devices, when the number of paired devices exceeds 8, the first one will be replaced.
◆ If you want to pair the headset with other devices, please pair it with the new device according to steps 1\~6 mentioned above.
Pairing the headset with Bluetooth transmitter
You can connect the headset to a Bluetooth transmitter to enjoy music wirelessly. Hereby take BTT010 (Bluetooth transmitter for iPod, not included) for example. The pairing steps are as follows:
1) Keep the Bluetooth transmitter and the headset within 1 meter when pairing;
2) Make the headset enter pairing mode (refer to “How to enter pairing mode);
3) Switch on the Bluetooth transmitter, it will search Bluetooth device automatically and start pairing;
4) When the headset requests PIN No, the Bluetooth transmitter will respond "0000" automatically;
5) After successful pairing and connecting, blue LED of the headset blinks twice every 4 seconds.
Notes:
◆ The pairing password of the headset is “0000”. So, the headset can only pair with a Bluetooth transmitter whose pairing password is “0000”.
- If pairing still fails after several tries, please refer to the Bluetooth transmitter’s user’s manual for further information.
Multi-pair
The headset can connect with two devices at most. One is a Bluetooth mobile phone supporting HFP profile, the other one is a Bluetooth music device supporting A2DP profile. If you want to finish the multi-pairing, please refer to the following steps:
1) Firstly, pair the headset with a Bluetooth transmitter (refer to “pairing the headset with a Bluetooth transmitter);
2) Switch off the Bluetooth transmitter;
3) Pair and connect the headset with a Bluetooth mobile phone (refer to "pairing the headset with a Bluetooth mobile phone").
4) Switch on the Bluetooth transmitter, it will connect to the headset automatically.
Notes:
◆ After successful pairing, the paired devices will remember each other. Unless pairing information is deleted because of new pairing, they will no need to pair next time. If the pairing information is deleted, please connect the mobile phone with the headset first and then switch on the Bluetooth transmitter, multi-connecting can be performed.
- For the mobile phone supporting the HSP and A2DP at the same time. It may set up HSP and A2DP connection with the headset simultaneously. At this time, the Bluetooth transmitter may not connect to the headset.
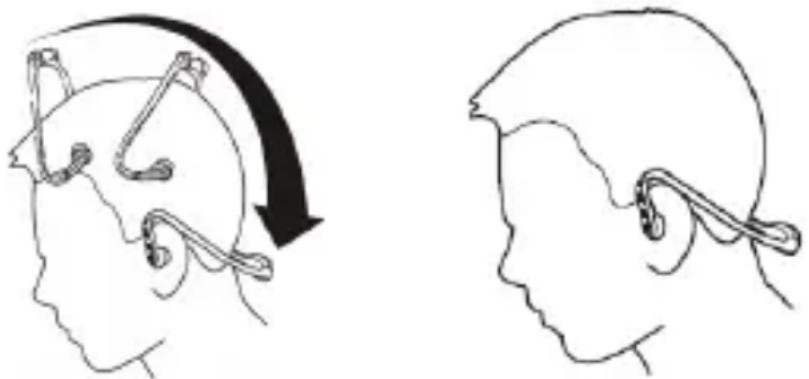
3. Wearing the headset
As per the following pictures show, hand the headset on your both ears. You must use both hands to put on or take off the headset, don't pull or push the headset.
natural_image
Side-by-side line drawings of a human head profile showing head and neck views with ear structures (no text or symbols)4. Making calls with the headset
| Function | Status of the headset | Operation |
| Voice dial Standby mode | Move Switch one to ➤ (Last song) button for 2S, and release it until hearing indication tone | |
| Redial last number | Standby mode Short press | twice |
| Volume up | Conversation mode | Move Switch two to +, and then release(or keep)it |
| Volume down | Conversation mode | Move Switch two to -, and then release(or keep)it. |
| Answer calling Ringing Short press | ↓ | |
| Reject calling Ringing | Press and hold ↓ for 2S, and release it until hearing indication tone | |
| End calling | Conversation mode | Short press ↓ |
| Voice transfer | Conversation mode | Press and hold ↓ for 2S, and release it until hearing indication tone |
| Microphone mute | Conversation mode | Short press ↓ twice quickly, the microphone of the headset will emits 2 “DU” tones every 10 seconds |
| Cancel mute | Conversation mode (mute) | Short press ↓ twice quickly |
Notes:
- Not all the mobile phones support all the functions listed above. Please refer to your mobile phone user’s manual.
When the volume is adjusted to max or min, you will hear a tone.
When pressing the answer button on some mobile phones, the call will be transferred to the mobile phone. You can switch the call to the headset by using the conversation switch button or through operating on the mobile phone. Please refer to your mobile phone user manual for further information.
5. Playing music
When the headset connects to a mobile phone or Bluetooth transmitter which supports A2DP, you can enjoy music wirelessly through the headset.
| Function | Status of headset | Operation |
| Volume up Playing music | Move Switch two to +, and then release (or keep)it. | |
| Volume down Playing music | Move Switch two to -, and then release (or keep) it. | |
| Pause Playing music Short press | ||
| Play | Pausing | Short ▶|| press |
| Last song Playing music | Move Switch one to ▶, and then release it | |
| Next song Playing music | Move Switch one to ◀, and then release it | |
Notes:
When playing music on some mobile phones, the music will be transmitted to the mobile phone's speaker instead of the headset. You have to select “transmit the sound via Bluetooth” in the settings menu and then choose “EARAIR” as speaker device. The music will be transmitted to the headset. Please refer to your mobile phone’s user’s manual for further information.
◆ When the volume is adjusted to max or min., you will hear a tone.
If you want to remote control last/next song, pause/play, it needs your Bluetooth mobile phone or Bluetooth transmitter paired with the headset to support AVRCP profile, please refer to the user's manual of your mobile phone or Bluetooth transmitter for further information.
6. Re-connecting with a Bluetooth device
1) Automatic connecting
Every time the headset is turned on, it will connect last connected device automatically.
2) Manual connecting to last connected HFP device
When the headset is in standby mode and doesn't connect to any HFP devices, short press ⏻ button twice, it will connect to last connected HFP device automatically.
3) Manual connecting to last connected A2DP device
When the headset is in standby mode and doesn't connect to any A2DP devices, move Switch One to (next song) button, it will connect to last connected A2DP device automatically.
Notes:
Before connecting to a Bluetooth device, please turn on the Bluetooth device's Bluetooth function.
- On some Bluetooth devices, take some Nokia mobile phones for example, you have to allow automatic connecting in the mobile phone’s settings. Please refer to your mobile phone’s manual for further information.
7. Restoring to factory defaults and resetting
Make sure the headset is off, press and hold ⏻ and ▶buttons simultaneously for about 8 seconds, release them when you hear two “DU” tones and see red and blue LEDs are on, now the headset restores to factory defaults, and the pairing information will be deleted.
Charge the headset to make it reset.
8. LED indicator
1) Charging
| LED indicator Status of the headset | |
| Red LED is on Charging | |
| Red LED is off Finish charging |
2) Pairing with the Bluetooth devices
| LED Indicator Status of the headset | |
| Red and blue LED blink alternately Pairing mode | |
| Blue LED blinks once quickly every 2 seconds | Not connected to a device |
| Blue LED blinks twice quickly every 4 seconds | Set up HFP or A2DP connection |
| Blue LED blinks three times quickly every 4 second | Set up HFP and A2DP connection |
| Blue LED gradually turns on and off Conversation mode | |
| Red LED blinks twice every 20 seconds | Low power |
9. Indication tone
| Indication tone Status | of the headset |
| Two tones every 10 seconds | Conversation mode and microphone mute |
| Three “DU” tones every 20 seconds | Low power |
■ Care and maintenance
Read the following recommendations carefully before using EARAIR. Following these you will be able to enjoy this product for many years.
- Keep it dry and don’t put it in the dump place to avoid the product’s internal circuit being affected.
- Keep the product away from direct sunlight or hot places. High temperatures will shorten the life of electronic devices, destroy the battery or distort certain plastic parts.
- Don’t expose the product to cold areas. It may damage the internal circuit board.
- Don’t try to disassemble the product as it may get damaged if you are not professional.
- Don’t let it fall down onto the floor or other hard surfaces. The internal circuit might get damaged.
- Don’t use intensive chemical products or detergent to clean the product.
- Don’t scratch the surface with sharp things.
In case the product doesn't function properly, send it to the store you bought it. The staff will help you to solve the problem
■ FAQs
- What does it mean when red LED is on?
Battery is low power, need to be recharged.
- Why is not the red LED on when charging?
a) Please make sure the charging device connect with headset Well;
b) You didn't use the headset for a long time, the battery may dry up. At this time, you have to charge the battery for 30 minutes, and then the red LED will be ON.
3. How far is the effective rang between the headset and mobile phone?
According to the Bluetooth standard, the max available range of ClassII headset is 10 meters. It varies under different environment.
4. Why my mobile phone can not search and find the headset?
The mobile phone will not find the headset if headset and mobile phone are not under the pairing mode. Make sure the headset is under the pairing mode and in the effective working range, and then the headset can be paired and connected.
5. Why can not hear the voice?
a) Make sure the headset has been switched on;
b) Make sure the volume is not too low or muted;
c) Make sure the headset connects with the mobile phone correctly;
d) Make sure the distance between the headset and the cell phone is in the available Bluetooth range.
6. Why is the voice not clear in conversation?
a) Make sure the mobile phone is in the strong signal area;
b) Make sure the headset is in the available range of this product.
7. Why can't control the function of pause, revert, control last song and next song when playing music?
This function needs your Bluetooth device supports AVRCP(Audio/Video Remote Control profile).
■ Specifications
| Bluetooth version Bluetooth V2.1+EDR | |
| Bluetooth frequency range 2.402GHz-2.480GHz | |
| Bluetooth profiles HSP, HFP,A2DP and AVRCP | |
| Operating distance 10 meters | |
| Talk time Up to 8 hours | |
| Music playing time Up to 7 hours | |
| Standby time Up to 140 hours | |
| Charging input DC 5.0V/130mA | |
| Charging time Approx 2.5 hours | |
| Dimensions | 135×136.5×63.5mm |
| Weight | 35 g |
Notes:
- This device complies with Part 15 of the FCC Rules. Operation is subject to the following two conditions: (1) this device may not cause harmful interference, and (2) this device must accept any interference received, including interference that may cause undesired operation.
- Changes or modifications not expressly approved by the party responsible for compliance could void the user's authority to operate the equipment.
AIDigital
C/Carpinteros, 6. Pol. Ind. Pinares Llanos
Edificio Prolar - 1°-Of. 13-24
For information about security, compliance, recycling, information in other languages or other important information regarding your Zipy, refer to the manual accompanying the device or go to www.zipylife.com.
The warranty for this Zipy device is granted by Accesorios Inteligentes Digital S.A. (AID), however if this equipment has been sold by AID to one of its official distributors, it will be from each one of those in the country concerned which takes charge of covering this limited warranty, being included in the text as us.
The warranty of this Zipy device covers operational defects, provided that such defects are not due to negligence or exclusive fault of the user in operating the device. Materials and workmanship under conditions of normal use for two years from the date of first purchase will be covered. During the first year, if an abnormality occurs in the device and you follow the instructions for its return, at our discretion insofar as permitted by law, we will repair the device using new or reconditioned parts, replace the device with a new or a reconditioned equivalent to the device replaced, or
completely or partially reimburse you the purchase price of the device. During the second year, the user must demonstrate that the failure of the device comes from a manufacturing defect. This limited warranty applies insofar as permitted by law to any spare repair or replacement of the device for the remainder of the original warranty period or for ninety days, whichever is more extensive. This warranty applies only to hardware components of the device which have not suffered external damage, such as those mentioned above. Any accessories or consumables are excluded.
For specific instructions on how to obtain this warranty service, go to: www.zipylife.com provided that it complies with the following:
The product has been used only in normal use for which it was intended.
It has not been opened, manipulated or altered by anyone outside the official technical service.
It has not been damaged by impacts, flood, overheating, electrical overload or any other circumstances showing a possible cause for CANCELLATION of the warranty as stated in the precautions of the manual of the device.
The product is to be returned to AID, protected with adequate packaging and with proof of purchase which clearly indicates the brand and type of product, the date of sale, the name and address of the dealer and the reason for the failure. For more information on shipping instructions and use of the warranty, see www.zipylife.com.
Before sending your device to the official technical service, you are responsible for making a backup copy of the data, software or other material that can be stored on your device, since it is possible that it will be reformatted and this information will be lost. AID guarantees the absolute confidentiality of data, but is not responsible for their loss nor will it be taken into account in the physical repair of the device.
Any of the following circumstances voids this warranty:
1 Breakage of ports (USB, headphone jack, etc.), screen or glass.
2 Loss of fluid on the screen.
Wear, with obvious signs of improper handling, misuse, abuse, impacts, falls, dirt, etc.
3 AID does not cover incorrect configuration or installation of
software/hardware by the customer, component or peripheral, including its drivers.
4 The legislation on guarantees establishes some limitations. "The warranty does not cover additional components such as batteries, whose life is limited and conditioned by use and recharging." These components are guaranteed for 6 months.
5 The waterproof bags have a trial period of 48 hours, as indicated on the product itself, so the time after that is not covered by any warranty.
6 End users will not need to send us the accessories of the equipment, especially if they are not originals, as we are not responsible for them.
Limitations:
To the extent permitted by law in each (states in the US), the warranty and rights set forth above are exclusive and replace all other warranties and rights, always with respect to the minimum requirements established by the law of each (states in the US), these being the minimum respected in any case, excluding warranties for hidden or latent defects. If we cannot legally exclude the warranties established by law or implied warranties, then insofar as permitted by law, such warranties are limited in duration to the duration of this limited warranty and to the repair or replacement service.
Some jurisdictions do not allow limitations on the duration of implied legal warranties, it is therefore possible that the above limitation does not apply in your case. We are not responsible for direct, special, or occasional damages, or those arising from breach of warranty or under any other legal theory. In some jurisdictions, the above limitation does not apply to claims for compensation for death or personal injury, or any legal liability for intentional acts or gross negligence and/or omissions, so the limitation may not apply in your case.
This limited warranty gives you specific legal rights. To the extent that it is not possible to waive those rights under applicable law in each country (states in the US), this limited warranty will not affect your rights.
To contact the technical service nearest you, inquire at: www.zipylife.com
DECLARATION OF CONFORMITY ACCESORIOS INTELIGENTES DIGITAL S.A. C/CARPINTEROS,6, OF-13 VILLAVICIOSA DE ODON. 28670 MADRID
We declare under our sole responsibility that the product:
BLUETOOTH HEADPHONE: ZIPY EARAIR which belongs to the brand Zipy, made in China

1313

Conforms with the requirements of the Directives below by compliance with the following standards listed:
| EN300 328 V1.7.1(2006-10) |
| EN301 489-17 V2.1.1 (2009-05) |
| EN301 489-1 V1.8.1 (2008-04) |
| EN60950-1:2006+A1:2009+A1:2010 |
| EN50371:2002 |
In accordance with the provisions of the Directive 99/05/EC, European Parliament and Council on March 9, 1999, transposed into Spanish legislation by Royal Decree 1890/2000, of November 20, 2000.
Place and date of issue June, 22, 2011
Signed by: Miguel Fauro

EARAIR
natural_image
Close-up of a black and white SNA 100 health device with earbuds and headband (no text or symbols visible)Sommaire
■ Brève introduction....2
Appareillage multiple 7
1) Commutateur un
Appareillage multiple
natural_image
Side profile of a human head with medical instruments on the forehead and a curved arrow indicating rotation (no text or symbols)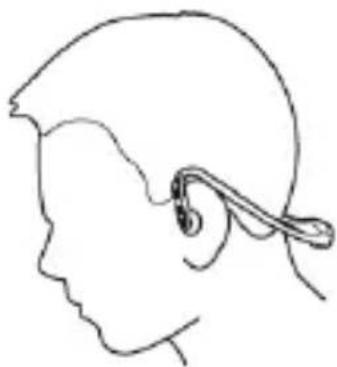
natural_image
Side profile line drawing of a human head and neck with a medical device attached (no text or symbols)CONDITIONS de GARANTIES RELATIVES AU ZIPY.
natural_image
Close-up of a black and white SNA 100-branded earband device (no text or symbols visible)Índice
1) Botão um
natural_image
Side profile of a human head with medical or surgical instruments attached, showing a curved arrow indicating rotation (no text or symbols present)
natural_image
Side profile line drawing of a person's head and ear with a medical device attached (no text or symbols)natural_image
Close-up of a black and silver wireless earband device (no text or symbols visible)Contenidos
1) Interruptor uno