GO Beating Plus - Mp3 player Zipy - Free user manual and instructions
Find the device manual for free GO Beating Plus Zipy in PDF.

User questions about GO Beating Plus Zipy
0 question about this device. Answer the ones you know or ask your own.
Ask a new question about this device
Download the instructions for your Mp3 player in PDF format for free! Find your manual GO Beating Plus - Zipy and take your electronic device back in hand. On this page are published all the documents necessary for the use of your device. GO Beating Plus by Zipy.
USER MANUAL GO Beating Plus Zipy
English Spanish Portuguese
The go! team
music fitness health emotion sport swimming adventure
go! with you
www.gowithyou-Zipy.com
go! Beating plus
www.gowithyou-Zipy.com
Congratulations on purchasing the go! Beating plus. The unique combination of features and ease of use of your new Go! Beating plus player will allow you to take intuitive control over your multimedia collection as well as a whole new jogging and walking experience.
IMPORTANT
THIS PRODUCT IS FOR SPORT PURPOSES ONLY AND IS NOT MEANT TO REPLACE ANY MEDICAL ADVICE.
WARNING:
The signals used by this monitor may interfere with a pacemaker or other implanted devices.
Consult the manufacturer of the implant device and your physician before using this monitor.
IMPORTANT SAFETY INFORMATION
Please read all safety information prior to using the go! Beating plus Player. Failure to do so may result in unnecessary injury.
Safety Precaution
- Please read all the information in this manual or any other literature included in the box before using the device. Please keep this manual for future reference.
- Do not make judgments yourself regarding the measurement results or self-treat yourself. Contact your physician or healthcare provider before beginning a weight reduction or exercise program.
- Consult your physician before using this device when pregnant.
- Operate the device only as intended. Do not use for any other purpose.
- Do not place heavy objects on the device and keep the device away from humid, dusty and smoky environments.
-
Do not use water, chemicals or detergent to clean the device. Clean the surface with a soft cloth.
-
Do not use excessive force on the buttons.
- Keep out of extreme heat or cold. The device is only operable between 0^ C and 40^ C.
- To avoid damage, make sure you do not drop, smash, bend or crash the device.
- Keep the device away from strong magnetic fields.
- Do not disassemble or modify the device yourself.
- Use only Perception Digital authorized parts and accessories. Parts and accessories not approved for use with the device may damage the unit.
- When you upload or download files using a USB cable, do not disconnect the USB cable during data transfer or turn the device off.
- Data can be damaged because of physical impact, lightning and power failure.
TABLE OF CONTENTS
PREFACE....2
IMPORTANT SAFETY INFORMATION....2
TABLE OF CONTENTS......4
PLAYER AND ACCESSORIES....7
PRODUCT HIGHLIGHTS 7
DEVICE RENDERING AND KEYS FUNCTIONS....8
GETTING START....10
NAVIGATING THROUGH THE MODES....11
MUSIC MODE....12
SONG SCREEN 12
LISTENING TO MUSIC....12
SETTING UP MUSIC PLAY SEQUENCE, REPEAT OPTION AND EQUALIZER....13
Music Play Sequence 13
Repeat Option....14
Equalizer....14
HEART BEAT MODE....15
TAKING YOUR HEART BEAT RATE....15
REVIEW THE SAVED HEART BEAT MEASUREMENT 16
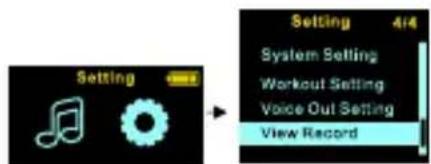
View Record 16
WORKOUT MODE....17
WEARING YOUR DEVICE....17
SELECT BELT TYPE 17
START THE COUNTER 18
COUNTER SCREENS 18
STOPWATCH 18
STOP THE COUNTER AND SAVE INFORMATION....19
REVIEW THE SAVED WORKOUT INFORMATION 19
View Record 19
SELECT WORKOUT PROGRAM....20
VOICE OUT....20
ACTIVE VOICE OUT 20
VOICE OUT SETTING....21
Selected Items....21
Voice Out Duration....21
Exercise 22
VOICE PACK RECOVERY PROCEDURE 22
SETTING....23
SYSTEM SETTING....24
Language....24
Display....24
Auto Power Off 24
Time & Date....24
System Info....25
Reset All....25
WORKOUT SETTING....25
Units....25
Profile Editing....25
Calibration....26
CONNECTION TO COMPUTER 27
MINIMUM SYSTEM REQUIREMENT 27
CONNECT THE DEVICE TO PC....27
BATTERY POWER INDICATION AND LOW BATTERY WARNING ....28
CHARGING YOUR PLAYER....28
PC SOFTWARE - HEARTPAL 28
Install HeartPal software 28
Start HeartPal 29
My Home 30
My Runs 31
My Goal 31
My Music 33
My Profile 33
My Support 34
Logout 34
Exit the Software 34
Format content (run data) of device 34
LOAD SONGS FROM PC TO THE DEVICE 35
Drag and Drop 35
FORMAT THE PLAYER 35
FIRMWARE UPGRADE....35
FIRMWARE RECOVERY ....36
DISCONNECT THE DEVICE FROM PC....39
TROUBLE SHOOTING....40
RESET PLAYER....41
LIABILITY EXEMPTION STATEMENT....41
TRADEMARKS 42
REGULATORY INFORMATION......42
CUSTOMER SERVICE 43
DISPOSAL OF YOUR OLD PRODUCT....44
SPECIFICATION 44
PLAYER AND ACCESSORIES
 GO! BEATING PLUS GO! BEATING PLUS | 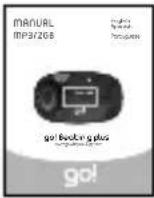 User Manual User Manual |  USB cable(for PC connectionand battery charing) USB cable(for PC connectionand battery charing) |
 Earphone Earphone |  (contains following PC software:- the Voice Pack Recovery tool- the HeartPal PC software- Firmware Recovery tool) (contains following PC software:- the Voice Pack Recovery tool- the HeartPal PC software- Firmware Recovery tool) |
- Pedometer
• Heart Beat Monitor - Stopwatch
- Voice Out Function
- Music Player
• ID3 Tag Supported - Music Library
• Mass Storage Device - USB 2.0 High Speed
- Upgradeable Firmware
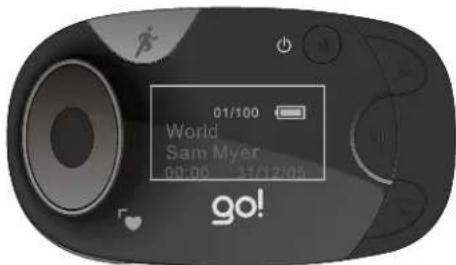
DEVICE RENDERING AND KEYS FUNCTIONS
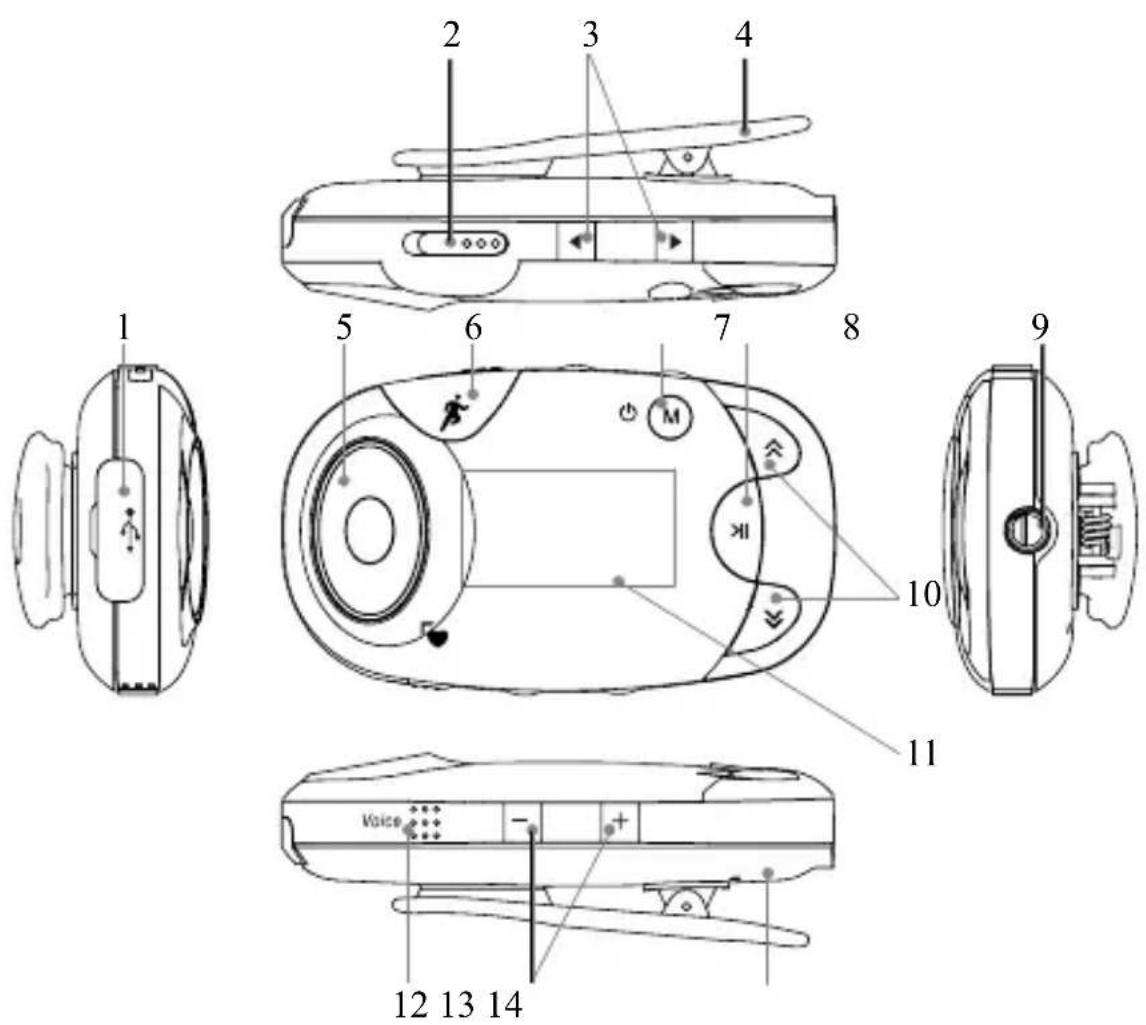
| Keys | Keys Name | Operation | Function | |
| 1 USB Cover | ||||
| 2 Lock Switch | Slide | Keys lock or unlock | ||
| 3 or Left or Right key | Press | Mode scroll | ||
| Counter screen scroll | ||||
| Decrease or increase value | ||||
| Press and hold | Decrease or Increase value fast | |||
| 4 Clip | ||||
| 5 Heart Rate Key Press Start Heart Beat checking mode | ||||
| 6 Workout Key Press Start/ Pause/ Resume the Workout mode | ||||
| 7 Menu Key | Press | Go to previous submenu or main menu | ||
| Exit | ||||
| Press and hold | Power on or power off | |||
| 8 Play/Pause Key Press | Play/ Pause/ Resume | |||
| Save record | ||||
| Confirm selection or enter submenu | ||||
| 9 Earphone Jack | ||||
| 10 or Up or Down key | Press | Browse up or down | ||
| Backward or forward | ||||
| Previous or next song | ||||
| Change date and time | ||||
| Press and hold | Browse up or down fast | |||
| 11 Display | ||||
| 12 Voice Out | Key Press Active Voice Out function | |||
| 13 - or + | - or + key | Press | Decrease or increase volume | |
| Press and hold | Decrease or increase volume fast | |||
| 14 Reset Key | Press Reset the device | |||
GETTING START
- To turn the device on, press and hold the key for three seconds.
- Your device will perform the following actions every time it is turned on.
2.1 A welcome message will appear.

2.2 Load your music library

Note:
If this is the first time you have turned your device on, a screen will appear prompting you to edit your profile by inputting your personal data. Please refer to “Profile Editing” in the “Workout Setting” under the “Setting” section for more details.
2.3 Bring up the music screen

To turn the device off, press and hold the key until a screen saying "Bye" appears.

flowchart
graph LR
    A["Shutting Down"] --> B["Sequence"]
    B --> C["Bye"]
Note:
Your device will automatically turn off if it is not used within your preset time period (default is three minutes). Please refer to the “Auto Power Off” in the “System Setting” under the “Setting” section for more details.
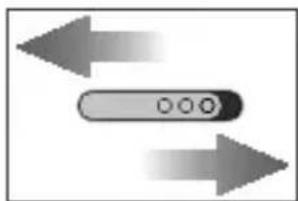
KEY LOCK
Slide the Lock switch to the left to LOCK the keys functions
natural_image
Two gray arrows pointing in opposite directions, with a central button symbol (no text or labels)Slide the Lock switch to the right to UNLOCK
NAVIGATING THROUGH THE MODES
Press the or key to start scrolling through different mode selections.
The mode selections will be shown in the following sequence: Music mode →
Setting mode.
Press the Hey to select the desired mode.

MUSIC MODE

SONG SCREEN
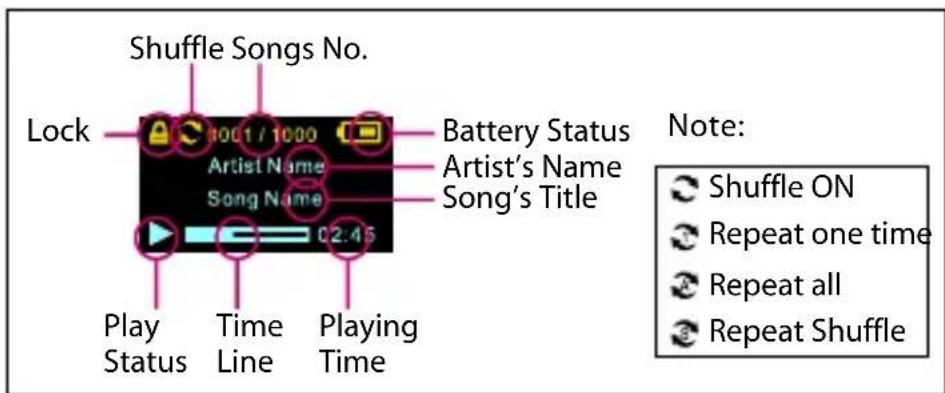
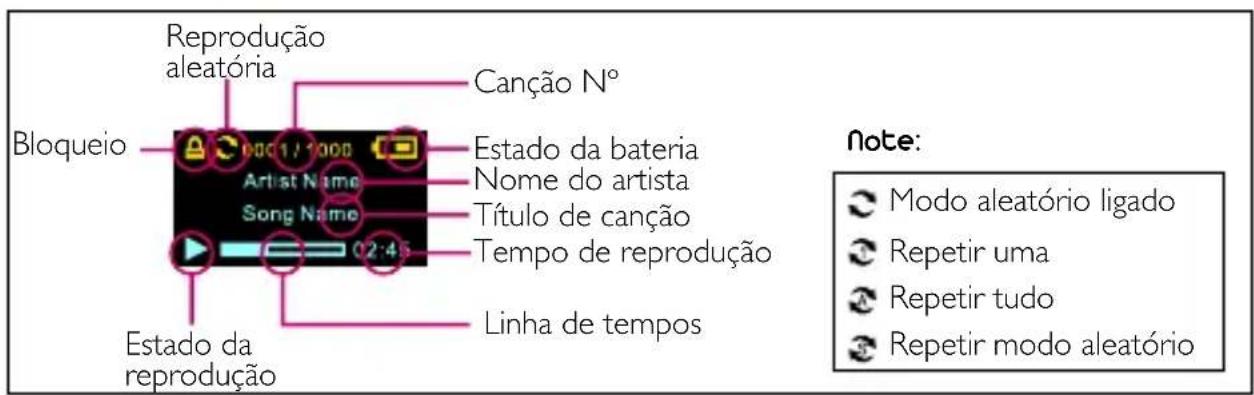
Once within the Music mode, you may select the music play sequence, repeat option and equalizer effect. This device supports 3 tag function. When a song is being played, the display will show the available information of that song, e.g. the song name, album and singer, etc.
LISTENING TO MUSIC
Once within the Music mode, you may select the music play sequence, repeat option and equalizer effect (describe in the next section).
Press the key to select the option, and press the or key to select a song. Press the key to play the selected song.
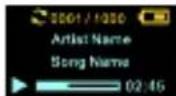
Press the or key to increase or decrease the volume. The volume ranges from 0 to 10. Press the key to play the next song, press the key to play the previous song. Press the key to pause music; press again n to resume music playback.
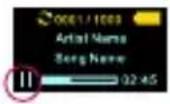
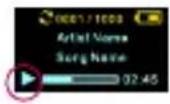
Press the key to go back to submenu of the Music mode. Music will not stop until you pause the current playing song under music playback screen.

SETTING UP MUSIC PLAY SEQUENCE, REPEAT OPTION AND EQUALIZER
- Press the or key for browsing up or down the list.
- Press the key to confirm selection.
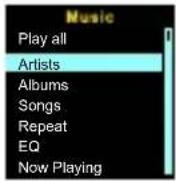
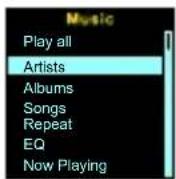
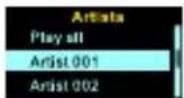
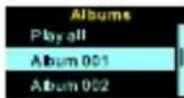
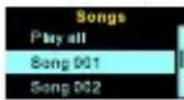
Music Play Sequence
Play all:
Play all songs in their loaded sequence in your device.
Artists:
Play songs by selected artist.
Albums:
Play songs in selected album.
Songs :
Select to play all songs or a particular song.
Now Playing :
Go to playback screen of the current playing song.
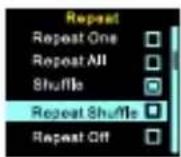
Repeat Option
Select repeat play settings:
- Repeat One: Play the current song repeatedly
- Repeat All: After the last songs in sequence is played, replay from the first song
- Shuffle: Play all songs in random sequence
- Repeat Shuffle: Replay the songs in random sequence
- Repeat Off: The device will not repeat songs played
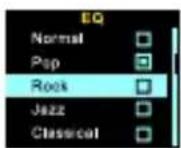
Equalizer
Select any of the following equalizer effect: Normal, Pop, Rock, Jazz and Classical.
HEART BEAT MODE

Note:
Consult your physician or healthcare provider to help you determine your maximum heart beat rate, resting heart beat rate, and target heart beat rate, required exercise frequency and appropriate duration.
The device has a built-in heart beat sensor, just place your thumb gently on the Heart Rate key to get your heart beat rate measured.

- Press the Heart Rate key to start the heart beat measurement. An animation will appear prompting you to place your thumb on the lens of the sensor.

- The whole measurement will take 15-20 seconds to complete. You will see the following screen. Do not mover your thumb during measurement.

- When the heart beat measurement has completed, your reading will appear. You can move your thumb away from the Heart Rate key.
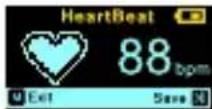
- Press the 🔊y to save the heart beat measurement. Or press the 🔕 key to go back to the main menu without saving the measurement.
Note:
If an error message shows up, you may have pressed on the lens too hard, not covering the lens entirely with your thumb or moved your thumb away from the lens during the measurement process. Repeat from Step 1 of “Taking your Heart Beat”.

REVIEW THE SAVED HEART BEAT MEASUREMENT
You may review your saved heart rate information, either once you downloaded them from the device to your PC and view them with the PC Software supplied, or directly from the device for further analysis.
View Record
- Go to option menu under Setting mode and select View Record. Press the key to enter submenu.
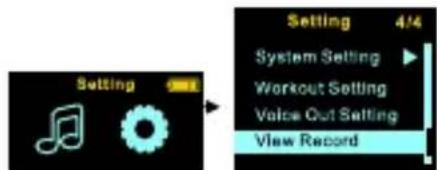
- Select "Heart rate" option and press the key
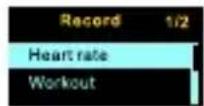
- Press the orkey to review the heart beat measurements.
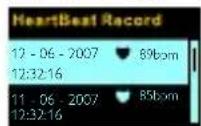
- Press the key to go back to previous submenu.
WORKOUT MODE

In this mode, the device will measure and capture your workout information: distance, number of running step/ walking step, time and calories consumed.
WEARING YOUR DEVICE
In order for the device to measure your workout information accurately, you must wear the device at one of the positions as illustrated in the diagram. You may use the clip at the back of device to attach it to your clothing and close to your body. Or wear it with specific arm belt (sold separately) on your arm.

Note:
Should select suitable "Belt type" option according to actual wearing position. Please refer to next section "Select Belt Type" for more details.
SELECT BELT TYPE

Select the suitable "Belt type" option according to actual wearing position:
Arm : Select this option when wearing the device on at position 3 as above diagram.
Waist (Default): Select this option when wearing the device at position 1 or 2 as above diagram.
- Go to option menu under "Setting → Workout Setting - Belt Type".
- Press the or key to scroll and select the option.
- Press the key to confirm selection of the option.
- Press the key to go back to previous submenu.
START THE COUNTER
Press the key to start the Workout mode. Screen will show animations and a sentence "Ready! Go!" will be voiced out at the same time to remind you to start to jog or walk..

flowchart
graph LR
    A["Water Drop"] --> B["Step 3"]
    B --> C["Water Drop"]
    C --> D["Step 2"]
    D --> E["Water Drop"]
    E --> F["Step 1"]
    F --> G["Water Drop"]
    G --> H["GO!"]
Note:
The belt type (Arm Bet, Waist Belt) will be shown on top of the screen. Waist Belt is the default belt type. Please refer to the “Belt Type” in the “Workout Setting” under “Setting” section for more details.
COUNTER SCREENS
There are 5 counter screens scroll automatically during workout measurement:
Distance → Running Step Walking Step Calories Time.
Press the key for advance to the next counter screen.

flowchart
graph LR
    A["Distance 800 m"] --> B["Run Step 328"]
    B --> C["Walk Step 328"]
    C --> D["Time 88h26°02" 32"]
    D --> E["Calories 328 Cal"]
Measurement Ranges:
Distance: from 0 to 9,999,999 kilometers (or miles)
Step: from 0 to 9,999,999 steps
Time: from 00h00'00" to 99h59'59"
Calorie: from 0 to 9,999,999 calories
STOPWATCH
In any counter screen, press the key to log down the current elapsed time counter. The logged time can only be seen at the bottom left hand corner of the Time screen while the elapsed time counter continues to count.
STOP THE COUNTER AND SAVE INFORMATION
-
Press the ✦ key at any counter screen to pause the counting.
-
Press the key to save the workout information such as counted distance, steps, elapsed time and calculated calories burned.
Note:
1) No steps will be counted until you have jogged or walked for at least six steps. 2) If the Workout mode is under Advance program (please refer to “Select Workout Program” under “Workout Mode” section for more details), the device will start Heart Beat mode after saved the workout information. Please refer to “Heart Beat Mode” section for more details.
Or press the key again to resume counting.
Or press the Ⓜ key to go back to the main menu without saving the information.
REVIEW THE SAVED WORKOUT INFORMATION
You may review your saved workout information, either once you downloaded them from the device to your PC and view them with the PC Software supplied, or directly from the device for further analysis.
View Record
- Go to option menu under Setting mode and select View Record. Press the >key to enter submenu.
- Select "Workout" option and press the key.
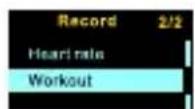
- Press the or key to scroll and select record (saved workout information). Press the key to review the details.
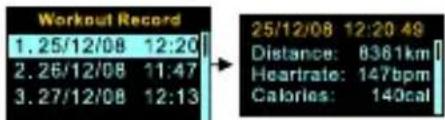
- Press the ∧ or ✘ key to browse up or down.
- Press the key to go back to previous submenu.
SELECT WORKOUT PROGRAM
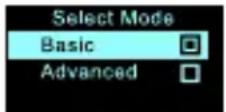
Under “Setting Workout Setting Workout Mode”, you can set the heart beat measurement ON & OFF while the pedometer and stopwatch remains active.
| Program | Descriptions | Information | |
| 1 | Basic Optimum for self-training with time and distance monitoring. | Default for Workout mode. | |
| 2 | Advanced Multi-counter for fitness and health training with static heart beat measured after training. | The device will automatically enter the heart beat mode to take your heart beat measurement after your ended the Workout mode. | |
- Press the or key to scroll and select the option.
- Press the key to confirm selection of the option.
- Press the key to go back to previous submenu.
VOICE OUT
ACTIVE VOICE OUT
Press the voice key to active the Voice Out. The workout information or heart beat rate information can be voice out in below situation:
i. When “Workout” mode is ON, it will voice out the workout info (e.g. distance, running steps, walking steps, time, calories) what the user sets
ii. When measuring heart rate, it will voice out the workout information.
iii. When finishing the heart rate measurement and still on heart rate screen, it will voice out the heart rate information
iv. When under “Advance” program in workout mode, after r finishing the workout and heart rate measurement, it will voice out workout info and heart rate information. Otherwise, it will just voice out workout information.
VOICE OUT SETTING
You can select set the voice-out information and duration when doing exercise.
Selected Items

Under “Settings → Voice out Settings → Selected Items”, there are 4 kinds of workout data can be selected to voice out during doing exercise: Distance, Steps, Calories and Time.
- Press the or key to scroll and select the option.
- Press the key to confirm selection of the option. Press again to delete the selection.
- Press the key to go back to previous submenu.
Voice Out Duration
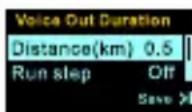
Above Selected Items will be voiced out periodically as the set duration.
Under “Settings → Voice out Settings → Duration”, one of the following 5 workout measurements can be set as the voice out duration during doing exercise: Distance, Run Steps, Walk Steps, Calories or Time.
- Press the or key to scroll and select the option.
- Press the or key to adjust value.
- Press the key to save setting
Or press the ⓣkey to go back to previous submenu without saving the setting.
Exercise
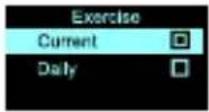
Under “Settings → Voice out Settings → Exercise”, you can select to voice out the current workout information or the daily summary information.
- Press the or key to scroll and select the option.
- Press the key to confirm selection of the option.
- Press the key to go back to previous submenu.
VOICE PACK RECOVERY PROCEDURE
Voice Out function doesn't work if voice files are missing. For any reason that missing the voice files from the device, you can reload the voice files from the supplied CD.
- Find the "voice pack recovery.exe" file from the CD-ROM or copy "voice pack recovery.exe" file to the PC / Notebook to recover the voice files.
- Connect the device to a PC / Notebook via USB cable.
- Double click this file and the voice pack recovery will be started automatically.
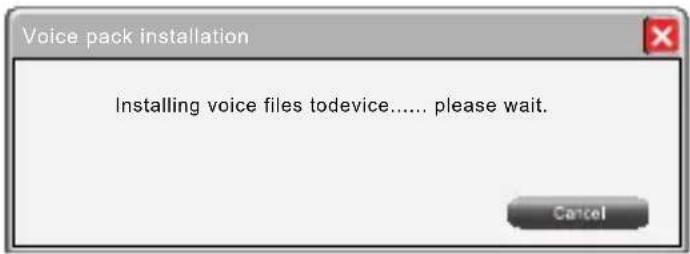
Note:
i. Click "cancel" button to stop the recovery
ii. Please don't disconnect your device until finishing the recovery
- After finishing the voice pack recovery, the following screen will be shown.
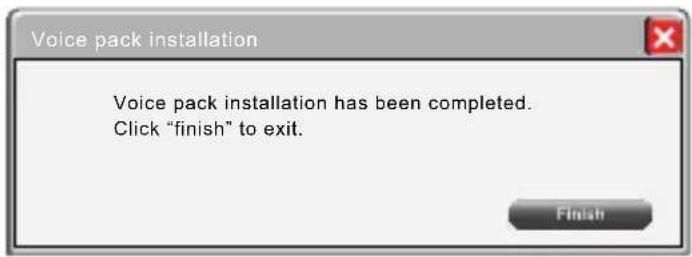
- Click "Finish" button to complete the voice pack recovery and disconnect the device from PC / Notebook.
Note:
During the recovery process, any error or corrupted file(s) have been found. The following screen has been shown.
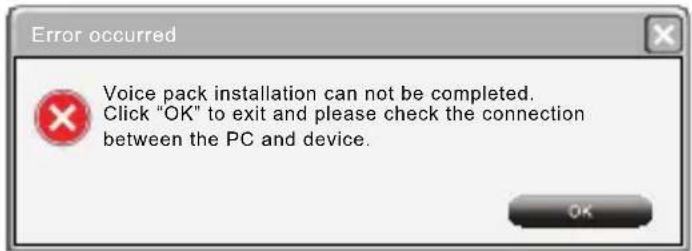
Please disconnect the device and re-connect again to restart the recovery process.
SETTING

At the Settings mode screen, press the Key to see the setting list. .Scroll and select the setting you want to change.
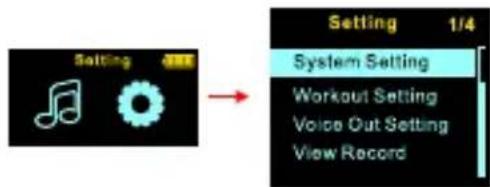
For those setting that requires numeric input, press the or key to decrease or increase the values.
SYSTEM SETTING
Language
Select the language to be used in all screens: English, Traditional Chinese, Simplified Chinese or German.

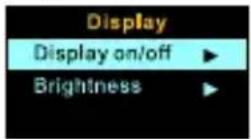
Display
Display On/Off: Set the duration (5s, 10s, 20s, 30s or Always On) in which the screen stay on. The default setting is ten seconds.
Brightness: Set screen display brightness level. The range is from 0 to 10.
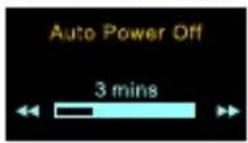
Auto Power Off
This function allows you to preset the time to turn off your device automatically when it is not in use. Default is three minutes.
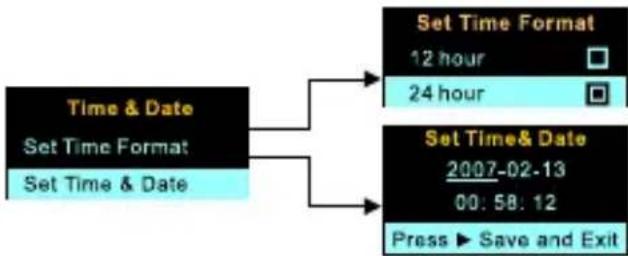
Time & Date
Set current time and date. Default setting of Time format is 12 Hours.
flowchart
graph TD
    A["Time & Date\nSet Time Format\nSet Time & Date"] --> B["Set Time Format\n12 hour\n24 hour"]
    A --> C["Set Time&Date\n2007-02-13\n00:58:12\nPress ▶ Save and Exit"]
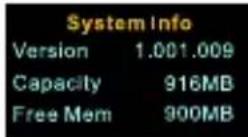
System Info
Version: Firmware version (for upgrade and problem reporting purpose)
Capacity: Built-in memory size in the device
Free Mem: Memory space left for storing songs and saving workout and heart beat measurement records.
Reset All
To reset all the above settings to default setting.

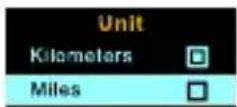
WORKOUT SETTING
Units
The distance units can be set as Kilometers (default) or Miles. The unit of measurements (Metric/ Imperial) in all screens in the device will be changed according to this setting.
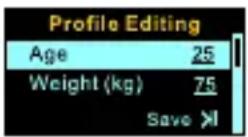
Profile Editing
This profile is share between the device and the PC software, and can be altered by this setting, or the PC Software. Input your own personal / health information into this profile for personalized activity reports, generated by the PC software.
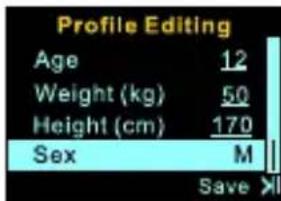
| Age Default setting is | 25 | (Range from 1~99) |
| Weight Default setting is | 75 | (Range from 5~300kg) |
| Height Default setting is | 180 | (Range from 30~300cm) |
| Sex Default setting is | M |
Calibration
The distance counter relies on the step counts and your stride length (the distant traveled with one step). While the device has a default stride length, this “Calibration” setup for accurate distance measurements using your stride length (i.e. step counts multiply by stride length). Since the “Calibration” requires you to walk / jog (run) for a fixed distant for it to count your steps and derived the stride length, you need to perform it at a track or an open field with clear distant markings.
Calibrate walking (Walk) and jogging (Run) stride length separately:
- Press the or key to select Walk / Run.
- Press the key
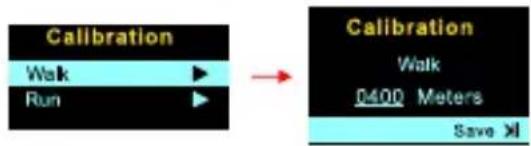
Note:
Default setting is 400m/0.25 mile (refer to Unit setting).
- As in this illustration, you have selected to calibrate walking steps. Press the key as soon as you start to run for 400 meters; press stop as soon as you reach the 400 meters mark.
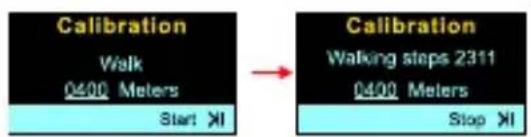
- The device counts the number of steps you take to walk for 400 meters and uses it in calculating walk distant. Press the key to save the calibration result or press the Ⓞ key to return to option screen and repeat from Step 2.

CONNECTION TO COMPUTER
MINIMUM SYSTEM REQUIREMENT
You can connect the device to a PC via the provided USB2.0 cable for charging and file transfer purposes. Your PC system must meet the following minimum requirements:
- Only supports Windows XP/ Windows Vista. Other systems are not supported.
- CD-ROM drive
- USB 1.1 port or above (USB 2.0 is recommended)
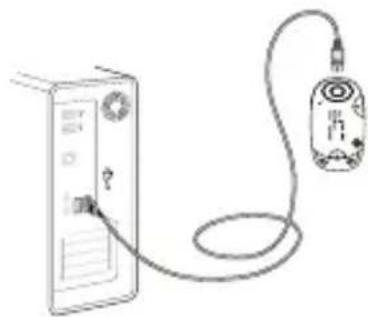
CONNECT THE DEVICE TO PC
Connect the smaller end of the included USB cable to the USB 2.0 port on the device and the bigger end to a free USB port on your computer.
natural_image
Line drawing of a device with a cable and connector (no text or symbols)There will be an additional drive called "Audio Player" which represents the device.
BATTERY POWER INDICATION AND LOW BATTERY WARNING
The battery sign at the upper right hand corner of the display, gives you an indication of estimated power left.
| 100% power | |
| 70% power left | |
| 50% power left | |
| 30% power left | |
| flashing | 10% power left |
Charge your player immediately when the battery sign flashes. It indicates the battery power level is too low for the device to continue operations. The device will turn off automatically after batter is empty.
Your device comes with a re-chargeable battery. Once connected to a PC via the supplied USB cable, your device will begin charging immediately.
Note:
i. Charge the device for at least four hours before using it for the first time.
ii. If the device is connected to a PC via a USB hub, the USB hub must be self-powered in order to charge the battery properly.
iii. File transferring during charging may prolong the charging time.
PC SOFTWARE - HEARTPAL
Install HeartPal software
1) Please insert the supplied CD and install the HeartPal software.
2) Follow the instruction and complete the installation.
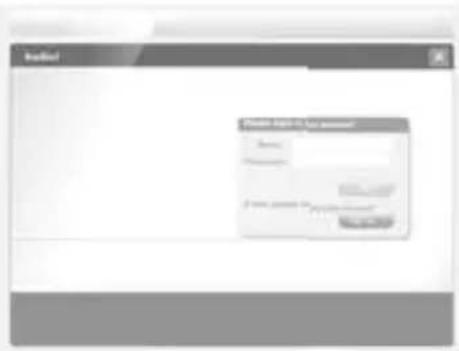
Start HeartPal
Please connect the device to your PC using a USB cable.
On Windows desktop, click Start -> HeartPal -> HeartPal
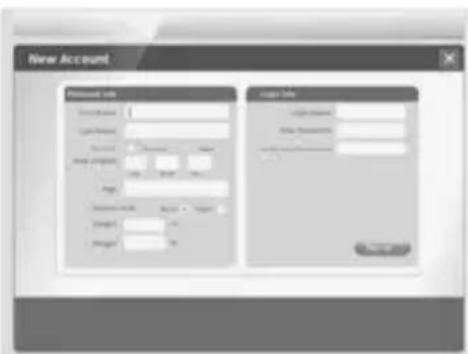
Create new account
On HeartPal initial page, click "Sign up".
The "New Account" page will show. Please fill in all fields and then click the button.
Login HeartPal with existing account
On HeartPal initial page, enter login name and password and then click the button.
Upload data from device to PC
With successful login/signup, the upload data page will come up.
Click Yes to upload data from device to PC if there is any. It also enables HeartPal to save changes made in your account to the device.
Click ☑ No to skip uploading data from device to PC. It also disables HeartPal to save changes made in your account to the device.
My Home
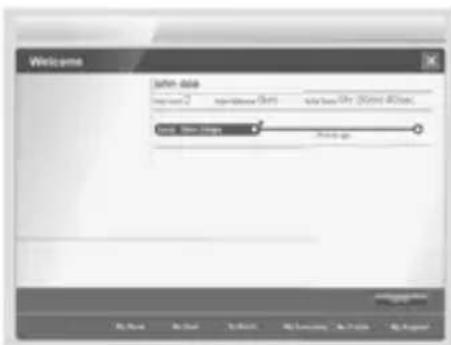
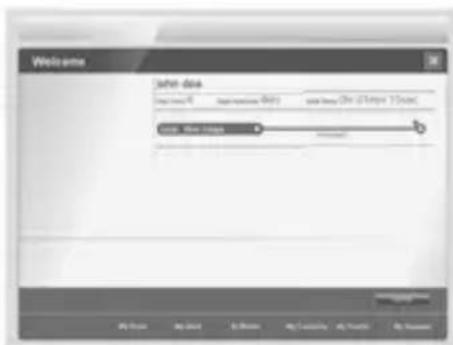
Click the "My Home" button in the bottom to go to My Home page.
This page shows the user's name, total number of runs, total distance run, and total time used in the runs.
This page also show the status of the latest goal if there is any.
My Runs
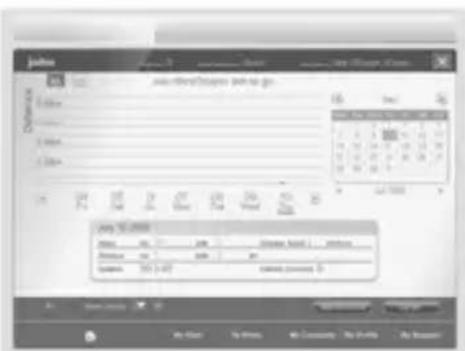
Click the button in the bottom to go to My Runs page.
Click the button to show run data by weeks.
Click the button to show run data by months.
Click the heart rate button to show heart rate data.
Click the calories button to show calories data
Click the line graph button on top left to show run data in line graph.
Click the bar chart button on top left to show run data in bar chart.
Click the or button to move forward or backward current display time frame.
My Goal
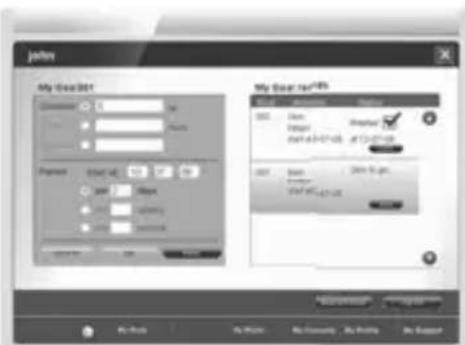
Click the button in the bottom to go to My Goal page.
Create new goal
- Select type of goal: distance, time, or calories.
- Enter/modify the target number for the type of goal.
- Enter/modify the "Start At" date.
- Select time period unit: days, weeks, or months.
- Enter/modify the number for the time period.
- Clicked button. Create New
Edit goal
- Select the goal record on the right side of the page that needs to be edited.
- Select type of goal: distance, time, or calories.
- Modify the target number for the type of goal.
- Modify the "Start At" date.
- Select time period unit: days, weeks, or months.
- Modify the number for the time period.
- Clicked button.
Delete goal
-
Select the goal record on the right side of the page that needs to be deleted.
-
Clicked button.
Goal Status
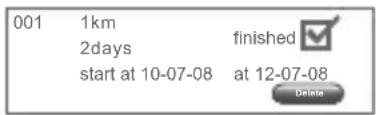
Finished Goal is shown with a "check".
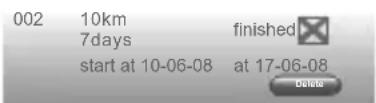
Unfinished and expired goal is shown with a “cross” and orange background
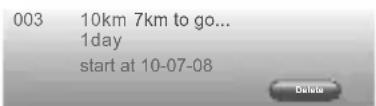
Unfinished and on-going goal is shown with how far to go to reach target.
My Music
Click the

button in the bottom to invoke Windows Media Player.
My Profile
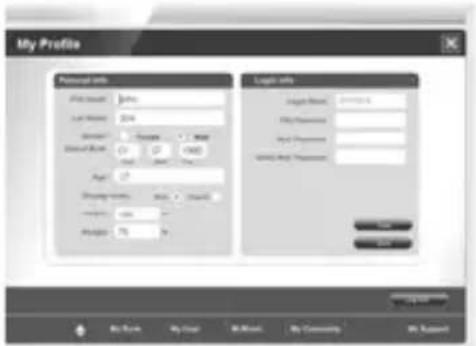
Edit and Save Profile
- Make modification on the information in the profile.
- Remember to enter the password entries. If not changing password, just enter the existing password in the "New Password" and "Confirm New Password" entries.
- Click the Save button. If device is connected and data was uploaded from device, the changes will be saved to both device and PC. Otherwise, the changes will only be saved on PC. It is recommended to have the device connected when making changes to the profile so that the data on both the device and PC can be in sync.
Delete Profile
Deleting just the profile data is not supported. You can choose to remove the account (under My Support). However, both profile and run data for the account will be deleted.
Clear Entries
Click the button will clear all entries on the page. It does not affect data that is stored in the device and PC.
My Support
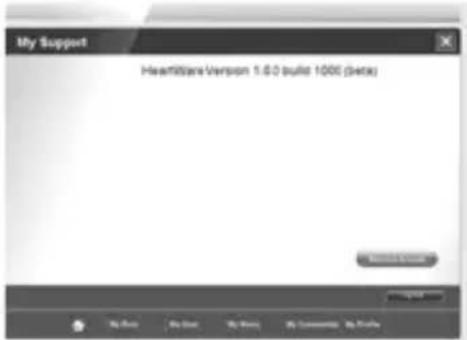
Click the but My Support in the bottom to go to My Support page.
This page shows the current version of the software.
Remove Account
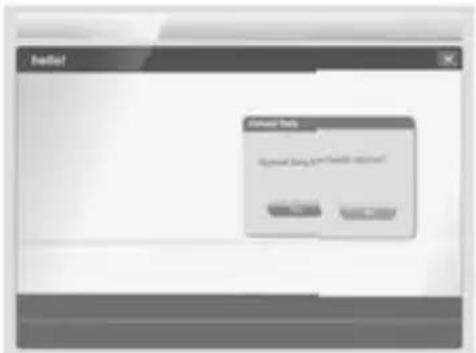
- Click the button. This will bring up the confirmation page.
- Click the Proceed button to confirm. Click the Cancel button to cancel and go back to My Support page.
Logout
- Click the LogOut button and it will bring up confirmation page.
- Click the button to confirm. This will bring up the initial login page.
Exit the Software
Click the button on the top right corner to quit the software.
Format content (run data) of device
- Connect device to PC.
- Delete the "FR.Dat" file in the device in window explorer.
- Disconnect device from PC.
LOAD SONGS FROM PC TO THE DEVICE
Drag and Drop
After the device is connected to the PC for uploading/downloading, simply “drag and drop” to copy / move the music / data files between PC and the device.
- Use the USB cable to connect the device to your PC.
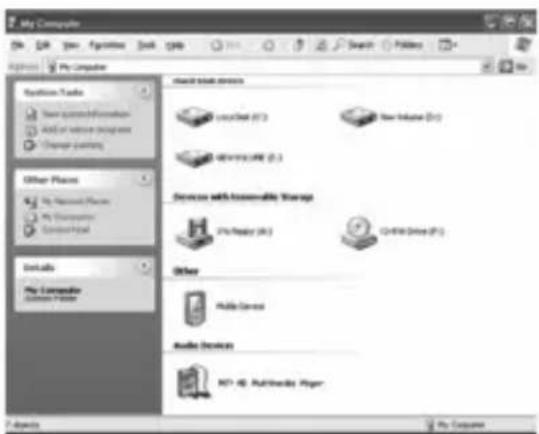
- In Windows, double click the "Audio Player" icon found in "My Computer".
- Drag and drop your MP3 / WMA files to "Audio Player" drive..
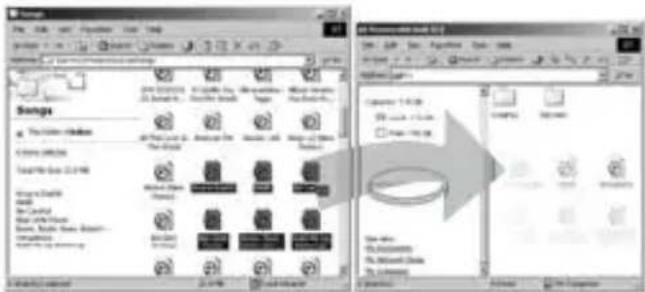
Note:
- You may also use the device as an USB storage device and save data files from PC on it.
- Data files that are stored on the device cannot be browsed using the device's interface.
FORMAT THE PLAYER
Connect the device with the PC, and format it using Windows Media Player.
FIRMWARE UPGRADE
AIDIGITAL is committed to offer the best experience to its customers.
As such, new firmware is released regularly to enhance the devices performance and features.
Please visit our website at www.gowithyou-Zipy.com to check for the latest firmware program.
FIRMWARE RECOVERY
Firmware recovery will erase all data on your player. Your PC must be connected to the internet to do this procedure. Hence, before you recovery the player, we remind you backup your data in PC first.
Steps:
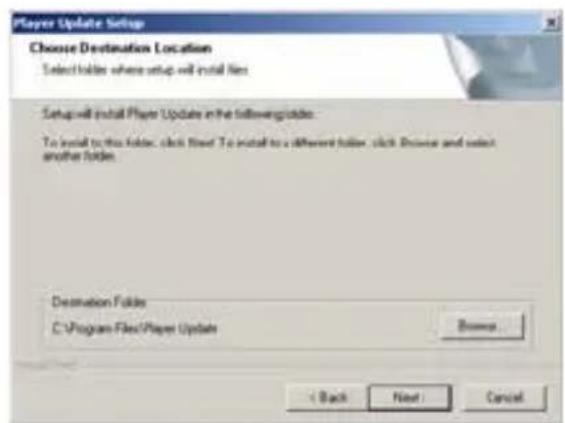
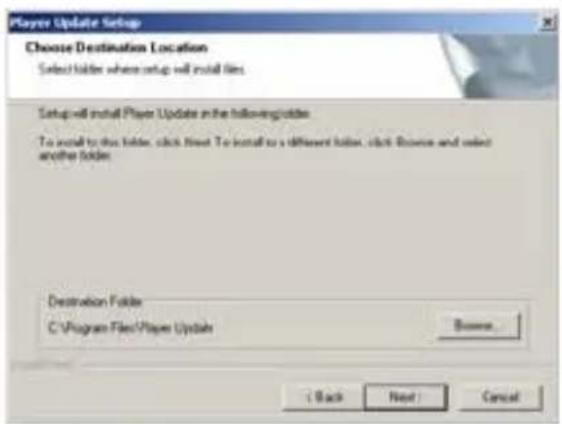
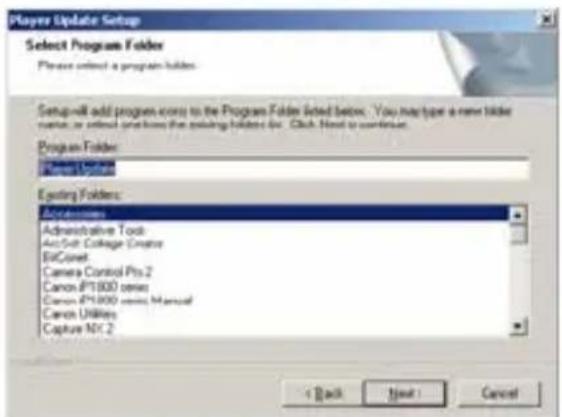
- Install Player update (You can find the folder named Firmware Recovery in the CD, double click the file named Setup.exe).

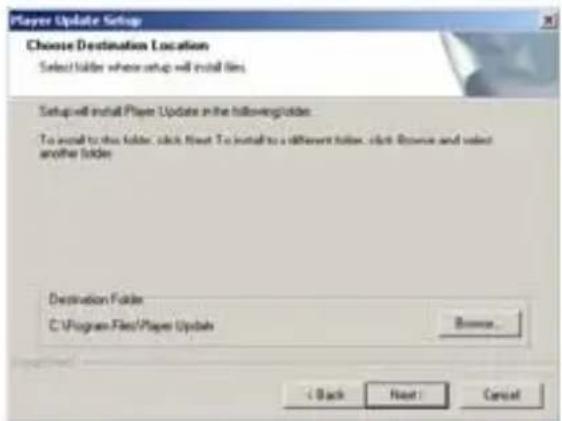
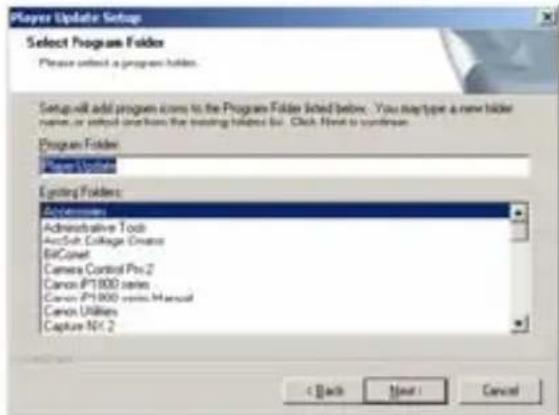
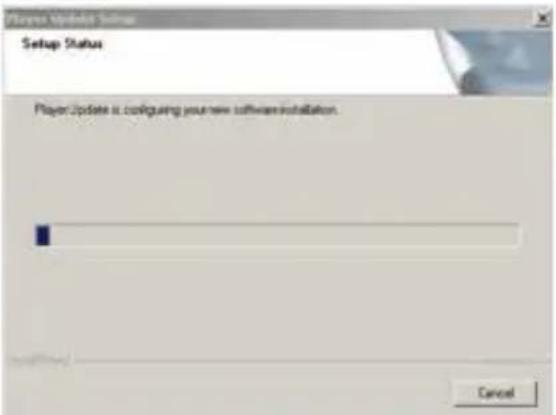
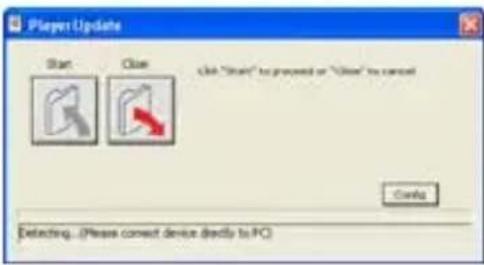
"Start" button to enter the update process.
![Player Update Start Close Update Server Update Server Hong Kong Hong Kong China Russia US Config [Detecting... Please connect device directly to PC]](/content/2026/06/1195274/images/11351795c8c43c0465c129c2eb57162ed4acd8eeb875dc7a1e99b360d2df0bd0.jpg)
- Enter the firmware licens e key, and press "ok" to confirm.
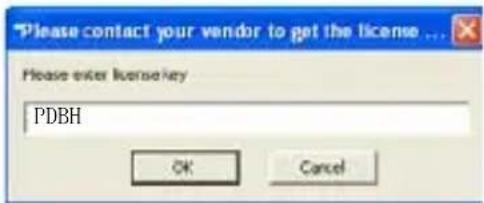
Note: Please contact your vencor to confirm the proper Firmware License Key of your device for completing this step.
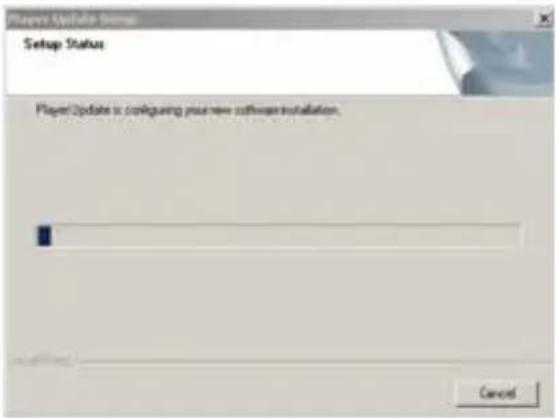
- Firmware download process will start
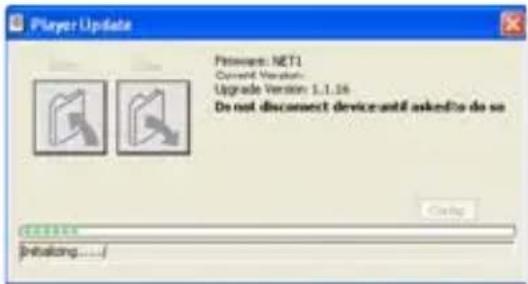
- Please confirm to format the data, and wait until the download process complete. You will see the "Firmware upgrade completed" in the dialog. Please press "Close" to exit the Player Update procedure.
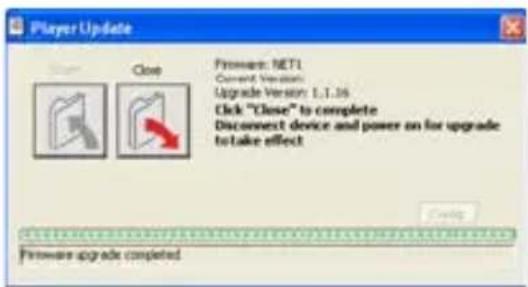
- Disconnect the player from your PC. Now you can enjoy the player again.
DISCONNECT THE DEVICE FROM PC
- Double click the hardware icon on the task tray of your computer as shown below:
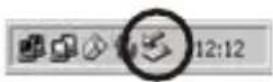
- Click the popup message as shown below and a window will appear.
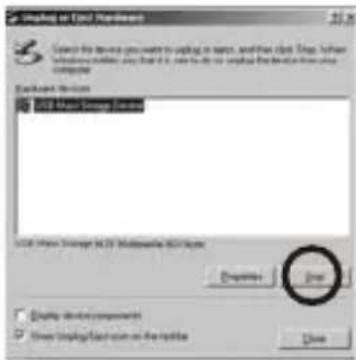
-
Select your device and click "ok" to confirm the disconnection.
-
When the popup window "Safe To Remove Hardware" appears, click "ok" and disconnect the USB cable from your PC.

If you are using Windows Media Player 10 synchronization, you can just unplug the device after the transfer is completed,
TROUBLE SHOOTING
| Symptom | Diagnostics |
| The device will not turn on The battery level is too low. Please charge the device. Reset the device. (Please refer “Reset your player” in this section) | |
| The device cannot be charged when connected to PC | If connect to an USB hub, make sure the hub is self-poweredDisconnect and reconnect the device to the PC. Try different USB port if available. |
| Player keys do not work | Check if the keys are LOCKED. Move the slide switch to its unlock position.Reset the device. (Please refer to the “Reset player” section) |
| The PC does not recognize the device | Check whether the USB cable is firmly attached to both the device and the PC.Check to see whether the PC meets the minimum requirements.Try another USB port if available. |
| No sound during playback. | Check if the volume level is set too low.Check if the earphones are inserted firmly.Check if the earphone plugs are dirty. Clean it with soft cloth. |
| There is noise during playback | Check if the earphones are inserted firmly.Check if the earphone plug is dirty.The song may be corrupted, download other songs and try again. |
| The music file cannot be played | The file may not be compatible with the device: MP3 or WMA types only.Check if it is a copyright protected file, if so, the transfer should be downloaded by Windows Media Player and check if the usage of the copyright protected file is expired. |
| Cannot transfer song to the device | Memory capacity of the device is full |
| The display is weak. The battery level is too low. Charge the device. | |
| The workout values displayed seems wrong. | Improper wear of the device (Please refer to “Wearing your device” section.)When the device is placed in a bag and the bag moves irregularly.Walking at an inconsistent pace.Jog or walk extremely slowly.The device may be capturing vibrations from a moving vehicle (Such as riding a bicycle, automobile, train or bus.) as step counts.The device cannot count steps accurately with:a) Standing up or sitting down movementb) Playing sports other than walking/jogging (running).c) Ascending or descending movements on stairs or hills.Inaccurate personal profile setting / without calibration. Check the setting. (Please refer to Profile Editing / Calibration in Settings section) |
| The pedometer is not reading your initial steps | The device is designed to count steps (including the initial steps) only after a few steps have been taken.. |
RESET PLAYER
In case your player is not functioning or not response to any key pressed, following the instructions below to reset it.
Use a small object to press on the RESET button on the back of your device. Turn the power on to complete reset.
TRADEMARKS
Windows XP, Windows Vista and Windows Media Player are the registered trademarks of Microsoft Corp.
REGULATORY INFORMATION
Declaration of Conformity Trade Name: AIDIGITAL Model: GO! BEATING PLUS
For customers in USA or Canada
This device complies with part 15 of FCC rules. Operation is subject to the following two conditions:
(1) This device may not cause harmful interference.
(2) This device must accept any interference received, including interference that may cause undesired operation.
FCC Notice:
This equipment has been tested and found to comply with the limits for a Class B digital device, pursuant to part 15 of the FCC Rules. These limits are designed to provide reasonable protection against harmful interference in a residential installation. This equipment generates, uses, and can radiate radio frequency energy
and, if not installed and used in accordance with the instructions, may cause harmful interference to radio communications. However, there is no guarantee that interference will not occur in a particular installation. If this equipment does cause harmful interference to radio and television reception, which can be determined by turning the equipment off and on, the user is encouraged to try to correct the interference by one or more of the following measures:
- Reorient or relocate the receiving antenna,
- Increase the separation between the equipment and the receiver,
- Connect the equipment into an outlet on a circuit different from that to which the receiver is connected.
- Consult the dealer or an experienced radio/ TV technician for help.
For customers in Europe
1) This product conforms to the following European Directives: 89/336/EEC (EMC Directive)
2) This product complies with EN55022/ A1: 2000 and EN 55024/ A1: 2001 for use in the following areas: residential, commercial and light industrial.
DISPOSAL OF YOUR OLD PRODUCT
Your product is designed and manufactured with high quality materials and components, which can be recycled and reused.
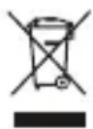
When this crossed-out wheeled bin symbol is attached to a product, it means the product is covered by the European Directive 2002/96/EC.
To prevent any potential negative consequences for the environment and human health, please act according to your local rules regarding the disposal of this device.
SPECIFICATION
| Product Model GO! BE | ATING PLUS |
| Size ( W x H x D) | 62 x 36 x 20mm |
| Weight 26g | |
| Flash Memory Up to 8GB | |
| Display 2-Color OLED | Display |
| Playable Format MP3, WMA, WAV | |
| Battery Type | Built-in Re-chargeable Li-Polymer Battery (140mAh, 3.7V) |
| Charging Charging through USB | |
| Play Time Music: 12 Hours | |
| USB Type Mini USB port. USB 2.0 High Speed | |
| OS Requirement Windows Vista | |
| Operating Temperature | 0 - 40°C |
| Compliance | FCC, CE |
Note:
The above specifications of the device are subject to change without prior notice for the purpose of performance upgrading.
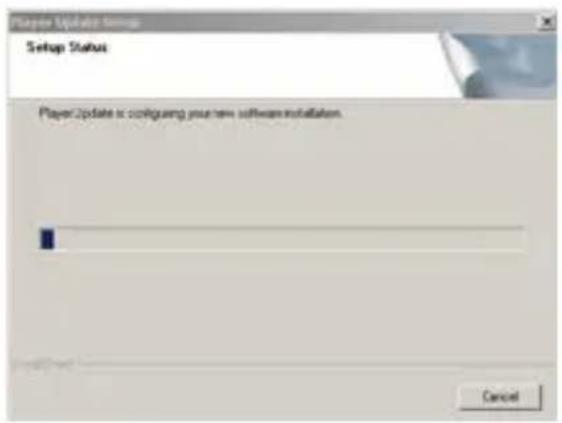
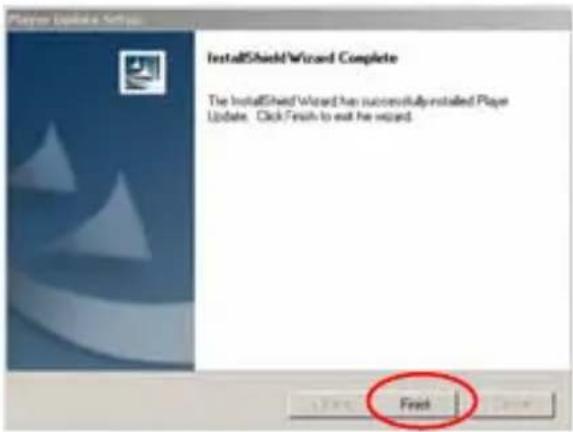
Press “next” until you see the “Finish” in below dialog. Press “Finish” to exit the installation.
- After you have installed the Player Update, click "Start\ All programs\ Player update Player update" to start the update software.
- Turn off the player, then press and hold on press the ">ll" key, at the mean time, connect the player to PC, until you can see below dialog with "Recovery mode ready", then you can release the ">ll" button (The "Start" button change to green color).
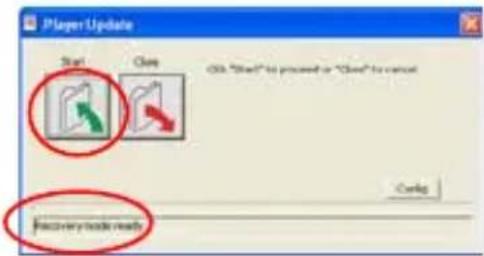
Notes: If it is the first time you plug the player to the PC, there may be a “Found New Hardware wizard” pop up, please follow the computer instruction to complete the Hardware installation firstly.
- Click the "Config" button, select "US" as update server station, or choose your nearby station. Such as, if you are in US, then you need choose US. Then click
DECLARATION OF CONFORMITY
ACCESORIOS INTELIGENTES DIGITAL S.A. C/CARPINTEROS,6, OF-13 VILLAVICIOSA DE ODON. 28670 MADRID
We hereby declare, under our exclusive responsibility, our conformity with the product:
MP3 : GO BEATING PLUS/ZIPY
To which this declaration refers with the following directives:
EN55022:2006+A1:2007;EN55024:1998+A1:2001+A2:2003
EN55013:2001+A1:2003+A22006;EN55020:2007
EN61000-3-2:2006;EN61000-3-3:1995+A1:2001+A2:2005
In compliance with the resolutions of the Directive 99/05/CE, of the European Parliament and the March 9 ^th 1999 Council, included in the Spanish law system by El Real Decreto 1890/2000, November 20 ^th .
Issue location and date 7 may 2009
Signed by: Miguel Fauro

PRÓLOGO
CONOZCA SU REPRODUCTOR RD-6810 DI LME LITE....7
CARACTERÍSTICASDEELPRODUCTO...7
manual Spanish go! Beating plus
Mi Perfil 35
MiAyuda 35
Salir del Sistema 36
Salir del Software 36
flowchart
graph LR
    A["Shutting Down"] --> B["Sequence 1"]
    A --> C["Sequence 2"]
    A --> D["Sequence 3"]
    A --> E["Sequence 4"]
    B --> F["Bye"]
MODO DE MÚSICA

flowchart
graph LR
    A["Vess Ball"] --> B["Add Ball"]
    B --> C["Hold Ball"]
    C --> D["Hold Ball"]
Nota:
Nota:
natural_image
Line drawing of a device with a cable and connected via a cable (no text or symbols)Comenzar HeartPal
Note:
Nota:
Note:
flowchart
graph LR
    A["Shutting Down"] --> B["Sequence 1"]
    A --> C["Sequence 2"]
    A --> D["Sequence 3"]
    A --> E["Sequence 4"]
    B --> F["Bye"]
Nota:
natural_image
Abstract diagram with two opposing arrows and a horizontal bar (no text or symbols)MODO DE MÚS CA

Note:
You may review your saved workout information, either once you downloaded them from the device to your PC and view them with the PC Software supplied, or directly from the device for further analysis.
Nota:
Display(Ecrã)
Nota:
natural_image
Line drawing of a device with a cable and a connected device (no text or symbols)Começar HeartPal
Editare Armazenario Perf.
Drag and Drop (Arrastar e Soltar)
Note: