Quatro CM2004M - Coffee machine Zelmer - Free user manual and instructions
Find the device manual for free Quatro CM2004M Zelmer in PDF.


| Product Type | Coffee Machine |
| Brand | Zelmer |
| Model | Quatro CM2004M |
| Dimensions (approx.) | 30 x 20 x 35 cm |
| Weight (approx.) | 2.5 kg |
| Power Supply | 220-240 V, 50/60 Hz |
| Power Consumption | 1000 W |
| Water Tank Capacity | 1.2 L |
| Brewing Method | Drip filter |
| Number of Cups | Up to 10 cups |
| Auto Shut-off | Yes |
| Keep Warm Function | Yes |
| Anti-Drip System | Yes |
| Pause & Serve | Yes |
| Water Level Indicator | Yes |
| Removable Filter Basket | Yes |
| Permanent Filter | Yes (included) |
| Cleaning | Descale regularly with descaling agent |
| Safety Features | Overheat protection, auto shut-off |
| Spare Parts Availability | Carafe, filter basket, water tank available |
| Manual Languages | Multiple languages (EN, PL, DE, etc.) |
| Color | Black/White (typical) |
Frequently Asked Questions - Quatro CM2004M Zelmer
User questions about Quatro CM2004M Zelmer
0 question about this device. Answer the ones you know or ask your own.
Ask a new question about this device
Download the instructions for your Coffee machine in PDF format for free! Find your manual Quatro CM2004M - Zelmer and take your electronic device back in hand. On this page are published all the documents necessary for the use of your device. Quatro CM2004M by Zelmer.
USER MANUAL Quatro CM2004M Zelmer




PARZENIE KAWY


④ Wciśnij przycisk


PŘÍPRAVA KÁVY

Čištění a údržba

Opakujte tento program 2x
Tlačidlo (začne blikat'. Signalizuje tým nahrievanie a prípravu spotrebiča.
PRÍPRAVA KÁVY

⑦ Po každom spenení mlieka starostlivo vyčistite parnu trysku (pozrite ČISTENIE TRYSKY PARY).

② Po zapnutí spotrebiča počkajte, ked' tlačidlo prestane blikat'. Ked' sa podsvetia tlačidlá menu, vyberte tlačidlo horúcej vody.

④ Zvolené tlačidlo horúcej vody prestane blikat' a bude signalizovat' zohriatie spotrebiča na požadovanú teplotu.
Čistenie a údržba

② Vyčistite misku.
Bri spätnej montáži dielov osušte.
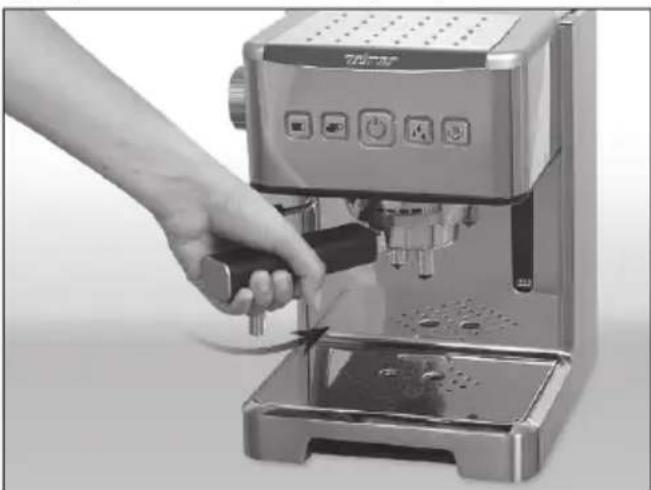
② Pripevnite držiak sitka bez kávy do spotrebiča.
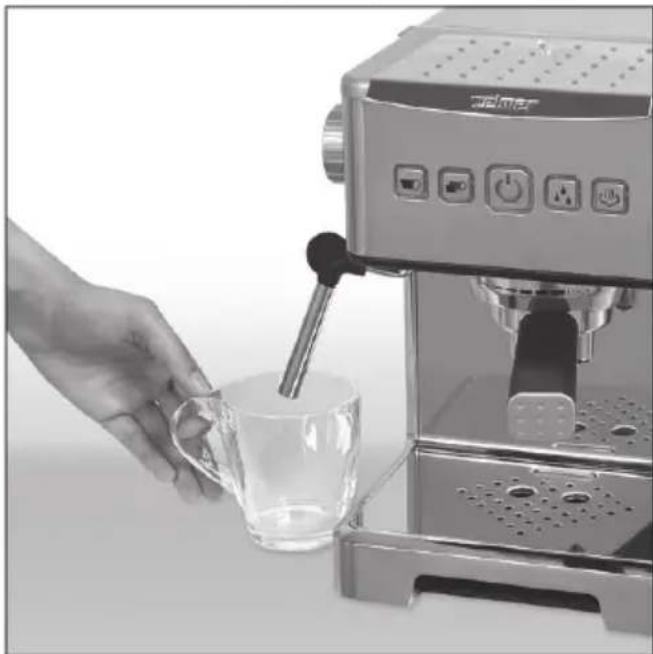
③ Postavte nádobu pod parnu trysku.
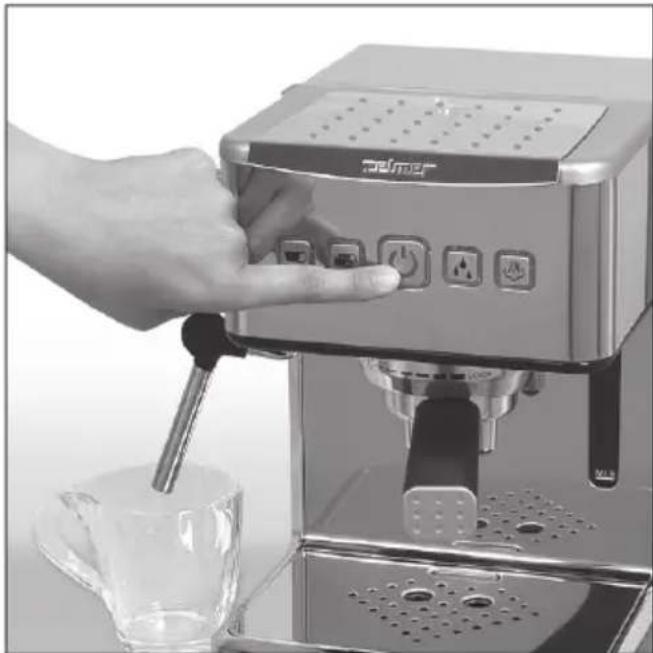
④ Stlačte tlačidlo

Tlačidlo (začne blikat' a signalizovat' zohrievanie a prípravu spotrebiča.
Ismételje meg 5x.
KÁVÉFŐZÉS

PREPARARE CAFEA

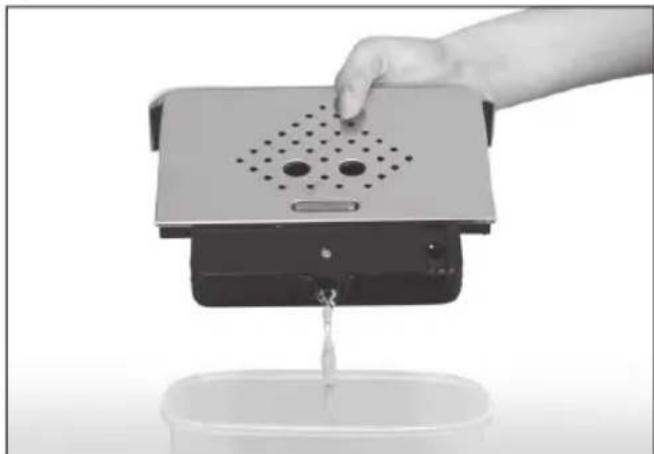
② Goliți tava.
④ Apăsați butonul
Efectuati acest program de 2 ori.

ПРИГОТОВЛЕНИЕ КОФЕ

④ Нажмите кнопку ⏻


ЗАПАРВАНЕ НА КАФЕТО


ЗАПАРЮВАННЯ КАВИ

Чищення та догляд

Виконайте цю программу 2 рази.
Congratulations on your choice of our appliance, and welcome among the users of Zelmer products.
In order to achieve best possible results we recommend using exclusively original Zelmer accessories. They have been specially designed for this product.
Please read this instruction manual carefully. Pay special attention to important safety instructions. Keep this instruction manual for future reference.
Operational safety guidelines

Danger! / Warning!
Health hazard
Never use this electrical appliance, if there are any visible damages, the power cable is damaged, the appliance has fallen or has been damaged in any other way. If you suspect the appliance has been damaged, it may only be checked, repaired or adjusted by a qualified technician of an authorized service center.
the non-detachable part of the cord is damaged, it should be replaced by the producer or at a proper service point or by a qualified person in order to avoid any hazards.
The appliance can only be repaired by qualified service personnel. Improper servicing may cause a serious hazard to the user. In case of defects please contact a qualified service center.
Never remove the filter holder during coffee making or pouring hot water, as the appliance works under pressure. Removing the filter holder during the above-mentioned operations may result in scalds or cuts.
The steam nozzle is extremely hot during foaming milk and water flow. It is advisable to avoid any direct contact of skin with the nozzle, as it may lead to scalding.
Before cleaning the espresso machine, and in case of any problems during coffee making, always turn off the appliance and pull the plug out of the socket fi rst.
Do not place your hands underneath steam, hot water or poured coffee, as it may lead to scalds and burns.
This appliance is not intended for use by persons (including children) with reduced physical, sensory or mental capabilities, or lack of experience and knowledge, unless they have been given supervision or instruction concerning use of the appliance by a person responsible for their safety.
Children should be supervised to ensure that they do not play with the appliance.

Caution!
Not observance can result in damage to possessions
The appliance shall be placed on an even, fl at surface at all times.
Do not use the espresso machine without any water in the container. The container should be filled with clean and cold water only. Do not go over the maximum capacity of the container.
Do not let the power cable touch the hot elements of the espresso machine, when turning on the cup hotplate and the steam nozzle.
Always turn off the appliance (by means of the Power button) before plugging it in or out. You should not unplug the appliance by pulling the power cable – grab only the plug instead.
the appliance is not used for a longer time or is going to be cleaned, always remember to turn it off and unplug it.
Do not use an extension cord with the espresso machine, unless it was checked by a qualified technician or service staff member.
The appliance should be plugged into a power socket with alternating current equipped with a safety pin, and voltage compatible with the one given on the rating plate of the appliance.
Do not let the power cable hang over the edge of a table or shelf, nor touch hot surfaces.
Do not immerse the appliance in water or any other liquid.
The appliance is not designed to work with exterior time switches or separate remote control systems.

stion
Information on the product and suggestions for its use
Read this manual carefully and save it for future reference.
Please make sure the above guidelines were understood.
Technical Data
The technical data is given on the rating plate of the appliance.
Water container capacity: max 1.0 l
The espresso machine is a 1st class appliance, equipped with a power cable with a protective conduct and a plug with a safety pin.
The espresso machine fulfi lls all the current standards.
The appliance is in conformity with the following directives:
- Low Voltage Directive – 2006/95/EC.
– Electromagnetic Compatibility (EMC) – 2004/108/EC.
The rating plate of the appliance has the CE mark on it.
Design of the Espresso Machine

1 Water container holder
2 Water container
3 Lid
4 Coffee scoop
5 Filter storage space
6 Cup hotplate
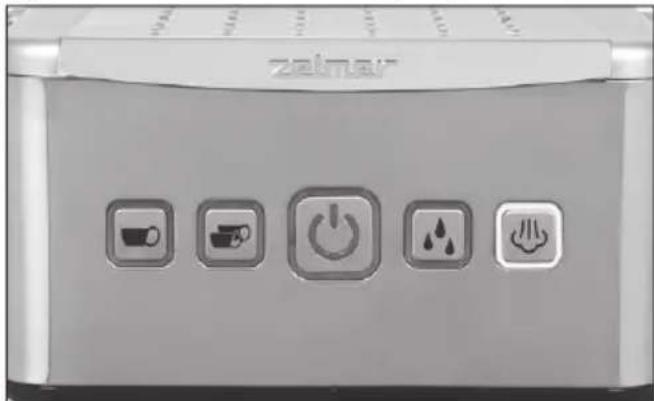
7 Control knob (turn left for steam/hot water)
8 Control panel
9 1-cup button
10 2-cup button
11 Stand-by button
12 Hot water button
13 Steam button
14 Steam nozzle
15 Dripping tray with fllling gauge
16 Dripping tray grid
17 Brewing head
18 Water level gauge
19 Filter holder
20 Dispenser
21 Silicone pad
22 1-cup fi Iter
23 2-cup fi Iter
Before Use
Before using the espresso machine for the first time clean all the accessories with warm water and a gentle dishwashing liquid. Dry thoroughly all the accessories before reassembling them
Follow these steps to prepare the appliance for its first use.
① Open the lid and take out the water container.

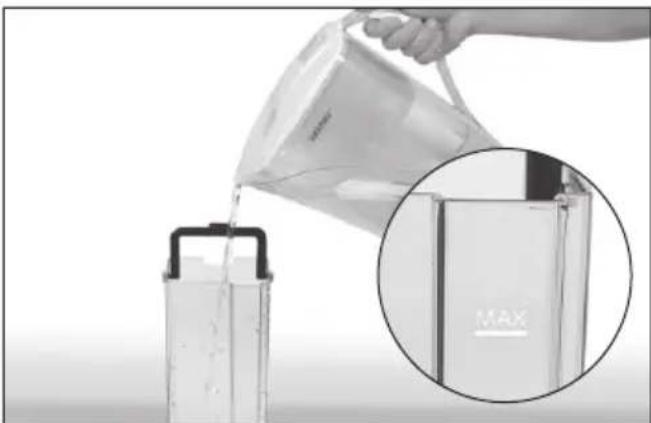
② Fill the container with fresh, cold water up to the MAX level.
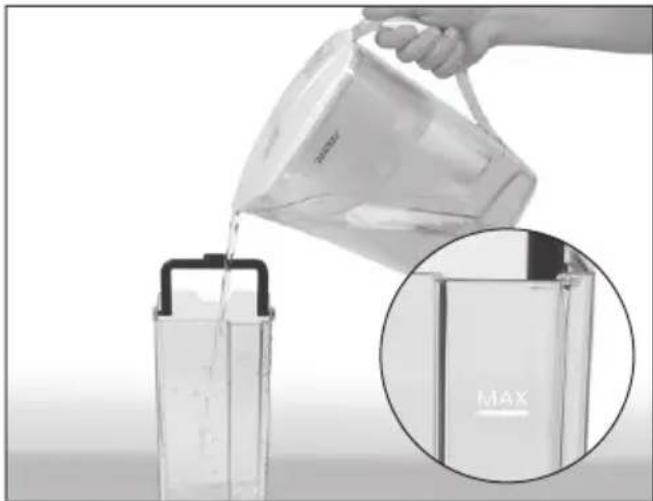
③ Place the filled container in the appliance. Make sure the container is secured, and close the lid.


possible to fill in the water without removing the container. In order to do this, lift the lid, and pour fresh, cold water into the container up to the MAX level.

The water filling hole should not be opened during coffee making.
④ Plug the appliance into the appropriate power source (data specified on the rating plate of the appliance).
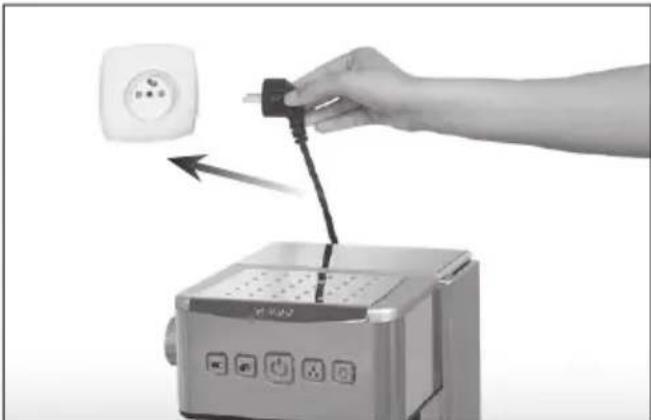
⑤ Ensure that the control knob is in the starting position and press the button.

The ⏻ button starts to flash indicating the appliance is heating-up and getting ready to operate.
⑥ Place the dispenser, the silicone pad, and the desired fi Iter into the fi Iter holder.
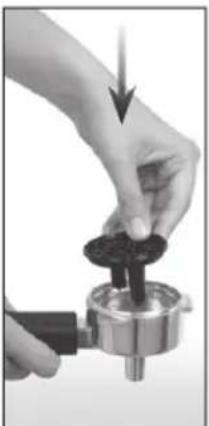


e the silicone pad always with its convex side facing downward.
⑦ Place the filter holder (without the coffee in it) in the appliance, and turn it home to the right.
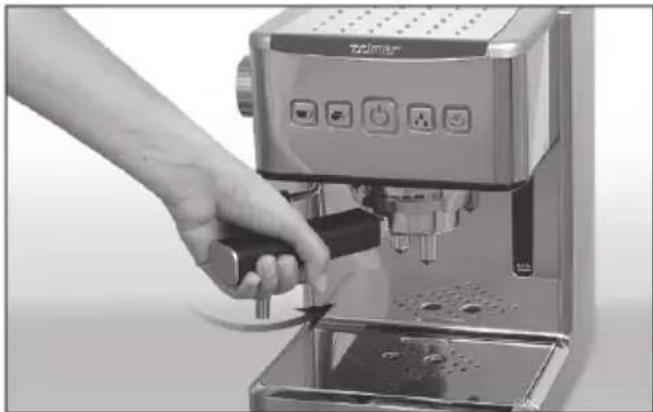
⑧ Place an appropriately large container (one which will hold the amount of water from the water container) under the brewing head.

⑨ After reaching an appropriate temperature the button stops flashing, and 4 optional buttons will turn on.
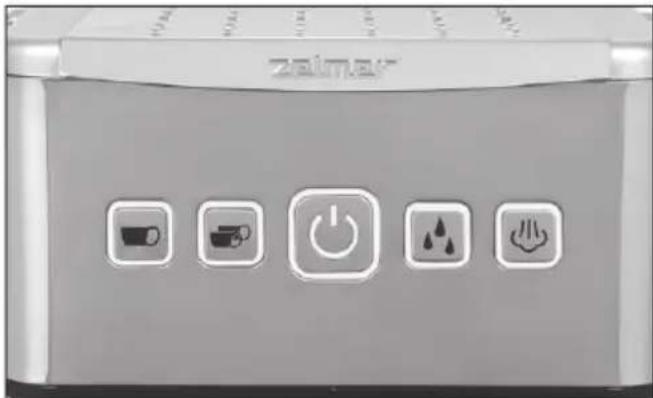
⑩ Press the 2-cup button, and let the water pour down into the container.

Repeat the process 5 times.
If it is necessary to empty the container, press the 2-cup button in order to stop the process. In order to restart the process, press the 2-cup button once again.
⑪ Empty the water container, and remove the filter holder by turning it to the left.


Extra careful while pouring out the hot water. Non-compliance may result in scalding.
Making an Espresso
HEATING-UP THE ACCESSORIES
We recommend heating up the cup and the filter holder before putting the coffee in to get the best results. In order to heat-up these elements, follow these steps.
① Fill the water container with fresh, cold water up to the MAX level.
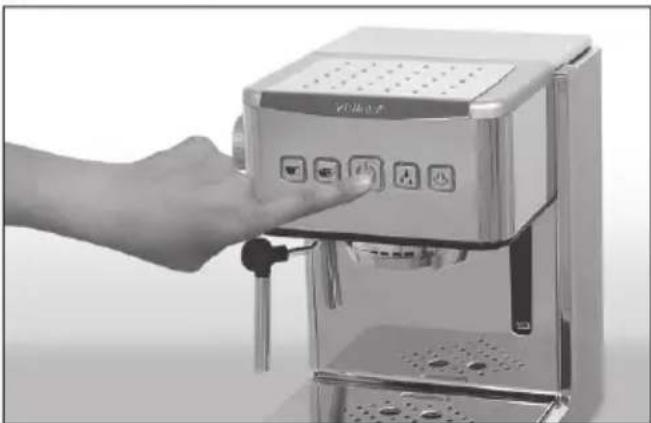
② Press the ⏻ button to turn the appliance on.
③ Place the dispenser, the silicone pad, and the desired fi Iter into the fi Iter holder.

④ Place the filter holder (without the coffee in it) in the appliance, and turn it home to the right.

⑤ Place an empty cup under the brewing head.

⑥ Press the 1-cup or the 2-cup button. When the cup is filled with hot water, and the water stops pouring, empty the cup.
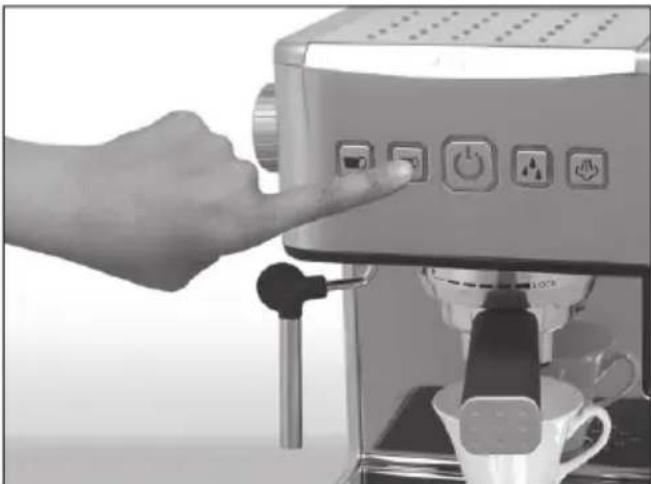
Be extra careful while pouring out the hot water. Non-compliance may result in scalding.
⑦ When the espresso machine stops working, remove the fi lter holder by turning it to the left.

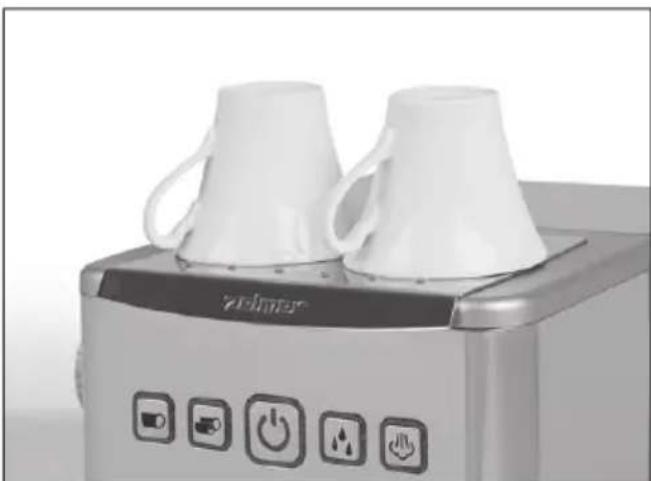
If the device has warmed up, it is possible to heat the coffee cups.
To do this, place the cups upside down on the cup warming tray.
MAKING COFFEE
The choice of coffee has a signifi cant influence on the flavor and aroma of the beverage. We recommend using only coffee for pressure coffee makers. Do not use instant coffee or coffee for pour-over coffee makers.
Please follow these steps, to make coffee.
① After completing the process described in the HEATING-UP THE ACCESSORIES paragraph, put coffee into the desired fi liter. Use the attached coffee scoop to do this.
Do not compress coffee in the filter but distribute it evenly all over the surface.
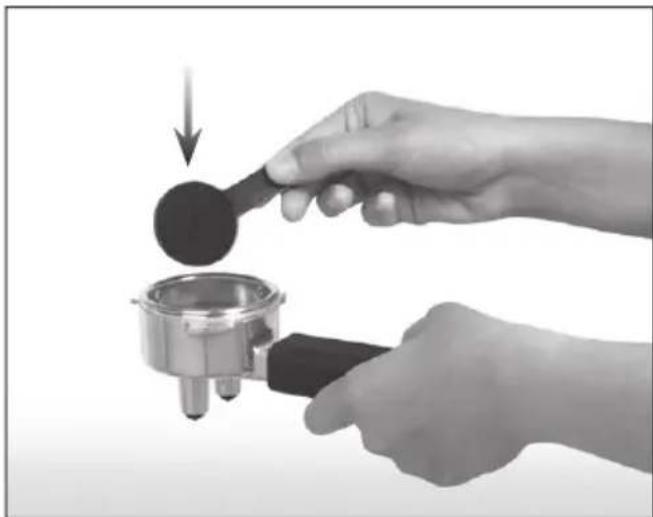
One scoop is enough for a single cup of coffee.
② Make sure there is no coffee on the edges of the filter. Its excess may disrupt the process.
③ Place the filter holder in the brewing head, and turn it home to the right.
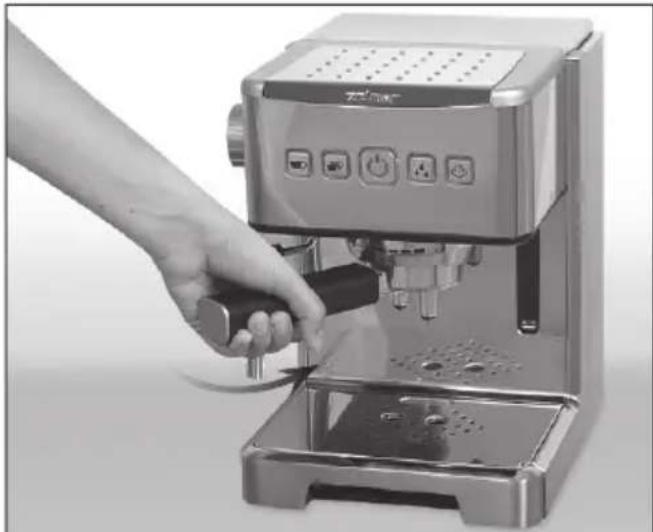
By securing the holder in the brewing head, you make sure there are no leaks during the process.
④ Place one or two cups under the brewing head, and select the desired coffee program (1-cup or 2-cup).

⑤ When the cup is filled with the appropriate amount of coffee, the appliance stops automatically.

The espresso machine is set by default to pour 60 ml of coffee per cup. In any given moment you may stop the coffee, by pressing again the selected program button.
Additional Functions
ADJUSTING THE AMOUNT OF COFFEE
You may adjust the amount of coffee you put in the machine. In order to this, when selecting a coffee program, please press and hold a selected program for ca. 2 seconds. The coffee starts pouring, the button will fl ash, until it is pressed once again or fl lling the desired capacity (for 1-cup or 2-cup 450 ml). The given value will be saved.
In order to change the saved value, you have to repeat the above process.
The espresso machine returns to its default setup, after unplugging it from and plugging it in to the power source again.
FOAMING MILK FUNCTION AND HOT WATER FUNCTION
The espresso machine is equipped with a steam nozzle, which allows you to foam milk, and pour hot water.

Remain extra careful when operating the steam nozzle. Any contact with hot steam/water or hot elements of the nozzle, may result in scalding.
FOAMING MILK
In order to use the foaming milk function, please follow these steps.
① Before using this function, make sure if there is enough water in the water container (see Before Use).
② After turning the appliance off, wait until the button stops flashing. After the menu buttons light up, select the steam button.
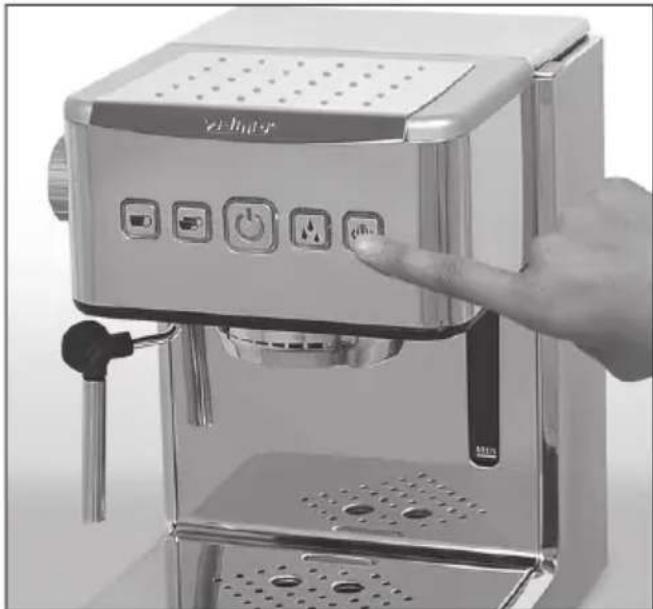
③ Bend the steam nozzle out of the outline of the espresso machine.

Pour about 90 ml of milk into a container – the container should not be too high, as it needs to fit under the steam nozzle.

We recommend both the container and the milk to be cold to get the best results. We also recommend pasteurized or UHT milk.
④ The select steam button stops flashing indicating the appliance has reached the necessary temperature.
⑤ Immerse the end of the steam nozzle in the milk, and gradually turn the control knob counterclockwise to its maximum setting (with the steam icon).


t foaming from the bottom of the container, and move slowly upward for best results. Make sure the nozzle is immersed in the milk the whole time.
⑥ If you think the milk is foamed enough, turn the control knob to its starting setting.

⑦ After each foaming, it is necessary to clean thoroughly the steam nozzle (see CLEANING THE STEAM NOZZLE).

Make sure the steam nozzle cools off before cleaning it.
Neglecting nozzle cleaning may limit the amount of steam coming out of the nozzle, and ultimately result in total nozzle blockage, ending in the defect of the appliance.
HOT/BOILING WATER
The hot water function is ideal for making a long black (an espresso mixed with hot water), hot chocolate or filling a piston coffee jug or a tea pot.
In order to obtain hot water, follow these steps.
① Before using this function, make sure if there is enough water in the water container (see Before Use).

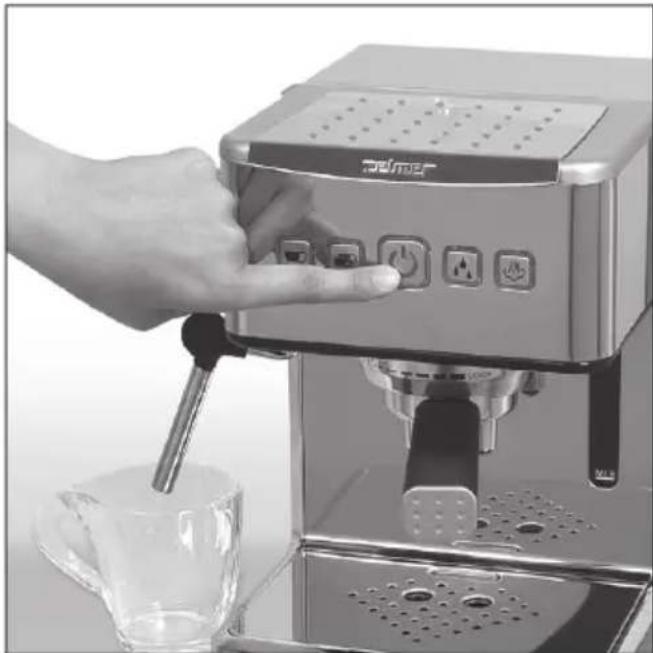
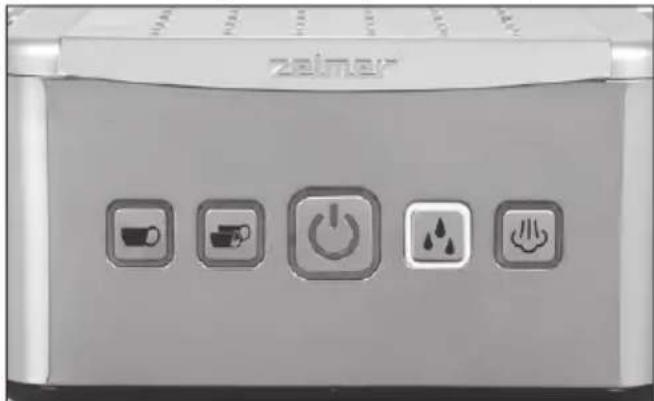
② After turning the appliance off, wait until the button stops flashing. After the menu buttons light up, select the Hot Water button.

③ Prepare a container for hot water (a cup).

④ The selected Hot Water button stops flashing, indicating the appliance has reached the necessary temperature.

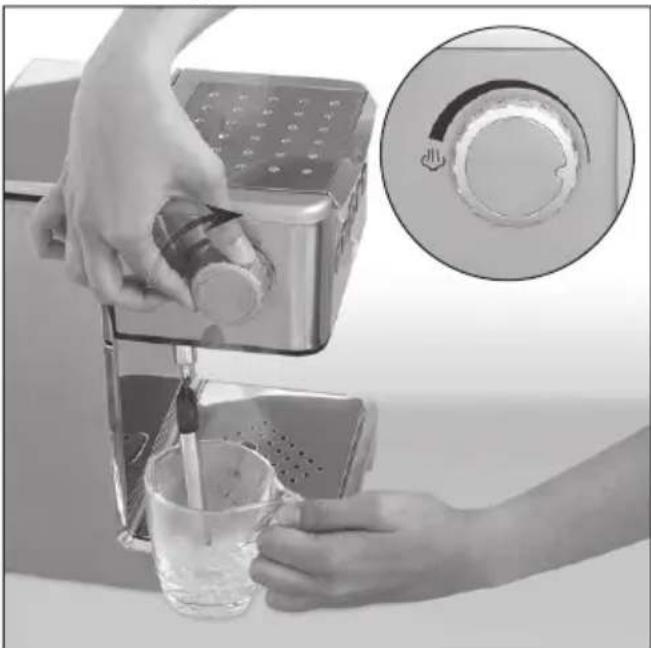
⑤ Place the container under the end of the steam nozzle, and gradually turn the control knob counterclockwise to its maximum setting (with the steam icon).
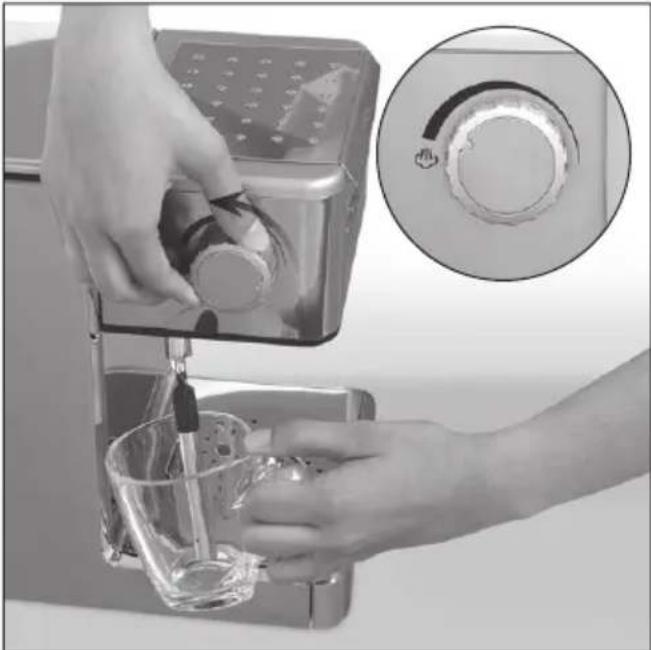
⑥ When you feel, you have enough water, turn the control knob to its starting position.
Cleaning and Maintenance

Do not machine wash the coffee scoop, the dripping tray, the filter holder, filters, the water container or any other elements. All the accessories and elements of the espresso machine are not designed to be cleaned in a dishwasher.
CLEANING THE APPLIANCE

re cleaning make sure the appliance is unplugged and has cooled off.
use only fine cloths and gentle dishwashing liquid or even clean, warm water alone to clean the appliance.

Using coarse cloths or sponges may lead to scratching the metal elements of the espresso machine.
Do not use aggressive, coarse or alcohol-based cleaning agents.
order to avoid limescale on the walls of the water container, it is recommended to rinse and empty it after each use.
there is any white residue visible in the water container, remove it with a cloth. Descale the appliance from time to time (see DESCALING THE APPLIANCE).
CLEANING THE DRIPPING TRAY
After fi nishing work, empty the dripping tray.

It is nothing out of the ordinary for the tray to be wet. It is not a sign of a leakage or defect of the appliance.
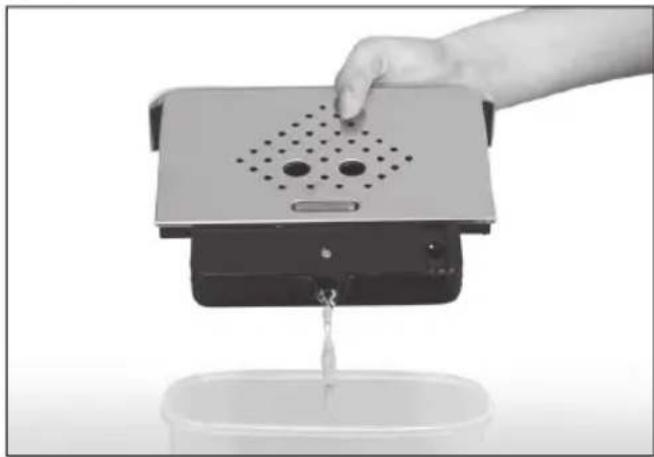
① In order to empty the dripping tray, lift it upwards a little bit, and pull it gently towards you.
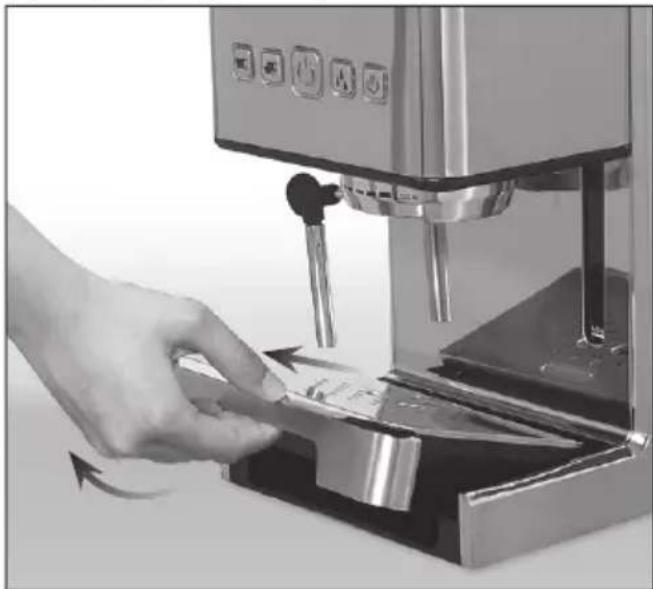
② Empty the tray.

③ After emptying the tray, remove the metal lid, and clean the container.

If it is necessary, use a delicate dishwashing liquid for the cleaning process.
④ Dry thoroughly the tray and the metal lid before placing it back into the appliance.
⑤ Place the tray in the appliance by pushing it towards the appliance.

Make sure the tray is situated tightly in order to avoid in any leakage.
order to avoid any liquid from spilling over, empty the tray once every couple of operations.
There is a red gauge indicating the level of liquid in the tray container. If the gauge is clearly visible, the tray needs to be emptied.
CLEANING THE BREWING HEAD AND THE FILTER HOLDER
The brewing head and the filter holder should be cleaned after each use.
Use warm water with an addition of delicate dishwashing liquid for cleaning.
Do not use aggressive, coarse or alcohol-based cleaning agents.
The filter holder may be cleaned with running water.
you do not use the espresso machine, store the filter holder closed. It will allow protecting the seal from unnecessary wearing out.
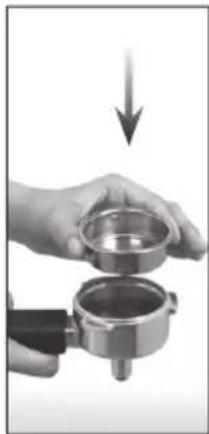
① In order to clean the inner elements of the fi lter holder, turn the fi lter, until you find a cut which lets you remove the fi lter.

② Next remove the silicone pad.

③ You will find the dispenser underneath the pad, which now you can easily remove..

Before reassembling the elements, dry them carefully.
order to situate the filter in its holder, the insets must overlap with the incisions on the holder.
DESCALING THE APPLIANCE
Limescale is a mineral residue found on surfaces of all appliances with the function of water heating. This is why the espresso machine needs descaling from time to time. We advise to descale the espresso machine every 4-6 months, depending on use.
DESCALING AGENTS
Traditionally the following agents are used to descale an espresso machine:
Vinegar solution
Fill the container in the following proportions: 1/3 vinegar, 2/3 water.
Citric acid solution
Dissolve a packet of citric acid in half a liter of water.
Dedicated liquids or tablets
case of liquids and tablets act accordingly to the guidelines provided on the label of these products.
In order to descale the appliance, please follow the steps below.
① Place the container with the desired solution into the espresso machine.
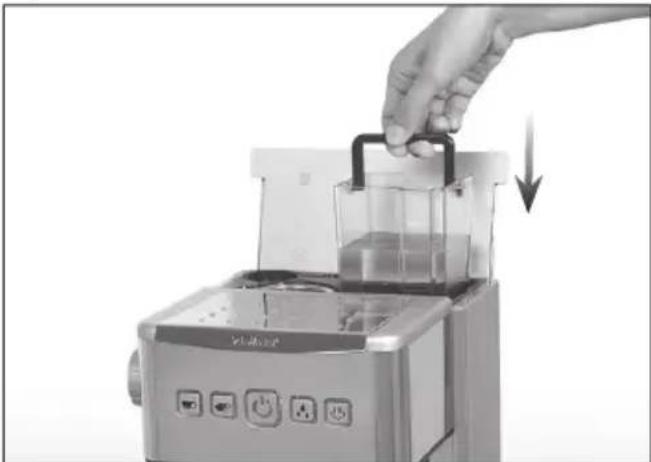
② Install the filter holder without any coffee in the appliance.

③ Place the container under the steam nozzle.
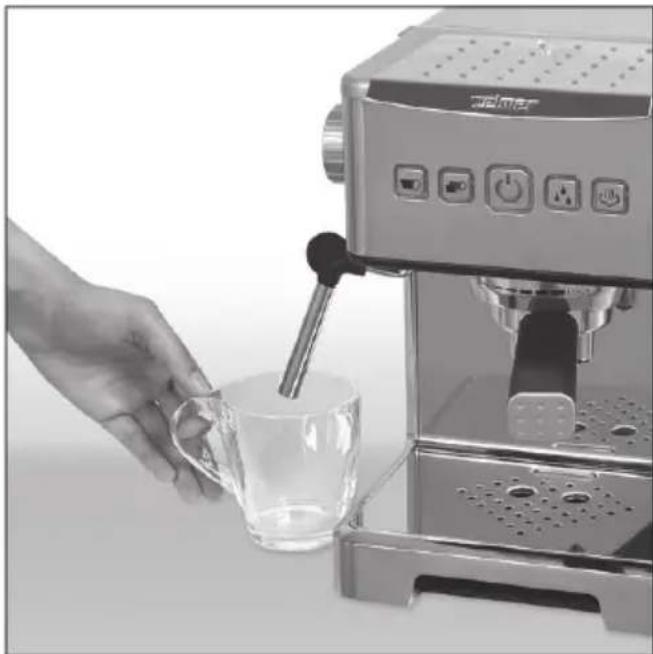
④ Press the button.

The ⏻ button starts to flash indicating the appliance is heating-up and getting ready to operate.
⑤ When the button stops flashing, all the select program buttons lit up.

⑥ Press the Hot Water button.

⑦ When the Hot Water button stops flashing, turn the control knob counterclockwise to its maximum setting (with the steam icon).
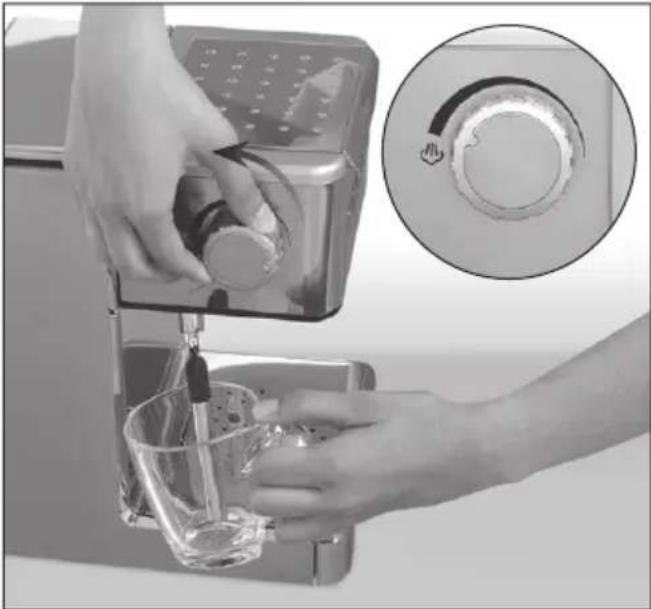
⑧ Let the solution flow until ca. 50 ml is left, and then turn the control knob to its start position to turn the hot water function off.

⑨ Next place the container under the fi Iter holder, and press the 2-cup button.

Repeat the process twice.
⑩ After the second cycle wait 15 minutes, and repeat the process again and again, until there is no solution in the container left.
⑪ Repeat descaling this time by filling the container with clean water.

After descaling, continue with 2-3 cleaning processes with clean water, as described in the paragraph Before Use.
CLEANING THE STEAM NOZZLE
If the nozzle is clogged due to careless use, it is necessary to clean it and its rubber elements.

Before cleaning the steam nozzle, make sure it is not hot.
Please follow the steps below to thoroughly clean the steam nozzle.
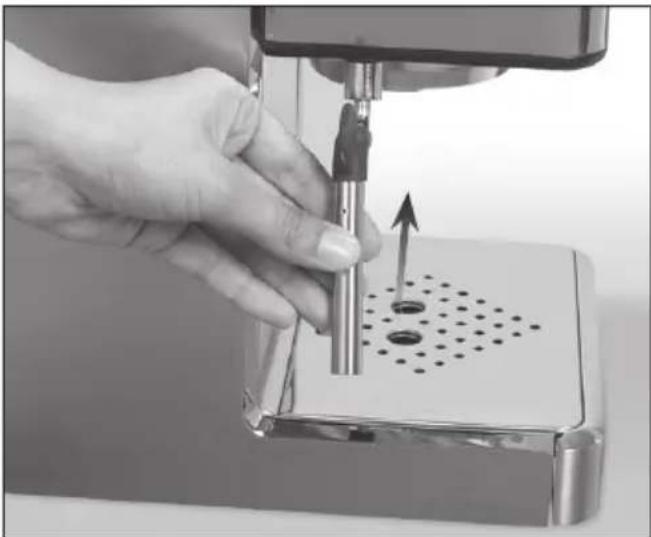
① Remove the metal casing from the nozzle by pulling it gently downwards.
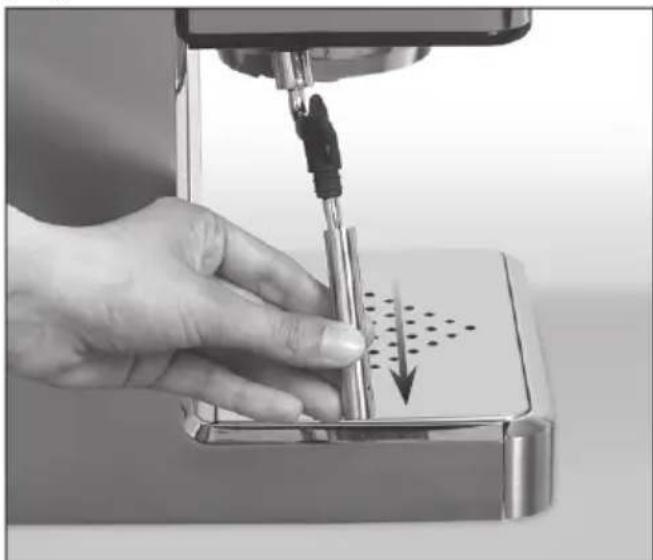
② There is a key for unscrewing the nozzle situated in the coffee scoop. Use it to unscrew the nozzle by turning it clockwise.
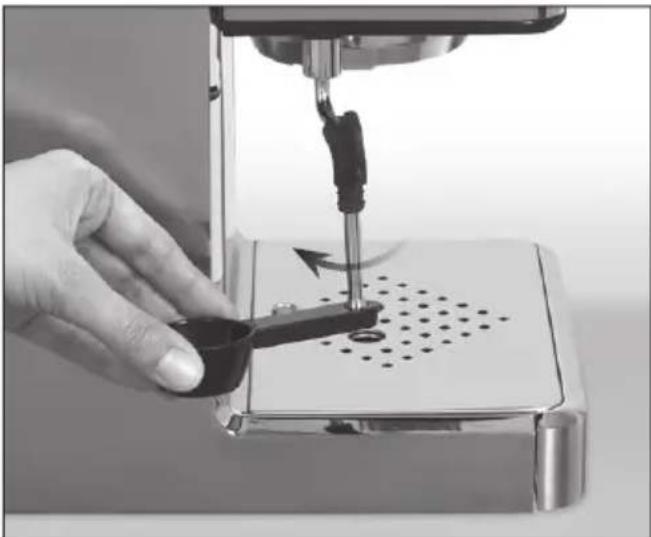
③ Clean all elements with warm, running water with an addition of a gentle dishwashing liquid. Carefully dry each and every element before reassembling them

You may use a needle or a pin to unclog the nozzle.
④ Reassemble all the elements in an order reverse to disassembly.
⑤ Carefully put on the metal casing on the rubber holder to avoid any leakiness.
Demonstration of problems encountered while using the espresso machine
| PROBLEM POSSIBLE CAUSE POSSIBLE SOLUTION | ||
| Coffee is dripping from the side of the filter holder. | The filter holder is incorrectly installed or screwed. | Make sure the holder is correctly situated in the brewing head set, and screwed tightly home. |
| There are grains of coffee on the edge of the filter pad. | Clean the edge around the filter, and wipe any traces of coffee from the head clean. | |
| The brewing head is dirty. Wipe the head with a moist cloth. | ||
| The head is damaged. Contact an authorized service center. | ||
| The rubber seal of the head is damaged or worn out. Contact an authorized service center. | ||
| Coffee does not pour out. | No water in the water container. Fill the container with water. | |
| The water container is incorrectly installed. | Press the water container to check whether it is correctly installed. | |
| The head filter is clogged. | See DESCALING THE APPLIANCE. | |
| The coffee filter is clogged. Coffee is too finely ground or too compressed. | Empty the filter and rinse it with running water. Dry the brewing head with a cloth. | |
| Coffee pours out in drops. | Coffee is too finely ground or too compressed. | If you use finely ground coffee, do not compress it too much. |
| The appliance is clogged by limestone. | See DESCALING THE APPLIANCE. | |
| Espresso does not have the characteristic froth. | Coffee is stale or dry. | Use fresh coffee. After opening coffee make sure that you store it in an airtight container |
| Coffee is not compressed enough. Compress the ground coffee more. | ||
| Coffee is too coarsely ground. | Use finely ground coffee or change the brand of your coffee. | |
| Not enough coffee in the filter. | See MAKING COFFEE. | |
| The holder is going loose during making coffee. | Coffee is compressed too much. Compress the ground coffee less. | |
| The ground coffee is too fine. Change coffee to a less fine type. | ||
| The filter holder is not situated tightly enough because it was not screwed tightly. | Make sure the filter holder is situated correctly and screwed tightly home in the brewing head.See MAKING COFFEE. | |
| There are grains of coffee on the edge of the filter pad. | Clean the edge around the filter, and wipe any traces of coffee from the head clean. | |
| The brewing head is dirty. Wipe the head with a moist cloth. | ||
| The head is damaged. Contact an authorized service center. | ||
| The rubber seal of the head is damaged or worn out. Contact an authorized service center. | ||
| Coffe is not hot. | Cups, filters or the filter head are cold. | Before making coffee heat up cups, filter, and the holder.See MAKING COFFEE. |
| During making cappuccino or latte, milk is not heated enough. | Check if milk is heated during foaming. Make sure milk is not boiling.See MILK FOAMING. | |
| No steam is coming from the steam nozzle. | The steam nozzle is blocked. | See Cleaning and Maintenance. |
| Not enough foamed milk. | Milk is not fresh. Check if milk is fresh. | |
| Milk temperature is too high. Make sure if milk is cool enough before use. | ||
| The jug. | In order to get the best effects in foaming, use the stainless steel jug, and if it is possible, cool it down or rinse it with cold water. | |
| The steam nozzle is clogged. | See Cleaning and Maintenance. | |
| Milk is boiled. Use fresh, cool milk. | ||
| Coffee is poured out unevenly into cups. | Coffee is not evenly poured out or flows on and off. | Make sure coffee is evenly compressed, and check, if there are no obstacles in the nozzles of the head. |
| Damaged barrier in the filter holder. Contact an authorized service center. | ||
| PROBLEM POSSIBLE | LE CAUSE POSSIBLE SOLUTION | |
| Espresso has a burnt taste. | Use an appropriate type of coffee. Check other types of coffee. | |
| The appliance has not been rinsed after descaling. | Rinse the appliance with a full water container until it is empty before making next coffee. | |
| The pump is making too much noise. | No water in the water container. Fill the container with water. | |
| The water container is not correctly installed. Check if the water container is correctly installed. | ||
| The appliance does not work. | The filter in the head may be clogged. | Remove the head of the filter, and clean the head set.See Cleaning and Maintenance. |
| The appliance is clogged by limescale. | See DESCALING THE APPLIANCE. | |
| After switching on the device, the buttons constantly blink and the coffee maker is unresponsive to the selection of functions. | The control knob is in the switching on position  | Turn the control knob to the off / start position. |
Ecology – environment protection
Each user can protect the natural environment. It is neither difficult nor expensive.
In order to do it: put the cardboard packing into recycling paper container; put the polyethylene (PE) bags into container for plastic.

When worn out, dispose the appliance to particular disposal centre, because of the dangerous elements of this appliance, which can be hazardous for natural environment.
Do not dispose into the domestic waste disposal!!!
The manufacturer/importer does not accept any liability for any damages resulting from unintended use or improper handling.
The manufacturer/importer reserves his rights to modify the product any time in order to adjust it to law regulations, norms, directives, or due to construction, trade, aesthetic or other reasons, without notifying in advance.


- PARZENIE KAWY
- PŘÍPRAVA KÁVY
- ČIŠTĚNÍ A ÚDRŽBA
- PRÍPRAVA KÁVY
- ČISTENIE A ÚDRŽBA
- KÁVÉFŐZÉS
- PREPARARE CAFEA
- ПРИГОТОВЛЕНИЕ КОФЕ
- ЗАПАРВАНЕ НА КАФЕТО
- ЗАПАРЮВАННЯ КАВИ
- ЧИЩЕННЯ ТА ДОГЛЯД
- OPERATIONAL SAFETY GUIDELINES
- DANGER! / WARNING
- HEALTH HAZARD
- CAUTION
- NOT OBSERVANCE CAN RESULT IN DAMAGE TO POSSESSIONS
- STION
- INFORMATION ON THE PRODUCT AND SUGGESTIONS FOR ITS USE
- TECHNICAL DATA
- DESIGN OF THE ESPRESSO MACHINE
- BEFORE USE
- MAKING AN ESPRESSO
- HEATING-UP THE ACCESSORIES
- MAKING COFFEE
- ADDITIONAL FUNCTIONS
- ADJUSTING THE AMOUNT OF COFFEE
- FOAMING MILK FUNCTION AND HOT WATER FUNCTION
- FOAMING MILK
- HOT/BOILING WATER
- CLEANING AND MAINTENANCE
- CLEANING THE APPLIANCE
- CLEANING THE DRIPPING TRAY
- CLEANING THE BREWING HEAD AND THE FILTER HOLDER
- DESCALING THE APPLIANCE
- DESCALING AGENTS
- CLEANING THE STEAM NOZZLE
- ECOLOGY – ENVIRONMENT PROTECTION
Brand : Zelmer
Model : Quatro CM2004M
Category : Coffee machine