
PWS 20-230 - Angle grinder BOSCH - Free user manual and instructions
Find the device manual for free PWS 20-230 BOSCH in PDF.
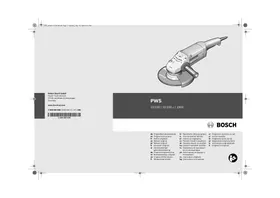



| Product Type | Angle Grinder |
| Brand | BOSCH |
| Model | PWS 20-230 |
| Nominal power input | 2000 W |
| Power output | 1250 W |
| No-load speed | 6500 rpm |
| Max. grinding wheel diameter | 230 mm |
| Spindle thread | M14 |
| Max. spindle thread length | 25 mm |
| Weight (according to EPTA) | 4.4 kg |
| Protection class | II (double insulation) |
| Power supply | Mains 230/240 V |
| Sound pressure level | 92 dB(A) |
| Sound power level | 103 dB(A) |
| Vibration (surface grinding) | 8 m/s² (K=1.5) |
| Vibration (sanding with abrasive sheet) | 3.5 m/s² (K=1.5) |
| Main functions | Grinding, cutting, sanding, brushing |
| Maintenance and cleaning | Clean ventilation slots; use extraction; have repairs done by a professional |
| Safety | Protection guard, auxiliary handle, spindle lock, on/off switch |
| Spare parts and repairability | SDS-clip quick-locking nut, flanges, covers; Bosch after-sales service |
| General information | Downloadable manual; Bosch customer support |
Frequently Asked Questions - PWS 20-230 BOSCH
User questions about PWS 20-230 BOSCH
0 question about this device. Answer the ones you know or ask your own.
Ask a new question about this device
Download the instructions for your Angle grinder in PDF format for free! Find your manual PWS 20-230 - BOSCH and take your electronic device back in hand. On this page are published all the documents necessary for the use of your device. PWS 20-230 by BOSCH.
USER MANUAL PWS 20-230 BOSCH
Power Tools Division
70745 Leinfelden-Echterdingen
Germany
www.bosch-pt.com
1 609 929 S69 (2009.05) O / 371 UNI
1609929S69
PWS
20-230 | 20-230 J | 1900

BOSCH
de Originalbetriebsanleitung en Original instructions fr Notice originale es Manual original pt Manual original it Istruzioni originali nl Oorspronkelijke gebruiksaanwijzing da Original brugsanvising sv Bruksanvisning i original no Original driftsinstruks fi Alkuperäiset ohjeet
el TpwoTOTUO oBnyiw xPnong tr Original isletmet talimati pl Instrukcja oryginalna cs Puvodni navod k pouzivani sk Póvodny námod na použitie hu Eredeti hasznalatiutasitas ru OpnHnHaIbHoe pyKOBOdCT-BO IIO 3KcIaYatauIN uk OnpriHaIbHa IHCtpyKciIeKcIpyataui ro Instruetiuni originale bg OpnHaHa nHCTpyKcua
sr Originalno uputstvo za rad sl Izvirna navodila hr Originalne upute za rad et Algupärane kasutusjuhend Iv Instrukcijas originalvaloda It Originali instrukcija

Deutsch . 6
English. 20
Francais. 33
Spanish. Page 48
Portuguese. Page 63
Italian. Page 77
Dutch. Page 91
Danish. Page 104
Swedish. Page 116
Norwegian. Page 128
Finnish. Page 140
Greek. Page 152
Turkish. Page 167
Polish. Page 180
Czech. Page 194
Slovak. Page 206
Hungarian. Page 220
Russian. Page 234
YkpaIHcbka. Page 249
Romana. 263
Быгарский ... Page 277
Srpski. Page 292
Slovensko. Page 305
Dr. Egbert Schneider Senior Vice President Engineering
Dr. Eckerhard Strötgen Head of Product Certification

Robert Bosch GmbH, Power Tools Division D-70745 Leinfelden-Echterdingen 30.03.2009
Assembly
General Power Tool Safety Warnings
WARNING
Read all safety warnings and all instructions. Failure to follow
the warnings and instructions may result in electric shock, fire and/or serious injury.
Save all warnings and instructions for future reference.
The term "power tool" in the warnings refers to your mains-operated (corded) power tool or battery-operated (cordless) power tool.
1) Work area safety
a) Keep work area clean and well lit. Cluttered or dark areas invite accidents. b) Do not operate power tools in explosive atmospheres, such as in the presence of flammable liquids, gases or dust. Power tools create sparks which may ignite the dust or fumes. c) Keep children and bystanders away while operating a power tool. Distractions can cause you to lose control.
2) Electrical safety
a) Power tool plugs must match the outlet. Never modify the plug in any way. Do not use any adapter plugs with earthed (grounded) power tools. Unmodified plugs and matching outlets will reduce risk of electric shock. b) Avoid body contact with earthed or grounded surfaces, such as pipes, radiators, ranges and refrigerators. There is an increased risk of electric shock if your body is earthed or grounded. c) Do not expose power tools to rain or wet conditions. Water entering a power tool will increase the risk of electric shock. d) Do not abuse the cord. Never use the cord for carrying, pulling or unplugging the power tool. Keep cord away from heat, oil, sharp edges and moving parts. Damaged or entangled cords increase the risk of electric shock.
e) When operating a power tool outdoors, use an extension cord suitable for outdoor use. Use of a cord suitable for outdoor use reduces the risk of electric shock. f) If operating a power tool in a damp location is unavoidable, use a residual current device (RCD) protected supply. Use of an RCD reduces the risk of electric shock.
3) Personal safety
a) Stay alert, watch what you are doing and use common sense when operating a power tool. Do not use a power tool while you are tired or under the influence of drugs, alcohol or medication. A moment of inattention while operating power tools may result in serious personal injury. b) Use personal protective equipment. Always wear eye protection. Protective equipment such as dust mask, non-skid safety shoes, hard hat, or hearing protection used for appropriate conditions will reduce personal injuries. c) Prevent unintentional starting. Ensure the switch is in the off-position before connecting to power source and/or battery pack, picking up or carrying the tool. Carrying power tools with your finger on the switch or energising power tools that have the switch on invites accidents. d) Remove any adjusting key or wrench before turning the power tool on. A wrench or a key left attached to a rotating part of the power tool may result in personal injury. e) Do not overreach. Keep proper footing and balance at all times. This enables better control of the power tool in unexpected situations. f) Dress properly. Do not wear loose clothing or jewellery. Keep your hair, clothing and gloves away from moving parts. Loose clothes, jewellery or long hair can be caught in moving parts.
g) If devices are provided for the connection of dust extraction and collection facilities, ensure these are connected and properly used. Use of dust collection can reduce dust-related hazards.
4) Power tool use and care
a) Do not force the power tool. Use the correct power tool for your application. The correct power tool will do the job better and safer at the rate for which it was designed. b) Do not use the power tool if the switch does not turn it on and off. Any power tool that cannot be controlled with the switch is dangerous and must be repaired. c) Disconnect the plug from the power source and/or the battery pack from the power tool before making any adjustments, changing accessories, or storing power tools. Such preventive safety measures reduce the risk of starting the power tool accidentally. d) Store idle power tools out of the reach of children and do not allow persons unfamiliar with the power tool or these instructions to operate the power tool. Power tools are dangerous in the hands of untrained users. e) Maintain power tools. Check for misalignment or binding of moving parts, breakage of parts and any other condition that may affect the power tool's operation. If damaged, have the power tool repaired before use. Many accidents are caused by poorly maintained power tools. f) Keep cutting tools sharp and clean. Properly maintained cutting tools with sharp cutting edges are less likely to bind and are easier to control. g) Use the power tool, accessories and tool bits etc. in accordance with these instructions, taking into account the working conditions and the work to be performed. Use of the power tool for operations different from those intended could result in a hazardous situation.
5) Service
a) Have your power tool serviced by a qualified repair person using only identical replacement parts. This will ensure that the safety of the power tool is maintained.
Safety Warnings for Angle Grinder
Safety Warnings common for Grinding, Sanding, Wire Brushing or Abrasive Cutting Off Operations
This power tool is intended to function as a grinder, sander, wire brush, or cut-off tool. Read all safety warnings, instructions, illustrations, and specifications provided with this power tool. Failure to follow all instructions listed below may result in electric shock, fire, and/or serious injury. This power tool is not recommended for polishing. Operations for which the power tool was not designed may create a hazard and cause personal injury. Do not use accessories that are not specifically designed and recommended by the tool manufacturer. Just because the accessory can be attached to your power tool does not assure safe operation. The rated speed of the accessory must be at least equal to the maximum speed marked on the power tool. Accessories running faster than their rated speed can break and fly apart. The outside diameter and the thickness of your accessory must be within the capacity rating of your power tool. Incorrectly sized accessories cannot be adequately guarded or controlled. The arbor size of wheels, flanges, backing pads, or any other accessory must properly fit the spindle of the power tool. Accessories with arbor holes that do not match the mounting hardware of the power tool will run out of balance, vibrate excessively, and may cause loss of control.
Do not use a damaged accessory. Before each use, inspect the accessory such as abrasive wheels for chips and cracks, backing pad for cracks, tear or excess wear, wire brush for loose or cracked wires. If the power tool or accessory is dropped, inspect for damage or install an undamaged accessory. After inspecting and installing an accessory, position yourself and bystanders away from the plane of the rotating accessory and run the power tool at maximum no-load speed for one minute. Damaged accessories will normally break apart during this test time. Wear personal protective equipment. Depending on application, use face shield, safety goggles or safety glasses. As appropriate, wear dust mask, hearing protectors, gloves and workshop apron capable of stopping small abrasive or workpiece fragments. The eye protection must be capable of stopping flying debris generated by various operations. The dust mask or respirator must be capable of filtrating particles generated by your operation. Prolonged exposure to high intensity noise may cause hearing loss. Keep bystanders a safe distance away from the work area. Anyone entering the work area must wear personal protective equipment. Fragments of workpiece or of a broken accessory may fly away and cause injury beyond immediate area of operation. Hold power tool by insulated gripping surfaces only, when performing an operation where the cutting accessory may contact hidden wiring or its own cord. Cutting accessory contacting a "live" wire may make exposed metal parts of the power tool "live" and shock the operator. Position the cord clear of the spinning accessory. If you lose control of the power tool, the cord may be cut or snagged and your hand or arm may be pulled into the spinning accessory. Never lay the power tool down until the accessory has come to a complete stop. The spinning accessory may grab the surface and pull the power tool out of your control.
Do not run the power tool while carrying it at your side. Accidental contact with the spinning accessory could snag your clothing, pulling the accessory into your body. Regularly clean the power tool's air vents. The motor's fan will draw the dust inside the housing and excessive accumulation of powdered metal may cause electrical hazards. Do not operate the power tool near flammable materials. Sparks could ignite these materials. Do not use accessories that require liquid coolants. Using water or other liquid coolants may result in electrocution or shock.
Kickback and related warnings
- Kickback is a sudden reaction to a pinched or snagged rotating wheel, backing pad, brush or any other accessory. Pinching or snagging causes rapid stalling of the rotating accessory which in turn causes the uncontrolled power tool to be forced in the direction opposite of the accessory's rotation at the point of the binding.
For example, if an abrasive wheel is snagged or pinched by the workpiece, the edge of the wheel that is entering into the pinch point can dig into the surface of the material causing the wheel to climb out or kick out. The wheel may either jump toward or away from the operator, depending on direction of the wheel's movement at the point of pinching. Abrasive wheels may also break under these conditions.
Kickback is the result of power tool misuse and/or incorrect operating procedures or conditions and can be avoided by taking proper precautions as given below.
- Maintain a firm grip on the power tool and position your body and arm to allow you to resist kickback forces. Always use auxiliary handle, if provided, for maximum control over kickback or torque reaction during
start-up. The operator can control torque reactions or kickback forces, if proper precautions are taken.
- Never place your hand near the rotating accessory. Accessory may kickback over your hand.
- Do not position your body in the area where power tool will move if kickback occurs. Kickback will propel the tool in direction opposite to the wheel's movement at the point of snagging.
- Use special care when working corners, sharp edges, etc. Avoid bouncing and snagging the accessory. Corners, sharp edges or bouncing have a tendency to snag the rotating accessory and cause loss of control or kickback. Do not attach a saw chain woodcarving blade or toothed saw blade. Such blades create frequent kickback and loss of control over the power tool.
Additional safety instructions for grinding and cutting off operations
- Use only wheel types that are recommended for your power tool and the specific guard designed for the selected wheel. Wheels for which the power tool was not designed cannot be adequately guarded and are unsafe. The guard must be securely attached to the power tool and positioned for maximum safety, so the least amount of wheel is exposed towards the operator. The guard helps to protect operator from broken wheel fragments and accidental contact with wheel.
- Wheels must be used only for recommended applications. For example: do not grind with the side of the cut-off wheel. Abrasive cut-off wheels are intended for peripheral grinding; side forces applied to these wheels may cause them to shatter. Always use undamaged wheel flanges that are of correct size and shape for your selected wheel. Proper wheel flanges support the wheel thus reducing the possibility of wheel breakage. Flanges for cut-off wheels may be different from grinding wheel flanges.
Do not use worn down wheels from larger power tools. Wheels intended for larger power tools are not suitable for the higher speed of a smaller tool and may burst.
Additional safety warnings specific for abrasive cutting off operations
Do not "jam" the cut-off wheel or apply excessive pressure. Do not attempt to make an excessive depth of cut. Overstressing the wheel increases the loading and susceptibility to twisting or binding of the wheel in the cut and the possibility of kickback or wheel breakage. Do not position your body in line with and behind the rotating wheel. When the wheel, at the point of operation, is moving away from your body, the possible kickback may propel the spinning wheel and the power tool directly at you. When wheel is binding or when interrupting a cut for any reason, switch off the power tool and hold the power tool motionless until the wheel comes to a complete stop. Never attempt to remove the cut-off wheel from the cut while the wheel is in motion otherwise kickback may occur. Investigate and take corrective action to eliminate the cause of wheel binding. Do not restart the cutting operation in the workpiece. Let the wheel reach full speed and carefully reenter the cut. The wheel may bind, walk up or kickback if the power tool is restarted in the workpiece. Support panels or any oversized workpiece to minimize the risk of wheel pinching and kickback. Large workpieces tend to sag under their own weight. Supports must be placed under the workpiece near the line of cut and near the edge of the workpiece on both sides of the wheel. Use extra caution when making a "pocket cut" into existing walls or other blind areas. The protruding wheel may cut gas or water pipes, electrical wiring or objects that can cause kickback.
Safety warnings specific for sanding operations
Do not use excessively oversized sanding disc paper. Follow manufacturers recommendations, when selecting sanding paper. Larger sanding paper extending beyond the sanding pad presents a laceration hazard and may cause snagging, tearing of the disc, or kickback.
Safety warnings specific for wire brushing operations
- Be aware that wire bristles are thrown by the brush even during ordinary operation. Do not overstress the wires by applying excessive load to the brush. The wire bristles can easily penetrate light clothing and/or skin. If the use of a guard is recommended for wire brushing, do not allow any interference of the wire wheel or brush with the guard. Wire wheel or brush may expand in diameter due to work load and centrifugal forces.
Additional safety warnings
Wear safety goggles.
- Use suitable detectors to determine if utility lines are hidden in the work area or call the local utility company for assistance. Contact with electric lines can lead to fire and electric shock. Damaging a gas line can lead to explosion. Penetrating a water line causes property damage or may cause an electric shock. Release the On/Off switch and set it to the off position when the power supply is interrupted, e.g., in case of a power failure or when the mains plug is pulled. This prevents uncontrolled restarting.
- When working stone, use dust extraction. The vacuum cleaner must be approved for the extraction of stone dust. Using this equipment reduces dust-related hazards.
Use a cutting guide when cutting stone. Without sideward guidance, the cutting disc can jam and cause kickback. - When working with the machine, always hold it firmly with both hands and provide for a secure stance. The power tool is guided more secure with both hands. - Secure the workpiece. A workpiece clamped with clamping devices or in a vice is held more secure than by hand. - Keep your workplace clean. Blends of materials are particularly dangerous. Dust from light alloys can burn or explode. - Never use the machine with a damaged cable. Do not touch the damaged cable and pull the mains plug when the cable is damaged while working. Damaged cables increase the risk of an electric shock.
Products sold in GB only: Your product is fitted with a BS 1363/A approved electric plug with internal fuse (ASTA approved to BS 1362).
If the plug is not suitable for your socket outlets, it should be cut off and an appropriate plug fitted in its place by an authorized customer service agent. The replacement plug should have the same fuse rating as the original plug.
The severed plug must be disposed of to avoid a possible shock hazard and should never be inserted into a mains socket elsewhere.
Products sold in AUS and NZ only: Use a residual current device (RCD) with a rated residual current of 30 mA or less.
Functional Description

Read all safety warnings and all instructions. Failure to follow the warnings and instructions may result in electric shock, fire and/or serious injury.
While reading the operating instructions, unfold the graphics page for the machine and leave it open.

English | 25
Intended Use
The machine is intended for cutting, roughing, and brushing metal and stone materials without using water.
For cutting metal, a special protection guard for cutting (accessory) must be used.
For cutting stone, a special extraction hood for cutting with cutting guide (accessory) must be used.
With approved sanding tools, the machine can be used for sanding with sanding discs.
Product Features
The numbering of the product features refers to the illustration of the machine on the graphics page.
1 Spindle lock button 2 On/Off switch 3 Auxiliary handle 4 Grinder spindle 5 Protection guard for grinding
6 Locking screw for protection guard 7 Protection guard for cutting 8 Mounting flange with O-ring 9 Grinding/cutting disc
10 Clamping nut 11 Quick-clamping nut SDS-clic 12 Protection guard for grinding cup 13 Grinding cup 14 Hand guard 15 Spacer discs* 16 Rubber sanding plate 17 Sanding sheet 18 Round nut 19 Cup brush 20 Cutting guide with dust extraction protection guard 21 Diamond cutting disc*
*Accessories shown or described are not part of the standard delivery scope of the product. A complete overview of accessories can be found in our accessories program.
Technical Data
| Angle Grinding | PWS 20-230 | PWS 20-230 J | PWS 1900 | ||
| Article number | 3 603 C59 W.. | 3 603 C59 V.. | 3 603 C59 W.. | ||
| Rated power input | W | 2000 | 2000 | 1900 | |
| Output power | W | 1250 | 1250 | 1170 | |
| Rated speed | \( \mathbf{{mi}{n}^{-1}} \) | 6500 | 6500 | 6500 | |
| Grinding disc diameter, max. | mm | 230 | 230 | 230 | |
| Thread of grinder spindle | M 14 | M 14 | M 14 | ||
| Thread length (max.) of grinder spindle | mm | 25 | 25 | 25 | |
| Reduced starting current | - | ● | - | ||
| Weight according to EPTA-Procedure 01/2003 | kg | 4.4 | 4.4 | 4.4 | |
| Protection class | ☐/II | ☐/II | ☐/II | ||
The values given are valid for nominal voltages [U] of 230/240 V. For lower voltage and models for specific countries, these values can vary.
Please observe the article number on the type plate of your machine. The trade names of the individual machines may vary.
Only for power tools without reduced starting current: Starting cycles generate brief voltage drops. Interference with other equipment/machines may occur in case of unfavourable mains system conditions. Malfunctions are not to be expected for system impedances below 0.25 ohm.
Bosch Power Tools
1609929S69|(20.4.09)
26 | English
Noise/Vibration Information
Measured values determined according to EN 60745.
Typically the A-weighted noise levels of the product are: Sound pressure level 92 dB(A); Sound power level 103 dB(A). Uncertainty K = 3 dB.
Wear hearing protection!
Vibration total values (triax vector sum) determined according to EN 60745:
Surface grinding: Vibration emission value a_h = 8 m/s^2, Uncertainty K = 1.5 m/s^2. Disk sanding: Vibration emission value a_h = 3.5 m/s^2, Uncertainty K = 1.5 m/s^2.
The vibration emission level given in this information sheet has been measured in accordance with a standardized test given in EN 60745 and may be used to compare one tool with another. It may be used for a preliminary assessment of exposure.
The declared vibration emission level represents the main applications of the tool. However, if the tool is used for different applications, with different accessories or poorly maintained, the vibration emission may differ. This may significantly increase the exposure level over the total working period.
An estimation of the level of exposure to vibration should also take into account the times when the tool is switched off or when it is running but not actually doing the job. This may significantly reduce the exposure level over the total working period.
Identify additional safety measures to protect the operator from the effects of vibration such as: maintain the tool and the accessories, keep the hands warm, organization of work patterns.
Declaration of Conformity
We declare under our sole responsibility that the product described under "Technical Data" is in conformity with the following standards or standardization documents: EN 60745 according to the provisions of the directives 2004/108/EC, 98/37/EC (until 28 Dec 2009), 2006/42/EC (from 29 Dec 2009).
Technical file at:
Robert Bosch GmbH, PT/ESC,
D-70745 Leinfelden-Echterdingen
Dr. Egbert Schneider
Senior Vice President
Engineering
Dr. Eckerhard Strötgen
Head of Product
Certification
Robert Bosch GmbH, Power Tools Division
D-70745 Leinfelden-Echterdingen
30.03.2009
Assembly
Mounting the Protective Devices
Before any work on the machine itself, pull the mains plug.
Note: After breakage of the grinding disc during operation or damage to the holding fixtures on the protection guard/power tool, the machine must promptly be sent to an after-sales service agent for maintenance (for addresses, see section "After-sales Service and Customer Assistance".
Protection Guard for Grinding
Place the protection guard 5 on the spindle collar. Adjust the position of the protection guard 5 to the requirements of the operation and lock the protection guard 5 with the locking screw 6.
Adjust the protection guard 5 in such a manner that sparking is prevented in the direction of the operator.
Protection Guard for Cutting
For cutting metal, always work with the protection guard for cutting 7. For cutting stone, always work with the cutting guide with dust extraction protection guard 20.
The protection guard for cutting 7 is mounted in the same manner as the protection guard for grinding 5.
Auxiliary Handle
Operate your machine only with the auxiliary handle 3.
Screw the auxiliary handle 3 on the right or left of the machine head depending on the working method.
Vibration-dampening Auxiliary Handle
Vibration Control
The vibration-dampening auxiliary handle reduces the vibrations, making operation more comfortable and secure.
Do not make any alterations to the auxiliary handle.
Do not continue to use an auxiliary handle if it is damaged.
Hand Guard
For operations with the rubber sanding plate 16 or with the cup brush/wheel brush/flap disc, always mount the hand guard 14.
The hand guard 14 is fastened with the auxiliary handle 3.
Mounting the Grinding Tools
Before any work on the machine itself, pull the mains plug. Grinding and cutting discs become very hot while working; do not touch until they have cooled.
Clean the grinder spindle 4 and all parts to be mounted.
To clamp and loosen the grinding tools, lock the grinder spindle using the spindle lock button 1.
- Only actuate the spindle lock button when the grinder spindle is at a standstill. Otherwise, the machine may be damaged.
Grinding/Cutting Disc
Pay attention to the dimensions of the grinding tools. The mounting hole diameter must fit the mounting flange without play. Do not use reducers or adapters.
When using diamond cutting discs, ensure that the direction-of-rotation arrow on the diamond cutting disc matches the direction of rotation of the machine (see the direction-of-rotation arrow on the machine head).
See the graphics page for the mounting sequence. To fasten the grinding/cutting disc, screw on the clamping nut 10 and tighten it with the two-pin spanner; see Section "Quick-clamping Nut".
After mounting the grinding tool and before switching on, check that the grinding tool is correctly mounted and that it can turn freely. Make sure that the grinding tool does not graze against the protection guard or other parts.
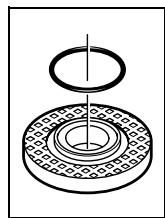
An O-ring (plastic part) is inserted in the mounting flange 8 around the centring collar. If the O-ring is missing or damaged, it must be replaced in all cases (article number 1600210039) before the mounting flange 8 is mounted.
Flap Disc
For operations with the flap disc, always mount the hand guard 14.
Rubber Sanding Plate
For operations with the rubber sanding plate 16, always mount the hand guard 14.
See the graphics page for the mounting sequence. Before mounting the rubber sanding plate 16, put the 2 spacer discs 15 onto the grinder spindle 4.
Screw on the round nut 18 and tighten it with the two-pin spanner.
28 | English
Cup Brush/Disc Brush
For operations with the cup brush/wheel brush, always mount the hand guard 14.
See graphics page for the mounting sequence. The cup brush/disc brush must be able to be screwed onto the grinder spindle until it rests firmly against the grinder spindle flange at the end of the grinder spindle threads. Tighten the cup brush/disc brush with an open-end spanner.
Grinding Cup
When working with the grinding cup, mount the special protection guard 12.
The grinding cup 13 should never project further out of the protection guard 12 than necessary for the respective grinding application. Adjust the protection guard 12 accordingly to this dimension.
See graphics page for the mounting sequence.
Screw on the clamping nut 10 and tighten with the corresponding offset two-pin spanner.
Quick-clamping Nut SDS-
For convenient changing of grinding tools without the use of additional tools, you can use the quick-clamping nut 11 instead of the clamping nut 10.
The quick-clamping nut 11 may be used only for grinding or cutting discs.
Use only a flawless, undamaged quick-clamping nut 11.
When screwing on, pay attention that the side of the quick-clamping nut 11 with printing does not face the grinding disc; the arrow must point to the index mark 22.
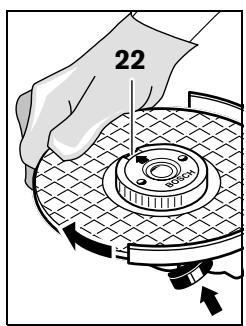
Lock the grinder spindle with the spindle lock button 1. To tighten the quick-clamping nut, firmly turn the grinding disc in clockwise direction.
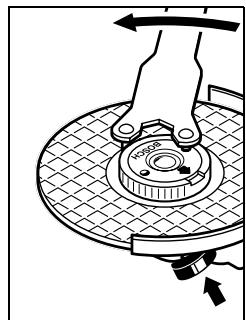
A properly attached, undamaged quick-clamping nut can be loosened by hand when turning the knurled ring in anticlockwise direction.
Never loosen a tight quick-clamping nut with pliers. Always use the two-pin spanner. Insert the two-pin
spanner as shown in the illustration.
Approved Grinding Tools
All grinding tools mentioned in these operating instructions can be used.
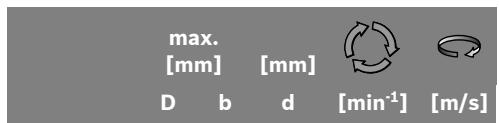
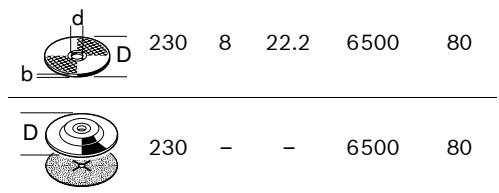
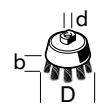
The permissible speed [min^-1] or the circumferential speed [m/s] of the grinding tools used must at least match the values given in the table.
Therefore, observe the permissible rotational/circumferential speed on the label of the grinding tool.

Rotating the Machine Head
Before any work on the machine itself, pull the mains plug.
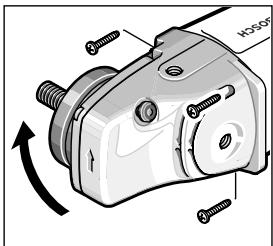
The machine head can be rotated with respect to the machine housing in 90° steps. In this manner, the On/Off switch can be brought into a more convenient position for special
working situations, e.g., for cutting operations using the cutting guide with dust extraction protection guard 20 or for left-handed persons.
Completely unscrew the four screws. Rotate the machine head carefully, without removing it from the housing, to the new position. Screw in and tighten the four screws again.
Dust/Chip Extraction
Dusts from materials such as lead-containing coatings, some wood types, minerals and metal can be harmful to one's health. Touching or breathing-in the dusts can cause allergic reactions and/or lead to respiratory infections of the user or bystanders. Certain dusts, such as oak or beech dust, are considered as carcinogenic, especially in connection with wood-treatment additives (chromate, wood preservative). Materials containing asbestos may only be worked by specialists.
- Use dust extraction whenever possible.
- Provide for good ventilation of the working place.
- It is recommended to wear a P2 filter-class respirator.
Observe the relevant regulations in your country for the materials to be worked.
Operation
Starting Operation
Observe correct mains voltage! The voltage of the power source must agree with the voltage specified on the nameplate of the machine. Power tools marked with 230V can also be operated with 220V .
When operating the machine with power from mobile generators that do not have sufficient reserve capacity or are not equipped with suitable voltage control with starting current amplification, loss of performance or untypical behavior can occur upon switching on.
Please observe the suitability of the power generator being used, particularly with regard to the mains voltage and frequency.
Switching On and Off
To start the power tool, press the On/Off switch
2 forward and then down.
To switch off the machine, release the On/Off switch 2.
- Check grinding tools before using. The grinding tool must be mounted properly and be able to move freely. Carry out a test run for at least one minute with no load. Do not use damaged, out-of-centre or vibrating grinding tools. Damaged grinding tools can burst and cause injuries.
Reduced starting current (PWS 20-230 J)
The electronic reduced starting current limits the power consumption when switching the tool on and enables operation from a 13 ampere fuse.
Working Advice
Exercise caution when cutting slots in structural walls; see Section "Information on Structures". - Clamp the workpiece if it does not remain stationary due to its own weight. Do not strain the machine so heavily that it comes to a standstill.
After heavily straining the power tool, continue to run it at no-load for several minutes to cool down the cutting/grinding tool. Grinding and cutting discs become very hot while working; do not touch until they have cooled. Do not use the power tool with a cut-off stand.
Rough Grinding
Never use a cutting disc for roughing.
The best roughing results are achieved when setting the machine at an angle of 30° to 40°. Move the machine back and forth with moderate pressure. In this manner, the workpiece will not become too hot, does not discolour and no grooves are formed.
Flap Disc
With the flap disc (accessory), curved surfaces and profiles can be worked.
Flap discs have a considerably higher service life, lower noise levels and lower sanding temperatures than conventional sanding sheets.
Cutting Metal
For cutting metal, always work with the cutting guard for cutting 7.
When cutting, work with moderate feed, adapted to the material being cut. Do not exert pressure onto the cutting disc, tilt or oscillate the machine.
Do not reduce the speed of running down cutting discs by applying sideward pressure.
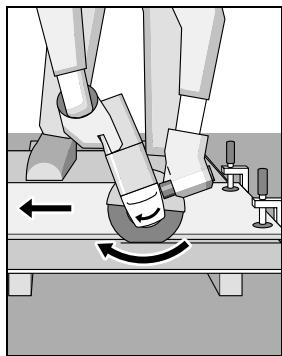
The machine must always work in an up-grinding motion. Otherwise, the danger exists of it being pushed uncontrolled out of the cut.
When cutting profiles and square bar, it is best to start at the smallest cross section.
Cutting Stone
For cutting stone, always work with the cutting guide with dust extraction protection guard 20. The machine may be used only for dry cutting/grinding.
For cutting stone, it is best to use a diamond cutting disc. As a safety measure against jamming, the cutting guide with dust extraction protection guard 20 must be used.
Operate the machine only with dust extraction and additionally wear a dust protection mask.
The vacuum cleaner must be approved for the extraction of masonry dust. Bosch provides suitable vacuum cleaners.
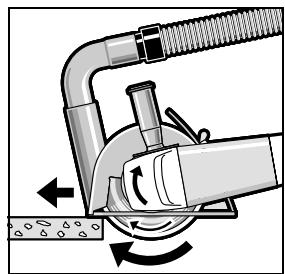
Switch on the machine and place the front part of the cutting guide on the workpiece. Slide the machine with moderate feed, adapted to the material to be worked.
For cutting especially hard material, e.g., concrete with high pebble content, the diamond cutting disc can overheat and become damaged as a result. This is clearly indicated by circular sparking, rotating with the diamond cutting disc. In this case, interrupt the cutting process and allow the diamond cutting disc to cool by running the machine for a short time at maximum speed with no load.
Noticeable decreasing work progress and circular sparking are indications of a diamond cutting disc that has become dull. Briefly cutting into abrasive material (e.g. lime-sand brick) can reshape the disc again.
Information on Structures
Slots in structural walls are subject to the Standard DIN 1053 Part 1, or country-specific regulations.
These regulations are to be observed under all circumstances. Before beginning work, consult the responsible structural engineer, architect or the construction supervisor.
Maintenance and Service
Maintenance and Cleaning
Before any work on the machine itself, pull the mains plug. For safe and proper working, always keep the machine and ventilation slots clean. In extreme working conditions, conductive dust can accumulate in the interior of the machine when working with metal. The protective insulation of the machine can be degraded. The use of a stationary extraction system is recommended in such cases as well as frequently blowing out the ventilation slots and installing a residual current device (RCD).
Please store and handle the accessory(-ies) carefully.
If the machine should fail despite the care taken in manufacturing and testing procedures, repair should be carried out by an after-sales service centre for Bosch power tools.
In all correspondence and spare parts order, please always include the 10-digit article number given on the type plate of the machine.
After-sales Service and Customer Assistance
Our after-sales service responds to your questions concerning maintenance and repair of your product as well as spare parts. Exploded views and information on spare parts can also be found under:
www.bosch-pt.com
Our customer consultants answer your questions concerning best buy, application and adjustment of products and accessories.
Great Britain
Robert Bosch Ltd. (B.S.C.)
P.O.Box 98
Broadwater Park
North Orbital Road
Denham
Uxbridge
UB95HJ
Tel. Service: +44 (0844) 736 0109
Fax: +44 (0844) 736 0146
Australia, New Zealand and Pacific Islands
Robert Bosch Australia Pty. Ltd.
Power Tools
Locked Bag 66
Clayton South VIC 3169
Customer Contact Center
Inside Australia:
Phone: +61 (01300) 307 044
Fax: +61 (01300) 307 045
Inside New Zealand:
Phone: +64 (0800) 543 353
Fax: +64 (0800) 428 570
Outside AU and NZ:
Phone: +61 (03) 9541 5555
www.bosch.com.au
Republic of South Africa
Customer service
Hotline: +27 (011) 6519600
Gauteng - BSC Service Centre
35 Roper Street, New Centre
Johannesburg
Tel.: +27 (011) 493 93 75
Fax: +27 (011) 4930126
E-Mail: bsctools@icon.co.za
KZN - BSC Service Centre
Unit E, Almar Centre
143 Crompton Street
Pinetown
Tel.: +27 (031) 7 01 21 20
Fax: +27 (031) 7 01 24 46
E-Mail: bsc.dur@za.bosch.com
Western Cape - BSC Service Centre
Democracy Way, Prosperity Park
Milnerton
Tel.: +27 (021) 5512577
Fax: +27 (021) 5513223
E-Mail: bsc@zsd.co.za
Bosch Headquarters
Midrand, Gauteng
Tel.: +27 (011) 6519600
Fax: +27 (011) 6519880
E-Mail: rbsa-hq.pts@za.bosch.com
Disposal
The machine, accessories and packaging should be sorted for environmental-friendly recycling.
Only for EC countries:
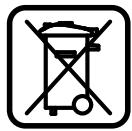
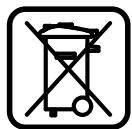
Do not dispose of power tools into household waste! According to the European Guideline 2002/96/EC for Waste Electrical and Electronic Equipment and its implementation into national
right, power tools that are no longer usable must be collected separately and disposed of in an environmentally correct manner.
Subject to change without notice.
Dr. Egbert Schneider Senior Vice President Engineering
Dr. Eckerhard Ströttgen Head of Product Certification

Robert Bosch GmbH, Power Tools Division D-70745 Leinfelden-Echterdingen 30.03.2009
Montage
Robert Bosch (France) S.A.S.
Dr. Egbert Schneider Senior Vice President Engineering
Dr. Eckerhard Strötgen Head of Product Certification
Robert Bosch GmbH, Power Tools Division D-70745 Leinfelden-Echterdingen 30.03.2009
Assembly
Dr. Egbert Schneider Dr. Eckerhard Strötgen Senior Vice President Head of Product Engineering Certification
Robert Bosch GmbH, Power Tools Division D-70745 Leinfelden-Echterdingen 30.03.2009
Assembly
Dr. Egbert Schneider Senior Vice President Engineering
Dr. Eckerhard Ströttgen Head of Product Certification

Robert Bosch GmbH, Power Tools Division D-70745 Leinfelden-Echterdingen 30.03.2009
Assembly
Dr. Egbert Schneider Dr. Eckerhard Ströttgen Senior Vice President Head of Product Engineering Certification
Robert Bosch GmbH, Power Tools Division D-70745 Leinfelden-Echterdingen 30.03.2009
Assembly
SDS-clic quick-release chuck
Senior Vice President
Engineering
Dr. Eckerhard Strötgen
Head of Product
Certification

Robert Bosch GmbH, Power Tools Division
D-70745 Leinfelden-Echterdingen
30.03.2009
Assembly
Bosch Service Center
Telegrafvej 3
2750 Ballerup
Tel. Service Center: +45 (4489) 8855
Fax: +45 (4489) 87 55
E-Mail: vaerktoej@dk.bosch.com
Disposal
Dr. Egbert Schneider Senior Vice President Engineering
Dr. Eckerhard Strötgen Head of Product Certification
Robert Bosch GmbH, Power Tools Division
D-70745 Leinfelden-Echterdingen
30.03.2009
Assembly
Bosch Service Center
Telegrafvej 3
2750 Ballerup
Denmark
Tel.: +46 (020) 41 44 55
Fax: +46 (011) 187691
Waste management
Only for EU countries:
Dr. Egbert Schneider Senior Vice President Engineering
Dr. Eckerhard Strötgen Head of Product Certification
Robert Bosch GmbH, Power Tools Division
D-70745 Leinfelden-Echterdingen
30.03.2009
Assembly
Dr. Egbert Schneider Senior Vice President Engineering
Dr. Eckerhard Strötgen Head of Product Certification

Robert Bosch GmbH, Power Tools Division D-70745 Leinfelden-Echterdingen 30.03.2009
Installation
Safety instructions for power tools
SAFETY WARNINGS
Information on noise and vibration
The measurement values were determined in accordance with EN 60745.
The sound pressure level at the workplace can reach 92 dB(A). The sound pressure level is 103 dB(A). Uncertainty of measurement K=3 dB.
Wear ear protectors!
All vibration values (vector sum of three directions) were determined in accordance with EN 60745:
Surface grinding (sanding): Vibration emission value a h = 8 m/s², uncertainty K=1.5 m/s².
Dr. Egbert Schneider Senior Vice President Engineering
Dr. Eckerhard Ströttgen Head of Product Certification
Robert Bosch GmbH, Power Tools Division D-70745 Leinfelden-Echterdingen 30.03.2009
Sigma
Before any work on the electric tool, pull the plug out of the socket.
Note: If during the course of work the guard becomes worn or the base plate becomes damaged, the tool must be sent immediately to the Service. For the relevant addresses, see the chapter "Service and customer advice".
Guard for sanding
Place the guard on the spindle. Adjust the position of the guard 5 according to the requirements of the respective work and secure the guard with the clamping screw 6.
Adjust the guard 5 in such a way that it covers the sparks directed towards the operator.
Guard for cutting
The chain must be checked for wear before each use. The chain must be replaced if it is worn by more than 20%.
The sprocket for chain 7 is fitted in the same way as the sprocket for chain 5.
Adding oil
Use the oil filler opening with the oil filler cap 3.
Depending on the work position, add oil 3 to the right or left side of the chain head.
Adding oil with vibration damper
Vibration
The oil filler cap 3 with vibration damper allows quieter and safer work with low vibration. The vibration damper is not included in the oil filler cap.
Never use a damaged oil filler cap.
Hand guard
For all work with the guide bar 16 or with the chain brake / guide bar brake / the guide bar, you must always use the hand guard 14.
Fit the hand guard 14 with the oil filler cap 3.
Activation of safety devices
Remove the plug from the power supply before any work on the electric tool. The guide bar and chain become hot during operation, so do not touch them before they cool down.
Clean the shaft 4 and all parts that are not fitted.
Turn on the tool and always wear the protective goggles. Never point the blade at yourself or at others. Only use the blade when it is stationary. Disconnect the power tool before making any adjustments.
Disc blades and guards
Always observe the specifications of the cutting tools. The diameter of the hole must match the flange of the disc. Do not use adapters or reducers.
When using cutting discs, the direction of rotation arrow on the cutting disc must match the direction of rotation of the power tool (see the arrow indicating direction of rotation on the tool head).
The assembly sequence is shown in the graphics section.
To attach the cutting and guard disc, first insert the flange 10 and tighten it with the wrench, see chapter "Quick-tightening".
After assembling the cutting tool and before switching on the power tool, ensure that the cutting tool is correctly fitted and can rotate freely. Also ensure that the cutting tool does not touch the guard or other parts.
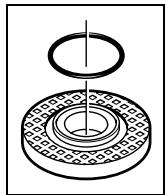
For the dust protection hood 8, a special dust protection ring (delta O) is required. In cases where the ring is missing or loose, it must be replaced (art. no. 1600210039) before the dust protection hood 8 is fitted.
1600210039), before the dust protection hood 8 is fitted.
Rinsing disc for cutting
For work with the rinsing disc, the guard 14 must always be fitted.
Elastic cutting disc
For work with the elastic cutting disc 16, the guard 14 must always be fitted.
The assembly sequence is shown in the graphics section.
Before assembling the elastic cutting disc 16, you must remove the two spacer rings 15 from the blade 4.
BiodwTe to oTPOvyuLo naEiμδI 18 kaoiΦiεTe to μe to yavTzokλειdo.
Tnpoue to 6ikaiomega aalaywv.
Türkce | 167
Güvenlik Talimati
Elektrikli El Aletleri icin Genel Uyari Talimati
Dr. Egbert Schneider Senior Vice President Engineering
Dr. Eckerhard Ströttgen Head of Product Certification
ppa. Maee i.v. Nogcu
Robert Bosch GmbH, Power Tools Division D-70745 Leinfelden-Echterdingen 30.03.2009
Montaj
Bosch San. ve Tic. A.S.
Ahi Evran Cad. No:1 Kat:22
Polaris Plaza
80670 Maslak/Istanbul
Müsteri Danismani: +90 (0212) 335 06 66
Customer Service Line: +90 (0212) 335 07 52
Disposal
Dr. Egbert Schneider Senior Vice President Engineering
Dr. Eckerhard Ströttgen Head of Product Certification

Robert Bosch GmbH, Power Tools Division D-70745 Leinfelden-Echterdingen 30.03.2009
Assembly
Robert Bosch Sp. z o.o.
Dr. Egbert Schneider Senior Vice President Engineering
Dr. Eckerhard Strötgen Head of Product Certification
Bosch Service Center PT
K Vapence 1621/16
692 01 Mikulov
Tel.: +420 (519) 305 700
Fax: +420 (519) 305 705
E-Mail: servis.naradi@cz.bosch.com
www.bosch.cz
Waste disposal
Dr. Egbert Schneider Senior Vice President Engineering
Dr. Eckerhard Strötgen Head of Product Certification

Robert Bosch GmbH, Power Tools Division D-70745 Leinfelden-Echterdingen 30.03.2009
Assembly
Dr. Egbert Schneider Dr. Eckerhard Strötgen Senior Vice President Head of Product Engineering Certification
ppa. Maee i.v. Nogcu
Robert Bosch GmbH, Power Tools Division D-70745 Leinfelden-Echterdingen 30.03.2009
Assembly
Power tools that cannot be switched on or off are dangerous and must be repaired.
B) Before adjusting or replacing accessories, or before storing the power tool, disconnect it from the power supply and/or remove the battery pack. This precautionary measure reduces the risk of accidental starting. C) Store power tools out of the reach of children. Do not allow persons unfamiliar with the power tool or these instructions to operate the power tool. Power tools are dangerous in the hands of untrained users. D) Maintain power tools. Check for misalignment or binding of moving parts, breakage of parts and any other condition that may affect the power tool's operation. If damaged, have the power tool repaired before use. Many accidents are caused by poorly maintained power tools. E) Keep cutting tools sharp and clean. Properly maintained cutting tools with sharp cutting edges are less likely to bind and are easier to control.
F) Use the power tool, accessories and tool bits etc., in accordance with these instructions, taking into account the working conditions and the work to be performed. Use of the power tool for operations different from those intended could result in a hazardous situation.
5) Service
a) Have your power tool serviced by a qualified repair person using only identical replacement parts. This will ensure that the safety of the power tool is maintained.
Safety instructions for angle grinders
General safety warnings for grinding, sanding, wire brushing, and cutting-off operations
This power tool is intended to function as a grinder, sander, wire brush, or cut-off tool. Read all safety warnings, instructions, illustrations, and specifications provided with this power tool. Failure to follow the instructions listed below may result in electric shock, fire, and/or serious injury. This power tool is not intended for polishing. Operations for which the power tool was not designed may create a hazard and cause personal injury. Do not use accessories not specifically designed and recommended by the tool manufacturer. Just because the accessory can be attached to your power tool, it does not assure safe operation.
The permissible speed of the working tool must be at least the maximum speed marked on the power tool. Accessories running faster than their rated speed can break and fly apart. The outside diameter and thickness of the working tool must be within the capacity rating of your power tool. Incorrectly sized workpieces cannot be adequately guarded or controlled. Grinding wheels, flanges, backing pads, or any other accessories must fit the spindle of your power tool. Workpieces that do not match the mounting hardware of the power tool will run out of balance, vibrate excessively, and may cause loss of control. Do not use damaged working tools. Before each use, inspect working tools such as grinding wheels for chips and cracks, grinding discs for cracks, tears, or excess wear, and wire brushes for loose or broken wires. After inspection, place the working tool and all persons in the area at a safe distance from the plane of rotation of the working tool, then run the power tool at maximum no-load speed for one minute. Damaged working tools will normally break apart during this test time. Use personal protective equipment depending on the work you are performing. Use safety glasses, a dust mask, or safety goggles. As appropriate, use a dust mask, hearing protection, protective gloves, or a workshop apron capable of stopping small abrasive or workpiece fragments.
Russian | 237
Always wear protective equipment. Dust masks must be used when performing various works. Respiratory protective masks must filter out dust generated during work. Prolonged exposure to strong noise can lead to hearing loss.
Make sure that all people are at a safe distance from the work area. Every person within the work area must have personal protective equipment. Fragments of workpieces or broken tools may fly away and cause injury beyond the immediate work area. Hold the power tool only by insulated gripping surfaces when performing work where the cutting tool may contact hidden wiring or its own cord. Contact with a live wire may energize metal parts of the power tool and lead to electric shock. Keep the power cord away from the rotating accessory. If you lose control of the tool, the cord may be cut or caught by the rotating accessory and your hand or arm may be pulled into the rotating accessory. Never release the power tool from your hands until the accessory has completely stopped. A rotating accessory may catch on a surface and cause you to lose control of the power tool. Switch off the power tool when transporting it. Loose clothing may be accidentally caught by the rotating accessory and cause injury.
Regularly clean the ventilation slots of your power tool. The motor fan draws dust into the housing, and excessive accumulation of metal dust can lead to electrical hazards. Do not use the power tool near flammable materials. Sparks may ignite these materials. Do not use accessories that require liquid coolants. Using water or other liquid coolants may lead to electric shock.
Reverse and corresponding precautionary instructions
Kickback is a sudden reaction resulting from a pinched or jammed rotating accessory, such as a grinding wheel, grinding disc, wire brush, etc., causing a sudden stop of the rotating accessory. In this case, the uncontrolled power tool accelerates at the point of jamming in the direction opposite to the rotation of the accessory. If a grinding wheel snags or jams in the workpiece, the edge of the wheel that is immersed in the workpiece may catch and cause the wheel to jump out or kickback. The wheel then moves toward or away from the operator, depending on the direction of rotation at the point of jamming. The grinding wheel may also break.
Kickback is a result of improper use of the power tool and can be prevented by the precautions described below.
Hold the power tool firmly with both hands and position your body and arms to resist kickback forces. If a auxiliary handle is available, always use it to have maximum control over kickback or reaction torque at start-up. The operator can control kickback forces with appropriate precautions. Your hand should never be near the rotating accessory. In case of kickback, the tool may jump toward your hand. Position yourself away from the area where the power tool will be moved during kickback. Kickback moves the power tool in the direction opposite to the movement of the grinding disc at the point of binding.
Work particularly carefully on corners, sharp edges, etc. Prevent the tool from bouncing and jamming. The rotating accessory tends to jam on corners, sharp edges, or when it bounces. This causes loss of control or kickback. Do not use toothed saw blades or other toothed accessories. Such accessories often cause kickback or loss of control over the power tool.
Special safety instructions for grinding and cutting
Use only the abrasive accessories specified for your power tool and the protective guard provided for them. Abrasive accessories not intended for this power tool cannot be adequately guarded and are unsafe.
The protective guard must be securely attached to the power tool and adjusted to achieve the maximum degree of safety, i.e., the smallest possible part of the abrasive accessory should be exposed towards the operator. The protective guard must protect the operator from fragments and accidental contact with the abrasive accessory. Abrasive accessories may only be used for the recommended applications. For example: never grind with the side surface of a cutting disc. Cutting discs are intended for cutting material with the edge. Lateral forces on these abrasive accessories can break them. Always use undamaged flanges with the correct dimensions and shape for the selected cutting disc. Correct flanges support the cutting disc and reduce the risk of breakage. Flanges for cutting discs may differ from flanges for grinding discs. Do not use worn-out flanges for larger power tools. Flanges for larger power tools are not designed for the high speeds of smaller power tools and may break.
Additional special safety instructions for cutting with a cutting disc
Prevent jamming and overloading of the cut-off wheel. Do not make excessively deep cuts. Overloading the cut-off wheel increases its load and susceptibility to twisting or jamming, and thus the possibility of kickback or wheel breakage.
Do not position your body in line with the rotating cut-off wheel. If the cut-off wheel kicks back, the power tool may jump directly toward you. When the cut-off wheel is jammed or when you interrupt a cut, switch off the power tool and hold it steady until the wheel has come to a complete stop. Never attempt to pull the rotating cut-off wheel out of the cut while it is still moving, as this may cause kickback. Investigate and take corrective action to eliminate the cause of wheel jamming. Do not restart the power tool while the abrasive wheel is still in the workpiece. Allow the cut-off wheel to reach full speed before carefully continuing the cut. Otherwise, the wheel may bind, jump out of the workpiece, or cause kickback. Support large workpieces to minimize the risk of kickback from a jammed wheel. Large workpieces may sag under their own weight. The workpiece must be supported on both sides, near the cut and at the edges. Be especially careful when making cuts in walls or other areas where you cannot see what is behind. The protruding cut-off wheel may cut into gas or water pipes, electrical wiring, or other objects and cause kickback.
Special safety instructions for sanding with sanding sheets
Do not use sanding sheets larger than the sanding pad; follow the manufacturer's recommendations regarding sanding sheet sizes. Sanding sheets that extend beyond the sanding pad can cause injury, snagging, tearing, or kickback.
Special safety instructions for working with wire brushes
Be aware that wire brushes lose bristles even during normal operation. Do not overload the wire brush by applying excessive pressure. The wire bristles can easily penetrate thin clothing and/or skin. If protective gloves are recommended for the work, avoid contact between the wire brush and the gloves. Disc and cup brushes may increase in diameter under the influence of centrifugal force.
Additional safety instructions

Wear protective goggles.
WARNING: Read the corresponding safety instructions for locating pipes and cables in walls. Contact the local utility company for information. Contact with electrical wires can lead to electric shock. Damage to gas pipes can lead to explosion. Damage to water pipes leads to property damage and can cause electric shock. Remove the lock-off switch and set it to the locked position if there is a power failure, for example, if the electricity goes out or the plug is pulled from the outlet. This prevents accidental restarting. When cutting, use a vacuum cleaner. The vacuum cleaner must be approved for collecting stone dust. Using such devices reduces the risk from dust.
For cutting, use guide rails. Without side guide, the cutting disc may jam and cause kickback. Always hold the power tool with both hands and maintain a stable stance. With both hands you work more reliably with the power tool. Clamping the workpiece. A workpiece clamped in a clamping device or in a vise is held more securely than in your hand. Keep your work area clean. Mixtures of materials are especially dangerous. Dust from colored metals can ignite or explode. Do not work with a power tool with a damaged cord or plug. Do not touch a damaged cord; disconnect the plug from the outlet if the cord was damaged during work. A damaged cord increases the risk of electric shock.
Function description

Read all safety instructions and instructions for the power tool.
Failure to follow the safety instructions and instructions may result in electric shock, fire, and serious injury.
Keep all safety instructions and instructions for future reference.
Please open the fold-out page with the illustrations of the power tool and keep it open while you study the operating instructions.
Intended use
This power tool is intended for cutting and grinding, for sanding and cutting stone materials without the use of water. For cutting metal, use a special protective guard for cutting (accessory).
For cutting stone, use a special protective guard with guide rails (accessory).
With sanding discs and sanding tools, the power tool can be used for sanding with sandpaper.
Illustrated components
The numbering of the components shown refers to the illustration on the graphics page.
1 Lock-off button for spindle 2 On/off switch 3 Auxiliary handle 4 Grinding spindle 5 Protective guard for grinding 6 Screw for securing the protective guard 7 Protective guard for cutting 8 Base plate with round cutting opening 9 Grinding disc / cutting disc*
10 Raika KpePienn 11 BbICTpo3axmHa nraKa SDS-clic 12 3aunTHbIK KOxydIy aIseHOrO IINΦOBaHOrO Kpyra* 13 YaueHbI uHFOBaHbI Kpyr* 14 3aunTHbI uNTOK dArykna 15 PacnOpHbIe 7aN6bI* 16 Pe3nHOBaJ WAnΦOBaBbHaTapeAka* 17 ⅢnФоваьнаяshkypka* 18 Kpyrla raika* 19 Yaueunha uetka* 20 3aunTHbI KOxuy DAn OTpe3aHnC HApBaJIHOUIMN CaA3KaMn* 21Ama3HbI OTe3HO Kpyr*
*H3o6paXeHHbIe HAN OINcAHbIe PpHaALeXHoCTn He BXOaT B cTaHApTbH bObE M IOCTaBKn. IIOHbI accopTMENT PpHaALeXHoCTe Bbl HaJeTe B hAwei Iporpamme PpHaALeXHoCTe.
Pycckn | 241
TexHnueckne DaHHbIe
AaHHbIe TIO WUMy N Bn6paunN
I3mepenBbIIOAHeHbI corgaCHO cTahapTy EN 60745.
A-B3BWeSeHHbI yPOBeHb ⅦMa OT INHCTpyMeHTa COCTaBIAReT TINNUHO: yPOBeHb 3ByKOBOr OaBAeHNr 92 A5(A); yPOBeHb 3ByKOBoM MoUHOCTn 103 A5(A). HeOcOToBepHoCTb K=3 A5.
TpImeHnTe cpeCTBa 3aunntbI opraHOB cLyxa!
O6uhe 3haueHn Bn6paunn (BeKToPnaCymMa Tpex HaIpaBLeHn), OIpedeEeHHbIe corlaacHO EN 60745:
山HnФOBaHHe IOBepxHocTH (ObAnpoUHoe): 3HaueHne 3MnCCn KOle6aHnra ah = 8 M / c2 HeoCTOBepHOCTb K=1,5 M/c².
山HnФOBaHHe HauDaunOH 6yMaIor:3HaueHne 3MnCCnn KoJe6aHnra ah = 3,5M / c2 HeOCTOBepHOCTbK=1,5M/c².
Yka3aHHbI B HacToHux INHCTpyKunx yPOBeHb Bn6paunu N3MpeH IIO MeTOAnke N3MpeHnI, IpOIncaHNo B cTaHApTe EN 60745, n MoXeT 6bIb NcTOnb3ObaH dA rCpaBHeHn INHCTpyMeHToB. OH TaKxe IpiRtoDeH dA BpeMeHHo OueHKn Harpy3Kn OT Bn6paunu.
YpOBeHb Bn6paunu yKa3aHdA OCHOBhIX BnIOB pa6oTb c 3eKtpOnHcTpymentom. ODAKO ecn 3eKtpOnHcTpyment 6yDet nCIOA3OBAH DAB bIIOAnHeHH npTo pImMeHeHHem pa6oUHX HcTpymentOB, He IpeDyCMOTPeHHbIX N3rTOBNTeAM, INI TexHnueckoe 06- C LyXHBaHne He 6yDet OTBeuATb PpeDIncaHnM, To ypOBeHb Bn6paunu MoKeT 6bITb INbIM. 3To MoKeT 3NaHTeBHO TOBbICHTb Harpy3ky OT Bn6paunu B TeueHne BCero pa6oUero Iepnoa. DAToTuHOn OuenHKn Harpy3Kn OT Bn6paunu DOJXHBi 6bITb UyTeHbTaKke OTpe3Kn BpeMeHN, BV KOTOpbl e 3eKtpOnHcTpyment BVkIAUoyeh INI BpauaetC, Ho DeJCTBNTeBHO He BbIOANHRe pa6oTb. 3To MoKeT 3NaHTeBHO COKpaTntb Harpy3ky OT Bn6paunu B paueTe Ha IIOHoe pa6oOee BpEM.
IpeycmOTnE OIOHHTeBhble MepbI 63- OTaCHOCTN A4 3aUNTbI OTepaTopaOT BO3dEChTBn Bn6paun, HApnPmEp:TexHueckoe 6cbLyKHBnHe 3eKTPoHNCTpyMeHTa n pa6oynx INCTpyMeHTOB, MepbI IIOPOAdepXaHNIO pyK B TePLe, OpraHn3aunI TexHOAnOrNeCKnx PtoceCCOB.
3aRbAeHne O COOTBETCTBHN
C
СПОЛСИНОТВETCTBEHHOМБI3AЯВЯЕМ,ЧTO OПИСАньИВ pa3dEe «TEXHNUECKNE DAHNBIE» ПЮДУКТ COOTBETCTByET HIXKcEduOuIM CTaHApTAM ИИ HOPMaTHBbIM DOKUMeHTAM: EN 60745 corlaacno IIOLOXeHnM AnpeKTNB 2004/108/EC,98/37/EC (do 28.12.2009), 2006/42/EC (Haunna c 29.12.2009).
TexhueckayokymeHTaun: Robert Bosch GmbH, PT/ESC, D-70745 Leinfelden-Echterdingen
Dr. Egbert Schneider Senior Vice President Engineering
Dr. Eckerhard Strötgen Head of Product Certification
Robert Bosch GmbH, Power Tools Division D-70745 Leinfelden-Echterdingen 30.03.2009
C6opKa
YcTaHOBka 3aunTHbIX yctpoCTB
Do hauaaa pa6oT IO 06cAUYKBAHHIO n Ha-CTpOKe 3AeKTPoHnHCTpymEHTa OTcoEHNHnTE Bnky Uhypa CETN OT WTeNCEbHOI pO3ETKn.
Yka3aHHe: Pn TIOLOMKe IuNFOBaIbHOrO Kpyra BO BpeMa pa6ToB IuN Pn IOBpeXeHnn UcTPOCTB KpeTIeHN 3aUHTHO KOxUxa/ 3LeKTPoINHCTpymeHTa 3LeKTPoINHCTpymeHT OAnKeH 6bITb HMeDAnEHHo HaPiPaBLeH CepBnCHyIO MaCTepCKyIO, aDpeCa CM. pa3DeI «CepBnChoe o6cLyXuBaHne I KOhCyIbTaun ITOkyIaTeJe|.
3aunthbik Koxy dxI WAnObaHn
HacaHTe 3aHTbI KOxuy 5 Ha ueKy HINHeA. YCTaHOBtpe TIOLOXeHne 3aHTHO Koxy5 B COOTBeTcBn C Tpe6OBAHNM paOoErpoceCa n 3aKePnte ero 5 KpeTKeHHbIMN BnHTAmN 6.
YctaHOBHTe 3aunTHbI KOxyx 5 TaK, yTo6bI NCKAouaCBy Bbl6poc HcKp B HappaBaeHHn OtepatoPA.
3aunTHbI KOxyx AOn OTe3aHn
AorOte3hix pa60rTO MeTaALy PpHMeHnTe TObKO 3aunTHbIKoKxuX AAR OTpe3AHn7. OTe3hIx pa6Ot TIO KAMHIO TPImeHnTe TObKO 3aunTHbIK KOKyX AOTpe3aHH C HApBaBIAUoUMn CaAa3KaMn 20.
The protective hood is installed in the same way as the protective hood for sanding.
Additional handle
Use the power tool only with the additional handle 3.
Screw the additional handle 3 on the right or left of the gearbox head depending on the method of work.
Vibration handle
Vibration Control
The vibration handle reduces the vibration level and provides more comfortable work. Never work without the additional handle.
Do not use a damaged additional handle.
Protective guard for sanding
For work with a sanding plate, or with a cup-shaped wire brush, or with a flap disc, install the protective guard 14.
Secure the protective guard 14 with the additional handle 3.
Mounting the sanding tools
Before any work on the power tool, pull the plug out of the socket. During work, the sanding and cutting discs become very hot; do not touch them until they have cooled down.
Mount the sanding tool 4 and all parts to be mounted.
The power tool is locked by pressing the spindle lock button only when the spindle is at a standstill! Otherwise, the power tool may be damaged.
Diamond cutting discs
Observe the dimensions of the diamond tools. The hole diameter must correspond to the mounting flange. Do not use adapters or reducers.
When using diamond cutting discs, ensure that the direction of rotation arrow on the diamond cutting disc matches the direction of rotation of the power tool (see arrow on the gear head).
The assembly sequence is shown on the illustration page.
Observe the applicable regulations in your country for the materials being processed.
Working with the machine
Switching the power tool on
Pay attention to the mains voltage! The voltage of the power source must match the data on the rating plate of the power tool. Power tools rated for 230 V can also operate at 220 V.
When operating the power tool from mobile generators that do not have sufficient power reserve or are not equipped with a suitable voltage regulator with starting current boost, power loss or unusual behavior of the power tool may occur upon switching on. Please observe the suitability of the generator you are using, especially with regard to voltage and mains frequency.
Switching on/off
To switch on the power tool, push the on/off switch 2 forward and then press it.
To switch off the power tool, release the on/off switch 2.
Check the diamond tool before use. The diamond tool must be mounted faultlessly and rotate freely. Perform a trial run for at least 1 minute without load. Do not use damaged, out-of-round or vibrating diamond tools. Damaged diamond tools can burst and cause injury.
Starting current limiting (PWS 20-230 J)
The soft-start system limits the power when switching on the power tool and allows operation from a 16 A socket.
Application instructions
Be careful when working in walls with concealed cables, see section "Instructions for installation". Secure the workpiece if its own weight does not ensure a stable position. Do not overload the power tool until it has stopped. The power tool can be cooled after high load by letting it run at idle for a few minutes. When working, the inserted tools and cutting discs heat up, do not touch them until they have cooled down. Do not use the power tool on an abrasive cutting station.
Surface sanding
Never use cutting discs for sanding!
With the disc at an angle of 30° to 40° to the workpiece, you will get the best results when surface sanding. Guide the power tool with moderate pressure back and forth. The workpiece does not heat up strongly, does not change its color, and no grooves remain.
Flap disc
With a flap disc (accessory), you can also work on curved surfaces and profiles (contour sanding).
Flap discs have a significantly longer service life, produce less noise and lower grinding temperature than conventional sanding discs.
Cutting metal materials
For cutting work on metal, only use the protective guard for cutting.
When cutting with a cutting disc, work with moderate feed, appropriate to the material being processed. Do not exert pressure on the cutting disc, do not tilt or rock it.
Do not brake the cutting disc with lateral pressure.
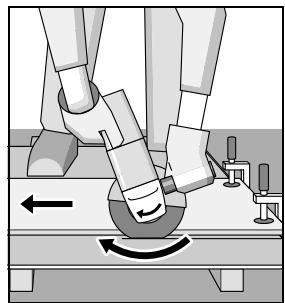
Always guide the power tool against the direction of rotation. Otherwise, there is a risk of uncontrolled kickback from the cut.
When cutting profiles and square tubes, start the cut at the smallest cross-section.
Cutting stones
Use the cutting machine only with protective goggles and a guide rail 20. The power tool is intended only for dry cutting and dry grinding.
For cutting stone, a diamond cutting disc is best. To prevent overheating, allow the disc to run at no load for a short time before starting the cutting work with guide rail 20.
Work only with a dust extraction system and additionally wear a protective respirator.
The dust extraction connection is designed for stone dust. Bosch offers suitable dust extraction hoses.
Russian | 247
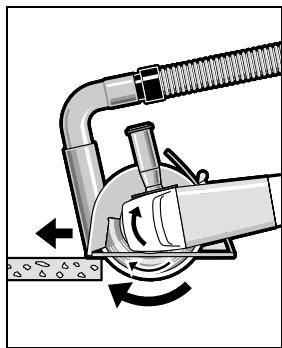
Switch on the power tool and set the guide rail on the workpiece. Guide the power tool with moderate feed, appropriate to the material being processed.
When processing very hard materials, e.g., concrete with a high content of gravel, the diamond cutting disc may overheat and be damaged. A rotating spark ring clearly indicates this.
In such a case, interrupt the process and let the diamond cutting disc run at no load at maximum speed for a short time.
A significant decrease in performance and a rotating spark ring indicate that the diamond cutting disc is worn.
You can sharpen the diamond cutting disc with short cuts in an abrasive material (e.g., in sand-lime brick).
Instructions for static
In Germany, the standard DIN 1053 part 1 and the specific regulations of the respective country apply.
These regulations must be observed. Before starting work, consult the responsible structural engineer, architect, or site manager.
Maintenance and service
Maintenance and cleaning
Before any maintenance or adjustment work on the power tool, disconnect the plug from the socket. To ensure quality and safe operation, keep the power tool and the ventilation slots clean at all times. If, despite careful manufacturing and testing, the power tool should fail, repair should be carried out by an authorized service center for power tools of the Bosch brand.
Carefully store and handle the accessories.
If the power tool, despite careful manufacturing and testing, should fail, repair should be carried out only by an authorized service center for power tools of the Bosch brand.
Please, in all inquiries and orders, always specify the 10-digit product number according to the type plate of the power tool.
Service and customer consultation
The service department will answer all your questions regarding repair and maintenance of your product as well as spare parts. You will also find detailed information on spare parts at the address:
www.bosch-pt.ru
The Bosch consultant team will gladly help you with questions regarding purchase, application, and adjustment of products and accessories.
Russia
Robert Bosch LLC
Service center for maintenance
of power tools
ul. Akademika Koroleva 13, stroenie 5
129515, Moscow
Tel.: +7 (495) 9358806
Fax: +7 (495) 9358807
E-Mail: rbru_ct_asa_mk@ru.bosch.com
OOO «Robert Bosch»
Service center for power tools
ul. Ilyeva, 41
198095, Saint Petersburg
Tel.: +7 (812) 4499711
620017, Yekaterinburg
Tel.: +7 (343) 3658674
Tel.: +7 (343) 3787756
Fax: +7 (343) 3787928
Belarus
IP «Robert Bosch» LLC
220035, Minsk
yI. Tmnp3eBa, 65A-020
TeA.: +375 (17) 2 54 78 71
TeA.: +375 (17) 254 79 15
TeA.: +375 (17) 254 79 16
ΦaKc: +375 (17) 2 54 78 75
E-Mail: bsc@by.bosch.com
yTHAN3aun
OTcIyXnBWeCBOIpCpOK 3eKtpOnHCTpyMeHTbl, IINHaADExKHOCTn UytakOBky CaeDyET CdaBaTb Ha 3KoIaOΓnueCKn UCHTyU peKyIpeaunIO OTxODOB.
ToIbko DAA CtpaH-4AeHOB EC:
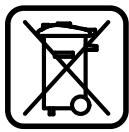
He Bb6paBbBaIte 3eKtpoHnCTpymEtbl B 6bITOBbIe OTOaBl! CoIaCHO EbpOeNcKOdNpeKTnBe 2002/96/EC o cTapbIX 3eKtpuYeCKNX n 3eKtpoHHbIX HnCTpyMeHTax n Pn6opax n
aEKBaTHOMy IpeAINsCaHnIO HaunOHaIbHOItpaBA,OTcLyXNBWne CBOI cPoK 3eAKTPOHNCTpyMeHTbl DOANKbI OTdAeBHO CO6HpTaBCN i CdaBaTbCRA Na 3KOLOrHueCKN UChTyO yTuIN3aUNIO.
Bo3MOxHbI n3MeHeHHa.
ME77
Bka3iBkn 3 texhikn 6e3neKn
3araIbHI 3aCTepeXeHHA DAA eAEKtpoPnlaIb
Read all safety warnings and instructions.
Failure to follow the warnings and instructions may result in electric shock, fire and/or serious injury.
Keep all warnings and instructions for future reference.
The term "power tool" in the warnings refers to your mains-operated (corded) power tool or battery-operated (cordless) power tool.
1) Work area safety
a) Keep your work area clean and well lit. Cluttered or dark areas invite accidents. b) Do not operate power tools in explosive atmospheres, such as in the presence of flammable liquids, gases or dust. Power tools create sparks which may ignite the dust or fumes. c) Keep children and bystanders away while operating a power tool. Distractions can cause you to lose control.
Component illustrations
The numbering of the illustrated components refers to the illustration of the power tool on the graphics page.
1 Lock-on button 2 On/off switch 3 Auxiliary handle 4 Adjustable guard 5 Protective guard 6 Locking screw for protective guard 7 Protective guard for cutting 8 Support flange with O-ring 9 Adjustable cutting guard 10 Clamping nut 11 Quick-clamping nut SDS-click 12 Protective guard for dust extraction guard* 13 Dust extraction guard* 14 Protective guard* 15 Spacer washers 16 Dull support flange* 17 Adjustable guard* 18 Round nut* 19 Adjustable guard* 20 Cutting disc for cutting with diamond* 21 Diamond cutting disc*
*Illustrated or described accessories are not included in the standard delivery. The complete range of accessories can be found in our accessories program.
256 | Ukrainian
Technical data
Dr. Egbert Schneider Senior Vice President Engineering
Dr. Eckerhard Strötgen Head of Product Certification
Robert Bosch GmbH, Power Tools Division D-70745 Leinfelden-Echterdingen 30.03.2009
MOHTAX
MOnTaX 3axnCHnx PnCtpoB
Before any manipulation, pull the mains plug out of the socket.
Note: After a break in the mains supply or when the machine is switched off, the protective switch on the housing/on the mains plug must be reset by sending the machine to a service workshop. Addresses are given in the "Service and Customer Service" section.
Protective hood for sanding
Press the protective cap 5 onto the spindle 7. Turn the protective cap 5 to the required working position and lock the protective cap 5 with the locking screw 6.
The protective cap 5 must be fitted so that it cannot come into contact with the working tool.
Protective hood for cutting
For cutting, use the protective hood for cutting. For cutting with a cutting disc, use the protective hood for cutting with a support plate 20.
The protective hood for cutting is mounted in the same way as the protective hood for sanding.
Auxiliary handle
Use the machine only with the auxiliary handle 3.
Screw the auxiliary handle 3 depending on the working method on the right or left of the gearbox head.
Auxiliary handle
Vibration Control
The damping handle reduces vibration and thus ensures more comfortable and safer work.
Do not make any modifications to the damping handle.
Do not use a damaged damping handle.
Protective equipment
When working with the auxiliary handle or with the abrasive cutting/grinding wheel or wire brush, always wear protective gloves.
Secure the protective gloves 14 with the help of the damping handle 3.
Mounting abrasive tools
Before any work, disconnect the plug from the power outlet. Cutting and grinding discs get hot during operation; do not touch them until they have cooled down.
258 | Ukrainian
Before mounting, clean all parts to be mounted.
Mounting and dismounting of abrasive tools is done by pressing the spindle lock 1 to lock the abrasive spindle.
First, press the spindle lock and turn the abrasive spindle until it engages! Otherwise, the power tool may be damaged.
Abrasive cutting/grinding disc
Pay attention to the dimensions of the abrasive tools. The hole diameter must fit the mounting flange without play. Do not use adapters or reducers.
When using magnetic or disk brakes, make sure that the arrow for the direction of rotation on the magnetic or disk brake matches the direction of rotation of the electric drive (see the arrow for the direction of rotation on the fan cover).
The mounting position is shown on the page with the figure.
To close the planned/ventilated or solid circle, screw on nut 10 and tighten it with a hook wrench, see section A "Tightening the nut".
Before mounting the grinding tool, before switching on the device, check that the grinding tool is correctly mounted and can rotate freely. Make sure that the grinding tool is not damaged by the protective cover or other parts.
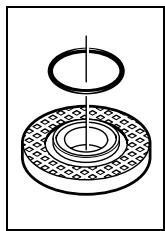
In the flange 8 on the central bore there is a plastic part (with a round cross-section). If the round cross-section ring is missing or damaged, it must be replaced (see part
Number 1600 210 039), before mounting the flange.
Grinding wheel
When working with a grinding wheel, mount the hand guard 14.
Rubber backing pad
When working with a rubber backing pad with a grinding wheel 16, mount the hand guard 14.
The mounting position is shown on the page with the figure.
Before mounting the rubber backing pad 16, put on 2 spacers 15 on the grinding spindle.
Screw on the round nut 18 and tighten it with a hook wrench.
Cup or disc brush
When working with a cup or disc brush, always mount the hand guard 14.
The installation procedure is shown on the page with the figure.
The lever/disc must be pressed onto the guide pin so that it fits tightly against the end of the guide pin. Press the lever/disc.
Guide pin
Using the guide pin, install the locking cap 12.
The guide pin 13 has a slot with the locking cap 12. The cap must be fully pressed in. Install the locking cap 12 on the pin.
The installation procedure is shown on the page with the figure.
Screw on the locking nut 10 and tighten it with the bent wrench.
Ukrainian|259
Quick-release nut SDS-clic
For quick tool changes without additional tools, you can replace the locking nut 10 with the quick-release nut 11.
The quick-release nut 11 can be used for both drilling and screwdriving.
Use only the original quick-release nut 11.
When tightening, ensure that the marking on the quick-release nut 11 does not face the guide pin; the arrow must point to the index mark 22.
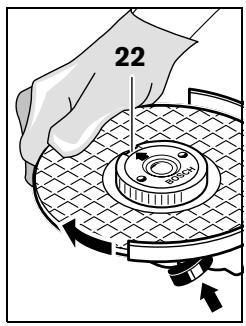
Press the release button 1 to lock
Guide
Turn the dial clockwise.
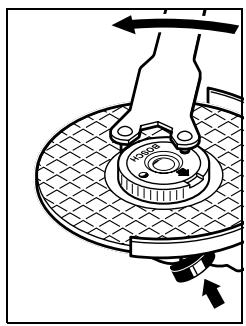
Securely fastened with a reliable screw, the indicator
can be released,
returning it
with the ring
against the arrow
of the clock.
Never unscrew the indicator
that is attached
very tightly, with pliers,
BHKOPHCTOBYte raIKOBN KIAOy. PpIcTaBTe raIKOBN KIAOy, IA PIOKa3aHO Ha MaHOHky.
Oa3BoIeHI wIiCyBaIbHi iHCTpyMeHTN
Bn moKeTe BnKOpncTObyBaTH yci Ha3BaHbI B cii IHcTpkyuui IuaIpyBaIbHi IHcTpymEnTH.
DOnyuctma qactota 06epTaHH [XbHn.1] a6o KOLOBA WbNkICtB [M/C] BHKOPNCTOByBaHN XIaYBaBHNx IHCTpymEtIB MaE RA K MHiIMyB IaIOBiaTaN daHm, 3a3HaueHm B HJXeNoaHni Ta5nui. 3 uei npuHH 3BaJaaTe Ha DoNYCTMMy yactOty o6eptaHnA60 KOALOby WbNkictb, 0o 3a3NaueHi Ha etNKetci WlAphiBaIbHoro iHCTpymenta.

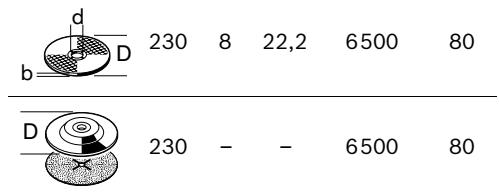
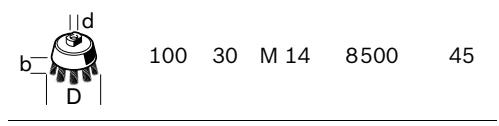
TObepTaHr rOIoBKn peAkykTopa
Ipea 6yab-RAKMMAHmYAAUcIMM3 eAeKTPoPpnaAOM BHTARHITb wTeTceA b 3 po3ETKn.
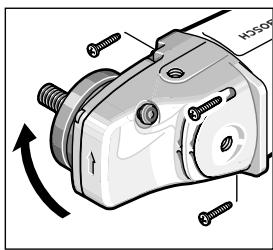
TolOBky peaykTopa MoXHa TIOBepTaTn 3 iHTepBaIOM y 90°
3aBdAKNcbOMy BmNka6yde
3HAXOHTNCAY
6iBw 3pyHOMy AIAI TeBHnX BnIb
po6OTn IIOLOXeHHI, HApP., PpN
po3pi3aHHI 3 BNTJxHNM KOBtAkom 3 AIOHETHM cyTOpTOM 20 a6o kkuO Bn AiBwa.
HikoAN He BnKOpNCbOyIe Aa 06AnpaHHB iAp3Hi WlifyBaBbHI Kpyr.
PiK KyTom 30° - 40° Bn OTPmaete np O6dnPHomy 7iifpyBaHHi HauKpaai pe3yIbTaTH po6OTn. CoBaHTe eAEKTPOpIIaA3 TOMIPHM HaTNCyBaHHam TYaN-CIOAn. ZIMB HnYHKnHte IpeerpBaanHO6p6IoBaHoJ 3arOTOBKN, 3mHN KoIbOpj iYTBOpEHN XBNb.
BiaIooIaI6HmIaIpyBaIbHn Kpyr
Thanks to the round shape, you can also process the inner surfaces and profiles.
Thanks to the movable round knives, the service life is mutually extended, they are significantly less worn and have a lower temperature of their transmission than movable knives.
CUTTING METAL
riangleright When cutting metal, always use the protective cover for cutting.
When cutting, work with a gentle pushing of the tool in accordance with the material being processed. Do not press on the cutting wheel, do not tilt it or bend it.
After finishing work, do not stop the cutting wheel by pressing it from the side.
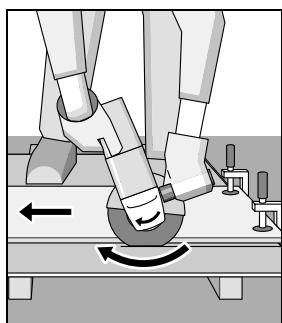
Cutting must always be done against the direction of rotation. Otherwise, there is a risk of uncontrolled
movement.
Removing the electric plug from the socket.
When cutting profiles and
square tubes, it is better to start from the smallest cross-section.
CUTTING STONE
riangleright When cutting stone, always use the dust guard for cutting with a diamond cutting disc. The electric tool can also be used for dry cutting/dry grinding.
For cutting stone, it is best to use a diamond cutting wheel. For safety reasons, it is necessary to use the dust guard for cutting with a diamond cutting disc.
Pull the electric tool away from the cut only when it is running and slowly tilt the cut open.
Please make sure to use only original accessories. Bosch will be liable for damages caused by the use of non-original accessories.
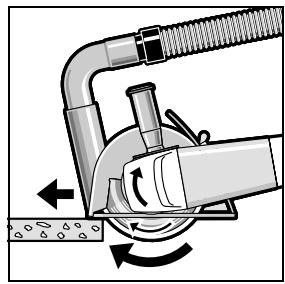
Remove the power tool and the accessory from the workpiece only after it has come to a complete stop. Slowly move the power tool
according to the material being processed.
When cutting materials with hard components, e.g., concrete with high pebble content, the diamond cutting disc may become blocked, which leads to its jamming. This is indicated by a noticeable sparking around the diamond cutting disc.
In this case, stop cutting and let the diamond cutting disc run at no load for a short time at maximum speed until it is free again.
Very slow feed and visible sparking are signs that the diamond cutting disc has become dull. You can sharpen it again by making short cuts in an abrasive material, e.g., in sandstone or lime sandstone.
262 | Ukrainian
Instructions for static loads
The walls in non-load-bearing partitions must comply with DIN 1053, part 1, or national regulations. These regulations must be strictly observed. For this reason, before starting work, you must consult the responsible structural engineer, architect, or site manager.
Technical service and maintenance
Technical service and maintenance
> Before any work on the power tool, pull the plug out of the socket. > Keep the power tool clean and dry. Keep the ventilation slots clean. In extreme working conditions, when processing metal, conductive dust can accumulate inside the power tool and may affect the protective insulation of the power tool. In such cases, it is recommended to use a stationary extraction system, blow out the ventilation slots frequently, and use a residual current device (RCD).
Store the tool carefully and handle it with care.
Despite careful manufacturing and testing, if the tool should nevertheless fail, repair must be carried out only by an authorized service center for Bosch power tools.
For all questions and orders for spare parts, please always specify the complete product number given on the nameplate of the power tool.
Service Center and Maintenance of Clients
In the service center you will receive a response to your questions regarding repair and technical maintenance of your product. Detailed information about the spare parts can be found at the address:
www.bosch-pt.com
Bosch consultants will gladly help you with questions regarding the purchase, use, and adjustment of products and their accessories.
Ukraine
Bosch Service Center for Power Tools, vul. Kranin, 1, 02660, Kyiv-60
Tel.: +38 (044) 5 12 03 75
Tel.: +38 (044) 5 12 04 46
Tel.: +38 (044) 5 12 05 91
Fax: +38 (044) 5 12 04 46
E-Mail: service@bosch.com.ua
The addresses of regional warranty service centers are indicated in the warranty card.
Disposal
Power tools, accessories, and packaging should be sent for environmentally friendly recycling.
Only for EU countries:
The power tool is manufactured in accordance with the European Directive 2002/96/EC on waste electrical and electronic equipment (WEEE) and its transposition into national law.
According to national legislation, power tools that are no longer usable must be collected separately and disposed of in an environmentally friendly manner.
Subject to change without notice.
Romania | 263
Senior Vice President
Head of Product
Engineering
Certification
Robert Bosch GmbH, Power Tools Division
D-70745 Leinfelden-Echterdingen
30.03.2009
Mounting
Bosch Service Center
Str. Horia Macelariu Nr. 30-34,
013937 Bucureşti
Tel. Service scule electrice: +40 (021) 4 05 75 40
Fax: +40 (021) 4057566
E-Mail: infoBSC@ro.bosch.com
Tel. Consultanta tehnica: +40 (021) 4 05 75 39
Fax: +40 (021) 4057566
E-Mail: infoBSC@ro.bosch.com
www.bosch-romania.ro
Disposal
Power tools, accessories and packaging must be disposed of at an ecological recycling station.
1) Safety at the workplace
a) Keep your work area clean and well lit. Cluttered or dark areas can lead to accidents. b) Do not operate power tools in explosive atmospheres, such as in the presence of flammable liquids, gases or dust. Power tools create sparks which may ignite the dust or fumes. c) Keep children and bystanders at a safe distance while operating a power tool. Distractions can cause you to lose control.
2) Electrical safety
a) The power tool plug must match the outlet. Never modify the plug in any way. Do not use any adapter plugs with earthed (grounded) power tools. Unmodified plugs and matching outlets will reduce risk of electric shock.
b) Avoid body contact with earthed or grounded surfaces, such as pipes, radiators, ranges and refrigerators. There is an increased risk of electric shock if your body is earthed or grounded. c) Do not expose power tools to rain or wet conditions. Water entering a power tool will increase the risk of electric shock. d) Do not abuse the cord. Never use the cord for carrying, pulling or unplugging the power tool. Keep cord away from heat, oil, sharp edges or moving parts. Damaged or entangled cords increase the risk of electric shock. e) When operating a power tool outdoors, use an extension cord suitable for outdoor use. Use of a cord suitable for outdoor use reduces the risk of electric shock. f) If operating a power tool in a damp location is unavoidable, use a residual current device (RCD) protected supply. Use of an RCD reduces the risk of electric shock.
3) Safe work practices
a) Be concentrated, follow carefully the instructions and act reasonably. Do not use the power tool when you are tired or under the influence of drugs, alcohol, or medication. A moment of inattention while working with the power tool may lead to serious personal injury.
b) Work with protective equipment and always wear safety glasses. Wearing personal protective equipment, such as a dust mask, non-slip safety shoes, a hard hat, or hearing protection (earplugs), depending on the type of work, reduces the risk of injury. c) Avoid accidental starting. Before connecting the tool to the power source and/or battery pack, make sure the switch is in the off position. Carrying the power tool with your finger on the switch or connecting it to the power source with the switch on can lead to accidents. d) Remove any adjusting key or wrench before turning the power tool on. A wrench or key left attached to a rotating part of the power tool may result in personal injury. e) Do not overreach. Keep proper footing and balance at all times. This enables better control of the power tool in unexpected situations. f) Dress properly. Do not wear loose clothing or jewelry. Keep your hair, clothing, and gloves away from moving parts. Loose clothes, jewelry, or long hair can be caught in moving parts.
g) If dust extraction and collection equipment is available, make sure it is connected and properly used. Use of dust collection can reduce dust-related hazards.
h) This applies to power tools.
a) Do not use the power tool. Use the power tool only for its intended purpose. You will work better and more safely when you use the power tool within the range specified by the manufacturer. b) Do not use the power tool if the switch is damaged. A power tool that cannot be turned on and off with the switch is dangerous and must be repaired. c) Unplug the power tool and/or remove the battery pack before making adjustments, changing accessories, or storing the power tool. Such preventive safety measures reduce the risk of starting the power tool accidentally. d) Store idle power tools out of the reach of children and do not allow persons unfamiliar with the power tool or these instructions to operate the power tool. Power tools are dangerous in the hands of untrained users.
a) Maintain power tools. Check for misalignment or binding of moving parts, breakage of parts and any other condition that may affect the power tool's operation. If damaged, have the power tool repaired before use. Many accidents are caused by poorly maintained power tools. b) Keep cutting tools sharp and clean. Properly maintained cutting tools with sharp cutting edges are less likely to bind and are easier to control. c) Use the power tool, accessories and tool bits etc., in accordance with these instructions, taking into account the working conditions and the work to be performed. Use of the power tool for operations different from those intended could result in a hazardous situation.
5) Maintenance
a) Have your power tool serviced by a qualified repair person using only identical replacement parts. This will ensure that the safety of the power tool is maintained.
Safety instructions for all operations
General power tool safety warnings for grinding, sanding, wire brushing, polishing or abrasive cutting-off operations
This power tool is intended to function as a grinder, sander, wire brush, polisher or cut-off tool. Read all safety warnings, instructions, illustrations and specifications provided with this power tool.
Warnings common for grinding, sanding, wire brushing, polishing or abrasive cutting-off operations: This power tool is intended to function as a grinder, sander, wire brush, polisher or cut-off tool. Read all safety warnings, instructions, illustrations and specifications provided with this power tool. Failure to follow all instructions listed below may result in electric shock, fire and/or serious injury.
Electrical power tool safety warnings. Pulling the tool, for which the electrical tool is not intended, may be dangerous and may lead to injury. Do not use accessories that are not specifically recommended by the manufacturer for this electrical tool. The fact that you can attach a certain accessory to the machine or work with the tool does not guarantee safe operation with it. The rated speed of the working tool must be at least equal to the maximum speed marked on the electrical tool. Working tools that rotate at a higher speed than the rated one may break and fly apart. The diameter and thickness of the working tool must correspond to the data given in the technical characteristics of your electrical tool. Working tools with incorrect dimensions cannot be adequately shielded or controlled. Discs, flanges, backing pads or other accessories must fit exactly on the spindle of your electrical tool. Working tools that do not fit exactly on the spindle of the electrical tool rotate unevenly, vibrate strongly and may lead to loss of control.
Do not use damaged working tools. Before each use, check the working tools, e.g. abrasive discs for cracks or tears, backing pads for cracks or excessive wear, wire brushes for loose or broken wires. If you drop the electrical tool or the working tool, check carefully for damage or use a new undamaged working tool. After you have checked and mounted the working tool, let the electrical tool run at maximum speed for one minute; hold it and keep your face away from the plane of rotation. Damaged working tools usually break during this test period. Work with personal protective equipment. Depending on the application, use a face shield, eye protection or safety glasses. If necessary, use a dust mask, hearing protection (anti-noise), work gloves and a special apron that protects against small abrasive particles. Your eyes must be protected from flying particles in the work area. The anti-dust and protective mask filters the dust generated during work. If you are exposed to loud noise for a long time, this may lead to hearing loss. Keep other people at a safe distance from the work area. Anyone who is in the work area must wear personal protective equipment. Fragments of the workpiece or of a broken working tool may fly off at high speed and cause injury beyond the work area.
Keep the power tool away from hidden electrical wiring. Contact with a live wire can make the metal parts of the power tool live and can cause an electric shock. Keep a safe distance from rotating power tools. If you lose control of the power tool, the cable may be cut or caught by the rotating tool, which can cause injury, e.g., to the hand. Never leave the power tool running unattended. The rotating tool may catch on an object, causing you to lose control of the power tool. When you are not using the power tool, do not leave it switched on. If you are distracted or stumble, the rotating tool may catch on your clothing, and as a result, the tool may cut into your body. Regularly clean the ventilation openings of your power tool. The fan of the motor draws dust into the housing, and excessive accumulation of metal dust increases the risk of electric shock. Do not use the power tool near flammable materials. Sparks can ignite such materials. Do not use power tools that require liquid coolants. Using water or other liquid coolants can cause an electric shock.
Disposal and recycling information
Kickback is a sudden reaction of the power tool to a jammed or blocked rotating accessory, e.g. grinding disc, sanding disc, wire brush, etc. Jamming or blocking leads to a sudden stop of the rotating accessory. As a result, the power tool is accelerated uncontrollably in the direction opposite to the direction of rotation of the accessory at the point of blocking, and becomes uncontrollable. If, for example, a grinding disc jams or blocks in the workpiece, the edge of the disc that dips into the material can catch and tear the disc out or cause a kickback. In such a case, the disc accelerates towards the operator or in the opposite direction, depending on the direction of rotation of the disc and the point of jamming. In such cases, grinding discs can also break. Kickback results from improper or incorrect use of the power tool. It can be prevented by taking suitable precautionary measures, as described below. Hold the power tool firmly with both hands and position your arms so that you can withstand any kickback forces. Always use the auxiliary handle, if provided, to have maximum control over kickback or reaction torque during start-up. If precautionary measures are taken, you can control the machine in the event of kickback or reaction torque. Never place your hands near rotating accessories. If kickback occurs, the tool may cut your hand. Avoid positioning your body in the area where the power tool would move in case of kickback. Kickback will propel the tool in the direction opposite to the movement of the accessory at the point of blocking.
Workpieces, edges, and sharp objects. Avoid searching for or jamming rotating accessories in the workpiece. When working on edges or sharp objects or when abruptly pulling the rotating accessory out, there is an increased risk of jamming. This leads to loss of control over the machine or kickback. Do not use blunt or damaged discs. Such accessories tend to cause kickback or loss of control over the power tool.
Special safety instructions for grinding and cutting with grinding discs.
The guard provided with the tool must be securely attached to the power tool and positioned for maximum safety, so that the least amount of the abrasive disc is exposed towards the operator. The guard helps to protect the operator from broken wheel fragments and accidental contact with the grinding wheel. Use the abrasive discs only for the intended purposes. For example: never grind with the side surface of the disc. Cutting discs are intended for removing material with the edge of the disc. Side grinding with these discs can cause them to break.
Always use undamaged flanges that are the correct size and shape for the abrasive disc you have selected. Proper flanges support the disc and reduce the risk of disc breakage. Flanges for cutting discs may differ from those for grinding discs. Do not use worn-down abrasive discs from larger power tools. Discs intended for larger power tools are not suitable for the higher speeds of smaller tools and may burst.
Safety warnings for cutting-off operations
Avoid jamming the cutting disc or applying excessive pressure. Do not attempt to make excessively deep cuts. Overstressing the disc increases the load and susceptibility to twisting or jamming, which can lead to kickback or disc breakage. When the disc is pinched or jammed, the power tool may kick back violently towards you. If the disc becomes jammed or if you interrupt a cut, switch off the power tool and hold it steady until the disc has come to a complete stop. Never attempt to remove a still-moving disc from the cut, as this could cause kickback. Investigate and correct the cause of the jamming. Do not restart the power tool while the disc is in the workpiece. Allow the disc to reach full speed before carefully continuing the cut.
Otherwise, the disc may jam, jump out of the workpiece, or cause kickback.
▷ POnTnPaTe TPOOuH NnroLempa3P3BaHn DeTaNIOPOXODaHauHn,3a Da OrpaHnUHe pNcKa OT Bb3HNKBAHe Ha OtKat Bpe3yIaTHa 3aknnHe pexeAnck. IOp BpeMe Ha pr3aHe rOleMn DeTaN MoRat da Ce ORbHaT IOd DeEChTBHe Ha CInaTa Ha CO6CTBEHOTo CN terAo. DeTaNbT Tp8Ba Da e IToPnOH OT ABete CTpaHn, KaKTO B6AN3OCTdo ANHHa Ta Pa3P3BaHe, Taka N BdpYnra cn Kpa. Бьдete oc06eHNo ppeIa3ANBn trnпpopraBaHe Ha KaHaAN B CTeHN HAn dpyrN 3OHN, KOHTO MOrAT Da KPNrT N3HeHaHn. PexeuNT dnck MoKe Da IpeIaN3BnKa OTkAT Ha MaunHaTa PnDOnIp DO rA3O- Hn BOOpIOPOBOHn, eAleKTPoIPPOBOHn HAn dpyrN o6ekTN.
CteuHaHn yka3aHn 3a 6e3oTacna pa6oTa npn wAnfoBaHe c Wkypka
He n3TOn3BaIe TBbpDe rOleMn AnCTObe shKypka, cna3BaIe Yka3aHnraHa npOn3BODHTeA 3a pa3MePHTe Ha ShKypkata. AnCTObe shKypka, KOnto Ce ITOdaBat N3BbH IIOAOxHNr DnCK, MOrTa Da IIpeDn3BnKaT HapaHBAHn, KaKTo N da DOBeDaT Do 6LoKnpaHe n pa3KbCbaHe Ha ShKypkata NnDo Bb3HNKBaHe Ha OKtA.
CteuHaHn yka3aHn 3a 6e3oTacna pa6oTa TpH ToOpHCTBaHe C TeLaHn YetKn
He 3a6paBnTe, ye n npH HopMaHa pa6oTa ot TeLeHata yetKa nAdat TeUyeta. He npTeOBapBaIe TeLeHata yetKa, kaTo nPHTNcKATE TBbpDe cHAnO. OxBbpyaunTe ot TeLeHata yetKa TeUyeta Moar IeCHO da npOHnKHAT pRe3 dpexHte H/nn Koxata Bn. Ako ce IpeTOpbUba H3IOA3BaHTo Ha IpeAtna3eH KOxUx, IpeBapHTeHNo Ce yBepraBte, Ye TeLaHata YeTKa He DoIHp a Hero. NsckOBnTe uAaKOBuHnTe TeLeHn YeTKN MoT Da yBeAuHt A DnAmEeTbpa Cn B pe3yAtat Ha CnAta Ha IpiNTnCKaHe n cENTpo6Exhnte CnI.
BbIrapckn | 283
OttbHnTeAHn yKa3aHH 3a 6e3oTacha pa6oTa
Pa6oTeTe C Ppea3Hn ouHa.
H3TPOL3BaIte TIOxO4AIIu NTPN60P, 3a Da OTKPNHEe EBEHTyAALHO CKNTH IOID IOBbpxHOCTTA Tp6oIPBOAOH, HnCe O6bPNETe KbM CbOTBETHOTO MecTHO CHa6DHTeHOpXectBO. Bn3aHTo BcTIPNKOCHOBeHne C IPOBOADHNIOI IOHaTIpeXeHHe MOKe Da IpeAn3BVkA ToXap I TOKOB yAp. YBrpeKaHTo Ha rA3OIPBOAOMoKe Da DOBeDe Do EKCnlo3n. IIOBpeKaHTo HA BOOIPBOAo IMa 3a TIOCLeACTBeN IToAEMMaTePnaAHn UeTN MoKe Da IpeAn3BVkA TOKOB yAp. Ako 3axpaHbauoTo Hnpexehne 6bde npekbchato (HaNP. BcAedCTBne Ha npekbcahe HA TOKA HAN aKO UeNTceTbT 6bde H3BaDeHOT KOHTa), De6LoKpaiTe NyCKOBnI pKeBcBauH rO TocTaBe T To3Nzra "N3KluoyeHo".Taka npeDoTbPaTBAte HeKOHTpoHpaHO BkAUOuBaHe Ha eAEKTPOINHCTpyMeHTa. ▷ PnO6pa6oTbAne Ha KaMeHHMaTePnaAaPa6oTeTe C BbHuaCnCTema 3a PpaxoyAaBHe. N3IOA3Bata PpaxocMykaKa Tpr6Ba Da e CeTpHnUncPapaHa 3a pa6oTa C KaMeHa Ppax. N3IOA3BaHeTo Ha PpaxoyAoBnteHaCnCTema OgrpaHnUuBA BpeAnTe 3a 3dpaBeTo Bn, PpeAn3BnKBAHNOT PpaxTa. ▷ Пгн разрязвае на Каменни MaTeрнали nIIOA3BaIte BOeSha WeiHa.Бe3 CTpaHnUHO BOeHe pexeIuR T DnCK MOnke da ce 3aklnHn I Da IIpeDn3BnKa OTKaT. По врeme Ha pa6oTa ApbKTe eAeKtpOnHCTpyMeHTa 3dpaBO C dBeTe pBuce N3aemaIte cT6nHIO IOAOXeHne Ha TIAOTO.C DBeTe pBuce eAeKTPoINHCTpyMeHTbT ce BOAnIPO-CnHyPHO. OchnpybaTte 6pa6oTBaHnA DeTaI. TaXBaHaT c IOxOaIu INPcNtocOb- AENH Nm CkOb, e 3actOnpeH IIO-3pArBO nCnYpHO, OTKoAKOTO, aKO rDbpxHTe C pKa.
Support the working position. Mixing different materials can be especially dangerous. Thin parts made of sheet metal can cut themselves. Do not use electric tools when the cable is damaged. If the cable is damaged during work, do not touch it; immediately disconnect the plug from the contact.
Damaged or tangled cables increase the risk of electric shock.
You can find the impact on the catalog number on the nameplate of the electric tool. The trade names of some electric tools may be changed.
Safety for electric tools without restriction on starting current: When switching on, a short-term voltage drop in the supply network may occur. Under unfavorable mains conditions, other electric devices may be affected. If the supply network impedance is less than 0.25 ohms, no disturbances are expected.
Information about use and selection
The measurements are carried out according to EN 60745.
The noise level of the device is typically: sound pressure level 92 dB(A); sound power level 103 dB(A). Uncertainty K=3 dB.
Wear hearing protection!
The vibration total value (vector sum of three directions) is determined according to EN 60745:
Surface grinding (rough grinding, cutting): vibration emission
ah=8 m / s2 , uncertainty K=1.5 m/s². Grinding with sandpaper: vibration emission ah=3.5 m / s2 , uncertainty K=1.5 m/s².
The vibration emission level given in this operating manual has been measured in accordance with the procedure defined in EN 60745 and can be used for comparison with other electric tools. It is also suitable for a preliminary assessment of the vibration load.
The stated vibration emission level is representative for the main applications of the electric tool. However, if the electric tool is used for other purposes, with different accessories or if it is not maintained properly, the vibration emission level may differ. This could significantly increase the total vibration load during the working process.
For an accurate assessment of the vibration load, the periods when the electric tool is switched off or running but not actually in use should also be taken into account. This could significantly reduce the total vibration load.
Take additional safety measures to protect the operator from the effects of vibration, such as: servicing the electric tool and the working tools, keeping the hands warm, and organizing the work processes appropriately.
Declaration of Conformity

We declare under our sole responsibility that the product described in "Technical Data" complies with the following standards or normative documents: EN 60745 according to the provisions of Directives 2004/108/EC, 98/37/EC (until 28.12.2009), 2006/42/EC (from 29.12.2009).
Technical file at: Robert Bosch GmbH, PT/ESC, D-70745 Leinfelden-Echterdingen
Dr. Egbert Schneider Senior Vice President Engineering
Dr. Eckerhard Ströttgen Head of Product Certification

Robert Bosch GmbH, Power Tools Division D-70745 Leinfelden-Echterdingen 30.03.2009
Mounting
Mounting of the auxiliary handles
Before any work on the power tool (e.g., maintenance, tool change, etc.) as well as during transport and storage, remove the auxiliary handle from the power tool.
Warning: If the abrasive disc breaks during operation or when replacing the auxiliary handle, the power tool must be sent for repair to an authorized Bosch service center. For the address, see the "Service and Consultation" section.
Vibration control auxiliary handle
Vibration Control
The vibration control auxiliary handle reduces hand vibration and makes work more comfortable and safer.
Never attempt to modify the auxiliary handle in any way.
Do not use the auxiliary handle if it is damaged.
TpeIa3eH ekpan
riangleright When working with the grinding disc 16, with the guard/cover adjusted clearly or the grinding disc for cutting, use the protective screen 14.
Grasp the protective screen 14 with the clamping handle 3.
Mounting the cutting tools
Before performing any work on the electric tool, disconnect the plug from the mains. riangleright When working, the grinding discs for cutting and grinding become very hot; do not touch them until they have cooled down.
Permitted working tools
You can use all the tools recommended in the operating instructions.
The permitted maximum speed of rotation [min-1], respectively the peripheral speed [m/s] of the working tool used, must not exceed the values specified in the table according to the tool type.
For checking the permitted speed of rotation, respectively the peripheral speed, see the label on the working tool.
| MaKC. [mm] | [mm] d | [mi n-1] | [m/s] | ||
| D | b | ||||
| b D | 230 | 8 | 22,2 | 6500 | 80 |
| D | 230 | - | - | 6500 | 80 |
| b D | 100 | 30 | M 14 | 8500 | 45 |
Turning the gearbox head
riangleright Before performing any work on the electric tool, disconnect the plug from the mains.
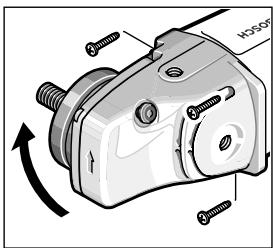
You can turn the gearbox head by 90° so that the switch can be placed in a convenient position for special working conditions.
E.g., when cutting with the protective hood with suction and dust extraction, work with the left hand.
Unscrew the four screws and remove them. Carefully turn the gearbox head to the new position, without detaching it from the housing of the electric tool.
Counting system
PpaxOBE, OTdEJIaUNCeIprnOBpa6oTbaHETO Ha MATEPnaNaN KaTO CbAbPxaU OLOVO 6On, HAKON BnOBe DbpBecuHa, MNHepaUN MeTaAMN MoT Aa 6bDat OTaChN 3a 3dpaTe. KOHTaKbTdo KOKaTa NmBnWBaHTo HA TaKNBa TpaxOBe MoT Aa IpeAn3BnKaT aLeprTuHN peakunn n/nn 3a6oJraBaHn Ha dnxatelHnTe TbTHua Ha pa6oTeuNc EeKtpOnHCTpyMeHt Ta NN HamnpaUn Ce H6AN30 Anua.
Oπpealehen πpaxoBe, haπp. OTdεληιte ce ππu O6pa60TbaHae Ha 6yK n ἀb6, ce cunτat 3a kaHεροREHHN, OC6eHO B KOM6nHaúnC xHmHKaH 3a TpeTHaPeHae Ha dþPBecHnA (xpoMaT, KOHcεPbAHn n ἁp.) . Dóπycka Ce o6pa60TbaHeTo Ha cbʌþPxαμn a36eCT MaTePnaHn caMo OT CbθBTHo ΜθEyHn KBaʌnΦnɪpuHn Λιça.
IIO Bb3MOXHOCT N3IPOA3BaITe CnCTema 3a IppaxOyAABHe. - OcnhypBaIte Do6po IpoBETpaBaHe Ha pa6OTHOTo MRCTO. -Преторьва ситпаловeto HaДихаTeHa Macka cФнТbpOTКлacР2.
CtanaBaIte BaIaHnHTe BbB BaIaTa CtpaHa 3aKoHOBN pa3TIOpe6n, BaIaN Hn Ipn 06pa6OToBAHe Ha CbOTBeTHnTe MaTePnaH.
Pa6ota c eAleKtpoHcTppyMeHTa
Korato n3kIouHte eAleKtpoHnCTpyMeHTa, He cTnpaTe PpHHyDnteLHO DnCKa, KaTO rO pPHTNcKaTE OT DBeTe CTPaHI.
290 |Блгарский
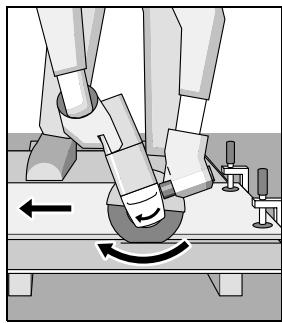
C eIeKtponHctpyMeHTa TpRA6Ba Da ce pa60TH BINHaH Na IpnHnTnHa IptHOBOIOJXHnTE DnHexHnB. B IptHOBeH CAYuayCbIeCTByBa ONaCHOCT Da H3CKOuH NcKOHTPOAnPyEmo OT Cpe3a.
Tpi p3aHe Ha IpoΦnH N Tp6bN C IpaBOBbHcceHHe e Hau-Do6pe Da 3aTOuBaTe p3aHTo OT Hau-MaKOTO HAnPeuHO ceHHe.
Pa3p3aBaHe Ha KaMeHH MaTePnaA
Pn p3aHe Ha KaMeHHMaTePnaAN BnHaRn H3IOA3BaIe TpeDn3HnKoKxUc TpaxOyAbaRe H BOeHa 20. OToycka ce n3IIOA3BaHeto Ha eNeKtponHCTpyMeHTa cAmO 3a cyxo p3aHe H cyxo WAnΦoBaHe.
Pn p3aHe Ha KaMeHHMaTepeHa e Hau-Do6pe Da n3T0A3BaTe dHaMaHTeH peKeu Dnck. 3a OcHpyraBe cpeuy 3aKlnHbHe Tpr6Ba Da ce n3T0A3Ba PpeDn3HKn KoxyX C npaxOyIaBHe N BODeHa WeHa 20.
ИЗПОЛЗВайтЕеLEКТРОИСТPyмЕТа само CBKЛЮЧЕн Прах氧УВОпЕАн СИСТЕМи pa6OTeCпpoTиBOПрaxOвДИХаTeMAн MaCKa.
I3TnA3BaHaTa CnCTeMa Tp8Ba Da e ceptnΦuNpaHa 3a pa60Ta C kAmEHHa IIpx. ΦIrma B0w IIpeDlara IIOxOdAun IIpxoCMyKaUKN.
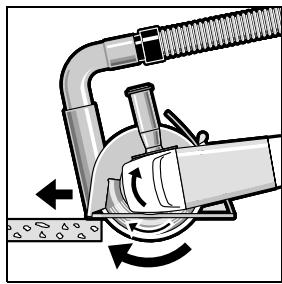
Bkluoyete ekektpo HnctpymeHTa n IocTaBeTe IpeHaTa yact Ha HaPpABlaUata WeHa Bbpxy detaIIa. PiuDbNkBaIte eEKeTPO HnctpymeHTa C ymepeHo,
Sample processing of material. Add.
When cutting materials, e.g. concrete with high reinforcement, diamond discs can overheat and be damaged. Indication of this is discoloration.
In such a case, reduce the feed rate and let the diamond disc cool down by running it idle for some time at maximum speed.
High cutting speed and overheating of the disc are indicated for the diamond disc. You can avoid this with short cutting intervals in abrasive material, e.g. sand-lime brick.
Instructions for stationary use
Cutting of channels in masonry must comply with the requirements of standard DIN 1053 Part 1 or the corresponding national regulations.
These instructions must be strictly followed. Before starting work, consult with the responsible structural engineer, architect, or construction manager.
Maintenance and service
Maintenance and cleaning
● Performing maintenance and cleaning activities on electrical tools must be done with the mains disconnected. For quality and safe work, keep the electrical tool and ventilation openings clean. ● Electrical tools can produce sparks when cutting metal, which may deposit on the inside of the housing. This can damage the insulation of the electrical tool. In such a case, use a stationary extraction system, ensure adequate ventilation of the openings, and connect the electrical tool through a residual current device (RCD).
Store and handle
Accessories carefully.
If, despite careful production and testing, damage occurs, the electrical tool must be sent for repair to an authorized service center for electrical tools.
When contacting the representatives, please always specify the 10-digit identification number on the rating plate of the electrical tool.
Service and consultation
You can obtain information regarding repairs and spare parts from our after-sales service. For spare parts information, you can also find it on
www.bosch-pt.com
Our consultants will be happy to assist you with any questions regarding the product, accessories, and settings for various products from the manufacturer's range.
Robert Bosch EOOD - Bulgaria
Service Center
Warranty and extended warranty repairs. Warranty period: 3-9
1907 Sofia
Tel.: +359 (02) 962 5302
Tel.: +359 (02) 962 5427
Tel.: +359 (02) 962 5295
Fax: +359 (02) 62 46 49
Rejected
Dr. Egbert Schneider Senior Vice President Engineering
Dr. Eckerhard Strötgen Head of Product Certification

Robert Bosch GmbH, Power Tools Division D-70745 Leinfelden-Echterdingen 30.03.2009
Assembly
Senior Vice President
Engineering
Dr. Eckerhard Strötgen
Head of Product
Certification

Robert Bosch GmbH, Power Tools Division
D-70745 Leinfelden-Echterdingen
30.03.2009
Assembly
Assembly of protective devices
Dr. Egbert Schneider Senior Vice President Engineering
Dr. Eckerhard Strötgen Head of Product Certification

Robert Bosch GmbH, Power Tools Division D-70745 Leinfelden-Echterdingen 30.03.2009
Assembly
Assembly of protective devices
Before performing any work on the power tool, pull the mains plug out of the socket.
General safety instructions
ATTENTION
Dr. Egbert Schneider Senior Vice President Engineering
Dr. Eckerhard Strötgen Head of Product Certification
ppa. Maee i.v. Nogcu
Robert Bosch GmbH, Power Tools Division D-70745 Leinfelden-Echterdingen 30.03.2009
Assembly
Static safety instructions
Dr. Egbert Schneider Dr. Eckerhard Ströttgen Senior Vice President Head of Product Engineering Certification
ppa. Maee i.v. Nogcu
Robert Bosch GmbH, Power Tools Division D-70745 Leinfelden-Echterdingen 30.03.2009
Assembly
Attaching the protective devices
Before servicing or cleaning the power tool, pull the plug out of the socket.
Note. If the grinding disc cracks during operation or the fastening device on the guard or on the power tool is damaged, the power tool must be sent immediately to a service center, the address of which can be found in the section "Service and customer consultation".
Grinding guard
Place the guard 5 on the spindle collar. Turn the guard 5 to the position that corresponds to the type of work to be performed, and then secure the guard 5 with the clamping screw 6.
The position of the grinding guard 5 must be such that sparks are not directed towards the operator.
Cutting guard
When cutting metal, always use the cutting guard 7. When cutting stone, always use the cutting guard with dust extraction and cutting guide 20.
Assembly
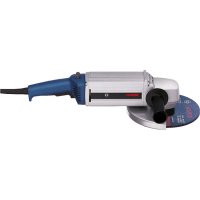

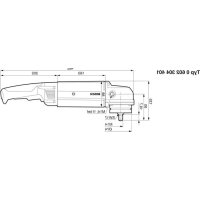
- PWS
- BOSCH
- ASSEMBLY
- GENERAL POWER TOOL SAFETY WARNINGS
- WARNING
- READ ALL SAFETY WARNINGS AND ALL INSTRUCTIONS. FAILURE TO FOLLOW
- SAVE ALL WARNINGS AND INSTRUCTIONS FOR FUTURE REFERENCE
- WORK AREA SAFETY
- ELECTRICAL SAFETY
- PERSONAL SAFETY
- POWER TOOL USE AND CARE
- SERVICE
- SAFETY WARNINGS FOR ANGLE GRINDER
- KICKBACK AND RELATED WARNINGS
- ADDITIONAL SAFETY INSTRUCTIONS FOR GRINDING AND CUTTING OFF OPERATIONS
- ADDITIONAL SAFETY WARNINGS SPECIFIC FOR ABRASIVE CUTTING OFF OPERATIONS
- SAFETY WARNINGS SPECIFIC FOR SANDING OPERATIONS
- SAFETY WARNINGS SPECIFIC FOR WIRE BRUSHING OPERATIONS
- ADDITIONAL SAFETY WARNINGS
- FUNCTIONAL DESCRIPTION
- INTENDED USE
- PRODUCT FEATURES
- TECHNICAL DATA
- NOISE/VIBRATION INFORMATION
- WEAR HEARING PROTECTION
- DECLARATION OF CONFORMITY
- MOUNTING THE PROTECTIVE DEVICES
- PROTECTION GUARD FOR GRINDING
- PROTECTION GUARD FOR CUTTING
- AUXILIARY HANDLE
- VIBRATION-DAMPENING AUXILIARY HANDLE
- VIBRATION CONTROL
- HAND GUARD
- MOUNTING THE GRINDING TOOLS
- GRINDING/CUTTING DISC
- FLAP DISC
- RUBBER SANDING PLATE
- ENGLISH
- CUP BRUSH/DISC BRUSH
- FOR OPERATIONS WITH THE CUP BRUSH/WHEEL BRUSH, ALWAYS MOUNT THE HAND GUARD
- GRINDING CUP
- WHEN WORKING WITH THE GRINDING CUP, MOUNT THE SPECIAL PROTECTION GUARD
- QUICK-CLAMPING NUT SDS
- THE QUICK-CLAMPING NUT 11 MAY BE USED ONLY FOR GRINDING OR CUTTING DISCS
- APPROVED GRINDING TOOLS
- ROTATING THE MACHINE HEAD
- DUST/CHIP EXTRACTION
- OPERATION
- STARTING OPERATION
- SWITCHING ON AND OFF
- REDUCED STARTING CURRENT (PWS 20-230 J)
- WORKING ADVICE
- ROUGH GRINDING
- CUTTING METAL
- CUTTING STONE
- INFORMATION ON STRUCTURES
- MAINTENANCE AND SERVICE
- MAINTENANCE AND CLEANING
- AFTER-SALES SERVICE AND CUSTOMER ASSISTANCE
- WWW.BOSCH-PT.COM
- GREAT BRITAIN
- AUSTRALIA, NEW ZEALAND AND PACIFIC ISLANDS
- REPUBLIC OF SOUTH AFRICA
- CUSTOMER SERVICE
- GAUTENG - BSC SERVICE CENTRE
- KZN - BSC SERVICE CENTRE
- WESTERN CAPE - BSC SERVICE CENTRE
- BOSCH HEADQUARTERS
- DISPOSAL
- ONLY FOR EC COUNTRIES
- MONTAGE
- SDS-CLIC QUICK-RELEASE CHUCK
- WASTE MANAGEMENT
- ONLY FOR EU COUNTRIES
- INSTALLATION
- SAFETY INSTRUCTIONS FOR POWER TOOLS
- SAFETY WARNINGS
- INFORMATION ON NOISE AND VIBRATION
- WEAR EAR PROTECTORS
- SIGMA
- GUARD FOR SANDING
- GUARD FOR CUTTING
- ADDING OIL
- ADDING OIL WITH VIBRATION DAMPER
- VIBRATION
- ACTIVATION OF SAFETY DEVICES
- DISC BLADES AND GUARDS
- RINSING DISC FOR CUTTING
- ELASTIC CUTTING DISC
- GÜVENLIK TALIMATI
- ELEKTRIKLI EL ALETLERI ICIN GENEL UYARI TALIMATI
- MONTAJ
- WASTE DISPOSAL
- SAFETY INSTRUCTIONS FOR ANGLE GRINDERS
- REVERSE AND CORRESPONDING PRECAUTIONARY INSTRUCTIONS
- SPECIAL SAFETY INSTRUCTIONS FOR GRINDING AND CUTTING
- ADDITIONAL SPECIAL SAFETY INSTRUCTIONS FOR CUTTING WITH A CUTTING DISC
- SPECIAL SAFETY INSTRUCTIONS FOR SANDING WITH SANDING SHEETS
- SPECIAL SAFETY INSTRUCTIONS FOR WORKING WITH WIRE BRUSHES
- ADDITIONAL SAFETY INSTRUCTIONS
- FUNCTION DESCRIPTION
- READ ALL SAFETY INSTRUCTIONS AND INSTRUCTIONS FOR THE POWER TOOL
- ILLUSTRATED COMPONENTS
- AAHHBIE TIO WUMY N BN6PAUNN
- TPIMEHNTE CPECTBA 3AUNNTBI OPRAHOB CLYXA
- ARBAEHNE O COOTBETCTBHN
- C
- C6OPKA
- YCTAHOBKA 3AUNTHBIX YCTPOCTB
- AUNTHBIK KOXY DXI WANOBAHN
- AUNTHBI KOXYX AON OTE3AHN
- ADDITIONAL HANDLE
- VIBRATION HANDLE
- PROTECTIVE GUARD FOR SANDING
- MOUNTING THE SANDING TOOLS
- DIAMOND CUTTING DISCS
- WORKING WITH THE MACHINE
- SWITCHING THE POWER TOOL ON
- SWITCHING ON/OFF
- STARTING CURRENT LIMITING (PWS 20-230 J)
- APPLICATION INSTRUCTIONS
- SURFACE SANDING
- NEVER USE CUTTING DISCS FOR SANDING
- CUTTING METAL MATERIALS
- CUTTING STONES
- INSTRUCTIONS FOR STATIC
- SERVICE AND CUSTOMER CONSULTATION
- WWW.BOSCH-PT.RU
- RUSSIA
- BELARUS
- YTHAN3AUN
- TOIBKO DAA CTPAH-4AEHOB EC
- BO3MOXHBI N3MEHEHHA
- BKA3IBKN 3 TEXHIKN 6E3NEKN
- ARAIBHI 3ACTEPEXEHHA DAA EAEKTPOPNLAIB
- KEEP ALL WARNINGS AND INSTRUCTIONS FOR FUTURE REFERENCE
- COMPONENT ILLUSTRATIONS
- MOHTAX
- MONTAX 3AXNCHNX PNCTPOB
- PROTECTIVE HOOD FOR SANDING
- PROTECTIVE EQUIPMENT
- MOUNTING ABRASIVE TOOLS
- UKRAINIAN
- ABRASIVE CUTTING/GRINDING DISC
- RUBBER BACKING PAD
- CUP OR DISC BRUSH
- GUIDE PIN
- QUICK-RELEASE NUT SDS-CLIC
- OA3BOIEHI WIICYBAIBHI IHCTPYMEHTN
- TOBEPTAHR ROIOBKN PEAKYKTOPA
- BIAIOOIAI6HMIAIPYBAIBHN KPYR
- MOVEMENT
- INSTRUCTIONS FOR STATIC LOADS
- TECHNICAL SERVICE AND MAINTENANCE
- SERVICE CENTER AND MAINTENANCE OF CLIENTS
- UKRAINE
- MOUNTING
- SAFETY AT THE WORKPLACE
- SAFE WORK PRACTICES
- MAINTENANCE
- SAFETY INSTRUCTIONS FOR ALL OPERATIONS
- DISPOSAL AND RECYCLING INFORMATION
- SPECIAL SAFETY INSTRUCTIONS FOR GRINDING AND CUTTING WITH GRINDING DISCS
- SAFETY WARNINGS FOR CUTTING-OFF OPERATIONS
- CTEUHAHN YKA3AHN 3A 6E3OTACNA PA6OTA NPN WANFOBAHE C WKYPKA
- CTEUHAHN YKA3AHN 3A 6E3OTACNA PA6OTA TPH TOOPHCTBAHE C TELAHN YETKN
- OTTBHNTEAHN YKA3AHH 3A 6E3OTACHA PA6OTA
- INFORMATION ABOUT USE AND SELECTION
- MOUNTING OF THE AUXILIARY HANDLES
- VIBRATION CONTROL AUXILIARY HANDLE
- TPEIA3EH EKPAN
- MOUNTING THE CUTTING TOOLS
- PERMITTED WORKING TOOLS
- TURNING THE GEARBOX HEAD
- COUNTING SYSTEM
- PA6OTA C EALEKTPOHCTPPYMEHTA
- БЛГАРСКИЙ
- PA3P3ABAHE HA KAMEHH MATEPNAA
- INSTRUCTIONS FOR STATIONARY USE
- SERVICE AND CONSULTATION
- ROBERT BOSCH EOOD - BULGARIA
- REJECTED
- ASSEMBLY OF PROTECTIVE DEVICES
- GENERAL SAFETY INSTRUCTIONS
- ATTENTION
- STATIC SAFETY INSTRUCTIONS
- ATTACHING THE PROTECTIVE DEVICES
- GRINDING GUARD
- CUTTING GUARD
Brand : BOSCH
Model : PWS 20-230
Category : Angle grinder