
PAS 11-21 - Vacuum Cleaner BOSCH - Free user manual and instructions
Find the device manual for free PAS 11-21 BOSCH in PDF.
| Brand | BOSCH |
| Model | PAS 11-21 |
| Product type | Universal vacuum cleaner |
| Rated power input | 900 W |
| Max power input | 1100 W |
| Tank capacity (gross) | 21 L |
| Dust bag volume | 6 L |
| Vacuum pressure | 150 mbar |
| Airflow | 50 L/s |
| Dust class (BIA) | M |
| Weight (according to EPTA) | 6.3 kg |
| Protection class | II |
| Rated voltage | 230/240 V |
| Sound pressure level | 77 dB(A) |
| Sound level uncertainty | K = 3 dB |
| Permanent filter | Yes, washable |
| Automatic shut-off float | Yes |
| Liquid suction | Yes, with float |
| Tool power outlet | No (model PAS 11-21) |
| Power cable length | Approx. 5 m (estimated) |
Frequently Asked Questions - PAS 11-21 BOSCH
User questions about PAS 11-21 BOSCH
0 question about this device. Answer the ones you know or ask your own.
Ask a new question about this device
Download the instructions for your Vacuum Cleaner in PDF format for free! Find your manual PAS 11-21 - BOSCH and take your electronic device back in hand. On this page are published all the documents necessary for the use of your device. PAS 11-21 by BOSCH.
USER MANUAL PAS 11-21 BOSCH
Power Tools Division
70745 Leinfelden-Echterdingen
Germany
www.bosch-pt.com
1 609 929 H72 (2009.09) O / 80 WEU

1609929H72
PAS
11-21 | 12-27 | 12-27 F

BOSCH
de Originalbetriebsanleitung
el PpwtuO oynw xphonc
en Original instructions
tr Original isletme talimati
fr Notice originale
es Manual original
pt Manual original
it Istruzioni originali
nl Oorspronkelijke
gebruksaanwijzing
da Original brugsanvisning
sv Bruksanvisning i original
no Original driftsinstruks
fi Alkuperäiset ohjeet


A

B

| A [U] | B [P(max.)] | |
| EU | 220–240V | 2 000 W |
| DK | 230 V | |
| GB | 110 V | |
| AUS | 240 V |

C

Deutsch. 6
English. Page 12
Français. Page 18
Espanol . Pagina 24
Portugues . Pagina 30
Italiano . 36
Nederlandsl. 42
Dansk . Side 47
Svenska. Sida 52
Norsk. Side 57
Suomi . 62
Elambdaiká 67
Türkce Sayfa 73
6 | Deutschland
Sicherheitshinweise

Dr. Egbert Schneider Senior Vice President Engineering
Dr. Eckerhard Strötgen
Head of Product Certification
ppa. Maee i.v. Nogcu
Robert Bosch GmbH, Power Tools Division D-70745 Leinfelden-Echterdingen 30.07.2009
8 | Deutschland
Technische Daten
Read all safety warnings and all instructions before use the appliance. Failure to follow the warnings and instructions may result in elec
tric shock, fire and/or serious injury.
Save these instructions.
Do not vacuum materials that are harmful to one's health, e. g. dust from beech or oak wood, masonry dust, asbestos. These materials are considered carcinogenic.
CAUTION! This appliance is not suitable for picking up hazardous dust. Do not vacuum inflammable or explosive fluids; for example, benzene, oil, alcohol, solvents. Do not vacuum hot or burning dust. Do not operate the machine in rooms where the danger of an explosion exists. The dusts, vapours or fluids can ignite or explode.
- Keep the vacuum cleaner away from rain and moisture. Water entering the vacuum cleaner increases the risk of an electric shock.
- When operating the vacuum cleaner in damp environments, use a residual current device (RCD). Using a residual current device (RCD) reduces the risk of an electric shock.
- Connect the vacuum cleaner to a properly earthed mains supply. The socket outlet and the extension cable must have an operative protective conductor.
Regularly examine the supply cord for damage, such as cracking or ageing. If damage is found, replace the cord before further use.
- Only use the socket outlet on the appliance for purposes specified in the instruction manual.
Do not drive over, crush or stretch the cable. Do not pull the cable to unplug the plug from the socket outlet or to move the vacuum cleaner. Damaged cables increase the risk of an electric shock.
The plug is to be removed from the socket outlet during cleaning or maintenance, and when replacing parts.
Provide for good ventilation at the working place.
The appliance is not intended for use by persons (including children) with reduced physical, sensory or mental capabilities, or lack of experience and knowledge, unless they have been given supervision or instruction concerning use of the unit by a person responsible for their safety.
Have the vacuum cleaner repaired only through qualified specialists and only using original spare parts. This ensures that the safety of your vacuum cleaner is maintained.
CAUTION! If foam or liquid escapes from the appliance, switch off immediately.
Regularly clean the water level limiting device in accordance with the instructions and examine it for signs of damage.
Products sold in GB only: Your product is fitted with an BS 1363/A approved electric plug with internal fuse (ASTA approved to BS 1362). If the plug is not suitable for your socket outlets, it should be cut off and an appropriate plug fitted in its place by an authorised customer service agent. The replacement plug should have the same fuse rating as the original plug.
The severed plug must be disposed of to avoid a possible shock hazard and should never be inserted into a mains socket elsewhere.
Products sold in AUS and NZ only: Use a residual current device (RCD) with a rated residual current of 30mA or less.
Symbols
The following symbols could have a meaning for the use of your vacuum cleaner. Please take note of the symbols and their meaning. The correct interpretation of the symbols will help you to use the vacuum cleaner in a better and safer manner.
Symbol
Meaning


CAUTION
Read all safety warnings and all
instructions before use the appliance. Failure to follow the warnings and instructions may result in electric shock, fire and/or serious injury.
Functional Description
Intended Use
The machine is intended for vacuuming and extraction of materials that are not hazardous to one's health and for non-flammable liquids. BIA dust category M.
Use the vacuum cleaner only when you fully understand and can perform all functions without limitation, or have received appropriate instructions.
Product Features
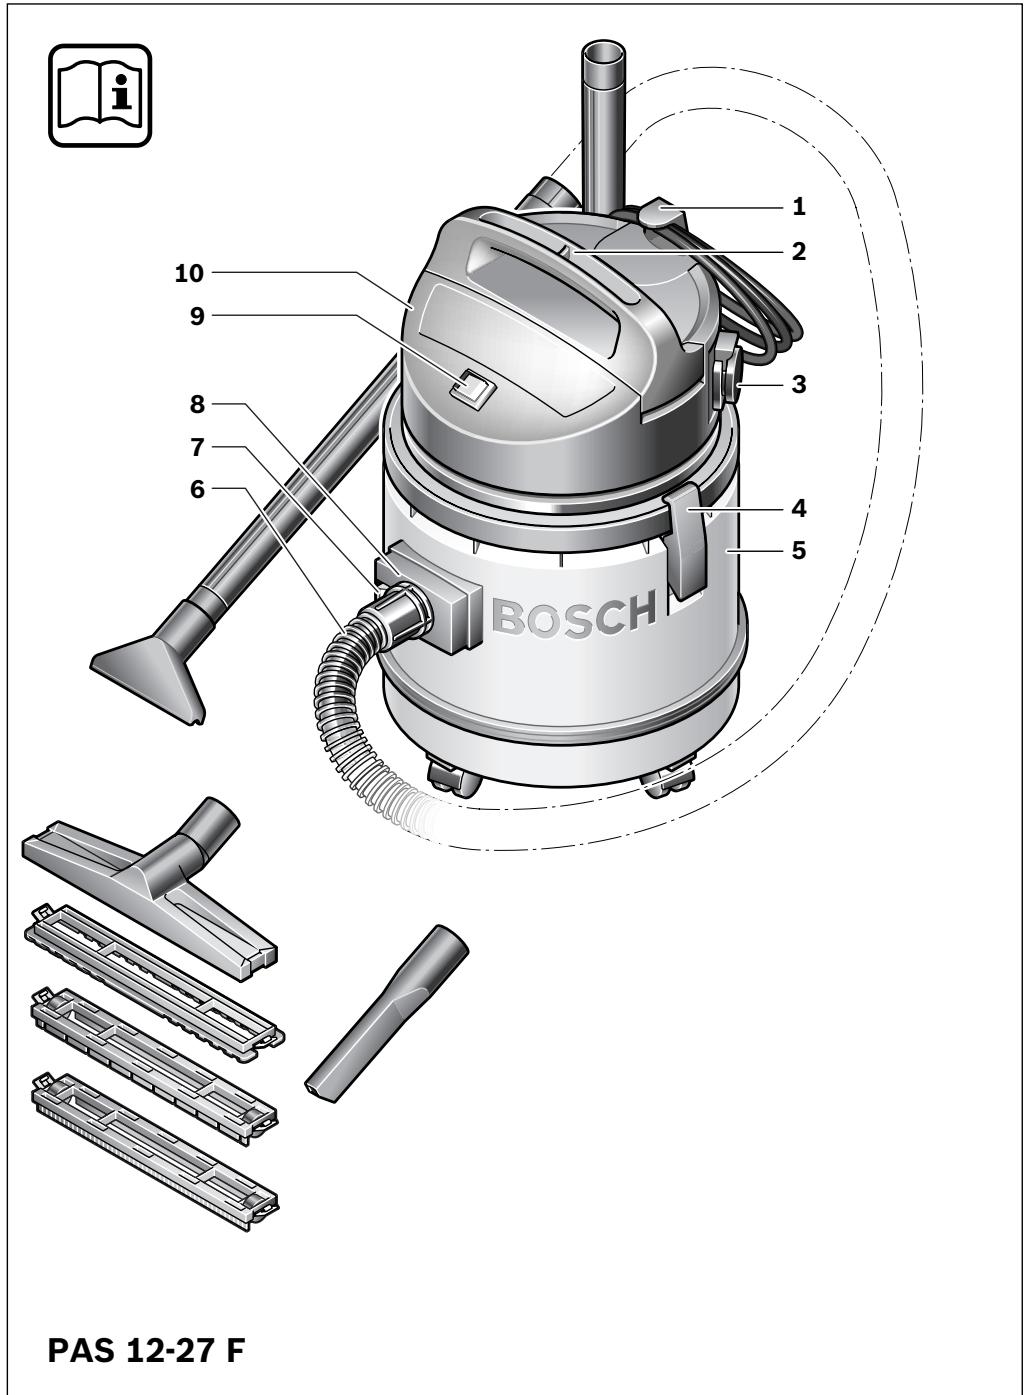
The numbering of the product features refers to the illustration of the vacuum cleaner on the graphics page.
1 Cable holder
2 Carrying handle
3 Socket for power tool (PAS 12-27 F)
4 Latch of the vacuum cover
5 Container
6 Vacuum hose
7 Release button for hose connection piece
8 Hose connection piece
9 On/Off switch (PAS 11-21/PAS 12-27)
9 Mode selector switch (PAS 12-27 F)
1.0 Vacuum lid
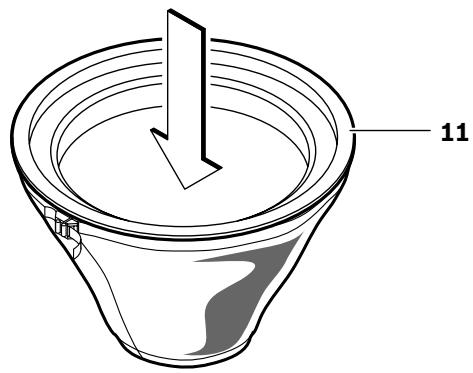
11 Permanent filter
12 Float
13 Accessory holder
14 Dust bag
15 Plastic basket
*Accessories shown or described are not part of the standard delivery scope of the product. A complete overview of accessories can be found in our accessories program.
Noise/Vibration Information
Measured values determined according to EN 60704.
Typically the A-weighted sound pressure level of the product is 77 dB(A). Uncertainty K = 3 dB.
Declaration of Conformity C
We declare under our sole responsibility that the product described under "Technical Data" is in conformity with the following standards or standardization documents: EN 60335 according to the provisions of the directives 2006/95/EC, 2004/108/EC.
C05
Dr. Egbert Schneider Senior Vice President Engineering
Dr. Eckerhard Strötgen
Head of Product Certification

Robert Bosch GmbH, Power Tools Division
D-70745 Leinfelden-Echterdingen
30.07.2009

14 | English
Technical Data
| All-Purpose Vacuum Cleaner | PAS 11-21 | PAS 11-21 | PAS 12-27 | PAS 12-27 F | |
| Article number | 0 603 395 034 | 0 603 395 003 | 0 603 395 1.. | 0 603 395 2.. | |
| 0 603 395 008 | |||||
| 0 603 395 032 | |||||
| 0 603 395 037 | |||||
| 0 603 395 042 | |||||
| Rated power input | W | 900 | 1100 | 1100 | 1100 |
| Power input, max. | W | 1100 | 1300 | 1300 | 1300 |
| Container volume (gross) | I | 21 | 21 | 27 | 27 |
| Dust bag contents | I | 6 | 6 | 10 | 10 |
| Vacuum* | mbar | 150 | 150 | 160 | 160 |
| Airflow* | I/s | 50 | 50 | 60 | 60 |
| Dust category (BIA) | M | M | M | M | |
| Weight according to EPTA-Procedure 01/2003 | kg | 6.3 | 6.3 | 6.5 | 6.5 |
| Protection class | ☐/II | ☐/II | ☐/II | ☐/I | |
- measured at the blower
The values given are valid for nominal voltages [U] of 230/240 V. For lower voltage and models for specific countries, these values can vary.
Please observe the article number on the type plate of your vacuum cleaner. The trade names of the individual vacuum cleaners may vary.
Assembly
Before any work on the vacuum cleaner itself, pull the mains plug.
Note: For vacuuming, the permanent filter 11 always must be inserted. In addition, the dust bag 14 must be used when dry vacuuming.
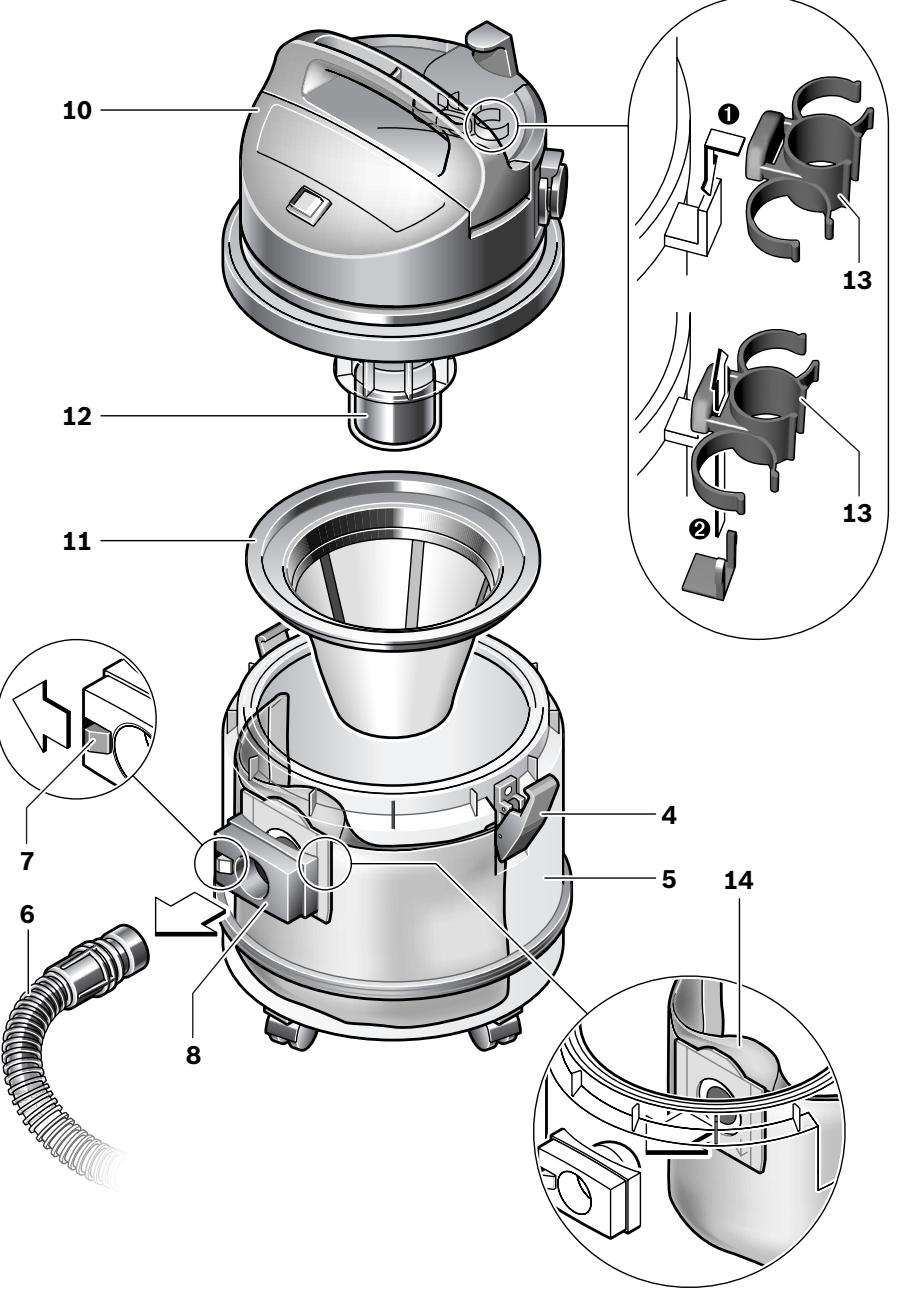
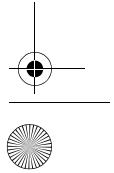
Replacing/Inserting the Dust Bag (see figure A)
Unlock the latches 4 and remove the vacuum lid 10.
Pull off the full dust bag 14 from the connection flange toward the rear. Close the opening of the dust bag by folding down the lid. Remove the closed dust bag from the vacuum cleaner.
- Slide the new dust bag 14 over the connection flange of the vacuum cleaner. Make sure that the full length of the dust bag 14 faces against the inner wall of the container 5. Reattach the vacuum lid 10.
- Lock the latches 4.
When using a dust bag 14, the permanent filter 11 remains unclogged longer, the vacuuming performance is maintained longer, and the disposal of dust is made easier.
Mounting the Vacuum Hose (see figure A)
Insert the vacuum hose 6 into the hose connection piece 8 until it is locked.
Insert the extension tubes firmly into each other.
English | 15
Insert the accessory holder 13 from above onto the holder of the vacuum lid 10. Afterwards, insert the angle piece into the accessory holder 13 from the bottom until it can be heard to latch.
For disassembly of the accessory holder 13, press the ends of the angle piece together and pull it out towards the bottom. Remove the accessory holder 13 to the top.
Removing the Vacuum Hose (see figure A)
To remove the vacuum hose 6, press the unlocking button 7 to the left and pull out the vacuum hose 6 at the same time.
Operation
Starting Operation
Observe the correct mains voltage! The voltage of the power source must agree with the voltage specified on the nameplate of the vacuum cleaner. Vacuum cleaners marked with 220-240 V can also be connected to 220 V
- Switch the vacuum cleaner off immediately as soon as foam or water comes out, and empty the container. Otherwise, the vacuum cleaner can become damaged.
Switching On and Off (PAS 11-21/PAS 12-27)
To start the vacuum cleaner, set the On/Off switch 9 to position "1".
To switch off the vacuum cleaner, set the On/Off switch 9 to position "0".
Switching On and Off (PAS 12-27 F)
To start the vacuum cleaner, set the mode selector switch 9 to position "l".
To switch off the vacuum cleaner, set the mode selector switch 9 to position "0".
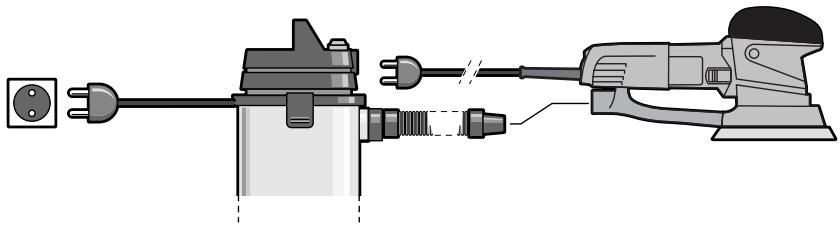
Operation with remote automatic switching (see figure B) (PAS 12-27 F)
A socket outlet with earthing contact 3 is integrated in the vacuum cleaner, which allows for connection of an external power tool. The vacuum cleaner is automatically put into operation via the power tool. Observe the maximal allowable load of the connected power tool.
Set the mode selector switch 9 to position "II".
For connecting power tools, various hose systems are available as accessories.
To start the operation of the vac, switch on the power tool connected to the socket 3. The vacuum cleaner starts automatically.
To switch off the vac, switch off the power tool. The vacuum cleaner switches off automatically approx. 6 seconds later.
Wet Vacuuming
CAUTION! This appliance is not suitable for picking up hazardous dust. Do not vacuum inflammable or explosive fluids; for example, benzene, oil, alcohol, solvents. Do not vacuum hot or burning dust. Do not operate the machine in rooms where the danger of an explosion exists. The dusts, vapours or fluids can ignite or explode.
The vacuum cleaner may not be used as a water pump. The vacuum cleaner is intended for vacuuming air and water mixtures.
Before any work on the vacuum cleaner itself, pull the mains plug.
Note: Before wet vacuuming, the dust bag 14 must be removed and the container 5 must be emptied.
The vacuum cleaner is equipped with a float 12. When the maximum filling height is reached, the vacuum cleaner switches off. Set the On/Off switch 9 to position "0" and empty the container 5.
After vacuuming, remove the permanent filter 11 to prevent the forming of mould and allow it to dry thoroughly; especially before using it for dry vacuuming.

16 | English
Maintenance and Service
Maintenance and Cleaning
Before any work on the vacuum cleaner itself, pull the mains plug.
For safe and proper working, always keep the vacuum cleaner and ventilation slots clean.
If the replacement of the supply cord is necessary, this has to be done by Bosch or an authorized Bosch service agent in order to avoid a safety hazard.
If the vacuum cleaner should fail despite the care taken in manufacturing and testing procedures, repair should be carried out by an after-sales service centre for Bosch power tools.
In all correspondence and spare parts orders, please always include the 10-digit article number given on the type plate of the vacuum cleaner.
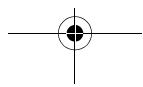
Removing/Replacing the Permanent Filter (see figure C)
To maintain the optimum performance of the vacuum cleaner, clean the permanent filter 11 by brushing off or rinsing with water after each use.
The permanent filter 11 can be replaced, if required. Cut through the band at the soiled permanent filter 11 and remove the inserted plastic basket 15. Press the plastic basket 15 firmly into the new permanent filter 11.
Container
Wipe out the container 5 from time to time with a commercially available, non-scouring cleaning agent and allow to dry.
Malfunctions
In the case of insufficient vacuuming performance, check the following:
Is the vacuum lid 10 attached properly?
Is the hose system clogged?
- Are the extension tubes connected firmly?
Is the container 5 full?
Is the dust bag 14 full?
Is the permanent filter 11 clogged with dust?
Emptying at regular intervals ensures optimum vacuuming performance.
If the vacuuming performance is not achieved thereafter, take the vacuum cleaner to customer service.
After-sales Service and Customer Assistance
Our after-sales service responds to your questions concerning maintenance and repair of your product as well as spare parts. Exploded views and information on spare parts can also be found under:
www.bosch-pt.com
Our customer service representatives can answer your questions concerning possible applications and adjustment of products and accessories.
Great Britain
Robert Bosch Ltd. (B.S.C.)
P.O.Box 98
Broadwater Park
North Orbital Road
Denham
Uxbridge
UB 9 5HJ
Tel. Service: +44 (0844) 736 0109
Fax:+44(0844)7360146
E-Mail: boschservicecentre@bosch.com
Ireland
Origo Ltd.
Unit 23 Magna Drive
Magna Business Park
City West
Dublin 24
Tel. Service: +353 (01) 466 67 00
Fax: +353 (01) 466 68 88


English | 17
Australia, New Zealand and Pacific Islands
Robert Bosch Australia Pty. Ltd.
Power Tools
Locked Bag 66
Clayton South VIC 3169
Customer Contact Center
Inside Australia:
Phone: +61 (01300) 307 044
Fax: +61 (01300) 307 045
Inside New Zealand:
Phone: +64 (0800) 543 353
Fax: +64 (0800) 428 570
Outside AU and NZ:
Phone: +61 (03) 9541 5555
www.bosch.com.au
Republic of South Africa
Customer service
Hotline: +27 (011) 6519600
Gauteng - BSC Service Centre
35 Roper Street, New Centre
Johannesburg
Tel.: +27 (011) 4939375
Fax: +27 (011) 4930126
E-Mail: bsctools@icon.co.za
KZN - BSC Service Centre
Unit E, Almar Centre
143 Crompton Street
Pinetown
Tel.: +27 (031) 7 01 21 20
Fax: +27 (031) 7 01 24 46
E-Mail: bsc.dur@za.bosch.com
Western Cape - BSC Service Centre
Democracy Way, Prosperity Park
Milnerton
Tel.: +27 (021) 551 25 77
Fax: +27 (021) 5513223
E-Mail: bsc@zsd.co.za
Bosch Headquarters
Midrand, Gauteng
Tel.: +27 (011) 6519600
Fax: +27 (011) 6519880
E-Mail: rbsa-hq.pts@za.bosch.com
Disposal
The vacuum cleaner, accessories and packaging should be sorted for environmental-friendly recycling.
Only for EC countries:
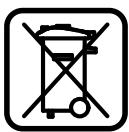
Do not dispose of vacuum cleaners into household waste! According the European Guideline 2002/96/EC for Waste Electrical and Electronic Equipment and its implementation into national
right, power tools that are no longer usable must be collected separately and disposed of in an environmentally correct manner.
Subject to change without notice.
18 | Français
Dr. Egbert Schneider Senior Vice President Engineering
Dr. Eckerhard Strötgen
Head of Product Certification

Robert Bosch GmbH, Power Tools Division D-70745 Leinfelden-Echterdingen 30.07.2009

20 | Français
\section*{Caracteristiques techniques}
Robert Bosch (France) S.A.S.
Dr. Egbert Schneider
Dr. Eckerhard Strötgen
Senior Vice President
Head of Product
Engineering
Certification

Robert Bosch GmbH, Power Tools Division
D-70745 Leinfelden-Echterdingen
30.07.2009
26 | Espanol
Datasétécnicos
| Aspirador universal | PAS 11-21 | PAS 11-21 | PAS 12-27 | PAS 12-27 F | |||
| No de articulo | 0 603 395 034 | 0 603 395 003 | 0 603 395 1.. | 0 603 395 2.. | |||
| 0 603 395 008 | |||||||
| 0 603 395 032 | |||||||
| 0 603 395 037 | |||||||
| 0 603 395 042 | |||||||
| Potencia absorbida nominal | W | 900 | 1100 | 1100 | 1100 | ||
| Potencia absorbida, max. | W | 1100 | 1300 | 1300 | 1300 | ||
| Capacidad brute del deposito | I | 21 | 21 | 27 | 27 | ||
| Capacidad del saco colector de polvo | I | 6 | 6 | 10 | 10 | ||
| Depresión* | mbar | 150 | 150 | 160 | 160 | ||
| Caudal de aire* | I/s | 50 | 50 | 60 | 60 | ||
| Clase de polvo (BIA) | M | M | M | M | |||
| Peso según EPTA-Procedure 01/2003 | kg | 6,3 | 6,3 | 6,5 | 6,5 | ||
| Clase de protección | □/II | □/II | □/II | ⊕/I | |||
Dr. Egbert Schneider Senior Vice President Engineering
Dr. Eckerhard Ströttgen
Head of Product Certification
paa aee i.v.
Robert Bosch GmbH, Power Tools Division D-70745 Leinfelden-Echterdingen 30.07.2009

32 | Portugues
Dados技术和
| Aspirador universal | PAS 11-21 | PAS 11-21 | PAS 12-27 | PAS 12-27 F | |||
| N° do produit | 0 603 395 034 | 0 603 395 003 | 0 603 395 1.. | 0 603 395 2.. | |||
| 0 603 395 008 | |||||||
| 0 603 395 032 | |||||||
| 0 603 395 037 | |||||||
| 0 603 395 042 | |||||||
| Potência nominalconsumida | W | 900 | 1100 | 1100 | 1100 | ||
| máx. potência consumida | W | 1100 | 1300 | 1300 | 1300 | ||
| Volume do depessoito(Bruto) | I | 21 | 21 | 27 | 27 | ||
| Volume do saco de pó | I | 6 | 6 | 10 | 10 | ||
| Vázuo* | mbar | 150 | 150 | 160 | 160 | ||
| Corrente de ar* | I/s | 50 | 50 | 60 | 60 | ||
| Classe de pó (BIA) | M | M | M | M | |||
| Peso conforme EPTA-Procedure 01/2003 | kg | 6,3 | 6,3 | 6,5 | 6,5 | ||
| Classe de proteção | □/II | □/II | □/II | #/I | |||
Dr. Egbert Schneider Senior Vice President Engineering
Dr. Eckerhard Ströttgen
Head of Product Certification

Robert Bosch GmbH, Power Tools Division
D-70745 Leinfelden-Echterdingen
30.07.2009

38 | Italiano
Dati tecnici
Dr. Egbert Schneider Senior Vice President Engineering
Dr. Eckerhard Strötgen
Head of Product Certification

Robert Bosch GmbH, Power Tools Division D-70745 Leinfelden-Echterdingen 30.07.2009
44 | Netherlands
Technische gegevens
| Allroundzuiger | PAS 11-21 | PAS 11-21 | PAS 12-27 | PAS 12-27 F | |||
| Zaaknummer | 0 603 395 034 | 0 603 395 003 | 0 603 395 1.. | 0 603 395 2.. | |||
| 0 603 395 008 | |||||||
| 0 603 395 032 | |||||||
| 0 603 395 037 | |||||||
| 0 603 395 042 | |||||||
| Opgenomen vermogen | W | 900 | 1100 | 1100 | 1100 | ||
| Max. opgenomen vermogen | W | 1100 | 1300 | 1300 | 1300 | ||
| Inhoud reservoir (bruto) | I | 21 | 21 | 27 | 27 | ||
| Inhoud stofzak | I | 6 | 6 | 10 | 10 | ||
| Onderdruk* | mbar | 150 | 150 | 160 | 160 | ||
| Luchtstroom* | I/s | 50 | 50 | 60 | 60 | ||
| Stofklasse (BIA) | M | M | M | M | |||
| Gewicht volgens EPTA-Procedure 01/2003 | kg | 6,3 | 6,3 | 6,5 | 6,5 | ||
| Isolatieklasse | □/II | □/II | □/II | #/I | |||
Dr. Egbert Schneider Senior Vice President Engineering
Dr. Eckerhard Strötgen
Head of Product Certification
ppa. Maee i.v. Nogcu
Robert Bosch GmbH, Power Tools Division
D-70745 Leinfelden-Echterdingen
30.07.2009
Dansk | 49
Tekniske data
| Universalsuger | PAS 11-21 | PAS 11-21 | PAS 12-27 | PAS 12-27 F | |||
| Typenummer | 0 603 395 034 | 0 603 395 003 | 0 603 395 1.. | 0 603 395 2.. | |||
| 0 603 395 008 | |||||||
| 0 603 395 032 | |||||||
| 0 603 395 037 | |||||||
| 0 603 395 042 | |||||||
| Nominel optagen effekt | W | 900 | 1100 | 1100 | 1100 | ||
| Max. optagen effekt | W | 1100 | 1300 | 1300 | 1300 | ||
| Beholdervolumen (brutto) | I | 21 | 21 | 27 | 27 | ||
| Støpsevolumen | I | 6 | 6 | 10 | 10 | ||
| Undertryk* | mbar | 150 | 150 | 160 | 160 | ||
| Luftstrøm* | I/s | 50 | 50 | 60 | 60 | ||
| Støvklasse (BIA) | M | M | M | M | |||
| Vægt svarer til EPTA-Procedure 01/2003 | kg | 6,3 | 6,3 | 6,5 | 6,5 | ||
| Beskyttelseklasse | □/II | □/II | □/II | ⊕/I | |||
Taend/sluk (PAS 11-21/PAS 12-27)
Sugen ibrugtages ved at vippe start-stop-kontakten 9 i position „I".
Sugeren slukkes ved at vippe start-stop-kontak-ten 9 i position „0".
Taend/sluk (PAS 12-27 F)
Sugen ibrugtages ved at vippe driftsform-valg-kontakten 9 i position „I".
Sugeren slukkes ved at vippe driftsform-valg-kontakten 9 i position „0".
Bosch Service Center
Telegrafvej 3
2750 Ballerup
Tel. Service Center: +45 (4489) 8855
Fax: +45 (4489) 87 55
E-Mail: vaerktoej@dk.bosch.com
Bortskaffelse
Smid参加会议的人员 Smid参加会议的人员 Smid did not attend the meeting.
Dr. Egbert Schneider Senior Vice President Engineering
Dr. Eckerhard Strötgen
Head of Product Certification
ppa. Maee i.v. Nogcu
Robert Bosch GmbH, Power Tools Division
D-70745 Leinfelden-Echterdingen
30.07.2009
54 | Svenska
Tekniska data
| Universaldammsugare | PAS 11-21 | PAS 11-21 | PAS 12-27 | PAS 12-27 F | |||
| Produktnummer | 0 603 395 034 | 0 603 395 003 | 0 603 395 1.. | 0 603 395 2.. | |||
| 0 603 395 008 | |||||||
| 0 603 395 032 | |||||||
| 0 603 395 037 | |||||||
| 0 603 395 042 | |||||||
| Upptagen märkeffekt | W | 900 | 1100 | 1100 | 1100 | ||
| max. upptagen effekt | W | 1100 | 1300 | 1300 | 1300 | ||
| Behçllarvolym (brutto) | I | 21 | 21 | 27 | 27 | ||
| Dammåsen volym | I | 6 | 6 | 10 | 10 | ||
| Vakuum* | mbar | 150 | 150 | 160 | 160 | ||
| Luftström* | l/s | 50 | 50 | 60 | 60 | ||
| Dammklass (BIA) | M | M | M | M | |||
| Vikt enligt EPTA-Procedure 01/2003 | kg | 6,3 | 6,3 | 6,5 | 6,5 | ||
| Skyddsklass | □/II | □/II | □/II | ⊕/I | |||
Bosch Service Center
Telegrafvej 3
2750 Ballerup
Danmark
Tel.: +46 (020) 41 44 55
Fax: +46 (011) 187691
Avfallshantering
Dr. Egbert Schneider
Dr. Eckerhard Ströttgen
Senior Vice President
Head of Product
Engineering
Certification

Robert Bosch GmbH, Power Tools Division D-70745 Leinfelden-Echterdingen 30.07.2009
Norsk | 59
Tekniske data
| Universalsuger | PAS 11-21 | PAS 11-21 | PAS 12-27 | PAS 12-27 F | |||
| Produktnummer | 0 603 395 034 | 0 603 395 003 | 0 603 395 1.. | 0 603 395 2.. | |||
| 0 603 395 008 | |||||||
| 0 603 395 032 | |||||||
| 0 603 395 037 | |||||||
| 0 603 395 042 | |||||||
| Opptatt effekt | W | 900 | 1100 | 1100 | 1100 | ||
| Maks. opptatt effekt | W | 1100 | 1300 | 1300 | 1300 | ||
| Beholdervolum (brutto) | I | 21 | 21 | 27 | 27 | ||
| Støvposevolum | I | 6 | 6 | 10 | 10 | ||
| Vakuum* | mbar | 150 | 150 | 160 | 160 | ||
| Luftstrøm* | I/s | 50 | 50 | 60 | 60 | ||
| Støvklasse (BIA) | M | M | M | M | |||
| Vekt tilsvarende EPTA-Procedure 01/2003 | kg | 6,3 | 6,3 | 6,5 | 6,5 | ||
| Beskyttelsesklasse | □/II | □/II | □/II | ⊕/I | |||
Dr. Egbert Schneider
Dr. Eckerhard Ströttgen
Senior Vice President
Head of Product
Engineering
Certification

Robert Bosch GmbH, Power Tools Division
D-70745 Leinfelden-Echterdingen
30.07.2009

64 | Suomi
Tekniset tiedot
| Yleisimuri | PAS 11-21 | PAS 11-21 | PAS 12-27 | PAS 12-27 F | |||
| Tuotenumero | 0 603 395 034 | 0 603 395 003 | 0 603 395 1.. | 0 603 395 2.. | |||
| 0 603 395 008 | |||||||
| 0 603 395 032 | |||||||
| 0 603 395 037 | |||||||
| 0 603 395 042 | |||||||
| Ottoteho | W | 900 | 1100 | 1100 | 1100 | ||
| maks. ottoteho | W | 1100 | 1300 | 1300 | 1300 | ||
| Säillön tilavuus (brutto) | I | 21 | 21 | 27 | 27 | ||
| Pölpussin tilavuus | I | 6 | 6 | 10 | 10 | ||
| Alipaine* | mbar | 150 | 150 | 160 | 160 | ||
| Ilmavirta* | I/s | 50 | 50 | 60 | 60 | ||
| Pölyluokka (BIA) | M | M | M | M | |||
| Paino vastaa EPTA-Procedure 01/2003 | kg | 6,3 | 6,3 | 6,5 | 6,5 | ||
| Sujoausluokka | □/II | □/II | □/II | ⊕/I | |||
IIInpoopoeic yia OpuBo kai dovioeic
Oi tuec metpnonc EekpiBwOtnkav ouuvar uTnv npoiaypaqn EN 60704.
H xapaktnpiotikn otaun akouotiknc pieoanc tou anoppoqnnpa eXakpiBwOnke ouuwova ue tyn kaun A kai avepxetai 77 dB(A). Avaaia aetpnoc K=3dB.
Anwon ouβarotntrac C
uneuOuvoc oT to npoiov nou nepiypapetai OTA TExviKa xaapaktnpioTiká eknnpwvei Touc eNc kavoviaouc n kataaekuaotikec ouotaoeic; EN 60335 ouuwpwa me tic diataEieC twv obnyiw 2006/95/EK, 2004/108/EK.
CC 05
Dr. Egbert Schneider
Dr. Eckerhard Ströttgen
Senior Vice President
Head of Product
Engineering
Certification

Robert Bosch GmbH, Power Tools Division D-70745 Leinfelden-Echterdingen 30.07.2009
Texvika xapaktnpOtiKa
Tnpoume to 6ikaiwa aalayov.
1609929H72|(10.9.09)
Bosch Power Tools
Türkce | 73
Güvenlik Talimati

Dr. Egbert Schneider Senior Vice President Engineering
Dr. Eckerhard Strötgen
Head of Product Certification


Robert Bosch GmbH, Power Tools Division D-70745 Leinfelden-Echterdingen 30.07.2009

1609929H72|(10.9.09)
Bosch Power Tools


Türkce | 75
Teknik veriler
| Çok amaçlı elektrik yupürgesi | PAS 11-21 | PAS 11-21 | PAS 12-27 | PAS 12-27 F |
| Ürün kodu | 0 603 395 034 | 0 603 395 003 | 0 603 395 1.. | 0 603 395 2.. |
| 0 603 395 008 | ||||
| 0 603 395 032 | ||||
| 0 603 395 037 | ||||
| 0 603 395 042 | ||||
| Giriş Gücü | W | 900 | 1100 | 1100 |
| Maksimum girş Gücü | W | 1100 | 1300 | 1300 |
| Kap hakmi(Brutto) | I | 21 | 21 | 27 |
| Toz torbası hakmi | I | 6 | 6 | 10 |
| Vakum* | mbar | 150 | 150 | 160 |
| Hava akimi* | I/s | 50 | 50 | 60 |
| Toz sinificant(BIA) | M | M | M | |
| Ağırkıngı EPTA-Procedure01/2003'èGRE | kg | 6,3 | 6,3 | 6,5 |
| Koruma sinificant | □/II | □/II | □/II |
Bosch San. ve Tic. A.S.
Ahi Evran Cad. No:1 Kat:22
Polaris Plaza
80670 Maslak/Istanbul
Müsteri Danismani: +90 (0212) 335 06 66
Müsteri Servis Hatti: +90 (0212) 335 07 52