
Pro X PGX1400PB - Charger EGO - Free user manual and instructions
Find the device manual for free Pro X PGX1400PB EGO in PDF.


| Product type | Portable charger |
| Brand | EGO |
| Model | Pro X PGX1400PB |
| Input/output voltage (AC mode) | 56 V --- |
| Output voltage (DC mode) | 56 V --- |
| Weight | 17.6 kg |
| Charging time (AC mode) | Approximately 170 min (for HC2240T + 2×BA4200T) |
| Charging time (DC mode) | 45 min (for 2×BA4200T) |
| Recommended charging temperature | 5 – 40 °C |
| Storage temperature | -20 – 70 °C |
| Main functions | Charges EGO lithium-ion batteries, AC and DC modes, Bluetooth® connectivity, wall-mountable |
| Protection rating | IPX2 (protected against water droplets) |
| Use | Indoor only |
| Maintenance | Clean with a clean cloth; do not use solvent |
| Safety | Safety symbols, read the manual, do not expose to water |
| Included accessories | PGXTM 70 cm charging cable (ACE0700), brackets, bolts, hex key |
| Spare parts available | ACE0700 (70 cm) and ACE1500 (150 cm) charging cables, PGX1600E-H hub |
| Repairability | Repairs by a qualified technician only |
| Compliance | CE, UKCA |
| Communication | Bluetooth® |
| Battery technology | Lithium-ion |
| Simultaneous charging capacity | Up to 3 batteries (depending on mode) |
Frequently Asked Questions - Pro X PGX1400PB EGO
User questions about Pro X PGX1400PB EGO
0 question about this device. Answer the ones you know or ask your own.
Ask a new question about this device
Download the instructions for your Charger in PDF format for free! Find your manual Pro X PGX1400PB - EGO and take your electronic device back in hand. On this page are published all the documents necessary for the use of your device. Pro X PGX1400PB by EGO.
USER MANUAL Pro X PGX1400PB EGO
natural_image
Technical line drawing of a mechanical device with labeled components (56V, EGO) and no readable text or symbols beyond labelsPGX· PGX1400PB
56 VOLT PGX™ POWER BANK
| EN 56 VOLT PGX TM POWER BANK 5 | |
| DE 56 VOLT PGX TM POWERBANK | 17 |
| FR CHARGEUR PORTABLE PGX TM 56 V | 30 |
| ES BATERÍA EXTERNA PGX TM DE 56 VOLTIOS | 42 |
| PT POWERBANK DE 56 VOLTS PGX TM | 55 |
| IT POWERBANK PGX TM 56 VOLT | 67 |
| NL 56 VOLT PGX TM POWERBANK | 79 |
| DK 56 VOLT PGX TM POWER BANK | 91 |
| SE 56 VOLT PGX TM POWERBANK | 103 |
| FI 56 VOLTIN PGX TM-VARAVIRTALÄHDE | 115 |
| NO 56 VOLT PGXTM STR∅MBANK | 127 |
| RU ЗАРЯДНОЕ УСТРОЙСТВО 56 В PGX TM | 139 |
| PL POWERBANK PGXTM 56 V | 154 |
| CZ 56 VOLTOVÁ POWERBANKA PGX TM | 168 |
| SK 56 VOLTOVÁ POWERBANKA PGX TM | 180 |
| HU 56 VOLT PGX TM POWER BANK | 192 |
| RO 56 VOLT PGX TM BATERIE EXTERNÄ | 204 |


natural_image
Technical line drawing of a vehicle chassis with EGO component, no visible text or symbols
natural_image
Technical line drawing of a mechanical device with internal components and mounting brackets (no text or symbols)


natural_image
Technical line drawing of a mechanical device with labeled component '56V' (no readable text or symbols beyond label)READ ALL INSTRUCTIONS!

READ OPERATOR'S MANUAL
NOTICE: These instructions shall also be available in an alternative format, e.g. on a website.
WARNING: To ensure safety and reliability, all repairs should be performed by a qualified service technician.
SAFETY SYMBOLS
The purpose of safety symbols is to attract your attention to possible dangers. The safety symbols and the explanations with them deserve your careful attention and understanding. The symbol warnings do not by themselves, eliminate any danger. The instructions and warnings they give are no substitutes for proper accident prevention measures.
WARNING: Be sure to read and understand all safety instructions in this Operator's Manual, including all safety alert symbols such as "DANGER," "WARNING", and "CAUTION" before using this product. Failure to follow all instructions listed below may result in electric shock, fire, and/or serious personal injury.
SAFETY INSTRUCTIONS
This page depicts and describes safety symbols that may appear on this product. Read, understand, and follow all instructions on the machine before attempting to assemble and operate.
| Safety Alert | Precautions that involve your safety | |
| Read Operator's Manual | To reduce the risk of injury, user must read operator's manual. | |
| Indoor Use Use | this device indoors only | |
| CE | CE | This product is in accordance with applicable EC directives. |
| UKCA | UKCA | This product is in accordance with applicable UK legislation. |
| Bluetooth® | Bluetooth® Symbol | |
| IPX2 | Ingress Protection Degree | Protected against vertically falling water drops when enclosure tilted up to 15° |
| WEEE | Waste electrical products should not be disposed of with household waste. Take to an authorized recycler. | |
| ~ | Alternating Current | Type of current |
| Direct Current | Type or a characteristic of current | |
| V Volt | Voltage | |
| A Amperes Current | ||
| W Watt Power | ||
| Min Minutes Time | ||
| Ah Ampere-hours Battery Capacity | ||
| kg Kilogram Weight | ||
| °C Celsius Temperature | ||
GENERAL SAFETY INSTRUCTIONS
WARNING: Read and understand all instructions. Failure to follow all instructions listed below may result in electric shock, fire and/or serious personal injury.
The term "appliance" in all of warnings listed below refers to corded appliances or battery operated (cordless) appliances.
Save all warnings and instructions for future reference.
WARNING: To ensure safety and reliability, all repairs should be performed by a qualified service technician.
■ Disconnect the battery pack from the appliance before making any adjustments, changing accessories, or storing appliance. Such preventive safety measures reduce the risk of starting the appliance accidentally.
■ Recharge only with the hub specified by the manufacturer. A hub that is suitable for one type of battery pack may create a risk of fire when used with another battery pack.
EN
EN
■ Use appliances only with specifically designated battery packs. Use of any other battery packs may create a risk of injury and fire.
In AC MODE this power bank can work with EGO Hub PGX1600E-H to charge the battery packs listed in Fig. B1.
In DC MODE, using EGO high-capacity battery HC2240T this power bank can charge EGO battery packs listed in Fig. B2.
- When battery pack is not in use, keep it away from other metal objects, like paper clips, coins, keys, nails, screws or other small metal objects, that can make a connection from one terminal to another.
Shorting the battery terminals together may cause burns or a fire.
■ Under abusive conditions, liquid may be ejected from the battery; avoid contact. If contact accidentally occurs, flush with water. If liquid contacts eyes, additionally seek medical help.
Liquid ejected from the battery may cause irritation or burns.
- Do not use a battery pack or appliance that is damaged or modified. Damaged or modified batteries may exhibit unpredictable behaviour resulting in fire, explosion or risk of injury.
- Do not expose a battery pack or appliance to fire or excessive temperature. Exposure to fire or temperature above 130 °C may cause explosion.
■ Follow all charging instructions and do not charge the battery pack or appliance outside the temperature range specified in the instructions.
Charging improperly or at temperatures outside the specified range may damage the battery and increase the risk of fire.
■ Never service damaged battery packs. Service of battery packs should only be performed by the manufacturer or authorized service providers.
■ Do not modify or attempt to repair the appliance or the battery pack (as applicable) except as indicated in the instructions for use and care.
- Do not use the power bank outdoors or expose it to wet or damp conditions. Water entering the power bank will increase the risk of electric shock.
■ Do not handle power bank with wet hands.
■ Use of an attachment not recommended or sold by the power bank manufacturer may result in a risk of fire, electric shock, or injury to persons.
- Do not allow gasoline, oils, petroleum-based products, etc. to come in contact with plastic parts. These materials contain chemicals that can damage, weaken, or destroy plastic.
- Do not operate the power bank if it has received a sharp blow, been dropped, or has otherwise been damaged in any way. Take it to an authorized service technician for an electrical check to determine if the power bank is in good working order.
Do not disassemble the power bank. Take it to an authorized service technician when service or repair is required. Incorrect reassembly may result in a risk of electric shock or fire.
- Risk of electric shock. Do not touch the uninsulated portion of output connector or uninsulated battery terminal.
■ To reduce the risk of injury, close supervision is necessary when an appliance is used near children.
■ To reduce the risk of electrical shock, do not put power bank in water or other liquid. Do not place or store appliance where it can fall or be pulled into a tub or sink.
■ During charging, the power bank with attached battery packs must be placed in a well-ventilated area.
■ Save these instructions. Refer to them frequently and use them to instruct others who may use this appliance. If you lend this appliance to someone else, also lend these instructions to them to prevent misuse of the product and possible injury.
■ Save these instructions. This manual contains important safety and operating instructions for Model PGX1400PB that shall be followed during installation and maintenance.
■ Before using the power bank, read all instructions and cautionary markings in this manual and on the hub, the battery pack and the product using the battery to prevent misuse of the products and possible injury or damage.
CAUTION: To reduce the risk of injury, charge only lithium-ion rechargeable batteries. Other types of batteries may burst, causing personal injury or damage.
SPECIFICATIONS
AC MODE
| Input / Output Voltage | 56 V --- |
| Compatible Hub PGX1600E-H | |
| Charging Time | Approximately 170 min for HC2240T (40.0 Ah)+2 x BA4200T (7.5 Ah) |
| Recommended Charging Temperature | 5 – 40 °C |
| Recommended Storage Temperature | -20 – 70 °C |
| Weight 17.6 kg | |
DC MODE:
| Output Voltage | 56 V |
| Output Power 2 x 700 W | |
| Charging Time | 45 min for 2 x BA4200T(7.5 Ah) |
| Recommended Charging Temperature | 5 – 40 °C |
| Recommended Storage Temperature | -20 – 70 °C |
RECOMMENDED ACCESSORIES
WARNING: Use only identical replacement parts listed below. Use of parts that do not meet the original equipment specifications may lead to improper performance and compromised safety.
| PART NAME MODEL NUMBER |
| PGXTM 70 cm Charging Cable ACE0700 |
| PGXTM 150 cm Charging Cable ACE1500 |
DESCRIPTION
KNOW YOUR POWER BANK (Fig. A)
- High-capacity Battery Bay
- High-capacity Battery-release Lever
- Portable Battery-release Button
- Charging Cable
- Portable Battery Bay (x 2)
- Mounting Hole
- Port (x 2)
-
Anti-theft Bar
-
Portable Battery-bay Status Indicator
- Power Button (Bluetooth® Button)
- Bluetooth® Indicator
- High-capacity Battery-bay Status Indicator
- DC Status Indicator
- AC Status Indicator
- Bracket (2)
- M8 x 25 Bolt and Washer Set (4)
- M8 x 50 Bolt and Washer Set (4)
- M8 x 95 Bolt and Washer Set (2)
- 5 mm Hex Wrench
OPERATION
In AC Mode, the EGO PGX™ power bank is designed to only work with EGO PGX™ 1600W hub PGX1600E-H to charge EGO high-capacity and portable battery packs.
In DC Mode, EGO high-capacity battery (HC2240T) can charge portable EGO battery packs via the EGO PGX™ power bank.
CHARGING BATTERY PACKS - AC Mode
NOTE: Lithium-Ion battery packs are shipped partially charged. Before using them for the first time, fully charge the battery packs.
WARNING: During charging, the power bank with attached battery packs must be placed in a well-ventilated area.
The following illustrations in Fig. C1 show how to charge the battery packs via the power bank(s):
- Push the collar of the hub connector to the port on either side of the power bank until you hear a click as shown in Fig. C1 (step 1).
NOTE: To disconnect the hub from the power bank, as shown in Fig. C2.
- Connect the power bank to the next power bank in the same way using provided cable (ACE0700) or ACE1500 (sold separately) to the 2nd port on the opposite side of the power bank. You can continue to connect more power banks (no more than 30 to a single hub) if necessary (step 2).
- Plug the hub into the power supply (step 3). The hub status indicator and power bank AC status indicator will glow green, indicating that the hub and the power bank are working properly and can charge the battery packs.
- Align the raised ribs of a battery pack with the mounting slots in one of the power bank's battery bays. Slide the battery pack down into the battery bay (step 4). The battery release button will spring up indicating that the battery pack is securely attached.
EN
NOTE: For the high-capacity battery, make sure the arrow on the battery pack aligns with the electronic contact in the high-capacity battery bay. Slide the battery pack down into the battery bay (Fig. D1). The two battery release levers will spring up and outward, at the same time the red marks I can be seen on the battery release levers, indicating that the battery pack is securely attached (Fig.D2).
To remove the battery pack, push the battery release levers inwards, then pull the battery pack out (Fig. D3).
- The power bank will communicate with the battery pack to evaluate the condition of the battery pack. When the battery pack meets the charging conditions, the power bank will begin charging the battery pack and the hub status indicator and the battery-bay status indicator (above the inserted battery pack) will flash green.
- Insert more battery packs.
- When connecting more power banks to the hub, the hub will supply power to the power banks in the order of proximity – the power bank nearest to the hub is powered first. The flashing green battery-bay status helps identify which battery pack is currently charging.
The charging sequence of the battery packs in the same power bank
If two battery packs are connected to the power bank at the same time, the battery pack with the lower voltage level is charged first, once the battery pack with the lower voltage level has the same voltage level as the other, the two battery packs are charged at the same time.
If three battery packs are connected to the power bank at the same time, the battery pack with the lowest voltage level is charged first, once the battery pack with the lowest voltage level has the same voltage level as the battery pack with medium voltage level, these two battery packs are charged at the same time. Once these two battery packs have the same voltage level as the battery pack with the highest voltage level, all three battery packs are charged at the same time. Refer to the figure below.

- When the battery packs are fully charged, the hub status indicator and the battery-bay status indicators will glow solid green. The “fuel gauges” on the battery packs will turn off. It is recommended to disconnect the hub from the power supply, if it is not going to be used for a long period of time.
NOTE:
■ A significantly reduced run time after fully charging a battery pack indicates that the battery pack is near the end of its usable life and must be replaced.
■ The hub and power bank may get warm during charging. This is part of the normal operation. Charge in a well-ventilated area.
Hub, Power Bank, and Battery Pack Indicators - AC Mode
| HUB POWER BANK | BATTERY PACK | |||
| Hub Status | Hub Status Indicator | AC Status Indicator | Battery-bay Status Indicator(s) | Fuel Gauge on the Battery Pack |
| Standby (no battery to charge) |  Solid green Solid green Solid green Solid green | Off N/A | ||
| Normal charging |  Flashing green Solid green Flashing green Solid green |  Flashing green above the battery pack(s) being charged Flashing green above the battery pack(s) being charged | 1. For portable EGO battery packs w/o “T” suffix:Flashing GREEN, RED and ORANGE alternately.2. For portable EGO battery packs with “T” suffix:Last LED flashing GREEN, the former LEDs shining solid GREEN.Or fuel gauge will shine solid GREEN in the last phase of the charging process, and the battery will refresh LED indicator every 1-2 minutes to update the real-time fuel gauge.For EGO battery pack BA2240T, no special indicator.3. For high-capacity battery (HC2240T)Last LED flashing GREEN, the former LEDs shining solid GREEN. | |
| Charging slowly when the hub temperature is 40 – 60°C | Solid orange Flashing orange Solid green |  Flashing green above the battery pack(s) being charged Flashing green above the battery pack(s) being charged | ||
| Fully charged | Solid green Solid green | Solid green above the fully charged battery pack(s) | Off | |
| Hub is too hot or too cold | Solid red | |||
| Hub error | Flashing red | |||
| Hub operates normally.Charging a hot or cold battery pack. | Solid green Solid green |  | Off | |
EN
Charging a hot or cold battery pack
If the battery pack in the charging power bank is outside of the normal temperature range, the corresponding battery-bay status indicator will glow solid red and the fuel gauge on the battery pack will turn off. When the battery pack cools down or warms up to a normal temperature range, the battery pack will resume to charge automatically.
Battery pack or power bank error
If the battery pack error is detected, the corresponding battery-bay status indicator will flash red and the fuel gauge on the battery pack will turn off.
- Remove and re-insert the battery pack into the power bank. If the battery-bay status indicator still flashes red, try charging a different battery pack that is known to be functional.
- If the new replacement battery pack can be charged normally, the original battery pack is faulty.
- If the battery-bay status indicator still flashes red after trying to charge a functional battery pack, reset the hub by unplugging the hub from power supply and waiting until the hub-status indicator turns off. Then reconnect the plug to the power supply.
- If the battery-bay status indicator still flashes red after step 3, the power bank may be faulty.
CHARGING PORTABLE BATTERY PACKS - DC MODE
- Disconnect the hub from power outlet or remove the charging cable from the power bank.
- Install the high-capacity battery and the portable battery pack, refer to the section "CHARGING BATTERY PACKS - AC Mode".
- Press the power button (for no longer than 3 seconds) and the power bank DC status indicator and the high-capacity battery-bay status indicator will glow green, indicating that the power bank is working properly. The power bank will communicate with the portable battery pack to evaluate the condition of the battery pack. When the battery pack meets the charging conditions, the high-capacity battery will begin charging the portable battery pack, and the DC status indicator and high-capacity battery-bay status indicator will glow solid green, and the portable battery-bay status indicator (above the inserted battery pack) will flash green.
- When two portable battery packs are connected to the power bank, they are charged at the same time. When the two portable battery packs are fully charged, the portable battery-bay status indicators will glow solid green. The “fuel gauges” on the battery packs will turn off.
- To stop DC charging mode, press the power button again (for no longer than 3 seconds).
- The DC status indicator will turn off automatically after four hours of inactivity when the inserted portable battery pack(s) is fully charged.
- The DC status indicator will turn off automatically after four hours when the high-capacity battery is overheated.
Power Bank, High-capacity Battery, and Portable Battery Pack Indicators - DC Mode
| POWER BANK | HIGH-CAPACITYBATTERY | PORTABLEBATTERY | |||
| Power BankStatus | DC StatusIndicator | High-capacityBattery-bay StatusIndicator | PortableBattery-bay StatusIndicators | ||
| Standby (onlyhigh-capacitybattery in thepower bank) |  Solid green Solid green |  Solid green Solid green | N/A |  Solid green Solid green | N/A |
| Normal charging |  Solid green Solid green |  Solid green Solid green | Flashinggreen |  Solid green Solid green | 1. For EGO batterypacks w/o “T” suffix:Flashing GREEN,RED and ORANGEalternately2. For EGO batterypacks with “T” suffix:Last LED flashingGREEN, the formerLEDs shining solidGREEN.For EGO batterypack BA2240T, nospecial indicator. |
| Fully charged |  Solid green Solid green |  Solid green Solid green | Solid green |  Solid green Solid green | Off |
| High-capacitybattery is faulty |  Flashing red Flashing red |  Flashing red Flashing red | Off Off Off | ||
EN
| POWER BANK | HIGH-CAPACITYBATTERY | PORTABLEBATTERY | |||
| Power BankStatus | DC StatusIndicator | High-capacityBattery-bay StatusIndicator | PortableBattery-bay StatusIndicators | ||
| High-capacitybattery is under-voltage. |  Flashing red Flashing red |  Solid green Solid green | Off |   Flashing red Flashing red | Off |
| High-capacitybattery is too hotor too cold. |  Solid red Solid red |  Solid red Solid red | Off |  Solid red Solid red | Off |
| Power bankoperates normally.Charging a defective portable battery pack. |  Solid green Solid green |  Solid green Solid green |  Flashing red Flashing red |  Solid green Solid green | Off |
| Power bankoperates normally.Charging a hot or cold portable battery pack. |  Solid green Solid green |  Solid green Solid green | Solid redabove theportablebatterypack being charged. |  Solid green Solid green | Off |
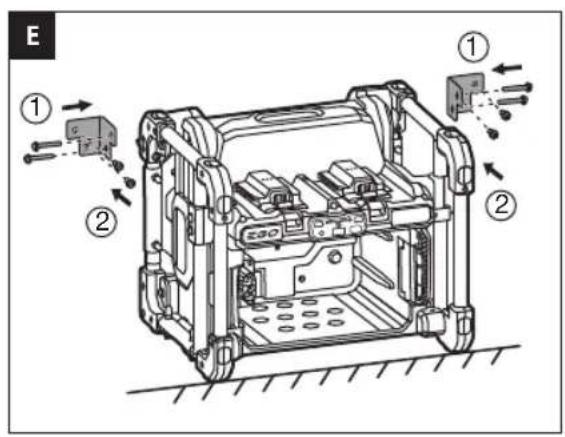
MOUNT THE POWER BANK (FIG. E)
Wall-mount holes for one power bank
- Disconnect the power bank from the hub and remove the battery packs.
- Put the power bank against the wall on the floor.
-
Secure two brackets (included) to the two sides of the power bank with four M8 x 50 bolt and washer sets (included), using the provided hex wrench.
-
Mark the locations of the four wall-mount holes at the desired location on a wall.
- Use four M8 x 25 bolt and washer set (included) to securely mount the power bank to the wall.
NOTICE: Mounting surface should be at least 19 mm thick to securely support the power bank.
Wall-mount Holes for stack of two power banks (Fig. F)
- Disconnect the two power banks from the hub and remove the battery packs.
- Secure two brackets to the two sides of the lower/upper power bank with four M8 x 50 bolt and washer sets (included), using the provided hex wrench.
- Put a power bank against the wall on the floor, place another power bank onto it by aligning the four protrusions on the upper power bank with the dents in the lower power bank.
- Using the hex wrench, secure the upper power bank to the lower power bank with two M8 x 95 bolt and washer sets (included).
- Mark the locations of the eight wall-mount holes at the desired location on a wall.
- Use eight M8 x 25 bolt and washer set (included) to securely mount the two power banks to the wall.
NOTICE: Mounting surface should be at least 19 mm thick to securely support the power banks.
ANTI-THEFT BAR ON THE POWER BANK (FIG.G)
To prevent unauthorized removal of battery packs, pull the tab of the anti-theft bar out and secure it with a padlock (not included). The shackle diameter range is 7–8 mm.
COMMUNICATION TECHNOLOGY
Your EGO PGX™ Power Bank is Bluetooth® enabled, for information on our full range of connected products and services, including connection instructions, please scan QR Code below or visit www.egopowerplus.eu/connect.

MAINTENANCE
WARNING: To avoid serious personal injury, always disconnect the hub from power outlet and remove the battery pack(s) from the power bank when cleaning or performing any maintenance.
WARNING: It is not recommended to use compressed dry air as a cleaning method of the power bank. If cleaning with compressed air is the only method to apply, always wear safety goggles or safety glasses with side shields when cleaning the power bank. If the operation is dusty, also wear a dust mask.
GENERAL MAINTENANCE
Avoid using solvents when cleaning plastic parts. Most plastics are susceptible to damage from various types of commercial solvents and may be damaged by their use.
Use clean clothes to remove dirt, dust, oil, grease, etc.
WARNING: Do not at any time let brake fluids, gasoline, petroleum-based products, penetrating oils, etc. to come in contact with plastic parts. Chemicals can damage, weaken or destroy plastic which may result in serious personal injury.
WARNING: When servicing, use only identical EGO replacement parts. Use of any other parts may create a hazard or cause product damage. To ensure safety and reliability, all repairs should be performed by a qualified service technician at an EGO Service Center. When not in use, store the machine in door.
PROTECTING THE ENVIRONMENT

Do not dispose of electrical appliances as unsorted municipal waste, use separate collection facilities.
Contact your local government for information regarding the collection systems available.
If electrical appliances are disposed of in landfills or dumps, hazardous substances can leak into the groundwater and get into the food chain, damaging your health and well-being.
EN TROUBLESHOOTING
AC Mode
| PROBLEM CAUSE SOLUTION | ||
| The hub status indicator flashes orange. | The hub will charge slowly when the hub temperature is 40 – 60 °C, which is normal operation. | No action needed. |
| The hub status indicator flashes red. | Hub output overcurrent. | Reset the hub by unplugging the hub from power supply and waiting until the hub-status indicator turns off, then reconnect the plug to the power supply. If this does not solve the problem, contact your local EGO Service Center. |
| The hub's fan is blocked or damaged. | Unplug the hub, shake the hub slightly, and then reconnect the hub to the power supply to see whether the hub works normally. If it does not work, contact your local EGO Service Center. | |
| AC input under-voltage. | No action needed. The hub will resume to charge after the AC input voltage is stable. If the AC input voltage is still not stable after many attempts, unplug the hub from power supply and wait until the hub status indicator turns off, then reconnect the plug to the power supply. | |
| The hub status indicator is solid red. | Hub is too hot. | Unplug the hub from power supply and wait until the hub cools down, then reconnect the plug to the power supply. If this does not solve the problem, contact your local EGO Service Center. |
| Hub is too cold. | Allow the hub to warm up. Charging will resume when the hub returns to the normal temperature. | |
| The battery-bay status indicator above one of the batteries is solid red. The hub-status indicator is solid green. | The battery pack is too hot or too cold. | Allow the battery pack to cool down or warm up. Charging will begin when battery pack returns to the normal temperature. |
| The power bank AC status indicator turns off. The hub-status indicator is solid green. | Bad connection between the hub and power bank. | Try to disconnect the hub connector and reconnect it to the power bank. |
| Faulty power bank. Contact your local | EGO Service Center | |
| The battery-bay status indicator above one of the batteries flashes red.The hub status indicator is solid green. | Battery pack or one of three battery-bays of the power bank is faulty. | 1. Remove and re-insert the battery pack into the power bank.2. If the battery-bay status indicator still flashes red, try charging a different battery pack. If the new replacement battery pack can be charged normally, the original battery pack is faulty.3. If the battery-bay status indicator still flashes red after replacing the battery pack, reset the hub by unplugging the hub from power supply and waiting until the hub-status indicator turns off, then reconnect the plug to the power supply.If the battery-bay status indicator still flashes red after step 3, the power bank may be faulty – contact your local EGO Service Center. |
| The power bank AC status indicator flashes red. | The power bank is faulty. Contact your | local EGO Service Center. |
| The power bank's fan is blocked or damaged. | Contact your local EGO Service Center. | |
DC Mode
| PROBLEM CAUSE SOLUTION | ||
| DC status indicator turns off. | The hub and power bank are connected. | Disconnect the hub from power supply or remove the power cable from the power bank. |
| High-capacity battery is faulty. Replace with a different high-capacity battery. | ||
| Power bank is faulty. | Contact your local EGO Service Center for the power bank replacement. | |
| The power button pressed for too long. | Press the power button for no longer than 3 seconds. | |
| DC status indicator is solid green.The battery-bay status indicator above one of the batteries is solid red. | The portable battery pack is too hot or too cold. | Allow the portable battery pack to cool down or warm up. Charging will begin when the battery pack returns to the normal temperature. |
| DC status indicator is solid red. | High-capacity battery is too hot or too cold. | Allow high-capacity battery to cool down or warm up. Charging will begin when the battery pack returns to the normal temperature. |
EN
| PROBLEM CAUSE SOLUTION | ||
| DC status indicator flashes red. | High-capacity battery charge level is low. | Charge the high-capacity battery. |
| High-capacity battery has communication error. | Replace with a different high-capacity battery or contact your local EGO Service Center. | |
| The power bank's fan is blocked or damaged. | Contact your local EGO Service Center for service or replacement as needed. | |
WARRANTY
EGO WARRANTY POLICY
Please visit the website egopowerplus.eu for full terms and conditions of the EGO Warranty policy.
MONTAR A POWERBANK (IMAGEM E)
Fout op accupack of powerbank
JÆVNSTR∅MSFUNKTION (DC):
GENERELT VEDLIKEHOLD
POLITYKA GWARANCYJNA EGO
REŽIM STEJNOSMĚRNÉHO PROUDU (REŽIM DC):
MONTÁŽ POWERBANKY (OBR. E)
MONTÁŽ POWERBANKY (OBR. E)
Otvory na montáž na stenu pre jednu powerbanku
CITIȚI MANUALUL DE INSTRUCTIUNI
LUGEGE KASUTUSJUHENDIT
OPĆA SIGURNOSNA UPUTSTVA
⚠ UPOZORENJE! S razumijevanjem pročitajte sva uputstva. Zanemarivanje svih uputstava navedenih u nastavku može rezultirati strujnim udarom, požarom i/ili teškim tjelesnim povredama.
| הכלה | ||
| .1.הכלההכלההכלההכלההכלההכלההכלההכלההכלההכלההכלההכלההכלההכלההכלההכלההכלההכלההכלההכלההכלההכלההכלההכלההכלההכלההכלההכלההכלההכלההכלההכלההכלההכלה | .2.3.4.5.6.7.8.9.10.11.12.13.14.15.16.17.18.19.20.21.22.23.24.25.26.27.28.29.30.31.32.33.34.35.36.37.38.39.40.41.42.43.44.45.46.47.48.49.50.51.52.53.54.55.56.57.58.59.60.61.62.63.64.65.66.67.68.69.70.71.72.73.74.75.76.77.78.79.80.81.82.83.84.85.86.87.88.89.90.91.92.93.94.95.96.97.98.99.100.101.102.103.104.105.106.107.108.109.110.111.112.113.114.115.116.117.118.119.120.121.122.123.124.125.126.127.128.129.130.131.132.133.134.135.136.137.138.139.140.141.142.143.144.145.146.147.148.149.150.151.152.153.154.155.156.157.158.159.160.161.162.163.164.165.166.167.168.169.170.171.172.173.174.175.176.177.178.179.180.181.182.183.184.185.186.187.188.189.190.191.192.193.194.195.196.197.198.199.200.201.202.203.204.205.206.207.208.209.210.211.212.213.214.215.216.217.218.219.220.221.222.223.224.225.226.227.228.229.230.231.232.233.234.235.236.237.238.239.240.241.242.243.244.245.246.247.248.249.250.251.252.253.254.255.256.257.258.259.260.261.262.263.264.265.266.267.268.269.270.271.272.273.274.275.276.277.278.279.280.281.282.283.284.285.286.287.288.289.290.291.292.293.294.295.296.297.298.299.300.301.302.303.304.305.306.307.308.309.310.311.312.313.314.315.316.317.318.319.320.321.322.323.324.325.326.327.328.329.330.331.332.333.334.335.336.337.338.339.340.341.342.343.344.345.346.347.348.349.350.351.352.353.354.355.356.357.358.359.360.361.362.363.364.365.366.367.368.369.370.371.372.373.374.375.376.377.378.379.380.381.382.383.384.385.386.387.388.389.390.391.392.393.394.395.396.397.398.399.400.401.402.403.404.405.406.407.408.409.410.411.412.413.414.415.416.417.418.419.420.421.422.423.424.425.426.427.428.429.430.431.432.433.434.435.436.437.438.439.440.441.442.443.444.445.446.447.448.449.450.451.452.453.454.455.456.457.458.459.460.461.462.463.464.465.466.467.468.469.470.471.472.473.474.475.476.477.478.479.480.481.482.483.484.485.486.487.488.489.490.491.492.493.494.495.496.497.498.499.500.501.502.503.504.505.506.507.508.509.510.511.512.513.514.515.516.517.518.519.520.521.522.523.524.525.526.527.528.529.530.531.532.533.534.535.536.537.538.539.540.541.542.543.544.545.546.547.548.549.550.551.552.553.554.555.556.557.558.559.560.561.562.563.564.565.566.567.568.569.570.571.572.573.574.575.576.577.578.579.580.581.582.583.584.585.586.587.588.589.590.591.592.593.594.595.596.597.598.599.600.601.602.603.604.605.606.607.608.609.610.611.612.613.614.615.616.617.618.619.620.621.622.623.624.625.626.627.628.629.630.631.632.633.634.635.636.637.638.639.640.641.642.643.644.645.646.647.648.649.650.651.652.653.654.655.656.657.658.659.660.661.662.663.664.665.666.667.668.669.670.671.672.673.674.675.676.677.678.679.680.681.682.683.684.685.686.687.688.689.690.691.692.693.694.695.696.697.698.699.700.701.702.703.704.705.706.707.708.709.710.711.712.713.714.715.716.717.718.719.720.721.722.723.724.725.726.727.728.729.730.731.732.733.734.735.736.737.738.739.740.741.742.743.744.745.746.747.748.749.750.751.752.753.754.755.756.757.758.759.760.761.762.763.764.765.766.767.768.769.770.771.772.773.774.775.776.777.778.779.780.781.782.783.784.785.786.787.788.789.790.791.792.793.794.795.796.797.798.799.800.801.802.803.804.805.806.807.808.809.810.811.812.813.814.815.816.817.818.819.820.821.822.823.824.825.826.827.828.829.830.831.832.833.834.835.836.837.838.839.840.841.842.843.844.845.846.847.848.849.850.851.852.853.854.855.856.857.858.859.860.861.862.863.864.865.866.867.868.869.870.871.872.873.874.875.876.877.878.879.880.881.882.883.884.885.886.887.888.889.890.891.892.893.894.895.896.897.898.899.900.901.902.903.904.905.906.907.908.909.910.911.912.913.914.915.916.917.918.919.920.921.922.923.924.925.926.927.928.929.930.931.932.933.934.935.936.937.938.939.940.941.942.943.944.945.946.947.948.949.950.951.952.953.954.955.956.957.958.959.960.961.962.963.964.965.966.967.968.969.970.971.972.973.974.975.976.977.978.979.980.981.982.983.984.985.986.987.988.989.990.991.992.993.994.995.996.997.998.999.1000 | |
DC
.הכלההוּרָהוּרָהוּרָהוּרָהוּרָהוּרָהוּרָהוּרָהוּרָהוּרָהוּרָהוּרָהוּרָהוּרָהוּרָה
HE
natural_image
Technical line drawing of a mechanical device with labeled components (56V and EGO), no readable text or symbols beyond labelsPGXPGX1400PB
56 VOLT PGX™ POWER BANK


- PGX· PGX1400PB
- VOLT PGX™ POWER BANK
- READ ALL INSTRUCTIONS!
- READ OPERATOR'S MANUAL
- SAFETY SYMBOLS
- SAFETY INSTRUCTIONS
- GENERAL SAFETY INSTRUCTIONS
- EN
- SPECIFICATIONS
- RECOMMENDED ACCESSORIES
- DESCRIPTION
- KNOW YOUR POWER BANK (Fig. A)
- OPERATION
- CHARGING BATTERY PACKS - AC Mode
- WARNING: During charging, the power bank with attached battery packs must be placed in a well-ventilated area.
- The following illustrations in Fig. C1 show how to charge the battery packs via the power bank(s):
- The charging sequence of the battery packs in the same power bank
- NOTE:
- Charging a hot or cold battery pack
- Battery pack or power bank error
- CHARGING PORTABLE BATTERY PACKS - DC MODE
- MOUNT THE POWER BANK (FIG. E)
- Wall-mount holes for one power bank
- Wall-mount Holes for stack of two power banks (Fig. F)
- ANTI-THEFT BAR ON THE POWER BANK (FIG.G)
- COMMUNICATION TECHNOLOGY
- MAINTENANCE
- GENERAL MAINTENANCE
- PROTECTING THE ENVIRONMENT
- EN TROUBLESHOOTING
- WARRANTY
- EGO WARRANTY POLICY
- MONTAR A POWERBANK (IMAGEM E)
- Fout op accupack of powerbank
- GENERELT VEDLIKEHOLD
- POLITYKA GWARANCYJNA EGO
- MONTÁŽ POWERBANKY (OBR. E)
- Otvory na montáž na stenu pre jednu powerbanku
- CITIȚI MANUALUL DE INSTRUCTIUNI
- LUGEGE KASUTUSJUHENDIT
- OPĆA SIGURNOSNA UPUTSTVA
- PGXPGX1400PB
Brand : EGO
Model : Pro X PGX1400PB
Category : Charger