
MSF701 - Razor BLAUPUNKT - Free user manual and instructions
Find the device manual for free MSF701 BLAUPUNKT in PDF.


| Product Type | Electric Shaver |
| Shaving System | 2 shaving foils and blades |
| Wet/Dry Usage | Yes, can be used with shaving foam or gel |
| Power Supply | AC adapter: input 100-240V~50/60Hz, 0.2A; output 5V, 800mA |
| Charging Indicator | Red plug symbol while charging, white battery symbol blinks when fully charged |
| Low Battery Warning | Red plug symbol blinks when 3-5 minutes of use remain |
| Usage While Charging | Yes, but do not use near water |
| Battery Type | Rechargeable, integrated |
| Trimmer | Integrated, slide-out trimmer |
| Display | LED display with battery and plug symbols |
| Maintenance | Clean with brush after each use; rinse under running water for wet shaving |
| Replacement Interval | Replace shaving foil unit and blades every 12 months |
| Accessories | Protective cap, cleaning brush, power cord with adapter |
| Spare Parts | Set of shaving foils and blades: Blaupunkt ACC012 |
| Safety | Do not use when charging near water; use only supplied adapter |
| Environment | Do not dispose in household waste; recycle according to local regulations |
| Compliance | CE marked, compliant with EU directives (LVD, EMC) |
| Dimensions | Approximately 15 x 5 x 3 cm (based on typical shaver) |
| Weight | Approximately 200 g (based on typical shaver) |
Frequently Asked Questions - MSF701 BLAUPUNKT
User questions about MSF701 BLAUPUNKT
0 question about this device. Answer the ones you know or ask your own.
Ask a new question about this device
Download the instructions for your Razor in PDF format for free! Find your manual MSF701 - BLAUPUNKT and take your electronic device back in hand. On this page are published all the documents necessary for the use of your device. MSF701 by BLAUPUNKT.
USER MANUAL MSF701 BLAUPUNKT
Enjoy it.
Men's shaver
Man's shaver
Men's shaver
Important notes
- Before using this device read the instruction manual and follow the instructions inside. The manufacturer is not liable for any damages caused by the misuse of this device due to inappropriate handling. Please keep this manual for future reference.
- This device is for domestic use only. Do not use for any other purposes.
- The device should be cleaned regularly complying with the recommendations described in the section on cleaning and maintenance.
- Do not place the device near sources of heat, flame, an electric heating element or a hot oven. Do not place on any other device.
- This equipment can be used by children aged 8 years and over as long as supervision is provided. People with reduced physical or mental capabilities, as well as people with no previous experience of using this equipment must be supervised and made aware of the risks. The instruction manual should be used as a reference for the safe use of this equipment. Children should not play with the equipment.
- Children without ensured supervision should not be allowed to perform the cleaning and maintenance of equipment.
- Additional precautions should be taken when using this device in the presence of children or pets. Do not allow children to play with the device.
- Never use the product close to combustibles.
- Never expose the product to atmospheric conditions such as direct sun light or rain, etc... Never use the product in humid conditions (like bathroom or camping house).
- Only Original accessories should be used, as well as
Accessories recommended by the manufacturer. Using accessories which are not recommended by the manufacturer may result in damage to the device and may render the device unsafe for use.
- The AC adapter should be connected to an outlet with characteristics consistent with the values on the rating label.
- If the cord, power plug, or adapter is damaged, or if the plug has a loose fit in the electrical outlet, do not charge the device and do not power it from the mains.
- Unplug the AC adapter from the electrical outlet when not in use.
- Do not connect or disconnect the adapter from the power source with wet hands.
- This device uses only the power adapter supplied with the device or recommended by the manufacturer. Having disconnected the appliance from the power supply, clean it under running water no warmer than 50 degrees. Only a wireless appliance may be used in the bath or shower.
- Do not use the shaver if the foil or blades are damaged in any way.
- The appliance may be charged in temperatures in the range of 5-35 degrees Celsius.
- For reasons of hygiene, the appliance should be used by one person only.
CE
Device is compliant with EU directives:
- Low voltage directive (LVD) - Electromagnetic compatibility (EMC)
Device marked CE mark on rating label

When this crossed-out wheeled bin symbol is attached to a product it means that the product is covered by the European Directive 2012/19/EU. Please inform yourself about the local separate collection system for electrical and electronic products. Used appliance should be delivered to the dedicated collecting points due to hazardous components, which may affect the environment. Do not dispose this appliance in the common waste bin.

Your product contains batteries covered by the European Directive 2013/56/UE, which cannot be disposed of with normal household waste. Please inform yourself about the local rules on separate collection of batteries because correct disposal helps to prevent negative consequences for the environment and human health.
Environmental information
All unnecessary packaging has been omitted. We have tried to make the packaging easy to separate into three materials: cardboard (box), polystyrene foam (buffer) and poly ethylene (bags, protective foam sheet). Your system consists of material which can be recycled and reused if disassembled by a specialized company. Please observe the local regulations regarding the disposal of packaging materials, exhausted batteries and old equipment.

Your product is designed and manufactured with high quality materials and components, which can be recycled and reused.
Technical data
TECHNICAL SPECIFICATIONS OF THE POWER SUPPLY UNIT
Input voltage: 100-240V~50/60Hz
Maximum input current: 0.2A
Output voltage: 5V
Maximum output current: 800mA
TECHNICAL SPECIFICATIONS OF THE APPLIANCE
Voltage: 5V
Max. input current: 800mA
- Protective cap
- Shaver head (Frame with 2 shaving foils and blade)
- Blades
- Shaver head's release buttons, 2x
- On/off button
- Socket for charging
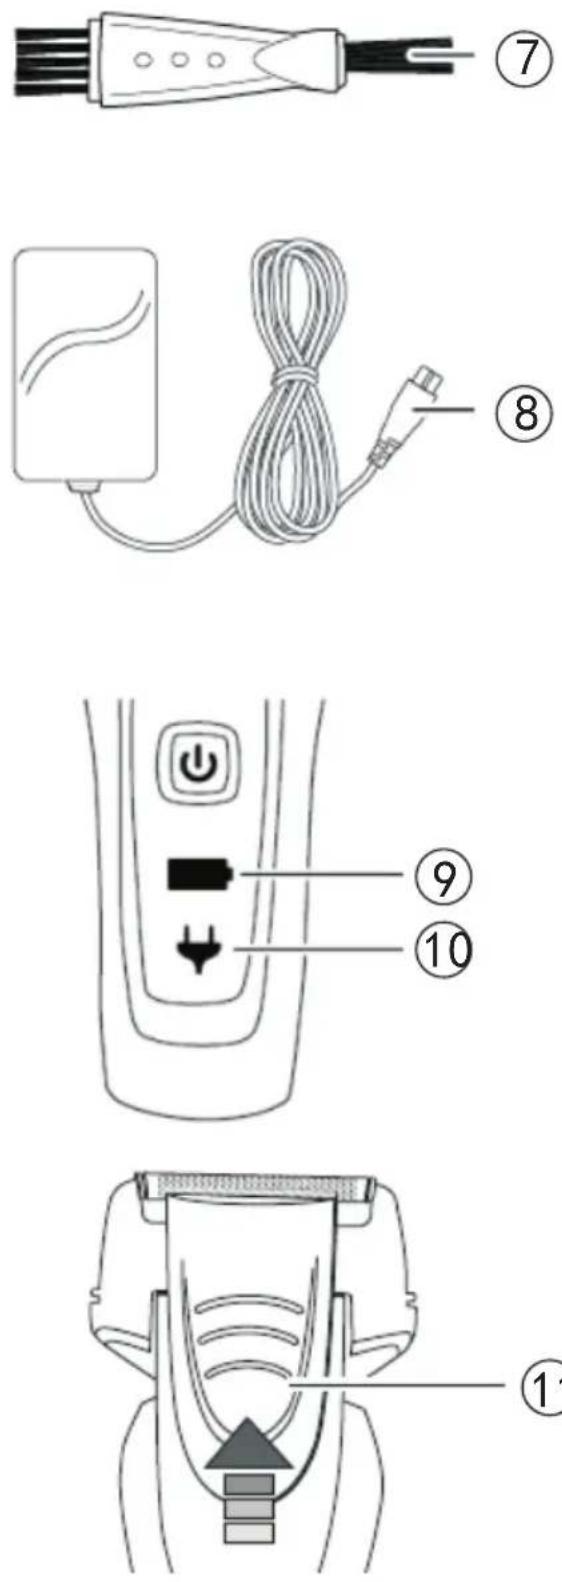
- Cleaning brush
- Power cord with adaptor
- Display, battery symbol
- Display, plug symbol
- Trimmer
CHARGING THE APPLIANCE
If the appliance's battery charge is low or the battery is totally discharged, it needs charging. Insert the power supply cord into the appliance and connect the power supply unit to the electrical grid.
The charging indicator of the appliance will then display its charging status. If the appliance is totally discharged, the indication of its charging status may be delayed. This delay should be no longer than 2 minutes.
Having connected the appliance to the charger, you may continue using the appliance. However, do not use the appliance in the vicinity of baths, showers, swimming pools or similar water tanks.
SHAVER OPERATION
Switch the shaver on with the On/Off button.
Move the shaver across the skin surface, stretching it gently.
Clean the shaving head after each use with the provided brush.
The appliance may be used for wet or dry shaving. If you use shaving foam or gel, rinse the shaver regularly under a stream of tap water to prevent the shaving head from "clogging".
Note: Each shaver requires the skin and hair growth to adjust to the blade system applied. The first shaves may not be perfectly accurate and the skin may be irritated. The adjustment period may last up to 3 weeks.
CLEANING AND MAINTENANCE
Before cleaning check if shaver is not connected to power supply and it is turned off.
- Daily cleaning after dry shaving
Depress both release buttons to release the shaver head. Pull the shaver head up and off. Tap the shaver head gently over a sink to remove any hair. Without the shaver head mounted, use the On/Off switch to switch the shaver on for approx. 5 – 10 seconds to dispel any hair from the shaver blades.
Firmly mount the shaver head on the shaver until the locking mechanism audibly engages. Place the protective cap on the shaver. The shaver is now ready for use again.
- Daily cleaning after wet shaving
Depress both release buttons to release the shaver head. Pull the shaver head up and off. Wash the shaver head thoroughly under warm running water on the inside and outside. Carefully dry the shaver head with a lint-free cloth or a paper towel. In the process, do not push the shaving foils in. Thoroughly rinse off the top part of the shaver and the shaver blades under warm running water. Without the shaver head mounted, use the On/Off switch to switch the shaver on for approx. 5 – 10 seconds to dispel any hair from the shaver blades. Firmly mount the shaver head on the shaver until the locking mechanism audibly engages. Place the protective cap on the shaver. The shaver is now ready for use again.
- User maintenance for the shaving foils and blades
To maintain the performance of your shaver and increase the service life of the shaving foils, you should perform user maintenance on the shaving foils every two months as follows:
- Put a drop of fine, non-resinous household oil on the tip of your finger.
- Distribute the oil evenly on the shaving foils.
- Without applying pressure, dab the shaving foils with a soft, lint-free cloth or paper towel.
- Replacing the shaving foil unit and blades
It is recommended to replace the shaving foil unit and blades after 12 months of daily use.
To change the shaving foils:
- Depress both release buttons to release the shaver head.
- Pull the shaver head up and off.
- Push the hooks on the left and right of the shaving foil unit into the shaver head frame 17
- Pull the shaving foil unit down and out of the shaver head frame.
- Dispose of the used shaving foil unit.
- Place the new shaving foil unit in the shaver head frame so that:
a. the guide braces inside the shaver head frame extend into the guide grooves outside along the shaving foil unit and b. the recess in the shaving foil unit is on the same side as the recess inside the shaver head frame.
- Place two fingers on the rear side of the integrated trimmer.
- Push the shaving foil unit into the shaver head frame until the hooks audibly lock into the shaver head frame.
- Firmly mount the shaver head on the shaver until the locking mechanism audibly locks into place.
- Place the protective cap onto the shaver.
To change the shaving blades:
- Depress both release buttons to release the shaver head.
- Pull the shaver head up and off of the shaver.
- Pull the shaver blades straight up and out of their brackets.
- Dispose of the used shaver blades.
- Mount the new shaver blades on the brackets.
- Place the protective cap onto the shaver.
- Firmly mount the shaver head 2 on the shaver until the locking mechanism audibly locks into place.
A set of shaving foils and blades is available as an accessory, Blaupunkt ACC012.
USING THE TRIMMER
Move the trimmer all the way out until it audibly locks into place. Use the On/Off switch to turn the shaver on. Slowly guide the trimmer up to the hair you intend to cut. Always use short strokes to cut your hair. Turn the shaver off.
LED DISPLAY
The white battery symbol will appear and remain lit when using without an adapter.
When using with the adapter, it remains black, and no symbol is shown.
When charging, the red plug symbol will appear and remain lit.
When charging is complete, the white battery symbol will blink.
When battery capacity becomes low and only 3-5 minutes of use remain, the red plug symbol will blink as a gentle warning.
IMPORTANT INFORMATION
Electromagnetic compatibility (EMC)
02-801 Warsaw, Poland
phone: +48 22 331 99 59
e-mail: info@everpol.pl
www.blaupunkt.com
In case of questions or problems
please contact our service.
Tel. 00 48 22 331 99 54
E-mail: sda@blaupunkt.pl
All rights reserved. All brand names are registered trademarks of their
respective owners. Specifications are subject to change without prior notice.
Enjoy it.


Brand : BLAUPUNKT
Model : MSF701
Category : Razor