
ER-GK40 - Electric mower PANASONIC - Free user manual and instructions
Find the device manual for free ER-GK40 PANASONIC in PDF.
| Product type | Electric body trimmer (body shaver) |
| Brand | Panasonic |
| Model | ER-GK40 |
| Power source | Rechargeable Ni-MH battery 1.2 V, AC adapter (RE7-69 / RE7-74) |
| Charging time | Approximately 8 hours (230 V) to 10 hours (240 V) |
| Battery life | Approximately 4 shaves of 7 minutes (full charge) |
| Usage | Dry or under the shower / in the bath (waterproof) |
| Main functions | Wet/dry shaving, pop-up trimmer for long hair, adjustable cutting comb (3/6/9 mm) |
| Cutting head | Fine outer foil and inner blade |
| Care and cleaning | Clean under running water, cleaning brush included; cleaning flap for rinsing |
| Blade replacement | Outer foil: once a year; Inner blade: once every 2 years |
| Safety | Automatic stop if overload? Not specified; use on healthy skin only; do not use on face |
| Noise level | 65 dB (shaving) / 66 dB (trimmer) |
| Included accessories | Combs 3/6/9 mm, AC adapter, cleaning brush |
| Intended use | Domestic only (body shaving, armpits, legs, arms, bikini line) |
| Recycling | Built-in Ni-MH battery to be removed before disposal; follow local regulations |
Frequently Asked Questions - ER-GK40 PANASONIC
User questions about ER-GK40 PANASONIC
0 question about this device. Answer the ones you know or ask your own.
Ask a new question about this device
Download the instructions for your Electric mower in PDF format for free! Find your manual ER-GK40 - PANASONIC and take your electronic device back in hand. On this page are published all the documents necessary for the use of your device. ER-GK40 by PANASONIC.
USER MANUAL ER-GK40 PANASONIC
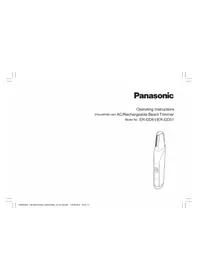
Operating Instructions
(Household) Rechargeable Body Shaver
Model No. ER-GK40
English 2 Dansk 50 Cesky 97
Deutsch 10 Português 58 Slovensky 105
François 18 Norsk 66 Magyar 113
Italiano 26 Svenska 74 Română 122
Nederlands 34 Suomi 82 Türkiye 130
Espanol 42 Polski 89
Before operating this unit, please read these instructions completely and save them for future use.
Thank you for choosing a Panasonic Body Shaver ER-GK40. With our WET/DRY technology, you can enjoy using your Panasonic shaver dry or in the shower or bath for gentle and easy shaving. Please read all instructions before use.
Important
This shaver has a built-in rechargeable battery. Do not throw into fire, apply heat, or charge, use, or leave in a high temperature environment.
Before use
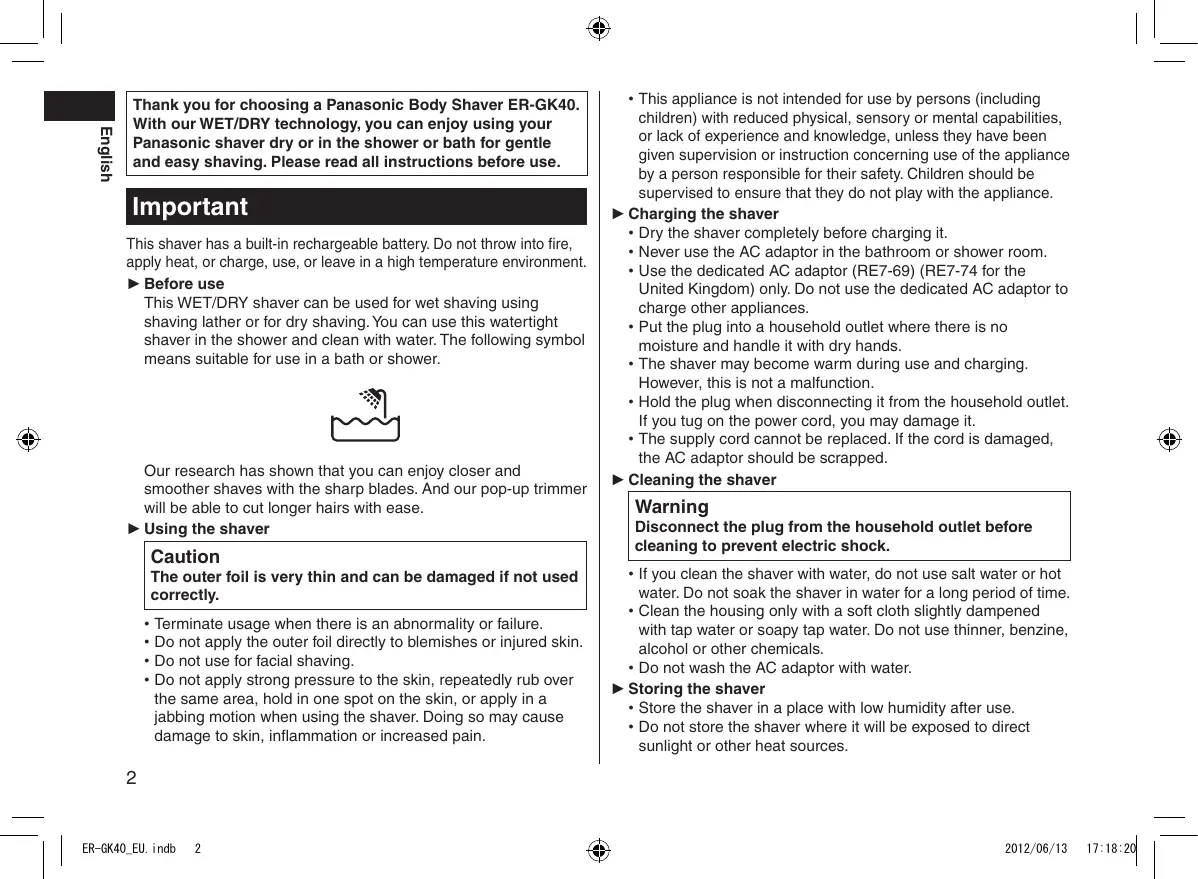
This WET/DRY shaver can be used for wet shaving using shaving lather or for dry shaving. You can use this watertight shaver in the shower and clean with water. The following symbol means suitable for use in a bath or shower.

Our research has shown that you can enjoy closer and smoother shaves with the sharp blades. And our pop-up trimmer will be able to cut longer hairs with ease.
Using the shaver
Caution
The outer foil is very thin and can be damaged if not used correctly.
- Terminate usage when there is an abnormality or failure.
- Do not apply the outer foil directly to blemishes or injured skin.
- Do not use for facial shaving.
-
Do not apply strong pressure to the skin, repeatedly rub over the same area, hold in one spot on the skin, or apply in a jabbing motion when using the shaver. Doing so may cause damage to skin, inflammation or increased pain.
-
This appliance is not intended for use by persons (including children) with reduced physical, sensory or mental capabilities, or lack of experience and knowledge, unless they have been given supervision or instruction concerning use of the appliance by a person responsible for their safety. Children should be supervised to ensure that they do not play with the appliance.
Charging the shaver
- Dry the shaver completely before charging it.
- Never use the AC adaptor in the bathroom or shower room.
- Use the dedicated AC adaptor (RE7-69) (RE7-74 for the United Kingdom) only. Do not use the dedicated AC adaptor to charge other appliances.
- Put the plug into a household outlet where there is no moisture and handle it with dry hands.
- The shaver may become warm during use and charging. However, this is not a malfunction.
- Hold the plug when disconnecting it from the household outlet. If you tug on the power cord, you may damage it.
- The supply cord cannot be replaced. If the cord is damaged, the AC adaptor should be scrapped.
Cleaning the shaver
Warning
Disconnect the plug from the household outlet before cleaning to prevent electric shock.
- If you clean the shaver with water, do not use salt water or hot water. Do not soak the shaver in water for a long period of time.
- Clean the housing only with a soft cloth slightly dampened with tap water or soapy tap water. Do not use thinner, benzine, alcohol or other chemicals.
- Do not wash the AC adaptor with water.
Storing the shaver
- Store the shaver in a place with low humidity after use.
-
Do not store the shaver where it will be exposed to direct sunlight or other heat sources.
-
Remove the plug from the household outlet when storing the shaver.
- Do not bend the power cord or wrap it around the AC adaptor.
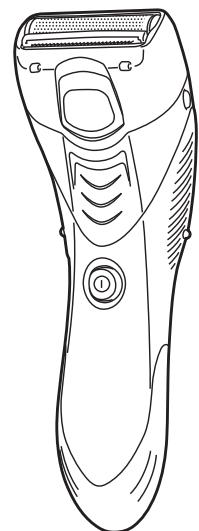
Parts identification
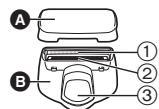

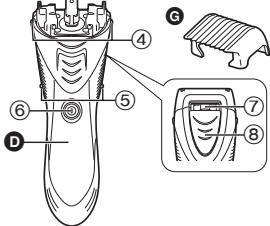

A Protective cap
B Foil frame
① Outerfoil
② Pop-up trimmer
③ Pop-up trimmer switch
Inner blade
D Main body
④ Foil frame release buttons
⑤ Side terminals
⑥ Power switch
⑦ Water outlet
⑧ Cleaning shutter
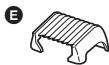
3 mm comb attachment
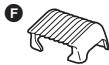
F 6 mm comb attachment
9 mm comb attachment
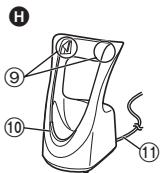
AC adaptor (RE7-69) (RE7-74 for the United Kingdom)
⑨ Charging terminals
10 Charge indicator lamp
1 Power cord
1 Cleaning brush
Charge
Charging the shaver
Perform the following steps to charge the shaver if it seems to lose the speed.
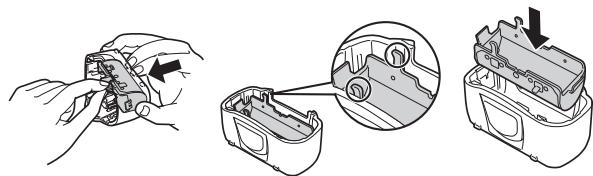
1 Turn off the shaver and insert it in the AC adaptor until it clicks as illustrated.
- The shaver will not charge unless the side terminals are in contact with the charging terminals.
- Wipe off any water droplets on the side terminals.
- If you charge the shaver with power switch turned on, it will start working when you remove from the AC adaptor.
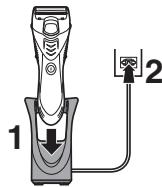
2 Put the plug into a household outlet.
The charge indicator lamp glows red.
- Charging time differs depending on the rated voltage. (See page 8.)
- When charging the shaver for the first time or when it has not been in use for more than 6 months, the charge indicator lamp may not glow for a few minutes, or the operating time may shorten. Please charge it for more than 20 hours in such cases.
3 Disconnect the plug after charging is completed.
- To keep charging the battery will not affect battery performance.
- Recommended ambient temperature for charging is 0 - 35^ . The battery may not charge properly or not at all under extreme low or high temperatures.

- The charge indicator lamp glows and stays on until the plug is disconnected from a household outlet.
- A full charge will supply enough power for approx. 4 shaves of 7 minutes each. (This will differ depending on usage.)
You cannot operate the shaver while charging.
Shave
Using the shaver
Trim your hair using the pop-up trimmer if it is longer than 5mm
Wet/Foam shaving
Shaving with soap lather makes the skin slippery for a closer shave.
Do not use shaving creams or face cleansers containing scrubbing compounds as these may cause the outer foil to clog.
1 Wet the area you want to shave and apply soap lather.
2 Remove the protective cap.
3 Wet the outer foil and place a small quantity of liquid body soap on the outer foil.
4 Press the power switch to turn on the shaver.
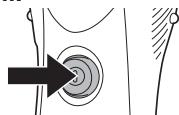
Press gently so that the whole of the outer foil is in close contact with the skin.
Caution
- Before shaving, check that the cleaning shutter is closed.
- Do not place your fingers on the power switch while using the shaver. This may cause the shaver to turn off.
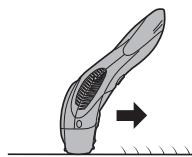
6 Apply the shaver to your skin and press gently while moving it slowly against the direction the hair grows.
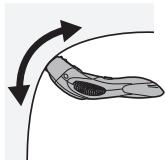
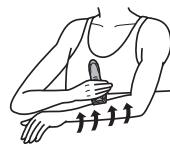
Underarm
Hold your arm up enough to stretch the skin and shave back and forth.
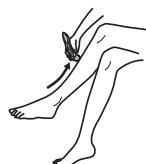
Legs
Move the shaver from ankle to knee.
Arms
Move the shaver from outside to inside.
For the best results
Pull the skin taut where the area is prone to sagging (on the inside of the knees and elbows).
Dry shaving
You can also shave without wetting your skin or the outer foil.
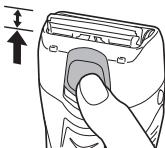
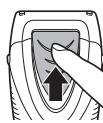
Using the pop-up trimmer
- Slide the pop-up trimmer switch upwards.
- Press the power switch to turn on the shaver.
- Apply the shaver to your skin and press gently while moving it slowly.
For bikini-line
Use the pop-up trimmer for bikini-line.

Using the comb attachments
Attaching the comb attachments
Select the attachment and attach it onto the shaver.
- Insert the hook at the front of comb attachments, and then snap in the rear hook.
- Slide the pop-up trimmer switch upwards.
- Press the power switch to turn on the shaver.
-
Apply the shaver to your skin and press gently while moving it slowly against the direction the hair grows.
-
Trim slowly and with care to avoid hairs being caught in the comb attachment.
- Clean the shaver when it is no longer shaving well or when it is clogged.
Removing the comb attachments
Push up the tab at the back of comb attachments.
uSs6


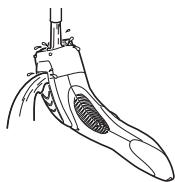
Clean
Cleaning the shaver
- Remove the shaver from the AC adaptor.
-
Close the cleaning shutter.
-
Apply some hand soap and some water to the outer foil.
- Turn the shaver on.
2
3-4
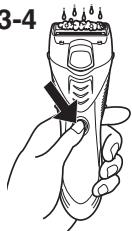
To remove light dirt
- Slide the cleaning shutter until it clicks.

- Slide the pop-up trimmer switch upwards.
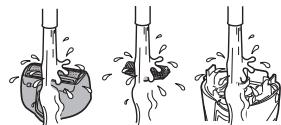
- Clean the foil frame with running water.
-
Turn the shaver off.
-
Rinse with water and shake up and down several times to remove the water.
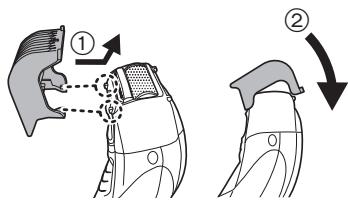
For heavy dirt
- Turn the shaver off after 10 - 20 seconds.
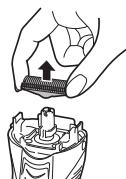
- Press the foil frame release buttons to remove the foil frame.
- Remove the inner blade by grasping it firmly at both ends and pulling straight away from the shaver.
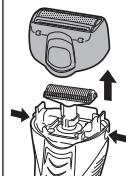
- Clean the shaver, the foil frame (including the pop-up trimmer) and inner blade with running water.
-
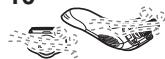
Wipe off any drops of water with a dry cloth.
-
Dry the foil frame and the shaver completely in a shaded area.
-
The foil frame will dry faster if removed from the main body.
-
Attach the foil frame to the shaver.
10
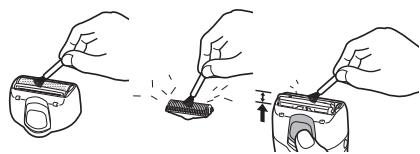
Cleaning with the brush
You can also clean the shaver with the cleaning brush.
Replacing the outer foil and the inner blade
| outer foil | once every year |
| inner blade | once every two years |
Replacing the outer foil
Never remove the outer foil at any time other than when replacing it.
- Press the foil frame release buttons to remove the foil frame.
- Squeeze the front and the back side of the foil frame and lift up one of the two knobs on the outer foil.
- Slip the outer foil into the frame and guide the plastic edges onto the hooks in the foil frame until it clicks into the shaver.
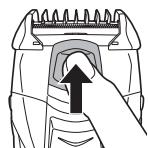
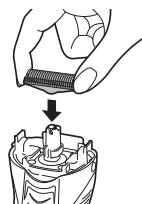
Replacing the inner blade
- Press the foil frame release buttons to remove the foil frame.
- Remove the inner blade by grasping it firmly at both ends and pulling straight away from the shaver.
- To insert the new inner blade, hold the blade at both ends and press downward until it snaps into the shaver.
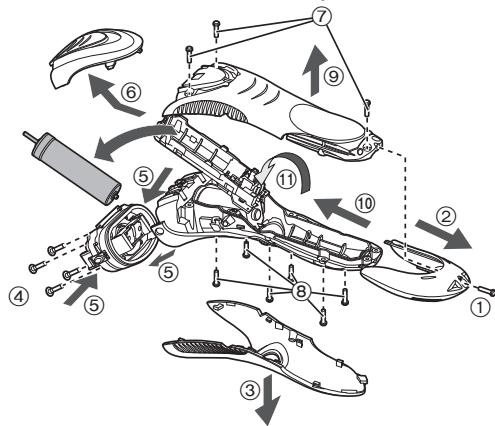
Removing the built-in rechargeable battery
Remove the built-in rechargeable battery before disposing of the shaver. Please make sure that the battery is disposed of at an officially designated location if there is one. Do not dismantle or replace the battery so that you can use the shaver again. This could cause fire or an electric shock.
Please contact an authorised service center.
- Remove the shaver from the AC adaptor when removing the battery.
- Perform steps ① to ⑪ and lift the battery, and then remove it.
- Please take care not to short-circuit the battery.
For environmental protection and recycling of materials
This shaver contains a Nickel-Metal Hydride battery.
Please make sure that the battery is disposed of at an officially assigned location, if there is one in your country.
Specifications
| Power source | See the name plate on the AC adaptor. | ||
| Motor voltage | 1.2 V--- | ||
| Charging time | RE7-69 | 230 V~ | Approx. 8 hours |
| RE7-74 for the United Kingdom | 240 V~ | Approx. 8 hours | |
| 230 V~ | Approx. 10 hours | ||
| Airborne Acoustical Noise | In shaving mode: 65 (dB (A) re 1 pW) In trimmer mode: 66 (dB (A) re 1 pW) | ||
This product is intended for household use only.
Information for Users on Collection and Disposal of Old Equipment and used Batteries
These symbols on the products, packaging, and/or accompanying documents mean that used electrical and electronic products and batteries should not be mixed with general household waste.
For proper treatment, recovery and recycling of old products and used batteries, please take them to applicable collection points, in accordance with your national legislation and the Directives 2002/96/EC and 2006/66/EC.
By disposing of these products and batteries correctly, you will help to save valuable resources and prevent
any potential negative effects on human health and the environment which could otherwise arise from inappropriate waste handling.
For more information about collection and recycling of old products and batteries, please contact your local municipality, your waste disposal service or the point of sale where you purchased the items.
Penalties may be applicable for incorrect disposal of this waste, in accordance with national legislation.
For business users in the European Union
If you wish to discard electrical and electronic equipment, please contact your dealer or supplier for further information.
[Information on Disposal in other Countries outside the European Union]
These symbols are only valid in the European Union. If you wish to discard these items, please contact your local authorities or dealer and ask for the correct method of disposal.
For at fjerne let snavs

- Important
- Before use
- Using the shaver
- Caution
- Charging the shaver
- Cleaning the shaver
- Warning
- Storing the shaver
- Parts identification
- Charge
- Turn off the shaver and insert it in the AC adaptor until it clicks as illustrated.
- Put the plug into a household outlet.
- Disconnect the plug after charging is completed.
- Shave
- Wet/Foam shaving
- For the best results
- Dry shaving
- Using the pop-up trimmer
- For bikini-line
- Using the comb attachments
- Attaching the comb attachments
- Removing the comb attachments
- Clean
- Cleaning the shaver
- 10
- Cleaning with the brush
- Replacing the outer foil and the inner blade
- Replacing the outer foil
- Replacing the inner blade
- Removing the built-in rechargeable battery
- For environmental protection and recycling of materials
- Specifications
- Information for Users on Collection and Disposal of Old Equipment and used Batteries
- For business users in the European Union
- [Information on Disposal in other Countries outside the European Union]
- For at fjerne let snavs
Brand : PANASONIC
Model : ER-GK40
Category : Electric mower