Indigo IS-525 - Bread maker Scarlett - Free user manual and instructions
Find the device manual for free Indigo IS-525 Scarlett in PDF.


| Product Type | Bread Maker |
| Brand | Scarlett |
| Model | Indigo IS-525 |
| Dimensions (L x W x H) | Approx. 30 x 25 x 35 cm |
| Weight | Approx. 5 kg |
| Power Supply | 220-240 V, 50/60 Hz |
| Power Consumption | 600 W |
| Bread Capacity | Up to 1.5 lb |
| Number of Programs | 12 |
| Display Type | LED |
| Delay Timer | Up to 13 hours |
| Keep Warm Function | Yes |
| Crust Control | Light, Medium, Dark |
| Non-stick Bread Pan | Yes |
| Viewing Window | Yes |
| Material | Plastic and stainless steel |
| Cleaning Instructions | Wipe with damp cloth; pan is non-stick |
| Safety Features | Automatic shut-off, overheat protection |
| Spare Parts Available | Kneading blade, measuring cup, spoon |
| Warranty | 1 year |
Frequently Asked Questions - Indigo IS-525 Scarlett
User questions about Indigo IS-525 Scarlett
0 question about this device. Answer the ones you know or ask your own.
Ask a new question about this device
Download the instructions for your Bread maker in PDF format for free! Find your manual Indigo IS-525 - Scarlett and take your electronic device back in hand. On this page are published all the documents necessary for the use of your device. Indigo IS-525 by Scarlett.
USER MANUAL Indigo IS-525 Scarlett
INNOVATIONPROGRESSIVETECHNOLOGYSELECTION
MODERN FASHIONSTYLE
natural_image
Exterior view of a stainless steel-colored organic bread maker with control panel (no visible text or symbols)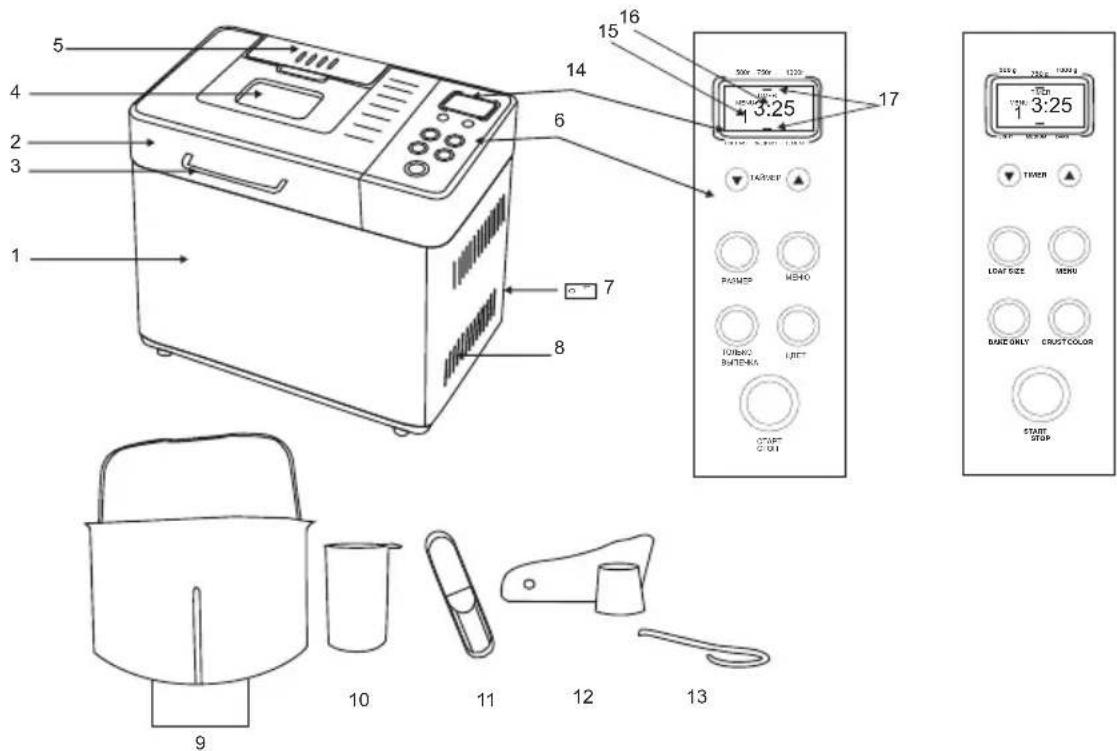
- Case
- Lid
- Lid handle
- Viewing window
- Dispenser
- Control panel
- Switch
- Ventilation openings
- Removable bowl
- Measuring cup
- Measuring spoon
- Mixing spatula
- Hook for bowl removal
- Screen
- Programme number
- Programme operation time
- Crust colour and loaf size indicators
PIs add month and year of production e.g. 08.2010 at this place
- Important safety procedures. Read attentively and keep for further references.
- Mishandling the breadmaker may lead to its breakdown and cause harm to the user.
- Before starting the breadmaker for the first time, make sure that technical specifications on the label comply with the power supply network parameters.
- ATTENTION! The power plug has a cord and grounding. Plug the breadmaker only into the corresponding ground sockets
- Use it for household purposes only in accordance with the User Manual. The breadmaker is not intended for industrial use.
- Do not use it out-of-doors.
- Always switch the breadmaker off before cleaning it, or if you do not use it.
- The breadmaker should not be used by people (including children) with low physical, emotional or mental capacity or if they have no life experience or knowledge, if they are not controlled or have not been instructed on the use of the breadmaker by the person responsible for their safety.
- Children should be under control to avoid playing with the breadmaker.
- Do not leave the switched on breadmaker unattended.
- Do not use the accessories which were not supplied with the breadmaker.
- Do not use the breadmaker if the power cord or the power plug is defective. To avoid danger the defective cord should be replaced in the authorized service centre.
- Do not put the breadmaker and the power cord into the water or other liquids. In case it happens, immediately switch the breadmaker off and before using it check
its operating capability and safety at the qualified specialists.
- Make sure that the power cord does not touch any sharp edges and hot surfaces.
- Do not pull the power cord, do not twist it or wrap around the breadmaker.
- Use the breadmaker for cooking only. Do not use it for drying clothes, paper or other things.
- Do not switch on an empty breadmaker. Do not use the breadmaker for storing anything.
- The breadmaker is not intended for conservation.
- Do not put the ingredients onto the bottom of the breadmaker, use the baking pan.
- Follow the recipes.
- To prevent short failure and breakdown of the breadmaker, avoid water in the venting holes.
- Improper cleaning of the breadmaker may lead to wear of the surface, which may affect operation of the breadmaker and create a risk to the user.
- When using an extension cord, make sure that the power handling ability of the cord complies with the breadmaker power handling ability.
- Avoid contacting the kneading blade during operation of the breadmaker, it may cause injury!
- ATTENTION! Do not open the lid and pull out the baking pan during the baking process! The lid can be opened only for folding in necessary ingredients strictly on beep signal.
- If the product has been exposed to temperatures below 0^ C for some time it should be kept at room temperature for at least 2 hours before turning it on.
- The manufacturer reserves the right to introduce minor changes into the product design without prior notice, unless such changes influence significantly the product safety, performance, and functions.
ADVANTAGES OF YOUR BREAD MACHINE
- The bread machine has an automatic mode for bread baking.
- You may select any out of 13 various programmes for baking; the bread machine can also make jam and prepare pasta dough.
- You may use ready-made baking mixtures.
- You may place the prepared components (nuts, raisins) in the dispenser, and it will add them in the bowl automatically upon a signal.
USEFUL TIPS
- First remove the bowl and place all the necessary ingredients inside, and then place the bowl inside the bread machine.
- Always follow the sequence for adding the ingredients. First, pour the liquid, then add butter, sugar, salt, then add flour and other ingredients; finally, add the yeast.
- All ingredients should be of room temperature; this will ensure the optimal yeast growth.
- Measure the quantity of the ingredients exactly. Even slight deviations from the amount specified in the recipe will affect the result of the baking process.
- You may add fruit and nuts in the dispenser at the beginning; but you should cut them in fine pieces prior to adding.
- Opening the lid will affect the temperature regime inside the bread machine, and it may affect the quality of bread baking.
- Press the "STOP/START" button to stop the machine in advance, and keep the button pressed for 2 seconds until you hear a sound signal.
INSTALLATION
- Make sure that there is no packaging and other things inside the breadmaker.
-
Make sure that the following has not been damaged during transportation:
-
lid;
- main body and viewing window;
- breadmaker walls;
-
baking pan.
-
If there are any defects, do not switch the breadmaker on; contact the seller or the service centre.
- Install the breadmaker on a dry, flat and heat-resistant surface.
- Do not install the breadmaker near flammable materials, explosives and spontaneously inflammable gases.
- Do not put the breadmaker near the gas or electric cooker, as well as other sources of heat.
- Do not put anything on the breadmaker. Do not shut off the venting holes.
- Do not put the breadmaker into the cupboard. For normal operation of the breadmaker, provide free space for ventilation: at least: 20 cm above, 10 cm at the rear and at least 5 cm on each side.
- Before starting it for the first time, wipe the baking pan, the kneading blade, the inside and outside parts of the breadmaker with a wet cloth. Remove the protective film from the control panel.
OPERATION
- Remove the bowl.
- Fasten the mixing spatula.
- Place the ingredients inside the bowl.
- ATTENTION: Make sure that the yeast does not come in contact with salt and liquid.
- Place the bowl inside the bread machine.
• Make sure that the bowl is placed correctly. - Close the lid of the device.
-
Plug the device in the socket. Move the switch which is located on the back wall of the bread machine into the "I" position.
-
Press the "MENU" button and select the programme number.
- You will hear a sound signal and the screen will display the programme number and the duration of cooking.
- Select crust colour and loaf size.
- Press the "START/STOP" button to start the programme.
- Once the programme is finished you will hear a sound signal.
- Let the bread set for a little while.
- Unplug the device from the socket before opening the lid.
- Remove the bowl using the hook or a pot holder.
- Turn the bowl and shake it slightly. If the bread does not come out, you may use wooden or plastic spatulas to remove the bread from the bowl. Do not use metal objects, they may scratch the bowl surface!
- Let the bread cool off for 30 minutes, and then you may cut the bread.
- ATTENTION: Make sure that the mixing spatula is not inside the bread. If this happens, carefully remove the spatula. Do not use metal objects, they may scratch the surface of the spatula!
CONTROL PANEL
"TIMER" BUTTONS
- The «TIMER» buttons are used to set the delay time for bread baking (till it's ready).
• The time setting step is 10 minutes.
• The maximum delay time is 13 hours. - For example: the current time is 20:30, and you would like the bread to be baked by 7:00 a.m., i.e. in 10 hours 30 minutes. Press the MENU button, select the mode, select the crust colour and the loaf size. Then press the timer button to add the time till 10 hours 30 minutes. The time will be displayed on the LCD screen. Then
press the «START/STOP» button to activate the timer, and the display will show the countdown.
- WARNING: We do not recommend to use the timer function when using ingredients that get spoiled quickly, such as eggs, milk, cream or cheese.
"SIZE" BUTTON
- The "SIZE" button is used to select the loaf size.
- Press the "SIZE" button once, twice or three times to select 500, 750 or 1000 g respectively.
- The LCD screen will display a line which will indicate the selected size.
- ATTENTION: By default the bread machine is set to make a large 1000 g loaf.
"MENU" BUTTON
- The "MENU" button is used to select the needed programme (1-15).
- To select the programme press the "MENU" button the necessary number of times.
- The LCD screen will display the programme number and the baking time for the selected programme.
"BAKE ONLY" BUTTON
- Use this button to turn on the "BAKE" programme; if needed, adjust the cooking time using "TIMER" buttons.
- In this programme, bread is baked using the standard settings in accelerated mode: loaf size 1000 g, medium crust colour, cooking time 1 hour 30 minutes.
"COLOUR" BUTTON
- The "COLOUR" button is used to program the baking of bread with light, medium or dark crust.
- Press the button once, twice or three times to obtain light, medium or dark crust respectively.
- The LCD screen will show a line which will indicate the selected crust colour.
- ATTENTION: By default the bread machine is set to make medium coloured crust.
"START/STOP" BUTTON
- Press the "START/STOP" button to start/set the operation of the bread machine or to cancel the selected function.
- Keep the button pressed for 2 seconds until you hear a sound signal in order to finish the operation or erase the settings.
- ATTENTION: Do not press the button if you want to check the condition of your baking. Use the viewing window in the lid of the bread machine to check the baking.
BAKING MODES:
- See more detailed description of various types of bread baking in the cook book.
1. White
- This mode is used for baking light bread with a crisp from white wheat flour. Baking time is 3 hours and 25 minutes.
2. White rapid
- This mode reduces the time needed for white bread preparation. It is used for baking light bread with a crisp from white wheat flour in the quick mode. Baking time is 1 hour and 08 minutes.
3. Whole wheat
- This mode is used for baking bread from whole-wheat flour. This mode includes prolonged doughing and bread rises for a significantly longer time. Preliminary warming of mixed ingredients takes 30 minutes. Baking time is 4 hours and 40 minutes.
4. Whole-wheat rapid
- This mode is used for baking bread from whole meal in the quick mode. Preliminary warming takes 5 minutes. Baking time is 1 hour and 08 minutes.
5. French
- This mode is used for baking bread with a crisp; it is suitable for baking French bread with low fat and sugar content. Baking time is 3 hours and 50 minutes.
6. French rapid
- This mode is used for baking French bread in the quick mode. Baking time is 1 hour 08 minutes.
7. Sweet
- This mode is used for baking pastry. Baking time is 3 hours 35 minutes.
8. Rye
- This mode is used for baking bread from rye flour with addition of wheat flour. Baking time is 3 hours 48 minutes
9. Quick
- This mode is used for baking sweet bread with various sweet additives, for example, marmalade. Baking time is 2 hours 08 minutes.
10. Low carb
- This mode is used for baking low carbohydrate bread from oat flour and ground flax seeds. Baking time is 4 hours 30 minutes.
11. Gluten free
- This mode is used for baking bread from flour without gluten and bread of mixed composition without gluten. Baking time is 2 hours 59 minutes.
12. Cake
- This mode is used for baking cakes and pies from ready dough. Baking time is 1 hour 30 minutes.
13. Dough
- This mode is used for making dough with further hand forming and baking in the oven. Making time is 1 hour 30 minutes.
14. Artisan dough
- This mode is used for making farmhouse dough used for pasta preparation. Making time is 5 hours 15 minutes.
15. Jam
- This mode is used for making confiture. Making time is 1 hour 25 minutes.
16. Bake
- This mode is used for baking ready dough. Baking time is 1 hour.
MEMORY FUNCTION
- In case of power failure for less than 7 minutes, the breadmaker will continue the selected program from the moment it stopped due to the power failure.
TROUBLESHOOTING
Bread does not rise
- Gluten in your flour is of improper quality, or you don't use baker's flour. (Gluten quality may vary depending on the temperature, moisture, flour storage conditions, and time of harvesting)
- Try another kind of flour, another manufacture or another batch.
- The dough became too hard because you added too little liquid.
- The baker's flour with high protein content takes up more water than other kinds of flour, try adding extra 10-20 ml of water.
- You use unsuitable yeast.
- Use dry yeast in packages that have the "fast-acting yeast" inscription. This type of yeast does not require prefermentation.
• You put little yeast, or your yeast is old. -
Use the measuring spoon. Check the expiry date of the yeast. (Store it in the fridge)
• Liquid got onto the yeast before kneading. -
Make sure you add the ingredients in the correct order according to the recipe.
- You added too much salt, or not enough sugar.
- Check the recipe and measure the quantity with the measuring spoon.
- Make sure there is no salt and sugar in other ingredients.
Bread is too loose
• You used too much yeast.
- Check the recipe and measure the quantity with the measuring spoon.
• You added too much liquid. - Some kinds of flour take up more water than other kinds, try reducing the amount of water by 10-20 ml.
Bread collapsed after rising
• The quality of your flour is unsatisfactory.
• Try flour produced by another manufacturer.
• You used too much liquid.
• Try reducing the amount of water by 10-20 ml.
Bread rose too much
• You use too much yeast/water.
- Check the recipe and measure the quantity with the measuring spoon (yeast) / measuring cup (water).
- Make sure that other ingredients do not give excess water.
• You put not enough flour.
Bread is pale and clammy
- You use not enough yeast, or your yeast is old.
- Use the measuring spoon. Check the expiry date of the yeast. (Store it in the fridge)
- There was a power failure or the breadmaker stopped during the baking process.
- The breadmaker will switch off if it is interrupted for more than ten minutes. You should remove the bread from the pan and restart the cycle with new ingredients.
There is flour on the bread
• You used too much flour, or too little liquid.
- Check the recipe and measure the right quantity of flour with the scales or the right quantity of liquid with the measuring cup supplied with the breadmaker.
Bread was mixed badly
- You did not put the kneading blade into the baking pan.
- Before adding the ingredients, make sure that the kneading blade is in the pan.
- There was a power failure or the breadmaker stopped during the baking process.
- The breadmaker will switch off if it is interrupted for more than ten minutes.
- You may have to restart the breadmaker, but it may lead to a negative result if kneading has already started.
The display shows HHH after starting the program
- It means that the temperature in the breadmaker is too low. Stop the program, unplug the breadmaker out the power outlet, open the lid and let the breadmaker cool, before continuing the program.
The display shows LLL after starting the program
- It means that the temperature in the breadmaker is too high. Move the breadmaker to a warmer room.
The display shows EE0/ EE1 after starting the breadmaker
- There was a power failure, error in the temperature sensor operation. Contact the Service Centre.
CLEANING AND CARE
- Clean the breadmaker regularly and remove any food remains from its surface.
- Before cleaning, switch the breadmaker off and plug it out a power outlet.
- Let the breadmaker cool completely.
- Wipe the control panel, outside and inside surfaces, the baking pan with a wet cloth and detergent.
- Do not use aggressive agents or abrasives.
STORAGE
- Make sure that the breadmaker is plugged out of the power outlet and cooled completely.
- Follow the requirements of the CLEANING AND MAINTENANCE section.
- Store the breadmaker with the lid half open in a dry clean place.
МЕРЫ БЕЗОПАСНОСТИ
KENYÉRSÜTŐJE ELŐNYEI
- ADVANTAGES OF YOUR BREAD MACHINE
- USEFUL TIPS
- INSTALLATION
- OPERATION
- CONTROL PANEL
- "TIMER" BUTTONS
- "SIZE" BUTTON
- "MENU" BUTTON
- "BAKE ONLY" BUTTON
- "COLOUR" BUTTON
- "START/STOP" BUTTON
- BAKING MODES:
- White
- White rapid
- Whole wheat
- Whole-wheat rapid
- French
- French rapid
- Sweet
- Rye
- Quick
- Low carb
- Gluten free
- Cake
- Dough
- Artisan dough
- Jam
- Bake
- MEMORY FUNCTION
- TROUBLESHOOTING
- Bread does not rise
- Bread is too loose
- Bread collapsed after rising
- Bread rose too much
- Bread is pale and clammy
- There is flour on the bread
- Bread was mixed badly
- The display shows HHH after starting the program
- The display shows LLL after starting the program
- The display shows EE0/ EE1 after starting the breadmaker
- CLEANING AND CARE
- STORAGE
- МЕРЫ БЕЗОПАСНОСТИ
- KENYÉRSÜTŐJE ELŐNYEI
Brand : Scarlett
Model : Indigo IS-525
Category : Bread maker