ER1610 - Electric mower PANASONIC - Free user manual and instructions
Find the device manual for free ER1610 PANASONIC in PDF.
User questions about ER1610 PANASONIC
0 question about this device. Answer the ones you know or ask your own.
Ask a new question about this device
Download the instructions for your Electric mower in PDF format for free! Find your manual ER1610 - PANASONIC and take your electronic device back in hand. On this page are published all the documents necessary for the use of your device. ER1610 by PANASONIC.
USER MANUAL ER1610 PANASONIC
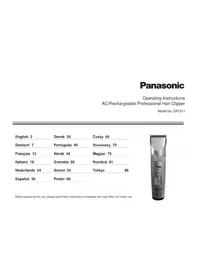
Operating Instructions
AC/Rechargeable Professional Hair Clipper
Model No. ER1610
Before operating this unit, please read these instructions completely.

4sll6u
Important
Before use
This clipper is designed for professional use to trim hair and beards. Charge it for 8 hours before use for the fist time in order to activate the built-in rechargeable batteries. It can be operated on either an AC adaptor or rechargeable batteries. Read all instructions carefully before use.
Charging the clipper
- Use the ER1610 hair clipper with the RE5-83 adaptor only.
- Avoid charging the batteries at temperatures below 5^ C or above 35^ C .
- Avoid charging the batteries in direct sunlight or near a radiating heat source.
- The recharge (□) lamp may blink at an early stage when it is used for the first time or if it has not been used for 6 or more months even if it is fully charged. This is not a malfunction.
- Even though the clipper may not be used for an extended period, charge every 6 months to preserve battery life.
- The power cord cannot be replaced. If it is damaged, the AC adaptor should be discarded.
Using the clipper
- Warning - Keep the appliance dry.
- The clipper may become warm during operation and/or charging. This is normal.
- Check that the blades and the attachments are not damaged before use. Replace them if they are damaged.
- You should not allow permanent wave lotion, hair restorer or hair spray to come into contact with the main body or the blades. Doing so may result in cracking, discoloring or corrosion.
- You should not drop the clipper on the floor.
- You should not knock the blades and the attachments against hard objects.
- You should not trim the hair of a pet.
2
Cleaning the clipper
- Clean the housing using only a cloth slightly dampened with water or a mild soap solution.
- Never use a caustic solution.
- Never submerge the clipper in water.
Storing the clipper
- This appliance is not intended for use by persons (including children) with reduced physical, sensory or mental capabilities, or lack of experience and knowledge, unless they have been given supervision or instruction concerning use of the appliance by a person responsible for their safety. Children should be supervised to ensure that they do not play with the appliance.
- Never tamper with moving parts.
- Avoid grabbing the clipper by the power cord, as it may become detached, causing damage or injury.
- If the clipper is not working properly, have it inspected at an authorized service center.
Specifications
Power source: 230V AC, 50 Hz
Motor voltage: 2.4 V DC
Charging time: 1 hour
Airborne Acoustical Noise: 60 (dB (A) re 1 pW)
READ ALL INSTRUCTIONS BEFORE USE.
Parts identification
A
B

C

D

E
F


H

0
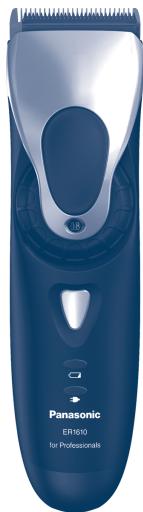
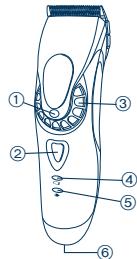
A Main body
① Trimming height indicator
② OFF/ON switch
③ Dial (Height adjustment control)
④ Recharge (□) lamp
⑤ Charge status (→) lamp
⑥ Appliance socket
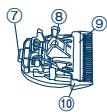
Blade
⑦ Mounting hook
⑧ Cleaning lever
⑨ Moving blade
Stationary blade
Short comb attachment (3 mm/4 mm)
Medium comb attachment (6 mm/9 mm)
E Long comb attachment (12 mm/15 mm)
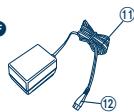
AC adaptor (RE5-83)
① Power cord
⑫ Appliance plug
Cleaning brush
Oil
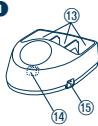
1 Charging stand
Comb attachment shelves
14 Charging plug
⑮ Socket
Charge
Charging the hair clipper
Charge the clipper when recharge ( ) lamp starts to blink. It can be used for approximately 5 minutes after the recharge ( ) lamp blinks.
1 Connect the power cord to the charging stand.
2 Press the OFF/ON switch to turn off the power.
3 Place the clipper on the charging stand and plug in the adaptor into a household outlet.
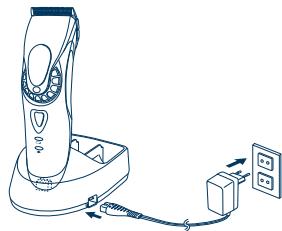
- Charge status ( => ) lamp glows and charging starts.
- Charging is completed when Charge status (▶) lamp blinks. (Max. 1 hour later)
- 1 full charge will provide approximately 50 minutes of continuous operation.

English
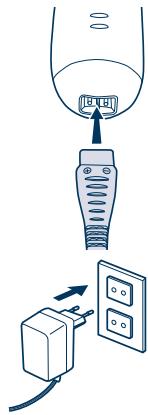
Charging without the charging stand
1. Press the OFF/ON switch to turn off the power, and insert the appliance plug into the clipper.
2. Plug in the adaptor into a household outlet.
AC operation
If you connect the AC adaptor to the clipper in the same way as for charging, and turn on the power, you can use it even if the battery capacity is low.
- If the clipper does not operate, charge the clipper for approximately 1 minute.
- Be careful not to discharge the battery completely with the power left turned on. It results in shortening the battery life.
Cuk
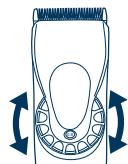
Using the hair clipper
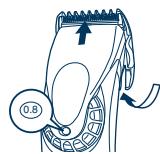
Turn the dial clockwise or counterclockwise to adjust the moving blade back and forth to get the desired height. Adjustable in 5 stages from 0.8mm to 2.0mm in 0.3mm steps without attachments.
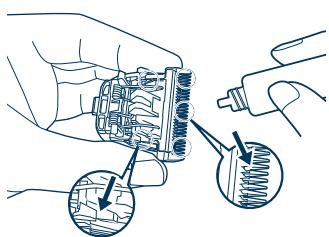
Using the comb attachments
1 Select the trimming heights indicated on the insides and sides of the attachments.
2 Set the dial to "0.8" and then mount the attachment to the clipper as illustrated.
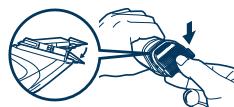
Removing the attachment from the clipper
Slide one side of the attachment off the mounting in direction indicated with the arrow.
Care
Blade maintenance
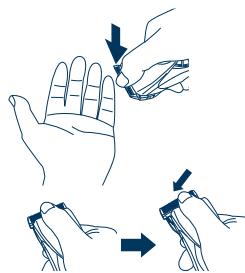
Removing and mounting the blade
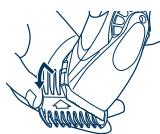
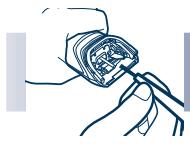
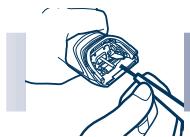
Removing the blade
- Hold the clipper with the switch facing upward and push the blade with your thumb while catching the blade in your other hand.
- Be sure to turn off the power before you remove the blade.

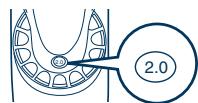
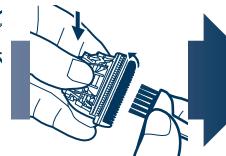
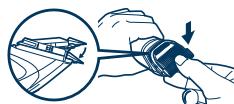
Mounting the blade
- Set the dial to "2.0".
- Fit the mounting hook into the blade mounting on the clipper and push in until it clicks.
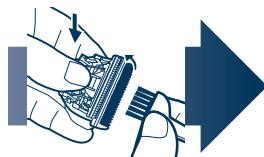
Cleaning the blade
- Brush off any hairs from the clipper and from around the blade.
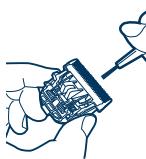
- Remove the blade and brush off the hairs from the blade edge.
- Brush the hairs out from between the stationary blade and the moving blade while pressing down on the cleaning lever to raise the moving blade.
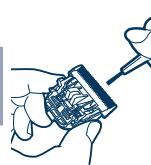
Lubrication
- Apply a few drops of the oil to the space between the stationary blade and moving blade.
- Apply the oil to the clipper before and after each use.
- Set the dial to "2.0" and then remount the blade on the clipper.
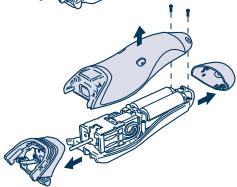
Removing the built-in rechargeable batteries
Remove the batteries as illustrated.
- Disconnect the clipper from a household outlet.
- Fully discharge the batteries.
- Be careful not to short-circuit the batteries.
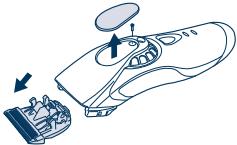
(1)
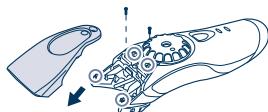
(2)
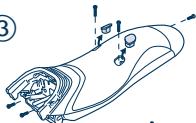
(3)
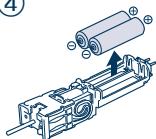
(4)
WARNING - Do not attempt to replace the batteries for the purpose of reusing the clipper. This could result in the risk of fire or electric shock.
Important notice regarding environmental protection
The built-in rechargeable Nickel-Metal Hydride batteries contain substances that may be environmentally harmful. Please remove the batteries before discarding your clipper.
For environmental protection and recycling materials
This clipper contains Nickel-Metal Hydride batteries.
Please make sure that the batteries are disposed of at an officially assigned location, if there is one in your country.
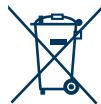
Information on Disposal for Users of Waste Electrical & Electronic Equipment (private households)

This symbol on the products and/or accompanying documents means that used electrical and electronic products should not be mixed with general household waste.
For proper treatment, recovery and recycling, please take these products to designated collection points, where they will be accepted on a free of charge basis.
Alternatively, in some countries you may be able to return your products to your local retailer upon the purchase of an equivalent new product.
Disposing of this product correctly will help to save valuable resources and prevent any potential negative effects on human health and the environment which could otherwise arise from inappropriate waste handling. Please contact your local authority for further details of your nearest designated collection point.
Penalties may be applicable for incorrect disposal of this waste, in accordance with national legislation.
For business users in the European Union
If you wish to discard electrical and electronic equipment, please contact your dealer or supplier for further information.
Information on Disposal in other Countries outside the European Union
This symbol is only valid in the European Union.
If you wish to discard this product, please contact your local authorities or dealer and ask for the correct method of disposal.
Wichtig
Identification of dele

A

B

C

D

E

F


H
0
A Hoveddel
Peped Hauanom 3KcnJyaTaun
3Ta Maunnka npeHa3NaheHa I pynpoeccnoHaIbHcO tprKKnBoloc b60dbl. Neped nepBbIM uNOnb3OBaHmE 3apRkaiTe np6oB p TeueHne 8acob, YTObI aKTHBnPoBaTb BCTPOeHNbIe AKyMynIToPbIe b4aTapei. Maunnka moket paBoTaTb KAp ot cTeBOrAo anTepa nepMeHHoro ToKa, taN oT akkyMynIToPbIbX b6aTape. Neped hauanom kckPiyaTuamn BHMaTeJIbHO npoUHTne BCE yKa3AHnI NO nCnONb3OBaHnO.
3apnka MaunHKn dIa CTpnKKn
ИспльбаутemeшинкдгсторьвОLOCER1610TOJIbKOcCEteBbIM aadantepomRE5-83,BXOДУПМВKOMПЛeКТ.
- He npoɪn3BɔɒnTe 3aɪpʌkny 6bʌtapeɪ npɪ TempepaType Hɪŋke 5 °C nɪn Bblüe 35 °C.
He 3apkaTe 6atapeu B mecTax, NOBBePkeHHbIX BO3dEiCTBIO npMbIX COInHeHbIX Jyuei, B6IINn HArpeBaTeIbHex npN6OpOB IN DpyTNX IcTOUHNKOB TeIIa.
Ha hauaIbhoN CTaDN INdNkATOp 3apJIKN ()MOKET MIRAtB,ecNI MaINHKA IcNOnJIb3yeTcB BnPBEIe NIN cNc OHA He NCOnJIb3OBAJaACb TceHeNe6 MecaIeB INI donbIe, daKe C nonHOCTbIO 3apJKeHHoA kAKyMJIyTAPOHON 6batapeE.3To He aBNJIeTcER HEMCnpabHOCTbO.
-Даме eclin BbydoIroe BpemЯ He nCnoIb3yeTe MaunHky, npOn3BODnTe 3apJky kaxdIbe 6 MecaIeB, YTO6bl npOdiNt b cpoK clyx6bl aKKyMJIyTophIx 6batape.
- Ceteboi shypr nitaHnre 3aMeHnEeTc. Ecn OH noBpeKdE, aanTep nepemehnoro Toka Heo6xOIMU ytninuropBaTb.
> NcnoJIb3OBAHHe MaunHKn DJIa CtpnXkN
- Ппсдурждени -хан'te рибор сухим.
-Пибов может Нагрваьсь в пюцесестпжки ИИли Зардк.Зто Hормальhoe яльенье. -
Ipeed nCnOJIb3OBAHnEM npOBepbTe, He nobPexJdeHbI Jy npB6opa pexJuI 6Iok nJIn hacaIkn. EcIIOn II NobPexJdeHbI, zameHIneIX.
-
He donyckaIte, YTObI cpeDCTBO IJX XIMUeCKo 3aBMBK BONOC, cpeDCTBO IJX BOCCTAHOBLEHNA BONOC IJN IaK IJY BONOC IONaJaI N KaPnyc npi6opba IJN Ha Ne3BnI peKyuIeO 6noka. 3To MojEt npiBeCTN K OpbazOBaHIO TpeuIN, IN3MeHeHIO CBeTa IJN Koppo3mI.
- He poŋaIte n He ydapaiTe MaunHky IaI cTpNkK.
- He yapraIte pexyuIe 6Iok npi6opa IIN erO hacAnIO TBepIbIe npedmetbl.
3aPpeuaeTcNcNoJIb3OBAtB MaUHHky dIy cTprnKu WepcTny XJIBOTbIX.
OuNTKa MaunHKn Dn CTpnXkN
- YICTNTe KOPNc MRAKoT KAtbIO, CJIeTK CMOueHHo BDOJ INIIN CnaBIMMbJIbHbIM pACTBOpOM.
- 3anpeuetaTcNcNoJIb3OBAbTДЯ ONUCTKII UeIOUHbIe pactBOpbI.
- 3anpeaetcOnyckaTb MaunHky Дя CTpnKkB B OvOy.
XpaenHeMaunHKnIJIaCTpNkK
3TOT npnbop He npedna3nauen I pyncnoB3OBaHnI NIOdbm (BKIOUay aTeey) c OgrapanuHbHIMn FNI3NueCKMn, CECNOPbIMn IINyUMCTBeHHbIMn CNOC6bOcTAMn ININ NIOaAMn 6e3 COOTBETCTBYoHux 3HaHn IOnbTa. NcNoB3OBaHne npnbopa TAKIMn IIObMn dONyckaetcr ToIbKO nOd Na6bIOJeHEm Niua, OTBeaHOJero 3a INx 6e3oNaCHOctb. HeoXoDIMO cIeIITb, YTO6bl detn He irpaJIc n npnbopom.
- 3anpeuetaetcdoTpaRnBaTbcDoDbNkUxxCyacTei npnbopa.
HeJepraite3aUHypnTAnHry,TakKAKOHMOxETOTCOeHNHTbCyr,YTO MOxETCTaTbpunuHNOBpeXDeHnIINTPaBMbl.
- Ecni MaunHka IJIa CTpNkKn He paobTaet HndIeXaIIm M obpa3OM, obaTntecb 3a KOHCyIbTaUneB OΦuImaJbHbI cepBVCbHbI ueHTp.
TexnueckxapakTepcntkN
BnMaHH Ta BCTaHOBJIeHH JIe3a
BnMaHnJaIe3a
- Utpmmyoyn MaunHky dny cTpnKKn BOLOCCNIEpEMNKaChem BROPy, HATNCHTb HaJe3O BeINKIM naJIbcM pyKN, OOnHOACHO yTpmyoyn Ioro IHWOpykoIO.
-пегдзиманнлесаобовязковьВИМКНТБЖИВЛЕнгМашинк.
BctaHOJIeHHJIe3a
- BctahOBiBt DnCK Ha "2.0".
- BCTABTE MOHTAXHNI rauOK y TpIMaY ne3 Ha MaunHci IJnA CTpIXKn Ta HATNCiTb Ha Hbro, DOKN BiH He KNaue Ha CBOE McIe.

UuHnJle3a
Matsushita Electric Works, Ltd.
1048, Kadoma, Osaka 571-8686, Japan
MaucytEneKtpnBopK,TTd.
1048,KaIOMa,Ocaka 571-8686,YnOHia
TelefoHnHm HOpEhOpMauiHoro LHTpy Panasonic:
+38(044) 490-38-98
Ihopmaia yoYo yTnla3aII B KpaHax, kI He BXOJaTB B EbponecBkn Co03
Danm CmB0J DiChn TlBKn Ha Tepntopii
CbponecBko CoO3y. Pnp notpe6i ytni3auii
DaHOro BnOby 3BepHiTc8 Do MiCzEBOrO KepiBnHTBa
a6o DInepera Qdo npabNtBHO rMeTOy II
3dIiChHeHHa.

MEMO


MEMO


Matsushita Electric Works, Ltd.
1048, Kadoma, Osaka 571-8686, Japan
No.2 EN, GE, FR, IT, DU, SP, DA, PT, NW, SW, FI, PL, CZ, SK, HU, RO, RU, TK, UA (欧州)
Printed in Japan