
AZ7374 - Portable CD player PHILIPS - Free user manual and instructions
Find the device manual for free AZ7374 PHILIPS in PDF.
| Product type | Portable CD player |
| Brand | PHILIPS |
| Model | AZ7374 |
| Dimensions (W x H x D) | 134 x 30.5 x 154 mm |
| Weight (without/with batteries) | Approx. 250 / 290 grams |
| Power supply | 2 AA/LR6/UM3 batteries (1.5 V) or mains adapter 4.5 V DC / 400 mA (AY 3160) |
| Battery life with alkaline batteries | 5.5 h (ESA inactive) / 4.5 h (ESA active) |
| Battery charging | Philips NiCad batteries, charging time 5.5 h |
| Playback modes | SHUFFLE, SHUFFLE REPEAT ALL, REPEAT 1, REPEAT ALL, SCAN, PROGRAM (max. 25 tracks) |
| Audio processing | DSP (Rock, Pop, CAR, Incredible Surround), ESA (Electronic Shock Absorption) |
| Outputs | Headphone jack LINE OUT / Ω (3.5 mm) |
| Frequency response | 20 - 20000 Hz |
| Signal-to-noise ratio | Typ. 95 dBA |
| Total harmonic distortion | Typ. 0.05 % |
| Display | Backlit (mains) or 10 s on batteries |
| Functions | RESUME/HOLD, OPEN, PLAY/PAUSE, STOP, PREV/NEXT, PROG, MODE, VOLUME, DSP, ESA |
| Maintenance | Do not clean the lens; cabinet can be cleaned with a damp chamois |
| Safety recommendations | Do not use earphones at high volume or while driving |
| Accessories supplied | Mains adapter AY 3160 (optional), batteries (not supplied) |
Frequently Asked Questions - AZ7374 PHILIPS
User questions about AZ7374 PHILIPS
0 question about this device. Answer the ones you know or ask your own.
Ask a new question about this device
Download the instructions for your Portable CD player in PDF format for free! Find your manual AZ7374 - PHILIPS and take your electronic device back in hand. On this page are published all the documents necessary for the use of your device. AZ7374 by PHILIPS.
USER MANUAL AZ7374 PHILIPS
AZ 7372 Portable Compact Disc Player

Instructions for Use
Mode d'emploi
Connections .....10-11
Operation 12-16
General information .....17
Troubleshooting .....18-19
Français
Commandes .....20-21
Accessoires 22
Alimentation......23
Branchements .....24-25
Anschlüsse......52-53
Bedienung ....54-58
Allg. Informationen .....59
Fehlersuche......60-61
Nederlands
Bedieningstoetsen ...62-63
Accessoires 64
Voeding......65
This set complies with the radio interference requirements of the European Community.
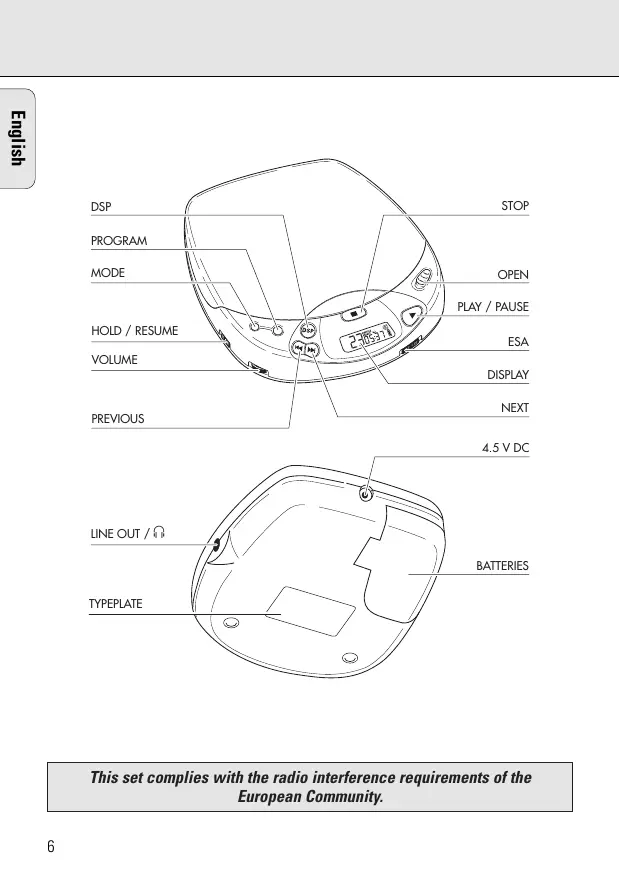
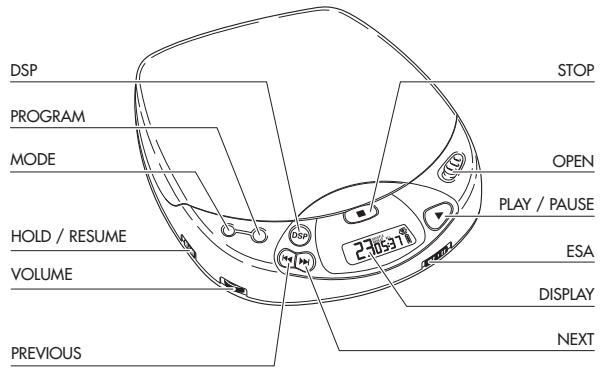
| DISPLAY....Window for showing the different playing modes, tracks and times | |
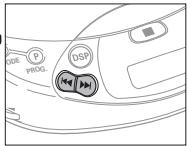
| ▶▶....Button for selecting the next music track or, if held down, for searching forward for a particular passage on the CD | |
| ◀◀....Button for selecting the previous music track or, if held down, for searching-backward for a particular passage on the CD | |
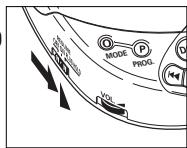
| VOLUME....Control for adjusting the volume at the headphone output | |
| RESUME/HOLD....Switch for activating the RESUME function (resuming CD play) and/or HOLD (blocking all buttons) function | |
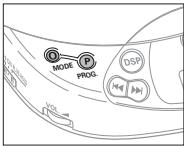
| MODE ○....Button for selecting the different playing modes:SHUFFLE→SHUFFLE REPEAT ALL→REPEAT 1→REPEAT ALL→SCAN→off | |
| PROG P....Button for storing tracks in a program and for reviewing the program | |
| DSP....Digital Sound Processing: Button for selecting the different sound settings at the headphone output:ROCK→POP→CAR→INCREDIBLE SURROUND→off | |
| STOP ■....Button for stopping CD play, deleting various settings, switching off the CD player and activating charging. | |
| OPEN....Slide control for opening the lid of the CD player | |
| ▶II....Button for starting and pausing CD play | |
| ESA....Electronic Shock Absorption: Switch for activating the electronic buffer memory for an undisturbed sound | |
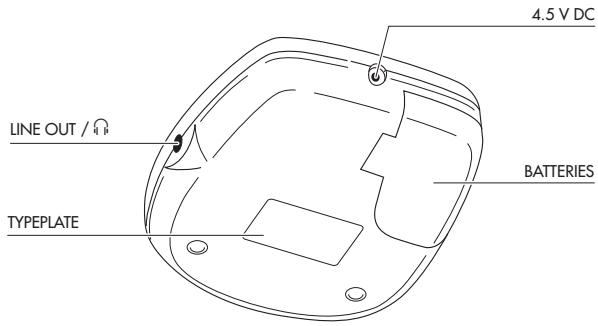
| LINE OUT / 🔊....Headphone socket (3.5 mm) | |
| 4,5 V DC....Socket for external power supply | |
| Battery compartmentfor inserting batteries |
Note: In case of power supply via the DC jack (mains adapter or cigarette lighter in your car) the display is backlighted. In battery mode, the illumination is activated for 10 seconds after key operations.
Accessories
Accessories for power supply
AY 3160 mains adapter 4.5 V/400 mA Direct current, plus-pole to the center pin Note: Use only the AY 3160 adapter, other products may damage the set.
AY 3361 - NiCad battery pack for recharging on board
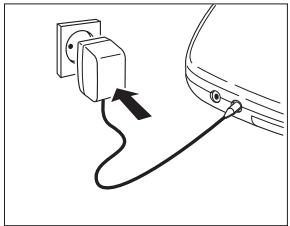
Mains adapter
1 Make sure that the local voltage corresponds to the voltage of the adapter (see accessories).
2 Connect the mains adapter to the player's 4.5 V DC socket and to the wall outlet.
- Always disconnect the adapter when you are not using it.
natural_image
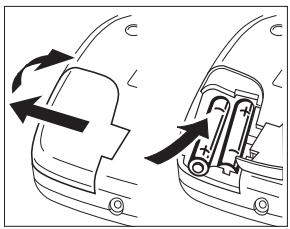
Diagram of an electrical plug connected to a car's side panel, showing cable routing (no text or symbols)Batteries, type LR6, UM3 or AA (supplied or optional available)
- Open the battery compartment and insert the rechargeable battery pack or 2 alkaline batteries.
Typical playing times under normal conditions: Alkaline batteries: 5.5 hours (ESA off) 4.5 hours (ESA on)
- Remove the batteries if they are empty or the CD player is not to be used for a long period of time.
natural_image
Diagram showing two views of a mechanical component with directional arrows indicating motion (no text or symbols)Note: In the right-hand corner of the display the battery condition will be indicated:
-Full batteries: no indication.
-Weak batteries: -symbol lights up. This symbol is not available when rechargeable batteries are used.
-Empty batteries: ☐ -symbol flashes and the message ☐ appears. Replace the batteries or connect the mains adapter.
-Full batteries: no indication. -Weak batteries: ☐ -symbol lights up. This symbol is not available when rechargeable batteries are used. -Empty batteries: ☐ -symbol flashes and the message ⌘️ appears. Replace the batteries or connect the mains adapter.
Batteries contain chemical substances, therefore they should be disposed of properly.
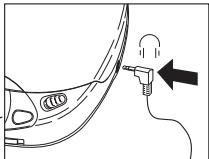
Connecting headphones (supplied)
- Connect the supplied headphones (16 ohms/3.5mm jack plug) with the LINE OUT/ 🔒 jack.
Note : Use this jack also for connecting your HiFi system (signal lead) or your car radio (adapter cassette or signal lead). In both cases, the volume of the CD player has to be set to maximum position (10).
natural_image
Diagram of a car's side profile with a plug inserted, showing motion direction (no text or symbols)Use your head when using headphones
Hearing safety: Do not play your headphones at a high volume. Hearing experts advise that continuous use at high volume can permanently damage hearing.
Traffic safety: Do not use headphones while driving a vehicle. It may create a hazard and it is illegal in many countries. Even if your headphones are an open-air type designed to let you hear outside sounds, do not turn up the volume so high that you cannot hear what is going on around you.
Recharging of Philips battery pack on board
The battery pack will be recharged if the mains adapter is connected, the set is switched off and you press the STOP ■ button.
→ Display indication during charging: CHARGE and Approx. charging time: 5.5 hours.
→ Display indication if fully charged: FULL and ☐
Notes:
- When using rechargeable batteries, we advise the use of the Philips battery pack only, as conventional separate Nickel-Cadmium batteries cannot be recharged on board.
- To ensure a long life for your battery pack, charging will automatically be interrupted at high ambient temperatures (Display indication: _2 ).
TECHNICAL DATA
Frequency range 20 - 20000 Hz
Signal-to-noise ratio ....typ. 95 dBA
Channel separation....typ. 70 dBA
Total harmonic distortion ....typ. 0.05 %
Conversion......Bitstream D/A Converter
Batteries....2 x 1.5 V, type AA / LR6 / UM3
Dimensions (w x h x d)....134 x 30.5 x 154 mm
Weight (without/with batteries)....approx. 250/290 gms
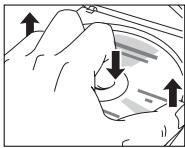
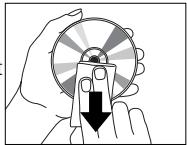
Inserting the CD
- Push gently on the CD center so that it fits onto the hub.

natural_image
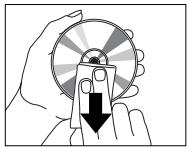
Illustration of hands using a circular tool to adjust a circular component (no text or symbols visible)Removing the CD
- Hold the CD by its edge and press the hub gently.
natural_image
Hand holding a rotary knob with directional arrows indicating motion (no text or symbols)Playing a CD
1 Open the lid by pushing the OPEN slide control to the side.
2 Insert an audio CD, printed side up.
3 Close the lid by pushing down on the right-hand side.

→ Display indication of: (example) 17 = total number of tracks / 51:06 = total playing time
175:06
4 Press the ▶II button to start CD play.
→ Display indication of: (example) 4 = current track / 2:56 = elapsed time of current track
4 2:56
5 Adjust the sound using the controls VOLUME and DSP.
6 You can interrupt CD play by pressing the ▶II button. Continue CD play by pressing the ▶II button again.
→ Display indication of: time of the current position (flashing).
7 Press the STOP ■ button to stop CD play.
→ Display indication of: total number of tracks / the total playing time.
- If you press the STOP ■ button again, you will switch off the set.
Note: If no button is pressed for 90 seconds, the set will switch off automatically.

Selecting another track
- Briefly press the ◀◀ or ▶▶ button once/several times to skip to the beginning of the current/previous or next track(s).
→ Display indication of: selected track number.
→ During play: CD play continues automatically with the selected track.
→ In stop position: press the ▶II button to start CD play.
Searching for a passage during CD play
1 Hold down the ◀◀ or ▶▶ button to find a particular passage in forward or backward direction.
→ After 2 seconds, searching will start at high speed.
2 Release the button when you have reached the desired passage.
Note: Searching is only possible within the particular track when you are in one of these modes: SHUFFLE, REPEAT 1 or PROGRAM. Searching is not possible in the SCAN mode.
MODE ○ – different playing modes
- By pressing the MODE ○ button, you can successively activate the playing modes:
SHUFFLE: The tracks are played in random order until all of them have been played once.
SHUFFLE REPEAT ALL: All tracks are played repeatedly in random order until you leave this n
REPEAT 1: The track is played repeatedly until you leave this mode.
REPEAT ALL: The CD is played repeatedly until you leave this mode.
SCAN: Each track is scanned for 10 seconds until you leave this mode or all tracks have been played once.
→ The selected playing mode is indicated in the display.
→ During play: CD play continues automatically with the selected playing mode.
→ In stop position: press the ▶II button to start CD play.
Notes:
- You can choose from 12 different playing modes when you combine all the above-mentioned modes with PROGRAM.
- Deactivate all modes with the MODE button.
PROG – programming of tracks (max. 25 tracks)
1 Select the desired track with PREV ◀◀ or NEXT ▶▶.
2 As soon as the desired track is displayed, press the PROG button to store the track in the memory.
→ Display indication of: track number / P / total number of stored tracks, e.g.
8 P03 PROGRAM
Notes:
- When you try to store more than 25 tracks, the display indicates FULL.
- When you press PROG and there is no track selected, the display indicates SELECT.
FULL ^PROGRAM
SELECT
Playing the program:
- If you have selected the tracks in STOP mode, press the PLAY/PAUSE ▶■ button.
- If you have selected the tracks during CD play, first press STOP ■ and then the PLAY/PAUSE ▶■ button.
→ Display indication: PROGRAM.
→ Your program will be played in the selected playing mode (e.g. shuffle).
Reviewing the settings:
- Press the PROG button for more than 2 seconds.
→ Display indication: each stored track successively flashes for a short moment.
Erasing the program in STOP mode:
- Press the STOP ■ button to erase the program.
→ PROGRAM disappears on the display and your program is erased.
→ CLEAR lights up briefly on the display.
Note: Interrupting the power supply or opening the lid will also erase the program.
ESA – Electronic Shock Absorption Memory
- Activate the ESA memory by sliding the ESA switch to the right.
→ The ESA symbol lights up in the display.
→ The ESA memory continuously stores in advance the CD data to be played. This is to prevent sound skipping during play due to shock and vibration.
→ Prolonged shocks and vibrations may empty the ESA memory completely. Then the display shows sorry and there will be no sound.

Note: When switching the ESA feature on and off, CD play will be delayed or interrupted for a short time.
RESUME / HOLD
RESUME – playing from where you have stopped
- Activate the RESUME feature by sliding the RESUME/HOLD switch to the middle.
- If you stop CD play by pressing the STOP ■ button, the last played position will be stored.
- Press ▶II to resume CD play from the position where it was stopped.
HOLD – deactivating all buttons
- Activate the HOLD feature by sliding the RESUME/HOLD switch to the far right.
→ Now all buttons are deactivated and will not function until you switch the feature off again. If you press a button (except OPEN), the display will indicate HOLD.
Notes:
-In the hold position, the resume function is automatically activated.
-Do not open the lid as this erases the information about the last position played.
Maintenance
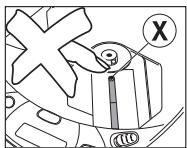
- The lens Ⓕ of the CD player should never be touched!
- Do not expose the CD player, batteries or CDs to rain and dampness, sand and dust or to excessive heat caused by heating equipment, or to direct sunlight.
- The lens may cloud over when the set is suddenly moved from cold to warm surroundings. Playing a CD is not possible then. Leave the CD player in a warm environment until the moisture evaporates.
- You can clean the CD player with a soft and slightly dampened chamois leather. Do not use any cleaning agents as they may have a corrosive effect.
- Always pick up the CD by the edge and put it back in its box after use.
- To clean the CD, wipe it off in a straight line from the center towards the edge using a soft, lint-free cloth. A cleaning agent may damage the disc!
- When a new CD does not stay on the hub, this is caused by small burrs around the center hole of the CD. Remove the burrs by rubbing the edge of the center hole with a pen or similar instrument.

natural_image
Illustration of a hand holding a circular object with a downward arrow, no text or symbols present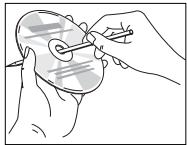
natural_image
Illustration of a hand holding a small object with a tool, no text or symbols presentEnvironmental information
Please observe the local regulations regarding the disposal of packing materials, exhausted batteries and obsolete equipment.
- All redundant packaging material has been omitted. We have done our utmost to make the packaging easily separable into three mono-materials: cardboard (box), expandable polystyrene (buffer), and polyethylene (bags, protective foam sheet).
- Your set consists of materials which can be recycled if disassembled by a specialized company.
-
Do not dispose of exhausted batteries with your household waste.
-
If a fault occurs, please check the points listed below before taking your set for repair.
- If you are not able to remedy a problem by following these hints, consult your dealer or service facility.
| PROBLEM | POSSIBLE CAUSE | SOLUTION |
| No power or no CD play start | Batteries | |
| Batteries incorrectly inserted | Insert the batteries correctly | |
| Use of new batteries | Press ▶II | |
| Display: no indication | Batteries are empty | Change/recharge the batteries |
| Contact pins are dirty | Clean them with a cloth | |
| mains adapter | ||
| Loose connection | Connect the adapter securely | |
| In-car use | ||
| Cigarette lighter is not powered when ignition is switched off | Switch on ignition or insert batteries | |
| CD play does not start or interrupts | HOLD feature is activated | Switch off the HOLD feature |
| CD lid is not closed securely | Close the lid securely | |
| Moisture condensation | Leave the player in a warm place until the moisture evaporates | |
| Display: no indication or no d ISC | CD is not or incorrectly inserted | Insert a CD, label facing up |
| CD is badly scratched | Use another CD | |
| CD is dirty | Clean the CD | |
| Battery-recharging on board does not work, no CHARGE-indication | Use of wrong batteries | Only a battery pack can be recharged on board |
| Contacts are dirty | Clean them with a cloth | |
| Play does not start from the first track | RESUME or SHUFFLE or PROGRAM is activated | Switch off RESUME, SHUFFLE or PROGRAM |
Under no circumstances should you try to repair the unit yourself, as this will invalidate the warranty.
| PROBLEM | POSSIBLE CAUSE | SOLUTION |
| No sound or bad sound quality | PAUSE is activated | Press ▶II |
| Loose or wrong connections | Check connections | |
| Volume is not turned up | Adjust the volume | |
| Headphones worn the wrong way | Pay attention to the L (left) and R (right) indications | |
| Headphone plug is dirty | Clean the headphone plug | |
| Strong magnetic fields near the CD player | Change the player's position or connections | |
| Electrostatic discharge from the user via the CD player | Press ◀◀ or ▶▶ once or press ▶II twice | |
| In-car use | ||
| Strong vibrations | Find another place for the set | |
| Adapter cassette is incorrectly inserted | Insert the adapter cassette correctly | |
| Temperature inside car is too high/low | Let the CD player adjust to the temperature | |
| Cigarette lighter/socket is too dirty | Clean the cigarette lighter/socket | |
| Wrong playback direction of the autoreverse feature of the car cassette player | Change the autoreverse direction |
Hum or noise in-car Unfit car radio input socket Use the adapter cassette
natural_image
Simple line drawing of an electrical plug connected to a car's side panel (no text or symbols)natural_image
Diagram showing two views of a car's side profile with arrows indicating rotation or movement (no text or symbols)natural_image
Diagram of a car's side profile with a plug inserted, showing motion direction (no text or symbols)natural_image
Illustration of hands using a circular tool to adjust a disc (no text or symbols visible)Retrait du CD
natural_image
Hand holding a mechanical component with directional arrows indicating motion (no text or symbols)Lecture d'un CD

natural_image
Illustration of a hand holding a circular object with a downward arrow, no text or symbols present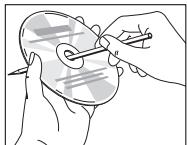
natural_image
Illustration of hands holding a circular object with a string, no text or symbols presentnatural_image
Diagram of an electrical plug connected to a car's side panel, showing cable routing (no text or symbols)natural_image
Diagram showing two mechanical components with directional arrows indicating motion (no text or symbols)natural_image
Diagram of a car's side profile with a plug inserted, showing motion direction (no text or symbols)natural_image
Illustration of hands using a rotary dial to move a circular button (no text or symbols visible)natural_image
Diagram of a hand holding a device with directional arrows indicating movement or force (no text or symbols present)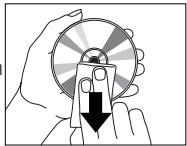
natural_image
Illustration of a hand holding a circular object with a downward arrow, no text or symbols present
natural_image
Illustration of hands holding a circular object with a string, no text or symbols present
natural_image
Diagram of an electrical plug connected to a car's side panel, showing cable routing (no text or symbols)natural_image
Diagram showing two views of a vehicle's side profile with arrows indicating motion (no text or symbols)natural_image
Diagram of a car's side profile with a plug inserted, showing motion direction (no text or symbols)natural_image
Illustration of hands using a compass to interact with a circular dial (no text or symbols visible)Herausnehmen der CD
natural_image
Diagram of a hand holding a device with directional arrows indicating movement or force (no text or symbols present)Abspielen einer CD
natural_image
Illustration of a hand holding a circular object with a downward arrow, no text or symbols present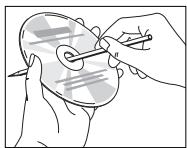
natural_image
Illustration of hands holding a circular object with a string, no text or symbols presentUmweltaspekte

natural_image
Simple line drawing of a trash bin with a crossed X symbol and a circular base (no text or labels)natural_image
Diagram of an electrical plug connected to a car's side panel, showing cable routing (no text or symbols)natural_image
Diagram showing two views of a car's front bumper with arrows indicating direction (no text or symbols)natural_image
Diagram of a car's side profile with a plug inserted, showing motion direction (no text or symbols)natural_image
Illustration of hands using a circular tool to adjust a disc (no text or symbols visible)Uitnemen van de CD
natural_image
Diagram of a hand holding a curved object with directional arrows indicating movement or force (no text or symbols present)Afspelen van een CD
RESUME / HOLD-schakelaar

natural_image
Illustration of a hand holding a circular object with a downward arrow, no text or symbols present
natural_image
Illustration of hands holding a circular object with a pen inserted, no text or symbols presentnatural_image
Diagram of an electrical plug connected to a car's side panel, showing cable routing (no text or symbols)natural_image
Diagram showing two views of a mechanical component with directional arrows indicating rotation or movement (no text or symbols present)natural_image
Diagram of a car's side profile with a plug inserted, showing motion direction (no text or symbols)natural_image
Illustration of hands using a circular tool to move a button on a disc (no text or symbols visible)Estrazione del CD
natural_image
Diagram of a hand holding a curved object with arrows indicating direction (no text or symbols)natural_image
Illustration of a hand holding a circular object with a downward arrow, no text or symbols present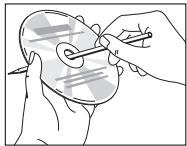
natural_image
Illustration of hands using a tool to adjust or mark a circular object on a surface (no text or symbols present)natural_image
Simple line drawing of an electrical plug connected to a car's side panel (no text or symbols)natural_image
Diagram showing two views of a car's front bumper with arrows indicating direction (no text or symbols)natural_image
Diagram of a car's side profile with a plug inserted, showing motion direction (no text or symbols)natural_image
Illustration of hands using a compass to interact with a circular dial (no text or symbols visible)natural_image
Diagram of a hand holding a device with arrows indicating motion or force direction (no text or symbols present)Uppspelning av CD
natural_image
Illustration of a hand holding a circular object with a downward arrow, no text or symbols present
natural_image
Illustration of a hand holding a circular object with a pen inserted, no text or symbols presentMiljöinformation
natural_image
Diagram of an electrical plug connected to a car's side panel, showing cable routing (no text or symbols)natural_image
Diagram showing two views of a car's front panel with arrows indicating rotation or movement (no text or symbols)natural_image
Diagram of a car's side profile with a plug inserted, showing motion direction (no text or symbols)Brug hovedet, når De anvender hovedtelefonerne!
natural_image
Illustration of hands using a rotary dial to press down a circular button (no text or symbols visible)natural_image
Diagram of a hand holding a circular object with directional arrows indicating motion or movement (no text or symbols)natural_image
Illustration of a hand holding a circular object with a downward arrow, no text or symbols present
natural_image
Illustration of hands holding a circular object with a pen inserted, no text or symbols presentMiljøinformation
natural_image
Diagram of an electrical plug connected to a car's side panel, showing cable routing (no text or symbols)natural_image
Diagram showing two mechanical components with directional arrows indicating motion (no text or symbols)natural_image
Diagram of a car's side profile with a plug inserted, showing motion direction (no text or symbols)natural_image
Illustration of hands operating a CD or DVD disc with arrows indicating rotation (no text or symbols)CD-levyn poisto
natural_image
Hand holding a mechanical component with directional arrows indicating motion (no text or symbols)CD-levyn toisto

natural_image
Illustration of a hand holding a circular object with a downward arrow, no text or symbols present
natural_image
Illustration of hands holding a circular object with a string, no text or symbols presentYmpäristötietoa

natural_image
Simple line drawing of an electrical plug connected to a car's side panel (no text or symbols)natural_image
Diagram showing two views of a mechanical component with directional arrows indicating motion (no text or symbols)natural_image
Diagram showing a car's side profile with a plug inserted into the nose area, indicating airflow direction (no text or symbols)natural_image
Illustration of hands operating a circular device with arrows indicating rotation or adjustment (no text or symbols)Para retirar o CD
natural_image
Hand holding a mechanical component with directional arrows indicating motion (no text or symbols)Reprodução de um CD
natural_image
Illustration of a hand holding a circular object with a downward arrow, no text or symbols present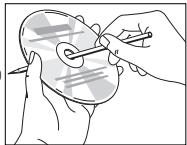
natural_image
Illustration of hands using a tool to apply a circular object to a face (no text or symbols visible)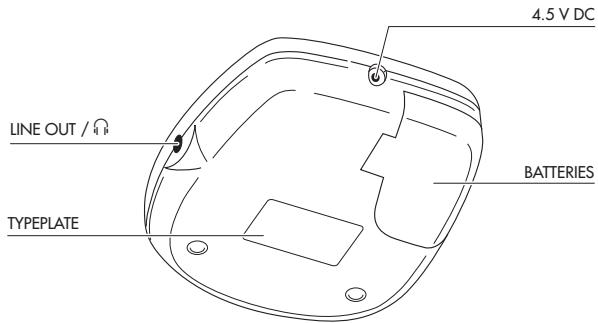
natural_image
Diagram of an electrical plug connected to a car's side panel, showing cable routing (no text or symbols)natural_image
Diagram showing two views of a mechanical component with directional arrows indicating rotation or movement (no text or symbols present)natural_image
Diagram of a car interior with a tool inserted, showing a hand near the wheel (no text or symbols present)natural_image
Illustration of hands using a circular tool to adjust a disc (no text or symbols visible)Πώς θα τον βγάλετε
natural_image
Diagram of a hand holding a circular object with directional arrows indicating movement or force (no text or symbols present)
natural_image
Illustration of a hand holding a circular object with a downward arrow, no text or symbols present
natural_image
Illustration of hands holding a circular object with a pen inserted, no text or symbols presentMeet Philips at the Internet
http://www.philips.com
CE

natural_image
Recycling symbol composed of three chasing arrows forming a triangle (no text or labels)CLASS 1 LASER PRODUCT
- Français
- Nederlands
- Accessories
- Accessories for power supply
- Mains adapter
- Batteries, type LR6, UM3 or AA (supplied or optional available)
- Connecting headphones (supplied)
- Use your head when using headphones
- Recharging of Philips battery pack on board
- Notes:
- TECHNICAL DATA
- Inserting the CD
- Removing the CD
- Playing a CD
- Selecting another track
- Searching for a passage during CD play
- MODE ○ – different playing modes
- PROG – programming of tracks (max. 25 tracks)
- Playing the program:
- Reviewing the settings:
- Erasing the program in STOP mode:
- ESA – Electronic Shock Absorption Memory
- RESUME / HOLD
- RESUME – playing from where you have stopped
- HOLD – deactivating all buttons
- Maintenance
- Environmental information
- Retrait du CD
- Lecture d'un CD
- Herausnehmen der CD
- Abspielen einer CD
- Umweltaspekte
- Uitnemen van de CD
- Afspelen van een CD
- RESUME / HOLD-schakelaar
- Estrazione del CD
- Uppspelning av CD
- Miljöinformation
- Brug hovedet, når De anvender hovedtelefonerne!
- Miljøinformation
- CD-levyn poisto
- CD-levyn toisto
- Ympäristötietoa
- Para retirar o CD
- Reprodução de um CD
- Πώς θα τον βγάλετε
- Meet Philips at the Internet
- http://www.philips.com
- CE
- CLASS 1 LASER PRODUCT
Brand : PHILIPS
Model : AZ7374
Category : Portable CD player