
Valence Lamp - Range hood Thermex - Free user manual and instructions
Find the device manual for free Valence Lamp Thermex in PDF.


| Product Type | Range hood |
| Model | Valence Lamp |
| Brand | Thermex |
| Dimensions (Width x Depth x Height) | 900 x 500 x 600 mm |
| Weight | 15 kg |
| Power Supply | 230 V / 50 Hz |
| Rated Power | 200 W |
| Motor Type | Single motor, 2 speeds |
| Maximum Airflow | 650 m³/h |
| Noise Level (max speed) | 65 dB(A) |
| Lighting | LED, 2 x 3 W |
| Filter Type | Aluminum grease filters, washable |
| Number of Filters | 3 |
| Installation Type | Wall-mounted, ducted or recirculating |
| Control Type | Push buttons |
| Energy Class | A |
| Grease Filter Efficiency Class | B |
| Fluid Dynamic Efficiency Class | A |
| Noise Emission Class | C |
| Cleaning | Wipe exterior with damp cloth; wash filters in dishwasher or by hand |
| Safety Features | Thermal cut-off, anti-flame backflow |
| Spare Parts Availability | Filters, LED lamps, motor available from authorized service centers |
| Repairability Index | 7.5 / 10 |
Frequently Asked Questions - Valence Lamp Thermex
User questions about Valence Lamp Thermex
0 question about this device. Answer the ones you know or ask your own.
Ask a new question about this device
Download the instructions for your Range hood in PDF format for free! Find your manual Valence Lamp - Thermex and take your electronic device back in hand. On this page are published all the documents necessary for the use of your device. Valence Lamp by Thermex.
USER MANUAL Valence Lamp Thermex
natural_image
Diagram of a mechanical component with a blue curved arrow indicating rotation or movement (no text or symbols present)natural_image
Diagram of a device with an upward arrow indicating motion or force, no text or symbols presentnatural_image
Diagram of a mechanical device with a blue curved arrow indicating rotation or movement (no text or symbols)UDSKIFTNING AF RECIRKULATIONSFILTER
natural_image
Diagram of a toilet with a blue arrow indicating clockwise motion (no text or symbols)natural_image
Two technical line drawings of a structural grid assembly, showing top and side views with no text or symbols.Monter recirkulationsfilteret bag på stålfiteret.
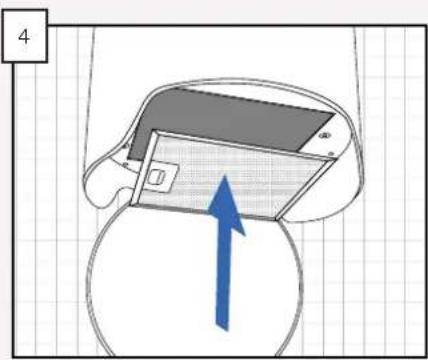
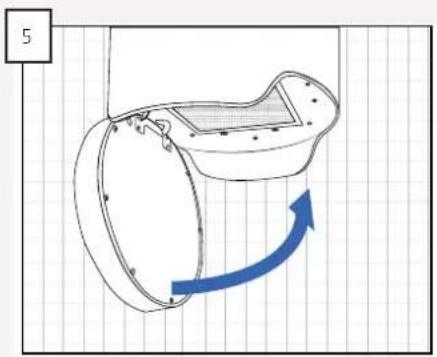
Monter filteret. Luk lågen.
natural_image
Diagram of a mechanical device with a blue curved arrow indicating rotation or movement (no text or symbols present)BATTERISKIFT
natural_image
Diagram of a mechanical component with a blue curved arrow indicating rotation or movement (no text or symbols present)natural_image
Diagram of a smartphone with an upward arrow indicating growth, no text or symbols presentnatural_image
Diagram of a mechanical component with a blue curved arrow indicating rotational motion (no text or symbols)natural_image
Diagram of a device with a blue curved arrow indicating rotation or movement (no text or symbols present)natural_image
Two technical line drawings of a grid-patterned structure, possibly solar panels or structural supports, with no visible text or symbols.Monter resirkuleringsfilteret bak på stålfiteret.
natural_image
Diagram of a mechanical device with a blue curved arrow indicating rotational motion (no text or symbols)BATTERIBYTTE
natural_image
Diagram of a mechanical component with a blue curved arrow indicating rotation or movement (no text or symbols present)natural_image
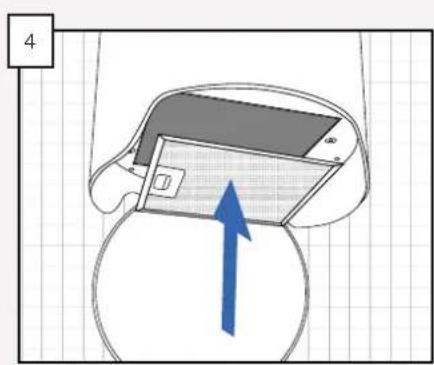
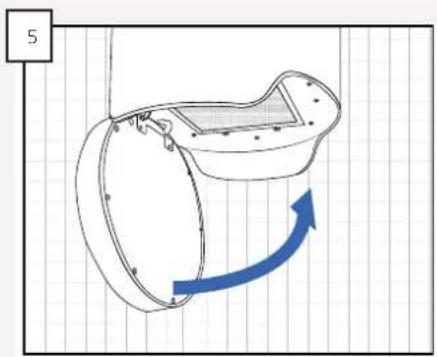
Diagram of a smartphone with an upward arrow indicating motion, no text or symbols presentMontera filtret. Stäng luckan.
natural_image
Diagram of a mechanical device with a blue curved arrow indicating rotation or motion (no text or symbols)BYTE AV RECIRKULATIONSFILTER
natural_image
Diagram of a mechanical component with a blue curved arrow indicating rotation or movement (no text or symbols present)natural_image
Two technical line drawings of a grid-patterned structure, possibly solar panels or structural supports, with no visible text or symbols.natural_image
Diagram of a mechanical device with a blue curved arrow indicating rotational motion (no text or symbols)BYTA BATTERIER
natural_image
Diagram of a mechanical component with a blue curved arrow indicating rotation or movement (no text or symbols present)natural_image
Diagram of a smartphone with a blue downward arrow indicating download or disassembly (no text or symbols present)natural_image
Diagram of a device with a blue upward arrow indicating motion or direction (no text or symbols present)natural_image
Diagram of a mechanical device with a blue curved arrow indicating rotational motion (no text or symbols)natural_image
Diagram of a mechanical component with a blue curved arrow indicating rotation or motion (no text or symbols)natural_image
Two technical line drawings of a grid-patterned structure, possibly solar panels or structural supports, with no visible text or symbols.natural_image
Diagram of a mechanical component with a blue curved arrow indicating rotational motion (no text or symbols)PARISTOJEN VAIHTO
natural_image
Diagram of a mechanical component with a blue curved arrow indicating rotation or movement (no text or symbols present)natural_image
Diagram of a smartphone with an upward arrow indicating growth, no text or symbols presentnatural_image
Diagram of a mechanical device with a blue curved arrow indicating rotation or motion (no text or symbols)natural_image
Diagram of a mechanical component with a blue curved arrow indicating rotation or movement (no text or symbols present)natural_image
Two technical diagrams showing structural grid patterns on a flat base, with arrows indicating direction of movement (no text or symbols present)natural_image
Diagram of a mechanical device with a blue curved arrow indicating rotational motion (no text or symbols)Maintenance and cleaning 48
Service
50
Environmental consideration 51
GENEREL ADVARSEL
• LEDs
- Remote control
- 3 speeds
- After-running
The hood can be operated either using the control panel or remote control. Hood settings are always shown on the control panel.
CONTROL PANEL
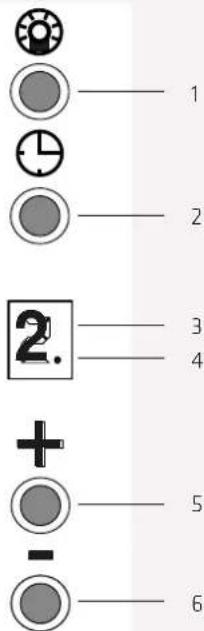
- On/off light
- On/off after-running
- Indicator for speed
- Panel indicator
- (+) button
- (-) button
There are lights around the buttons on the control panel. The light in the control panel will turn on, as soon as the power is connected to the hood. The light can however be switched off by holding the on/off after-running button down for approx. 5 seconds.
REMOTE CONTROL
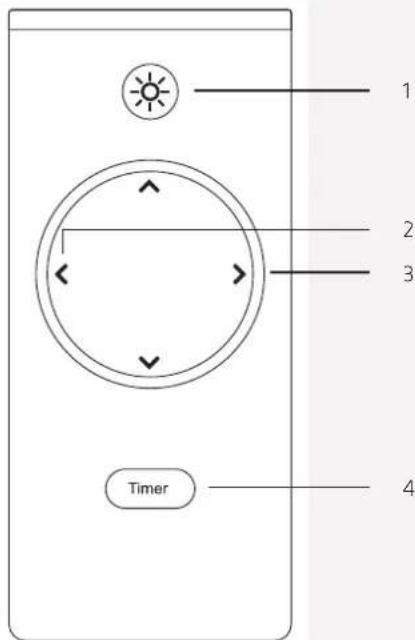
- On/off light
- (+) button
- (-) button
- On/off after-running
When using the remote control for the first time, the accompanying battery must be inserted first:
- Unpack the battery.
- Remove the battery holder from the base of the remote control by releasing the small clips in the base of the remote control.
- Insert the battery. NOTE: take care to position the battery correctly.
- Push the battery holder back into place.
• The remote control is now ready for use.
EXTRACTION
The motor is activated by pressing the (+) button. The motor always starts at speed 1. The motor speed is increased by pressing on the (+) button and reduced by pressing on the (-) button. The indicator for speed shows which speed the motor is running at.
The motor is switched off by pressing the (-) button until the indicator for speed reads 0.
LIGHT
The light on the hood is turned on and off by pressing on the on/off light button.
AFTER-RUNNING
After-running means that the motor will stop automatically a given number of minutes after this function has been activated. After-running can run from 10 to 90 minutes, and runs at the selected speed.
After-running is activated in the following way:
- Switch on the hood to the desired speed.
- Press on the on/off after-run button.
• The indicator will now flash with the number 0. - Use the (+) and (-) buttons to adjust the time for which the after-run function should run. If '1' is selected, the after-run will run for 10 minutes, if '2' is selected, after-run runs for 20 minutes, etc. The after-run function can be set for a maximum of 90 minutes.
- Confirm the selected time by pressing the on/off after-run button.
- The indicator of speed will now display the speed at which the motor runs and the panel indicator will flash to indicate the after-run function is activated.
The after-run function can always be cancelled by pressing on the on/off after-run button or by switching off the hood. If the after-run function is cancelled, then the panel indicator will stop flashing.
Should it be desirable to regulate the speed of the after-run function during activation, it is done using the (+) and (-) buttons until the desired speed has been reached. The panel indicator will continue to flash to indicate that the after-run function is activated.
MAINTENANCE AND CLEANING
• Always disconnect the power before cleaning.
- The hood must be cleaned regularly to ensure optimal operation and long service life.
- Grease and dust debris collect in the filter and may risk igniting with insufficient cleaning.
- The hood should be cleaned inside and out frequently to avoid grease stains on walls or other surfaces.
DAILY CLEANING
- For cupboard-integrated, free-hanging and wall-mounted hoods, Thermex recommends that the grease filter be wiped with a damp cloth after each cooking session. It requires very little effort every day to keep your cooker hood clean and effective.
- Steel surfaces are cleaned with a damp cloth and detergent, and finished with a metal polish (can be purchased with the item number 499.99.9999.9).
• Lacquered surfaces should be cleaned with a damp cloth with detergent/washing-up liquid. Never use abrasives.
CLEANING THE GREASE FILTER
The grease filter should be cleaned as needed. Thermex recommends as a minimum that the filter be cleaned at the following intervals, depending on the fat used for frying:
- Frying margarine - the filter should be cleaned every 3 weeks.
- Liquid margarine - the filter should be cleaned every 2 weeks.
- Oil - the filter should be cleaned once a week.
- Deep fat frying - the filter should be cleaned 2-3 times per week.
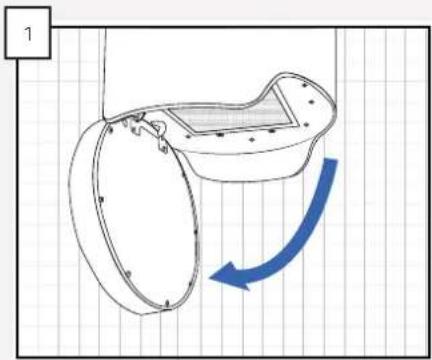
The grease filters are cleaned in the following way:
natural_image
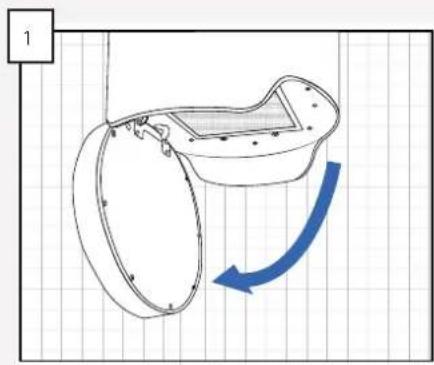
Diagram of a mechanical component with a blue curved arrow indicating rotation or movement (no text or symbols present)Open the cover by pulling down the edge of the cover on the front of the hood.
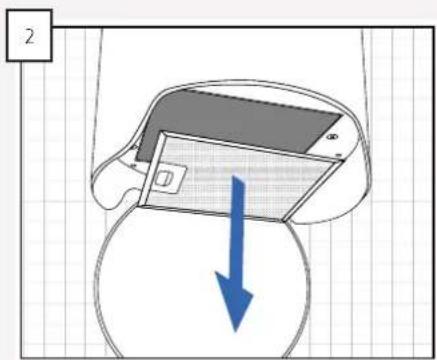
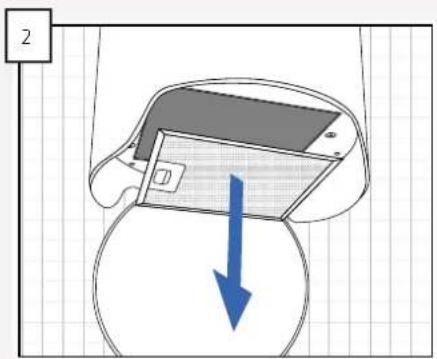
Remove the grease filter by pulling on the filter locking mechanism.
3
- Place the filter in warm soapy water and clean with a soft brush if necessary.
- Rinse with warm water.
- Place the filters on a dishcloth or similar to dry.
- Repeat the process if necessary.
natural_image
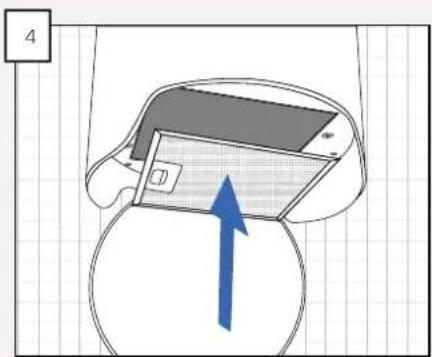
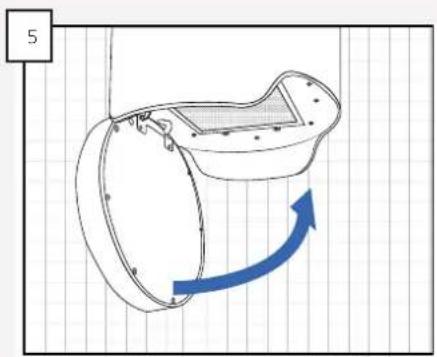
Diagram of a smartphone with an upward arrow indicating growth, no text or symbols presentReplace the filter. Close the cover.
natural_image
Diagram of a mechanical component with a blue curved arrow indicating rotational motion (no text or symbols)The filter can also be washed in the dishwasher. Please note, however, that machine washing can result in discolouration of the filter. Discolouration of the filter does not affect performance.
REPLACING THE RECIRCULATION FILTER
The recirculation filter cannot be washed, but must be replaced when required. Thermex recommends that the recirculation filter be replaced at least 2-4 times per year.
NOTE: The item number for a new recirculation filter is 535.23.0575.9.
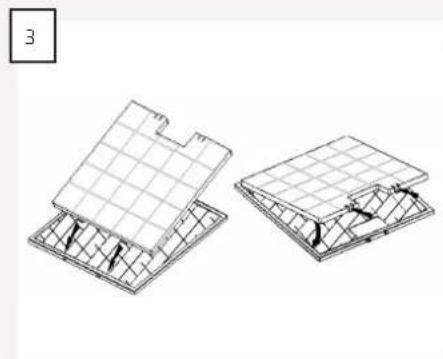
The recirculation filter is mounted on the steel filter as follows:
natural_image
Diagram of a mechanical component with a blue curved arrow indicating rotation or force direction (no text or symbols)Open the cover by pulling down the edge of the cover on the front of the hood.
Remove the grease filter by pulling on the filter locking mechanism.
natural_image
Two technical line drawings of a grid-patterned structure, possibly solar panels or structural supports, with no visible text or symbols.Mount the recirculation filter behind the steel filter.
natural_image
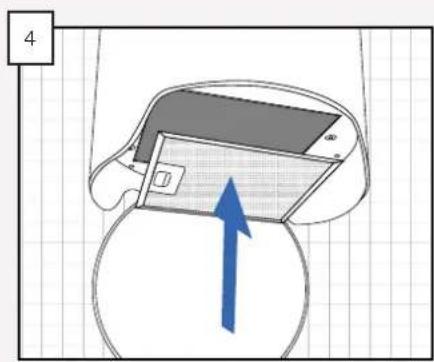
Diagram of a device with an upward arrow indicating motion or force, no text or symbols presentReplace the filter. Close the door.
natural_image
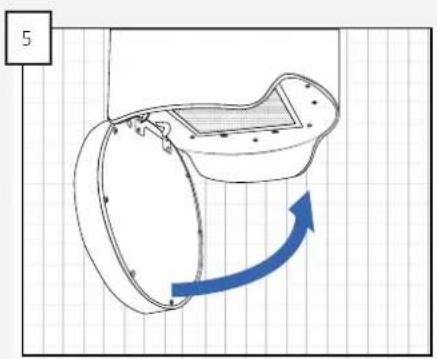
Diagram of a mechanical component with a blue curved arrow indicating rotational motion (no text or symbols)BATTERY REPLACEMENT
The batteries in the remote control need to be replaced when they are dead. The lifetime of the batteries depends upon what type of battery it is as well as how much the remote control has been used. The batteries need replacing when the remote control can no longer control the hood.
One CR2032 battery is used in the remote control.
Change battery as follows:
- Unpack the battery.
- Remove the battery holder from the base of the remote control by releasing the small clips in the base of the remote control.
- Remove the old battery. NOTE: Batteries must be taken to a recycling station.
- Insert the battery. NOTE: take care to position the battery correctly.
- Push the battery holder back into place.
• The remote control is now ready for use.
SERVICE
It is important that you read the installation and/or user instructions carefully before reporting your Thermex hood to the service department. This ensures that Thermex can provide you with the best possible assistance.
The service department at Thermex can be contacted regarding:
• Getting technical support for mounting and installing your hood.
- Explaining the functionalities of your hood.
• Service requests while your hood is under warranty.
Always try to disconnect the power supply to the hood for approx. 5 minutes. Reconnect the power to see if the problem has been solved.
If this does not solve the problem, disconnect the power supply to the hood for one hour. If the hood is still not working properly, even though you have consulted the troubleshooting section for help, contact the service department.
NOTE: When making inquiries regarding your warranty, you will be asked for proof of your purchase in the form of a sales receipt. You should therefore always save your sales receipt.
It is important to have all the necessary information ready before contacting us regarding service requests while your product is under warranty:
• Description of error
- Model
- Type of hood and serial number (indicated on the chassis plate)
• Purchase information
You can fill out the service form at www.thermex.dk/service for making service requests while your product is under warranty. You can also read the terms of service here.
Inquiries regarding technical support or an explanation of the functionalities of your product can be made by sending your inquiry to service@thermex.dk or by telephoning +45 9892 6233.
TROUBLESHOOTING OVERVIEW
| PROBLEM POSSIBLE CAUSE SOLUTION | ||
| The hood is not working | There is no power | Check the power supply to the hood. Disconnect the power for approximately 5 minutes and connect again to check if the fault is still there. |
| The hood is not connected to the power supply. | Check that the hood is connected to the power supply. Disconnect the power for approximately 5 minutes and connect again to check if the fault is still there. | |
| Air extraction of the hood is not sufficient. | Filter is dirty and blocked. Check to see if | the filter is clean and if necessary, clean according to the section on cleaning and maintenance in this manual. |
ENVIRONMENTAL CONSIDERATION
PACKAGING
The packaging must be disposed of in accordance with the local regulations for waste management.
DISPOSAL OF THE HOOD
The symbol on the product or the accompanying documentation indicates that this product must not be disposed of as household waste but delivered to the nearest collection centre for the recycling of electrical and electronic equipment.
THERMEX SCANDINAVIA A/S
Brand : Thermex
Model : Valence Lamp
Category : Range hood