
TFMH 360 - Range hood Thermex - Free user manual and instructions
Find the device manual for free TFMH 360 Thermex in PDF.


| Product Type | Range Hood |
| Brand | Thermex |
| Model | TFMH 360 |
| Width | 60 cm |
| Depth | 50 cm |
| Height | 15 cm (built-in) |
| Net Weight | 12 kg |
| Power Supply | 220-240 V, 50 Hz |
| Rated Power | 250 W |
| Motor Type | Single motor, 3 speeds |
| Maximum Airflow | 650 m³/h |
| Noise Level | 55-65 dB(A) |
| Lighting | 2 x 1.5 W LED |
| Control Type | Electronic push buttons |
| Filter Type | Grease filter (aluminum) |
| Ducting Options | Recirculation or extraction |
| Charcoal Filter Required | Yes (for recirculation mode) |
| Installation Type | Built-in / Under cabinet |
| Energy Class | A+ |
| Annual Energy Consumption | 30 kWh |
| Grease Filter Efficiency | Class B |
| Fluid Dynamic Efficiency | Class A |
| Lighting Efficiency | Class A |
| Spare Parts Availability | Filters and bulbs easy to replace |
| Warranty | 2 years |
Frequently Asked Questions - TFMH 360 Thermex
User questions about TFMH 360 Thermex
0 question about this device. Answer the ones you know or ask your own.
Ask a new question about this device
Download the instructions for your Range hood in PDF format for free! Find your manual TFMH 360 - Thermex and take your electronic device back in hand. On this page are published all the documents necessary for the use of your device. TFMH 360 by Thermex.
USER MANUAL TFMH 360 Thermex
TFH + TFMH 300 Series
Dansk • English • Svenska • Deutsch • Norsk • Español
Generelt
Fig. 1
Fig. 2
The range hood is most easily built into a Thermex cooker hood that is custom made for the purpose. It is recommended that the fitting height of the range hood should be at least 50-60cm over the gas cooker.
NB!
The range hood shall be extra protected cf. the high voltage regulations.
Fitting
Connect the tube to the outlet flange ∅ 150mm (fig. 1, A), that should be 1. installed with collar clip (extra accessory), check that the flaps in the outlet tube (counter damper) (fig. 1, B) opens and closes.
- Make the electrical connection (fig. 2). The range hood is equipped with 1 or 2 leads: TFMH with one lead for the supply source. Besides TFH with 1 lead for use for external ventilator.
Decide where to place the control panel (fig. 2, A, B): 3.
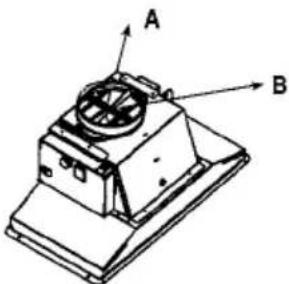
Fig. 1
a. Immediately under the range hood
Then connect the lead from the control box (through the holes in the control panel) to the control panel and attach it on the triangle.
b. On the outside of the cabinet
Draw the lead out from the range hood and place it where the panel shall sit (note the length of the lead before making a decision).
Connect the control panel to the lead and attach the control panel in a flat area that is cleaned thoroughly. Possibly replace the fitting plate with a cut-out triangle with the enclosed fitting plate. Detach the fitting plate by removing the 2 finger-screws behind the filters. Move the halogen spotlights over into the new fitting plate and attach it back into the range hood.

Fig. 2
Fit the range hood (fig. 2) in the opening and only attach it to the cabinet with 4 of the enclosed screws 4. (there are 8 screws enclosed, which are necessary for the 80cm model).
Outlet to the open air
Access to the open air is established either through the ceiling, wall or outlet duct.
Note:
Never connect the outlet range hood for existing hot air system or chimney.
Recirculation
The air is cleaned with the help of active carbon filters, after which it is returned to the room. The carbon filter brackets for attaching them are ordered as a set and are an option that can be ordered. See the catalogue for the product number.
Fitting of carbon filters
- The carbon filter is fitted inside the metal filter. Use a screwdriver if needed.
Power Supply
The range hood shall be connected to 230V in accordance with the high-voltage regulations.
Finger touch panel:
ON/OFF button for light.

OFF button for motor.

ON button and motor speed selector 1-2-3.

ON button - turbo function

This speed should be used when the concentration of food odour or smell is particularly strong. The turbo function will run for approximately 5 minutes and then automatically return to the previously configured speed (1, 2 or 3) or turn off if no speed has been selected. Press the STOP button for the motor or the speed selector 1-2-3 to turn off the turbo function before the 5 minutes have passed.

Filter clean indicator
Light diode for cleaning of metal filters. (In the latter case a diode at the letter F will blink). To reset this function, hold down the OFF-button for the motor for about 5 seconds, after which you will hear a beep sound and the readout will be reset.

Timer function
15 minute timer - by pressing once on this button, the range hood will run at the selected speed for 15 minutes and then stop. Press this button one more time to interrupt the timer and the range hood will run at the selected speed until the OFF button for the motor is pressed.
Home ventilation
The range hood is equipped with an electronic device that allows the user to enter a certain number of minutes per hour for the range hood to run. This will also help with air ventilation in the room. Instructions for pre-programmed ventilaiton:
- Press "start/stop button" once until a beep is heard. (Occasionally the beep will not occur)
- Press and hold "timer button" for a few seconds until the light comes on.
- Choose between 5(pos.1), 10(pos.2), 15(pos.3) minutes of ventilation pr. Hour on the speed selector switch.
- Confirm your choice by pressing the "start/stop" button.
If the range hood does not work as intended, disconnect the power supply for about 5 seconds by pulling out the plug. Then replace the plug in the socket again and try one more time before summoning maintenance.
Allmänt
Fig. 2
Abb. 1
Abb. 2
Fig. 2
Fig. 2
Brand : Thermex
Model : TFMH 360
Category : Range hood