
001-873 - Radio Marquant - Free user manual and instructions
Find the device manual for free 001-873 Marquant in PDF.


| Product type | DAB+/FM Radio with Bluetooth |
| Brand | Marquant |
| Model | 001-873 |
| Dimensions (W x H x D) | 340 x 180 x 175 mm |
| Weight | 2.7 kg |
| Power supply | 230 V ~ 50 Hz via mains adapter |
| Speaker output (RMS) | 2 x 5 W |
| FM frequency range | 87.5 – 108 MHz |
| DAB frequency range | 174 – 240 MHz |
| Display | LCD with backlight |
| Connectivity | Bluetooth v3.0, 3.5 mm AUX input, 3.5 mm headphone jack, USB port (charging only) |
| Preset memory | 20 FM + 20 DAB stations |
| RDS | Yes (Radio Data System) |
| Automatic station search | Yes |
| Remote control | Included |
| USB charging output | 5 V DC / 1 A |
| Safety class | II (double insulation) |
| Indoor use only | Yes |
| Cleaning | With a dry cloth |
| Standby power consumption (ErP) | Automatic standby after 15 min without audio |
| Accessories included | Mains adapter, remote control, FM wire antenna |
Frequently Asked Questions - 001-873 Marquant
User questions about 001-873 Marquant
0 question about this device. Answer the ones you know or ask your own.
Ask a new question about this device
Download the instructions for your Radio in PDF format for free! Find your manual 001-873 - Marquant and take your electronic device back in hand. On this page are published all the documents necessary for the use of your device. 001-873 by Marquant.
USER MANUAL 001-873 Marquant
natural_image
Black rectangular electronic device with dual dials and control knobs (no visible text or symbols)
SE DAB-RADIO
Operating instructions (Translation of the original instructions) Important! Read the user instructions carefully before use. Save them for future reference.
Värna om miljön!
Care for the environment!
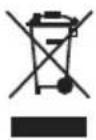
Must not be discarded with household waste! This product contains electrical or electronic components that should be recycled. Leave the product for recycling at the designated station e.g. the local authority's recycling station.
Jula reserves the right to make changes. In the event of problems, please contact our service department.
www.jula.com
Tillverkare/ Produsent/ Producenci/ Manufacturer
Jula AB, Box 363, 532 24 SKARA
Distributör/ Distributør/ Dystrybutor/ Distributor
Jula Poland Sp. z o.o., ul.
EC DECLARATION OF CONFORMITY
EG FÖRSÄKRAN OM ÖVERENSSTÄMMELSE
EF SAMSVARSERKLÆRING
DEKLARACJA ZGODNOŚCI WE

Jula AB, Box 363, SE-532 24 SKARA, SWEDEN
RoHS Directive 2011/65/EU
EN 50581:2012
This product was CE marked in year -17
Skara 2017-03-23

MATTIAS LIF
BUSINESS AREA MANAGER
1

SÄKERHETSANVISNINGAR
Radio DAB (Digital Audio Broadcasting)
- Follow the instructions to avoid electric shock, fire and/or serious personal injury.
- Only use the unit indoors.
- Check that the mains voltage corresponds to the rated voltage on the type plate.
- Connect the appliance by following these instructions.
- Handle the appliance with care, and do not expose it to knocks or blows.
- The appliance has a fuse to protect it from overloading. If the fuse has tripped it must be replaced by a qualified technician.
- Pull out the plug during thunder storms and when the appliance is not going to be used for a long time (the radio's channel memory is lost when the power is cut).
- If the adapter is used as a disconnection unit it should be easily accessible.
-
The appliance must only be adjusted or repaired by qualified personnel.
-
Only use the power supply specified in the user handbook.
- Keep the adapter and power cord out of the way so that they cannot be walked over or clenched.
- Do not attempt to carry out any maintenance or repairs that are not described in these instructions, this can put safety at risk and will invalidate the warranty.
- Do not remove the casing from the unit.
- Do not block the ventilation openings on the appliance – risk of overheating. Leave a few centimetres of free space around the appliance.
- Do not expose the appliance to moisture or liquids.
- Do not place the product in direct sunlight or near other equipment that emits heat.
- Do not put the unit over any other electrical equipment.
-
Do not put any potentially dangerous objects on the unit (e.g. flower vase or candle).
-
The use of controllers, settings or procedures that are not described in these instructions can result in exposure to harmful radiation.
- Only use auxiliary equipment and accessories approved by the manufacturer.
- Clean the product with a dry cloth.
SYMBOLS
Description of symbols used on the product. Familiarise yourself with them to reduce the risk of personal injury and material damage.
 | Safety class II, extra or double insulation. |
 | Approved in accordance with the relevant EU directives. |
 | Sort at source as electrical waste. |
TECHNICAL DATA
| Mains voltage 230 V | ~ 50 Hz |
| Speaker output (RMS) 2x 5 W | |
| Frequency range FM 87.5-108 MHz | |
| Frequency range DAB 174-240 MHz | |
| Automatic channel search Yes | |
| RDS | Yes |
| LCD display Yes | |
| Remote control Yes | |
| Interface Bluetooth (v3.0), 3.5 mm, USB | |
| Size W340xH180xD175 mm | |
| Weight 2.7 kg |
DESCRIPTION
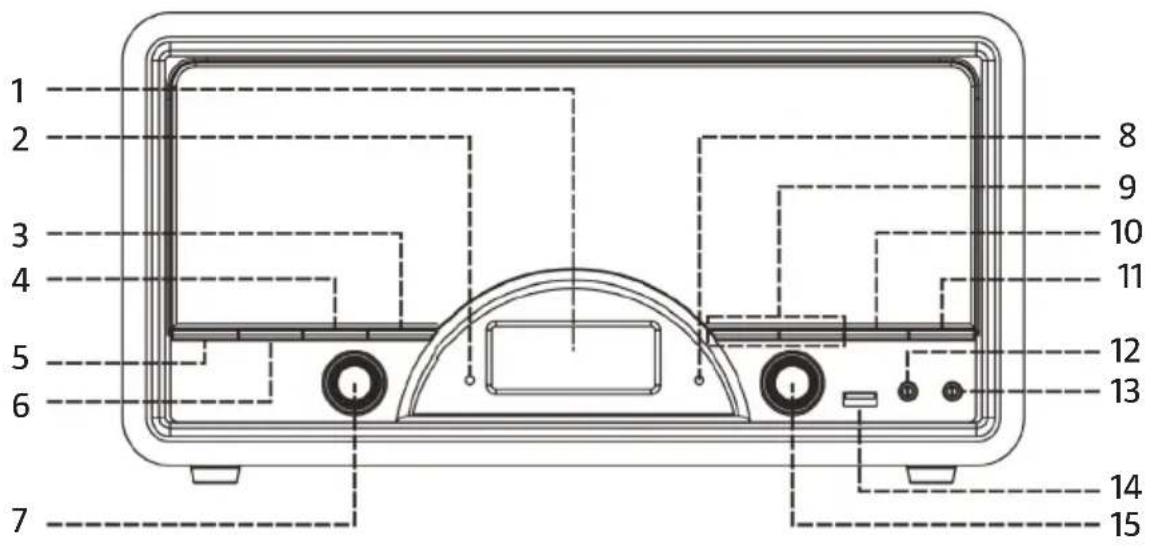
- LCD display
- Status lamp standby
- Button Info
- Button Pre/Mem
- Button OFF/ON
- Select button
- Tone control
-
Status lamp Bluetooth
-
Button skip/station search up/down
- Button Stop/Enter
- Button Play/Pause/Scan
- 3.5 mm AUX input
- 3.5 mm headphones jack
- USB port
- Volume control
- FM wire antenna
- DC input
FIG. 1
USE
PREPARATIONS
Installation
- Unpack the appliance and check that all the parts are included and undamaged.
- Check that the mains voltage corresponds to the rated voltage on the type plate. Do not plug in the plug until all the other connections are ready.
- Do not block the ventilation openings on the appliance – risk of overheating. Leave a few centimetres of free space around the appliance for ventilation.
Mains connection
- Connect the DC plug on the supplied mains adapter to the DC input (18) on the main unit. Plug the mains adapter into a power point. The status lamp for standby (2) goes on.
- Switch on the appliance with the ON/OFF button (6). The power supply is working as it should if the LCD display (1) backlight goes on. The system is then ready to use.
RADIO
Manual station search
- Switch on the appliance with the ON/OFF button (6) and press the select button (7) to show FM mode.
- Press the buttons for station searching (10) until you find the station you want.
Automatic station search
- Go to FM mode. Press the Play/Scan button (12) once. The appliance searches for a radio station. If a RDS signal (Radio Data System) is received the appliance sets the time automatically.
RDS (Radio Data System)
This function shows information from the radio transmission. Press the button Info/+10 (4) to switch over the LCD display as follows:
Radio text > Programme type > Signal strength
Date/time > Frequency > Mono/Stereo
DAB radio (Digital Audio Broadcasting)
- Go to DAB mode with the select button (7).
- Press the Play/Scan button (12) once. The appliance runs a complete search from 11b-12d in about 2 seconds. Press the buttons for station searching (10) until you find the DAB station you want.
- Press the button Info/+10 (4) to show the following DAB information: Group name > Frequency > Transmission speed > Signal strength > Date/time> Programme type > Rolling text
Presetting radio stations
A total of 40 radio stations can be saved in the memory (20 FM/20 DAB).
- Go to FM/DAB mode.
- Go to the required radio station with manual or automatic station search.
- Press in the Pre/Mem/Play (5) button to activate memory save mode.
- Press the buttons for station searching (10) to save the required station in the memory.
- Confirm with the button Stop/Enter (11).
- Repeat steps 2 to 5 to save more stations.
Activating preset radio stations
- Press the button Pre/Mem/Play (5) once to activate a radio station.
- Press the button for station search up/down (10) to select the required station in the memory.
- Confirm the saved station with the button Stop/Enter (11).
NOTE:
- Saved stations are erased from the memory if the power supply is cut.
- We recommend putting the system in standby mode when not in use.
- If no buttons are pressed for 3 seconds the appliance automatically returns to radio mode.
- Saved stations can be replaced with other stations.
- In accordance with the requirements in ErP stage II the appliance automatically switches to standby mode if no music is played for 15 minutes.
Tips for best reception
The receiver has a built-in FM wire antenna (17) on the back of the casing. The antenna should be pulled out to its full length for best reception.
DAB reset
Press the select button (11) for 1 second in DAB mode to complete a system reset and to remove all preset DAB stations. The LCD display (1) shows SYSTEM RESET OK and the system automatically runs a new search for DAB stations.
Charging via USB port
- Another device, such as a mobile phone, can be connected to the USB port and charged with 5 VDC/1 A.
- Charging via the USB port is available when the appliance is in standby mode.
NOTE:
Some devices cannot be charged via the USB port.
Bluetooth connection and playback
- Press the select button (7) to select BT mode.
- The Bluetooth status lamp (9) flashes to show that no Bluetooth connection has been established, but that searching for Bluetooth devices is in progress.
- Activate Bluetooth on the Bluetooth device (e.g. mobile phone) and select the device DAB-61B.
- When the connection is established the Bluetooth status lamp (9) stops flashing and stays on.
- You can now play music from the Bluetooth device on the main device.
AUX input
- Connect other audio device, such as (portable) CD player, MP3 player, (portable) cassette recorder, iPod etc. to the system with a cable and 3.5 mm plug (sold separately).
- Connect one end of the cable to the external headphones jack on the device and the other end to the AUX input (13) on the side of the appliance.
- Press the select button (7) to select AUX mode.
- You can now play music from the external device on the main device.
Headphones
- Plug the headphones plug into the headphones jack (14). Adjust the volume. Keep the volume low enough so that you can hear sounds from the immediate surroundings when playing music.
Tone control
- Adjust the reproduction of high frequencies with the tone control (8).
- SE DAB-RADIO
- EC DECLARATION OF CONFORMITY
- EG FÖRSÄKRAN OM ÖVERENSSTÄMMELSE
- EF SAMSVARSERKLÆRING
- DEKLARACJA ZGODNOŚCI WE
- SÄKERHETSANVISNINGAR
- Radio DAB (Digital Audio Broadcasting)
- SYMBOLS
- DESCRIPTION
- USE
- PREPARATIONS
- Installation
- Mains connection
- RADIO
- Manual station search
- Automatic station search
- RDS (Radio Data System)
- DAB radio (Digital Audio Broadcasting)
- Presetting radio stations
- Activating preset radio stations
- NOTE:
- Tips for best reception
- DAB reset
- Charging via USB port
- Bluetooth connection and playback
- AUX input
- Headphones
- Tone control
Brand : Marquant
Model : 001-873
Category : Radio