
MPR89 - Radio Marquant - Free user manual and instructions
Find the device manual for free MPR89 Marquant in PDF.
| Product type | Radio cassette with CD player, USB and SD card |
| Brand | Marquant |
| Model | MPR89 |
| Mains power supply | AC 230 V~ (via built-in mains adapter) |
| Battery power supply | 8 C type batteries (LR14) not included |
| Radio bands | FM (stereo) |
| Station memory | Up to 30 FM presets |
| CD formats | Audio CD, MP3 CD |
| USB/SD formats | MP3 (playback and programming up to 99 tracks) |
| Cassette | Playback and recording (radio, CD) |
| Headphone output | 3.5 mm stereo jack |
| Equalizer | POP, Jazz, Neutral, Classical, Rock |
| CD playback functions | Normal play, pause, skip, fast forward/rewind, repeat (1, ALL, random), programming |
| Radio functions | Auto search, manual presets, memory |
| Recording | From radio or CD to cassette |
| Display | LCD with function indicators |
| Carrying handle | Built-in |
| Maintenance | Clean the CD lens with a soft cloth; clean the cassette heads with a cotton swab and alcohol |
| Battery safety | Respect polarity, do not mix new and used types, remove if not used for a long time |
| Included accessories | Mains power cable |
Frequently Asked Questions - MPR89 Marquant
User questions about MPR89 Marquant
0 question about this device. Answer the ones you know or ask your own.
Ask a new question about this device
Download the instructions for your Radio in PDF format for free! Find your manual MPR89 - Marquant and take your electronic device back in hand. On this page are published all the documents necessary for the use of your device. MPR89 by Marquant.
USER MANUAL MPR89 Marquant
TO REDUCE THE RISK OF FIRE OR ELECTRIC SHOCK, DO NOT EXPOSE THIS APPLIANCE TO RAIN OR MOISTURE.
CAUTION
Use of controls or adjustments or performance of procedures other than those specified herein may result in hazardous radiation exposure.

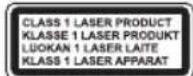
This Compact Disc player is classified as CLASS 1 LASER product.
CAUTION!
Invisible laser radiation when open and interlocks defeated. Avoid exposure to beam.

Covers - Do not remove any fixed covers as this may expose dangerous voltages.
Weather - It is advisable to unplug an external aerial during a thunderstorm.
Ventilation - The ventilation holes on the casing prevent your product from over heating. Do not block or cover these holes, especially with cloth or paper. It is recommended you eave a 10cm gap all around the unit.
Damage - Never use the product if it is damaged in any way. Always place the unit on a flat level surface avoiding anywhere which may be subject to strong vibration.
Batteries - Batteries are easily swallowed by young children. Do not allow young children to play with the unit or remote control. Dispose of used batteries in an environmentally friendly manner.
Temperature - Avoid extremes of temperature, either hot or cold, place your product well away from heat sources such as radiators or gas/electric fires. Don't use this apparatus in tropical climates.
Moisture - Do not allow your product to be exposed to rain, moisture or dust. If any liquid is spilt into this product it can cause serious damage. If you spill any liquid switch the unit off at the mains immediately. Contact your store immediately.
Accessibility - ensure that the mains plug is easily accessible.
Naked Flames - naked flames such as candles and night lights should not be placed on or near the unit.
USB Storage Device Data Protection
- Always insert the USB device in the correct direction. Failure to do so may result in damage to the USB device and this product.
- Do not remove the USB device whilst it is being accessed.
- Electrical interference and electrostatic discharges may cause the USB device to malfunction and suffer damage, resulting in data loss.
It is strongly recommended that any important data is backed up on a PC to protect against corruption, data loss or device malfunction. Please note that our company shall not accept any liability for damage or loss of stored data.
- The apparatus shall not be exposed to dripping or splashing.
Do not install the equipment in a confined spaces, such as a book case or built-in cabinet.
THIS UNIT SHOULD NOT BE ADJUSTED OR REPAIRED BY ANYONE EXCEPT PROPERLY QUALIFIED SERVICE PERSONNEL.
POWER SUPPLY

AC power operation
- Connect one end of the mains lead to the (AC ~IN) socket and the other end to an AC outlet.
To disconnect the product, unplug from the mains supply.
CAUTION:
WHEN INSTALLING BATTERIES
To prevent battery electrolyte leakage, which may result in injury and damage to the unit or other objects, observe the following precautions:
- All batteries must be installed with the proper polarity (seed diagram in the compartment of the unit).
- Do not mix new with old or used batteries.
- Only use batteries of the same type and brand.
- Remove the batteries when they are not to be used for a long period time.
Battery power operation
- Open the battery compartment lid by pushing down on the tabs.
- Install 8 × "C" size batteries (not supplied). Refer to the polarity diagram in the battery compartment of the unit.
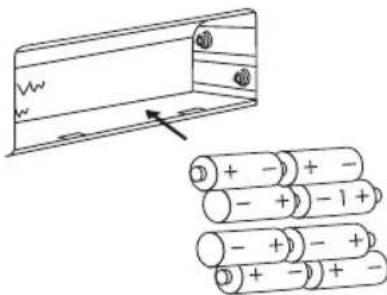
8 x "C" size batteries.
- Replace the lid.
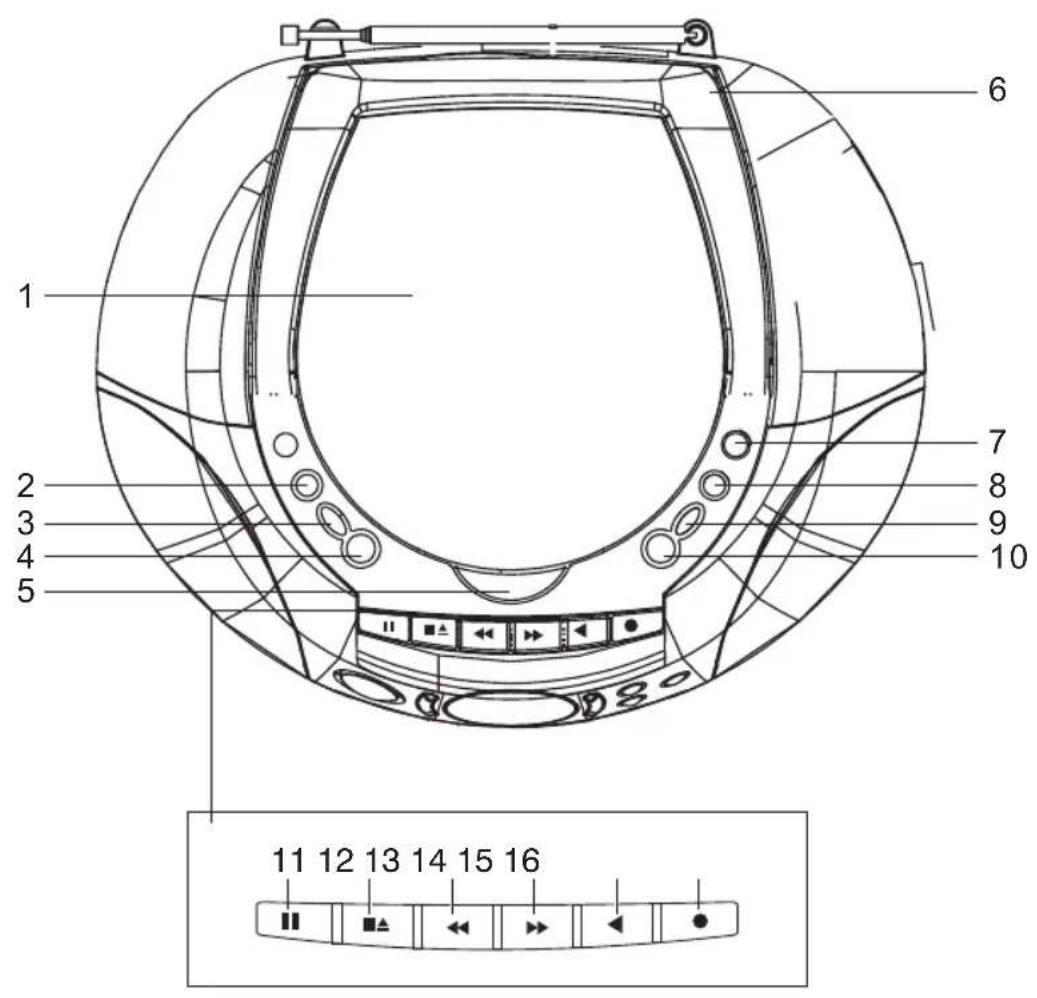
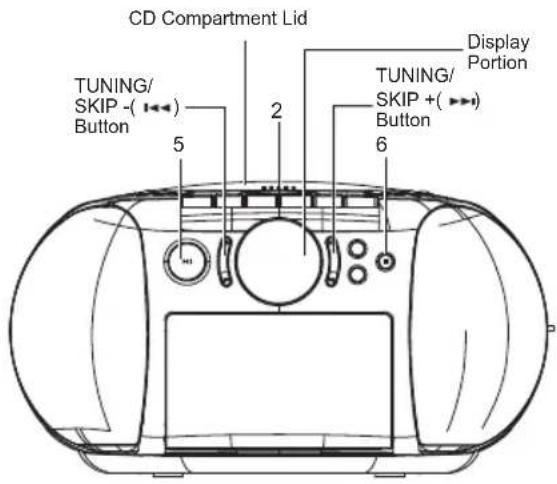
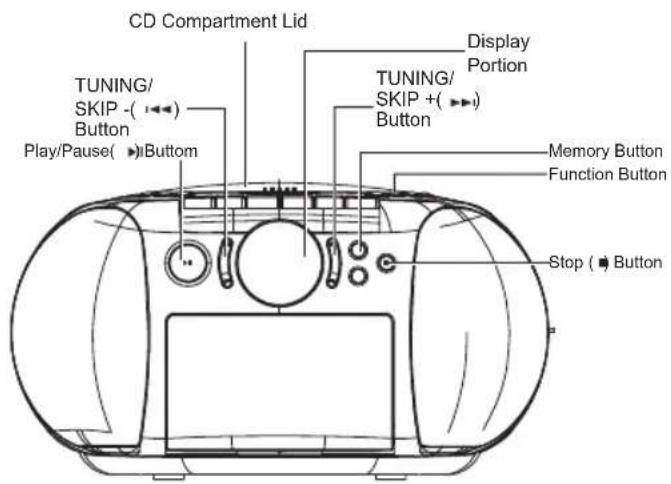
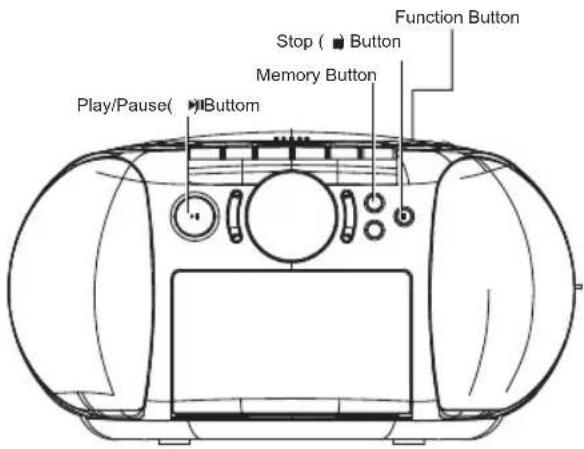
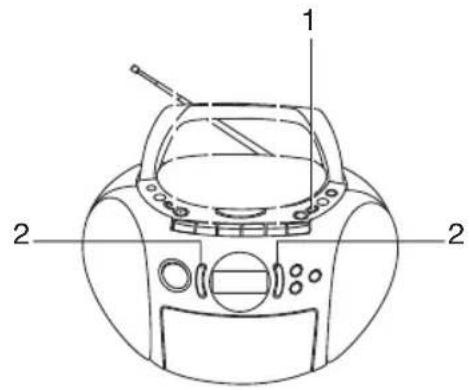
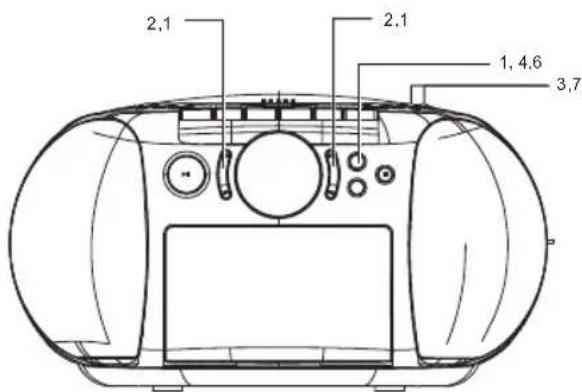
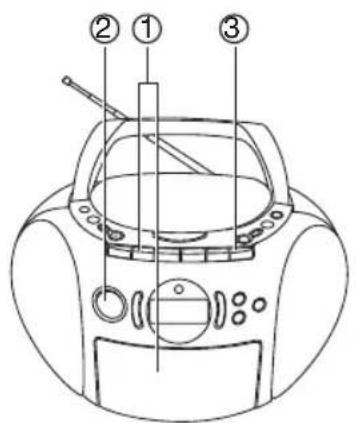
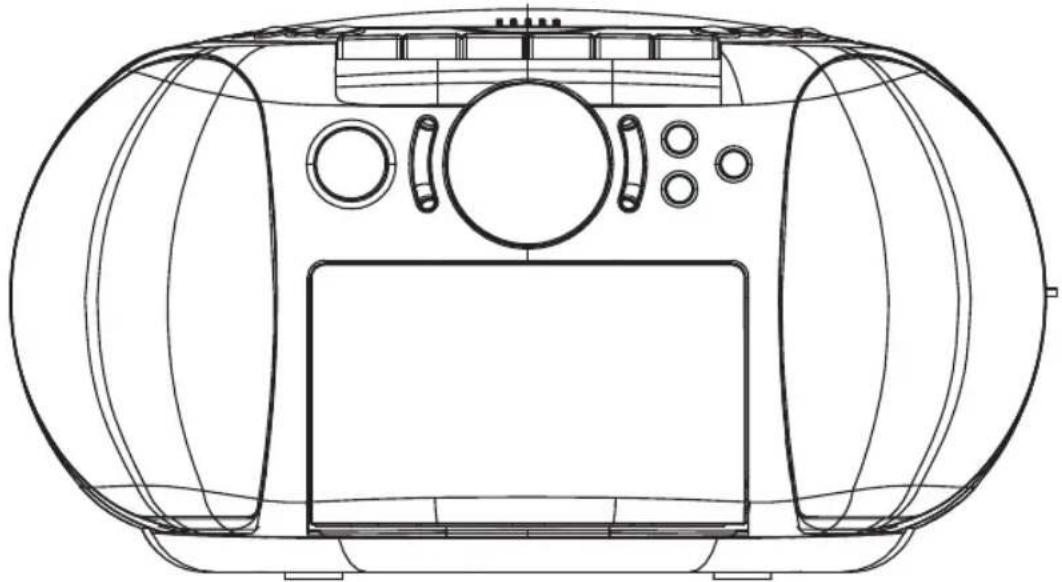
THE FUNCTION PARTS OF THE UNIT
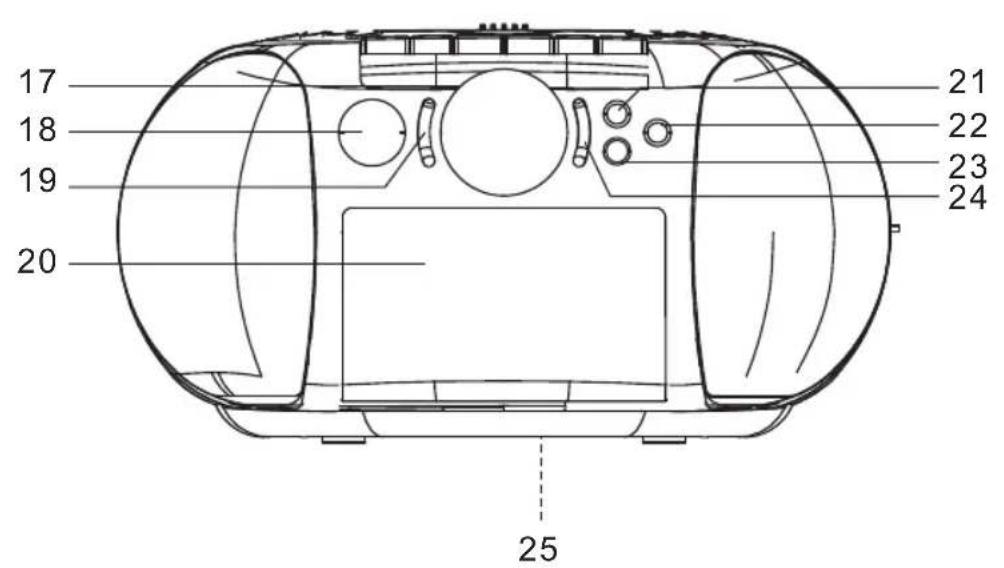
GB-04
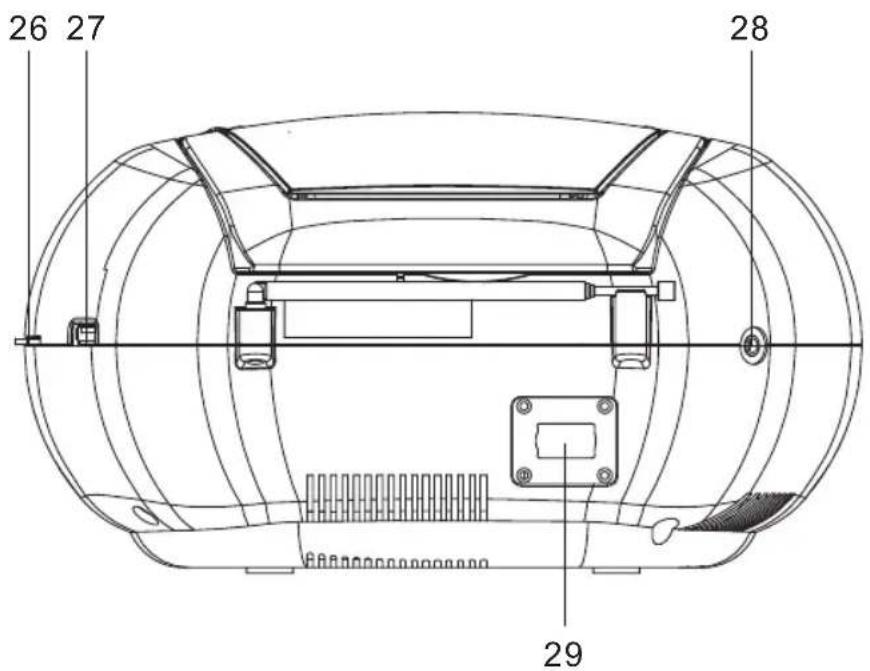
CONTROLS
- CD compartment lid
- EQ Button
- VOL UP Button
- VOL Down Button
- CD open(OPEN)
- Hand link
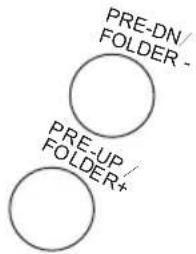
- Preset down/FOLDER- button
- Preset up/FOLDER+button
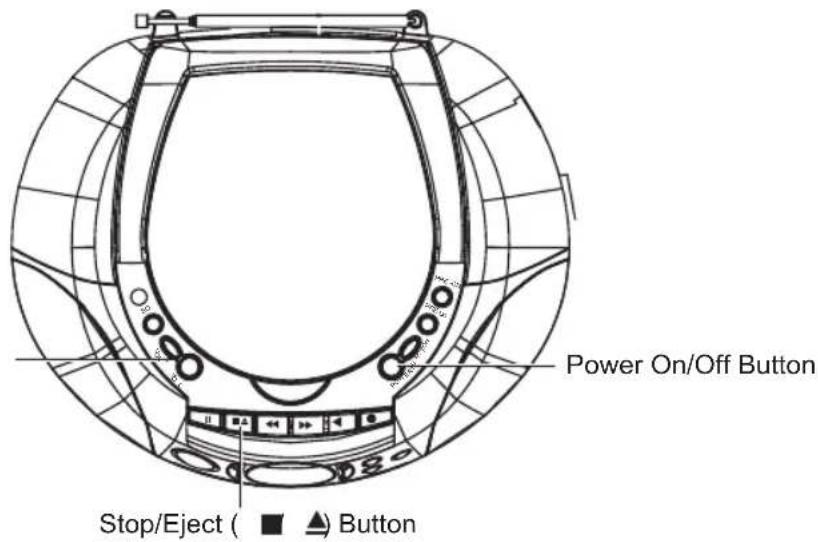
9.FUNCTION button - POWER button
- Pause button ( )
- Stop/eject button (
- Fast forward button (
- Rewind button (
- Play button (
-
Record button (
-
LCD
- Play/Pause button ( )
- CD Skip Floder-button (
- Cassette compartment
- MEM/PROG button
- STOP button (
- MODE button
- CD Skip Floder+button (
- Battery compartment
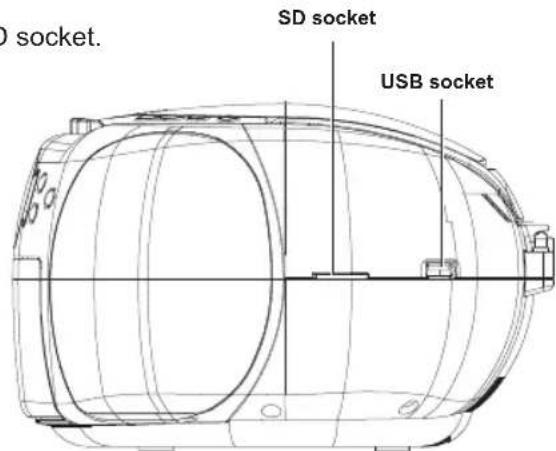
- SD socket
- USB socket
- Stereo headphones socket (PHONES)
- Ac input socket (\~AC IN)
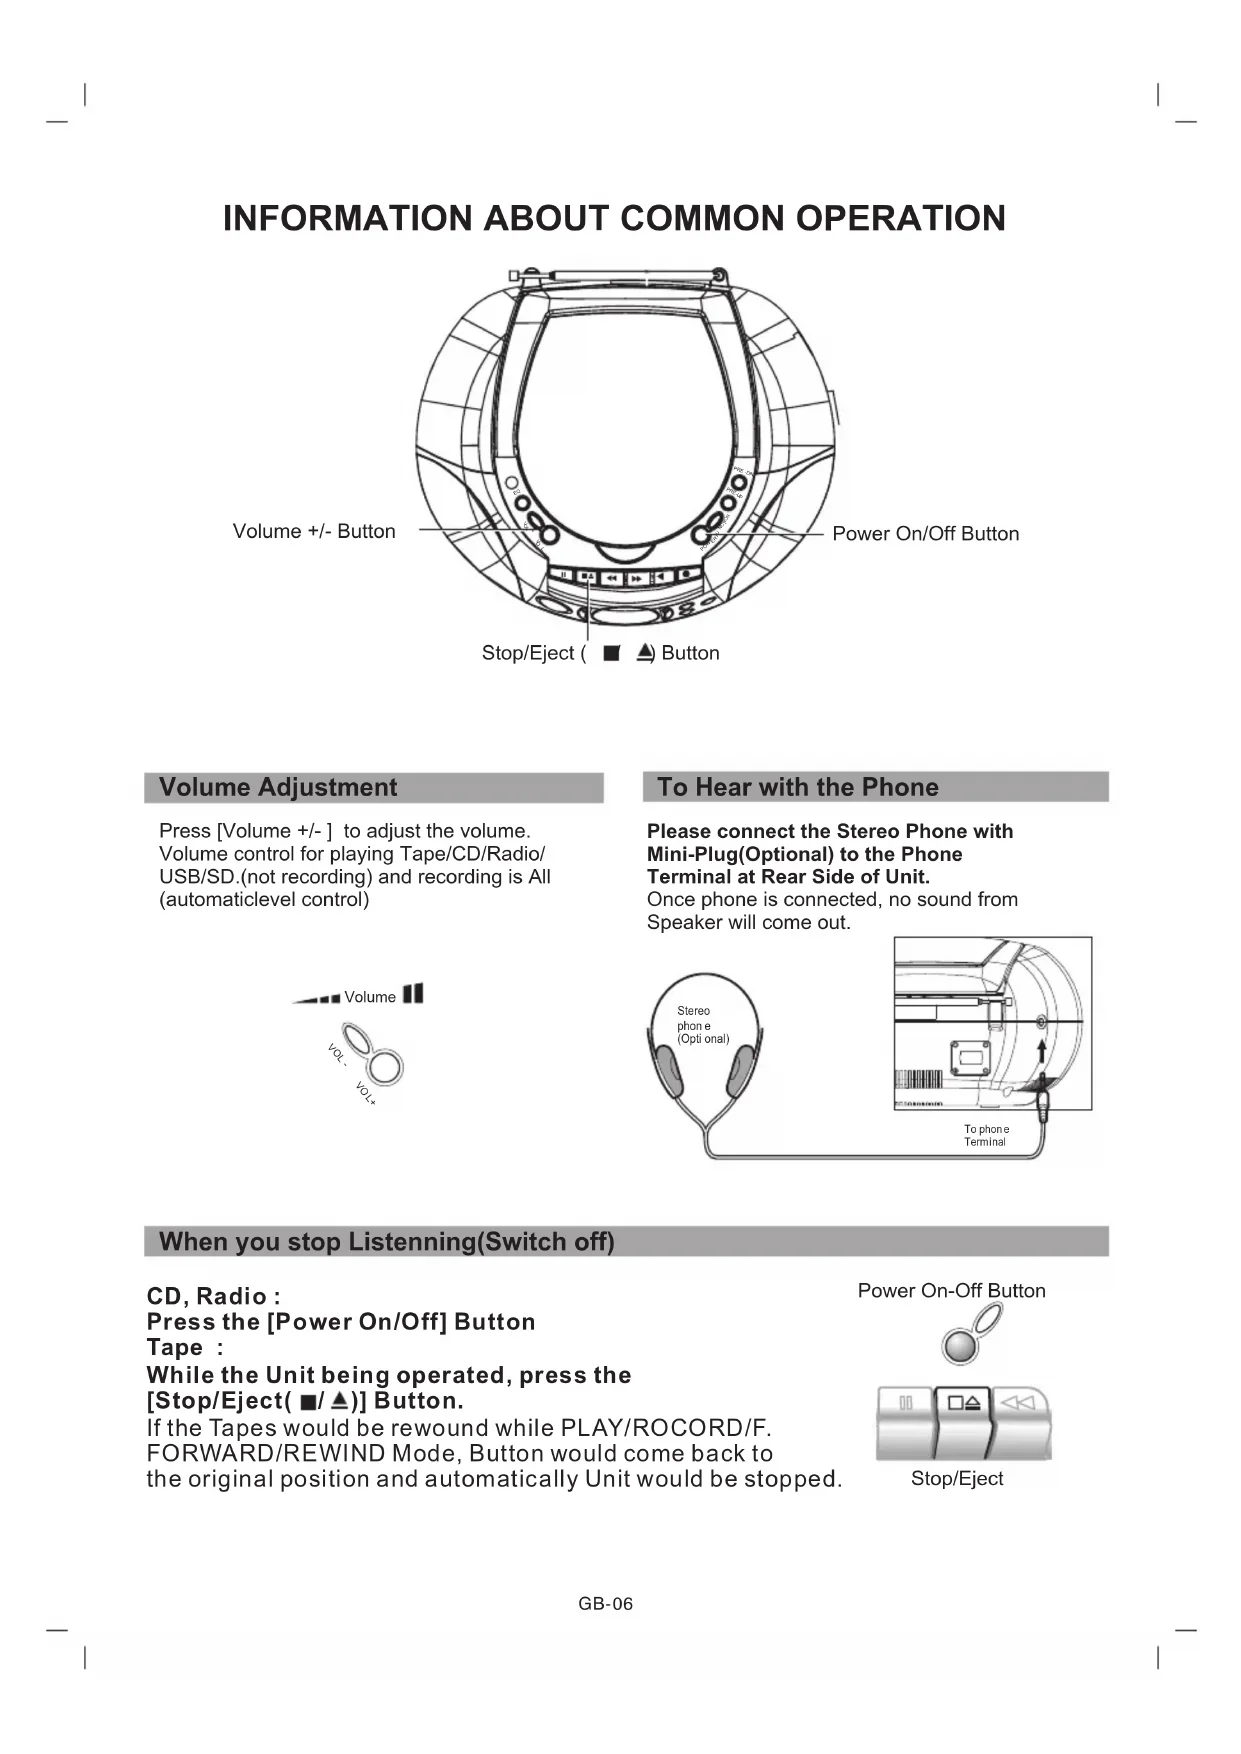
INFORMATION ABOUT COMMON OPERATION
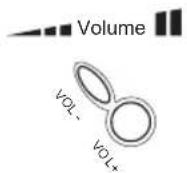
Volume + / - Button
Volume Adjustment
Press [Volume +/-] to adjust the volume. Volume control for playing Tape/CD/Radio/ USB/SD.(not recording) and recording is All (automaticlevel control)
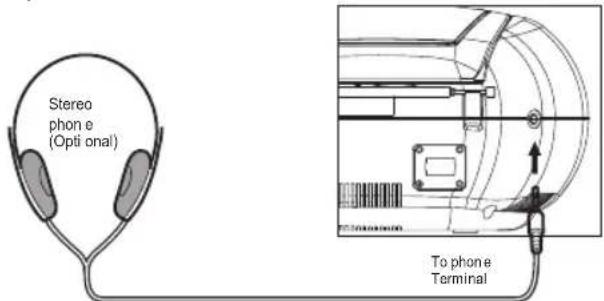
To Hear with the Phone
Please connect the Stereo Phone with Mini-Plug(Optional) to the Phone Terminal at Rear Side of Unit.
Once phone is connected, no sound from Speaker will come out.
When you stop Listening(Switch off)
CD, Radio :
Press the [Power On/Off] Button
Tape :
While the Unit being operated, press the
[Stop/Eject(■/▲)] Button.
If the Tapes would be rewound while PLAY/ROCORD/F.
FORWARD/REWIND Mode, Button would come back to
the original position and automatically Unit would be stopped.
Power On-Off Button


Stop/Eject
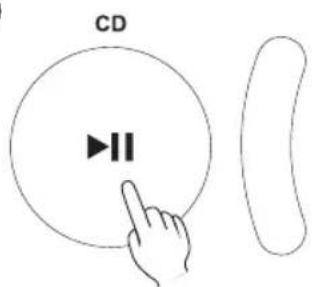
Listen to CD
Usual Play Back
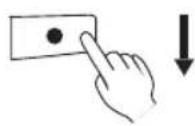
1 Press POWER button and set Function switch to CD mode.
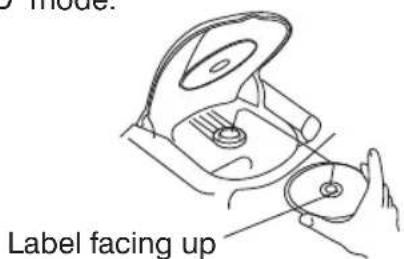
2 Press the [Lift to open] button to Open The CD Compartment Lid.
3 Put CD into.
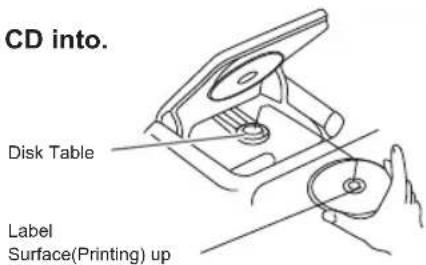
Please refrain from Putting More than 2pcs of Cds.
4 Close the CD Compartment Lid
By pressing the CD compartment Lid, and make sure to close it until you could hear the sound "Katchi".
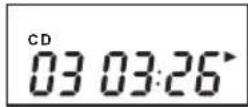
After 5-seconds later, the indication about Total Number of songs in the CD and total playing Back Time will come out on the display portion.
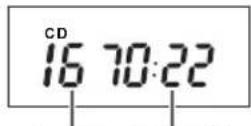
Total Number of Songs.
Total Play-Back Time
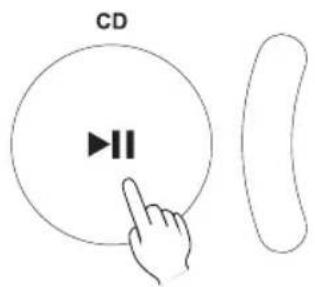
5 Press the Play/Pause(▶) Button
Play back to start from song Number 1.
6 To stop the Play-Back, Press [Stop (■)] button
To take out the CD,
Press [Stop (■)] button, then after waiting for the CD rotation completely stop, press the [Lift to open] button and take out the CD.
The Pause of Play Back
Press [Play/Pause( ) button, while playing-back.
If you would press it again, PLAY-BACK will re-start again.
To start from the Song which you like to listen to.
Please select the song which you prefer, with [TUNING/SKIP + or - (▶▶r I▲] button, then you release the button.
Our Request
- Please refrain from Opening the CD Compartment Lid, while Playing-Back.
It may cause the CD to be damaged. - Please note that before starting to use, the protection sheet covers the Disk-Table. When you start to use, please take the sheet off.
- If the CD is not placed at the proper position, it may cause the CD damaged or Unit Problem.
- If you would put the CD the other way round, "No Disc" indication will come out at display portion, and the Play-Back can not be operated.
- If there would be any Damages, Fingerprint or Dirts on the CD, it may not be played back.
F.Forward, F.Rewind(Search)
While Play-Back or Pause mode, you would continue to press [TUNING/SKIP + or - (1 or 1)] Button, then release your button at the position of your preferable song.
F.Forward, F.Rewind(Search)
While Play-Back or Pause mode, Please press [TUNING/SKIP + or - (or) button in a short while.
To Repeat the PLAY-BACK (Repeat-Play Back)
Press the [MODE] Button.
You may repeat and play-back 1 song out of Total Songs, All songs or the songs which you have programmed earlier.
- In case you would like to repeat and playback only one song. [MODE] button to be pressed 1-time. (" Lamp on the display portion will be on.)
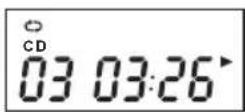
- In case you would like to repeat and playback ALL Songs. [MODE] button to be pressed 2-times. ("CALL" Lamp on the display portion will be on.)
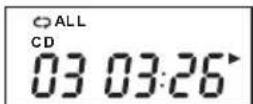
- In case you would like to random play-back all songs,[MODE] button to be pressed 3-times. ("RAN" Lamp on the display portion will be on.)
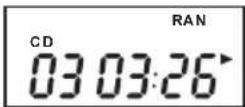
- In case you would like to repeat and playback only programmed song, you need to programme first(Please refer to Page 11), then press the [MODE] button, then the light "ALL" on and press [Play/Pause( ) button.
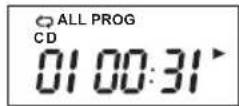
- To release the Repeat-play back.[MODE] button to be pressed 4-times.(No Lamp will be on.)
Our Request
Please make sure to use Disc with the MARKS stated at Left Side or Disc which are qualified JIS Standard.
We are unable to Guarantee the Sound Reproduction against Copy Controlled CD, or other strange shaped CD which are out of CD Disc Standard.
Caution
CD-R/RW Disc
This unit can play-back the CD-R/CD-RW Disc which were recorded with CD-DA Format ^() . However, depend on the condition of Recorder which were used for Disc and Recording, there might be possible not to play-back. (^) CD-DA stands for "Compact Disc Digital Audio", and is the standard for Music Recording with General Audio CD.Please refrain from putting the CD-R/RW Disc which are no data recorded. This is because that It might take a long time to read Disc, then it might be damaged, when you want to take out the Disc with error while its rotation.
VCD(Video CD) can not be played back with this Unit too.
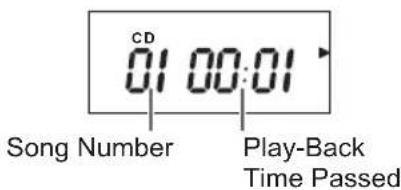
Listen to your Favorite Song (Programme Play-Back)
You may select your Favorite Songs upto 99-steps and Play-Back.
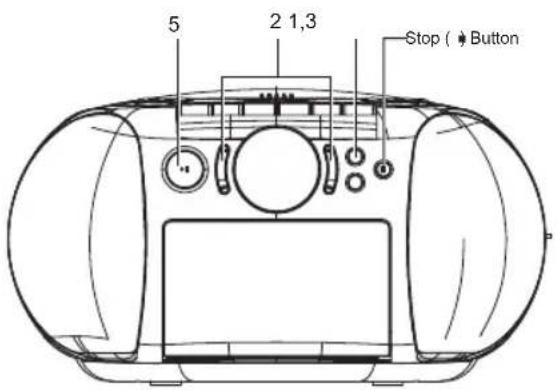
1 Press the [MEM] button in stop mode.
Song Number "01" will come out display.
![Marquant MPR89 - Press the [MEM] button in stop mode. - 1](/content/2026/02/373949/images/a6064d12c08ad7f4ebb8af2a587631afdacce53081146a27c866dd0fcca236fe.jpg)
2 Press [TUNING/SKIP + (▶) button or [TUNING/SKIP - (▶) button repeatedly, and programme the song numbers which you want to listen to.
3 Press [MEM] Button
The next song Step will be displayed, and Song Number indication "02" will come out.
![Marquant MPR89 - Press [MEM] Button - 1](/content/2026/02/373949/images/5671260b6f9fc43b48ed21479052042c3ba7879277a0caca913160f23c887bc1.jpg)
Song Step Song Number
4 Repeat the process 2 & 3, and continue to programmed Songs.
5 Press the [Play/Pause( ) button.
Programmed play-back will start.
Notice
Even you want to programme more than 40 songs, "FULL" will come out on the display portion.
After all the Play-Back for all songs programmed, it will stop operation. Even you want to stop half way, by pressing the [Stop (■)] button, you may stop it. All the programmed memories will still remain.
Our Requests
How to handle & Keep DISC
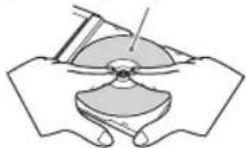
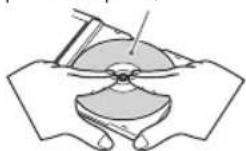
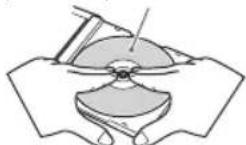
About taking-Out DISC from Case and how to put CH into Case.
To Take-out
Hold the Holder Center,
with avoiding to touch the surface where the songs are recorded, then take out DISC.
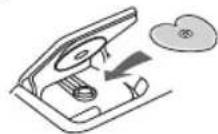
To Insert
Make sure that the surface printed is upside,
and insert DISC by pressing the center portion of DISC.
- Please refrain from Putting the Paper on Sheel on DISC.
- Please refrain from Bending DISC.
About Keeping DISC
Make sure to keep DISCs in the exclusive Case.
- Please refrain from Putting DISCs at those places.
Direct Sun Beam
Near place to the Heating Equipments on the place with High Temperature.
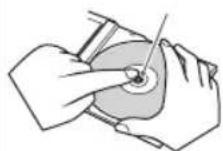
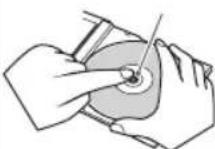
About the maintenance of DISC
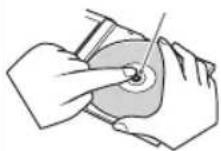
Before playing-back DISC, please clean DISC from the center to outside, and shape off the Dust, or Finger Print sticked on the surface for Play Back with the soft cloth.
- Please refrain from Using thinner, benzene or Alcohol for Cleaning.
To Cancell the Programe Play-Back Mode
You may go back to Normal Play-Back Mode, after cancelling the programme. While Programmed Play-Back is on, you press [Stop (■)] button twice. While stopping, you have to press [Stop (■)] button one time.
About Programme
a) To Confirm :
While Stopping, the indication of the song set & Song Numbers will be displayed, by pressing the [TUNING/SKIP + or - (▶▶or|▶) button.
b) To Change
While stopping, after continuing to press the [Memory] Button until the indication of Song Number of your Favourite Song will come out, by following the same process 2-3 stated at page left side, you may change the Song Number.
- It is impossible to insert the new song between the songs which you programmed earlier, or delete the song.
c) To cancel
- When you change DISC, the programmed songs will be cancelled.

CAUTION

Prohibition
Please refrain from using other than round type of DISC
If you would use other shaped DISC(Heart Shape or Card Type)
than normal round type, it may come
out by itself
because of
High-Speed
rotation. It may
cause the injury.
TO LISTEN TO THE SONGS FUNCTION (Function PLAY-BACK)
By Pressing [Repeat] Button, wait for the indication "RND" to be displayed.
By pressing it every time, display will be going to change" ^ ^ ^ ^ ^ ^ indication")
In case you selected the [Function Play-Back] mode before play-back, press [Play/Pause() button, so that Play will start.

After all the songs are played function, it stops. To release the FUNCTION Play
- While FUNCTION PLAY, press the [STOP() button twice.
While Stopping, press the [STOP() button one time.
- Set function switch to USB status or SD status.
- Insert USB or SD/MMC memorizer to USB socket or SD socket.
- Press PLAY/PAUSE to control PLAY/PAUSE mode.
- Press volume button to adjust the sound volume.
- Press STOP key to stop playing.
- Press TUNING/SKIP + to play next track.
- Press TUNING/SKIP - to play previous track.
- Press Play MODE to select the repeat mode(
ALL Folder RAN).NormaI
Press folder + or - button to select the folder.
- Press Memory to start program play when stopping; press stop button twice to delete all memory.
- Press [STOP] key to stop playing.
CHANGE THE SOUND QUALITY
Press the [EQ]Button.
By pressing this button every time, The sound change "POP" "Jazz"
"Flat" "Classic" "Rock".
Please check at the LCD Display.
![Marquant MPR89 - Press the [EQ]Button. - 1](/content/2026/02/373949/images/1bf670b345da02de8ab6041289c0dd0336960153a9969e09668516e160112ce8.jpg)
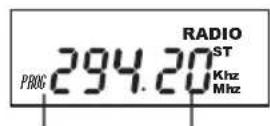
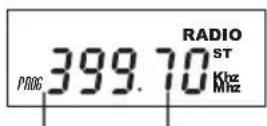
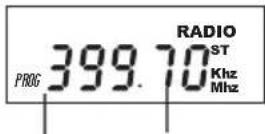
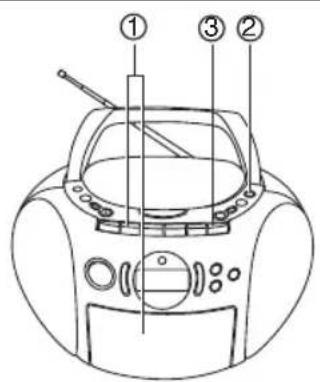
To Listen to the RADIO
RADIO

①
To RADIO
Press the [Function] button, to select Radio.

②
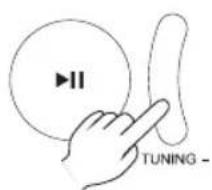
Press the [TUNING/SKIP+(▶]or [TUNING/SKIP+(▶] button to select the Radio Channel.
By keeping to press the button, if you release your finger from Button, when the figures start to move, the Frequency Figures will stop automatically at CH which you receive the Radio Broadcasting at first. When you receive the STEREO Broadcasting, Indication "ST" will flash on the display.
(3)
If you would press the [PRE-UP/FOLDER+] button or [PRE-UP/FOLDER-] button, you can receive the Radio Broadcasting which you did pre-set earlier.
To Memorize the Channel
If you pre-set channel to memorize No. by No., with preset Number the selection of Channel can be easily done.
- FM 30-channels.
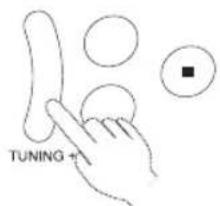
1 Press [MEM] Button
The station Frequency will be indicated on the LCD. the PRESET Number will flash.
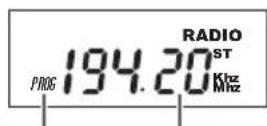
Pre-Set number
Receiving Frequency
2 Press either [TUNING SKIP+ (▶) button or [TUNING SKIP - (1▶) button and select your prefer.
Pre-Set number
Favourable
3 Press [PRESET + -] button and receive your Favourable Channel.
If you keep on pressing and Once the figure will start to move then if you release your fingers from button, it will stop at the Channel where you received at first.
Pre-Set Number
Receiving Frequency
4 Press the [MEM] Button
Channel will be memorized. The indication of Preset with plus one will be displayed, and the receiving Frequency will show.
Pre-Set Number
Receiving Frequency
5 By repeating the process 3 - 5, then please memorize the other radio Channels.
6 Press the[ MEM] Button, then finish the memorizing process.
7 In radio mode, press Preset down or up button to select memoried station.
Press to temporarily stop the tape during playback or recording. Press it again to continue.
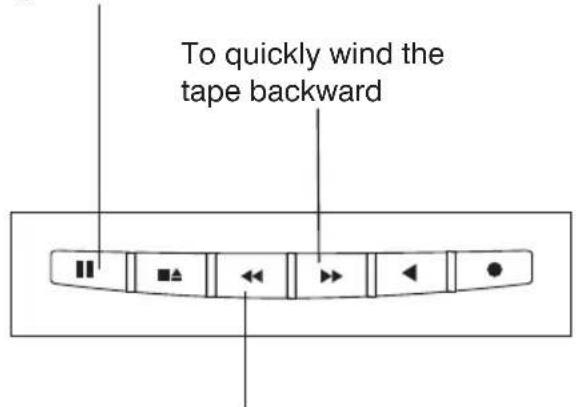
To quickly wind the tape forward
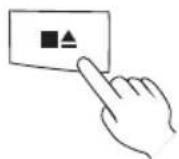
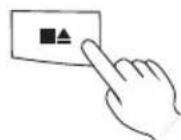
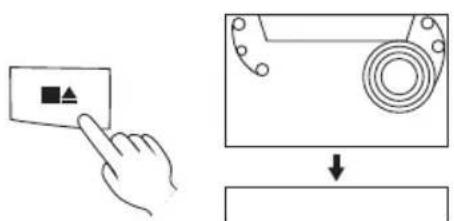
Press STOP/EJECT once to stop the tape. Press again to remove the cassette.

To OFF
④ To control the sound.
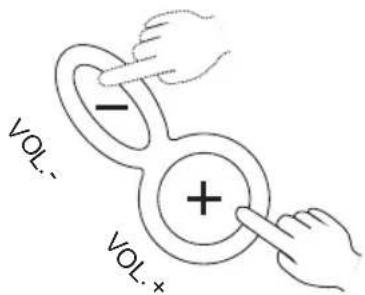
Press the "VOL.+ or "VOL.-" button to adjust the sound.
To Listen to the Tape
1 Press the [STOP/REJECT( button, and open the cassette Compartment Lid, then Insert the TAPE
Place a pre-recorded cassette tape Surface for Paly-Back into the slots on the inside of the door with the exposed tape facing up.
2 Close the Cassette Door.
3 Press the power button and set Function to TAPE. Then Press the [Play( ] button.

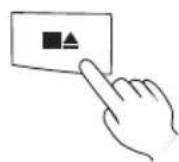
To stop Playing Back, press the [STOP/EJECT(■/▲)] button.
If you would press the same button one more time, the Cassette Lid will open.

PAUSE
While Play-Back Mode, press the [PAUSE(II)] button.
Press it twice time, The Play-back will start.
Fast Forward, Rewind
While Stopping, press the [F.Forward( or Rewind( ] button.

When you reach at the desired point, press STOP/EJECT( button.
Our Request
While Play-back, Recording, F.Forward or Rewind, after the ALL Tape are rewound, button will be released and stop automatically.
While Play-back,or Recording, please refrain from pressing the [F.FWD( or Rewind ( ) button at the same time.It may cause the Tape Jam.
- Make to operate the Button. If you would press 2-buttons at the same time, or treat it very roughly, it may cause also the Tape Jam.
RECORDING
(B) Recording from the built-in radio
WARNING
Recording copyright material without permission of the copyright owners is usually an infringement. If you wish to re-record copyright material, permission from the copyright owner is necessary. OHAYO does not approve of, and cannot be held responsible for, any unlawful of this machine.
Automatic Level Control (ALC) recording
The ALC circuit adjusts the recording input level automatically. No adjustments are required.
① Press STOP/EJECT. Insert cassette.
② TO RADIO
Tune in a station.
Select FM mode (STEREO or MONO)
(3) Press REC.

Press STOP/EJECT once to stop the tape. Press again to remove the cassette.
(C) Recording from a compact disc
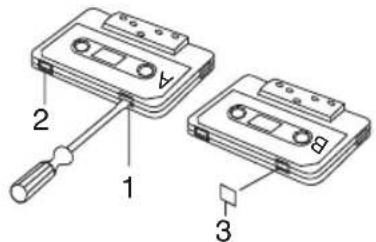
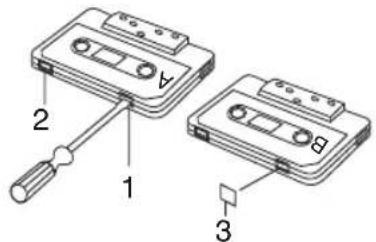
Safeguards against accidental erasure To protect side A, break out tab (1).To protect side B, break out tab (2). NOTE:
A cassette with the erase guard tabs removed cannot be erased or used for recording and the REC button cannot be depressed. To record or erase a protect cassette, cover the tab openings with adhesive taps (3).
① Press STOP/EJECT. Insert cassette.
② To CD
PLAY/PAUSE button will be on in CD mode.
(3) Press REC.
Press PLAY/PAUSE.

Press STOP/EJECT once to stop the tape. Press again to remove the cassette.
MAINTENANCE
Cleaning the unit
Clean the outside of the unit with a clean soft cloth, moistened with lukewarm water. Do not use solvents such as benzene or thinner. These will permanently damage the units finish.
Cleaning the CD player lens
The lens should never be touched. If dust is on t camera he leans, blow it off using a lens blower. (Please consult your dealer.)

If trouble occurs...
To avoid the harzard of electric shock and damage to the unit, have the unit bench tested by an authorized OHAYO service station. Do not remove the unit from its cabinet to attempt repairs yourself.
Warning
- Do not block the ventilation hole.
- Do not expose to rain or moisture.
Cleaning the tape heads
When dust or reddish-brown oxide builds up on the tape deck heads, pinch roller and capstan, the following problems may result:
Poor sound quality during playback
Distorted, poor quality recordings
Erratic tape speed during recording or playback
To ensure playback and recording with good quality sound, use a cleaning tape (available from your local audio dealer) to clean the head block of the deck after about every 10 hours of use.
OR
- Open the cassette compartment lid by pressing (STOP/EJECT).
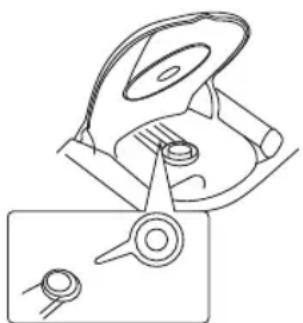
- Press REC while pushing in the lever as Illustration.
- Moisten a cotton swab (1) with isopropyl alcohol or special head cleaning fluid. Gently rub the face of each head (2,3) with alcohol.
Also clean the capstan (5) and pinch roller (4).

SPECIFICATIONS
(Cassette Section)
Recording system : AC bias, 4 track stereo
Erasing system :Magnet erase
Tape Speed : 4.75 cm/sec.
Fast forward and
rewind time :Approx 170 sec.(C-60 tape)
Frequency response: 80-10,000Hz (normal tape)
(CD Section)
Channels : 2 channels
S/N ratio 70 dB
Wow & Flutter : Undetectable
Sampling frequency: 44.1 kHz
Quantization : 16 bits linear/ch
Pick up light source : Semi-conductor laser
Pick up wave length : 790nm
Laser output : Continuous wave max. 0.6mW
(Radio Section)
Tuning ranges : FM : 88-108MHz
Aerials : telescopic rod aerials
(General)
Power output : 1.2W x 2 (CH)
Speaker : 92mm x 2 (8 ohms)
Terminals - Output : Headphones
Power source : AC:230V/50Hz
DC: 12V (8 x "C" size batteries)
Dimensions : 290 × 160 × 250 ~mm (W) x (H) x (D)
weight (approx) : 2.4kg (excluding batteries)
MARQUANT
MODE D'EMPLOI
MPR-89

RADIO FM STÉRÉO CD/USB/SD
WARNING
TO REDUCE THE RISK OF FIRE OR ELECTRIC SHOCK, DO NOT EXPOSE THIS APPLIANCE TO RAIN OR MOISTURE.
CAUTION
Use of controls or adjustments or performance of procedures other than those specified herein may result in hazardous radiation exposure.
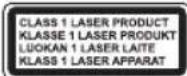
This Compact Disc player is classified as CLASS 1 LASER product.
CAUTION!
Invisible laser radiation when open and interlocks defeated. Avoid exposure to beam.

Covers - Do not remove any fixed covers as this may expose dangerous voltages.
Weather - It is advisable to unplug an external aerial during a thunderstorm.
Ventilation - The ventilation holes on the casing prevent your product from over heating. Do not block or cover these holes, especially with cloth or paper. It is recommended you eave a 10cm gap all around the unit.
Damage - Never use the product if it is damaged in any way. Always place the unit on a flat level surface avoiding anywhere which may be subject to strong vibration.
Batteries - Batteries are easily swallowed by young children. Do not allow young children to play with the unit or remote control. Dispose of used batteries in an environmentally friendly manner.
Temperature - Avoid extremes of temperature, either hot or cold, place your product well away from heat sources such as radiators or gas/electric fires. Don't use this apparatus in tropical climates.
Moisture - Do not allow your product to be exposed to rain, moisture or dust. If any liquid is spilt into this product it can cause serious damage. If you spill any liquid switch the unit off at the mains immediately. Contact your store immediately.
Accessibility - ensure that the mains plug is easily accessible.
Naked Flames - naked flames such as candles and night lights should not be placed on or near the unit.
USB Storage Device Data Protection
- Always insert the USB device in the correct direction. Failure to do so may result in damage to the USB device and this product.
- Do not remove the USB device whilst it is being accessed.
- Electrical interference and electrostatic discharges may cause the USB device to malfunction and suffer damage, resulting in data loss.
It is strongly recommended that any important data is backed up on a PC to protect against corruption, data loss or device malfunction. Please note that our company shall not accept any liability for damage or loss of stored data.
- The apparatus shall not be exposed to dripping or splashing.
Do not install the equipment in a confined spaces, such as a book case or built-in cabinet.
THIS UNIT SHOULD NOT BE ADJUSTED OR REPAIRED BY ANYONE EXCEPT PROPERLY QUALIFIED SERVICE PERSONNEL.
ALIMENTATION

Please make sure to use Disc with the MARKS stated at Left Side or Disc which are qualified JIS Standard.
We are unable to Guarantee the Sound Reproduction against Copy Controlled CD, or other strange shaped CD which are out of CD Disc Standard.
Caution
CD-R/RW Disc
This unit can play-back the CD-R/CD-RW Disc which were recorded with CD-DA Format ^() . However, depend on the condition of Recorder which were used for Disc and Recording, there might be possible not to play-back. (^) CD-DA stands for "Compact Disc Digital Audio", and is the standard for Music Recording with General Audio CD.Please refrain from putting the CD-R/RW Disc which are no data recorded. This is because that It might take a long time to read Disc, then it might be damaged, when you want to take out the Disc with error while its rotation.
VCD(Video CD) can not be played back with this Unit too.
How to handle & Keep DISC
About taking-Out DISC from Case and how to put CH into Case.
To Take-out
Hold the Holder Center,
with avoiding to touch the surface where the songs are recorded, then take out DISC.
To Insert
Make sure that the surface printed is upside,
and insert DISC by pressing the center portion of DISC.
Please refrain from Putting the Paper on Sheel on DISC.
- Please refrain from Bending DISC.
About Keeping DISC
Make sure to keep DISCs in the exclusive Case.
- Please refrain from Putting DISCs at those places.
Direct Sun Beam
Near place to the Heating Equipments on the place with High Temperature.
About the maintenance of DISC
Before playing-back DISC, please clean DISC from the center to outside, and shape off the Dust, or Finger Print sticked on the surface for Play Back with the soft cloth.
- Please refrain from Using thinner, benzene or Alcohol for Cleaning.
Annuler le mode de Lecture programme
Please refrain from using other than round type of DISC
If you would use other shaped DISC(Heart Shape or Card Type) than normal round type, it may come
out by itself because of High-Speed rotation. It may cause the injury.

ÉCOUTER LES CHANSONS EN MODE FONCTION (Fonction LECTURE)
FONCTIONS USB & SD/MMC
Recording copyright material without permission of the copyright owners is usually an infringement. If you wish to re-record copyright material, permission from the copyright owner is necessary. OHAYO does not approve of, and cannot be held responsible for, any unlawful of this machine.
Automatic Level Control (ALC) recording
The ALC circuit adjusts the recording input level automatically. No adjustments are required.
A cassette with the erase guard tabs removed cannot be erased or used for recording and the REC button cannot be depressed. To record or erase a protect cassette, cover the tab openings with adhesive taps (3).

Clean the outside of the unit with a clean soft cloth, moistened with lukewarm water. Do not use solvents such as benzene or thinner. These will permanently damage the units finish.
Cleaning the CD player lens
The lens should never be touched. If dust is on t camera he leans, blow it off using a lens blower. (Please consult your dealer.)

If trouble occurs...
To avoid the harzard of electric shock and damage to the unit, have the unit bench tested by an authorized OHAYO service station. Do not remove the unit from its cabinet to attempt repairs yourself.
Warning
- Do not block the ventilation hole.
- Do not expose to rain or moisture.
Cleaning the tape heads
When dust or reddish-brown oxide builds up on the tape deck heads, pinch roller and capstan, the following problems may result:
Poor sound quality during playback
Distorted, poor quality recordings
Erratic tape speed during recording or playback
To ensure playback and recording with good quality sound, use a cleaning tape (available from your local audio dealer) to clean the head block of the deck after about every 10 hours of use.
OR
- Open the cassette compartment lid by pressing (STOP/EJECT).
- Press REC while pushing in the lever as Illustration.
- Moisten a cotton swab (1) with isopropyl alcohol or special head cleaning fluid. Gently rub the face of each head (2,3) with alcohol.
Also clean the capstan (5) and pinch roller (4).

SPECIFICATIONS
(Cassette Section)
Recording system : AC bias, 4 track stereo
Erasing system :Magnet erase
Tape Speed : 4.75 cm/sec.
Fast forward and
rewind time :Approx 170 sec.(C-60 tape)
Frequency response: 80-10,000Hz (normal tape)
(CD Section)
Channels : 2 channels
S/N ratio 70 dB
Wow & Flutter : Undetectable
Sampling frequency: 44.1 kHz
Quantization : 16 bits linear/ch
Pick up light source : Semi-conductor laser
Pick up wave length : 790nm
Laser output : Continuous wave max. 0.6mW
(Radio Section)
Tuning ranges : FM : 88-108MHz
Aerials : telescopic rod aerials
(General)
Power output : 1.2W x 2 (CH)
Speaker : 92mm x 2 (8 ohms)
Terminals - Output : Headphones
Power source : AC:230V/50Hz
DC: 12V (8 x "C" size batteries)
Dimensions : 290 × 160 × 250 ~mm (W) x (H) x (D)
weight (approx) : 2.4kg (excluding batteries)
- Specifications subject to change without notice.
MARQUANT
GEBRUIKSAANWIJZING
MPR-89
WARNING
TO REDUCE THE RISK OF FIRE OR ELECTRIC SHOCK, DO NOT EXPOSE THIS APPLIANCE TO RAIN OR MOISTURE.
CAUTION
Use of controls or adjustments or performance of procedures other than those specified herein may result in hazardous radiation exposure.
This Compact Disc player is classified as CLASS 1 LASER product.
CAUTION!
Invisible laser radiation when open and interlocks defeated. Avoid exposure to beam.

Covers - Do not remove any fixed covers as this may expose dangerous voltages.
Weather - It is advisable to unplug an external aerial during a thunderstorm.
Ventilation - The ventilation holes on the casing prevent your product from over heating. Do not block or cover these holes, especially with cloth or paper. It is recommended you eave a 10cm gap all around the unit.
Damage - Never use the product if it is damaged in any way. Always place the unit on a flat level surface avoiding anywhere which may be subject to strong vibration.
Batteries - Batteries are easily swallowed by young children. Do not allow young children to play with the unit or remote control. Dispose of used batteries in an environmentally friendly manner.
Temperature - Avoid extremes of temperature, either hot or cold, place your product well away from heat sources such as radiators or gas/electric fires. Don't use this apparatus in tropical climates.
Moisture - Do not allow your product to be exposed to rain, moisture or dust. If any liquid is spilt into this product it can cause serious damage. If you spill any liquid switch the unit off at the mains immediately. Contact your store immediately.
Accessibility - ensure that the mains plug is easily accessible.
Naked Flames - naked flames such as candles and night lights should not be placed on or near the unit.
USB Storage Device Data Protection
- Always insert the USB device in the correct direction. Failure to do so may result in damage to the USB device and this product.
- Do not remove the USB device whilst it is being accessed.
- Electrical interference and electrostatic discharges may cause the USB device to malfunction and suffer damage, resulting in data loss.
It is strongly recommended that any important data is backed up on a PC to protect against corruption, data loss or device malfunction. Please note that our company shall not accept any liability for damage or loss of stored data.
- The apparatus shall not be exposed to dripping or splashing.
Do not install the equipment in a confined spaces, such as a book case or built-in cabinet.
THIS UNIT SHOULD NOT BE ADJUSTED OR REPAIRED BY ANYONE EXCEPT PROPERLY QUALIFIED SERVICE PERSONNEL.
VOEDING
Please make sure to use Disc with the MARKS stated at Left Side or Disc which are qualified JIS Standard.
We are unable to Guarantee the Sound Reproduction against Copy Controlled CD, or other strange shaped CD which are out of CD Disc Standard.
Caution
CD-R/RW Disc
This unit can play-back the CD-R/CD-RW Disc which were recorded with CD-DA Format ^() . However, depend on the condition of Recorder which were used for Disc and Recording, there might be possible not to play-back. (^) CD-DA stands for "Compact Disc Digital Audio", and is the standard for Music Recording with General Audio CD.Please refrain from putting the CD-R/RW Disc which are no data recorded. This is because that It might take a long time to read Disc, then it might be damaged, when you want to take out the Disc with error while its rotation.
VCD(Video CD) can not be played back with this Unit too.
How to handle & Keep DISC
About taking-Out DISC from Case and how to put CH into Case.
To Take-out
Hold the Holder Center,
with avoiding to touch the surface where the songs are recorded, then take out DISC.
To Insert
Make sure that the surface printed is upside,
and insert DISC by pressing the center portion of DISC.
Please refrain from Putting the Paper on Sheel on DISC.
- Please refrain from Bending DISC.
About Keeping DISC
Make sure to keep DISCs in the exclusive Case.
- Please refrain from Putting DISCs at those places.
Direct Sun Beam
Near place to the Heating Equipments on the place with High Temperature.
About the maintenance of DISC
Before playing-back DISC, please clean DISC from the center to outside, and shape off the Dust, or Finger Print sticked on the surface for Play Back with the soft cloth.
- Please refrain from Using thinner, benzene or Alcohol for Cleaning.
Please refrain from using other than round type of DISC
If you would use other shaped DISC(Heart Shape or Card Type) than normal round type, it may come
out by itself because of High-Speed rotation. It may cause the injury.

Recording copyright material without permission of the copyright owners is usually an infringement. If you wish to re-record copyright material, permission from the copyright owner is necessary. OHAYO does not approve of, and cannot be held responsible for, any unlawful of this machine.
Automatic Level Control (ALC) recording
The ALC circuit adjusts the recording input level automatically. No adjustments are required.
A cassette with the erase guard tabs removed cannot be erased or used for recording and the REC button cannot be depressed. To record or erase a protect cassette, cover the tab openings with adhesive taps (3).
Clean the outside of the unit with a clean soft cloth, moistened with lukewarm water. Do not use solvents such as benzene or thinner. These will permanently damage the units finish.
Cleaning the CD player lens
The lens should never be touched. If dust is on t camera he leans, blow it off using a lens blower. (Please consult your dealer.)
If trouble occurs...
To avoid the harzard of electric shock and damage to the unit, have the unit bench tested by an authorized OHAYO service station. Do not remove the unit from its cabinet to attempt repairs yourself.
Warning
- Do not block the ventilation hole.
- Do not expose to rain or moisture.
Cleaning the tape heads
When dust or reddish-brown oxide builds up on the tape deck heads, pinch roller and capstan, the following problems may result:
Poor sound quality during playback
Distorted, poor quality recordings
Erratic tape speed during recording or playback
To ensure playback and recording with good quality sound, use a cleaning tape (available from your local audio dealer) to clean the head block of the deck after about every 10 hours of use.
OR
- Open the cassette compartment lid by pressing (STOP/EJECT).
- Press REC while pushing in the lever as Illustration.
- Moisten a cotton swab (1) with isopropyl alcohol or special head cleaning fluid. Gently rub the face of each head (2,3) with alcohol.
Also clean the capstan (5) and pinch roller (4).

SPECIFICATIONS
(Cassette Section)
Recording system : AC bias, 4 track stereo
Erasing system :Magnet erase
Tape Speed : 4.75 cm/sec.
Fast forward and
rewind time :Approx 170 sec.(C-60 tape)
Frequency response: 80-10,000Hz (normal tape)
(CD Section)
Channels : 2 channels
S/N ratio 70 dB
Wow & Flutter : Undetectable
Sampling frequency: 44.1 kHz
Quantization : 16 bits linear/ch
Pick up light source : Semi-conductor laser
Pick up wave length : 790nm
Laser output : Continuous wave max. 0.6mW
(Radio Section)
Tuning ranges : FM : 88-108MHz
Aerials : telescopic rod aerials
(General)
Power output : 1.2W x 2 (CH)
Speaker : 92mm x 2 (8 ohms)
Terminals - Output : Headphones
Power source : AC:230V/50Hz
DC: 12V (8 x "C" size batteries)
Dimensions : 290 × 160 × 250 ~mm (W) x (H) x (D)
weight (approx) : 2.4kg (excluding batteries)

- CAUTION
- CAUTION!
- USB Storage Device Data Protection
- THIS UNIT SHOULD NOT BE ADJUSTED OR REPAIRED BY ANYONE EXCEPT PROPERLY QUALIFIED SERVICE PERSONNEL.
- POWER SUPPLY
- AC power operation
- CAUTION:
- Battery power operation
- CONTROLS
- INFORMATION ABOUT COMMON OPERATION
- Volume Adjustment
- To Hear with the Phone
- When you stop Listening(Switch off)
- Listen to CD
- Usual Play Back
- The Pause of Play Back
- To start from the Song which you like to listen to.
- Our Request
- F.Forward, F.Rewind(Search)
- To Repeat the PLAY-BACK (Repeat-Play Back)
- CD-R/RW Disc
- Listen to your Favorite Song (Programme Play-Back)
- Press the [MEM] button in stop mode.
- Press [MEM] Button
- Notice
- Our Requests
- To Take-out
- To Insert
- About Keeping DISC
- About the maintenance of DISC
- To Cancell the Programe Play-Back Mode
- About Programme
- Please refrain from using other than round type of DISC
- TO LISTEN TO THE SONGS FUNCTION (Function PLAY-BACK)
- CHANGE THE SOUND QUALITY
- Press the [EQ]Button.
- To Listen to the RADIO
- To Memorize the Channel
- To Listen to the Tape
- PAUSE
- Fast Forward, Rewind
- RECORDING
- Recording from the built-in radio
- WARNING
- Automatic Level Control (ALC) recording
- ① Press STOP/EJECT. Insert cassette.
- ② TO RADIO
- Press REC.
- MAINTENANCE
- Cleaning the unit
- Cleaning the CD player lens
- If trouble occurs...
- Cleaning the tape heads
- OR
- SPECIFICATIONS
- (Cassette Section)
- (CD Section)
- (Radio Section)
- (General)
- MARQUANT
- MODE D'EMPLOI
- ALIMENTATION
- How to handle & Keep DISC
- Annuler le mode de Lecture programme
- ÉCOUTER LES CHANSONS EN MODE FONCTION (Fonction LECTURE)
- FONCTIONS USB & SD/MMC
- GEBRUIKSAANWIJZING
- VOEDING
Brand : Marquant
Model : MPR89
Category : Radio