SPF-71E PINK - Digital photo frame SAMSUNG - Free user manual and instructions
Find the device manual for free SPF-71E PINK SAMSUNG in PDF.
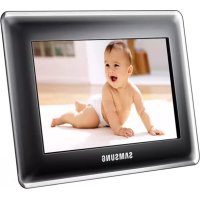
| Product type | Digital photo frame |
| Brand | Samsung |
| Model | SPF-71E |
| Color | Pink |
| Screen size | 7 inches (17 cm) |
| Screen resolution | 480 x 234 pixels |
| Screen type | Analog TFT |
| Internal memory | 120 MB |
| Supported photo formats | JPEG (except Progressive JPEG and CMYK JPEG) |
| Connectivity | USB host port (storage devices), USB device port (PC), flash memory card slot |
| Main functions | Slideshow, clock, screen saver, firmware update, photo copying |
| Power supply | External power adapter 12V, 2A, 24W |
| Power consumption | Less than 7W in normal mode, less than 1W in standby |
| Dimensions (L x D x H) | 217.5 x 156.5 x 43 mm |
| Weight | 496.3 g |
| Care and cleaning | Unplug and wipe with a soft, dry cloth. Do not use chemicals |
| Safety | Do not expose to water, do not block ventilation openings, do not insert metal objects |
| Repairability | Contact an authorized service center for any repairs |
| Spare parts | Power adapter, USB cable, user manual |
| General information | Product registration at www.samsung.com/global/register |
Frequently Asked Questions - SPF-71E PINK SAMSUNG
User questions about SPF-71E PINK SAMSUNG
0 question about this device. Answer the ones you know or ask your own.
Ask a new question about this device
Download the instructions for your Digital photo frame in PDF format for free! Find your manual SPF-71E PINK - SAMSUNG and take your electronic device back in hand. On this page are published all the documents necessary for the use of your device. SPF-71E PINK by SAMSUNG.
USER MANUAL SPF-71E PINK SAMSUNG
Thank you for purchasing this Samsung product. To receive more complete service, please register your product at www.samsung.com/global/register
Model ____ Serial No. ____
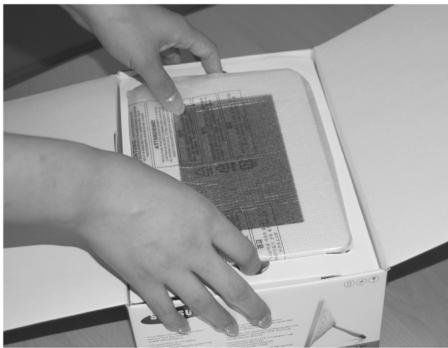
Please check all items are contained in your delivered package.

User manual

Warranty Card
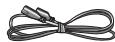
Power Code

Power Adapter
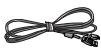
USB cable
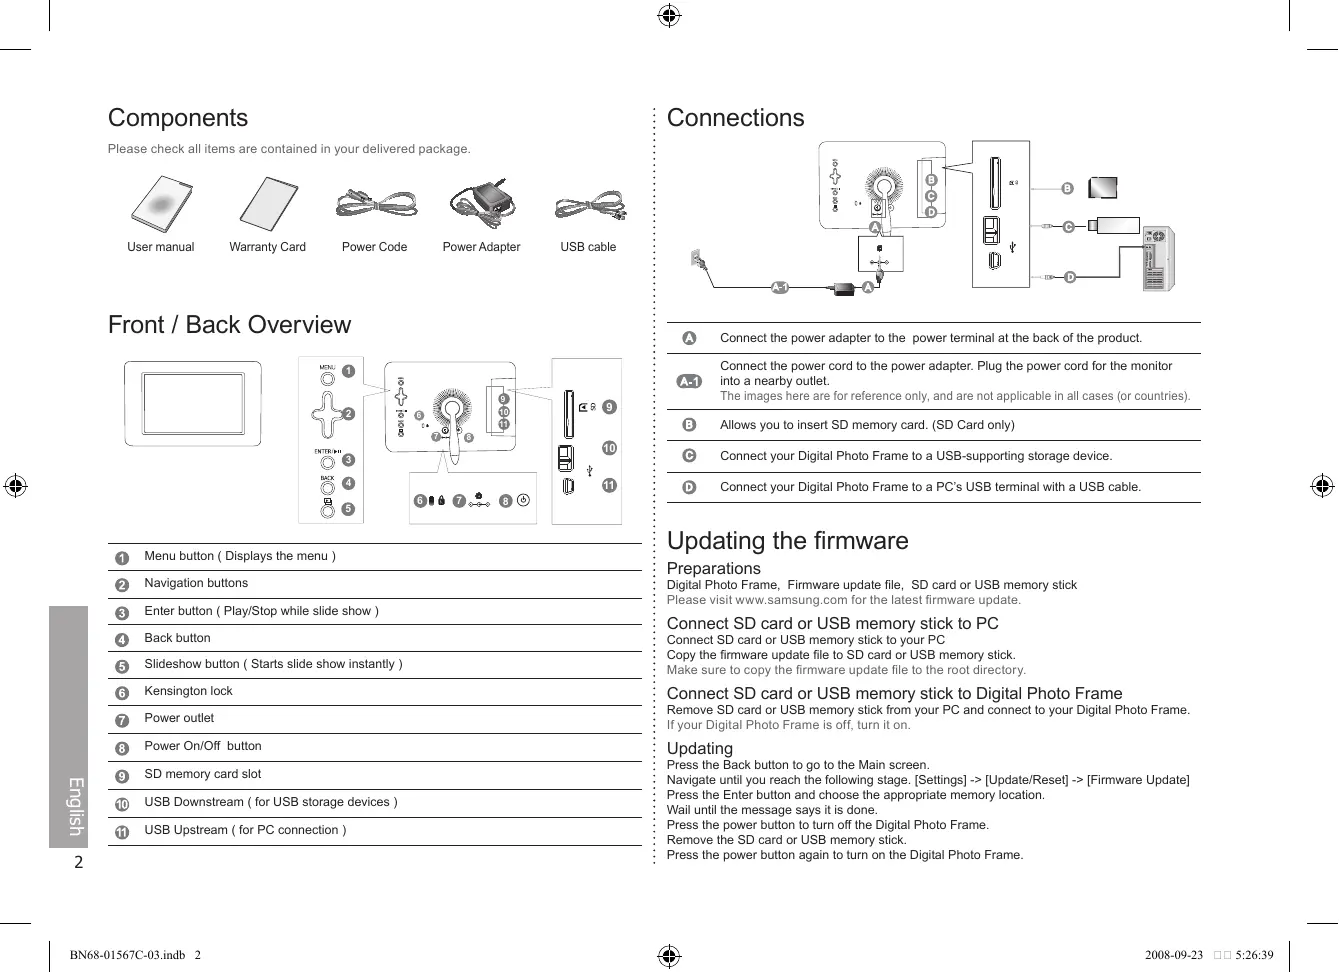
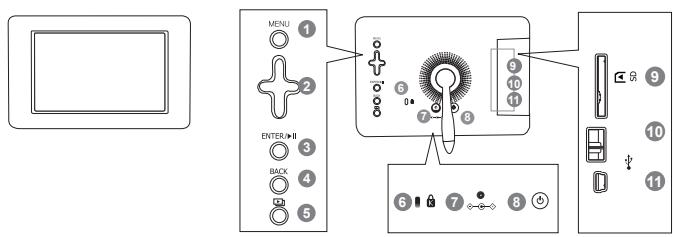
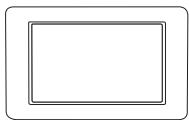
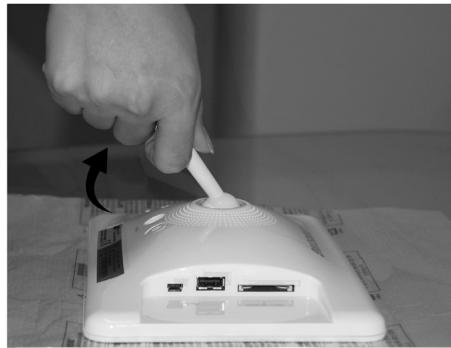
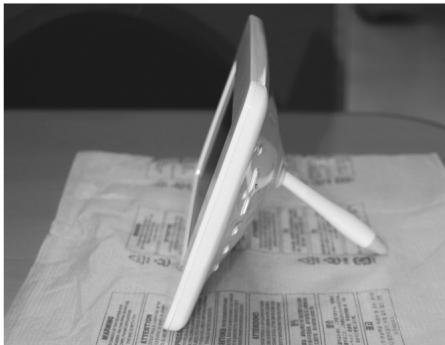
Front / Back Overview
text_image
MENU 1 2 3 4 5 ENTER >>II BACK 6 7 8 9 10 11 6 7 8 9 10 111 Menu button ( Displays the menu )
② Navigation buttons
3 Enter button ( Play/Stop while slide show )
4 Back button
⑤ Slideshow button ( Starts slide show instantly )
6 Kensington lock
7 Power outlet
8 Power On/Off button
9 SD memory card slot
10 USB Downstream ( for USB storage devices )
11 USB Upstream ( for PC connection )
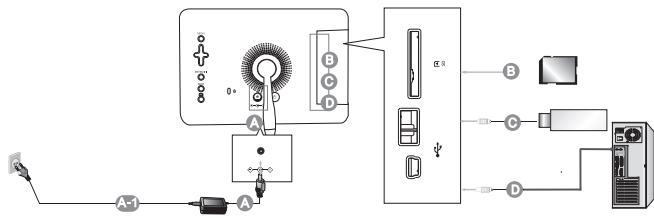
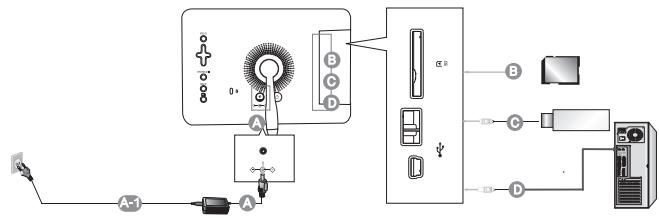
Connections
text_image
Diagram showing connections between a device, cable, and server with labeled components A, B, C, D, and connection points.A Connect the power adapter to the power terminal at the back of the product.
Connect the power cord to the power adapter. Plug the power cord for the monitor into a nearby outlet.
The images here are for reference only, and are not applicable in all cases (or countries).
B Allows you to insert SD memory card. (SD Card only)
© Connect your Digital Photo Frame to a USB-supporting storage device.
Connect your Digital Photo Frame to a PC's USB terminal with a USB cable.
Updating the firmware
Preparations
Digital Photo Frame, Firmware update file, SD card or USB memory stick
Please visit www.samsung.com for the latest firmware update.
Connect SD card or USB memory stick to PC
Connect SD card or USB memory stick to your PC
Copy the firmware update file to SD card or USB memory stick.
Make sure to copy the firmware update file to the root directory.
Connect SD card or USB memory stick to Digital Photo Frame
Remove SD card or USB memory stick from your PC and connect to your Digital Photo Frame. If your Digital Photo Frame is off, turn it on.
Updating
Press the Back button to go to the Main screen.
Navigate until you reach the following stage. [Settings] -> [Update/Reset] -> [Firmware Update]
Press the Enter button and choose the appropriate memory location.
Wail until the message says it is done.
Press the power button to turn off the Digital Photo Frame.
Remove the SD card or USB memory stick.
Press the power button again to turn on the Digital Photo Frame.
Operations
If no button is operated for ten minutes, the screensaver starts to protect the monitor. However, the screensaver does not start in the slideshow status.
| Direct Functions | |
| MENU | Enters or exits a menu. |
| Navigation buttons | Moves around the items and adjusts a value. |
| Selects a function you want to use. | |
| Returns to the previous screen.Hold down this button for two seconds to return to the Main screen. | |
| Starts a slideshow.When playing a slideshow by pressing the [→] button, the photos in the location of the last played photo are played. If the photos in the location of the last played photo have been removed, they are automatically searched for and then played in a slideshow. | |
| Photo | |
If you press the Menu button, the menu of the selected item is displayed on the screen.
| When selecting a folder | Open, Copy, Delete |
| When selecting a thumbnail | Start Slideshow, Copy, Copy All files, Delete, Delete All files, Set as background |
| When copying a photo from external memory (SD, USB memory) to internal memory and the following option (Settings -> Options -> Frame Memory Copy -> Resized) is activated, the screen quality size is reduced automatically before copying. This provides the resized photo to be displayed ideally in the screen. But the EXIF (camera related information) is removed when this option is used.So please make sure that resized photo is used only in the Digital Photo Frame.It may take a long time if many files are copied at a time. | |
| Slide Show | Stop Slideshow, Slide Show Settings, Brightness, Rotate, Zoom, Aspect Ratio, Delete, Set as Background |
| Only photos with a resolution of less than 8000 (width) * 8000 (height) pixels can be displayed on the screen. | |
| Clock | |
| Date and Time, Time Format, Date Format, Clock Type | |
| Settings | |
| If you press the Menu button, the menu of the selected item is displayed on the screen. | |
| Options | Language, Brightness, Direct Slideshow, Auto Fit Portrait Photo, Frame Memory Copy |
| Preference | Starting Mode, Screen Saver, Home Background, Auto Picture On/Off |
| Update/Reset | Firmware Update, Reset Settings, Product Information |
Troubleshooting
| Symptoms | Causes and Actions |
| I have connected an external storage device but it is not recognized. | Check the connection between product and external storage. Connect to PC and check the operation state. |
| It takes time to display the next photo. | When the resolution is high or the file size is large, it takes some time to display on the screen. |
Specifications
| Items | Specifications | |
| Model Name | SPF-71E | |
| Panel | Type | 7" (17cm) TFT (Analog) |
| Resolution | 480 x 234 | |
| Supported Formats | JPEG (Progressive,CMYK JPEG is not supported.) | |
| Built-in Memory | 120 MB | |
| Power | Rating | External DC power adapter (12 V, 2 A, 24 W) |
| Consumption | Normal mode : under 7 WPower off mode : under 1 W | |
| General | Dimensions (WxHxD) | 217.5 x 156.5 x 43 mm |
| Weight | 496.3 g | |
| The product design may differ according to the model, and specifications are subject to change without prior notice for product performance enhancement. | ||
Warning! Important Safety Instructions
(Please read the appropriate section that corresponds to the marking on your Samsung product before attempting to install the product.)
CAUTION
RISK OF ELECTRIC SHOCK DO NOT OPEN
CAUTION: TO REDUCE THE RISK OF ELECTRIC SHOCK, DO NOT REMOVE COVER (OR BACK). THERE ARE NO USER SERVICEABLE PARTS INSIDE. REFER ALL SERVICING TO QUALIFIED PERSONNEL.

This symbol indicates that high voltage is present inside. It is dangerous to make any kind of contact with any internal part of this product.

This symbol alerts you that important literature concerning operation and maintenance has been included with this product.
- The slots and openings in the cabinet and in the back or bottom are provided for necessary ventilation. To ensure reliable operation of this apparatus, and to protect it from overheating, these slots and openings must never be blocked or covered.
- Do not cover the slots and openings with a cloth or other materials.
- Do not block the slots and openings by placing this apparatus on a bed, sofa, rug or other similar surface.
- Do not place this apparatus in a confined space, such as a bookcase, or built-in cabinet, unless proper ventilation is provided.
- Do not place this apparatus near or over a radiator or heat resistor, or where it is exposed to direct sunlight.
- Do not place a water containing vessel(vases etc.) on this apparatus, as this can result in a risk of fire or electric shock.
- Do not expose this apparatus to rain or place it near water(near a bathtub, washbowl, kitchen sink, or laundry tub, in a wet basement, or near a swimming pool etc.). If this apparatus accidentally gets wet, unplug it and contact an authorized dealer immediately. Make sure to pull out the power cord from the outlet before cleaning.
- Do not overload wall outlets, extension cords or adaptors beyond their capacity, since this can result in fire or electric shock.
- Power-supply cords should be routed so that they are not likely to be walked on or pinched by items placed upon or against them, paying particular attention to cords at plug end, adaptors and the point where they exit from the appliance.
- To protect this apparatus from a lightning storm, or when it is left unattended and unused for long periods of time, unplug it from the wall outlet and disconnect the antenna or cable system. This will prevent damage to the set due to lightning and power line surges.
- Before connecting the AC power cord to the DC adaptor outlet, make sure the voltage designation of the DC adaptor corresponds to the local electrical supply.
- Never insert anything metallic into the open parts of this apparatus. Doing so many create a danger of electric shock.
-
To avoid electric shock, never touch the inside of this apparatus. Only a qualified technician should open this apparatus.
-
Make sure to plug the power cord in until it is firmly inserted. When removing the power cord, make sure to hold the power plug when pulling the plug from the outlet. Do not touch the power cord with wet hands.
- If this apparatus does not operate normally - in particular, if there are any unusual sounds or smells coming from it
- unplug it immediately and contact an authorized dealer or service center.
- Be sure to contact an authorized service center, when installing your set in a location with heavy dust, high or low temperatures, high humidity, chemical substances and where it operates for 24 hours such as the airport, the train station etc. Failure to do so may cause serious damage to your set.
- Use only a properly grounded plug and receptacle.
- An improper ground may cause electric shock or equipment damage. (Class 1 Equipment only.)
- To disconnect the apparatus from the mains, the plug must be pulled out from the mains socket, therefore the mains plug shall be readily operable.
- Do not allow children to hang onto the product.
- Store the accessories (battery, etc.) in a location safely out of the reach of children.
- Do not install the product in an unstable location such as a shaky self, a slanted floor or a location exposed to vibration.
- Do not drop or impart any shock to the product. If the product is damaged, disconnect the power cord and contact a service center.
- Unplug the power cord from the power outlet and wipe the product using a soft, dry cloth. Do not use any chemicals such as wax, benzene, alcohol, thinners, insecticide, air freshener, lubricant or detergent. This may damage the appearance or erase the printing on the product.
- Apparatus shall not be exposed to dripping or splashing.
- WARNING - TO PREVENT THE SPREAD OF FIRE, KEEP CANDLES OR OTHER OPEN FLAMES AWAY FROM THIS PRODUCT AT ALL TIMES.


Komponenter
Kontroller, at alle elementer findes i produktets emballage.

Brugervejledning

Garantikort
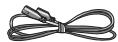
Strømkabel

Strømadapter
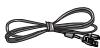
USB-kabel
Set forfra/bagfra

text_image
MENU 1 2 3 4 5 ENTER/HI 6 7 8 9 10 11 12 13 14 15 16 17 18 19 20 21 22 23 24 25 26 27 28 29 30 31 32 33 34 35 36 37 38 39 40 41 42 43 44 45 46 47 48 49 501 Menu-knap (viser menuen)
② Navigationsknapper
3 Enter-knap (afspil/stop under diasshow)
4 Back-knap
5 Diasshow-knap (starter diasshow med det samme)
6 Kensington-lås
7 Strømstik
8 Tænd/sluk-knap
9 Åbning til SD-hukommelseskort
10 USB-downstream (til USB-lagringsenheder)
11 USB-upstream (til pc-tilslutning)
Tilslutninger
text_image
Diagram showing connections between a device, audio jack, and computer interface with labeled ports A, B, C, D and connection points A-1, A.A Tilslut strømadapteren til strømstikket på bagsiden af produktet.

| Ved valg af en mappe | Open, Copy, Delete |
| Ved valg af en miniature | Start Slideshow, Copy, Copy All files, Delete, Delete All files, Set as background |
| Slide Show | Stop Slideshow, Slide Show Settings, Brightness, Rotate, Zoom, Aspect Ratio, Delete, Set as Background |
Date and Time, Time Format, Date Format, Clock Type
| Options | Language, Brightness, Direct Slideshow, Auto Fit Portrait Photo, Frame Memory Copy |
| Preference | Starting Mode, Screen Saver, Home Background, Auto Picture On/Off |
| Update/Reset | Firmware Update, Reset Settings, Product Information |
Fejlfinding
text_image
Diagram showing device connections and labeled components including audio, display, and network equipmenttext_image
Diagram showing connections between a device, audio equipment, and computer interface with labeled ports A, B, C, D and connection points A-1, A.If you press the Menu button, the menu of the selected item is displayed on the screen.
RISQUE D'ELECTROCUTION NE PAS OUVRIR
natural_image
Simple geometric diagram with two concentric rectangles (no text or symbols)
text_image
MENU 1 2 ENTER >II 3 BACK 4 5 6 7 8 9 10 11 ⑤ ⑥ ⑦ ⑧ ⑨ ⑩ ⑪text_image
Diagram showing connections between a device, audio jack, and computer interface with labeled ports A, B, C, D and ports A-1, B, C, D.| Options | Language, Brightness, Direct Slideshow, Auto Fit Portrait Photo, Frame Memory Copy |
| Preference | Starting Mode, Screen Saver, Home Background, Auto Picture On/Off |
| Update/Reset | Firmware Update, Reset Settings, Product Information |
text_image
Diagram showing connections between a device, audio jack, and computer interface with labeled ports A, B, C, D and connection points A-1, A.RISQUE D'ELECTROCUTION NE PAS OUVRIR
ATTENTION : POUR REDUIRE LES RISQUES D'ELECTROCUTION, NE RETIREZ PAS LE CAPOT (NI LE PANNEAU ARRIERE). A L'INTERIEUR DE L'APPAREIL, AUCUNE PIECE NE PEUT ETRE REPAREE PAR L'UTILISATEUR. POUR TOUT DEPANNAGE, ADRESSEZ-VOUS A UN SPECIALISTE.

text_image
Diagram showing connections between a device, cable, and server with labeled components A, B, C, D, and connection points.natural_image
Simple geometric diagram with two nested rectangles (no text or symbols)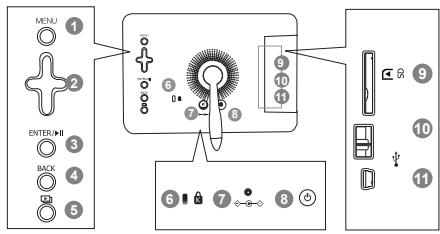
text_image
MENU 1 2 ENTER/MI 3 BACK 4 5 6 7 8 9 10 11 12 13 14 15 16 17 18 19 20 21 22 23 24 25 26 27 28 29 30 31 32 33 34 35 36 37 38 39 40 41 42 43 44 45 46 47 48 49 50text_image
Diagram showing connections between a device, audio jack, and computer interface with labeled ports A, B, C, D and connection points A-1, A.text_image
Diagram showing connections between a device, cable, and server with labeled components A, B, C, D, and connection points.text_image
Diagram showing connections between a device, audio jack, and computer interface with labeled ports A, B, C, D and connection points A-1, A.text_image
Diagram showing connections between a device, cable, and server with labeled components A, B, C, D, and connection points.text_image
Diagram showing audio device connections with labeled ports A, B, C, D and audio equipmentnatural_image
Simple geometric diagram with two concentric rectangles (no text or symbols)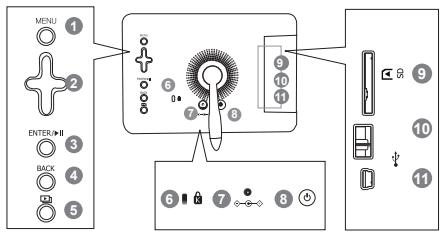
text_image
MENU 1 2 ENTER >II 3 BACK 4 5 6 7 8 9 10 11 ⑤ ⑥ ⑦ ⑧ ⑨ ⑩ ⑪text_image
Diagram showing connections between a device, cable, and server with labeled components A, B, C, D, and connection points.text_image
Diagram showing connections between a device, audio jack, and computer interface with labeled ports A, B, C, D and connection points A-1, A.text_image
Diagram showing connections between a device, cable, and server with labeled components A, B, C, D, and connection points.text_image
Diagram showing connections between a device, audio jack, and computer interface with labeled ports A-D and B-Cnatural_image
Simple geometric diagram with two concentric rectangles (no text or symbols)
text_image
MENU 1 2 ENTER/MI 3 BACK 4 5 6 7 8 9 10 11 12 13 14 15 16 17 18 19 20 21 22 23 24 25 26 27 28 29 30 31 32 33 34 35 36 37 38 39 40 41 42 43 44 45 46 47 48 49 50text_image
Diagram showing device connections with labeled ports A, B, C, D and a central switch labeled 0*A 將電源變壓器連接至產品背面的端子。
| Options | Language, Brightness, Direct Slideshow, Auto Fit Portrait Photo, Frame Memory Copy |
| Preference | Starting Mode, Screen Saver, Home Background, Auto Picture On/Off |
| Update/Reset | Firmware Update, Reset Settings, Product Information |
疑難排解
natural_image
Simple geometric diagram with two concentric rectangles (no text or symbols)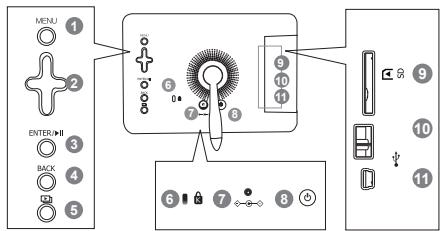
text_image
MENU 1 2 3 4 5 ENTER/MI BACK 6 7 8 9 10 11 12 13 14 15 16 17 18 19 20 21 22 23 24 25 26 27 28 29 30 31 32 33 34 35 36 37 38 39 40 41 42 43 44 45 46 47 48 49 50text_image
Diagram showing connections between a device, ports, and a server with labeled componentsnatural_image
Simple geometric diagram with two concentric rectangles (no text or symbols)
text_image
MENU 1 2 3 4 5 ENTER >II BACK 6 7 8 9 10 11 12 13 14 15 16 17 18 19 20 21 22 23 24 25 26 27 28 29 30 31 32 33 34 35 36 37 38 39 40 41 42 43 44 45 46 47 48 49 50text_image
Diagram showing connections between a device, cable, and server with labeled components A, B, C, D, and connection points.Regulatory Compliance Statements
Your Samsung product is marked to indicate its compliance class
- Federal Communications Commission (FCC) - USA
- Industry Canada Equipment Standard for Digital Equipment (ICES-003) - Canada
- Voluntary Control Council for Interference (VCCI) - Japan
- Bureau of Standards Metrology and Inspection (BSMI) - Taiwan
- Ministry of Information and Communication (MIC) - Republic of Korea
- Italian Post Ministry (Homologation) - Italy
FCC Class B Notice
This device complies with part 15 of the FCC Rules. Operation is subject to the following two conditions:
- This device may not cause harmful interference, and
- This device must accept any interference received, including interference that may cause undesired operation.
NOTE:
This equipment has been tested and found to comply with the limits for a Class B digital device, pursuant to Part 15 of the FCC Rules. These limits are designed to provide reasonable protection against harmful interference in a residential installation. This equipment generates, uses and can radiate radio frequency energy and, if not installed and used in accordance with the instructions, may cause harmful interference to radio communications. However, there is no guarantee that interference will not occur in a particular installation. If this equipment does cause harmful interference to radio or television reception, which can be determined by turning the equipment off and on, the user is encouraged to try to correct the interference by one or more of the following measures:
-- Reorient or relocate the receiving antenna.
-- Increase the separation between the equipment and receiver.
-- Connect the equipment into an outlet on a circuit different from that to which the receiver is connected.
-- Consult the dealer or an experienced radio/TV technician for help.
User Information
Changes or modifications not expressly approved by the party responsible for compliance could void the user's authority to operate the equipment. If necessary, consult with your dealer or an experienced radio/television technician for additiona suggestions. You may find the booklet called How to Identify and Resolve Radio/TV Interference Problems helpful.
This booklet was prepared by the Federal Communications Commission. It is available from the U.S. Government Printing Office.
Washington, DC 20402, Stock Number 004-000-00345-4.
The party responsible for product compliance:
SAMSUNG ELECTRONICS CO., LTD.
America QA Lab of Samsung
3351 Michelson Drive
Suite #290, Irvine, CA92612 USA
Warning
User must use shielded signal interface cables to maintain FCC compliance for the product.
Provided with this monitor is a detachable power supply cord with IEC320 style terminations.
It may be suitable for connection to any UL Listed personal computer with similar configuration.
Before making the connection, make sure the voltage rating of the computer convenience outlet is the same as the monitor and that the ampere rating of the computer convenience outlet is equal or exceeds the monitor voltage rating.
For 120 Volt applications, use only UL Listed detachable power cord with NEMA configuration 5-15P type(parallel blades) plug cap. For 240 Volt applications use only UL Listed detachable power supply cord with NEMA configuration 6-15P type (tandem blades) plug cap.
This television receiver provides display of television closed captioning in accordance with Section 15.119 of the FCC rules.
(TV broadcast receivers with picture screens 13 inches or larger in diameter models only)

ICES-003 Class B Notice - Avis NMB-003, Classe B
This Class B digital apparatus complies with Canadian ICES-003.
European Notice(Europe Only)
Products with the CE marking comply with the EMC Directive(89/336/EEC), (92/31/EEC),(93/68/EEC) and the Low Voltage Directive(73/23/EEC) issued by the Commission of the European Community.
Compliance with these directives implies conformity to the following European Norms:
- EN55022: Radio Frequency Interference
- EN55024: Electromagnetic Immunity of Information Technology Equipment
- EN61000-3-2: Power Line Harmonics
- EN61000-3-3: Voltage Fluctuations
- EN55013: Radio disturbance characteristics of broadcast receivers and associated equipments
- EN55020: Electromagnetic immunity of broadcast receivers and associated equipments
Wiring the Mains Power Supply Plug(UK Only)
IMPORTANT NOTICE
The mains lead on this equipment is supplied with a moulded plug incorporating a fuse. The value of the fuse is indicated on the pin face of the plug and, if it requires replacing, a fuse approved to BSI1362 of the same rating must be used.
Never use the plug with the fuse cover omitted if the cover is detachable. If a replacement fuse cover is required, it must be of the same colour as the pin face of the plug. Replacement covers are available from your dealer.
If the fitted plug is not suitable for the power points in your house or the cable is not long enough to
reach a power point, you should obtain a suitable safety approved extension lead or consult your dealer for assistance. However, if there is no alternative but to cut off the plug, remove the fuse and then safely dispose of the plug.
Do NOT connect the plug to a mains socket as there is a risk of shock hazard from the bared flexible cord.
IMPORTANT
The wires in the mains lead are coloured in accordance with the following code: BLUE - NEUTRAL BROWN - LIVE
As these colours may not correspond to the coloured markings identifying the terminals in your plug, proceed as follows :
The wire coloured BLUE must be connected to the terminal marked with the letter N or coloured BLUE or BLACK. The wire coloured BROWN must be connected to the terminal marked with the letter L or coloured BROWN or RED.
WARNING:
DO NOT CONNECT EITHER WIRE TO THE EARTH TERMINAL, WHICH IS MARKED WITH THE LETTER E OR BY THE EARTH SYMBOL ⏻, OR COLOURED GREEN OR GREEN AND YELLOW.
Russia Only - PCT Notice

AE95
Service Centers
| North America | ||
| U.S.A | 1-800-SAMSUNG(726-7864) | http://www.samsung.com/us |
| CANADA | 1-800-SAMSUNG(726-7864) | http://www.samsung.com/ca |
| MEXICO | 01-800-SAMSUNG(726-7864) | http://www.samsung.com/mx |
| Latin America | ||
| ARGENTINE | 0800-333-3733 | http://www.samsung.com/ar |
| BRAZIL | 0800-124-421, 4004-0000 | http://www.samsung.com/br |
| CHILE | 800-SAMSUNG(726-7864) | http://www.samsung.com/cl |
| COLOMBIA | 01-8000112112 | http://www.samsung.com/co |
| COSTA RICA | 0-800-507-7267 | http://www.samsung.com/latin |
| ECUADOR | 1-800-10-7267 | http://www.samsung.com/latin |
| EL SALVADOR | 800-6225 | http://www.samsung.com/latin |
| GUATEMALA | 1-800-299-0013 | http://www.samsung.com/latin |
| HONDURAS | 800-7919267 | http://www.samsung.com/latin |
| JAMAICA | 1-800-234-7267 | http://www.samsung.com/latin |
| NICARAGUA | 00-1800-5077267 | http://www.samsung.com/latin |
| PANAMA | 800-7267 | http://www.samsung.com/latin |
| PUERTO RICO | 1-800-682-3180 | http://www.samsung.com/latin |
| REP. DOMINICA | 1-800-751-2676 | http://www.samsung.com/latin |
| TRINIDAD & TOBAGO | 1-800-SAMSUNG(726-7864) | http://www.samsung.com/latin |
| VENEZUELA | 0-800-100-5303 | http://www.samsung.com/latin |
| Europe | ||
| AUSTRIA | 0810 - SAMSUNG(7267864, € 0.07/min) | http://www.samsung.com/at |
| BELGIUM | 02 201 2418 | http://www.samsung.com/be |
| CZECH REPUBLIC | 800 - SAMSUNG(800-726786) | http://www.samsung.com/cz |
| Distributor pro Českou republiku:Samsung Zrt., Česká organizační složka, Oasis Florenc,Sokolovská394/17, 180 00, Praha 8 | ||
| DENMARK | 8 - SAMSUNG (7267864) | http://www.samsung.com/dk |
| EIRE | 0818 717 100 | http://www.samsung.com/ie |
| FINLAND | 30 - 6227 515 | http://www.samsung.com/fi |
| FRANCE | 3260 'dites' SAMSUNG (€ 0,15/Min)0825 08 65 65(€ 0.15/Min) | http://www.samsung.com/fr |
| GERMANY | 01805 - SAMSUNG(7267864, € 0.14/Min) | http://www.samsung.de |
| HUNGARY | 06-80-SAMSUNG(726-7864) | http://www.samsung.com/hu |
| ITALIA | 800 SAMSUNG (726-7864) | http://www.samsung.com/it |
| LUXEMBURG | 02 261 03 710 | http://www.samsung.com/lu |
| NETHERLANDS | 0900 - SAMSUNG(7267864, € 0.10/Min) | http://www.samsung.com/nl |
| NORWAY | 3 - SAMSUNG(7267864) | http://www.samsung.com/no |
| POLAND | 0 - 801 - 1SAMSUNG (172678)022 - 607 - 93 - 33 | http://www.samsung.com/pl |
| PORTUGAL | 808 20 - SAMSUNG(7267864) | http://www.samsung.com/pt |
| SLOVAKIA | 0800-SAMSUNG(726-7864) | http://www.samsung.com/sk |
| SPAIN | 902 - 1 - SAMSUNG(902 172 678) | http://www.samsung.com/es |
| SWEDEN | 075 - SAMSUNG(726 78 64) | http://www.samsung.com/se |
| SWITZERLAND | 0848 - SAMSUNG(7267864, CHF 0.08/min) | http://www.samsung.com/ch |
| U.K | 0845 SAMSUNG (7267864) | http://www.samsung.com/uk |
CIS
| ESTONIA | 800-7267 | http://www.samsung.ee/ |
| LATVIA | 8000-7267 | http://www.samsung.com/lv |
| LITHUANIA | 8-800-77777 | http://www.samsung.lt/ |
| KAZAKHSTAN | 8-10-800-500-55-500 | http://www.samsung.com/kz_ru |
| KYRGYZSTAN | 00-800-500-55-500 | |
| RUSSIA | 8-800-555-55-55 | http://www.samsung.ru |
| TADJIKISTAN | 8-10-800-500-55-500 | |
| UKRAINE | 8-800-502-0000 | http://www.samsung.ua |
| UZBEKISTAN | 8-10-800-500-55-500 | http://www.samsung.com/kz_ru |
Asia Pacific
| AUSTRALIA | 1300 362 603 | http://www.samsung.com/au |
| CHINA | 800-810-5858400-810-5858010-6475 1880 | http://www.samsung.com/cn |
| HONG KONG : 3698-4698 | http://www.samsung.com/hk | |
| INDIA | 3030 82821-800-3000-82821800 110011 | http://www.samsung.com/in |
| INDONESIA | 0800-112-8888 | http://www.samsung.com/id |
| JAPAN | 0120-327-527 | http://www.samsung.com/jp |
| MALAYSIA | 1800-88-9999 | http://www.samsung.com/my |
| NEW ZEALAND | 0800 SAMSUNG (0800 726 786) | http://www.samsung.com/nz |
| PHILIPPINES | 1800-10-SAMSUNG (726-7864) | http://www.samsung.com/ph |
| REPUBLIC OF KOREA | 1588-3366 | http://www.sec.co.kr |
| SINGAPORE | 1800-SAMSUNG (726-7864) | http://www.samsung.com/sg |
| THAILAND | 1800-29-3232, 02-689-3232 | http://www.samsung.com/th |
| TAIWAN | 0800-329-999 | http://www.samsung.com/tw |
| VIETNAM | 1 800 588 889 | http://www.samsung.com/vn |
Middle East & Africa
| SOUTH AFRICA | 0860-SAMSUNG(726-7864) | http://www.samsung.com/za |
| TURKEY | 444 77 11 | http://www.samsung.com/tr |
| U.A.E | 800-SAMSUNG(726-7864)8000-4726 | http://www.samsung.com/ae |

1
natural_image
Hand placing a printed card into a white box with visible printed text (no readable document content)2
natural_image
Black-and-white photo of a Samsung portable electronic device on a textured surface, with a pen and ruler placed nearby (no visible text or symbols on the device itself)3
natural_image
Hand using a white tool to adjust or install a white wireless router on a table (no visible text or symbols)4
natural_image
Hand using a power tool to press or install a white electronic device (no visible text or symbols)5
natural_image
Close-up of hands cleaning a white electronic device with USB port and cable (no visible text or symbols)6
natural_image
Hand inserting a USB into a white wireless router device (no visible text or symbols)7
natural_image
Black-and-white photo of a white stand-shaped object on a printed surface, no visible text or symbols.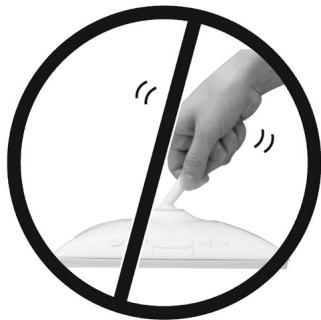
natural_image
Black and white illustration of a hand holding a pencil over a dome-shaped object, enclosed in a circle with crossed-out lines (no text or symbols)SAMSUNG

text_image
Barcode image containing encoded digital informationBN68-01567C-03