
SC190DW - Circular saw MAKITA - Free user manual and instructions
Find the device manual for free SC190DW MAKITA in PDF.

User questions about SC190DW MAKITA
0 question about this device. Answer the ones you know or ask your own.
Ask a new question about this device
Download the instructions for your Circular saw in PDF format for free! Find your manual SC190DW - MAKITA and take your electronic device back in hand. On this page are published all the documents necessary for the use of your device. SC190DW by MAKITA.
USER MANUAL SC190DW MAKITA
GB Cordless steel rod cutter
Instruction manual
13-2
SC130DRA/SC160DRA
13
15
10
SC190DW
12
SC190DW
SC190DW
14
16
Symbols
The following show the symbols used for the tool. Be sure that you understand their meaning before use.
Symboles
The recycling method may differ from country to country, or state (province) to state (province). Consult with your nearest Makita Authorized Service Center or Distributor.
Note :
Explanation of general view
① Set plate
② Battery cartridge
③ Push button
④ Charging light
⑤ Battery charger
⑥ Cutter head
⑦ Hex socket head bolt
⑧ Flat washer
⑨ Cutter head
10 Vents
① Balance stand
Switch trigger
⑬ Steel rod
14 Cutters
15 Stopper
16 Adjusting hex bolt
17 Hex wrench
18 Return valve
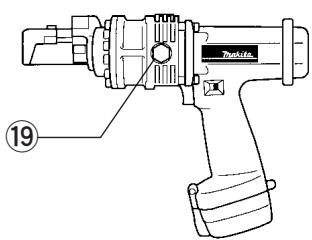
19 Hex bolt
SPECIFICATIONS
Model
SC130DRA
Cutting capacity (Diameter)
3-13mm
Cutting speed
4 seconds
Overall length
312 mm
Net weight
4.0 kg
Rated voltage
D.C. 12 ~V
SC160DRA
3-16mm
5.5 seconds
371 mm
5.8 kg
D.C. 12 ~V
SC190DW
3-19 mm
6 seconds
430 mm
10.5 kg
D.C. 18 ~V
- Due to our continuing program of research and development, the specifications herein are subject to change without notice.
Note: Specifications may differ from country to country.
Safety hints
For your own safety, please refer to the enclosed safety instructions.
IMPORTANT SAFETY INSTRUCTIONS FOR CHARGER & BATTERY
ENC001-2
- SAVE THESE INSTRUCTIONS - This manual contains important safety and operating instructions for battery charger.
- Before using battery charger, read all instructions and cautionary markings on (1) battery charger, (2) battery, and (3) product using battery.
- CAUTION - To reduce risk of injury, charge only MAKITA type rechargeable batteries. Other types of batteries may burst causing personal injury and damage.
- Do not expose charger to rain or snow.
- Use of an attachment not recommended or sold by the battery charger manufacturer may result in a risk of fire, electric shock, or injury to persons.
- To reduce risk of damage to electric plug and cord, pull by plug rather than cord when disconnecting charger.
- Make sure cord is located so that it will not be stepped on, tripped over, or otherwise subjected to damage or stress.
- Do not operate charger with damaged cord or plug - replace them immediately.
-
Do not operate charger if it has received a sharp blow, been dropped, or otherwise damaged in any way; take it to a qualified serviceman.
-
Do not disassemble charger or battery cartridge; take it to a qualified serviceman when service or repair is required. Incorrect reassembly may result in a risk of electric shock or fire.
- To reduce risk of electric shock, unplug charger from outlet before attempting any maintenance or cleaning. Turning off controls will not reduce this risk.
- The battery charger is not intended for use by young children or infirm persons without supervision.
- Young children should be supervised to ensure that they do not play with the battery charger.
ADDITIONAL SAFETY RULES FOR CHARGER & BATTERY CARTRIDGE
- Do not charge battery cartridge when temperature is BELOW 10^ (50^) or ABOVE 40^ (104^) .
- Do not attempt to use a step-up transformer, an engine generator or DC power receptacle.
- Do not allow anything to cover or clog the charger vents.
- Always cover the battery terminals with the battery cover when the battery cartridge is not used.
- Do not short the battery cartridge:
(1) Do not touch the terminals with any conductive material.
(2) Avoid storing battery cartridge in a container with other metal objects such as nails, coins, etc.
(3) Do not expose battery cartridge to water or rain.
A battery short can cause a large current flow, overheating, possible burns and even a breakdown.
-
Do not store the machine and battery cartridge in locations where the temperature may reach or exceed 50^ (122^) .
-
Do not incinerate the battery cartridge even if it is severely damaged or is completely worn out. The battery cartridge can explode in a fire.
- Be careful not to drop, shake or strike battery.
- Do not charge inside a box or container of any kind. The battery must be placed in a well ventilated area during charging.
ADDITIONAL SAFETY RULES FOR TOOL
- Be aware that this tool is always in an operating condition, because it does not have to be plugged into an electrical outlet.
- Hold the tool firmly.
- Keep face/hands, etc. away from cutters and vicinity during operation.
- Switch off and discontinue use immediately when the tool does not work well or abnormal sound occurs. Have it repaired at point of purchase or your nearest Makita Authorized Service Center.
- An accidentally dropped or struck tool must be inspected carefully for breakage, cracks or deformities.
- Don't charge battery cartridge anywhere near locations where lacquer, paint, benzene, thinner, gasoline, gas or the like may be.
- Never charge battery cartridge on top of cardboard or paper, seat/floor cushions, carpet, vinyl, etc.
- Never charge in a dusty location where dust/dirt accumulates.
-
Install cutters carefully in accordance with the instruction manual.
-
Always be sure you have a firm footing. Be sure no one is below when using the tool in high locations.
- Cutters that become worn, deformed, nicked or broken not only cause a tool breakdown; they may cause a serious accident. Replace them right away with new ones from Makita.
SAVE THESE INSTRUCTIONS.
OPERATING INSTRUCTIONS
Installing or removing battery cartridge
(Fig. 1 for SC130DRA and SC160DRA)
- Always switch off the tool before insertion or removal of the battery cartridge.
- To remove the battery cartridge, pull out the set plate on the tool and grasp both sides of the cartridge while withdrawing it from the tool.
- To insert the battery cartridge, align the tongue on the battery cartridge with the groove in the housing and slip it into place. Snap the set plate back into place. Be sure to close the set plate fully before using the tool.
- Do not use force when inserting the battery cartridge. If the cartridge does not slide in easily, it is not being inserted correctly.
(Fig. 2 for SC190DW)
Always switch off the tool before insertion or removal of the battery cartridge.
- To remove the battery cartridge, withdraw it from the tool while pressing the buttons on both sides of the cartridge.
- To insert the battery cartridge, align the tongue on the battery cartridge with the groove in the housing and slip it into place. Always insert it all the way until it locks in place with a little click. If not, it may accidentally fall out of the tool, causing injury to you or someone around you.
- Do not use force when inserting the battery cartridge. If the cartridge does not slide in easily, it is not being inserted correctly.
Charging (Fig. 3 for SC130DRA and SC160DRA)
Plug the fast charger into your power source. The charging light will flash in green color. Insert the battery cartridge so that the plus and minus terminals on the battery cartridge are on the same sides as their respective markings on the fast charger. Insert the cartridge fully into the port so that it rests on the charger port floor. When the battery cartridge is inserted, the charging light color will change from green to red and charging will begin. The charging light will remain lit steadily during charging. When charging is completed, the charging light color will change from red to green and tone will sound steadily for about 5 seconds. After charging, unplug the charger from the power source. Refer to the table below for the charging time.
| Battery type | Capacity (mAh) | Number of cells | Charging time | |
| Fast charger DC1439 | Fast charger DC1209 | |||
| 1202/1202A | 2,000 | 10 | Approx. 14 min. | Approx. 14 min. |
| 1200 | 1,300 | 10 | Approx. 9 min. | Approx. 9 min. |
(Fig. 4 for SC190DW)
- Plug the battery charger into your power source. The charging light will flash in green color.
- Insert the battery cartridge so that the plus and minus terminals on the battery cartridge are on the same sides as their respective markings on the battery charger. Insert the cartridge fully into the port so that it rests on the charger port floor.
- When the battery cartridge is inserted, the charging light color will change from green to red and charging will begin. The charging light will keep lighting up steadily during charging.
- When charging is completed, the charging light color will change from red to green.
- After charging, unplug the charger from the power source. The charging time is as follows:
| Battery type | Capacity (mAh) | Number of cells | Charging time |
| 1822 | 2,000 | 15 | Approx. 60 min. |
| 1833 | 2,200 | 15 | Approx. 65 min. |
| 1834 | 2,600 | 15 | Approx. 75 min. |
| 1835 | 3,000 | 15 | Approx. 90 min. |
CAUTION for SC130DRA and SC160DRA:
- The fast charger Model DC1439/DC1209 is for charging Makita battery cartridge. Never use it for other purposes or for other manufacturer's batteries.
- When you charge a new battery cartridge or a battery cartridge which has not been used for a long period of time, it may not accept a full charge. This is a normal condition and does not indicate a problem. You can recharge the battery cartridge fully after discharging it completely and recharging a couple of times.
- If you charge a battery cartridge from a just-operated tool or a battery cartridge which has been left in a location exposed to direct sunlight or heat for a long time, the charging light may flash in red color. If this occurs, wait for a while. Charging will begin after the battery cartridge cools.
- If the charging light flashes alternately in green and red color and tone will sound "beep, beep, beep, ...." for about 20 seconds, a problem exists and charging is not possible. The terminals on the charger or battery cartridge are clogged with dust or the battery cartridge is worn out or damaged.
- If charging two or more battery cartridges in succession with fast charger DC1209, the charging time may become longer to protect the charger.
CAUTION for SC190DW:
- The battery charger Model DC1801 is for charging Makita-battery cartridge. Never use it for other purposes or for other manufacturer's batteries.
- When you charge a new battery cartridge or a battery cartridge which has not been used for a long period of time, it may not accept a full charge. This is a normal condition and does not indicate a problem. You can recharge the battery cartridge fully after discharging it completely and recharging a couple of times.
- If you charge a battery cartridge from a just-operated tool or a battery cartridge which has been left in a location exposed to direct sunlight or heat for a long time, the charging light may flash in red color. If this occurs, wait for a while. Charging will begin after the battery cartridge cools.
- If the charging light flashes alternately in green and red color, charging is not possible. The terminals on the charger or battery cartridge are clogged with dust or the battery cartridge is worn out or damaged.
- If you wish to charge two battery cartridges, allow 15 minutes between chargings on the battery charger.
- Any of the following conditions indicates damage to the charger and/or battery cartridge. Ask your Makita Authorized or Factory Service Center to check them.
1) The charging light does not flash (green) when the battery charger is plugged into a power source.
2) The charging light does not light up or flash (red) when the battery is inserted in the charger port.
3) Charging is not completed at even more than two hours after red light comes ON at start of charging.
Installing or removing cutters
(Fig. 5 for SC130DRA, Fig. 6 for SC160DRA and Fig. 7 for SC190DW)
CAUTION:
Always be sure that the tool is switched off and the battery cartridge is removed before installing or removing the cutters.
Replace the cutters in accordance with the following procedure. Use only Makita genuine cutters for the tool.
- There are two cutters. Cutter A is to be installed on the cutter head, and cutter B on the cutter rod. Be sure to install them in the correct respective position. Refer to the table below for the cutter sizes.
| For Model | Cutter A | Cutter B |
| SC130DRA | 20 x 15 x 9 mm (four cutting edges) | 20 x 15 x 8 mm (four cutting edges) |
| SC160DRA | 22 x 17 x 9 mm (four cutting edges) | 22 x 17 x 8 mm (one cutting edge) |
| SC190DW | 28 x 20 x 11.5 mm (four cutting edges) | 26 x 20 x 10 mm (four cutting edges) |
- To install the cutters, first remove the two hex socket head bolts holding the cutters on the cutter head and cutter rod, respectively.
- Wipe off any dirt or foreign matter from the cutter-mounting position on the cutter head and cutter rod.
- Secure firmly cutter A on the cutter head and cutter B on the cutter rod, using their respective flat washers and hex socket head bolts. Failure to tighten securely is extremely dangerous.
Installing balance stand (Fig. 8)
When using the balance stand on the tool, be sure not to block the air vents.
Switch action (Fig. 9)
CAUTION:
Before inserting the battery cartridge into the tool, always check to see that the switch trigger actuates properly and returns to the "OFF" position when released.
To start the tool, simply pull the trigger. Tool speed is increased by increasing pressure on the trigger. Release the trigger to stop.
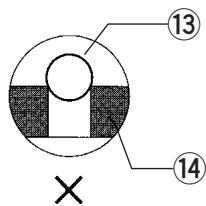
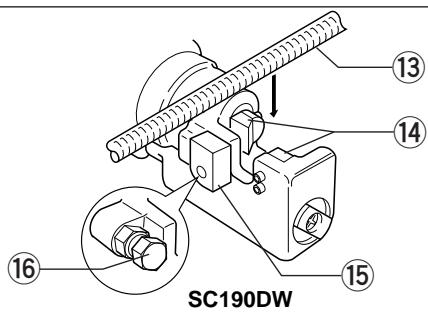
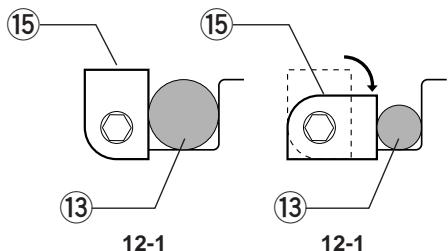
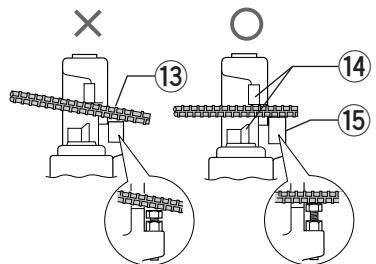
Cutting operation (Fig. 10, 11, 12, 13 and 14)
- Place the steel rod (material to be cut) in the opening so as to be at right angles to the cutters. Adjust the stopper (adjusting hex bolt for SC190DW) in terms of the steel rod size (diameter). When cutting large size steel rods, position the stopper (adjusting hex bolt) as shown in Fig. 11-1, 12-1. When cutting small size steel rods, position the stopper (adjusting hex bolt) as shown in Fig. 11-2, 12-2. The stopper (adjusting hex bolt) keeps the steel rod at right angles to the cutters during the cutting.
- Keep the steel rod at the deepest position in between the cutters as shown in Fig. 13-1. Never keep it as shown in Fig. 13-2. If the steel rod is not placed at the deepest position between the cutters, it may ride up and cause a fragment or piece to fly up. Besides this dangerous situation, the cutters may be damaged. Always position the steel rod properly.
-
Pull the trigger. The cutter rod advances to cut off the steel rod. Keep the trigger pulled until the steel rod is completely cut off.
-
Release the trigger, and the cutter rod will automatically return to its initial position.
NOTE:
The cutter rod will not return to its initial position even if you release the trigger until the cutter rod advances all the way and stops. And until the cutter rod completely returns to its initial position, it will not move forward again even if you pull the trigger. Pull the trigger to begin the next cut-off only after the cutter rod has completely returned to its initial position.
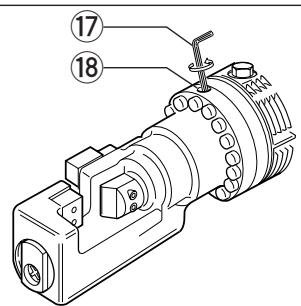
Return valve (Fig. 15)
For SC160DRA and SC190DW
It may happen that the cutters will engage the steel rod and come to a stop before the cut-off is completed. In that case, use the hex wrench M4 to release the hydraulic pressure in the return valve. Insert the hex wrench M4 into the return valve hole and make a half turn in the counterclockwise direction. This releases the hydraulic pressure inside the tool, allowing the cutter rod to return to its initial position. Always retighten the valve before doing the next cut-off job.
Angling into tight places
For SC160DRA and SC190DW
One useful feature is that you can, even after beginning a cut-off (load condition), rotate the tool by the handle 360^ left or right. This makes work in tight places easier, especially trigger access and activation. You can even swing the tool while pulling the trigger.
MAINTENANCE
CAUTION:
Always be sure that the tool is switched off and the battery cartridge is removed before carrying out any work on the tool.
Oil replenishment (Fig. 16)
This cordless rod cutter is electrohydraulic. When shipped from the factory, it was filled with the oil. Do not attempt to add oil as long as the tool performs well. When the oil-pressure is not enough to cut steel rods, replenish the oil as follows. Use only Genuine Makita Hydraulic Oil #46.
- Place the steel rod between the cutters and pull the trigger.
- Release the trigger just before cut-off is completed to stop the tool.
- Remove the battery cartridge from the tool.
- Remove the hex bolt which caps the oil hole. Replenish oil, being careful not to allow any oil into the motor.
- Replace the hex bolt and tighten securely.
- Install the battery cartridge on the tool and complete cut-off of the steel rod.
- Repeat the above procedures several times.
To maintain product safety and reliability, repairs, maintenance or adjustment should be carried out by Makita Authorized Service Center.
(Fig. 2 for SC190DW)
FORSIGTIG for SC190DW:
(Fig. 2 for SC190DW)
(Fig. 2 for SC190DW)
Lading (Fig. 4 for SC190DW)
IPOSOXH yia SC130DRA kai SC160DRA:
O taxauphiotioTc MovTeLo DC1439/DC1209 eivai yia fopion kaoetovmuatapia ctns Makita. Mny tov xpoiouoieiyeia aalouc okoiouc nyia uataapiec aalou kataokveaotn.
- Otav φορτιζετε μα Kaivóupia Kaδετa μπatapiac ἡ μα Kaδετa μπatapiac nou δεν εχει χρομιοπηθει γι αλύ Kaipó, iως ανμησεν αφοτιθει πλήρως. Autó είαι μα φυσιλούγικη κατάσαη κα δεν εδεικυνει πρόβλημα. Μηροείνε τε επαναφορτιεοτην Kaδετα μπatapiac πλήρως φαρου τὴν στοφορτιετε κα πλήρως και τὴν φορτιθετε Εμρικες φορες.
Eav optioe ta kaoet aunatapiaac ano eva unxavna nou molic exe i eitoupyoei n ia kaoet aunatapia c nooiia exi aethetaia aleo aektethetaevn oe nlaikok ooc n thepotntyia kpu xpviok diaotma, to owtaki optionc iooc avaei o KKKivo xpoua. Eav ouubei auto nepieveTe yia liyo. H option 0a Ekivnoi apou n kaoet aunatapia c enavlambdae o fuioioyikn eepokpiaia.
Eav to wtaki optionc ava o nvei evaalao evo o e kokivo kal npaoivo xpwa kal akuoyetau evac tovoc oav "muin, mui, mui..." ia nepiou 20 deutepolenta, unapxei kantoio npoBnaia kal n optiond evivaluat. Oe nane cto pofopnti n otny kaeta maatapiac siva kalauevoi me okovn n kaeta maatapiac exei thetai n kataotpaei.
Eav optioe duo n nepioootepe c kaoetc mntapiaic diaoxika e tov tauxphiotiot DC1209, o xpovoc optionc iowc yivei eyaluteposy ia va npoataeuei o optiotnC.
IPOEOXH yia SC190DW:
O optiotns MovTeo DC1801 eivai yia foption kaesewu mpatias tnc Makita. Mny tov xpoioeite yia aalouc okonouc n yia mpatipecs aalou kataokuaotn.
Otav optiTe mia kaivoupia kaoet a maTAPiac n ia kaoet a maTAPiac nou dev exx xpoaioTnEi yia tolu kapo, iow s my npotie va optoi tei npwoc. Ato evai ia fuoioloyikn kataoan kalv evdiovvui npobma. Mnpoeite va enavaofoprtae tvkaoet a maTAPiac nIpwos apou tyn atofoptieTe kai npwoc kai tnovoptiee mepiKes opoc.
Eav optioe ta kaoteta matapiaac ano eva mxavma nou moic exei leitoupynei n iia kaoteta matapiaac n onoiia exi afethetai oe tonotheoi auea ektethetaevn oe nlaiko owc n eepohtna yia maqupu xpvikdoiaotna, to owtaki optianc iooc avasei oe kokivo xpoua. Eav oubetauto nepieve te yia liyo. H option tha Eekivnoi apou n kaoteta matapiaac enaveAe i e duiooloyikn eepukpaia.
Eav to 1aunaki fopioanc avaooBnevEvaaalooeva oKokivo kai npaoivo xpwma, n foptiand evivduvatni. OI aepocotov fopriatn th KAeTe ta natapiaac exouv kaluohei ano kovn n kaeteta natapiaic exei paei n kataoTPaei.
Eav 0eTc va optioe 0o kaoetc mataipiac, aonr eva xpvikpio 15 aeWv eTaGtns aaayng otov tauxphiotn.
Kaεμia ano tic napakatw kataotáacic εvδεκvúει ημiα OTOV Φoptiŋh /kai OTNY kaεetan μanatapiac. Znteioane TOV EEOAUodOTnEvO AvTnpoaωno n To KevTPO EpyooTaiaKawYmpeoiav wa oac tic λεEyxov
1) To option ava (npaoivo) otav o option tnc nC mnatapiaac ouvdeetai otny npoxn nEKTPIKOU pUmuos.
2) To option avaβει avaβoβηvει (Kokko) otav n μπatapia μnaivει στην unöoxŋ tou φοptiσnt.
3) H φopTion δεν oλokλnpωvετai akóμη kal μετα antδu ωρες φoú To kokkivo φωtaki EXE1 ANAPEI Σην aρχιης φóptiόns.
Tonoetnon kai anopakpuvan kontrnpwv
(EiK. 5 yia SC130DRA, Eik. 6 yia SC160DRA kai Eik. 7 yia SC190DW)
PPOEOXH:
Iiyoupueite navta otu to mnxavma eiva oeta kai n kaotaa natapiaac yaaevn npotou tonoetnoe t anopakpuve touc kontnpec.
Avtikataotieotouc konntpeo ufoa e Tnv akolouoia. Xpnoonoiote ovo yvniouc konntpeo Makita yia to unxavna.
- Ynapxouv duo konnpcE. O konnpac A npenvi va ekataotathetai otnv kepaH tou kontn, kal o konnpac B otn paBDO tou konTn. IiyouputeiE va touc ekataoteiaeTe otnv owotn avtioxN thoA. AvaeptheOToV napakawivaka yia tsi diaotaeeicTwv konntpov.
These accessories or attachments are recommended for use with your Makita tool specified in this manual. The use of any other accessories or attachments might present a risk of injury to persons. The accessories or attachments should be used only in the proper and intended manner.
F ACCESSIORES
ATTENTION :

- Symbols
- Symboles
- Note :
- Explanation of general view
- SPECIFICATIONS
- Safety hints
- IMPORTANT SAFETY INSTRUCTIONS FOR CHARGER & BATTERY
- ADDITIONAL SAFETY RULES FOR CHARGER & BATTERY CARTRIDGE
- ADDITIONAL SAFETY RULES FOR TOOL
- SAVE THESE INSTRUCTIONS.
- OPERATING INSTRUCTIONS
- Installing or removing battery cartridge
- (Fig. 1 for SC130DRA and SC160DRA)
- (Fig. 2 for SC190DW)
- Charging (Fig. 3 for SC130DRA and SC160DRA)
- (Fig. 4 for SC190DW)
- CAUTION for SC130DRA and SC160DRA:
- CAUTION for SC190DW:
- Installing or removing cutters
- (Fig. 5 for SC130DRA, Fig. 6 for SC160DRA and Fig. 7 for SC190DW)
- CAUTION:
- Installing balance stand (Fig. 8)
- Switch action (Fig. 9)
- Cutting operation (Fig. 10, 11, 12, 13 and 14)
- NOTE:
- Return valve (Fig. 15)
- For SC160DRA and SC190DW
- Angling into tight places
- MAINTENANCE
- Oil replenishment (Fig. 16)
- FORSIGTIG for SC190DW:
- Lading (Fig. 4 for SC190DW)
- IPOSOXH yia SC130DRA kai SC160DRA:
- IPOEOXH yia SC190DW:
- Tonoetnon kai anopakpuvan kontrnpwv
- (EiK. 5 yia SC130DRA, Eik. 6 yia SC160DRA kai Eik. 7 yia SC190DW)
- PPOEOXH:
- F ACCESSIORES
- ATTENTION :
Brand : MAKITA
Model : SC190DW
Category : Circular saw