
510 - Audio Amplifier NAD - Free user manual and instructions
Find the device manual for free 510 NAD in PDF.

| Type of product | CD (Compact Disc) audio player |
| Brand | NAD |
| Model | 510 |
| Power supply | 220-240 V AC, 50/60 Hz |
| Standby consumption | Less than 1 W (estimate) |
| Audio outputs | 1 pair of RCA line outputs (left/right) |
| Compatible disc formats | Audio CD (CD-DA), 5" (12 cm) and 3" (8 cm) CDs |
| Playback functions | Play, Pause, Stop, Skip forward/backward, Fast forward/reverse, Track repeat, Disc repeat, Random play |
| Display | Display panel indicating track number, elapsed/remaining time, track list (up to 20), and modes (Play, Pause, Random, Repeat) |
| Disc tray opening | Motorized, controlled by OPEN/CLOSE button |
| Maintenance and cleaning | Wipe with a soft, dry cloth; if necessary, use a cloth dampened with soapy water. Do not use benzol or volatile solvents. |
| Safety | Do not remove the cover. No user-serviceable parts inside. Unplug the unit if not used for a long time or if water enters. |
| General information | Install on a stable, flat and horizontal surface, away from direct sunlight, heat sources and moisture. |
| Model number | 510 |
| Country of origin | Made in Canada (estimate based on NAD brand) |
Frequently Asked Questions - 510 NAD
User questions about 510 NAD
0 question about this device. Answer the ones you know or ask your own.
Ask a new question about this device
Download the instructions for your Audio Amplifier in PDF format for free! Find your manual 510 - NAD and take your electronic device back in hand. On this page are published all the documents necessary for the use of your device. 510 by NAD.
USER MANUAL 510 NAD
WARNING:TO PREVENT FIRE OR ELECTRIC SHOCK, DO NOT EXPOSE THIS APPLIANCE TO RAIN OR MOISTURE
Note to CATV system installer: This reminder is provided to call the CATV installer's attention to Article 820-40 of the NEC, which provides guidelines for proper grounding and, in particular, specifies that the cable should be connected to the grounding system of the building, as close to the point of cable entry as practical.
THIS DIGITAL APPARATUS DOES NOT EXCEED THE CLASS B LIMITS FOR RADIO NOISE EMISSIONS FROM DIGITAL APPARATUS AS SET OUT IN THE RADIO INTERFERENCE REGULATIONS OF THE CANADIAN DEPARTMENT OF COMMUNICATIONS.
LE PRESENT APPAREIL NUMVERIQUE N'EMET PAS DE BRUITS RADIOELECTRIQUES DEPASSANT LES LIMITES APPLICABLES AUX APPAREILS NUMERIQUES DE LA CLASSE B PRESCRITES DANS LE REGLEMENT SUR LE BROUILAGE RADIO ELECTRIQUE EDICTE PAR LE MINISTERE DES COMMUNICATIONS DU CANADA.
CAUTION: TO PREVENT ELECTRIC SHOCK DO NOT USE THIS POLARISED PLUG WITH AN EXTENSION CORD RECEPTACLE OR OTHER OUTLET UNLESS THE BLADES CAN BE FULLY INSERTED TO PREVENT BLADE EXPOSURE.
ATTENTION: POUR PREVENIR LES CHOCSE ELECTRIQUES NE PAS UTILISER CETTE FICHE POLARISEE AVEC UN PROLONGATEUR, UNE PRISE DE COURANT OU UNE AUTRE SORTIE DE COURANT, SAUF SI LES LAMES PEUVENT ETRE INSEREES A FOND SANS EN LAISSER AUCUNE PARTIE A DECOUVERT.
CLASS 1 LASER PRODUCT LUOKAN 1 LASERPLAITE KCLASS 1 LASERAPPARAT

WARNING! INVISIBLE LASER RADIATION WHEN OPEN AND INTERLOCKS DEFEATED. AVOID EXPOSURE TO BEAM.
The lightning flash with arrowhead, within an equilateral triangle is intended to alert the user of the presence of uninsulated "dangerous voltage" within the product's enclosure; that may be of sufficient magnitude to constitute a risk of electric shock to persons.

The exclamation point within an equilateral triangle is intended to alert the user of the presence of important operating and maintenance (servicing) instructions in the literature accompanying the appliance
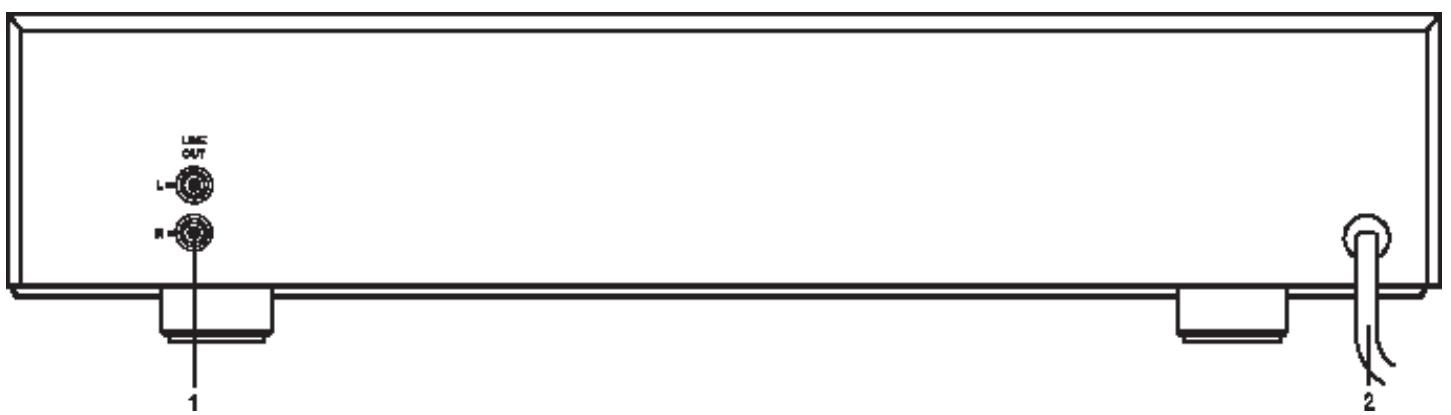
REAR PANEL CONNECTIONS (Figure 1.)
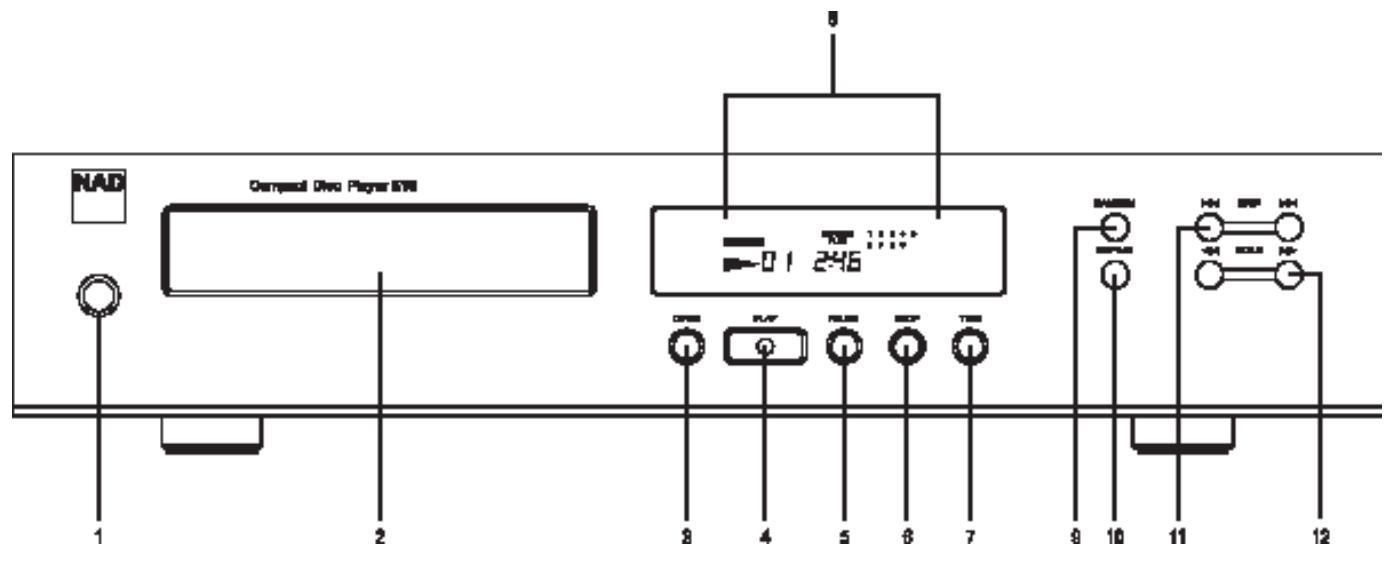
FRONT PANEL CONTROLS (Figure 2.)
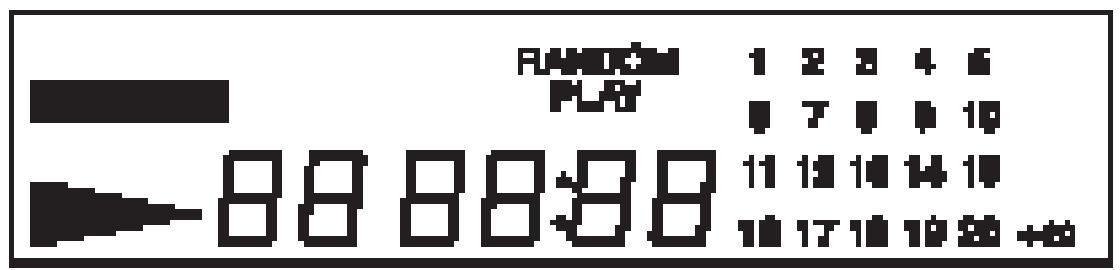
DISPLAY (Figure 3.)
QUICK START
- Use the phono-to-phonoload to connect the NAD 510's left & right outputs to the CD Input of your amplifier or receiver.
- Plug in the AC power cord.
- Press the POWER button to turn the NAD 510 on.
- Press OPEN to open the CD drawer and place the CD in the tray, label side up.
- Press PLAY to close CD tray and start playing from the first track.
- Press PAUSE to stop the CD playing but keeping the current position on the CD. To resume playing the CD press PLAY.
- Press Skip or to go to other tracks on the CD.
- Press Stop to stop the CD playing and return to the start of the CD.
NOTES ON INSTALLATION.
Your NAD 510 should be placed on a firm, level surface. Avoid placing the unit in direct sunlight, near sources of heat and damp or in poorly ventilated positions.
The CD player comes with phono leads for connection to your amplifier or receiver. Switch the unit off before making any connections. Ensure that leads and connectors are not damaged in any way and all connectors are firmly pushed home.
If the unit is not going to be used for some time, disconnect the plug from the AC socket. Should water get into your NAD 510, shut off the power to the unit and remove the plug from the AC socket. Have the unit inspected by a qualified service technician before attempting to use it again.
Do not remove the cover, there are no user-serviceable parts inside.
Use a dry soft cloth to clean the unit and the CD Tray. If necessary, lightly dampened the cloth with soapy water. Do not use solutions containing benzol or other volatile agents.
As with most digital circuits, the processor inside your CD player may radiate a small amount of electrical 'noise' which could interfere with reception of very weak radio or TV signals. If this occurs, move the CD player away from the other devices or switch it off when viewing or listening to broadcasts.
WARNING TO UK USERS. If this apparatus is not fitted with a UK three-pin plug, do not attempt to insert the attached plug into a UK mains socket. Instead, cut the plug from the mains lead and attach a fused UK three-pin plug using the following safety advice on wiring.
IMPORTANT. The wires in this mains lead are coloured BLUE and BROWN;
BLUE:NEUTRAL BROWN:LIVE
The colours of these mains lead wires may not correspond with the coloured markings identifying the terminals in your plug. In this case the BROWN wire must be connected to the terminal which is marked
L(ive) or coloured RED. The BLUE wire must be connected to the terminal marked N(eutral) or coloured BLACK. No connection should be made to the terminal marked E or coloured green or green and yellow
REAR PANEL CONNECTIONS
1. LINE OUTPUT
The 510's analogue audio output. Using the supplied twin phono-to-phon leads, connect to the left (white) and right (red) outputs of the NAD 510 to the 'CD' input or other line-level input such as Aux In' of your amplifier or receiver. Do not connect this cable to the amplifier's PHONO input jacks.
2. AC LINE CORD.
Connect this power cord to an AC mains wall outlet
Plug the AC power cord into a live AC wall socket or to an AC convenience outlet at the rear of your amplifier.
FRONT PANEL CONTROLS
1. POWER ON/OFF.
POWER switches the player on or off. Pressing the power switch turns the CD player on, indicated by the Display Panel becoming active. Pressing the POWER button again will switch the player off.
When switched Off, no power is supplied to the NAD 510's electronics.
CAUTION: Disconnect your NAD 510 from the AC outlet when it is not being used for long periods of time.
2. CD TRAY
CDs should be placed in the CD Tray, label side up. The CD Tray has two recesses to securely hold either 5'' or 3'' CDs. 5'' CDs sit in the larger recess and 3'' CD singles in the smaller central recess.
Use only Audio CDs in your NAD 510. Do not use CD-V, CD-ROM CD-i or Photo-CD discs in this player, it will not be able to decode and play them.
CAUTION: Do not put anything except a compact disc into the tray. Foreign objects can damage the mechanism.
3. OPEN
The OPEN button controls the CD Tray. Press OPEN to open the Tray. The Display Panel will show the word 'OPEN'.
Press OPEN again to close the tray. The NAD 510 will then close the tray completely. Do not use physical force to close the tray as this can damage the drawer mechanism. Always use the OPEN button to open or close the disc drawer.
With a CD loaded and the tray closed, the CD Player will scan the disc and Display Panel will show
the number of tracks and the total playing time of the disc. If the CD Tray is empty, then the Display Panel will display the words 'no disc'.
Pressing OPEN when a CD is playing will stop the playback and open the CD Tray.
Caution: The NAD 510 is not designed for use with 'damping discs' placed on the CD, or two CDs stacked together in the CD Tray.
Do not close the CD Tray by hand with the power off. This may result in damage to the mechanism.
4. PLAY
Press PLAY to start playing the CD from the start of the track shown in the Display Panel. Pressing PLAY with the CD Tray open and a CD loaded, will close the CD Tray and start playing the CD from Track 1.
Pressing Play again when the CD is already playing, will re-start playback from the beginning of the current track.
When the 510 is in Play mode, the Play mode indicator will be shown in the Display Panel. This will also show the current track number and position in the track in minutes and seconds.
5. PAUSE
Pressing PAUSE stops CD playback, without loosing the current position on the CD. Press PLAY to continue playback from that position on the CD.
Pressing PAUSE twice will cue up the beginning of the current track, whilst keeping the NAD 510 in Pause mode. Press PLAY to start playing the CD.
Both SCAN and SKIP can be used in the Pause mode to select other tracks, or another position on the current track before returning to play the CD.
When the 510 is in Pause mode, the Play mode indicator will flash and the Display Panel will show the current track number and position in the track in minutes and seconds.
6. STOP
The STOP button stops disc playing, cancels any Repeat mode, and returns the 510 to the start of the disk. In Stop mode, the Display Panel will show the total number of tracks and the total playing time of the disc.
7. TIME
The TIME button switches the Time Display through three different modes, showing either:
The time played of the current track, in minutes and seconds.
The playing time remaining for the current track, in minutes and seconds.
The total time played so far on the disc, in minutes and seconds.
The total playing time remaining on the CD, in minutes and seconds.
The 510 will normally display the current track number and position in the track in minutes, and seconds (the default display). Pressing the TIME button will cycle through the alternative display options and back to the default display.
8. DISPLAY PANEL
The Display Panel shows information about the NAD 510's operating modes and information about the CD currently loaded.
OPEN. The CD Tray is open
no disc. There is no disc in the CD Tray
The unit is in Play mode
[Flashing] The unit is in Pause mode
RANDOM PLAY. The unit is in Random Play Mode
REPEAT. The unit is in Track Repeat mode
REPEAT. [Flashing] The unit is in Disc Repeat Mode
TRACK NUMBER. Displays the current track number being played or the track number that will be played when PLAY is pressed. When the disc is first loaded, Track Number shows the total number of tracks available on the disc.
TIME. Is used in conjunction with the TIME button. Normally in Play mode the Time Display shows the time played so far on the current track. The TIME button can switch this to display playing time remaining on the current track, time played so far on the disc, or playing time remaining on the disc current track. (See TIME Button)
TRACK LISTING. Displays a list of tracks available on the disc. As each track is played its number is blanked out on the Track Listing, giving a simple indication of how much of the disc has been played and how much remains. The display shows up to 20 numbered tracks. For CDs with more than 20 tracks, the 20+ indicator illuminates until all the tracks have been played.
The track Listing display does not operate in Random mode.
ERROR The Error indicator is displayed when an 'illegal' button sequence is used, such as pressing any of the controls apart from OPEN/CLOSE when there is no disc in the CD Tray.
Other common 'illegal' button sequences that will produce the Error display are pressing PAUSE, TIME or SCAN when the NAD 510 is in Stop mode. Press STOP to clear the Error message.
9. RANDOM
Pressing RANDOM will play all the tracks on the CD in a random order. Press RANDOM either from Stop or Play modes and the 510 will play the tracks on the CD in random order until all the tracks have been played.
Press RANDOM button again to cancel Random play and return the 510 to the normal Play mode.
When the 510 is in Random mode 'RANDOM PLAY' will be shown in the Display Panel.
10. REPEAT
The REPEAT Button switches the NAD 510 between Track Repeat and Disc Repeat modes.
Pressing REPEAT once puts the player into Track Repeat mode. This will continuously repeat the current track as shown in the Display Panel. In Track Repeat mode, 'REPEAT' is shown in the Display Panel.
GB
Pressing REPEAT a second time puts the player into Disc Repeat mode. This will continuously play the whole disc, returning to Track 1 each time the last track has been finished. In Disc Repeat, 'REPEAT' flashes in the Display Panel.
Pressing REPEAT a third time cancels the Repeat function and returns the NAD 510 to normal play from the current track. Pressing STOP also cancels the Repeat mode.
11. SKIP
The SKIP buttons will move the 510 on to the next track or back to the previous track on the disc.
In Stop mode, use Skip to select a particular track on the CD. Press SKIP Forward or SKIP reverse to select the required track number, which is shown in the Track Display. Pressing Play will then play the rest of the CD from that track number onwards.
In Play mode, pressing SKIP Forward jumps to the start of the next track. Pressing SKIP reverse jumps to the start of the previous track. After using Skip, the NAD 510 will then play all remaining tracks on the disc. If the disc is encoded with Index points within tracks, then Skip will jump to the start of the next or previous Index point.
Skip also functions in Random Mode, jumping to the start of the next or previous track in the Random Play sequence.
12. SCAN
The SCAN buttons fast forward or fast reverse through the tracks on the disc, giving an audible indication of the contents of the tracks.
To fast forward through a track in Play or Pause modes, press and hold down the SCAN Forward button and listen, or use the Track and Time displays, to find the required position on the track or disc. Release the SCAN button when the required position is located.
To move backwards through the track or the disk, press and hold down the SCAN Backwards button to find the required position.
Scan function stops when the beginning or the end of the disc is reached.
HANDLING AND LOOKING AFTER COMPACT DISCS
Compact discs need to be handled with care. Always hold the discs by the outer edges and avoid touching the playing (non-printed) surface of the disc. Remove the disc from the NAD 510 when it is not being played and store it in its CD case.
Minor scratches and finger marks will not affect the ability of the disc to play, although larger marks and damage may cause the disk to skip, repeat very short sections or stop altogether.
If this happens, inspect the disk for dirt or damage.
Clean CDs by wiping the playing surface with a soft dry cloth. Wipe from the centre of the disc outwards rather than radially. If the CD playing surface becomes dirty, lightly dampened the cloth with soapy water to remove any dirt and then wipe with a cloth lightly damped with water only. Do not use LP record cleaning solutions on your CDs.
IN CASE OF DIFFICULTY: A TROUBLE-SHOOOTING GUIDE
If you have followed the instructions and are still having difficulty operating your compact disc player, locate the PROBLEM in the left hand column below. Check the corresponding POSSIBLE CAUSE and REMEDY columns to locate and solve the problem.
| PROBLEM | POSSIBLE CAUSE | REMEDY |
| No power when the POWER button is set to ON. | Poor or no power plug connection at the AC outlet. | Insert the power plug firmly into the AC outlet. |
| Disc play does not start. | The disc is loaded upside down | Reload the disc with the label side UP. |
| The disc is too dirty | Clean the disc. | |
| No Sound. | Incorrect audio cable connections. | Connect the CD player to the amplifier/receiver correctly. |
| Incorrect amplifier/receiver operation | Make sure that the input selector on your amplifier or receiver is set to CD. | |
| Sound Skips. | The CD player is subject to vibration or physical shock from external sources. | Change the installation location. |
| A"humming" sound can be heard. | Loose cable connections. | Check the cable connections particularly the phono connecting cables |
MISE EN OEUVRE RAPIDE
1. MARCHE/ARRET [POWER ON/OFF]
REPETITION [REPEAT] (clignotant)
| Disc capacity | One disc, 120 or 80mm |
| Decoding | Bitstream converter |
| Laser | Single beam |
| Analog filter | 5 pole active |
| Frequency response 5Hz - 20kHz | ±0.3dB |
| De-emphasis error | ±0.2dB |
| THD (at 0dB, 1kHz) | 0.002% |
| Intermodulation distortion (19+20kHz) | <-100dB |
| Dynamic range | 98dB |
| Signal to Noise ratio A weighted | >100dB |
| measured with all zeroes test disc. | |
| Channel separation 1kHz | >110dB |
| 10kHz | >102dB |
| Wow and flutter | Unmeasurable (quartz crystal accuracy) |
| Output impedance | 110 |
| Output level at 0dB | 2.2V rms |
| Digital error correction | CIRC with double error correction in C1 and C2 |
PHYSICAL SPECIFICATION
| Dimensions in mm | 435 x 93 x 295 |
| (Width x Height x Depth) | |
| Net weight | 4kg |
| Shipping Weight | 5.4kg |
NAD ELECTRONICS LTD
LONDON
© 1995. 510 I.M.
- QUICK START
- NOTES ON INSTALLATION.
- BLUE:NEUTRAL BROWN:LIVE
- REAR PANEL CONNECTIONS
- LINE OUTPUT
- AC LINE CORD.
- FRONT PANEL CONTROLS
- POWER ON/OFF.
- CD TRAY
- OPEN
- PLAY
- PAUSE
- STOP
- TIME
- DISPLAY PANEL
- RANDOM
- REPEAT
- GB
- SKIP
- SCAN
- HANDLING AND LOOKING AFTER COMPACT DISCS
- IN CASE OF DIFFICULTY: A TROUBLE-SHOOOTING GUIDE
- MISE EN OEUVRE RAPIDE
- MARCHE/ARRET [POWER ON/OFF]
- REPETITION [REPEAT] (clignotant)
- PHYSICAL SPECIFICATION
- NAD ELECTRONICS LTD
Brand : NAD
Model : 510
Category : Audio Amplifier