
DXZ948RMP - Car stereo CLARION - Free user manual and instructions
Find the device manual for free DXZ948RMP CLARION in PDF.
| Product Type | Car Stereo |
| Brand | CLARION |
| Model | DXZ948RMP |
| Dimensions (L x H x D) | 178 x 50 x 162 mm (1-DIN) |
| Weight | 1.5 kg |
| Power Supply | 14.4 V DC (10.8 – 15.6 V allowable) |
| Main Functions | CD/MP3/WMA player, FM/AM tuner with RDS, MOSFET amplification 4×50 W, auxiliary input, OEL display, compatible steering wheel control |
| Maintenance and Cleaning | Clean the unit with a soft, dry cloth. Do not use chemicals or abrasives. |
| Safety | Protection fuse (15 A), removable anti-theft code (detachable front panel) |
| Spare Parts and Repairability | Contact an authorized Clarion service center. Spare parts available through the official network. |
| General Information | Max output power 50 W × 4 (MOSFET), signal-to-noise ratio > 80 dB, FM frequency range 87.5 – 108 MHz |
Frequently Asked Questions - DXZ948RMP CLARION
User questions about DXZ948RMP CLARION
0 question about this device. Answer the ones you know or ask your own.
Ask a new question about this device
Download the instructions for your Car stereo in PDF format for free! Find your manual DXZ948RMP - CLARION and take your electronic device back in hand. On this page are published all the documents necessary for the use of your device. DXZ948RMP by CLARION.
USER MANUAL DXZ948RMP CLARION
All Rights Reserved. Copyright © 2004: Clarion Co., Ltd.
Printed in China / Imprimé en Chine / Gedruckt in China / Stampato in Cina
Gedrukt in China / Impreso en China / Tryckt i Kina / Impresso na China
PE-2636E
280-8037-00
clarion
CenET

DOLBY
SURROUND
PROLOGIC II
COMPACT
SUBROUND
PROLOGIC II
CQR-D-S
EON
ISO
CONNE
Plays
Windows MediraTM
Thank you for purchasing this Clarion product.
- Please read this owner's manual in its entirety before operating this unit.
- After reading this manual, be sure to keep it in a handy place (e.g., glove compartment).
- Check the contents of the enclosed warranty card and keep it carefully with this manual.
- This manual includes the operating procedures of the CD changer, DAB and TV tuner connected via the CeNET cable. The CD changer and TV tuner have their own manuals, but no explanations for operating them are described.
CAUTIONS:
This appliance contains a laser system and is classified as a "CLASS 1 LASER PRODUCT". To use this model properly, read this Owner's Manual carefully and keep this manual for your future reference. In case of any trouble with this player, please contact your nearest "AUTHORIZED service station". To prevent direct exposure to the laser beam, do not try to open the enclosure.
!CAUTIONS
USE OF CONTROLS OR ADJUSTMENTS OR PERFORMANCE OF PROCEDURES OTHER THAN THOSE SPECIFIED IN THE OWNER'S MANUAL MAY RESULT IN HAZARDOUS RADIATION EXPOSURE.
ADVARSEL.
| MODEL | clarion | |
| 12V GROUND | ||
| LW 153-279kHz MW 531-1602kHz FM(UKW) 87.5-108MHz | ||
| This unit is designed for on-road vehicle purpose | ||
| CLASS 1 LASER PRODUCT | ||
| Manufactured under license from Dolby Laboratories. "Dolby", "Pro Logic" and the double-D symbol are trademarks of Dolby Laboratories. | ||
| This product includes technology owned by Microsoft Corporation and cannot be used or distributed without a license from MSLGP. | ||
Bottom View of Main Unit
Contents
- PRECAUTIONS 3
4 Sloping Console 4
Handling Compact Discs 4
2.CONTROLS 5 - NOMENCLATURE 6
Names of the Buttons and their Functions 6
Major Button Operations when External Equipment is Connected to this Unit 7
Display Items 7
Display Operations 8
4.DCP 9 - REMOTE CONTROL 10
Inserting the Batteries 10
Functions of Remote Control Unit Buttons 11 - OPERATIONS 12
Basic Operations 12
AC-Processor III Operations 17
Radio Operations 23
RDS Operations 26
CD / MP3 / WMA Operations 31
Different Pieces of Music Heard by Plural Listeners (2-ZONE function) 36
Operations Common to Each Mode 37 - OPERATIONS OF ACCESSORIES 51
CDChanger Operations 51
TV Operations 54
Digital Radio / DAB Operations 58
5.1ch Surround Decoder Operations 61 - IN CASE OF DIFFICULTY 66
- ERROR DISPLAYS 68
- SPECIFICATIONS 69
1. PRECAUTIONS
- This unit is applicable for on-road 4 wheel vehicle purpose only. Use for tractor, fork truck, bulldozer, off road vehicle, 2 or 3 wheel motor bicycle, marine boat or other special purpose vehicle is not appropriate.
-
When the inside of the car is very cold and the player is used soon after switching on the heater, moisture may form on the disc or the optical parts of the player and proper playback may not be possible. If moisture forms on the disc, wipe it off with a soft cloth. If moisture forms on the optical parts of the player, do not use the player for about 1 hour. The condensation will disappear naturally allowing normal operation.
-
Driving on extremely bumpy roads may cause severe vibration and cause the sound to skip.
INFORMATION FOR USERS:
CHANGES OR MODIFICATIONS TO THIS PRODUCT NOT APPROVED BY THE MANUFACTURER WILL VOID THE WARRANTY.
WARNING
For your safety, do not watch or operate the touch panel while driving.
Sloping Console
This unit uses a SLOPING CONSOLE to make large screen displays possible.
When you use the SLOPING CONSOLE, be sure to close it.
CAUTION
BE CAREFUL NOT TO GET YOUR FINGERS CAUGHT WHEN OPENING AND CLOSING THE SLOPING CONSOLE.
- For safety's sake, always close the SLOPING CONSOLE before leaving this unit unused for a prolonged period or switching OFF the ignition key.
If you switch OFF the ignition key with the SLOPING CONSOLE tilted, the SLOPING CONSOLE does not close.
- Before the SLOPING CONSOLE closes, there may be a braking sound from the safety mechanism. This is normal.
- If you move the SLOPING CONSOLE by hand, this may start play. To correct this play, with the power for the unit ON, press the [▲] button to close the SLOPING CONSOLE.
- After a disc is ejected, the SLOPING CONSOLE automatically returns to the tilted or closed state. If there is any obstruction when the SLOPING CONSOLE tries to close, the safety mechanism is triggered and the SLOPING CONSOLE returns to the open state. If this happens, remove the obstruction, then press the [▲] button.
- To avoid scratching the compact disc, keep the 12 or 8cm CD level when loading or removing it.
Handling Compact Discs
Use only compact discs bearing the 015C or

mark.
Do not play heart-shaped, octagonal, or other specially shaped compact discs.
Some CDs recorded in the CD-R/CD-RW mode may not be usable.
Handling
- Compared to ordinary music CDs, CD-R and CD-RW discs are both easily affected by high temperature and humidity and some CD-R and CD-RW discs may not be playable. Therefore, do not leave them for a long time in the car.
- New discs may
have some roughness around the edges. If su
discs are used, the player may not work or the sound may be ball-point pen or the remove any rough disc.
- Never stick labels on the surface of the compact disc or mark the surface with a pencil or pen.
- Never play a compact disc with any cellophane tape or other glue on it or with peeling off marks. If you try to play such a compact disc,
you may not be able to remove it from the CD player or it may damage the CD player.
- Do not use compact discs that have large scratches, are misshapen, cracked, etc. Use of such discs may cause misoperation or damage.
- To remove a compact disc from its storage case, press down on the centre of the case and lift the disc out, holding it carefully by the edges.
- Do not use commercially available CD protection sheets or discs equipped with stabilizers, etc. These may damage the disc or break the internal mechanism.
Storage
- Do not expose compact discs to direct sunlight or any heat source.
- Do not expose compact discs to excess humidity or dust.
- Do not expose compact discs to direct heat from heaters.
Cleaning
- To remove fingermarks and dust, use a soft cloth and wipe in a straight line from the centre of the compact disc to the circumference.
- Do not use any solvents, such as commercially available cleaners, anti-static spray, or thinner to clean compact discs.
After using special compact disc cleaner, let the compact disc dry off well before playing it.
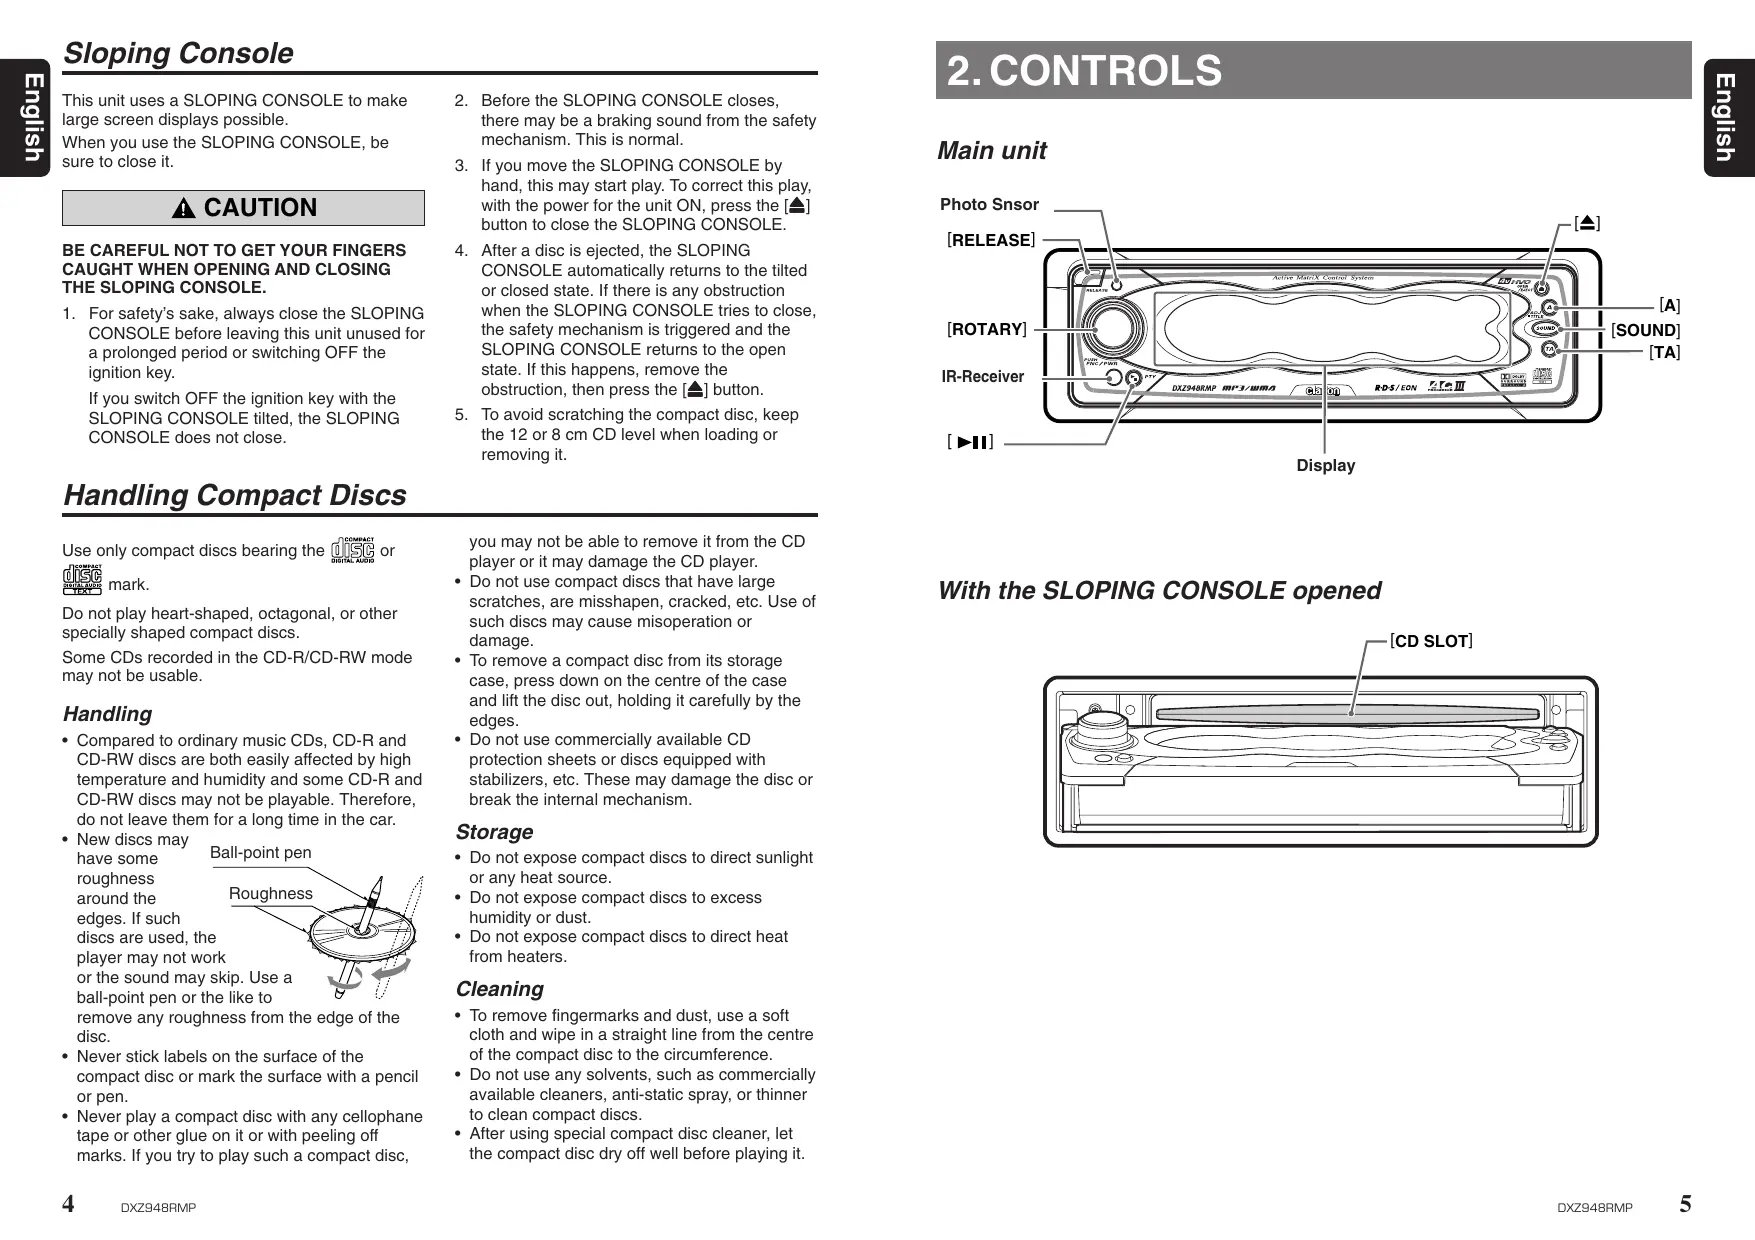
2.CONTROLS
Main unit
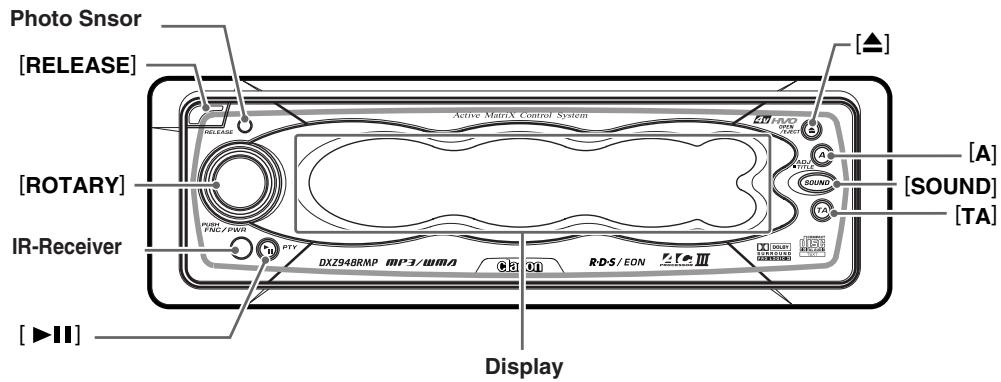
With the SLOPING CONSOLE opened
3. NOMENCLATURE
Names of the Buttons and their Functions
[RELEASE] button
- Remove the DCP.
Photo Sensor
- This sensor detects the brightness inside your car. When the auto-dimmer function is set to "AUTO", the brightness of the display is dimmed according to the brightness detected by this sensor.
[ROTARY] knob
- Press the knob to turn the power ON. Each press of this knob switches the mode.
- Press and hold the knob for 1 second or longer to turn the power OFF.
- This knob can also be turned to adjust the volume, or to adjust the various settings in the adjust mode.
![CLARION DXZ948RMP - [ROTARY] knob - 1](/content/2025/01/95883/images/18909b1ca1225b7c68c8ffafd62893f231162c1c0b490f98dd7f91781f4f7313.jpg)
button
- Opens/closes the control panel.
If a disc is already loaded, it will be ejected when the control panel is opened.
Note:
If the disc is not ejected, hold down the [▲] button for 1 second or longer.
[A] button
- Use this button to set or adjust the various settings in the adjust mode.
- Use this button to enter station names in the radio mode or disc titles in the CD mode.
[SOUND] button
- Use this button for setting or adjusting various settings such as audio space.
- Holding this button down for 1 second or longer also toggles the 2-ZONE function ON and OFF.
[TA] button
- Use the button to set the TA (Traffic Announcement) standby mode (when the 2-ZONE function is "OFF").
Switches the operation of the 2-ZONE function. Holding this button down for 1 second or longer switches the 2-ZONE type (when the 2-ZONE function is "ON").
[▶II] button
- Pauses and unpauses a track (in the CD mode).
- Use the button to set the PTY (Programme Type) standby mode or PTY items.
Display
- Displays the various information that indicates the operating state of this unit such as tuning/ play state and indicators.
- Touch the display with your finger, and touch
to enable operation. (cf. page 8)
Major Button Operations when External Equipment is Connected to this Unit
- When the CD/DVD changer is connected
- For details, see the section "CD changer operations" (cf. page 51). For the DVD changer, refer to the Owner's Manual provided with the DVD changer.
[▶II] button
- Play or pause a CD or DVD.
[A] button
- Used for entering disc titles in the CD changer mode.
- When the TV/DAB is connected
- For details, see the section "TV operations" (cf. page 54) or "Digital Radio / DAB operations" (cf. page 58).
[TA] button
- Use the button to set the TA (Traffic Announcement) standby mode to the DAB mode. (This function is available only for a DAB tuner.)
- Press and hold for 1 second or longer to turn the INFO mode on or off. (in the DAB mode)
[▶II] button
- Switch the TV picture mode or VTR (external) picture mode. (in the TV mode)
- Use the button to set the PTY (Programme Type) standby mode or PTY items in the DAB mode.
[A] button
- This button is used for entering the name of the TV station. (in the TV mode)
![CLARION DXZ948RMP - [A] button - 1](/content/2025/01/95883/images/9943165146c9b2b6fb198a7a062011afd9065e1316c40a6dd191763a3271b751.jpg)
Display Items
Display Operations
A touch panel display is used as the display on this unit. You can operate this display just by touching it with your fingertip. There are four main display operations as follows:
Touch
Touch the display with your fingertip and take it away within 1 second. This is the most basic operation when operating the display.
Touch and hold
Touch the display with your fingertip and hold it on the display for 1 or 2 seconds or longer. Do not move your finger while you are touching the display.
Touching and holding the display for 1 second or longer displays lists, for example, and calls up other handy functions.
Touching and holding the display for 2 seconds or longer is used for storing preset memory or other information.
Touch
#
Touch the display with your fingertip, and move your finger to the left () or right () with your fingertip still touching the display, and take your fingertip away within 1 second. This operation is used for selecting preset memory (1 to 6) or tracks.
Touch
←→
Touch the display with your fingertip, and move your finger to the left () or right () with your fingertip still touching the display, and keep your fingertip on the display. The current operation continues for the time your fingertip is held on the display. This operation is used, for example, for manual tuning or fast-forwarding/fast-backwarding tracks.
4.DCP
The control panel can be detached to prevent theft. When detaching the control panel, store it in the DCP (DETACHABLE CONTROL PANEL) case to prevent scratches.
We recommend taking the DCP with you when leaving the car.
Removing the DCP
- With the SLOPING CONSOLE closed, turn off the power.
- Press the [RELEASE] button deeply to open the DCP.
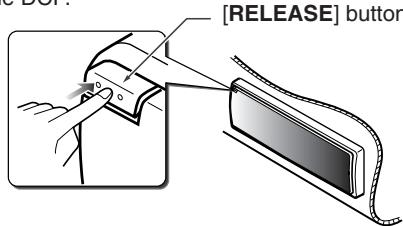
- Pull the DCP toward you and remove it.
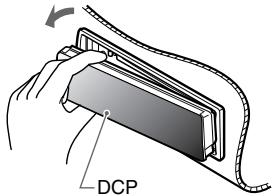
CAUTION
Always close the SLOPING CONSOLE before removing the DCP.
- If you remove the DCP with the SLOPING CONSOLE open, the sloping console closes immediately. Be careful not to get your fingers caught.
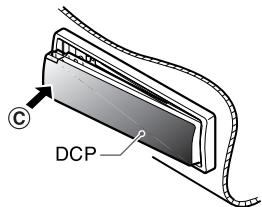
Attaching the DCP
- Insert the DCP so that the A section on the right side of the DCP catches on the hook B on the unit.
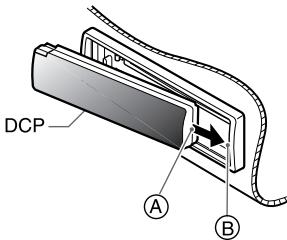
- Press the left side of the DCP carefully to fit it in place.
CAUTION
- The DCP can easily be damaged by shocks. After removing it, be careful not to drop it or subject it to strong shocks.
- If the [RELEASE] button is pressed and the DCP is not locked into place, it may fall out from vibration of the car. This can break the DCP, so after removing it, either install it on the unit or put it in its DCP case.
- The connector connecting the unit and the DCP is an extremely important part. Be careful not to damage it by pressing on it with fingernails, screwdrivers, etc.
Note:
- If the DCP is dirty, wipe off the dirt with a soft, dry cloth only.
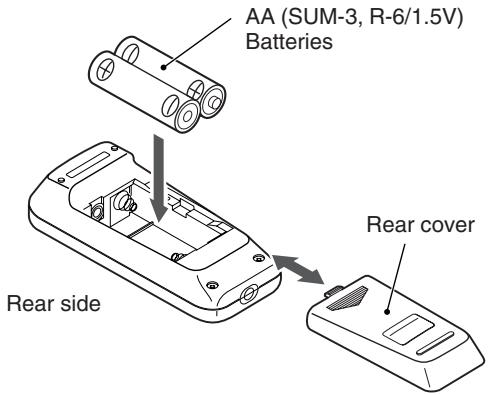
5. REMOTE CONTROL

Inserting the Batteries
- Turn the remote control unit over, then slide the rear cover in the direction of the arrow.
- Insert the AA (SUM-3, R-6/1.5V) batteries that came with the remote control unit facing in the directions shown in the figure, then close the rear cover.
Notes:
Using batteries improperly can cause them to explode. Take note of the following points:
- When replacing batteries, replace both batteries with new ones.
- Do not short-circuit, disassemble or heat batteries.
- Do not dispose of batteries into fire or flames.
- Dispose of spent batteries properly.
Functions of Remote Control Unit Buttons
| Mode Button | Radio (RDS) / DAB | CD/MP3 | CD changer DVD changer | TV |
| [FUNC] | Switches among radio, DAB, CD/MP3, AUX, CD changer, DVD changer and TV. | |||
| [BAND] | Switches reception band. | Plays the first track. Top play. | Moves the next disc in increasing order. | Switches reception band. |
| [▲], [▼] | Increases and decreases volume (in all modes). | |||
| [←], [►] | Moves preset channels up and down. | Moves tracks up and down. When pressed and held for 1 second or longer: Fast-forward/fast-backward. | Moves preset channels up and down. | |
| [►■] | No function. | Switches between playback and pause. | No function. | |
| [MUTE] | Turns mute on and off. | |||
| [TA] | TA on and off. Press and hold the button for 1 second or longer to switch the main and sub zone sound source (only while 2-ZONE mode on). | |||
| [DISP] | Switches among main display, clock (CT) display. | |||
| [PS/AS] | Preset scan. When pressed and held for 2 seconds or longer: Auto store. | Scan play. Press and hold the button for 1 second or longer to perform folder scan play while in the MP3/WMA disc. | Scan play. When pressed and held for 1 second or longer: Disc scan play. | Preset scan. When pressed and held for 2 seconds or longer: Auto store. |
| [AF] | AF function on and off. When pressed and held for 1 second or longer: REG function on and off | Repeat play. Press and hold the button for 1 second or longer to perform folder repeat play while in the MP3/WMA disc. | Repeat play. When pressed and held for 1 second or longer: Disc repeat play. | No function. |
| [PTY] | PTY mode on and off. | Random play. Press and hold the button for 1 second or longer to perform folder random play while in the MP3/WMA disc. | Random play. When pressed and held for 1 second or longer: Disc random play. | Switches between TV and VTR. |
| [2-ZONE] | Press and hold for 1 second or longer to turn on or off the 2-ZONE mode. Press to switch the control zone between main zone or sub zone while 2-ZONE mode on. | |||
- Some of the corresponding buttons on the main unit and remote control unit have different functions.
6. OPERATIONS
Basic Operations
CAUTION
Be sure to lower the volume before switching the unit off or the ignition key. The unit remembers its last volume setting. If you switch the power OFF with the volume up, when you switch the power back ON, the sudden loud volume may hurt your hearing and damage the unit.
Turning ON/OFF the power
Turning on
Note:
- Be careful when using this unit for a long time without running the engine. If you drain the car's battery too far, you may not be able to start the engine and this can reduce the service life of the battery.
- Press the [ROTARY] knob.
The mode that was previously active is displayed.
System check
The first time that this unit is turned on after wire connections are completed, this unit checks which equipment is connected. (This is called the "system check.") When the power is turned ON, and "System Check" is displayed, follow the procedure below to perform the system check.
- When "System Check" appears on the display, press the [ROTARY] knob.
The system check starts.
When the system check is complete,
"Completed" appears on the display.
- Press the [ROTARY] knob again. The main display for the radio mode appears.
CODEMATIC function
When "CODEMATIC" is set to "ON", and the power is turned ON with the DCP attached, the Touch Code display appears. Touch the display in the order that was set in the adjust mode.
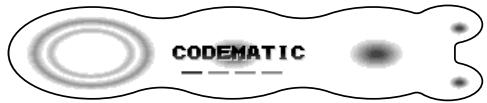
For details on the CODEMATIC function, see "Using the security function (CODEMATIC)" (cf. page 50).
Turning off
- Hold down the [ROTARY] knob for 1 second or longer.
Selecting a mode
- Press the [ROTARY] knob to change the operation mode.
- Each time you press the [ROTARY] knob, the operation mode changes in the following order:
Radio mode DAB mode CD/MP3 mode CD changer mode DVD changer mode TV mode AUX mode Radio mode...
- External equipment not connected with CeNET is not displayed.
Adjusting the volume
-
Turning the [ROTARY] knob clockwise increases the volume; turning it counterclockwise decreases the volume
-
The volume level is from 0 (minimum) to 33 (maximum).
Switching the operation mode
There are 2 basic operation modes: standard operation and simple operation.
- In the main display screen, touch and hold the left of the display for 1 second or longer. The operation mode is switched.

In the simple operation, the operations of touching or in the radio mode or CD mode main display screen are not required, and this unit can be used by performing simple operation.
Note, however, that the following operations are not available in the simple operation.
- Preset tuning, folder selection, disc selection, and other operations that involve touching on the right of the display
- Display switching operations (cf. page 13)
- Title display switching operations (cf. page 14)
- Operations for displaying title entry screens. In screens (e.g. list display, adjust mode, etc.) other than the main display, there is no difference between the standard operation and the simple operation.
Descriptions given in this manual are mainly for the standard operation. For descriptions for operations in the simple operation, refer to the descriptions for the screen displays in the radio mode or the CD mode.
Switching the display
- Touch the centre of the display.
Each time you touch the display, it changes as follows:
Title display
Screen saver
When the screen saver function is set to "ON", and you do not operate this unit for about 30 seconds, the screen saver will be displayed. For details, see page 41.
Wallpaper
Touching and holding the center of the display for 1 second or longer switches to the wallpaper display.
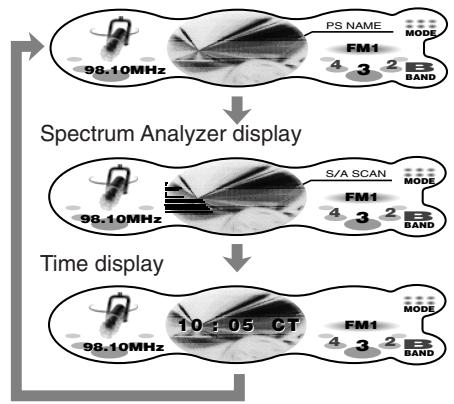
Spectrum analyzer display
Touching and holding the right of the display for 1 second or longer during the spectrum analyzer (S/A) display switches the spectrum analyzer display.
| ① | ⑨ |
| ② | ⑩ |
| ③ | ⑪ |
| ④ | ⑫ |
| ⑤ | ⑬ |
| ⑥ | ⑭ |
| ⑦ | ⑮ |
| ⑧ | ⑯ |
| S/A SCAN | S/A 1, S/A 2, and S/A 3 are displayed for 10 seconds or longer each. |
| S/A 1 | S/A 1 FLDR No. 003 TOP |
| S/A 2 | S/A 2 FLDR No. 003 TOP |
| S/A 3 | S/A 3 FLDR No. 003 TOP |
Switching the title display
You can display disc titles and other information that is stored to discs when playing back CDs in the CD or CD changer modes.
- Touch and hold the right of the display for 1 second or longer in the title display. Each time you touch and hold the display switches the display as follows:
CD-TEXT disc
User title (disc) CD-text title (disc)
Artist name CD-text title (track) User title (disc)...
MP3/WMA disc
Folder File Album TAG Artist TAG Title TAG Folder...
Notes:
- MP3 supports ID3 Tags V2.3 / 2.2 / 1.1 / 1.0.
- Tag displays give priority to V2.3 / 2.2.
In the case of album Tags for WMA, the information written into the extension header is displayed. - Only ASCII characters can be displayed in Tags.
To scroll a title
Touch on the title display while the title is displayed.
The title scrolls to the left.
To stop scrolling
Touch on the title display.
CT (Clock Time) function
The CT allows you to receive CT data sent from an RDS station and display the time. To display the CT screen, touch the centre of the display.
- If CT data is not being received, “---CT” appears in the display.
Note:
- CT data is not transmitted in some countries and by some broadcast stations. Also, in some areas, the CT data may not display accurately.
Setting the ADF
- ADF is the abbreviation of Anti Distortion Filter.
The adopted "Liveliness Enhancement Filter" and "Sound Tone Compensation" functions allow well-modulated realistic playback without affecting the characteristics of the original sound tone.
This unit are provided with 4 types of sound tone effects stored in memory. Select the one you prefer.
ADF-1:Suitable for genuine speakers
ADF-2:Suitable for separate speakers
ADF-3:Suitable for co-axial speakers
USER : This setting can be adjusted by the user to his or her individual preference.
OFF: No sound effect
- The factory default setting for "OFF".
Notes:
- As the volume changes when ADF is switched, switch ADF with the volume and "SW VOLUME" (sub-woofer) and "CTR VOLUME" (center speaker) turned down as far as possible.
- On some speaker systems, sufficient effect sometimes cannot be obtained. If this happens, adjust the ADF parameter or the volume.
-
When ADF is set to "USER", "1", "2" or "3", the VSE function and BASS/TREB function under EQ-SELECT are disabled.
-
Press the [SOUND] button.
- Touch ADF.

- Touch on the right of the display to select the ADF mode.

When ADF is set to "OFF", the ADF setting is not reflected on the music source. This ends the ADF setting. Press the [SOUND] button to return to the original mode.
* Select one of USER, 1, 2, 3, or OFF.
- To change the details of the ADF setting, press the [A] button.
-
Touch on the adjustment item display to select the desired item. Each touch of switches the adjustment item display as follows:
-
Adjustment item (when USER is selected in step 3)
BASS TREBLE COMP BASS...
- Adjustment item (when 1 to 3 is selected in step 3)
LEVEL COMP LEVEL...
-
Touch on the right of the display to adjust the item.
-
"BASS" and "TREBLE" can be adjusted within the range 1 to 13.
- “LEVEL” can be adjusted within the range -3 to +3.
-
Select either "ON" or "OFF" for "COMP".
-
Press the [SOUND] button to return to the original mode.
Adjusting the Sub-woofer and Centre Speaker
- "SW VOLUME" (sub-woofer) can be adjusted only when "SUB-WOOFER" is set to "ON".
- "CTR VOLUME" (centre speaker) can be adjusted only when the Dolby Pro Logic II mode is set to either "MUSIC" or "MATRIX", "SP-SETTING" is set to "CTR+SW" and "CENTER-SP" is set to "ON".
- The factory default setting for SW VOLUME is "0" and for CTR VOLUME is "0".
-
Press the [SOUND] button.
-
Touch A-MODE.

- Touch on the adjustment item display to select "SW VOLUME" or "CTR VOLUME".

- Touch on the right of the display and adjust the item as desired.
- This item can be adjusted within the range -5 to +5.
- Press the [SOUND] button to return to the original mode.
Adjusting balance/fader
BALANCE:
Adjusts the volume balance between the left and right speakers.
FADER:
Adjust the volume balance between the front and rear speakers.
- The factory default setting for BALANCE is "0" and for FADER is "0".
Note:
-
Balance/fader cannot be adjusted when "PRO" is selected at AC-PRO III (cf. page 44) and the position function is set to "ON". Adjust balance/fader by the "Selecting the position menu" (cf. page 17).
-
Press the [SOUND] button.
- Touch A-MODE.

- Touch on the adjustment item display to select "BALANCE" or "FADER".

-
Touch on the right of the display adjust the item as desired.
-
"BALANCE" can be adjusted within the range L13 (left side emphasized) and R13 (right side emphasized).
-
“FADER” can be adjusted within the range R12 (rear side emphasized) and F12 (front side emphasized).
-
Press the [SOUND] button to return to the original mode.
Adjusting bass/treble
The bass/treble mode can be adjusted only when the Dolby Pro Logic II mode is set to "OFF" (cf. page 17) and "EQ SELECT" is set to "BAS/TREB"(cf. page 44).
- The factory default setting is "0".
- Press the [SOUND] button.
- Touch A-MODE.

- Touch on the adjustment item display to select "BASS" or "TREBLE".

- Touch on the right of the display and adjust the item as desired.
- This item can be adjusted within the range -6 to +6.
- Repeat steps 3 and 4 to adjust the desired item.
- Press the [SOUND] button to return to the original mode.
AC-Processor III Operations
Dolby Pro Logic II
Dolby Pro Logic II is a matrix decoding technology in which updated digital matrix technology is applied and Dolby Pro Logic is further improved. Dolby Pro Logic II realizes excellent 5.1 channel reproduction of Dolby surround source as well as stereo sound sources such as CDs, thereby causing a surround channel to be full-ranged (20 Hz to 20 kHz) and become stereo. Therefore, you can enjoy any stereo sources with dynamic sound of 5.1 channel. The Music Mode or Matrix Mode can be selected according to a source to be reproduced.
This product is manufactured under license from Dolby Laboratories. "Dolby", "Pro Logic" and the double-D symbol are trademarks of Dolby Laboratories.
Selecting the PL II menu (Dolby PL II)
Select the MUSIC mode or the MATRIX mode matched the source you are to play as the Dolby Pro Logic II mode.
- The factory default setting is "OFF".
■ MUSIC (music mode)
- This mode is suited for stereo sound sources such as CDs.
- Another adjustment mode that enables more detailed adjustment is also available as the sound field spreads differently depending on the state of the recorded music source. (See page 47)
■ MATRIX (matrix mode)
- This mode is suited for sound sources such as AM/FM radio.
OFF
-
The Dolby Pro Logic II mode is not used, and the AC-PROIII mode is used. For details on the AC-PROIII mode, see "Selecting each mode" (cf. page 44).
-
Press the [SOUND] button.
-
Touch Dolby PLII.
-
Touch on the right of the display to select the Dolby Pro Logic II mode.

The mode display is switched as follows:
MUSIC (music mode) MATRIX (matrix mode) OFF (PL II off) MUSIC (music mode)...
-
For details on the volume adjustment of the centre speaker/sub-woofer, see page 45.
-
Touch RTN.
Selecting the position menu
With POSITION, you can select from 5 types it takes for the sound to arrive from the speaker to your seat position.
Also, the time alignment function allows pinpoint setting of speakers so that the same audio effect can be obtained from each speaker up to all listeners.
In the "Selecting each mode" procedure (cf. page 44), set AC-PROIII to "PRO".
- The factory default setting for POSITION is "OFF" and for the position basic menu is "FRONT".
Position menu
This function is pre-stored with 5 position menus. Select the desired menu to suit your preference.
- Press the [SOUND] button.
- Touch POSITION.


- Touch on the ON/OFF display. The position effect is toggled ON/OFF.

When the position effect is set to "OFF", the position setting is not reflected on the music source. This ends the position setting. Press the [SOUND] button to return to the original mode.
- Touch B/U to select "BASIC".
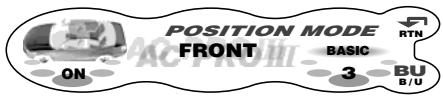
Each touch of B/U toggles between "BASIC" and "USER".
5. Touch on the position basic menu No. to select the position basic menu.
Position basic menu
| No. | Display Name | Seat Position |
| 1 | FRONT-L | Front left seat |
| 2 | FRONT-R | Front right seat |
| 3 | FRONT | Front seats |
| 4 | REAR | Rear seats |
| 5 | FULL SEAT | All seats |
- Press the [SOUND] button to return to the original mode.
Adjusting/storing positions (user memory)
With user memory, pin-point setting of speakers is enabled so that the same audio effect can be obtained from each speaker up to all listeners based upon the position basic menu. Up to 5 adjustment setups can be stored to user memory.
T-ALIGN (time alignment):
The distance from the listener up to each speaker can be entered in 2.3 cm steps, and the time that the sound reaches the listener from each speaker can be adjusted.
SP GAIN (speaker gain):
Adjusts the speaker output level. Adjust so that the volumes that are output from each speaker are all the same.
- Press the [SOUND] button.
- Touch POSITION.
- Touch on the ON/OFF display. The position effect is toggled ON/OFF.
- Touch B/U to select "BASIC" or "USER".
- Touch on the right of the display to select the menu that is used as the menu for adjustment.
- Press the [A] button.
- Touch on the left of the display to select "T-ALIGN" or "SP GAIN".
- Touch 山 on the centre of the display to select each adjustment item. Each touch of 山 switches the adjustment items as follows:
Adjustment items
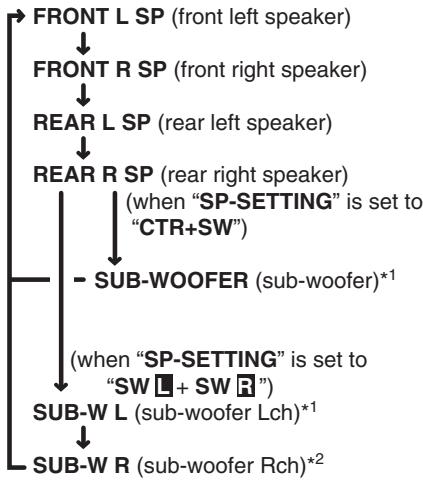
1 This is displayed only when "SUB-WOOFER" under "SOUND" in the adjust mode is set to "ON".
2 This is displayed only when "SUB-WOOFER" under "SOUND" in the adjust mode is set to "ON", and "T-ALIGN" is selected at step 7.
- Touch on the right of the display and adjust the item as desired.

- "T-ALIGN" can be adjusted within the range 0 cm to 501.4 cm in 2.3 cm steps.
-
"SP GAIN" can be adjusted within the range -20dB to 0dB.
-
Repeat steps 7 to 9 to adjust the desired item.
- When you have finished adjusting each item, touch RTN.
The display returns to the original screen, and “>>” is displayed at the BASIC or USER display.
Operation so far completes position adjustment. To continue to store the adjustment values to the position user menu, perform the following.
- Touch and hold RTN for 1 second or longer. The position menu list is displayed.
- Touch and hold the user memory you want to store the adjustment values to for 2 seconds or longer.
You will hear a long beep, and the values you adjusted up to step 10 are stored to the position user menu.
If you hear a short beep, the adjustment values up to step 10 are discarded. Adjust these values again as required.
- Touch RTN.
- Press the [SOUND] button to return to the original mode.
- To select a stored user memory, touch B/U to display "USER" and touch of ⋅ ⋅ on the user memory No.
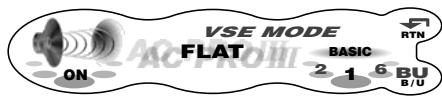
Selecting the VSE menu
VSE (Virtual Space Enhancer) allows you to compensate the sound pressure balance inside your car so that the same sound effect can be obtained whichever seat you are sitting in as proved in compensation simulations.
In the "Selecting each mode" procedure (cf. page 44), set AC-PROIII to "STD".
- The factory default setting for VSE is "OFF" and for the VSE basic menu is "FLAT".
VSE basic menu
Six basic menus are pre-stored to this function. Select the basic menu to suit your preference.
- Press the [SOUND] button.
- Touch VSE.
2-ZONE
OFF
ADE
OFF
A-MODE
- Touch on the ON/OFF display. The VSE effect is toggled ON/OFF.

When VSE is set to "OFF", the VSE setting is not reflected on the music source. This completes the VSE setting. Press the [SOUND] button to return to the original mode.
- Touch B/U to select "BASIC".
Each touch of B/U toggles between "BASIC" and "USER".
- Touch on the VSE basic menu No. to select the desired VSE basic menu.
VSE basic menus
| No. | Function Name | Description |
| 1 | FLAT | Sound source flat equalizing |
| 2 | BASS BOOST | Bass tones enhanced |
| 3 | HIGH BOOST | Mid and treble enhanced |
| 4 | IMPACT | Low and treble enhanced |
| 5 | ACOUSTICAL | Mid tones (human voice) enhanced |
| 6 | SMOOTH | Produces smooth-sounding tones. |
- Press the [SOUND] button to return to the original mode.
Adjusting/storing VSE (user memory)
User memory settings allow you to compensate the sound pressure distribution to suit your preference based upon the VSE basic menu. Up to six user adjustments can be stored.
DIFFUSE:
Adjusts the deviation in diffused sound pressure.
CARWIDTH:
Adjusts the deviation in sound pressure along the width of the car.
CAR LENGTH:
Adjusts the deviation in sound pressure along the length of the car.
- Press the [SOUND] button.
- Touch VSE.
- Touch on the ON/OFF display. The VSE effect is toggled ON/OFF.
- Touch B/U to select "BASIC" or "USER".
- Touch on the right of the display to select the menu that is used as the menu for adjustment.
- Press the [A] button.
- Touch on the adjustment item display to select "DIFFUSE", "CAR WIDTH" or "CAR LENGTH".

- Touch on the right of the display and adjust the item as desired.
- This item can be adjusted within the range 1 to 10.
- Repeat steps 7 and 8 to adjust the desired item.
- When you have finished adjusting each item, touch RTN.
The display returns to the original screen, and is displayed at the BASIC or USER display.
Operation so far completes VSE adjustment. To continue to store the adjustment values to the VSE user menu, perform the following.
-
Touch and hold RTN for 1 second or longer. The VSE user menu list is displayed.
-
Touch and hold the user memory you want to store the adjustment values to for 2 seconds or longer.
You will hear a long beep, and the values you adjusted up to step 9 are stored to the VSE user menu.
If you hear a short beep, the adjustment values up to step 9 are discarded. Adjust these values again as required.
- Touch RTN.
- Press the [SOUND] button to return to the original mode.
- To select a stored user memory, touch B/U to display "USER" and touch ↑ 📦 📦 on the user memory No.
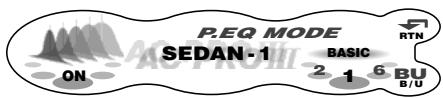
Selecting the P.EQ menu
P.EQ (Parametric Equalizer) allows you to compensate the entire frequency level range in detail by smooth curve using frequency compensation matched to the type of your car. In the "Selecting each mode" procedure (cf. page 44), set EQ SELECT to "P.EQ".
The factory default setting for P.EQ is "OFF" and for the P.EQ basic menu is "SEDAN-1".
P.EQ basic menu
6 types of P.EQ basic menu are pre-stored to this function matched to the type of your car and the speaker mounting position. Select the basic menu to suit you car.
- Press the [SOUND] button.
- Touch P.EQ.

- Touch on the ON/OFF display. The P.EQ effect is toggled ON/OFF.

When the P.EQ effect is set to "OFF", the P.EQ setting is not reflected on the music source. This ends the P.EQ setting. Press the [SOUND] button to return to the original mode.
- Touch B/U to select "BASIC".
Each touch of B/U toggles between "BASIC" and "USER".
- Touch on the P.EQ basic menu No. to select the P.EQ basic menu.
P.EQ basic menu
| No. | Display name | Speaker Mounting position |
| 1 | SEDAN-1 | Front: Front door Rear: Rear parcel |
| 2 | SEDAN-2 | Front: Front door Rear: Rear door |
| 3 | WAGON-1 | Front: Front door Rear: Luggage (side) |
| 4 | WAGON-2 | Front: Front door Rear: Rear door |
| 5 | MINI VAN-1 | Front: Front door Rear: Luggage (side) |
| 6 | MINI VAN-2 | Front: Front door Rear: Rear door |
- Press the [SOUND] button to return to the original mode.
Adjusting/storing P.EQ (user memory)
With user memory, you can compensate the frequency characteristics to suit your car based upon the P.EQ basic menu. Up to 6 adjustment setups can be stored to user memory. For details, see "P.EQ adjustment".
- Press the [SOUND] button.
- Touch P.EQ.
- Touch on the ON/OFF display The P.EQ effect is toggled ON/OFF.
- Touch B/U to select "BASIC" or "USER".
- Touch on the right of the display to select the menu that is used as the menu for adjustment.
- Press the [A] button.
- Touch on the left of the display to select "FRONT" or "REAR".

- Touch on the centre of the display to select each adjustment item.
Each touch of switches the adjustment item as follows:
Adjustment items
BAND FREQ Q GAIN BAND...
-
Touch on the right of the display and adjust the item as desired.
-
"BAND" can be adjusted within the range 1 to 3.
- "FREQ" can be adjusted within the range 20Hz to 20kHz.
- Select one of 1, 3, 5, 7, or 20 as “Q”.
-
"GAIN" can be adjusted within the range -12dB to +12dB.
-
Repeat steps 7 to 9 to adjust the desired item.
-
When you have finished adjusting each item, touch RTN.
The display returns to the original screen, and is displayed at the BASIC or USER display.
Operation so far completes P.EQ adjustment. To continue to store the adjustment values to the P.EQ user menu, perform the following.
-
Touch and hold RTN for 1 second or longer. The P.EQ menu list is displayed.
-
Touch and hold the user memory you want to store the adjustment values to for 2 seconds or longer.
You will hear a long beep, and the values you adjusted up to step 10 are stored to the P.EQ user menu.
If you hear a short beep, the adjustment values up to step 10 are discarded. Adjust these values again as required.
-
Touch RTN.
-
Press the [SOUND] button to return to the original mode.
-
To select a stored user memory, touch B/U to display "USER" and touch ↑ 📦 📦 on the user memory No.
P.EQ adjustment
The settings that can be adjusted in the P.EQ menu are as follows. The centre frequency, gain and Q curve can be stored to channel/band combinations.
For example, centre frequency "250Hz", gain "-8dB" and Q curve "3" can be stored to band on the front.
FRONT/REAR (channel selection)
Selects the channel (front or rear) to adjust.
BAND (band selection)
Selects the frequency band (1 to 3) to adjust. Set the centre frequency (FREQUENCY), gain (GAIN) and Q curve (Q) for each frequency band.
FREQUENCY (centre frequency selection)
Selects the frequency to be used as the centre of the frequency band to be compensated from the range 20Hz to 20kHz. (1/3 octave steps, 31 points)
GAIN (gain adjustment)
Adjusts the gain (output level) within the range
-12dB to +12dB.
(1dB steps, 25 points)
Q (Q curve selection)
Sets one of 1, 3, 5, 7, or 20 as the sharpness of the Q curve.
Compensation
There is no need to compensate frequency characteristics if they are flat (no peaks or valleys) when you have measured the frequency characteristics with a measuring device. However, sometimes the frequency characteristics rise or fall in some places. If this happens, the frequency characteristics must be compensated. Create a frequency curve having characteristics that are opposite to the centre frequency of parts where the characteristics rise and fall to cancel out these peaks and values, and make the frequency characteristics as flat as possible.
Making the frequency characteristics as flat as possible is called "compensation."
On this unit, frequency characteristics can be compensated by P.EQ (Parametric Equalizer).
Compensation of frequency characteristics
The figure below shows the relationship between the centre frequency, gain and Q curve.
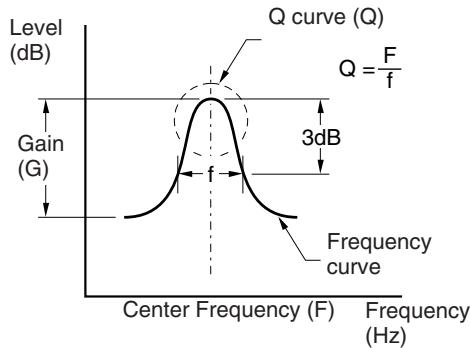
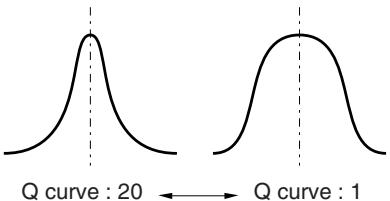
Q curve
The Q curve becomes sharper when the numerical value is increased, and smoother when the numerical value is decreased.
Flat frequency characteristics can be made by selecting a Q curve opposite to that of the curve to be compensated.
Q curve : (Q)
F: Centre frequency, G: Gain (output level), Q: Q curve
| No.(car type) | Parametric Equalizer Parameters | |||||||||
| Channel | Band 1 | Band 2 | Band 3 | |||||||
| F | G | Q | F | G | Q | F | G | Q | ||
| 1(SEDAN-1) | Front | 250 Hz | -8 dB | 3 | 2 kHz | -4 dB | 1 | 5 kHz | -4 dB | 1 |
| Rear | 250 Hz | -10 dB | 3 | 1.25 kHz | 0 dB | 5 | 8 kHz | 0 dB | 5 | |
| 2(SEDAN-2) | Front | 250 Hz | -10 dB | 7 | 800 Hz | -4 dB | 3 | 8 kHz | -5 dB | 1 |
| Rear | 80 Hz | 3 dB | 7 | 125 Hz | -12 dB | 5 | 1.25 kHz | 0 dB | 5 | |
| 3(WAGON-1) | Front | 250 Hz | -8 dB | 3 | 1 kHz | -8 dB | 3 | 10 kHz | -6 dB | 1 |
| Rear | 250 Hz | -8 dB | 3 | 800 Hz | -8 dB | 1 | 8 kHz | 0 dB | 5 | |
| 4(WAGON-2) | Front | 250 Hz | -8 dB | 7 | 400 Hz | -10 dB | 7 | 1.25 kHz | -8 dB | 7 |
| Rear | 125 Hz | -8 dB | 3 | 500 Hz | -5 dB | 5 | 1.6 kHz | 0 dB | 3 | |
| 5(MINI VAN-1) | Front | 125 Hz | -4 dB | 5 | 1.25 kHz | -4 dB | 3 | 2 kHz | 3 dB | 7 |
| Rear | 250 Hz | -6 dB | 1 | 630 Hz | -4 dB | 3 | 8 kHz | 0 dB | 5 | |
| 6(MINI VAN-2) | Front | 250 Hz | -4 dB | 3 | 1.25 Hz | -8 dB | 3 | 80 Hz | 3 dB | 3 |
| Rear | 250 Hz | -8 dB | 3 | 500 Hz | -5 dB | 5 | 8 kHz | 0 dB | 5 | |
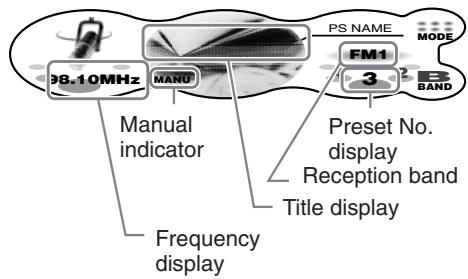
Radio Operations
Screen displays in the radio mode
Main display
This is displayed by pressing the [ROTARY] knob and selecting the radio mode.
Touching the left of the display for 1 second or longer switches the simple operation display.
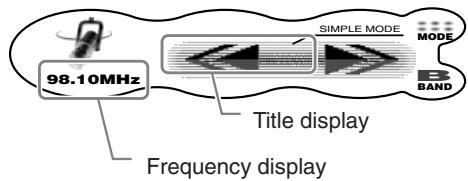
Frequency display
The frequency currently being received is displayed.
Touching or the in the standard operation display allows you to perform seek tuning or manual tuning.
Title display
Displays the name of the broadcast channel currently being received. Touching this name switches the display.
Reception band display
AM: AM band name
FM1: FM band name
Preset No. display
Touching in the standard operation display selects a preset memory.
MODE
Touching this displays sub-functions. Touching and holding this for 1 second or longer displays the preset memory list.
P-SCAN:
This is displayed during a preset scan.
Touching this ends the preset scan.
A-STORE:
This is displayed during an auto store.
Touching this ends auto store.
BAND
Touching this switches the reception band. Touching and holding this for 1 second or longer switches between the manual tuning mode and the seek tuning mode.
(only in the simple operation display)
Touching these enables seek tuning or step tuning (in the manual tuning mode).
Touching and holding these enables quick tuning (in the manual tuning mode).
■ Preset memory list display
This is displayed when MODE is touched and held for 1 second or longer in the main display.
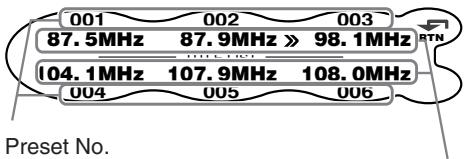
Station name (or frequency)
: Tuning in progress
RTN: Touch this to return to the main display.
Listening to the radio
- Press the [ROTARY] knob to select the radio mode.
Each press of the [ROTARY] knob switches the mode as follows:
Radio (DAB) CD / MP3 (CD Changer) (DVD Changer) (TV) AUX Radio...
-
The mode of equipment that is not connected is not displayed.
-
Touch BAND to switch the reception band. Each touch of BAND switches the reception band as follows:
FM1 FM2 FM3 AM (MW / LW) FM1...
Tuning
There are 3 types of tuning mode available, seek tuning, manual tuning and preset tuning.
Seek tuning
There are 2 types of seek tuning: DX SEEK and LOCAL SEEK.
DX SEEK can automatically tune in to receivable broadcast stations, while LOCAL SEEK can tune in to only broadcast stations with good reception sensitivity.
-
Touch BAND to select the desired band (FM or AM (MW, LW)).
-
Tune into a station.
-
When MANU is displayed, touch and hold BAND for 1 second or longer. "MANU" in the display goes off and seek tuning is now available.
- If "TA" is lit in the display, TP stations are automatically sought.
DX SEEK
When 山 is touched in the frequency display, automatic tuning starts.
When is touched, the station is sought in the direction of higher frequencies; when is touched, the station is sought in the direction of lower frequencies.
- When seek tuning starts, "DX SEEK" appears in the display.
LOCAL SEEK
When is touched in the frequency display, local seek tuning is carried out. Broadcast stations with good reception sensitivity are selected.
- When local seek starts, "LO SEEK" appears in the display.
Manual tuning
There are 2 ways available: quick tuning and step tuning.
In the step tuning mode, the frequency changes 1 step at a time. In the quick tuning mode, you can quickly tune the desired frequency.
- Touch and hold BAND for 1 second or longer while MANU is not displayed. Manual tuning is possible when MANU is displayed.
- Operate the frequency display to tune to a frequency on which there is a broadcast.
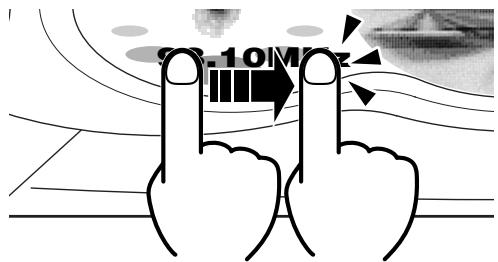
Step tuning
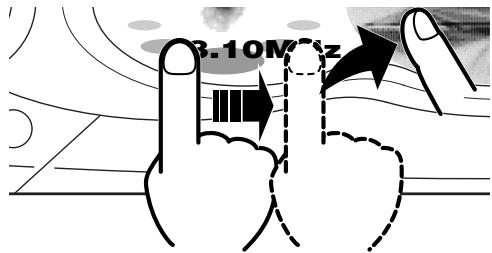
Touch on the frequency display.
Quick tuning
Touch on the frequency display. Tuning stops when you take your finger away from the panel.
Recalling a preset station
Recalling a preset station is a function for tuning pre-stored stations.
- Touch and hold MODE for 1 second or longer. The preset memory list is displayed.
-
Touch the station you want to listen to.
-
In the normal mode, preset No. can also be tuned by touching ↑ 📁 in the main display.
To cancel tuning
- Touch RTN.
Preset memory
A total of 24 preset positions (6-FM1, 6-FM2, 6-FM3, 6-AM) exists to store individual radio stations in memory.
- Touch BAND to switch the reception band.
- Operate the frequency display to store the station to.
- Touch and hold MODE for 1 second or longer. The preset memory list is displayed.
- Touch and hold the preset No. to store the station to for 2 seconds or longer. You will hear a long beep, and the station is stored in memory.
Auto store
Auto store is a function for storing up to 6 stations that are automatically tuned in sequentially.
- Touch MODE.
- Touch and hold A-STORE for 2 seconds or longer. The MODE display changes to "A-STORE" and the preset No. in the auto-store operation appears on the preset No. display.
- Stations with good reception are automatically searched, and are stored to preset memory (No.1 to No.6) in order from the station having the lowest frequency.
Notes:
- When auto store is performed, stations stored to memory so far are cleared.
- When there are fewer than 6 stations with good reception in LOCAL SEEK, low frequencies are automatically returned to, and auto store is performed again by DX SEEK. If there are fewer than 6 stations even after auto store is performed twice, stations stored so far remain in memory.
- If auto store is performed in the FM bands, the stations are stored in FM3 even if FM1 or FM2 was chosen for storing stations.
Preset scan
Preset scan is a function for receiving stations in the order that they are currently stored to preset No. so that broadcasts can be checked.
- Touch MODE.
- Touch P-SCAN.
The MODE display changes to "P-SCA and the preset No. in the preset scan operation is displayed in the preset No. display.
- The currently stored stations are received in order for 7 seconds or longer each. Stations with poor reception are skipped, and the next station is received. When preset scan is performed in an FM broadcast, FM stations are received as follows:
$$ \begin{array}{l} \text {F M 1 (1 \to 6) \to F M 2 (1 \to 6) \to F M 3 (1 \to} \ 6)... \end{array} $$
When preset scan is performed in an AM broadcast, AM stations are received as follows:
$$ A M (1 \rightarrow 6) \rightarrow A M (1 \rightarrow 6) a n d s o f o r t h. $$
To cancel preset scan
- Touch P-SCAN.
The P-SCAN display changes to "MODE", and the stations that were being received when P-SCAN was touched are received next.
RDS (Radio Data System)
This unit has a built-in RDS decoder system that supports broadcast stations transmitting RDS data.
This system can display the name of the broadcast station being received (PS), and can automatically switch to the broadcast station with the best reception as you move over long distances (AF switching).
If a traffic announcement or programme type is broadcasted from an RDS station, this broadcast is received no matter what mode you are in.
Also, if EON information is received, this information enables automatic switching of other preset stations on the same network and interruption of the station being received with traffic information from other stations (TP). This function is not available in some areas.
When using the RDS function, always set the radio to the FM mode.
- AF: Alternative Frequency
- PS: Programme Service Name
- PTY: Programme Type
- EON: Enhanced Other Network
- TP: Traffic Programme
PI: Programme Identification -
TA : Traffic Announcement
-
RDS interrupt does not function during AM radio reception.
- When this unit receives the RDS signal, and can read PS data, PS appears in the display.
AF function
The AF function switches to a different frequency on the same network in order to maintain optimum reception.
- The factory default setting is "ON".
To switch the AF function ON/OFF
- Touch MODE.
- Touch AF.
Each touch toggles the display on AF between "ON" and "OFF".
-
Touch RTN.
-
If the reception of the current broadcast station deteriorates, "SEARCH" appears in the display, and the radio searches for the same programme on another frequency.
AF function between RDS and DAB
When the same programme is broadcasted by both RDS and DAB, and this function is ON, this unit automatically switches to receive the broadcast with the better reception.
- This function only operates when the DAH923 or DAH913 DAB unit (Optional) is connected.
-
This factory default setting is "ON".
-
Press the [A] button to set the adjust mode.
- Touch on the setting item display to select "LINK ACT" under "TUNER".

- Either touch on the right of the display, or turn the [ROTARY] knob to select either "ON" or "OFF".
ON:
AF switching between DAB and RDS is enabled.
OFF:
AF switching between DAB and RDS is disabled.
- Press the [A] button to return to the previous mode.
REG (Regional programme) function
When the REG function is ON, the optimum regional station can be received. When this function is OFF, the optimum station for that region is received if the regional station area switches as you drive.
- The factory default setting is "OFF".
Notes:
- This function is disabled when a national station such as BBC R2 is being received.
- The REG function ON/OFF setting is valid when the AF function is ON.
To switch the REG function ON/OFF
- Touch MODE.
- Touch REG.
Each touch toggles the display on REG between "ON" and "OFF".
3. Touch RTN.
Manually tuning a regional station in the same network
- This function is valid when the AF function is ON.
- The operation differs according to the ON/OFF setting of the REG function. When the REG function is ON, broadcasts having a perfectly matching PI code can be received. When the REG function is OFF, broadcasts of the same type of PI code can be received.
Notes:
This function can be used when a regional broadcast of the same network is received.
- The PI code is a coding system that is unique to each broadcast station.
- Touch and hold MODE for 1 second or longer.
The preset memory list is displayed. - Touch the preset No. of the broadcast to be received.
TA (Traffic Announcement)
When a traffic announcement broadcast starts in the TA standby mode, the traffic announcement broadcast is received as top priority regardless of the function mode so you can listen to it. Traffic programme (TP) automatic tuning is also possible.
- This function can only be used when "TP" is lit in the display. When "TP" is lit, this means that the RDS broadcast station being received has traffic announcement programmes.
To set the TA standby mode
If you press the [TA] button when only "TP" is lit in the display, "TP" and "TA" light in the display, and this unit is set to the TA standby mode until a traffic announcement is broadcast. When a traffic announcement broadcast starts, "TRA INFO" appears in the display. If you press the [TA] button while a traffic announcement broadcast is being received, the traffic announcement broadcast reception is cancelled and this unit enters the TA standby mode.
To cancel the TA standby mode
With "TP" and "TA" lit in the display, press the [TA] button. "TA" in the display goes off and the TA standby mode is cancelled.
- If "TP" is not lit, pressing the [TA] button searches for a TP station.
To search for a TP station
If you press the [TA] button when "TP" is not lit, "TA" in the display lights and this unit automatically receives a TP station.
Note:
- When a TP station cannot be received, "TP SEEK" is displayed, and the search for the TP station is continued. When the [TA] button is pressed again, "TA" and "TP SEEK" in the display go off, and the search for the TP station ends.
Auto store function for TP stations
You can automatically store up to 6 TP stations to preset memory. If the number of TPs that can be received is less than 6, broadcast stations already stored in memory are left without being overwritten.
- Make sure that "TA" is displayed, and touch MODE.
If "TA" is not displayed, press the [TA] button to display "TA". - Touch and hold A-STORE for 2 seconds or longer.
The MODE display changes to "A-STORE" and the preset No. in the auto-store operation appears on the preset No. display. - TP stations with good reception sensitivity are stored to preset memory.
- Even if you select FM1 or FM2, a TP station is stored to memory for FM3.
PTY
This function enables you to listen to a broadcast of the selected programme type even if this unit is in a function mode other than radio.
- Some countries do not yet have PTY broadcast.
- In the TA standby mode, a TP station has priority over a PTY broadcast station.
To set the PTY standby mode
When you press the [▶II] button, "PTY" lights in the display and the PTY standby mode is turned on. When the selected PTY broadcast starts, the PTY item name appears in the display.
To cancel the PTY standby mode
Press and hold the [▶II] button for 1 second or longer. "PTY" goes off in the display and the PTY standby mode is cancelled.
To cancel a PTY interrupt broadcast
Press the [▶][ ] button during the PTY interrupt broadcast. The PTY interrupt broadcast is cancelled and this unit returns to the PTY standby mode.
Selecting PTY
- When you press the [▶■] button, this unit enters the PTY select mode.
- Either touch on the right of the display, or turn the [ROTARY] knob to select PTY.
- Below are the factory default settings stored:
| Preset number | PTY item | |
| ENGLISH | Contents | |
| 001 | News | News |
| 002 | Info | Information |
| 003 | Pop M | Pop Music |
| 004 | Sport | Sport |
| 005 | Classics | Serious Classical Music |
| 006 | Easy M | Easy Listening Music |
- The PTY select mode is cancelled automatically 7 seconds after, or touch RTN a PTY is selected.
PTY seek
- When you press the [▶][] button, the PTY select mode is turned on.
- Either touch on the centre of the display, or turn the [ROTARY] knob to select PTY.
- Touch on the left of the display. When is touched, this unit seeks a PTY broadcast moving up the frequencies, while when is touched it seeks moving down the frequencies.
- If no station with the selected PTY broadcast can be received, this unit returns to the previous mode.
PTY preset memory
- When you press the [▶][] button, the PTY select mode is turned on.
- Touch on the centre of the display to select PTY. The 29 PTY types in the table below can be selected.
| PTY item | ||||
| ENGLISH | DEUTSCH | SVENSKA | FRANÇAIS | Contents |
| News | Nachrich | Nyheter | Infos | News |
| Affairs | Aktuell | Aktuellt | Magazine | Today's events |
| Info | Service | Info | Services | Information |
| Sport | Sport | Sport | Sport | Sports |
| Educate | Bildung | Utbildn | Educatif | Education |
| Drama | Hör + Lit | Teater | Fiction | Drama |
| Culture | Kultur | Kultur | Culture | Culture |
| Science | Wissen | Vetenskp | Sciences | Science |
| Varied | Unterh | Underh | Divers | Variety |
| Pop M | Pop | Pop | M Pop | Pop music |
| Rock M | Rock | Rock | M Rock | Rock music |
| Easy M | U-Musik | Lättlyss | Chansons | Easy music |
| Light M | L-Musik | L klass | M Cl Lég | Light music |
| Classics | E-Musik | Klassik | Classiq | Classics |
| Other M | - - Musik | Övrig m | Autre M | Other music |
| Weather | Wetter | Väder | Météo | Weather |
| Finance | Wirtsch | Ekonomi | Economie | Finance |
| Children | Kinder | För barn | Enfants | For children |
| Social | Soziales | Sozialt | Société | Social |
| Religion | Religion | Andligt | Religion | Religion |
| Phone In | Anruf | Telefon | Forum | Phone in |
| Travel | Reise | Resor | Voyages | Travel |
| Leisure | Freizeit | Fritid | Loisirs | Leisure |
| Jazz | Jazz | Jazz | Jazz | Jazz |
| Country | Country | Country | Country | Country |
| Nation M | Landes M | Nation m | Ch pays | Nation music |
| Oldies | Oldies | Oldies | Rétro | Oldies |
| Folk M | Folklore | Folkm | Folklore | Folk music |
| Document | Feature | Dokument | Document | Documentaries |
- Touch RTN for 1 second or longer. The PTY memory title list is displayed.
- Touch and hold the preset No. to be stored for 2 seconds or longer. You will hear a long beep, and the selected PTY is stored to that preset channel memory.
Emergency broadcast
If an emergency broadcast is received, all function mode operations are stopped, "ALARM" appears in the display, and the emergency broadcast can be heard.
To cancel an emergency broadcast
If you press the [AF] button, emergency broadcast reception is cancelled.
Switching the PTY display language
You can select one of 4 languages (English, German, Swedish or French) for the PTY displayed in the display.
The factory default setting is "ENGLISH".
1. Press the [A] button to set the adjust mode.
2. Touch on the setting item display to select "LANGUAGE" under "TUNER".

- Either touch on the right of the display, or turn the [ROTARY] knob to select the language.
- Select one of ENGLISH, DEUTSCH (German), SVENSKA (Swedish) or FRANÇAIS (French).
- Press the [A] button to return to the previous mode.
Setting RDS interrupt when the 2-ZONE function is used (RDS-INT 2Z)
When this function is set to "ON", and there is an RDS interrupt while the 2-ZONE function is in use, RDS information can be received.
- When there is an RDS interrupt, the 2-ZONE function turns "OFF".
- If there was an alarm interrupt even with "RDS-INT 2Z" set to "OFF", the RDS information is received.
- The factory default setting is "ON".
- Press the [A] button to set the adjust mode.
- Touch 卡 on the setting item display to select "RDS-INT 2Z" under "TUNER".

- Either touch on the right of the display, or turn the [ROTARY] knob to select either "ON" or "OFF".
ON:
RDS information is received when there is an RDS interrupt while the 2-ZONE function is in use.
OFF:
When the 2-ZONE function is in use, RDS information other than the alarm interrupt is not received.
Note:
-
If Radio mode is selected when TA (Traffic Announcement) and PTY are turned "ON", the interrupts are received even if RDS Interrupt is turned "OFF".
-
Press the [A] button to return to the previous mode.
Volume setting of TA, emergency broadcast (ALARM) and PTY
The volume for TA, ALARM and PTY interrupt broadcasts can be set during TA, ALARM or PTY interrupt broadcast.
- The factory default setting is "15".
During a TA, ALARM or PTY interrupt broadcast, turn the [ROTARY] knob clockwise or counterclockwise to set the volume to the desired level (0 to 33).
- When the TA, ALARM or PTY interrupt broadcast ends, the volume returns to the level that was active before the interrupt broadcast.
Screen displays in the CD mode
Main display
This is displayed by pressing the [ROTARY] knob to select the CD mode.
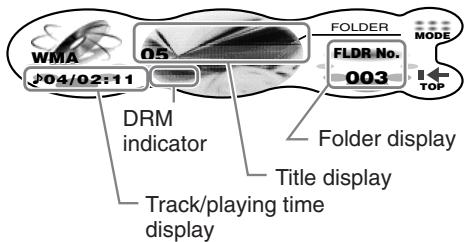
Touching the left of the display for 1 second or longer switches the operation mode.
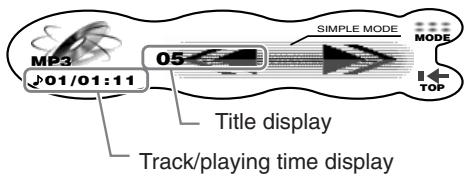
Track/playing time display
J01/02:00:
The track No. being played and the playing time are displayed.
If or is touched in the standard operation, you can select the track to play, or fast-forward or fast-backward tracks.
Title display
The display is switched when this display is touched.
Folder display (in the case of MP3/WMA)
Touching in the standard operation selects folders.
MODE:
Touching this displays sub-functions. Touching and holding this in the case of MP3/WMA for 1 second or longer displays the folder list.
Note:
- This function is enabled only when a disc is playing.
-SCAN: -SCAN: This is displayed during scan play. Touching this ends scan play.
-RPT/RPT: This is displayed during repeat play. Touching this ends repeat play.
- RDM/RDM: This is displayed during random play. Touching this ends random play.
TOP:
Touching this starts play from the track at the top of the disc or folder being played.
(only in the simple operation display)
Touching these buttons selects the track to play. Touching and holding these buttons fast-forwards or fast-backwards tracks.
Folder list display (in the case of MP3/WMA)
This is displayed by touching and holding MODE for 1 second or longer in the main display.

Folder name
Folder No.
When this is displayed in gray, the folder cannot be selected.
>>: Selection in progress
Touching a folder name returns the screen to the main display, and play starts from the first track in the folder you touched.
Touching this displays the previous folder list. Touching and holding this for 1 second or longer returns the screen to the main display.
NEXT:
Touching this displays the next folder list.
What is MP3?
MP3 is an audio compression method and is classified as audio layer 3 of the MPEG standard.
This audio compression method has gained ground into PC users and Become a standard format.
This MP3 features original audio data compression to about 10 percent of its initial size while keeping high sound quality intact. This means that about 10 music CDs can be recorded on a CD-R disc or CD-RW disc to allow a long listening time without having to change CDs.
What is WMA?
WMA is the abbreviation of Windows Media Audio, an audio file format developed by Microsoft Corporation.
Notes:
- If you play a file with DRM (Digital Rights Management) for WMA remaining ON, no audio is output. (The WMA indicator blinks)
- Windows Media™, and the Windows® logo are trademarks, or stored trademarks of Microsoft Corporation in the United States and/or other countries.
To disable DRM (Digital Rights Management):
- When using Windows Media Player 8, click on TOOLS OPTIONS COPY MUSIC tab, then under COPY SETTINGS, unclick the check box for PROTECT CONTENT. Then, reconstruct files.
- When using Windows Media Player 9, click on TOOLS OPTIONS MUSIC record tab, then under COPY SETTINGS, unclick the check box for PROTECT CONTENT. Then, reconstruct files.
Personally constructed WMA files are used at your own responsibility.
Precautions when creating an MP3/WMA disc
- Usable sampling rates and bit rates:
1. MP3: Sampling rate: 11.025 kHz to 48 kHz Bit rate: 8 kbps to 320 kbps / VBR
2. WMA: Bit rate 48 kbps to 192 kbps
- File extensions
1. Always add a file extension“.MP3” or“.WMA” to an MP3 or WMA file by using single byte letters. If you add a file extension other than specified or forget to add the file extension, the file cannot be played.
2. Files without MP3/WMA data will not play. The indication "--: --" appears in the playing time display if you attempt to play files without MP3/WMA data.
- Logical format (File system)
1. When writing an MP3/WMA file on a CD-R disc or CD-RW disc, please select "ISO9660 level 1, 2 or JOLIET or Romeo" as the writing software format. Normal play may not be possible if the disc is recorded on another format.
2. The folder name and file name can be displayed as the title in the case of MP3/WMA play but the title must be within 128 single byte alphabetical letters and numerals (including an extension).
3. Do not give a name to a file inside a folder having the same name.
- Folder structure
1. A disc with a folder having more than 8 hierarchical levels is not allowed.
Number of files or folders
1. Up to 255 files can be recognized per folder.
Up to 500 files can be played.
2. Tracks are played in the order that they were recorded onto a disc. (Tracks might not always be played in the order displayed on the PC.)
3. Some noise may occur depending on the type of encoder software used while recording.
Multi-session selection
This function allows you to select either CD-DA or MP3/WMA files in the case of discs (e.g. CD-EXTRA) containing a mixture of CD-DA (music CD) and MP3/WMA files.
1. Touch MODE.
2. Touch M-SESS.
Each touch of M-SESS toggles the M-SESS display between "CD" (play CD-DA) or "MP3/WMA" (play MP3/WMA).
* If M-SESS is not displayed, touch NEXT.
3. Touch RTN.
The multi-session selection setting is reflected the next time you load a CD.
Note:
- When playing a CCCD (Copy Control CD), set the setting to CD type. When this is set to MP3/WMA type, the cannot be playing normally in some cases.
CAUTION
Be careful not to catch your hand or fingers while closing the SLOPING CONSOLE.
Notes:
- If the SLOPING CONSOLE does not open fully, gently open with your hand.
After loading a CD, always close the SLOPING CONSOLE.
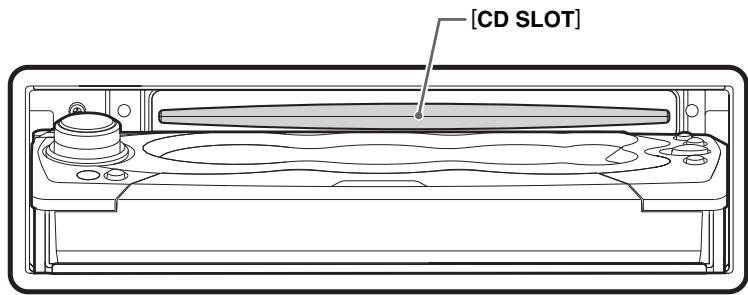
- Do not try to put your hand or fingers in the CD SLOT. Also never insert foreign objects into the slot.
- Do not load discs where adhesive comes out from cellophane tape or a rental CD label, or discs with marks where cellophane tape or rental CD labels were removed. It may be impossible to eject these discs from the unit and they may cause the unit to break down.
Loading a CD
1. Press the [A] button.
The control panel opens.
2. Load the disc into the CD SLOT.
When the disc is loaded, the control panel automatically closes after several seconds, and play starts.
Notes:
- Never insert foreign objects into the CD SLOT.
- If the CD is not loaded easily, there may be another CD in the mechanism or the unit may require service.

or mark and
CD-ROMs cannot be played by this unit.
- Some CDs recorded in the CD-R/CD-RW mode may not be usable.
Loading 8 cm compact discs
No adapter is required to play an 8 cm CD. Load the 8 cm CD into the centre of the CD SLOT.
Ejecting a CD
You can eject a disc by pressing the [▲] button even if the engine key or ACC is at the OFF position.automatically.
CAUTION
When the disc is ejected, press the [▲] button to close the control panel. If the control panel is left open, You will hear a double beep, and the control panel automatically closes.
1. Press the [▲] button.
The control panel opens, and the disc is ejected. The mode automatically switches to the radio mode.
* Be sure to remove ejected discs from this unit. If you leave the disc in the disc tray, it is pulled back into the unit after 15 seconds or longer, and the control panel closes. (auto reload function)
* Single CDs are not auto-loaded. Be sure to remove single CDs after ejecting them
CAUTION
If you use excessive force to load a disc after it has been ejected, the surface of the disc may become scratched. Remove the disc before loading it again.
Listening to a disc already loaded in the unit
1. Press the [ROTARY] knob to select the CD mode.
* Play automatically starts when the mode changes to the CD mode.
Pausing play
1. Press the [▶■] button.
To resume play
1. Press the [▶][] button again.
Selecting a track
When a CD-R/CD-RW recorded with an MP3 file or a WMA file is loaded, you can select only tracks recorded to the same folder by touching on the track display.
1. To listen to the next track, touch on the track display.
2. To listen to the previous track, touch twice on the track display. Touching plays the next track. If you touch more times, the track advances ahead to the track for the number of times you touched and that track is played. Touching plays the previous track. If you touch more times, zthe track moves back to the track for the number of times you touched and that track is played. * If you touch twice on the track display while the start of the track is being played, the track 2 tracks back is sometimes played.
To select a folder
To select a different folder, either touch on the folder display, or perform the following.
1. Touch and hold MODE for 1 second or longer. The folder list is displayed. Touching PREV or NEXT displays the previous or next part of the folder list.
2. Touch the folder name.
To play the play list
Play lists (M3U file) also can be played. Note, however, that of M3U files currently saved down to five layers (including the root) in the file hierarchy, only the top 5 files having new file timestamps can be played.
Notes:
- Up to 255 files can be played in a single play list.
- Only MP3 or WMA files currently saved to folders down to five layers (including the root) in the file hierarchy can be played.
Perform the following to play the play list.
1. Touch MODE.
2. Touch NEXT.
3. Touch PLY LIST. Reading of the play list starts. When reading of the play list ends, the play list having the newest timestamp starts automatically. The operation of selecting the play list or tracks in the play list is the same as that of selecting a folder or tracks in a folder. *PLY LIST is not displayed when a correct play list (M3U file) is not saved on the CD-R/CD-RW loaded on the unit.
Stopping play of play list
1. Touch MODE.
2. Touch NEXT.
3. Touch PLY LIST.
Fast-forward/Fast-backward
1. To fast-forward, touch on the track display.
2. To fast-forward, touch on the track display.
Top function
The top function resets the CD player to the first track of the disc.
1. Touch TOP. Play starts from the first track (track No.1). In case of MP3/WMA, the first track of a folder being played will be returned.
Scan play
This function allows you to locate and play the first 10 seconds of all the tracks recorded on a disc.
1. Touch MODE.
2. Touch -SCAN. The MODE display changes to "F-SCAN" and scan play starts.
* Scan play starts from the next track after the track currently being played.
To cancel scan play
1. Touch -SCAN. The -SCAN display changes to "MODE", and the track that was playing when you touched -SCAN is played.
Folder scan play
This function allows you to locate and play the first 10 seconds of the first track of all the folders on an MP3/WMA disc.
1. Touch MODE
2. Touch -SCAN. The MODE display changes to "SCAN" and folder scan play starts. * Folder scan play starts from the folder following the folder that is playing.
To cancel folder scan play
1. Touch -SCAN. The -SCAN display changes to "MODE", and the track that was playing when you touched -SCAN is played.
Repeat play
This function allows you to play the current track repeatedly.
1. Touch MODE
2. Touch -REPEAT. The MODE display changes to "RPT" and repeat play is started.
To cancel repeat play
1. Touch -RPT. The -RPT display changes to "MODE", and regular play starts from the track that was playing when you touched -RPT.
Folder repeat play
This function allows you to repeatedly play the folder currently being played. This function is available only when a CD-R/CD-RW recorded with MP3 files or WMA files is loaded.
1. Touch MODE.
2. Touch -REPEAT. The MODE display changes to "RPT" and folder repeat play is started.
To cancel folder repeat play
1. Touch -RPT. The -RPT display changes to "MODE", and regular play starts from the track that was playing when you touched -RPT.
Random play
This function allows you to play all tracks recorded on a disc in a random order.
-RANDOM
Plays all tracks on the disc at random.
When the disc contains 2 or more folders, all of the tracks in the folder are played at random, followed by all of the tracks in the next folder.
This is repeated for all folders.
-RANDOM
Plays tracks on the disc at random. This function is available only when a CD-R/CDRW recorded with MP3 files or WMA files is loaded.
1. Touch MODE.
2. Touch -RANDOM or -RANDOM. The MODE display changes to "P-RDM" or "RDM", and random play starts.
To cancel random play
1. Touch -RDM or -RDM. The -RDM display or -RDM display changes to "MODE", and regular play starts from the track that was playing when you touched these buttons.
Different Pieces of Music Heard by Plural Listeners (2-ZONE function)
The 2-ZONE function outputs separate sounds from the MAIN zone and SUB zone by simultaneously operating 2 sources in the 1 centre unit, thereby allowing 2 or more listeners to enjoy separate music sources.
This unit can control its internal sources (radio, CD, MP3, etc.) to play them back, and further, can simultaneously play back sources from external equipment connected via CeNET (for instance, CD changers etc.).
The sources of the MAIN zone are played back from the speakers inside your car, and those of the SUB zone are from the headphone systems (WH143).

The upper figure is for when a sound source is being played by the unit's internal mode (radio, CD, AUX) on the speakers.
The lower figure is for when a sound source is being played by the unit's external mode (CD changer, DVD changer, TV, AUX) on the speakers.
- The factory default setting is "OFF".
Notes:
- The ISR function is not available while the 2-ZONE function is in use.
- The new volume adjustment made by turning the [ROTARY] knob on this unit is reflected only on the speakers.
The AUX-SENS setting is reflected on both the speakers and the headphones.
Screen display when the 2-ZONE function is in use
"INT." (internal mode) or "EXT." (external mode) is displayed in the centre of the display to indicate whether you can hear play in the internal mode or external mode in the current 2-ZONE function operation mode.
1. Press the [SOUND] button.
2. Touch 2-ZONE.

3. Touch and hold the ON/OFF centre of the display for 1 second or longer.

When 2-ZONE is set to ON, the current 2-ZONE type is displayed.
The 2-ZONE function is not available when 2-ZONE is set to OFF. Press the [SOUND] button to return to the original mode.
4. Touch on the ON/OFF display to select the 2-ZONE type.
2-ZONE type
Speaker Headphones Type 1 Internal (internal mode) External (external mode) Type 2 External (external mode) Internal (internal mode)
5. Touch the speaker display or the headphone display to select the 2-ZONE function operation mode.
If you touch the speaker display, you can operate audio on the speakers.
If you touch the headphone display, you can operate audio on the headphones.
6. Press the [SOUND] button to return to the original mode.
Different Pieces of Music Heard by Plural Listeners (2-ZONE function)
To switch the 2-ZONE function ON/OFF
1. Press and hold the [SOUND] button on the unit for 1 second or longer.
To switch the 2-ZONE type
Press and hold the [TA] button on the unit for 1 second or longer while the 2-ZONE function is in use.
To switch the 2-ZONE function operation mode
Press the [TA] button on the unit while the 2-ZONE function is in use.
Selecting the mode when the 2-ZONE function is in use
When you load a CD while the 2-ZONE function is in use, the functions of the internal mode on this unit change to CD, and play starts automatically.
1. Press the [TA] button on the unit to switch the 2-ZONE function operation mode.
The display for the equipment (speaker or headphone) that can be currently operated is switched.
2. Press and hold the [TA] button for 1 second or longer to select the 2-ZONE type. The "INT." or "EXT." display is toggled.
3. Press the [ROTARY] knob.
Each press of the [ROTARY] knob while "INT." is displayed switches the mode as follows:
Radio CD AUX Radio...
Each press of the [ROTARY] knob while "EXT." is displayed switches the mode as follows:
AUX (CD changer) (DVD changer) (TV^*1) AUX
* The mode of equipment that is not connected is not displayed.
*1 When the TV mode is selected, the mode automatically changes to the VTR mode, and cannot be changed.
Operations Common to Each Mode
Screen display in the title entry mode
Main display
This is displayed when the title entry mode is selected. (cf. page 14)

Text type display
A: Capital alphabet letters
a: Small alphabet letters
0-9: Numbers
!?: Symbols
A: Umlaut
Title display
The currently entered title is displayed. Touch
to determine the entry position. Touching and holding the button for 2 seconds or longer causes all title text to disappear.
Entered text display
Touch to select the entered text.
RTN
Touching this cancels entry of titles, and returns the display to the original screen. Touching and holding this for 1 second or longer displays the text list matched to current text type.
MEMO
Touching and holding this for 2 seconds or longer stores the title that was input, and returns the display to the original screen.
Text list display
This is displayed by touching and holding RTN for 1 second or longer in the main display.

Type of text
The text that is displayed changes according to the text type display.
When text type display is "A": A E I M Q U X (space)
When text type display is "a": a e i m q u
When text type is "0-9", "1? or "A":
All characters are displayed.
RTN
Touching this returns the display to the main display.
NEXT
Touching this displays the next text list.
Entering titles
You can give TV stations a title up to 10 characters long, and to CDs. These titles can be displayed when broadcasts are received or when playing CDs.
The number of titles that can be entered is as follows:
Mode Number of titles CD mode 50 titles TV mode 20 titles
CD changer mode Number of titles DCZ628 connected 100 titles CDC655Tz connected 100 titles CDC1255z connected 50 titles
1. Either receive the TV station, or play a CD for which you want to enter the title.
2. Touch the centre of the display to set to the user title display.
When the display changes to the user title display, "USER" is displayed above the preset No. display.
3. Press and hold the [A] button for 1 second or longer.
The mode changes to the title entry mode.
4. Touch on the title display to determine the entry position.
The position of the blinking text moves to the left or the right.

* Up to ten characters can be input.
CAUTION
Pressing the reset button clears all user memories such as titles stored on this unit.
5. Touch 山 山 on the text type display to select the type of text.
Each touch of switches the type of text as follows:
Capital alphabet letters
(space)ABCDEFGHIJKLMNOPQ RSTUVWXYZ
Small alphabet letters
abcdefghijklmnpqrstuvwxyz Numbers
0123456789
Symbols, Umlaut
AEEEEIAEaeeeieoo
6. Either touch on the right of the display, or turn the [ROTARY] knob to determine the entered characters.
7. Repeat steps 4 to 6 to enter the title. Pressing and holding the title display for 2 seconds or longer causes all currently entered title characters to disappear.
8. Touch and hold MEMO for 2 seconds or longer.
You will hear a long beep, and the title is stored in memory.
To switch the title display to the clock or other display
Touch the centre of the display.
■ When a new title is stored beyond the maximum number of titles
In the case of a TV station
Titles not stored to preset channels are automatically cleared, and the new title is stored in memory.
In the case of a CD
Titles of CDs that have been played the least are cleared, and the new title is stored in memory.
Clearing titles
1. Either receive the TV station, or play a CD whose title you want to clear.
2. Touch the centre of the display to set to the user title display.
When the display changes to the user title display, "USER" is displayed above the preset No. display.
3. Press and hold the [A] button for 1 second or longer.
The mode changes to the title entry mode.
4. Touch and hold the title display for 2 seconds or longer.
All characters in the title disappear.
5. Touch and hold MEMO for 2 seconds or longer.
You will hear a long beep, and the title is cleared.
Changing settings
Selecting setting items
1. Press the [A] button.
The mode changes to the adjust mode.

2. Touch on the setting item display to select the item to set.
* Touching on the left of the display switches main items 1 item at a time. Touching on the left of the display switches sub-items continuously.
* Touching on the centre of the display switches the sub-items 1 item at a time. Touching switches sub-items continuously.
3. When "EDIT" is displayed at the right of the display, touch EDIT to switch to the adjustment details display.

4. Either touch on the right of the display, or turn the [ROTARY] knob to set the details.
To return to the original mode
1. Press the [A] button again.
- Setting items
Main Item Sub-item DISPLAY SCREEN SVR
• Screen saver setting (cf. page 41) MSG INPUT
• Message information input (cf. page 41) MESSAGE
• Message display setting at power ON/OFF (cf. page 42) S/A SENS
• Setting the Spectrum analyzer sensitivity (cf. page 42) SCROLL
• Adjusting the scroll speed (cf. page 42) APPERNCE DIMMER IN
• Auto-dimmer setting (cf. page 43) DMR LEVEL
• Setting the dimmer level (cf. page 43) CONTRAST
• Adjusting the display contrast (cf. page 43) BLINK LED
• Making the LED blink when DCP is removed (cf. page 43) BEEP
• Setting beep (cf. page 44) SOUND AC-PRO III
• Selecting the VSE mode (STD/PRO) (cf. page 44) EQ SELECT
• Selecting the equalizer mode (cf. page 44) SP-SETTING
• Setting the speaker configuration (cf. page 44) CENTER-SP / SUB-WOOFER
• Setting sub-woofer speaker ON/OFF (cf. page 45) HPF / SUB-W LPF
• Adjusting the speaker filter frequency (cf. page 45) AMP CANCEL
• Setting internal amplifier use ON/OFF (cf. page 46) SP GAIN
• Adjusting the speaker output level (cf. page 46) PL II DELAY SRD-SP
• Adjusting the rear speaker delay time (cf. page 46) PL II CONT PANorama / DIMENSION / CTR WIDTH
• Setting the music mode in detail (cf. page 47) TUNER TV ARER
• Setting the TV area (cf. page 57) TV DIVER
• Setting TV diversity (cf. page 57) LINK ACT
• Setting the AF function between RDS and DAB (cf. page 26) LANGUAGE
• Setting the PTY screen language (cf. page 30) RDS-INT 2Z
• Setting the RDS interrupt while the 2-ZONE function is in use (cf. page 30) SETTING AUX / TEL
• Setting AUX and TEL (cf. page 47) AUX SENS
• Setting the portable audio (AUX) input level (cf. page 48) TEL-SP
• Setting the car speaker output for the cellular phone (Optional TEL-002) (cf. page 48) TEL-SWITCH
• Cellular phone interrupt setting (cf. page 48) CALIBRATE / A-VOL SENS
• Setting the auto-volume function (cf. page 49) SYSTEM CHECK
• Performing a system check (cf. page 49) CODEMATIC
• Setting security (cf. page 50)
Setting the screen saver (SCREEN SVR)
This function allows you display a screen saver when you have not operated this unit for about 30 seconds.
- The factory default setting is "ON".
1. Press the [A] button to set to the adjust mode.
2. Touch on the setting item display to select "SCREEN SVR" under "DISPLAY".

3. Either touch on the right of the display, or turn the [ROTARY] knob to select "ON" or "OFF".
4. Press the [A] button to return to the original mode.
To switch the screen saver display
Touch PREV or NEXT while the screen saver is displayed.
Each touch of these buttons switches the screen saver display.
- Screen savers
Screen saver pattern 1

Screen saver pattern 2

Screen saver pattern 3

Spectrum analyzer pattern 1

Spectrum analyzer pattern 2

Spectrum analyzer pattern 3

Spectrum analyzer pattern 4

Message information

SS SCAN
The above 8 indications are displayed for about 10 seconds each.
Entering messages to display in message information (MSG INPUT)
1 type of screen saver is available. For details on how to switch the screen saver display, see "Setting the screen saver".
- Up to 30 characters can be entered.
- The factory default setting is "Active Matrix Control System".
1. Press the [A] button to set to the adjust mode.
2. Touch on the setting item display to select "MSG INPUT" under "DISPLAY".

DISPLAY
ADJUST MODE
MSG INPUT> EDIT
AY
3. Touch EDIT.
The mode changes to the message entry mode.
4. Touch on the centre of the display to determine the entry position.
* To clear the message, touch and hold the centre of the display for 2 seconds or longer.
If you perform the operation at step 8 with the message cleared, the message returns to its factory default setting.
5. Touch on the left of the display to select the type of text.
Each touch of switches the type of text. For details, see page 37.
6. Either touch on the right of the display, or turn the [ROTARY] knob to determine the entered characters.
7. Repeat steps 4 to 6 to enter the message.
8. Touch and hold MEMO for 2 seconds or longer.
You will hear a long beep, and the message is stored in memory.
9. Press the [A] button to return to the original mode.
Displaying messages (MESSAGE)
This function allows you to display messages on the display when the power is turned ON/OFF. "Hello" is displayed when the power is turned ON, and "See you" is displayed when power is turned OFF.
- The factory default setting is "ON".
1. Press the [A] button to set to the adjust mode.
2. Touch on the setting item display to select "MESSAGE" under "DISPLAY".

3. Either touch on the right of the display, or turn the [ROTARY] knob to select "ON" or "OFF".
4. Press the [A] button to return to the original mode.
Setting the sensitivity of the Spectrum analyzer (S/A SENS)
This function allows you to adjust the sensitivity (amount of deflection) of the Spectrum analyzer. For details on displaying the Spectrum analyzer, see "Switching the display" (cf. page 13) or "Setting the screen saver" (cf. page 41).
- The factory default setting is "MID".
1. Press the [A] button to set to the adjust mode.
2. Touch on the setting item display to select "S/A SENS" under "DISPLAY".

3. Either touch on the right of the display, or turn the [ROTARY] knob to adjust the sensitivity.
* Select either LOW (small deflection amount), MID or HIGH (large deflection amount).
4. Press the [A] button to return to the original mode.
Adjusting the display scroll speed (SCROLL)
This feature allows you to slow down the scroll speed when the scroll speed is too fast, making it difficult to view the screen.
- The factory default setting is "SPEED 2".
1. Press the [A] button to set to the adjust mode.
2. Touch on the setting item display to select "SCROLL" under "DISPLAY".

3. Either touch on the right of the display, or turn the [ROTARY] knob to adjust the sensitivity.
* This setting item can be adjusted within the range SPEED 1 to SPEED 7. Adjust this setting item while viewing how the appearance of the display changes.
4. Press the [A] button to return to the original mode.
Setting the auto-dimmer (DIMMER IN)
This function allows you to dim the lighting of the display matched to the illumination or the brightness inside your car.
Select either "AUTO" (interlocked to the brightness inside your car) or "ILLUMI" (interlocked to the illumination inside your car) as the auto-dimmer setting.
- When the auto-dimmer function is set to "AUTO", the brightness of the display is dimmed according to the brightness detected by this sensor.
- Set the dimmer setting at DMR LEVEL.
- The factory default setting is "AUTO".
1. Press the [A] button to set to the adjust mode.
2. Touch on the setting item display to select "DIMMER IN" under "APPERNCE".

3. Either touch on the right of the display, or turn the [ROTARY] knob to select "AUTO" or "ILLUMI".
4. Press the [A] button to return to the original mode.
Setting the dimmer level (DMR LEVEL)
This function allows you to set how much the displayed is to be dimmed.
- The factory default setting is "3".
1. Press the [A] button to set to the adjust mode.
2. Touch on the setting item display to select "DMR LEVEL" under "APPERNCE"

3. Either touch on the right of the display, or turn the [ROTARY] knob to set the dimmer level.
* Select one of OFF (dimming OFF, bright), 1 (slightly dimmed) to 5 (dark).
4. Press the [A] button to return to the original mode.
Adjusting the contrast of the display (CONTRAST)
You can adjust the contrast of the display to match the mounting angle of the unit.
- The factory default setting is "6".
1. Press the [A] button to set to the adjust mode.
2. Touch on the setting item display to select "CONTRAST" under "APPENCE".
3. Either touch on the right of the display, or turn the [ROTARY] knob to adjust the contrast.

* This setting item can be adjusted within the range 1 to 11.
Adjust this setting item while viewing how the appearance of the display changes.
4. Press the [A] button to return to the original mode.
Making the LED blink when DCP is removed (BLINK LED)
You can make the LED on this unit blink when the DCP is removed.
- The factory default setting is "OFF".
1. Press the [A] button to set to the adjust mode.
2. Touch on the setting item display to select "BLINK LED" under "APPERNCE".

APPERNCE
ADJUST MODE
BLINK LED》 OFF
NCE
3. Either touch on the right of the display, or turn the [ROTARY] knob to select "ON" or "OFF".
4. Press the [A] button to return to the original mode.
Setting the beep for when buttons are operated (BEEP)
The short or long high-pitched tone you hear when a button is operated is called a "BEEP".
- The factory default setting is "ON".
1. Press the [A] button to set to the adjust mode.
2. Touch on the setting item display to select "BEEP" under "APPERNCE".

3. Either touch on the right of the display, or turn the [ROTARY] knob to select "ON" or "OFF".
4. Press the [A] button to return to the original mode.
Selecting each mode
This item cannot be selected when the Dolby Pro Logic II is set to "MUSIC" or "MATRIX" (cf. page 17).
The factory default setting is "PRO" for AC-PRO III and "P.EQ" for EQ SELECT.
AC-PROIII
When "STD" (standard mode) is selected, the sound quality and field can be adjusted by VSE (Virtual Space Enhancer) so that the same audio effect can be obtained whichever seat you are sitting in.
When "PRO" (PRO mode) is selected, the sound quality and field can be adjusted in detail for each seating position.
EQ SELECT
When "P.EQ" (equalizer mode) is selected, the entire frequency level range can be compensated by a detailed smooth curve.
When "BAS/TREB" (bass / treble mode) is selected, the frequency level can be compensated by dividing it into 2 major levels, bass (low tones) and treble (high tones).
1. Press the [A] button to set to the adjust mode.
2. Touch on the setting item display to select "AC-PRO III" under "SOUND" and "EQ SELECT" under "SOUND".

3. Either touch on the right of the display, or turn the [ROTARY] knob to select the mode.
Mode selection
AC-PRO III STD
• Standard mode (VSE menu) PRO
• PRO mode (position menu) EQ SELECT P.EQ
• Equalizer mode (P.EQ menu) BAS / TREB
• Bass / treble mode
4. Press the [A] button to return to the original mode.
Setting the speaker configuration (SP-SETTING)
Set to match the speaker configuration of your car to fully bring out the audio characteristics of this unit.
The factory default setting is "SWL + SWR"
1. Press the [A] button to set to the adjust mode.
2. Touch on the setting item display to select "SP-SETTING" under "SOUND".

3. Either touch on the right of the display, or turn the [ROTARY] knob to set the speaker configuration.
Speaker configuration
CTR+SW
5.1ch
configuration Front/rear speakers (4ch)
Centre speaker (1ch)
Sub-woofer (1ch) SWL +SWR
4ch+sub-woofer
configuration Front/rear speakers (4ch)
Sub-woofer (2ch)
Notes:
Sound is not output from the centre speaker unless the following settings are made when CTR + SW is set.
(1) Referring to "Selecting the PLII menu (Dolby PL II)" (cf. page 17), set the Dolby Pro Logic II mode to "MUSIC" or "MATRIX".
(2) Referring to "Setting speakers ON/OFF (CENTER-SP/SUB-WOOFER)" (cf. page 45), set the centre speaker to "ON".
Sound is not output from the sub-woofer Lch when SWL + SWR is set and the Dolby Pro Logic II mode is set to MUSIC" or "MATRIX".
4. Press the [A] button to return to the original mode.
Setting speakers ON/OFF (CENTER-SP/SUB-WOOFER)
Set the centre speaker (CENTER-SP) and subwoofer (SUB-WOOFER) ON/OFF.
Be sure to set this setting to "OFF" when there is no centre speaker or sub-woofer.
- The centre speaker (CENTER-SP) can be set when the Dolby Pro Logic II mode is set to "MUSIC" or "MATRIX", and "SP-SETTING" is set to "CTR-SW".
- The factory default setting is "ON".
1. Press the [A] button to set to the adjust mode.
2. Touch on the setting item display to select "CENTER-SP" under "SOUND" and "SUB-WOOFER" under "SOUND".

3. Either touch on the right of the display, or turn the [ROTARY] knob to select "ON" or "OFF".
4. Press the [A] button to return to the original mode.
Adjusting the filter frequencies of speakers (HPF/SUB-W LPF)
This function allows you to adjust the filter frequency matched to the speakers you are using.
- The filters (HPF/SUB-W LPF) that you can use differ according to the Dolby Pro Logic II mode setting.
Dolby Pro Logic II mode setting Filter HPF SUB-W LPF*1 MUSIC/MATRIX Not adjustable Adjustable OFF Adjustable Adjustable
*1 Adjustment is possible only when
"SUB-WOOFER" is set to "ON".
The factory default setting is "THROUGH".
Filter adjustment
HPF (high-pass filter adjustment)
This filter cuts bass sound from the front and rear speakers.
THROUGH 50Hz 80Hz 120Hz
Set the filter matched to the speaker when small-diameter speakers are used.
THROUGH
Set this when using speakers that can generate bass.
SUB-W LPF (sub-woofer low-pass filter adjustment)
This filter cuts treble sound from the sub-woofer.
THROUGH 50Hz 80Hz 120Hz
Set the filter frequency to match the sub-woofer.
THROUGH
Set this when a low-pass filter built-in powered sub-woofer is used.
1. Press the [A] button to set to the adjust mode.
2. Touch on the setting item display to select "HPF" under "SOUND" and "SUB-W LPF" under "SOUND".

3. Either touch on the right of the display, or turn the [ROTARY] knob to set the frequency.
* Select one of THROUGH, 50Hz, 80Hz, and 120Hz.
4. Press the [A] button to return to the original mode.
Setting internal amplifier use ON/OFF (AMP CANCEL)
Set internal amplifier use ON/OFF matched to whether or not an external amplifier is used.
Set AMP CANCEL to "ON" (internal amplifier use OFF) when an external amplifier is connected and the internal amplifier is not used.
- The factory default setting is "OFF" (internal amplifier used).
1. Press the [A] button to set to the adjust mode.
2. Touch on the setting item display to select "AMP CANCEL" under "SOUND".

3. Either touch on the right of the display, or turn the [ROTARY] knob to select "ON" or "OFF".
4. Press the [A] button to return to the original mode.
Adjusting the output level of the speakers (SP GAIN)
Use the test tone function built into this unit to adjust so that the volume that is output from all speakers is the same.
- This item can be set only when the Dolby Pro Logic II mode is set to "MUSIC" or "MATRIX".
- The factory default setting is "0dB".
1. Press the [A] button to set to the adjust mode.
2. Touch on the setting item display to select "SP GAIN" under "SOUND".

3. Touch EDIT.
The mode changes to the SP GAIN adjustment mode.
4. Touch on the adjustment item display to select the desired item.
Each touch of switches the adjustment item as follows:
Adjustment items

*1 "CTR GAIN" is displayed only when "SP-SETTING" is set to "CTR+SW" and "CENTER-SP" is set to "ON".
^*2 SUB-W GAIN is displayed only when "SUB-WOOFER" is set to "ON".
5. Either touch on the right of the display, or turn the [ROTARY] knob to adjust the output level.
The output level can be adjusted within the range -10 dB to +10 dB
6. Repeat steps 4 and 5 to adjust each item.
7. Press the [A] button to return to the original mode.
Adjusting the delay time of the rear speaker (PL II DELAY)
The timing that sound arrives at the listening position differs according to the mounting position of the rear speakers and the size of your car. If you adjust the delay time of the rear speakers, you can adjust so that sound from the rear speakers can be heard at the same timing as output from the front speakers.
- This item can be set only when the Dolby Pro Logic II mode is set to "MUSIC" or "MATRIX".
- The factory default setting is "0ms".
1. Press the [A] button to set to the adjust mode.
2. Touch on the setting item display to select "SRD-SP" under "PL II DELAY".

3. Either touch on the right of the display, or turn the [ROTARY] knob to adjust the delay time.
* "SRD-SP" can be adjusted within the range 0 ms to 15 ms.
4. Press the [A] button to return to the original mode.
Setting the music mode in detail (PL II CONT)
This function allows you to set the music mode in more detail when the Dolby Pro Logic II mode is set to "MUSIC".
- This item can be set only when the Dolby Pro Logic II mode is set to "MUSIC".
- The factory default setting for PANorama is "NO", for DIMENSION is "3" and for CTR WIDTH is "3".
Adjustment items
PANorama (panorama control setting)
This widens the soundfield image at the front up to the rear speakers. Set this item to "YES" if you feel that there is no surround effect.
DIMENSION (dimension setting)
Shifts the soundfield image to the front or the rear. When the soundfield image inclines to either the front or the rear, this inclination can be compensated.
Adjustment value 3 is the centre position.
Adjustment values 2 to 0 shift the soundfield image to the rear, while adjustment values 4 to 6 shift the soundfield image to the front.
CTR WIDTH (centre width setting)\*1
Adjusts the fixed position of the centre channel between the centre speaker and L/R front speakers.
When the centre sound is divided equally to the left and right, the entire soundfield image increases to produce a naturally expanding feeling.
Adjustment value 0 plays back all centre sounds on the centre speaker.
Adjustment value 7 divides the centre sound equally between the L/R front speakers.
*1 "CTR WIDTH" is displayed only when "SP-SETTING" is set to "CTR+SW" and "CENTER-SP" is set to "ON".
1. Press the [A] button to set to the adjust mode.
2. Touch on the setting item display to select the desired adjustment item under "PL II CONT".
The adjustment items are "PANorama", "DIMENSION" and "CTR WIDTH".

3. Either touch on the right of the display, or turn the [ROTARY] knob and adjust the item as desired.
* Select "YES" or "NO" for "PANorama".
* "DIMENSION" can be adjusted within the range 0 to 6.
* “CTR WIDTH” can be adjusted within the range 0 to 7.
4. Press the [A] button to return to the original mode.
AUX function
This system has an external RCA input so you can listen to sounds and music from external devices connected to this unit.
Selecting AUX / TEL
You can listen to sound and music from external devices, or your telephone calls from the speakers when connected to this unit.
When TEL INT or External device is connected to this unit, you can select the TEL mode or AUX mode.
- The factory default setting is "AUX".
1. Press the [A] button to set the adjust mode.
2. Touch on the setting item display to select "AUX/TEL" under "SETTING".

3. Either touch on the right of the display, or turn the [ROTARY] knob to select "AUX" or "TEL".
AUX:
The AUX/TEL input cable is for external Audio input.
TEL:
The AUX/TEL input cable is for cellular phone audio input.
4. Press the [A] button to return to the previous mode.
Setting the input level (AUX SENS) of portable audio (AUX mode)
This function allows you to set the input level of optional external devices connected to this unit.
- This can be set when "AUX/TEL" is set to "AUX".
The factory default setting is "MID".
1. Press the [A] button to set to the adjust mode.
2. Touch on the setting item display to select "AUX SENS" under "SETTING".

3. Either touch on the right of the display, or turn the [ROTARY] knob to set the input level.
* Select one of LOW, MID or HIGH.
4. Press the [A] button to return to the original mode.
Setting the car speaker output for the cellular phone (Optional TEL-002)
- To output telephone calls, set the cellular phone.
- The factory default setting is "RIGHT".
1. Press the [A] button to set the adjust mode.
2. Touch on the setting item display to select "TEL-SP" under "SETTING".

3. Either touch on the right of the display, or turn the [ROTARY] knob to select "LEFT" or "RIGHT".
LEFT:
Telephone calls can be heard on the front left speaker connected to this unit.
RIGHT:
Telephone calls can be heard on the front right speaker connected to this unit.
4. Press the [A] button to return to the previous mode.
Cellular phone interrupt setting
If you connect this unit and your cellular phone with a unit (Optional, TEL-002), you can listen to your telephone calls on your car speakers.
- The factory default setting is "OFF".
1. Press the [A] button to set the adjust mode.
2. Touch on the setting item display to select "TEL-SWITCH" under "SETTING".

3. Either touch on the right of the display, or turn the [ROTARY] knob to select the settings.
Each time you turn the [ROTARY] knob, the setting changes in the following order:
OFF ON MUTE OFF...
OFF:
This unit continues normal operation even when the cellular phone is used.
Note:
- When connecting a hands-free kit, make sure that the setting is ON to receive the telephone audio through the system.
ON:
You can listen to your telephone calls from the speakers connected to this unit.
* When listening to your calls on your car speakers, you can adjust the volume by turning the [ROTARY] knob.
MUTE:
The sound from this unit is muted during telephone calls.
4. Press the [A] button to return to the previous mode.
Setting the auto-volume function (CALIBRATE/A-VOL SEN
You can automatically change the volume to match your car's speed.
- The factory default setting is "LOW".
1. Press the [A] button to set the adjust mode.
2. Touch on the setting item display to select "CALIBRATE" under "SETTING".

3. Accelerate to a speed of 50~km
4. When you reach 50km , touch START. Calibration is executed.
After 2 seconds or longer, you will hear a long beep, and "SUCCEEDFUL" will appear on the display.
If you hear a short beep, this indicates that calibration failed. Repeat the procedure from step 3.
5. Next, adjust the sensitivity. Touch on the setting item display to select "A-VOL SENS" under "SETTING".

6. Either touch on the right of the display, or turn the [ROTARY] knob to select the sensitivity.
Each time you turn the [ROTARY] knob, the setting changes in the following order:
OFF (no change in volume) LOW (change in volume: small) MID-LOW MID MID-HIGH HIGH (change in volume: large) ...
7. Press the [A] button to return to the previous mode.
Performing a system check
This function allows you to perform a system check from the adjust mode when required.
1. Press the [A] button to set to the adjust mode.
2. Touch on the setting item display to select "SYSTEM CHECK" under "SETTING".

3. Touch and hold START for 1 second or longer.
"System Check" appears on the display.
4. Press the [ROTARY] knob.
The system check starts.
When the system check is complete,
"Completed" appears on the display.
5. Press the [ROTARY] knob again.
The main display for the radio mode appears.
Using the security function (CODEMATIC)
This function prevents persons who do not know the touch sequence from easily operating this unit. The Touch Code display appears when DCP is attached and the power is turned ON with "CODEMATIC" set to "ON".
If you touch the display in this screen in the preset order, "SUCCEEDFUL" is displayed and the power is turned OFF.
When the power is next turned ON, the Touch Code display does not appear, and the main display in the radio mode or CD mode is displayed.
1. Press the [A] button to set to the adjust mode.
2. Touch on the setting item display to select "CODEMATIC" under "SETTING".

2 types of items are displayed for "CODEMATIC", items for which "ON" or "OFF" is displayed at the right of the screen, and items for which "INPUT" is displayed at the right of the screen. Here, select the item for which "ON" or "OFF" is displayed at the right of the display.
3. Either touch on the right of the display, or turn the [ROTARY] knob to select "ON" or "OFF".
4. Touch on the setting item display to select "CODEMATIC" under "SETTING". Here, select the item for which "INPUT" is displayed at the right of the display.
5. Touch INPUT. The Touch Code display appears.
6. Enter the touch code.
* Touch one of 5 locations (left, centre, right, top right, or bottom right) of the display. Each touch of the display lights one of the Touch Code indicators.
* For example, touch (1) centre, (2) top right, (3) left, and (4) bottom right, in that order. You can also repeatedly touch the same location. When you touch 4 times, you will hear a long beep, and the original mode is returned to.
To cancel CODEMATIC
If you have forgotten the touch order, either touch ① bottom right, ② left, ③ top right and then ④ right in that order, or press [SCN] on the remote control unit.

7. OPERATIONS OF ACCESSORIES
CD Changer Operations
CD changer
When an optional CD changer is connected through the CeNET cable, this unit can control CD changer operations. This unit can be connected to a total of 2 CeNET-wired CD changers.
DVD changer
When an optional DVD changer is connected through the CeNET cable, this unit can control DVD changer operations. To view a DVD, an optional monitor is required.
Operation and display of the DVD changer on this unit is a simplified version, and does not support all DVD changer functions. For operating the DVD changer, use the remote control unit that is provided with the DVD changer. For details, refer to the User's Manual provided with the DVD changer.
When 2 CD changers are connected
Press the [ROTARY] knob to select the changer connected to this unit. (Each press of the [ROTARY] knob switches the changer.)
- If the CD changer does not contain a magazine, "NO MAG" is displayed, and if the magazine does not contain a CD, "NO DISC" is not displayed for that disc No.
- For details on the title display, see "Switching the title display" (cf. page 14).
Screen displays in the changer mode
Main display (CD changer mode)
This is displayed by pressing the [ROTARY] knob to select the CD changer mode.

Touching the left of the display for 1 second or longer switches the simple operation mode.

Track/playing time display
T01/02: 00: The No. of the track currently being played and the playing time are displayed.
Touching or in the normal mode allows you to select the track to play, or fast-forward/back-forward tracks.
Title display
Touching this switches the display.
Disc No. display
If you touch in the normal mode, you can select a disc.
MODE
Touching this displays sub-functions. Touching and holding this for 1 second or longer displays the disc list.
T-SCAN/D-SCAN
This is displayed during scan play. Touching T-SCAN/D-SCAN ends scan play.
T-RPT/D-RPT
This is displayed during repeat play. Touching T-RPT/D-RPT ends repeat play.
T-RDM/D-RDM
This is displayed during random play.
Touching T-RDM/D-RDM ends random play.
DISC
Touching this starts play of the next disc.
(only in the simple operation display)
Touching these selects the track to play.
Touching and holding these fast-forwards/fast-backwards tracks.
Disc list display (CD changer mode)
This is displayed by touching and holding MODE for 1 second or longer in the main display.

Disc name
>>: Selection in progress
Touching a disc name returns the screen to the main display, and play starts from the first track in the disc you touched.
←PREV-RTN:
Touching this displays the previous title list. Touching and holding this for 1 second or longer returns the screen to the main display.
NEXT:
Touching this displays the next title list.
CAUTION
CD-ROM discs cannot be played from every CD changer. This depends on the model.
Note:
- Some CDs recorded in the CD-R/CD-RW mode may not be usable.
Selecting the changer mode
1. Press the [ROTARY] knob to select the changer mode.
* The mode of equipment that is not connected is not displayed. Play starts automatically when the mode changes to the changer mode.
Pausing play
1. Press the [▶■] button.
To resume play
1. Press the [▶■] button again.
Selecting a CD
1. Touch on the disc No. display to select a disc.
Play starts.
* If magazine does not contain the disc you selected, the No. for that disc is not displayed.
* Touching DISC ↑ starts play of the next disc.
To select a disc from the disc list display
1. Touch and hold MODE for 1 second or longer.
The disc list is displayed. If you touch NEXT, the next part of the disc list is displayed.
2. Touch the disc name.
* If magazine does not contain the disc you selected, "NO DISC" is displayed for that disc No.
* If you selected the same disc as that currently being played, play returns to and starts from the first track on that disc. (top function)
Selecting a track
1. To listen to the next track, touch on the track display.
2. To listen to the previous track, touch twice on the track display.
Touching 品 plays the next track. If you touch more times, the track advances ahead to the track for the number of times you touched and that track is played. Touching 品 plays the previous track. If y touch more times, the track moves ba to the track for the number of times you touched and that track is played.
* If you touch BB twice on the track display while the start of the track is being played, the track 2 tracks back is sometimes played.
Fast-forward/Fast-backward
1. To fast-forward, touch on the track display.
2. To fast-forward, touch on the track display.
isc scan play
Top function
The top function starts play from the first track on the disc currently being played.
1. Touch and hold MODE for 1 second or longer.
The disc list is displayed. If you touch NEXT, the next part of the disc list is displayed.
2. Touch the disc name.
* If magazine does not contain the disc you selected, "NO DISC" is displayed for that disc No.
* If you selected the same disc as that currently being played, play returns to and starts from the first track on that disc.
Scan play
Scan play locates and plays the first 10 seconds of each track on a disc automatically. This function continues on the disc until it is canceled.
The scan play function is useful when you want to select a desired track.
1. Touch MODE.
2. Touch T-SCAN.
The MODE display changes to "T-SCAN" and scan play starts.
* Scan play starts from the next track after the track currently being played.
To cancel scan play
1. Touch T-SCAN.
The T-SCAN display changes to "MODE", and the track that was playing when you touched T-SCAN is played.
Disc scan play
Disc scan play locates and plays the first 10 seconds of the first track on each disc in the currently selected CD changer. This function continues automatically until it is canceled.
Disc scan play is useful when you want to select a desired CD.
1. Touch MODE.
2. Touch D-SCAN.
The MODE display changes to "D-SCAN" and disc scan play starts.
* Disc scan play starts from the next disc after the disc currently being played.
To cancel disc scan play
1. Touch D-SCAN.
The D-SCAN display changes to "MODE", and the track that was playing when you touched D-SCAN is played.
Repeat play
Repeat play continuously plays the current track. This function continues automatically until it is canceled.
1. Touch MODE.
2. Touch T-REPEAT.
The MODE display changes to "T-RPT" and repeat play is started.
To cancel repeat play
1. Touch T-RPT.
The T-RPT display changes to "MODE", and regular play starts from the track that was playing when you touched T-RPT.
Disc repeat play
After all the tracks on the current disc have been played, disc repeat play automatically replays the current disc over from the first track. This function continues automatically until it is canceled.
1. Touch MODE.
2. Touch D-REPEAT.
The MODE display changes to "D-RPT" and disc repeat play is started.
To cancel disc repeat play
1. Touch D-RPT.
The D-RPT display changes to "MODE", and regular play starts from the track that was playing when you touched D-RPT.
Random play
Random play selects and plays individual tracks on the disc in no particular order. This function continues automatically until it is canceled.
1. Touch MODE.
2. Touch T-RANDOM.
The MODE display changes to "T-RDM" and random play starts.
To cancel random play
1. Touch T-RDM.
The T-RDM display changes to "MODE", and regular play starts from the track that was playing when you touched T-RDM.
Disc random play
The disc random play selects and plays individual tracks or discs automatically in no particular order. This function continues automatically until it is canceled.
1. Touch MODE.
2. Touch D-RANDOM.
The MODE display changes to "D-RDM" and random play starts.
To cancel disc random play
1. Touch D-RDM.
The D-RDM display changes to "MODE", and regular play starts from the track that was playing when you touched D-RDM.
TV Operations
TV tuner function
When an optional TV tuner is connected through the CeNET cable, this unit controls all TV tuner functions. To watch TV, you need a TV tuner and a monitor.
Screen displays in the TV mode
Main display
This is displayed by pressing the [ROTARY] knob to select the TV mode.

Touching the left of the display for 1 second or longer switches the simple operation mode.

Channel display
1ch: The channel currently being received is displayed.
Touching or in the normal mode allows you to perform seek tuning or manual tuning.
Title display
3ch: The name of the station currently being received is displayed.
VTR: In video mode
Touching these switches the display.
Reception band display
TV1: Band name
Preset No. display
Touching 品 in the normal mode selects a preset memory.
MODE
Touching this displays sub-functions. Touching and holding this for 1 second or longer displays the preset memory list.
P-SCAN: This is displayed during a preset scan. Touching this ends the preset scan.
A-STORE: This is displayed during an auto-store. Touching this ends the auto-store.
BAND
Touching this switches the reception band.
Touching and holding this for 1 second or longer toggles between the manual tuning mode and the seek tuning mode.
(only in the simple operation display) Touching these buttons enables seek tuning or step tuning (in the manual tuning mode).
Touch and holding these buttons enables quick tuning (in manual tuning mode).
■ Preset memory list display
This is displayed by touching and holding MODE for 1 second or longer in the main display.

Station name
>>:
Tuning in progress
RTN:
Touching this returns the display to the main display.
Selecting the TV mode
1. Press the [ROTARY] knob to select the TV mode.
Each press of the [ROTARY] knob switches the mode as follows:
* The mode of equipment that is not connected is not displayed.
Switching the reception band
1. Touch BAND to switch the reception band. Each touch of BAND switches the reception band.
TV1 TV2 TV1...
Seek tuning
Seek tuning is a function for automatically tuning stations with good reception.
1. Touch and hold BAND for 1 second or longer while MANU is displayed.
Automatic tuning is possible when MANU disappears.
2. Touch on the channel display. SEEK UP/SEEK DOWN is displayed, and tuning starts. Tuning automatically stops at stations with good reception.
To cancel tuning
1. Touch on the channel display again.
Manual tuning
There are 2 ways available: quick tuning and step tuning.
When you are in the step tuning mode, the frequency changes 1 step at a time. In the quick tuning mode, you can quickly tune the desired frequency.
1. Touch and hold BAND for 1 second or longer while MANU is not displayed.
Manual tuning is possible when MANU is displayed.
2. Operate the channel display to tune to a channel on which there is a broadcast.
There are 2 manual tuning methods: step tuning and quick tuning.
* Step tuning is a function for switching the channel 1 step at a time.
Touch on the frequency display.
* Quick tuning is a function for switching the channel continuously.
Touch at the channel display.
Tuning stops when you take your finger away from the panel.
Recalling a preset station
Preset scan allows the user to view each preset position before it automatically advances to the next preset. This function is useful for searching for a desired TV station in memory.
1. Touch and hold MODE for 1 second or longer.
The preset memory list is displayed.
2. Touch the station you want to listen to.
* The station can also be tuned by touching at a preset No.
To cancel tuning
1. Touch RTN.
Preset memory
A total of 12 TV stations can be stored (6-TV1 and 6-TV2). This allows you to select your favorite TV stations and store them in memory for later recall.
1. Touch BAND to switch the reception band.
2. Operate the channel display to select the station to store to.
3. Touch and hold MODE for 1 second or longer.
The preset memory list is displayed.
4. Touch and hold the preset No. to store for 2 seconds or longer.
You will hear a long beep, and the station is stored in memory.
If you hear a short beep, the station is not stored to memory. Repeat the procedure from step 1.
Auto store
Auto store selects 6 TV stations automatically and stores each one into preset memory.
If there are not 6 stations with good reception, stations previously stored in memory remain and only the strong stations are stored into memory.
1. Touch MODE.
2. Touch and hold A-STORE for 2 seconds or longer.
The MODE display changes to "A-STORE" and the preset No. in the auto-store operation appears on the preset No. display
* Stations with good reception are automatically searched, and are stored to preset memory (No.1 to No.6) in order from the station having the lowest frequency.
Notes:
- When auto store is performed, stations stored to memory so far are cleared.
- When there are fewer than 6 stations with good reception, low frequencies are automatically returned to, and auto store is performed again. If there are fewer than 6 stations even after auto store is performed twice, stations stored so far remain in memory.
Preset scan
Preset scan is a function for receiving stations in the order that they are currently stored to preset Nos. so that broadcasts can be checked.
1. Touch MODE.
2. Touch P-SCAN. The MODE display changes to "P-SCAN" and the preset No. in the preset scan operation is displayed in the preset No. display.
* The currently stored stations are received in order for 7 seconds or longer each.
Stations with poor reception are skipped, and the next station is received.
TV stations are received as follows:
TV1 (1 6) TV2(1 6) TV1(1 6) and so forth.
To cancel the preset scan
1. Touch P-SCAN.
The P-SCAN display changes to "MODE", and the stations that were being received when P-SCAN was touched are received next.
Watching a video
The TV tuner has a VTR input terminal to which 1 external device can be connected. Connect a 12 V video cassette player (VCP) or video cassette recorder (VCR) to the TV tuner input terminal.
1. Press the [▶■] button.
VTR is displayed, and the mode is switched to the VTR mode.
* The TV screen enters the video input mode, and videos can be viewed.
To return to the TV mode
1. Press the [▶] button again.
Setting the TV area (TV AREA)
When you select the TV area (TV reception area), the TV tuner area setting changes.
- The factory default setting is "GERMANY".
1. Press the [A] button to set the adjust mode.
2. Touch on the setting item display to select "TV AREA" under "TUNER".

3. Either touch on the right of the display, or turn the [ROTARY] knob to select the area.
4. Press the [A] button to return to the previous mode.
Setting the TV diver (TV DIVER)
You can change the reception setting for the TV antenna connected to the TV tuner.
- Set this item to "OFF" when a TV diversity antenna is not in use.
- The factory default setting is "ON".
1. Press the [A] button to set to the adjust mode.
2. Touch on the setting item display, and select "TV DIVER" under "TUNER".

3. Either touch on the right of the display, or turn the [ROTARY] knob to select "ON" or "OFF".
4. Press the [A] button to return to the original mode.
DAB control function
When a CeNET cable is used to connect a DAB (Optional, DAH913 or DAH923), all functions can be operated.
Listening to the DAB station
1. Press the [ROTARY] knob to change the operation mode.
Notes:
- The display shown in the normal reception mode and the preset reception mode is the same as that when a DAB station is received.
The number of programmes and broadcasting times depend on the DAB station.
- When the strength of DAB signals is weak, audio output is muted.
Seek tuning
1. Press the [ROTARY] knob to select the DAB mode.
2. Touch on the left of the display. "DAB" lights up in the display when the main unit receives a DAB station.
* The main unit stops the seek tuning when it cannot find a DAB station. The display returns to the previous mode.
Manual tuning
1. Press the [ROTARY] knob to select the DAB mode.
2. If "MANU" is not displayed, touch and hold BAND for 1 second or longer. If "MANU" is displayed, manual tuning is possible.
3. Touch on the left of the display to tune the station.
* If no operation is performed for more than 7 seconds, manual tuning is cancelled and the display returns to the previous mode.
Switching programmes
1. Press the [ROTARY] knob to select the DAB mode.
2. Touch on the left of the display to switch programmes in the DAB station.
Note:
The programme name may be the same depending on the DAB programme.
Programme scan
This function scans through each receivable programme in a DAB station being received for 10 seconds sequentially. This is useful when you want to search for a desired programme.
1. Press the [ROTARY] knob to select the DAB mode.
2. Touch MODE.
3. Touch S-SCAN. "S-SCAN" lights up and this unit starts scanning each programme for 10 seconds sequentially. Each time the main unit scans, the programme name is shown in the display.
4. To stop programme scan when a desired programme is tuned in touch S-SCAN.
Manual memory
The main unit has a manual memory function for DAB programmes. Up to 18 programmes (6 programmes each) can be preset to the preset buttons.
[M1], [M2] and [M3]
1. Press the [ROTARY] knob to select the DAB mode.
2. Touch BAND to select any one shown above.
3. Touch and hold MODE for 1 second or longer. The preset memory list is displayed.
4 Touch and hold the preset No. to be stored for 2 seconds or longer. You will hear a long beep, and the station is stored to memory. If you hear a short beep, the station is not stored to memory. Repeat the procedure from step 1.
Note:
- Interrupt programmes (PTY or INFO) cannot be written to manual memory.
Recalling a preset programme
1. Press the [ROTARY] knob to select the DAB mode.
2. Touch BAND. Each touch of BAND changes the display in the following order:
MEMO1 MEMO2 MEMO3 MEMO1...
3. Touch on the right of the display to recall a preset programme.
AF function
The AF function switches to a different frequency on the same network in order to maintain optimum reception.
The factory default setting is "ON"
- If the reception of the current broadcast station deteriorates, "SEARCH" appears in the display and the radio searches for the same programme on another frequency.
- For details on the "AF function" (cf. page 26), refer to the section "RDS operation" of the respective owner's manual.
- To switch the AF function ON
- To switch the AF function OFF
AF function between RDS and DAB
When the same programme is broadcast by both RDS and DAB, and this function is ON, the main unit automatically switches to receive the broadcast with the better reception.
TA (Traffic Announcement)
When a traffic announcement broadcast starts in the TA standby mode, the traffic announcement broadcast is received as top priority regardless of the function mode. Traffic programme (TP) automatic tuning is also possible.
- This function can only be used when "TP" is lit in the display. When "TP" is lit, this means that the DAB or RDS broadcast station being received has traffic announcement programmes.
- For details on "TA" (cf. page 27), refer to the section "RDS operation" of the respective owner's manual.
To set the TA standby mode
- To cancel the TA standby mode
To search for a TP station
Notes:
If a TP station is not received, the main unit stops the search operation.
- "TP" may be lit in the display when a TP broadcast is transmitted from an RDS station. In this case, press the [TA] button to perform TP seek tuning. Press the [TA] button again to return to the previous mode.
INFO (Announcement)
In the INFO standby mode, when the selected announcement programme starts, the main unit automatically switches to the selected announcement programme.
- To set the INFO standby mode
If you press and hold the [TA] button for 1 second or longer, "INFO" lights in the display and the main unit is set to the INFO standby mode until the selected announcement is broadcast.
When the selected announcement broadcast starts, the announcement item appears in the display. If you press and hold the [TA] button for 1 second or longer while the selected announcement broadcast is being received, reception of the selected announcement broadcast is cancelled and the main unit enters the INFO standby mode.
- To cancel the INFO standby mode
To cancel the INFO standby mode, press and hold the [TA] button for 1 second or longer.
Information select
This is a function for selecting INFORMATION ON or OFF in the Information interrupt mode. You can set ON for up to 6 information items. You can select any of the 6 items below:
INFORMATION item ENGLISH Contents Travel Transport flash Warning Warning / Service News News flash Weather Area weather flash Event Event announcement Special Special event
1. Touch MODE.
2. Touch INFO SEL to enter the "INFO SEL" mode.
3. Either touch on the centre of the display, or turn the [ROTARY] knob to select an information item. You can select any of 6 items:
Travel Warning News Weather Event Special Travel...
4. Touch on the right of the display to select "ON" or "OFF".
5. Touch RTN.
PTY
This function enables you to listen to the selected programme type regardless of the function mode.
- One common PTY can be selected for DAB or RDS.
- Of DAB PTY and RDS PTY, the PTY which is received earlier takes priority over the other.
- PTY broadcasts are not yet available in all countries.
- In the INFO standby mode, INFO stations have priority over PTY stations.
- In the TA standby mode, TP stations have priority over PTY stations.
- For details on "PTY" (cf. page 28), refer to the section "RDS operation" of the respective owner's manual.
To set the PTY standby mode
To cancel the PTY standby mode
- To cancel a PTY interrupt broadcast
To select PTY
- PTY seek
- PTY preset memory
Emergency broadcast
When an emergency broadcast is received, all function mode operations are stopped,
"ALARM" appears in the display, and the emergency broadcast can be heard.
- For details on "Emergency broadcast" (cf. page 29), refer to the section "RDS operation" of the respective owner's manual.
To cancel an emergency broadcast
Switching the PTY and INFO display language
You can select one of 4 languages (English, German, Swedish or French) for the PTY and INFO shown in the display.
The factory default setting is "ENGLISH".
- For details on "Switching the PTY display language" (cf. page 30), refer to the section "RDS operation" of the respective owner's manual.
Volume setting of TA, INFO, emergency broadcast (ALARM) and PTY
The volume for TA, INFO, ALARM and PTY interrupt broadcasts can be set during TA, INFO, ALARM and PTY interrupt broadcasts. Perform the following operation depending on the connected model.
- The factory default setting is "15".
During a TA, INFO, ALARM or PTY interrupt broadcasts, turn the [ROTARY] knob clockwise or counterclockwise to set the volume to a desired level (0 to 33).
* When the TA, INFO, ALARM or PTY interrupt broadcast ends, the volume returns to the level that was active before the interrupt broadcast.
5.1ch Surround Decoder Operations
When an optional CeNET wiring-compatible 5.1ch surround decoder is connected, the 5.1ch surround decoder can be controlled on this unit. The following functions change when a 5.1ch surround decoder is connected:
- Two modes "MOVIE" and "VIRTUAL" are added to the Dolby Pro Logic II mode.
- The VSE/POSITION mode is changed to the DSF (Digital Sound Field) mode.
- In the P.EQ (Parametric Equalizer) mode, the settings of each speaker can be adjusted in even more detail.
- Settings relating to music in setting items (cf. page 39) are changed.
Selecting PL II (Dolby PL II)
Select one of the available four modes matched to the source you are to play as the Dolby Pro Logic II mode.
The factory default setting is "OFF".
■ MUSIC (Music mode)
See "Selecting the PLII menu (Dolby PLII)" (cf. page 17).
■ MATRIX (Matrix mode)
See "Selecting the PLII menu (Dolby PLII)" (cf. page 17).
MOVIE (Movie mode)
Suitable for DVD video movies.
■ VIRTUAL (Virtual mode)
Suitable for movies and other audio sources.
OFF
The Dolby Pro Logic II mode is not used.
1. Press the [SOUND] button.
2. Touch Dolby PLII.

3. Touch on the right of the display to select the Dolby Pro Logic II mode.

The mode display is switched as follows:
MUSIC (music mode) MATRIX (matrix mode) MOVIE (movie mode) VIRTUAL (virtual mode) OFF (PL II off) MUSIC (music mode)...
* For details on the volume adjustment of the centre speaker/sub-woofer, see page 45.
4. Touch RTN.
Selecting the DSF menu
DSF (Digital Sound Field) makes it possible through sound simulation to enjoy the acoustic experience you would have in a concert hall or live performance hall.
- When the DSF menu is selected, the volume sometimes decreases.
- The factory default setting for DSF is "OFF" and for the DSF menu is "HALL".
1. Press the [SOUND] button.
2. Touch DSF.

3. Touch on the ON/OFF display. The DSF effect is toggled ON/OFF.

When DSF is set to "OFF", the DSF setting is not reflected on the music source. This completes the DSF setting. Press the [SOUND] button to return to the original mode.
4. Touch on the DSF menu No. to select the desired DSF menu.

DSF menus
HALL CHURCH STADIUM LIVE JAZZCLUB THEATER HALL...
No. Function Name Discription 1 HALL Large concert hall 2 CHURCH Church with a vaulted ceiling 3 STADIUM Large stadium without roof or walls 4 LIVE Live performance hall, larger than a jazz club 5 JAZZCLUB Jazz club with a low ceiling 6 THEATER Movie or drama theater
5. Press the [SOUND] button to return to the original mode.
Selecting the Parametric Equalizer menu
Parametric Equalizer (P.EQ) allows you to compensate the entire frequency level range in detail by smooth curve using frequency compensation matched to the type of your car.
- The factory default setting provides the following settings for all speakers. FREQ = 1kHz, Q = 1, GAIN = 0dB
1. Press the [SOUND] button.
2. Touch P.EQ.

3. Touch on the ON/OFF display. The P.EQ effect is toggled ON/OFF.

When the P.EQ effect is set to "OFF", the
P.EQ setting is not reflected on the music source. This ends the P.EQ setting. Press the [SOUND] button to return to the original mode.
4. Touch on the P.EQ menu No. to select the P.EQ menu.

P.EQ menus
SIGNAL SP-SEL BAND FREQ Q GAIN SIGNAL...
5. Touch 山 on the right on the display and adjust the item as desired.
SIGNAL (selects the adjustment signal): Selects "P-NOIS" or "MUSIC"
P-NOIS: set when pink noise is to be used
MUSIC: set to use music signals
SP-SEL (selects the speakers whose P.EQ value is to be adjusted):
Select one of "FRONT", "CENTER" or "SURROUND".
- FRONT: front speaker
- CENTER: centre speaker
- SURROUND: surround speaker
BAND (selects the frequency band): Select one of band 1 to 3
FREQ (selects the centre frequency): The adjustment range is from 20 Hz to 20 kHz.
Q (sets the Q curve): Sets one of 1, 3, 5, 7, or 20 as the sharpness of the Q curve.
GAIN (adjusts the output level): Adjusts the gain (output level) within the range -12dB to +12dB. (1dB steps, 25 points)
6. Repeat steps 4 and 5 to adjust the desired item.
7. Press the [SOUND] button to return to the original mode.
P. EQ adjustment
The settings that can be adjusted in the P.EQ menu are as follows. The centre frequency, gain and Q curve can be stored to channel/band combinations.
For example, centre frequency "250Hz", gain "
-8dB" and Q curve "3" can be stored to band 1 on the front.
For details on the P.EQ function, see "P. EQ adjustment" (cf. page 21).
Changing settings
When a 5.1ch surround decoder is connected, settings relating to music in the adjust mode are changed.
Selecting setting items
The following describes the items whose settings are changed.
For details of other items that are not changed, see "Changing settings" (cf. Page 39) at "Operations Common to Each Mode".
1. Press the [A] button.
The mode changes to the adjust mode.

ADJUST MODECENTER-SP>ON
2. Touch on the setting item display to select the item to set.
* Touching on the left of the display switches main items 1 item at a time.
Touching on the left of the display switches sub-items continuously.
* Touching on the centre of the display switches the sub-items 1 item at a time. Touching switches sub-items continuously.
3. When "THROUGH" is displayed at the right of the display, touch THROUGH to switch to the adjustment details display.
4. Either touch on the right of the display, or turn the [ROTARY] knob to set the details.
To return to the original mode
1. Press the [A] button again.
- Setting items
Main Item Sub-item SOUND CENTER-SP / SRD-SP / SUB-WOOFER
• Setting the speaker ON/OFF (cf. page 64) FRONT HPF / CENTER HPF / SRD HPF / SUB-W LPF
• Adjusting the speaker filter frequency (cf. Page 64) SP GAIN
• Adjusting the speaker output level (cf. page 46) DELAY CENTER-SP / SRD-SP
• Adjusting the speaker delay time (cf. page 65) DOLBY D D-RANGE
• Adjusting the dynamic range (cf. page 65) PL II CONT PANorama / DIMENSION / CTR WIDTH
• Setting the music mode in detail (cf. page 47)
Setting speakers ON/OFF (CENTER-SP/SRD-SP/SUB-WOOFER)
Set the centre speaker (CENTER-SP), surround speaker (SRD-SP) and sub-woofer (SUB-WOOFER) ON/OFF.
Be sure to set this setting to "OFF" when there is no centre speaker, surround speaker or subwoofer.
- The factory default setting is "ON".
1. Press the [A] button to set to the adjust mode.
2. Touch on the setting item display to select "CENTER-SP" under "SOUND", "SRD-SP" under "SOUND", and "SUB-WOOFER" under "SOUND".

ADJUST MODE CENTER-SP》ON
3. Either touch on the right of the display, or turn the [ROTARY] knob to select "ON" or "OFF".
* In the case of "SUB-WOOFER", select one of "ON+", "ON-" or "OFF". Normally, select "ON+". However, when "ON-" is set, an effect in the low range can be strongly felt.
4. Press the [A] button to return to the original mode.
Adjusting the filter frequencies of speakers (FRONT HPF/CENTER HPF/ SRD HPF/SUB-W LPF)
This function allows you to adjust the filter frequency matched to the speakers you are using.
- A speaker that was turned off in the section "Setting speakers on or off (CENTER-SP/ SRD-SP/SUB-WOOFER)" is not displayed.
- The factory default setting for "FRONT HPF" or "SRD HPF" is "THROUGH" (no filter), and for "CENTER HPF" or "SUB-W LPF" is "120Hz".
Filter adjustment
FRONT HPF/CENTER HPF/SRD HPF (high-pass filter adjustment)
This filter cuts bass sound from the front centre and surround speakers.
$$
\text {T H R O U G H} \rightarrow 5 0 \mathrm {H z} \rightarrow 8 0 \mathrm {H z} \rightarrow 1 2 0 \mathrm {H z}
$$
Set the filter matched to the speaker when small-diameter speakers are used.
THROUGH
Set this when using speakers that can generate bass. THROUGH cannot be set at CENTER HPF.
SUB-W LPF (sub-woofer low-pass filter adjustment)
This filter cuts treble sound from the sub-woofer.
$$
5 0 \mathrm {H z} \rightarrow 8 0 \mathrm {H z} \rightarrow 1 2 0 \mathrm {H z}
$$
Set the filter frequency to match the sub-woofer.
1. Press the [A] button to set to the adjust mode.
2. Touch on the setting item display to select "FRONT HPF" under "SOUND", "CENTER HPF" under "SOUND", "SRD HPF" under "SOUND", and "SUB-W LPF" under "SOUND".

ADJUST MODE FRONT HPF THROUGH
3. Either touch on the right of the display, or turn the [ROTARY] knob to set the frequency.
* Select one of THROUGH*, 50Hz, 80Hz, and 120Hz.
^*1 THROUGH is displayed only when "FRONT HPF" or "SRD HPF" is selected.
4. Press the [A] button to return to the original mode.
Adjusting the delay time of the speaker (CENTER-SP/SRD-SP)
The timing when the sound of each speaker reaches the listening position depends on your speaker installation and the size of your car. Adjust the delay time of each speaker so that the sound of all speakers reaches the listening position at the same time as the sound from the front speakers.
- The factory default setting is "0 ms".
1. Press the [A] button to set to the adjust mode.
2. Touch on the setting item display to select "CENTER-SP" under "DELAY" and "SRD-SP" under "DELAY".

ADJUST MODE CENTER-SP» Oms
3. Touch on the right of the display to adjust the delay time.
* "CENTER-SP" can be adjusted within the range 0 ms to 5 ms.
* "SRD-SP" can be adjusted within the range 0 ms to 15 ms.
4. Press the [A] button to return to the original mode.
Adjusting the Dolby Digital functions (D-RANGE)
This function compresses the dynamic range of Dolby Digital to maintain low level sounds such as actor conversation and suppress loud sound volumes.
These functions are only available on Dolby Digital DVD discs.
- The factory default setting is "MAX".
1. Press the [A] button to set to the adjust mode.
2. Touch on the setting item display to select "DOLBY D" under "D-RANGE".

3. Touch on the right of the display to adjust the dynamic range and adjust the desired item.
MAX: maximum dynamic range mode of the original source
STD: recommended mode for standard listening
MIN: the most compressed dynamic range mode that renders even low sounds easy to hear.
4. Press the [A] button to return to the original mode.
8. IN CASE OF DIFFICULTY
Problem Cause Measure General Power does not turn on.
(No sound is produced.) Fuse is blown. Replace with a fuse of the same amperage. If the fuse blows again, consult your store of purchase. Incorrect wiring. Consult your store of purchase. No sound output when operating the unit with amplifiers or power antenna attached. Power antenna lead is shorted to ground or excessive current is required for remote-on the amplifiers or power antenna. 1. Turn the unit off.
2. Remove all wires attached to the power antenna lead. Check each wire for a possible short to ground using an ohm meter.
3. Turn the unit back on.
4. Reconnect each amplifier remote wire to the power antenna lead one by one. If the amplifiers turn off before all wires are attached, use an external relay to provide remote-on voltage (excessive current required). Nothing happens when buttons are pressed.
Display is not accurate. The microprocessor has malfunctioned due to noise, etc. Reset button
Button and remove the DCP.
Press the reset button with a thin rod. DCP or main unit connectors are dirty. Wipe the dirt off with a soft cloth moistened with cleaning alcohol. CD/MP3NMA No sound heard. There is a disc other than a compact disc or foreign matter already in place. With the sloping console open, press and hold the [▲] button for 3 seconds or longer.
The foreign matter is forcibly ejected. MP3/WMA files are absent in a disc. Write MP3/WMA files onto the disc properly. Files are not recognized as an MP3/WMA file. Use MP3/WMA files encoded properly. File system is not correct. Use ISO9660 level 1, 2 or JOLIET or Romeo file system. Sound skips or is noisy. Disc is dirty. Clean the disc with a soft cloth. Disc is heavily scratched or warped. Replace with a disc with no scratches. Sound is cut or skipped.
Noise is generated or noise is mixed with sound. MP3/WMA files are not encoded properly. Use MP3/WMA files encoded properly.
Problem Cause Measure CD/MP3/WMA Sound is bad directly after power is turned on. Water droplets may form on the internal lens when the car is parked in a humid place. Let dry for about 1 hour with the power on. Wrong filename File system is not correct. Use ISO9660 level 1, 2 or JOLIET or Romeo file system. Play list play is not performed. File name or extension is not correct. Use alphanumeric/ASCII characters for MP3/WMA file name.
Use“.M3U” for the file extension of a play list.
9. ERROR DISPLAYS
If an error occurs, one of the following displays is displayed.
Take the measures described below to eliminate the problem.
Error Display Cause Measure CD/MP3/WMA ERROR 2 A DISC is caught inside the CD deck and is not ejected. This is a failure of CD deck's mechanism and consult your store of purchase. ERROR 3 A DISC cannot be played due to scratches, etc. Replace with a non-scratched, non-warped-disc. ERROR 6 A DISC is loaded upside-down inside the CD deck and does not play. Eject the disc then reload it properly. General AMP GUARD The speaker protection circuit is operating. During this operation, if any volume operation is performed, the display shows "AMP GUARD". "AMP GUARD" sometimes functions when special test signals are used. 1. Turn down sound volume. Function can also be restored by turning the power off and on again. (Speaker volume is reduced automatically when the speaker protection circuit operates).
2. If the sound is muted again, consult our service department. CD changer ERROR 2 A DISC inside the CD changer is not loaded. This is a failure of CD changer's mechanism and consult your store of purchase. ERROR 3 A DISC inside the CD changer cannot be played due to scratches, etc. Replace with a non-scratched, non-warped disc. ERROR 6 A DISC inside the CD changer cannot be played because it is loaded upside-down. Eject the disc then reload it properly. DVD changer ERROR 2 A DISC inside the DVD changer cannot be played. This is a failure of DVD mechanism and consult your store of purchase. ERROR 3 A DISC cannot be played due to scratches, etc. Retry or replace with a non-scratched, non-warped-disc. ERROR 6 A DISC inside the DVD changer cannot be played because it is loaded upside-down. Eject the disc then reload it properly ERROR P Parental level error Set the correct Parental level. ERROR R Region code error Eject the disc and replace correct region code disc.
If an error display other than the ones described above appears, press the reset button. If the problem persists, turn off the power and consult your store of purchase.
10. SPECIFICATIONS
Radio section
Tuning System: PLL synthesizer tuned
Receiving Frequencies:
FM : 87.5 to 108 MHz (0.05 MHz steps)
MW: 531 to 1602 kHz (9 kHz steps)
LW : 153 to 279 kHz (3 kHz steps)
CD player section
System: Compact disc digital audio system
Frequency Response: 5 Hz to 20 kHz (±1 dB)
Signal to Noise Ratio: 100 dB (1 kHz) IHF-A
Dynamic Range: 96 dB (1 kHz)
Distortion: 0.01%
General
Output Power: 4 × 31 W (DIN 45324, +B=14.4V)
Power Supply Voltage:
14.4 V DC (10.8 to 15.6 V allowable),
negative ground
Power Consumption: Less than 15 A
Speaker Impedance: 4 Ω (4 to 8 Ω allowable)
Auto Antenna Rated Current: 500 mA or less
Weight:
Main unit: 1.7kg
Remote control unit: 80g (including battery)
Dimensions:
Main unit :
178 (W) × 50( H) × 155( D) mm
Remote control unit:
44 (W) × 110 (H) × 27 (D) mm
Note:
- Specifications and design are subject to change without notice for further improvement.
Nous vous remercions d'avoir acheté ce produit Clarion.
* Lisez tout le manuel de l'utilisateur avant demettre l'appareil en service.
* Àprouv avoir lu ce manuel, conservez-le dans un endroit pratique (par ex. dans la boîte à gants).
* Lisez le contenu de la carte de garantie jointe et conservez-la précieusement avec ce manuel.
* Ce mode d'emploi contient les procédures de fonctionnement du changeur CD, du tuner DAB et TV, raccordé par le cable CeNET. Le changeur CD, et le tuner TV ont leur propre manuel et aucune explication sur leur fonctionnement n'est fournie.
Table des matières
1. PRECAUTIONS 3
Console rabatable 4
Manipulation des disques compacts 4
2. LES COMMANDES 5
3. NOMENCLATURE DES TOUCHES 6
Nom des touches et leurs fonctions 6
Principales opérations des touches lorsqu'un apparéil externe est raccordé à l' apparéil 7
Eléments de l'écran 7
Commandes de I'ecran 8
4. CLAVIER DE COMMANDE AMOVIBLE (DCP) 9
5. TELECOMMANDE 10
Installation des piles 10
Fonctions des touches de la télécommande 11
6. FONCTIONNEMENT 12
Fonctionnement de base 12
Fonctionnement de AC-Processor III 17
Fonctionnement de la radio 23
Fonctionnement RDS 26
Commandes CD / MP3 / WMA 31
Ecoute de différents morceaux de musique par différentes personnes (fonction 2-ZONE) 36
Opérations communes à chaque mode 37
7. FONCTIONNEMENT DES ACCESSOIRES 51
Fonctionnement du changeur de CD 51
Fonctionnement du téléviseur 54
Fonctionnement de la radio numérique / DAB 58
Commandes du Decodeur Surround 5.1ch 61
8. EN CAS DE DIFFICULTÉ 66
9.AFFICHAGE DES ERREURS 68
10. CARACTERISTIQUES TECHNIQUES 69
1. PRECAUTIONS
1. L'appareil est unconçu exclusivement pour un vehicule à 4 roues roulant sur route. Il n'est pas adapté à une utilisation sur tracteur, camion, bouteur sur chenilles, vehicule tout terrain, motocyclette à 2 ou 3 roues, bateau ni jusqu'à autre vehicule à usage spécifique.
2. Lorsque l'habitacle de la voiture est très froid et que le lecteur est utilisé juste après la mise en route du chauffage, de la condensation risque de se former sur le disque ou sur les pieces optiques du lecteur et d'empêcher le bon déroulement de la lecture. Si de la condensation s'est formée sur le disque, essuyez le disque avec un chiffon doux. Si de la condensation s'est formée sur les
pièces optiques du lecteur, attendez environ une heures avant d'utiliser le lecteur pour que la condensation puisse s'évaporer naturellement et permettre un fonctionnement normal.
3. Une conduite sur routes mauvaises qui provoque de fortes vibrations peut entraîner des interruptions du son.
INFORMATIONS AUX UTILISATEURS:
LES ALTIATIONS OU MODIFICATIONS APORTÉES À L'APPAREIL ET NON EXPRESSEMENT APPROUVÉES PAR LE FABRICANT ANNULENT LA GARANTIE.
A VERTISSEMENT
Pour votre sécurité, ne regardez pas et n'actionnez pas l'écran tactile en conduisant.
Console rabatable
Cet apparéil possé de une console rabattable qui rend possible l'utilisation de gros écrans.
Lorsque you utilisez la console rabattable, pensez bien à la referrer.
ATTENTION
Quand vous ouvrez ou que vous refermez la CONSOLE RABATTABLE, faites attention de ne pas vous coincer les doigts.
1. A des fins de sécurité, refermez toujours la CONSOLE RABATTABLE quand vous restez longtemps sans utiliser l'appareil ou que vous coupez (OFF) le contact. Si vous coupez le contact alors que la CONSOLE RABATTABLE est inclinée, elle ne se reférer na pas.
2. Avant que la CONSOLE RABATTABLE ne soit complètement fermée, le mecanisme de
sécurities risque de freiner le mouvement à des fins de sécurité. Ceci est normal.
3. Si vous bougez la CONSOLE RABATTABLE à la main, cela risque de déclencher la lecture. Pour annuler la lecture, appuyez sur la touche [▲] alors que l'appareil est sous tension pour referrer la CONSOLE RABATTABLE.
4. Quand le disque est ejecté, la CONSOLE RABATTABLE revient automatiquement en position inclinée ou fermée. Si un objet empêche la fermeture de la CONSOLE RABATTABLE, le mécanisme de sécurité se déclenché et la CONSOLE RABATTABLE s'ouvre à nouveau. Dans ce cas, retirez l'objet qui fait obstacle à la fermeture, puis appuyez sur la touche [▲].
5. Pour éviter de rayer le disque compact, maintenez le CD de 12 cm ou de 8 cm à l'horizontal pour l'insérer ou le retarder.
Manipulation des disques compacts
Utilisez uniquement des disques compacts,
portant le label


N'utilise pas de disques en forme de coeur, octogonale ou des disques compacts d'autres formes. Certains modèles de CD enregistrés en mode CD-R/CD-RW risquent de ne pas être utilisables.
Manipulation des disques
- Comparés aux CD de musique ordinaires, les CD-R et CD-RW sont tous deux plus sensibles aux niveaux élevés de présence et d'humidity, et avec certains CD-R et CD-RW la lecture risque de ne pas être possible.
- Les disques neufs présenteront certaines asperités sur les bords. Avec ces disques, l'appareil peut ne pas fonctionner ou le son Stylo-bille
s'interrompre. A
l'aide d'un stylo-bille, etc. retirez les
asperités sur le
pourtour du disque.
- Ne collez jamais d'étiquettes sur la surface du disque compact et n'y écrivez rien avec un stylo ou un cra
- Ne lisez jamais un disque compact ayant du ruban adhésié ou de la colle sur sa surface. Si vous lisez ce genre de disques, vous risquez de ne pas pouvoir le sortir du lecteur de CD ou d'endommager le lecteur de CD.

- N'utilise pas de disques compacts fortement rayés, gondolés ou fendillés, etc. Cela provoquerait des anomalies de fonctionnement ou des dommages.
- Pourvoir le disque compact de son etui de rangement, appuyez sur le centre de I'etui et soulever le disque en le tenant delicatement par les bords.
- N'utilisez pas de feuilles de protection de CD en vente dans le commerce ni de disques dotés de stabilisateur, etc. Ils risquent d'endommager le disque ou de provoquer une panne du mécanisme interne.
Rangement
N'exposez pas les disques compacts en plein soleil ni à une source de chaleur.
- N'exposez pas les disques compacts à une humidité ou une poussière excessives.
- N'exposez pas les disques compacts directement à la chaleur d'un apparéil de chauffage.
Nettoyage
- Pour enlever les marques de doigs ou la saleté, essuyez le disque en ligne droite avec un chiffon sec, en procédant du centre du disque vers la périhérie.
- N'utilisez aucun type de solvant, par exemple des produits de nettoyage, vaporisateurs anti'électricité statique ou diluant vendus dans le commerce, pour nettoyer les disques compacts.
- Àprous avoir utilisé le nettoyeur de disque compact spécial, laissez le disque secher complètement avant de l'utiliser.
2. LES COMMANDES
Appareil pilot

Ouvrez la CONSOLE RABATTABLE

3. NOMENCLATURE DES TOUCHES
Nom des touches et leurs fonctions
Bouton [RELEASE]
Supprime le DCP.
Capeur Photosensible
- Ce capteur détecte la luminosité ambiente de votre voiture. Lorsque la fonction d'attenuation automatique est régée sur "AUTO" la luminosité de l'écran varie en fonction de cette mesure par le capteur.
Bouton [ROTARY]
- Appuyez sur le bouton pourmettre en marche.
Chaque pression sur ce bouton change de mode.
- Appuyez et maintenez enforcé le bouton pendant au moins une seconde pour éteindre.
- Vous pouvez aussi tournez ce bouton pour ajuster le volume ou les divers régles en mode ajustement.
Bouton [△]
- Ouvre/ferme l'écran de contrôle.
Si un disque est déjà charge, il sera éjecté lors de l'ouverture de l'écran de contrôle.
Remarque:
Si le disque n'est pas ejecté, maintenez le bouton [▲] enforcé pendant au moins une seconde.
Bouton [A]
Utilise ce bouton pour regler ou ajuster les divers réglages en mode ajustement.
Utilisez ce bouton pour saisir les noms de stations en mode radio ou les titres de disques en mode CD.
Bouton [SOUND]
Utilise ce bouton pour regler ou ajuster les divers réglages tel que l'espace audio.
- Maintenir ce bouton pendant au moins une seconde bascule entre ON (MARCHE) et OFF pour la fonction 2-ZONE.
Bouton [TA]
Utilise ce bouton pour regler le mode veille du TA (Traffic Annoucement (Informations trafic)) (lorsque la fonction 2-ZONE est sur "OFF") Commute la fonction 2-ZONE. Maintenir ce bouton enforcé pendant au moins une seconde commute entre les types de 2-ZONE (Lorsque la fonction 2-ZONE est "ON").
Bouton [▶II]
- Démarre et arrêté la pause d'une piste (en mode CD).
- Utilisez ce bouton pour régler le mode veille du PTY (Programme Type (Type de programme)) ou les éléments du PTY.
Écran
- Affiche les diverses informations qui indiquent l'etat de cet apparéil tels que l'accord/la lecture et les tiemoins.
Effleurez l'écran avec le doigt, et effleurez pourmettre en marche.(cf.page8)
Principales opérations des touches lorsqu'un apparéil externe est raccordé à l' apparéil
Lorsque le changeur de CD/DVD est connecté
* Pour plus de détails, voir la section "Fonctionnement du changeur de CD" (cf. page 51). Pour le changeur de DVD, reportez-vous au manuel de l'utilisateur fourni avec le changeur de DVD.
Bouton [▶II]
- Lire ou mesure un CD ou DVD en pause.
Bouton [A]
- Sert à saisir les titres en mode changeur de CD.
Lorsque la télé/le DAB sont connectés.
* Pour plus de détails, voir la section "Fonctionnement du téléviseur" (cf. page 54) ou "Fonctionnement de la radio numérique / DAB" (cf. page 58).
Bouton [TA]
Utilisez le bouton pour regler le mode veille du TA (Traffic Annoucement (Informations traffic)) pour le mode DAB. (Cette fonction n'est disponible que pour les tuners DAB.)
- Appuyez et maintenez pendant au moins une seconde pour allumer ou eteindre le mode INFO. (en mode DAB)
Bouton [▶III]
- Commute entre le mode image télé et le mode image VTR (external). (en mode TV)
- Utilisez ce bouton pour régler le mode veille du PTY (Programme Type (Type de programme)) ou les éléments du PTY en mode DAB.
Bouton [A]
- Ce bouton sert à saisir le nom de la station dé télé. (en mode TV)
Éléments de l'écran

Commandes de l'écran
Un écran tactile est utilisé comme écran sur cet apparéil. Vous pouvez commander cet écran simplement en l'effleurant avec le bout des doits. Il y a quatre utilisations de l'écran, comme suit:
Effleurer
Effleurez l'écran avec le bout du doigt puis retirez-le dans la seconde qui suit. C'est l'utilisation la plus simple lorsque vous commandez l'écran.
Effleurer et maintainir
Effleurez l'écran du bout du doigt et maintenez - le sur l'écran pendant 1 à 2 secondes ou plus. Ne rougez pas le doigt lorsque vous effleurez l'écran.
Effleurer et maintainir l'écran pendant 1 seconde ou plus affiche par exemple les listes et appelle d'autres fonctions pratiques.
Effleurer et maintainir l'écran pendant 2 secondes ou plus sert à enregistrer dans la mémoire présélectionnée et d'autres informations.
Effleurer
Effleurez l'écran du bout du doigt, puis déplacez le doigt vers la gauche ( ) ou la droite ( ) en maintainant le bout du doigt sur l'écran, puis retirez le doigt dans le seconde qui suit. Cette commande sert à désirir la mémoire préseLECTIONnée (1 à 6) ou les pistes.

Effleurer
Effleurez l'écran du bout du doigt, puis déplacez le doigt vers la gauche ( ) ou la droite () en maintainant le bout du doigt sur l'écran, puis maintenez le doigt sur l'écran. La commande en cours continue tant que vous maintainez le doigt sur l'écran. Cette commande, sert, par exemple, pour l'accord ou l'avance rapide/le retour rapide des pistes.

4. CLAVIER DE COMMANDE AMOVIBLE (DCP)
Le clavier de commande se retire, de façon à éviter le vol. Quand vous l'enlevez, rangez-le dans le boitier DCP (CLAVIER DE COMMANDE AMOVIBLE) pour le protégger des rayures.
Nous vous recommendons d'emporter le DCP avec vous quand vous quittez votre voiture.
Retrait du CLAVIER DE COMMANDE AMOVIBLE (DCP)
1. La CONSOLE RABATTABLE étant fermée, mettez l'appareil hors tension.
2. Appuyez à fond sur la touche de [RELEASE] pour ouvrir le DCP.

3. Tirez le DCP vers vous et retirez-le.

ATTENTION
- A des fins de sécurité, refermez bien la CONSOLE RABATTABLE quand vous enlevez le DCP.
- Si vous retirez le DCP alors que la CONSOLE RABATTABLE est ouverte, la CONSOLE RABATTABLE se refermera immédiatement. Faites attention de ne pas vous coincer les doigts.
Fixation du CLAVIER DE COMMANDE AMOVIBLE (DCP)
1. Insérez le DCP de façon que la section A sur le côté droit du DCP rentrée dans le crochet B de l'appareil.

2. Appuyez délicatement sur le côte gauche © du DCP pour l'insérer en place.

ATTENTION
- Le DCP est très sensible aux chocs. Quand vous l'enlevez, faites attention de ne pas le faire tomber ni le hourter violemment.
- Si vous appuyez sur la touche de [RELEASE] alors que le DCP n'est pas verrouille, ce dernier risque de tomber sous l'effet des vibrations de la voiture et de se casser. En conséquence, après avoir retire le DCP, fixez-le sur l'appareil ou rangez-le dans son boitier.
- Le connecteur qui raccorde l'appareil principal au DCP est une piece extrémement importante. Faites attention de ne pas l'abîmer en appuyant dessus avec les ongles, un tournevis, etc.
Remarque:
- Si le DCP est sale, enlevez la saleté avec un chiffon doux et sec.
5. TÉLÉCOMMANDE

Télécommande
Installation des piles
1. Retournez la télécommande à l'envers, puis+pousse le couvercle arrêté dans le sens de la flèche.
2. Insérez les piles AA (SUM-3, R-6/1,5 V) fournies avec la télécommande dans le sens indiqué sur la figure, puis reférer que la couvercle arrêté.
Remarques:
Une utilisation incorrecte des piles risque de les faire exploer. Notez les points suivants:
- Quand vous remplacez les piles, remplacez bien les deux piles en même temps.
- Ne court-circuitez pas, ne demontez pas et ne chauffez pas les piles.
- Ne jetez pas les piles au feu.
- Mettez les piles usées au rebut de la manière appropriée.

Fonctions des touches de la télécommande
Mode Touche Radio (RDS)/DAB CD/MP3 Changeur de CD Changeur de DVD Téléviseur [FUNC] Fait passer entre la radio, DAB, CD/MP3, changeur CD, changeur DVD et téléviseur, AUX. [BAND] Sélection de la gamme de réception. Lecture de la première plage. Lecture TOP. Saut au disque suivant dans l'ordre croissant. Sélection de la gamme de réception. [▲], [▼] Augmentation et diminution du volume (tous les modes). [←], [►] Balayage ascendant/descendant des canaux pré régés. Sélection ascendante/descendante des plages. Pression de plus de 1 seconde: Avance rapide/retour rapide. Balayage ascendant/descendant des canaux pré régés. [►■] Sans fonction. Commutation entre la lecture et la pause. Sans fonction. [MUTE] Mise en/hors service du silencieux. [TA] Marche/arrêt d'announces sur la circulation routière. Maintenez la touche enforcée pendant 1 seconde ou plus pour altermier entre la source sonore de la zone principale et celle de la zone secondaire (seulement en mode 2-ZONE). [DISP] Fait passer entre l'affichage principal et l'affichage d'horloge (CT). [PS/AS] Balayage des stations pré régées. Pression de 2 secondes: Prééglage automatique des stations. Lecture à exploration. Maintenez la touche enforcée pendant plus d'une seconde pour effectuer la lecture à Exploration d'un dossier en mode MP3/WMA. Lecture des introductions. Pression de plus de 1 seconde: Balayage de tous les disques. Balayage des stations pré régées. Pression de 2 secondes: Prééglage automatique des stations. [AF] Marche/arrêt de la fonction AF. Pression de plus de 1 seconde: Marche/arrêt de la fonction REG. Lecture repétée. Maintenez la touche enforcée pendant plus d'une seconde pour effectuer la lecture repétée d'un dossier en mode MP3/WMA. Lecture repétée. Pression de plus de 1 seconde: Lecture repétée de tous les disques. Sans fonction. [PTY] Marche/arrêt du mode PTY. Lecture aléatoire. Maintenez la touche enforcée pendant plus d'une seconde pour effectuer la lecture aléatoire d'un dossier en mode MP3/WMA. Lecture aléatoire. Pression de plus de 1 seconde: Lecture aléatoire de tous les disques. Commute alternatively entre la télévision (TV) et le magnétoscope (VTR). [2-ZONE] Maintenez la touche enforcée pendant 1 seconde ou plus pour activer ou désactiver le mode de 2-ZONE. Appuyez pour commuter alternatively la zone de commande entre la zone principale et la zone secondaire lorsque le mode de 2-ZONE est activé.
* Certains des touches correspondantes de l'appareil principal et de la télécommande ont des fonctions différentes.
6. FONCTIONNEMENT
Fonctionnement de base
ATTENTION
Réglez bien le volume au minimum avant demettre l'appareil hors tension. Un sonpuissant au moment de la mise sous tensionrisque d'abimer les tympans etd'endommager l'appareil. Si vous mettezl'appareil hors tension avec le volume reglé à un niveau élevé et que vous remettezl'appareil sous tension, l'augmentationbrusque du volume risque de vous abimerles tympans et d'endommager l'appareil.
Mise en marche/arrêt de l'alimentation
Mise en marche
Remarque:
- Attention si vous utilisez longtemps cet apparéil sans faire tourner le moteur. Si vous videz la batterie de la voiture, il se peut que vous ne puissiez plus démarrer eteci peut réduire la durée de vie de la batterie.
1. Appuyez sur le bouton [ROTARY]
Le mode précédemment actif est affchéé.
Vérification du système
La première fois que cet apparéil est mis en marche après la connexion des cables, il vérifie l'équipement connecté. (Ceci s'appelle "system check". ("vérification du système")) Lorsque l'alimentation est mise en marche et que "System Check" s'affiche, suivez la procédure ci-dessous pour effectuer la vérification du système.
1. Lorsque "System Check" s'affiche, appuyez sur le bouton [ROTARY]. La vérification du système commence. Lorsque la vérification du système est terminée, "Completed" (Terminé) s'affiche.
2. Appuyez de nouveau sur le bouton [ROTARY] L'écran principal du mode radio apparait.
Fonction CODEMATIC
Lorsque "CODEMATIC" est sur "ON", et que l'alimentation est en marche avec le DCP fixé, le Touch Code (Code touche) s'affiche. Effleurez l'écran dans l'ordre régledans le mode d'ajustement.

Pour plus de détails sur la fonction CODEMATIC, voir "Utilisation de la fonction de sécurité (CODEMATIC)" (cf. page 50).
Arrêt de l'alimentation
1. Maintenez enforcé le bouton [ROTARY] pendant au moins une seconde.
Selection d'un mode
1. Appuyez sur le bouton [ROTARY] pour changer le mode de commande.
2. A chaque fois que vous appuyez sur le bouton [ROTARY], le mode de commande change dans l'ordre suivant: mode Radio mode DAB mode CD/ MP3 mode changeur de CD mode changeur de DVD mode Télé mode AUX mode Radio...
* Un équipement externe non connecté avec CeNET ne s'affiche pas.
Ajustement du volume
1. Tourner le bouton [ROTARY] dans le sens des aiguilles d'une montre augmente le volume ; le tourner dans le sens contraire diminue le volume.
* Le niveau de volume varie de 0 (minimum) à 33 (maximum).
Commutation du mode de commande
Il y a deux modes de commande de base: les commandes standard et les commandes simples.
1. Sur l'écran de l'écran principal, effleurez et maintenez le doigt sur la gauche de l'écran pendant au moins 1 seconde. Le mode de commande est commuté.

En mode de commande simple, il n'est pas nécessaire d'effleurer ou sur l'écran de l'écran principal en mode radio ou en mode CD, et vous pouvez utiliser cet apparéil en effectuant des commandes simples.
Remarquez, cependant, que les commandes suivantes ne sont pas accessibles en commande simple.
- Accord préprogramme, Sélection de dossier, Sélection de disque, et les autres commandes qui impliquent l'effleurement de 1 sur la droite de l'écran.
- Commandes de commutation d'écran (cf. page 13)
- Commandes de commutation d'écran de titre (cf. page 14)
- Opérations pour afficher les écrans de saisie de titres.
Sur les écrans (Ex. Écran liste, mode ajustement, etc.) autres que l'écran principal, il n'y a aucune différence entre la commande standard et la commande simple.
Les descriptions dans ce manuel sont principalement celles des commandes standard. Pour les descriptions des commandes simples, reportez-vous aux descriptions des écans de l'écran en mode radio ou en mode CD.
Commutation de l'écran
1. Effleurez le centre de l'écran.
A chaque fois que vous effleurez l'écran, il change comme suit :

Écran titre
Economiseur d'écran
Lorsque la fonction économiqueur d'écran est activée, et que vous n'utilise pas cet apparéil pendant environ 30 secondes, l'économiserd'écran s'affiche. Pour plus de détails, voir page 41.
Fond d'écran
Effleurer et maintainir le doigt au centre de l'écran pendant au moins 1 seconde commute vers l'écran de fond d'écran.
① ⑨ ② ⑩ ③ ⑪ ④ ⑫ ⑤ ⑬ ⑥ ⑭ ⑦ ⑮ ⑧ ⑯
Écran analyseur de spectre
Effleurer et maintainir le doigt sur la droite de I'ecran pendant au moins 1 seconde pendant I'ecran de I'analyseur de spectre (S/A) commute vers I'ecran de I'analyseur de spectre.
S/A
SCAN S/A 1, S/A 2, et S/A 3 sont
affichés chacun pendant 10
seconds au moins. S/A 1 S/A 1
FLDR No.
003
TOP S/A 2 S/A 2
FLDR No.
003
TOP S/A 3 S/A 3
FLDR No.
003
TOP
Commutation de I'écran du titre
Voupez afficher les titres des disques et d'autres informations qui sont stockées sur les disques en lisant les CD en mode CD ou changeur de CD.
1. Effleurez et maintenez le doigt sur la droite de l'écran pendant au moins une seconde sur l'écran du titre.
A chaque fois que vous effleurez et maintenez le doigt, l'écran commute l'écran comme suit :
Disque CD-TEXT
Titre utilisateur (disque) Titre CD-texte (disque) Nom d'artiste Titre CD-texte (piste) Titre utilisateur (disque)...
Disque MP3/WMA
Dossier Fichier Balise Album Balise
Artiste Balise titre Dossier...
Remarques:
- Les MP3 supportent les TAGs ID3 V2.3 / 2.2 / 1.1 / 1.0.
- Les écrons de TAGs donnent la priorité aux V2.3/2.2.
- Dans le cas de TAGs d'album pour WMA, les informations écrites dans l'extension d'en-tête sont affichées.
- Seuls les caractères ASCII peuvent être affichés dans les TAGs.
Pour faire defiler un titre
Effleurez 卡 sur l'écran de titre lorsque le titre est affché.
Le titre défile vers la gauche.
Pour arrêté le défilament
Effleurez sur l'écran du titre.
Fonction CT (Clock Time) (Horloge)
Le CT vous permet de receivevoir les données CT envoyées depuis une station RDS et d'afficher l'heure. Pour afficher l'écran CT, effleurez le centre de l'écran.
- Si les données CT ne sont pas reçues, "--CT" s'affiche à l'écran.
Remarque:
- Les données CT ne sont pas transmises dans certains pays et par certaines stations de radio. De plus, dans certaines zones, il est possible que les données CT ne soient pas précises.
Réglage de l'ADF
- ADF est l'abréviation de Anti Distortion Filter (Filtre Anti Distorsion).
Les fonctions adoptées "Liveliness
Enhancement Filter" (Filtre d'enrichissement de direct) et "Sound Tone Compensation"
Compensation de tonalité) permettent une lecture réalisée et bien modulée sans affecter les caractéristiques de la tonalité du son d'origine.
Cet apparéil est fourni avec 4 types d'effets de tonalité en mémoire. Choisissez celui que vous préférez.
ADF-1: Convient à de vérables enceintes
ADF-2: Convient à des enceintes séparées
ADF-3: Convient à des enceintes coaxiales USER (UTILISATEUR)
: Ce réglage peut être ajusté par l'utilisateur selon ses goûts.
OFF: Pas d'effet sonore
- Le réglage d'usine par défaut est "OFF".
Remarques:
- Comme le volume change lorsque l'ADF est commuté, commutez l'ADF avec le volume, le "SW VOLUME" (sub-woofer) et le "CTR VOLUME" (center speaker) (enceinte centrale) baisse autant que possible.
- Avec certains ensembles d'enceintes il arrive parfois qu'on ne puisse obtenir un effet suffisant. Si cela se produit, ajustez les paramétres ADF ou le volume.
Lorraine ADF is regéled sur "USER", "1", "2" ou "3" la fonction VSE et la fonction BASS/TREB sous EQ-SELECT sont désactivées.
1. Appuyez sur le bouton [SOUND].
2. Effleurez ADF.

3. Effleurez sur la droite de l'écran pourCHOISIR le mode ADF.

Lorsque l'ADF est réglé sur "OFF", le réglage de l'ADF n'est pas répercuté sur la source musicale. Ceci termine le réglage ADF. Appuyez sur le bouton [SOUND] pour revenir au mode original.
* Choisissez parmi USER, 1, 2, 3 ou OFF.
4. Pour changer les détails des réglages ADF, appuyez sur le bouton [A].
5. Effleurez sur l'écran d'ajustement des éléments pourCHOISIR I'elément souhaite. Chaque effleurement de commute l'écran d'ajustement des éléments comme suit :
- Ajustement d'élement (Lorsque USER est sélectionné à l'objet 3)
BASS TREBLE COMP BASS...
- Ajustement d'élement (Lorsque 1 à 3 sont sélectionnés à l' étape 3)
LEVEL COMP LEVEL...
6. Effleurez sur la droite de l'écran pour ajuster l'objet.
* "BASS" et "TREBLE" peuvent être ajustés dans une fourchette de 1 à 13.
* “LEVEL” peut être ajusté dans une fourchette de -3 à +3.
* Sélectionnez soit “ON” soit “OFF” pour “COMP”.
7. Appuyez sur le bouton [SOUND] pour revenir au mode original.
Ajustement du Sub-woofer et de l'enceinte centrale
- "SW VOLUME" (sub-woofer) ne peut être ajusté que lorsque "SUB-WOOFER" est régle sur "ON".
- "CTR VOLUME" (enceinte centrale) ne peut être ajusté que lorsque le mode Dolby Pro Logic II est réglé sur "MUSIC" ou "MATRIX", que "SP-SETTING" est réglé sur "CTR+SW" et que "CENTER-SP" est réglé sur "ON".
- Le réglage d'usine par défaut pour SW VOLUME et pour CTR VOLUME est "0".
1. Appuyez sur le bouton [SOUND].
2. Effleurez A-MODE.

3. Effleurez sur l'écran d'ajustement des éléments pourCHOISIR "SW VOLUME"ou "CTR VOLUME".

4. Effleurez sur la droite de l'écran et ajustez l'objet.
* L'élement peut être ajusté dans une fourchette de -5 à +5.
5. Appuyez sur le bouton [SOUND] pour revenir au mode original.
Ajustement de la balance/du fondu
BALANCE:
Ajuste le volume de la balance entre les enceintes gauche et droite.
FADER:
Ajuste le volume de la balance entre les enceintes avant et arriere.
- Le réglage d'usine par défaut pour BALANCE et pour FADER est "0".
Remarque:
- Balance/fader ne peut pas être ajusté lorsqu'PRO'est sélectionné dans AC-PRO III (cf. page 44) et que la position de la fonction est sur "ON". Ajustez la balance/fader avec la "Sélection du menu de position" (cf. page 17).
1. Appuyez sur le bouton [SOUND].
2. Effleurez A-MODE.

3. Effleurez sur l'écran d'ajustement des éléments pourCHOIR "BALANCE"ou "FADER".

4. Effleurez sur la droite de l'écran et ajustez l'objet comme souhaïte.
* "BALANCE" peut être ajusté dans la fourchette L13 (côté gauche accentué) et R13 (côté droit accentué).
* “FADER” peut être ajusté dans la fourchette F12 (arrière accentué) et R12 (avant accentué).
5. Appuyez sur le bouton [SOUND] pour revenir au mode original.
Ajustement des basses/aigus
Le mode basses/aigus ne peut être ajusté que lorsque le mode Dolby Pro Logic II est réglé sur "OFF" (cf. page 17) et que "EQ-SELECT" est réglé sur "BAS/TREB" (cf. page 44).
- Le réglage d'usine par défaut est "0".
1. Appuyez sur le bouton [SOUND].
2. Effleurez A-MODE.

3. Effleurez sur l'écran d'ajustement des éléments pour sélectionner "BASS" ou "TREBLE".

4. Effleurez sur la droite de l'écran et ajustez l'objet.
* L'élement peut être ajusté dans une fourchette de -6 à +6.
5. Répétez les étapes 3 et 4 pour ajuster l'élément souhaïte.
6. Appuyez sur le bouton [SOUND] pour revenir au mode original.
Fonctionnement de AC-Processor III
Dolby Pro Logic II
Le Dolby Pro Logic II est une technologie de décodage de matrice qui applique la technologie de matrice numérique mise à niveau et qui améliore encore le Dolby Pro Logic. Il réalise une excellente reproduction à 5,1 canaux des sources Dolby surround ainsi que des sources stéreo comme les CD, ce qui confère au canal surround une plage intégrale (20 Hz à 20 kHz) et le rend stéropheonomique. Vous pouvez ainsi écouter les sources stéreo avec un son dynamique à 5,1 canaux. Selon la sourceroduite, vous pouze sélectionner le mode Music ou le mode Matrix.
Fabrique sous licence de Dolby Laboratories. "Dolby", "Pro Logic" et le symbole double-D sont des marques de Dolby Laboratories.
Sélection du menu PL II (Dolby PL II)
Choisissez le mode MUSIC ou le mode MATRIX qui correspond à la source que youlez dire en tant que mode Dolby Pro Logic II.
- Le réglage d'usine par défaut est "OFF".
■ MUSIC (mode musique)
- Ce mode convient aux sources de son stéroides que les CD.
- Un autre mode d'ajustement qui permet un ajustement plus précis est aussi disponible car le champ sonore se propage de manière différente selon l'état de la source musicale enregistrée. (Voir page 47)
■ MATRIX (mode matrix)
- Ce mode convient aux sources sonores telles que la radio AM/FM.
OFF
- Le mode Dolby Pro Logic II n'est pas utilisé, et le mode AC-PRO III est utilisé. Pour plus de détails sur le mode AC-PRO III, voir " Sélection de chaque mode" (cf. page 44).
1. Appuyez sur le bouton [SOUND].
2. Effleurez Dolby PLII.
3. Effleurez sur la droite de l'écran pour sélectionner le mode Dolby Pro Logic II.

Le mode d'écran est commuté comme suit.
MUSIC (mode musique) MATRIX (mode matrix) OFF (arret PL II) MUSIC (mode musique)...
* Pour plus de détails sur l'ajustement du volume du speaker central/sub-woofer, voir page 45.
4. Effleurez RTN.
Selection du menu de position
Avec POSITION, vous pouvez désir parmi 5 types d'arrivée du son de l'enceinte jusqu'à la position de votre siège.
En outre, la fonction de temporisation permet un réglage très précis des enceintes afin que le même effet sonore soit obtenu sur chaque enceinte pour tous les auditeurs.
Dans la procédure " Sélection de chaque mode" (cf. page 44), réglez AC-PRO III sur "PRO".
- Le réglage d'usine par défaut pour POSITION est "OFF" et pour le menu de base de position c'est "FRONT".
■ Menu position
Cette fonction est préenregistrée avec 5 menus de position. Choisissez le menu souhaïte selon vos goûts.
1. Appuyez sur le bouton [SOUND].
2. Effleurez POSITION.


3. Effleurez sur l'écran ON/OFF.
L'effet de position bascule entre ON et OFF.

Lorsque l'effet de position est régé sur "OFF", le réglage de la position n'est pas répercuté sur la source sociale. Ceci termine le réglage de la position. Appuyez sur le bouton [SOUND] pour revenir au mode original.
4. Effleurez B/U pour désir "BASIC".

Chaque effleurement de B/U bascule entre "BASIC" et "USER".
5. Effleurez sur le No. de menu de base de position pourCHOISIR le menu de base de position.
Menu de base de position
Eléments d'ajustement
No. Écran Nom Position du siège 1 FRONT-L Siège avant gauche 2 FRONT-R Siège avant droit 3 FRONT Sièges avant 4 REAR Sièges arrière 5 FULL SEAT Tous les sièges
6. Appuyez sur le bouton [SOUND] pour revenir au mode original.
Ajustement/enregistrement des positions (mémoire utilisateur)
Avec la mémoire utilisateur, un réglage très précis des enceintes est effectué de manière à ce que le même effet audio soit obtenu sur chaque enceinte pour tous les auditeurs en fonction du menu de base de position. jusqu'à 5 réglages d'ajustement peuvent être enregistrés dans la mémoire utilisateur.
T-ALIGN (temporisation)
La distance de l'auditeur à chaque enceinte peut être saisie par pas de 2.3 cm, le temps mis par le son pour atteindre l'auditeur depuis chaque enceinte peut être ajusté.
SP GAIN (gain enceinte):
Ajusté le niveau de sortie de l'enceinte. Ajustez de manière à ce que le volume de sortie de chaque enceinte soit le même.
1. Appuyez sur le bouton [SOUND].
2. Effleurez POSITION.
3. Effleurez sur l'écran ON/OFF. L'effet de position bascule entre ON et OFF.
4. Effleurez B/U pour désir "BASIC" ou "USER".
5. Effleurez sur la croite de l'écran pour désirir le menu utilisé comme menu pour le réglage.
6. Appuyez sur le bouton [A].
7. Effleurez sur la gauche de l'écran pour sélectionner "T-ALIGN" ou "SP-GAIN".
8. Effleurez au centre de l'écran pour désirir chaque élément d'ajustement.
Chaque effleurement de commute l'écran d'ajustement des éléments comme suit :

*1 Ceci ne s'affiche que lorsque “SUB-WOOFER”, sous “SOUND”, est régé sur “ON” dans le mode d'ajustement.
*2 Ceci ne s'affiche que lorsque “SUB-WOOFER”, sous “SOUND”, est régèle sur “ON” dans le mode d'ajustement, et que “T-ALIGN” est sélectionné à l'étape 7.
9. Effleurez sur la droite de l'écran et ajustez l'objet.

POSITION EDIT
FRONT L SP» 085.1cm
* “T-ALIGN” peut être ajusté dans une fourchette de 0cm à 501,4 cm par pas de 2,3 cm.
* "SP GAIN" peut être ajusté dans une fourchette de -20dB à 0dB.
10. Répétez les étapes 7 à 9 pour ajuster l'élement souhaïte.
11. Lorsque vous avez fini d'ajuster chaque élément, effleurez RTN.
L'écran revient à l'écran d'origine et “>>” est affché sur l'écran BASIC ou USER.
Ceci termine l'ajustement de la position.
Pour continuer à enregistrer des valeurs d'ajustement dans le menu utilisé de position, effectuez ce qui suit.
12. Effleurez et maintenance RTN pendant au moins une seconde.
La liste du menu de position s'affiche.
13. Effleurez et maintenez la mémoire utilisateur dont vous souhaitez enregistrer les valeurs d'ajustement pendant au moins 2 secondes. Vous entendrez un long signal sonore, et les valeurs que vous avez ajustées jusqu'à l'étape 10 sont enregistrées dans le menu utilisateur de position.
Si vous entendez un signal sonore bref, les valeurs d'ajustement jusqu'à l'étape 10 sont rejetées. Ajustez à nouveau ces valeurs selon les indications.
14. Effleurez RTN.
15. Appuyez sur le bouton [SOUND] pour revenir au mode original.
* Pour désirir une mémoire utilisateur enregistrée, effleurez B/U pour afficher "USER" et effleurez sur le No. de mémoire utilisateur.
Selection du menu VSE.
VSE (Virtual Space Enhancer) you permit de compenser la balance de pression du son dans votre voiture de telle maniere que le même effet sonore puisse etre obtenu quel que soit le siège sur lequel vous estes assis comme cela a ete montré dans les simulations de compensation.
Dans la procédure " Sélection de chaque mode" (cf. page 44), réglez AC-PRO III sur "STD".
- Le réglage d'usine par défaut pour VSE est "OFF" et pour le menu de base de VSE c'est "FLAT".
■ Menu de base VSE
Six menus de base sont préenregistrés pour cette fonction. Choisissez le menu souhaïte selon vos goûts.
1. Appuyez sur le bouton [SOUND].
2. Effleurez VSE.

3. Effleurez 山 sur I'ecran ON/OFF. L'effet VSE bascule entre ON et OFF

Lorsque le VSE est reglé sur "OFF", le réglage du VSE n'est pas répercuté sur la source musicale. Ceci termine le réglage VSE. Appuyez sur le bouton [SOUND] pour revenir au mode original.
4. Effleurez B/U pour désir "BASIC".

Chaque effleurement de B/U bascule entre "BASIC" et "USER".
5. Effleurez sur le No. de menu de base de VSE pourCHOISIR le menu de base VSE souhaite.
Menu de base VSE
No. Nom de fonction Description 1 FLAT Égalisation plate de la source sonore 2 BASS BOOST Basses améliorées 3 HIGH BOOST Moyens et aiguus améliorés 4 IMPACT Basses et aiguus améliorés 5 ACOUSTICAL Tonalités moyennes (voix humaine) améliorées 6 SMOTH Crée un adoucissement dessons.
6. Appuyez sur le bouton [SOUND] pour revenir au mode original.
Ajustement/enregistrement VSE (mémoire utilisateur)
Les réglages de la mémoire utilisateur vous permettent de compenser la distribution de la pression sonore pour convenir à给你们 goûts en fonction du menu de base VSE. jusqu'à six ajustements utilisateur peuvent être enregistrés.
DIFFUSE:
Ajuste la déviation de la pression sonore diffusée.
CARWIDTH:
Ajusté la déviation de la pression sonore selon la largeur de la voiture.
CAR LENGTH:
Ajuste la déviation de la pression sonore selon la longueur de la voiture.
1. Appuyez sur le bouton [SOUND].
2. Effleurez VSE.
3. Effleurez sur l'écran ON/OFF. L'effect VSE bascule entre ON et OFF.
4. Effleurez B/U pourCHOISIR "BASIC"ou "USER".
5. Effleurez sur la croite de l'écran pour désirir le menu utilisé comme menu pour le réglage.
6. Appuyez sur le bouton [A].
7. Effleurez sur l'écran d'ajustement des éléments pour sélectionner "DIFFUSE", "CAR WIDTH" ou "CAR LENGTH".

8. Effleurez sur la droite de l'écran et ajustez l'objet.
* L'élement peut être ajusté dans une fourchette de 1 à 10.
9. Repétez les étapes 7 et 8 pour ajuster l'élément souhaïte.
10. Lorsque vous avez fini d'ajuster chaque élément, effleurez RTN. L'écran revient à l'écran d'origine et ">>" est affché sur l'écran BASIC ou USER. Ceci termine l'ajustement VSE. Pour continuer à enregistrer des valeurs d'ajustement dans le menu utilisé VSE, effectuez ce qui suit.
11. Effleurez et maintenez RTN pendant au moins une seconde. La liste du menu utilisé VSE s'affiche
12. Effleurez et maintenez la mémoire utilisateur dont vous souhaitez enregistrer les valeurs d'ajustement pendant au moins 2 secondes. Vous entendrez un long signal sonore, et les valeurs que vous avez ajustées jusqu'à l'étape 9 sont enregistrées dans le menu utilisateur VSE. Si vous entendez un signal sonore bref, les valeurs d'ajustement jusqu'à l'étape 9 sont rejetées. Ajustez à nouveau ces valeurs selon les indications.
13. Effleurez RTN.
14. Appuyez sur le bouton [SOUND] pour revenir au mode original.
* Pour désirir une mémoire utilisateur enregistrée, effleurez B/U pour affic "USER" et effleurez ↑ ↓ sur le No mémoire utilisateur.
Selection du menu P.EQ.
P.EQ (Parametric Equalizer) (Egaliseur paramétrique) vous permet de compenser toute l'étendue du niveau des fréquences de manière précise grâce à une courbe douce utilisant la compensation de fréquences qui convient à votre type de voiture.
Dans la procEDURE "Selection de chaque mode" (cf. page 44), réglez EQ SELECT sur "P.EQ".
- Le réglage d'usine par défaut pour P.EQ est "OFF" et pour le menu de base de P.EQ c'est "SEDAN-1".
■ Menu de base P.EQ
6 types de menus de base P.EQ sont préenregistrés pour cette fonction et conviennent à votre voiture et à la position de montage des enceintes. Choisissez le menu de base qui convient à votre voiture.
1. Appuyez sur le bouton [SOUND].
2. Effleurez P.EQ.

3. Effleurez 卡 sur l'écran ON/OFF. L'effect P.EQ bascule entre ON et OFF.

Lorsque I'effet de P.EQ est regle sur "OFF, le réglage de P.EQ n'est pas répercuté sur la source musicale. Ceci termine le réglage de P.EQ. Appuyez sur le bouton [SOUND] pour revenir au mode original.
4. Effleurez B/U pour désirir "BASIC".

Chaque effleurement de B/U bascule entre "BASIC" et "USER".
5. Effleurez sur le No. de menu de base de P.EQ pourCHOISIR le menu de base de P.EQ.
Menu de base P.EQ
No. Écran du nom Position de montage de l'enceinte 1 SEDAN-1 Avant: Porte avant
Arrière: Tablette arrêté 2 SEDAN-2 Avant: Porte avant
Arrière: Tablette arrêté 3 WAGON-1 Avant: Porte avant
Arrière: Bagage (lateral) 4 WAGON-2 Avant: Porte avant
Arrière: Tablette arrêté 5 MINI VAN-1 Avant: Porte avant
Arrière: Bagage (lateral) 6 MINI VAN-2 Avant: Porte avant
Arrière: Tablette arrêté
6. Appuyez sur le bouton [SOUND] pour revenir au mode original.
Ajustement/enregistrement P.EQ (mémoire utilisateur)
Avec la mémoire utilisateur, vous pouvez compenser les caractéristiques de fréquence pour qu'elles conviennent à votre voiture en fonction du menu de base P.EQ. jusqu'à 6 réglages d'ajustement peuvent être enregistrés dans la mémoire utilisateur. Pour plus de détails, voir "Ajustement P.EQ".
1. Appuyez sur le bouton [SOUND].
2. Effleurez P.EQ.
3. Effleurez 山 sur l'écran ON/OFF. L'effet P.EQ bascule entre ON et OFF.
4. Effleurez B/U pour désirer "BASIC" ou "USER".
5. Effleurez sur la droite de l'écran pour désirir le menu utilisé comme menu pour le réglage.
6. Appuyez sur le bouton [A].
7. Effleurez sur la gauche de l'écran pour désir “FRONT” ou “REAR”.

8. Effleurez au centre de l'écran pour désirir chaque élément d'ajustement.
Chaque effleurement de commute l'écran d'ajustement de l'élement comme suit :
Éléments d'ajustement
BAND FREQ Q GAIN BAND...
9. Effleurez sur la droite de l'écran et ajustez l'élement.
* "BAND" peut être ajusté dans une fourchette de 1 à 3.
* "FREQ" peut être ajusté dans une fourchette de 20Hz à 20kHz.
* Choisissez 1, 3, 5, 7 ou 20 pour "Q".
* “GAIN” peut être ajusté dans une fourchette de -12dB à +12dB.
10. Repetez les étapes 7 à 9 pour ajuster l'élément souhaite.
11. Lorsque vous avez fini d'ajuster chaque élément, effleurez RTN. L'écran revient à l'écran d'origine et ">>" est affchéé sur l'écran BASIC ou USER. Ceci termine l'ajustement P.EQ. Pour continuer à enregistrer des valeurs d'ajustement dans le menu utilisateur P.EQ, effectuez ce qui suit.
12. Effleurez et maintenez RTN pendant au moins une seconde. La liste du menu P.EQ s'affiche.
13. Effleurez et maintenez la mémoire utilisateur dont vous souhaitez enregistrer les valeurs d'ajustement pendant au moins 2 secondes. Vous entendrez un long signal sonore, et les valeurs que vous avez ajustées jusqu'à l'étépe 10 sont enregistrées dans le menu utilisateur P.EQ. Si vous entendez un signal sonore bref, les valeurs d'ajustement jusqu'à l'étépe 10 sont rejetées. Ajustez à nouveau ces valeurs selon les indications.
14. Effleurez RTN.
15. Appuyez sur le bouton [SOUND] pour revenir au mode original.
* Pour désigner une mémoire utilisateur enregistrée, effleurez B/U pour afficher "USER" et effleurez sur le No. de mémoire utilisateur.
■ Ajustement P.EQ
Les réglages peuvent être ajustés comme suit dans le menu P.EQ. La fréquence centrale, le gain et la courbe Q peuvent être enregistrés dans des combinaisons de canal/bande.
Par exemple, fréquence centrale “250 Hz”, gain “-8dB” et la courbe Q “3” peuvent être enregistrés dans la bande 1 à l'avant.
FRONT/REAR (sLECTION de canal) Sélectionne le canal (avant ou arrêté) à ajuster.
BAND (Selection de bande)
Sélectionne la bande de fréquence (1 à 3) à ajuster.
Réglez la fréquence centrale (FREQUENCY), le gain (GAIN) et la courbe Q (Q) pour chaque bande de fréquence.
FREQUENCY (selection de la fréquence centrale)
Selectionne la fréquence à utiliser en tant que centre de la bande de fréquence à compenser dans une fourchette de 20Hz à 20 kHz. (pas de 1/3 d'octave, 31 points)
GAIN (ajustement du gain)
Ajuste le gain (niveau de sortie) dans une fourchette -12dB to +12dB.
(Pas de 1dB, 25 points)
Q (selection de la courbe Q)
Selectionnez 1, 3, 5, 7 ou 20 pour la précision de la courbe Q.
Compensation
Il n'est pas nécessaire de compenser les caractéristiques de la fréquence si elles sont plates (pas de pics ni de creux) lorsque vous avez mesure celles-ci avec un dispositif de mesure. Cependant, qu'ilquefois les caractéristiques de la fréquence augmentent ou diminuuent par endroit. Si cela se produit, les caractéristiques de la fréquence doivent etre compensées.Crieez une courbe de fréquence dont les caractéristiques sont opposées à la fréquence centrale de parties ou elles augmentent ou diminuents pour annuler ces pics et creux, et des valeurs qui les rendent aussi plates que possibles.
Le fait de rendre les caractéristiques de la fréquence aussi plates que possible s'appelle "compensation".
Sur cet apparéil, les caractéristiques de fréquence peuvent être compensées avec le P.EQ. (Egaliseur Paramétrique).
Compensation de caractéristiques de fréquence
La figure ci-dessous montre les relations entre la fréquence centrale, le gain et la courbe Q.

Courbe Q
La courbe Q devient plus précise lorsque la valeur numérique augmente, et plus douce lorsqu'elle diminue.
Des caractéristiques de fréquence plate peuvent être créées en selectionnant une courbe Q opposée à celles de la courbe à compenser.

F: Fréquence centrale, G: Gain (niveau de sortie), Q: Courbe Q
No.(type devoiture) Paramètres de l'égaliseur paramétrique Canal Bande 1 Bande 2 Bande 3 F G Q F G Q F G Q 1(SEDAN-1) Avant 250 Hz -8 dB 3 2 kHz -4 dB 1 5 kHz -4 dB 1 Arrière 250 Hz -10 dB 3 1.25 kHz 0 dB 5 8 kHz 0 dB 5 2(SEDAN-2) Avant 250 Hz -10 dB 7 800 Hz -4 dB 3 8 kHz -5 dB 1 Arrière 80 Hz 3 dB 7 125 Hz -12 dB 5 1.25 kHz 0 dB 5 3(WAGON-1) Avant 250 Hz -8 dB 3 1 kHz -8 dB 3 10 kHz -6 dB 1 Arrière 250 Hz -8 dB 3 800 Hz -8 dB 1 8 kHz 0 dB 5 4(WAGON-2) Avant 250 Hz -8 dB 7 400 Hz -10 dB 7 1.25 kHz -8 dB 7 Arrière 125 Hz -8 dB 3 500 Hz -5 dB 5 1.6 kHz 0 dB 3 5(MINI VAN-1) Avant 125 Hz -4 dB 5 1.25 kHz -4 dB 3 2 kHz 3 dB 7 Arrière 250 Hz -6 dB 1 630 Hz -4 dB 3 8 kHz 0 dB 5 6(MINI VAN-2) Avant 250 Hz -4 dB 3 1.25 Hz -8 dB 3 80 Hz 3 dB 3 Arrière 250 Hz -8 dB 3 500 Hz -5 dB 5 8 kHz 0 dB 5
Fonctionnement de la radio
Écrans d'écran en mode radio
Écran principal
Il s'affiche en appuyant sur le bouton [ROTARY] et en selectionnant le mode radio.

Effleurer la gauche de l'écran pendant au moins 1 seconde commute l'écran de commande simple.

Écran de la féquence
La fréquence en cours de réception l'affichage.
Effleurer ou le sur l'afficha de commande standard vous permet d'effectuer une recherche d'accord ou un accord manuel.
Écran titre
Affiche le nom du canal de diffusion en cours de réception. Effleurer ce nom change l'écran.
Écran de la bande de réception
AM: Nom de la bande AM
FM1: Nom de la bande FM
Écran du No. de prééglage
Effleurer sur l'écran de commande standard selectionne une mémoire préselectionnée.
MODE
L'effleurer affiche les sous fonctions. L'effleurer et le maintainir pendant au moins 1 seconde écran la liste de la mémoire préseLECTIONnée.
P-SCAN:
S'affiche pendant une recherche prerégrée. L'effleurer termine la recherche prerégrée.
A-STORE:
S'affiche pendant un enregistrement automatique. L'effleurer termine l'enregistrement automatique.
BAND
L'effleurer commute la bande réception.
L'effleurer et le maintainir pendant au moins 1 seconde commute entre le mode d'accord manuel et le mode de recherche d'accord.
(sequentially pour l'écran de commande simple)
Les effleurer permet la recherche d'accord ou l'accord par paliers (en mode d'accord manuel). Les effleurer et les doivent permit un accord rapide (en mode d'accord manuel).
Écran de la liste de la mémoire préseLECTIONnée
S'affiche lorsque vous effleurez MODE et le maintenez pendant au moins 1 seconde sur l'écran principal.

>>: Accord en cours
RTN: L'effleurer revient à l'écran principal
Ecouter la radio
1. Appuyez sur le bouton [ROTARY] pour désirer le mode radio.
Chaque pression sur le bouton [ROTARY] commute entre les modes comme suit :
Radio (DAB) CD / MP3 (changeur de CD) (changeur de DVD) (TV) AUX Radio...
* Le mode d'un équipement qui n'est pas branché ne s'affiche pas.
2. Effleurez BAND pour commuter la bande de réception.
Chaque pression sur BAND commute la bande de réception comme suit :
FM1 FM2 FM3 AM (MW / LW) FM1...
Accord
Il y a trois types de modes d'accords disponibles, la recherche d'accord, l'accord manuel et l'accord préréglé.
Recherche d'accord
Il y a deux types de recherches d'accord. DX SEEK et LOCAL SEEK.
DX SEEK peut accorder automatiquement les stations captables, tandis que LOCAL SEEK peut seulement accorder les stations ayant une bonne sensibilité de réception.
1. Effleurez BAND pour sélectionner la bande souhaitation (FM ou AM (MW, LW)).
2. Accordez une station.
* Lorsque MANU est affché, effleurez et maintenez BAND pendant au moins 1 seconde.
"MANU" s'efface de I'écran et la recherche d'accord devient possible.
* Si "TA" est allumé sur l'écran, les stations TP sont recherchées automatiquement.
DX SEEK
Lorsque you effleurez sur l'affichage de la fréquence, l'accord automatique commence.
Lorsque you effleurez 日 la station est recherche vers les fréquences les plus haute; lorsque you effleurez 日 elle est recherche vers les fréquences les plus basses.
* Lorsque la recherche d'accord commence, "DX SEEK" s'affiche à l'écran.
LOCAL SEEK
Lorsque vous effleurez sur l'affichage de la fréquence, la recherche d'accord local s'effectue. Les stations d'émission avec une bonne sensibilité de réception sont sélectionnées.
* Lorsque la recherche d'accord local commence, "LO SEEK" s'affiche à l'écran.
Accord manuel
Il y a deux possibilités: l'accord rapide et l'accord par paliers.
En mode d'accord par paliers, la fréquence change d'un pas à la fois. En mode d'accord rapide, vous pouvez rapidement accorder la fréquence souhaitation.
1. Effleurez et maintenez BAND pendant au moins une seconde lorsque MANU n'est pas affché.
L'accord manuel est possible lorsque MANU s'affiche.
2. Manoeuvrez l'écran de la fréquence pour accorder une fréquence sur laquelle on diffuse.
- Accord par paliers
Effleurez sur I'ecran de la frquence.
Accord rapide
Effleurez sur I'ecran de la frquence.
L'accord s'arrête lorsque vous retirez le doigt du panneau.
Rappel d'une station préréglée
Le rappel d'une station préregliée est une fonction pour l'accord des stations préenregistrées.
1. Effleurez et maintenez MODE pendant au moins une seconde.
La liste de la mémoire présélectionnée s'affiche.
2. Effleurez la station que vous souhaitez écouter.
* En mode normal, les No. préreglés peuvent aussi être accordés en effleurant
品 sur l'écran principal.
Pour annuler I'accord
1. Effleurez RTN.
Mémoire préselectionnée.
Il y a un total de 24 positions prérgélées (6-FM1, 6-FM2, 6-FM3, 6-AM) pour enregistrer des stations de radios individuelles en mémoire.
1. Effleurez BAND pour commuter la bande de réception.
2. Manoeuvrez l'écran de la fréquence pour y enregistrer la station.
3. Effleurez et maintenez MODE pendant au moins une seconde.
La liste de la mémoire préseLECTIONnée s'affiche.
4. Effleurez et maintenance le No. préréglé pour enregistrer la station pendant au moins 2 secondes.
Vousetendrez un long signal sonore, puis la station est enregistrree en memoire.
Enregistrement automatique
L'enregistrement automatique est une fonction pour enregistrer jusqu'à 6 stations accordées automatiquement en série.
1. Effleurez MODE.
2. Effleurez en maintenez A-STORE pendant au moins 2 secondes.
L'écran MODE change pour "A-STORE" et le No. prééré glé dans la commande d'enregistrement automatique apparait sur l'écran du No. prééré glé.
* Les stations ayant une bonne réception sont recherchées automatiquement et enregistrées dans la mémoire présélectionnée (No.1 à No.6) dans l'ordre des fréquences croissantes.
Remarques:
- Lors de l'enregistrement automatique, les stations enregistrées en mémoire jusqu'à sont effacées.
- Lorsqu'il y a moins de 6 stations ayant une bonne réception en LOCAL SEEK, les fréquences basses sont automatiquement libérées, et l'enregistrement automatique recommence avec DX SEEK. S'il y a moins de 6 stations après qu'un enregistrement automatique a été effectué deux fois, les stations mémorisées jusqu'à là sont conservées.
- Si l'enregistrement automatique est effectué dans les bandes FM, les stations sont enregistrées dans FM3 même si vous avons choisi FM1 ou FM2 pour enregistrer les stations.
Recherche préreglee
La recherche préreglée est une fonction pour receivevoir les stations dans l'ordre où elles sont actuellement enregistrées sous les No. préreglés de manière à pouvoir contrcler les émissions.
1. Effleurez MODE.
2. Effleurez P-SCAN. L'écran MODE change pour "P-SCAN" et le No. préréglé de la commande de recherche préréglée apparait sur l'écran du No. préréglé..
* Les stations actuelles en mémoire sont reçues dans l'ordre pendant 7 secondes au moins. Les stations ayant une mauvaise réception sont passées et la station suivante est reçue. Lorsque la recherche pré régée est faite en diffusion FM, les stations FM sont reçues comme suit:
$$
\begin{array}{l} \text {F M 1 (1 \to 6) \to F M 2 (1 \to 6) \to F M 3 (1 \to} \\ 6)... \end{array}
$$
Lorsque la recherche prééglée est faite en diffusion AM, les stations AM sont reçues comme suit:
$$
A M (1 \rightarrow 6) \rightarrow A M (1 \rightarrow 6)...
$$
Pour annuler la recherche prépréglée
1. Effleurez P-SCAN.
L'écran P-SCAN change pour “MODE” et les stations reçues lors de l'effleurement de P-SCAN sont reçues ensuite.
RDS (Radio Data System)
L'appareil comprend un décodeur de système RDS qui supporte les stations diffusant des données RDS.
Ce système permet à la radio d'afficher le nom de la station en cours de réception (PS), ainsi que de commuter automatiquement sur une meilleure fréquence s'il en existe une dans la région lors de longs déplacements (commutation AF).
Il permet également de receivevoir automatiquement les announces sur la circulation routière ou une émission du type de programme spécifique lorsqu'elles sont diffusés par une station RDS,quel que soit le mode de fonctionnement actuel de l'appareil.
En outre, lors de la réception d'une information EON, cette information permet de commuter automatiquement sur les autres stations prérgéées du même réseau et d'interr compromise la station en cours de réception par la diffusion des announcements sur la circulation routière des autres stations (TP). Cette fonction n'est pas disponible dans toutes les régions.
Pour pouvoir utiliser la fonction RDS, réglez toujours la radio en mode FM.
- AF: Fréquence alternative
- PS: Programme Service Name (Nom de service de programme)
- PTY: Programme Type (Type de programme)
- EON: Enhanced Other Network (Autre réseau amélioré)
- TP: Traffic Programme (Programme traffic)
PI: Programme Identification (Identification de programme)
- TA: Traffic Announcement (Informations traffic)
* L'interruption RDS ne fonctionne pas pendant la réception radio AM.
* Lorsque l'appareil recoit un signal RDS et qu'il peut dire les données PS, le voyant PS apparait sur l'afficheur.
Fonction AF (Fréquence alternative)
La fonction AF permet à l'appareil de conserver une réception optimale en commutant sur une autre fréquence du même réseau.
- Le réglage usine est "ON" (acté).
Pour commuter la fonction AF ON/OFF.
1. Effleurez MODE.
2. Effleurez AF.
Chaque effleurement bascule l'affichage de AF entre "ON" et "OFF".
3. Effleurez RTN.
* Si la réception de la station en cours se dégrade, “SEARCH” s'affiche à l'écran, et la radio recherche le même programme sur une autre fréquence.
Commutation de la fonction AF entre RDS et DAB
Lorsque la même émission est diffusée à la fois par RDS et par DAB et que cette fonction est activée, l'appareil commute automatiquement sur l'émission offrant la meilleure qualité de réception.
- Cette fonction n'est possible que si le module DAB DAH923 ou DAH913, vendu séparément, a été raccordé.
- Le réglage usine est "ON" (activé).
1. Appuyez sur le bouton [A] pour régler le mode d'ajustement.
2. Effleurez sur l'écran de réglage des éléments pour désirir "LINK ACT" sous "TUNER".

3. Effleurez sur la droite de l'écran ou tournez le bouton [ROTARY] pour sélectionner soit "ON" soit "OFF". ON:
La commutation de AF entre DAB et RDS est activée. OFF:
La commutation de AF entre DAB et RDS est désactivée.
4. Appuyez sur le bouton [A] pour revenir au mode précédent.
Fonction REG (Programme régional)
Quand la fonction REG est activée, la réception des stations régionales est optimisée. Lorsque la fonction est désactivée, l'appareil commute sur la station régionale de la zone suivante quand vous pénétrez dans une autre région.
- Le réglage usine est "OFF" (désactivé).
Remarques:
- Cette fonction est sans effet lors de la réception des stations nationales comme la BBC R2.
- La mise en/hors service de la fonction REG est effective lorsque la fonction AF est activée.
Pour commuter la fonction REG ON/OFF.
1. Effleurez MODE.
2. Effleurez REG.
Chaque effleurement bascule l'affichage de REG entre "ON" et "OFF".
3. Effleurez RTN.
Accord manuel d'une station régionale sur le même réseau
- Cette fonction est possible lorsque la fonction AF est sur ON.
- La manoeuvre est différente selon le réglage ON/OFF de la fonction REG. Lorsque la fonction REG est sur ON, les émissions dont le code PI correspond parfaitement peuvent être reçues. Lorsque la fonction REG est sur OFF, les émissions de même type de code PI peuvent être reçues.
Remarques:
- Cette fonction peut être utilisé lorsqu'une émission régionale du même réseau est reçue.
Le code PI est un système de codage unique pour chaque station d'émission.
1. Effleurez et maintenez MODE pendant au moins une seconde. La liste de la mémoire préseLECTIONnée s'affiche.
2. Effleurez le No. préréglé de l'émission à recevoir.
TA (Announces sur la circulation routière)
Lorsque l'appareil est en mode d'attente TA, vous receivez les announces sur la circulation routière en priorite lorsqu'elles sont diffusées, indépendamment du mode de fonctionnement actuel. Vous pourrez également symponiser automatiquement les stations TP (Programme d'announces sur la circulation routière).
- Cette fonction n'est possible que si "TP" est allumé sur l'afficheur. Quand "TP" est allumé, cela peut dire que la station RDS en cours de réception diffuse des émissions d'announces sur la circulation routière.
Pour activer le mode d'attente TA
Si you appuyez sur la touche [TA] lorsque seul "TP" est allumé sur l'afficheur, "TP" et "TA" s'allument sur l'afficheur et l'appareil passée en mode d'attente TA jusqu'à ce que les announces sur la circulation routière seront diffusées. Lorsque la diffusion des announcements sur la circulation routière démarre, "TRA INFO" s'allume sur l'afficheur. Si vous appuyez alors sur la touche [TA] pendant la réception des announces sur la circulation routière, les announces sur la circulation routière s'annulent et l'appareil passée en mode d'attente TA.
Pour annuler le mode veille de TA.
Lorsque "TP" et "TA" sont allumés sur l'écran, appuyez sur le bouton [TA]. "TA" s'efface et le mode veille de TA est annulé.
- Si "TP" n'est pas allumé, appuyer sur le bouton [TA] recherche une station TP.
Pour recherche une station TP.
Si vous appuyez sur le bouton [TA] lorsque "TP" n'est pas allumé "TA" s'allume sur l'écran et cet apparéil recoit automatiquement une station TP.
Remarque:
Lorsqu'une station TP ne peut etre reque,TP SEEK" s'affiche, et la recherche d'une station TP se poursuit. Quand vous appuyez de nouveau sur le bouton [TA], "TA" et TP SEEK" s'effacent de I'ecran et la recherche de station TP s'arrete.
Fonction de mémorisation automatique des stations TP
Voussouspouceplacerautomatiquementjusqu'a6 stationsTP dans lamemoivre de preréglage.Si le nombre des stationsTP que youssouspouce recevoirestinférieurà6,cellesqui sontdéja mémorisées subsistent sansetre écrasées.
1. Assurez-vous que "TA" est affché, puis effleurez MODE.
Si "TA" n'est pas affché, appuyez sur le bouton [TA] pour afficher "TA".
2. Effleurez en maintenez A-STORE pendant au moins 2 secondes.
L'écran MODE change pour "A-STORE" et le No. préréglé dans la commande d'enregistrement automatique apparait sur l'écran du No. préréglé.
- Les stations TP ayant une bonne sensibilité de réception sont enregistrées de la mémoire préselectionnée.
- Mème si vous sélectionnez FM1 ou FM2, une station TP est enregistrée en mémoire FM3.
PTY (Type de programme)
Cette fonction vous permet d'éçouter une émission du type de programme sélectionné, même si l'appareil est régé à un mode autre que la radio.
- Les émissions PTY ne sont pas encore disponibles dans tous les pays.
- En mode d'attente TA, les stations TP ont priorité sur les stations diffusant des émissions PTY.
Réglage du mode d'attente PTY
Quand vous appuyez sur la touche [▶■], "PTY" s'allume sur l'afficheur et le mode d'attente PTY est activé. Quand l'émission du PTY sélectionné démarre, le nom de programme PTY apparait sur l'afficheur.
Annulation du mode d'attente PTY
Quand vous maintainez la touche [▶III] enforcée pendant 1 seconde ou plus, "PTY" s'eteint sur l'afficheur et le mode d'attente PTY s'annule.
Annulation d'une émission
d'interruption PTY
Appuyez sur la touche [▶II] pendant l'émission d'interruption PTY. L'interruption PTY s'annule et l'appareil revient au mode d'attente PTY.
Sélection de PTY
1. Lorsque you appuyez sur le bouton [▶■], cet apparéil entre en mode de sélection PTY.
2. Effleurez 卡 卡 sur la droite de l'écran ou tournez le bouton [ROTARY] pour sélectionner PTY.
* Ci dessous sont affichés les réglages d'usine par défaut:
No. de préréglage Rubrique PTY FRANÇAIS Contenu 001 Infos Informations 002 Services Info-Service 003 M Pop Pop 004 Sport Sport 005 Classiq Musique classique 006 Chansons Chansons
3. Les mode de sélection PTY est annulé automatiquement après 7 secondes après la sélection d'un PTY ou l'effleurement de RTN.
Recherche PTY
1. Lorsque you appuyez sur le bouton [▶■], le mode de seLECTION PTY est en marche.
2. Effleurez au centre de l'écran ou tournez le bouton [ROTARY] pour sélectionner PTY.
3. Effleurez 卡 sur la gauche de I'ecran. Lorsque vous effleurez 卡 , cet appeareil recherche une émission PTY en balayant les fréquences vers le haut, tandis que lorsque vous effleurez 卡 il recherche en balayant vers le bas.
* Si aucune station ne peut être reçue avec l'émission PTY sélectionnée, cet apparéil revient au mode précédent.
Mémoire préselectionnée PTY
1. Lorsque you appuyez sur le bouton [▶■], le mode de seLECTION PTY est en marche.
2. Effleurez au centre de l'écran pour sélectionner PTY.
Les 29 types de PTY du tableau ci-dessous peuvent être sélectionnés.
Rubrique PTY ENGLISH DEUTSCH SVENSKA FRANÇAIS Contenu News Nachrich Nyhetier Infos Informations Affairs Aktuell Aktuellt Magazine Magazine Info Service Info Services Info-Service Sport Sport Sport Sport Sport Educate Bildung Utbildn Educatif Education Drama Hör + Lit Teater Fiction Dramatique Culture Kultur Kultur Culture Culture Science Wissen Vetenskp Sciences Sciences Varied Unterh Underh Divers Divertissement Pop M Pop Pop M Pop Pop Rock M Rock Rock M Rock Rock Easy M U-Musik Lättlyss Chansons Chansons Light M L-Musik L klass M Cl Lég Classique Léger Classics E-Musik Klassik Classiq Musique classique Other M -- Musik Övrig m Autre M Autres Musiques Weather Wetter Väder Météo Météo Finance Wirtsch Ekonomi Economie Economie et Finances Children Kinder Für barn Enfants Programmes pour enfants Social Soziales Socialt Société Société Religion Religion Andligt Religion Religion Phone In Anruf Telefon Forum Ligne ouverte et interactivité Travel Reise Resor Voyages Voyages Leisure Freizeit Fritid Loisirs Loisirs Jazz Jazz Jazz Jazz Musique de jazz Country Country Country Country Musique de country Nation M Landes M Nation m Ch pays Chansons du pays Oldies Oldies Oldies Rétro Musique rétro Folk M Folklore Folkm Folklore Musique folklorique Document Feature Dokument Document Documentaire
3. Effleurez RTN pendant au moins une seconde.
La liste des titres en mémoire PTY s'affiche.
4. Effleurez et maintenez le No. préréglé à enregistrer pendant au moins 2 secondes.
Vousetendrez un long signal sonore, puis le PTY selectionné est enregistré dans le canal de mémoire préselectionné.
Diffusion d'urgence
Si une diffusion d'urgence est reçue, toutes les opérations s'arrêtent. "ALARM" s'allume sur l'afficheur et le message d'urgence est diffusé.
Annulation de la diffusion d'urgence
Si vous appuyez sur la touche [AF], la réception des émissions d'urgence s'annule.
Commuter la langue d'affichage du PTY
Vous pouvez désirir une langue parmi les 4 (anglais, allemand, suédois ou français) pour le PTY qui s'affiche à l'écran.
- Le réglage d'usine par défaut est "ENGLISH".
1. Appuyez sur le bouton [A] pour régler le mode d'ajustement.
2. Effleurez sur l'écran de réglage des éléments pour désirir "LANGUAGE" sous "TUNER".

3. Effleurez sur la droite de l'écran ou tournez le bouton [ROTARY] pour désirar la langue.
* Sélectionnez parmi ENGLISH, DEUTSCH (allemand), SVENSKA (Suédois) ou FRANÇAIS (français).
4. Appuyez sur le bouton [A] pour revenir au mode précédent.
Réglage de l'interruption RDS lorsque la fonction 2-ZONE est utilisé (RDS-INT-2Z)
Lorsque cette fonction est sur "ON", et qu'il y a une interruption RDS lorsque la fonction 2-ZONE est utilisée, les informations RDS peuvent être reçues.
- Lorsqu'il y a une interruption RDS, la fonction 2-ZONE s'arrête.
- S'il y avait une interruption alarmé même avec "RDS-INT 2Z" sur "OFF", les informations RDS sont reçues.
- Le réglage d'usine par défaut est "ON".
1. Appuyez sur le bouton [A] pour régler le mode d'ajustement.
2. Effleurez sur l'écran de réglage des éléments pour désirir "RDS-INT 2Z" sous "TUNER".

3. Effleurez sur la droite de l'écran ou tournez le bouton [ROTARY] pour sélectionner soit "ON" soit "OFF". ON:
Les informations RDS sont reçues lorsqu'il y a une interruption RDS alors que la fonction 2-ZONE est utilisé.
OFF:
Lorsque la fonction 2-ZONE est utilisée, les informations RDS autre que l'interruption alarmé ne sont pas reçues.
Remarque:
- Si le mode Radio est seLECTIONné alors que TA (informations routières) et PTY sont actifs (ON), les interruptions sont reçues même si l'interruption RDS est désactivée (OFF).
4. Appuyez sur le bouton [A] pour revenir au mode précédent.
Réglage du volume de TA, de l'émission d'urgence (ALARM) et de PTY
Le volume des émissions d'interruption TA, ALARM et PTY peut être régle pendant une émission d'interruption TA, ALARME ou PTY.
- Le réglage d'usine par défaut est "15".
Pendant une émission d'interruption TA, ALARM ou PTY, tournez le bouton [ROTARY] dans le sens des aiguilles d'une montre ou dans le sens contraire pour regler le niveau de volume souhaité (0 à 33).
- Lorsque l'émission d'interruption TA, ALARM ou PTY se termine, le volume revient au niveau actif avant l'interruption.
Écrans d'écran en mode CD
Écran principal
Il s'affiche en appuyant sur le bouton [ROTARY] pourCHOISIRLEMODECD.

Effleurer la gauche de l'écran pendant au moins 1 seconde commute en mode de commande.

Écran piste/durée de lecture
01/02: 00:
Le No. de piste lue et la durée de lecture s'affichent.
Si vous effleurez ou sur la commande standard, vous pouvez désir la piste à dire ou avancer ou reculer rapidement d'une piste à l'autre.
Ecran titre
L'écran est commute lorsque vous l'effleurez.
Écran dossier (dans le cas de MP3/WMA)
Effleurer 卡 sur la commande standard seLECTIONne les dossiers.
MODE:
L'effleurer affiche les sous fonctions. L'effleurer et le maintainir dans le cas de MP3/WMA pendant au moins 1 seconde affiche la liste des dossiers.
Remarque:
- Cette fonction n'est disponible que lors de la lecture d'un disque.
J-SCAN/SCAN: S'affiche pendant la lecture de recherche. L'effleurer termine la lecture de recherche.
- RPT/RPT: S'affiche pendant la lecture repétée. L'effleurer termine la lecture repétée
- RDM/RDM: S'affiche pendant la lecture aléatoire. L'effleurer termine la lecture aléatoire.
TOP:
L'effleurer commence la lecture à partir de la piste en haut du disque ou du dossier en cours.
(usually pour l'écran de commande simple)
Effleurer ces boutons seLECTIONne la piste à litre. Effleurer et maintainir ces boutons avance ou recule rapidement d'une piste à l'autre.
Écran de la liste des dossiers (dans le cas de MP3/WMA)
S'affiche lorsque vous effleurez MODE et le maintenez pendant au moins 1 seconde sur l'écran principal.

Nom de dossier
No. de dossier
Lorsque ceci est affiché en gris, vous ne pouvez pas désir ce dossier.
>>: Sélection en cours
Effleurer un nom de dossier ramène l'écran à l'écran principal, et la lecture commence à partir de la première piste du dossier que vous avez sélectionné.
←PREV-RTN:
L'effleurer affiche la liste précédente des dossiers. L'effleurer et le maintainir pendant au moins 1 seconde ramène l'écran à l'écran principal.
NEXT:
L'effleurer affiche la liste suivante des dossiers.
Qu'est-ce que le MP3 ?
Le MP3 est une méthode de compression audio qui est classée dans les normes MPEG à couche audio 3. Cette méthode de compression audio s'est repandue parmi les utilisateurs de PC et elle est maintainant devenue un format standard.
Le MP3 offre une compression des données audio d'origine égale à environ 10 pour cent de leur taille initiale avec une haute qualité du son.
Cela peut dire qu'il est possible d'enregistrer environ 10 CD de musique sur un CD-R ou un CD-RW afin de permettre de longues sessions de lecture sans qu'il soit nécessaire de replacer les CD.
Qu'est-ce que WMA?
WMA est l'abréviation de Windows Media Audio, format de fichier audio mis au point par Microsoft Corporation.
Remarques:
- Si vous lisez un fichier avec DRM (Digital Rights Management - Gestion des droits numériques) pour WMA toujours activé, aucun son n'est envoyé. (L'indicateur WMA clignote.)
- "Windows Media™ et le logo Windows® sont des marques déposées ou des marques déposées enregistrées chez Microsoft Corporation aux États-Unis et/ou dans d'autres pays."
Pour invalider DRM (Gestion de Droits Numériques):
- Si vous utilisez Windows Media Player 8, cliquez sur TOOLS OPTIONS l'onglet COPY MUSIC, puis sous COPY SETTINGS, suprimez la coche de la case PROTECT CONTENT. Ensuite, reconstruirez les fichiers.
- Si vous utilisez Windows Media Player 9, cliquez sur TOOLS OPTIONS l'onglet MUSIC RECORD, puis dans les paramétres d'enregistrement, supprimez la coche de la case RECORD PROTECTED MUSIC. Ensuite, reconstruirez les fichiers.
Les fichiers WMA personnellement construits devront ettre utilisés sous votre propre responsabilité.
Précautions lors de la création d'un CD MP3/WMA
Taux d'échantillonnage et de bit utilisables :
1. MP3:
Taux d'échantillonnage: 11.025 kHz à 48 kHz
Taux de bit: 8 kbps à 320 kbps / VBR
2. WMA: Taux de bit 48 kbps à 192 kbps
- Extensions de fichiers
1. Ajoutez toujours une extension“.MP3” ou“.WMA” à des fichiers MP3 ou WMA en utilisant des caractères codés sur un octet. Le fichier ne peut pas être lu si vous ajoutez une extension autre que celles spécifiées ou si vous l'oubliez.
2. Des fichiers sans données MP3/WMA ne seront pas lus. L'indication "---: --" s'affiche au niveau de l'écran de la durée si vous essayez de dire des fichiers sans données MP3/WMA.
Formatage logique (Système de fichiers)
1. Lorsque vous gravez un fichier MP3/WMA sur un CD-R ou un CD-RW, veillez besoinir "ISO9660 level 1, 2 or JOLIET ou Romeo" comme format d'ecriture du logiciel. Une lecture normale pourrait être impossible si le disque est enregistré dans un autre format.
2. Le nom du dossier et le nom du fichier peuvent s'afficher comme titre dans le cas d'une lecture MP3/WMA mais le titre doit faire au maximum 128 caractères alphanumeriques (extension y compris).
3. Ne donne pas à un fichier le même nom que le dossier dans lequel il se trouve.
Stucture des dossiers
1. Il n'est pas possible d'avoir un disque avec un dossier de plus de 8 niveaux hierarchiques.
- Nombre de fichiers et dossiers
1. Jusqu'à 255 fisiers sont reconnus dans chaque dossier. Jusqu'à 500 files peuvent être lus.
2. Les pistes sont lues dans l'ordre dans lequel elles ont ete enregistrées sur le disque. (ll se peut qu'elles ne soient pas always lues dans I'ordre dans lequel elles sont affichees sur un ordinateur).
3. Il peut y avoir du bruit en fonction du type d'encodeur logiciel utilisé pour l'enregistrement.
Selection multisession
Cette fonction vous permet deCHOISIR soit CD- DA soit MP3/WMA dans le cas de disques (ex. CD-EXTRA) contenant un melange de CD-DA CD musical) et de fichiers MP3/WMA.
1. Effleurez MODE.
2. Effleurez M-SESS.
Chaque effleurement de M-SESS bascule l'écran de M-SESS entre "CD" (lit un CD-DA) et "MP3/WMA" (lit un MP3/WMA).
* Si M-SESS ne s'affiche pas, effleurez NEXT.
3. Effleurez RTN. Le réglage de la seLECTION multisession est conservé la prochaine fois que vous lisez un CD.
Remarque:
Lors de la lecture d'un CCCD (Copy Control CD), réglez sur CD type. Lorsqu'il est régle sur MP3/WMA, le Cd ne peut pas être lu convenablement dans certains cas.
ATTENTION
Faites attention de ne pas vous coincer la main ou les doigts pendant la fermeture de la CONSOLE RABATTABLE.
Remarques:
- Si la CONSOLE RABATTABLE ne s'ouvre pas complètement, ouvrez-le dangaclement à la main.
- Refermez toujours la CONSOLE RABATTABLE après avoir charge un disque.
- N'enforcez jamais la main ni les doigts dans la fente d'insertion du disque. De même, n'enforcez jamais de corps étrangers dans la fente.
- N'insérez pas de disques sur lesquels de la colle dépasse du ruban de cellophane ou de l'étiquette, dans le cas d'un CD de location, ni de disques dont le ruban de cellophane ou l'étiquette, dans le cas d'un disque de location, ont été rétrés. Vous risqueriez de ne plus pouvoir sortir ces disques de l'appareil, et ils pourraient provoquer une panne de l'appareil.
Chargement d'un CD
1. Appuyez sur le bouton [▲].
Le panneau de contrôle s'ouvre.
2. Chargez le disque dans le CD SLOT. Lorsque le CD est chargé, le panneau de contrôle se referme automatiquement quelques secondes plus tard, et la lecture commence.
Remarques:
- N'introduisez jamais d'objets étrangers dans le CD SLOT.
- Si le CD ne se charge pas facilement, il est possible qu'il y ait un autre CD dans le mecanisme ou bien l'appareil peut nécessiter une réparation.

Les disques ne portant pas les marques 05C 05C A05C or
ne peuvent pas etre lus dans cet apparéil.
- Certains CD enregistrés en mode CD-R/CD-RW peuvent être inutilisables.
Chargement des disques compacts de 8 cm
Aucun adaptateur n'est nécessaire pour dire un CD 8 cm. Chargez le CD 8 cm dans le centre du CD SLOT.
Ejection d'un CD
Vou puez éjecter un disque en appuyant sur le bouton [▲] même si la clé de contact ou si le courant est coupé, automatiquement.
ATTENTION
Lorsque le disque est ejecté, appuyez sur le bouton [▲] pour fermer le panneau de contrôle. Si vous laissez le panneau de contrôle ouvert, vous entendrez un double signal sonore et le panneau de contrôle se refermera automatiquement.
1. Appuyez sur le bouton [▲].
Le panneau de contrôle s'ouvre et le disque est ejecté. Le mode passe automatiquement en mode radio.
* Assurez-vous d'oter les CD éjectés de cet apparéil. Si vous laisssez le disque sur le plateau, il sera réintroduit dans l' apparéil après 15 secondes ou plus, et le panneau de contrôle se fermera. (fonction rechargement automatique)
* Les CD simples ne sont pas charges automatiquement. Assurez-vous d'oter les CD simples après les avoir ejectés.
ATTENTION
Si vous forcez trop le chargement d'un disque après son éjection, sa surface peut se rayer. Otez le disque avant de le recharger.
Ecouter un disque déjà dans l'appareil
1. Appuyez sur le bouton [ROTARY] pour désirer le mode CD.
* La lecture commence automatiquement lorsque le mode passe en mode CD.
Pause
1. Appuyez sur le bouton [▶■].
Pour reprendre la lecture
1. Appuyez de nouveau sur le bouton [▶■].
Sélection d'une piste
Lorsqu'un CD-R/CD-RW enregistré avec des fichiers MP3 ou WMA est chargé, vous ne pouvez désirir que des pistes enregistrées dans le même dossier en effleurant à la sur l'écran de piste.
1. Pour écouter la piste suivante, effleurez sur l'écran de piste.
2. Pour écouter la piste précédente, effleurez sur l'écran de piste.
Effleurer lit la piste suivante. Si vous effleurez Plusieurs fois, la piste avance jusqu'au numero de piste correspondant au nombre de fois où vous avez appuyé sur et cette piste est lue.
Effleurer lit la piste precedente. Si vous effleurez Plusieurs fois, la piste recule jusqu'au numero de piste correspondant au nombre de fois ou vous avez appuyé sur et cette piste est lue.
* Si vous effleurez ↑ à deux fois sur l'écran de piste alors que le début de la piste est lu, parfois la piste située à deux pistes en arrêté est lue.
■ Sélection d'un dossier
Pour désir un dossier différent, effleurez soit
喜 sur I'ecran dossier, soit effectuez ce qui suit.
1. Effleurez et maintenance MODE pendant au moins une seconde.
La liste des dossiers s'affiche. Effleurer PREV ou NEXT affiche la partie precedente ou suivante de la liste du dossier.
2. Effleurer le nom du dossier.
Lecture de la liste de lecture
Les listes de lecture (fichiers M3U) peuvent aussi être lues.
Remarquez, cependant, parmi les fichiers M3U enregistrres récemment avec 5 niveaux (dont la racine) dans la hierarchie des fichiers, seuls les 5 fichiers du début qui ont les dates les plus récentes peuvent être lus.
Remarques:
- Jusqu'à 255 fichiers peuvent être lus dans une liste de lecture.
Seuls les fichiers MP3 et WMA enregistrés dans des dossiers jusqu'à cinq niveaux (dont la racine) dans la hierarchie des fichiers peuvent être lus.
Effectuez ce qui suit pour dire une liste de lecture.
1. Effleurez MODE.
2. Effleurez NEXT.
3. Effleurez PLY LIST. La lecture de la liste de lecture commence. Lorsque la lecture de la liste de lecture est terminée, la liste de lecture dont la date est la plus recente commence automatiquement. Le principe de selection de la liste de lecture et des pistes dans la liste de lecture est le même que celui de selection des dossiers ou des pistes dans un dossier.
* PLY LIST ne s'affiche pas lorsqu'il n'y a pas de liste de lecture correcte (fichiers M3U) enregistrée sur le CD-R/CD-RW charged dans l'appareil.
■ Arrêt de la lecture d'une liste de lecture
1. Effleurez MODE.
2. Effleurez NEXT.
3. Effleurez PLY LIST.
Avance rapide / Retour rapide
1. Pour l'avance rapide, effleurez sur l'écran piste.
2. Pour le return rapide, effleurez sur l'écran piste.
Fonction top
La fonction top remet le lecteur CD à la première piste du disque.
1. Effleurez TOP.
La lecture commence à partir de la première piste (piste No.1).
Dans le cas de MP3/WMA, la première piste du dossier en cours en returnée.
Lecture de recherche
Cette fonction vous permet de localiser et de dire les 10 premières secondes de toutes les pistes enregistrées sur un disque.
1. Effleurez MODE.
2. Effleurez -SCAN.
L'écran MODE change pour "J-SCAN" et la lecture de recherche commence.
* La lecture de recherche commence à partir de la piste suivant celle qui est en cours de lecture.
Pour annuler la lecture de recherche
1. Effleurez -SCAN.
L'écran ^P -SCAN change pour "MODE", et la piste qui était lue lorsque vous avez effleuré ^P -SCAN est lue.
Lecture de recherche de dossier
Cette fonction vous permet de localiser et de dire les 10 premières secondes de la première piste de tous les dossiers d'un disque MP3/WMA.
1. Effleurez MODE.
2. Effleurez -SCAN.
L'écran MODE change pour "D-SCAN" et la lecture de recherche de dossier commence.
* La lecture de recherche de dossier commence à partir du dossier en cours.
Pour annuler la lecture de recherche de dossier
1. Effleurez -SCAN.
L'écran -SCAN change pour "MODE", et la piste qui était lue lorsque vous avez effleuré -SCAN est lue.
Lecture repétée
Cette fonction vous permet de dire la piste en cours de manière répetée.
1. Effleurez MODE.
2. Effleurez -REPEAT.
L'écran MODE change pour “P-RPT” et la lecture repétée commence.
Pour annuler la lecture repétée
1. Effleurez ^p -RPT.
L'écran -RPT change pour "MODE", et la lecture normale commence à partir de la piste en cours lorsque vous avez effleuré -RPT.
Lecture repétée de dossier
Cette fonction vous permet de dire de manière répétée le dossier en cours. Cette fonction n'est disponible que si un CD-R/CR-RW enregistré avec des fichiers MP3 ou WMA est charge.
1. Effleurez MODE.
2. Effleurez -REPEAT.
L'écran MODE change pour "RPT" et la lecture repétée de dossier commence.
Pour annuler la lecture repétée de dossier
1. Effleurez R-PRT.
L'écran -RPT change pour "MODE", et la lecture normale commence à partir de la piste en cours lorsque vous avez effleuré -RPT.
Lecture aléatoire
Cette fonction vous permet de dire toutes les pistes enregistrées dans un ordre aléatoire.
-RANDOM
Joue toutes les pistes du disque au hasard.
Lorsque le disque contient 2 dossiers ou plus toutes les pistes du dossiers sont lues au hazard, puis toutes celles du dossier suivant. Ceci se repête pour tous les dossiers.
-RANDOM
Joue les pistes du disque au hasard.
Cette fonction n'est disponible que si un CD-R/ CR-RW enregistré avec des fichiers MP3 ou WMA est charge.
1. Effleurez MODE.
2. Effleurez -RANDOM ou -RANDOM. L'écran MODE change pour "P-RDM" ou "RDM" et la lecture aléatoire commence.
Pour annuler la lecture aléatoire
1. Effleurez ^ -RDM ou -RDM.
L'écran -RDM ou -RDM change pour "MODE", et la lecture normale commence à partir de la piste en cours lorsque vous avez effleuré ces boutons.
Écoute de différents morceaux de musique par différentes personnes (fonction 2-ZONE)
La fonction 2-ZONE est une fonction qui envoie dessons séparés de la zone MAIN et de la zone SUB en lisant simultanément deux sources dans l'élément central, ce qui permet à plusieurs auditeurs d'éçouter des sources musicales différentes.
L'appareil est capable de commander ses propres sources internes (radio, CD, MP3 etc.) en vue de leur lecture, et de plus il est capable de dire simultanément les sources d'un apparéil externe raccordé via CeNET (par exemple de changeur CD, etc.).
Les sources de la zone MAIN sont lues par les haut-parleurs sur le cote vehicule, tandis que celles de la zone SUB sont reproduites par le casque (WH143).

La figure ci-dessus est pour lorsqu'une source sonore est rue par le mode interne de l'appareil (radio, CD, AUX) sur les enceintes.
La figure en dessous est pour lorsqu'une source sonore est lue par le mode externe de l'appareil (changeur de CD, changeur de DVD, TV, AUX) sur les enceintes.
- Le réglage d'usine par défaut est "OFF".
Remarques:
- La fonction 2-ZONE n'est pas disponible lorsque le DAB est connecté.
Le nouvel ajustement de volume effectué en tournant le bouton [ROTARY] sur cet apparéil est répercuté sur les encéintes.
Le réglage AUX-SENS est répercuté sur les deux enceintes et les écouteurs.
Écran de l'écran lorsque la fonction 2-ZONE est en cours d'utilisation.
"INT." (mode interne) ou "EXT." (mode externe) s'affiche au centre de l'écran pour indiquer si vous pouvez entendre jouer dans le mode interne ou le mode externe du mode en cours de la fonction 2-ZONE.
1. Appuyez sur le bouton [SOUND].
2. Effleurez 2-ZONE.

3. Effleurez et maintenez ON/OFF du centre de l'écran pendant au moins 1 seconde.

Lorsque 2-ZONE est sur ON, le type de 2-ZONE s'affiche.
La fonction 2-ZONE n'est pas disponible lorsque 2-ZONE est sur OFF. Appuyez sur le bouton [SOUND] pour revenir au mode original.
4. Effleurez 山 sur l'écran ON/OFF pourCHOISIR le type de 2-ZONE.
Type de 2-ZONE
Enceinte Ecouteurs Type 1 Interne (mode interne) Externe (mode externe) Type 2 Externe (mode externe) Interne (mode interne)
5. Effleurez l'écran de l'enceinte ou des écouteurs pourCHOIR le mode de la fonction 2-ZONE.
Si vous uffleurez l'écran des enceintes, vous pouvez utiliser l'audio sur les enceintes.
Si vous effleurez l'écran des écouteurs, vous pouvez utiliser l'audio sur les écouteurs.
6. Appuyez sur le bouton [SOUND] pour revenir au mode original.
Ecoute de différents morceaux de musique par différentes personnes (fonction 2-ZONE)
Pour commuter la fonction 2-ZONE ON/OFF.
1. Appuyez et maintenez le bouton [SOUND] pendant au moins 1 seconde.
Pour commuter le type de 2-ZONE
Appuyez et maintenez enforcé le bouton [TA] de l'appareil pendant au moins 1 seconde alors que la fonction 2-ZONE est en cours d'utilisation.
Pour commuter le mode de la fonction 2-ZONE
Appuyez sur le bouton [TA] de l'appareil alors que la fonction 2-ZONE est en cours d'utilisation.
Sélection du mode lorsque la fonction 2-ZONE est en cours d'utilisation
Lorsque vous chargez un CD alors que la fonction 2-ZONE est en cours d'utilisation, les fonctions du mode externe de cet apparéil passent sur le CD et la lecture commence automatiquement.
1. Appuyez sur le bouton [TA] de l'appareil pour commuter la fonction le mode de la fonction 2-ZONE.
L'écran pour l'équipement (enceintes ou écouteurs) qui est alors utilisé est commuté.
2. Appuyez et maintenez les boutons [TA] pendant au moins 1 seconde pour désir le type de 2-ZONE.
L'écran "INT." ou "EXT." bascule.
3. Appuyez sur le bouton [ROTARY]
Chaque pression sur le bouton [ROTARY] alors que "INT." est affiché commute entre les modes comme suit :
Radio CD AUX Radio...
Chaque pression sur le bouton [ROTARY] alors que "EXT." est affiché commute entre les modes comme suit :
AUX (CD changer) (DVD changer) (TV^*1) AUX ...
* Le mode d'un équipement qui n'est pas branché ne s'affiche pas.
*1 Lorsque le mode TV est sélectionné, le mode/passse automatiquement en mode VTR, et ne peut pas être changé.
Opérations communes à chaque mode
Écran de l'écran en mode de saisie de titre
Écran principal
Ceci s'affiche lorsque le mode de saisie de titre est selectionné. (cf. page 14)

Écran de type texte
A: Majuscules d'imprimerie
a: Minuscules d'imprimerie
0-9: Nombres
!?: Symboles
A:Tréma
Écran titre
Le titre en cours de saisie s'affiche. Effleurez
卡 pour avoir la position de saisie. Effleurer et maintainir le bouton pendant au moins 2 secondes efface tout le titre en texte.
Écran de texte saisi
Effleurez 卡 pourCHOISIR le texte saisi.
RTN
Effleurer ceci annule la saisie de titres et revient à l'écran de l'écran d'origine. Effleurer et maintainir ceci pendant au moins une seconde affiche la liste de texte correspondant au type de texte en cours.
MEMO
Effleurer et maintainir ceci pendant 2 secondes au moins enregistrre le titre saisi et revient à l'écran de l'écran d'origine.
Écran de la liste de texte
S'affiche lorsque vous effleurez RTN et le maintenez pendant au moins 1 seconde sur l'écran principal.

Type de texte
Le texte qui est affiché change selon l'écran du type de texte.
Lorsque I'ecran du type de texte est "A": A E I
M Q U X
(espace)
Lorsque l'écran du type de texte est "a": a é m q u
Lorsque le type de texte est "0-9", !? " ou "A":
Tous les caractères sont affichés.
RTN
Effleurer ceci revient à l'écran principal.
NEXT
L'effleurer affiche la liste de texte suivante.
Saisie de titres
Vou pousse donner aux stations de tete un titre jusqu'à 10 caractères de long, ainsi qu'aux CD. Ces titres peuvent etre affiches lorsque les émissions sont reçues ou lors de la lecture de CD. Le nombre de titres qui peuvent etre saisis est comme suit:
Mode Nombre de titres Mode CD 50 titres Mode TV 20 titres
Mode changeur de CD Nombre de titres DCZ628 connecté 100 titres CDC655Tz connecté 100 titres CDC1255z connecté 50 titres
1. Capte la station de télé ou lit un CD dont vous souhaitez saisir le titre.
2. Effleurez le centre de l'écran pour régler l'écran de titre utilisé. Lorsque l'écran passée à l'écran de titre utilisé, "USER" s'affiche au dessus de l'écran du No. préréglé.
3. Appuyez et maintenez le bouton [A] pendant au moins 1 seconde. Le mode passe au mode de saisie de titre.
4. Effleurez 卡 sur l'écran de titre pourCHOISIR la position de saisie. La position du texte clignotant se déplace vers la gauche ou la droite.

* Jusqu'à 10 caractères peuvent être saisis.
ATTENTION
Appuyer sur le bouton reset efface toutes les mémoires utiliser tels que les titres enregistrés sur cet apparéil.
5. Effleurez 卡 sur l'écran du type de texte pourCHOISIR le type de texte. Chaque effleurement de 卡 commute le type de texte comme suit :
Majuscules d'imprimerie
(espace)ABCDEFGHIJKLMNOPQ RSTUVWXYZ
Minuscules d'imprimerie
abcdefghijklmnpqrstuvwxz Nombres
0123456789
Symboles, Tréma
AAEEEEIAEaeeeeeioae
6. Effleurez sur la droite de l'écran ou tournez le bouton [ROTARY] pour désir les caractères à entra.
7. Répétez les étapes 4 à 6 pour saisir le titre. Appuyer et maintainir l'écran de titre pendant au moins 2 secondes efface tous les caractères saisis.
8. Effleurez et maintenez MEMO pendant au moins 2 secondes
Vous entendrez un long signal sonore, puis le titre est enregistré en mémoire.
Pour commuter l'écran de titre et l'horloge ou un autre écran
Effleurez le centre de l'écran.
Lorsqu'un nouveau titre est enregistré au-delà du nombre maximal de titres.
Dans le cas d'une station de télé
Les titres non enregistrés dans les canaux préregliés sont effacés automatiquement, et le nouveau titre est enregistré en mémoire.
Dans le cas d'un CD
Les titres des CD qui ont eté lus en dernier sont effacés, et le nouveau titre est enregistré en mémoire.
Effacement de titres
1. Captez la station de télé ou lisez un CD dont vous souhaitez effacer le titre.
2. Effleurez le centre de l'écran pour régler l'écran de titre utilisé.
Lorsque I'écran passé à l'écran de titre utilisateur, "USER" s'affiche au dessus de l'écran du No. préréglé.
3. Appuyez et maintenez le bouton [A] pendant au moins 1 seconde.
Le mode passe au mode de saisie de titre.
4. Effleurez et maintenance l'écran de titre pendant au moins 2 secondes Tous les caractères du titre s'effacent.
5. Effleurez et maintenez MEMO pendant au moins 2 secondes
Vous entendrez un long signal sonore, puis le titre est effacé.
Changement des réglages Sélection des éléments à régler
1. Appuyez sur le bouton [A].
Le mode passe au mode d'ajustement.

2. Effleurez 卡 包 sur I'ecran de reglage des éléments pour selectionner I'élément à régler.
* Effleurer ↑ ↓ sur la gauche de l'écran commute les éléments principaux un à la fois. Effleurer ← → sur la gauche de l'écran commute les sous éléments en continu.
* Effleurer ↑ au centre de l'écran commute les sous éléments un à la fois. Effleurer ← → commute les sous éléments en continu.
3. Lorsque "EDIT" s'affiche sur la droite de l'écran, effleurez EDIT pour commuter vers l'écran des détails d'ajustement.

4. Effleurez sur la droite de l'écran ou tournez le bouton [ROTARY] pour régler les détails.
Pour revenir à au mode d'origine.
1. Appuyez de nouveau sur le bouton [A].
Réglage des éléments
Elément principal Sous élément DISPLAY SCREEN SVR
• Réglage de l'économiseur d'écran (cf. page 41) MSG INPUT
• Saisie de message d'information (cf. page 41) MESSAGE
• Réglage de l'écran du message à la mise en marche/ll'arrêt (cf. page 42) S/A SENS
• Réglage de la sensibilité de l'analyseur de spectre (cf. page 42) SCROLL
• Ajustement la vitesse de défillement (cf. page 42) APPERNCE DIMMER IN
• Réglage de l'atténuation automatique (cf. page 43) DMR LEVEL
• Réglage du niveau de l'atténuation automatique (cf. page 43) CONTRAST
• Ajustement du contraste de l'écran (cf. page 43) BLINK LED
• Fait clignoter la LED lorsque DCP est retire (cf. page 43) BEEP
• Réglage du signal sonore (cf. page 44) SOUND AC-PRO III
• Sélection du mode VSE (STD/PRO) (cf. page 44) EQ SELECT
• Sélection du mode égaliser (cf. page 44) SP-SETTING
• Réglage de la configuration de l'enceinte (cf. page 44) CENTER-SP / SUB-WOOFER
• Réglage du sub-woofer ON/OFF (cf. page 45) HPF / SUB-W LPF
• Ajustement de la fréquence de filtre de l'enceinte (cf. page 45) AMP CANCEL
• Réglage de l'utilisation de l'amplificateur interne ON/OFF (cf. page 46) SP GAIN
• Ajustement du niveau de sortie de l'enceinte (cf. page 46) PL II DELAY SRD-SP
• Ajustement du niveau de sortie de l'enceinte (cf. page 46) PL II CONT PANORAMA / DIMENSION / CTR WIDTH
• Réglage du mode musical en détaill (cf. page 47) TUNER TV ARER
• Réglage de la zone télé (cf. page 57) TV DIVER
• Réglage de la diversité TV (cf. page 57) LINK ACT
• Réglage de la fonction AF entre RDS et DAB (cf. page 26) LANGUAGE
• Réglage de la langue de l'écran PTY (cf. page 30) RDS-INT 2Z
• Réglage de l'interruption RDS lorsque la fonction 2-ZONE est utilisée (cf. page 30) SETTING AUX / TEL
• Réglage AUX et TEL (cf. page 47) AUX SENS
• Réglage du niveau d'entrée de l'audio portable (AUX) (cf. page 48) TEL-SP
• Réglage des enceintes de la voiture pour le téléphone portable (TEL-002 en option) (cf. page 48) TEL-SWITCH
• Réglage de l'interruption téléphone portable (cf. page 48) CALIBRATE / A-VOL SENS
• Réglage de la fonction de volume automatique (cf. page 49) SYSTEM CHECK
• Faire une vérification du système (cf. page 49) CODEMATIC
• Réglage de la sécurité (cf. page 50)
Réglage de l'économiseur d'écran (SCREEN SVR)
Cette fonction vous permet d'afficher un économiseur d'écran lorsque vous n'avez pas actionné cet apparéil pendant 30 secondes environ.
- Le réglage d'usine par défaut est "ON".
1. Appuyez sur le bouton [A] pour régler le mode d'ajustement.
2. Effleurez t 山 sur l'écran de réglage des éléments pour désir "SCREEN SVR" sous "DISPLAY".

3. Effleurez sur la droite de l'écran ou tournez le bouton [ROTARY] pour sélectionner "ON" ou "OFF".
4. Appuyez sur le bouton [A] pour revenir au mode original.
Pour commuter vers l'écran de économisteur d'écran
Effleurez PREV ou NEXT lorsque l'économiseur d'écran est affché.
Chaque effleurement de ces boutons commute l'écran de l'économiseur d'écran.
Economiseurs d'écran
Economiseur d'écran motif 1

Economiseur d'écran motif 2

Economiseur d'écran motif 3

Analyseur de spectre motif 1

Analyseur de spectre motif 2

Analyseur de spectre motif 3

Analyseur de spectre motif 4

Message d'information

SS SCAN
Les 8 indications ci-dessus sont affichées pendant environ 10 secondes chacune.
Saisir des messages pour les afficher dans message d'information (MSG INPUT)
1 type d'économiseur d'écran est disponible. Pour plus de détails sur la façon de commuter l'écran de l'économiseur d'écran, voir "Réglage de l'économiseur d'écran".
- Jusqu'à 30 caractères peuvent être saisis.
- Le réglage d'usine par défaut est "Active Matrix Control System".
1. Appuyez sur le bouton [A] pour régler le mode d'ajustement.
2. Effleurez sur l'écran de réglage des éléments pour désirir "MSG INPUT" sous "DISPLAY".

DISPLAY
ADJUST MODE
MSG INPUT> EDIT
4. Effleurez au centre de l'écran pourCHOISIR LA POSITION DE Saisie.
* Pour effacer le message, effleurez et maintenez le centre de l'écran pendant au moins 2 secondes. Si vous effectuez l'opération de l'étape 8 avec le message effacé, le message revient à son réglage d'usine par défaut.
5. Effleurez 山 sur la gauche de I'ecran pourCHOir le type de texte. Chaque effleurement de 山 commute le type de texte : Pour plus de details, voir page 37.
6. Effleurez sur la droite de l'écran ou tournez le bouton [ROTARY] pour désir les caractères à entra.
7. Répétez les étapes 4 à 6 pour saisir le message.
8. Effleurez et maintenez MEMO pendant au moins 2 secondes
Vous entendrez un long signal sonore, puis le message est enregistré en mémoire.
9. Appuyez sur le bouton [A] pour revenir au mode original.
Écran des messages (MESSAGE)
Cette fonction vous permet d'afficher des messages sur l'écran lorsque l'alimentation est coupée. "Hello" s'affiche au démarrage et "See you" s'affiche à l'arrêt.
- Le réglage d'usine par défaut est "ON".
1. Appuyez sur le bouton [A] pour régler le mode d'ajustement.
2. Effleurez sur l'écran de réglage des éléments pour désirir "MESSAGE" sous "DISPLAY".

3. Effleurez sur la droite de l'écran ou tournez le bouton [ROTARY] pour sélectionner "ON" ou "OFF".
4. Appuyez sur le bouton [A] pour revenir au mode original.
Réglage de la sensibilité de l'analyseur de spectre (S/A SENS)
Cette fonction vous permet d'ajuster la sensibilité (quantité de déflexion) de l'analyseur de spectre. Pour plus de détails sur l'écran de l'analyseur de spectre, voir "Commutation de l'écran" (cf. page 13) ou "Réglage de l'économiseur d'écran" (cf. page 41).
- Le réglage d'usine par défaut est "MID".
1. Appuyez sur le bouton [A] pour régler le mode d'ajustement.
2. Effleurez sur l'écran de réglage des éléments pour désirer "S/A SENS" sous "DISPLAY".

3. Effleurez sur la droite de l'écran ou tournez le bouton [ROTARY] pour ajuster la sensibilité.
* Choisissez soit LOW (petite quantité de déflexion), MID ou HIGH (grande quantité de déflexion).
4. Appuyez sur le bouton [A] pour revenir au mode original.
Ajustement de la vitesse de défilament de l'affichage (SCROLL)
Cette caractéristique vous permet de ralentir la vitesse de défilament lorsqu'elle est trop rapide, et donc difficile à voir sur l'écran.
- Le réglage d'usine par défaut est "SPEED2".
1. Appuyez sur le bouton [A] pour régler le mode d'ajustement.
2. Effleurez sur l'écran de réglage des éléments pour désirir "SCROLL" sous "DISPLAY".

3. Effleurez sur la droite de l'écran ou tournez le bouton [ROTARY] pour ajuster la sensibilité.
* Le réglage peut être ajusté dans une fourchette de SPEED 1 à SPEED 7. Ajustez cet élément de réglage en regardant comment l'apparce de l'écran évolve.
4. Appuyez sur le bouton [A] pour revenir au mode original.
Réglage de l'atténuation automatique (DIMMER IN)
Cette fonction vous permet de varier l'éclairage de l'écran pour qu'il corresponde à la luminosité de votre voiture.
Choisissez soit "AUTO" (coïncide avec la luminosité de votre voiture) soit "ILLUMI" (coïncide avec l'éclairage de votre voiture) comme réglage de l'atténuation automatique.
- Lorsque la fonction d'atténuation automatique est reglee sur "AUTO", la luminosite de l'écran varie en fonction de celui mesure par le capteur.
- Reglez l'atténuation sur DMR LEVEL.
- Le réglage d'usine par défaut est "AUTO".
1. Appuyez sur le bouton [A] pour régler le mode d'ajustement.
2. Effleurez sur l'écran de réglage des éléments pour désirir "DIMMER IN" sous "APPERNCE".

3. Effleurez sur la droite de l'écran ou tournez le bouton [ROTARY] pour désir "AUTO" ou "ILLUMI".
4. Appuyez sur le bouton [A] pour revenir au mode original.
Réglage du niveau d'atténuation (DMR LEVEL)
Cette fonction vous permet de régler de combien l'écran est attenué.
- Le réglage d'usine par défaut est "3".
1. Appuyez sur le bouton [A] pour régler le mode d'ajustement.
2. Effleurez 卡 巴 sur I'ecran de réglage des éléments pour désirir "DMR LEVEL" sous "APPERNCE".

3. Effleurez 山 sur la droite de l'écran ou tournez le bouton [ROTARY] pour régler le niveau d'attenuation.
* Choisissez parmi OFF (atténuation OFF, clair), 1 (légèrement attenué) à 5 (sombre).
4. Appuyez sur le bouton [A] pour revenir au mode original.
Ajustement du contraste de l'écran (CONTRAST)
Vous pouvez ajuster le contraste de I'ecran pour qu'il corresponde à l'angle de montage de I'appareil
- Le réglage d'usine par défaut est "6".
1. Appuyez sur le bouton [A] pour régler le mode d'ajustement.
2. Effleurez sur l'écran de réglage des éléments pour désirer "CONTRAST" sous "APPENCE".
3. Effleurez sur la droite de l'écran ou tournez le bouton [ROTARY] pour ajuster le contraste.

* L'élement peut être ajusté dans une fourchette de 1 à 11.
Ajustez cet élément de réglage en regardant comment l'apparace de l'écran évolve.
4. Appuyez sur le bouton [A] pour revenir au mode original.
Faire clignoter la LED lorsque le DCP est retire (BLINK LED)
Vou puevez faire clignoter la LED de cet apparéil lorsqu'le DCP est retire.
- Le réglage d'usine par défaut est "OFF".
1. Appuyez sur le bouton [A] pour régler le mode d'ajustement.
2. Effleurez sur l'écran de réglage des éléments pour désirir "BLINK LED" sous "APPENCE".

APPERNCE
ADJUST MODE
BLINK LED》 OFF
NCE
3. Effleurez sur la droite de l'écran ou tournez le bouton [ROTARY] pour sélectionner "ON" ou "OFF".
4. Appuyez sur le bouton [A] pour revenir au mode original.
Réglage du signal sonore lors de l'utilisation des boutons (BEEP)
Le son aigu bref ou long que vous entendez lorsqu'un bouton est pressé s'appelle un "BEEP".
- Le réglage d'usine par défaut est "ON".
1. Appuyez sur le bouton [A] pour régler le mode d'ajustement.
2. Effleurez 山 山 sur l'écran de réglage des éléments pour désirir "BEEP" sous "APPERNCE".

3. Effleurez sur la droite de l'écran ou tournez le bouton [ROTARY] pour sélectionner "ON" ou "OFF".
4. Appuyez sur le bouton [A] pour revenir au mode original.
Sélection de chaque mode
L'élement ne peut pas être sélectionné lorsque le Dolby Pro Logic II est régé sur "MUSIC" ou "MATRIX" (cf. page 17).
- Le réglage d'usine par défaut est "PRO" pour AC-PRO III et "P.EQ" pour EQ SELECT.
AC-PROIII
Lorsque "STD" (mode standard) est sélectionné, la qualité du son et le champ peuvent être régles par le VSE (Virtual Space Enhancer) de telle manière que le même effet audio soit obtenu quelsque soit le siège sur lequel vous étres assis.
Lorsque "PRO (mode PRO) est selectionné, la qualité du son et le champ peuvent être ajustés précisément pour chaque position de siège.
EQ SELECT
Lorsque "P.EQ" (mode égaliseur) est sélectionné, toute la gamme de niveaux de fréquences peut être compensée par une courbe douce et précise.
Lorsque "BAS/TREB" (mode basses/aigus) est sélectionné, le niveau de fréquence peut être compensé en le divisant en 2 niveaux principaux, basses (tonalités basses) et aiguus (tonalité haute).
1. Appuyez sur le bouton [A] pour régler le mode d'ajustement.
2. Effleurez 山 sur l'écran de réglage des éléments pour désir "AC-PRO III" sous "SOUND" et "EQ SELECT" sous "SOUND".

3. Effleurez sur la droite de l'écran ou tournez le bouton [ROTARY] pour désirir le mode.
Sélection de mode
AC-PRO III STD
• Mode standard (menu VSE) PRO
• Mode PRO (menu de position) EQ SELECT P.EQ
• Mode égaliser (Menu P.EQ) BAS / TREB
• Mode basses/aigus
4. Appuyez sur le bouton [A] pour revenir au mode original.
Réglage de la configuration des enceintes (SP-SETTING)
Réglez afin que la configuration des enceintes fasse ressortir toutes les caractéristiques de cet apparéil dans votre voiture.
- Le réglage d'usine par défaut est "SWL + SWR".
1. Appuyez sur le bouton [A] pour régler le mode d'ajustement.
2. Effleurez 卡 sur l'écran de réglage des éléments pour désirir "SP-SETTING" sous "SOUND".

3. Effleurez sur la droite de l'écran ou tournez le bouton[ROTARY] pour régler la configuration des enceintes.
Configuration des enceintes
CTR+SW
5.1ch
configuration Enceintes avant/arroire (4cn)
Enceinte centrale (1cn)
Sub-woofer (1cn) SWL +SWR
4ch+sub-woofer
configuration Enceintes avant/arroire (4cn)
Sub-woofer (2cn)
Remarques:
- Le son ne sort pas par l'enceinte centrale à moins que les réglages suivants ne soient effectuels lors du réglage de "CTR+SW".
(1) En vous reportant à " Sélection du menu PLII (Dolby PL II)" (cf. page 17), réglez le mode Dolby Pro Logic II sur "MUSIC" ou "MATRIX".
(2) En vous reportant à “Réglage des enceintes ON/OFF (CENTER-SP/SUB-WOOFER)” (cf. page 45), réglez l'enceinte centrale sur “ON”.
- Le son ne sort pas sur le sub-woofer Lch lorsque "SWU + SWR" est régèle et que le mode Dolby Pro Logic Il est régèle sur "MUSIC" ou "MATRIX".
4. Appuyez sur le bouton [A] pour revenir au mode original.
Réglage ON/OFF des enceintes (CENTER-SP/SUB-WOOFER)
Réglez l'enceinte centrale (CENTER-SP) et le sub-woofer (SUB-WOOFER) sur ON/OFF.
Assurez-vous que ce réglage est sur "OFF" lorsqu'il n'y a pas d'enceinte centrale ou de subwoofer.
L'enceinte centrale (CENTER-SP) peut être régée lorsque le mode Dolby Pro Logic II est régé sur "MUSIC" ou "MATRIX", et que "SP-SETTING" est régé sur "CTR-SW".
- Le réglage d'usine par défaut est "ON".
1. Appuyez sur le bouton [A] pour régler le mode d'ajustement.
2. Effleurez sur l'écran de réglage des éléments pour désirir "CENTER-SP" sous "SOUND" et "SUB-WOOFER" sous "SOUND".

3. Effleurez sur la droite de l'écran ou tournez le bouton [ROTARY] pour sélectionner "ON" ou "OFF".
4. Appuyez sur le bouton [A] pour revenir au mode original.
Ajustement des fréquences filtrés des enceintes (HPF/ SUB-W LPF)
Cette fonction vous permet d'ajuster la fréquence filtré qui convient aux enceintes que vous utilisez.
- Les filtres (HPF/SUB-W LPF) que vous pouvez utiliser sont différents en fonction du réglage du mode Dolby Pro Logic II.
Dolby Pro Logic II Réglage du mode Filtre HPF SUB-W LPF*1 MUSIC / MATRIX Non ajustable Ajustable OFF Ajustable Ajustable
*1 L'ajustement n'est possible que lorsque "SUB-WOOFER" est régle sur "ON".
- Le réglage d'usine par défaut est "THROUGH".
■ Ajustement du filtré
HPF (ajustement du contrôle passée-haut)
Ce filtre enlève lessons de basses des enceintes avant et arrière.
THROUGH 50Hz 80Hz 120Hz
Réglez le filtré pour qu'il convienne aux enceintes lorsque vous en utilisez de petit diamètre.
THROUGH
Réglez ici lorsque vous utilisez des enceintes qui généré des basses.
SUB-W LPF (ajustement du filtré passage-bas du sub-woofer)
Ce filtre enlève les aigus du sub-woofer.
THROUGH 50Hz 80Hz 120Hz
Réglez la fréquence du filtré pour qu'elle corresponde au sub-woofer.
THROUGH
Réglez ceci lorsque vous utilisez un sub-woofer à alimentation intégrée à filtrer salle-bas.
1. Appuyez sur le bouton [A] pour régler le mode d'ajustement.
2. Effleurez sur l'écran de réglage des éléments pourCHOIR "HPF" sous "SOUND et "SUB-W LPF" sous "SOUND".

3. Effleurez sur la droite de l'écran ou tournez le bouton [ROTARY] pour régler la fréquence.
* Choisissez parmi THROUGH, 50Hz, 80Hz, et 120Hz.
4. Appuyez sur le bouton [A] pour revenir au mode original.
Réglage de l'utilisation de l'amplificateur interne ON/OFF (AMP CANCEL)
Réglez l'utilisation de l'amplificateur ON/OFF en fonction de l'usage ou non d'un amplificateur externe.
Réglez AMP CANCEL sur "ON" (utilisation d'amplificateur interne OFF) si un amplificateur exter est connecté et si l'amplificateur interne n'est pas utilisé.
- Le réglage d'usine par défaut est "OFF" (amplificateur interne utilisé).
1. Appuyez sur le bouton [A] pour régler le mode d'ajustement.
2. Effleurez sur l'écran de réglage des éléments pour désirir "AMP CANCEL" sous "SOUND".

3. Effleurez sur la droite de l'écran ou tournez le bouton [ROTARY] pour sélectionner "ON" ou "OFF".
4. Appuyez sur le bouton [A] pour revenir au mode original.
Ajustement du niveau de sortie des enceintes (SP GAIN)
Utilisez la fonction de test de tonalité intégrée à cet apparéil pour ajuster jusqu'à ce que le volume de sortie soit le même pour toutes les enceintes.
L'élement ne peut être seLECTIONné que lorsque le Dolby Pro Logic II est régé sur "MUSIC" ou "MATRIX".
- Le réglage d'usine par défaut est "0dB".
1. Appuyez sur le bouton [A] pour régler le mode d'ajustement.
2. Effleurez sur l'écran de réglage des éléments pour désirir "SP GAIN" sous "SOUND".

3. Effleurez EDIT.
Le mode passe au mode d'ajustement SP GAIN.
4. Effleurez sur l'écran d'ajustement des éléments pourCHOISIR I'elément souhaite. Chaque effleurement de commute l'écran d'ajustement de I'elément comme suit :
Éléments d'ajustement

*1 "CTR GAIN" s'affiche seulement lorsque "SP-SETTING" est régle sur "CTR+SW" et lorsque "CENTER-SP" est régle sur "ON".
^*2 "SUB-W GAIN" ne s'affiche que lorsque "SUB-WOOFER" est reglé sur "ON".
5. Effleurez sur la droite de l'écran ou tournez le bouton [ROTARY] pour ajuster le niveau de sortie.
Le niveau de sortie peut être régé dans une fourchette de -10 dB à +10 dB
6. Répétez les étapes 4 et 5 pour ajuster chaque élément.
7. Appuyez sur le bouton [A] pour revenir au mode original.
Ajustement de la temporisation des enceintes arrêté (PL II DELAY)
Le moment où le son arrive à la position d'audition varie selon la position de montage des enceintes arrêté et de la taille de votre voiture. Si vous reglez la temporisation des enceintes arrêté, vous pouvez ajuster le son de telle manière que le son des enceintes arrêté soit entendu en même temps que celui des enceintes avant.
L'élément ne peut être sélectionné que lorsque le Dolby Pro Logic II est régé sur "MUSIC" ou "MATRIX".
- Le réglage d'usine par défaut est "0ms".
1. Appuyez sur le bouton [A] pour régler le mode d'ajustement.
2. Effleurez 卡 卡 sur I'ecran de réglage des éléments pourCHOIR "SRD-SP" sous "PL II DELAY".

3. Effleurez sur la droite de l'écran ou tournez le bouton [ROTARY] pour ajuster la temporisation.
* "SRD-SP" peut être ajusté dans une fourchette de 0 à 15 ms.
4. Appuyez sur le bouton [A] pour revenir au mode original.
Réglage du mode musical en détaill (PL II CONT)
Cette fonction vous permet de régler le mode musical de manière plus détaillée lorsque le mode Dolby Pro Logic II est réglé sur "MUSIC".
L'élément ne peut être sélectionné que lorsque le Dolby Pro Logic II est réglé sur "MUSIC".
- Le réglage d'usine par défaut pour PANORAMA est "NO", pour DIMENSION c'est "3" et pour CTR WIDTH c'est "3".
Éléments d'ajustement
PANORAMA (réglage du contrôle de panorama) Ceci élargit l'image du champ sonore de l'avant jusqu'aux enceintes arrriere. Réglez cet élément sur "YES" si vous ne sentez pas d'effet surround.
DIMENSION (réglage de la dimension)
Change l'image du camp sonore vers l'avant ou l'arrière. Lorsque l'image du champ sonore penche vers l'avant ou l'arrière, il est possible de corriger cela.
La valeur d'ajustement est 3 en position centrale. Les valeurs d'ajustement de 2 à 0 modifiert l'image du champ sonore vers l'arrière, tandis que des valeurs de 4 à 6 le modifiert vers l'avant.
CTR WIDTH (réglage de la largeur centrale)*1
Ajusté la position fixée du canal central entre l'enceinte centrale et les enceintes avant gauche et droite.
Lorsque le son central est réparti également à gauche et à droite, toute l'image du champ sonore augmente pour produit une sensation d'expansion naturelle.
La valeur d'ajustement 0 joue tous lessons centraux sur l'enceinte centrale.
La valeur d'ajustement 7 répartit le son central de manière égale entre les enceintes gauche et droite.
*1 "CTR WIDTH" s'affiche seulement lorsque "SP-SETTING" est régé sur "CTR+SW" et lorsque "CENTER-SP" est régé sur "ON".
1. Appuyez sur le bouton [A] pour régler le mode d'ajustement.
2. Effleurez 卡 已 sur I'ecran de réglage des éléments pour désirir l'objet d'ajustement désiré sous "PL II CONT". Les éléments d'ajustement sont "PANorama", "DIMENSION" et "CTR WIDTH".

3. Effleurez sur la droite de l'écran ou tournez le bouton [ROTARY] et ajustez l'élement comme souhaité.
* Choisissez "YES" ou "NO" pour "PANorama".
* “DIMENSION” peut être ajusté dans une fourchette de 0 à 6.
* “CTR WIDTH” peut être ajusté dans une fourchette de 0 à 7.
4. Appuyez sur le bouton [A] pour revenir au mode original.
Fonction AUX
Ce système dispose d'une entrée exterce RCA de sorte que vous pouvez écouter dessons et de la musique à partir de dispositifs externes connectés à cet apparéil.
Sélection de AUX / TEL
Lorsqu'elles sont connectées à cet apparéil, vous pouvez écouter des sons et de la musique à partir de sources externes, ou vos appeals téléphoniques depuis les enceintes.
Lorsque TEL INT ou un dispositif externe est connecté à cet apparéil, vous pouvez sélectionner le mode TEL ou le mode AUX.
- Le réglage d'usine par défaut est "AUX".
1. Appuyez sur le bouton [A] pour régler le mode d'ajustement.
2. Effleurez sur l'écran de réglage des éléments pour désirir "AUX/TEL" sous "SETTING".

3. Effleurez 卡 卡 sur la droite de l'écran ou tournez le bouton [ROTARY] pour selectionner "AUX" ou "TEL".
AUX:
Le cable d'entrée AUX/TEL sert à l'entrée audio externe.
TEL:
Le cable d'entrée AUX/TEL sert l'entrée audio d'un téléphone portable.
4. Appuyez sur le bouton [A] pour revenir au mode précédent.
Réglage du niveau d'entrée (AUX SENS) de l'audio portable (mode AUX)
Cette fonction vous permet de régler le niveau d'entrée de dispositifs externes optionnels connectés à cet apparéil.
- Ceci peut être régle lorsque “AUX/TEL” est régle sur “AUX”.
- Le réglage d'usine par défaut est "MID".
1. Appuyez sur le bouton [A] pour régler le mode d'ajustement.
2. Effleurez sur l'écran de réglage des éléments pour désirir "AUX SENS" sous "SETTING".

3. Effleurez 山 sur la droite de I'ecran ou tournez le bouton [ROTARY] pour regler le niveau d'entree.
* Choisissez parmi LOW, MID et HIGH.
4. Appuyez sur le bouton [A] pour revenir au mode original.
Réglage des enceintes de la voiture pour le téléphone portable (TEL-002 en option)
- Pour envoyer des appeals téléphoniques, réglez le téléphone portable.
- Le réglage d'usine par défaut est "RIGHT".
1. Appuyez sur le bouton [A] pour régler le mode d'ajustement.
2. Effleurez sur l'écran de réglage des éléments pour désirir "TEL-SP" sous "SETTING".

ADJUST MODE TEL - SP > RIGHT
3. Effleurez sur la droite de l'écran ou tournez le bouton [ROTARY] pour sélectionner "LEFT" ou "RIGHT". LEFT:
Les appellés téléphoniques peuvent être entendus sur l'enceinte avant gauche connectée à cet apparéil.
RIGHT:
Les appellés téléphoniques peuvent être entendus sur l'enceinte avant droite connectée à cet apparéil.
4. Appuyez sur le bouton [A] pour revenir au mode précédent.
Réglage de l'interruption de téléphone portable
Si vous connectez cet apparéil à votre téléphone portable avec un dispositif (TEL-002 en option), vous pouvez écouter vos appeals téléphoniques sur les enceintes de votre voiture.
- Le réglage d'usine par défaut est "OFF".
1. Appuyez sur le bouton [A] pour régler le mode d'ajustement.
2. Effleurez sur l'écran de réglage des éléments pour désirer "TEL-SWITCH" sous "SETTING".

ADJUST MODE TEL - SWITCH OFF
3. Effleurez 卡 sur la droite de l'écran ou tournez le bouton [ROTARY] pour désir les réglages.
A chaque fois que vous tournez le bouton [ROTARY], le réglage change dans l'ordre suivant :
OFF ON MUTE OFF...
OFF:
Cet apparéil continue son fonctionnement normal même lorsque le téléphone portable est utilisé.
Remarque:
- Lors de la connexion d'un kit mains-libres, assurez-vous que le réglage est sur ON pour receivevoir le son du téléphone sur le système.
ON:
Voupeuz écouter vos appelés téléphoniques depuis les enceintes connectées sur cet apparéil.
* Lorsque vous écoutez vos appeals sur les enceintes de la voiture, vous pouvez ajuster le volume en tournant le bouton [ROTARY].
MUTE:
Le son de cet apparéil est mis en sourdine pendant les appeals téléphoniques.
4. Appuyez sur le bouton [A] pour revenir au mode précédent.
Réglage de la fonction de volume automatique (CALIBRATE/A-VOL SENS)
Vous pouvez changer automatiquement le volume pour qu'il corresponde à la vitesse de votre voiture.
- Le réglage d'usine par défaut est "LOW".
1. Appuyez sur le bouton [A] pour régler le mode d'ajustement.
2. Effleurez sur l'écran de réglage des éléments pour désir “CALIBRATE” sous “SETTING”.

3. Accélérez jusqu'à 50 km/h.
4. Lorsque vousatteignez 50~km / h effleurez START.
L'étaconnage s'effectue.
Après 2 secondes ou plus, vous entendrez un long signal sonore et "SUCCESSIONS" s'affichera sur l'écran.
Si vous entendez un signal sonore bref, c'est que l'étalonnage a échoué. Repétez la procédure depuis l'étape 3.
5. Ensuite, ajustez la sensibilité. Effleurez sur l'écran de réglage des éléments pour désirir "A-VOL SENS" sous "SETTING".

6. Effleurez sur la droite de l'écran ou tournez le bouton [ROTARY] pour désirar la sensibilité.
A chaque fois que vous tournez le bouton [ROTARY], le réglage change dans l'ordre suivant :
OFF (pas de modification du volume) LOW (modification du volume: bas) MIDLOW MID MID-HIGH HIGH (modification du volume: haut) ...
7. Appuyez sur le bouton [A] pour revenir au mode précédent.
Effectuer une vérification du système
Cette fonction vous permet d'effectuer une vérification du système à partir du mode d'ajustement lorsque c'est nécessaire.
1. Appuyez sur le bouton [A] pour régler le mode d'ajustement.
2. Effleurez sur l'écran de réglage des éléments pour désirir "SYSTEM CHECK" sous "SETTING".

SETTING
ADJUST MODE
SYSTEM CHECK START
3. Effleurez et maintenez START pendant au moins une seconde.
"System Check" s'affiche.
4. Appuyez sur le bouton [ROTARY]
La vérification du système commence.
Lorsque la vérification du système est terminée, "Completed" ("Terminé") s'affiche.
5. Appuyez de nouveau sur le bouton [ROTARY]
L'écran principal du mode radio apparait.
Utilisation de la fonction de sécurité (CODEMATIC)
Cette fonction empêche des personnes qui ne connaissent pas la sequence de touche d'utiliser facilement cet apparéil. L'écran Touch Code apparait lorsque le DCP est fixé et que l'alimentation est en marche avec "CODEMATIC" régèle sur "ON".
Si vous effleurez l'écran sur cet écran dans l'ordre préréglé, “SUCESSFUL” s'affiche et l'alimentation est coupée.
Lorsque l'alimentation est remise en marche, I'ecran Touch Code n'apparait pas, et I'ecran principal en mode radio ou CD est affché.
1. Appuyez sur le bouton [A] pour régler le mode d'ajustement.
2. Effleurez 山 sur l'écran de réglage des éléments pour désirir "CODEMATIC" sous "SETTING".

2 types d'éléments sont affichés pour "CODEMATIC", les éléments pour lesquels "ON" ou "OFF" s'affiche à la droite de l'écran, et les éléments pour lesquels "INPUT" s'affiche à la droite de l'écran. Ici,CHOISSEZ l'élément pour lequel "ON" ou "OFF" est affiqué à la droite de l'écran.
3. Effleurez sur la droite de l'écran ou tournez le bouton [ROTARY] pour sélectionner "ON" ou "OFF".
4. Effleurez sur l'écran de réglage des éléments pour désir "CODEMATIC" sous "SETTING". Ici, choisissez l'élement pour lequel "INPUT" est affiqué à la droite de l'écran.
5. Effleurez INPUT. L'écran Touch Code s'efface.
6. Entrez le code de touche.
* Effleurez l'un des 5 endroits (gauche, centre, droit, supérieur droit ou inférieur droit) de l'écran.
Chaque effleurement de l'écran allume l'un des témoins du Touch Code.
* Par exemple, effleurez (1) le centre, (2) en haut à droite, (3) à gauche, (4) en bas à droite, dans cet ordre. Vous pouvez aussi effleurer le même endroit à plusieurs reprises. Lorsque vous avez effleurez 4 fois, vous entendez un long signal sonore et le mode d'origine est rappelé.
Pour annuler CODEMATIC
Si vous avez oublie l'ordre d'effleurement, soit effleurez ① en bas a droite, ② a gauche, ③ en haut a droite puis ④ a droite, dans cet ordre, soit appuyez sur [SCN] sur la telecommande.

7. FONCTIONNEMENT DES ACCESSOIRES
Fonctionnement du changeur de CD
Changeur de CD
Lorsqu'un changeur de CD optionnel est connecté par le cable CeNET, cet apparéil peut contrôler les opérations du changeur de CD. Cet apparéil peut être connecté à 2 changeurs CD câblés CeNET au total.
Changeur DVD
Lorsqu'un changeur DVD optionnel est connecté par le cable CeNET, cet appeareil peut contrôler les opérations du changeur DVD. Pour regarder un DVD, un écran externe est nécessaire.
Les commandes et l'écran du changeur de DVD sur cet appeareil sont une version simplifiée et ne supportent pas toutes les fonctions de changeur de DVD. Pour commande le changeur de DVD, utilisez la télécommander fournie avec le changeur de DVD. Pour plus de détails, reportez-vous au manuel de l'utilisateur fourni avec le changeur de DVD.
Lorsque 2 changeurs de CD sont connectés
Appuyez sur le bouton [ROTARY] pour désiré le changeur connecté à cet apparéil. (Chaque pression sur le bouton [ROTARY] commute entre les changeurs.)
- Si le changeur de CD ne compte pas de magasin, "NO MAG" s'affiche et le magasin ne contient pas de CD, "NO DISC" ne s'affiche pas pour de No. de disque.
Pour plus de détails sur l'écran du titre, voir "Commutation de l'écran de titre" (cf. page 14).
Écrans d'écran en mode changeur
Écran principal (mode changeur de CD) Il s'affiche en appuyant sur le bouton [ROTARY] pour désirir le mode changeur de CD.

Effleurer la gauche de l'écran pendant au moins 1 seconde commute en mode de commande simple.

Écran piste/durée de lecture
T01/02: 00: Le No. de la piste en cours de lecture et la durée de lecture s'affichent.
Effleurer ou en mode normal vous permit deCHOISIR la piste a dire ou avancer ou reculer rapidement d'une piste a I'autre.
Écran titre
Effleurer ce commutateur change l'écran.
Écran du No. de disque
Si vous effleurez en mode normal, vous pouvez désir un disque.
MODE
L'effleurer affiche les sous fonctions. Effleurer et maintainir ceci pendant au moins 1 seconde affiche la liste des disques.
T-SCAN/D-SCAN
S'affiche pendant la lecture de recherche. Effleurer T-SCAN/D-SCAN terminé l'écran
T-RPT/D-RPT
S'affiche pendant la lecture repétée. Effleurer T-RPT/D-RPT terminé la lecture repétée.
T-RDM/D-RDM
S'affiche pendant la lecture aléatoire. Effleurer T-RDM/D-RDM termine la lecture aléatoire.
DISC
Effleurer ceci commence la lecture du disque suivant.
(sequentially pour l'écran de commande simple)
Effleurer ces boutons seLECTIONne la piste à dire.
Effleurer et maintainir ces boutons avance ou recule rapidement d'une piste à l'autre.
Écran de la liste des disques (mode changeur de CD)
S'affiche lorsque vous effleurez MODE et le maintenez pendant au moins 1 seconde sur l'écran principal.

Nom de disque
>>: Sélection en cours
Effleurer un nom de disque ramène l'écran à l'écran principal, et la lecture commence à partir de la première piste du disque que vous avez sélectionné.
←PREV-RTN:
L'effleurer affiche la liste précédente des titres. L'effleurer et le maintainir pendant au moins 1 seconde ramène l'écran à l'écran principal.
NEXT:
L'effleurer affiche la liste de titres suivante.
ATTENTION
Les CD-ROM ne peuvent pas etre lui sur tous les changeurs de CD.Cela depend du modele.
Remarque:
- Certains CD enregistrés en mode CD-R/CD-RW peuvent être inutilisables.
Sélection du mode changeur
1. Appuyez sur le bouton [ROTARY] pourCHOISIR le mode changeur.
* Le mode d'un équipement qui n'est pas branché ne s'affiche pas.
La lecture commence automatiquement lorsque le mode passe en mode change
Pause
1. Appuyez sur le bouton [▶■].
Pour reprendre la lecture
1. Appuyez de nouveau sur le bouton [▶■].
Selection d'un CD
1. Effleurez sur l'écran du No. de disque pour désirir un disque.
La lecture commence.
* Si le magasin ne comporte pas le disque que vous avez sélectionné, le No. de ce disque n s'affiche pas.
* Effleurer DISC ↑ commence la lecture du disque suivant.
■ Sélection d'un disque depuis l'écran de la liste des disques
1. Effleurez et maintenez MODE pendant au moins une seconde.
La liste des disques s'affiche. Si vous effleurez NEXT, la partie suivante de la liste des disques s'affiche.
2. Effleurez le nom de disque.
* Si le magasin ne contient pas le disque que vous avez sélectionné, “NO DISC” s'affiche pour ce No. de disque.
* Si vous avons sélectionné le même disque que celui en cours de lecture, la lecture recommence à partir de la première piste de ce disque. (fonction top)
Sélection d'une piste
1. Pour écouter la piste suivante, effleurez sur l'écran de piste.
2. Pour écouter la piste précédente, effleurez sur l'écran de piste.
Effleurer lit la piste suivante. Si vous effleurez plusieurs fois, la piste avance jusqu'au numero de piste correspondant au nombre de fois ou vous avez appuyé sur et cette piste est lue.
Effleurer lit la piste precedente. Si vous effleurez plusieurs fois, la piste recule jusqu'au numero de piste correspondant au nombre de fois où vous avez appuyé sur et cette piste est lue.
* Si vous effleurez ♦ boths fais sur l'écran de piste alors que le début de la piste est lu, parfois la piste située à deux pistes en arrêté est lue.
Avance rapide / Retour rapide
1. Pour l'avance rapide, effleurez sur l'écran piste.
2. Pour le return rapide, effleurez sur l'écran piste.
Fonction top
La fonction top commence la lecture a partir de la première piste du disque en cours de lecture.
1. Effleurez et maintenez MODE pendant au moins une seconde.
La liste des disques s'affiche. Si vous effleurez NEXT, la partie suivante de la liste des disques s'affiche.
2. Effleurez le nom de disque.
* Si le magasin ne contient pas le disque que vous avez sélectionné, “NO DISC” s'affiche pour ce No. de disque.
* Si vous avons sélectionné le même disque que celui en cours de lecture, la lecture recommence à partir de la première piste de ce disque.
Lecture de recherche
La lecture de recherche localise et lit les 10 premières secondes de chaque piste du disque automatique. Cette fonction continue sur le disque jusqu'à ce qu'elle soit annulée.
La fonction de lecture de recherche est utile pourCHOISIR une piste souhaitee.
1. Effleurez MODE.
2. Effleurez T-SCAN.
L'écran MODE change pour "T-SCAN" et la lecture de recherche commence.
* La lecture de recherche commence à partir de la piste suivant celle qui est en cours de lecture.
Pour annuler la lecture de recherche
1. Effleurez T-SCAN.
L'écran T-SCAN change pour “MODE”, et la piste qui était lue lorsque vous avez effleuré T-SCAN est lue.
Lecture de recherche de disque
La lecture de recherche de disque localise et lit les 10 premières secondes de la première piste de chaque disque dans le changeur de CD en cours d'utilisation. Cette fonction continue automatiquement jusqu'à ce qu'elle soit annulée.
La fonction de lecture de recherche de disque est utile pour désir un CD souhaité.
1. Effleurez MODE.
2. Effleurez D-SCAN.
L'écran MODE change pour "D-SCAN" et la lecture de recherche de disque commence.
* La lecture de recherche de disque commence à partir du disque suivant celui qui est en cours de lecture.
Pour annuler la lecture de recherche de disque
1. Effleurez D-SCAN.
L'écran D-SCAN change pour “MODE”, et la piste qui était lue lorsque vous avez effleuré D-SCAN est lue.
Lecture repétée
La lecture repétée lit de manière continue la piste en cours. Cette fonction continue automatiquement jusqu'à ce qu'elle soit annulée.
1. Effleurez MODE.
2. Effleurez T-REPEAT.
L'écran MODE change pour "T-RPT" et la lecture repétée commence.
Pour annuler la lecture repétée
1. Effleurez T-RPT.
L'écran T-RPT change pour “MODE”, et la lecture normale commence à partir de la piste en cours lorsque vous avez effleuré T-RPT.
Lecture repétée de disque
Lorsque toutes les pistes du disque en cours ont ete lues, la lecture repeteee de disque reliet le disque en cours a partir de la premiere piste.
Cette fonction continue automatiquement jusqu'à ce qu'elle soit annulée.
1. Effleurez MODE.
2. Effleurez D-REPEAT.
L'écran MODE change pour "D-RPT" et la lecture repétée commence.
Pour annuler la lecture repétée de disque
1. Effleurez D-RPT.
L'écran D-RPT change pour “MODE”, et la lecture normale commence à partir de la piste en cours lorsque vous avez effleuré D-RPT.
Lecture aléatoire
La lecture aléatoire sélection et lit des pistes individuelles sur le disque, sans ordre particulier. Cette fonction continue automatiquement jusqu'à ce qu'elle soit annulée.
1. Effleurez MODE.
2. Effleurez T-RANDOM.
L'écran MODE change pour "T-RDM" et la lecture aléatoire commence.
Pour annuler la lecture aléatoire
1. Effleurez T-RDM.
L'écran T-RDM change pour “MODE”, et la lecture normale commence à partir de la piste en cours lorsque vous avez effleuré T-RDM.
Lecture aléatoire de disque
La lecture aléatoire de disque sélectionne et lit des pistes individuelles ou des disques, sans ordre particulier. Cette fonction continue automatiquement jusqu'à ce qu'elle soit annulée.
1. Effleurez MODE.
2. Effleurez D-RANDOM.
L'écran MODE change pour "D-RDM" et la lecture aléatoire commence.
Pour annuler la lecture aléatoire de disque
1. Effleurez D-RDM.
L'écran D-RDM change pour “MODE”, et la lecture normale commence à partir de la piste en cours lorsque vous avez effleuré D-RDM.
Fonctionnement du téléviseur
Fonctions du tuner TV
Si vous raccordez un tuner TV en option via le cable CeNET, cet appeareil poursra piloter toutes les fonctions du tuner TV. Pour pouvoir regardar la télévision, vous nevez avoir un tuner TV et un monieur.
Écrans d'écran en mode TV
Écran principal
Il s'affiche en appuyant sur le bouton [ROTARY] pour désirir le mode TV.

Effleurer la gauche de l'écran pendant au moins 1 seconde commute en mode de commande simple.

Écran du canal
1ch: Le canal en cours de réception s'affiche.
Effleurer ou le en mode normal.
vous permet d'effectuer une recherche d'accord ou un accord manuel.
Écran titre
3ch: Le nom de la station en cours de réception s'affiche.
VTR: En mode video
Les effleurer change l'écran.
Écran de la bande de réception
TV1: Nom de bande
Écran du No. de préRéglage
Effleurer 卡 en mode normal selectionne une memoire preselectionnee.
MODE
L'effleurer affiche les sous fonctions. L'effleurer et le maintainir pendant au moins 1 seconde écran la liste de la mémoire préseLECTIONnée.
P-SCAN: S'affiche pendant une recherche preréglée. L'effleurer termine la recherche preréglée.
A-STORE: S'affiche pendant un enregistrement automatique. L'effleurer termine l'enregistrement automatique.
BAND
L'effleurer commute la bande réception.
L'effleurer et le maintainir pendant au moins 1 seconde bascule entre le mode d'accord manuel et le mode de recherche d'accord.
(sequentially pour l'écran de commande simple)
Effleurer des boutons permet le recherche d'accord ou l'accord par paliers (en mode d'accord manuel).
Effleurer et maintainir ces boutons permet un accord rapide (en mode d'accord manuel).
Écran de la liste de la mémoire présélectionnée
S'affiche lorsque vous effleurez MODE et le maintenez pendant au moins 1 seconde sur l'écran principal.
Nom de station

>>:
Accord en cours
RTN:
Effleurer ceci revient à l'écran principal.
Sélection du mode TV
1. Appuyez sur le bouton [ROTARY] pour désirir le mode TV.
Chaque pression sur le bouton [ROTARY] commute entre les modes comme suit :
* Le mode d'un équipement qui n'est pas branché ne s'affiche pas.
Commutation de la bande de réception
1. Effleurez BAND pour commuter la bande de réception.
Chaque pression sur BAND commute la bande de réception.
TV1 TV2 TV1...
Recherche d'accord
La recherche d'accord est une fonction d'accord automatique des stations ayant une bonne réception.
1. Effleurez et maintenance BAND pendant au moins une seconde lorsque MANU est affché. L'accord automatique est possible lorsque MANU s'efface.
2. Effleurez sur l'écran du canal. SEEK UP/SEEK DOWN s'affiche et l'accord commence. L'accord s'arrête automatiquement sur les stations ayant une bonne réception.
Pour annuler I'accord
1. Effleurez sur l'écran du canal de nouveau.
Accord manuel
Il y a deux possibilités: l'accord rapide et l'accord par paliers.
Lorsque vous étes en mode d'accord par paliers, la fréquence change d'un pas à la fois. En mode d'accord rapide, vous pouvez rapidement accorder la fréquence souhaïée.
1. Effleurez et maintenez BAND pendant au moins une seconde lorsque MANU n'est pas affché.
L'accord manuel est possible lorsque MANU s'affiche.
2. Manoeuvrez l'écran du canal pour accorder un canal sur lequel on diffuse.
Il y a 2 méthodes d'accord manuel: l'accord par paliers et l'accord rapide.
* L'accord par paliers est une fonction pour commuter le canal 1 pas à la fois.
Effleurez 山 sur l'écran de la fréquence.
* L'accord rapide est une fonction pour commuter le canal de manière continue. Effleurez ← → sur l'écran du canal.
L'accord s'arrête lorsque vous retirez le doigt du panneau.
Rappel d'une chaine préréglée
Cette fonction permet à l'utilisateur de seLECTIONner une station préselectionnée.
1. Effleurez et maintenez MODE pendant au moins une seconde. La liste de la mémoire présélectionnée s'affiche.
2. Effleurez la station que vous souhaitez écouter.
* La station peut aussi être accordée en effleurant d'un No. préréglé.
Pour annuler I'accord
1. Effleurez RTN.
Mémoire préselectionnée.
Un total de 12 stations de télé peut être enregistré (6-TV1 et 6-TV2). Ceci vous permet de désirir vos stations de télé favorites et de les enregistrer en mémoire pour un rappel ultérieur.
1. Effleurez BAND pour commuter la bande de réception.
2. Manoeuvrez l'écran du canal pour désir la station à y enregistrer.
3. Effleurez et maintenez MODE pendant au moins une seconde. La liste de la mémoire présélectionnée s'affiche.
4. Effleurez et maintenez le No. préréglé à enregistrer pendant au moins 2 secondes. Vous entendrez un long signal sonore, puis la station est enregistrée en mémoire. Si vous entendez un signal sonore bref, la station n'est pas enregistrée en mémoire. Répétez la procédure depuis l'étape 1.
Enregistrement automatique
L'enregistrement automatique selectionne automatiquement 6 stations de tete et enregistr checune d'elles dans une memoire preselectionnee.
S'il n'y a pas 6 stations ayant une bonne réception, les stations enregistrées en mémoire aparavant restent et seules les stations les plus fortes sont enregistrées.
1. Effleurez MODE.
2. Effleurez en maintenez A-STORE pendant au moins 2 secondes. L'écran MODE change pour "A-STORE" et le No. préréglé dans la commande d'enregistrement automatique apparait sur l'écran du No. préréglé.
* Les stations ayant une bonne réception sont recherchées automatiquement et enregistrées dans la mémoire préseLECTIONnée (No.1 à No.6) dans l'ordre des féquences croissantes.
Remarques:
Lors de I'enregistrement automatique, les stations enregistrées en mémoire jusqu'à là sont effacées.
- Lorsqu'il y a moins de 6 stations ayant une bonne réception, les fréquences basses sont automatiquement libérées, et l'enregistrement automatique recommence. S'il y a moins de 6 stations après qu'un enregistrement automatique a été effectué deux fois, les stations mémorisées jusqu'à là sont conservedes.
Recherche préregée
La recherche préreglée est une fonction pour receivevoir les stations dans l'ordre ou elles sont actuellément enregistrée sous les No. préreglés de manière à pouvoir contrcler les émissions.
1. Effleurez MODE.
2. Effleurez P-SCAN. L'écran MODE change pour "P-SCAN" et le No. prérégèle de la commande de recherche préréglee apparait sur l'écran du No. prérégèle.
* Les stations actuelles en mémoire sont reçues dans l'ordre pendant 7 secondes au moins. Les stations ayant une mauvaise réception sont passées et la station suivante est reçue.
Les stations de télé sont reçues comme suit: TV1 (1 → 6) → TV2 (1 → 6) → TV1 (1 → 6) et ainsi de suite.
Pour annuler la recherche prépréglée
1. Effleurez P-SCAN. L'écran P-SCAN change pour “MODE” et les stations reçues lors de l'effleurement de P-SCAN sont reçues ensuite.
Regarder une video
Le tuner têle dispose d'une prise d'entrée VTR à laquelle un dispositif exter ne peut être connecté. Connectez un lecteur de cassettes video 12V (VCP) ou un magnétoscope (VCR) à la prise d'entrée du tuner têle.
1. Appuyez sur le bouton [▶III].
VTR s'affiche et le mode est commuté en mode VTR.
* Le mode TV entre en mode d'entrée de video, et les video peuvent être visionnées.
Pour revenir au mode TV.
1. Appuyez de nouveau sur le bouton [▶■]
Réglage de la zone télé (TV AREA)
Lorsque you selectionnez la zone telé (Zone de réception télé), le réglage de la zone télé change.
- Le réglage d'usine par défaut est "GERMANY".
1. Appuyez sur le bouton [A] pour régler le mode d'ajustement.
2. Effleurez sur l'écran de réglage des éléments pour désirir "TV AREA" sous "TUNER".

3. Effleurez sur la droite de l'écran ou tournez le bouton [ROTARY] pour désirar la zone.
4. Appuyez sur le bouton [A] pour revenir au mode précédent.
Réglage de la diversité TV (TV DIVER)
Vous pouvez changer le réglage de la réception pour l'antenne télé connectée au tuner télé.
- Réglez cet élément sur "OFF" lorsqu'une antennée télé externe n'est pas utilisée.
- Le réglage d'usine par défaut est "ON".
1. Appuyez sur le bouton [A] pour régler le mode d'ajustement.
2. Effleurez 卡 包 sur I'ecran de réglage des éléments, et choisissez "TV DIVER" sous "TUNER".

3. Effleurez sur la droite de l'écran ou tournez le bouton [ROTARY] pour sélectionner "ON" ou "OFF".
4. Appuyez sur le bouton [A] pour revenir au mode original.
Fonction de commande de DAB
Si vous utilisez un cable CeNET pour effectuer le raccordement à un DAB (DAH913 ou DAH923) (vendu séparation), vous pourrez piloter toutes les fonctions.
Ecouter une station DAB
1. Appuyez sur le bouton [ROTARY] pour changer le mode de commande.
Remarques:
- Les écans affichés en mode de réception normale et en mode de réception préréglée sont les mêmes que lorsqu'une station DAB est reçue.
- Le nombre de programmes et les heures d'émission dépendant de la station DAB.
- Lorsque la force du signal DAB est faible, la sortie audio est mise en sourdine.
Recherche d'accord
1. Appuyez sur le bouton [ROTARY] pour désirir le mode DAB.
2. Effleurez sur la gauche de l'écran. "DAB" s'allume à l'écran lorsque l'appareil principal recoit une station DAB.
* L'appareil principal arrêté la recherche d'accord lorsqu'il ne peut pas tracer de station DAB. L'écran revient au mode précédent.
Accord manuel
1. Appuyez sur le bouton [ROTARY] pour désirir le mode DAB.
2. Si "MANU" n'est pas affché, effleurez et maintenez BAND pendant au moins 1 seconde.
Si "MANU" est affché, l'accord manuel est possible.
3. Effleurez sur la gauche de l'écran pour accorder la station.
* Si aucune opération n'est effectué dans les 7 secondes, l'accord manuel est annulé et l'affichage revient au mode précédent.
Commutation des programmes
1. Appuyez sur le bouton [ROTARY] pour désirir le mode DAB.
2. Effleurez 卡 sur la gauche de I'ecran pour commuter les programmes de la station DAB.
Remarque:
- Il se peut que le nom de programme soit le même selon le programme DAB.
Recherche programme
Cette fonction recherche séquentiellement pendant 10 secondes chaque programme qui peut être capté sur une station DAB reçue.
C'est utile lorsque vous souhaitez chercher un programme particulier.
1. Appuyez sur le bouton [ROTARY] pour désirir le mode DAB.
2. Effleurez MODE.
3. Effleurez S-SCAN. "S-SCAN" s'allume et cet apparéil commence à rechercher des programmes séquentiellement pendant 10 secondes.
A chaque fois que l'appareil principal effectue une recherche, le nom du programme s'affiche à l'écran.
4. Pour arrêter la recherche de programmes lorsqu'un programme est accordé, effleurez S-SCAN.
Mémoire manuelle
L'appareil principal dispose d'une mémoire manuelle pour les programmes DAB. jusqu'à 18 programmes peuvent être préréglés sur les boutons préseLECTIONnés (6 programmes chacun).
[M1], [M2] et [M3]
1. Appuyez sur le bouton [ROTARY] pour désirir le mode DAB.
2. Effleurez BAND pour selectionner l'un de ceux affichés ci-dessus.
3. Effleurez et maintenez MODE pendant au moins une seconde. La liste de la mémoire préseLECTIONnée s'affiche.
4 Effleurez et maintenez le No. préréglé à enregistrer pendant au moins 2 secondes. Vous entendrez un long signal sonore, puis la station est enregistrée en mémoire. Si vous entendez un signal sonore bref, la station n'est pas enregistrée en mémoire.
Répêtez la procédure depuis l' étape 1.
Remarque:
- Les programmes à interruption (PTY ou INFO) ne peuvent pas être enregistrés en mémoire.
Rappel d'un programme préréglé
1. Appuyez sur le bouton [ROTARY] pour désirir le mode DAB.
2. Effleurez BAND
Chaque effleurement de BAND change l'affichage de la maniere suivante:
MEMO1 MEMO2 MEMO3 MEMO1...
3. Effleurez sur la droite de l'écran pour rappeler un programme préréglé.
Fonction AF (Fréquence alternative)
La fonction AF permet de passer à une autre fréquence du même réseau afin de dévelopir la qualité de réception optimale.
- Le réglage usine est "ON" (en service).
- Si la réception de la station actuelle se détiériore, "SEARCH" (RECHERCHE) apparaît sur l'afficheur et la radio recherche le même programme sur une autre fréquence.
- Pour les détails sur la "Fonction AF" (cf. page 26), voirz la section "Fonctionnement RDS" de chaque mode d'emploi.
- Mise hors service de la fonction AF
- Mise en service de la fonction AF
- Commutation de la fonction AF entre RDS et DAB
Lorsque le même programme est diffusé par les deux stations RDS et DAB et que cette fonction est en service, l'unité principale passée automatiquement à la diffusion permettant la meilleure réception.
TA (Announces sur la circulation routière)
En mode d'attente TA, lorsqu'une émission d'announce sur la circulation routière commence, cette émission est reçue en priorité quel que soit le mode de fonctionnement actuel. La syntonisation automatique des programmes routiers (TP) est également possible.
- Cette fonction n'est possible que si "TP" est allumé sur l'afficheur. Lorsque "TP" est allumé, cela peut dire que la station DAB ou RDS en cours de réception possède des programmes d'annonce sur la circulation routière.
- Pour les détails sur la fonction "TA" (cf. page 27), voirz la section "Fonctionnement RDS" de chaque mode d'emploi.
Pour activer le mode d'attente TA
Annulation du mode d'attente TA
- Recherche d'une station TP
Remarques:
- Si aucune station TP n'est reçue, l'unité principale cèsse la recherche.
- Il est possible que "TP" s'allume sur l'afficheur lors de la diffusion d'une émission TP par une station RDS. Dans ce cas, appuyez sur la touche [TA] pour effectuer une symtonisation TP automatique. Appuyez à nouveau sur la touche [TA] pour revenir au mode précédent.
INFO (Announce)
En mode d'attente INFO, lorsque le programme d'annonce sélectionné commence, l'unité principale commute automatiquement sur le programme d'annonce sélectionné.
- Mise en service du mode d'attente INFO
Si vous maintainez la touche [TA] enforcée pendant 1 seconde ou plus, "INFO" s'allume sur l'afficheur et l'unité principale passée en mode d'attente INFO jusqu'à ce que l'announce sélectionnée soit diffusée. Lorsque la diffusion de l'announce sélectionnée commence, la rubrique d'announce apparait sur l'afficheur. Si vous maintainez la touche [TA] enforcée pendant 1 seconde ou plus pendant la réception de l'émission d'annonce sélectionnée, la réception de l'émission d'annonce sélectionnée s'annule et l'unité principale revient au mode d'attente INFO.
Annulation du mode d'attente INFO
Pour annuler le mode d'attente INFO, maintenez la touche [TA] enfoncée pendant 1 seconde ou plus.
- Sélection des informations
Cette fonction permet d'activer (ON) ou de désactiver (OFF) l'information sur le mode d'interruption d'information.
Voupsousvezactiver(ON)chacune des6 rubriquesd'informationquevasvoulez,soit6 au maximum.
Vous pouvez selectionner n'importe laquelle des 6 rubriques ci-dessous:
Rubrique d'information FRANÇAIS Contenu Transport Flash de transport Incident Avertissement/service Nouvelle Flash d'information Météo Flash météo locale Flash Annonce d'événement Spécial Evénement spécial
1. Effleurez MODE.
2. Effleurez INFO SEL pour saisir le mode "INFO SEL".
3. Effleurez au centre de l'écran ou tournez le bouton [ROTARY] pour sélectionner un élément d'information. Vous pouvez désir parmi 6 éléments:
Transport Incident Nouvelle Météo Flash Spécial Transport...
4. Effleurez sur la droite de l'écran pour sélectionner "ON" ou "OFF".
5. Effleurez RTN.
PTY
Cette fonction vous permet de recevoir le type de programme sélectionné, quel que soit le mode de fonctionnement.
- Vous pouvez selectionner un PTY commun pour DAB et RDS.
- Entre le PTY de DAB et le PTY de RDS, le PTY reçu precedemment a priorité sur l'autre.
- Les émissions PTY n'existent pas encore dans tous les pays.
- En mode d'attente INFO, les stations INFO ont priorité sur les stations PTY.
- En mode d'attente TA, les stations TP ont priorité sur les stations PTY.
- Pour les détails sur le "PTY" (cf. page 28), voyagez la section "Fonctionnement RDS" de chaque mode d'emploi.
Réglage du mode d'attente PTY
Annulation du mode d'attente PTY
Annulation d'une émission avec interruption PTY
- Sélection PTY
Recherche PTY
Adresse mémoire PTY
Emissions de détresse
Lorsqu'une émission de détresse est reçue, toutes les opérations des modes de fonctionnement s'arrêtent. "ALARM" (ALARME) apparait sur l'afficheur et l'émission de détresse est reçue.
- Pour les détails sur les "Diffusion d'urgence" (cf. page 29), voirz la section "Fonctionnement RDS" de chaque mode d'emploi.
- Annulation de la diffusion d'urgence
Commuter la langue d'affichage du PTY et d'INFO.
Vous pouvez désirir une langue parmi les 4 (anglais, allemand, suédois ou français) pour le PTY et INFO qui s'affiche à l'écran.
- Le réglage d'usine par défaut est "ENGLISH".
- Pour plus de détails "Commuter la langue d'affichage du PTY" (cf. page 30), reportez-vous à la section "Utilisation de RDS" des manuels de l'utilateur respectifs.
Réglage du volume des émissions TA, INFO, de détresse (ALARM) et PTY
Voupez regler le volume des interruptions TA, INFO, ALARM et PTY pendant une interruption TA, INFO, ALARM et PTY. Effectez l'opération suivante en fonction du modele raccordé.
- Le réglage usine est "15".
Pendant une interruption TA, INFO, ALARM et PTY, tournez le bouton [ROTARY] dans le sens des aiguilles d'une montre ou dans le sens inverse pour régler le volume au niveau voulu (0 à 33).
* Lorsque l'interruption TA, INFO, ALARM et PTY prend fin, le volume revient au niveau régle avant l'interruption.
Commandes du Decodeur Surround 5.1ch
Lorsqu'un décodeur surround 5.1ch compatible cable CeNET optionnel est connecté, il peut être contrôle par cet apparéil.
Les fonctions suivantes changent lorsqu'un décodeur surround 5.1ch est connecté :
- Deux modes "MOVIE" ("FILM") et "VIRTUAL" ("VICTUEL") sont ajoutés au mode Dolby Pro Logic II.
- Le mode VSE/POSITION passe au mode DSF (Digital Sound Field) (Champ Sonore Numérique).
- Dans le mode P.EQ (Parametric Equalizer) (Egaliseur paramétrique), les réglages de chaque enceinte peuvent être ajustés de manière encore plus précise.
- Réglages en rapport avec la musique dans les éléments de réglage (cf. page 39) sont modifiés.
3. Effleurez sur la droite de l'écran pour sélectionner le mode Dolby Pro Logic II.

Le mode d'écran est commuté comme suit.
MUSIC (mode musique) MATRIX (mode matrix) MOVIE (mode film) VIRTUAL (mode virtuel) OFF (PL II off)) MUSIC (mode musique)...
* Pour plus de détails sur l'ajustement du volume du speaker central/sub-woofer, voir page 45.
4. Effleurez RTN.
Sélection de PL II (Dolby PL II)
Selectionnez un des quatre modes disponibles qui correspond à la source que poulez dire en tant que mode Dolby Pro Logic II.
- Le réglage d'usine par défaut est "OFF".
■ MUSIC (mode musique)
Voir ("Sélection du menu PLII (Dolby PLII)" (cf. page 17).
■ MATRIX (mode matrix)
Voir ("Sélection du menu PLII (Dolby PLII)" (cf. page 17).
MOVIE (mode Film)
Convient aux films videotos DVD.
VIRTUAL (Mode virtuel)
Convient aux films et autres sources audio.
OFF
Le mode Dolby Pro Logic II n'est pas utilisé.
1. Appuyez sur le bouton [SOUND].
2. Effleurez Dolby PLII.

Selection du menu DSF.
DSF (Digital Sound Field) (Champ Sonore Numérique) rend possible grâce à la simulation sonore de savourer l'expérience acoustique que vous fieriez dans une salle de concerts ou une salle de spectacles.
Lorsque le menu DSF est selectionné, il arrive que le volume diminue.
- Le réglage d'usine par défaut pour DSF est "OFF" et pour le menu de base DSF c'est "HALL".
1. Appuyez sur le bouton [SOUND].
2. Effleurez DSF.

3. Effleurez sur l'écran ON/OFF.
L'effet DSF bascule entre ON et OFF.

Lorsque DSF est reglé sur "OFF", le réglage de DSF n'est pas répercuté sur la source musicale. Ceci termine le réglage DSF. Appuyez sur le bouton [SOUND] pour revenir au mode original.
4. Effleurez sur le No. de menu DSF pour sélectionner le menu DSF souhaité.

Menus DSF
HALL CHURCH STADIUM LIVE JAZZCLUB THEATER HALL...
No. Nom de fonction Description 1 HALL Grande salle de concerts 2 CHURCH Eglise à plafond-vous 3 STADIUM Grand stade sans toit ni murs 4 LIVE Salle de spectacles, plus grande qu'un club de jazz 5 JAZZCLUB Club de jazz à plafond bas 6 THEATER Cinéma ou théâtre
5. Appuyez sur le bouton [SOUND] pour revenir au mode original.
Selection du menu Parametric Equalizer
Parametric Equalizer (P.EQ) (Egaliseur paramétrique)
vous permet de compenser toute l'endetue du niveau des fréquence de manière précise grâce à une courbe douce utilisant la compensation de fréquences qui convient à votre type de voiture.
Le réglage d'usine par défaut donne les réglages suivants pour toutes les enceintes. FREQ = 1kHz, Q = 1, GAIN = 0dB
1. Appuyez sur le bouton [SOUND].
2. Effleurez P.EQ.

3. Effleurez sur l'écran ON/OFF. L'effet P.EQ bascule entre ON et OFF.

Lorsque l'effet P.EQ est régle sur "OFF (ARRET)", le réglage de P.EQ n'est pas répercuté sur la source musicale. Ceci termine le réglage de P.EQ. Appuyez sur le bouton [SOUND] pour revenir au mode original.
4. Effleurez sur le No. de menu de P.EQ pour selectionner le menu de P.EQ.

Menu P.EQ
SIGNAL SP-SEL BAND FREQ Q GAIN SIGNAL...
5. Effleurez sur la droite de l'écran et ajustez l'objet.
SIGNAL (seLECTIONne le signal d'ajustement): Sélectionne "P-NOIS" ou "MUSIC"
P-NOIS: régèle lorsqu'il faut utiliser du bruit rose
MUSIC: réglé pour utiliser des signaux musicaux
SP-SEL (seLECTIONne l'enceinte dont il faut ajuster la valeur P.EQ):
Selectionnez parmi "FRONT", "CENTER" et "SURROUND".
- FRONT (Avant) : Enceinte avant
- CENTER (Centre): enceinte centrale
- SURROUND: enceinte surround
BAND (seLECTIONne la bande de fréquence): Sélectionnéz une bande parmi 1 à 3.
FREQ (seLECTIONne la fréquence centrale): Le champ d'ajustement va de 20 Hz à 20 kHz.
Q (règle la courbe Q): Sélectionnéz 1, 3, 5, 7 ou 20 pour la précision de la courbe Q.
GAIN (ajuste le niveau de sortie): Ajuste le gain (niveau de sortie) dans une fourchette de -12dB à +12dB (Pas de 1dB, 25 points)
Répétez les étapes 4 et 5 pour ajuster l'élément souhaité.
7. Appuyez sur le bouton [SOUND] pour revenir au mode original.
■ Ajustement P.EQ
Les réglages peuvent être ajustés comme suit dans le menu P.EQ. La fréquence centrale, le gain et la courbe Q peuvent être enregistrés dans des combinaisons de canal/bande.
Par exemple, fréquence centrale “250 Hz”, gain “-8dB” et la courbe Q “3” peuvent être enregistrés dans la bande 1 à l'avant.
Pour plus de détails sur la fonction P.EQ, voir "Ajustement P.EQ" (cf. page 21).
Changement des réglages
Lorsque un décodeur surround 5.1ch est connecté, les réglages en rapport avec la musique dans le mode d'ajustement sont modifiés.
Sélection des éléments à régler
Ce qui suit décrit les éléments dont les réglages sont modifiés.
Pour plus de détails sur d'autres éléments qui ne sont pas modifiés, voir "Changement des réglages" (cf. page 39) à "Opérations communes à chaque mode".
1. Appuyez sur le bouton [A].
Le mode passé au mode d'ajustement.

2. Effleurez sur l'écran de réglage des éléments pour sélectionner l'élement à régler.
* Effleurer ↑ ↓ sur la gauche de l'écran commute les éléments principaux un à la fois. Effleurer ← → sur la gauche de l'écran commute les sous éléments en continu.
* Effleurer ↑ au centre de l'écran commute les sous éléments un à la fois. Effleurer ← → commute les sous éléments en continu.
3. Lorsque "THROUGH" s'affiche sur la droite de l'écran, effleurez THROUGH pour commuter vers l'écran des détails d'ajustement.
4. Effleurez sur la droite de l'écran ou tournez le bouton [ROTARY] pour régler les détails.
Pour revenir au mode d'origine.
1. Appuyez de nouveau sur le bouton [A].
Réglage des éléments
Élement principal Sous élément SOUND CENTER-SP / SRD-SP / SUB-WOOFER
• Réglage de l'enceinte ON/OFF (cf. page 64) FRONT HPF / CENTER HPF / SRD HPF / SUB-W LPF
• Ajustement de la fréquence de filtre de l'enceinte (cf. page 64) SP GAIN
• Ajustement du niveau de sortie de l'enceinte (cf. page 46) DELAY CENTER-SP / SRD-SP
• Ajustement de la temporisation de l'enceinte (cf. page 65) DOLBY D D-RANGE
• Ajustement du champ dynamique (cf. page 65) PL II CONT PANorama / DIMENSION / CTR WIDTH
• Réglage du mode musical en détaill (cf. page 47)
Réglage des enceintes ON/OFF (CENTER-SP/SRD-SP/SUB-WOOFER)
Réglez l'enceinte centrale (CENTER-SP), l'enceinte surround (SRD-SP) et le sub-woofer (SUB-WOOFER) sur ON/OFF.
Assurez-vous que ce réglage est sur "OFF" lorsqu'il n'y a pas d'enceinte centrale ou de subwoofer.
- Le réglage d'usine par défaut est "ON".
1. Appuyez sur le bouton [A] pour régler le mode d'ajustement.
2. Effleurez sur l'écran de réglage des éléments pour sélectionner "CENTER-SP" sous "SOUND", "SRD-SP" sous "SOUND", et "SUB-WOOFER" sous "SOUND".

ADJUST MODE CENTER-SP> ON
3. Effleurez sur la droite de l'écran ou tournez le bouton [ROTARY] pour sélectionner "ON" ou "OFF".
* Dans le cas de “SUB-WOOFER”, sélectionnez parmi “ON+”, “ON-” et “OFF”. Normalement, sélectionnez “ON+”. Cependant, lorsque “ON-” est réglé, un effet peut être fortement ressenti dans la gamme des basses.
4. Appuyez sur le bouton [A] pour revenir au mode original.
Ajustement des fréquences filtrés des enceintes (FRONT HPF/CENTER HPF/ SRD HPF/ SUB-W LPF)
Cette fonction vous permet d'ajuster la fréquence filtre qui convient aux enceintes que vous utilisez.
- Une enceinte qui a eté désactivée dans la section "Réglez les enceintes sur ON ou OFF (CENTER-SP/ SRD-SP/SUB-WOOFER)" n'est pas affché.
- Le réglage d'usine par défaut pour "FRONT HPF" ou "SRD HPF" est "THROUGH" (pas de filtré), et pour "CENTER HPF" ou "SUB-W LPF" c'est "120Hz".
Ajustement du filtré
FRONT HPF/CENTER HPF/SRD HPF (ajustement du contrôle passée-haut)
Ce filtre enlève lessons de basses des enceintes centrale et surround.
THROUGH 50Hz 80Hz 120Hz
Réglez le filtré pour qu'il convienne aux enceintes lorsque vous en utilisez de petit diamètre.
THROUGH
Réglez ceci lorsque vous utilisez des enceintes qui généré des basses. THROUGH ne peut pas etre régle sur CENTER HPF.
SUB-W LPF (ajustement du filtre passer-bas du sub-woofer)
Ce filtré enlève les aigus du sub-woofer.
50Hz 80Hz 120Hz
Réglez la fréquence du filtré pour qu'elle corresponde au sub-woofer.
1. Appuyez sur le bouton [A] pour régler le mode d'ajustement.
2. Effleurez sur l'écran de réglage des éléments pour sélectionner "FRONT HPF" sous "SOUND", "CENTER HPF" sous "SOUND", "SRD HPF" sous "SOUND", et "SUB-W LPF" sous "SOUND".

SOUND
ADJUST MODE FRONT HPF THROUGH
3. Effleurez sur la droite de l'écran ou tournez le bouton [ROTARY] pour régler la fréquence.
* Sélectionnez parmi THROUGH*, 50Hz, 80Hz, et 120Hz.
^*1 THROUGH s'affiche seulement lorsque "FRONT HPF" ou "SRD HPF" est sélectionné.
4. Appuyez sur le bouton [A] pour revenir au mode original.
Ajustement de la temporisation de l'enceinte (CENTER-SP / SRD-SP)
Le moment où le son de chaque enceinte atteint la position d'audition dépend de l'installation de vos enceintes et de la taille de votre voiture. Ajustez la temporisation de chaque enceinte de sorte que le son de chacun d'eux atteigne la position d'audition au même moment que celui des enceintes avant.
- Le réglage d'usine par défaut est "0 ms".
1. Appuyez sur le bouton [A] pour régler le mode d'ajustement.
2. Effleurez sur l'écran de réglage des éléments pour sélectionner "CENTER-SP" sous "DELAY" et "SRD-SP" sous "DELAY".

ADJUST MODE CENTER-SP» Oms
3. Effleurez sur la droite de l'écran pour ajuster la temporisation.
* "CENTER-SP" peut être ajusté dans une fourchette de 0 à 5 ms.
* "SRD-SP" peut être ajusté dans une fourchette de 0 à 15 ms.
4. Appuyez sur le bouton [A] pour revenir au mode original.
Ajustement des fonctions Dolby Digital (D-RANGE)
Cette fonction compressée le champ dynamique du Dolby Digital pour maintainir des sons de bas niveau tels que la conversation d'un acteur et supprime les volumes sonores élevés.
Ces fonctions ne sont disponibles que sur les disques DVD Dolby Digital.
- Le réglage d'usine par défaut est "MAX".
1. Appuyez sur le bouton [A] pour régler le mode d'ajustement.
2. Effleurez sur l'écran de réglage des éléments pour sélectionner "DOLBY D" sous "D-RANGE".

3. Effleurez sur la droite de l'écran pour ajuster l'objet le champ dynamique et l'élement désire.
MAX: mode de champ dynamique maximal de la source originale
STD: mode recommandié pour l'audition standard
MIN: le mode de champ dynamique le plus compressé qui rend facile à entendre même lessons bas.
4. Appuyez sur le bouton [A] pour revenir au mode original.
8. EN CAS DE DIFFICULTÉ
Problème Cause Solution Généralité Pas d'alimentation. (Pas de son.) Fusible sauté. Remplacez le fusible par un autre de même ampérage. Si le fusible saute à nouveau, consultez votre magasin. Raccordement incorrect. Consultez votre magasin. Pas de son lorsque les amplificateurs et l'antenne automatique sont raccordés. Le fil de l'antenna automatique est court-circuité à la masse, ou un courant excessif est requis pour la télécommande des amplificateurs et de l'antenna automatique. 1. Mettez l'appareil hors tension.2. Retirez tous les fils raccordés au fil d'antenne automatique. Vérifie chaque fil pour voir s'il n'est pas court-circuité à la masse à l'aide d'un ohmmètre.3. Remettez l'appareil sous tension.4. Raccordez chaque fil de télécommande d'amplificateur au fil d'antenne automatique un par un. Si les amplificateurs s'éteignent avant que tous les fils ne soient raccordés, utilisez un relais exterme pour obtenir la tension de commande à distance nécessaire (courant excessif requis). Rien ne se passé quand on appuie sur les touches. L'affichage est incorrect. Mauvais fonctionnement du microprocesseur à cause du bruit, etc. Eteignez l'appareil, appuyez sur la touche [RELEASE] du CLAVIER DE COMMANDME AMOVIBLE (DCP) et retirez le clavier. Appuyez sur la touche de réinitialisation pendant environ 2 secondes avec une petite tige. Touche de réinitialisation Les connecteurs du CLAVIER DE COMMANDE AMOVIBLE (DCP) ou de l'appareil principal sont sales. Enlevez la saleté avec un chiffon doux humecté d'alcool de nettoyage. CD/MP3/WMA Pas de son. Il y a déjà un disque qui n'est pas un CD ou un corps étranger dans le tiroir. La console rabatable étant ouverte, maintainez la touche [▲] enforcée pendant 3 secondes ou plus. Le corps étranger est éjecté de force Il n'y a pas de fichiers MP3/WMA sur le disque. Enregistrez les fichiers MP3/WMA correctement sur le disque. Les fichiers ne sont pas reconnus comme fichiers MP3/WMA. Utilisez des fichiers MP3/WMA correctement codés. Le système de fichier n'est pas correct. Utilisez le système de fichier ISO9660 niveau 1, 2 ou JOLIET ou Romeo.
Problème Cause Solution CD/MP3/WMA Interruptions du son ou parasites. Le disque est sale. Nettoyez le disque avec un chiffon doux. Le disque est fortement rayé ou gondolé. Remplacez-le par un disque sans rayures. Le son est coupé ou sauté partiellement. Des parasites se produit ou sont mélangés aux sons. Les fichiers MP3/WMA ne sont pas codés correctement. Utilisez des fichiers MP3/WMA correctement codés. Le son se détiroye tout de suite après la mise sous tension. Des gouttelettes d'eau risquent de se former sur la lentille interne si la voiture a été garée dans un lieu humide. Allumez l'appareil et laisserez-le sécher pendant environ 1 heures. Erreur de nom de fichier Le système de fichier n'est pas correct. Utilisez le système de fichier ISO9660 niveau 1, 2 ou JOLIET ou Romeo. La lecture de la liste de lecture ne s'effectue pas. Le nom ou l'extension du fichier ne sont pas corrects. Utilisez des caractères alphanumeric/ASCII pour le nom des fichiers MP3/WMA. Utilisez“.M3U” pour l'extension fichier de la liste de lecture.
9.AFFICHAGE DES ERREURS
S'il se produit une erreur, l'un des affichages suivants apparait.
Prenez les mesures expliquées ci-dessous pour résoudre le problème.
Affichage d'erreur Cause Mesure CD/MP3/MWA ERROR 2 Le disque est coincé à l'intérieur du lecteur de CD et qu'il ne s'éjecte pas. Ceci est une anomalie du mécanisme du lecteur CD. Consultez votre magasin. ERROR 3 La lecture du disque est impossible parce qu'il est rayé, etc. Remplacez-le par un disque non rayé et non gondolé. ERROR 6 Le disque est chargé à l'envers dans le lecteur CD et la lecture est impossible. Ejectez le disque et rechargez-le correctement. Généralité AMP GUARD Le circuit de protection des enceintes est entré en service. Si vous réglez le volume pendant cette opération, l'afficheur indique "AMP GUARD". "AMP GUARD" marche quelqu'fois lorsque des signaux de test spéciaux sont utilisés. 1. Abaissez le volume sonore. Le fonctionnement peut aussi être rétabli en mettant l'appareil hors tension, puis sous tension. (Le volume des haut-parleurs est automatiquement réduit lorsque le circuit de protection entre en service.)2. Si le son est à nouveau mis en sourdine, consultez notre service d'entretien. Changer de CD ERROR 2 Le disque à l'intérieur du changeur de CD n'est pas chargé. Ceci est une anomalie du mécanisme du changeur de CD. Consultez votre magasin. ERROR 3 La lecture du disque à l'intérieur du changeur de CD est impossible parce qu'il est rayé. Remplacez-le par un disque non rayé et non gondolé. ERROR 6 La lecture du disque à l'intérieur du changeur de disque est impossible parce qu'il est chargé à l'envers. Ejectez le disque et rechargez-le correctement. Changer de DVD ERROR 2 La lecture du disque à l'intérieur du changeur de DVD n'est pas possible. Il s'agit d'une défaillance du mécanisme du DVD. Consultez votre magasin d'achat. ERROR 3 La lecture du disque n'est pas possible parce qu'il est rayé, etc. Réessayez ou remplacez le disque par un disque ni rayé, ni gondolé, etc. ERROR 6 La lecture du disque à l'intérieur du changeur de DVD n'est pas possible parce qu'il est mis à l'envers. Ejectez le disque, puis rechargez-le correctement. ERROR P Erreur de niveau de censure parentale. Réglez le niveau de censure parentale voulu. ERROR R Erreur de code de région. Ejectez le disque et remplacez-le par un disque ayant le bon code de région.
Si un affichage d'erreur autre que ceux décrits ci-dessus apparait, appuyez sur la touche de réinitialisation.
Si le problème persististe, mettez l'appareil hors tension et consultez votre magasin.
10. CARACTERISTIQUES TECHNIQUES
Section radio
Système de syntonisation:
Tuner à synthétiseur PLL
Fréquences de réception:
FM:87,5 à 108 MHz (pas de 0,05 MHz)
PO:531 à 1602 kHz (pas de 9 kHz)
GO:153 à 279 kHz (pas de 3 kHz)
Section lecteur de CD
Système :
Système audionumérique de disque compact
Réponse en fréquence: 5 Hz à 20 kHz (±1 dB)
Rapport signal/bruit: 100 dB (1 kHz) IHF-A
Plage dynamique: 96 dB (1 kHz)
Distorsion: 0.01%
Données générales
Puissance de sortie :
4× 31W (DIN 45324, +B = 14,4V)
Tension d'alimentation:
14,4 V CC (10,8 V à 15,6 V admissible),
masse négative
Consommation: Inférieure à 15 A
Impedance de haut-parleurs :
4Ω (4Ω à 8Ω admissible)
Courant nominal d'antenne automatique :
500 mA ou moins
Poids:
Appareil principal: 1,7 kg
Télécommande: 80 g (avec la pile)
Dimensions:
Appareil principal:
178 (L) × 50 (H) × 155 (P) mm
Télécommande:
44 (L) × 110 (H) × 27 (P) mm
Remarque:
- La conception et les caractéristiques techniques sont sujettes à modification sans préavis pour des raisons d'amélioration.
Wir danken Ihnen für den Kauf these Clarion-Produkts.
* Bette lesen Sie diese Bedienungsanleitung von Inbetriebnahme des Geräts vollständig durch.
* Nach der Lekture dieser Anleitung sollte sie griffbereit aufbewahrt werden (z.B. im Handschuhfach).
* Prüfen Sie den Inhalt der beiliegenden Garantiekarte und bewahren Sie sie zusammen mit dieser Anleitung auf.
* These Anleitung enthalt Beschreibungen der Verfahren zur Bedienung eines über CeNET-Kabel angeschlossenen optionalen CD-Wechslers, DAB und TV-Tuners. Für CD-Wechsler und TV-Tuner sind separate Anleitungen vorhanden, noch enthalten diese keine Bedienungshinweise.
Inhalt
1. VORSICHTSMASSNAHMEN 3
Schrägkonsole 4
Handhabung von CDs 4
2. REGLER 5
3.BENENNUNG 6
Bezeichnung der Tasten und deren Funktionen 6
Wichtige Tastenbedienungen, wenn externe Geräte an thisem Gerät angeschlossen sind .... 7
Display-Anzeigeelemente 7
Bedienung des Displays 8
4. ABNEHMBARES BEDIENTEIL (DCP) 9
5. FERNBEDIENUNG 10
Einlagen der Batterien 10
Funktionen der Fernbedienungstasten 11
6. BEDIENUNG 12
Grundbetrieb 12
AC-Processor III Betrieb 17
Radiobetrieb 23
RDS-Betrieb 26
CD/MP3/WMA-Betrieb 31
Horen verschiedener Musiktücke durch mehrere Hörer (2-ZONE-Funktion) 36
Bedienungen, die für andere Betriebsarten gemeinsam sind 37
7. BEDIENUNG DES ZUBEHÖRS 51
CD-Wechsler-Betrieb 51
Fernsehbetrieb 54
Digitalradio/DAB-Betrieb 58
5.1-Kanal-Surround-Decoderbetrieb 61
8. FEHLERSUCHE 66
9. FEHLERANZEIGEN 68
10. TECHNISCHE DATEN 69
1. VORSICHTSMASSNAHMEN
1. Dieses Gerät kann nur für Straβenfahrzeuge mit 4 Rädern verwendet werden. Es eignet sich nicht für Trecker, Gabelstapler, Planierfahrzeuge, Geländefahrzeuge, Motrräder mit 2 oder 3 Rädern, Boote oder andere Spezialfahrzeuge.
2. Wenn das Fahrzeuginnere sehr kalt ist und der Spieler sofort nach Einschaltung der Heizung benutzt wird, dann konnte sich auf der CD und den optischen Teilen des Spieler Feuchtigkeit bilden und eine korrekte Wiedergabe konnte nicht möglich sein. Soltte sich auf der CD Feuchtigkeit gebildet haben, die CD mit einem weichen Tuch abwischen. Soltte sich bei den optischen Teilen des Spieler Feuchtigkeit
gebildet haben, sollte der Spieler für mindestens eine Stunde nicht benutzt werden. Die Kondensation verfluchtigt sich auf natürliche Weise und ein normaler Betrieb ist möglich.
3. Beim Fahren auf extrem schlechten Straβen können Erschütterungen auftreten, wodurch CD-Stellen übersprungen werden konnten.
INFORMATION FÜR BENUTZER.:
ÄNDERUNGEN ODER MODIFIKATIONEN, DIE NICTV VOM HERSTELLER DIESES PRODUKTS GENEHMIG WURDEN, FÜRHREN ZU EINEM VERFALL DER GARANTIE.
WARNING
Aus Sicherheitsgründen sollenn Sie das Touch Panel-Display während der Fahrt weder ablesen noch bedieren.
Schragkonsole
Um groBformatige Anzeigen zu ermöglich, wird für diese Gerät eine Schragkonsole verwendet.
Nach Benutzung der Schragkonsole sollte sie immer geschlossen werden.
A VORSICHT
Beim Öffnen und Schlieben der SCHRAGKONSOLE darauf auf achten, daß Slesich nicht ihre Finger einklennen.
1. Aus Sicherheitsgründen sollte die SCHRAGKONSOLE immer geschlossen werden, wenn das Gerät für längerere Zeit nicht benutzt wird oder der Zündschlüssel ausgeschaltet wird.
Wird der Zündschlüssel bei geneiger SCHRAGKONSOLE ausgeschaltet, dann laßt sich die SCHRAGKONSOLE nicht schlieben.
Handhabung von CDs
Mit thisem Gerät ausschließlich Compact-Discs
verwenden, die mit der Kennzeichnung

odcr h 100000000000000000000000000000000000000000000000000000000000000000000000
Es sollen den keine CDs wiedergegeben werden, die herzfürmig, achteckig sind oder eine andere spezielle Form besitzen.
Es ist möglich, daß CDs, die in der CD-R/CD-RW-Betriebsart aufgezeichnet wurde, nicht verwendet werden können.
Handhabung
- Im Gegensatz zu herkömmlichen Musik-CDs sind CD-R und CD-RW-CDs anfällig gegenüber hohen Temperaten und hoher Feuchtigkeit und eine Wiedergabe von CD-R und CD-RW-CDs können manchmal nicht möglich sein. Deshalb sollenen sie nicht für langere Zeit im Fahrzeug gelassen werden.
Die Rander bei neuen CDs sind meinst etwas uneben. Wenn solche CDs
verwendet werden,
könnte der Spieler nicht
funktionieren oder es
werden Stellen übersprungen.
Um die Unebenheit am Rand der CD zu beseitigen, einen Kugelschreiber oder ähnlichen Gegenstand verwenden.
- Niemals Aufkleber auf die CD-Oberfläche kleben oder die Oberfläche beschreiben.
- Niemals CDs wiedergeben, die mit Zellophanband oder andere Klebemitteln
2. Vor Schliebung der SCHRAGKONSOLE konnte vom Sicherheitsmechanismus ein Bremsgeräusch gehört werden. Dies ist normal.
3. Wird die SCHRÄGKONSOLE mit der Hand bewegt, konnte Spiel erzeugt werden. Für die Korrektur des Games bei eingeschalteten Gerät, für Schliebung der SCHRÄGKONSOLE die [▲]-Taste betätigten.
4. Nach Auswurf einer CD/MD kehrt die SCHRAGKONSOLE automatisch auf den Neigungs- und SchlieBungsstatus zusammen. Sollte die Schliebung der SCHRAGKONSOLE behindiert sein, dann wird der Sicherheitsmechanismus ausgelost und die SCHRAGKONSOLE kehrt auf den Öffnungssstatus zusammen. Sollte dies der Fall sein, die Ursache der Behinderung entfern und die [▲]-Taste betätigten.
5. Damit die CD nicht zerkratzt wird, die 12 oder 8cm CD in horizontaler Lage einlagen oder entnahmen.
verklebt sind oder deren Markierungen abblättern. Wir solch eine CD abgeschweit, konnte sie im CD-Spieler stecken bleiben oder den CD-Spieler beschädigden.
- Keine CDs benutz, die große Kratzer Verformungen, Risse, usw. aufweisen. Eine Verwendung solcher CDs könnte zu einem Fehlbetrieb oder Beschäftigungen führen.
- Für Entnahme einer CD aus deren Aufbewahrungsbehäuse, die Mitte des Gehäuse herunterrücken und die CD hersausheiten, indem sie vorsichtig an deren Rändern gehalten wird.
- Nicht im Handel erhältliche CD-Schutzfolien oder CDs mit Stabilisatoren, usw. verwenden. Diese können die CD beschädigden oder einen Ausfall des internen Mechanismus verursachen.
Aufbewährung
Die CDs sollen nicht direktem Sonnenlicht oder einer Wärmequelle ausgesetzt werden.
Die CDs sollen nicht übermaßiger Feuchtigkeit oder Staub ausgesetzt werden.
Die CDs sollen nicht direkter Wärme von Heizungen ausgesetzt werden.
Reinigung
- Für Entfernung von Fingerabdrücken und Staub, mit einem weichen Tuch geradinig von der CD-Mitte zum Außenrand hin die CD abwischen.
Keine Lösungsmittel verwenden, wie z.B. im Handel erhältliche Reiniger, Sprays gegen elektrische Aufladung oder Verdünner, um die CD zu reinigen.
- Nach Benutzung eines speziellen CD-Reinigers, die CD ausgiebig trocknen halten, bevor sie benutzt wird.
2. REGLER
Hauptgerät

ÖFFNUNG DER SCHRÄGKONSOLE

3. BENENNUNG
Bezeichnung der Tasten und deren Funktionen
[RELEASE]-Taste
Abnahme des DCP
Helligkeitssensor
- Dieser Sensor ermittelt die Helligkeit im Fahrzeuginnenraum. Wenn die automatische Dimmer-Steuerung auf "AUTO" eingestellt ist, wird die Beleuchtung der Anzeige gemäß der von thisem Sensor festgestelltten Helligkeit angepasst.
[ROTARY]-Knopf
- Drücken Sie auf den Drehknopf, um das Gerät einzuschalten. Bei jedem weiteren Druck auf diesen Knopf wird die Betriebsart umgeschaltet.
Zum Ausschalten des Gerätes den Drehknopf drücken und mindestens eine Sekunde lang halten.
- Durch Drehen an thisem Knopf können Sie die Lautstärke einstehen oder im Einstellmodus Änderungen der verschiedene Einstellungen vornehmen.
[△]-Taste
- Öffnet/schlieBt das Bedienfeld.
Wenn eine CD eingelegt ist, wird sie beim Öffnen des Bedienfels ausgeworfen.
Hinweis:
Wenn die CD nicht ausgeworfen wird, die [▲]-Taste mindestens eine Sekunde lang gedrück halten.
[A]-Taste
- Mit dieser Taste werden im Einstellmodus die verschiedene Einstellungen vorgenommen oder angepasst.
- Bei Radiobetrieb konnen mit dieser Taste Sendernamen eingegeben werden, bei CD-Betrieb CD-Titel.
[SOUND]-Taste
- Mit dieser Taste können verschiedene Einstellungen vorgenommen bzw. angepasst werden, z. B. der Raumklang.
- Wenn Sie diese Tastes betätigten und mindestens eine Sekunde lang halten, wird die 2-ZONE-Funktion ein-bzw. ausgeschaltet.
[TA]-Taste
- Mit dieser Taste wird der Verkehrsdurchsagen-Bereitschaftsbetrieb (TA) eingestellt (bei ausgeschalteter 2-ZONE-Funktion).
Dient zur Umschaltung der Betriebsart der 2-ZONE-Funktion: Wenn Sie diese TASTE betäglich und mindestens eine Sekunde lang gedrück halten, wird der 2-ZONE-Typ umgeschaltet (bei eingeschalteter 2-ZONE-Funktion).
[Tate]
- Schaltet bei der Wiedergabe eines Titels auf Pause bzw. Fortsetzung (bei CD-Betrieb).
- Mit dieser Taste aktivieren Sie den PTY-(Programmart-) Bereitschaftsbetrieb odernehmen die PTY-Einstellungen vor.
Display
- Hier werden die verschiedene Informationen zur Angabe des Betriebszustands (z. B. Frenzeinstellungen-/Wiedergabestatus) und die Anzeigen dargestellt.
- Zur Aktivierung das Display mit dem Finger antippen und die Blätterbewegung durchfahren (siehe Seite 8).
Wichtige Tastenbedienungen, wenn externe Geräte an thisem Gerät angeschlossen sind
- Wenn ein CD-/DVD-Wechsler angeschlossen ist
* Für Einzelheiten siehe den Abschnitt "CD-Wechsler-Betrieb" (Seite 51). Zum DVD-Wechsler siehe die mit dem DVD-Wechsler geleiferte Bedienungsanleitung.
[Tate]
- Für CD- oder DVD-Wiedergabe bzw. -Pause.
[A]-Taste
- Zur Eingabe von Disc-Titeln im CD-Wechsler-Betrieb.
- Wenn ein Fernseher/DAB-Empfänger angeschlossen ist
* Für Einzelheiten siehe den Abschnitt "Fernsehbetrieb" (Seite 54) bzw. "Digitalradio/DAB-Betrieb" (Seite 58).
[TA]-Taste
- These Taste verwenden, um den TA-(Verkehrs durchsage-) Bereitschaftsbetrieb in den DAB-Modus zu schalten. (These Funktion steht nur für den DAB-Tuner zur Verfügung.)
Die Taste betätigten und mindestens 1 Sekunde lang halten, um den INFO-Modus zu aktivieren bzw. zu deaktivieren (im DAB-Modus).
[Tate]
- Umschaltung der Bildwiedergabe zwischen Fernsehen und VTR (extern) (im Fernsehmodus).
- Im DAB-Modus wird diese Taste verwendet, um auf PTY (Programmart-) Bereitschaftsbetrieb zu schalten oder eine Programmart zu wahren.
[A]-Taste
- These Taste verwenden, um den Name des Fernsehsenders einzugeben (im Fernsehmodus).
Display-Anzeigeelemente

Bedienung des Displays
Bei thisem Gerat wird ein
berührungsempfindliches Touch Panel-Display für die Anzeige verwendet. Zur Bedienung muss das Display lediglich mit der Fingerspitze berührt werden. Dabei werden die vier folgenden Haupt-Bedienungsvorgänge unterschieden:
Antippen
Die Fingerspitze berührt das Display maximal eine Sekunde lang und wird dann wieder weggenommen. Dies ist die wichtige Bedienungsart des Displays.
Berühren und halten
Die Fingerspitze berührt das Display und bleibt mindestens 1 bis 2 Sekunden lang darauf liegen. Den Finger damit auf dem Display nicht bewegen.
Der Finger muss mindestens 1 Sekunde lang auf dem Display gehalten werden, um beispelsweise Listen anzuzeigen und andere praktische Funktionen aufzurufen.
Der Finger muss mindestens 2 Sekunden lang auf dem Display gehalten werden, um Festsenderplätze oder andere Daten einzuspeichern.
Blätterbewegung

durchfuhren
Das Display mit der Fingerspitze berühren, den Finger nach links ( ) bzw. rechts () bewegen, ohne loszulassen, und den Finger dann innerhalb 1 Sekunde wegnehmen. Dieses Verfahren dient zum Anwahlen von eingespeicherten Festsenden (1 bis 6) oder von Titeln.

Durchlaufbewegung durchführren

Das Display mit der Fingerspitze berühren, den Finger nach links () bzw. rechts () bewegen, ohne loszulassen, und den Finger dann auf dem Display liegen{lassen. Die momentan gewählte Funktion wird so lange fortgesetzt, wie der Finger auf dem Display liegen bleibt. Dieses Verfahren dient beispiselsweise zur manuellen Sendereinstellung oder fur den schellen Titelvorlauf/-rücklauf.

4. ABNEHMBARES BEDIENTEIL (DCP)
Zur Verhinderung von Diebstahl kann das Bedienteil abgenommen werden. Wenn das Bedienteil entfern wird, sollte es im DCP-Gehäuse (ABNEHMBARES BEDIENTEIL) aufbewahrt werden, um Beschädigungen zu verhinden.
Wir empfehlen, daß Sie das DCP beim Verlassen Ohres Fahrzeugs mitnehmen.
Abnahme des DCP
1. Bei geschlossener SCHRÄGKONSOLE
Ausschaltung vornehmen.
2. Für Öffnung des DCP, die [RELEASE]-Taste ganz herunterrücken.

3. Das DCP auf Sie zu Herausziehen und abnehmer.

A VORSICHT
Vor Abnahme des DCP immer die SCHRAGKONSOLE schlieben.
- Wird das DCP bei geöffneter SCHRAGKONSOLE abgenommen, dann schließt sich der Schragkonsole augenblicklich. Seien Sie vorsichtig, daß Sie sich nicht Ihr Finger einklennen.
Anbringung des DCP
1. Das DCP so einfahren, daß das Teil (A) an der rechten Seite des DCP beim Haken (B) des Geräts einrastet.

2. Die linke Seite © des DCP sache undrücken, um es einzupassen.

A VORSICHT
- Das DCP wird leicht durch Stöbe bechädigt. Nach Abnahme darauf aufchten, daß es nicht fallen gelassen oder starken Stößen ausgesetzt wird.
- Wird die [RELEASE]-Taste betätig und das DCP ist nicht fest verriegelt, können es durch die Vibrationen des Fahrzeugs Herausfallen. Dadurch konnte es beschädigt werden, weshalb es nach Abnahme entweder eingebaut oder im DCP-Aufbewahrungsgehäuse verwahrt werden sollente.
- Der Stecker für die Verbindung von Gerät und DCP ist äußert wichtig. Darauf achten, daß er nicht durch Andrücken mit Fingernägeln, Schraubenziehern, usw. beschädigt wird.
Hinweis:
- Wenn das DCP verschmutzt ist, sollte es nur mit einem weichen, trockenen Tuch abgewischt werden.
5. FERNBEDIENUNG
Fernbedienung

Betriebsbereich: 30^ in allen Richtungen

Einlagen der Batterien
1. Die Fermbedienung umdrehen und den Rückdeckel in Pfeilrichtung schiben.
2. Die mit der Fernbedienung mitgelieferten AA (SUM-3, R-6/1,5 V) Batterien entsprechend der Abbildungsrichtung einlagen und den Rückdeckel schlieben.
Hinweise:
Bei einer unsachgemäßen Verwendung der Batterien konnten diese explodieren. Deshalb folgende Punkte beachten:
- Für den Austausch von Batterien sollenn immer beimbe Batterien gegen neue ausgetauscht werden.
- Batterien niemals kurzschreiben, zerlegen oder erwärmen.
- Batterien niemals in ein Feuer wenfen.
- Verbrauchte Batterien umweltgerecht entsorgen.

Funktionen der Fernbedienungstasten
Modus
Taste Radio (RDS)/DAB CD/MP3 CD-Wechsler
DVD-Wechsler Fernseher [FUNC] Für Umschaltung zwischen den Betriebsarten Radio, DAB, CD/MP3-Betrieb, CD-Wechsler, DVD-Wechsler und Fernsehgerät, AUX. [BAND] Für Umschaltung des Empfangswellenber-eichs. Wiedergabe des ersten Titels.
TOP-Wiedergabe (erster Titel). Einstellung der nachsten CD in ansteigender Reihenfolge. Für Umschaltung des Empfangswellenbe-reichs. [▲], [▼] Erhöhung oder Senkung der Lautstärke (bei allen Betriebsarten). [←], [►] Aufwärts- und Abwärtsinstellung für Festsenderkanäle. Aufwärts- und Abwärtsinstellung für Titel.
Wird die Taste für 1 Sekunde gedrück gehalten: Schnellvorlauf/rücklauf. Aufwärts- und Abwärtsinstellung für Festsenderkanäle. [►II] Keine Funktion. Für Umschaltung zwischen Wiedergabe und Pausenbetrieb. Keine Funktion. [MUTE] Für Ein- und Ausschaltung der Stummschaltung. [TA] Für Ein- und Ausschaltung des TA-Betriebs
Die Taste betätigten und für 1 Sekunde oder länger gedrück halten, um auf die Haupt- und Subzone-Klangquelle zu schalten (nur während der 2-ZONE-Modus eingeschaltet ist). [DISP] Für Umschaltung der Displayanzeige (Hauptanzeige, Uhrzeitanzeige). [PS/AS] Festsenderansprü-lung.
Wird die Taste für 2 Sekunden gedrück gehalten: Automatis-
che Speicherung. Für Anspielwiedergabe.
Im MP3/WMA-Modus,
diese Taste mindestens eine
Sekunde lang gedrück halten, um jeder
Ordner jeweils 10
Sekunden lang anzuspielen. Anspielwiedergabe.
Wird die Taste für 1
Sekunde gedrück gehalten:
CD-
Anspielwiedergabe. Festsenderanspie-lung.
Wird die Taste für 2
Sekunden gedrück gehalten: Automatis-
che Speicherung. [AF] Ein- und Auschaltung der AF-Funktion.
Wird die Taste für 1 Sekunde gedrück gehalten:
Ein- und Auschaltung der REG-Funktion. Für Wiedergabe-
wiederholung. Im
MP3/WMA-Modus,
diese Taste mindestens eine
Sekunde lang
gedrück halten, um
Ordner-Wiedergabe-
wiederholung auszuführen. Wiedergabewiederhol
ung.
Wird die Taste für 1
Sekunde gedrück gehalten:
CD-Wiedergabe-
wiederholung. Keine Funktion. [PTY] Ein- und Ausschal-tung des PTY-Modus. Für Zufallswiedergabe.
Im MP3/WMA-Modus,
diese Taste mindestens eine
Sekunde lang
gedrück halten, um
Ordner-
Zufallswiedergabe
auszuführen. Zufallswiedergabe.
Wird die Taste für 1
Sekunde gedrück gehalten:
CD-
Zufallswiedergabe. Für Umschaltung zwi-schen Fernseher und Videorekorder. [2-ZONE] Für Ein- oder Ausschaltung des 2-ZONE-Modus, die Taste betätigten und für 1 Sekunde oder länger gedrück halten.
Für Umschaltung der Steuerzone zwischen Haupt- und Subzone bie eingeschalteten 2-ZONE-Modus betätigten.
* Einige der entsprechenden Tasten beim Hauptgerät und der Fernbedienung haben unterscheidliche Funktionen.
Grundbetrieb
A VORSICHT
Vor Ausschaltung des Geräts oder des Zündschlüssels die Lautstärke verringn. Das Gerät speichert die letzte Lautstärkeeinstellung. Wir Aussenhaltung bei hoher Lautstärke ausgeführrt und dann später wieder Einschaltung vorgenommen, konnte die plötzliche hohe Lautstärke Ihr Gehör oder das Gerät beschädigten.
Ein-/Ausschalten des Geräts
Einschalten
Hinweis:
- Das Gerät nicht längerere Zeit ohne laufenden Motor benutzten. Wenn die Autobatterie zu stark entladen wird, kann eventuell der Motor nicht mehr angelassen werden, und die Lebensdauer der Batterie verkurzt sich.
1. Den [ROTARY]-Knopf drücken. Die zuletzt gewählte Betriebsart wird angezeigt.
Systemprüfung
Beim ersten Einschalten nach Herstellen der Kabelverbindungen prüft das Gerät, welche Komponenten angeschlossen sind. (Dieser Vorgang wird als "Systemprüfung"bezeichnet.) Wenn nach dem Einschalten "System Check" angezeigt wird, die folgenden Schritte durchführten, um diese Systemprüfung durchzuführen.
1. Wenn "System Check" angezeigt wird, den [ROTARY]-Knopf drucken. Die Systemprüfung beginnt. Nach Abschluss der Systemprüfung wird "Completed" angezeigt.
2. Nochmals den [ROTARY]-Knopf drücken. Die Hauptanzeige für den Radiobetrieb erscheint.
CODEMATIC-Funktion
Bei aktivierter CODEMATIC-Funktion erscheint, wenn das DCP aufgesetzt ist, beim Einschalten des Geräts die Touch Code-Anzeige. Das Display in der im Einstellmodus festgelegten Reihenfolge antippen.

Für Einzelheiten zur CODEMATIC-Funktion siehe "Verwendung der Diebstahlsicherungsfunktion (CODEMATIC)" (Seite 50).
Ausschalten
1. Den [ROTARY]-Knopf mindestens 1 Sekunde lang gedrückt halten.
Einstellung der Betriebsart
1. Den [ROTARY]-Knopf drucken, um die Betriebsart zu wechseln.
2. Bei jedem Druck auf den [ROTARY]-Knopfändert sich die Betriebsart in der folgenden Reihenfolge: Radio-Betrieb DAB-Betrieb CD/MP3 Betrieb CD-Wechsler-Betrieb DVD-Wechsler-Betrieb TV-Betrieb AUX-Betrieb Radio-Betrieb...
* Externe Geräte, die nicht über CeNET angeschlossen sind, werden nicht angezeigt.
Einstellung der Lautstärke
1. Den [ROTARY]-Knopf im Uhrzeigersinn drehen, um die Lautstärke zu erhöhen, bzw. entgegen dem Uhrzeigersinn, um die Lautstärke zu vermindern.
* Die Lautstärkelässt sich im Bereich zwischen 0 (Minimum) und 33 (Maximum) einstehen.
Umschaltung des Bedienungsmodus
Es gibt zwei Grund-Bedienungsmodi: Standardbedienung und vereinfache Bedienung.
1. In der Hauptanzeige die linke Seite des Displays berühren und mindestens 1 Sekunde lang halten. Der Bedienungsmodus wird umgeschaltet.

Bei der vereinfachten Bedienung ist die Blätterbewegung oder Durchlaufbewegung auf dem Hauptanzeige-Bildschirm für den Radio-oder CD-Betrieb nicht erforderlich, und das Gerät kann auf eine vereinfachte Weise bedient werden.
Dabei ist aber zu beachten, dass die folgenden Funktionen bei der vereinfachten Bedienung nicht zur Verfugung stehen:
- Einstellung der Festsender, Auswahl von Ordern oder Discks sowie weitere Funktionen, bei denen auf der rechten Seite des Displays die Blätterbewegung durchgeführt werden muss.
- Umschaltung des Displays (siehe Seite 13)
- Umschaltung der Titelanzeige (siehe Seite 14)
- Funktionen zur Anzeige von Titleleingabe-Bildschirmen.
Bei anderen Bildschirmen als der Hauptanzeige (z. B. Listenanzeige, Einstellmodus etc.) besteht kein Unterschied zwischen Standardbedienung und vereinfachten Bedienung.
Die Beschreibungen in dieser Anleitung beziehen sich hauptsächlich auf die Standardbedienung. Die Vorgehensweise bei der vereinfachten Bedienung ist jeweils bei den Beschreibungen der Bildschirmanzeigen im Radio- oder CD-Betrieb dargestellt.
Umschaltung der Anzeige
1. Das Display in der Mitte antippen
Bei jedem Antippen ändert sich die Anzeige in der folgenden Reihenfolge:

Titelanzeige
Bildschirmschoner
Bei aktivierter Bildschirmschoner-Funktion wird der Bildschirmschoner angezeigt, wenn das Gerät ca. 30 Sekunden lang nicht bedient worden ist. Für ausfuhrlichere Informationen siehe Seite 41.
Hintergrund
Wenn Sie das Display in der Mitte berühren und mindestens eine Sekunde lang halten, wird die Anzeige der Bildschirmhintergrund-Grafik eingeschaltet.
① ⑨ ② ⑩ ③ ⑪ ④ ⑫ ⑤ ⑬ ⑥ ⑭ ⑦ ⑮ ⑧ ⑯
Spektrumanalysator-Anzeige
Wenn Sie bei eingeschalteter Spektrumanalysator-Anzeige (S/A) die rechte Seite des Displays berühren und mindestens 1 Sekunde lang halten, wird der Anzeigemodus des Spektrumanalysators umgeschaltet.
S/A
SCAN S/A 1, S/A 2 und S/A 3 werden jeweils mindestens 10 Sekunden lang angezeigt. S/A 1 S/A 1
FLDR No.
003
TOP S/A 2 S/A 2
FLDR No.
003
TOP S/A 3 S/A 3
FLDR No.
003
TOP
Umschaltung der Titelanzeige
Disc-Titel und andere für die jeweiligen Discs gespeicherten Informationen konnen während der Wiedergabe von CDs im CD- oder CD-Wechsler-Betrieb angezeigt werden.
1. Bei aktiver Titelanzeige die rechte Seite des Displays berühren und mindestens 1 Sekunde lang halten. Dabeiändert sich die Anzeige{jedes Mal, wenn Sie das Display berühren und halten, in der folgenden Reihenfolge: CD-TEXT-Disc Benutzerspezifischer Name (Disc) CD-Text-Name (Disc) Interpretenname CD-Text-Name (Titel) Benutzerspezifischer Name (Disc)... MP3/WMA-Disc Ordner Datei Album-TAG Interpretenname-TAG Titel-TAG Ordner...
Hinweise:
- Bei MP3-Dateien werden ID3-Tags V2.3 / 2.2 / 1.1 / 1.0 unterstützen.
- Bei der Anzeige von Tag-Informationen werden ID3-Tags V2.3 / 2.2 mit Vorrang behandelt.
- Bei Album-Tags für WMA-Dateien werden die in die Erweiterungs-Kopfzeile geschriebenen Informationen angezeigt.
- In Tags können nur ASCII-Zeichen angezeigt werden.
Durchroll eines Titels
Auf der Titelanzeige die Blätterbewegung ↑ durchführren, während der Titel angezeigt wird. Der Titel wird nach links durchgerollt.
Anhaltendes Durchrollens
Auf der Titelanzeige die Blätterbewegung durchführren.
CT (Uhrzeit) - Funktion
Mit der CT-Funktion konnen Sie die von RDS-Senden ausgestrahlten Uhrzeitdaten empfangen und die Uhrzeit aneigen halten. Zum Aufrufen des CT-Bildschirms das Display in der Mitte antippen.
- Wenn keine CT-Daten empfangen werden, zeit das Display “--CT”.
Hinweis:
- CT-Daten werden in einigen Ländern sowie von bestimmten Sendern nicht übertragen. Außer dem werden in bestimmten Gegen die CT-Daten eventuell nicht korrekt angezeigt.
Einstellung des ADF
- ADF ist die Abkürzung für "Anti Distortion Filter". Die verfügbaren Funktionen "Liveliness Enhancement Filter" und "Sound Tone Compensation" erhögen eine gut modulierte, realistische Wiedergabe ohne Beeinträchtigung der ursprünglichen Klangeigenschaften.
Dieses Gerat verfügbar über 4 gespeicherte Klangcharakteristiken. Die bevorzugte Charakteristik auswahlen.
ADF-1: Geeignet fur normale Lautsprecher.
ADF-2: Geeignet für getrennte Lautsprecher
ADF-3: Geeignet für koaxiale Lautsprecher
USER : These Einstellung kann vom Benutzer gemäß den eigenen Vorlieben angepasst werden.
OFF: Kein Klangeffekt
Die werkseitige Ausgangseinstellung ist "OFF".
Hinweise:
- Beim Umschalten der ADF-Einstellung verändert sich die Lautstärke. Vermindern Sie davon vor einer ADF-Umschaltung so welt wie möglich die Gesamtlautstärke und die Einstellungen "SW VOLUME" (Subwoofer-Lautstärke) und "CTR VOLUME" (Center-Laatsprecher-Lautstärke).
- Bei einigen Laufsprechersystemen lässt sich kein hinreichender Effekt erzielen. In diesen Fällen den ADF-Parameter oder die Lautstärke entsprechend anpassen.
- Wenn ADF auf "USER", "1", "2" oder "3" eingestellt ist, sind die VSE-Funktion sowie die Funktion BASS/TREB bei EQ-SELECT deaktiviert.
1. Die [SOUND]-Taste betätigen.
2. ADF antippen.
OFF
POSITION OFF
P. EQ OFF
Dolby PLII 2 - ZONE ADF A - MODE OFF OFF
3. Auf der rechten Seite des Displays mit der Blätterbewegung 1 den ADF-Modus wahren.

Wenn ADF auf "OFF" eingestellt ist, wirkt sich die ADF-Einstellung nicht auf die Wiedergabe der Tonquelle aus. Damit ist die ADF-Einstellung abgeschlossen. Die
[Sound]Taste betätigten, um zur ursprünglichen Betriebsart zurückzukehren.
* Eine der Einstellungen USER, 1, 2, 3 oder OFF wahren.
4. Zum Ändern der einzelnen ADF-Einstellungen die [A]-Taste betätigten.
5. Auf der Einstellungen-Wahlanzeige mit der Blätterbewegung den gewündsten Einstellungspunkt auswahlen.
Jedes Mal wenn Sie die Blätterbewegung
山 durchfuhren, werden die jeweils angezeigten Einstellungspunkte wie folgt durchgeschaltet:
Einstellungspunkt (wenn in Schritt 3 "USER" gewählt wurde)
BASS TREBLE COMP BASS...
Einstellungspunkt (wenn in Schritt 3 "1" bis "3" gewählt wurde) LEVEL COMP LEVEL...
6. Auf der rechten Seite des Displays mit der Blätterbewegung ↑ ↓ den betreffenden Punkt wie gewünscht einstellen.
* "BASS" und "TREBLE" halten sich zwischen 1 und 13 einstehen.
* “LEVEL”lässt sich zwischen -3 und +3 einstellen.
* Für “COMP” entweder “ON” oder “OFF” wahlen.
7. Die [SOUND]-Taste betätigten, um zur ursprünglichen Betriebsart zurückzukehren.
Einstellung des Subwoofoers und Center-Lautsprechers
- "SW VOLUME" (Subwoofer-Lautstärke) lässt sich nur einstellen, wenn "SUB-WOOFER" auf "ON" eingestellt ist.
- "CTR VOLUME" (Center-Lautsprecher-Lautstärke) lässt sich nur einstellen, wenn als Modus für Dolby Pro Logic II entweder "MUSIC" oder "MATRIX" gewählt ist und "SP-SETTING" auf "CTR+SW" sowie "CENTER-SP" auf "ON" eingestellt ist.
- Die werkseitige Ausgangseinstellung für SW VOLUME ist "0" und für CTR VOLUME ebenfalls "0".
1. Die [SOUND]-Taste betätigen.
2. A-MODE antippen.

3. Auf der Einstellungen-Wahlanzeige mit der Blätterbewegung 卡 卡 卡" SW VOLUME" oder "CTR VOLUME" wahren.

4. Auf der rechten Seite des Displays mit der Blätterbewegung den betreffenden Punkt wie gewünscht einstellen.
* Dieser Punkt{lssst sich im Bereich von -5 bis +5 einstellen.
5. Die [SOUND]-Taste betätigten, um zur ursprünglichen Betriebsart zurückzukehren.
Balance-/Fader-Einstellung
BALANCE:
Zur Einstellung der Lautstärke-Balance zwischen den linken und rechten Laufsprechem.
FADER:
Zur Einstellung der Lautstärke-Balance zwischen den vorderen und hinteren Lautsprechem.
Diewerkseitige Ausgangseinstellung fur BALANCEist "0" und fur FADER ebenfalls "0" Hinweis:
Die Einstellung von Balance und Fader ist nicht möglich, wenn bei AC-PRO III die Einstellung "PRO" gewählt wurde (siehe Seite 44) und für die Positions-Funktion "ON" eingestellt ist. In dieser Fall die Balance-/Fader-Einstellung mit dem unter Verwendung des Positions-Menus" beschrieben Verfahren (siehe Seite 18) vornehen.
1. Die [SOUND]-Taste betätigen.
2. A-MODE antippen.

3. Auf der Einstellungen-Wahlanzeige mit der Blätterbewegung 卡 卡 "BALANCE" oder "FADER" wahren.

4. Auf der rechten Seite des Displays mit der Blätterbewegung den betreffenden Punkt wie gewünscht einstellen.
* "BALANCE"lässt sich zwischen L13 (Lautstärke links angehoben) und R13 (Lautstärke rechts angehoben) einstellen.
* “FADER”lässt sich zwischen R12 (Lautstärke hintsen angehoben) und F12 (Lautstärke vorn angehoben) einstehen.
5. Die [SOUND]-Taste betätigten, um zur ursprünglichen Betriebsart zurückzukehren.
Tiefen-/Höhen-Einstellung
Die Tiefen-/Höheneinstellung kann nur vorgenommen werden, wenn Dolby Pro Logic II ausgeschaltet ist (siehe Seite 17) und “EQ SELECT” auf “BAS/TREB” eingestellt ist (siehe Seite 44).
Die werkseitige Ausgangseinstellung ist 0^
1. Die [SOUND]-Taste betätigten.
2. A-MODE antippen.

3. Auf der Einstellungen-Wahlanzeige mit der Blätterbewegung ↑ den Punkt “BASS” (Tiefen) bzw. “TREBLE” (Höhen) wahren.

4. Auf der rechten Seite des Displays mit der Blätterbewegung den betreffenden Punkt wie gewünscht einstellen.
* Dieser Punkt{lässt sich im Bereich von -6 bis +6 einstellen.
5. Die Schritte 3 und 4 für alle gewünschten Einstellungspunkte wiederholen.
6. Die [SOUND]-Taste betätigten, um zur ursprünglichen Betriebsart zurückzukehren.
AC-Processor III Betrieb
Dolby Pro Logic II
Dolby Pro Logic II ist eine Matrix-Dekodierungstechnologie, bei der die neueste digitale Matrixtechnologie für Verbesserung von Dolby Pro Logic angewendet wird. Sie ermöglich eine ausgezeichnete 5.1-Kanal-Wiedergabe der Dolby Surround-Klangquelle sowie von Stereoklangquellen, wie z.B. CDs, wodurch ein Surround-Kanal über den gesamten Frequenzbereich (20 Hz bis 20 kHz) erhalten und ein Stereoeffekt erzeugt wird. Dadurch konnen Stereoklangquellen mit einem dynamischen 5.1.-Kanal-Klang erhalten werden. Entsprechend der Klangquelle, die wiedergegeben werden soll, kann jeweils Musikmodus oder Matrixmodus eingestellt werden.
Hergestellt unter der Lizensz der Dolby Laboratories. "Dolby", "Pro Logic" und das Doppel-D-Symbol sind Warenzeichen der Dolby Laboratories.
Auswahl des PL II-Modus (Dolby PL II)
Passend zu der gewündsten Tonquelle fur den Dolby Pro Logic II-Modus entweder den MUSICoder den MATRIX-Modus auswahlen.
Die werkseitige Ausgangseinstellung ist "OFF".
■ MUSIC (Musik-Modus)
- Dieser Modus eignet sich für Stereo-Tonquellen wie CDs.
- Daneben steht ein weiterer Modus zur Verfugung, der eine genaure Anpassung ermöglicht, da sich das Schallfeld je nach Art der aufgezeichneten Musikquelle unterschied durch ausbreitet (siehe Seite 47).
■ MATRIX (Matrix-Modus)
- Dieser Modus eignet sich für Tonquellen wie MW/UKW-Radiosendungen.
OFF
- Es wird nicht der Dolby Pro Logic II-Modus, sondern der AC-PROIII-Modus verwendet. Für Einzelheiten zum AC-PROIII-Modus siehe "Auswahl des Modus" (Seite 44).
1. Die [SOUND]-Taste betätigen.
2. Dolby PLII antippen.

3. Auf der rechten Seite des Displays die Blätterbewegung ↑ ⿱ ↑ durchführren, um den Dolby Pro Logic II-Modus anzuwahlen.

Die Modusanzeige ändert sich in der folgenden Reihenfolge:
MUSIC (Musik-Modus) MATRIX (Matrix-Modus) OFF (PL II aus) MUSIC (Musik-Modus)...
* Für Einzelheiten zur Lautstärkeeinstellung für den Center-Laatsprecher/Subwoofer siehe Seite 45.
4. RTN antippen.
Verwendung des Positions-Menus
Mit dem POSITION-MENU konnen Sie zwischen f芮 Wiedergabeeinstellungen wahlen, die den Schallweg zwischen dem Lautsprecher und Ihrer Sitzposition beeinflussen.
Ebenso ist ein punktgenauer Laufzeitenabgleich für die Lautsprecher möglich, so dass sich von jedem Lautsprecher für alle Hörer der gleiche Klangeindruck ergibt.
Mit dem unter "Auswahl des Modus" beschriebenen Verfahren (siehe Seite 44) ACPROII auf PRO" einstellen.
Die werkseitige Ausgangseinstellung fur POSITION ist "OFF" und für das Positions-BasismENU "FRONT".
Positions-Menu
Für diese Funktion sind 5 Voreinstellungen gespeichert. Die bevorzugte Voreinstellung auswahlen.
1. Die [SOUND]-Taste betätigten.
2. POSITION antippen.

3. Auf der ON/OFF-Anzeige die Blätterbewegung durchführren. Der Positions-Effekt wird abwechselnd aktiviert und deaktiviert (ON/OFF).

Wenn der Positionseffekt auf "OFF" eingestellt ist, wirkt sich die Positionseinstellung nicht auf die Wiedergabe der Tonquelle aus. Damit ist die Positionseinstellung abgeschlossen. Die [SOUND]-Taste betätgten, um zur ursprünglichen Betriebsart zurückzukehren.
4. B/U antippen, um "BASIC" auszuwahlen.

Mit jedem Antippen von B/U wird zwischen "BASIC" (Grundeinstellung) und "USER" (benutzerspezifisch) hin- und hergeschaltet.
5. Auf der Nummer des Positions-Grundeinstellungsmenus mit der Blätterbewegung den gewünschten Eintrag im Positions-Grundeinstellungsmenu auswahlen.
Grundeinstellungenmenu "Position"
Nr. Angezeigter Name Sitzposition 1 FRONT-L Vordersitz links 2 FRONT-R Vordersitz rechts 3 FRONT Vordersitze 4 REAR Rücksitze 5 FULL SEAT Alle Sitze
6. Die [SOUND]-Taste betätigten, um zur ursprünglichen Betriebsart zurückzukehren.
Anpassen/Speichern von Positionen (Benutzerspeicher)
Mit dem Benutzerspeicher ist eine punktgenaue Lautsprereinstellung möglich, so dass alle Lautsprecher für sümmtliche Zuhörer in Abhängigkeit von der im Positions-Grundeinstellungsmenu gewährten Einstellung den gleichen Klangeffekt liefern. Im Benutzerspeicher konnen bis zu 5 Einstellungen abgelegt werden.
T-ALIGN (Laufzeitanpassung):
Hier besteht die Möglichkeit, den Abstand zwischen dem Hörer und den einzelnen Lautsprechem in 2,3-cm-Schritten einzugeben und so den Zeitabstand, nach dem der Ton den Hörer erreicht, für jeder Lautsprecher einzustellen.
SP GAIN (Laatsprecherverstärkung):
Anpassung der Wiedergabelautstärke der einzelnen Lautsprecher. Die Einstellung so vornehmen, dass die Wiedergabelautstärke aller Lautsprecher gleich ist.
1. Die [SOUND]-Taste betätigten.
2. POSITION antippen.
3. Auf der ON/OFF-Anzeige die Blätterbewegung durchführten. Der Positions-Effekt wird abwechselnd aktiviert und deaktiviert (ON/OFF).
4. B/U antippen, um "BASIC" bzw. "USER" auszuwahlen.
5. Auf der rechten Seite des Displays mit das Menu auswahlen, das für die Einstellung verwendet werden soll.
6. Die [A]-Taste betätigen.
7. Auf der linken Seite des Displays mit der Blätterbewegung ↑ die Einstellung "T-ALIGN" oder "SP GAIN" wahren.
8. In der Mitte des Displays mit der Blätterbewegung die einzelnen Einstellungspunkte auswahlen. Mit jeder Blätterbewegung werden die Einstellungspunkte in der folgenden Reihenfolge durchgeschalte:

Einstellungspunkte
*1 Wird nur angezeigt, wenn unter "SOUND" im Einstellmodus "SUB-WOOFER" auf "ON" eingestellt ist.
*2 Wird nur angezeigt, wenn unter "SOUND" im Einstellmodus "SUB-WOOFER" auf "ON" eingestellt ist und in Schritt 7 "T-ALIGN" gewährt wurde.
9. Auf der rechten Seite des Displays mit der Blätterbewegung ↑ ↓ den betreffenden Punkt wie gewünscht einstellen.

* “T-ALIGN”{lsst sich im Bereich von 0 cm bis 501,4 cm in 2,3-cm-Schritten einstellen.
* "SP GAIN"lässt sich im Bereich von -20dB bis 0dB einstellen.
10. Die Schritte 7 bis 9 für alle gewünschten Einstellungspunkte wiederholen.
11. Wenn die Einstellung samentlicher Punkte abgeschlüssen ist, RTN antippen. Das Display zeigt wieder den ursprünglichen Bildschirm, und in der BASIC- bzw. USER-Anzeige erscheidt ”. Damit ist die Positionseinstellung abgeschlussen. Um die eingestellten Werte anschließend im Menu der benutzerdefinierten Positionseinstellungen zu speichern, die folgenden Schritte durchführten:
12. RTN berühren und mindestens 1 Sekunde lang halten. Die Positions-Menüliste wird angezeigt.
13. Mindestens 2 Sekunden lang den Benutzer-Speicherplatz berühren und halten, an dem die Einstellwerte abgelegt werden sollen. Ein langer Signatlon zeigt an, dass die bis Schritt 10 eingestillten Werte im Positions-Benutzermenü gespeichert wurden. Wenn nur ein kurzer Signatlon zu horen ist, werden die Einstellwerte bis Schritt 10 verworfen. Die Einstellung dieser Werte gegebenenfalls wiederholen.
14. RTN antippen.
15. Die [SOUND]-Taste betätigten, um zur ursprünglichen Betriebsart zurückzukehren. * Um einen gespeicherten Benutzereintrag auszuwahlen, B/U antippen, so dass "USER" angezeigt wird, und auf der Nummer des Benutzer-Speichereintrags die Blätterbewegung ↑ ⿱ ↑ durchführung.
Auswahl des VSE-Menüs
Die VSE-Funktion (Virtual Space Enhancer)GLEICHTE Schalldruckbalance im Fahrzeugaus,so dass sich auf allen Sitzplätzen dergleiche Klangeeffekt erzielen lasst, wie inKompensations-Simulationen ermittelt. Mit dem unter "Auswahldes Modus" bescribten Verfahren (siehe Seite 44) ACPROIII auf "STD" einstellen.
Die werkseitige Ausgangseinstellung fur VSE ist "OFF" bzw. im VSE-Grundeinstellungsmenu FLAT
VSE-Grundeinstellungsmenu
Für diese Funktion sind sechs
Grundeinstellungsmenüeinträge mit Voreinstellungen vorhanden. Den Grundeinstellungsmenüeintrag mit der von Ihnen bevorzugten Voreinstellung auswahlen.
1. Die [SOUND]-Taste betätigen.
2. VSE antippen.

3. Auf der ON/OFF-Anzeige die
Blätterbewegung 1 durchführen.
Der VSE-Effekt wird abwechselnd aktiviert und deaktiviert.

Wenn VSE auf "OFF" eingestellt ist, wirkt sich die VSE-Einstellung nicht auf die Wiedergabe der Tonquelle aus. Damit ist die VSE-Einstellung abgeschlossen. Die [SOUND]-Taste betätigten, um zur ursprünglichen Betriebsart zurückzukehren.
4. B/U antippen, um "BASIC" auszuwahlen.

Mit jedem Antippen von B/U wird zwischen "BASIC" und "USER" hin- und hergeschaltet.
5. Auf der Nummernanzeige des VSE-Grundeinstellungsmenus mit der Blätterbewegung den gewürschten Eintrag im VSE-Grundeinstellungsmenu auswahlen.
VSE-Grundeinstellungensmenu
Nr. Funktionsname Beschreibung 1 FLAT Gerader Frenenzgang der Tonquelle 2 BASS BOOST Tiefenbereich angehoben 3 HIGH BOOST Mitten- und Höhenbereich angehoben 4 IMPACT Tiefen- und Höhenbereich angehoben 5 ACOUSTICAL Mittenbereich (Gesangsstimmen) angehoben 6 SMOOTH Lieferiert ein weiches Klangbild
6. Die [SOUND]-Taste betätigten, um zur ursprünglichen Betriebsart zurückzukehren.
Anpassen/Speichern der VSE-Einstellungen (Benutzerspeicher)
Mit den im Benutzerspezicher abgelegten Einstellungen konnen Sie die Schalldruckverteilung auf der Grundlage der Einstellungen im VSE-GrundeinstellungsmENU gemaB他们在Vorlieben anpassen。Eskonnenbiszu sechsbenutzerspezifische Einstellungen gespeichert werden.
DIFFUSE:
Anpassung der diffusen Schaldruckverteilung.
CARWIDTH:
Anpassung der Schaldruckverteilung in Richtung der Fahrzeugbreite.
CAR LENGTH:
Anpassung der Schaldruckverteilung in Richtung der Fahrzeuglänge.
1. Die [SOUND]-Taste betätigen.
2. VSE antippen.
3. Auf der ON/OFF-Anzeige die Blätterbewegung durchführen. Der VSE-Effekt wird abwechselnd aktiviert und deaktiviert.
4. B/U antippen, um "BASIC" bzw. "USER" auszuwahlen.
5. Auf der rechten Seite des Displays mit der Blätterbewegung ↑ ↓ das Menu auswahlen, das für die Einstellung verwendet werden soll.
6. Die [A]-Taste betätigen.
7. Auf der Einstellungen-Wahlanzeige mit der Blätterbewegung ↑“DIFFUSE”, “CAR WIDTH” oder “CAR LENGTH” auswählen.

8. Auf der rechten Seite des Displays mit der Blätterbewegung ↑ ⊙ ⊙ den betreffenden Punkt wie gewünscht einstellen.
* Dieser Punkt{lásst sich im Bereich von 1 bis 10 einstellen.
9. Die Schritte 7 und 8 für alle gewünschten Einstellungspunkte wiederholen.
10. Wenn die Einstellung samtlicher Punkte abgeschlüssen ist, RTN antipen. Das Display zeigt wieder den ursprünglichen Bildschirm, und in der BASIC- bzw. USER-Anzeige erscheint
Damit ist die VSE-Einstellung abgeschlossen. Um die eingestellen Werte anschließend im Menu der benutzerdefinierten VSE-Einstellungen zu speichern, die folgenden Schritte durchführten:
11. RTN berühren und mindestens 1 Sekunde lang halten.
Die VSE-Benutzermenüleiwe wird angezeigt.
12. Mindestens 2 Sekunden lang den Benutzer-Speicherplatz berühren und halten, an dem die Einstellwerte abgelegt werden sollen. Ein langer Signalton zeigt an, dass die bis Schritt 9 eingestillten Werte im VSE-Benutztermenü gespeichert wurden. Wenn nur ein kurzer Signalton zu horen ist, werden die Einstellwerte bis Schritt 9 verworfen. Die Einstellung dieser Werte gegebenenfalls wiederholen.
13. RTN antippen.
14. Die [SOUND]-Taste betätigten, um zur ursprünglichen Betriebsart zurückzukehren.
* Um einen gespeicherten Benutzereintrag
2 auszuwahlen, B/U antippen, so
"USER" angezeigt wird, und auf der Nummer des Benutzer-Speichereintrags die Blätterbewegung ↑ durchführten.
Verwendung des P.EQ-Menüs
Der parametrische Equalizer (P.EQ) erhögt. eine detailierte Kompensation des gesamten Frequenzbereichs durch die Anwendung einer geglifteten, an den Fahrzeugtyp angepassten Freqenz-Kompensationskurve.
Mit dem unter "Auswahl des Modus" beschreibenben Verfahren (siehe Seite 44) EQ SELECT auf P.EQ einstellen.
Die werkseitige Ausgangseinstellung fur P.EQ ist "OFF" und fur das P.EQ.-
Grundeinstellungenmenu "SEDAN-1".
P.EQ-Grundeinstellungsmenu
Im P.EQ-Grundeinstellungensmenu sind für diese Funktion 6 an die Karosserieform und die Lautspricher-Einbauposition angepasste Voreinstellungen gespeichert. Das auf das Fahrzeug zuteffende Grundeinstellungensmenu auswahlen.
1. Die [SOUND]-Taste betätigten.
2. P.EQ antippen.

3. Auf der ON/OFF-Anzeige die
Blätterbewegung 14 durchführren.
Der P.EQ-Effekt wird abwechselnd aktiviert und deaktiviert.

Wenn der P.EQ-Effekt auf "OFF" eingestellt ist, wirkt sich die P.EQ-Einstellung nicht auf die Wiedergabe der Tonquelle aus. Damit ist die P.EQ-Einstellung abgeschlossen. Die [SOUND]-Taste betätigten, um zur ursprünglichen Betriebsart zurückzukehren.
4. B/U antippen, um "BASIC" auszuwahlen.

Mit jedem Antippen von B/U wird zwischen "BASIC" und "USER" hin- und hergeschaltet.
5. Auf der Nummernanzeige des P.EQ-Grundeinstellungsmenü die Blätterbewegung 山 山 山 durchführten, um den gewünschten Eintrag des P.EQ-Grundeinstellungsmenü auszuwahlen.
P.EQ-Grundeinstellungsmenu
Nr. Angezeigter Name Lautsprecher-Einbauposition 1 SEDAN-1 (Limousine 1) Vorn: Vordere Türen
Hinten: Heckablage 2 SEDAN-2 (Limousine 2) Vorn: Vordere Türen
Hinten: Hintere Türen 3 WAGON-1 (Kombi 1) Vorn: Vordere Türen
Hinten: Gepäckablagen (seitlich) 4 WAGON-2 (Kombi 2) Vorn: Vordere Türen
Hinten: Hintere Türen 5 MINI VAN-1 (Minivan 1) Vorn: Vordere Türen
Hinten: Gepäckablagen (seitlich) 6 MINI VAN-2 (Minivan 2) Vorn: Vordere Türen
Hinten: Hintere Türen
6. Die [SOUND]-Taste betätigten, um zur ursprünglichen Betriebsart zurückzukehren.
Anpassen/Speichern der P.EQ-Einstellungen (Benutzerspeicher)
Mit den im Benutzerspeicher abgelegten Einstellungen können Sie die Frequenzcharakteristik auf der Grundlage der Einstellungen im P.EQ-Grundeinstellungsmenu passend für Ihr Fahrzeug kompensieren. Im Benutzerspeicher können bis zu 6 Einstellungen abgelegt werden. Für ausfuhrlichere Informationen siehe "P.EQ-Einstellung".
1. Die [SOUND]-Taste betätigten.
2. P.EQ antippen.
3. Auf der ON/OFF-Anzeige die Blätterbewegung durchführren. Der P.EQ-Effekt wird abwechselnd aktiviert und deaktiviert.
4. B/U antippen, um "BASIC" bzw. "USER" auszuwahlen.
5. Auf der rechten Seite des Displays mit der Blätterbewegung ↑ ↓ das Menu auswahlen, das für die Einstellung verwendet werden soll.
6. Die [A]-Taste betätigen.
7. Auf der linken Seite des Displays mit der Blätterbewegung ↑ Ⓞ ↓ die Einstellung "FRONT" oder "REAR" auswahlen.

8. In der Mitte des Displays mit der Blätterbewegung die einzelnen Einstellungspunkte auswahlen. Mit jeder Blätterbewegung werden die Einstellungspunkte in der folgenden Reihenfolge durchgeschaltet: Einstellungspunkte BAND FREQ Q GAIN BAND...
9. Auf der rechten Seite des Displays mit der Blätterbewegung ↑ ⿱ den betreffenden Punkt wie gewünscht einstellen.
* "BAND" (Frequenzband)lässt sich zwischen 1 und 3 einstellen.
* “FREQ” (Frequenz)lässt sich zwischen 20Hz und 20kHz einstellen.
* Für “Q” einen der Werte 1, 3, 5, 7 oder 20 wahren.
* “GAIN” (Verständung)lässt sich zwischen -12 dB und +12 dB einstellen.
10. Die Schritte 7 bis 9 für alle gewünschten Einstellungspunkte wiederholen.
11. Wenn die Einstellung sãmtlicher Punkte abgeschlossen ist, RTN antipinen. Das Display zeit wird den ursprünglichen Bildschirm, und in der BASIC- bzw. USER-Anzeige erscheidt . Damit ist die P.EQ-Einstellung abgeschlossen. Um die eingestallen Werte anschließend im Menu der benutzerdefinierten P.EQ-Einstellungen zu speichern, die folgenden Schritte durchführten:
12. RTN berühren und mindestens 1 Sekunde lang halten. Die P.EQ-Menülsierte wird angezeigt.
13. Mindestens 2 Sekunden lang den Benutzer-Speicherplatz berühren und halten, an dem die Einstellwerte abgelegt werden sollen. Ein langer Signatlon zeigt an, dass die bis Schritt 10 eingestallen Werte im P.EQ-Benutzernü gespeichert wurden. Wenn nur ein kurzer Signatlon zu horen ist, werden die Einstellwerte bis Schritt 10 verworfen. Die Einstellung dieser Werte gegebenenfalls wiederholen.
14. RTN antippen.
15. Die [SOUND]-Taste betätigten, um zur ursprünglichen Betriebsart zurückzukehren. * Um einen gespeicherten Benutzereintrag auszuwahlen, B/U antippen, so dass "USER" angezeigt wird, und auf der Nummer des Benutzer-Speichereintrags die Blätterbewegung ↑Bü durchführten.
P.EQ-Einstellung
Die Einstellungen im P.EQ-Menu halten sich in gewissem Umfang anpassen. Mittenfrequenz, Verstärkung und Q-Kurve können jeweils für Kanal/ Freqenzband-Kombinationen gespeichert werden. Beisiel: Für das Freqenzband 1 vorn können die Mittenfrequenz "250 Hz", die Verstärkung "-8 dB" und die Q-Kurve "3" gespeichert werden.
FRONT/REAR (Kanal-Ausbahl)
AuswahldesanzupassendenKanals(vornoderhinten).
BAND (Frequenzband-Auswahl)
AuswahldesanzupassendenFrequenzbands1bis3. FurjedesFrequenzband sind dieMittenfrequenz (FREQUENCY),Verstarkung(GAIN)undQ-Kurve(Q) einzustellen.
FREQUENCY (Mittenfrequenz-Ausbahl)
Auswah der Freqenz, die als Mittelpunkt des zu kompensierenden Freqenzbands verwendet werden soll, im Bereich von 20 Hz bis 20 kHz. (1/3-Oktavschritte, 31 Punkte)
GAIN (Verständkungs-Einstellung)
Anpassung der Verständung (Ausgangspiegel) zwischen -12 dB und +12 dB.
(1-dB-Schritte, 25 Punkte)
Q (Q-Kurven-Auswahl)
Auswahl eines der Werte 1, 3, 5, 7 oder 20 zur Festlegung der Scharfe der Q-Kurve.
Kompensation
Eine Kompensation der Frequenzcharakteristik ist nicht erforderlich, wenn sich bei der Ermittlung des Frequenzgangs mit einem Messgerät ein flacher Verlauf (ohne Spitzen oder Einschnitt) ergibt. Manchmal weist jeder der Frequenzgang an einigen Stellen einen Anstieg oder Abfall auf. In diesen Fällen muss der Frequenzgang kompressiert werden. Hierzu wird ein Frequenzgang erzeugt, dessen Verlauf zu den Mittenfrequenzen der ansteigenden und abfallenden Abschnittte entgegengesetzt ist, um diese Spitzen und Einschnittte auszugleichen und die Frequenzgangkurve so flach wie möglich werden zu halten.
Die Erzeugung eines möglichst flichen Frequenzgangs wird als "Kompensation" bezeichnet.
Bei dieser Gerät kann der Frequenzgang mit Hilfe der P.EQ-Funktion (parametrischer Equalizer) kompensiert werden.
- Kompensation des Frenzgangs
Die unter stehende Abbildung verdeutlicht den Zusammenhang zwischen Mittenfrequenz, Verstärkung und Q-Kurve.

Q-Kurve
Die Q-Kurve wird bei größeren Zahlenwertenscharfer und bei kleineren Zahlenwertenglatter. Um einen geraden Frequenzgang zu erzielen, ist eine Q-Kurve mit der zu kompensierenden Curve entgegengesetztener Eigenschaften zu wahren.

F: Mittenfrequenz, G: Verständung (Ausgangspegel), Q: Q-Kurve
Nr. (Fahrzeugtyp) Parameter für den parametrischen Equalizer Kanal Frequenzband 1 Frequenzband 2 Frequenzband 3 F G Q F G Q F G Q 1 (SEDAN-1) (Limousine 1) Vorn 250 Hz -8 dB 3 2 kHz -4 dB 1 5 kHz -4 dB 1 Hinten 250 Hz -10 dB 3 1.25 kHz 0 dB 5 8 kHz 0 dB 5 2 (SEDAN-2) (Limousine 2) Vorn 250 Hz -10 dB 7 800 Hz -4 dB 3 8 kHz -5 dB 1 Hinten 80 Hz 3 dB 7 125 Hz -12 dB 5 1.25 kHz 0 dB 5 3 (WAGON-1) (Kombi 1) Vorn 250 Hz -8 dB 3 1 kHz -8 dB 3 10 kHz -6 dB 1 Hinten 250 Hz -8 dB 3 800 Hz -8 dB 1 8 kHz 0 dB 5 4 (WAGON-2) (Kombi 2) Vorn 250 Hz -8 dB 7 400 Hz -10 dB 7 1.25 kHz -8 dB 7 Hinten 125 Hz -8 dB 3 500 Hz -5 dB 5 1.6 kHz 0 dB 3 5 (MINI VAN-1) (Minivan 1) Vorn 125 Hz -4 dB 5 1.25 kHz -4 dB 3 2 kHz 3 dB 7 Hinten 250 Hz -6 dB 1 630 Hz -4 dB 3 8 kHz 0 dB 5 6 (MINI VAN-2) (Minivan 2) Vorn 250 Hz -4 dB 3 1.25 Hz -8 dB 3 80 Hz 3 dB 3 Hinten 250 Hz -8 dB 3 500 Hz -5 dB 5 8 kHz 0 dB 5
Radiobetrieb
Bildschirmanzeigen im Radiobetrieb
Hauptanzeige
These Anzeige erscheint, wenn Sie den [ROTARY]-Knopf drucken und Radiobetrieb wahlen.

Wenn Sie den linken Teil der Anzeige mindestens 1 Sekunde lang berühren, wird auf die einfache Anzeigevariante umgeschaltet.

Frequenzanzeige
Die momentan empfangene Frequenz wird angezeigt.
Wenn Sie auf der Standardanzeige die Durchlaufbewegung oder die Blätterbewegung
山 durchfuhren, aktiviert dies den Sendersuchlauf bzw. die manuelle Sendereinstellung.
Titelanziige
Zeigt den Name des momentan empfangenen Radiosenders an. Beim Antippen des Namens wird die Anzeige umgeschaltet.
Wellenbereich-Anzeige
AM: Name des MW-Wellenbereichs
FM1: Name des UKW-Wellenbereichs
Anzeige der Festsender-Nummer
In der Standardbetriebsanzeige wird mit der Blätterbewegung einer der eingespeicherten Festsender angewählt.
MODE
Durch Antippen dieser Anzeige werden
Unterfunktionen angezeigt. Wenn Sie diese Anzeige mindestens 1 Sekunde lang berühren, erscheint die Beste der eingespeicherten Voreinstellungen.
P-SCAN:
These Anzeige entscheidt während der Festsenderanspielung. Durch Antippen wird die Festsenderanspielung abgebrochen.
A-STORE:
These Anzeige erscheint während der automatischen Speicherung. Durch Antippen wird die automatische Speicherung abgebrochen.
BAND
Beim Antippen dieser Anzeige wird der Wellenbereich umgeschaltet.
Wenn Sie diese Anzeige mindestens 1 Sekunde lang berühren, wird zwischen manueller Sendereinstellung und Sendersuchlauf umgeschaltet.
(nier in der Anzeige fur den einfachen Bedienungsmodus)
Durch Antippen dieser Anzeigen wird der Sendersuchlauf gestartet bzw. die schrittweise Einstellung durchgeführt (bei manueller Einstellung). Durch Berühren und Halten dieser Anzeigen wird die Schnelleinstellung gestartet (bei manueller Einstellung).
Anzeige der Festsenderliste
Thesee Listewird angezeigt, wenn Sie auf der Hauptanzeige MODE berühren und mindestens 1 Sekunde lang halten.

Sendername (oder -frequenz)
>>: Suchlauf lauft
RTN: Durch Antippen wird wieder die Hauptanzeige aufgerufen.
Hören von Radiosendungen
1. Drucken Sie den [ROTARY]-Knopf, um Radiobetrieb zu wahren.
Bei jedem Druck auf den [ROTARY]-Knopfändert sich die Betriebsart in der folgenden Reihenfolge:
$$
\begin{array}{l}\text {R a d i o} \rightarrow (\text {D A B}) \rightarrow \text {C D / M P 3} \rightarrow\\(\text {C D - W e c h s l e r}) \rightarrow (\text {D V D - W e c h s l e r}) \rightarrow\\(\text {T V}) \rightarrow \text {A U X} \rightarrow \text {R a d i o . . .}\end{array}
$$
* Betriebsarten für nicht angeschlossene Geräte werden nicht angezeigt.
2. BAND antippen, um den Wellenbereich umzuschalten.
Jedes Mal wenn Sie BAND antippen, ändert sich der Wellenbereich in der folgenden Reihenfolge:
$$
\begin{array}{l}\text {F M 1} \rightarrow \text {F M 2} \rightarrow \text {F M 3} \rightarrow \text {A M (M W / L W)} \rightarrow\\\text {F M 1} \dots\end{array}
$$
Sendereinstellung
Es gibt 3 Arten der Sendereinstellung: Sendersuchlauf, manuelle Sendereinstellung und Festsendereinstellung.
Sendersuchlauf
Es gibt 2 Arten des Sendersuchlaufs: DX SEEK und LOCAL SEEK.
DX SEEK stellt automatisch alle empfangbaren Sender ein; LOCAL SEEK stellt nur Sender mit gutem Empfang ein.
1. BAND antippen und den gewünschten Wellenbereich einstellen (FM/UKW oder AM (MW, LW)).
2. Einen Sender einstellen.
* Wenn MANU angezeigt wird, BAND berühren und mindestens 1 Sekunde lang halten.
Daraufhin erlischt "MANU" in der Anzeige, und der Sendersuchlauf ist möglich.
* Wenn "TA" angezeigt wird, werden automatisch nur Sender mit Verkehrsfunk gesucht.
DX SEEK
Wenn auf der Frenzenanzeige die Blätterbewegung ↑durchgeführt wird, beginnt die automatische Sendersuche.
Mit 品 werden Sender mit hohenen
Frequenzen gesucht; mit lauft die Sendersuche in Richtung niedrigerer Frenquen.
* Wenn der Sendersuchlauf beginnt, wird "DX SEEK" im Display angezeigt.
LOCAL SEEK
Wenn Sie auf der Frequenzanzeige die Durchlaufbewegung durchführen, wird ein lokaler Sendersuchlauf durchgeführt. Es werden nur Sender mit gutem Empfang eingestellt.
* Wenn der lokale Sendersuchlauf beginnt, wird "LO SEEK" im Display angezeigt.
Manuelle Sendereinstellung
Es gibt 2 Arten der Sendereinstellung: Schnelleinstellung und schrittweise Einstellung. Bei der schrittweisen Sendereinstellung ändert sich die Frequenz jeweils in Einzelschritten. Die Senderschnelleinstellung erhögt einechnelle Einstellung der gewünschten Freqenz.
1. Wenn MANU nicht angezeigt wird, BAND berühren und mindestens 1 Sekunde lang halten.
Die manuelle Sendereinstellung ist nur möglich, wenn MANU angezeigt wird.
2. Mit Hilfe der Frenuzanzeige eine Frequenz einstehen, auf der eine Sendung ausgestrahlt wird.
Schrittweise Sendereinstellung
Auf der Frenuzanzeige die Blätterbewegung
t durchfuhren.
- Senderschnelleinstellung
Auf der Frenuzanzeige die
Durchlaufbewegung durchfuhren. Die
Frequenzanzeige lauft durch, bis Sie den Finger wieder vom Displayephmen.
Abruf eines Festsenders
Beim Abruf eines Festsenders wird ein zuvor gespeicherter Sender eingestellt.
1. MODE berühren und mindestens 1 Sekunde lang halten.
Die ListederingespeichertenSenderwirnd angezeigt.
2. Den gewünschten Sender antippen.
* Im normalen Bedienungsmodus kann ein Festsender auch mit der Blätterbewegung
↑Bim Haupt-Anzeigebildschirm angewählt werden.
Abbrechen der Sendereinstellung
1. RTN antippen.
Festsender-Speicherplatz
Es stehen insgesamt 24 Speicherplätze (6 x FM1, 6 x FM2, 6 x FM3, 6 x AM) zur Verfügung, an denen Festsender abgelegt werden können.
1. BAND antippen, um den Wellenbereich umzuschalten.
2. An der Frenuzanzeige den gewünschten Sender einstellen.
3. MODE berühren und mindestens 1 Sekunde lang halten.
Die Liste der eingespeicherten Sender wird angezeigt.
4. Die Nummer des für den Sender vorgesehenen Festsender-Speicherplatzes berühren und mindestens 2 Sekunden lang halten.
Ein langer Signalton zeigt an, dass der Sender gespeichert wurde.
Automatische Speicherung
Mit der Funktion für automatische Speicherung konnen bis zu 6 Sender automatisch nacheinander eingestellt und gespeichert werden.
1. MODE antippen.
2. A-STORE berühren und mindestens 2 Sekunden lang halten.
Die MODE-Anzeige ändert sich in "A-STORE", und die Nummer des momentan eingespeicherten Festsenders entscheid in der Festsender-Nummernanzeige.
* Es werden automatisch Sender mit gutem Empfang gesucht und beginnend mit der niedrigsten Sendefrequenz an den
Festsender-Speicherplätzen Nr. 1 bis 6 abgelegt.
Hinweise:
- Bei der automatischen Speicherung werden die bisher gespeicherten SenderGIS.
- Wenn bei LOCAL SEEK weniger als 6 Sender mit gutem Empfang gefunden werden, wird die automatische Speicherung, wieder mit den unteren Frenzen beginnend, mit DX SEEK fortgesetzt. Wenn auch nach dieser zweimaligen automatischen Speicherung weniger als 6 Sender gefunden wurden, bleiben die bisher gespeicherten Sender erhalten.
- Wenn die automatische Speicherung für den UKW-Wellenbereich durchgeführt wird, werden die Sender bei FM3 abgelegt, auch wenn für die Speicherung von Sendern FM1 oder FM2 gewählt wurde.
Festsenderanspielung
Bei der Festsenderanspielung werden die im Speicher abgelegten Sender in der momentan gespeicherten Reihenfolge nacheinander angewählt, damit Sie in die momentan ausgestrahlten Sendungen hineinhoren können.
1. MODE antippen.
2. P-SCAN antippen.
Die MODE-Anzeige ändert sich in “P-SCAN”, und die Nummer des momentan angespielten Festsenders erscheint in der Festsender-Nummernanzeige.
* Die momentan gespeicherten Festsender werden nacheinander jeweils mindestens 7 Sekunden lang empfangen. Sender mit schlechtem Empfang werden übersprungen, und der Empfang wird bei dem{nachsten Sender fortgesetzt.
Wenn die Festsenderanspielung im UKW-Wellenbereich durchgefuhrt wird, werden die UKW-Sender in der folgenden Reihenfolge angespielt:
FM1 (1 6) FM2 (1 6) FM3 (1 6)...
Wenn die Festsenderanspielung im MW-Wellenbereich durchgefuhrt wird, werden die MW-Sender in der folgenden Reihenfolge angespielt:
AM (1 6) AM(1 6) etc.
Abbrechen der Festsenderanspielung
1. P-SCAN antippen.
The P-SCAN-Anzeige ändert sich in "MODE", und der Radioempfang wird mit dem Sender fortgesetzt, der beim Antippen von P-SCAN empfangen wurde.
RDS (Radiodatensystem)
Dieses Gerät besitzt ein eingebautes RDS-Dekodierersystem, das Sender Unterstützung, die RDS-Daten übertragen.
Dieses System zeigt den Name des empfangenen Senders an (PS) und kann automatisch den Sender mit dem besten Empfang einstellen, während Sie auf langen Strecken unterwegs sind (AF-Umschaltung). Ebenfalls, wenn eine Verkehrsdurchsage oder eine Programmart von einem RDS-Sender gesendet wird, dann kann dieser Sender ungeachtet der eingestillten Betriebsart empfangen werden.
Wenn zusätzlich EON-Informationen empfangen werden, dann kann mittels diesen Informationen eine automatische Umschaltung von anderen Festsendern des gleichen Sendernetzes erfolgen und eine Unterbrechung des empfangenens Senders für Verkehrsinformationen von anderen Sendern ausgeführten werden (TP). Diese Funktion ist in einigen Gegen den nicht verfügbar.
Bei Anwendung der RDS-Funktion, das Radio immer auf UKW-Betrieb einstehen.
- AF: Alternative Frequenz
- PS: Senderkennung (Programme Service Name)
- PTY: Programmart (Programme Type)
- EON: Erweitertes Netz anderer Sender (Enhanced Other Network)
- TP: Verkehrsfunk (Traffic Programme)
PI: ProgrammKennung (Programme Identification)
- TA: Verkehrsdurchsage (Traffic Announcement)
* Wahrend AM-Radioempfang ist die RDS-Unterbrechung nicht wirksam.
* Wenn das Gerät ein RDS-Signal empfängt und die PS-Datenlesen kann, wird der Programdmienstname des momentan empfangenen Senders angezeigt.
AF-Funktion
Mittels der AF-Funktion wird auf eine andere Frequenz im gleichen Sendernetz geschalte, um einen optimalen Empfang beizubehalten.
Die werkseitige Ausgangseinstellung ist "ON".
Ein-/Ausschalten der AF-Funktion
1. MODE antippen.
2. AF antippen. Bei jedem Antippen wird die AF-Anzeige zwischen "ON" und "OFF" umgeschaltet.
3. RTN antippen.
* Solletse sich der Empfang des derzeitig eingestellten Senders verschlechtern, so wird im Display "SEARCH" angezeigt, und das Radio führte eine Suche nach dem gleichen Programm auf einer anderen Frequenz durch.
■ AF-Funktion-Umschaltung zwischen RDS und DAB
Wenn das gleiche Programm bei RDS und DAB gesendet wird und diese Funktion eingeschaltet ist (ON), dann schaltet das Gerät automatisch auf den Sender mit dem besseren Empfang.
- Diese Funktion ist nur verfügbar, wenn das getrennt erhältliche DAB-Gerät DAH923 oder DAH913 angeschlossen ist.
Die werkseitige Ausgangseinstellung ist "ON".
1. Die [A]-Taste betätigten, um den Einstellmodus aufzurufen.
2. Auf der Einstellungen-Wahlanzeige mit ↑ ↓ unter “TUNER” den Punkt “LINK ACT” wahren.

3. Entweder auf der rechten Seite des Displays die Blätterbewegung ↑ ↓ durchführten oder den [ROTARY]-Knopf drehen, um die Einstellung “ON” oder “OFF” zu wahlen. ON:
AF-Umschaltung zwischen DAB und RDS ist möglich.
OFF:
AF-Umschaltung zwischen DAB und RDS ist nicht möglich.
4. Die [A]-Taste betätigten, um zur vorherigen Betriebsart zusückzukehren.
REG-Funktion (Regionalprogramm)
Wenn die REG-Funktion eingeschaltet ist, kann der optimale Regionalsender empfangen werden. Wenn diese Funktion ausgeschaltet ist und sich der Regionalsenderbereich während der Fahrtändert, dann wird der Regionalsender für diesen Bereich empfangen.
Die werkseitige Ausgangseinstellung ist OFF
Hinweise:
- Diese Funktion ist gespert, wenn ein nationaler Sender empfangen wird, wie z.B. BBC R2.
Die ON/OFF-Einstellung (EIN/AUS) ist wirksam, wenn die AF-Funktion auf ON (EIN) eingestellt ist.
Ein-/Ausschalten der REG-Funktion
1. MODE antippen.
2. REG antippen.
Bei jedem Antippen wird die REG-Anzeige zwischen "ON" und "OFF" umgeschaltet.
3. RTN antippen.
Manuelle Sendereinstellung eines Regionalprogramms im gleichen Sendernetz
- Diese Funktion ist wirksam, wenn die AF-Funktion eingeschaltet ist.
- Die Bedienung unterscheidet sich je nachdem, ob die REG-Funktion ein- oder ausgeschaltet ist (ON/OFF). Wenn für die REG-Funktion ON gewählt ist, können nur Sendungen mit genau übereinstimmendem PI-Code empfangen werden. Wenn für die REG-Funktion OFF gewählt ist, können Sendungen mit einem PI-Code des gleichen Typs empfangen werden.
Hinweise:
- These Funktion kann verwendet werden, wenn ein Regionalsender des gleichen Sendernetzes empfangen wird.
- Der PI-Code ist ein Codiersystem mit einem für jeder Sonder eindeutigen Code.
1. MODE berühren und mindestens 1 Sekunde lang halten. Die Beste der eingespeicherten Sender wird angezeigt.
2. Die Festsendernummer des zu empfangenden Senders antippen.
TA-Funktion (Verkehrsdurchsage)
Bei TA-Bereitschaftsbetrieb, wenn eine Verkehrs durchsage beginnt, wird ungeachtet des Funktionmodus dem Sender mit der Verkehrs durchsage Vorrang gegeben, damit Sie sie horen. Eine automatische Sendereinstellung für Verkehrsprogramm (TP) ist ebenfalls möglich.
- Diese Funktion kann nur angewendet werden, wenn im Display "TP" aufleuchtet. Wenn "TP" aufleuchtet, zeigt dies an, dass der empfangene RDS-Sender Programme mit Verkehrsdurchsagen enthalt.
Einstellung des TABereitschaftsbetriebs
Wird die [TA]-Taste betätig, wenn nur "TP" im Display aufleuchtet, dann leuchten im Display "TP" und "TA" auf und das Gerät wird auf TA-Bereitschaftsbetrieb eingestellt, bis eine Verkehrs durchsage gesendet wird. Wenn eine Verkehrs durchsage beginnnt, dann leuchtet im Display "TRA INFO" auf. Wird während des Empfangs einer Verkehrs durchsage die [TA]-Taste betätig, dann wird der Empfang für den Sender mit der Verkehrs durchsage gestopt und das Gerät schaltet auf TA-Bereitschaftsbetrieb.
■ Aufhebung des TABereitschaftsbetriebs
Während im Display "TP" und "TA" angezeigt wird, die [TA]-Taste betätigten. Daraufhin wird "TA" im Display gelöscht, und der TA-Bereitschaftsbetrieb wird aufgehoben.
- Wenn "TP" nicht angezeigt wird, startet die [TA]-Taste die Suche nach einem TP-Sender.
SuchenachenaemTP-Sender
Wenn die [TA]-Taste gedrück wird, während "TP" nicht angezeigt wird, entscheidt "TA" in der Anzeige, und das Gerät empfängt automatisch einen TP-Sender.
Hinweis:
- Wenn kein TP-Sender zu empfangen ist, wird "TP SEEK" angezeigt und die Sueche nach dem TP-Sender fortgesetzt. Bei erneuter Betätigung der [TA]-Taste werden "TA" und "TP SEEK" in der Anzeige gelöscht, und die Sueche nach dem TP-Sender wird abgebrochen.
Automatische Speicherfunktion für TP-Sender
Bis zu 6 TP-Sender können automatisch in den Festsenderspeicher eingespeichert werden. Betragt die Anzahl der empfangbaren TP-Sender weniger als 6, werden die bereits eingespeicherten Sender nicht überschreiben.
1. Sicherstellen, dass "TA" angezeigt wird, und MODE antippen. Wenn "TA" nicht angezeigt wird, die [TA]-Taste betätigten. "TA" wird angezeigt.
2. A-STORE berühren und mindestens 2 Sekunden lang halten. Die MODE-Anzeige ändert sich in "A-STORE", und die Nummer des momentan eingespeicherten Festsenders erscheint in der Festsender-Nummernanzeige.
- TP-Sender mit gutem Empfang werden als Festsender eingespeichert.
- Auch wenn FM1 oder FM2 gewählt ist, werden TP-Sender bei FM3 gespeichert.
PTY
These Funktion ermitteligt den Empfang eines Senders der gewünschten Programmart, selbst wenn das Gerät momentan auf eine andere Betriebsart als Radiobetrieb geschäftet ist.
- In einigen Ländern gibt es noch keine PTY-Sender.
- Bei TA-Bereitschaftsbetrieb hat ein TP-Sender Vorrang gegenüber einem PTY-Sender.
■ Einstellung des PTY-Bereitschaftsbetriebs
Bei Betätigung der [▶II]-Taste leuchtet "PTY" im Display auf und der PTY-Bereitschaftsbetrieb wird eingeschaltet. Wenn der gewährte PTY-Sender beginnnt, wird im Display der PTY-Name angezeigt.
■ Aufhebung des PTY-Bereitschaftsbetriebs
Wenn die [▶II]-Taste betätig und für 1 Sekunde oder länger gedrück gehalten wird, erlischt "PTY" im Display und der PTY-Bereitschaftsbetrieb wird aufgehoben.
■ Aufhebung einer PTY-Senderunterbrechung
Während der PTY-Senderunterbrechung die [▶II]-Taste betätigten. Dann wird die PTY-Unterbrechung aufgehoben und das Gerätschaltet auf PTY-Bereitschaftsbetrieb.
PTY-Einstellung
1. Bei Betätigung der [▶II]-Taste schaltet das Gerät auf PTY-Senderwahl.
2. Entweder auf der rechten Seite des Displays die Blätterbewegung ↑ durchführten oder den [ROTARY]-Knopf drehen, um PTY zu wahlen.
* Unten sind die werkseitig gespeicherten Ausgangseinstellungen aufgeführt:
Festsender-
nummer PTY-Name DEUTSCH Inhalt 001 Nachrich Nachrichtendienst 002 Service Service Programm 003 Pop Popmusik 004 Sport Sport 005 E-Musik Ernstige klassische Musik 006 U-Musik Unterhaltungsmusik
3. Der PTY-Wahlmodus wird automatisch nach 7 Sekunden bzw. nach Antippen von RTN wieder aufgehoben.
PTY-Suche
1. Bei Betätigung der [▶■]-Taste wird die PTY-Senderwahl aktiviert.
2. Entweder in der Mitte des Displays die Blätterbewegung durchführten oder den [ROTARY]-Knopf drehen, um PTY zu wahlen.
3. Auf der linken Seite des Displays die Blätterbewegung 卡 durchführren. Bei der Bewegung 卡 ucht das Gerät in Richtung der hohenen Frenzen nach einem PTY-Sender, bei der Bewegung 卡 erfolgt die Sueche in Richtung der niedrigeren Frenzen.
* Falls kein Sender mit dem gewählten PTY-Programm empfangen werden kann, schaltet das Gerät auf den vorherigen Modus zurück.
PTY-Festsenderspeicher
1. Bei Betätigung der [▶■]-Taste wird die PTY-Senderwahl aktiviert.
2. In der Mitte des Displays die Blätterbewegung 100 durchführten, um PTY zu wahren. Es können die unter aufgeführten 29 PTy Programmarten gewählt werden.
PTY-Name ENGLISH DEUTSCH SVENSKA FRANÇAIS Inhalt News Nachrich Nyhet Infos Nachrichtendienst Affairs Aktuell Aktuellt Magazine Politik und Zeitgeschehen Info Service Info Services Service Programm Sport Sport Sport Sport Sport Educate Bildung Utbildn Educatif Lernen und Weiterbildung Drama Hör + Lit Teater Fiction Hörspiel und Literatur Culture Kultur Kultur Culture Kultur, Kirche und Gesellschaft Science Wissen Vetenskp Sciences Wissenschaft Varied Unterh Underh Divers Unterhaltendes Wort Pop M Pop Pop M Pop Popmusik Rock M Rock M Rock M Rock Rockmusik Easy M U-Musik Lättlyss Chansons Unterhaltungsmusik Light M L-Musik L klass M Cl Lég Leichte klassische Musik Classics E-Musik Klassisk Classiq Ernstige klassische Musik Other M - - Musik Övrig m Autre M Spezielle Musikprogramme Weather Wetter Väder Météo Wetter Finance Wirtsch Ekonomi Economie Wirtschaft Children Kinder För barn Enfants Kinderprogramm Social Soziales Sozialt Société Soziales Religion Religion Andligt Religion Religion Phone In Anruf Telefon Forum Anrufsendung Travel Reise Resor Voyages Reiseinformation Leisure Freizeit Fritid Loisirs Freizeit Jazz Jazz Jazz Jazz Jazz Country Country Country Country Countrymusik Nation M Landes M Nation m Ch pays Musik des Landes Oldies Oldies Oldies Rétro Oldiemusik Folk M Folklore Folkm Folklore Folklore Document Feature Dokument Document Feature
3. RTN berühren und mindestens 1 Sekunde lang halten.
Die PTY-Speichertitelliste wird angezeigt.
4. Die Nummer des Festsenders für die Speicherung berühren und mindestens 2 Sekunden lang halten.
Ein langer Signalon zeigt an, dass die gewählte PTY-Programmart für den betreffenden Festsender gespeichert wurde.
Notrufmeldung
Wenn eine Notufremdung empfangen wird, werden alle Funktionsmodus-Betriebsarten gestopt. "ALARM" wird im Display angezeigt und die Notufremdung wird übertragen.
■ Aufhebung der Notrufmeldung
Wenn die [AF]-Taste betätig wird, wird der Empfang der Notrufmeldung aufgehoben.
Änderung der PTY-Display-Sprache
Es kann eine von 4 Sprachen (Englisch, Deutsch, Schwedisch oder Französisch) für das PTY-Display gewählt werden.
Die werkseitige Ausgangseinstellung ist "ENGLISH".
1. Die [A]-Taste betätigten, um den Einstellmodus aufzurufen.
2. Auf der Einstellungen-Wahlanzeige mit der Blätterbewegung unter "TUNER" den Punkt "LANGUAGE" wahren.

3. Entweder auf der rechten Seite des Displays die Blätterbewegung 444 durchführten oder den [ROTARY]-Knopf drehen, um die Sprache zu wahlen.
* Eine der Einstellungen ENGLISH (Englisch), DEUTSCH, SVENSKA (Schwedisch) oder FRANÇAIS (Französisch) wahren.
4. Die [A]-Taste betätigten, um zur vorherigen Betriebsart zusückzukehren.
Einstellung der RDS- Unterbrechung bei Verwendung der 2-ZONE-Funktion (RDS-INT 2Z)
Wenn these Funktion aktiviert ist (ON) und eine RDS-Programmunterbrechung erfolgt, während die 2-ZONE-Funktion aktiv ist, konnen RDS-Informationen empfangen werden.
- Bei einer RDS-Programmunterbrechung wird die 2-ZONE-Funktion deaktiviert (OFF).
- Wenn eine Alarm-Programmunterbrechung erfolgt ist, werden die RDS-Informationen auch dann empfangen, wenn "RDS-INT 2Z" auf "OFF" eingestellt ist.
Die werkseitige Ausgangseinstellung ist "ON".
1. Die [A]-Taste betätigten, um den Einstellmodus aufzurufen.
2. Auf der Einstellungen-Wahlanzeige mit der Blätterbewegung 15 unter "TUNER" den Punkt "RDS-INT 2Z" wahren.

3. Entweder auf der rechten Seite des Displays die Blätterbewegung ↑ durchführten oder den [ROTARY]-Knopf drehen, um die Einstellung “ON” oder “OFF” zu wahlen. ON:
Wenn bei aktivierter 2-ZONE-Funktion eine RDS-Programmunterbrechung erfolgt, werden die RDS-Informationen empfangen.
OFF:
Bei aktivierter 2-ZONE-Funktion werden keine RDS-Informationen außer Notruf-Programmunterbrechungen empfangen.
Hinweis:
- Wenn Radiobetrieb gewählt ist und die Funktionen TA (Verkehrsdurchsagen) und PTY (Programmart) aktiviert sind ("ON"), erfolgen Programmunterbrechungen auch bei deaktivierter RDS-Unterberechnung ("OFF").
4. Die [A]-Taste betätigten, um zur vorherigen Betriebsart zusückzukehren.
Lautstärkeeinstellung für TA, Notrufmeldung (ALARM) und PTY
Die Lautstärke für TA-, ALARM- und PTY-Programmunterbrechungen kann eingestellt werden, während eine TA-, ALARM- oder PTY-Unterbrechung erfolgt.
- Die werkseitige Ausgangseinstellung ist "15". Wahlend einer TA-, ALARM- oder PTY-Programmunterbrechung den [ROTARY]-Knot nach rechts oder links drehen, um den gewünschen Lautstärkepegel (0 bis 33) einzustellen.
- Im Anschluss an die TA-, ALARM- oder PTY-Programmunterbrechung wird wieder der gleiche Lautstärkepegel wie vor der Unterbrechung eingestellt.
Bildschirmanzeigen im CD-Betrieb
Hauptanzeige
These Anzeige entscheid, wenn Sie den [ROTARY]-Knopf drucken und CD-Betrieb wahlen.

Wenn Sie den linken Teil der Anzeige mindestens 1 Sekunde lang berühren, wird die Betriebsart umgeschaltt.

Titel-/Spieldaueranzeige
01/02:00
Die Nummer des momentan abgespielten Titels und die Spieldauer werden angezeigt.
Im Standardbetrieb kann die Blätterbewegung
oder die Durchlaufbewegung durchgefuhrt werden, um den abzuspielenden Titel auszuwahlen oder einen schellen Titelvorlauf oder -rücklauf durchzufahren.
Namensanzeige
Beim Berühren dieser Anzeige wird das Display umgeschaltet.
Ordneranzeige (bei MP3/WMA)
Im Standardbetrieb werden mit der Blätterbewegung 4 Ordner ausgewählt.
MODE:
Durch Antippen dieser Anzeige werden Unterfunktionen angezeigt. Wenn im MP3-/ WMA-Betrieb diese Anzeige berührt und mindestens 1 Sekunde lang gehalten wird, erscheint die Ordnerliste.
Hinweis:
- Diese Funktion ist nur während der Wiedergabe einer Disc aktiviert.
F-SCAN/SCAN: These Anzeige erscheidt während der Anspielwiedergabe. Durch Antippen wird die Anspielwiedergabe abgebrochen.
- RPT/RPT: These Anzeige erscheint während der Wiedergabewiederholung. Durch Antippen wird die Wiedergabewiederholung abgebrochen.
-RDM-RDM: These Anzeige erscheint whilst der Zufallswiedergab. Durch Antippen wird die Zufallswiedergab abgebrochen.
TOP:
Wenn diese Anzeige angetippt wird, beginnt die Wiedergabe mit dem obersten Titel der Disc bzw. des Ordners, die/der momentan abgeschweit wird.
(nur in der einfachen Betriebsanzeige) Mit diesen Tasten wird der abzuspielende Titel ausgewählt.
Wenn diese Tasten betätig und gehalten werden, erfolgt ein Schneller Titelvorlauf bzw. - rücklauf.
Ordnerlistenanzeige (bei MP3/WMA)
Thesee Lieste wird angezeigt, wenn auf der Hauptanzeige MODE berührt und mindestens 1 Sekunde lang gehalten wird.

Ordename
Ordner-Nr.
Wenn these Anzeige grau dargestellt ist, kann der Ordner nicht ausgewählt werden.
>>: Auswahl lauft
Beim Antippen eines Ordernamens wird wieder die Hauptanzeige aufgerufen, und die Wiedergabe beginnt mit dem ersten Titel in dem angetipten Ordner.
←PREV-RTN:
Durch Antippen dieser Anzeige wird wieder die vorherige Ordnerliste angezeigt. Wenn Sie diese Anzeige berühren und mindestens 1 Sekunde lang halten, erscheidt auf dem Display wieder die Hauptanzeige.
NEXT:
Durch Antippen dieser Anzeige wird die{nachste Ordnerliste angezeigt.
Was bedeutet "MP3"?
Bei "MP3" handelt es sich die Abkürzung von "MPEG Audio Layer 3", eines genormten Verfahrens zur Komprimierung von Audiodaten, das weltweit bei Audio-Anwendungen auf Personalcomputer verw Breitbart ist.
Beim MP3-Format werden die Audiodaten auf etwas ein Zehntel ihrer Originalgroße komprimiert, wobei eine hohe Klangqualität gewährleistet bleibt. Dies ermöglich die Aufzeichnung von bis zu zehn Musik-CDs auf eine einzige CD-R-oder CD-RW-Discs, so dass lange Wiedergabezeiten ohne die durch das Auswechseln von Discs entstehen Unterbrechungen erhalten werden.
Was bedeutet "WMA"?
Bei "WMA" handelt es sich die Abkürzung von "Windows Media Audio", eines von Microsoft Corporation für Audiodateien entwickelten Formats.
Hinweise:
- Beim Abspielen einer Datei mit aktiviertem DRM (Digital Rights Management) für WMA wird kein Ton ausgegeben. (Die WMA-Anzeige blinkt.)
- "Windows Media™" und das Windows®-Logo sind Warenzeichen bzw. eingetragene Warenzeichen von Microsoft Corporation in den Vereinigten Staaten und/oder anderen Ländern.
Zum Sperren von DRM (Digital Rights Management):
- Bei Benutzung von Windows Media Player 8, auf die Registerkarte TOOLS OPTIONS COPY MUSIC klichen und dann unter COPY SETTINGS, das Auswahlzeichen im Auswahlfeld "PROTECT CONTENT" durch Klichenlöschen. Danach die Dateien wiederherstellen.
- Bei Benutzung von Windows Media Player 9, auf die Registerkarte TOOLS OPTIONS MUSIC RECORD klichen und dann unter den Einstellungen für Aufnahme, das Auswahlzeichen im Auswahlfeld "RECORD PROTECTED MUSIC" durch Klichen loschen. Danach die Dateien wiederherstellen.
Der Hersteller bietet keinerlei Gewähr fur Dateien, die vom Benutzer selbst konstruiert wurden.
Vorsichtshinweise zur Erstellung von MP3-/WMA-Discs
Geeignete Abtastfrequenzen und Bitraten:
1. MP3:
Abtastfrequenz: 11,025 kHz bis 48 kHz
Bitrate: 8 kbps bis 320 kbps / VBR
2. WMA:
Bitrate 48 kbps bis 192 kbps
- Dateinamenserweiterungen
1. Achten Sie stets darauf, eine MP3- oder WMA-Datei mit der Namenserweiterung "MP3" bzw. .WMA" in Einzelbyte-Zeichen zu verstehen. Dateien, die mit einer anderen als dieser vorgeschreibenen oder gar keiner Namenserweiterung verstehen sind, halten sich nicht abspielen.
2. Dateien, die keine MP3-/WMA-Daten enthalten, können nicht abgespielt werden. In der Spieldauer-Anzeige erscheint “--- --”, wenn versucht wird, Dateien ohne MP3-/ WMA-Daten abzuspielen.
- Logisches Format (Dateisystem)
1. Wahlen Sie zur Aufzeichnung von MP3-/WMA-Dateien auf eine CD-R- oder CD-RW-Disc in der Brenn-Software stets eines der Formate "ISO9660 level 1, 2", "JOLIET" oder "Romeo". Wird ein anderes Datenformat zur Aufzeichnung verwendet, ist u. U. keine einwandfrei Wiedergabe der Disc möglich.
2. Bei MP3-/WMA-Wiedergabe können Ordername und Datename als Titelname angezeigt werden, sofern die maximale Anzahl von 128 Einzelbyte-Zeichen (Buchstaben und Ziffern, einschließlich Dateinamenserweiterung) nicht übersritten wird.
3. Eine Datei darf nicht den gleichen Namen erhalten wie der Ordner, in dem sie sich befindet.
- Ordnerstruktur
1. Die auf einer Disc vorhandenen Ordner dürfen in nicht mehr als 8 Hierarchiegeben angeordnet sein.
Anzahl von Dateien oder Ordnern
1. In jedem Ordner können bis zu 255 Dateien erkannt werden. Bis zu 500 Dateien können abgespielt werden.
2. Die einzelnen Titel einer Disc werden in der Reihenfolge ihrer Aufzeichnung abgeschweit. (Die Wiedergabe von Titeln erfolgt u. U. nicht in der am PC angezeigten Reihenfolge.)
3. Je nach der zur Aufzeichnung verwendeten Codierer-Software kann ein gewisses Rauschen auftreten.
Multisession-Ausbahl
Mit dieser Funktion konnen Sie auf Discs, die eine Mischung von CD-DA-Dateien (Musik-CDs) und MP3-/WMA-Dateien enthalten (z. B. CD-EXTRA), entweder CD-DA- oder MP3-/WMA-Dateien auswahlen.
1. MODE antippen.
2. M-SESS antippen.
Bei jedem Antippen von M-SESS schaltet die M-SESS-Anzeige zwischen "CD" (CD-DA abspielten) und "MP3/WMA" (MP3/WMA abspielten) um.
* Wenn M-SESS nicht angezeigt wird, NEXT antippen.
3. RTN antippen.
Die Einstellung für die Multisession-Ausbwahl wird beim nachsten Einlagen einer CD angezeigt.
Hinweis:
- Beim Abspielen einer CCCD (Copy Control CD - kopiergeschützte CD) muss der Typ "CD" eingestellt werden. Wenn als Typ MP3/WMA eingestellt ist, lasst sich die Disc in manchen Fälle nicht normal abspielen.
A VORSICHT
Gehen Sie beim Schlieben der SCHRAGKONSOLE sorgsam vor, um ein Einklemmen der Hand oder Finger zu vermeiden.
Hinweise:
- Falls sich die SCHRÄGKONSOLE nicht welt genug öffnet, öffnen Sie sie sacht von Hand.
- Achten Sie nach dem Einsetzen einer Disc stets darauf, die SCHRAGKONSOLE wieder zu schlieben.
- Stecken Sie auf keinen Fall ihre Hand oder einzelne Finger in den Disc-Schlitz. Es dürfen keine anderen Gegenstände als Discs in diesen Schlitz eingeführt werden!
- Setzen Sie keine Disc ein, auf deren Oberfläche Klebstoff unterhalb eines Klebestreifens oder Aufklebers austritt, oder auf der Klebstoffreste von abgezogenen Klebestreifen oder Aufklebern zurückgeblieben sind. Anderenfalls besteht die Gefahr, dass sich eine solche Disc nicht mehr entfern den latent, und das Gerät kann durch den Gebrauch derartiger Discs beschädigt werden.
Einlagen einer CD
1. Die [▲]-Taste betätigten. Das Bedienfeld öffnet sich.
2. Setzen Sie die Disc in den CD-Schlitz ein. Einige Sekunden nach dem die Disc eingezogen wurde schließt sich das Bedienfeld automatisch, und die Wiedergabe beginnt.
Hinweise:
- Niemals andere Gegenstände in den CD-Schlitz einfahren.
- Falls sich die CD nicht ohne Widerstand einführtenläst, ist eventuell bereits eine andere CD geladen, oder das Gerät ist defekt.
- CDs ohne die Kennzeichnung DISTRIG oder UUSMark sowie CD-ROMs konnen in thisem Gerät nicht abgespielt werden.
- Bestimmte CDs, die im CD-R-/CD-RW-Modus gebrannt wurden, können u. U. nicht verwendet werden.
Einsetzen von 8-cm-Kompakt-CDs
Zum Abspielen von 8-cm-CDs ist kein Single-Adapter erforderlich. 8-cm-CDs müssen in die Mitte des CD-Schlitzes eingeführt werden.
Auswerfen einer CD
Discs können auch dann durch Betätigten der [Taste automatisch ausgeworfen werden, wenn der Zündschlüssel bzw. der ACC-Schalter in Stellung OFF liegt.
VORSICHT
Nach dem Auswerfen der CD immer die [▲]-Taste betätigten, um das Bedienfeld wieder zu schlieben. Wenn Sie das Bedienfeld geöffnet lessen, ertont ein doppelter Signatlon, und das Bedienfeld schließt sich automatisch.
1. Die [▲]-Taste betätigen.
Das Bedienfeld wird geöffnet, und die Disc wird ausgeworfen. Das Gerät schaltet automatisch auf Radiobetrieb um.
* Ausgeworfene CDs müssen aus dem Gerät entnommen werden. Wenn Sie die Disc im Disc-Fach halten, wird sie nach mindestens 15 Sekunden wieder in das Gerät eingezogen, und das Bedienfeld schließt sich (automatischer Neueinzug).
* Single-CDs werden nicht automatisch neu eingezogen. Bei Single-CDs müssen Sie nach dem Auswerfen davon denken, sie aus dem Gerät zu entnahmen.
VORSICHT
Wenn Sie beim erneuten Laden einer bereits ausgeworfenen CD zu viel Kraft aufwenden, kann die Disc-Oberfläche zerkratzt werden. Vor dem erneuten Laden die Disc zunachst entnahmen.
Abspielen einer bereits eingelegten Disc
1. Den [ROTARY]-Knopf drücken, um CD-Betrieb zu wahlen.
* Nach der Umschaltung auf CD-Betrieb beginnnt automatisch die Wiedergabe.
Pausieren der Wiedergabe
1. Die [▶■]-Taste betätigten.
Fortsetzen der Wiedergabe
1. Die [ ] -Taste nochmals betätigen.
Wahl eines Titels
Wenn e a CD-R/CD-RW geladen ist, auf der MP3- oder WMA-Dateien aufgezeichneten wurden, konnen Si meit der Blatterbewegung auf der Titelanzeige nur Titel auswahlen, die sie im gleichen Ordner befinden.
1. Zum Horen des nachsten Titels auf der Titelanzeige die Blätterbewegung durchführren.
2. Zum Horen des vorherigen Titels auf der Titelanzeige zweimal die Blätterbewegung durchfuhren. Mit wird der nachste Titel abgeschlipt. Wenn Sie die Blätterbewegung mehmals durchfuhren, wird dadurch um so viele Titel weitergesprungen, wie oft Sie die Blätterbewegung durchgefuhlten haben, und der entsprechende Titel wird abgeschlipt. Mit wird der vorausgegangene Titel abgeschlipt. Wenn Sie die Blätterbewegung mehrmals durchfuhren, wird dadurch um so viele Titel zurückgesprungen, wie oft Sie die Blätterbewegung durchgefuhlten, und der entsprechende Titel wird abgeschlipt.
* Wenn die Blätterbewegung ↑ auf der Titelanzeige zweimal durchgeführt wird, während sich die Wiedergabe noch am Titelanfang befindet, wird in manchen Fällen der um 2 Titel darüber liegende Titel abgespielt.
Wahl eines Ordners
Zur Auswahl eines anderen Ordners führen Sie entweder auf der Ordneranzeige die Blätterbewegung t durch, oder gehen Sie wie folgt vor.
1. MODE berühren und mindestens 1 Sekunde lang halten. Die Ordnerliste wird angezeigt. Durch Antippen von PREV oder NEXT wird der jeweils folgende bzw. vorherige Teil der Ordnerliste angezeigt.
2. Den Ordnarnamen antippen.
Wiedergabe einer Abspielliste
Es können auch Abspiellisten (M3U-Dateien) wiedergegeben werden.
Dabei ist jedoch zu beachten, dass bei M3U-Dateien, die mit einer Tiefe von fünf Ebenen (einschließlich der Stamm-Ebene) in der Dateihierarchie gespeichert sind, nur die
obersten f芮 Dateien mit neuem Zeitstempel abgespielt werden konnen.
Hinweise:
In jeweils einer Abspielliste konnen bis zu 255.
Dateien abgeschweit werden.
- Es können nur MP3- oder WMA-Dateien abgeschweit werden, die in Ordern mit einer Tiefe von maximal fünf Ebenen (einschließlich der Stamm-Ebene) in der Dateihierarchie gespeichert sind.
Zur Wiedergabe der Abspielliste ist wie folgt vorzugehen:
1. MODE antippen.
2. NEXT antippen.
3. PLY LIST antippen. Das Einlesen der Abspielliste beginnt. Sobald die Abspielliste vollständig eingelesen ist, beginnnt automatisch die Wiedergabe der Abspielliste mit dem neuesten Zeitstempel. Die Auswahl der Abspielliste oder der Titel in der Abspiellste erfolgt auf die gleiche Weise wie die Auswahl eines Ordners oder der Titel in einem Ordner. \* PLY LIST wird nicht angezeigt, wenn auf der eingelegten CD-R/CD-RW keine korrekte Abspielliste (M3U-Datei) gespeichert ist.
■ Abbruch der Wiedergabe einer Abspiellende
1. MODE antippen.
2. NEXT antippen.
3. PLY LIST antippen.
Schneller Vorlauf / Schneller Rücklauf
1. Um einen Schnellen Vorlauf auszulösen, auf der Titelanzeige die Durchlaufbewegung durchführren.
2. Um einen schellen Rücklauf auszulösen, auf der Titelanzeige die Durchlaufbewegung durchführren.
Top-Funktion
Mit der Top-Funktion wird der CD-Spieler auf den ersten Titel der Disc zusückgesetzt.
1. TOP antippen. Die Wiedergabe beginnt mit dem ersten Titel (Titel Nr. 1). Bei MP3/WMA-Wiedergabe wird der erste Titel des momentan wiedergegebenen Ordners angewählt.
Anspielwiedergabe
These Funktion ermittelte, die ersten 10 Sekunden aller auf der Disc aufgezeichneten Titel der Reihe nach anzuspielen.
1. MODE antippen.
2. P -SCAN antipinen. Die Anzeige MODEändert sich in "P-SCAN", und die Anspielwiedergabe beginnnt.
* Die Anspielwiedergabe beginnt bei dem auf den momentan abgespielten Titel folgenden Titel.
Aufheben der Anspielwiedergabe
1. J^ -SCAN antippen. Die Anzeige J^ -SCAN ändert sich in "MODE", und es wird wieder der Titel abgeschlipt, der beim Antippen von J^ -SCAN wiedergegeben wurde.
Ordner-Anspielwiedergabe
These Funktion ermodlich es, die ersten 10 Sekunden des jeweils ersten Titels aller auf einer MP3-/WMA-Disc vorhandenen Ordner der Reihe nach anzuspielen.
1. MODE antippen.
2. -SCAN antippen. Die Anzeige MODEändert sich in "SCAN", und die Ordner-Anspielwiedergabe beginnt. * Die Ordner-Anspielwiedergabe beginnt bei dem auf den momentan abgespielten Ordner folgenden Ordner.
Aufheben der Ordner
Anspielwiedergabe
1. -SCAN antippen. Die Anzeige -SCAN ändert sich in "MODE", und es wird wieder der Titel abgespielt, der beim Antippen von -SCAN wiedergegeben wurde.
Wiedergabewiederholung
These Funktion ermöglich es, den laufenden Titel wiederholt abzuspielen.
1. MODE antippen.
2. P -REPEAT antippen. Die Anzeige MODEändert sich in "P-RPT", und die Wiedergabewiederholung beginnnt.
■ Aufheben der
Wiedergabewiederholung
1. -RPT antippen. Die Anzeige -RPTändert sich in "MODE", und die normale Wiedergabe beginnt mit dem Titel, der beim Antippen von -RPT abgeschweit wurde.
Ordner
Wiedergabewiederholung
These Funktion ermittelte es, den momentan gewährten Ordner wiederholt abzuspielen. These Funktion stehn nur zur Verfügung, wenn eine CD-R/CD-RW eingelegt ist, auf der MP3-oder WMA-Dateien aufgezeichnet sind.
1. MODE antippen.
2. -REPEAT antipinen. Die Anzeige MODEändert sich in "RPT", und die Ordner-Wiedergabewiederholung beginnnt.
■ Aufheben der Ordner
Wiedergabewiederholung
1. -RPT antippen. Die Anzeige -RPT andert sich in "MODE", und die normale Wiedergabe beginnt mit dem Titel, der beim Antippen von -RPT abgespielt wurde.
Zufallswiedergabe
These Funktion ermitteligt es, alle auf einer Disc aufgezeichneten Titel in einer zufallsbestimmten Reihenfolge abzuspielen.
-RANDOM
Alle Titel auf der Disc werden in einer zufallsbestimmten Reihenfolge abgespielt. Wenn die Disc 2 oder mehr Ordner enthalt, werden zunachst sümmtliche Titel in dem einen Ordner und anschließend sümmtliche Titel im nächsten Ordner in einer zufallsbestimmten Reihenfolge abgespielt. Dies wiederholt sich für sümmtliche Ordner.
-RANDOM
Die Titel auf der Disc werden in einer zufallsbestimmten Reihenfolge abgeschweit. Diese Funktion steth nur zur Verfugung, wenn eine CD-R/CD-RW eingelegt ist, auf der MP3-oder WMA-Dateien aufgezeichnet sind.
1. MODE antippen.
2. -RANDOM oder -RANDOM antippen. Die Anzeige MODEändert sich in "RDM" bzw. "RDM", und die Zufallswiedergabe beginnt.
Aufheben der Zufallswiedergabe
1. -RDM oder -RDM antipinen. Die Anzeige -RDM bzw. -RDMändert sich in "MODE", und die normale Wiedergabe beginnt mit dem Titel, der beim Antipen der betreffenden Anzeige abgespielt wurde.
Hören verschiedener Musikstücke durch mehrere Hörer (2-ZONE-Funktion)
Bei der 2-ZONE-Funktion werden getrennte Tone von der MAIN Zone und SUB Zone ausgesendet, indem具有良好 zwei Klangquellen bei dem einen Hauptgerät betrieben werden, wodurch mehrere Hörer getrennte Musikqellen horen können.
Dieses Gerät steuert deren interne Klangquellen (Radio, CD, MP3, usw.) für deren Wiedergabe und kann darüberhinaus Klangquellen von externen Geräten, die über CeNET angeschlossen sind (wie z.B. CD-Wechsler, usw.), wiedergegeben.
Die Klangquellen der MAIN Zone werden über die Lautsprecher des Fahrzeugs und die der SUB Zone über die Kopfhörersysteme (WH143) wiedergegeben.

Die obere Abbildung gilt, wenn eine Tonquelle im internen Abspielmodus des Geräts (Radio, CD, AUX) über die Laufsprecher wiedergegeben wird.
Dieunte Abbildung gilt, wenn eine Tonquelle im externen Abspielmodus des Gerats (CD-Wechsler, DVD-Wechsler, TV, AUX) über die Lautsprecher wiedergegeben wird.
Die werkseitige Voreinstellung ist "OFF" (aus). Hinweise:
Die 2-ZONE-Funktion steht bei angeschlossen dem DAB nicht ur Verflugung.
Die durch Drehen des [ROTARY]-Knopfes an this Gerat vorgenommene neue Lautstärkeeinstellung wirkt sich nur auf die Laufsprecher aus. Die AUX-SENS-Einstellung wirkt sich sowohl auf die Laufsprecher als auch auf den Kopfhörer aus.
■ Bildschirmanzeige bei aktivierter 2-ZONE-Funktion
In der Mitte des Displays wird mit "INT." (Internal Modus) bzw. "EXT." (External Modus) angezeigt, ob die Wiedergabe in der momentanen Betriebsart der 2-ZONE-Funktion im internen oder im externen Modus erfolgt.
1. Die [SOUND]-Taste betätigen.
2. 2-ZONE antippen.

3. ON/OFF in der Mitte des Displays berühren und mindestens 1 Sekunde lang halten.

Wenn 2-ZONE auf ON eingestellt ist, wird der aktuelle 2-ZONE-Typ angezeigt. Die 2-ZONE-Funktion steht nicht zur Verfügung, wenn 2-ZONE auf OFF eingestellt ist. Die [SOUND]-Taste betätigten, um zur ursprünglichen Betriebsart zusammen zukehren.
4. Auf der ON/OFF-Anzeige die Blätterbewegung durchführung, um den 2-ZONE Typ auszuwahlen.
2-ZONE-Typ
Laufsprecher Kopfhörer Typ 1 Intern (internet Modus) Extern (externer Modus) Typ 2 Extern (externer Modus) Intern (internet Modus)
5. Durch Antippen der Lautsprecher oder des Kopfhörers auf dem Display die gewünschte Betriebsart der 2-ZONE-Funktion auswahlen.
Wenn die angezeigten Laufsprecher angetippt werden, erfolgt die Tonwiedergabe über die Laufsprecher.
Wenn der angezeigte Kopfhörer angetippt wird, erfolgt die Tonwiedergabe über den Kopfhörer.
6. Die [SOUND]-Taste betätigten, um zur ursprünglichen Betriebsart zurückzukehren.
Hören verschiedener Musikstücke durch mehrere Hörer (2-ZONE-Funktion)
Ein-/Ausschalten der 2-ZONE-Funktion
1. Die [SOUND]-Taste am Gerät betätigten und mindestens 1 Sekunde lang halten.
Umschalten des 2-ZONE-Types
Bei aktivierter 2-ZONE-Funktion die [TA]-Taste am Gerät betätigten und mindestens 1 Sekunde lang halten.
Umschalten der Betriebsart der 2-ZONE-Funktion
Bei aktivierter 2-ZONE-Funktion die [TA]-Taste am Gerat betätigten.
Auswahl der Betriebsart bei aktivierter 2-ZONE-Funktion
Wenn bei aktivierter 2-ZONE-Funktion eine CD eingelegt wird, werden die Funktionen des internen Modus these Gerätes auf CD umgeschaltet, und die Wiedergabe beginnnt automatisch.
1. Die [TA]-Taste am Gerät betätigten, um die Betriebsart der 2-ZONE-Funktion umzuschalten.
Die Anzeige für die Geräte (Lautsprecher oder Kopfhörer), über die momentan die Wiedergabe möglich ist, schaltet um.
2. Die [TA]-Taste betätigten und mindestens 1 Sekunde lang halten, um den 2-ZONE-Typ zu wahlen.
Die Anzeige schaltet zwischen "INT." und "EXT." um.
3. Den [ROTARY]-Knopf drucken.
Wenn "INT." angezeigt wird, ändert sich bei jedem Druck auf den [ROTARY]-Knopf die Betriebsart in der folgenden Reihenfolge:
Radio CD AUX Radio...
Wenn "EXT." angezeigt wird,ändert sich bei jedem Druck auf den [ROTARY]-Knopf die Betriebsart in der folgenden Reihenfolge:
AUX (CD changer) (DVD changer) (TV^*1) AUX
* Betriebsarten für nicht angeschlossene Geräte werden nicht angezeigt.
*1Wenn der TV-Modus gewählt wird,ändert sich der Modus automatisch in VTR und kann nicht gewechselt werden.
Bedienungen, die für beiden Betriebsarten gemeinsam sind
Bildschirmanzeige im Titleleingabe-Modus
Hauptanzeige
Dieser Bildschirm erscheint, wenn der Titleeingabe-Modus gewählt wird (siehe Seite 14).

Zeichentyp-Anzeige
A: Großbuchstaben
a: Kleinbuchstaben
0-9: Ziffern
!?: Symbole
A: Umlaute
Titelnamensanzeige
Der momentan eingebene Titel wird angezeigt. Mit der Blätterbewegung ↑ ↑ kann die Texteingabe-Position festgelegt werden. Wenn diese Anzeide berührt und mindestens 2 Sekunden lang gehalten wird, so wird der gesamte eingebene Titeltext gelöscht.
Eingabezeichen-Anzeige
Mit der Blätterbewegung ↑daseinzugebende Zeichen auswahlen.
RTN
Durch Berühren dieser Anzeige wird die Titleleingabe abgebrochen und wieder der ursprüngliche Bildschirm angezeigt. Wenn diese Anzeige berührt und mindestens 1 Sekunde lang gehalten wird, so wird die Zeichenliste für den momentanen Zeichentyp angezeigt.
MEMO
Wenn these Anzeige berührt und mindestens 2 Sekunden lang gehalten wird, so wird der eingebene Titel gespeichert und wieder der ursprüngliche Bildschirm angezeigt.
Zeichenliste-Anzeige
These Anzeige erscheint, wenn in der Hauptanzeige RTN berührt und mindestens 1 Sekunde lang gehalten wird.

Beispieltext
Je nach Zeichentyp wird ein unterschiedlicher Beispieltext angezeigt.
Wenn der Zeichentyp "A" angezeigt wird: A E I M Q U X (Leerzeichen)
Wenn der Zeichentyp "a" angezeigt wird: a e i m q u Wenn der Zeichentyp "0-9", "!?" oder "A" angezeigt wird:
Es werden alle Zeichen angezeigt.
RTN
Durch Antippen wird wieder die Hauptanzeige aufgerufen.
NEXT
Durch Antippen dieser Anzeige wird die jeweils nachste Zeichenliste aufgerufen.
Eingabe von Titeln
Sie können Fernsehsenden und CDs jeweils einen bis zu 10 Zeichen langen Titel zuweisen.
These Titel können dann beim Empfang von Sendungen oder beim Abspielen von CDs angezeigt werden.
Je nach Betriebsart können entsprechlich die Title eingebehen werden:
Betriebsart Anzahl der Titel CD-Betrieb 50 Titel TV-Betrieb 20 Titel
CD-Wechsler-Modus Anzahl der Titel DCZ628 angeschlossen 100 Titel CDC655Tz angeschlossen 100 Titel CDC1255z angeschlossen 50 Titel
1. Den TV-Sender einstellen bzw. die CD abspieten, für die ein Titel eingegeben werden soll.
2. Die Mitte des Displays antippen, um die Anzeige der benutzerdefinierten Titel zu aktivieren. Wenn das Display auf die Anzeige der benutzerdefinierten Titel umschaltet, wird über der Anzeige der Festsender-Nummern "USER" (Benutzer) angezeigt.
3. Die [A]-Taste betätigten und mindestens 1 Sekunde lang halten. Das Gerät wechseln in den Titleeingabe-Modus.
4. Mit der Blätterbewegung ↑ ↑ auf der Titelanzeige kann die Texteingabe-Position festgelegt werden. Die blinkende Textposition bewegt sich nach links bzw. rechts.

* Es können bis zu zehn Zeichen eingegeben werden.
A VORSICHT
Durch Betätigten der Reset-Taste werden alle Benutzereingaben im Gerät gelöscht, z. B. auch die Titel.
5. Auf der Zeichentyp-Anzeige mit der Blätterbewegung den Zeichentyp auswahlen.
Mit jeder Blätterbewegung Ändert sich der Textzeichentyp in der folgenden
Reihenfolge:
Großbuchstaben
(Leerzeichen) ABCDEFGHJKLMN
OPQRSTUVWXYZ
Kleinbuchstaben
a b c d e f g h i j k l m n o p q r s t u v w x y Ziffern
0123456789
Symbole, Umlaute
AAEEEEIAEaeeeieioo
6. Zur Einstellung des jeweils einzugebenden Zeichens entweder auf der rechten Seite des Displays die Blätterbewegung durchführten oder den [ROTARY]-Knopf drehen.
7. Die Schritte 4 bis 6 wiederholen, um den Titel einzugegeben.
Wenn die Titelanzeige berührt und mindestens 2 Sekunden lang gehalten wird, werden sãmtliche bisher eingegebenen Titelzeichen gelöscht.
8. MEMO berühren und mindestens 2 Sekunden lang halten.
Ein langer Signalton zeigt an, dass der Titel gespeichert wurde.
■ Umschaltung der Titelanzeige auf die Uhrzeitanzeige oder eine andere
Anzeige
Die Mitte des Displays antippen
■ Überschreitung der maximal möglichen Titelanzahl
Bei Fernsehsendern
Titel, die keinen Festsendern zugeordnet sind, werden automatisch gelöscht, und der neue Titel wird eingespeichert.
Bei CDs
Die Titel der am seltensten gesplitten CDs werden gelöscht, und der neue Titel wird eingespeichert.
Lösung von Titeln
1. Den TV-Sender einstellen bzw. die CD abspielen, deren Titel gelöscht werden soll.
2. Die Mitte des Displays antippen, um die Anzeige der benutzerdefinierten Titel zu aktivieren. Wenn das Display auf die Anzeige der benutzerdefinierten Titel umschaltet, wir über der Anzeige der Festsender-Numm "USER" (Benutzer) angezeigt.
3. Die [A]-Taste betätigten und mindestens 1 Sekunde lang halten. Das Gerät wechseln in den Titleeingabe-M
4. Die Titelanzeige berühren und mindestens 2 Sekunden lang halten. Sümttliche Zeichen im Titel werden gelöscht.
5. MEMO berühren und mindestens 2 Sekunden lang halten. Ein langer Signatlon zeigt an, dass der Titel gelöscht wurde.
Änderung der Einstellungen Auswahl der Einstellungspunkt
1. Die [A]-Taste betätigten.
Der Modus wechsel in den Einstellmodus.

2. Auf der Einstellungen-Wahlanzeige mit der Blätterbewegung den betreffenden Einstellungspunkt auswahlen.
* Mit der Blätterbewegung ↑ auf der linken Seite des Displays werden die Haupt-Einstellungspunkte jeweils einzel durchgeschaltet.
Mit der Durchlaufbewegung auf der Linken Seite des Displays werden die Unterpunkte kontinuierlich durchgeschhaltet.
\* Mit der Blätterbewegung 山 in der Mitte des Displays werden die Unterpunkte jeweils einzeln durchgeschaltet. Mit der Durchlaufbewegung werden die Unterpunkte kontinuierlich durchgeschaltet.
3. Wenn auf der rechten Seite des Displays "EDIT" angezeigt wird, EDIT antippen, um zur Einstellungen-Detailanzeige zu wechseln.

4. Entweder auf der rechten Seite des Displays die Blätterbewegung ↑ durchführren oder den [ROTARY]-Knopf drehen, um die Details einzustellen.
Rückkehr in die ursprüngliche Betriebsart
1. Erneut die [A]-Taste betätigten.
Einstellungspunkte
Hauptpunkt Unterpunkt DISPLAY (Anzeige) SCREEN SVR
• Bildschirmschoner (siehe Seite 41) MSG INPUT
• Meldungseingabe (siehe Seite 41) MESSAGE
• Meldungsanzeige beim Ein-/Ausschalten (siehe Seite 42) S/A SENS
• Empfindlichkeit des Spektrumanalysators (siehe Seite 42) SCROLL
• Durchrollgeschwindigkeit (siehe Seite 42) APPERNCE (Darstellung) DIMMER IN
• Automatische Helligeitsregelung (siehe Seite 43) DMR LEVEL
• Dimmer-Helligeitsstufe (siehe Seite 43) CONTRAST
• Einstellung des Anzeigenkontrasts (siehe Seite 43) BLINK LED
• Blinken der LED bei abgenommenem DCP (siehe Seite 43) BEEP
• Signalton (siehe Seite 44) SOUND (Ton) AC-PRO III
• VSE-Modus (STD/PRO) (siehe Seite 44) EQ SELECT
• Equalizer-Modus (siehe Seite 44) SP-SETTING
• Latsprecher-Konfigurierung (siehe Seite 44) CENTER-SP / SUB-WOOFER
• Center-Latsprecher/Subwoofer ein-/ausschalten (siehe Seite 45) HPF / SUB-W LPF
• Latsprecher-Filterfrequenz (siehe Seite 45) AMP CANCEL
• Internen Verständiger ein-/ausschalten (siehe Seite 46) SP GAIN
• Latsprecher-Ausgangspiegel (siehe Seite 46) PL II DELAY (PL II-Laufzeitverzögerung) SRD-SP
• Laufzeitverzögerung der hinteren Latsprecher (siehe Seite 46) PL II CONT PANORAMA / DIMENSION / CTR WIDTH
• Deteilinstellungen des Musik-Wiedergabemodus (siehe Seite 47) TUNER TV AREA
• TV-Empfangsbereich (siehe Seite 57) TV DIVER
• TV-Diversity-Antenne (siehe Seite 57) LINK ACT
• AF-Funktion zwischen RDS und DAB (siehe Seite 26) LANGUAGE
• PTY-Anzeigesprache (siehe Seite 30) RDS-INT 2Z
• RDS-Uterberechnung bei aktivierter 2-ZONE-Funktion (siehe Seite 30) SETTING
(Einstellungen) AUX / TEL
• AUX und TEL (siehe Seite 47) AUX SENS
• Eingangspegel für tragbare Audio-Geräte (AUX) (siehe Seite 48) TEL-SP
• Autolaatsprecher-Ausgang für das Mobiletelefon (Optional TEL-002) (siehe Seite 48) TEL-SWITCH
• Unterbrechung durch Mobiletelefon (siehe Seite 48) CALIBRATE / A-VOL SENS
• Automatische Lautstärkeregelung (siehe Seite 49) SYSTEM CHECK
• Systemprüfung (siehe Seite 49) CODEMATIC
• Diebstahlsicherung (siehe Seite 50)
Einstellung des Bildschirmschoners (SCREEN SVR)
These Funktion ermitteligt die Anzeige eines Bildschirmschoners, wenn das Gerät ca. 30 Sekunden lang nicht bedient wurde.
Die werkseitige Voreinstellung ist "ON" (Ein).
1. Die [A]-Taste betätigten, um den Einstellmodus aufzurufen.
2. Auf der Einstellungen-Wahlanzeige mit ↑ ↓ ↑ unter “DISPLAY” den Punkt “SCREEN SVR” wahren.

3. Entweder auf der rechten Seite des Displays die Blätterbewegung ↑ durchführten oder den [ROTARY]-Knopf drehen, um die Einstellung “ON” oder “OFF” zu wahren.
4. Die [A]-Taste betätigten, um zur ursprünglichen Betriebsart zurückzukehren.
Umschaltung der
Bildschirmschoneranzeige
PREV oder NEXT betätigten, während der Bildschirmschoner angezeigt wird.
Bei jeder Betätigung dieser Tasten wechselt der angezeigte Bildschirmschoner.
Bildschirmschoner
Bildschirmschoner-Muster 1

Bildschirmschoner-Muster 2

Bildschirmschoner-Muster 3

Spektrumanalysator-Muster 1

Spektrumanalysator-Muster 2

Spektrumanalysator-Muster 3

Spektrumanalysator-Muster 4

Meldungsanzeige

SS SCAN
Die 8 oben abgebildeten
Bildschirmschoner-Anzeigen werden nacheinander jeweils ca. 10 Sekunden lang dargestellt.
Texteingabe für die Meldungsanzeige (MSG INPUT)
Hierfür steht 1 Bildschirmschoner-Typ zur Verfügung. Für Einzelheiten zur Umschaltung der Bildschirmschoneranzeige siehe "Einstellung des Bildschirmschoners".
- Es können bis zu 30 Zeichen eingegeben werden.
Die werkseitige Voreinstellung lautet "Active Matrix Control System".
1. Die [A]-Taste betätigten, um den Einstellmodus aufzurufen.
2. Auf der Einstellungen-Wahlanzeige mit der Blätterbewegung unter "DISPLAY" den Punkt "MSG INPUT" wahren.

DISPLAY
ADJUST MODE
MSG INPUT> EDIT
4. Mit der Blätterbewegung in der Mitte des Displays kann die Texteingabe-Position festgelegt werden.
* Zum Löschen der Meldung die Mitte des Displays berühren und mindestens 2 Sekunden lang halten.
Wenn Sie Schritt 8 mit leerem Meldungstext durchfuhren, wird die werkseitig voreingestellte Meldung wiederhergestellt.
5. Auf der linken Seite des Displays die Blätterbewegung durchführren, um den Zeichentyp zu wahlen.
Mit jeder Blätterbewegung 且 wechsel der Textzeichentyp. Naheres hierzu siehe.
Seite 37.
6. Zur Einstellung des jeweils einzugebenden Zeichens entweder auf der rechten Seite des Displays die Blätterbewegung 48 durchführren oder den [ROTARY]-Knopf drehen.
7. Die Schritte 4 bis 6 wiederholen, um die Meldung einzugeben.
8. MEMO berühren und mindestens 2 Sekunden lang halten. Ein langer Signalton zeigt an, dass die Meldung gespeichert wurde.
9. Die [A]-Taste betätigten, um zur ursprünglichen Betriebsart zurückzukehren.
Meldungsanzeige (MESSAGE)
These Funktion ermodlich es, beim Ein-/ Ausschalten des Gerats auf dem Display Meldungen anzuzeigen. Beim Einschalten wird "Hello" angezeigt, beim Ausschalten "See you".
Die werkseitige Voreinstellung ist "ON" (Ein).
1. Die [A]-Taste betätigten, um den Einstellmodus aufzurufen.
2. Auf der Einstellungen-Wahlanzeige mit der Blätterbewegung unter "DISPLAY" den Punkt "MESSAGE" wahren.

DISPLAY
ADJUST MODEMESSAGE » ON
3. Entweder auf der rechten Seite des Displays die Blätterbewegung ↑durchführren oder den [ROTARY]-Knopf drehen, um die Einstellung “ON” oder “OFF” zu wahren.
4. Die [A]-Taste betätigten, um zur ursprünglichen Betriebsart zurückzukehren.
Einstellung der Empfindlichkeit des Spektrumanalysators (S/A SENS)
Mit dieser Funktion kann die Empfindlichkeit (Grad der Auslenkung) des Spekr Trumanalsators eingestellt werden. Für Einzelheiten zur Anzeige des Spekr Trumanalsators siehe "Umschaltung der Anzeige" (siehe Seite 13) oder "Einstellung des Bildschirmschoners" (siehe Seite 41).
Die werkseitige Voreinstellung ist "MID" (Mittel).
1. Die [A]-Taste betätigten, um den Einstellmodus aufzurufen.
2. Auf der Einstellungen-Wahlanzeige mit der Blätterbewegung t unter "DISPLAY" den Punkt "S/A SENS" wahren.

3. Entweder auf der rechten Seite des Displays die Blätterbewegung durchführten oder den [ROTARY]-Knopf drehen, um die Empfindlichkeit einzustellen.
* Entweder LOW (geringe Auslenkung), MID oder HIGH (starke Auslenkung) wahren.
4. Die [A]-Taste betätigten, um zur ursprünglichen Betriebsart zurückzukehren.
Einstellung der Display-Durchrollgeschwindigkeit (SCROLL)
Mit dieser Funktion konnen Sie die Durchrollgeschwindigkeit vermindern, wenn die Bildschirmanzeigen sochnell durchrolten,dass sie sich nur schwer erkennen halten.
Die werkseitige Voreinstellung ist "SPEED 2" (Geschwindigkeit 2).
1. Die [A]-Taste betätigten, um den Einstellmodus aufzurufen.
2. Auf der Einstellungen-Wahlanzeige mit der Blätterbewegung ↑ unter “DISPLAY” den Punkt “SCROLL” wahren.

3. Entweder auf der rechten Seite des Displays die Blätterbewegung ↑ durchführten oder den [ROTARY]-Knopf drehen, um die Empfindlichkeit einzustellen.
* Dieser Punkt lassst sich im Bereich von SPEED 1 bis SPEED 7 einstehen. Wahrend der Einstellung kann beobachtet werden, wie sich die Änderung auf dem Display auswirkt.
4. Die [A]-Taste betätigten, um zur ursprünglichen Betriebsart zurückzukehren.
Einstellung der automatischen Dimmer-Steuerung (DIMMER IN)
Mit dieser Funktion kann die Helligkeit der Display-Beleuchtung entweder gemeinsam mit der Fahrzeuginnenraumbeleuchtung oder entsprechend der Helligkeit im Fahrzeuginnenraum geregelt werden. Dabei ist als Einstellung fur die automatische Dimmer-Steuerung entweder "AUTO" zu wahle (Koppelung an die Helligkeit im Fahrzeug) oder "ILLUMI" (Koppelung an die Innenraumbeleuchtung).
- Wenn die Dimmer-Steuerung auf "AUTO" eingestellt ist, wird die Display-Beleuchting entsprechend der von dieser dem Sensor festgestelltten Helligkeit geregt.
Die Einstellung wird bei DMR LEVEL vorgenommen.
Die werkseitige Voreinstellung ist "AUTO".
1. Die [A]-Taste betätigten, um den Einstellmodus aufzurufen.
2. Auf der Einstellungen-Wahlanzeige mit der Blätterbewegung ↑ unter "APPERNCE" den Punkt "DIMMER IN" wahren.

APPERNCE
ADJUST MODE IMMER IN> AUTO
3. Entweder auf der rechten Seite des Displays die Blätterbewegung 4 durchfuhren oder den [ROTARY]-Knopf drehen, um die Einstellung "AUTO" oder "ILLUMI" zu wahren.
4. Die [A]-Taste betätigten, um zur ursprünglichen Betriebsart zurückzukehren.
Einstellung der Dimmer-Helligkeitsregelung (DMR LEVEL)
Mit dieser Funktion lassst sich einstehen, wie stark die Display-Helligkeit abgesenkt werden soll.
Die werkseitige Ausgangseinstellung ist "3".
1. Die [A]-Taste betätigten, um den Einstellmodus aufzurufen.
2. Auf der Einstellungen-Wahlanzeige mit der Blätterbewegung 135 unter "APPERNCE" den Punkt "DMR LEVEL" wahren.
3. Entweder auf der rechten Seite des Displays die Blätterbewegung ↑ durchführten oder den [ROTARY]-Knopf drehen, um die Stärke der Dimmerwirkung einzustellen.
* Entweder OFF (Dimmer aus, Beleuchtung hell) oder 1 (leicht abgedunkelt) bis 5 (dunkel) wahren.
4. Die [A]-Taste betätigten, um zur ursprünglichen Betriebsart zurückzukehren.
Einstellung des Display-Kontrasts (CONTRAST)
Der Display-Kontrast lässt sich zur Anpassung an den Einbauwinkel des Geräts einstellen.
Die werkseitige Ausgangseinstellung ist "6".
1. Die [A]-Taste betätigten, um den Einstellmodus aufzurufen.
2. Auf der Einstellungen-Wahlanzeige mit der Blätterbewegung unter "APPERNCE" den Punkt "CONTRAST" wahren.
3. Entweder auf der rechten Seite des Displays die Blätterbewegung ↑ durchführten oder den [ROTARY]-Knopf drehen, um den Kontrast einzustellen.

APPERNCE
ADJUST MODE
CONTRAST 》 6
* Dieser Punkt lässt sich im Bereich von 1 bis 11 einstehen. Wahrend der Einstellung kann beobacht werden, wie sie die Änderung auf dem Display auswirkt.
4. Die [A]-Taste betätigten, um zur ursprünglichen Betriebsart zurückzukehren.
LED-Blinkanzeige bei abgenommenem DCP (BLINK LED)
Es ist möglich, die LED am Gerät bei abgenommenem DCP blinken zu{lassen.
Die werkseitige Voreinstellung ist "OFF" (aus).
1. Die [A]-Taste betätigten, um den Einstellmodus aufzurufen.
2. Auf der Einstellungen-Wahlanzeige mit der Blätterbewegung unter "APPERNCE" den Punkt "BLINK LED" wahren.

APPERNCE
ADJUST MODE
BLINK LED》 OFF

APPERNCE
ADJUST MODE MR LEVEL》 3
3. Entweder auf der rechten Seite des Displays die Blätterbewegung ↑durchführten oder den [ROTARY]-Knopf drehen, um die Einstellung “ON” oder “OFF” zu wahren.
4. Die [A]-Taste betätigten, um zur ursprünglichen Betriebsart zurückzukehren.
Einstellung des Signaltons bei Tastenbetätigung (BEEP)
Der kurze oder lange hochfrequente Ton, der bei Tastenbetätigung ertört, wird als "BEEP" bezeichnet.
Die werkseltige Voreinstellung ist "ON".
1. Die [A]-Taste betätigten, um den Einstellmodus aufzurufen.
2. Auf der Einstellungen-Wahlanzeige mit der Blätterbewegung unter "APPERNCE" den Punkt "BEEP" wahren.

3. Entweder auf der rechten Seite des Displays die Blätterbewegung ↑ ↓ durchführten oder den [ROTARY]-Knopf drehen, um die Einstellung “ON” oder “OFF” zu halten.
4. Die [A]-Taste betätigten, um zur ursprünglichen Betriebsart zurückzukehren.
Auswahl des Modus
Dieser Einstellungspunkt lässt sich nicht anwahlen, wenn Dolby Pro Logic II auf "MUSIC" oder "MATRIX" eingestellt ist (siehe Seite 17).
Die werkseitige Voreinstellung fur AC-PRO III ist "PRO" und fur EQ SELECT "P.EQ".
AC-PROIII
Wenn "STD" (Standard-Modus) gewählt ist, konnen Klangqualität und Feldcharakteristik durch die VSE-Funktion (Virtual Space Enhancer) so angepasst werden, dass sich unabhängig von der Hörposition der gleiche Klangeffekt erzielen{lss.
Wenn "PRO" (PRO-Modus) gewählt ist, dassen sich Klangqualität und Feldcharakteristik für jeder Hörposition detailiert anpassen.
EQ SELECT
Wenn "P.EQ" (Equalizer-Modus) gewählt ist, kann für den gesamten Frequenzbereich eine Kompensation in Form einer detailierten geglißteten Curve vorgenommen werden.
Wenn "BAS/TREB" (Basse-/Hohen-Modus) gewählt ist, kann der Frequenzgang für 2 größere Frequenzbereiche, die Basse (tiefere TONE) und Höhen (höhere TONE) getrennt kompensiert werden.
1. Die [A]-Taste betätigten, um den Einstellmodus aufzurufen.
2. Auf der Einstellungen-Wahlanzeige mit der Blätterbewegung ↑ ↓ unter "SOUND" die Punkte "AC-PRO III" und "EQ SELECT" wahren.

ADJUST MODE AC-PROIII PRO
3. Entweder auf der rechten Seite des Displays die Blätterbewegung ↑ durchführten oder den [ROTARY]-Knopf drehen, um den Modus zu wahren.
Modusauswahl
AC-PRO III STD
• Standard-Modus (VSE-Menü) PRO
• PRO-Modus (Positions-Menü) EQ SELECT P.EQ
• Equalizer-Modus (P.EQ-Menü) BAS / TREB
• Tiefen-/Höhen-Modus
4. Die [A]-Taste betätigten, um zur ursprünglichen Betriebsart zurückzukehren.
Einstellung der Laufsprecherkonfiguration (SP-SETTING)
Hier muss die im Fahrzeug vorhandene Lautspracherkconfiguration eingestellt werden, damit das Gerät seine Klangeigenschaften voll entfallen kann.
Die werkseitige Voreinstellung ist SWL + SWR
1. Die [A]-Taste betätigten, um den Einstellmodus aufzurufen.
2. Auf der Einstellungen-Wahlanzeige mit der Blätterbewegung ↑ unter "SOUND" den Punkt "SP-SETTING" wahren.

ADJUST MODE SP-SETTING SW+SW
3. Entweder auf der rechten Seite des Displays die Blätterbewegung ↑ durchführten oder den [ROTARY]-Knopf drehen, um die Lautspecherkenconfiguration einzustellen.
Lautsprecherkonfiguration
CTR+SW
5.1-Kanal-
Kconfiguration Lautsprecher vom/hinten (4 Kanäle)
Center-Lautsprecher (1 Kanal)
Subwoofer (1 Kanal) SWLR+SWR
4-Kanal-/Subwoofer-
Kconfiguration Lautsprecher vom/hinten (4 Kanäle)
Subwoofer (2 Kanäle)
Hinweise:
- Der Center-Lautsprecher gibt nur dann Ton aus, wenn bei der Einstellung "CTR+SW" die folgenden Einstellungen vorgenommen werden:
(1) Gemäß der Anleitung unter “Auswahl des PLII-Modus (Dolby PL II)” (siehe Seite 17) den Dolby Pro Logic II-Modus auf “MUSIC” oder “MATRIX” einstehen.
(2) Gemäß der Anleitung unter "Aktivieren/Deaktivieren von Laufsprechnern (CENTER-SP/SUB-WOOFER)" (siehe Seite 45) den Center-Laufsprecher aktivierten ("ON").
- Über den Subwoofer-Kanal erfolgt keine Tonausgabe, wenn "SWI + SWR" aktiviert ist und der Dolby Pro Logic II-Modus auf "MUSIC" oder "MATRIX" eingestellt ist.
4. Die [A]-Taste betätigten, um zur ursprünglichen Betriebsart zurückzukehren.
Aktivieren/Deaktivieren von Laufsprechern (CENTER-SP/ SUB-WOOFER)
Den Center-Lautsprecher (CENTER-SP) und den Subwoofer (SUB-WOOFER) aktivieren/deaktivieren (ON/OFF).
Wenn kein Center-Lautsprecher oder Subwoofer angeschlossen ist, muss hier "OFF" gewählt sein.
- Der Center-Lautsprecher (CENTER-SP) lassst sich aktivieren, wenn der Dolby Pro Logic II-Modus auf "MUSIC" oder "MATRIX" und "SP-SETTING" auf "CTR-SW" eingestellt ist.
Die werkseitige Voreinstellung ist "ON".
1. Die [A]-Taste betätigten, um den Einstellmodus aufzurufen.
2. Auf der Einstellungen-Wahlanzeige mit der Blätterbewegung ↑ unter "SOUND" die Punkte "CENTER-SP" und "SUB-WOOFER" wahren.

SOUND
ADJUST MODE
CENTER-SP> ON
3. Entweder auf der rechten Seite des Displays die Blätterbewegung ↑ durchführten oder den [ROTARY]-Knopf drehen, um die Einstellung “ON” oder “OFF” zu wahren.
4. Die [A]-Taste betätigten, um zur ursprünglichen Betriebsart zurückzukehren.
Die Filterfrequenzen der Laufsprecher einstellen (HPF/ SUB-W LPF)
Mit dieser Funktion kann die Filterfrequenz an die verwendeten Lautsprecher angepasst werden.
- Welche Filter (HPF/Sub-W LPF) angewandt werden können, ist je nach eingestellt Dolby Pro Logic II-Modus unterschiedlich.
Dolby Pro Logic II Modus-Einstellung Filter HPF SUB-W LPF*1 MUSIC/MATRIX Nicht einstellbar Einstellbar OFF Einstellbar Einstellbar
*1 Eine Einstellung ist nur möglich, wenn
"SUB-WOOFER" auf "ON" eingestellt ist.
Die werkseitige Voreinstellung ist "THROUGH" (ungefiltert).
Einstellung der Filter
HPF (Einstellung des Hochpassfilters)
Dieses Filter dampf die Bassfrequenzen der vorderen und hinteren Lautsprecher.
THROUGH 50Hz 80Hz 120Hz
Die Filtrereinstellung passend zum Laufsprecher wahlen, wenn Laufsprecher mit kleinerem Durchmesser verwendet werden.
THROUGH
These Einstellung wahlen, wenn Laatsprecher verwendet werden, die Bassfrequenzen wiedergeben konnen.
SUB-W LPF (Einstellung des Subwoofer-Tiefpassfilters)
Dieses Filter dampf die Hohenfrequenzen des Subwooers.
THROUGH 50Hz 80Hz 120Hz
Die Filterfrequenz passend zum Subwoofer einstellen.
THROUGH
These Einstellung wahlen, wenn ein aktiver Subwoofer mit eingebautem Tiefpassfilter verwendet wird.
1. Die [A]-Taste betätigten, um den Einstellmodus aufzurufen.
2. Auf der Einstellungen-Wahlanzeige mit der Blätterbewegung ↑ unter "SOUND" die Punkte "HPF" und "SUB-W LPF" wahren.

3. Entweder auf der rechten Seite des Displays die Blätterbewegung ↑ durchführten oder den [ROTARY]-Knopf drehen, um die Frequenz einzustellen.
* Eine der Einstellungen THROUGH, 50Hz, 80Hz oder 120Hz wahren.
4. Die [A]-Taste betätigten, um zur ursprünglichen Betriebsart zurückzukehren.
Internen Veränderaktivieren/deaktivieren (AMP CANCEL)
Den internen Veränder in Abhängigkeit davon, ob ein externer Veränder verwendet wird, ein bzw. ausschalten.
AMP CANCEL auf "ON" einstehen (interner Veränder ausgeschalte), wenn ein externer Veränder kanger geschlossen ist und der interne Veränder nicht verwendet wird.
Die werkseitige Ausgangseinstellung ist "OFF" (internet Veränderer verwendet).
1. Die [A]-Taste betätigten, um den Einstellmodus aufzurufen.
2. Auf der Einstellungen-Wahlanzeige mit der Blätterbewegung ↑ unter "SOUND" den Punkt "AMP CANCEL" wahren.

3. Entweder auf der rechten Seite des Displays die Blätterbewegung ↑durchführren oder den [ROTARY]-Knopf drehen, um die Einstellung “ON” oder “OFF” zu wahren.
4. Die [A]-Taste betätigten, um zur ursprünglichen Betriebsart zurückzukehren.
Einstellung des Ausgangspegels der Laufsprecher (SP GAIN)
Mit der integrierten Teston-Funktion des Gerätes die Pegel so einstellen, dass die Ausgangslautstärke samtlicher Lautsprecher gleich ist.
- These Einstellunglässt sich nur vornehmen, wenn als Dolby Pro Logic II-Modus "MUSIC" oder "MATRIX" eingestellt ist.
Die werkseitige Ausgangseinstellung ist "0dB".
1. Die [A]-Taste betätigten, um den Einstellmodus aufzurufen.
2. Auf der Einstellungen-Wahlanzeige mit der Blätterbewegung ↑ unter "SOUND" den Punkt "SP GAIN" wahren.

3.EDIT antippen.
Der Modus wechsel in den SP GAIN-Einstellmodus.
4. Auf der Einstellungen-Wahlanzeige mit der Blätterbewegung den betreffenden Einstellungspunkt auswahlen. Mit jeder Blätterbewegung wechsel der Einstellungspunkt in der folgenden Reihenfolge:
Einstellungspunkte

^*1 "CTR GAIN" wird nur angezeigt, wenn "SP-SETTING" auf "CTR+SW" und "CENTER-SP" auf "ON" eingestellt ist.
*2“SUB-W GAIN” wird nur angezeigt, wenn "SUB-WOOFER" auf "ON" eingestellt ist.
5. Entweder auf der rechten Seite des Displays die Blätterbewegung ↑ ↓ durchführten oder den [ROTARY]-Knopf drehen, um den Ausgangspiegel einzustellen. Der Ausgangspiegel{lsst sich im Bereich -10 dB bis +10 dB einstellen.
6. Die Schritte 4 und 5 für jeder Einstellungspunkt wiederholen.
7. Die [A]-Taste betätigten, um zur ursprünglichen Betriebsart zurückzukehren.
Einstellung der Laufzeitverzögerung für die Hecklautsprecher (PL II DELAY)
Zu welchem Zeitpunkt der Ton an der Hörposition eintrift, ist je nach Einbauposition der Hecklautsprecher und Fahrzeuggroße unterscheidlich. Durch Anpassung der Laufzeitverzögerung für die Hecklautsprecher kann dieser Effekt so korrigiert werden, dass der Ton von den Hecklautsprechn zum gleichen Zeitpunkt eintriftt wie von den Frontlautsprechn.
- These Einstellunglässt sich nur vornehmen, wenn als Dolby Pro Logic II-Modus "MUSIC" oder "MATRIX" eingestellt ist.
Die werkseitige Ausgangseinstellung ist "0ms".
1. Die [A]-Taste betätigten, um den Einstellmodus aufzurufen.
2. Auf der Einstellungen-Wahlanzeige mit der Blätterbewegung ↑ unter “PL II DELAY” den Punkt “SRD-SP” wahren.

3. Entweder auf der rechten Seite des Displays die Blätterbewegung t durchführren oder den [ROTARY]-Knopf drehen, um die Verzögerungszeit einzustellen.
* "SRD-SP"lässt sich im Bereich von 0 ms bis 15 ms einstehen.
4. Die [A]-Taste betätigten, um zur ursprünglichen Betriebsart zurückzukehren.
Detaillierte Einstellung des Musik-Modus (PL II CONT)
Mit dieser Funktion konnen Sie den Musik-Modus detaillierter festlegen, wenn der Dolby Pro Logic II-Modus auf "MUSIC" eingestellt ist.
- These Einstellung{lasst sich nur vormehmen, wenn als Dolby Pro Logic II-Modus "MUSIC" eingestellt ist.
Die werkseitige Ausgangseinstellung fur PANORAMA ist "NO", fur DIMENSION "3" und fur CTR WIDTH "3".
Einstellungspunkte
PANorama (Steuerung des Panoramaeffekts)
Dieser Effekt erweitert die Schallfeld-Abbildung im vorderen Bereich bis zu den Hecklautsprechem. Stellen Sie für diesen Punkt "YES" ein, wenn Sie den Surround-Effekt zu vermissen scheinen.
DIMENSION (Gröbeneinstellung)
Verschiebt das Schalfeld-Abbild nach vorn oder hinten. Wenn das Schalfeld-Abbild nach vorn oder hinten verschoben scheint, kann diese Tendenz hiermit kompensiert werden. Der Einstellwert 3 entspricht der Mittenposition. Mit den Enstellwerten 2 bis 0 wird das Schalfeldbild nach hinten verschoben, mit den Einstellwerten 4 bis 6 nach vorn.
CTR WIDTH (Breiteneinstellung Center-Lautsprecher)*1
Dient zur Anpassung der Aufteilung des Center-Kanals zwischen dem Center-Lautsprecher und den Frontlautsprechem links und rechts.
Wenn der Ton des Center-Kanals gleichmäßig auf den linken und rechten Kanal verteil wird, vergroßert sich das gesamte Klangfeldbild, so dass ein natürlicher Verbreiterungseindruck entsteht.
Beim Einstellwert 0 wird der Tonanteil des Center-Kanals komplett über den Center-Lautsprecher wiedergegeben.
Beim Einstellwert 7 wird der Tonanteil des Center-Kanals gleichmäßig zwischen den Frontlautsprechern links und rechts aufgeitlt.
*1 "CTR WIDTH" wird nur angezeigt, wenn "SP-SETTING" auf "CTR+SW" und "CENTER-SP" auf "ON" eingestellt ist.
1. Die [A]-Taste betätigten, um den Einstellmodus aufzurufen.
2. Auf der Einstellungen-Wahlanzeige mit der Blätterbewegung unter "PL II CONT" den gewürschten Einstellungspunkt wahren. Einstellungspunkte sind "PANorama", "DIMENSION" und "CTR WIDTH".

3. Entweder auf der rechten Seite des Displays die Blätterbewegung durchführten oder den [ROTARY]-Knopf drehen, um die gewünschte Einstellung vorzunehmen.
* Für “PANORAMA” entweder “YES” oder “NO” wahren.
* "DIMENSION" lassst sich im Bereich von 0 bis 6 einstehen.
* "CTR WIDTH"lässt sich im Bereich von 0 bis 7 einstellen.
4. Die [A]-Taste betätigten, um zur ursprünglichen Betriebsart zurückzukehren.
AUX-Funktion
Dieses Gerät besitzt einen externen Cinch-Eingang, so dass auch externe, über diesen Eingang angeschlossene Tonquellen wiedergegeben werden können.
Auswahl von AUX / TEL
Tonsignale und Musik von externen Geräten sowie Telefonanrufe konnen über die Laufsprecher wiedergegeben werden, wenn die Geräte über diesen Eingang angeschlossen sind.
Wenn TEL INT oder ein externes Gerät mit thisem Gerät verbunden ist, kann entweder der TEL- oder der AUX-Modus gewählt werden.
Die werkseitige Ausgangseinstellung ist "AUX".
1. Die [A]-Taste betätigten, um den Einstellmodus aufzurufen.
2. Auf der Einstellungen-Wahlanzeige mit der Blätterbewegung unter “SETTING” den Punkt “AUX/TEL” wahren.

3. Entweder auf der rechten Seite des Displays die Blätterbewegung durchführten oder den [ROTARY]-Knopf drehen, um die Einstellung "AUX" oder "TEL" zu wahren. AUX: The AUX/TEL-Eingangskabel wird für externe Audio-Eingangssignale verwendet. TEL: The AUX/TEL-Eingangskabel wird für Audio-Eingangssignale von einem Mobiltelefon verwendet.
4. Die [A]-Taste betätigten, um zur vorherigen Betriebsart zusückzukehren.
Einstellung des Eingangspegels (AUX SENS) für portable Audio-Quellen (AUX-Modus)
Mit dieser Funktion kann der Eingangspegel für optionale externe Geräte eingestellt werden, die an diesen Gerät angeschlossen werden.
- These Einstellung ist möglich, wenn "AUX/TEL" auf "AUX" eingestellt ist.
Die werkseitige Ausgangseinstellung ist "MID".
1. Die [A]-Taste betätigten, um den Einstellmodus aufzurufen.
2. Auf der Einstellungen-Wahlanzeige mit der Blätterbewegung unter “SETTING” den Punkt “AUX SENS” wahren.

3. Entweder auf der rechten Seite des Displays die Blätterbewegung ↑ durchführten oder den [ROTARY]-Knopf drehen, um den Eingangspegel einzustellen.
* Eine der Einstellungen LOW (niedrig), MID (mittel) oder HIGH (hoch) wahren.
4. Die [A]-Taste betätigten, um zur ursprünglichen Betriebsart zurückzukehren.
Einstellung des AutolaufsprecherAusgangs für das Mobiltelefon (Zubehör TEL-002)
- Einstellen, über welche Laufsprecher Telefonanrufe wiedergegeben werden sollen.
Die werkseitige Ausgangseinstellung ist "RIGHT".
1. Die [A]-Taste betätigten, um den Einstellmodus aufzurufen.
2. Auf der Einstellungen-Wahlanzeige mit der Blätterbewegung unter "SETTING" den Punkt "TEL-SP" wahren.

ADJUST MODE
TEL·SP « RIGHT
3. Entweder auf der rechten Seite des Displays die Blätterbewegung 4 durchfahren oder den [ROTARY]-Knopf drehen, um die Einstellung "LEFT" (links) oder "RIGHT" (rechts) zu wahlen.
LEFT:
Telefonanrufe können über den an das Gerät angeschlossenen linken Frontlautsprecher gehört werden.
RIGHT:
Telefonanrufe können über den an das Gerät angeschlossenen rechten Frontlautsprecher gehört werden.
4. Die [A]-Taste betätigten, um zur vorherigen Betriebsart zusückzukehren.
Einstellung für Mobilfunkunterbrechung
Wenn an这点 Gerat über entsprechendes Zubehör (optional TEL-002) ein Mobittelefon angeschlossen wird, konnen Telefonrufe über die Autolatsprecher wiedergegeben werden.
Die werkseitige Voreinstellung ist "OFF" (aus).
1. Die [A]-Taste betätigten, um den Einstellmodus aufzurufen.
2. Auf der Einstellungen-Wahlanzeige mit der Blätterbewegung ↑ ↓ unter “SETTING” den Punkt “TEL-SWITCH” wahren.

ADJUST MODE TEL·SWITCH》 OFF
3. Entweder auf der rechten Seite des Displays die Blätterbewegung 4 durchführten oder den [ROTARY]-Knopf direhen, um die Einstellungen vorzunehmen. Jedes Mal wenn der [ROTARY]-Knopf gedreht wird,ändert sich die Einstellung in der folgenden Reihenfolge:
OFF ON MUTE OFF...
OFF:
Das Gerät setzen seine normale Funktion fort,
auch während das Mobilitelefon benutzt wird.
Hinweis:
- Bei Anschluss einer Freisprechanlage darauf achtenden, dass die Einstellung ON gewählt ist, damit die Tonausgabe des Telefons über die Anlage erfolgt.
ON:
Telefonanrufe können über die an das Gerät angeschlossenen Lautsprecher führt werden.
* Bei der Wiedergabe von Telefongesprächen über die Autolautsprecher lässt sich die Lautstärke durch Drehen des [ROTARY]-Knopfesenstellen.
MUTE:
Die Tonwiedergabe über theses Gerät wird während Telefonrufen stumm geschaltet.
4. Die [A]-Taste betätigten, um zur vorherigen Betriebsart zusückzukehren.
Einstellung der automatischen Lautstärkeregelung (CALIBRATE/A-VOL SENS)
Die Lautstärke kann automatisch an die von der Fahrzeuggeschwindigkeit abhängigen Fahrtgeräuche angepasst werden.
Die werkseitige Ausgangseinstellung ist "LOW".
1. Die [A]-Taste betätigten, um den Einstellmodus aufzurufen.
2. Auf der Einstellungen-Wahlanzeige mit der Blätterbewegung unter "SETTING" den Punkt "CALIBRATE" wahren.

ADJUST MODE CALIBRATE START
3. Das Fahrzeug auf 50km / h beschleunigen.
4. Bei Erreichen von 50 km/h START antippen. Die Kalibrierung wird durchgeführt. Nach mindestens 2 Sekunden ertönt ein langer Signalton, und auf dem Display erscheint "SUCCEEDFUL" (Erfolg).
Ein kurzer Signaton weist darauf hin, dass die Kalibrierung fehlgeschlagen ist. In thisem Fall den Vorgang von Schritt 3 an wiederholen.
5. AnschlieBend die Empfindlichkeit einstellen. Auf der Einstellungen-Wahlanzeige mit der Blätterbewegung unter "SETTING" den Punkt "A-VOL SENS" wahlen.

6. Entweder auf der rechten Seite des Displays die Blätterbewegung ↑ durchführten oder den [ROTARY]-Knopf drehen, um die Empfindlichkeit einzustellen.
Jedes Mal wenn der [ROTARY]-Knopf gedreht wird, ändert sich die Einstellung in der folgenden Reihenfolge:
OFF (keine Anpassung der Lautstärke) LOW (Anpassung der Lautstärke: gering) MID-LOW MID MID-HIGH HIGH (Änderung der Lautstärke: stark) ...
7. Die [A]-Taste betätigten, um zur vorherigen Betriebsart zusückzukehren.
Durchführung einer Systemprüfung
These Funktion ermitteligt es, bei Bedarf vom Einstellmodus aus eine Systemprüfung durchzuführen.
1. Die [A]-Taste betätigten, um den Einstellmodus aufzurufen.
2. Auf der Einstellungen-Wahlanzeige mit der Blätterbewegung unter "SETTING" den Punkt "SYSTEM CHECK" wahren.

3. START berühren und mindestens 1 Sekunde lang halten.
Auf dem Display entscheid "System Check".
4. Den [ROTARY]-Knopf drucken. Die Systemprüfung beginnnt.
Wenn die Systemprüfung abgeschlossen ist, entscheidiert "Completed" (Abgeschlossen) im Display.
5. Den [ROTARY]-Knopf erneut drücken. Die Hauptanzeige für den Radiobetrieb erscheint.
Verwendung der Diebstahlsicherungsfunktion (CODEMATIC)
These Funktion bewirkt, dass Personen, deren Tastensequenz nicht besteht ist, diese Gerät nicht ohne weiteres in Betriebnehmen konnen. Der Sicherungcode (Touch Code) wird angezeigt, wenn das DCP aufgesetzt ist und das Gerät bei aktivierter "CODEMATIC"-Funktion eingeschaltet wird.
Wenn die auf thisem Bildschirm dargesteltere Anzeige in der richtigen Reihenfolge angetippt wird, erscheint die Meldung "SUCCESSIONAL" (Erfolg), und das Gerät wird wieder ausgeschaltet.
Beim nachsten Einsatzen wird der Touch Code nicht mehr angezeigt, sondern die Hauptanzeige des Radio- bzw. CD-Modus erscheint.
1. Die [A]-Taste betätigten, um den Einstellmodus aufzurufen.
2. Auf der Einstellungen-Wahlanzeige mit der Blätterbewegung unter "SETTING" den Punkt "CODEMATIC" wahren.

Für "CODEMATIC" werden zwei verschiedene Arten von Einstellungspunkten angezeigt: Punkte, für die auf der rechten Seite des Displays "ON" oder "OFF" angezeigt wird, und Punkte, für die auf der rechten Seite des Displays "INPUT" angezeigt wird. Hier den Punkt wahren, für den auf der rechten Seite des Displays "ON" oder "OFF" angezeigt wird.
3. Entweder auf der rechten Seite des Displays die Blätterbewegung ↑durchführten oder den [ROTARY]-Knopf drehen, um die Einstellung “ON” oder “OFF” zu wahren.
4. Auf der Einstellungen-Wahlanzeige mit der Blätterbewegung unter “SETTING” den Punkt “CODEMATIC” wahren. Hier den Punkt wahren, für den auf der rechten Seite des Displays “INPUT” angezeigt wird.
5. INPUT antippen. Der Touch Code-Bildschirm wird angezeigt.
6. Den Touch Code eingeben.
* Eine von 5 Stellen (links, Mitte, rechts, oben rechts oder unter rechts) auf dem Display antippen.
Jedes Antippen wird durch eine der Touch Code-Anzeigen quittiert.
* Beispiel: Die Felder (1) Mitte, (2) oben rechts, (3) links und (4) unter rechts in dieser Reihenfolge antippen. Es ist auch möglich, mehrmals die gleiche Stelle anzutippen.
Nach viermaligem Tippen ertont ein langer Signatlon, und der ursprüngliche Modus wird wieder aktiviert.
Abbrechen der CODEMATIC-Funktion
Wenn Sie die Reihenfolge vergessen haben, tippen Sie entweder die Felder ① unter rechts, ② links, ③ oben rechts und schließlich ④ rechts in dieser Reihenfolge an oder drücken Sie [SCN] auf der Fernbedienung.

7. BEDIENUNG DES ZUBEHÖRS
CD-Wechsler-Betrieb
CD-Wechsler
Wenn ein als Zubehör erhältlicher CD-Wechsler über das CeNET-Kabel angeschlossen wurde, kann diese Gerät die Funktionen des CD-Wechslers steuern. Das Gerät kann mit insgesamt 2 über CeNET-Kabel angeschlossenen CD-Wechslern verbunden werden.
DVD-Wechsler
Wenn ein als Zubehör erhältlicher DVD-Wechsler über das CeNET-Kabel
angeschlossen wurde, kann diese Gerät die Funktionen des DVD-Wechslers steuern. Zur Betrachtung einer DVD wird ein als Zubehör erhältlicher Monitor besteht. Die Betriebs- und Anzeigefunktionen des DVD-Wechslers in Verbindung mit thisem Gerät sind vereinfacht, und es werden nicht sümmtliche Funktionen des DVD-Wechslers unterstützt. Zur Bedienung des DVD-Wechslers wird die mit dem DVD-Wechsler gefelte Fernbedienung verwendet. Nähere Informationen hierzu enthalt die mit dem DVD-Wechsler gefelfte Bedienungsanleitung.
■ Bei Anschluss von 2 CD-Wechslern
Den [ROTARY]-Knopf drucken, um den an这点es Gerät angeschlssenen Wechsler auszuwahlen. (Mit jedem Druck auf den [ROTARY]-Knopf wird der gewählte Wechsler umgeschaltet.)
- Wenn der CD-Wechsler kein Magazin enthalt, wird "NO MAG" angezeigt. Enthalt das Magazin keine CD, wird für die betreffende Disc-Nr. "NO DISC" angezeigt.
- Für Einzelheiten zur Titelanzeige siehe "Umschaltung der Titelanzeige" (siehe Seite 14).
Bildschirmanzeigen im Wechslermodus
■ Hauptanzeige (CD-Wechsler-Modus)
These Anzeige entscheid, wenn durch Drucken des [ROTARY]-Knopfes der CD-WechslerModus gewählt wird.

Wenn Sie den linken Teil der Anzeige mindestens 1 Sekunde lang berühren, wird in den einfachen Bedienungsmodus umgeschaltet.

Titel-/Spieldaueranzeige
T01/02: 00: Die Nummer des momentan abgespielten Titels und die Spieldauer werden angezeigt.
Im Standardmodus kann mit der
Blätterbewegung ⓹ ⓸ ⓺ oder der
Durchlaufbewegung der abzuspielende
Titel ausgewählt bzw. ein Schneller Titelvorlauf oder -rücklauf durchgefuhrt werden.
Titelnamensanzeige
Durch Antippen wird die Anzeige umgeschaltet.
Disc-Nr.-Anzeige
Mit der Blätterbewegung im
Normalmodus kann eine Disc gewählt werden.
MODE
Durch Antippen werden Unterfunktionen angezeigt. Wenn diese Anzeige berührt und mindestens 1 Sekunde lang gehalten wird, erscheidt die Disc-Liste.
T-SCAN/D-SCAN
These Anzeige erscheint während der
Anspielwiedergabe. Durch Antippen von T-
SCAN/D-SCAN wird die Anspielwiedergabe abgebrochen.
T-RPT/D-RPT
These Anzeige erscheint während der
Wiedergabewiederholung. Durch Antippen
von T-RPT/D-RPT wird die
Wiedergabewiederholung beendet.
T-RDM/D-RDM
These Anzeige erscheint während der
Zufallswiedergabe. Durch Antippen von T-
RDM/D-RDM wird die Zufallswiedergabe beendet.
DISC
Durch Antippen wird die Wiedergabe der
nachsten Disc gestartet.
(nier der einfachen Bedienanzeige)
Durch Antippen wird der abzuspielende Titel ausgewählt.
Wenn these Anzeigen berührt und gehalten werden, erfolgt ein Schneller Titelvorlauf bzw. - rücklauf.
Disc-Listen-Anzeige (CD-WechslerModus)
Thesee Lieste wird angezeigt, wenn auf der Hauptanzeige MODE berührt und mindestens 1 Sekunde lang gehalten wird.

Disc-Name
>>: Auswahl lauft
Beim Antippen eines Disc-Namens wird wieder die Hauptanzeige aufgerufen, und die Wiedergabe beginnnt mit dem ersten Titel auf der angetipten Disc.
←PREV-RTN:
Durch Antippen wird wieder die vorherige Titelnamensliste angezeigt. Wenn Sie diese Anzeige berühren und mindestens 1 Sekunde lang halten, erscheidt auf dem Display wieder die Hauptanzeige.
NEXT:
Durch Antippen wird die jeweils{nachste Titelnamensliste aufgerufen.
VORSICHT
Nicht jeder CD-Wechsler kann CD-ROM-Discs abspielen; dies ist vom Modell abhängig.
Hinweis:
- Bestimmte CDs, die im CD-R-/CD-RW-Modus gebrannt wurden, können u. U. nicht verwendet werden.
Auswahl des Wechsler-Modus
1. Den [ROTARY]-Knopf drucken, um CD-Wechsler-Betrieb zu wahlen.
\* Betriebsarten fur nicht angeschlossene Geräte werden nicht angezeigt. Nach der Umschaltung auf CD-Wechsler-Betrieb beginnnt automatisch die Wiedergabe.
Pausieren der Wiedergabe
1. Die [▶■]-Taste betätigten.
Fortsetzen der Wiedergabe
1. Die [ ] -Taste nochmals betätigten.
Auswahl einer CD
1. Auf der Anzeige der Disc-Nr. die Blätterbewegung 45 durchführren, um eine Disc auszuwahlen. Die Wiedergabe beginnt.
* Wenn das Magazin die gewähte Disc nicht enthalt, wird die Nummer für die betreffende Disc nicht angezeigt.
* Durch Antippen von DISC ↑ wird die Wiedergabe der{nachsten Disc gestartet.
Auswahl einer Disc aus der Disc-Listen-Anzeige
1. MODE berühren und mindestens 1 Sekunde lang halten.
Die Disc-Liste wird angezeigt. Durch Antippen von NEXT wird der jeweils folgende Teil der Disc-Liste abgerufen.
2. Den Disc-Namen antippen.
* Wenn das Magazin die gewählte Disc nicht enthalt, wird für die betreffende DiscNr. "NO DISC" angezeigt.
* Wenn die momentan abgespielete Disc gewählt wird, startet die Wiedergabe wieder mit dem ersten Titel dieser Disc (Top-Funktion).
Wahl eines Titels
1. Zum Horen des nachsten Titels auf der Titelanzeige die Blätterbewegung durchführen.
2. Zum Horen des vorherigen Titels auf der Titelanzeige zweimal die Blätterbewegung
durchfuhren.
Mit wird der{nachste Titel abgeschweit.
Wenn Sie die Blätterbewegung 艹 mehrals durchfuhren, wird dadurch um so viele Titel weitergesprungen, wie oft Sie die Blätterbewegung 艹 durchgeführt haben, und der entsprechende Titel wird abgeschliet. Mit 艹 wird der vorausgegangene Titel abgeschliet. Wenn Sie die Blätterbewegung
喜 mehrmals durchfuhren, wird dadurch um so viele Titel zurückgesprungen, wie oft Sied die Blätterbewegung 喜 durchgefuhlrt haben, und der entsprechende Titel wird abgespiel.
* Wenn die Blätterbewegung ↑ auf der Titelanzeige zweimal durchgeführt wird, während sich die Wiedergabe noch am Titelanfang befindet, wird in manchen Fällen der um 2 Titel darüber liegende Titel abgespielt.
Schneller Vorlauf / Schneller Rücklauf
1. Um einen Schnellen Vorlauf auszulösen, auf der Titelanzeige die Durchlaufbewegung durchführren.
2. Um einen schellen Rücklauf auszulösen, auf der Titelanzeige die Durchlaufbewegung durchführren.
Top-Funktion
Die Top-Funktion beginnt die Wiedergabe beim ersten Titel der momentan abgespielten Disc.
1. MODE berühren und mindestens 1 Sekunde lang halten.
Die Disc-Liste wird angezeigt. Durch
Antippen von NEXT wird der jeweils folgende Teil der Disc-Liste abgerufen.
2. Den Disc-Namen antippen.
* Wenn das Magazin die gewählte Disc nicht enthalt, wird für die betreffende DiscNr. "NO DISC" angezeigt.
* Wenn die momentan abgespielte Disc gewählt wird, startet die Wiedergabe wieder mit dem ersten Titel dieser Disc.
Anspielwiedergabe
Die Anspielfungtion spielt automatisch die ersten 10 Sekunden jedem Titels auf einer Disc an. Diese Funktion lauft auf der Disc so lange weiter, bis sie abgebrochen wird.
Die Anspielfungtion ist hilfreich, wenn ein bestimmer Titel gesucht wird.
1. MODE antippen.
2. T-SCAN antippen. Die Anzeige MODE ändert sich in "T-SCAN", und die Anspielwiedergabe beginnt.
* Die Anspielwiedergabe beginnt bei dem auf den momentan abgespielten Titel folgenden Titel.
Aufheben der Anspielwiedergabe
1. T-SCAN antippen.
Die Anzeige T-SCAN ändert sich in "MODE", und es wird wieder der Titel abgeschliet, der beim Antippen von T-SCAN wiedergegeben wurde.
Disc-Anspielwiedergabe
Die Disc-Anspielfung spält automatisch die ersten 10 Sekunden des ersten Titels auf jeder Disc im momentan gewählten CD-Wechsler an. Diese Funktion lauft automatisch so lange weiter, bis sie abgebrochen wird.
Die Disc-Anspielwiedergabe ist hilfreich, wenn eine bestimmte CD ausgewählten werden soll.
1. MODE antippen.
2. D-SCAN antipinen. Die Anzeige MODE ändert sich in "D-SCAN", und die Anspielwiedergabe beginnnt.
* Die Disc-Anspielwiedergabe beginnt bei der auf die momentan abgespielte Disc folgenden Disc.
■ Aufheben der Disc-
Anspielwiedergabe
1. D-SCAN antippen.
Die Anzeige D-SCAN ändert sich in
"MODE", und es wird wieder der Titel abgeschpielt, der beim Antippen von D-SCAN wiedergegeben wurde.
Wiedergabewiederholung
Bei der Wiedergabewiederholung wird der aktuelle Titel kontinuierlich abgespielt. Diese Funktion lauft automatisch so lange weiter, bis sie abgebrochen wird.
1. MODE antippen.
2. T-REPEAT antippen.
Die Anzeige MODE ändert sich in "T-RPT", und die Wiedergabewiederholung beginnt.
■ Aufheben der
Wiedergabewiederholung
1. T-RPT antippen.
Die Anzeige T-RPT ändert sich in "MODE", und die normale Wiedergabe beginnnt mit dem Titel, der beim Antippen von T-RPT abgespielt wurde.
Disc-
Wiedergabewiederholung
Nachdem sãmtliche Titel auf der aktuellen Disc abgespielt worden sind, beginnt die Disc-Wiedergabewiederholung automatisch mit der Wiedergabe der aktuellen Disc ab dem ersten Titel. Diese Funktion lauft automatisch so lange weiter, bis sie abgebrochen wird.
1. MODE antippen.
2. D-REPEAT antippen.
Die Anzeige MODE ändert sich in "D-RPT", und die Disc-Wiedergabewiederholung beginnnt.
■ Aufheben der Disc
Wiedergabewiederholung
1. D-RPT antippen.
Die Anzeige D-RPT ändert sich in "MODE", und die normale Wiedergabe beginnt mit dem Titel, der beim Antippen von D-RPT abgespielt wurde.
Zufallswiedergabe
Bei der Zufallswiedergabe werden einzelne Titel auf der Disc ohne Einhaltung einer bestimmten Reihenfolge ausgewählt und abgeschweit. Diese Funktion lauft automatisch so lange weiter, bis sie abgebrochen wird.
1. MODE antippen.
2. T-RANDOM antippen. Die Anzeige MODEändert sich in "T-RDM", und die Zufallswiedergabe beginnt.
Aufheben der Zufallswiedergabe
1. T-RDM antippen. Die Anzeige T-RDM ändert sich in "MODE", und die normale Wiedergabe beginnt mit dem Titel, der beim Antippen von T-RDM abgespielt wurde.
Disc-Zufallswiedergabe
Bei der Disc-Zufallswiedergabe werden einzelne Titel oder Discs ohne Einhaltung einer bestimmten Reihenfolge automatisch ausgewählt und abgeschiert. Diese Funktion lauft automatisch so lange weiter, bis sie abgebrochen wird.
1. MODE antippen.
2. D-RANDOM antippen. Die Anzeige MODEändert sich in "D-RDM", und die Zufallswiedergabe beginnt.
Aufheben der Disc-Zufallswiedergabe
1. D-RDM antippen. Die Anzeige D-RDM ändert sich in "MODE", und die normale Wiedergabe beginnnt mit dem Titel, der beim Antippen von D-RDM abgespielt wurde.
Fernsehbetrieb
Fernsehtuner-Funktionen
Wenn ein wahlweiser Fernsehtuner über das CeNET-Kabel angeschlossen wird, dann steuert these Gerät alle Fernsehtuner-Funktionen. Für Fernsehen ist ein Fernsehtuner und -monitor erforderlich.
Bildschirmanzeigen im TV-Betrieb
Hauptanzeige
These Anzeige erscheint, wenn Sie den [ROTARY]-Knopf drucken und TV-Betrieb wahlen.

Wenn Sie den linken Teil der Anzeige mindestens 1 Sekunde lang berühren, wird in den einfachen Bedienungsmodus umgeschaltet.

Kanalanzeige
1ch: Der momentan empfangene Kanal wird angezeigt.
Wenn im Normalmodus die Bewegung 山 oder durchgefuhrt wird, aktiviert dies den Sendersuchlauf bzw. die manuelle Sendereinstellung.
Namensanzeige
3ch: Der Name des momentan empfangenen Senders wird angezeigt.
VTR: Im Video-Modus
Durch Antippen wird die Anzeige umgeschaltet.
Wellenbereich-Anzeige
TV1: Wellenbereich-Name
Anzeige der Festsender-Nummer
Im Normalmodus wird mit der Blätterbewegung
一 ein der eingespeicherten Festsender angewählt.
MODE
Durch Antippen werden Unterfunktionen angezeigt. Wenn Sie diese Anzeige mindestens 1 Sekunde lang berühren, erscheint die Liste der eingespeicherten Voreinstellungen.
P-SCAN: Diese Anzeige erscheidt während der Festsenderanspielung. Durch Antippen wird die Festsenderanspielung abgebrochen.
A-STORE: These Anzeige erscheidt während der automatischen Speicherung. Durch Antippen wird die automatische Speicherung abgebrochen.
BAND
Beim Antippen dieser Anzeige wird der Wellenbereich umgeschaltet.
Wenn Sie diese Anzeige mindestens 1 Sekunde lang berühren, wird zwischen manueller Sendereinstellung und Sendersuchlauf hin- und hergeschaltet.
(1) (nur in der einfachen Bedienanzeige)
Durch Antippen dieser Tasten wird der Sendersuchlauf gestartet bzw. die schrittweise Einstellung durchgeführt (bei manueller Einstellung).
Durch Berühren und Halten dieser Tasten wird die Schnelleinstellung gestartet (bei manueller Einstellung).
Anzeige der Festsenderliste
These listed here, which are the most important for the study of the human brain.
Sendername

>>:
Suchlauf lauft
RTN:
Durch Antippen wird wieder die Hauptanzeige aufgerufen.
Auswahl des TV-Modus
1. Den [ROTARY]-Knopf drücken, um TV-Betrieb zu wahlen.
Bei jedem Druck auf den [ROTARY]-Knopfändert sich die Betriebsart in der folgenden Reihenfolge:
* Betriebsarten für nicht angeschlossene Geräte werden nicht angezeigt.
Umschaltung des Wellenbereichs
1. Tippen Sie BAND an, um den Wellenbereich umzuschalten.
Jedes Mal wenn Sie BAND antippen, wird der Wellenbereich umgeschaltet.
TV1 TV2 TV1...
Sendersuchlauf
Der Sendersuchlauf ist eine Funktion zur automatischen Einstellung von Sendern mit gutem Empfangssignal.
1. Wenn MANU angezeigt wird, BAND ber und mindestens 1 Sekunde lang halten Die automatische Sendereinstellung ist möglich, sobald MANU verschwindet.
2. Auf der Frenuzanzeige die Durchlaufbewegung durchfuhren. SEEK UP/SEEK DOWN wird angezeigt, und die Sendereinstellung beginnnt. Bei Sendern mit gutem Empfang hält der Suchlauf automatisch an.
Abbrechen der Sendereinstellung
1. Auf der Frenuzanzeige erneut die Durchlaufbewegung durchfuhren.
Manuelle Sendereinstellung
Es gibt 2 Arten der Sendereinstellung: Schnelleinstellung und schrittweise Einstellung. Bei der schrittweisen Sendereinstellung ändert sich die Freqenz jeweils in Einzelschritten. Bei der Senderschnelleinstellung kann die gewünschte Freqenz schnell eingestellt werden.
1. Wenn MANU nicht angezeigt wird, BAND berühren und mindestens 1 Sekunde lang halten.
Die manuelle Sendereinstellung ist nur möglich, wenn MANU angezeigt wird.
2. Mit Hilfe der Kanalanzeige einen Kanal einstehen, auf dem eine Sendung ausgestrahlt wird.
Es gibt 2 Arten der manuellen
Sendereinstellung: schrittweise Einstellung und Schnelleinstellung.
* Bei der schrittweisen Sendereinstellung ändert sich die Freqenz jeweils in Einzelsritten.
Auf der Frenuzanzeige die Blätterbewegung ↑ durchführten.
* Bei der Schnelleinstellung werden die Kanäle kontinuierlich durchgeschaltet.
Auf der Kanalanzeige die
Durchlaufbewegung durchfuhren.
Die Frequenzanzeige lauft durch, bis Sie den Finger wieder vom Displayephmen.
Abruf eines Festsenders
Mit dieser Funktion kann der Benutzer einen Festsender ausgehalten.
1. MODE berühren und mindestens 1 Sekunde lang halten.
Die Listederingespeicherten Sender wird angezeigt.
2. Tippen Sie den gewünschten Sender an.
* Zum Einstellen des Senders kann auch die Blätterbewegung ↑ ↑ auf der Festsender-Nr. durchgeführt werden.
Abbrechen der Sendereinstellung
1. RTN antippen.
Festsender-Speicherplatz
Es können insgesamt 12 TV-Sender gespeichert werden (6 x TV1 und 6 x TV2). Sie können mit dieser Funktion ihre bevorzugten TV-Sender auswahlen und zum späteren Abrufen einspeichern.
1. BAND antippen, um den Wellenbereich umzuschalten.
2. An der Kanalanzeige den gewünschten Sender einstehen.
3. MODE berühren und mindestens 1 Sekunde lang halten.
Die ListederingespeichertenSender wird angezeigt.
4. Die Nummer des Festsenders für die Speicherung berühren und mindestens 2 Sekunden lang halten.
Ein langer Signalon zeigt an, dass der Sender gespeichert wurde.
Wenn nur ein kurzer Signatlon zu horen ist, wurde der Sender nicht gespeichert. In thisem Fall den Vorgang von Schritt 1 an wiederholen.
Automatische Speicherung
Bei der automatischen Speicherung werden 6 Fensehsender automatisch angewählt und jeweils an den einzelnen Festspeicherplätzen abgelegt.
Wenn weniger als 6 Sender mit gutem Empfang gefunden werden konnen, bleiben die bisherigen Sender gespeichert, und nur die stärkeren Sender werden eingespeichert.
1. MODE antippen.
2. A-STORE berühren und mindest Sekunden lang halten.
Die MODE-Anzeige ändert sich in "A-STORE", und die Nummer des momentan eingespeicherten Festsenders erscheint in der Festsender-Nummernanzeige.
* Es werden automatisch Sender mit gutem Empfang gesucht und beginnend mit der niedrigsten Sendefrequenz an den Festsender-Speicherplätzen Nr. 1 bis 6 abgelegt.
Hinweise:
- Bei der automatischen Speicherung werden die bisher gespeicherten Sender gelöscht.
- Wenn weniger als 6 Sender mit gutem Empfang gefunden werden, wird die automatische Speicherung (wieder mit den unteren Frenzen beginnend) wiederholt. Wenn auch nach dieser zweimaligen automatischen Speicherung weniger als 6 Sender gefunden wurden, bleiben die bisher gespeicherten Sender erhalten.
Festsenderanspielung
Bei der Festsenderanspielung werden die im Speicher abgelegten Sender in der momentan gespeicherten Reihenfolge nacheinander angewählt, damit Sie die momentan ausgestrahnten Sendungen sichen können.
1. MODE antippen.
2. P-SCAN antippen.
Die MODE-Anzeige ändert sich in "P-SCAN", und die Nummer des momentan angespielten Festsenders erscheint in der Festsender-Nummernanzeige.
* Die momentan gespeicherten Festsender werden nacheinander jeweils mindestens 7 Sekunden lang empfangen. Sender mit schlechtem Empfang werden übersprungen, und der Empfang wird bei dem{nachsten Sender fortgesetzt. Die TV-Sender werden in der folgenden Reihenfolge angewählt:
$$
\begin{array}{l} \text {T V 1 (1 \to 6) \to T V 2 (1 \to 6) \to T V 1 (1 \to} \\ 6) \text {u s w .} \end{array}
$$
Abbrechen der Festsenderanspielung
1. P-SCAN antippen.
The P-SCAN-Anzeige ändert sich in "MODE", und der Radioempfang wird mit dem Sender fortgesetzt, der beim Antippen von P-SCAN empfangen wurde.
Ansehen eines Videoprogramms
Der Fernseh-Tuner verfügbar über einen VTR-Eingang, an den 1 externes Gerät angeschlossen werden kann. An den Fernseh-Tuner einen 12-V-Videocassettenspieler (VCP) oder -Videocassettenrecorder (VCR) anschließen.
1. Die [▶III]-Taste betätigten.
"VTR" wird angezeigt, und das Gerät schaltet auf Videobetrieb um.
* Der Fernsehbildschirm schaltet auf den Videoeingang um, so dass
Videoprogramme angesehen werden können.
Rückkehr zum TV-Betrieb
1. Die [ ] -Taste nochmals betätigen.
Einstellung des Fernseh-Empfangsbereichs (TV AREA)
Bei Einstellung des Fernseh-Empfangsbereichs ändert sich die Bereichseinstellung des TV-Tuners.
Die werkseitige Ausgangseinstellung ist "GERMANY" (Deutschland).
1. Die [A]-Taste betätigten, um den Einstellmodus aufzurufen.
2. Auf der Anzeige der Einstellungspunkte mit der Blätterbewegung unter "TUNER" den Punkt "TV AREA" wahren.

3. Entweder auf der rechten Seite des Displays die Blätterbewegung t durchführren oder den [ROTARY]-Knopf drehen, um den Bereich zu wahlen.
4. Die [A]-Taste betätigten, um zur vorherigen Betriebsart zusückzukehren.
Einstellung für "TV Diversity" (TV DIVER)
Die Empfangseinstellung für die am TV-Tuner angeschlossene Fernsehantenne kann geändert werden.
- Für diesen Punkt "OFF" einstellen, wenn keine TV-Diversity-Antenne verwendet wird.
Die werkseitige Voreinstellung ist "ON".
1. Die [A]-Taste betätigten, um den Einstellmodus aufzurufen.
2. Auf der Einstellungen-Wahlanzeige mit der Blätterbewegung ↑ unter “TUNER” den Punkt “TV DIVER” wahren.

3. Entweder auf der rechten Seite des Displays die Blätterbewegung t durchführren oder den [ROTARY]-Knopf drehen, um die Einstellung "ON" oder "OFF" zu wahlen.
4. Die [A]-Taste betätigten, um zur ursprünglichen Betriebsart zurückzukehren.
DAB-Steuerfungtion
Wenn ein CeNET-Kabel zum Anschlieben eines DAB-Geräts (DAH913 oder DAH923) (getrennt erhältlich) verwendet wird, dann können alle Funktionen ausgeführrt werden.
Hören eines DAB-Senders
1. Den [ROTARY]-Knopf drücken, um die Betriebsart zu wechseln.
Hinweise:
- Beim normalen Empfang und beim Festsenderempfang erscheint auf dem Display die gleiche Anzeige wie beim Empfang eines DAB-Senders.
Die Anzahl der Programme und die Sendezeiten sind je nach DAB-Sender entsprechlich.
- Bei zu schwachen DAB-Signalen wird der AudioAusgang stumm gescheltet.
Sendersuchlauf
1. Den [ROTARY]-Knopf drücken, um DAB-Betrieb zu wahlen.
2. Auf der linken Seite des Displays die Durchlaufbewegung durchführten. Wenn das Hauptgerät einen DAB-Sender empfängt, entscheid im Display "DAB".
* Wenn kein DAB-Sender gefunden wird, bricht das Hauptgerät den Suchlauf ab. Das Display kehrt in den vorherigen Anzeigemodus zurück.
Manuelle Sendereinstellung
1. Den [ROTARY]-Knopf drucken, um DAB-Betrieb zu wahlen.
2. Wenn "MANU" nicht angezeigt wird, BAND berühren und mindestens 1 Sekunde lang halten.
Manuelle Sendereinstellung ist möglich, wenn "MANU" angezeigt wird.
3. Auf der linken Seite des Displays die Blätterbewegung durchführung, um den Sender einzustellen.
* Wenn über 7 Sekunden lang kein Bedienvorgang erfolgt, wird die manuelle Sendereinstellung abgebrochen, und das Display kehrt in den vorherigen Anzeigemodus zusammen.
Umschaltung von Programmen
1. Den [ROTARY]-Knopf drucken, um DAB-Betrieb zu wahlen.
2. Auf der linken Seite des Displays die Blätterbewegung durchführren, um
zwischen den Programmen des DAB-Senders umzuschalten.
Hinweis:
Die Programmnamen können je nach DAB-Programm identisch sein.
Programmanspielung
Mittels dieser Funktion werden die einzelnen empfangbaren Programme eines eingestellten DAB-Senders der Reihe nach 10 Sekunden lang angespielt. Dies ist für die Suche nach einem gewünschten Programm hifreich.
1. Den [ROTARY]-Knopf drücken, um DAB-Betrieb zu wahlen.
2. MODE antippen.
3. S-SCAN antippen. "S-SCAN" wird angezeigt, und das Gerät beginnnt, alle Programme der Reihe nach 10 Sekunden lang anzuspielen. Jedes Mal wenn das Hauptgerät ein Programm anspielt, wird der Programmname im Display angezeigt.
4. Um die Programmanspielung zu beenden, wenn das gewünschte Programm gefunden ist, S-SCAN antippen.
Manuelle Speicherfunktion
Das Hauptgerät besitzt eine manuelle Speicherfunktion für DAB-Programme. Die Festsendertasten konnen mit bis zu 18 Programmen (jeweils 6 Programme) belegt werden.
[M1], [M2] und [M3]
1. Den [ROTARY]-Knopf drücken, um DAB-Betrieb zu wahlen.
2. BAND berühren, um einen der oben gezeigten Bereiche zu wahlen.
3. MODE berühren und mindestens 1 Sekunde lang halten. Die Liste der eingespeicherten Sender wird angezeigt.
4 Die Nummer des Festsenders für die Speicherung berühren und mindestens 2 Sekunden lang halten. Ein langer Signatlon zeigt an, dass der Sender gespeichert wurde.
Wenn nur ein kurzer Signatton zu horen ist, wurde der Sender nicht gespeichert. In thisem Fall den Vorgang von Schritt 1 an wiederholen.
Hinweis:
- Unterbrechungsprogramme (PTY oder INFO) können nicht manuell eingespeichert werden.
Abruf eines
Festspeicherprogramms
1. Den [ROTARY]-Knopf drücken, um DAB-Betrieb zu wahlen.
2. BAND antippen.
Jedes Mal wenn Sie BAND antippen,
wechselt die Anzeige in der folgenden
Reihenfolge:
MEMO1 MEMO2 MEMO3 MEMO1...
3. Auf der rechten Seite des Displays die Blätterbewegung durchführren, um ein Festspeicherprogramm abzurufen.
AF-Funktion
Um einen optimalen Empfang beizubehalten, wird mittels der AF-Funktion auf eine andere Frequenz im gleichen Sendernetz umgeschaltet.
Die werkseitige Standardeinstellung ist "ON".
- Sollte der Empfang des derzeitgen Senders schwacher werden, dann wird im Display "SEARCH" angezeigt und das Radioucht das gleiche Programm auf einer anderen Freqenz.
- Für Einzelheiten zur "AF-Funktion" (siehe Seite 26) siehe den Abschnitt "RDS-Betrieb" der jeweiligen Bedienungsanleitung.
Ausschaltung der AF-Funktion (OFF)
Einschaltung der AF-Funktion (ON)
- AF-Funktion-Umschaltung zwischen RDS und DAB
Wenn das gleiche Programm von RDS und DAB gesendet wird und diese Funktion eingeschaltet ist, dann schaltet das Hauptgerät automatisch auf den Sender mit dem besseren Empfang um.
TA-Funktion
(Verkehrsdurchsage)
Wenn bei TA-Bereitschaftsbetrieb, eine Verkehrs durchsage beginnt, hat der Empfang eines Senders mit Verkehrs durchsage Vorrang, damit diese ungeachtet des Funktionsmodus gehört werden kann. Eine automatische Sendereinstellung für Verkehrsprogramme (TP) ist ebenfalls möglich.
- Nur wenn "TP" im Display aufleuchtket, die diese Funktion angewendet werden. We "TP" aufleuchtet, bebedeut dies, daß der empfangene DAB- oder RDS-Sender Programme mit Verkehrsdurchsagen er
- Für Einzelheiten zu "TA-Funktion" (siehe Seite 27) siehe den Abschnitt "RDS-Betrieb" der jeweiligen Bedienungsanleitung.
Einstellung des TA-Bereitschaftsbetriebs
Aufhebung des TA-Bereitschaftsbetriebs
- SuchenachenaemTP-Sender
Hinweise:
- Wenn kein TP-Sender empfangen wird, stoppt das Hauptgerät den Suchbetrieb.
- Im Display leuchtet "TP" auf, wenn eine TP-kennung von einem RDS-Sender übertragen wird. In solch einem Fall, die [TA]-Taste für TP-Sendersuchlauf betätigten. Für Rückkehr zur vorherigen Betriebsart die [TA]-Taste erneut drücken.
INFO (Ankündigung)
Wenn bei INFO-Bereitschaftsbetrieb das eingesestte Ankündigungssprogramm beginnt, schaltet das Hauptgerat automatisch auf das eingesestte Ankündigungssprogramm.
- Einstellung des INFO-Bereitschaftsbetriebs
Wenn die [TA]-Taste betätig und für 1 Sekunde oder länger gedrück gehalten wird, dann leuchtet im Display "INFO" auf und das Hauptgerät wird auf CFO-Bereitschaftsbetrieb eingestellt, bis die eingestellte Ankündigung gesendet wird.
Wenn die Sendung der eingestellen Ankündigung beginnnt, wird die Ankündigung im Display angezeigt. Wird die [TA]-Taste während Empfang der eingestellen Ankündigung betätig und für 1 Sekunde oder länger gedrück gehalten, dann wird der Empfang des eingestellen Ankündigungssenders aufgehoben und das Hauptgerät schaltet auf INFO-Bereitschaftsbetrieb.
- Aufhebung des INFO-Bereitschaftsbetriebs für Aufhebung des INFO-Bereitschaftsbetriebs, die [TA]-Taste betätigten und für 1 Sekunde oder länger gedrückt halten.
Informationseinstellung
These Funktion dient der Einstellung für INFORMATION EIN oder AUS bei Information-Unterbrechungsbetrieb.
Es können bis zu 6 Informationsarten eingestellt werden.
Jede der folgenden 6 Informationsarten kann eingestellt werden:
INFORMATION DEUTSCH Inhalt Reisen Reisedurchsage Warnung Warnung/Service Aktuell Aktuelle Meldung Wetter Regionales Wetter Service Veranstaltungsmeld Eilmeld Sonderveranstaltung
1. MODE antippen.
2. INFO SEL antippen, um den "INFO SEL" Modus aufzurufen.
3. Entweder in der Mitte des Displays die Blätterbewegung durchführten oder den [ROTARY]-Knopf drehen, um eine Informationskategorie zu wahren. Es stehen 6 Kategorien zur Wahl:
Travel (Reisen) Warning (Warning)
News (Aktuell) Weather (Wetter)
Event(Service) Special(Filmeld)
Event (Services) · Special (Emphasis) · Travel (Reisen)...
4. Auf der rechten Seite des Displays die Blätterbewegung 13 durchführren, um die Einstellung "ON" oder "OFF" zu wahren.
5. RTN antippen.
PTY
Mittels dieser Funktion kann die eingestellte Programmart ungeachtet des Funktionmodus gehört werden.
- Für DAB und RDS kann ein gemeinsames PTY-Programm gewählt werden.
- Bei DAB PTY und RDS PTY besitzt der erhempfangene PTY-Sender Vorrang gegenüber den anderen.
- PTY-Sender können noch nicht in allen Ländern empfangen werden.
- Bei INFO-Bereitschaftsbetrieb haben INFO-Sender Vorrang vor PTY-Sendern.
- Bei TA-Bereitschaftsbetrieb haben TP-Sender Vorrang vor PTY-Sendern.
- Für Einzelheiten zu "PTY" (siehe Seite 28) siehe den Abschnitt "RDS-Betrieb" in der jeweiligen Bedienungsanleitung.
Einstellung des PTY-Bereitschaftsbetriebs
Aufhebung des PTY-Bereitschaftsbetriebs
Aufhebung einer PTY-Senderunterbrechung
- PTY-Einstellung
- PTY-Suche
- PTY-Festsenderspeicher
Notrufmeldung
Wenn eine Notufremdung empfangen wird, wird jeglicher Funktionsmodusbetrieb gestopt. Im Display wird "ALARM" angezeigt und die Notufremdung kann gehen.
- Für Einzelheiten zur "Notrufmeldung" (siehe Seite 29) siehe den Abschnitt "RDS-Betrieb" in der jeweiligen Bedienungsanleitung.
Aufhebung der Notrufmeldung
Änderung der
Anzeigensprache für PTY and INFO
Es kann eine von 4 Sprachen (Englisch, Deutsch, Schwedisch oder Französisch) für die im Display angezeigten PTY- und INFOAngaben gewählt werden.
Die werkseitige Ausgangseinstellung ist "ENGLISH".
- Einzelheiten zur Änderung der PTY-Display-Sprache" (siehe Seite 30) enthalt der Abschnitt "RDS-Betrieb" der betreffenden Bedienungsanleitung.
Lautstärkeeinstellung für TA, INFO, Notrufmeldung (ALARM) und PTY
Die Lautstärke für TA, INFO, ALARM und PTY Unterbrechungen kann während TA, INFO, ALARM und PTY Unterbrechung eingestellt werden. Die folgende Bedienung entsprechend dem angeschlossenen Modells ausführten.
- Die werkseitige Standardeinstellung ist "15". Wahlrend einer TA, INFO, ALARM oder PTY Unterbrechung zur Einstellung der Lautstärke auf einen gewünschten Pegel (0 bis 33), den [ROTARY]-Knopf im Uhrzeiger- oder Gegenuhrzeigersinn drehen.
* Wenn die TA, INFO, ALARM oder PTY Unterbrechung beendet ist, kehrt die Lautstärke auf den Pegel vor der Unterbrechung darüber.
5.1-Kanal-Surround-Decoderbetrieb
Wenn ein als Zubehör erhältlicher, zum CeNET-Kabelsystem kompatibler 5.1-Kanal-Surround-Decoder angeschlossen ist, kann der Decoder von thisem Gerät aus angesteuert werden.
Bei den folgenden Funktionen ergeben sich Veränderungen, wenn ein 5.1-Kanal-Surround-Decoder angeschlossen ist:
- Der Dolby Pro Logic II-Betrieb wird um die beiden Modi "MOVIE" und "VIRTUAL" ergänzt.
- Der VSE/POSITION-Modus wird durch den DSF-Modus (Digital Sound Field) ersetzt.
- Im P.EQ-Modus (Parametric Equalizer) lässt sich die Einstellungen für jeder Lautsprecher noch genauer anpassen.
- Musikbezogene Einstellungen bestimmter Einstellungspunkte (siehe Seite 39) werden geändert.
Auswahl von PL II (Dolby PL II)
Passend zu der gewünschten Tonquelle für den Dolby Pro Logic II-Modus einen der vier verfügbarbaren Modi auswahlen.
Die werkseitige Voreinstellung ist "OFF" (aus).
■ MUSIC (Musik-Modus)
Siehe "Auswahldes PLII-Menus (Dolby PLII)" (siehe Seite 17).
MATRIX (Matrix-Modus)
Siehe "Auswahl des PLII-Menus (Dolby PLII)" (siehe Seite 17).
MOVIE (Film-Modus)
Geeignet fur DVD-Videofilme.
■ VIRTUAL (Virtual-Audio-Modus)
Geeignet fur Filme und andere Audioquellen.
OFF
Der Dolby Pro Logic II-Modus wird nicht verwendet.
1. Die [SOUND]-Taste betätigen.
2. Dolby PLII antippen.

3. Auf der rechten Seite des Displays die Blätterbewegung ↑ ⿱ ↑ durchführren, um den Dolby Pro Logic II-Modus anzuwahlen.

Die Modusanzeige ändert sich in der folgenden Reihenfolge:
MUSIC (Musik-Modus) MATRIX (Matrix-Modus) MOVIE (Film-Modus) VIRTUAL (Virtual-Audio-Modus) OFF (PL II aus) MUSIC (Musik-Modus)...
* Für Einzelheiten zur Lautstärkeeinstellung für den Center-Laatsprecher/Subwoofer siehe Seite 45.
4. RTN antippen.
Auswahl im DSF-Menu
Die DSF-Funktion (Digital Sound Field) erfolgt eine Simulation des akustischen Eindrucks in einem Konzertsaal oder bei einem Live-Hallenkonzert.
- Bei der Anzahl des DSF-Menus nimmt in manchen Fälle die Lautstärke ab.
- Dies werkseitige Ausgangseinstellung für DSF ist "OFF" (Aus), für das DSF-MENU "HALL" (Saal).
1. Die [SOUND]-Taste betätigten.
2. DSF antippen.

3. Auf der ON/OFF-Anzeige die
Blätterbewegung 1b1 durchführren. Der DSF-Effekt wird abwechselnd aktiviert und deaktiviert.

Wenn DSF auf "OFF" eingestellt ist, wirkt sich die DSF-Einstellung nicht auf die Wiedergabe der Tonquelle aus. Damit ist die DSF-Einstellung abgeschlossen. Die [SOUND]-Taste betätigten, um zur ursprünglichen Betriebsart zurückzukehren.
4. Auf der Nummernanzeige des DSF-Menü die Blätterbewegung 14 durchführren, um den gewündsten DSF-Menüeintrag anzuwahlen.

DSF-Menüeinträge
HALL CHURCH STADIUM LIVE JAZZCLUB THEATER HALL...
Nr. Funktionsname Beschreibung 1 HALL Großer Konzertsaal 2 CHURCH Kirche mit Gewölbedecke 3 STADIUM Großes Stadion ohne Dach oder Wände 4 LIVE Live-Konzertsaal, größer als Jazz-Club 5 JAZZCLUB Jazz-Club mit niedriger Decke 6 THEATER Kino oder Theater
5. Die [SOUND]-Taste betätigten, um zur ursprünglichen Betriebsart zurückzukehren.
Auswahl im Menu für den parametrischen Equalizer
Der parametrische Equalizer (P.EQ) erhögt. eine detailierte Kompensation des gesamten Freqenzbereichs durch die Anwendung einer geglifteten, an den Fahrzeugtyp angepassten Freqenz-Kompensationskurve.
- In der werkseitigen Ausgangseinstellung gelten fürSAMTliche Laufsprecher die folgenden Einstellungen: FREQ = 1kHz Q = 1 GAIN = 0dB
1. Die [SOUND]-Taste betätigen.
2. P.EQ antippen.

3. Auf der ON/OFF-Anzeige die Blätterbewegung durchführren. Der P.EQ-Effekt wird abwechselnd aktiviert und deaktiviert.

Wenn der P.EQ-Effekt auf "OFF" eingestellt ist, wirkt sich die P.EQ-Einstellung nicht auf die Wiedergabe der Tonquelle aus. Damit ist die P.EQ-Einstellung abgeschlossen. Die [SOUND]-Taste betätigten, um zur ursprünglichen Betriebsart zurückzukehren.
4. Auf der Nummernanzeige des P.EQ-Menü die Blätterbewegung ↑ durchführren, um den gewündsten P.EQ-Menüintrag anzuwahlen.

P.EQ-Menüeinträge
SIGNAL SP-SEL BAND FREQ Q GAIN SIGNAL...
5. Auf der rechten Seite des Displays mit der Blätterbewegung den betreffenden Punkt wie gewünscht einstellen. SIGNAL (wählt den Signatz für die Einstellung):
"P-NOIS" oder "MUSIC" auswahlen
P-NOIS: Für die Einstellung soll rosa Rauschen verwendet werden
MUSIC: Für die Einstellung sollen Musiksignale verwendet werden
SP-SEL (Auswahl der Laufsprecher, deren P.EQ-Wert eingestellt werden soll):
"FRONT", "CENTER" oder "SURROUND" wahren.
- FRONT: Frontlautsprecher
- CENTER: Center-Lautsprecher
- SURROUND: Surround-Laufsprecher
BAND (wählt das Freqenzband): Eines der Freqenzbänder 1 bis 3 auswahlen
FREQ (Auswahl der Mittenfrequenz): Der Einstellbereich liegt zwischen 20 Hz und 20 kHz.
Q (Einstellung der Q-Kurve): Auswahl eines der Werte 1, 3, 5, 7 oder 20 als Scharfe der Q-Kurve.
GAIN (Einstellung des Ausgangspegels): Anpassung der Verständigung (Ausgangspiegel) im Bereich von -12 dB bis +12 dB (1-dB-Schritte, 25 Punkte).
6. Die Schritte 4 und 5 für alle gewünschten Einstellungspunkte wiederholen.
7. Die [SOUND]-Taste betätigten, um zur ursprünglichen Betriebsart zurückzukehren.
Anpassung der P.EQ-Funktion
Die Einstellungen im P.EQ-Menu halten sich in gewissem Umfang anpassen. Mittenfrequenz, Verstärkung und Q-Kurve können jeweils für Kanal/Frequenzband-Kombinationen gespeichert werden.
Beispiel: Mittenfrequenz "250Hz", Verständung "8dB" und Q-Kurve "3" können für das Freqenzband 1 und die Frontlautsprecher gespeichert werden.
Für Einzelheiten zur P.EQ-Funktion siehe
"P.EQ-Einstellung" (siehe Seite 21).
Änderung der Einstellungen
Beim Anschluss eines 5.1-Kanal-Surround-Decoders ändern sich musikbezogene Einstellungen im Einstellmodus.
AuswahlderEinstellungspunkte
Im Folgenden werden diejenigen Punkte beschreiben, deren Einstellungen sich ändern.
Zu den anderen, nicht veränderten Einstellungspunkten siehe "Änderung der Einstellungen" (Seite 39) im Abschnitt "Bedienungen, die für beiden Betriebsarten gemeinsam sind".
1. Die [A]-Taste betätigten. Der Modus wechseln in den Einstellmodus.

2. Auf der Einstellungen-Wahlanzeige mit der Blätterbewegung den betreffenden Einstellungspunkt auswahlen.
\* Mit der Blätterbewegung 卡 auf der linken Seite des Displays werden die Haupt-Einstellungspunkte der Reihe nach durchgeschaltet. Mit der Durchlaufbewegung auf der linken Seite des Displays werden die Unterpunkte kontinuierlich durchgeschaltet.
\* Mit der Blätterbewegung 卡 in der Mitte des Displays werden die Unterpunkte jeweils der Reihe nach durchgeschaltet. Mit der Durchlaufbewegung werden die Unterpunkte kontinuierlich durchgeschaltet.
3. Wenn auf der rechten Seite des Displays "THROUGH" angezeigt wird, THROUGH antippen, um zur Einstellungen-Detailanzeige zu wechseln.
4. Entweder auf der rechten Seite des Displays die Blätterbewegung ↑ durchführten oder den [ROTARY]-Knopf drehen, um die Details einzustellen.
Rückkehr in die ursprüngliche Betriebsart
1. Erneut die [A]-Taste betätigten.
Einstellungspunkte
Hauptpunkte Unterpunkte SOUND (Ton) CENTER-SP / SRD-SP / SUB-WOOFER
• Ein-/Ausschalten von Laufsprechern (siehe Seite 64) FRONT HPF / CENTER HPF / SRD HPF / SUB-W LPF
• Einstellung der Laufsprecher-Filterfrequenz (siehe Seite 64) SP GAIN
• Einstellung der Laufsprecher-Ausgangspiegel (siehe Seite 46) DELAY
(Laufzeitverzögerung) CENTER-SP / SRD-SP
• Einstellung der Laufsprecher-Laufzeitverzögerung (siehe Seite 65) DOLBY D D-RANGE
• Einstellung des Dynamikbereichs (siehe Seite 65) PL II CONT PANorama / DIMENSION / CTR WIDTH
• Detaillierte Einstellung des Musik-Modus (siehe Seite 47)
Aktivieren/Deaktivieren von Laufsprechern (CENTER-SP/ SRD-SP/SUB-WOOFER)
Den Center-Lautsprecher (CENTER-SP), die Surround-Lautsprecher (SRD-SP) und den Subwoofer (SUB-WOOFER) aktivieren/deaktivieren (ON/OFF).
Wenn kein Center-Lautsprecher, Surround-Lautsprecher oder Subwoofer angeschlossen ist, muss hier "OFF" gewählt sein.
Die werkseitige Ausgangseinstellung ist "ON".
1. Die [A]-Taste betätigten, um den Einstellmodus aufzurufen.
2. Auf der Einstellungen-Wahlanzeige mit der Blätterbewegung ↑ ↓ unter "SOUND" die Punkte "CENTER-SP", "SRD-SP" und "SUB-WOOFER" wahren.

3. Entweder auf der rechten Seite des Displays die Blätterbewegung ↑ ▲ durchführten oder den [ROTARY]-Knopf drehen, um die Einstellung “ON” oder “OFF” zu wahren.
* Bei "SUB-WOOFER" entweder "ON+", "ON-" oder "OFF" wahren. Im Normalfall ist "ON+" zu wahren. Bei "ON-" ist ein deutlicher Effekt im tiefen Frequenzbereich wahrnehmbar.
4. Die [A]-Taste betätigten, um zur ursprünglichen Betriebsart zurückzukehren.
Einstellung der Laatsprecher-Filterfrequenzen (FRONT HPF/CENTER HPF/SRD HPF/ SUB-W LPF)
Mit dieser Funktion kann die Filterfrequenz an die verwendeten Lautsprecher angepasst werden.
- Laufsprecher, die im Abschnittt "Aktivieren/Deaktivieren von Laufsprechern (CENTER-SP/SRD-SP/SUB-WOOFER)" abgescheltewurden, werden nicht angezeigt.
Die werkseitige Ausgangseinstellung für "FRONT HPF" und "SRD HPF" ist "THROUGH" (ungefiltert) und für "CENTER HPF" und "SUB-W LPF" jeweils "120Hz".
Einstellung der Filter
FRONT HPF/CENTER HPF/SRD HPF (Einstellung der Hochpassfilter)
Dieses Filter dampf die Bassfrequenzen der Front-, Center- und Surround-Lautsprecher.
$$
\text {T H R O U G H} \rightarrow 5 0 \mathrm {H z} \rightarrow 8 0 \mathrm {H z} \rightarrow 1 2 0 \mathrm {H z}
$$
Die Filtrereinstellung passend zum Lautsprecher wahren, wenn Lautsprecher mit kleinerem Durchmesser verwendet werden.
THROUGH
These Einstellung wahlen, wenn Laatsprecher verwendet werden, die Bassfrequenzen wiedergeben konnen. Für CENTER HPF ist die Einstellung THROUGH nicht wählbar.
SUB-W LPF (Einstellung des Subwoofer-Tiefpassfilters)
Dieses Filter dampf die Höhenfrequenzen des Subwoofer.
$$
5 0 \mathrm {H z} \rightarrow 8 0 \mathrm {H z} \rightarrow 1 2 0 \mathrm {H z}
$$
Die Filterfrequenz passend zum Subwoofer einstellen.
1. Die [A]-Taste betätigten, um den Einstellmodus aufzurufen.
2. Auf der Einstellungen-Wahlanzeige mit der Blätterbewegung ↑ unter "SOUND" die Punkte "FRONT HPF", "CENTER HPF", "SRD HPF" und "SUB-W LPF" wahren.

3. Entweder auf der rechten Seite des Displays die Blätterbewegung ↑ durchführten oder den [ROTARY]-Knopf drehen, um die Frequenz einzustellen.
* Eine der Einstellungen THROUGH*, 50Hz, 80Hz oder 120Hz wahren.
^*1 THROUGH wird nur dann angezeigt, wenn "FRONT HPF" oder "SRD HPF" gewählt ist.
4. Die [A]-Taste betätigten, um zur ursprünglichen Betriebsart zurückzukehren.
Einstellung der Laufzeitverzögerung für die Lautsprecher (CENTER-SP/ SRD-SP)
Zu welchem Zeitpunkt der Ton von den einzelnen Laufsprechnen an der Hörposition eintriff, ist je nach Laufsprecherkconfiguration und Fahrzeuggroße unterscheidlich. Durch Anpassung der Laufzeitverzögerung für die einzelnen Laufsprecher kann dieser Effekt so korrigiert werden, dass der Ton von allen Laufsprechnem zum gleichen Zeitpunkt an der Hörposition eintriff wie von den Frontlaufsprechnem.
Die weltseitige Ausgangseinstellung ist "0 ms".
1. Die [A]-Taste betätigten, um den Einstellmodus aufzurufen.
2. Auf der Anzeige der Einstellungspunkte mit der Blätterbewegung ↑ Ⓞ ↑ unter “DELAY” die Punkte “CENTER-SP” und “SRD-SP” wahren.

3. Auf der rechten Seite des Displays die Blätterbewegung durchführren, um die Laufzeitverzögerung einzustellen.
* “CENTER-SP”{lssst sich im Bereich von 0 ms bis 5 ms einstellen.
* "SRD-SP"{lösst sich im Bereich von 0 ms bis 15 ms einstehen.
4. Die [A]-Taste betätigten, um zur ursprünglichen Betriebsart zurückzukehren.
Anpassung der Dolby Digital-Funktionen (D-RANGE)
These Funktion komprimiert den Dynamikbereich von Dolby-Digital-Signalen, so dass Tonsignale mit niedrigem Pegel, z. B. Schauspielerdialoge, hörbar bleiben, wogegen die Lautstärke lauter Passagen abgesenkt wird. These Funktionen stehen nur bei DVDs mit Dolby-Digital-Ton zur Verfügung.
Die werkseitige Ausgangseinstellung ist MAX
1. Die [A]-Taste betätigten, um den Einstellmodus aufzurufen.

2. Auf der Einstellungen-Wahlanzeige mit der Blätterbewegung t unter "D-RANGE" den Punkt "DOLBY D" wahlen.
3. Auf der rechten Seite des Displays mit der Blätterbewegung den Dynamikbereich wie gewünscht einstellen.
MAX: maximaler Dynamikumfang der Original-Tonquelle
STD: empfehlener Modus für die normale Programmwiedergabe
MIN: stärkste Komprimierung des Dynamikumfangs, so dass auch leise Tonpassagen gut hörbar sind.
4. Die [A]-Taste betätigten, um zur ursprünglichen Betriebsart zurückzukehren.
8. FEHLERSUCHE
Störung Ursache Behebung Allgemein Einschaltung nicht möglich. (Kein Ton.) Sicherung durchgebrannt. Gegen eine neue Sicherung mit gleicher Amperezahl ausstauschen. Sollte die Sicherung erneut durchbrennen, dann wenden Sie sichitte an das Geschäft, wo Sie das Gerät erworben haben. Falsche Verdraught. Bitte wenden Sie sich an das Geschäft, wo Sie das Gerät erworben haben. Kein Tonausgang bei Betrieb des Geräts mit angeschlossenen Verständern oder elektrischer Antenne. Leitung der elektrischen Antenne ist mit Erdung kurzgeschlossen oder zu hoher Strom ist für die Fernbedienung der Veränder oder elektrischen Antenne erforderlich. 1. Das Gerät aushalten.2. Alle an das kabel der elektrischen Antenne angeschlossen Drähte entfernen. Alle Drähte mittels eines Ohmmiters auf einen möglichen Kurzschluß mit der Erdung prüfen.3. Das Gerät wieder einschalten.4. Die einzelnen Drähte für die Verständernbedienung erneut bei der Leitung der elektrischen Antenne anschließen. Sollen sich die Veränder vor Anschluß aller Drähte ausschalten, ein externes Relais für die Fernbedienungsspannung verwenden (hoher Strom erforderlich). Kein Betrieb bei Tastenbetätigung. Anzeige nicht korrekt. Störung des Mikroprozessors aufgrund von Störsignalen etc. Das Gerät aushalten und dann die [RELASE]-Taste für Entfernung des DCP (abnehmbares Bedienteil) betätigten. Die Neueinstellungstaste mittels eines kleinen Stabs für ca. 2 Sekunden drücken. Die Anschlüsse des DCP oder der Hauptinheit sind verschmutzt. Mit einem weichen Tuch sauberwischen, das mit Reinigungslalkohol angefeuchtet ist. CD/MP3/WMA Kein Ton. Es wurde eine andere Disc und keine CD eingelegt oder ein Fremdkörper ist vorhanden. Bei geöffneter Schrägkonsole die [▲] Taste betätigten für 3 Sekunden oder länger gedrück htalien. Dann wird der Fremdkörper zwangsausgeworfen. Disc enthalt keine MP3/WMA-Dateien. MP3/WMA-Dateien korrekt auf die Disc brennen. Dateien werden nicht als MP3/WMA-Dateien erkannt. Korrekt kodierte MP3/WMA-Dateien verwenden. Dateisystem nicht korrekt. Verwenden Sie das Dateisystem "ISO9660 level 1, 2", "JOLIET" oder "Romeo".
Störung Ursache Behebung CD/MP3/WMA Stellen werden übersprungen oder Rauschen. Die Disc ist verschmutzt. Die Disc mit einem weichen Tuch reinigen. Disc ist stark zerkratzt oder veriformt. Gegen eine Disc ohne Kratzer austauschen. Ton wird unterbro-chen oder setzen kurzzeitig aus. Rauschen wird erzeugt oder dem Ton hinzuge-mischt. MP3/WMA-Dateien wurden nicht korrekt kodiert. Korrekt kodierte MP3/WMA-Dateien verwenden. Schlechter Klang(sofort nach Einschaltung. Auf der internen Linse konnten sich Wassertropfen gebildet haben, wenn das Fahrzeug an einem feuchten Ort geparkt worden ist. Bei eingeschalteten Gerät für ca. 1 Stunde trocknen halten. FalscherDatumname. Datumsystem ist nicht korrekt. Verwendten Sie das Datumsystem "ISO9660 level 1, 2", "JOLIET" oder "Romeo". Abspiellisten-Wiedergabe ist nicht möglich. DerDatumname oder die Dateierweiterung ist inkorrekt. Verwendten Sie ausschließlich alphanumeric bzw. ASCII-Zeichen in MP3/WMA-Dateinamen.
Verwendten Sie ausschließlich ".M3U" als Datumweiterung einer Abspielliste.
9. FEHLERANZEIGEN
Wenn ein Fehler auftritt, erscheint eine der folgenden Anzeigen.
Für Behebung der Störung jeweils die unten beschriebene Maßnahme ausführten.
Fehleranzeige Ursache Behebung CD/MP3/WMA ERROR 2 Eine Disc steck im CD-Deck fest und kann nicht ausgeworfen werden. Defekt beim Mechanismus des CD-Decks,itte wenden Sie sich an das Geschäft,wo sie das Gerät erworben haben. ERROR 3 Disc kann aufgrund von Kratzern, usw. nicht wiedergegeben werden. Gegen eine Disc austauschen, die nicht zerkratzt oder verformt ist. ERROR 6 Eine Disc wurde verkehrn herum im CD-Deck eingelegt und kann nicht wiedergegeben werden. Die Disc auswerfen und korrekt einlagen. Allgemein AMP GUARD Die Lautspricher-Schutzschaltung ist in Betrieb. Wenn während deren Betrieb Lautstärkeeinstellung vorgenommen wird, wird im Display "AMP GUARD" angezeigt.Die Funktion "AMP GUARD" sprecht in manchen Fälle bei speziellen Testsignalen an. 1. Drehen Sie die Lautstärke zurück.Die einwandfrei Gerätefunktion kann auch wiedergestellt werden, indem das Gerätomal aus- und dann wieder eingeschaltet wird.(Bei aktivierten Schutzschaltung wird die Lautstärke automatisch reduziert.)2. Falls die Stummschaltung erneut aktiviert wird, wenden Sie sichitte an den Clarion-Kundendienst. CD-Wechsler ERROR 2 Eine CD im CD-Wechsler wurde nicht geladen. Defekt beim Mechanismus des CD-Wechslers.itte wenden Sie sich an das Geschäft,wo Sie das Gerät erworben haben. ERROR 3 Eine CD im CD-Wechsler kann aufgrund von Kratzern, usw. nicht wiedergegeben werden. Gegen eine CD austauschen, die nicht zerkratzt oder verformt ist. ERROR 6 Eine CD im CD-Wechsler wurde verkehrn herum eingelegt und kann nicht wiedergegeben werden. Die CD auswerfen und korrekt einlagen. DVD-Wechsler ERROR 2 Eine im DVD-Wechsler befindliche DVD kann nicht wiedergegeben werden. Störung beim DVD-Mechanismus,itte wenden Sie sich an ihren Händler. ERROR 3 Eine DVD kann aufgrund von Kratzern nicht wiedergegeben werden. Erneut versuchen oder eine DVD einlagen, die nicht zerkratzt oder verformt ist. ERROR 6 Eine DVD im DVD-Wechsler kann nicht wiedergegeben werden, da sie verkehrn herum eingelegt wurde. Die DVD auswerfen und dann korrekt einlagen. ERROR P Falsche Jugendenschutz-Stufe. Die richtige Jugendenschutz-Stufe einstellen. ERROR R Regionalcodefehler. Die DVD auswerfen und gegen DVD mit korrektem Regionalcode austauschen.
Wenn eine andere Fehleranzeige als die oben aufgeführten erscheint, die Neueinstellungstaste betätigten. Soltte die Störung nicht behoben werden, Ausschaltung vornehmen.itte wenden Sie sich dann an das Geschäft, wo Sie das Gerät erworben haben.
10. TECHNISCHE DATEN
Radio-Bereich
Tuner-System: PLL-Synthesizer-Tuner
Empfangsfrequencyn:
UKW: 87,5 bis 108 MHz (0,05 MHz Schritte)
MW:531 bis 1602 kHz (9 kHz Schritte)
LW:153 bis 279 kHz (3kHz Schritte)
CD-Deck
System: CD-Digitalaudiosystem
Frequenzgang: 5 Hz bis 20 kHz (±1 dB)
Rauschabstand: 100 dB (1 kHz) IHF-A
Dynamikbereich: 96 dB (1 kHz)
Verzerrung: 0,01%
Allgemeines
Ausgangsleistung:
4× 31W (DIN 45324, +B = 14,4V)
Versorgungsspannung:
14,4 V GS (10,8 V bis 15,6 V zulässig), neg.
Masse
Leistungsaufnahme: Weniger als 15 A
Lautsprecher-Impedanz:
4Ω (4Ω bis 8Ω zulässig)
Nennstrom, elektrische Antenne:
500 mA oder weniger
Gewicht:
Hauptgerat: 1,7 kg
Fernbedienung: 80 g (einschließlich Batterie)
Abmessungen:
Hauptgerät:
178 (B) × 50 (H) × 155 (T) mm
Fernbedienung:
44 (B) × 110 (H) × 27 (T) mm
Hinweis:
- Änderungen von technischen Daten und Design dienen der Verbesserung und sind deshalb vorbehalten.
Grazie per averereacquistatoquesto prodotto Clarion.
* Prima di utilizzare quello apparecchio, leggere il manuale di istruzioni per intero.
* Dop aver letto il manuale, accertarsi di conservarlo a portata di mano (per esempio, nel comparto porta-guanti).
* Verificare il contento della cartolina di garanzia acclusa e conservarla con cura insieme a questo manuale.
* Questo manuale comprende le procedure operative per il funzionamento degli scambiatori CD del sistema DAB e del sintonizzatore TV collegati all'apparecchio per mezzo del cavo CeNET. Gli scambiatori CD, ed il sintonizzatore TV dispongono di un proprio manuale di istruzioni, che perché non contiene istruzioni per il loro funzionamento.
Indice
1. PRECAUZIONI 3
Console inclinata 4
Modalità di impiego dei compact disc 4
2.CONTROLLERI 5
3. NOMENCLATURA 6
Nomi dei tasti e loro funzioni 6
Principali operazioni con i tasti quando un appearecchio esterno è collegato a但这a unità. 7
Display delle opzioni 7
Operazioni del display 8
4. FRONTALINO ESTRAIBILE (DCP) 9
5. TELECOMANDO 10
Inserimento delle batterie 10
Funzioni dei tasti del telecomando 11
6. OPERAZIONI 12
Operazioni di base 12
Uso di AC-Processor III 17
Operazioni radio 23
Operazioni RDS 26
Operazioni CD/MP3/WMA 31
Brani diversi di musica per più asconsultatori
(funzone 2-ZONE) 36
Operazioni comuni in entrambé le modalità 37
7. OPERAZIONI CON GLI ACCESSORI 51
Operazioni con il cambiadischi CD 51
Operazioni con la TV 54
Operazioni radio digitale / DAB 58
Operazioni sul Decoder Surround 5.1ch 61
8. IN CASO DI DIFFICOLTÀ 66
9. CODICI D'ERRORE 68
10. SPECIFICHE 69
1. PRECAUZIONI
1. Questa unità è applicabile solo per veicoli da strada a 4 ruote. L'uso per trattori, camion popolari, bulldozer, veicoli fuoristrada, bicyclette a motore a 2 o 3 ruote, motoscafi o altri veicoli per scopi speciali non è appropriato.
2. Quando l'interno dell'auto è molto freddo e illettore viene utilizzato subito dopo l'accensione, più formarsi umidità dovutta al riscaldamento sul disco o sui componenti ottici dellettore e più essere impossibile una riproduzione corretta. Se si forma dell'umidità sul disco, toglierla con un panno morbido. Se si forma umidità sui componenti ottici dellettore, non utilizzare illettore per almeno un'ora. La condensa sparirà da sola, consentendo il funzionamento normale.
3. La guida su strade molto sconnesse, che causa parecchie vibrazioni, cui causare dei salti nella riproduzione.
INFORMAZIONI PER GLI UTENTI.:
MODIFICHE O CAMIAMENTI A QUESTO PRODOTTO NON APPROVATI DAL PRODUTTORE ANNULLERANNO LA GARANZIA.

AVVERTIMENTO
Per la propria sicurezza, non guardare o usare il pannello a tocco nelle si sta guidando.
Console inclinata
Questa unitàutilizza console inclinate per rendere possibile un display su schermo ampio.
Quando si usa la console inclinata, assicurarsi di chiuderla.
ATTENZIONE
Attenzione a non farsi intrappolare le dita quando si après o si chiude la CONSOLE INCLINATA.
1. Per motivi di sicurezza, chiudere sempre la CONSOLE INCLINATA prima di lasciare l'unità spenta per un periodo prolongato oppure spegnere l'interruttore di accensione. Se si spegne l'interruttore di accensione con la CONSOLE INCLINATA, la CONSOLE INCLINATA non si chiude.
2. Prima che la CONSOLE INCLINATA si chiuda, si potrebbe udire un suono di frenata
proveniente dal meccanismo di sicurezza.
Questo è normale.
3. Se si sposta la CONSOLE INCLINATA a mano,\
eso potrebbe create gioco. Per correggere\
eso gioco, con l'unità accesa, premere il tasto [▲] per chiudere la CONSOLE INCLINATA.
4. Dopo aver espulso un disco, la CONSOLE INCLINATA torna automaticamente allo stato di inclinazione o di chiusura. Se, quando la CONSOLE INCLINATA tenta di chiudersi, incontrà alcuni ostacolo, viene attivato il meccanismo di sicurezza e la CONSOLE INCLINATA torna allo stato aperto. In quello caso, rimuovere l'ostacolo, quando premere il tasto [▲].
5. Per evitare di graffiare i compact disc, tenere i dischi da 12 o 8 cm diritti durante l'inserimento e l'estrazione.
Modalità di impiego dei compact disc
Usare solamente compact disc riportanti il

Non utilizzato in riproduzione dischi a forma di cuore, ottagonali o di altre forme particulari.
Certi compact disc registrati con la modalità CD-R/CD-RW possono risultare non utilizzabili.
Modalità di impiego
Rispetto ai normali CD di musica, i dischi CD-R e CD-RW sono disponibile influenzati da temperatura o umidità elevate e alcuni dischi CD-R o CD-RW possono non essere riprodotti. Non lasciarli+dunque per lungo tempo in auto.
I dischi nuovi potrebbero presentare quale asperità intorno ai bordi. Se si usa quello tipo di disco, illettore
potrebbe non funzionare o ci potrebbero essere dei salti nella coproduzione. Utilizzare una penna a sfera o un oggettoto simile per rimuovere qualsiasi asperità dai bordi del disco.
Non attaccare mai etichette sulla superficie del compact disc e non scrivere mai sulla superficie con una matita o una penna.
- Non eseguire mai la riproduzione di un compact disc chiuso in una confazione di plastica o con colla sopra diesso o con indicatori per l'apertura della confezione. Se si tenta di riproduire un disco del
genere, si potrebbe non riuscire più a estrarlo dallettore CD o potrebbe danneggiare illettore CD.
Non utilizzato compact disc che hanno grandi graffiature, che sono deformati, incrinati, ecc. L'uso di dischi del genere cui causare un cattivo funzionamento o dei danni dellettore.
- Per rimuovere un compact disc alla custodia, premere il centro della custodia e sollevare fuori il disco, tenendolo con attenzione per i bordi.
- Non utilizzato fogli di protezione per CD disponibili sul mercato o dischi attrezzati con stabilizzatori, ecc. Queste cose potrebbero danneggiare il disco o causare una rottrura del meccanismo interno.
Conservazione
Non esporre i compact disc alla luce diretta del sole o a nessuna fonte di calore.
Non esporre i compact disc a eccessiva umidita o alla polvere.
Non esporre i compact disc al calore diretto prodotto da apparecchi per il riscaldamento.
Pulizia
- Per rimuovere le impronte delle dita e la polvere, utilizes un panno morbido e pulire in linea retta partendo dal centro del compact disc per arrivare al bordo.
- Non utilizzato nessun solvente, come i liquidi per la pulizia disponibili sul mercato, nessuno spray antistatico e nessun diluente per pulire i compact disc.
- Dopo l'uso di dispositivi di pulizia speciali per compact disc, lasciare che il compact disc si asciughi per bene prima di utilizzato di nuovo.
2.CONTROLLERI
Apparecchio principale

Apertura della CONSOLE INCLINATA

3. NOMENCLATURA
Nomi dei tasti e loro funzioni
Tasto [RELEASE]
Rimuove il DCP
Sensore fotografico
- Questo sensore misura la luminosità presente all'interno della vettura. Quando la funzione del variatore di luminosità automatico viene impostato su "AUTO", la luminosità del display è indebolita in accordo alla luminosità rilevata dal sensore.
Manopola [ROTARY]
- Premere la manopola per accendere l'apparecchio Ogni pressione su esta manopola cambia la modalità.
- Premere e tenere premuto per 1 secondo o più per spengere l'apparecchio.
- Questa manopola può essere girata per regolare il volume, o per regolare le varie impostazioni nella modalità di aggiustamento.
Tasto [△]
- Apre/chiude il pannello di controllo.
Se è già inserto un disco, quello sera espulso quando si après il pannello di controllo.
Nota:
Se il disco non viene espulso, tenere premuto il tasto [▲] per 1 secondo o più.
Tasto [A]
- Usare quello tasto per impostare o regolare le varie impostazioni nella modalità di aggiustamento.
- Usare quello tasto per insertire i nomi delle stazioni nella modalità radio o i titoli dei dischi nella modalità CD.
Tasto [SOUND]
- Usare quello tasto per impostare o regolare le varie impostazioni come per es. lo spazio audio.
- Tenendo premuto quello tasto per 1 secondo o più si attiva o disattiva la funzione 2-ZONE.
Tasto [TA]
- Usare quello tasto per impostare il TA (annunci concimenti il traffico) in modalità standby (quando la funzione 2-ZONE è impostata su "OFF").
Cambia le operazioni della funzione 2-ZONE. Tenere premuto quello tasto per 1 secondo o più faambiare il tipo 2-ZONE ( quando la funzione 2-ZONE è impostata su "ON").
Tasto [▶II]
- Toglie oppure mette in pausa un brano musicale (in modalità CD).
- Mette in pausa e ce lo toglie un brano musicale (in modalità CD).
- Usare il tasto per impostare in modalità standby il PTY (tipodi programma) o le opzioni PTY.
Display
- Visualizzazione le varie informazioni che indicano lo stato operativo di quello apparecchio come ad esempio se è in funzione radio o di riproduzione e altri indicatori.
- Toccare il display con le proprie dita, e toccare 卡 卡 卡 per attivare le operazioni. (cfr. pag. 8)
Principali operazioni con i tasti quando un apparecchio esterno è collegato a questa unità
- Quando il cambia-CD/DVD è connesso
* Per maggiori dettagli, guardare la sezione "Operazioni con il cambiadischi CD" (ved. pag. 51). Per il cambia-DVD,fare riferimento al manuale delle istruzioni provvisto con il cambia-DVD.
Tasto [▶II]
- Avvia la riproduzione o mette in pausa il CD o il DVD.
Tasto [A]
- Usato per l'insertimento dei titoli dei dischi nella modalità cambia-CD.
-Quando il TV/DAB è connesso
* Per maggiori dettagli, guardare la sezione "Operazioni con la TV" (ved. pag. 54) o "Operazioni radio digitale/DAB" (ved. pag. 58).
Tasto [TA]
- Usare il tasto per impostare TA (Notiziario sul traffico) alla modalità standby alla modalità DAB. (Questa funzione è disponibile sono per una radio DAB.)
- Premere e tenere premuto per 1 secondo o più per attivare o disattivare la modalità INFO. (nella modalità DAB)
Tasto [▶II]
- Cambiare la modalità immagine TV o la modalità immagine VTR (esterna). (nella modalità TV)
- Usare il tasting per impostare in modalità standby il PTY (tipodi di programma) o le opzioni PTY nella modalità DAB.
Tasto [A]
- Questo tastinge viene usato per insertire il nome della stazione TV. (nella modalità TV)
Display delle opzioni

Operazioni del display
Il display di quello apparecchio è un display con il pannello a tocco. Si può essere quello pannello semplicamente toccandolo con la punta delle dita. Ci sono quattro operazioni nel display principale, nell'ordine seguente:
Toccare
Toccare il display con la punta di un ditastaccandola entro 1 secondo. Questo è l'operazione fondamentale quando si usa ildisplay.
Toccare tenere premuto
Toccare il display con la punta di un dito e tenere premuto il display per 1 o 2 secondi o andere più. Non muovero il dito nelle si sta toccando il display.
Toccare e tenere premuto il display per 1 secondo o più visualizzazione liste, per esempio, e richiama autres funzioni utili.
Il toccare e tenere premuto per 2 secondi o più è usato per memorizzare una memoria preimpostata o altre informazioni.
Toccare
Toccare il display con la punta della dito, e muovere il dito a sinistra () o a destra () perché staccarlo dal display, per poi staccarlo entro 1 secondo. Questa operazione è usata per selezione una memoria preimpostata (da 1 a 6) o dei brani.

Toccare
Toccare il display con la punta della dito, e muovere il dito a sinistra () o a destra () -, alla staccarlo dal display, e tenerlo sul display. L'operazione in atto continua fino a che il dito è tenuto sul display. Questa operazione viene usata, per esempio, per la sintonizzazione manuale o per far avanzare o retrocedere velocamente i vari brani.

4. FRONTALINO ESTRAIBILE (DCP)
Il pannello dei comandi cui po essere rimioso per prevenir furti. Quando si rimuove il FRONTALINO ESTRABILE (DCP), conservarlo nella custodia apposita, per evitare graffiature.
Si raccomanda di portare con se il frontalino quando si lascia l'automobile.
Rimozione del DCP
1. Con la CONSOLE INCLINATA chiusa, specnere l'apparecchio.
2. Premere a fondo il tasto [RELEASE] per aprirè il DCP.

3. Tirare il DCP verso di se e rimuoverlo.

ATTENZIONE
- Chiudere sempre la CONSOLE INCLINATA prima di rimuovere il DCP.
- Se si rimuove il DCP con la CONSOLE INCLINATA aperta, la console inclinata si chiude immediatamente. Attenzione a non farsi incastrare le dita.
Montaggio del frontalino
1. Inserire il DCP in modo che la sezione A sul lato destro del DCP si insertisca nel gancio dell'unità.

2. Premere con attenzione il dato sinistro © del DCP per montarlo al suoippo.

ATTENZIONE
- Il DCP può essere facilemente danneggiato dagli urti. Dopao averlo rimioso, accertarsi di non farlo cadere o di non assoggettarlo a forti urti.
- Se il tasto di [RELEASE] è premuto e il DCP non è bloccato al suoosto, il DCP potrebbe cadere a causa delle vibrazioni dell'auto. Ciò provocherebbe dei danni al DCP, per cui dopo averlo rimioso installarlo sull'unità oppure conservarlo nella relativa custodia.
- Il connettore che collega l'unità al DCP è un componente estremamente importante. Fare attenzione a non danneggiarlo premendo su diesso con le unghie, con un cacciavitè, ecc.
Nota:
Se il DCP è sporco, pulirlo solamente con un panno morbido e asciutto.
5. TELECOMANDO

Inserimento delle batterie
1. Girare l'unità telecomando, quandi far scivolare il coperchio posteriorie in direzione della freccia.
2. Inserire le batterie AA (SUM-3, R-6/1,5 V) in dotazione con il telecomando di fronte, nella direzione individata in figura, quindi chiudere il coperchio posteriore.
Note:
Un uso improprio delle batterie può provocare la loro esplosione. Preponderere nota dei punti seguenti:
- Quando si sostituiscono le batterie, sostitur entrambre le batterie con batterie nuove.
- Non cortocircuitare, disassemblare o riscaldare le batterie.
Non gettare le batterie in fuoco o fiamme.
- Gestire lo smaltimento delle batterie scariche nel modo corretto.

Funzioni dei tasti del telecomando
Modalità Tasto Radio (RDS)/DAB CD/MP3 Cambiadischi CD Cambiadischi DVD TV [FUNC] Per la commutazione delle varie funzioni: radio, DAB, CD, MP3, scambiatori CD, scambiatore DVD e TV, AUX. [BAND] Alterna le bande di ricezione. Riproduce la prima traccia, del disco più in alto. Si sposta al disco successivo, in ordine crescente. Alterna le bande di ricezione. [▲], [▼] Aumenta e diminuisce il volume (in tutte le modalità). [←], [►] Sposta i canali preselezionati in alto e in basso. Sposta le tracce in su e in giù. Quando viene tenuto premuto per 1 secondo: Avanzamento veloce/retrocessione veloce. Sposta i canali preselezionati in alto e in basso. [►■] Nessuna funzione. Alterna riproduzione e pausa. Nessuna funzione. [MUTE] Abilita e disabilita la funzione mute. [TA] Abilita e disabilita la funzione TA. Tenere premuto il tasto per 1 secondo o più per alternare tra le fonti sonore della zona princi-pale e secondaria (solo quando il modo 2-ZONE è attivato). [DISP] Per la commutazione fra la visualizzazione delle informazioni principali, e dell'orologio (CT). [PS/AS] Scansione canali preselezionati. Quando viene tenuto premuto per 2 secondi: Memorizzazione automatica. Riproduzione a scan-sione. Tenere premuto il ta-sto per almeno 1 se-condo per effettuire lalettura a scansione del-le cartelle, con l'apparecchio in moda-lità MP3/WMA. Lettura con scansione. Quando viene tenuto premuto per 1 secondo: Lettura disco con scansione. Scansione canali preselezionati. Quando viene tenuto premuto per 2 secondi: Memorizzazione automatica. [AF] Abilita e disabilita la funzione AF. Quando viene tenuto premuto per 1 secondo: Abilita e disabilita la funzione REG. Riproduzione ripetu-ta. Tenere premuto il ta-sto per almeno 1 se-condo per effettuire la ripetizione della let-tura delle cartelle, con l'apparecchio in modalità MP3/WMA. Ripetizione riproduzione. quando viene tenuto premuto per 1 secondo: Ripetizione riproduzione disco. Nessuna funzione. [PTY] Attivazione e disattivazione della modalità PTY. Riproduzione in ordine casuale. Tenere premuto il ta-sto per almeno 1 se-condo per effettuire lalettura in ordine casua-le delle cartelle, con l'apparecchio in modalità MP3/WMA. Esecuzione casuale. Quando viene tenuto premuto per 1 secondo: Riproduzione casuale disco. Alterna TV e VTR. [2-ZONE] Tenere premuto per 1 secondo o più per attivare o disattivare il modo 2-ZONE. Premere per和其他are la zona di controllo tra zona principale e zona secondaria quando il modo 2-ZONE è attivato.
* Alcuni tasti corrispondenti sull'unità centrale e sul telecomando hanno funzioni diverse.
6. OPERAZIONI
Operazioni di base
ATTENZIONE
Accertarsi di abbassare il volume prima di spegnere l'unità o l'automobile. L'unità ricorda l'ultima impostazione del volume. Se si spegne con il volume al massimo, quando si riaccende il volume immediatamente alto potrebbe urtare le orecchie o danneggiare l'unità.
Accensione/spegnimento dell'apparecchio
Accensione
Nota:
- Stare attenti quando si usa quello apparetcchio per lungo tempo a motore spento. Se si usa troppa la batteria della vettura, cui non èsere possibile avviare il motore e quello cui ridurre la vita della batteria.
1. Premere la manopola [ROTARY]. Viene visualizzata la modalità precedentamente attiva.
Controllo del sistema
La prima volta che si accende quello apparecchio dopo aver completeness la connessione dei cavi, l'apparecchio controlling quali apparecchiature siano connesse. (Questo viene chiamato "System Check") Quando l'apparecchio è accedo, e viene visualizzato "System Check", seguire le procedure che seguono per efettuare il controllo di sitema.
1. Quando appeare "System Check" sul display, premere la manopola [ROTARY]. Il controllediistema viene avviato. Quando il controllo di sistema viene completato, "Completed" appeare sul display.
2. Premere ancora la manopola [ROTARY]. Appare il display principale per la modalità radio.
Funzione CODEMATIC
Quando "CODEMATIC" èimpostato su "ON" e l'apparecchio acceso con il DCP attaccato, viene visualizzato il display del codice a tocchi. Toccare il display nell'ordine in cui era stato impostato nella modalità di aggiustamento.

Pe maggiori dettagli sulla funzione
CODEMATIC, guardare "Uso della funzione di sicurezza (CODEMATIC)" (ved. pag. 50).
Spegnimento
1. Tenere premuta la manopola [ROTARY] per 1 secondo o più.
Selezione di una modalità
1. Premere la manopola [ROTARY] per selezionare la modalità di operazione.
2. Ogni volta che si preme la manopola [ROTARY], la modalità d'operazione cambia nel seguente ordine:
Modalità radio Modalità DAB Modalità CD/MP3 Modalità cambia-CD Modalità cambia-DVD Modalità TV Modalità AUX Modalità radio...
* Non vengono visualizzate le apparecchiature esterne non connesse con CeNET.
Regolazione del volume
1. Girare la manopola [ROTARY] in senso orario per augmentare il volume, in senso antiorario per diminuirlo.
* Il livello del volume va da 0 (il minimo) a 33 (il massimo).
Cambiare le modalità d'operazione
Ci sono 2 modalità d'operazione fondamentali: le operazioni standarde e le operazione di base
1. Nello scherno del display principale, toccare e tenere premuto il lato sinistro del display per 1 secondo o più. La modalità d'operazione vieneambiata.

Nelle operazioni di base, non viene richiesto di toccare or nello schermo del display principale nelle modalità radio o i in那一 CD, e l'apparecchio può essere usatoattraverso semplici operazioni.
Nota, in agli caso, che le seguenti operazioni non sono disponibili tra le operazioni di base.
- Sintonizzazione delle preselezioni, selezione della cartella, selezione del disco, e altre operazioni che prevedono il tocco di sul lato destro del display
- Operazioni per il cambiamento del display (ved. pag. 13)
- Operazioni per il cambiamento del display del titolo (ved. pag. 14)
- Operazioni per la visualizzazione degli schermi dell'insertimento titoli.
Tranne che nello schermo principale (p. es. quello del display delle liste, della modalità di aggiustamento, ecc.), non c'é differenza tra le operazioni standarde qu'elle di base.
Le spiegazioni cont∉ne in questo manuale sono principamente per le operazioni standard. Per spiegazioni inerenti alle operazioni nelle operazioni di base,fare riferimento ai display nella modalità radio o nella modalità CD.
Cambiamento del display
1. Toccare il centro del display
Ogni volta che si tocca il display, quello cambia nell'ordine seguente:

Display del titolo
Salva-schermo
Quando la funzione salva-schermo viene impostata su "ON", e l'apparecchio non viene usato per circa 30 secondi, alla è viene visualizzato il salva-schermo. Per maggiori dettagli, vedere a pagina 41.
Sfondo
Toccando e tenendo premuto il centro del display per 1 secondo o più porta al display degli sfondi.
① ⑨ ② ⑩ ③ ⑪ ④ ⑫ ⑤ ⑬ ⑥ ⑭ ⑦ ⑮ ⑧ ⑯
Display dell'analizzatore di spettro
Toccando et tenendo premuto per 1 secondo o più il dato destro del display während quello è un display di analizzatore di spettro (S/A) si cambia il display analizzatore di spettro.
S/A
SCAN S/A 1, S/A 2, e S/A 3 sono visualizzati ognuno per 10 secondi o più. S/A 1 S/A 1
FLDR No.
003
TOP S/A 2 S/A 2
FLDR No.
003
TOP S/A 3 S/A 3
FLDR No.
003
TOP
Cambiamento del display del titolo
È possibile visualizzare i titoli del disco e altre informazioni memorizzate nei dischi quando si riproducono dei CD nella modalità CD o cambia-CD.
1. Toccare e tenere premuto il lato destro del display per 1 secondo o più nel display del titolo. Ogni volta che si tocca e siiene premuto il display, quello cambia nell'ordine seguente
Disco CD-TEXT
Titolo utente (disco) Titolo/testo del CD (disco) Nome dell'artista Titolo/testo del CD (brano) Titolo utente (disco)...
Disco MP3/WMA
Cartella File Album TAG Artista TAG Titolo TAG Cartella...
Note:
- MP3 supporta ID3 Tags V2.3 / 2.2 / 1.1 / 1.0.
- I display dei Tags danno la priorità a V2.3 / 2.2.
- Nel caso di Tags dell'album per WMA, vengono visualizzate le informazioni scritte nelle 'intestazione allargata'.
- Nelle Tags possono venire visualizzati solo i carattere ASCII.
Per far scorrere un titolo
Toccare 念 nel display del titolo quando viene visualizzato il titolo.
Il titolo scorre verso sinistra.
Per fermare lo scorrimento
Toccare 品 sul display del titolo.
Funzione CT (Orologic)
Il CT permette di ricevere i dati CT inviati da una stazione RDS e di visualizzare l'ora. Per visualizzare lo schermo CT, toccare il centro del display.
- Se non si ricevono dati CT, nel display viene visualizzato "---CT".
Nota:
- I dati CT non sono trasmessi in alcuni paesi e da alcune stazioni emittenti. Inoltre, in alcune zone, i dati CT possono non essere visualizzati perfettamente.
Impostazion del ADF
- ADF è l'abbreviatione di Anti Distortion Filter (Filtro Anti Distorsioni).
L'adozione delle funzioni "Filtro di rinsforzo della vivacità" e "Compensazione della tonalità" permette una coproduzione ben modulata e realistica perché inficiare le caratteristiche originali del suono.
Questo appearecchio ha memorizzato 4 tipi di tonalità. Selezionare la preferita.
ADF-1: Adatto per altoparlanti semplici
ADF-2: Adatto per altoparlanti separati
ADF-3: Adatto per altoparlanti coassiali
USER: Questa impostazione può essere modificata dall'utente secondo le proprie preferenze personali.
OFF: Nessun effetto sonoro
- L'impostazione predefinita alla fabbrica è "OFF" Note:
- Poicha il volume cambia quando viene inserito ADF, inseire ADF con il volume di "SW VOLUME" (sub woofer) e di "CTR VOLUME" (altoplante centrale) abbassato il più possible.
- In alcuni sistemi di altoparanti, talvolta non possono essere ottenuti effetti sufficienti. Se succede quello, regolare il parametro ADF o il volume.
- Quando ADF è impostato su "USER", "1", "2" o "3", la funzione VSE e la funzione BASS/TREB molto EQ-SELECT sono disabilitati.
1. Premere il tasto [SOUND].
2. Toccare ADF.

3. Toccare 山 sul lato destro del display per aggustare la modalità ADF.

Quando ADFiene impostato su "OFF", l'impostazione ADF non si riflette nella sorgente musicale. Questo termina le impostazioni ADF. Premere il tasto [SOUND] per tornare alla modalità originale.
* Scegliere tra USER, 1, 2, 3, o OFF.
4. Per cancellare i dettagli dell'impostazione ADF, premere il tasto [A].
5. Toccare sul display delle impostazioni per selezionare l'opzione desiderata. Ogni tocco di cambia il display di regolazione nell'ordine seguente:
Regolazione ( quando viene selezionato USER nella fase 3)
BASS TREBLE COMP BASS...
Regolazione ( quando un numero da 1 a 3 viene selezionato nella fase 3) LEVEL COMP LEVEL...
6. Toccare 山 sul lato destro del display per effettuare la regolazione.
* "BASS" e "TREBLE" possono essere sintonizzati tra i valori 1 e 13.
* LEVEL più SSD estesare aggiustato in una gamma di valori che vanno da -3 a +3.
* Scegliere "ON" o "OFF" per "COMP".
7. Premere il tasto [SOUND] per tornare alla modalità originale.
Regolazione del sub woofer e dell'altoparlante centrale
- Il "SW VOLUME" (sub-woofer) pourrait essere regolato solo quando "SUB-WOOFER" è impostato su "ON".
- Il "CTR VOLUME" (altoparlante centrale) può essere regolato solo quando la modalità Dolby Pro Logic Il è stata impostata su "MUSIC" o "MATRIX", "SP-SETTING" è stato impostato su "CTR+SW" e "CENTER-SP" è stato impostato su "ON".
L'impostazione predefinita alla fabbrica per SW VOLUME è "0" e per CTR VOLUME è "0".
1. Premere il tasto [SOUND].
2. Toccare A-MODE.

3. Toccare 山 sul display delle impostazioni per selezionare "SW VOLUME" o "CTR VOLUME".

4. Toccare sul lato destro del display e aggistiustare I'opzione come si desidera.
* Questa impostazione può essere aggiustata tra i valori -5 e +5.
5. Premere il tasto [SOUND] per tornare alla modalità originale.
Regolazione del bilancimiento/equilibristo
BALANCE:
Regola il bilanciamento di volume tra l'altoparlante destro e quello sinistro.
FADER:
Regola il bilanciamento di volume tra l'altoparlante frontale e quello posteriore.
- L'impostazione predefinita alla fabbrica per BALANCE è "0" e per FADER è "0".
Nota:
- Il bilanciamento/equilibramento non può essere regolato quando viene selezionato "PRO" in AC-PRO III (ved. pag. 44) e la funzione di posizionamento è impostata su "ON". Regolazione del bilanciamento/equilibramento attaverso la "Selezione del menu positioning" (ved. pag. 17).
1. Premere il tasting [SOUND].
2. Toccare A-MODE.

3. Toccare 山 山 sul display delle impostazioni per selezionare "BALANCE" o "FADER".

4. Toccare sul lato destro del display e aggistiustare I'opzione come si desidera.
* "BALANCE" più essere regolato in una gamma di valori che va da L13 (il lato sinistro viene enfatizzato) a R13 (il lato destro viene enfatizzato).
* "FADER" più essere regolato in una gamma di valore che va da R12 (la parte posteriore viene enfatizzata) a F12 (la parte anteriore viene enfatizzata).
5. Premere il tasto [SOUND] per tornare alla modalità originale.
Regolazione del basso/soproano
La modalità basso/soprano può essere regolata solo quando la modalità Dolby Pro Logic II è impostata su "OFF" (ved. pag. 17) e "EQ SELECT" è impostata su "BAS/TREB" (ved. pag. 44).
- L'impostazione predefinita alla fabbrica è "0".
1. Premere il tasting [SOUND].
2. Toccare A-MODE.

3. Toccare sul display delle impostazioni per selezionare "BASS" o "TREBLE".

4. Toccare sul lato destro del display e aggiustare l'opzione come si desidera.
* Questa impostazione può essere aggiustata tra i valori -6 e +6.
5. Ripetere le fasi 3 e 4 per regolare l'unità desiderata.
6. Premere il tasto [SOUND] per tornare alla modalità originale.
Uso di AC-Processor III
Dolby Pro Logic II
Dolby Pro Logic II è una Tecnologia di decodifica matrice in cui viene applicata la Tecnologia matrice digitale aggiornata e Dolby Pro Logic è ulterioramente migliorato. Ottiene un'eccellente coproduzione a 5.1 canali di fonti Dolby surround nonché è di fonti stereo come CD, causando la trasformazione del canale surround in gamma completeness (da 20Hz a 20kHz ) e quindi stereo. Di conseguenza, si può ascoltare qualsiasi fonte stereo con suono dinamico a 5.1 canali. Secondo la fonte da riproduire, si più selezionare il modo musica o il modo matrice.
Fabbricato su licenza di Dolby Laboratories. "Dolby", "Pro Logic" e il symbolo della dopbia D sono marchi di Dolby Laboratories.
Selezione del menu PL II (Dolby PL II)
Selectionare la modalità MUSIC o la modalità MATRIX adatte alla sorgente che si usa nella modalità Dolby Pro Logic II.
- L'impostazione predefinita alla fabbrica è "OFF".
■ MUSIC (modalità musica)
- Questa modalità è adatta alle sorgenti sonore stereo come i CD.
- èanche disponibile un'altra modalità di aggiustamento che permette una regolazione molto più dettagliata quando il Campo di suono si difonde differentemente a causa dello stato della sorgente musicae registrata. (Ved. pag. 47)
MATRIX (modalità matrix)
- Questa modalità è adatta per sorgenti sonore come la radio AM/FM.
OFF
- La modalità Dolby Pro Logic II non è in uso, notamment lo è la modalità AC-PROIII. Per maggiori dettagli sulla modalità AC-PROIII, guardare "Selezionare ogni modalità" (ved. pag. 44).
1. Premere il tasting [SOUND].
2. Toccare Dolby PLII.

3. Toccare sul lato destro del display per selezionare la modalità Dolby Pro Logic II.

Il display delle modalità cambia nell'ordine seguente:
MUSIC (modalità musica) MATRIX (modalità matrix) OFF (PL II off) MUSIC (modalità musica)...
* Per maggiori dettagli a proposito della regolazione del volume dell'altoparlante/ sub-woofer centrale, guardare pagina 45.
4. Toccare RTN.
Selezione del menu posizione
Con POSITION, si più selezionare tra 5 possibilità il modo in cui il suono arrivava dall'altoparlante al sedile.
Inoltre, la funzione di aggiustamento del tempo permette di fissare le impostazioni degli altoparlanti in modo che lo stesso effetto audio possa essere ottentuto da agli altoparlante a favore di anni ascoltatore.
Nella procedura "Selezionare agli modalità" (ved. pag. 44), impostare AC-PROIII su "PRO".
- L'impostazione predefinita alla fabbrica per POSITION è "OFF" e per il menu delle posizioni fondamentali è "FRONT".
■ Menu posizione
Questa funzione è pre-memorizzata con 5 menu posizione. Selezionare il menu desiderato per adattarlo alle proprie preferenze.
1. Premere il tasto [SOUND].
2. Toccare POSITION.

3. Toccare 山 sul display ON/OFF. L'effetto posizione cambia in ON/OFF.

Quando l'effetto posizione viene impostato su "OFF", l'effetto posizione non si riflette nella sorgente musicale. Questo termina le impostazioni della posizione. Premere il tasto [SOUND] per tornare alla modalità originale.
4. Toccare B/U per selezionare "BASIC".

Ogni tocco di B/U fa andare da "BASIC" a "USER".
5. Toccare 一 日 nel menu delle posizioni fondamentali Num. per selezionare il menu delle posizioni fondamentali.
Menu delle posizioni fondamentali
Num. Nome del display Posizione del sedile 1 FRONT-L Sedile anteriore sinistro 2 FRONT-R Sedile anteriore destro 3 FRONT Sedili anteriorsi 4 REAR Sedili posteriori 5 FULL SEAT Tutti i sedili
6. Premere il tasto [SOUND] per tornare alla modalità originale.
Posizoni di eegolazione/ memorizzazione (memoria utente)
Con la memoria utente, è possibile impostare esattamente gli altoparanti in modo tale che lo stesso effetto audio possa essere ottenuto da agli altoparlate a favore di anni ascoltatore in base al menu delle posizioni fondamentali. Posso sono essere memorizzati fino a 5 impostazioni di aggiustamento.
T-ALIGN (allineamento temporale):
La distanza di agli ascoltare da agli altoparlante può essere insertita in intervalli di 2,3 cm e si può regolare il tempo che il suono impiega per raggiungere, da gligli altoparlante, l'ascoltatore.
SP GAIN (altoparlante gain)
Regola il livello di emissione dell'altoparlante. Gli aggiustamenti sono tali per cui il volume emesso da agli altoparlante sia lo stesso per tutti.
1. Premere il tasto [SOUND].
2. Toccare POSITION.
3. Toccare sul display ON/OFF. L'effetto posizione cambia in ON/OFF.
4. Toccare B/U per selezionare "BASIC" o "USER".
5. Toccare 山 sul lato destro del display per selezionare un menu che sua usato come menu per l'aggiustamento.
6. Premere il tasting [A].
7. Toccare 卡 nel lato sinistro del display per selezionare "T-ALIGN" o "SP GAIN".
8. Toccare 念 nel centro del display per selezionare agliaggiustamento.
Ogni tocco di 卡 cambia l'aggiustamento nell'ordine seguente:

Aggiustamento delle opzioni
*1 Questo viene visualizzato quando "SUB-WOOFER" sotto "SOUND" nella modalità aggiosoamento è impostato su "ON".
*2 Questo viene visualizzato solo quando "SUB-WOOFER" sotto "SOUND" nella modalità aggiestamento è impostato su "ON", e "T-ALIGN" è stato selezionato come descripto nella fase 7.
9. Toccare sul lato destro del display e aggustare I'opzione come si desidera.

POSITION EDIT FRONT L SP>085.1cm
* "T-ALIGN" più essere regolato all'interno di una gamma che va da 0 cm a 501.4 cm per intervalli di 2.3 cm.
* "SP GAIN" più essere regolato all'interno di una gamma che va da -20dB 0dB.
10. Ripetere le fasi da 7 a 9 per fare la regolazione desiderata.
11. Quando si è finito di fare l'aggiustamento per agli funzione, toccare RTN. Il display torna allo schermo originale, e viene visualizzato ">>" nel display BASIC o USER. Le operazioni fatte fin qui completano la regolazione della posizione. Per completare la memorizzazione dei valori diaggiustamento del menu della posizione utente, effettuire le seguenti operazioni.
12. Toccare e tenere premuto RTN per 1 secondo o più. Viene visualizzata il menu della lista delle posizioni.
13. Toccare e tenere premuta per 2 secondi o più la memoria utente dove si vuole memorizzare i valori di regolazione. L'emissione di un lungo bip segnalera l'avvenuta memorizzazione nel menu delle posizioni utente di un massimo di 10 valori di regolazione. L'emissione di un breve bip segnalera che i valori di aggiustamento sono a 10 sono stati scartati. Aggiustare nuovamente questi valori come è richiesto.
14. Toccare RTN.
15. Premere il tasto [SOUND] per tornare alla modalità originale.
* Per selezionare la memoria utente, toccare B/U per visualizzare "USER" e toccare 🚫 🚫 nella memoria utente Num.
Selezione del menu VSE
La VSE (intensificatore dello spazio virtuale) permette di compensare i bilanciamento della pressione sonora dentro la vettura in modo tale che lo steso effetto possa essere percepito dovunque ci si sieda quello stesso modo che nelle simulazioni di compenazione, Nella procedura "Selezionale agli modalità" (ved. pag. 44), impostare AC-PROIII su "STD".
- L'impostazione predefinita alla fabbrica per VSE è "OFF" e per il menu fondamente di VSE è "FLAT".
■ Menu fondamentale di VSE
Sotto Questa funzione sono prememorizzati sei menu fondamentali. Selezionale il menu fondamentale per adattarlo alle proprie preferenze.
1. Premere il tasting [SOUND].
2. Toccare VSE.

3. Toccare sul display ON/OFF. L'effetto VSE cambia in ON/OFF.

Quando VSEiene impostato su "OFF", l'impostazione VSE non si riflette nella sorgente musica. Questo completa l'impostazione VSE. Premere il tasto [SOUND] per tornare alla modalità originale.
4. Toccare B/U per selezionare "BASIC".

Ogni tocco di B/U fa andare da "BASIC" a "USER".
5. Toccare nel menu VSE Num. per selezionare il desiderato menu fondamentale VSE.
Menu fondamentali di VSE
Num. Nome della funzione Descrizione 1 FLAT Sorgente sonora flat equalizing 2 BASS BOOST Tono bassi potenziati 3 HIGH BOOST Toni medi e alti potenziati 4 IMPACT Toni bassi e alti potenziati 5 ACOUSTICAL Toni medi (voce umana) potenziati 6 SMOTH Produce toni delicati
6. Premere il tasto [SOUND] per tornare alla modalità originale.
Aggiustamento/memorizzazione VSE (memoria utente)
L'impostazione memoria utente permette di compensare la distribuzione della pressione sonora per meglio adattarsi alle preferenze personali basandosi su un menu fondamentale VSE. Posso sono essere memorizzate fino a sei regolazioni utente.
DIFFUSE:
Regola la deviazione nella pressione del suono diffuso.
CARWIDTH:
Regola la deviazione nella pressione del suono diffuso secondo la grandezza della vetura.
CAR LENGTH:
Regola the deviazione nella pressione del suono diffuso secondo la lunghezza della vettura.
1. Premere il tasting [SOUND].
2. Toccare VSE.
3. Toccare sul display ON/OFF. L'effetto VSE cambia in ON/OFF.
4. Toccare B/U per selezionare "BASIC" o "USER".
5. Toccare sul lato destro del display per selezionare un menu che sua usato come menu per l'aggiustamento.
6. Premere il tasto [A].
7. Toccare ↑ sul display delle impostazioni per selezionare "DIFFUSE", "CAR WIDTH" o "CAR LENGTH".

8. Toccare sul lato destro del display e aggiustare l'opzione come si desidera.
* Questa impostazione può essere aggiustata tra i valori 1 e 10.
9. Ripetere le fasi 7 e 8 per regolare l'unità desiderata.
10. Quando si è finito di fare l'aggiustamento per agli funzione, toccare RTN. Il display torna allo schermo originale, e viene visualizzato ">>" nel display BASIC o USER. Le operazioni fatte fin qui completano la regolazione VSE. Per continuare la memorizzazione dei valori diaggiustamento del menu dell'utente VSE, effettare le seguenti operazioni.
11. Toccare e tenere premuto RTN per 1 secondo o più. Viene visualizzata la lista del menu utente VSE.
12. Toccare et tenere premuta per 2 secondi o più la memoria utente dove si vuole memorizzare i valori di regolazione. L'emissione di un lungo bip segnalera l'avvenuta memorizzazione nel menu utente VSE dei valori regolati fino a un massimo di 9 passi. L'emissione di un breve bip segnalera che i valori di aggiustamento fino a 9 sono stati scartati. Aggiustare nuvamente questi valori come è richiesto.
13. Toccare RTN
14. Premere il tasto [SOUND] per tornare alla modalità originale.
* Per selezionare una memoria utente, toccare B/U per visualizzare "USER" e toccare « « « « « « « « « « « « « « « « « « « « « « « « « « « « « « « « « « « « « « « « « « « « « « « « « « « « « « « « « « « « « « « « « « « « « « « « « « « « « « « « « « « « « «« « « « « « « « « « « « « « « « «« »
* Per selezionare una memoria utente, toccare B/U per visualizzare "USER" e toccare « « « « « « «« «« «««««««««««««««««««««««««««««««««««««««««««««««««««««««««««.
* Per selezionare una memoria utente, toccare B/U per visualizzare "USER" e toccare « « « « « « « « « « « « « «« «« ««««««««««««««««««.
* Per selezionare una memoria utente, toccare B/U per visualizzare "USER" e toccare « « « « « « « « ““ “ “ “ “ “ “ “ “ “ “ “ “ “ “ “ “ “ “ “ “ “ “ “ “ “ “ “ ”
Selezione del menu P.EQ
L'equalizzatore dei parametri (P.EQ) permette di bilanciare l'intera gamma di livelli di frequenza in dettaglioattraversouna curva omogenea usingiol compensatoredfrequenzeadattato al tipo di vettura.
Nella procedura "Selezionare agli modalità" (ved. pag. 44), impostare EQ SELECT su "P.EQ".
- L'impostazione predefinita alla fabbrica per P.EQ è "OFF" e per il menu fondamentale P.EQ è "SEDAN-1".
■ Menu fondamentale P.EQ
Sotto esta funzione sono preinstilati 6 tipi di menu fondamentale P.EQ adattati al tipo di vettra e alla posizione in cui sono montati gli altoparlanti. Selezionare il menu fondamentale per adattarlo alla propria vettra.
1. Premere il tasting [SOUND].
2. Toccare P.EQ.

3. Toccare sul display ON/OFF. L'effetto P.EQ cambia in ON/OFF.

Quando I'effetto P.EQ viene impostato su "OFF", l'impostazione P.EQ non si riflette nella sorgente musica. Questo termina le impostazioni P.EQ. Premere il tasto [SOUND] per tornare alla modalità originale.
4. Toccare B/U per selezionare "BASIC".

Ogni tocco di B/U fa andare da "BASIC" a "USER".
5. Toccare 日 nel menu fondamentale P.EQ Num. per selezionare il menu fondamentale P.EQ.
sul lato destro del display e pzione come si desidera.
* "BAND" più essere aggistiato in una gamma di valori che vanno da 1 a 3.
* "FREQ" più essere aggiustato in una gamma di valori che vanno da 20Hz a 20kHz.
* Scegliere come “Q” uno tra 1, 3, 5, 7, o 20.
* “GAIN” più essere aggiustato in una gamma di valori che vanno da -12dB a +12dB.
10. Ripetere le fas da 7 a 9 per fare la regolazione desiderata.
11. Quando si è finito di fare l'aggiustamento per agli funzione, toccare RTN. Il display torna allo schermo originale, e viene visualizzato ">>" nel display BASIC o USER. Le operazioni fatte fin qui completano la regolazione P.EQ. Per continuare la memorizzazione dei valori diaggiustamento del menu utente P.EQ, effettuire le seguenti operazioni.
12. Toccare e tenere premuto RTN per 1 secondo o più. Viene visualizzata la lista dei menu P.EQ.
13. Toccare e tenere premuta per 2 secondi o più la memoria utente dove si vuole memorizzare i valori di regolazione. L'emissione di un lungo bip segnalera l'avvenuta memorizzazione nel menu utente P.EQ di un massimo di 10 valori di regolazione. L'emissione di un breve bip segnalera che i valori di aggiustamento sono a 10 sono stati scartati. Aggiustare nuovamenteQUESTi valori come è richiesto.
14. Toccare RTN.
15. Premere il tasto [SOUND] per tornare alla modalità originale.
* Per selezionare una memoria utente, toccare B/U per visualizzare "USER" e toccare ↑ 🙩️ nella memoria utente Nur
Regolazione del P.EQ
Le impostazioni possono essere regolate nel menu P.EQ nel modo segmente: La Frequenza centrale, il gain e la curva Q sono essere memorizzate in combinazioni di canali o bande. Per esempio, la Frequenza centrale "250Hz", il gain "-8dB" e la curva Q "3" sono essere memorizzati nella banda 1 del frontale.
FRONT/REAR (seLECTIONe dei canali)
Selezionale il canale (anteriore o posteriore) da regolare.
BAND (seLECTIONE della banda)
Selezione la banda di frequenza (da 1 a 3) da regolare. Impostare la frequenza centrale, (FREQUENCY), il gain (GAIN) e la curva Q (Q) per ognuna delle bande di frequenza.
FREQUENCY (selezione della frequenza centrale)
Selezione la frequenza da usarsi come centro delle bande di frequenza che deve essere compensato in una gamma da 20Hz a 20kHz. (intervali di 1/3 di ottava, 31 puniti)
GAIN (regolazione del gain)
Regola il gain (livello di emissione) nella gamma da -12dB a +12dB.
(1dB steps, 25 puncti)
Q (selezione della curva Q)
Imposta un valore tra 1, 3, 5, 7, o 20 per indicare l'intensità della curva Q.
Compensazione
Non c'è bisogno di compensare le caratteristiche di frequenza sequeste sono risultate piatte (privi di picchi o vale) quando si sono misurate con un apparecchio misuratore. In agli caso, talvolta le caratteristiche di frequenza salgono o scendono in certi punti. Se accade quello, le caratteristiche di frequenza devono essere compensate. Creare una curva di frequenza che ha caratteristiche opposite alla frequenza centrale nella parte in cui esta sale o scende per annullare quosti picchi e valori, e rendere la frequenza la più piatta possibile.
Il rendere le caratteristiche di frequenza le più piatte possibile si chiama "compensazione".
Su gesto apparecchio, le caratteristiche di frequenza possono essere compensate atraverso il P.EQ (equalizzatore parametrico).
- Compensazione delle caratteristiche di frequenza
Lo schema在哪的 relazione tra la frequenza centrale, il gain e la curva Q.

Curva Q
La curva Q diventa più acuta quando più il valor numerico aumenta, e più dolce quando più il valor numerico diminuisce.
Le caratteristiche di frequenza possono essere appiattite selezionando una curva Q opposta alla curva che si vuole compensare.

F: Freqenza centrale, G: Gain (livello di emissione), Q: Curva Q
Num.(tipodi automobile) Parametri dell'equalizzatore parametrico Canale Banda 1 Banda 2 Banda 3 F G Q F G Q F G Q 1(SEDAN-1) Davanti 250 Hz -8 dB 3 2 kHz -4 dB 1 5 kHz -4 dB 1 Dietro 250 Hz -10 dB 3 1.25 kHz 0 dB 5 8 kHz 0 dB 5 2(SEDAN-2) Davanti 250 Hz -10 dB 7 800 Hz -4 dB 3 8 kHz -5 dB 1 Dietro 80 Hz 3 dB 7 125 Hz -12 dB 5 1.25 kHz 0 dB 5 3(WAGON-1) Davanti 250 Hz -8 dB 3 1 kHz -8 dB 3 10 kHz -6 dB 1 Dietro 250 Hz -8 dB 3 800 Hz -8 dB 1 8 kHz 0 dB 5 4(WAGON-2) Davanti 250 Hz -8 dB 7 400 Hz -10 dB 7 1.25 kHz -8 dB 7 Dietro 125 Hz -8 dB 3 500 Hz -5 dB 5 1.6 kHz 0 dB 3 5(MINI VAN-1) Davanti 125 Hz -4 dB 5 1.25 kHz -4 dB 3 2 kHz 3 dB 7 Dietro 250 Hz -6 dB 1 630 Hz -4 dB 3 8 kHz 0 dB 5 6(MINI VAN-2) Davanti 250 Hz -4 dB 3 1.25 Hz -8 dB 3 80 Hz 3 dB 3 Dietro 250 Hz -8 dB 3 500 Hz -5 dB 5 8 kHz 0 dB 5
Operazioni radio
Display dello schermo nella modalità radio
Display principale
Questo è quello che appeare premendo la manopola [ROTARY] e selezionando la modalità radio.

Toccando il lato sinistro del display per 1 secondo o più si torna al display delle operazioni di base.

Display delle frequenze
Viene migliorata la frequenza attualmente in fase di ricezione.
Toccare o nel display delle operazioni di base permette di effettuire la sintonizzazione automatica o la sintonizzazione manuale.
Display del titolo
Mostra il nome della stazione radio attualmente in fase di ricezione. Toccare quello nome si cambia il display.
Display della banda di ricezione
AM: Nome della banda di frequenza AM
FM1: Nome della banda di frequenza FM
Display del Num. preselezionato
Toccando nel display delle operazioni standard si selezione una memoria preimpostata.
MODE
Toccandolo si visualizzano le sub-funzioni.
Toccandolo e mantenendolo premuto si visualizzata la lista delle memorie preselezionate.
P-SCAN:
Questo viene visualizzato durante una scansione preselezioni. Toccandolo si termina la scansione preselezioni.
A-STORE
Questo viene visualizzato durante una memorizzazione automatica. Toccandolo si termina la memorizzazione automatica.
BAND
Il toccarlo cambia la banda di ricezione.
Toccandolo et tenendolo premuto per 1 secondo o più si cambia alla modalità di sintonizzazione manuale alla sintonizzazione automatica e viceversa.
(solo nel display delle operazioni di base)
Toccandoli si abilita la sintonizzazione automatica o la sintonizzazione a passo. Toccandololi e tendoli premuti si abilita la sintonizzazione rapida (nella modalità di sintonizzazione manuale).
Display della lista delle memorie preselezionate
Questo è quello che appeare quando MODE viene toccato e tenuto premuto per 1 secondo o più nel display principale.

>>: In fase di sintonizzazione
RTN: Toccandolo si ritorna al display principale.
Ascolto della radio
1. Premere la manopola [ROTARY] per selezionare la modalità radio. Ogni pressione sulla manopola [ROTARY] cambia la modalità nell'ordine seguente: Radio (DAB) CD / MP3 (CD Changer) (DVD Changer) (TV) AUX Radio...
* Se una data apparecchiatura non è connessa, la rispettiva modalità non appeare visualizzata.
2. Toccare BAND perambiare la banda di ricezione.
Ogni volta che si preme BAND la banda di ricezione cambia nell'ordine seguente:
FM1 FM2 FM3 AM (MW / LW) FM1...
Sintonizzazione
Ci sono 3 tipi di modalità di sintonizzazione disponibili: sintonizzazione automatica, sintonizzazione manuale e sintonizzazione delle preselezioni.
Sintonizzazione automatica
Ci sono 2 tipi do sintonizzazione automatica: DX SEEK e LOCAL SEEK.
La funzione DX SEEK più sintonizzari automaticamente nelle stazioni emittenti ricevibili; LOCAL SEEK, inceve, più sintonizzari solo sulle stazioni emittenti con una Buona sensibilità di ricerca.
1. Toccare BAND per selezionare la banda desiderata (FM or AM (MW, LW)).
2. Sintonizzarsi su una stazione.
* Se sul display appare MANU, toccare e tenere premuto BAND per 1 secondo o più. "MANU" scomparirà dal display e sare subito disponibile la sintonizzazione automatica.
* Se "TA" appeare illuminato nel display, vengono ricercate automaticamente le stazioni TP.
DX SEEK
Quando si tocca 一 一 nel display delle frequenze, viene avviata la sintonizzazione automatica.
Quando si tocca 山 , la stazione viene ricercata in direzione delle frequenza più alto,除去 se si tocca 山 , la stazione viene ricercata in direzione delle frequenza più basse.
* Quando si avvia la ricerca automatica, "DX SEEK" appeare nel display.
LOCAL SEEK
Quando si tocca nel display delle frequenze, viene eseguita una ricerca per la sintonizzazione locale. Vengono selezionate solo le stazioni radio con buona sensibilità di ricezione.
* Quando si avvia la ricerca per la sintonizzazione locale, "LO SEEK" appeare nel display.
Sintonizzazione manuale
Ci sono 2 modalità disponibili: sintonizzazione rapida e sintonizzazione a passo.
Quando ci si trovava in modalità di sintonizzazione a passo, la frequenza cambia di un passo per volta. In modalità di ricerca rapida, è possible sintonizzarsi rapidamente sulla frequenza desiderata.
1. Toccare e tenere premuto BAND per 1 secondo o più nel caso che MANU non venga visualizzato. La sintonizzazione manuale è disponibile quando viene visualizzato MANU.
2. Usare il display delle frequenze per sintonizzari su una frequenza in cui c'è una stazione emittente.
Sintonizzazione a passo
Toccare 山 sul display delle frequenze.
Sintonizzazione rapida
Toccare sul display delle frequenze. La sintonizzazione viene interrotta se si toglie il dito dal pannello.
Richiamareuna stazione preselezionata
Il richiamare una stazione preselezionata è una funzione riservata alle stazioni più memorizzate.
1. Toccare e tenere premuto MODE per 1 secondo o più. Viene visualizzata la lista delle memorie preselezionate.
2. Toccare la stazione che si vuole ascoltare.
* Se si è in modalità normale, èanches possible sintonizzarsi nel Num. preselezionato toccando nel display principale.
Per annullare una sintonizzazione
1. Toccare RTN.
Memoria preselezionata
Per memorizzare singole stazioni radio sono disponibili 24 posizioni preselezionate (6-FM1, 6-FM2, 6-FM3, 6-AM).
1. Toccare BAND perambiare la banda di rivezione.
2. Usare il display delle frequenze per memorizzare la stazione.
3. Toccare e tenere premuto MODE per 1 secondo o più. Viene visualizzata la lista delle memorie preselezionate.
4. Toccare e tenere premuto per 2 secondi o più il Num. preselezionato per memorizzare la stazione. L'emissione di un lungo bip segnalera l'avvenuta memorizzazione della stazione.
Memorizzazione automatica
La memorizzazione automatica è una funzione che permette la memorizzazione sino a 6 stazioni che sono automaticamente sintonizzate in seguenza.
1. Toccare MODE.
2. Toccare e tenere premuto A-STORE per 2 secondo o più. Il display MODE cambia in "A-STORE" e il Num. selezionato durante le operazioni di memorizzazione automatica appare nel display Num. selezionato.
* Vengono automaticamente ricercate le stazioni con una buona riscizione, e quando memorizzate tra le memorie preselezionate (No.1 to No.6) in ordine partendo alla stazione con la frequenza più Bassa.
Note:
- Quando viene effettuata la memorizzazione automatica, le stazioni memorizzate sono a quel momento vengono cancellate.
- Nel caso che ci siano meno di 6 stazioni con una Buona ricezione in LOCAL SEEK, leasse frequenze saranno automaticamente richiamate e la memorizzazione automatica verrà ri-effettuata in modalità DX-SEEK. Le stazioni precedentamente memorizzate rimangono in memoria nel caso in cui risultano esserci meno di 6 stazioni disponibili, malgrado la memorizzazione automatica sia stata effettuata 2 volte.
- Se la memorizzazione automatica viene effettuata nelle bande FM, le stazioni sono memorizzate in FM3anche se FM1 o FM2 erano state scelte per la memorizzazione delle stationi.
Scanzione preselezioni
La scanzione preselezioni è una funzione per ricevere le stazioni nell'ordine in cui sono memorizzate per Num. preselezionato in modo che si possano controllare le trasmissioni.
1. Toccare MODE.
2. Toccare P-SCAN.
Il display MODE cambia in "P-SCAN" e il Num. selezionato durante le operazioni di scanzione preselezioni appeare nel display Num. selezionato.
* Le stazioni attualmente memorizzate sono ricevute in ordine per 7 secondi o più. Le stazioni con scarsa ricercazione sono saltate e viene ricevuta la stazione successiva. Quando viene effettuata la scanizione preselezioni in una trasmissione FM, le stazioni FM sono ricevute nell'ordine seguente:
FM1 (1 6) FM2 (1 6) FM3 (1 6)...
Quando viene effettuata la scanzione preselezioni in una trasmissione AM, le stazioni AM sono ricevute nell'ordine segunte:
AM (1 6) AM (1 6) e cosi via.
Per annullare la scanizione preselezioni
1. Toccare P-SCAN.
Il display P-SCAN cambia in "MODE" e, in seguito, saranno ricevute le stazioni che si stavano ricevendo quando si è toccato P-SCAN.
RDS (Sistema dati radio)
L'unità dispone di un sistema di decodifica RDS incorp.orato che supporta le stazioni emittenti che trasmettono dati RDS.
Questoistema può visualizzare il nome della stazione emittente in corso di ricezione (PS) e cui agganciarsi automaticamente alla stazione ricevente con la riscizione migliorhe quando ci si sposta a lunghe distance (Alternanza AF).
Inoltre, se da una stazione emittente RDS vengono trasmessi annunci sul traffico o un tipo tipo di programmà,但这a trasmissione viene ricevuta indipendentemente alla modalità in cui ci si trovà.
In aggiunta, se si ricevono informazioni EON, queste informazioni abilitano il passaggio automatico ad altre stazioni preselectionate della stessa rete e l'interruzione delle trasmissioni in corso da parte dei notiziari sul traffico trasmessi da altre stazioni (TP). Questa funzione non è disponibile in alcune zone.
Quando si usa la funzione RDS, impostare sempre la radio sulla modalità FM.
- AF: Freqenza Alternativa
- PS: Nome servizio programma
- PTY: Tipo programma
- EON: Rete avanzata
- TP: Programma sul traffico
PI: Identificazione programmata
- TA: Notiziario sul traffico
* L'interruzione RDS non si attiva durante la ricezione radiofonica AM.
* Nel corso della ricezione di segnali RDS, se l'apparecchio è in grado di leggere i dati PS, sul quadrante compare l'indicazione PS.
Funzione AF
La funzione AF passa a un'altra frequenza della stessa rete per mantenere una riscezione ottimale.
L'impostazione predefinita alla fabbrica è "ON" (Attivata).
Per attivare o disattivare la funzione AF
1. Toccare MODE.
2. Toccare AF. Ogni tocco fa andare il display di AF alternativamente tra "ON" e "OFF"
3. Toccare RTN.
* Nel caso in cui peggiori la riscione della stazione emittente in ascolto, nel display appare "SEARCH" e la radiocca lo stesso programma in un'altra frequenza.
La funzione AF tra RDS e DAB
Quando lo stesso programma viene trasmesso.
sia in RDS che in DAB e esta funzione è
attivata, l'unità sintonizza automaticamente il
ricevitore in modo da ricevere la trasmissione
con migliorare qualità di ricezione.
- Questa funzione agisce quando è collegata l'unità DAB DAH923 o DAH913, venduta separatamente.
- L'impostazione originale di fabbrica è "ON".
1. Premere il tasto [A] per impostare la modalità di regolazione.
2. Toccare 卡 路 卡 nel display delle opzioni selezionare "LINK ACT" sotto "TUNER".

3. Toccare nel lato destro del display o, in alternatively, girare la manopola [ROTARY] per selezionare "ON" o "OFF". ON:
L'alternanza di AF tra DAB e RDS è attivata. OFF:
L'alternanza di AF tra DAB e RDS è disattivata.
4. Premere il tasting [A] per tornare alla modalità precedente.
Funzione REG (Programma regionale)
Quando la funzione REG è attivata, è possibile ricevere le miglior i stazioni regionali. Quando esta funzione è disattivata, se nelle si guidà si cambia area di stazioni regionali, viene ricevuta una stazione della nuova regione.
- L'impostazione predefinita alla fabbrica è "OFF" (Disattivata).
Note:
- Questa funzione viene disabilitata quando è in corso di ricezione una stazione nazionale, coma la BBC 2-FM.
- L'impostazione della funzione REG su ON/OFF è valida quando è attivata (ON) la funzione AF.
Attivazione e disattivazione delle funzione REG
1. Toccare MODE.
2. Toccare REG.
Ogni tocco fa andare il display di REG alternativamente da "ON" a "OFF".
3. Toccare RTN.
Sintonizzazione manuale di una stazione regionale nella stessa rete
- Questa funzione è disponibile solo se la funzione AF è attivata.
- L'operazione cambia a secondo dell'impostazione ON/OFF della funzione REG. Quando la funzione REG è ON, possono essere ricevute quale trasmissioni che hanno un codice PI perfettamente adatto. Quando la funzione REG è OFF, possono essere ricevute quale trasmissioni che hanno lo stesso tipo di codice PI.
Note:
- Questa funzione può essere usata quando si riceve una trasmissione regionale della stessa rete.
- Il codice PI è un codice di sistema unico per agli stazione emittente.
1. Toccare e tenere premuto MODE per 1 secondo o più. Viene visualizzata la lista delle memorie preselezionate.
2. Toccare il Num. preselezionato della stazione che si vuole ricevere.
TA (Notiziario sul traffico)
Nella modalità di attesa della funzione TA, quando viene avviato un notiziario sul traffico,esso viene ricevuto con priorità assoluta, indipendenteamente alla modalità di funzionamento, in modo che si possibile ascoltarlo. Eanche possibile la sintonizzazione automatica su un programma sul traffico (TP).
- Questa funzione può essere utilizzata solo quando nel display appara il messaggio "TP", che significà che la stazione emittente RDS che si sta ricevendo è dotata di programmi di notiziari sul traffico.
Impostazione della modalità di attesa della funzione TA
Se si preme il tasto [TA] quando nel display appeare solo il messaggio "TP", nel display iniziano a lampeggiare le scritte "TP" e "TA" e l'unità viene posta in modalità di attesa fine a che viene trasmesso un notiziario sul traffico. Quando viene avviato un notiziario sul traffico, nel display appeare il messaggio "TRA INFO". Se si preme il tasto [TA], cioè è in corso la ricezione di un notiziario sul traffico, la riscizione del notiziario sul trafficoiene interrotta e l'unità passa in modalità di attesa TA.
Per annullare la modalità stadby di TA Quando "TP" e "TA" sono illuminate nel display, premere il tasto [TA]. "TA" sparisce dal display e viene annullata la modalità stadby di TA.
- Se "TP" non è illuminato, premendo il tasto [TA] si cercHERA una stazione TP.
Per cercare una stazione TP
Se si preme il tasting [TA] quando "TP" non è illuminato, "TA" si illumina nel display e esta unità riceve automaticamente riceve una stazione TP.
Nota:
- Quando una stazione TP non può essere ricevuta, non viene visualizzato "TP SEEK" e la ricerca da una stazione TP viene continuata.
- Quando il tasto [TA]iene premuto nuovamente, "TA" e "TP SEEK" scompaiono dal display e la ricerca da stazioni TP viene terminata.
Funzione di memorizzazione automatica per le stazioni TP
Nella memoria a predesignazione si possono memorizzare sino a sei stazioni TP. Se il numero di stazioni TP ricevibili è inferiore a 6, le rimanenti stazioni trasmittenti più memorizzate rimangono memorizzate come erano.
1. Assicurarsi che "TA" sia visualizzato, e toccare MODE. Se "TA" non viene visualizzato, premere il tasto [TA] per visualizzare "TA".
2. Toccare e tenere premuto A-STORE per 2 secondo o più. Il display MODE cambia in "A-STORE" e il Num. selezionato durante le operazioni di memorizzazione automatica appare nel display Num. selezionato.
- Le stazioni TP con una buona sensibilità di ricezione sono memorizzate nelle memorie preselezionate.
- Anche se viene selezionato FM1 o FM2, una stazione TP è memorizzata come FM3.
PTY
Questa funzione consente di ascoltare la trasmissione di un tipo tipo di programma radio,anche se l'apparecchio si trova predisporto su una modalità diversa da quella della radio.
- Alcune nazioni non sono più recenti di trasmissioni PTY.
- In modalità di attesa TA, una stazione TP ha la priorità su una stazione emittente PTY.
Impostazione della modalità di attesa PTY
Quando si preme il tasto [▶III] nel display si accende il messaggio "PTY" e viene attivata la modalità di attesa PTY. Quando ha inizio la trasmissione PTY selezonata, il nome della trasmissione PTYiene visualizzato nel display.
■ Annullamento della modalità di attesa PTY
Quando si preme e si tiene premuto il tasto [▶II], per 1 secondo, o più a lungo, "PTY" si spegne nel display e la modalità di attesa PTY è annullata.
■ Annullamento di trasmissione interrotta PTY
Premere il tasto [▶III] durante la trasmissione interrotta PTY, l'interruzione PTYiene cancellata e l'unita ritorna in modalità di attesa PTY.
Selezione PTY
1. Whenever you want to use the "passive" option, you can use the following command:
2. Toccare 山 山 nel lato destro del display o, in alternatively, girare la manopola [ROTARY] per selezionare PTY.
* Di seguito vengono indicati le impostazioni predefinite alla fabbrica:
Numero presezione Voce PTY ENGLISH Conteno 001 News Notizie 002 Info Informazioni 003 Pop M Musica Pop 004 Sport Sport 005 Classics Musica classica 006 Easy M Musica leggera
3. La modalità di selezione PTY viene cancellata automaticamente dopo 7 secondi, o toccando RTN che selezione un PTY.
Ricerca PTY
1. Whenever si preme il tasto [▶■],iene attivata la modalità di selezione PTY.
2. Toccare 山 nel centro del display o, in alternatively, girare la manopola [ROTARY] per selezionare PTY.
3. Toccare 山 sul lato sinistro del display. Se viene toccato , questa unita ricerca una trasmissione PTY in direzione delle frequenze più alto; se si preme il tasto 山 , l'unita ricerca la trasmissione PTY in direzione delle frequenze più BASSE.
* Se non risulta possibile la ricezione di alcuna stazione con il tipo di programma PTY selezionato, l'apparecchio ritorna alla modalità precedente
Memoria di presezione PTY
1. Whenever si preme il tasto [▶■],iene attivata la modalità di selezione PTY.
2. Toccare 日 nel centro del display per selezionare PTY. Si possono selezionare i 29 tipi di PTY della tabella seguente.
Voce PTY ENGLISH DEUTSCH SVENSKA FRANÇAIS Contenuto News Nachrich Nyheter Infos Notizie Affairs Aktuell Aktuellt Magazine Attualità Info Service Info Services Informazioni Sport Sport Sport Sport Sport Educate Bildung Utbildn Educatif Educazione Drama Hör + Lit Teater Fiction Teatro Culture Kultur Kultur Culture Cultura Science Wissen Vetenskp Sciences Scienza Varied Unterh Underh Divers Varietà Pop M Pop Pop M Pop Musica Pop Rock M Rock Rock M Rock Musica Rock Easy M U-Musik Lättlyss Chansons Musica leggera Light M L-Musik L klass M Cl Lég Musica classica leggera Classics E-Musik Klassisk Classiq Musica classica Other M - - Musik Övrig m Autre M Altra musica Weather Wetter Väder Météo Previsioni del tempo Finance Wirtsch Ekonomi Economie Informazioni finanziarie Children Kinder Für barn Enfants Programmi per i bambini Social Soziales Socialt Société Questioni sociali Religion Religion Andligt Religion Religione Phone In Anruf Telefon Forum Telefonate in diretta Travel Reise Resor Voyages Viaggi Leisure Freizeit Fritid Loisirs Tempo libero Jazz Jazz Jazz Jazz Musica Jazz Country Country Country Country Musica Country Nation M Landes M Nation m Ch pays Musica nazionale Oldies Oldies Oldies Rétro Vecchi successi Folk M Folklore Folkm Folklore Musica folk Document Feature Dokument Document Documentari
3. Toccare RTN per 1 secondo o più. Viene visualizzata la lista dei titoli della memoria PTY.
4. Toccare e tenere premuto per 2 secondi o più il Num. preselezionato perché sia memorizzato.
Si sentirà un lungo bip, e il PTY selezionato verrà memorizzato nella memoria di quel canale preselezionato.
Trasmissione di emergenza
Se si riceve una trasmissione di emergenza, tutte le operazioni della modalità funzioni vengono interrotte. Nel display appara il messaggio "ALARM" ed è possibile ascoltare la trasmissione di emergenza.
■ Annullamento di una trasmissione di emergenza
Se si preme il tasto [AF], la riscione della trasmissione di emergenza viene annullata.
Cambiamento della lingua del display PTY
Per i PTY visualizzati nel display è possibile selezionare una delle 4 lingue disponibili (Inglese, Tedesco, Svedese o Francesese).
L'impostazione predefinita alla fabbrica è "ENGLISH".
1. Premere il tasto [A] per impostare la modalità di regolazione.
2. Toccare 一 _ 一 nel display delle opzioni per selezionare "LANGUAGE" sotto "TUNER".

3. Toccare 山 nel lato destro del display o, in alternatively, girare la manopola [ROTARY] per selezionare il linguaggio.
* Selezionare una lingua tra ENGLISH, DEUTSCH (German), SVENSKA (Swedish) or FRANÇAIS (French).
4. Premere il tasting [A] per tornare alla modalità precedente.
Impostare una interrupzione RDS quando la funzione 2-ZONE è in funzione (RDS-INT 2Z)
Le informazione RDS possono essere ricevute quando la funzione è impostata su "ON", e c'è una interruzione RDS nelle funzioni 2-ZONE è in uso.
- La funzione 2-ZONE si disattiva quando c'è una interruzione RDS.
- Se ci fosse stato una interruzione di allarme ancche se con "RDS-INT 2Z" impostato su "OFF", alla si ricevono le informazioni RDS.
- L'impostazione predefinita alla fabbrica è "ON".
1. Premere il tasto [A] per impostare la modalità di regolazione.
2. Toccare 念 nel display delle opzioni e selezionare "RDS-INT 2Z" sotto "TUNER".

3. Toccare 山 山 nel lato destro del display o, in alternatively, girare la manopola [ROTARY] per selezionare "ON" o "OFF".
ON:
Le informazioni RDS si ricevono quando c'è una interruzione RDS nelle funzioni 2-ZONE è in uso.
OFF:
Quando la funzione 2-ZONE è in uso, è possibile ricevere solo l'interruzione di allarme tra le informazioni RDS.
Nota:
- Se è selezionato il modo Radio quando TA (Traffic Announcement) e PTY sono positonati su "ON", le interruzioni vengono ricevuteanche se l'impostazione dell'interruzione RDS è posizionata su "OFF".
4. Premere il tasto [A] per tornare alla modalità precedente.
Impostazione del volume di TA, trasmissioni d'allarme (ALARM) e PTY
Durante le trasmissioni di interruzione TA, ALARM, PTY è possible impostare il volume delle trasmissioni di interruzione TA, ALARM e PTY.
- L'Âfimpostazione predefinita alla fabbrica è "15".
Durante una trasmissione di interruzione TA, ALARM o PTY, girare la manopola [ROTARY] in senso orario per impostare il volume al livello desiderato (da 0 a 33).
- Dopo che la trasmissione di interruzione TA, ALARM o PTY fisisce, il volume ritorna al livello precedente alla trasmissione di interruzione.
Display dello schermo nella modalità CD
Display principale
Questo è quello che appeare premendo la manopola [ROTARY] per selezionare la modalità CD.

Toccando il lato sinistro del display per 1 secondo o più si cambia in modalità operazioni.

Display del brano/tempo di riproduzione J'01/02: 00:
Sono visualizzati il Num. del brano in fase di riproduzione e il tempo di riproduzione. Se viene toccato o nelle operazioni standard, è possibile selezionale il brano da riproduzione, o i brani da far avanzare velocamente o da far andare indietro velocamente.
Display del titolo
Il display cambia quando this is toccato.
Display della cartella (nel caso di MP3/WMA)
Toccando nelle operazioni standard permeate di selezionare le cartelle.
MODE:
Toccandolo si visualizzano le sub-funzioni. Nel caso di MP3/WMA, toccando e tenendo premuto quello per 1 secondo o più visualità la lista delle cartelle.
Nota:
- Questa funzione è disponibile solo quando il disco è in fase di riproduzione.
-SCAN: -SCAN: Questo viene visualizzato durante la scansione delle riproduzioni. Toccandolo si interremporà la scansione delle riproduzioni.
- RPT/RPT: Questo viene visualizzato durante la ripetizione della riproduzione. Toccandolo si interromperà la ripetizione delle riproduzioni.
F-RDM/RDM: Questoiene visualizzato durante la coproduzione in ordine casuale. Toccandolo si interrornpera la coproduzione in odine casuale.
TOP:
Toccandolo si avvia la riproduzione a partire dal brano all'inizio del disco o della cartella in fase di riproduzione.
(solo nel display delle operazioni di base) Toccando quei tasti si selezione il brano da riproduire.
Toccando e tenendo premuti questi tasti si mandano i brani avanti o indietro velocimento.
■ Display della lista delle cartelle (nel caso di MP3/WMA)
Questo è quello che appeare quando MODE viene toccato e tenuto premuto per 1 secondo o più nel display principale.

Nome della cartella
Cartella Num.
Quando questo è visualizzato in grigio, la cartella non può essere selezionata.
>>:Selezione in progressione
Toccando il nome di una cartella si fa tornare lo schermo al display principale, e la riproduzione viene avviata a partire dal primo brano della cartella toccata.
Toccandolo si visualizza la lista delle cartelle precedenti. Toccandolo e tenendolo premuto per 1 secondo o più si fa tornare lo schermo al display principale.
NEXT:
Toccandolo si visualizza la lista delle cartelle successive.
Che casa è ilsystema MP3?
IlsystemaMP3eunmetodi dcompresione audioclassificato nello strato audio 3 degli standard MPEG.
Questo metododi compressione audio si è talmente diffuso fra gli utenti di personal computer, da essere considerato ormai un formato standard.
Ilsystema MP3 presenta i dati dell'audio originale compressi sino a circa il 10% della dimensione originale, con un'alta qualità sonora. Questo significica che 10 CD di musica possono venire registrati su un unico disco del tipo CD-R o CD-RW, per consentire un lungo tempo di ascoltorawnazadovercinuamente procedere alla sottomuzione dei CD.
Che casa è ilsystema WMA?
WMA è l'acronimo di Windows Media Audio, un formato di file audio sviluppato alla Microsoft Corporation.
Note:
- Riproducendo un file con il metod DRM (Gestione dei diritti digitali) perché ilsystema WMA è attivato (ON) non viene emesso alcun suono audio. (L'indicatore WMA lampeggia.)
- Il terme "Windows Media™" ed il logo "Windows®" sono marchi di fabbrica, o marchi di fabbrica della Microsoft Corporation registrati negli Stati Uniti e/o in altri Paesi.
- Disattivazione delsystema DRM (Gestione dei diritti digitali):
- Quando si usa Windows Media Player 8,fareclscu TOOLS OPTIONS scheda COPY MUSIC,poi in COPY SETTING togliere la spunta dalla casella PROTECT CONTENT. Poi ricostruire i file.
- Quando si usa Windows Media Player 9,fare clic su TOOLS OPTIONS scheda MUSIC RECORD, poi nelle impostazioni Recording togliere la spunta alla casella RECORD PROTECTED MUSIC. Poi ricostruire i file.
I file WMA realizzati su base personale sono utilizzati molto la diretta responsabilità dell'utente.
Precauzioni per la creatione di un disco MP3/WMA
- Valori di campionamento e di bit utilizzabili:
1. MP3:
Valori di campionamento: da 11.025 kHz a 48 kHz
Valori bit: da 8 kbps a 320 kbps / VBR
2. WMA:
Valori bit da 48 kbps a 192 kbps
- Extensione del nome del file
1. Bisogna sempre aggiuungere un'estensione "MP3" o .WMA a un file MP3 o WMA using lettere di un solo byte. Se si aggiunge una estensione diversa da quella indicate o ci si dimentica di aggiuungere l'estensione del file, la riproduzione del file sera impossibile.
2. I file dati MP3/WMA non saranno riprodotti. L'indicazione "--: --" appeare nel display del tempo di riproduzione se si tenta di riproduurre dei file privi di dati MP3/WMA.
- Formato logico (sistema dei file)
1. Quando si scrive un file MP3/WMA su un disco CD-R o CD-RW, si prega di selezionare "ISO9660 level 1, 2 or JOLIET or Romeo" come lavorato di scrittura del software. La riproduzione normale cui non sono possibile se il disco è registrato in un'alto lavorato.
2. Il nome della cartella e del file possono essere visualizzati come titolo nel caso di una riproduzione di un MP3/WMA ma il titolo deve essere entro 128 lettere alfabetiche o numerali a byte singoli (inclendo un'estensione).
3. Non dare a un file lo stesso nome della cartella in cui è contentuto.
Struttura della cartella
1. Non sono autorizzati dischi con cartelle costituite da più di 8 livelli gerarchici.
-Numero dei file o delle cartelle
1. Per agli cartella possono essere riconosciuti fino a 255 file. Possono essere riprodotti fino a 500 file.
2. I brani sono riprodotti nell'ordine in cui erano registrati nel disco. (I brani possono non essere sempre riproducibili nell'ordine visualizzato nel PC).
3. Possono esserci alcuni disturbi a secondo del tipo di programma codificatore utilizzato durante la registrazione.
Selezione multisessione
Questa funzione permette di selezionare sia CD-DA sia file MP3/WMA nel caso di dischi (p.es. CD-EXTRA) contenti sia CD-DA (CD musicali) sia file MP3/WMA.
1. Toccare MODE.
2. Toccare M-SESS.
Ogni tocco su M-SESS fa andare il display di M-SESS alternativamente da "CD" (riproduzione CD-DA) o "MP3/WMA" (riproduzione MP3/WMA).
* Se non viene visualizzato M-SESS, toccare NEXT.
3. Toccare RTN.
La selezione della multissessione avrè effetto la volta seguente in cui sare caricato il CD.
Nota:
- Quando si riproduisce un CCCS (Copy Control CD), selezionareIl tipo CD. Se è impostato il tipo MP3/WMA, in alcuni casi, il CD potrebbe non essere riprodotto bene.
ATTENZIONE
Fare attenzione a non lasciarsi prendere la mano o le dita nelle si richiude la CONSOLE INCLINATA.
Note:
- Se la CONSOLE INCLINATA non si après completeness a prioro a mano con delicatezza.
- Richiudere sempre la CONSOLE INCLINATAupon l'insertimento del CD.
- Non insere la mano o le dita nella fessura di caricamento del disco. Ugualmente, nella fessura non devono essere inserti oggetti estranei.
Non inserire dischi con adesivi sporgenti dal nastro di cellophane o dischi CD in affitto, contententi l'etichetta del negotio in cui sono stati affittati, o dischi con contrassegni i cui nastri o etichette di affitto di copertura sono stati toti. Tali tipi di dischi possono risultare impossibili da estrarre e possono causare danni all'apparecchio.
Insetimento di un CD
1. Premere il tasting [▲].
Il pannello di controllo si après.
2. Inserire il disco nel CD SLOT.
Quando il disco è stato inserito, il pannello di controllo si chiude automaticamente dopo quello secondo, e quando ha inizio la riproduzione.
Note:
Non inserire mai oggetti estranei nel CD SLOT.
- Se l'inserimento del CD risulta dificoltoso, potrebbe esserci un'alto CD nel meccanismo o che l'apparecchio non funzioni perfettamente e richieda una revisione.

che non riportano i contrassegni [0158]
e i CD-ROM non possono essere tti con quello apparecchio.
- Certi tipi di Cd, registrati secondo la modalità CD-R/CD-RW, possono risultare non riproducibili.
Instrimento di compact disc da 8 cm
Per la riproduzione di CD da 8cm non è necessario alcun tipo di adattatore. Inserire il CD da 8 cm al centro del CD SLOT.
Espulsione di un CD
Premendo il tasting [▲] è possibile espellere automaticamente un discoanche se la chiave d'accensiono o ACC è nelle posizione OFF.
ATTENZIONE
Quando viene espulso un disco, premere il tasto [▲] per chiudere il pannello di controlo. Se il pannello di controllo viene lasciato aperto, l'emissione di un doppio bip segnalera la chiusura automatica del pannello di controlo.
1. Premere il tasto [▲].
Il pannello di controllo siCTL, e il disco viene espulso. La modalità cambia, automaticamente, in modalità radio.
* Assicurarsi di rimuovere i dischi espulsi da questo apparecchio. Se si lascia il disco nella fessura dei dischi, quello sare rittirato e il pannello di controllo si chiudera. (funzione di inserimento automatico)
* Singoli CD non sono inserti in automatico. Assicurarsi di rimuovere i singoli CD dopo averli espulsi.
ATTENZIONE
Se si usa una forza eccessiva nel caricare un disco après che quello è stato espulso, la superficie del disco potrebbe danneggiarsi. Rimuovere il disco prima di re-insertirlo nuovamente.
Ascolto di un disco già inserto nell'apparecchio
1. Premere la manopola [ROTARY] per selezionare la modalità CD.
* Attivando la modalità CD la riproduzione ha automaticamente inizio.
Arresto temporaneo della riproduzione
1. Premere il tasting [▶■].
■ Riavvio della riproduzione
1. Premere nuovamente il tasto [▶■].
Selezione di un brano
Quando viene inserto un CD-R/CD-RW registrarato con un file MP3 o WMA, è possibile selezionale solo i brani registrati nella stessa cartella toccando nel display del brano.
1. Per sentire il brano successivo, toccare nel display del brano.
2. Per sentire il brano precedente, toccare due volte nel display del brano. Toccando si riproduce il brano successivo. Per agli successiva pressione del tasting l'apparecchio avanza sino all'inizio del brano successivo.
Toccando 山 si riproduce il brano precedente. Per agli successiva pressione del tasting 山 l'apparecchio retrocede sino all'inizio del brano precedente che viene poi riproduzione..
* Se si tocca ↑ due volte nel display del brano perché sta per cominciare la sua riproduzione, talvolta viene riproduzione il secondo brano precedente.
■ Selezione delle cartelle
Per selezionare un'altra cartella si può sia toccare
南 neI display delle cartelle, sua fare come segue..
1. Toccare e tenere premuto MODE per 1 secondo o più. Viene visualizzata le lista delle cartelle. Toccando PREV o NEXT si visualizza la parte precedente o successiva della lista delle cartelle.
2. Toccare il nome della cartella.
Riproduzione della lista di riproduzione
Possono essere riprodotteanche delle liste di riproduzioni (file M3U).
Bisogna notare che solo i primi 5 file aventi la data e l'orario più recenti possono essere visualizzati tra tutti i file M3U attualmente archiviati nei 5 layer (inclusa la directory principale).
Note:
- Per agli singola lista di riproduzioni sono essere riprodotti sino a 255 file.
- Possono essere riprodotti solo i file M3U o WMA attualmente archiviati nella gerarchia dei file nelle cartelle contenate nei 5 layer (inclua la directory principale).
Fare come segue per riproduire la lista di riproduzione.
1. Toccare MODE.
2. Toccare NEXT.
3. Toccare PLY LIST.
Viene avviata lalettura della lista di riproduzioni. Quandoviene terminata lalettura della lista di riproduzioni, viene attivatamountacamente la lista di riproduzioni condata e orario più recente. Le operazioni dafare per selezionare la lista di riproduzioni oibrani in una lista di riproduzioni sono comequelleda farsi per selezionare una cartella o dei brani in una cartella.
* PLY LIST non viene visualizzato nel caso in cui una segenza di brani (M3U) corretta non risulta essere stata salvata nel CD-R/CD-RW inserito nell'apparecchio.
■ Interruzione della riproduzione di una lista di riproduzione
1. Toccare MODE.
2. Toccare NEXT.
3. Toccare PLY LIST.
Avanzamento veloce/ Retrocessione velce
1. Per avanzare velocemente, toccare sul display dei brani.
2. Per retrocedere velocimento, toccare sul display dei brani.
Funzione TOP
La funzione Top riporta lagettura del CD al brano d'inizio del CD stesso.
1. Toccare TOP. La riproduzione viene avviata dal primo brano (brano num 1). Nel caso di MP3/WMA, si torna al primo brano della cartella in fase di riproduzione.
Riproduzione a scansione
Questa funzione consente di individuare e riproduire i primi 10 secondi di tutti i brani contentuti nel disco.
1. Toccare MODE.
2. Toccare F^ -SCAN. Il display MODE cambia in "F'-SCAN" e si avvia la riproduzione a scansione.
* La riproduzione a scansione viene avviata dal brano successivo a quello attualmente in fase di riproduzione.
■ Annullamento della riproduzione a scansione
1. Toccare J^ -SCAN. Il display J^ -SCAN cambia in "MODE", e viene riproduotto il brano che era in fase di riproduzione quando si è toccato J^ -SCAN.
Riproduzione a scansione delle cartelle
Questa funzione permette di localizzare e riproduire i primi 10 secondi del primo brano di tutte le cartelle di un disco MP/WMA.
1. Toccare MODE.
2. Toccare -SCAN. Il display MODE cambia in "SCAN" e si avvia la coproduzione a scansione delle cartelle. * La coproduzione a scansione delle cartelle viene avviata a partire alla cartella successiva a quella attualmente in fase di coproduzione.
■ Annullamento della riproduzione a scansione delle cartelle
1. Toccare -SCAN. Il display -SCAN cambia in "MODE", e viene riproduzione il brano che era in fase di riproduzione quando si è toccato -SCAN.
Riproducione ripetuta
Questa funzione consente di riproduire ripetutamente il brano in corso di riproduzione.
1. Toccare MODE.
2. Toccare ^一 REPEAT. Il display MODE cambia in " ^ 一 R P " e viene avviata la riproduzione ripetuta.
Annullamento della riproduzione ripetuta
1. Toccare P -RPT. Il display P -RPT cambia in "MODE", e la riproduzione regolare ricomincia dal brano che era in fase di riproduzione quando si è toccato P -RPT.
Riproduzione ripetuta della cartella
Questa funzione consente di riproduire ripetutamente la cartella in corso di riproduzione. Questa funzione è disponibile solo quando si è inserito un CD-R/CD-RW contente file MP3 o WMA.
1. Toccare MODE.
2. Toccare -REPEAT. Il display MODE cambia in "RPT" e viene avviata la riproduzione ripetuta della cartella.
■ Annullamento della riproduzione ripetuta della cartella
1. Toccare -RPT. Il display -RPT cambia in "MODE", e la riproduzione regolare ricomincia dal brano che era in fase di riproduzione quando si è toccato -RPT.
Riproduzione in ordine casuale
Questa funzione consente di riproduire in un ordine casuale tutti i brani contenuti sul disco
-RANDOM
Riproduce tutti i brani del disco in ordine casuale, Nel caso in cui il disco contiene 2 o più cartelle, tutti i brani della prima cartella sono riprodotti in odine casuale, seguiti da tutti i brani della cartella successiva. Questo viene ripetuto per tutte le cartelle.
-RANDOM
Riproduce i brani del disco in ordine casuale, Questa funzione è disponibile solo quando si è inserito un CD-R/CD-RW contente file MP3 o WMA.
1. Toccare MODE.
2. Toccare -RANDOM o -RANDOM. Il display MODE cambia in "RDM" o in "RDM" e si avvia la riproduzione in ordine casuale.
■ Annullamento della riproduzione in ordine casuale
1. Toccare f^ -RDM o -RDM. Il display f^ -RDM o -RDM cambia in "MODE", e la riproduzione regolare ricomincia dal brano che era in fase di riproduzione quando si sono toccati i tasti.
Brani diversi di musica per più asconsultatori (funzione 2-ZONE)
La funzione 2-ZONE è una funzione che émette suoni separati per la zona MAIN e la zona SUB impiegando automaticamente due fonti in una sola unità centrale, permettendo+dunque a più ascoltatori di ascoltare fonti musicali分开e.
Questa unitàouldontrollarelesuefontiinterne (radio,CD,MP3,ecc.)per la riproduzione e inoltrepuroidurresimultaneamentefontida apparecchi esternicollegatitramite CeNET (per esempio,cambiadischi CD,ecc.).
Le fonti della zona MAIN sono riprodotte dai diffusori del veicolo e quale della zona SUBtramite ilsystema cuffie (WH143).

La figura superiore si riferisce al caso in cui una sorgente sonora viene riprodotta nelle casse acustiche dall'apparecchio in modalità interna (radio, CD, AUX).
La figura inferiore si riferisce al caso in cui una sorgente sonora viene riprodotta nelle casse acustiche dall'apparecchio in modalità interna (cambia-CD, cambia-DVD, TV, AUX).
- L'impostazione predefinita alla fabbrica è "OFF".
Note:
- La funzione 2-ZONE non è disponibile quando DAB è connesso.
- Ogni nuovo aggiustamento di volume fatto girando la manopola [ROTARY] si riflette unicamente nelle casse acustiche.
Le impostazioni AUX-SENS si riflette sua nelle casse via delle cuffie.
■ Display dello schermo quando è in uso la funzione 2-ZONE
"INT." (modalità interna) o "EXT." (modalità esterna) viene visualizzato al centro del display perindicare se è possibile ascoltare in modalità interna o in modalità esterna nella modalità operativa 2-ZONE in corso.
1. Premere il tasting [SOUND].
2. Toccare 2-ZONE.

3. Toccare e tenere premuto per 1 secondo o più il centro ON/OFF del display.

Quando 2-ZONE viene impostato sull'ON, viene visualizzato il tipo di 2-ZONE in corso. La funzione 2-ZONE non è disponibile quando 2-ZONE è impostato su OFF. Premere il tasto [SOUND] per tornare alla modalità originale.
4. Toccare 日 nel display ON/OFF per selezionare il tipo di 2-ZONE.
Tipi di 2-ZONE
Altoparlante Cuffie Tipo1 Interno (modalità interna) Esterno (modalità esterna) Tipo2 Esterno (modalità esterna) Interno (modalità interna)
5. Toccare il disply dell'altoparlante o il display della cuffia per selezionare la modalità operativa 2-ZONE.
Si possono usare gli altoparlianti per l'audio quando si tocca il display dell'altoparlante. Si possono usare le cuffie per l'audio quando si tocca il display dell'altoparlante.
6. Premere il tasto [SOUND] per tornare alla modalità originale.
Brani diversi di musica per più ascoltatori (funzione 2-ZONE)
Attivazione e disattivazione delle funzione 2-ZONE
1. Premere e tenere premuto per 1 secondo o più il tasting [SOUND] nell'apparecchio.
Perambiare il tipo di 2-ZONE
Premere e tenere premuto per 1 secondo o più il tasto [TA] nell'apparecchio nelle si sta usinga la funzione 2-ZONE.
Perambiare la modalità operativa 2-ZONE
Premere il tasto [TA] nelle si sta usando la funzione 2-ZONE.
Selezione della modalità quando è in uso la funzione 2-ZONE
Quando si insertisce un CD nelle si sta usando la funizione 2-ZONE, le funzioni della modalità interna cambiano in CD, e la riproduzione viene avviata automaticamente.
1. Premere il tasto [TA] perambiare la funzione operativa 2-ZONE.
Vlene attenuato il display dell'apparecchiatura (altoparlante o cuffia) che può essere usato attualmente.
2. Premere e tenere premuto per un secondo o più il tasto [TA] per selezionare il tipo 2-ZONE.
Viene commutato il display "INT." o "EXT."
3. Premere la manopola [ROTARY].
Mentre appeare "INT," ogni pressione sulla manopola [ROTARY] cambia la modalità nell'ordine seguente:
Radio CD AUX Radio...
Mentre appeare "EXT.", ogni pressione sulla manopola [ROTARY] cambia la modalità nell'ordine seguente:
$$
\begin{array}{l}\text {A U X} \rightarrow (\text {C D c h a n g e r}) \rightarrow (\text {D V D c h a n g e r}) \rightarrow\\(\text {T V} ^ {\prime 1}) \rightarrow \text {A U X} \dots\end{array}
$$
* Se una data apparecchiatura non è connessa, la rispettiva modalità non appeare visualizzata.
*1 Whenever viene selezionata la modalità TV, la modalità cambia automaticamente in modalità VTR, e non può essereambiata.
Operazioni comuni in entrambé le modalità
Display dello schermo in modalità di inserimento dei titoli
Display principale
Questo viene visualizzato quando viene selezionata la modalità di inserimento dei titoli. (cfr. pag. 14)

Display caratteri di testo
A: Lettere alfabetiche maiuscole
a: Lettere alfabetiche minuscole
0-9: Nemeri
!?: Simboli
A: Accenti speciali: Umlaut
Display del titolo
Viene visualizzato il titolo attualmente inserito. Toccare per determinare la posizione di inserimento. Toccando e tenendo premuto il tasto per 2 secondi o più si causa la cancellazione di tutto il testo inserito.
Display del testo scritto
Toccare 山 per selezionare il testo inserto.
RTN
Toccando questo si annulla l'insertimento dei titoli, e il display ritorna allo schermo originale. Toccando e tenero premuto per 1 secondo o più si visualizza la lista dei titoli che si accompagnano al corrente carattere di testo.
MEMO
Toccando e tenendo quello premuto per 2 secondi o più si salva il titolo inserto, e il display torna allo schermo originale.
Display della lista dei testi
Questo è quello che appeare quando RTN viene toccato e tenuto premuto per 1 secondo o più nel display principale.

Caratteri del testo
Il testo che viene visualizzato cambia a secondo del display del carattere di testo.
Nel caso in cui il carattere di testo visualizzato è“A”: A E I M Q U X(spazio)
Nel caso in cui il carattere di testo visualizzato è “a”: a e i m q
Nel caso in cui il carattere di testo visualizzato e "0-9", "!?" o "A":
Vengono visualizzati tutti i caratteri.
RTN
Toccandolo si ritorna al display principale.
NEXT
Toccandolo si visualizza la lista dei testi successivi.
Inserimento titoli
Si possono dare alle varie stazioni TV dei titoli lunghi forn a 10 caratteri, eanche ai CD. Questi titoli possono essere visualizzati quando si ricevono le trasmissioni o quando si riproduze un CD. Il numero dei titoli inseribili è il seguente:
Modalità Numero dei titoli Modalità CD 50 titoli Modalità TV 20 titoli
Modalità cambia-CD Numero dei titoli DCZ628 connesso 100 titoli CDC655Tz connesso 100 titoli CDC1255z connesso 50 titoli
1. Si possono ricevere le stazioni TV e si cui si rroduire un CD per cui si voglia insertire il titolo.
2. Toccare il centro del display per impostare il display del titolo dell'utente.
Quando il display cambia nel display del titolo dell'utente, "USER" viene visualizzato tutto il display del Num. preselezionato.
3. Premere e tenere premuto per 1 secondo o piu il tasting [A].
La modalità cambia in modalità di insertimento dei titoli.
4. Toccare nel display del titolo per determinare la posizione di inserimento. La posizione del testo lampeggiante si muove a sinistra o a destra.

* Possono essere insertiti forn a 10 caratteri.
ATTENZIONE
Premendo il tasto di preselezionr si cancellano tutte le memorie utente, come ad esempio i titoli salvati in questa unità.
5. TOccare 山 sul display del carattere di testo per selezionare il carattere del testo. Ogni tocco di 山 cambia il carattere del testo nell'ordine seguente:
Letteralelfabetichemaisuscole
(spazio) ABCDEFGHIJKLMNOPQ RSTUVWXYZ
Lettere alfabetiche minuscole
abcdefghijklmnpqrstuvwxyz Numeri
0123456789
Simboli, Accenti speciali: Umlaut
AEEEEIAEaeeeeeioae
6. Toccare nel lato destro del display o, in alternatively, girare la manopola [ROTARY] per scegliere i caratteri da insertire.
7. Ripetere alla fase 4 alla 6 per insere il titolo. Premendo e tenendo premuto per 2 secondi o piu il display del titolo, si causa la cancellazione dei caratteri attualmente inseriti per il titolo.
8. Toccare e tenere premuto MEMO per 2 secondi o più.
L'emissione di un lungo bip segnalera
l'avvenuta memorizzazione del titolo.
Per cancellare il display del titolo in orologio o in un'alto display
Toccare il centro del disply
■ Quando si memorizza un nuovo titolo che eccede il numero massimo di titoli
Nel caso di una stazione TV
I titoli non memorizzati tra i canali preselezionati sono automaticamente cancellati, e il nuovo titolo viene così memorizzato.
Nel caso di un CD
Vengono cancellati i titoli dei CD di quei che sono stati riprodotti meno, e il nuovo titolo viene memorizzato.
Cancellazione dei titoli
1. Ricevere la stazione TV o riproduire un CD di cui si vuole cancellare il titolo.
2. Toccare il centro del display per impostare il display del titolo dell'utente.
Quando il display cambia nel display del titolo dell'utente, "USER" viene visualizzato在整个 display del Num. preselezionato.
3. Premere e tenere premuto per 1 secondo o più il tasting [A].
La modalità cambia in modalità di inserimento dei titoli.
4. Toccare e tenere premuto il display dei titoli per 2 secondo o più.
Tutti caratteri nel titolo spariranno.
5. Toccare e tenere premuto MEMO per 2 secondo o più.
L'emissione di un lungo bip segnalera l'avvenuta cancellazione del titolo.
Cambiamento delle impostazioni Selezionare le impostazioni
1. Premere il tasto [A].
La modalità cambia in modalità di aggiustamento.

2. TOccare 山 sul display delle impostazioni per selezionare quella che si vuole impostare..
* Toccando ↑ 📁 ↑ nel lato sinistro del display si cambia la scelta di una opzione per volta. Toccando ← 📁 → sul lato sinistro del display si cambia continuamente le sub-opzioni..
* Toccando ↑ ⇌ nel centro del display si cambia la scelta di una sub-opzione perolta. Toccando ← ⇌ → si cambiano continuamente le sub-opzioni.
3. Quando viene visualizzato "EDIT" nel Late destro del display, toccare EDIT per cancellare il display dell'aggiustamento dei dettagli.

4. Toccare 念 nel lato destro del display o, in alternatively, girare la manopola [ROTARY] per impostare i dettagli.
Per ritornare in modalità originale
1. Premere ancora il tasto [A].
Opzioni principali Sub-opzioni DISPLAY SCEEN SVR
• Impostazione del salva-scherno (ved. pag. 41) MSG INPUT
• Immissione dei messaggi di informazione (ved. pag. 41) MESSAGE
• Impostazione di accenzione o spegnimento del display dei messaggi (ved. pag. 42) S/A SENS
• Impostazione della sensibilità dell'analizzatore dello Spettro (ved. pag. 42) SCROLL
• Aggiustamento della velocità di scorrimento (ved. pag. 42) APPERNCE DIMMER IN
• Impostazione del variatore di luminosità automatico (ved. pag. 43) DMR LEVEL
• Impostazione del livello del variatore di luminosità (ved. pag. 43) CONTRAST
• Aggiustamento del contrasto del display (ved. pag. 43) BLINK LED
• Fa lampeggiare il LED quando si rimuove il DCP (ved. pag. 43) BEEP
• Impostazione del bip (cfr. pag. 44) SOUND AC-PRO III
• Selezione della modalità VSE (STD/PRO) (ved. pag. 44) EQ SELECT
• Selezione della modalità equalizzatore (ved. pag. 44) SP-SETTING
• Impostazione delle configurazioni dell'altoparlante (ved. pag. 44) CENTER-SP / SUB-WOOFER
• Impostazione ON/OFF degli altoparlanti sub-woofer (ved. pag. 45) HPF / SUB-W LPF
• Aggiustamento della frequenza del filtrlo degli altoparlanti (ved. pag. 45) AMP CANCEL
• Impostazione ON/OFF dell'uso dell'amplificatore interno (ved. pag. 46) SP-GAIN
• Aggiustamento del livello di uscita dell'altoparlante (ved. pag. 46) PL II DELAY SRD-SP
• Aggiustamento del ritardo dell'altoparlante posteriore (ved. pag. 46) PL II CONT PANORAMA / DIMENSION / CTR WIDTH
• Impostazione in dettaglio della modalità musicale (ved. pag. 47) TUNER TV ARER
• Impostazione dell'area TV (ved. pag. 57) TV DIVER
• Impostazione della diversità TV (cfr. pag. 57) LINK ACT
• Impostazione della funzione AF tra RDS e DAB (ved. pag. 26) LANGUAGE
• Impostazione del linguaggio dello schermo PTY (ved. pag. 30) RDS-INT 2Z
• Impostazione dell'interruzione di RDS quando la funzione 2-ZONE è in uso (cf. page 30) SETTING AUX / TEL
• Impostazione di AUX e TEL (ved. pag. 47) AUX SENS
• Impostazione del livello d'immissione dell'audio portatile (ved. pag. 48) TEL-SP
• Impostazione dell'emissione degli altoparlanti della macchina per il Telefono cellulare (TEL-002 opzionale) (ved. pag. 48) TEL-SWITCH
• Impostazione dell'interruzione del Telefono cellulare (cf. page 48) CALIBRATE / A-VOL SENS
• Impostazione della funzione del volume automatico TV (ved. pag. 49) SYSTEM CHECK
• Svilgimento del controllo del sistema (ved. pag. 49) CODEMATICZ
• Impostazione della sicurezza (ved. pag. 50)
Impostazione del salvaschermo (SCREEN SVR)
Questa funzione avvia la visualizzazione di un salva-schermo quando non si utilizes l'apparecchio per circa 30 secondi.
L'impostazione predefinita alla fabbrica è "ON".
1. Premere il tasto [A] per impostare la modalità di aggiustamento.
2. Toccare 卡 nel display delle opzioni per selezionare "SCREEN SVR" sotto "DISPLAY".

3. Toccare 念 nel lato destro del display o, in alternatively, girare la manopola [ROTARY] per selezionare "ON" o "OFF".
4. Premere il tasting [A] per tornare alla modalità originale.
Perambiare il display del salva-schermo
Toccare PREV o NEXT quando viene visualizzato il salva-schermo.
Ogni tocco su quosti tasti cambia il display del saliva-schermo.
Salva-schermi
Salva-schemo modello 1

Salva-schemo modello 2

Salva-schermo modello 3

Analizzatore di spettro modello 1

Analizzatore di spettro modello 2

Analizzatore di spettro modello 3

Analizzatore di spettro modello 4

Messaggio di informazione

SS SCAN
Ognuna delleindicazioni di cui{sopraverrà visualizzata per circa 10 secondi.
Inserimento dei messaggi da visualizzare tra i messaggi di informazione (MSG INPUT)
È disponibile 1 tipo di salute-scherno. Per maggiori dettagli su come cancellare il display del salute-scherno, vedere "Impostazione del salute-scherno".
- Possono essere inserti fino a 30 caratteri.
- L'impostazione predefinita alla fabbrica è "Active MatriX Control System".
1. Premere il tasto [A] per impostare la modalità di aggiustamento.
2. Toccare 且 且 nel display delle opzioni per selezionare "MSG INPUT" sotto "DISPLAY".

3. Toccare EDIT.
La modalità cambia in modalità di insertimento dei messaggi.
4. Toccare 且 nel centro del display per determinare la posizione di inserimento.
* Per cancellare il messaggio, toccare e tenere premuto il centro del display per 2 secondi o più.
Se si attua l'opération della fase 8 con il messaggio cancellato, il messaggio torna quello dell'impostazione predefinita alla fabbrica.
5. Toccare nel dato sinistro del display per selezionare il carattere del testo.
Ogni tocco di cambia il carattere del testo. Per maggiori dettagli, vedere a pagina 37.
6. Toccare 山 nel lato destro del display o, in alternatively, girare la manopola [ROTARY] per scegliere i caratteri da insertire.
7. Ripetere alla fase 4 alla 6 per insertire il messaggio.
8. Toccare e tenere premuto MEMO per 2 secondi o più.
L'emissione di un lungo bip segnalera l'avvenuta memorizzazione del messaggio.
9. Premere il tasto [A] per tornare alla modalità originale.
Visualizzazione dei messaggi (MESSAGE)
Questa funzione permette di visualizzare i messaggi nel display quando l'apparechio è ON/OFF. Quando l'apparechio viene accesso viene visualizzato "Hello", cioè appeare "See you" quando l'apparechio viene spento.
- L'impostazione predefinita alla fabbrica è "ON".
1. Premere il tasto [A] per impostare la modalità di aggiustamento.
2. Toccare 一 _ 一 nel display delle opzioni per selezionare "MESSAGE" sotto "DISPLAY".

3. Toccare nel lato destro del display o, in alternatively, girare la manopola [ROTARY] per selezionare "ON" o "OFF".
4. Premere il tasting [A] per tornare alla modalità originale.
Impostazione della sensibilità dell'analizzatore dello spettro (S/A SENS)
Questa funzione permette di aggiustare la sensibilità (quantità della deflessione) dell'analizzatore dllo spettro. Per maggiori dettagli sulla visualizzazione dell'analizzatore dello spettro, vedere "Cambiamento del display" (ved. pag. 13) o "Impostazione del salva-schermo" (ved. pag. 41).
- L'impostazione predefinita alla fabbrica è "MID".
1. Premere il tasto [A] per impostare la modalità di aggiustamento.
2. Toccare 卡 巴 卡 nel display delle opzioni per selezionare "S/A SENS" sotto "DISPLAY".

3. Toccare ne lato destro del display o, in alternatively, girare la manopola [ROTARY] per aggiustare la sensibilità.
* Selezionale LOW (piccola quantità della deflessione), MID o HIGH (grande quantità della deflessione).
4. Premere il tasto [A] per tornare alla modalità originale.
Aggiustamento della velocità di scorrimento del display (SCROLL)
Questa configurazione permette di rallentare lo scrollamento quando lo scrollamento è troppo veloce, rendendo dificile la visione dello schermo.
L'impostazione predefinita alla fabbrica è "SPEED 2".
1. Premere il tasto [A] per impostare la modalità di aggiustamento.
2. Toccare nel display delle opzioni per selezionare "SCROLL" sotto "DISPLAY".

3. Toccare 卡 卡 nel lato destro del display o, in alternatively, girare la manopola [ROTARY] per aggiustare la sensibilità.
* Questa impostazione può essere aggiustata tra i valori SPEED 1 e SPEED 7. Aggiustare questa opzione nelle vede come cambia l'aspetto del display.
4. Premere il tasting [A] per tornare alla modalità originale.
Impostazione del variatore di luminosità (DIMMER IN)
Questa funzione permette di indebolire
l'illuminazione del display in armonia all'illuminazione e alla brillantezza all'interno della vettura.
Selezionare "AUTO" (connesso alla brillantezza dentro la vettura) o "ILLUMI" (connesso all'illuminazione dentro la vettura) come le impostazioni del variatore di luminosità.
- Quando la funzione del variatore automatico di luminosità viene impostato su "AUTO", la brillantezza del displayiene armonizzata alla brillantezza percepita da questo sensore.
- Impostare il variatore di luminosità a DMR LEVEL.
L'impostazione predefinita alla fabbrica è "AUTO".
1. Premere il tasto [A] per impostare la modalità di aggiustamento.
2. Toccare nel display delle opzioni per selezionare "DIMMER IN" sotto "APPERNCE".

3. Toccare 山 山 山 nel lato destro del display o, in alternatively, girare la manopola [ROTARY] per selezionare "AUTO" o "ILLUMI".
4. Premere il tasting [A] per tornare alla modalità originale.
Impostazione il livello del variatore di luminosità (DMR LEVEL)
Questa funzione permette l'impostazione di quanto debba indebolirsi il display.
- L'impostazione predefinita alla fabbrica è "3".
1. Premere il tasto [A] per impostare la modalità di aggiustamento.
2. Toccare 卡 卡 nel display delle opzioni per selezionare "DMR LEVEL" sotto "APPERNCE".

3. Toccare ne Ielato destro del display o, in alternatively, girare la manopola [ROTARY] per impostare il livello del variatore di luminosità.
* Scegliere tra OFF (indebolimento OFF, luminoso), da 1 (leggero indebolimento) a 5 (scuro).
4. Premere il tasting [A] per tornare alla modalità originale.
Aggiustamento del contrasto del display (CONTRAST)
Si più aggustare il contrasto del display fina a armonizzarsi con l'angolo crescente dell'apparecchio.
- L'impostazione predefinita alla fabbrica è "6".
1. Premere il tasto [A] per impostare la modalità di aggiustamento.
2. Toccare 山 山 nel display delle opzioni per selezionare "CONTRAST" sotto "APPERNCE".
3. Toccare 念 nel lato destro del display o, in alternatively, girare la manopola [ROTARY] per aggiustare il contrasto.

* Questa impostazione può essere aggiustata tra i valori 1 e 11.
Aggiustare esta opzione quando si vede come cambia l'aspetto del display.
4. Premere il tasting [A] per tornare alla modalità originale.
Fa lampeggiare il LED quando viene rimioso DCP (BLINK LED)
Si può far lampeggiare il LED di但这a unità quando viene rimioso il DCP.
- L'impostazione predefinita alla fabbrica è "OFF".
1. Premere il tasto [A] per impostare la modalità di aggiustamento.
2. Toccare nel display delle opzioni per selezionare "BLINK LED" sotto "APPERNCE".

APPERNCE
ADJUST MODE
BLINK LED》 OFF
NCE
3. Toccare nel lato destro del display o, in alternatively, girare la manopola [ROTARY] per selezionare "ON" o "OFF".
4. Premere il tasto [A] per tornare alla modalità originale.
Impostare il bip per quando i tasti sono usati (BEEP)
L'acuto tono, breve o lungo, che si può sentire quando si usano i tasti viene chiamato "BEEP".
- L'impostazione predefinita alla fabbrica è "ON".
1. Premere il tasto [A] per impostare la modalità di aggiustamento.
2. Toccare 卡 卡 卡 nel display delle opzioni per selezionare "BEEP" sotto "APPERNCE".

3. Toccare nel lato destro del display o, in alternatively, girare la manopola [ROTARY] per selezionare "ON" o "OFF".
4. Premere il tasto [A] per tornare alla modalità originale.
Selezionare ogni modalità
Questa opzione non può essere selezionata quando il Dolby Pro Logic Il viene impostata "MUSIC" o "MATRIX" (ved. pag. 17).
- L'impostazione preferedinita alla fabbrica è "PRO" per AC-PRO III e "P.EQ" per EQ SELECT.
AC-PROIII
Quando viene selezionato "STD" (modalità standard), la qualità è il Campo del suono possono essere aggistiati dal VSE (intensificatore dello spazio virtuale) in modo tale che lo stesso effetto audio possa essere percepito dovunque ci si siede.
Quando viene selezionato "PRO" (modalità PRO), la qualità è il Campo del suono possono essere aggiustati appositamente per agli sedile.
EQ SELECT
Quando viene selezionato "P.EQ." (modalità equalizzatore), l'intera gamma dei livelli di frequenza più essere compensata da una dettagliata curva uniforme.
Quando viene selezionato "BAS/TREB" (modalità basso/soprano), il livello della frequenza può essere compensato dividendo in 2 livelli principali, basso (toni bassi) e soprano (toni alto).
1. Premere il tasto [A] per impostare la modalità di aggiustamento.
2. Toccare nel display delle opzioni per selezionare "AC-PRO III" sotto "SOUND" e "EQ SELECT" sotto "SOUND".

3. Toccare nel lato destro del display o, in alternatively, girare la manopola [ROTARY] per selezionare la modalità.
Selezione modalità
AC-PRO III STD
• Modalità standard (menu VSE) PRO
• Modalità PRO (menu posizione) EQ SELECT P.EQ
• Modalità equalizzatore (menu P.EQ) BAS / TREB
• Modalità basso/soprano
4. Premere il tasto [A] per tornare alla modalità originale.
Impostazione della configurazione dell'altoparlante (SP-SETTING)
Armonizzare la configurazione dell'altoparlante della propria vettura per sfruttare appieno le caratteristiche di quello appearecchio.
L'impostazione predefinita alla fabbrica e "SWL+SWR".
1. Premere il tasto [A] per impostare la modalità di aggiustamento.
2. Toccare 且 nel display delle opzioni per selezionare "SP-SETTING" sotto "SOUND".

3. Toccare 卡 卡 nel lato destro del display o, in alternatively, girare la manopola [ROTARY] per impostare la configurazione degli altoparlanti.
Configurazione degli altoparlanti
CTR+SW
can. 5.1
configurazione Altoparlanti frontali/posteriori (4 can.)
Altoparlante centrale (can. 1)
Sub-woofer (can. 1) SWL +SWR
can. 4+sub-woofer
configurazione Altoparlanti frontali/posteriori (4 can.)
Sub-woofer (can. 2)
Note:
- Quando è impostato "CTR+SW", il suono non viene emesso dall'toparlante centrale a meno che non siano fatto le segmente impostazioni.
(1) Facendo riferimento a "Selezione del menu PLII (Dolby PL II)" (ved. pag. 17), impostare la modalità Dolby Pro Logic II in "MUSIC" o "MATRIX".
(2) Facendo riferimento a "Impostare in ON/OFF gli altoparlanti (CENTER-SP/SUB-WOOFER)" (ved. pag. 45), impostare in ON l'altoparlante centrale.
- Quando la modalità di Dolby Pro Logic II è impostato in "MUSIC" o "MATRIX" e viene impostato "SWI +SWF", il suono non viene emesso dal sub-woofer Lch.
4. Premere il tasting [A] per tornare alla modalità originale.
Impostare in ON/OFF gli altoparlanti (CENTER-SP / SUB-WOOFER)
Impostare l'altoparlante centrale (CENTER-SP) e il sub-woofer (SUB-WOOFER) in ON/OFF.
Assicurarsi di aver impostato "OFF" quando non ci sono altoparlanti centrali o sub-woofer.
L'altoparlante centrale (CENTER-SP) puosoesse impostato quando la modalita del Dolby Pro Logic Il viene impostata in "MUSIC o"MATRIX",e"SP-SETTING"viene impostato in "CTR-SW".
L'impostazione predefinita alla fabbrica è "ON".
1. Premere il tasto [A] per impostare la modalità di aggiustamento.
2. Toccare 日 nel display delle opzioni per selezionare "CENTER-SP" sotto "SOUND" e "SUB-WOOFER" sotto "SOUND".

3. Toccare ne Iato destro del display o, in alternatively, girare la manopola [ROTARY] per selezionare "ON" o "OFF".
4. Premere il tasto [A] per tornare alla modalità originale.
Aggiustamento del filtrodi frequenza degli altoparlanti (HPF/SUB-W LPF)
Questa funzione permette l'aggiustamento del filtr di frequenza per armonizzarlo con gli altoparlanti in uso.
- I filtri (HPF/SUB-W LPF) che possono essere usati differiscono a secondo delle impostazioni della modalità del Dolby Pro Logic II.
Dolby Pro Logic II
Impostazione
deli modalità Filtro HPF SUB-W LPF*1 MUSIC/MATRIX Non aggiustabile Aggiustabile OFF Aggiustabile Aggiustabile
*1 L'aggiustamento è possibile sono quando "SUB-WOOFER" è impostato in "ON".
- L'impostazione predefinita alla fabbrica è "THROUGH".
■ Aggiustamento del filtro
HPF (aggiustamento del filtro high-pass)
Questo filtering eliminates suoni bassi dagli altoparlanti frontali e posteriori.
THROUGH 50Hz 80Hz 120Hz
Impostare il filtro armonizzatoagli altoparlanti quando si usano altoparlanti dal diametro inferiore.
THROUGH
Impostare quello quando si usano altoparlanti che possono generare i bassi.
SUB-W LPF (aggiustamento del filtro del sub-woofer low-pass)
Questo filtro eliminata i suoni più alto dal subwoofer.
THROUGH 50Hz 80Hz 120Hz
Impostare ilhetto di frequenza per armonizzarlo al sub-woofer.
THROUGH
Impostare quello quando si usano subwoofer che includono un filtrlo low-pass.
1. Premere il tasto [A] per impostare la modalità di aggiustamento.
2. Toccare 日 nel display delle opzioni per selezionare "HPF" sotto "SOUND" e "SUBW LPF"otto "SOUND".

3. Toccare nel lato destro del display o, in alternatively, girare la manopola [ROTARY] per impostare la frequenza.
* Scegliere tra THROUGH, 50Hz, 80Hz, and 120Hz.
4. Premere il tasto [A] per tornare alla modalità originale.
Impostare in ON/OFF I'uso dell'amplificatore interna (AMP CANCEL)
Impostare in ON/OFF l'uso dell'amplificatore interno a secondo che si usi o meno un amplificatore esterno.
Impostare AMP CANCEL in "ON" (uso dell'amplificatore interno OFF) quando viene usato un amplificatore esterno e quindi non viene usato quello interno.
- L'impostazione predefinita alla fabbrica è "OFF" (amplificatore interno in uso).
1. Premere il tasto [A] per impostare la modalità di aggiustamento.
2. Toccare 卡 卡 卡 nel display delle opzioni per selezionare "AMP CANCEL" sotto "SOUND".

3. Toccare nel lato destro del display o, in alternatively, girare la manopola [ROTARY] per selezionare "ON" o "OFF".
4. Premere il tasto [A] per tornare alla modalità originale.
Aggiustamento del livello d'emissione degli altoparlanti (SP GAIN)
Uso della funzione del test tonale presente in quello apparecchio per regolare il volume in modo tale che l'émissione da tutti gli altoparlanti sia uguale.
- Questa opzione non può essere selezionata solo quando la modalità Dolby Pro Logic II viene impostata "MUSIC" o "MATRIX".
- L'impostazione predefinita alla fabbrica è "0dB".
1. Premere il tasto [A] per impostare la modalità di aggiustamento.
2. Toccare nel display delle opzioni per selezionare "SP GAIN" sotto "SOUND".

3. Toccare EDIT.
La modalità cambia nella modalità di aggiustamento SP GAIN.
4. Toccare 山 山 sul display delle impostazioni per selezionare l'opzione desiderata. Ogni tocco di 山 山 cambia l'opzione fattanell'ordine seguente:
Aggiustamento delle opzioni

*1 Viene visualizzato "CTR GAIN" solo quando "SP-SETTING" viene impostato in "CTR+SW" e "CENTER-SP" viene impostato in "ON".
*2 "SUB-W GAIN" viene visualizzato solo quando "SUB-WOOFER" viene impostato in "ON".
5. Toccare nel lato destro del display o, in alternatively, girare la manopola [ROTARY] per aggustare il livello di emissione. Il livello di emissione cui essere regolato nella gamma da -10 dB a +10 dB
6. Ripetere le fasi 4 e 5 per aggustare agli unità.
7. Premere il tasto [A] per tornare alla modalità originale.
Aggiustamento del ritardo degli altoparlanti posteriori (PL II DELAY)
Il tempo che il suono impiega per arrivare all'ascoltatore dipende alla posizione in cui sono montati gli altoparlanti posteriori e dalle dimensioni della vettura. Se il ritardo del suono degli altoparlanti posteriori viene regolato, alla甚么 èpuo essere sentito contemporaneamente al suono emesso dagli altoparlanti frontali.
- Questa opzione non può essere selezionata solo quando la modalità Dolby Pro Logic II viene impostata "MUSIC" o "MATRIX".
L'impostazione predefinita alla fabbrica è "0ms".
1. Premere il tasto [A] per impostare la modalità di aggiustamento.
2. Toccare 日 nel display delle opzioni per selezionare "SRD-SP" sotto "PL II DELAY".

3. Toccare 山 nel lato destro del display o, in alternatively, girare la manopola [ROTARY] per aggiustare il ritardo del suono.
* "SRD-SP" cui si sono gli uomini e donne nuoi.
4. Premere il tasting [A] per tornare alla modalità originale.
Impostazione della modalità musica in dettaglio (PL II CONT)
Questa funzione permette di impostare la modalità musica con più dettagli quando la modalità di Dolby Pro Logic II viene impostata in "MUSIC".
- Questa opzione non può essere selezionata solo quando la modalità Dolby Pro Logic II viene impostata in "MUSIC".
L'impostazione predefinita alla fabbrica per PANORAMA e "NO", per DIMENSION e "3" e per CTR WIDTH e "3".
Aggiustamento delle opzioni
PANorama (impostazione del controllo del panorama)
Questo amplia l'imagine del Campo del suono dagli altoparlanti frontali a quelli posteriori. Impostare questa opzione su "YES" se si pensa che manca un effetto avvolgente.
DIMENSION (impostazione delle dimensioni)
L'imagine del Campo del suono va davanti o duro.
Quando l'imagine del Campo del suono tendse verso
la parte frontale o posteriori, quello sbilanciamento
può essere compensato.
Il valore di aggiustamento 3 è in posizione centrale. I valori di aggiustamento da 2 a 0 Cambiano l'immagine del Campo del suono nella parte posteriore, nelle gli aggiustamenti di valori da 4 a 6 cambiano l'immagine del Campo del suono nella parte frontale.
CTR WIDTH (impostazione della profondità nel centro)*1
Aggiusta la posizione fissa del canale centrale tra l'altoparlante centrale e gli altoparlanti frontali Six/Dex.
Quando il suono centrale è diviso equivalente tra destra e sinistra, l'intera imagine del Campo del suono aumenta fino a produrre una sensazione di diffusione naturale.
Il valore di aggiustamento 0 riproduce tutti i suoni centrali dall'altoparlante centrale.
Il valore di aggiustamento 7 divide il suono centrale.
ugualmente tra gli altoparlanti frontali Dex/Six.
*1 Viene visualizzato "CTR WIDTH" solo quando "SP-SETTING" viene impostato in "CTR+SW" e "CENTER-SP" viene impostato in "ON".
1. Premere il tasto [A] per impostare la modalità di aggiustamento.
2. Toccare 且 且 nel display delle opzioni per selezionare I'opzione di aggiustamento desiderato molto "PL II CONT". Le opzioni di aggiustamento sono PANORAMA "DIMENSION" and "CTR WIDTH".

3. Toccare 卡 卡 nel lato destro del display o, in alternatively, girare la manopola [ROTARY] e regolare l'opzione come si desidera.
* Selezionare "YES" o "NO" per "PANorama".
* "DIMENSION" più essere aggiustato in una gamma di valori da 0 a 6.
* "CTR WIDTH" più essere aggiustato in una gamma di valori da 0 a 7.
4. Premere il tasting [A] per tornare alla modalità originale.
Funzione AUX
Questoistema ha un'immissione RCA esterna
cosi che si possono ascoltare i suoni e la
musica provenienti da periferiche esterne
connesse a esta unità.
Selezione AUX/TEL.
Si possono ascabtare suoni e musica da periferiche esterne, oanche le Telefonate al cellulare, se queste periferiche sono connesse all'unità.
Quando TEL INT o una periferica esterna viene connessa al'unità, si può selezionare la modalitàTEL o la modalità AUX.
- L'impostazione predefinita alla fabbrica è "AUX".
1. Premere il tasto [A] per impostare la modalità di regolazione.
2. Toccare 且 且 nel display delle opzioni e selezionare "AUX/TEL" sotto "SETTING".

3. Toccare nel lato destro del display o, in alternatively, girare la manopola [ROTARY] per selezionare "AUX" o "TEL".
AUX:
Il cavo d'immissione AUX/TEL è per l'immissione Audio esterna.
TEL:
Il cavo d'immissione AUX/TEL è per l'immissione audio dal Telefono cellulare.
4. Premere il tasto [A] per tornare alla modalità precedente.
Impostazione del livello di immissione (AUX SENS) dell'audio portatile (modalità AUX)
Questa funzione permette l'impostazione del livello d'immissione delle periferiche esterne opzionali connesse all'unità.
- Questo più essere impostato quando "AUX/TEL" viene impostato in "AUX".
L'impostazione predefinita alla fabbrica è "MID".
1. Premere il tasto [A] per impostare la modalità di aggiustamento.
2. Toccare nel display delle opzioni per selezionare "AUX/TEL"izzato.

3. Toccare nel lato destro del display o, in alternatively, girare la manopola [ROTARY] per impostare il livello di immissione.
* Scegliere tra LOW, MID o HIGH.
4. Premere il tasting [A] per tornare alla modalità originale.
Impostazione dell'émissione dagli altoparlanti della vettura delle chiamate del Telefono cellulare (TEL-002 opzionale)
- Per l'émissione delle chiamate Telefoniche, impostare il Telefono cellulare.
- L'impostazione predefinita alla fabbrica è "RIGHT".
1. Premere il tasto [A] per impostare la modalità di regolazione.
2. Toccare 山 山 nel display delle opzioni per selezionare "TEL-SP" sotto "SETTING".

3. Toccare ne lato destro del display o, in alternatively, girare la manopola [ROTARY] per selezionare "LEFT" o "RIGHT".
LEFT:
Le chiamate Telefoniche possono essere ascoltate dall'altoparlante frontale sinistro connesso all'unità.
RIGHT:
Le chiamate Telefoniche possono essere ascoltate dall'altoparlante frontale destro connesso all'unità.
4. Premere il tasting [A] per tornare alla modalità precedente.
Impostazione dell'interruzione del telefonocellulare
Se si connette esta unità e il Telefono cellulare con un'unità (TEL-002, opzionale), si possono ascoltare le chiamate Telefoniche dagli altoparlanti della vettura.
- L'impostazione predefinita alla fabbrica è "OFF".
1. Premere il tasto [A] per impostare la modalità di regolazione.
2. Toccare 卡 nel display delle opzioni per selezionare "TEL-SWITCH" sotto "SETTING".

3. Toccare 卡 卡 卡 nel lato destro del display o, in alternatively, girare la manopola [ROTARY] per selezionare le impostazioni.
Ogni volta che si gira la manopola [ROTARY], la selezione cambia nel seguente ordine.
OFF ON MUTE OFF...
OFF:
L'unità continua le operazioni normalianchesse si usa il Telefono cellulare.
Nota:
- Quando si connette un kit hand-free, assicurarsi che l'impostazione sia ON per ricevere l'audio del Telefono atraverso il sistema.
ON:
Si possono ascoltare le chiamate Telefoniche dagli altoparlanti connessi a esta unità.
* Mentre si ascoltano le chiamate dagli altoparlanti della vettura, si vuo regolare il volume girando la manopola [ROTARY].
MUTE:
Il suono di但这a unità viene eliminato durante le chiamate Telefoniche.
4. Premere il tasting [A] per tornare alla modalità precedente.
Impostazione della funzione del volume automatico (CALIBRATE/A-VOL SENS)
Si piùckiare automaticamente il volume a secondo della velocità della vettura.
- L'impostazione predefinita alla fabbrica è "LOW".
1. Premere il tasto [A] per impostare la modalità di regolazione.
2. Toccare 卡 卡 卡 nel display delle opzioni per selezionare "CALIBRATE" sotto "SETTING".

3. Accelerare fino a una velocità di 50~km
4. Quando si raggiunge la velocità di 50 km, toccare START.
Dopo 2 secondi o più, si ascolterà un lungo bip, e apparirà “SUCCESSIONAL” nel display. Se si ascolterà un breve bip, quello indica che la calibratura è fallita. Ripetere la procedura alla fase 3.
5. Poi, regolare la sensibilità. Toccare nel display delle opzioni per selezionare "A-VOL SENS"izzato.

6. Toccare ne lato destro del display o, in alternatively, girare la manopola [ROTARY] per aggiustare la sensibilità.
Ogni volta che si gira la manopola [ROTARY], la selezione cambia nel seguente ordine.
OFF (il volume non cambia) LOW (il volume cambia: un poco) MID-LOW MID MID-HIGH HIGH (cambia il volume: molto) ...
7. Premere il tasto [A] per tornare alla modalità precedente.
Performare un controllo del sistema
Questa funzione permette di effettuare un controlo di sistema alla modalità di aggiustamento quando richiesto.
1. Premere il tasto [A] per impostare la modalità di aggiustamento.
2. Toccare nel display delle opzioni per selezionare "SYSTEM CHECK" sotto "SETTING".

3. Toccare e tenere premuto START per 1 secondo o più.
"System Check" appeare sul display.
4. Premere la manopola [ROTARY]. Il controlledo diistema viene avviato
Quando il controlo di sistema viene completato, "Completed" appeare sul display.
5. Premere ancora la manopola [ROTARY]. Appare il display principale per la modalità radio.
Uso della funzione di sicurezza (CODEMATIC)
Questa funzione impedisce di usare lavoramente\
eso apparetcchio alle persona che non conoscono\
la seguenza di tocchi. Il display del Codice a Tocchi\
appare quando DCPiene attaccato e accesso\
mente "CODEMATIC" è impostato su "ON".
Se si tocca il display di quello schermone nell'ordine preselezionato, viene visualizzato "SUCCESSFUL" e l'apparecchio si spenge.
Quando l'apparecchio viene poi acceso, il display del Codice a Tocchi non appeare, e viene visualizzato il display principale nella modalità radio o nella modalità CD.
1. Premere il tasto [A] per impostare la modalità di aggiustamento.
2. Toccare 卡 卡 卡 nel display delle opzioni per selezionare "CODEMATIC" sotto "SETTING".

Sono visualizzati 2 tipi di opzioni per "CODEMATIC", opzioni per cui viene visualizzato "ON" o "OFF" sulla destra dello schermo, e opzioni per cui viene visualizzato "INPUT" sulla destra dello schermo. Quindi, selezionale le opzioni per cui viene visualizzato "ON" o "OFF" nel dato destro del display.
3. Toccare nel lato destro del display o, in alternatively, girare la manopola [ROTARY] per selezionare "ON" o "OFF".
4. Toccare neI display delle opzioni per selezionare "CODEMATIC" sotto "SETTING". Quindi, selezionare le opzioni per cui viene visualizzato "INPUT" nel lato destro del display.
5. Toccare INPUT. Appare il display del Codice a Tocchi.
6. Inserire il codice a tocchi.
* Toccare una delle 5 posizioni (sinistra, centro, destro, destra superiore, o destra inferiore) sul display.
Ogni tocco sul diplay illumina uno degli indicatori del Codice a Tocchi.
* Per esempio, toccare (1) centro, (2) destra superiore, (3) sinistra, e (4) destra inferiore, in quest'ordine. è possible toccareanche ripeturamente la stessa posizione. Quando di tocca 4 volté, si sentirà un bip lungo, e si ritorna alla modalità originale.
Per cancellare CODEMATIC
Se si è dimenticato l'ordine del tocco, toccare ① destra inferiore, ② sinistra, ③ destra superiore e poi ④ destra in quest'ordine o, in alternatively, premere [SCN] sul telecomando dell'apparecchio.

7. OPERAZIONI CON GLI ACCESSORI
Operazioni con il cambiadischi CD
Cambia-CD
Quando un cambia-CD optionale è connesso atraverso il cavo CeNET,但这a unità più controllare le operazioni del cambia-CD. Questa unità più essere connessa fino a un totale di 2 cambia-CD collegati con il CeNET.
Cambia-DVD
Quando un cambia-DVD optionale è connesso attraverso il cavo CeNET,但这a unità più controllare le operazioni del cambia-DVD. Per visualizzare un DVD, si richiede l'uso di un monitor opzionale.
Le operazioni disponibili e il display del cambiaDVD di但这a unità sono in versione amplificata, e non supporta tutte le funzioni del cambia-DVD. Per controllare il cambia-DVD, usare il telecomando che viene provistono con il cambiaDVD. Per maggiori dettagli, fare riferimento al Manuale Utente provistono con il cambia-DVD.
Nel caso in cui si connettono 2 cambia-DVD
Premere la manopola [ROTARY] per selezionare il cambiatore connesso a esta unità. (Ogni pressione sulla manopola [ROTARY] cambia cambiatore.)
- Se il cambia-CD non contiene un contentatore, viene visionato "NO MAG", e se il contentatore non contiene CD, non viene visualizzato "NO DISC" per il disco Num.
Per maggiori dettagli del display dei titoli, vedere "Cambiamento del display del titolo" (ved. pag. 14).
Lo schermo visualizza nella modalità cambiatore
Display principale (modalità cambia-CD)
Questo è quello che appeare premendo la manopola [ROTARY] per selezionare la modalità cambia-CD.

Toccando il lato sinistro del display per 1 secondo o più si cambia in modalità delle operazioni di base.

Display del brano/tempo di riproduzione T01/02: 00: Sono visualizzati il Num. del brano in fase di riproduzione e il tempo di riproduzione.
Toccando o nelle operazioni standard, si permette la selezione del brano da riproduire, o i brani da far avanzare velocamente o da far andare indietro velocamente.
Display del titolo
Toccando quello si cambia il display.
Display del disco Num.
Se sitocca nella modalita normale,si puo selezionale un disco.
MODE
Toccandolo si visualizzano le sub-funzioni.
Toccandolo e tenendolo premuto per 1 secondo o più viene visualizzata la lista dei dischi.
T-SCAN/D-SCAN
Questo viene visualizzato durante la scansione delle riproduzioni. Toccando T-SCAN/D-SCANiene terminata la riproduzione a scanzione.
T-RPT/D-RPT
Questo viene visualizzato durante la rpeticione della riproduzione. Toccando T-RPT/D-RPTiene terminata la riproduzione ripetuta.
T-RDM/D-RDM
Questo viene visualizzato durante la riproduzione in ordine casuale. Toccando T-RDM/D-RDM viene terminata la riproduzione in ordine casuale.
DISC
Toccando甚么 si avvia la riproduzione del disco successivo.
(solo nel display delle operazioni di base) Toccando questi tasti si selezione il brano da riproduire.
Toccando e tenendo premuti questi tasti si mandano i brani avanti o indietro velocimento.
Display della lista dischi (modalità cambia-CD)
Questo è quello che appeare quando MODE viene toccato e tenuto premuto per 1 secondo o più nel display principale.

Nome del disco
>>:Selezione in progressione
Toccando il nome di un disco si fa tornare lo schermo al display principale, e la riproduzione viene avviata a partire dal primo brano del disco toccato.
←PREV-RTN:
Toccandolo si visualizza la lista dei titoli precedenti. Toccandolo e tenendolo premuto per 1 secondo o più si fa tornare lo schermo al display principale.
NEXT:
Toccandolo si visualizza la lista dei titoli successivi.
ATTENZIONE
CD-ROM non possono essere riprodotti da!.!.!.!.!.!.!.!.!.!.!.!.!.!.!.!.!.!.!.!.!.!.!.!.!.!.!.!.!.!.!.!.!.!.!.!.!.!.!.!.!.!.!.!
Nota:
- Alcuni CD registrati nella modalità CD-R/CD-RW potrebbero non essere utilizzabili.
Selezione della modalità combustatore
1. Premere la manopola [ROTARY] per selezionare la modalità cambiatore.
* Se una data apparecchiatura non è connessa, la rispettiva modalità non appeare visualizzata. La riproduzione si avvia automaticamente quando la modalità cambia in modalità Cambiatore.
Arresto temporaneo della riproduzione
1. Premere il tasto [▶■].
■ Riavvio della riproduzione
1. Premere nuovamente il tasting [▶■].
Selezione di un CD
1. Toccare 日 nel display del disco Num. per selezionare un disco.
Si avvia la riproduzione.
* Se il contentatore non contiene il disco selezionato, il Num. di quello disco non viene visualizzato.
* Toccando DISC ↑ si avvia la riproduzione del disco successivo.
■ Selezione di un disco dal display della lista di dischi
1. Toccare e tenere premuto MODE per 1 secondo o più.
Viene visualizzata le lista dei dischi. Se viene toccato NEXT, viene visualizzata la parte successiva della lista dei dischi.
2. Toccare il nome del disco.
* Se il contentatore non contiene il disco che si è selezionato, viene visualizzato "NO DISC" per quel disco Num.
* Se si selezione lo stesso disco che è in fase di riproduzione, la riproduzione ricomincia dal primo brano di quel disco. (funzione top)
Selezione di un brano
1. Per sentire il brano successivo, toccare nei display del brano.
2. Per sentire il brano precedente, toccare due volte nel display del brano.
Toccando 品 si riproduce il brano successivo. Per anni successiva pressione del tasting l'apparecchio avanza sino all'inizio del brano successivo che viene poi riproduotto.
Toccando 山 si riproduce il brano precedente. Per anni successiva pressione del tasto l'apparecchio retrocede sino all'inizio del brano precedente che viene poi riproduotto.
* Se si tocca ↑ due volte nel display del brano quando sta per cominciare la sua riproduzione, talvolta viene riprodotto il secondo brano precedente.
Avanzamento veloce/ Retrocessione veloce
1. Per avanzare velocemente, toccare 5 sul display dei brani.
2. Per retrocedere velocimento, toccare sul display dei brani.
Funzione TOP
La funzione top avvia la riproduzione dal primo brano nel disco attualmente in fase di riproduzione.
1. Toccare et tenere premuto MODE per 1 secondo o più. Viene visualizzata le lista dei dischi. Se viene toccato NEXT, viene visualizzata la parte successiva della lista dei dischi.
2. Toccare il nome del disco.
* Se il contentatore non contiene il disco che si è selezionato, viene visualizzato "NO DISC" per quel disco Num.
* Se si è selezionato lo stesso disco che è attualmente in fase di riproduzione, la riproduzione ricomincia dal primo brano di quel disco.
Riproduzione a scansione
La riproduzione a scansione localizza e riproduce automaticamente i primi 10 secondi di tutti i brani di un disco. Questa funzioneiene ripetuta su quello disco fino a che non viene annullata.
La riproduzione a scansion è utile quando si vuole selezionare un brano desiderato.
1. Toccare MODE.
2. Toccare T-SCAN.
Il display MODE cambia in "T-SCAN" e si avvia la coproduzione a scansione.
* La riproduzione a scansione viene avviata dal brano successivo a quello attualmente in fase di riproduzione.
■ Annullamento della riproduzione a scansione
1. Toccare T-SCAN.
Il display T-SCAN cambia in "MODE", e viene riproduzione il brano che era in fase di riproduzione quando si è toccato T-SCAN.
Riproduzione a scansione dei dischi
La riproduzione a scansione dei dischi località e riproduci
i primi 10 secondi del primo brano di agli disco nel cambia-
CD currentemente selezionato. Questa funzione continua
automatically fino a che non viene annullata.
La riproduzione a scansion è utile quando si vuole selezionare un CD desiderato.
1. Toccare MODE.
2. Toccare D-SCAN.
Il display MODE cambia in "D-SCAN" e si avvia la riproduzione a scansione dei dischi.
* La riproduzione a scansione dei dischi viene avviata dal disco successivo a quello attualmente in fase di riproduzione.
■ Annullamento della riproduzione a scansione dei dischi
1. Toccare D-SCAN.
Il display D-SCAN cambia in "MODE", e viene riproduotto il brano che era in fase di riproduzione quando si è toccato D-SCAN.
Riproduzione ripetuta
La coproduzione continuata riproduce continuamente il brano attuale. Questa funzione continua automaticamente fino a che non viene annullata.
1. Toccare MODE.
2. Toccare T-REPEAT.
Il display MODE cambia in "T-RPT" e viene avviata la coproduzione ripetuta.
Annullamento della riproduzione ripetuta
1. Toccare T-RPT.
Il display T-RPT cambia in "MODE", e la riproduzione regolare ricomincia dal brano che era in fase di riproduzione quando si è toccato T-RPT.
Riproduzione ripetuta dei dischi
Dopo che sono stati riprodotti tutti i brani di un disco, la riproduzione ripetuta automaticamente ripete lo stesso disco dal primo brano. Questa funizione continua automaticamente fino a che non viene annullata.
1. Toccare MODE.
2. Toccare D-REPEAT.
Il display MODE cambia in "D-RPT" e viene avviata la riproduzione ripetuta dei dischi.
Annullamento della riproduzione ripetuta dei dischi
1. Toccare D-RPT.
Il display D-RPT cambia in "MODE", e la riproduzione regolare ricomincia dal brano che era in fase di riproduzione quando si è toccato D-RPT.
Riproduzione in ordine casuale
La riproduzione in ordine casuale seleziona e riproduce i vari brani nel disco in un ordine non particolare. Questa funzione continua automaticamente fino a che non viene annullata.
1. Toccare MODE.
2. Toccare T-RANDOM. Il display MODE cambia in "T-RDM" e si avvia la coproduzione a scansione.
■ Annullamento della riproduzione in ordine casuale
1. Toccare T-RDM. Il display T-RDM cambia in "MODE", e la riproduzione regolare ricomincia dal brano che era in fase di riproduzione quando si è toccato T-RDM.
Riproduzione in ordine casuale dei dischi
La riproduzione in ordine casuale dei dischi selezione e riproduce automaticamente i vari brani o dischi in un ordine non particolare. Questa funzione continua automaticamente fino a che non viene annullata.
1. Toccare MODE.
2. Toccare D-RANDOM. Il display MODE cambia in "D-RDM" e si avvia la riproduzione in ordine casuale.
■ Annullamento della riproduzione in ordine casuale
1. Toccare D-RDM. Il display D-RDM cambia in "MODE", e la riproduzione regolare ricomincia dal brano che era in fase di riproduzione quando si è toccato D-RDM.
Funzioni del sintonizzatore TV
Quando un sintonizzatore TV opzionale è collegatotramite un cavo CeNET,questa unità controla lefunzioni del sintonizzatore TV.Per videere la TVsono necessari un sintonizzatore TV e un monitor.
Display dello schermo nella modalità TV
Display principale
Questo è quello che appeare premendo la manopola [ROTARY] per selezionare la modalità TV.

Toccando il dato sinistro del display per 1 secondo o più si cambia in modalità delle operazioni di base.

Dislay dei canali
1ch: Viene molto il canale attualmente in fase di ricezione.
Toccare 山 山 山 山 山 山 山 山 山 山 山 山 山 山 山 山 山 山 山 山 山 ^ 1 o in modalità normale permette di effettuare la sintonizzazione automatica o la sintonizzazione manuale.
Display del titolo
3ch: Viene visualizzato il nome della stazione attualmente in fase di ricezione.
VTR: In modalità video
Toccando quosti si cambia il display.
Display della banda di ricezione
TV 1: Nome della banda:
Display del Num. preselezionato
Toccando 山 in modalitànormale siselezionana una memoria preimpostata.
Quando un sintonizzatore TV opzionale è collegato tramite un cavo CeNET, esta unità controlling le funzioni del sintonizzatore TV. Per essere la TV sono necessari un sintonizzatore TV e un monitor.
Display del Num. preselezionato Toccando 山 in modalità normale si selezione una memoria preimpostata.
MODE
Toccandolo si visualizzano le sub-funzioni.
Toccandolo e mantenendolo premuto si visualizza la lista delle memorie preseselezionate.
P-SCAN: Questo viene visualizzato durante una scansione preselezioni. Toccandolo si termina la scansione preselezioni.
A-STORE: Questoiene visualizzato durante una memorizzazione automatica. Toccandolo si termina la memorizzazione automatica.
BAND
Il toccarlo cambia la banda di ricezione.
Toccandolo e tenendolo premuto per 1 secondo o più si cambia alla modalità di sintonizzazione manuale alla sintonizzazione automatica e viceversa.
(solo nel display delle operazioni di base) Toccando questi tasti si abilita la sintonizzazione automatica o la sintonizzazione a passo (nella modalità di sintonizzazione manuale).
Toccandolo e tenendo premuti quosti tasti si abilita la sintonizzazione rapida (nella modalità di sintonizzazione manuale).
Display della lista delle memorie preselezionate
Questo è quello che appeare quando MODE viene toccato e tenuto premuto per 1 secondo o più nel display principale.

>>
In fase di sintonizzazione
RTN:
Toccandolo si ritorna al display principale.
Selezione della modalità TV
1. Premere la manopola [ROTARY] per selezionare la modalità TV.
Ogni pressione sulla manopola [ROT] cambia la modalità nell'ordine segue
* Se una data apparecchiatura non è connessa, la rispettiva modalità non appeare visualizzata.
banda di ricezione
1. Toccare BAND per cancellare la banda di ricezione. Ogni volta che si preme BAND la banda di ricezione cambia.
TV1 TV2 TV1...
Sintonizzazione automatica
La sintonizzazione automatica è una funzione per sintonizzato automaticamente le stazioni con una Buona ricezione.
1. Toccare e tenere premuto BAND per 1 secondo più quando viene visualizzato MANU. La sintonizzazione automatica diventa possibile quando scompare MANU.
2. Toccare sul display dei canali. Viene visualizzato SEEK UP/SEEK DOWN, e la sintonizzazione viene avviata. La sintonizzazione si ferma automaticamente alle stazioni con una buona ricezione.
Per annullare una sintonizzazione
1. Toccare ancora sul display dei canali.
Sintonizzazione manuale
Ci sono 2 modalità disponibili: sintonizzazione rapida e sintonizzazione a passo.
Quando ci si trovato in modalità di sintonizzazione a passo, la frequenza cambia di un passo per volta. In modalità di ricerca rapida, è possibile sintonizzarsi rapidamente sulla frequenza desiderata.
1. Toccare e tenere premuto BAND per 1 secondo o più nel caso che MANU non venga visualizzato .
La sintonizzazione manuale è disponibile quando viene visualizzato MANU.
2. Usare il display dei canali per sintonizzarsi su un canale in cui c'e una stazione emittente. Ci sono 2 modi per effettuire la sintonizzazione manuale: sintonizzazione a passo e sintonizzazione rapida.
* La sintonizzazione a passo è una funzione per cui si cambia di un canale perolta. Toccare ↑ ⿱ sul display delle frequenze.
* La sintonizzazione veloce è una funzione per cui il canale cambia continuamente. Toccare ↔ ➔ sul display dei canali. La sintonizzazioneiene interrotta se si toglie il dito dal pannello.
Richiamareuna stazione preselezionata
Questa funzione permette all'utente di selezionare una stazione presezionata.
1. Toccare e tenere premuto MODE per 1 secondo o più.
Viene visualizzata la lista delle memorie preselezionate.
2. Toccare la stazione che si vuole ascoltare.
* La stazione può essere sintonizzata toccando in un Num. preimpostato.
Per annullare una sintonizzazione
1. Toccare RTN.
Memoria preselezionata
Possono essere memorizzate un totale di 12 stazioni TV (6-TV1 e 6-TV2). Questo permette di selezionare le stazioni TV preferite e memorizzarle per richiamarle successivement.
1. Toccare BAND perambiare la banda di ricezione.
2. Usare il display dei canali per selezionare la stazione da memorizzare.
3. Toccare e tenere premuto MODE per 1 secondo o più.
Viene visualizzata la lista delle memorie preselezionate.
4. Toccare e tenere premuto per 2 secondi o più il Num. preimpostato per la memorizzazione. L'émissione di un lungo bip segnalera l'avvenuta memorizzazione della stazione. Se si sentirà un breve bip, la stazione non è stata memorizzata. Ripetere la procedura alla fase 1.
Funzione di memorizzazione automatica
La memorizzazione automatica selezione automaticamente 6 stazioni TV e le memorizzate tutte nella memoria preimpostata.
Se non ci sono 6 stazioni con una buona ricezione, rimangono memorizzate le stazioni precedentamente memorizzate e solo le stazioni forti sono memorizzate.
1. Toccare MODE.
2. Toccare e tenere premuto A-STORE per 2 secondo o più.
Il display MODE cambia in "A-STORE" e il Num. selezionato durante le operazioni di memorizzazione automatica appeare nel display Num. selezionato.
* Vengono automaticamente ricercate le stazioni con una buona riseczione, e quindi memorizzate tra le memorie preselezionate (No.1 to No.6) in ordine partendo alla stazione con la frequenza più bassa.
Note:
- Quando viene effettuata la memorizzazione automatica, le stazioni memorizzate fino a quel momento vengono cancellate.
- Nel caso che ci siano meno di 6 stazioni con una buona ricezione, le basse frequenze saranno automaticamente richiamate e la memorizzazione automatica verrà ripetuta. Le stazioni precedentemente memorizzate rimangono in memoria nel caso in cui risultano eserci meno di 6 stazioni disponibili, malgrado che la memorizzazione automatica sia stata effettuata 2 volte.
Scansione preimpostata
La scanzione preselezioni è una funzione per ricevere le stazioni nell'ordine in cui sono attualmente memorizzate per Num. preimpostato in modo che si possano controllare le trasmissioni.
1. Toccare MODE.
2. Toccare P-SCAN.
Il display MODE cambia in "P-SCAN" e il Num. selezionato durante le operazioni di scanzione preselezioni appara nel display Num. selezionato.
* Le stazioni attualmente memorizzate sono ricevute in ordine per 7 secondi o più. Le stazioni con scarsa ricezione sono saltate e viene ricevuta la stazione successiva.
Le stazioni TV sono ricevute nell'ordine seguente: TV1 (1 6) TV2 (1 6) TV1 (1 6) e cosi via.
Per annullare la scanzione preselezioni
1. Toccare P-SCAN.
Il display P-SCAN cambia in "MODE" e, in seguito, saranno ricevute le stazioni che si stavano ricevendo quando si è toccato P-SCAN.
Guardare un video
Il sintonizzatore TV ha un terminale d'immissione VTR a cui può essere connesso 1 periferica esterna. Connettere un video-riproduttore 12 V (VCP) o un video-registrarore (VCR) al terminal d'immissione del terminale TV.
1. Premere il tasto [▶■].
Viene visualizzato VTR, e la modalità vieneambiata in modalità VTR.
* Lo schermo TV entra in modalità d'immissione video, e si possono visualizzare i video.
Per ritornare alla modalità TV
1. Premere nuovamente il tasto [▶■].
Impostare I'area TV (TV AREA)
Quando si selezione l'area TV (l'area di ricezione della TV), si modifica l'impostazione dell'area del sintonizzatore della TV.
L'impostazione predefinita alla fabbrica è "GERMANY".
1. Premere il tasto [A] per impostare la modalità di regolazione.
2. Toccare 日 nel display delle opzioni selezionare "TV AREA" sotto "TUNER".

3. Toccare nel lato destro del display o, in alternatively, girare la manopola [ROTARY] per selezionare l'area.
4. Premere il tasting [A] per tornare alla modalità precedente.
Impostazione
dell'amplificatore TV (TV DIVER)
E possibile modificare le impostazioni di ricezione dell'antenna TV connessa all'amplificatore TV.
- Impostare esta opzioni su "OFF" quando un'antenna TV non è in uso.
- L'impostazione predefinita alla fabbrica è "ON".
1. Premere il tasto [A] per impostare la modalità di aggiustamento.
2. Toccare 山 nel display delle opzioni selezionare "TV DIVER" sotto "TUNER".

3. Toccare 念 nel lato destro del display o, in alternatively, girare la manopola [ROTARY] per selezionare "ON" o "OFF".
4. Premere il tasting [A] per tornare alla modalità originale.
Funzione di lavoro DAB
Quando si usa un carr o CeNET per collegare un'unità DAB (DAH913 o DAH923, venduta separamente), possono essere controllate tutte le funzioni.
Ascoltare la stazione DAB
1. Premere la manopola [ROTARY] per selezionare la modalità di operazione.
Note:
- Il display molto nella modalità di ricezione normale e nella modalità di ricezione preimpostata è lo stesso quando viene ricevuta una stazione DAB.
- Il numero dei programmi e dei tempi delle trasmissioni dipende alla stazione DAB.
- Quando la forza dei segnali DAB diminuisce, l'émissione audio viene interrotta.
Sintonizzazione automatica
1. Premere la manopola [ROTARY] per selezionare la modalità DAB.
2. Toccare sul lato sinistro del display. "DAB" si illumina nel display quando l'unita principale riceve una stazione DAB.
* L'unità principale interrompe la sintonizzazione automatica quando non si riesce più a trovare una stazione DAB. Il display torna alla modalità precedente.
Sintonizzazione manuale
1. Premere la manopola [ROTARY] per selezionare la modalità DAB.
2. Se sul display non appeare "MANU", toccare etenere premuto BAND per 1 secondo o più. Se viene visualizzato "MANU", diventa possibile la sintonizzazione manuale.
3. Toccare sul lato sinistro del display per sintonizzato la stazione.
* Se non vengono effettuate operazioni per più di 7 secondi, la sintonizzazione manuale viene annulata e il display ritorna nella modalità precedente.
Cambiamento dei programmi
1. Premere la manopola [ROTARY] per selezionare la modalità DAB.
2. Toccare sul lato sinistro del display per cambiare i programmi nella stazione DAB.
Nota:
- Il nome del programma può essere lo stesso a seconda del programma DAB.
Scansione dei programmi
Questa funzione effettua una scansione di tutti i programmi ricevibili in una stazione DAB che si sta ricevendo per 10 secondi, in sequenza. Questo è utile quando si vuole cercare un programma particolare.
1. Premere la manopola [ROTARY] per selezionare la modalità DAB.
2. Toccare MODE.
3. Toccare S-SCAN. "S-SCAN" si illumina equesta unità comincia la scansione di tutti i programmi per 10 secondi in sequenza. Ogni volta che l'unità effettua una scansione, il nome del programma viene molto在哪o nel display.
4. Per terminare la scansione dei programmi quando viene sintonizzato il programma desiderato, premere S-SCAN.
Memoria manuale
L'unità principale ha una funzione di memoria manuale per i programmi DAB. Possono essere preimpostati fino a 18 programmi (sei programmi ognuno) nei tasti di preselezione.
[M1], [M2] e [M3]
1. Premere la manopola [ROTARY] per selezionare la modalità DAB.
2. Toccare BAND per selezionare una delle scelte mostrate sopra.
3. Toccare e tenere premuto MODE per 1 secondo o più. Viene visualizzata la lista delle memorie preselezionate.
4 Toccare et tenere premuto per 2 secondi o più il Num. preselezionato perché sa memorizzato. L'émissione di un lungo bip segnalera l'avvenuta memorizzazione della stazione. Se si sentirà un breve bip, la stazione non è stata memorizzata. Ripetere la procedura dalla fase 1.
Nota:
L'interruzione dei programmi (PTY o INFO) non\
puo essere scritto nella memoria manuale.
Richiamare un programma preselezionato
1. Premere la manopola [ROTARY] per selezionare la modalità DAB.
2. Toccare BAND. Per agli tocco di BAND si cambia il display nell'ordine seguente:
MEMO1 MEMO2 MEMO3 MEMO1...
3. Toccare 山 nel lato destro del display per richiamare un programma preselezionato.
Funzione AF
La funzione AF passa a una frequenza diversa della stessa rete per mantenere la riscezione migliorie.
L'impostazione predefinita in fabbrica è "ON" (Attivata)
- Se la ricezione della stazione corrente si deteriorata, "SEARCH" appeare sul display e la radiocca lo stesso programma su un'altra frequenza.
- Per ulteriori dettagli sulla "Funzione AF" (ved. pag. 26), consultare la sezione "Operazioni RDS" di agli manuale dell'utente.
- Disattivazione della funzione AF
Attivazione della funzione AF
La funzione AF tra RDS e DAB
Quando lo stesso programma viene trasmesso sua da RDS che da DAB e esta funzione è ATTIVATA (ON), l'unità principale passa automaticamente alla riscione della trasmissione con la riscione migliorare.
TA (Annunci sul traffico)
In modalità di attesa TA, quando inizia la trasmissione di un annunciò sul traffico, la trasmissione dell'annunci sul traffico viene ricevuta con priorità principale indipendente幔a la modalità di funzione. èanche possibile la sintonizzazione automatica dei programmi sul traffico (TP).
- Questa funzione può essere utilizzata solo quando la scritta "TP" è illuminata sul display. Se la scritta "TP" è illuminata, significa che le stazioni di trasmissione RDS o DAB in corso di riszezione sono dotate di programmi di annunci sul traffico.
- Per ulteriori dettagli su "TA" (ved. pag. 27), consultare la sezione "Operazioni RDS" di uno qualsiasti dei manuali dell'utente.
- Impostazione della modalità di attesa della funizione TA
- Annullamento della modalità di attesa della funizione TA
Ricerca di una stazione TP
Note:
- Se non viene ricevuta nessuna stazione TP, l'unità principale interrompe l'opération di ricerca.
- La scritta "TP" delve essere illuminata sul display quando una trasmissione radio TP viene trasmessa da una stazione RDS. In questo caso, premere il tasto [TA] per eseguire la ricerca di sintonizzazione TP Premere più il tasto [TA] per tornare alla modalità precedente.
INFO (Annunci0)
In modalità di attesa INFO, quando il programma di annunci ha inizio, l'unità principale commuta automaticamente nel programma di annunci selezionato.
- Impostazione della modalità di attesa INFO
Se si preme e siiene premuto il tasto [TA] per 1 secondo o più a lungo, sul display si illumina la scritta "INFO" e l'unità principale viene impostata nella modalità di attesa INFO fino a quando viene trasmesso l'annuncioc selezionato. Quando inizia la trasmissione dell'annuncioc selezionato, la voce dell'annuncioc appeare sul display. Se si preme e siiene premuto il tasto [TA] per 1 secondo o più a lungo nelle è in corso di ricezione l'annuncioc selezionato, la ricezione della trasmissione dell'annuncioc selezionato viene annullata e l'unità principale torna in modalità di attesa INFO.
- Annullamento della modalità di attesa INFO
Per annullare la modalità di attesa INFO, premere e tenere premuto il tasto [TA] per 1 secondo o più a lungo.
- Selezione informazioni
Questa funzione serve per selezionare I'ATTIVAZIONE (ON) o la DISATTIVAZIONE (OFF) delle INFORMAZIONI in modalità di interruzione delle informazioni.
E possibile ATTIVARE fino a 6 elementi di informazione a scelta.
É possibile effettuare la selezione tra gli 6 elementi elencati qui sotto:
Elemento INFORMAZIONE ENGLISH Contenuto Travel Notizie flash sui trasporti Warning Servizio di averporto News Notizie flash Weather Notizie flash sul tempo Event Annunci di eventi Special Evento speciale
1. Toccare MODE.
2. Toccare INFO SEL per entrare nella modalità "INFO SEL".
3. Toccare 念 nel centro del display o, in alternatively, girare la manopola [ROTARY] per selezionare un'informazione. Si cui selezionare una delle seguenti scelte:
Travel Warning News Weather Event Special Travel...
4. Toccare 山 nel lato destro del display per selezionare "ON" o "OFF".
5. Toccare RTN.
PTY
Questa funzione consente di ascoltare il tipo di programma selezionato, indipendentamente alla modalità di funzione.
- Un PTY comune più essere selezionato per DAB o RDS.
- Tra DAB PTY e RDS PTY il programma PTY ricevuto per primo assume la priorità sull'altro.
- Le trasmissioni PTY non sono ancora disponibili in tutti i Paesi.
- In modalità di attesa INFO, le stazioni INFO hanno la priorità sulle stazioni PTY.
- In modalità di attesa TA, le stazioni TP hanno la priorità sulle stazioni PTY.
Per ulteriori dettagli su "PTY" (ved. pag. 28), consultare la sezione "Operazioni RDS" in uno qualsi dei manuali dell'utente.
- Impostazione della modalità di attesa PTY
- Annullamento della modalità di attesa PTY
- Annullamento di trasmissione interrotta PTY
- Selezione PTY
Ricerca PTY
- Memoria di presezione PTY
Trasmissioni di emergenza
Quando è in corso di ricezione una trasmissione di emergenza, tutte le operazioni di modalità di funzione vengono interrotte. Sul display appara il messaggio "ALARM" ed è possibile ascoltare la trasmissione di emergenza.
- Per ulteriori dettagli sulle "Trasmissione di emergenza" (ved. pag. 29), consultare la sezione "Operazioni RDS" in uno qualsiasti dei manuali dell'utente.
- Annullamento di una trasmissione di emergenza
Cambiamento delle lingua del display PTY e INFO
Per i PTY e INFO visualizzati nel display è possibile selezionare una delle 4 lingue disponibili (Inglese, Tedesco, Svedese o Francese).
L'impostazione predefinita alla fabbrica è "ENGLISH".
- Per maggiori dettagli su "Cambiamento della lingua del display PTV" (ved. pag. 30),fare riferimento alla sezione "operazioni RDS" nel rispetto manuale per il proprietario.
Impostazione del volume per TA, INFO, trasmissioni di emergenza (ALARM) e PTY
É possibile impostare il volume delle interruzioni TA, INFO, ALARM e PTY durante le interruzioni TA, INFO, ALARM e PTY. Eseguire le operazioni seguenti, a seconda del modello collegato.
L'impostazione predefinita in fabbrica e "15".
Durante un'interruzione TA, INFO, ALARM o PTY, ruotare la manopola [ROTARY] in senso orario o antiorario per impostare il volume al livello desiderato (da 0 a 33).
* Quando finisce l'interruzione TA, INFO, ALARM o PTY, il volume torna al livello che aveva prima dell'interruzione.
Operazioni sul Decoder Surround 5.1ch
Quando viene connesso un decoder surround 5.1ch CeNET compatible opzionale, il decodercouldesserecontrolladastessoapparecchio.Le seguenti funzioni cambiano quando viene connesso un decoder surround 5.1ch:
- Alle modalità del Dolby Pro Logic II siaggiungono le due modalità "MOVIE" e "VIRTUAL".
- La modalità VSE/POSITION vieneambiato nella modalità del DSF (Digital Sound Field).
- Nella modalità P.EQ (Parametric Equalizer), le impostazioni di agli altoparlante sono essere regolareanche in maggior dettaglio.
Le impostazioni relative alla musica tra le opzioni (ved. pag. 39) sono cambiati.
Selezione di PL II (Dolby PL II)
Selezionare uno delle quattro modalità disponibili e adatte alla sorgente che stai usando nella modalità Dolby Pro Logic II.
- L'impostazione predefinita alla fabbrica è "OFF".
■ MUSIC (modalità musica)
Guarda "Selezione del menu PLII (Dolby PLII)" (ved. pag. 17).
MATRIX (modalità matrix)
Guarda "Selezione del menu PLII (Dolby PLII)" (ved. pag. 17).
MOVIE (modalità film)
Disponibile per film da video DVD.
■ VIRTUAL (modalità virtuale)
Disponibile per film o altre sorgenti audio.
OFF
La modalità Dolby Pro Logic II non viene usata.
1. Premere il tasto [SOUND].
2. Toccare Dolby PLII.

3. Toccare sul lato destro del display per selezionare la modalità Dolby Pro Logic II.

Il display delle modalità cambia nell'ordine seguente:
MUSIC (modalità musica) MATRIX (modalità matrix) MOVIE (modalità film) VIRTUAL (modalità virtuale) OFF (PL II off) MUSIC (modalità musica)...
* Per maggiori dettagli a proposito della regolazione del volume dell'altoparlante/ sub-woofer centrale, guardare pagina 45.
4. Toccare RTN.
Selezione del menu DSF
DSF (Digital Sound Field) rende possibile atraverso la simulazione sonora si godere la stessa esperienza acustica che di vivrebbe in una sala per i concerti o in un auditorium.
- Quando si selezione il menu DSF, a volte il volume diminuisce.
- L'impostazione predefinita alla fabbrica per DSF è "OFF" e per il menu DSF è "HALL".
1. Premere il tasting [SOUND].
2. Toccare DSF.

3. Toccare sul display ON/OFF. L'effetto DSF cambia in ON/OFF.

Quando DSFiene impostato su "OFF", I'impostazione DSF non si riflette nella sorgente musica. Questo completa I'impostazione di DSF.Premere il tasto [SOUND] per tornare alla modalità originale.
4. Toccare nel menu DSF Num. per selezionare il menu DSF desiderato.

Menu DSF
HALL CHURCH STADIUM LIVE JAZZCLUB THEATER HALL...
Num. Nome della funzione Descrizione 1 HALL Grande sala per i concerti 2 CHURCH Chiesa con il fatto a volte 3 STADIUM Grande stadio senza fatto o mura 4 LIVE Sala per musica dal vivo, più grande di un jazz club. 5 JAZZCLUB Jazz club con un soffitto basso 6 THEATER Cinema o teatro
5. Premere il tasto [SOUND] per tornare alla modalità originale.
Selezionare il menu dell'equalizatore dei parametri
L'equalizzatore dei parametri (P.EQ) permette di bilanciare l'intera gamma di livelli di frequenza in dettaglioattraversouna curvaomogeneausando il compensatore di frequenze adattato al tipo di vettura.
- Le impostazioni predefinite alla fabbrica sono le seguenti per tutti gli altoparlanti. FREQ = 1kHz, Q = 1, GAIN = 0dB
1. Premere il tasting [SOUND].
2. Toccare P.EQ.

3. Toccare 山 sul display ON/OFF. L'effetto P.EQ cambia in ON/OFF.

Quando L7effetto P.EQ viene impostato su "OFF", l'impostazione P.EQ non si riflette
nella sorgente musicale. Questo termina le impostazioni P.EQ. Premere il tasto [SOUND] per tornare alla modalità originale
4. Toccare 山 nel menu P.EQ Num. per selezionare il menu P.EQ.

Menu P.EQ
SIGNAL SP-SEL BAND FREQ Q GAIN SIGNAL...
5. Toccare sul lato destro del display e aggistiustare I'opzione come si desidera.
SIGNAL (seleziona la regolazione del segnale): Selaziona "P-NOIS" o "MUSIC"
P-NOIS: imposta quando non si deve usare il rumore rosa
MUSIC: imposta I'uso di segnali misucali
SP-SEL (seleziona gli altoparlanti il cui valore P.EQ deve essere aggiestato): Scegliere tra "FRONT", "CENTER" o "SURROUND".
- FRONT: altoparlante frontale
- CENTER: altoparlante centrale
- SURROUND: altoparlante avvolgente
BAND (seleziona la banda di frequenza): Seleziona una delle bande da 1 a 3
FREQ (seleziona la frequenza centrale): La gamma di aggiustamento è da 20 Hz a 20 kHz.
Q (imposta la curva Q): Imposta un valore tra 1, 3, 5, 7, o 20 per indicate l'intensità della curva Q.
GAIN (regola il livello di emissione): Regola il gain (livello di emissione) nella gamma da -12dB to +12dB. (1dB steps, 25 punti)
6. Ripetere le fasi 4 e 5 per regolare l'unità desiderata.
7. Premere il tasto [SOUND] per tornare alla modalità originale.
Regolazione di P.EQ
Le impostazioni sono essere regolate nel menu P.EQ nel modo seguente: La frequenza centrale, il gain e la curva Q sono essere memorizzate in combinazioni di canali o bande.
Per esempio, la Frequenza centrale "250Hz", il gain "8dB" e la curva Q "3" posso sono essere memorizzati nella banda 1 del frontale.
Per maggiori dettagli della funzione P.EQ, vedere "Regolazione del P.EQ" (ved. pag. 21).
Cambiamento delle impostazioni
Quando viene connesso un decoder surround 5.1 ch, vengono caambiate le impostazioni relative alla musica nelle modalità di aggiustamento.
Selezionare le impostazioni
Quello che segue descrive le opzioni le cui impostazioni vengono cambiate.
Per maggiori dettagli sulle altre opzioni che non vengono cambiati, guardare "Cambiamento delle impostazioni" (ved. pag. 39) in "Operazioni comuni per tutte le modalità".
1. Premere il tasto [A]. La modalità cambia in modalità di aggiustamento.

2. Toccare sul display delle impostazioni per selezionare quella che si vuole impostare..
* Toccando ↑ ⇌ nel lato sinistro del display si cambia la scelta di una opzione perolta. Toccando ← ⇌ sul lato sinistro del display cambia continuamente le sub-opzioni..
* Toccando ↑ ⇌ nel centro del display si cambia la scelta di una sub-opzione per volta. Toccando ← ⇌ si cambiano continuamente le sub-opzioni.
3. Quando viene visualizzato "THROUGH" nel降至 display, toccare THROUGH per andare nel display dell'aggiustamento dei dettagli.
4. Toccare ne lato destro del display o, in alternatively, girare la manopola [ROTARY] per impostare i dettagli.
Per ritornare in modalità originale
1. Premere ancora il tasting [A].
- Impostazione delle opzioni
Opzioni principali Sub-opzioni SOUND CENTER-SP / SRD-SP / SUB-WOOFER
• Impostazione ON/OFF degli altoparlanti (ved. pag. 64) FRONT HPF / CENTER HPF / SRD HPF / SUB-W LPF
• Aggiustamento della frequenza del filtrlo degli altoparlanti (ved. pag. 64) SP-GAIN
• Aggiustamento del livello di uscita dell'altoparlante (ved. pag. 46) DELAY CENTER-SP / SRD-SP
• Aggiustamento del ritardo degli altoparlanti (ved. pag. 65) DOLBY D D-RANGE
• Aggiustamento della gamma dinamica (ved. pag. 65) PL II CONT PANorama / DIMENSION / CTR WIDTH
• Impostazione in dettaglio della modalità musicale (ved. pag. 47)
Impostazione ON/OFF degli altoparlanti (CENTER-SP/ SRD-SP/SUB-WOOFER)
Impostare l'altoparlante centrale (CENTER-SP), l'altoparlante avvolgente (SRD-SP) e il subwoofer (SUB-WOOFER) in ON/OFF.
Assicurarsi di aver impostato queste impostazioni "OFF" quando non c'e l'altoparlante centrale, l'altoparlante avvolgente o il sub-woofer.
- L'impostazione predefinita alla fabbrica è "ON".
1. Premere il tasto [A] per impostare la modalità di aggiustamento.
2. Toccare 一 _ 一 nel display delle opzioni per selezionare "CENTER-SP" sotto "SOUND", "SRD-SP" sotto "SOUND" e "SUB-WOOFER" sotto "SOUND".

3. Toccare 山 山 nel lato destro del display o, in alternatively, girare la manopola [ROTARY] per selezionare "ON" o "OFF".
* Nel caso del "SUB-WOOFER", scegliere tra "ON+", "ON-" e "OFF".
Normalmente, selezionare "ON+. In agli caso, quando viene impostato "ON-," si più fortemente percepire un effetto di Bassa gamma.
4. Premere il tasting [A] per tornare alla modalità originale.
Aggiustamento del filtrodi frequenza degli altoparlanti (FRONT HPF/CENTER HPF/ SRD HPF/SUB-W LPF)
Questa funzione permette l'aggiustamento del filtro di frequenza per armonizzato con gli altoparlanti in uso.
Non viene visualizzato quell'altoparlante che viene spento nella sezione "Impostazione on o off degli altoparlanti (CENTER-SP/SRD-SP/ SUB-WOOFER)".
L'impostazione predefinita alla fabbrica per "FRONT HPF" o "SRD HPF" e "THROUGH" (nessun filtro), e per "CENTER HPF" o "SUB-W LPF" e "120Hz".
■ Aggiustamento del filtro
FRONT HPF/CENTER HPF/SRD HPF (aggiustamento del filtro high-pass)
Questo filtering eliminates suoni bassi dagli altoparlanti frontali centrali e da quelli avvolgenti.
THROUGH 50Hz 80Hz 120Hz
Impostare il filtro armonizzatoagli altoparlanti quando si usano altoparlanti dal diametro inferiore.
THROUGH
Impostare questo quando si usano altoparlanti che possono generare i bassi. THROUGH non cui èsere impostato al CENTER HPF.
SUB-W LPF (aggiustamento del filtro del sub-woofer low-pass)
Questo filtro eliminata i suoni più alto dal subwoofer.
50Hz 80Hz 120Hz
Impostare ilhetto di frequenza per armonizzarlo al sub-woofer.
1. Premere il tasto [A] per impostare la modalità di aggiustamento.
2. Toccare nel display delle opzioni per selezionare "FRONT HPF" sotto "SOUND", "CENTER HPF" sotto "SOUND", "SRD HPF" sotto "SOUND" e "SUB-W LPF" sotto "SOUND".

SOUND
ADJUST MODE FRONT HPF THROUGH
3. Toccare nel lato destro del display o, in alternatively, girare la manopola [ROTARY] per impostare la frequenza.
* Scegliere tra THROUGH*, 50Hz, 80Hz, and 120Hz.
*1 THROUGH viene visualizzato solo quando si selezione "FRONT HPF" o "SRD HPF".
4. Premere il tasting [A] per tornare alla modalità originale.
Aggiustamento del ritardo degli altoparlanti (CENTER-SP/SRD-SP)
Il tempo che il suono impiega da agli altoparlante per arrivare all'ascoltatore dipende dalla posizione in cui sono montati gli altoparlanti e dalle dimensioni della vettura Regolare il tempo del ritardo di agli altoparlante in modo tale che il suono di tutti gli altoparlanti giunge alle posizioni d'ascolto nello stesso momento di quello che viene dagli altoparlanti frontali.
- L'impostazione predefinita alla fabbrica è "0 ms".
1. Premere il tasto [A] per impostare la modalità di aggiustamento.
2. Toccare 日 nel display delle opzioni per selezionare "CENTER-SP" sotto "DELAY" e "SRD-SP" sotto "DELAY".

3. Toccare 山 sul lato destro del display per agiustare il tempo del ritardo.
* "CENTER-SP" più essere aggliustato in una gamma da 0 ms a 5 ms.
* "SRD-SP" can be adjusted within the range 0 ms to 15 ms.
4. Premere il tasting [A] per tornare alla modalità originale.
Regolazione delle funzioni del Dolby Digital (D-RANGE)
Questa funzione comprime la gamma dinamica del Dolby Digital per mantenere basso il livello di suoni come quello di una conversazione tra gli attori e soprime i volumi dal suono basso.
Queste funzioni sono disponibili solo per i dischi DVD in Dolby Digital.
- L'impostazione predefinita alla fabbrica è "MAX".
1. Premere il tasto [A] per impostare la modalità di aggiustamento.
2. Toccare 卡 nel display delle opzioni per selezionare "DOLBY-D" sotto "D-RANGE".

3. Toccare sul lato destro del display per aggustare la gamma delle dinamiche e regolare l'opzione desiderata.
MAX: modalità della gamma di massima dinamica della sorgente originale
STD: modalità raccomandata per l'ascolto standard
MIN: MIN: La modalità della gamma dinamica più compressa che rende facile l'ascoltoanche dei suoni più bassi.
4. Premere il tasto [A] per tornare alla modalità originale.
8. IN CASO DI DIFFICOLTÀ
Problema Causa Misura Generale L'apparecchio non si accende (non viene prodotto nessun suono.) È saltato il fusibile. Sostituire il fusibile con un altro dello stesso amperaggio. Se il fusibile salute nuovoamente, consultrare il negotio presso il quale si è acquistato l'apparecchio. Incorretto collegamento dei cavi. Consultare il negotio presso il quale si è acquistato l'apparecchio. Nessuna uscita audio quando si fa funzionare l'unità con amplificatori o antenna motorizzata collegati. Il filo dell'antenna motorizzata è in cortocircuito con la messa a terra o si richiede un'alimentazione eccessiva per gestire gli amplificatori o l'antenna motorizzata. 1. Spagnere l'unità2. Rimuoverete tutti i cavi connessi con il filo dell'antenna motorizzata. Per mezzo di un ohmetro, verificare agli cavo per l'eventuale presenza di un cortocircuito a terra3. Riaccendere l'unità4. Ricollegare agli cavo dell'amplificatore al filo dell'antenna motorizzato, uno perolta. Se gli amplificatori si attivano prima che tutti i cavi vengano collegati, utilizzato un relè esterno per fornire il voltaggio remoto (eccessiva richiesta di corrente). Quando si premono i tasti non succede niente. Il display non è accurato. Il microprocessore non funziona bene a causa del rumore, ecc. Spagnere l'unità, poi premere il tastingo [RELEASE] e rimuoverete del FRONTALINO ESTRAIBILE Tasto di reset (DCP).Premere il tastingo di reset per circa 2 secondi con un'asta sottile. I connettori del DCP o principali sono sporchi. Pulire lo sporco con un panno soffice inumidito con alcol per pulizia. CD/MP3/WMA Non è udibile alcun suono. È gia inserto un disco che non è un compact disc, o quale oggetto estraneo. Con il pannello di copertura aperto, tenere premuto il tastingo [▲] per 3 secondi o più.L'oggetto estraneo viene espulso forzamente. Non esistono file MP3/WMA sul disco. Scrivere correttamente i file MP3/WMA sul disco. I file non sono riconosciuti come file MP3/WMA. Usare file MP3/WMA codificati correttamente. Ilsystema file non è corretto. Usare il systema di file ISO9660 livelli 1, o 2, o i sistemi "JOLIET" o "Romeo". Il suono salute o è disturbato. Il disc è sporco. Pulire il disc con un panno morbio. Il disc è molto graffiti o deformato. Sostituire il disc con un altrezza graffiti. Il suono si interrompe o "scivola". Si producono dei rumori, o il suono risulta mescolato con rumori. I file MP3/WMA non sono codificati correttamente. Usare file MP3/WMA codificati correttamente.
CD/MP3/WMA Problema Causa Misura Appena l'unità viene accesa, l'audio è pessimo. Quando l'automobile è stata parcheggiate in un posto umido possono formarsi gobce d'acqua sulla lente interna. Lasciare asciugare l'unità accesa per circa 1 ora. Nome di file errato. Ilsystema file non è corretto. Usare ilsystema di file ISO9660 livelli 1, o 2, o i sistemi “JOLIET” o “Romeo”. La riproduzione della lista dilettura non viene effettuata. Ilnome del file, o l'estensione, non sono quelli corretti. Per il nome del file usare solamente caratteri alfanumerici o ASCII. Come estensione del file di una lista dilettura usare“.M3U”.
9. CODICI D'ERRORE
In caso di erre di funzionamento viene visualizzato uno dei seguenti display. Per eliminare il problema, attuire la controversuraindicataippo.
Codice erre Causa Misura CD/MP3/WMA ERROR 2 Un Disc è rimasto intrappolato nel vano CD è non viene espulso. Si tratta di un cattivo funzionamento del meccanismo del vano CD. Consultare il negozio presso cui si è acquistato l'apparecchio. ERROR 3 Impossibile riproduire il Disc a causa di graffi, ecc. Sostiturio con un Disc non graffiti, non deformato. ERROR 6 Nel vano CD è stato caricato un Disc rovesciato che quandì non viene riproduotto. Espellere il Disc e poi ricaricarlo correttamente. Generale AMP GUARD Si è attivato il circuito di protezione diffusori. Durante QUESTia operazione, se viene eseguita alcuna operazione riguardante il volume, sul display appara "AMP GUARD". "AMP GUARD" funziona talvolta quando sono usati segnali test speciali. 1. Abbassare il volume sonoro. La funzione più venire ripristinataanche speggendo l'apparecchio e riaccendendolo (all'attivazione del circuito di protezione degli altoparlanti il volume degli altoparlanti viene automaticamente ridotto).2. Se il suono risulta di nuovo silenziato, rivolgersi al nostro Centro di assistenza. Cambiadischi CD ERROR 2 Un CD all'interno del cambiadischi CD non viene caricato. Si tratta di un cattivo funzionamento del meccanismo del cambiadischi CD.Consultare il negozio presso cui si è acquistato l'apparecchio. ERROR 3 Impossible riproduire un CD all'interno del cambiadischi CD a causa di graffi, ecc. Sostiturio con un CD non graffiti, non deformato. ERROR 6 Un CD all'interno del cambiadischi CD non più essere riproduotto perché è stato caricato rovesciato. Espellere il CD e poi ricaricarlo correttamente. Cambiadischi DVD ERROR 2 Non è possible riproduire un disco all'interno del cambiadischi DVD. Questo è un guasto del meccanismo DVD e consultare il negozio di acquisto. ERROR 3 Non è possible riproduire un disco a Causea di graffi, ecc. Riprovare o sostuire con un disco non graffiti, non deformato. ERROR 6 Non è possible riproduire un disco all'interno del cambiadischi DVD perché è inserito capovolto. Espellere il DVD e poi ricaricarlo correttamente. ERROR P Errore di livello di controllo genitori. Impostare il livello di controllo genitori corretto. ERROR R Errore di codice area. Estrarre il disco e insereire un disco con il codice area corretto.
Se appeare un codice di erre diverso da quelli descritti qui sopra, premere il tasto di reset. Se il problema persististe, spegnere l'apparecchio e consultare il negotio presso il quale si è acquistata l'unità.
10. SPECIFICHE
Sezione Radio
Sistema di sintonizzazione:
sintonizzatore del sintetizzatore PLL
Frequenze di ricezione:
FM:da 87,5 a 108 MHz (fasi 0,05 MHz)
MW:da 531 a 1602 kHz (fasi 9 kHz)
LW:da 153 a 279 kHz (fasi 3 kHz)
Sezione riproduktore CD
Sistema:systema di compact disc audiodigitale
Rispostainfrequenza:
da 5 Hz a 20 kHz (±1 dB)
Rapporto segnale-rumore:
100 dB (1 kHz) IHF-A
Gamma dinamica: 96 dB (1 kHz)
Distorsione: 0,01%
Cenni generali
Potenza in uscita:
4× 31W DIN45324, +B = 14,4V
Voltaggio di alimentazione:
14,4 V DC (ammesso da 10,8 V a 15,6 V),
massa negativa
Consumo di corrente: Meno di 15 A
Impedenza altoparlanti:
4Ω (da 4Ω a 8Ω ammessi)
Alimentazione nominale antenna auto:
500 mA o meno
Peso:
Unità principale: 1,7 kg
Telecomando: 80 g (compresa la batteria)
Dimensioni:
Unità principale:
178 (L) × 50 (A) × 155 (P) mm
Telecomando:
44 (L) × 110 (A) × 27 (P) mm
Nota:
- Le specifiche ed il design sono soggetti a modifiche alla preavviso per ulteriori miglioramenti.
Hartelijk dank voor uw aankoop van dit Clarion-product.
* Gelieve deze gebruiksaanwijzing in+zijn geheel door te lezen alvorens het apparaat te bedieren.
* Nadat u deze gebruiksaanwijzing hebt gelezen, adviseren wij u deze op een handigeplaats te bewaren (bijv. in het handschoenenkastje).
* Controller de informatie op de bijgeleverde garantiekaart en bewaar deze tezamen met deze gebruiksaanwijzing.
* Deze gebruiksaanwijzing bevat tevens de bedieningsprocedures voor een CD-wisselaar, DAB en TV-tuner, die is aangesloten met behulp van een CeNET-kabel. De CD-wisselaar en TV-tuner hebben een eigengebruiksaanwijzing, maar hierin worden geen bedieningsinstrukties geveven.
Inhoud
Displayonderdelen 7
Displaybedieningen 8
1. VOORZORGSMAATREGELEN 3
Kantelend bedieningspaneel 4
1. Omgaan met compact discs 43
2. BEDIENINGSELEMENTEN 5
3. BEDIENINGSPANEEL 6
De namen en functies van de bedieningselementen 6
Functies van de belangrijkste toetsen in geval externe apparatuur is aangesloten op dit apparaat
4. VOORPANEL 9
5. AFSTANDSBEDIERING 10
De batterijenplaatsen 10
Functies van de toetsen op de afstandsbediening 11
6. BEDIENING 12
Basisbediening 12
Bediening van de AC-Processor III 17
Bediening van de radio 23
Bediening van RDS 26
Bediening van de CD/MP3/WMA-speler 31
Meerdere personen luisteren naar twee verschillende muziekbronnen (2-ZONE-functie) 36
Gemeenschappelijk bediedingen in iedere functie 37
7. BEDIENING VAN ACCESSOIRES 51
Bediening van de CD-wisselaar 51
Bediening van de TV 54
Bediening van de digitale radio/DAB 58
De 5.1-kanalen surrounddecoder bedieren 61
8.PROBLEMEN OPLOSSEN 66
9. FOUTMELDINGEN 68
10. TECHNISCHE GEGEVENS 69
1. VOORZORGSGMAATREGELEN
1. Dit apparaat isuitsluitend geschikt voor wegvoertuigen met 4 wielen. Het is Niet geschikt voor gebruik in een trekker, vorkheftetruck, bulldozer, terreinvoertuig, motorfiets met twee of drie wielen, boot, of ander gespecialiseerd voertuig.
2. Als het binnenin de auto erg koud is en de CD-speler kort nadat de verwarming is aangezet worden gebruikt, kan zich condens vormen op de disc of op de optische onderdelen van de CD-speler, waardoor normalaal weergeven Niet möglichk is. Als zich condens op de disc hebft gezormd, veegt u dit eraf met een zachtde doek. Als zich condens heeft gezormd op de optische
onderdelen van de CD-speler, mag u deze gedurende ongeveer een uur Niet gebruiken. Het condens zal vanzelf verdwijnen, waarna normale bediening weer möglichk is.
3. Als u op een bijzonder hobbelige weg rijdt, kan door de sterke trillingen het geluid overslaan.
INFORMATIE VOOR GEBRUIKERS:
HET ZONDER TOESTEMMING VAN DE FABRIKANT VERANDEREN OF WIJZIGEN VAN DIT APPARAAT MAAKT DE GARANTIE ONGELDIG.
WAARSCHUWING
Voor uw eigeneiligheid mag u tijdens het rijden Niet maar het aanraakschem kijken of dit bedieren.
Kantelend bedieningspaneel
Dit apparatus is uitgerust met een KANTELEND BEDIENINGSPANEEL zodat groter display kon worden toegepast.
Als u het KANTELEND BEDIERINGSPANEEL wilt bedieren, moet u het eerst sluiten.
A VOORZICHTIG
WEES VOORZICTIG DAT UW VINGERS NIET BEKNELD RAKEN BIJ HET OPENEN EN SLUITEN VAN HET KANTELEND BEDIENINGSPANEEL.
1. Om verilgheidsredenen moet u het KANTELEND BEDIERINGSPANEEEL altijd sluiten voordat u het apparaat lange tijt neig hebzeugt of met de contactsleutel de stroom onderbreekt.
Als u met de contactsleutel de stroom onderbreekt
terwijt het KANTELEND BEDIENINGSPANEEL
open staat, wordt het KANTELEND
BEDIENINGSPANEEL Niet gesloten.
2. Bij het sluiten van het KANTELEND BEDIERINGSPANEEL kunt u een krakend geluid horen van het beveiligingsmechanisme. Dit is darüber normalaal.
3. Als u het KANTELEND BEDIENINGSPANEEL met de hand beweegt, kan de weergave beginnen. Om de weergave te stoppen, drukt u, terwijl het apparaat is ingeschakeld, op de [▲] toets zodate het KANTELEND BEDIENINGSPANEEL worden gesloten.
4. Nadat een disc is uitgeworpen, keert het KANTELEND BEDIERINGSPANEEL automatisch terug maar de geopende of gesloten stand. Bij de geringste tegendrukijdens het sluiten van het KANTELEND BEDIERINGSPANEEL, za een beveligingsmechanisme in werkung treden en za het KANTELEND BEDIERINGSPANEEL terugkeren maar de geopende stand. Als dit geleurt, heft u de oorzaak op en drukt u verwolgens op de [▲] toets.
5. Om te voorkomen dat de 12-cm of 8-cm CD bij hetplaatsen en verwijderen bekrast worden, moet u deze horizontally honden.
Omgaan met compact discs
Gebruikuitsluitend compact discs waarop het


logo staat.
Plaats geen hartvormige of achthoekige discs, of andere disc met een speciale vorm in het apparaat.
Het is möglich dat sommige CD's opgenomen in de CD-R/CD-RW-functie Niet bruikbaar zich.
Discs hanteren
- In vergelijk met gewone CD-DA-discs (muziek-CD's), zich zowel CD-R-discs als CD-RW-discs gevoelig voor hoge temperatuur en luchtvochtigheid, en kan bij sommige CD-R-discs en CD-RW-discs weergave onmogelijk+zijn. Laat ze waarom nicht gedurende een langeijd in een auto liggen.
- Het is möglichk dat een neue disc ruwe randen heeft. Als u een dergelijk disc staat, is het möglichk dat de cspeler nicht werkst of het geluid overslaat. Gebruik balpen of iets dergelijks or ruwe randen van de disc make.
- Plak nooit stickers op de compact discs en schrijf er nooit op met een potlood of balpen.
- Plaats nooit een compact disc met plankband of lijmresten erop of waarvan het etiket is losgelaten in het apparaat. Als u een dergelijk disc in het apparaat plaatst, is het möglichk dat u deze nicht
meer uit de CD-speler=kunt verwijderen of dat de CD-speler beschadigd worden.
- Plaats geen compact disc in het apparaat waarop grote krassen staan, die misvormd is, die gebarsten is, enz. Als u een dergelijk disc in het apparaatplaast, kan een storing optreden of het apparaat beschadigd worden.
- Als u een compact disc uit het doosje wilt halen, drukt u op het midden van het doosje en tilt u de disc voorzichtig met uw vingers aan de randen op.
- Gebruik geen in de handel verkrijgbare CD-beschemvellen of discs voorzien van een stabilisator, enz. Hierdoor kan de compact disc beschadigd worden of het inwendige mechanisme van het apparaat kapot gaan.
Discs bewaren
Stel compact discs nicht bloat aan rechtstreeks zonlicht of een warmtebron.
Stel compact discs nicht bloot aan hoge vochtigkeit of veel stof.
Stel compact discs Niet bloot aanrechtstreekse warmestraling van verwarmingsapparatuur.
Discs schoonmake
- Als u vingerafdrukken of stof van de compact disc wilt vegen, gebruikt u een zachte doeck en veegt u vanuit het midden van de disc in een rechte lijn aan de buitenrand.
- Gebruik geen oplosmiddelen, zoals in de handel verkrijgbare disreinigers, antistatische spray of spiritus om compact discs schoon te make.
- Na gelebruik van speciale compact-discreiniger, moet u de disc goed lately drogen voordat u deze in het apparataa plaatst.
2. BEDIENINGSELEMENTEN
Vooranzicht van het apparaat

Met het KANTELEND BEDIERINGSPANEEL in de geopende stand

3. BEDIENINGSPANEEL
De namen en functies van de bedieningselementen
[RELEASE] toets
- Druk deze knop diep in om het afneembare voorpaneel eraf te halen.
Lichtsensor
- Deze sensor meet de lichtsterkte in uw auto. Als de automatische displaydimmer is ingesteld op "AUTO", worden de helderheid van het display gedimd afhankelijk van de lichtsterkte gemeten door deze sensor.
[ROTARY] knop
- Druk op deze knop om het apparaat in te schaken. Met jegere druk op deze knop, worden het apparaat beurtelings in- enuitgeschakeld.
- Houd de knop gedurende 1 seconde of longer ingedrukt om het apparaat UIT te schakelen.
- U kunt deze knop ook draaien om het volumeniveau in te stellen, of om diverse instellingen te make in de instelfunctie.
[△] toets
- Druk op deze toets om het bedieningsspaneel te openen of sluiten. Als reeds een disc is geplaatst, worden deze uitgeworpen nadat het bedieningsspaneel is geopend.
Opmerking:
Als de disc Niet worden uitgeworpen, houdt u de [▲] toets gedurende 1 Seconde of longer ingedrukt.
[A] toets
- Druk op deze toets om diverse instellingen te make in de instelfunctie.
- Druk op deze toets voor het invoeren van de zendernamen in de radiofunctie, of de discititels in de CD-functie.
[Sound] toets
- Druk op deze toets om diverse instellingen te make, zoals audioruimte.
- Houd deze toets 1 seconde of langer ingedrukt om de 2-ZONE-functie beurtelings in en uit te schakelen.
[TA]toets
- Druk op deze toets om de TA-functionie (verkeersinformatie) op standby te zetten (als de 2-ZONE-functionie is ingesteld op "OFF"). Druk op deze toets om de werkung van de 2-ZONE-functionie om te schaken. Als udezete toets gedurende 1 seconde of langer ingedrukt houdt, worden het 2-ZONE-type omgeschakeld (als de 2-ZONE-functionie is ingesteld op "ON").
[II] toets
- Druk op deze toets om een track te pauzeren en te hervatten (in de CD-functione).
- Druk op deze toets om de PTY-standingbyfunctie in te stellen of een programmatype te kiezen.
Aanraakschem
- Hierop wird de informatatie afgebeeld die de bedieningstoestand van het apparaat aangeeft, Zoals aanduidingen voor afstemmen/ weergeven en hun indicators.
- Raak met uw vinger het display aan met om bediening möglich te make. (zie blz. 8)
Functies van de belangrijkste toetsen in geval externe apparatuur is aangesloten op dit apparaat
- Als een CD- of DVD-wisselaar is aangesloten
* Voor verdere informatatie, zich het hoofdstukje "Bediening van de CD-wisselaar" (zie blz. 51). Voor de DVD-wisselaar, raadpleegt u de gebruiksaanwijzing die bij de DVD-wisselaar werden geleverd.
[II]toets
- Druk op deze toets om een CD of DVD waar te geven of te pauzeren.
[A] toets
- Druk op deze toets om de disctitelis in te voeren in de CD-wisselaarfunctie.
- Als een TV of DAB is aangesloten
* Voor verdere informatatie, zich het hoofdstukje "Bediening van de TV" (zie blz. 54) of "Bediening van de digitale radio/DAB" (zie blz. 58).
[TA] toets
- Druk op deze toets om de TA-standingbyfunctie (verkeersinformatie) in te stellen op de DAB-functie. (Deze functie is alleen beschikkaar voor een DAB-tuner.)
- Houdt deze toets gedurende 1 seconde of langer ingedrukt om de INFO-functie in of uit te schakelen. (in de DAB-functie)
[▶II] toets
- Druk op deze toets om te schakelen:tussen de TV-functie en de VTR-functie voor externe beelden. (in de TV-functie)
- Druk op deze toets om de PTY-standingbyfunctie in te stellen of een programmatype te kiezen in de DAB-functie.
[A] toets
- Druk op deze toets om de naam van een TV-zender in te voeren. (in de TV-functie)
Displayonderdelen

Displaybedieningen
Het display op dit apparaat is een aanraakschem. U kurz dit display bedieren door het met uw vingtortuppen aan te raken. Op het display kurz u de volgend vier bedieningsmethodenuitvoeren:
Aanraken kort
Raak met uw vingtertop het display aan en LAST dit binnen 1 seconde weeer los. Dit is de eenvoudigste bedieningsmethode van het display.
Aanraken lang
Raak met uw vingertop het display aan en houdt deze gedurende 1 of 2 seconden of langer op het display. Beweeg uw vinger Niet verwijl deze het display aanraakt.
Door het display gedurende 1 seconde of langer aan te raken, worden bijvoorbeeld een lijst afgebeeld, of worden andere handige functies opgeroepen.
Door het display gedurende 2 seconden of langer aan te raken, kutu u voorkeurzenders of andere informatie in het geheugen opslaan.
Aanraken me

Raak met uw vingertop het display aan en beweeg uw vingeraar links () of rechts () verwij uw vingertop nog steeds het display aanraakt, en LAST binnen 1 seconden het display los. Met deze bediening kunt u een voorkeurgeheugen (1 t/m 6) of tracks kiezen.

Aanraken met

Raak met uw vingertop het display aan en beweeg uw vingeraar links () of rechts () terwij uw vingertop nog steeds het display aanraakt, en houdt uw vingertop op het display. Deze bediening worden voortgezet zolang u uw vingertop op het display houdt. Met deze bediening kunt u bijvoorbeeld handmatig afstemmen of tracks vooruit-/achteruitspoelen.

4. VOORPANEEL
Het Voorpaneel kan erfol worden gehald om diefstal van het apparaat te voorkomen. Nadat u het voorpaneel eraf hebt gehald, bewaart u deze in de voortpaneelhoes om te voorkomen dat er krassen op komen.
Wij adviseren u het voorpaneel mee te nemen wanner u uit de auto stapt.
Het voorpaneel eraf halen
1. Schakel het apparaat UIT verwijl het KANTELEND BEDIENINGSPANEEL gesloten is.
2. Druk de [RELEASE] knop diep in om het voorpaneel te ontgrendelen.

3. Trek het voorpaneel maar u toe en haal het van het apparaat af.

A VOORZICHTIG
- Sluit algid eerst het KANTELEND BEDIERINGSPANEEL voordat u het Voorpaneel eraf haalt.
- Als u het voorpaneel eraf haalt terwijl het KANTELEND BEDIENINGSPANEEL geopend is, worden het kanteleend bedieningspaneel onmiddelijk gesloten. Wees voorzichtig dat uw vingers Nietbekneld raken.
Het voorpaneel bevestigen
1. Plaats het voorpaneel op het apparaat zodate het gedeelte A A aan de rechterzijkant van het voorpaneel grijpt in haak B op het apparaat.

2. Druk de linkerzijkant van het voorpaneel voorzichtig op het apparaat.

VOORZICHTIG
- Het voorpaneel kan gemakkelijk door schokken worden beschadigd. Nadat u het voorpaneel eraf hebte gehaald, moet u voorzichtig bijn het Niet te latenten vallen of aan sterke schokken bloot te stellen.
- Als de [RELEASE] knop ingedrukt blij waardoor het Voorpaneel Niet op+zijn plaats vergrendeld is, kan het door de trillingen van het voertuig eraf vallen. Hierdoor kan het voorpaneel kapot gaan. Het is dus belangrijk het voorpaneel, nadat het eraf is gehaal, in de voorpaneelhoes op te bergen of weer te bevestigen op het apparaat.
- De aansluiting waarme het voorpaneel op het apparaat is aangesloten is een bijzonder belangrijk onderdeel. Wees voorzichtig dat u deze nicht beschadigt door erop te drukken met uw vingenagel, een schroevendraaier, enz.
Opmerking:
- Als het voorpaneel vuil is, mag u het alleen schoonvegen met een zachte, droge doeck.
5. AFSTANDBEDIENING

De batterijenplaatsen
1. Draai de afstandsbediening om en schuif het deksel van het batterijvak in de richting van de pijl.
2. Plaats de twee batterijen van het type AA (SUM-3, R-6/1,5 V) die bij het apparaat werden geleverd, met de polen in de richting aangegeven in de afbeelding, en bevestig daarna het deksel weeop het batterijvak.
Opmerkingen:
Als u de batterijen op een onjuiste manier gebruikt, kunnende ze exploderen. Let goed op de volgende punten:
- Als u de batterijen verrangt, verrangt u beiden batterijen tegelijk door{nieuwe.
- U mag de batterijen nicht kortsluiten, openmake of verwarmen.
- Gooi de batterijen Niet in het vuur.
- Lever de batterijen in als kca.

Functies van de toetsen op de afstandsbediening
Functie
Toets Radio (RDS) / DAB CD/MP3 CD-wisselaar
DVD-wisselaar TV [FUNC] Schakelt om:tussen radio, DAB, CD/MP3, AUX, CD-wisselaar, DVD-wisselaar en TV. [BAND] Schakelt de
frequentieband om. Geeft de eerste track
weer.
Beginweergave. Gaat maar de
volgende disc in
oplopende volgorde. Schakelt de
frequentieband om. [▲], [▼] Verhoogt en verlaagt het volumeniveau (in alle functies). [←], [►] Gaat maar de vorige
en volgende
voorkeurzender. Gaat maar de vorige en volgende track.
Indien ingedrukt gehonden gedurende 1
seconde of langer:
Achter- en vooruitspoelen. Gaat maar de vorige
en volgende
voorkeurzender. [►III] Geen functie. Schakelt om:tussen pauze en weergave. Geen functie. [MUTE] Schakelt de geluidsonderbreking in en uit. [TA] Schakelt TA in en uit.
Houd de toets gedurende 1 seconde of langer ingedrukt om te wisselen:tussen de hoofdzone
en de subzone (alleen als de 2-ZONE-functionie isingeschakeld). [DISP] Schakelt om:tussen het hoofddisplay en het klokdisplay. [PS/AS] Voorkeurzender-
scannen. Indien
ingedrukt gehunden
gedurende 2
seconden of langer:
Voorkeurzenders
automatisch opslaan. Scanweergave.
Houd de toets
gedurende 1
seconde of langer
ingedrukt om
mapscanweergave
uit te voeren op een
MP3/WMA-disc. Scanweergave.
Indien ingedrukt
gehonden
gedurende 1
seconde of langer:
Discscanweergave. Voorkeurzender-
scannen. Indien
ingedrukt gehunden
gedurende 2
seconden of langer:
Voorkeurzenders
automatisch opslaan. [AF] Schakelt de AF-
functie in en uit.
Indien ingedrukt
gehunden gedurende
1 seconde of langer:
Schakelt de REG-
functie in en uit. Herhaalde weergave.
Houd de toets
gedurende 1 seconde of
langer ingedrukt om
herhaalde mapweergave
uit te voeren op een
MP3/WMA-disc. Herhaalde weergave.
Indien ingedrukt
gehonden
gedurende 1
seconde of langer:
Herhaalde
discweergave. Geen functie. [PTY] Schakelt PTY in en
uit. Willekeurige weergave.
Houd de toets gedurende
1 seconde of langer
ingedrukt om willekeurige
mapweergave uit te
voeren op een
MP3/WMA-disc. Willekeurige
weergave. Indien
ingedrukt gehunden
gedurende 1
seconde of langer:
Willekeurige
discweergave. Schakelt om:tussen
TV en VTR. [2-ZONE] Houdt deze toets gedurende 1 seconde of langer ingedrukt om de 2-ZONE-functionie in of uit te schakelen.
Druk op deze toets om de bedieningszone om te schakelen:tussen de hoofdzone en de subzone, als de 2-ZONE-functionie isingeschakeld.
* Sommige van de toetsen op het apparaat en de afstandsbediening die overeenkomen hebben verschillende functies.
Basisbediening
A VOORZICHTIG
Vergeet Niet het volumeniveau te verlagen voordat u het apparaat uitschakelt of met de contactsleutel de stroom onderbreekt. Het apparaat onthoudt de LASTE volumeinstalling. Als u de stroom uitschakelt op een hoog volumeniveau, kan de eerstvolgende keer dat u het apparaat inschakelt het hoge volumeniveau uw gehoor bijn doeon en het apparaat beschadigen.
Het apparatus in- en uitschakelen
Inschakelen
Opmerking:
- Wees voorzichtig wanneer u dit apparaat langeijd gebruikt zonder dat de motor heeft gelopen. Als de accu van de auto te leeg raakt, kan het onmobelijk zijn de motor te starten waardoor de levensduur van de accu terugloopt.
1. Druk op de [ROTARY] knop. De functie die de LASTe keer werk gebruikt worden afgebeeld.
Systeemcontrole
De eerste keer dat het apparaat worden ingeschakeld nadat de draden+zijn aangesloten, controleert het apparaat welke apparatuur is aangesloten. (Dit heet de "System Check".) Als het apparaat worden ingeschakeld en "System Check" wordt afgebeeld, volgt u onderstaande procedure om de systeemcontrole uit te voeren.
1. Als "System Check" op het display worden afgebeeld, drukt u op de [ROTARY] knop. De systemdcontrole start. Nadat de systemdcontrole klaar is, worden "Completed" afgebeeld op het display.
2. Druk nogmaals op de [ROTARY] knop. Het hoofddisplay van de radiofunctie worden afgebeeld.
CODEMATIC-functie
Wanneer "CODEMATIC" is ingesteld op "ON", en het apparaat worden ingeschakeld met de DCP erop bevestigd, worden het aanraakcodedisplay afgebeeld. Raak het display aan in de volgorde die werk ingesteld in de instelfunctie.

Voor verdere informatatie over de CODEMATIC-functie, leest u "De beveiligingsfunctie gebruiken (CODEMATIC)" (zie blz. 50).
Uitschakelen
1. Houd de [ROTARY] knop gedurende 1 seconde of langer ingedrukt.
Een functie kiezen
1. Druk op de [ROTARY] knop om de bedieningsfunctie te veranderen.
2. Met iedere druk op de [ROTARY] knop, verandert de bedieningsfunctie in de onderstaande volgorde:
Radiofunctie DAB-functie CD/MP3-functie CD-wisselaarfungtie DVD-wisselaarfungtie TV-functie AUX-functie Radiofunctie...
* Externe apparatuur die nicht is aingesloten met behulp van een CeNET-kabel, worden nicht aufgebeeld.
Het volumeniveau instellen
1. Draai de [ROTARY] knop rechtsom om het volumeniveau te verhogen, en linksom om het volumeniveau te verlagen.
* Het volumeniveau kan worden ingesteld:tussen 0 (minimum) en 33 (maximum).
De bedieningsfunctie omschakelen
Er zijn twee basisbedieningsfuncties:
standaardbediening en simpele bediening.
1. Op het hoofddisplay, raakt u de linkerkant van het display gedurende 1 seconde of longer aan. De bedieningsfunctie worden omgeschakeld

In de simplete bedieningsfunctie zijn de bedieningen met en op het hoofddisplay van de radiofunctie of CD-functioniet Nietoodzakelijk, en wordt de bediening van het apparatusdus eenvoudiger.
Merk darüber op dat de volgende bediingen nicht möglichelijk zijn in de simpele bedieningsfunctie.
Bedieningen voor het afstemmen op een voorkeurzender, het kiezen van een map, het kiezen van een disc, en andere bedieningen waar bij u aanraakt met 卡 op de rechterkant van het display.
Bedieningen voor het omschakelen van het display (zie blz. 13).
Bedieningen voor het omschakelen van het titeldisplay (zie blz. 14).
- Bedieningen voor het afbeelden van het titelinovoerdisplay.
Op andere displays dan het hoofddisplay (bijv. lijstdisplay, instelfunctie, enz.) is er geen verschilussen de standardbedieningsfunctie en de simpele bedieningsfunctie.
De beschrijvingen in deze gebruiksaanwijzing zijn hoofdzakelijk voor stanaardbediening. Voor beschrijvingen van bedieningen in de simpele bedieningsfunctie, raadpleegt u de beschrijvingen van de displays in de radio- en CD-functions.
Het display omschakelen
1. Raak het midden van het display aan.
Met iedere aanraking van het display, verandert dit als volgt:

Titeldisplay
Schembeveiliging
Als de schermbeveiliging is ingesteld op "ON" en u het apparaat gedurende ongeveer 30 seconden nicht bedient, worden de schermbeveiliging afgebeeld. Voor verdere informatie, zie bladzijde 41.
Achtergrund
Door het midden van het display gedurende 1 seconde of langer aan te raken, schakelt u om maar het hintergrunddisplay.
① ⑨ ② ⑩ ③ ⑪ ④ ⑫ ⑤ ⑬ ⑥ ⑭ ⑦ ⑮ ⑧ ⑯
Spectrumanalysatordisplay
Door op het spectrumanalysatordisplay (S/A) de rechtserkant van het display gedurende 1 seconde of langer aan te raken, worden de spectrumanalysatordisplays doorlopen.
S/A
SCAN S/A 1, S/A 2 en S/A 3 worden)ieder
gedurette de 10 seconden of langer
afgebeeld. S/A 1 S/A 1
FLDR No.
003
TOP S/A 2 S/A 2
FLDR No.
003
TOP S/A 3 S/A 3
FLDR No.
003
TOP
Het titeldisplay omschakelen
U kunt discitels en andere informatatie afbeelden die op de discs+zijn opgeslagen wanneer uDEXeergeft in de CD-functie of CDwisselaarfunctie.
1. Raak op het titeldisplay de rechterkant van het display gedurende 1 seconde of longer aan.
Met iedere aanraking van het display, schakelt het display als volgt om:
CD-text-disc
User title (disc) CD-text title (disc)
Artist name CD-text title (track) User title (disc)...
MP3/WMA-disc
Folder File Album TAG Artist TAG
Title TAG Folder...
Opmerkingen:
- Mp3 ondersteunt ID3-tags V2.3 / 2.2 / 1.1 / 1.0.
- De tag-displays given voorrang aan V2.3/2.2.
In het geval van album-tags voor wma worden de informatatie afgebeeld die in de extensie is opgenomen.
- Alleen ASCII-tekens können worden aufgebeeld in tags.
Een titel over het display latent lopen
Raak het titeldisplay met aan verwijl de titel worden afgebeeld.
De titel looptaar links over het display.
Het lopen over het display stoppen
Raak het titeldisplay met 巴 aan.
CT-functie (kloktijdfunctie)
De CT-functie stelt u in staat CT-informatie te ontvangen vanaf een RDS-zender en deijd af te beelden. Raak het midden van het display aan om het CT-display af te beelden.
- Als geen CT-informatie worden ontvangen, wordt "-:-CT" afgebeel op het display.
Opmerking:
- In sommige landen en door sommige zenders worden geen CT-informatie uitgezonden. Bovendien is het möglichk dat in sommige gebeden de CT-informatie Niet发展格局.
Instellen van het ADF
- ADF is de afkorting van Anti Distortion Filter (antivervormingsfilter).
De ingestelde functies "Liveliness
Enhancement Filter en "Sound Tone
Compensation"makeen een goed gemoduleerde en realistische weergave möglich,zonder de eigenschappen van het oorspronkelijke geluid aan te tasten.
Dit apparatus is uitgerust met vier verschillende geluidseffecten, opgeslagen in het geheugen. Kies het gewenste geluidseffect.
ADF-1: Geschikt voor de standarduiidsprekers.
ADF-2: Geschikt voor afzonderlijke luidsprekers.
ADF-3 : Geschikt voor coaxiale luidsprekers.
USER: Deze instelling kan door de gebruiker zich worden aangepast aan+zijn ofhaar persoonlijke voorkeuren.
OFF: Geen geluideffect.
- De fabrieksinstalling is "OFF".
Opmerkingen:
Aangezien het volumeniveau verandert wanner het ADF wordt in- of uitgeschakeld, schakelt u het ADF in of uit terwijl het volumeniveau en "SW VOLUME" (subwoofer) en "CTR VOLUME" (middenluidspreker) zo laag maybeijk zich ingesteld.
- Op sommige luidsprekersystemen kan het ontogelijk voldoende effect te krijgen. Als dit het geval is, stelt u de ADF-parameter of het volumeniveau in.
- Als het ADF is ingesteld op "USER", "1", "2" of "3", maar bij EQ-SELECT de functies VSE en BASS/TREBuitgeschakeld.
1. Druk op de [SOUND] toets.
2. Raak ADF aan.
3. Raak de rechterkant van het display met aan om de ADF-functie te kiezen.

Als ADF is ingesteld op "OFF", heeft de ADF-instelling geen invloed op het weergavegeluid. Hiermee is de ADFinstellung voltoid. Druk op de [SOUND] toets om terug te keren maar de oorspronkelijke functie.
* Kies een instelling uit USER, 1, 2, 3 of OFF.
4. Als u de afzonderlijke items van de ADFinstelling wilt veranderen, drukt u op de [A]toets.
5. Raak het insteltemdisplay met 山 山 aan en kies het gewenste insteltem. Met iedere aanraking met 山 山 , doorloopt u het insteltemdisplay als volgt:
Instelitem (als USER is gekozen in stap 3)
BASS TREBLE COMP BASS...
-Insteltem (als 1, 2 of 3 is gekozen in stap 3)
LEVEL COMP LEVEL...
6. Raak de rechterkant van het display met aan en verander de instelling van het item.
* “BASS” en “TREBLE” können worden ingesteld binnen het bereik van 1 t/m 13.
* “LEVEL” kan worden ingesteld binnen het bereik van -3 t/m +3.
* Kies voor "COMP" "ON" of "OFF".
7. Druk op de [SOUND] toets om terug te keren maar de oorspronkelijke functie.
De subwoofer en middenluidspreker instellen
- "SW VOLUME" (subwoofer) kan alleen worden ingesteld als "SUB-WOOFER" is ingesteld op "ON".
- "CTR VOLUME" (middenluidspreker) kan allen worden ingesteld als de Dolby Pro Logic II functie is ingesteld op "MUSIC" of "MATRIX", als "SP-SETTING" is ingesteld op "CTR+SW", en als "CENTER-SP" is ingesteld op "ON".
- De fabrieksinstelling van SW VOLUME is "0" en van CTR VOLUME is "0".
1. Druk op de [SOUND] toets.
2. Raak A-MODE aan.

3. Raak het insteltemdisplay met aan en kies "SW VOLUME" of "CTR VOLUME".

4. Raak de rechterkant van het display met aan en stel het item maar wens in.
* Dit item kan worden ingesteld binnen het bereik van -5 t/m +5.
5. Druk op de [SOUND] toets om terug te keren maar de oorspronkelijke functie.
De balans/fader instellen
BALANCE:
Hiermee stelt u de balans van het volumeniveau inussen de linker en rechter luidsprekers.
FADER:
Hiermee stelt u de balans van het volumeniveau inussen de voor- enchyterluidsprekers.
- De fabrieksinstalling van BALANCE is "0" en van FADER is "0".
Opmerking:
Balans/fader kan het worden ingesteld als "PRO" is ingesteld bij AC-PRO III (zie blz. 44) en de positiefunctie is ingesteld op "ON". Stel de balans/fader in aan de hand van "Het positiemenu kiezen" (zie blz. 17).
1. Druk op de [SOUND] toets.
2. Raak A-MODE aan.

3. Raak het insteltemdisplay met 山 山 aan en kies "BALANCE" of "FADER".

4. Raak de rechterkant van het display met aan en stel het item maar wens in.
* "BALANCE" kan worden ingesteld binnen het bereik van L13 (linkerkanalen versterkt) t/m R13 (rechterkanalen versterkt).
* “FADER” kan worden ingesteld binnen het bereik van R12 (achterkanalen versterkt) t/m F12 (voorkanalen versterkt).
5. Druk op de [SOUND] toets om terug te keren maar de oorspronkelijke functie.
De hoge en lage tonen instellen
De hoge en lage tonen können alleen worden ingesteld als Dolby Pro Logic II is ingesteld op "OFF" (zie blz. 17) en "EQ SELECT" is ingesteld op "BAS/TREB" (zie blz. 44).
- De fabrieksinstelling is "0".
1. Druk op de [SOUND] toets.
2. Raak A-MODE aan.

3. Raak het instelitemdisplay met aan en kies "BASS" of "TREBLE".

4. Raak rechterkant van het display met 山 aan en stel het item maar wens in.
* Dit item kan worden ingesteld binnen het bereik van -6 t/m +6.
5. Herhaal de stappen 3 en 4 om het gewenste item in te stellen.
6. Druk op de [SOUND] toets om terug te keren maar de oorspronkelijke functie.
Bediening van de AC-Processor III
Dolby Pro Logic II
Dolby Pro Logic II is een matrix-decodeertechnologie waarin verbeterde, digitale matrixtechnologie is toegepast en waarmee Dolby Pro Logic verder ward verbeterd. Dolby Pro Logic Il realiseert uiststekende 5.1-kanalen reproductie van zowel Dolby-surroundbronnen als stereogeluidsbronnen, zoals CD's, waar bij het surroundkanaal over het volledige freiendentiebereik (20 Hz t/m 20 kHz) krijt en stereo worden. Hierdoor kurz u maar iedere stereobron luisteren met het dynamische geluid van 5.1 kanalen. U kurz de muziekfunctie of matrixfunctie kiezen overeenkomstig de bron die u wilt weergeven.
Dit product is gemaakt onder licentie van Dolby Laboratories. "Dolby", "Pro Logic" en het dubbel-D-symbol voor bij handelsmerken van Dolby Laboratories.
3. Raak de rechterkant van het display met aan en kies de Dolby Pro Logic II-functie.

De functiedisplays worden als volgt doorlopen:
MUSIC (muziekfunctie) MATRIX (matrixfunctie) OFF (PL II uit) MUSIC (muziekfunctie)...
* Voor verdere informatie over het instellen van het volumeniveau van de middenluidspreker/subwoofer, raadpleegt u bladzijde 45.
4. Raak RTN aan.
Het PL II-menu (Dolby PL II) kiezen
Kies de MUSIC-functionie of de MATRIX-functionie overeenkomstig de bron die u wilt weergeven in de Dolby Pro Logic II-functionie.
- De fabrieksinstalling is "OFF".


(muziekfunctie)
- Deze functie is geschikt voor stereogeluidsbronnen, zoals CD's.
- Een andere instelfunctie, waarmee u meer gedetailleerde instelleningen kurz makez, is ook beschikbaar,ondat het geluidsveld zich anders gedraagt affankelijk van de toestand van de opgenomen muziekbron. (Zie blz. 47.)
MATRIX (matrixfunctie)
- Deze functie is geschikt voor geluidsbronnen zoals AM/FM-radio.
OFF
- De Dolby Pro Logic II-functie worden nicht gebrukt, maar de AC-PROIII-functie worden gebrukt. Voor verdere informatatie over de AC-PROIII-functie, raadpleegt u "Een functie kiezen" (zie blz. 44).
1. Druk op de [SOUND] toets.
2. Raak Dolby PLII aan.
Het positiemenu kiezen
Met POSITION Aunt u kiezen uit vijf mogelijkheden waarop het geluid uit de luidsprekers maar uw zitpositie komt.
Bovendien kurz u met deijduitlijnfungtie deluidsprekers zeer precies instellen, zodat hetzelfde geluidseffect worden verkregen uit iedereuidspreker voor alle luisteraars.
In de procedure "Een functie kiezen" (zie blz. 44) stelt u AC-PROIII in op "PRO".
- De fabrieksinstalling van POSITION is "OFF" en op het positie-basiskenu is "FRONT".
Positiemenu
Deze functie is vooraf geprogrammeerd met vrij positiemenu's. Kies het gewenste menu overeenkomstig uw voorkeuren.
1. Druk op de [SOUND] toets.
2. Raak POSITION aan.


3. Raak het ON/OFF-display met aan. Het positie-effect worden beurtelings in- en uitgeschakeld.

Als het positie-effect is ingesteld op "OFF", heeft de positie-installing geen effect op de geluidsbron. Hiermee is de positie-instelling voltooid. Druk op de [SOUND] toets om terug te keren maar de oorspronkelijke functie.
4. Raak B/U aan en kies "BASIC".

Met iedere aanraking van B/U, wisselt de instelling:tussen "BASIC"en "USER".
5. Raak het positie-basismenummer met aan en kies het positie-basismenu.
Het positie-basismenu
Nr. Naam op het display Zitpositie 1 FRONT-L Linkervoorstoel 2 FRONT-R Rechtervoorstoel 3 FRONT Voorstoelen 4 REAR Achterstoelen 5 FULL SEAT Alle stoelen
6. Druk op de [SOUND] toets om terug te keren maar de oorspronkelijke functie.
Posities instellen en opslaan (gebruikersgeheugen)
In het gebruikersgehugen is zeer precies instellen van de luidsprekers möglichk, zodat hetzelfde geluidseffect worden verkreten uit iedere luidspreker voor alle luisteraars, gebaseerd op het positie-basismenu. Maximaal vrij gebruikersinstellingen konnen in het gebruikersgehugen worden op geslagen.
T-ALIGN (tijduitlijnfunctie):
De afstand van de luisteraar tot iedere
luidspreker kan worden ingeoord in stappen
van 2,3 cm, en de benodigde tijsduur voor het
geluid om de luisteraar te bereiken kan worden
ingesteld.
SP GAIN (uitgangsiveau van de luidsprekers):
Hiermee stelt u het uitgangsiveau van de luidspreker in. Stel het uitgangsiveau voor iedere luidspreker zodanig in dat de uitvoer uit iedere luidspreker hetzelfde is.
1. Druk op de [SOUND] toets.
2. Raak POSITION aan.
3. Raak het ON/OFF-display met 山 aaan. Het positie-effect worden beurtelings in- enuitgeschakeld.
4. Raak B/U aan en kies "BASIC" of "USER".
5. Raak de rechterkant van het display met aan en kies het menu waarup instellenen wilt make.
6. Druk op de [A] toets.
7. Raak de linkerkant van het display met aan en kies "T-ALIGN" of "SP GAIN".
8. Raak het midden van het display met 卡 aan en kies een insteltem. Met iedere aanraking met 卡 worden de insteltems als volgt doorlopen:

InstelItems
*1 Dit worden alleen aufgebeeld als in de instelfunctie bij "SOUND" het item "SUB-WOOFER" is ingesteld op "ON".
*2 Dit wordt allen aufgebeeld als in de instelfunctie bij "SOUND" het item "SUB-WOOFER" is ingested op "ON" en in stap 7 "T-ALIGN" is gekozen.
9. Raak de rechterkant van het display met aan en stel het item maar wens in.

* "T-ALIGN" kan worden ingesteld binnen het bereik van 0 cm tot 501,4 cm in stappen van 2,3 cm.
* "SP GAIN" kan worden ingesteld binnen het bereik van -20 dB t/m 0 dB.
10. Herhaal de stappen 7 t/m 9 om het gewenste item in te stellen.
11. Nadat u klaar bent met het instellen van ieder item, raakt u RTN aan. Het apparaat keert terug maar het oorspronkelijkke display en wordt afgebeeld op het BASIC- of USER-display. Met deze bediening is het instellen van de positie voltooid. Om verder te gaan en de instelwaarden voor het positiegebruikersmenu op te slaan, voert u de volgende stappenuit.
12. Raak RTN gedurende 1 seconde of langer aan. De positie-menulijst worden afgebeeld.
13. Raak het gebruikersgeheugen waar in u de instelwaarden wilt opslaan gedurende 2 seconden of langer aan. U hoor een lange pieptoon en de waarden die u tot en met stap 10 hebt ingesteld, worden opgeslagen in het positie-gebruikersmenu.
Als u een korte pieptoon hoort, worden de instelwaarden tot en met stap 10 gewist. Stel deze waarden opnieuw in, indien gewenst.
14. Raak RTN aan.
15. Druk op de [SOUND] toets om terug te keren maar de oorspronkelijke functie.
* Als u een opgeslagen
gebruikersgeheugen wiltkiezen, raakt u B/U aan zodat "USER"wordt afgebeeld, en raakt uervovalgens het
gebruikersmenummer met † ‡ †aan.
Het VSE-menukiezen
Met VSE (Virtual Space Enhancer) bent u in staat de geluidsdrukbalans in uw auto te compenseren zodate hetzelfde geluidseffect wordt verkregen, ongeacht op welke steo u zit, zoals aangetoond met compensasiesimulaties. In de procedure "Een functie kiezen" (zie blz. 44) stelt u AC-PROIII in op "STD".
- De fabrieksinstelling van VSE is "OFF" en op het VSE-basiskenu is "FLAT".
Het VSE-basismenu
Deze functie is vooral geprogrammeerd met zes basismenu's. Kies het basismenu overeenkomstig uw voorkeuren.
1. Druk op de [SOUND] toets.
2. Raak VSE aan.

3. Raak het ON/OFF-display met aan. Het VSE-effect worden beurtelings in- enuitgeschakeld.

Als VSE is ingesteld op "OFF", heeft de VSEinstalling geen invloed op het weergavegeluid. Hiermee is de VSE-instelling voltooid. Druk op de [SOUND] toets om terug te keren maar de oorspronkelijke functie.
4. Raak B/U aan en kies "BASIC".

Met iedere aanraking van B/U, wisselt de instelling:tussen "BASIC" en "USER".
5. Raak het VSE-basismunummer met 卡 aan en kies het gewenste VSE-basismenu.
De VSE-basismenu's
Nr. Functienaam Beschrijving 1 FLAT Vlakke niveauregeling van de geluidsbron. 2 BASS BOOST Lage tonen versterkt. 3 HIGH BOOST Midden- en hoge tonen versterkt. 4 IMPACT Lage en hoge tonen versterkt. 5 ACOUSTICAL Middentonen (menselijke stem) versterkt. 6 SMOOTH Levert soepel-klinkende tonen op.
6. Druk op de [SOUND] toets om terug te keren maar de oorspronkelijke functie.
VSE instellen en opslaan (gebruikersgeheugen)
Door het maken van instellenen in het gebruikersgeheugen is het möglichk de geluidsdrukverdeling te compenseren overeenkomstig uw voorkeuren, gebaseerd op het VSE-basiskemu. Maximaal zes gebruikersinstelleningen konnen in het gebruikersgeheugen worden opgeslagen.
DIFFUSE:
Hiermee stelt u de afwijking van de verstrooide geluidsdruk in.
CARWIDTH:
Hiermee stelt u de afwijking van de geluidsdruk in de breedterichting van de auto in.
CAR LENGTH:
Hiermee stelt u de afwijking van de geluidsdruk in de lengterichting van de auto in.
1. Druk op de [SOUND] toets.
2. Raak VSE aan.
3. Raak het ON/OFF-display met aan. Het VSE-effect worden beurtelings in- en uitgeschakeld.
4. Raak B/U aan en kies "BASIC" of "USER".
5. Raak de rechterkant van het display met aan en kies het menu waarop u instellenen wilt make.
6. Druk op de [A] toets.
7. Raak het instelitemdisplay met aan en kies "DIFFUSE", "CAR WIDTH" of "CAR LENGTH".

8. Raak de rechterkant van het display met aan en stel het item waar wens in.
* Dit item kan worden ingesteld binnen het bereik van 1 t/m 10.
9. Herhaal de stappen 7 en 8 om het gewenste item in te stellen.
10. Nadat u klaar bent met het instellen van ieder item, raakt u RTN aan. Het apparaat keert terug maar het oorspronkelijke display en ” worden afgebeeld op het BASIC- of USER-display. Met deze bediening is het instellen van de VSE voltooid. Om verdter te gaan en de instelwaarden voor het VSE-begruikersmenu op te slaan, voert u de volgende stappen UIT.
11. Raak RTN gedurende 1 seconde of langer aan. De VSE-menulijst worden afgebeeld.
12. Raak het gebruikersgeheugen waarin u de instelwaarden wilt opslaan gedurende 2 seconden of longer aan. U hoor een lange pieptoon en de waarden die u tot en met stap 9 hebt ingesteld, worden opgeslagen in het VSE-gebruikersmenu.
Als u een korte pieptoon hoor, worden de instelwaarden tot en met stap 9 gewist. Stel deutsche waarden opnieuw in, indien gewenst.
13. Raak RTN aan.
14. Druk op de [SOUND] toets om terug te keren maar de oorspronkelijke functie.
* Als u een opgeslagen
gebruikersgeheugen wiltkiezen, raakt u B/U aan zodat "USER"wordt afgebeeld, en raakt u verwolgens het
gebruikersmenummer met▲▲aan.
Het P.EQ-menukiezen
P.EQ (Parametrische Equalizer) stelt u in staat het gehele freiorentiebereik nauwkeurig te compenseren tot een vloeije kromme met behulp van freiorentiecompensatie overeenkomstig het type auto dat u hebt.
In de procedure "Een functie kiezen" (zie blz. 44) stelt u EQ SELECT in op "P.EQ".
- De fabrieksinstelling van P.EQ is "OFF" en op het P.EQ-basisk menu is "SEDAN-1".
Het P.EQ basismenu
Deze functie is vooraf geprogrammeerd met zes types P.EQ-basismenu, overeenkomstig het type auto dat u hebt en de montageposities van de luidspreskers. Kies het basismenu overeenkomstig uw type auto.
1. Druk op de [SOUND] toets.
2. Raak P.EQ aan.

3. Raak het ON/OFF-display met 山 aaan. Het P.EQ-effect worden beurtelings in- enuitgeschakeld.

Als het P.EQ-effect is ingesteld op "OFF", heeft de P.EQ-instelling geen effect op de geluidsbron. Hiermee is de P.EQ-instelling voltooid. Druk op de [SOUND] toets om terug te keren maar de oorspronkelijke functie.
4. Raak B/U aan en kies "BASIC".

Met iedere aanraking van B/U, wisselt de instelling:tussen "BASIC"en "USER".
5. Raak het P.EQ-basismenummer met aan en kies het P.EQ-basismenu.
Het P.EQ basismenu
Nr. Naam op het display Montagepositie van de luidsprekers 1 SEDAN-1 Voorin: Voorportier Achterin: Hoedenplank 2 SEDAN-2 Voorin: Voorportier Achterin: Achterportier 3 WAGON-1 Voorin: Voorportier Achterin: Zijkant bagageruimte 4 WAGON-2 Voorin: Voorportier Achterin: Achterportier 5 MINI VAN-1 Voorin: Voorportier Achterin: Zijkant bagageruimte 6 MINI VAN-2 Voorin: Voorportier Achterin: Achterportier
6. Druk op de [SOUND] toets om terug te keren maar de oorspronkelijke functie.
P.EQ instellen en opslaan (gebruikersgeheugen)
In het gebruikersgehugenkest u de frequentiekarakteristieken compenseren overeenkomstig uw type auto,gebaseerd op het P.EQ-basismenu. Maximaal zes gebruikersinstallingen konnen in het gebruikersgehugen worden op geslagen.Voor verdere informatie, raadpleegt u "P.EQ instellen".
1. Druk op de [SOUND] toets.
2. Raak P.EQ aan.
3. Raak het ON/OFF-display met 山 aaan. Het P.EQ-effect worden beurtelings in- enuitgeschakeld.
4. Raak B/U aan en kies "BASIC" of "USER".
5. Raak de rechterkant van het display met aan en kies het menu waarup instellenen wilt make.
6. Druk op de [A] toets.
7. Raak de linkerkant van het display met 卡 aan en kies "FRONT" of "REAR".

8. Raak het midden van het display met 卡 aan en kies een insteltem.
Met iedere aanraking met 卡 10 worden de instelitems als volgt doorlopen:
Instelitems
BAND FREQ Q GAIN BAND...
9. Raak de rechterkant van het display met aan en stel het item maar wens in.
* "BAND" kan worden ingesteld binnen het bereik van 1 t/m 3.
* “FREQ” kan worden ingesteld binnen het bereik van 20 Hz t/m 20 kHz.
* Kies een instelling voor “Q” UIT 1, 3, 5, 7 of 20.
* “GAIN” kan worden ingesteld binnen het bereik van -12 dB t/m +12 dB.
10. Herhaal de stappen 7 t/m 9 om het gewenste item in te stellen.
11. Nadat u klaar bent met het instellen van ieder item, raakt u RTN aan.
Het apparaat keert terug maar het oorspronkelijke display en ”wordt
afgebeeld op het BASIC- of USER-display. Met deze bediening is het instellen van de P.EQ voltooid. Om verder te gaan en de instelwaarden voor het P.EQ-gebruikersme op te slaan, voert u de volgende stappen u
12. Raak RTN gedurende 1 seconde of longer aan. De P.EQ-menulijst worden afgebeeld.
13. Raak het gebruikersgeheugen waarin u de instelwaarden wilt opslaan gedurende 2 seconden of langer aan.
U hoor een lange pieptoon en de waarden die u tot en met stap 10 hebts ingesteld, worden opgeslagen in het P.EQ-gebruikersmenu. Als u een korte pieptoon hoort, worden de instelwaarden tot en met stap 10 gewist. Stel deutsche waarden opniewin, indien gewenst.
14. Raak RTN aan.
15. Druk op de [SOUND] toets om terug te keren maar de oorspronkelijke functie.
* Als u een opgeslagen gebruikersgeheugen wilt kiezen, raakt u B/U aan zodat "USER" worden afgebeeld, en raakt uervoalgens het gebruikersmenummer met ↑ ⿱ ↑aan.
De P.EQ instellen
Deinstallingen die kunnen worden verandererd op het P.EQ-menu zich de volgende:De middenfrequente,versterking en Q-kromme kunnen worden opgeslagen in combinatie met een kanaal/band.
Bijvoorbeeld: middenfrequentie "250Hz", versterking "-8dB" en Q-kromme "3" können worden opgeslagen voor band 1 voor.
FRONT/REAR (keuze van het kanaal)
Hiermee kiest u het kanaal (voor ofijken) dat u wilt instellen.
BAND (keuze van de frequentieband)
Hiermee kiest u de frequentieband (1 t/m 3) die u wilt instellen.
Stel de middenfrequentie (FREQUENCY), versterking (GAIN) en Q-kromme (Q) in voor iedere frequentieband.
FREQUENCY (keuze van de middenfrequente)
Hiermee kiest u de middenfrequentie die moet worden gebruikt als het midden van de freuquentieband die u wilt compenseren uit het bereik van 20Hz t/m 20 kHz. (in stappen van 1/3 octaaf, 31 punten)
GAIN (instelling van de versterking)
Hiermee stelt u de versterking (uitgangsiveau) in binnen het bereik van -12 dB t/m +12 dB. (in stappen van 1 dB, 25 punten)
Q (keuze van de Q-kromme)
Hiermee stelt u de spitsheid van de Q-kromme in op 1, 3, 5, 7 of 20.
Compensatie
Het is Niet nodig de frequentiekarakteristieken te compenseren als deze vlak blijken (geen pieken of dalen) na meting van de frequentiekarakteristieken met een meetapparaat. Het gebeurtSHOTters dat de frequentiekarakteristieken op bepaaldeplaatsen omhoog lopen of omaaag vallen. Als dat het geval is,要去en de frequentiekarakteristieken worden gecompenseerd. Creer een frequentiekromme met karakteristieken die het tegenervergestelde zichen van de middenfrequenties van de delen waar de karakteristieken omhoog lopen en omaaag vallen om deze pieken en dalen op te heffen en de frequentiekarakteristieken zo vlak möglich te make.
Het zo vlak möglichk makev van de
frequentiekarakteristieken worden "compenseren" genoemd.
Op dit apparaat+kunnen de
frequentiekarakteristieken worden
gecompenseerd door P.EQ (Parametrische Equalizer).
Compensatie van
frequentiekarakteristieken
Onderstaande figuuraat de verhouding zien tussen de middenfrequentie,versterking en Qkromme.

Middenfrequentie (F) Frequentie
(Hz)
Q-kromme
De Q-kromme worden spitser als de numerieke waarde hoger worden, en worden ronder als de numerieke waarde lager worden.
Vlakke frequentlyekarakteristieken kannen worden verkreten door een Q-kromme te kiezen die het tegenovergestelde is van de kromme die u wilt compenseren.

Q-kromme: (Q)
Q-kromme: 20 Q-kromme: 1
F: Middenfrequentie, G: Versterking (uitgangsiveau), Q: Q-kromme
Nr.(type auto) Parameters van de Parametrische Equalizer Kanaal Band 1 Band 2 Band 3 F G Q F G Q F G Q 1(SEDAN-1) Voor 250 Hz -8 dB 3 2 kHz -4 dB 1 5 kHz -4 dB 1 Achter 250 Hz -10 dB 3 1.25 kHz 0 dB 5 8 kHz 0 dB 5 2(SEDAN-2) Voor 250 Hz -10 dB 7 800 Hz -4 dB 3 8 kHz -5 dB 1 Achter 80 Hz 3 dB 7 125 Hz -12 dB 5 1.25 kHz 0 dB 5 3(WAGON-1) Voor 250 Hz -8 dB 3 1 kHz -8 dB 3 10 kHz -6 dB 1 Achter 250 Hz -8 dB 3 800 Hz -8 dB 1 8 kHz 0 dB 5 4(WAGON-2) Voor 250 Hz -8 dB 7 400 Hz -10 dB 7 1.25 kHz -8 dB 7 Achter 125 Hz -8 dB 3 500 Hz -5 dB 5 1.6 kHz 0 dB 3 5(MINI VAN-1) Voor 125 Hz -4 dB 5 1.25 kHz -4 dB 3 2 kHz 3 dB 7 Achter 250 Hz -6 dB 1 630 Hz -4 dB 3 8 kHz 0 dB 5 6(MINI VAN-2) Voor 250 Hz -4 dB 3 1.25 Hz -8 dB 3 80 Hz 3 dB 3 Achter 250 Hz -8 dB 3 500 Hz -5 dB 5 8 kHz 0 dB 5
Bediening van de radio
De displays in de radiofungtie
Hoofddisplay
Het hoofddisplay worden afgebeeld als u op de [ROTARY] knop drukt en de radiofunctie kiest.

Als u de linkerkant van het display gedurende 1 seconde de longer aanraakt, schakelt het display over maar de simpele bedieningsfunctie.

Frequentiedisplay
De frequenie die op dat moment worden ontvangen worden afgebeeld.
Als u het display van de
standaardbedieningsfunctie met → of ↑ aanraakt, kurz u zoek-afstemmen of handmatig afstemmen uityvoeren.
Titeldisplay
Hierop worden de naam afgebeeld van de zender die op dat moment worden ontvangen. Door deze naam aan te raken worden het display omgeschakeld.
Frequentiebanddisplay
AM: AM-frequentiebandnaam
FM1: FM-frequentiebandnaam
Voorkeurnummerdisplay
Als u het display van de
standaardbedieningsfunctie met
aanraakt, kunt u een voorkeurgeheugen kiezen.
MODE
Als u dit aanraakt, worden subfuncties
afegebeeld. Door dit gedurende 1 seconde of
langer aan te raken, worden de
voorkeurgeheugenlijst afgebeeld.
P-SCAN:
Dit wordt afgebeeld tijdens het
voorkeurzender-scannen. Als u dit aanraakt,
stoot het voorkeurzender-scannen.
A-STORE:
Dit worden aufgebeeldijdens het automatisch opslaan. Als u dit aanraakt, stopt het automatisch opslaan.
BAND
Door dit aan te raken worden de frequentieband omgeschakeld.
Als u dit gedurende 1 Seconde of langer aanraakt, schakelt u om:tussen de handmatige afstemfunctie en de zoek-afstemfunctie.

(alleen op het display van de simpele bedieningsfunctie)
Door deze toetsen aan te raken kutn u zoekafstemmen of stap.afstemmen (in de handmatige afstemfunctie).
Door deze toetsen aan te raken en aangeraakt te houden kut u snel-afstemmen (in de handmatige afstemfunctie).
De Voorkeurgeheugenlijst afbeelden
Deze lijst kunt u afbeelden door op het hoofddisplay gedurende 1 Seconde of langer MODE aan te raken.

Zendernaam (of frequentie)
>>:
Bezig met afstemmen
RTN:
Raak dit aan om terug te keren maar het hoofddisplay.
Naar de radio luisteren
1. Druk op de [ROTARY] knop om deradiofunctie te kiezen.
Met iedere druk op de [ROTARY] knop, verandert de functie als volgt:
Radio (DAB) CD / MP3
(CD-wisselaar) (DVD-wisselaar) (TV) AUX Radio...
* De functie van een apparaat dat nicht is aangesloten worden nicht afgebeeld.
2. Raak BAND aan om de frequentieband te veranderen.
Metijdere aanraking van BAND, verandert de frequentieband als volgt:
FM1 FM2 FM3 AM (MW / LW) FM1...
Afstemmen
Er zijn drie manieren waarop u kunt afstemmen:zoek-afstemmen,handmatig afstemmen en voorkeurzender-afstemmen.
Zoek-afstemmen
Er zijn twee manieren voor zoek-afstemmen: DX SEEK en LOCAL SEEK.
Met DX SEEK stemt u automatisch af op alle zenders die ontvangen können worden, verwijl u met LOCAL SEEK alleen afstemt op zenders met een goede ontvangstkwaliteit.
1. Raak BAND aan om de gewenste freiendentieband te kiezen (FM of AM (MW of LW)).
2. Stem af op een zender.
* Als MANU worden afgebeeld, raakt u BAND aan gedurende 1 seconde of langer. "MANU" op het display gaat uit en Zoekafstemmen is nu möglichk.
* Als "TA" op het display worden afgebeeld, worden automatisch TP-zenders gezocht.
DX SEEK
Als u het frequentiedisplay met 山 山 山 aanraakt, begint het automatisch zoek-afstemmen op alle zenders.
Wanner u met 念 aanraakt, wordt een zender gezocht in de richting van hogere frequencies, terwijl wonneer u met 念 aanraakt, een zender wordt gezocht in de richting van lagere frequencies.
* Nadat het Zoek-afstemmen is begonnen,**
wordt "DX SEEK" afgebeeld op het display.
LOCAL SEEK
Als u het frequentiedisplay met aanraakt, wordtzoek-aftstemmenuitgevoerd,voor zenders met een sterk signaal. Er wort alleen afgestemd op zenders met een goede ontvangstkwaliteit.
* Nadat het zoek-afstemmen is begonnen,**
wordt "LO SEEK" afgebeeld op het display.
Handmatig afstemmen
Er zijn tweer manieren waarop u handmatig kunt afstemmen: snel-afstemmen en stap-afstemmen.
In de stap-afstemfunctie verandert de frequenta stap voor stap. In de snel-afstemfunctie kut u snel afstemmen op de gewenste frequentie.
1. Raak BAND aan gedurende 1 seconde of langer verwijl MANU Niet wordt afgebeeld. Als MANU wordt afgebeeld is handmatig afstemmen möglichk.
2. Bedien het frequentlyiedisplay en stem af op een freiquentie waarop wordenuit gezonden.
Stap-afstemmen
Raak het titeldisplay met 已 aan.
Snel-afstemmen
Raak het frequentietdisplay met aan. Het afstemmen stopt zodra u uw vinger van het display afhaalt.
Een voorkeurzender oproepen
Het oproepen van een Voorkeurzender is een bediening voor zenders die van tevoren in het geheugen zijn opgeslagen.
1. Raak MODE gedurende 1 seconde of langer aan. De voorkeurgeheugenlijst worden afgebeeld.
2. Raak de zender aan waarnaar u wilt luisteren.
* In de standardbedieningsfunctie kut u ook op een voorkeurzender afstemmen door het hoofddisplay aan te raken met t.
Het afstemmen annuleren
1. Raak RTN aan.
Voorkeurzenders handmatig opslaan
In totaal(Int u in het geheugen 24 afzonderlijke voorkeurzenders opslaan (6-FM1,6-FM2,6- FM3,6-AM).
1. Raak BAND aan om de freiagentieband te veranderen.
2. Bedien het frequentlyiedisplay en stem af op de frequentie die u wilt opslaan.
3. Raak MODE gedurende 1 seconde of langer aan. De voorkeurgeheugenlijst worden afgebeeld.
4. Raak het voorkeurnummer waaronder u de zender wilt opslaan gedurende 2 seconden of langer aan. U hoor een lange pieptoon en de zender worden in het geheugen opgeslagen.
Voorkeurzenders automatisch opslaan
U kunt automatisch eén voor eén afstemmen op maximaal zes zenders en deze automatisch opslaan.
1. Raak MODE aan.
2. Raak A-STORE gedurende 2 seconden of langer aan. MODE verandert in "A-STORE" en het voorkeurnummer van het automatisch opslaan worden op het voorkeurnummerdisplay afgebeeld.
* Zenders met een goede ontvangstkwaliteit worden automatisch gezocht en opgeslagen in het voorkeurgeheugen (onder voorkeurnummers 1 t/m 6) in oplopende volgorde vanaf de zender met de laagste_freqtie.
Opmerkingen:
- Wanner u automatisch voorkeurzenders opslaat, worden eerder opgeslagen zenders gewist.
- Als er minder dan zes zenders met een goede ontvangstkwaliteit worden gezonden met in de LOCAL SEEK-afstemfunctie, keert het apparaat automatisch terug maar de laagste freiagentie en wordt het automatisch opslaan nogmaals uitgevoerd in de DX SEEK-afstemfunctie. Als daarna nog steeds minder dan zes zenders worden gezonden, blijven de eerder opgeslagen zenders in het geheugen.
- Als het automatisch opslaan wordenucht uitgevoerd op de FM-banden, worden de zenders opgeslagen in FM3, zichs als FM1 of FM2 werk gekozen om de zenders in op te slaan.
Voorkeurzender-scannen
Met voorkeurzender-scannenkest u de Voorkeurzenders eén voor een controeren in de volgorde waarin ze in het geheugen zich opgeslagen.
1. Raak MODE aan.
2. Raak P-SCAN aan. MODE verandert in "P-SCAN" en het voorkeurnummer van het voorkeurnummer-scammen worden op het voorkeurnummerdisplay afgebeeld. \* De huidig opgeslagen voorkeurzenders worden een voor een op volgorde ontvangen gedurende 7 seconden of langer elk. Zenders met een slechte ontvangst worden overgeslagen en de volgende zender worden ontvangen. Als het voorkeurzender-scammen op de FM-band worden uitgevoerd, worden de FMzenders in onderstaande volgorde ontvangen:
FM1 (1 6) FM2 (1 6) FM3 (1 6)...
Als het voorkeurzender-scannen op de AM-band worden dit uitgevoerd, worden de AM-zenders in onderstaande volgorde ontvangen:
AM (1 6) AM(1 6) enzovoort.
Het voorkeurzender-scannen annuleren
1. Raak P-SCAN aan.
P-SCAN verandert in "MODE", en de zender die werden ontvangen voordat op P-SCAN werk gedrukt, worden meer ontvangen.
RDS (radio-informationsystem)
Dit apparatus is uitgerust met een ingebouwd RDS-decodersystem zodate u gebruik kutn make n van de RDS-informatie die sommige zenders uitzenden.
Dit system kan de naam afbeelden van de zender die wordt ontvangen (PS) en kan automatisch overschakelen maar de zender met de Beste ontvangstkwaliteit wonneer u grote afstanden aflegt.
Als verkeersinformatie of een verkeersprogramma worden uit gezonden door een RDS-zender, kan automatisch overgeschakeld worden maar deze uitzending, ongeacht welke functie in werkung is.
Bovendien, als EON-informatie worden ontvangen, kan automatisch worden overgeschakeld waar andere voorkeurzenders op hetzelfdeetwork, zodat de zender die worden ontvangen kan worden onderbroken door het verkeersprogramma van andere zenders (TP). Deze functie is Niet overal beschikbaar.
Als u de RDS-functie wilt gebruiken, moet u altiijd de radio eerst in de FM-ontvangstfunctie zetten.
- AF: Alternativene frequente
- PS: Zendernaam
- PTY: Programmatype
- EON: Verbeterde overige netwerken
TP: Verkeersprogramma
PI: Programma-identificatie
TA: Verkeersinformatie
* De RDS-onderbreking werkkt nicht in de AMontvangstfunctie.
* Als dit apparaat een RDS-signaal ontvangt en de PS-informatie erin kan lezen, worden de zendernaam op het display afgebeeld.
De AF-functie
De AF-functie schakelt overaar een andere frequentie op hetzelfde netwerk om een zo goed möglichk ontvangstkwaliteit te verkrijgen.
- De fabrieksinstelling is "ON".
De AF-functie in- en uitschakelen
1. Raak MODE aan.
2. Raak AF aan. Met iedere aanraking wisselt het AF-display zusammen "ON" en "OFF".
3. Raak RTN aan.
* Als de ontvangstkwaliteit van de huidige zenderchychteruit gaat,wordt "SEARCH" op het display afgebeeld en zoekt de radio waar hetzelfde radioprogramma op een andere_freqentie.
AF-functie tussen RDS en DAB
Als hetzelfde programme worden uit gezonden door RDS en DAB, en deze functie is ingeschakeld, schakelt dit apparaat automatisch over zodat de uitzending met de Beste ontvangstkwaliteit worden ontvangen.
- Deze functie werkkt alleen als de DAB-eenheid DAH923 of DAH913 (optioneel) is aangesloten op het apparaat.
- De fabrieksinstelling is "ON".
1. Druk op de [A] toets om de instelfunctie op te roepen.
2. Raak het insteltemdisplay met aan en kies bij "TUNER" het item "LINK ACT".

3. Raak de rechterkant van het display met aan of draai de [ROTARY] knop en kies "ON" of "OFF".
ON:
Het AF-overschakelenCUSSEN DAB en RDS is ingeschakeld.
OFF:
Het AF-overschakelen:tussen DAB en RDS isuitgeschakeld.
4. Druk op de [A] toets om terug te keren maar de voorgaande functie.
REG (regional programma)-functie
Als de REG-functie is ingeschakeld, kan automatisch worden afgestemd op de regionale zender met de Beste ontvangstkwaliteit. Als deze functie is ingeschakeld en u tijdens het rijden het gebied van een andere regionale zender binnengaat, stembt het apparaat automatisch af op de zender met de beste ontvangstkwaliteit in die regio.
- De fabrieksinstelling is "OFF".
Opmerkingen:
- Deze functie isuitgeschakeld wanner een nationale zender, zoals BBC R2, worden ontvangen.
- De REG-functie ON/OFF-instelling is alleen van invloed als de AF-functie is ingeschakeld.
De REG-functie in- en uitschakelen
1. Raak MODE aan.
2. Raak REG aan. Met iedere aanraking wisselt het REGdisplay:tussen "ON"en "OFF".
3. Raak RTN aan.
Handmatig op een regionale zender in hetzelfde network afstemmen
- Deze functie werkt alleen als de AF-functie is ingeschakeld.
- De bediening verschift afhankelijk van de ON/OFF-instelling van de REG-functie. Als de REG-functie is ingesteld op ON, kannen uitzendingen met een exact overeenkomende PI-code worden ontvangen. Als de REG-functie is ingesteld op OFF, kannen uitzendingen met hetzelfde soort PI-code worden ontvangen.
Opmerkingen:
- Deze functie kan worden gebruikt wanneer een regionale uitzending van hetzelfde network wird ontvangen.
- De PI-code is een coderingssystem dat een unieke code toenkent aan iedere zender.
1. Raak MODE gedurende 1 seconde of langer aan. De voorkeurgeheugenlijst worden afgebeeld.
2. Raak het voorkeumummer aan van de Voorkeurzender die u wilt ontvangen.
TA (verkeersinformatie)
Als een uitzending met verkeersinformatie begint in de TA-standingbyfunctie, worden die uitzending met voorrang ontvangen, ongeacht de functie die in werkung is, zodat u maar de verkeersinformatie kutlusteren. Het is tevens möglichk automatisch op een verkeersprogramma (TP) af te stemmen.
- Deze functie kan alleen worden gebruikt als "TP" op het display worden afgebeeld. Als "TP" worden afgebeeld betekent dit dat de RDS-zender die op dat moment worden ontvangen programme's met verkeersinformatie uitzendt.
De TA-standingbyfunctie instellen
Als u op de [TA] toets drukt verwijl alleen "TP" op het display worden afgebeeld, worden zowel "TP" als "TA" op het display afgebeeld en wordt het apparaat in de TA-standbyfunctie gezet totdat een uitzending met verkeersinformatie begint. Zodra een uitzending met verkeersinformatie begint, worden "TRA INFO" op het display afgebeeld. Als u op de [TA] toets drukt verwijl een uitzending met verkeersinformatie worden ontvangen, stopt de ontvangst van de uitzending met verkeersinformatie en keert het apparaat terug maar de TA-standbyfunctie.
De TA-standingbyfunctie annuleren
Terwijil "TP" en "TA" op het display worden afgebeeld, drukt u op de [TA] toets. Op het display gaat "TA"uit en de TA-standbyfunctie is geannuleerd.
- Als "TP" nicht worden aufgebeeld, zal door op de [TA] toets te drukken de radio gaan zoeken maar een TP-zender.
Een TP-zender zoeken
Als u op de [TA] toets drukt verwijl "TP" Niet op het display worden afgebeeld, worden "TA" op het display afgebeeld en ontvangt het apparaat automatisch een TP-zender.
Opmerking:
- Als een TP-zender nicht kan worden ontvangen, worden "TP SEEK" afgebeeld en worden het zoeken maar een TP-zender voortgezet. Als u nogmaals op de [TA] toets drukt, gaan "TA" en "TP SEEK"uit op het display en worden het zoeken maar een TP-zender geannuleerd.
TP-zenders automatisch als voorkeurzender opslaan
U kurz automatisch maximaal zes TP-zenders in het voorkeurgeheugen opslaan. Als er minder dan zes TP-zenders konnen worden ontvangen, zullen de zenders die erder in het gehuugen opgeslagen werden gehandhaafd blijven.
1. Controller dat "TA" worden afgebeeld en raak MODE aan.
Als "TA" nicht worden afgebeeld, drukt u op de [TA] toets zodate "TA" worden afgebeeld.
2. Raak A-STORE gedurende 2 seconden of langer aan.
MODE verandert in "A-STORE" en het voorkeurnummer van het automatisch opslaan worden op het voorkeurnummerdisplay afgebeeld.
- TP-zenders met een goede ontvangstkwaliteit worden in het voorkeurgeheugen opgeslagen.
Zelfs als u FM1 of FM2 hebt gekozen, worden een TP-zender opgeslagen in het FM3-geheugen.
PTY
Met deze functie kurz u maar een uitzending van het gewenste programmatype luisteren, zichs als het apparaat in een andere bedieningsfunctie staat dan de radio.
- In sommige landen zijn PTY-uitzendingen nog nicht beschikbaar.
- In de TA-standingbyfunctie, heeft een TP-zender voorrang boven een PTY-zender.
De PTY-standingbyfunctie instellen
Als u op de [▶III] toets drukt, worden "PTY" op het display afgebeeld en worden het apparaat in de PTY-standbyfunctie gezet. Zodra een uitzending van het gekozen programmatype begint, worden de naam van het programmatype op het display afgebeeld.
De PTY-standingbyfunctie annuleren
Houd de [▶III] toets gedurende 1 seconde of langer ingedrukt. Op het display gaat "PTY"uit en de PTY-standingbyfunctie is geannuleerd.
Een PTY-onderbrekingsuitzending annuleren
Druktijdens een PTY-onderbrekingsuitzending op de [▶■] toets. De PTY
onderbrekingsuitzending worden geannuleerd en dit apparaat keert terug maar de PTY-standbyfunctie.
Een programmatype (PTY) kiezen
1. Als u op de [▶■] toets drukt, roept het apparatusat de PTY-keuzefunctie op.
2. Raak de rechterkant van het display met aan of draai de [ROTARY] knop en kies een programmatype.
* Hieronder staan de fabrieksinstellungen die zich opgeslagen:
Voorkeur
number Programmatype ENGLISH Inhoud 001 News Nieuws 002 Info Informatie 003 Pop M Pop muziek 004 Sport Sport 005 Classics Klassiek 006 Easy M Melodie:ontspanningsmuziek
3. De PTY-keuzefunctie worden automatisch 7 seconden nadat een programmatype is gekozen, of RTN is aangeraakt, geannuleerd.
Een programmatype (PTY) Zoeken
1. Als u op de [▶III] toets drukt, worden de PTY-keuzefunctie opgeroepen.
2. Raak het midden van het display met aan of draai de [ROTARY] knop en kies een programmatype.
3. Raak de linkerkant van het display met aan.
Wanneer het display met 且 iwordtaangeraakt, zoekt het apparaat met oplopendefrequentie maar een PTY-uitzending,enwanneer het display met 且 wordt aangeraakt,zoekt het apparaat met aflopende frequentaar een PTY-uitzending.
* Als geen zender worden gezonden met de gekozen PTY-uitzending, keert het apparaat terug maar de voorgaande functie.
Het PTY-voorkeurgeheugen
1. Als u op de [▶III] toets drukt, worden de PTY-keuzefunctie opgeroepen.
2. Raak het midden van het display met 山 aan en kies een programmatype.
U knot kiezen uit de 29 programmatypen in de volgende tabel.
Programma type benaming ENGLISH DEUTSCH SVENSKA FRANÇAIS Inhoud News Nachrich Nyhet Infos Nieuws Affairs Aktuell Aktuellt Magazine Actualiteiten Info Service Info Services Informatie Sport Sport Sport Sport Sport Educate Bildung Utbildn Educatif Educatie Drama Hör + Lit Teater Fiction Drama Culture Kultur Kultur Culture Cultuur Science Wissen Vetenskp Sciences Wetenschap Varied Unterh Underh Divers Varia en gesprekken Pop M Pop Pop M Pop Pop muziek Rock M Rock Rock M Rock Rock muziek Easy M U-Musik Lättlyss Chansons Melodie:ontspanningsmuziek Light M L-Musik L klass M Cl Lég Licht klassiek Classics E-Musik Klassik Classiq Klassiek Other M - - Musik Övrig m Autre M Overige muziek Weather Wetter Väder Météo Weerbericht Finance Wirtsch Ekonomi Economie Economie Children Kinder För barn Enfants Voor kinderen Social Soziales Sozialt Société Maatschappelijk Religion Religion Andligt Religion Religie Phone In Anruf Telefon Forum Doe mee! Travel Reise Resor Voyages Reizen Leisure Freizeit Fritid Loisirs Vrijeijd Jazz Jazz Jazz Jazz Jazz Country Country Country Country Country muziek Nation M Landes M Nation m Ch pays Nationale muziek Oldies Oldies Oldies Rétro Gouwe Ouwe Folk M Folklore Folkm Folklore Volkmuziek Document Feature Dokument Document Documentaires
3. Raak RTN gedurende 1 seconde of langer aan.
De PTY-voorkeurgeheugenlijst worden afgebeeld.
4. Raak het voorkeurnummer waaronder u het gekozen programmatype wilt opslaan gedurende 2 seconden of langer aan. U hoor een lange pieptoon en het gekozen programmatype worden in het PTY-voorkeurgeheugen opgeslagen.
Nooduitzending
Als een noodlesitzending worden ontvangen, worden alle functiebedieningen aufgeb broken, worden "ALARM" op het display afgebeeld, en worden de noodlesitzending ontvangen en weergegeven.
De noodleszending annuleren
Als u op de [AF] toets op de afstandsbediening drukt, worden de nooduitzending geannuleerd.
De taal van het PTY-display veranderen
U=kunt een taal kiezen uit de vier beschikbare talen (Engels, Duits, Zweeds of Frans) waarin het programmatype op het display kan worden afgebeeld.
- De fabrieksinstalling is "ENGLISH".
1. Druk op de [A] toets om de instelfunctie op te roepen.
2. Raak het insteltemdisplay met aan en kies bij "TUNER" het item "LANGUAGE".

3. Raak de rechterkant van het display met aan of draai de [ROTARY] knop en kies een taal.
* Kies een taal UIT ENGLISH (Engels), DEUTSCH (Duits), SVENSKA (Zweeds) en FRANÇAIS (Frans).
4. Druk op de [A] toets om terug te keren maar de voorgaande functie.
De RDS-onderbreking instellen verwijl de 2-ZONE-functie in gebruik is (RDS-INT 2Z)
Als deze functie op worden ingesteld "ON" en zich een RDS-onderbreking voordoet verwijl de 2-ZONE-functie in gebruik is, kan de RDS-informatie worden ontvangen.
- Als zich een RDS-onderbreking voordoet, worden de 2-ZONE-functie uitgeschakeld.
- Als zich een alarmonderbreking voordoet verwijd “RDS-INT 2Z” is ingesteld op “OFF”, worden de RDS-informatie ontvangen.
- De fabrieksinstelling is "ON".
1. Druk op de [A] toets om de instelfunctie op te roepen.
2. Raak het insteltemdisplay met aan en kies bij "TUNER" het item "RDS-INT 2Z".

3. Raak de rechterkant van het display met aan of draai de [ROTARY] knop en kies "ON" of "OFF".
ON:
De RDS-informatie worden ontvangen wanner zich een RDS-onderbreking voordoet verwijl de 2-ZONE-functie in gebruik is.
OFF:
Wanner de 2-ZONE-functie in gebruik is,
wordt geen RDS-informatie ontvangen,
uitgezonderd een alarmonderbreking.
Opmerking:
- Als de radiofungtie is gekozen verwijl TA (verkeersinformatie) en PTY zijn ingeschakeld, worden de onderbrekigen ontvangen, zichs als RDS onderbreking isuitgeschakeld.
4. Druk op de [A] toets om terug te keren maar de voorgaande functie.
Volume-installing van TA, nooduitzending (ALARM) en PTY
Het volume van de TA-, ALARM- en PTY-onderbrekingsuitzendingen kan worden ingesteldijdens de TA-, ALARM- en PTY-onderbrekingsuitzendingen.
- De fabrieksinstelling is "15".
Tijdens een TA-, ALARM- of PTY-onderbrekingsuitzending, draait u de [ROTARY] knop recht som of linksom en stelt u het volume in op het gewenste niveau (0 t/m 33).
- Als de TA-, ALARM- of PTY-onderbrekingsuitzending is afgelopen, keert het volume terug maar het niveau dat was ingesteld voor de onderbrekingsuitzending.
De displays in de CD-functionie
Hoofddisplay
Het hoofddisplay wordt afgebeeld als u op de [ROTARY] knop drukt en de CD-functie kiest.

Als u de linkerkant van het display gedurende 1 seconde of longer aanraakt, worden de bedieningsfunctie omgeschakeld.

Track/weergavetijd-display
J01/02:00:
Het nummer van de track die worden weergegeven en de weergavetijd worden afgebeeld.
Als u in de standardbedieningsfunctie het display met 0f aanraakt, kurz u de track die u wilt weergeven kiezen, of vooruit/chteruitspoeelen.
Titeldisplay
Als u het titeldisplay aanraakt, verandert het display.
Mapdisplay (in het geval van MP3/WMA)
Als u in de standardbedieningsfunctie het display met 卡 aanraakt, kurz u een map kiezen.
MODE:
Als u dit aanraakt, worden subfuncties afgebeeld. Als u in het geval van MP3/WMA dit gedurende 1 seconde of langer aanraakt, worden de mappenlijst afgebeeld.
Opmerking:
- Deze functie werkkt alleen als een disc worden weergegeven.
-SCAN-SCAN: Dit worden afgebeeldijdens scanweergave. Door dit aan te raken, worden de scanweergave gestopt.
- RPT/RP: Dit worden afgebeeldijdens herhaalde weergave. Door dit aan te raken, worden de herhaalde weergave gestopt.
-RDM/RDM: Dit worden afgebeeldijdens willekeurige weergave. Door dit aan te raken, worden de willekeurige weergave gestopt.
TOP:
Door dit aan te raken begint de weergave vanaf de eerste track op de disc of in de map die worden weergegeven.

(alleen op het display van de simpele bedieningsfunctie)
Door deze toetsen aan te raken kurz u de track kiezen die u wilt weergeven.
Door deze toetsen te blijven aanraken=kunt u de tracks vooruit-/achteruiestspoelen.
■ Mappenlijstdisplay (in het geval van MP3/WMA)
Deze lijst kunt u afbeelden door op het hoofddisplay gedurende 1 Seconde of langer MODE aan te raken.

Mapnaam
Mapnummer
Als dit grijs worden aufgebeeld,kest u de map nicht kiezen.
>>: Bezig met kiezen
Als u een mapnaam aanraakt, keert het display terug maar het hoofddisplay en begint de weergave vanaf de eerste track in de map die u hebt aangeraakt.
Als u dit aanraakt, worden de voorgaande mappenlijst afgebeeld. Door dit gedurende 1 seconde of langer aan te raken, keert het display terug maar het hoofddisplay.
NEXT:
Als u dit aanraakt, worden de volgende mappenlijst afgebeeld.
Wat is MP3?
MP3 is een audiocompressiemethode die is geclassifiedeerd als audiolaag 3 van de MPEGnorm.
Deze audiocompressiemethode is populair geworden bij computerergebruikers en uitgegoeid tot de standardnorm.
MP3 heeft als eigenschap de originele audiodata tot onceveer 10% van de oorspronkelijke groorte te comprimeren verwijl de hoge geluidskwaliteit behouden blijt. Dit betekent dat onceveer 10 muziek-CD's kan den worden opgenomen op een CD-R-disc of CDRW-disc, waardoor lang maar muziek geluisterd kan worden zonder dat de CD要去 worden verwisseld.
Wat is WMA?
WMA is de afkorting van Windows Media Audio: een audiobestandsformaat ontwikkeld door Microsoft Corporation.
Opmerkingen:
- Als u een bestand weergeeft met DRM (Digital Rights Management = digitale-rechtenbeheuer) ingeschakeld voor wma, za er geen geluid worden uitgevoerd (de WMA-indicator knippert).
- Windows Media en het Windows®-logo zijn handelsmerken of wettig gedeponeerde handelsmerken van Microsoft Corporation in de Verenigde Staten en andere landen.
DRM (Digital Rights Management) uitschakelen:
- In het programme Windows Media Player 8, klik op het TOOLS OPTIONS COPY MUSIC-tabblad, en klik verzolgens onder COPY SETTINGS in het selectiekavke proteTECT CONTENT zodat het vinkje uitgaat. Bouw verzolgens de bestanden opnieuw op.
In het programme Windows Media Player 9, klik op het TOOLS OPTIONS MUSIC RECORD-tabblad, en klik verrolgens onder COPY SETTINGS in het selectiekavkeje PROTECT CONTENT zodat het vinkjeuitgaat. Bouw verrolgens de bestanden opnieuw op.
Gebruik door uzelf opgebouwde WMAbestanden voor eigenerverantwoording.
Voorzorgsmaatregelen voor het creeren van een MP3-disc of WMA-disc
- Bruikbare bemonsteringssnelheden en overdrachtsnelheden:
1. MP3: Bemonsteringsfrequentie: 11,025 kHz t/m 48 kHz Overdrachtsnelheid: 8 kbps t/m 320 kbps / VBR
2. WMA: Overdrachtsnelheid: 48 kbps t/m 192 kbps
Bestandsextensies
1. Voeg algid een bestandsextensie ("MP3" of "WMA") toe aan een MP3- of WMA-bestand met behulp van enkel-byte letters. Als u een andere dan de gespecifieerde bestandsextensie toevoegt, of vergeet een bestandsextensie toe te voegen, kan het bestand Niet worden weergegeven.
2. Bestanden die geen MP3/WMA-data bevatten können nicht worden weergegeben. De aanduiding "--: --" worden op het weergavetijddisplay afgebeeld als u probeert bestanden wee ter te geben die geen mp3/ wma-data bevatten.
Logisch formaat (bestandssysteme)
1. Bij het schrijven van een MP3/WMA-bestand op een CD-R-disc of CD-RW-disc, moet u "ISO9660 level 1, 2 of JOLIET of Romeo" kiezen als formaat van de schrijfsoftware. Normale weergave is Niet möglich als de disc is opgenomen in een ander formaat.
2. De mapnaam en de bestandsnaam hunnen worden afgebeel als de titel in het geval van MP3/WMA-weergave, maar de titel moet korter zichen dan 128 enkel-byte alfanumerieke tekens (inclusief de bestandsextensie).
3. Geef een bestand nicht bezelfde naam als demap waarin deze zit.
Mapstructuur
1. Een disc mag een mapstructuur van maximaal 8 hierarchische niveaus diep hebben.
Aantal bestanden of mappings
1. Maximaal 255 bestanden konnen per map worden herkend. Maximaal 500 bestanden konnen worden weergegeven.
2. De tracks worden weergegeven in de volgorde waarin deze op de disc werden opgenomen. (De tracks worden nicht alti\dj weergegeven in bezelfde volgorde die op een computer worden aangegeven.)
3. Enige ruis kan optreden afhankelijk van het type codeersoftware dat voor de opname werk gebruikt.
Multisessieskiezen
Met deze functie kunt u of CD-DA-bestanden, of MP3/WMA-bestanden kiezen in het geval een disc (bijv. een CD-EXTRA-disc) een combinatie van CD-DA-bestanden en MP3/WMA-bestanden bevat.
1. Raak MODE aan.
2. Raak M-SESS aan. Met iedere aanraking van M-SESS wisselt het M-SESS-displayussen "CD" (CD-Daweergave) en "MP3/WMA" (MP3/WMA-weergave).
* Als M-SESS nicht worden afgebeeld, raakt u NEXT aan.
3. Raak RTN aan. De instelling voor het kiezen van multisessies is van kracht de volgende keer dat u een CD in het apparaatplaatst.
Opmerking:
- Als u een CCCD (Copy Control CD) weergeeft, stelt u de instelling in op het CD-type. Als dit is ingesteld op het MP3/WMA-type, kan in sommige gevallen de CD Niet normal worden weergegeven.
A VOORZICTHIG
Wees voorzichtig dat uw hand of vingers Niet bekneld raken bij het openen en sluiten van het KANTELEND BEDIENINGSPANEEL.
Opmerkingen:
- Als het KANTELEND BEDIENINGSPANEEL Niet volledig worden geopend, opent u het voorzichtig met uw hand.
- Nadat u een CD hebte geplaatst, sluit u altijd eerst het KANTELEND BEDIENINGSPANEEL.
Probeer nicht uw hand of vinger in de discgleuf te steken. Steek ook nooit vreme de voorwerpen in de discgleuf.
- Steek ook nooit discs in de discgleuf waarop lijmresten onder plakband of verhuurstickersuitkomt,of discs waarop nog restanten vanplakband of verhuurstickers zitten. Het kan onmobelijk zijn dergelijkde discs uit het apparaat te werpen en ze konnen tot storing leiden.
Een CD plaatsen
1. Druk op de [▲] toets. Het bedieningspaneel gaat open.
2. Plaats de disc in de discgleuf. Nadat de disc is geplaatst gaat het bedieningspaneel automatisch dicht.
Opmerkingen:
- Steek nooit vreeimde voorwerpen in de discgleuf.
- Als de CD Niet gemakkelijk kan worden geplaatst, kan hetijken dat er reeds een andere CD in de discgleuf zich, of dat het apparaat要去 worden gerepareerd.
Discs zonder het QUSG of logen CD-ROMs kuren nicht door dit apparaat worden weergegeben.
- Het is möglich dat sommige CD's opgenomen in de CD-R/CD-RW-functionie nicht bruikbaar zijn.
Een 8-cm CD plaatsen
U heeft geen adapterring nodig om een 8-cm CD waar te gehen. Plaats de 8-cm CD in het midden van de discgleuf.
Een CD uitwerpen
U kunt een CD uitwerpen door op de [▲] toets te drukken, zichs als het apparaat isuitgeschakeld of met de contactsleutel de stroom is onderbroken.
A VOORZICHTIG
Nadat de disc is uitgeworpen, drukt u op de [A] toets om het bedieningspaneel te sluiten. Als u het bedieningspaneel open LAST staan, hoort u een dubbe pleiptoon en gaat het bedieningspaneel automatisch dicht.
1. Druk op de [A] toets.
Het bedieningspaneel gaat open en de disc wordtuitgeworpen.De functie wordt automatisch ingesteld op de radiofunctie.
* Zorg ervoor dat u een uitgeworpen disc uit het apparaat verwijdert. Als u de disc in de discgleuf LAST zitten, worden deze na 15 seconden of langer automatisch wee in het apparaat getrokken en gaat het bedieningspaneel dicht (automatisch opnieuw plaatsen).
* Single-CD's worden nicht automatisch opniewu geplaatst. Zorg ervoor dat u een single-CD UIT het apparaat haalt nadat.Deze isuitgeworpen.
A VOORZICHTIG
Als u buitensporige kracht gebruikt om een disc teplaatsen nadat deze is uitgeworpen, kan de disc worden bekrant. Haal de disc eruit voordat u deze weeer plaatst.
Een disc beluisteren die al in het apparaat is geplaatst
1. Druk op de [ROTARY] knop om de CD-functie te kiezen.
* De weergave begint automatisch nadat de functie is veranderd in de CD-functie.
De weergave pauzeren
1. Druk op de [▶■] toets.
De weergave hervatten
1. Druk nogmaals op de [▶■] toets.
Een track kiezen
Als een CD-R of CD-RW is geplaatst waarop een MP3-bestand of WMA-bestand is opgenomen,(Int u alleen tracks kiezen die in bezelfde map+zijn opgenomen door het trackdisplay met 一 _ 一 aan te raken.
1. Als u maar de volgende track wilt luisteren, raakt u het trackdisplay met 日 aan.
2. Als u waar de voorgaande track wilt luisteren, raakt u het trackdisplay tweeemaal met aan.
Door met 日 aan te raken worden de volgende track weergegeven. Als u vaker met 日 aanraakt, verspringt u hetzelfde aantal tracks vooruit als u met 日 heb t aangeraakt, waarna de weergave van de track begint.
Door met 山 aan te raken worden de voorgaande track weergegeven. Als u vaker met 山 aanraakt, verspringt u hetzelfde aantal tracks achefteruit als u met 山 hebt aangeraakt, waarna de weergave van de track begint.
* Als u het trackdisplay tweeemaal met † aanraakt verwijl het begin van een track worden weergegeven, worden soms tweet tracks achechteruit gesprongen, en begint de weergave van die track.
Een map kiezen
Om een andere map te kiezen, raakt u het mapdisplay met 卡 aan of voert u de volgende stappen UIT.
1. Raak MODE gedurende 1 seconde of longer aan.
De mappenlijst worden afgebeeld. Door PREV of NEXT aan te raken worden het voorgaande of volgende gedeelte van de mappenlijst afgebeeld.
2. Raak de mapnaam aan.
De afspeellijst weergeven
U kunt een afspeellijst (een M3U-bestand) weergeven.
Merk城县 op dat van de M3U-bestanden die op dat moment tot vrijlagen diep (inclusief de
root) in de hierarchie zijn opgeslagen, slechts de bovenste vrij bestanden met een neue tijdstempel können worden weergegeven.
Opmerkingen:
Maximaal 255 bestanden van een enkele aftspeellijst kannen worden weergegeven.
- Alleen MP3- of WMA-bestanden die op dat moment tot vrij lagen diep (inclusief de root) in de hierarchie� opgeslagen, hunnen worden weergegeven.
Ga als volgt te werk om een afspeellijst wee tergeven.
1. Raak MODE aan.
2. Raak NEXT aan.
3. Raak PLY LIST aan. Het lezen van de afspeellijst begint. Wanner het lezen van de afspeellijst waar is, start de weergave van de afspeellijst met de meest recente tijdstempel automatisch. De bediening voor het kiezen van de afspeellijst of tracks op de afspeellijst isdezelfde als die voor het kiezen van een map of tracks in een map.
* PLY LIST worden nicht aufgebeeld als geen correcte aftspeellijst (een M3U-bestand) is opgeslagen op de CD-R of CD-RW die in het apparaat is geplaatst.
De weergave van de afspeellijst stoppen
1. Raak MODE aan.
2. Raak NEXT aan.
3. Raak PLY LIST aan.
Vooruit- en Achteruitspoelen
1. Om vooruit te spoelen raakt u het trackdisplay met 出 aan.
2. Om achechteruit te spoelen raakt u het trackdisplay met aan.
Beginfunctie
De beginfungtie doet de CD-speler terugkeren\
aar het begin van de eerste track op de CD.
1. Raak TOP aan. De weergave begint vanaf de eerste track (tracknummer 1).
In het geval van MP3/WMA, keert de CDspeler terug maar de eerste track in de map die worden weergegeven.
Scanweergave
Met deze functie=kunt de eerste 10 seconden van iedere track op de disc weergeven.
1. Raak MODE aan.
2. Raak P -SCAN aan. MODE verandert in " P -SCAN" en de scanweergave begint.
* De scanweergave begint vanaf de track die volgt op de track die op dat moment worden weergegeven.
De scanweergave stoppen
1. Raak P -SCAN aan. P -SCAN verandert in "MODE" en de track die werden weergegeven toen u P -SCAN aanraakte, worden weergegeven.
Mapscanweergave
Met deze functie=kunt u de eerste 10 seconden weergeven van de eerste track in iedere map op een MP3-disc of WMA-disc.
1. Raak MODE aan.
2. Raak -SCAN aan. MODE verandert in " -SCAN" en de mapscanweergave begint.
* De mapscanweergave begint vanaf de map die volgt op de map die op dat moment worden weergegeven.
De mapscanweergave stoppen
1. Raak -SCAN aan. -SCAN display changes toverandert in "MODE" en de weergave begint vanaf de track die werd weergegeven toen u -SCAN aanraakte.
Herhaalde weergave
Met deze functie kurz u de huidige track herhaaldelijk weergeven.
1. Raak MODE aan.
2. Raak J^ -REPEAT aan. MODE verandert in "RPT" en de herhaalde weergave begint.
De herhaalde weergave stoppen
1. Raak P -RPT aan. P -RPT verandert in "MODE" en de normale weergave begint vanaf de track die werden weergegeven voordat u P -RPT aanraakte.
Herhaalde mapweergave
Met deze functie=kunt de map die op dat moment wordenweergeveen herhaaldelijk weergeven. Deze functie is alleen beschikbaar wanner een CD-R of CD-RW waarop MP3bestanden of WMA-bestanden zijn opgenomen, is geplaatst.
1. Raak MODE aan.
2. Raak -REPEAT aan. MODE verandert in "RPT" en de herhaalde mapweergave begint.
De herhaalde mapweergave stoppen
1. Raak -RPT aan. -RPT verandert in "MODE" en de normale weergave begun vanaf de track die werd weergegeven voordat u -RPT aanraakte.
Willekeurige weergave
Met deze functie=kunt u alle tracks die op een disc,zijn opgenomen in willekeurige volgorde weergeven.
-RANDOM
Hiermee geeft u alle tracks op de disc in willekeurige volgorde weeR. Als de disc twee ofeer mappings bevat, worder alle tracks in de map in willekeurige volgorde weergegeven, gevolgd door alle tracks in de volgende map.Dit proces herhaalt zich voor alle mappen.
-RANDOM
Hiermee geeft u alle tracks op de disc in willekeurige volgorde weeer. Deze functie is alleen beschikbaar wanneer een CD-R of CD-RW waarop MP3-bestanden of MWA-bestanden zich opgenomen, is geplaatst.
1. Raak MODE aan.
2. Raak P -RANDOM of -RANDOM aan. MODE verandert in " P RDM" of "RDM", en de willekeurige weergave begint.
De willekeurige weergave stoppen
1. Raak F -RDM of -RDM aan. F -RDM of -RDM verandert in "MODE" en de normale weergave begint vanaf de track die werden weergegeven voordat u F -RDM of -RDM aanraakte.
Meerdere Personen luisteren maar twee verschillende muziekbronnen (2-ZONE-functie)
De 2-ZONE-functie kan afzonderlijk geluid uitvoeren aan de MAIN-zone en de SUB-zone doordat het apparaat twee bronnen tegelijktijd kan verwerken, zodate twee ofeer luisteraars maar twee verschillende muziekbronnen konnen luisteren.
Dit apparaat kan de interne bronnen (radio, CD, MP3, enz.) weergeven en kan daarnaast tegelijkkertijd materiaal weergeven vanaf externe apparatuur, die is aangesloten met behulp van een CeNET-kabel (bijv. CD-wisselaar, enz.).
De bronnen van de MAIN-zone worden
weergegeven via de luidsprekers in uw auto, en
de bronnen van de SUB-zone worden
weergegeven via de hoofdtelefoon (WH143).

De bovenste twee afbeeldingen zijn voorbeelden wanner een geluidsbron worden weergegeven door een interne bedieningsfunctie van het apparatus (radio, CD, AUX) via de luidsprekers.
De onderste afbeelding is een voorbeeld wonneer een geluidsbron worden weergegeven door een externe bedieningsfunctie van het apparatus (CD-wisselaar, DVD-wisselaar, TV, AUX) via de luidsprekers.
* De fabrieksinstalling is "OFF".
Opmerkingen:
- De 2-ZONE-functie is nicht beschikkaar als DAB is aangesloten.
- Door aan de [ROTARY] knop op het apparaat te draaien verandert alleen het volumeniveau van het geluid uit de luidsprekers.
De AUX-SENS-instelling heeft betrekking op zowel de luidsprekers als de hoofdtelefoon.
Het display bij gebruik van de 2-ZONE-functie
In het midden van het display wordt "INT." (interne functie) of "EXT." (externe functie) afgebeeld om aan te geven of u de weergave van een interne bedieningsfunctie of een externe bedieningsfunctie hoor in de huidige bedieningsfunctie van de 2-ZONE-functie.
1. Druk op de [SOUND] toets.
2. Raak 2-ZONE aan.

3. Raak in het midden van het display ON/OFF aan gedurende 1 Seconde of langer.

Als 2-ZONE is ingesteld op ON, wordt het huidige type 2-ZONE afgebeeld.
De 2-ZONE-functie kan nicht worden gebrukt wanner 2-ZONE is ingesteld op OFF. Druk op de [SOUND] toets om terug te keren maar de oorspronkelijke functie.
4. Raak het ON/OFF-display met 山 山 山 aan en kies het type 2-ZONE.
2-ZONE-type
Luidsprekers Hoofdtelefon Type 1 Intern (interne functie) Extern (externe functie) Type 2 Extern (externe functie) Intern (interne functie)
5. Raak het luidsprekerdisplay of het hoofdtelefoondisplay aan en kies de bedieningsfunctie van de 2-ZONE-functie.
Als u het luidsprekerdisplay aanraakt,kest u de geluidsbron bedieren die via de luidsprekers worden weergegeven.
Als u het hoofdtelefoondisplay aanraakt,
kunt u de geluidsbron bedieren die via de
hoofdtelefooon worden weergegeven.
6. Druk op de [SOUND] toets om terug te keren maar de oorspronkelijke functie.
Meerdere Personen luisteren maar twee verschillende muziekbronnen (2-ZONE-functie)
De 2-ZONE-functie in- en uitschakelen
1. Houd de [SOUND] toets op het apparaat gedurende 1 seconde of langer ingedrukt.
Het 2-ZONE-type omschakelen
Houd de [TA] toets op het apparataat gedurende 1 seconde of langer ingedrukt verwijl de 2-ZONE-functie is ingeschakeld.
De bedieningsfunctie van de 2-ZONE-functie omschakelen
Druk op de [TA] toets op het apparaat verwijl de 2-ZONE-functie is ingeschakeld.
De functie kiezen wanneer de 2-ZONE-functie is ingeschakeld
Als u een CD staat terwijl de 2-ZONE-functie is ingeschakeld, veranderen de bedieningsfuncties van de interne functie van dit apparaat waar de CD-functie en begint de weergave automatisch.
1. Druk op de [TA] toets op het apparaat om de bedieningsfunctie van de 2-ZONE-functie om te schakelen.
Het (luidspreker- of hoofdtelefoon-) display van de geluidsbron die op dat moment kan worden bediend, wisselt om.
2. Houd de [TA] toets gedurende 1 seconde of langer ingedrukt en kies het 2-ZONE-type. Het display wisselt:tussen "INT."en "EXT."
3. Druk op de [ROTARY] knop.
Met iedere druk op de [ROTARY] knop terwijl "INT." worden afgebeeld, verandert de functie in onderstaande volgorde:
$$
\mathrm {R a d i o} \rightarrow \mathrm {C D} \rightarrow \mathrm {A U X} \rightarrow \mathrm {R a d i o} \dots
$$
Met iedere druk op de [ROTARY] knop verwijl "EXT." worden afgebeeld, verandert de functie in onderstaande volgorde:
$$
\begin{array}{l}\text {A U X} \rightarrow (\text {C D - w i s s e l a r}) \rightarrow (\text {D V D - w i s s e l a r})\\\rightarrow (\text {T V} ^ {* 1}) \rightarrow \text {A U X . . .}\end{array}
$$
* De functie van een apparaat dat Niet is aangesloten worden Niet afgebeeld.
*1 Als de TV-functie is gekozen, verandert de functie automatisch maar de VTR-functie en kan nicht worden veranderd.
Gemeenschappelijk bedieningen in jegere functie
Het display in de titelinoferfunctie
Hoofddisplay
Dit worden aufgebeeld wanner de titelinvoerfungtie is gekozen (zie blz. 14).

Teksttypedisplay
A: Hoofdletters
a: Kleine letters
0-9: Cijfers
!?: Leestekens
A: Accenten
Titeldisplay
De huidig ingevoerde titel worden afgebeeld. Raak dit display met 卡 巴 卡 aan en kies de invoerpositie. Door dit display gedurende 2 seconden langer aan te raken, verdwijnen alle tekens van de titeltekst.
Invoertekstdisplay
Raak dit display met 山 aan en kies de tekst die u wilt invoeren.
RTN
Door dit aan te raken worden het invoeren van titels geannuleerd en keert het apparaat terug waar het oorspronkelijke display. Door dit gedurende 1 seconde of langer aan te raken worden de tekstlijf afgebeeld die hoor bij het huidige teksttype.
MEMO
Door dit gedurende 2 seconden of langer aan te raken kut u de ingevoerde titel opslaan, en keert het apparaat terug maar het oorspronkelijke display.
Tekstlijstdisplay
Deze lijst kurz u afbeelden door op het hoofddisplay gedurende 1 Seconde of langer RTN aan te raken.

Teksttype
De tekst die worden aufgebeeld verandert aan de hand van de instelling op het teksttypedataplay.
Als het teksttypedisplay is ingesteld op "A": A E I M Q U X (spatie)
Als het teksttypedisplay is ingesteld op “a”: a e i m q u
Als het teksttypedisplay is ingesteld op "0-9", "!?" of "Ä":
Alle tekens worden afgebeeld.
RTN
Als u dit aanraakt, keert het display terug maar het hoofddisplay.
NEXT
Als u dit aanraakt, worden de volgende tekstlijst afgebeeld.
Eentitel invoeren
U kunt TV-zenders en CD's een titel van maximaal 10 tekens geben. Deze titels können worden afgebeeld wanner een TV-uitzending worden ontvangen of een CD worden weergegeben.
Het aantal titels dat u kunt invoeren is als volgt:
Functie Aantal titels CD-functie 50 titles TV-functie 20 titles
CD-wisselaarfunctie Aantal titels DCZ628 aangesloten 100 titles CDC655Tz aangesloten 100 titles CDC1255z aangesloten 50 titles
1. Ontvang de TV-zender of geef de CD waar waarvan u de titel wilt invoeren.
2. Raak het midden van het display aan om het gebruikerstiteldisplay op te roepen. Het display verandert maar het gebruikerstiteldisplay en "USER" worden afgebeeld boven het voorkeurnummerdisplay.
3. Houd de [A] toets gedurende 1 seconde of langer ingedrukt. De functie verandert maar de titelinvoerfunctie.
4. Raak dit display met 卡 aan en kies de invoerpositie. De positie van de knipperende tekst worden\
haar links of rechts verplaatst.

* U kunt maximaal 10 tekens invoeren.
A VOORZICHTIG
Als u op de terugsteltoets drukt worden alle inhoud, waaronder de titels,uit de gebruikersgeugens van dit apparaat gewist.
5. Raak het teksttypedisplay met 山 aaan en kies het teksttype.
Met iedere aanraking met 卡 verandert het tekstype als volgt:
Hoofdletters
(spatie) ABCDEFGHIJKLMNOPQ RSTUVWXYZ
Kleine letters
abcdefghijklmnpqrstuvwxzy Cijfers
0123456789
Leestekens, Accenten
AEEEEIAOaaaeeetouoo
6. Raak de rechterkant van het display met aan, of draai de [ROTARY] knop en kies het teken dat u wilt invoeren.
7. Herhaal de stappen 4 t/m 6 om de hele titel in te voeren.
Als u het titeldisplay gedurende 2 seconden of langer aanraakt, verdwijnen alle tot dan toe ingevoerde tekens van de titeltekst.
8. Raak MEMO gedurende 2 seconden of langer aan.
U hoor een lange pieptoon en de titel worden in het geheugen opgeslagen.
Het titeldisplay veranderen in het klokdisplay of een ander display
Raak het midden van het display aan.
■ Als u een(AP) neue titel opslaat verwijl het maximale aantal titels al is opgeslagen
In het geval van een TV-zender
De titels die nicht zich opgeslagen in de voorkeurkanalen worden automatisch gewist en deijke titel worden in het geheugen opgeslagen.
In het geval van een CD
Titels van CD's die het minst zijn weergegeven worden gewist en de(APpe titel worden in het geheugen opgeslagen.
Eentitelwissen
1. Ontvang de TV-zender of geef de CD waar van u de titel wilt wissen.
2. Raak het midden van het display aan om het gebruikerstiteldisplay op te roepen.
Het display verandertaar het gebruikerstiteldisplay en "USER"wordt afgebeeld boven het voorkeurnummerdisplay.
3. Houd de [A] toets gedurende 1 seconde of longer ingedrukt.
De functie verandert maar de titelinoverfunctie.
4. Raak het titeldisplay gedurende 2 seconden of longer aan.
Alle tekens van de titeltekst verdwijnen.
5. Raak MEMO gedurende 2 seconden of longer aan.
U hoor een lange pieptoon en de titel worden gewist.
Deinstallingenveranderen Deinstelitemskiezen
1. Druk op de [A] toets.
De functie verandert maar de instelfunctie.

2. Raak het insteltemdisplay met 山 山 aan en kies het item dat u wilt instellen.
* Als u de linkerkant van het display met
anraakt, worden de hoofditem een voor een doorlopen.
Als u de linkerkant van het display met
aanraakt, worden de hoofditemsononderbroken doorlopen.
* Als u het midden van het display met
aanraakt, worden de subitems eén voor een doorkopen. Als u het midden van het display met aanraakt, worden de subitems ononderbroken doorkopen.
3. Als op de rechterkant van het display "EDIT" wordt afgebeeld, raakt u EDIT aan om over te schakelen maar het instellingendisplay.

4. Raak de rechterkant van het display met 卡 aan of draai de [ROTARY] knop en kies een instelling.
■ Terugkeren maar de oorspronkelijke functie
1. Druk nogmaals op de [A] toets.
- Instelitems
Hoofditem SubItem DISPLAY SCREEN SVR
• Schermbeveiliging (zie blz. 41) MSG INPUT
• Berichtinformatie-invoer (zie blz. 41) MESSAGE
• Berichtdisplayinstalling bij in-/uitschakelen (zie blz. 42) S/A SENS
• De gevoeligheid van de spectrumanalysator instellen (zie blz. 42) SCROLL
• De doorloopsnelheid instellen (zie blz. 42) APPERNCE DIMMER IN
• De automatische displaydimmer instellen (zie blz. 43) DMR LEVEL
• Het niveau van de displaydimmer instellen (zie blz. 43) CONTRAST
• Het displaycontrast instellen (zie blz. 43) BLINK LED
• De LED latent knipperen wanner de DCP worden verwijderd (zie blz. 43) BEEP
• De pieptoon instellen (zie blz. 44) Hoofditem Subitem SOUND AC-PRO III
• De VSE-functiekiezen (STD/PRO) (zie blz. 44) EQ SELECT
• De equalizerfunctiekiezen (zie blz. 44) SP-SETTING
• De luidsprekerconfigatie instellen (zie blz. 44) CENTER-SP / SUB-WOOFER
• De subwoofer in-/uitschakelen (zie blz. 45) HPF / SUB-W LPF
• De filterfrequentie van de luidsprekers instellen (zie blz. 45) AMP CANCEL
• De ingebouwdeversterker in-/uitschakelen (zie blz. 46) SP GAIN
• Het uitgangsiveau van de luidsprekers instellen (zie blz. 46) PL II DELAY SRD-SP
• De vertragsstijd van de achterluidsprekers instellen (zie blz. 46) PL II CONT PANorama / DIMENSION / CTR WIDTH
• De muziekfunctie in detail instellen (zie blz. 47) TUNER TV ARER
• Het TV-zendergebiedinstellen (zie blz. 57) TV DIVER
• De TV-diversiteitinstellen (zie blz. 57) LINK ACT
• De AF-functie:tussen RDS en DAB instellen (zie blz. 26) LANGUAGE
• De taal van het PTY-display instellen (zie blz. 30) RDS-INT 2Z
• De RDS-onderbreking verwijl de 2-ZONE-functie is ingeschakeld instellen (zie blz. 30) SETTING AUX / TEL
• AUX en TELinstellen (zie blz. 47) AUX SENS
• Het ingangsniveau van de draagbare audio (AUX) instellen (zie blz. 48) TEL-SP
• De autoluidsprekeruitgang voor de mobiele telefoon (TEL-002, optioneel) instellen (zie blz. 48) TEL-SWITCH
• De mobiele-telefononderbreking instellen (zie blz. 48) CALIBRATE / A-VOL SENS
• De automatische volumeregeling instellen (zie blz. 49) SYSTEM CHECK
• Een systemcontroleuitvoeren (zie blz. 49) CODEMATIC
• De beveiliging instellen (zie blz. 50)
De schermbeveiliging instellen (SCREEN SVR)
Met deze functie=kunt u een schermbeveiliging. laten afbeelden als u het apparaat gedurende ongeveer 30 seconden nicht bedient.
- De fabrieksinstelling is "ON".
1. Druk op de [A] toets om de instelfunctie op te roepen.
2. Raak het insteltemdisplay met 卡 aan en kies bij "DISPLAY" het item "SCREEN SVR".

3. Raak de rechterkant van het display met aan of draai de [ROTARY] knop en kies "ON" of "OFF".
4. Druk op de [A] toets om terug te keren maar de oorspronkelijke functie.
Het schermbeveiligingsdisplay wisselen
Raak PREV of NEXT aan verwij de schermbeveiliging worden afgebeeld.
Met iedere aanraking hiervan wisselt het schermbeveiligingsdisplay.
- Schermbeveiligingen
Schembeveiligingspatroon 1


Schermbeveiligingspatroon 2

Schermbeveiligingspatroon 3

Spectrumanalysepatroon 1

Spectrumanalysepatroon 2
Spectrumanalysepatroon 3

Spectrumanalysepatroon 4

Berichtinformationie

SS SCAN
Bovenstaande 8 displays worden elk gedurende ongeveer 10 seconden aufgebeeld.
Berichten invoeren om af te beelden als berichtinformationatie (MSG INPUT)
1 type schermbeveiliging is beschikbaar. Voor verdere informatie over het wisselen van de schermbeveiligingsdisplays, raadpleegt u "De schermbeveiliging instellen".
- U kunt maximaal 30 tekens invoeren.
- De fabrieksinstalling is "Active Matrix Control System".
1. Druk op de [A] toets om de instelfunctie op te roepen.
2. Raak het insteltemdisplay met aan en kies bij "DISPLAY" het item "MSG INPUT".

DISPLAY
ADJUST MODE
MSG INPUT> EDIT
EDIT
3. Raak EDIT aan.
De functie verandert maar de
berichtinvoerfunctie.
4. Raak het midden van het display met 山 aan en kies de invoerpositie.
* Om het bericht te wissen, raakt u het midden van het display gedurende 2 seconden of langer aan. Als u de bediening van stap 8 uitvoert werwijl het bericht is gewist, keert het bericht terug maar de fabrieksinstelling.
5. Raak de linkerkant van het display met aan en kies het teksttype.
Met iedere aanraking met 山 山 山 verandert het teksttype. Voor verdere informatatie, zie bladzijde 37.
6. Raak de rechterkant van het display met aan, of draai de [ROTARY] knop en kies het teken dat u wilt invoeren.
7. Herhaal de stappen 4 t/m 6 om het hele bericht in te voeren.
8. Raak MEMO gedurende 2 seconden of langer aan.
U hoor een lange pieptoon en het bericht wordt in het geheugen opgeslagen.
9. Druk op de [A] toets om terug te keren maar de oorspronkelijke functie.
Berichten afbeelden (MESSAGE)
Met deze functie=kuntu berachten afbeelden op hetdisplaywannerhetapparaatwordin-ofuitgeschakeld. "Hello"wordtafgebeeldwannerhet apparaatwordtingschakeld,en"Seeyou" wordtafgebeeldwannerhet apparaatwordtuitgeschakeld.
- De fabrieksinstelling is "ON".
1. Druk op de [A] toets om de instelfunctie op te roepen.
2. Raak het insteltemdisplay met aan en kies bij "DISPLAY" het item "MESSAGE".

3. Raak de rechterkant van het display met aan of draai de [ROTARY] knop en kies "ON" of "OFF".
4. Druk op de [A] toets om terug te keren maar de oorspronkelijke functie.
De gevoeligkeit van de spectrumanalysator instellen (S/A SENS)
Met deze functie=kuntudgevoeligheid(grootte van de afwijking) van de spectrumanalysator instellen.Voor verdere informatie over het afbeelden van de spectrumanalysator, raadpleegt u "Het display omschakenen" (zie blz.13)of"De schermbeveilig inginstellen" (zie blz.41).
- De fabrieksinstelling is "MID".
1. Druk op de [A] toets om de instelfunctie op te roepen.
2. Raak het instelitemdisplay met aan en kies bij "DISPLAY" het item "S/A SENS".

DISPLAY
ADJUST MODE
S/A SENS > MID
3. Raak de rechterkant van het display met 卡 aan of draai de [ROTARY] knop en stel de gevoeligheid in.
* Kies LOW (eenkleine afwijking), MID of HIGH (eengroef afwijking).
4. Druk op de [A] toets om terug te keren maar de oorspronkelijke functie.
De doorloopsnelheid van het display instellen (SCROLL)
Met deze functie kurz u de doorloopsnelheid verlagen als de tekst te snel over het display loopt waardoor u deze Niet kurz lezen.
- De fabrieksinstelling is "SPEED 2".
1. Druk op de [A] toets om de instelfunctie op te roepen.
2. Raak het instelitemdisplay met aan en kies bij "DISPLAY" het item "SCROLL".

DISPLAY
ADJUST MODE
SCROLL » SPEED2
3. Raak de rechterkant van het display met aan of draai de [ROTARY] knop en stel de gevoeligheid in.
* Dit item kan worden ingesteld binnen het bereik van SPEED 1 t/m SPEED 7.
Stel het item in verwijl u kijkth hoe het display verandert.
4. Druk op de [A] toets om terug te keren maar de oorspronkelijke functie.
De automatische displaydimmer instellen (DIMMER IN)
Met deze functie=kunt u de displayverlichting verzwakken overeenkomstig de verlichting of helderheid in uw auto.
Stel de automatische displaydimmer in op "AUTO" (gekoppeld aan de helderheid in uw auto) of "ILLUMI" (gekoppeld aan de verlichting in uw auto).
- Als de automatische displaydimmer is ingesteld op "AUTO", worden de helderheid van het display gedimd afhankelijk van delichtsterkte gemeten door deze sensor.
- Stel verwolgens het niveau van de displaydimmer in bij DMR LEVEL.
- De fabrieksinstelling is "AUTO".
1. Druk op de [A] toets om de instelfunctie op te roepen.
2. Raak het insteltemdisplay met aan en kies bij "APPERNCE" het item "DIMMER IN".

APPERNCE
ADJUST MODE
DIMMER IN> AUTO
3. Raak de rechterkant van het display met 卡 aan of draai de [ROTARY] knop en stel het niveau van de displaydimmer in.
* Kies een instelling UIT OFF (displaydimmeruitgeschakeld, helder) en 1 (licht gedimdt) t/m 5 (donker).
4. Druk op de [A] toets om terug te keren maar de oorspronkelijke functie.
Het displaycontrast instellen (CONTRAST)
Met deze functie=kunt u het contrast van hetdisplay instellen afhankelijk van de hoekwaaronder het apparaat is gemonteerd.
- De fabrieksinstelling is "6".
1. Druk op de [A] toets om de instelfunctie op te roepen.
2. Raak het insteltemdisplay met aan en kies bij "APPERNCE" het item "CONTRAST".
3. Raak de rechterkant van het display met 卡 aan of draai de [ROTARY] knop en stel het contrast in.

APPENCE
ADJUST MODE
CONTRAST 》 6
* Dit item kan worden ingesteld binnen het bereik van 1 t/m 11.
Stel het item in terwijl u kijkht hoe het display verandert.
4. Druk op de [A] toets om terug te keren maar de oorspronkelijke functie.
3. Raak de rechterkant van het display met aan of draai de [ROTARY] knop en kies "AUTO" of "ILLUMI".
4. Druk op de [A] toets om terug te keren maar de oorspronkelijke functie.
De LED laten knipperen wanneer de DCP worden verwijderd (BLINK LED)
Met deze functie kutu de LED van dit apparaat\
laten knipperen wonneer de DCP worden\
verwijderd.
- De fabrieksinstelling is "OFF".
1. Druk op de [A] toets om de instelfunctie op te roepen.
2. Raak het insteltemdisplay met 山 aan en kies bij "APPERNCE" het item "BLINK RED".

APPERNCE
ADJUST MODE
DMR LEVEL》 3
ADJUST MODE
BLINK LED》 OFF
3. Raak de rechterkant van het display met aan of draai de [ROTARY] knop en kies "ON" of "OFF".
4. Druk op de [A] toets om terug te keren maar de oorspronkelijke functie.
De pieptoon instellen voor wanner de toetsen worden bediend (BEEP)
Met deze functie=kunt u de korte en lange hoge pieptonen ("BEEP" genaamd) instellen die u hoort wanner een toets worden bediend.
- De fabrieksinstelling is "ON".
1. Druk op de [A] toets om de instelfunctie op te roepen.
2. Raak het insteltemdisplay met aan en kies bij "APPERNCE" het item "BEEP".

3. Raak de rechterkant van het display met 卡 aan of draai de [ROTARY] knop en kies "ON" of "OFF".
4. Druk op de [A] toets om terug te keren maar de oorspronkelijke functie.
Een functie kiezen
Dit item kan nicht worden gekozen wanner Dolby Pro Logic II is ingesteld op "MUSIC" of "MATRIX" (zie blz. 17).
- De fabrieksinstelling is "PRO" voor AC-PRO III en "PEQ" voor EQ SELECT.
AC-PROIII
Als "STD" (standaardfunctie) is gekozen, kunden de geluidskwaliteit en het geluidsveld worden ingesteld met VSE (Virtual Space Enhancer) zodate in eache zitpositie hetzelfdelle geluideffect kan worden verkrogen.
Als "PRO" (professionele functie) is gekozen, können de geluidskwaliteit en het geluidsveld in detail afzonderlijk voor iedere zitpositie worden ingesteld.
EQ SELECT
Als "P.EQ" (equalizerfunctie) is gekozen, kan het hele freiorentiebereik worden gecompenseerd door een gedetailleerde vloeende kromme.
Als "BAS / TREB" (lagetonen-/ hogetonenfunctie) is gekozen, kan het freiquentiebereik worden gecompenseerd door dit te verdelen in twee deelbereiken: lage tonen en hoge tonen.
1. Druk op de [A] toets om de instelfunctie op te roepen.
2. Raak het instelitemdisplay met aan en kies bij "SOUND" het item "AC-PRO III", en bij "SOUND" het item "EQ SELECT".

3. Raak de rechterkant van het display met aan of draai de [ROTARY] knop en kies de functie.
Functiekeuze
AC-PRO III STD
• Standaardfunctie (VSE-menu) PRO
• Professionele functie (positi菜单) EQ SELECT P.EQ
• Equalizerfunctie (P.EQ-menu) BAS / TREB
• Lagetonen-/hogetonnenfunctie
4. Druk op de [A] toets om terug te keren maar de oorspronkelijke functie.
De luidsprekerconfigurationinstellen (SP-SETTING)
Met deze functie=kunt u de configuratie van de luidsprekers in uw auto instellen zodat de geluidskarakteristieken van dit apparaat volledig tot hun rechtkommen.
- De fabrieksinstalling is "SWL + SWR".
1. Druk op de [A] toets om de instelfunctie op te roepen.
2. Raak het instelitemdisplay met aan en kies bij "SOUND" het item "SP-SETTING".

3. Raak de rechterkant van het display met 卡 aan of draai de [ROTARY] knop en kies de luidsprekerconfigatie.
Luidsprekerconfigurations
CTR+SW
5.1-kanalen
configuratie Voor-/achterluidsprekers (4 kanalen)
Middenluidspreker (1 kanaal)
Subwoofer (1 kanaal) SWL + SWR
4 kan. + subwoofer
configuratie Voor-/achterluidsprekers (4 kanalen)
Subwoofer (2 kanalen)
Opmerkingen:
- Het geluid worden nicht door de middenluidspreker uitgevoerd, behalte als de onderstaande instelleningen worden gemaakt wanneer "CTR+SW" is ingesteld.
(1) Raadpleeg "Het PLII-menu (Dolby PL II) kiezen" (zie blz. 17) en stel de Dolby Pro Logic II-functionie in op "MUSIC" of "MATRIX".
(2) Raadpleeg "De luidsprekers in-/uitschaken (CENTER-SP/SUB-WOOFER)" (zie blz. 45) en stel de middenluidspreker in op "ON".
- Het geluid worden nicht uitgevoerd uit de het linkerkanaal van de subwoofer als "SWL + SWR" is ingesteld en de Dolby Pro Logic II-functionie is ingesteld op "MUSIC" of "MATRIX".
4. Druk op de [A] toets om terug te keren maar de oorspronkelijke functie.
De luidsprekers in-/ uitschakelen (CENTER-SP/ SUB-WOOFER)
Met deze functie kurz u de middenluidspeker (CENTER-SP) en de subwoofer (SUB-WOOFER) in- en uitschakelen.
Zorg ervoor dat deze instelling op "OFF" is ingesteld als er geen middenluidspreker of subwoofer is aangesloten.
- De middenluidspreker (CENTER-SP) kan worden ingesteld als de Dolby Pro Logic II-functie is ingesteld op "MUSIC" of "MATRIX", en "SP-SETTING" is ingesteld op "CTR-SW".
- De fabrieksinstelling is "ON".
1. Druk op de [A] toets om de instelfunctie op te roepen.
2. Raak het instelitemdisplay met aan en kies bij "SOUND" het item "CENTER-SP", en bij "SOUND" het item "SUB-WOOFER".

3. Raak de rechterkant van het display met aan of draai de [ROTARY] knop en kies "ON" of "OFF".
4. Druk op de [A] toets om terug te keren maar de oorspronkelijke functie.
De filterfrequentie van de luidsprekers instellen (HPF/ SUB-W LPF)
Met deze functie=kunt u de filterfrequentie instellen overeenkomstig de luidsprekers die u gebrukt.
- De filters (HPF/SUB-W LPF) die u kurz gebruiken verschellen afhankelijk van de instelling van de Dolby Pro Logic II-functie.
Dolby Pro Logic II
functie-instelling Filter HPF SUB-W LPF*1 MUSIC/MATRIX Niet instelbaar Instelbaar OFF Instelbaar Instelbaar
^*1 Instellen is alleen mogelijk als "SUB-WOOFER" is ingesteld op "ON".
- De fabrieksinstelling is "THROUGH".
Filterinstalling
HPF (installing van hoogdoorlaatfilter)
Dit filter verwijdert de lage tonen UIT het geluid voor de voor- enchyterluidsprekers.
THROUGH 50Hz 80Hz 120Hz
Stel het filter in overeenkomstig uw luidsprekers als de luidsprekers eenkleine diameter hebben.
THROUGH
Kies deze instelling als u luidsprekers gebruikt die lage tonen können weergeven.
SUB-W LPF (installing van laagdoorlaatfilter voor subwoofer)
Dit filter verwijdert de hoge tonen uit het geluid voor de subwoofer.
THROUGH 50Hz 80Hz 120Hz
Stel de filterfrequentie in overeenkomstig uw subwoofer.
THROUGH
Kies deze instelling als u een subwoofer gebruikt met ingebouwde versterker uitgerust met een laagdoorlaatfilter.
1. Druk op de [A] toets om de instelfunctie op te roepen.
2. Raak het insteltemdisplay met aan en kies bij "SOUND" het item "HPF", en bij "SOUND" het item "SUB-W LPF".

3. Raak de rechterkant van het display met aan of draai de [ROTARY] knop en kies de frequente.
* Kies een instelling uit THROUGH, 50Hz, 80Hz en 120Hz.
4. Druk op de [A] toets om terug te keren maar de oorspronkelijke functie.
De ingebouwde versterker in-/uitschakelen (AMP CANCEL)
Met deze functie kurz u de ingebouwde versterker in- en uitschaken, alaar gelang een externe versterker worden gebruikt.
Stel AMP CANCEL in op "ON" (ingebouwde versterker uitgeschakeld) als een exterversterker is aangesloten en de ingebouwdeversterker Niet worden gebruikt.
- De fabrieksinstelling is "OFF" (ingebouwdeversterker ingeschakeld).
1. Druk op de [A] toets om de instelfunctie op te roepen.
2. Raak het insteltemdisplay met 卡 aan en kies bij "SOUND" het item "AMP CANCEL".

3. Raak de rechterkant van het display met aan of draai de [ROTARY] knop en kies "ON" of "OFF".
4. Druk op de [A] toets om terug te keren maar de oorspronkelijke functie.
Het uitgangsiveau van de Iuidsprekers instellen (SP GAIN)
Gebruik de ingebouwde testtoonfunctie van het apparaat om het uitgangsniveau van de luidsprekers zodanig in te stellen dat het volumeniveau dat iedere luidspreker voortbrengt hetzelfde klinkt.
- Dit item kan alleen worden ingesteld als de Dolby Pro Logic II-functie is ingesteld op "MUSIC" of "MATRIX".
- De fabrieksinstalling is "0dB".
1. Druk op de [A] toets om de instelfunctie op te roepen.
2. Raak het insteltemdisplay met aan en kies bij "SOUND" het item "SP GAIN".

3. Raak EDIT aan. De functie verandert maar de instelfunctie voor SP GAIN.
4. Raak het insteltemdisplay met 卡 aan en kies het gewenste insteltem. Met iedere aanraking met 卡 worden de instelitems als volgt doorlopen:
Instelitems

*1“CTR GAIN” wordt alleen aufgebeeld als "SP-SETTING" is ingesteld op "CTR+SW", en "CENTER-SP" is ingesteld op "ON".
^*2 "SUB-W GAIN" wordt alleen afgebeeld als "SUB-WOOFER" is ingesteld op "ON".
5. Raak de rechterkant van het display met 山 _ 1 ^ 山 aan of draai de [ROTARY] knop en stel het uitgangsnaveau in. Het uitgangsiveau kan worden ingesteld binnen het bereik van -10 dB t/m +10 dB.
6. Herhaal de stappen 4 en 5 om ieder item in te stellen.
7. Druk op de [A] toets om terug te keren maar de oorspronkelijke functie.
De vertragingstijd van de awhilesprekers instellen (PL II DELAY)
De tijdsduur waarna het geluid van iedere
luidspreker aankomt op de luisterpositie
verschilt affankelijk van de montagepositie van
dechterluidsprekers en de grotte van uw
auto. Als u de vertragingstijd van de
acterluidsprekers instelt,kest u deze tijdsduur
instellen zodate het geluid van de
acterluidsprekers tegelijkertijd worden gehoord
als dat van de voorluidsprekers.
- Dit item kan alleen worden ingesteld als de Dolby Pro Logic II-functie is ingesteld op "MUSIC" of "MATRIX".
- De fabrieksinstalling is "0ms".
1. Druk op de [A] toets om de instelfunctie op te roepen.
2. Raak het insteltemdisplay met aan en kies bij "PL II DELAY" het item "SRD-SP".

3. Raak de rechterkant van het display met 卡 aan of draai de [ROTARY] knop en stel de vertragingsstijd in.
* "SRD-SP" kan worden ingesteld binnen het bereik van 0 ms t/m 15 ms.
4. Druk op de [A] toets om terug te keren maar de oorspronkelijke functie.
De muziekfunctie in detail instellen (PL II CONT)
Met deze functie=kunt u de muziekfunctie gedetailleerder instellen als de Dolby Pro Logic II is ingesteld op "MUSIC".
- Dit item kan alleen worden ingesteld als de Dolby Pro Logic II-functie is ingesteld op "MUSIC".
- De fabrieksinstelling van PANORAMA is "NO", van DIMENSION is "3", en van CTR WIDTH is "3".
InstelItems
PANorama (installing van panoramaregeling)
Dit item verw breedt het geluidsveldbeeld van de voor- tot aan de achechterluidsprekers. Stel dit item in op "YES" als u geen surroundeffect hoort.
DIMENSION (installing van dimensie)
Dit item verplaatst het geluidsveldbeeld waar voren of achefteren. Als het geluidsveldbeeld waar voren ofaar achteren lijkt te liggen, kan deze afwijking worden gecompenseerd. Instelling 3 is de middenpositie. De instellenen 2 t/m 0 verplaatsen het geluidsveldbeeldaar achefteren, en de instellenen 4 t/m 6 verplaatsen het geluidsveldbeeldaar voren.
CTR WIDTH (installing van de middenbreds) 1 Dit item stelt de vaste positie van het middenkanaal inussen de middenluidspreker en de linker- enrechtervoorluidsprekers. Als het middengeluid gelijkmatig is verdeld
tussen links en rechts, neemt het hele geluidsveldbeeld toe en produeert een naturuurlijk uitdijend gevoel.
In deinstalling 0 wordt al het middengeluid weergegeven via de middenluidspreker. In deinstalling 7 is het middengeluid gelijkmatig verdoeffend over de linker- en rechtservoorluidsprekers.
*1 "CTR WIDTH" wordt alleen aufgebeeld als "SP-SETTING" is ingesteld op "CTR+SW", en "CENTER-SP" is ingesteld op "ON".
1. Druk op de [A] toets om de instelfunctie op te roepen.
2. Raak het insteltemdisplay met 山 山 aan en kies bij "PL II CONT" het gewenste insteltem. De insteltems zijn "PANorama", "DIMENSION" en "CTR WIDTH".

3. Raak de rechterkant van het display met aan of draai de [ROTARY] knop en stel het item maar wens in.
* Kies voor "PANORAMA" de instelling "YES" of "NO".
* "DIMENSION" kan worden ingesteld binnen het bereik van 0 t/m 6.
* "CTR WIDTH" kan worden ingesteld binnen het bereik van 0 t/m 7.
4. Druk op de [A] toets om terug te keren maar de oorspronkelijke functie.
De AUX-functionie
Dit system is uitergerust met een tulpingangen zodate u kunt luisteren hier geluid en muziek van externe apparaten aangesloten op dit apparaat.
AUX/TELkiezen
U kunt via de luidsprekers luisteren maar geluid en muziek van externe apparaten, of maar uw telefoongesprekken, indien deze+zijn aangesloten op dit apparaat.
Als TEL INT of een extern apparaat is aangesloten op dit apparaat,kest u de TEL-functie of de AUX-functie kiezen.
- De fabrieksinstelling is "AUX".
1. Druk op de [A] toets om de instelfunctie op te roepen.
2. Raak het insteltemdisplay met aan en kies bij "SETTING" het item "AUX/TEL".

3. Raak de rechterkant van het display met aan of draai de [ROTARY] knop en kies "AUX" of "TEL". AUX:
De AUX/TEL-ingangskabel is voor de geluidsinvoer vanaf een extern apparaat. TEL:
De AUX/TEL-ingangskabel is voor de geluidsinvoor vanaf een mobiele telefoon.
4. Druk op de [A] toets om terug te keren maar de voorgaande functie.
Het ingangsiveau van draagbare audio (AUX-functie) instellen (AUX SENS)
Met deze functie=kunt u het ingangsnaveau instellen van optionele externe apparaten die..., aanegasloten op dit apparaat.
- Dit kan worden ingesteld als "AUX/TEL" is ingesteld op "AUX".
- De fabrieksinstalling is "MID".
1. Druk op de [A] toets om de instelfunctie op te roepen.
2. Raak het insteltemdisplay met aan en kies bij "SETTING" het item "AUX SENS".

3. Raak de rechterkant van het display met 卡 aan of draai de [ROTARY] knop en stel het ingangsniveau in.
* Kies een instelling UIT LOW, MID of HIGH.
4. Druk op de [A] toets om terug te keren maar de oorspronkelijke functie.
De autoluidsprekeruitgang voor de mobiele telefoon (TEL-002, optioneel) instellen
Stel de mobiele telefoon in als u telefoongesprekken wiltuitvoeren.
- De fabrieksinstelling is "RIGHT".
1. Druk op de [A] toets om de instelfunctie op te roepen.
2. Raak het instelitemdisplay met aan en kies bij "SETTING" het item "TEL-SP".

3. Raak de rechterkant van het display met aan of draai de [ROTARY] knop en kies "LEFT" of "RIGHT".
LEFT:
De telefoongesprekken können worden gehoord via de linkervoorluidspreker die is aangesloten op dit apparaat.
RIGHT:
De telefoongesprekken können worden gehoord via de rechtervoorluidspreker die is aangesloten op dit apparaat.
4. Druk op de [A] toets om terug te keren maar de voorgaande functie.
De mobiele-telefooonnderbreking instellen
Als u dit apparaat en uw mobiele telefoon aansluit op een apparaatje (TEL-002, optioneel), kutn u luisteren maar uw telefoongesprekken via de luidsprekers in uw auto.
- De fabrieksinstalling is "OFF".
1. Druk op de [A] toets om de instelfunctie op te roepen.
2. Raak het insteltemdisplay met aan en kies bij "SETTING" het item "TEL-SWITCH".

3. Raak de rechterkant van het display met
aan of draai de [ROTARY] knop en kies de instenting.
Met iedere druk op de [ROTARY] knop, verandert de instelling in onderstaande volgorde:
OFF ON MUTE OFF...
OFF:
Dit apparaat blij normala Werken, zelfs als de mobiele telefoon worden gebruikt.
Opmerking:
- Als u een handsfree-set aansluit, zorgt u ervoor deze instelling op ON te zetten om het geluid van de mobiele telefoon via het systeme te ontvangen.
ON:
U cunt waar uw telefoongesprekken luisteren via de luidsprekers aangesloten op dit apparaat.
* Wanner u maar uw telefoongesprekken luistert via de luidsprekers van uw auto,kest u het volumeniveau instellen door de the [ROTARY] knop te draaien.
MUTE:
Het weergavegeluid van dit apparaat worden onderbrokenijdens telefoongesprekken.
4. Druk op de [A] toets om terug te keren maar de voorgaande functie.
De automatische volumeregeling instellen (CALIBRATE/A-VOL SENS)
U kunt het volumeniveau automatisch veranderen aan de hand van de rijsnelheid van uw auto.
- De fabrieksinstelling is "LOW".
1. Druk op de [A] toets om de instelfunctie op te roepen.
2. Raak het insteltemdisplay met aan en kies bij "SETTING" het item "CALIBRATE".

3. Versnel tot een snelheid van 50~km / h
4. Als u 50 km/h rijdt, drukt u op START. Het kalibreren worden UITgevoerd.
Na 2 seconden of langer hoort u een lange pieptoon, en op het display worden "SUCCESSIONAL" afgebeeld.
Als u een korte pieptoon hoot, is het kalibreren mislukt. Herhaal de procedure vanaf stap 3.
5. Stel cervolgens de gevoeligheid in. Raak het instelitemdisplay met aan en kies bij "SETTING" het item "A-VOL SENS".

6. Raak de rechterkant van het display met aan of draai de [ROTARY] knop en kies de gevoeligheid.
Met iedere druk op de [ROTARY] knop, verandert de instelling in onderstaande volgorde:
OFF (geen verandering in het volumeniveau) LOW (kleine verandering in het volumeniveau) MID-LOW MID MID-HIGH HIGH (grote verandering in het volumeniveau) ...
7. Druk op de [A] toets om terug te keren maar de voorgaande functie.
Een systeemcontroleuitvoeren
Met deze functie=kunt u een systeemcontroleuitvoeren van de instelfunctie indien dit nodigmighten.
1. Druk op de [A] toets om de instelfunctie op te roepen.
2. Raak het instelitemdisplay met aan en kies bij "SETTING" het item "SYSTEM CHECK".

SETTING
ADJUST MODE
SYSTEM CHECK START
3. Raak START gedurrende 1 seconde of langer aan.
"System Check" wordt op het display afgebeeld.
4. Druk op de [ROTARY] knop.
De systeemcontrole start.
Nadat de systeemcontrole maar is, worden
"Completed" aufgebeeld op het display.
5. Druk nogmaals op de [ROTARY] knop. Het hoofddisplay van de radiofunctie worden afgebeeld.
De beveiligingsfunctie gebruiken (CODEMATIC)
Met deze functie kurz u voorkomen dat personen die de juiste aanraakvolgorde nicht kennen dit apparaat gemakkelijk können bedienen. Het aanraakcodedisplay worden afgebeeld als het DCP worden bevestigd en het apparaat worden ingeschakeld verwijl "CODEMATIC" is ingesteld op "ON".
Als u het display op de juiste locaties in de Vooraf bepaalde volgorde aanraakt, worden "SUCCESSFUL" afgebeeld en wordt het apparaatuitgeschakeld.
De volgende keer dat het apparaat worden ingeschakeld, wordt het aanraakcodedisplay Niet afgebeeld, maar worden het hoofddisplay van de radiofunctie of CD-functie afgebeeld.
1. Druk op de [A] toets om de instelfunctie op te roepen.
2. Raak het insteltemdisplay met aan en kies bij "SETTING" het item "CODEMATIC".

Er worden twee typen instelitems afgebeeld bij "CODEMATIC": items waarvoor aan de rechterkant van het display "ON" of "OFF" worden afgebeeld, en items waarvoor aan de rechterkant van het display "INPUT" worden afgebeeld.
Kies hier een item waarvoor aan de rechterkant van het display "ON" of "OFF" worden afgebeeld.
3. Raak de rechterkant van het display met 卡 aan of draai de [ROTARY] knop en kies "ON" of "OFF".
4. Raak het insteltemdisplay met aan en kies bij "SETTING" het item "CODEMATIC". Kies hier een item waarvoor aan de rechterkant van het display "INPUT" worden afgebeeld.
5. Raak INPUT aan.
Het aanraakcodedisplay gaat UIT.
6. Voer de aanraakcode in.
* Raak één van de vijf locaties op het display aan (links, midden, rechts, rechtsboven of rechtsonder).
Met iedere aanraking van een locatie op het display,licht een van de aanraakcodeindicators op.
* Bijvoorbeeld, raak (1) midden, (2) rechtsboven, (3) links en (4) rechtsonder in die volgorde aan. U kurz ookdezelfde locatie meerere keren aanraken. Nadat u vierkeeen locatie hebt aangeraakt, hoort u een lange pieptoon en keert het apparaat terug maar de oorspronkelijke functie.
CODEMATIC annuleren
Als u de aanraakvolgorde bent vergeten, raakt u ① rechtsonder, ② links, ③ rechtsboven en ④ rechts in die volgorde aan, of drukt u op [SCN] op de afstandsbediening.

7. BEDIENING VAN ACCESSORIES
Bediening van de CD-wisselaar
CD-wisselaar
Als een optionele CD-wisselaar is aangesloten met behulp van een CeNET-kabel, kan dit apparaat de functies van de CD-wisselaar bedieren. Dit apparaat kan op maximaal twee, met behulp van een CeNET-kabel aangesloten, CD-wisselaars worden aangesloten.
DVD-wisselaar
Als een optionele DVD-wisselaar is aangesloten met behulp van een CeNET-kabel, kan dit apparaat de functies van de DVD-wisselaar bedieren. Om een DVD te kunnen bekijken hebt u een optionele tv-monitor nodig.
De bediening en het display van de DVD-wisselaar op dit apparaat is slechts een vereenvoudigde versie en ondersteunt nicht alle functies van de DVD-wisselaar. Als u de DVD-wisselaar wilt bedieren, gebruikt u de afstandsbediening van de DVD-wisselaar. Voor verdere informatie raadpleegt u de gebruiksaanwijzing van de DVD-wisselaar.
■ Als twee CD-wisselaarsঃn aangesloten
Druk op de [ROTARY] knop en kies een CD-wisselaar die op dit apparaat is aangesloten. (Met iedere druk op de [ROTARY] knop verandert de CD-wisselaar.)
- Als de CD-wisselaar geen magazijn bevat, worden "NO MAG" afgebeeld, en als het magazijn geen CD bevat, worden "NO DISC" Niet afgebeeld voor dat disnummer.
- Voor verdere informatatie over het titeldisplay, raadpleegt u "Het titeldisplay omschakelen" (zie blz. 14).
De displays in dewisselaarfunctie
Hoofddisplay (CD-wisselaarfunctie) Het hoofddisplay wordt aufgebeeld als u op de [ROTARY] knop drukt en de CDwisselaarfunctie kiest.

Als u de linkerkant van het display gedurende 1 seconde de langer aanraakt, schakelt het display over maar de simpele bedieningsfunctie.

Track/weergavetijd-display
T01/02: 00: Het nummer van de track die nu wordt weergegeven en de weergavetijd worden afgebeeld.
Als u het display van de standardbedieningsfunctie met 山 山 of aanraakt, kurz u de track kiezen die u wilt weergeven of vooruit-/achteruiitspoeen.
Titeldisplay
Als u dit aanraakt, worden het display omgeschakeld.
Discnummerdisplay
Als u het display van de
standaardbedieningsfunctie met 卡 aanraakt, kut u een disc kiezen.
MODE
As u dit aanraakt, worden subfuncties afgebeeld. Als u dit gedurende 1 seconde of langer aanraakt, worden de dislijst afgebeeld.
T-SCAN/D-SCAN
Dit worden aufgebeeld tijdens scanweergave. Als u T-SCAN/D-SCAN aanraakt, stopt de scanweergave.
T-RPT/D-RPT
Dit worden aufgebeeldijdens herhaalde weergave. Als u T-RPT/D-RPT aanraakt, stopt de herhaalde weergave.
T-RDM/D-RDM
Dit worden afgebeeld tijdens willekeurige weergave. Als u T-RDM/D-RDM aanraakt, stocht de willekeurige weergave.
DISC↑
Als u dit aanraakt, begint de weergave van de volgende disc.
(alleen op het display van de simpele bedieningsfunctie)
Door deze aan te raken kutu de track kiezen die u wilt weergeven.
Door deze te blijven aanraken=kunt u de tracks vooruit-/achteruiestspoelen.
Disclijstdisplay (CD-wisselaarfunctie)
Deze lijst kunt u afbeelden door op het hoofddisplay gedurende 1 Seconde of longer MODE aan te raken.

Discnaam
>>: Bezig met kiezen
Als u een discnaam aanraakt, keert het display terug maar het hoofddisplay en begint de weergave vanaf de eerste track op de disc die u hebt aangeraakt.
←PREV-RTN:
Alsuditaanraakt,wordtdevoorgaande disclijsta
afgebeeld.Dooditgedurende1secondeof
langeraan teraken,keert hetdisplayterugnarr
hethoofddisplay.
NEXT:
Als u dit aanraakt, worden de volgende dislijst afgebeeld.
VOORZICHTIG
Niet iedere CD-wisselaar kan CD-ROMs weergegeven. Dit is afhankelijk van het model.
Opmerking:
- Het is möglich dat sommige CD's opgenomen in de CD-R/CD-RW-functie Niet bruikbaar zich.
De wisselaarfunctie kiezen
1. Druk op de [ROTARY] knop om de wisselaarfunctie te kiezen.
* De functie van een apparaat dat nicht is aangesloten worden nicht afgebeeld.
De weergave begint automatisch nadat de functie is veranderd in de wisselaarfunctie.
De weergave pauzeren
1. Druk op de [▶■] toets.
De weergave hervatten
1. Druk nogmaals op de [▶■] toets.
Een CD kiezen
1. Raak het discnummerdisplay met 山 山 aan en kies een disc. De weergave begint.
* Als de gekozen disc Niet in het magazijn zit, worden het discnummer Niet afgebeeld.
* Als u DISC ↑aanraakt, begint de weergave van de volgende disc.
Een disc kiezen op het disclijstdisplay
1. Raak MODE gedurende 1 seconde of longer aan.
De disclijst worden afgebeeld. Als u NEXT aanraakt, worden het volgende deel van de disclijst afgebeeld.
2. Raak de discnaam aan.
* Als de gekozen disc Niet in het magazijn zit, worden "NO DISC" afgebeeld voor dat disnummer.
* Als udezelfde disc kiest als die op dat moment worden teergegeben, keert de weergave terug maar en begint vanaf de eerste track op die disc (beginfunctie).
Een track kiezen
1. Als u maar de volgende track wilt luisteren, raaktu het trackdisplay met 品 aan.
2. Als u waar de voorgaande track wilt luisteren, raakt u het trackdisplay tweeemaal met 山 aan.
Door met 品 aan te raken worden de volgende track weergegeven.Als u vaker met 品 aanraakt, verspringt u hetzelfde aantal tracks vooruit als u met 品 hebt aangeraakt, waarna de weergave van de track begint.
Door met 卡 aan te raken worden de voorgande track weergegeven. Als u vaker met 卡 aanraakt, verspringt u hetzelfde aantal tracks achechteruit als u met 卡 hebt aangeraakt, waarna de weergave van de track begint.
* Als u het trackdisplay tweeemaal met † aanraakt toenwij het begin van een track worden waergegeven, worden soms tweet tracks acheeruit gesprongen, en begint de weergave van die track.
Vooruit- en Achteruitspoelen
1. Om vooruit te spoelen raakt u het trackdisplay met 出 aan.
2. Om anschteruit te spoelen raakt u het trackdisplay met aan.
Beginfunctie
De beginfungtie begint de weergave vanaf de eerste track op de disc die op dat moment worden weergegeven.
1. Raak MODE gedurende 1 seconde of longer aan.
De disclijst worden afgebeeld. Als u NEXT aanraakt, worden het volgende deel van de disclijst afgebeeld.
2. Raak de discnaam aan.
* Als de gekozen disc Niet in het magazijn zit, worden "NO DISC" afgebeeld voor dat discnummer.
* Als udezelfde disc kiest als die op dat moment worden weergegeven, keert de weergave terug maar en begint vanaf de eerste track op die disc.
Scanweergave
In de scanweergave worden de eerste 10 seconden vanijdere track op een disc automatisch weergegeven. Deze functie blijdt doorgaan totdat deze worden uitgeschakeld.
Scanweergave is handig wanner u een gewenste track zoekt.
1. Raak MODE aan.
2. Raak T-SCAN aan. MODE verandert in "T-SCAN" en de scanweergave begint.
* De scanweergave begint vanaf de track die volgt op de track die op dat moment worden weergegeven.
De scanweergave stoppen
1. Raak T-SCAN aan.
T-SCAN verandert in "MODE" en de weergave begint vanaf de track die werd weergegeven toen u T-SCAN aanraakte.
Discscanweergave
In de discscanweergave worden de eerste 10 seconden van de eerste track op iedere disc in de huidig gekozen CD-wisselaar automatisch weergegeven. Deze functie blijdt doorgaan totdat deze worden uitgeschakeld.
Discscanweergave is handig wanner u een gewenste CD zoekt.
1. Raak MODE aan.
2. Raak D-SCAN aan.
MODE verandert in "D-SCAN" en de discscanweergave begint.
* De discscanweergave begint vanaf de disc die volgt op de disc die op dat moment worden weergegeven.
De discscanweergave stoppen
1. Raak D-SCAN aan.
D-SCAN verandert in "MODE" en de weergave begint vanaf de track die werden weergegeven toen u D-SCAN aanraakte.
Herhaalde weergave
In de herhaalde weergave wordt de track die op dat moment wordt weergegeven continu herhaald. Deze functie blijdt doorgaan totdat deze wordt uitgeschakeld.
1. Raak MODE aan.
2. Raak T-REPEAT aan. MODE verandert in "T-RPT" en de herhaalde weergave begint.
De herhaalde weergave stoppen
1. Raak T-RPT aan.
T-RPT verandert in "MODE" en de normale weergave begint vanaf de track die werd weergegeven voordat u T-RPT aanraakte.
Herhaalde discweergave
In de herhaalde discweergave worden, nadat alle tracks op de huidige disc zich weergegeven, de disc opniew vanaf de eerste track weergegeven. Deze functie blijft doorgaan totdat deze worden uitgeschakeld.
1. Raak MODE aan.
2. Raak D-REPEAT aan.
MODE verandert in "D-RPT" en de herhaalde discweergave begint.
■ De herhaalde discweergave stoppen
1. Raak D-RPT aan.
D-RPT verandert in "MODE" en de normale weergave begint vanaf de track die werden weergegeven voordat u D-RPT aanraakte.
Willekeurige weergave
In de willekeurige weergave worden de afzonderlijke tracks op de disc automatisch willekeurig gekozen en weergegeven. Deze functie blijdt doorgaan totdat deze wordenuitgeschakeld.
1. Raak MODE aan.
2. Raak T-RANDOM aan. MODE verandert in "T-RDM" en de willekeurige weergave begint.
De willekeurige weergave stoppen
1. Raak T-RDM aan.
T-RDM verandert in "MODE" en de normale weergave begint vanaf de track die werden weergegeven voordat u T-RDM aanraakte.
Willekeurige discweergave
In de willekeurige discweergave worden de afzonderlijke tracks of discs automatisch willekeurig gekozen en weergegeven. Deze functie blijft doorgaan totdat.Deze wordenuitgeschakeld.
1. Raak MODE aan.
2. Raak D-RANDOM aan. MODE verandert in "D-RDM" en de willekeurige discweergave begint.
De willekeurige discweergave stoppen
1. Raak D-RDM aan.
D-RDM verandert in "MODE" en de normale weergave begint vanaf de track die werd weergegeven voordat u D-RDM aanraakte.
TV-tuner
Als een optionele TV-tuner is aangesloten met behulp van een CeNET-kabel, kan dit apparaat alle functies van de TV-tuner bedieren. Als u een TV-uitzending wilt bekijken, heb t een TVtuner en een tv-monitor nodig.
De displays in de TV-functionie
Hoofddisplay
Het hoofddisplay worden aufgebeeld als u op de [ROTARY] knop drukt en de TV-functie kiest.

Als u de linkerkant van het display gedurende 1 seconde de langer aanraakt, schakelt het display over maar de simpele bedieningsfunctie.

Kanaaldisplay
1ch: Het kanaal dat op dat moment worden ontvangen worden afgebeeld.
Als u het display van de standaardbedieningsfunctie met of aanraakt, kurz u Zoek-afstemmen of handmatig afstemmenuitvoeren.
Titeldisplay
3ch: De naam van de zender die op dat moment worden ontvangen worden afgebeeld.
VTR: In de videofunctie
Als u deze aanraakt, worden het display omgeschakeld.
Frequentiebanddisplay
TV1: Frequentiebandnaam
Voorkeurnummerdisplay
Als u het display van de
standaardbedieningsfunctie met 山 山 aanraakt, kurz u een voorkeurgeheugen kiezen.
MODE
As u dit aanraakt, worden subfuncties afgebeeld. Door dit gedurende 1 seconde of langer aan te raken, worden de voorkeurgeheugenlijst afgebeeld.
P-SCAN: Dit worden afgebeeldijdens het voorkeurzender-scannen. Als u dit aanraakt, stoot het voorkeurzender-scannen.
A-STORE: Dit worden afgebeeldijdens het automatisch opslaan. Als u dit aanraakt, stopt het automatisch opslaan.
BAND
Door dit aan te raken worden de frequentieband omgeschakeld.
Als u dit gedurende 1 seconde of langer aanraakt, schakelt dezoekfunctie beurtelings tussen de handmatige afstemfunctie en dezoek-afstemfunctie.

(alleen op het display van de simpele bedieningsfunctie)
Door deze toetsen aan te raken=kunt u zoekafstemmen of stap-afstemmen in dehandmatige afstemfunctie).
Door deze toetsen aan te raken en aangeraakt te houden kurz u snel-afstemmen (in de handmatige afstemfunctie).
De Voorkeurgeugenlijst afbeelden
Deze lijst kunt u afbeelden door op het hoofddisplay gedurende 1 Seconde of langer MODE aan te raken.

>>
Bezig met afstemmen
RTN:
Als u dit aanraakt, keert het display terug maar het hoofddisplay.
De TV-functie kiezen
1. Druk op de [ROTARY] knop om deTV-functionie te kiezen.
Met iedere druk op de [ROTARY] knop, verandert de functie als volgt:
* De functie van een apparaat dat nicht is aangesloten worden nicht afgebeeld.
Eband wisselen
1. Raak BAND aan om de frequentieband te veranderen.
Met jegere aanraking van BAND verandert de frequentieband in onderstaande volgorde.
TV1 TV2 TV1...
Zoek-afstemmen
Met Zoek-afstemmen=kunt u automatisch afstemmen op zenders met een goede ontvangstkwaliteit.
1. Raak BAND aan gedurende 1 Seconde of langer verwil MANU wordt afgebeeld. Als MANU uit is, is automatisch afstemmen möglichk.
2. Raak het kanaaldisplay met aan. SEEK UP/SEEK DOWN worden afgebeeld en het afstemmen begint. Het afstemmen stopt automatisch bij zenders met een goede ontvangstkwaliteit.
Het afstemmen annuleren
1. Raak nogmaals het kanaaldisplay met aan.
Handmatig afstemmen
Er zijn twee manieren waarop u handmatig kunt afstemmen: snel-afstemmen en stap-afstemmen.
In de stap-afstemfunctie verandert de frequentie stap voor stap. In de snel-afstemfunctie kut u snel afstemmen op de gewenste frequentie.
1. Raak BAND aan gedurende 1 seconde of langer verwijl MANU zich wordt afgebeeld. Als MANU wordt afgebeeld is handmatig afstemmen möglichk.
2. Bedien het kanaaldisplay en stem af op een kanaal waarop wordenuit gezonden. Er zich twee methoden voor handmatig afstemmen: stap.afstemmen en snelafstemmen.
* In de stap-afstemfunctie verandert het kanaal stap voor stap.
Raak het titeldisplay met 一 _ 一 aan.
* In de snel-afstemfunctie kutu het kanaalsnel ononderbroken veranderen. Raak het kanaaldisplay met aan. Het afstemmen stoot zodra u uw vinger van het display afhaalt.
Oproepen van een voorgeprogrammeerd station
Met deze functie=kunt u een voorkeurzender kiezen.
1. Raak MODE gedurende 1 seconde of langer aan. De voorkeurgeheugenlijst worden afgebeeld.
2. Raak de zender aan waarnaar u wilt luisteren.
* U=kunt ook op de zender afstemmen door het voorkeurnummer met ①aan te raken.
Het afstemmen annuleren
1. Raak RTN aan.
Voorkeurzenders handmatig opslaan
U kunt maximaal 12 TV-zenders opslaan (6-TV1 en 6-TV2). Hiermee kunt u uw favoriete TV-zenders in het geheugen opslaan en later weer oproepen.
1. Raak BAND aan om de freiorentieband te veranderen.
2. Bedien het kanaaldisplay en kies de zender die u wilt opslaan.
3. Raak MODE gedurende 1 seconde of langer aan. De voorkeurgeheugenlijst worden afgebeeld.
4. Raak het voorkeurnummer waaronder u de zender wilt opslaan gedurende 2 seconden of langer aan.
U hoor een lange pieptoon en de zender wordt in het geheugen opgeslagen.
Als u een korte pieptoon hoog, is de zender nicht in het geheugen opgeslagen. Herhaal de procedure vanaf stap 1.
Voorkeurzenders automatisch opslaan
U kunt automatisch 6 TV-zenders in het voorkeurgeheugen opslaan.
Als er minder dan ces zenders met een goede ontvangstkwaliteit gezonden worden, zullen de zenders die eerder in het geheugen werden opgeslagen gehandhaafd blijven en alleen de zenders met een sterk signaal in het geheugen worden opgeslagen.
1. Raak MODE aan.
2. Raak A-STORE gedurende 2 seconden of langer aan.
MODE verandert in "A-STORE" en het voorkeurnummer van het automatisch opslaan worden op het voorkeurnummerdisplay afgebeeld.
* Zenders met een goede ontvangstkwaliteit worden automatisch gezocht en opgeslagen in het voorkeurgeheugen (onder voorkeurnummers 1 t/m 6) in oplopende volgorde vanaf de zender met de laagste freiorentie.
Opmerkingen:
- Wanner u automatisch voorkeurzenders opslaat, worden eerder opgeslagen zenders gewist.
- Als er minder dan zes zenders met een goede ontvangstkwaliteit worden gezonden, keert het apparaat automatisch terug maar de laagste freqente en wordt het automatisch opstaan nogmaals uitgevoerd. Als daarna nog steeds minder dan zes zenders worden gezonden, blijven de eerder opgeslagen zenders in het geheugen.
Voorkeurzender-scannen
Met voorkeurzender-scannenkest u de Voorkeurzenders eén voor een controeren in de volgorde waarin ze in het geheugen zich opgeslagen.
1. Raak MODE aan.
2. Raak P-SCAN aan.
MODE verandert in "P-SCAN" en het voorkeurnummer van het voorkeurzender-scannen worden op het voorkeurnummerdisplay afgebeeld.
* De huidig opgeslagen voorkeurzenders worden een voor een op volgorde ontvangen gedurende 7 seconden of langer elk. Zenders met een slechte ontvangst worden overgeslagen en de volgende zender worden ontvangen.
De TV-zenders worden in onderstaande volgorde ontvangen: TV1 (1 6) TV2(1 6) TV1(1 6) enzovoort.
Het voorkeurzender-scannen annuleren
1. Raak P-SCAN aan.
P-SCAN verandert in "MODE", en de zender die werden ontvangen voordat op P-SCAN werk gedrukt, worden waar ontvangen.
Naar een video kijken
De TV-tuner is uitergerust met een VTR-ingangsaansluiting waarop u eén extern apparaat kutn aansluiten. Sluit een 12-volt videocassettespeler (VCP) of videocassetterecorder (VCR) aan op de ingangsaansluiting van de TV-tuner.
1. Druk op de [▶■] toets.
VTR worden aufgebeeld en het apparaat worden in de VTR-functie gezet.
* Het TV-schem roept de video-ingangsfungtie op, waarna u een video-kunt weergeven.
■ Terugkeren maar de TV-functie
1. Druk nogmaals op de [▶II] toets.
Het TV-zendergebied instellen (TV AREA)
Als u het TV-zendergebied (waarin het tv-signal kan worden ontvangen) instelt, verandert de gebiedsinstelling van de TV-tuner.
- De fabrieksinstelling is "GERMANY".
1. Druk op de [A] toets om de instelfunctie op te roepen.
2. Raak het insteltemdisplay met aan en kies bij "TUNER" het item "TV AREA".

ADJUST MODE TV AREA GERMANY
3. Raak de rechterkant van het display met aan of draai de [ROTARY] knop en kies het zendergebied.
4. Druk op de [A] toets om terug te keren maar de voorgaande functie.
De TV-diversiteit instellen (TV DIVER)
U kurz de ontvangstinstelling van de TV-antenne die op de TV-tuner is aangesloten instellen.
Stel dit item in op "OFF" als u geen TV-antenne voor meervoudige ontvangst gezruikt.
- De fabrieksinstelling is "ON".
1. Druk op de [A] toets om de instelfunctie op te roepen.
2. Raak het insteltemdisplay met aan en kies bij "TUNER" het item "TV DIVER".

3. Raak de rechterkant van het display met aan of draai de [ROTARY] knop en kies "ON" of "OFF".
4. Druk op de [A] toets om terug te keren maar de oorspronkelijke functie.
De DAB-bedieningsfunctie
Als een DAB (optioneel, DAH913 of DAH923) is aangesloten met behulp van een CeNET-kabel, kan dit apparaat alle functies van de DAB bedieren.
Naar een DAB-zender luisteren
1. Druk op de [ROTARY] knop om de bedieningsfunctie te veranderen.
Opmerkingen:
- Het display dat worden afgebeeld wonneer een DAB-zender worden ontvangen is hetzelfde als dit wonneer een zender handmatig worden ontvangen of een voorkeurzender worden ontvangen.
- Het aantal programma's en de uitzendtijden verzillen per DAB-zender.
- Als het DAB-sigmaal zwak is, worden de geluidsuitvoer onderbroken.
Zoek-afstemmen
1. Druk op de [ROTARY] knop en kies de DAB-functionie.
2. Raak de linkerkant van het display met aan.
Als het apparaat een DAB-zender ontvangt,\
wordt "DAB" afgebeeld op het display.
* Het apparaat stopt hetzoek-afstemmen als het geen DAB-zender kan vinden. Het display keert terug maar de voorgaande functie.
Handmatig afstemmen
1. Druk op de [ROTARY] knop en kies de DAB-functionie.
2. Als "MANU" nied wordt afgebeeld, raakt u BAND aan gedurende 1 seconde of langer. Als "MANU" wordt afgebeeld, is handmatig afstemmen möglichk.
3. Raak de linkerkant van het display met aan en stem af op de zender.
* Als gedurende 7 seconden of langer geen bediening worden ditgevoerd, worden het handmatig afstemmen beeindigd en keert het display terug maar de voorgaande functie.
Wisselen tussen programma's
1. Druk op de [ROTARY] knop en kies de DAB-functionie.
2. Raak de linkerkant van het displa
品 aan om tussen de programma's van de DAB-zender te wisselen.
Opmerking:
- De programmanamen können hetzelfde zijn, afhankelijk van de DAB-zender.
Programma-scannen
Met deze functie=kunt u ieder ontvangbaarprogramma van de DAB-zender die wordenontvangen eén voor een gedurende 10seconden elk scanden.Dit is handig wanner uunaar een gewenst programma wilt zoeken.
1. Druk op de [ROTARY] knop en kies de DAB-functie.
2. Raak MODE aan.
3. Raak S-SCAN aan. "S-SCAN" wird afgebeeld en dit apparaat begint de programme's een voor een geduerende 10 seconden elk te scannen. Van ieder programma dat het apparaat scant wordt de naam op het display afgebeeld.
4. Als u het scannen wilt stoppen wanner het gewenste programme is gezonden, raakt u S-SCAN aan.
Handmatig opslaan in het geheugen
Het apparaat kan DAB-programma's handmatig in het geheugen opslaan. Maximaal 18 programme's kunnen onder de voorkeurtoetsen (6 programme's elk) worden opgeslagen.
[M1], [M2] en [M3]
1. Druk op de [ROTARY] knop en kies de DAB-functie.
2. Raak BAND aan en kies een voorkeurtoets.
3. Raak MODE gedurende 1 seconde of langer aan.
De voorkeurgeheugenlijst worden afgebeeld.
4 Raak het voorkeurnummer waaronder u het programmatype wilt opslaan gedurende 2 seconden of langer aan.
U hoor een lange pieptoon en de zender wordt in het geheugen opgeslagen.
Als u een korte pieptoon hoort, is de zender.
niet in het geheugen opgeslagen.Herhaal
de procedure vanaf stap 1.
Opmerking:
- Onderbrekingsprogramma's (PTY of INFO) können nicht handmatig in het opgeslagen worden opgeslagen.
Een voorkeurprogramma oproepen
1. Druk op de [ROTARY] knop en kies de DAB-functie.
2. Raak BAND aan.
Met iedere aanraking van BAND verander het display in de onderstaande volgorde.
MEMO1 MEMO2 MEMO3 MEMO1...
3. Raak de rechterkant van het display met aan om een voorkeurprogramma op te roepen.
De AF-functie
De AF-functie schakelt over maar een andere frequentie op hetzelfde netwerk om een zo goed möglich ontvangstkaliteit te verkrijgen.
- De fabrieksinstelling is "ON".
- Als de ontvangstkwaliteit van de huidige zenderchyteruit gaat, wordt "SEARCH" op het display afgebeeld en zoekt de radio waar hetzelfde radioprogramma op een andere freqentie.
- Voor verdere informatie raadpleegt u de "AF-functionie" (zie blz. 26) in het gedeelte "Bediening van RDS" van de betreffende gebruiksaanwijzing.
- De AF-functie in- en uitschakelen
- AF-functie:tussenRDSenDAB
Als hetzelfde programma worden uitgezonden door RDS en DAB, en deze functie is ingeschakeld, schakelt dit apparaat automatisch over zodate de uitzending met de beste ontvangstkwaliteit worden ontvangen.
TA (verkeersinformatie)
Als een uitzending met verkeersinformatie begin in de TA-standingbyfunctie, worden die uitzending met voorrang ontvangen, ongeacht de functie die in werkig is. Het is tevens möglichk automatisch op een verkeersprogramma (TP) af te stemmen.
- Deze functie kan alleen worden gebruikt als "TP" op het display wordt afgebeeld. Als "TP" wordt afgebeeld betekent dit dat de DAB- of RDS-zender die op dat moment worden ontvangen programma's met verkeersinformatie uitzendt.
- Voor verdere informatatie raadpleegt u "TA" (zie blz. 27) in het gedeelte Bediening van RDS van de betreffende gebruksaanwijzing.
- De TA-standingbyfunctie instellen
- De TA-standingbyfunctie annuleren
Een TP-zender zoeken
Opmerkingen:
- Als een TP-zender Niet kan worden ontvangen, stopt het apparatusat met zoeken.
- "TP" kan op het display worden afgebeeld wanneer een verkeersprogramma worden uit gezonden door een RDS-zender. Druk in dat geval op de [TA] toets om TP-zoek-aftstemmen uit te voeren. Druk nogmaals op de [TA] toets om terug te keren maar de voorgaande functie.
INFO (aankondiging)
In de INFO-standbyfunctie schakelt het apparaat automatisch overaar het gekozen aankondigingsprogramma zodra dit begint.
- De INFO-standingbyfunctie instellen
Als u gedurende 1 seconde of langer de [TA] toets ingedrukt houdt, wordt "INFO" op het display afgebeeld en wordt het apparaat in de INFO-standingbyfunctie gezet totdat de gekozen aankondigering wordt uitgezonden.
Zodra de gekozen aankondigingsuitzending begint, worden de naam van de aankondiging op het display afgebeeld. Als u gedurende 1 seconde of langer de [TA] toets ingedrukt houdt terwijl de gekozen aankondigingsuitzending worden ontvangen, stopt de ontvangst van de gekozen aankondigingsuitzending en keert het apparaat terug maar de INFO-standbyfunctie.
- De INFO-standingbyfunctie annuleren
Als u de INFO-standingbyfunctie wilt annuleren, houdt u gedurende 1 seconde of langer de [TA] toets ingedrukt.
- Informatiekeuze
Met deze functie kurz u INFORMATIE AAN of UIT kiezen in de informatie-onderbrekingsfunctie.
U kunt maximaal zes informatatie-items op ON instellen
U kunt kiezen uit de onderstaande zes informatatie-items:
INFORMATIE-item ENGLISH Inhoud Travel Vervoersbericht Warning Waarschuwing/Service News Nieuwsbericht Weather Weerbericht Event Evenementenaankondiging Special Speciaal evenement
1. Raak MODE aan.
2. Raak INFO SEL aan om de "INFO SEL" functie op te roepen.
3. Raak het midden van het display met aan of draai de [ROTARY] knop en kies een informatie-item.
U kunt kiezen uit zes informatie-items:
Reizen Waarschuwing Nieuws Weerbericht Evenementen Speciaal Reizen...
4. Raak de rechterkant van het display met aan en kies "ON" of "OFF".
5. Raak RTN aan.
PTY
Met deze functie kurz u maar het gekozen programmatype luisteren, ongeacht de functie die in werkung is.
- U kunt een gemeenschappelijk PTY kiezen voor DAB en RDS.
Van de DAB-PTY en de RDS-PTY krijigt de PTY die het eerst worden ontvangen voorrang boven de andere.
- PTY-uitzendingen zijn nog nicht in alle landen beschikbaar.
- In de INFO-standingbyfunctie haben INFO-zenders voorrang boven andere PTY-zenders.
- In de TA-standingbyfunctie hebben TP-zenders voorrang boven andere PTY-zenders.
- Voor verdere informatatie raadpleegt u "PTY" (zie blz. 28) in het gedeelte "Bediening van RDS" van de betreffende gebruiksaanwijzing.
- De PTY-standingbyfunctie instellen
- De PTY-standingbyfunctie annuleren
Een PTY-onderbrekingsuitzending annuleren
Een programmatype kiezen
Een programmatype zoeken
Het PTY-voorkeurgeheugen
Nooduitzending
Als een noodlesitzending worden ontvangen, worden alle functiebedieningen aufgeb broken, worden "ALARM" op het display afgebeeld, en worden de nooduitzending ontvangen en weergegeven.
- Voor verdere informatie raadpleegt u "Nooduitending" (zie blz. 29) in het gedeelte "Bediening van RDS" van de betreffende gebruiksaanwijzing.
- De noodlesitzending annuleren
De taal van het PTY- en INFOdisplay wisselen
U=kunt een taal kiezen uit de vier beschikbare talen (Engels, Duits, Zweeds of Frans) waarin het programmatype en de informatie op het display kan worden afgebeeld.
- De fabrieksinstelling is "ENGLISH".
- Voor verdere informatie over "De taal van het PTY-display veranderen" (zie blz. 30), raadpleegt u het gedeelte over "De RDS bedieren" in de betreffende gebruiksaanwijzing.
Volume-installing van TA, INFO,ooduitzending (ALARM) en PTY
Het volume van de TA-, INFO-, ALARM- en PTY-onderbrekingsuitzenden gen kan worden ingesteldijdens de TA-, INFO-, ALARM- en PTY-onderbrekingsuitzenden. Voer de volgende bediening uit, afhankelijk van het aangesloten model.
- De fabrieksinstalling is "15".
Tijdens een TA-, INFO-, ALARM- of PTY- onderbrekingsuitzending, draait u de [ROTARY] knop recht som of linksom en stelt u het volume in op het gewenste niveau (0 t/m 33).
* Als de TA-, INFO-, ALARM- of PTY- onderbrekingsuitzending is afgelopen, keert het volume terug maar het niveau dat was ingesteld voör de onderbrekingsuitzending.
De 5.1-kanalen surrounddecoder bedieren
Als een optionele, met behulp van een CeNET-kabel aangesloten, compatibile 5.1-kanalensurrounddecoder is aangesloten, kan dit apparaat de functies van de 5.1-kanalensurrounddecoder bedieren.
De volgende functies veranderen als een 5.1-kanalen surrounddecoder is aangesloten.
- Twee functies, "MOVIE" en "VIRTUAL", worden toegevoegt aan de Dolby Pro Logic II-functie.
- De VSE/POSITION-functie verandert in de DSF (digitaal geluidsveld)-functie.
- In de P.EQ (parametrische equalizer)-functie, können de instellingen van{iedere luidspreker in nog groter detail worden ingesteld.
- De instellingen van de instelitems (zie blz. 39) die betrekking hebben op de muziek, veranderen.
PL II (Dolby PL II) kiezen
Kies een van de vier beschikbare functies overeenkomstig de bron die u wilt weergeven in de Dolby Pro Logic II-functie.
- De fabrieksinstalling is "OFF".
■ MUSIC (muziekfunctie)
Zie "Het PLII-menukiezen (Dolby PLII)" (zie blz.17).
■ MATRIX (matrixfunctie)
Zie "Het PLII-menukiezen (Dolby PLII)" (zie blz.17).
MOVIE (filmfunctie)
Geschikt voor DVD-films.
VIRTUAL (virtuelle functie)
Geschikt voor films en andere geluidsbronnen.
OFF
De Dolby Pro Logic II-functie wirdt nicht gebrukt.
1. Druk op de [SOUND] toets.
2. Raak Dolby PLII aan.

3. Raak de rechterkant van het display met aan en kies de Dolby Pro Logic II-functionie.

De functiedisplays worden als volgt doorlopen:
MUSIC (muziekfunctie) MATRIX (matrixfunctie) MOVIE (filmfunctie) VIRTUAL (virtuele functie) OFF (PL IIuit) MUSIC (muziekfunctie)...
* Voor verdere informatie over het instellen van het volumeniveau van de middenluidspreker/subwoofer, raadpleegt u bladzijde 45.
4. Raak RTN aan.
Het DSF-menu kiezen
Met DSF (digitaal geluidsveld) is het vis geluidssimulatie möglichk een geluidservaring te creeren alsof u zich in een concertzaal bevindt of een liveoptreden bijwoont.
- Als het DSF-menu worden gekozen, worden het volumeniveau soms lager.
- De fabrieksinstalling van DSF is "OFF" en op het DSF-basismenu is "HALL".
1. Druk op de [SOUND] toets.
2. Raak DSF aan.

3. Raak het ON/OFF-display met aan. Het DSF-effect worden beurtelings in- enuitgeschakeld.

Als DSF is ingesteld op "OFF", heeft de DSF-installing geen invloed op het weergavegeluid. Hiermee is de DSF-installing voltooid. Druk op de [SOUND] toets om terug te keren maar de oorspronkelijke functie.
4. Raak het DSF-menunummer met 山 aan en kies het gewenste DSF-menu.

De DSF-menu's zich:
HALL CHURCH STADIUM LIVE JAZZCLUB THEATER HALL...
Nr. Functienaam Beschrijving 1 HALL Een große concertzaal 2 CHURCH Een kerk met een gewelfd plafond 3 STADIUM Een groot stadion+zonder dak of muren 4 LIVE Een zaal voor liveoptredens, groter dan een jazzclub 5 JAZZCLUB Een jazzclub met een laag plafond 6 THEATER Een bioscoop of theater
5. Druk op de [SOUND] toets om terug te keren maar de oorspronkelijke functie.
Het parametrischeequalizermenu kiezen
De parametrische equalizer (P.EQ) stelt u in staat het gehele freiorentiebereik nauwkeurig te compenseren tot een vloeijeende kromme met behulp van freiorentiecompensation overeenkomstig het type auto dat u hebt.
- De fabrieksinstelling stelt alle luidsprekers in op de volgende instelleningen: FREQ = 1kHz, Q = 1, GAIN = 0dB
1. Druk op de [SOUND] toets.
2. Raak P.EQ aan.

3. Raak het ON/OFF-display met 山 aaan. Het P.EQ-effect worden beurtelings in- enuitgeschakeld.

Als het P.EQ-effect is ingesteld op "OFF", heeft de P.EQ-instelling geen effect op de geluidsbron. Hiermee is de P.EQ-instelling voltooid. Druk op de [SOUND] toets om terug te keren maar de oorspronkelijke functie.
4. Raak het P.EQ-menunummer met 山 aaen kies het P.EQ-menu.

De P.EQ-menu's waar:
SIGNAL SP-SEL BAND FREQ Q GAIN SIGNAL...
5. Raak de rechterkant van het display met
aan en stel het item maar wens in.
SIGNAL (Kies het in te stellen signaal.): Kies "P-NOIS" of "MUSIC".
P-NOIS: Kies deze instelling wanneer pingelgeluid worden gebruikt.
MUSIC: Kies deze instelling wanneer muzieksignalen worden gebruikt.
SP-SEL (Kies de luidsprekers waarvan u de
P.EQ-waarde wilt instellen.)
Kies een instelling UIT "FRONT", "CENTER" of "SURROUND".
- FRONT: Voorluidspreker
- CENTER: middenluidspreker
- SURROUND: surroundfluidspreker
BAND (Kies de frequentrieband.):
Kies een van de banden 1 t/m 3.
FREQ (Kies de middenfrequentie.):
Het instelbereik loopt van 20 Hz t/m 20 kHz.
Q (Stel de Q-kromme in.):
Hiermee stelt u de spitsheid van de Q-kromme in op 1, 3, 5, 7 of 20.
GAIN (Stel het uitgangsiveau in.):
Hiermee stelt u de versterking (uitgangsnavau) in binnen het bereik van -12 dB t/m +12 dB. (in stappen van 1 dB, 25 punten)
6. Herhaal de stappen 4 en 5 om het gewenste item in te stellen.
7. Druk op de [SOUND] toets om terug te keren maar de oorspronkelijke functie.
De P.EQ instellen
De instellungen die kuren worden veranderd op het P.EQ-menu zijn de volgende: De middenfrequentie, versterking en Q-kromme kuren worden opgeslagen in combinatie met een kanaal/band.
Bijvoorbeeld: middenfrequentie "250Hz", versterking "-8dB" en Q-kromme "3" können worden opgeslagen voor band 1 voor.
Voor verdere informatie over de P.EQ-functie, raadpleegt u "De P.EQ instellen" (zie blz. 21).
Deinstallingenveränderen
Als een 5.1-kanalen surrounddecoder is aangesloten, veranderen de instellenen die betrekking hebben op de muzzlek.
De instelitems kiezen
Hieronder volgt een beschrijving van de items waarvan de instelling worden veranderd.
Voor verdere informatie over de andere items die Niet worden verandered, raadpleegt u "De instellengen veranderen" (zie blz. 39) onder "Gemeenschappelijk bedienden in iedere functie".
1. Druk op de [A] toets
De functie verandert maar de instelfunctie.

2. Raak het instelitemdisplay met 山 山 aan en kies het item dat u wilt instellen.
* Als u de linkerkant van het display met
anraakt, worden de hoofditem een voor een doorlopen.
Als u de linkerkant van het display met
aanraakt, worden de hoofd items ononderbroken doorlopen.
* Als u het midden van het display met
anraakt, worden de subitems een voor een doorlopen. Als u het midden van het display met aanraakt, worden de subitems ononderbroken doorlopen.
3. Als op de rechterkant van het display "THROUGH" wordt afgebeeld, raakt u THROUGH aan om over te schakelen waar het instellingendisplay.
4. Raak de rechterkant van het display met 卡 aan of draai de [ROTARY] knop en kies een instelling.
■ Terugkeren maar de oorspronkelijke functie
1. Druk nogmaals op de [A] toets.
- Instelitems
Hoofditem SubItem SOUND CENTER-SP / SRD-SP / SUB-WOOFER
• De luidspreker in-/uitschakelen (zie blz. 64) FRONT HPF / CENTER HPF / SRD HPF / SUB-W LPF
• De filterfrequentie van de luidsprekers instellen (zie blz. 64) SP GAIN
• Het uitgangsiveau van de luidsprekers instellen (zie blz. 46) DELAY CENTER-SP / SRD-SP
• De vertragingstijd van de luidsprekers instellen (zie blz. 65) DOLBY D D-RANGE
• Het dynamisch bereik instellen (zie blz. 65) PL II CONT PANorama / DIMENSION / CTR WIDTH
• De muziekfunctie in detail instellen (zie blz. 47)
De luidsprekers in-/ uitschakelen (CENTER-SP/ SRD-SP/SUB-WOOFER)
Met deze functie kurz u de middenluidspreker (CENTER-SP), de surroundluidspreker (SRD-SP) en de subwoofer (SUB-WOOFER) in- en uitschaken.
Zorg ervoor dat重点领域 instelling op "OFF" is ingesteld als er geen middenluidspreker, surroundluidspreker of subwoofer is aangesloten.
- De fabrieksinstalling is "ON".
1. Druk op de [A] toets om de instelfunctie op te roepen.
2. Raak het instelitemdisplay met aan en kies bij "SOUND" het item "CENTER-SP", bij "SOUND" het item "SRD-SP", en bij "SOUND" het item "SUB-WOOFER".

ADJUST MODE CENTER-SP 串 ON
3. Raak de rechterkant van het display met aan of draai de [ROTARY] knop en kies "ON" of "OFF".
* In het geval van "SUB-WOOFER", kiest u "ON+", "ON-" of "OFF". Normaal gesproken kies u "ON+". Wanneru erchter "ON-" instelt, krijgt u een sterk effect van de lage tonen.
4. Druk op de [A] toets om terug te keren maar de oorspronkelijke functie.
De filterfrequentie van de luidsprekers instellen (FRONT HPF/CENTER HPF/ SRD HPF/SUB-W LPF)
Met deze functie=kunt u de filterfrequentie instellen overeenkomstig de luidsprekers die u gebrukt.
- Luidsprekers die bij "Deuidsprekers in-/uitschakelen (CENTER-SP/SRD-SP/SUB-WOOFER)" werden uitgeschakeld, wordeniet aufgebeeld.
- De fabrieksinstalling van "FRONT HPF" en "SRD HPF" is "THROUGH" (geen filter), en van "CENTER HPF" en "SUB-W LPF" is "120Hz".
Filterinstalling
FRONT HPF/CENTER HPF/SRD HPF (installing van hoogdoorlaatfilter)
Dit filter verwijdert de lage tonen uit het geluid voor de voor-, midden- en surroundluidsprekers.
THROUGH 50Hz 80Hz 120Hz
Stel het filter in overeenkomstig uw luidsprekers als de luidsprekers eenkleine diameter hebben.
THROUGH
Kies deze instelling als u luidsprekers gelebruikt die rage tonen können weergeven. CENTER HPF kan nicht worden ingesteld op THROUGH.
SUB-W LPF (instelling van laagdoorlaatfilter voor subwoofer)
Dit filter verwijdert de hoge tonen uit het geluid voor de subwoofer.
50Hz 80Hz 120Hz
Stel de filterfrequentie in overeenkomstig uw subwoofer.
1. Druk op de [A] toets om de instelfunctie op te roepen.
2. Raak het instelitemdisplay met aan en kies bij "SOUND" het item "FRONT HPF", bij "SOUND" het item "CENTER HPF", bij "SOUND" het item "SRD HPF" en bij "SOUND" het item "SUB-W LPF".

ADJUST MODE FRONT HPF THROUGH
3. Raak de rechterkant van het display met 卡 aan of draai de [ROTARY] knop en kies de frequentie.
* Kies een instelling uit THROUGH*, 50Hz, 80Hz en 120Hz.
^*1 THROUGH wordt alleen aufgebeeld als "FRONT HPF" of "SRD HPF" is gekozen.
4. Druk op de [A] toets om terug te keren maar de oorspronkelijke functie.
De vertragingstijd van de luidsprekers instellen (CENTER-SP/SRD-SP)
De tijdsduur waarna het geluid van iedere luidspreker aankomt op de luisterpositie verschilt afhankelijk van de montagepositie van de luidsprekers en de grotte van uw auto. Stel de vertragingstijd van iedere luidspreker zodanig in dat het geluid van alle luidsprekers tegelijk met het geluid van de voorluidsprekers de luisterpositie bereikt.
- De fabrieksinstalling is "0ms".
1. Druk op de [A] toets om de instelfunctie op te roepen.
2. Raak het insteltemdisplay met aan en kies bij "DELAY" het item "CENTER-SP", en bij "DELAY" het item "SRD-SP".

DELAY
ADJUST MODE
CENTER-SP》 0ms
3. Raak de rechterkant van het display met
aan en stel de vertragingstijd in.
* "CENTER-SP" kan worden ingesteld binnen het bereik van 0 ms t/m 5 ms.
* "SRD-SP" kan worden ingesteld binnen het bereik van 0 ms t/m 15 ms.
4. Druk op de [A] toets om terug te keren maar de oorspronkelijke functie.
De Dolby Digital functies instellen (D-RANGE)
Deze functie comprimeert het dynamisch bereik van Dolby Digital om geluid met een laag volumeniveau, zoals bijvoorbeeld de stem van een acteur, te behonden, maar geluid met een hoog volumeniveau te onderdrukken.
Deze functies zich alleen beschikbaar opDVD's opgenomen in Dolby Digital.
- De fabrieksinstalling is "MAX".
1. Druk op de [A] toets om de instelfunctie op te roepen.
2. Raak het insteltemdisplay met aan en kies bij "D-RANGE" het item "DOLBY D".

ADJUST MODE
D-RANGE MAX
3. Raak de rechterkant van het display met aan en stel het gewenste item van het dynamisch bereik maar wens in.
MAX: het maximale dynamisch bereik van de oorspronkelijke geluidsbron.
STD: de aanbevolen functie voor normalaal luisteren.
MIN: het sterkst gekomprimeerde dynamisch bereik, waar bij zichs zachte geluiden goed te horenল.
4. Druk op de [A] toets om terug te keren maar de oorspronkelijke functie.
8. PROBLEMEN OPLOSSEN
Probleem Oorzaak Oplossing Algemeen Het apparaat wordt Niet ingeschakeld. (Er wordt geen geluid voortgebracht.) De zekering is doorgbebrand. Vervang de zekering door een neue vandezelfde sterkte. Als de zekering waar doorbrandt, neemt u contact op met de winkel waar u het apparaat heb gekocht. Onjuiste bedrading. Neem contact op met de winkel waar u het apparaat heb gekocht. Er wordt geen geluid voortgebracht wonneer het apparaat bediend wordt terwijversterkers of een vermogensantenne is aangesloten. De kabel van de elektrische antennene is kortgeslooten maar massa of een te hoge stroomsterkte is nodig voor het inschaken van de versterkers of de elektrische antennene. 1. Schakel het apparaat uit.2. Maak alle draden los die aan de kabel van de elektrische antennene vastzitten. Controleerijdere draad met behulp van een ohm-meter op möglichke kortsuiitingaar massa.3. Schakel het apparaat wee in.4. Sluitijdere draad eén voor eén waar aan op de kabel van de elektrische antennene. Als de versterkers uitgaan voordat alle draden+zijn aangesloten,gebruikt u een extern relais om de inschakelspanning te leveren (de vereist stroomsterkte is te hoog). Als op de toetsen wordt gedrukt, gebeurt er niets.Het display geeft verkeerde indicators, enz., aan. De microprocessor is gestoord door ruis, enz. Schakel het apparaat uit,druk daarna op de [RELEASE] knop en haal het voorpaneel eraf. Druk op de terugstelknop met een dun ijzerdraadje.Terugsteltoets De aansluiting:tussen het voorpaneel en het apparaat is vies. Veeg het vuil eraf met een zachte doeck bevochtigdemet alcohol. CDMP3WMA Er is geen geluid hoorbaar. Een ongeschikte disc (geen compact disc) of een vreemd voorwerp bevindt zich in het apparaat. Met het kantelend bedieningsspaneel geopend, houdt u de [▲] toets gedurende 3 seconden of langer ingedrukt.Het vreemde voorwerp worden gedwongenuitgeworpen. Er staan geen MP3/WMA-bestanden op de disc. Neem op de juiste manier MP3/WMA-bestanden op de disc op. De bestanden worden nicht herkend als MP3/WMA-bestanden. Zorg ervoor dat de MP3/WMA-bestanden op de juiste manier zijn gecodeerd. Het bestandssystem is Niet juist. Gebruik het bestandsystem ISO9660 level 1,2,of JOLIET of Romeo. Het geluid slaat over of is bevat veel ruis. De disc is vuil. Maak de disc schoon met een zachte doeck. De disc is ernstig bekrast of verbogen. Vervang de disc door een disc zonder krassen. Het geluid wordt onderbroken of slaat over.Er treedt ruis op of de ruis is vermengd met het geluid. De MP3/WMA-bestanden zich net op de juiste manier gecodeerd. Zorg ervoor dat de MP3/WMA-bestanden op de juiste manier zijn gecodeerd.
Probleem Oorzaak Oplossing CD/MP3/WMA De geluidskwaliteit is slecht onmiddelijk nadat het apparaat is ingeschakeld. Er{kunnen zich waterdruppels haben gezvermd op de lens in het apparaat terwijl de auto op een vochtigeplaats geparkeerd stond. Schakel het apparaat in enaar het onceveer een uur drogen. De bestandsnamen zijn verkeerd. Het bestandsystem is nicht juist. Gebruik het bestandsystem ISO9660 level 1,2, of JOLIET of Romeo. De afspeellijst kan nicht worden weergegeven. De bestandsnamen of de afspeellijst-extensie zijn nicht juist. Gebruik alleen alfanumerieke of ASCII-tekens in de namev an MP3/WMA-bestanden. Gebruik voor de afspeellijst de extensie“.M3U”.
9. FOUTMELDINGEN
Als zich een probleem voordoet, worden één van de volgende foumt melding afgebeeld. Volg de gegeven instructies om het probleem op te losesten.
Foutmelding Oorzaak Oplossing CD/MP3/MMA ERROR 2 Een disc is binnenin de CD-speler vastgelopen en kan nicht worden uitgeworpen. Dit is een storing van het mechanismisme in de CD-speler. Neem contact op met de winkel waar u het apparaat hebt gekocht. ERROR 3 Een disc in de CD-speler is bekrant, enz., en kan nicht worden weergegeven. Vervang de disc door een disc zonder krassen die nicht verbogen is. ERROR 6 Een disc is ondersteboven in de CD-speler geplaatst en kan nicht worden weergegeven. Werp de disc uit enplaats deze verrolgens op de juiste manier. Algemeen AMP GUARD De beveiligingsschakeling van de luidspreker is in werkig getreden. Als tijdens deze bediening het volumeniveau worden veranderd, worden "AMP GUARD" op het display afgebeeld. "AMP GUARD" treedt soms in werkig wanneser speciale testsignalen worden gebruikt. 1. Verlaag het volumeniveau. De juiste werkung kan ook worden hersteld door het apparaat uit en waar in te schakelen. (Wanner de beveiligingsschakeling van de luidspreker in werkung treedt, worden automatisch het volumeniveau van de luidsprekers verlaagd.)2. Als het volumeniveauoor worden verlaagd, neemt u contact op met once serviceafdeling. CD-wisselaar ERROR 2 Een disc binnenin de CD-wisselaar worden Niet in positie gebracht voor weergave. Dit is een storing van het mechanismisme in de CD-wisselaar. Neem contact op met de winkel waar u het apparaat hebt gekocht. ERROR 3 Een disc in de CD-wisselaar is bekrant, enz., en kan nicht worden weergegeven. Vervang de disc door een disc zonder krassen die nicht verbogen is. ERROR 6 Een disc is ondersteboven in de CD-wisselaar geplaatst en kan nicht worden weergegeven. Werp de disc uit enplaats deze verrolgens op de juiste manier. DVD-wisselaar ERROR 2 Een disc in de DVD-wisselaar kan nicht worden weergegeven. Dit is een storing van het mechanismisme in de DVD-wisselaar. Neem contact op met de winkel waar u het apparaat hebt gekocht. ERROR 3 Een disc in de DVD-wisselaar is bekrant, enz., en kan nicht worden weergegeven. Probeer de disc opnieuweer te geven of verwang de disc door een disc zonder krassen die nicht verbogen is. ERROR 6 Een disc is ondersteboven in de DVD-wisselaar geplaatst en kan nicht worden weergegeven. Werp de disc uit enplaats deze verrolgens op de juiste manier. ERROR P Foutief kinderslotniveau. Stel het juiste kinderslotniveau in. ERROR R Foutieve regiocode. Werp de disc uit enplaats een disc met de juiste regiocode.
Als een andere foulmeling dan die hierboven worden beschreiben worden aufgebeeld, drukt u op de terugsteltoets. Als het probleem aanhoudt, schakelt u het apparaat uit en neemt u contact op met de winkel waar u het apparaat hebt gekocht.
10. TECHNISCHE GEGEVENS
Radio
Afstemsystem: PLL-synthesizertuner
Ontvangstfrequencies:
FM:
87.5 t/m 108 mHz (in stappen van 0.05 mHz)
MG:531 t/m 1602 kHz (in stappen van 9 kHz)
LG: 153 t/m 279 kHz (in stappen van 3 kHz)
CD-speler
Systeem:
Digitalaudiosystemeenvoorcompactdiscs
Frequentiebereik: 5 Hz t/m 20 kHz (±1 dB)
Signal-ruisverhouding: 100 dB (1 kHz) IHF-A
Dynamisch bereik: 96 dB (1 kHz)
Vervorming: 0,01%
Algemeen
Uitgangsvermogen:
4× 31W (DIN 45324, +B = 14,4V)
Voedingsspanning:
14,4 V gelijkstroom (10,8 t/m 15,6 V
toegestaan), negatieve massa
Stroomverbruik: Minder dan 15 A
Luidsprekerimpedantie:
4Ω (4 t/m 8 Ω toelaatbaar)
Nominale stroomsterkte van autoantenna:
500 mA of minder
Gewicht:
Hoofdtoestel: 1,7 kg
Afstandsbediening: 80 g (inklusief batterij)
Afmetingen:
Hoofdtoestel:
178 (B) × 50 (H) × 155 (D) mm
Afstandsbediening:
44 (B) × 110 (H) × 27 (D) mm
Opmerking:
- De technische gegevens en het ontwerp+zijn onderhevig aan veranderingen ten behoeve van productverbetering zonder voorafgaande kennisgeving.
Muchasgraciasporlaadquisidonedeste productoClarion.
* Antes de utiliser este equipo lea Completely el manual de instrucciones.
* Después de haber leído este manual, cerciórese de guardarlo a mano (p. ej., en la guantera).
* Compruebe el contenido de la tarjeta de garantía adjunta y guardela ciuidadosamente con este manual.
* Este manual incluye los procedimientos de operación del Cambiador de discos CD y sintonizador de DAB y TV conectados a工程技术 de cable CeNET. El Cambiador de discos CD y sintonizador de TV tiene sus propios manuales, pero no se describes los procedimientos de su operación.
Índice
1. PRECAUCIONES 3
Consola inclinable 4
Manejo de los discos compactos 4
2.CONTROLES 5
3. NOMENCLATURA 6
Nombres de los botones y sus functions 6
Operaciones de los principales botones cuando se haya conectado un equipo externo a esta .. 7
Elementos de visualización 7
Operaciones en pantalla 8
4. PANEL DE CONTROL DESMONTABLE (DCP) 9
5. CONTROLADOR REMOTO 10
Insercion de las pilas 10
Funciones de los botones del controlador remoto 11
6. OPERACIONES 12
Operacionesbasicas 12
Operación del procesador AC III 17
Operaciones de la radio 23
Operaciones del systemadeatosradiofonicos(RDS) 26
Oeraciones de CD / MP3 / WMA 31
Diferentes piezas musicales eschuchadas por various oyentes (funcion 2-ZONE) 36
Operaciones comunes de cada modo 37
7. OPERACIONES DE LOS ACCESORIOS 51
Operaciones del Cambiador de discos compactos 51
Operaciones del televisor 54
Operaciones digitales de radio/DAB 58
Operaciones del decodificador surround de 5,1 canales 61
8. EN CASO DE DIFICULTAD 66
9. INDICACIONES DE ERROR 68
10. ESPECIFICACIONES 69
1. PRECAUCIONES
1.Estaunidad se aplica solamente para fines de vehículos de 4 ruertas en carretera.No es apropiado elutilizarla para tractores, camiones, aplanadoras, vehículos todo terreno, ni motocicletas de 2 o 3 ruadas, embarcaciones, nithers vehículos para fines especiales.
2. Si el interior del automóvil está muy frío y utilizes la unidad inmediamente afterwards de haber encendido el calefactor, es posible que se condense humedad en el disco o en las piezas del reproductor, y que的结果 impossible realizar la reproducción apropiada. Si se condensa humedad en el disco, fróteo con un paño seco. Si se condensa humedad
en las piezas opticas del reproductor, no lo utilise durante aproximamente una hora, y la humedad condensada desaparecerá de forma natural para permitir la operation normal.
3. La conducccion por carreteras accidentadas que Causeen vibraciones notables可以使 caurar el salto del sonido.
INFORMACION PARA LOS USUARIOS:
LOS CABIOS O MODIFICACIONES REALIZADOS EN ESTE PRODUCTO NO APROBADOS POR EL FABRICANTE ANULARAN LA GARANTIA.
ADVERTENCIA
Para su seguridad, no mire ni maneje el panel tactil cuando conducze.
Consola inclinable
Estaunidadutilizaconsolasinclinablespara permitir que lasvisualizacionessean lo mayores posibles.
Cuando utilise una consola abatible, cerciórese de cerrarla.
PRECAUCION
Tenga cuidado de no pillarse los dedos cuando abra o cierra la CONSOLA INCLINABLE.
1. Por motivos de seguidad, cierre la CONSOLA INCLINABLE cuando no vaya a utilizesla durante mucho tiempo, o antes deponer en OFF la llave de encendido. Si pusiese en OFF la llave de encendido con la CONSOLA INCLINABLE inclinada, esta no se cerraría.
2. Antes de que la CONSOLA INCLINABLE se
cierre, pourrait oírse un sonido de frenado procedente del mecanismo de seguridad. Esto es normal.
3. Si mueve la CONSOLA INCLINABLE con la mano, puede ser que adquiera cierto juego. Para corregir este jeu, con la alimentacion de la unidad connectada, presione el boton [▲] para cerrar la CONSOLA INCLINABLE.
4. Después de haber extraído un disco, la CONSOLA INCLINABLE volverá automáticamente al estado de inclínación o cierre. Si hay algunos obstáculo trate de cerrarse, el mecanismo de seguridad se disparará y la CONSOLA INCLINABLE volverá al estado de aperture. Cuando suceda this, elimine the obstáculo. y afterwards presione el botón [▲].
5. Para evaporar rayar el disco compacto, mantenga bajo el nivel del disco compacto de 12 u 8 cm cuando lo inserte o lo extraiga.
Manejo de los discos compactos
Emplee solamente discos compactos que tengan la marca @SIC o
No reproduzca discos compactos en forma de corazon, octogonales, ni de ninguna other forma especial.
Es possible que algunos discos CD grabados en el modo CD-R/CD-RW no;puede emplease.
Manejo
- En comparación con los discos compactos de música normales, los discos CD-R y CD-RW se ven afectados fácilmente por la temperatura y la humedad elevadas, y es posible que algunos de tales discos no能把 reproductarse. Por lo tanto, no los deje durante mucho tiempo en un automóvil.
- Los discos nuevos你能 tener rugosidades en el borde. Si utilizes tales discos, el reproductor podría u trabajo, o el sonido podría saltar. Utilice u objeto similar, para rugosidades del borde.
- No pegue nunca etiquetas sobre la superficie de los discos compactos, ni marque dicha superficie con lápices ni bolígrafos.
- No reproduzca nunca un disco compacto pegado con cinta plástica nithers pegamentos, ni con las marcas despegadas. Si tratase de producir uno de tales discos, quizas no pudiese SACARLO del reproductor de discos compactos o dañarlo.
- No utilise discos compactos que posean ralladura grandes, deformados, rajados, etc. La utilización de tales discosURTDA可以使 el mal funciona como dos días.
- Para extraer un disco compacto de su caja, presione el centro de dicha caja y levante el disco, sujetándolo cuidadosamente por los bordes.
- No utilise hojas protectoras de discos compactos, vendidas en establishimientos del ramo, ni discos provistos de estabilizadores, etc. Estos elementos podriani darar los discos o el mecanismo interno.
Almacenamento
- No exponga los discos compactos a la luz solar directa ni a fuentesTERMicas.
- No exponga los discos compactos a humedad ni polvo excessivo.
- No exponga los discos compactos al calor directo de aparatos de calefacción.
Limpieza
- Para eliminar las huellas ductilares y el polvo, utilise un paño suave y frote el disco en linea recta del centro a la periferia.
- No utilise disolventes, como limpiadores adquiridos en establecimientos del ramo, rociadores antiestátics, ni diluidor de pintura para limpar los discos compactos.
- Después de haber utilisé un limpiador de discos compactos, deja que el disco compacto se seque bien antes de reproducirlo.
2.CONTROLES
Unidad fuente

Apertura de la CONSOLA INCLINABLE

3. NOMENCLATURA
Nombres de los botones y sus sistemas
Botón [RELEASE]
- Extracción del panel de control desmontable (DCP).
Fotosensor
- Este sensor detecta la intensidad de brillo Dentro del automóvil. Cuando la función de atenuación automática está configurada en "AUTO", la intensidad de brillo de la pantalla se reduce para adaptarse a la intensidad de brillo que detecte este sensor.
Mando [ROTARY]
- Presione este mando para conectar la alimentacion. Cada vez que presiona este mando, se cambia de modo.
- Presione el mando prolongadamente durante 1 segundo o más para desconectar la alimentación.
- Este mando también se pueda girar para regular el volumen o para realizarkestinos ajustes en el modo de ajuste.
Boton [△]
- Abre/cierra el panel de control.
Si hay un disco cargado, este se expulsa cuando se abide el panel de control.
Nota:
Si no se expulsa el disco, presione el botón [▲] durante 1 segundo o más.
Boton [A]
- Utilice este botón en el modo de ajuste para establecer o configurar losDistinctosajustes.
- Utilice este botón en el modo de radio para introducir los nombres de emisoras, o en el modo CD, para introducir los titulos de discos.
Botón [SOUND]
- Utilice este botón para establercer o configurar losDistinctosajustes, como el espacio de audio.
- Si presiona este botón prolongadamente durante 1 segundo o más, tambiénoulda activar (ON) y desactivar (OFF) la funciona 2-ZONE.
Botón [TA]
- Utilice este botón paraaabstar el modo deespera TA (Información sobre el tráfico) (cuando la funciona 2-ZONE está desactivada, "OFF").
Cambia el funciona de 2-ZONE. Si presiona este botón prolongadamente durante 1 segundo o más, cambia el tipo de 2-ZONE (cuando la funciona 2-ZONE está activada "ON").
Boton [▶■]
- Interrumpe o reanuda la reproduccion de una pista (en el modo CD).
- Utilice este botón paraaabustar el modo de espera PTY ( Tipo de programa) o los parámetros de PTY.
Pantalla
- Muestra losDistinctos datos que indican el estado de configuracion de la unidad, como losindicadores y el estado de sintonizacion/reproduccion.
Toque la pantalla con el dedo y bajo toque para activar la operation. (cf. pagina 8)
Operaciones de los principales botones cuando se haya connectado un equipo externo a estaunidad
- Cuando el Cambiador de CD/DVD está conectado
* Para Obtener más información, consulte la sección “Operaciones del Cambiador de discos compactos” (cf. págrina 51). Para Obtener información sobre el Cambiador de DVD, consulte el Manual de instructcciones que se suministra con el Cambiador de DVD.
Boton [11]
- Este botón le permite reproducir o interruptir (pausa) un CD o un DVD.
Boton[A]
- En el modo de转型发展 de CD se usa para introducir los títulos de discos.
- Cuando TV/DAB está conectado
* Para Obtener más información, consulte la sección “Operaciones del televisor” (cf. páginas 54) u “Operaciones digitales de radio/DAB” (cf. páginas 58).
Botón [TA]
- Utilice este botón paraaabrear el modo de espera TA (Información sobre el tráfico) en modo DAB. (Estamericano está disponible para un sintonizador DAB.)
- Presione el botón prolongadamente durante 1 segundo o más para activar o desactivar el modo INFO. (en el modo DAB).
Boton [II]
- Permite cambio el modo deImagen de la television o el modo deImagen del video (external). (en el modo TV).
- Utilice este botón paraaabustar el modo de espera PTY ( Tipo de programa) o los parámetros de PTY en el modo DAB.
Boton [A]
- Este botón se usa para introducir el nombre de la emisión de television. (en el modo TV).
Elementos de visualización

Operaciones en pantalla
Estaunidad emplea un panel táctil a modo de pantalla de visualización. Para hacerlo funciona, sólo tiene que tocarlo con la yema de los dedos. Existen cuatro operaciones principales de visualización, que son:
Tocar
Toque la pantalla con el dedo y retirelo antes de 1 segundo.Esta es la operation más baja para usar la pantalla.
Tocar prolongadamente
Toque la pantalla con el dedo de forma prolongada durante 1 o 2 segundos, como minimo. NoURTVA el dedo cuando toca laagna.
Cuando toca la pantalla prolongamente durante 1 segundo o más, aparecen listas, por exemple, e se invocan otheras functions practicas.
Cuando toca la pantalla prolongamente durante 2 segundos o más, se guarda una memoria preprogramada u另一边 información.
Tocar
Toque la pantalla con el dedo y desplace el dedo hacía la izquierda ( ) o hacía la derecha ( ) sin despegarlo de la pantalla, y luego retiéreo antes de 1 segundo.Esta operation se utilizes para seleccionar una memoria preprogramada (1 a 6) o pistas.

Tocar
Toque la pantalla con el dedo y desplace el dedo hacia la izquierda ( ) o hacía la derecha () sin despegarlo de la pantalla, y manténgalo asi. La operation en bajo se prolongará durante el tiempo que el dedo se mantenga en la pantalla.Esta operation se usa, por exemple, para sintonizar de forma manual o para hacer avanzar/retroceder rápidamente las pistas.

4. PANEL DE CONTROL DESMONTABLE (DCP)
El panel de control podra desmontarse como medida antirrboro. Despues de haber desmontado el panel de control, guardelo en la caja para el PANEL DE CONTROL DESMONTABLE (DCP) para evaporar que se raye.
Le recomendamos que lleve el DCP consigo cuando salga del automóvil.
Extracción del panel de control desmontable (DCP)
1. Con la CONSOLA INCLINABLE cerrada, desconnecte la alimentacion.
2. Presione a fondo el botón [RELEASE] para abrir el DCP.

3. Tire del DCP hacía usted y extráigalo.

PRECAUCION
- Cierre sempre la CONSOLA INCLINABLE antes de extraer el DCP.
- Si extrae el DCP con la CONSOLA INCLINABLE abierta, esta se cerrará inmediamente. Tenga cuidado de no pillarse los dedos.
Instalación del panel de control desmontable (DCP)
1. Inserte el DCP de forma que la sección (A) de la parte derecha del本身就是 quede fjada en el gancho (B) de la unidad.

2. Presione@cuidadosamente la parte izquierda © del DCP para encasarlo en su lugar.

PRECAUCION
- El DCP pueda danarse fácilmente con los golpes. Después de haberlo extraido, colocuelo en su caja, yonga cuidado de no partir lo caer ni de someterlo a golpes fuertes.
- Si presiona el botón de [RELEASE] y el DCP no está bloqueado en su lugar, pueda caerse debido a las vibraciones del automóvil. Nombre que el DCP se rompies, motivo por el que, après de haberlo extraido, instalelo en launities o colóquelo en la caja para el本身就是.
- El conector de la unidad al DCP es una pieza extremadamente importante. Tenga cuidado de no danarlo presionando con sus uñas, bolígrafos, destornilladores, etc.
Nota:
- Si el DCP se ensucía, fróte lo solamente con un paño suave y seco.
5. CONTROLADOR REMOTO

Inserción de las pilas
1. Dé la vuelta al controlador remoto, y después deslice la cubierta posterior en el sentido de la flecha.
2. Inserte las pilas AA (SUM-3, R-6/1,5 V) suministradas con el controlador remot en el sentidoamente en la figura, y antes cierre la cubierta posterior.
Notas:
La utilización inadequada de las pilas puede provocar su explosión. Tenga en cuenta los+puntos seguides:
- Cuando reemplace las pilas, cambie ambas por Otherwise.
- No cortocircuite, desarme, ni caliente las pilas.
- No tire las pilas al fuego.
- Tire las pilas agotadas en el lugar apropiado.

Funciones de los botones del controlador remoto
ModoBotón Radio (RDS)/DAB Reproductor de discos compactos/MP3 Cambiador de discos compactosCambiador de DVD Televisor [FUNC] Cambia entre la radio, DAB, CD/MP3, Cambiarde CD, cambiarde DVD y el televisor,AUX. [BAND] Cambio de la banda de recepción. Reproducción de la primera canción.Reproducción desdeel tope. Movimiento al disco seguidente enorden ascendente. Cambio de la banda de recepción. [▲], [▼] Aumento o reducción del volumen (en todos losmos). [←], [▶] Movimiento a canales memorizados superiores e inferiores. Movimiento a canociones superiores e inferiores. Cuando lo mantenga presionado durante 1 segundo: Avance/retroceso rápido. Movimiento a canales memorizados superiores e inferiores. [▶■] Sin funciona. Cambio entre reproducción y pausa. Sin funciona. [MUTE] Activación y desactivación del silenciamiento. [TA] Activación y desactivación de TA.Mantenga presionado este botón durante 1 segundo o más para Cambiar entre la fuente de sonido principal y de la zona secundaria (solamente con el modo 2-ZONE activado). [DISP] Cambia entre la visualización principal y visualización del reloj (CT). [PS/AS] Exploración de emisoras memorizadas.C时候 lo mantenga presionado durante 2segundos:Almacenamiento automático. Reproducción por exploraciónPresione y mantenga presionado el botón durante 1 o más segundos para efectuar la reproducción por exploración de la carpeta durante el modo de MP3/WMA. Reproducción con exploración.C时候 lo mantenga presionado durante 1segundo:Reproducción con exploración de discos. Exploración de emisoras memorizadas.C时候 lo mantenga presionado durante 2segundos:Almacenamiento automático. [AF] Activación y desactivación de la funciona AF.C时候 lo mantenga presionado durante 1segundo:Activación y desactivación de la funciona REG. Repetición de la reproducciónPresione y mantenga presionado el botón durante 1 o más segundos para efectuar la reproducción de la carpeta durante el modo de MP3/WMA. Reproducción repetIDA.C时候 lo mantenga presionado durante 1segundo:Reproducción repetIDA de discos. Sin funciona. [PTY] Activación y desactivación del modo de PTY. Reproducción aleatoriaPresione y mantenga presionado el botón durante 1 o más segundos para efectuar la reproducción aleatoria de la carpeta durante el modo de MP3/WMA. Reproducción aleatoria.C时候 lo mantenga presionado durante 1segundo:Reproducción aleatoria de discos. Cambio entre televisiony videograbadora. [2-ZONE] Manténgalo presionado durante 1 segundo o más para activar o desactivar el mode de zona doble.Presióno para Cambiar la zona de control entre la principal y la secundaria cuando el modo de zona doble está activado.
* Algunos de los botones correspondientes de launidad principal y del controlador remoto posen unidades differs.
6. OPERACIONES
Operaciones básicas
PRECAUCION
Cerciórese de reducir el nivel del volumen antes de desconectar la alimentación de la unidad o de poder la llave de encendido en OFF. Si deselectase la alimentación con el volumen a alto nivel, cuando volviene a conectarla, el volumen alto repentino podra dañar sus oidos y la unidad.
Encendidoyapagado
Encendido
Nota:
- Tenga cuidado cuando utilise esta unidad durante un tiempo prolongado con el motor apagado. Si agota la bateria del automóvil, noURTRA encender el motor yarlo podrA reducir la vida util de la bateria.
1. Presione el mando [ROTARY]. Se做不到 el modo que está anterionmente activo.
Comprobación del sistema
Cuando se conecta la alimentacion de esta unidad por primera vez, una vez realizadas todas las conexiones, esta compruba que equipos estar connectados. (Esto se denomina "system check", es decir, comprobacion del system.) Cuando se conecta la alimentacion y aparece "System Check", siga los pasos que se indicate a continuacion para realizar la comprobacion del system.
1. Cuando aparezca "System Check" en噎alla, presione el mando [ROTARY]. Comienza la comprobacion del systema. Una vez finalizada la comprobacion del systema, aparecerá "Completed" en la噎alla.
2. Presione el mando [ROTARY] de nuevo.
Aparece la visualización principal del modo de radio.
Función CODEMATIC
Cuando "CODEMATIC" está activada ("ON"), y se conecta la alimentación con el DCP acoplado, aparecerá la visualización Touch Code (Cólico táctil). Toque la visualización en el order que se programó en el modo de ajuste.

Para Obtener más información sobre la función CODEMATIC, consulte la sección "Uso de la funciona de sécurité (CODEMATIC)" (ct págin 50).
Apagado
1. Presione el mando [ROTARY] durante 1 segundo o más.
Selección de modo
1. Presione el mando [ROTARY] para Cambiar de modo de funciona bajo.
2. Cada vez que presiona el mando [ROTARY], cambia el modo de funciona bajo en el sigúienteorden:
Modo Radio Modo DAB Modo CD/ MP3 Modo MMI Modocambiador de CD Modocambiador de DVD Modo TV Modo AUX Modo Radio...
* Los equipos externos que no estén connectados con CeNET no se做不到.
Ajusted volume
1. Gire el mando [ROTARY] hacía la derecha paraacular de volumen, o hacía la izquierda para disminuirlo.
* El nthel de volumen es de 0 (minimo) a 33 (maximo).
Cambio del modo de funciona bajo la lawa de la lawa.
Existen 2 modelos de funciona bajo: funciona estandar y funciona simple.
1. En la visualización principal de la pantalla, toque la parte izquierda durante 1 segundo o más.
Cambia el modo de funciona.

En el modo de funciona simple, no es necessitiesoicar 山 o la visualizacion principal del mode de radio o el mode CD.
Tenga en cuenta, sin embargo, que lassiguientes operaciones no estan disponibles enel modo de funcionaimple.
- Presintonizacion, seleccion de carpetas, seleccion de discos y otheras operaciones que requieran tocar la parte la derecha de la pantalla
- Operaciones de cambio de visualización (cf.頁面13)
- Operaciones de cambio de visualización de títulos (cf. págin 14)
- Operaciones para la visualización de las pantallas de introduccion de titulos. En pantallas (p. ej. visualización de listas, modo de ajuste, etc.)-distintas de la principal, no hay diferencia entre el funcionaimiento estándar y el funcionaimiento simple.
Las descricciones que seOfrecen en este manual corresponden principalmente alfuncionamento estandar. Para Obtener descripciones de las operaciones que sepuede realizar en el modo simple, consulte las descripciones de las visualizaciones de pantalla en el mode de radio o el modo CD.
Cambio de visualización
1. Toque el centro de la pantalla.
Cada vez que toca la visualización, esta cambía como se indica a continuación:
Visualización de títulos

Salvapantallas
Cuando la funciona de salvapantallas está activada ("ON"), y no usa launidad durante unos 30segundos, apareceré el salvapantallas. Para Obtener más información, consulte la página 41.
Papel tapiz
Si toca prolongadamente el centro de la pantalla durante 1 segundo o más, aparecerá la visualización de papel tapiz.
① ⑨ ② ⑩ ③ ⑪ ④ ⑫ ⑤ ⑬ ⑥ ⑭ ⑦ ⑮ ⑧ ⑯
Visualización del analizador de espectro
Si toca prolongadamente la parte derecha de la pantalla durante 1 segundo o más cuando visualiza el analizador de espectro (S/A), cambiará la visualización del analizador de espectro.
S/A
SCAN Aparece S/A 1, S/A 2 y S/A 3 durante 10segundos o más cada una. S/A 1 S/A 1
WMA
FLDR No.
003
TOP S/A 2 S/A 2
WMA
FLDR No.
003
TOP S/A 3 S/A 3
WMA
FLDR No.
003
TOP
Cambio de la visualización de títulos
Es possible visualizar los titulos de discos yDEMAS Informacion almacenada en los discosm吲ntras reproduce discos compactos en losmodos CD oeturnador de CD.
1. En la visualización de titulos, toque prolongadamente la parte derecha de la pantalla durante 1 segundo o más. Cada vez que toca prolongadamente la visualización, esta cambia como se indica a continuación:
Disco CD de dato
Túltode usuario (disco) Titulo de CD de texto (disco) Nombre de interpréte
→ Titulo de CD de texto (pista) → Titulo de usuario (disco)...
Disco MP3/WMA
Carpeta Archivo Etiqueta dealbum
Etiqueta de interpréte Etiqueta de titre Carpeta...
Notas:
- MP3 es compatible con las etiquetas (Tags) ID3 V2.3/2.2/1.1/1.0.
Las visualizaciones de etiquetas dan prioridad a V2.3/2.2.
- Si se tratate de etiquetas de album para WMA, se做不到a informacion contentida en la ampliacion de cabecera.
- En la etiquetas solo se pueda做不到 clarar characteres ASCII.
Para desplazar un titulo
Toque la visualización de titulos con el titulo visible.
El titulo se desplaza hacía la izquierda
Para detener el desplazimiento
Toque la visualización de titulos.
Función CT (Hora del reloj)
Esta funciona le permitte recibir datos CT enviados desde una emisora RDS y visualizar la hora. Para visualizar la pantalla CT, toque el centro de la pantalla.
- Si no se está recubiendo datos CT, aparecerá "---CT" en la pantalla.
Nota:
- Los datos CT no se emiten en algunos País y enellas emisoras de radio. también es possible que en algunos zonas los datos CT no se visualicen correctamente.
Ajuste del ADF
- ADF es la abreviatura de "Anti Distortion Filter" (Filtro antidistorsión).
Lasmerican Psychiatric Association (APHA) has recently announced a new program that will be designed to improve the quality of life of people with chronic medical conditions. The program will be designed to improve the health status of individuals with chronic medical conditions, including diabetes, heart disease, and cancer.
Esta unidad dispone de 4tips de efectos de sonido memorizados. Seleccione el que preferia.
ADF-1: Apropiado para altavoces originales
ADF-2: Apropiado para altavoces separados
ADF-3: Apropiado para altavoces coaxiales
USER: Este valor puede ajustarlo el usuario a su gusto.
OFF: No hay efecto de sonido
- El valor preajustado de fabricula es "OFF".
Notas:
- Como el volumen varía cuando se cambia ADF, conviene Cambiar de tipo de ADF con el volumen, "SW VOLUME" (altavoz de subgraves) y "CTR VOLUME" (altavoz central) al minimo.
- En algunos sistemas de altavoces, en occasions no se obtiene el efecto sufiente. En tal caso, ajuste el parámetro del ADF o el volumen.
- Cuando ADF está configurado en "USER", "1", "2" o "3", lasustralianes VSE y BASS/TREB en EQ-SELECT queden desactivadas
1. Presione el botón [SOUND].
2. Toque ADF.

3. Toque la parte derecha de la pantalla para selectionar el modo ADF.

Cuando el ADF está desactivado ("OFF"), el ajuste de ADF no se refleja en la fuente de música. Con thiso recluye el ajuste del ADF. Presione el botón [SOUND] paravoltar al modo original.
* Selectione USER, 1, 2, 3 u OFF.
4. Para modifier los parámetros de ajuste del ADF, presione el botón [A].
5. Toque la visualización de ajustes para selecciónar el ajuste deseado. Cada vez que toca ,la visualización de ajustes cambia como se indica a continuación:
- Ajuste (cuando se selecciona USER en el paso 3)
BASS (graves) TREBLE (agudos) COMP BASS (graves)...
- Ajuste (cuando se selección 1 a 3 en el paso 3)
LEVEL (nivel) COMP LEVEL...
6. Toque la parte derecha de la pantalla para realizar el ajuste.
* El margen de ajuste de "BASS" y "TREBLE" es de 1 a 13.
\* El margen de ajuste de "LEVEL" es de -3 a +3
*Selezione“ON”o“OFF”para“COMP”.
7. Presione el botón [SOUND] para volver al modo original.
Ajuste del altovoz de subgraves y el altovoz central
- "SW VOLUME" (subgraves) sólo se pueda ajustar cuando "SUB-WOOFER" está activado ("ON").
- "CTR VOLUME" (altavoz central) sólo se pueda ajustar cuando el modo Dolby Pro Logic II está configurado en "MUSIC" o "MATRIX", "SP-SETTING" está en "CTR+SW" y "CENTER-SP" estáactivado ("ON").
- El valor preajustado de fabricula de SW VOLUME y de CTR VOLUME es "0".
1. Presione el botón [SOUND].
2. Toque A-MODE.

3. Toque ↑ ↓ la visualización de ajustes para selecciónar "SW VOLUME" o "CTR VOLUME".

4. Toque la parte derecha de la pantalla para realizar el ajuste deseado.
* El margen de ajuste de este elemento es de -5 a +5.
5. Presione el botón [SOUND] para volver al modo original.
Ajuste del balance/ desvanecedor
BALANCE:
Permite ajustar el balance de volumen entre los altavoces izquierdos y derechos.
FADER:
Permite ajustar el balance de volumen entre los altavoces delanteros y traseros.
- El valor preajustado de fabricula de BALANCE y de FADER es "0".
Nota:
- El balance/desvanecedor no se pueda ajustar cuando AC-PRO IIIiene configurado el parametro "PRO" (cf.頁目44) y la direccion de posicion está activada ("ON"). Ajuste el balance/desvanecedor "Selección del menu de posicion" (cf.頁目17).
1. Presione el botón [SOUND].
2. Toque A-MODE.

3. Toque ↓ la visualización de ajustes para selecciónar “BALANCE” o “FADER”.

4. Toque la parte derecha de la pantalla para realizar el ajuste deseado.
* "BALANCE" pourrait ajustarse dentro del margen L13 (predominio del lado izquierdo) a R13 (predominio del lado derecho).
* “FADER” puede ajustarse dentro el margen R12 (predominio del lado trasero) a F12 (predominio del lado delantero).
5. Presione el botón [SOUND] para volver al modo original.
Ajuste de graves/agudos
El modo de graves/agudos sólo se pueda ajustar cuando el modo Dolby Pro Logic II está desactivado ("OFF") (cf. págin 17) y "EQ-SELECT" tiene configurado el parámetro "BAS/TREB" (cf. págin 44).
- El valor preajustado de fabricula es "0"
1. Presione el botón [SOUND].
2. Toque A-MODE.

3. Toque la visualización de ajustes para selecciónar "BASS" o "TREBLE".

4. Toque la parte derecha de la pantalla para realizar el ajuste deseado.
* El margen de ajuste de este elemento es de -6 a +6.
5. Repita los pasos 3 y 4 para realizar el ajustedeaseado.
6. Presione el botón [SOUND] para volver al modo original.
Operación del procesador AC III
Dolby Pro Logic II
Dolby Pro Logic II es una Tecnología de decodificación de matriz en la que se aplicá la Tecnología de matriz digital actualizada y se的最佳as Dolby Pro Logic. Ofrece una reproducción excellente de 5,1 canales de fuentes perimétricas Dolby como como de fuentes de sonido estéreo, como discos compactos, produciendo por lo tanto un canal perimétrico de gama completa (20 Hz a 20 kHz) y se convierte en estéreo. Por lo tanto, ustedouldrásacrutar de cualquier fuente estéreo con sonido dinámico de 5,1 canales. De acuerdo con la fuente aroducirse, PODRA seleccionarse el modo de música o el modo de matriz.
Fabricado bajo licencia de Dolby Laboratories. "Dolby", "Pro Logic" y el symbolo de la doble D son marcas de Dolby Laboratories.
Selección del menu PL II (Dolby PL II)
Selezione MUSIC o MATRIX como modo Dolby Pro Logic II, según la fuente que vaya a reproducir.
- El valor preajustado de fabricula es "OFF".
■ MUSIC (modo de música)
- Este modo es apropiado para fuentes de sonido estéreo, como los discos compactos.
- Como el camino de sonido se propaga de forma diferente según el estado de la fuente musical grabada, existe(other modo de ajuste que permite afinar aun más. (Consultte la página 47).
■ MATRIX (modulo matricial)
- Este modo es apropiado para fuentes de sonido tales como la radio AM/FM.
OFF
- No se utilizes el modo Dolby Pro Logic II, sino el modo AC-PROIII. Para Obtener más información sobre el modo AC-PROIII, consulte la sección "Selección de cada modo" (ct págin44).
1. Presione el botón [SOUND].
2. Toque Dolby PLII.

3. Toque la parte derecha de la pantalla para seleccionar el modo Dolby Pro Logic II.

La visualización de modelos cambia como se indica a continuación:
MUSIC (modo de música) MATRIX (modo matricial) OFF (PL II desconectado) MUSIC (modo de música)...
* Para Obtener más información sobre elajuste de volumen de los altavocescentral/subgraves, consulte la página 45.
4. Toque RTN.
Selección del menu de posición
Con POSITION, puede selectionar entre 5tips el tiempo que el sonido tarda en临港ar desde el altovoz hasta su posición en el asiento.
Además, la función de alineación temporal permite ajustar los altavoces con precision de forma que el本身就是 efecto de sonido puedaninger desde cada altovoz a todos los oyentes.
En el procedimiento "Selección de cada modo" (cf. págin44),ajuste AC-PROIII en "PRO".
- El valor preajustado de fabricula de POSITION es "OFF" y el del menu Basics de posicion, "FRONT".
■ Menu de posición
Esta función está preprogramada con 5 menus de posicion. Seleeccione el menu que desee.
1. Presione el botón [SOUND].
2. Toque POSITION.

3. Toque la visualización ON/OFF. El modo de posición se activa o desactiva (ON/OFF).

Cuando el efecto de posicion está desactivado ("OFF"),DICHOajuste de posicion no se refleja en la fuente de musica. Con thiso recluye el ajuste de posicion.Presione el boton [SOUND] para volver al modo original.
4. Toque B/U para selectionar "BASIC".

Cada vez que toca B/U, "BASIC" y "USER" se alternan suscesivamente.
5. Toque el N° de menu básico de posición para selección ar menú báscico de posición.
6. Presione el botón [SOUND] para volver al modo original.
Menu Basics de posicion
N° Nombre de visualización Posición del asiento 1 FRONT-L Asiento delantero izquierdo 2 FRONT-R Asiento delantero derecho 3 FRONT Asientos delaneros. 4 REAR Asientos traseros. 5 FULL SEAT Todoos asientos
Ajuste/memorizacion de las positions (memoria de usuario)
Con la memoria de usuario, se pueda ajustar los altevoces con precision para que el本身就是 efecto de audio pueda临港ar desde cada altovoz a todos los oyentes segun el menu b asiico de posicion. La memoria de usuario permite programar hasta 5 valeurs de ajuste.
T-ALIGN (alineación temporal):
La distancia entre el oyente y cada altovoz se suece introducir en pasos de 2,3 cm, como también se suece ajustar el tiempo que el sonido tarda enninger al oyente desde cada altovoz.
SP GAIN (ganancia del altovoz):
Permitte ajustar el nivel de salute del altovoz. Ajuste este nivel de forma que todos los volúmenes que salgan de cada altovoz Sean iguales.
1. Presione el botón [SOUND].
2. Toque POSITION.
3. Toque ↑ ↓ la visualización ON/OFF. El modo de posición se activa o desactiva (ON/OFF).
4. Toque B/U para selectionar "BASIC" o "USER".
5. Toque la parte derecha de la pantalla para selectionar el menu que se utilizes como menu de ajuste.
6. Presione el botón [A].
7. Toque la parte izquierda de la pantalla para seleccionar "T-ALIGN" o "SP GAIN".
8. Toque la parte central de la pantalla para seleccionar cada ajuste.
Cada vez que toca , los ajustes se cambian como se indica a continuación:
Ajustes

*1 Sólo se muestra cuando, en modo de ajuste, "SUB-WOOFER" en "SOUND" está activado ("ON").
*2 Sólo se muestra cuando, en modo de ajuste, "SUB-WOOFER" en "SOUND" está activado ("ON") y se selección "T-ALIGN" en el Paso 7.
9. Toque la parte derecha de la pantalla para realizar el ajuste deseado.

* El margen de ajuste de "T-ALIGN" es de 0 cm a 501,4 cm, en pasos de 2,3 cm.
* El margen de ajuste de "SP GAIN" es de - 20dB a 0dB.
10. Repita los pasos 7 a 9 para realizar el ajustedeaseado.
11. Cuando haya terminado de realizar losDistinctos ajustes, toque RTN.
La visualización vuye a la pantalla original, y aparece “>>” en la visualización BASIC o USER.
Conestoconcluye la operaciondeajuste de低位. Para proseguir con la memorizacion de losvalores deajuste enelmenudecursoro de低位,haga lo singular.
12. Toque RTN prolongamente durante 1 segundo o más.
Aparecerá la lista de manos de posición.
13. Toque prolongamente durante 2 segundos o más la memoria de usuario en la que紊ee programar los valeurs de ajuste.
Escuchará un tono largo paraindicarle que los values que ajustó hasta el paso 10 se han memorizzato en el menu de usuario de posición.
Si escaucha un tono corto, es que los values de ajuste configurados hasta el paso 10 han sido descartados. Ajuste these values según sea besoinario.
14. Toque RTN.
15. Presione el botón [SOUND] para volver al modo original.
* Para seleccionar una memoria de usuario programada, toque B/U para ver “USER” y luego toque ↑ ⇌ el N° de memoria de usuario.
Selección del menu VSE
VSE (Virtual Space Enhancer) le permite compensar el balance de presión acústica bajo el automóvil, de forma que se pueda percibir el"Myso"effecto de sonido en todos los asientos, como lo demuestran las simulaciones de compensación realizadas.
En el procedimiento "Selección de cada modo" (cf. págin44),ajuste AC-PROIII en "STD".
- El valor preajustado de fabricula de VSE es "OFF" y el del menu Basics de VSE, "FLAT".
■ Menu Basics de VSE
Estamericanos.
1. Presione el botón [SOUND].
2. Toque VSE.

3. Toque la visualización ON/OFF. El efecto VSE se activa o desactiva (ON/OFF).

Cuando VSE está desactivado ("OFF"),DICHO ajuste de VSE no se refleja en la fuente de musica. Con thiso conclusye la configuracion de VSE.Presione el boton [SOUND] para volver al modo original.
4. Toque B/U para seleccionar "BASIC".

Cada vez que toca B/U, "BASIC" y "USER" se alternan suscesivamente.
5. Toque el N° de menu báscido de VSE para selección ar menú báscido de VSE.
Menús Basics de VSE
N° Nombre de la.,
función Descripción 1 FLAT Evaluación plana de
la fuente de sonido 2 BASS BOOST Reforzamiento de
tonos graves 3 HIGH BOOST Reforzamiento de tonos
medios y agudos 4 IMPACT Reforzamiento de
tonos graves y agudos 5 ACOUSTICAL Reforzamiento de tonos
medios (voz humana) 6 SMOTH Produce tonos suaves.
6. Presione el botón [SOUND] para volver al modo original.
Ajuste/memorizacion de VSE (memoria de usuario)
Los ajustes de la memoria de usuario le permiten compensar la distribución de la presión acústica a su gusto con arreglo al menú Basics de VSE. Se pueda memorizar hasta seis ajustes de usuario.
DIFFUSE:
Permitteaabstar la desviacion de la presion acustica difusa.
CARWIDTH:
Permitte ajustar la desviación de la presión acústica a lo ancho del automóvil.
CAR LENGTH:
Permitte ajustar la desviación de la presión acústica a lo largo del automóvil.
1. Presione el botón [SOUND].
2. Toque VSE.
3. Toque la visualización ON/OFF. El efecto VSE se activa o desactiva (ON/OFF).
4. Toque B/U para selectionar "BASIC" o "USER".
5. Toque la parte derecha de la pantalla para selectionar el menu que se utilizes como menu de ajuste.
6. Presione el botón [A].
7. Toque la visualización de ajustes para selectionar "DIFFUSE", "CAR WIDTH" o "CAR LENGTH".

8. Toque la parte derecha de la pantalla para realizar el ajuste deseado.
* El margen de ajuste de este elemento es de 1 a 10.
9. Repita los pasos 7 y 8 para realizar el ajustedeaso.
10. Cuando haya terminado de realizar los distinctos ajustes, toque RTN. La visualización vuelve a la pantalla original, y aparece “>>” en la visualización BASIC o USER.
Conestoconcluyeelajuste deVSE.Paraproseguir conla memorizacionde losvaloresdeajuste enelmenudeviasuario deVSE,hagalo significante.
11. Toque RTN prolongamente durante 1 segundo o más.
Aparecerá la lista de menús de usuario de VSE.
12. Toque prolongamente durante 2 segundos o más la memoria de usuario en la que deseee programar los values de ajuste. Escuchará un tono长大o para indicarle que los values que ajustó hasta el paso 9 se han memorizzato en el menu de usuario de VSE. Si escucha un tono corto, es que los values de ajuste configurados hasta el paso 9 han sido descartados. Ajuste these values según sea besoinario.
13. Toque RTN.
14. Presione el botón [SOUND] para volver al modo original.
* Para seleccionar una memoria de usuario programada, toque B/U para ver "USER" y bajo toque ↑ ↓ el N° de memoria de usuario.
Selección del menu P.EQ
P.EQ (Evaluador paramétrico) le permite compensar con precision todo el margen de niveles de frequencies mediante curva suave utilizing compensación de frequencies para adaptarlo a su tipo de automóvil.
En el procedimiento "Selección de cada modo" (cf. págin44),ajuste EQ SELECT en P.EQ
- El valor preajustado de fabricula de P.EQ es "OFF" y el del menu Basics de P.EQ, "SEDAN-1".
■ Menuístico de P.EQ
Esta función tiene prememorizados 6 temas de menus BASICS de P.EQ, selon el tipo de automóvil y la posición de instalación de los altavoces. Selección el menu BASICO que se ajuste a su automóvil.
1. Presione el botón [SOUND].
2. Toque P.EQ.

3. Toque la visualización ON/OFF. El efecto P.EQ se activa o desactiva (ON/OFF).

Cuando el efecto P.EQ está desactivado ("OFF"),)dicho ajuste no se refleja en la fuente de música. Con thiso conclusye el ajuste de P.EQ.Presione el boton [SOUND] para volver al modo original.
4. Toque B/U para selectionar "BASIC".

Cada vez que toca B/U, "BASIC" y "USER" se alternan suscesivamente.
5. Toque 山 el N° de menu báscido de P.EQ para selecciónar el menu báscido de P.EQ.
Menu Basics of P.EQ
N° Nombre de la visualización Posición de instalación de los altavoces 1 SEDAN-1 Delantera: Puerta Delantera
Trasera: Panel trasero 2 SEDAN-2 Delantera: Puerta Delantera
Trasera: Panel trasero 3 WAGON-1 Delantera: Puerta Delantera
Trasera: Portaequipaje (lateral) 4 WAGON-2 Delantera: Puerta Delantera
Trasera: Panel trasero 5 MINI VAN-1 Delantera: Puerta Delantera
Trasera: Portaequipaje (lateral) 6 MINI VAN-2 Delantera: Puerta Delantera
Trasera: Panel trasero
6. Presione el botón [SOUND] para volver al modo original.
Ajuste/memorizacion de P.EQ (memoria de usuario)
La memoria de usuario le permite compensar lascharacteristicas de fecuencia para ajustarlas a suautomovil segun el menubasico de P.EQ.Lamemoria de usuario permitted programar hasta 6valores de ajuste Para Obtener mas informacion,consulta la seccion"Ajuste de P.EQ".
1. Presione el botón [SOUND].
2. Toque P.EQ.
3. Toque la visualización ON/OFF. El efecto P.EQ seactivo o desactiva (ON/OFF).
4. Toque B/U para selectionar "BASIC" o "USER".
5. Toque la parte derecha de la pantalla para selectionar el menu que se utilizes como menu de ajuste.
6. Presione el botón [A].
7. Toque la parte izquierda de la pantalla para seleccionar "FRONT" o "REAR".

8. Toque la parte central de la pantalla para seleccionar cada ajuste.
Cada vez que toca ↑, los ajustes se suseden como se indica a continuación:
Ajustes
BAND (banda) FREQ (frecuencia) Q GAIN (ganancia) BAND (banda)...
9. Toque la parte derecha de la pantalla para realizar el ajuste deseado.
* El margen de ajuste de "BAND" es de 1 a 3.
* El margen de ajuste de "FREQ" es de 20Hz a 20kHz.
*Selezione 1,3,5,7ó20paraajustar“Q”
* El margen de ajuste de "GAIN" es de - 12dB a +12dB.
10. Repita los pasos 7 a 9 para realizar el ajustedeaseado.
11. Cuando haya terminado de realizar los distinctos ajustes, toque RTN. La visualización vuelve a la pantalla original, y aparece “>>” en la visualización BASIC o USER. Con这一点 concluye el ajuste de P.EQ. Para proseguir con la memorización de los values de ajuste en el menu de usuario de P.EQ,=haga lo siguientes.
12. Toque RTN prolongamente durante segundo o más.
Aparecerá la lista de manos de P.EQ.
13. Toque prolongadamente durante 2 segundos o más la memoria de usuario en la que deseee programar los valeurs de ajuste. Escuchará un tono largo paraindicarle que los valeurs que ajustó hasta el paso 10 se han memorizzato en el menu de usuario de P.EQ. Si escucha un tono corto, es que los valeurs de ajuste configurados hasta el paso 10 han sido descartados. Ajuste these values según sea besoinario.
14. Toque RTN.
15. Presione el botón [SOUND] para volver al modo original.
* Para selectionar una memoria de usuario programada, toque B/U para ver "USER" y cuando toque ↑ ⇌ el N° de memoria de usuario.
Ajuste de P.EQ
A continuación se específican los values que se pueda ajustar en el menu de P.EQ. La Frequencia central, ganancia y curva de Q se pueda memorizar en combinaciones de canales y bandas.
Por exemple, la fecuencia central "250Hz", ganancia "-8dB" y curva de Q "3" pueda memorizarse en la banda 1 delantera.
FRONT/REAR (selección de canal)
Permite seleccionar el canal (delantero o trasero) que se va a ajustar.
BAND (selección de banda)
Permite seleccionar la banda de freuencias (de 1 a 3) que se va a ajustar.
Ajuste la fecuencia central (FREQUENCY), la ganancia (GAIN) y la curva de Q (Q) para cada banda de fecuencias.
FREQUENCY (selección de la Frequencia central)
Permite seleccionar la fecuencia que se va a
utilizar como centro de la banda de fecuencias
para compensar en un margen de 20Hz a 20kHz (pasos de 1/3 octavas, 31 punto)
GAIN (ajuste de ganancia)
Permite ajustar la ganancia (nivel de salute) en un margen de -12dB a +12dB. (pasos de 1dB, 25 punto)
Q (selección de la curva de Q)
Permite ajustar la pendiente de la curva Q en uno de los parámetros siguientes: 1, 3, 5, 7 á 20.
Compensación
Si ha medido las caracteristicas de fecuencia con un dispositivo de medicacion y son planas (sin picos ni valleys), no esnecessary compensarlas. Sin embargo, en occasions las caracteristicas de fecuencia aumento o disminuyen en algunos punto. De producirse dicha situacion, sedeferan compensar. Cree una curva de fecuencia concharacteristicasqueean opuestos a la fecuencia central de los punto enlos que augmeno disminuyan lascharacteristicas,afin de anular los picos yvalles, procurando queSean lo mas plana possible.
La operation de aplanado de las caracteristicas se denomina "compensacion."
En esta unidad, las caracteristicas de fecuencia se pueda compensar con P.EQ (ecualizarador paramétrico).
Compensación de lascharacteristicadocurrencia
La?siguiente figura muestra la relacion existente entre fecuencia central, ganancia y curva de Q.

Curva de Q.
La curva de Q se hace más aguda a medida que AUGUNTAN LOS VALORES NUMERICOS, y SE aplANA A MEDIDA QUE ESTOs disminuyen.
Las caracteristicas de fecuencia se PUden aplanar seleccionando una curva de Q opuesta a la curva que se va a compensate.

F: Frecuencia central G: Ganancia (nivel de salute), Q: Curva de Q.
N°( Tipo de automóvil) Parámetros del ecualizador paramétrico Canal Band 1 Band 2 Band 3 F G Q F G Q F G Q 1(SEDAN-1) Delantero 250 Hz -8 dB 3 2 kHz -4 dB 1 5 kHz -4 dB 1 Trasero 250 Hz -10 dB 3 1.25 kHz 0 dB 5 8 kHz 0 dB 5 2(SEDAN-2) Delantero 250 Hz -10 dB 7 800 Hz -4 dB 3 8 kHz -5 dB 1 Trasero 80 Hz 3 dB 7 125 Hz -12 dB 5 1.25 kHz 0 dB 5 3(WAGON-1) Delantero 250 Hz -8 dB 3 1 kHz -8 dB 3 10 kHz -6 dB 1 Trasero 250 Hz -8 dB 3 800 Hz -8 dB 1 8 kHz 0 dB 5 4(WAGON-2) Delantero 250 Hz -8 dB 7 400 Hz -10 dB 7 1.25 kHz -8 dB 7 Trasero 125 Hz -8 dB 3 500 Hz -5 dB 5 1.6 kHz 0 dB 3 5(MINI VAN-1) Delantero 125 Hz -4 dB 5 1.25 kHz -4 dB 3 2 kHz 3 dB 7 Trasero 250 Hz -6 dB 1 630 Hz -4 dB 3 8 kHz 0 dB 5 6(MINI VAN-2) Delantero 250 Hz -4 dB 3 1.25 Hz -8 dB 3 80 Hz 3 dB 3 Trasero 250 Hz -8 dB 3 500 Hz -5 dB 5 8 kHz 0 dB 5
Operaciones de la radio
Visualizaciones del modo de radio
Visualización principal
Para verla, presione el mando [ROTARY] y seleccione el modo de radio.

Si toca la parte izquierda de la pantalla durante 1 segundo o más, cambiará la visualización de funciona simple.

Visualización de Frequencias
Aparece la fecuencia que se está recubiendo actualmente.
Si toca o la visualización de configuración estandar,URT realizar sintonización de búsqueada o sintonización manual.
Visualización de títulos
Muestra el nombre del canal que se está recubiendoactualmente.Al tocar el nombre, cambia la visualizacion.
Visualización de banda de recepción
AM: Nombre de banda AM
FM1: Nombre de banda FM
Visualización de N° de presinstonia
Toque la visualización de funciona estándar para selectionar una memoria preprogramada.
MODE
Al tocar esta visualización aparecen varias subfunciones. Tóquela prolongadamente durante 1 segundo o más para ver la lista de memorias preprogramada.
P-SCAN:
Aparece durante una exploración de presintonías.
Toque esta funciona para finalizar la exploración de presintonías.
A-STORE:
Aparece durante una memorización automatica.
Toque esta funciona para finalizar la memorización automatica.
BAND
Toque esta funciona para携带 de banda de recepción.
Si la toca prolongadamente durante 1 segundo o mas, se alternaré entre el modo de sintonización manual y el modo de sintonización de búsqueda.
(úlo en la visualización de funciona simple)
Estos botones le permitted realizar sintonizacion de búsqueada o sintonizacion por pasos (en el mode de sintonizacion manual).
Si los toca prolongadamente, podra realizar una sintonizaciónVisualización de la lista de memorias preprogramadas
Aparece cuando se toca MODE de forma prolongada durante 1segundo o más en la visualización principal.

Nombre de la emisora (o frequencia)
Sintonización en bajo:
RTN: Toque esta funciona para volver a la visualización principal.
Escuchar la radio
1. Presione el mando [ROTARY] para seleccionar el modo de radio.
Cada vez que presiona este mando, se pasade un modo a otro en elsignificanteorden:
Radio (DAB) CD / MP3 (Cambiador de CD) (Cambiador de DVD) (TV) AUX Radio...
* El modo de aquellos equipos que no estén conectados no se muestra.
2. Toque BAND para Cambiar de banda de recepcion.
Cada vez que toca BAND, cambia la banda de recepción el suivienteorden:
FM1 FM2 FM3 AM (MW / LW) FM1...
Sintonizacion
Hay 3tipsodemosde sintonaciondisponibles:sintonacion debuesueda, sintonacionmanualypresintonacion.
Sintonización de búsqueada
Existen 2 temas de sintonizacion de businga: DX SEEK y LOCAL SEEK.
DX SEEK puede sintonizar de forma automática emisoras de radio con recepcion,@m间隙as de LOCAL SEEK solo sintoniza aquellas emisoras de radio que gown de una buena sensibilityde recepcion.
1. Toque BAND para selectionar la banda deseada (FM o AM (MW, LW)).
2. Sintonice una emisora.
* Cuando aparezca MANU, toque BAND prolongadamente durante 1 segundo o más.
"MANU" desaparece de la pantalladeferando disponible la sintonizacion debúsqueda.
* Si "TA" está iluminada en la pantalla, automatistically se buscarán las emisoras TP.
DX SEEK
Cuando se toca la visualización de freuencias, comienza la sintonización automática.
Cuando se toca 日 ,la emisora se busca en directiona las Frequencias mas altas,y cuando se toca 日 ,la emisora se busca en directiona las Frequencia mas bajas.
* Cuando comienza la sintonización de búsqueada, "DX SEEK" aparece en pantalla.
LOCAL SEEK
Cuando se toca la visualización de freecuencias, comienza la sintonización local. Se selecciónan las emisoras de radio con buena sensibilitidad de recepción.
* Cuando comienza la búsqueada local, "LO SEEK" aparece en pantalla.
Sintonización manual
Existen 2 métodos: sintonización rápida y sintonización por pasos.
En el modo de sintonización por pasos, las fecuencias cambian una a una. En el modo de sintonización rápida, pueda sintonizar la fecuencia deseada al instante.
1. Toque BAND prolongamente durante 1 segundo o más cuando MANU no aparezca en pantalla.
La sintonizacion manual se pueda realizar,msteadasmeuda MANU.
2. Utilice la visualización de Frequencias para sintonizar una Frequencia que está transmitido.
Sintonizacion por pasos
Toque la visualización de Frequencia.
Sintonizacionrapida
Toque la visualización de freuencias. El proceso de sintonización se detiene cuando retina el dedo del panel.
Recuperación de emisoras preprogramadas
La función de recuperación de emisoras preprogramadas permite sintonizar emisoras previamente memorizadas.
1. Toque MODE prolongamente durante un segundo o más.
Aparecerá la lista de的记忆as preprogramadas
2. Toque la emisora que desee escuchar.
* En el modo normal, también puede選擇aciones un N° de presintonía tocando
en la visualizacion principal.
Para cancelar la sintonizacion
1. Toque RTN.
Memoria preprogramada
Existe un total de 24 memorias de sintonizacion (6-FM1, 6-FM2, 6-FM3, 6-AM) para memorizar emisoras de radio individuales.
1. Toque BAND paraonian de banda de recepcion.
2. Utilice la visualizacion de freuencias para memorizar las emisoras.
3. Toque MODE prolongamente durante un segundo o más.
Aparecerá la lista de的记忆as preprogramadas
4. Toque prolongamente durante 2 segundos o más el N° de presintonía donde se memorizará la emisora.
Escuchará un tono长大o para indicarle que se ha memorizzato la emisora.
Memorización automática
La función de memorización automática permitte programar hasta 6 emisoras que se sintonizar automatistically de forma secuencial.
1. Toque MODE.
2. Toque A-STORE prolongamente durante 2 segundos o más.
La visualización MODE cambia a “A-STORE” y el N° de presinstonia de la operación de memorización automática aparece en la visualización de N° de presinstonia.
* Se buscan las emisoras con buena recepción y se guardan en la memoria preprogramada (N° 1 al N° 6) enorden empezando por la emisión con la Frequencia más baja.
Notas:
- Cuando se realiza una memorizacion automatica, se borran las emisoras que hasta entones estaban memorizadas.
- Si hay menos de 6 emisoras con buena recepción en LOCAL SEEK, se vuelve automatistically a las Frequencias同比下降 y DX SEEK realiza otra memorización automática. Si tras launda memorización automatística,sville habiendo menos de 6 emisoras con buena recección, las emisoras anteriores permanecerán en la memoria.
- Si la memorización automatica se realiza en las bandas de FM, las emisoras se memorizarán en FM3, although she may have elected FM1 or FM2 to memorizar las emisoras.
Exploración de presintonías
La función de exploración de presintonías le permite recibir las emisoras en elorden en que estáactualmentememorizadas enel N^ de presintonía,para poder examinarlas emisiones.
1. Toque MODE.
2. Toque P-SCAN.
La visualización MODE cambia a "P-SCAN", y el N° de presintonía de la operation de exploración de presintonías aparece en la visualización de N° de presintonía.
* Las emisoras actualmente memorizadas se reciben en suorden durante 7segundos o más cada una. Se omiten las emisoras con mala recepción y se pasa a recibir la",[siguiente].
Cuando se realiza una exploración de presintonías en una emisión de FM, las emisoras de FM se reciben en el suiviente orderly:
FM1 (1 6) FM2 (1 6) FM3 (1 6)...
Cuando se realiza una exploración de presintonías en una emisión de AM, las emisoras de AM se reciben en el suiviente orderly:
AM (1 6) AM (1 6) y asi sucesivamente.
Para cancelar la exploración de presintonías
1. Toque P-SCAN.
La visualización P-SCAN cambia a “MODE”, y las emisoras que se estaban recibiendo cuando se toco P-SCAN se reciben a continuación.
Sistema de datos radiofonicos (RDS)
Estaunidadtieneincorporadoundecodificador delsystemadatasradiofonicos(RDS)parautilizarsecon emisoras que transmitan datos deRDS.
Este sistemas peut visualizar el nombre de la emisora recibida (PS), y tambiénCambiar automatistically a otheremorsa con la mayor recepcion,mñtras seencuentreeviando a grandes distancias (cambio de AF).
Además si una emisión de RDS transmite unannouncement sobre el refrío o un tipo de programa,se recibirá esta emisión independiente del modo en el que se enquiry.
Adicondalmente, si se recibe informacion de EON, esta informacion permitira el cambio automatico de除外 emisoras memorizadas de la mesma red y interrupcion de la emorsa que este recibiendose para recibir informacion sobre el trafico de除外 emisoras (TP).
Para utiliser la funciona de RDS,pongasiempre la radio en el modo de FM.
- AF: Alternative Frequency (Frecuencia alternativa)
- PS: Programme Service Name (Nombre de contrôle del programa)
- PTY: Programme Type (Tipo de programa)
- EON : Enhanced Other Network (Información mejorada de除外es redes)
- TP: Traffic Programme (Programa sobre el tráfico)
PI: Programme Identification (Identificacion de programa)
- TA: Traffic Announcement (Información sobre el tráfico)
* La función de RDS no trabajoará durante la recepción de radio de AM.
* Cuando el aparato recibe la seals RDS y pueda leer los datos PS, aparece PS en el visualizador.
Función de Frequencias Alternativas (AF)
La funciona de AF cambiará a una Frequencia diferente de la mesma red a fin de mantener la optima recepción.
- El ajuste de fabricula es "ON".
Para activar o desactivar (ON/OFF) la funciona AF
1. Toque MODE.
2. Toque AF. Cada vez que toca esta visualización, la funciona AF seactiva ("ON") y desactiva ("OFF") suscesivamente.
3. Toque RTN.
* Si la Reception de la emisión de radio se debilita, "SEARCH" aparece en pantalla y la_radio empieza aUGCAR el mismoprograma en othera freuencia.
Función de AF entre RDS y DAB
Cuando el本身就是 programa está radiodifundiendose mediating RDS y DAB, y está的功能 está activada, launidad cambiará automatistically para recibir la emisión con mayor recepción.
-Estafuncion solamentetrabajaracuandohayaconectaruna unidadDABDAH923o DAH913, vendidaaparte.
- El ajuste predeterminado de fabrica es "ON".
1. Presione el botón [A] para selecciónar el modo de ajuste.
2. Toque la visualización de ajustes para selecciónar "LINK ACT" en "TUNER".

3. Toque la parte derecha de la pantalla o gire el mando [ROTARY] para seleccionar "ON" u "OFF".
ON:
Se activa la commutación de AF entre DAB y RDS.
OFF:
Se desactiva la conmutacion de AF entre DAB y RDS.
4. Presione el botón [A] para volver al modo anterior.
Función de programareregional (REG)
Cuando la funciona de REG está activada, la recepción de emisoras locales está optimizada. Cuando esta funciona está desactivada, si el área regional cambia cuando conducza, se recibirá la emisiónal para tal region.
- El ajuste de fabricula es "OFF".
Notas:
-Estamericanestarahabituladacuandose esterecibiendounaemisorasnacional,comoBBC2_FM.
- El ajuste de activación/desactivación de la función de REG sera正值 cuando la funciona de AF está activada.
Para activar o desactivar (ON/OFF) la funciona REG
1. Toque MODE.
2. Toque REG.
Cada vez que toca esta visualización, la funciona REG seactiva ("ON") y desactiva ("OFF") suscesivamente.
3. Toque RTN.
Sintonización manual de una emisiónal regional en la misma red
-EstafunciionesaldoquandolafunciOnAF estáactivada("ON").
- La operation variedegun esté activado o desactivada (ON/OFF) de la referencia REG. Cuando la referencia REG está activada (ON), se pueda recibir las emisiones que poseen un número PI totalmente coincidente. Cuando la referencia REG está desactivada (OFF), se pueda recibir las emisiones que poseen el本身就是 tipo de número PI.
Notas:
-Estafunciopuedeutilizarsecuandesecrbcuna emisión regional de la misma red.
- El número PI es un sistemas de codificacion unico de cada emisora de radio.
1. Toque MODE prolongamente durante un segundo o más.
Aparecerá la lista de的记忆as preprogramadas
2. Toque el N° de presintonía de la emisión que se vaya a recibir.
Anuncios sobre el tráfico (TA)
En el modo de espera de TA, cuando se inicia la emisión de announcements sobre el refrío, tal emisión se recibirá con la(Maxima prioridad independiente) del modo de funciona a fin de que pueda escharla. Internacionalmente, para un programa sobre refrío (TP).
-Estafuncion solamentepodarutilizarusewhen enelvisualizadorestedindicandose“TP” Cuando estedindicandose“TP”,significarque laemisoradRDSquesta recibiendose posee programsadanunciossobrelertrfico.
Establecimiento del modo de espera de TA
Si presiona el botón [TA] cuando en el visualizador solamente está indicándose "TP", aparecerán "TP" y "TA" y launidad entrada en el modo de espera de TA hasta que comience un anuncio sobre el tráfico. Cuando comience una emisión de announcements sobre el tráfico, en el visualizador aparecería "TRA INFO". Si presiona el botón [TA]mintras está recibiendo una emisión de announcements sobre el tráfico, la recepción de dicha emisión se cancelará, y launidad entrada en el mode de espera de TA.
Para cancelar el modo de espera TA
Con lasindicaciones“TP”y“TA”iluminadas en pantalla, presione el boton [TA].Se apaga la indicacion“TA”y se cancela el modo de espera TA.
- Si "TP" está apagada, pode presionar el botón [TA] paraocular una emisora TP.
ParaocularunaemisoraTP
Si presiona el botón [TA] con "TP" apagada, "TA" se ilumina en la pantalla y la unidad automatistically recibe una emisora TP.
Nota:
- Cuando no se pueda recibir una emisión TP, "TP SEEK" aparece en pantalla y prosigue la BUSqueda de la emisión TP. Cuando se presiona el botón [TA] de nuevo, "TA" y "TP SEEK" se apagan en la pantalla y finaliza la BUSqueda de la emisión TP.
Función de almacenimiento automatico de emisoras de TP
Podrá almacenar automatistically hasta 6 emisoras TP en la memoria de preajustes. Si el número de emisoras TP que pueda recibirse es de menos de 6, se DEAan sin sobrescribir las emisoras difusoras que ya está almacenadas en la memoria.
1. Compruebe que "TA" aparece en pantalla, y toque MODE.
Si "TA" no aparece en pantalla, presione el botón [TA] para que aparezca.
2. Toque A-STORE prolongamente durante 2 segundos o más.
La visualización MODE cambia a "A-STORE" y el N° de presinstonia de la operation de memorización automatica aparece en la visualización de N° de presinstonia.
- Las emisoras TP con buena sensibilitidad de recepcion se memorizan en las的记忆as preprogramadas.
- Aúnque selección FM1 o FM2, se memorizará una emisióna TP para FM3.
Tipo de programa (PTY)
Esta funciona le permite escharar las difusiones del tipo de programa seleccionado excepto que la unidad está en un modo de referencia que no sea el de la radio.
- Algunos País no realizan todas emisiones de PTY.
- En el modo de espera de TA, una emisora de TP tendrá prioridad sobre otra de radiodifusión de PTY.
Establecimiento del modo de espera de PTY
Si presiona el botón [▶III], en el visualizador aparecerá "PTY" y seactivará el modo de espera de PTY. Cuando se incide la emisión de PTY selección, en el visualizador aparecerá el nombre del item de PTY.
■ Cancelación del modo de espera de PTY
Si mantiene presionado el botón [▶■] durante 1 o más segundo "PTY" desaparecerá del visualizador y se cancelará el modo de espera de PTY.
■ Cancelación de una emisión
con interruptación de PTY
Presione el botón [▶III] durante la emisión con interruptions de PTY, dicha interruptions de PTY se cancelará y launidadvoltara al modo de espera de PTY.
Selección de PTY
1. Cuando presiona el botón [■■], launidadENA al modo de selección de PTY.
2. Toque la parte derecha de la pantalla o gire el mando [ROTARY] para seleccionar PTY.
* A continua se muestran los Valores preajustados de fabrica memorizados:
Número de memorización Itém de PTY ENGLISH -contained 001 News Noticias 002 Info Información 003 Pop M Música Pop 004 Sport Deportes 005 Classics Música Clásica 006 Easy M Grand éxitos
3. El modo de selección de PTY se Cancela automatistically a los 7segundos, o toque RTN se selecciona un PTY.
Búsqueda de PTY
1. Cuando presiona el botón [▶■], se activa el modo de selección de PTY.
2. Toque el centro de la pantalla o gire el mando [ROTARY] para seleccionar PTY.
3. Toque la izquierda de la pantalla. Cuando toca, la unidad busca una emisión PTY desplazándose por las Frequencia en sentido ascendente, cuando que cuando toca la búsqueda se realiza en sentido descendiente.
* Si no se recibeacular emisora con la emisión PTY selecciónada, launidad vuelve al modo anterior.
Memoria preprogramada de PTY
1. Cuando presiona el botón [▶II], se activa el modo de selección de PTY.
2. Toque la parte central de la pantalla para selectionar PTY.
Se pueda selectionar los 29 temas de PTY que se muestran en lasuma table.
Itém de PTY ENGLISH DEUTSCH SVENSKA FRANÇAIS Contenido News Nachrich Nyheter Infos Noticias Affairs Aktuell Aktuellt Magazine Magazin Info Service Info Services Informação Sport Sport Sport Sport Deportes Educate Bildung Utbildn Educatif Educación Drama Hör + Lit Teater Fiction Drama Culture Kultur Kultur Culture Cultura Science Wissen Vetenskap Sciences Ciencia Varied Unterh Underh Divers Varios Pop M Pop Pop M Pop Música Pop Rock M Rock Rock M Rock Música Rock Easy M U-Musik Lättlyss Chansons Grand éxitos Light M L-Musik L klass M Cl Lég Música Ligera Classics E-Musik Klassisk Classiq Música Clásica Other M -- Musik Övrig m Autre M Otro Música Weather Wetter Väder Météo Informação Metereológica Finance Wirtsch Ekonomi Economie Economia Children Kinder För barn Enfants Infancia Social Soziales Sozialt Société Sociedad Religion Religion Andligt Religion Religión Phone In Anruf Telefon Forum Opinión Travel Reise Resor Voyages Viajes Leisure Freizeit Fritid Loisirs Ocio Jazz Jazz Jazz Jazz Música Jazz Country Country Country Country Música Country Nation M Landes M Nation m Ch pays Música Nacional Oldies Oldies Oldies Rétro Música de ayer Folk M Folklore Folkm Folklore Música Folk Document Feature Dokument Document Documental
3. Toque RTN prolongamente durante 1 segundo o más.
Aparecerá la lista de titulos de la memoria PTY
4. Toque prolongadamente durante 2 seguidos o más el N° de presintonía que se va a memorizar.
Escuchará un tono largo paraindicarle que el PTY seleccionado se ha memorizzato en la memoria de canal preprogramada.
Emisión de emergencia
Si se recibe una emisión de emergencia, todas las operaciones del modo de funciona se pararan. En el visualizador aparecerá "ALARM" youlda eschar la emisión de emergencia.
■ Cancelación de una emisión de emergencia
Si presiona el botón [AF], la recepción de la emisión de emergencia se cancelará.
Cambio del idioma de visualización de PTY
Puede selectionar uno de los 4 idiomas existentes (inglés, aleman, sueco o francés) para visualizar la pantalla.
- El valor preajustado de fabrica es "ENGLISH" (Inglés).
1. Presione el botón [A] para selección ar el modo de ajuste.
2. Toque la visualización de ajustes para selecciónar "LANGUAGE" en "TUNER".

3. Toque la parte derecha de la pantalla o gire el mando [ROTARY] para seleccionar el idioma.
* Selección ENGLISH (Inglés), DEUTSCH (Alemán), SVENSKA (Sueco) o FRANÇAIS (Francès).
4. Presione el botón [A] para volver al modo anterior.
Ajuste de la interrupción de RDS cuando la funciona 2-ZONE está en uso (RDS-INT 2Z)
Cuando esta funciona está activada ("ON"), y se interrupme el RDS con la funciona 2-ZONE en uso, se dejan de recibir los datos RDS.
- Cuando se produce una interruptions en el RDS, la funciona 2-ZONE se desactiva ("OFF").
- Si se produjera una interrupcia de alerta aun con "RDS-INT 2Z" desactivado ("OFF"), se recibiran los datos RDS.
- El valor preajustado de fabricula es "ON".
1. Presione el botón [A] para selección el modo de ajuste.
2. Toque la visualización de ajustes para selecciónar "RDS-INT 2Z" en "TUNER".

3. Toque la parte derecha de la pantalla o gire el mando [ROTARY] para seleccionar "ON" u "OFF".
ON:
Los datos RDS se reciben cuando se produce una interrupción del RDS con la func tion 2-ZONE en uso.
OFF:
Cuando la funciona 2-ZONE está en uso, no se recibe ningún dato RDS, excepto la Interruption de alerta.
Nota:
- Si selección el modo Radio cuando TA (Información sobre el tráfico) y PTY está activadas ("ON"), se recibirán interruptions, también la interrupccion de RDS está desactivada ("OFF").
4. Presione el botón [A] para volver al modo anterior.
Ajuste del volumen de TA, emisión de emergencia (ALARM) y PTY
El volumen de las emisiones de interrupción de TA, ALARM y PTY se pueda ajustar durante la emisión de interrupción de TA, ALARM o PTY.
- El valor preajustado de fabricula es "15"
Durante una emisión de interrupción de TA, ALARM o PTY, gire el mando [ROTARY] hacía lareshedra o hacía la izquierda paraaabsturar el nivel del volumen deseado (de 0 a 33).
- Una vez finalizada la emisión de interrupción de TA, ALARM o PTY, el volumen vuelte al nivel que está activo antes de la emisión de interrupción.
Visualizaciones del modo CD
Visualización principal
Para verla, presione el mando [ROTARY] y seleccione el modo CD.

Si toca la parte izquierda de la pantalla durante 1 segundo o más, cambiará el modo de funciona bajo.

Visualización de tiempo de pista/reproducción
J01/02:00:
Muestra el N° de pista en reproduccion y el tiempo de reproduccion.
Si toca 一 四 一 一 o durante el
funcimiento estándar, pourrait selectionar la pista que deseee reproducir o hacer avanzar o retroceder rápidamente las pistas.
Visualización de títulos
Esta visualización cambia cuando se toca.
Visualización de carpetas (en caso de MP3/WMA)
Si toca duringe el funcionaamente estandar, podra seleccionar carpetas.
MODE:
Al tocar esta visualización aparecen varias subfunciones. En el caso de MP3/WMA, si la toca prolongadamente durante 1 segundo o más, aparecerá la lista de carpetas.
Nota:
- Este funciona solo está activada durante la reproduccion de un disco.
-SCAN: SCAN: Aparece durante la reproduccion por exploracion. Toque esta referencia para finalizar la reproduccion por exploracion.
-RPT/RPT: Aparece durante la reproduccion repetition. Toque esta direccion para finalizar la reproduccion repetition.
- RDM/RDM: Aparece muestra durante la reproduccion aleatoria. Toque esta direccion para finalizar la reproduccion aleatoria.
TOP:
Toque esta funciona para,iniciar la reproduccion a partir de la prima pista del disco o de la carpeta que se esté reproduciendo.

(sólo en la visualización de onacimiento simple)
Toque这些东西 botones para selectionar la pista que deseee reproducir.
Si toca los botones de forma prolongada, ha para avanzar o retroceder las pistas rápidamente.
Visualización delists de carpetas (en caso de MP3/WMA)
Aparece cuando se toca MODE de forma prolongada durante 1 segundo o más en la visualización principal.

Nombre de carpeta
N° de carpeta
Si aparece?sombreada(gris),la carpeta no se(puede seleccionar.
>>:Selección en bajo 100%
Toque el nombre de la carpeta para volver a la visualización principal e起初 la reproduccion desde la primera pista de la carpeta tocada.
←PREV-RTN:
Toque esta funciona para ver la lista de carpetas anterior. Si la toca prolongadamente durante 1 segundo o más, volverá a la visualización principal.
NEXT:
Toque esta funciona para ver la lista de carpetas.),
siguiente.
¿Qué es MP3?
MP3 es un método de comprensión de audio clasificado en la capa 3 de audio de las normas MPEG.
Este método de compresión de audio ha penetrado en los.usquarios de PC y se ha convertido en un formattingstandar.
Este formatting MP3 se caracteriza por la compresión de los datos de audio a aproximadamente el 10 por cierto de su時間 original con gran calidad de sonido. Esto significía que podran grabarse 10 discos compactos de música en un disco CD-R o un disco CD-RW para permitir长大o tiempo de escharc sin tener que cambiar discos compactos.
¿Qué es WMA?
WMA es la abreviatura de Windows Media Audio, un tipo de ARCHivos de audio desarrollado por Mirosoft Corporation.
Notas:
- Si reproduce un archivo con DRM (Digital Rights Management) para WMA en ON, no trabra calidad de audio. (El indicator WMA parpadeará.)
- "Windows Media™ y el logotipo Windows® son MARCA MARCEIA O MARCA REGISTRadas de Microsoft Corporation en los Estados Unidos de América y/others países."
- Para,inhabilar la DRM (Administración dearethchos digitales):
- Cuando utilise Windows Media Placer 8, haga的比例在 TOOLS OPTIONS COPY MUSIC, y bajo de COPY SETTINGS, quite la marca de verificacion de la casilla para PROTECT CONTENT. Después reconstruya los ARCHIVOS.
- Cuando utilise Windows Media Placer 9, haga,
optic en TOOLS OPTIONS MUSIC
RECORD, y文化底蕴 de Recording settings,
quite lamarca de verificacion de la casilla para RECORD PROTECTED MUSIC.
Después reconstruya los archivos.
Los archivos WMA personalmente formados se emplean bajo propia responsabilitad personal.
Precauciones al crear un disco MP3/WMA
- Velocidades de muestreo y velocidades de transferencia realizables:
1. MP3: Velocidad de muestro: de 11,025 kHz a 48 kHz Velocidad de transferencia: de 8 kbps a 320 kbps / VBR
2. WMA: Velocidad de transferencia: de 48 kbps a 192 kbps
- Extensiones de ARCHIVOS
1. Añada siempre una extension de archivo“.MP3” o“.WMA” a los ARCHIVOS MP3 o WMA utilizing letras de un solo byte. Siañade una extension Distinta a la asignificada o si se olvidaañadir la extension de archivo, este no seoulda reproducir.
2. Los ARCHIVOS sin datos MP3/WMA no se reproduce. Si intenta reproducir ARCHIVOS sin datos MP3/WMA, en lugar del tiempo, la pantalla做不到la indicación“--:--”.
- Formato lógico (Sistema de ARCHivos)
1. Para bootloader un archivo MP3/WMA en un disco CD-R o en un disco CD-RW, seleccione "ISO9660 level 1, 2 o JOLIET o Romeo" como formattingo de software de,)!. La reproduccion normal no sera possible si graba el disco en othero formattingo.
2. El nombre de la carpeta y el nombre del archivo podrán visualizarse como titulo durante la reproduccion de MP3/WMA, si bien el titulo no deben contener más de 128 caracteres alfanumericos de un solo byte (incluida la extension).
3. No asigne un nombre a un archive de una carpeta queonga el mesmo nombre.
Estructura de carpetas
1. No se pueda grabar un disco con una carpeta que posea más de 8 niveles jerarquicos.
- Nível de ARCHIVOs o de carpetas
1. SeSEO reconocerpora 255 archivos en una carpeta.Y seSEO reproducirpora 500 archivos.
2. Las pistas se reproducen en el ordin en le que fueron grabadas en el disco. (Es possible que las pistas no se reproducan siempre en el ordin en que aparecen en el PC.)
3. Dependiendo del tipo de software codificador que se usa durante la grabacion, es possible que se produza cierto ruido.
Selección multisesión
Estamericano de la revolución del siglo.
La revolución de los discos (p.ej. CD-EXTRA) contienen una mezcla de ARCHIVOS CD-DA (CD de música) y MP3/WMA.
1. Toque MODE.
2. Toque M-SESS. Cada vez que toca M-SESS, la visualización M-SESS cambia entre "CD" (reproducir CD-DA) y "MP3/WMA" (reproducir MP3/WMA).
* Si- M-SESS no aparece en la pantalla, toque NEXT.
3. Toque RTN. El ajuste de selección multisesión aparecerá laproxima vez quecargue un CD.
Nota:
- Cuando reproduzca un CCCD (CD con control de copia), selección el ajuste de tipo de CD. Si lo ajusta en el tipo MP3/WMA, el CDotta no producirse con normalidad en algunos casos.
PRECAUCION
Tenga cuidado de no pillarse los dedos cuando cierre la CONSOLA INCLINABLE.
Notas:
- Si la CONSOLA INCLINABLE no se abre Completely, abralo suavamente con la
- Después de haber cargado un disco compacto, cierre sempre la CONSOLA INCLINABLE.
- No intente insertar sus dedos en la ranura de insertión del disco. Tampoco.Inserteledge的对象extra en la ranura.
- No inserte discos cuando haya salido adhesivo de la cinta de celofán o de una etiqueta de un disco CD alquilado, cuando tales discos tengan marcas de cinta de celofán o etiquetas despegadas. Podía resultar imposible extraer these discs de la unidad y averiarla.
Cargar un CD
1. Presione el botón [▲]
Se abre el panel de control.
2. Cargue el disco compacto a工程技术 de la ranura para CD (CD SLOT).
Una vez cargado el disco, al cabo deanos
segundos el panel de control se cierra
automátamente y se empieza a repr
Notas:
- No inserte nunca objetos extranos a工程技术 de la ranura para CD (CD SLOT).
- Si el CD no se pueda insertar con satisfid, es possible que haya other CD bajo del aparato o que lachaft requiera reparacion.
-Esta unidad no puedaroducirdiscos que noporten lamarca o CD-ROMs. DIGITALO 00000000000000000000000000000000000000000000000000000000
- Es possible que algunos CDs grabados en modo CD-R/CD-RW no pueda utiliser.
Carga de discos compactos de 8 cm
Para reproducir discos compactos de 8 cm no se necesita adaptador. Inserte el CD de 8 cm en el centro de la ranura para CD (CD SLOT).
Expulsión de un CD
Se peutes expulsar un disco compaco presionando el boton [A],aqueue la llave del motor del automovil este en la posicfon OFF o ACC.
PRECAUCION
Cuando se expulse el disco, presione el botón [▲] para cerrar el panel de control. Sidea el panel de control abierto, eschucará un tono doble y bajo se cerrará automatistically.
1. Presione el botón [▲].
Se abre el panel de control y se expulsa el disco compacto. El equipooca automatamente a modo de radio.
* Asegürese de retiring los discos compactos expulsados de la unidad. Si no retira el disco compacto de la bandeja de CD, al cabo de 15 segundos o más se reintroduciría automatistically en la unidad y se cerrará el panel de control. (función de reintroduccion automatica)
* Los discos compactos individuales no se cargan automatistically. Asegúrese de retiring los discos compactos individuales una vez expulsados.
PRECAUCION
Si ejerce demasiada fuerza para insertar un disco expulsado,可以更好 arañar la superficie de este. Retire el disco antes de volver a cargarlo.
Escuchar un disco ya cargado en launidad
1. Presione el mando [ROTARY] para seleccionar el modo de CD.
* Cuando el modo cambie a CD, la reproduccion se inicia automatistically.
Interruption de la reproduccion
1. Presione el botón [▶■].
Reanudación de la reproducción:
1. Presione el botón [▶■] de nuevo.
Selección de una pista
Cuando inserta un CD-R/CD-RW grabado con un archivo MP3 o un archivo WMA, solo可以选择 las pistas grabadas en la misma carpeta tocando 山 la visualización de pistas.
1. Para esuchar la?sigaiente pista,toque la pista.
2. Para esuchar la pista anterior, toque 品 de pista.
Cuando toca 已 已 ,se reproduce la?siguiente pista. Si toca 已 已 sucesivamente, la pista avanza el numero de veces que toque 已 已 y bajo se reproduce.
Cuando toca se reproduce la pista anterior. Si toca sucesivamente, la pista retrocede el numero de veces que toque
yuego se reproduce.
* Si toca dos vezes la visualización de pista cuando se reproduce el principio de la pista, posiblemente se reproduzca la pista situada 2 pistas por detrás.
■ SeLECTION de una carpeta
Para seleccionar una carpetadistincta,toque 已 la visualizacion de carpetas o haga lo seguido.
1. Toque MODE prolongadamente durante un segundo o más.
Aparecerá la lista de carpetas Si toca PREV o NEXT,oulda desplazarse arriba o bajo por la lista de carpetas.
2. Toque el nombre de la carpeta.
Para escuchar la lista de reproduccion
Tambien peut esecuchar listas de reproduccion (archivo M3U).
Tenga en cuenta, sin embargo, que de los archivos M3U que estén grabados hasta cinco niveles en la jearquía de ARCHivos (incluida la carpeta raíz),sole se podráre reproduir los 5 primeros que disponan de marcas de tiempo de archivo新模式.
Notas:
- En una lista de reproduccion se pueda reproducir hasta 255 ARCHivos.
- Só le podrárn reproducir los ARCHivos MP3 o WMA que estén actualmente guardados hasta cinco niveles (incluida la carpeta raíz) en la jerarquía de ARCHivos.
Para eschar la lista de reproduccion, haga lo suiviente.
1. Toque MODE.
2. Toque NEXT.
3. Toque PLY LIST. Se empieza a leer la lista de reproduccion. Una vez finaliza esta lecture, automatically se empezará por la lista de reproduccion que contenga lamarca de tiempo más ahora. La selección de la lista de reproduccion o de pistas bajo de la lista de reproduccion se realiza del mesmo modo que la selección de una carpeta o pistas de una carpeta.
* PLY LIST no aparecerá si no se ha guardado una lista de reproducción correcta (archivo M3U) en el CD-R/CD-RW cargado en launalidad.
Para detener la reproduccion de la lista de reproduccion
1. Toque MODE.
2. Toque NEXT.
3. Toque PLY LIST.
Avance=rápido/Retroceso rápido
1. Para avanzar de forma rápida, toque la pista.
2. Para retroceder de forma rápida, toque la pista.
Función de principio
Con esta función el reproductor de CD vuelve a la prima pista del disco.
1. Toque TOP. La reproduccion empieza a partir de la prima pista (pista N° 1). Si se tratate de ARCHivos MP3/WMA, se volverá a la prima pista de la carpeta que se esté reproduciendo.
Reproducción por exploración
Estamericano.
1. Toque MODE.
2. Toque -SCAN. La visualización MODE pasa a "P-SCAN" y se inicia la reproducción por exploración.
* La reproducción por exploración comienza desde la pistasuma a la pista que se esté reproduciendo en ese momento.
Para cancelar la reproduccion por exploracion
1. Toque J^ -SCAN. La visualización J^ -SCAN pasa a "MODE", y se reproduce la pista que se está reproduciendo cuando toco J^ -SCAN.
Reproducción por exploración de carpetas
Esta funciona le permitte localizar y reproducir los primeros 10 segundos de la prima pista de todas las carpetas de un disco MP3/WMA.
1. Toque MODE.
2. Toque -SCAN. La visualización MODE pasa a "SCAN" y se inicia la reproducción por exploración de carpetas.
* La reproduccion por exploracion de carpetas comienza desde la carpeta?siguea a la que se este reproduciendo.
Para cancelar la reproduccion por exploracion de carpetas
1. Toque -SCAN. La visualización SCAN para a "MODE", y se reproduce la pista que se estaba reproduciendo cuando toco SCAN.
Reproducción repetida
Estamericano.
1. Toque MODE.
2. Toque -REPEAT. La visualización MODE pasa a "RPT" y se inicia la reproducción repetida.
Para cancelar la reproduccion repetitiona
1. Toque -RPT. La visualización -RPTonga "MODE", y se empieza a reproducir normalmente a partir de la pista que se está reproduciendo cuando toco -RPT.
Reproduccion repetida de carpetas
Esta funciona le permittedreprodukcir continuamente la carpeta en bajo. Sólo está disponible cuando seonga un CD-R/CD-RW grabado con ARCHivos MP3 o WMA.
1. Toque MODE.
2. Toque --REPEAT. La visualización MODE pasa a "RPT" y se inicia la reproducción repetida de carpetas.
Para cancelar la reproduccion repetition de carpetas
1. Toque -RPT. La visualización -RPTENA "MODE", y se empieza a reproducir normalmente a partir de la pista que se estaba reproduciendo cuando toco -RPT.
Reproducción aleatoria
Estamericano.
±bJ -RANDOM
Permite reproducir todas las pistas del disco de forma aleatoria.
Si el disco contiene 2 carpetas o mas, se producirán todas las pistas de una carpeta, seguidas de todas las pistas de la carpeta?sigue. Y asi suscesivamente con todas las carpetas.
-RANDOM
Permite reproducir pistas del disco de forma aleatoria.
Sólo está disponible cuando searga un CD-R/ CD-RW grabado con ARCHivos MP3 o WMA.
1. Toque MODE.
2. Toque -RANDOM o -RANDOM
La visualización MODE pasa a “f-RDM” o “RDM” y se inicia la reproducción aleatoria.
Para cancelar la reproduccion aleatoria
1. Toque -RDM o -RDM. La visualización -RDM o -RDM pasa a "MODE", y se empieza aREENOMINALmente a partir de la pista que se estaba reproduciendo cuando toco these botones.
Diferentes piezas musicales eschuchadas por various oyentes (función 2-ZONE)
2-ZONE es una funciona que da
simultaneously salute a sonidos separados a工程技术 de la zona principal (MAIN) y la zona secundaria (SUB) operando dos fuentes en la unidad central, para permitir que various oyentes disfruten de fuentes de músicaSeparated.
Estaunidaduedecontrolar sus fuentes internas (radio,CD,MP3etc.)para reproducirlas y,adelmas,puede reproducir simultaneamente fuentes de equipos externos connectadosa travésde CeNET (porejemplo, cambiadores de disco CD,etc.).
Las fuentes de la zona MAIN se reproducirán a工程技术 de los altavoces del vehiculo, y las de la zona SUB a工程技术 de los sistemas de altavoces (WH143).

La figura superior correponde a la reproduccion de una fuente de sonido mediante el modo interno de launidad (radio, CD, AUX) en los altavoces.
La figura inferior correponde a la reproduccion de una fuente de sonido mediante el modo externo de la unidad (cambiador de CD,ambiador de DVD, TV,AUX) en los altavoces.
* El valor preajustado de fabricula es "OFF".
Notas:
- Si la funciona 2-ZONE no está disponible cuando se conecta DAB.
- El nuevo ajuste de volumen que se realiza girando el mando [ROTARY] de esta unidadsole se refleja en los altavoces. El ajuste AUX-SENS se refleja tanto en los altavoces como en los auriculares.
Visualización de la pantalla cuando se usa la funciona 2-ZONE
En el centro de la pantalla aparece "INT." (modo interno) o "EXT." (modo externo) paraindicar si pueda escharar la reproduccion en el modo interno or除外 del modo de funcionaactual de 2-ZONE.
1. Presione el botón [SOUND].
2. Toque 2-ZONE.

3. Toque prolongamente ON/OFF en el centro de la pantalla durante 1 segundo o más.

Cuando 2-ZONE está activado ("ON"), se muestra el tipo de 2-ZONE actual.
Si 2-ZONE está desactivado ("OFF"), no se podrá usar la funciona 2-ZONE. Presione el botón [SOUND] para volver al modo original.
4. Toque ON/OFF en la pantalla para selectionar el tipo de 2-ZONE.
Tip de 2-ZONE
Altavoz Auriculas Tipo 1 Interno (modo interno) Interno (modo externo) Tipo 2 Interno (modo externo) Interno (modo interno)
5. Toque el altovo o los auriculas en la pantalla para seleccionar el modo de funcionajo de 2-ZONE.
Si toca el altovoz en la pantalla, podra ajustar el sonido de los altavoces.
Si toca los auriculares en la pantalla, podra ajustar el sonido de los auriculares.
6. Presione el botón [SOUND] para volver al modo original.
Diferentes piezas musicales eschuchadas por various oyentes (funcion 2-ZONE)
Para activar o desactivar (ON/OFF) la referencia 2-ZONE
1. Presione prolongamente el botón [SOUND] de launidad durante 1segundo o más.
Para combustir de tipo de 2-ZONE
Presione prolongadamente el botón [TA] de la unidad durante 1 segundo o más cuando la funciona 2-ZONE está en uso.
Paracaeiar el modo defuncionamento de 2-ZONE
Presione prolongadamente el botón [TA] de la unidad cuando la función 2-ZONE está en uso.
Selección del modo cuando la funciona 2-ZONE está en uso
Cuandoonga un CD,estando la referencia 2-ZONE en uso,las functiones del modo internode estaunidad cambian a CD y se empieza a reproducir automatistically.
1. Presione el botón [TA] de launidad para Cambiar el modo de funciona bajo 2-ZONE.
Cambia la visualización del equipo (altavoz o aurículares) que se puedaaabrear en ese momento.
2. Presione prolongadamente el botón [TA] durante 1 segundo o más para selección el tipo de 2-ZONE.
Se cambia a "INT." o "EXT."
3. Presione el mando [ROTARY].
Cada vez que presiona este mando con "INT." en pantalla, cambia el modo en elARRYUEnteorden:
Radio CD AUX Radio...
Cada vez que presiona el mando [ROTARY] con "EXT." en pantalla, cambia el modo en el作為ido:
AUX (Cambiador de CD)
(Cambiador de DVD) (TV ^*1 ) AUX...
* El modo de aquellos equipos que no estén connectados no se muestra.
*1 Si el modo TV está的选择acion, el modooca automatamente a modo VTR sin que se puedaCambiar.
Operaciones comunes de cada modo
Visualización del modo de introduccion de titulos
Visualización principal
Aparece cuando se selección el modo de introduccion de títulos. (cf. págin 14)

Visualización de tipo de dato
A: Letras alfabeticas en mayusculas
a: Letras alfabeticas en minuoculars
0-9: Númos
!?: Simbolos
A: Diéresis
Visualización de titulos
Muestra el texto que se ha introducido. Toque
para determinar la posicón de introducción. Si toca el botón prolongadamente durante 2seguidos o más,desaparecerá todo el texto del tíolo.
Visualización de texto introducido
Toque para seleccionar el texto introducido.
RTN
Si tocaaquicancelarála introduccionde titulos y se volverá a la visualizacion original.Toque prolongadamente durante 1segundo o más para ver la?singularmente lista correspondiente al tipo de datoactual.
MEMO
Si tocaAquiprolongadamente durante 2 segundos o mas,se memorizarareltitle introducido y se volverá a la visualización original.
Visualización delists de texto
Aparece cuando se toca RTN de forma prolongada durante 1 segundo o más en la visualización principal.

Tipode texto:
Según la visualización de tipo de dato
Seleccionada, el texto se verá de una forma u另一边.
Si la visualización de tipo de texto es “A”: A E I M Q U X (espacio)
Si la visualización de tipo de texto es "a": a e i m qu Si el tipo de texto es "0-9", "!?" o "A":
Apareceran todos los characteres.
RTN
Toquequiryparavolvera lavisualizacionprincipal.
NEXT
ToqueAquipara verla lista de texto seguiente.
Introduccion de títulos
Puede asignar unModo Número de títulos Modo de CD 50 títulos Modo de TV 20 títulos modo de cambio de CD Número de títulos DCZ628 conectado 100 titutos CDC655Tz conectado 100 titutos CDC1255z conectado 50 titutos
1. Reciba la emisora de TV o reproduzca un CD para el que deseee introducir el titulo.
2. Toque el centro de la pantalla para selectionar la visualizacion de tildos de usuario. Cuando se pase a la visualizacion de tildos de usuario, "USER" aparecera encima del N° de presinonia.
3. Presione prolongamente el botón [A] durante 1 segundo o más. La visualización cambia al modo de introduccion de títulos.
4. Toque la visualización de titulos para determinar la posión de introduccion del texto. La posicion del texto parpadeante se desplaza a la izquierda o a la derecha.

* Se;puede introducir hasta diez characteres.
PRECAUCION
Al presionar el botón de reinicio se borraran todas las的记忆ias, incluidos los titulos, que se hayan programado en la unidad.
5. Toque la visualización de tipo de dato para selección ar el tipo de dato.
Cada vez que toca , seuda de un ajuste aanother en elsiguienteorden:
Letras alfabeticas en mayusculas (espacio) ABCDEFGHJKLMNOP QRSTUVWXYZ
Letras alfabeticas en minusculas
a b c d e f g h i j k l m n o p q r s t u v w x y z
Numeros
0123456789
Simbolos, Diéresis
AÄÉÉEÉI/AØaëeeéiöüæø
6. Toque 卡 la parte derecha de la pantalla o gire el mando [ROTARY] para seleccionar los characteres que va a introducir.
7. Repita los pasos 4 a 6 para introducer el titulo.
Si toca la visualización de titulos prolongadamente durante 2seguidos o mas,desapareceran todos los charactres del titulo.
8. Toque MEMO prolongamente durante un segundo o más.
Escuchará un tono长大o para indicarle que se ha memorizzato el titulo.
Para pagar de la visualización de titulos a la visualización de reloj u另一边
Toque el centro de la pantalla.
Cuando se memoriza un titulo nuevo que excede el número máximo de titulos
Si se tratate de una emisora de TV
Los titulos que no estén memorizados en canales preprogramados se borraran automatistically y se memorizará el titulo nuevo.
Si se tratate de un CD
Se borrarán los titulos de los CDs que se hayan reproducido menos veces y se memorizará el titulo nuevo.
Eliminación de titulos
1. Reciba la emisión de TV o reproduzca un CD cuando titulo desee borrar.
2. Toque el centro de la pantalla para seleccionar la visualizacion de tildulos de usuario.
Cuando se pase a la visualización de títulos de usuario, "USER" aparecerá encima del N° de presintonía.
3. Presione prolongamente el botón [A] durante 1 segundo o más.
La visualización cambia al modo de introduccion de títulos.
4. Toque la visualización de titulos prolongamente durante un segundo o más. Desaparecerán todos los caracteres del titulo.
5. Toque MEMO prolongamente durante un segundo o más.
Escuchará un tono largo para indicarle que se ha borrado el titulo.
Modificación de los ajustes Selección de ajustes
1. Presione el boton [A].
La visualización cambia al modo de ajuste.

2. Toque la visualización de ajustes para selección arajste que va a programar.
\*Si toca 一 日 la parte izquierda de la pantalla, los ajustes principales cambian uno a uno. Si toca la parte izquierda de laGMT, los ajustes secundarios cambian continuamente.
* Si toca ⊥ ⊕ el centro de la pantalla, los ajustes secundarios cambian uno a uno. Si toca ← ⊕ →, los ajustes secundarios cambian continuamente.
3. Si aparece "EDIT" a la referencia de la pantalla, toque EDIT para pagar a la visualización de detailles de ajuste.

4. Toque la parte derecha de la pantalla o gire el mando [ROTARY] para ajustar los detalles.
Para:volveralmodooriginal
1. Presione el botón [A] de nuevo.
- Ajustes
Ajuste principal Ajuste secundario DISPLAY SCREEN SVR
• Ajuste del salvapantallas (cf. págin 41) MSG INPUT
• Introducción de datos de mensaje (cf. págin 41) MESSAGE
• Ajuste del mensaje que aparece en pantalla al encender (ON) o apagar (OFF) (cf. págin 42) S/A SENS
• Ajuste de la sensibilitad del analizador de espectro (cf. págin 42) SCROLL
• Ajuste de la velocidad de desplazimiento (cf. págin 42) APPERNCE DIMMER IN
• Ajuste del atenuador automático (cf. págin 43) DMR LEVEL
• Ajuste del nivel de atenuación (cf. págin 43) CONTRAST
• Ajuste del contraste de pantalla (cf. págin 43) BLINK LED
• Ajuste del parpadeo del LED al extraer el DCP (cf. págin 43) BEEP
• Ajuste del tono (cf. págin 44) SOUND AC-PRO III
• Seleección del modo VSE (STD/PRO) (cf. págin 44) EQ SELECT
• Seleección del modo de ecualizador (cf. págin 44) SP-SETTING
• Ajuste de la configuración de los altavoces (cf. págin 44) CENTER-SP / SUB-WOOFER
• Ajuste ON/OFF del altovoz de subgraves (cf. págin 45) HPF / SUB-W LPF
• Ajuste de la Frequencia de filtrado de los altavoces (cf. págin 45) AMP CANCEL
• Ajuste ON/OFF del amplificador (cf. págin 46) SP GAIN
• Ajuste del nivel de salute de los altavoces (cf. págin 46) PL II DELAY SRD-SP
• Ajuste del tiempo de retardo de los altavoces traseros (cf. págin 46) PL II CONT PANORAMA / DIMENSION / CTR WIDTH
• Ajuste fino del modo de música (cf. págin 47) TUNER TV ARER
• Ajuste del aire de TV (cf. págin 57) TV DIVER
• Ajuste de la diversidad TV (cf. págin 57) LINK ACT
• Ajuste de la funciona entre RDS y DAB (cf. págin 26) LANGUAGE
• Ajuste del idioma de visualización de PTY (cf. págin 30) RDS-INT 2Z
• Ajuste de la interrupción de RDS cuando la funciona 2-ZONE está en uso (cf. págin 30) SETTING AUX / TEL
• Ajuste de AUX y TEL (cf. págin 47) AUX SENS
• Ajuste de nivel de la entrada (AUX) de audio portátil (cf. págin 48) TEL-SP
• Ajuste de la calidad de altavoces del automóvil para el téléphone móvil (Optional TEL-002) (cf. págin 48) TEL-SWITCH
• Ajuste de la interrupción para el téléphone (cf. págin 48) CALIBRATE / A-VOL SENS
• Ajuste de la funciona de volumen automatístico (cf. págin 49) SYSTEM CHECK
• Comprobación del sistema (cf. págin 49) CODEMATIC
• Ajuste de la seguridad (cf. págin 50)
Ajuste del salvapantallas (SCREEN SVR)
Estamericano de la unidad.
- El valor preajustado de fabricula es "ON".
1. Presione el botón [A] para selecciónar el modo de ajuste.
2. Toque la visualización de ajustes para selectionar "SCREEN SVR" en "DISPLAY".

3. Toque la parte derecha de la pantalla o gire el mando [ROTARY] para seleccionar "ON" u "OFF".
4. Presione el botón [A] para volver al modo original.
Para cambio de salvapantallas
Toque PREV (Anterior) o NEXT (Siguiente))m润滑as se muestra el salvapantallas.
Cada vez que toca uno de这些东西 botones se cambia de salvapantallas.
Salvapantallas
Modelo de salvapantallas 1

Modelo de salvapantallas 2

Modelo de salvapantallas 3

Modelo de analizador de espectro 1

Modelo de analizador de espectro 2

Modelo de analizador de espectro 3

Modelo de analizador de espectro 4

Mensaje informativo

SS SCAN
Los 8indicadores anteriores aparecen durante 10segundosapproximamente cada uno.
Introduccion del texto de los.". mensajes informativos (MSG INPUT)
Hay 1 tipo de salvapantallas disponible. Para Obtener más información sobre como cambiar de salvapantallas, consulte la sección "Ajuste del salvapantallas".
- Se pueda introducir hasta 30 characteres.
- El valor preajustado de fabrica es "Active Matrix Control System".
1. Presione el botón [A] para selecciónar el modo de ajuste.
2. Toque ↓la visualización de ajustes para selecciónar "MSG INPUT" en "DISPLAY".

DISPLAY
ADJUST MODE
MSG INPUT> EDIT
。
3. Toque EDIT.
La visualización cambia al modo de introduccion de mensaje.
4. Toque el centro de la pantalla para determinar la posicion de introduccion de texto.
* Para:borrar el mensaje, toque prolongamente el centro de la pantalla durante 2segundos o más.
Si realiza la operation en el caso 8 con el mensaje borrado, se recuperará al valor preajustado de fabrica.
5. Toque la parte izquierda de la pantalla para selectionar el tipo de dato.
Cada vez que toca , cambia el tipo de texto: Para Obtener más información, consulte la págrina 37.
6. Toque la parte derecha de la pantalla o gire el mando [ROTARY] para seleccionar los caricacteres que va a introducir.
7. Repita los pasos 4 a 6 para introducer el mensaje.
8. Toque MEMO prolongamente durante un segundo o más.
Escuchará un tono长大o paraindicarlesque se ha memorizzato el mensaje.
9. Presione el botón [A] para volver al modo original.
Visualización de temas (MESSAGE)
Este funciona le permite visualizar mensajes en la pantalla al encender (ON) y apagar (OFF) la unidad. El网讯 "Hello" (Hola) aparece cuando la enciende y "See you" (Hasta bajo), cuando la apaga.
- El valor preajustado de fabrica es "ON".
1. Presione el botón [A] para selección ar el modo de ajuste.
2. Toque ↓la visualización de ajustes para selecciónar "MESSAGE" en "DISPLAY".

3. Toque la parte derecha de la pantalla o gire el mando [ROTARY] para seleccionar "ON" u "OFF".
4. Presione el botón [A] para volver al modo original.
Ajuste de la sensibilitad del analizador de espectro (S/ASENS)
Esta funciona le permiteaabstar la sensibilidad (cantidad de deflexion) del analizador de espectro. Para tener mas informacion sobre como visualizar el analizador de espectro, consulte la seccion "Cambio de visualizacion" (cf. pagina 13) o"Ajuste del salvapantallas" (cf. pagina 41).
- El valor preajustado de fabricula es "MID"
1. Presione el botón [A] para selección ar el modo de ajuste.
2. Toque ↑ ↓ la visualización de ajustes para selecciónar "S/A SENS" en "DISPLAY".

3. Toque la parte derecha de la pantalla o gire el mando [ROTARY] para ajustar la sensibilitidad.
* Selección LOW (baja deflexión), MID (deflexión media) o HIGH (alta deflexión).
4. Presione el botón [A] para volver al modo original.
Ajuste de la velocidad de desplazimiento de la visualización (SCROLL)
Esta funciona le permite reducir la velocidad de desplazimiento cuando es demasiado rápida y dificulta la visualización de la pantalla.
- El valor preajustado de fabrica es "SPEED 2".
1. Presione el botón [A] para selecciónar el modo de ajuste.
2. Toque ↑ ↓ la visualización de ajustes para selecciónar "SCROLL" en "DISPLAY".

3. Toque 山 la parte derecha de la pantalla o gire el mando [ROTARY] paraaabstar la sensibilitidad.
* El margen de ajuste de este elemento es de SPEEDD 1 a SPEEDD 7.
Realice este ajuste@m间隙 observa como cambia el aspecto de la pantalla.
4. Presione el botón [A] para volver al modo original.
Ajuste del atenuador automatico (DIMMER IN)
Esta funciona le permitte atenuar la iluminacion de la pantalla para adaptarla a la iluminacion o a la intensidad de brillno en el interior del automovil.
Selección "AUTO" (enclavada a la intensidad de brillo del interior del automóvil) o "ILLUMI" (enclavada a la iluminación del interior del automóvil), como ajuste de atenuación automática.
- Cuando la funciona de atenuación automática está configurada en "AUTO", la intensidad de brillo de la pantalla se reduce para adaptarse a la intensidad de brillo que detecte este sensor.
- Ajuste el atenuador en DMR LEVEL.
- El valor preajustado de fabricula es "AUTO".
1. Presione el botón [A] para selección el modo de ajuste.
2. Toque la visualización de ajustes para選擇ar "DIMMER IN" en "APPERNCE".

3. Toque la parte derecha de la pantalla o gire el mando [ROTARY] para seleccionar "AUTO" o "ILUMMI".
4. Presione el botón [A] para volver al modo original.
Ajuste del nivel de atenuacion (DMR LEVEL)
Estamericano.
- El valor preajustado de fabricula es "3"
1. Presione el botón [A] para selección ar el modo de ajuste.
2. Toque la visualización de ajustes para selecciónar "DMR LEVEL" en "APPERNCE".

3. Toque la parte derecha de la pantalla o gire el mando [ROTARY] paraaabstar el nivel de atenuacion.
* Selección OFF (atenuación desactivada, brillante), 1 (poco atenuada), hasta 5 (oscura).
4. Presione el botón [A] para volver al modo original.
Ajuste del contraste de la pantalla (CONTRAST)
Es possibleaabstarelcontrastede la pantalla para adaptarlo al ángulo de instalación de la unidad.
- El valor preajustado de fabrica es "6"
1. Presione el botón [A] para selecciónar el modo de ajuste.
2. Toque la visualización de ajustes para選擇ar "CONTRAST" en "APPERNCE".
3. Toque la parte derecha de la pantalla o gire el mando [ROTARY] para ajustar el contraste.

* El margen de ajuste de esta referencia es de 1 a 11.
Realice este ajuste@m间隙 observa como cambia el aspecto de la pantalla.
4. Presione el botón [A] para volver al modo original.
Ajuste del parpadeo del LED al extraer el DCP (BLINK LED)
Es possible hacer que el LED de estaunidad parpadee cuando se extrae el DCP.
- El valor preajustado de fabricula es "OFF".
1. Presione el botón [A] para selección ar el modo de ajuste.
2. Toque la visualización de ajustes para selectionar "BLINK LED" en "APPERNCE".

3. Toque la parte derecha de la pantalla o gire el mando [ROTARY] para seleccionar "ON" u "OFF".
4. Presione el botón [A] para volver al modo original.
Ajuste del tono que suena cuando se presionan los botones (BEEP)
El tono alto, corto o largo, que escucha cada vez que presiona un botón se denomina "BEEP".
- El valor preajustado de fabricula es "ON".
1. Presione el botón [A] para selecciónar el modo de ajuste.
2. Toque la visualización de ajustes para selecciónar “BEEP” en “APPERNCE”.

3. Toque la parte derecha de la pantalla o gire el mando [ROTARY] para seleccionar "ON" u "OFF".
4. Presione el botón [A] para volver al modo original.
Selección de cada modo
Esteajusteno sepuedeselectionarcuando DolbyProLogicII tieneconfiguradoel parametro"MUSIC"o“MATRIX"(cf.pagina17).
- El valor preajustado de fabricula es "PRO" para AC-PRO III, y "P.EQ" para EQ SELECT.
AC-PROIII
Cuando se seleccióna "STD" (modo estándar), se puedaajsitar la calidad y el camino de sonido con VSE (Virtual Space Enhancer) para que se perdiba el本身就是 efecto de sonido en todos los asientos.
Cuando se selección "PRO" (modo PRO), se puedaaabstar la calidad y el Campo de sonido conprecision para cada asiento.
EQ SELECT
Cuando se selección "P.EQ" (modo de ecualizarador), se pueda compensar todo el margen de niveles de Frequencias mediante una curva suave detallada.
Cuando se selección "BAS/TREB" (modo de graves/agudos), se pueda compensar el nivel de Frequencia, dividendiolo en 2 niveles principales: graves (tonos bajos) y agudos (tonos altos).
1. Presione el botón [A] para selección el modo de ajuste.
2. Toque la visualización de ajustes para selecciónar "AC-PRO III" en "SOUND" y "EQ SELECT" en "SOUND".

3. Toque la parte derecha de la pantalla o gire el mando [ROTARY] para seleccionar el modo.
Selección de modo
AC-PRO III STD
• Tipo estandar (Menú VSE) PRO
• Tipo PRO (Menú de posición) EQ SELECT P.EQ
• Tipo de ecualizador (Menú P.EQ) BAS / TREB
• Tipo de graves/agudos
4. Presione el botón [A] para volver al modo original.
Ajuste de la configuración de los altavoces (SP-SETTING)
Ajuste la configuracion de los altavoces del automovil para sacar el máximo provechos de las caracteristicas de sonido de esta unidad.
- El valor preajustado de fabrica es "SWL + SWR".
1. Presione el botón [A] para selección el modo de ajuste.
2. Toque la visualización de ajustes para selectionar "SP-SETTING" en "SOUND".

SOUND
ADJUST MODE
SP-SETTING SW + SW
3. Toque la parte derecha de la pantalla o gire el mando [ROTARY] para ajustar la configuracion de los altovoces.
Configuración de los altavoces
CTR+SW
Configuración
de 5,1 canales Altavoces frontales/traseros
(4 canales)
Altavoz central (1 canal)
Altavoz de subgraves (1 canal) SW[ ] + SW[ ] Altavoces frontales/traseros
(4 canales)
Altavoz de subgraves
(2 canales) Configuración
de altavoz de
subgraves
con 4 canales
Notas:
- El sonido no saldra del altovo central salvo que se realizen los siguientes ajustes una vez configurado "CTR+SW".
(1) Consulte la seccion "Seleccion del menu PLII (Dolby PL II)" (cf. pagina 17) paraajan el modo Dolby Pro Logic II en "MUSC" o "MATRIX".
(2) Consulte la�� "Activacion/ desactivacion (ON/OFF) de los altavoces (CENTER-SP/SUB-WOOFER)" (cf. pagina 45) para activar el altovoz central ("ON").
- El sonido no saldra del altovo de graves Lch cuando "SWILL + SWIR" está selección y el modo Dolby Pro Logic II está configurado en "MUSIC" o "MATRIX".
4. Presione el botón [A] para volver al modo original.
Activación/desactivación (ON/OFF) de los altavocé (CENTER-SP/SUB-WOOF)
Activa/desactive (ON/OFF) el altovoz central (CENTER-SP) y el altovoz de subgraves(SUB-WOOFER).
Selección "OFF" si no hay ningún altovo central o altovoz de graves.
- El.altavoz central (CENTER-SP) se pueda ajustar cuando el modo Dolby Pro Logic II está configurado en "MUSIC" o "MATRIX" y "SP-SETTING" está en "CTR-SW".
- El valor preajustado de fabricula es "ON".
1. Presione el botón [A] para selecciónar el modo de ajuste.
2. Toque ↑ la visualización de ajustes para selecciónar "CENTER-SP" en "SOUND" y "SUB-WOOFER" en "SOUND".

SOUND
ADJUST MODE
CENTER-SP> ON
3. Toque la parte derecha de la pantalla o gire el mando [ROTARY] para seleccionar "ON" u "OFF".
4. Presione el botón [A] para volver al modo original.
Ajuste de las Frequencias de filtrado de los altavoces (HPF/ SUB-W LPF)
Esta funciona le permiteaabrear la fecuencia de filtrado correspondiente a los altavoces realizados.
- Los filtros (HPF/SUB-W LPF) que se pueda usar varian según el ajuste del modo Dolby Pro Logic II.
Ajuste del modo
Dolby Pro Logic II Filtro HPF SUB-W LPF*1 MUSIC/MATRIX No ajustable Ajustable OFF Ajustable Ajustable
*1 El ajuste sólo se pueda realizar si "SUB-WOOFER" está activado ("ON").
- El valor preajustado de fabricula es "THROUGH".
Ajuste del filtró
HPF (ajuste del filtró de paso alto)
Este filtro suprime los graves en los altavoces delanteros y traseros.
THROUGH 50Hz 80Hz 120Hz
Ajuste el filtro correspondiente al altovo.
cuando se utilizes altavoces de poco diametro.
THROUGH
Realice este ajuste cuando utilise altavoces capaces de tener graves.
SUB-W LPF (ajuste del filtró de paso bajo en el altovoz de subgraves)
Este filtered suprime los agudos en el altovoz de subgraves.
THROUGH 50Hz 80Hz 120Hz
Ajuste la fecuencia de filtrado que corresponda al altovoz de subgraves.
THROUGH
Realice este ajuste cuando utilise un altoz de subgraves incorporeal de caso bajo.
1. Presione el botón [A] para selección ar el modo de ajuste.
2. Toque la visualización de ajustes para selecciónar "HPF" en "SOUND" y "SUB-W LPF" en "SOUND".

3. Toque la parte derecha de la pantalla o gire el mando [ROTARY] paraaabstar la fecuencia.
* Selezione THROUGH, 50Hz, 80Hz o 120Hz.
4. Presione el botón [A] para volver al modo original.
Activación/desactivación (ON/OFF) del amplíficator interno (AMP CANCEL)
Active o desactive el amplificador interno en referencia de que se utilise o no un amplificador externo.
Active ("ON") AMP CANCEL (amplificador interno en OFF) cuando haya un amplificador externo conectado y no se usa el amplificador interno.
- El valor preajustado de fibricula es "OFF" (uso del amplificador interno).
1. Presione el botón [A] para selecciónar el modo de ajuste.
2. Toque la visualización de ajustes para selectionar "AMP CANCEL" en "SOUND".

3. Toque la parte derecha de la pantalla o gire el mando [ROTARY] para seleccionar "ON" u "OFF".
4. Presione el botón [A] para volver al modo original.
Ajuste del nivel de salute de los altavoces (SP GAIN)
Utilice la funciona de tono de prueba que incorpora la unidad paraaabstar el volumen de forma que el volumen que salga de todos los altavoces sea el mesmo.
- Este ajuste solo se pueda selectionar cuando el modo Dolby Pro Logic II tiene configurado el parámetro "MUSIC" o "MATRIX".
- El valor preajustado de fabricula es "0dB"
1. Presione el botón [A] para selección el modo de ajuste.
2. Toque la visualización de ajustes para selectionar "SP-GAIN" en "SOUND".

3. Toque EDIT.
La visualización cambia al modo de ajuste SP-GAIN.
4. Toque la visualización de ajustes para selecciónar elajuste deseedo.
Cada vez que toca ↑, los ajustes se sueden como se indica a continuación:
Ajustes

*1 "CTR GAIN"sole smuestra cuando "SP-SETTING" está ajustado en "CTR+SW" y "CENTER-SP" está activado ("ON").
^*2 "SUB-W GAIN"sole so muestra cuando "SUB-WOOFER" está activado ("ON").
5. Toque la parte derecha de la pantalla o gire el mando [ROTARY] para ajustar el nivel de salute.
El margen de ajuste del nivel de salute es de -10 dB a +10 dB.
6. Repita los pasos 4 y 5 para realizar cada ajuste.
7. Presione el botón [A] para volver al modo original.
Ajuste del tiempo de retardode los altavoces (PL II DELAY)
El tiempo que tarda el sonido enninger a la posicón de escucha varía según la posicón de instalación de los altavoces tritureros y el tamanó del automóvil. Si ajustla el tiempo de retardo de los altavoces tritureros,ould configurar el sonido procedente del los altavoces tritureros para que se pueda escharchar al mismo tiempo que la calidad de los altavoces delanteros.
- Este ajuste solo se pueda selectionar cuando el modo Dolby Pro Logic II tiene configurado el parámetro "MUSIC" o "MATRIX".
- El valor preajustado de fabricula es "0ms"
1. Presione el botón [A] para selección ar el modo de ajuste.
2. Toque la visualización de ajustes para selecciónar "SRD-SP" en "PL II DELAY".

3. Toque la parte derecha de la pantalla o gire el mando [ROTARY] paraaabstar el tiempo de retardo.
* El margen de ajuste de "SRD-SP" es de 0 ms a 15 ms.
4. Presione el botón [A] para volver al modo original.
Ajuste bajo el modo de música (PL II CONT)
Esta función le permite ajustar el modo de música con mayor precision cuando el modo Dolby Pro Logic II tiene configurado el parámetro "MUSIC".
- Sólo se pueda selectionar cuando el modo Dolby Pro Logic II tiene configurado el parámetro "MUSIC".
- El valor preajustado de fibricula de PANORAMA es "NO", el de DIMENSION es "3" y el de CTR WIDTH es "3".
Ajustes
PANorama (ajuste del control de panorama)
Esta funciona amplia laImagen del campo de sonido en la parte delantera hasta los altavoces traseros. Seleccion "YES" si estima que no hay efecto surround.
DIMENSION (ajuste de la dimisión)
Cambia laImagen del camino de sonido a la parte delantera o trasera. Cuando laImagen del camino de sonido se inclina hacía la parte delantera o hacía la parte trasera, es posible compensar dicha inclinación.
La posicón intermedia es el valor de ajuste 3. Los values de ajuste 2 a 0 desplazan laImagen del camino de sonido hacía extras, cuando que los values de ajuste 4 a 6 la desplazan hacía delante.
CTR WIDTH (ajuste del ancho central)\*1
Esta funciona le permitteJKLM ajanar la posicion del canal central entre el altovoz central y los altavoces delanteros izquierdo y derechocho.
Cuando el sonido central se divide
equisitavamente entre la derecha y la izquierda,
aumenta toda laImagen del camino de sonido para
producir una sensacion de expansion natural.
El valor de ajuste 0 reproduce todos los sonidos
centrales en el altovoz central.
El valor de ajuste 7 divide el sonido central a
partes iguales entre los altavoces delanteros
izquierdo y Derecho.
*1 "CTR WIDTH"solemuesstrawheno "SP- SETTING"estáajustadoen“CTR+SW”y "CENTER-SP"estáactivado("ON").
1. Presione el botón [A] para selección ar el modo de ajuste.
2. Toque la visualización de ajustes para selección ar el ajuste desrado en "PL II CONT". Los ajustes son "PANorama", "DIMENSION" y "CTR WIDTH".

3. Toque la parte derecha de la pantalla o gire el mando [ROTARY] para realizar el ajuste deseado.
* Selezione "YES" (Si) o "NO" en "PANorama".
* El margen de ajuste de “DIMENSION” es de 0 a 6.
* El margen de ajuste de "CTR WIDTH" es de 0 a 7.
4. Presione el botón [A] para volver al modo original.
Función AUX
Esteistema dispone de una entrada RCA externa para que pueda escharcer sonidos y música de aparatos externos conectados a la unidad.
Selección de AUX / TEL
Puede escharsonidoymúsica de aparatos externos o bien laslllamadastelefonicasdesde los altavocesi estáconectaroalunidad.
Si TEL INT o un dispositivo externo está connectado a estaunidad, pueda seleccionar el modo TEL o el modo AUX.
- El valor preajustado de fabricula es "AUX"
1. Presione el botón [A] para selección el modo de ajuste.
2. Toque la visualización de ajustes para selecciónar "AUX/TEL" en "SETTING".

3. Toque la parte derecha de la pantalla o gire el mando [ROTARY] para seleccionar "AUX" o "TEL".
AUX:
El cable de entrada AUX/TEL es para la entrada de audio externa.
TEL:
El cable de entrada AUX/TEL es para la entrada de audio del téléphone móvil.
4. Presione el botón [A] para volver al modo anterior.
Ajuste del nivel de entrada (AUX SENS) del audio portátil (modo AUX)
Esta funciona le permette ajustar el nivel de entrada de aparatos externos OPCIONALES que estén connectados a esta unidad.
- Puede ajustarse cuando “AUX/TEL” está configurado en “AUX”.
- El valor preajustado de fabricula es "MID"
1. Presione el botón [A] para selecciónar el modo de ajuste.
2. Toque la visualización de ajustes para selecciónar "AUX SENS" en "SETTING".

3. Toque la parte derecha de la pantalla o gire el mando [ROTARY] para ajustar el nivel de entrada.
* Selezione LOW (Bajo), MID (Intermedio) o HIGH (Alto).
4. Presione el botón [A] para volver al modo original.
Ajuste de la calidad de altavoces del automóvil para el Telefonomóvil (Optional TEL-002)
- Para realizar llamadas Telefonicas, ajuste el téléphone móvil.
- El valor preajustado de fabricula es "RIGHT"
1. Presione el botón [A] para selección ar el modo de ajuste.
2. Toque la visualización de ajustes para selecciónar "TEL-SP" en "SETTING".

3. Toque la parte derecha de la pantalla o gire el mando [ROTARY] para seleccionar "LEFT" (Izquierda) o "RIGHT" (Derecha). LEFT:
Las llamadas Telefonicas se PUden oir a工程技术 del altevaz delantero izquierdo conectado a esta unidad.
RIGHT:
Las llamadas Telefonicas se pueda oir a工程技术 del altovoz delantero derecho conectado a esta unidad.
4. Presione el botón [A] para volver al modo anterior.
Ajuste de la interrupción para el Telefono móvil
Si conecta esta unidad y el Telefono móvil con una unidad (Optional, TEL-002), puede escurrchar las llamadas Telefonicas a工程技术 de los altavoces del automóvil.
- El valor preajustado de fabrica es "OFF".
1. Presione el botón [A] para selección ar el modo de ajuste.
2. Toque ↑ ↓ la visualización de ajustes para selecciónar "TEL-SWITCH" en "SETTING".

3. Toque 山 la parte derecha de la pantalla o gire el mando [ROTARY] para seleccionar los ajustes. Cada vez que gira el mando [ROTARY], cambia el ajuste en el suivienteorden: OFF (Desactivado) ON (Activado) MUTE (Silenciamiento) OFF(Desactivado)... OFF:
La unidad continua的功能ando con normalidad incluso cuando se usa el téléphone móvil.
Nota:
- Al conectar un kit manos libres, asegúrese de activar (ON) esta funciona para recibir el sonido del téléphone a工程技术 del sistema.
ON:
Puede esrear lasllamadastelefonicas atravésde los altavocconectadosaesta unidad.
* Cuando escucha las llamadas a工程技术 de los altavoces del automóvil, pueda ajustar el volumen girando el mando [ROTARY]. MUTE:
El sonido de launidad se silencia durante las llamadas Telefonicas.
4. Presione el botón [A] para volver al modo anterior.
Ajuste de la funciona de volumen automatico (CALIBRATE/A-VOL SENS)
Puede regular automatically el volumen para adaptarlo a la velocidad del automóvil.
- El valor preajustado de fabricula es "LOW"
1. Presione el botón [A] para selecciónar el modo de ajuste.
2. Toque la visualización de ajustes para selecciónar "CALIBRATE" en "SETTING".

3. Acelere a una velocidad de 50~km / h
4. Cuando alcance los 50~km / h toque START. Se ejecta la calibracion
Al cabo de 2 segundos o más, oira un tono largo y "SUCCEEDFUL" aparecerá en la pantalla.
Si oye un tono corte, es que la calibración ha fallado. Repita el procedimiento desde el paso 3.
5. A continuación, ajuste la sensibilitad. Toque la visualización de ajustes para selectionar "A-VOL SENS" en "SETTING".

6. Toque la parte derecha de la pantalla o gire el mando [ROTARY] para seleccionar la sensibilitidad.
Cada vez que gira el mando [ROTARY], cambia el ajuste en elsignificantoorden:
OFF (no hay cambio de volumen) LOW (hay cambio de volumen:klequeño) MIDLOW (Medio-bajo) MID (Medio) MID-HIGH (Medio-alto) HIGH (cambio de volumen: grande) ...
7. Presione el botón [A] para volver al modo anterior.
Comprobación delsystems
Esta funciona le permitte realizar una comprobacion del systema desde el modo de ajuste segúnsea necessario.
1. Presione el botón [A] para selección ar el modo de ajuste.
2. Toque la visualización de ajustes para selecciónar "SYSTEM CHECK" en "SETTING".

3. Toque START prolongamente durante 1 segundo o más.
"System Check" appearece en la pantalla.
4. Presione el mando [ROTARY]. Comienza la comprobación del sistema Una vez finalizada la comprobación del sistema, aparecerá "Completed" en la pantalla.
5. Presione el mando [ROTARY] de nuevo.
Aparece la visualización principal del modo de radio.
Uso de la referencia de seguidad (CODEMATIC)
Estamericanidad.
Estasfuncionimpideraeslaspersonasque
desconcenlacsequenciatactilpuedanutilizar
estasanid.Cuandoseconctalalimentacion
conelDCPacopladoy“CODEMATIC”activado ("ON"),aparecelambdavisualizacionTouchCode (Cólico tactil).
Si toca la pantalla en elorden preajustado, aparecerá “SUCCESSIONAL” y se desconectará la alimentación.
Laproxima vez que se conecte la alimentacion, no aparecera la visualizacion Touch Code sino la visualizacion principal en el mode de radio o CD.
1. Presione el botón [A] para selecciónar el modo de ajuste.
2. Toque la visualización de ajustes para selecciónar "CODEMATIC" en "SETTING".

Aparecen 2 típos de ajustes para
"CODEMATIC", ajustes para los cuales se muestran los valores "ON" u "OFF" a la derecha de la pantalla y ajustes para los cuales se muestra "INPUT" a la derecha de la pantalla.
Selecciónquiry elajuste para el que se muestra "ON”u“OFF"a la derecha de la pantalla.
3. Toque la parte derecha de la pantalla o gire el mando [ROTARY] para seleccionar "ON" u "OFF".
4. Toque ↓la visualización de ajustes para selecciónar "CODEMATIC" en "SETTING". Seccione ahora el ajuste para el que se muestra "INPUT" a la derecha de la pantalla.
5. Toque INPUT.
Aparece la visualización Touch Code.
6. Introduzca el dato tactil.
* Toque una de las 5 posiciones (izquierda, centro, referencia, ángulo superior derecho o ángulo inferior derecho) de la pantalla. Cada vez que toca la pantalla, se ilumina uno de los indicadores Touch Code.
* Por exemple, toque (1) el centro, (2) el ángulo superior derecho, (3) la izquierda y (4) el ángulo inferior derecho, en esteorden. Internacionalmente, para seres consideradas.
Cuando toca 4 vezes, escuchará un tonolardo y volverá al modo original.
Para cancelar CODEMATIC
Si olvidó el ordin, toque ① el ángulo inferioro均线, ②) la izquierda, ③ el ángulo superioro均线 y bajo ④ la均线 de la pantalla en ese ordin, o bien presione [SCN] en la unidad de control remoto.

7. OPERACIONES DE LOS ACCESORIOS
Operaciones del Cambiador de discos compactos
Cambiador de CD
Si hay un Cambiador de CD optional conectado a工程技术 de la wire, está unidad para controlar las operaciones del Cambiador de CD. Launidad可以选择 connectarse a un total de 2 ambiadores de CD conectados a工程技术 de CD.
Cambiador de discos DVD
Si hay un Cambiador de DVD optional conectado a工程技术 del cable CeNET, está unidad podra controlar las operaciones del Cambiador de DVD. Para ver un DVD, se necesita un monitor oficial.
El funciona y visualización del Cambiador de DVD en estaunidad es una version simplificada y no admite functions de Cambiador de DVD. Para usar el Cambiador de DVD,utilice launidad de control remoto que se suministra con el Cambiador de DVD. Para Obtener información, consulte el Manual de instructiones que se suministra con el Cambiador de DVD.
Cuando hay 2ambiadores de CD conectados
Presione el mando [ROTARY] para selectionar el MMI conectado a this unidad. (Cada vez que presiona el mando [ROTARY], se pasa de un MMI a lo.
- Si el cambioso de CD no contiene un cargador, aparecerá "NO MAG", y si el cargador no contiene ningún CD, aparecerá "NO DISC" para做到 N° de disco.
- Para Obtener más información sobre la visualización de titulos, consulte la sección "Cambio de la visualización de titulos" (ct頁目14).
Visualizaciones del modo de combustor
Visualización principal (Modo de Cambiador de CD)
Para verla, presione el mando [ROTARY] y seleccione el modo combustor de CD.

Si toca la parte izquierda de la pantalla durante 1segundo o mas,cribará el modo de funcioncimiento simple.

Visualización de tiempo de pista/reproducción
T01/02: 00: Muestra el N° de la pista
actualmente en reproducción y el tiempo de
reproducción.
Si toca o en el modo de configuraciono normal, podra seleccionar la pista que va a reproducir, o hacer avanzar o retroceder rapidamente las pistas.
Visualización de titulos
Al tocarla, cambia la visualizacion.
Visualización de N° de presinstonia
Si toca 卡 en el modo normal, podra的选择向一个 disco.
MODE
Al tocar esta visualización aparecen varias subfunciones. Si la toca prolongadamente durante 1segundo o más,aparecerála lista de discos.
T-SCAN/D-SCAN
Aparece durante la reproduccion por exploracion.Toque T-SCAN/D-SCAN para construir la reproduccion por exploracion.
T-RPT/D-RPT
Aparece durante la reproduccion repetida.
Toque T-RPT/D-RPT para concurrir la reproduccion repetida.
T-RDM/D-RDM
Aparece muestra durante la reproduccion aleatoria. Toque T-RDM/D-RDM para conclusir la reproduccion aleatoria.
DISC
Toque esta funciona para iniciaar la reproduccion delARRYnte disco.
(,) (sólo en la visualización de funciona simple)
Toque这些东西 botones para selectionar la pista que deseee reproducir.
Si toca los botones de forma prolongada, ha r avanzar o retroceder las pistasrapidamente.
Visualización de lista de discos (Modo de Cambiador de CD)
Aparece cuando se toca MODE de forma prolongada durante 1 segundo o más en la visualización principal.

Nombre de disco
>>: Señeción en bajo
Toque el nombre del disco para volver a la visualización principal e起初ar la reproduccion desde la primera pista del disco tocado.
←PREV-RTN:
Toque agli para ver la lista de tóculos anterior. Si la toca prolongadamente durante 1 segundo o más, volverá a la visualización principal.
NEXT:
Toquequiry para ver la lista de títulossiguiente.
PRECAUCION
Los discos CD-ROM no se pueda reproducir desde todos losambiadores de CD.Depende del modelo.
Nota:
- Es possible que algunos CDs grabados en modo CD-R/CD-RW no pueda utilizar.
Selección del modo de combustor
1. Presione el mando [ROTARY] para seleccionar el modo de Cambiador.
* El modo de aquellos equipos que no estén connectados no se muestra.
Cuando el modo cambie a Cambiador, la reproduccion se inicia automatistically.
Interruption de la reproduccion
1. Presione el botón [▶■].
Reanudación de la reproducción:
1. Presione el botón [▶■] de nuevo.
Selección de un CD
1. Toque la visualización de N° de disco para selectionar un disco.
Comienza la reproduccion.
* Si el cargador no contiene el disco selecciónado, no se做不到e el N° del disco en cuestion.
* Si toca DISC ↑, se inicia la reproduccion del suiviente disco.
Para seleccionar un disco en la visualizacion de lista de discos
1. Toque MODE prolongamente durante un segundo o más.
Aparecerá la lista de discos Si toca NEXT, aparecerá lasuma parte de la lista de discos.
2. Toque el nombre del disco.
* Si el cargador no contiene el disco selecciónado, aparecerá “NO DISC” en relacion con disco en@cuestion.
* Si selecciónó el@mismo disco que se está reproduciendo, la unidad empezará a reproducir de nuevo desdela primera pista de dicho disco.(funciOn de principio)
Selección de una pista
1. Para esuchar lasuma pista, toque la pista.
2. Para escuchar la pista anterior, toque 山 de pista.
Cuando toca 已 ^ 已 , se reproduce lasuma pista. Si toca 已 ^ 已 suscesivamente, la pista avanza el numero de vezes que toque y luego se reproduce.
Cuando toca se reproduce la pista anterior. Si toca sucesivamente, la pista retrocede el número de veces que toque
y违法违规
* Si toca ↑ dos vezes la visualización de pista cuando se reproduce el principio de la pista, posiblemente se reproduzca la pista situada 2 pistas por detrás.
Avance=rápido/Retroceso rápido
1. Para avanzar de forma rápida, toque la pista.
2. Para retroceder de forma rápida, toque la pista.
Función de principio
La función de principio inicia la reproducción desde laprimera pista del disco que se esté reproduciendo.
1. Toque MODE prolongamente durante un segundo o más.
Aparecerá la lista de discos Si toca NEXT,
aparecerá lasuma parte de la lista de discos.
2. Toque el nombre del disco.
* Si el cargador no contiene el disco selecciónado, aparecerá “NO DISC” en relacion con disco en cuestion.
* Si selecciónó el mesmo disco que se está reproduciendo, launidad empezará a reproducir de nuevo desdelaprimera pista de dicho disco.
Reproducción por exploración
La reproduccion por exploracion localiza y reproduce automatically los primeros 10 segundos de cada pista de un disco.Esta funciona continua avanzando en el disco hasta que se cancele.
La función de reproducción por exploración的结果ly,whendeshsea seleccionaruna determinada pista.
1. Toque MODE.
2. Toque T-SCAN.
La visualización MODE pasa a "T-SCAN" y se inicia la reproducción por exploración.
* La reproducción por exploración comienza desde la pista",[siguierte a la pista que se esté reproduciendo en este momento.
Para cancelar la reproduccion por exploracion
1. Toque T-SCAN.
La visualización T-SCAN pasa a “MODE”, y se reproduce la pista que se estaba reproduciendo cuando todo T-SCAN.
Reproducción por exploración de discos
La reproduccion por exploracion de discs localiza y reproduce los primeros 10 seguidos de la prima pista de cada disco contenido en eleturnador de CDactualmente seleccionado.Estamericana continua avanzando automatically hasta que se cancele.
La reproduccion por exploracion de discos resulta util.
cuando deseaa seleccionar un determinado disco.
1. Toque MODE.
2. Toque D-SCAN.
La visualización MODE pasa a "D-SCAN" y se inicia la reproducción por exploración de discos.
* La reproduccion por exploracion de discos comienza desde la pista?siguea a la pista que se este reproduciendo en es momento.
Para cancelar la reproduccion por exploracion de discos
1. Toque D-SCAN.
La visualización D-SCAN pasa a “MODE”, y se reproduce la pista que se está reproduciendo cuando toco D-SCAN.
Reproducción repetida
La reproduccion repetida reproduce continuamente la pista actual.Esta funciona continually avanzando automatistically hasta que se cancele.
1. Toque MODE.
2. Toque T-REPEAT.
La visualización MODE pasa a “T-RPT” y se inicia la reproducción repetida.
Para cancelar la reproduccion repetitiona
1. Toque T-RPT.
La visualización T-RPTonga a“MODE”,y se empieza a producir normalmente a partir de la pista que se estaba reproduciendo cuando toco T-RPT.
Reproduccion repetida de discos
Una vez reproducedas todas las pistas del disco actual, la reproduccion repetition de discs reproduce automatically el disco actual de nuevo desde la primera pista.Esta referencia continua avanzando automatistically hasta que se cancele.
1. Toque MODE.
2. Toque D-REPEAT.
La visualización MODE pasa a “D-RPT” y se inicia la reproducción repetida de discos.
Para cancelar la reproduccion repetition de discos
1. Toque D-RPT.
La visualización D-RPTonga a“MODE”,y se empieza a reproducir normalmente a partir de la pista que se está reproduciendo cuando toco D-RPT.
Operaciones del Cambiador de discos compactos
Reproducción aleatoria
La reproduccion aleatoria selecciona y reproduce pistas aisladas del disco sin ningúnorden concreto.Estamericana continua avanzando automatistically hasta que se cancele.
1. Toque MODE.
2. Toque T-RANDOM.
La visualización MODE pasa a "T-RDM" y se inicia la reproducción aleatoria.
Para cancelar la reproduccion aleatoria
1. Toque T-RDM.
La visualización T-RDMonga a MODE, y se empieza a reproducir normalmente a partir de la pista que se estaba reproduciendo cuando toco T-RDM.
Reproduccion aleatoria de discos
La reproduccion aleatoria de discos selecciona y reproduce automatically pistas o discos individuales sin ningúnorden concreto.Estamericana hasta que se cancele.
1. Toque MODE.
2. Toque D-RANDOM.
La visualización MODE pasa a “D-RDM” y se inicia la reproducción aleatoria.
Para cancelar la reproduccion aleatoria de discos
1. Toque D-RDM.
La visualización D-RDMonga a MODE", y se empieza a reproducir normalmente a partir de la pista que se está reproduciendo cuando toco D-RDM.
Operaciones del telector
Funciones del sintonizadora de television
Cuando haya connectado un sintonizador de television optional a工程技术 del cable CeNET, estaunidadouldravorcontrallosdaslasoniones del sintonizador de television. Para contemplar programasde television,necesitarun sintonizador de television y un monitor.
Visualizaciones del modo TV
Visualización principal
Para verla, presione el mando [ROTARY] y seleccione el modo de TV.

Si toca la parte izquierda de la pantalla durante 1segundo o mas, cancellar el modo de funciona bajo su水泵.

Visualización de canales
1ch.: Aparece el canal que se está recubiendoactualmente.
Si toca o en el modo normal, pode realizar sintonizacion de busicada o sintonizacionmanual.
Visualización de titulos
3ch.:Aparece el nombre de la emisora que se está recibiendoactualmente.
VTR: Tipo de entrada de video Al tocarla, cambia la visualizacion
Visualización de banda de recepción TV1: Nombre de banda
Visualización de N° de presintonía
Si toca 卡 en el modo normal, podra selectionaruna memoria preprogramada.
MODE
Al tocar esta visualización aparecen varias subfunciones. Tóquela prolongadamente durante 1 segundo o más para ver la lista de memorias preprogramada.
P-SCAN: Aparece durante una exploración de presintonías. Toque esta funciona para finalizar la exploración de presintonías.
A-STORE: Aparece durante una memorización automática. Toque esta funciona para finalizar la memorización automática.
BAND
Toque esta funciona para携带 de banda de recepción.
Si la toca prolongadamente durante 1 segundo o más, se alternará entre el modo de sintonización manual y el modo de sintonización de búsqueada.
(solen la visualizacion defuncionamento simple)
Estos botones le permitted realizar sintonizacion de busqueada o sintonizacion por pasos (en el mode de sintonizacion manual).
Si los toca prolongadamente, podra realizar una sintonizaciónVisualización de la lista de memorias preprogramadas
Aparece cuando se toca MODE de forma prolongada durante 1segundo o más en la visualización principal.

Nombre de emisora
>>:
Sintonizacion en bajo
RTN:
ToqueAquipara,volvera lavisualizacion principal.
Selección del modo de TV
1. Presione el mando [ROTARY] para seleccionar el modo de TV.
Cada vez que presiona este mando, se pasa de un modo a otro en elsignificantoorden:
* El modo de aquellos equipos que no estén connectados no se muestra.
Cambio de banda de recepción
1. Toque BAND paraonian de banda de recepcion.
Cada vez que toca BAND, cambia la banda de recepción:
TV1 TV2 TV1...
Sintonización de búsqueada
La función de sintonización de búsqueada permite sintonizar de forma automatica emisoras con buena recepción.
1. Toque BAND prolongamente durante 1 segundo o más cuando se muestra MANU. La sintonización automatística se pueda realizar cuando no se mueste MANU.
2. Toque la visualización de canales. Aparece SEEK UP/SEEK DOWN, y comienza la sintonización. La sintonización de detiene automatistically en las emisoras con buenaREETC.
To cancel tuning
1. Vuelva a tocar la visualizacion de canales.
Sintonización manual
Existen 2 métodos: sintonización rápida y sintonización por pasos.
En el modo de sintonización por pasos, las velocidades cambian una a una. En el modo de sintonización rápida, pueda sintonizar la velocumbia眼看 at instante.
1. Toque BAND prolongamente durante 1 segundo o más cuando MANU no aparezca en pantalla.
La sintonizacion manual se pueda realizar,msteadasuestreamANU.
2. Utilice la visualización de canales para sintonizar un canal que está transmitiendo. Existen 2 métodos de sintonización manual: sintonización rápida y sintonización por pasos.
* La sintonización por pasos es una función que permitecaejar de canaluno a uno. Toque la visualización de freuency.
* La sintonización rápida es una función que permite Cambia de canal continuamente. Toque ← ➔ la visualización de canales. El proceso de sintonización se detiene cuando retina el dedo del panel.
Invocación de una emisióna memorizada
Estamericano.
1. Toque MODE prolongamente durante un segundo o más.
Aparecerá la lista de的记忆as preprogramadas
2. Toque la emisora que desee escuchar.
* Internacionalmente, el encuentó su américa.
tocando 日 且 日 el N° de presintonía.
Para cancelar la sintonizacion
1. Toque RTN.
Memoria preprogramada
Se pueda memorizar un total de 12 emisoras de TV (6-TV1 y 6-TV2). Este le permitirá seleccionar sus emisoras de TV favoritas y memoriarlas para recuperarlas más adelante.
1. Toque BAND paraonian de banda de recepcion.
2. Utilice la visualizacion de canales para selectionar la emisora que va a memorizar.
3. Toque MODE prolongamente durante un segundo o más.
Aparecerá la lista de的记忆as preprogramadas
4. Toque prolongadamente durante 2 segundos o más el N° de presintonía sobre se memorizará la emisora.
Escuchará un tono长大o paraindicarlesque se ha memorizzato la emisora.
Si escaucha un tono certo, es que la emisora no se ha memorizzato. Repita el procedimiento desde el paso 1.
Memoración automática
La memorización automática selección 6 emisoras de TV automatistically y memoria cada una de ellas en una memoria preprogramada.
Si no se enquiryran 6 emisoras con buena recepcion, se conservaran las emisoras previamente memorizadas y solo se memorizaran aquellas que tengan una recepcion buena.
1. Toque MODE.
2. Toque A-STORE prolongamente durante 2 seguidos o más. La visualización MODE cambia a "A-STORE" y el N° de presinonia de la operación de memorización automática aparece en la visualización de N° de presinonia.
* Se buscan las emisoras con buena recepción y se guardan en la memoria preprogramada (N° 1 al N° 6) enorden empezando por la emorsora con la Frequencia más baja.
Notas:
- Cuando se realiza una memorización automatística, se borran las emisoras que hasta entones estaban memorizadas.
- Si hay menos de 6 emisoras con buena recepción, se vuelve automatistically a las Frequencias同比下降 y se realiza otra memorización automática. Si tras la?).Si quene la?.memorizacion automatistica, sigue haberido menos de 6 emisoras con buena recepción, las emisoras anteriores permaneceran en la memoria.
Exploración de presintonías
La función de exploración de presintonías permite recibir las emisoras en elorden en que estáactualmentememorizadas enlos N° de presintonía,para poder examinarlas emisiones.
1. Toque MODE.
2. Toque P-SCAN.
La visualización MODE cambia a "P-SCAN", y el N° de presintonía de la operation de exploración de presintonías aparece en la visualización de N° de presintonía.
* Las emisoras actualmente memorizadas se reciben en suorden durante 7segundos o más cada una. Se omiten lasemisoras con mala recepción y seoca arecibir la",[siguiente].
Las emisoras de TV se reciben se la.), forma:
TV1 (1 6) TV2(1 6) TV1(1 6) y asi suscesivamente.
Para cancelar la exploración de presintonías
1. Toque P-SCAN. La visualización P-SCAN cambia a “MODE”, y las emisoras que se estaban recibiendo cuando se toco P-SCAN se reciben a continuación.
Visualización de video
El sintonizador de TV dispone de un terminal de entrada de VTR al que se pueda conectar 1 aparato externo. Conecte un reproductor deCNTas de video (VCP) o una grabadora deCNTas de video (VCR) de 12V al terminal del entrada del sintonizador de TV.
1. Presione el botón [▶■].
Aparece VTR, y seoca al modo VTR.
* La visualización de TVonga al modo de entrada de video y ya se pueda ver os videos.
Para:volveralmodoTV
1. Presione el botón [▶■] de nuevo.
Ajuste del area de TV (TV AREA)
Cuando selección el airea de TV (airea de recepcion de TV), cambia el ajuste de areal del sintonizador de TV.
- El valor preajustado de fabricula es "GERMANY".
1. Presione el botón [A] para selección el modo de ajuste.
2. Toque la visualización de ajustes para selectionar "TV AREA" en "TUNER".

3. Toque la parte derecha de la pantalla o gire el mando [ROTARY] para selectionar el和地区.
4. Presione el botón [A] para volver al modo anterior.
Ajuste de diversidad de TV (TV DIVER)
Se puede modifier el ajuste de Reception de la antenna de TV conectada al sintonizador de TV.
- Seleccione "OFF" cuando no se usa la antenna de diversidad de TV.
- El valor preajustado de fabricula es "ON".
1. Presione el botón [A] para selección ar el modo de ajuste.
2. Toque la visualización de ajustes para selectionar "TV DIVER" en "TUNER".

3. Toque la parte derecha de la pantalla o gire el mando [ROTARY] para seleccionar "ON" u "OFF".
4. Presione el botón [A] para volver al modo original.
Función de control de DAB
Cuando se emplea un cable CeNET para conectar un DAB (DAH913 o DAH923z) (vendido por分开ado), poderan operarse todas las functions.
Escuchar la emisora DAB
1. Presione el mando [ROTARY] para Cambiar de modo de funciona bajo.
Notas:
- La visualización que aparece en el modo de recepción normal y en el modo de recepción de presintonía es elsameo que cuando se recibe una emisión DAB.
- El número de programas y horas de emisión depende de la emisora DAB.
- Cuando la potencia de las senales DAB es débil, se silencia la calidad de audio.
Sintonización de búsqueada
1. Presione el mando [ROTARY] para seleccionar el modo DAB.
2. Toque la izquierda de la pantalla. Cuando la unidad principal recibe una emisora DAB, "DAB" se ilumina en la pantalla.
* Cuando no pueda localizar una emisión DAB, launidad principal detiene la sintonización de búsqueada. La visualización vuelve al modo anterior.
Sintonización manual
1. Presione el mando [ROTARY] para seleccionar el modo DAB.
2. Si "MANU" no aparece en pantalla, toque BAND prolongamente durante 1 segundo o más.
Si aparece "MANU", se pueda realizar la sintonizacion manual.
3. Toque la parte izquierda de la pantalla para sintonizar la emisora.
* Si no se realiza ninguna operation durante más de 7seguidos,se cancela la sintonizacionmanual yla pantalla vuelve al modo anterior.
Cambio de programas
1. Presione el mando [ROTARY] para seleccionar el modo DAB.
2. Toque la parte izquierda de la pantalla para Cambiar de programa en la emisora DAB.
Nota:
- El nombre del programa可以选择 ser el mesmo según el programa DAB.
Exploración de programas
Esta función explora cada programa con posibiliad de recepción en una emisión DAB que se reciba durante 10seguidos de forma secuencial. Este resultautilo cuando deseaa buscar un programa en cuestion.
1. Presione el mando [ROTARY] para seleccionar el modo DAB.
2. Toque MODE.
3. Toque S-SCAN. "S-SCAN" se illumina y launidad empieza a explorar cada programa durante 10segundos de forma secuencial. Cada vez que launidad principal realiza una exploracion, el nombre del programa se muestra en la pantalla.
4. Para detener la exploración de programas cuando se sintonice un determinado programa, toque S-SCAN.
Memoria manual
La unidad principal dispone de una función de memoria manual para los programas DAB. Se pueda memoriar hasta 18 programas (6 programas cada uno) en los botones preprogramados.
[M1], [M2] y [M3]
1. Presione el mando [ROTARY] para selectionar el modo DAB.
2. Toque BAND para selectionar uno de los botones anteriores.
3. Toque MODE prolongamente durante un segundo o más.
Aparecerá la lista de的记忆as preprogramadas
4 Toque prolongadamente durante 2 segundos o más el N° de presintonía que se va a memorizar. Escuchará un tono largo para indicarle que se ha memorizzato la emisora.
Si escucha un tono corto, es que la emisora no se ha memorizzato. Repita el procedimiento desde el paso 1.
Nota:
- Los programas de interrupción (PTY o INFO) no se pueda guardar en una memoria manual.
Recuperación de programs preajustados
1. Presione el mando [ROTARY] para seleccionar el modo DAB.
2. Toque BAND.
Cada vez que toca BAND cambía la visualización en elorden;)
MEMO1 MEMO2 MEMO3 MEMO1...
3. Toque la parte derecha de la pantalla para recuperar un programa preajustado.
Función AF
La funciona AF cambia a una Frequenciadistincta de la mesma red para podermanterla optima recepcion.
- El ajuste inicial de fabricula es "ON"
- Si la recepción de la emisión difusora actual se deteriorara, aparecerá "SEARCH" en el visualizador y la radio buscará el mesmo programa en另一边 Frequencia.
- Para más detalles sobre la "Función de frequencies alternativas (AF)" (cf. páginas 26), consulte la sección "Operaciones del Sistema de datos radiofáticos (RDS)" del manual de instructuciones.
- Desactivación de la funciona AF
- Activación de la funciona AF
Función de AF entre RDS y DAB
Cuando se difunde el mesmo programa mediante RDS y DAB, y esta funciona está activada, launidad principal cambia a la recepcion de la difusión con la mejor recepción de forma automatística.
TA (Anuncios de tráfico)
En el modo deresherva de TA, cuando se inicia la difusión de un anuncio de tráfico,la difusión del anuncio de tráfico se recibe con la mayor prioridad independentemente del mode de referencia.
Tambien es possiblelearvaracabo sintonizacion automáticadeprogramade trafico(TP).
-Estafunciionsoledopeculizarsecuando"TP" estáencendido enelvisualizador.Cuando "TP"estáencendido significa que la emisoradifusora deDABoRDSque se estárecibiendotieneprogramasdeanunciosdetráfico.
- Para más detalles sobre "Anuncios sobre el tráfico (TA)" (cf. págrina 27), consulte la sección de "Operaciones del sistema de datos radiofónicos (RDS)" del manual de instructiones.
- Ajuste del modo de réserve de TA
- Cancelación del modo deresherva de TA
Búsqueada de emisoras TP
Notas:
- Si no se está recubiendo una emisión TP, launidad principal detiene la operation de busquada.
- Es possible que se encienda "TP" en el visualizador cuando se una emisora RDS transmits a una defusión TP. En este caso, presione el botón [TA] para efectuar la sintonización por búsqueada de TP. Presione de nuevo el botón [TA] paravoltar al modo anterior.
INFO (Anuncio)
En el modo de resolver INFO, cuando se inicia el programa deannouncementado, la unidad principal cambia automatistically al programa deannouncementado.
- Ajuste del modo deresherva INFO
Si presiona y mantiene presionado el botón [TA] durante 1 segundo o más tiempo, se enciende "INFO" en el visualizador y launidad principal se establiece en el modo de reserve INFO hasta que se difunda el acontecimiento selectionado. Cuando se inicia la difusión de anuncio selectionada, el的对象 del anuncio aparece en el visualizador. Si presiona y mantiene presionado el botón [TA] durante 1 segundo o más tiempo cuando se recibe la difusión del anuncio selectionada, se cancela la recepción de la difusión del anuncio selectionada y launitieshincipalseestabliece en el mode del reserveda INFO.
- Cancelación del modo deresherva INFO
Para cancelar el modo de reserve INFO, presione y mantenga presionado el botón [TA] durante 1 segundo o más tiempo.
- Seleitung de la informacion
Estamerican (ON) or desactivacion (OFF) de la informacion (INFORMATION) en el mode de interrupcion de la informacion.
Podrá selección ON para hasta 6它们 de información.
Podrá selecciónar cualesera de los 6 itemes seguidentes:
Ítem de INFORMATION ENGLISH Contenido Travel Noticia deULTima hora sobre transporte Warning Advertencia/servicio News Noticias deULTima hora Weather Noticias deULTima hora sobre el tiempo Event Anuncios sobre acontecimientos Special Acontecimientos especiales
1. Toque MODE.
2. Toque INFO SEL para pagar al modo "INFO SEL".
3. Toque 山 山 el centro de la pantalla o gire el mando [ROTARY] para seleccionar un elemento informativo.
Puede selectionar entre 6 valeurs:
Travel (Viaje) Warning (Advertencia)
News (Noticias) Weather (Tiempo)
Event(Evento) Special(Especial) Travel(Viaje)...
4. Toque la parte derecha de la pantalla para activar ("ON") o desactivar ("OFF") la funciona.
5. Toque RTN.
PTY
Estamericano, independiente, y como el encuentado por la lawina, señan a la lawina.
- Puede selectionar un PTYcomings para DAB o RDS.
- Entre DAB PTY y RDS PTY, el PTY que se recibe antes toma prioridad sobre el除外.
- Las difusions de PTY todas no está disponible todos los País.
- En el modo de reserve INFO, las emisoras de INFO tienen prioridad sobre las emisoras de PTY.
- En el modo de reserve TA, las emisoras de TP tienen prioridad sobre las emisoras de PTY.
- Para detailles sobre " Tipo de programa (PTY)" (cf.-page 28), consulte el apartado "Operaciones del sistemas de datos radiofonicos (RDS)" del manual de instrucciones.
Establecimiento del modo de espera de PTY
- Cancelación del modo de espera de PTY
- Cancelación de una emisión con interruptions de PTY
- SeLECTION del tipo de programa (PTY)
- Búsqueada por tipo de programa (PTY)
- Memoria de preajuste de temas de programas (PTY)
Difusión de emergencia
Cuando se recibe una dificultad de emergencia, todas las operaciones del modo de la referencia se detienen. Aparece "ALARM" en el visualizador y se eschaça la dificultad de emergencia.
- Para los detalles sobre la "Emission de emergencia" (cf. págin29), consulte el aparato de "Operaciones del sistema de datos radiofonicos (RDS)" del manual de instrucciones.
- Cancelación de una emisión de emergencia
Cambio del idioma de visualización de PTY e INFO
Puede selectionaruno de los 4 idiomas existentes (inglés, aleman, sueco or francés) para visualizar PTY e INFO.
- El valor preajustado de fabrica es "ENGLISH" (Inglés).
- Para Obtener más información, sobre el "Cargo del idioma de visualización de PTY" (cf. págrina 30), consulte la sección "Operaciones del sistema de datos radiofónicos (RDS)" en el manual de instructuciones correspondiente.
Ajuste del volumen de la difusión TA, INFO, de emergencia (ALARM) y PTY
El volumen de las interruptions de TA, INFO, ALARM y PTY puede ajustarse durante las interruptions de TA, INFO, ALARM y PTY. Efectue la operation suiviente dependiendo del Modelo conectado.
- El ajuste inicial de fabricula es "15".
Durante una interrupción de TA, INFO, ALARM o PTY, gire el mando [ROTARY] hacía la derecha o izquierda paraaabustar el volumen al nivel deseado (0 a 33).
* Cuando finaliza la Erruption de TA, INFO, ALARM o PTY, el volumen returna al nivel que tenía antes de la erruption.
Operaciones del decodificador surround de 5,1 canales
En estaunidad permite controlar un decodificador surround de 5,1 canales que esté conectado mediante cable CeNET.
Las functionsesiones varian cuando se conecta un decodificador surround de 5,1 canales:
- Al modo Dolby Pro Logic II se anaden dos modos新模式, "MOVIE" y "VIRTUAL".
- El modo VSE/POSITION cambia al modo DSF (Campo de sonido digital).
- En el modo P.EQ (Evaluador paramétrico), los altavoces de poderán ajustar con mayor precision aun.
- Cambian los ajustes de música (cf. páginas 39).
Selección de PL II (Dolby PL II)
Selección uno de los cuales modo disponibles como modo Dolby Pro Logic II, según la fuente que vaya a reproducir.
- El valor preajustado de fabricula es "OFF".
■ MUSIC (Modo de música)
Consulte "Selección del menu PLII (Dolby PLII)" (cf. págin 17).
MATRIX (Modo matricial)
Consulte "Selección del menu PLII (Dolby PLII)" (cf. págin 17).
MOVIE (Modo depellicula)
Ideado parapelliculas de video enDVD.
VIRTUAL (Modo virtual)
Ideado parapelliculas yotras fuentes de audio.
OFF
No se utilizes el modo Dolby Pro Logic II.
1. Presione el botón [SOUND].
2. Toque Dolby PLII.

3. Toque la parte derecha de la pantalla para seleccionar el modo Dolby Pro Logic II.

La visualización de modelos cambia como se indica a continuación:
MUSIC (modo de música) MATRIX (modo matricular) MOVIE (modo depelícula) VIRTUAL (modo virtual) OFF (PL II desconectado) MUSIC (modo de música)...
* Para Obtener más información sobre el ajuste de volumen de los altavoces central/subgraves, consulte la página 45.
4. Toque RTN.
Selección del menu DSF
Mediente simulación del sonido, DSF (Campo de sonido digital) permite disfrutar de la sensación acústica que experimentaría en un auditorio o en un recinto de actuaciones en directo.
- Cuando se selección el menu DSF, es possible que;aumente el volumen.
- El valor preajustado de fabricula de DSF es "OFF" y el del menu DSF es "HALL".
1. Presione el botón [SOUND].
2. Toque DSF.

3. Toque la visualización ON/OFF. El efecto DSF se activa o desactiva (ON/OFF).

Cuando el DSF está desactivado ("OFF"), el ajuste de DSF no se refleja en la fuente de música. Con thiso recluye la configuracion de DSF. Presione el boton [SOUND] paravoltar al modo original.
4. Toque el N° de dato de DSF para seleccionar el dato de DSF deseado.

Menús de DSF
HALL (Auditorio) CHURCH (Iglesia) STADIUM (Estadio) LIVE (En directo) JAZZCLUB (SALA DE JAZZ) THEATER (Teatro) HALL (Auditorio)
N° Nombre de la función Descripción 1 AUDITORIO Auditorio grande 2 CHURCH Iglesia con techo abovedado 3 ESTUDIO Estadio grande sin techo ni pareDES 4 LIVE Recinto de actuaciones en directo, mayor de una sala de jazz 5 JAZZCLUB Sala de jazz con techo bajo 6 THEATER Cine o teatro
5. Presione el botón [SOUND] para volver al modo original.
Selección del menu de ecualizador paramétrico
El ecualizador paramétrico (P.EQ) le permite compensar con precision todo el margen de niveles de Frequencias mediante curva suave utilizing compensacion de Frequencias para adaptarlo a su tipo de automóvil.
- La configuración preajustada de张家 incluye los siguientes values para todos los altavoces. FREQ = 1kHz, Q = 1, GAIN = 0dB
1. Presione el botón [SOUND].
2. Toque P.EQ.

3. Toque la visualización ON/OFF. El efecto P.EQ se activa o desactiva (ON/OFF).

Cuando el efecto P.EQ está desactivado ("OFF"),DICHOajuste no se refleja en la fuente de musica. Con thiso conclusye el ajuste de P.EQ.Presione el boton [SOUND] para volver al modo original.
4. Toque 山 el N° de menu P.EQ para seleccionar el menu P.EQ.

Menús de P.EQ
SIGNAL (Señal) SP-SEL (Selección de altavoz) BAND (Banda) FREQ (Frecuencia) Q GAIN (Ganancia) SIGNAL (Señal)...
5. Toque la parte derecha de la pantalla para realizar el ajuste deseado.
SIGNAL (permite seleccionar la seals de ajuste):
Selezione "P-NOIS" o "MUSIC"
P-NOIS: selección este valor cuando vaya a utiliser ruido rosa
MUSIC: selezione este valor para utilizesenalesmusicales
SP-SEL (permite seleccionar los altovasces a los que se va a ajustar el valor P.EQ): Seleccione "FRONT", "CENTER" o "SURROUND".
- FRONT: Altavoz delantero
- CENTER: altavoz central
- SURROUND: altavoz surround
BAND (permite selectionar la banda de frequencies):
Selezione una banda de 1 a 3
FREQ (permite selectionar la banda central):
El margen de ajuste es de 20 Hz a 20 kHz.
Q (permite ajustar la curva de Q):
Permite ajustar laPENDiente de la curva Q en uno de los parámetros siguientes: 1,3,5,7o20.
GAIN (permite ajustar el nivel de salute): Permite ajustar la ganancia (nivel de salute) en un margen de -12dB a +12dB. (pasos de 1dB, 25+puntos)
6. Repita los pasos 4 y 5 para realizar el ajustedeaseado.
7. Presione el botón [SOUND] para volver al modo original.
Ajuste de P. EQ
A continuación se específican los values que se pueda ajustar en el menu de P.EQ. La Frequencia central, ganancia y curva de Q se pueda memorizar en combinaciones de canales y bandas.
Por exemple, freuencia central "250Hz", ganancia "-8dB" y curva de Q "3" pueda memorizarse en la banda 1 delantera.
Para Obtener más información sobre la función P.EQ, consulte la sección "Ajuste de P. EQ" (ct págin21).
Modificación de los ajustes
Cuando se conecta un decodificador surround de 5,1 canales, se modifican los ajustes de música del modo de ajuste.
Selección de ajustes
A continuación de describen los ajustes@cuyos valores se modifican.
Para Obtener más información sobre otros ajustes que permanecen invariables, consulte la sección "Modificación de los ajustes" (cf.頁面39) en "Operaciones comunes de cada modo".
1. Presione el botón [A].
La visualización cambia al modo de ajuste.

2. Toque la visualización de ajustes para selectionar el ajuste que va a programar.
* Si toca la parte izquierda de la pantalla, los ajustes principales cambian uno a uno.
Si toca la parte izquierda de la pantalla, los ajustes secundarios cambian continuamente.
\* Si toca 山 el centro de la pantalla, los ajustes secundarios cambian uno a uno. Si toca 山 ,los ajustes secundarios cambian continuamente.
3. Si aparece "THROUGH" a la referencia de la pantalla, toque THROUGH para pagar a la visualizacion de detailles de ajuste.
4. Toque 山 la parte derecha de la pantalla o gire el mando [ROTARY] para ajustar los detalles.
Para:volveralmodooriginal
1. Presione el botón [A] de nuevo.
- Ajustes
Ajuste principal Ajuste secundario SOUND CENTER-SP / SRD-SP / SUB-WOOFER
• Activación/desactivación (ON/OFF) de los altavoces (cf. págrina 64) FRONT HPF / CENTER HPF / SRD HPF / SUB-W LPF
• Ajuste de la Frequencia de filtrado de los altavoces (cf. págrina 64) SP GAIN
• Ajuste del nivel de salute de los altavoces (cf. págrina 46) DELAY CENTER-SP / SRD-SP
• Ajuste del tiempo de retardo de los altavoces (cf. págrina 65) DOLBY D D-RANGE
• Ajuste del alcance dinámico (cf. págrina 65) PL II CONT PANorama / DIMENSION / CTR WIDTH
• Ajuste fino del modo de música (cf. págrina 47)
Activación/desactivación (ON/OFF) de los altavoces (CENTER-SP/SRD-SP/SUB-WOOFER)
Activa/desactive (ON/OFF) el altavoz central (CENTER-SP), el altavoz surround (SRD-SP) y el altavoz de subgraves (SUB-WOOFER).
Selección "OFF" si no hay ningún altovo central, altovo surround o altovo de subgraves.
- El valor preajustado de fabricula es "ON".
1. Presione el botón [A] para selecciónar el modo de ajuste.
2. Toque ↑ ↓ la visualización de ajustes para selecciónar “CENTER-SP” en “SOUND”, “SRD-SP” en “SOUND” y “SUB-WOOFER” en “SOUND”.

3. Toque la parte derecha de la pantalla o gire el mando [ROTARY] para seleccionar "ON" u "OFF".
* Si se tratate de "SUB-WOOFER", selección "ON+", "ON- u "OFF". En conditiones normales, selección "ON+". Sin embargo, cuando se selección "ON-", se pueda percirbir claramente un efecto en el rango bajo.
4. Presione el botón [A] para volver al modo original.
Ajuste de las Frequencias de filtrado de los altavoces (FRONT HPF/CENTER HPF/ SRD HPF/SUB-W LPF)
Esta funciona le permitteJKLM de filtrado correspondiente a los altavoces realizados.
- No se做不到 los altavoces que hayan sido desactivados en la sección "Activación/ desactivación (ON/OFF) de los altavoces (CENTER-SP/SRD-SP/SUB-WOOFER)".
- El valor preajustado de fibricula de "FRONT HPF" o "SRD HPF" es "THROUGH" (sin filtró) y el de "CENTER HPF" o "SUB-W LPF" es "120Hz".
Ajuste del filtro
FRONT HPF/CENTER HPF/SRD HPF (ajuste del filtró de paso alto)
Este filtro suprime los graves en los altavoces delanteros, central y surround.
$$
\text {T H R O U G H} \rightarrow 5 0 \mathrm {H z} \rightarrow 8 0 \mathrm {H z} \rightarrow 1 2 0 \mathrm {H z}
$$
Ajuste el filtro correspondiente al altovoz cuando se utilizes altavoces de poco diametro.
THROUGH
Realice este ajuste cuando utilise altavoces capaces de tener graves. THROUGH no se pueda ajustar en CENTER HPF.
SUB-W LPF (ajuste del filtró de paso bajo en el altovoz de subgraves)
Este filtered suprime los agudos en el altovoz de subgraves.
$$
5 0 \mathrm {H z} \rightarrow 8 0 \mathrm {H z} \rightarrow 1 2 0 \mathrm {H z}
$$
Ajuste la fecuencia de filtrado que corresponda al altovoz de subgraves.
1. Presione el botón [A] para selección el modo de ajuste.
2. Toque ↑ la visualización de ajustes para selecciónar "FRONT HPF" en "SOUND", "CENTER HPF" en "SOUND", "SRD HPF" en "SOUND" y "SUB-W LPF" en "SOUND".

SOUND
ADJUST MODE FRONT HPF » THROUGH
3. Toque la parte derecha de la pantalla o gire el mando [ROTARY] paraaabstar la fecuencia.
* Selezione THROUGH1, 50Hz, 80Hz o 120Hz.
*1 THROUGHsolemuestuacuong "FRONTHPF"o“SRDHPF"estaselenacionado.
4. Presione el botón [A] para volver al modo original.
Ajuste del tiempo de retardo de los altavoces (CENTER-SP/SRD-SP)
El tiempo que tarda el sonido de cada altovo en llegar a la posición de escucha depende de la instalación del altovo y del時間 del automóvil. Ajuste el tiempo de retardo de cada altovo de forma que el sonido de todos los altavoces llegue a la posición de escucha al mismo tiempo que el sonido de los altavoces delanteros.
- El valor preajustado de fabrica es "0 ms".
1. Presione el botón [A] para selecciónar el modo de ajuste.
2. Toque ↑ ↓ la visualización de ajustes para selecciónar "CENTER-SP" en "DELAY" y "SRD-SP" en "DELAY".

3. Toque la parte derecha de la pantalla para ajustar el tiempo de retardo.
* El margen de ajuste de "CENTER-SP" es de 0 ms a 5 ms.
* El margen de ajuste de "SRD-SP" es de 0 ms a 15 ms.
4. Presione el botón [A] para volver al modo original.
Ajuste de lasmericanos de Dolby Digital (D-RANGE)
Estamericano de Dolby Digital para tener los niveles bajo desonido, como las conversaciones de losactores, y suprimir volumenes de sonido altos.
Estas functions solo estárn disponible en los discos DVD Dolby Digital.
- El valor preajustado de fabricula es "MAX"
1. Presione el botón [A] para selección el modo de ajuste.
2. Toque la visualización de ajustes para selecciónar "DOLBY D" en "D-RANGE".

3. Toque la parte derecha de la pantalla paraaabstar el alcance dinamico y realizar el ajuste deseado.
MAX: modo de alcance dinámico máximo de la fuente original
STD: modo recomendado para eschucanormal
MIN: el modo de alcance dinamico más comprimido que permite eschar con calidad hasta los sonidos bajos.
4. Presione el botón [A] para volver al modo original.
8. EN CASO DE DIFICULTAD
Problema Causa Solutión Generales La alimentación no se conecta. (No se produce sonido.) El fusible está quemado. Reemplace el fusible por otherwise del本身就是 amperaje. Si el fusible vuelve a quemarse, pángase en contacto con el commercio en el que adquirió launidad. Las conexiones son incorrectas. Póngase en contacto con el commercio en el que adquirió laundry. Al utilizes la unidad con amplificadores o con una antenna motorizada, no sale sonido. El conductor de la antenna motorizada está cortocircuitado a tierra, o se necesita excessiva corrente para controlar remotamente los amplificadores o la antenna motorizada. 1. Desconecte la alimentación de laundry. 2. Desconecte todos los conductores connectados al conductor de la antenna motorizada. Compruebe todos los conductores para ver si existe un cortocircuito a casa realizando un ohmímetro. 3. Vuela a conectar la alimentación de laundry. 4. Vuela a conectar, uno tras除外, todos los conductores de control remoto del (de los) amplífico (es) al conductor de la antenna motorizada. Si la alimentación de los amplificadores se desconnecta antes de haber connectado todos los conductores, utilise un relé externo para suministrar tensión de alimentación remota (se requiree corrente excesiva). No suede nada al presionar los botones. La visualización no es precisa. El microprocesador ha的功能ado mal debido al ruido, etc. Desconnecte la alimentación, presione el botón [RELEASE] y extraiga el panel de control desmontable (DCP). Mantenga presionado el botón de reposión durante uno 2segundos con un objecto puntiagudo. Botón de reposión Los connectores del panel de control desmontable (DCP) o de laundry principal está sucios. Limpie la sueidad con un paño suave ligeramente humedecido en alcohol de limpieza. Reproductor de discos compactos/MP3/WMA No se oye sonido. Ha insertado un disco que no es compacto, o existen materias extrañas. Con el panel abatible abierto, mantenga presionado el botón [▲] durante 3segundos o más. La materia extraña saldrá expulsada. No hay ARCHivos MP3/WMA en el disco. Escribe adeuadamente archivos MP3/WMA en el disco. Los archivos no se reconocen como MP3/WMA. Utilice archivos MP3/WMA adeuadamente codificados. Elsystema de archivos no es correcto. Utilice el systema de archivos ISO9660 level 1, 2 o JOLIET o Romeo. El sonido salute o se oye ruido. El disco está sucio. Limpie el disco con un paño suave. El disco está muy rayado o alabeado. Reemplace el disco por otherwise que esté en buena conditiones. Se canta o se salute el sonido. Se genera ruido o se mezcía ruido con el sonido. Los archivos MP3/WMA no está干嘛 adeuadamente codificados. Utilice archivos MP3/WMA adeuadamente codificados.
Problema Causa Solutución Reprodctor de discos compactos/MP3/WMA El sonido es malo inmediamente después de haber connectado la alimentación. Es possible que se hayan formado gotas de agua en el objetivo interno cuando haya estacionado en un lugar humedo. Deje que se seque durante 1 hora con la alimentación connectada. Nombre de archivo erróneo El sistema de ARCHivos no es correcto. Utilice el Sistema de archivos ISO9660 level 1, 2 o JOLIET o Romeo. No se realiza la reproducción de la lista de reproducción. El nombre o la extension del archivo no son correctos. Para el nombre de archivo de MP3/WMA, utilize characteres alfanumericos/ASCII. Para la extensión de archivo de una lista de reproducción, utilise“.M3U”.
9. INDICACIONES DE ERROR
Cuando occurra un error, se visualizará el tipo del本身就是.
Tome las medidas descritas a continuacion para SOLUTIONAR el problema.
Indicación de error Causa Solución CD/MP3/WMA ERROR 2 El disco se haya atascado en el interior del reproductor de discos compactos y no pueda extraerse. Éste es un problema del reproductor de discos. Póngase en contacto con el commercio en el que adquiría laividad. ERROR 3 El disco no pueda reproducirse debido a ralladuras, etc. Reemplace el disco por(other que no está rayado ni alabeado. ERROR 6 El disco está cargado al revés en el reproductor de discos compactos y no pueda reproducirse. Extraiga el disco y cárguelo adecuadamente. Generales AMP GUARD El circuito de protección de los altavoces está operando.Durante esta operación, si realiza cualquier operación de volumen, el visualizador做不到 "AMP GUARD". "AMP GUARD"funciona en occasions cuando se Employmente señales de prueba especialas. 1. Reduzca el volumen del sonido.La funciona tambiénoulda restaurarsedesconectando la alimentación y volviéndola a conectar.(El volumen de los altavoces se reduceautomática cuando se activa elcircuito de protección de los altavoces).2. Si el sonido se silencia de nuevo,consulte a了我的 Departamento de servicios. Cambiador de discos compactos ERROR 2 No hay discos cargados en el interior del Cambiador de discos compactos. Éste es un problema del cambiador de discos compactos. Póngase en contacto conel commercio en el que adquiría laividad. ERROR 3 El disco compacto del cambiador de discos compactos no pueda reproducirse debido aralladuras, etc. Reemplace el disco compacto por(other que no está rayado ni alabeado. ERROR 6 El disco compacto del cambiador de discos compactos no pueda reproducirse debido aque está cargado al revés. Extraiga el disco y cárguelo adecuadamente. Cambiador de videodiscos ERROR 2 No es possible reproducir un disco insertado en el cambiador de discos DVD. Este es un fallo debido al mecanismo del cambiador de discos DVD.Consulte alestablishcimiento en el que adquiría laividad. ERROR 3 No es possible reproducir un disco debido aralladuras, etc. Vuelva a probarlo, o reemplace el disco porotó que no está rallado ni alabeado. ERROR 6 No es possible reproducir un disco DVD del cambiador debido a que está insertado al revés. Extraiga el disco y después vuela acargarlo adecuadamente. ERROR P Error de nivel de censura de los padres Ajuste el nivel de censura de los padrescorrecto. ERROR R Error de número de region Extraiga el disco y corrija el error de region.
Si aparece una indicación de error no descrita arriba, presione el botón de reposión. Si el problema continua, desconnecte la alimentación ypongase en contacto con el commercio en el que adquirido laupon.
10. ESPECIFICACIONES
Sección de laundry
Sistema de sintonía:
Sintonizador sintetizador con bucle de enganche de fase (PLL)
Frecuencias de recepcion:
FM:87,5a108MHz (pagos de 0,05 MHz)
MW:531 a 1602 kHz (pasos de 9 kHz)
LW:153 a 279kHz (pasos de 3kHz )
Sección del reproductor de discos compactos
Sistema:
Sistema audiodigital de discos compactos
Respuesta en Frequencia: 5 Hz a 20 kHz (±1 dB)
Relación postal-ruido: 100 dB (1 kHz) IHF-A
Gama dinamica: 96 dB (1 kHz)
Distorsión: 0,01%
Generales
Potencia de calidad:
4× 31W (DIN 45324, +B = 14,4V)
Tensión de alimentación:
14,4 V CC (permisible de 10,8 a 15,6 V), negativo a masa
Consumo de corriente:
Menos de 15 A
Impedancia de los altavoces:
4Ω (permisiblede4a8Ω)
Corriente nominal de la antenna motorizada:
500 mA o menos
Peso:
Unidad principal: 1,7 kg
Controlador remoto: 80g (incluyendo la pila)
Dimensiones:
Unidad principal:
178 (An) × 50 (Al) × 155 (Prf) mm
Controlador remoto:
44 (An) × 110 (Al) × 27 (Prf) mm
Nota:
Las specifications y el Diseño está susjetos a cambio sin previo aviso por motivo de mejoras.
Tack for att du har kocht denna Clarion-apparat.
* Läsigenom hela bruksanvisingen innan du böjr använda bilstereon.
* Spara bruksanvisingen på nagot lättillgangligt stalle (t.ex. i handskfacket) after att du LASTigenom den.
* Kontrollera innehålet på det medfoljande garantikortet och tag väl vara på det tillsammans med braksanvisningen.
* Denna bruksanvisning innehäller instruktioner om hur du manövrar en CD-växlare, DAB och TV-tuner som har anslutits via en CeNET-kabel. CD-växlaren och TV-tunern har också sina egnà bruksanvisningar, men i dem beskrivs inte hur apparaterna faktiskt används.
Innehäll
1. FÖRSIKTIGHETSÄTGÄRDER 3
Den lutande konsolen 4
Hantering av CD-skivor 4
2. KONTROLLER 5
3. TERMINOLOGI 6
Knapparnas namn och vad de anvands till 6
De huvudsakliga manoverknapparna nár andra apparater ar anslutna till den har bilstereon .... 7
Displayenfunktioner 7
Displayenfunktioner 8
4. DEN LÖSTAGBARA KONTROLLPANELEN (DCP) 9
5. FJARRKONTROLLEN 10
Hur man satter i batterierna 10
Hur knapparna på fjarrkontrollen fungerar 11
6. HUR MAN ANVANDER BILSTEREON 12
Grundlaggande anvandningssatt 12
Hur man anvander AC-Processor III 17
Hur man anvander radion 23
Hur man anvander RDS 26
Manövrering for CD/MP3/WMA-skiva 31
Att lata olika lyssnare lyssna på olika musik samtidigt (2-ZONE-funktionen) 36
Gemensamma Funktioner for bada lagena 37
7. HUR MAN ANVANDER OLIKA TILLVALSKOMPONENTER 51
Hur man anvander en CD-vaxlare 51
Hur man anvander en TV-tuner 54
Digital radio / Hur man anvander DAB 58
5.1ch Surround-avkodning 61
8. OM DET UPPSTAR PROBLEM 66
9. FELMEDDELANDEN PÄ DISPLAYEN 68
10. TEKNISKA DATA 69
1. FÖRSIKTIGHETSÄTGÄRDER
1. Denna apparat ar endast avsedd att anvandas i vanlga 4-hjuliga fordon. Den lampar sig inte for anvandning i traktorer, gaffeltruckar, gravmaskiner, terranggående fordon, 2-ller 3-hjuliga motorcyklar, motorbatar erler andra speciella sorters fordon.
2. När det ar mycket kallt i bilen och du använder CD-spelaren strax after att du slagit pa bilvärmaren kan det bildas imma pa CD-n erller pa optiken inuti CD-spelaren sa att det inte gär att spel a skivan ordentlich. Om det bildas imma pa CD-n sa torka av den med en mjuk tornduk. Om det bildas imma pa optiken i CD-spelaren sa vanta ungefär en timme med att anvanda CD-spelaren tills kondensen
avdunstat av sig själv och det går att använda CD-spelaren på normalt sattigen.
3. Vid körning på mycket ojemnt underlag kan det uppstä kraftiga vibrationer som leder till att CD-spelaren hoppar.
INFORMATION FÖR ANVÄNDARE.:
ÄNDERINGAR ELLER OMBYGGNAD AV DENNA PRODUKT SOM EJ GODKÄNTS AV TILLVERKAREN MEDFOR ATT GARANTIN BLIR OGILTIG.
A WARNING
Av sakerhetsskal bör du inte titta på erler använda pekskärmen när du kör.
Den Iutande konsolen
Pà denna modell används en lutande konsol som gör det möjlig att använda en stor display. Var noga med att stänga den lutande konsolen纳税人 den används.
A VARNING
Var försiktig sä att du intekommen i kläm med fingrarna;när du öppnar eller stänger den LUTANDE KONSOLEN.
1. Stäng alltid den LUTANDE KONSOLEN für sakerhets skull när du inte tänker anecd bilstereon pääett tag erler innan du vrider om tändningsnyckeln till AVSTÄNGT lage. Om du vrider om tändningsnyckeln till AVSTÄNGT lage med den LUTANDE KONSOLEN i vinklat lage gär den LUTANDE KONSOLEN inte att stänga.
Hantering av CD-skivor
Använd endast CD-skivor som är försedda med markningen iller
Spela inte hjartformade, attkantiga aller andra CD-skivor med ovenlig form ienna CD-spelare. Det kan hända att vissa CD-skivor, inspelade i CD-R/CD-RW-funktionen, inte kan användas.
Hantering
- Jämfört med vanliga musik-CD-skivor ar CD-R-skivor och CD-RW-skivor mycket kānslga for Hög temperatur och luftfuktigkeit, vilket kan góra att det inte gár att spelva vissa CD-R-skivor och CD-RW-skivor. Undvik därfor att lata sādana skivor ligga kvar进展情况 i bilen.
- Nya CD-skivor
kan vara en
aning ojämnä i
kanterna. För
sādana skivor kan
det hända att CD-spelaren inte fungerar
eller att ljudet hoppar. Jämnä i
sā fall till skivkanten med en
kulspetsppenna e.d.
Klistra aldrig fast etiketter på CD-ns yta och skriv inte på den med blyerts- eller kulspetsppennor.
- Spela aldrig CD-skivor med tejp erler lim pa, aller med rester after avrivna etiketter. Om du forsoker spelena sadan CD kan det hända att det inte gär att mata ut den ur CD-spelaren igen ellert det uppstar andra skador pa CD-spelaren.
2. Innan den LUTANDE KONSOLEN stängs kan det höras ett bromsljud frän sakerhetsmekanismen, men det ar normalt.
3. Om du flyttar den LUTANDE KONSOLEN for hand kan det uppsta spelrum. Om det skulle uppsta spelsum sa ratta till det medan bilstereon ar paskigen genom att trycka pa [A]-knappen for den LUTANDE KONSOLEN.
4. När en skiva/minidisk har matats ut Återgår den LUTANDE KONSOLEN automatiskt till vinklat ell er stängt lage. Om det finns nagot hinter i vägen nar den LUTANDE KONSOLEN försöker stängas utlöses en sakerhetsmekanism som gör att den LUTANDE KONSOLEN öppnas igen. Om detta skulle inträffa sa flytta undan hindret och tryck på [▲]-knappen.
5. Håll 8 respektive 12 cm CD-skivorna plant när du sätter i eller tar ut dem for att undvika att de blir repade.
- Spelainte CD-skivor med grova repor, eller CD-skivor som ar skeva, knackta e.d. Sádana CD-skivor kan leda till Funktionsfel ull til skador på CD-spelaren.
- Ta ut CD-n ur sin ask genom att trycka på upphöjningen mitt i asken och lyfta ut skivan. Håll skivan försiktigt i kanterna.
- Använd inte södana skyddsark für CD-skivor som finns i handeln, eller skivor med stabilisatorer eller liknande. De kan skada skivan eller fastna i mekanismen inuti CD-spelaren sa att den går sönder.
Förvaring
- Utsatt inte CD-skivor für direkt solljus eller nägon form av värmekällor.
- Utsatt inte CD-skivor für hög luftfuktigkeit aller damm.
- Utsatt inte CD-skivor for utblåset från bilvärmaren.
Rengöring
- Torka av evdamm ell fingeravtryck med en mjuk torkduk. Torka alltid frAn CD-ns mitt och ut mot kanten.
- Använd inga kemikalier som t.ex. rengöringsmedel, antistatspray, eller thinner for att rengöra CD-skivor.
- Om du anvander en speciell CD-skivrengörare sà lát CD-n torka ordentligt innan du börjar spelà den.
2. KONTROLLER
Huvudenhet

DEN LUTANDE KONSOLEN öppen

3. TERMINOLOGI
Knapparnas namn och vad de används till
Knappen [RELEASE]
- Ta loss frontpanelen.
Ljussensor
- Denna sensor registrar ljusstyrkan i din bil. När autodimmerfunktionen ar installd pa "AUTO" dämpas displayens ljusstyrka i forhällande till den ljusstyrka som denna sensor registrar.
Knappen [ROTARY]
Tryck pā knappen För att satta pā anlaggningen. För varje tryck pā denna knappändras laget.
Tryck pa knappen och häll den intryckt i 1 sekund eller langre for att stenga av anlaggningen.
- Du kan ocksá vrida på denna knapp für att ställa in volymen eller für att modificera de olika installingarna i instalningslaget.
Knappen [△]
- Kopplar in/bort kontrollpanelen. Om en skiva sitter i matas den ut Near kontrollpanelen kopplas in.
OBS:
Häll knappen [▲] intryckt i 1 sekund aller mer om skivan inte matas ut.
Knappen [A]
- Använd denna knapp für att ställa in aller,andra de olika inställingarna i andringslåget.
- Användenna knapp for att lagga in stationsnamn i radiolaget aller skivtitlar i CD-laget.
Knappen [SOUND]
- Använd denna knapp für att gora eller öandra olika ljudinställningar.
- Om du häller denna knapp intryckt i mer än 1 sekund växlar också 2-zonsfunktionen mellan PÅ och AV.
Knappen [TA]
- Användenna knapp for att ställa in standbylaget for TA (trafikmeddelanden) nar 2-zonsfunktionen ar "AV").
Kopplar om 2-zonsfunktionen. Om du häller denna knapp intryckt i mer än 1 sekund ändras typen av 2-zonsfunktion (om denna Å "PÄ").
Knappen [▶II]
- För att pausa och starta om ett spår (i CD-låget).
- Användenna knappforall ställa in standbylagetfor PTY(programtyp)eller PTYprogram.
Displayen
- Visar information om anlaggningens status, sösom fininställning/avspelning och indicatorer.
- Rör vid displayen med fingret och peka på ökänd for att aktivera Funktionen. (se sidan 8)
De huvudsakliga manöverknapparna Near andra apparater ar anslutna till den har bilstereon
När CD-/DVD-växlare ar inkopplad
* Se avsnittet "Hur man anvanderen CD-växlaren" (sidan 51) for ytterligare uppliesningar. DVD-växlaren beskrivs i den braksanvisning som medfoljer DVD-växlaren.
Knappen [▶II]
- Spela eller pausa en CD eller DVD.
Knappen [A]
- Används für att lagga in skivtitlar i CD-växlarläget.
När TV/DAB ar inkopplad
* Se avsnittet "Hur man använder en TV-tuner" (sidan 54) respektive "Digital radio/Hur man använder DAB" (sidan 58) fürytterligare uppliesnaringar.
Knappen [TA]
- Användenna knapp for att ställa in standbylaget for TA (trafikmeddelanden) till DAB-laget. (Denna Funktion ar bara tillganglig for DAB-mottagare.)
Tryck på knappen ochhall den intryckt i 1 sekund eller langre for att stanga av erller satta på INFO-laget. (i DAB-laget)
Knappen [▶II]
- Bytläge for TV-bilden eller VTR (externt) bildlåge. (i TV-låget)
- Användenna knappforall ställa in standbylagetforPTY(programtyp)ellerPTYprogrami DAB-laget.
Knappen [A]
- Denna knapp används for att lagga in namnet på TV-stationerna. (i TV-låget)
Displayenkutioner

Displayenfunktioner
Ienna anlaggning anvands en pekskarm som display. Du kan manovrera denna display genom att bara rora vid den med fingertoppen. Det finns fyra huvudsakliga displayfunktioner:
Peka
Rör vid displayen med fingertoppen och ta bort den inom 1 sekund. Detta ar den mest grundläggande manövern Near du anvander displayen.
Peka och tryck
Rör vid displayen med fingertoppen och häll kvar den på skärmen i 1-2 sekunder eller mer. Flytta inte fingret nar du rör displayen.
När du pekar och trycker på displayen i 1 sekund eller langre visas till exempel listor, eller sakkopplas andra praktiska funktoner in.
När du pekar och trycker på displayen i 2 sekunder eller langre lagrasinstallingar ullann information i minnet.
Peka pà
Peka pá displayen med fingertoppen, flyta fingret till vänster (←) eller höger (→) à att det fortfarande rör displayen och ta bort fingret inom 1 sekund. Denna Funktion används für att valja forinställda minnen (1 till 6) eller spar.

Peka
Peka på displayen med fingertoppen, flytta fingret till vänster ( ) eller hóger ( ) à att det fortfarande rör displayen ochhall kvar fingret på displayen. Funktionen i fraga fortsätter under den tid som du häller fingret på displayen. Denna Funktion används till exempl für manuell inställning ell snabbspolning framå/bakåt.

4. DEN LÖSTAGBARA KONTROLLPANELEN (DCP)
Kontrollpanelen går att ta av for att Förhindra att bilstereon blir stulen. Förvara DEN LÖSTAGBARA KONTROLLPANELEN i sitt fédral njär du tar av den sä att den inte blir repad.
Vi rekommenderar att du tar med dig kontrollpanelen nar du lämnar bilen.
Hur man tar av DEN LÖSTAGBARA KONTROLLPANELEN (DCP)
1. Kontrollera att den LUTANDE KONSOLEN ar stängd och stäng av bilstereon.
2. Tryck in [RELEASE]-knappen djupt for att oppna DEN LOSTAGBARA KONTROLLPANELEN.

3. Dra DEN LÖSTAGBARA KONTROLLPANELEN (DCP) mot dig och ta av den.

A WARNING
- Stäng alltid den LUTANDE KONSOLEN innan du tar av DEN LÖSTAGBARA KONTROLLPANELEN.
- Om du tar av DEN LÖSTAGBARA KONTROLLPANELEN med den LUTANDE KONSOLEN öppen, stängs genast den lutande konsolen. Var försiktig sä att du intekommen i kläm med fingrarna.
Hur man sätter på DEN LÖSTAG-BARA KONTROLLPANELEN (DCP)
1. Stick in DEN LÖSTAGBARA KONTROLLPANELEN sà att del (A) på DEN LÖSTAGBARA KONTROLLPANELENs högr sida hakar fast i haken (B) på huvudenheten.

2. Tryck forsiktigt in DEN LÖSTAGBARA KONTROLLPANELENs vänstra sida © på plats i huvudenheten.

A WARNING
- DEN LÖSTAGBARA KONTROLLPANELEN blir lätt skadad om den utsats for stötar. Var försiktig sä att du inte tappar den ell erller utsätter den for kraftiga stötarRARY du tagit av den.
- Om [RELEASE]-knappen trycks in och DEN NEDFällBARA PANELEN inte ar fastlåst på plats kan den falla ned på grund av bilens vibrationen. Detta kan leda till skador på DEN LÖSTAGBARA KONTROLLPANELEN. Var därför noga med att antingen satta tillbaka den på huvudhenet erller att lagga den i sitt fédral after att du tagit av DEN LÖSTAGBARA KONTROLLPANELEN.
- Kontakten som forbinder DEN LÖSTAGBARA KONTROLLPANELEN med huvudenheten ar en extrem viktig del. Var försiktig sä att du inte skadar den genom att trycka på den med naglarna, skruvmejslar, e.d.
Observera:
- Om DEN LÖSTAGBARA KONTROLLPANELEN blir smutsig sä anecd bara en mjuk, torr torkduk För att torka rent den.
5. FJÄRRKONTROLLEN

Hur man sätter i batterierna
1. Vänd fjärrkontrollen upp och ned, och skjut sedan av locket på baksidan i pilens riktning.
2. Satt i de medfoljande AA-batterierna (SUM-3, R-6/1,5 V) i fjarrkontrollen vanda pa det satt som visas i figuren, och stang sedan locket pa baksidan igen.
Observera:
Om batterier hanteras felaktigt finns det risk att de exploderar. Var darfornoga med foljande punkter:
- Byt alltid ut báda batterierna mot nya batterier vid batteribyte.
- Undvik att kortsluta, ta isär erller värma upp batterier.
- Elda aldrig upp forbrukade batterier.
- Lämna forbrukade batterier till atervinning på lamplig plats.

Hur knapparna på fjärrkontrollen fungerar
FunktionslägeKnapp Radio (RDS)/DAB CD/MP3 CD-växlareDVD-växlare TV [FUNC] Växlar mellan radion, DAB, CD/MP3-spelaren, CD-växlare, DVD-växlare och TV-mottagning,AUX. [BAND] Växlar mellan frekvensbanden. Spelar det Första spåret. Hoppar till det Första spåret och börjar spelà det. Hoppar tillnecta CD i stigande ordning. Växlar mellan frekvensbanden. [▲], [▼] Höjer och sänker volymen (for alla Funktionslägen). [←], [▶] Hoppar uppät och nedät mellan snabbvals-stationerna. Hoppar framät och bakät mellan spåren. När knappen hälls intryckt i mer øn 1 sekund: Snabbssökning framål/bakål. Hoppar uppät och nedät mellan snabbvals-stationerna. [▶■] Saknar Funktion. Växlar mellan spelning och paus. Saknar Funktion. [MUTE] Slår på och stänger av ljuddämpningen. [TA] Slår på och stänger av TA-funktionen.Tryck in knappen och häll den intryckt i mer øn 1 sekund fortt växla mellan ljudkällan forMAIN-zonen (huvudzonen) och den for SUB-zonen (underzonen) (gäller bara;när 2-ZONE-funktionen År pāslagen). [DISP] Växlar mellan huvudisplay och klocka (CT). [PS/AS] Snabbvalsavsökning.När knappen hälls intryckt i mer øn 2 sekunder: automatisk stationslagring. Snabbkontroll.Häll knappen ned-tryckt under 1 sekund erler mer for att starta snabbkontroll av map-par i MP3/WMA-funk-tionen. Snabbgenomlyss-ing. När knappen hälls intryckt i mer øn 1 sekund: Snabbgenomlyssing av alla CD-skivorna. Snabbvalsavsökning.När knappen hälls intryckt i mer øn 2 sekunder: automatisk stationslagring. [AF] Slår på och stänger av AF-funktionen.När knappen hälls intryckt i mer øn 1 sekund: REG-funktionen på och av. Repeterad spelning.Häll knappen ned-tryckt under 1 sekund erler mer for att starta repeterad spelning av mappar i MP3/WMA-funktionen. Upprepad spelning.När knappen hälls intryckt i mer øn 1 sekund: Upprepad spelning av alla CD-skivorna. Saknar Funktion. [PTY] Slår på och stänger av PTY-funktionen. Slumpmässig spel-ning.Häll knappen ned-tryckt under 1 sekund erler mer for att starta slumpmässig spel-ning av mappar i MP3/WMA-funktio-nen. Spelning i slumpvis ordning.När knappen hälls intryckt i mer øn 1 sekund: Spelning av alla spå-ren på alla CD-skivor-na i slumpvis ord-ing. Växlar mellan TV-och videoband-spelarläget. [2-ZONE] Tryck in knappen och häll den intryckt i mer øn 1 sekund fortt slå på respektive stänga av 2-ZONE-funktionen.Tryck på knappen fortt växla mellan huvudzonen och subzonen;när 2-ZONE-funktionen ør pāslagen.
* Vissa av knapparna på fjärrkontrollen fungerar annorlundaän motsvarande knappar på huvudenheten.
6. HUR MAN ANVÄNDER BILSTEREON
Grundläggande användningssätt
A WARNING
Skruva alltid ner volymen innan du stänger av bilstereon eller vrider om tändningsnyckeln. Bilstereon kommer namligen ihåg den senaste volyminställingen. Om du stanger av bilstereon med volymen högt uppskruvad, kan det plötsliga höga ljudet när du slår på bilstereon igen orsaka hörsk达标 erller skador på bilstereon.
Att satta på/stänga av anlaggningen
Att satta på anlaggningen
OBS:
- Var försiktig när du använder anlaggningen under lang tid utan att motorn gär. Om du laddar ur bilbatteriet for mycket kan du inte starta motorn, vilket kan minska batteriets livslangd.
1. Tryck på knappen [ROTARY]. Det tidigare aktiva laget visas
Systemkontroll
Första gängen som anlaggningen sätts på after att ha anslutits kontrolleras vilken utrusting som ar inkopplad (detta kallas "systemkontroll"). Gà till vaga enligt foljande for att genomföra systemkontrollen narr strömmen ar på och texten "System Check" visas.
1. Tryck på knappen [ROTARY]ningar texten "System Check" visas på displayen. Systemkontrollen startar. När systemkontrollen är avsutad visas texten "Completed" på displayen.
2. Tryck på knappen [ROTARY] ingen. Huvudsjanfor radiolagetvisas.
CODEMATIC-funktion
När "CODEMATIC" ar installd på "ON" och anlaggningen slås på med frontpanelen på visas sakerhetssidan. Peka på skärmen i den ordning som har ställts in iändringslåget.

Se avsnittet "Att anvanda sakerhetsfunktionen (CODEMATIC)" (sidan 50) for mer information om CODEMATIC-funktionen.
Att stänga av anlaggningen
1. Håll knappen [ROTARY] intryckt i minst 1 sekund.
Att valja ett lage
1. Tryck på knappen [ROTARY] für attalandadriftsläge.
2. För varje tryck på knappen [ROTARY] andras driftslåget i följande ordning: Radioläge DAB-läge CD/MP3-läge CD-växlarläge DVD-växlarläge TV-läge AUX-läge Radioläge ...
* Extern utrustning som inte År ansluten till CeNET visas inte.
Att ställa in volymen
1. Om du vrider knappen [ROTARY] medsols ökar volymen, om du vrider den motsols minskar volymen.
* Volymniván kan stállas in pá mellan 0 (minimum) och 33 (maximum).
Byte av driftslage
Det finns 2 grundlägen: standarddrift och forenklad drift.
1. Peka till vänster på huvudsdan med fingertoppen ochhall kvar fingret i 1 sekund erler mer. Driftslaget andras.

Vid forenklad drift behover duinte peka pa eller pa huvudsan i radiolaget och CD-laget och anlaggningen kan anvandas med forenklade komndon.
Mark dock att följande Funktioner inte ar tillgangliga vid forenklad drift:
- Snabbval, val av mapp, val av skiva och andra Funktioner som fordrar att du trycker pa t till hoger pa displayen
- Åndring av visningen på displayen (se sidan 13)
- Åndring av titelvisningen (se sidan 14)
- Visning av titelinmatningslåget.
På andere sidor øn hvudsdan (t. ex. listdisplayyen och ändringslåget) ør det ingen skillnad mellan standarddrift och forenklad drift.
Beskrivningarna ienna bruksanvisning avser huvudsakligen standarddrift. Se beskrivningarna av skarmvisningen i radiolaget och CD-laget for information om hur den forenklade driften fungerar.
Attalandavisingenpá displayen
1. Peka i mitten av displayen. For varje tryck andras visningen enligt foljande:

Skärmslackare
När skärmslåckaren ar inställd på "ON" och du inte använder anlaggningen under 30 sekunder visas skärmslåckaren. Se sidan 41 För mer information.
Bakgrundsbild
Om du pekar i mitten av displayen och häller kvar fingret i 1 sekund aller mer ändras bakgrundsbilden.
① ⑨ ② ⑩ ③ ⑪ ④ ⑫ ⑤ ⑬ ⑥ ⑭ ⑦ ⑮ ⑧ ⑯
Spektrumanalysatorn
Om du pekar till hoger på displayen och haller kvar fingret i 1 sekund eller mer narr spektrumanalysatom (S/A) visas andras visningen av spektrumanalysatom.
S/A
SCAN S/A 1, S/A 2, och S/A 3 visas
i minst 10 sekunder vardera. S/A 1 S/A 1
FLDR No.
003
TOP S/A 2 S/A 2
FLDR No.
003
TOP S/A 3 S/A 3
FLDR No.
003
TOP
Att andra titelvisningen
Du kan visa skivtitlar och annan information som finns lagrad pa skivorna när du spelar CDskivor i CD- eller CD-växlarlaget.
1. Peka till höger på titeldisplayen ochhall kvar fingret i 1 sekund eller mer. For varje tryck andras visningen enligt följande:
CD-TEXT
User title (disc) CD-text title (disc)
Artist name CD-text title (track) User title (disc) ...
MP3/WMA
Folder File Album TAG Artist TAG
Title TAG Folder...
Anmärkningar:
- MP3 stöder ID3-taggarna i V2.3/2.2/1.1/1.0.
- Vid taggvisningen prioriteras V2.3/2.2.
- När det gäller album-taggar für WMA visas den information som finns i filhuvudet.
- BarA SCIll-tecken kan visas i taggarna.
Att rulla en titel
Peka pa t p at titeldisplayen n ar titeln visas.
Titeln rullar at vänster.
Att slutarulla
Peka pa 日 pa titeldisplayen.
CT-funktion (klocka)
CT-funktionen tar emot CT-data frän en RDS-station och visar tiden på displayen. Peka i mitten av displayen for att visa CT-sidan.
- Om inga CT-data tas emot visas "---CT" på displayen.
OBS:
- CT-data sänds inte av alla radiostationer eller i allaaland. I vissa områden kan det ochså hända att CT-data inte visas som de skä.
Inställniing av ADF
- ADF ar en förkortning für Anti Distorsion Filter. De använda Funktionerna "Liveliness Enhancement Filter" och "Sound Tone Compensation" ger en välmodulerad realistisk avspelning utan att pāverka den ursprungliga tonklangen.
Anlaggningen har 4 olika sorters tonklangseffekter lagrade i minnet. Välj den du foredrar.
ADF-1: Lämpig für originalhögtalare
ADF-2:Lamplig for extrahogtalare
ADF-3: Lämpig für koaxialhögtalare
USER : Denna effekt kan du ställa in after dina egna preferenser.
OFF: Ingen tonklangseffekt
- Standardinställingen ar "OFF".
Anmärkningar:
- Volymen ändras när ADF-installungen ändras. Sänk dārfor volymen, sub-woofervolymen ("SW VOLUME") och mithögtalarvolymen ("CTR VOLUME") sā mycket som möjigt när du ändern installingen.
- I vissa högtalarsystem går det inte alltid att få ut tillräcklig effekt. Justera i sö fall ADF-parametern eller volymen.
- När ADF ar INSTALL på "USER", "1", "2" eller "3"är inte VSE-funktionen eller BASS/TREB-funktionen under EQ-SELECT inkopplade.
1. Tryck på knappen [SOUND].
2. Peka pà ADF.

3. Peka pà till hoger pà displayen for att valja ADF-laget.

När ADF ar entwickel på "OFF" paverkar inte ADF-installingen musikkällan. Därmed ar ADF-installingen avslutad. Tryck på knappen [SOUND] for att gå tillbaka till ursprungslaget.
* Tryck på USER, 1, 2, 3 eller OFF.
4. Tryck på knappen [A] für att äandra i ADFinställningen.
5. Peka pa 山 山 pa displayen for att valja den parameter som sha andras. For varje tryck pa 山 山 andras visningen enigt foljande:
- Parameter (när du har valt USER i punkt 3)
BASS TREBLE COMP BASS...
Parameter (när du har valt 1-3 i punkt 3) LEVEL COMP LEVEL...
6. Peka på till höger på displayen für attalandarametern.
* “BASS” och “TREBLE” kan ställas in mellan 1 och 13.
* “LEVEL” kan ställas in mellan -3 och +3.
* Valj antingen "ON" eller "OFF" für "COMP".
7. Tryck på knappen [SOUND] for att gå tillbaka till ursprungslaget.
Att ställa in sub-woofern och mithmögtalaren
- "SW VOLUME" (sub-wooervolymen) kan bara stallas in nar "SUB-WOOFER" ar installd pa "ON".
- "CTR VOLUME" (mitthögtalarvolymen) kan bara ställas in nar Dolby Pro Logic II-laget ar installet pa antingen "MUSIC" eller "MATRIX", "SP-SETTING" pa "CTR+SW" och "CENTER-SP" pa "ON".
- Standardinställingen für SW VOLUME ar "0" och für CTR VOLUME "0".
1. Tryck på knappen [SOUND].
2. Peka på A-MODE.

3. Peka pa t ppa parameterdisplayen for att valja "SW VOLUME"ller "CTR VOLUME".

4. Peka på till hoger på displayen for att andra parametern.
* Denna parameter kan ställas in mellan -5 och +5.
5. Tryck på knappen [SOUND] for att gå tillbaka till ursprungslaget.
Att stalla in balans/fader
BALANS:
Används für att ställa in volymbalansen mellan vänster och höger högitalare.
FADER:
Används für att ställa in volymbalansen mellan de främre och bakre högtalarna.
- Standardinställingen für BALANCE ar "0" och für FADER "0".
OBS:
Balans/fader kan inte stallas in när du har ställt in AC-PRO III på "PRO" (se sidan 44) och positionsfunktionen ar installd på "ON". Ställ in balans/fader via "Att öppna positismyn" (se sidan 17).
1. Tryck på knappen [SOUND].
2. Peka på A-MODE.

3. Peka pa t ppa parameterdisplayen for att valja "BALANCE" ether "FADER".

4. Peka på till hoger på displayen for att andere parametern.
* "BALANCE" kan ställas in mellan L13 (vänster sida dominerar) och R13 (höger sida dominerar).
* "FADER" kan ställas in mellan R12 (de bakre högtalarna dominerar) och F12 (de främre högtalarna dominerar).
5. Tryck på knappen [SOUND] for att gå tillbaka till ursprungslaget.
Att ställa in bas/diskant
Bas och diskant kan bara stallas in nár Dolby Pro Logic II-åget ar INSTALL på "OFF" (se sidan 17) och "EQ SELECT" på "BAS/TREB"(se sidan 44).
- Standardinstallingen ar "0".
1. Tryck på knappen [SOUND].
2. Peka på A-MODE.

3. Peka pa t ppa parameterdisplayen for att valja "BASS" ether "TREBLE".

4. Peka på till hoger på displayen for att andere parametern.
* Denna parameter kan ställas in mellan -6 och +6.
5. Upprepa moment 3 och 4 for att anders parametern.
6. Tryck på knappen [SOUND] für att gå tillbaka till ursprungslaget.
Hur man anvander AC-Processor III
Dolby Pro Logic II
Dolby Pro Logic II ar en
matrisavkodningsteknologi som anvanderen
upppaterad digital matristeknologi for att
ytterligare forbättra Dolby Pro Logic. Det ger ett
utmärkt 5,1-kanaligt ljud bade for material som
är kodat med Dolby Surround och for material i
stereo som CD-skivor. Dessutom blir
surroundkanalerna i stereo och täcker hela
frekvensbandet (20 Hz till 20 kHz). Tack vare
det kan du lyssna på vilket stereomaterial du vill
med dynamiskt 5,1-kanalsljud. Beroende på
vilken sorts material du lyssnar på gär det att
välja mellan ett musikläge och ett matrisläge.
Tillverkas på licens frän Dolby Laboratories. "Dolby", "Pro Logic" och dubbel-D-symbolen ar
varumärken für Dolby Laboratories.
PL II-menyn (Dolby PL II)
Välj driftslägena MUSIC aller MATRIX beroende på den källa du skaspela i Dolby Pro Logic II-låget.
- Standardinställningen ar "OFF".
■ MUSIC (musiklåget)
- Detta läge lämpar sig für stereoljudkällor sāsom CD-skivor.
- Det finns ytterligare ett inställningsläge für finjusteringar eftersom ljudfaltet breder ut sig på olika satt beroende på den inspelade musikkällans skick (se sidan 47).
MATRIX (matrisäget)
- Detta läge lampar sig für ljudkällor sösom AM/ FM-radio.
OFF
- Dolby Pro Logic II anvands inte. I stället anvands AC-PROIII. Se avsnittet "Att välja ett lage" (sidan 44) für mer information om AC-PROIII.
1. Tryck på knappen [SOUND].
2. Peka pà Dolby PLII.
3. Peka pà till hóger pà displayen for att valja Dolby Pro Logic II.

Lagesvisningen andras enlistigt foljande:
MUSIC (musikläge) MATRIX (matrisläge) OFF (PL II av) MUSIC (musikläge) ...
* Se sidan 45 für mer information om volymjustering für mitthögtalaren/subwoofern.
4. Peka pà RTN.
Att öppna positionsmenyn
Med hjälp av POSITION kan du välja mellan 5 inställingar av hur ljudet gär mellan högtalarna och den plats)där du sitter.
Tidsanpassningsfunktionen gör också att högtalarna kan regleras så att varje högtalare ger sama ljudeffekt till alla lyssnare.
Ställ in AC-PROIII på "PRO" (se "Att valja ett lage" på sidan 44).
- Standardinställningen für POSITION ar "OFF" och "FRONT" für grundmenyn.
Positionsmenyn
5 positionsmenyer har lagrats i minnet. Tryck pà onskad meny.
1. Tryck på knappen [SOUND].
2. Peka på POSITION.

3. Peka på «» på ON/OFF-displayen. Positionseffekten växlar mellan ON och OFF.

När positionseffekten ar installd på “OFF” påverkar inte positionsinställingen musikkällan. Därmed ar positionsinställingen avslutad. Tryck på knappen [SOUND] for att gå tillbaka till ursprungslaget.
4. Peka pA B/U for att valja "BASIC".

Varje gäng du trycker på B/U增值税 du mellan "BASIC" och "USER".
5. Peka pa 卡 pa grundmenyns nummer for att valja en grundmeny.
Grundmenyn
Nr Beteckning Sittplats 1 FRONT-L Främre vänstra stolen 2 FRONT-R Främre högra stolen 3 FRONT Framsäte 4 REAR Baksäte 5 FULL SEAT Alla platser
6. Tryck på knappen [SOUND] für att gå tillbaka till ursprungslaget.
Att ändra/spara positioner (användarminnet)
Användarminnet gör också att högtalarna kan regleras så att varje högtalare ger sama ljudeffekt till alla lyssnare med utgangspunkt frän grundmenyn. Du kan spara upp till 5 inställingar i användarminnet.
T-ALIGN (tidsanpassning):
Avstandet mellan lyssnaren och varje högtalare kan laggas in i steg pa 2,3 cm och den tid det tar forljudet fran varje högtalare att na lyssnaren kan stallas in.
SP GAIN (högtalarfürstärkning):
Justerar hógtalarens utvolym. Ställer in sama utvolym frān alla hógtalare.
1. Tryck på knappen [SOUND].
2. Peka på POSITION.
3. Peka på «» på ON/OFF-displayen. Positionseffekten växlar mellan ON och OFF.
4. Peka på B/U for att valja "BASIC" eller "USER".
5. Peka på 山 till hoger på displayen for att valja den meny som anvands som den som sha andras.
6. Tryck på knappen [A].
7. Peka pà till vänster pa displayen for att valja "T-ALIGN" eller "SP GAIN".
8. Peka pa 山 山 mitt pa displayen for att valja den parameter som sha andras. For varje tryck pa 山 山 andras parametern enigt foljande:

Parametrar
*1 Visas endast:när "SUB-WOOFER" under "SOUND" ar installd på "ON" iändringslåget.
*2 Visas endast;nar "SUB-WOOFER" under "SOUND" ar installd på "ON" i andringslaget och "T-ALIGN" valjs i steg 7.
9. Peka på till hoger på displayen for att andere parametern.

POSITION EDIT FRONT L SP>085.1cm
* "T-ALIGN" kan ställas in mellan 0 och 501,4 cm i steg på 2,3 cm.
* "SP GAIN" kan ställas in mellan -20 och 0 dB.
10. Upprepa moment 7 till 9 for attalandra onskad parameter.
11. Peka på RTN;när du har ställt in varje parameter.
Displayen Återgår till att visa utgangssidan och “»” visas på BASIC- eller USER-displayen.
Därmed ar positionsinställningen slutförd.
Gà till väga enligt följande für att fortsätta att lögga in nya varden i användarmenyn.
12. Peka på RTN ochhall kvar fingret i 1 sekund erler langre.
Positionsmenylistan visas.
13. Peka och på det användarminne du vill laggga in de nga värdena i i 2 sekunder ullängre.
En lang ton hors och de varden du har andrat fram till punkt 10 lagras i anvandarmenyn.
Om du hör en kort ton sparas inte värdena.
Gör om inställingen fram till punkt 10.
14. Peka pà RTN.
15. Tryck på knappen [SOUND] für att gå tillbaka till ursprungslaget.
* Peka på B/U sä att “USER” visas och peka på t Üpä användarminnets nummer für att valja ett sparat användarminne.
Att öppna VSE-menyn
Med VSE (Virtual Space Enhancer) kan du kompensera ljudtrycket innate i bilen sa att sama ljudeffekt uppnas oavsett var du sitter. Detta har visats genom simulering.
Ställ in AC-PROIII på "STD" (se "Att välja ett läge" på sidan 44).
- Standardinställingen für VSE ar "OFF" och "FLAT" für grundmenyn.
■ Grundmenyn
Det finns sex sparade grundmenyer furenna Funktion. Tryck på onskad grundmeny.
1. Tryck på knappen [SOUND].
2. Peka pä VSE.

3. Peka pä pä ON/OFF-displayen.
VSE-effekten växlar mellan ON och OFF.

När VSE ar entwickel à “OFF” paverkar inte VSE-installingen musikkällan. Därmed ar VSE-installingen avslutad. Tryck på knappen [SOUND] für att gå tillbaka till ursprungslaget.
4. Peka B/U for att valja "BASIC".

Varje gäng du trycker på B/U växlar du mellan "BASIC" och "USER".
5. Peka pa 山 pa grundmenyns nummer for att valja en grundmeny.
Grundmenyer
Nr Funktion Beskrivning 1 FLAT Flat utjämning av ljudkällan 2 BASS BOOST Förstärkta bastoner 3 HIGH BOOST Förstärkta mellan- och diskanttoner 4 IMPACT Förstärkta laga toner och diskanttoner 5 ACOUSTICAL Förstärkta mellantoner (människorösten) 6 SMOTH Lättå och mjuka toner
6. Tryck på knappen [SOUND] für att gå tillbaka till ursprungslaget.
Att ställa in/spara VSE (användarminnet)
Med hjälp av användarminnesinställingarna kan du kompensera ljudtrycksfordelningen after dina önskemål på grundval av grundmenyn for VSE. Upp till sex användarändringar kan sparas.
DIFFUSE:
Modiferar avikelsen i ljdtryckets pridning.
CARWIDTH:
Modifierar avvikelsen i ljudtryck langs bilens bredd.
CAR LENGTH:
Modifierar avvikelsen i Ijudtryck langs bilens langd.
1. Tryck på knappen [SOUND].
2. Peka pà VSE.
3. Peka pa t p a ON/OFF-displayen. VSE-effekten vaxlar mellan ON och OFF.
4. Peka på B/U for att valja "BASIC" eller "USER".
5. Peka pà till hóger pá displayen für att valja den meny som används som den som ská andras.
6. Tryck på knappen [A].
7. Peka pa t ppa parameterdisplayen for att valja "DIFFUSE", "CAR WIDTH"ller "CAR LENGTH".

8. Peka på till höger på displayen for attalandarametern.
* Denna parameter kan ställas in mellan 1 och 10.
9. Upprepa moment 7 och 8 for att anders parametern.
10. Peka på RTNningar du har ställt in varje parameter.
Displayen Återgår till att visa utgangssidan och “»” visas på BASIC- eller USER-displayen.
Därmed ar VSE-installingen slutförd. Gà till vaga enligt följande for att fortsätta att lögga in nya varden i användarmenyn:
11. Peka på RTN ochhall kvar fingret i 1 sekund eller langre.
Anvandarmenylistanvisas.
12. Peka och på det användarminne du vill lagga in de nya vardena i i 2 sekunder aller langre. En lang ton hors och de varden du har andrat fram till punkt 9 lagras i användarmenyn.
Omdu hör en kort ton sparas inte vardena. Görominställingenframtilpunkt9.
13. Peka pa RTN.
14. Tryck på knappen [SOUND] for att gå tillbaka till ursprungslaget.
* Peka på B/U sä att “USER” visas och peka på t Üp ànvändarminnets nummer für att välja ett sparat användarminne.
Att öppna P.EQ-menyn
Med P.EQ (Parametric Equalizer) kan du kompensera hela frekvensområdet i detaj med en slät kurva)där frekvenskompensationen anpassas till biltypen.
Ställ in EQ SELECT på “P.EQ” (se “Att välja ett läge” på sidan 44).
- Standardinställingen für P.EQ är "OFF" och "SEDAN-1" für grundmenyn.
■ Grundmenyn
Det finns 6 typer av grundmenyer for P.EQ lagrade for oika slags bilar och högtalarplaceringar. Tryck pa den grundmeny som motsvarar din bil.
1. Tryck på knappen [SOUND].
2. Peka pÅ P.EQ.

3. Peka på « fat » på ON/OFF-displayen.
P.EQ-effekten växlar mellan ON och OFF.

När P.EQ-effekten ar installd på “OFF” paverkar inte P.EQ-installingen musikkallan. Därmed ar P.EQ-installingen avslutad. Tryck på knappen [SOUND] für att gå tillbaka till ursprungslaget.
4. Peka på B/U for att valja "BASIC".

Varje gäng du trycker på B/U växlar du mellan "BASIC" och "USER".
5. Peka pa 山 pa grundmenyns nummer for att valja en grundmeny.
Grundmenyn
Nr Beteckning Högtalarplacering 1 SEDAN-1 Fram: framdörren
Bak: hatthyllan 2 SEDAN-2 Fram: framdörren
Bak: bakdörren 3 WAGON-1 Fram: framdörren
Bak: bagageutrymmet (sidan) 4 WAGON-2 Fram: framdörren
Bak: bakdörren 5 MINI VAN-1 Fram: framdörren
Bak: bagageutrymmet (sidan) 6 MINI VAN-2 Fram: framdörren
Bak: bakdörren
6. Tryck på knappen [SOUND] für att gå tillbaka till ursprungslaget.
Att ställa in/spara P.EQ (användarminnet)
Med hjälp av anecdarminnesinställingarnan kan du kompensera frekvenskurvan sa att den passar din bil på grundval av grundmenyn for P.EQ. Du kan spara upp till 6 inställingar i anecdarminnet. Se avsnittet "Att stalla in P.EQ" for mer information.
1. Tryck på knappen [SOUND].
2. Peka P.EQ.
3. Peka på «» på ON/OFF-displayen.
P.EQ-effekten växlar mellan ON och OFF.
4. Peka på B/U für att valja "BASIC" eller "USER".
5. Peka på 卡 till hoger på displayen for att valja den meny som anvands som den som sha anders.
6. Tryck på knappen [A].
7. Peka pa till vänster pa displayen for att valja "FRONT" eller "REAR".

8. Peka pa 山 山 mitt pa displayen for att valja den parameter som ske andras. For varje tryck pa 山 山 andras parametern enigt foljande:
Parametrar BAND FREQ Q GAIN BAND...
9. Peka pà ↑ till Höger på displayen für attalandraparametern.
* "BAND" kan ställas in mellan 1 och 3.
* “FREQ” kan ställas in mellan 20 Hz och 20 kHz.
* Valj 1, 3, 5, 7 eller 20 som "Q".
* “GAIN” kan ställas in mellan -12 och +12 dB.
10. Upprepamoment 7 till 9for att andar parametern.
11. Peka på RTNningar du har ställt in varje parameter.
Displayen Återgår till att visa utgangssidan och “»” visas på BASIC- eller USER-displayen.
Därmed ar P.EQ-installingen slutford. Gà till vaga enligt följande for att fortssatta att lagga in nya varden i anvandarmenyn:
12. Peka på RTN ochhall kvar fingret i 1 sekund eller langre.
Menylistan for P.EQ visas.
13. Peka och på det användarinne du vill lagga in de nya värdena i i 2 sekunder aller langre.
En lang ton hors och de varden du har andrat fram till punkt 10 lagras i anvandarmenyn.
Om du hör en kort ton sparas inte värdena.
Gör om inställningen frem till punkt 10.
14. Peka pà RTN.
15. Tryck på knappen [SOUND] für att gå tillbaka till ursprungslaget.
* Peka pa B/U sa att "USER" visas och peka pa t bpa användarminnets nummer for att valja ett sparat användarminne.
Att ställa in P.EQ
Följande inställninger kan göras på P.EQ-menyn: mittfrekvens, forstärkning och Q-kurva kan sparas für kombinationer av kanaler/band.
Till exempel kan mittfrekvensen "250 Hz", Forstärkningen "-8 dB" och Q-kurvan "3" sparas på band 1 frem.
FRONT/REAR (val av kanal)
Välj den kanal (fram eller bak) som ska ställas in.
BAND (val av band)
Välj det frekvensband (1 till 3) som skä ställas in.
Ställ in mittfrekvensen (FREQUENCY),
fürstärkningen (GAIN) och Q-kurvan (Q) für varje frekvensband.
FREQUENCY (val av mittfrekvens)
Välj en frekvens mellan 20 Hz och 20 kHz som
ska användas som mittpunkt på det
frekvensband som ska kompenseras.
(steg på 1/3 oktav, 31 punkter)
GAIN (installing av forstarkning)
Justera forstarkningen (utnivån) inom intervallet
-12 dB till +12 dB.
(steg pà 1 dB, 25 punkter)
Q (installing av Q-kurva)
Ställ in Q-kurvans utseende till 1, 3, 5, 7 aller 20.
Kompensation
Om du mäter frekvensegenskaperna och finner att frekvenskurvan ár rak (inga toppar eller)dalar) behövs ingen kompensation. Ibland stiger och faller dock frekvenskurvan på vissa stallen. Om sá ár fallet maste frekvensegenskaperna kompenseras. Skapa en frekvenskurva som har med motsatta karamakteristika mot mittfrekvensen for delar där egenskaperna stiger och sjunker for att fá bort dessa toppar och/DDAR OFREKENSURVAN SÁ RAK SOM MÖJIGT.
Att gora frekvenskurvan sá plan som möjlt kallas for att "kompensera".
Pä den har anlaggningen kan frekvenskurvan kompenseras med P.EQ (parametrisk equalizer-funktion).
- Kompensation av frekventsegenskaper
Figuren nedan visar forhällandet mellan mittfrekvens, Förstärkning och Q-kurva.

Q-kurva
Q-kurvan blir smalare när det numeriska vardet ökar och bredare när det numeriska vardet minskar.
Om du valjer en motsatt Q-kurva mot den kurvasom ska kompenseras blir frekvenskurvan rak.

F: mittfrekvens, G: forstärkning (utniva), Q: Q-kurva
Nr
(typ av bil) Parametrar für parametrisk equalizer-funktion Kanal Band 1 Band 2 Band 3 F G Q F G Q F G Q 1
(SEDAN-1) Fram 250 Hz -8 dB 3 2 kHz -4 dB 1 5 kHz -4 dB 1 Bak 250 Hz -10 dB 3 1.25 kHz 0 dB 5 8 kHz 0 dB 5 2
(SEDAN-2) Fram 250 Hz -10 dB 7 800 Hz -4 dB 3 8 kHz -5 dB 1 Bak 80 Hz 3 dB 7 125 Hz -12 dB 5 1.25 kHz 0 dB 5 3
(WAGON-1) Fram 250 Hz -8 dB 3 1 kHz -8 dB 3 10 kHz -6 dB 1 Bak 250 Hz -8 dB 3 800 Hz -8 dB 1 8 kHz 0 dB 5 4
(WAGON-2) Fram 250 Hz -8 dB 7 400 Hz -10 dB 7 1.25 kHz -8 dB 7 Bak 125 Hz -8 dB 3 500 Hz -5 dB 5 1.6 kHz 0 dB 3 5
(MINI VAN-1) Fram 125 Hz -4 dB 5 1.25 kHz -4 dB 3 2 kHz 3 dB 7 Bak 250 Hz -6 dB 1 630 Hz -4 dB 3 8 kHz 0 dB 5 6
(MINI VAN-2) Fram 250 Hz -4 dB 3 1.25 Hz -8 dB 3 80 Hz 3 dB 3 Bak 250 Hz -8 dB 3 500 Hz -5 dB 5 8 kHz 0 dB 5
Hur man anvander radion
Skärmbilderr i radioläget
Huvudsidan
Tryck på knappen [ROTARY] och välj radioläget sä visas huvudsdan.

Peka till vänster på displayen ochhall kvar fingret i 1 sekund eller mer for att overgå till forenklad drift.

Frekvensdisplayen
Mottagningsfrekvensen visas.
Genom att peka pa Eller pàdisplayenfor standarddriftkan du stalla in stationer genom sökning ellarmuellt.
Titeldisplayen
Visar namnet på den mottagna kanalen. Om du pekar på detta namn kopplas displayen om.
Mottagningsband
AM: AM-bandets namn
FM1: FM-bandets namn
Snabbvalsstation nr.
Peka pa 山 山 pa displayen for standarddrift for att valja en sparad station.
MODE
Om du pekar på detta visas underfunktioner.
När du pekar och trycker i 1 sekund eller langre visas den forinställda minneslistan.
P-SCAN:
Visas under en avsökning av sparade stationer. Om du pekar på texten avslutas avsökningen.
A-STORE:
Visas under en automatisk lagring. Om du pekar på texten avslutas lagringen.
BAND
Peka på denna text För att byta mottagningsband.
Peka och häll kvar fingret i 1 sekund eller langre for att växla mellan manuell inställning och sökning.
(2018) (endast på displayen für förenklad drift)
Peka på dessa for att starta stationsinställning genom sökning eller stegvis (i det manuella inställningslåget).
Peka och hall kvar fingret for att starta snabbinställning (i det manuella inställningsläget).
■ Listamedsnabbvalsstationer
Visas nár du pekar på MODE på huvudidan och häller kvar fingret i 1 sekund eller langre.

>>: Installng pagar
RTN: Peka hare for att gà tillbaka till huvudsidan.
Att lyssna pa radio
1. Tryck på knappen [ROTARY] für att välja radioläget.
För varje tryck på knappen [ROTARY]
andras laget enligt foljande:
Radio (DAB) CD/MP3 (CD-växlare) (DVD-växlare) (TV) AUX Radio ...
* Enheter som inte År inkopplade visas inte.
2. Peka på BAND För att byta mottagningsband.
För varje tryck på BAND ändras
mottagningsbandet enligt följande:
FM1 FM2 FM3 AM (MW / LW) FM1...
Stationsinställning
Det finns 3 olika satt att stalla in stationer: installng genom sokning, manuell installng och forinstalling.
Sökning
Det finns 2 slags stationssökningar: DX SEEK och LOCAL SEEK.
DX SEEK söker automatiskt after radiostationer som kan tas emot och LOCAL SEEK söker bara stationer med god mottagning.
1. Peka på BAND für att välja önskat band (FM eller AM (MW, LW)).
2. Ställ in en station.
* Peka på BAND ochhall kvar fingret i 1 sekund eller langre när texten MANU visas.
Texten "MANU" på displayen släcks och sökning blir möjlig.
* Om "TA" lyser på displayen söks TP-stationer automatiskt.
DX SEEK
När du pekar på ⋅ ⋅ ↑ på frekvensdisplayen startup den automatiska inställningen.
När du pekar på ⓷ söks en station med högre frekvens och;när du pekar på ⓸ en station med lagre frekvens.
* När sökningen böjar visas texten "DX SEEK" på displayen.
LOCAL SEEK
När du pekar på ↔ B → på frekvensdisplayen startup den lokala sökningen. Radiostationer med god mottagning ställs in.
* När sökningen böjr visas texten "LO SEEK" på displayen.
Manuellinstalling
Det finns 2 satt att gora manuella inställningar: snabbinställning och steginställning.
Vid steginställning andras frekvensen i 1 steg i taget. Vid snabbinställnng kan du snabbt stalla in önskad frekvens.
1. Peka på BAND och höll kvar fingret i 1 sekund eller langre nar texten MANUinte visas.
När texten MANU visas går det att góra manuella inställningar.
2. Ställ in en frekvens med utsändning med hjälp av frekvensdisplayen.
Steginställning
Peka pa 一 一 pa frekvensdisplayyen.
Snabbinställning
Peka pà ← → pà frekvensdisplayen.
Inställingen upphör när du tar bort fingret fran displayeden.
Att hamta en snabbvalsstation
Hämtning av snabbvalsstationer används für att ställa in sparade stationer.
1. Peka på MODE och häll kvar fingret i 1 sekund eller langre. Listan med snabbvalsstationer visas.
2. Peka på den station du vill lyssna på.
* I normaläget kan du också ställa in en sparad station genom att peka på tøpå på huvudSIDAN.
Att avsluta installningen
1. Peka på RTN.
Förinställning
Det finns totalt 24 olika minnespositioner (6-FM1, 6-FM2, 6-FM3 och 6-AM) där du kan spara radiostationer.
1. Peka på BAND für att byta mottagningsband.
2. Välj det frekvensband som stationen skasparas på med frekvensdisplayen.
3. Peka på MODE och häll kvar fingret i 1 sekund eller langre. Listan med snabbvalsstationer visas.
4. Peka på den minnesposition där du vill spara stationen ochhall kvar fingret i 2 sekunder eller langre. En lang ton hors och stationen sparas i minnet.
Automatisk lagring
Medenna Funktion kan du spara upp till 6 stationer som automatiskt stalls in i tur och ordning.
1. Peka på MODE.
2. Peka på A-STORE och häll kvar fingret i 2 sekunder eller langre. Visningen av driftssatt änderas till "A-STORE" och snabbvalsstationens nummer visas på displayen.
* Stationer med god mottagning söks upp automatiskt och sparas på minnespositionerna (nummer 1 till 6) med den station som har lögst frekvens Först.
Anmärkningar:
- Vid automatisk lagring raderas tidigare sparade stationer ur minnet.
- Om det finns färre øn 6 stationer med god mottagning vid LOCAL SEEK ätergår sökningen automatiskt till de laga frekvenserna och en ny automatisk lagring genomførs med DX SEEK. Om det after två automatiska lagringar fortfarande finns färre øn 6 stationer med god mottagning ligger tidigare sparade stationer kvar på de Återstående minnespositionerna.
- Vid automatisk lagring på FM-banden sparas stationerna på FM3 även om du valjer att spara dem på FM1 eller FM2.
Avsökning av sparade stationer
Medennafunctiontasstationernaemotidenordning som de liggeriminnet,saattdu kankontrollerautsandningarna.
1. Peka på MODE.
2. Peka på P-SCAN.
Visningen av driftssatt ändras till “P-SCAN” och snabbvalsstationens nummer visas på displayen.
* De sparade stationerna ställs in i tur och ordning i minst 7 sekunder var. Stationer med dālig mottagning hoppas över och "...sta station ställs in.
När du gör en avsökning av FM-bandet ställs FM-stationerna in enligt följande:
FM1 (1 6) FM2 (1 6) FM3 (1 6)...
När du gör en avsökning av AM-bandet ställs AM-stationerna en enligt följande:
AM (1 6) AM(1 6) och sà vidare.
Att avsluta avsokningen
1. Peka pà P-SCAN.
P-SCAN-displayenalandras till“MODE”och de stationer som var installda nár du tryckte pA P-SCAN tas emot.
RDS (Radio Data System)
Denna bilstereo har en inbyggd RDS-dekoder for att kunna ta emot information frän stationer som sander RDS-data.
Detta system gör det möjligt für radion att visa namnet på den station du lyssnar på (PS), och att automatiskt gå over till en annan station på sama radionat med bättre mottagning;när du kör länga sträckor (AF-omkoppling).
Det ar ocksa mojligt att gå direkt over till trafikmeddelanden eller program av en viss typ sa fort de börjar sändas av en RDS-station, oavsett vad du höll pa att lyssna pa.
Om radion tar emot EON-information kan den dessutom gä over till andra snabbvalsstationer på sama radionät och bryta in i mottagningen av den station du höll på att lyssna på med trafikinformation frän"Andra stationer (TP).Detta fungerar dock inte i alla områden.
Radion maste vara inställd på FM-bandet for att det skag att anecd RDS-funktionerna.
- AF: alternatively frekvenser
- PS: programserviceanm
- PTY: programtyp
- EON: information om andra kanaler
- TP: trafikprogram
- PI: programidentification
- TA: trafikmeddelanden
* RDS-avbrotten fungerar inte medan man lyssnar på en AM-station.
* När Funktionen har valts mottages RDS-signaler och PS-data kan avlåsas. PS tänds på displayen.
AF-funktionen
AF-funktionen gört det möjgt für radion att bibehalla basta möjliga motagnig genom att växla mellan olica frekvenser på sama radionät.
- Fabriksinställningen ar "ON" (på).
Att stänga av och satta på AF-funktionen
1. Peka på MODE.
2. Peka på AF. För varje tryckning växlar AF mellan "ON" och "OFF".
3. Peka på RTN.
* Om mottagingen av den installda radiostationen försämras visas “SEARCH” på displayen och radion söker after sama program på en annan frekvens.
■ AF-övergang mellan RDS och DAB
Omamma program sänds av bade en RDSstation och en DAB-station och denna Funktion ar pascalgen, gär radion automatiskt over till den station som ger den basta mottagningen.
- Detta fungerar bara nár现阶段 av DAB-mottagarna DAH923 eller DAH913 (säljs separat) ar ansluten.
* Fabrikinstallenä “ON” (pà).
1. Tryck på knappen [A] für att gå tilländringslåget.
2. Peka pa 山 山 pa parameterdisplayen for att valja "LINK ACT" under "TUNER".

3. Peka antingen på till höger på displayen eller vrid på knappen [ROTARY] För att valja "ON" eller "OFF".
ON:
AF-omkoppling mellan DAB och RDS är aktiverad.
OFF:
AF-omkoppling mellan DAB och RDS är inaktiverad.
4. Tryck på knappen [A] För att gå tillbaka till det tidigare laget.
Regionalprogramfunktionen (REG)
När REG-funktionen ar pascalagen tas lokalstationen med den basta mottagningen in. När denna Funktion ar avständ och du kör in i ett annat regionalomräde gär radion over till en lokalstation i det nya området.
- Fabriksinställningen ar "OFF" (av).
Observera:
Denna Funktion stängs av nar en riksstation som t.ex. BBC 2_FM ar installd.
- På/av-inställingen für REG-funktionen gäller bara nar AF-funktionen ar pâslagen.
Att stänga av och satta på REG-funktionen
1. Peka på MODE.
2. Peka på REG. För varje tryckning växlar REG mellan "ON" och "OFF".
3. Pekapà RTN.
Att ställa in en regional station i samma sändningsnät manuellt
- Denna Funktion ar tillganglig Near AF-funktionen ar pa.
- Funktionssättet varierar beroende på om REG-funktionen är av eller på. När REG-funktionen är på kan sändninger med exakt sama PI-kod tes emot. När REG-funktionen är av kan sändninger med sama slags PI-kod tes emot.
Anmärkningar:
- Denna Funktion kan användas när en regional sändning frän sama nät tas emot.
- PI-koderna ar unika identieringskoder for radiostationer.
1. Peka på MODE ochhall kvar fingret i 1 sekund eller langre. Listan med snabbvalsstationer visas.
2. Peka på den station du vill lyssna på.
Trafikmeddelanden (TA)
När bilstereon ar i TA-beredskapläge har trafikmeddelanden högsta prioritet och ställs in sö fort de böjr sändas sä att du kan hörä dem, oavsett vilket faktionsläge som arinställt. Det gär även att ställa in TP-stationer (trafikprogramstationer) automatiskt.
- Denna Funktion går bara att använda nar "TP" lyser på displayen. Att "TP" lyser betyder att den installda RDS-stationen sönder program med trafikmeddelanden.
Hur man ställer bilstereon i TAberedskapsläge
Om du trycker på [TA]-knappen:när bara "TP" lyser på displayen, tänds "TP" och "TA" på displayen och bilstereon ställs i TA- beredskapsläge tills ett trafikmeddelande börjar sändas. När ett trafikmeddelande börjar sändas tänds "TRA INFO" på displayen. Om du trycker på [TA]-knappen medan att trafikmeddelande häller på att tes emot, stängs mottagningen av det meddelandet av och bilstereon ätergår till TA-beredskapslåget.
Att stänga av TA-vänteläget
Tryck pa knappen [TA] när "TP" och "TA" lyser pa displayen. Texten "TA" pa displayen släcks och TA-laget ar avständ.
- Om "TP"inte lyser sker sökning after en TP-station när du trycker på knappen [TA].
Att söka after en TP-station
Om du trycker på knappen [TA] Near "TP" intelyser tänds "TA" på displayen och encheten ställer automatiskt in en TP-station.
OBS:
- Om ingen TP-station kan tas emot visas "TP SEEK" och sökningen after TP-stationen fortösätter. Om du trycker på knappen [TA]对其进行 släcks "TA" och "TP SEEK" på displayen och sökningen after TP-stationen upphör.
Automatism lagring av TP-stationer i snabbvalsminnet
Du kan automatiskt minneslagra upp till 6 TP-stationer i snabbvalsminnet. Om du kan mottaga färer TP-stationer an 6,kommen radiostationer som redan finns i minnet inte att raderas och ersattas.
1. Kontrollera att "TA" visas och peka på MODE. Tryck på knappen [TA] sä att "TA" visas om det inte gör det.
2. Peka på A-STORE och häll kvar fingret i 2 sekunder eller langre. Visningen av driftssatt änderas till "A-STORE" och snabbvalsstationens nummer visas på displayen.
- TP-stationer med god mottagning sparas i minnet.
- Aven om du trycker på FM1 eller FM2 sparas en TP-station i minnet for FM3.
Programtypsfunktionen (PTY)
Denna Funktion ger dig möjlighet att lyssna på en station som börjar sända den valda programtypen, även om apparaten ar omkopplad till nàgon annan Funktion an radiofungtionen.
- PTY-sändningar forekomm er annu inte i alla Länder.
- I TA-beredskapslåget har TP-stationer f Oreträde framfor stationer som sander PTY-program.
Hur man ställer radion i PTY-beredskapsläge
När du trycker på [▶■]-knappenalands“PTY”pádisplayen och radion gár over i PTY-beredskapslåge. Sa fort att program av vald typborjar sändas visas dess PTY-namn på displayen.
Hur man stänger av PTYberedskapslaget
När du trycker in [▶III]-knappen pch häller den intryckt i mer øn 1 sekund släcks “PTY” på displayen och PTY-beredskapslåget stängs av.
Hur man stänger av ett PTY-avbrott
Tryckp [▶III]-knappen under PTY-avbrottet. PTY-avbrottet stängs av och bilstereon Återgår till PTY-beredskapsläget.
Att ställa in PTY-läget
1. När du trycker på knappen [▶■] övergår enheten till PTY-läget.
2. Peka antingen på till hoger på displayen eller vrid på knappen [ROTARY]forall PTY.
* Följande standardinställningar har gjorts:
Snabbvals
-nummer Programtyp (PTY) ENGLISH Innehåll 001 News Korta nyheter 002 Info Allmän Information 003 Pop M Populärmusik 004 Sport Sport 005 Classics Komplettta klassiska verk 006 Easy M Underhällningsmusik
3. Efter 7 sekunder stangs PTY-laget automatiskt, och om du pekar på RTN valjs en PTY.
PTY-sökning
1. När du trycker på knappen [▶■] övergår encheten till PTY-läget.
2. Peka antingen på i mitten av displayen eller vrid på knappen [ROTARY] För att valja PTY.
3. Peka pa till vänster pa displayen. Om du pekar pa söks en PTY-sändning med högre frekvens och om du pekar pa
söks en station med lagre frekvens.
* Om ingen station med den valda PTY-sändningen kan tas emot Återgår anlaggningen till det tidigare låget.
PTY-minne
1. När du trycker på knappen [▶■] övergår encheten till PTY-läget.
2. Peka pà mitt pa displayen for att valja PTY.
Du kan valja mellan de 29 PTY-typerna i tabellen nedan.
Programtyp (PTY) ENGLISH DEUTSCH SVENSKA FRANÇAIS Innehålll News Nachrich Nyheter Infos Korta nyheter Affairs Aktuell Aktuellt Magazine Fördjupning av nyheter Info Service Info Services Allmän Information Sport Sport Sport Sport Sport Educate Bildung Utbildn Educatif Utbildningsprogram Drama Hör + Lit Teater Fiction Teater och program om teater Culture Kultur Kultur Culture Kultur i bred mening Science Wissen Vetenskp Sciences Vetenskapssprogram Varied Unterh Underh Divers Underhällningsprogram Pop M Pop Pop M Pop Populärmusik Rock M Rock Rock M Rock Rockmusik Easy M U-Musik Lättlyss Chansons Underhällningsmusik Light M L-Musik L klass M CI Lég Lätt klassik musik (ejkcompletta verk) Classics E-Musik Klassik Classiq Kompletta Klassiska verk Other M - - Musik Övrig m Autre M Övrig Musik Weather Wetter Väder Météo Väderraporter Finance Wirtsch Ekonomi Economie Ekonomiprogram Children Kinder För barn Enfants Barnprogram Social Soziales Sozialt Société Program om sociale frågor Religion Religion Andligt Religion Andliga frågor Phone In Anruf Telefon Forum Telefonvåkteri Travel Reise Resor Voyages Resor och semester Leisure Freizeit Fritid Loisirs Fritid och hobby Jazz Jazz Jazz Jazz Jazzmusik Country Country Country Country Countrymusik Nation M Landes M Nation m Ch pays Nationell musik Oldies Oldies Oldies Rétro Kationell musik Folk M Folklore Folkm Folklore Folkmusik Document Feature Dokument Document Dokumentärer
3. Peka på RTN ochhall kvar fingret i 1 sekund eller langre.
Listan med PTY-titlar visas.
4. Peka på den minnesposition)dru vill spara stationen och häll kvar fingret i 2 sekunder eller langre.
En lang ton hors och den valda PTYstationen sparas i kanalmminnet.
Nödsändningar
Om radion uppfattar en nödsändning avbryts alla de andra Funktionerna, "ALARM" tänds på displayen och nödsändningen hör s i högtalarna.
Hur man stänger av en nödsändning
Om du trycker på [AF]-knappen stängs nödsändningen av.
Att byta sprek for PTYvisningen
Du kan valja mellan 4 språk (engelska, tyska,SVNSKA och franska) for PTY-displayen.
- Standardinställningen ar "ENGLISH".
1. Tryck på knappen [A] für att gå tilländringslåget.
2. Peka pa t ppa parameterdisplayen och valj "LANGUAGE" under "TUNER".

3. Peka antingen på till hoger på displayen eller vrid på knappen [ROTARY]forall språk.
* Tryck på ENGLISH (engelska), DEUTSCH (tyska), SVENSKA eller FRANÇAIS (franska).
4. Tryck på knappen [A] För att gå tillbaka till det tidigare laget.
Att ställa in RDS-avbrott när 2-zonsfunktionen används (RDS-INT 2Z)
Närenna Funktion ar på och det inträffar att RDS-avbrott medan 2-zonsfunktionen används kan RDS-information tas emot.
- När att RDS-avbrott sker stågs 2-zonsfunktionen av.
- Aven om "RDS-INT 2Z" inte är på tas RDS-informationen emot om det inträffar att larmavbrott.
- Standardinställingen ar "ON".
1. Tryck på knappen [A] für att gå tilländringslåget.
2. Peka pa 卡 卡 pa parameterdisplayen och valj "RDS-INT 2Z" under "TUNER".

3. Peka antingen på till höger på displayen eller vrid på knappen [ROTARY] För att valja "ON" eller "OFF".
ON:
RDS-information tas emot nar det intraffar ett RDS-avbrott medan 2-zonsfunktionen anvands.
OFF:
När 2-zonsfunktionen används tas ingen annan RDS-informationän larm emot.
Observera:
- Om du valjer radiolaget;nar TA (trafikmeddelanden) och PTY ar installda pa "ON"tas RDS-information emot även om RDS-avbrott ar installda 'OFF'.
4. Tryck på knappen [A] För att gå tillbaka till det tidigare laget.
Att ställa in volymen für TA, nödmeddelanden (ALARM) och PTY
Du kan ställa in volymen für TA-, ALARM- och PTY-sändningar under ett avbrott für TA-, ALARM- eller PTY-sändning.
- Standardinställningen ar "15".
Vrid knappen [ROTARY] medsols eller motsols under en TA-, ALARM- erler PTY-sändning for att ställa in önskad volym (0 till 33).
- När TA-, ALARM- eller PTY-sändningen upphör ätergår volymen till den niva som var installd före avbrottet.
Skärmbilderr i CD-läget
Huvudsidan
Visas nár du trycker på knappen [ROTARY] och valjer CD-laget.

Peka till vänster på displayen och häll kvar fingret i 1 sekund eller mer För att byta driftssätt.

Spár/speltidsisplayen
01/02:00
Det spår som spelas och speltiden visas.
Om du pekar pa 卡 10 ether 2 vid standarddrift kan du valja vilket spar du skaspela eller snabbt forflyta dig framat eller bakat mellan sparen.
Titeldisplayen
När du pekar på dennaändras visningen.
Mappdisplayen (for MP3/WMA)
Peka pa 卡 under standarddrift for att valja en mapp.
MODE:
Om du pekar på detta visas underfunktioner.
När du pekar och trycker i 1 sekund eller langre vid spelning av MP3/WMA visas mapplistan.
OBS:
- Denna Funktion ar bara tillganglig vid avspelning av en skiva.
-SCAN-SCAN: visas under avsökning. Om du pekar på texten avslutas avsökningen.
-RPT-RPT:visas under repeterad avspelning.Om du pekar pa texten avslutas den repeterade avspelningen.
- RDM/RDM: visas under slumpvis avspelning. Om du pekar på texten avslutas den slumpvisa avspelningen.
TOP:
Om du pekar har börjar avspelningen fran det forsta spåret på skivan eller i mappen.

(endast på displayen für forenklad drift)
Tryck på dessa knappar För att välja det spår du vill spelva.
Om du pekar på dessa knappar och häller kvar fingret forflyttas du snabbt framåt eller bakat mellan spåren.

applistdisplayen (for MP3/WMA)
Visas nár du pekar på MODE på huvudstan och häller kvar fingret i 1 sekund eller langre.

Mappens namn
Mappens nr.
När detta visas gratonat kan du inte valjaenna mapp.
>>:Inställning págár
Om du pekar pa en mappkommen du tillbaka till huvudsidan och avspelningen startup fran det forsta sparet i den mapp du pekade pa.
←PREV-RTN:
Om du pekar på denna text visas den foregående mapliistan. När du pekar och trycker i 1 sekund eller langrekommen du tillbaka till huvudsidan.
NEXT:
Om du pekar påenna text visas nasta.
mapplusta.
Vadär MP3?
MP3 ar en metod for komprimering av ljud och har klassificerats som ljudlager 3 for MPEG-standard.
Denna metod for komprimering av ljud har uppmarksammats av datoranvändare och har blivit ett standardformat.
Denna MP3-funktion komprimerar det ursprungliga ljudet till ca. 10 procent av den ursprungliga storleken med en bibehallen hog ljdukvalitet. Detta betyder att omkring 10 musik- CD-skivor kan spelas in pa en enda skiva av typen CD-R eller CD-RW, vilket mojiggor en mycket lang lyssningsid utan att CD-skivan behover bytas ut.
VadärWMA?
WMA ar en forskortning for Windows Media Audio, ett format for ljudfilr som har utvecklats av Microsoft Corporation.
Observera:
- Inget ljud hörns om du spelar en fil med DRM (Digital Rights Management) medan WMA-funktionen ar aktiverad (ON). (WMA-indikatorn blinkkar.)
- Windows Media™ och Windows® logo Är varumärken eller registrarade varumärken for Microsoft Corporation i USA och/eller andraalander.
Bortkoppling av DRM (Digital Rights Management):
- Om du använder Windows Media Player 8 sä klicka på fliken TOOLS OPTIONS COPY MUSIC, och klicka sedan bort bocken i kryssrutan for PROTECT CONTENT bland COPY SETTINGS. Återskapa sedan filerna
- Om du anvander Windows Media Player 9 sä klicka på filken TOOLS OPTIONS MUSIC RECORD, och klicka sedan bort bocken i kryssrutan for RECORD PROTECTED MUSIC bland inspelningsinställningarna. Återskapa sedan filerna.
Dina personligt tillverkade WMA-filer används på ditt eget ansvar.
Anvisningar for inpelning aven MP3/WMA-skiva
Lapligrasamplingsfrekvenser och bitströmmar:
1. MP3:
- Samplingsfrekvens: 11,025 kHz till 48 kHz
Bitström: 8 kbps till 320 kbps/VBR
2. WMA: Bitström 48 kbps till 192 kbps
Filamnsforlangninger
1. Lagg alltid till filnamnsforlängningen“.MP3” aller“.WMA” till en MP3-ller WMA-fil med bokstaver på en bit. Om du lagger till en annan filnamnsforlängning erler glommen att lagga till en filnamnsforlängning kan inte filen spelas.
2. Filerutan MP3-/WMA-data kan inte spelas. --"visaspalspeltidsdisplayenomdu forsoker spelena filutan MP3-/WMA-data.
Logiskt format (f信息系统)
1. Välj "ISO9660 niva 1, 2 eller JOLIET aller Romeo" som programformat nar du spelar in en MP3-/WMA-fil på en CD-R- eller CDRW-skiva. Om skivan är inspelad i att annat format kan det hända att den inte kan spelas på rätt sätt.
2. Mappnamnet och filamnet kan visas som titel nar du spelar MP3/WMA, men titelns langd fär höGST bestå av 128 bokstäver och siffrøp en bit (inklusive filamnsforlangningen).
3. Ge inte en fil sama namn som den mapp den ligger i.
- Mappstruktur
1. Det går inte att skapa en skiva som innehäller en mapp med fler øn 8 hierarkiska nivær.
Antal filer eller mapperpar
1. Det går att registrera upp till 255 filer per mapp. Upp till 500 filer kan spelas.
2. Spåren spelas i den ordning i vilken de har spelats in på skivan. (Det är inte sakkert att spåren alltid spelas i den ordning som visas på pc:n.)
3. Störningslud kan uppträda, beroende på vilken typ av kodningsprogram som användes vid inspelningen.
Multi-session
Denna Funktioninnebar att du kan valja antingen en CD-DA ell MP3-/WMA-filer om skivan (t. ex. en CD-EXTRA) innehaller en blandning av CD-DA (musik-CD) och MP3-/WMA-filer.
1. Peka på MODE.
2. Peka pà M-SESS.
For varje tryck på M-SESS væxlar M-SESSdisplayen mellan "CD" (spela CD-DA) och "MP3/WMA" (spela MP3/WMA).
* Tryck på NEXT om M-SESS inte visas.
3. Peka på RTN.
Nästa gang du satter i en CD ar multisession-installingen aktiv.
OBS:
- Ställ in CD när du spelar en CCCD (Copy Control CD). Om MP3/WMA ar installt kan det hända att skivan inte kan spelas normalt.
A WARNING
Var forsiktig sa att inte din hand eller fingrar fastnar, nar du stanger DEN LUTANDE KONSOLEN.
Observera:
- Om DEN LUTANDE KONSOLEN inte öppnas tillräcklig mycket, skall du öppna den varsamt for hand.
- När du har satt in en CD-skiva, skall du alltid stänga DEN LUTANDE KONSOLEN.
- Försök inte att satta in din hand aller fingrar i skivfacet. Du für aldrig försöka att satta in främmande foremäl i skivfacet.
- Sätt inte in skivor där klibb tränger fram frän tejp erlen en etikett på en CD-skiva som har länats i en affär, eller skivor som har marken där tejp erler etiketter frän hyrbutiken har tagits bort. Det kan bli omöjligt att ta bort en sādán skiva frän apparaten, och sādana skivor kan góra att apparaten skadas.
Att satta i en CD
1. Tryck på knappen [▲]. Kontrollpanelen öppnas
2. Satt i skivan i CD SLOT. När skivan sätts i stängs kontrollpanelen automatiskt after nagra sekunder och avspelningen börjar.
Anmärkningar:
- Stoppa aldrig in nagra främande foremål i CD SLOT.
- Om det inte går lätt att satta i CD-skivan kan det bero på att det redan finns en annan CD-skiva isatt eller på att anlaggningen behöver service.
- Skivor som inte ar märkta med UUSG aller och CD-ROM-skivor kan inte spelas ienna anlaggning.
- Det kan hända att vissa CD-skivor som har spelats in med CD-R-/CD-RW-funktionerna inte kan användas.

Att satta i CD-skivor på 8 cm
Det fordras ingen adapter for att spel a CDskivor pa 8 cm. Satt i skivan mitt i CD SLOT.
Att ta ut en CD-skiva
Du kan mata ut en skiva genom att trycka pa knappen [▲] aven om startnyckeln aller ACC ar i laget OFF.
A WARNING
Tryck på knappen [▲] Near skivan ar utmatad, for att stenga kontrollpanelen. Om kontrollpanelen lämnas öppen hörns en dubbel beep-signal och panelen stängs automatiskt.
1. Tryck pa knappen [A].
Kontrollpanellen öppnas och skivan matas ut. Anlaggningen kopplas automatiskt om till radioläget.
* Glöm inte att ta ut utmatade skivor ur anlaggningen. Om du lämnar skivan i skivf Jacket dras den tillbaka in i anlaggningen after cirka 15 sekunder och kontrollpanelen stängs. (automatisk reload-funktion)
* Vanliga CD-skivor matas inte in automatiskt. Glöm inte att ta ut utmatade CD-skivor.
A VARNING
Om du anvander for mycket kraft nar du skasatta i en skiva som har matats ut kan skivans yta repas. Ta ut skivan och satt sedan i denigen.
Att lyssna på en skiva som redan sitter i anlaggningen
1. Tryck på knappen [ROTARY] für att valja CD-laget.
* När CD-laget ställs in startup avspelningen automatiskt.
Att pausa avspelningen
1. Tryck på knappen [▶■].
Att ateruppta avspelningen
1. Tryck på knappen [▶■]igen.
Att välja ett spär
När en CD-R/CD-RW som innehäller MP3- eller
WMA-filer sitter i kan du valja att bara spelā
spār som ligger iamma mapp genom att peka
pá ↑ ♦ ↑ pā spārdisplayen.
1. Peka pa 山 pa spardisplayen for att lyssna pa nasta spar.
2. Tryck pa 卡 pa spardisplayen tva ganger for att lyssna pa foregaende spar. Om du pekar pa 卡 spelas nasta spar. Om du trycker pa flera ganger forflyttar du dig ett spar framat for varje tryckning och detta spar spelas.
Om du pekar pa 卡 spelas foregäende spar. Om du trycker pa 卡 flera ganger forflyttar du dig ett spar bakat for varje tryckning och detta spar spelas.
* Om du trycker på 📁 📁 pa spárdisplayen tvā gänger när börgan av ett spar spelas förflyttas du ibland 2 spar tillbaka.
Att valja en mapp
Peka antingen pa 卡 pa mappdisplayen ellerga till vaga enligt foljande for att valja en annanmapp:
1. Peka på MODE ochhall kvar fingret i 1 sekund eller langre.
Mapliistan visas. Om du pekar på PREV eller NEXT visas foregående respektive nasta del av mapliistan.
2. Peka på mappens namn.
Att spelena en spelningsliste
Du kan ocksa spelaspelningslistor (M3U-filer).
Mark dock att av de M3U-filer som finns sparade fem skikt ner (inklusive roten) i filhierarkin ar det bara de 5 filer som har de nyaste tidsmärkningarna som kan spelas.
Anmärkningar:
- Upp till 255 filer kan spelas i en spelningsliste.
- Det ar bara MP3- och WMA-filer som har sparats i mappers ner till fem skikt (inklusive roten) i filhierarkin som kan spelas.
Gà till väga enligt följande für att spelena en spelningsliste:
1. Peka på MODE.
2. Peka Na NEXT.
3. Peka på PLY LIST.
Avlåsningen av spelningslistan startar. Efter avlåsningen startas den spelningsliste som har den nyaste tidsmärkningen automatiskt. Duwäjer spelningsliste eller spår i spelningslistan på samma sätt som duwäjer en mapp eller spår i en mapp.
* PLY LIST visas inte om inte en godkänd spelningsliste (M3U-fil) finns sparad på den CD-R/CD-RW som sitter i anlaggningen.
Att avbryta spelningen av en spelningsliste
1. Peka på MODE.
2. Peka på NEXT.
3. Peka pà PLY LIST.
Snabb forflytting Framat/ Bakat
1. Peka pá 5→ pá spárdisplayen für att fórlfyta dig framát.
2. Peka pa pā spārdisplayen for att förlfyta dig bakat.
Toppfunktionen
Toppfunktionen gör att CD-spelaren Återgår till det Första spåret på skivan.
1. Peka på TOP.
Avspelningen börjar från det Första spåret (spår nr. 1).
For MP3-/WMA-skivor sker en Återgang till det forsta spåret i den aktuella mappen.
Avsökning
Medenna Funktion kan du söka upp och spel de forsta 10 sekunderna av alla inspelade spå på en skiva.
1. Peka på MODE.
2. Peka pä -SCAN.
Visningen av driftssatt andras till "J-SCAN" och avsokningen börjar.
* Avsökningen börjar med spåret after det som spelas.
Att avsluta avsokningen
1. Pekapä-SCAN.
-SCAN-displayen andras till "MODE" och det spar som spelades nar du tryckte på -SCAN spelas.
Avsökning av mappar
Med denna Funktion kan du söka upp och spel a de forsta 10 sekunderna av det forsta spåret i alla mappings pæn MP3-/WMA-skiva.
1. Peka på MODE.
2. Peka pà -SCAN.
Visningen av driftssatt anders till "SCAN" och mappavsokningen börjar.
* Avsökningen börjar med mitten after den som spelas.
Att avsluta mappavsokningen
1. Peka pà □-SCAN.
-SCAN-displayen ändras till "MODE" och det spår som spelades Near du tryckte på SCAN spelas.
Repeterad avspelning
Medenna Funktion kan du spel aett spar flera ganger i rad.
1. Peka på MODE.
2. Peka pà J-REPEAT.
Visningen av driftssatt andras till "J-RPT" och den repeterade avspelingen börjar.
Att avs抗体 repeterad avspelning
1. Peka pä RPT.
CRPT-displayenändras till“MODE”och det spår som spelades nár du tryckte på P -RPT spelas.
Repeterad avspelning av mappar
Med denna Funktion kan du spel a en mapp flera ganger i rad. Den ar bara tillganglig nar en CD-R/CD-RW som innehaller MP3- eller WMA-filer sitter i.
1. Peka på MODE.
2. Peka pà -REPEAT.
Visningen av driftssatt andras till "RPT" och den repeterade avspelningen börjar.
Att avsluta repeterad avspelning av mappar
1. Peka pá -RPT.
- RPT-displayenalandras till "MODE" och det spar som spelades när du tryckte på -RPT spelas.
Slumpvis avspelning
Medenna Funktion kan du spelala spar pa en skiva i slumpmaggig ordning.
-RANDOM
Spelar alla spår på skivan i slumpmässig ordning.
Om skivan innehäller 2 eller fler mappar spelas alla spår i mappen slumpmässigt och sedan alla spår i Nästa mapp. Detta upprepasforall mappar.
-RANDOM
Spelar spår på skivan i slumpmässig ordning.
Denna Funktion ar bara tillganglig;nar en CD-R/ CD-RW som innehäller MP3- eller WMA-filer sitter i.
1. Peka på MODE.
2. Peka på „RANDOM eller „RANDOM. Visningen av driftssattändras till „P-RDM" ihrer “„RDM" och den slumpmässiga avspelningen börjar.
Att avsluta slumpvis avspelning
1. Peka pà ^一 -RDM ell er [D-RDM.
- RDM-displayen aller -RDM-displayen andras till "MODE" och det spår som spelades när du tryckte på knappen spelas
Att lata olika lyssnare lyssna på olika musik samtidigt (2-ZONE-funktionen)
2-ZONE-funktionen ar en fonction som matar ut olica ljd till MAIN-zonen (huvudzonen) och SUBzonen (underzonen) samtidigt genom att styra tvə olika ljudkallor fran en och sama huvudenhet. Tack vare denna Funktion ar det mögigt for olica lyssnare att lyssna på olica musik samtidigt.
Huvudenheten kan spelà upp ljud frän de olika inbyggda ludkällorna (radion, CD-spelaren, MP3-spelaren osv.) och dessutom samtidigt spelù upp ljud frän en annan apparat som ar ansluten via CeNET (t.ex. en CD-växlare).
Ljudet for MAIN-zoneon spelas upp via högntalarna i fordonet, medan ljudet for SUB-zoonen spelas upp via hörurlssystemet (WH143).

Den övre bilden avser en ljudkälla som spelas av anlaggningens interna delar (radio, CD, AUX) via högitalarna.
Den nedre bilden avser en ljudkalla som spelas av anlaggningens externa delar (CD-vaxlare, DVD-vaxlare, TV, AUX) via Hogtalarna.
* Standardinställningen ar “OFF”.
Anmarkningar:
- 2-zonsfunktionen ar inte tillganglig'nar DAB ar inkopplad.
- En volymjustering som gös genom att vrida på knappen [ROTARY] på anlaggningen paverkar bara högtalearjdet.
AUX-SENS-installingen påverkar bade högitalarna och hörurlarna.
Skärmvisning'nar 2-zonsfunktionen används
"INT." (internlage) erler "EXT." (externlage) visas mitt pa displayen for att tala om hurvida du kan lyssna pa en intern ertern extern ljudkalla i detta 2-zonslauge.
1. Tryck på knappen [SOUND].
2. Peka på 2-ZONE.

3. Peka på ON/OFF i mitten av displayen och häll kvar fingret i 1 sekund eller langre.

När 2-ZONE ar installd på ON visas aktuell 2-zonstyp.
2-zonsfunktionen ar inte tillganglig nár 2-ZONE ar installd pa OFF. Tryck pa knappen [SOUND] for att gà tillbaka till ursprungslaget.
4. Peka pà ì ì ì pà ON/OFF-displayen För att valja 2-zonstyp.
2-zonstyp
Högtalare Hörlurar Typ 1 Intern (intern länge) Extern (extern länge) Typ 2 Extern (externlänge) Intern (intern länge)
5. Peka på högtalar- eller hörlurssymbolen for att valja lyssningssätt.
Om du pekar på högtalarsymbolenkommen ljudet ur högtalarna.
Om du pekar på hörurlssymbolenkommen ljudet ur hörurlarna.
6. Tryck på knappen [SOUND] for att gå tillbaka till ursprungslaget.
Att lata olika lyssnare lyssna pø olika musik samtidigt (2-ZONE-funktionen)
Att stänga av och satta på 2-zonsfunktionen
1. Tryck på knappen [SOUND] och häll kvar fingret i 1 sekund eller länger.
Att byta 2-zonstyp
Tryck på knappen [TA] och häll kvar fingret i 1 sekund eller langre;när 2-zonsfunktionen ar på.
Att byta 2-zonslage
Tryck på knappen [TA] Near 2-zonsfunktionen är på.
Att välja lage)när 2-zonsfunktionen används
När du satter i en CD när 2-zonsfunktionen
används übergen den interna ljudkällan till CD
och avspelningen startar automatiskt.
1. Tryck på knappen [TA] für att byta 2-zonsläge.
Symbolen for den utrustning (högtalare aller hörllarur) varur ljudetkommenändras.
2. Tryck på knappen [TA] ochhall den intryckt i 1 sekund eller langre for att valja 2-zonstyp. Visningen overgår fraan "INT." till "EXT." ellertvärtom.
3. Tryck på knappen [ROTARY].
För varje tryck på knappen [ROTARY] Near "INT." visas änderas laget enlicht följande: Radio CD AUX Radio ...
For varje tryck på knappen [ROTARY] Near "EXT." visasalandras laget enligt foljande: AUX (CD-vaxlare) (DVD-vaxlare) (TV\*1) AUX ...
* Enheter som inte ar inkopplade visas inte.
*1 När TV-laget väljs övergår driftslaget automatiskt till VTR-laget och kan inteändras.
Gemensamma Funktioner für bāda lagena
Skärmvisning i titelläget
Huvudsidan
Visas nár du öppnar titelläget. (se sidan 14)

Texttyp
A: Stora bokstäver
a: Små bokstäver
0-9: Siffror
!?: Symboler
A: Accenterade bokstaver
Titeldisplayen
Den inlagda titeln visas. Peka pa 卡 卡 卡 for att faststalla en position. Om du pekar och trycker i 2 sekunder erler langre forsvinner all titeltext.
Inlagd textdisplayen
Peka pà 104 for att valja den inlagda texten.
RTN
Om du pekar har avbryts inlaggningen av titlar och du kommer tillbaka till utgangssidan. Om du pekar och trycker i 1 sekund erler langre visas den textlista som overensstammer med den aktuella texttypen.
MEMO
Om du pekar och trycker har i 2 sekunder aller langre sparas den inlagda titeln och dukommen tillbaka till utgangssidan.
Text lista
Visas nár du pekar på RTN på huvudsan och häller kvar fingret i 1 sekund eller langre.

Typ av text
Den text som visas ändras beroende på texttypen.
Om texttypen ar “A”: A E I M Q U X (mellanslag)
Om texttypen ar "a": a e i m qu
Om texttypen ar "0-9", "!?" eller "Å".
Alla tecken visas.
RTN
Omdu pekarpà denna textkommen du tillbaka tillhuvudsidan.
NEXT
Om du pekar på denna text visas nestsa textlista.
Att lagga in titlar
Du kan ge TV-stationer och CD-skivor upp till 10 tecken lanya titlar. Dessa titlar kan visas när du tar emot sändninger erller lyssnar pa CD-skivor.
Foljande antal titlar kan laggs in:
Länge Antal titlar CD-länge 50 TV-länge 20
CD-växlarläge Antal titlar DCZ628 inkopplad 100 CDC655Tz inkopplad 100 CDC1255z inkopplad 50
1. Ställ in en TV-station eller spelα en CD vars titel du vill lögga in.
2. Peka mitt på displayen for att öppna användartiteldisplayen.
Närennaoppnasvisas“USER”ovanfor snabbvalsstationsnumret.
3. Tryck på knappen [A] ochhall kvar fingret i 1 sekund eller langre. Titellaget koplas in.
4. Peka pa t at titeldisplayen for att faststalla en position.
Den blinkende texten rör sig是从 vänster aller Höger.

* Du kan lagga in upp till tio tecken.
A VARNING
Om du trycker på reset-knappen raderas alla anvandarminnen i anlaggningen.
5. Peka pà tþþþ pæ textypdisplayen För att valja en texttyp.
For varje tryck på «B»ändras texttypen enligt följande:
Stora bokstäver
(mellanslag) ABCDEFGHIJKLMNO PQRSTUVWXYZ
Små bokstäver
abcdefghijklmnpqrstuvwxz Siffror
0123456789
Symboler, Accenterade bokstaver
AAEEEIeOaeeeiouo
6. Peka antingen på till hoger på displayen eller vrid på knappen [ROTARY] for att valja tecken.
7. Upprepamoment4till6forattlaggatin titeln.
Omdu pekar och trycker på titeldisplayen i 2 sekunder aller langre forsvinner alla inlagda tecken.
8. Peka på MEMO och häll kvar fingret i 2 sekunder eller langre.
En lang ton hors och titeln sparas i minnet.
Att gfrn titeldisplayen till klockenanller nagon annan display
Peka i mitten av displayen.
■ Om en ny titel laggs in trots att det maxima lantalet titlar har uppnàtts
Om det gäller en TV-station
Titlar som inte har sparat for Förinställda kanaler raderas automatiskt och den nya titeln sparas i minnet.
Om det gäller en CD
Titlarna pà de CD-skivor som du har spelat minst ofta raderas och den nga titeln sparas i minnet.
Att radera titlar
1. Ställ in den TV-station aller spelà den CD vars titel du vill radera.
2. Peka mitt på displayen for att öppna användartiteldisplayen.
Närennaöppnasvisas“USER”ovanfor snabbvalsstationsnumret.
3. Tryck på knappen [A] ochhall kvar fingret i 1 sekund eller langre.
Titellaget kopplas in.
4. Peka på titeldisplayen och häll kvar fingret i 2 sekunder eller langre.
Alla tecknen i titeln forsvinner.
5. Peka på MEMO och hull kvar fingret i 2 sekunder eller langre.
En lang ton hors och titeln raderas.
Att andra installingarna
Att väljainstallingsparametrar
1. Tryck på knappen [A].
Andringslaget kopplas in.

2. Peka pa 卡 pa parameterdisplayen for att valja den parameter som ska andras.
* Om du pekar på † ‡ † till vänster på displayen visas en huvudparameter i taget.
Omdupekarpa tillvanderdisplayenvxlarunderparametrarnakontinuerrigt.
* Om du pekar på « ⌊ ⌊ i mitten av displayen visas en underparameter i taget.
Omdu pekarp 5 vaxlar underparametrarna kontinuierligt.
3. När "EDIT" visas till höger på displayen kan du peka på denna text För att övergå till displayen for detaljändringar.

DISPLAY
ADJUST MODE
ISG INPUT> EDIT
4. Peka antingen på till hoger på displayen eller vrid på knappen [ROTARY] for att ställa in detaljerna.
Att gà tillbaka till utgangsläget
1. Tryck på knappen [A] igen.
Parametrar
Huvudparametrar Underparametrar DISPLAY SCREEN SVR
• Installling av skärmslättare (se sedan 41) MSG INPUT
• Inmatning av meddelande (se sedan 41) MESSAGE
• Vising av meddelande:när anlaggningen slås på eller stängs av (se sedan 42) S/A SENS
• Installling av spektrumanalysatorns känsligget (se sedan 42) SCROLL
• Installling av rullningshestigheten (se sedan 42) APPERNCE DIMMER IN
• Installling av autodimmer (se sedan 43) DMR LEVEL
• Installling av dimmernivå (se sedan 43) CONTRAST
• Installling av displayens kontrast (se sedan 43) BLINK LED
• Inkoppling av blinkende lysdiod:när frontpanelen tas bort (se sedan 43) BEEP
• Installling av ljudsignal (se sedan 44) SOUND AC-PRO III
• Installng av VSE-läget (STD/PRO) (se sidan 44) EQ SELECT
• Installng av equalizer-läget (se sidan 44) SP-SETTING
• Konfigurerring av högtalarna (se sidan 44) CENTER-SP / SUB-WOOFER
• Installng av sub-wooferhögtalaren ON/OFF (se sidan 45) HPF / SUB-W LPF
• Installng av högtalarfiltrens frekvens (se sidan 45) AMP CANCEL
• Installng av inbyggd Förstärkare ON/OFF (se sidan 46) SP GAIN
• Installng av högtalarnas utnivå (se sidan 46) PL II DELAY SRD-SP
• Installng av tidsförskjutning für de bakre högtalarna (se sidan 46) PL II CONT PANorama / DIMENSION / CTR WIDTH
• Detaljinställningar für musiklåget (se sidan 47) TUNER TV ARER
• Installng av TV-området (se sidan 57) TV DIVER
• Installng av TV:ns diversitet (se sidan 57) LINK ACT
• Omkoppling av AF-funktionen mellan RDS och DAB (se sidan 26) LANGUAGE
• Installng av språk für PTY-displayen (se sidan 30) RDS-INT 2Z
• Installng av RDS-avbrott;när 2-zonsfunktionen används (se sidan 30) SETTING AUX / TEL
• Installng av AUX och TEL (se sidan 47) AUX SENS
• Installng av AUX-ingångens känslighat (se sidan 48) TEL-SP
• Installng av bilhögtilare für mobilitelefonljudet (für extraeurustningen TEL-002) (se sidan 48) TEL-SWITCH
• Installng av avbrott für mobilitelefon (se sidan 48) CALIBRATE / A-VOL SENS
• Installng av autovolym (se sidan 49) SYSTEM CHECK
• Utförande av en systemkontroll (se sidan 49) CODEMATIC
• Säkerhetsinställningar (se sidan 50)
Inställing av skärmsläckare (SCREEN SVR)
Med denna Funktion kan du koppla in en skärmslåckare som startar nr anlaggningen inte har används på cirka 30 sekunder.
- Standardinställingen ar "ON".
1. Tryck på knappen [A] for att gå tilländringslåget.
2. Peka pá ↑ 📅 ↑ pá parameterdisplayen für att valja “SCREEN SVR” under “DISPLAY”.

3. Peka antingen pà till Höger pá displayen eller vrid på knappen [ROTARY] För att valja “ON” eller “OFF”.
4. Tryck på knappen [A] För att gå tillbaka till det tidigare laget.
Att växla mellan olika skärmsläckare
Peka på PREV eller NEXT nr skärmslåckaren visas.
För varje tryck på dessa knappar andras skärmslackaren enligt foljande:
Skärmslackare
Skärmsläckare 1


Skärmslackare 2

Skärmslackare 3
Spektrumanalysator 1

Spektrumanalysator 2
Spektrumanalysator 3

Spektrumanalysator 4

Skärmsläckartext

SS SCAN
Ovansende 8 skärmslackare visas i cirka 10 sekunder vardera.
Inmatning av meddelanden som skärmsläckartext (MSG INPUT)
Det finns 1 typ av skärmslackare tillganglig for meddelanden. Se avsnittet "Inställning av skärmslackare" for information om hur du koplar om visningen av skärmslackare.
- Du kan lagga in upp till 30 tecken.
- Standardinställingen ar "Active Matrix Control System".
1. Tryck på knappen [A] für att gå tilländringslåget.
2. Peka pa 卡 pa parameterdisplayen for att valja "MSG INPUT" under "DISPLAY".

DISPLAY
ADJUST MODE
MSG INPUT> EDIT
SPLAY
#
\( \left\{ {2 : {x}^{\prime }\left( x\right) = {y}^{\prime }\left( x\right) }\right\} \text{. 故 \( {y}^{\prime } = {2x}} \)
1
>
.
一
#
#
12 =
\( \left\{ {2 : {x}^{\prime }\left( x\right) = {y}^{\prime }\left( x\right) }\right\} \text{. 故 \( {y}^{\prime } = {2x}} \)

3. Peka pá EDIT.
Inmatningslaget kopplas in.
4. Peka pa t mitt pa displayen for att faststalla en position.
* Peka mitt på displayen med fingertoppen och häll kvar fingret i 2 sekunder aller mer För att radera meddelandet. Om du utfor moment 8;när meddelandet ár raderat átergár meddelandetexten till standardinställningen.
5. Peka pa till vander pà displayen for att valja typ av text.
For varje tryck pa 一 一 andras texttypen. Se sidan 37 for mer information.
6. Peka antingen på till hoger på displayen eller vrid på knappen [ROTARY]forall tecken.
7. Upprepa moment 4 till 6 for att lagga in meddelandet.
8. Peka på MEMO och häll kvar fingret i 2 sekunder eller langre. En lang ton hörs och meddelandet sparas i minnet.
9. Tryck på knappen [A] För att gå tillbaka till det tidigare laget.
Visning av meddelanden (MESSAGE)
Medenna Funktion kan du visa meddelanden
pàdisplayen nár strömmen slásvättsp.
"Hello"visas nár du satterp anlaggningen och
"See you"nár du stanger av den.
- Standardinställingen ar “ON”.
1. Tryck på knappen [A] for att gå tilländringslaget.
2. Peka pa t ppa parameterdisplayen och valj "MESSAGE" under "DISPLAY".

DISPLAY
ADJUST MODE
MESSAGE 已 ON
3. Peka antingen på till höger på displayen eller vrid på knappen [ROTARY] För att valja "ON" eller "OFF".
4. Tryck på knappen [A] För att gå tillbaka till det tidigare laget.
Inställning av spektrumanalysatorns känslighat (S/A SENS)
Medenna Funktion kan du stalla in spektrumanalysisrats känslighth (avböjningsgrad). Se avsnittet "Attändra visinngen på displayen" (sidan 13) aller "Inställning av skärmslackare" (sidan 41) fürytterligare uppliesnigar.
- Standardinställingen ar "MID".
1. Tryck på knappen [A] für att gå tilländringslåget.
2. Peka på «» på parameterdisplayen och valj “S/A SENS” under “DISPLAY”.

DISPLAY
ADJUST MODE
S/A SENS > MID
3. Peka antingen på till höger på displayen eller vrid på knappen [ROTARY] für att ställa in kändsligheten.
* Tryck antingen på LOW (lag avböjningsgrad), MID eller HIGH (hög avböjningsgrad).
4. Tryck på knappen [A] För att gå tillbaka till det tidigare laget.
Inställning av rullningshestigheten (SCROLL)
Medenna Funktion kan du sanka rullningshestigheten om den ar for hog och g Dor det svart att se skarmen.
- Standardinställingen ar "SPEED 2".
1. Tryck på knappen [A] für att gå tilländringslåget.
2. Peka pá t b pá parameterdisplayen och valj "SCROLL" under "DISPLAY".

DISPLAY
ADJUST MODE
SCROLL SPEED2
3. Peka antingen på till höger på displayen eller vrid på knappen [ROTARY] für att ställa in kändslighthen.
* Denna parameter kan ställas in mellan SPEED 1 och SPEED 7.
Modificera denna parameter samtidigt som du tittar på hur visningen på displayen änderas.
4. Tryck på knappen [A] För att gå tillbaka till det tidigare laget.
Inställing av autodimmer (DIMMER IN)
Med denna Funktion kan du dampa belysningen pa displayen for att anpassa den till belysningen aller lusstyrkan i bilen.
Tryck antingen på "AUTO" (for att koppla autodimmern till lusstyrkan i bilen) eller "ILLUMI" (for att koppla den till belysningen i bilen).
- När autodimmerfunktionen ar installd på "AUTO" dämpas bildskarmens lusstyrka i forhällande till den lusstyrka somenna sensor registrar.
- Ställ in dimmern med DMR LEVEL.
- Standardinställningen ar "AUTO".
1. Tryck på knappen [A] für att gå tilländringslåget.
2. Peka pà pà parameterdisplayen for att valja "DIMMER IN" under "APPERNCE".

APPERNCE
ADJUST MODE
DIMMER IN» AUTO
3. Peka antingen på till hoger på displayen eller vrid på knappen [ROTARY] for att ställa in dimmernivån.
* Tryck på OFF (ingen dämpning, ljust), eller på 1 (lätt dämpning) till 5 (mökt).
4. Tryck på knappen [A] För att gå tillbaka till det tidigare laget.
Inställing av displayens kontrast (CONTRAST)
Du kan modifiera kontrasten på displayen for att anpassa den till anlaggningens monteringsvinkel.
- Standardinställingen ar "6".
1. Tryck på knappen [A] für att gå tilländringslåget.
2. Peka pa t 山 pa parameterdisplayen och valj "CONTRAST" under "APPENCE".
3. Peka antingen på till hoger på displayen eller vrid på knappen [ROTARY] for att ställa in kontrasten.

APPERNCE
ADJUST MODE
CONTRAST 》 6
3. Peka antingen på till hoger på displayen eller vrid på knappen [ROTARY] for att valja "AUTO" eller "ILLUMI".
4. Tryck på knappen [A] För att gå tillbaka till det tidigare laget.
* Denna parameter kan ställas in mellan 1 och 11. Modificera denna parameter samtidigt son du tittar på hur visningen på displayen ändras.
4. Tryck på knappen [A] För att gå tillbaka till det tidigare laget.
Inställing av dimmernivå (DMR LEVEL)
Med denna Funktion kan du stalla in hur mycket displayens belysning ska dampas.
- Standardinställingen ar "3".
1. Tryck på knappen [A] für att gå tilländringslåget.
2. Peka pä pä parameterdisplayen for att valija "DMR LEVEL" under "APPERNCE".

APPERNCE
ADJUST MODE
DMR LEVEL》 3
Inkoppling av blinkende lysdiodRARY frontpanelen tas bort (BLINK LED)
Du kan se till att anlaggningens lysdiod blinkar\
när frontpanelen tas bort.
- Standardinställningen ar "OFF".
1. Tryck på knappen [A] für att gå tilländringslåget.
2. Peka pa 卡 @p a parameterdisplayen for att valja "BLINK LED" under "APPERNCE".
PERNCE
ADJUST MODE
BLINK LED》 OFF
#
3. Peka antingen på till höger på displayen eller vrid på knappen [ROTARY] För att valja "ON" eller "OFF".
4. Tryck på knappen [A] För att gå tillbaka till det tidigare laget.
Inkoppling av ljudsignal vid knaptryckningar (BEEP)
Du kan stalla in de korta eller langa signaler du hör;när du trycker på en knapp.
- Standardinställningen ar "ON".
1. Tryck på knappen [A] für att gå tilländringslåget.
2. Peka pá ↑ ↓ pá parameterdisplayen och valj “BEEP” under “APPERNCE”.

3. Peka antingen på till höger på displayen eller vrid på knappen [ROTARY] För att valja "ON" eller "OFF".
4. Tryck på knappen [A] För att gå tillbaka till det tidigare laget.
Att välja att lage
Denna parameter kan inte ställas inningar Dolby Pro Logic II-laget arinstallpantingen "MUSIC"ellER"MATRIX"(se sidan 17).
- Standardinställingen ar “PRO” für AC-PRO III och “P.EQ” für EQ SELECT.
AC-PROIII
När "STD" (standardläget) ar inkopplat kan ljudkvaliteten och ludfaltet stallas in med VSE (Virtual Space Enhancer) sa att l Judeffekten blir densamma oavsett var i bilen du sitter.
När "PRO" (PRO-laget) Är inkopplat kan du finjustera ljudkvaliteten och ljudfältet for varje plats.
EQ SELECT
När "P.EQ" (equalizer-laget) ar inkopplat kan hela frekvensområdet kompenseras med en detailjerad slät kurva.
När "BAS/TREB" (bas-/diskantlåget) År inkopplat kan frekvensnivån kompenseras genom att det delas in i 2 huvudnivaer, bas (laga toner) och diskant (höga toner).
1. Tryck på knappen [A] für att gå tilländringslåget.
2. Peka pá ↑ pá parameterdisplayen och valj "AC-PRO III" under "SOUND" och "EQ SELECT" under "SOUND".

3. Peka antingen på till hoger på displayen eller vrid på knappen [ROTARY] for att valja lage.
Val av lage
AC-PRO III STD
• Standardläget (VSE-menyn) PRO
• PRO-läget (positionsmenyn) EQ SELECT P.EQ
• Equalizer-läget (P.EQ-menyn) BAS / TREB
• Bas-/diskantläget
4. Tryck på knappen [A] für att gå tillbaka till det tidigare laget.
Konfigurering av högtalarna (SP-SETTING)
Konfigurera bilhögtalarna sà att du utnytjar anlaggningens fulla ljudpotential.
- Standardinstallingen ar "SWL + SWR".
1. Tryck på knappen [A] für att gå tilländringslåget.
2. Peka pa 山 pa parameterdisplayen for att valja "SP-SETTING" under "SOUND".

3. Peka antingen på till hoger på displayen eller vrid på knappen [ROTARY] for att ställa in högtalarna.
Högtalarkconfiguration
CTR+SW
5.1ch
konfiguration Framre/bakre högtalare (4ch)
Mithmögtalare (1ch)
Sub-woofer (1ch) SWL +SWR
4ch+sub-woofer
konfiguration Framre/bakre högtalare (4ch)
Sub-woofer (2ch)
Anmärkningar:
- Detkommen inget lijd fran mithögtalaren om du inte gör följande inställningar nr du staller in "CTR+SW".
(1) Ställ in Dolby Pro Logic II-läget på antingen "MUSIC" eller "MATRIX" enlicht anvisningarna i avsnittet "PLII-menyn (Dolby PL II)" på sidan 17.
(2) Satt mithögtalaren på "ON" enlgit anvisingarna i avsnittet "Inställning av högtalare ON/OFF (CENTER-SP/SUB-WOOFER)" (pà sidan 45).
- Detkommen inget ljud ur sub-woofern Lch när "SWU + SWR" ar installd och Dolby Pro Logic II ar installd pa "MUSIC" eller "MATRIX".
4. Tryck på knappen [A] För att gå tillbaka till det tidigare laget.
Inställing av högtalare ON/OFF (CENTER-SP/SUB-WOOFER)
Koppla in aller bort mitthögtalaren (CENTER-SP) och sub-woofern (SUB-WOOFER).
Se till attenna inställning ar "OFF" om det inte finns nàgon mitthögztalare eller sub-woofer.
- Mitthögtalaren (CENTER-SP) kan ställas in**
när Dolby Pro Logic II-läget arinstall på
antingen "MUSIC" eller "MATRIX" och "SP-SETTING" på "CTR-SW".
- Standardinställingen ar "ON".
1. Tryck på knappen [A] für att gå tilländringslåget.
2. Peka pa t ppa parameterdisplayen och valj "CENTER-SP" under "SOUND" och "SUB-WOOFER" under "SOUND".

3. Peka antingen på « till höger på displayen eller vrid på knappen [ROTARY] För att valja “ON” eller “OFF”.
4. Tryck på knappen [A] För att gå tillbaka till det tidigare laget.
Inställing av högtalarfiltrens frekvens (HPF/SUB-W LPF)
Medenna Funktion kan du modifiera filterfrekvensen for att anpassa den till de hogtalare du anvander.
- Vilka filter (HPF/SUB-W LPF) du kan använda beror på Dolby Pro Logic II-inställingen.
Dolby Pro Logic II
-installing Filter HPF SUB-W LPF*1 MUSIC/MATRIX ej justerbart justerbart OFF justerbart justerbart
*1 Det går bara att justera filtret nar “SUB-WOOFER”år inställd på “ON”.
- Standardinställingen ar "THROUGH".
Filterjustering
HPF (installing av hogpassfilter)
Detta filter tar bort basljud från de främre och bakre högtalarna.
THROUGH 50Hz 80Hz 120Hz
Ställ in filtret after högtalaren när du använder högtalare med liters diameter.
THROUGH
Används für högtalare som kan generera bas.
SUB-W LPF (installing av laggpassfilter for sub-woofern)
Detta filter tar bort diskantljud fran sub-woofern.
THROUGH 50Hz 80Hz 120Hz
Ställ in filterfrekvensen after sub-wooern.
THROUGH
Anvands for en inbyggd sub-woofer med lagpassfilter.
1. Tryck på knappen [A] für att gå tilländringslåget.
2. Peka pa t ppa parameterdisplayen och valj "HPF" under "SOUND" och "SUB-W LPF" under "SOUND".

3. Peka antingen på till hoger på displayen eller vrid på knappen [ROTARY]forall att stalla in frekvensen.
* Valj THROUGH, 50Hz, 80Hz eller 120Hz.
4. Tryck på knappen [A] För att gå tillbaka till det tidigare laget.
Inställing av inbyggd Förstärkare ON/OFF (AMP CANCEL)
Ställ inenna parameter på ON eller OFF beroende på om en extern forstarkare används erler ej.
Sätt AMP CANCEL på “ON” (ingen inbyggd Förstärkare) Near du ansluter en separat Förstärkare och inte skä använda den inbyggda Förstärkaren.
- Standardinställingen ar "OFF" (inbyggd Förstärkare används).
1. Tryck på knappen [A] für att gå tilländringslåget.
2. Peka pä tä pä parameterdisplayen for att valja "AMP CANCEL" under "SOUND".

3. Peka antingen på till höger på displayen eller vrid på knappen [ROTARY] För att valja "ON" eller "OFF".
4. Tryck på knappen [A] För att gå tillbaka till det tidigare laget.
Inställing av högtalarnas utnivå (SP GAIN)
Använd anlaggnings testtonsfunktion for att modifera volymen sà att den blir densamma frān alla högtalarna.
- Denna parameter kan bara stallas in nar Dolby Pro Logic II-laget ar instaltt på antingen "MUSIC" eller "MATRIX".
- Standardinställingen ar "0dB".
1. Tryck på knappen [A] für att gå tilländringslåget.
2. Peka pa t ppa parameterdisplayen for att valja "SP GAIN" under "SOUND".

3. Peka pá EDT.
Andringslaget for SP GAIN kopplas in.
4. Peka pa 山 ppadisplayenforattvalja den parameter som skäandras.
For varje tryck pa 卡 andras parametern enligt foljande:
Parametrar

*1 "CTR GAIN" visas bara Near "SP-SETTING" ar installd pada "CTR+SW" och "CENTER-SP" pada "ON".
*2“SUB-W GAIN” visas bara nár “SUB-WOOFER” ār installd på “ON”.
5. Peka antingen på till hoger på displayen eller vrid på knappen [ROTARY] for att ställa in utnivân.
Utniv'an kan stallas in mellan -10 dB och +10 dB.
6. Upprepa moment 4 och 5 fort att andra varje parametern.
7. Tryck på knappen [A] För att gå tillbaka till det tidigare laget.
Inställing av tidsforskjutning für de bakre högtalarna (PL II DELAY)
När lJudet när lyssningspositionen beror på var de bakre högtalarna ar placerade och på bilens storlek. Genom att modifiera tidsforskjutningen for de bakre högtalarna kan du se till att lJudet frän de bakre högtalarna kan hör samtidigt som lJudet frän de främre högtalarna.
- Denna parameter kan bara ställas in nar Dolby Pro Logic II-laget ar installt på antingen "MUSIC" eller "MATRIX".
- Standardinställningen ar "0ms".
1. Tryck på knappen [A] für att gå tilländringslåget.
2. Peka pá t b pá parameterdisplayen och valj "SRD-SP" under "PL II DELAY".

3. Peka antingen på till höger på displayen eller vrid på knappen [ROTARY]forall att stalla in tidsforskjutningen.
* "SRD-SP" kan ställas in mellan 0 och 15 ms.
4. Tryck på knappen [A] För att gå tillbaka till det tidigare laget.
Detaljinställningar for musiklåget (PL II CONT)
Medenna Funktion kan du finjustera musiklaget nar Dolby Pro Logic II-laget ar install på "MUSIC".
- Denna parameter kan bara stallas in Near Dolby Pro Logic II-laget ar installet pa "MUSIC".
- Standardinställingen für PANORAMA är "NO", für DIMENSION "3" och für CTR WIDTH "3".
Parametrar
PANorama (brett ljudfalt)
Breddar det frâmre ljudfälte till de bakre högntalarna. Ställ in denna parameter på “YES” om du inte tycker att du har nàgon surroundeffekt.
DIMENSION (ljudfalt bak aller fram)
Flyttar lJudfaltet till framre eller bakre delen av bilen. Om lJudfaltet fram uller bak dominerar kan du kompensera for det.
Inställingen 3 ar mittenläget. Med inställingarna 2 till 0 flytas ljudfälte till den bakre delen och med inställingarna 4 till 6 till den främre delen.
CTR WIDTH (installing av mitthögtalarens [judbild]) ^*1
Modifierar mittenkanalens fasta position mellan mitthogtalaren och de främe högre och vänstra högtalarna.
När mittljudet delas lika mellan vänster och höger ökar hela ljudfältet och ger en känsla av naturlig expansion.
Med inställingen 0kommen allt mittlud frän mithögtalaren.
Med inställingen 7 delas mittludet upp likamellan de främre högre och vänstra högtalarna.
*1 "CTR WIDTH" visas bara Near "SP-SETTING" ar installd pa "CTR+SW" och "CENTER-SP" pa "ON".
1. Tryck på knappen [A] für att gå tilländringslåget.
2. Peka pa 卡 ppa parameterdisplayen och valj onskad parameter under "PL II CONT". Parametrarna ar PANORAMA, "DIMENSION"och CTRWIDTH

3. Peka antingen på till höger på displayen eller vrid på knappen [ROTARY] För att ställa in parametern.
* Valj "YES" aller "NO" für "PANorama".
* “DIMENSION” kan ställas in mellan 0 och 6.
* "CTR WIDTH" kan ställas in mellan 0 och 7.
4. Tryck på knappen [A] För att gå tillbaka till det tidigare laget.
AUX-funktionen
Anlaggningen har en RCA-ingang sa att du kan lyssna pa Ijud och musik fran extern utrustning som ar ansluten till den.
Inställing av AUX och TEL
Du kan lyssna på ljud och musik fran extern ansluten utrustning eller koppla dina telefonsamtal till högztalarna.
Om en TEL INT aller en extern apparat ar ansluten till anlaggningen kan du valja TEL-lage aller AUX-lage.
- Standardinställningen ar "AUX".
1. Tryck på knappen [A] für att gå tilländringslåget.
2. Peka pa t 山山 pa parameterdisplayen for att valja "AUX/TEL" under "SETTING".

3. Peka antingen på till höger på displayen eller vrid på knappen [ROTARY] För att valja "AUX" eller "TEL".
AUX:
AUX/TEL-kabeln används für ljudet från en extern apparat.
TEL:
AUX/TEL-kabeln anvands for ljudet fran mobiltelefonen.
4. Tryck på knappen [A] För att gå tillbaka till det tidigare laget.
Inställning av AUX-ingängens känslighem (AUX SENS) i AUX-laget
Medenna Funktion kan du stalla in kansligeheten for externa apparater som ar anslutna till anlaggningen.
- Du kan gora inställingen)när "AUX/TEL" ar installd på"AUX".
- Standardinställningen ar "MID".
1. Tryck på knappen [A] für att gå tilländringslåget.
2. Peka pā tūpā parameterdisplayen for att valja “AUX/SENS” under “SETTING”.

3. Peka antingen på till hoger på displayen eller vrid på knappen [ROTARY]forall att ställa in innivån.
* Tryck på LOW, MID eller HIGH.
4. Tryck på knappen [A] För att gå tillbaka till det tidigare laget.
Inställing av bilhögtalare für mobiltelefonljudet (für extrautrustingen TEL-002)
- Ställ in mobilitelefonen sa att ljudetkommen ur högtalarna.
- Standardinställingen ar "RIGHT".
1. Tryck på knappen [A] für att gå tilländringslåget.
2. Peka pa t p a parameterdisplayen for att valja "TEL-SP" under "SETTING".

3. Peka antingen på till höger på displayen eller vrid på knappen [ROTARY]foralljaleft"llerRIGHTLEFT:
Telefonljudet kommt ur den främre vänstra högtalaren.
RIGHT:
Telefonljudet kommt ur den främre högra högitalaren.
4. Tryck på knappen [A] För att gå tillbaka till det tidigare laget.
Inställing av avbrott für mobiltelefon
Om du koplar din mobiletelefon till anlaggningen med en speciell enchet (extrautrustningen TEL-002) kan du hora Telefonludet genom bilens högtalare.
- Standardinställingen ar "OFF".
1. Tryck på knappen [A] für att gå tilländringslåget.
2. Peka pā tūpā parameterdisplayen for att valja "TEL-SWITCH" under "SETTING".

3. Peka antingen på till hoger på displayen eller vrid på knappen [ROTARY]foralljinstallning.
För varje steg du vrider knappen [ROTARY]
ändras inställingen i följande ordning:
OFF ON MUTE OFF..
OFF:
Anlaggning fungerar som vanligt oksa när du anvander mobiltelefonen.
OBS:
- Om du ansluter en hands-free mâste du se till att inställningen ar ON für att kunna höratefonljudet via högtalarna.
ON:
Telefonludet kommt ur de högtalare som ar anslutna till anlaggningen.
* När du Telefonljudetkommen ur bilhögitalarna kan du justera volymen genom att vrida knappen [ROTARY].
MUTE:
Ljudet frän anlaggningen stågs av under telefonsamtal.
4. Tryck på knappen [A] För att gå tillbaka till det tidigare laget.
Inställing av autovolym (CALIBRATE/A-VOL SENS)
Du kan andra volymen automatiskt sa att den anpassas till bilens hastighet.
- Standardinställningen ar "LOW".
1. Tryck på knappen [A] für att gå tilländringslåget.
2. Peka pa t ppa parameterdisplayen och valj "CALIBRATE" under "SETTING".

3. Accelererata till en hastighet på 50~km / h
4. Peka på START;när du är uppe i 50 km/h. Kalibreringen är utförd.
After 2 sekunder aller merkommen du att hora en lang ljudsignal och texten "SUCCESSIONF"visas pà displayen.
Om du hör en kort ljudsignal har kalibreringen misslyckats. Upprepamomenten frän punkt 3.
5. Ställ sedan in känsligehen. Peka på «» « auf parameterdisplayen für att välja “A-VOL SENS” under “SETTING”.

6. Peka antingen på till höger på displayen eller vrid på knappen [ROTARY]foralljka kanslighat.
För varje steg du vrider knappen [ROTARY]
ändras inställingen i följande ordning:
OFF (ingen volymändring) LOW (liten volymändring) MID-LOW MID MID-HIGH HIGH (stor volymändring) ...
7. Tryck på knappen [A] För att gå tillbaka till det tidigare laget.
Utförande avensystemkontroll
Med denna Funktion kan du vid behov genomföra en systemkontroll frän äandringslåget.
1. Tryck på knappen [A] für att gå tilländringslåget.
2. Peka pa t ppa parameterdisplayen for att valja "SYSTEM CHECK" under "SETTING".

3. Peka på START och häll kvar fingret i 1 sekund eller langre.
"System Check" visas på displayen.
4. Tryck på knappen [ROTARY].
Systemkontrollen startar.
När systemkontrollen ar avslutad visas texten "Completed" på displayen.
5. Tryck på knappen [ROTARY] igen.
Huvudsidan for radiolagetvisas.
Att användasakerhetsfunktionen(CODEMATIC)
Denna Funktion forsvarar for manniskor som inte kanner till peksekvensen att anvanda anlaggingen. När frontpanelen sitter på, "CODEMATIC" ar installd på "ON" och anlaggingen slås på visas sakerhetssidan.
Om du pekar pà displayen i rätt ordning visas "SUCCESSION" och anlaggningen stångs av.
Nästa gäng du sätter på den visas inte sakerhetssidan, utan huvudsidan i radiolaget aller CD-laget.
1. Tryck på knappen [A] für att gå tilländringslåget.
2. Peka pa t ppa parameterdisplayen och valj "CODEMATIC" under "SETTING".

2 slags parametrar for "CODEMATIC" visas, sādana für vilka "ON" eller "OFF" visas till höger på skärmen och sādana für vilka "INPUT" visas till höger på skärmen. Välj en parameter För vilken "ON" eller "OFF" visas till höger på displayen.
3. Peka antingen på till höger på displayen eller vrid på knappen [ROTARY] För att valja "ON" eller "OFF".
4. Peka pa 卡 pa parameterdisplayen och valj "CODEMATIC" under SETTING". Valj en parameter for vilen "INPUT" visas till hoger pa displayen.
5. Peka på INPUT. Sakerhetssidan visas.
6. Lagg in pekkoden.
* Peka på en av 5 punkter (vänster, mitten, höger, upptill till höger eller nedtilt till höger) på displayen.
Varjegang du pekar på displayenalandev pekkodsindikatorerna.
* Peka till exempl på (1) mitten, (2) upptill till höger, (3) vänster och (4) nedd till höger i den ordningen. Du kan också peka på samma punkt flera gänger. Efter 4 tryckningerkommen du att höra en lang ljudsignal ochkommen tillbaka till utgangsläget.
Att stänga av CODEMATIC
Om du har glömt sekordningen kan du antingen peka ① nedd till höger, ② vänster, ③ upp till till höger och sedan ④ höger i den ordningen eller trycka på [SCN] på fjärrkontrollen.

7. HUR MAN ANVÄNDER OLIKATILLVALSKOMPONENTER
Hur man anvander en CD-växlare
CD-växlare
När en CD-växlare ar ansluten via CeNET-kabeln kanenna styras frän anlaggningen. Total 2 stycken CeNET-anslutna CD-växlare kan styras.
DVD-växlare
När en DVD-växlare ár ansluten via CeNET-kabeln kanenna styras frän anlaggningen. För att titta på DVD fordras att en monitor ansluts.
DVD-växlares styrning och display ar forenklade
pàenna anlaggning och alla DVD-växlarfunctiomer stöd inte. Använd den
fjarrkontroll som medfoljer DVD-växlaren for att
strya den. Se den bruksanvising som medfoljer
DVD-växlaren for mer information.
När 2 CD-växlare ar inkopplade
Tryck på knappen [ROTARY] für att välja en CD-växlare. (För varje tryck på knappen [ROTARY]alandras CD-växlare.)
- Om CD-växlaren inte innehäller nagot magasin visas "NO MAG" och om magasinet inte innehäller一定程度 CD visas "NO DISC" für det skivnumret.
Se avsnittet "Att andra titelvisingen" (sidan 14) for mer information on titeldisplayen.
Skärmbilderr i CD-växlaråget
Huvudsidan (CD-växlaråget)
Visas nár du trycker på knappen [ROTARY] och valjer CD-växlaråget.

Peka till vänster på displayen och häll kvar fingret i 1 sekund eller mer För att övergå till forenklad drift.

Spär/speltidsdisplayen
T01/02: 00: Det spår som spelas och speltiden visas.
Om du pekar pa 一 已 一 eller vid standarddrift kan du valja vilket spar du skaspela eller snabbt forflyta dig framat eller bakat mellan sparen.
Titeldisplayen
Om du pekar på denna kopplas displayen om.
Skivnummerdisplayen
Om du pekar pà ➀ ➁ vid standarddrift kan du välja en skiva.
MODE
Om du pekar på detta visas underfunktioner.
När du pekar och trycker i 1 sekund eller langre visas skivlistan.
T-SCAN/D-SCAN
Visas under avsökning. Om du pekar pátexten avslutas avsökningen.
T-RPT/D-RPT
Visas under repeterad avspelning. Om du pekar på texten avslutas den repeterade avspelningen.
T-RDM/D-RDM
Visas under slumpvis avspeling. Om du pekar på texten avslutas den slumpvis avspelingen.
DISC
Om du pekar på detta spelas{nsta spar.
(endast på displayen für forenklad drift) Tryck på dessa knappar for att valja det spår du vill spelva.
Om du pekar på dessa knappar och häller kvar fingret forflyttas du snabbt framåt eller bakat mellan spåren.
Skivlistdisplayen (CD-växlarläget)
Visas nár du pekar på MODE på huvudsidan och häller kvar fingret i 1 sekund aller langre. Skivans namn

>>:Inställning págår
Om du pekar pa ett skivnamn kommer du tillbaka till huvudsidan och avspelningen startar fran det forsta sparet pa den skiva du pekade pa.
←PREV-RTN:
Om du pekar på denna text visas den foregående skivlistan. När du pekar och trycker i 1 sekund eller langrekommen du tillbaka till huvudsidan.
NEXT:
Om du pekar på denna text visas nasta skivista.
A WARNING
CD-ROM-skivor kan inte spelas i alla CDvaxlare. Det beror på modellen.
OBS:
- Det kan hända att vissa CD-skivor som har spelats in med CD-R-/CD-RW-funktionerna inte kan användas.
Att ställa in CD-växlarläget
1. Tryck på knappen [ROTARY] for att valja CD-växlarläget.
* Enheter som inte ar inkopplade visas inte. När CD-laget ställs in startup avspelningen automatiskt.
Att pausa avspelningen
1. Tryck på knappen [▶■].
Att aterupta avspelningen
1. Tryck på knappen [▶■]igen.
Att välja en CD
1. Peka på urskivnummerdisplayen for att valja en skiva.
Avspelningen börjar.
* Om den skiva du har valt inte finns i magasinet visas inte dess skivnummer.
* Om du pekar på DISC ↑ spelas nasta skiva.
Att välja en skiva ur skivlistan
1. Peka på MODE och häll kvar fingret i 1 sekund eller langre.
Skivlistan visas. Om du pekar på NEXT visas;nasta del av skivlistan.
2. Peka paskivans namn.
* Om den skiva du har valt inte finns i magasinet visas "NO DISC" für dess skivnummer.
* Om du väljeramma skiva som spelas böjar avspelningen om frän det Första spåret påenna skiva (toppfunktionen).
Att välja ett spår
1. Peka pa 山 pa spardisplayen for att lyssna pa nasta spar.
2. Tryck pa 山 pa spardisplayen tva ganger for att lyssna pa foregaende spar.
Om du pekar pa ♕ spelas nàsta spar. Om du trycker pa ♕ flera gänger fforflyttar du dig ett spar framat for varje tryckning och detta spar spelas.
Om du pekar pa t spelas foregäende spar. Om du trycker pa t flera ganger forflyttar du dig ett spar bakat for varje tryckning och detta spar spelas.
* Om du trycker på «» pa spårdisplayen två gänger nar början av ett spar spelas forflyttas du ibland 2 spar tillbaka.
Snabb forflytting Framat/ Bakat
1. Peka pa 日 pa spardisplayen for att forflytta dig framat.
2. Peka pa pā spārdisplayen für att förllyta dig bakāt.
Toppfunktionen
Toppfunktionen innebär att avspelningen börjar med det Första späret på skivan.
1. Peka på MODE och hull kvar fingret i 1 sekund eller langre.
Skivlistan visas. Om du pekar på NEXT visas;nasta del av skivlistan.
2. Peka på skivans namn.
* Om den skiva du har valt inte finns i magasinet visas "NO DISC" für dess skivnummer.
* Om du valjer somma skiva som spelas börjar avspelningen om från det Första spåret påenna skiva.
Avsökning
Söker upp och spelar de Första 10 sekunderna av varje spår på en skiva automatiskt.
Avsökningen fortssatter tills du stanger av den.
Avsökningsfunktionen ar användbarRARY sokerett visst spär.
1. Peka på MODE.
2. Peka på T-SCAN.
Visningen av driftssatt andras till "T-SCAN" och avsokningen börjar.
* Avsökningen börjar med spåret after det som spelas.
Att avsluta avsokningen
1. Peka på T-SCAN.
T-SCAN-displayen änderas till "MODE" och det spar som spelades när du tryckte på T-SCAN spelas.
Avsökning av CD-växlaren
Söker upp och spelar de Första 10 sekunderna av det Första spåret på alla skivorna i CDväxlaren automatiskt. Avsökningen fortsätter tills du stänger av den.
Avsökningsfunktionen ar användbarRARY dosoker en viss CD.
1. Peka på MODE.
2. Peka pà D-SCAN.
Visningen av driftssatt andras till "D-SCAN" och avsokningen börjar.
* Avsökningen börjar med skivan after den som spelas.
Att avsluta avsokningen
1. Peka pà D-SCAN.
D-SCAN-displayen andras till "MODE" och det spar som spelades när du tryckte på D-SCAN spelas.
Repeterad avspelning
Med denna Funktion kan du spel aett spar flera ganger i rad. Avspelningen fortssatter tills du stanger av den.
1. Peka på MODE.
2. Peka pà T- REPEAT.
Visningen av driftssatt andras till "T-RPT" och den repeterade avspelningen börjar.
Att avsulta repeterad avspelning
1. Peka på T-RPT.
T-RPT-displayen ändras till "MODE" och det spår som spelades när du tryckte på T-RPT spelas.
Repeterad avspelning av enskiva
När alla spår på en skiva har spelats upprepas avspelningen automatiskt frän det Första spåret. Avspelningen fortsetter tills du stänger av den.
1. Peka på MODE.
2. Peka pà D- REPEAT.
Visningen av driftssatt andras till "D-RPT" och den repeterade avspelingen börjar.
Att avs抗体 repeterad avspelning
1. Peka pá D-RPT.
D-RPT-displayen ändras till "MODE" och det spår som spelades när du tryckte på D-RPT spelas.
Slumpvis avspelning
Olika spår på skivan spelas i slumpmüssig ordning. Avspelningen Fortsätter tills du stänger av den.
1. Peka på MODE.
2. Peka på T-RANDOM.
Visningen av driftssatt andras till "T-RDM" och avspelningen börjar.
Att avsluta slumpvis avspelning
1. Peka på T-RDM.
T-RDM-displayen ändras till "MODE" och det spår som spelades när du tryckte på T-RDM spelas.
Slumpvis avspelning av skivor
Olika spår eller skivor spelas automatiskt i slumpmässig ordning. Avspelningen fortsätter tills du stänger av den.
1. Peka på MODE.
2. Peka på D-RANDOM.
Visningen av driftssatt andras till "D-RDM" och avspelningen börjar.
Att avsluta slumpvis avspelning av skivor
1. Peka pà D-RDM.
D-RDM-displayen ändras till "MODE" och det spar som spelades;när du tryckte på D-RDM spelas.
Hur man anvanderen TV-tuner
Funktioner på TV-tunern
När en TV-tuner som säljs separat ar inkopplad i bilstereon via en CeNET-kabel styrs smtliga Funktioner på TV-tunern frän huvudenheten. För att kunna se på TV kravs det en TV-tuner och en monitor.
Skärmbilderr i TV-läget
Huvudsidan
Visas när du trycker på knappen [ROTARY] och valjer TV-låget.

Peka till vänster på displayen och häll kvar fingret i 1 sekund eller mer För att övergå till forenklad drift.

Kanaldisplayen
1ch: Den mottagna kanalen visas.
Genom att peka pa 05 ether vid standarddrift kan du stalla in stationer genom sokning aller manuellt.
Titeldisplayen
3ch: Namnet på den mottagna stationen visas.
VTR: I videoläget
Om du pekar på denna kopplas displayen om.
Mottagningsband
TV1: Bandets namn
Snabbvalsstation nr.
Peka pa 卡 vid standarddrift for att valja en sparad station.
MODE
Om du pekar på detta visas underfunktioner.
När du pekar och trycker i 1 sekund eller langre visas den forinställda minneslistan.
P-SCAN: Visas under en avsökning av sparade stationer. Om du pekar på texten avslutas avsökningen.
A-STORE: Visas under en automatisk lagring. Om du pekar på texten avslutas lagringen.
BAND
Peka på denna text För att byta mottagningsband.
Peka och häll kvar fingret i 1 sekund eller langre for att växla mellan manuell inställning och sökning.

(endast på displayen für forenklad drift)
Peka på dessa knappar for att starta stationsinställning genom sökning eller stegvis (i det manuella inställningslåget).
Peka ochhall kvar fingret for att startasnabbbinstallning (idet manuellainstallningslaget).
■ Listamedsnabbvalsstationer
Visas nár du pekar på MODE på huvudsan och häller kvar fingret i 1 sekund eller langre.

Stationsnamn
>>:
Inställning pagar
RTN:
Om du pekar på denna textkommen du tillbaka till huvudsidan.
Att ställa in TV-läget
1. Tryck på knappen [ROTARY] für att valja TV-låget.
For varje tryck på knappen [ROTARY]
Ändras laget enlicht foljande:
* Enheter som inte ar inkopplade visas inte.
Att byta mottagningsband
1. Peka på BAND För att byta mottagningsband.
För varje tryck på BAND öndras mottagningsbandet enlgit följande:
TV1 TV2 TV1...
Sökning
Sökningen används für att automatisch ställa in stationer med god mottagning.
1. Peka på BAND ochhall kvar fingret i 1 sekund eller langre nar texten MANU visas. När texten MANU forsvinner går det att Göra automatisk sökning.
2. Peka pà pà kanaldisplayayen. SEEK UP/SEEK DOWN visas och inställingen brojar. Stationer med god mottagning stàlls in automatiskt.
Att avsluta instalIningen
1. Pekapá←b→pakanaldisplayenigen.
Manuellinställning
Det finns 2 satt att gora manuella inställningar: snabbinställning och steginställning.
Vid steginställning andras frekvensen i 1 steg i taget. Vid snabbinställnng kan du snabbt stalla in önskad frekvens.
1. Peka på BAND ochhall kvar fingret i 1 sekund eller langre nar texten MANU inte visas.
När texten MANU visas går det att Göra manuella inställningar.
2. Ställ in en kanal med utsändning med hjälp av kanaldisplayen.
Det finns 2 satt att gora manuella inställingar: snabbinställning och steginställning.
* Vid steginställning öndras kanalerna i 1 steg i taget.
Peka pà ↑ ¶ à frekvensdisplayen.
* Vid snabbinställng öndras kanalerna kontinuerigt.
Peka pã←pãkanaldisplayen.
Inställningen upphör när du tar bort fingret fran displayen.
För att se på en snabbvalsstation
Medenna Funktion kan du valja en forinstalld station.
1. Peka på MODE och häll kvar fingret i 1 sekund eller langre. Listan med snabbvalsstationer visas.
2. Peka pá den station du vill lyssna pá
* Du kan också ställa in en sparad station genom att peka på « ⌒ ⌒ på en snabbvalsstation.
Att avsluta installningen
1. Peka pà RTN.
Förinställning
Totalt 12 TV-stationer kan sparas i minnet (6-TV1 och 6-TV2). På sä satt kan du valja ut dina favoritstationer och spara dem i minnet.
1. Peka på BAND für att byta mottagningsband.
2. Välj den stationen som ska sparas med kanaldisplayen.
3. Peka på MODE och häll kvar fingret i 1 sekund eller langre. Listan med snabbvalsstationer visas.
4. Peka på den minnesposition där du vill spara stationen och häll kvar fingret i 2 sekunder eller langre. En lang ton hörs och stationen sparas i minnet.
Om du hör en kort ton sparas inte stationen i minnet. Upprepa momentarily frän punkt 1.
Automatisk lagring
Denna Funktion valjer automatiskt ut 6 TV-stationer och sparar dem i minnet.
Om det inte finns 6 stationer med god mottagning ligger tidigare sparade stationer kvar i minnet och bara stationer med god mottagning sparas.
1. Peka på MODE.
2. Peka på A-STORE ochhall kvar fingret i 2 sekunder eller langre. Visningen av driftssatt andras till "A-STORE" och snabbvalsstationens nummer visas på displayen.
* Stationer med god mottagning söks upp automatiskt och sparas på minnespositionerna (nummer 1 till 6) med den station som har lögst frekvens Först.
Anmärkningar:
- Vid automatisk lagring raderas tidigare sparade stationer ur minnet.
- Om det finns färre øn 6 stationer med god mottagning ätergår sökningen automatisk till de laga frekvenserna och en ny automatisk lagring genomfors. Om det after två automatiska lagringar fortfarande finns färre øn 6 stationer med god mottagning ligger tidigare sparade stationer kvar på de Återstående minnespositionerna.
Avsökning av sparade stationer
Medennafunctiontasstationernaemotidenordning som de liggeriminnet,saatt du kankontrollerautsandningarna.
1. Peka på MODE.
2. Peka på P-SCAN. Visningen av driftssattändras till “P-SCAN” och snabbvalsstationens nummer visas på displayen.
* De sparade stationerna ställs in i tur och ordning i minst 7 sekunder var. Stationer med dālig mottagning hoppas över och Nästa station ställs in.
TV-stationerna tas emotenet folfjande: TV1 (1 6) TV2(1 6) TV1(1 6) och sà vidare.
Att avsluta avsokningen
1. Peka på P-SCAN.
P-SCAN-displayen änderas till "MODE" och de stationer som var inställda Near du tryckte på P-SCAN tes emot.
Att titta på video
TV:n har en VTR-ingang som 1 extern apparat kan kopplas till. Anslut en 12 V videobandspelare (VCP aller VCR) till TV-ingangen.
1. Tryck på knappen [▶■]. VTR visas och anlaggningen kopplas om till VTR-låget.
* TV-skärmen övergår till videolåget och det går att titta på videoband.
Att gà tillbaka till TV-läget
1. Tryck på knappen [▶■]igen.
Inställing av TV-området (TV AREA)
När du väljer TV-område (TV:ns mottagningsområde) andras TV:ns områdesinställning.
- Standardinställingen ar “GERMANY”.
1. Tryck på knappen [A] für att gå tilländringslåget.
2. Peka pa t ppa parameterdisplayen for att valja "TV AREA" under "TUNER".

3. Peka antingen på till hoger på displayen eller vrid på knappen [ROTARY] for att valja område.
4. Tryck på knappen [A] För att gå tillbaka till det tidigare laget.
Inställing av TV:ns diversitet (TV DIVER)
Du kan andra TV-antennens mottagningsinstallning.
- Ställ inenna parameter på "OFF"ningar du inte anvander en TV-diversitetsantenn.
- Standardinställningen ar "ON".
1. Tryck på knappen [A] für att gå tilländringslåget.
2. Peka pa t ppa parameterdisplayen och valj "TV DIVER" under "TUNER".

3. Peka antingen på till höger på displayen eller vrid på knappen [ROTARY]forall "ON"eller "OFF".
4. Tryck på knappen [A] För att gå tillbaka till det tidigare laget.
DAB-kontrollfunktion
När en DAB-mottagare (DAH913 eller DAH923, saljs separat) År ansluten via en CeNET-kabel jeg det att styra samtliga Funktioner på DAB-mottagaren.
Att lyssna på en DAB-station
1. Tryck på knappen [ROTARY] für attalandradriftsläge.
Anmärkningar:
- Samma information visas på displayen bade i standardlägget och snabbvalslage nuten DABstation tesmot.
- Antalet program och deras sändningstider beror på DAB-stationerna.
- Om DAB-signalerna ar alltför svaga stängs ljudet tillfälligt av.
Sökning
1. Tryck på knappen [ROTARY] für att välja DAB-läget.
2. Peka på till vänster på displayen Texten "DAB" tandes på displayen när anlaggningen tar emot en DAB-station.
* Om anlaggningen inte kan hitta naggon DAB-station avbryts sökningen. Displayen Återgår till utgangslåget.
Manuellinstalling
1. Tryck på knappen [ROTARY] für att välja DAB-laget.
2. Peka på BAND ochhall kvar fingret i 1 sekund eller langre om texten "MANU"inte visas.
När texten "MANU" visas går det att góra manuella inställningar.
3. Peka på till vänster på displayen for att ställa in en station.
* Om du inte gör nágon installing inom 7 sekunder avbryts den manuella installingen och displayen Återgår till utgangsläget.
Byte av program
1. Tryck på knappen [ROTARY] für att välja DAB-läget.
2. Peka pa till vander p a displayen for att byta program for DAB-stationen.
OBS:
- Det nga programmet kan ha sama namn, beroende på DAB-programmet i fraga.
Programavsökning
Medenna Funktion ställs alla program som kan tas emot für en DAB-station in i 10 sekunder i tur och ordning. Avsökningsfunktionen ar anecdbarRARY du söker att visst program.
1. Tryck på knappen [ROTARY] für att välja DAB-läget.
2. Peka på MODE.
3. Peka på S-SCAN.
Texten "S-SCAN" tänds och anlaggningen böjar ställa in programmes i 10 sekunder vardera.
For varie inställning visas programnamnet på displayen.
4. Peka på S-SCAN für att avbryta avsökningen;när det önskade programmet har ställt in.
Manuell lagring i minnet
Anlaggningen har en manuell minnesfunktion for DAB-program. Upp till 18 program (6 program per minne) kan forinstallas for snabbvalsknapparna.
[M1], [M2] och [M3]
1. Tryck på knappen [ROTARY] für att valja DAB-laget.
2. Peka på BAND ochwälj ess av alternativen ovan.
3. Peka på MODE och häll kvar fingret i 1 sekund eller langre. Listen med snabbvalsstationer visas.
4 Peka pa den minnesposition där du vill spara stationen och häll kvar fingret i 2 sekunder eller langre. En lang ton hör och stationen sparas i minnet. Om du hör en kort ton sparas inte stationen i minnet. Upprepa momentarily frän punkt 1.
OBS:
- Avbrottprogram (PTY och INFO) kan inte lagras i det manuella minnet.
Att hamta en snabbvalsstation
1. Tryck på knappen [ROTARY] für att valja DAB-laget.
2. Peka på BAND. För varje tryck på BAND ändras displayen enlgit följande:
MEMO1 MEMO2 MEMO3 MEMO1...
3. Peka på till hoger på displayen for att hamta en snabbvalsstation.
AF-funktionen
Med AF-funktionen går radion över till en annan frekvens på samma radionät for att bibehälla basta möjiga mottagningskvalitet.
- Fabrikinstallingen ar “ON”.
- Om mottagningsforhällandena for den station du lyssnar på försämras tänds "SEARCH" på displayen och radion böjr söka after sama program på nágon annan frekvens.
Se avsnittet "Hur man anvander RDS" i respektive bruksanvisning for narmare detailjer om "AF-funktionen" (se sidan 26).
Hur man stänger av AF-funktionen
Hur man slár på AF-funktionen
AF-oversgang mellan RDS och DAB
Omamma program sänds báde via RDS och via DAB och denna Funktion ar páslagen, gár huvudapparaten automatiskt over till det lage)där mottagningskvaliteten blir böst.
Trafikmeddelanden (TA)
När radion är i TA-beredskapslage och ett
trafikmeddelande böjr sändas har
trafikmeddelandet högsta prioritet och bilstereon
går over till det oavsett vilket faktionslage som
var inställ. Det går även att automatiskt ställa in
stationer som sönder trafikprogram (TP).
- Denna Funktion gär bara att använda;när indikatorn "TP" ar tänd på displayen. När "TP" ar tänd betyder det att den inställda DAB- eller RDS-stationen även sänder program med trafkmeddelanden.
- Se avsnittet "Hur man anvander RDS" i respektive bruksanvising for narmare detailer om "Trafikmeddelanden" (se sedan 27).
Hur man ställer bilstereon i TAberedskapläge
Hur man stänger av TA-beredskapslaget
Sökning after en TP-station
Observera:
- Om radion inte kan hitta nágon TP-station avbryts stationssökningen.
- Det kan hända att "TP"alands på displayen under mottagning av en TP-sändning frän en RDS-station. Tryck i sö fall på [TA]-knappen for att starta TP-stationsökningen. Tryck en gang till på [TA]-knappen for att atergå till det tidigare laget.
Information (INFO)
När radion ar i INFO-beredskapläge och ett informationsprogram av vald typ böjar sändas gär bilstereon automatiskt over till det programmet.
Hur man ställer bilstereon i INFOberedskapsläge
Om du trycker in [TA]-knappen och häller den intryckt i mer än 1 sekund tänds "INFO" på displayen och bilstereo ställs i INFO-beredskapsläge tills att program av valid typ börjar sändas. När ett södant program börjar sändas visas informationens typ på displayen. Om du trycker in [TA]-knappen och häller den intryckt i mer än 1 sekund medan det valda informationsprogrammet häller på att tes emot, avbryts mottagningen av det programmet och bilstereåtergår till INFO-beredskapslätget.
Hur man stänger av INFO-beredskapen
Tryck in [TA]-knappen ochhall den intryckt i mer an 1 sekund for att avbryta INFO-beredskapen.
Hur man valjer informationstyp
Detta ar en fonction for att sla P' er stanga AV olica sorters information i informationsberedskapslaget.
Det går att slå PÅ upp till 6 olika sorters information.
Välj bland följande 6 informationstyper:
Informationstyp SVENSKA Innehäll Koll. Tra Trafikmeddelande Service Varnings/servicemeddelande Nyheter Nyhetsrapport Väder Lokalt väder Evenema Utannonsering av evenemang Extra Speciella handelser
1. Peka pa MODE.
2. Peka på INFO SEL och välj "INFO SEL".
3. Peka antingen pà ↑ mitt pá displayen
eller vrid pá knappen [ROTARY] für en
informationstyp.
Du kan valja mellan 6 olica typé:
Travel Warning News Weather Event Special Travel...
4. Peka pà till hóger pà displayen for att valja "ON" eller "OFF".
5. Peka pà RTN.
PTY
Tack vareenna Funktion kan du lyssna pa program av onskad typ sa fort de borjar sandas, oavsett vilket functionslage bilstereon ar installd pa.
- Det går att välja en gemeinsam programtyp (PTY) både für DAB och für RDS.
- Bland DAB PTY och RDS PTY har den PTY som tas emot Först fötreäde.
- PTY-sändningar forekommer inte i alla länder annu.
- I INFO-beredskapslåget har INFO-stationer foreträde framfor PTY-stationer.
- I TA-beredskapslaget har TP-stationer foretrade framfor PTY-stationer.
- Se avsnittel "Hur man anvander RDS" i respektive bruksanvising for narmare detailer om "Programtypsfunktionen" (se sedan 28).
Hur man staller radion i PTYberedskapslage
Hur man stänger av PTY-beredskapslaget
Hur man stänger av ett PTY-avbrott
- Val av PTY
- PTY-sökning
Lagring av PTY-koder i snabbvalsminnet
Nödmeddelanden
Närettnodmeddelande tas emot avbryts alla manovrer for det installda Funktionslaget.
"ALARM" tänds på displayen och nömeddelandet hör s Högtalarna.
Se avsnitet "Hur man anvander RDS" i respektive bruksanvising for narmare detaljer om "Nodsandingar" (se sidan 29).
Hur man stänger av en nödsändnig
Att byta språk für PTY och INFO
Du kan välja mellan 4 språk (engelska, tyska,SVNSKA och franska) for PTY och INFO.
- Standardinställingen ar "ENGLISH".
- Se avsnittet "Att anvanda RDS" i respektive bruksanvisning for mer informaiton om "Att byta språk for PTY-visingen" (se sidan 30).
Volyminstalling for trafikmeddelanden (TA), information (INFO), nödmeddelanden (ALARM) och PTY-sändningar
Det gär att ställa in volymen for avbrytande trafikmeddelanden (TA), information (INFO), nömeddelanden (ALARM) och PTY-sändninger under ett TA-, INFO-, ALARM- eller PTY-avbrott. Utför fällande manövrer beroende på vilken modell som ar ansluten.
- Fabrikinställningen für volymen ar "15".
Vrid [ROTARY]-ratten medurs aller moturs under ett pagaende TA-, INFO-, ALARM- ell PTY-avbrott for att stalla in volymen på önskad niva (0 till 33).
* När TA-, INFO-, ALARM-ller PTY-avbrottet
tar slut ätergår volymen till den niva som var
inställd innan avbrottet.
5.1ch Surround-avkodning
Om en 5.1ch surround-avkodare som ar kompatibel med CeNET ansluts kan den styras fran anlaggningen.
Följande Funktioner fürndras när en 5.1ch surround-avkodare kopplas in:
- Lägena "MOVIE" och "VIRTUAL" laggs till i Dolby Pro Logic II-laget.
- Laget VSE/POSITION andras till DSF-laget (Digital Sound Field).
I P.EQ-laget (parametrisk equalizer) kan högtalarinställingarna justeras mer i detalj.
- Parametrarna for musikinställningar (se sidan 39) andras.
Att ställa in PL II (Dolby PL II)
Välj ett av de fyra driftslägena for den källa duska spelai Dolby Pro Logic II-laget.
- Standardinställningen ar "OFF".
■ MUSIC (musiklåget)
Se "PLII-menyn (Dolby PLII)" pá sidan 17.
MATRIX (matrisäget)
Se "PLII-menyn (Dolby PLII)" pā sidan 17.
MOVIE (filmäget)
Anvands for DVD-filmer.
VIRTUAL (det virtuella laget)
Anvands for filmer och andra ljudkallor.
OFF
Dolby Pro Logic II anvands inte.
1. Tryck på knappen [SOUND].
2. Peka pà Dolby PLII.

3. Peka pà till hóger pà displayen För att valja Dolby Pro Logic II.

Lagesvisningen andras enlistigt foljande:
MUSIC (musiklåget) MATRIX
(matrislåget) MOVIE (filmlåget) VIRTUAL (det virtuella låget) OFF (PL II av) MUSIC (musiklåget)...
* Se sidan 45 für mer information om volymjustering für mitthögtalaren/subwoofern.
4. Peka pà RTN.
Att öppna DSF-menyn
DSF (Digital Sound Field) gör det möjligt att simulera ljud För att erhälla sama upplevelse som i ett koncerthus eller i vid en live-spelning.
Nar du valjer DSF-menyn sjunker volymen ibland.
- Standardinställingen für DSF är "OFF" och "HALL" für DSF-menyn.
1. Tryck på knappen [SOUND].
2. Peka på DSF.

3. Peka pa ppa ON/OFF-displayen. DSF-effekten vaxlar mellan ON och OFF.

När DSF ar entwickel à “OFF” paverkar inte DSF-installingen musikkällan. Därmed ar DSF-installingen avslutad. Tryck på knappen [SOUND] für att gå tillbaka till ursprungslaget.
4. Peka pa t p a DSF-menyns nummer for att valja en DSF-meny.

DSF-menyer
HALL CHURCH STADIUM LIVE JAZZCLUB THEATER HALL...
Nr Funktion Beskrivning 1 HALL Stor koncertlokal 2 CHURCH Kyrka med välvt tak 3 STADIUM Stor stadionutan tak och vöggar 4 LIVE Konzertlokal for liveframträdenden, störreòn en jazzklubb 5 JAZZCLUB Jazzklubb med lågt i tak 6 THEATER Bio- eller teatersalong
5. Tryck på knappen [SOUND] für att gå tillbaka till ursprungslaget.
Att öppna P.EQ-menyn
Med P.EQ (Parametric Equalizer) kan du kompensera hela frekvensområdet i detalj med en slät kurva där frekvenskompensationen anpassas till biltypen.
- Standardinställingen innebär foljande inställinger for alla högtalarna. FREQ = 1kHz, Q = 1, GAIN = 0dB
1. Tryck på knappen [SOUND].
2. PekaP.EQ.

3. Peka pā ⓷ ⓸ ⓺ pā ON/OFF-displayen.
P.EQ-effekten vāxlar mellan ON och OFF.

När P.EQ.-effekten ar installd pa "OFF" paverkar inte P.EQ.-inställingen musikkallan. Därmed ar P.EQ-inställingen avslutad. Tryck pa knappen [SOUND] for att gà tillbaka till ursprungslaget.
4. Peka pa 山 pa P.EQ-menyns nummer for att valja en P.EQ.-meny.

P.EQ-menyer
SIGNAL SP-SEL BAND FREQ Q GAIN SIGNAL...
5. Peka på till höger på displayen für att andra parametern.
SIGNAL (val av signal):
Välj mellan “P-NOIS” och “MUSIC”
P-NOIS: när skär brus sca användas
MUSIC: nar musiksignaler ska,.
anvandas
SP-SEL (val av den högtalare vars P.EQvärde skäändras):
Välj mellan "FRONT", "CENTER" och "SURROUND".
- FRONT: främre högtalaren
- CENTER: mithögtalaren
- SURROUND: surroundhögtalaren
BAND (val av frekvensband):
Välj mellan band 1-3
FREQ (val av mittfrekvens): kan ställas in på mellan 20 Hz och 20 kHz.
Q (installing av Q-kurva): Ställ in Q-kurvans utseende till 1, 3, 5, 7 erler 20.
GAIN (installing av utnivan): Justera forstarkninger (utnivan) inom intervallet -12 dB till +12 dB (steg p 1 dB, 25 punkter)
Upprepa moment 4 och 5 forr att andraparametern.
7. Tryck på knappen [SOUND] for att gå tillbaka till ursprungslaget.
P. EQ-justering
Följande inställninger kan góras på P.EQ-menyn: mittfrekvens, forstärkning och Q-kurva kan sparas für kombinationer av kanaler/band.
Till exempl kan mittfrekvensen "250 Hz", Forstarkningen -8 dB" och Q-kurvan 3" sparas pa band 1 fram.
Se avsnittet "Att stalla in P.EQ" (se sidan 21) for mer information om P.EQ-funktionen.
Att andrainstallingarna
När en 5.1ch surround-avkodare ár inkopplad andras musikinställningarna iändringslåget.
Att väljainstallingsparametrar
Nedan beskrivs vilka parameterinställningar som ändras.
Se avsnittet "Att andra inställingarna" (sidan 39) under "Gemensamma manovr for alla Iagen" for mer information som parametrar som inte andras.
1. Tryck på knappen [A]. Åndringslåget kopplas in.

ADJUST MODE CENTER-SP
2. Peka pa 山 pa parameterdisplayen for att valja den parameter som ska andras.
* Om du pekar på ⊥ Ⓞ Ⓞ till vänster på displayen visas en huvudparameter i taget.
Omdu pekarp tillvanderdisplayenvxlarunderparametrarnakontinuerrigt.
* Om du pekar på ⊥ ⊥ ⊥ i mitten av displayen visas en underparameter i taget. Om du pekar på ⊥ ⊥ → växlar underparametrarna kontinuertigt.
3. När "THROUGH" visas till höger på displayen kan du peka på denna text for att overgå till displayen for detaljändringar.
4. Peka antingen på till hoger på displayen eller vrid på knappen [ROTARY]forall att stalla in detaljerna.
Att gà tillbaka till utgangsläget
1. Tryck på knappen [A] igen.
Parametrar
Huvudparametrar Underparametrar SOUND CENTER-SP / SRD-SP / SUB-WOOFER
• Inställning av högtalaren ON/OFF (se sidan 64) FRONT HPF / CENTER HPF / SRD HPF / SUB-W LPF
• Inställning av högtalarfiltrets frekvens (se sidan 64) SP GAIN
• Inställning av högtalarnas utnivå (se sidan 46) DELAY CENTER-SP / SRD-SP
• Inställning av tidsförskjutning für högtalarna (se sidan 65) DOLBY D D-RANGE
• Inställning av dynamiskt omfäng (se sidan 65) PL II CONT PANorama / DIMENSION / CTR WIDTH
• Detaljinställingar für musiklåget (se sidan 47)
Inställing av högtalare ON/OFF (CENTER-SP/SRD-SP/SUB-WOOFER)
Koppla in aller bort mitthögtalaren (CENTER-SP), surroundhögtalaren (SRD-SP) och subwoofern (SUB-WOOFER).
Se till attenna inställning ar "OFF" om det inte finns nàgon mitthögtalare, surroundhögtalare erler sub-woofer.
- Standardinställningen ar "ON".
1. Tryck på knappen [A] für att gå tilländringslåget.
2. Peka pa t ppa parameterdisplayen och valj "CENTER-SP" under "SOUND", "SRD- SP" under "SOUND" och "SUB-WOOFER" under "SOUND".

3. Peka antingen på till höger på displayen eller vrid på knappen [ROTARY] För att valja "ON" eller "OFF".
* Valj "ON+", "ON-" eller "OFF" für "SUB-WOOFER".
Normalinställningen ar "ON+". När den ar installd på "ON-kan dock en effekt i det laga registret kännas starkt.
4. Tryck på knappen [A] För att gå tillbaka till det tidigare laget.
Inställing av högtalarfiltrens frekvens (FRONT HPF/CENTER HPF/SRD HPF/SUB-W LPF)
Medenna Funktion kan du modifiera filterfrekvensen for att anpassa den till de hogtalare du anvander.
Högtalare som har stängts av enigt anvisingarna i avsnittet "Inställning av högtalare (CENTER-SP/SRD-SP/SUB-WOOFER)" visas inte.
- Standardinställingen für “FRONT HPF” eller “SRD HPF” ar für “THROUGH” (inget filter) och “120Hz” für “CENTER HPF” eller “SUB-W LPF”.
Filterjustering
FRONT HPF/CENTER HPF/SRD HPF (installing av hogpassfilter)
Detta filter tar bort basljud från de främre, mittoch surroundhögctalarna.
$$
\text {T H R O U G H} \rightarrow 5 0 \mathrm {H z} \rightarrow 8 0 \mathrm {H z} \rightarrow 1 2 0 \mathrm {H z}
$$
Ställ in filtret after högtalaren när du använder högtalare med liters diameter.
THROUGH
Används für högtalare som kan generera bas.
THROUGH kan inte ställas in på CENTER HPF.
SUB-W LPF (installing av laggpassfilter for sub-woofern)
Detta filter tar bort diskantljud fran sub-woofern.
$$
5 0 \mathrm {H z} \rightarrow 8 0 \mathrm {H z} \rightarrow 1 2 0 \mathrm {H z}
$$
Ställ in filterfrekvensen after sub-wooern.
1. Tryck på knappen [A] für att gå tilländringslåget.
2. Peka pa t ppa parameterdisplayen och valj "FRONT HPF" under "SOUND", "CENTER HPF" under "SOUND", "SRD HPF" under "SOUND" och "SUB-W LPF" under "SOUND".

3. Peka antingen på till hoger på displayen eller vrid på knappen [ROTARY]forall att ställa in frekvensen.
* Valj 50Hz, 80Hz erer 120Hz.
*1 THROUGH visas bara när du har valt "FRONT HPF" eller "SRD HPF".
4. Tryck på knappen [A] För att gå tillbaka till det tidigare laget.
Inställing av tidsforskjutning für högtalarna (CENTER-SP/ SRD-SP)
Nár ludet frán varje högtalare nár lyssningspositionen beror på var högtalarna ár placerade och på bilens storlek. Justera tidsforskjutningen for Högtalarna sa att ludet frán alla högtalare nár lyssningspositionen samtidigt som ludet frán de främre högtalarna.
- Standardinställingen ar "0 ms".
1. Tryck på knappen [A] für att gå tilländringslåget.
2. Peka på « Center-SP » under “DELAY” och “SRD-SP” under “DELAY”.

3. Peka på till hoger på displayen for att andere tidsforskjutningen.
* “CENTER-SP” kan ställas in mellan 0 och 5 ms.
* "SRD-SP" kan ställas in mellan 0 och 15 ms.
4. Tryck på knappen [A] För att gå tillbaka till det tidigare laget.
Att ställa in de Dolby Digital-funktionerna (D-RANGE)
Denna Funktion komprimerar det dynamiska omfånget hos Dolby Digital-lud sö att laga ljud som skádespelardialoger bärs fram och höga polymer dämpas.
Dessa Funktioner ar bara tillganglia på Dolby Digital-DVD-skivor.
- Standardinställningen ar "MAX".
1. Tryck på knappen [A] für att gå till andringslåget.
2. Peka pa t ppa parameterdisplayen for att valja "DOLBY D" under "D-RANGE".

3. Peka på till Höger på displayen für attändra det dynamiska omfånget och önskad parameter.
MAX: maximalt dynamiskt omfang for källan
STD: rekommenderat lage for
standardlyssning
MIN: de mest komprimerade dynamiska omfang som gör att också laga ljud hör slett
4. Tryck på knappen [A] För att gå tillbaka till det tidigare laget.
8. OM DET UPPSTAR PROBLEM
Problem Orsak Åtgård Allgemein Det gär inte att slå på bilstereon. (Det hörns inget ljud.) En säkring har,gätt. Sätt i en ny säkring med samma ampere-tal. Om säkringen gär ingen,så rädfrögga affaren)darr du köpte bilstereon. Felaktig ledningsdragning. Rädfrögga affaren darr du köpte bilstereon. Inget ljud matas ut.när bilstereon används med Förstärkare anslutna eller en motorantenn ansluten. Motorantennens kabel arkortsluten till jord,eller det kravs alltfor kraftig strömstyrka for fjärrstyrtr strömpåslag till Förstärkarna aller motorantennen. 1. Stäng av bilstereon.2. Koppla loss alla kablar frän motorantennkabeln. Kontrollera att var och en av kablarna inte arkortsluten till jord med hjälp av en ohmmeter.3. Slå på bilstereon ingen.4. Anslut Förstärkarnas fjärrstyrningskaplar till motorantennkabeln en i taget. Om Förstärkarna stängs av innan alla kablar ar anslutna,sa användett separat relä for att tillföra spänning for fjärrstyrd pâslagning(alltfor kraftig strömstyrkakravs). Inget händer.när du trycker påknapparna. Det har blivit fel pà mikroprocessorn på grund av störningar e.d. Stäng av bilstereon,och tryck sedan på [RELEASE]-knappen och ta av DEN LÖSTAGBARA KONTROLLPANELEN (DCP). Tryck in Återställningsknappen med nagot smalt foremål ochhall den intryckt i ungefär 2 sekunder. Displayen visar fel. Kontakterna på DEN LÖSTAGBARA KONTROLLPANELEN (DCP)ller huvudenhetenhar blivit smutsiga. Torka rent kontakterna med en mjuk trasa som fuktats med rengöringsprit. CD/MP3/WMA Det hörns inget ljud. En annan sorts skiva,anden CD-skiva eller nöggot annat främmande foremål ar redan isatt. Öppna den lutande konsolen och tryck in [▲]-knappen ochhall den intryckt i mer än 3 sekunder.Det främmande foremålet matas ut. Det finns inga MP3/WMA-filer på skivan. Lagra MP3/WMA-filer på skivan på rätt sätt. Filarma kännns inte ingen som MP3/WMA-filer. Använd rätt kodade MP3/WMA-filer. Fel filsystem. Använd ISO9660 nivistå 1,2Eller JOLIETEller Romeo filsystem.
Problem Orsak Åtgård CDMP3/WMA Ljudet hoppar eller det uppstår störningar. Skivan är smutsig Rengör skivan med en mjuk torkduk. Skivan är kraftigt repad eller svek. Byt ut den mot en repfri skiva. Ljud avbryts eller hoppas över.Störningar alstras eller störningarblandas med ljudet. MP3/WMA-filerna är inte rätt kodade. Använd rätt kodade MP3/WMA-filer. Ljudet är däligt när du precis slagit på bilstereon. Det kan bildas smà vattendroppar på linsen inuti CD-spelaren;när bilen stär parkerad på ett fuktigt/Ställe. Låt bilstereon stå påslagen i ungefär 1 timme tills sukten torkat. Fel filnamn. Fel filsystem. Använd ISO9660 nivå 1,2 eller JOLIET aller Romeo filsystem. Spelning med en spelningsliste kan inte utföras. Filnamn eller filnamnsförlängning är inte korrekt. Använd alfanumeriska/ASCII-tecken for MP3/WMA-filmnamn.Använd“.M3U” som filnamnsförlängning För en spelningsliste.
9. FELMEDDELANDEN PÄ DISPLAYEN
Om det uppstar nagot fel visas nagot av foljande meddelanden pa displayen.
Utför de Åtgärder som beskrivs nedan für att avhjalpa problemet.
Felmeddelande Orsak Åtgård CD/MP3/WMA ERROR 2 En skiva har fastnat inuti CD-spelaren och gär inte att mata ut. Det har blivit fel på CD-spelarmekanismen. Rädfråga affären)där du köpte bilstereon. ERROR 3 En skiva gär inte att spelà på grund av repor, e.d. Sätt i en skivautan repor och som inte ár skev i stället. ERROR 6 En skiva År isatt upp och ned i CD-spelaren och gär inte att spelà. Mata ut skivan och sätt i denigen på rätt häll. Allmänt AMP GUARD Högitalarnas skyddskrets har aktiverats. Om man försöker höja volymen i det lögget tänds "AMP GUARD" på displayen. "AMP GUARD" kan ibland starta under påverkan av speciella testsignaler. 1. Funktionen kan också Återställas genom att du stänger av apparaten och sätter på denigen. (Ljudet i högtalarna avskärs automatiskt;när högtalarnas skyddskrets aktiveras.)2. Kontakta en serviceverkstad om ljudet försvinnerigen. CD-växäre ERROR 2 En CD i CD-växlaren gär inte att ladda in. Det har blivit fel på CD-växalarmekanismen. Rädfråga affären)där du köpte bilstereon. ERROR 3 En CD i CD-växlaren gär inte att spelà på grund av repor, e.d. Sätt i en CDutan repor och som inte ár skev i stället. ERROR 6 En CD i CD-växlaren gär inte att spelæ eftersom den är isatt upp och ned. Mata ut CD-n och sätt i denigen på rätt häll. DVD-växäre ERROR 2 En skiva i DVD-växlaren gär inte att spelà. Det har blivit fel på själva DVD-spelarmekanismen. Kontakta affären)där du köpte apparaten. ERROR 3 En skiva gär inte att spelà på grund av repor e.d. Försök engang tillEller lagg i en annan skiva i stället som inte ár repad eller skev. ERROR 6 En skiva i DVD-växlaren gär inte att spelæ eftersom den är ilagd upp och ned. Mata ut DVD och sätt i denigen på rätt häll. ERROR P Föräldrakontrollfel. Ställ in rätt nivalföräldrakontrollen. ERROR R Regionskodfel. Mata ut skivan och lagg i en annan skiva med rätt regionskod i stället.
Om det skulle visas nagot annat felmeddelande på displayen än de som beskrivs ovan sä tryck pa Återställningsknappen. Om problemet kvarstår sä stäng av bilstereon och rädfräga affären)där du köpte bilstereon.
10. TEKNISKA DATA
Radiodel
Stationsinställningssystem: PLL-synthesizer
Frekvensband:
FM:87,5 till 108 MHz (steg om 0,05 MHz)
MV:531 till 1602 kHz (steg om 9 kHz)
LV:153 till 279 kHz (steg om 3 kHz)
CD-spelardel
System: Digitalt ljudsystem for kompakstkivor
Frekvensgang: 5 Hz till 20 kHz (±1 dB)
Signalbrusforhallande:100dB(1kHz) IHF-A
Dynamikomfång: 96 dB (1 kHz)
Distorsion: 0,01%
Allmänt
Uteffekt: 4 × 31 W (DIN 45324, +B=14,4 V)
Matningsspänning:
14,4 V likström (10,8 till 15,6 V tillatet), negativ jord
Strömforbrukning: Mindre ön 15 A
Högtalarimpedans: 4 Ω (4 till 8 Ω tillatet)
Bilantennens markström: Högst 500 mA
Vikt:
Huvudenhet: 1,7 kg
Fjarrkontroll: 80g (inklusive batterier)
Matt:
Huvudenhet:
178 (B) × 50 (H) × 155 (D) mm
Fjarrkontroll:
44 (B) × 110 (H) × 27 (D) mm
Observera:
Ratt till andringar forytterligare forbattringar forbehalles.
Gratos pela aquisicao deste produits Clarion.
* Leia completeness this manual do propriétário antes de operar este equipamento.
* Aparto a leitura deste manual, certificque-se de guardá-lo num local de fácil acesso (por exemple: porta-luvas).
* Verifique o conteudo da carta de garantia anexa e guarde-a residadosamente com este manual.
* Este manual descreve o procedimento de utilizesao do carregaror CD e do sintonizador TV ligados com o cabo CeNET. O carregaror CD e o sintonizador TV tem o seu propremanual; não é aque descririto o modo de utilizesao destes.
Conteudo
1. PRECAUÇOES 3
Consola inclinavel 4
Manuseamento de discos compactos 4
2.CONTROLOS 5
3. NOMECLATURA 6
Nome dos botões e suas funções 6
Operações dos principais botões quando um equipamento externo estiver ligado a este aparecido
7
Indicações do Mostrador 7
Funcionamento do Mostrador 8
4. DCP (PAINEL DE CONTROLLO DESTACÁVEL) 9
5. TELECOMANDO 10
Insercao de pilhas 10
Funcao dos botoes da unidade de telecomando 11
6. OPERACOs 12
Operacionesbasicas 12
Operacao do AC-Processor III 17
Operacoes do rado 23
Operacoes do RDS 26
Operacoes de CD/MP3/WMA 31
Diferentes seções da música escutadas por various ouvintes (Função 2-ZONE) 36
Operacoes comuns a cada modo 37
7. OPERATIONS DE ACESSORIOS 51
Operacoes do Permutador de CDs 51
Operacoes de TV 54
RADIO Digital / Operacoes DAB 58
5.1ch Operações do Descodificador Periférico 61
8. NO CASO DE SURGIR ALGUM PROBLEMA 66
9. INDICAÇOÉS DE ERRO 68
10. ESPECIFICAções 69
1. PRECAUÇÖES
1. Este aparelho é aplicável somente para veículos rodoviários de 4 rodas. O uso este aparelho não é apropiado em tractores, empilhadores de forquilha, tractores de terraplanagem, veículos todo-o-terreno, bicicletas motorizadas de 2 ou 3 rodas, barcos marítimos ou em veículos destinados para outros propósitos especials.
2. quando o interior do automóvel estiver muito frio e o leitor for uso logo après o aquecedor ter sido activado, poderá ocorrer condensação de humidade no disco ou nas partes ópticas do leitor e poderá não ser possível realizar a reprodução apropriada. Caso ocorra condensação de humidade no disco, limpe-o com um pano macio. Caso ocorra condensação
dehumidade nas partes opticas do leitor, não utilize o leitor durante circa de uma hora. A condensation desaparecerá naturalmente, possibilizando o funcimento normal.
3. Conduzir o automóvel em estradas extremamente irregulares que provocam violentas vibrações poderá occasionar o salto do som.
AVISO AOS UTENTES:
ALTERACOES OU MODIFICACOs DESTE PRODUTO NAO APROVadas PELO FABRICANTE INVALIDARAO A GARANTIA.
ADVERTÊNCIA
Para a sua seguranca, não olhe nem acontece o paine de toque quando estiver a conducir.
Consola inclinável
Esta unidad utilizes consolas inclináveis para possibilitar as exibições de écran amplo.
Quando utilizar a consola inclinével, certifique-se de fecha-la.
PRECAUÇAO
Tome cuidado para não prender os dedos quando abrir e fechar a CONSOLA INCLINÁVEL.
1. Por quostoes de seguranca, feche sempre a CONSOLA INCLINAVEL antes deouxar esta unidade sem serutilizada por um periodo prolongado ou antes de DESLIGAR a chave de ignicao.
Caso DESLIGUE a chave de ignicao com a CONSOLA INCLINAVEL inclinada, a CONSOLA INCLINAVEL não se fechara.
2. Antes da CONSOLA INCLINÁVEL fechar-se, um ruido de trabalho poderá ser emitido do mecanismo de segurança. Isto é normal.
3. Caso movimento a CONSOLA INCLINÁVEL com a mão, isto poderá Criar uma folga. Para corrigi-la, carregue no botão [▲] para fechar a CONSOLA INCLINÁVEL com a alimentação daunities activada.
4. Após a execção de um disco, a CONSOLA INCLINÁVEL retorna automaticamente ao estado inclinado ou fechado. Se houver alguma obstruição quando a CONSOLA INCLINÁVEL tentar fechar-se, o mecanismo de segurar está acontecido e a CONSOLA INCLINÁVEL returná ao estado aberto. Caso isto ocorrara, retire a obstruição, e em seguida carregue no botão [▲].
5. Para fazer riscar o disco compaco, mantenha o;nivel do CD em 12 ou 8 cm durante a sua insercao ou retirada.
Manuseamento de discos compactos
Utilize somente discos compactos que possuem
a


Não reproduza discos compactos cordiformes, octogonais ou discos com outros formatos esp
Alguns CDs gravados no modo CD-R podem não ser'utilizando.
Mesmo quando gravados no modo CD-R/W, algunos CDs podem não ser'utilizableis.
Manuseamento
- Em comparação com os CDs de música comum, tanto os CD-Rs (discos compactos graváveis) como os CD-RWs (discos compactos regraváveis) são fácilmente
affectados pelalaalta temperatura ehumidade e algunosCD-Rs e CD-RWs poderao não serreproduzidos.
Portanto, não os deixe no interior de um automóvel durante muito tempo.
- Discos novos podem conter alguma rugosidade ao redor das bordas. O leitor pode não funciona ou o som pode saltar, no caso de utilizez tais/discos. Use uma caneta esferografica ou algo semelhante paraletalugosidade das bordasdo disco.
- Jamais cole etiquetas na superficie do disco compaco e tampouco marque a superficie com um lápis ou caneta.
- Jamais reproduza um disco compacto com fita
celofane ou qualier除外o tipo de cola aderido, ou com MARAS de despendimento. Casa tente reproduzir um disco compaco nessas condições, poderá não ser capaz de encontrar retirá-lo do leitor de CDs ou poderáavariar o proprietary leitor de CDs.
- Não utilize/discos compactos que possem grandes riscos,errodesystemato,rachaduras,etc.O uso de tais discos poderavprovocar falhas na operacao ou avarias.
- Para retiring um disco compaco do seu estojo de armazenamento, pressione o centro do estojo e retire o disco, segurando-o@cuidadosamente pelas bordas.
- Não utilize capas de proteção de CDs disponíveis no comércio nem discos equipados com estabilizadores, etc. Estes poderãoavariar o disco ou provocar falhas no mecanismo interno.
Armazenamento
- Não exponha os discos compactos à luz solar directa ou à qualquer fonte de calor.
- Não exponha os discos compactos à humidade ou poeira excessiva.
- Não exponha os discos compactos ao calor directo de aquecedores.
Limpeza
- Para retiring impressões digitais e sujidas, utilize um pano maco e limpe em LINHA recta a partir do centro do disco compacto até a circunferência.
- Não utilize utilize nenhum solvente, tal como limpadores disponíveis no comércio, pulverizarador antiestálico, ou dissolventes para limpar discos compactos.
- DepoS de utiliser um limpador especial de disco compaco, deixe o disco compaco fazer antes de reproduzi-lo.
2.CONTROLOS
Unidade principal

Com a CONSOLA INCLINÁVEL aberta

3. NOMECLATURA
Nome dos botões e suas funções
Botão [RELEASE]
- Remove o DCP (painel de controlo destactével).
Sensor fotogálico
- Este sensor detecta a luminosidade no interior do seu automóvel. quando a funcção auto-dimmer está ajustada para "AUTO", a luminosidade do measurador regula a consoante a luminosidade detectada por este sensor.
Botão rotatório [ROTARY]
- Pressione o botão para ligar o aparecido. A cada vez que se pressiona este botão alterna o modo.
- Pressione e mantenha pressionado o botão durante 1 segundo ou mais para desligar o aparecido.
- Este botão también pode ser utilizado paraaabstar o volume, ou para executar os variousajustamentos no modo ajuste.
Botao [△]
- Abre/fecha o pailen de controlo.
Se ja está carregado um disco, esse sera ejectado quando se abre o pailen de controlo.
Nota:
Se o disco não for ejectado, mantenha pressionado o botão [▲] durante 1 segundo ou mais.
Botao [A]
- Utilize este botão para selecionar ou ajustar os various parâmetros em modo ajuste.
- Utilize este botão para introduzir os names das estações em modo rádio ou títulos de discos em modo CD.
Botão [SOUND]
- Utilize este botão para definir ou executar various ajustes tais como espaço录音.
- Mantendo pressionado este botão durante 1 segundo ou mais quando se comuta a função 2-ZONE de ON para OFF.
Botão [TA]
- Utilize o botão para escolher o modo de espera TA (Anúncio de Tráfego) ( quando a funcção 2-ZONE está desactivada). Comute a operationação da funcção 2-ZONE. Mantendo pressionado este botão durante 1 segundo ou mais comuta-se o tipo de 2-ZONE ( quando a funcção 2-ZONE está activada).
Botao [▶II]
- Interrompe e faz repartir uma pista (no modo CD).
- Utilize o botão para escolher o modo de espera PTY ( Tipo Programa) ou items PTY.
Mostrador
- Visualiza asyardas informacoes que indicam o estado de functiamento esta unidade tais como estado sintonização/reproducao e individadores.
Toque no主義or com o seu dedo, e toque no botao 已 para habilitar o funciona. (veja pagina 8)
Operações dos principais botões quando um equipamento externo estiver ligado a este aparecido
- Quando o permutador de CDs/DVDs estiver ligado
* Quanto acos pemensores, consulte a�� "Operações do Permutador de CDs" (veja páginá 51). Quanto ao permutador de DVDs, consulte o Manual do proprietário fornecido com o permutador de DVDs.
Botao [▶II]
- Reproduz ou pausa um CD ou DVD.
Botão [A]
- Utilido para fazer entrada titles de discos em modo permutador de CDs.
- Quando um TV/DAB estiver ligado
* Quanto aos dormenores, consulte a secção "Operações de TV" (veja páginha 54) ou "Rádio Digital / Operações DAB" (veja página 58).
Botão [TA]
- Utilize o botão para escolher o modo dereshpera TA (Anuncio de Trafego) no modo DAB. (Esta funcao está disponible somente para osintonizador DAB.)
- Pressione e mantenha pressionado durante um segundo ou mais para ligar ou desligar o modo INFO. (no modo DAB)
Botao [▶II]
Comuta o modo de imagem do tevisor ou o modo de imagem VTR (externo). (no modo TV)
- Utilize o botão para escolher o modo de espera PTY ( Tipo de Programa) ou items PTY no modo DAB.
Botão [A]
- Este botãoutilizzato para fazer entrada o nome da estaqao TV. (no modo TV)
Indicações do Mostrador

Funcimiento do Mostrador
Nesta unidade utilizes umadora como pailen de toque. Pode-se utilize a址adora tocando-o com um dedo. Existem quatro operacoes principais doadora especuldamente:
Tocar
Toque no主義者 com um dedo e largue-o Dentro de 1 segundo. esta é a operacao basia quando se utilizes o主義者.
Tocar e manter tocado
Toque no主義者 com um dedo e mantenha o dedo sobre o主義者 durante 1 ou 2segundos ou mais tempo. Não mova o dedo quando estiver tocando o主義者.
Tocando e mantendo o toque sobre oestrador durante um segundo ou mais oestrador lista, por exemple, e chama outras funções manuais.
Tocando e mantendo o toque sobre o主義o durante 2 segundos ou mais tempoutilizando para armazenar na memória de pre-Selecao ou outras informacoes.
Toque no botão

Toque noestrador com um dedo, e mova o dedo para a esquerda () ou direita () com o dedo ainda sobre oestrador, e tire o dedo dentro de 1 segundo.Esta operacaoutiliza para selecionar a memoria de pre-selecao (de 1a6) ou as pistas.

Toque no botão

Toque noestrador com umdedo,e mova o dedo para a esquerda () ou direita () com o dedo ainda sobre oestrador, e mantenha o dedo sobre oestrador. A operacao actual continua quando o seu dedo fortantudo sobre oestrador.Esta operacaoutilizada,por exemple,paraasintonizacaomanualouavanço/ retroprocesso rapiido das pistas.

4. DCP (PAINEL DE CONTROLO DESTACÁVEL)
O painel de controlo pode ser retirado para evitar roubos. Quando retirar o painel de controlo, guarde-o noestojo do DCP (PAINEL DE CONTROLLO DESTACÁVEL) para prevenir arranhões.
Recomendamos que leve consigo o DCP (painel de controlo destacável) quando sair do automóvel.
Retirada do DCP (painel de controlo destacável)
1. Desligue a alimentacao, com a CONSOLA INCLINAVEL fechada.
2. Pressione completeness o botao [RELEASE] para Abrir o DCP (painel de controlo destacavel).

3. Puxe o DCP (painel de controlo destacavel) na sua direcção e retireo.

PRECAUÇAO
- Fecha sempre a CONSOLA INCLINÁVEL antes de retiring o DCP (painel de controlo destacável).
- Caso retire o DCP (painel de controlo destacável) com a CONSOLA INCLINÁVEL aberta, a consola inclínável fechar-se-a imeditamente. Tome cuidado para não prender os dedos.
Fixação do DCP (painel de controle destacável)
1. Insira o DCP (painel de controlo destacável) de maneira que a secção A do lado direito do DCP se encaixe no gancho B da unidade.

2. Pressione@cuidadosamente o lado esquerdo © do DCP para encaixa-lo.

PRECAUÇAO
- O DCP pode ficar fácilmente aviado devido a choques mecânicos. Após retirálo, tome cuidado para não derrubá-lo e tao-pouco o sujeite a choques violentes.
- Se o botão [RELEASE] for pressionado e o DCP não estiver preso no lugar, este poderá cair devido às vibrações do carro e quebrar-se; portanto, antes retirá-lo, instale-o naunities ou guarde-o no seuestojo.
- O dispositoivo de ligação que liga a unidade e o DCP é uma coisa extremamente importante. Tome cuidado para não avariário, pressionando com as unhas, chaves de fendas, etc.
Nota:
- Se o DCP estiver sujo, limpe a sujidade somente com um pano macio e seco.
5. TELECOMANDO

Inserção de pilhas
1. Vire a unidade de telecomando ao avesso, em seguida deslize a tampa traseira na direcção da seta.
2. Insira pilhas AA (SUM-3, R-6/1,5V) fornecidas com a unidade de telecomando, com os seuis pólos orientados no sentido indicado na figura, eenthao feche a tampa traseira.
Notas:
O uso Incorrecto das pilhas pode provocar a sua explosão. Leve em consideração os seguiços pontos:
- Quando for substituir as pilhas, substitua ambas as pilhas por outras novas.
- Não curto-circuite, desmonte nem aqueça as pilhas.
- São jogue as pilhas ao fogo ou chamas.
- Jogue as pilhas exauridas apropriadamente.

Funções dos botões daunities de telecomando
ModoBotão Rádio (RDS)/DAB Leitor de CDs/MP3 Permutador de CDsPermutador de DVDs TV [FUNC] Alterna entre rádio, DAB, CD/MP3, corregrador CD, corregrador DVD e TV, AUX. [BAND] Comuta a banda de recepçao. Reproducz a primarya faixa.Reprodução do topo do disco Desloca o proxies disco em ordem crescente. Comuta a banda de recepçao. [▲], [▼] Aumenta e diminui o volume (em todos os modos). [←], [▶] Desloca os canais de programação em ordem ascendente e descendente. Desloca as faixas em ordem ascendente e descendente. Se for mantido premio durante 1 segundo:ança rapidamente/retrocede rapidamente. Desloca os canais de programação em ordem ascendente e descendente. [▶■] Nenhuma função. Comuta entre os modos de reprodução e de pausa. Nenhuma função. [MUTE] Activa e desactiva o silenciamento. [TA] Activa e desactiva TA.Mantenha pressionado o botão durante 1 segundo ou mais para comutar entre a fonte sonora da zona principal e da zona secundária (somente quando o modo 2-ZONE estiver aktivado). [DISP] Alterna entre oMASTER principal e oMASTER de relógio (CT). [PS/AS] Exploraçãoprogramada. Se for mantido premio durante 2 seguros: Armazenamento automatico. Reproção introdutória.Pressione e mantenha o botão pressionado durante 1 segundo ou mais, para a efetuar a reprodução introdutória das pastas, quando em modoMP3/WMA. Reproção introdutória.Quando pressionado e mantido pressionado durante 1 segundo ou mais: reprodução introdutória do disco. Reproção pré-definida.Quando pressionado e mantido pressionado durante 2(secondo ou mais: auto armazenamento. [AF] Activa e desactiva a função AF. Se for mantido premio durante 1 segundo: activa e desactiva a função REG. Reproção repetida.Pressione e mante-nha o botão pressionaldo durante 1 segundo ou mais, para a efec-tuar a reprodução repetida das pastas, quando em modo MP3/WMA. Reproção repetida.Quando pressionado e mantido pressionado durante 1 segundo ou mais: reprodução repetida do disco. Nenhuma função. [PTY] Modo PTY ligado e desligado. Reproção aleatoria.Pressione e mante-nha o botão pressionaldo durante 1 segundo ou mais, para a efec-tuar uma reprodução por ordem aleatoria das pastas, quando em modo MP3/WMA. Reproção aleatoria.Quando pressionado e mantido pressionado durante 1(secondo ou mais: reprodução aleatoria do disco. Alterna entre TV e VTR. [2-ZONE] Pressione este botão e mantenha-o pressionado durante 1 segundo ou mais para activar ou desactivar o modo 2-ZONE.Pressione este botão para comutar a zona de controlo entre a zona principal ou a zona se-cundária durante a activação do modo 2-ZONE.
* Alguns dos botões correspondentes na unidade principal e na unidade de telecomando possuem funções differs.
Operaçõesbasicas
PRECAUÇA O
Certifique-se deaabstarovolume para o niveni minimoantesde desligar oraparelho ouachave de igniao.A unidade memoriza o ultimateajuste de volume.Se desligar oraparelho com o volume elevado, osom excessivamente alto ao religar oraparelho podera prejudicar a sua audicaooudanificarauunidade.
Ligar/Desligar o aparelho
Ligar
Nota:
Tenha cuidado quando usar esta unidade por muito tempo sem ligar o motor do veiculo. Se descarregar excessively a bateria do automóvel, poder não ser capaz de actionar o motor e, a vidautil da bateria poder ser reduzida.
1. Pressione o botão rotatório [ROTARY]. O modo precedente幔e activado é exibido.
Verónica do sistemas
APrimeira vez que ligar esta unidade après ter completinga ligaço dos fios,essa verificaqais os equipamentos connectados.(Essa denominada "verificação deSYSTEM."
Quando se liga a alimentação do aparelho,
exibido"System Check", siga o procedimento abaixo para executar a verificação do system.
1. Quando aparece "System Check" no公共场所, pressione o botão rotatório [ROTARY]. Inicia a verificação de sistemas. quando a verificação de sistemas é completeness, aparece "Completed" no公共场所.
2. Pressione o botão rotatório [ROTARY] de novo.
Aparece oestrador principal para o modulo rádio.
Função CODEMATIC
Quando "CODEMATIC" está posicionado em "ON", e a alimentacao está ligada com DCP connectado, aparece oestrador de Csgido de Toque. Toque noestrador na ordem em que foi definido no modo ajuste.

Quanto acos pormenores sobre a funcao CODEMATIC, consulte "Utilização da funcao de seguranca (CODEMATIC)" (veja pagina 50).
Desligar
1. Mantenha pressionado o botão rotatório [ROTARY] durante um segundo ou mais.
Selección um modo
1. Pressione o botão rotatório [ROTARY] para mudar o modo de funções.
2. Cada vez que se pressiona o botão rotatório [ROTARY], o modo de funções muda esta sequência:
Modo rádio Modo DAB Modo CD/ MP3 Modo permutador de CDs Modo permutador de DVDs Modo TV Modo AUX Modo rádio...
* Equipamento externo não conectado a CeNET não é exibido.
Ajuste do volume
1. Rode o botão rotatório [ROTARY] para a direita paraLERar o volume;rode-o para a esquerda para diminui r volume.
* O;nével de volume varia de 0 (mínimo) a 33 (máximo).
Mudar o modo de funções
Existem 2 modelos de funçõesbineicos: operacao padrao e operacao simples.
1. No écran do主義or principal, toque e mantenha tocada a parte esquerda do主義or durante um segundo ou mais. O modo de funções mudado.

Na operação simples, as operações de tocar ↑ ⇌ ⇌ ou ⇌ ⇌ no modo rádio ou modo CD écran do主義or principal não são necessarias, e esta unidade pode ser usada para executar a operação simples.
Note-se, todas, que as seguemes funções não está disponible na operação simples.
- Sintonização pré-seLECTIONada, seleção de pastas, seleção de discos, e outras funções que abrangem o toque do botão direita doadora
- Operações de comutatione do主義or (veja paga 13)
- Operações de comutatione do tuito do ].
mostrador (veja paga 14)
- Operações para exibir écrans de entrada de títulos. Nos écrans (ex. minha), como eu me falou, não houve a mesma coisa.
As descrições dadas nesthemanual são sobretudo para a operação padrão. Quanto as descrições para as funções na operação simples, consulte as descrições para as exibições de écran no modo rádio ou no modo CD.
Mudar o mostrador
1. Toque no centro do主義。
Cada vez que tocar no主義or,esse muda esta sequencia:
Mostrador do titulo

Proteção do ecran
Quando a funcao de protecao do ecran está activada, e nao se efectua nenhuma operationa esta unidade por circa de 30 segundos, a protecao do ecran sera exigida. Quanto aos hormenores, consulte pagina 41.
Fundo
Tocando e mantendo tocado o centro do ].
mostrador durante um segundo ou mais comuta ao mostrador do ).
① ⑨ ② ⑩ ③ ⑪ ④ ⑫ ⑤ ⑬ ⑥ ⑭ ⑦ ⑮ ⑧ ⑯
Mostrador do Analisador do espectro
Tocando e mantendo tocada a parte direita do主義ist, é um segundo ou mais durante a exibicao do analisador do espectro (S/A) comuta o主義ist do analisador do espectro.
S/A
SCAN S/A 1, S/A 2, são S/A 3 exibidos
por 10 segundos ou mais tempo
cada um. S/A 1 S/A 1
FLDR No.
003
TOP S/A 2 S/A 2
FLDR No.
003
TOP S/A 3 S/A 3
FLDR No.
003
TOP
Comutationdomostatdo tuito
É possével ver titulos de discos e autres informações que foram guardadas nos discos quando se reproduz CDs no modo CD ou modo permutador de CDs.
1. Toque e mantenha tocada a parte direita do主義istico durante um segundo ou mais no主義istico de tíolo.
Cada vez que tocar e做不到izar o做不到o.
mostrador alterna pela mesma ordem:
Discos CD-Texto
Título do utilizesdor (disco) Titulo CD-texto (disco) Nome do Artista Titulo CD-texto (pista) Titulo do utilizesdor (disco)...
Disco MP3/WMA
Pasta Ficheiro ETIQUETA Álbum
ETIQUETA Artista ETIQUETA Titulo Pasta...
Notas:
- MP3 suporta Etiquetas ID3 V2.3 / 2.2 / 1.1 / 1.0.
- Mostrador de Etiquetas da prioridade a V2.3/2.2.
- No caso de Etiquetas album para WMA, a informação escrita no cabeçalho de extensão exibida.
- Somente characteres ASCII pourrait ser exibidos nas Etiquetas.
Rolar um titulo
Toque noasnodetituleno tituloexibido.
O titulo rola para a esquerda.
Interromper a rolagem
Toque no botão noestrado de titulo.
Função de CT (Hora de relógio)
A funcão de CT consente de receber dados CT enviados de uma estação RDS e exibir a hora. Para ver o écran de CT, toque no centro do主義者。
- Se os dados de CT não estiverem sentido recebidos, “---CT” aparece no主義者.
Nota:
- Os dados de CT não são transmitidos em outros paises e por algumas estações de radiodifusão. Não, em algumas zonas, os dados de CT podem não ser exibidos com precisão.
Colocação do ADF
- ADF a abreviação de Anti Distortion Filter.
As funções de "Filtro de Reforço Activo" e "Compensação de Tonalidade Sonora"
adoptadas而成tem de executar uma reprodução realista bem modulada sem afectar as caractéctricas da tonalidade sonora original.
Esta unidade vem equipada com 4 temas de efeitos de tonalidade sonora guardados na memória. Selecione aquela que preferir.
ADF-1: Adequado para altifalantes genuinos
ADF-2: Adequado para altifalantes avulsos
ADF-3: Adequado para altifalantes coaxiais
USER: Este ajustamento pode ser executado pelo'utilizar de acordo com a sua preferencia individual.
OFF: Nenhum efeito sonoro
- A predefinição original de fabrica "OFF".
Notas:
- Enquanto o volume muda quando ADF comutado, comute ADF com o volume e "SW VOLUME" (sub-woofer) e "CTR VOLUME" (altifalante central) abaixado o mais possivel.
- Por vezes não se pode obter efeitos satisfátórios com algunos sistemas de altifalantes Em tais casos, ajuste o parâmetro ADF ou o volume.
- quando ADF estiver ajustado para "USER", "1", "2" ou "3", a funcao VSE e funcao BASS/TREB sob EQ-SELECT está desactivada.
1. Pressione o botão [SOUND].
2. Toque no botão ADF.

3. Toque no botão ↑ ↓ direita do meuhror para selecionar o modo ADF.

Quando ADF está desactivado "OFF", o ajuste ADF não se reflecte na fonte musical.
Com isto termina-se o ajuste de ADF.
Pressione o botão [SOUND] para voltar ao modo original.
* Selezione um dos UTILIZADOS, 1, 2, 3, ou OFF.
4. Para Mudar os pormenores do ajuste ADF, pressione o botão [A].
5. Toque no botão ↑ noestrador de指示ores de ajuste para selecionar o指示or pretendido.
Cada vez que se toca em comuta-se oestrador deindicadores deajuste como segue:
- Indicador de ajuste ( quando USER está選擇acionado em passo 3)
$$
B A S S \rightarrow T R E B L E \rightarrow C O M P \rightarrow B A S S \dots
$$
- Indicador de ajuste ( quando de 1 a 3 está seleccionado em fase 3)
$$
\text {L E V E L} \rightarrow \text {C O M P} \rightarrow \text {L E V E L} \dots
$$
6. Toque no botão direita do主義 paraaabstaroindicador.
* "BASS" e "TREBLE" pode ser ajustados dentro de um intervalo de 1 a13.
* “LEVEL” pode ser ajustado dentro de um intervalo de -3 a +3.
* Selezione ou "ON" ou "OFF" para "COMP".
7. Pressione o botão [SOUND] para voltar ao modo original.
Ajuste do Sub-woofer e do Altifalante Central
- "SW VOLUME" (sub-woofer) pode ser ajustado somente quando "SUB-WOOFER" está ajustado para "ON".
- "CTR VOLUME" (altifalante central) pode ser ajustado somente quando o modo Dolby Pro Logic II está ajustado ou para "MUSIC" ou "MATRIX", "SP-SETTING" está ajustado para "CTR+SW" e "CENTER-SP" está ajustado para "ON".
- O ajuste predefinido de fabrica para SW VOLUME "0" e para CTR VOLUME "0".
1. Pressione o botão [SOUND].
2. Toque no botão A-MODE.

3. Toque no botão ↑ noestrador de指示符指示的指示符 no estrador de指示符指示的指示符指示的指示符指示的指示符指示的指示符指示的指示符指示的指示符指示的指示符指示的指示符指示的指示符指示的指示符指示的指示符指示的指示符指示的指示符指示的指示符指示的指示符指示的指示符指示的指示符指示的指示符指示的指示符指示的指示符指示的指示符指示的指示符指示的指示符指示的指示符指示的指示符指示

4. Toque no botão direita do主義o ajuste o indicator como(desjar.
* Este indicator pode ser ajustado dentro de um intervalo de -5 a +5.
5. Pressione o botão [SOUND] para voltar ao modo original.
Ajuste do balanco esquerdo/direito e anterior/posterior
BALANCE:
Ajusta o balanco de volume entre o altovalante esquerdo e direito.
FADER:
Ajusta o balanco de volume entre o altovalante anterior e posterior.
- O ajuste predefinido de fabrica para BALANCE "0" e para FADER "0".
Nota:
Balance/fader não poder ser ajustados quando "PRO" está selecionado em AC-PRO III (veja网页 44) e a funcao de posicao está activada. Ajuste do balanco esquecido/direito e anterior/posterior por meio da "Selecao do menu posicao"(veja网页17).
1. Pressione o botão [SOUND].
2. Toque no botão A-MODE.

3. Toque no botão ↑ no主義 no主義 de指示ores de ajuste para seleccionar "BALANCE" ou "FADER".

4. Toque no botão direita do主義者ajuste o indicator como(desjar.
* "BALANCE" pode ser ajustado dentro de um intervalo de L13 (lado esquido intensificado) e R13 (lado direito intensificado).
* "FADER" pode ser ajustado dentro de um intervalo de R12 (lado posterior intensificado) e F12 (lado frontal intensificado).
5. Pressione o botão [SOUND] para voltar ao modo original.
Ajuste de graves/agudos
O modo graves/agudos pode ser ajustado somente quando o modo Dolby Pro Logic II está desactivado (veja páginá 17) e “EQ SELECT” está ajustado para “BAS/TREB” (veja páginá 44).
- O ajuste predefinido de fabrica é "0".
1. Pressione o botão [SOUND].
2. Toque no botão A-MODE.

3. Toque no botão ↑ no主義 no主義or dos indicadores de ajustamento para seleccionar "BASS" ou "TREBLE".

4. Toque no botão direita do主義er e ajuste o indicator como desejar.
* Este indicator pode ser ajustado dentro de um intervalo de -6 a +6.
5. Repita os passos 3 e 4 para fazer o indicator prétencido.
6. Pressione o botão [SOUND] para voltar ao modo original.
Operação do AC-Processor III
Dolby Pro Logic II
Dolby Pro Logic II é uma Tecnologia de descodificação de MATRIX, na qual a Tecnologia de MATRIX digital actualizada é aplicada e Dolby Pro Logic mais aprimarada. Realizando excellente reprodução com 5,1 canais da fonte perimétrica Dolby, bem como de fontes sonoras estéreó tais como CDs, esta Tecnologia permite que um canal perimétrico se torne de gama completeness (20 Hz a 20 kHz) e estéreó. Assim, é possivel desfurar de quaisquer fontes estéreó com som dinário de 5,1 canais. De acordo com a fonte a ser reproduzida, o Modelo de Música ou o Modelo de Matrix pode ser selecionado.
Fabricado sob licença de Dolby Laboratories.
"Dolby", "Pro Logic" e o*símbolo de duplo D são MARCAS comérciais de Dolby Laboratories.
Selecao do menu PL II (Dolby PL II)
Selezione o modo MUSIC ou o modo MATRIX correspondente a fonte que estiver a reproduzir segundo o modo Dolby Pro Logic II.
- O ajuste predefinido de fabrica "OFF".
■ MUSIC (modo música)
- Este modo adequado para fontes sonoras Stereo tais como CDs.
- UmOTHERmoedajustamentoquepermiteajustestmasipormenorizadosamultemestadisponivelsequeo Campo sonoro difundese diferentemente dependendo do estado dafonte de musica gravada.Consultepagina 47)
■ MATRIX (modo matrix)
- Este modo adequado para fontes sonoras tais como rádio AM/FM.
OFF
- O modo Dolby Pro Logic II não utilizao, e o modo AC-PROIII utilizao. Quanto aos pomenores sobre o modo AC-PROIII, consulte "Selecao de cada modo" (veja pagina 44).
1. Pressione o botão [SOUND].
2. Toque no botão Dolby PLII.
3. Toque no botão ↑ Direita doestrador para selecionar o modo Dolby Pro Logic II.

Oestrador de modo muda esta.
sequencia:
MUSIC (modo música) MATRIX (modo matrix) OFF (PL II desactivado) MUSIC (modo música)...
* Quanto aos pormenores sobre o ajuste de volume do altovalente central /sub-woofer, consulte páginá 45.
4. Toque no botão RTN.
Selecao do menu de posicao
Com POSITION, possível de escolher entre 5 seleções para fazer com que o som cheque do altovalante ao seu assento.
Ainda, a funcao tempo de alinhamento consente o ajustamento exacto de altifalantes de modo que o mesmo efeito audio possa ser obtido de cada altifalante para todos ou ouvintes.
No procedimento "Selecao de cada modo" (veja pagina 44), ajuste AC-PROIII para "PRO".
- O ajuste predefinido de fabrica para POSITION "OFF" e para o menu Basics do posicao "FRONT".
■ Menu de posicao
Esta funciona está pré-armazenada com 5 menus de posicao. SeLECTIONO o menu pretendedo de acordo com a sua preferencia.
1. Pressione o botão [SOUND].
2. Toque no botão POSIÇÂO.


3. Toque no botão ↑ ↓ noestrador ON/OFF. O efeito posicao comuta-se em ON/OFF.

Quando o efeito de posicao está desligado, o ajustamento de posicao não se reflecte na fonte de musica. Isto termina ou ajustamento de posicao. Pressione o botao [SOUND] paravoltar ao modo original.
4. Toque no botão B/U para selecionar "BASIC".

Cada toque de em B/U comahta entre "BASIC" e "USER".
5. Toque no botão ↑ no menu bxico de posicao No. para selecionar o menu bxico de posicao.
Menu Basics de posicao
N° Nome do主義者 Posão do assento 1 FRONT-L Asserto esquerdo dianteiro 2 FRONT-R Asserto direito dianteiro 3 FRONT Assentes dianteiros 4 REAR Assentes traseiros 5 FULL SEAT Todo os assentes
6. Pressione o botão [SOUND] para voltar ao modo original.
Posições Ajustamento/ armazenamento (memória do Utilizador)
Com memória do'utilizar, possível executar o ajustamento exacto dos altifalantes de maneira que o mesmo efeito录音 pode ser obtido de cada altifalante para todos os ouvintes com base no menu bxico de posicao. Na memória do'utilizar poder ser armazenados até 5 ajustamentos.
T-ALIGN (tempo de alinhamento):
A distência entre o ouvinte e cada altifalante pode ser introduzida com passos de 2,3 cm, e pode ser ajustado o tempo que o som de cada altifalante leva a chegar ao ouvinte.
SP GAIN (ganho altofalante):
Ajusta o;nível de saída do altofalante. Ajuste de modo que os volumes em saída de cada altofalante sejam iguais.
1. Pressione o botão [SOUND].
2. Toque no botão POSITION.
3. Toque no botão ↑ noestrador ON/OFF. O efeito de posicao comuta-se em ON/OFF.
4. Toque no botão B/U para selecionar "BASIC" ou "USER".
5. Toque no botão ↑ ↓ direita do meuhrador para selecionar o menuutilizo para o ajustamento.
6. Pressione o botão [A].
7. Toque no botão ↑ esquerda doestrador para selecionar "T-ALIGN" ou "SP GAIN".
8. Toque no botão ↑ no centro do主義or para selecionar cada indicator de ajuste. Cada toque de ↑ muda os indicadores de ajuste como segue:

Indicadores de ajuste
*1 É exibido somente quando “SUB-WOOFER” sob “SOUND” no modo ajuste está aktivado.
*2 É exibido somente quando “SUB-WOOFER” sob “SOUND” no modo ajuste está aktivado, e “T-ALIGN” está selecionado para o passo 7.
9. Toque no botão direita do主義er e ajuste o indicator como desejar.

* "T-ALIGN" pode ser ajustado dentro de um intervalo de 0 cm a 501,4 cm com passos de 2,3 cm.
* "SP GAIN" pode ser ajustado dentro de um intervalo de -20dB a 0dB.
10. Repita os passos de 7 a 9 para fazer o indicator prétencido.
11. Quando tiver acabado deaabstar cada indicator,toque no botao RTN. Oasnodratorvolta para oecran original,e>>"exibido noasnodratorBASICoudoUSER.A operacao executada ateparaora completenessaajustamento da posicao Paracontinuar aarmazenar osvaloresdeajustamento nonenuodeposicao doutilizador,executeo segunte.
12. Toque e mantenha tocado RTN durante um segundo ou mais. A lista do menu de posicao exigida.
13. Toque e mantenha tocada a memória do Utilizador onde quer armazenar os values de ajustamento durante 2 segundos ou mais tempo. Irá ouvir um beep longo, e os values ajustados até ao passo 10 são armazenados no menu de posicao do Utilizador. Se ouvir um beep curto, os values de ajustamento até ao passo 10 são descartados. Ajuste these values de novo comorequiredo.
14. Toque no botão RTN.
15. Pressione o botão [SOUND] para voltar ao modo original.
* Para selección a memória do utilizes armazenada, toque B/U no做不到 "USER" e toque no botão ↑ ↓ na memória do utilizes N°.
Selecao do menu VSE
VSE (Virtual Space Enhancer) consente de compensar o balanco de pressão sonora dentro do seu automóvel de maneira que o mesmo efeito sonoro possa ser obtido em qualquer assento que você esteeja sentido tal como experimentado nas simulacoes de compensacao.
No procedimento de "Selecao de cada modo" (veja pagina 44), ajuste AC-PROIII para "STD".
- O ajuste predefinido de fabrica para VSE é "OFF" e para o menu Basics VSE é "FLAT".
■ Menu Basics VSE
Seis menus tíciaos são pré-armazenados para.
thisi:. Seleciono o menu tíciao de.
acordo com a sua preferencia.
1. Pressione o botão [SOUND].
2. Toque no botão VSE.

3. Toque no botão ↑ ↓ noestrador ON/OFF. Oefeito VSE comuta-se em ON/OFF.

Quando VSE está ajustado para "OFF", o ajuste de VSE não se reflecte na fonte de música. Isto complete a ajustamento de VSE. Pressione o botão [SOUND] para voltar ao modo original.
4. Toque B/U para seleccionar "BASIC".

Cada toque em B/U comuta entre "BASIC" e "USER".
5. Toque no botão ↑ no Menu Basics VSE No. para selecionar o Menu Basics VSE pretendido.
Menu basicos VSE
N° Nome da Função Descrição 1 FLAT Compensação uniforme da fonte sonora 2 BASS BOOST Tonalidades graves incrementadas 3 HIGH BOOST Médios e agudos incrementados 4 IMPACT Baixos e agudos incrementados 5 ACOUSTICAL Tonalidades médias (voz humana) incrementadas 6 SMOOTH Produz tonalidades sonoras suaves.
6. Pressione o botão [SOUND] para voltar ao modo original.
Ajuste/armazenamento de VSE (memória do'utilizador)
Os ajustes na memória do'utilizar consentem de compensar a distribuição da pressão sonora de acordo com a sua preferência com base no Menu Basics VSE. Podem ser armazenados até às vezes ajustamentos do'utilizar.
DIFFUSE (DIFUSão):
Ajusta o desvio na pressao sonora difundida.
CAR WIDTH (LARGURA DO AUTOMÓVEL):
Ajusta o desvio na pressao sonora ao longo da largura do automóvel.
CAR LENGTH (COMPRIMENTO DO AUTOMOVEL):
Ajusta o desvio na pressao sonora ao longo do comprimento do automóvel.
1. Pressione o botão [SOUND].
2. Toque no botão VSE.
3. Toque no botão ↑ ↓ noestrador ON/OFF. O efeito VSE comuta-se em ON/OFF.
4. Toque em B/U para selectionar "BASIC" ou "USER".
5. Toque no botão na direita do.), como menu para o ajustamento.
6. Pressione o botão [A].
7. Toque no botão ↑ ↓ no restrador de指示 para selecionar a campos do botão.

"DIFFUSE", "CARWIDTH" ou "CAR LENGTH".
8. Toque no botão na direita do主義 e ajuste o indicator como desejar.
* Este indicator pode ser ajustado dentro de um intervalo de 1 a 10.
9. Repita os passos 7 e 8 para fazer o指示or pretendido.
10. Quando tiver acabado deaabstar cada indicator, toque no botao RTN.
O Holocaust para o Ecran original, e “>>” é exibido no Holocaust BASIC ou USER.
A operação executada até antes completeness o ajustamento de VSE. Para Continuing a armazenar os valuores de ajustamento para o menu VSE do'utilizar, execute o seguito.
11. Toque e mantenha tocado RTN durante um segundo ou mais.
A lista do menu VSE do utiliser é exibida.
12. Toque e mantenha tocada a memória do'utilizar na qual pretende armazenar os valore de ajustamento durante 2segundos ou mais tempo. Irá ouvir um beep longo, e os valore ajustados até ao passo 9 são armazenados no menu VSE do'utilizar.
Se ouvir um beep curto, os valore de ajustamento até ao passo 9 são descartados. Ajuste"These valeurs de novo comorequiredo.
13. Toque no botão RTN.
14. Pressione o botão [SOUND] para voltar ao modo original.
* Para selecciónar una的记忆ía do utilizes armazenada, toque em B/U para visualizar "USER" e toque no botão ↑ 🙏 🙏 na的记忆ía do utilizes N°.
Selecao do menu P.EQ
P.EQ (Equalizarador Paramétrico) consente de compensar toda a gama de nivel frequência em detailhe por meio da curva plana using A compensação da frequência correspondente ao tipo do seu automóvel.
No procedimento "Selecao de cada modo" (veja pagina 44),ajuste EQ SELECT para P.EQ
- O ajuste predefinido de fabrica para P.EQ é "OFF" e para o Menu Basics P.EQ é "SEDAN-1".
■ Menu Basics P.EQ
6 típos de menu Basics P.EQ está préarmazenados para esta funcção correspondentes ao tipo do seu automóvel e a posicao de montagem do altovalente. SeLECTIONO ou menu Basics mais adequado para o seu automóvel.
1. Pressione o botão [SOUND].
2. Toque no botão P.EQ.

3. Toque no botão ↑ ↓ noestrador ON/OFF. Oefeito P.EQ comuta-se em ON/OFF.

Quando o efeito P.EQ está desligado "OFF", o ajustamento de P.EQ não se reflecte na fonte de música. Isto termina o ajustamento de P.EQ. Pressione o botão [SOUND] para voltar ao modo original.
4. Toque em B/U para seleccionar "BASIC".

A cada vez que se toca em B/U comuta entre "BASIC" e "USER".
5. Toque no botão ↑ no menuístico P.EQ No. para selección o menuístico P.EQ.
Menu Basics P.EQ
N° Nome do nostrador Posão de montagem do altifalante 1 SEDAN-1 Dienteira: Porta dienteira
Traseira: Porta traseira 2 SEDAN-2 Dienteira: Porta dienteira
Traseira: Porta traseira 3 WAGON-1 Dienteira: Porta dienteira
Traseira: Mala (lado) 4 WAGON-2 Dienteira: Porta dienteira
Traseira: Porta traseira 5 MINI VAN-1 Dienteira: Porta dienteira
Traseira: Mala (lado) 6 MINI VAN-2 Dienteira: Porta dienteira
Traseira: Porta traseira
6. Pressione o botão [SOUND] para voltar ao modo original.
Ajuste/armazenamento P.EQ (memória do'utilizar)
Com a的记忆 do uso, pode compensar ascharacteristicas de frequencia mais convenientespara o seu automóvel com base no menu bajoP.EQ. Na的记忆 do uso é不错Guardadas até 6 ajustamentos.Quanto aospormenores, consulte "Ajustamento de P.EQ".
1. Pressione o botão [SOUND].
2. Toque no botão P.EQ.
3. Toque em 品 no主義ORON/OFF Oefeito P.EQ comuta-se em ON/OFF.
4. Toque em B/U para seleccionar "BASIC" ou "USER".
5. Toque no botão na direita do ].do:. para o ajustamento.
6. Pressione o botão [A].
7. Toque no botão à esquerda do主義or para seleccionar "FRONT" ou "REAR".

8. Toque no botão ↑ no centro do主義or para seleccionar cada indicator de ajuste.
Cada toque no botao comuta o indicator de ajuste como segue:
Indicadores de ajuste
BAND FREQ Q GAIN BAND...
9. Toque no botão na direita do公共场所 e ajuste o指示or como desejar.
* "BAND" pode ser ajustada dentro de um intervalo de 1 a 3.
* “FREQ” pode ser ajustada dentro de um intervalo de 20Hz a 20kHz.
* Selezione um de 1, 3, 5, 7, ou 20 como “Q”.
* “GAIN” pode ser ajustado dentro de um intervalo de -12dB a +12dB.
10. Repita os passos de 7 a 9 para fazer o indicator prétencido.
11. Quando tiver acabado deaabstar cada indicator, toque no botao RTN. O meustrador volta para o écran original, e é exhibido no meustrador BASIC ou do USER. A operacao executada atepara sua completeness ajustamento de P.EQ Para continua a armazenar os values deaabustamento para o menu P.EQ do uso, execute o segunte.
12. Toque e mantenha tocado RTN durante um segundo ou mais. A lista do menu P.EQ é exibida.
13. Toque e mantenha tocada a memória do utilizesnator na qual quer armazenar os values de ajustamento durante 2 segundos ou mais tempo. Irá ouvir um beep longo, e os values ajustados até ao passo 10 são armazenados no menu P.EQ do utilizesd. Se ouvir um beep curto, os values de ajustamento até ao passo 10 são descartados. Ajuste"These values de novo como requireido.
14. Toque no botão RTN.
15. Pressione o botão [SOUND] para voltar ao modo original.
* Para selecciónar una的记忆ía do utiliser armazenada, toque em B/U para visualizar "USER" e toque ↑ ↓ na memoria do utiliser N°.
Ajustamento de P.EQ
Os ajustamentos que podem ser executados no menu P.EQ são os seguições. A frequência central, ganho e Curva Q pode ser armazenados nas assocações de canal/faixa.
Por exemple, frequência central "250Hz", ganho "-8dB"e Curva Q "3" pode ser armazenados na faixa 1 na dienteira.
FRONT (SEGUIDE)/REAR (ANTERIOR) (seleção de canal)
Selección o canal (seguido ou anterior) a ser ajustado.
BAND (FAIXA) (selecção da faixa)
Selección a faixa de frequência (de 1 a 3) a ser ajustada.
Ajuste da central frequência (FREQUENCY), ganho (GAIN) e Curva Q (Q) para cada faixa de frequência.
FREQUÊNCIA (seleção da frequência central)
Seleciona a frequência a usar como o centro da faixa de frequência a ser compensada no intervalo de 20Hz a 20kHz.
( passos de 1/3 oitava, 31 pontos)
GANHO (ajustamento de ganho)
Ajusta o ganho (nível de saida) dentro de um intervalo de -12dB a +12dB.
( passos de 1dB, 25 pontos)
Q (Selecao da Curva Q)
Introduza 1, 3, 5, 7, ou 20 como pendência da Curva Q.
Compensacao
Não é necessário compensar as caracteristicas de frequência se estas são uniformes (sem picos nem depressões) quando tiver medico as caracteristicas de frequência com um dispositivo de medicação. Todavia, algumas vezes as caracteristicas de frequência AUGmente ou diminuem em eles lugares. quando isso acontece, as caracteristicas de frequência devem ser compensadas. Crie uma curva de frequência com as caracteristicas opostas à frequência central de partes ode as caracteristicas AUGmente ou diminuem para eliminar os picos e valeros, e tornando as caracteristicas de frequência o mais uniformes possível.
Tornar as caracteristicas de frequência o mais uniforme possível é denominado "compensação".
Nesta unidade, as caracteristicas de frequência podem ser compensadas pelo P.EQ (Equalizador paramérico).
Compensação das caractéricas de frequência
As figuras abaixo muito claram as relações existentes entre a Frequencia central, ganho e Curva Q.

Curva Q
A Curva Q torna-se pendente quando o valor numérico é incrementado, e plana quando o valor numérico diminuído.
Characteristicas de frequencia uniformes podem ser obtidas atraves da selecao da Curva Q oposta naquela da curva a ser compensada.
Curva Q: (Q)

F: Freqência central, G: Ganho (nível de��), Q: Curva Q
N°(esto de automóvel) Parámetros do Equalizador paramétrico Canal Faixa 1 Faixa 2 Faixa 3 F G Q F G Q F G Q 1(SEDAN-1) Seguinte 250 Hz -8 dB 3 2 kHz -4 dB 1 5 kHz -4 dB 1 Anterior 250 Hz -10 dB 3 1.25 kHz 0 dB 5 8 kHz 0 dB 5 2(SEDAN-2) Seguinte 250 Hz -10 dB 7 800 Hz -4 dB 3 8 kHz -5 dB 1 Anterior 80 Hz 3 dB 7 125 Hz -12 dB 5 1.25 kHz 0 dB 5 3(WAGON-1) Seguinte 250 Hz -8 dB 3 1 kHz -8 dB 3 10 kHz -6 dB 1 Anterior 250 Hz -8 dB 3 800 Hz -8 dB 1 8 kHz 0 dB 5 4(WAGON-2) Seguinte 250 Hz -8 dB 7 400 Hz -10 dB 7 1.25 kHz -8 dB 7 Anterior 125 Hz -8 dB 3 500 Hz -5 dB 5 1.6 kHz 0 dB 3 5(MINI VAN-1) Seguinte 125 Hz -4 dB 5 1.25 kHz -4 dB 3 2 kHz 3 dB 7 Anterior 250 Hz -6 dB 1 630 Hz -4 dB 3 8 kHz 0 dB 5 6(MINI VAN-2) Seguinte 250 Hz -4 dB 3 1.25 Hz -8 dB 3 80 Hz 3 dB 3 Anterior 250 Hz -8 dB 3 500 Hz -5 dB 5 8 kHz 0 dB 5
Operações do rádio
Exibções de écran no modo rádio
■ Mostrador principal
É exibido por meio da pressão do botão rotatório [ROTARY] e seleção do modo rádio.

Tocando na parte esquerda do主義ador durante 1 segundo ou mais comuta o主義ador de operacao simples.

Mostrador de frequência
A frequência que está sentoactually recebida é exibida.
Tocando no botão ou é possível executar a sintonização por busca ou a sintonização manual no主義o de operação padrão.
Mostrador de titulo
Exibe o nome do canal de radiodifusao que actualmente está送去 recebido. Tocando nesse nome comuta o主義or.
Mostrador da Faixa de recepçao
AM: Nome da banda AM
FM1: Nome da banda FM
Mostrador do N° de pré-Seleção
Tocando no botão ↑ noestrador de operação padrão seleciona a memória pré-seLECTIONada.
MODE (MODO)
Tocando este botão exibe as sub-funções.
Mantendo o botão pressionado durante 1 segundo ou mais exibe a lista de memória pré-seLECTIONada.
P-SCAN:
É exibido durante uma exploração programada. Tocando neste botão termina a exploração programada.
A-STORE:
É exibido durante um armazenamento automatico. Tocando este botãotera o armazenamento automatico.
BAND (FAIXA)
Tocando no botão BAND comuta a faixa de recepçao.
Tocando e mantendo tocado este botão durante 1 segundo ou mais comuta entre o modo de sintonização manual e o modo de sintonização por busca.
(sono no do的操作简单)
Tocando este botão habilita a sintonização porbusca ou sintonização por passos (no modo de sintonizaçãomanual).
Tocando e mantendo tocasto este botão habilita a sintonização rápida (no modo de sintonização manual).
■ Mostrador da lista de memória pré-seLECTIONada
É exibido quando MODE é tocado e mantido tocado durante 1 segundo ou mais no restrador principal.

Nome da estação (ou frequência)
Sintonização em andamento
RTN: Toque;neste botao para voltar para o ].
mostrador principal.
Ouvir o RADIO
1. Pressione o botão rotatório [ROTARY] para selección o modo rácio.
Cada vez que se pressiona o botão rotatório [ROTARY] o modo muda esta sequência:
Rádio (DAB) CD / MP3 (Permutador de CDs) (Permutador de DVDs) (TV) AUX Rádio...
* O modo do equipamento que não está ligado não é exibido.
2. Toque em BAND para comutar a faixa de recepçao.
A cada vez que se toca em BAND, a faixa de receção alterna como segue:
FM1 FM2 FM3 AM (MW / LW) FM1...
Sintonização
Existem 3 temas de modelos de sintonização disponible, sintonização por busca, sintonização manual e sintonização pré-seLECTIONada.
Sintonização porquisa
Existem 2 problemas de sintonização por busca: DX SEEK e LOCAL SEEK.
A DX SEEK pode sintonizar automaticamente estações de radiodifusão captações, quando que, LOCAL SEEK pode sintonizar somente estações radiofónicas com boa sensibilitadede receção.
1. Toque em BAND para seleccionar a bandapretendida (FM ou AM (MW, LW)).
2. Sintonize uma estação.
* Se MANU estiver iluminado no主義or, toque e mantenha tocado o botão BAND durante 1 segundo ou mais.
"MANU" desaparece do meustrador e a sintonização por busca torna-se disponível.
* Se "TA" estiver iluminado no主義or, estações de TP são buscadas automaticamente.
DX SEEK
Quando se toca o botão ↑ ↓ inicia a sintonização automática noadora de frequência,.
Quando se toca o botão 已 , a estação é busicada na direção de frequências mais altas; Quando se toca o botão 已 , a estação é busicada na direção de frequências mais baixas.
* Quando a sintonização por busca Começa, "DX SEEK" aparece no主義者.
LOCAL SEEK
Quando se toca o botão é realizada uma sintonização por busca local no主義o de frequência.,. Estações de radiodifusão com boa sensibilitadé de receção são selecionadas.
* Quando a sintonização porbusca local começa,“LO SEEK”aparece no mostrador.
Sintonização manual
São 2 os modos disponíveis: sintonização rápida e sintonização por passos.
No modo sintonização por passos, a frequência muda a 1 passo de cada vez. No modo sintonização rápida, épossible sintonizar rapidamente a frequência pretendida.
1. Toque e mantenha tocado o botão BAND durante 1 segundo ou mais quando MANU não estiver iluminado no主義or. A sintonização manual é possivel quando MANU está iluminado no主義or.
2. Opere noestrador de frequencia para sintonizar numa frequencia ond ha umaradiodifusao.
Sintonização por passos
Toque no botao 山 noestrador de frequencia.
Sintonização
Toque no botão noestrador de frequência. A sintonização interrompe-se quando colocar o dedo afastado do painei.
Chamada de uma estação pré-sintonizada
Chamada de uma estaqao pre-sintonizada é uma funcao para a sintonizacao de estacoes pre-armazenadas.
1. Toque e mantenha tocado MODE durante 1 segundo ou mais.
A lista da的记忆 pré-seLECTIONADA é exibida.
2. Toque na estação que quiser ouvir.
* No modo normal, pré-seLECTION N°. également se pode sintonizar tocando no botão ↑ 📁 🄾 no restrador principal.
Para cancelar uma sintonização
1. Toque no botão RTN.
Memória pré-seLECTIONA
Um total de 24 posições de pré-sintonia (6-FM1, 6-FM2, 6-FM3, 6-AM) existe para armazenar estações de rádio individuais na memória.
1. Toque no botão BAND para comutar a faixa de receção.
2. Opere no主義者 de frequência para armazenar a estação.
3. Toque e mantenha tocado MODE durante 1 segundo ou mais. A lista da memória pré-seLECTIONada é exibida.
4. Toque e mantenha tocado o N^ pre-Selecao durante 2 segundos ou mais para armazenar a estacao. Irá ouvir um beep longo, e a estacao é armazenada na memoria.
Armazenamento automatico
Armazenamento automatico é uma coisa para armazenar até 6 estações que são automaticamente sintonizadas em sequência.
1. Toque em MODE.
2. Toque e mantenha tocado A-STORE durante 2 segundos ou mais. O主義or de MODE muda para "A-STORE"e N^ de pre-selecao na operationa armazenamento automatico aparece no主義or de N^ de pre-selecao.
* Estações com boa receção são automaticamente buscadas, e são armazenadas na memória pré-seLECTIONada (de N° 1 a N° 6) por ordem a partir da estação com a frequência mais baixa.
Notas:
- Quando o armazenamento automatico é executado, as estagens armazenadas até agora na memória são canceladas.
- quando há menos de 6 estações com boa receção em LOCAL SEEK, as baixas freqências são automaticamente retomadas, e o armazenamento automatico é executado de novo por DX SEEK. Se há menos de 6 estações mesmo depuis que o armazenamento automatico foi executado das vezes, as estações armazenadas até antes ficam na memória.
- Se o armazenamento automatico é executados nas bandas FM, as estações são armazenadas em FM3 mesmo se FM1 ou FM2 foram escolhidos para armazenar estações.
Exploração programada
Exploração programada é uma coisa para captar estações de modo que estas sãoactualmente armazenadas no N^ de pre-seleção de maneira que as estaçõesradiofónicas possam ser controladas.
1. Toque em MODE.
2. Toque em P-SCAN.
Oestrador de MODE muda para "P-SCAN" e o N° pré-selecção numa operação de exploraçao programada é exibido no estrador do N° pré-selecção.
* As estações armazenadas actualmente são receidas por ordem durante 7 segundos ou mais cada uma. Estações com fraça receção são saltadas, e é captada a estação sucessiva. Quando a Exploração programada é executada em radiodifusão FM, as estações FM são receidas na sequência: FM1 (1 → 6) → FM2 (1 → 6) → FM3 (1 → 6)...
Quando a Exploração programada é executada em radiodifusão AM, as estações AM são recebidas na sequência:
AM (1 6) AM (1 6) e assim por adiante.
Cancelar uma Exploração programada
1. Toque no botão P-SCAN. Oadora P-SCAN muda para "MODE", e as estações que estavam sentido receidas quando o botão P-SCAN foi tocado são receidas em seguida.
RDS (sistema de dados por raggio)
Esta unidade incorpora umsystemadescodificador de RDS capaz de captar estaceoesde radiodifusao que transitem dados de RDS.
Este planta pode exibir o nome da estação de radiodifusão captada (PS) e pode mudar automaticamente para a estação de radiodifusão com a melhor receção à medida que o veiculo se desloque por distências longas (comutacao de AF).
Além disso, se um acontecido de tráfego ou tipo de programa é emitido por uma estação de RDS, a transmissão é recebida independente do modo corrente de escuta.
Adicionalmente, se uma informação EON é recebida, esta informação habilita uma comutatione automatica de outras estações prefixadas na mesma rede e a interrupcao da址acao sintonizada com informacao de trafego de otheras estacoes (TP).Esta funcao nao está disponivel em algumas areas.
quando usar a funcao RDS, sempre coloque o radio em modo de FM.
AF: Frequência Alternativa
- PS: Nome do service de programa
- PTY: Tipo de programa
- EON: Outras redes Transmissoras
- TP: Programa de Tráfego
PI: Identificacao de Programa
- TA: Anúncios de Tráfego
* A interruptação RDS não funciona durante a receção AM de rádio.
* Quando o aparecido receiveber um sinal RDS e for capaz de ler dados PS, a indicação PS aparece no主義or.
Função AF
A funcão AF muda para uma frequência diferente na mesma rede de modo a manter a recepçao optima.
- O ajuste feito na fabrica é "ON".
Para comutar a funcao AF entre ON/OFF
1. Toque em MODE.
2. Toque em AF.
A cada vez que se toca o主義or AF comuta entre "ON"e "OFF".
3. Toque em RTN.
* Se a receção da estação de radiodifusão actual se deteriorar, aparece “SEARCH” no主義者,e o rádio procurura uma outras frequência para o mesmo programa.
Função AF entre RDS e DAB
Quando o mesmo programa é transmitido tanto por RDS como por DAB e esta funcção está activada, a unidade muda para receber a transmissão com melhor receção automaticamente.
- Esta funcao opera somente quando a unidade DAH923 ou DAH913 DAB, vendida separadamente, está conectada.
- O ajuste feito na fabrica é "ON".
1. Pressione no botão [A] para selecionar o modo de ajuste.
2. Toque no botão ↑ noestrador dos indicadores de ajuste para seleccionar "LINK ACT" sob "TUNER".

3. Tocar no botão a direita do measurador, ou rodar o botão rotatório [ROTARY] para selecciónar "ON" ou "OFF". ON:
A comutatione AF entre DAB e RDS está activada.
OFF:
A comutatione AF entre DAB e RDS está desactivada.
4. Pressione o botão [A] para voltar ao modo anterior.
Função REG (programa regional)
Quando a funcao REG está activada, a estacao regionalo optima pode ser sintonizada. Quando esta funcao está desactivada, se a area de estacoes regionais mudar durante o deslocamento do veiculo, uma estacao regionala para aquela regiao e sintonizada.
- O ajuste feito na fabrica é "OFF".
Notas:
-核心区 de la frontera
-Está função desactiva-se quando uma estação Nacional, como BBC 2_FM é sintonizada.
- O ajuste ON/OFF da função REG é valido quando a função de AF está activada.
Para comutar a funcao REG entre ON/OFF
1. Toque no botão MODE.
2. Toque no botão REG. A cada vez que se toca o botão REG o主義者 comuna entre "ON" e "OFF".
3. Toque no botão RTN.
Sintonização manual de uma estação regional na mesma rede
- Esta funcção é valida quando a funcção AF está activada.
- A operação difere de acordo com a seleção de ON/OFF da função REG. quando a função REG está activada, pode ser receidas estações radiofónicas com um Código PI perfeitamente correspondente. quando a função REG está desactivada, pode ser receidas estações radiofónicas com o mesmo tipo de:Código PI.
Notas:
- Esta função pode ser usada quando uma estação radiofónica regional da mesma rede é recebida.
- O Código PI é umsystema de)códio que é unico para cada estação de radiodifusão.
1. Toque e mantenha tocado MODE durante 1 segundo ou mais.
A lista da memória pré-selectionada é exibida.
2. Toque no N^ de pre-selectação da estatão radiofónica a ser recebida.
TA (anúncio de tráfego)
Em modo de espera TA, quando começa uma transmissão de acontecido de tráfego, a transmissão de anúcio de tráfego é recebida com prioridade Tmaxima, independenteamento do modeo de funcao, para possibilhar sua audicao. A sintonia automatica de programa de trafego (TP) tambem é possivel.
- Esta função está para ser usada quando “TP” está iluminado no主義者. quando “TP” está iluminado, isto significava que a estação de radiodifusão de RDS sintonizada tem programas de anúscio de tráfego.
Activar o modo de espera TA
Caso se pressione o botão [TA] quando é "TP" estiver iluminado no主義or, "TP" e "TA" iluminar-se-ão no主義or e a unidade activará o modo de espera TA até que um anúncio de tr胶囊-seja transmitido. Quando começa uma transmissão de anúncio de tr胶囊, "TRA INFO" aparece no主義or. Quando se pressiona o botão [TA] durante uma recepçao de anúncio de tr胶囊, a transmissão de anúncio de tr胶囊 é cancelada e a unidade entra em modo de espera TA.
■ Cancelar o modo de espera TA
Com osindicadores "TP"e "TA"acesos no
mostrador, pressione o botao [TA].Oindicador "TA"no mostrador apaga-se e o modo de
espera TA é cancelado.
- Se "TP" não estiver iluminado, pressionar o botão [TA] aconteça uma busca de estação de TP.
■ Buscar uma estaqao de TP
Ao se pressionar o botão [TA], quando “TP” não estiver iluminado, “TA” illumina-se no主義o.
e esta unidade sintoniza automaticamente uma
estação de TP.
Nota:
- Quando uma estação de TP não pode ser sintonizada, "TP SEEK" aparece noestrador, e a busca de uma estação de TP continua. quando o botão [TA] é pressionado de novo, "TA" e "TP SEEK" desaparecem doestrador, e interromperse a busca de uma estação de TP.
Função de armazenamento automatico para estações de TP
Pode armazenar 6 estações de TP na memória de pré-sintonia automaticamente. Se o número de estações de TP que pode ser sintonizadas for menor do que 6, o prefixo de estações de radiodifusão ja armazenadas na memória permanece registrar na mesma.
1. Acerte-se de que "TA" esteja iluminado no主義者, e toque no botão MODE. Se "TA" não está iluminado no主義者, pressione o botão [TA] para exibir "TA".
2. Toque e mantenha tocado A-STORE durante 2 segundos ou mais. O meustrador MODE muda para "A-STORE" e N^ de pre-selectacao na operatione de armazenamento automatico aparece no meustrador de N^ pre-selectacionado.
- Estações de TP com boa sensibilitidade de receção são armazenadas na memória de pré-sintonia.
- Mesmo que se selección FM1 ou FM2, a estação de TP é armazenada na memória para FM3.
PTY
Esta funciona permite aAUDICAO de una emissao de um determinado tipo de programa, mesmo quando o aparelho estiver numa funcao que nao a de radio.
- Alguns paises não tem transmissão de PTY.
- Em modo de espera TA, uma estação de TP tem prioridade sobre uma estação de transmissão de PTY.
Activar o modo de espera de PTY
Quando se pressiona o botão [▶III], “PTY” illumina-se no主義o e o modo de espera PTY é activado. quando começa a transmissão do PTY selecionado, o nome do item de PTY aparece no主義o.
■ Cancelar o modo de espera de PTY
Quando se pressiona o botão [▶■] durante 1 segundo ou mais, "PTY" desaparece do主義者 e o modo de espera de PTY é cancelado.
■ Cancelar una transmissão de interruptação PTY
Pressione o botão [▶III] durante uma transmissão de interrupção PTY. A interrupção PTY é cancelada e a unidade volta ao modo de espera de PTY.
Selecciónar PTY
1. quando se pressiona o botão [▶■], aunities entra no modo de seleção de PTY.
2. Tocar no botão à direita do主義or, ou rodar o botão rotatório [ROTARY] para selección o PTY.
* A seguir está os ajustes predefinidos armazenados na fabrica:
Número de在此之前 Item de PTY ENGLISH Conteudo 001 News Noticias 002 Info Informação 003 Pop M Música Pop 004 Sport Desporto 005 Classics Música Clássica 006 Easy M Música Ligeira
3. O modo de seleção de PTY é cancelado automaticamente 7 segundos antes, ou quando tocando no botão RTN um PTY é selecionado.
Busca de PTY
1. quando se pressiona o botão [▶■], o modo de seleção de PTY é activado.
2. Tocar no botão ↑ ⇌ no centro do主義者, ou rodar o botão rotatório [ROTARY] para selección o PTY.
3. Toque no botão a esquerda do公共场所.
Quando se toca no botão, a equipe busca uma transmissao de PTY em ordem crescente de frequencias; quando se toca no botão busca em ordem decrescente de frequencias.
* Se não for possível a receção de nenhum estado emissora com o PTY seleção, o aparecido returna ao modo anterior.
Memória de pré-Seleção do PTY
1. quando se pressiona o botão [▶■], o modo de seleção de PTY é activado.
2. Toque no botão ↑ no centro do mostrador para selecionar o PTY. Os 29 problemas de PTY naanela abaixo podem ser selecionados.
Item de PTY ENGLISH DEUTSCH SVENSKA FRANÇAIS Conteúdo News Nachrich Nyheter Infos Noticias Affairs Aktuell Aktuellt Magazine Actualidade Info Service Info Services Informação Sport Sport Sport Sport Desporto Educate Bildung Utbildn Educatif Educação Drama Hör + Lit Teater Fiction Teatro Radiofínico Culture Kultur Kultur Culture Cultura Science Wissen Vetenskap Sciences Ciência Varied Unterh Underh Divers Variade Pop M Pop Pop M Pop Música Pop Rock M Rock Rock M Rock Música Rock Easy M U-Musik Lättlyss Chansons Música Ligeira Light M L-Musik L klass M Cl Lég Clássica Ligeira Classics E-Musik Klassik Classiq Música Clássica Other M - - Musik Övrig m Autre M Outras Músicas Weather Wetter Väder Météo Meteorologia Finance Wirtsch Ekonomi Economie Economia Children Kinder Für barn Enfants Programas Infantil Social Soziales Sozialt Société Soisas Religion Religion Andligt Religion Religião Phone In Anruf Telefon Forum Telefonemas dos ouvintes Travel Reise Resor Voyages Viagem Leisure Freizeit Fritid Loisirs Lazer Jazz Jazz Jazz Jazz Jazz Country Country Country Country Música Country Nation M Landes M Nation m Ch pays Música Nacional Oldies Oldies Oldies Rétro Antiga Folk M Folklore Folkm Folklore Música Folk Document Feature Dokument Document Documentário
3. Toque no botão RTN durante 1 segundo ou mais.
A lista dos títulos da memória do PTY é exibida.
4. Toque e mantenha tocada durante 2 segundos ou mais o N^ de pre-selectao a armazenar.
Irá ouvir um beep longo, e o PTY selecionado é armazenado no canal da memória de pré-selectação.
Transmissão de emergência
Se uma transmissão de emergência é recebida, todas as operações de modo de funções são interrompidas. "ALARM" aparece no主義e a transmissão de emergência pode ser ouvida.
■ Cancelar uma transmissão de emergência
Quando se pressiona o botão [AF], a receção da transmissão de emergência é cancelada.
Mudar o idioma de exibição do PTY
Pode seleccionar entre os 4 idiomas (Inglês, Alemão, Sueco ou Francês) para o PTY exibido no主義or.
- O ajuste feito na fabrica é "ENGLISH" (inglês).
1. Pressione o botão [A] para selecionar o modo ajuste.
2. Toque no botão ↑ noestrador dos指示os de ajuste para selecionar "LANGUAGE" sob "TUNER".

3. Tocar no botão ↑ à direita do主義or, ou rodar o botão rotatório [ROTARY] para selección o idioma pretendedo.
* Selezione um dos idiomas ENGLISH (Inglês), DEUTSCH (Alemão), SVENSKA (Sueco) ou FRANÇAIS (Francês).
4. Pressione o botão [A] para voltar ao modo anterior.
Selecione Interrupcao de RDS quando a funcao 2-ZONE é usada (RDS-INT 2Z)
Quando esta funcao está ajustada em "ON", e ocorrre uma interrupcao de RDS quando a funcao 2-ZONE está em uso, pode ser recebidas as informacoes de RDS.
- quando ocorrre um interrupcao de RDS, a funcao 2-ZONE desactiva-se.
- Se occurs uma Interrução de emergência acreda que com "RDS-INT 2Z" ajustado em "OFF", é recebida a informação de RDS.
- O ajuste feito na fabrica é "ON".
1. Pressione o botão [A] para selecionar o modo ajuste.
2. Toque no botão ↑ ↓ noestrador dos指示符指示的指示符。indicações de ajuste para selecionar "RDS-INT 2Z" sob "TUNER".

3. Tocar no botão ↑ à direita do主義or, ou rodar o botão rotatório [ROTARY] para selección ou "ON" ou "OFF". ON:
A informação RDS é recebida quando ocorrê uma Interrupção de RDS quando a função 2-ZONE está em uso.
OFF:
Quando a funcao 2-ZONE está em uso, as informacoes RDS diversas da interrupcao de emergencia não são recebidas.
Nota:
- Se o modo Radio é selecionado quando TA (Anúncio de Tráfego) e PTY está ligados, as interruptões são recebidas mesmo se a Interrupção RDS está ajustada para “OFF”.
4. Pressione o botão [A] para voltar ao modo anterior.
Ajuste de volume das transmissões de TA, de emergência (ALARM) e de PTY
O volume das interrupções de TA, ALARM e PTY pode ser ajustado durante a interrupção de TA, ALARM ou PTY.
- O ajuste feito na fabricula é "15".
Durante a interrupção de TA, ALARM ou PTY, rode o botão rotatório [ROTARY] à direita ou à esquerda para fazer o volume ao;nível pretendido (de 0 a 33).
- Quando a Interruptione da TA, ALARM ou PTY termina, o volume volta ao nivel que está activo antes da Interrupcao de transmissao.
Mostradores de écran no modo CD
■ Mostrador principal
É exibido por meio da pressão do botão rotatório [ROTARY] para selecionar o modo CD.

Tocando na parte esquerda do主義ista durante 1 segundo ou mais comuta o modo de operacao.

Mostrador de Pista/tempo reproducao 01/02:00:
O N° da pista que está送给 reproduzida e o tempo de reprodução são exibidos.
Se toca-se no botão ↑ 📁 ↑ ou ← 📁 → na operationa padrão, é possível selecionar a pista a reproduzir, ou o avanço-rápido ou retroprocesso-rápido das pistas.
Mostrador de titulo
Oasnadradorécomutadoquando toca-seeste mostrador.
Mostrador de pasta (no caso de MP3/WMA)
Tocando na operationa padr o botao seleciona as pastas.
MODE:
Tocando neste botão exibe as sub-conções. Tocando e mantendo tocasto este botão durante 1 segundo ou mais no caso de MP3/WMA é exibida a lista de pastas.
Nota:
- Esta funcao está activada somente quando um disco está em reproducao
-SCAN/SCAN: é exibido durante a reprodução introdúrtoria. Tocando neste botão termina a reprodução introdúrtoria.
- RPT/ -RPT: É exibido durante uma reprodução repetida. Tocando neste botão termina a reprodução repetida.
F-RDM/RDM: E exibido durante a reprodução aleatoria. Tocando neste botão termina a reprodução aleatoria.
TOP:
Tocando neste botão começa a reprodução da pista do topo do disco ou da pasta que está sentido reproduzida.
(sono no do的操作简单)
Tocando nestes botões seleciona a pista a reproduzir.
Tocando e mantendo tocados these botões executase o avanço-rápido ou retroprocesso-rápido das pistas.
■ Mostrador da lista de pastas (no caso de MP3/WMA)
É exibido quando se mantém tocado o botão MODE durante 1 segundo ou mais no restrador principal.

Nome da pasta
Pasta N°
Quando está evidenciada em cinzento, a pasta não pode ser selecionada.
>>: Selecção em andamento
Tocando num nome da pasta returno o écran ao公共场所 principal, e a reproducao começape para primaira pista na pasta tocada.
←PREV-RTV:
Tocando;neste botao,exibe a lista da pasta anterior. Mantendo o botao pressionado durante 1 segundo ou mais returno o ecran ao restrador principal.
NEXT:
Tocando neste botão exibe aproxima lista de pastas.
O que é o MP3?
MP3 é um método de compressão audio, classificado na terceira camada audio dos standards MPEG. Este método de compressão audio penetrou no mercado de computadores pessoasis, tornando-se num formato standard.
O MP3 comprime os dados audio paraerca de 10 por cento do seu tamanho original, mantendo uma alta qualidade sonora.
Quer isto fazer queerca de 10 CDs de musica pode ser gravados num disco CD-R ou CDRW, permitindo uma audicao prolongada sem ter de Mudar o CD.
O que é o WMA?
WMA é a abreviatura de Windows Media Audio, um tipo de ficheiro audio desenvolvido pela Microsoft Corporation.
Notas:
- Não é produzido som quando reproduzir um ficheiro com DRM (Gestão de Direitos Músicas) realizando o WMA. (O indicator WMA indicator passa a piscar.)
- Windows Media™ e o logotipo Windows® sãoemarks registadas da Microsoft Corporation, nos Estados Unidos da América e/ou em outros países.
- Para desactivar o DRM (Gestor de direitos musicais):
- Quando utilizes o Windows Media Player 8, dê um clique em TOOLS → OPTIONS → guia COPY MUSIC, e então de um clique em COPY SETTINGS e retire a marca de verificação da caixa de verificação de PROTECT CONTENT. A seguir, reconstrua os ficheiros.
- Quando utilizes o Windows Media Player 9, dê um clique em TOOLS → OPTIONS → guia MUSIC RECORD, e então dé um clique em configurações de gravação e retire a marca de verificação da caixa de verificação de RECORD PROTECTED MUSIC. À seguir, reconstrua os ficheiros.
Ficheiros pessoalmente preparados são realizados sob a sua responsabilité.
Precauções na 创建ação de um disco MP3/WMA
- Frequências de amostragem e velocidades de transmissãoutilizáveis:
1. MP3: Frequências de amostragem: 11,025 kHz a 48 kHz Velocidades de transmissão: 8 kbps a 320 kbps / VBR
2. WMA: Velocidades de transmissao 48 kbps a 192 kbps
Extensões dos ficheiros
1. Adicione sempre uma extension“.MP3” ou“.WMA” a um ficheiro MP3 ou WMA utilizing letras de um einzelvo byte. Se adcionar uma outra extensionDifferente da especialcada ou se esquecer de adcionar a extension, o ficheiro não podera ser reproduzido.
2. Ficheiros sem dados MP3/WMA não serao reproduzidos. A indicação "--:--" aparece no公共场所 do tempo de reproducao se tentar de reproducir ficheiros sem dados MP3/WMA.
Formato lógico (Sistema de ficheiros)
1. Quando escrever um ficheiro MP3/WMA num disco CD-R ou CD-RW, por favor selecione "ISO9660 level 1, 2 ou JOLIET ou Romeo" como FORMAT de software decrire. A reproducao normal não sera possivel se o disco é gravado num及其他这对于 agradeamento é inconsiderable.
2. O nome da pasta e o nome do ficheiro podem ser exibidos como TITLE no caso de reproducao MP3/WMA mas o TITLE deve ter no maior 128 letras ou digitos de um unicno byte (incluindo uma extensao).
3. Não atrribua um nome a um ficheiro dentro de uma pasta com o mesmo nome.
Estrutura das pastas
1. Não é possevel Criar discos com mais de 8 níveis hieráquicos.
-Numero de ficheiros ou pastas
1. São reconhecidos no máximo 255 ficheiros por pasta. São reproduzidos no(Maximo 500 ficheiros.
2. As pistas são reproduzidas pela ordem em que foram gravadas no disco. (As pistas nem sempre podem ser reproduzidas pela ordem exibida no PC.)
3. Pode ser produzido ruido, dependendo do tipo de software realizado na gravacao.
Selecao de Multi-sessao
Esta funciona consente de selectionar quer ficheiros CD-DA que MP3/WMA no caso de discos (ex. CD-EXTRA) commistura de CD-DA (CDs de música) e ficheiros MP3/WMA.
1. Toque no botão MODE.
2. Toque no botão M-SESS. A cada vez que se toca no botão M-SESS comuta o主義or M-SESS entre "CD" (play CD-DA) ou "MP3/WMA" (play MP3/WMA). * Se M-SESS não é exibido, toque no botão NEXT.
3. Toque no botão RTN. O ajuste da seleção multi-sessão é reflectida àproxima vez quecarregar um CD.
Nota:
- Quando reproducir um CCCD (CD de controlo de Cópia), define o ajuste para tipo CD. quando o ajuste for definindo para tipo MP3/WMA, em eles casos o CD não poderá ser reproducido normalmente.
PRECAUÇAO
Tenha cuidado para não entalar os dedos quando fechar a CONSOLA INCLINÁVEL.
Notas:
- Se a CONSOLA INCLINÁVEL nãoAbrir completeness,abra-o suavamente com a boa.
- Feche a CONSOLA INCLINÁVEL depuis de introduzir um CD.
- Não tente introduzir os dedos ou a maior na ranhura de inscrção do disco. Além disso, não introduza nunca objectos estranhos na ranhura.
- Não introduza discos com autocolante de celofane ou róculos de discs alugados descolados, ou discos com marcas deixadas por autocolante de celofane ou de róculos descolados. Pode ser impossívelrirutar este tipo de discos,agem de poderem avariar o aparelho.
Introdução de um CD
1. Pressione o botão [▲] O painel de controlo abre-se.
2. Introduza um CD na ranhura do CD. Após a introdução do disco, o painel de controlo fecha-se automaticamente, passadosagems segundos, e a reprodução meça.
Notas:
- Nunca introduza objetivos estranhos na ranhura do CD.
- Se o CD não entra fácilmente, pode estar muito CD no aparecido, ou o mesmo pode estar a necessitar de reparação.


Discos que não exibem a marca [0][5] [6] ou mark e CD-ROMs não podem ser ouvidos neste aparelho.
- Alguns CDs gravados em formato CD-R/CD-RW podem não ser'utilizando.
Introdução de discos compactos de 8 cm
Não é necessário nenhum adaptor para reproduzir um CD de 8 cm. Introduza o CD de 8 cm no centro da ranhura de inserção.
Ejecção de um CD
É possé往来 um CD pressionando o botão [▲] mesmo se mecanismo de segurarou ACC está automaticamente na posção OFF.
PRECAUÇA O
Quando o disco è ejectado, pressione o botão [▲] para fechar o panei de controlo. SeDEXAR opanei de controlo aberto, irá ouvir um duplo beep, e opanei de controlo fecha-se automaticamente.
1. Pressione o botão [▲].
O paine de controlo abre-se, e o disco é ejectado. O modo comuta automaticamente para o modo de rádio.
* Acerte-se de remover o disco ejectado do aparelho. SeDEXAR o disco no prato do disco, passados 15 segundos ou mais tempo, o disco é levado para dentro do aparelho e o paine de controlo fecha-se. (funcao de auto inscracao)
* Os CDs Single não são de inserção automática. Acerte-se de remover os CDs single(before dações dos outros.
PRECAUÇAO
Seutilizarexcessivaforca para insertirum discodeposdessetseriodejectado,a superficiedo disco poderaserriscada. Remova o disco ante de inserti-lo novamente.
Escutar um disco ja inserido no aparelho
1. Pressione o botão rotatório [ROTARY] para selección o modo de CD.
* A reprodução commence automaticamente quando o modo muda para o modo CD.
Interromper a reproducao
1. Pressione o botão [▶■]
Retomarareproducao
1. Pressione o botão [▶■] de novo.
Selección urma pista
Quando um CD-R/CD-RW gravado com um ficheiro MP3 ou WMA é inserido, é possível的选择ar somente as pistas gravadas na mesma pasta tocando no botão ↑ 📦 🦩 no主義者 da pista.
1. Para escutar aproxima pista,toque no botao 日 no nostrador da pista.
2. Para escatar a pista precedente, toque das vezes no botão ↑ noestrador da pista. Tocando no botão ↑ reproducu aproxima pista. Se tocar no botão ↑ varias vezes, a pista move-se para frete até a pista correspondente ao número de vezes que se tocou o botão ↑ eessa pista é reproduzida.
Tocando no botão ↑ reproduz a pista anterior. Se tocar varias vezes no botão ↑, a pista move-se para trás até a pista correspondente ao número de vezes que se tocou o botão ↑ eessa pista é reproduzida.
* Se tocar dos vezes no botão ↑ no*
no*
mostrador da pista quando o inico da
pista está a reproduzir, por vezes é
reproduzida a pista 2.
■ SeLECTIONAR Uma pasta
Para selecionar una pasta diferente, tocar no botão ↑ ↓ no主義 de pasta, ou executar o segunte.
1. Toque e mantenha tocado o botão MODE durante 1 segundo ou mais. É exibida uma lista de pistas. Tocando no botão PREV ou NEXT exibe a parte anterio ou sucessiva da lista de pastas.
2. Toque no nome da pasta.
Reproduzir a lista de reproducao
Listas de reprodução (ficheiro M3U) también podem ser reproduzidas. Note-se, todas, que os ficheiros M3Uactualmente guardados nas cinco camadas (incluindo a raiz) na hierarquia dos ficheiros somente os 5 ficheiros de topo com novas marcas de tempo podem ser reproduzidos.
Notas:
- Podem ser reproduzidos até 255 ficheiros numa uma lista de reprodução.
- É possèvèr reproduzir somente os ficheiros MP3 ou WMA actualmente guardados nas pastas nascinco camadas (incluindo a raiz) na hierarquía dos ficheiros.
Execute o segunte para reproducir a lista de reproducao.
1. Toque no botão MODE.
2. Touch NEXT.
3. Touch PLY LIST. Inicia a leitura de uma lista de reproducao. quando a leitura de uma lista de reproducao termina, a lista de reproducao com as ultimas MARCAS de tempo começa automaticamente. A selecao de uma lista de reproducao ou pistas numa lista de reproducao é a mesma que aquela de selecao de uma pasta ou pistas numa pasta.
* PLY LIST não é exibida quando uma lista de reprodução actual (ficheiro M3U) não está guardada no CD-R/CD-RW inserido no aparecido.
Interromper a reproducao de uma lista de reproducao
1. Toque no botão MODE.
2. Toque no botão NEXT.
3. Toque no botão PLY LIST.
Avanço-rápido / Retrocesso-rápido
1. Para o avanço-rápido, toque no botão no主義 no主義 da pista.
2. Para o retroprocesso-rápido, toque no botão no主義 no主義 da pista.
Função TOPO
A funcão topo reinicializa o reproduidor de CD colocando-o na primeira pista do disco.
1. Toque no botão Top.
A reprodução inicia pela primaira pista (pista N°1).
No caso de MP3/WMA, o reproduidor volta à primaira pista da pasta que está sentido reproduzida.
Reprodução introdúttória
Esta funcao consente de localizar e reproduzir os primeiros 10 segundos de cada pista gravada no disco.
1. Toque no botão MODE.
2. Toque no botão J^ -SCAN. O meuador modo muda para "J ^ - S C A N " e meça a reproducao introdutoria.
* A reprodução introdúctoriaComeça pela pista sucessiva à pistaactualmente em reprodução.
■ Cancelar a reprodução introdúctoria
1. Toque no botão ^一 SCAN. O meuador SCAN muda para MODE, e a pista que estiver em reproducao quando se tocou em SCAN é reproduzida.
Reprodução introdúrtória das pastas
Esta funciona consente de localizar e reproduzir os primeiros 10 segundos da primarya pista de cada pasta no disco MP3/WMA.
1. Toque no botão MODE.
2. Toque no botão -SCAN. O meuador MODE muda para "SCAN" e meça a reprodução introdúctoria das pastas.
* A reprodução introdúctoria das pastas comoça pela pasta a seguir à pasta que está em reprodução.
■ Cancelar a reprodução introdúctoria das pastas
1. Toque no botão -SCAN. O botão -SCAN do做不到 muda para "MODE", e a pista que estiver em reprodução quando se tocou o botão -SCAN é reproduzida.
Reprodução repetida
Esta funcao consente de reproducir a pista actual repetidamente.
1. Toque no botão MODE.
2. Toque no botão -REPEAT. O meuador MODE muda para "P-RPT" e a reproducao repetida é iniciada.
■ Cancelar a reprodução repetida
1. Toque no botão -RPT. O botão -RPT do meuétr muda para "MODE", e começa a reprodução normal da pista que está em reprodução quando se tocou o botão -RPT.
Reprodução repetida das pastas
Esta funciona consente de reproduzir repetidamente a pasta que actualmente está em reprodução.Esta funciona está disponible somente quando um CD-R/CD-RW gravado com ficheiros MP3 ou WMA está inserido.
1. Toque no botão MODE.
2. Toque no botão -REPEAT. O meuhrador MODE muda para "RPT" e iniciada a reproducao repetida das pastas.
■ Cancelar a reprodução repetida das pastas
1. Toque no botão -RPT. O botão -RPT do mostrador muda para "MODE", e inicia a reproducao normal da pista que está em reproducao quando se tocou no botão -RPT.
Reprodução aleatória
Esta funciona consente de reproduzir todas as pistas gravadas no disco por ordem aleatoria.
-RANDOM
Reproduz todas as pistas no disco por ordem aleatoria.
Quando o disco contém 2 ou mais pastas, todas as pistas na pasta são reproduzidas por ordem aleatoria, seguidas por todas as pistas na pasta sucessiva. Isto é repetido para todas as pastas.
-RANDOM
Reproduz pistas no disco por ordem aleatoria.
Esta função está disponible somente quando um CD-R/CD-RW gravado com ficheiros MP3 ou WMA está已在ido.
1. Toque no botão MODE.
2. Toque no botão -RANDOM ou RANDOM. O meuador MODE muda para " -RDM" ou " -RDM", e meça a reprodução aleatoria.
■ Cancelar a reprodução aleatoria
1. Toque no botão -RDM ou -RDM. O botão -RDM do主義o ou -RDM muda para "MODE", e começa a reproducao normal da pista que está em reproducao quando se tocou os botões.
Diferentes seções da música escutadas por various ouvintes (Função 2-ZONE)
A funcão 2-ZONE é uma funcão que emite os sons separadamente da zona MAIN (Principal) e da zona SUB (Secundária) ao operar simultaneamente das fontes numa umaunitiescentrale, permitindo assim que varios ouvintes desfrutem de fontes musicais separadas.
Esta unidad pode controlar sus fontes internas (ráo, CD, MP3, etc.) para reproduzi-las, e além disso, pode reproducir simultaneamente as fontes de equipamentos externos ligados atraves de CeNET (por exemple, permutadores de CDs, etc.).
As fontes da zona MAIN (Principal) são reproduzidas pelos altifantes laterais do célico, e as fontes da zona SUB (Secundária) são reproduzidas pelos sistemas de auscultadores (WH143).

A parte alta da figura refere-se à situação em que uma fonte sonora está送给 reproduzida no modo interno do aparelho (rádio, CD, AUX) nos altifalantes.
A parte baixa da figura refere-se à situação em que uma fonte sonora está sento reproduzida no modo externo do aparelho (Permutador de CDs, Permutador de DVDs, TV, AUX) nos altifalantes.
* O ajuste feito na fabrica é “OFF”.
Notas:
- A função 2-ZONE não está disponible quando DAB está connectado.
- O novo ajustamento de volume feito rodando o botão rotatório [ROTARY] neste aparenho é reflectido somente nos altifalantes.
O ajustamento AUX-SENS é reflectido em outros altifalantes e nos auscultadores.
■ Exibicao do ecran quando a funcao 2-ZONE está em uso
"INT." (modo interno) ou "EXT." (modo externo) é exibido no centro do主義o para indicar qual dosculos escutar no modo interno ou modo externo noactual mode operationao das funcaoes2-ZONE.
1. Pressione o botão [SOUND].
2. Toque no botão 2-ZONE.

3. Toque e mantenha tocado o botão ON/OFF do centro do主義ador durante 1 segundo ou mais.

Quando 2-ZONE está ajustado para ON, o tipo actual 2-ZONE é exibido.
A funcão 2-ZONE não está disponible quando 2-ZONE está ajustado para OFF. Pressione o botão [SOUND] para voltar ao modo original.
4. Toque no botão ↑ noestrador de ON/OFF para seleccionar o tipo 2-ZONE.
Tip02-ZONE
Altifalante Auscultadores Tipo 1 Interno (modo interno) Externo (modo externo) Tipo 2 Externo (modo externo) Interno (modo interno)
5. Toque noestrador do altifalante ou no estrador dos auscultadores para selecionar o modo de operacao da funcao 2-ZONE.
Quando se toca oasnocradordo altifalante,epossivel operar no audio nos altifalantes.
Quando se toca no主義or do auscultador, é possevel operar no audio nos auscultadores.
6. Pressione o botão [SOUND] para voltar ao modo original.
Diferentes seções da música escutadas por various ouvintes (Função 2-ZONE)
Comutar a funcao 2-ZONE a ON/OFF
1. Mantenha pressionado o botão [SOUND] durante 1 segundo ou mais naunities.
Comutar o tipo de 2-ZONE
Mantenha pressionado o botão [TA] naunities de 1 segundo ou mais quando a funcao 2-ZONE está em uso.
Comutar o modo de operacao da funcao 2-ZONE
Pressione o botão [TA] na unidade quando a funcção 2-ZONE está em uso.
Seleção do modo quando a funcção 2-ZONE está em uso
Quando se insere um CD quando a funcao 2-ZONE está em uso, as funções do modo interno esta unidade mudam para CD, e a reproducao começa automaticamente.
1. Pressione o botão [TA] na unidade para comutar o modo de operação da função 2-ZONE.
Oestrador para o equipamento (altifalante ou auscultador) que pode ser actualmente realizado é comutado.
2. Pressione e mantenha pressionado o botão [TA] durante 1 segundo ou mais para seleccionar o tipo de 2-ZONE.
O moltoador "INT." ou "EXT." é comutado.
3. Pressione o botão rotatório [ROTARY]. Cada vez que se pressiona o botão rotatório [ROTARY] quando "INT." é exibido alterna o modo na sequência:
Radio CD AUX Radio...
Cada vez que se pressiona o botão rotatório [ROTARY] enwhicho "EXT." é exibido alterna o modo na sequência:
AUX (Permutador de CDs)
(Permutador de DVDs) (TV *1) AUX...
* O modo do equipamento que não está connectado não é exibido.
*1 Whenever o modo TV está seleccionado, o modo muda automaticamente para o modo VTR, e não pode ser mudado.
Operações comuns a cada modo
Mostrador do écran no modo de entrada de titulos
■ Mostrador principal
É excitado quando o modo de entrada de títulos é selecciónado. (veja páginá 14)

Mostrador de tipo de texto
A: Letras de alfabeto maiusculas
a: Letras de alfabeto minúsculas
0-9: Númos
!?: Simbolos
A: Umlaut
Mostrador de titulo
O titre introduzidoactualmenteéexibido. Toque no botao 已 para determinar a posicao de entrada.Tocar emanter tocado botao durante 2segundos ou maisprovoc desaparecidomentodeadosos textosde t it
Mostrador de texto introduzido
Toque no botao 山 para seleccionar o texto introduzido.
RTN
Tocando neste botão Cancela a entrada de titulos, e o mostrador volta para o écran original. Mantendo o botão pressionado durante 1 segundo ou mais exibe a lista de textos adequada para o tipo de texto actual.
MEMO
Mantendo o botão pressionado durante 2 segundos ou mais armazena o■ Mostrador da lista de-textos
É exibido quando se mantém tocado o botão RTN durante 1 segundo ou mais noestrador principal.

Tipode texto
O texto que é exibido muda de acordo com o ].
mostrador de tipo de texto.
Quando oestrador de tipo de texto é“A”: A EIMQUX (espaço)
Quando oasnodradorde tipo de texto é“a”: a eimqu
Quando o tipo de texto é "0-9", "!?" ou "A".
Todos os characteres são exibidos.
RTN
Tocando neste botão o主義or volta para a exibicao principal.
NEXT
Tocando neste botão exibe a successiva lista de-textos.
Atribuição de titulos
É possével atrribuir a estações TV e para CDs titulos com uma extensão maior de 10 characteres. Estes titulos podem ser exibidos quando são captadas estações radiofónicas ou quando se reproduz CDs.
O número de títulos que podem ser atribuções são os següentes:
modo Número de títulos modo CD 50 títulos modo TV 20 titles
Estado de permutador de CDs Número de títulos DCZ628 conectado 100 títulos CDC655Tz conectado 100 títulos CDC1255z conectado 50 títulos
1. Sintonize uma estação de TV, ou reproduza um CD em que pretende atribuir o título.
2. Toque no centro doMASTER para selecionar oMASTER de títulos do'utilizar. quando oMASTER muda para oMASTER de títulos do utiliser, "USER" é exibido sobre oMASTER do N° de pré-Seleção.
3. Mantenha pressionado o botão [A] durante 1 segundo ou mais. O modo muda para o modo de entrada de títulos.
4. Toque no botão ↑ no主義 no主義o do tuito para determinar a posicao de entrada. A posicao do texto que pesca move-se para a esquerda ou para a direita.

* Podem ser introduzidos antedez caracteres.
PRECAUÇAO
A pressão do botão "reset" Cancela todas as memórias do'utilizar tais como títulos armazenados estaunities.
5. Toque no botão ↑ noestrador de tipo de texto para selecionar o tipo de texto. A cada vez que se toca no botão ↑ o tipo de texto comuta na sequência:
Letras do alfabeto maiusulas
(espaço) A B C D E F G H I J K L M N O P Q R S T U V W X Y Z
Letras do alfabeto minúsculas
a b c d e f g h i j k l m n o p q r s t u v w x y Z Numberos
0123456789
Simbolos, Umlaut
AEEEEIAEaeeeeeioae
6. Tocar no botão à direita do主義or, ou rodar o botão rotatório [ROTARY] para determinar os charactres introduzidos.
7. Repita os passos de 4 a 6 para introduzir o titulo.
Pressionando e mantendo pressionado o nostrador de títulos durante 2 segundos ou mais provoca o desaparecidonto todos os caracteres dos títulosactualmente introduzidos.
8. Toque e mantenha tocado MEMO durante 2 segundos ou mais.
Irá ouvir um beep longo, e o titulo é armazenado na memória.
Para comutar o主義者 de tólico para relógio ou outras主義者
Toque no centro do主義。
■ Quando um titulo novo é armazenado além do número máximo de titulos
No caso de una estação TV
Os titulos não armazenados nos canais pré-seLECTIONados são automaticamente cancelados, e o novo titulo é armazenado na memória.
No caso de um CD
Os titutos de CDs que estavam sendo reproduzidos porultimate sancancelados,e o novo titulo é armazenado na memória.
Apagar titulos
1. Sintonize uma estação de TV, ou reproduza um CD cujos títulos pretende apagar.
2. Toque no centro doMASTER para seleccionar oMASTER de títulos do'utilizar.
Quando o®, o®, o®, o®, o®, o®, o®, o®, o®, o®, o®, o®, o®, o®, o®, o®, o®, o®, o®, o®, o®, o®, o®, o®, o®, o®, o®, o®, o®, o®, o®, o®, o®, o®, o®, o®, o®, o®, o®, o®, o®, o®, o®, o®, o®, o®, o®, o®, o®, o®, o%, o%, o%, o%, o%, o%, o%, o%, o%, o%, o%, o%, o%, o%, o%, o%, o%, o%, o%, o%, o%, o%, o%, o%, o%, o%, o%, o%, o%, o%, o%, o%, o%, o%, o%, o%, o%, o%, o%, o%, o%, o%, o%, o%, o%, o%, o%, o%, o%, o%, o%
Do títulos do'utilizar, "USER" é exibido sobre ouMASTER do N° de pré-Seleção.
3. Mantenha pressionado o botão [A] durante 1 segundo ou mais.
O modo muda para o modo de entrada de titulos.
4. Toque e mantenha tocado o nostrador de títulos durante 2 segundos ou mais.
Todooscaracteredostitulodesaparecem.
5. Toque e mantenha tocado o botão MEMO durante 2 segundos ou mais.
Ira ouvir um beep longo, e o titulo é apagado.
Mudança de ajustamentos Seleção de指示ores de ajuste
1. Pressione o botão [A].
O modo muda para o modo de ajuste.

2. Toque no botão ↑ noestrador dos indicadores de ajuste para selecionar o indicator a ajustar.
* Tocando no botão ↑ à esquerda do主義者 o indicator principal, comuta 1 indicator de cada vez.
Tocando no botão a esquerda do主義or sub-indicador comutacontinuamente.
* Tocando no botão ↑ 📦 🠾 no centro do主義者 o sub-indicador comuta, 1 indicator de cada vez. Tocando no botão
0 sub-indicador comuta continuamente.
3. Quando "EDIT" é exibido à direita do主義or, toque no botao EDIT para comutar para o主義or de pormenores de ajustamento.

ADJUST MODE MSG INPUT> EDIT
4. Tocar no botão à direita do主義or, ou rodar o botão rotatório [ROTARY] para fazer os pormenores.
Paravoltarao modo original
1. Pressione o botão [A] de novo.
- Indicadores de seleção
Indicator Principal Sub-indicator MOSTRADOR SCREEN SVR
• Ajustamento da proteção do écran (veja pagina 41) MSG INPUT
• Introdução de informação de mensagem (veja pagina 41) MESSAGE
• Ajuste do主義者 de mensagem ON/OFF (veja pagina 42) S/A SENS
• Ajuste da sensibilitadade do analisador de espectro (veja pagina 42) SCROLL
• Ajuste da velocidade de rolagem (veja pagina 42) APPERNCE DIMMER IN
• Ajuste de Auto-dimmer (veja pagina 43) DMR LEVEL
• Ajuste do[nível de escurecido (veja pagina 43) CONTRAST
• Ajuste do contraste do主義者 (veja pagina 43) BLINK LED
• Faz com que o LED piseque quando DCP é Removedido (veja pagina 43) BEEP
• Ajustar o beep (veja pagina 44) Indicador principal Sub-item SOUND AC-PRO III
• Selecção do Mode VSE (STD/PRO) (veja página 44) EQ SELECT
• Selecção do modo equalizar (veja página 44) SP-SETTING
• Ajustar a configuração do altoalante (veja página 44) CENTER-SP / SUB-WOOFER
• Ajustar o altoalante sub-woofer para ON/OFF (veja página 45) HPF / SUB-W LPF
• Ajustamento da frequência do FILTER do altoalante (veja página 45) AMP CANCEL
• Ajustar o amplificador interno em uso para ON/OFF (veja página 46) SP GAIN
• Ajustamento do[nível de saída do altoalante (veja página 46) PL II DELAY SRD-SP
• Ajustamento do tempo de atraso do altoalante traseiro (veja página 46) PL II CONT PANORAMA / DIMENSION / CTR WIDTH
• Ajuste da música no modo pormenorizado (veja página 47) TUNER TV ARER
• Ajuste da area TV (veja página 57) TV DIVER
• Ajuste da diversidade TV (veja página 57) LINK ACT
• Ajuste da função AF ENTRE RDS e DAB (veja página 26) LANGUAGE (IDIOMA)
• Ajuste do idioma do écran de PTY (veja página 30) RDS-INT 2Z
• Ajuste da Interrupção de RDS quando a função 2-ZONE está em uso (veja página 30) SETTING AUX / TEL
• Ajuste de AUX e TEL (veja página 47) AUX SENS
• Ajuste do[nível de entrada do录音 externo (AUX) (veja página 48) TEL-SP
• Ajuste da saída do altoalante do automóvel para o telemóvel (Optional TEL-002) (veja página 48) TEL-SWITCH
• Ajuste da interrupção do telemóvel (veja página 48) CALIBRATE / A-VOL SENS
• Ajuste da função auto-volume (veja página 49) SYSTEM CHECK
• Executar uma verificação do sistema (veja página 49) CODEMATIC
• Ajuste da segurança (veja página 50)
Ajuste da proteção do écran (SCREEN SVR)
Esta funciona consente de exibir uma proteção do écran quando não se utilizes esta unidade por和地区 de 30 segundos.
- O ajuste feito na fabrica é "ON".
1. Pressione o botão [A] para seleccionar o modo de ajuste.
2. Toque no botão ↑ noestrador dos indicadores de ajuste para seleccionar "SCREEN SVR" sob "DISPLAY".

3. Tocar no botão à direita do measurador, ou rodar o botão rotatório [ROTARY] para selecionar "ON" ou "OFF".
4. Pressione o botão [A] para voltar ao modo original.
Comutar oestrador de protecao do ecran
Toque no botão PREV ou NEXT quando a proteção do écran é exibida.
A cada vez que se tocam estas botões comu ta oestrador de proteção do écran.
Proteççao do écran
Proteção do écran Modelo 1

Proteção do écran modelo 2

Proteção do ecran Modelo 3

Analisador de espectro Modelo 1
Analisador de espectro Modelo 2

Analisador de espectro Modelo 3

Analisador de espectro Modelo 4

Informação de mensagem

SS SCAN
As 8 indentações acima são exibidas por circa de 10 segundos cada uma.
Introdução de mensagens a exibir em informação deLatch (MSG INPUT)
1 tipo de proteção do écran está disponible. Para os peminores sobre como comutar o nostrador de proteção do écran, consulte "Ajuste da proteção do écran".
- Podem ser introduzidos um Tmaxido de 30 characteres.
- O ajuste feito na fabrica é "Active Matrix Control System".
1. Pressione o botão [A] para selecionar o modo de ajuste.
2. Toque no botão ↑ noestrador dos指示符指示器的指示符。indicações de ajuste para selecionar "MSG INPUT" sob "DISPLAY".

DISPLAY
ADJUST MODE
MSG INPUT> EDIT
4. Toque no botão ↑ no centro do主義o para determinar a posicao de entrada.
* Para apagar a mensagem, toque e mantenha tocado durante 2 segundos ou mais o centro do主義or. Se executar a operacao ate ao passo 8 com a mensagem apagada, a mensagem returnar para o ajuste de fabrica.
5. Toque no botão a esquerda do ]. A cada vez que se toca no botão comuta o tipo de texto. Para detalhes, consulte a págin37.
6. Tocar no botão a direita do主義or, ou rodar o botao rotatorio [ROTARY] para determinar os characteres introduzidos.
7. Repita os passos de 4 a 6 para introduzir uma mensagem.
8. Toque e mantenha tocado o botão MEMO durante 2 segundos ou mais. Irá ouvir um beep longo, e a mensagem é armazenada na memória.
9. Pressione o botão [A] para voltar ao modo original.
Exibicao de mensagens (MESSAGE)
Esta funciona consente de exibir mensagens no公共场所 quando se liga ou desliga a unidade. "Hello" é exibido quando se liga a unidade, e "See you" é exibido quando se desliga a unidade.
- O ajuste feito na fabrica é “ON”.
1. Pressione o botão [A] para selección o modo de ajuste.
2. Toque no botão ↑ noestrador dos指示ores de ajuste para selecionar "MESSAGE" sob "DISPLAY".

3. Tocar no botão a direita do主義or, ou rodar o botão rotatório [ROTARY] para selecciónar "ON" ou "OFF".
4. Pressione o botão [A] para voltar ao modo original.
Ajuste da sensibilitadode Analisador de espectro (S/ASENS)
Esta funcção consente de fazer a sensibilidade (quantidade de deflexão) do Analisador de espectro. Para detalhes sobre a exibização do Analisador de espectro, consulte "Mudar o主義or" (veja páginga 13) ou "Ajuste da proteção do ecran" (veja páginga 41).
- O ajuste feito na fabrica é “MID”.
1. Pressione o botão [A] para seleccionar o modo de ajuste.
2. Toque no botão ↑ 📅 ↑ noestrador dos indicadores de ajuste para selecionar "S/ASENS" sob "DISPLAY".

3. Tocar no botão à direita do主義or, ou rodar o botão rotatório [ROTARY] para melhorar a sensibilitadé.
* SeLECTIONAR LOW (pequena quantidade de deflexão), MID ou HIGH (Grande quantidade de deflexão).
4. Pressione o botão [A] para voltar ao modo original.
Ajustamento da velocidade de rolagem do主義or (SCROLL)
Esta característica consente de diminuir a velocidade de rolagem quando a velocidade de rolagem é muitoAjuste do auto-dimmer (DIM-MER IN)
NEXT:
Touching this displays the next folder list.What is MP3?
MP3 is an audio compression method and is classified as audio layer 3 of the MPEG standard. This audio compression method has gained ground into PC users and Become a standard format. This MP3 features original audio data compression to about 10 percent of its initial size while keeping high sound quality intact. This means that about 10 music CDs can be recorded on a CD-R disc or CD-RW disc to allow a long listening time without having to change CDs.What is WMA?
WMA is the abbreviation of Windows Media Audio, an audio file format developed by Microsoft Corporation.Notes:
- If you play a file with DRM (Digital Rights Management) for WMA remaining ON, no audio is output. (The WMA indicator blinks) - Windows Media™, and the Windows® logo are trademarks, or stored trademarks of Microsoft Corporation in the United States and/or other countries.To disable DRM (Digital Rights Management):
- When using Windows Media Player 8, click on TOOLS OPTIONS COPY MUSIC tab, then under COPY SETTINGS, unclick the check box for PROTECT CONTENT. Then, reconstruct files. - When using Windows Media Player 9, click on TOOLS OPTIONS MUSIC record tab, then under COPY SETTINGS, unclick the check box for PROTECT CONTENT. Then, reconstruct files. Personally constructed WMA files are used at your own responsibility.Precautions when creating an MP3/WMA disc
- Usable sampling rates and bit rates: 1. MP3: Sampling rate: 11.025 kHz to 48 kHz Bit rate: 8 kbps to 320 kbps / VBR 2. WMA: Bit rate 48 kbps to 192 kbps- File extensions
1. Always add a file extension“.MP3” or“.WMA” to an MP3 or WMA file by using single byte letters. If you add a file extension other than specified or forget to add the file extension, the file cannot be played. 2. Files without MP3/WMA data will not play. The indication "--: --" appears in the playing time display if you attempt to play files without MP3/WMA data.- Logical format (File system)
1. When writing an MP3/WMA file on a CD-R disc or CD-RW disc, please select "ISO9660 level 1, 2 or JOLIET or Romeo" as the writing software format. Normal play may not be possible if the disc is recorded on another format. 2. The folder name and file name can be displayed as the title in the case of MP3/WMA play but the title must be within 128 single byte alphabetical letters and numerals (including an extension). 3. Do not give a name to a file inside a folder having the same name.- Folder structure
1. A disc with a folder having more than 8 hierarchical levels is not allowed.Number of files or folders
1. Up to 255 files can be recognized per folder. Up to 500 files can be played. 2. Tracks are played in the order that they were recorded onto a disc. (Tracks might not always be played in the order displayed on the PC.) 3. Some noise may occur depending on the type of encoder software used while recording.Multi-session selection
This function allows you to select either CD-DA or MP3/WMA files in the case of discs (e.g. CD-EXTRA) containing a mixture of CD-DA (music CD) and MP3/WMA files. 1. Touch MODE. 2. Touch M-SESS. Each touch of M-SESS toggles the M-SESS display between "CD" (play CD-DA) or "MP3/WMA" (play MP3/WMA). * If M-SESS is not displayed, touch NEXT. 3. Touch RTN. The multi-session selection setting is reflected the next time you load a CD.Note:
- When playing a CCCD (Copy Control CD), set the setting to CD type. When this is set to MP3/WMA type, the cannot be playing normally in some cases.CAUTION
Be careful not to catch your hand or fingers while closing the SLOPING CONSOLE.
Notes:
- If the SLOPING CONSOLE does not open fully, gently open with your hand. After loading a CD, always close the SLOPING CONSOLE. - Do not try to put your hand or fingers in the CD SLOT. Also never insert foreign objects into the slot. - Do not load discs where adhesive comes out from cellophane tape or a rental CD label, or discs with marks where cellophane tape or rental CD labels were removed. It may be impossible to eject these discs from the unit and they may cause the unit to break down.Loading a CD
1. Press the [A] button. The control panel opens. 2. Load the disc into the CD SLOT. When the disc is loaded, the control panel automatically closes after several seconds, and play starts.Notes:
- Never insert foreign objects into the CD SLOT. - If the CD is not loaded easily, there may be another CD in the mechanism or the unit may require service.  or mark and CD-ROMs cannot be played by this unit. - Some CDs recorded in the CD-R/CD-RW mode may not be usable.Loading 8 cm compact discs
No adapter is required to play an 8 cm CD. Load the 8 cm CD into the centre of the CD SLOT.Ejecting a CD
You can eject a disc by pressing the [▲] button even if the engine key or ACC is at the OFF position.automatically.CAUTION
When the disc is ejected, press the [▲] button to close the control panel. If the control panel is left open, You will hear a double beep, and the control panel automatically closes. 1. Press the [▲] button. The control panel opens, and the disc is ejected. The mode automatically switches to the radio mode. * Be sure to remove ejected discs from this unit. If you leave the disc in the disc tray, it is pulled back into the unit after 15 seconds or longer, and the control panel closes. (auto reload function) * Single CDs are not auto-loaded. Be sure to remove single CDs after ejecting themCAUTION
If you use excessive force to load a disc after it has been ejected, the surface of the disc may become scratched. Remove the disc before loading it again.Listening to a disc already loaded in the unit
1. Press the [ROTARY] knob to select the CD mode. * Play automatically starts when the mode changes to the CD mode.Pausing play
1. Press the [▶■] button.To resume play
1. Press the [▶][] button again.Selecting a track
When a CD-R/CD-RW recorded with an MP3 file or a WMA file is loaded, you can select only tracks recorded to the same folder by touching on the track display. 1. To listen to the next track, touch on the track display. 2. To listen to the previous track, touch twice on the track display. Touching plays the next track. If you touch more times, the track advances ahead to the track for the number of times you touched and that track is played. Touching plays the previous track. If you touch more times, zthe track moves back to the track for the number of times you touched and that track is played. * If you touch twice on the track display while the start of the track is being played, the track 2 tracks back is sometimes played.To select a folder
To select a different folder, either touch on the folder display, or perform the following. 1. Touch and hold MODE for 1 second or longer. The folder list is displayed. Touching PREV or NEXT displays the previous or next part of the folder list. 2. Touch the folder name.To play the play list
Play lists (M3U file) also can be played. Note, however, that of M3U files currently saved down to five layers (including the root) in the file hierarchy, only the top 5 files having new file timestamps can be played.Notes:
- Up to 255 files can be played in a single play list. - Only MP3 or WMA files currently saved to folders down to five layers (including the root) in the file hierarchy can be played.Perform the following to play the play list.
1. Touch MODE. 2. Touch NEXT. 3. Touch PLY LIST. Reading of the play list starts. When reading of the play list ends, the play list having the newest timestamp starts automatically. The operation of selecting the play list or tracks in the play list is the same as that of selecting a folder or tracks in a folder. *PLY LIST is not displayed when a correct play list (M3U file) is not saved on the CD-R/CD-RW loaded on the unit.Stopping play of play list
1. Touch MODE. 2. Touch NEXT. 3. Touch PLY LIST.Fast-forward/Fast-backward
1. To fast-forward, touch on the track display. 2. To fast-forward, touch on the track display.Top function
The top function resets the CD player to the first track of the disc. 1. Touch TOP. Play starts from the first track (track No.1). In case of MP3/WMA, the first track of a folder being played will be returned.Scan play
This function allows you to locate and play the first 10 seconds of all the tracks recorded on a disc. 1. Touch MODE. 2. Touch -SCAN. The MODE display changes to "F-SCAN" and scan play starts. * Scan play starts from the next track after the track currently being played.To cancel scan play
1. Touch -SCAN. The -SCAN display changes to "MODE", and the track that was playing when you touched -SCAN is played.Folder scan play
This function allows you to locate and play the first 10 seconds of the first track of all the folders on an MP3/WMA disc. 1. Touch MODE 2. Touch -SCAN. The MODE display changes to "SCAN" and folder scan play starts. * Folder scan play starts from the folder following the folder that is playing.To cancel folder scan play
1. Touch -SCAN. The -SCAN display changes to "MODE", and the track that was playing when you touched -SCAN is played.Repeat play
This function allows you to play the current track repeatedly. 1. Touch MODE 2. Touch -REPEAT. The MODE display changes to "RPT" and repeat play is started.To cancel repeat play
1. Touch -RPT. The -RPT display changes to "MODE", and regular play starts from the track that was playing when you touched -RPT.Folder repeat play
This function allows you to repeatedly play the folder currently being played. This function is available only when a CD-R/CD-RW recorded with MP3 files or WMA files is loaded. 1. Touch MODE. 2. Touch -REPEAT. The MODE display changes to "RPT" and folder repeat play is started.To cancel folder repeat play
1. Touch -RPT. The -RPT display changes to "MODE", and regular play starts from the track that was playing when you touched -RPT.Random play
This function allows you to play all tracks recorded on a disc in a random order.-RANDOM
Plays all tracks on the disc at random. When the disc contains 2 or more folders, all of the tracks in the folder are played at random, followed by all of the tracks in the next folder. This is repeated for all folders.-RANDOM
Plays tracks on the disc at random. This function is available only when a CD-R/CDRW recorded with MP3 files or WMA files is loaded. 1. Touch MODE. 2. Touch -RANDOM or -RANDOM. The MODE display changes to "P-RDM" or "RDM", and random play starts.To cancel random play
1. Touch -RDM or -RDM. The -RDM display or -RDM display changes to "MODE", and regular play starts from the track that was playing when you touched these buttons.Different Pieces of Music Heard by Plural Listeners (2-ZONE function)
The 2-ZONE function outputs separate sounds from the MAIN zone and SUB zone by simultaneously operating 2 sources in the 1 centre unit, thereby allowing 2 or more listeners to enjoy separate music sources. This unit can control its internal sources (radio, CD, MP3, etc.) to play them back, and further, can simultaneously play back sources from external equipment connected via CeNET (for instance, CD changers etc.). The sources of the MAIN zone are played back from the speakers inside your car, and those of the SUB zone are from the headphone systems (WH143).  The upper figure is for when a sound source is being played by the unit's internal mode (radio, CD, AUX) on the speakers. The lower figure is for when a sound source is being played by the unit's external mode (CD changer, DVD changer, TV, AUX) on the speakers. - The factory default setting is "OFF".Notes:
- The ISR function is not available while the 2-ZONE function is in use. - The new volume adjustment made by turning the [ROTARY] knob on this unit is reflected only on the speakers. The AUX-SENS setting is reflected on both the speakers and the headphones.Screen display when the 2-ZONE function is in use
"INT." (internal mode) or "EXT." (external mode) is displayed in the centre of the display to indicate whether you can hear play in the internal mode or external mode in the current 2-ZONE function operation mode. 1. Press the [SOUND] button. 2. Touch 2-ZONE.  3. Touch and hold the ON/OFF centre of the display for 1 second or longer.  When 2-ZONE is set to ON, the current 2-ZONE type is displayed. The 2-ZONE function is not available when 2-ZONE is set to OFF. Press the [SOUND] button to return to the original mode. 4. Touch on the ON/OFF display to select the 2-ZONE type. 2-ZONE type| Speaker | Headphones | |
| Type 1 | Internal (internal mode) | External (external mode) |
| Type 2 | External (external mode) | Internal (internal mode) |
Different Pieces of Music Heard by Plural Listeners (2-ZONE function)
To switch the 2-ZONE function ON/OFF
1. Press and hold the [SOUND] button on the unit for 1 second or longer.To switch the 2-ZONE type
Press and hold the [TA] button on the unit for 1 second or longer while the 2-ZONE function is in use.To switch the 2-ZONE function operation mode
Press the [TA] button on the unit while the 2-ZONE function is in use.Selecting the mode when the 2-ZONE function is in use
When you load a CD while the 2-ZONE function is in use, the functions of the internal mode on this unit change to CD, and play starts automatically. 1. Press the [TA] button on the unit to switch the 2-ZONE function operation mode. The display for the equipment (speaker or headphone) that can be currently operated is switched. 2. Press and hold the [TA] button for 1 second or longer to select the 2-ZONE type. The "INT." or "EXT." display is toggled. 3. Press the [ROTARY] knob. Each press of the [ROTARY] knob while "INT." is displayed switches the mode as follows: Radio CD AUX Radio... Each press of the [ROTARY] knob while "EXT." is displayed switches the mode as follows: AUX (CD changer) (DVD changer) (TV^*1) AUX * The mode of equipment that is not connected is not displayed. *1 When the TV mode is selected, the mode automatically changes to the VTR mode, and cannot be changed.Operations Common to Each Mode
Screen display in the title entry mode
Main display
This is displayed when the title entry mode is selected. (cf. page 14) Text type display
A: Capital alphabet letters a: Small alphabet letters 0-9: Numbers !?: Symbols A: UmlautTitle display
The currently entered title is displayed. Touch to determine the entry position. Touching and holding the button for 2 seconds or longer causes all title text to disappear.Entered text display
Touch to select the entered text.RTN
Touching this cancels entry of titles, and returns the display to the original screen. Touching and holding this for 1 second or longer displays the text list matched to current text type.MEMO
Touching and holding this for 2 seconds or longer stores the title that was input, and returns the display to the original screen.Text list display
This is displayed by touching and holding RTN for 1 second or longer in the main display. Type of text
The text that is displayed changes according to the text type display. When text type display is "A": A E I M Q U X (space) When text type display is "a": a e i m q u When text type is "0-9", "1? or "A": All characters are displayed.RTN
Touching this returns the display to the main display.NEXT
Touching this displays the next text list.Entering titles
You can give TV stations a title up to 10 characters long, and to CDs. These titles can be displayed when broadcasts are received or when playing CDs. The number of titles that can be entered is as follows:| Mode | Number of titles |
| CD mode | 50 titles |
| TV mode | 20 titles |
| CD changer mode | Number of titles |
| DCZ628 connected | 100 titles |
| CDC655Tz connected | 100 titles |
| CDC1255z connected | 50 titles |
CAUTION
Pressing the reset button clears all user memories such as titles stored on this unit. 5. Touch 山 山 on the text type display to select the type of text. Each touch of switches the type of text as follows:Capital alphabet letters
(space)ABCDEFGHIJKLMNOPQ RSTUVWXYZSmall alphabet letters
abcdefghijklmnpqrstuvwxyz Numbers 0123456789Symbols, Umlaut
AEEEEIAEaeeeieoo 6. Either touch on the right of the display, or turn the [ROTARY] knob to determine the entered characters. 7. Repeat steps 4 to 6 to enter the title. Pressing and holding the title display for 2 seconds or longer causes all currently entered title characters to disappear. 8. Touch and hold MEMO for 2 seconds or longer. You will hear a long beep, and the title is stored in memory.To switch the title display to the clock or other display
Touch the centre of the display.■ When a new title is stored beyond the maximum number of titles
In the case of a TV station
Titles not stored to preset channels are automatically cleared, and the new title is stored in memory.In the case of a CD
Titles of CDs that have been played the least are cleared, and the new title is stored in memory.Clearing titles
1. Either receive the TV station, or play a CD whose title you want to clear. 2. Touch the centre of the display to set to the user title display. When the display changes to the user title display, "USER" is displayed above the preset No. display. 3. Press and hold the [A] button for 1 second or longer. The mode changes to the title entry mode. 4. Touch and hold the title display for 2 seconds or longer. All characters in the title disappear. 5. Touch and hold MEMO for 2 seconds or longer. You will hear a long beep, and the title is cleared.Changing settings
Selecting setting items
1. Press the [A] button. The mode changes to the adjust mode.  2. Touch on the setting item display to select the item to set. * Touching on the left of the display switches main items 1 item at a time. Touching on the left of the display switches sub-items continuously. * Touching on the centre of the display switches the sub-items 1 item at a time. Touching switches sub-items continuously. 3. When "EDIT" is displayed at the right of the display, touch EDIT to switch to the adjustment details display.  4. Either touch on the right of the display, or turn the [ROTARY] knob to set the details.To return to the original mode
1. Press the [A] button again. - Setting items| Main Item | Sub-item |
| DISPLAY | SCREEN SVR • Screen saver setting (cf. page 41) |
| MSG INPUT • Message information input (cf. page 41) | |
| MESSAGE • Message display setting at power ON/OFF (cf. page 42) | |
| S/A SENS • Setting the Spectrum analyzer sensitivity (cf. page 42) | |
| SCROLL • Adjusting the scroll speed (cf. page 42) | |
| APPERNCE | DIMMER IN • Auto-dimmer setting (cf. page 43) |
| DMR LEVEL • Setting the dimmer level (cf. page 43) | |
| CONTRAST • Adjusting the display contrast (cf. page 43) | |
| BLINK LED • Making the LED blink when DCP is removed (cf. page 43) | |
| BEEP • Setting beep (cf. page 44) | |
| SOUND | AC-PRO III • Selecting the VSE mode (STD/PRO) (cf. page 44) |
| EQ SELECT • Selecting the equalizer mode (cf. page 44) | |
| SP-SETTING • Setting the speaker configuration (cf. page 44) | |
| CENTER-SP / SUB-WOOFER • Setting sub-woofer speaker ON/OFF (cf. page 45) | |
| HPF / SUB-W LPF • Adjusting the speaker filter frequency (cf. page 45) | |
| AMP CANCEL • Setting internal amplifier use ON/OFF (cf. page 46) | |
| SP GAIN • Adjusting the speaker output level (cf. page 46) | |
| PL II DELAY | SRD-SP • Adjusting the rear speaker delay time (cf. page 46) |
| PL II CONT | PANorama / DIMENSION / CTR WIDTH • Setting the music mode in detail (cf. page 47) |
| TUNER | TV ARER • Setting the TV area (cf. page 57) |
| TV DIVER • Setting TV diversity (cf. page 57) | |
| LINK ACT • Setting the AF function between RDS and DAB (cf. page 26) | |
| LANGUAGE • Setting the PTY screen language (cf. page 30) | |
| RDS-INT 2Z • Setting the RDS interrupt while the 2-ZONE function is in use (cf. page 30) | |
| SETTING | AUX / TEL • Setting AUX and TEL (cf. page 47) |
| AUX SENS • Setting the portable audio (AUX) input level (cf. page 48) | |
| TEL-SP • Setting the car speaker output for the cellular phone (Optional TEL-002) (cf. page 48) | |
| TEL-SWITCH • Cellular phone interrupt setting (cf. page 48) | |
| CALIBRATE / A-VOL SENS • Setting the auto-volume function (cf. page 49) | |
| SYSTEM CHECK • Performing a system check (cf. page 49) | |
| CODEMATIC • Setting security (cf. page 50) |
Setting the screen saver (SCREEN SVR)
This function allows you display a screen saver when you have not operated this unit for about 30 seconds. - The factory default setting is "ON". 1. Press the [A] button to set to the adjust mode. 2. Touch on the setting item display to select "SCREEN SVR" under "DISPLAY".  3. Either touch on the right of the display, or turn the [ROTARY] knob to select "ON" or "OFF". 4. Press the [A] button to return to the original mode.To switch the screen saver display
Touch PREV or NEXT while the screen saver is displayed. Each touch of these buttons switches the screen saver display. - Screen savers Screen saver pattern 1  Screen saver pattern 2  Screen saver pattern 3  Spectrum analyzer pattern 1  Spectrum analyzer pattern 2  Spectrum analyzer pattern 3  Spectrum analyzer pattern 4  Message information  SS SCAN The above 8 indications are displayed for about 10 seconds each.Entering messages to display in message information (MSG INPUT)
1 type of screen saver is available. For details on how to switch the screen saver display, see "Setting the screen saver". - Up to 30 characters can be entered. - The factory default setting is "Active Matrix Control System". 1. Press the [A] button to set to the adjust mode. 2. Touch on the setting item display to select "MSG INPUT" under "DISPLAY".  DISPLAY ADJUST MODE MSG INPUT> EDIT AY 3. Touch EDIT. The mode changes to the message entry mode. 4. Touch on the centre of the display to determine the entry position. * To clear the message, touch and hold the centre of the display for 2 seconds or longer. If you perform the operation at step 8 with the message cleared, the message returns to its factory default setting. 5. Touch on the left of the display to select the type of text. Each touch of switches the type of text. For details, see page 37. 6. Either touch on the right of the display, or turn the [ROTARY] knob to determine the entered characters. 7. Repeat steps 4 to 6 to enter the message. 8. Touch and hold MEMO for 2 seconds or longer. You will hear a long beep, and the message is stored in memory. 9. Press the [A] button to return to the original mode.Displaying messages (MESSAGE)
This function allows you to display messages on the display when the power is turned ON/OFF. "Hello" is displayed when the power is turned ON, and "See you" is displayed when power is turned OFF. - The factory default setting is "ON". 1. Press the [A] button to set to the adjust mode. 2. Touch on the setting item display to select "MESSAGE" under "DISPLAY".  3. Either touch on the right of the display, or turn the [ROTARY] knob to select "ON" or "OFF". 4. Press the [A] button to return to the original mode.Setting the sensitivity of the Spectrum analyzer (S/A SENS)
This function allows you to adjust the sensitivity (amount of deflection) of the Spectrum analyzer. For details on displaying the Spectrum analyzer, see "Switching the display" (cf. page 13) or "Setting the screen saver" (cf. page 41). - The factory default setting is "MID". 1. Press the [A] button to set to the adjust mode. 2. Touch on the setting item display to select "S/A SENS" under "DISPLAY".  3. Either touch on the right of the display, or turn the [ROTARY] knob to adjust the sensitivity. * Select either LOW (small deflection amount), MID or HIGH (large deflection amount). 4. Press the [A] button to return to the original mode.Adjusting the display scroll speed (SCROLL)
This feature allows you to slow down the scroll speed when the scroll speed is too fast, making it difficult to view the screen. - The factory default setting is "SPEED 2". 1. Press the [A] button to set to the adjust mode. 2. Touch on the setting item display to select "SCROLL" under "DISPLAY".  3. Either touch on the right of the display, or turn the [ROTARY] knob to adjust the sensitivity. * This setting item can be adjusted within the range SPEED 1 to SPEED 7. Adjust this setting item while viewing how the appearance of the display changes. 4. Press the [A] button to return to the original mode.Setting the auto-dimmer (DIMMER IN)
This function allows you to dim the lighting of the display matched to the illumination or the brightness inside your car. Select either "AUTO" (interlocked to the brightness inside your car) or "ILLUMI" (interlocked to the illumination inside your car) as the auto-dimmer setting. - When the auto-dimmer function is set to "AUTO", the brightness of the display is dimmed according to the brightness detected by this sensor. - Set the dimmer setting at DMR LEVEL. - The factory default setting is "AUTO". 1. Press the [A] button to set to the adjust mode. 2. Touch on the setting item display to select "DIMMER IN" under "APPERNCE".  3. Either touch on the right of the display, or turn the [ROTARY] knob to select "AUTO" or "ILLUMI". 4. Press the [A] button to return to the original mode.Setting the dimmer level (DMR LEVEL)
This function allows you to set how much the displayed is to be dimmed. - The factory default setting is "3". 1. Press the [A] button to set to the adjust mode. 2. Touch on the setting item display to select "DMR LEVEL" under "APPERNCE"  3. Either touch on the right of the display, or turn the [ROTARY] knob to set the dimmer level. * Select one of OFF (dimming OFF, bright), 1 (slightly dimmed) to 5 (dark). 4. Press the [A] button to return to the original mode.Adjusting the contrast of the display (CONTRAST)
You can adjust the contrast of the display to match the mounting angle of the unit. - The factory default setting is "6". 1. Press the [A] button to set to the adjust mode. 2. Touch on the setting item display to select "CONTRAST" under "APPENCE". 3. Either touch on the right of the display, or turn the [ROTARY] knob to adjust the contrast.  * This setting item can be adjusted within the range 1 to 11. Adjust this setting item while viewing how the appearance of the display changes. 4. Press the [A] button to return to the original mode.Making the LED blink when DCP is removed (BLINK LED)
You can make the LED on this unit blink when the DCP is removed. - The factory default setting is "OFF". 1. Press the [A] button to set to the adjust mode. 2. Touch on the setting item display to select "BLINK LED" under "APPERNCE".  APPERNCE ADJUST MODE BLINK LED》 OFF NCE 3. Either touch on the right of the display, or turn the [ROTARY] knob to select "ON" or "OFF". 4. Press the [A] button to return to the original mode.Setting the beep for when buttons are operated (BEEP)
The short or long high-pitched tone you hear when a button is operated is called a "BEEP". - The factory default setting is "ON". 1. Press the [A] button to set to the adjust mode. 2. Touch on the setting item display to select "BEEP" under "APPERNCE".  3. Either touch on the right of the display, or turn the [ROTARY] knob to select "ON" or "OFF". 4. Press the [A] button to return to the original mode.Selecting each mode
This item cannot be selected when the Dolby Pro Logic II is set to "MUSIC" or "MATRIX" (cf. page 17). The factory default setting is "PRO" for AC-PRO III and "P.EQ" for EQ SELECT.AC-PROIII
When "STD" (standard mode) is selected, the sound quality and field can be adjusted by VSE (Virtual Space Enhancer) so that the same audio effect can be obtained whichever seat you are sitting in. When "PRO" (PRO mode) is selected, the sound quality and field can be adjusted in detail for each seating position.EQ SELECT
When "P.EQ" (equalizer mode) is selected, the entire frequency level range can be compensated by a detailed smooth curve. When "BAS/TREB" (bass / treble mode) is selected, the frequency level can be compensated by dividing it into 2 major levels, bass (low tones) and treble (high tones). 1. Press the [A] button to set to the adjust mode. 2. Touch on the setting item display to select "AC-PRO III" under "SOUND" and "EQ SELECT" under "SOUND".  3. Either touch on the right of the display, or turn the [ROTARY] knob to select the mode. Mode selection| AC-PRO III | STD • Standard mode (VSE menu) |
| PRO • PRO mode (position menu) | |
| EQ SELECT | P.EQ • Equalizer mode (P.EQ menu) |
| BAS / TREB • Bass / treble mode |
Setting the speaker configuration (SP-SETTING)
Set to match the speaker configuration of your car to fully bring out the audio characteristics of this unit. The factory default setting is "SWL + SWR" 1. Press the [A] button to set to the adjust mode. 2. Touch on the setting item display to select "SP-SETTING" under "SOUND".  3. Either touch on the right of the display, or turn the [ROTARY] knob to set the speaker configuration. Speaker configuration| CTR+SW 5.1ch configuration | Front/rear speakers (4ch) Centre speaker (1ch) Sub-woofer (1ch) |
| SWL +SWR 4ch+sub-woofer configuration | Front/rear speakers (4ch) Sub-woofer (2ch) |
Notes:
Sound is not output from the centre speaker unless the following settings are made when CTR + SW is set. (1) Referring to "Selecting the PLII menu (Dolby PL II)" (cf. page 17), set the Dolby Pro Logic II mode to "MUSIC" or "MATRIX". (2) Referring to "Setting speakers ON/OFF (CENTER-SP/SUB-WOOFER)" (cf. page 45), set the centre speaker to "ON". Sound is not output from the sub-woofer Lch when SWL + SWR is set and the Dolby Pro Logic II mode is set to MUSIC" or "MATRIX". 4. Press the [A] button to return to the original mode.Setting speakers ON/OFF (CENTER-SP/SUB-WOOFER)
Set the centre speaker (CENTER-SP) and subwoofer (SUB-WOOFER) ON/OFF. Be sure to set this setting to "OFF" when there is no centre speaker or sub-woofer. - The centre speaker (CENTER-SP) can be set when the Dolby Pro Logic II mode is set to "MUSIC" or "MATRIX", and "SP-SETTING" is set to "CTR-SW". - The factory default setting is "ON". 1. Press the [A] button to set to the adjust mode. 2. Touch on the setting item display to select "CENTER-SP" under "SOUND" and "SUB-WOOFER" under "SOUND".  3. Either touch on the right of the display, or turn the [ROTARY] knob to select "ON" or "OFF". 4. Press the [A] button to return to the original mode.Adjusting the filter frequencies of speakers (HPF/SUB-W LPF)
This function allows you to adjust the filter frequency matched to the speakers you are using. - The filters (HPF/SUB-W LPF) that you can use differ according to the Dolby Pro Logic II mode setting.| Dolby Pro Logic II mode setting | Filter | |
| HPF | SUB-W LPF*1 | |
| MUSIC/MATRIX | Not adjustable | Adjustable |
| OFF | Adjustable | Adjustable |
Filter adjustment
HPF (high-pass filter adjustment) This filter cuts bass sound from the front and rear speakers. THROUGH 50Hz 80Hz 120Hz Set the filter matched to the speaker when small-diameter speakers are used.THROUGH
Set this when using speakers that can generate bass. SUB-W LPF (sub-woofer low-pass filter adjustment) This filter cuts treble sound from the sub-woofer. THROUGH 50Hz 80Hz 120Hz Set the filter frequency to match the sub-woofer.THROUGH
Set this when a low-pass filter built-in powered sub-woofer is used. 1. Press the [A] button to set to the adjust mode. 2. Touch on the setting item display to select "HPF" under "SOUND" and "SUB-W LPF" under "SOUND".  3. Either touch on the right of the display, or turn the [ROTARY] knob to set the frequency. * Select one of THROUGH, 50Hz, 80Hz, and 120Hz. 4. Press the [A] button to return to the original mode.Setting internal amplifier use ON/OFF (AMP CANCEL)
Set internal amplifier use ON/OFF matched to whether or not an external amplifier is used. Set AMP CANCEL to "ON" (internal amplifier use OFF) when an external amplifier is connected and the internal amplifier is not used. - The factory default setting is "OFF" (internal amplifier used). 1. Press the [A] button to set to the adjust mode. 2. Touch on the setting item display to select "AMP CANCEL" under "SOUND".  3. Either touch on the right of the display, or turn the [ROTARY] knob to select "ON" or "OFF". 4. Press the [A] button to return to the original mode.Adjusting the output level of the speakers (SP GAIN)
Use the test tone function built into this unit to adjust so that the volume that is output from all speakers is the same. - This item can be set only when the Dolby Pro Logic II mode is set to "MUSIC" or "MATRIX". - The factory default setting is "0dB". 1. Press the [A] button to set to the adjust mode. 2. Touch on the setting item display to select "SP GAIN" under "SOUND".  3. Touch EDIT. The mode changes to the SP GAIN adjustment mode. 4. Touch on the adjustment item display to select the desired item. Each touch of switches the adjustment item as follows:Adjustment items
 *1 "CTR GAIN" is displayed only when "SP-SETTING" is set to "CTR+SW" and "CENTER-SP" is set to "ON". ^*2 SUB-W GAIN is displayed only when "SUB-WOOFER" is set to "ON". 5. Either touch on the right of the display, or turn the [ROTARY] knob to adjust the output level. The output level can be adjusted within the range -10 dB to +10 dB 6. Repeat steps 4 and 5 to adjust each item. 7. Press the [A] button to return to the original mode.Adjusting the delay time of the rear speaker (PL II DELAY)
The timing that sound arrives at the listening position differs according to the mounting position of the rear speakers and the size of your car. If you adjust the delay time of the rear speakers, you can adjust so that sound from the rear speakers can be heard at the same timing as output from the front speakers. - This item can be set only when the Dolby Pro Logic II mode is set to "MUSIC" or "MATRIX". - The factory default setting is "0ms". 1. Press the [A] button to set to the adjust mode. 2. Touch on the setting item display to select "SRD-SP" under "PL II DELAY".  3. Either touch on the right of the display, or turn the [ROTARY] knob to adjust the delay time. * "SRD-SP" can be adjusted within the range 0 ms to 15 ms. 4. Press the [A] button to return to the original mode.Setting the music mode in detail (PL II CONT)
This function allows you to set the music mode in more detail when the Dolby Pro Logic II mode is set to "MUSIC". - This item can be set only when the Dolby Pro Logic II mode is set to "MUSIC". - The factory default setting for PANorama is "NO", for DIMENSION is "3" and for CTR WIDTH is "3".Adjustment items
PANorama (panorama control setting)
This widens the soundfield image at the front up to the rear speakers. Set this item to "YES" if you feel that there is no surround effect.DIMENSION (dimension setting)
Shifts the soundfield image to the front or the rear. When the soundfield image inclines to either the front or the rear, this inclination can be compensated. Adjustment value 3 is the centre position. Adjustment values 2 to 0 shift the soundfield image to the rear, while adjustment values 4 to 6 shift the soundfield image to the front.CTR WIDTH (centre width setting)\*1
Adjusts the fixed position of the centre channel between the centre speaker and L/R front speakers. When the centre sound is divided equally to the left and right, the entire soundfield image increases to produce a naturally expanding feeling. Adjustment value 0 plays back all centre sounds on the centre speaker. Adjustment value 7 divides the centre sound equally between the L/R front speakers. *1 "CTR WIDTH" is displayed only when "SP-SETTING" is set to "CTR+SW" and "CENTER-SP" is set to "ON". 1. Press the [A] button to set to the adjust mode. 2. Touch on the setting item display to select the desired adjustment item under "PL II CONT". The adjustment items are "PANorama", "DIMENSION" and "CTR WIDTH".  3. Either touch on the right of the display, or turn the [ROTARY] knob and adjust the item as desired. * Select "YES" or "NO" for "PANorama". * "DIMENSION" can be adjusted within the range 0 to 6. * “CTR WIDTH” can be adjusted within the range 0 to 7. 4. Press the [A] button to return to the original mode.AUX function
This system has an external RCA input so you can listen to sounds and music from external devices connected to this unit.Selecting AUX / TEL
You can listen to sound and music from external devices, or your telephone calls from the speakers when connected to this unit. When TEL INT or External device is connected to this unit, you can select the TEL mode or AUX mode. - The factory default setting is "AUX". 1. Press the [A] button to set the adjust mode. 2. Touch on the setting item display to select "AUX/TEL" under "SETTING".  3. Either touch on the right of the display, or turn the [ROTARY] knob to select "AUX" or "TEL". AUX: The AUX/TEL input cable is for external Audio input. TEL: The AUX/TEL input cable is for cellular phone audio input. 4. Press the [A] button to return to the previous mode.Setting the input level (AUX SENS) of portable audio (AUX mode)
This function allows you to set the input level of optional external devices connected to this unit. - This can be set when "AUX/TEL" is set to "AUX". The factory default setting is "MID". 1. Press the [A] button to set to the adjust mode. 2. Touch on the setting item display to select "AUX SENS" under "SETTING".  3. Either touch on the right of the display, or turn the [ROTARY] knob to set the input level. * Select one of LOW, MID or HIGH. 4. Press the [A] button to return to the original mode.Setting the car speaker output for the cellular phone (Optional TEL-002)
- To output telephone calls, set the cellular phone. - The factory default setting is "RIGHT". 1. Press the [A] button to set the adjust mode. 2. Touch on the setting item display to select "TEL-SP" under "SETTING".  3. Either touch on the right of the display, or turn the [ROTARY] knob to select "LEFT" or "RIGHT". LEFT: Telephone calls can be heard on the front left speaker connected to this unit. RIGHT: Telephone calls can be heard on the front right speaker connected to this unit. 4. Press the [A] button to return to the previous mode.Cellular phone interrupt setting
If you connect this unit and your cellular phone with a unit (Optional, TEL-002), you can listen to your telephone calls on your car speakers. - The factory default setting is "OFF". 1. Press the [A] button to set the adjust mode. 2. Touch on the setting item display to select "TEL-SWITCH" under "SETTING".  3. Either touch on the right of the display, or turn the [ROTARY] knob to select the settings. Each time you turn the [ROTARY] knob, the setting changes in the following order: OFF ON MUTE OFF... OFF: This unit continues normal operation even when the cellular phone is used.Note:
- When connecting a hands-free kit, make sure that the setting is ON to receive the telephone audio through the system. ON: You can listen to your telephone calls from the speakers connected to this unit. * When listening to your calls on your car speakers, you can adjust the volume by turning the [ROTARY] knob. MUTE: The sound from this unit is muted during telephone calls. 4. Press the [A] button to return to the previous mode.Setting the auto-volume function (CALIBRATE/A-VOL SEN
You can automatically change the volume to match your car's speed. - The factory default setting is "LOW". 1. Press the [A] button to set the adjust mode. 2. Touch on the setting item display to select "CALIBRATE" under "SETTING".  3. Accelerate to a speed of 50~km 4. When you reach 50km , touch START. Calibration is executed. After 2 seconds or longer, you will hear a long beep, and "SUCCEEDFUL" will appear on the display. If you hear a short beep, this indicates that calibration failed. Repeat the procedure from step 3. 5. Next, adjust the sensitivity. Touch on the setting item display to select "A-VOL SENS" under "SETTING".  6. Either touch on the right of the display, or turn the [ROTARY] knob to select the sensitivity. Each time you turn the [ROTARY] knob, the setting changes in the following order: OFF (no change in volume) LOW (change in volume: small) MID-LOW MID MID-HIGH HIGH (change in volume: large) ... 7. Press the [A] button to return to the previous mode.Performing a system check
This function allows you to perform a system check from the adjust mode when required. 1. Press the [A] button to set to the adjust mode. 2. Touch on the setting item display to select "SYSTEM CHECK" under "SETTING".  3. Touch and hold START for 1 second or longer. "System Check" appears on the display. 4. Press the [ROTARY] knob. The system check starts. When the system check is complete, "Completed" appears on the display. 5. Press the [ROTARY] knob again. The main display for the radio mode appears.Using the security function (CODEMATIC)
This function prevents persons who do not know the touch sequence from easily operating this unit. The Touch Code display appears when DCP is attached and the power is turned ON with "CODEMATIC" set to "ON". If you touch the display in this screen in the preset order, "SUCCEEDFUL" is displayed and the power is turned OFF. When the power is next turned ON, the Touch Code display does not appear, and the main display in the radio mode or CD mode is displayed. 1. Press the [A] button to set to the adjust mode. 2. Touch on the setting item display to select "CODEMATIC" under "SETTING".  2 types of items are displayed for "CODEMATIC", items for which "ON" or "OFF" is displayed at the right of the screen, and items for which "INPUT" is displayed at the right of the screen. Here, select the item for which "ON" or "OFF" is displayed at the right of the display. 3. Either touch on the right of the display, or turn the [ROTARY] knob to select "ON" or "OFF". 4. Touch on the setting item display to select "CODEMATIC" under "SETTING". Here, select the item for which "INPUT" is displayed at the right of the display. 5. Touch INPUT. The Touch Code display appears. 6. Enter the touch code. * Touch one of 5 locations (left, centre, right, top right, or bottom right) of the display. Each touch of the display lights one of the Touch Code indicators. * For example, touch (1) centre, (2) top right, (3) left, and (4) bottom right, in that order. You can also repeatedly touch the same location. When you touch 4 times, you will hear a long beep, and the original mode is returned to.To cancel CODEMATIC
If you have forgotten the touch order, either touch ① bottom right, ② left, ③ top right and then ④ right in that order, or press [SCN] on the remote control unit. 7. OPERATIONS OF ACCESSORIES
CD Changer Operations
CD changer
When an optional CD changer is connected through the CeNET cable, this unit can control CD changer operations. This unit can be connected to a total of 2 CeNET-wired CD changers.DVD changer
When an optional DVD changer is connected through the CeNET cable, this unit can control DVD changer operations. To view a DVD, an optional monitor is required. Operation and display of the DVD changer on this unit is a simplified version, and does not support all DVD changer functions. For operating the DVD changer, use the remote control unit that is provided with the DVD changer. For details, refer to the User's Manual provided with the DVD changer.When 2 CD changers are connected
Press the [ROTARY] knob to select the changer connected to this unit. (Each press of the [ROTARY] knob switches the changer.) - If the CD changer does not contain a magazine, "NO MAG" is displayed, and if the magazine does not contain a CD, "NO DISC" is not displayed for that disc No. - For details on the title display, see "Switching the title display" (cf. page 14).Screen displays in the changer mode
Main display (CD changer mode)
This is displayed by pressing the [ROTARY] knob to select the CD changer mode.  Touching the left of the display for 1 second or longer switches the simple operation mode. Track/playing time display
T01/02: 00: The No. of the track currently being played and the playing time are displayed. Touching or in the normal mode allows you to select the track to play, or fast-forward/back-forward tracks.Title display
Touching this switches the display.Disc No. display
If you touch in the normal mode, you can select a disc.MODE
Touching this displays sub-functions. Touching and holding this for 1 second or longer displays the disc list.T-SCAN/D-SCAN
This is displayed during scan play. Touching T-SCAN/D-SCAN ends scan play.T-RPT/D-RPT
This is displayed during repeat play. Touching T-RPT/D-RPT ends repeat play.T-RDM/D-RDM
This is displayed during random play. Touching T-RDM/D-RDM ends random play.DISC
Touching this starts play of the next disc.(only in the simple operation display)
Touching these selects the track to play. Touching and holding these fast-forwards/fast-backwards tracks.Disc list display (CD changer mode)
This is displayed by touching and holding MODE for 1 second or longer in the main display.  Disc name>>: Selection in progress
Touching a disc name returns the screen to the main display, and play starts from the first track in the disc you touched.←PREV-RTN:
Touching this displays the previous title list. Touching and holding this for 1 second or longer returns the screen to the main display.NEXT:
Touching this displays the next title list.CAUTION
CD-ROM discs cannot be played from every CD changer. This depends on the model.
Note:
- Some CDs recorded in the CD-R/CD-RW mode may not be usable.Selecting the changer mode
1. Press the [ROTARY] knob to select the changer mode. * The mode of equipment that is not connected is not displayed. Play starts automatically when the mode changes to the changer mode.Pausing play
1. Press the [▶■] button.To resume play
1. Press the [▶■] button again.Selecting a CD
1. Touch on the disc No. display to select a disc. Play starts. * If magazine does not contain the disc you selected, the No. for that disc is not displayed. * Touching DISC ↑ starts play of the next disc.To select a disc from the disc list display
1. Touch and hold MODE for 1 second or longer. The disc list is displayed. If you touch NEXT, the next part of the disc list is displayed. 2. Touch the disc name. * If magazine does not contain the disc you selected, "NO DISC" is displayed for that disc No. * If you selected the same disc as that currently being played, play returns to and starts from the first track on that disc. (top function)Selecting a track
1. To listen to the next track, touch on the track display. 2. To listen to the previous track, touch twice on the track display. Touching 品 plays the next track. If you touch more times, the track advances ahead to the track for the number of times you touched and that track is played. Touching 品 plays the previous track. If y touch more times, the track moves ba to the track for the number of times you touched and that track is played. * If you touch BB twice on the track display while the start of the track is being played, the track 2 tracks back is sometimes played.Fast-forward/Fast-backward
1. To fast-forward, touch on the track display. 2. To fast-forward, touch on the track display.isc scan play
Top function
The top function starts play from the first track on the disc currently being played. 1. Touch and hold MODE for 1 second or longer. The disc list is displayed. If you touch NEXT, the next part of the disc list is displayed. 2. Touch the disc name. * If magazine does not contain the disc you selected, "NO DISC" is displayed for that disc No. * If you selected the same disc as that currently being played, play returns to and starts from the first track on that disc.Scan play
Scan play locates and plays the first 10 seconds of each track on a disc automatically. This function continues on the disc until it is canceled. The scan play function is useful when you want to select a desired track. 1. Touch MODE. 2. Touch T-SCAN. The MODE display changes to "T-SCAN" and scan play starts. * Scan play starts from the next track after the track currently being played.To cancel scan play
1. Touch T-SCAN. The T-SCAN display changes to "MODE", and the track that was playing when you touched T-SCAN is played.Disc scan play
Disc scan play locates and plays the first 10 seconds of the first track on each disc in the currently selected CD changer. This function continues automatically until it is canceled. Disc scan play is useful when you want to select a desired CD. 1. Touch MODE. 2. Touch D-SCAN. The MODE display changes to "D-SCAN" and disc scan play starts. * Disc scan play starts from the next disc after the disc currently being played.To cancel disc scan play
1. Touch D-SCAN. The D-SCAN display changes to "MODE", and the track that was playing when you touched D-SCAN is played.Repeat play
Repeat play continuously plays the current track. This function continues automatically until it is canceled. 1. Touch MODE. 2. Touch T-REPEAT. The MODE display changes to "T-RPT" and repeat play is started.To cancel repeat play
1. Touch T-RPT. The T-RPT display changes to "MODE", and regular play starts from the track that was playing when you touched T-RPT.Disc repeat play
After all the tracks on the current disc have been played, disc repeat play automatically replays the current disc over from the first track. This function continues automatically until it is canceled. 1. Touch MODE. 2. Touch D-REPEAT. The MODE display changes to "D-RPT" and disc repeat play is started.To cancel disc repeat play
1. Touch D-RPT. The D-RPT display changes to "MODE", and regular play starts from the track that was playing when you touched D-RPT.Random play
Random play selects and plays individual tracks on the disc in no particular order. This function continues automatically until it is canceled. 1. Touch MODE. 2. Touch T-RANDOM. The MODE display changes to "T-RDM" and random play starts.To cancel random play
1. Touch T-RDM. The T-RDM display changes to "MODE", and regular play starts from the track that was playing when you touched T-RDM.Disc random play
The disc random play selects and plays individual tracks or discs automatically in no particular order. This function continues automatically until it is canceled. 1. Touch MODE. 2. Touch D-RANDOM. The MODE display changes to "D-RDM" and random play starts.To cancel disc random play
1. Touch D-RDM. The D-RDM display changes to "MODE", and regular play starts from the track that was playing when you touched D-RDM.TV Operations
TV tuner function
When an optional TV tuner is connected through the CeNET cable, this unit controls all TV tuner functions. To watch TV, you need a TV tuner and a monitor.Screen displays in the TV mode
Main display
This is displayed by pressing the [ROTARY] knob to select the TV mode.  Touching the left of the display for 1 second or longer switches the simple operation mode. Channel display
1ch: The channel currently being received is displayed. Touching or in the normal mode allows you to perform seek tuning or manual tuning.Title display
3ch: The name of the station currently being received is displayed. VTR: In video mode Touching these switches the display.Reception band display
TV1: Band namePreset No. display
Touching 品 in the normal mode selects a preset memory.MODE
Touching this displays sub-functions. Touching and holding this for 1 second or longer displays the preset memory list. P-SCAN: This is displayed during a preset scan. Touching this ends the preset scan. A-STORE: This is displayed during an auto-store. Touching this ends the auto-store.BAND
Touching this switches the reception band. Touching and holding this for 1 second or longer toggles between the manual tuning mode and the seek tuning mode.(only in the simple operation display) Touching these buttons enables seek tuning or step tuning (in the manual tuning mode).
Touch and holding these buttons enables quick tuning (in manual tuning mode).■ Preset memory list display
This is displayed by touching and holding MODE for 1 second or longer in the main display.  Station name >>: Tuning in progressRTN:
Touching this returns the display to the main display.Selecting the TV mode
1. Press the [ROTARY] knob to select the TV mode. Each press of the [ROTARY] knob switches the mode as follows: * The mode of equipment that is not connected is not displayed.Switching the reception band
1. Touch BAND to switch the reception band. Each touch of BAND switches the reception band. TV1 TV2 TV1...Seek tuning
Seek tuning is a function for automatically tuning stations with good reception. 1. Touch and hold BAND for 1 second or longer while MANU is displayed. Automatic tuning is possible when MANU disappears. 2. Touch on the channel display. SEEK UP/SEEK DOWN is displayed, and tuning starts. Tuning automatically stops at stations with good reception.To cancel tuning
1. Touch on the channel display again.Manual tuning
There are 2 ways available: quick tuning and step tuning. When you are in the step tuning mode, the frequency changes 1 step at a time. In the quick tuning mode, you can quickly tune the desired frequency. 1. Touch and hold BAND for 1 second or longer while MANU is not displayed. Manual tuning is possible when MANU is displayed. 2. Operate the channel display to tune to a channel on which there is a broadcast. There are 2 manual tuning methods: step tuning and quick tuning. * Step tuning is a function for switching the channel 1 step at a time. Touch on the frequency display. * Quick tuning is a function for switching the channel continuously. Touch at the channel display. Tuning stops when you take your finger away from the panel.Recalling a preset station
Preset scan allows the user to view each preset position before it automatically advances to the next preset. This function is useful for searching for a desired TV station in memory. 1. Touch and hold MODE for 1 second or longer. The preset memory list is displayed. 2. Touch the station you want to listen to. * The station can also be tuned by touching at a preset No.To cancel tuning
1. Touch RTN.Preset memory
A total of 12 TV stations can be stored (6-TV1 and 6-TV2). This allows you to select your favorite TV stations and store them in memory for later recall. 1. Touch BAND to switch the reception band. 2. Operate the channel display to select the station to store to. 3. Touch and hold MODE for 1 second or longer. The preset memory list is displayed. 4. Touch and hold the preset No. to store for 2 seconds or longer. You will hear a long beep, and the station is stored in memory. If you hear a short beep, the station is not stored to memory. Repeat the procedure from step 1.Auto store
Auto store selects 6 TV stations automatically and stores each one into preset memory. If there are not 6 stations with good reception, stations previously stored in memory remain and only the strong stations are stored into memory. 1. Touch MODE. 2. Touch and hold A-STORE for 2 seconds or longer. The MODE display changes to "A-STORE" and the preset No. in the auto-store operation appears on the preset No. display * Stations with good reception are automatically searched, and are stored to preset memory (No.1 to No.6) in order from the station having the lowest frequency.Notes:
- When auto store is performed, stations stored to memory so far are cleared. - When there are fewer than 6 stations with good reception, low frequencies are automatically returned to, and auto store is performed again. If there are fewer than 6 stations even after auto store is performed twice, stations stored so far remain in memory.Preset scan
Preset scan is a function for receiving stations in the order that they are currently stored to preset Nos. so that broadcasts can be checked. 1. Touch MODE. 2. Touch P-SCAN. The MODE display changes to "P-SCAN" and the preset No. in the preset scan operation is displayed in the preset No. display. * The currently stored stations are received in order for 7 seconds or longer each. Stations with poor reception are skipped, and the next station is received. TV stations are received as follows: TV1 (1 6) TV2(1 6) TV1(1 6) and so forth.To cancel the preset scan
1. Touch P-SCAN. The P-SCAN display changes to "MODE", and the stations that were being received when P-SCAN was touched are received next.Watching a video
The TV tuner has a VTR input terminal to which 1 external device can be connected. Connect a 12 V video cassette player (VCP) or video cassette recorder (VCR) to the TV tuner input terminal. 1. Press the [▶■] button. VTR is displayed, and the mode is switched to the VTR mode. * The TV screen enters the video input mode, and videos can be viewed.To return to the TV mode
1. Press the [▶] button again.Setting the TV area (TV AREA)
When you select the TV area (TV reception area), the TV tuner area setting changes. - The factory default setting is "GERMANY". 1. Press the [A] button to set the adjust mode. 2. Touch on the setting item display to select "TV AREA" under "TUNER".  3. Either touch on the right of the display, or turn the [ROTARY] knob to select the area. 4. Press the [A] button to return to the previous mode.Setting the TV diver (TV DIVER)
You can change the reception setting for the TV antenna connected to the TV tuner. - Set this item to "OFF" when a TV diversity antenna is not in use. - The factory default setting is "ON". 1. Press the [A] button to set to the adjust mode. 2. Touch on the setting item display, and select "TV DIVER" under "TUNER".  3. Either touch on the right of the display, or turn the [ROTARY] knob to select "ON" or "OFF". 4. Press the [A] button to return to the original mode.DAB control function
When a CeNET cable is used to connect a DAB (Optional, DAH913 or DAH923), all functions can be operated.Listening to the DAB station
1. Press the [ROTARY] knob to change the operation mode.Notes:
- The display shown in the normal reception mode and the preset reception mode is the same as that when a DAB station is received. The number of programmes and broadcasting times depend on the DAB station. - When the strength of DAB signals is weak, audio output is muted.Seek tuning
1. Press the [ROTARY] knob to select the DAB mode. 2. Touch on the left of the display. "DAB" lights up in the display when the main unit receives a DAB station. * The main unit stops the seek tuning when it cannot find a DAB station. The display returns to the previous mode.Manual tuning
1. Press the [ROTARY] knob to select the DAB mode. 2. If "MANU" is not displayed, touch and hold BAND for 1 second or longer. If "MANU" is displayed, manual tuning is possible. 3. Touch on the left of the display to tune the station. * If no operation is performed for more than 7 seconds, manual tuning is cancelled and the display returns to the previous mode.Switching programmes
1. Press the [ROTARY] knob to select the DAB mode. 2. Touch on the left of the display to switch programmes in the DAB station.Note:
The programme name may be the same depending on the DAB programme.Programme scan
This function scans through each receivable programme in a DAB station being received for 10 seconds sequentially. This is useful when you want to search for a desired programme. 1. Press the [ROTARY] knob to select the DAB mode. 2. Touch MODE. 3. Touch S-SCAN. "S-SCAN" lights up and this unit starts scanning each programme for 10 seconds sequentially. Each time the main unit scans, the programme name is shown in the display. 4. To stop programme scan when a desired programme is tuned in touch S-SCAN.Manual memory
The main unit has a manual memory function for DAB programmes. Up to 18 programmes (6 programmes each) can be preset to the preset buttons.[M1], [M2] and [M3]
1. Press the [ROTARY] knob to select the DAB mode. 2. Touch BAND to select any one shown above. 3. Touch and hold MODE for 1 second or longer. The preset memory list is displayed. 4 Touch and hold the preset No. to be stored for 2 seconds or longer. You will hear a long beep, and the station is stored to memory. If you hear a short beep, the station is not stored to memory. Repeat the procedure from step 1.Note:
- Interrupt programmes (PTY or INFO) cannot be written to manual memory.Recalling a preset programme
1. Press the [ROTARY] knob to select the DAB mode. 2. Touch BAND. Each touch of BAND changes the display in the following order: MEMO1 MEMO2 MEMO3 MEMO1... 3. Touch on the right of the display to recall a preset programme.AF function
The AF function switches to a different frequency on the same network in order to maintain optimum reception. The factory default setting is "ON" - If the reception of the current broadcast station deteriorates, "SEARCH" appears in the display and the radio searches for the same programme on another frequency. - For details on the "AF function" (cf. page 26), refer to the section "RDS operation" of the respective owner's manual. - To switch the AF function ON - To switch the AF function OFF AF function between RDS and DAB When the same programme is broadcast by both RDS and DAB, and this function is ON, the main unit automatically switches to receive the broadcast with the better reception.TA (Traffic Announcement)
When a traffic announcement broadcast starts in the TA standby mode, the traffic announcement broadcast is received as top priority regardless of the function mode. Traffic programme (TP) automatic tuning is also possible. - This function can only be used when "TP" is lit in the display. When "TP" is lit, this means that the DAB or RDS broadcast station being received has traffic announcement programmes. - For details on "TA" (cf. page 27), refer to the section "RDS operation" of the respective owner's manual. To set the TA standby mode - To cancel the TA standby mode To search for a TP stationNotes:
If a TP station is not received, the main unit stops the search operation. - "TP" may be lit in the display when a TP broadcast is transmitted from an RDS station. In this case, press the [TA] button to perform TP seek tuning. Press the [TA] button again to return to the previous mode.INFO (Announcement)
In the INFO standby mode, when the selected announcement programme starts, the main unit automatically switches to the selected announcement programme.- To set the INFO standby mode
If you press and hold the [TA] button for 1 second or longer, "INFO" lights in the display and the main unit is set to the INFO standby mode until the selected announcement is broadcast. When the selected announcement broadcast starts, the announcement item appears in the display. If you press and hold the [TA] button for 1 second or longer while the selected announcement broadcast is being received, reception of the selected announcement broadcast is cancelled and the main unit enters the INFO standby mode.- To cancel the INFO standby mode
To cancel the INFO standby mode, press and hold the [TA] button for 1 second or longer.Information select
This is a function for selecting INFORMATION ON or OFF in the Information interrupt mode. You can set ON for up to 6 information items. You can select any of the 6 items below:| INFORMATION item | |
| ENGLISH | Contents |
| Travel | Transport flash |
| Warning | Warning / Service |
| News | News flash |
| Weather | Area weather flash |
| Event | Event announcement |
| Special | Special event |
PTY
This function enables you to listen to the selected programme type regardless of the function mode. - One common PTY can be selected for DAB or RDS. - Of DAB PTY and RDS PTY, the PTY which is received earlier takes priority over the other. - PTY broadcasts are not yet available in all countries. - In the INFO standby mode, INFO stations have priority over PTY stations. - In the TA standby mode, TP stations have priority over PTY stations. - For details on "PTY" (cf. page 28), refer to the section "RDS operation" of the respective owner's manual. To set the PTY standby mode To cancel the PTY standby mode - To cancel a PTY interrupt broadcast To select PTY - PTY seek - PTY preset memoryEmergency broadcast
When an emergency broadcast is received, all function mode operations are stopped, "ALARM" appears in the display, and the emergency broadcast can be heard. - For details on "Emergency broadcast" (cf. page 29), refer to the section "RDS operation" of the respective owner's manual. To cancel an emergency broadcastSwitching the PTY and INFO display language
You can select one of 4 languages (English, German, Swedish or French) for the PTY and INFO shown in the display. The factory default setting is "ENGLISH". - For details on "Switching the PTY display language" (cf. page 30), refer to the section "RDS operation" of the respective owner's manual.Volume setting of TA, INFO, emergency broadcast (ALARM) and PTY
The volume for TA, INFO, ALARM and PTY interrupt broadcasts can be set during TA, INFO, ALARM and PTY interrupt broadcasts. Perform the following operation depending on the connected model. - The factory default setting is "15". During a TA, INFO, ALARM or PTY interrupt broadcasts, turn the [ROTARY] knob clockwise or counterclockwise to set the volume to a desired level (0 to 33). * When the TA, INFO, ALARM or PTY interrupt broadcast ends, the volume returns to the level that was active before the interrupt broadcast.5.1ch Surround Decoder Operations
When an optional CeNET wiring-compatible 5.1ch surround decoder is connected, the 5.1ch surround decoder can be controlled on this unit. The following functions change when a 5.1ch surround decoder is connected: - Two modes "MOVIE" and "VIRTUAL" are added to the Dolby Pro Logic II mode. - The VSE/POSITION mode is changed to the DSF (Digital Sound Field) mode. - In the P.EQ (Parametric Equalizer) mode, the settings of each speaker can be adjusted in even more detail. - Settings relating to music in setting items (cf. page 39) are changed.Selecting PL II (Dolby PL II)
Select one of the available four modes matched to the source you are to play as the Dolby Pro Logic II mode. The factory default setting is "OFF".■ MUSIC (Music mode)
See "Selecting the PLII menu (Dolby PLII)" (cf. page 17).■ MATRIX (Matrix mode)
See "Selecting the PLII menu (Dolby PLII)" (cf. page 17).MOVIE (Movie mode)
Suitable for DVD video movies.■ VIRTUAL (Virtual mode)
Suitable for movies and other audio sources.OFF
The Dolby Pro Logic II mode is not used. 1. Press the [SOUND] button. 2. Touch Dolby PLII.  3. Touch on the right of the display to select the Dolby Pro Logic II mode.  The mode display is switched as follows: MUSIC (music mode) MATRIX (matrix mode) MOVIE (movie mode) VIRTUAL (virtual mode) OFF (PL II off) MUSIC (music mode)... * For details on the volume adjustment of the centre speaker/sub-woofer, see page 45. 4. Touch RTN.Selecting the DSF menu
DSF (Digital Sound Field) makes it possible through sound simulation to enjoy the acoustic experience you would have in a concert hall or live performance hall. - When the DSF menu is selected, the volume sometimes decreases. - The factory default setting for DSF is "OFF" and for the DSF menu is "HALL". 1. Press the [SOUND] button. 2. Touch DSF.  3. Touch on the ON/OFF display. The DSF effect is toggled ON/OFF.  When DSF is set to "OFF", the DSF setting is not reflected on the music source. This completes the DSF setting. Press the [SOUND] button to return to the original mode. 4. Touch on the DSF menu No. to select the desired DSF menu. DSF menus
HALL CHURCH STADIUM LIVE JAZZCLUB THEATER HALL...| No. | Function Name | Discription |
| 1 | HALL | Large concert hall |
| 2 | CHURCH | Church with a vaulted ceiling |
| 3 | STADIUM | Large stadium without roof or walls |
| 4 | LIVE | Live performance hall, larger than a jazz club |
| 5 | JAZZCLUB | Jazz club with a low ceiling |
| 6 | THEATER | Movie or drama theater |
Selecting the Parametric Equalizer menu
Parametric Equalizer (P.EQ) allows you to compensate the entire frequency level range in detail by smooth curve using frequency compensation matched to the type of your car. - The factory default setting provides the following settings for all speakers. FREQ = 1kHz, Q = 1, GAIN = 0dB 1. Press the [SOUND] button. 2. Touch P.EQ.  3. Touch on the ON/OFF display. The P.EQ effect is toggled ON/OFF.  When the P.EQ effect is set to "OFF", the P.EQ setting is not reflected on the music source. This ends the P.EQ setting. Press the [SOUND] button to return to the original mode. 4. Touch on the P.EQ menu No. to select the P.EQ menu. P.EQ menus
SIGNAL SP-SEL BAND FREQ Q GAIN SIGNAL... 5. Touch 山 on the right on the display and adjust the item as desired. SIGNAL (selects the adjustment signal): Selects "P-NOIS" or "MUSIC" P-NOIS: set when pink noise is to be used MUSIC: set to use music signals SP-SEL (selects the speakers whose P.EQ value is to be adjusted): Select one of "FRONT", "CENTER" or "SURROUND". - FRONT: front speaker - CENTER: centre speaker - SURROUND: surround speaker BAND (selects the frequency band): Select one of band 1 to 3 FREQ (selects the centre frequency): The adjustment range is from 20 Hz to 20 kHz. Q (sets the Q curve): Sets one of 1, 3, 5, 7, or 20 as the sharpness of the Q curve. GAIN (adjusts the output level): Adjusts the gain (output level) within the range -12dB to +12dB. (1dB steps, 25 points) 6. Repeat steps 4 and 5 to adjust the desired item. 7. Press the [SOUND] button to return to the original mode.P. EQ adjustment
The settings that can be adjusted in the P.EQ menu are as follows. The centre frequency, gain and Q curve can be stored to channel/band combinations. For example, centre frequency "250Hz", gain " -8dB" and Q curve "3" can be stored to band 1 on the front. For details on the P.EQ function, see "P. EQ adjustment" (cf. page 21).Changing settings
When a 5.1ch surround decoder is connected, settings relating to music in the adjust mode are changed.Selecting setting items
The following describes the items whose settings are changed. For details of other items that are not changed, see "Changing settings" (cf. Page 39) at "Operations Common to Each Mode". 1. Press the [A] button. The mode changes to the adjust mode.  ADJUST MODECENTER-SP>ON 2. Touch on the setting item display to select the item to set. * Touching on the left of the display switches main items 1 item at a time. Touching on the left of the display switches sub-items continuously. * Touching on the centre of the display switches the sub-items 1 item at a time. Touching switches sub-items continuously. 3. When "THROUGH" is displayed at the right of the display, touch THROUGH to switch to the adjustment details display. 4. Either touch on the right of the display, or turn the [ROTARY] knob to set the details.To return to the original mode
1. Press the [A] button again. - Setting items| Main Item | Sub-item |
| SOUND | CENTER-SP / SRD-SP / SUB-WOOFER • Setting the speaker ON/OFF (cf. page 64) |
| FRONT HPF / CENTER HPF / SRD HPF / SUB-W LPF • Adjusting the speaker filter frequency (cf. Page 64) | |
| SP GAIN • Adjusting the speaker output level (cf. page 46) | |
| DELAY | CENTER-SP / SRD-SP • Adjusting the speaker delay time (cf. page 65) |
| DOLBY D | D-RANGE • Adjusting the dynamic range (cf. page 65) |
| PL II CONT | PANorama / DIMENSION / CTR WIDTH • Setting the music mode in detail (cf. page 47) |
Setting speakers ON/OFF (CENTER-SP/SRD-SP/SUB-WOOFER)
Set the centre speaker (CENTER-SP), surround speaker (SRD-SP) and sub-woofer (SUB-WOOFER) ON/OFF. Be sure to set this setting to "OFF" when there is no centre speaker, surround speaker or subwoofer. - The factory default setting is "ON". 1. Press the [A] button to set to the adjust mode. 2. Touch on the setting item display to select "CENTER-SP" under "SOUND", "SRD-SP" under "SOUND", and "SUB-WOOFER" under "SOUND".  ADJUST MODE CENTER-SP》ON 3. Either touch on the right of the display, or turn the [ROTARY] knob to select "ON" or "OFF". * In the case of "SUB-WOOFER", select one of "ON+", "ON-" or "OFF". Normally, select "ON+". However, when "ON-" is set, an effect in the low range can be strongly felt. 4. Press the [A] button to return to the original mode.Adjusting the filter frequencies of speakers (FRONT HPF/CENTER HPF/ SRD HPF/SUB-W LPF)
This function allows you to adjust the filter frequency matched to the speakers you are using. - A speaker that was turned off in the section "Setting speakers on or off (CENTER-SP/ SRD-SP/SUB-WOOFER)" is not displayed. - The factory default setting for "FRONT HPF" or "SRD HPF" is "THROUGH" (no filter), and for "CENTER HPF" or "SUB-W LPF" is "120Hz". Filter adjustmentFRONT HPF/CENTER HPF/SRD HPF (high-pass filter adjustment)
This filter cuts bass sound from the front centre and surround speakers. $$ \text {T H R O U G H} \rightarrow 5 0 \mathrm {H z} \rightarrow 8 0 \mathrm {H z} \rightarrow 1 2 0 \mathrm {H z} $$ Set the filter matched to the speaker when small-diameter speakers are used.THROUGH
Set this when using speakers that can generate bass. THROUGH cannot be set at CENTER HPF.SUB-W LPF (sub-woofer low-pass filter adjustment)
This filter cuts treble sound from the sub-woofer. $$ 5 0 \mathrm {H z} \rightarrow 8 0 \mathrm {H z} \rightarrow 1 2 0 \mathrm {H z} $$ Set the filter frequency to match the sub-woofer. 1. Press the [A] button to set to the adjust mode. 2. Touch on the setting item display to select "FRONT HPF" under "SOUND", "CENTER HPF" under "SOUND", "SRD HPF" under "SOUND", and "SUB-W LPF" under "SOUND".  ADJUST MODE FRONT HPF THROUGH 3. Either touch on the right of the display, or turn the [ROTARY] knob to set the frequency. * Select one of THROUGH*, 50Hz, 80Hz, and 120Hz. ^*1 THROUGH is displayed only when "FRONT HPF" or "SRD HPF" is selected. 4. Press the [A] button to return to the original mode.Adjusting the delay time of the speaker (CENTER-SP/SRD-SP)
The timing when the sound of each speaker reaches the listening position depends on your speaker installation and the size of your car. Adjust the delay time of each speaker so that the sound of all speakers reaches the listening position at the same time as the sound from the front speakers. - The factory default setting is "0 ms". 1. Press the [A] button to set to the adjust mode. 2. Touch on the setting item display to select "CENTER-SP" under "DELAY" and "SRD-SP" under "DELAY".  ADJUST MODE CENTER-SP» Oms 3. Touch on the right of the display to adjust the delay time. * "CENTER-SP" can be adjusted within the range 0 ms to 5 ms. * "SRD-SP" can be adjusted within the range 0 ms to 15 ms. 4. Press the [A] button to return to the original mode.Adjusting the Dolby Digital functions (D-RANGE)
This function compresses the dynamic range of Dolby Digital to maintain low level sounds such as actor conversation and suppress loud sound volumes. These functions are only available on Dolby Digital DVD discs. - The factory default setting is "MAX". 1. Press the [A] button to set to the adjust mode. 2. Touch on the setting item display to select "DOLBY D" under "D-RANGE".  3. Touch on the right of the display to adjust the dynamic range and adjust the desired item. MAX: maximum dynamic range mode of the original source STD: recommended mode for standard listening MIN: the most compressed dynamic range mode that renders even low sounds easy to hear. 4. Press the [A] button to return to the original mode.8. IN CASE OF DIFFICULTY
| Problem | Cause | Measure | |
| General | Power does not turn on. (No sound is produced.) | Fuse is blown. | Replace with a fuse of the same amperage. If the fuse blows again, consult your store of purchase. |
| Incorrect wiring. | Consult your store of purchase. | ||
| No sound output when operating the unit with amplifiers or power antenna attached. | Power antenna lead is shorted to ground or excessive current is required for remote-on the amplifiers or power antenna. | 1. Turn the unit off. 2. Remove all wires attached to the power antenna lead. Check each wire for a possible short to ground using an ohm meter. 3. Turn the unit back on. 4. Reconnect each amplifier remote wire to the power antenna lead one by one. If the amplifiers turn off before all wires are attached, use an external relay to provide remote-on voltage (excessive current required). | |
| Nothing happens when buttons are pressed. Display is not accurate. | The microprocessor has malfunctioned due to noise, etc. | Reset button Button and remove the DCP. Press the reset button with a thin rod. | |
| DCP or main unit connectors are dirty. | Wipe the dirt off with a soft cloth moistened with cleaning alcohol. | ||
| CD/MP3NMA | No sound heard. | There is a disc other than a compact disc or foreign matter already in place. | With the sloping console open, press and hold the [▲] button for 3 seconds or longer. The foreign matter is forcibly ejected. |
| MP3/WMA files are absent in a disc. | Write MP3/WMA files onto the disc properly. | ||
| Files are not recognized as an MP3/WMA file. | Use MP3/WMA files encoded properly. | ||
| File system is not correct. | Use ISO9660 level 1, 2 or JOLIET or Romeo file system. | ||
| Sound skips or is noisy. | Disc is dirty. | Clean the disc with a soft cloth. | |
| Disc is heavily scratched or warped. | Replace with a disc with no scratches. | ||
| Sound is cut or skipped. Noise is generated or noise is mixed with sound. | MP3/WMA files are not encoded properly. | Use MP3/WMA files encoded properly. |
| Problem | Cause | Measure | |
| CD/MP3/WMA | Sound is bad directly after power is turned on. | Water droplets may form on the internal lens when the car is parked in a humid place. | Let dry for about 1 hour with the power on. |
| Wrong filename | File system is not correct. | Use ISO9660 level 1, 2 or JOLIET or Romeo file system. | |
| Play list play is not performed. | File name or extension is not correct. | Use alphanumeric/ASCII characters for MP3/WMA file name. Use“.M3U” for the file extension of a play list. |
9. ERROR DISPLAYS
If an error occurs, one of the following displays is displayed. Take the measures described below to eliminate the problem.| Error Display | Cause | Measure | |
| CD/MP3/WMA | ERROR 2 | A DISC is caught inside the CD deck and is not ejected. | This is a failure of CD deck's mechanism and consult your store of purchase. |
| ERROR 3 | A DISC cannot be played due to scratches, etc. | Replace with a non-scratched, non-warped-disc. | |
| ERROR 6 | A DISC is loaded upside-down inside the CD deck and does not play. | Eject the disc then reload it properly. | |
| General | AMP GUARD | The speaker protection circuit is operating. During this operation, if any volume operation is performed, the display shows "AMP GUARD". "AMP GUARD" sometimes functions when special test signals are used. | 1. Turn down sound volume. Function can also be restored by turning the power off and on again. (Speaker volume is reduced automatically when the speaker protection circuit operates). 2. If the sound is muted again, consult our service department. |
| CD changer | ERROR 2 | A DISC inside the CD changer is not loaded. | This is a failure of CD changer's mechanism and consult your store of purchase. |
| ERROR 3 | A DISC inside the CD changer cannot be played due to scratches, etc. | Replace with a non-scratched, non-warped disc. | |
| ERROR 6 | A DISC inside the CD changer cannot be played because it is loaded upside-down. | Eject the disc then reload it properly. | |
| DVD changer | ERROR 2 | A DISC inside the DVD changer cannot be played. | This is a failure of DVD mechanism and consult your store of purchase. |
| ERROR 3 | A DISC cannot be played due to scratches, etc. | Retry or replace with a non-scratched, non-warped-disc. | |
| ERROR 6 | A DISC inside the DVD changer cannot be played because it is loaded upside-down. | Eject the disc then reload it properly | |
| ERROR P | Parental level error | Set the correct Parental level. | |
| ERROR R | Region code error | Eject the disc and replace correct region code disc. |
10. SPECIFICATIONS
Radio section
Tuning System: PLL synthesizer tuned Receiving Frequencies: FM : 87.5 to 108 MHz (0.05 MHz steps) MW: 531 to 1602 kHz (9 kHz steps) LW : 153 to 279 kHz (3 kHz steps)CD player section
System: Compact disc digital audio system Frequency Response: 5 Hz to 20 kHz (±1 dB) Signal to Noise Ratio: 100 dB (1 kHz) IHF-A Dynamic Range: 96 dB (1 kHz) Distortion: 0.01%General
Output Power: 4 × 31 W (DIN 45324, +B=14.4V) Power Supply Voltage: 14.4 V DC (10.8 to 15.6 V allowable), negative ground Power Consumption: Less than 15 A Speaker Impedance: 4 Ω (4 to 8 Ω allowable) Auto Antenna Rated Current: 500 mA or less Weight: Main unit: 1.7kg Remote control unit: 80g (including battery) Dimensions: Main unit : 178 (W) × 50( H) × 155( D) mm Remote control unit: 44 (W) × 110 (H) × 27 (D) mmNote:
- Specifications and design are subject to change without notice for further improvement. Nous vous remercions d'avoir acheté ce produit Clarion. * Lisez tout le manuel de l'utilisateur avant demettre l'appareil en service. * Àprouv avoir lu ce manuel, conservez-le dans un endroit pratique (par ex. dans la boîte à gants). * Lisez le contenu de la carte de garantie jointe et conservez-la précieusement avec ce manuel. * Ce mode d'emploi contient les procédures de fonctionnement du changeur CD, du tuner DAB et TV, raccordé par le cable CeNET. Le changeur CD, et le tuner TV ont leur propre manuel et aucune explication sur leur fonctionnement n'est fournie.Table des matières
1. PRECAUTIONS 3 Console rabatable 4 Manipulation des disques compacts 4 2. LES COMMANDES 5 3. NOMENCLATURE DES TOUCHES 6 Nom des touches et leurs fonctions 6 Principales opérations des touches lorsqu'un apparéil externe est raccordé à l' apparéil 7 Eléments de l'écran 7 Commandes de I'ecran 8 4. CLAVIER DE COMMANDE AMOVIBLE (DCP) 9 5. TELECOMMANDE 10 Installation des piles 10 Fonctions des touches de la télécommande 11 6. FONCTIONNEMENT 12 Fonctionnement de base 12 Fonctionnement de AC-Processor III 17 Fonctionnement de la radio 23 Fonctionnement RDS 26 Commandes CD / MP3 / WMA 31 Ecoute de différents morceaux de musique par différentes personnes (fonction 2-ZONE) 36 Opérations communes à chaque mode 37 7. FONCTIONNEMENT DES ACCESSOIRES 51 Fonctionnement du changeur de CD 51 Fonctionnement du téléviseur 54 Fonctionnement de la radio numérique / DAB 58 Commandes du Decodeur Surround 5.1ch 61 8. EN CAS DE DIFFICULTÉ 66 9.AFFICHAGE DES ERREURS 68 10. CARACTERISTIQUES TECHNIQUES 691. PRECAUTIONS
1. L'appareil est unconçu exclusivement pour un vehicule à 4 roues roulant sur route. Il n'est pas adapté à une utilisation sur tracteur, camion, bouteur sur chenilles, vehicule tout terrain, motocyclette à 2 ou 3 roues, bateau ni jusqu'à autre vehicule à usage spécifique. 2. Lorsque l'habitacle de la voiture est très froid et que le lecteur est utilisé juste après la mise en route du chauffage, de la condensation risque de se former sur le disque ou sur les pieces optiques du lecteur et d'empêcher le bon déroulement de la lecture. Si de la condensation s'est formée sur le disque, essuyez le disque avec un chiffon doux. Si de la condensation s'est formée sur les pièces optiques du lecteur, attendez environ une heures avant d'utiliser le lecteur pour que la condensation puisse s'évaporer naturellement et permettre un fonctionnement normal. 3. Une conduite sur routes mauvaises qui provoque de fortes vibrations peut entraîner des interruptions du son.INFORMATIONS AUX UTILISATEURS:
LES ALTIATIONS OU MODIFICATIONS APORTÉES À L'APPAREIL ET NON EXPRESSEMENT APPROUVÉES PAR LE FABRICANT ANNULENT LA GARANTIE.A VERTISSEMENT
Pour votre sécurité, ne regardez pas et n'actionnez pas l'écran tactile en conduisant.Console rabatable
Cet apparéil possé de une console rabattable qui rend possible l'utilisation de gros écrans. Lorsque you utilisez la console rabattable, pensez bien à la referrer.ATTENTION
Quand vous ouvrez ou que vous refermez la CONSOLE RABATTABLE, faites attention de ne pas vous coincer les doigts.
1. A des fins de sécurité, refermez toujours la CONSOLE RABATTABLE quand vous restez longtemps sans utiliser l'appareil ou que vous coupez (OFF) le contact. Si vous coupez le contact alors que la CONSOLE RABATTABLE est inclinée, elle ne se reférer na pas. 2. Avant que la CONSOLE RABATTABLE ne soit complètement fermée, le mecanisme de sécurities risque de freiner le mouvement à des fins de sécurité. Ceci est normal. 3. Si vous bougez la CONSOLE RABATTABLE à la main, cela risque de déclencher la lecture. Pour annuler la lecture, appuyez sur la touche [▲] alors que l'appareil est sous tension pour referrer la CONSOLE RABATTABLE. 4. Quand le disque est ejecté, la CONSOLE RABATTABLE revient automatiquement en position inclinée ou fermée. Si un objet empêche la fermeture de la CONSOLE RABATTABLE, le mécanisme de sécurité se déclenché et la CONSOLE RABATTABLE s'ouvre à nouveau. Dans ce cas, retirez l'objet qui fait obstacle à la fermeture, puis appuyez sur la touche [▲]. 5. Pour éviter de rayer le disque compact, maintenez le CD de 12 cm ou de 8 cm à l'horizontal pour l'insérer ou le retarder.Manipulation des disques compacts
Utilisez uniquement des disques compacts, portant le label   N'utilise pas de disques en forme de coeur, octogonale ou des disques compacts d'autres formes. Certains modèles de CD enregistrés en mode CD-R/CD-RW risquent de ne pas être utilisables.Manipulation des disques
- Comparés aux CD de musique ordinaires, les CD-R et CD-RW sont tous deux plus sensibles aux niveaux élevés de présence et d'humidity, et avec certains CD-R et CD-RW la lecture risque de ne pas être possible. - Les disques neufs présenteront certaines asperités sur les bords. Avec ces disques, l'appareil peut ne pas fonctionner ou le son Stylo-bille s'interrompre. A l'aide d'un stylo-bille, etc. retirez les asperités sur le pourtour du disque. - Ne collez jamais d'étiquettes sur la surface du disque compact et n'y écrivez rien avec un stylo ou un cra - Ne lisez jamais un disque compact ayant du ruban adhésié ou de la colle sur sa surface. Si vous lisez ce genre de disques, vous risquez de ne pas pouvoir le sortir du lecteur de CD ou d'endommager le lecteur de CD.  - N'utilise pas de disques compacts fortement rayés, gondolés ou fendillés, etc. Cela provoquerait des anomalies de fonctionnement ou des dommages. - Pourvoir le disque compact de son etui de rangement, appuyez sur le centre de I'etui et soulever le disque en le tenant delicatement par les bords. - N'utilisez pas de feuilles de protection de CD en vente dans le commerce ni de disques dotés de stabilisateur, etc. Ils risquent d'endommager le disque ou de provoquer une panne du mécanisme interne.Rangement
N'exposez pas les disques compacts en plein soleil ni à une source de chaleur. - N'exposez pas les disques compacts à une humidité ou une poussière excessives. - N'exposez pas les disques compacts directement à la chaleur d'un apparéil de chauffage.Nettoyage
- Pour enlever les marques de doigs ou la saleté, essuyez le disque en ligne droite avec un chiffon sec, en procédant du centre du disque vers la périhérie. - N'utilisez aucun type de solvant, par exemple des produits de nettoyage, vaporisateurs anti'électricité statique ou diluant vendus dans le commerce, pour nettoyer les disques compacts. - Àprous avoir utilisé le nettoyeur de disque compact spécial, laissez le disque secher complètement avant de l'utiliser.2. LES COMMANDES
Appareil pilot
Ouvrez la CONSOLE RABATTABLE
3. NOMENCLATURE DES TOUCHES
Nom des touches et leurs fonctions
Bouton [RELEASE]
Supprime le DCP.Capeur Photosensible
- Ce capteur détecte la luminosité ambiente de votre voiture. Lorsque la fonction d'attenuation automatique est régée sur "AUTO" la luminosité de l'écran varie en fonction de cette mesure par le capteur.Bouton [ROTARY]
- Appuyez sur le bouton pourmettre en marche. Chaque pression sur ce bouton change de mode. - Appuyez et maintenez enforcé le bouton pendant au moins une seconde pour éteindre. - Vous pouvez aussi tournez ce bouton pour ajuster le volume ou les divers régles en mode ajustement.Bouton [△]
- Ouvre/ferme l'écran de contrôle. Si un disque est déjà charge, il sera éjecté lors de l'ouverture de l'écran de contrôle.Remarque:
Si le disque n'est pas ejecté, maintenez le bouton [▲] enforcé pendant au moins une seconde.Bouton [A]
Utilise ce bouton pour regler ou ajuster les divers réglages en mode ajustement. Utilisez ce bouton pour saisir les noms de stations en mode radio ou les titres de disques en mode CD.Bouton [SOUND]
Utilise ce bouton pour regler ou ajuster les divers réglages tel que l'espace audio. - Maintenir ce bouton pendant au moins une seconde bascule entre ON (MARCHE) et OFF pour la fonction 2-ZONE.Bouton [TA]
Utilise ce bouton pour regler le mode veille du TA (Traffic Annoucement (Informations trafic)) (lorsque la fonction 2-ZONE est sur "OFF") Commute la fonction 2-ZONE. Maintenir ce bouton enforcé pendant au moins une seconde commute entre les types de 2-ZONE (Lorsque la fonction 2-ZONE est "ON").Bouton [▶II]
- Démarre et arrêté la pause d'une piste (en mode CD). - Utilisez ce bouton pour régler le mode veille du PTY (Programme Type (Type de programme)) ou les éléments du PTY.Écran
- Affiche les diverses informations qui indiquent l'etat de cet apparéil tels que l'accord/la lecture et les tiemoins. Effleurez l'écran avec le doigt, et effleurez pourmettre en marche.(cf.page8)Principales opérations des touches lorsqu'un apparéil externe est raccordé à l' apparéil
Lorsque le changeur de CD/DVD est connecté
* Pour plus de détails, voir la section "Fonctionnement du changeur de CD" (cf. page 51). Pour le changeur de DVD, reportez-vous au manuel de l'utilisateur fourni avec le changeur de DVD.Bouton [▶II]
- Lire ou mesure un CD ou DVD en pause.Bouton [A]
- Sert à saisir les titres en mode changeur de CD.Lorsque la télé/le DAB sont connectés.
* Pour plus de détails, voir la section "Fonctionnement du téléviseur" (cf. page 54) ou "Fonctionnement de la radio numérique / DAB" (cf. page 58).Bouton [TA]
Utilisez le bouton pour regler le mode veille du TA (Traffic Annoucement (Informations traffic)) pour le mode DAB. (Cette fonction n'est disponible que pour les tuners DAB.) - Appuyez et maintenez pendant au moins une seconde pour allumer ou eteindre le mode INFO. (en mode DAB)Bouton [▶III]
- Commute entre le mode image télé et le mode image VTR (external). (en mode TV) - Utilisez ce bouton pour régler le mode veille du PTY (Programme Type (Type de programme)) ou les éléments du PTY en mode DAB.Bouton [A]
- Ce bouton sert à saisir le nom de la station dé télé. (en mode TV)Éléments de l'écran
Commandes de l'écran
Un écran tactile est utilisé comme écran sur cet apparéil. Vous pouvez commander cet écran simplement en l'effleurant avec le bout des doits. Il y a quatre utilisations de l'écran, comme suit:Effleurer
Effleurez l'écran avec le bout du doigt puis retirez-le dans la seconde qui suit. C'est l'utilisation la plus simple lorsque vous commandez l'écran.Effleurer et maintainir
Effleurez l'écran du bout du doigt et maintenez - le sur l'écran pendant 1 à 2 secondes ou plus. Ne rougez pas le doigt lorsque vous effleurez l'écran. Effleurer et maintainir l'écran pendant 1 seconde ou plus affiche par exemple les listes et appelle d'autres fonctions pratiques. Effleurer et maintainir l'écran pendant 2 secondes ou plus sert à enregistrer dans la mémoire présélectionnée et d'autres informations.Effleurer
Effleurez l'écran du bout du doigt, puis déplacez le doigt vers la gauche ( ) ou la droite ( ) en maintainant le bout du doigt sur l'écran, puis retirez le doigt dans le seconde qui suit. Cette commande sert à désirir la mémoire préseLECTIONnée (1 à 6) ou les pistes. Effleurer
Effleurez l'écran du bout du doigt, puis déplacez le doigt vers la gauche ( ) ou la droite () en maintainant le bout du doigt sur l'écran, puis maintenez le doigt sur l'écran. La commande en cours continue tant que vous maintainez le doigt sur l'écran. Cette commande, sert, par exemple, pour l'accord ou l'avance rapide/le retour rapide des pistes. 4. CLAVIER DE COMMANDE AMOVIBLE (DCP)
Le clavier de commande se retire, de façon à éviter le vol. Quand vous l'enlevez, rangez-le dans le boitier DCP (CLAVIER DE COMMANDE AMOVIBLE) pour le protégger des rayures. Nous vous recommendons d'emporter le DCP avec vous quand vous quittez votre voiture.Retrait du CLAVIER DE COMMANDE AMOVIBLE (DCP)
1. La CONSOLE RABATTABLE étant fermée, mettez l'appareil hors tension. 2. Appuyez à fond sur la touche de [RELEASE] pour ouvrir le DCP.  3. Tirez le DCP vers vous et retirez-le. ATTENTION
- A des fins de sécurité, refermez bien la CONSOLE RABATTABLE quand vous enlevez le DCP. - Si vous retirez le DCP alors que la CONSOLE RABATTABLE est ouverte, la CONSOLE RABATTABLE se refermera immédiatement. Faites attention de ne pas vous coincer les doigts.Fixation du CLAVIER DE COMMANDE AMOVIBLE (DCP)
1. Insérez le DCP de façon que la section A sur le côté droit du DCP rentrée dans le crochet B de l'appareil.  2. Appuyez délicatement sur le côte gauche © du DCP pour l'insérer en place. ATTENTION
- Le DCP est très sensible aux chocs. Quand vous l'enlevez, faites attention de ne pas le faire tomber ni le hourter violemment. - Si vous appuyez sur la touche de [RELEASE] alors que le DCP n'est pas verrouille, ce dernier risque de tomber sous l'effet des vibrations de la voiture et de se casser. En conséquence, après avoir retire le DCP, fixez-le sur l'appareil ou rangez-le dans son boitier. - Le connecteur qui raccorde l'appareil principal au DCP est une piece extrémement importante. Faites attention de ne pas l'abîmer en appuyant dessus avec les ongles, un tournevis, etc.Remarque:
- Si le DCP est sale, enlevez la saleté avec un chiffon doux et sec.5. TÉLÉCOMMANDE
 TélécommandeInstallation des piles
1. Retournez la télécommande à l'envers, puis+pousse le couvercle arrêté dans le sens de la flèche. 2. Insérez les piles AA (SUM-3, R-6/1,5 V) fournies avec la télécommande dans le sens indiqué sur la figure, puis reférer que la couvercle arrêté.Remarques:
Une utilisation incorrecte des piles risque de les faire exploer. Notez les points suivants: - Quand vous remplacez les piles, remplacez bien les deux piles en même temps. - Ne court-circuitez pas, ne demontez pas et ne chauffez pas les piles. - Ne jetez pas les piles au feu. - Mettez les piles usées au rebut de la manière appropriée. Fonctions des touches de la télécommande
| Mode Touche | Radio (RDS)/DAB | CD/MP3 | Changeur de CD Changeur de DVD | Téléviseur |
| [FUNC] | Fait passer entre la radio, DAB, CD/MP3, changeur CD, changeur DVD et téléviseur, AUX. | |||
| [BAND] | Sélection de la gamme de réception. | Lecture de la première plage. Lecture TOP. | Saut au disque suivant dans l'ordre croissant. | Sélection de la gamme de réception. |
| [▲], [▼] | Augmentation et diminution du volume (tous les modes). | |||
| [←], [►] | Balayage ascendant/descendant des canaux pré régés. | Sélection ascendante/descendante des plages. Pression de plus de 1 seconde: Avance rapide/retour rapide. | Balayage ascendant/descendant des canaux pré régés. | |
| [►■] | Sans fonction. | Commutation entre la lecture et la pause. | Sans fonction. | |
| [MUTE] | Mise en/hors service du silencieux. | |||
| [TA] | Marche/arrêt d'announces sur la circulation routière. Maintenez la touche enforcée pendant 1 seconde ou plus pour altermier entre la source sonore de la zone principale et celle de la zone secondaire (seulement en mode 2-ZONE). | |||
| [DISP] | Fait passer entre l'affichage principal et l'affichage d'horloge (CT). | |||
| [PS/AS] | Balayage des stations pré régées. Pression de 2 secondes: Prééglage automatique des stations. | Lecture à exploration. Maintenez la touche enforcée pendant plus d'une seconde pour effectuer la lecture à Exploration d'un dossier en mode MP3/WMA. | Lecture des introductions. Pression de plus de 1 seconde: Balayage de tous les disques. | Balayage des stations pré régées. Pression de 2 secondes: Prééglage automatique des stations. |
| [AF] | Marche/arrêt de la fonction AF. Pression de plus de 1 seconde: Marche/arrêt de la fonction REG. | Lecture repétée. Maintenez la touche enforcée pendant plus d'une seconde pour effectuer la lecture repétée d'un dossier en mode MP3/WMA. | Lecture repétée. Pression de plus de 1 seconde: Lecture repétée de tous les disques. | Sans fonction. |
| [PTY] | Marche/arrêt du mode PTY. | Lecture aléatoire. Maintenez la touche enforcée pendant plus d'une seconde pour effectuer la lecture aléatoire d'un dossier en mode MP3/WMA. | Lecture aléatoire. Pression de plus de 1 seconde: Lecture aléatoire de tous les disques. | Commute alternatively entre la télévision (TV) et le magnétoscope (VTR). |
| [2-ZONE] | Maintenez la touche enforcée pendant 1 seconde ou plus pour activer ou désactiver le mode de 2-ZONE. Appuyez pour commuter alternatively la zone de commande entre la zone principale et la zone secondaire lorsque le mode de 2-ZONE est activé. | |||
6. FONCTIONNEMENT
Fonctionnement de base
ATTENTION
Réglez bien le volume au minimum avant demettre l'appareil hors tension. Un sonpuissant au moment de la mise sous tensionrisque d'abimer les tympans etd'endommager l'appareil. Si vous mettezl'appareil hors tension avec le volume reglé à un niveau élevé et que vous remettezl'appareil sous tension, l'augmentationbrusque du volume risque de vous abimerles tympans et d'endommager l'appareil.Mise en marche/arrêt de l'alimentation
Mise en marche
Remarque:
- Attention si vous utilisez longtemps cet apparéil sans faire tourner le moteur. Si vous videz la batterie de la voiture, il se peut que vous ne puissiez plus démarrer eteci peut réduire la durée de vie de la batterie. 1. Appuyez sur le bouton [ROTARY] Le mode précédemment actif est affchéé.Vérification du système
La première fois que cet apparéil est mis en marche après la connexion des cables, il vérifie l'équipement connecté. (Ceci s'appelle "system check". ("vérification du système")) Lorsque l'alimentation est mise en marche et que "System Check" s'affiche, suivez la procédure ci-dessous pour effectuer la vérification du système. 1. Lorsque "System Check" s'affiche, appuyez sur le bouton [ROTARY]. La vérification du système commence. Lorsque la vérification du système est terminée, "Completed" (Terminé) s'affiche. 2. Appuyez de nouveau sur le bouton [ROTARY] L'écran principal du mode radio apparait.Fonction CODEMATIC
Lorsque "CODEMATIC" est sur "ON", et que l'alimentation est en marche avec le DCP fixé, le Touch Code (Code touche) s'affiche. Effleurez l'écran dans l'ordre régledans le mode d'ajustement.  Pour plus de détails sur la fonction CODEMATIC, voir "Utilisation de la fonction de sécurité (CODEMATIC)" (cf. page 50).Arrêt de l'alimentation
1. Maintenez enforcé le bouton [ROTARY] pendant au moins une seconde.Selection d'un mode
1. Appuyez sur le bouton [ROTARY] pour changer le mode de commande. 2. A chaque fois que vous appuyez sur le bouton [ROTARY], le mode de commande change dans l'ordre suivant: mode Radio mode DAB mode CD/ MP3 mode changeur de CD mode changeur de DVD mode Télé mode AUX mode Radio... * Un équipement externe non connecté avec CeNET ne s'affiche pas.Ajustement du volume
1. Tourner le bouton [ROTARY] dans le sens des aiguilles d'une montre augmente le volume ; le tourner dans le sens contraire diminue le volume. * Le niveau de volume varie de 0 (minimum) à 33 (maximum).Commutation du mode de commande
Il y a deux modes de commande de base: les commandes standard et les commandes simples. 1. Sur l'écran de l'écran principal, effleurez et maintenez le doigt sur la gauche de l'écran pendant au moins 1 seconde. Le mode de commande est commuté.  En mode de commande simple, il n'est pas nécessaire d'effleurer ou sur l'écran de l'écran principal en mode radio ou en mode CD, et vous pouvez utiliser cet apparéil en effectuant des commandes simples. Remarquez, cependant, que les commandes suivantes ne sont pas accessibles en commande simple. - Accord préprogramme, Sélection de dossier, Sélection de disque, et les autres commandes qui impliquent l'effleurement de 1 sur la droite de l'écran. - Commandes de commutation d'écran (cf. page 13) - Commandes de commutation d'écran de titre (cf. page 14) - Opérations pour afficher les écrans de saisie de titres. Sur les écrans (Ex. Écran liste, mode ajustement, etc.) autres que l'écran principal, il n'y a aucune différence entre la commande standard et la commande simple. Les descriptions dans ce manuel sont principalement celles des commandes standard. Pour les descriptions des commandes simples, reportez-vous aux descriptions des écans de l'écran en mode radio ou en mode CD.Commutation de l'écran
1. Effleurez le centre de l'écran.
A chaque fois que vous effleurez l'écran, il change comme suit :  Écran titreEconomiseur d'écran
Lorsque la fonction économiqueur d'écran est activée, et que vous n'utilise pas cet apparéil pendant environ 30 secondes, l'économiserd'écran s'affiche. Pour plus de détails, voir page 41.Fond d'écran
Effleurer et maintainir le doigt au centre de l'écran pendant au moins 1 seconde commute vers l'écran de fond d'écran.| ① | ⑨ |
| ② | ⑩ |
| ③ | ⑪ |
| ④ | ⑫ |
| ⑤ | ⑬ |
| ⑥ | ⑭ |
| ⑦ | ⑮ |
| ⑧ | ⑯ |
Écran analyseur de spectre
Effleurer et maintainir le doigt sur la droite de I'ecran pendant au moins 1 seconde pendant I'ecran de I'analyseur de spectre (S/A) commute vers I'ecran de I'analyseur de spectre.| S/A SCAN | S/A 1, S/A 2, et S/A 3 sont affichés chacun pendant 10 seconds au moins. |
| S/A 1 | S/A 1 FLDR No. 003 TOP |
| S/A 2 | S/A 2 FLDR No. 003 TOP |
| S/A 3 | S/A 3 FLDR No. 003 TOP |
Commutation de I'écran du titre
Voupez afficher les titres des disques et d'autres informations qui sont stockées sur les disques en lisant les CD en mode CD ou changeur de CD. 1. Effleurez et maintenez le doigt sur la droite de l'écran pendant au moins une seconde sur l'écran du titre. A chaque fois que vous effleurez et maintenez le doigt, l'écran commute l'écran comme suit : Disque CD-TEXT Titre utilisateur (disque) Titre CD-texte (disque) Nom d'artiste Titre CD-texte (piste) Titre utilisateur (disque)... Disque MP3/WMA Dossier Fichier Balise Album Balise Artiste Balise titre Dossier...Remarques:
- Les MP3 supportent les TAGs ID3 V2.3 / 2.2 / 1.1 / 1.0. - Les écrons de TAGs donnent la priorité aux V2.3/2.2. - Dans le cas de TAGs d'album pour WMA, les informations écrites dans l'extension d'en-tête sont affichées. - Seuls les caractères ASCII peuvent être affichés dans les TAGs.Pour faire defiler un titre
Effleurez 卡 sur l'écran de titre lorsque le titre est affché. Le titre défile vers la gauche.Pour arrêté le défilament
Effleurez sur l'écran du titre.Fonction CT (Clock Time) (Horloge)
Le CT vous permet de receivevoir les données CT envoyées depuis une station RDS et d'afficher l'heure. Pour afficher l'écran CT, effleurez le centre de l'écran. - Si les données CT ne sont pas reçues, "--CT" s'affiche à l'écran.Remarque:
- Les données CT ne sont pas transmises dans certains pays et par certaines stations de radio. De plus, dans certaines zones, il est possible que les données CT ne soient pas précises.Réglage de l'ADF
- ADF est l'abréviation de Anti Distortion Filter (Filtre Anti Distorsion). Les fonctions adoptées "Liveliness Enhancement Filter" (Filtre d'enrichissement de direct) et "Sound Tone Compensation" Compensation de tonalité) permettent une lecture réalisée et bien modulée sans affecter les caractéristiques de la tonalité du son d'origine. Cet apparéil est fourni avec 4 types d'effets de tonalité en mémoire. Choisissez celui que vous préférez. ADF-1: Convient à de vérables enceintes ADF-2: Convient à des enceintes séparées ADF-3: Convient à des enceintes coaxiales USER (UTILISATEUR) : Ce réglage peut être ajusté par l'utilisateur selon ses goûts. OFF: Pas d'effet sonore - Le réglage d'usine par défaut est "OFF".Remarques:
- Comme le volume change lorsque l'ADF est commuté, commutez l'ADF avec le volume, le "SW VOLUME" (sub-woofer) et le "CTR VOLUME" (center speaker) (enceinte centrale) baisse autant que possible. - Avec certains ensembles d'enceintes il arrive parfois qu'on ne puisse obtenir un effet suffisant. Si cela se produit, ajustez les paramétres ADF ou le volume. Lorraine ADF is regéled sur "USER", "1", "2" ou "3" la fonction VSE et la fonction BASS/TREB sous EQ-SELECT sont désactivées. 1. Appuyez sur le bouton [SOUND]. 2. Effleurez ADF.  3. Effleurez sur la droite de l'écran pourCHOISIR le mode ADF.  Lorsque l'ADF est réglé sur "OFF", le réglage de l'ADF n'est pas répercuté sur la source musicale. Ceci termine le réglage ADF. Appuyez sur le bouton [SOUND] pour revenir au mode original. * Choisissez parmi USER, 1, 2, 3 ou OFF. 4. Pour changer les détails des réglages ADF, appuyez sur le bouton [A]. 5. Effleurez sur l'écran d'ajustement des éléments pourCHOISIR I'elément souhaite. Chaque effleurement de commute l'écran d'ajustement des éléments comme suit : - Ajustement d'élement (Lorsque USER est sélectionné à l'objet 3) BASS TREBLE COMP BASS... - Ajustement d'élement (Lorsque 1 à 3 sont sélectionnés à l' étape 3) LEVEL COMP LEVEL... 6. Effleurez sur la droite de l'écran pour ajuster l'objet. * "BASS" et "TREBLE" peuvent être ajustés dans une fourchette de 1 à 13. * “LEVEL” peut être ajusté dans une fourchette de -3 à +3. * Sélectionnez soit “ON” soit “OFF” pour “COMP”. 7. Appuyez sur le bouton [SOUND] pour revenir au mode original.Ajustement du Sub-woofer et de l'enceinte centrale
- "SW VOLUME" (sub-woofer) ne peut être ajusté que lorsque "SUB-WOOFER" est régle sur "ON". - "CTR VOLUME" (enceinte centrale) ne peut être ajusté que lorsque le mode Dolby Pro Logic II est réglé sur "MUSIC" ou "MATRIX", que "SP-SETTING" est réglé sur "CTR+SW" et que "CENTER-SP" est réglé sur "ON". - Le réglage d'usine par défaut pour SW VOLUME et pour CTR VOLUME est "0". 1. Appuyez sur le bouton [SOUND]. 2. Effleurez A-MODE.  3. Effleurez sur l'écran d'ajustement des éléments pourCHOISIR "SW VOLUME"ou "CTR VOLUME".  4. Effleurez sur la droite de l'écran et ajustez l'objet. * L'élement peut être ajusté dans une fourchette de -5 à +5. 5. Appuyez sur le bouton [SOUND] pour revenir au mode original.Ajustement de la balance/du fondu
BALANCE:
Ajuste le volume de la balance entre les enceintes gauche et droite.FADER:
Ajuste le volume de la balance entre les enceintes avant et arriere. - Le réglage d'usine par défaut pour BALANCE et pour FADER est "0".Remarque:
- Balance/fader ne peut pas être ajusté lorsqu'PRO'est sélectionné dans AC-PRO III (cf. page 44) et que la position de la fonction est sur "ON". Ajustez la balance/fader avec la "Sélection du menu de position" (cf. page 17). 1. Appuyez sur le bouton [SOUND]. 2. Effleurez A-MODE.  3. Effleurez sur l'écran d'ajustement des éléments pourCHOIR "BALANCE"ou "FADER".  4. Effleurez sur la droite de l'écran et ajustez l'objet comme souhaïte. * "BALANCE" peut être ajusté dans la fourchette L13 (côté gauche accentué) et R13 (côté droit accentué). * “FADER” peut être ajusté dans la fourchette F12 (arrière accentué) et R12 (avant accentué). 5. Appuyez sur le bouton [SOUND] pour revenir au mode original.Ajustement des basses/aigus
Le mode basses/aigus ne peut être ajusté que lorsque le mode Dolby Pro Logic II est réglé sur "OFF" (cf. page 17) et que "EQ-SELECT" est réglé sur "BAS/TREB" (cf. page 44). - Le réglage d'usine par défaut est "0". 1. Appuyez sur le bouton [SOUND]. 2. Effleurez A-MODE.  3. Effleurez sur l'écran d'ajustement des éléments pour sélectionner "BASS" ou "TREBLE".  4. Effleurez sur la droite de l'écran et ajustez l'objet. * L'élement peut être ajusté dans une fourchette de -6 à +6. 5. Répétez les étapes 3 et 4 pour ajuster l'élément souhaïte. 6. Appuyez sur le bouton [SOUND] pour revenir au mode original.Fonctionnement de AC-Processor III
Dolby Pro Logic II
Le Dolby Pro Logic II est une technologie de décodage de matrice qui applique la technologie de matrice numérique mise à niveau et qui améliore encore le Dolby Pro Logic. Il réalise une excellente reproduction à 5,1 canaux des sources Dolby surround ainsi que des sources stéreo comme les CD, ce qui confère au canal surround une plage intégrale (20 Hz à 20 kHz) et le rend stéropheonomique. Vous pouvez ainsi écouter les sources stéreo avec un son dynamique à 5,1 canaux. Selon la sourceroduite, vous pouze sélectionner le mode Music ou le mode Matrix. Fabrique sous licence de Dolby Laboratories. "Dolby", "Pro Logic" et le symbole double-D sont des marques de Dolby Laboratories.Sélection du menu PL II (Dolby PL II)
Choisissez le mode MUSIC ou le mode MATRIX qui correspond à la source que youlez dire en tant que mode Dolby Pro Logic II. - Le réglage d'usine par défaut est "OFF".■ MUSIC (mode musique)
- Ce mode convient aux sources de son stéroides que les CD. - Un autre mode d'ajustement qui permet un ajustement plus précis est aussi disponible car le champ sonore se propage de manière différente selon l'état de la source musicale enregistrée. (Voir page 47)■ MATRIX (mode matrix)
- Ce mode convient aux sources sonores telles que la radio AM/FM.OFF
- Le mode Dolby Pro Logic II n'est pas utilisé, et le mode AC-PRO III est utilisé. Pour plus de détails sur le mode AC-PRO III, voir " Sélection de chaque mode" (cf. page 44). 1. Appuyez sur le bouton [SOUND]. 2. Effleurez Dolby PLII. 3. Effleurez sur la droite de l'écran pour sélectionner le mode Dolby Pro Logic II.  Le mode d'écran est commuté comme suit. MUSIC (mode musique) MATRIX (mode matrix) OFF (arret PL II) MUSIC (mode musique)... * Pour plus de détails sur l'ajustement du volume du speaker central/sub-woofer, voir page 45. 4. Effleurez RTN.Selection du menu de position
Avec POSITION, vous pouvez désir parmi 5 types d'arrivée du son de l'enceinte jusqu'à la position de votre siège. En outre, la fonction de temporisation permet un réglage très précis des enceintes afin que le même effet sonore soit obtenu sur chaque enceinte pour tous les auditeurs. Dans la procédure " Sélection de chaque mode" (cf. page 44), réglez AC-PRO III sur "PRO". - Le réglage d'usine par défaut pour POSITION est "OFF" et pour le menu de base de position c'est "FRONT".■ Menu position
Cette fonction est préenregistrée avec 5 menus de position. Choisissez le menu souhaïte selon vos goûts. 1. Appuyez sur le bouton [SOUND]. 2. Effleurez POSITION.   3. Effleurez sur l'écran ON/OFF. L'effet de position bascule entre ON et OFF.  Lorsque l'effet de position est régé sur "OFF", le réglage de la position n'est pas répercuté sur la source sociale. Ceci termine le réglage de la position. Appuyez sur le bouton [SOUND] pour revenir au mode original. 4. Effleurez B/U pour désir "BASIC".  Chaque effleurement de B/U bascule entre "BASIC" et "USER". 5. Effleurez sur le No. de menu de base de position pourCHOISIR le menu de base de position. Menu de base de position Eléments d'ajustement| No. | Écran Nom | Position du siège |
| 1 | FRONT-L | Siège avant gauche |
| 2 | FRONT-R | Siège avant droit |
| 3 | FRONT | Sièges avant |
| 4 | REAR | Sièges arrière |
| 5 | FULL SEAT | Tous les sièges |
Ajustement/enregistrement des positions (mémoire utilisateur)
Avec la mémoire utilisateur, un réglage très précis des enceintes est effectué de manière à ce que le même effet audio soit obtenu sur chaque enceinte pour tous les auditeurs en fonction du menu de base de position. jusqu'à 5 réglages d'ajustement peuvent être enregistrés dans la mémoire utilisateur.T-ALIGN (temporisation)
La distance de l'auditeur à chaque enceinte peut être saisie par pas de 2.3 cm, le temps mis par le son pour atteindre l'auditeur depuis chaque enceinte peut être ajusté.SP GAIN (gain enceinte):
Ajusté le niveau de sortie de l'enceinte. Ajustez de manière à ce que le volume de sortie de chaque enceinte soit le même. 1. Appuyez sur le bouton [SOUND]. 2. Effleurez POSITION. 3. Effleurez sur l'écran ON/OFF. L'effet de position bascule entre ON et OFF. 4. Effleurez B/U pour désir "BASIC" ou "USER". 5. Effleurez sur la croite de l'écran pour désirir le menu utilisé comme menu pour le réglage. 6. Appuyez sur le bouton [A]. 7. Effleurez sur la gauche de l'écran pour sélectionner "T-ALIGN" ou "SP-GAIN". 8. Effleurez au centre de l'écran pour désirir chaque élément d'ajustement. Chaque effleurement de commute l'écran d'ajustement des éléments comme suit :  *1 Ceci ne s'affiche que lorsque “SUB-WOOFER”, sous “SOUND”, est régé sur “ON” dans le mode d'ajustement. *2 Ceci ne s'affiche que lorsque “SUB-WOOFER”, sous “SOUND”, est régèle sur “ON” dans le mode d'ajustement, et que “T-ALIGN” est sélectionné à l'étape 7. 9. Effleurez sur la droite de l'écran et ajustez l'objet.  POSITION EDIT FRONT L SP» 085.1cm * “T-ALIGN” peut être ajusté dans une fourchette de 0cm à 501,4 cm par pas de 2,3 cm. * "SP GAIN" peut être ajusté dans une fourchette de -20dB à 0dB. 10. Répétez les étapes 7 à 9 pour ajuster l'élement souhaïte. 11. Lorsque vous avez fini d'ajuster chaque élément, effleurez RTN. L'écran revient à l'écran d'origine et “>>” est affché sur l'écran BASIC ou USER. Ceci termine l'ajustement de la position. Pour continuer à enregistrer des valeurs d'ajustement dans le menu utilisé de position, effectuez ce qui suit. 12. Effleurez et maintenance RTN pendant au moins une seconde. La liste du menu de position s'affiche. 13. Effleurez et maintenez la mémoire utilisateur dont vous souhaitez enregistrer les valeurs d'ajustement pendant au moins 2 secondes. Vous entendrez un long signal sonore, et les valeurs que vous avez ajustées jusqu'à l'étape 10 sont enregistrées dans le menu utilisateur de position. Si vous entendez un signal sonore bref, les valeurs d'ajustement jusqu'à l'étape 10 sont rejetées. Ajustez à nouveau ces valeurs selon les indications. 14. Effleurez RTN. 15. Appuyez sur le bouton [SOUND] pour revenir au mode original. * Pour désirir une mémoire utilisateur enregistrée, effleurez B/U pour afficher "USER" et effleurez sur le No. de mémoire utilisateur.Selection du menu VSE.
VSE (Virtual Space Enhancer) you permit de compenser la balance de pression du son dans votre voiture de telle maniere que le même effet sonore puisse etre obtenu quel que soit le siège sur lequel vous estes assis comme cela a ete montré dans les simulations de compensation. Dans la procédure " Sélection de chaque mode" (cf. page 44), réglez AC-PRO III sur "STD". - Le réglage d'usine par défaut pour VSE est "OFF" et pour le menu de base de VSE c'est "FLAT".■ Menu de base VSE
Six menus de base sont préenregistrés pour cette fonction. Choisissez le menu souhaïte selon vos goûts. 1. Appuyez sur le bouton [SOUND]. 2. Effleurez VSE.  3. Effleurez 山 sur I'ecran ON/OFF. L'effet VSE bascule entre ON et OFF  Lorsque le VSE est reglé sur "OFF", le réglage du VSE n'est pas répercuté sur la source musicale. Ceci termine le réglage VSE. Appuyez sur le bouton [SOUND] pour revenir au mode original. 4. Effleurez B/U pour désir "BASIC".  Chaque effleurement de B/U bascule entre "BASIC" et "USER". 5. Effleurez sur le No. de menu de base de VSE pourCHOISIR le menu de base VSE souhaite. Menu de base VSE| No. | Nom de fonction | Description |
| 1 | FLAT | Égalisation plate de la source sonore |
| 2 | BASS BOOST | Basses améliorées |
| 3 | HIGH BOOST | Moyens et aiguus améliorés |
| 4 | IMPACT | Basses et aiguus améliorés |
| 5 | ACOUSTICAL | Tonalités moyennes (voix humaine) améliorées |
| 6 | SMOTH | Crée un adoucissement dessons. |
Ajustement/enregistrement VSE (mémoire utilisateur)
Les réglages de la mémoire utilisateur vous permettent de compenser la distribution de la pression sonore pour convenir à给你们 goûts en fonction du menu de base VSE. jusqu'à six ajustements utilisateur peuvent être enregistrés.DIFFUSE:
Ajuste la déviation de la pression sonore diffusée.CARWIDTH:
Ajusté la déviation de la pression sonore selon la largeur de la voiture.CAR LENGTH:
Ajuste la déviation de la pression sonore selon la longueur de la voiture. 1. Appuyez sur le bouton [SOUND]. 2. Effleurez VSE. 3. Effleurez sur l'écran ON/OFF. L'effect VSE bascule entre ON et OFF. 4. Effleurez B/U pourCHOISIR "BASIC"ou "USER". 5. Effleurez sur la croite de l'écran pour désirir le menu utilisé comme menu pour le réglage. 6. Appuyez sur le bouton [A]. 7. Effleurez sur l'écran d'ajustement des éléments pour sélectionner "DIFFUSE", "CAR WIDTH" ou "CAR LENGTH".  8. Effleurez sur la droite de l'écran et ajustez l'objet. * L'élement peut être ajusté dans une fourchette de 1 à 10. 9. Repétez les étapes 7 et 8 pour ajuster l'élément souhaïte. 10. Lorsque vous avez fini d'ajuster chaque élément, effleurez RTN. L'écran revient à l'écran d'origine et ">>" est affché sur l'écran BASIC ou USER. Ceci termine l'ajustement VSE. Pour continuer à enregistrer des valeurs d'ajustement dans le menu utilisé VSE, effectuez ce qui suit. 11. Effleurez et maintenez RTN pendant au moins une seconde. La liste du menu utilisé VSE s'affiche 12. Effleurez et maintenez la mémoire utilisateur dont vous souhaitez enregistrer les valeurs d'ajustement pendant au moins 2 secondes. Vous entendrez un long signal sonore, et les valeurs que vous avez ajustées jusqu'à l'étape 9 sont enregistrées dans le menu utilisateur VSE. Si vous entendez un signal sonore bref, les valeurs d'ajustement jusqu'à l'étape 9 sont rejetées. Ajustez à nouveau ces valeurs selon les indications. 13. Effleurez RTN. 14. Appuyez sur le bouton [SOUND] pour revenir au mode original. * Pour désirir une mémoire utilisateur enregistrée, effleurez B/U pour affic "USER" et effleurez ↑ ↓ sur le No mémoire utilisateur.Selection du menu P.EQ.
P.EQ (Parametric Equalizer) (Egaliseur paramétrique) vous permet de compenser toute l'étendue du niveau des fréquences de manière précise grâce à une courbe douce utilisant la compensation de fréquences qui convient à votre type de voiture. Dans la procEDURE "Selection de chaque mode" (cf. page 44), réglez EQ SELECT sur "P.EQ". - Le réglage d'usine par défaut pour P.EQ est "OFF" et pour le menu de base de P.EQ c'est "SEDAN-1".■ Menu de base P.EQ
6 types de menus de base P.EQ sont préenregistrés pour cette fonction et conviennent à votre voiture et à la position de montage des enceintes. Choisissez le menu de base qui convient à votre voiture. 1. Appuyez sur le bouton [SOUND]. 2. Effleurez P.EQ.  3. Effleurez 卡 sur l'écran ON/OFF. L'effect P.EQ bascule entre ON et OFF.  Lorsque I'effet de P.EQ est regle sur "OFF, le réglage de P.EQ n'est pas répercuté sur la source musicale. Ceci termine le réglage de P.EQ. Appuyez sur le bouton [SOUND] pour revenir au mode original. 4. Effleurez B/U pour désirir "BASIC".  Chaque effleurement de B/U bascule entre "BASIC" et "USER". 5. Effleurez sur le No. de menu de base de P.EQ pourCHOISIR le menu de base de P.EQ. Menu de base P.EQ| No. | Écran du nom | Position de montage de l'enceinte |
| 1 | SEDAN-1 | Avant: Porte avant Arrière: Tablette arrêté |
| 2 | SEDAN-2 | Avant: Porte avant Arrière: Tablette arrêté |
| 3 | WAGON-1 | Avant: Porte avant Arrière: Bagage (lateral) |
| 4 | WAGON-2 | Avant: Porte avant Arrière: Tablette arrêté |
| 5 | MINI VAN-1 | Avant: Porte avant Arrière: Bagage (lateral) |
| 6 | MINI VAN-2 | Avant: Porte avant Arrière: Tablette arrêté |
Ajustement/enregistrement P.EQ (mémoire utilisateur)
Avec la mémoire utilisateur, vous pouvez compenser les caractéristiques de fréquence pour qu'elles conviennent à votre voiture en fonction du menu de base P.EQ. jusqu'à 6 réglages d'ajustement peuvent être enregistrés dans la mémoire utilisateur. Pour plus de détails, voir "Ajustement P.EQ". 1. Appuyez sur le bouton [SOUND]. 2. Effleurez P.EQ. 3. Effleurez 山 sur l'écran ON/OFF. L'effet P.EQ bascule entre ON et OFF. 4. Effleurez B/U pour désirer "BASIC" ou "USER". 5. Effleurez sur la droite de l'écran pour désirir le menu utilisé comme menu pour le réglage. 6. Appuyez sur le bouton [A]. 7. Effleurez sur la gauche de l'écran pour désir “FRONT” ou “REAR”.  8. Effleurez au centre de l'écran pour désirir chaque élément d'ajustement. Chaque effleurement de commute l'écran d'ajustement de l'élement comme suit : Éléments d'ajustement BAND FREQ Q GAIN BAND... 9. Effleurez sur la droite de l'écran et ajustez l'élement. * "BAND" peut être ajusté dans une fourchette de 1 à 3. * "FREQ" peut être ajusté dans une fourchette de 20Hz à 20kHz. * Choisissez 1, 3, 5, 7 ou 20 pour "Q". * “GAIN” peut être ajusté dans une fourchette de -12dB à +12dB. 10. Repetez les étapes 7 à 9 pour ajuster l'élément souhaite. 11. Lorsque vous avez fini d'ajuster chaque élément, effleurez RTN. L'écran revient à l'écran d'origine et ">>" est affchéé sur l'écran BASIC ou USER. Ceci termine l'ajustement P.EQ. Pour continuer à enregistrer des valeurs d'ajustement dans le menu utilisateur P.EQ, effectuez ce qui suit. 12. Effleurez et maintenez RTN pendant au moins une seconde. La liste du menu P.EQ s'affiche. 13. Effleurez et maintenez la mémoire utilisateur dont vous souhaitez enregistrer les valeurs d'ajustement pendant au moins 2 secondes. Vous entendrez un long signal sonore, et les valeurs que vous avez ajustées jusqu'à l'étépe 10 sont enregistrées dans le menu utilisateur P.EQ. Si vous entendez un signal sonore bref, les valeurs d'ajustement jusqu'à l'étépe 10 sont rejetées. Ajustez à nouveau ces valeurs selon les indications. 14. Effleurez RTN. 15. Appuyez sur le bouton [SOUND] pour revenir au mode original. * Pour désigner une mémoire utilisateur enregistrée, effleurez B/U pour afficher "USER" et effleurez sur le No. de mémoire utilisateur.■ Ajustement P.EQ
Les réglages peuvent être ajustés comme suit dans le menu P.EQ. La fréquence centrale, le gain et la courbe Q peuvent être enregistrés dans des combinaisons de canal/bande. Par exemple, fréquence centrale “250 Hz”, gain “-8dB” et la courbe Q “3” peuvent être enregistrés dans la bande 1 à l'avant. FRONT/REAR (sLECTION de canal) Sélectionne le canal (avant ou arrêté) à ajuster. BAND (Selection de bande) Sélectionne la bande de fréquence (1 à 3) à ajuster. Réglez la fréquence centrale (FREQUENCY), le gain (GAIN) et la courbe Q (Q) pour chaque bande de fréquence.FREQUENCY (selection de la fréquence centrale)
Selectionne la fréquence à utiliser en tant que centre de la bande de fréquence à compenser dans une fourchette de 20Hz à 20 kHz. (pas de 1/3 d'octave, 31 points)GAIN (ajustement du gain)
Ajuste le gain (niveau de sortie) dans une fourchette -12dB to +12dB. (Pas de 1dB, 25 points)Q (selection de la courbe Q)
Selectionnez 1, 3, 5, 7 ou 20 pour la précision de la courbe Q.Compensation
Il n'est pas nécessaire de compenser les caractéristiques de la fréquence si elles sont plates (pas de pics ni de creux) lorsque vous avez mesure celles-ci avec un dispositif de mesure. Cependant, qu'ilquefois les caractéristiques de la fréquence augmentent ou diminuuent par endroit. Si cela se produit, les caractéristiques de la fréquence doivent etre compensées.Crieez une courbe de fréquence dont les caractéristiques sont opposées à la fréquence centrale de parties ou elles augmentent ou diminuents pour annuler ces pics et creux, et des valeurs qui les rendent aussi plates que possibles. Le fait de rendre les caractéristiques de la fréquence aussi plates que possible s'appelle "compensation". Sur cet apparéil, les caractéristiques de fréquence peuvent être compensées avec le P.EQ. (Egaliseur Paramétrique).Compensation de caractéristiques de fréquence
La figure ci-dessous montre les relations entre la fréquence centrale, le gain et la courbe Q. Courbe Q
La courbe Q devient plus précise lorsque la valeur numérique augmente, et plus douce lorsqu'elle diminue. Des caractéristiques de fréquence plate peuvent être créées en selectionnant une courbe Q opposée à celles de la courbe à compenser.  F: Fréquence centrale, G: Gain (niveau de sortie), Q: Courbe Q| No.(type devoiture) | Paramètres de l'égaliseur paramétrique | |||||||||
| Canal | Bande 1 | Bande 2 | Bande 3 | |||||||
| F | G | Q | F | G | Q | F | G | Q | ||
| 1(SEDAN-1) | Avant | 250 Hz | -8 dB | 3 | 2 kHz | -4 dB | 1 | 5 kHz | -4 dB | 1 |
| Arrière | 250 Hz | -10 dB | 3 | 1.25 kHz | 0 dB | 5 | 8 kHz | 0 dB | 5 | |
| 2(SEDAN-2) | Avant | 250 Hz | -10 dB | 7 | 800 Hz | -4 dB | 3 | 8 kHz | -5 dB | 1 |
| Arrière | 80 Hz | 3 dB | 7 | 125 Hz | -12 dB | 5 | 1.25 kHz | 0 dB | 5 | |
| 3(WAGON-1) | Avant | 250 Hz | -8 dB | 3 | 1 kHz | -8 dB | 3 | 10 kHz | -6 dB | 1 |
| Arrière | 250 Hz | -8 dB | 3 | 800 Hz | -8 dB | 1 | 8 kHz | 0 dB | 5 | |
| 4(WAGON-2) | Avant | 250 Hz | -8 dB | 7 | 400 Hz | -10 dB | 7 | 1.25 kHz | -8 dB | 7 |
| Arrière | 125 Hz | -8 dB | 3 | 500 Hz | -5 dB | 5 | 1.6 kHz | 0 dB | 3 | |
| 5(MINI VAN-1) | Avant | 125 Hz | -4 dB | 5 | 1.25 kHz | -4 dB | 3 | 2 kHz | 3 dB | 7 |
| Arrière | 250 Hz | -6 dB | 1 | 630 Hz | -4 dB | 3 | 8 kHz | 0 dB | 5 | |
| 6(MINI VAN-2) | Avant | 250 Hz | -4 dB | 3 | 1.25 Hz | -8 dB | 3 | 80 Hz | 3 dB | 3 |
| Arrière | 250 Hz | -8 dB | 3 | 500 Hz | -5 dB | 5 | 8 kHz | 0 dB | 5 | |
Fonctionnement de la radio
Écrans d'écran en mode radio
Écran principal
Il s'affiche en appuyant sur le bouton [ROTARY] et en selectionnant le mode radio.  Effleurer la gauche de l'écran pendant au moins 1 seconde commute l'écran de commande simple. Écran de la féquence
La fréquence en cours de réception l'affichage. Effleurer ou le sur l'afficha de commande standard vous permet d'effectuer une recherche d'accord ou un accord manuel.Écran titre
Affiche le nom du canal de diffusion en cours de réception. Effleurer ce nom change l'écran.Écran de la bande de réception
AM: Nom de la bande AM FM1: Nom de la bande FMÉcran du No. de prééglage
Effleurer sur l'écran de commande standard selectionne une mémoire préselectionnée.MODE
L'effleurer affiche les sous fonctions. L'effleurer et le maintainir pendant au moins 1 seconde écran la liste de la mémoire préseLECTIONnée.P-SCAN:
S'affiche pendant une recherche prerégrée. L'effleurer termine la recherche prerégrée.A-STORE:
S'affiche pendant un enregistrement automatique. L'effleurer termine l'enregistrement automatique.BAND
L'effleurer commute la bande réception. L'effleurer et le maintainir pendant au moins 1 seconde commute entre le mode d'accord manuel et le mode de recherche d'accord.(sequentially pour l'écran de commande simple)
Les effleurer permet la recherche d'accord ou l'accord par paliers (en mode d'accord manuel). Les effleurer et les doivent permit un accord rapide (en mode d'accord manuel).Écran de la liste de la mémoire préseLECTIONnée
S'affiche lorsque vous effleurez MODE et le maintenez pendant au moins 1 seconde sur l'écran principal.  >>: Accord en cours RTN: L'effleurer revient à l'écran principalEcouter la radio
1. Appuyez sur le bouton [ROTARY] pour désirer le mode radio. Chaque pression sur le bouton [ROTARY] commute entre les modes comme suit : Radio (DAB) CD / MP3 (changeur de CD) (changeur de DVD) (TV) AUX Radio... * Le mode d'un équipement qui n'est pas branché ne s'affiche pas. 2. Effleurez BAND pour commuter la bande de réception. Chaque pression sur BAND commute la bande de réception comme suit : FM1 FM2 FM3 AM (MW / LW) FM1...Accord
Il y a trois types de modes d'accords disponibles, la recherche d'accord, l'accord manuel et l'accord préréglé.Recherche d'accord
Il y a deux types de recherches d'accord. DX SEEK et LOCAL SEEK. DX SEEK peut accorder automatiquement les stations captables, tandis que LOCAL SEEK peut seulement accorder les stations ayant une bonne sensibilité de réception. 1. Effleurez BAND pour sélectionner la bande souhaitation (FM ou AM (MW, LW)). 2. Accordez une station. * Lorsque MANU est affché, effleurez et maintenez BAND pendant au moins 1 seconde. "MANU" s'efface de I'écran et la recherche d'accord devient possible. * Si "TA" est allumé sur l'écran, les stations TP sont recherchées automatiquement.DX SEEK
Lorsque you effleurez sur l'affichage de la fréquence, l'accord automatique commence. Lorsque you effleurez 日 la station est recherche vers les fréquences les plus haute; lorsque you effleurez 日 elle est recherche vers les fréquences les plus basses. * Lorsque la recherche d'accord commence, "DX SEEK" s'affiche à l'écran.LOCAL SEEK
Lorsque vous effleurez sur l'affichage de la fréquence, la recherche d'accord local s'effectue. Les stations d'émission avec une bonne sensibilité de réception sont sélectionnées. * Lorsque la recherche d'accord local commence, "LO SEEK" s'affiche à l'écran.Accord manuel
Il y a deux possibilités: l'accord rapide et l'accord par paliers. En mode d'accord par paliers, la fréquence change d'un pas à la fois. En mode d'accord rapide, vous pouvez rapidement accorder la fréquence souhaitation. 1. Effleurez et maintenez BAND pendant au moins une seconde lorsque MANU n'est pas affché. L'accord manuel est possible lorsque MANU s'affiche. 2. Manoeuvrez l'écran de la fréquence pour accorder une fréquence sur laquelle on diffuse. - Accord par paliers Effleurez sur I'ecran de la frquence. Accord rapide Effleurez sur I'ecran de la frquence. L'accord s'arrête lorsque vous retirez le doigt du panneau.Rappel d'une station préréglée
Le rappel d'une station préregliée est une fonction pour l'accord des stations préenregistrées. 1. Effleurez et maintenez MODE pendant au moins une seconde. La liste de la mémoire présélectionnée s'affiche. 2. Effleurez la station que vous souhaitez écouter. * En mode normal, les No. préreglés peuvent aussi être accordés en effleurant 品 sur l'écran principal.Pour annuler I'accord
1. Effleurez RTN.Mémoire préselectionnée.
Il y a un total de 24 positions prérgélées (6-FM1, 6-FM2, 6-FM3, 6-AM) pour enregistrer des stations de radios individuelles en mémoire. 1. Effleurez BAND pour commuter la bande de réception. 2. Manoeuvrez l'écran de la fréquence pour y enregistrer la station. 3. Effleurez et maintenez MODE pendant au moins une seconde. La liste de la mémoire préseLECTIONnée s'affiche. 4. Effleurez et maintenance le No. préréglé pour enregistrer la station pendant au moins 2 secondes. Vousetendrez un long signal sonore, puis la station est enregistrree en memoire.Enregistrement automatique
L'enregistrement automatique est une fonction pour enregistrer jusqu'à 6 stations accordées automatiquement en série. 1. Effleurez MODE. 2. Effleurez en maintenez A-STORE pendant au moins 2 secondes. L'écran MODE change pour "A-STORE" et le No. prééré glé dans la commande d'enregistrement automatique apparait sur l'écran du No. prééré glé. * Les stations ayant une bonne réception sont recherchées automatiquement et enregistrées dans la mémoire présélectionnée (No.1 à No.6) dans l'ordre des fréquences croissantes.Remarques:
- Lors de l'enregistrement automatique, les stations enregistrées en mémoire jusqu'à sont effacées. - Lorsqu'il y a moins de 6 stations ayant une bonne réception en LOCAL SEEK, les fréquences basses sont automatiquement libérées, et l'enregistrement automatique recommence avec DX SEEK. S'il y a moins de 6 stations après qu'un enregistrement automatique a été effectué deux fois, les stations mémorisées jusqu'à là sont conservées. - Si l'enregistrement automatique est effectué dans les bandes FM, les stations sont enregistrées dans FM3 même si vous avons choisi FM1 ou FM2 pour enregistrer les stations.Recherche préreglee
La recherche préreglée est une fonction pour receivevoir les stations dans l'ordre où elles sont actuellement enregistrées sous les No. préreglés de manière à pouvoir contrcler les émissions. 1. Effleurez MODE. 2. Effleurez P-SCAN. L'écran MODE change pour "P-SCAN" et le No. préréglé de la commande de recherche préréglée apparait sur l'écran du No. préréglé.. * Les stations actuelles en mémoire sont reçues dans l'ordre pendant 7 secondes au moins. Les stations ayant une mauvaise réception sont passées et la station suivante est reçue. Lorsque la recherche pré régée est faite en diffusion FM, les stations FM sont reçues comme suit: $$ \begin{array}{l} \text {F M 1 (1 \to 6) \to F M 2 (1 \to 6) \to F M 3 (1 \to} \\ 6)... \end{array} $$ Lorsque la recherche prééglée est faite en diffusion AM, les stations AM sont reçues comme suit: $$ A M (1 \rightarrow 6) \rightarrow A M (1 \rightarrow 6)... $$Pour annuler la recherche prépréglée
1. Effleurez P-SCAN. L'écran P-SCAN change pour “MODE” et les stations reçues lors de l'effleurement de P-SCAN sont reçues ensuite.RDS (Radio Data System)
L'appareil comprend un décodeur de système RDS qui supporte les stations diffusant des données RDS. Ce système permet à la radio d'afficher le nom de la station en cours de réception (PS), ainsi que de commuter automatiquement sur une meilleure fréquence s'il en existe une dans la région lors de longs déplacements (commutation AF). Il permet également de receivevoir automatiquement les announces sur la circulation routière ou une émission du type de programme spécifique lorsqu'elles sont diffusés par une station RDS,quel que soit le mode de fonctionnement actuel de l'appareil. En outre, lors de la réception d'une information EON, cette information permet de commuter automatiquement sur les autres stations prérgéées du même réseau et d'interr compromise la station en cours de réception par la diffusion des announcements sur la circulation routière des autres stations (TP). Cette fonction n'est pas disponible dans toutes les régions. Pour pouvoir utiliser la fonction RDS, réglez toujours la radio en mode FM. - AF: Fréquence alternative - PS: Programme Service Name (Nom de service de programme) - PTY: Programme Type (Type de programme) - EON: Enhanced Other Network (Autre réseau amélioré) - TP: Traffic Programme (Programme traffic) PI: Programme Identification (Identification de programme) - TA: Traffic Announcement (Informations traffic) * L'interruption RDS ne fonctionne pas pendant la réception radio AM. * Lorsque l'appareil recoit un signal RDS et qu'il peut dire les données PS, le voyant PS apparait sur l'afficheur.Fonction AF (Fréquence alternative)
La fonction AF permet à l'appareil de conserver une réception optimale en commutant sur une autre fréquence du même réseau. - Le réglage usine est "ON" (acté).Pour commuter la fonction AF ON/OFF.
1. Effleurez MODE. 2. Effleurez AF. Chaque effleurement bascule l'affichage de AF entre "ON" et "OFF". 3. Effleurez RTN. * Si la réception de la station en cours se dégrade, “SEARCH” s'affiche à l'écran, et la radio recherche le même programme sur une autre fréquence.Commutation de la fonction AF entre RDS et DAB
Lorsque la même émission est diffusée à la fois par RDS et par DAB et que cette fonction est activée, l'appareil commute automatiquement sur l'émission offrant la meilleure qualité de réception. - Cette fonction n'est possible que si le module DAB DAH923 ou DAH913, vendu séparément, a été raccordé. - Le réglage usine est "ON" (activé). 1. Appuyez sur le bouton [A] pour régler le mode d'ajustement. 2. Effleurez sur l'écran de réglage des éléments pour désirir "LINK ACT" sous "TUNER".  3. Effleurez sur la droite de l'écran ou tournez le bouton [ROTARY] pour sélectionner soit "ON" soit "OFF". ON: La commutation de AF entre DAB et RDS est activée. OFF: La commutation de AF entre DAB et RDS est désactivée. 4. Appuyez sur le bouton [A] pour revenir au mode précédent.Fonction REG (Programme régional)
Quand la fonction REG est activée, la réception des stations régionales est optimisée. Lorsque la fonction est désactivée, l'appareil commute sur la station régionale de la zone suivante quand vous pénétrez dans une autre région. - Le réglage usine est "OFF" (désactivé).Remarques:
- Cette fonction est sans effet lors de la réception des stations nationales comme la BBC R2. - La mise en/hors service de la fonction REG est effective lorsque la fonction AF est activée.Pour commuter la fonction REG ON/OFF.
1. Effleurez MODE. 2. Effleurez REG. Chaque effleurement bascule l'affichage de REG entre "ON" et "OFF". 3. Effleurez RTN.Accord manuel d'une station régionale sur le même réseau
- Cette fonction est possible lorsque la fonction AF est sur ON. - La manoeuvre est différente selon le réglage ON/OFF de la fonction REG. Lorsque la fonction REG est sur ON, les émissions dont le code PI correspond parfaitement peuvent être reçues. Lorsque la fonction REG est sur OFF, les émissions de même type de code PI peuvent être reçues.Remarques:
- Cette fonction peut être utilisé lorsqu'une émission régionale du même réseau est reçue. Le code PI est un système de codage unique pour chaque station d'émission. 1. Effleurez et maintenez MODE pendant au moins une seconde. La liste de la mémoire préseLECTIONnée s'affiche. 2. Effleurez le No. préréglé de l'émission à recevoir.TA (Announces sur la circulation routière)
Lorsque l'appareil est en mode d'attente TA, vous receivez les announces sur la circulation routière en priorite lorsqu'elles sont diffusées, indépendamment du mode de fonctionnement actuel. Vous pourrez également symponiser automatiquement les stations TP (Programme d'announces sur la circulation routière). - Cette fonction n'est possible que si "TP" est allumé sur l'afficheur. Quand "TP" est allumé, cela peut dire que la station RDS en cours de réception diffuse des émissions d'announces sur la circulation routière.Pour activer le mode d'attente TA
Si you appuyez sur la touche [TA] lorsque seul "TP" est allumé sur l'afficheur, "TP" et "TA" s'allument sur l'afficheur et l'appareil passée en mode d'attente TA jusqu'à ce que les announces sur la circulation routière seront diffusées. Lorsque la diffusion des announcements sur la circulation routière démarre, "TRA INFO" s'allume sur l'afficheur. Si vous appuyez alors sur la touche [TA] pendant la réception des announces sur la circulation routière, les announces sur la circulation routière s'annulent et l'appareil passée en mode d'attente TA.Pour annuler le mode veille de TA.
Lorsque "TP" et "TA" sont allumés sur l'écran, appuyez sur le bouton [TA]. "TA" s'efface et le mode veille de TA est annulé. - Si "TP" n'est pas allumé, appuyer sur le bouton [TA] recherche une station TP.Pour recherche une station TP.
Si vous appuyez sur le bouton [TA] lorsque "TP" n'est pas allumé "TA" s'allume sur l'écran et cet apparéil recoit automatiquement une station TP.Remarque:
Lorsqu'une station TP ne peut etre reque,TP SEEK" s'affiche, et la recherche d'une station TP se poursuit. Quand vous appuyez de nouveau sur le bouton [TA], "TA" et TP SEEK" s'effacent de I'ecran et la recherche de station TP s'arrete.Fonction de mémorisation automatique des stations TP
Voussouspouceplacerautomatiquementjusqu'a6 stationsTP dans lamemoivre de preréglage.Si le nombre des stationsTP que youssouspouce recevoirestinférieurà6,cellesqui sontdéja mémorisées subsistent sansetre écrasées. 1. Assurez-vous que "TA" est affché, puis effleurez MODE. Si "TA" n'est pas affché, appuyez sur le bouton [TA] pour afficher "TA". 2. Effleurez en maintenez A-STORE pendant au moins 2 secondes. L'écran MODE change pour "A-STORE" et le No. préréglé dans la commande d'enregistrement automatique apparait sur l'écran du No. préréglé. - Les stations TP ayant une bonne sensibilité de réception sont enregistrées de la mémoire préselectionnée. - Mème si vous sélectionnez FM1 ou FM2, une station TP est enregistrée en mémoire FM3.PTY (Type de programme)
Cette fonction vous permet d'éçouter une émission du type de programme sélectionné, même si l'appareil est régé à un mode autre que la radio. - Les émissions PTY ne sont pas encore disponibles dans tous les pays. - En mode d'attente TA, les stations TP ont priorité sur les stations diffusant des émissions PTY.Réglage du mode d'attente PTY
Quand vous appuyez sur la touche [▶■], "PTY" s'allume sur l'afficheur et le mode d'attente PTY est activé. Quand l'émission du PTY sélectionné démarre, le nom de programme PTY apparait sur l'afficheur.Annulation du mode d'attente PTY
Quand vous maintainez la touche [▶III] enforcée pendant 1 seconde ou plus, "PTY" s'eteint sur l'afficheur et le mode d'attente PTY s'annule.Annulation d'une émission
d'interruption PTY
Appuyez sur la touche [▶II] pendant l'émission d'interruption PTY. L'interruption PTY s'annule et l'appareil revient au mode d'attente PTY.Sélection de PTY
1. Lorsque you appuyez sur le bouton [▶■], cet apparéil entre en mode de sélection PTY. 2. Effleurez 卡 卡 sur la droite de l'écran ou tournez le bouton [ROTARY] pour sélectionner PTY. * Ci dessous sont affichés les réglages d'usine par défaut:| No. de préréglage | Rubrique PTY | |
| FRANÇAIS | Contenu | |
| 001 | Infos | Informations |
| 002 | Services | Info-Service |
| 003 | M Pop | Pop |
| 004 | Sport | Sport |
| 005 | Classiq | Musique classique |
| 006 | Chansons | Chansons |
Recherche PTY
1. Lorsque you appuyez sur le bouton [▶■], le mode de seLECTION PTY est en marche. 2. Effleurez au centre de l'écran ou tournez le bouton [ROTARY] pour sélectionner PTY. 3. Effleurez 卡 sur la gauche de I'ecran. Lorsque vous effleurez 卡 , cet appeareil recherche une émission PTY en balayant les fréquences vers le haut, tandis que lorsque vous effleurez 卡 il recherche en balayant vers le bas. * Si aucune station ne peut être reçue avec l'émission PTY sélectionnée, cet apparéil revient au mode précédent.Mémoire préselectionnée PTY
1. Lorsque you appuyez sur le bouton [▶■], le mode de seLECTION PTY est en marche. 2. Effleurez au centre de l'écran pour sélectionner PTY. Les 29 types de PTY du tableau ci-dessous peuvent être sélectionnés.| Rubrique PTY | ||||
| ENGLISH | DEUTSCH | SVENSKA | FRANÇAIS | Contenu |
| News | Nachrich | Nyhetier | Infos | Informations |
| Affairs | Aktuell | Aktuellt | Magazine | Magazine |
| Info | Service | Info | Services | Info-Service |
| Sport | Sport | Sport | Sport | Sport |
| Educate | Bildung | Utbildn | Educatif | Education |
| Drama | Hör + Lit | Teater | Fiction | Dramatique |
| Culture | Kultur | Kultur | Culture | Culture |
| Science | Wissen | Vetenskp | Sciences | Sciences |
| Varied | Unterh | Underh | Divers | Divertissement |
| Pop M | Pop | Pop | M Pop | Pop |
| Rock M | Rock | Rock | M Rock | Rock |
| Easy M | U-Musik | Lättlyss | Chansons | Chansons |
| Light M | L-Musik | L klass | M Cl Lég | Classique Léger |
| Classics | E-Musik | Klassik | Classiq | Musique classique |
| Other M | -- Musik | Övrig m | Autre M | Autres Musiques |
| Weather | Wetter | Väder | Météo | Météo |
| Finance | Wirtsch | Ekonomi | Economie | Economie et Finances |
| Children | Kinder | Für barn | Enfants | Programmes pour enfants |
| Social | Soziales | Socialt | Société | Société |
| Religion | Religion | Andligt | Religion | Religion |
| Phone In | Anruf | Telefon | Forum | Ligne ouverte et interactivité |
| Travel | Reise | Resor | Voyages | Voyages |
| Leisure | Freizeit | Fritid | Loisirs | Loisirs |
| Jazz | Jazz | Jazz | Jazz | Musique de jazz |
| Country | Country | Country | Country | Musique de country |
| Nation M | Landes M | Nation m | Ch pays | Chansons du pays |
| Oldies | Oldies | Oldies | Rétro | Musique rétro |
| Folk M | Folklore | Folkm | Folklore | Musique folklorique |
| Document | Feature | Dokument | Document | Documentaire |
Diffusion d'urgence
Si une diffusion d'urgence est reçue, toutes les opérations s'arrêtent. "ALARM" s'allume sur l'afficheur et le message d'urgence est diffusé.Annulation de la diffusion d'urgence
Si vous appuyez sur la touche [AF], la réception des émissions d'urgence s'annule.Commuter la langue d'affichage du PTY
Vous pouvez désirir une langue parmi les 4 (anglais, allemand, suédois ou français) pour le PTY qui s'affiche à l'écran. - Le réglage d'usine par défaut est "ENGLISH". 1. Appuyez sur le bouton [A] pour régler le mode d'ajustement. 2. Effleurez sur l'écran de réglage des éléments pour désirir "LANGUAGE" sous "TUNER".  3. Effleurez sur la droite de l'écran ou tournez le bouton [ROTARY] pour désirar la langue. * Sélectionnez parmi ENGLISH, DEUTSCH (allemand), SVENSKA (Suédois) ou FRANÇAIS (français). 4. Appuyez sur le bouton [A] pour revenir au mode précédent.Réglage de l'interruption RDS lorsque la fonction 2-ZONE est utilisé (RDS-INT-2Z)
Lorsque cette fonction est sur "ON", et qu'il y a une interruption RDS lorsque la fonction 2-ZONE est utilisée, les informations RDS peuvent être reçues. - Lorsqu'il y a une interruption RDS, la fonction 2-ZONE s'arrête. - S'il y avait une interruption alarmé même avec "RDS-INT 2Z" sur "OFF", les informations RDS sont reçues. - Le réglage d'usine par défaut est "ON". 1. Appuyez sur le bouton [A] pour régler le mode d'ajustement. 2. Effleurez sur l'écran de réglage des éléments pour désirir "RDS-INT 2Z" sous "TUNER".  3. Effleurez sur la droite de l'écran ou tournez le bouton [ROTARY] pour sélectionner soit "ON" soit "OFF". ON: Les informations RDS sont reçues lorsqu'il y a une interruption RDS alors que la fonction 2-ZONE est utilisé.OFF:
Lorsque la fonction 2-ZONE est utilisée, les informations RDS autre que l'interruption alarmé ne sont pas reçues.Remarque:
- Si le mode Radio est seLECTIONné alors que TA (informations routières) et PTY sont actifs (ON), les interruptions sont reçues même si l'interruption RDS est désactivée (OFF). 4. Appuyez sur le bouton [A] pour revenir au mode précédent.Réglage du volume de TA, de l'émission d'urgence (ALARM) et de PTY
Le volume des émissions d'interruption TA, ALARM et PTY peut être régle pendant une émission d'interruption TA, ALARME ou PTY. - Le réglage d'usine par défaut est "15". Pendant une émission d'interruption TA, ALARM ou PTY, tournez le bouton [ROTARY] dans le sens des aiguilles d'une montre ou dans le sens contraire pour regler le niveau de volume souhaité (0 à 33). - Lorsque l'émission d'interruption TA, ALARM ou PTY se termine, le volume revient au niveau actif avant l'interruption.Écrans d'écran en mode CD
Écran principal
Il s'affiche en appuyant sur le bouton [ROTARY] pourCHOISIRLEMODECD.  Effleurer la gauche de l'écran pendant au moins 1 seconde commute en mode de commande. Écran piste/durée de lecture
01/02: 00:
Le No. de piste lue et la durée de lecture s'affichent. Si vous effleurez ou sur la commande standard, vous pouvez désir la piste à dire ou avancer ou reculer rapidement d'une piste à l'autre.Ecran titre
L'écran est commute lorsque vous l'effleurez.Écran dossier (dans le cas de MP3/WMA)
Effleurer 卡 sur la commande standard seLECTIONne les dossiers.MODE:
L'effleurer affiche les sous fonctions. L'effleurer et le maintainir dans le cas de MP3/WMA pendant au moins 1 seconde affiche la liste des dossiers.Remarque:
- Cette fonction n'est disponible que lors de la lecture d'un disque. J-SCAN/SCAN: S'affiche pendant la lecture de recherche. L'effleurer termine la lecture de recherche. - RPT/RPT: S'affiche pendant la lecture repétée. L'effleurer termine la lecture repétée - RDM/RDM: S'affiche pendant la lecture aléatoire. L'effleurer termine la lecture aléatoire.TOP:
L'effleurer commence la lecture à partir de la piste en haut du disque ou du dossier en cours.(usually pour l'écran de commande simple)
Effleurer ces boutons seLECTIONne la piste à litre. Effleurer et maintainir ces boutons avance ou recule rapidement d'une piste à l'autre.Écran de la liste des dossiers (dans le cas de MP3/WMA)
S'affiche lorsque vous effleurez MODE et le maintenez pendant au moins 1 seconde sur l'écran principal.  Nom de dossierNo. de dossier
Lorsque ceci est affiché en gris, vous ne pouvez pas désir ce dossier.>>: Sélection en cours
Effleurer un nom de dossier ramène l'écran à l'écran principal, et la lecture commence à partir de la première piste du dossier que vous avez sélectionné.←PREV-RTN:
L'effleurer affiche la liste précédente des dossiers. L'effleurer et le maintainir pendant au moins 1 seconde ramène l'écran à l'écran principal.NEXT:
L'effleurer affiche la liste suivante des dossiers.Qu'est-ce que le MP3 ?
Le MP3 est une méthode de compression audio qui est classée dans les normes MPEG à couche audio 3. Cette méthode de compression audio s'est repandue parmi les utilisateurs de PC et elle est maintainant devenue un format standard. Le MP3 offre une compression des données audio d'origine égale à environ 10 pour cent de leur taille initiale avec une haute qualité du son. Cela peut dire qu'il est possible d'enregistrer environ 10 CD de musique sur un CD-R ou un CD-RW afin de permettre de longues sessions de lecture sans qu'il soit nécessaire de replacer les CD.Qu'est-ce que WMA?
WMA est l'abréviation de Windows Media Audio, format de fichier audio mis au point par Microsoft Corporation.Remarques:
- Si vous lisez un fichier avec DRM (Digital Rights Management - Gestion des droits numériques) pour WMA toujours activé, aucun son n'est envoyé. (L'indicateur WMA clignote.) - "Windows Media™ et le logo Windows® sont des marques déposées ou des marques déposées enregistrées chez Microsoft Corporation aux États-Unis et/ou dans d'autres pays."Pour invalider DRM (Gestion de Droits Numériques):
- Si vous utilisez Windows Media Player 8, cliquez sur TOOLS OPTIONS l'onglet COPY MUSIC, puis sous COPY SETTINGS, suprimez la coche de la case PROTECT CONTENT. Ensuite, reconstruirez les fichiers. - Si vous utilisez Windows Media Player 9, cliquez sur TOOLS OPTIONS l'onglet MUSIC RECORD, puis dans les paramétres d'enregistrement, supprimez la coche de la case RECORD PROTECTED MUSIC. Ensuite, reconstruirez les fichiers. Les fichiers WMA personnellement construits devront ettre utilisés sous votre propre responsabilité.Précautions lors de la création d'un CD MP3/WMA
Taux d'échantillonnage et de bit utilisables : 1. MP3: Taux d'échantillonnage: 11.025 kHz à 48 kHz Taux de bit: 8 kbps à 320 kbps / VBR 2. WMA: Taux de bit 48 kbps à 192 kbps- Extensions de fichiers
1. Ajoutez toujours une extension“.MP3” ou“.WMA” à des fichiers MP3 ou WMA en utilisant des caractères codés sur un octet. Le fichier ne peut pas être lu si vous ajoutez une extension autre que celles spécifiées ou si vous l'oubliez. 2. Des fichiers sans données MP3/WMA ne seront pas lus. L'indication "---: --" s'affiche au niveau de l'écran de la durée si vous essayez de dire des fichiers sans données MP3/WMA.Formatage logique (Système de fichiers)
1. Lorsque vous gravez un fichier MP3/WMA sur un CD-R ou un CD-RW, veillez besoinir "ISO9660 level 1, 2 or JOLIET ou Romeo" comme format d'ecriture du logiciel. Une lecture normale pourrait être impossible si le disque est enregistré dans un autre format. 2. Le nom du dossier et le nom du fichier peuvent s'afficher comme titre dans le cas d'une lecture MP3/WMA mais le titre doit faire au maximum 128 caractères alphanumeriques (extension y compris). 3. Ne donne pas à un fichier le même nom que le dossier dans lequel il se trouve.Stucture des dossiers
1. Il n'est pas possible d'avoir un disque avec un dossier de plus de 8 niveaux hierarchiques.- Nombre de fichiers et dossiers
1. Jusqu'à 255 fisiers sont reconnus dans chaque dossier. Jusqu'à 500 files peuvent être lus. 2. Les pistes sont lues dans l'ordre dans lequel elles ont ete enregistrées sur le disque. (ll se peut qu'elles ne soient pas always lues dans I'ordre dans lequel elles sont affichees sur un ordinateur). 3. Il peut y avoir du bruit en fonction du type d'encodeur logiciel utilisé pour l'enregistrement.Selection multisession
Cette fonction vous permet deCHOISIR soit CD- DA soit MP3/WMA dans le cas de disques (ex. CD-EXTRA) contenant un melange de CD-DA CD musical) et de fichiers MP3/WMA. 1. Effleurez MODE. 2. Effleurez M-SESS. Chaque effleurement de M-SESS bascule l'écran de M-SESS entre "CD" (lit un CD-DA) et "MP3/WMA" (lit un MP3/WMA). * Si M-SESS ne s'affiche pas, effleurez NEXT. 3. Effleurez RTN. Le réglage de la seLECTION multisession est conservé la prochaine fois que vous lisez un CD.Remarque:
Lors de la lecture d'un CCCD (Copy Control CD), réglez sur CD type. Lorsqu'il est régle sur MP3/WMA, le Cd ne peut pas être lu convenablement dans certains cas.ATTENTION
Faites attention de ne pas vous coincer la main ou les doigts pendant la fermeture de la CONSOLE RABATTABLE.
Remarques:
- Si la CONSOLE RABATTABLE ne s'ouvre pas complètement, ouvrez-le dangaclement à la main. - Refermez toujours la CONSOLE RABATTABLE après avoir charge un disque. - N'enforcez jamais la main ni les doigts dans la fente d'insertion du disque. De même, n'enforcez jamais de corps étrangers dans la fente. - N'insérez pas de disques sur lesquels de la colle dépasse du ruban de cellophane ou de l'étiquette, dans le cas d'un CD de location, ni de disques dont le ruban de cellophane ou l'étiquette, dans le cas d'un disque de location, ont été rétrés. Vous risqueriez de ne plus pouvoir sortir ces disques de l'appareil, et ils pourraient provoquer une panne de l'appareil.Chargement d'un CD
1. Appuyez sur le bouton [▲]. Le panneau de contrôle s'ouvre. 2. Chargez le disque dans le CD SLOT. Lorsque le CD est chargé, le panneau de contrôle se referme automatiquement quelques secondes plus tard, et la lecture commence.Remarques:
- N'introduisez jamais d'objets étrangers dans le CD SLOT. - Si le CD ne se charge pas facilement, il est possible qu'il y ait un autre CD dans le mecanisme ou bien l'appareil peut nécessiter une réparation.  Les disques ne portant pas les marques 05C 05C A05C or ne peuvent pas etre lus dans cet apparéil. - Certains CD enregistrés en mode CD-R/CD-RW peuvent être inutilisables.Chargement des disques compacts de 8 cm
Aucun adaptateur n'est nécessaire pour dire un CD 8 cm. Chargez le CD 8 cm dans le centre du CD SLOT.Ejection d'un CD
Vou puez éjecter un disque en appuyant sur le bouton [▲] même si la clé de contact ou si le courant est coupé, automatiquement.ATTENTION
Lorsque le disque est ejecté, appuyez sur le bouton [▲] pour fermer le panneau de contrôle. Si vous laissez le panneau de contrôle ouvert, vous entendrez un double signal sonore et le panneau de contrôle se refermera automatiquement. 1. Appuyez sur le bouton [▲]. Le panneau de contrôle s'ouvre et le disque est ejecté. Le mode passe automatiquement en mode radio. * Assurez-vous d'oter les CD éjectés de cet apparéil. Si vous laisssez le disque sur le plateau, il sera réintroduit dans l' apparéil après 15 secondes ou plus, et le panneau de contrôle se fermera. (fonction rechargement automatique) * Les CD simples ne sont pas charges automatiquement. Assurez-vous d'oter les CD simples après les avoir ejectés.ATTENTION
Si vous forcez trop le chargement d'un disque après son éjection, sa surface peut se rayer. Otez le disque avant de le recharger.Ecouter un disque déjà dans l'appareil
1. Appuyez sur le bouton [ROTARY] pour désirer le mode CD. * La lecture commence automatiquement lorsque le mode passe en mode CD.Pause
1. Appuyez sur le bouton [▶■].Pour reprendre la lecture
1. Appuyez de nouveau sur le bouton [▶■].Sélection d'une piste
Lorsqu'un CD-R/CD-RW enregistré avec des fichiers MP3 ou WMA est chargé, vous ne pouvez désirir que des pistes enregistrées dans le même dossier en effleurant à la sur l'écran de piste. 1. Pour écouter la piste suivante, effleurez sur l'écran de piste. 2. Pour écouter la piste précédente, effleurez sur l'écran de piste. Effleurer lit la piste suivante. Si vous effleurez Plusieurs fois, la piste avance jusqu'au numero de piste correspondant au nombre de fois où vous avez appuyé sur et cette piste est lue. Effleurer lit la piste precedente. Si vous effleurez Plusieurs fois, la piste recule jusqu'au numero de piste correspondant au nombre de fois ou vous avez appuyé sur et cette piste est lue. * Si vous effleurez ↑ à deux fois sur l'écran de piste alors que le début de la piste est lu, parfois la piste située à deux pistes en arrêté est lue.■ Sélection d'un dossier
Pour désir un dossier différent, effleurez soit 喜 sur I'ecran dossier, soit effectuez ce qui suit. 1. Effleurez et maintenance MODE pendant au moins une seconde. La liste des dossiers s'affiche. Effleurer PREV ou NEXT affiche la partie precedente ou suivante de la liste du dossier. 2. Effleurer le nom du dossier.Lecture de la liste de lecture
Les listes de lecture (fichiers M3U) peuvent aussi être lues. Remarquez, cependant, parmi les fichiers M3U enregistrres récemment avec 5 niveaux (dont la racine) dans la hierarchie des fichiers, seuls les 5 fichiers du début qui ont les dates les plus récentes peuvent être lus.Remarques:
- Jusqu'à 255 fichiers peuvent être lus dans une liste de lecture. Seuls les fichiers MP3 et WMA enregistrés dans des dossiers jusqu'à cinq niveaux (dont la racine) dans la hierarchie des fichiers peuvent être lus.Effectuez ce qui suit pour dire une liste de lecture.
1. Effleurez MODE. 2. Effleurez NEXT. 3. Effleurez PLY LIST. La lecture de la liste de lecture commence. Lorsque la lecture de la liste de lecture est terminée, la liste de lecture dont la date est la plus recente commence automatiquement. Le principe de selection de la liste de lecture et des pistes dans la liste de lecture est le même que celui de selection des dossiers ou des pistes dans un dossier. * PLY LIST ne s'affiche pas lorsqu'il n'y a pas de liste de lecture correcte (fichiers M3U) enregistrée sur le CD-R/CD-RW charged dans l'appareil.■ Arrêt de la lecture d'une liste de lecture
1. Effleurez MODE. 2. Effleurez NEXT. 3. Effleurez PLY LIST.Avance rapide / Retour rapide
1. Pour l'avance rapide, effleurez sur l'écran piste. 2. Pour le return rapide, effleurez sur l'écran piste.Fonction top
La fonction top remet le lecteur CD à la première piste du disque. 1. Effleurez TOP. La lecture commence à partir de la première piste (piste No.1). Dans le cas de MP3/WMA, la première piste du dossier en cours en returnée.Lecture de recherche
Cette fonction vous permet de localiser et de dire les 10 premières secondes de toutes les pistes enregistrées sur un disque. 1. Effleurez MODE. 2. Effleurez -SCAN. L'écran MODE change pour "J-SCAN" et la lecture de recherche commence. * La lecture de recherche commence à partir de la piste suivant celle qui est en cours de lecture.Pour annuler la lecture de recherche
1. Effleurez -SCAN. L'écran ^P -SCAN change pour "MODE", et la piste qui était lue lorsque vous avez effleuré ^P -SCAN est lue.Lecture de recherche de dossier
Cette fonction vous permet de localiser et de dire les 10 premières secondes de la première piste de tous les dossiers d'un disque MP3/WMA. 1. Effleurez MODE. 2. Effleurez -SCAN. L'écran MODE change pour "D-SCAN" et la lecture de recherche de dossier commence. * La lecture de recherche de dossier commence à partir du dossier en cours.Pour annuler la lecture de recherche de dossier
1. Effleurez -SCAN. L'écran -SCAN change pour "MODE", et la piste qui était lue lorsque vous avez effleuré -SCAN est lue.Lecture repétée
Cette fonction vous permet de dire la piste en cours de manière répetée. 1. Effleurez MODE. 2. Effleurez -REPEAT. L'écran MODE change pour “P-RPT” et la lecture repétée commence.Pour annuler la lecture repétée
1. Effleurez ^p -RPT. L'écran -RPT change pour "MODE", et la lecture normale commence à partir de la piste en cours lorsque vous avez effleuré -RPT.Lecture repétée de dossier
Cette fonction vous permet de dire de manière répétée le dossier en cours. Cette fonction n'est disponible que si un CD-R/CR-RW enregistré avec des fichiers MP3 ou WMA est charge. 1. Effleurez MODE. 2. Effleurez -REPEAT. L'écran MODE change pour "RPT" et la lecture repétée de dossier commence.Pour annuler la lecture repétée de dossier
1. Effleurez R-PRT. L'écran -RPT change pour "MODE", et la lecture normale commence à partir de la piste en cours lorsque vous avez effleuré -RPT.Lecture aléatoire
Cette fonction vous permet de dire toutes les pistes enregistrées dans un ordre aléatoire.-RANDOM
Joue toutes les pistes du disque au hasard. Lorsque le disque contient 2 dossiers ou plus toutes les pistes du dossiers sont lues au hazard, puis toutes celles du dossier suivant. Ceci se repête pour tous les dossiers.-RANDOM
Joue les pistes du disque au hasard. Cette fonction n'est disponible que si un CD-R/ CR-RW enregistré avec des fichiers MP3 ou WMA est charge. 1. Effleurez MODE. 2. Effleurez -RANDOM ou -RANDOM. L'écran MODE change pour "P-RDM" ou "RDM" et la lecture aléatoire commence.Pour annuler la lecture aléatoire
1. Effleurez ^ -RDM ou -RDM. L'écran -RDM ou -RDM change pour "MODE", et la lecture normale commence à partir de la piste en cours lorsque vous avez effleuré ces boutons.Écoute de différents morceaux de musique par différentes personnes (fonction 2-ZONE)
La fonction 2-ZONE est une fonction qui envoie dessons séparés de la zone MAIN et de la zone SUB en lisant simultanément deux sources dans l'élément central, ce qui permet à plusieurs auditeurs d'éçouter des sources musicales différentes. L'appareil est capable de commander ses propres sources internes (radio, CD, MP3 etc.) en vue de leur lecture, et de plus il est capable de dire simultanément les sources d'un apparéil externe raccordé via CeNET (par exemple de changeur CD, etc.). Les sources de la zone MAIN sont lues par les haut-parleurs sur le cote vehicule, tandis que celles de la zone SUB sont reproduites par le casque (WH143).  La figure ci-dessus est pour lorsqu'une source sonore est rue par le mode interne de l'appareil (radio, CD, AUX) sur les enceintes. La figure en dessous est pour lorsqu'une source sonore est lue par le mode externe de l'appareil (changeur de CD, changeur de DVD, TV, AUX) sur les enceintes. - Le réglage d'usine par défaut est "OFF".Remarques:
- La fonction 2-ZONE n'est pas disponible lorsque le DAB est connecté. Le nouvel ajustement de volume effectué en tournant le bouton [ROTARY] sur cet apparéil est répercuté sur les encéintes. Le réglage AUX-SENS est répercuté sur les deux enceintes et les écouteurs.Écran de l'écran lorsque la fonction 2-ZONE est en cours d'utilisation.
"INT." (mode interne) ou "EXT." (mode externe) s'affiche au centre de l'écran pour indiquer si vous pouvez entendre jouer dans le mode interne ou le mode externe du mode en cours de la fonction 2-ZONE. 1. Appuyez sur le bouton [SOUND]. 2. Effleurez 2-ZONE.  3. Effleurez et maintenez ON/OFF du centre de l'écran pendant au moins 1 seconde.  Lorsque 2-ZONE est sur ON, le type de 2-ZONE s'affiche. La fonction 2-ZONE n'est pas disponible lorsque 2-ZONE est sur OFF. Appuyez sur le bouton [SOUND] pour revenir au mode original. 4. Effleurez 山 sur l'écran ON/OFF pourCHOISIR le type de 2-ZONE. Type de 2-ZONE| Enceinte | Ecouteurs | |
| Type 1 | Interne (mode interne) | Externe (mode externe) |
| Type 2 | Externe (mode externe) | Interne (mode interne) |
Ecoute de différents morceaux de musique par différentes personnes (fonction 2-ZONE)
Pour commuter la fonction 2-ZONE ON/OFF.
1. Appuyez et maintenez le bouton [SOUND] pendant au moins 1 seconde.Pour commuter le type de 2-ZONE
Appuyez et maintenez enforcé le bouton [TA] de l'appareil pendant au moins 1 seconde alors que la fonction 2-ZONE est en cours d'utilisation.Pour commuter le mode de la fonction 2-ZONE
Appuyez sur le bouton [TA] de l'appareil alors que la fonction 2-ZONE est en cours d'utilisation.Sélection du mode lorsque la fonction 2-ZONE est en cours d'utilisation
Lorsque vous chargez un CD alors que la fonction 2-ZONE est en cours d'utilisation, les fonctions du mode externe de cet apparéil passent sur le CD et la lecture commence automatiquement. 1. Appuyez sur le bouton [TA] de l'appareil pour commuter la fonction le mode de la fonction 2-ZONE. L'écran pour l'équipement (enceintes ou écouteurs) qui est alors utilisé est commuté. 2. Appuyez et maintenez les boutons [TA] pendant au moins 1 seconde pour désir le type de 2-ZONE. L'écran "INT." ou "EXT." bascule. 3. Appuyez sur le bouton [ROTARY] Chaque pression sur le bouton [ROTARY] alors que "INT." est affiché commute entre les modes comme suit : Radio CD AUX Radio... Chaque pression sur le bouton [ROTARY] alors que "EXT." est affiché commute entre les modes comme suit : AUX (CD changer) (DVD changer) (TV^*1) AUX ... * Le mode d'un équipement qui n'est pas branché ne s'affiche pas. *1 Lorsque le mode TV est sélectionné, le mode/passse automatiquement en mode VTR, et ne peut pas être changé.Opérations communes à chaque mode
Écran de l'écran en mode de saisie de titre
Écran principal
Ceci s'affiche lorsque le mode de saisie de titre est selectionné. (cf. page 14) Écran de type texte
A: Majuscules d'imprimerie a: Minuscules d'imprimerie 0-9: Nombres !?: Symboles A:TrémaÉcran titre
Le titre en cours de saisie s'affiche. Effleurez 卡 pour avoir la position de saisie. Effleurer et maintainir le bouton pendant au moins 2 secondes efface tout le titre en texte.Écran de texte saisi
Effleurez 卡 pourCHOISIR le texte saisi.RTN
Effleurer ceci annule la saisie de titres et revient à l'écran de l'écran d'origine. Effleurer et maintainir ceci pendant au moins une seconde affiche la liste de texte correspondant au type de texte en cours.MEMO
Effleurer et maintainir ceci pendant 2 secondes au moins enregistrre le titre saisi et revient à l'écran de l'écran d'origine.Écran de la liste de texte
S'affiche lorsque vous effleurez RTN et le maintenez pendant au moins 1 seconde sur l'écran principal. Type de texte
Le texte qui est affiché change selon l'écran du type de texte. Lorsque I'ecran du type de texte est "A": A E I M Q U X (espace) Lorsque l'écran du type de texte est "a": a é m q u Lorsque le type de texte est "0-9", !? " ou "A": Tous les caractères sont affichés.RTN
Effleurer ceci revient à l'écran principal.NEXT
L'effleurer affiche la liste de texte suivante.Saisie de titres
Vou pousse donner aux stations de tete un titre jusqu'à 10 caractères de long, ainsi qu'aux CD. Ces titres peuvent etre affiches lorsque les émissions sont reçues ou lors de la lecture de CD. Le nombre de titres qui peuvent etre saisis est comme suit:| Mode | Nombre de titres |
| Mode CD | 50 titres |
| Mode TV | 20 titres |
| Mode changeur de CD | Nombre de titres |
| DCZ628 connecté | 100 titres |
| CDC655Tz connecté | 100 titres |
| CDC1255z connecté | 50 titres |
ATTENTION
Appuyer sur le bouton reset efface toutes les mémoires utiliser tels que les titres enregistrés sur cet apparéil. 5. Effleurez 卡 sur l'écran du type de texte pourCHOISIR le type de texte. Chaque effleurement de 卡 commute le type de texte comme suit : Majuscules d'imprimerie (espace)ABCDEFGHIJKLMNOPQ RSTUVWXYZ Minuscules d'imprimerie abcdefghijklmnpqrstuvwxz Nombres 0123456789 Symboles, Tréma AAEEEEIAEaeeeeeioae 6. Effleurez sur la droite de l'écran ou tournez le bouton [ROTARY] pour désir les caractères à entra. 7. Répétez les étapes 4 à 6 pour saisir le titre. Appuyer et maintainir l'écran de titre pendant au moins 2 secondes efface tous les caractères saisis. 8. Effleurez et maintenez MEMO pendant au moins 2 secondes Vous entendrez un long signal sonore, puis le titre est enregistré en mémoire.Pour commuter l'écran de titre et l'horloge ou un autre écran
Effleurez le centre de l'écran.Lorsqu'un nouveau titre est enregistré au-delà du nombre maximal de titres.
Dans le cas d'une station de télé
Les titres non enregistrés dans les canaux préregliés sont effacés automatiquement, et le nouveau titre est enregistré en mémoire.Dans le cas d'un CD
Les titres des CD qui ont eté lus en dernier sont effacés, et le nouveau titre est enregistré en mémoire.Effacement de titres
1. Captez la station de télé ou lisez un CD dont vous souhaitez effacer le titre. 2. Effleurez le centre de l'écran pour régler l'écran de titre utilisé. Lorsque I'écran passé à l'écran de titre utilisateur, "USER" s'affiche au dessus de l'écran du No. préréglé. 3. Appuyez et maintenez le bouton [A] pendant au moins 1 seconde. Le mode passe au mode de saisie de titre. 4. Effleurez et maintenance l'écran de titre pendant au moins 2 secondes Tous les caractères du titre s'effacent. 5. Effleurez et maintenez MEMO pendant au moins 2 secondes Vous entendrez un long signal sonore, puis le titre est effacé.Changement des réglages Sélection des éléments à régler
1. Appuyez sur le bouton [A]. Le mode passe au mode d'ajustement.  2. Effleurez 卡 包 sur I'ecran de reglage des éléments pour selectionner I'élément à régler. * Effleurer ↑ ↓ sur la gauche de l'écran commute les éléments principaux un à la fois. Effleurer ← → sur la gauche de l'écran commute les sous éléments en continu. * Effleurer ↑ au centre de l'écran commute les sous éléments un à la fois. Effleurer ← → commute les sous éléments en continu. 3. Lorsque "EDIT" s'affiche sur la droite de l'écran, effleurez EDIT pour commuter vers l'écran des détails d'ajustement.  4. Effleurez sur la droite de l'écran ou tournez le bouton [ROTARY] pour régler les détails.Pour revenir à au mode d'origine.
1. Appuyez de nouveau sur le bouton [A]. Réglage des éléments| Elément principal | Sous élément |
| DISPLAY | SCREEN SVR • Réglage de l'économiseur d'écran (cf. page 41) |
| MSG INPUT • Saisie de message d'information (cf. page 41) | |
| MESSAGE • Réglage de l'écran du message à la mise en marche/ll'arrêt (cf. page 42) | |
| S/A SENS • Réglage de la sensibilité de l'analyseur de spectre (cf. page 42) | |
| SCROLL • Ajustement la vitesse de défillement (cf. page 42) | |
| APPERNCE | DIMMER IN • Réglage de l'atténuation automatique (cf. page 43) |
| DMR LEVEL • Réglage du niveau de l'atténuation automatique (cf. page 43) | |
| CONTRAST • Ajustement du contraste de l'écran (cf. page 43) | |
| BLINK LED • Fait clignoter la LED lorsque DCP est retire (cf. page 43) | |
| BEEP • Réglage du signal sonore (cf. page 44) | |
| SOUND | AC-PRO III • Sélection du mode VSE (STD/PRO) (cf. page 44) |
| EQ SELECT • Sélection du mode égaliser (cf. page 44) | |
| SP-SETTING • Réglage de la configuration de l'enceinte (cf. page 44) | |
| CENTER-SP / SUB-WOOFER • Réglage du sub-woofer ON/OFF (cf. page 45) | |
| HPF / SUB-W LPF • Ajustement de la fréquence de filtre de l'enceinte (cf. page 45) | |
| AMP CANCEL • Réglage de l'utilisation de l'amplificateur interne ON/OFF (cf. page 46) | |
| SP GAIN • Ajustement du niveau de sortie de l'enceinte (cf. page 46) | |
| PL II DELAY | SRD-SP • Ajustement du niveau de sortie de l'enceinte (cf. page 46) |
| PL II CONT | PANORAMA / DIMENSION / CTR WIDTH • Réglage du mode musical en détaill (cf. page 47) |
| TUNER | TV ARER • Réglage de la zone télé (cf. page 57) |
| TV DIVER • Réglage de la diversité TV (cf. page 57) | |
| LINK ACT • Réglage de la fonction AF entre RDS et DAB (cf. page 26) | |
| LANGUAGE • Réglage de la langue de l'écran PTY (cf. page 30) | |
| RDS-INT 2Z • Réglage de l'interruption RDS lorsque la fonction 2-ZONE est utilisée (cf. page 30) | |
| SETTING | AUX / TEL • Réglage AUX et TEL (cf. page 47) |
| AUX SENS • Réglage du niveau d'entrée de l'audio portable (AUX) (cf. page 48) | |
| TEL-SP • Réglage des enceintes de la voiture pour le téléphone portable (TEL-002 en option) (cf. page 48) | |
| TEL-SWITCH • Réglage de l'interruption téléphone portable (cf. page 48) | |
| CALIBRATE / A-VOL SENS • Réglage de la fonction de volume automatique (cf. page 49) | |
| SYSTEM CHECK • Faire une vérification du système (cf. page 49) | |
| CODEMATIC • Réglage de la sécurité (cf. page 50) |
Réglage de l'économiseur d'écran (SCREEN SVR)
Cette fonction vous permet d'afficher un économiseur d'écran lorsque vous n'avez pas actionné cet apparéil pendant 30 secondes environ. - Le réglage d'usine par défaut est "ON". 1. Appuyez sur le bouton [A] pour régler le mode d'ajustement. 2. Effleurez t 山 sur l'écran de réglage des éléments pour désir "SCREEN SVR" sous "DISPLAY".  3. Effleurez sur la droite de l'écran ou tournez le bouton [ROTARY] pour sélectionner "ON" ou "OFF". 4. Appuyez sur le bouton [A] pour revenir au mode original.Pour commuter vers l'écran de économisteur d'écran
Effleurez PREV ou NEXT lorsque l'économiseur d'écran est affché. Chaque effleurement de ces boutons commute l'écran de l'économiseur d'écran.Economiseurs d'écran
Economiseur d'écran motif 1  Economiseur d'écran motif 2  Economiseur d'écran motif 3  Analyseur de spectre motif 1  Analyseur de spectre motif 2  Analyseur de spectre motif 3  Analyseur de spectre motif 4  Message d'information SS SCAN
Les 8 indications ci-dessus sont affichées pendant environ 10 secondes chacune.Saisir des messages pour les afficher dans message d'information (MSG INPUT)
1 type d'économiseur d'écran est disponible. Pour plus de détails sur la façon de commuter l'écran de l'économiseur d'écran, voir "Réglage de l'économiseur d'écran". - Jusqu'à 30 caractères peuvent être saisis. - Le réglage d'usine par défaut est "Active Matrix Control System". 1. Appuyez sur le bouton [A] pour régler le mode d'ajustement. 2. Effleurez sur l'écran de réglage des éléments pour désirir "MSG INPUT" sous "DISPLAY".  DISPLAY ADJUST MODE MSG INPUT> EDIT 4. Effleurez au centre de l'écran pourCHOISIR LA POSITION DE Saisie. * Pour effacer le message, effleurez et maintenez le centre de l'écran pendant au moins 2 secondes. Si vous effectuez l'opération de l'étape 8 avec le message effacé, le message revient à son réglage d'usine par défaut. 5. Effleurez 山 sur la gauche de I'ecran pourCHOir le type de texte. Chaque effleurement de 山 commute le type de texte : Pour plus de details, voir page 37. 6. Effleurez sur la droite de l'écran ou tournez le bouton [ROTARY] pour désir les caractères à entra. 7. Répétez les étapes 4 à 6 pour saisir le message. 8. Effleurez et maintenez MEMO pendant au moins 2 secondes Vous entendrez un long signal sonore, puis le message est enregistré en mémoire. 9. Appuyez sur le bouton [A] pour revenir au mode original.Écran des messages (MESSAGE)
Cette fonction vous permet d'afficher des messages sur l'écran lorsque l'alimentation est coupée. "Hello" s'affiche au démarrage et "See you" s'affiche à l'arrêt. - Le réglage d'usine par défaut est "ON". 1. Appuyez sur le bouton [A] pour régler le mode d'ajustement. 2. Effleurez sur l'écran de réglage des éléments pour désirir "MESSAGE" sous "DISPLAY".  3. Effleurez sur la droite de l'écran ou tournez le bouton [ROTARY] pour sélectionner "ON" ou "OFF". 4. Appuyez sur le bouton [A] pour revenir au mode original.Réglage de la sensibilité de l'analyseur de spectre (S/A SENS)
Cette fonction vous permet d'ajuster la sensibilité (quantité de déflexion) de l'analyseur de spectre. Pour plus de détails sur l'écran de l'analyseur de spectre, voir "Commutation de l'écran" (cf. page 13) ou "Réglage de l'économiseur d'écran" (cf. page 41). - Le réglage d'usine par défaut est "MID". 1. Appuyez sur le bouton [A] pour régler le mode d'ajustement. 2. Effleurez sur l'écran de réglage des éléments pour désirer "S/A SENS" sous "DISPLAY".  3. Effleurez sur la droite de l'écran ou tournez le bouton [ROTARY] pour ajuster la sensibilité. * Choisissez soit LOW (petite quantité de déflexion), MID ou HIGH (grande quantité de déflexion). 4. Appuyez sur le bouton [A] pour revenir au mode original.Ajustement de la vitesse de défilament de l'affichage (SCROLL)
Cette caractéristique vous permet de ralentir la vitesse de défilament lorsqu'elle est trop rapide, et donc difficile à voir sur l'écran. - Le réglage d'usine par défaut est "SPEED2". 1. Appuyez sur le bouton [A] pour régler le mode d'ajustement. 2. Effleurez sur l'écran de réglage des éléments pour désirir "SCROLL" sous "DISPLAY".  3. Effleurez sur la droite de l'écran ou tournez le bouton [ROTARY] pour ajuster la sensibilité. * Le réglage peut être ajusté dans une fourchette de SPEED 1 à SPEED 7. Ajustez cet élément de réglage en regardant comment l'apparce de l'écran évolve. 4. Appuyez sur le bouton [A] pour revenir au mode original.Réglage de l'atténuation automatique (DIMMER IN)
Cette fonction vous permet de varier l'éclairage de l'écran pour qu'il corresponde à la luminosité de votre voiture. Choisissez soit "AUTO" (coïncide avec la luminosité de votre voiture) soit "ILLUMI" (coïncide avec l'éclairage de votre voiture) comme réglage de l'atténuation automatique. - Lorsque la fonction d'atténuation automatique est reglee sur "AUTO", la luminosite de l'écran varie en fonction de celui mesure par le capteur. - Reglez l'atténuation sur DMR LEVEL. - Le réglage d'usine par défaut est "AUTO". 1. Appuyez sur le bouton [A] pour régler le mode d'ajustement. 2. Effleurez sur l'écran de réglage des éléments pour désirir "DIMMER IN" sous "APPERNCE".  3. Effleurez sur la droite de l'écran ou tournez le bouton [ROTARY] pour désir "AUTO" ou "ILLUMI". 4. Appuyez sur le bouton [A] pour revenir au mode original.Réglage du niveau d'atténuation (DMR LEVEL)
Cette fonction vous permet de régler de combien l'écran est attenué. - Le réglage d'usine par défaut est "3". 1. Appuyez sur le bouton [A] pour régler le mode d'ajustement. 2. Effleurez 卡 巴 sur I'ecran de réglage des éléments pour désirir "DMR LEVEL" sous "APPERNCE".  3. Effleurez 山 sur la droite de l'écran ou tournez le bouton [ROTARY] pour régler le niveau d'attenuation. * Choisissez parmi OFF (atténuation OFF, clair), 1 (légèrement attenué) à 5 (sombre). 4. Appuyez sur le bouton [A] pour revenir au mode original.Ajustement du contraste de l'écran (CONTRAST)
Vous pouvez ajuster le contraste de I'ecran pour qu'il corresponde à l'angle de montage de I'appareil - Le réglage d'usine par défaut est "6". 1. Appuyez sur le bouton [A] pour régler le mode d'ajustement. 2. Effleurez sur l'écran de réglage des éléments pour désirer "CONTRAST" sous "APPENCE". 3. Effleurez sur la droite de l'écran ou tournez le bouton [ROTARY] pour ajuster le contraste.  * L'élement peut être ajusté dans une fourchette de 1 à 11. Ajustez cet élément de réglage en regardant comment l'apparace de l'écran évolve. 4. Appuyez sur le bouton [A] pour revenir au mode original.Faire clignoter la LED lorsque le DCP est retire (BLINK LED)
Vou puevez faire clignoter la LED de cet apparéil lorsqu'le DCP est retire. - Le réglage d'usine par défaut est "OFF". 1. Appuyez sur le bouton [A] pour régler le mode d'ajustement. 2. Effleurez sur l'écran de réglage des éléments pour désirir "BLINK LED" sous "APPENCE".  APPERNCE ADJUST MODE BLINK LED》 OFF NCE 3. Effleurez sur la droite de l'écran ou tournez le bouton [ROTARY] pour sélectionner "ON" ou "OFF". 4. Appuyez sur le bouton [A] pour revenir au mode original.Réglage du signal sonore lors de l'utilisation des boutons (BEEP)
Le son aigu bref ou long que vous entendez lorsqu'un bouton est pressé s'appelle un "BEEP". - Le réglage d'usine par défaut est "ON". 1. Appuyez sur le bouton [A] pour régler le mode d'ajustement. 2. Effleurez 山 山 sur l'écran de réglage des éléments pour désirir "BEEP" sous "APPERNCE".  3. Effleurez sur la droite de l'écran ou tournez le bouton [ROTARY] pour sélectionner "ON" ou "OFF". 4. Appuyez sur le bouton [A] pour revenir au mode original.Sélection de chaque mode
L'élement ne peut pas être sélectionné lorsque le Dolby Pro Logic II est régé sur "MUSIC" ou "MATRIX" (cf. page 17). - Le réglage d'usine par défaut est "PRO" pour AC-PRO III et "P.EQ" pour EQ SELECT.AC-PROIII
Lorsque "STD" (mode standard) est sélectionné, la qualité du son et le champ peuvent être régles par le VSE (Virtual Space Enhancer) de telle manière que le même effet audio soit obtenu quelsque soit le siège sur lequel vous étres assis. Lorsque "PRO (mode PRO) est selectionné, la qualité du son et le champ peuvent être ajustés précisément pour chaque position de siège.EQ SELECT
Lorsque "P.EQ" (mode égaliseur) est sélectionné, toute la gamme de niveaux de fréquences peut être compensée par une courbe douce et précise. Lorsque "BAS/TREB" (mode basses/aigus) est sélectionné, le niveau de fréquence peut être compensé en le divisant en 2 niveaux principaux, basses (tonalités basses) et aiguus (tonalité haute). 1. Appuyez sur le bouton [A] pour régler le mode d'ajustement. 2. Effleurez 山 sur l'écran de réglage des éléments pour désir "AC-PRO III" sous "SOUND" et "EQ SELECT" sous "SOUND".  3. Effleurez sur la droite de l'écran ou tournez le bouton [ROTARY] pour désirir le mode. Sélection de mode| AC-PRO III | STD • Mode standard (menu VSE) |
| PRO • Mode PRO (menu de position) | |
| EQ SELECT | P.EQ • Mode égaliser (Menu P.EQ) |
| BAS / TREB • Mode basses/aigus |
Réglage de la configuration des enceintes (SP-SETTING)
Réglez afin que la configuration des enceintes fasse ressortir toutes les caractéristiques de cet apparéil dans votre voiture. - Le réglage d'usine par défaut est "SWL + SWR". 1. Appuyez sur le bouton [A] pour régler le mode d'ajustement. 2. Effleurez 卡 sur l'écran de réglage des éléments pour désirir "SP-SETTING" sous "SOUND".  3. Effleurez sur la droite de l'écran ou tournez le bouton[ROTARY] pour régler la configuration des enceintes. Configuration des enceintes| CTR+SW 5.1ch configuration | Enceintes avant/arroire (4cn) Enceinte centrale (1cn) Sub-woofer (1cn) |
| SWL +SWR 4ch+sub-woofer configuration | Enceintes avant/arroire (4cn) Sub-woofer (2cn) |
Remarques:
- Le son ne sort pas par l'enceinte centrale à moins que les réglages suivants ne soient effectuels lors du réglage de "CTR+SW". (1) En vous reportant à " Sélection du menu PLII (Dolby PL II)" (cf. page 17), réglez le mode Dolby Pro Logic II sur "MUSIC" ou "MATRIX". (2) En vous reportant à “Réglage des enceintes ON/OFF (CENTER-SP/SUB-WOOFER)” (cf. page 45), réglez l'enceinte centrale sur “ON”. - Le son ne sort pas sur le sub-woofer Lch lorsque "SWU + SWR" est régèle et que le mode Dolby Pro Logic Il est régèle sur "MUSIC" ou "MATRIX". 4. Appuyez sur le bouton [A] pour revenir au mode original.Réglage ON/OFF des enceintes (CENTER-SP/SUB-WOOFER)
Réglez l'enceinte centrale (CENTER-SP) et le sub-woofer (SUB-WOOFER) sur ON/OFF. Assurez-vous que ce réglage est sur "OFF" lorsqu'il n'y a pas d'enceinte centrale ou de subwoofer. L'enceinte centrale (CENTER-SP) peut être régée lorsque le mode Dolby Pro Logic II est régé sur "MUSIC" ou "MATRIX", et que "SP-SETTING" est régé sur "CTR-SW". - Le réglage d'usine par défaut est "ON". 1. Appuyez sur le bouton [A] pour régler le mode d'ajustement. 2. Effleurez sur l'écran de réglage des éléments pour désirir "CENTER-SP" sous "SOUND" et "SUB-WOOFER" sous "SOUND".  3. Effleurez sur la droite de l'écran ou tournez le bouton [ROTARY] pour sélectionner "ON" ou "OFF". 4. Appuyez sur le bouton [A] pour revenir au mode original.Ajustement des fréquences filtrés des enceintes (HPF/ SUB-W LPF)
Cette fonction vous permet d'ajuster la fréquence filtré qui convient aux enceintes que vous utilisez. - Les filtres (HPF/SUB-W LPF) que vous pouvez utiliser sont différents en fonction du réglage du mode Dolby Pro Logic II.| Dolby Pro Logic II Réglage du mode | Filtre | |
| HPF | SUB-W LPF*1 | |
| MUSIC / MATRIX | Non ajustable | Ajustable |
| OFF | Ajustable | Ajustable |
■ Ajustement du filtré
HPF (ajustement du contrôle passée-haut) Ce filtre enlève lessons de basses des enceintes avant et arrière. THROUGH 50Hz 80Hz 120Hz Réglez le filtré pour qu'il convienne aux enceintes lorsque vous en utilisez de petit diamètre.THROUGH
Réglez ici lorsque vous utilisez des enceintes qui généré des basses. SUB-W LPF (ajustement du filtré passage-bas du sub-woofer) Ce filtre enlève les aigus du sub-woofer. THROUGH 50Hz 80Hz 120Hz Réglez la fréquence du filtré pour qu'elle corresponde au sub-woofer.THROUGH
Réglez ceci lorsque vous utilisez un sub-woofer à alimentation intégrée à filtrer salle-bas. 1. Appuyez sur le bouton [A] pour régler le mode d'ajustement. 2. Effleurez sur l'écran de réglage des éléments pourCHOIR "HPF" sous "SOUND et "SUB-W LPF" sous "SOUND".  3. Effleurez sur la droite de l'écran ou tournez le bouton [ROTARY] pour régler la fréquence. * Choisissez parmi THROUGH, 50Hz, 80Hz, et 120Hz. 4. Appuyez sur le bouton [A] pour revenir au mode original.Réglage de l'utilisation de l'amplificateur interne ON/OFF (AMP CANCEL)
Réglez l'utilisation de l'amplificateur ON/OFF en fonction de l'usage ou non d'un amplificateur externe. Réglez AMP CANCEL sur "ON" (utilisation d'amplificateur interne OFF) si un amplificateur exter est connecté et si l'amplificateur interne n'est pas utilisé. - Le réglage d'usine par défaut est "OFF" (amplificateur interne utilisé). 1. Appuyez sur le bouton [A] pour régler le mode d'ajustement. 2. Effleurez sur l'écran de réglage des éléments pour désirir "AMP CANCEL" sous "SOUND".  3. Effleurez sur la droite de l'écran ou tournez le bouton [ROTARY] pour sélectionner "ON" ou "OFF". 4. Appuyez sur le bouton [A] pour revenir au mode original.Ajustement du niveau de sortie des enceintes (SP GAIN)
Utilisez la fonction de test de tonalité intégrée à cet apparéil pour ajuster jusqu'à ce que le volume de sortie soit le même pour toutes les enceintes. L'élement ne peut être seLECTIONné que lorsque le Dolby Pro Logic II est régé sur "MUSIC" ou "MATRIX". - Le réglage d'usine par défaut est "0dB". 1. Appuyez sur le bouton [A] pour régler le mode d'ajustement. 2. Effleurez sur l'écran de réglage des éléments pour désirir "SP GAIN" sous "SOUND".  3. Effleurez EDIT. Le mode passe au mode d'ajustement SP GAIN. 4. Effleurez sur l'écran d'ajustement des éléments pourCHOISIR I'elément souhaite. Chaque effleurement de commute l'écran d'ajustement de I'elément comme suit :Éléments d'ajustement
 *1 "CTR GAIN" s'affiche seulement lorsque "SP-SETTING" est régle sur "CTR+SW" et lorsque "CENTER-SP" est régle sur "ON". ^*2 "SUB-W GAIN" ne s'affiche que lorsque "SUB-WOOFER" est reglé sur "ON". 5. Effleurez sur la droite de l'écran ou tournez le bouton [ROTARY] pour ajuster le niveau de sortie. Le niveau de sortie peut être régé dans une fourchette de -10 dB à +10 dB 6. Répétez les étapes 4 et 5 pour ajuster chaque élément. 7. Appuyez sur le bouton [A] pour revenir au mode original.Ajustement de la temporisation des enceintes arrêté (PL II DELAY)
Le moment où le son arrive à la position d'audition varie selon la position de montage des enceintes arrêté et de la taille de votre voiture. Si vous reglez la temporisation des enceintes arrêté, vous pouvez ajuster le son de telle manière que le son des enceintes arrêté soit entendu en même temps que celui des enceintes avant. L'élément ne peut être sélectionné que lorsque le Dolby Pro Logic II est régé sur "MUSIC" ou "MATRIX". - Le réglage d'usine par défaut est "0ms". 1. Appuyez sur le bouton [A] pour régler le mode d'ajustement. 2. Effleurez 卡 卡 sur I'ecran de réglage des éléments pourCHOIR "SRD-SP" sous "PL II DELAY".  3. Effleurez sur la droite de l'écran ou tournez le bouton [ROTARY] pour ajuster la temporisation. * "SRD-SP" peut être ajusté dans une fourchette de 0 à 15 ms. 4. Appuyez sur le bouton [A] pour revenir au mode original.Réglage du mode musical en détaill (PL II CONT)
Cette fonction vous permet de régler le mode musical de manière plus détaillée lorsque le mode Dolby Pro Logic II est réglé sur "MUSIC". L'élément ne peut être sélectionné que lorsque le Dolby Pro Logic II est réglé sur "MUSIC". - Le réglage d'usine par défaut pour PANORAMA est "NO", pour DIMENSION c'est "3" et pour CTR WIDTH c'est "3".Éléments d'ajustement
PANORAMA (réglage du contrôle de panorama) Ceci élargit l'image du champ sonore de l'avant jusqu'aux enceintes arrriere. Réglez cet élément sur "YES" si vous ne sentez pas d'effet surround.DIMENSION (réglage de la dimension)
Change l'image du camp sonore vers l'avant ou l'arrière. Lorsque l'image du champ sonore penche vers l'avant ou l'arrière, il est possible de corriger cela. La valeur d'ajustement est 3 en position centrale. Les valeurs d'ajustement de 2 à 0 modifiert l'image du champ sonore vers l'arrière, tandis que des valeurs de 4 à 6 le modifiert vers l'avant.CTR WIDTH (réglage de la largeur centrale)*1
Ajusté la position fixée du canal central entre l'enceinte centrale et les enceintes avant gauche et droite. Lorsque le son central est réparti également à gauche et à droite, toute l'image du champ sonore augmente pour produit une sensation d'expansion naturelle. La valeur d'ajustement 0 joue tous lessons centraux sur l'enceinte centrale. La valeur d'ajustement 7 répartit le son central de manière égale entre les enceintes gauche et droite. *1 "CTR WIDTH" s'affiche seulement lorsque "SP-SETTING" est régé sur "CTR+SW" et lorsque "CENTER-SP" est régé sur "ON". 1. Appuyez sur le bouton [A] pour régler le mode d'ajustement. 2. Effleurez 卡 已 sur I'ecran de réglage des éléments pour désirir l'objet d'ajustement désiré sous "PL II CONT". Les éléments d'ajustement sont "PANorama", "DIMENSION" et "CTR WIDTH".  3. Effleurez sur la droite de l'écran ou tournez le bouton [ROTARY] et ajustez l'élement comme souhaité. * Choisissez "YES" ou "NO" pour "PANorama". * “DIMENSION” peut être ajusté dans une fourchette de 0 à 6. * “CTR WIDTH” peut être ajusté dans une fourchette de 0 à 7. 4. Appuyez sur le bouton [A] pour revenir au mode original.Fonction AUX
Ce système dispose d'une entrée exterce RCA de sorte que vous pouvez écouter dessons et de la musique à partir de dispositifs externes connectés à cet apparéil.Sélection de AUX / TEL
Lorsqu'elles sont connectées à cet apparéil, vous pouvez écouter des sons et de la musique à partir de sources externes, ou vos appeals téléphoniques depuis les enceintes. Lorsque TEL INT ou un dispositif externe est connecté à cet apparéil, vous pouvez sélectionner le mode TEL ou le mode AUX. - Le réglage d'usine par défaut est "AUX". 1. Appuyez sur le bouton [A] pour régler le mode d'ajustement. 2. Effleurez sur l'écran de réglage des éléments pour désirir "AUX/TEL" sous "SETTING".  3. Effleurez 卡 卡 sur la droite de l'écran ou tournez le bouton [ROTARY] pour selectionner "AUX" ou "TEL".AUX:
Le cable d'entrée AUX/TEL sert à l'entrée audio externe.TEL:
Le cable d'entrée AUX/TEL sert l'entrée audio d'un téléphone portable. 4. Appuyez sur le bouton [A] pour revenir au mode précédent.Réglage du niveau d'entrée (AUX SENS) de l'audio portable (mode AUX)
Cette fonction vous permet de régler le niveau d'entrée de dispositifs externes optionnels connectés à cet apparéil. - Ceci peut être régle lorsque “AUX/TEL” est régle sur “AUX”. - Le réglage d'usine par défaut est "MID". 1. Appuyez sur le bouton [A] pour régler le mode d'ajustement. 2. Effleurez sur l'écran de réglage des éléments pour désirir "AUX SENS" sous "SETTING".  3. Effleurez 山 sur la droite de I'ecran ou tournez le bouton [ROTARY] pour regler le niveau d'entree. * Choisissez parmi LOW, MID et HIGH. 4. Appuyez sur le bouton [A] pour revenir au mode original.Réglage des enceintes de la voiture pour le téléphone portable (TEL-002 en option)
- Pour envoyer des appeals téléphoniques, réglez le téléphone portable. - Le réglage d'usine par défaut est "RIGHT". 1. Appuyez sur le bouton [A] pour régler le mode d'ajustement. 2. Effleurez sur l'écran de réglage des éléments pour désirir "TEL-SP" sous "SETTING". ADJUST MODE TEL - SP > RIGHT
3. Effleurez sur la droite de l'écran ou tournez le bouton [ROTARY] pour sélectionner "LEFT" ou "RIGHT". LEFT: Les appellés téléphoniques peuvent être entendus sur l'enceinte avant gauche connectée à cet apparéil.RIGHT:
Les appellés téléphoniques peuvent être entendus sur l'enceinte avant droite connectée à cet apparéil. 4. Appuyez sur le bouton [A] pour revenir au mode précédent.Réglage de l'interruption de téléphone portable
Si vous connectez cet apparéil à votre téléphone portable avec un dispositif (TEL-002 en option), vous pouvez écouter vos appeals téléphoniques sur les enceintes de votre voiture. - Le réglage d'usine par défaut est "OFF". 1. Appuyez sur le bouton [A] pour régler le mode d'ajustement. 2. Effleurez sur l'écran de réglage des éléments pour désirer "TEL-SWITCH" sous "SETTING". ADJUST MODE TEL - SWITCH OFF
3. Effleurez 卡 sur la droite de l'écran ou tournez le bouton [ROTARY] pour désir les réglages. A chaque fois que vous tournez le bouton [ROTARY], le réglage change dans l'ordre suivant : OFF ON MUTE OFF...OFF:
Cet apparéil continue son fonctionnement normal même lorsque le téléphone portable est utilisé.Remarque:
- Lors de la connexion d'un kit mains-libres, assurez-vous que le réglage est sur ON pour receivevoir le son du téléphone sur le système.ON:
Voupeuz écouter vos appelés téléphoniques depuis les enceintes connectées sur cet apparéil. * Lorsque vous écoutez vos appeals sur les enceintes de la voiture, vous pouvez ajuster le volume en tournant le bouton [ROTARY].MUTE:
Le son de cet apparéil est mis en sourdine pendant les appeals téléphoniques. 4. Appuyez sur le bouton [A] pour revenir au mode précédent.Réglage de la fonction de volume automatique (CALIBRATE/A-VOL SENS)
Vous pouvez changer automatiquement le volume pour qu'il corresponde à la vitesse de votre voiture. - Le réglage d'usine par défaut est "LOW". 1. Appuyez sur le bouton [A] pour régler le mode d'ajustement. 2. Effleurez sur l'écran de réglage des éléments pour désir “CALIBRATE” sous “SETTING”.  3. Accélérez jusqu'à 50 km/h. 4. Lorsque vousatteignez 50~km / h effleurez START. L'étaconnage s'effectue. Après 2 secondes ou plus, vous entendrez un long signal sonore et "SUCCESSIONS" s'affichera sur l'écran. Si vous entendez un signal sonore bref, c'est que l'étalonnage a échoué. Repétez la procédure depuis l'étape 3. 5. Ensuite, ajustez la sensibilité. Effleurez sur l'écran de réglage des éléments pour désirir "A-VOL SENS" sous "SETTING".  6. Effleurez sur la droite de l'écran ou tournez le bouton [ROTARY] pour désirar la sensibilité. A chaque fois que vous tournez le bouton [ROTARY], le réglage change dans l'ordre suivant : OFF (pas de modification du volume) LOW (modification du volume: bas) MIDLOW MID MID-HIGH HIGH (modification du volume: haut) ... 7. Appuyez sur le bouton [A] pour revenir au mode précédent.Effectuer une vérification du système
Cette fonction vous permet d'effectuer une vérification du système à partir du mode d'ajustement lorsque c'est nécessaire. 1. Appuyez sur le bouton [A] pour régler le mode d'ajustement. 2. Effleurez sur l'écran de réglage des éléments pour désirir "SYSTEM CHECK" sous "SETTING".  SETTING ADJUST MODE SYSTEM CHECK START 3. Effleurez et maintenez START pendant au moins une seconde. "System Check" s'affiche. 4. Appuyez sur le bouton [ROTARY] La vérification du système commence. Lorsque la vérification du système est terminée, "Completed" ("Terminé") s'affiche. 5. Appuyez de nouveau sur le bouton [ROTARY] L'écran principal du mode radio apparait.Utilisation de la fonction de sécurité (CODEMATIC)
Cette fonction empêche des personnes qui ne connaissent pas la sequence de touche d'utiliser facilement cet apparéil. L'écran Touch Code apparait lorsque le DCP est fixé et que l'alimentation est en marche avec "CODEMATIC" régèle sur "ON". Si vous effleurez l'écran sur cet écran dans l'ordre préréglé, “SUCESSFUL” s'affiche et l'alimentation est coupée. Lorsque l'alimentation est remise en marche, I'ecran Touch Code n'apparait pas, et I'ecran principal en mode radio ou CD est affché. 1. Appuyez sur le bouton [A] pour régler le mode d'ajustement. 2. Effleurez 山 sur l'écran de réglage des éléments pour désirir "CODEMATIC" sous "SETTING".  2 types d'éléments sont affichés pour "CODEMATIC", les éléments pour lesquels "ON" ou "OFF" s'affiche à la droite de l'écran, et les éléments pour lesquels "INPUT" s'affiche à la droite de l'écran. Ici,CHOISSEZ l'élément pour lequel "ON" ou "OFF" est affiqué à la droite de l'écran. 3. Effleurez sur la droite de l'écran ou tournez le bouton [ROTARY] pour sélectionner "ON" ou "OFF". 4. Effleurez sur l'écran de réglage des éléments pour désir "CODEMATIC" sous "SETTING". Ici, choisissez l'élement pour lequel "INPUT" est affiqué à la droite de l'écran. 5. Effleurez INPUT. L'écran Touch Code s'efface. 6. Entrez le code de touche. * Effleurez l'un des 5 endroits (gauche, centre, droit, supérieur droit ou inférieur droit) de l'écran. Chaque effleurement de l'écran allume l'un des témoins du Touch Code. * Par exemple, effleurez (1) le centre, (2) en haut à droite, (3) à gauche, (4) en bas à droite, dans cet ordre. Vous pouvez aussi effleurer le même endroit à plusieurs reprises. Lorsque vous avez effleurez 4 fois, vous entendez un long signal sonore et le mode d'origine est rappelé.Pour annuler CODEMATIC
Si vous avez oublie l'ordre d'effleurement, soit effleurez ① en bas a droite, ② a gauche, ③ en haut a droite puis ④ a droite, dans cet ordre, soit appuyez sur [SCN] sur la telecommande. 7. FONCTIONNEMENT DES ACCESSOIRES
Fonctionnement du changeur de CD
Changeur de CD
Lorsqu'un changeur de CD optionnel est connecté par le cable CeNET, cet apparéil peut contrôler les opérations du changeur de CD. Cet apparéil peut être connecté à 2 changeurs CD câblés CeNET au total.Changeur DVD
Lorsqu'un changeur DVD optionnel est connecté par le cable CeNET, cet appeareil peut contrôler les opérations du changeur DVD. Pour regarder un DVD, un écran externe est nécessaire. Les commandes et l'écran du changeur de DVD sur cet appeareil sont une version simplifiée et ne supportent pas toutes les fonctions de changeur de DVD. Pour commande le changeur de DVD, utilisez la télécommander fournie avec le changeur de DVD. Pour plus de détails, reportez-vous au manuel de l'utilisateur fourni avec le changeur de DVD.Lorsque 2 changeurs de CD sont connectés
Appuyez sur le bouton [ROTARY] pour désiré le changeur connecté à cet apparéil. (Chaque pression sur le bouton [ROTARY] commute entre les changeurs.) - Si le changeur de CD ne compte pas de magasin, "NO MAG" s'affiche et le magasin ne contient pas de CD, "NO DISC" ne s'affiche pas pour de No. de disque. Pour plus de détails sur l'écran du titre, voir "Commutation de l'écran de titre" (cf. page 14).Écrans d'écran en mode changeur
Écran principal (mode changeur de CD) Il s'affiche en appuyant sur le bouton [ROTARY] pour désirir le mode changeur de CD.  Effleurer la gauche de l'écran pendant au moins 1 seconde commute en mode de commande simple. Écran piste/durée de lecture
T01/02: 00: Le No. de la piste en cours de lecture et la durée de lecture s'affichent. Effleurer ou en mode normal vous permit deCHOISIR la piste a dire ou avancer ou reculer rapidement d'une piste a I'autre.Écran titre
Effleurer ce commutateur change l'écran.Écran du No. de disque
Si vous effleurez en mode normal, vous pouvez désir un disque.MODE
L'effleurer affiche les sous fonctions. Effleurer et maintainir ceci pendant au moins 1 seconde affiche la liste des disques.T-SCAN/D-SCAN
S'affiche pendant la lecture de recherche. Effleurer T-SCAN/D-SCAN terminé l'écranT-RPT/D-RPT
S'affiche pendant la lecture repétée. Effleurer T-RPT/D-RPT terminé la lecture repétée.T-RDM/D-RDM
S'affiche pendant la lecture aléatoire. Effleurer T-RDM/D-RDM termine la lecture aléatoire.DISC
Effleurer ceci commence la lecture du disque suivant.(sequentially pour l'écran de commande simple)
Effleurer ces boutons seLECTIONne la piste à dire. Effleurer et maintainir ces boutons avance ou recule rapidement d'une piste à l'autre.Écran de la liste des disques (mode changeur de CD)
S'affiche lorsque vous effleurez MODE et le maintenez pendant au moins 1 seconde sur l'écran principal.  Nom de disque>>: Sélection en cours
Effleurer un nom de disque ramène l'écran à l'écran principal, et la lecture commence à partir de la première piste du disque que vous avez sélectionné.←PREV-RTN:
L'effleurer affiche la liste précédente des titres. L'effleurer et le maintainir pendant au moins 1 seconde ramène l'écran à l'écran principal.NEXT:
L'effleurer affiche la liste de titres suivante.ATTENTION
Les CD-ROM ne peuvent pas etre lui sur tous les changeurs de CD.Cela depend du modele.Remarque:
- Certains CD enregistrés en mode CD-R/CD-RW peuvent être inutilisables.Sélection du mode changeur
1. Appuyez sur le bouton [ROTARY] pourCHOISIR le mode changeur. * Le mode d'un équipement qui n'est pas branché ne s'affiche pas. La lecture commence automatiquement lorsque le mode passe en mode changePause
1. Appuyez sur le bouton [▶■].Pour reprendre la lecture
1. Appuyez de nouveau sur le bouton [▶■].Selection d'un CD
1. Effleurez sur l'écran du No. de disque pour désirir un disque. La lecture commence. * Si le magasin ne comporte pas le disque que vous avez sélectionné, le No. de ce disque n s'affiche pas. * Effleurer DISC ↑ commence la lecture du disque suivant.■ Sélection d'un disque depuis l'écran de la liste des disques
1. Effleurez et maintenez MODE pendant au moins une seconde. La liste des disques s'affiche. Si vous effleurez NEXT, la partie suivante de la liste des disques s'affiche. 2. Effleurez le nom de disque. * Si le magasin ne contient pas le disque que vous avez sélectionné, “NO DISC” s'affiche pour ce No. de disque. * Si vous avons sélectionné le même disque que celui en cours de lecture, la lecture recommence à partir de la première piste de ce disque. (fonction top)Sélection d'une piste
1. Pour écouter la piste suivante, effleurez sur l'écran de piste. 2. Pour écouter la piste précédente, effleurez sur l'écran de piste. Effleurer lit la piste suivante. Si vous effleurez plusieurs fois, la piste avance jusqu'au numero de piste correspondant au nombre de fois ou vous avez appuyé sur et cette piste est lue. Effleurer lit la piste precedente. Si vous effleurez plusieurs fois, la piste recule jusqu'au numero de piste correspondant au nombre de fois où vous avez appuyé sur et cette piste est lue. * Si vous effleurez ♦ boths fais sur l'écran de piste alors que le début de la piste est lu, parfois la piste située à deux pistes en arrêté est lue.Avance rapide / Retour rapide
1. Pour l'avance rapide, effleurez sur l'écran piste. 2. Pour le return rapide, effleurez sur l'écran piste.Fonction top
La fonction top commence la lecture a partir de la première piste du disque en cours de lecture. 1. Effleurez et maintenez MODE pendant au moins une seconde. La liste des disques s'affiche. Si vous effleurez NEXT, la partie suivante de la liste des disques s'affiche. 2. Effleurez le nom de disque. * Si le magasin ne contient pas le disque que vous avez sélectionné, “NO DISC” s'affiche pour ce No. de disque. * Si vous avons sélectionné le même disque que celui en cours de lecture, la lecture recommence à partir de la première piste de ce disque.Lecture de recherche
La lecture de recherche localise et lit les 10 premières secondes de chaque piste du disque automatique. Cette fonction continue sur le disque jusqu'à ce qu'elle soit annulée. La fonction de lecture de recherche est utile pourCHOISIR une piste souhaitee. 1. Effleurez MODE. 2. Effleurez T-SCAN. L'écran MODE change pour "T-SCAN" et la lecture de recherche commence. * La lecture de recherche commence à partir de la piste suivant celle qui est en cours de lecture.Pour annuler la lecture de recherche
1. Effleurez T-SCAN. L'écran T-SCAN change pour “MODE”, et la piste qui était lue lorsque vous avez effleuré T-SCAN est lue.Lecture de recherche de disque
La lecture de recherche de disque localise et lit les 10 premières secondes de la première piste de chaque disque dans le changeur de CD en cours d'utilisation. Cette fonction continue automatiquement jusqu'à ce qu'elle soit annulée. La fonction de lecture de recherche de disque est utile pour désir un CD souhaité. 1. Effleurez MODE. 2. Effleurez D-SCAN. L'écran MODE change pour "D-SCAN" et la lecture de recherche de disque commence. * La lecture de recherche de disque commence à partir du disque suivant celui qui est en cours de lecture.Pour annuler la lecture de recherche de disque
1. Effleurez D-SCAN. L'écran D-SCAN change pour “MODE”, et la piste qui était lue lorsque vous avez effleuré D-SCAN est lue.Lecture repétée
La lecture repétée lit de manière continue la piste en cours. Cette fonction continue automatiquement jusqu'à ce qu'elle soit annulée. 1. Effleurez MODE. 2. Effleurez T-REPEAT. L'écran MODE change pour "T-RPT" et la lecture repétée commence.Pour annuler la lecture repétée
1. Effleurez T-RPT. L'écran T-RPT change pour “MODE”, et la lecture normale commence à partir de la piste en cours lorsque vous avez effleuré T-RPT.Lecture repétée de disque
Lorsque toutes les pistes du disque en cours ont ete lues, la lecture repeteee de disque reliet le disque en cours a partir de la premiere piste. Cette fonction continue automatiquement jusqu'à ce qu'elle soit annulée. 1. Effleurez MODE. 2. Effleurez D-REPEAT. L'écran MODE change pour "D-RPT" et la lecture repétée commence.Pour annuler la lecture repétée de disque
1. Effleurez D-RPT. L'écran D-RPT change pour “MODE”, et la lecture normale commence à partir de la piste en cours lorsque vous avez effleuré D-RPT.Lecture aléatoire
La lecture aléatoire sélection et lit des pistes individuelles sur le disque, sans ordre particulier. Cette fonction continue automatiquement jusqu'à ce qu'elle soit annulée. 1. Effleurez MODE. 2. Effleurez T-RANDOM. L'écran MODE change pour "T-RDM" et la lecture aléatoire commence.Pour annuler la lecture aléatoire
1. Effleurez T-RDM. L'écran T-RDM change pour “MODE”, et la lecture normale commence à partir de la piste en cours lorsque vous avez effleuré T-RDM.Lecture aléatoire de disque
La lecture aléatoire de disque sélectionne et lit des pistes individuelles ou des disques, sans ordre particulier. Cette fonction continue automatiquement jusqu'à ce qu'elle soit annulée. 1. Effleurez MODE. 2. Effleurez D-RANDOM. L'écran MODE change pour "D-RDM" et la lecture aléatoire commence.Pour annuler la lecture aléatoire de disque
1. Effleurez D-RDM. L'écran D-RDM change pour “MODE”, et la lecture normale commence à partir de la piste en cours lorsque vous avez effleuré D-RDM.Fonctionnement du téléviseur
Fonctions du tuner TV
Si vous raccordez un tuner TV en option via le cable CeNET, cet appeareil poursra piloter toutes les fonctions du tuner TV. Pour pouvoir regardar la télévision, vous nevez avoir un tuner TV et un monieur.Écrans d'écran en mode TV
Écran principal
Il s'affiche en appuyant sur le bouton [ROTARY] pour désirir le mode TV.  Effleurer la gauche de l'écran pendant au moins 1 seconde commute en mode de commande simple. Écran du canal
1ch: Le canal en cours de réception s'affiche. Effleurer ou le en mode normal. vous permet d'effectuer une recherche d'accord ou un accord manuel.Écran titre
3ch: Le nom de la station en cours de réception s'affiche. VTR: En mode video Les effleurer change l'écran.Écran de la bande de réception
TV1: Nom de bandeÉcran du No. de préRéglage
Effleurer 卡 en mode normal selectionne une memoire preselectionnee.MODE
L'effleurer affiche les sous fonctions. L'effleurer et le maintainir pendant au moins 1 seconde écran la liste de la mémoire préseLECTIONnée. P-SCAN: S'affiche pendant une recherche preréglée. L'effleurer termine la recherche preréglée. A-STORE: S'affiche pendant un enregistrement automatique. L'effleurer termine l'enregistrement automatique.BAND
L'effleurer commute la bande réception. L'effleurer et le maintainir pendant au moins 1 seconde bascule entre le mode d'accord manuel et le mode de recherche d'accord.(sequentially pour l'écran de commande simple)
Effleurer des boutons permet le recherche d'accord ou l'accord par paliers (en mode d'accord manuel). Effleurer et maintainir ces boutons permet un accord rapide (en mode d'accord manuel).Écran de la liste de la mémoire présélectionnée
S'affiche lorsque vous effleurez MODE et le maintenez pendant au moins 1 seconde sur l'écran principal. Nom de station  >>: Accord en coursRTN:
Effleurer ceci revient à l'écran principal.Sélection du mode TV
1. Appuyez sur le bouton [ROTARY] pour désirir le mode TV. Chaque pression sur le bouton [ROTARY] commute entre les modes comme suit : * Le mode d'un équipement qui n'est pas branché ne s'affiche pas.Commutation de la bande de réception
1. Effleurez BAND pour commuter la bande de réception. Chaque pression sur BAND commute la bande de réception. TV1 TV2 TV1...Recherche d'accord
La recherche d'accord est une fonction d'accord automatique des stations ayant une bonne réception. 1. Effleurez et maintenance BAND pendant au moins une seconde lorsque MANU est affché. L'accord automatique est possible lorsque MANU s'efface. 2. Effleurez sur l'écran du canal. SEEK UP/SEEK DOWN s'affiche et l'accord commence. L'accord s'arrête automatiquement sur les stations ayant une bonne réception.Pour annuler I'accord
1. Effleurez sur l'écran du canal de nouveau.Accord manuel
Il y a deux possibilités: l'accord rapide et l'accord par paliers. Lorsque vous étes en mode d'accord par paliers, la fréquence change d'un pas à la fois. En mode d'accord rapide, vous pouvez rapidement accorder la fréquence souhaïée. 1. Effleurez et maintenez BAND pendant au moins une seconde lorsque MANU n'est pas affché. L'accord manuel est possible lorsque MANU s'affiche. 2. Manoeuvrez l'écran du canal pour accorder un canal sur lequel on diffuse. Il y a 2 méthodes d'accord manuel: l'accord par paliers et l'accord rapide. * L'accord par paliers est une fonction pour commuter le canal 1 pas à la fois. Effleurez 山 sur l'écran de la fréquence. * L'accord rapide est une fonction pour commuter le canal de manière continue. Effleurez ← → sur l'écran du canal. L'accord s'arrête lorsque vous retirez le doigt du panneau.Rappel d'une chaine préréglée
Cette fonction permet à l'utilisateur de seLECTIONner une station préselectionnée. 1. Effleurez et maintenez MODE pendant au moins une seconde. La liste de la mémoire présélectionnée s'affiche. 2. Effleurez la station que vous souhaitez écouter. * La station peut aussi être accordée en effleurant d'un No. préréglé.Pour annuler I'accord
1. Effleurez RTN.Mémoire préselectionnée.
Un total de 12 stations de télé peut être enregistré (6-TV1 et 6-TV2). Ceci vous permet de désirir vos stations de télé favorites et de les enregistrer en mémoire pour un rappel ultérieur. 1. Effleurez BAND pour commuter la bande de réception. 2. Manoeuvrez l'écran du canal pour désir la station à y enregistrer. 3. Effleurez et maintenez MODE pendant au moins une seconde. La liste de la mémoire présélectionnée s'affiche. 4. Effleurez et maintenez le No. préréglé à enregistrer pendant au moins 2 secondes. Vous entendrez un long signal sonore, puis la station est enregistrée en mémoire. Si vous entendez un signal sonore bref, la station n'est pas enregistrée en mémoire. Répétez la procédure depuis l'étape 1.Enregistrement automatique
L'enregistrement automatique selectionne automatiquement 6 stations de tete et enregistr checune d'elles dans une memoire preselectionnee. S'il n'y a pas 6 stations ayant une bonne réception, les stations enregistrées en mémoire aparavant restent et seules les stations les plus fortes sont enregistrées. 1. Effleurez MODE. 2. Effleurez en maintenez A-STORE pendant au moins 2 secondes. L'écran MODE change pour "A-STORE" et le No. préréglé dans la commande d'enregistrement automatique apparait sur l'écran du No. préréglé. * Les stations ayant une bonne réception sont recherchées automatiquement et enregistrées dans la mémoire préseLECTIONnée (No.1 à No.6) dans l'ordre des féquences croissantes.Remarques:
Lors de I'enregistrement automatique, les stations enregistrées en mémoire jusqu'à là sont effacées. - Lorsqu'il y a moins de 6 stations ayant une bonne réception, les fréquences basses sont automatiquement libérées, et l'enregistrement automatique recommence. S'il y a moins de 6 stations après qu'un enregistrement automatique a été effectué deux fois, les stations mémorisées jusqu'à là sont conservedes.Recherche préregée
La recherche préreglée est une fonction pour receivevoir les stations dans l'ordre ou elles sont actuellément enregistrée sous les No. préreglés de manière à pouvoir contrcler les émissions. 1. Effleurez MODE. 2. Effleurez P-SCAN. L'écran MODE change pour "P-SCAN" et le No. prérégèle de la commande de recherche préréglee apparait sur l'écran du No. prérégèle. * Les stations actuelles en mémoire sont reçues dans l'ordre pendant 7 secondes au moins. Les stations ayant une mauvaise réception sont passées et la station suivante est reçue. Les stations de télé sont reçues comme suit: TV1 (1 → 6) → TV2 (1 → 6) → TV1 (1 → 6) et ainsi de suite.Pour annuler la recherche prépréglée
1. Effleurez P-SCAN. L'écran P-SCAN change pour “MODE” et les stations reçues lors de l'effleurement de P-SCAN sont reçues ensuite.Regarder une video
Le tuner têle dispose d'une prise d'entrée VTR à laquelle un dispositif exter ne peut être connecté. Connectez un lecteur de cassettes video 12V (VCP) ou un magnétoscope (VCR) à la prise d'entrée du tuner têle. 1. Appuyez sur le bouton [▶III]. VTR s'affiche et le mode est commuté en mode VTR. * Le mode TV entre en mode d'entrée de video, et les video peuvent être visionnées.Pour revenir au mode TV.
1. Appuyez de nouveau sur le bouton [▶■]Réglage de la zone télé (TV AREA)
Lorsque you selectionnez la zone telé (Zone de réception télé), le réglage de la zone télé change. - Le réglage d'usine par défaut est "GERMANY". 1. Appuyez sur le bouton [A] pour régler le mode d'ajustement. 2. Effleurez sur l'écran de réglage des éléments pour désirir "TV AREA" sous "TUNER".  3. Effleurez sur la droite de l'écran ou tournez le bouton [ROTARY] pour désirar la zone. 4. Appuyez sur le bouton [A] pour revenir au mode précédent.Réglage de la diversité TV (TV DIVER)
Vous pouvez changer le réglage de la réception pour l'antenne télé connectée au tuner télé. - Réglez cet élément sur "OFF" lorsqu'une antennée télé externe n'est pas utilisée. - Le réglage d'usine par défaut est "ON". 1. Appuyez sur le bouton [A] pour régler le mode d'ajustement. 2. Effleurez 卡 包 sur I'ecran de réglage des éléments, et choisissez "TV DIVER" sous "TUNER".  3. Effleurez sur la droite de l'écran ou tournez le bouton [ROTARY] pour sélectionner "ON" ou "OFF". 4. Appuyez sur le bouton [A] pour revenir au mode original.Fonction de commande de DAB
Si vous utilisez un cable CeNET pour effectuer le raccordement à un DAB (DAH913 ou DAH923) (vendu séparation), vous pourrez piloter toutes les fonctions.Ecouter une station DAB
1. Appuyez sur le bouton [ROTARY] pour changer le mode de commande.Remarques:
- Les écans affichés en mode de réception normale et en mode de réception préréglée sont les mêmes que lorsqu'une station DAB est reçue. - Le nombre de programmes et les heures d'émission dépendant de la station DAB. - Lorsque la force du signal DAB est faible, la sortie audio est mise en sourdine.Recherche d'accord
1. Appuyez sur le bouton [ROTARY] pour désirir le mode DAB. 2. Effleurez sur la gauche de l'écran. "DAB" s'allume à l'écran lorsque l'appareil principal recoit une station DAB. * L'appareil principal arrêté la recherche d'accord lorsqu'il ne peut pas tracer de station DAB. L'écran revient au mode précédent.Accord manuel
1. Appuyez sur le bouton [ROTARY] pour désirir le mode DAB. 2. Si "MANU" n'est pas affché, effleurez et maintenez BAND pendant au moins 1 seconde. Si "MANU" est affché, l'accord manuel est possible. 3. Effleurez sur la gauche de l'écran pour accorder la station. * Si aucune opération n'est effectué dans les 7 secondes, l'accord manuel est annulé et l'affichage revient au mode précédent.Commutation des programmes
1. Appuyez sur le bouton [ROTARY] pour désirir le mode DAB. 2. Effleurez 卡 sur la gauche de I'ecran pour commuter les programmes de la station DAB.Remarque:
- Il se peut que le nom de programme soit le même selon le programme DAB.Recherche programme
Cette fonction recherche séquentiellement pendant 10 secondes chaque programme qui peut être capté sur une station DAB reçue. C'est utile lorsque vous souhaitez chercher un programme particulier. 1. Appuyez sur le bouton [ROTARY] pour désirir le mode DAB. 2. Effleurez MODE. 3. Effleurez S-SCAN. "S-SCAN" s'allume et cet apparéil commence à rechercher des programmes séquentiellement pendant 10 secondes. A chaque fois que l'appareil principal effectue une recherche, le nom du programme s'affiche à l'écran. 4. Pour arrêter la recherche de programmes lorsqu'un programme est accordé, effleurez S-SCAN.Mémoire manuelle
L'appareil principal dispose d'une mémoire manuelle pour les programmes DAB. jusqu'à 18 programmes peuvent être préréglés sur les boutons préseLECTIONnés (6 programmes chacun).[M1], [M2] et [M3]
1. Appuyez sur le bouton [ROTARY] pour désirir le mode DAB. 2. Effleurez BAND pour selectionner l'un de ceux affichés ci-dessus. 3. Effleurez et maintenez MODE pendant au moins une seconde. La liste de la mémoire préseLECTIONnée s'affiche. 4 Effleurez et maintenez le No. préréglé à enregistrer pendant au moins 2 secondes. Vous entendrez un long signal sonore, puis la station est enregistrée en mémoire. Si vous entendez un signal sonore bref, la station n'est pas enregistrée en mémoire. Répêtez la procédure depuis l' étape 1.Remarque:
- Les programmes à interruption (PTY ou INFO) ne peuvent pas être enregistrés en mémoire.Rappel d'un programme préréglé
1. Appuyez sur le bouton [ROTARY] pour désirir le mode DAB. 2. Effleurez BAND Chaque effleurement de BAND change l'affichage de la maniere suivante: MEMO1 MEMO2 MEMO3 MEMO1... 3. Effleurez sur la droite de l'écran pour rappeler un programme préréglé.Fonction AF (Fréquence alternative)
La fonction AF permet de passer à une autre fréquence du même réseau afin de dévelopir la qualité de réception optimale. - Le réglage usine est "ON" (en service). - Si la réception de la station actuelle se détiériore, "SEARCH" (RECHERCHE) apparaît sur l'afficheur et la radio recherche le même programme sur une autre fréquence. - Pour les détails sur la "Fonction AF" (cf. page 26), voirz la section "Fonctionnement RDS" de chaque mode d'emploi. - Mise hors service de la fonction AF - Mise en service de la fonction AF - Commutation de la fonction AF entre RDS et DAB Lorsque le même programme est diffusé par les deux stations RDS et DAB et que cette fonction est en service, l'unité principale passée automatiquement à la diffusion permettant la meilleure réception.TA (Announces sur la circulation routière)
En mode d'attente TA, lorsqu'une émission d'announce sur la circulation routière commence, cette émission est reçue en priorité quel que soit le mode de fonctionnement actuel. La syntonisation automatique des programmes routiers (TP) est également possible. - Cette fonction n'est possible que si "TP" est allumé sur l'afficheur. Lorsque "TP" est allumé, cela peut dire que la station DAB ou RDS en cours de réception possède des programmes d'annonce sur la circulation routière. - Pour les détails sur la fonction "TA" (cf. page 27), voirz la section "Fonctionnement RDS" de chaque mode d'emploi. Pour activer le mode d'attente TA Annulation du mode d'attente TA - Recherche d'une station TPRemarques:
- Si aucune station TP n'est reçue, l'unité principale cèsse la recherche. - Il est possible que "TP" s'allume sur l'afficheur lors de la diffusion d'une émission TP par une station RDS. Dans ce cas, appuyez sur la touche [TA] pour effectuer une symtonisation TP automatique. Appuyez à nouveau sur la touche [TA] pour revenir au mode précédent.INFO (Announce)
En mode d'attente INFO, lorsque le programme d'annonce sélectionné commence, l'unité principale commute automatiquement sur le programme d'annonce sélectionné. - Mise en service du mode d'attente INFO Si vous maintainez la touche [TA] enforcée pendant 1 seconde ou plus, "INFO" s'allume sur l'afficheur et l'unité principale passée en mode d'attente INFO jusqu'à ce que l'announce sélectionnée soit diffusée. Lorsque la diffusion de l'announce sélectionnée commence, la rubrique d'announce apparait sur l'afficheur. Si vous maintainez la touche [TA] enforcée pendant 1 seconde ou plus pendant la réception de l'émission d'annonce sélectionnée, la réception de l'émission d'annonce sélectionnée s'annule et l'unité principale revient au mode d'attente INFO.Annulation du mode d'attente INFO
Pour annuler le mode d'attente INFO, maintenez la touche [TA] enfoncée pendant 1 seconde ou plus.- Sélection des informations
Cette fonction permet d'activer (ON) ou de désactiver (OFF) l'information sur le mode d'interruption d'information. Voupsousvezactiver(ON)chacune des6 rubriquesd'informationquevasvoulez,soit6 au maximum. Vous pouvez selectionner n'importe laquelle des 6 rubriques ci-dessous:| Rubrique d'information | |
| FRANÇAIS | Contenu |
| Transport | Flash de transport |
| Incident | Avertissement/service |
| Nouvelle | Flash d'information |
| Météo | Flash météo locale |
| Flash | Annonce d'événement |
| Spécial | Evénement spécial |
PTY
Cette fonction vous permet de recevoir le type de programme sélectionné, quel que soit le mode de fonctionnement. - Vous pouvez selectionner un PTY commun pour DAB et RDS. - Entre le PTY de DAB et le PTY de RDS, le PTY reçu precedemment a priorité sur l'autre. - Les émissions PTY n'existent pas encore dans tous les pays. - En mode d'attente INFO, les stations INFO ont priorité sur les stations PTY. - En mode d'attente TA, les stations TP ont priorité sur les stations PTY. - Pour les détails sur le "PTY" (cf. page 28), voyagez la section "Fonctionnement RDS" de chaque mode d'emploi. Réglage du mode d'attente PTY Annulation du mode d'attente PTY Annulation d'une émission avec interruption PTY - Sélection PTY Recherche PTY Adresse mémoire PTYEmissions de détresse
Lorsqu'une émission de détresse est reçue, toutes les opérations des modes de fonctionnement s'arrêtent. "ALARM" (ALARME) apparait sur l'afficheur et l'émission de détresse est reçue. - Pour les détails sur les "Diffusion d'urgence" (cf. page 29), voirz la section "Fonctionnement RDS" de chaque mode d'emploi. - Annulation de la diffusion d'urgenceCommuter la langue d'affichage du PTY et d'INFO.
Vous pouvez désirir une langue parmi les 4 (anglais, allemand, suédois ou français) pour le PTY et INFO qui s'affiche à l'écran. - Le réglage d'usine par défaut est "ENGLISH". - Pour plus de détails "Commuter la langue d'affichage du PTY" (cf. page 30), reportez-vous à la section "Utilisation de RDS" des manuels de l'utilateur respectifs.Réglage du volume des émissions TA, INFO, de détresse (ALARM) et PTY
Voupez regler le volume des interruptions TA, INFO, ALARM et PTY pendant une interruption TA, INFO, ALARM et PTY. Effectez l'opération suivante en fonction du modele raccordé. - Le réglage usine est "15". Pendant une interruption TA, INFO, ALARM et PTY, tournez le bouton [ROTARY] dans le sens des aiguilles d'une montre ou dans le sens inverse pour régler le volume au niveau voulu (0 à 33). * Lorsque l'interruption TA, INFO, ALARM et PTY prend fin, le volume revient au niveau régle avant l'interruption.Commandes du Decodeur Surround 5.1ch
Lorsqu'un décodeur surround 5.1ch compatible cable CeNET optionnel est connecté, il peut être contrôle par cet apparéil. Les fonctions suivantes changent lorsqu'un décodeur surround 5.1ch est connecté : - Deux modes "MOVIE" ("FILM") et "VIRTUAL" ("VICTUEL") sont ajoutés au mode Dolby Pro Logic II. - Le mode VSE/POSITION passe au mode DSF (Digital Sound Field) (Champ Sonore Numérique). - Dans le mode P.EQ (Parametric Equalizer) (Egaliseur paramétrique), les réglages de chaque enceinte peuvent être ajustés de manière encore plus précise. - Réglages en rapport avec la musique dans les éléments de réglage (cf. page 39) sont modifiés. 3. Effleurez sur la droite de l'écran pour sélectionner le mode Dolby Pro Logic II.  Le mode d'écran est commuté comme suit. MUSIC (mode musique) MATRIX (mode matrix) MOVIE (mode film) VIRTUAL (mode virtuel) OFF (PL II off)) MUSIC (mode musique)... * Pour plus de détails sur l'ajustement du volume du speaker central/sub-woofer, voir page 45. 4. Effleurez RTN.Sélection de PL II (Dolby PL II)
Selectionnez un des quatre modes disponibles qui correspond à la source que poulez dire en tant que mode Dolby Pro Logic II. - Le réglage d'usine par défaut est "OFF".■ MUSIC (mode musique)
Voir ("Sélection du menu PLII (Dolby PLII)" (cf. page 17).■ MATRIX (mode matrix)
Voir ("Sélection du menu PLII (Dolby PLII)" (cf. page 17).MOVIE (mode Film)
Convient aux films videotos DVD.VIRTUAL (Mode virtuel)
Convient aux films et autres sources audio.OFF
Le mode Dolby Pro Logic II n'est pas utilisé. 1. Appuyez sur le bouton [SOUND]. 2. Effleurez Dolby PLII. Selection du menu DSF.
DSF (Digital Sound Field) (Champ Sonore Numérique) rend possible grâce à la simulation sonore de savourer l'expérience acoustique que vous fieriez dans une salle de concerts ou une salle de spectacles. Lorsque le menu DSF est selectionné, il arrive que le volume diminue. - Le réglage d'usine par défaut pour DSF est "OFF" et pour le menu de base DSF c'est "HALL". 1. Appuyez sur le bouton [SOUND]. 2. Effleurez DSF.  3. Effleurez sur l'écran ON/OFF. L'effet DSF bascule entre ON et OFF.  Lorsque DSF est reglé sur "OFF", le réglage de DSF n'est pas répercuté sur la source musicale. Ceci termine le réglage DSF. Appuyez sur le bouton [SOUND] pour revenir au mode original. 4. Effleurez sur le No. de menu DSF pour sélectionner le menu DSF souhaité.  Menus DSF HALL CHURCH STADIUM LIVE JAZZCLUB THEATER HALL...| No. | Nom de fonction | Description |
| 1 | HALL | Grande salle de concerts |
| 2 | CHURCH | Eglise à plafond-vous |
| 3 | STADIUM | Grand stade sans toit ni murs |
| 4 | LIVE | Salle de spectacles, plus grande qu'un club de jazz |
| 5 | JAZZCLUB | Club de jazz à plafond bas |
| 6 | THEATER | Cinéma ou théâtre |
Selection du menu Parametric Equalizer
Parametric Equalizer (P.EQ) (Egaliseur paramétrique) vous permet de compenser toute l'endetue du niveau des fréquence de manière précise grâce à une courbe douce utilisant la compensation de fréquences qui convient à votre type de voiture. Le réglage d'usine par défaut donne les réglages suivants pour toutes les enceintes. FREQ = 1kHz, Q = 1, GAIN = 0dB 1. Appuyez sur le bouton [SOUND]. 2. Effleurez P.EQ.  3. Effleurez sur l'écran ON/OFF. L'effet P.EQ bascule entre ON et OFF.  Lorsque l'effet P.EQ est régle sur "OFF (ARRET)", le réglage de P.EQ n'est pas répercuté sur la source musicale. Ceci termine le réglage de P.EQ. Appuyez sur le bouton [SOUND] pour revenir au mode original. 4. Effleurez sur le No. de menu de P.EQ pour selectionner le menu de P.EQ.  Menu P.EQ SIGNAL SP-SEL BAND FREQ Q GAIN SIGNAL... 5. Effleurez sur la droite de l'écran et ajustez l'objet. SIGNAL (seLECTIONne le signal d'ajustement): Sélectionne "P-NOIS" ou "MUSIC" P-NOIS: régèle lorsqu'il faut utiliser du bruit rose MUSIC: réglé pour utiliser des signaux musicaux SP-SEL (seLECTIONne l'enceinte dont il faut ajuster la valeur P.EQ): Selectionnez parmi "FRONT", "CENTER" et "SURROUND". - FRONT (Avant) : Enceinte avant - CENTER (Centre): enceinte centrale - SURROUND: enceinte surround BAND (seLECTIONne la bande de fréquence): Sélectionnéz une bande parmi 1 à 3. FREQ (seLECTIONne la fréquence centrale): Le champ d'ajustement va de 20 Hz à 20 kHz. Q (règle la courbe Q): Sélectionnéz 1, 3, 5, 7 ou 20 pour la précision de la courbe Q. GAIN (ajuste le niveau de sortie): Ajuste le gain (niveau de sortie) dans une fourchette de -12dB à +12dB (Pas de 1dB, 25 points) Répétez les étapes 4 et 5 pour ajuster l'élément souhaité. 7. Appuyez sur le bouton [SOUND] pour revenir au mode original.■ Ajustement P.EQ
Les réglages peuvent être ajustés comme suit dans le menu P.EQ. La fréquence centrale, le gain et la courbe Q peuvent être enregistrés dans des combinaisons de canal/bande. Par exemple, fréquence centrale “250 Hz”, gain “-8dB” et la courbe Q “3” peuvent être enregistrés dans la bande 1 à l'avant. Pour plus de détails sur la fonction P.EQ, voir "Ajustement P.EQ" (cf. page 21).Changement des réglages
Lorsque un décodeur surround 5.1ch est connecté, les réglages en rapport avec la musique dans le mode d'ajustement sont modifiés.Sélection des éléments à régler
Ce qui suit décrit les éléments dont les réglages sont modifiés. Pour plus de détails sur d'autres éléments qui ne sont pas modifiés, voir "Changement des réglages" (cf. page 39) à "Opérations communes à chaque mode". 1. Appuyez sur le bouton [A]. Le mode passé au mode d'ajustement.  2. Effleurez sur l'écran de réglage des éléments pour sélectionner l'élement à régler. * Effleurer ↑ ↓ sur la gauche de l'écran commute les éléments principaux un à la fois. Effleurer ← → sur la gauche de l'écran commute les sous éléments en continu. * Effleurer ↑ au centre de l'écran commute les sous éléments un à la fois. Effleurer ← → commute les sous éléments en continu. 3. Lorsque "THROUGH" s'affiche sur la droite de l'écran, effleurez THROUGH pour commuter vers l'écran des détails d'ajustement. 4. Effleurez sur la droite de l'écran ou tournez le bouton [ROTARY] pour régler les détails.Pour revenir au mode d'origine.
1. Appuyez de nouveau sur le bouton [A]. Réglage des éléments| Élement principal | Sous élément |
| SOUND | CENTER-SP / SRD-SP / SUB-WOOFER • Réglage de l'enceinte ON/OFF (cf. page 64) |
| FRONT HPF / CENTER HPF / SRD HPF / SUB-W LPF • Ajustement de la fréquence de filtre de l'enceinte (cf. page 64) | |
| SP GAIN • Ajustement du niveau de sortie de l'enceinte (cf. page 46) | |
| DELAY | CENTER-SP / SRD-SP • Ajustement de la temporisation de l'enceinte (cf. page 65) |
| DOLBY D | D-RANGE • Ajustement du champ dynamique (cf. page 65) |
| PL II CONT | PANorama / DIMENSION / CTR WIDTH • Réglage du mode musical en détaill (cf. page 47) |
Réglage des enceintes ON/OFF (CENTER-SP/SRD-SP/SUB-WOOFER)
Réglez l'enceinte centrale (CENTER-SP), l'enceinte surround (SRD-SP) et le sub-woofer (SUB-WOOFER) sur ON/OFF. Assurez-vous que ce réglage est sur "OFF" lorsqu'il n'y a pas d'enceinte centrale ou de subwoofer. - Le réglage d'usine par défaut est "ON". 1. Appuyez sur le bouton [A] pour régler le mode d'ajustement. 2. Effleurez sur l'écran de réglage des éléments pour sélectionner "CENTER-SP" sous "SOUND", "SRD-SP" sous "SOUND", et "SUB-WOOFER" sous "SOUND". ADJUST MODE CENTER-SP> ON
3. Effleurez sur la droite de l'écran ou tournez le bouton [ROTARY] pour sélectionner "ON" ou "OFF". * Dans le cas de “SUB-WOOFER”, sélectionnez parmi “ON+”, “ON-” et “OFF”. Normalement, sélectionnez “ON+”. Cependant, lorsque “ON-” est réglé, un effet peut être fortement ressenti dans la gamme des basses. 4. Appuyez sur le bouton [A] pour revenir au mode original.Ajustement des fréquences filtrés des enceintes (FRONT HPF/CENTER HPF/ SRD HPF/ SUB-W LPF)
Cette fonction vous permet d'ajuster la fréquence filtre qui convient aux enceintes que vous utilisez. - Une enceinte qui a eté désactivée dans la section "Réglez les enceintes sur ON ou OFF (CENTER-SP/ SRD-SP/SUB-WOOFER)" n'est pas affché. - Le réglage d'usine par défaut pour "FRONT HPF" ou "SRD HPF" est "THROUGH" (pas de filtré), et pour "CENTER HPF" ou "SUB-W LPF" c'est "120Hz".Ajustement du filtré
FRONT HPF/CENTER HPF/SRD HPF (ajustement du contrôle passée-haut)
Ce filtre enlève lessons de basses des enceintes centrale et surround.THROUGH 50Hz 80Hz 120Hz
Réglez le filtré pour qu'il convienne aux enceintes lorsque vous en utilisez de petit diamètre.THROUGH
Réglez ceci lorsque vous utilisez des enceintes qui généré des basses. THROUGH ne peut pas etre régle sur CENTER HPF.SUB-W LPF (ajustement du filtre passer-bas du sub-woofer)
Ce filtré enlève les aigus du sub-woofer.50Hz 80Hz 120Hz
Réglez la fréquence du filtré pour qu'elle corresponde au sub-woofer. 1. Appuyez sur le bouton [A] pour régler le mode d'ajustement. 2. Effleurez sur l'écran de réglage des éléments pour sélectionner "FRONT HPF" sous "SOUND", "CENTER HPF" sous "SOUND", "SRD HPF" sous "SOUND", et "SUB-W LPF" sous "SOUND".  SOUNDADJUST MODE FRONT HPF THROUGH
3. Effleurez sur la droite de l'écran ou tournez le bouton [ROTARY] pour régler la fréquence. * Sélectionnez parmi THROUGH*, 50Hz, 80Hz, et 120Hz. ^*1 THROUGH s'affiche seulement lorsque "FRONT HPF" ou "SRD HPF" est sélectionné. 4. Appuyez sur le bouton [A] pour revenir au mode original.Ajustement de la temporisation de l'enceinte (CENTER-SP / SRD-SP)
Le moment où le son de chaque enceinte atteint la position d'audition dépend de l'installation de vos enceintes et de la taille de votre voiture. Ajustez la temporisation de chaque enceinte de sorte que le son de chacun d'eux atteigne la position d'audition au même moment que celui des enceintes avant. - Le réglage d'usine par défaut est "0 ms". 1. Appuyez sur le bouton [A] pour régler le mode d'ajustement. 2. Effleurez sur l'écran de réglage des éléments pour sélectionner "CENTER-SP" sous "DELAY" et "SRD-SP" sous "DELAY". ADJUST MODE CENTER-SP» Oms
3. Effleurez sur la droite de l'écran pour ajuster la temporisation. * "CENTER-SP" peut être ajusté dans une fourchette de 0 à 5 ms. * "SRD-SP" peut être ajusté dans une fourchette de 0 à 15 ms. 4. Appuyez sur le bouton [A] pour revenir au mode original.Ajustement des fonctions Dolby Digital (D-RANGE)
Cette fonction compressée le champ dynamique du Dolby Digital pour maintainir des sons de bas niveau tels que la conversation d'un acteur et supprime les volumes sonores élevés. Ces fonctions ne sont disponibles que sur les disques DVD Dolby Digital. - Le réglage d'usine par défaut est "MAX". 1. Appuyez sur le bouton [A] pour régler le mode d'ajustement. 2. Effleurez sur l'écran de réglage des éléments pour sélectionner "DOLBY D" sous "D-RANGE".  3. Effleurez sur la droite de l'écran pour ajuster l'objet le champ dynamique et l'élement désire. MAX: mode de champ dynamique maximal de la source originale STD: mode recommandié pour l'audition standard MIN: le mode de champ dynamique le plus compressé qui rend facile à entendre même lessons bas. 4. Appuyez sur le bouton [A] pour revenir au mode original.8. EN CAS DE DIFFICULTÉ
| Problème | Cause | Solution | |
| Généralité | Pas d'alimentation. (Pas de son.) | Fusible sauté. | Remplacez le fusible par un autre de même ampérage. Si le fusible saute à nouveau, consultez votre magasin. |
| Raccordement incorrect. | Consultez votre magasin. | ||
| Pas de son lorsque les amplificateurs et l'antenne automatique sont raccordés. | Le fil de l'antenna automatique est court-circuité à la masse, ou un courant excessif est requis pour la télécommande des amplificateurs et de l'antenna automatique. | 1. Mettez l'appareil hors tension.2. Retirez tous les fils raccordés au fil d'antenne automatique. Vérifie chaque fil pour voir s'il n'est pas court-circuité à la masse à l'aide d'un ohmmètre.3. Remettez l'appareil sous tension.4. Raccordez chaque fil de télécommande d'amplificateur au fil d'antenne automatique un par un. Si les amplificateurs s'éteignent avant que tous les fils ne soient raccordés, utilisez un relais exterme pour obtenir la tension de commande à distance nécessaire (courant excessif requis). | |
| Rien ne se passé quand on appuie sur les touches. L'affichage est incorrect. | Mauvais fonctionnement du microprocesseur à cause du bruit, etc. | Eteignez l'appareil, appuyez sur la touche [RELEASE] du CLAVIER DE COMMANDME AMOVIBLE (DCP) et retirez le clavier. Appuyez sur la touche de réinitialisation pendant environ 2 secondes avec une petite tige. Touche de réinitialisation | |
| Les connecteurs du CLAVIER DE COMMANDE AMOVIBLE (DCP) ou de l'appareil principal sont sales. | Enlevez la saleté avec un chiffon doux humecté d'alcool de nettoyage. | ||
| CD/MP3/WMA | Pas de son. | Il y a déjà un disque qui n'est pas un CD ou un corps étranger dans le tiroir. | La console rabatable étant ouverte, maintainez la touche [▲] enforcée pendant 3 secondes ou plus. Le corps étranger est éjecté de force |
| Il n'y a pas de fichiers MP3/WMA sur le disque. | Enregistrez les fichiers MP3/WMA correctement sur le disque. | ||
| Les fichiers ne sont pas reconnus comme fichiers MP3/WMA. | Utilisez des fichiers MP3/WMA correctement codés. | ||
| Le système de fichier n'est pas correct. | Utilisez le système de fichier ISO9660 niveau 1, 2 ou JOLIET ou Romeo. |
| Problème | Cause | Solution | |
| CD/MP3/WMA | Interruptions du son ou parasites. | Le disque est sale. | Nettoyez le disque avec un chiffon doux. |
| Le disque est fortement rayé ou gondolé. | Remplacez-le par un disque sans rayures. | ||
| Le son est coupé ou sauté partiellement. Des parasites se produit ou sont mélangés aux sons. | Les fichiers MP3/WMA ne sont pas codés correctement. | Utilisez des fichiers MP3/WMA correctement codés. | |
| Le son se détiroye tout de suite après la mise sous tension. | Des gouttelettes d'eau risquent de se former sur la lentille interne si la voiture a été garée dans un lieu humide. | Allumez l'appareil et laisserez-le sécher pendant environ 1 heures. | |
| Erreur de nom de fichier | Le système de fichier n'est pas correct. | Utilisez le système de fichier ISO9660 niveau 1, 2 ou JOLIET ou Romeo. | |
| La lecture de la liste de lecture ne s'effectue pas. | Le nom ou l'extension du fichier ne sont pas corrects. | Utilisez des caractères alphanumeric/ASCII pour le nom des fichiers MP3/WMA. Utilisez“.M3U” pour l'extension fichier de la liste de lecture. |
9.AFFICHAGE DES ERREURS
S'il se produit une erreur, l'un des affichages suivants apparait. Prenez les mesures expliquées ci-dessous pour résoudre le problème.| Affichage d'erreur | Cause | Mesure | |
| CD/MP3/MWA | ERROR 2 | Le disque est coincé à l'intérieur du lecteur de CD et qu'il ne s'éjecte pas. | Ceci est une anomalie du mécanisme du lecteur CD. Consultez votre magasin. |
| ERROR 3 | La lecture du disque est impossible parce qu'il est rayé, etc. | Remplacez-le par un disque non rayé et non gondolé. | |
| ERROR 6 | Le disque est chargé à l'envers dans le lecteur CD et la lecture est impossible. | Ejectez le disque et rechargez-le correctement. | |
| Généralité | AMP GUARD | Le circuit de protection des enceintes est entré en service. Si vous réglez le volume pendant cette opération, l'afficheur indique "AMP GUARD". "AMP GUARD" marche quelqu'fois lorsque des signaux de test spéciaux sont utilisés. | 1. Abaissez le volume sonore. Le fonctionnement peut aussi être rétabli en mettant l'appareil hors tension, puis sous tension. (Le volume des haut-parleurs est automatiquement réduit lorsque le circuit de protection entre en service.)2. Si le son est à nouveau mis en sourdine, consultez notre service d'entretien. |
| Changer de CD | ERROR 2 | Le disque à l'intérieur du changeur de CD n'est pas chargé. | Ceci est une anomalie du mécanisme du changeur de CD. Consultez votre magasin. |
| ERROR 3 | La lecture du disque à l'intérieur du changeur de CD est impossible parce qu'il est rayé. | Remplacez-le par un disque non rayé et non gondolé. | |
| ERROR 6 | La lecture du disque à l'intérieur du changeur de disque est impossible parce qu'il est chargé à l'envers. | Ejectez le disque et rechargez-le correctement. | |
| Changer de DVD | ERROR 2 | La lecture du disque à l'intérieur du changeur de DVD n'est pas possible. | Il s'agit d'une défaillance du mécanisme du DVD. Consultez votre magasin d'achat. |
| ERROR 3 | La lecture du disque n'est pas possible parce qu'il est rayé, etc. | Réessayez ou remplacez le disque par un disque ni rayé, ni gondolé, etc. | |
| ERROR 6 | La lecture du disque à l'intérieur du changeur de DVD n'est pas possible parce qu'il est mis à l'envers. | Ejectez le disque, puis rechargez-le correctement. | |
| ERROR P | Erreur de niveau de censure parentale. | Réglez le niveau de censure parentale voulu. | |
| ERROR R | Erreur de code de région. | Ejectez le disque et remplacez-le par un disque ayant le bon code de région. |
10. CARACTERISTIQUES TECHNIQUES
Section radio
Système de syntonisation: Tuner à synthétiseur PLL Fréquences de réception: FM:87,5 à 108 MHz (pas de 0,05 MHz) PO:531 à 1602 kHz (pas de 9 kHz) GO:153 à 279 kHz (pas de 3 kHz)Section lecteur de CD
Système : Système audionumérique de disque compact Réponse en fréquence: 5 Hz à 20 kHz (±1 dB) Rapport signal/bruit: 100 dB (1 kHz) IHF-A Plage dynamique: 96 dB (1 kHz) Distorsion: 0.01%Données générales
Puissance de sortie : 4× 31W (DIN 45324, +B = 14,4V) Tension d'alimentation: 14,4 V CC (10,8 V à 15,6 V admissible), masse négative Consommation: Inférieure à 15 A Impedance de haut-parleurs : 4Ω (4Ω à 8Ω admissible) Courant nominal d'antenne automatique : 500 mA ou moins Poids: Appareil principal: 1,7 kg Télécommande: 80 g (avec la pile) Dimensions: Appareil principal: 178 (L) × 50 (H) × 155 (P) mm Télécommande: 44 (L) × 110 (H) × 27 (P) mmRemarque:
- La conception et les caractéristiques techniques sont sujettes à modification sans préavis pour des raisons d'amélioration. Wir danken Ihnen für den Kauf these Clarion-Produkts. * Bette lesen Sie diese Bedienungsanleitung von Inbetriebnahme des Geräts vollständig durch. * Nach der Lekture dieser Anleitung sollte sie griffbereit aufbewahrt werden (z.B. im Handschuhfach). * Prüfen Sie den Inhalt der beiliegenden Garantiekarte und bewahren Sie sie zusammen mit dieser Anleitung auf. * These Anleitung enthalt Beschreibungen der Verfahren zur Bedienung eines über CeNET-Kabel angeschlossenen optionalen CD-Wechslers, DAB und TV-Tuners. Für CD-Wechsler und TV-Tuner sind separate Anleitungen vorhanden, noch enthalten diese keine Bedienungshinweise.Inhalt
1. VORSICHTSMASSNAHMEN 3 Schrägkonsole 4 Handhabung von CDs 4 2. REGLER 5 3.BENENNUNG 6 Bezeichnung der Tasten und deren Funktionen 6 Wichtige Tastenbedienungen, wenn externe Geräte an thisem Gerät angeschlossen sind .... 7 Display-Anzeigeelemente 7 Bedienung des Displays 8 4. ABNEHMBARES BEDIENTEIL (DCP) 9 5. FERNBEDIENUNG 10 Einlagen der Batterien 10 Funktionen der Fernbedienungstasten 11 6. BEDIENUNG 12 Grundbetrieb 12 AC-Processor III Betrieb 17 Radiobetrieb 23 RDS-Betrieb 26 CD/MP3/WMA-Betrieb 31 Horen verschiedener Musiktücke durch mehrere Hörer (2-ZONE-Funktion) 36 Bedienungen, die für andere Betriebsarten gemeinsam sind 37 7. BEDIENUNG DES ZUBEHÖRS 51 CD-Wechsler-Betrieb 51 Fernsehbetrieb 54 Digitalradio/DAB-Betrieb 58 5.1-Kanal-Surround-Decoderbetrieb 61 8. FEHLERSUCHE 66 9. FEHLERANZEIGEN 68 10. TECHNISCHE DATEN 691. VORSICHTSMASSNAHMEN
1. Dieses Gerät kann nur für Straβenfahrzeuge mit 4 Rädern verwendet werden. Es eignet sich nicht für Trecker, Gabelstapler, Planierfahrzeuge, Geländefahrzeuge, Motrräder mit 2 oder 3 Rädern, Boote oder andere Spezialfahrzeuge. 2. Wenn das Fahrzeuginnere sehr kalt ist und der Spieler sofort nach Einschaltung der Heizung benutzt wird, dann konnte sich auf der CD und den optischen Teilen des Spieler Feuchtigkeit bilden und eine korrekte Wiedergabe konnte nicht möglich sein. Soltte sich auf der CD Feuchtigkeit gebildet haben, die CD mit einem weichen Tuch abwischen. Soltte sich bei den optischen Teilen des Spieler Feuchtigkeit gebildet haben, sollte der Spieler für mindestens eine Stunde nicht benutzt werden. Die Kondensation verfluchtigt sich auf natürliche Weise und ein normaler Betrieb ist möglich. 3. Beim Fahren auf extrem schlechten Straβen können Erschütterungen auftreten, wodurch CD-Stellen übersprungen werden konnten.INFORMATION FÜR BENUTZER.:
ÄNDERUNGEN ODER MODIFIKATIONEN, DIE NICTV VOM HERSTELLER DIESES PRODUKTS GENEHMIG WURDEN, FÜRHREN ZU EINEM VERFALL DER GARANTIE.WARNING
Aus Sicherheitsgründen sollenn Sie das Touch Panel-Display während der Fahrt weder ablesen noch bedieren.Schragkonsole
Um groBformatige Anzeigen zu ermöglich, wird für diese Gerät eine Schragkonsole verwendet. Nach Benutzung der Schragkonsole sollte sie immer geschlossen werden.A VORSICHT
Beim Öffnen und Schlieben der SCHRAGKONSOLE darauf auf achten, daß Slesich nicht ihre Finger einklennen. 1. Aus Sicherheitsgründen sollte die SCHRAGKONSOLE immer geschlossen werden, wenn das Gerät für längerere Zeit nicht benutzt wird oder der Zündschlüssel ausgeschaltet wird. Wird der Zündschlüssel bei geneiger SCHRAGKONSOLE ausgeschaltet, dann laßt sich die SCHRAGKONSOLE nicht schlieben.Handhabung von CDs
Mit thisem Gerät ausschließlich Compact-Discs verwenden, die mit der Kennzeichnung  odcr h 100000000000000000000000000000000000000000000000000000000000000000000000 Es sollen den keine CDs wiedergegeben werden, die herzfürmig, achteckig sind oder eine andere spezielle Form besitzen. Es ist möglich, daß CDs, die in der CD-R/CD-RW-Betriebsart aufgezeichnet wurde, nicht verwendet werden können.Handhabung
- Im Gegensatz zu herkömmlichen Musik-CDs sind CD-R und CD-RW-CDs anfällig gegenüber hohen Temperaten und hoher Feuchtigkeit und eine Wiedergabe von CD-R und CD-RW-CDs können manchmal nicht möglich sein. Deshalb sollenen sie nicht für langere Zeit im Fahrzeug gelassen werden. Die Rander bei neuen CDs sind meinst etwas uneben. Wenn solche CDs verwendet werden, könnte der Spieler nicht funktionieren oder es werden Stellen übersprungen. Um die Unebenheit am Rand der CD zu beseitigen, einen Kugelschreiber oder ähnlichen Gegenstand verwenden. - Niemals Aufkleber auf die CD-Oberfläche kleben oder die Oberfläche beschreiben. - Niemals CDs wiedergeben, die mit Zellophanband oder andere Klebemitteln 2. Vor Schliebung der SCHRAGKONSOLE konnte vom Sicherheitsmechanismus ein Bremsgeräusch gehört werden. Dies ist normal. 3. Wird die SCHRÄGKONSOLE mit der Hand bewegt, konnte Spiel erzeugt werden. Für die Korrektur des Games bei eingeschalteten Gerät, für Schliebung der SCHRÄGKONSOLE die [▲]-Taste betätigten. 4. Nach Auswurf einer CD/MD kehrt die SCHRAGKONSOLE automatisch auf den Neigungs- und SchlieBungsstatus zusammen. Sollte die Schliebung der SCHRAGKONSOLE behindiert sein, dann wird der Sicherheitsmechanismus ausgelost und die SCHRAGKONSOLE kehrt auf den Öffnungssstatus zusammen. Sollte dies der Fall sein, die Ursache der Behinderung entfern und die [▲]-Taste betätigten. 5. Damit die CD nicht zerkratzt wird, die 12 oder 8cm CD in horizontaler Lage einlagen oder entnahmen. verklebt sind oder deren Markierungen abblättern. Wir solch eine CD abgeschweit, konnte sie im CD-Spieler stecken bleiben oder den CD-Spieler beschädigden. - Keine CDs benutz, die große Kratzer Verformungen, Risse, usw. aufweisen. Eine Verwendung solcher CDs könnte zu einem Fehlbetrieb oder Beschäftigungen führen. - Für Entnahme einer CD aus deren Aufbewahrungsbehäuse, die Mitte des Gehäuse herunterrücken und die CD hersausheiten, indem sie vorsichtig an deren Rändern gehalten wird. - Nicht im Handel erhältliche CD-Schutzfolien oder CDs mit Stabilisatoren, usw. verwenden. Diese können die CD beschädigden oder einen Ausfall des internen Mechanismus verursachen.Aufbewährung
Die CDs sollen nicht direktem Sonnenlicht oder einer Wärmequelle ausgesetzt werden. Die CDs sollen nicht übermaßiger Feuchtigkeit oder Staub ausgesetzt werden. Die CDs sollen nicht direkter Wärme von Heizungen ausgesetzt werden.Reinigung
- Für Entfernung von Fingerabdrücken und Staub, mit einem weichen Tuch geradinig von der CD-Mitte zum Außenrand hin die CD abwischen. Keine Lösungsmittel verwenden, wie z.B. im Handel erhältliche Reiniger, Sprays gegen elektrische Aufladung oder Verdünner, um die CD zu reinigen. - Nach Benutzung eines speziellen CD-Reinigers, die CD ausgiebig trocknen halten, bevor sie benutzt wird.2. REGLER
Hauptgerät
ÖFFNUNG DER SCHRÄGKONSOLE
3. BENENNUNG
Bezeichnung der Tasten und deren Funktionen
[RELEASE]-Taste
Abnahme des DCPHelligkeitssensor
- Dieser Sensor ermittelt die Helligkeit im Fahrzeuginnenraum. Wenn die automatische Dimmer-Steuerung auf "AUTO" eingestellt ist, wird die Beleuchtung der Anzeige gemäß der von thisem Sensor festgestelltten Helligkeit angepasst.[ROTARY]-Knopf
- Drücken Sie auf den Drehknopf, um das Gerät einzuschalten. Bei jedem weiteren Druck auf diesen Knopf wird die Betriebsart umgeschaltet. Zum Ausschalten des Gerätes den Drehknopf drücken und mindestens eine Sekunde lang halten. - Durch Drehen an thisem Knopf können Sie die Lautstärke einstehen oder im Einstellmodus Änderungen der verschiedene Einstellungen vornehmen.[△]-Taste
- Öffnet/schlieBt das Bedienfeld. Wenn eine CD eingelegt ist, wird sie beim Öffnen des Bedienfels ausgeworfen.Hinweis:
Wenn die CD nicht ausgeworfen wird, die [▲]-Taste mindestens eine Sekunde lang gedrück halten.[A]-Taste
- Mit dieser Taste werden im Einstellmodus die verschiedene Einstellungen vorgenommen oder angepasst. - Bei Radiobetrieb konnen mit dieser Taste Sendernamen eingegeben werden, bei CD-Betrieb CD-Titel.[SOUND]-Taste
- Mit dieser Taste können verschiedene Einstellungen vorgenommen bzw. angepasst werden, z. B. der Raumklang. - Wenn Sie diese Tastes betätigten und mindestens eine Sekunde lang halten, wird die 2-ZONE-Funktion ein-bzw. ausgeschaltet.[TA]-Taste
- Mit dieser Taste wird der Verkehrsdurchsagen-Bereitschaftsbetrieb (TA) eingestellt (bei ausgeschalteter 2-ZONE-Funktion). Dient zur Umschaltung der Betriebsart der 2-ZONE-Funktion: Wenn Sie diese TASTE betäglich und mindestens eine Sekunde lang gedrück halten, wird der 2-ZONE-Typ umgeschaltet (bei eingeschalteter 2-ZONE-Funktion).[Tate]
- Schaltet bei der Wiedergabe eines Titels auf Pause bzw. Fortsetzung (bei CD-Betrieb). - Mit dieser Taste aktivieren Sie den PTY-(Programmart-) Bereitschaftsbetrieb odernehmen die PTY-Einstellungen vor.Display
- Hier werden die verschiedene Informationen zur Angabe des Betriebszustands (z. B. Frenzeinstellungen-/Wiedergabestatus) und die Anzeigen dargestellt. - Zur Aktivierung das Display mit dem Finger antippen und die Blätterbewegung durchfahren (siehe Seite 8).Wichtige Tastenbedienungen, wenn externe Geräte an thisem Gerät angeschlossen sind
- Wenn ein CD-/DVD-Wechsler angeschlossen ist
* Für Einzelheiten siehe den Abschnitt "CD-Wechsler-Betrieb" (Seite 51). Zum DVD-Wechsler siehe die mit dem DVD-Wechsler geleiferte Bedienungsanleitung.[Tate]
- Für CD- oder DVD-Wiedergabe bzw. -Pause.[A]-Taste
- Zur Eingabe von Disc-Titeln im CD-Wechsler-Betrieb.- Wenn ein Fernseher/DAB-Empfänger angeschlossen ist
* Für Einzelheiten siehe den Abschnitt "Fernsehbetrieb" (Seite 54) bzw. "Digitalradio/DAB-Betrieb" (Seite 58).[TA]-Taste
- These Taste verwenden, um den TA-(Verkehrs durchsage-) Bereitschaftsbetrieb in den DAB-Modus zu schalten. (These Funktion steht nur für den DAB-Tuner zur Verfügung.) Die Taste betätigten und mindestens 1 Sekunde lang halten, um den INFO-Modus zu aktivieren bzw. zu deaktivieren (im DAB-Modus).[Tate]
- Umschaltung der Bildwiedergabe zwischen Fernsehen und VTR (extern) (im Fernsehmodus). - Im DAB-Modus wird diese Taste verwendet, um auf PTY (Programmart-) Bereitschaftsbetrieb zu schalten oder eine Programmart zu wahren.[A]-Taste
- These Taste verwenden, um den Name des Fernsehsenders einzugeben (im Fernsehmodus).Display-Anzeigeelemente
Bedienung des Displays
Bei thisem Gerat wird ein berührungsempfindliches Touch Panel-Display für die Anzeige verwendet. Zur Bedienung muss das Display lediglich mit der Fingerspitze berührt werden. Dabei werden die vier folgenden Haupt-Bedienungsvorgänge unterschieden:Antippen
Die Fingerspitze berührt das Display maximal eine Sekunde lang und wird dann wieder weggenommen. Dies ist die wichtige Bedienungsart des Displays.Berühren und halten
Die Fingerspitze berührt das Display und bleibt mindestens 1 bis 2 Sekunden lang darauf liegen. Den Finger damit auf dem Display nicht bewegen. Der Finger muss mindestens 1 Sekunde lang auf dem Display gehalten werden, um beispelsweise Listen anzuzeigen und andere praktische Funktionen aufzurufen. Der Finger muss mindestens 2 Sekunden lang auf dem Display gehalten werden, um Festsenderplätze oder andere Daten einzuspeichern.Blätterbewegung
durchfuhren
Das Display mit der Fingerspitze berühren, den Finger nach links ( ) bzw. rechts () bewegen, ohne loszulassen, und den Finger dann innerhalb 1 Sekunde wegnehmen. Dieses Verfahren dient zum Anwahlen von eingespeicherten Festsenden (1 bis 6) oder von Titeln. Durchlaufbewegung durchführren
 Das Display mit der Fingerspitze berühren, den Finger nach links () bzw. rechts () bewegen, ohne loszulassen, und den Finger dann auf dem Display liegen{lassen. Die momentan gewählte Funktion wird so lange fortgesetzt, wie der Finger auf dem Display liegen bleibt. Dieses Verfahren dient beispiselsweise zur manuellen Sendereinstellung oder fur den schellen Titelvorlauf/-rücklauf. 4. ABNEHMBARES BEDIENTEIL (DCP)
Zur Verhinderung von Diebstahl kann das Bedienteil abgenommen werden. Wenn das Bedienteil entfern wird, sollte es im DCP-Gehäuse (ABNEHMBARES BEDIENTEIL) aufbewahrt werden, um Beschädigungen zu verhinden. Wir empfehlen, daß Sie das DCP beim Verlassen Ohres Fahrzeugs mitnehmen.Abnahme des DCP
1. Bei geschlossener SCHRÄGKONSOLE Ausschaltung vornehmen. 2. Für Öffnung des DCP, die [RELEASE]-Taste ganz herunterrücken.  3. Das DCP auf Sie zu Herausziehen und abnehmer. A VORSICHT
Vor Abnahme des DCP immer die SCHRAGKONSOLE schlieben. - Wird das DCP bei geöffneter SCHRAGKONSOLE abgenommen, dann schließt sich der Schragkonsole augenblicklich. Seien Sie vorsichtig, daß Sie sich nicht Ihr Finger einklennen.Anbringung des DCP
1. Das DCP so einfahren, daß das Teil (A) an der rechten Seite des DCP beim Haken (B) des Geräts einrastet.  2. Die linke Seite © des DCP sache undrücken, um es einzupassen. A VORSICHT
- Das DCP wird leicht durch Stöbe bechädigt. Nach Abnahme darauf aufchten, daß es nicht fallen gelassen oder starken Stößen ausgesetzt wird. - Wird die [RELEASE]-Taste betätig und das DCP ist nicht fest verriegelt, können es durch die Vibrationen des Fahrzeugs Herausfallen. Dadurch konnte es beschädigt werden, weshalb es nach Abnahme entweder eingebaut oder im DCP-Aufbewahrungsgehäuse verwahrt werden sollente. - Der Stecker für die Verbindung von Gerät und DCP ist äußert wichtig. Darauf achten, daß er nicht durch Andrücken mit Fingernägeln, Schraubenziehern, usw. beschädigt wird.Hinweis:
- Wenn das DCP verschmutzt ist, sollte es nur mit einem weichen, trockenen Tuch abgewischt werden.5. FERNBEDIENUNG
Fernbedienung
 Betriebsbereich: 30^ in allen Richtungen Einlagen der Batterien
1. Die Fermbedienung umdrehen und den Rückdeckel in Pfeilrichtung schiben. 2. Die mit der Fernbedienung mitgelieferten AA (SUM-3, R-6/1,5 V) Batterien entsprechend der Abbildungsrichtung einlagen und den Rückdeckel schlieben.Hinweise:
Bei einer unsachgemäßen Verwendung der Batterien konnten diese explodieren. Deshalb folgende Punkte beachten: - Für den Austausch von Batterien sollenn immer beimbe Batterien gegen neue ausgetauscht werden. - Batterien niemals kurzschreiben, zerlegen oder erwärmen. - Batterien niemals in ein Feuer wenfen. - Verbrauchte Batterien umweltgerecht entsorgen. Funktionen der Fernbedienungstasten
| Modus Taste | Radio (RDS)/DAB | CD/MP3 | CD-Wechsler DVD-Wechsler | Fernseher |
| [FUNC] | Für Umschaltung zwischen den Betriebsarten Radio, DAB, CD/MP3-Betrieb, CD-Wechsler, DVD-Wechsler und Fernsehgerät, AUX. | |||
| [BAND] | Für Umschaltung des Empfangswellenber-eichs. | Wiedergabe des ersten Titels. TOP-Wiedergabe (erster Titel). | Einstellung der nachsten CD in ansteigender Reihenfolge. | Für Umschaltung des Empfangswellenbe-reichs. |
| [▲], [▼] | Erhöhung oder Senkung der Lautstärke (bei allen Betriebsarten). | |||
| [←], [►] | Aufwärts- und Abwärtsinstellung für Festsenderkanäle. | Aufwärts- und Abwärtsinstellung für Titel. Wird die Taste für 1 Sekunde gedrück gehalten: Schnellvorlauf/rücklauf. | Aufwärts- und Abwärtsinstellung für Festsenderkanäle. | |
| [►II] | Keine Funktion. | Für Umschaltung zwischen Wiedergabe und Pausenbetrieb. | Keine Funktion. | |
| [MUTE] | Für Ein- und Ausschaltung der Stummschaltung. | |||
| [TA] | Für Ein- und Ausschaltung des TA-Betriebs Die Taste betätigten und für 1 Sekunde oder länger gedrück halten, um auf die Haupt- und Subzone-Klangquelle zu schalten (nur während der 2-ZONE-Modus eingeschaltet ist). | |||
| [DISP] | Für Umschaltung der Displayanzeige (Hauptanzeige, Uhrzeitanzeige). | |||
| [PS/AS] | Festsenderansprü-lung. Wird die Taste für 2 Sekunden gedrück gehalten: Automatis- che Speicherung. | Für Anspielwiedergabe. Im MP3/WMA-Modus, diese Taste mindestens eine Sekunde lang gedrück halten, um jeder Ordner jeweils 10 Sekunden lang anzuspielen. | Anspielwiedergabe. Wird die Taste für 1 Sekunde gedrück gehalten: CD- Anspielwiedergabe. | Festsenderanspie-lung. Wird die Taste für 2 Sekunden gedrück gehalten: Automatis- che Speicherung. |
| [AF] | Ein- und Auschaltung der AF-Funktion. Wird die Taste für 1 Sekunde gedrück gehalten: Ein- und Auschaltung der REG-Funktion. | Für Wiedergabe- wiederholung. Im MP3/WMA-Modus, diese Taste mindestens eine Sekunde lang gedrück halten, um Ordner-Wiedergabe- wiederholung auszuführen. | Wiedergabewiederhol ung. Wird die Taste für 1 Sekunde gedrück gehalten: CD-Wiedergabe- wiederholung. | Keine Funktion. |
| [PTY] | Ein- und Ausschal-tung des PTY-Modus. | Für Zufallswiedergabe. Im MP3/WMA-Modus, diese Taste mindestens eine Sekunde lang gedrück halten, um Ordner- Zufallswiedergabe auszuführen. | Zufallswiedergabe. Wird die Taste für 1 Sekunde gedrück gehalten: CD- Zufallswiedergabe. | Für Umschaltung zwi-schen Fernseher und Videorekorder. |
| [2-ZONE] | Für Ein- oder Ausschaltung des 2-ZONE-Modus, die Taste betätigten und für 1 Sekunde oder länger gedrück halten. Für Umschaltung der Steuerzone zwischen Haupt- und Subzone bie eingeschalteten 2-ZONE-Modus betätigten. | |||
Grundbetrieb
A VORSICHT
Vor Ausschaltung des Geräts oder des Zündschlüssels die Lautstärke verringn. Das Gerät speichert die letzte Lautstärkeeinstellung. Wir Aussenhaltung bei hoher Lautstärke ausgeführrt und dann später wieder Einschaltung vorgenommen, konnte die plötzliche hohe Lautstärke Ihr Gehör oder das Gerät beschädigten.Ein-/Ausschalten des Geräts
Einschalten
Hinweis:
- Das Gerät nicht längerere Zeit ohne laufenden Motor benutzten. Wenn die Autobatterie zu stark entladen wird, kann eventuell der Motor nicht mehr angelassen werden, und die Lebensdauer der Batterie verkurzt sich. 1. Den [ROTARY]-Knopf drücken. Die zuletzt gewählte Betriebsart wird angezeigt.Systemprüfung
Beim ersten Einschalten nach Herstellen der Kabelverbindungen prüft das Gerät, welche Komponenten angeschlossen sind. (Dieser Vorgang wird als "Systemprüfung"bezeichnet.) Wenn nach dem Einschalten "System Check" angezeigt wird, die folgenden Schritte durchführten, um diese Systemprüfung durchzuführen. 1. Wenn "System Check" angezeigt wird, den [ROTARY]-Knopf drucken. Die Systemprüfung beginnt. Nach Abschluss der Systemprüfung wird "Completed" angezeigt. 2. Nochmals den [ROTARY]-Knopf drücken. Die Hauptanzeige für den Radiobetrieb erscheint.CODEMATIC-Funktion
Bei aktivierter CODEMATIC-Funktion erscheint, wenn das DCP aufgesetzt ist, beim Einschalten des Geräts die Touch Code-Anzeige. Das Display in der im Einstellmodus festgelegten Reihenfolge antippen.  Für Einzelheiten zur CODEMATIC-Funktion siehe "Verwendung der Diebstahlsicherungsfunktion (CODEMATIC)" (Seite 50).Ausschalten
1. Den [ROTARY]-Knopf mindestens 1 Sekunde lang gedrückt halten.Einstellung der Betriebsart
1. Den [ROTARY]-Knopf drucken, um die Betriebsart zu wechseln. 2. Bei jedem Druck auf den [ROTARY]-Knopfändert sich die Betriebsart in der folgenden Reihenfolge: Radio-Betrieb DAB-Betrieb CD/MP3 Betrieb CD-Wechsler-Betrieb DVD-Wechsler-Betrieb TV-Betrieb AUX-Betrieb Radio-Betrieb... * Externe Geräte, die nicht über CeNET angeschlossen sind, werden nicht angezeigt.Einstellung der Lautstärke
1. Den [ROTARY]-Knopf im Uhrzeigersinn drehen, um die Lautstärke zu erhöhen, bzw. entgegen dem Uhrzeigersinn, um die Lautstärke zu vermindern. * Die Lautstärkelässt sich im Bereich zwischen 0 (Minimum) und 33 (Maximum) einstehen.Umschaltung des Bedienungsmodus
Es gibt zwei Grund-Bedienungsmodi: Standardbedienung und vereinfache Bedienung. 1. In der Hauptanzeige die linke Seite des Displays berühren und mindestens 1 Sekunde lang halten. Der Bedienungsmodus wird umgeschaltet.  Bei der vereinfachten Bedienung ist die Blätterbewegung oder Durchlaufbewegung auf dem Hauptanzeige-Bildschirm für den Radio-oder CD-Betrieb nicht erforderlich, und das Gerät kann auf eine vereinfachte Weise bedient werden. Dabei ist aber zu beachten, dass die folgenden Funktionen bei der vereinfachten Bedienung nicht zur Verfugung stehen: - Einstellung der Festsender, Auswahl von Ordern oder Discks sowie weitere Funktionen, bei denen auf der rechten Seite des Displays die Blätterbewegung durchgeführt werden muss. - Umschaltung des Displays (siehe Seite 13) - Umschaltung der Titelanzeige (siehe Seite 14) - Funktionen zur Anzeige von Titleleingabe-Bildschirmen. Bei anderen Bildschirmen als der Hauptanzeige (z. B. Listenanzeige, Einstellmodus etc.) besteht kein Unterschied zwischen Standardbedienung und vereinfachten Bedienung. Die Beschreibungen in dieser Anleitung beziehen sich hauptsächlich auf die Standardbedienung. Die Vorgehensweise bei der vereinfachten Bedienung ist jeweils bei den Beschreibungen der Bildschirmanzeigen im Radio- oder CD-Betrieb dargestellt.Umschaltung der Anzeige
1. Das Display in der Mitte antippen Bei jedem Antippen ändert sich die Anzeige in der folgenden Reihenfolge:  TitelanzeigeBildschirmschoner
Bei aktivierter Bildschirmschoner-Funktion wird der Bildschirmschoner angezeigt, wenn das Gerät ca. 30 Sekunden lang nicht bedient worden ist. Für ausfuhrlichere Informationen siehe Seite 41.Hintergrund
Wenn Sie das Display in der Mitte berühren und mindestens eine Sekunde lang halten, wird die Anzeige der Bildschirmhintergrund-Grafik eingeschaltet.| ① | ⑨ |
| ② | ⑩ |
| ③ | ⑪ |
| ④ | ⑫ |
| ⑤ | ⑬ |
| ⑥ | ⑭ |
| ⑦ | ⑮ |
| ⑧ | ⑯ |
Spektrumanalysator-Anzeige
Wenn Sie bei eingeschalteter Spektrumanalysator-Anzeige (S/A) die rechte Seite des Displays berühren und mindestens 1 Sekunde lang halten, wird der Anzeigemodus des Spektrumanalysators umgeschaltet.| S/A SCAN | S/A 1, S/A 2 und S/A 3 werden jeweils mindestens 10 Sekunden lang angezeigt. |
| S/A 1 | S/A 1 FLDR No. 003 TOP |
| S/A 2 | S/A 2 FLDR No. 003 TOP |
| S/A 3 | S/A 3 FLDR No. 003 TOP |
Umschaltung der Titelanzeige
Disc-Titel und andere für die jeweiligen Discs gespeicherten Informationen konnen während der Wiedergabe von CDs im CD- oder CD-Wechsler-Betrieb angezeigt werden. 1. Bei aktiver Titelanzeige die rechte Seite des Displays berühren und mindestens 1 Sekunde lang halten. Dabeiändert sich die Anzeige{jedes Mal, wenn Sie das Display berühren und halten, in der folgenden Reihenfolge: CD-TEXT-Disc Benutzerspezifischer Name (Disc) CD-Text-Name (Disc) Interpretenname CD-Text-Name (Titel) Benutzerspezifischer Name (Disc)... MP3/WMA-Disc Ordner Datei Album-TAG Interpretenname-TAG Titel-TAG Ordner...Hinweise:
- Bei MP3-Dateien werden ID3-Tags V2.3 / 2.2 / 1.1 / 1.0 unterstützen. - Bei der Anzeige von Tag-Informationen werden ID3-Tags V2.3 / 2.2 mit Vorrang behandelt. - Bei Album-Tags für WMA-Dateien werden die in die Erweiterungs-Kopfzeile geschriebenen Informationen angezeigt. - In Tags können nur ASCII-Zeichen angezeigt werden.Durchroll eines Titels
Auf der Titelanzeige die Blätterbewegung ↑ durchführren, während der Titel angezeigt wird. Der Titel wird nach links durchgerollt.Anhaltendes Durchrollens
Auf der Titelanzeige die Blätterbewegung durchführren.CT (Uhrzeit) - Funktion
Mit der CT-Funktion konnen Sie die von RDS-Senden ausgestrahlten Uhrzeitdaten empfangen und die Uhrzeit aneigen halten. Zum Aufrufen des CT-Bildschirms das Display in der Mitte antippen. - Wenn keine CT-Daten empfangen werden, zeit das Display “--CT”.Hinweis:
- CT-Daten werden in einigen Ländern sowie von bestimmten Sendern nicht übertragen. Außer dem werden in bestimmten Gegen die CT-Daten eventuell nicht korrekt angezeigt.Einstellung des ADF
- ADF ist die Abkürzung für "Anti Distortion Filter". Die verfügbaren Funktionen "Liveliness Enhancement Filter" und "Sound Tone Compensation" erhögen eine gut modulierte, realistische Wiedergabe ohne Beeinträchtigung der ursprünglichen Klangeigenschaften. Dieses Gerat verfügbar über 4 gespeicherte Klangcharakteristiken. Die bevorzugte Charakteristik auswahlen. ADF-1: Geeignet fur normale Lautsprecher. ADF-2: Geeignet für getrennte Lautsprecher ADF-3: Geeignet für koaxiale Lautsprecher USER : These Einstellung kann vom Benutzer gemäß den eigenen Vorlieben angepasst werden. OFF: Kein Klangeffekt Die werkseitige Ausgangseinstellung ist "OFF".Hinweise:
- Beim Umschalten der ADF-Einstellung verändert sich die Lautstärke. Vermindern Sie davon vor einer ADF-Umschaltung so welt wie möglich die Gesamtlautstärke und die Einstellungen "SW VOLUME" (Subwoofer-Lautstärke) und "CTR VOLUME" (Center-Laatsprecher-Lautstärke). - Bei einigen Laufsprechersystemen lässt sich kein hinreichender Effekt erzielen. In diesen Fällen den ADF-Parameter oder die Lautstärke entsprechend anpassen. - Wenn ADF auf "USER", "1", "2" oder "3" eingestellt ist, sind die VSE-Funktion sowie die Funktion BASS/TREB bei EQ-SELECT deaktiviert. 1. Die [SOUND]-Taste betätigen. 2. ADF antippen.| OFF POSITION | OFF P. EQ | OFF Dolby PLII |
| 2 - ZONE | ADF | A - MODE |
| OFF | OFF |
Einstellung des Subwoofoers und Center-Lautsprechers
- "SW VOLUME" (Subwoofer-Lautstärke) lässt sich nur einstellen, wenn "SUB-WOOFER" auf "ON" eingestellt ist. - "CTR VOLUME" (Center-Lautsprecher-Lautstärke) lässt sich nur einstellen, wenn als Modus für Dolby Pro Logic II entweder "MUSIC" oder "MATRIX" gewählt ist und "SP-SETTING" auf "CTR+SW" sowie "CENTER-SP" auf "ON" eingestellt ist. - Die werkseitige Ausgangseinstellung für SW VOLUME ist "0" und für CTR VOLUME ebenfalls "0". 1. Die [SOUND]-Taste betätigen. 2. A-MODE antippen.  3. Auf der Einstellungen-Wahlanzeige mit der Blätterbewegung 卡 卡 卡" SW VOLUME" oder "CTR VOLUME" wahren.  4. Auf der rechten Seite des Displays mit der Blätterbewegung den betreffenden Punkt wie gewünscht einstellen. * Dieser Punkt{lssst sich im Bereich von -5 bis +5 einstellen. 5. Die [SOUND]-Taste betätigten, um zur ursprünglichen Betriebsart zurückzukehren.Balance-/Fader-Einstellung
BALANCE:
Zur Einstellung der Lautstärke-Balance zwischen den linken und rechten Laufsprechem.FADER:
Zur Einstellung der Lautstärke-Balance zwischen den vorderen und hinteren Lautsprechem. Diewerkseitige Ausgangseinstellung fur BALANCEist "0" und fur FADER ebenfalls "0" Hinweis: Die Einstellung von Balance und Fader ist nicht möglich, wenn bei AC-PRO III die Einstellung "PRO" gewählt wurde (siehe Seite 44) und für die Positions-Funktion "ON" eingestellt ist. In dieser Fall die Balance-/Fader-Einstellung mit dem unter Verwendung des Positions-Menus" beschrieben Verfahren (siehe Seite 18) vornehen. 1. Die [SOUND]-Taste betätigen. 2. A-MODE antippen.  3. Auf der Einstellungen-Wahlanzeige mit der Blätterbewegung 卡 卡 "BALANCE" oder "FADER" wahren.  4. Auf der rechten Seite des Displays mit der Blätterbewegung den betreffenden Punkt wie gewünscht einstellen. * "BALANCE"lässt sich zwischen L13 (Lautstärke links angehoben) und R13 (Lautstärke rechts angehoben) einstellen. * “FADER”lässt sich zwischen R12 (Lautstärke hintsen angehoben) und F12 (Lautstärke vorn angehoben) einstehen. 5. Die [SOUND]-Taste betätigten, um zur ursprünglichen Betriebsart zurückzukehren.Tiefen-/Höhen-Einstellung
Die Tiefen-/Höheneinstellung kann nur vorgenommen werden, wenn Dolby Pro Logic II ausgeschaltet ist (siehe Seite 17) und “EQ SELECT” auf “BAS/TREB” eingestellt ist (siehe Seite 44). Die werkseitige Ausgangseinstellung ist 0^ 1. Die [SOUND]-Taste betätigten. 2. A-MODE antippen.  3. Auf der Einstellungen-Wahlanzeige mit der Blätterbewegung ↑ den Punkt “BASS” (Tiefen) bzw. “TREBLE” (Höhen) wahren.  4. Auf der rechten Seite des Displays mit der Blätterbewegung den betreffenden Punkt wie gewünscht einstellen. * Dieser Punkt{lässt sich im Bereich von -6 bis +6 einstellen. 5. Die Schritte 3 und 4 für alle gewünschten Einstellungspunkte wiederholen. 6. Die [SOUND]-Taste betätigten, um zur ursprünglichen Betriebsart zurückzukehren.AC-Processor III Betrieb
Dolby Pro Logic II
Dolby Pro Logic II ist eine Matrix-Dekodierungstechnologie, bei der die neueste digitale Matrixtechnologie für Verbesserung von Dolby Pro Logic angewendet wird. Sie ermöglich eine ausgezeichnete 5.1-Kanal-Wiedergabe der Dolby Surround-Klangquelle sowie von Stereoklangquellen, wie z.B. CDs, wodurch ein Surround-Kanal über den gesamten Frequenzbereich (20 Hz bis 20 kHz) erhalten und ein Stereoeffekt erzeugt wird. Dadurch konnen Stereoklangquellen mit einem dynamischen 5.1.-Kanal-Klang erhalten werden. Entsprechend der Klangquelle, die wiedergegeben werden soll, kann jeweils Musikmodus oder Matrixmodus eingestellt werden. Hergestellt unter der Lizensz der Dolby Laboratories. "Dolby", "Pro Logic" und das Doppel-D-Symbol sind Warenzeichen der Dolby Laboratories.Auswahl des PL II-Modus (Dolby PL II)
Passend zu der gewündsten Tonquelle fur den Dolby Pro Logic II-Modus entweder den MUSICoder den MATRIX-Modus auswahlen. Die werkseitige Ausgangseinstellung ist "OFF".■ MUSIC (Musik-Modus)
- Dieser Modus eignet sich für Stereo-Tonquellen wie CDs. - Daneben steht ein weiterer Modus zur Verfugung, der eine genaure Anpassung ermöglicht, da sich das Schallfeld je nach Art der aufgezeichneten Musikquelle unterschied durch ausbreitet (siehe Seite 47).■ MATRIX (Matrix-Modus)
- Dieser Modus eignet sich für Tonquellen wie MW/UKW-Radiosendungen.OFF
- Es wird nicht der Dolby Pro Logic II-Modus, sondern der AC-PROIII-Modus verwendet. Für Einzelheiten zum AC-PROIII-Modus siehe "Auswahl des Modus" (Seite 44). 1. Die [SOUND]-Taste betätigen. 2. Dolby PLII antippen.  3. Auf der rechten Seite des Displays die Blätterbewegung ↑ ⿱ ↑ durchführren, um den Dolby Pro Logic II-Modus anzuwahlen.  Die Modusanzeige ändert sich in der folgenden Reihenfolge: MUSIC (Musik-Modus) MATRIX (Matrix-Modus) OFF (PL II aus) MUSIC (Musik-Modus)... * Für Einzelheiten zur Lautstärkeeinstellung für den Center-Laatsprecher/Subwoofer siehe Seite 45. 4. RTN antippen.Verwendung des Positions-Menus
Mit dem POSITION-MENU konnen Sie zwischen f芮 Wiedergabeeinstellungen wahlen, die den Schallweg zwischen dem Lautsprecher und Ihrer Sitzposition beeinflussen. Ebenso ist ein punktgenauer Laufzeitenabgleich für die Lautsprecher möglich, so dass sich von jedem Lautsprecher für alle Hörer der gleiche Klangeindruck ergibt. Mit dem unter "Auswahl des Modus" beschriebenen Verfahren (siehe Seite 44) ACPROII auf PRO" einstellen. Die werkseitige Ausgangseinstellung fur POSITION ist "OFF" und für das Positions-BasismENU "FRONT".Positions-Menu
Für diese Funktion sind 5 Voreinstellungen gespeichert. Die bevorzugte Voreinstellung auswahlen. 1. Die [SOUND]-Taste betätigten. 2. POSITION antippen.  3. Auf der ON/OFF-Anzeige die Blätterbewegung durchführren. Der Positions-Effekt wird abwechselnd aktiviert und deaktiviert (ON/OFF).  Wenn der Positionseffekt auf "OFF" eingestellt ist, wirkt sich die Positionseinstellung nicht auf die Wiedergabe der Tonquelle aus. Damit ist die Positionseinstellung abgeschlossen. Die [SOUND]-Taste betätgten, um zur ursprünglichen Betriebsart zurückzukehren. 4. B/U antippen, um "BASIC" auszuwahlen.  Mit jedem Antippen von B/U wird zwischen "BASIC" (Grundeinstellung) und "USER" (benutzerspezifisch) hin- und hergeschaltet. 5. Auf der Nummer des Positions-Grundeinstellungsmenus mit der Blätterbewegung den gewünschten Eintrag im Positions-Grundeinstellungsmenu auswahlen. Grundeinstellungenmenu "Position"| Nr. | Angezeigter Name | Sitzposition |
| 1 | FRONT-L | Vordersitz links |
| 2 | FRONT-R | Vordersitz rechts |
| 3 | FRONT | Vordersitze |
| 4 | REAR | Rücksitze |
| 5 | FULL SEAT | Alle Sitze |
Anpassen/Speichern von Positionen (Benutzerspeicher)
Mit dem Benutzerspeicher ist eine punktgenaue Lautsprereinstellung möglich, so dass alle Lautsprecher für sümmtliche Zuhörer in Abhängigkeit von der im Positions-Grundeinstellungsmenu gewährten Einstellung den gleichen Klangeffekt liefern. Im Benutzerspeicher konnen bis zu 5 Einstellungen abgelegt werden.T-ALIGN (Laufzeitanpassung):
Hier besteht die Möglichkeit, den Abstand zwischen dem Hörer und den einzelnen Lautsprechem in 2,3-cm-Schritten einzugeben und so den Zeitabstand, nach dem der Ton den Hörer erreicht, für jeder Lautsprecher einzustellen.SP GAIN (Laatsprecherverstärkung):
Anpassung der Wiedergabelautstärke der einzelnen Lautsprecher. Die Einstellung so vornehmen, dass die Wiedergabelautstärke aller Lautsprecher gleich ist. 1. Die [SOUND]-Taste betätigten. 2. POSITION antippen. 3. Auf der ON/OFF-Anzeige die Blätterbewegung durchführten. Der Positions-Effekt wird abwechselnd aktiviert und deaktiviert (ON/OFF). 4. B/U antippen, um "BASIC" bzw. "USER" auszuwahlen. 5. Auf der rechten Seite des Displays mit das Menu auswahlen, das für die Einstellung verwendet werden soll. 6. Die [A]-Taste betätigen. 7. Auf der linken Seite des Displays mit der Blätterbewegung ↑ die Einstellung "T-ALIGN" oder "SP GAIN" wahren. 8. In der Mitte des Displays mit der Blätterbewegung die einzelnen Einstellungspunkte auswahlen. Mit jeder Blätterbewegung werden die Einstellungspunkte in der folgenden Reihenfolge durchgeschalte:  Einstellungspunkte *1 Wird nur angezeigt, wenn unter "SOUND" im Einstellmodus "SUB-WOOFER" auf "ON" eingestellt ist. *2 Wird nur angezeigt, wenn unter "SOUND" im Einstellmodus "SUB-WOOFER" auf "ON" eingestellt ist und in Schritt 7 "T-ALIGN" gewährt wurde. 9. Auf der rechten Seite des Displays mit der Blätterbewegung ↑ ↓ den betreffenden Punkt wie gewünscht einstellen.  * “T-ALIGN”{lsst sich im Bereich von 0 cm bis 501,4 cm in 2,3-cm-Schritten einstellen. * "SP GAIN"lässt sich im Bereich von -20dB bis 0dB einstellen. 10. Die Schritte 7 bis 9 für alle gewünschten Einstellungspunkte wiederholen. 11. Wenn die Einstellung samentlicher Punkte abgeschlüssen ist, RTN antippen. Das Display zeigt wieder den ursprünglichen Bildschirm, und in der BASIC- bzw. USER-Anzeige erscheidt ”. Damit ist die Positionseinstellung abgeschlussen. Um die eingestellten Werte anschließend im Menu der benutzerdefinierten Positionseinstellungen zu speichern, die folgenden Schritte durchführten: 12. RTN berühren und mindestens 1 Sekunde lang halten. Die Positions-Menüliste wird angezeigt. 13. Mindestens 2 Sekunden lang den Benutzer-Speicherplatz berühren und halten, an dem die Einstellwerte abgelegt werden sollen. Ein langer Signatlon zeigt an, dass die bis Schritt 10 eingestillten Werte im Positions-Benutzermenü gespeichert wurden. Wenn nur ein kurzer Signatlon zu horen ist, werden die Einstellwerte bis Schritt 10 verworfen. Die Einstellung dieser Werte gegebenenfalls wiederholen. 14. RTN antippen. 15. Die [SOUND]-Taste betätigten, um zur ursprünglichen Betriebsart zurückzukehren. * Um einen gespeicherten Benutzereintrag auszuwahlen, B/U antippen, so dass "USER" angezeigt wird, und auf der Nummer des Benutzer-Speichereintrags die Blätterbewegung ↑ ⿱ ↑ durchführung.Auswahl des VSE-Menüs
Die VSE-Funktion (Virtual Space Enhancer)GLEICHTE Schalldruckbalance im Fahrzeugaus,so dass sich auf allen Sitzplätzen dergleiche Klangeeffekt erzielen lasst, wie inKompensations-Simulationen ermittelt. Mit dem unter "Auswahldes Modus" bescribten Verfahren (siehe Seite 44) ACPROIII auf "STD" einstellen. Die werkseitige Ausgangseinstellung fur VSE ist "OFF" bzw. im VSE-Grundeinstellungsmenu FLATVSE-Grundeinstellungsmenu
Für diese Funktion sind sechs Grundeinstellungsmenüeinträge mit Voreinstellungen vorhanden. Den Grundeinstellungsmenüeintrag mit der von Ihnen bevorzugten Voreinstellung auswahlen. 1. Die [SOUND]-Taste betätigen. 2. VSE antippen.  3. Auf der ON/OFF-Anzeige die Blätterbewegung 1 durchführen. Der VSE-Effekt wird abwechselnd aktiviert und deaktiviert.  Wenn VSE auf "OFF" eingestellt ist, wirkt sich die VSE-Einstellung nicht auf die Wiedergabe der Tonquelle aus. Damit ist die VSE-Einstellung abgeschlossen. Die [SOUND]-Taste betätigten, um zur ursprünglichen Betriebsart zurückzukehren. 4. B/U antippen, um "BASIC" auszuwahlen.  Mit jedem Antippen von B/U wird zwischen "BASIC" und "USER" hin- und hergeschaltet. 5. Auf der Nummernanzeige des VSE-Grundeinstellungsmenus mit der Blätterbewegung den gewürschten Eintrag im VSE-Grundeinstellungsmenu auswahlen. VSE-Grundeinstellungensmenu| Nr. | Funktionsname | Beschreibung |
| 1 | FLAT | Gerader Frenenzgang der Tonquelle |
| 2 | BASS BOOST | Tiefenbereich angehoben |
| 3 | HIGH BOOST | Mitten- und Höhenbereich angehoben |
| 4 | IMPACT | Tiefen- und Höhenbereich angehoben |
| 5 | ACOUSTICAL | Mittenbereich (Gesangsstimmen) angehoben |
| 6 | SMOOTH | Lieferiert ein weiches Klangbild |
Anpassen/Speichern der VSE-Einstellungen (Benutzerspeicher)
Mit den im Benutzerspezicher abgelegten Einstellungen konnen Sie die Schalldruckverteilung auf der Grundlage der Einstellungen im VSE-GrundeinstellungsmENU gemaB他们在Vorlieben anpassen。Eskonnenbiszu sechsbenutzerspezifische Einstellungen gespeichert werden.DIFFUSE:
Anpassung der diffusen Schaldruckverteilung.CARWIDTH:
Anpassung der Schaldruckverteilung in Richtung der Fahrzeugbreite.CAR LENGTH:
Anpassung der Schaldruckverteilung in Richtung der Fahrzeuglänge. 1. Die [SOUND]-Taste betätigen. 2. VSE antippen. 3. Auf der ON/OFF-Anzeige die Blätterbewegung durchführen. Der VSE-Effekt wird abwechselnd aktiviert und deaktiviert. 4. B/U antippen, um "BASIC" bzw. "USER" auszuwahlen. 5. Auf der rechten Seite des Displays mit der Blätterbewegung ↑ ↓ das Menu auswahlen, das für die Einstellung verwendet werden soll. 6. Die [A]-Taste betätigen. 7. Auf der Einstellungen-Wahlanzeige mit der Blätterbewegung ↑“DIFFUSE”, “CAR WIDTH” oder “CAR LENGTH” auswählen.  8. Auf der rechten Seite des Displays mit der Blätterbewegung ↑ ⊙ ⊙ den betreffenden Punkt wie gewünscht einstellen. * Dieser Punkt{lásst sich im Bereich von 1 bis 10 einstellen. 9. Die Schritte 7 und 8 für alle gewünschten Einstellungspunkte wiederholen. 10. Wenn die Einstellung samtlicher Punkte abgeschlüssen ist, RTN antipen. Das Display zeigt wieder den ursprünglichen Bildschirm, und in der BASIC- bzw. USER-Anzeige erscheint Damit ist die VSE-Einstellung abgeschlossen. Um die eingestellen Werte anschließend im Menu der benutzerdefinierten VSE-Einstellungen zu speichern, die folgenden Schritte durchführten: 11. RTN berühren und mindestens 1 Sekunde lang halten. Die VSE-Benutzermenüleiwe wird angezeigt. 12. Mindestens 2 Sekunden lang den Benutzer-Speicherplatz berühren und halten, an dem die Einstellwerte abgelegt werden sollen. Ein langer Signalton zeigt an, dass die bis Schritt 9 eingestillten Werte im VSE-Benutztermenü gespeichert wurden. Wenn nur ein kurzer Signalton zu horen ist, werden die Einstellwerte bis Schritt 9 verworfen. Die Einstellung dieser Werte gegebenenfalls wiederholen. 13. RTN antippen. 14. Die [SOUND]-Taste betätigten, um zur ursprünglichen Betriebsart zurückzukehren. * Um einen gespeicherten Benutzereintrag 2 auszuwahlen, B/U antippen, so "USER" angezeigt wird, und auf der Nummer des Benutzer-Speichereintrags die Blätterbewegung ↑ durchführten.Verwendung des P.EQ-Menüs
Der parametrische Equalizer (P.EQ) erhögt. eine detailierte Kompensation des gesamten Frequenzbereichs durch die Anwendung einer geglifteten, an den Fahrzeugtyp angepassten Freqenz-Kompensationskurve. Mit dem unter "Auswahl des Modus" beschreibenben Verfahren (siehe Seite 44) EQ SELECT auf P.EQ einstellen. Die werkseitige Ausgangseinstellung fur P.EQ ist "OFF" und fur das P.EQ.- Grundeinstellungenmenu "SEDAN-1".P.EQ-Grundeinstellungsmenu
Im P.EQ-Grundeinstellungensmenu sind für diese Funktion 6 an die Karosserieform und die Lautspricher-Einbauposition angepasste Voreinstellungen gespeichert. Das auf das Fahrzeug zuteffende Grundeinstellungensmenu auswahlen. 1. Die [SOUND]-Taste betätigten. 2. P.EQ antippen.  3. Auf der ON/OFF-Anzeige die Blätterbewegung 14 durchführren. Der P.EQ-Effekt wird abwechselnd aktiviert und deaktiviert.  Wenn der P.EQ-Effekt auf "OFF" eingestellt ist, wirkt sich die P.EQ-Einstellung nicht auf die Wiedergabe der Tonquelle aus. Damit ist die P.EQ-Einstellung abgeschlossen. Die [SOUND]-Taste betätigten, um zur ursprünglichen Betriebsart zurückzukehren. 4. B/U antippen, um "BASIC" auszuwahlen.  Mit jedem Antippen von B/U wird zwischen "BASIC" und "USER" hin- und hergeschaltet. 5. Auf der Nummernanzeige des P.EQ-Grundeinstellungsmenü die Blätterbewegung 山 山 山 durchführten, um den gewünschten Eintrag des P.EQ-Grundeinstellungsmenü auszuwahlen. P.EQ-Grundeinstellungsmenu| Nr. | Angezeigter Name | Lautsprecher-Einbauposition |
| 1 | SEDAN-1 (Limousine 1) | Vorn: Vordere Türen Hinten: Heckablage |
| 2 | SEDAN-2 (Limousine 2) | Vorn: Vordere Türen Hinten: Hintere Türen |
| 3 | WAGON-1 (Kombi 1) | Vorn: Vordere Türen Hinten: Gepäckablagen (seitlich) |
| 4 | WAGON-2 (Kombi 2) | Vorn: Vordere Türen Hinten: Hintere Türen |
| 5 | MINI VAN-1 (Minivan 1) | Vorn: Vordere Türen Hinten: Gepäckablagen (seitlich) |
| 6 | MINI VAN-2 (Minivan 2) | Vorn: Vordere Türen Hinten: Hintere Türen |
Anpassen/Speichern der P.EQ-Einstellungen (Benutzerspeicher)
Mit den im Benutzerspeicher abgelegten Einstellungen können Sie die Frequenzcharakteristik auf der Grundlage der Einstellungen im P.EQ-Grundeinstellungsmenu passend für Ihr Fahrzeug kompensieren. Im Benutzerspeicher können bis zu 6 Einstellungen abgelegt werden. Für ausfuhrlichere Informationen siehe "P.EQ-Einstellung". 1. Die [SOUND]-Taste betätigten. 2. P.EQ antippen. 3. Auf der ON/OFF-Anzeige die Blätterbewegung durchführren. Der P.EQ-Effekt wird abwechselnd aktiviert und deaktiviert. 4. B/U antippen, um "BASIC" bzw. "USER" auszuwahlen. 5. Auf der rechten Seite des Displays mit der Blätterbewegung ↑ ↓ das Menu auswahlen, das für die Einstellung verwendet werden soll. 6. Die [A]-Taste betätigen. 7. Auf der linken Seite des Displays mit der Blätterbewegung ↑ Ⓞ ↓ die Einstellung "FRONT" oder "REAR" auswahlen.  8. In der Mitte des Displays mit der Blätterbewegung die einzelnen Einstellungspunkte auswahlen. Mit jeder Blätterbewegung werden die Einstellungspunkte in der folgenden Reihenfolge durchgeschaltet: Einstellungspunkte BAND FREQ Q GAIN BAND... 9. Auf der rechten Seite des Displays mit der Blätterbewegung ↑ ⿱ den betreffenden Punkt wie gewünscht einstellen. * "BAND" (Frequenzband)lässt sich zwischen 1 und 3 einstellen. * “FREQ” (Frequenz)lässt sich zwischen 20Hz und 20kHz einstellen. * Für “Q” einen der Werte 1, 3, 5, 7 oder 20 wahren. * “GAIN” (Verständung)lässt sich zwischen -12 dB und +12 dB einstellen. 10. Die Schritte 7 bis 9 für alle gewünschten Einstellungspunkte wiederholen. 11. Wenn die Einstellung sãmtlicher Punkte abgeschlossen ist, RTN antipinen. Das Display zeit wird den ursprünglichen Bildschirm, und in der BASIC- bzw. USER-Anzeige erscheidt . Damit ist die P.EQ-Einstellung abgeschlossen. Um die eingestallen Werte anschließend im Menu der benutzerdefinierten P.EQ-Einstellungen zu speichern, die folgenden Schritte durchführten: 12. RTN berühren und mindestens 1 Sekunde lang halten. Die P.EQ-Menülsierte wird angezeigt. 13. Mindestens 2 Sekunden lang den Benutzer-Speicherplatz berühren und halten, an dem die Einstellwerte abgelegt werden sollen. Ein langer Signatlon zeigt an, dass die bis Schritt 10 eingestallen Werte im P.EQ-Benutzernü gespeichert wurden. Wenn nur ein kurzer Signatlon zu horen ist, werden die Einstellwerte bis Schritt 10 verworfen. Die Einstellung dieser Werte gegebenenfalls wiederholen. 14. RTN antippen. 15. Die [SOUND]-Taste betätigten, um zur ursprünglichen Betriebsart zurückzukehren. * Um einen gespeicherten Benutzereintrag auszuwahlen, B/U antippen, so dass "USER" angezeigt wird, und auf der Nummer des Benutzer-Speichereintrags die Blätterbewegung ↑Bü durchführten.P.EQ-Einstellung
Die Einstellungen im P.EQ-Menu halten sich in gewissem Umfang anpassen. Mittenfrequenz, Verstärkung und Q-Kurve können jeweils für Kanal/ Freqenzband-Kombinationen gespeichert werden. Beisiel: Für das Freqenzband 1 vorn können die Mittenfrequenz "250 Hz", die Verstärkung "-8 dB" und die Q-Kurve "3" gespeichert werden.FRONT/REAR (Kanal-Ausbahl)
AuswahldesanzupassendenKanals(vornoderhinten).BAND (Frequenzband-Auswahl)
AuswahldesanzupassendenFrequenzbands1bis3. FurjedesFrequenzband sind dieMittenfrequenz (FREQUENCY),Verstarkung(GAIN)undQ-Kurve(Q) einzustellen.FREQUENCY (Mittenfrequenz-Ausbahl)
Auswah der Freqenz, die als Mittelpunkt des zu kompensierenden Freqenzbands verwendet werden soll, im Bereich von 20 Hz bis 20 kHz. (1/3-Oktavschritte, 31 Punkte)GAIN (Verständkungs-Einstellung)
Anpassung der Verständung (Ausgangspiegel) zwischen -12 dB und +12 dB. (1-dB-Schritte, 25 Punkte)Q (Q-Kurven-Auswahl)
Auswahl eines der Werte 1, 3, 5, 7 oder 20 zur Festlegung der Scharfe der Q-Kurve.Kompensation
Eine Kompensation der Frequenzcharakteristik ist nicht erforderlich, wenn sich bei der Ermittlung des Frequenzgangs mit einem Messgerät ein flacher Verlauf (ohne Spitzen oder Einschnitt) ergibt. Manchmal weist jeder der Frequenzgang an einigen Stellen einen Anstieg oder Abfall auf. In diesen Fällen muss der Frequenzgang kompressiert werden. Hierzu wird ein Frequenzgang erzeugt, dessen Verlauf zu den Mittenfrequenzen der ansteigenden und abfallenden Abschnittte entgegengesetzt ist, um diese Spitzen und Einschnittte auszugleichen und die Frequenzgangkurve so flach wie möglich werden zu halten. Die Erzeugung eines möglichst flichen Frequenzgangs wird als "Kompensation" bezeichnet. Bei dieser Gerät kann der Frequenzgang mit Hilfe der P.EQ-Funktion (parametrischer Equalizer) kompensiert werden.- Kompensation des Frenzgangs
Die unter stehende Abbildung verdeutlicht den Zusammenhang zwischen Mittenfrequenz, Verstärkung und Q-Kurve. Q-Kurve
Die Q-Kurve wird bei größeren Zahlenwertenscharfer und bei kleineren Zahlenwertenglatter. Um einen geraden Frequenzgang zu erzielen, ist eine Q-Kurve mit der zu kompensierenden Curve entgegengesetztener Eigenschaften zu wahren.  F: Mittenfrequenz, G: Verständung (Ausgangspegel), Q: Q-Kurve| Nr. (Fahrzeugtyp) | Parameter für den parametrischen Equalizer | |||||||||
| Kanal | Frequenzband 1 | Frequenzband 2 | Frequenzband 3 | |||||||
| F | G | Q | F | G | Q | F | G | Q | ||
| 1 (SEDAN-1) (Limousine 1) | Vorn | 250 Hz | -8 dB | 3 | 2 kHz | -4 dB | 1 | 5 kHz | -4 dB | 1 |
| Hinten | 250 Hz | -10 dB | 3 | 1.25 kHz | 0 dB | 5 | 8 kHz | 0 dB | 5 | |
| 2 (SEDAN-2) (Limousine 2) | Vorn | 250 Hz | -10 dB | 7 | 800 Hz | -4 dB | 3 | 8 kHz | -5 dB | 1 |
| Hinten | 80 Hz | 3 dB | 7 | 125 Hz | -12 dB | 5 | 1.25 kHz | 0 dB | 5 | |
| 3 (WAGON-1) (Kombi 1) | Vorn | 250 Hz | -8 dB | 3 | 1 kHz | -8 dB | 3 | 10 kHz | -6 dB | 1 |
| Hinten | 250 Hz | -8 dB | 3 | 800 Hz | -8 dB | 1 | 8 kHz | 0 dB | 5 | |
| 4 (WAGON-2) (Kombi 2) | Vorn | 250 Hz | -8 dB | 7 | 400 Hz | -10 dB | 7 | 1.25 kHz | -8 dB | 7 |
| Hinten | 125 Hz | -8 dB | 3 | 500 Hz | -5 dB | 5 | 1.6 kHz | 0 dB | 3 | |
| 5 (MINI VAN-1) (Minivan 1) | Vorn | 125 Hz | -4 dB | 5 | 1.25 kHz | -4 dB | 3 | 2 kHz | 3 dB | 7 |
| Hinten | 250 Hz | -6 dB | 1 | 630 Hz | -4 dB | 3 | 8 kHz | 0 dB | 5 | |
| 6 (MINI VAN-2) (Minivan 2) | Vorn | 250 Hz | -4 dB | 3 | 1.25 Hz | -8 dB | 3 | 80 Hz | 3 dB | 3 |
| Hinten | 250 Hz | -8 dB | 3 | 500 Hz | -5 dB | 5 | 8 kHz | 0 dB | 5 | |
Radiobetrieb
Bildschirmanzeigen im Radiobetrieb
Hauptanzeige
These Anzeige erscheint, wenn Sie den [ROTARY]-Knopf drucken und Radiobetrieb wahlen.  Wenn Sie den linken Teil der Anzeige mindestens 1 Sekunde lang berühren, wird auf die einfache Anzeigevariante umgeschaltet. Frequenzanzeige
Die momentan empfangene Frequenz wird angezeigt. Wenn Sie auf der Standardanzeige die Durchlaufbewegung oder die Blätterbewegung 山 durchfuhren, aktiviert dies den Sendersuchlauf bzw. die manuelle Sendereinstellung.Titelanziige
Zeigt den Name des momentan empfangenen Radiosenders an. Beim Antippen des Namens wird die Anzeige umgeschaltet.Wellenbereich-Anzeige
AM: Name des MW-Wellenbereichs FM1: Name des UKW-WellenbereichsAnzeige der Festsender-Nummer
In der Standardbetriebsanzeige wird mit der Blätterbewegung einer der eingespeicherten Festsender angewählt.MODE
Durch Antippen dieser Anzeige werden Unterfunktionen angezeigt. Wenn Sie diese Anzeige mindestens 1 Sekunde lang berühren, erscheint die Beste der eingespeicherten Voreinstellungen.P-SCAN:
These Anzeige entscheidt während der Festsenderanspielung. Durch Antippen wird die Festsenderanspielung abgebrochen.A-STORE:
These Anzeige erscheint während der automatischen Speicherung. Durch Antippen wird die automatische Speicherung abgebrochen.BAND
Beim Antippen dieser Anzeige wird der Wellenbereich umgeschaltet. Wenn Sie diese Anzeige mindestens 1 Sekunde lang berühren, wird zwischen manueller Sendereinstellung und Sendersuchlauf umgeschaltet.(nier in der Anzeige fur den einfachen Bedienungsmodus)
Durch Antippen dieser Anzeigen wird der Sendersuchlauf gestartet bzw. die schrittweise Einstellung durchgeführt (bei manueller Einstellung). Durch Berühren und Halten dieser Anzeigen wird die Schnelleinstellung gestartet (bei manueller Einstellung).Anzeige der Festsenderliste
Thesee Listewird angezeigt, wenn Sie auf der Hauptanzeige MODE berühren und mindestens 1 Sekunde lang halten.  Sendername (oder -frequenz) >>: Suchlauf lauft RTN: Durch Antippen wird wieder die Hauptanzeige aufgerufen.Hören von Radiosendungen
1. Drucken Sie den [ROTARY]-Knopf, um Radiobetrieb zu wahren. Bei jedem Druck auf den [ROTARY]-Knopfändert sich die Betriebsart in der folgenden Reihenfolge: $$ \begin{array}{l}\text {R a d i o} \rightarrow (\text {D A B}) \rightarrow \text {C D / M P 3} \rightarrow\\(\text {C D - W e c h s l e r}) \rightarrow (\text {D V D - W e c h s l e r}) \rightarrow\\(\text {T V}) \rightarrow \text {A U X} \rightarrow \text {R a d i o . . .}\end{array} $$ * Betriebsarten für nicht angeschlossene Geräte werden nicht angezeigt. 2. BAND antippen, um den Wellenbereich umzuschalten. Jedes Mal wenn Sie BAND antippen, ändert sich der Wellenbereich in der folgenden Reihenfolge: $$ \begin{array}{l}\text {F M 1} \rightarrow \text {F M 2} \rightarrow \text {F M 3} \rightarrow \text {A M (M W / L W)} \rightarrow\\\text {F M 1} \dots\end{array} $$Sendereinstellung
Es gibt 3 Arten der Sendereinstellung: Sendersuchlauf, manuelle Sendereinstellung und Festsendereinstellung.Sendersuchlauf
Es gibt 2 Arten des Sendersuchlaufs: DX SEEK und LOCAL SEEK. DX SEEK stellt automatisch alle empfangbaren Sender ein; LOCAL SEEK stellt nur Sender mit gutem Empfang ein. 1. BAND antippen und den gewünschten Wellenbereich einstellen (FM/UKW oder AM (MW, LW)). 2. Einen Sender einstellen. * Wenn MANU angezeigt wird, BAND berühren und mindestens 1 Sekunde lang halten. Daraufhin erlischt "MANU" in der Anzeige, und der Sendersuchlauf ist möglich. * Wenn "TA" angezeigt wird, werden automatisch nur Sender mit Verkehrsfunk gesucht.DX SEEK
Wenn auf der Frenzenanzeige die Blätterbewegung ↑durchgeführt wird, beginnt die automatische Sendersuche. Mit 品 werden Sender mit hohenen Frequenzen gesucht; mit lauft die Sendersuche in Richtung niedrigerer Frenquen. * Wenn der Sendersuchlauf beginnt, wird "DX SEEK" im Display angezeigt.LOCAL SEEK
Wenn Sie auf der Frequenzanzeige die Durchlaufbewegung durchführen, wird ein lokaler Sendersuchlauf durchgeführt. Es werden nur Sender mit gutem Empfang eingestellt. * Wenn der lokale Sendersuchlauf beginnt, wird "LO SEEK" im Display angezeigt.Manuelle Sendereinstellung
Es gibt 2 Arten der Sendereinstellung: Schnelleinstellung und schrittweise Einstellung. Bei der schrittweisen Sendereinstellung ändert sich die Frequenz jeweils in Einzelschritten. Die Senderschnelleinstellung erhögt einechnelle Einstellung der gewünschten Freqenz. 1. Wenn MANU nicht angezeigt wird, BAND berühren und mindestens 1 Sekunde lang halten. Die manuelle Sendereinstellung ist nur möglich, wenn MANU angezeigt wird. 2. Mit Hilfe der Frenuzanzeige eine Frequenz einstehen, auf der eine Sendung ausgestrahlt wird.Schrittweise Sendereinstellung
Auf der Frenuzanzeige die Blätterbewegung t durchfuhren.- Senderschnelleinstellung
Auf der Frenuzanzeige die Durchlaufbewegung durchfuhren. Die Frequenzanzeige lauft durch, bis Sie den Finger wieder vom Displayephmen.Abruf eines Festsenders
Beim Abruf eines Festsenders wird ein zuvor gespeicherter Sender eingestellt. 1. MODE berühren und mindestens 1 Sekunde lang halten. Die ListederingespeichertenSenderwirnd angezeigt. 2. Den gewünschten Sender antippen. * Im normalen Bedienungsmodus kann ein Festsender auch mit der Blätterbewegung ↑Bim Haupt-Anzeigebildschirm angewählt werden.Abbrechen der Sendereinstellung
1. RTN antippen.Festsender-Speicherplatz
Es stehen insgesamt 24 Speicherplätze (6 x FM1, 6 x FM2, 6 x FM3, 6 x AM) zur Verfügung, an denen Festsender abgelegt werden können. 1. BAND antippen, um den Wellenbereich umzuschalten. 2. An der Frenuzanzeige den gewünschten Sender einstellen. 3. MODE berühren und mindestens 1 Sekunde lang halten. Die Liste der eingespeicherten Sender wird angezeigt. 4. Die Nummer des für den Sender vorgesehenen Festsender-Speicherplatzes berühren und mindestens 2 Sekunden lang halten. Ein langer Signalton zeigt an, dass der Sender gespeichert wurde.Automatische Speicherung
Mit der Funktion für automatische Speicherung konnen bis zu 6 Sender automatisch nacheinander eingestellt und gespeichert werden. 1. MODE antippen. 2. A-STORE berühren und mindestens 2 Sekunden lang halten. Die MODE-Anzeige ändert sich in "A-STORE", und die Nummer des momentan eingespeicherten Festsenders entscheid in der Festsender-Nummernanzeige. * Es werden automatisch Sender mit gutem Empfang gesucht und beginnend mit der niedrigsten Sendefrequenz an den Festsender-Speicherplätzen Nr. 1 bis 6 abgelegt.Hinweise:
- Bei der automatischen Speicherung werden die bisher gespeicherten SenderGIS. - Wenn bei LOCAL SEEK weniger als 6 Sender mit gutem Empfang gefunden werden, wird die automatische Speicherung, wieder mit den unteren Frenzen beginnend, mit DX SEEK fortgesetzt. Wenn auch nach dieser zweimaligen automatischen Speicherung weniger als 6 Sender gefunden wurden, bleiben die bisher gespeicherten Sender erhalten. - Wenn die automatische Speicherung für den UKW-Wellenbereich durchgeführt wird, werden die Sender bei FM3 abgelegt, auch wenn für die Speicherung von Sendern FM1 oder FM2 gewählt wurde.Festsenderanspielung
Bei der Festsenderanspielung werden die im Speicher abgelegten Sender in der momentan gespeicherten Reihenfolge nacheinander angewählt, damit Sie in die momentan ausgestrahlten Sendungen hineinhoren können. 1. MODE antippen. 2. P-SCAN antippen. Die MODE-Anzeige ändert sich in “P-SCAN”, und die Nummer des momentan angespielten Festsenders erscheint in der Festsender-Nummernanzeige. * Die momentan gespeicherten Festsender werden nacheinander jeweils mindestens 7 Sekunden lang empfangen. Sender mit schlechtem Empfang werden übersprungen, und der Empfang wird bei dem{nachsten Sender fortgesetzt. Wenn die Festsenderanspielung im UKW-Wellenbereich durchgefuhrt wird, werden die UKW-Sender in der folgenden Reihenfolge angespielt: FM1 (1 6) FM2 (1 6) FM3 (1 6)... Wenn die Festsenderanspielung im MW-Wellenbereich durchgefuhrt wird, werden die MW-Sender in der folgenden Reihenfolge angespielt: AM (1 6) AM(1 6) etc.Abbrechen der Festsenderanspielung
1. P-SCAN antippen. The P-SCAN-Anzeige ändert sich in "MODE", und der Radioempfang wird mit dem Sender fortgesetzt, der beim Antippen von P-SCAN empfangen wurde.RDS (Radiodatensystem)
Dieses Gerät besitzt ein eingebautes RDS-Dekodierersystem, das Sender Unterstützung, die RDS-Daten übertragen. Dieses System zeigt den Name des empfangenen Senders an (PS) und kann automatisch den Sender mit dem besten Empfang einstellen, während Sie auf langen Strecken unterwegs sind (AF-Umschaltung). Ebenfalls, wenn eine Verkehrsdurchsage oder eine Programmart von einem RDS-Sender gesendet wird, dann kann dieser Sender ungeachtet der eingestillten Betriebsart empfangen werden. Wenn zusätzlich EON-Informationen empfangen werden, dann kann mittels diesen Informationen eine automatische Umschaltung von anderen Festsendern des gleichen Sendernetzes erfolgen und eine Unterbrechung des empfangenens Senders für Verkehrsinformationen von anderen Sendern ausgeführten werden (TP). Diese Funktion ist in einigen Gegen den nicht verfügbar. Bei Anwendung der RDS-Funktion, das Radio immer auf UKW-Betrieb einstehen. - AF: Alternative Frequenz - PS: Senderkennung (Programme Service Name) - PTY: Programmart (Programme Type) - EON: Erweitertes Netz anderer Sender (Enhanced Other Network) - TP: Verkehrsfunk (Traffic Programme) PI: ProgrammKennung (Programme Identification) - TA: Verkehrsdurchsage (Traffic Announcement) * Wahrend AM-Radioempfang ist die RDS-Unterbrechung nicht wirksam. * Wenn das Gerät ein RDS-Signal empfängt und die PS-Datenlesen kann, wird der Programdmienstname des momentan empfangenen Senders angezeigt.AF-Funktion
Mittels der AF-Funktion wird auf eine andere Frequenz im gleichen Sendernetz geschalte, um einen optimalen Empfang beizubehalten. Die werkseitige Ausgangseinstellung ist "ON".Ein-/Ausschalten der AF-Funktion
1. MODE antippen. 2. AF antippen. Bei jedem Antippen wird die AF-Anzeige zwischen "ON" und "OFF" umgeschaltet. 3. RTN antippen. * Solletse sich der Empfang des derzeitig eingestellten Senders verschlechtern, so wird im Display "SEARCH" angezeigt, und das Radio führte eine Suche nach dem gleichen Programm auf einer anderen Frequenz durch.■ AF-Funktion-Umschaltung zwischen RDS und DAB
Wenn das gleiche Programm bei RDS und DAB gesendet wird und diese Funktion eingeschaltet ist (ON), dann schaltet das Gerät automatisch auf den Sender mit dem besseren Empfang. - Diese Funktion ist nur verfügbar, wenn das getrennt erhältliche DAB-Gerät DAH923 oder DAH913 angeschlossen ist. Die werkseitige Ausgangseinstellung ist "ON". 1. Die [A]-Taste betätigten, um den Einstellmodus aufzurufen. 2. Auf der Einstellungen-Wahlanzeige mit ↑ ↓ unter “TUNER” den Punkt “LINK ACT” wahren.  3. Entweder auf der rechten Seite des Displays die Blätterbewegung ↑ ↓ durchführten oder den [ROTARY]-Knopf drehen, um die Einstellung “ON” oder “OFF” zu wahlen. ON: AF-Umschaltung zwischen DAB und RDS ist möglich. OFF: AF-Umschaltung zwischen DAB und RDS ist nicht möglich. 4. Die [A]-Taste betätigten, um zur vorherigen Betriebsart zusückzukehren.REG-Funktion (Regionalprogramm)
Wenn die REG-Funktion eingeschaltet ist, kann der optimale Regionalsender empfangen werden. Wenn diese Funktion ausgeschaltet ist und sich der Regionalsenderbereich während der Fahrtändert, dann wird der Regionalsender für diesen Bereich empfangen. Die werkseitige Ausgangseinstellung ist OFFHinweise:
- Diese Funktion ist gespert, wenn ein nationaler Sender empfangen wird, wie z.B. BBC R2. Die ON/OFF-Einstellung (EIN/AUS) ist wirksam, wenn die AF-Funktion auf ON (EIN) eingestellt ist.Ein-/Ausschalten der REG-Funktion
1. MODE antippen. 2. REG antippen. Bei jedem Antippen wird die REG-Anzeige zwischen "ON" und "OFF" umgeschaltet. 3. RTN antippen.Manuelle Sendereinstellung eines Regionalprogramms im gleichen Sendernetz
- Diese Funktion ist wirksam, wenn die AF-Funktion eingeschaltet ist. - Die Bedienung unterscheidet sich je nachdem, ob die REG-Funktion ein- oder ausgeschaltet ist (ON/OFF). Wenn für die REG-Funktion ON gewählt ist, können nur Sendungen mit genau übereinstimmendem PI-Code empfangen werden. Wenn für die REG-Funktion OFF gewählt ist, können Sendungen mit einem PI-Code des gleichen Typs empfangen werden.Hinweise:
- These Funktion kann verwendet werden, wenn ein Regionalsender des gleichen Sendernetzes empfangen wird. - Der PI-Code ist ein Codiersystem mit einem für jeder Sonder eindeutigen Code. 1. MODE berühren und mindestens 1 Sekunde lang halten. Die Beste der eingespeicherten Sender wird angezeigt. 2. Die Festsendernummer des zu empfangenden Senders antippen.TA-Funktion (Verkehrsdurchsage)
Bei TA-Bereitschaftsbetrieb, wenn eine Verkehrs durchsage beginnt, wird ungeachtet des Funktionmodus dem Sender mit der Verkehrs durchsage Vorrang gegeben, damit Sie sie horen. Eine automatische Sendereinstellung für Verkehrsprogramm (TP) ist ebenfalls möglich. - Diese Funktion kann nur angewendet werden, wenn im Display "TP" aufleuchtet. Wenn "TP" aufleuchtet, zeigt dies an, dass der empfangene RDS-Sender Programme mit Verkehrsdurchsagen enthalt.Einstellung des TABereitschaftsbetriebs
Wird die [TA]-Taste betätig, wenn nur "TP" im Display aufleuchtet, dann leuchten im Display "TP" und "TA" auf und das Gerät wird auf TA-Bereitschaftsbetrieb eingestellt, bis eine Verkehrs durchsage gesendet wird. Wenn eine Verkehrs durchsage beginnnt, dann leuchtet im Display "TRA INFO" auf. Wird während des Empfangs einer Verkehrs durchsage die [TA]-Taste betätig, dann wird der Empfang für den Sender mit der Verkehrs durchsage gestopt und das Gerät schaltet auf TA-Bereitschaftsbetrieb.■ Aufhebung des TABereitschaftsbetriebs
Während im Display "TP" und "TA" angezeigt wird, die [TA]-Taste betätigten. Daraufhin wird "TA" im Display gelöscht, und der TA-Bereitschaftsbetrieb wird aufgehoben. - Wenn "TP" nicht angezeigt wird, startet die [TA]-Taste die Suche nach einem TP-Sender.SuchenachenaemTP-Sender
Wenn die [TA]-Taste gedrück wird, während "TP" nicht angezeigt wird, entscheidt "TA" in der Anzeige, und das Gerät empfängt automatisch einen TP-Sender.Hinweis:
- Wenn kein TP-Sender zu empfangen ist, wird "TP SEEK" angezeigt und die Sueche nach dem TP-Sender fortgesetzt. Bei erneuter Betätigung der [TA]-Taste werden "TA" und "TP SEEK" in der Anzeige gelöscht, und die Sueche nach dem TP-Sender wird abgebrochen.Automatische Speicherfunktion für TP-Sender
Bis zu 6 TP-Sender können automatisch in den Festsenderspeicher eingespeichert werden. Betragt die Anzahl der empfangbaren TP-Sender weniger als 6, werden die bereits eingespeicherten Sender nicht überschreiben. 1. Sicherstellen, dass "TA" angezeigt wird, und MODE antippen. Wenn "TA" nicht angezeigt wird, die [TA]-Taste betätigten. "TA" wird angezeigt. 2. A-STORE berühren und mindestens 2 Sekunden lang halten. Die MODE-Anzeige ändert sich in "A-STORE", und die Nummer des momentan eingespeicherten Festsenders erscheint in der Festsender-Nummernanzeige. - TP-Sender mit gutem Empfang werden als Festsender eingespeichert. - Auch wenn FM1 oder FM2 gewählt ist, werden TP-Sender bei FM3 gespeichert.PTY
These Funktion ermitteligt den Empfang eines Senders der gewünschten Programmart, selbst wenn das Gerät momentan auf eine andere Betriebsart als Radiobetrieb geschäftet ist. - In einigen Ländern gibt es noch keine PTY-Sender. - Bei TA-Bereitschaftsbetrieb hat ein TP-Sender Vorrang gegenüber einem PTY-Sender.■ Einstellung des PTY-Bereitschaftsbetriebs
Bei Betätigung der [▶II]-Taste leuchtet "PTY" im Display auf und der PTY-Bereitschaftsbetrieb wird eingeschaltet. Wenn der gewährte PTY-Sender beginnnt, wird im Display der PTY-Name angezeigt.■ Aufhebung des PTY-Bereitschaftsbetriebs
Wenn die [▶II]-Taste betätig und für 1 Sekunde oder länger gedrück gehalten wird, erlischt "PTY" im Display und der PTY-Bereitschaftsbetrieb wird aufgehoben.■ Aufhebung einer PTY-Senderunterbrechung
Während der PTY-Senderunterbrechung die [▶II]-Taste betätigten. Dann wird die PTY-Unterbrechung aufgehoben und das Gerätschaltet auf PTY-Bereitschaftsbetrieb.PTY-Einstellung
1. Bei Betätigung der [▶II]-Taste schaltet das Gerät auf PTY-Senderwahl. 2. Entweder auf der rechten Seite des Displays die Blätterbewegung ↑ durchführten oder den [ROTARY]-Knopf drehen, um PTY zu wahlen. * Unten sind die werkseitig gespeicherten Ausgangseinstellungen aufgeführt:| Festsender- nummer | PTY-Name | |
| DEUTSCH | Inhalt | |
| 001 | Nachrich | Nachrichtendienst |
| 002 | Service | Service Programm |
| 003 | Pop | Popmusik |
| 004 | Sport | Sport |
| 005 | E-Musik | Ernstige klassische Musik |
| 006 | U-Musik | Unterhaltungsmusik |
PTY-Suche
1. Bei Betätigung der [▶■]-Taste wird die PTY-Senderwahl aktiviert. 2. Entweder in der Mitte des Displays die Blätterbewegung durchführten oder den [ROTARY]-Knopf drehen, um PTY zu wahlen. 3. Auf der linken Seite des Displays die Blätterbewegung 卡 durchführren. Bei der Bewegung 卡 ucht das Gerät in Richtung der hohenen Frenzen nach einem PTY-Sender, bei der Bewegung 卡 erfolgt die Sueche in Richtung der niedrigeren Frenzen. * Falls kein Sender mit dem gewählten PTY-Programm empfangen werden kann, schaltet das Gerät auf den vorherigen Modus zurück.PTY-Festsenderspeicher
1. Bei Betätigung der [▶■]-Taste wird die PTY-Senderwahl aktiviert. 2. In der Mitte des Displays die Blätterbewegung 100 durchführten, um PTY zu wahren. Es können die unter aufgeführten 29 PTy Programmarten gewählt werden.| PTY-Name | ||||
| ENGLISH | DEUTSCH | SVENSKA | FRANÇAIS | Inhalt |
| News | Nachrich | Nyhet | Infos | Nachrichtendienst |
| Affairs | Aktuell | Aktuellt | Magazine | Politik und Zeitgeschehen |
| Info | Service | Info | Services | Service Programm |
| Sport | Sport | Sport | Sport | Sport |
| Educate | Bildung | Utbildn | Educatif | Lernen und Weiterbildung |
| Drama | Hör + Lit | Teater | Fiction | Hörspiel und Literatur |
| Culture | Kultur | Kultur | Culture | Kultur, Kirche und Gesellschaft |
| Science | Wissen | Vetenskp | Sciences | Wissenschaft |
| Varied | Unterh | Underh | Divers | Unterhaltendes Wort |
| Pop M | Pop | Pop | M Pop | Popmusik |
| Rock M | Rock M | Rock | M Rock | Rockmusik |
| Easy M | U-Musik | Lättlyss | Chansons | Unterhaltungsmusik |
| Light M | L-Musik | L klass | M Cl Lég | Leichte klassische Musik |
| Classics | E-Musik | Klassisk | Classiq | Ernstige klassische Musik |
| Other M | - - Musik | Övrig m | Autre M | Spezielle Musikprogramme |
| Weather | Wetter | Väder | Météo | Wetter |
| Finance | Wirtsch | Ekonomi | Economie | Wirtschaft |
| Children | Kinder | För barn | Enfants | Kinderprogramm |
| Social | Soziales | Sozialt | Société | Soziales |
| Religion | Religion | Andligt | Religion | Religion |
| Phone In | Anruf | Telefon | Forum | Anrufsendung |
| Travel | Reise | Resor | Voyages | Reiseinformation |
| Leisure | Freizeit | Fritid | Loisirs | Freizeit |
| Jazz | Jazz | Jazz | Jazz | Jazz |
| Country | Country | Country | Country | Countrymusik |
| Nation M | Landes M | Nation m | Ch pays | Musik des Landes |
| Oldies | Oldies | Oldies | Rétro | Oldiemusik |
| Folk M | Folklore | Folkm | Folklore | Folklore |
| Document | Feature | Dokument | Document | Feature |
Notrufmeldung
Wenn eine Notufremdung empfangen wird, werden alle Funktionsmodus-Betriebsarten gestopt. "ALARM" wird im Display angezeigt und die Notufremdung wird übertragen.■ Aufhebung der Notrufmeldung
Wenn die [AF]-Taste betätig wird, wird der Empfang der Notrufmeldung aufgehoben.Änderung der PTY-Display-Sprache
Es kann eine von 4 Sprachen (Englisch, Deutsch, Schwedisch oder Französisch) für das PTY-Display gewählt werden. Die werkseitige Ausgangseinstellung ist "ENGLISH". 1. Die [A]-Taste betätigten, um den Einstellmodus aufzurufen. 2. Auf der Einstellungen-Wahlanzeige mit der Blätterbewegung unter "TUNER" den Punkt "LANGUAGE" wahren.  3. Entweder auf der rechten Seite des Displays die Blätterbewegung 444 durchführten oder den [ROTARY]-Knopf drehen, um die Sprache zu wahlen. * Eine der Einstellungen ENGLISH (Englisch), DEUTSCH, SVENSKA (Schwedisch) oder FRANÇAIS (Französisch) wahren. 4. Die [A]-Taste betätigten, um zur vorherigen Betriebsart zusückzukehren.Einstellung der RDS- Unterbrechung bei Verwendung der 2-ZONE-Funktion (RDS-INT 2Z)
Wenn these Funktion aktiviert ist (ON) und eine RDS-Programmunterbrechung erfolgt, während die 2-ZONE-Funktion aktiv ist, konnen RDS-Informationen empfangen werden. - Bei einer RDS-Programmunterbrechung wird die 2-ZONE-Funktion deaktiviert (OFF). - Wenn eine Alarm-Programmunterbrechung erfolgt ist, werden die RDS-Informationen auch dann empfangen, wenn "RDS-INT 2Z" auf "OFF" eingestellt ist. Die werkseitige Ausgangseinstellung ist "ON". 1. Die [A]-Taste betätigten, um den Einstellmodus aufzurufen. 2. Auf der Einstellungen-Wahlanzeige mit der Blätterbewegung 15 unter "TUNER" den Punkt "RDS-INT 2Z" wahren.  3. Entweder auf der rechten Seite des Displays die Blätterbewegung ↑ durchführten oder den [ROTARY]-Knopf drehen, um die Einstellung “ON” oder “OFF” zu wahlen. ON: Wenn bei aktivierter 2-ZONE-Funktion eine RDS-Programmunterbrechung erfolgt, werden die RDS-Informationen empfangen.OFF:
Bei aktivierter 2-ZONE-Funktion werden keine RDS-Informationen außer Notruf-Programmunterbrechungen empfangen.Hinweis:
- Wenn Radiobetrieb gewählt ist und die Funktionen TA (Verkehrsdurchsagen) und PTY (Programmart) aktiviert sind ("ON"), erfolgen Programmunterbrechungen auch bei deaktivierter RDS-Unterberechnung ("OFF"). 4. Die [A]-Taste betätigten, um zur vorherigen Betriebsart zusückzukehren.Lautstärkeeinstellung für TA, Notrufmeldung (ALARM) und PTY
Die Lautstärke für TA-, ALARM- und PTY-Programmunterbrechungen kann eingestellt werden, während eine TA-, ALARM- oder PTY-Unterbrechung erfolgt. - Die werkseitige Ausgangseinstellung ist "15". Wahlend einer TA-, ALARM- oder PTY-Programmunterbrechung den [ROTARY]-Knot nach rechts oder links drehen, um den gewünschen Lautstärkepegel (0 bis 33) einzustellen. - Im Anschluss an die TA-, ALARM- oder PTY-Programmunterbrechung wird wieder der gleiche Lautstärkepegel wie vor der Unterbrechung eingestellt.Bildschirmanzeigen im CD-Betrieb
Hauptanzeige
These Anzeige entscheid, wenn Sie den [ROTARY]-Knopf drucken und CD-Betrieb wahlen.  Wenn Sie den linken Teil der Anzeige mindestens 1 Sekunde lang berühren, wird die Betriebsart umgeschaltt. Titel-/Spieldaueranzeige
01/02:00 Die Nummer des momentan abgespielten Titels und die Spieldauer werden angezeigt. Im Standardbetrieb kann die Blätterbewegung oder die Durchlaufbewegung durchgefuhrt werden, um den abzuspielenden Titel auszuwahlen oder einen schellen Titelvorlauf oder -rücklauf durchzufahren.Namensanzeige
Beim Berühren dieser Anzeige wird das Display umgeschaltet.Ordneranzeige (bei MP3/WMA)
Im Standardbetrieb werden mit der Blätterbewegung 4 Ordner ausgewählt.MODE:
Durch Antippen dieser Anzeige werden Unterfunktionen angezeigt. Wenn im MP3-/ WMA-Betrieb diese Anzeige berührt und mindestens 1 Sekunde lang gehalten wird, erscheint die Ordnerliste.Hinweis:
- Diese Funktion ist nur während der Wiedergabe einer Disc aktiviert. F-SCAN/SCAN: These Anzeige erscheidt während der Anspielwiedergabe. Durch Antippen wird die Anspielwiedergabe abgebrochen. - RPT/RPT: These Anzeige erscheint während der Wiedergabewiederholung. Durch Antippen wird die Wiedergabewiederholung abgebrochen. -RDM-RDM: These Anzeige erscheint whilst der Zufallswiedergab. Durch Antippen wird die Zufallswiedergab abgebrochen.TOP:
Wenn diese Anzeige angetippt wird, beginnt die Wiedergabe mit dem obersten Titel der Disc bzw. des Ordners, die/der momentan abgeschweit wird. (nur in der einfachen Betriebsanzeige) Mit diesen Tasten wird der abzuspielende Titel ausgewählt. Wenn diese Tasten betätig und gehalten werden, erfolgt ein Schneller Titelvorlauf bzw. - rücklauf.Ordnerlistenanzeige (bei MP3/WMA)
Thesee Lieste wird angezeigt, wenn auf der Hauptanzeige MODE berührt und mindestens 1 Sekunde lang gehalten wird.  OrdenameOrdner-Nr.
Wenn these Anzeige grau dargestellt ist, kann der Ordner nicht ausgewählt werden.>>: Auswahl lauft
Beim Antippen eines Ordernamens wird wieder die Hauptanzeige aufgerufen, und die Wiedergabe beginnt mit dem ersten Titel in dem angetipten Ordner.←PREV-RTN:
Durch Antippen dieser Anzeige wird wieder die vorherige Ordnerliste angezeigt. Wenn Sie diese Anzeige berühren und mindestens 1 Sekunde lang halten, erscheidt auf dem Display wieder die Hauptanzeige.NEXT:
Durch Antippen dieser Anzeige wird die{nachste Ordnerliste angezeigt.Was bedeutet "MP3"?
Bei "MP3" handelt es sich die Abkürzung von "MPEG Audio Layer 3", eines genormten Verfahrens zur Komprimierung von Audiodaten, das weltweit bei Audio-Anwendungen auf Personalcomputer verw Breitbart ist. Beim MP3-Format werden die Audiodaten auf etwas ein Zehntel ihrer Originalgroße komprimiert, wobei eine hohe Klangqualität gewährleistet bleibt. Dies ermöglich die Aufzeichnung von bis zu zehn Musik-CDs auf eine einzige CD-R-oder CD-RW-Discs, so dass lange Wiedergabezeiten ohne die durch das Auswechseln von Discs entstehen Unterbrechungen erhalten werden.Was bedeutet "WMA"?
Bei "WMA" handelt es sich die Abkürzung von "Windows Media Audio", eines von Microsoft Corporation für Audiodateien entwickelten Formats.Hinweise:
- Beim Abspielen einer Datei mit aktiviertem DRM (Digital Rights Management) für WMA wird kein Ton ausgegeben. (Die WMA-Anzeige blinkt.) - "Windows Media™" und das Windows®-Logo sind Warenzeichen bzw. eingetragene Warenzeichen von Microsoft Corporation in den Vereinigten Staaten und/oder anderen Ländern.Zum Sperren von DRM (Digital Rights Management):
- Bei Benutzung von Windows Media Player 8, auf die Registerkarte TOOLS OPTIONS COPY MUSIC klichen und dann unter COPY SETTINGS, das Auswahlzeichen im Auswahlfeld "PROTECT CONTENT" durch Klichenlöschen. Danach die Dateien wiederherstellen. - Bei Benutzung von Windows Media Player 9, auf die Registerkarte TOOLS OPTIONS MUSIC RECORD klichen und dann unter den Einstellungen für Aufnahme, das Auswahlzeichen im Auswahlfeld "RECORD PROTECTED MUSIC" durch Klichen loschen. Danach die Dateien wiederherstellen. Der Hersteller bietet keinerlei Gewähr fur Dateien, die vom Benutzer selbst konstruiert wurden.Vorsichtshinweise zur Erstellung von MP3-/WMA-Discs
Geeignete Abtastfrequenzen und Bitraten: 1. MP3: Abtastfrequenz: 11,025 kHz bis 48 kHz Bitrate: 8 kbps bis 320 kbps / VBR 2. WMA: Bitrate 48 kbps bis 192 kbps- Dateinamenserweiterungen
1. Achten Sie stets darauf, eine MP3- oder WMA-Datei mit der Namenserweiterung "MP3" bzw. .WMA" in Einzelbyte-Zeichen zu verstehen. Dateien, die mit einer anderen als dieser vorgeschreibenen oder gar keiner Namenserweiterung verstehen sind, halten sich nicht abspielen. 2. Dateien, die keine MP3-/WMA-Daten enthalten, können nicht abgespielt werden. In der Spieldauer-Anzeige erscheint “--- --”, wenn versucht wird, Dateien ohne MP3-/ WMA-Daten abzuspielen.- Logisches Format (Dateisystem)
1. Wahlen Sie zur Aufzeichnung von MP3-/WMA-Dateien auf eine CD-R- oder CD-RW-Disc in der Brenn-Software stets eines der Formate "ISO9660 level 1, 2", "JOLIET" oder "Romeo". Wird ein anderes Datenformat zur Aufzeichnung verwendet, ist u. U. keine einwandfrei Wiedergabe der Disc möglich. 2. Bei MP3-/WMA-Wiedergabe können Ordername und Datename als Titelname angezeigt werden, sofern die maximale Anzahl von 128 Einzelbyte-Zeichen (Buchstaben und Ziffern, einschließlich Dateinamenserweiterung) nicht übersritten wird. 3. Eine Datei darf nicht den gleichen Namen erhalten wie der Ordner, in dem sie sich befindet.- Ordnerstruktur
1. Die auf einer Disc vorhandenen Ordner dürfen in nicht mehr als 8 Hierarchiegeben angeordnet sein.Anzahl von Dateien oder Ordnern
1. In jedem Ordner können bis zu 255 Dateien erkannt werden. Bis zu 500 Dateien können abgespielt werden. 2. Die einzelnen Titel einer Disc werden in der Reihenfolge ihrer Aufzeichnung abgeschweit. (Die Wiedergabe von Titeln erfolgt u. U. nicht in der am PC angezeigten Reihenfolge.) 3. Je nach der zur Aufzeichnung verwendeten Codierer-Software kann ein gewisses Rauschen auftreten.Multisession-Ausbahl
Mit dieser Funktion konnen Sie auf Discs, die eine Mischung von CD-DA-Dateien (Musik-CDs) und MP3-/WMA-Dateien enthalten (z. B. CD-EXTRA), entweder CD-DA- oder MP3-/WMA-Dateien auswahlen. 1. MODE antippen. 2. M-SESS antippen. Bei jedem Antippen von M-SESS schaltet die M-SESS-Anzeige zwischen "CD" (CD-DA abspielten) und "MP3/WMA" (MP3/WMA abspielten) um. * Wenn M-SESS nicht angezeigt wird, NEXT antippen. 3. RTN antippen. Die Einstellung für die Multisession-Ausbwahl wird beim nachsten Einlagen einer CD angezeigt.Hinweis:
- Beim Abspielen einer CCCD (Copy Control CD - kopiergeschützte CD) muss der Typ "CD" eingestellt werden. Wenn als Typ MP3/WMA eingestellt ist, lasst sich die Disc in manchen Fälle nicht normal abspielen.A VORSICHT
Gehen Sie beim Schlieben der SCHRAGKONSOLE sorgsam vor, um ein Einklemmen der Hand oder Finger zu vermeiden.
Hinweise:
- Falls sich die SCHRÄGKONSOLE nicht welt genug öffnet, öffnen Sie sie sacht von Hand. - Achten Sie nach dem Einsetzen einer Disc stets darauf, die SCHRAGKONSOLE wieder zu schlieben. - Stecken Sie auf keinen Fall ihre Hand oder einzelne Finger in den Disc-Schlitz. Es dürfen keine anderen Gegenstände als Discs in diesen Schlitz eingeführt werden! - Setzen Sie keine Disc ein, auf deren Oberfläche Klebstoff unterhalb eines Klebestreifens oder Aufklebers austritt, oder auf der Klebstoffreste von abgezogenen Klebestreifen oder Aufklebern zurückgeblieben sind. Anderenfalls besteht die Gefahr, dass sich eine solche Disc nicht mehr entfern den latent, und das Gerät kann durch den Gebrauch derartiger Discs beschädigt werden.Einlagen einer CD
1. Die [▲]-Taste betätigten. Das Bedienfeld öffnet sich. 2. Setzen Sie die Disc in den CD-Schlitz ein. Einige Sekunden nach dem die Disc eingezogen wurde schließt sich das Bedienfeld automatisch, und die Wiedergabe beginnt.Hinweise:
- Niemals andere Gegenstände in den CD-Schlitz einfahren. - Falls sich die CD nicht ohne Widerstand einführtenläst, ist eventuell bereits eine andere CD geladen, oder das Gerät ist defekt. - CDs ohne die Kennzeichnung DISTRIG oder UUSMark sowie CD-ROMs konnen in thisem Gerät nicht abgespielt werden. - Bestimmte CDs, die im CD-R-/CD-RW-Modus gebrannt wurden, können u. U. nicht verwendet werden.Einsetzen von 8-cm-Kompakt-CDs
Zum Abspielen von 8-cm-CDs ist kein Single-Adapter erforderlich. 8-cm-CDs müssen in die Mitte des CD-Schlitzes eingeführt werden.Auswerfen einer CD
Discs können auch dann durch Betätigten der [Taste automatisch ausgeworfen werden, wenn der Zündschlüssel bzw. der ACC-Schalter in Stellung OFF liegt.VORSICHT
Nach dem Auswerfen der CD immer die [▲]-Taste betätigten, um das Bedienfeld wieder zu schlieben. Wenn Sie das Bedienfeld geöffnet lessen, ertont ein doppelter Signatlon, und das Bedienfeld schließt sich automatisch.
1. Die [▲]-Taste betätigen. Das Bedienfeld wird geöffnet, und die Disc wird ausgeworfen. Das Gerät schaltet automatisch auf Radiobetrieb um. * Ausgeworfene CDs müssen aus dem Gerät entnommen werden. Wenn Sie die Disc im Disc-Fach halten, wird sie nach mindestens 15 Sekunden wieder in das Gerät eingezogen, und das Bedienfeld schließt sich (automatischer Neueinzug). * Single-CDs werden nicht automatisch neu eingezogen. Bei Single-CDs müssen Sie nach dem Auswerfen davon denken, sie aus dem Gerät zu entnahmen.VORSICHT
Wenn Sie beim erneuten Laden einer bereits ausgeworfenen CD zu viel Kraft aufwenden, kann die Disc-Oberfläche zerkratzt werden. Vor dem erneuten Laden die Disc zunachst entnahmen.Abspielen einer bereits eingelegten Disc
1. Den [ROTARY]-Knopf drücken, um CD-Betrieb zu wahlen. * Nach der Umschaltung auf CD-Betrieb beginnnt automatisch die Wiedergabe.Pausieren der Wiedergabe
1. Die [▶■]-Taste betätigten.Fortsetzen der Wiedergabe
1. Die [ ] -Taste nochmals betätigen.Wahl eines Titels
Wenn e a CD-R/CD-RW geladen ist, auf der MP3- oder WMA-Dateien aufgezeichneten wurden, konnen Si meit der Blatterbewegung auf der Titelanzeige nur Titel auswahlen, die sie im gleichen Ordner befinden. 1. Zum Horen des nachsten Titels auf der Titelanzeige die Blätterbewegung durchführren. 2. Zum Horen des vorherigen Titels auf der Titelanzeige zweimal die Blätterbewegung durchfuhren. Mit wird der nachste Titel abgeschlipt. Wenn Sie die Blätterbewegung mehmals durchfuhren, wird dadurch um so viele Titel weitergesprungen, wie oft Sie die Blätterbewegung durchgefuhlten haben, und der entsprechende Titel wird abgeschlipt. Mit wird der vorausgegangene Titel abgeschlipt. Wenn Sie die Blätterbewegung mehrmals durchfuhren, wird dadurch um so viele Titel zurückgesprungen, wie oft Sie die Blätterbewegung durchgefuhlten, und der entsprechende Titel wird abgeschlipt. * Wenn die Blätterbewegung ↑ auf der Titelanzeige zweimal durchgeführt wird, während sich die Wiedergabe noch am Titelanfang befindet, wird in manchen Fällen der um 2 Titel darüber liegende Titel abgespielt.Wahl eines Ordners
Zur Auswahl eines anderen Ordners führen Sie entweder auf der Ordneranzeige die Blätterbewegung t durch, oder gehen Sie wie folgt vor. 1. MODE berühren und mindestens 1 Sekunde lang halten. Die Ordnerliste wird angezeigt. Durch Antippen von PREV oder NEXT wird der jeweils folgende bzw. vorherige Teil der Ordnerliste angezeigt. 2. Den Ordnarnamen antippen.Wiedergabe einer Abspielliste
Es können auch Abspiellisten (M3U-Dateien) wiedergegeben werden. Dabei ist jedoch zu beachten, dass bei M3U-Dateien, die mit einer Tiefe von fünf Ebenen (einschließlich der Stamm-Ebene) in der Dateihierarchie gespeichert sind, nur die obersten f芮 Dateien mit neuem Zeitstempel abgespielt werden konnen.Hinweise:
In jeweils einer Abspielliste konnen bis zu 255. Dateien abgeschweit werden. - Es können nur MP3- oder WMA-Dateien abgeschweit werden, die in Ordern mit einer Tiefe von maximal fünf Ebenen (einschließlich der Stamm-Ebene) in der Dateihierarchie gespeichert sind.Zur Wiedergabe der Abspielliste ist wie folgt vorzugehen:
1. MODE antippen. 2. NEXT antippen. 3. PLY LIST antippen. Das Einlesen der Abspielliste beginnt. Sobald die Abspielliste vollständig eingelesen ist, beginnnt automatisch die Wiedergabe der Abspielliste mit dem neuesten Zeitstempel. Die Auswahl der Abspielliste oder der Titel in der Abspiellste erfolgt auf die gleiche Weise wie die Auswahl eines Ordners oder der Titel in einem Ordner. \* PLY LIST wird nicht angezeigt, wenn auf der eingelegten CD-R/CD-RW keine korrekte Abspielliste (M3U-Datei) gespeichert ist.■ Abbruch der Wiedergabe einer Abspiellende
1. MODE antippen. 2. NEXT antippen. 3. PLY LIST antippen.Schneller Vorlauf / Schneller Rücklauf
1. Um einen Schnellen Vorlauf auszulösen, auf der Titelanzeige die Durchlaufbewegung durchführren. 2. Um einen schellen Rücklauf auszulösen, auf der Titelanzeige die Durchlaufbewegung durchführren.Top-Funktion
Mit der Top-Funktion wird der CD-Spieler auf den ersten Titel der Disc zusückgesetzt. 1. TOP antippen. Die Wiedergabe beginnt mit dem ersten Titel (Titel Nr. 1). Bei MP3/WMA-Wiedergabe wird der erste Titel des momentan wiedergegebenen Ordners angewählt.Anspielwiedergabe
These Funktion ermittelte, die ersten 10 Sekunden aller auf der Disc aufgezeichneten Titel der Reihe nach anzuspielen. 1. MODE antippen. 2. P -SCAN antipinen. Die Anzeige MODEändert sich in "P-SCAN", und die Anspielwiedergabe beginnnt. * Die Anspielwiedergabe beginnt bei dem auf den momentan abgespielten Titel folgenden Titel.Aufheben der Anspielwiedergabe
1. J^ -SCAN antippen. Die Anzeige J^ -SCAN ändert sich in "MODE", und es wird wieder der Titel abgeschlipt, der beim Antippen von J^ -SCAN wiedergegeben wurde.Ordner-Anspielwiedergabe
These Funktion ermodlich es, die ersten 10 Sekunden des jeweils ersten Titels aller auf einer MP3-/WMA-Disc vorhandenen Ordner der Reihe nach anzuspielen. 1. MODE antippen. 2. -SCAN antippen. Die Anzeige MODEändert sich in "SCAN", und die Ordner-Anspielwiedergabe beginnt. * Die Ordner-Anspielwiedergabe beginnt bei dem auf den momentan abgespielten Ordner folgenden Ordner.Aufheben der Ordner
Anspielwiedergabe
1. -SCAN antippen. Die Anzeige -SCAN ändert sich in "MODE", und es wird wieder der Titel abgespielt, der beim Antippen von -SCAN wiedergegeben wurde.Wiedergabewiederholung
These Funktion ermöglich es, den laufenden Titel wiederholt abzuspielen. 1. MODE antippen. 2. P -REPEAT antippen. Die Anzeige MODEändert sich in "P-RPT", und die Wiedergabewiederholung beginnnt.■ Aufheben der
Wiedergabewiederholung
1. -RPT antippen. Die Anzeige -RPTändert sich in "MODE", und die normale Wiedergabe beginnt mit dem Titel, der beim Antippen von -RPT abgeschweit wurde.Ordner
Wiedergabewiederholung
These Funktion ermittelte es, den momentan gewährten Ordner wiederholt abzuspielen. These Funktion stehn nur zur Verfügung, wenn eine CD-R/CD-RW eingelegt ist, auf der MP3-oder WMA-Dateien aufgezeichnet sind. 1. MODE antippen. 2. -REPEAT antipinen. Die Anzeige MODEändert sich in "RPT", und die Ordner-Wiedergabewiederholung beginnnt.■ Aufheben der Ordner
Wiedergabewiederholung
1. -RPT antippen. Die Anzeige -RPT andert sich in "MODE", und die normale Wiedergabe beginnt mit dem Titel, der beim Antippen von -RPT abgespielt wurde.Zufallswiedergabe
These Funktion ermitteligt es, alle auf einer Disc aufgezeichneten Titel in einer zufallsbestimmten Reihenfolge abzuspielen.-RANDOM
Alle Titel auf der Disc werden in einer zufallsbestimmten Reihenfolge abgespielt. Wenn die Disc 2 oder mehr Ordner enthalt, werden zunachst sümmtliche Titel in dem einen Ordner und anschließend sümmtliche Titel im nächsten Ordner in einer zufallsbestimmten Reihenfolge abgespielt. Dies wiederholt sich für sümmtliche Ordner.-RANDOM
Die Titel auf der Disc werden in einer zufallsbestimmten Reihenfolge abgeschweit. Diese Funktion steth nur zur Verfugung, wenn eine CD-R/CD-RW eingelegt ist, auf der MP3-oder WMA-Dateien aufgezeichnet sind. 1. MODE antippen. 2. -RANDOM oder -RANDOM antippen. Die Anzeige MODEändert sich in "RDM" bzw. "RDM", und die Zufallswiedergabe beginnt.Aufheben der Zufallswiedergabe
1. -RDM oder -RDM antipinen. Die Anzeige -RDM bzw. -RDMändert sich in "MODE", und die normale Wiedergabe beginnt mit dem Titel, der beim Antipen der betreffenden Anzeige abgespielt wurde.Hören verschiedener Musikstücke durch mehrere Hörer (2-ZONE-Funktion)
Bei der 2-ZONE-Funktion werden getrennte Tone von der MAIN Zone und SUB Zone ausgesendet, indem具有良好 zwei Klangquellen bei dem einen Hauptgerät betrieben werden, wodurch mehrere Hörer getrennte Musikqellen horen können. Dieses Gerät steuert deren interne Klangquellen (Radio, CD, MP3, usw.) für deren Wiedergabe und kann darüberhinaus Klangquellen von externen Geräten, die über CeNET angeschlossen sind (wie z.B. CD-Wechsler, usw.), wiedergegeben. Die Klangquellen der MAIN Zone werden über die Lautsprecher des Fahrzeugs und die der SUB Zone über die Kopfhörersysteme (WH143) wiedergegeben.  Die obere Abbildung gilt, wenn eine Tonquelle im internen Abspielmodus des Geräts (Radio, CD, AUX) über die Laufsprecher wiedergegeben wird. Dieunte Abbildung gilt, wenn eine Tonquelle im externen Abspielmodus des Gerats (CD-Wechsler, DVD-Wechsler, TV, AUX) über die Lautsprecher wiedergegeben wird. Die werkseitige Voreinstellung ist "OFF" (aus). Hinweise: Die 2-ZONE-Funktion steht bei angeschlossen dem DAB nicht ur Verflugung. Die durch Drehen des [ROTARY]-Knopfes an this Gerat vorgenommene neue Lautstärkeeinstellung wirkt sich nur auf die Laufsprecher aus. Die AUX-SENS-Einstellung wirkt sich sowohl auf die Laufsprecher als auch auf den Kopfhörer aus.■ Bildschirmanzeige bei aktivierter 2-ZONE-Funktion
In der Mitte des Displays wird mit "INT." (Internal Modus) bzw. "EXT." (External Modus) angezeigt, ob die Wiedergabe in der momentanen Betriebsart der 2-ZONE-Funktion im internen oder im externen Modus erfolgt. 1. Die [SOUND]-Taste betätigen. 2. 2-ZONE antippen.  3. ON/OFF in der Mitte des Displays berühren und mindestens 1 Sekunde lang halten.  Wenn 2-ZONE auf ON eingestellt ist, wird der aktuelle 2-ZONE-Typ angezeigt. Die 2-ZONE-Funktion steht nicht zur Verfügung, wenn 2-ZONE auf OFF eingestellt ist. Die [SOUND]-Taste betätigten, um zur ursprünglichen Betriebsart zusammen zukehren. 4. Auf der ON/OFF-Anzeige die Blätterbewegung durchführung, um den 2-ZONE Typ auszuwahlen. 2-ZONE-Typ| Laufsprecher | Kopfhörer | |
| Typ 1 | Intern (internet Modus) | Extern (externer Modus) |
| Typ 2 | Extern (externer Modus) | Intern (internet Modus) |
Hören verschiedener Musikstücke durch mehrere Hörer (2-ZONE-Funktion)
Ein-/Ausschalten der 2-ZONE-Funktion
1. Die [SOUND]-Taste am Gerät betätigten und mindestens 1 Sekunde lang halten.Umschalten des 2-ZONE-Types
Bei aktivierter 2-ZONE-Funktion die [TA]-Taste am Gerät betätigten und mindestens 1 Sekunde lang halten.Umschalten der Betriebsart der 2-ZONE-Funktion
Bei aktivierter 2-ZONE-Funktion die [TA]-Taste am Gerat betätigten.Auswahl der Betriebsart bei aktivierter 2-ZONE-Funktion
Wenn bei aktivierter 2-ZONE-Funktion eine CD eingelegt wird, werden die Funktionen des internen Modus these Gerätes auf CD umgeschaltet, und die Wiedergabe beginnnt automatisch. 1. Die [TA]-Taste am Gerät betätigten, um die Betriebsart der 2-ZONE-Funktion umzuschalten. Die Anzeige für die Geräte (Lautsprecher oder Kopfhörer), über die momentan die Wiedergabe möglich ist, schaltet um. 2. Die [TA]-Taste betätigten und mindestens 1 Sekunde lang halten, um den 2-ZONE-Typ zu wahlen. Die Anzeige schaltet zwischen "INT." und "EXT." um. 3. Den [ROTARY]-Knopf drucken. Wenn "INT." angezeigt wird, ändert sich bei jedem Druck auf den [ROTARY]-Knopf die Betriebsart in der folgenden Reihenfolge: Radio CD AUX Radio... Wenn "EXT." angezeigt wird,ändert sich bei jedem Druck auf den [ROTARY]-Knopf die Betriebsart in der folgenden Reihenfolge: AUX (CD changer) (DVD changer) (TV^*1) AUX * Betriebsarten für nicht angeschlossene Geräte werden nicht angezeigt. *1Wenn der TV-Modus gewählt wird,ändert sich der Modus automatisch in VTR und kann nicht gewechselt werden.Bedienungen, die für beiden Betriebsarten gemeinsam sind
Bildschirmanzeige im Titleleingabe-Modus
Hauptanzeige
Dieser Bildschirm erscheint, wenn der Titleeingabe-Modus gewählt wird (siehe Seite 14). Zeichentyp-Anzeige
A: Großbuchstaben a: Kleinbuchstaben 0-9: Ziffern !?: Symbole A: UmlauteTitelnamensanzeige
Der momentan eingebene Titel wird angezeigt. Mit der Blätterbewegung ↑ ↑ kann die Texteingabe-Position festgelegt werden. Wenn diese Anzeide berührt und mindestens 2 Sekunden lang gehalten wird, so wird der gesamte eingebene Titeltext gelöscht.Eingabezeichen-Anzeige
Mit der Blätterbewegung ↑daseinzugebende Zeichen auswahlen.RTN
Durch Berühren dieser Anzeige wird die Titleleingabe abgebrochen und wieder der ursprüngliche Bildschirm angezeigt. Wenn diese Anzeige berührt und mindestens 1 Sekunde lang gehalten wird, so wird die Zeichenliste für den momentanen Zeichentyp angezeigt.MEMO
Wenn these Anzeige berührt und mindestens 2 Sekunden lang gehalten wird, so wird der eingebene Titel gespeichert und wieder der ursprüngliche Bildschirm angezeigt.Zeichenliste-Anzeige
These Anzeige erscheint, wenn in der Hauptanzeige RTN berührt und mindestens 1 Sekunde lang gehalten wird. Beispieltext
Je nach Zeichentyp wird ein unterschiedlicher Beispieltext angezeigt. Wenn der Zeichentyp "A" angezeigt wird: A E I M Q U X (Leerzeichen) Wenn der Zeichentyp "a" angezeigt wird: a e i m q u Wenn der Zeichentyp "0-9", "!?" oder "A" angezeigt wird: Es werden alle Zeichen angezeigt.RTN
Durch Antippen wird wieder die Hauptanzeige aufgerufen.NEXT
Durch Antippen dieser Anzeige wird die jeweils nachste Zeichenliste aufgerufen.Eingabe von Titeln
Sie können Fernsehsenden und CDs jeweils einen bis zu 10 Zeichen langen Titel zuweisen. These Titel können dann beim Empfang von Sendungen oder beim Abspielen von CDs angezeigt werden. Je nach Betriebsart können entsprechlich die Title eingebehen werden:| Betriebsart | Anzahl der Titel |
| CD-Betrieb | 50 Titel |
| TV-Betrieb | 20 Titel |
| CD-Wechsler-Modus | Anzahl der Titel |
| DCZ628 angeschlossen | 100 Titel |
| CDC655Tz angeschlossen | 100 Titel |
| CDC1255z angeschlossen | 50 Titel |
A VORSICHT
Durch Betätigten der Reset-Taste werden alle Benutzereingaben im Gerät gelöscht, z. B. auch die Titel. 5. Auf der Zeichentyp-Anzeige mit der Blätterbewegung den Zeichentyp auswahlen. Mit jeder Blätterbewegung Ändert sich der Textzeichentyp in der folgenden Reihenfolge:Großbuchstaben
(Leerzeichen) ABCDEFGHJKLMN OPQRSTUVWXYZKleinbuchstaben
a b c d e f g h i j k l m n o p q r s t u v w x y Ziffern 0123456789Symbole, Umlaute
AAEEEEIAEaeeeieioo 6. Zur Einstellung des jeweils einzugebenden Zeichens entweder auf der rechten Seite des Displays die Blätterbewegung durchführten oder den [ROTARY]-Knopf drehen. 7. Die Schritte 4 bis 6 wiederholen, um den Titel einzugegeben. Wenn die Titelanzeige berührt und mindestens 2 Sekunden lang gehalten wird, werden sãmtliche bisher eingegebenen Titelzeichen gelöscht. 8. MEMO berühren und mindestens 2 Sekunden lang halten. Ein langer Signalton zeigt an, dass der Titel gespeichert wurde.■ Umschaltung der Titelanzeige auf die Uhrzeitanzeige oder eine andere
Anzeige
Die Mitte des Displays antippen■ Überschreitung der maximal möglichen Titelanzahl
Bei Fernsehsendern
Titel, die keinen Festsendern zugeordnet sind, werden automatisch gelöscht, und der neue Titel wird eingespeichert.Bei CDs
Die Titel der am seltensten gesplitten CDs werden gelöscht, und der neue Titel wird eingespeichert.Lösung von Titeln
1. Den TV-Sender einstellen bzw. die CD abspielen, deren Titel gelöscht werden soll. 2. Die Mitte des Displays antippen, um die Anzeige der benutzerdefinierten Titel zu aktivieren. Wenn das Display auf die Anzeige der benutzerdefinierten Titel umschaltet, wir über der Anzeige der Festsender-Numm "USER" (Benutzer) angezeigt. 3. Die [A]-Taste betätigten und mindestens 1 Sekunde lang halten. Das Gerät wechseln in den Titleeingabe-M 4. Die Titelanzeige berühren und mindestens 2 Sekunden lang halten. Sümttliche Zeichen im Titel werden gelöscht. 5. MEMO berühren und mindestens 2 Sekunden lang halten. Ein langer Signatlon zeigt an, dass der Titel gelöscht wurde.Änderung der Einstellungen Auswahl der Einstellungspunkt
1. Die [A]-Taste betätigten. Der Modus wechsel in den Einstellmodus.  2. Auf der Einstellungen-Wahlanzeige mit der Blätterbewegung den betreffenden Einstellungspunkt auswahlen. * Mit der Blätterbewegung ↑ auf der linken Seite des Displays werden die Haupt-Einstellungspunkte jeweils einzel durchgeschaltet. Mit der Durchlaufbewegung auf der Linken Seite des Displays werden die Unterpunkte kontinuierlich durchgeschhaltet. \* Mit der Blätterbewegung 山 in der Mitte des Displays werden die Unterpunkte jeweils einzeln durchgeschaltet. Mit der Durchlaufbewegung werden die Unterpunkte kontinuierlich durchgeschaltet. 3. Wenn auf der rechten Seite des Displays "EDIT" angezeigt wird, EDIT antippen, um zur Einstellungen-Detailanzeige zu wechseln.  4. Entweder auf der rechten Seite des Displays die Blätterbewegung ↑ durchführren oder den [ROTARY]-Knopf drehen, um die Details einzustellen.Rückkehr in die ursprüngliche Betriebsart
1. Erneut die [A]-Taste betätigten. Einstellungspunkte| Hauptpunkt | Unterpunkt |
| DISPLAY (Anzeige) | SCREEN SVR • Bildschirmschoner (siehe Seite 41) |
| MSG INPUT • Meldungseingabe (siehe Seite 41) | |
| MESSAGE • Meldungsanzeige beim Ein-/Ausschalten (siehe Seite 42) | |
| S/A SENS • Empfindlichkeit des Spektrumanalysators (siehe Seite 42) | |
| SCROLL • Durchrollgeschwindigkeit (siehe Seite 42) | |
| APPERNCE (Darstellung) | DIMMER IN • Automatische Helligeitsregelung (siehe Seite 43) |
| DMR LEVEL • Dimmer-Helligeitsstufe (siehe Seite 43) | |
| CONTRAST • Einstellung des Anzeigenkontrasts (siehe Seite 43) | |
| BLINK LED • Blinken der LED bei abgenommenem DCP (siehe Seite 43) | |
| BEEP • Signalton (siehe Seite 44) | |
| SOUND (Ton) | AC-PRO III • VSE-Modus (STD/PRO) (siehe Seite 44) |
| EQ SELECT • Equalizer-Modus (siehe Seite 44) | |
| SP-SETTING • Latsprecher-Konfigurierung (siehe Seite 44) | |
| CENTER-SP / SUB-WOOFER • Center-Latsprecher/Subwoofer ein-/ausschalten (siehe Seite 45) | |
| HPF / SUB-W LPF • Latsprecher-Filterfrequenz (siehe Seite 45) | |
| AMP CANCEL • Internen Verständiger ein-/ausschalten (siehe Seite 46) | |
| SP GAIN • Latsprecher-Ausgangspiegel (siehe Seite 46) | |
| PL II DELAY (PL II-Laufzeitverzögerung) | SRD-SP • Laufzeitverzögerung der hinteren Latsprecher (siehe Seite 46) |
| PL II CONT | PANORAMA / DIMENSION / CTR WIDTH • Deteilinstellungen des Musik-Wiedergabemodus (siehe Seite 47) |
| TUNER | TV AREA • TV-Empfangsbereich (siehe Seite 57) |
| TV DIVER • TV-Diversity-Antenne (siehe Seite 57) | |
| LINK ACT • AF-Funktion zwischen RDS und DAB (siehe Seite 26) | |
| LANGUAGE • PTY-Anzeigesprache (siehe Seite 30) | |
| RDS-INT 2Z • RDS-Uterberechnung bei aktivierter 2-ZONE-Funktion (siehe Seite 30) | |
| SETTING (Einstellungen) | AUX / TEL • AUX und TEL (siehe Seite 47) |
| AUX SENS • Eingangspegel für tragbare Audio-Geräte (AUX) (siehe Seite 48) | |
| TEL-SP • Autolaatsprecher-Ausgang für das Mobiletelefon (Optional TEL-002) (siehe Seite 48) | |
| TEL-SWITCH • Unterbrechung durch Mobiletelefon (siehe Seite 48) | |
| CALIBRATE / A-VOL SENS • Automatische Lautstärkeregelung (siehe Seite 49) | |
| SYSTEM CHECK • Systemprüfung (siehe Seite 49) | |
| CODEMATIC • Diebstahlsicherung (siehe Seite 50) |
Einstellung des Bildschirmschoners (SCREEN SVR)
These Funktion ermitteligt die Anzeige eines Bildschirmschoners, wenn das Gerät ca. 30 Sekunden lang nicht bedient wurde. Die werkseitige Voreinstellung ist "ON" (Ein). 1. Die [A]-Taste betätigten, um den Einstellmodus aufzurufen. 2. Auf der Einstellungen-Wahlanzeige mit ↑ ↓ ↑ unter “DISPLAY” den Punkt “SCREEN SVR” wahren.  3. Entweder auf der rechten Seite des Displays die Blätterbewegung ↑ durchführten oder den [ROTARY]-Knopf drehen, um die Einstellung “ON” oder “OFF” zu wahren. 4. Die [A]-Taste betätigten, um zur ursprünglichen Betriebsart zurückzukehren.Umschaltung der
Bildschirmschoneranzeige
PREV oder NEXT betätigten, während der Bildschirmschoner angezeigt wird. Bei jeder Betätigung dieser Tasten wechselt der angezeigte Bildschirmschoner. Bildschirmschoner Bildschirmschoner-Muster 1  Bildschirmschoner-Muster 2  Bildschirmschoner-Muster 3  Spektrumanalysator-Muster 1  Spektrumanalysator-Muster 2  Spektrumanalysator-Muster 3  Spektrumanalysator-Muster 4  Meldungsanzeige  SS SCAN Die 8 oben abgebildeten Bildschirmschoner-Anzeigen werden nacheinander jeweils ca. 10 Sekunden lang dargestellt.Texteingabe für die Meldungsanzeige (MSG INPUT)
Hierfür steht 1 Bildschirmschoner-Typ zur Verfügung. Für Einzelheiten zur Umschaltung der Bildschirmschoneranzeige siehe "Einstellung des Bildschirmschoners". - Es können bis zu 30 Zeichen eingegeben werden. Die werkseitige Voreinstellung lautet "Active Matrix Control System". 1. Die [A]-Taste betätigten, um den Einstellmodus aufzurufen. 2. Auf der Einstellungen-Wahlanzeige mit der Blätterbewegung unter "DISPLAY" den Punkt "MSG INPUT" wahren.  DISPLAY ADJUST MODE MSG INPUT> EDIT 4. Mit der Blätterbewegung in der Mitte des Displays kann die Texteingabe-Position festgelegt werden. * Zum Löschen der Meldung die Mitte des Displays berühren und mindestens 2 Sekunden lang halten. Wenn Sie Schritt 8 mit leerem Meldungstext durchfuhren, wird die werkseitig voreingestellte Meldung wiederhergestellt. 5. Auf der linken Seite des Displays die Blätterbewegung durchführren, um den Zeichentyp zu wahlen. Mit jeder Blätterbewegung 且 wechsel der Textzeichentyp. Naheres hierzu siehe. Seite 37. 6. Zur Einstellung des jeweils einzugebenden Zeichens entweder auf der rechten Seite des Displays die Blätterbewegung 48 durchführren oder den [ROTARY]-Knopf drehen. 7. Die Schritte 4 bis 6 wiederholen, um die Meldung einzugeben. 8. MEMO berühren und mindestens 2 Sekunden lang halten. Ein langer Signalton zeigt an, dass die Meldung gespeichert wurde. 9. Die [A]-Taste betätigten, um zur ursprünglichen Betriebsart zurückzukehren.Meldungsanzeige (MESSAGE)
These Funktion ermodlich es, beim Ein-/ Ausschalten des Gerats auf dem Display Meldungen anzuzeigen. Beim Einschalten wird "Hello" angezeigt, beim Ausschalten "See you". Die werkseitige Voreinstellung ist "ON" (Ein). 1. Die [A]-Taste betätigten, um den Einstellmodus aufzurufen. 2. Auf der Einstellungen-Wahlanzeige mit der Blätterbewegung unter "DISPLAY" den Punkt "MESSAGE" wahren.  DISPLAY ADJUST MODEMESSAGE » ON 3. Entweder auf der rechten Seite des Displays die Blätterbewegung ↑durchführren oder den [ROTARY]-Knopf drehen, um die Einstellung “ON” oder “OFF” zu wahren. 4. Die [A]-Taste betätigten, um zur ursprünglichen Betriebsart zurückzukehren.Einstellung der Empfindlichkeit des Spektrumanalysators (S/A SENS)
Mit dieser Funktion kann die Empfindlichkeit (Grad der Auslenkung) des Spekr Trumanalsators eingestellt werden. Für Einzelheiten zur Anzeige des Spekr Trumanalsators siehe "Umschaltung der Anzeige" (siehe Seite 13) oder "Einstellung des Bildschirmschoners" (siehe Seite 41). Die werkseitige Voreinstellung ist "MID" (Mittel). 1. Die [A]-Taste betätigten, um den Einstellmodus aufzurufen. 2. Auf der Einstellungen-Wahlanzeige mit der Blätterbewegung t unter "DISPLAY" den Punkt "S/A SENS" wahren.  3. Entweder auf der rechten Seite des Displays die Blätterbewegung durchführten oder den [ROTARY]-Knopf drehen, um die Empfindlichkeit einzustellen. * Entweder LOW (geringe Auslenkung), MID oder HIGH (starke Auslenkung) wahren. 4. Die [A]-Taste betätigten, um zur ursprünglichen Betriebsart zurückzukehren.Einstellung der Display-Durchrollgeschwindigkeit (SCROLL)
Mit dieser Funktion konnen Sie die Durchrollgeschwindigkeit vermindern, wenn die Bildschirmanzeigen sochnell durchrolten,dass sie sich nur schwer erkennen halten. Die werkseitige Voreinstellung ist "SPEED 2" (Geschwindigkeit 2). 1. Die [A]-Taste betätigten, um den Einstellmodus aufzurufen. 2. Auf der Einstellungen-Wahlanzeige mit der Blätterbewegung ↑ unter “DISPLAY” den Punkt “SCROLL” wahren.  3. Entweder auf der rechten Seite des Displays die Blätterbewegung ↑ durchführten oder den [ROTARY]-Knopf drehen, um die Empfindlichkeit einzustellen. * Dieser Punkt lassst sich im Bereich von SPEED 1 bis SPEED 7 einstehen. Wahrend der Einstellung kann beobachtet werden, wie sich die Änderung auf dem Display auswirkt. 4. Die [A]-Taste betätigten, um zur ursprünglichen Betriebsart zurückzukehren.Einstellung der automatischen Dimmer-Steuerung (DIMMER IN)
Mit dieser Funktion kann die Helligkeit der Display-Beleuchtung entweder gemeinsam mit der Fahrzeuginnenraumbeleuchtung oder entsprechend der Helligkeit im Fahrzeuginnenraum geregelt werden. Dabei ist als Einstellung fur die automatische Dimmer-Steuerung entweder "AUTO" zu wahle (Koppelung an die Helligkeit im Fahrzeug) oder "ILLUMI" (Koppelung an die Innenraumbeleuchtung). - Wenn die Dimmer-Steuerung auf "AUTO" eingestellt ist, wird die Display-Beleuchting entsprechend der von dieser dem Sensor festgestelltten Helligkeit geregt. Die Einstellung wird bei DMR LEVEL vorgenommen. Die werkseitige Voreinstellung ist "AUTO". 1. Die [A]-Taste betätigten, um den Einstellmodus aufzurufen. 2. Auf der Einstellungen-Wahlanzeige mit der Blätterbewegung ↑ unter "APPERNCE" den Punkt "DIMMER IN" wahren.  APPERNCE ADJUST MODE IMMER IN> AUTO 3. Entweder auf der rechten Seite des Displays die Blätterbewegung 4 durchfuhren oder den [ROTARY]-Knopf drehen, um die Einstellung "AUTO" oder "ILLUMI" zu wahren. 4. Die [A]-Taste betätigten, um zur ursprünglichen Betriebsart zurückzukehren.Einstellung der Dimmer-Helligkeitsregelung (DMR LEVEL)
Mit dieser Funktion lassst sich einstehen, wie stark die Display-Helligkeit abgesenkt werden soll. Die werkseitige Ausgangseinstellung ist "3". 1. Die [A]-Taste betätigten, um den Einstellmodus aufzurufen. 2. Auf der Einstellungen-Wahlanzeige mit der Blätterbewegung 135 unter "APPERNCE" den Punkt "DMR LEVEL" wahren. 3. Entweder auf der rechten Seite des Displays die Blätterbewegung ↑ durchführten oder den [ROTARY]-Knopf drehen, um die Stärke der Dimmerwirkung einzustellen. * Entweder OFF (Dimmer aus, Beleuchtung hell) oder 1 (leicht abgedunkelt) bis 5 (dunkel) wahren. 4. Die [A]-Taste betätigten, um zur ursprünglichen Betriebsart zurückzukehren.Einstellung des Display-Kontrasts (CONTRAST)
Der Display-Kontrast lässt sich zur Anpassung an den Einbauwinkel des Geräts einstellen. Die werkseitige Ausgangseinstellung ist "6". 1. Die [A]-Taste betätigten, um den Einstellmodus aufzurufen. 2. Auf der Einstellungen-Wahlanzeige mit der Blätterbewegung unter "APPERNCE" den Punkt "CONTRAST" wahren. 3. Entweder auf der rechten Seite des Displays die Blätterbewegung ↑ durchführten oder den [ROTARY]-Knopf drehen, um den Kontrast einzustellen.  APPERNCE ADJUST MODE CONTRAST 》 6 * Dieser Punkt lässt sich im Bereich von 1 bis 11 einstehen. Wahrend der Einstellung kann beobacht werden, wie sie die Änderung auf dem Display auswirkt. 4. Die [A]-Taste betätigten, um zur ursprünglichen Betriebsart zurückzukehren.LED-Blinkanzeige bei abgenommenem DCP (BLINK LED)
Es ist möglich, die LED am Gerät bei abgenommenem DCP blinken zu{lassen. Die werkseitige Voreinstellung ist "OFF" (aus). 1. Die [A]-Taste betätigten, um den Einstellmodus aufzurufen. 2. Auf der Einstellungen-Wahlanzeige mit der Blätterbewegung unter "APPERNCE" den Punkt "BLINK LED" wahren.  APPERNCE ADJUST MODE BLINK LED》 OFF  APPERNCE ADJUST MODE MR LEVEL》 3 3. Entweder auf der rechten Seite des Displays die Blätterbewegung ↑durchführten oder den [ROTARY]-Knopf drehen, um die Einstellung “ON” oder “OFF” zu wahren. 4. Die [A]-Taste betätigten, um zur ursprünglichen Betriebsart zurückzukehren.Einstellung des Signaltons bei Tastenbetätigung (BEEP)
Der kurze oder lange hochfrequente Ton, der bei Tastenbetätigung ertört, wird als "BEEP" bezeichnet. Die werkseltige Voreinstellung ist "ON". 1. Die [A]-Taste betätigten, um den Einstellmodus aufzurufen. 2. Auf der Einstellungen-Wahlanzeige mit der Blätterbewegung unter "APPERNCE" den Punkt "BEEP" wahren.  3. Entweder auf der rechten Seite des Displays die Blätterbewegung ↑ ↓ durchführten oder den [ROTARY]-Knopf drehen, um die Einstellung “ON” oder “OFF” zu halten. 4. Die [A]-Taste betätigten, um zur ursprünglichen Betriebsart zurückzukehren.Auswahl des Modus
Dieser Einstellungspunkt lässt sich nicht anwahlen, wenn Dolby Pro Logic II auf "MUSIC" oder "MATRIX" eingestellt ist (siehe Seite 17). Die werkseitige Voreinstellung fur AC-PRO III ist "PRO" und fur EQ SELECT "P.EQ".AC-PROIII
Wenn "STD" (Standard-Modus) gewählt ist, konnen Klangqualität und Feldcharakteristik durch die VSE-Funktion (Virtual Space Enhancer) so angepasst werden, dass sich unabhängig von der Hörposition der gleiche Klangeffekt erzielen{lss. Wenn "PRO" (PRO-Modus) gewählt ist, dassen sich Klangqualität und Feldcharakteristik für jeder Hörposition detailiert anpassen.EQ SELECT
Wenn "P.EQ" (Equalizer-Modus) gewählt ist, kann für den gesamten Frequenzbereich eine Kompensation in Form einer detailierten geglißteten Curve vorgenommen werden. Wenn "BAS/TREB" (Basse-/Hohen-Modus) gewählt ist, kann der Frequenzgang für 2 größere Frequenzbereiche, die Basse (tiefere TONE) und Höhen (höhere TONE) getrennt kompensiert werden. 1. Die [A]-Taste betätigten, um den Einstellmodus aufzurufen. 2. Auf der Einstellungen-Wahlanzeige mit der Blätterbewegung ↑ ↓ unter "SOUND" die Punkte "AC-PRO III" und "EQ SELECT" wahren.  ADJUST MODE AC-PROIII PRO 3. Entweder auf der rechten Seite des Displays die Blätterbewegung ↑ durchführten oder den [ROTARY]-Knopf drehen, um den Modus zu wahren. Modusauswahl| AC-PRO III | STD • Standard-Modus (VSE-Menü) |
| PRO • PRO-Modus (Positions-Menü) | |
| EQ SELECT | P.EQ • Equalizer-Modus (P.EQ-Menü) |
| BAS / TREB • Tiefen-/Höhen-Modus |
Einstellung der Laufsprecherkonfiguration (SP-SETTING)
Hier muss die im Fahrzeug vorhandene Lautspracherkconfiguration eingestellt werden, damit das Gerät seine Klangeigenschaften voll entfallen kann. Die werkseitige Voreinstellung ist SWL + SWR 1. Die [A]-Taste betätigten, um den Einstellmodus aufzurufen. 2. Auf der Einstellungen-Wahlanzeige mit der Blätterbewegung ↑ unter "SOUND" den Punkt "SP-SETTING" wahren.  ADJUST MODE SP-SETTING SW+SW 3. Entweder auf der rechten Seite des Displays die Blätterbewegung ↑ durchführten oder den [ROTARY]-Knopf drehen, um die Lautspecherkenconfiguration einzustellen. Lautsprecherkonfiguration| CTR+SW 5.1-Kanal- Kconfiguration | Lautsprecher vom/hinten (4 Kanäle) Center-Lautsprecher (1 Kanal) Subwoofer (1 Kanal) |
| SWLR+SWR 4-Kanal-/Subwoofer- Kconfiguration | Lautsprecher vom/hinten (4 Kanäle) Subwoofer (2 Kanäle) |
Hinweise:
- Der Center-Lautsprecher gibt nur dann Ton aus, wenn bei der Einstellung "CTR+SW" die folgenden Einstellungen vorgenommen werden: (1) Gemäß der Anleitung unter “Auswahl des PLII-Modus (Dolby PL II)” (siehe Seite 17) den Dolby Pro Logic II-Modus auf “MUSIC” oder “MATRIX” einstehen. (2) Gemäß der Anleitung unter "Aktivieren/Deaktivieren von Laufsprechnern (CENTER-SP/SUB-WOOFER)" (siehe Seite 45) den Center-Laufsprecher aktivierten ("ON"). - Über den Subwoofer-Kanal erfolgt keine Tonausgabe, wenn "SWI + SWR" aktiviert ist und der Dolby Pro Logic II-Modus auf "MUSIC" oder "MATRIX" eingestellt ist. 4. Die [A]-Taste betätigten, um zur ursprünglichen Betriebsart zurückzukehren.Aktivieren/Deaktivieren von Laufsprechern (CENTER-SP/ SUB-WOOFER)
Den Center-Lautsprecher (CENTER-SP) und den Subwoofer (SUB-WOOFER) aktivieren/deaktivieren (ON/OFF). Wenn kein Center-Lautsprecher oder Subwoofer angeschlossen ist, muss hier "OFF" gewählt sein. - Der Center-Lautsprecher (CENTER-SP) lassst sich aktivieren, wenn der Dolby Pro Logic II-Modus auf "MUSIC" oder "MATRIX" und "SP-SETTING" auf "CTR-SW" eingestellt ist. Die werkseitige Voreinstellung ist "ON". 1. Die [A]-Taste betätigten, um den Einstellmodus aufzurufen. 2. Auf der Einstellungen-Wahlanzeige mit der Blätterbewegung ↑ unter "SOUND" die Punkte "CENTER-SP" und "SUB-WOOFER" wahren.  SOUND ADJUST MODE CENTER-SP> ON 3. Entweder auf der rechten Seite des Displays die Blätterbewegung ↑ durchführten oder den [ROTARY]-Knopf drehen, um die Einstellung “ON” oder “OFF” zu wahren. 4. Die [A]-Taste betätigten, um zur ursprünglichen Betriebsart zurückzukehren.Die Filterfrequenzen der Laufsprecher einstellen (HPF/ SUB-W LPF)
Mit dieser Funktion kann die Filterfrequenz an die verwendeten Lautsprecher angepasst werden. - Welche Filter (HPF/Sub-W LPF) angewandt werden können, ist je nach eingestellt Dolby Pro Logic II-Modus unterschiedlich.| Dolby Pro Logic II Modus-Einstellung | Filter | |
| HPF | SUB-W LPF*1 | |
| MUSIC/MATRIX | Nicht einstellbar | Einstellbar |
| OFF | Einstellbar | Einstellbar |
Einstellung der Filter
HPF (Einstellung des Hochpassfilters) Dieses Filter dampf die Bassfrequenzen der vorderen und hinteren Lautsprecher. THROUGH 50Hz 80Hz 120Hz Die Filtrereinstellung passend zum Laufsprecher wahlen, wenn Laufsprecher mit kleinerem Durchmesser verwendet werden.THROUGH
These Einstellung wahlen, wenn Laatsprecher verwendet werden, die Bassfrequenzen wiedergeben konnen. SUB-W LPF (Einstellung des Subwoofer-Tiefpassfilters) Dieses Filter dampf die Hohenfrequenzen des Subwooers. THROUGH 50Hz 80Hz 120Hz Die Filterfrequenz passend zum Subwoofer einstellen.THROUGH
These Einstellung wahlen, wenn ein aktiver Subwoofer mit eingebautem Tiefpassfilter verwendet wird. 1. Die [A]-Taste betätigten, um den Einstellmodus aufzurufen. 2. Auf der Einstellungen-Wahlanzeige mit der Blätterbewegung ↑ unter "SOUND" die Punkte "HPF" und "SUB-W LPF" wahren.  3. Entweder auf der rechten Seite des Displays die Blätterbewegung ↑ durchführten oder den [ROTARY]-Knopf drehen, um die Frequenz einzustellen. * Eine der Einstellungen THROUGH, 50Hz, 80Hz oder 120Hz wahren. 4. Die [A]-Taste betätigten, um zur ursprünglichen Betriebsart zurückzukehren.Internen Veränderaktivieren/deaktivieren (AMP CANCEL)
Den internen Veränder in Abhängigkeit davon, ob ein externer Veränder verwendet wird, ein bzw. ausschalten. AMP CANCEL auf "ON" einstehen (interner Veränder ausgeschalte), wenn ein externer Veränder kanger geschlossen ist und der interne Veränder nicht verwendet wird. Die werkseitige Ausgangseinstellung ist "OFF" (internet Veränderer verwendet). 1. Die [A]-Taste betätigten, um den Einstellmodus aufzurufen. 2. Auf der Einstellungen-Wahlanzeige mit der Blätterbewegung ↑ unter "SOUND" den Punkt "AMP CANCEL" wahren.  3. Entweder auf der rechten Seite des Displays die Blätterbewegung ↑durchführren oder den [ROTARY]-Knopf drehen, um die Einstellung “ON” oder “OFF” zu wahren. 4. Die [A]-Taste betätigten, um zur ursprünglichen Betriebsart zurückzukehren.Einstellung des Ausgangspegels der Laufsprecher (SP GAIN)
Mit der integrierten Teston-Funktion des Gerätes die Pegel so einstellen, dass die Ausgangslautstärke samtlicher Lautsprecher gleich ist. - These Einstellunglässt sich nur vornehmen, wenn als Dolby Pro Logic II-Modus "MUSIC" oder "MATRIX" eingestellt ist. Die werkseitige Ausgangseinstellung ist "0dB". 1. Die [A]-Taste betätigten, um den Einstellmodus aufzurufen. 2. Auf der Einstellungen-Wahlanzeige mit der Blätterbewegung ↑ unter "SOUND" den Punkt "SP GAIN" wahren.  3.EDIT antippen. Der Modus wechsel in den SP GAIN-Einstellmodus. 4. Auf der Einstellungen-Wahlanzeige mit der Blätterbewegung den betreffenden Einstellungspunkt auswahlen. Mit jeder Blätterbewegung wechsel der Einstellungspunkt in der folgenden Reihenfolge:Einstellungspunkte
 ^*1 "CTR GAIN" wird nur angezeigt, wenn "SP-SETTING" auf "CTR+SW" und "CENTER-SP" auf "ON" eingestellt ist. *2“SUB-W GAIN” wird nur angezeigt, wenn "SUB-WOOFER" auf "ON" eingestellt ist. 5. Entweder auf der rechten Seite des Displays die Blätterbewegung ↑ ↓ durchführten oder den [ROTARY]-Knopf drehen, um den Ausgangspiegel einzustellen. Der Ausgangspiegel{lsst sich im Bereich -10 dB bis +10 dB einstellen. 6. Die Schritte 4 und 5 für jeder Einstellungspunkt wiederholen. 7. Die [A]-Taste betätigten, um zur ursprünglichen Betriebsart zurückzukehren.Einstellung der Laufzeitverzögerung für die Hecklautsprecher (PL II DELAY)
Zu welchem Zeitpunkt der Ton an der Hörposition eintrift, ist je nach Einbauposition der Hecklautsprecher und Fahrzeuggroße unterscheidlich. Durch Anpassung der Laufzeitverzögerung für die Hecklautsprecher kann dieser Effekt so korrigiert werden, dass der Ton von den Hecklautsprechn zum gleichen Zeitpunkt eintriftt wie von den Frontlautsprechn. - These Einstellunglässt sich nur vornehmen, wenn als Dolby Pro Logic II-Modus "MUSIC" oder "MATRIX" eingestellt ist. Die werkseitige Ausgangseinstellung ist "0ms". 1. Die [A]-Taste betätigten, um den Einstellmodus aufzurufen. 2. Auf der Einstellungen-Wahlanzeige mit der Blätterbewegung ↑ unter “PL II DELAY” den Punkt “SRD-SP” wahren.  3. Entweder auf der rechten Seite des Displays die Blätterbewegung t durchführren oder den [ROTARY]-Knopf drehen, um die Verzögerungszeit einzustellen. * "SRD-SP"lässt sich im Bereich von 0 ms bis 15 ms einstehen. 4. Die [A]-Taste betätigten, um zur ursprünglichen Betriebsart zurückzukehren.Detaillierte Einstellung des Musik-Modus (PL II CONT)
Mit dieser Funktion konnen Sie den Musik-Modus detaillierter festlegen, wenn der Dolby Pro Logic II-Modus auf "MUSIC" eingestellt ist. - These Einstellung{lasst sich nur vormehmen, wenn als Dolby Pro Logic II-Modus "MUSIC" eingestellt ist. Die werkseitige Ausgangseinstellung fur PANORAMA ist "NO", fur DIMENSION "3" und fur CTR WIDTH "3".Einstellungspunkte
PANorama (Steuerung des Panoramaeffekts)
Dieser Effekt erweitert die Schallfeld-Abbildung im vorderen Bereich bis zu den Hecklautsprechem. Stellen Sie für diesen Punkt "YES" ein, wenn Sie den Surround-Effekt zu vermissen scheinen.DIMENSION (Gröbeneinstellung)
Verschiebt das Schalfeld-Abbild nach vorn oder hinten. Wenn das Schalfeld-Abbild nach vorn oder hinten verschoben scheint, kann diese Tendenz hiermit kompensiert werden. Der Einstellwert 3 entspricht der Mittenposition. Mit den Enstellwerten 2 bis 0 wird das Schalfeldbild nach hinten verschoben, mit den Einstellwerten 4 bis 6 nach vorn.CTR WIDTH (Breiteneinstellung Center-Lautsprecher)*1
Dient zur Anpassung der Aufteilung des Center-Kanals zwischen dem Center-Lautsprecher und den Frontlautsprechem links und rechts. Wenn der Ton des Center-Kanals gleichmäßig auf den linken und rechten Kanal verteil wird, vergroßert sich das gesamte Klangfeldbild, so dass ein natürlicher Verbreiterungseindruck entsteht. Beim Einstellwert 0 wird der Tonanteil des Center-Kanals komplett über den Center-Lautsprecher wiedergegeben. Beim Einstellwert 7 wird der Tonanteil des Center-Kanals gleichmäßig zwischen den Frontlautsprechern links und rechts aufgeitlt. *1 "CTR WIDTH" wird nur angezeigt, wenn "SP-SETTING" auf "CTR+SW" und "CENTER-SP" auf "ON" eingestellt ist. 1. Die [A]-Taste betätigten, um den Einstellmodus aufzurufen. 2. Auf der Einstellungen-Wahlanzeige mit der Blätterbewegung unter "PL II CONT" den gewürschten Einstellungspunkt wahren. Einstellungspunkte sind "PANorama", "DIMENSION" und "CTR WIDTH".  3. Entweder auf der rechten Seite des Displays die Blätterbewegung durchführten oder den [ROTARY]-Knopf drehen, um die gewünschte Einstellung vorzunehmen. * Für “PANORAMA” entweder “YES” oder “NO” wahren. * "DIMENSION" lassst sich im Bereich von 0 bis 6 einstehen. * "CTR WIDTH"lässt sich im Bereich von 0 bis 7 einstellen. 4. Die [A]-Taste betätigten, um zur ursprünglichen Betriebsart zurückzukehren.AUX-Funktion
Dieses Gerät besitzt einen externen Cinch-Eingang, so dass auch externe, über diesen Eingang angeschlossene Tonquellen wiedergegeben werden können.Auswahl von AUX / TEL
Tonsignale und Musik von externen Geräten sowie Telefonanrufe konnen über die Laufsprecher wiedergegeben werden, wenn die Geräte über diesen Eingang angeschlossen sind. Wenn TEL INT oder ein externes Gerät mit thisem Gerät verbunden ist, kann entweder der TEL- oder der AUX-Modus gewählt werden. Die werkseitige Ausgangseinstellung ist "AUX". 1. Die [A]-Taste betätigten, um den Einstellmodus aufzurufen. 2. Auf der Einstellungen-Wahlanzeige mit der Blätterbewegung unter “SETTING” den Punkt “AUX/TEL” wahren.  3. Entweder auf der rechten Seite des Displays die Blätterbewegung durchführten oder den [ROTARY]-Knopf drehen, um die Einstellung "AUX" oder "TEL" zu wahren. AUX: The AUX/TEL-Eingangskabel wird für externe Audio-Eingangssignale verwendet. TEL: The AUX/TEL-Eingangskabel wird für Audio-Eingangssignale von einem Mobiltelefon verwendet. 4. Die [A]-Taste betätigten, um zur vorherigen Betriebsart zusückzukehren.Einstellung des Eingangspegels (AUX SENS) für portable Audio-Quellen (AUX-Modus)
Mit dieser Funktion kann der Eingangspegel für optionale externe Geräte eingestellt werden, die an diesen Gerät angeschlossen werden. - These Einstellung ist möglich, wenn "AUX/TEL" auf "AUX" eingestellt ist. Die werkseitige Ausgangseinstellung ist "MID". 1. Die [A]-Taste betätigten, um den Einstellmodus aufzurufen. 2. Auf der Einstellungen-Wahlanzeige mit der Blätterbewegung unter “SETTING” den Punkt “AUX SENS” wahren.  3. Entweder auf der rechten Seite des Displays die Blätterbewegung ↑ durchführten oder den [ROTARY]-Knopf drehen, um den Eingangspegel einzustellen. * Eine der Einstellungen LOW (niedrig), MID (mittel) oder HIGH (hoch) wahren. 4. Die [A]-Taste betätigten, um zur ursprünglichen Betriebsart zurückzukehren.Einstellung des AutolaufsprecherAusgangs für das Mobiltelefon (Zubehör TEL-002)
- Einstellen, über welche Laufsprecher Telefonanrufe wiedergegeben werden sollen. Die werkseitige Ausgangseinstellung ist "RIGHT". 1. Die [A]-Taste betätigten, um den Einstellmodus aufzurufen. 2. Auf der Einstellungen-Wahlanzeige mit der Blätterbewegung unter "SETTING" den Punkt "TEL-SP" wahren.  ADJUST MODE TEL·SP « RIGHT 3. Entweder auf der rechten Seite des Displays die Blätterbewegung 4 durchfahren oder den [ROTARY]-Knopf drehen, um die Einstellung "LEFT" (links) oder "RIGHT" (rechts) zu wahlen.LEFT:
Telefonanrufe können über den an das Gerät angeschlossenen linken Frontlautsprecher gehört werden.RIGHT:
Telefonanrufe können über den an das Gerät angeschlossenen rechten Frontlautsprecher gehört werden. 4. Die [A]-Taste betätigten, um zur vorherigen Betriebsart zusückzukehren.Einstellung für Mobilfunkunterbrechung
Wenn an这点 Gerat über entsprechendes Zubehör (optional TEL-002) ein Mobittelefon angeschlossen wird, konnen Telefonrufe über die Autolatsprecher wiedergegeben werden. Die werkseitige Voreinstellung ist "OFF" (aus). 1. Die [A]-Taste betätigten, um den Einstellmodus aufzurufen. 2. Auf der Einstellungen-Wahlanzeige mit der Blätterbewegung ↑ ↓ unter “SETTING” den Punkt “TEL-SWITCH” wahren.  ADJUST MODE TEL·SWITCH》 OFF 3. Entweder auf der rechten Seite des Displays die Blätterbewegung 4 durchführten oder den [ROTARY]-Knopf direhen, um die Einstellungen vorzunehmen. Jedes Mal wenn der [ROTARY]-Knopf gedreht wird,ändert sich die Einstellung in der folgenden Reihenfolge: OFF ON MUTE OFF...OFF:
Das Gerät setzen seine normale Funktion fort, auch während das Mobilitelefon benutzt wird.Hinweis:
- Bei Anschluss einer Freisprechanlage darauf achtenden, dass die Einstellung ON gewählt ist, damit die Tonausgabe des Telefons über die Anlage erfolgt.ON:
Telefonanrufe können über die an das Gerät angeschlossenen Lautsprecher führt werden. * Bei der Wiedergabe von Telefongesprächen über die Autolautsprecher lässt sich die Lautstärke durch Drehen des [ROTARY]-Knopfesenstellen.MUTE:
Die Tonwiedergabe über theses Gerät wird während Telefonrufen stumm geschaltet. 4. Die [A]-Taste betätigten, um zur vorherigen Betriebsart zusückzukehren.Einstellung der automatischen Lautstärkeregelung (CALIBRATE/A-VOL SENS)
Die Lautstärke kann automatisch an die von der Fahrzeuggeschwindigkeit abhängigen Fahrtgeräuche angepasst werden. Die werkseitige Ausgangseinstellung ist "LOW". 1. Die [A]-Taste betätigten, um den Einstellmodus aufzurufen. 2. Auf der Einstellungen-Wahlanzeige mit der Blätterbewegung unter "SETTING" den Punkt "CALIBRATE" wahren.  ADJUST MODE CALIBRATE START 3. Das Fahrzeug auf 50km / h beschleunigen. 4. Bei Erreichen von 50 km/h START antippen. Die Kalibrierung wird durchgeführt. Nach mindestens 2 Sekunden ertönt ein langer Signalton, und auf dem Display erscheint "SUCCEEDFUL" (Erfolg). Ein kurzer Signaton weist darauf hin, dass die Kalibrierung fehlgeschlagen ist. In thisem Fall den Vorgang von Schritt 3 an wiederholen. 5. AnschlieBend die Empfindlichkeit einstellen. Auf der Einstellungen-Wahlanzeige mit der Blätterbewegung unter "SETTING" den Punkt "A-VOL SENS" wahlen.  6. Entweder auf der rechten Seite des Displays die Blätterbewegung ↑ durchführten oder den [ROTARY]-Knopf drehen, um die Empfindlichkeit einzustellen. Jedes Mal wenn der [ROTARY]-Knopf gedreht wird, ändert sich die Einstellung in der folgenden Reihenfolge: OFF (keine Anpassung der Lautstärke) LOW (Anpassung der Lautstärke: gering) MID-LOW MID MID-HIGH HIGH (Änderung der Lautstärke: stark) ... 7. Die [A]-Taste betätigten, um zur vorherigen Betriebsart zusückzukehren.Durchführung einer Systemprüfung
These Funktion ermitteligt es, bei Bedarf vom Einstellmodus aus eine Systemprüfung durchzuführen. 1. Die [A]-Taste betätigten, um den Einstellmodus aufzurufen. 2. Auf der Einstellungen-Wahlanzeige mit der Blätterbewegung unter "SETTING" den Punkt "SYSTEM CHECK" wahren.  3. START berühren und mindestens 1 Sekunde lang halten. Auf dem Display entscheid "System Check". 4. Den [ROTARY]-Knopf drucken. Die Systemprüfung beginnnt. Wenn die Systemprüfung abgeschlossen ist, entscheidiert "Completed" (Abgeschlossen) im Display. 5. Den [ROTARY]-Knopf erneut drücken. Die Hauptanzeige für den Radiobetrieb erscheint.Verwendung der Diebstahlsicherungsfunktion (CODEMATIC)
These Funktion bewirkt, dass Personen, deren Tastensequenz nicht besteht ist, diese Gerät nicht ohne weiteres in Betriebnehmen konnen. Der Sicherungcode (Touch Code) wird angezeigt, wenn das DCP aufgesetzt ist und das Gerät bei aktivierter "CODEMATIC"-Funktion eingeschaltet wird. Wenn die auf thisem Bildschirm dargesteltere Anzeige in der richtigen Reihenfolge angetippt wird, erscheint die Meldung "SUCCESSIONAL" (Erfolg), und das Gerät wird wieder ausgeschaltet. Beim nachsten Einsatzen wird der Touch Code nicht mehr angezeigt, sondern die Hauptanzeige des Radio- bzw. CD-Modus erscheint. 1. Die [A]-Taste betätigten, um den Einstellmodus aufzurufen. 2. Auf der Einstellungen-Wahlanzeige mit der Blätterbewegung unter "SETTING" den Punkt "CODEMATIC" wahren.  Für "CODEMATIC" werden zwei verschiedene Arten von Einstellungspunkten angezeigt: Punkte, für die auf der rechten Seite des Displays "ON" oder "OFF" angezeigt wird, und Punkte, für die auf der rechten Seite des Displays "INPUT" angezeigt wird. Hier den Punkt wahren, für den auf der rechten Seite des Displays "ON" oder "OFF" angezeigt wird. 3. Entweder auf der rechten Seite des Displays die Blätterbewegung ↑durchführten oder den [ROTARY]-Knopf drehen, um die Einstellung “ON” oder “OFF” zu wahren. 4. Auf der Einstellungen-Wahlanzeige mit der Blätterbewegung unter “SETTING” den Punkt “CODEMATIC” wahren. Hier den Punkt wahren, für den auf der rechten Seite des Displays “INPUT” angezeigt wird. 5. INPUT antippen. Der Touch Code-Bildschirm wird angezeigt. 6. Den Touch Code eingeben. * Eine von 5 Stellen (links, Mitte, rechts, oben rechts oder unter rechts) auf dem Display antippen. Jedes Antippen wird durch eine der Touch Code-Anzeigen quittiert. * Beispiel: Die Felder (1) Mitte, (2) oben rechts, (3) links und (4) unter rechts in dieser Reihenfolge antippen. Es ist auch möglich, mehrmals die gleiche Stelle anzutippen. Nach viermaligem Tippen ertont ein langer Signatlon, und der ursprüngliche Modus wird wieder aktiviert.Abbrechen der CODEMATIC-Funktion
Wenn Sie die Reihenfolge vergessen haben, tippen Sie entweder die Felder ① unter rechts, ② links, ③ oben rechts und schließlich ④ rechts in dieser Reihenfolge an oder drücken Sie [SCN] auf der Fernbedienung. 7. BEDIENUNG DES ZUBEHÖRS
CD-Wechsler-Betrieb
CD-Wechsler
Wenn ein als Zubehör erhältlicher CD-Wechsler über das CeNET-Kabel angeschlossen wurde, kann diese Gerät die Funktionen des CD-Wechslers steuern. Das Gerät kann mit insgesamt 2 über CeNET-Kabel angeschlossenen CD-Wechslern verbunden werden.DVD-Wechsler
Wenn ein als Zubehör erhältlicher DVD-Wechsler über das CeNET-Kabel angeschlossen wurde, kann diese Gerät die Funktionen des DVD-Wechslers steuern. Zur Betrachtung einer DVD wird ein als Zubehör erhältlicher Monitor besteht. Die Betriebs- und Anzeigefunktionen des DVD-Wechslers in Verbindung mit thisem Gerät sind vereinfacht, und es werden nicht sümmtliche Funktionen des DVD-Wechslers unterstützt. Zur Bedienung des DVD-Wechslers wird die mit dem DVD-Wechsler gefelte Fernbedienung verwendet. Nähere Informationen hierzu enthalt die mit dem DVD-Wechsler gefelfte Bedienungsanleitung.■ Bei Anschluss von 2 CD-Wechslern
Den [ROTARY]-Knopf drucken, um den an这点es Gerät angeschlssenen Wechsler auszuwahlen. (Mit jedem Druck auf den [ROTARY]-Knopf wird der gewählte Wechsler umgeschaltet.) - Wenn der CD-Wechsler kein Magazin enthalt, wird "NO MAG" angezeigt. Enthalt das Magazin keine CD, wird für die betreffende Disc-Nr. "NO DISC" angezeigt. - Für Einzelheiten zur Titelanzeige siehe "Umschaltung der Titelanzeige" (siehe Seite 14).Bildschirmanzeigen im Wechslermodus
■ Hauptanzeige (CD-Wechsler-Modus)
These Anzeige entscheid, wenn durch Drucken des [ROTARY]-Knopfes der CD-WechslerModus gewählt wird.  Wenn Sie den linken Teil der Anzeige mindestens 1 Sekunde lang berühren, wird in den einfachen Bedienungsmodus umgeschaltet. Titel-/Spieldaueranzeige
T01/02: 00: Die Nummer des momentan abgespielten Titels und die Spieldauer werden angezeigt. Im Standardmodus kann mit der Blätterbewegung ⓹ ⓸ ⓺ oder der Durchlaufbewegung der abzuspielende Titel ausgewählt bzw. ein Schneller Titelvorlauf oder -rücklauf durchgefuhrt werden.Titelnamensanzeige
Durch Antippen wird die Anzeige umgeschaltet.Disc-Nr.-Anzeige
Mit der Blätterbewegung im Normalmodus kann eine Disc gewählt werden.MODE
Durch Antippen werden Unterfunktionen angezeigt. Wenn diese Anzeige berührt und mindestens 1 Sekunde lang gehalten wird, erscheidt die Disc-Liste.T-SCAN/D-SCAN
These Anzeige erscheint während der Anspielwiedergabe. Durch Antippen von T- SCAN/D-SCAN wird die Anspielwiedergabe abgebrochen.T-RPT/D-RPT
These Anzeige erscheint während der Wiedergabewiederholung. Durch Antippen von T-RPT/D-RPT wird die Wiedergabewiederholung beendet.T-RDM/D-RDM
These Anzeige erscheint während der Zufallswiedergabe. Durch Antippen von T- RDM/D-RDM wird die Zufallswiedergabe beendet.DISC
Durch Antippen wird die Wiedergabe der nachsten Disc gestartet.(nier der einfachen Bedienanzeige)
Durch Antippen wird der abzuspielende Titel ausgewählt. Wenn these Anzeigen berührt und gehalten werden, erfolgt ein Schneller Titelvorlauf bzw. - rücklauf.Disc-Listen-Anzeige (CD-WechslerModus)
Thesee Lieste wird angezeigt, wenn auf der Hauptanzeige MODE berührt und mindestens 1 Sekunde lang gehalten wird.  Disc-Name>>: Auswahl lauft
Beim Antippen eines Disc-Namens wird wieder die Hauptanzeige aufgerufen, und die Wiedergabe beginnnt mit dem ersten Titel auf der angetipten Disc.←PREV-RTN:
Durch Antippen wird wieder die vorherige Titelnamensliste angezeigt. Wenn Sie diese Anzeige berühren und mindestens 1 Sekunde lang halten, erscheidt auf dem Display wieder die Hauptanzeige.NEXT:
Durch Antippen wird die jeweils{nachste Titelnamensliste aufgerufen.VORSICHT
Nicht jeder CD-Wechsler kann CD-ROM-Discs abspielen; dies ist vom Modell abhängig.Hinweis:
- Bestimmte CDs, die im CD-R-/CD-RW-Modus gebrannt wurden, können u. U. nicht verwendet werden.Auswahl des Wechsler-Modus
1. Den [ROTARY]-Knopf drucken, um CD-Wechsler-Betrieb zu wahlen. \* Betriebsarten fur nicht angeschlossene Geräte werden nicht angezeigt. Nach der Umschaltung auf CD-Wechsler-Betrieb beginnnt automatisch die Wiedergabe.Pausieren der Wiedergabe
1. Die [▶■]-Taste betätigten.Fortsetzen der Wiedergabe
1. Die [ ] -Taste nochmals betätigten.Auswahl einer CD
1. Auf der Anzeige der Disc-Nr. die Blätterbewegung 45 durchführren, um eine Disc auszuwahlen. Die Wiedergabe beginnt. * Wenn das Magazin die gewähte Disc nicht enthalt, wird die Nummer für die betreffende Disc nicht angezeigt. * Durch Antippen von DISC ↑ wird die Wiedergabe der{nachsten Disc gestartet.Auswahl einer Disc aus der Disc-Listen-Anzeige
1. MODE berühren und mindestens 1 Sekunde lang halten. Die Disc-Liste wird angezeigt. Durch Antippen von NEXT wird der jeweils folgende Teil der Disc-Liste abgerufen. 2. Den Disc-Namen antippen. * Wenn das Magazin die gewählte Disc nicht enthalt, wird für die betreffende DiscNr. "NO DISC" angezeigt. * Wenn die momentan abgespielete Disc gewählt wird, startet die Wiedergabe wieder mit dem ersten Titel dieser Disc (Top-Funktion).Wahl eines Titels
1. Zum Horen des nachsten Titels auf der Titelanzeige die Blätterbewegung durchführen. 2. Zum Horen des vorherigen Titels auf der Titelanzeige zweimal die Blätterbewegung durchfuhren. Mit wird der{nachste Titel abgeschweit. Wenn Sie die Blätterbewegung 艹 mehrals durchfuhren, wird dadurch um so viele Titel weitergesprungen, wie oft Sie die Blätterbewegung 艹 durchgeführt haben, und der entsprechende Titel wird abgeschliet. Mit 艹 wird der vorausgegangene Titel abgeschliet. Wenn Sie die Blätterbewegung 喜 mehrmals durchfuhren, wird dadurch um so viele Titel zurückgesprungen, wie oft Sied die Blätterbewegung 喜 durchgefuhlrt haben, und der entsprechende Titel wird abgespiel. * Wenn die Blätterbewegung ↑ auf der Titelanzeige zweimal durchgeführt wird, während sich die Wiedergabe noch am Titelanfang befindet, wird in manchen Fällen der um 2 Titel darüber liegende Titel abgespielt.Schneller Vorlauf / Schneller Rücklauf
1. Um einen Schnellen Vorlauf auszulösen, auf der Titelanzeige die Durchlaufbewegung durchführren. 2. Um einen schellen Rücklauf auszulösen, auf der Titelanzeige die Durchlaufbewegung durchführren.Top-Funktion
Die Top-Funktion beginnt die Wiedergabe beim ersten Titel der momentan abgespielten Disc. 1. MODE berühren und mindestens 1 Sekunde lang halten. Die Disc-Liste wird angezeigt. Durch Antippen von NEXT wird der jeweils folgende Teil der Disc-Liste abgerufen. 2. Den Disc-Namen antippen. * Wenn das Magazin die gewählte Disc nicht enthalt, wird für die betreffende DiscNr. "NO DISC" angezeigt. * Wenn die momentan abgespielte Disc gewählt wird, startet die Wiedergabe wieder mit dem ersten Titel dieser Disc.Anspielwiedergabe
Die Anspielfungtion spielt automatisch die ersten 10 Sekunden jedem Titels auf einer Disc an. Diese Funktion lauft auf der Disc so lange weiter, bis sie abgebrochen wird. Die Anspielfungtion ist hilfreich, wenn ein bestimmer Titel gesucht wird. 1. MODE antippen. 2. T-SCAN antippen. Die Anzeige MODE ändert sich in "T-SCAN", und die Anspielwiedergabe beginnt. * Die Anspielwiedergabe beginnt bei dem auf den momentan abgespielten Titel folgenden Titel.Aufheben der Anspielwiedergabe
1. T-SCAN antippen. Die Anzeige T-SCAN ändert sich in "MODE", und es wird wieder der Titel abgeschliet, der beim Antippen von T-SCAN wiedergegeben wurde.Disc-Anspielwiedergabe
Die Disc-Anspielfung spält automatisch die ersten 10 Sekunden des ersten Titels auf jeder Disc im momentan gewählten CD-Wechsler an. Diese Funktion lauft automatisch so lange weiter, bis sie abgebrochen wird. Die Disc-Anspielwiedergabe ist hilfreich, wenn eine bestimmte CD ausgewählten werden soll. 1. MODE antippen. 2. D-SCAN antipinen. Die Anzeige MODE ändert sich in "D-SCAN", und die Anspielwiedergabe beginnnt. * Die Disc-Anspielwiedergabe beginnt bei der auf die momentan abgespielte Disc folgenden Disc.■ Aufheben der Disc-
Anspielwiedergabe
1. D-SCAN antippen. Die Anzeige D-SCAN ändert sich in "MODE", und es wird wieder der Titel abgeschpielt, der beim Antippen von D-SCAN wiedergegeben wurde.Wiedergabewiederholung
Bei der Wiedergabewiederholung wird der aktuelle Titel kontinuierlich abgespielt. Diese Funktion lauft automatisch so lange weiter, bis sie abgebrochen wird. 1. MODE antippen. 2. T-REPEAT antippen. Die Anzeige MODE ändert sich in "T-RPT", und die Wiedergabewiederholung beginnt.■ Aufheben der
Wiedergabewiederholung
1. T-RPT antippen. Die Anzeige T-RPT ändert sich in "MODE", und die normale Wiedergabe beginnnt mit dem Titel, der beim Antippen von T-RPT abgespielt wurde.Disc-
Wiedergabewiederholung
Nachdem sãmtliche Titel auf der aktuellen Disc abgespielt worden sind, beginnt die Disc-Wiedergabewiederholung automatisch mit der Wiedergabe der aktuellen Disc ab dem ersten Titel. Diese Funktion lauft automatisch so lange weiter, bis sie abgebrochen wird. 1. MODE antippen. 2. D-REPEAT antippen. Die Anzeige MODE ändert sich in "D-RPT", und die Disc-Wiedergabewiederholung beginnnt.■ Aufheben der Disc
Wiedergabewiederholung
1. D-RPT antippen. Die Anzeige D-RPT ändert sich in "MODE", und die normale Wiedergabe beginnt mit dem Titel, der beim Antippen von D-RPT abgespielt wurde.Zufallswiedergabe
Bei der Zufallswiedergabe werden einzelne Titel auf der Disc ohne Einhaltung einer bestimmten Reihenfolge ausgewählt und abgeschweit. Diese Funktion lauft automatisch so lange weiter, bis sie abgebrochen wird. 1. MODE antippen. 2. T-RANDOM antippen. Die Anzeige MODEändert sich in "T-RDM", und die Zufallswiedergabe beginnt.Aufheben der Zufallswiedergabe
1. T-RDM antippen. Die Anzeige T-RDM ändert sich in "MODE", und die normale Wiedergabe beginnt mit dem Titel, der beim Antippen von T-RDM abgespielt wurde.Disc-Zufallswiedergabe
Bei der Disc-Zufallswiedergabe werden einzelne Titel oder Discs ohne Einhaltung einer bestimmten Reihenfolge automatisch ausgewählt und abgeschiert. Diese Funktion lauft automatisch so lange weiter, bis sie abgebrochen wird. 1. MODE antippen. 2. D-RANDOM antippen. Die Anzeige MODEändert sich in "D-RDM", und die Zufallswiedergabe beginnt.Aufheben der Disc-Zufallswiedergabe
1. D-RDM antippen. Die Anzeige D-RDM ändert sich in "MODE", und die normale Wiedergabe beginnnt mit dem Titel, der beim Antippen von D-RDM abgespielt wurde.Fernsehbetrieb
Fernsehtuner-Funktionen
Wenn ein wahlweiser Fernsehtuner über das CeNET-Kabel angeschlossen wird, dann steuert these Gerät alle Fernsehtuner-Funktionen. Für Fernsehen ist ein Fernsehtuner und -monitor erforderlich.Bildschirmanzeigen im TV-Betrieb
Hauptanzeige
These Anzeige erscheint, wenn Sie den [ROTARY]-Knopf drucken und TV-Betrieb wahlen.  Wenn Sie den linken Teil der Anzeige mindestens 1 Sekunde lang berühren, wird in den einfachen Bedienungsmodus umgeschaltet. Kanalanzeige
1ch: Der momentan empfangene Kanal wird angezeigt. Wenn im Normalmodus die Bewegung 山 oder durchgefuhrt wird, aktiviert dies den Sendersuchlauf bzw. die manuelle Sendereinstellung.Namensanzeige
3ch: Der Name des momentan empfangenen Senders wird angezeigt. VTR: Im Video-Modus Durch Antippen wird die Anzeige umgeschaltet.Wellenbereich-Anzeige
TV1: Wellenbereich-NameAnzeige der Festsender-Nummer
Im Normalmodus wird mit der Blätterbewegung 一 ein der eingespeicherten Festsender angewählt.MODE
Durch Antippen werden Unterfunktionen angezeigt. Wenn Sie diese Anzeige mindestens 1 Sekunde lang berühren, erscheint die Liste der eingespeicherten Voreinstellungen. P-SCAN: Diese Anzeige erscheidt während der Festsenderanspielung. Durch Antippen wird die Festsenderanspielung abgebrochen. A-STORE: These Anzeige erscheidt während der automatischen Speicherung. Durch Antippen wird die automatische Speicherung abgebrochen.BAND
Beim Antippen dieser Anzeige wird der Wellenbereich umgeschaltet. Wenn Sie diese Anzeige mindestens 1 Sekunde lang berühren, wird zwischen manueller Sendereinstellung und Sendersuchlauf hin- und hergeschaltet.(1) (nur in der einfachen Bedienanzeige)
Durch Antippen dieser Tasten wird der Sendersuchlauf gestartet bzw. die schrittweise Einstellung durchgeführt (bei manueller Einstellung). Durch Berühren und Halten dieser Tasten wird die Schnelleinstellung gestartet (bei manueller Einstellung).Anzeige der Festsenderliste
These listed here, which are the most important for the study of the human brain. Sendername >>:
Suchlauf lauftRTN:
Durch Antippen wird wieder die Hauptanzeige aufgerufen.Auswahl des TV-Modus
1. Den [ROTARY]-Knopf drücken, um TV-Betrieb zu wahlen. Bei jedem Druck auf den [ROTARY]-Knopfändert sich die Betriebsart in der folgenden Reihenfolge: * Betriebsarten für nicht angeschlossene Geräte werden nicht angezeigt.Umschaltung des Wellenbereichs
1. Tippen Sie BAND an, um den Wellenbereich umzuschalten. Jedes Mal wenn Sie BAND antippen, wird der Wellenbereich umgeschaltet. TV1 TV2 TV1...Sendersuchlauf
Der Sendersuchlauf ist eine Funktion zur automatischen Einstellung von Sendern mit gutem Empfangssignal. 1. Wenn MANU angezeigt wird, BAND ber und mindestens 1 Sekunde lang halten Die automatische Sendereinstellung ist möglich, sobald MANU verschwindet. 2. Auf der Frenuzanzeige die Durchlaufbewegung durchfuhren. SEEK UP/SEEK DOWN wird angezeigt, und die Sendereinstellung beginnnt. Bei Sendern mit gutem Empfang hält der Suchlauf automatisch an.Abbrechen der Sendereinstellung
1. Auf der Frenuzanzeige erneut die Durchlaufbewegung durchfuhren.Manuelle Sendereinstellung
Es gibt 2 Arten der Sendereinstellung: Schnelleinstellung und schrittweise Einstellung. Bei der schrittweisen Sendereinstellung ändert sich die Freqenz jeweils in Einzelschritten. Bei der Senderschnelleinstellung kann die gewünschte Freqenz schnell eingestellt werden. 1. Wenn MANU nicht angezeigt wird, BAND berühren und mindestens 1 Sekunde lang halten. Die manuelle Sendereinstellung ist nur möglich, wenn MANU angezeigt wird. 2. Mit Hilfe der Kanalanzeige einen Kanal einstehen, auf dem eine Sendung ausgestrahlt wird. Es gibt 2 Arten der manuellen Sendereinstellung: schrittweise Einstellung und Schnelleinstellung. * Bei der schrittweisen Sendereinstellung ändert sich die Freqenz jeweils in Einzelsritten. Auf der Frenuzanzeige die Blätterbewegung ↑ durchführten. * Bei der Schnelleinstellung werden die Kanäle kontinuierlich durchgeschaltet. Auf der Kanalanzeige die Durchlaufbewegung durchfuhren. Die Frequenzanzeige lauft durch, bis Sie den Finger wieder vom Displayephmen.Abruf eines Festsenders
Mit dieser Funktion kann der Benutzer einen Festsender ausgehalten. 1. MODE berühren und mindestens 1 Sekunde lang halten. Die Listederingespeicherten Sender wird angezeigt. 2. Tippen Sie den gewünschten Sender an. * Zum Einstellen des Senders kann auch die Blätterbewegung ↑ ↑ auf der Festsender-Nr. durchgeführt werden.Abbrechen der Sendereinstellung
1. RTN antippen.Festsender-Speicherplatz
Es können insgesamt 12 TV-Sender gespeichert werden (6 x TV1 und 6 x TV2). Sie können mit dieser Funktion ihre bevorzugten TV-Sender auswahlen und zum späteren Abrufen einspeichern. 1. BAND antippen, um den Wellenbereich umzuschalten. 2. An der Kanalanzeige den gewünschten Sender einstehen. 3. MODE berühren und mindestens 1 Sekunde lang halten. Die ListederingespeichertenSender wird angezeigt. 4. Die Nummer des Festsenders für die Speicherung berühren und mindestens 2 Sekunden lang halten. Ein langer Signalon zeigt an, dass der Sender gespeichert wurde. Wenn nur ein kurzer Signatlon zu horen ist, wurde der Sender nicht gespeichert. In thisem Fall den Vorgang von Schritt 1 an wiederholen.Automatische Speicherung
Bei der automatischen Speicherung werden 6 Fensehsender automatisch angewählt und jeweils an den einzelnen Festspeicherplätzen abgelegt. Wenn weniger als 6 Sender mit gutem Empfang gefunden werden konnen, bleiben die bisherigen Sender gespeichert, und nur die stärkeren Sender werden eingespeichert. 1. MODE antippen. 2. A-STORE berühren und mindest Sekunden lang halten. Die MODE-Anzeige ändert sich in "A-STORE", und die Nummer des momentan eingespeicherten Festsenders erscheint in der Festsender-Nummernanzeige. * Es werden automatisch Sender mit gutem Empfang gesucht und beginnend mit der niedrigsten Sendefrequenz an den Festsender-Speicherplätzen Nr. 1 bis 6 abgelegt.Hinweise:
- Bei der automatischen Speicherung werden die bisher gespeicherten Sender gelöscht. - Wenn weniger als 6 Sender mit gutem Empfang gefunden werden, wird die automatische Speicherung (wieder mit den unteren Frenzen beginnend) wiederholt. Wenn auch nach dieser zweimaligen automatischen Speicherung weniger als 6 Sender gefunden wurden, bleiben die bisher gespeicherten Sender erhalten.Festsenderanspielung
Bei der Festsenderanspielung werden die im Speicher abgelegten Sender in der momentan gespeicherten Reihenfolge nacheinander angewählt, damit Sie die momentan ausgestrahnten Sendungen sichen können. 1. MODE antippen. 2. P-SCAN antippen. Die MODE-Anzeige ändert sich in "P-SCAN", und die Nummer des momentan angespielten Festsenders erscheint in der Festsender-Nummernanzeige. * Die momentan gespeicherten Festsender werden nacheinander jeweils mindestens 7 Sekunden lang empfangen. Sender mit schlechtem Empfang werden übersprungen, und der Empfang wird bei dem{nachsten Sender fortgesetzt. Die TV-Sender werden in der folgenden Reihenfolge angewählt: $$ \begin{array}{l} \text {T V 1 (1 \to 6) \to T V 2 (1 \to 6) \to T V 1 (1 \to} \\ 6) \text {u s w .} \end{array} $$Abbrechen der Festsenderanspielung
1. P-SCAN antippen. The P-SCAN-Anzeige ändert sich in "MODE", und der Radioempfang wird mit dem Sender fortgesetzt, der beim Antippen von P-SCAN empfangen wurde.Ansehen eines Videoprogramms
Der Fernseh-Tuner verfügbar über einen VTR-Eingang, an den 1 externes Gerät angeschlossen werden kann. An den Fernseh-Tuner einen 12-V-Videocassettenspieler (VCP) oder -Videocassettenrecorder (VCR) anschließen. 1. Die [▶III]-Taste betätigten. "VTR" wird angezeigt, und das Gerät schaltet auf Videobetrieb um. * Der Fernsehbildschirm schaltet auf den Videoeingang um, so dass Videoprogramme angesehen werden können.Rückkehr zum TV-Betrieb
1. Die [ ] -Taste nochmals betätigen.Einstellung des Fernseh-Empfangsbereichs (TV AREA)
Bei Einstellung des Fernseh-Empfangsbereichs ändert sich die Bereichseinstellung des TV-Tuners. Die werkseitige Ausgangseinstellung ist "GERMANY" (Deutschland). 1. Die [A]-Taste betätigten, um den Einstellmodus aufzurufen. 2. Auf der Anzeige der Einstellungspunkte mit der Blätterbewegung unter "TUNER" den Punkt "TV AREA" wahren.  3. Entweder auf der rechten Seite des Displays die Blätterbewegung t durchführren oder den [ROTARY]-Knopf drehen, um den Bereich zu wahlen. 4. Die [A]-Taste betätigten, um zur vorherigen Betriebsart zusückzukehren.Einstellung für "TV Diversity" (TV DIVER)
Die Empfangseinstellung für die am TV-Tuner angeschlossene Fernsehantenne kann geändert werden. - Für diesen Punkt "OFF" einstellen, wenn keine TV-Diversity-Antenne verwendet wird. Die werkseitige Voreinstellung ist "ON". 1. Die [A]-Taste betätigten, um den Einstellmodus aufzurufen. 2. Auf der Einstellungen-Wahlanzeige mit der Blätterbewegung ↑ unter “TUNER” den Punkt “TV DIVER” wahren.  3. Entweder auf der rechten Seite des Displays die Blätterbewegung t durchführren oder den [ROTARY]-Knopf drehen, um die Einstellung "ON" oder "OFF" zu wahlen. 4. Die [A]-Taste betätigten, um zur ursprünglichen Betriebsart zurückzukehren.DAB-Steuerfungtion
Wenn ein CeNET-Kabel zum Anschlieben eines DAB-Geräts (DAH913 oder DAH923) (getrennt erhältlich) verwendet wird, dann können alle Funktionen ausgeführrt werden.Hören eines DAB-Senders
1. Den [ROTARY]-Knopf drücken, um die Betriebsart zu wechseln.Hinweise:
- Beim normalen Empfang und beim Festsenderempfang erscheint auf dem Display die gleiche Anzeige wie beim Empfang eines DAB-Senders. Die Anzahl der Programme und die Sendezeiten sind je nach DAB-Sender entsprechlich. - Bei zu schwachen DAB-Signalen wird der AudioAusgang stumm gescheltet.Sendersuchlauf
1. Den [ROTARY]-Knopf drücken, um DAB-Betrieb zu wahlen. 2. Auf der linken Seite des Displays die Durchlaufbewegung durchführten. Wenn das Hauptgerät einen DAB-Sender empfängt, entscheid im Display "DAB". * Wenn kein DAB-Sender gefunden wird, bricht das Hauptgerät den Suchlauf ab. Das Display kehrt in den vorherigen Anzeigemodus zurück.Manuelle Sendereinstellung
1. Den [ROTARY]-Knopf drucken, um DAB-Betrieb zu wahlen. 2. Wenn "MANU" nicht angezeigt wird, BAND berühren und mindestens 1 Sekunde lang halten. Manuelle Sendereinstellung ist möglich, wenn "MANU" angezeigt wird. 3. Auf der linken Seite des Displays die Blätterbewegung durchführung, um den Sender einzustellen. * Wenn über 7 Sekunden lang kein Bedienvorgang erfolgt, wird die manuelle Sendereinstellung abgebrochen, und das Display kehrt in den vorherigen Anzeigemodus zusammen.Umschaltung von Programmen
1. Den [ROTARY]-Knopf drucken, um DAB-Betrieb zu wahlen. 2. Auf der linken Seite des Displays die Blätterbewegung durchführren, um zwischen den Programmen des DAB-Senders umzuschalten.Hinweis:
Die Programmnamen können je nach DAB-Programm identisch sein.Programmanspielung
Mittels dieser Funktion werden die einzelnen empfangbaren Programme eines eingestellten DAB-Senders der Reihe nach 10 Sekunden lang angespielt. Dies ist für die Suche nach einem gewünschten Programm hifreich. 1. Den [ROTARY]-Knopf drücken, um DAB-Betrieb zu wahlen. 2. MODE antippen. 3. S-SCAN antippen. "S-SCAN" wird angezeigt, und das Gerät beginnnt, alle Programme der Reihe nach 10 Sekunden lang anzuspielen. Jedes Mal wenn das Hauptgerät ein Programm anspielt, wird der Programmname im Display angezeigt. 4. Um die Programmanspielung zu beenden, wenn das gewünschte Programm gefunden ist, S-SCAN antippen.Manuelle Speicherfunktion
Das Hauptgerät besitzt eine manuelle Speicherfunktion für DAB-Programme. Die Festsendertasten konnen mit bis zu 18 Programmen (jeweils 6 Programme) belegt werden.[M1], [M2] und [M3]
1. Den [ROTARY]-Knopf drücken, um DAB-Betrieb zu wahlen. 2. BAND berühren, um einen der oben gezeigten Bereiche zu wahlen. 3. MODE berühren und mindestens 1 Sekunde lang halten. Die Liste der eingespeicherten Sender wird angezeigt. 4 Die Nummer des Festsenders für die Speicherung berühren und mindestens 2 Sekunden lang halten. Ein langer Signatlon zeigt an, dass der Sender gespeichert wurde. Wenn nur ein kurzer Signatton zu horen ist, wurde der Sender nicht gespeichert. In thisem Fall den Vorgang von Schritt 1 an wiederholen.Hinweis:
- Unterbrechungsprogramme (PTY oder INFO) können nicht manuell eingespeichert werden.Abruf eines
Festspeicherprogramms
1. Den [ROTARY]-Knopf drücken, um DAB-Betrieb zu wahlen. 2. BAND antippen. Jedes Mal wenn Sie BAND antippen, wechselt die Anzeige in der folgenden Reihenfolge: MEMO1 MEMO2 MEMO3 MEMO1... 3. Auf der rechten Seite des Displays die Blätterbewegung durchführren, um ein Festspeicherprogramm abzurufen.AF-Funktion
Um einen optimalen Empfang beizubehalten, wird mittels der AF-Funktion auf eine andere Frequenz im gleichen Sendernetz umgeschaltet. Die werkseitige Standardeinstellung ist "ON". - Sollte der Empfang des derzeitgen Senders schwacher werden, dann wird im Display "SEARCH" angezeigt und das Radioucht das gleiche Programm auf einer anderen Freqenz. - Für Einzelheiten zur "AF-Funktion" (siehe Seite 26) siehe den Abschnitt "RDS-Betrieb" der jeweiligen Bedienungsanleitung. Ausschaltung der AF-Funktion (OFF) Einschaltung der AF-Funktion (ON) - AF-Funktion-Umschaltung zwischen RDS und DAB Wenn das gleiche Programm von RDS und DAB gesendet wird und diese Funktion eingeschaltet ist, dann schaltet das Hauptgerät automatisch auf den Sender mit dem besseren Empfang um.TA-Funktion
(Verkehrsdurchsage)
Wenn bei TA-Bereitschaftsbetrieb, eine Verkehrs durchsage beginnt, hat der Empfang eines Senders mit Verkehrs durchsage Vorrang, damit diese ungeachtet des Funktionsmodus gehört werden kann. Eine automatische Sendereinstellung für Verkehrsprogramme (TP) ist ebenfalls möglich. - Nur wenn "TP" im Display aufleuchtket, die diese Funktion angewendet werden. We "TP" aufleuchtet, bebedeut dies, daß der empfangene DAB- oder RDS-Sender Programme mit Verkehrsdurchsagen er - Für Einzelheiten zu "TA-Funktion" (siehe Seite 27) siehe den Abschnitt "RDS-Betrieb" der jeweiligen Bedienungsanleitung. Einstellung des TA-Bereitschaftsbetriebs Aufhebung des TA-Bereitschaftsbetriebs - SuchenachenaemTP-SenderHinweise:
- Wenn kein TP-Sender empfangen wird, stoppt das Hauptgerät den Suchbetrieb. - Im Display leuchtet "TP" auf, wenn eine TP-kennung von einem RDS-Sender übertragen wird. In solch einem Fall, die [TA]-Taste für TP-Sendersuchlauf betätigten. Für Rückkehr zur vorherigen Betriebsart die [TA]-Taste erneut drücken.INFO (Ankündigung)
Wenn bei INFO-Bereitschaftsbetrieb das eingesestte Ankündigungssprogramm beginnt, schaltet das Hauptgerat automatisch auf das eingesestte Ankündigungssprogramm.- Einstellung des INFO-Bereitschaftsbetriebs
Wenn die [TA]-Taste betätig und für 1 Sekunde oder länger gedrück gehalten wird, dann leuchtet im Display "INFO" auf und das Hauptgerät wird auf CFO-Bereitschaftsbetrieb eingestellt, bis die eingestellte Ankündigung gesendet wird. Wenn die Sendung der eingestellen Ankündigung beginnnt, wird die Ankündigung im Display angezeigt. Wird die [TA]-Taste während Empfang der eingestellen Ankündigung betätig und für 1 Sekunde oder länger gedrück gehalten, dann wird der Empfang des eingestellen Ankündigungssenders aufgehoben und das Hauptgerät schaltet auf INFO-Bereitschaftsbetrieb. - Aufhebung des INFO-Bereitschaftsbetriebs für Aufhebung des INFO-Bereitschaftsbetriebs, die [TA]-Taste betätigten und für 1 Sekunde oder länger gedrückt halten.Informationseinstellung
These Funktion dient der Einstellung für INFORMATION EIN oder AUS bei Information-Unterbrechungsbetrieb. Es können bis zu 6 Informationsarten eingestellt werden. Jede der folgenden 6 Informationsarten kann eingestellt werden:| INFORMATION | |
| DEUTSCH | Inhalt |
| Reisen | Reisedurchsage |
| Warnung | Warnung/Service |
| Aktuell | Aktuelle Meldung |
| Wetter | Regionales Wetter |
| Service | Veranstaltungsmeld |
| Eilmeld | Sonderveranstaltung |
PTY
Mittels dieser Funktion kann die eingestellte Programmart ungeachtet des Funktionmodus gehört werden. - Für DAB und RDS kann ein gemeinsames PTY-Programm gewählt werden. - Bei DAB PTY und RDS PTY besitzt der erhempfangene PTY-Sender Vorrang gegenüber den anderen. - PTY-Sender können noch nicht in allen Ländern empfangen werden. - Bei INFO-Bereitschaftsbetrieb haben INFO-Sender Vorrang vor PTY-Sendern. - Bei TA-Bereitschaftsbetrieb haben TP-Sender Vorrang vor PTY-Sendern. - Für Einzelheiten zu "PTY" (siehe Seite 28) siehe den Abschnitt "RDS-Betrieb" in der jeweiligen Bedienungsanleitung. Einstellung des PTY-Bereitschaftsbetriebs Aufhebung des PTY-Bereitschaftsbetriebs Aufhebung einer PTY-Senderunterbrechung - PTY-Einstellung - PTY-Suche - PTY-FestsenderspeicherNotrufmeldung
Wenn eine Notufremdung empfangen wird, wird jeglicher Funktionsmodusbetrieb gestopt. Im Display wird "ALARM" angezeigt und die Notufremdung kann gehen. - Für Einzelheiten zur "Notrufmeldung" (siehe Seite 29) siehe den Abschnitt "RDS-Betrieb" in der jeweiligen Bedienungsanleitung. Aufhebung der NotrufmeldungÄnderung der
Anzeigensprache für PTY and INFO
Es kann eine von 4 Sprachen (Englisch, Deutsch, Schwedisch oder Französisch) für die im Display angezeigten PTY- und INFOAngaben gewählt werden. Die werkseitige Ausgangseinstellung ist "ENGLISH". - Einzelheiten zur Änderung der PTY-Display-Sprache" (siehe Seite 30) enthalt der Abschnitt "RDS-Betrieb" der betreffenden Bedienungsanleitung.Lautstärkeeinstellung für TA, INFO, Notrufmeldung (ALARM) und PTY
Die Lautstärke für TA, INFO, ALARM und PTY Unterbrechungen kann während TA, INFO, ALARM und PTY Unterbrechung eingestellt werden. Die folgende Bedienung entsprechend dem angeschlossenen Modells ausführten. - Die werkseitige Standardeinstellung ist "15". Wahlrend einer TA, INFO, ALARM oder PTY Unterbrechung zur Einstellung der Lautstärke auf einen gewünschten Pegel (0 bis 33), den [ROTARY]-Knopf im Uhrzeiger- oder Gegenuhrzeigersinn drehen. * Wenn die TA, INFO, ALARM oder PTY Unterbrechung beendet ist, kehrt die Lautstärke auf den Pegel vor der Unterbrechung darüber.5.1-Kanal-Surround-Decoderbetrieb
Wenn ein als Zubehör erhältlicher, zum CeNET-Kabelsystem kompatibler 5.1-Kanal-Surround-Decoder angeschlossen ist, kann der Decoder von thisem Gerät aus angesteuert werden. Bei den folgenden Funktionen ergeben sich Veränderungen, wenn ein 5.1-Kanal-Surround-Decoder angeschlossen ist: - Der Dolby Pro Logic II-Betrieb wird um die beiden Modi "MOVIE" und "VIRTUAL" ergänzt. - Der VSE/POSITION-Modus wird durch den DSF-Modus (Digital Sound Field) ersetzt. - Im P.EQ-Modus (Parametric Equalizer) lässt sich die Einstellungen für jeder Lautsprecher noch genauer anpassen. - Musikbezogene Einstellungen bestimmter Einstellungspunkte (siehe Seite 39) werden geändert.Auswahl von PL II (Dolby PL II)
Passend zu der gewünschten Tonquelle für den Dolby Pro Logic II-Modus einen der vier verfügbarbaren Modi auswahlen. Die werkseitige Voreinstellung ist "OFF" (aus).■ MUSIC (Musik-Modus)
Siehe "Auswahldes PLII-Menus (Dolby PLII)" (siehe Seite 17).MATRIX (Matrix-Modus)
Siehe "Auswahl des PLII-Menus (Dolby PLII)" (siehe Seite 17).MOVIE (Film-Modus)
Geeignet fur DVD-Videofilme.■ VIRTUAL (Virtual-Audio-Modus)
Geeignet fur Filme und andere Audioquellen.OFF
Der Dolby Pro Logic II-Modus wird nicht verwendet. 1. Die [SOUND]-Taste betätigen. 2. Dolby PLII antippen.  3. Auf der rechten Seite des Displays die Blätterbewegung ↑ ⿱ ↑ durchführren, um den Dolby Pro Logic II-Modus anzuwahlen.  Die Modusanzeige ändert sich in der folgenden Reihenfolge: MUSIC (Musik-Modus) MATRIX (Matrix-Modus) MOVIE (Film-Modus) VIRTUAL (Virtual-Audio-Modus) OFF (PL II aus) MUSIC (Musik-Modus)... * Für Einzelheiten zur Lautstärkeeinstellung für den Center-Laatsprecher/Subwoofer siehe Seite 45. 4. RTN antippen.Auswahl im DSF-Menu
Die DSF-Funktion (Digital Sound Field) erfolgt eine Simulation des akustischen Eindrucks in einem Konzertsaal oder bei einem Live-Hallenkonzert. - Bei der Anzahl des DSF-Menus nimmt in manchen Fälle die Lautstärke ab. - Dies werkseitige Ausgangseinstellung für DSF ist "OFF" (Aus), für das DSF-MENU "HALL" (Saal). 1. Die [SOUND]-Taste betätigten. 2. DSF antippen.  3. Auf der ON/OFF-Anzeige die Blätterbewegung 1b1 durchführren. Der DSF-Effekt wird abwechselnd aktiviert und deaktiviert.  Wenn DSF auf "OFF" eingestellt ist, wirkt sich die DSF-Einstellung nicht auf die Wiedergabe der Tonquelle aus. Damit ist die DSF-Einstellung abgeschlossen. Die [SOUND]-Taste betätigten, um zur ursprünglichen Betriebsart zurückzukehren. 4. Auf der Nummernanzeige des DSF-Menü die Blätterbewegung 14 durchführren, um den gewündsten DSF-Menüeintrag anzuwahlen.  DSF-Menüeinträge HALL CHURCH STADIUM LIVE JAZZCLUB THEATER HALL...| Nr. | Funktionsname | Beschreibung |
| 1 | HALL | Großer Konzertsaal |
| 2 | CHURCH | Kirche mit Gewölbedecke |
| 3 | STADIUM | Großes Stadion ohne Dach oder Wände |
| 4 | LIVE | Live-Konzertsaal, größer als Jazz-Club |
| 5 | JAZZCLUB | Jazz-Club mit niedriger Decke |
| 6 | THEATER | Kino oder Theater |
Auswahl im Menu für den parametrischen Equalizer
Der parametrische Equalizer (P.EQ) erhögt. eine detailierte Kompensation des gesamten Freqenzbereichs durch die Anwendung einer geglifteten, an den Fahrzeugtyp angepassten Freqenz-Kompensationskurve. - In der werkseitigen Ausgangseinstellung gelten fürSAMTliche Laufsprecher die folgenden Einstellungen: FREQ = 1kHz Q = 1 GAIN = 0dB 1. Die [SOUND]-Taste betätigen. 2. P.EQ antippen.  3. Auf der ON/OFF-Anzeige die Blätterbewegung durchführren. Der P.EQ-Effekt wird abwechselnd aktiviert und deaktiviert.  Wenn der P.EQ-Effekt auf "OFF" eingestellt ist, wirkt sich die P.EQ-Einstellung nicht auf die Wiedergabe der Tonquelle aus. Damit ist die P.EQ-Einstellung abgeschlossen. Die [SOUND]-Taste betätigten, um zur ursprünglichen Betriebsart zurückzukehren. 4. Auf der Nummernanzeige des P.EQ-Menü die Blätterbewegung ↑ durchführren, um den gewündsten P.EQ-Menüintrag anzuwahlen.  P.EQ-Menüeinträge SIGNAL SP-SEL BAND FREQ Q GAIN SIGNAL... 5. Auf der rechten Seite des Displays mit der Blätterbewegung den betreffenden Punkt wie gewünscht einstellen. SIGNAL (wählt den Signatz für die Einstellung): "P-NOIS" oder "MUSIC" auswahlen P-NOIS: Für die Einstellung soll rosa Rauschen verwendet werden MUSIC: Für die Einstellung sollen Musiksignale verwendet werden SP-SEL (Auswahl der Laufsprecher, deren P.EQ-Wert eingestellt werden soll): "FRONT", "CENTER" oder "SURROUND" wahren. - FRONT: Frontlautsprecher - CENTER: Center-Lautsprecher - SURROUND: Surround-Laufsprecher BAND (wählt das Freqenzband): Eines der Freqenzbänder 1 bis 3 auswahlen FREQ (Auswahl der Mittenfrequenz): Der Einstellbereich liegt zwischen 20 Hz und 20 kHz. Q (Einstellung der Q-Kurve): Auswahl eines der Werte 1, 3, 5, 7 oder 20 als Scharfe der Q-Kurve. GAIN (Einstellung des Ausgangspegels): Anpassung der Verständigung (Ausgangspiegel) im Bereich von -12 dB bis +12 dB (1-dB-Schritte, 25 Punkte). 6. Die Schritte 4 und 5 für alle gewünschten Einstellungspunkte wiederholen. 7. Die [SOUND]-Taste betätigten, um zur ursprünglichen Betriebsart zurückzukehren.Anpassung der P.EQ-Funktion
Die Einstellungen im P.EQ-Menu halten sich in gewissem Umfang anpassen. Mittenfrequenz, Verstärkung und Q-Kurve können jeweils für Kanal/Frequenzband-Kombinationen gespeichert werden. Beispiel: Mittenfrequenz "250Hz", Verständung "8dB" und Q-Kurve "3" können für das Freqenzband 1 und die Frontlautsprecher gespeichert werden. Für Einzelheiten zur P.EQ-Funktion siehe "P.EQ-Einstellung" (siehe Seite 21).Änderung der Einstellungen
Beim Anschluss eines 5.1-Kanal-Surround-Decoders ändern sich musikbezogene Einstellungen im Einstellmodus.AuswahlderEinstellungspunkte
Im Folgenden werden diejenigen Punkte beschreiben, deren Einstellungen sich ändern. Zu den anderen, nicht veränderten Einstellungspunkten siehe "Änderung der Einstellungen" (Seite 39) im Abschnitt "Bedienungen, die für beiden Betriebsarten gemeinsam sind". 1. Die [A]-Taste betätigten. Der Modus wechseln in den Einstellmodus.  2. Auf der Einstellungen-Wahlanzeige mit der Blätterbewegung den betreffenden Einstellungspunkt auswahlen. \* Mit der Blätterbewegung 卡 auf der linken Seite des Displays werden die Haupt-Einstellungspunkte der Reihe nach durchgeschaltet. Mit der Durchlaufbewegung auf der linken Seite des Displays werden die Unterpunkte kontinuierlich durchgeschaltet. \* Mit der Blätterbewegung 卡 in der Mitte des Displays werden die Unterpunkte jeweils der Reihe nach durchgeschaltet. Mit der Durchlaufbewegung werden die Unterpunkte kontinuierlich durchgeschaltet. 3. Wenn auf der rechten Seite des Displays "THROUGH" angezeigt wird, THROUGH antippen, um zur Einstellungen-Detailanzeige zu wechseln. 4. Entweder auf der rechten Seite des Displays die Blätterbewegung ↑ durchführten oder den [ROTARY]-Knopf drehen, um die Details einzustellen.Rückkehr in die ursprüngliche Betriebsart
1. Erneut die [A]-Taste betätigten. Einstellungspunkte| Hauptpunkte | Unterpunkte |
| SOUND (Ton) | CENTER-SP / SRD-SP / SUB-WOOFER • Ein-/Ausschalten von Laufsprechern (siehe Seite 64) |
| FRONT HPF / CENTER HPF / SRD HPF / SUB-W LPF • Einstellung der Laufsprecher-Filterfrequenz (siehe Seite 64) | |
| SP GAIN • Einstellung der Laufsprecher-Ausgangspiegel (siehe Seite 46) | |
| DELAY (Laufzeitverzögerung) | CENTER-SP / SRD-SP • Einstellung der Laufsprecher-Laufzeitverzögerung (siehe Seite 65) |
| DOLBY D | D-RANGE • Einstellung des Dynamikbereichs (siehe Seite 65) |
| PL II CONT | PANorama / DIMENSION / CTR WIDTH • Detaillierte Einstellung des Musik-Modus (siehe Seite 47) |
Aktivieren/Deaktivieren von Laufsprechern (CENTER-SP/ SRD-SP/SUB-WOOFER)
Den Center-Lautsprecher (CENTER-SP), die Surround-Lautsprecher (SRD-SP) und den Subwoofer (SUB-WOOFER) aktivieren/deaktivieren (ON/OFF). Wenn kein Center-Lautsprecher, Surround-Lautsprecher oder Subwoofer angeschlossen ist, muss hier "OFF" gewählt sein. Die werkseitige Ausgangseinstellung ist "ON". 1. Die [A]-Taste betätigten, um den Einstellmodus aufzurufen. 2. Auf der Einstellungen-Wahlanzeige mit der Blätterbewegung ↑ ↓ unter "SOUND" die Punkte "CENTER-SP", "SRD-SP" und "SUB-WOOFER" wahren.  3. Entweder auf der rechten Seite des Displays die Blätterbewegung ↑ ▲ durchführten oder den [ROTARY]-Knopf drehen, um die Einstellung “ON” oder “OFF” zu wahren. * Bei "SUB-WOOFER" entweder "ON+", "ON-" oder "OFF" wahren. Im Normalfall ist "ON+" zu wahren. Bei "ON-" ist ein deutlicher Effekt im tiefen Frequenzbereich wahrnehmbar. 4. Die [A]-Taste betätigten, um zur ursprünglichen Betriebsart zurückzukehren.Einstellung der Laatsprecher-Filterfrequenzen (FRONT HPF/CENTER HPF/SRD HPF/ SUB-W LPF)
Mit dieser Funktion kann die Filterfrequenz an die verwendeten Lautsprecher angepasst werden. - Laufsprecher, die im Abschnittt "Aktivieren/Deaktivieren von Laufsprechern (CENTER-SP/SRD-SP/SUB-WOOFER)" abgescheltewurden, werden nicht angezeigt. Die werkseitige Ausgangseinstellung für "FRONT HPF" und "SRD HPF" ist "THROUGH" (ungefiltert) und für "CENTER HPF" und "SUB-W LPF" jeweils "120Hz".Einstellung der Filter
FRONT HPF/CENTER HPF/SRD HPF (Einstellung der Hochpassfilter)
Dieses Filter dampf die Bassfrequenzen der Front-, Center- und Surround-Lautsprecher. $$ \text {T H R O U G H} \rightarrow 5 0 \mathrm {H z} \rightarrow 8 0 \mathrm {H z} \rightarrow 1 2 0 \mathrm {H z} $$ Die Filtrereinstellung passend zum Lautsprecher wahren, wenn Lautsprecher mit kleinerem Durchmesser verwendet werden.THROUGH
These Einstellung wahlen, wenn Laatsprecher verwendet werden, die Bassfrequenzen wiedergeben konnen. Für CENTER HPF ist die Einstellung THROUGH nicht wählbar.SUB-W LPF (Einstellung des Subwoofer-Tiefpassfilters)
Dieses Filter dampf die Höhenfrequenzen des Subwoofer. $$ 5 0 \mathrm {H z} \rightarrow 8 0 \mathrm {H z} \rightarrow 1 2 0 \mathrm {H z} $$ Die Filterfrequenz passend zum Subwoofer einstellen. 1. Die [A]-Taste betätigten, um den Einstellmodus aufzurufen. 2. Auf der Einstellungen-Wahlanzeige mit der Blätterbewegung ↑ unter "SOUND" die Punkte "FRONT HPF", "CENTER HPF", "SRD HPF" und "SUB-W LPF" wahren.  3. Entweder auf der rechten Seite des Displays die Blätterbewegung ↑ durchführten oder den [ROTARY]-Knopf drehen, um die Frequenz einzustellen. * Eine der Einstellungen THROUGH*, 50Hz, 80Hz oder 120Hz wahren. ^*1 THROUGH wird nur dann angezeigt, wenn "FRONT HPF" oder "SRD HPF" gewählt ist. 4. Die [A]-Taste betätigten, um zur ursprünglichen Betriebsart zurückzukehren.Einstellung der Laufzeitverzögerung für die Lautsprecher (CENTER-SP/ SRD-SP)
Zu welchem Zeitpunkt der Ton von den einzelnen Laufsprechnen an der Hörposition eintriff, ist je nach Laufsprecherkconfiguration und Fahrzeuggroße unterscheidlich. Durch Anpassung der Laufzeitverzögerung für die einzelnen Laufsprecher kann dieser Effekt so korrigiert werden, dass der Ton von allen Laufsprechnem zum gleichen Zeitpunkt an der Hörposition eintriff wie von den Frontlaufsprechnem. Die weltseitige Ausgangseinstellung ist "0 ms". 1. Die [A]-Taste betätigten, um den Einstellmodus aufzurufen. 2. Auf der Anzeige der Einstellungspunkte mit der Blätterbewegung ↑ Ⓞ ↑ unter “DELAY” die Punkte “CENTER-SP” und “SRD-SP” wahren.  3. Auf der rechten Seite des Displays die Blätterbewegung durchführren, um die Laufzeitverzögerung einzustellen. * “CENTER-SP”{lssst sich im Bereich von 0 ms bis 5 ms einstellen. * "SRD-SP"{lösst sich im Bereich von 0 ms bis 15 ms einstehen. 4. Die [A]-Taste betätigten, um zur ursprünglichen Betriebsart zurückzukehren.Anpassung der Dolby Digital-Funktionen (D-RANGE)
These Funktion komprimiert den Dynamikbereich von Dolby-Digital-Signalen, so dass Tonsignale mit niedrigem Pegel, z. B. Schauspielerdialoge, hörbar bleiben, wogegen die Lautstärke lauter Passagen abgesenkt wird. These Funktionen stehen nur bei DVDs mit Dolby-Digital-Ton zur Verfügung. Die werkseitige Ausgangseinstellung ist MAX 1. Die [A]-Taste betätigten, um den Einstellmodus aufzurufen.  2. Auf der Einstellungen-Wahlanzeige mit der Blätterbewegung t unter "D-RANGE" den Punkt "DOLBY D" wahlen. 3. Auf der rechten Seite des Displays mit der Blätterbewegung den Dynamikbereich wie gewünscht einstellen. MAX: maximaler Dynamikumfang der Original-Tonquelle STD: empfehlener Modus für die normale Programmwiedergabe MIN: stärkste Komprimierung des Dynamikumfangs, so dass auch leise Tonpassagen gut hörbar sind. 4. Die [A]-Taste betätigten, um zur ursprünglichen Betriebsart zurückzukehren.8. FEHLERSUCHE
| Störung | Ursache | Behebung | |
| Allgemein | Einschaltung nicht möglich. (Kein Ton.) | Sicherung durchgebrannt. | Gegen eine neue Sicherung mit gleicher Amperezahl ausstauschen. Sollte die Sicherung erneut durchbrennen, dann wenden Sie sichitte an das Geschäft, wo Sie das Gerät erworben haben. |
| Falsche Verdraught. | Bitte wenden Sie sich an das Geschäft, wo Sie das Gerät erworben haben. | ||
| Kein Tonausgang bei Betrieb des Geräts mit angeschlossenen Verständern oder elektrischer Antenne. | Leitung der elektrischen Antenne ist mit Erdung kurzgeschlossen oder zu hoher Strom ist für die Fernbedienung der Veränder oder elektrischen Antenne erforderlich. | 1. Das Gerät aushalten.2. Alle an das kabel der elektrischen Antenne angeschlossen Drähte entfernen. Alle Drähte mittels eines Ohmmiters auf einen möglichen Kurzschluß mit der Erdung prüfen.3. Das Gerät wieder einschalten.4. Die einzelnen Drähte für die Verständernbedienung erneut bei der Leitung der elektrischen Antenne anschließen. Sollen sich die Veränder vor Anschluß aller Drähte ausschalten, ein externes Relais für die Fernbedienungsspannung verwenden (hoher Strom erforderlich). | |
| Kein Betrieb bei Tastenbetätigung. Anzeige nicht korrekt. | Störung des Mikroprozessors aufgrund von Störsignalen etc. | Das Gerät aushalten und dann die [RELASE]-Taste für Entfernung des DCP (abnehmbares Bedienteil) betätigten. Die Neueinstellungstaste mittels eines kleinen Stabs für ca. 2 Sekunden drücken. | |
| Die Anschlüsse des DCP oder der Hauptinheit sind verschmutzt. | Mit einem weichen Tuch sauberwischen, das mit Reinigungslalkohol angefeuchtet ist. | ||
| CD/MP3/WMA | Kein Ton. | Es wurde eine andere Disc und keine CD eingelegt oder ein Fremdkörper ist vorhanden. | Bei geöffneter Schrägkonsole die [▲] Taste betätigten für 3 Sekunden oder länger gedrück htalien. Dann wird der Fremdkörper zwangsausgeworfen. |
| Disc enthalt keine MP3/WMA-Dateien. | MP3/WMA-Dateien korrekt auf die Disc brennen. | ||
| Dateien werden nicht als MP3/WMA-Dateien erkannt. | Korrekt kodierte MP3/WMA-Dateien verwenden. | ||
| Dateisystem nicht korrekt. | Verwenden Sie das Dateisystem "ISO9660 level 1, 2", "JOLIET" oder "Romeo". |
| Störung | Ursache | Behebung | |
| CD/MP3/WMA | Stellen werden übersprungen oder Rauschen. | Die Disc ist verschmutzt. | Die Disc mit einem weichen Tuch reinigen. |
| Disc ist stark zerkratzt oder veriformt. | Gegen eine Disc ohne Kratzer austauschen. | ||
| Ton wird unterbro-chen oder setzen kurzzeitig aus. Rauschen wird erzeugt oder dem Ton hinzuge-mischt. | MP3/WMA-Dateien wurden nicht korrekt kodiert. | Korrekt kodierte MP3/WMA-Dateien verwenden. | |
| Schlechter Klang(sofort nach Einschaltung. | Auf der internen Linse konnten sich Wassertropfen gebildet haben, wenn das Fahrzeug an einem feuchten Ort geparkt worden ist. | Bei eingeschalteten Gerät für ca. 1 Stunde trocknen halten. | |
| FalscherDatumname. | Datumsystem ist nicht korrekt. | Verwendten Sie das Datumsystem "ISO9660 level 1, 2", "JOLIET" oder "Romeo". | |
| Abspiellisten-Wiedergabe ist nicht möglich. | DerDatumname oder die Dateierweiterung ist inkorrekt. | Verwendten Sie ausschließlich alphanumeric bzw. ASCII-Zeichen in MP3/WMA-Dateinamen. Verwendten Sie ausschließlich ".M3U" als Datumweiterung einer Abspielliste. |
9. FEHLERANZEIGEN
Wenn ein Fehler auftritt, erscheint eine der folgenden Anzeigen. Für Behebung der Störung jeweils die unten beschriebene Maßnahme ausführten.| Fehleranzeige | Ursache | Behebung | |
| CD/MP3/WMA | ERROR 2 | Eine Disc steck im CD-Deck fest und kann nicht ausgeworfen werden. | Defekt beim Mechanismus des CD-Decks,itte wenden Sie sich an das Geschäft,wo sie das Gerät erworben haben. |
| ERROR 3 | Disc kann aufgrund von Kratzern, usw. nicht wiedergegeben werden. | Gegen eine Disc austauschen, die nicht zerkratzt oder verformt ist. | |
| ERROR 6 | Eine Disc wurde verkehrn herum im CD-Deck eingelegt und kann nicht wiedergegeben werden. | Die Disc auswerfen und korrekt einlagen. | |
| Allgemein | AMP GUARD | Die Lautspricher-Schutzschaltung ist in Betrieb. Wenn während deren Betrieb Lautstärkeeinstellung vorgenommen wird, wird im Display "AMP GUARD" angezeigt.Die Funktion "AMP GUARD" sprecht in manchen Fälle bei speziellen Testsignalen an. | 1. Drehen Sie die Lautstärke zurück.Die einwandfrei Gerätefunktion kann auch wiedergestellt werden, indem das Gerätomal aus- und dann wieder eingeschaltet wird.(Bei aktivierten Schutzschaltung wird die Lautstärke automatisch reduziert.)2. Falls die Stummschaltung erneut aktiviert wird, wenden Sie sichitte an den Clarion-Kundendienst. |
| CD-Wechsler | ERROR 2 | Eine CD im CD-Wechsler wurde nicht geladen. | Defekt beim Mechanismus des CD-Wechslers.itte wenden Sie sich an das Geschäft,wo Sie das Gerät erworben haben. |
| ERROR 3 | Eine CD im CD-Wechsler kann aufgrund von Kratzern, usw. nicht wiedergegeben werden. | Gegen eine CD austauschen, die nicht zerkratzt oder verformt ist. | |
| ERROR 6 | Eine CD im CD-Wechsler wurde verkehrn herum eingelegt und kann nicht wiedergegeben werden. | Die CD auswerfen und korrekt einlagen. | |
| DVD-Wechsler | ERROR 2 | Eine im DVD-Wechsler befindliche DVD kann nicht wiedergegeben werden. | Störung beim DVD-Mechanismus,itte wenden Sie sich an ihren Händler. |
| ERROR 3 | Eine DVD kann aufgrund von Kratzern nicht wiedergegeben werden. | Erneut versuchen oder eine DVD einlagen, die nicht zerkratzt oder verformt ist. | |
| ERROR 6 | Eine DVD im DVD-Wechsler kann nicht wiedergegeben werden, da sie verkehrn herum eingelegt wurde. | Die DVD auswerfen und dann korrekt einlagen. | |
| ERROR P | Falsche Jugendenschutz-Stufe. | Die richtige Jugendenschutz-Stufe einstellen. | |
| ERROR R | Regionalcodefehler. | Die DVD auswerfen und gegen DVD mit korrektem Regionalcode austauschen. |
10. TECHNISCHE DATEN
Radio-Bereich
Tuner-System: PLL-Synthesizer-Tuner Empfangsfrequencyn: UKW: 87,5 bis 108 MHz (0,05 MHz Schritte) MW:531 bis 1602 kHz (9 kHz Schritte) LW:153 bis 279 kHz (3kHz Schritte)CD-Deck
System: CD-Digitalaudiosystem Frequenzgang: 5 Hz bis 20 kHz (±1 dB) Rauschabstand: 100 dB (1 kHz) IHF-A Dynamikbereich: 96 dB (1 kHz) Verzerrung: 0,01%Allgemeines
Ausgangsleistung: 4× 31W (DIN 45324, +B = 14,4V) Versorgungsspannung: 14,4 V GS (10,8 V bis 15,6 V zulässig), neg. Masse Leistungsaufnahme: Weniger als 15 A Lautsprecher-Impedanz: 4Ω (4Ω bis 8Ω zulässig) Nennstrom, elektrische Antenne: 500 mA oder weniger Gewicht: Hauptgerat: 1,7 kg Fernbedienung: 80 g (einschließlich Batterie) Abmessungen: Hauptgerät: 178 (B) × 50 (H) × 155 (T) mm Fernbedienung: 44 (B) × 110 (H) × 27 (T) mmHinweis:
- Änderungen von technischen Daten und Design dienen der Verbesserung und sind deshalb vorbehalten. Grazie per averereacquistatoquesto prodotto Clarion. * Prima di utilizzare quello apparecchio, leggere il manuale di istruzioni per intero. * Dop aver letto il manuale, accertarsi di conservarlo a portata di mano (per esempio, nel comparto porta-guanti). * Verificare il contento della cartolina di garanzia acclusa e conservarla con cura insieme a questo manuale. * Questo manuale comprende le procedure operative per il funzionamento degli scambiatori CD del sistema DAB e del sintonizzatore TV collegati all'apparecchio per mezzo del cavo CeNET. Gli scambiatori CD, ed il sintonizzatore TV dispongono di un proprio manuale di istruzioni, che perché non contiene istruzioni per il loro funzionamento.Indice
1. PRECAUZIONI 3 Console inclinata 4 Modalità di impiego dei compact disc 4 2.CONTROLLERI 5 3. NOMENCLATURA 6 Nomi dei tasti e loro funzioni 6 Principali operazioni con i tasti quando un appearecchio esterno è collegato a但这a unità. 7 Display delle opzioni 7 Operazioni del display 8 4. FRONTALINO ESTRAIBILE (DCP) 9 5. TELECOMANDO 10 Inserimento delle batterie 10 Funzioni dei tasti del telecomando 11 6. OPERAZIONI 12 Operazioni di base 12 Uso di AC-Processor III 17 Operazioni radio 23 Operazioni RDS 26 Operazioni CD/MP3/WMA 31 Brani diversi di musica per più asconsultatori (funzone 2-ZONE) 36 Operazioni comuni in entrambé le modalità 37 7. OPERAZIONI CON GLI ACCESSORI 51 Operazioni con il cambiadischi CD 51 Operazioni con la TV 54 Operazioni radio digitale / DAB 58 Operazioni sul Decoder Surround 5.1ch 61 8. IN CASO DI DIFFICOLTÀ 66 9. CODICI D'ERRORE 68 10. SPECIFICHE 691. PRECAUZIONI
1. Questa unità è applicabile solo per veicoli da strada a 4 ruote. L'uso per trattori, camion popolari, bulldozer, veicoli fuoristrada, bicyclette a motore a 2 o 3 ruote, motoscafi o altri veicoli per scopi speciali non è appropriato. 2. Quando l'interno dell'auto è molto freddo e illettore viene utilizzato subito dopo l'accensione, più formarsi umidità dovutta al riscaldamento sul disco o sui componenti ottici dellettore e più essere impossibile una riproduzione corretta. Se si forma dell'umidità sul disco, toglierla con un panno morbido. Se si forma umidità sui componenti ottici dellettore, non utilizzare illettore per almeno un'ora. La condensa sparirà da sola, consentendo il funzionamento normale. 3. La guida su strade molto sconnesse, che causa parecchie vibrazioni, cui causare dei salti nella riproduzione. INFORMAZIONI PER GLI UTENTI.: MODIFICHE O CAMIAMENTI A QUESTO PRODOTTO NON APPROVATI DAL PRODUTTORE ANNULLERANNO LA GARANZIA. AVVERTIMENTO
Per la propria sicurezza, non guardare o usare il pannello a tocco nelle si sta guidando.Console inclinata
Questa unitàutilizza console inclinate per rendere possibile un display su schermo ampio. Quando si usa la console inclinata, assicurarsi di chiuderla.ATTENZIONE
Attenzione a non farsi intrappolare le dita quando si après o si chiude la CONSOLE INCLINATA.
1. Per motivi di sicurezza, chiudere sempre la CONSOLE INCLINATA prima di lasciare l'unità spenta per un periodo prolongato oppure spegnere l'interruttore di accensione. Se si spegne l'interruttore di accensione con la CONSOLE INCLINATA, la CONSOLE INCLINATA non si chiude. 2. Prima che la CONSOLE INCLINATA si chiuda, si potrebbe udire un suono di frenata proveniente dal meccanismo di sicurezza. Questo è normale. 3. Se si sposta la CONSOLE INCLINATA a mano,\ eso potrebbe create gioco. Per correggere\ eso gioco, con l'unità accesa, premere il tasto [▲] per chiudere la CONSOLE INCLINATA. 4. Dopo aver espulso un disco, la CONSOLE INCLINATA torna automaticamente allo stato di inclinazione o di chiusura. Se, quando la CONSOLE INCLINATA tenta di chiudersi, incontrà alcuni ostacolo, viene attivato il meccanismo di sicurezza e la CONSOLE INCLINATA torna allo stato aperto. In quello caso, rimuovere l'ostacolo, quando premere il tasto [▲]. 5. Per evitare di graffiare i compact disc, tenere i dischi da 12 o 8 cm diritti durante l'inserimento e l'estrazione.Modalità di impiego dei compact disc
Usare solamente compact disc riportanti il  Non utilizzato in riproduzione dischi a forma di cuore, ottagonali o di altre forme particulari. Certi compact disc registrati con la modalità CD-R/CD-RW possono risultare non utilizzabili.Modalità di impiego
Rispetto ai normali CD di musica, i dischi CD-R e CD-RW sono disponibile influenzati da temperatura o umidità elevate e alcuni dischi CD-R o CD-RW possono non essere riprodotti. Non lasciarli+dunque per lungo tempo in auto. I dischi nuovi potrebbero presentare quale asperità intorno ai bordi. Se si usa quello tipo di disco, illettore potrebbe non funzionare o ci potrebbero essere dei salti nella coproduzione. Utilizzare una penna a sfera o un oggettoto simile per rimuovere qualsiasi asperità dai bordi del disco. Non attaccare mai etichette sulla superficie del compact disc e non scrivere mai sulla superficie con una matita o una penna. - Non eseguire mai la riproduzione di un compact disc chiuso in una confazione di plastica o con colla sopra diesso o con indicatori per l'apertura della confezione. Se si tenta di riproduire un disco del genere, si potrebbe non riuscire più a estrarlo dallettore CD o potrebbe danneggiare illettore CD. Non utilizzato compact disc che hanno grandi graffiature, che sono deformati, incrinati, ecc. L'uso di dischi del genere cui causare un cattivo funzionamento o dei danni dellettore. - Per rimuovere un compact disc alla custodia, premere il centro della custodia e sollevare fuori il disco, tenendolo con attenzione per i bordi. - Non utilizzato fogli di protezione per CD disponibili sul mercato o dischi attrezzati con stabilizzatori, ecc. Queste cose potrebbero danneggiare il disco o causare una rottrura del meccanismo interno.Conservazione
Non esporre i compact disc alla luce diretta del sole o a nessuna fonte di calore. Non esporre i compact disc a eccessiva umidita o alla polvere. Non esporre i compact disc al calore diretto prodotto da apparecchi per il riscaldamento.Pulizia
- Per rimuovere le impronte delle dita e la polvere, utilizes un panno morbido e pulire in linea retta partendo dal centro del compact disc per arrivare al bordo. - Non utilizzato nessun solvente, come i liquidi per la pulizia disponibili sul mercato, nessuno spray antistatico e nessun diluente per pulire i compact disc. - Dopo l'uso di dispositivi di pulizia speciali per compact disc, lasciare che il compact disc si asciughi per bene prima di utilizzato di nuovo.2.CONTROLLERI
Apparecchio principale
Apertura della CONSOLE INCLINATA
3. NOMENCLATURA
Nomi dei tasti e loro funzioni
Tasto [RELEASE]
Rimuove il DCPSensore fotografico
- Questo sensore misura la luminosità presente all'interno della vettura. Quando la funzione del variatore di luminosità automatico viene impostato su "AUTO", la luminosità del display è indebolita in accordo alla luminosità rilevata dal sensore.Manopola [ROTARY]
- Premere la manopola per accendere l'apparecchio Ogni pressione su esta manopola cambia la modalità. - Premere e tenere premuto per 1 secondo o più per spengere l'apparecchio. - Questa manopola può essere girata per regolare il volume, o per regolare le varie impostazioni nella modalità di aggiustamento.Tasto [△]
- Apre/chiude il pannello di controllo. Se è già inserto un disco, quello sera espulso quando si après il pannello di controllo.Nota:
Se il disco non viene espulso, tenere premuto il tasto [▲] per 1 secondo o più.Tasto [A]
- Usare quello tasto per impostare o regolare le varie impostazioni nella modalità di aggiustamento. - Usare quello tasto per insertire i nomi delle stazioni nella modalità radio o i titoli dei dischi nella modalità CD.Tasto [SOUND]
- Usare quello tasto per impostare o regolare le varie impostazioni come per es. lo spazio audio. - Tenendo premuto quello tasto per 1 secondo o più si attiva o disattiva la funzione 2-ZONE.Tasto [TA]
- Usare quello tasto per impostare il TA (annunci concimenti il traffico) in modalità standby (quando la funzione 2-ZONE è impostata su "OFF"). Cambia le operazioni della funzione 2-ZONE. Tenere premuto quello tasto per 1 secondo o più faambiare il tipo 2-ZONE ( quando la funzione 2-ZONE è impostata su "ON").Tasto [▶II]
- Toglie oppure mette in pausa un brano musicale (in modalità CD). - Mette in pausa e ce lo toglie un brano musicale (in modalità CD). - Usare il tasto per impostare in modalità standby il PTY (tipodi programma) o le opzioni PTY.Display
- Visualizzazione le varie informazioni che indicano lo stato operativo di quello apparecchio come ad esempio se è in funzione radio o di riproduzione e altri indicatori. - Toccare il display con le proprie dita, e toccare 卡 卡 卡 per attivare le operazioni. (cfr. pag. 8)Principali operazioni con i tasti quando un apparecchio esterno è collegato a questa unità
- Quando il cambia-CD/DVD è connesso
* Per maggiori dettagli, guardare la sezione "Operazioni con il cambiadischi CD" (ved. pag. 51). Per il cambia-DVD,fare riferimento al manuale delle istruzioni provvisto con il cambia-DVD.Tasto [▶II]
- Avvia la riproduzione o mette in pausa il CD o il DVD.Tasto [A]
- Usato per l'insertimento dei titoli dei dischi nella modalità cambia-CD.-Quando il TV/DAB è connesso
* Per maggiori dettagli, guardare la sezione "Operazioni con la TV" (ved. pag. 54) o "Operazioni radio digitale/DAB" (ved. pag. 58).Tasto [TA]
- Usare il tasto per impostare TA (Notiziario sul traffico) alla modalità standby alla modalità DAB. (Questa funzione è disponibile sono per una radio DAB.) - Premere e tenere premuto per 1 secondo o più per attivare o disattivare la modalità INFO. (nella modalità DAB)Tasto [▶II]
- Cambiare la modalità immagine TV o la modalità immagine VTR (esterna). (nella modalità TV) - Usare il tasting per impostare in modalità standby il PTY (tipodi di programma) o le opzioni PTY nella modalità DAB.Tasto [A]
- Questo tastinge viene usato per insertire il nome della stazione TV. (nella modalità TV)Display delle opzioni
Operazioni del display
Il display di quello apparecchio è un display con il pannello a tocco. Si può essere quello pannello semplicamente toccandolo con la punta delle dita. Ci sono quattro operazioni nel display principale, nell'ordine seguente:Toccare
Toccare il display con la punta di un ditastaccandola entro 1 secondo. Questo è l'operazione fondamentale quando si usa ildisplay.Toccare tenere premuto
Toccare il display con la punta di un dito e tenere premuto il display per 1 o 2 secondi o andere più. Non muovero il dito nelle si sta toccando il display. Toccare e tenere premuto il display per 1 secondo o più visualizzazione liste, per esempio, e richiama autres funzioni utili. Il toccare e tenere premuto per 2 secondi o più è usato per memorizzare una memoria preimpostata o altre informazioni.Toccare
Toccare il display con la punta della dito, e muovere il dito a sinistra () o a destra () perché staccarlo dal display, per poi staccarlo entro 1 secondo. Questa operazione è usata per selezione una memoria preimpostata (da 1 a 6) o dei brani. Toccare
 il display con la punta della dito, e muovere il dito a sinistra () o a destra () -, alla staccarlo dal display, e tenerlo sul display. L'operazione in atto continua fino a che il dito è tenuto sul display. Questa operazione viene usata, per esempio, per la sintonizzazione manuale o per far avanzare o retrocedere velocamente i vari brani. 4. FRONTALINO ESTRAIBILE (DCP)
Il pannello dei comandi cui po essere rimioso per prevenir furti. Quando si rimuove il FRONTALINO ESTRABILE (DCP), conservarlo nella custodia apposita, per evitare graffiature. Si raccomanda di portare con se il frontalino quando si lascia l'automobile.Rimozione del DCP
1. Con la CONSOLE INCLINATA chiusa, specnere l'apparecchio. 2. Premere a fondo il tasto [RELEASE] per aprirè il DCP.  3. Tirare il DCP verso di se e rimuoverlo. ATTENZIONE
- Chiudere sempre la CONSOLE INCLINATA prima di rimuovere il DCP. - Se si rimuove il DCP con la CONSOLE INCLINATA aperta, la console inclinata si chiude immediatamente. Attenzione a non farsi incastrare le dita.Montaggio del frontalino
1. Inserire il DCP in modo che la sezione A sul lato destro del DCP si insertisca nel gancio dell'unità.  2. Premere con attenzione il dato sinistro © del DCP per montarlo al suoippo. ATTENZIONE
- Il DCP può essere facilemente danneggiato dagli urti. Dopao averlo rimioso, accertarsi di non farlo cadere o di non assoggettarlo a forti urti. - Se il tasto di [RELEASE] è premuto e il DCP non è bloccato al suoosto, il DCP potrebbe cadere a causa delle vibrazioni dell'auto. Ciò provocherebbe dei danni al DCP, per cui dopo averlo rimioso installarlo sull'unità oppure conservarlo nella relativa custodia. - Il connettore che collega l'unità al DCP è un componente estremamente importante. Fare attenzione a non danneggiarlo premendo su diesso con le unghie, con un cacciavitè, ecc.Nota:
Se il DCP è sporco, pulirlo solamente con un panno morbido e asciutto.5. TELECOMANDO
Inserimento delle batterie
1. Girare l'unità telecomando, quandi far scivolare il coperchio posteriorie in direzione della freccia. 2. Inserire le batterie AA (SUM-3, R-6/1,5 V) in dotazione con il telecomando di fronte, nella direzione individata in figura, quindi chiudere il coperchio posteriore.Note:
Un uso improprio delle batterie può provocare la loro esplosione. Preponderere nota dei punti seguenti: - Quando si sostituiscono le batterie, sostitur entrambre le batterie con batterie nuove. - Non cortocircuitare, disassemblare o riscaldare le batterie. Non gettare le batterie in fuoco o fiamme. - Gestire lo smaltimento delle batterie scariche nel modo corretto. Funzioni dei tasti del telecomando
| Modalità Tasto | Radio (RDS)/DAB | CD/MP3 | Cambiadischi CD Cambiadischi DVD | TV |
| [FUNC] | Per la commutazione delle varie funzioni: radio, DAB, CD, MP3, scambiatori CD, scambiatore DVD e TV, AUX. | |||
| [BAND] | Alterna le bande di ricezione. | Riproduce la prima traccia, del disco più in alto. | Si sposta al disco successivo, in ordine crescente. | Alterna le bande di ricezione. |
| [▲], [▼] | Aumenta e diminuisce il volume (in tutte le modalità). | |||
| [←], [►] | Sposta i canali preselezionati in alto e in basso. | Sposta le tracce in su e in giù. Quando viene tenuto premuto per 1 secondo: Avanzamento veloce/retrocessione veloce. | Sposta i canali preselezionati in alto e in basso. | |
| [►■] | Nessuna funzione. | Alterna riproduzione e pausa. | Nessuna funzione. | |
| [MUTE] | Abilita e disabilita la funzione mute. | |||
| [TA] | Abilita e disabilita la funzione TA. Tenere premuto il tasto per 1 secondo o più per alternare tra le fonti sonore della zona princi-pale e secondaria (solo quando il modo 2-ZONE è attivato). | |||
| [DISP] | Per la commutazione fra la visualizzazione delle informazioni principali, e dell'orologio (CT). | |||
| [PS/AS] | Scansione canali preselezionati. Quando viene tenuto premuto per 2 secondi: Memorizzazione automatica. | Riproduzione a scan-sione. Tenere premuto il ta-sto per almeno 1 se-condo per effettuire lalettura a scansione del-le cartelle, con l'apparecchio in moda-lità MP3/WMA. | Lettura con scansione. Quando viene tenuto premuto per 1 secondo: Lettura disco con scansione. | Scansione canali preselezionati. Quando viene tenuto premuto per 2 secondi: Memorizzazione automatica. |
| [AF] | Abilita e disabilita la funzione AF. Quando viene tenuto premuto per 1 secondo: Abilita e disabilita la funzione REG. | Riproduzione ripetu-ta. Tenere premuto il ta-sto per almeno 1 se-condo per effettuire la ripetizione della let-tura delle cartelle, con l'apparecchio in modalità MP3/WMA. | Ripetizione riproduzione. quando viene tenuto premuto per 1 secondo: Ripetizione riproduzione disco. | Nessuna funzione. |
| [PTY] | Attivazione e disattivazione della modalità PTY. | Riproduzione in ordine casuale. Tenere premuto il ta-sto per almeno 1 se-condo per effettuire lalettura in ordine casua-le delle cartelle, con l'apparecchio in modalità MP3/WMA. | Esecuzione casuale. Quando viene tenuto premuto per 1 secondo: Riproduzione casuale disco. | Alterna TV e VTR. |
| [2-ZONE] | Tenere premuto per 1 secondo o più per attivare o disattivare il modo 2-ZONE. Premere per和其他are la zona di controllo tra zona principale e zona secondaria quando il modo 2-ZONE è attivato. | |||
6. OPERAZIONI
Operazioni di base
ATTENZIONE
Accertarsi di abbassare il volume prima di spegnere l'unità o l'automobile. L'unità ricorda l'ultima impostazione del volume. Se si spegne con il volume al massimo, quando si riaccende il volume immediatamente alto potrebbe urtare le orecchie o danneggiare l'unità.Accensione/spegnimento dell'apparecchio
Accensione
Nota:
- Stare attenti quando si usa quello apparetcchio per lungo tempo a motore spento. Se si usa troppa la batteria della vettura, cui non èsere possibile avviare il motore e quello cui ridurre la vita della batteria. 1. Premere la manopola [ROTARY]. Viene visualizzata la modalità precedentamente attiva.Controllo del sistema
La prima volta che si accende quello apparecchio dopo aver completeness la connessione dei cavi, l'apparecchio controlling quali apparecchiature siano connesse. (Questo viene chiamato "System Check") Quando l'apparecchio è accedo, e viene visualizzato "System Check", seguire le procedure che seguono per efettuare il controllo di sitema. 1. Quando appeare "System Check" sul display, premere la manopola [ROTARY]. Il controllediistema viene avviato. Quando il controllo di sistema viene completato, "Completed" appeare sul display. 2. Premere ancora la manopola [ROTARY]. Appare il display principale per la modalità radio.Funzione CODEMATIC
Quando "CODEMATIC" èimpostato su "ON" e l'apparecchio acceso con il DCP attaccato, viene visualizzato il display del codice a tocchi. Toccare il display nell'ordine in cui era stato impostato nella modalità di aggiustamento.  Pe maggiori dettagli sulla funzione CODEMATIC, guardare "Uso della funzione di sicurezza (CODEMATIC)" (ved. pag. 50).Spegnimento
1. Tenere premuta la manopola [ROTARY] per 1 secondo o più.Selezione di una modalità
1. Premere la manopola [ROTARY] per selezionare la modalità di operazione. 2. Ogni volta che si preme la manopola [ROTARY], la modalità d'operazione cambia nel seguente ordine: Modalità radio Modalità DAB Modalità CD/MP3 Modalità cambia-CD Modalità cambia-DVD Modalità TV Modalità AUX Modalità radio... * Non vengono visualizzate le apparecchiature esterne non connesse con CeNET.Regolazione del volume
1. Girare la manopola [ROTARY] in senso orario per augmentare il volume, in senso antiorario per diminuirlo. * Il livello del volume va da 0 (il minimo) a 33 (il massimo).Cambiare le modalità d'operazione
Ci sono 2 modalità d'operazione fondamentali: le operazioni standarde e le operazione di base 1. Nello scherno del display principale, toccare e tenere premuto il lato sinistro del display per 1 secondo o più. La modalità d'operazione vieneambiata.  Nelle operazioni di base, non viene richiesto di toccare or nello schermo del display principale nelle modalità radio o i in那一 CD, e l'apparecchio può essere usatoattraverso semplici operazioni. Nota, in agli caso, che le seguenti operazioni non sono disponibili tra le operazioni di base. - Sintonizzazione delle preselezioni, selezione della cartella, selezione del disco, e altre operazioni che prevedono il tocco di sul lato destro del display - Operazioni per il cambiamento del display (ved. pag. 13) - Operazioni per il cambiamento del display del titolo (ved. pag. 14) - Operazioni per la visualizzazione degli schermi dell'insertimento titoli. Tranne che nello schermo principale (p. es. quello del display delle liste, della modalità di aggiustamento, ecc.), non c'é differenza tra le operazioni standarde qu'elle di base. Le spiegazioni cont∉ne in questo manuale sono principamente per le operazioni standard. Per spiegazioni inerenti alle operazioni nelle operazioni di base,fare riferimento ai display nella modalità radio o nella modalità CD.Cambiamento del display
1. Toccare il centro del display Ogni volta che si tocca il display, quello cambia nell'ordine seguente:  Display del titoloSalva-schermo
Quando la funzione salva-schermo viene impostata su "ON", e l'apparecchio non viene usato per circa 30 secondi, alla è viene visualizzato il salva-schermo. Per maggiori dettagli, vedere a pagina 41.Sfondo
Toccando e tenendo premuto il centro del display per 1 secondo o più porta al display degli sfondi.| ① | ⑨ |
| ② | ⑩ |
| ③ | ⑪ |
| ④ | ⑫ |
| ⑤ | ⑬ |
| ⑥ | ⑭ |
| ⑦ | ⑮ |
| ⑧ | ⑯ |
Display dell'analizzatore di spettro
Toccando et tenendo premuto per 1 secondo o più il dato destro del display während quello è un display di analizzatore di spettro (S/A) si cambia il display analizzatore di spettro.| S/A SCAN | S/A 1, S/A 2, e S/A 3 sono visualizzati ognuno per 10 secondi o più. |
| S/A 1 | S/A 1 FLDR No. 003 TOP |
| S/A 2 | S/A 2 FLDR No. 003 TOP |
| S/A 3 | S/A 3 FLDR No. 003 TOP |
Cambiamento del display del titolo
È possibile visualizzare i titoli del disco e altre informazioni memorizzate nei dischi quando si riproducono dei CD nella modalità CD o cambia-CD. 1. Toccare e tenere premuto il lato destro del display per 1 secondo o più nel display del titolo. Ogni volta che si tocca e siiene premuto il display, quello cambia nell'ordine seguenteDisco CD-TEXT
Titolo utente (disco) Titolo/testo del CD (disco) Nome dell'artista Titolo/testo del CD (brano) Titolo utente (disco)...Disco MP3/WMA
Cartella File Album TAG Artista TAG Titolo TAG Cartella...Note:
- MP3 supporta ID3 Tags V2.3 / 2.2 / 1.1 / 1.0. - I display dei Tags danno la priorità a V2.3 / 2.2. - Nel caso di Tags dell'album per WMA, vengono visualizzate le informazioni scritte nelle 'intestazione allargata'. - Nelle Tags possono venire visualizzati solo i carattere ASCII.Per far scorrere un titolo
Toccare 念 nel display del titolo quando viene visualizzato il titolo. Il titolo scorre verso sinistra.Per fermare lo scorrimento
Toccare 品 sul display del titolo.Funzione CT (Orologic)
Il CT permette di ricevere i dati CT inviati da una stazione RDS e di visualizzare l'ora. Per visualizzare lo schermo CT, toccare il centro del display. - Se non si ricevono dati CT, nel display viene visualizzato "---CT".Nota:
- I dati CT non sono trasmessi in alcuni paesi e da alcune stazioni emittenti. Inoltre, in alcune zone, i dati CT possono non essere visualizzati perfettamente.Impostazion del ADF
- ADF è l'abbreviatione di Anti Distortion Filter (Filtro Anti Distorsioni). L'adozione delle funzioni "Filtro di rinsforzo della vivacità" e "Compensazione della tonalità" permette una coproduzione ben modulata e realistica perché inficiare le caratteristiche originali del suono. Questo appearecchio ha memorizzato 4 tipi di tonalità. Selezionare la preferita. ADF-1: Adatto per altoparlanti semplici ADF-2: Adatto per altoparlanti separati ADF-3: Adatto per altoparlanti coassiali USER: Questa impostazione può essere modificata dall'utente secondo le proprie preferenze personali. OFF: Nessun effetto sonoro - L'impostazione predefinita alla fabbrica è "OFF" Note: - Poicha il volume cambia quando viene inserito ADF, inseire ADF con il volume di "SW VOLUME" (sub woofer) e di "CTR VOLUME" (altoplante centrale) abbassato il più possible. - In alcuni sistemi di altoparanti, talvolta non possono essere ottenuti effetti sufficienti. Se succede quello, regolare il parametro ADF o il volume. - Quando ADF è impostato su "USER", "1", "2" o "3", la funzione VSE e la funzione BASS/TREB molto EQ-SELECT sono disabilitati. 1. Premere il tasto [SOUND]. 2. Toccare ADF.  3. Toccare 山 sul lato destro del display per aggustare la modalità ADF.  Quando ADFiene impostato su "OFF", l'impostazione ADF non si riflette nella sorgente musicale. Questo termina le impostazioni ADF. Premere il tasto [SOUND] per tornare alla modalità originale. * Scegliere tra USER, 1, 2, 3, o OFF. 4. Per cancellare i dettagli dell'impostazione ADF, premere il tasto [A]. 5. Toccare sul display delle impostazioni per selezionare l'opzione desiderata. Ogni tocco di cambia il display di regolazione nell'ordine seguente: Regolazione ( quando viene selezionato USER nella fase 3) BASS TREBLE COMP BASS... Regolazione ( quando un numero da 1 a 3 viene selezionato nella fase 3) LEVEL COMP LEVEL... 6. Toccare 山 sul lato destro del display per effettuare la regolazione. * "BASS" e "TREBLE" possono essere sintonizzati tra i valori 1 e 13. * LEVEL più SSD estesare aggiustato in una gamma di valori che vanno da -3 a +3. * Scegliere "ON" o "OFF" per "COMP". 7. Premere il tasto [SOUND] per tornare alla modalità originale.Regolazione del sub woofer e dell'altoparlante centrale
- Il "SW VOLUME" (sub-woofer) pourrait essere regolato solo quando "SUB-WOOFER" è impostato su "ON". - Il "CTR VOLUME" (altoparlante centrale) può essere regolato solo quando la modalità Dolby Pro Logic Il è stata impostata su "MUSIC" o "MATRIX", "SP-SETTING" è stato impostato su "CTR+SW" e "CENTER-SP" è stato impostato su "ON". L'impostazione predefinita alla fabbrica per SW VOLUME è "0" e per CTR VOLUME è "0". 1. Premere il tasto [SOUND]. 2. Toccare A-MODE.  3. Toccare 山 sul display delle impostazioni per selezionare "SW VOLUME" o "CTR VOLUME".  4. Toccare sul lato destro del display e aggistiustare I'opzione come si desidera. * Questa impostazione può essere aggiustata tra i valori -5 e +5. 5. Premere il tasto [SOUND] per tornare alla modalità originale.Regolazione del bilancimiento/equilibristo
BALANCE:
Regola il bilanciamento di volume tra l'altoparlante destro e quello sinistro.FADER:
Regola il bilanciamento di volume tra l'altoparlante frontale e quello posteriore. - L'impostazione predefinita alla fabbrica per BALANCE è "0" e per FADER è "0".Nota:
- Il bilanciamento/equilibramento non può essere regolato quando viene selezionato "PRO" in AC-PRO III (ved. pag. 44) e la funzione di posizionamento è impostata su "ON". Regolazione del bilanciamento/equilibramento attaverso la "Selezione del menu positioning" (ved. pag. 17). 1. Premere il tasting [SOUND]. 2. Toccare A-MODE.  3. Toccare 山 山 sul display delle impostazioni per selezionare "BALANCE" o "FADER".  4. Toccare sul lato destro del display e aggistiustare I'opzione come si desidera. * "BALANCE" più essere regolato in una gamma di valori che va da L13 (il lato sinistro viene enfatizzato) a R13 (il lato destro viene enfatizzato). * "FADER" più essere regolato in una gamma di valore che va da R12 (la parte posteriore viene enfatizzata) a F12 (la parte anteriore viene enfatizzata). 5. Premere il tasto [SOUND] per tornare alla modalità originale.Regolazione del basso/soproano
La modalità basso/soprano può essere regolata solo quando la modalità Dolby Pro Logic II è impostata su "OFF" (ved. pag. 17) e "EQ SELECT" è impostata su "BAS/TREB" (ved. pag. 44). - L'impostazione predefinita alla fabbrica è "0". 1. Premere il tasting [SOUND]. 2. Toccare A-MODE.  3. Toccare sul display delle impostazioni per selezionare "BASS" o "TREBLE".  4. Toccare sul lato destro del display e aggiustare l'opzione come si desidera. * Questa impostazione può essere aggiustata tra i valori -6 e +6. 5. Ripetere le fasi 3 e 4 per regolare l'unità desiderata. 6. Premere il tasto [SOUND] per tornare alla modalità originale.Uso di AC-Processor III
Dolby Pro Logic II
Dolby Pro Logic II è una Tecnologia di decodifica matrice in cui viene applicata la Tecnologia matrice digitale aggiornata e Dolby Pro Logic è ulterioramente migliorato. Ottiene un'eccellente coproduzione a 5.1 canali di fonti Dolby surround nonché è di fonti stereo come CD, causando la trasformazione del canale surround in gamma completeness (da 20Hz a 20kHz ) e quindi stereo. Di conseguenza, si può ascoltare qualsiasi fonte stereo con suono dinamico a 5.1 canali. Secondo la fonte da riproduire, si più selezionare il modo musica o il modo matrice. Fabbricato su licenza di Dolby Laboratories. "Dolby", "Pro Logic" e il symbolo della dopbia D sono marchi di Dolby Laboratories.Selezione del menu PL II (Dolby PL II)
Selectionare la modalità MUSIC o la modalità MATRIX adatte alla sorgente che si usa nella modalità Dolby Pro Logic II. - L'impostazione predefinita alla fabbrica è "OFF".■ MUSIC (modalità musica)
- Questa modalità è adatta alle sorgenti sonore stereo come i CD. - èanche disponibile un'altra modalità di aggiustamento che permette una regolazione molto più dettagliata quando il Campo di suono si difonde differentemente a causa dello stato della sorgente musicae registrata. (Ved. pag. 47)MATRIX (modalità matrix)
- Questa modalità è adatta per sorgenti sonore come la radio AM/FM.OFF
- La modalità Dolby Pro Logic II non è in uso, notamment lo è la modalità AC-PROIII. Per maggiori dettagli sulla modalità AC-PROIII, guardare "Selezionare ogni modalità" (ved. pag. 44). 1. Premere il tasting [SOUND]. 2. Toccare Dolby PLII.  3. Toccare sul lato destro del display per selezionare la modalità Dolby Pro Logic II.  Il display delle modalità cambia nell'ordine seguente: MUSIC (modalità musica) MATRIX (modalità matrix) OFF (PL II off) MUSIC (modalità musica)... * Per maggiori dettagli a proposito della regolazione del volume dell'altoparlante/ sub-woofer centrale, guardare pagina 45. 4. Toccare RTN.Selezione del menu posizione
Con POSITION, si più selezionare tra 5 possibilità il modo in cui il suono arrivava dall'altoparlante al sedile. Inoltre, la funzione di aggiustamento del tempo permette di fissare le impostazioni degli altoparlanti in modo che lo stesso effetto audio possa essere ottentuto da agli altoparlante a favore di anni ascoltatore. Nella procedura "Selezionare agli modalità" (ved. pag. 44), impostare AC-PROIII su "PRO". - L'impostazione predefinita alla fabbrica per POSITION è "OFF" e per il menu delle posizioni fondamentali è "FRONT".■ Menu posizione
Questa funzione è pre-memorizzata con 5 menu posizione. Selezionare il menu desiderato per adattarlo alle proprie preferenze. 1. Premere il tasto [SOUND]. 2. Toccare POSITION.  3. Toccare 山 sul display ON/OFF. L'effetto posizione cambia in ON/OFF.  Quando l'effetto posizione viene impostato su "OFF", l'effetto posizione non si riflette nella sorgente musicale. Questo termina le impostazioni della posizione. Premere il tasto [SOUND] per tornare alla modalità originale. 4. Toccare B/U per selezionare "BASIC".  Ogni tocco di B/U fa andare da "BASIC" a "USER". 5. Toccare 一 日 nel menu delle posizioni fondamentali Num. per selezionare il menu delle posizioni fondamentali. Menu delle posizioni fondamentali| Num. | Nome del display | Posizione del sedile |
| 1 | FRONT-L | Sedile anteriore sinistro |
| 2 | FRONT-R | Sedile anteriore destro |
| 3 | FRONT | Sedili anteriorsi |
| 4 | REAR | Sedili posteriori |
| 5 | FULL SEAT | Tutti i sedili |
Posizoni di eegolazione/ memorizzazione (memoria utente)
Con la memoria utente, è possibile impostare esattamente gli altoparanti in modo tale che lo stesso effetto audio possa essere ottenuto da agli altoparlate a favore di anni ascoltatore in base al menu delle posizioni fondamentali. Posso sono essere memorizzati fino a 5 impostazioni di aggiustamento.T-ALIGN (allineamento temporale):
La distanza di agli ascoltare da agli altoparlante può essere insertita in intervalli di 2,3 cm e si può regolare il tempo che il suono impiega per raggiungere, da gligli altoparlante, l'ascoltatore.SP GAIN (altoparlante gain)
Regola il livello di emissione dell'altoparlante. Gli aggiustamenti sono tali per cui il volume emesso da agli altoparlante sia lo stesso per tutti. 1. Premere il tasto [SOUND]. 2. Toccare POSITION. 3. Toccare sul display ON/OFF. L'effetto posizione cambia in ON/OFF. 4. Toccare B/U per selezionare "BASIC" o "USER". 5. Toccare 山 sul lato destro del display per selezionare un menu che sua usato come menu per l'aggiustamento. 6. Premere il tasting [A]. 7. Toccare 卡 nel lato sinistro del display per selezionare "T-ALIGN" o "SP GAIN". 8. Toccare 念 nel centro del display per selezionare agliaggiustamento. Ogni tocco di 卡 cambia l'aggiustamento nell'ordine seguente:  Aggiustamento delle opzioni *1 Questo viene visualizzato quando "SUB-WOOFER" sotto "SOUND" nella modalità aggiosoamento è impostato su "ON". *2 Questo viene visualizzato solo quando "SUB-WOOFER" sotto "SOUND" nella modalità aggiestamento è impostato su "ON", e "T-ALIGN" è stato selezionato come descripto nella fase 7. 9. Toccare sul lato destro del display e aggustare I'opzione come si desidera.  POSITION EDIT FRONT L SP>085.1cm * "T-ALIGN" più essere regolato all'interno di una gamma che va da 0 cm a 501.4 cm per intervalli di 2.3 cm. * "SP GAIN" più essere regolato all'interno di una gamma che va da -20dB 0dB. 10. Ripetere le fasi da 7 a 9 per fare la regolazione desiderata. 11. Quando si è finito di fare l'aggiustamento per agli funzione, toccare RTN. Il display torna allo schermo originale, e viene visualizzato ">>" nel display BASIC o USER. Le operazioni fatte fin qui completano la regolazione della posizione. Per completare la memorizzazione dei valori diaggiustamento del menu della posizione utente, effettuire le seguenti operazioni. 12. Toccare e tenere premuto RTN per 1 secondo o più. Viene visualizzata il menu della lista delle posizioni. 13. Toccare e tenere premuta per 2 secondi o più la memoria utente dove si vuole memorizzare i valori di regolazione. L'emissione di un lungo bip segnalera l'avvenuta memorizzazione nel menu delle posizioni utente di un massimo di 10 valori di regolazione. L'emissione di un breve bip segnalera che i valori di aggiustamento sono a 10 sono stati scartati. Aggiustare nuovamente questi valori come è richiesto. 14. Toccare RTN. 15. Premere il tasto [SOUND] per tornare alla modalità originale. * Per selezionare la memoria utente, toccare B/U per visualizzare "USER" e toccare 🚫 🚫 nella memoria utente Num.Selezione del menu VSE
La VSE (intensificatore dello spazio virtuale) permette di compensare i bilanciamento della pressione sonora dentro la vettura in modo tale che lo steso effetto possa essere percepito dovunque ci si sieda quello stesso modo che nelle simulazioni di compenazione, Nella procedura "Selezionale agli modalità" (ved. pag. 44), impostare AC-PROIII su "STD". - L'impostazione predefinita alla fabbrica per VSE è "OFF" e per il menu fondamente di VSE è "FLAT".■ Menu fondamentale di VSE
Sotto Questa funzione sono prememorizzati sei menu fondamentali. Selezionale il menu fondamentale per adattarlo alle proprie preferenze. 1. Premere il tasting [SOUND]. 2. Toccare VSE.  3. Toccare sul display ON/OFF. L'effetto VSE cambia in ON/OFF.  Quando VSEiene impostato su "OFF", l'impostazione VSE non si riflette nella sorgente musica. Questo completa l'impostazione VSE. Premere il tasto [SOUND] per tornare alla modalità originale. 4. Toccare B/U per selezionare "BASIC".  Ogni tocco di B/U fa andare da "BASIC" a "USER". 5. Toccare nel menu VSE Num. per selezionare il desiderato menu fondamentale VSE. Menu fondamentali di VSE| Num. | Nome della funzione | Descrizione |
| 1 | FLAT | Sorgente sonora flat equalizing |
| 2 | BASS BOOST | Tono bassi potenziati |
| 3 | HIGH BOOST | Toni medi e alti potenziati |
| 4 | IMPACT | Toni bassi e alti potenziati |
| 5 | ACOUSTICAL | Toni medi (voce umana) potenziati |
| 6 | SMOTH | Produce toni delicati |
Aggiustamento/memorizzazione VSE (memoria utente)
L'impostazione memoria utente permette di compensare la distribuzione della pressione sonora per meglio adattarsi alle preferenze personali basandosi su un menu fondamentale VSE. Posso sono essere memorizzate fino a sei regolazioni utente.DIFFUSE:
Regola la deviazione nella pressione del suono diffuso.CARWIDTH:
Regola la deviazione nella pressione del suono diffuso secondo la grandezza della vetura.CAR LENGTH:
Regola the deviazione nella pressione del suono diffuso secondo la lunghezza della vettura. 1. Premere il tasting [SOUND]. 2. Toccare VSE. 3. Toccare sul display ON/OFF. L'effetto VSE cambia in ON/OFF. 4. Toccare B/U per selezionare "BASIC" o "USER". 5. Toccare sul lato destro del display per selezionare un menu che sua usato come menu per l'aggiustamento. 6. Premere il tasto [A]. 7. Toccare ↑ sul display delle impostazioni per selezionare "DIFFUSE", "CAR WIDTH" o "CAR LENGTH".  8. Toccare sul lato destro del display e aggiustare l'opzione come si desidera. * Questa impostazione può essere aggiustata tra i valori 1 e 10. 9. Ripetere le fasi 7 e 8 per regolare l'unità desiderata. 10. Quando si è finito di fare l'aggiustamento per agli funzione, toccare RTN. Il display torna allo schermo originale, e viene visualizzato ">>" nel display BASIC o USER. Le operazioni fatte fin qui completano la regolazione VSE. Per continuare la memorizzazione dei valori diaggiustamento del menu dell'utente VSE, effettare le seguenti operazioni. 11. Toccare e tenere premuto RTN per 1 secondo o più. Viene visualizzata la lista del menu utente VSE. 12. Toccare et tenere premuta per 2 secondi o più la memoria utente dove si vuole memorizzare i valori di regolazione. L'emissione di un lungo bip segnalera l'avvenuta memorizzazione nel menu utente VSE dei valori regolati fino a un massimo di 9 passi. L'emissione di un breve bip segnalera che i valori di aggiustamento fino a 9 sono stati scartati. Aggiustare nuvamente questi valori come è richiesto. 13. Toccare RTN 14. Premere il tasto [SOUND] per tornare alla modalità originale. * Per selezionare una memoria utente, toccare B/U per visualizzare "USER" e toccare « « « « « « « « « « « « « « « « « « « « « « « « « « « « « « « « « « « « « « « « « « « « « « « « « « « « « « « « « « « « « « « « « « « « « « « « « « « « « « « « « « « « « «« « « « « « « « « « « « « « « « «« » * Per selezionare una memoria utente, toccare B/U per visualizzare "USER" e toccare « « « « « « «« «« «««««««««««««««««««««««««««««««««««««««««««««««««««««««««««. * Per selezionare una memoria utente, toccare B/U per visualizzare "USER" e toccare « « « « « « « « « « « « « «« «« ««««««««««««««««««. * Per selezionare una memoria utente, toccare B/U per visualizzare "USER" e toccare « « « « « « « « ““ “ “ “ “ “ “ “ “ “ “ “ “ “ “ “ “ “ “ “ “ “ “ “ “ “ “ “ ”Selezione del menu P.EQ
L'equalizzatore dei parametri (P.EQ) permette di bilanciare l'intera gamma di livelli di frequenza in dettaglioattraversouna curva omogenea usingiol compensatoredfrequenzeadattato al tipo di vettura. Nella procedura "Selezionare agli modalità" (ved. pag. 44), impostare EQ SELECT su "P.EQ". - L'impostazione predefinita alla fabbrica per P.EQ è "OFF" e per il menu fondamentale P.EQ è "SEDAN-1".■ Menu fondamentale P.EQ
Sotto esta funzione sono preinstilati 6 tipi di menu fondamentale P.EQ adattati al tipo di vettra e alla posizione in cui sono montati gli altoparlanti. Selezionare il menu fondamentale per adattarlo alla propria vettra. 1. Premere il tasting [SOUND]. 2. Toccare P.EQ.  3. Toccare sul display ON/OFF. L'effetto P.EQ cambia in ON/OFF.  Quando I'effetto P.EQ viene impostato su "OFF", l'impostazione P.EQ non si riflette nella sorgente musica. Questo termina le impostazioni P.EQ. Premere il tasto [SOUND] per tornare alla modalità originale. 4. Toccare B/U per selezionare "BASIC".  Ogni tocco di B/U fa andare da "BASIC" a "USER". 5. Toccare 日 nel menu fondamentale P.EQ Num. per selezionare il menu fondamentale P.EQ. sul lato destro del display e pzione come si desidera. * "BAND" più essere aggistiato in una gamma di valori che vanno da 1 a 3. * "FREQ" più essere aggiustato in una gamma di valori che vanno da 20Hz a 20kHz. * Scegliere come “Q” uno tra 1, 3, 5, 7, o 20. * “GAIN” più essere aggiustato in una gamma di valori che vanno da -12dB a +12dB. 10. Ripetere le fas da 7 a 9 per fare la regolazione desiderata. 11. Quando si è finito di fare l'aggiustamento per agli funzione, toccare RTN. Il display torna allo schermo originale, e viene visualizzato ">>" nel display BASIC o USER. Le operazioni fatte fin qui completano la regolazione P.EQ. Per continuare la memorizzazione dei valori diaggiustamento del menu utente P.EQ, effettuire le seguenti operazioni. 12. Toccare e tenere premuto RTN per 1 secondo o più. Viene visualizzata la lista dei menu P.EQ. 13. Toccare e tenere premuta per 2 secondi o più la memoria utente dove si vuole memorizzare i valori di regolazione. L'emissione di un lungo bip segnalera l'avvenuta memorizzazione nel menu utente P.EQ di un massimo di 10 valori di regolazione. L'emissione di un breve bip segnalera che i valori di aggiustamento sono a 10 sono stati scartati. Aggiustare nuovamenteQUESTi valori come è richiesto. 14. Toccare RTN. 15. Premere il tasto [SOUND] per tornare alla modalità originale. * Per selezionare una memoria utente, toccare B/U per visualizzare "USER" e toccare ↑ 🙩️ nella memoria utente NurRegolazione del P.EQ
Le impostazioni possono essere regolate nel menu P.EQ nel modo segmente: La Frequenza centrale, il gain e la curva Q sono essere memorizzate in combinazioni di canali o bande. Per esempio, la Frequenza centrale "250Hz", il gain "-8dB" e la curva Q "3" sono essere memorizzati nella banda 1 del frontale. FRONT/REAR (seLECTIONe dei canali) Selezionale il canale (anteriore o posteriore) da regolare. BAND (seLECTIONE della banda) Selezione la banda di frequenza (da 1 a 3) da regolare. Impostare la frequenza centrale, (FREQUENCY), il gain (GAIN) e la curva Q (Q) per ognuna delle bande di frequenza.FREQUENCY (selezione della frequenza centrale)
Selezione la frequenza da usarsi come centro delle bande di frequenza che deve essere compensato in una gamma da 20Hz a 20kHz. (intervali di 1/3 di ottava, 31 puniti)GAIN (regolazione del gain)
Regola il gain (livello di emissione) nella gamma da -12dB a +12dB. (1dB steps, 25 puncti)Q (selezione della curva Q)
Imposta un valore tra 1, 3, 5, 7, o 20 per indicare l'intensità della curva Q.Compensazione
Non c'è bisogno di compensare le caratteristiche di frequenza sequeste sono risultate piatte (privi di picchi o vale) quando si sono misurate con un apparecchio misuratore. In agli caso, talvolta le caratteristiche di frequenza salgono o scendono in certi punti. Se accade quello, le caratteristiche di frequenza devono essere compensate. Creare una curva di frequenza che ha caratteristiche opposite alla frequenza centrale nella parte in cui esta sale o scende per annullare quosti picchi e valori, e rendere la frequenza la più piatta possibile. Il rendere le caratteristiche di frequenza le più piatte possibile si chiama "compensazione". Su gesto apparecchio, le caratteristiche di frequenza possono essere compensate atraverso il P.EQ (equalizzatore parametrico).- Compensazione delle caratteristiche di frequenza
Lo schema在哪的 relazione tra la frequenza centrale, il gain e la curva Q. Curva Q
La curva Q diventa più acuta quando più il valor numerico aumenta, e più dolce quando più il valor numerico diminuisce. Le caratteristiche di frequenza possono essere appiattite selezionando una curva Q opposta alla curva che si vuole compensare.  F: Freqenza centrale, G: Gain (livello di emissione), Q: Curva Q| Num.(tipodi automobile) | Parametri dell'equalizzatore parametrico | |||||||||
| Canale | Banda 1 | Banda 2 | Banda 3 | |||||||
| F | G | Q | F | G | Q | F | G | Q | ||
| 1(SEDAN-1) | Davanti | 250 Hz | -8 dB | 3 | 2 kHz | -4 dB | 1 | 5 kHz | -4 dB | 1 |
| Dietro | 250 Hz | -10 dB | 3 | 1.25 kHz | 0 dB | 5 | 8 kHz | 0 dB | 5 | |
| 2(SEDAN-2) | Davanti | 250 Hz | -10 dB | 7 | 800 Hz | -4 dB | 3 | 8 kHz | -5 dB | 1 |
| Dietro | 80 Hz | 3 dB | 7 | 125 Hz | -12 dB | 5 | 1.25 kHz | 0 dB | 5 | |
| 3(WAGON-1) | Davanti | 250 Hz | -8 dB | 3 | 1 kHz | -8 dB | 3 | 10 kHz | -6 dB | 1 |
| Dietro | 250 Hz | -8 dB | 3 | 800 Hz | -8 dB | 1 | 8 kHz | 0 dB | 5 | |
| 4(WAGON-2) | Davanti | 250 Hz | -8 dB | 7 | 400 Hz | -10 dB | 7 | 1.25 kHz | -8 dB | 7 |
| Dietro | 125 Hz | -8 dB | 3 | 500 Hz | -5 dB | 5 | 1.6 kHz | 0 dB | 3 | |
| 5(MINI VAN-1) | Davanti | 125 Hz | -4 dB | 5 | 1.25 kHz | -4 dB | 3 | 2 kHz | 3 dB | 7 |
| Dietro | 250 Hz | -6 dB | 1 | 630 Hz | -4 dB | 3 | 8 kHz | 0 dB | 5 | |
| 6(MINI VAN-2) | Davanti | 250 Hz | -4 dB | 3 | 1.25 Hz | -8 dB | 3 | 80 Hz | 3 dB | 3 |
| Dietro | 250 Hz | -8 dB | 3 | 500 Hz | -5 dB | 5 | 8 kHz | 0 dB | 5 | |
Operazioni radio
Display dello schermo nella modalità radio
Display principale
Questo è quello che appeare premendo la manopola [ROTARY] e selezionando la modalità radio.  Toccando il lato sinistro del display per 1 secondo o più si torna al display delle operazioni di base. Display delle frequenze
Viene migliorata la frequenza attualmente in fase di ricezione. Toccare o nel display delle operazioni di base permette di effettuire la sintonizzazione automatica o la sintonizzazione manuale.Display del titolo
Mostra il nome della stazione radio attualmente in fase di ricezione. Toccare quello nome si cambia il display.Display della banda di ricezione
AM: Nome della banda di frequenza AM FM1: Nome della banda di frequenza FMDisplay del Num. preselezionato
Toccando nel display delle operazioni standard si selezione una memoria preimpostata.MODE
Toccandolo si visualizzano le sub-funzioni. Toccandolo e mantenendolo premuto si visualizzata la lista delle memorie preselezionate.P-SCAN:
Questo viene visualizzato durante una scansione preselezioni. Toccandolo si termina la scansione preselezioni.A-STORE
Questo viene visualizzato durante una memorizzazione automatica. Toccandolo si termina la memorizzazione automatica.BAND
Il toccarlo cambia la banda di ricezione. Toccandolo et tenendolo premuto per 1 secondo o più si cambia alla modalità di sintonizzazione manuale alla sintonizzazione automatica e viceversa.(solo nel display delle operazioni di base)
Toccandoli si abilita la sintonizzazione automatica o la sintonizzazione a passo. Toccandololi e tendoli premuti si abilita la sintonizzazione rapida (nella modalità di sintonizzazione manuale).Display della lista delle memorie preselezionate
Questo è quello che appeare quando MODE viene toccato e tenuto premuto per 1 secondo o più nel display principale.  >>: In fase di sintonizzazione RTN: Toccandolo si ritorna al display principale.Ascolto della radio
1. Premere la manopola [ROTARY] per selezionare la modalità radio. Ogni pressione sulla manopola [ROTARY] cambia la modalità nell'ordine seguente: Radio (DAB) CD / MP3 (CD Changer) (DVD Changer) (TV) AUX Radio... * Se una data apparecchiatura non è connessa, la rispettiva modalità non appeare visualizzata. 2. Toccare BAND perambiare la banda di ricezione. Ogni volta che si preme BAND la banda di ricezione cambia nell'ordine seguente: FM1 FM2 FM3 AM (MW / LW) FM1...Sintonizzazione
Ci sono 3 tipi di modalità di sintonizzazione disponibili: sintonizzazione automatica, sintonizzazione manuale e sintonizzazione delle preselezioni.Sintonizzazione automatica
Ci sono 2 tipi do sintonizzazione automatica: DX SEEK e LOCAL SEEK. La funzione DX SEEK più sintonizzari automaticamente nelle stazioni emittenti ricevibili; LOCAL SEEK, inceve, più sintonizzari solo sulle stazioni emittenti con una Buona sensibilità di ricerca. 1. Toccare BAND per selezionare la banda desiderata (FM or AM (MW, LW)). 2. Sintonizzarsi su una stazione. * Se sul display appare MANU, toccare e tenere premuto BAND per 1 secondo o più. "MANU" scomparirà dal display e sare subito disponibile la sintonizzazione automatica. * Se "TA" appeare illuminato nel display, vengono ricercate automaticamente le stazioni TP.DX SEEK
Quando si tocca 一 一 nel display delle frequenze, viene avviata la sintonizzazione automatica. Quando si tocca 山 , la stazione viene ricercata in direzione delle frequenza più alto,除去 se si tocca 山 , la stazione viene ricercata in direzione delle frequenza più basse. * Quando si avvia la ricerca automatica, "DX SEEK" appeare nel display.LOCAL SEEK
Quando si tocca nel display delle frequenze, viene eseguita una ricerca per la sintonizzazione locale. Vengono selezionate solo le stazioni radio con buona sensibilità di ricezione. * Quando si avvia la ricerca per la sintonizzazione locale, "LO SEEK" appeare nel display.Sintonizzazione manuale
Ci sono 2 modalità disponibili: sintonizzazione rapida e sintonizzazione a passo. Quando ci si trovava in modalità di sintonizzazione a passo, la frequenza cambia di un passo per volta. In modalità di ricerca rapida, è possible sintonizzarsi rapidamente sulla frequenza desiderata. 1. Toccare e tenere premuto BAND per 1 secondo o più nel caso che MANU non venga visualizzato. La sintonizzazione manuale è disponibile quando viene visualizzato MANU. 2. Usare il display delle frequenze per sintonizzari su una frequenza in cui c'è una stazione emittente.Sintonizzazione a passo
Toccare 山 sul display delle frequenze.Sintonizzazione rapida
Toccare sul display delle frequenze. La sintonizzazione viene interrotta se si toglie il dito dal pannello.Richiamareuna stazione preselezionata
Il richiamare una stazione preselezionata è una funzione riservata alle stazioni più memorizzate. 1. Toccare e tenere premuto MODE per 1 secondo o più. Viene visualizzata la lista delle memorie preselezionate. 2. Toccare la stazione che si vuole ascoltare. * Se si è in modalità normale, èanches possible sintonizzarsi nel Num. preselezionato toccando nel display principale.Per annullare una sintonizzazione
1. Toccare RTN.Memoria preselezionata
Per memorizzare singole stazioni radio sono disponibili 24 posizioni preselezionate (6-FM1, 6-FM2, 6-FM3, 6-AM). 1. Toccare BAND perambiare la banda di rivezione. 2. Usare il display delle frequenze per memorizzare la stazione. 3. Toccare e tenere premuto MODE per 1 secondo o più. Viene visualizzata la lista delle memorie preselezionate. 4. Toccare e tenere premuto per 2 secondi o più il Num. preselezionato per memorizzare la stazione. L'emissione di un lungo bip segnalera l'avvenuta memorizzazione della stazione.Memorizzazione automatica
La memorizzazione automatica è una funzione che permette la memorizzazione sino a 6 stazioni che sono automaticamente sintonizzate in seguenza. 1. Toccare MODE. 2. Toccare e tenere premuto A-STORE per 2 secondo o più. Il display MODE cambia in "A-STORE" e il Num. selezionato durante le operazioni di memorizzazione automatica appare nel display Num. selezionato. * Vengono automaticamente ricercate le stazioni con una buona riscizione, e quando memorizzate tra le memorie preselezionate (No.1 to No.6) in ordine partendo alla stazione con la frequenza più Bassa.Note:
- Quando viene effettuata la memorizzazione automatica, le stazioni memorizzate sono a quel momento vengono cancellate. - Nel caso che ci siano meno di 6 stazioni con una Buona ricezione in LOCAL SEEK, leasse frequenze saranno automaticamente richiamate e la memorizzazione automatica verrà ri-effettuata in modalità DX-SEEK. Le stazioni precedentamente memorizzate rimangono in memoria nel caso in cui risultano esserci meno di 6 stazioni disponibili, malgrado la memorizzazione automatica sia stata effettuata 2 volte. - Se la memorizzazione automatica viene effettuata nelle bande FM, le stazioni sono memorizzate in FM3anche se FM1 o FM2 erano state scelte per la memorizzazione delle stationi.Scanzione preselezioni
La scanzione preselezioni è una funzione per ricevere le stazioni nell'ordine in cui sono memorizzate per Num. preselezionato in modo che si possano controllare le trasmissioni. 1. Toccare MODE. 2. Toccare P-SCAN. Il display MODE cambia in "P-SCAN" e il Num. selezionato durante le operazioni di scanzione preselezioni appeare nel display Num. selezionato. * Le stazioni attualmente memorizzate sono ricevute in ordine per 7 secondi o più. Le stazioni con scarsa ricercazione sono saltate e viene ricevuta la stazione successiva. Quando viene effettuata la scanizione preselezioni in una trasmissione FM, le stazioni FM sono ricevute nell'ordine seguente: FM1 (1 6) FM2 (1 6) FM3 (1 6)... Quando viene effettuata la scanzione preselezioni in una trasmissione AM, le stazioni AM sono ricevute nell'ordine segunte: AM (1 6) AM (1 6) e cosi via.Per annullare la scanizione preselezioni
1. Toccare P-SCAN. Il display P-SCAN cambia in "MODE" e, in seguito, saranno ricevute le stazioni che si stavano ricevendo quando si è toccato P-SCAN.RDS (Sistema dati radio)
L'unità dispone di un sistema di decodifica RDS incorp.orato che supporta le stazioni emittenti che trasmettono dati RDS. Questoistema può visualizzare il nome della stazione emittente in corso di ricezione (PS) e cui agganciarsi automaticamente alla stazione ricevente con la riscizione migliorhe quando ci si sposta a lunghe distance (Alternanza AF). Inoltre, se da una stazione emittente RDS vengono trasmessi annunci sul traffico o un tipo tipo di programmà,但这a trasmissione viene ricevuta indipendentemente alla modalità in cui ci si trovà. In aggiunta, se si ricevono informazioni EON, queste informazioni abilitano il passaggio automatico ad altre stazioni preselectionate della stessa rete e l'interruzione delle trasmissioni in corso da parte dei notiziari sul traffico trasmessi da altre stazioni (TP). Questa funzione non è disponibile in alcune zone. Quando si usa la funzione RDS, impostare sempre la radio sulla modalità FM. - AF: Freqenza Alternativa - PS: Nome servizio programma - PTY: Tipo programma - EON: Rete avanzata - TP: Programma sul traffico PI: Identificazione programmata - TA: Notiziario sul traffico * L'interruzione RDS non si attiva durante la ricezione radiofonica AM. * Nel corso della ricezione di segnali RDS, se l'apparecchio è in grado di leggere i dati PS, sul quadrante compare l'indicazione PS.Funzione AF
La funzione AF passa a un'altra frequenza della stessa rete per mantenere una riscezione ottimale. L'impostazione predefinita alla fabbrica è "ON" (Attivata).Per attivare o disattivare la funzione AF
1. Toccare MODE. 2. Toccare AF. Ogni tocco fa andare il display di AF alternativamente tra "ON" e "OFF" 3. Toccare RTN. * Nel caso in cui peggiori la riscione della stazione emittente in ascolto, nel display appare "SEARCH" e la radiocca lo stesso programma in un'altra frequenza.La funzione AF tra RDS e DAB
Quando lo stesso programma viene trasmesso. sia in RDS che in DAB e esta funzione è attivata, l'unità sintonizza automaticamente il ricevitore in modo da ricevere la trasmissione con migliorare qualità di ricezione. - Questa funzione agisce quando è collegata l'unità DAB DAH923 o DAH913, venduta separatamente. - L'impostazione originale di fabbrica è "ON". 1. Premere il tasto [A] per impostare la modalità di regolazione. 2. Toccare 卡 路 卡 nel display delle opzioni selezionare "LINK ACT" sotto "TUNER".  3. Toccare nel lato destro del display o, in alternatively, girare la manopola [ROTARY] per selezionare "ON" o "OFF". ON: L'alternanza di AF tra DAB e RDS è attivata. OFF: L'alternanza di AF tra DAB e RDS è disattivata. 4. Premere il tasting [A] per tornare alla modalità precedente.Funzione REG (Programma regionale)
Quando la funzione REG è attivata, è possibile ricevere le miglior i stazioni regionali. Quando esta funzione è disattivata, se nelle si guidà si cambia area di stazioni regionali, viene ricevuta una stazione della nuova regione. - L'impostazione predefinita alla fabbrica è "OFF" (Disattivata).Note:
- Questa funzione viene disabilitata quando è in corso di ricezione una stazione nazionale, coma la BBC 2-FM. - L'impostazione della funzione REG su ON/OFF è valida quando è attivata (ON) la funzione AF.Attivazione e disattivazione delle funzione REG
1. Toccare MODE. 2. Toccare REG. Ogni tocco fa andare il display di REG alternativamente da "ON" a "OFF". 3. Toccare RTN.Sintonizzazione manuale di una stazione regionale nella stessa rete
- Questa funzione è disponibile solo se la funzione AF è attivata. - L'operazione cambia a secondo dell'impostazione ON/OFF della funzione REG. Quando la funzione REG è ON, possono essere ricevute quale trasmissioni che hanno un codice PI perfettamente adatto. Quando la funzione REG è OFF, possono essere ricevute quale trasmissioni che hanno lo stesso tipo di codice PI.Note:
- Questa funzione può essere usata quando si riceve una trasmissione regionale della stessa rete. - Il codice PI è un codice di sistema unico per agli stazione emittente. 1. Toccare e tenere premuto MODE per 1 secondo o più. Viene visualizzata la lista delle memorie preselezionate. 2. Toccare il Num. preselezionato della stazione che si vuole ricevere.TA (Notiziario sul traffico)
Nella modalità di attesa della funzione TA, quando viene avviato un notiziario sul traffico,esso viene ricevuto con priorità assoluta, indipendenteamente alla modalità di funzionamento, in modo che si possibile ascoltarlo. Eanche possibile la sintonizzazione automatica su un programma sul traffico (TP). - Questa funzione può essere utilizzata solo quando nel display appara il messaggio "TP", che significà che la stazione emittente RDS che si sta ricevendo è dotata di programmi di notiziari sul traffico.Impostazione della modalità di attesa della funzione TA
Se si preme il tasto [TA] quando nel display appeare solo il messaggio "TP", nel display iniziano a lampeggiare le scritte "TP" e "TA" e l'unità viene posta in modalità di attesa fine a che viene trasmesso un notiziario sul traffico. Quando viene avviato un notiziario sul traffico, nel display appeare il messaggio "TRA INFO". Se si preme il tasto [TA], cioè è in corso la ricezione di un notiziario sul traffico, la riscizione del notiziario sul trafficoiene interrotta e l'unità passa in modalità di attesa TA.Per annullare la modalità stadby di TA Quando "TP" e "TA" sono illuminate nel display, premere il tasto [TA]. "TA" sparisce dal display e viene annullata la modalità stadby di TA.
- Se "TP" non è illuminato, premendo il tasto [TA] si cercHERA una stazione TP.Per cercare una stazione TP
Se si preme il tasting [TA] quando "TP" non è illuminato, "TA" si illumina nel display e esta unità riceve automaticamente riceve una stazione TP.Nota:
- Quando una stazione TP non può essere ricevuta, non viene visualizzato "TP SEEK" e la ricerca da una stazione TP viene continuata. - Quando il tasto [TA]iene premuto nuovamente, "TA" e "TP SEEK" scompaiono dal display e la ricerca da stazioni TP viene terminata.Funzione di memorizzazione automatica per le stazioni TP
Nella memoria a predesignazione si possono memorizzare sino a sei stazioni TP. Se il numero di stazioni TP ricevibili è inferiore a 6, le rimanenti stazioni trasmittenti più memorizzate rimangono memorizzate come erano. 1. Assicurarsi che "TA" sia visualizzato, e toccare MODE. Se "TA" non viene visualizzato, premere il tasto [TA] per visualizzare "TA". 2. Toccare e tenere premuto A-STORE per 2 secondo o più. Il display MODE cambia in "A-STORE" e il Num. selezionato durante le operazioni di memorizzazione automatica appare nel display Num. selezionato. - Le stazioni TP con una buona sensibilità di ricezione sono memorizzate nelle memorie preselezionate. - Anche se viene selezionato FM1 o FM2, una stazione TP è memorizzata come FM3.PTY
Questa funzione consente di ascoltare la trasmissione di un tipo tipo di programma radio,anche se l'apparecchio si trova predisporto su una modalità diversa da quella della radio. - Alcune nazioni non sono più recenti di trasmissioni PTY. - In modalità di attesa TA, una stazione TP ha la priorità su una stazione emittente PTY.Impostazione della modalità di attesa PTY
Quando si preme il tasto [▶III] nel display si accende il messaggio "PTY" e viene attivata la modalità di attesa PTY. Quando ha inizio la trasmissione PTY selezonata, il nome della trasmissione PTYiene visualizzato nel display.■ Annullamento della modalità di attesa PTY
Quando si preme e si tiene premuto il tasto [▶II], per 1 secondo, o più a lungo, "PTY" si spegne nel display e la modalità di attesa PTY è annullata.■ Annullamento di trasmissione interrotta PTY
Premere il tasto [▶III] durante la trasmissione interrotta PTY, l'interruzione PTYiene cancellata e l'unita ritorna in modalità di attesa PTY.Selezione PTY
1. Whenever you want to use the "passive" option, you can use the following command: 2. Toccare 山 山 nel lato destro del display o, in alternatively, girare la manopola [ROTARY] per selezionare PTY. * Di seguito vengono indicati le impostazioni predefinite alla fabbrica:| Numero presezione | Voce PTY | |
| ENGLISH | Conteno | |
| 001 | News | Notizie |
| 002 | Info | Informazioni |
| 003 | Pop M | Musica Pop |
| 004 | Sport | Sport |
| 005 | Classics | Musica classica |
| 006 | Easy M | Musica leggera |
Ricerca PTY
1. Whenever si preme il tasto [▶■],iene attivata la modalità di selezione PTY. 2. Toccare 山 nel centro del display o, in alternatively, girare la manopola [ROTARY] per selezionare PTY. 3. Toccare 山 sul lato sinistro del display. Se viene toccato , questa unita ricerca una trasmissione PTY in direzione delle frequenze più alto; se si preme il tasto 山 , l'unita ricerca la trasmissione PTY in direzione delle frequenze più BASSE. * Se non risulta possibile la ricezione di alcuna stazione con il tipo di programma PTY selezionato, l'apparecchio ritorna alla modalità precedenteMemoria di presezione PTY
1. Whenever si preme il tasto [▶■],iene attivata la modalità di selezione PTY. 2. Toccare 日 nel centro del display per selezionare PTY. Si possono selezionare i 29 tipi di PTY della tabella seguente.| Voce PTY | ||||
| ENGLISH | DEUTSCH | SVENSKA | FRANÇAIS | Contenuto |
| News | Nachrich | Nyheter | Infos | Notizie |
| Affairs | Aktuell | Aktuellt | Magazine | Attualità |
| Info | Service | Info | Services | Informazioni |
| Sport | Sport | Sport | Sport | Sport |
| Educate | Bildung | Utbildn | Educatif | Educazione |
| Drama | Hör + Lit | Teater | Fiction | Teatro |
| Culture | Kultur | Kultur | Culture | Cultura |
| Science | Wissen | Vetenskp | Sciences | Scienza |
| Varied | Unterh | Underh | Divers | Varietà |
| Pop M | Pop | Pop | M Pop | Musica Pop |
| Rock M | Rock | Rock | M Rock | Musica Rock |
| Easy M | U-Musik | Lättlyss | Chansons | Musica leggera |
| Light M | L-Musik | L klass | M Cl Lég | Musica classica leggera |
| Classics | E-Musik | Klassisk | Classiq | Musica classica |
| Other M | - - Musik | Övrig m | Autre M | Altra musica |
| Weather | Wetter | Väder | Météo | Previsioni del tempo |
| Finance | Wirtsch | Ekonomi | Economie | Informazioni finanziarie |
| Children | Kinder | Für barn | Enfants | Programmi per i bambini |
| Social | Soziales | Socialt | Société | Questioni sociali |
| Religion | Religion | Andligt | Religion | Religione |
| Phone In | Anruf | Telefon | Forum | Telefonate in diretta |
| Travel | Reise | Resor | Voyages | Viaggi |
| Leisure | Freizeit | Fritid | Loisirs | Tempo libero |
| Jazz | Jazz | Jazz | Jazz | Musica Jazz |
| Country | Country | Country | Country | Musica Country |
| Nation M | Landes M | Nation m | Ch pays | Musica nazionale |
| Oldies | Oldies | Oldies | Rétro | Vecchi successi |
| Folk M | Folklore | Folkm | Folklore | Musica folk |
| Document | Feature | Dokument | Document | Documentari |
Trasmissione di emergenza
Se si riceve una trasmissione di emergenza, tutte le operazioni della modalità funzioni vengono interrotte. Nel display appara il messaggio "ALARM" ed è possibile ascoltare la trasmissione di emergenza.■ Annullamento di una trasmissione di emergenza
Se si preme il tasto [AF], la riscione della trasmissione di emergenza viene annullata.Cambiamento della lingua del display PTY
Per i PTY visualizzati nel display è possibile selezionare una delle 4 lingue disponibili (Inglese, Tedesco, Svedese o Francesese). L'impostazione predefinita alla fabbrica è "ENGLISH". 1. Premere il tasto [A] per impostare la modalità di regolazione. 2. Toccare 一 _ 一 nel display delle opzioni per selezionare "LANGUAGE" sotto "TUNER".  3. Toccare 山 nel lato destro del display o, in alternatively, girare la manopola [ROTARY] per selezionare il linguaggio. * Selezionare una lingua tra ENGLISH, DEUTSCH (German), SVENSKA (Swedish) or FRANÇAIS (French). 4. Premere il tasting [A] per tornare alla modalità precedente.Impostare una interrupzione RDS quando la funzione 2-ZONE è in funzione (RDS-INT 2Z)
Le informazione RDS possono essere ricevute quando la funzione è impostata su "ON", e c'è una interruzione RDS nelle funzioni 2-ZONE è in uso. - La funzione 2-ZONE si disattiva quando c'è una interruzione RDS. - Se ci fosse stato una interruzione di allarme ancche se con "RDS-INT 2Z" impostato su "OFF", alla si ricevono le informazioni RDS. - L'impostazione predefinita alla fabbrica è "ON". 1. Premere il tasto [A] per impostare la modalità di regolazione. 2. Toccare 念 nel display delle opzioni e selezionare "RDS-INT 2Z" sotto "TUNER".  3. Toccare 山 山 nel lato destro del display o, in alternatively, girare la manopola [ROTARY] per selezionare "ON" o "OFF". ON: Le informazioni RDS si ricevono quando c'è una interruzione RDS nelle funzioni 2-ZONE è in uso. OFF: Quando la funzione 2-ZONE è in uso, è possibile ricevere solo l'interruzione di allarme tra le informazioni RDS. Nota: - Se è selezionato il modo Radio quando TA (Traffic Announcement) e PTY sono positonati su "ON", le interruzioni vengono ricevuteanche se l'impostazione dell'interruzione RDS è posizionata su "OFF". 4. Premere il tasto [A] per tornare alla modalità precedente.Impostazione del volume di TA, trasmissioni d'allarme (ALARM) e PTY
Durante le trasmissioni di interruzione TA, ALARM, PTY è possible impostare il volume delle trasmissioni di interruzione TA, ALARM e PTY. - L'Âfimpostazione predefinita alla fabbrica è "15". Durante una trasmissione di interruzione TA, ALARM o PTY, girare la manopola [ROTARY] in senso orario per impostare il volume al livello desiderato (da 0 a 33). - Dopo che la trasmissione di interruzione TA, ALARM o PTY fisisce, il volume ritorna al livello precedente alla trasmissione di interruzione.Display dello schermo nella modalità CD
Display principale
Questo è quello che appeare premendo la manopola [ROTARY] per selezionare la modalità CD.  Toccando il lato sinistro del display per 1 secondo o più si cambia in modalità operazioni. Display del brano/tempo di riproduzione J'01/02: 00:
Sono visualizzati il Num. del brano in fase di riproduzione e il tempo di riproduzione. Se viene toccato o nelle operazioni standard, è possibile selezionale il brano da riproduzione, o i brani da far avanzare velocamente o da far andare indietro velocamente.Display del titolo
Il display cambia quando this is toccato. Display della cartella (nel caso di MP3/WMA) Toccando nelle operazioni standard permeate di selezionare le cartelle.MODE:
Toccandolo si visualizzano le sub-funzioni. Nel caso di MP3/WMA, toccando e tenendo premuto quello per 1 secondo o più visualità la lista delle cartelle.Nota:
- Questa funzione è disponibile solo quando il disco è in fase di riproduzione. -SCAN: -SCAN: Questo viene visualizzato durante la scansione delle riproduzioni. Toccandolo si interremporà la scansione delle riproduzioni. - RPT/RPT: Questo viene visualizzato durante la ripetizione della riproduzione. Toccandolo si interromperà la ripetizione delle riproduzioni. F-RDM/RDM: Questoiene visualizzato durante la coproduzione in ordine casuale. Toccandolo si interrornpera la coproduzione in odine casuale.TOP:
Toccandolo si avvia la riproduzione a partire dal brano all'inizio del disco o della cartella in fase di riproduzione. (solo nel display delle operazioni di base) Toccando quei tasti si selezione il brano da riproduire. Toccando e tenendo premuti questi tasti si mandano i brani avanti o indietro velocimento.■ Display della lista delle cartelle (nel caso di MP3/WMA)
Questo è quello che appeare quando MODE viene toccato e tenuto premuto per 1 secondo o più nel display principale.  Nome della cartellaCartella Num.
Quando questo è visualizzato in grigio, la cartella non può essere selezionata.>>:Selezione in progressione
Toccando il nome di una cartella si fa tornare lo schermo al display principale, e la riproduzione viene avviata a partire dal primo brano della cartella toccata.
Toccandolo si visualizza la lista delle cartelle precedenti. Toccandolo e tenendolo premuto per 1 secondo o più si fa tornare lo schermo al display principale.
NEXT:
Toccandolo si visualizza la lista delle cartelle successive.
Che casa è ilsystema MP3?
IlsystemaMP3eunmetodi dcompresione audioclassificato nello strato audio 3 degli standard MPEG.
Questo metododi compressione audio si è talmente diffuso fra gli utenti di personal computer, da essere considerato ormai un formato standard.
Ilsystema MP3 presenta i dati dell'audio originale compressi sino a circa il 10% della dimensione originale, con un'alta qualità sonora. Questo significica che 10 CD di musica possono venire registrati su un unico disco del tipo CD-R o CD-RW, per consentire un lungo tempo di ascoltorawnazadovercinuamente procedere alla sottomuzione dei CD.
Che casa è ilsystema WMA?
WMA è l'acronimo di Windows Media Audio, un formato di file audio sviluppato alla Microsoft Corporation.
Note:
- Riproducendo un file con il metod DRM (Gestione dei diritti digitali) perché ilsystema WMA è attivato (ON) non viene emesso alcun suono audio. (L'indicatore WMA lampeggia.)
- Il terme "Windows Media™" ed il logo "Windows®" sono marchi di fabbrica, o marchi di fabbrica della Microsoft Corporation registrati negli Stati Uniti e/o in altri Paesi.
- Disattivazione delsystema DRM (Gestione dei diritti digitali):
- Quando si usa Windows Media Player 8,fareclscu TOOLS OPTIONS scheda COPY MUSIC,poi in COPY SETTING togliere la spunta dalla casella PROTECT CONTENT. Poi ricostruire i file.
- Quando si usa Windows Media Player 9,fare clic su TOOLS OPTIONS scheda MUSIC RECORD, poi nelle impostazioni Recording togliere la spunta alla casella RECORD PROTECTED MUSIC. Poi ricostruire i file.
I file WMA realizzati su base personale sono utilizzati molto la diretta responsabilità dell'utente.
Precauzioni per la creatione di un disco MP3/WMA
- Valori di campionamento e di bit utilizzabili:
1. MP3:
Valori di campionamento: da 11.025 kHz a 48 kHz
Valori bit: da 8 kbps a 320 kbps / VBR
2. WMA:
Valori bit da 48 kbps a 192 kbps
- Extensione del nome del file
1. Bisogna sempre aggiuungere un'estensione "MP3" o .WMA a un file MP3 o WMA using lettere di un solo byte. Se si aggiunge una estensione diversa da quella indicate o ci si dimentica di aggiuungere l'estensione del file, la riproduzione del file sera impossibile.
2. I file dati MP3/WMA non saranno riprodotti. L'indicazione "--: --" appeare nel display del tempo di riproduzione se si tenta di riproduurre dei file privi di dati MP3/WMA.
- Formato logico (sistema dei file)
1. Quando si scrive un file MP3/WMA su un disco CD-R o CD-RW, si prega di selezionare "ISO9660 level 1, 2 or JOLIET or Romeo" come lavorato di scrittura del software. La riproduzione normale cui non sono possibile se il disco è registrato in un'alto lavorato.
2. Il nome della cartella e del file possono essere visualizzati come titolo nel caso di una riproduzione di un MP3/WMA ma il titolo deve essere entro 128 lettere alfabetiche o numerali a byte singoli (inclendo un'estensione).
3. Non dare a un file lo stesso nome della cartella in cui è contentuto.
Struttura della cartella
1. Non sono autorizzati dischi con cartelle costituite da più di 8 livelli gerarchici.
-Numero dei file o delle cartelle
1. Per agli cartella possono essere riconosciuti fino a 255 file. Possono essere riprodotti fino a 500 file.
2. I brani sono riprodotti nell'ordine in cui erano registrati nel disco. (I brani possono non essere sempre riproducibili nell'ordine visualizzato nel PC).
3. Possono esserci alcuni disturbi a secondo del tipo di programma codificatore utilizzato durante la registrazione.
Selezione multisessione
Questa funzione permette di selezionare sia CD-DA sia file MP3/WMA nel caso di dischi (p.es. CD-EXTRA) contenti sia CD-DA (CD musicali) sia file MP3/WMA.
1. Toccare MODE.
2. Toccare M-SESS.
Ogni tocco su M-SESS fa andare il display di M-SESS alternativamente da "CD" (riproduzione CD-DA) o "MP3/WMA" (riproduzione MP3/WMA).
* Se non viene visualizzato M-SESS, toccare NEXT.
3. Toccare RTN.
La selezione della multissessione avrè effetto la volta seguente in cui sare caricato il CD.
Nota:
- Quando si riproduisce un CCCS (Copy Control CD), selezionareIl tipo CD. Se è impostato il tipo MP3/WMA, in alcuni casi, il CD potrebbe non essere riprodotto bene.
ATTENZIONE
Fare attenzione a non lasciarsi prendere la mano o le dita nelle si richiude la CONSOLE INCLINATA.
Note:
- Se la CONSOLE INCLINATA non si après completeness a prioro a mano con delicatezza.
- Richiudere sempre la CONSOLE INCLINATAupon l'insertimento del CD.
- Non insere la mano o le dita nella fessura di caricamento del disco. Ugualmente, nella fessura non devono essere inserti oggetti estranei.
Non inserire dischi con adesivi sporgenti dal nastro di cellophane o dischi CD in affitto, contententi l'etichetta del negotio in cui sono stati affittati, o dischi con contrassegni i cui nastri o etichette di affitto di copertura sono stati toti. Tali tipi di dischi possono risultare impossibili da estrarre e possono causare danni all'apparecchio.
Insetimento di un CD
1. Premere il tasting [▲].
Il pannello di controllo si après.
2. Inserire il disco nel CD SLOT.
Quando il disco è stato inserito, il pannello di controllo si chiude automaticamente dopo quello secondo, e quando ha inizio la riproduzione.
Note:
Non inserire mai oggetti estranei nel CD SLOT.
- Se l'inserimento del CD risulta dificoltoso, potrebbe esserci un'alto CD nel meccanismo o che l'apparecchio non funzioni perfettamente e richieda una revisione.

che non riportano i contrassegni [0158]
e i CD-ROM non possono essere tti con quello apparecchio.
- Certi tipi di Cd, registrati secondo la modalità CD-R/CD-RW, possono risultare non riproducibili.
Instrimento di compact disc da 8 cm
Per la riproduzione di CD da 8cm non è necessario alcun tipo di adattatore. Inserire il CD da 8 cm al centro del CD SLOT.
Espulsione di un CD
Premendo il tasting [▲] è possibile espellere automaticamente un discoanche se la chiave d'accensiono o ACC è nelle posizione OFF.
ATTENZIONE
Quando viene espulso un disco, premere il tasto [▲] per chiudere il pannello di controlo. Se il pannello di controllo viene lasciato aperto, l'emissione di un doppio bip segnalera la chiusura automatica del pannello di controlo.
1. Premere il tasto [▲].
Il pannello di controllo siCTL, e il disco viene espulso. La modalità cambia, automaticamente, in modalità radio.
* Assicurarsi di rimuovere i dischi espulsi da questo apparecchio. Se si lascia il disco nella fessura dei dischi, quello sare rittirato e il pannello di controllo si chiudera. (funzione di inserimento automatico)
* Singoli CD non sono inserti in automatico. Assicurarsi di rimuovere i singoli CD dopo averli espulsi.
ATTENZIONE
Se si usa una forza eccessiva nel caricare un disco après che quello è stato espulso, la superficie del disco potrebbe danneggiarsi. Rimuovere il disco prima di re-insertirlo nuovamente.
Ascolto di un disco già inserto nell'apparecchio
1. Premere la manopola [ROTARY] per selezionare la modalità CD.
* Attivando la modalità CD la riproduzione ha automaticamente inizio.
Arresto temporaneo della riproduzione
1. Premere il tasting [▶■].
■ Riavvio della riproduzione
1. Premere nuovamente il tasto [▶■].
Selezione di un brano
Quando viene inserto un CD-R/CD-RW registrarato con un file MP3 o WMA, è possibile selezionale solo i brani registrati nella stessa cartella toccando nel display del brano.
1. Per sentire il brano successivo, toccare nel display del brano.
2. Per sentire il brano precedente, toccare due volte nel display del brano. Toccando si riproduce il brano successivo. Per agli successiva pressione del tasting l'apparecchio avanza sino all'inizio del brano successivo.
Toccando 山 si riproduce il brano precedente. Per agli successiva pressione del tasting 山 l'apparecchio retrocede sino all'inizio del brano precedente che viene poi riproduzione..
* Se si tocca ↑ due volte nel display del brano perché sta per cominciare la sua riproduzione, talvolta viene riproduzione il secondo brano precedente.
■ Selezione delle cartelle
Per selezionare un'altra cartella si può sia toccare
南 neI display delle cartelle, sua fare come segue..
1. Toccare e tenere premuto MODE per 1 secondo o più. Viene visualizzata le lista delle cartelle. Toccando PREV o NEXT si visualizza la parte precedente o successiva della lista delle cartelle.
2. Toccare il nome della cartella.
Riproduzione della lista di riproduzione
Possono essere riprodotteanche delle liste di riproduzioni (file M3U).
Bisogna notare che solo i primi 5 file aventi la data e l'orario più recenti possono essere visualizzati tra tutti i file M3U attualmente archiviati nei 5 layer (inclusa la directory principale).
Note:
- Per agli singola lista di riproduzioni sono essere riprodotti sino a 255 file.
- Possono essere riprodotti solo i file M3U o WMA attualmente archiviati nella gerarchia dei file nelle cartelle contenate nei 5 layer (inclua la directory principale).
Fare come segue per riproduire la lista di riproduzione.
1. Toccare MODE.
2. Toccare NEXT.
3. Toccare PLY LIST.
Viene avviata lalettura della lista di riproduzioni. Quandoviene terminata lalettura della lista di riproduzioni, viene attivatamountacamente la lista di riproduzioni condata e orario più recente. Le operazioni dafare per selezionare la lista di riproduzioni oibrani in una lista di riproduzioni sono comequelleda farsi per selezionare una cartella o dei brani in una cartella.
* PLY LIST non viene visualizzato nel caso in cui una segenza di brani (M3U) corretta non risulta essere stata salvata nel CD-R/CD-RW inserito nell'apparecchio.
■ Interruzione della riproduzione di una lista di riproduzione
1. Toccare MODE.
2. Toccare NEXT.
3. Toccare PLY LIST.
Avanzamento veloce/ Retrocessione velce
1. Per avanzare velocemente, toccare sul display dei brani.
2. Per retrocedere velocimento, toccare sul display dei brani.
Funzione TOP
La funzione Top riporta lagettura del CD al brano d'inizio del CD stesso.
1. Toccare TOP. La riproduzione viene avviata dal primo brano (brano num 1). Nel caso di MP3/WMA, si torna al primo brano della cartella in fase di riproduzione.
Riproduzione a scansione
Questa funzione consente di individuare e riproduire i primi 10 secondi di tutti i brani contentuti nel disco.
1. Toccare MODE.
2. Toccare F^ -SCAN. Il display MODE cambia in "F'-SCAN" e si avvia la riproduzione a scansione.
* La riproduzione a scansione viene avviata dal brano successivo a quello attualmente in fase di riproduzione.
■ Annullamento della riproduzione a scansione
1. Toccare J^ -SCAN. Il display J^ -SCAN cambia in "MODE", e viene riproduotto il brano che era in fase di riproduzione quando si è toccato J^ -SCAN.
Riproduzione a scansione delle cartelle
Questa funzione permette di localizzare e riproduire i primi 10 secondi del primo brano di tutte le cartelle di un disco MP/WMA.
1. Toccare MODE.
2. Toccare -SCAN. Il display MODE cambia in "SCAN" e si avvia la coproduzione a scansione delle cartelle. * La coproduzione a scansione delle cartelle viene avviata a partire alla cartella successiva a quella attualmente in fase di coproduzione.
■ Annullamento della riproduzione a scansione delle cartelle
1. Toccare -SCAN. Il display -SCAN cambia in "MODE", e viene riproduzione il brano che era in fase di riproduzione quando si è toccato -SCAN.
Riproducione ripetuta
Questa funzione consente di riproduire ripetutamente il brano in corso di riproduzione.
1. Toccare MODE.
2. Toccare ^一 REPEAT. Il display MODE cambia in " ^ 一 R P " e viene avviata la riproduzione ripetuta.
Annullamento della riproduzione ripetuta
1. Toccare P -RPT. Il display P -RPT cambia in "MODE", e la riproduzione regolare ricomincia dal brano che era in fase di riproduzione quando si è toccato P -RPT.
Riproduzione ripetuta della cartella
Questa funzione consente di riproduire ripetutamente la cartella in corso di riproduzione. Questa funzione è disponibile solo quando si è inserito un CD-R/CD-RW contente file MP3 o WMA.
1. Toccare MODE.
2. Toccare -REPEAT. Il display MODE cambia in "RPT" e viene avviata la riproduzione ripetuta della cartella.
■ Annullamento della riproduzione ripetuta della cartella
1. Toccare -RPT. Il display -RPT cambia in "MODE", e la riproduzione regolare ricomincia dal brano che era in fase di riproduzione quando si è toccato -RPT.
Riproduzione in ordine casuale
Questa funzione consente di riproduire in un ordine casuale tutti i brani contenuti sul disco
-RANDOM
Riproduce tutti i brani del disco in ordine casuale, Nel caso in cui il disco contiene 2 o più cartelle, tutti i brani della prima cartella sono riprodotti in odine casuale, seguiti da tutti i brani della cartella successiva. Questo viene ripetuto per tutte le cartelle.
-RANDOM
Riproduce i brani del disco in ordine casuale, Questa funzione è disponibile solo quando si è inserito un CD-R/CD-RW contente file MP3 o WMA.
1. Toccare MODE.
2. Toccare -RANDOM o -RANDOM. Il display MODE cambia in "RDM" o in "RDM" e si avvia la riproduzione in ordine casuale.
■ Annullamento della riproduzione in ordine casuale
1. Toccare f^ -RDM o -RDM. Il display f^ -RDM o -RDM cambia in "MODE", e la riproduzione regolare ricomincia dal brano che era in fase di riproduzione quando si sono toccati i tasti.
Brani diversi di musica per più asconsultatori (funzione 2-ZONE)
La funzione 2-ZONE è una funzione che émette suoni separati per la zona MAIN e la zona SUB impiegando automaticamente due fonti in una sola unità centrale, permettendo+dunque a più ascoltatori di ascoltare fonti musicali分开e.
Questa unitàouldontrollarelesuefontiinterne (radio,CD,MP3,ecc.)per la riproduzione e inoltrepuroidurresimultaneamentefontida apparecchi esternicollegatitramite CeNET (per esempio,cambiadischi CD,ecc.).
Le fonti della zona MAIN sono riprodotte dai diffusori del veicolo e quale della zona SUBtramite ilsystema cuffie (WH143).

La figura superiore si riferisce al caso in cui una sorgente sonora viene riprodotta nelle casse acustiche dall'apparecchio in modalità interna (radio, CD, AUX).
La figura inferiore si riferisce al caso in cui una sorgente sonora viene riprodotta nelle casse acustiche dall'apparecchio in modalità interna (cambia-CD, cambia-DVD, TV, AUX).
- L'impostazione predefinita alla fabbrica è "OFF".
Note:
- La funzione 2-ZONE non è disponibile quando DAB è connesso.
- Ogni nuovo aggiustamento di volume fatto girando la manopola [ROTARY] si riflette unicamente nelle casse acustiche.
Le impostazioni AUX-SENS si riflette sua nelle casse via delle cuffie.
■ Display dello schermo quando è in uso la funzione 2-ZONE
"INT." (modalità interna) o "EXT." (modalità esterna) viene visualizzato al centro del display perindicare se è possibile ascoltare in modalità interna o in modalità esterna nella modalità operativa 2-ZONE in corso.
1. Premere il tasting [SOUND].
2. Toccare 2-ZONE.

3. Toccare e tenere premuto per 1 secondo o più il centro ON/OFF del display.

Quando 2-ZONE viene impostato sull'ON, viene visualizzato il tipo di 2-ZONE in corso. La funzione 2-ZONE non è disponibile quando 2-ZONE è impostato su OFF. Premere il tasto [SOUND] per tornare alla modalità originale.
4. Toccare 日 nel display ON/OFF per selezionare il tipo di 2-ZONE.
Tipi di 2-ZONE
Altoparlante Cuffie Tipo1 Interno (modalità interna) Esterno (modalità esterna) Tipo2 Esterno (modalità esterna) Interno (modalità interna)
5. Toccare il disply dell'altoparlante o il display della cuffia per selezionare la modalità operativa 2-ZONE.
Si possono usare gli altoparlianti per l'audio quando si tocca il display dell'altoparlante. Si possono usare le cuffie per l'audio quando si tocca il display dell'altoparlante.
6. Premere il tasto [SOUND] per tornare alla modalità originale.
Brani diversi di musica per più ascoltatori (funzione 2-ZONE)
Attivazione e disattivazione delle funzione 2-ZONE
1. Premere e tenere premuto per 1 secondo o più il tasting [SOUND] nell'apparecchio.
Perambiare il tipo di 2-ZONE
Premere e tenere premuto per 1 secondo o più il tasto [TA] nell'apparecchio nelle si sta usinga la funzione 2-ZONE.
Perambiare la modalità operativa 2-ZONE
Premere il tasto [TA] nelle si sta usando la funzione 2-ZONE.
Selezione della modalità quando è in uso la funzione 2-ZONE
Quando si insertisce un CD nelle si sta usando la funizione 2-ZONE, le funzioni della modalità interna cambiano in CD, e la riproduzione viene avviata automaticamente.
1. Premere il tasto [TA] perambiare la funzione operativa 2-ZONE.
Vlene attenuato il display dell'apparecchiatura (altoparlante o cuffia) che può essere usato attualmente.
2. Premere e tenere premuto per un secondo o più il tasto [TA] per selezionare il tipo 2-ZONE.
Viene commutato il display "INT." o "EXT."
3. Premere la manopola [ROTARY].
Mentre appeare "INT," ogni pressione sulla manopola [ROTARY] cambia la modalità nell'ordine seguente:
Radio CD AUX Radio...
Mentre appeare "EXT.", ogni pressione sulla manopola [ROTARY] cambia la modalità nell'ordine seguente:
$$
\begin{array}{l}\text {A U X} \rightarrow (\text {C D c h a n g e r}) \rightarrow (\text {D V D c h a n g e r}) \rightarrow\\(\text {T V} ^ {\prime 1}) \rightarrow \text {A U X} \dots\end{array}
$$
* Se una data apparecchiatura non è connessa, la rispettiva modalità non appeare visualizzata.
*1 Whenever viene selezionata la modalità TV, la modalità cambia automaticamente in modalità VTR, e non può essereambiata.
Operazioni comuni in entrambé le modalità
Display dello schermo in modalità di inserimento dei titoli
Display principale
Questo viene visualizzato quando viene selezionata la modalità di inserimento dei titoli. (cfr. pag. 14)

Display caratteri di testo
A: Lettere alfabetiche maiuscole
a: Lettere alfabetiche minuscole
0-9: Nemeri
!?: Simboli
A: Accenti speciali: Umlaut
Display del titolo
Viene visualizzato il titolo attualmente inserito. Toccare per determinare la posizione di inserimento. Toccando e tenendo premuto il tasto per 2 secondi o più si causa la cancellazione di tutto il testo inserito.
Display del testo scritto
Toccare 山 per selezionare il testo inserto.
RTN
Toccando questo si annulla l'insertimento dei titoli, e il display ritorna allo schermo originale. Toccando e tenero premuto per 1 secondo o più si visualizza la lista dei titoli che si accompagnano al corrente carattere di testo.
MEMO
Toccando e tenendo quello premuto per 2 secondi o più si salva il titolo inserto, e il display torna allo schermo originale.
Display della lista dei testi
Questo è quello che appeare quando RTN viene toccato e tenuto premuto per 1 secondo o più nel display principale.

Caratteri del testo
Il testo che viene visualizzato cambia a secondo del display del carattere di testo.
Nel caso in cui il carattere di testo visualizzato è“A”: A E I M Q U X(spazio)
Nel caso in cui il carattere di testo visualizzato è “a”: a e i m q
Nel caso in cui il carattere di testo visualizzato e "0-9", "!?" o "A":
Vengono visualizzati tutti i caratteri.
RTN
Toccandolo si ritorna al display principale.
NEXT
Toccandolo si visualizza la lista dei testi successivi.
Inserimento titoli
Si possono dare alle varie stazioni TV dei titoli lunghi forn a 10 caratteri, eanche ai CD. Questi titoli possono essere visualizzati quando si ricevono le trasmissioni o quando si riproduze un CD. Il numero dei titoli inseribili è il seguente:
Modalità Numero dei titoli Modalità CD 50 titoli Modalità TV 20 titoli
Modalità cambia-CD Numero dei titoli DCZ628 connesso 100 titoli CDC655Tz connesso 100 titoli CDC1255z connesso 50 titoli
1. Si possono ricevere le stazioni TV e si cui si rroduire un CD per cui si voglia insertire il titolo.
2. Toccare il centro del display per impostare il display del titolo dell'utente.
Quando il display cambia nel display del titolo dell'utente, "USER" viene visualizzato tutto il display del Num. preselezionato.
3. Premere e tenere premuto per 1 secondo o piu il tasting [A].
La modalità cambia in modalità di insertimento dei titoli.
4. Toccare nel display del titolo per determinare la posizione di inserimento. La posizione del testo lampeggiante si muove a sinistra o a destra.

* Possono essere insertiti forn a 10 caratteri.
ATTENZIONE
Premendo il tasto di preselezionr si cancellano tutte le memorie utente, come ad esempio i titoli salvati in questa unità.
5. TOccare 山 sul display del carattere di testo per selezionare il carattere del testo. Ogni tocco di 山 cambia il carattere del testo nell'ordine seguente:
Letteralelfabetichemaisuscole
(spazio) ABCDEFGHIJKLMNOPQ RSTUVWXYZ
Lettere alfabetiche minuscole
abcdefghijklmnpqrstuvwxyz Numeri
0123456789
Simboli, Accenti speciali: Umlaut
AEEEEIAEaeeeeeioae
6. Toccare nel lato destro del display o, in alternatively, girare la manopola [ROTARY] per scegliere i caratteri da insertire.
7. Ripetere alla fase 4 alla 6 per insere il titolo. Premendo e tenendo premuto per 2 secondi o piu il display del titolo, si causa la cancellazione dei caratteri attualmente inseriti per il titolo.
8. Toccare e tenere premuto MEMO per 2 secondi o più.
L'emissione di un lungo bip segnalera
l'avvenuta memorizzazione del titolo.
Per cancellare il display del titolo in orologio o in un'alto display
Toccare il centro del disply
■ Quando si memorizza un nuovo titolo che eccede il numero massimo di titoli
Nel caso di una stazione TV
I titoli non memorizzati tra i canali preselezionati sono automaticamente cancellati, e il nuovo titolo viene così memorizzato.
Nel caso di un CD
Vengono cancellati i titoli dei CD di quei che sono stati riprodotti meno, e il nuovo titolo viene memorizzato.
Cancellazione dei titoli
1. Ricevere la stazione TV o riproduire un CD di cui si vuole cancellare il titolo.
2. Toccare il centro del display per impostare il display del titolo dell'utente.
Quando il display cambia nel display del titolo dell'utente, "USER" viene visualizzato在整个 display del Num. preselezionato.
3. Premere e tenere premuto per 1 secondo o più il tasting [A].
La modalità cambia in modalità di inserimento dei titoli.
4. Toccare e tenere premuto il display dei titoli per 2 secondo o più.
Tutti caratteri nel titolo spariranno.
5. Toccare e tenere premuto MEMO per 2 secondo o più.
L'emissione di un lungo bip segnalera l'avvenuta cancellazione del titolo.
Cambiamento delle impostazioni Selezionare le impostazioni
1. Premere il tasto [A].
La modalità cambia in modalità di aggiustamento.

2. TOccare 山 sul display delle impostazioni per selezionare quella che si vuole impostare..
* Toccando ↑ 📁 ↑ nel lato sinistro del display si cambia la scelta di una opzione per volta. Toccando ← 📁 → sul lato sinistro del display si cambia continuamente le sub-opzioni..
* Toccando ↑ ⇌ nel centro del display si cambia la scelta di una sub-opzione perolta. Toccando ← ⇌ → si cambiano continuamente le sub-opzioni.
3. Quando viene visualizzato "EDIT" nel Late destro del display, toccare EDIT per cancellare il display dell'aggiustamento dei dettagli.

4. Toccare 念 nel lato destro del display o, in alternatively, girare la manopola [ROTARY] per impostare i dettagli.
Per ritornare in modalità originale
1. Premere ancora il tasto [A].
Opzioni principali Sub-opzioni DISPLAY SCEEN SVR
• Impostazione del salva-scherno (ved. pag. 41) MSG INPUT
• Immissione dei messaggi di informazione (ved. pag. 41) MESSAGE
• Impostazione di accenzione o spegnimento del display dei messaggi (ved. pag. 42) S/A SENS
• Impostazione della sensibilità dell'analizzatore dello Spettro (ved. pag. 42) SCROLL
• Aggiustamento della velocità di scorrimento (ved. pag. 42) APPERNCE DIMMER IN
• Impostazione del variatore di luminosità automatico (ved. pag. 43) DMR LEVEL
• Impostazione del livello del variatore di luminosità (ved. pag. 43) CONTRAST
• Aggiustamento del contrasto del display (ved. pag. 43) BLINK LED
• Fa lampeggiare il LED quando si rimuove il DCP (ved. pag. 43) BEEP
• Impostazione del bip (cfr. pag. 44) SOUND AC-PRO III
• Selezione della modalità VSE (STD/PRO) (ved. pag. 44) EQ SELECT
• Selezione della modalità equalizzatore (ved. pag. 44) SP-SETTING
• Impostazione delle configurazioni dell'altoparlante (ved. pag. 44) CENTER-SP / SUB-WOOFER
• Impostazione ON/OFF degli altoparlanti sub-woofer (ved. pag. 45) HPF / SUB-W LPF
• Aggiustamento della frequenza del filtrlo degli altoparlanti (ved. pag. 45) AMP CANCEL
• Impostazione ON/OFF dell'uso dell'amplificatore interno (ved. pag. 46) SP-GAIN
• Aggiustamento del livello di uscita dell'altoparlante (ved. pag. 46) PL II DELAY SRD-SP
• Aggiustamento del ritardo dell'altoparlante posteriore (ved. pag. 46) PL II CONT PANORAMA / DIMENSION / CTR WIDTH
• Impostazione in dettaglio della modalità musicale (ved. pag. 47) TUNER TV ARER
• Impostazione dell'area TV (ved. pag. 57) TV DIVER
• Impostazione della diversità TV (cfr. pag. 57) LINK ACT
• Impostazione della funzione AF tra RDS e DAB (ved. pag. 26) LANGUAGE
• Impostazione del linguaggio dello schermo PTY (ved. pag. 30) RDS-INT 2Z
• Impostazione dell'interruzione di RDS quando la funzione 2-ZONE è in uso (cf. page 30) SETTING AUX / TEL
• Impostazione di AUX e TEL (ved. pag. 47) AUX SENS
• Impostazione del livello d'immissione dell'audio portatile (ved. pag. 48) TEL-SP
• Impostazione dell'emissione degli altoparlanti della macchina per il Telefono cellulare (TEL-002 opzionale) (ved. pag. 48) TEL-SWITCH
• Impostazione dell'interruzione del Telefono cellulare (cf. page 48) CALIBRATE / A-VOL SENS
• Impostazione della funzione del volume automatico TV (ved. pag. 49) SYSTEM CHECK
• Svilgimento del controllo del sistema (ved. pag. 49) CODEMATICZ
• Impostazione della sicurezza (ved. pag. 50)
Impostazione del salvaschermo (SCREEN SVR)
Questa funzione avvia la visualizzazione di un salva-schermo quando non si utilizes l'apparecchio per circa 30 secondi.
L'impostazione predefinita alla fabbrica è "ON".
1. Premere il tasto [A] per impostare la modalità di aggiustamento.
2. Toccare 卡 nel display delle opzioni per selezionare "SCREEN SVR" sotto "DISPLAY".

3. Toccare 念 nel lato destro del display o, in alternatively, girare la manopola [ROTARY] per selezionare "ON" o "OFF".
4. Premere il tasting [A] per tornare alla modalità originale.
Perambiare il display del salva-schermo
Toccare PREV o NEXT quando viene visualizzato il salva-schermo.
Ogni tocco su quosti tasti cambia il display del saliva-schermo.
Salva-schermi
Salva-schemo modello 1

Salva-schemo modello 2

Salva-schermo modello 3

Analizzatore di spettro modello 1

Analizzatore di spettro modello 2

Analizzatore di spettro modello 3

Analizzatore di spettro modello 4

Messaggio di informazione

SS SCAN
Ognuna delleindicazioni di cui{sopraverrà visualizzata per circa 10 secondi.
Inserimento dei messaggi da visualizzare tra i messaggi di informazione (MSG INPUT)
È disponibile 1 tipo di salute-scherno. Per maggiori dettagli su come cancellare il display del salute-scherno, vedere "Impostazione del salute-scherno".
- Possono essere inserti fino a 30 caratteri.
- L'impostazione predefinita alla fabbrica è "Active MatriX Control System".
1. Premere il tasto [A] per impostare la modalità di aggiustamento.
2. Toccare 且 且 nel display delle opzioni per selezionare "MSG INPUT" sotto "DISPLAY".

3. Toccare EDIT.
La modalità cambia in modalità di insertimento dei messaggi.
4. Toccare 且 nel centro del display per determinare la posizione di inserimento.
* Per cancellare il messaggio, toccare e tenere premuto il centro del display per 2 secondi o più.
Se si attua l'opération della fase 8 con il messaggio cancellato, il messaggio torna quello dell'impostazione predefinita alla fabbrica.
5. Toccare nel dato sinistro del display per selezionare il carattere del testo.
Ogni tocco di cambia il carattere del testo. Per maggiori dettagli, vedere a pagina 37.
6. Toccare 山 nel lato destro del display o, in alternatively, girare la manopola [ROTARY] per scegliere i caratteri da insertire.
7. Ripetere alla fase 4 alla 6 per insertire il messaggio.
8. Toccare e tenere premuto MEMO per 2 secondi o più.
L'emissione di un lungo bip segnalera l'avvenuta memorizzazione del messaggio.
9. Premere il tasto [A] per tornare alla modalità originale.
Visualizzazione dei messaggi (MESSAGE)
Questa funzione permette di visualizzare i messaggi nel display quando l'apparechio è ON/OFF. Quando l'apparechio viene accesso viene visualizzato "Hello", cioè appeare "See you" quando l'apparechio viene spento.
- L'impostazione predefinita alla fabbrica è "ON".
1. Premere il tasto [A] per impostare la modalità di aggiustamento.
2. Toccare 一 _ 一 nel display delle opzioni per selezionare "MESSAGE" sotto "DISPLAY".

3. Toccare nel lato destro del display o, in alternatively, girare la manopola [ROTARY] per selezionare "ON" o "OFF".
4. Premere il tasting [A] per tornare alla modalità originale.
Impostazione della sensibilità dell'analizzatore dello spettro (S/A SENS)
Questa funzione permette di aggiustare la sensibilità (quantità della deflessione) dell'analizzatore dllo spettro. Per maggiori dettagli sulla visualizzazione dell'analizzatore dello spettro, vedere "Cambiamento del display" (ved. pag. 13) o "Impostazione del salva-schermo" (ved. pag. 41).
- L'impostazione predefinita alla fabbrica è "MID".
1. Premere il tasto [A] per impostare la modalità di aggiustamento.
2. Toccare 卡 巴 卡 nel display delle opzioni per selezionare "S/A SENS" sotto "DISPLAY".

3. Toccare ne lato destro del display o, in alternatively, girare la manopola [ROTARY] per aggiustare la sensibilità.
* Selezionale LOW (piccola quantità della deflessione), MID o HIGH (grande quantità della deflessione).
4. Premere il tasto [A] per tornare alla modalità originale.
Aggiustamento della velocità di scorrimento del display (SCROLL)
Questa configurazione permette di rallentare lo scrollamento quando lo scrollamento è troppo veloce, rendendo dificile la visione dello schermo.
L'impostazione predefinita alla fabbrica è "SPEED 2".
1. Premere il tasto [A] per impostare la modalità di aggiustamento.
2. Toccare nel display delle opzioni per selezionare "SCROLL" sotto "DISPLAY".

3. Toccare 卡 卡 nel lato destro del display o, in alternatively, girare la manopola [ROTARY] per aggiustare la sensibilità.
* Questa impostazione può essere aggiustata tra i valori SPEED 1 e SPEED 7. Aggiustare questa opzione nelle vede come cambia l'aspetto del display.
4. Premere il tasting [A] per tornare alla modalità originale.
Impostazione del variatore di luminosità (DIMMER IN)
Questa funzione permette di indebolire
l'illuminazione del display in armonia all'illuminazione e alla brillantezza all'interno della vettura.
Selezionare "AUTO" (connesso alla brillantezza dentro la vettura) o "ILLUMI" (connesso all'illuminazione dentro la vettura) come le impostazioni del variatore di luminosità.
- Quando la funzione del variatore automatico di luminosità viene impostato su "AUTO", la brillantezza del displayiene armonizzata alla brillantezza percepita da questo sensore.
- Impostare il variatore di luminosità a DMR LEVEL.
L'impostazione predefinita alla fabbrica è "AUTO".
1. Premere il tasto [A] per impostare la modalità di aggiustamento.
2. Toccare nel display delle opzioni per selezionare "DIMMER IN" sotto "APPERNCE".

3. Toccare 山 山 山 nel lato destro del display o, in alternatively, girare la manopola [ROTARY] per selezionare "AUTO" o "ILLUMI".
4. Premere il tasting [A] per tornare alla modalità originale.
Impostazione il livello del variatore di luminosità (DMR LEVEL)
Questa funzione permette l'impostazione di quanto debba indebolirsi il display.
- L'impostazione predefinita alla fabbrica è "3".
1. Premere il tasto [A] per impostare la modalità di aggiustamento.
2. Toccare 卡 卡 nel display delle opzioni per selezionare "DMR LEVEL" sotto "APPERNCE".

3. Toccare ne Ielato destro del display o, in alternatively, girare la manopola [ROTARY] per impostare il livello del variatore di luminosità.
* Scegliere tra OFF (indebolimento OFF, luminoso), da 1 (leggero indebolimento) a 5 (scuro).
4. Premere il tasting [A] per tornare alla modalità originale.
Aggiustamento del contrasto del display (CONTRAST)
Si più aggustare il contrasto del display fina a armonizzarsi con l'angolo crescente dell'apparecchio.
- L'impostazione predefinita alla fabbrica è "6".
1. Premere il tasto [A] per impostare la modalità di aggiustamento.
2. Toccare 山 山 nel display delle opzioni per selezionare "CONTRAST" sotto "APPERNCE".
3. Toccare 念 nel lato destro del display o, in alternatively, girare la manopola [ROTARY] per aggiustare il contrasto.

* Questa impostazione può essere aggiustata tra i valori 1 e 11.
Aggiustare esta opzione quando si vede come cambia l'aspetto del display.
4. Premere il tasting [A] per tornare alla modalità originale.
Fa lampeggiare il LED quando viene rimioso DCP (BLINK LED)
Si può far lampeggiare il LED di但这a unità quando viene rimioso il DCP.
- L'impostazione predefinita alla fabbrica è "OFF".
1. Premere il tasto [A] per impostare la modalità di aggiustamento.
2. Toccare nel display delle opzioni per selezionare "BLINK LED" sotto "APPERNCE".

APPERNCE
ADJUST MODE
BLINK LED》 OFF
NCE
3. Toccare nel lato destro del display o, in alternatively, girare la manopola [ROTARY] per selezionare "ON" o "OFF".
4. Premere il tasto [A] per tornare alla modalità originale.
Impostare il bip per quando i tasti sono usati (BEEP)
L'acuto tono, breve o lungo, che si può sentire quando si usano i tasti viene chiamato "BEEP".
- L'impostazione predefinita alla fabbrica è "ON".
1. Premere il tasto [A] per impostare la modalità di aggiustamento.
2. Toccare 卡 卡 卡 nel display delle opzioni per selezionare "BEEP" sotto "APPERNCE".

3. Toccare nel lato destro del display o, in alternatively, girare la manopola [ROTARY] per selezionare "ON" o "OFF".
4. Premere il tasto [A] per tornare alla modalità originale.
Selezionare ogni modalità
Questa opzione non può essere selezionata quando il Dolby Pro Logic Il viene impostata "MUSIC" o "MATRIX" (ved. pag. 17).
- L'impostazione preferedinita alla fabbrica è "PRO" per AC-PRO III e "P.EQ" per EQ SELECT.
AC-PROIII
Quando viene selezionato "STD" (modalità standard), la qualità è il Campo del suono possono essere aggistiati dal VSE (intensificatore dello spazio virtuale) in modo tale che lo stesso effetto audio possa essere percepito dovunque ci si siede.
Quando viene selezionato "PRO" (modalità PRO), la qualità è il Campo del suono possono essere aggiustati appositamente per agli sedile.
EQ SELECT
Quando viene selezionato "P.EQ." (modalità equalizzatore), l'intera gamma dei livelli di frequenza più essere compensata da una dettagliata curva uniforme.
Quando viene selezionato "BAS/TREB" (modalità basso/soprano), il livello della frequenza può essere compensato dividendo in 2 livelli principali, basso (toni bassi) e soprano (toni alto).
1. Premere il tasto [A] per impostare la modalità di aggiustamento.
2. Toccare nel display delle opzioni per selezionare "AC-PRO III" sotto "SOUND" e "EQ SELECT" sotto "SOUND".

3. Toccare nel lato destro del display o, in alternatively, girare la manopola [ROTARY] per selezionare la modalità.
Selezione modalità
AC-PRO III STD
• Modalità standard (menu VSE) PRO
• Modalità PRO (menu posizione) EQ SELECT P.EQ
• Modalità equalizzatore (menu P.EQ) BAS / TREB
• Modalità basso/soprano
4. Premere il tasto [A] per tornare alla modalità originale.
Impostazione della configurazione dell'altoparlante (SP-SETTING)
Armonizzare la configurazione dell'altoparlante della propria vettura per sfruttare appieno le caratteristiche di quello appearecchio.
L'impostazione predefinita alla fabbrica e "SWL+SWR".
1. Premere il tasto [A] per impostare la modalità di aggiustamento.
2. Toccare 且 nel display delle opzioni per selezionare "SP-SETTING" sotto "SOUND".

3. Toccare 卡 卡 nel lato destro del display o, in alternatively, girare la manopola [ROTARY] per impostare la configurazione degli altoparlanti.
Configurazione degli altoparlanti
CTR+SW
can. 5.1
configurazione Altoparlanti frontali/posteriori (4 can.)
Altoparlante centrale (can. 1)
Sub-woofer (can. 1) SWL +SWR
can. 4+sub-woofer
configurazione Altoparlanti frontali/posteriori (4 can.)
Sub-woofer (can. 2)
Note:
- Quando è impostato "CTR+SW", il suono non viene emesso dall'toparlante centrale a meno che non siano fatto le segmente impostazioni.
(1) Facendo riferimento a "Selezione del menu PLII (Dolby PL II)" (ved. pag. 17), impostare la modalità Dolby Pro Logic II in "MUSIC" o "MATRIX".
(2) Facendo riferimento a "Impostare in ON/OFF gli altoparlanti (CENTER-SP/SUB-WOOFER)" (ved. pag. 45), impostare in ON l'altoparlante centrale.
- Quando la modalità di Dolby Pro Logic II è impostato in "MUSIC" o "MATRIX" e viene impostato "SWI +SWF", il suono non viene emesso dal sub-woofer Lch.
4. Premere il tasting [A] per tornare alla modalità originale.
Impostare in ON/OFF gli altoparlanti (CENTER-SP / SUB-WOOFER)
Impostare l'altoparlante centrale (CENTER-SP) e il sub-woofer (SUB-WOOFER) in ON/OFF.
Assicurarsi di aver impostato "OFF" quando non ci sono altoparlanti centrali o sub-woofer.
L'altoparlante centrale (CENTER-SP) puosoesse impostato quando la modalita del Dolby Pro Logic Il viene impostata in "MUSIC o"MATRIX",e"SP-SETTING"viene impostato in "CTR-SW".
L'impostazione predefinita alla fabbrica è "ON".
1. Premere il tasto [A] per impostare la modalità di aggiustamento.
2. Toccare 日 nel display delle opzioni per selezionare "CENTER-SP" sotto "SOUND" e "SUB-WOOFER" sotto "SOUND".

3. Toccare ne Iato destro del display o, in alternatively, girare la manopola [ROTARY] per selezionare "ON" o "OFF".
4. Premere il tasto [A] per tornare alla modalità originale.
Aggiustamento del filtrodi frequenza degli altoparlanti (HPF/SUB-W LPF)
Questa funzione permette l'aggiustamento del filtr di frequenza per armonizzarlo con gli altoparlanti in uso.
- I filtri (HPF/SUB-W LPF) che possono essere usati differiscono a secondo delle impostazioni della modalità del Dolby Pro Logic II.
Dolby Pro Logic II
Impostazione
deli modalità Filtro HPF SUB-W LPF*1 MUSIC/MATRIX Non aggiustabile Aggiustabile OFF Aggiustabile Aggiustabile
*1 L'aggiustamento è possibile sono quando "SUB-WOOFER" è impostato in "ON".
- L'impostazione predefinita alla fabbrica è "THROUGH".
■ Aggiustamento del filtro
HPF (aggiustamento del filtro high-pass)
Questo filtering eliminates suoni bassi dagli altoparlanti frontali e posteriori.
THROUGH 50Hz 80Hz 120Hz
Impostare il filtro armonizzatoagli altoparlanti quando si usano altoparlanti dal diametro inferiore.
THROUGH
Impostare quello quando si usano altoparlanti che possono generare i bassi.
SUB-W LPF (aggiustamento del filtro del sub-woofer low-pass)
Questo filtro eliminata i suoni più alto dal subwoofer.
THROUGH 50Hz 80Hz 120Hz
Impostare ilhetto di frequenza per armonizzarlo al sub-woofer.
THROUGH
Impostare quello quando si usano subwoofer che includono un filtrlo low-pass.
1. Premere il tasto [A] per impostare la modalità di aggiustamento.
2. Toccare 日 nel display delle opzioni per selezionare "HPF" sotto "SOUND" e "SUBW LPF"otto "SOUND".

3. Toccare nel lato destro del display o, in alternatively, girare la manopola [ROTARY] per impostare la frequenza.
* Scegliere tra THROUGH, 50Hz, 80Hz, and 120Hz.
4. Premere il tasto [A] per tornare alla modalità originale.
Impostare in ON/OFF I'uso dell'amplificatore interna (AMP CANCEL)
Impostare in ON/OFF l'uso dell'amplificatore interno a secondo che si usi o meno un amplificatore esterno.
Impostare AMP CANCEL in "ON" (uso dell'amplificatore interno OFF) quando viene usato un amplificatore esterno e quindi non viene usato quello interno.
- L'impostazione predefinita alla fabbrica è "OFF" (amplificatore interno in uso).
1. Premere il tasto [A] per impostare la modalità di aggiustamento.
2. Toccare 卡 卡 卡 nel display delle opzioni per selezionare "AMP CANCEL" sotto "SOUND".

3. Toccare nel lato destro del display o, in alternatively, girare la manopola [ROTARY] per selezionare "ON" o "OFF".
4. Premere il tasto [A] per tornare alla modalità originale.
Aggiustamento del livello d'emissione degli altoparlanti (SP GAIN)
Uso della funzione del test tonale presente in quello apparecchio per regolare il volume in modo tale che l'émissione da tutti gli altoparlanti sia uguale.
- Questa opzione non può essere selezionata solo quando la modalità Dolby Pro Logic II viene impostata "MUSIC" o "MATRIX".
- L'impostazione predefinita alla fabbrica è "0dB".
1. Premere il tasto [A] per impostare la modalità di aggiustamento.
2. Toccare nel display delle opzioni per selezionare "SP GAIN" sotto "SOUND".

3. Toccare EDIT.
La modalità cambia nella modalità di aggiustamento SP GAIN.
4. Toccare 山 山 sul display delle impostazioni per selezionare l'opzione desiderata. Ogni tocco di 山 山 cambia l'opzione fattanell'ordine seguente:
Aggiustamento delle opzioni

*1 Viene visualizzato "CTR GAIN" solo quando "SP-SETTING" viene impostato in "CTR+SW" e "CENTER-SP" viene impostato in "ON".
*2 "SUB-W GAIN" viene visualizzato solo quando "SUB-WOOFER" viene impostato in "ON".
5. Toccare nel lato destro del display o, in alternatively, girare la manopola [ROTARY] per aggustare il livello di emissione. Il livello di emissione cui essere regolato nella gamma da -10 dB a +10 dB
6. Ripetere le fasi 4 e 5 per aggustare agli unità.
7. Premere il tasto [A] per tornare alla modalità originale.
Aggiustamento del ritardo degli altoparlanti posteriori (PL II DELAY)
Il tempo che il suono impiega per arrivare all'ascoltatore dipende alla posizione in cui sono montati gli altoparlanti posteriori e dalle dimensioni della vettura. Se il ritardo del suono degli altoparlanti posteriori viene regolato, alla甚么 èpuo essere sentito contemporaneamente al suono emesso dagli altoparlanti frontali.
- Questa opzione non può essere selezionata solo quando la modalità Dolby Pro Logic II viene impostata "MUSIC" o "MATRIX".
L'impostazione predefinita alla fabbrica è "0ms".
1. Premere il tasto [A] per impostare la modalità di aggiustamento.
2. Toccare 日 nel display delle opzioni per selezionare "SRD-SP" sotto "PL II DELAY".

3. Toccare 山 nel lato destro del display o, in alternatively, girare la manopola [ROTARY] per aggiustare il ritardo del suono.
* "SRD-SP" cui si sono gli uomini e donne nuoi.
4. Premere il tasting [A] per tornare alla modalità originale.
Impostazione della modalità musica in dettaglio (PL II CONT)
Questa funzione permette di impostare la modalità musica con più dettagli quando la modalità di Dolby Pro Logic II viene impostata in "MUSIC".
- Questa opzione non può essere selezionata solo quando la modalità Dolby Pro Logic II viene impostata in "MUSIC".
L'impostazione predefinita alla fabbrica per PANORAMA e "NO", per DIMENSION e "3" e per CTR WIDTH e "3".
Aggiustamento delle opzioni
PANorama (impostazione del controllo del panorama)
Questo amplia l'imagine del Campo del suono dagli altoparlanti frontali a quelli posteriori. Impostare questa opzione su "YES" se si pensa che manca un effetto avvolgente.
DIMENSION (impostazione delle dimensioni)
L'imagine del Campo del suono va davanti o duro.
Quando l'imagine del Campo del suono tendse verso
la parte frontale o posteriori, quello sbilanciamento
può essere compensato.
Il valore di aggiustamento 3 è in posizione centrale. I valori di aggiustamento da 2 a 0 Cambiano l'immagine del Campo del suono nella parte posteriore, nelle gli aggiustamenti di valori da 4 a 6 cambiano l'immagine del Campo del suono nella parte frontale.
CTR WIDTH (impostazione della profondità nel centro)*1
Aggiusta la posizione fissa del canale centrale tra l'altoparlante centrale e gli altoparlanti frontali Six/Dex.
Quando il suono centrale è diviso equivalente tra destra e sinistra, l'intera imagine del Campo del suono aumenta fino a produrre una sensazione di diffusione naturale.
Il valore di aggiustamento 0 riproduce tutti i suoni centrali dall'altoparlante centrale.
Il valore di aggiustamento 7 divide il suono centrale.
ugualmente tra gli altoparlanti frontali Dex/Six.
*1 Viene visualizzato "CTR WIDTH" solo quando "SP-SETTING" viene impostato in "CTR+SW" e "CENTER-SP" viene impostato in "ON".
1. Premere il tasto [A] per impostare la modalità di aggiustamento.
2. Toccare 且 且 nel display delle opzioni per selezionare I'opzione di aggiustamento desiderato molto "PL II CONT". Le opzioni di aggiustamento sono PANORAMA "DIMENSION" and "CTR WIDTH".

3. Toccare 卡 卡 nel lato destro del display o, in alternatively, girare la manopola [ROTARY] e regolare l'opzione come si desidera.
* Selezionare "YES" o "NO" per "PANorama".
* "DIMENSION" più essere aggiustato in una gamma di valori da 0 a 6.
* "CTR WIDTH" più essere aggiustato in una gamma di valori da 0 a 7.
4. Premere il tasting [A] per tornare alla modalità originale.
Funzione AUX
Questoistema ha un'immissione RCA esterna
cosi che si possono ascoltare i suoni e la
musica provenienti da periferiche esterne
connesse a esta unità.
Selezione AUX/TEL.
Si possono ascabtare suoni e musica da periferiche esterne, oanche le Telefonate al cellulare, se queste periferiche sono connesse all'unità.
Quando TEL INT o una periferica esterna viene connessa al'unità, si può selezionare la modalitàTEL o la modalità AUX.
- L'impostazione predefinita alla fabbrica è "AUX".
1. Premere il tasto [A] per impostare la modalità di regolazione.
2. Toccare 且 且 nel display delle opzioni e selezionare "AUX/TEL" sotto "SETTING".

3. Toccare nel lato destro del display o, in alternatively, girare la manopola [ROTARY] per selezionare "AUX" o "TEL".
AUX:
Il cavo d'immissione AUX/TEL è per l'immissione Audio esterna.
TEL:
Il cavo d'immissione AUX/TEL è per l'immissione audio dal Telefono cellulare.
4. Premere il tasto [A] per tornare alla modalità precedente.
Impostazione del livello di immissione (AUX SENS) dell'audio portatile (modalità AUX)
Questa funzione permette l'impostazione del livello d'immissione delle periferiche esterne opzionali connesse all'unità.
- Questo più essere impostato quando "AUX/TEL" viene impostato in "AUX".
L'impostazione predefinita alla fabbrica è "MID".
1. Premere il tasto [A] per impostare la modalità di aggiustamento.
2. Toccare nel display delle opzioni per selezionare "AUX/TEL"izzato.

3. Toccare nel lato destro del display o, in alternatively, girare la manopola [ROTARY] per impostare il livello di immissione.
* Scegliere tra LOW, MID o HIGH.
4. Premere il tasting [A] per tornare alla modalità originale.
Impostazione dell'émissione dagli altoparlanti della vettura delle chiamate del Telefono cellulare (TEL-002 opzionale)
- Per l'émissione delle chiamate Telefoniche, impostare il Telefono cellulare.
- L'impostazione predefinita alla fabbrica è "RIGHT".
1. Premere il tasto [A] per impostare la modalità di regolazione.
2. Toccare 山 山 nel display delle opzioni per selezionare "TEL-SP" sotto "SETTING".

3. Toccare ne lato destro del display o, in alternatively, girare la manopola [ROTARY] per selezionare "LEFT" o "RIGHT".
LEFT:
Le chiamate Telefoniche possono essere ascoltate dall'altoparlante frontale sinistro connesso all'unità.
RIGHT:
Le chiamate Telefoniche possono essere ascoltate dall'altoparlante frontale destro connesso all'unità.
4. Premere il tasting [A] per tornare alla modalità precedente.
Impostazione dell'interruzione del telefonocellulare
Se si connette esta unità e il Telefono cellulare con un'unità (TEL-002, opzionale), si possono ascoltare le chiamate Telefoniche dagli altoparlanti della vettura.
- L'impostazione predefinita alla fabbrica è "OFF".
1. Premere il tasto [A] per impostare la modalità di regolazione.
2. Toccare 卡 nel display delle opzioni per selezionare "TEL-SWITCH" sotto "SETTING".

3. Toccare 卡 卡 卡 nel lato destro del display o, in alternatively, girare la manopola [ROTARY] per selezionare le impostazioni.
Ogni volta che si gira la manopola [ROTARY], la selezione cambia nel seguente ordine.
OFF ON MUTE OFF...
OFF:
L'unità continua le operazioni normalianchesse si usa il Telefono cellulare.
Nota:
- Quando si connette un kit hand-free, assicurarsi che l'impostazione sia ON per ricevere l'audio del Telefono atraverso il sistema.
ON:
Si possono ascoltare le chiamate Telefoniche dagli altoparlanti connessi a esta unità.
* Mentre si ascoltano le chiamate dagli altoparlanti della vettura, si vuo regolare il volume girando la manopola [ROTARY].
MUTE:
Il suono di但这a unità viene eliminato durante le chiamate Telefoniche.
4. Premere il tasting [A] per tornare alla modalità precedente.
Impostazione della funzione del volume automatico (CALIBRATE/A-VOL SENS)
Si piùckiare automaticamente il volume a secondo della velocità della vettura.
- L'impostazione predefinita alla fabbrica è "LOW".
1. Premere il tasto [A] per impostare la modalità di regolazione.
2. Toccare 卡 卡 卡 nel display delle opzioni per selezionare "CALIBRATE" sotto "SETTING".

3. Accelerare fino a una velocità di 50~km
4. Quando si raggiunge la velocità di 50 km, toccare START.
Dopo 2 secondi o più, si ascolterà un lungo bip, e apparirà “SUCCESSIONAL” nel display. Se si ascolterà un breve bip, quello indica che la calibratura è fallita. Ripetere la procedura alla fase 3.
5. Poi, regolare la sensibilità. Toccare nel display delle opzioni per selezionare "A-VOL SENS"izzato.

6. Toccare ne lato destro del display o, in alternatively, girare la manopola [ROTARY] per aggiustare la sensibilità.
Ogni volta che si gira la manopola [ROTARY], la selezione cambia nel seguente ordine.
OFF (il volume non cambia) LOW (il volume cambia: un poco) MID-LOW MID MID-HIGH HIGH (cambia il volume: molto) ...
7. Premere il tasto [A] per tornare alla modalità precedente.
Performare un controllo del sistema
Questa funzione permette di effettuare un controlo di sistema alla modalità di aggiustamento quando richiesto.
1. Premere il tasto [A] per impostare la modalità di aggiustamento.
2. Toccare nel display delle opzioni per selezionare "SYSTEM CHECK" sotto "SETTING".

3. Toccare e tenere premuto START per 1 secondo o più.
"System Check" appeare sul display.
4. Premere la manopola [ROTARY]. Il controlledo diistema viene avviato
Quando il controlo di sistema viene completato, "Completed" appeare sul display.
5. Premere ancora la manopola [ROTARY]. Appare il display principale per la modalità radio.
Uso della funzione di sicurezza (CODEMATIC)
Questa funzione impedisce di usare lavoramente\
eso apparetcchio alle persona che non conoscono\
la seguenza di tocchi. Il display del Codice a Tocchi\
appare quando DCPiene attaccato e accesso\
mente "CODEMATIC" è impostato su "ON".
Se si tocca il display di quello schermone nell'ordine preselezionato, viene visualizzato "SUCCESSFUL" e l'apparecchio si spenge.
Quando l'apparecchio viene poi acceso, il display del Codice a Tocchi non appeare, e viene visualizzato il display principale nella modalità radio o nella modalità CD.
1. Premere il tasto [A] per impostare la modalità di aggiustamento.
2. Toccare 卡 卡 卡 nel display delle opzioni per selezionare "CODEMATIC" sotto "SETTING".

Sono visualizzati 2 tipi di opzioni per "CODEMATIC", opzioni per cui viene visualizzato "ON" o "OFF" sulla destra dello schermo, e opzioni per cui viene visualizzato "INPUT" sulla destra dello schermo. Quindi, selezionale le opzioni per cui viene visualizzato "ON" o "OFF" nel dato destro del display.
3. Toccare nel lato destro del display o, in alternatively, girare la manopola [ROTARY] per selezionare "ON" o "OFF".
4. Toccare neI display delle opzioni per selezionare "CODEMATIC" sotto "SETTING". Quindi, selezionare le opzioni per cui viene visualizzato "INPUT" nel lato destro del display.
5. Toccare INPUT. Appare il display del Codice a Tocchi.
6. Inserire il codice a tocchi.
* Toccare una delle 5 posizioni (sinistra, centro, destro, destra superiore, o destra inferiore) sul display.
Ogni tocco sul diplay illumina uno degli indicatori del Codice a Tocchi.
* Per esempio, toccare (1) centro, (2) destra superiore, (3) sinistra, e (4) destra inferiore, in quest'ordine. è possible toccareanche ripeturamente la stessa posizione. Quando di tocca 4 volté, si sentirà un bip lungo, e si ritorna alla modalità originale.
Per cancellare CODEMATIC
Se si è dimenticato l'ordine del tocco, toccare ① destra inferiore, ② sinistra, ③ destra superiore e poi ④ destra in quest'ordine o, in alternatively, premere [SCN] sul telecomando dell'apparecchio.

7. OPERAZIONI CON GLI ACCESSORI
Operazioni con il cambiadischi CD
Cambia-CD
Quando un cambia-CD optionale è connesso atraverso il cavo CeNET,但这a unità più controllare le operazioni del cambia-CD. Questa unità più essere connessa fino a un totale di 2 cambia-CD collegati con il CeNET.
Cambia-DVD
Quando un cambia-DVD optionale è connesso attraverso il cavo CeNET,但这a unità più controllare le operazioni del cambia-DVD. Per visualizzare un DVD, si richiede l'uso di un monitor opzionale.
Le operazioni disponibili e il display del cambiaDVD di但这a unità sono in versione amplificata, e non supporta tutte le funzioni del cambia-DVD. Per controllare il cambia-DVD, usare il telecomando che viene provistono con il cambiaDVD. Per maggiori dettagli, fare riferimento al Manuale Utente provistono con il cambia-DVD.
Nel caso in cui si connettono 2 cambia-DVD
Premere la manopola [ROTARY] per selezionare il cambiatore connesso a esta unità. (Ogni pressione sulla manopola [ROTARY] cambia cambiatore.)
- Se il cambia-CD non contiene un contentatore, viene visionato "NO MAG", e se il contentatore non contiene CD, non viene visualizzato "NO DISC" per il disco Num.
Per maggiori dettagli del display dei titoli, vedere "Cambiamento del display del titolo" (ved. pag. 14).
Lo schermo visualizza nella modalità cambiatore
Display principale (modalità cambia-CD)
Questo è quello che appeare premendo la manopola [ROTARY] per selezionare la modalità cambia-CD.

Toccando il lato sinistro del display per 1 secondo o più si cambia in modalità delle operazioni di base.

Display del brano/tempo di riproduzione T01/02: 00: Sono visualizzati il Num. del brano in fase di riproduzione e il tempo di riproduzione.
Toccando o nelle operazioni standard, si permette la selezione del brano da riproduire, o i brani da far avanzare velocamente o da far andare indietro velocamente.
Display del titolo
Toccando quello si cambia il display.
Display del disco Num.
Se sitocca nella modalita normale,si puo selezionale un disco.
MODE
Toccandolo si visualizzano le sub-funzioni.
Toccandolo e tenendolo premuto per 1 secondo o più viene visualizzata la lista dei dischi.
T-SCAN/D-SCAN
Questo viene visualizzato durante la scansione delle riproduzioni. Toccando T-SCAN/D-SCANiene terminata la riproduzione a scanzione.
T-RPT/D-RPT
Questo viene visualizzato durante la rpeticione della riproduzione. Toccando T-RPT/D-RPTiene terminata la riproduzione ripetuta.
T-RDM/D-RDM
Questo viene visualizzato durante la riproduzione in ordine casuale. Toccando T-RDM/D-RDM viene terminata la riproduzione in ordine casuale.
DISC
Toccando甚么 si avvia la riproduzione del disco successivo.
(solo nel display delle operazioni di base) Toccando questi tasti si selezione il brano da riproduire.
Toccando e tenendo premuti questi tasti si mandano i brani avanti o indietro velocimento.
Display della lista dischi (modalità cambia-CD)
Questo è quello che appeare quando MODE viene toccato e tenuto premuto per 1 secondo o più nel display principale.

Nome del disco
>>:Selezione in progressione
Toccando il nome di un disco si fa tornare lo schermo al display principale, e la riproduzione viene avviata a partire dal primo brano del disco toccato.
←PREV-RTN:
Toccandolo si visualizza la lista dei titoli precedenti. Toccandolo e tenendolo premuto per 1 secondo o più si fa tornare lo schermo al display principale.
NEXT:
Toccandolo si visualizza la lista dei titoli successivi.
ATTENZIONE
CD-ROM non possono essere riprodotti da!.!.!.!.!.!.!.!.!.!.!.!.!.!.!.!.!.!.!.!.!.!.!.!.!.!.!.!.!.!.!.!.!.!.!.!.!.!.!.!.!.!.!.!
Nota:
- Alcuni CD registrati nella modalità CD-R/CD-RW potrebbero non essere utilizzabili.
Selezione della modalità combustatore
1. Premere la manopola [ROTARY] per selezionare la modalità cambiatore.
* Se una data apparecchiatura non è connessa, la rispettiva modalità non appeare visualizzata. La riproduzione si avvia automaticamente quando la modalità cambia in modalità Cambiatore.
Arresto temporaneo della riproduzione
1. Premere il tasto [▶■].
■ Riavvio della riproduzione
1. Premere nuovamente il tasting [▶■].
Selezione di un CD
1. Toccare 日 nel display del disco Num. per selezionare un disco.
Si avvia la riproduzione.
* Se il contentatore non contiene il disco selezionato, il Num. di quello disco non viene visualizzato.
* Toccando DISC ↑ si avvia la riproduzione del disco successivo.
■ Selezione di un disco dal display della lista di dischi
1. Toccare e tenere premuto MODE per 1 secondo o più.
Viene visualizzata le lista dei dischi. Se viene toccato NEXT, viene visualizzata la parte successiva della lista dei dischi.
2. Toccare il nome del disco.
* Se il contentatore non contiene il disco che si è selezionato, viene visualizzato "NO DISC" per quel disco Num.
* Se si selezione lo stesso disco che è in fase di riproduzione, la riproduzione ricomincia dal primo brano di quel disco. (funzione top)
Selezione di un brano
1. Per sentire il brano successivo, toccare nei display del brano.
2. Per sentire il brano precedente, toccare due volte nel display del brano.
Toccando 品 si riproduce il brano successivo. Per anni successiva pressione del tasting l'apparecchio avanza sino all'inizio del brano successivo che viene poi riproduotto.
Toccando 山 si riproduce il brano precedente. Per anni successiva pressione del tasto l'apparecchio retrocede sino all'inizio del brano precedente che viene poi riproduotto.
* Se si tocca ↑ due volte nel display del brano quando sta per cominciare la sua riproduzione, talvolta viene riprodotto il secondo brano precedente.
Avanzamento veloce/ Retrocessione veloce
1. Per avanzare velocemente, toccare 5 sul display dei brani.
2. Per retrocedere velocimento, toccare sul display dei brani.
Funzione TOP
La funzione top avvia la riproduzione dal primo brano nel disco attualmente in fase di riproduzione.
1. Toccare et tenere premuto MODE per 1 secondo o più. Viene visualizzata le lista dei dischi. Se viene toccato NEXT, viene visualizzata la parte successiva della lista dei dischi.
2. Toccare il nome del disco.
* Se il contentatore non contiene il disco che si è selezionato, viene visualizzato "NO DISC" per quel disco Num.
* Se si è selezionato lo stesso disco che è attualmente in fase di riproduzione, la riproduzione ricomincia dal primo brano di quel disco.
Riproduzione a scansione
La riproduzione a scansione localizza e riproduce automaticamente i primi 10 secondi di tutti i brani di un disco. Questa funzioneiene ripetuta su quello disco fino a che non viene annullata.
La riproduzione a scansion è utile quando si vuole selezionare un brano desiderato.
1. Toccare MODE.
2. Toccare T-SCAN.
Il display MODE cambia in "T-SCAN" e si avvia la coproduzione a scansione.
* La riproduzione a scansione viene avviata dal brano successivo a quello attualmente in fase di riproduzione.
■ Annullamento della riproduzione a scansione
1. Toccare T-SCAN.
Il display T-SCAN cambia in "MODE", e viene riproduzione il brano che era in fase di riproduzione quando si è toccato T-SCAN.
Riproduzione a scansione dei dischi
La riproduzione a scansione dei dischi località e riproduci
i primi 10 secondi del primo brano di agli disco nel cambia-
CD currentemente selezionato. Questa funzione continua
automatically fino a che non viene annullata.
La riproduzione a scansion è utile quando si vuole selezionare un CD desiderato.
1. Toccare MODE.
2. Toccare D-SCAN.
Il display MODE cambia in "D-SCAN" e si avvia la riproduzione a scansione dei dischi.
* La riproduzione a scansione dei dischi viene avviata dal disco successivo a quello attualmente in fase di riproduzione.
■ Annullamento della riproduzione a scansione dei dischi
1. Toccare D-SCAN.
Il display D-SCAN cambia in "MODE", e viene riproduotto il brano che era in fase di riproduzione quando si è toccato D-SCAN.
Riproduzione ripetuta
La coproduzione continuata riproduce continuamente il brano attuale. Questa funzione continua automaticamente fino a che non viene annullata.
1. Toccare MODE.
2. Toccare T-REPEAT.
Il display MODE cambia in "T-RPT" e viene avviata la coproduzione ripetuta.
Annullamento della riproduzione ripetuta
1. Toccare T-RPT.
Il display T-RPT cambia in "MODE", e la riproduzione regolare ricomincia dal brano che era in fase di riproduzione quando si è toccato T-RPT.
Riproduzione ripetuta dei dischi
Dopo che sono stati riprodotti tutti i brani di un disco, la riproduzione ripetuta automaticamente ripete lo stesso disco dal primo brano. Questa funizione continua automaticamente fino a che non viene annullata.
1. Toccare MODE.
2. Toccare D-REPEAT.
Il display MODE cambia in "D-RPT" e viene avviata la riproduzione ripetuta dei dischi.
Annullamento della riproduzione ripetuta dei dischi
1. Toccare D-RPT.
Il display D-RPT cambia in "MODE", e la riproduzione regolare ricomincia dal brano che era in fase di riproduzione quando si è toccato D-RPT.
Riproduzione in ordine casuale
La riproduzione in ordine casuale seleziona e riproduce i vari brani nel disco in un ordine non particolare. Questa funzione continua automaticamente fino a che non viene annullata.
1. Toccare MODE.
2. Toccare T-RANDOM. Il display MODE cambia in "T-RDM" e si avvia la coproduzione a scansione.
■ Annullamento della riproduzione in ordine casuale
1. Toccare T-RDM. Il display T-RDM cambia in "MODE", e la riproduzione regolare ricomincia dal brano che era in fase di riproduzione quando si è toccato T-RDM.
Riproduzione in ordine casuale dei dischi
La riproduzione in ordine casuale dei dischi selezione e riproduce automaticamente i vari brani o dischi in un ordine non particolare. Questa funzione continua automaticamente fino a che non viene annullata.
1. Toccare MODE.
2. Toccare D-RANDOM. Il display MODE cambia in "D-RDM" e si avvia la riproduzione in ordine casuale.
■ Annullamento della riproduzione in ordine casuale
1. Toccare D-RDM. Il display D-RDM cambia in "MODE", e la riproduzione regolare ricomincia dal brano che era in fase di riproduzione quando si è toccato D-RDM.
Funzioni del sintonizzatore TV
Quando un sintonizzatore TV opzionale è collegatotramite un cavo CeNET,questa unità controla lefunzioni del sintonizzatore TV.Per videere la TVsono necessari un sintonizzatore TV e un monitor.
Display dello schermo nella modalità TV
Display principale
Questo è quello che appeare premendo la manopola [ROTARY] per selezionare la modalità TV.

Toccando il dato sinistro del display per 1 secondo o più si cambia in modalità delle operazioni di base.

Dislay dei canali
1ch: Viene molto il canale attualmente in fase di ricezione.
Toccare 山 山 山 山 山 山 山 山 山 山 山 山 山 山 山 山 山 山 山 山 山 ^ 1 o in modalità normale permette di effettuare la sintonizzazione automatica o la sintonizzazione manuale.
Display del titolo
3ch: Viene visualizzato il nome della stazione attualmente in fase di ricezione.
VTR: In modalità video
Toccando quosti si cambia il display.
Display della banda di ricezione
TV 1: Nome della banda:
Display del Num. preselezionato
Toccando 山 in modalitànormale siselezionana una memoria preimpostata.
Quando un sintonizzatore TV opzionale è collegato tramite un cavo CeNET, esta unità controlling le funzioni del sintonizzatore TV. Per essere la TV sono necessari un sintonizzatore TV e un monitor.
Display del Num. preselezionato Toccando 山 in modalità normale si selezione una memoria preimpostata.
MODE
Toccandolo si visualizzano le sub-funzioni.
Toccandolo e mantenendolo premuto si visualizza la lista delle memorie preseselezionate.
P-SCAN: Questo viene visualizzato durante una scansione preselezioni. Toccandolo si termina la scansione preselezioni.
A-STORE: Questoiene visualizzato durante una memorizzazione automatica. Toccandolo si termina la memorizzazione automatica.
BAND
Il toccarlo cambia la banda di ricezione.
Toccandolo e tenendolo premuto per 1 secondo o più si cambia alla modalità di sintonizzazione manuale alla sintonizzazione automatica e viceversa.
(solo nel display delle operazioni di base) Toccando questi tasti si abilita la sintonizzazione automatica o la sintonizzazione a passo (nella modalità di sintonizzazione manuale).
Toccandolo e tenendo premuti quosti tasti si abilita la sintonizzazione rapida (nella modalità di sintonizzazione manuale).
Display della lista delle memorie preselezionate
Questo è quello che appeare quando MODE viene toccato e tenuto premuto per 1 secondo o più nel display principale.

>>
In fase di sintonizzazione
RTN:
Toccandolo si ritorna al display principale.
Selezione della modalità TV
1. Premere la manopola [ROTARY] per selezionare la modalità TV.
Ogni pressione sulla manopola [ROT] cambia la modalità nell'ordine segue
* Se una data apparecchiatura non è connessa, la rispettiva modalità non appeare visualizzata.
banda di ricezione
1. Toccare BAND per cancellare la banda di ricezione. Ogni volta che si preme BAND la banda di ricezione cambia.
TV1 TV2 TV1...
Sintonizzazione automatica
La sintonizzazione automatica è una funzione per sintonizzato automaticamente le stazioni con una Buona ricezione.
1. Toccare e tenere premuto BAND per 1 secondo più quando viene visualizzato MANU. La sintonizzazione automatica diventa possibile quando scompare MANU.
2. Toccare sul display dei canali. Viene visualizzato SEEK UP/SEEK DOWN, e la sintonizzazione viene avviata. La sintonizzazione si ferma automaticamente alle stazioni con una buona ricezione.
Per annullare una sintonizzazione
1. Toccare ancora sul display dei canali.
Sintonizzazione manuale
Ci sono 2 modalità disponibili: sintonizzazione rapida e sintonizzazione a passo.
Quando ci si trovato in modalità di sintonizzazione a passo, la frequenza cambia di un passo per volta. In modalità di ricerca rapida, è possibile sintonizzarsi rapidamente sulla frequenza desiderata.
1. Toccare e tenere premuto BAND per 1 secondo o più nel caso che MANU non venga visualizzato .
La sintonizzazione manuale è disponibile quando viene visualizzato MANU.
2. Usare il display dei canali per sintonizzarsi su un canale in cui c'e una stazione emittente. Ci sono 2 modi per effettuire la sintonizzazione manuale: sintonizzazione a passo e sintonizzazione rapida.
* La sintonizzazione a passo è una funzione per cui si cambia di un canale perolta. Toccare ↑ ⿱ sul display delle frequenze.
* La sintonizzazione veloce è una funzione per cui il canale cambia continuamente. Toccare ↔ ➔ sul display dei canali. La sintonizzazioneiene interrotta se si toglie il dito dal pannello.
Richiamareuna stazione preselezionata
Questa funzione permette all'utente di selezionare una stazione presezionata.
1. Toccare e tenere premuto MODE per 1 secondo o più.
Viene visualizzata la lista delle memorie preselezionate.
2. Toccare la stazione che si vuole ascoltare.
* La stazione può essere sintonizzata toccando in un Num. preimpostato.
Per annullare una sintonizzazione
1. Toccare RTN.
Memoria preselezionata
Possono essere memorizzate un totale di 12 stazioni TV (6-TV1 e 6-TV2). Questo permette di selezionare le stazioni TV preferite e memorizzarle per richiamarle successivement.
1. Toccare BAND perambiare la banda di ricezione.
2. Usare il display dei canali per selezionare la stazione da memorizzare.
3. Toccare e tenere premuto MODE per 1 secondo o più.
Viene visualizzata la lista delle memorie preselezionate.
4. Toccare e tenere premuto per 2 secondi o più il Num. preimpostato per la memorizzazione. L'émissione di un lungo bip segnalera l'avvenuta memorizzazione della stazione. Se si sentirà un breve bip, la stazione non è stata memorizzata. Ripetere la procedura alla fase 1.
Funzione di memorizzazione automatica
La memorizzazione automatica selezione automaticamente 6 stazioni TV e le memorizzate tutte nella memoria preimpostata.
Se non ci sono 6 stazioni con una buona ricezione, rimangono memorizzate le stazioni precedentamente memorizzate e solo le stazioni forti sono memorizzate.
1. Toccare MODE.
2. Toccare e tenere premuto A-STORE per 2 secondo o più.
Il display MODE cambia in "A-STORE" e il Num. selezionato durante le operazioni di memorizzazione automatica appeare nel display Num. selezionato.
* Vengono automaticamente ricercate le stazioni con una buona riseczione, e quindi memorizzate tra le memorie preselezionate (No.1 to No.6) in ordine partendo alla stazione con la frequenza più bassa.
Note:
- Quando viene effettuata la memorizzazione automatica, le stazioni memorizzate fino a quel momento vengono cancellate.
- Nel caso che ci siano meno di 6 stazioni con una buona ricezione, le basse frequenze saranno automaticamente richiamate e la memorizzazione automatica verrà ripetuta. Le stazioni precedentemente memorizzate rimangono in memoria nel caso in cui risultano eserci meno di 6 stazioni disponibili, malgrado che la memorizzazione automatica sia stata effettuata 2 volte.
Scansione preimpostata
La scanzione preselezioni è una funzione per ricevere le stazioni nell'ordine in cui sono attualmente memorizzate per Num. preimpostato in modo che si possano controllare le trasmissioni.
1. Toccare MODE.
2. Toccare P-SCAN.
Il display MODE cambia in "P-SCAN" e il Num. selezionato durante le operazioni di scanzione preselezioni appara nel display Num. selezionato.
* Le stazioni attualmente memorizzate sono ricevute in ordine per 7 secondi o più. Le stazioni con scarsa ricezione sono saltate e viene ricevuta la stazione successiva.
Le stazioni TV sono ricevute nell'ordine seguente: TV1 (1 6) TV2 (1 6) TV1 (1 6) e cosi via.
Per annullare la scanzione preselezioni
1. Toccare P-SCAN.
Il display P-SCAN cambia in "MODE" e, in seguito, saranno ricevute le stazioni che si stavano ricevendo quando si è toccato P-SCAN.
Guardare un video
Il sintonizzatore TV ha un terminale d'immissione VTR a cui può essere connesso 1 periferica esterna. Connettere un video-riproduttore 12 V (VCP) o un video-registrarore (VCR) al terminal d'immissione del terminale TV.
1. Premere il tasto [▶■].
Viene visualizzato VTR, e la modalità vieneambiata in modalità VTR.
* Lo schermo TV entra in modalità d'immissione video, e si possono visualizzare i video.
Per ritornare alla modalità TV
1. Premere nuovamente il tasto [▶■].
Impostare I'area TV (TV AREA)
Quando si selezione l'area TV (l'area di ricezione della TV), si modifica l'impostazione dell'area del sintonizzatore della TV.
L'impostazione predefinita alla fabbrica è "GERMANY".
1. Premere il tasto [A] per impostare la modalità di regolazione.
2. Toccare 日 nel display delle opzioni selezionare "TV AREA" sotto "TUNER".

3. Toccare nel lato destro del display o, in alternatively, girare la manopola [ROTARY] per selezionare l'area.
4. Premere il tasting [A] per tornare alla modalità precedente.
Impostazione
dell'amplificatore TV (TV DIVER)
E possibile modificare le impostazioni di ricezione dell'antenna TV connessa all'amplificatore TV.
- Impostare esta opzioni su "OFF" quando un'antenna TV non è in uso.
- L'impostazione predefinita alla fabbrica è "ON".
1. Premere il tasto [A] per impostare la modalità di aggiustamento.
2. Toccare 山 nel display delle opzioni selezionare "TV DIVER" sotto "TUNER".

3. Toccare 念 nel lato destro del display o, in alternatively, girare la manopola [ROTARY] per selezionare "ON" o "OFF".
4. Premere il tasting [A] per tornare alla modalità originale.
Funzione di lavoro DAB
Quando si usa un carr o CeNET per collegare un'unità DAB (DAH913 o DAH923, venduta separamente), possono essere controllate tutte le funzioni.
Ascoltare la stazione DAB
1. Premere la manopola [ROTARY] per selezionare la modalità di operazione.
Note:
- Il display molto nella modalità di ricezione normale e nella modalità di ricezione preimpostata è lo stesso quando viene ricevuta una stazione DAB.
- Il numero dei programmi e dei tempi delle trasmissioni dipende alla stazione DAB.
- Quando la forza dei segnali DAB diminuisce, l'émissione audio viene interrotta.
Sintonizzazione automatica
1. Premere la manopola [ROTARY] per selezionare la modalità DAB.
2. Toccare sul lato sinistro del display. "DAB" si illumina nel display quando l'unita principale riceve una stazione DAB.
* L'unità principale interrompe la sintonizzazione automatica quando non si riesce più a trovare una stazione DAB. Il display torna alla modalità precedente.
Sintonizzazione manuale
1. Premere la manopola [ROTARY] per selezionare la modalità DAB.
2. Se sul display non appeare "MANU", toccare etenere premuto BAND per 1 secondo o più. Se viene visualizzato "MANU", diventa possibile la sintonizzazione manuale.
3. Toccare sul lato sinistro del display per sintonizzato la stazione.
* Se non vengono effettuate operazioni per più di 7 secondi, la sintonizzazione manuale viene annulata e il display ritorna nella modalità precedente.
Cambiamento dei programmi
1. Premere la manopola [ROTARY] per selezionare la modalità DAB.
2. Toccare sul lato sinistro del display per cambiare i programmi nella stazione DAB.
Nota:
- Il nome del programma può essere lo stesso a seconda del programma DAB.
Scansione dei programmi
Questa funzione effettua una scansione di tutti i programmi ricevibili in una stazione DAB che si sta ricevendo per 10 secondi, in sequenza. Questo è utile quando si vuole cercare un programma particolare.
1. Premere la manopola [ROTARY] per selezionare la modalità DAB.
2. Toccare MODE.
3. Toccare S-SCAN. "S-SCAN" si illumina equesta unità comincia la scansione di tutti i programmi per 10 secondi in sequenza. Ogni volta che l'unità effettua una scansione, il nome del programma viene molto在哪o nel display.
4. Per terminare la scansione dei programmi quando viene sintonizzato il programma desiderato, premere S-SCAN.
Memoria manuale
L'unità principale ha una funzione di memoria manuale per i programmi DAB. Possono essere preimpostati fino a 18 programmi (sei programmi ognuno) nei tasti di preselezione.
[M1], [M2] e [M3]
1. Premere la manopola [ROTARY] per selezionare la modalità DAB.
2. Toccare BAND per selezionare una delle scelte mostrate sopra.
3. Toccare e tenere premuto MODE per 1 secondo o più. Viene visualizzata la lista delle memorie preselezionate.
4 Toccare et tenere premuto per 2 secondi o più il Num. preselezionato perché sa memorizzato. L'émissione di un lungo bip segnalera l'avvenuta memorizzazione della stazione. Se si sentirà un breve bip, la stazione non è stata memorizzata. Ripetere la procedura dalla fase 1.
Nota:
L'interruzione dei programmi (PTY o INFO) non\
puo essere scritto nella memoria manuale.
Richiamare un programma preselezionato
1. Premere la manopola [ROTARY] per selezionare la modalità DAB.
2. Toccare BAND. Per agli tocco di BAND si cambia il display nell'ordine seguente:
MEMO1 MEMO2 MEMO3 MEMO1...
3. Toccare 山 nel lato destro del display per richiamare un programma preselezionato.
Funzione AF
La funzione AF passa a una frequenza diversa della stessa rete per mantenere la riscezione migliorie.
L'impostazione predefinita in fabbrica è "ON" (Attivata)
- Se la ricezione della stazione corrente si deteriorata, "SEARCH" appeare sul display e la radiocca lo stesso programma su un'altra frequenza.
- Per ulteriori dettagli sulla "Funzione AF" (ved. pag. 26), consultare la sezione "Operazioni RDS" di agli manuale dell'utente.
- Disattivazione della funzione AF
Attivazione della funzione AF
La funzione AF tra RDS e DAB
Quando lo stesso programma viene trasmesso sua da RDS che da DAB e esta funzione è ATTIVATA (ON), l'unità principale passa automaticamente alla riscione della trasmissione con la riscione migliorare.
TA (Annunci sul traffico)
In modalità di attesa TA, quando inizia la trasmissione di un annunciò sul traffico, la trasmissione dell'annunci sul traffico viene ricevuta con priorità principale indipendente幔a la modalità di funzione. èanche possibile la sintonizzazione automatica dei programmi sul traffico (TP).
- Questa funzione può essere utilizzata solo quando la scritta "TP" è illuminata sul display. Se la scritta "TP" è illuminata, significa che le stazioni di trasmissione RDS o DAB in corso di riszezione sono dotate di programmi di annunci sul traffico.
- Per ulteriori dettagli su "TA" (ved. pag. 27), consultare la sezione "Operazioni RDS" di uno qualsiasti dei manuali dell'utente.
- Impostazione della modalità di attesa della funizione TA
- Annullamento della modalità di attesa della funizione TA
Ricerca di una stazione TP
Note:
- Se non viene ricevuta nessuna stazione TP, l'unità principale interrompe l'opération di ricerca.
- La scritta "TP" delve essere illuminata sul display quando una trasmissione radio TP viene trasmessa da una stazione RDS. In questo caso, premere il tasto [TA] per eseguire la ricerca di sintonizzazione TP Premere più il tasto [TA] per tornare alla modalità precedente.
INFO (Annunci0)
In modalità di attesa INFO, quando il programma di annunci ha inizio, l'unità principale commuta automaticamente nel programma di annunci selezionato.
- Impostazione della modalità di attesa INFO
Se si preme e siiene premuto il tasto [TA] per 1 secondo o più a lungo, sul display si illumina la scritta "INFO" e l'unità principale viene impostata nella modalità di attesa INFO fino a quando viene trasmesso l'annuncioc selezionato. Quando inizia la trasmissione dell'annuncioc selezionato, la voce dell'annuncioc appeare sul display. Se si preme e siiene premuto il tasto [TA] per 1 secondo o più a lungo nelle è in corso di ricezione l'annuncioc selezionato, la ricezione della trasmissione dell'annuncioc selezionato viene annullata e l'unità principale torna in modalità di attesa INFO.
- Annullamento della modalità di attesa INFO
Per annullare la modalità di attesa INFO, premere e tenere premuto il tasto [TA] per 1 secondo o più a lungo.
- Selezione informazioni
Questa funzione serve per selezionare I'ATTIVAZIONE (ON) o la DISATTIVAZIONE (OFF) delle INFORMAZIONI in modalità di interruzione delle informazioni.
E possibile ATTIVARE fino a 6 elementi di informazione a scelta.
É possibile effettuare la selezione tra gli 6 elementi elencati qui sotto:
Elemento INFORMAZIONE ENGLISH Contenuto Travel Notizie flash sui trasporti Warning Servizio di averporto News Notizie flash Weather Notizie flash sul tempo Event Annunci di eventi Special Evento speciale
1. Toccare MODE.
2. Toccare INFO SEL per entrare nella modalità "INFO SEL".
3. Toccare 念 nel centro del display o, in alternatively, girare la manopola [ROTARY] per selezionare un'informazione. Si cui selezionare una delle seguenti scelte:
Travel Warning News Weather Event Special Travel...
4. Toccare 山 nel lato destro del display per selezionare "ON" o "OFF".
5. Toccare RTN.
PTY
Questa funzione consente di ascoltare il tipo di programma selezionato, indipendentamente alla modalità di funzione.
- Un PTY comune più essere selezionato per DAB o RDS.
- Tra DAB PTY e RDS PTY il programma PTY ricevuto per primo assume la priorità sull'altro.
- Le trasmissioni PTY non sono ancora disponibili in tutti i Paesi.
- In modalità di attesa INFO, le stazioni INFO hanno la priorità sulle stazioni PTY.
- In modalità di attesa TA, le stazioni TP hanno la priorità sulle stazioni PTY.
Per ulteriori dettagli su "PTY" (ved. pag. 28), consultare la sezione "Operazioni RDS" in uno qualsi dei manuali dell'utente.
- Impostazione della modalità di attesa PTY
- Annullamento della modalità di attesa PTY
- Annullamento di trasmissione interrotta PTY
- Selezione PTY
Ricerca PTY
- Memoria di presezione PTY
Trasmissioni di emergenza
Quando è in corso di ricezione una trasmissione di emergenza, tutte le operazioni di modalità di funzione vengono interrotte. Sul display appara il messaggio "ALARM" ed è possibile ascoltare la trasmissione di emergenza.
- Per ulteriori dettagli sulle "Trasmissione di emergenza" (ved. pag. 29), consultare la sezione "Operazioni RDS" in uno qualsiasti dei manuali dell'utente.
- Annullamento di una trasmissione di emergenza
Cambiamento delle lingua del display PTY e INFO
Per i PTY e INFO visualizzati nel display è possibile selezionare una delle 4 lingue disponibili (Inglese, Tedesco, Svedese o Francese).
L'impostazione predefinita alla fabbrica è "ENGLISH".
- Per maggiori dettagli su "Cambiamento della lingua del display PTV" (ved. pag. 30),fare riferimento alla sezione "operazioni RDS" nel rispetto manuale per il proprietario.
Impostazione del volume per TA, INFO, trasmissioni di emergenza (ALARM) e PTY
É possibile impostare il volume delle interruzioni TA, INFO, ALARM e PTY durante le interruzioni TA, INFO, ALARM e PTY. Eseguire le operazioni seguenti, a seconda del modello collegato.
L'impostazione predefinita in fabbrica e "15".
Durante un'interruzione TA, INFO, ALARM o PTY, ruotare la manopola [ROTARY] in senso orario o antiorario per impostare il volume al livello desiderato (da 0 a 33).
* Quando finisce l'interruzione TA, INFO, ALARM o PTY, il volume torna al livello che aveva prima dell'interruzione.
Operazioni sul Decoder Surround 5.1ch
Quando viene connesso un decoder surround 5.1ch CeNET compatible opzionale, il decodercouldesserecontrolladastessoapparecchio.Le seguenti funzioni cambiano quando viene connesso un decoder surround 5.1ch:
- Alle modalità del Dolby Pro Logic II siaggiungono le due modalità "MOVIE" e "VIRTUAL".
- La modalità VSE/POSITION vieneambiato nella modalità del DSF (Digital Sound Field).
- Nella modalità P.EQ (Parametric Equalizer), le impostazioni di agli altoparlante sono essere regolareanche in maggior dettaglio.
Le impostazioni relative alla musica tra le opzioni (ved. pag. 39) sono cambiati.
Selezione di PL II (Dolby PL II)
Selezionare uno delle quattro modalità disponibili e adatte alla sorgente che stai usando nella modalità Dolby Pro Logic II.
- L'impostazione predefinita alla fabbrica è "OFF".
■ MUSIC (modalità musica)
Guarda "Selezione del menu PLII (Dolby PLII)" (ved. pag. 17).
MATRIX (modalità matrix)
Guarda "Selezione del menu PLII (Dolby PLII)" (ved. pag. 17).
MOVIE (modalità film)
Disponibile per film da video DVD.
■ VIRTUAL (modalità virtuale)
Disponibile per film o altre sorgenti audio.
OFF
La modalità Dolby Pro Logic II non viene usata.
1. Premere il tasto [SOUND].
2. Toccare Dolby PLII.

3. Toccare sul lato destro del display per selezionare la modalità Dolby Pro Logic II.

Il display delle modalità cambia nell'ordine seguente:
MUSIC (modalità musica) MATRIX (modalità matrix) MOVIE (modalità film) VIRTUAL (modalità virtuale) OFF (PL II off) MUSIC (modalità musica)...
* Per maggiori dettagli a proposito della regolazione del volume dell'altoparlante/ sub-woofer centrale, guardare pagina 45.
4. Toccare RTN.
Selezione del menu DSF
DSF (Digital Sound Field) rende possibile atraverso la simulazione sonora si godere la stessa esperienza acustica che di vivrebbe in una sala per i concerti o in un auditorium.
- Quando si selezione il menu DSF, a volte il volume diminuisce.
- L'impostazione predefinita alla fabbrica per DSF è "OFF" e per il menu DSF è "HALL".
1. Premere il tasting [SOUND].
2. Toccare DSF.

3. Toccare sul display ON/OFF. L'effetto DSF cambia in ON/OFF.

Quando DSFiene impostato su "OFF", I'impostazione DSF non si riflette nella sorgente musica. Questo completa I'impostazione di DSF.Premere il tasto [SOUND] per tornare alla modalità originale.
4. Toccare nel menu DSF Num. per selezionare il menu DSF desiderato.

Menu DSF
HALL CHURCH STADIUM LIVE JAZZCLUB THEATER HALL...
Num. Nome della funzione Descrizione 1 HALL Grande sala per i concerti 2 CHURCH Chiesa con il fatto a volte 3 STADIUM Grande stadio senza fatto o mura 4 LIVE Sala per musica dal vivo, più grande di un jazz club. 5 JAZZCLUB Jazz club con un soffitto basso 6 THEATER Cinema o teatro
5. Premere il tasto [SOUND] per tornare alla modalità originale.
Selezionare il menu dell'equalizatore dei parametri
L'equalizzatore dei parametri (P.EQ) permette di bilanciare l'intera gamma di livelli di frequenza in dettaglioattraversouna curvaomogeneausando il compensatore di frequenze adattato al tipo di vettura.
- Le impostazioni predefinite alla fabbrica sono le seguenti per tutti gli altoparlanti. FREQ = 1kHz, Q = 1, GAIN = 0dB
1. Premere il tasting [SOUND].
2. Toccare P.EQ.

3. Toccare 山 sul display ON/OFF. L'effetto P.EQ cambia in ON/OFF.

Quando L7effetto P.EQ viene impostato su "OFF", l'impostazione P.EQ non si riflette
nella sorgente musicale. Questo termina le impostazioni P.EQ. Premere il tasto [SOUND] per tornare alla modalità originale
4. Toccare 山 nel menu P.EQ Num. per selezionare il menu P.EQ.

Menu P.EQ
SIGNAL SP-SEL BAND FREQ Q GAIN SIGNAL...
5. Toccare sul lato destro del display e aggistiustare I'opzione come si desidera.
SIGNAL (seleziona la regolazione del segnale): Selaziona "P-NOIS" o "MUSIC"
P-NOIS: imposta quando non si deve usare il rumore rosa
MUSIC: imposta I'uso di segnali misucali
SP-SEL (seleziona gli altoparlanti il cui valore P.EQ deve essere aggiestato): Scegliere tra "FRONT", "CENTER" o "SURROUND".
- FRONT: altoparlante frontale
- CENTER: altoparlante centrale
- SURROUND: altoparlante avvolgente
BAND (seleziona la banda di frequenza): Seleziona una delle bande da 1 a 3
FREQ (seleziona la frequenza centrale): La gamma di aggiustamento è da 20 Hz a 20 kHz.
Q (imposta la curva Q): Imposta un valore tra 1, 3, 5, 7, o 20 per indicate l'intensità della curva Q.
GAIN (regola il livello di emissione): Regola il gain (livello di emissione) nella gamma da -12dB to +12dB. (1dB steps, 25 punti)
6. Ripetere le fasi 4 e 5 per regolare l'unità desiderata.
7. Premere il tasto [SOUND] per tornare alla modalità originale.
Regolazione di P.EQ
Le impostazioni sono essere regolate nel menu P.EQ nel modo seguente: La frequenza centrale, il gain e la curva Q sono essere memorizzate in combinazioni di canali o bande.
Per esempio, la Frequenza centrale "250Hz", il gain "8dB" e la curva Q "3" posso sono essere memorizzati nella banda 1 del frontale.
Per maggiori dettagli della funzione P.EQ, vedere "Regolazione del P.EQ" (ved. pag. 21).
Cambiamento delle impostazioni
Quando viene connesso un decoder surround 5.1 ch, vengono caambiate le impostazioni relative alla musica nelle modalità di aggiustamento.
Selezionare le impostazioni
Quello che segue descrive le opzioni le cui impostazioni vengono cambiate.
Per maggiori dettagli sulle altre opzioni che non vengono cambiati, guardare "Cambiamento delle impostazioni" (ved. pag. 39) in "Operazioni comuni per tutte le modalità".
1. Premere il tasto [A]. La modalità cambia in modalità di aggiustamento.

2. Toccare sul display delle impostazioni per selezionare quella che si vuole impostare..
* Toccando ↑ ⇌ nel lato sinistro del display si cambia la scelta di una opzione perolta. Toccando ← ⇌ sul lato sinistro del display cambia continuamente le sub-opzioni..
* Toccando ↑ ⇌ nel centro del display si cambia la scelta di una sub-opzione per volta. Toccando ← ⇌ si cambiano continuamente le sub-opzioni.
3. Quando viene visualizzato "THROUGH" nel降至 display, toccare THROUGH per andare nel display dell'aggiustamento dei dettagli.
4. Toccare ne lato destro del display o, in alternatively, girare la manopola [ROTARY] per impostare i dettagli.
Per ritornare in modalità originale
1. Premere ancora il tasting [A].
- Impostazione delle opzioni
Opzioni principali Sub-opzioni SOUND CENTER-SP / SRD-SP / SUB-WOOFER
• Impostazione ON/OFF degli altoparlanti (ved. pag. 64) FRONT HPF / CENTER HPF / SRD HPF / SUB-W LPF
• Aggiustamento della frequenza del filtrlo degli altoparlanti (ved. pag. 64) SP-GAIN
• Aggiustamento del livello di uscita dell'altoparlante (ved. pag. 46) DELAY CENTER-SP / SRD-SP
• Aggiustamento del ritardo degli altoparlanti (ved. pag. 65) DOLBY D D-RANGE
• Aggiustamento della gamma dinamica (ved. pag. 65) PL II CONT PANorama / DIMENSION / CTR WIDTH
• Impostazione in dettaglio della modalità musicale (ved. pag. 47)
Impostazione ON/OFF degli altoparlanti (CENTER-SP/ SRD-SP/SUB-WOOFER)
Impostare l'altoparlante centrale (CENTER-SP), l'altoparlante avvolgente (SRD-SP) e il subwoofer (SUB-WOOFER) in ON/OFF.
Assicurarsi di aver impostato queste impostazioni "OFF" quando non c'e l'altoparlante centrale, l'altoparlante avvolgente o il sub-woofer.
- L'impostazione predefinita alla fabbrica è "ON".
1. Premere il tasto [A] per impostare la modalità di aggiustamento.
2. Toccare 一 _ 一 nel display delle opzioni per selezionare "CENTER-SP" sotto "SOUND", "SRD-SP" sotto "SOUND" e "SUB-WOOFER" sotto "SOUND".

3. Toccare 山 山 nel lato destro del display o, in alternatively, girare la manopola [ROTARY] per selezionare "ON" o "OFF".
* Nel caso del "SUB-WOOFER", scegliere tra "ON+", "ON-" e "OFF".
Normalmente, selezionare "ON+. In agli caso, quando viene impostato "ON-," si più fortemente percepire un effetto di Bassa gamma.
4. Premere il tasting [A] per tornare alla modalità originale.
Aggiustamento del filtrodi frequenza degli altoparlanti (FRONT HPF/CENTER HPF/ SRD HPF/SUB-W LPF)
Questa funzione permette l'aggiustamento del filtro di frequenza per armonizzato con gli altoparlanti in uso.
Non viene visualizzato quell'altoparlante che viene spento nella sezione "Impostazione on o off degli altoparlanti (CENTER-SP/SRD-SP/ SUB-WOOFER)".
L'impostazione predefinita alla fabbrica per "FRONT HPF" o "SRD HPF" e "THROUGH" (nessun filtro), e per "CENTER HPF" o "SUB-W LPF" e "120Hz".
■ Aggiustamento del filtro
FRONT HPF/CENTER HPF/SRD HPF (aggiustamento del filtro high-pass)
Questo filtering eliminates suoni bassi dagli altoparlanti frontali centrali e da quelli avvolgenti.
THROUGH 50Hz 80Hz 120Hz
Impostare il filtro armonizzatoagli altoparlanti quando si usano altoparlanti dal diametro inferiore.
THROUGH
Impostare questo quando si usano altoparlanti che possono generare i bassi. THROUGH non cui èsere impostato al CENTER HPF.
SUB-W LPF (aggiustamento del filtro del sub-woofer low-pass)
Questo filtro eliminata i suoni più alto dal subwoofer.
50Hz 80Hz 120Hz
Impostare ilhetto di frequenza per armonizzarlo al sub-woofer.
1. Premere il tasto [A] per impostare la modalità di aggiustamento.
2. Toccare nel display delle opzioni per selezionare "FRONT HPF" sotto "SOUND", "CENTER HPF" sotto "SOUND", "SRD HPF" sotto "SOUND" e "SUB-W LPF" sotto "SOUND".

SOUND
ADJUST MODE FRONT HPF THROUGH
3. Toccare nel lato destro del display o, in alternatively, girare la manopola [ROTARY] per impostare la frequenza.
* Scegliere tra THROUGH*, 50Hz, 80Hz, and 120Hz.
*1 THROUGH viene visualizzato solo quando si selezione "FRONT HPF" o "SRD HPF".
4. Premere il tasting [A] per tornare alla modalità originale.
Aggiustamento del ritardo degli altoparlanti (CENTER-SP/SRD-SP)
Il tempo che il suono impiega da agli altoparlante per arrivare all'ascoltatore dipende dalla posizione in cui sono montati gli altoparlanti e dalle dimensioni della vettura Regolare il tempo del ritardo di agli altoparlante in modo tale che il suono di tutti gli altoparlanti giunge alle posizioni d'ascolto nello stesso momento di quello che viene dagli altoparlanti frontali.
- L'impostazione predefinita alla fabbrica è "0 ms".
1. Premere il tasto [A] per impostare la modalità di aggiustamento.
2. Toccare 日 nel display delle opzioni per selezionare "CENTER-SP" sotto "DELAY" e "SRD-SP" sotto "DELAY".

3. Toccare 山 sul lato destro del display per agiustare il tempo del ritardo.
* "CENTER-SP" più essere aggliustato in una gamma da 0 ms a 5 ms.
* "SRD-SP" can be adjusted within the range 0 ms to 15 ms.
4. Premere il tasting [A] per tornare alla modalità originale.
Regolazione delle funzioni del Dolby Digital (D-RANGE)
Questa funzione comprime la gamma dinamica del Dolby Digital per mantenere basso il livello di suoni come quello di una conversazione tra gli attori e soprime i volumi dal suono basso.
Queste funzioni sono disponibili solo per i dischi DVD in Dolby Digital.
- L'impostazione predefinita alla fabbrica è "MAX".
1. Premere il tasto [A] per impostare la modalità di aggiustamento.
2. Toccare 卡 nel display delle opzioni per selezionare "DOLBY-D" sotto "D-RANGE".

3. Toccare sul lato destro del display per aggustare la gamma delle dinamiche e regolare l'opzione desiderata.
MAX: modalità della gamma di massima dinamica della sorgente originale
STD: modalità raccomandata per l'ascolto standard
MIN: MIN: La modalità della gamma dinamica più compressa che rende facile l'ascoltoanche dei suoni più bassi.
4. Premere il tasto [A] per tornare alla modalità originale.
8. IN CASO DI DIFFICOLTÀ
Problema Causa Misura Generale L'apparecchio non si accende (non viene prodotto nessun suono.) È saltato il fusibile. Sostituire il fusibile con un altro dello stesso amperaggio. Se il fusibile salute nuovoamente, consultrare il negotio presso il quale si è acquistato l'apparecchio. Incorretto collegamento dei cavi. Consultare il negotio presso il quale si è acquistato l'apparecchio. Nessuna uscita audio quando si fa funzionare l'unità con amplificatori o antenna motorizzata collegati. Il filo dell'antenna motorizzata è in cortocircuito con la messa a terra o si richiede un'alimentazione eccessiva per gestire gli amplificatori o l'antenna motorizzata. 1. Spagnere l'unità2. Rimuoverete tutti i cavi connessi con il filo dell'antenna motorizzata. Per mezzo di un ohmetro, verificare agli cavo per l'eventuale presenza di un cortocircuito a terra3. Riaccendere l'unità4. Ricollegare agli cavo dell'amplificatore al filo dell'antenna motorizzato, uno perolta. Se gli amplificatori si attivano prima che tutti i cavi vengano collegati, utilizzato un relè esterno per fornire il voltaggio remoto (eccessiva richiesta di corrente). Quando si premono i tasti non succede niente. Il display non è accurato. Il microprocessore non funziona bene a causa del rumore, ecc. Spagnere l'unità, poi premere il tastingo [RELEASE] e rimuoverete del FRONTALINO ESTRAIBILE Tasto di reset (DCP).Premere il tastingo di reset per circa 2 secondi con un'asta sottile. I connettori del DCP o principali sono sporchi. Pulire lo sporco con un panno soffice inumidito con alcol per pulizia. CD/MP3/WMA Non è udibile alcun suono. È gia inserto un disco che non è un compact disc, o quale oggetto estraneo. Con il pannello di copertura aperto, tenere premuto il tastingo [▲] per 3 secondi o più.L'oggetto estraneo viene espulso forzamente. Non esistono file MP3/WMA sul disco. Scrivere correttamente i file MP3/WMA sul disco. I file non sono riconosciuti come file MP3/WMA. Usare file MP3/WMA codificati correttamente. Ilsystema file non è corretto. Usare il systema di file ISO9660 livelli 1, o 2, o i sistemi "JOLIET" o "Romeo". Il suono salute o è disturbato. Il disc è sporco. Pulire il disc con un panno morbio. Il disc è molto graffiti o deformato. Sostituire il disc con un altrezza graffiti. Il suono si interrompe o "scivola". Si producono dei rumori, o il suono risulta mescolato con rumori. I file MP3/WMA non sono codificati correttamente. Usare file MP3/WMA codificati correttamente.
CD/MP3/WMA Problema Causa Misura Appena l'unità viene accesa, l'audio è pessimo. Quando l'automobile è stata parcheggiate in un posto umido possono formarsi gobce d'acqua sulla lente interna. Lasciare asciugare l'unità accesa per circa 1 ora. Nome di file errato. Ilsystema file non è corretto. Usare ilsystema di file ISO9660 livelli 1, o 2, o i sistemi “JOLIET” o “Romeo”. La riproduzione della lista dilettura non viene effettuata. Ilnome del file, o l'estensione, non sono quelli corretti. Per il nome del file usare solamente caratteri alfanumerici o ASCII. Come estensione del file di una lista dilettura usare“.M3U”.
9. CODICI D'ERRORE
In caso di erre di funzionamento viene visualizzato uno dei seguenti display. Per eliminare il problema, attuire la controversuraindicataippo.
Codice erre Causa Misura CD/MP3/WMA ERROR 2 Un Disc è rimasto intrappolato nel vano CD è non viene espulso. Si tratta di un cattivo funzionamento del meccanismo del vano CD. Consultare il negozio presso cui si è acquistato l'apparecchio. ERROR 3 Impossibile riproduire il Disc a causa di graffi, ecc. Sostiturio con un Disc non graffiti, non deformato. ERROR 6 Nel vano CD è stato caricato un Disc rovesciato che quandì non viene riproduotto. Espellere il Disc e poi ricaricarlo correttamente. Generale AMP GUARD Si è attivato il circuito di protezione diffusori. Durante QUESTia operazione, se viene eseguita alcuna operazione riguardante il volume, sul display appara "AMP GUARD". "AMP GUARD" funziona talvolta quando sono usati segnali test speciali. 1. Abbassare il volume sonoro. La funzione più venire ripristinataanche speggendo l'apparecchio e riaccendendolo (all'attivazione del circuito di protezione degli altoparlanti il volume degli altoparlanti viene automaticamente ridotto).2. Se il suono risulta di nuovo silenziato, rivolgersi al nostro Centro di assistenza. Cambiadischi CD ERROR 2 Un CD all'interno del cambiadischi CD non viene caricato. Si tratta di un cattivo funzionamento del meccanismo del cambiadischi CD.Consultare il negozio presso cui si è acquistato l'apparecchio. ERROR 3 Impossible riproduire un CD all'interno del cambiadischi CD a causa di graffi, ecc. Sostiturio con un CD non graffiti, non deformato. ERROR 6 Un CD all'interno del cambiadischi CD non più essere riproduotto perché è stato caricato rovesciato. Espellere il CD e poi ricaricarlo correttamente. Cambiadischi DVD ERROR 2 Non è possible riproduire un disco all'interno del cambiadischi DVD. Questo è un guasto del meccanismo DVD e consultare il negozio di acquisto. ERROR 3 Non è possible riproduire un disco a Causea di graffi, ecc. Riprovare o sostuire con un disco non graffiti, non deformato. ERROR 6 Non è possible riproduire un disco all'interno del cambiadischi DVD perché è inserito capovolto. Espellere il DVD e poi ricaricarlo correttamente. ERROR P Errore di livello di controllo genitori. Impostare il livello di controllo genitori corretto. ERROR R Errore di codice area. Estrarre il disco e insereire un disco con il codice area corretto.
Se appeare un codice di erre diverso da quelli descritti qui sopra, premere il tasto di reset. Se il problema persististe, spegnere l'apparecchio e consultare il negotio presso il quale si è acquistata l'unità.
10. SPECIFICHE
Sezione Radio
Sistema di sintonizzazione:
sintonizzatore del sintetizzatore PLL
Frequenze di ricezione:
FM:da 87,5 a 108 MHz (fasi 0,05 MHz)
MW:da 531 a 1602 kHz (fasi 9 kHz)
LW:da 153 a 279 kHz (fasi 3 kHz)
Sezione riproduktore CD
Sistema:systema di compact disc audiodigitale
Rispostainfrequenza:
da 5 Hz a 20 kHz (±1 dB)
Rapporto segnale-rumore:
100 dB (1 kHz) IHF-A
Gamma dinamica: 96 dB (1 kHz)
Distorsione: 0,01%
Cenni generali
Potenza in uscita:
4× 31W DIN45324, +B = 14,4V
Voltaggio di alimentazione:
14,4 V DC (ammesso da 10,8 V a 15,6 V),
massa negativa
Consumo di corrente: Meno di 15 A
Impedenza altoparlanti:
4Ω (da 4Ω a 8Ω ammessi)
Alimentazione nominale antenna auto:
500 mA o meno
Peso:
Unità principale: 1,7 kg
Telecomando: 80 g (compresa la batteria)
Dimensioni:
Unità principale:
178 (L) × 50 (A) × 155 (P) mm
Telecomando:
44 (L) × 110 (A) × 27 (P) mm
Nota:
- Le specifiche ed il design sono soggetti a modifiche alla preavviso per ulteriori miglioramenti.
Hartelijk dank voor uw aankoop van dit Clarion-product.
* Gelieve deze gebruiksaanwijzing in+zijn geheel door te lezen alvorens het apparaat te bedieren.
* Nadat u deze gebruiksaanwijzing hebt gelezen, adviseren wij u deze op een handigeplaats te bewaren (bijv. in het handschoenenkastje).
* Controller de informatie op de bijgeleverde garantiekaart en bewaar deze tezamen met deze gebruiksaanwijzing.
* Deze gebruiksaanwijzing bevat tevens de bedieningsprocedures voor een CD-wisselaar, DAB en TV-tuner, die is aangesloten met behulp van een CeNET-kabel. De CD-wisselaar en TV-tuner hebben een eigengebruiksaanwijzing, maar hierin worden geen bedieningsinstrukties geveven.
Inhoud
Displayonderdelen 7
Displaybedieningen 8
1. VOORZORGSMAATREGELEN 3
Kantelend bedieningspaneel 4
1. Omgaan met compact discs 43
2. BEDIENINGSELEMENTEN 5
3. BEDIENINGSPANEEL 6
De namen en functies van de bedieningselementen 6
Functies van de belangrijkste toetsen in geval externe apparatuur is aangesloten op dit apparaat
4. VOORPANEL 9
5. AFSTANDSBEDIERING 10
De batterijenplaatsen 10
Functies van de toetsen op de afstandsbediening 11
6. BEDIENING 12
Basisbediening 12
Bediening van de AC-Processor III 17
Bediening van de radio 23
Bediening van RDS 26
Bediening van de CD/MP3/WMA-speler 31
Meerdere personen luisteren naar twee verschillende muziekbronnen (2-ZONE-functie) 36
Gemeenschappelijk bediedingen in iedere functie 37
7. BEDIENING VAN ACCESSOIRES 51
Bediening van de CD-wisselaar 51
Bediening van de TV 54
Bediening van de digitale radio/DAB 58
De 5.1-kanalen surrounddecoder bedieren 61
8.PROBLEMEN OPLOSSEN 66
9. FOUTMELDINGEN 68
10. TECHNISCHE GEGEVENS 69
1. VOORZORGSGMAATREGELEN
1. Dit apparaat isuitsluitend geschikt voor wegvoertuigen met 4 wielen. Het is Niet geschikt voor gebruik in een trekker, vorkheftetruck, bulldozer, terreinvoertuig, motorfiets met twee of drie wielen, boot, of ander gespecialiseerd voertuig.
2. Als het binnenin de auto erg koud is en de CD-speler kort nadat de verwarming is aangezet worden gebruikt, kan zich condens vormen op de disc of op de optische onderdelen van de CD-speler, waardoor normalaal weergeven Niet möglichk is. Als zich condens op de disc hebft gezormd, veegt u dit eraf met een zachtde doek. Als zich condens heeft gezormd op de optische
onderdelen van de CD-speler, mag u deze gedurende ongeveer een uur Niet gebruiken. Het condens zal vanzelf verdwijnen, waarna normale bediening weer möglichk is.
3. Als u op een bijzonder hobbelige weg rijdt, kan door de sterke trillingen het geluid overslaan.
INFORMATIE VOOR GEBRUIKERS:
HET ZONDER TOESTEMMING VAN DE FABRIKANT VERANDEREN OF WIJZIGEN VAN DIT APPARAAT MAAKT DE GARANTIE ONGELDIG.
WAARSCHUWING
Voor uw eigeneiligheid mag u tijdens het rijden Niet maar het aanraakschem kijken of dit bedieren.
Kantelend bedieningspaneel
Dit apparatus is uitgerust met een KANTELEND BEDIENINGSPANEEL zodat groter display kon worden toegepast.
Als u het KANTELEND BEDIERINGSPANEEL wilt bedieren, moet u het eerst sluiten.
A VOORZICHTIG
WEES VOORZICTIG DAT UW VINGERS NIET BEKNELD RAKEN BIJ HET OPENEN EN SLUITEN VAN HET KANTELEND BEDIENINGSPANEEL.
1. Om verilgheidsredenen moet u het KANTELEND BEDIERINGSPANEEEL altijd sluiten voordat u het apparaat lange tijt neig hebzeugt of met de contactsleutel de stroom onderbreekt.
Als u met de contactsleutel de stroom onderbreekt
terwijt het KANTELEND BEDIENINGSPANEEL
open staat, wordt het KANTELEND
BEDIENINGSPANEEL Niet gesloten.
2. Bij het sluiten van het KANTELEND BEDIERINGSPANEEL kunt u een krakend geluid horen van het beveiligingsmechanisme. Dit is darüber normalaal.
3. Als u het KANTELEND BEDIENINGSPANEEL met de hand beweegt, kan de weergave beginnen. Om de weergave te stoppen, drukt u, terwijl het apparaat is ingeschakeld, op de [▲] toets zodate het KANTELEND BEDIENINGSPANEEL worden gesloten.
4. Nadat een disc is uitgeworpen, keert het KANTELEND BEDIERINGSPANEEL automatisch terug maar de geopende of gesloten stand. Bij de geringste tegendrukijdens het sluiten van het KANTELEND BEDIERINGSPANEEL, za een beveligingsmechanisme in werkung treden en za het KANTELEND BEDIERINGSPANEEL terugkeren maar de geopende stand. Als dit geleurt, heft u de oorzaak op en drukt u verwolgens op de [▲] toets.
5. Om te voorkomen dat de 12-cm of 8-cm CD bij hetplaatsen en verwijderen bekrast worden, moet u deze horizontally honden.
Omgaan met compact discs
Gebruikuitsluitend compact discs waarop het


logo staat.
Plaats geen hartvormige of achthoekige discs, of andere disc met een speciale vorm in het apparaat.
Het is möglich dat sommige CD's opgenomen in de CD-R/CD-RW-functie Niet bruikbaar zich.
Discs hanteren
- In vergelijk met gewone CD-DA-discs (muziek-CD's), zich zowel CD-R-discs als CD-RW-discs gevoelig voor hoge temperatuur en luchtvochtigheid, en kan bij sommige CD-R-discs en CD-RW-discs weergave onmogelijk+zijn. Laat ze waarom nicht gedurende een langeijd in een auto liggen.
- Het is möglichk dat een neue disc ruwe randen heeft. Als u een dergelijk disc staat, is het möglichk dat de cspeler nicht werkst of het geluid overslaat. Gebruik balpen of iets dergelijks or ruwe randen van de disc make.
- Plak nooit stickers op de compact discs en schrijf er nooit op met een potlood of balpen.
- Plaats nooit een compact disc met plankband of lijmresten erop of waarvan het etiket is losgelaten in het apparaat. Als u een dergelijk disc in het apparaat plaatst, is het möglichk dat u deze nicht
meer uit de CD-speler=kunt verwijderen of dat de CD-speler beschadigd worden.
- Plaats geen compact disc in het apparaat waarop grote krassen staan, die misvormd is, die gebarsten is, enz. Als u een dergelijk disc in het apparaatplaast, kan een storing optreden of het apparaat beschadigd worden.
- Als u een compact disc uit het doosje wilt halen, drukt u op het midden van het doosje en tilt u de disc voorzichtig met uw vingers aan de randen op.
- Gebruik geen in de handel verkrijgbare CD-beschemvellen of discs voorzien van een stabilisator, enz. Hierdoor kan de compact disc beschadigd worden of het inwendige mechanisme van het apparaat kapot gaan.
Discs bewaren
Stel compact discs nicht bloat aan rechtstreeks zonlicht of een warmtebron.
Stel compact discs nicht bloot aan hoge vochtigkeit of veel stof.
Stel compact discs Niet bloot aanrechtstreekse warmestraling van verwarmingsapparatuur.
Discs schoonmake
- Als u vingerafdrukken of stof van de compact disc wilt vegen, gebruikt u een zachte doeck en veegt u vanuit het midden van de disc in een rechte lijn aan de buitenrand.
- Gebruik geen oplosmiddelen, zoals in de handel verkrijgbare disreinigers, antistatische spray of spiritus om compact discs schoon te make.
- Na gelebruik van speciale compact-discreiniger, moet u de disc goed lately drogen voordat u deze in het apparataa plaatst.
2. BEDIENINGSELEMENTEN
Vooranzicht van het apparaat

Met het KANTELEND BEDIERINGSPANEEL in de geopende stand

3. BEDIENINGSPANEEL
De namen en functies van de bedieningselementen
[RELEASE] toets
- Druk deze knop diep in om het afneembare voorpaneel eraf te halen.
Lichtsensor
- Deze sensor meet de lichtsterkte in uw auto. Als de automatische displaydimmer is ingesteld op "AUTO", worden de helderheid van het display gedimd afhankelijk van de lichtsterkte gemeten door deze sensor.
[ROTARY] knop
- Druk op deze knop om het apparaat in te schaken. Met jegere druk op deze knop, worden het apparaat beurtelings in- enuitgeschakeld.
- Houd de knop gedurende 1 seconde of longer ingedrukt om het apparaat UIT te schakelen.
- U kunt deze knop ook draaien om het volumeniveau in te stellen, of om diverse instellingen te make in de instelfunctie.
[△] toets
- Druk op deze toets om het bedieningsspaneel te openen of sluiten. Als reeds een disc is geplaatst, worden deze uitgeworpen nadat het bedieningsspaneel is geopend.
Opmerking:
Als de disc Niet worden uitgeworpen, houdt u de [▲] toets gedurende 1 Seconde of longer ingedrukt.
[A] toets
- Druk op deze toets om diverse instellingen te make in de instelfunctie.
- Druk op deze toets voor het invoeren van de zendernamen in de radiofunctie, of de discititels in de CD-functie.
[Sound] toets
- Druk op deze toets om diverse instellingen te make, zoals audioruimte.
- Houd deze toets 1 seconde of langer ingedrukt om de 2-ZONE-functie beurtelings in en uit te schakelen.
[TA]toets
- Druk op deze toets om de TA-functionie (verkeersinformatie) op standby te zetten (als de 2-ZONE-functionie is ingesteld op "OFF"). Druk op deze toets om de werkung van de 2-ZONE-functionie om te schaken. Als udezete toets gedurende 1 seconde of langer ingedrukt houdt, worden het 2-ZONE-type omgeschakeld (als de 2-ZONE-functionie is ingesteld op "ON").
[II] toets
- Druk op deze toets om een track te pauzeren en te hervatten (in de CD-functione).
- Druk op deze toets om de PTY-standingbyfunctie in te stellen of een programmatype te kiezen.
Aanraakschem
- Hierop wird de informatatie afgebeeld die de bedieningstoestand van het apparaat aangeeft, Zoals aanduidingen voor afstemmen/ weergeven en hun indicators.
- Raak met uw vinger het display aan met om bediening möglich te make. (zie blz. 8)
Functies van de belangrijkste toetsen in geval externe apparatuur is aangesloten op dit apparaat
- Als een CD- of DVD-wisselaar is aangesloten
* Voor verdere informatatie, zich het hoofdstukje "Bediening van de CD-wisselaar" (zie blz. 51). Voor de DVD-wisselaar, raadpleegt u de gebruiksaanwijzing die bij de DVD-wisselaar werden geleverd.
[II]toets
- Druk op deze toets om een CD of DVD waar te geven of te pauzeren.
[A] toets
- Druk op deze toets om de disctitelis in te voeren in de CD-wisselaarfunctie.
- Als een TV of DAB is aangesloten
* Voor verdere informatatie, zich het hoofdstukje "Bediening van de TV" (zie blz. 54) of "Bediening van de digitale radio/DAB" (zie blz. 58).
[TA] toets
- Druk op deze toets om de TA-standingbyfunctie (verkeersinformatie) in te stellen op de DAB-functie. (Deze functie is alleen beschikkaar voor een DAB-tuner.)
- Houdt deze toets gedurende 1 seconde of langer ingedrukt om de INFO-functie in of uit te schakelen. (in de DAB-functie)
[▶II] toets
- Druk op deze toets om te schakelen:tussen de TV-functie en de VTR-functie voor externe beelden. (in de TV-functie)
- Druk op deze toets om de PTY-standingbyfunctie in te stellen of een programmatype te kiezen in de DAB-functie.
[A] toets
- Druk op deze toets om de naam van een TV-zender in te voeren. (in de TV-functie)
Displayonderdelen

Displaybedieningen
Het display op dit apparaat is een aanraakschem. U kurz dit display bedieren door het met uw vingtortuppen aan te raken. Op het display kurz u de volgend vier bedieningsmethodenuitvoeren:
Aanraken kort
Raak met uw vingtertop het display aan en LAST dit binnen 1 seconde weeer los. Dit is de eenvoudigste bedieningsmethode van het display.
Aanraken lang
Raak met uw vingertop het display aan en houdt deze gedurende 1 of 2 seconden of langer op het display. Beweeg uw vinger Niet verwijl deze het display aanraakt.
Door het display gedurende 1 seconde of langer aan te raken, worden bijvoorbeeld een lijst afgebeeld, of worden andere handige functies opgeroepen.
Door het display gedurende 2 seconden of langer aan te raken, kutu u voorkeurzenders of andere informatie in het geheugen opslaan.
Aanraken me

Raak met uw vingertop het display aan en beweeg uw vingeraar links () of rechts () verwij uw vingertop nog steeds het display aanraakt, en LAST binnen 1 seconden het display los. Met deze bediening kunt u een voorkeurgeheugen (1 t/m 6) of tracks kiezen.

Aanraken met

Raak met uw vingertop het display aan en beweeg uw vingeraar links () of rechts () terwij uw vingertop nog steeds het display aanraakt, en houdt uw vingertop op het display. Deze bediening worden voortgezet zolang u uw vingertop op het display houdt. Met deze bediening kunt u bijvoorbeeld handmatig afstemmen of tracks vooruit-/achteruitspoelen.

4. VOORPANEEL
Het Voorpaneel kan erfol worden gehald om diefstal van het apparaat te voorkomen. Nadat u het voorpaneel eraf hebt gehald, bewaart u deze in de voortpaneelhoes om te voorkomen dat er krassen op komen.
Wij adviseren u het voorpaneel mee te nemen wanner u uit de auto stapt.
Het voorpaneel eraf halen
1. Schakel het apparaat UIT verwijl het KANTELEND BEDIENINGSPANEEL gesloten is.
2. Druk de [RELEASE] knop diep in om het voorpaneel te ontgrendelen.

3. Trek het voorpaneel maar u toe en haal het van het apparaat af.

A VOORZICHTIG
- Sluit algid eerst het KANTELEND BEDIERINGSPANEEL voordat u het Voorpaneel eraf haalt.
- Als u het voorpaneel eraf haalt terwijl het KANTELEND BEDIENINGSPANEEL geopend is, worden het kanteleend bedieningspaneel onmiddelijk gesloten. Wees voorzichtig dat uw vingers Nietbekneld raken.
Het voorpaneel bevestigen
1. Plaats het voorpaneel op het apparaat zodate het gedeelte A A aan de rechterzijkant van het voorpaneel grijpt in haak B op het apparaat.

2. Druk de linkerzijkant van het voorpaneel voorzichtig op het apparaat.

VOORZICHTIG
- Het voorpaneel kan gemakkelijk door schokken worden beschadigd. Nadat u het voorpaneel eraf hebte gehaald, moet u voorzichtig bijn het Niet te latenten vallen of aan sterke schokken bloot te stellen.
- Als de [RELEASE] knop ingedrukt blij waardoor het Voorpaneel Niet op+zijn plaats vergrendeld is, kan het door de trillingen van het voertuig eraf vallen. Hierdoor kan het voorpaneel kapot gaan. Het is dus belangrijk het voorpaneel, nadat het eraf is gehaal, in de voorpaneelhoes op te bergen of weer te bevestigen op het apparaat.
- De aansluiting waarme het voorpaneel op het apparaat is aangesloten is een bijzonder belangrijk onderdeel. Wees voorzichtig dat u deze nicht beschadigt door erop te drukken met uw vingenagel, een schroevendraaier, enz.
Opmerking:
- Als het voorpaneel vuil is, mag u het alleen schoonvegen met een zachte, droge doeck.
5. AFSTANDBEDIENING

De batterijenplaatsen
1. Draai de afstandsbediening om en schuif het deksel van het batterijvak in de richting van de pijl.
2. Plaats de twee batterijen van het type AA (SUM-3, R-6/1,5 V) die bij het apparaat werden geleverd, met de polen in de richting aangegeven in de afbeelding, en bevestig daarna het deksel weeop het batterijvak.
Opmerkingen:
Als u de batterijen op een onjuiste manier gebruikt, kunnende ze exploderen. Let goed op de volgende punten:
- Als u de batterijen verrangt, verrangt u beiden batterijen tegelijk door{nieuwe.
- U mag de batterijen nicht kortsluiten, openmake of verwarmen.
- Gooi de batterijen Niet in het vuur.
- Lever de batterijen in als kca.

Functies van de toetsen op de afstandsbediening
Functie
Toets Radio (RDS) / DAB CD/MP3 CD-wisselaar
DVD-wisselaar TV [FUNC] Schakelt om:tussen radio, DAB, CD/MP3, AUX, CD-wisselaar, DVD-wisselaar en TV. [BAND] Schakelt de
frequentieband om. Geeft de eerste track
weer.
Beginweergave. Gaat maar de
volgende disc in
oplopende volgorde. Schakelt de
frequentieband om. [▲], [▼] Verhoogt en verlaagt het volumeniveau (in alle functies). [←], [►] Gaat maar de vorige
en volgende
voorkeurzender. Gaat maar de vorige en volgende track.
Indien ingedrukt gehonden gedurende 1
seconde of langer:
Achter- en vooruitspoelen. Gaat maar de vorige
en volgende
voorkeurzender. [►III] Geen functie. Schakelt om:tussen pauze en weergave. Geen functie. [MUTE] Schakelt de geluidsonderbreking in en uit. [TA] Schakelt TA in en uit.
Houd de toets gedurende 1 seconde of langer ingedrukt om te wisselen:tussen de hoofdzone
en de subzone (alleen als de 2-ZONE-functionie isingeschakeld). [DISP] Schakelt om:tussen het hoofddisplay en het klokdisplay. [PS/AS] Voorkeurzender-
scannen. Indien
ingedrukt gehunden
gedurende 2
seconden of langer:
Voorkeurzenders
automatisch opslaan. Scanweergave.
Houd de toets
gedurende 1
seconde of langer
ingedrukt om
mapscanweergave
uit te voeren op een
MP3/WMA-disc. Scanweergave.
Indien ingedrukt
gehonden
gedurende 1
seconde of langer:
Discscanweergave. Voorkeurzender-
scannen. Indien
ingedrukt gehunden
gedurende 2
seconden of langer:
Voorkeurzenders
automatisch opslaan. [AF] Schakelt de AF-
functie in en uit.
Indien ingedrukt
gehunden gedurende
1 seconde of langer:
Schakelt de REG-
functie in en uit. Herhaalde weergave.
Houd de toets
gedurende 1 seconde of
langer ingedrukt om
herhaalde mapweergave
uit te voeren op een
MP3/WMA-disc. Herhaalde weergave.
Indien ingedrukt
gehonden
gedurende 1
seconde of langer:
Herhaalde
discweergave. Geen functie. [PTY] Schakelt PTY in en
uit. Willekeurige weergave.
Houd de toets gedurende
1 seconde of langer
ingedrukt om willekeurige
mapweergave uit te
voeren op een
MP3/WMA-disc. Willekeurige
weergave. Indien
ingedrukt gehunden
gedurende 1
seconde of langer:
Willekeurige
discweergave. Schakelt om:tussen
TV en VTR. [2-ZONE] Houdt deze toets gedurende 1 seconde of langer ingedrukt om de 2-ZONE-functionie in of uit te schakelen.
Druk op deze toets om de bedieningszone om te schakelen:tussen de hoofdzone en de subzone, als de 2-ZONE-functionie isingeschakeld.
* Sommige van de toetsen op het apparaat en de afstandsbediening die overeenkomen hebben verschillende functies.
Basisbediening
A VOORZICHTIG
Vergeet Niet het volumeniveau te verlagen voordat u het apparaat uitschakelt of met de contactsleutel de stroom onderbreekt. Het apparaat onthoudt de LASTE volumeinstalling. Als u de stroom uitschakelt op een hoog volumeniveau, kan de eerstvolgende keer dat u het apparaat inschakelt het hoge volumeniveau uw gehoor bijn doeon en het apparaat beschadigen.
Het apparatus in- en uitschakelen
Inschakelen
Opmerking:
- Wees voorzichtig wanneer u dit apparaat langeijd gebruikt zonder dat de motor heeft gelopen. Als de accu van de auto te leeg raakt, kan het onmobelijk zijn de motor te starten waardoor de levensduur van de accu terugloopt.
1. Druk op de [ROTARY] knop. De functie die de LASTe keer werk gebruikt worden afgebeeld.
Systeemcontrole
De eerste keer dat het apparaat worden ingeschakeld nadat de draden+zijn aangesloten, controleert het apparaat welke apparatuur is aangesloten. (Dit heet de "System Check".) Als het apparaat worden ingeschakeld en "System Check" wordt afgebeeld, volgt u onderstaande procedure om de systeemcontrole uit te voeren.
1. Als "System Check" op het display worden afgebeeld, drukt u op de [ROTARY] knop. De systemdcontrole start. Nadat de systemdcontrole klaar is, worden "Completed" afgebeeld op het display.
2. Druk nogmaals op de [ROTARY] knop. Het hoofddisplay van de radiofunctie worden afgebeeld.
CODEMATIC-functie
Wanneer "CODEMATIC" is ingesteld op "ON", en het apparaat worden ingeschakeld met de DCP erop bevestigd, worden het aanraakcodedisplay afgebeeld. Raak het display aan in de volgorde die werk ingesteld in de instelfunctie.

Voor verdere informatatie over de CODEMATIC-functie, leest u "De beveiligingsfunctie gebruiken (CODEMATIC)" (zie blz. 50).
Uitschakelen
1. Houd de [ROTARY] knop gedurende 1 seconde of langer ingedrukt.
Een functie kiezen
1. Druk op de [ROTARY] knop om de bedieningsfunctie te veranderen.
2. Met iedere druk op de [ROTARY] knop, verandert de bedieningsfunctie in de onderstaande volgorde:
Radiofunctie DAB-functie CD/MP3-functie CD-wisselaarfungtie DVD-wisselaarfungtie TV-functie AUX-functie Radiofunctie...
* Externe apparatuur die nicht is aingesloten met behulp van een CeNET-kabel, worden nicht aufgebeeld.
Het volumeniveau instellen
1. Draai de [ROTARY] knop rechtsom om het volumeniveau te verhogen, en linksom om het volumeniveau te verlagen.
* Het volumeniveau kan worden ingesteld:tussen 0 (minimum) en 33 (maximum).
De bedieningsfunctie omschakelen
Er zijn twee basisbedieningsfuncties:
standaardbediening en simpele bediening.
1. Op het hoofddisplay, raakt u de linkerkant van het display gedurende 1 seconde of longer aan. De bedieningsfunctie worden omgeschakeld

In de simplete bedieningsfunctie zijn de bedieningen met en op het hoofddisplay van de radiofunctie of CD-functioniet Nietoodzakelijk, en wordt de bediening van het apparatusdus eenvoudiger.
Merk darüber op dat de volgende bediingen nicht möglichelijk zijn in de simpele bedieningsfunctie.
Bedieningen voor het afstemmen op een voorkeurzender, het kiezen van een map, het kiezen van een disc, en andere bedieningen waar bij u aanraakt met 卡 op de rechterkant van het display.
Bedieningen voor het omschakelen van het display (zie blz. 13).
Bedieningen voor het omschakelen van het titeldisplay (zie blz. 14).
- Bedieningen voor het afbeelden van het titelinovoerdisplay.
Op andere displays dan het hoofddisplay (bijv. lijstdisplay, instelfunctie, enz.) is er geen verschilussen de standardbedieningsfunctie en de simpele bedieningsfunctie.
De beschrijvingen in deze gebruiksaanwijzing zijn hoofdzakelijk voor stanaardbediening. Voor beschrijvingen van bedieningen in de simpele bedieningsfunctie, raadpleegt u de beschrijvingen van de displays in de radio- en CD-functions.
Het display omschakelen
1. Raak het midden van het display aan.
Met iedere aanraking van het display, verandert dit als volgt:

Titeldisplay
Schembeveiliging
Als de schermbeveiliging is ingesteld op "ON" en u het apparaat gedurende ongeveer 30 seconden nicht bedient, worden de schermbeveiliging afgebeeld. Voor verdere informatie, zie bladzijde 41.
Achtergrund
Door het midden van het display gedurende 1 seconde of langer aan te raken, schakelt u om maar het hintergrunddisplay.
① ⑨ ② ⑩ ③ ⑪ ④ ⑫ ⑤ ⑬ ⑥ ⑭ ⑦ ⑮ ⑧ ⑯
Spectrumanalysatordisplay
Door op het spectrumanalysatordisplay (S/A) de rechtserkant van het display gedurende 1 seconde of langer aan te raken, worden de spectrumanalysatordisplays doorlopen.
S/A
SCAN S/A 1, S/A 2 en S/A 3 worden)ieder
gedurette de 10 seconden of langer
afgebeeld. S/A 1 S/A 1
FLDR No.
003
TOP S/A 2 S/A 2
FLDR No.
003
TOP S/A 3 S/A 3
FLDR No.
003
TOP
Het titeldisplay omschakelen
U kunt discitels en andere informatatie afbeelden die op de discs+zijn opgeslagen wanneer uDEXeergeft in de CD-functie of CDwisselaarfunctie.
1. Raak op het titeldisplay de rechterkant van het display gedurende 1 seconde of longer aan.
Met iedere aanraking van het display, schakelt het display als volgt om:
CD-text-disc
User title (disc) CD-text title (disc)
Artist name CD-text title (track) User title (disc)...
MP3/WMA-disc
Folder File Album TAG Artist TAG
Title TAG Folder...
Opmerkingen:
- Mp3 ondersteunt ID3-tags V2.3 / 2.2 / 1.1 / 1.0.
- De tag-displays given voorrang aan V2.3/2.2.
In het geval van album-tags voor wma worden de informatatie afgebeeld die in de extensie is opgenomen.
- Alleen ASCII-tekens können worden aufgebeeld in tags.
Een titel over het display latent lopen
Raak het titeldisplay met aan verwijl de titel worden afgebeeld.
De titel looptaar links over het display.
Het lopen over het display stoppen
Raak het titeldisplay met 巴 aan.
CT-functie (kloktijdfunctie)
De CT-functie stelt u in staat CT-informatie te ontvangen vanaf een RDS-zender en deijd af te beelden. Raak het midden van het display aan om het CT-display af te beelden.
- Als geen CT-informatie worden ontvangen, wordt "-:-CT" afgebeel op het display.
Opmerking:
- In sommige landen en door sommige zenders worden geen CT-informatie uitgezonden. Bovendien is het möglichk dat in sommige gebeden de CT-informatie Niet发展格局.
Instellen van het ADF
- ADF is de afkorting van Anti Distortion Filter (antivervormingsfilter).
De ingestelde functies "Liveliness
Enhancement Filter en "Sound Tone
Compensation"makeen een goed gemoduleerde en realistische weergave möglich,zonder de eigenschappen van het oorspronkelijke geluid aan te tasten.
Dit apparatus is uitgerust met vier verschillende geluidseffecten, opgeslagen in het geheugen. Kies het gewenste geluidseffect.
ADF-1: Geschikt voor de standarduiidsprekers.
ADF-2: Geschikt voor afzonderlijke luidsprekers.
ADF-3 : Geschikt voor coaxiale luidsprekers.
USER: Deze instelling kan door de gebruiker zich worden aangepast aan+zijn ofhaar persoonlijke voorkeuren.
OFF: Geen geluideffect.
- De fabrieksinstalling is "OFF".
Opmerkingen:
Aangezien het volumeniveau verandert wanner het ADF wordt in- of uitgeschakeld, schakelt u het ADF in of uit terwijl het volumeniveau en "SW VOLUME" (subwoofer) en "CTR VOLUME" (middenluidspreker) zo laag maybeijk zich ingesteld.
- Op sommige luidsprekersystemen kan het ontogelijk voldoende effect te krijgen. Als dit het geval is, stelt u de ADF-parameter of het volumeniveau in.
- Als het ADF is ingesteld op "USER", "1", "2" of "3", maar bij EQ-SELECT de functies VSE en BASS/TREBuitgeschakeld.
1. Druk op de [SOUND] toets.
2. Raak ADF aan.
3. Raak de rechterkant van het display met aan om de ADF-functie te kiezen.

Als ADF is ingesteld op "OFF", heeft de ADF-instelling geen invloed op het weergavegeluid. Hiermee is de ADFinstellung voltoid. Druk op de [SOUND] toets om terug te keren maar de oorspronkelijke functie.
* Kies een instelling uit USER, 1, 2, 3 of OFF.
4. Als u de afzonderlijke items van de ADFinstelling wilt veranderen, drukt u op de [A]toets.
5. Raak het insteltemdisplay met 山 山 aan en kies het gewenste insteltem. Met iedere aanraking met 山 山 , doorloopt u het insteltemdisplay als volgt:
Instelitem (als USER is gekozen in stap 3)
BASS TREBLE COMP BASS...
-Insteltem (als 1, 2 of 3 is gekozen in stap 3)
LEVEL COMP LEVEL...
6. Raak de rechterkant van het display met aan en verander de instelling van het item.
* “BASS” en “TREBLE” können worden ingesteld binnen het bereik van 1 t/m 13.
* “LEVEL” kan worden ingesteld binnen het bereik van -3 t/m +3.
* Kies voor "COMP" "ON" of "OFF".
7. Druk op de [SOUND] toets om terug te keren maar de oorspronkelijke functie.
De subwoofer en middenluidspreker instellen
- "SW VOLUME" (subwoofer) kan alleen worden ingesteld als "SUB-WOOFER" is ingesteld op "ON".
- "CTR VOLUME" (middenluidspreker) kan allen worden ingesteld als de Dolby Pro Logic II functie is ingesteld op "MUSIC" of "MATRIX", als "SP-SETTING" is ingesteld op "CTR+SW", en als "CENTER-SP" is ingesteld op "ON".
- De fabrieksinstelling van SW VOLUME is "0" en van CTR VOLUME is "0".
1. Druk op de [SOUND] toets.
2. Raak A-MODE aan.

3. Raak het insteltemdisplay met aan en kies "SW VOLUME" of "CTR VOLUME".

4. Raak de rechterkant van het display met aan en stel het item maar wens in.
* Dit item kan worden ingesteld binnen het bereik van -5 t/m +5.
5. Druk op de [SOUND] toets om terug te keren maar de oorspronkelijke functie.
De balans/fader instellen
BALANCE:
Hiermee stelt u de balans van het volumeniveau inussen de linker en rechter luidsprekers.
FADER:
Hiermee stelt u de balans van het volumeniveau inussen de voor- enchyterluidsprekers.
- De fabrieksinstalling van BALANCE is "0" en van FADER is "0".
Opmerking:
Balans/fader kan het worden ingesteld als "PRO" is ingesteld bij AC-PRO III (zie blz. 44) en de positiefunctie is ingesteld op "ON". Stel de balans/fader in aan de hand van "Het positiemenu kiezen" (zie blz. 17).
1. Druk op de [SOUND] toets.
2. Raak A-MODE aan.

3. Raak het insteltemdisplay met 山 山 aan en kies "BALANCE" of "FADER".

4. Raak de rechterkant van het display met aan en stel het item maar wens in.
* "BALANCE" kan worden ingesteld binnen het bereik van L13 (linkerkanalen versterkt) t/m R13 (rechterkanalen versterkt).
* “FADER” kan worden ingesteld binnen het bereik van R12 (achterkanalen versterkt) t/m F12 (voorkanalen versterkt).
5. Druk op de [SOUND] toets om terug te keren maar de oorspronkelijke functie.
De hoge en lage tonen instellen
De hoge en lage tonen können alleen worden ingesteld als Dolby Pro Logic II is ingesteld op "OFF" (zie blz. 17) en "EQ SELECT" is ingesteld op "BAS/TREB" (zie blz. 44).
- De fabrieksinstelling is "0".
1. Druk op de [SOUND] toets.
2. Raak A-MODE aan.

3. Raak het instelitemdisplay met aan en kies "BASS" of "TREBLE".

4. Raak rechterkant van het display met 山 aan en stel het item maar wens in.
* Dit item kan worden ingesteld binnen het bereik van -6 t/m +6.
5. Herhaal de stappen 3 en 4 om het gewenste item in te stellen.
6. Druk op de [SOUND] toets om terug te keren maar de oorspronkelijke functie.
Bediening van de AC-Processor III
Dolby Pro Logic II
Dolby Pro Logic II is een matrix-decodeertechnologie waarin verbeterde, digitale matrixtechnologie is toegepast en waarmee Dolby Pro Logic verder ward verbeterd. Dolby Pro Logic Il realiseert uiststekende 5.1-kanalen reproductie van zowel Dolby-surroundbronnen als stereogeluidsbronnen, zoals CD's, waar bij het surroundkanaal over het volledige freiendentiebereik (20 Hz t/m 20 kHz) krijt en stereo worden. Hierdoor kurz u maar iedere stereobron luisteren met het dynamische geluid van 5.1 kanalen. U kurz de muziekfunctie of matrixfunctie kiezen overeenkomstig de bron die u wilt weergeven.
Dit product is gemaakt onder licentie van Dolby Laboratories. "Dolby", "Pro Logic" en het dubbel-D-symbol voor bij handelsmerken van Dolby Laboratories.
3. Raak de rechterkant van het display met aan en kies de Dolby Pro Logic II-functie.

De functiedisplays worden als volgt doorlopen:
MUSIC (muziekfunctie) MATRIX (matrixfunctie) OFF (PL II uit) MUSIC (muziekfunctie)...
* Voor verdere informatie over het instellen van het volumeniveau van de middenluidspreker/subwoofer, raadpleegt u bladzijde 45.
4. Raak RTN aan.
Het PL II-menu (Dolby PL II) kiezen
Kies de MUSIC-functionie of de MATRIX-functionie overeenkomstig de bron die u wilt weergeven in de Dolby Pro Logic II-functionie.
- De fabrieksinstalling is "OFF".


(muziekfunctie)
- Deze functie is geschikt voor stereogeluidsbronnen, zoals CD's.
- Een andere instelfunctie, waarmee u meer gedetailleerde instelleningen kurz makez, is ook beschikbaar,ondat het geluidsveld zich anders gedraagt affankelijk van de toestand van de opgenomen muziekbron. (Zie blz. 47.)
MATRIX (matrixfunctie)
- Deze functie is geschikt voor geluidsbronnen zoals AM/FM-radio.
OFF
- De Dolby Pro Logic II-functie worden nicht gebrukt, maar de AC-PROIII-functie worden gebrukt. Voor verdere informatatie over de AC-PROIII-functie, raadpleegt u "Een functie kiezen" (zie blz. 44).
1. Druk op de [SOUND] toets.
2. Raak Dolby PLII aan.
Het positiemenu kiezen
Met POSITION Aunt u kiezen uit vijf mogelijkheden waarop het geluid uit de luidsprekers maar uw zitpositie komt.
Bovendien kurz u met deijduitlijnfungtie deluidsprekers zeer precies instellen, zodat hetzelfde geluidseffect worden verkregen uit iedereuidspreker voor alle luisteraars.
In de procedure "Een functie kiezen" (zie blz. 44) stelt u AC-PROIII in op "PRO".
- De fabrieksinstalling van POSITION is "OFF" en op het positie-basiskenu is "FRONT".
Positiemenu
Deze functie is vooraf geprogrammeerd met vrij positiemenu's. Kies het gewenste menu overeenkomstig uw voorkeuren.
1. Druk op de [SOUND] toets.
2. Raak POSITION aan.


3. Raak het ON/OFF-display met aan. Het positie-effect worden beurtelings in- en uitgeschakeld.

Als het positie-effect is ingesteld op "OFF", heeft de positie-installing geen effect op de geluidsbron. Hiermee is de positie-instelling voltooid. Druk op de [SOUND] toets om terug te keren maar de oorspronkelijke functie.
4. Raak B/U aan en kies "BASIC".

Met iedere aanraking van B/U, wisselt de instelling:tussen "BASIC"en "USER".
5. Raak het positie-basismenummer met aan en kies het positie-basismenu.
Het positie-basismenu
Nr. Naam op het display Zitpositie 1 FRONT-L Linkervoorstoel 2 FRONT-R Rechtervoorstoel 3 FRONT Voorstoelen 4 REAR Achterstoelen 5 FULL SEAT Alle stoelen
6. Druk op de [SOUND] toets om terug te keren maar de oorspronkelijke functie.
Posities instellen en opslaan (gebruikersgeheugen)
In het gebruikersgehugen is zeer precies instellen van de luidsprekers möglichk, zodat hetzelfde geluidseffect worden verkreten uit iedere luidspreker voor alle luisteraars, gebaseerd op het positie-basismenu. Maximaal vrij gebruikersinstellingen konnen in het gebruikersgehugen worden op geslagen.
T-ALIGN (tijduitlijnfunctie):
De afstand van de luisteraar tot iedere
luidspreker kan worden ingeoord in stappen
van 2,3 cm, en de benodigde tijsduur voor het
geluid om de luisteraar te bereiken kan worden
ingesteld.
SP GAIN (uitgangsiveau van de luidsprekers):
Hiermee stelt u het uitgangsiveau van de luidspreker in. Stel het uitgangsiveau voor iedere luidspreker zodanig in dat de uitvoer uit iedere luidspreker hetzelfde is.
1. Druk op de [SOUND] toets.
2. Raak POSITION aan.
3. Raak het ON/OFF-display met 山 aaan. Het positie-effect worden beurtelings in- enuitgeschakeld.
4. Raak B/U aan en kies "BASIC" of "USER".
5. Raak de rechterkant van het display met aan en kies het menu waarup instellenen wilt make.
6. Druk op de [A] toets.
7. Raak de linkerkant van het display met aan en kies "T-ALIGN" of "SP GAIN".
8. Raak het midden van het display met 卡 aan en kies een insteltem. Met iedere aanraking met 卡 worden de insteltems als volgt doorlopen:

InstelItems
*1 Dit worden alleen aufgebeeld als in de instelfunctie bij "SOUND" het item "SUB-WOOFER" is ingesteld op "ON".
*2 Dit wordt allen aufgebeeld als in de instelfunctie bij "SOUND" het item "SUB-WOOFER" is ingested op "ON" en in stap 7 "T-ALIGN" is gekozen.
9. Raak de rechterkant van het display met aan en stel het item maar wens in.

* "T-ALIGN" kan worden ingesteld binnen het bereik van 0 cm tot 501,4 cm in stappen van 2,3 cm.
* "SP GAIN" kan worden ingesteld binnen het bereik van -20 dB t/m 0 dB.
10. Herhaal de stappen 7 t/m 9 om het gewenste item in te stellen.
11. Nadat u klaar bent met het instellen van ieder item, raakt u RTN aan. Het apparaat keert terug maar het oorspronkelijkke display en wordt afgebeeld op het BASIC- of USER-display. Met deze bediening is het instellen van de positie voltooid. Om verder te gaan en de instelwaarden voor het positiegebruikersmenu op te slaan, voert u de volgende stappenuit.
12. Raak RTN gedurende 1 seconde of langer aan. De positie-menulijst worden afgebeeld.
13. Raak het gebruikersgeheugen waar in u de instelwaarden wilt opslaan gedurende 2 seconden of langer aan. U hoor een lange pieptoon en de waarden die u tot en met stap 10 hebt ingesteld, worden opgeslagen in het positie-gebruikersmenu.
Als u een korte pieptoon hoort, worden de instelwaarden tot en met stap 10 gewist. Stel deze waarden opnieuw in, indien gewenst.
14. Raak RTN aan.
15. Druk op de [SOUND] toets om terug te keren maar de oorspronkelijke functie.
* Als u een opgeslagen
gebruikersgeheugen wiltkiezen, raakt u B/U aan zodat "USER"wordt afgebeeld, en raakt uervovalgens het
gebruikersmenummer met † ‡ †aan.
Het VSE-menukiezen
Met VSE (Virtual Space Enhancer) bent u in staat de geluidsdrukbalans in uw auto te compenseren zodate hetzelfde geluidseffect wordt verkregen, ongeacht op welke steo u zit, zoals aangetoond met compensasiesimulaties. In de procedure "Een functie kiezen" (zie blz. 44) stelt u AC-PROIII in op "STD".
- De fabrieksinstelling van VSE is "OFF" en op het VSE-basiskenu is "FLAT".
Het VSE-basismenu
Deze functie is vooral geprogrammeerd met zes basismenu's. Kies het basismenu overeenkomstig uw voorkeuren.
1. Druk op de [SOUND] toets.
2. Raak VSE aan.

3. Raak het ON/OFF-display met aan. Het VSE-effect worden beurtelings in- enuitgeschakeld.

Als VSE is ingesteld op "OFF", heeft de VSEinstalling geen invloed op het weergavegeluid. Hiermee is de VSE-instelling voltooid. Druk op de [SOUND] toets om terug te keren maar de oorspronkelijke functie.
4. Raak B/U aan en kies "BASIC".

Met iedere aanraking van B/U, wisselt de instelling:tussen "BASIC" en "USER".
5. Raak het VSE-basismunummer met 卡 aan en kies het gewenste VSE-basismenu.
De VSE-basismenu's
Nr. Functienaam Beschrijving 1 FLAT Vlakke niveauregeling van de geluidsbron. 2 BASS BOOST Lage tonen versterkt. 3 HIGH BOOST Midden- en hoge tonen versterkt. 4 IMPACT Lage en hoge tonen versterkt. 5 ACOUSTICAL Middentonen (menselijke stem) versterkt. 6 SMOOTH Levert soepel-klinkende tonen op.
6. Druk op de [SOUND] toets om terug te keren maar de oorspronkelijke functie.
VSE instellen en opslaan (gebruikersgeheugen)
Door het maken van instellenen in het gebruikersgeheugen is het möglichk de geluidsdrukverdeling te compenseren overeenkomstig uw voorkeuren, gebaseerd op het VSE-basiskemu. Maximaal zes gebruikersinstelleningen konnen in het gebruikersgeheugen worden opgeslagen.
DIFFUSE:
Hiermee stelt u de afwijking van de verstrooide geluidsdruk in.
CARWIDTH:
Hiermee stelt u de afwijking van de geluidsdruk in de breedterichting van de auto in.
CAR LENGTH:
Hiermee stelt u de afwijking van de geluidsdruk in de lengterichting van de auto in.
1. Druk op de [SOUND] toets.
2. Raak VSE aan.
3. Raak het ON/OFF-display met aan. Het VSE-effect worden beurtelings in- en uitgeschakeld.
4. Raak B/U aan en kies "BASIC" of "USER".
5. Raak de rechterkant van het display met aan en kies het menu waarop u instellenen wilt make.
6. Druk op de [A] toets.
7. Raak het instelitemdisplay met aan en kies "DIFFUSE", "CAR WIDTH" of "CAR LENGTH".

8. Raak de rechterkant van het display met aan en stel het item waar wens in.
* Dit item kan worden ingesteld binnen het bereik van 1 t/m 10.
9. Herhaal de stappen 7 en 8 om het gewenste item in te stellen.
10. Nadat u klaar bent met het instellen van ieder item, raakt u RTN aan. Het apparaat keert terug maar het oorspronkelijke display en ” worden afgebeeld op het BASIC- of USER-display. Met deze bediening is het instellen van de VSE voltooid. Om verdter te gaan en de instelwaarden voor het VSE-begruikersmenu op te slaan, voert u de volgende stappen UIT.
11. Raak RTN gedurende 1 seconde of langer aan. De VSE-menulijst worden afgebeeld.
12. Raak het gebruikersgeheugen waarin u de instelwaarden wilt opslaan gedurende 2 seconden of longer aan. U hoor een lange pieptoon en de waarden die u tot en met stap 9 hebt ingesteld, worden opgeslagen in het VSE-gebruikersmenu.
Als u een korte pieptoon hoor, worden de instelwaarden tot en met stap 9 gewist. Stel deutsche waarden opnieuw in, indien gewenst.
13. Raak RTN aan.
14. Druk op de [SOUND] toets om terug te keren maar de oorspronkelijke functie.
* Als u een opgeslagen
gebruikersgeheugen wiltkiezen, raakt u B/U aan zodat "USER"wordt afgebeeld, en raakt u verwolgens het
gebruikersmenummer met▲▲aan.
Het P.EQ-menukiezen
P.EQ (Parametrische Equalizer) stelt u in staat het gehele freiorentiebereik nauwkeurig te compenseren tot een vloeije kromme met behulp van freiorentiecompensatie overeenkomstig het type auto dat u hebt.
In de procedure "Een functie kiezen" (zie blz. 44) stelt u EQ SELECT in op "P.EQ".
- De fabrieksinstelling van P.EQ is "OFF" en op het P.EQ-basisk menu is "SEDAN-1".
Het P.EQ basismenu
Deze functie is vooraf geprogrammeerd met zes types P.EQ-basismenu, overeenkomstig het type auto dat u hebt en de montageposities van de luidspreskers. Kies het basismenu overeenkomstig uw type auto.
1. Druk op de [SOUND] toets.
2. Raak P.EQ aan.

3. Raak het ON/OFF-display met 山 aaan. Het P.EQ-effect worden beurtelings in- enuitgeschakeld.

Als het P.EQ-effect is ingesteld op "OFF", heeft de P.EQ-instelling geen effect op de geluidsbron. Hiermee is de P.EQ-instelling voltooid. Druk op de [SOUND] toets om terug te keren maar de oorspronkelijke functie.
4. Raak B/U aan en kies "BASIC".

Met iedere aanraking van B/U, wisselt de instelling:tussen "BASIC"en "USER".
5. Raak het P.EQ-basismenummer met aan en kies het P.EQ-basismenu.
Het P.EQ basismenu
Nr. Naam op het display Montagepositie van de luidsprekers 1 SEDAN-1 Voorin: Voorportier Achterin: Hoedenplank 2 SEDAN-2 Voorin: Voorportier Achterin: Achterportier 3 WAGON-1 Voorin: Voorportier Achterin: Zijkant bagageruimte 4 WAGON-2 Voorin: Voorportier Achterin: Achterportier 5 MINI VAN-1 Voorin: Voorportier Achterin: Zijkant bagageruimte 6 MINI VAN-2 Voorin: Voorportier Achterin: Achterportier
6. Druk op de [SOUND] toets om terug te keren maar de oorspronkelijke functie.
P.EQ instellen en opslaan (gebruikersgeheugen)
In het gebruikersgehugenkest u de frequentiekarakteristieken compenseren overeenkomstig uw type auto,gebaseerd op het P.EQ-basismenu. Maximaal zes gebruikersinstallingen konnen in het gebruikersgehugen worden op geslagen.Voor verdere informatie, raadpleegt u "P.EQ instellen".
1. Druk op de [SOUND] toets.
2. Raak P.EQ aan.
3. Raak het ON/OFF-display met 山 aaan. Het P.EQ-effect worden beurtelings in- enuitgeschakeld.
4. Raak B/U aan en kies "BASIC" of "USER".
5. Raak de rechterkant van het display met aan en kies het menu waarup instellenen wilt make.
6. Druk op de [A] toets.
7. Raak de linkerkant van het display met 卡 aan en kies "FRONT" of "REAR".

8. Raak het midden van het display met 卡 aan en kies een insteltem.
Met iedere aanraking met 卡 10 worden de instelitems als volgt doorlopen:
Instelitems
BAND FREQ Q GAIN BAND...
9. Raak de rechterkant van het display met aan en stel het item maar wens in.
* "BAND" kan worden ingesteld binnen het bereik van 1 t/m 3.
* “FREQ” kan worden ingesteld binnen het bereik van 20 Hz t/m 20 kHz.
* Kies een instelling voor “Q” UIT 1, 3, 5, 7 of 20.
* “GAIN” kan worden ingesteld binnen het bereik van -12 dB t/m +12 dB.
10. Herhaal de stappen 7 t/m 9 om het gewenste item in te stellen.
11. Nadat u klaar bent met het instellen van ieder item, raakt u RTN aan.
Het apparaat keert terug maar het oorspronkelijke display en ”wordt
afgebeeld op het BASIC- of USER-display. Met deze bediening is het instellen van de P.EQ voltooid. Om verder te gaan en de instelwaarden voor het P.EQ-gebruikersme op te slaan, voert u de volgende stappen u
12. Raak RTN gedurende 1 seconde of longer aan. De P.EQ-menulijst worden afgebeeld.
13. Raak het gebruikersgeheugen waarin u de instelwaarden wilt opslaan gedurende 2 seconden of langer aan.
U hoor een lange pieptoon en de waarden die u tot en met stap 10 hebts ingesteld, worden opgeslagen in het P.EQ-gebruikersmenu. Als u een korte pieptoon hoort, worden de instelwaarden tot en met stap 10 gewist. Stel deutsche waarden opniewin, indien gewenst.
14. Raak RTN aan.
15. Druk op de [SOUND] toets om terug te keren maar de oorspronkelijke functie.
* Als u een opgeslagen gebruikersgeheugen wilt kiezen, raakt u B/U aan zodat "USER" worden afgebeeld, en raakt uervoalgens het gebruikersmenummer met ↑ ⿱ ↑aan.
De P.EQ instellen
Deinstallingen die kunnen worden verandererd op het P.EQ-menu zich de volgende:De middenfrequente,versterking en Q-kromme kunnen worden opgeslagen in combinatie met een kanaal/band.
Bijvoorbeeld: middenfrequentie "250Hz", versterking "-8dB" en Q-kromme "3" können worden opgeslagen voor band 1 voor.
FRONT/REAR (keuze van het kanaal)
Hiermee kiest u het kanaal (voor ofijken) dat u wilt instellen.
BAND (keuze van de frequentieband)
Hiermee kiest u de frequentieband (1 t/m 3) die u wilt instellen.
Stel de middenfrequentie (FREQUENCY), versterking (GAIN) en Q-kromme (Q) in voor iedere frequentieband.
FREQUENCY (keuze van de middenfrequente)
Hiermee kiest u de middenfrequentie die moet worden gebruikt als het midden van de freuquentieband die u wilt compenseren uit het bereik van 20Hz t/m 20 kHz. (in stappen van 1/3 octaaf, 31 punten)
GAIN (instelling van de versterking)
Hiermee stelt u de versterking (uitgangsiveau) in binnen het bereik van -12 dB t/m +12 dB. (in stappen van 1 dB, 25 punten)
Q (keuze van de Q-kromme)
Hiermee stelt u de spitsheid van de Q-kromme in op 1, 3, 5, 7 of 20.
Compensatie
Het is Niet nodig de frequentiekarakteristieken te compenseren als deze vlak blijken (geen pieken of dalen) na meting van de frequentiekarakteristieken met een meetapparaat. Het gebeurtSHOTters dat de frequentiekarakteristieken op bepaaldeplaatsen omhoog lopen of omaaag vallen. Als dat het geval is,要去en de frequentiekarakteristieken worden gecompenseerd. Creer een frequentiekromme met karakteristieken die het tegenervergestelde zichen van de middenfrequenties van de delen waar de karakteristieken omhoog lopen en omaaag vallen om deze pieken en dalen op te heffen en de frequentiekarakteristieken zo vlak möglich te make.
Het zo vlak möglichk makev van de
frequentiekarakteristieken worden "compenseren" genoemd.
Op dit apparaat+kunnen de
frequentiekarakteristieken worden
gecompenseerd door P.EQ (Parametrische Equalizer).
Compensatie van
frequentiekarakteristieken
Onderstaande figuuraat de verhouding zien tussen de middenfrequentie,versterking en Qkromme.

Middenfrequentie (F) Frequentie
(Hz)
Q-kromme
De Q-kromme worden spitser als de numerieke waarde hoger worden, en worden ronder als de numerieke waarde lager worden.
Vlakke frequentlyekarakteristieken kannen worden verkreten door een Q-kromme te kiezen die het tegenovergestelde is van de kromme die u wilt compenseren.

Q-kromme: (Q)
Q-kromme: 20 Q-kromme: 1
F: Middenfrequentie, G: Versterking (uitgangsiveau), Q: Q-kromme
Nr.(type auto) Parameters van de Parametrische Equalizer Kanaal Band 1 Band 2 Band 3 F G Q F G Q F G Q 1(SEDAN-1) Voor 250 Hz -8 dB 3 2 kHz -4 dB 1 5 kHz -4 dB 1 Achter 250 Hz -10 dB 3 1.25 kHz 0 dB 5 8 kHz 0 dB 5 2(SEDAN-2) Voor 250 Hz -10 dB 7 800 Hz -4 dB 3 8 kHz -5 dB 1 Achter 80 Hz 3 dB 7 125 Hz -12 dB 5 1.25 kHz 0 dB 5 3(WAGON-1) Voor 250 Hz -8 dB 3 1 kHz -8 dB 3 10 kHz -6 dB 1 Achter 250 Hz -8 dB 3 800 Hz -8 dB 1 8 kHz 0 dB 5 4(WAGON-2) Voor 250 Hz -8 dB 7 400 Hz -10 dB 7 1.25 kHz -8 dB 7 Achter 125 Hz -8 dB 3 500 Hz -5 dB 5 1.6 kHz 0 dB 3 5(MINI VAN-1) Voor 125 Hz -4 dB 5 1.25 kHz -4 dB 3 2 kHz 3 dB 7 Achter 250 Hz -6 dB 1 630 Hz -4 dB 3 8 kHz 0 dB 5 6(MINI VAN-2) Voor 250 Hz -4 dB 3 1.25 Hz -8 dB 3 80 Hz 3 dB 3 Achter 250 Hz -8 dB 3 500 Hz -5 dB 5 8 kHz 0 dB 5
Bediening van de radio
De displays in de radiofungtie
Hoofddisplay
Het hoofddisplay worden afgebeeld als u op de [ROTARY] knop drukt en de radiofunctie kiest.

Als u de linkerkant van het display gedurende 1 seconde de longer aanraakt, schakelt het display over maar de simpele bedieningsfunctie.

Frequentiedisplay
De frequenie die op dat moment worden ontvangen worden afgebeeld.
Als u het display van de
standaardbedieningsfunctie met → of ↑ aanraakt, kurz u zoek-afstemmen of handmatig afstemmen uityvoeren.
Titeldisplay
Hierop worden de naam afgebeeld van de zender die op dat moment worden ontvangen. Door deze naam aan te raken worden het display omgeschakeld.
Frequentiebanddisplay
AM: AM-frequentiebandnaam
FM1: FM-frequentiebandnaam
Voorkeurnummerdisplay
Als u het display van de
standaardbedieningsfunctie met
aanraakt, kunt u een voorkeurgeheugen kiezen.
MODE
Als u dit aanraakt, worden subfuncties
afegebeeld. Door dit gedurende 1 seconde of
langer aan te raken, worden de
voorkeurgeheugenlijst afgebeeld.
P-SCAN:
Dit wordt afgebeeld tijdens het
voorkeurzender-scannen. Als u dit aanraakt,
stoot het voorkeurzender-scannen.
A-STORE:
Dit worden aufgebeeldijdens het automatisch opslaan. Als u dit aanraakt, stopt het automatisch opslaan.
BAND
Door dit aan te raken worden de frequentieband omgeschakeld.
Als u dit gedurende 1 Seconde of langer aanraakt, schakelt u om:tussen de handmatige afstemfunctie en de zoek-afstemfunctie.

(alleen op het display van de simpele bedieningsfunctie)
Door deze toetsen aan te raken kutn u zoekafstemmen of stap.afstemmen (in de handmatige afstemfunctie).
Door deze toetsen aan te raken en aangeraakt te houden kut u snel-afstemmen (in de handmatige afstemfunctie).
De Voorkeurgeheugenlijst afbeelden
Deze lijst kunt u afbeelden door op het hoofddisplay gedurende 1 Seconde of langer MODE aan te raken.

Zendernaam (of frequentie)
>>:
Bezig met afstemmen
RTN:
Raak dit aan om terug te keren maar het hoofddisplay.
Naar de radio luisteren
1. Druk op de [ROTARY] knop om deradiofunctie te kiezen.
Met iedere druk op de [ROTARY] knop, verandert de functie als volgt:
Radio (DAB) CD / MP3
(CD-wisselaar) (DVD-wisselaar) (TV) AUX Radio...
* De functie van een apparaat dat nicht is aangesloten worden nicht afgebeeld.
2. Raak BAND aan om de frequentieband te veranderen.
Metijdere aanraking van BAND, verandert de frequentieband als volgt:
FM1 FM2 FM3 AM (MW / LW) FM1...
Afstemmen
Er zijn drie manieren waarop u kunt afstemmen:zoek-afstemmen,handmatig afstemmen en voorkeurzender-afstemmen.
Zoek-afstemmen
Er zijn twee manieren voor zoek-afstemmen: DX SEEK en LOCAL SEEK.
Met DX SEEK stemt u automatisch af op alle zenders die ontvangen können worden, verwijl u met LOCAL SEEK alleen afstemt op zenders met een goede ontvangstkwaliteit.
1. Raak BAND aan om de gewenste freiendentieband te kiezen (FM of AM (MW of LW)).
2. Stem af op een zender.
* Als MANU worden afgebeeld, raakt u BAND aan gedurende 1 seconde of langer. "MANU" op het display gaat uit en Zoekafstemmen is nu möglichk.
* Als "TA" op het display worden afgebeeld, worden automatisch TP-zenders gezocht.
DX SEEK
Als u het frequentiedisplay met 山 山 山 aanraakt, begint het automatisch zoek-afstemmen op alle zenders.
Wanner u met 念 aanraakt, wordt een zender gezocht in de richting van hogere frequencies, terwijl wonneer u met 念 aanraakt, een zender wordt gezocht in de richting van lagere frequencies.
* Nadat het Zoek-afstemmen is begonnen,**
wordt "DX SEEK" afgebeeld op het display.
LOCAL SEEK
Als u het frequentiedisplay met aanraakt, wordtzoek-aftstemmenuitgevoerd,voor zenders met een sterk signaal. Er wort alleen afgestemd op zenders met een goede ontvangstkwaliteit.
* Nadat het zoek-afstemmen is begonnen,**
wordt "LO SEEK" afgebeeld op het display.
Handmatig afstemmen
Er zijn tweer manieren waarop u handmatig kunt afstemmen: snel-afstemmen en stap-afstemmen.
In de stap-afstemfunctie verandert de frequenta stap voor stap. In de snel-afstemfunctie kut u snel afstemmen op de gewenste frequentie.
1. Raak BAND aan gedurende 1 seconde of langer verwijl MANU Niet wordt afgebeeld. Als MANU wordt afgebeeld is handmatig afstemmen möglichk.
2. Bedien het frequentlyiedisplay en stem af op een freiquentie waarop wordenuit gezonden.
Stap-afstemmen
Raak het titeldisplay met 已 aan.
Snel-afstemmen
Raak het frequentietdisplay met aan. Het afstemmen stopt zodra u uw vinger van het display afhaalt.
Een voorkeurzender oproepen
Het oproepen van een Voorkeurzender is een bediening voor zenders die van tevoren in het geheugen zijn opgeslagen.
1. Raak MODE gedurende 1 seconde of langer aan. De voorkeurgeheugenlijst worden afgebeeld.
2. Raak de zender aan waarnaar u wilt luisteren.
* In de standardbedieningsfunctie kut u ook op een voorkeurzender afstemmen door het hoofddisplay aan te raken met t.
Het afstemmen annuleren
1. Raak RTN aan.
Voorkeurzenders handmatig opslaan
In totaal(Int u in het geheugen 24 afzonderlijke voorkeurzenders opslaan (6-FM1,6-FM2,6- FM3,6-AM).
1. Raak BAND aan om de freiagentieband te veranderen.
2. Bedien het frequentlyiedisplay en stem af op de frequentie die u wilt opslaan.
3. Raak MODE gedurende 1 seconde of langer aan. De voorkeurgeheugenlijst worden afgebeeld.
4. Raak het voorkeurnummer waaronder u de zender wilt opslaan gedurende 2 seconden of langer aan. U hoor een lange pieptoon en de zender worden in het geheugen opgeslagen.
Voorkeurzenders automatisch opslaan
U kunt automatisch eén voor eén afstemmen op maximaal zes zenders en deze automatisch opslaan.
1. Raak MODE aan.
2. Raak A-STORE gedurende 2 seconden of langer aan. MODE verandert in "A-STORE" en het voorkeurnummer van het automatisch opslaan worden op het voorkeurnummerdisplay afgebeeld.
* Zenders met een goede ontvangstkwaliteit worden automatisch gezocht en opgeslagen in het voorkeurgeheugen (onder voorkeurnummers 1 t/m 6) in oplopende volgorde vanaf de zender met de laagste_freqtie.
Opmerkingen:
- Wanner u automatisch voorkeurzenders opslaat, worden eerder opgeslagen zenders gewist.
- Als er minder dan zes zenders met een goede ontvangstkwaliteit worden gezonden met in de LOCAL SEEK-afstemfunctie, keert het apparaat automatisch terug maar de laagste freiagentie en wordt het automatisch opslaan nogmaals uitgevoerd in de DX SEEK-afstemfunctie. Als daarna nog steeds minder dan zes zenders worden gezonden, blijven de eerder opgeslagen zenders in het geheugen.
- Als het automatisch opslaan wordenucht uitgevoerd op de FM-banden, worden de zenders opgeslagen in FM3, zichs als FM1 of FM2 werk gekozen om de zenders in op te slaan.
Voorkeurzender-scannen
Met voorkeurzender-scannenkest u de Voorkeurzenders eén voor een controeren in de volgorde waarin ze in het geheugen zich opgeslagen.
1. Raak MODE aan.
2. Raak P-SCAN aan. MODE verandert in "P-SCAN" en het voorkeurnummer van het voorkeurnummer-scammen worden op het voorkeurnummerdisplay afgebeeld. \* De huidig opgeslagen voorkeurzenders worden een voor een op volgorde ontvangen gedurende 7 seconden of langer elk. Zenders met een slechte ontvangst worden overgeslagen en de volgende zender worden ontvangen. Als het voorkeurzender-scammen op de FM-band worden uitgevoerd, worden de FMzenders in onderstaande volgorde ontvangen:
FM1 (1 6) FM2 (1 6) FM3 (1 6)...
Als het voorkeurzender-scannen op de AM-band worden dit uitgevoerd, worden de AM-zenders in onderstaande volgorde ontvangen:
AM (1 6) AM(1 6) enzovoort.
Het voorkeurzender-scannen annuleren
1. Raak P-SCAN aan.
P-SCAN verandert in "MODE", en de zender die werden ontvangen voordat op P-SCAN werk gedrukt, worden meer ontvangen.
RDS (radio-informationsystem)
Dit apparatus is uitgerust met een ingebouwd RDS-decodersystem zodate u gebruik kutn make n van de RDS-informatie die sommige zenders uitzenden.
Dit system kan de naam afbeelden van de zender die wordt ontvangen (PS) en kan automatisch overschakelen maar de zender met de Beste ontvangstkwaliteit wonneer u grote afstanden aflegt.
Als verkeersinformatie of een verkeersprogramma worden uit gezonden door een RDS-zender, kan automatisch overgeschakeld worden maar deze uitzending, ongeacht welke functie in werkung is.
Bovendien, als EON-informatie worden ontvangen, kan automatisch worden overgeschakeld waar andere voorkeurzenders op hetzelfdeetwork, zodat de zender die worden ontvangen kan worden onderbroken door het verkeersprogramma van andere zenders (TP). Deze functie is Niet overal beschikbaar.
Als u de RDS-functie wilt gebruiken, moet u altiijd de radio eerst in de FM-ontvangstfunctie zetten.
- AF: Alternativene frequente
- PS: Zendernaam
- PTY: Programmatype
- EON: Verbeterde overige netwerken
TP: Verkeersprogramma
PI: Programma-identificatie
TA: Verkeersinformatie
* De RDS-onderbreking werkkt nicht in de AMontvangstfunctie.
* Als dit apparaat een RDS-signaal ontvangt en de PS-informatie erin kan lezen, worden de zendernaam op het display afgebeeld.
De AF-functie
De AF-functie schakelt overaar een andere frequentie op hetzelfde netwerk om een zo goed möglichk ontvangstkwaliteit te verkrijgen.
- De fabrieksinstelling is "ON".
De AF-functie in- en uitschakelen
1. Raak MODE aan.
2. Raak AF aan. Met iedere aanraking wisselt het AF-display zusammen "ON" en "OFF".
3. Raak RTN aan.
* Als de ontvangstkwaliteit van de huidige zenderchychteruit gaat,wordt "SEARCH" op het display afgebeeld en zoekt de radio waar hetzelfde radioprogramma op een andere_freqentie.
AF-functie tussen RDS en DAB
Als hetzelfde programme worden uit gezonden door RDS en DAB, en deze functie is ingeschakeld, schakelt dit apparaat automatisch over zodat de uitzending met de Beste ontvangstkwaliteit worden ontvangen.
- Deze functie werkkt alleen als de DAB-eenheid DAH923 of DAH913 (optioneel) is aangesloten op het apparaat.
- De fabrieksinstelling is "ON".
1. Druk op de [A] toets om de instelfunctie op te roepen.
2. Raak het insteltemdisplay met aan en kies bij "TUNER" het item "LINK ACT".

3. Raak de rechterkant van het display met aan of draai de [ROTARY] knop en kies "ON" of "OFF".
ON:
Het AF-overschakelenCUSSEN DAB en RDS is ingeschakeld.
OFF:
Het AF-overschakelen:tussen DAB en RDS isuitgeschakeld.
4. Druk op de [A] toets om terug te keren maar de voorgaande functie.
REG (regional programma)-functie
Als de REG-functie is ingeschakeld, kan automatisch worden afgestemd op de regionale zender met de Beste ontvangstkwaliteit. Als deze functie is ingeschakeld en u tijdens het rijden het gebied van een andere regionale zender binnengaat, stembt het apparaat automatisch af op de zender met de beste ontvangstkwaliteit in die regio.
- De fabrieksinstelling is "OFF".
Opmerkingen:
- Deze functie isuitgeschakeld wanner een nationale zender, zoals BBC R2, worden ontvangen.
- De REG-functie ON/OFF-instelling is alleen van invloed als de AF-functie is ingeschakeld.
De REG-functie in- en uitschakelen
1. Raak MODE aan.
2. Raak REG aan. Met iedere aanraking wisselt het REGdisplay:tussen "ON"en "OFF".
3. Raak RTN aan.
Handmatig op een regionale zender in hetzelfde network afstemmen
- Deze functie werkt alleen als de AF-functie is ingeschakeld.
- De bediening verschift afhankelijk van de ON/OFF-instelling van de REG-functie. Als de REG-functie is ingesteld op ON, kannen uitzendingen met een exact overeenkomende PI-code worden ontvangen. Als de REG-functie is ingesteld op OFF, kannen uitzendingen met hetzelfde soort PI-code worden ontvangen.
Opmerkingen:
- Deze functie kan worden gebruikt wanneer een regionale uitzending van hetzelfde network wird ontvangen.
- De PI-code is een coderingssystem dat een unieke code toenkent aan iedere zender.
1. Raak MODE gedurende 1 seconde of langer aan. De voorkeurgeheugenlijst worden afgebeeld.
2. Raak het voorkeumummer aan van de Voorkeurzender die u wilt ontvangen.
TA (verkeersinformatie)
Als een uitzending met verkeersinformatie begint in de TA-standingbyfunctie, worden die uitzending met voorrang ontvangen, ongeacht de functie die in werkung is, zodat u maar de verkeersinformatie kutlusteren. Het is tevens möglichk automatisch op een verkeersprogramma (TP) af te stemmen.
- Deze functie kan alleen worden gebruikt als "TP" op het display worden afgebeeld. Als "TP" worden afgebeeld betekent dit dat de RDS-zender die op dat moment worden ontvangen programme's met verkeersinformatie uitzendt.
De TA-standingbyfunctie instellen
Als u op de [TA] toets drukt verwijl alleen "TP" op het display worden afgebeeld, worden zowel "TP" als "TA" op het display afgebeeld en wordt het apparaat in de TA-standbyfunctie gezet totdat een uitzending met verkeersinformatie begint. Zodra een uitzending met verkeersinformatie begint, worden "TRA INFO" op het display afgebeeld. Als u op de [TA] toets drukt verwijl een uitzending met verkeersinformatie worden ontvangen, stopt de ontvangst van de uitzending met verkeersinformatie en keert het apparaat terug maar de TA-standbyfunctie.
De TA-standingbyfunctie annuleren
Terwijil "TP" en "TA" op het display worden afgebeeld, drukt u op de [TA] toets. Op het display gaat "TA"uit en de TA-standbyfunctie is geannuleerd.
- Als "TP" nicht worden aufgebeeld, zal door op de [TA] toets te drukken de radio gaan zoeken maar een TP-zender.
Een TP-zender zoeken
Als u op de [TA] toets drukt verwijl "TP" Niet op het display worden afgebeeld, worden "TA" op het display afgebeeld en ontvangt het apparaat automatisch een TP-zender.
Opmerking:
- Als een TP-zender nicht kan worden ontvangen, worden "TP SEEK" afgebeeld en worden het zoeken maar een TP-zender voortgezet. Als u nogmaals op de [TA] toets drukt, gaan "TA" en "TP SEEK"uit op het display en worden het zoeken maar een TP-zender geannuleerd.
TP-zenders automatisch als voorkeurzender opslaan
U kurz automatisch maximaal zes TP-zenders in het voorkeurgeheugen opslaan. Als er minder dan zes TP-zenders konnen worden ontvangen, zullen de zenders die erder in het gehuugen opgeslagen werden gehandhaafd blijven.
1. Controller dat "TA" worden afgebeeld en raak MODE aan.
Als "TA" nicht worden afgebeeld, drukt u op de [TA] toets zodate "TA" worden afgebeeld.
2. Raak A-STORE gedurende 2 seconden of langer aan.
MODE verandert in "A-STORE" en het voorkeurnummer van het automatisch opslaan worden op het voorkeurnummerdisplay afgebeeld.
- TP-zenders met een goede ontvangstkwaliteit worden in het voorkeurgeheugen opgeslagen.
Zelfs als u FM1 of FM2 hebt gekozen, worden een TP-zender opgeslagen in het FM3-geheugen.
PTY
Met deze functie kurz u maar een uitzending van het gewenste programmatype luisteren, zichs als het apparaat in een andere bedieningsfunctie staat dan de radio.
- In sommige landen zijn PTY-uitzendingen nog nicht beschikbaar.
- In de TA-standingbyfunctie, heeft een TP-zender voorrang boven een PTY-zender.
De PTY-standingbyfunctie instellen
Als u op de [▶III] toets drukt, worden "PTY" op het display afgebeeld en worden het apparaat in de PTY-standbyfunctie gezet. Zodra een uitzending van het gekozen programmatype begint, worden de naam van het programmatype op het display afgebeeld.
De PTY-standingbyfunctie annuleren
Houd de [▶III] toets gedurende 1 seconde of langer ingedrukt. Op het display gaat "PTY"uit en de PTY-standingbyfunctie is geannuleerd.
Een PTY-onderbrekingsuitzending annuleren
Druktijdens een PTY-onderbrekingsuitzending op de [▶■] toets. De PTY
onderbrekingsuitzending worden geannuleerd en dit apparaat keert terug maar de PTY-standbyfunctie.
Een programmatype (PTY) kiezen
1. Als u op de [▶■] toets drukt, roept het apparatusat de PTY-keuzefunctie op.
2. Raak de rechterkant van het display met aan of draai de [ROTARY] knop en kies een programmatype.
* Hieronder staan de fabrieksinstellungen die zich opgeslagen:
Voorkeur
number Programmatype ENGLISH Inhoud 001 News Nieuws 002 Info Informatie 003 Pop M Pop muziek 004 Sport Sport 005 Classics Klassiek 006 Easy M Melodie:ontspanningsmuziek
3. De PTY-keuzefunctie worden automatisch 7 seconden nadat een programmatype is gekozen, of RTN is aangeraakt, geannuleerd.
Een programmatype (PTY) Zoeken
1. Als u op de [▶III] toets drukt, worden de PTY-keuzefunctie opgeroepen.
2. Raak het midden van het display met aan of draai de [ROTARY] knop en kies een programmatype.
3. Raak de linkerkant van het display met aan.
Wanneer het display met 且 iwordtaangeraakt, zoekt het apparaat met oplopendefrequentie maar een PTY-uitzending,enwanneer het display met 且 wordt aangeraakt,zoekt het apparaat met aflopende frequentaar een PTY-uitzending.
* Als geen zender worden gezonden met de gekozen PTY-uitzending, keert het apparaat terug maar de voorgaande functie.
Het PTY-voorkeurgeheugen
1. Als u op de [▶III] toets drukt, worden de PTY-keuzefunctie opgeroepen.
2. Raak het midden van het display met 山 aan en kies een programmatype.
U knot kiezen uit de 29 programmatypen in de volgende tabel.
Programma type benaming ENGLISH DEUTSCH SVENSKA FRANÇAIS Inhoud News Nachrich Nyhet Infos Nieuws Affairs Aktuell Aktuellt Magazine Actualiteiten Info Service Info Services Informatie Sport Sport Sport Sport Sport Educate Bildung Utbildn Educatif Educatie Drama Hör + Lit Teater Fiction Drama Culture Kultur Kultur Culture Cultuur Science Wissen Vetenskp Sciences Wetenschap Varied Unterh Underh Divers Varia en gesprekken Pop M Pop Pop M Pop Pop muziek Rock M Rock Rock M Rock Rock muziek Easy M U-Musik Lättlyss Chansons Melodie:ontspanningsmuziek Light M L-Musik L klass M Cl Lég Licht klassiek Classics E-Musik Klassik Classiq Klassiek Other M - - Musik Övrig m Autre M Overige muziek Weather Wetter Väder Météo Weerbericht Finance Wirtsch Ekonomi Economie Economie Children Kinder För barn Enfants Voor kinderen Social Soziales Sozialt Société Maatschappelijk Religion Religion Andligt Religion Religie Phone In Anruf Telefon Forum Doe mee! Travel Reise Resor Voyages Reizen Leisure Freizeit Fritid Loisirs Vrijeijd Jazz Jazz Jazz Jazz Jazz Country Country Country Country Country muziek Nation M Landes M Nation m Ch pays Nationale muziek Oldies Oldies Oldies Rétro Gouwe Ouwe Folk M Folklore Folkm Folklore Volkmuziek Document Feature Dokument Document Documentaires
3. Raak RTN gedurende 1 seconde of langer aan.
De PTY-voorkeurgeheugenlijst worden afgebeeld.
4. Raak het voorkeurnummer waaronder u het gekozen programmatype wilt opslaan gedurende 2 seconden of langer aan. U hoor een lange pieptoon en het gekozen programmatype worden in het PTY-voorkeurgeheugen opgeslagen.
Nooduitzending
Als een noodlesitzending worden ontvangen, worden alle functiebedieningen aufgeb broken, worden "ALARM" op het display afgebeeld, en worden de noodlesitzending ontvangen en weergegeven.
De noodleszending annuleren
Als u op de [AF] toets op de afstandsbediening drukt, worden de nooduitzending geannuleerd.
De taal van het PTY-display veranderen
U=kunt een taal kiezen uit de vier beschikbare talen (Engels, Duits, Zweeds of Frans) waarin het programmatype op het display kan worden afgebeeld.
- De fabrieksinstalling is "ENGLISH".
1. Druk op de [A] toets om de instelfunctie op te roepen.
2. Raak het insteltemdisplay met aan en kies bij "TUNER" het item "LANGUAGE".

3. Raak de rechterkant van het display met aan of draai de [ROTARY] knop en kies een taal.
* Kies een taal UIT ENGLISH (Engels), DEUTSCH (Duits), SVENSKA (Zweeds) en FRANÇAIS (Frans).
4. Druk op de [A] toets om terug te keren maar de voorgaande functie.
De RDS-onderbreking instellen verwijl de 2-ZONE-functie in gebruik is (RDS-INT 2Z)
Als deze functie op worden ingesteld "ON" en zich een RDS-onderbreking voordoet verwijl de 2-ZONE-functie in gebruik is, kan de RDS-informatie worden ontvangen.
- Als zich een RDS-onderbreking voordoet, worden de 2-ZONE-functie uitgeschakeld.
- Als zich een alarmonderbreking voordoet verwijd “RDS-INT 2Z” is ingesteld op “OFF”, worden de RDS-informatie ontvangen.
- De fabrieksinstelling is "ON".
1. Druk op de [A] toets om de instelfunctie op te roepen.
2. Raak het insteltemdisplay met aan en kies bij "TUNER" het item "RDS-INT 2Z".

3. Raak de rechterkant van het display met aan of draai de [ROTARY] knop en kies "ON" of "OFF".
ON:
De RDS-informatie worden ontvangen wanner zich een RDS-onderbreking voordoet verwijl de 2-ZONE-functie in gebruik is.
OFF:
Wanner de 2-ZONE-functie in gebruik is,
wordt geen RDS-informatie ontvangen,
uitgezonderd een alarmonderbreking.
Opmerking:
- Als de radiofungtie is gekozen verwijl TA (verkeersinformatie) en PTY zijn ingeschakeld, worden de onderbrekigen ontvangen, zichs als RDS onderbreking isuitgeschakeld.
4. Druk op de [A] toets om terug te keren maar de voorgaande functie.
Volume-installing van TA, nooduitzending (ALARM) en PTY
Het volume van de TA-, ALARM- en PTY-onderbrekingsuitzendingen kan worden ingesteldijdens de TA-, ALARM- en PTY-onderbrekingsuitzendingen.
- De fabrieksinstelling is "15".
Tijdens een TA-, ALARM- of PTY-onderbrekingsuitzending, draait u de [ROTARY] knop recht som of linksom en stelt u het volume in op het gewenste niveau (0 t/m 33).
- Als de TA-, ALARM- of PTY-onderbrekingsuitzending is afgelopen, keert het volume terug maar het niveau dat was ingesteld voor de onderbrekingsuitzending.
De displays in de CD-functionie
Hoofddisplay
Het hoofddisplay wordt afgebeeld als u op de [ROTARY] knop drukt en de CD-functie kiest.

Als u de linkerkant van het display gedurende 1 seconde of longer aanraakt, worden de bedieningsfunctie omgeschakeld.

Track/weergavetijd-display
J01/02:00:
Het nummer van de track die worden weergegeven en de weergavetijd worden afgebeeld.
Als u in de standardbedieningsfunctie het display met 0f aanraakt, kurz u de track die u wilt weergeven kiezen, of vooruit/chteruitspoeelen.
Titeldisplay
Als u het titeldisplay aanraakt, verandert het display.
Mapdisplay (in het geval van MP3/WMA)
Als u in de standardbedieningsfunctie het display met 卡 aanraakt, kurz u een map kiezen.
MODE:
Als u dit aanraakt, worden subfuncties afgebeeld. Als u in het geval van MP3/WMA dit gedurende 1 seconde of langer aanraakt, worden de mappenlijst afgebeeld.
Opmerking:
- Deze functie werkkt alleen als een disc worden weergegeven.
-SCAN-SCAN: Dit worden afgebeeldijdens scanweergave. Door dit aan te raken, worden de scanweergave gestopt.
- RPT/RP: Dit worden afgebeeldijdens herhaalde weergave. Door dit aan te raken, worden de herhaalde weergave gestopt.
-RDM/RDM: Dit worden afgebeeldijdens willekeurige weergave. Door dit aan te raken, worden de willekeurige weergave gestopt.
TOP:
Door dit aan te raken begint de weergave vanaf de eerste track op de disc of in de map die worden weergegeven.

(alleen op het display van de simpele bedieningsfunctie)
Door deze toetsen aan te raken kurz u de track kiezen die u wilt weergeven.
Door deze toetsen te blijven aanraken=kunt u de tracks vooruit-/achteruiestspoelen.
■ Mappenlijstdisplay (in het geval van MP3/WMA)
Deze lijst kunt u afbeelden door op het hoofddisplay gedurende 1 Seconde of langer MODE aan te raken.

Mapnaam
Mapnummer
Als dit grijs worden aufgebeeld,kest u de map nicht kiezen.
>>: Bezig met kiezen
Als u een mapnaam aanraakt, keert het display terug maar het hoofddisplay en begint de weergave vanaf de eerste track in de map die u hebt aangeraakt.
Als u dit aanraakt, worden de voorgaande mappenlijst afgebeeld. Door dit gedurende 1 seconde of langer aan te raken, keert het display terug maar het hoofddisplay.
NEXT:
Als u dit aanraakt, worden de volgende mappenlijst afgebeeld.
Wat is MP3?
MP3 is een audiocompressiemethode die is geclassifiedeerd als audiolaag 3 van de MPEGnorm.
Deze audiocompressiemethode is populair geworden bij computerergebruikers en uitgegoeid tot de standardnorm.
MP3 heeft als eigenschap de originele audiodata tot onceveer 10% van de oorspronkelijke groorte te comprimeren verwijl de hoge geluidskwaliteit behouden blijt. Dit betekent dat onceveer 10 muziek-CD's kan den worden opgenomen op een CD-R-disc of CDRW-disc, waardoor lang maar muziek geluisterd kan worden zonder dat de CD要去 worden verwisseld.
Wat is WMA?
WMA is de afkorting van Windows Media Audio: een audiobestandsformaat ontwikkeld door Microsoft Corporation.
Opmerkingen:
- Als u een bestand weergeeft met DRM (Digital Rights Management = digitale-rechtenbeheuer) ingeschakeld voor wma, za er geen geluid worden uitgevoerd (de WMA-indicator knippert).
- Windows Media en het Windows®-logo zijn handelsmerken of wettig gedeponeerde handelsmerken van Microsoft Corporation in de Verenigde Staten en andere landen.
DRM (Digital Rights Management) uitschakelen:
- In het programme Windows Media Player 8, klik op het TOOLS OPTIONS COPY MUSIC-tabblad, en klik verzolgens onder COPY SETTINGS in het selectiekavke proteTECT CONTENT zodat het vinkje uitgaat. Bouw verzolgens de bestanden opnieuw op.
In het programme Windows Media Player 9, klik op het TOOLS OPTIONS MUSIC RECORD-tabblad, en klik verrolgens onder COPY SETTINGS in het selectiekavkeje PROTECT CONTENT zodat het vinkjeuitgaat. Bouw verrolgens de bestanden opnieuw op.
Gebruik door uzelf opgebouwde WMAbestanden voor eigenerverantwoording.
Voorzorgsmaatregelen voor het creeren van een MP3-disc of WMA-disc
- Bruikbare bemonsteringssnelheden en overdrachtsnelheden:
1. MP3: Bemonsteringsfrequentie: 11,025 kHz t/m 48 kHz Overdrachtsnelheid: 8 kbps t/m 320 kbps / VBR
2. WMA: Overdrachtsnelheid: 48 kbps t/m 192 kbps
Bestandsextensies
1. Voeg algid een bestandsextensie ("MP3" of "WMA") toe aan een MP3- of WMA-bestand met behulp van enkel-byte letters. Als u een andere dan de gespecifieerde bestandsextensie toevoegt, of vergeet een bestandsextensie toe te voegen, kan het bestand Niet worden weergegeven.
2. Bestanden die geen MP3/WMA-data bevatten können nicht worden weergegeben. De aanduiding "--: --" worden op het weergavetijddisplay afgebeeld als u probeert bestanden wee ter te geben die geen mp3/ wma-data bevatten.
Logisch formaat (bestandssysteme)
1. Bij het schrijven van een MP3/WMA-bestand op een CD-R-disc of CD-RW-disc, moet u "ISO9660 level 1, 2 of JOLIET of Romeo" kiezen als formaat van de schrijfsoftware. Normale weergave is Niet möglich als de disc is opgenomen in een ander formaat.
2. De mapnaam en de bestandsnaam hunnen worden afgebeel als de titel in het geval van MP3/WMA-weergave, maar de titel moet korter zichen dan 128 enkel-byte alfanumerieke tekens (inclusief de bestandsextensie).
3. Geef een bestand nicht bezelfde naam als demap waarin deze zit.
Mapstructuur
1. Een disc mag een mapstructuur van maximaal 8 hierarchische niveaus diep hebben.
Aantal bestanden of mappings
1. Maximaal 255 bestanden konnen per map worden herkend. Maximaal 500 bestanden konnen worden weergegeven.
2. De tracks worden weergegeven in de volgorde waarin deze op de disc werden opgenomen. (De tracks worden nicht alti\dj weergegeven in bezelfde volgorde die op een computer worden aangegeven.)
3. Enige ruis kan optreden afhankelijk van het type codeersoftware dat voor de opname werk gebruikt.
Multisessieskiezen
Met deze functie kunt u of CD-DA-bestanden, of MP3/WMA-bestanden kiezen in het geval een disc (bijv. een CD-EXTRA-disc) een combinatie van CD-DA-bestanden en MP3/WMA-bestanden bevat.
1. Raak MODE aan.
2. Raak M-SESS aan. Met iedere aanraking van M-SESS wisselt het M-SESS-displayussen "CD" (CD-Daweergave) en "MP3/WMA" (MP3/WMA-weergave).
* Als M-SESS nicht worden afgebeeld, raakt u NEXT aan.
3. Raak RTN aan. De instelling voor het kiezen van multisessies is van kracht de volgende keer dat u een CD in het apparaatplaatst.
Opmerking:
- Als u een CCCD (Copy Control CD) weergeeft, stelt u de instelling in op het CD-type. Als dit is ingesteld op het MP3/WMA-type, kan in sommige gevallen de CD Niet normal worden weergegeven.
A VOORZICTHIG
Wees voorzichtig dat uw hand of vingers Niet bekneld raken bij het openen en sluiten van het KANTELEND BEDIENINGSPANEEL.
Opmerkingen:
- Als het KANTELEND BEDIENINGSPANEEL Niet volledig worden geopend, opent u het voorzichtig met uw hand.
- Nadat u een CD hebte geplaatst, sluit u altijd eerst het KANTELEND BEDIENINGSPANEEL.
Probeer nicht uw hand of vinger in de discgleuf te steken. Steek ook nooit vreme de voorwerpen in de discgleuf.
- Steek ook nooit discs in de discgleuf waarop lijmresten onder plakband of verhuurstickersuitkomt,of discs waarop nog restanten vanplakband of verhuurstickers zitten. Het kan onmobelijk zijn dergelijkde discs uit het apparaat te werpen en ze konnen tot storing leiden.
Een CD plaatsen
1. Druk op de [▲] toets. Het bedieningspaneel gaat open.
2. Plaats de disc in de discgleuf. Nadat de disc is geplaatst gaat het bedieningspaneel automatisch dicht.
Opmerkingen:
- Steek nooit vreeimde voorwerpen in de discgleuf.
- Als de CD Niet gemakkelijk kan worden geplaatst, kan hetijken dat er reeds een andere CD in de discgleuf zich, of dat het apparaat要去 worden gerepareerd.
Discs zonder het QUSG of logen CD-ROMs kuren nicht door dit apparaat worden weergegeben.
- Het is möglich dat sommige CD's opgenomen in de CD-R/CD-RW-functionie nicht bruikbaar zijn.
Een 8-cm CD plaatsen
U heeft geen adapterring nodig om een 8-cm CD waar te gehen. Plaats de 8-cm CD in het midden van de discgleuf.
Een CD uitwerpen
U kunt een CD uitwerpen door op de [▲] toets te drukken, zichs als het apparaat isuitgeschakeld of met de contactsleutel de stroom is onderbroken.
A VOORZICHTIG
Nadat de disc is uitgeworpen, drukt u op de [A] toets om het bedieningspaneel te sluiten. Als u het bedieningspaneel open LAST staan, hoort u een dubbe pleiptoon en gaat het bedieningspaneel automatisch dicht.
1. Druk op de [A] toets.
Het bedieningspaneel gaat open en de disc wordtuitgeworpen.De functie wordt automatisch ingesteld op de radiofunctie.
* Zorg ervoor dat u een uitgeworpen disc uit het apparaat verwijdert. Als u de disc in de discgleuf LAST zitten, worden deze na 15 seconden of langer automatisch wee in het apparaat getrokken en gaat het bedieningspaneel dicht (automatisch opnieuw plaatsen).
* Single-CD's worden nicht automatisch opniewu geplaatst. Zorg ervoor dat u een single-CD UIT het apparaat haalt nadat.Deze isuitgeworpen.
A VOORZICHTIG
Als u buitensporige kracht gebruikt om een disc teplaatsen nadat deze is uitgeworpen, kan de disc worden bekrant. Haal de disc eruit voordat u deze weeer plaatst.
Een disc beluisteren die al in het apparaat is geplaatst
1. Druk op de [ROTARY] knop om de CD-functie te kiezen.
* De weergave begint automatisch nadat de functie is veranderd in de CD-functie.
De weergave pauzeren
1. Druk op de [▶■] toets.
De weergave hervatten
1. Druk nogmaals op de [▶■] toets.
Een track kiezen
Als een CD-R of CD-RW is geplaatst waarop een MP3-bestand of WMA-bestand is opgenomen,(Int u alleen tracks kiezen die in bezelfde map+zijn opgenomen door het trackdisplay met 一 _ 一 aan te raken.
1. Als u maar de volgende track wilt luisteren, raakt u het trackdisplay met 日 aan.
2. Als u waar de voorgaande track wilt luisteren, raakt u het trackdisplay tweeemaal met aan.
Door met 日 aan te raken worden de volgende track weergegeven. Als u vaker met 日 aanraakt, verspringt u hetzelfde aantal tracks vooruit als u met 日 heb t aangeraakt, waarna de weergave van de track begint.
Door met 山 aan te raken worden de voorgaande track weergegeven. Als u vaker met 山 aanraakt, verspringt u hetzelfde aantal tracks achefteruit als u met 山 hebt aangeraakt, waarna de weergave van de track begint.
* Als u het trackdisplay tweeemaal met † aanraakt verwijl het begin van een track worden weergegeven, worden soms tweet tracks achechteruit gesprongen, en begint de weergave van die track.
Een map kiezen
Om een andere map te kiezen, raakt u het mapdisplay met 卡 aan of voert u de volgende stappen UIT.
1. Raak MODE gedurende 1 seconde of longer aan.
De mappenlijst worden afgebeeld. Door PREV of NEXT aan te raken worden het voorgaande of volgende gedeelte van de mappenlijst afgebeeld.
2. Raak de mapnaam aan.
De afspeellijst weergeven
U kunt een afspeellijst (een M3U-bestand) weergeven.
Merk城县 op dat van de M3U-bestanden die op dat moment tot vrijlagen diep (inclusief de
root) in de hierarchie zijn opgeslagen, slechts de bovenste vrij bestanden met een neue tijdstempel können worden weergegeven.
Opmerkingen:
Maximaal 255 bestanden van een enkele aftspeellijst kannen worden weergegeven.
- Alleen MP3- of WMA-bestanden die op dat moment tot vrij lagen diep (inclusief de root) in de hierarchie� opgeslagen, hunnen worden weergegeven.
Ga als volgt te werk om een afspeellijst wee tergeven.
1. Raak MODE aan.
2. Raak NEXT aan.
3. Raak PLY LIST aan. Het lezen van de afspeellijst begint. Wanner het lezen van de afspeellijst waar is, start de weergave van de afspeellijst met de meest recente tijdstempel automatisch. De bediening voor het kiezen van de afspeellijst of tracks op de afspeellijst isdezelfde als die voor het kiezen van een map of tracks in een map.
* PLY LIST worden nicht aufgebeeld als geen correcte aftspeellijst (een M3U-bestand) is opgeslagen op de CD-R of CD-RW die in het apparaat is geplaatst.
De weergave van de afspeellijst stoppen
1. Raak MODE aan.
2. Raak NEXT aan.
3. Raak PLY LIST aan.
Vooruit- en Achteruitspoelen
1. Om vooruit te spoelen raakt u het trackdisplay met 出 aan.
2. Om achechteruit te spoelen raakt u het trackdisplay met aan.
Beginfunctie
De beginfungtie doet de CD-speler terugkeren\
aar het begin van de eerste track op de CD.
1. Raak TOP aan. De weergave begint vanaf de eerste track (tracknummer 1).
In het geval van MP3/WMA, keert de CDspeler terug maar de eerste track in de map die worden weergegeven.
Scanweergave
Met deze functie=kunt de eerste 10 seconden van iedere track op de disc weergeven.
1. Raak MODE aan.
2. Raak P -SCAN aan. MODE verandert in " P -SCAN" en de scanweergave begint.
* De scanweergave begint vanaf de track die volgt op de track die op dat moment worden weergegeven.
De scanweergave stoppen
1. Raak P -SCAN aan. P -SCAN verandert in "MODE" en de track die werden weergegeven toen u P -SCAN aanraakte, worden weergegeven.
Mapscanweergave
Met deze functie=kunt u de eerste 10 seconden weergeven van de eerste track in iedere map op een MP3-disc of WMA-disc.
1. Raak MODE aan.
2. Raak -SCAN aan. MODE verandert in " -SCAN" en de mapscanweergave begint.
* De mapscanweergave begint vanaf de map die volgt op de map die op dat moment worden weergegeven.
De mapscanweergave stoppen
1. Raak -SCAN aan. -SCAN display changes toverandert in "MODE" en de weergave begint vanaf de track die werd weergegeven toen u -SCAN aanraakte.
Herhaalde weergave
Met deze functie kurz u de huidige track herhaaldelijk weergeven.
1. Raak MODE aan.
2. Raak J^ -REPEAT aan. MODE verandert in "RPT" en de herhaalde weergave begint.
De herhaalde weergave stoppen
1. Raak P -RPT aan. P -RPT verandert in "MODE" en de normale weergave begint vanaf de track die werden weergegeven voordat u P -RPT aanraakte.
Herhaalde mapweergave
Met deze functie=kunt de map die op dat moment wordenweergeveen herhaaldelijk weergeven. Deze functie is alleen beschikbaar wanner een CD-R of CD-RW waarop MP3bestanden of WMA-bestanden zijn opgenomen, is geplaatst.
1. Raak MODE aan.
2. Raak -REPEAT aan. MODE verandert in "RPT" en de herhaalde mapweergave begint.
De herhaalde mapweergave stoppen
1. Raak -RPT aan. -RPT verandert in "MODE" en de normale weergave begun vanaf de track die werd weergegeven voordat u -RPT aanraakte.
Willekeurige weergave
Met deze functie=kunt u alle tracks die op een disc,zijn opgenomen in willekeurige volgorde weergeven.
-RANDOM
Hiermee geeft u alle tracks op de disc in willekeurige volgorde weeR. Als de disc twee ofeer mappings bevat, worder alle tracks in de map in willekeurige volgorde weergegeven, gevolgd door alle tracks in de volgende map.Dit proces herhaalt zich voor alle mappen.
-RANDOM
Hiermee geeft u alle tracks op de disc in willekeurige volgorde weeer. Deze functie is alleen beschikbaar wanneer een CD-R of CD-RW waarop MP3-bestanden of MWA-bestanden zich opgenomen, is geplaatst.
1. Raak MODE aan.
2. Raak P -RANDOM of -RANDOM aan. MODE verandert in " P RDM" of "RDM", en de willekeurige weergave begint.
De willekeurige weergave stoppen
1. Raak F -RDM of -RDM aan. F -RDM of -RDM verandert in "MODE" en de normale weergave begint vanaf de track die werden weergegeven voordat u F -RDM of -RDM aanraakte.
Meerdere Personen luisteren maar twee verschillende muziekbronnen (2-ZONE-functie)
De 2-ZONE-functie kan afzonderlijk geluid uitvoeren aan de MAIN-zone en de SUB-zone doordat het apparaat twee bronnen tegelijktijd kan verwerken, zodate twee ofeer luisteraars maar twee verschillende muziekbronnen konnen luisteren.
Dit apparaat kan de interne bronnen (radio, CD, MP3, enz.) weergeven en kan daarnaast tegelijkkertijd materiaal weergeven vanaf externe apparatuur, die is aangesloten met behulp van een CeNET-kabel (bijv. CD-wisselaar, enz.).
De bronnen van de MAIN-zone worden
weergegeven via de luidsprekers in uw auto, en
de bronnen van de SUB-zone worden
weergegeven via de hoofdtelefoon (WH143).

De bovenste twee afbeeldingen zijn voorbeelden wanner een geluidsbron worden weergegeven door een interne bedieningsfunctie van het apparatus (radio, CD, AUX) via de luidsprekers.
De onderste afbeelding is een voorbeeld wonneer een geluidsbron worden weergegeven door een externe bedieningsfunctie van het apparatus (CD-wisselaar, DVD-wisselaar, TV, AUX) via de luidsprekers.
* De fabrieksinstalling is "OFF".
Opmerkingen:
- De 2-ZONE-functie is nicht beschikkaar als DAB is aangesloten.
- Door aan de [ROTARY] knop op het apparaat te draaien verandert alleen het volumeniveau van het geluid uit de luidsprekers.
De AUX-SENS-instelling heeft betrekking op zowel de luidsprekers als de hoofdtelefoon.
Het display bij gebruik van de 2-ZONE-functie
In het midden van het display wordt "INT." (interne functie) of "EXT." (externe functie) afgebeeld om aan te geven of u de weergave van een interne bedieningsfunctie of een externe bedieningsfunctie hoor in de huidige bedieningsfunctie van de 2-ZONE-functie.
1. Druk op de [SOUND] toets.
2. Raak 2-ZONE aan.

3. Raak in het midden van het display ON/OFF aan gedurende 1 Seconde of langer.

Als 2-ZONE is ingesteld op ON, wordt het huidige type 2-ZONE afgebeeld.
De 2-ZONE-functie kan nicht worden gebrukt wanner 2-ZONE is ingesteld op OFF. Druk op de [SOUND] toets om terug te keren maar de oorspronkelijke functie.
4. Raak het ON/OFF-display met 山 山 山 aan en kies het type 2-ZONE.
2-ZONE-type
Luidsprekers Hoofdtelefon Type 1 Intern (interne functie) Extern (externe functie) Type 2 Extern (externe functie) Intern (interne functie)
5. Raak het luidsprekerdisplay of het hoofdtelefoondisplay aan en kies de bedieningsfunctie van de 2-ZONE-functie.
Als u het luidsprekerdisplay aanraakt,kest u de geluidsbron bedieren die via de luidsprekers worden weergegeven.
Als u het hoofdtelefoondisplay aanraakt,
kunt u de geluidsbron bedieren die via de
hoofdtelefooon worden weergegeven.
6. Druk op de [SOUND] toets om terug te keren maar de oorspronkelijke functie.
Meerdere Personen luisteren maar twee verschillende muziekbronnen (2-ZONE-functie)
De 2-ZONE-functie in- en uitschakelen
1. Houd de [SOUND] toets op het apparaat gedurende 1 seconde of langer ingedrukt.
Het 2-ZONE-type omschakelen
Houd de [TA] toets op het apparataat gedurende 1 seconde of langer ingedrukt verwijl de 2-ZONE-functie is ingeschakeld.
De bedieningsfunctie van de 2-ZONE-functie omschakelen
Druk op de [TA] toets op het apparaat verwijl de 2-ZONE-functie is ingeschakeld.
De functie kiezen wanneer de 2-ZONE-functie is ingeschakeld
Als u een CD staat terwijl de 2-ZONE-functie is ingeschakeld, veranderen de bedieningsfuncties van de interne functie van dit apparaat waar de CD-functie en begint de weergave automatisch.
1. Druk op de [TA] toets op het apparaat om de bedieningsfunctie van de 2-ZONE-functie om te schakelen.
Het (luidspreker- of hoofdtelefoon-) display van de geluidsbron die op dat moment kan worden bediend, wisselt om.
2. Houd de [TA] toets gedurende 1 seconde of langer ingedrukt en kies het 2-ZONE-type. Het display wisselt:tussen "INT."en "EXT."
3. Druk op de [ROTARY] knop.
Met iedere druk op de [ROTARY] knop terwijl "INT." worden afgebeeld, verandert de functie in onderstaande volgorde:
$$
\mathrm {R a d i o} \rightarrow \mathrm {C D} \rightarrow \mathrm {A U X} \rightarrow \mathrm {R a d i o} \dots
$$
Met iedere druk op de [ROTARY] knop verwijl "EXT." worden afgebeeld, verandert de functie in onderstaande volgorde:
$$
\begin{array}{l}\text {A U X} \rightarrow (\text {C D - w i s s e l a r}) \rightarrow (\text {D V D - w i s s e l a r})\\\rightarrow (\text {T V} ^ {* 1}) \rightarrow \text {A U X . . .}\end{array}
$$
* De functie van een apparaat dat Niet is aangesloten worden Niet afgebeeld.
*1 Als de TV-functie is gekozen, verandert de functie automatisch maar de VTR-functie en kan nicht worden veranderd.
Gemeenschappelijk bedieningen in jegere functie
Het display in de titelinoferfunctie
Hoofddisplay
Dit worden aufgebeeld wanner de titelinvoerfungtie is gekozen (zie blz. 14).

Teksttypedisplay
A: Hoofdletters
a: Kleine letters
0-9: Cijfers
!?: Leestekens
A: Accenten
Titeldisplay
De huidig ingevoerde titel worden afgebeeld. Raak dit display met 卡 巴 卡 aan en kies de invoerpositie. Door dit display gedurende 2 seconden langer aan te raken, verdwijnen alle tekens van de titeltekst.
Invoertekstdisplay
Raak dit display met 山 aan en kies de tekst die u wilt invoeren.
RTN
Door dit aan te raken worden het invoeren van titels geannuleerd en keert het apparaat terug waar het oorspronkelijke display. Door dit gedurende 1 seconde of langer aan te raken worden de tekstlijf afgebeeld die hoor bij het huidige teksttype.
MEMO
Door dit gedurende 2 seconden of langer aan te raken kut u de ingevoerde titel opslaan, en keert het apparaat terug maar het oorspronkelijke display.
Tekstlijstdisplay
Deze lijst kurz u afbeelden door op het hoofddisplay gedurende 1 Seconde of langer RTN aan te raken.

Teksttype
De tekst die worden aufgebeeld verandert aan de hand van de instelling op het teksttypedataplay.
Als het teksttypedisplay is ingesteld op "A": A E I M Q U X (spatie)
Als het teksttypedisplay is ingesteld op “a”: a e i m q u
Als het teksttypedisplay is ingesteld op "0-9", "!?" of "Ä":
Alle tekens worden afgebeeld.
RTN
Als u dit aanraakt, keert het display terug maar het hoofddisplay.
NEXT
Als u dit aanraakt, worden de volgende tekstlijst afgebeeld.
Eentitel invoeren
U kunt TV-zenders en CD's een titel van maximaal 10 tekens geben. Deze titels können worden afgebeeld wanner een TV-uitzending worden ontvangen of een CD worden weergegeben.
Het aantal titels dat u kunt invoeren is als volgt:
Functie Aantal titels CD-functie 50 titles TV-functie 20 titles
CD-wisselaarfunctie Aantal titels DCZ628 aangesloten 100 titles CDC655Tz aangesloten 100 titles CDC1255z aangesloten 50 titles
1. Ontvang de TV-zender of geef de CD waar waarvan u de titel wilt invoeren.
2. Raak het midden van het display aan om het gebruikerstiteldisplay op te roepen. Het display verandert maar het gebruikerstiteldisplay en "USER" worden afgebeeld boven het voorkeurnummerdisplay.
3. Houd de [A] toets gedurende 1 seconde of langer ingedrukt. De functie verandert maar de titelinvoerfunctie.
4. Raak dit display met 卡 aan en kies de invoerpositie. De positie van de knipperende tekst worden\
haar links of rechts verplaatst.

* U kunt maximaal 10 tekens invoeren.
A VOORZICHTIG
Als u op de terugsteltoets drukt worden alle inhoud, waaronder de titels,uit de gebruikersgeugens van dit apparaat gewist.
5. Raak het teksttypedisplay met 山 aaan en kies het teksttype.
Met iedere aanraking met 卡 verandert het tekstype als volgt:
Hoofdletters
(spatie) ABCDEFGHIJKLMNOPQ RSTUVWXYZ
Kleine letters
abcdefghijklmnpqrstuvwxzy Cijfers
0123456789
Leestekens, Accenten
AEEEEIAOaaaeeetouoo
6. Raak de rechterkant van het display met aan, of draai de [ROTARY] knop en kies het teken dat u wilt invoeren.
7. Herhaal de stappen 4 t/m 6 om de hele titel in te voeren.
Als u het titeldisplay gedurende 2 seconden of langer aanraakt, verdwijnen alle tot dan toe ingevoerde tekens van de titeltekst.
8. Raak MEMO gedurende 2 seconden of langer aan.
U hoor een lange pieptoon en de titel worden in het geheugen opgeslagen.
Het titeldisplay veranderen in het klokdisplay of een ander display
Raak het midden van het display aan.
■ Als u een(AP) neue titel opslaat verwijl het maximale aantal titels al is opgeslagen
In het geval van een TV-zender
De titels die nicht zich opgeslagen in de voorkeurkanalen worden automatisch gewist en deijke titel worden in het geheugen opgeslagen.
In het geval van een CD
Titels van CD's die het minst zijn weergegeven worden gewist en de(APpe titel worden in het geheugen opgeslagen.
Eentitelwissen
1. Ontvang de TV-zender of geef de CD waar van u de titel wilt wissen.
2. Raak het midden van het display aan om het gebruikerstiteldisplay op te roepen.
Het display verandertaar het gebruikerstiteldisplay en "USER"wordt afgebeeld boven het voorkeurnummerdisplay.
3. Houd de [A] toets gedurende 1 seconde of longer ingedrukt.
De functie verandert maar de titelinoverfunctie.
4. Raak het titeldisplay gedurende 2 seconden of longer aan.
Alle tekens van de titeltekst verdwijnen.
5. Raak MEMO gedurende 2 seconden of longer aan.
U hoor een lange pieptoon en de titel worden gewist.
Deinstallingenveranderen Deinstelitemskiezen
1. Druk op de [A] toets.
De functie verandert maar de instelfunctie.

2. Raak het insteltemdisplay met 山 山 aan en kies het item dat u wilt instellen.
* Als u de linkerkant van het display met
anraakt, worden de hoofditem een voor een doorlopen.
Als u de linkerkant van het display met
aanraakt, worden de hoofditemsononderbroken doorlopen.
* Als u het midden van het display met
aanraakt, worden de subitems eén voor een doorkopen. Als u het midden van het display met aanraakt, worden de subitems ononderbroken doorkopen.
3. Als op de rechterkant van het display "EDIT" wordt afgebeeld, raakt u EDIT aan om over te schakelen maar het instellingendisplay.

4. Raak de rechterkant van het display met 卡 aan of draai de [ROTARY] knop en kies een instelling.
■ Terugkeren maar de oorspronkelijke functie
1. Druk nogmaals op de [A] toets.
- Instelitems
Hoofditem SubItem DISPLAY SCREEN SVR
• Schermbeveiliging (zie blz. 41) MSG INPUT
• Berichtinformatie-invoer (zie blz. 41) MESSAGE
• Berichtdisplayinstalling bij in-/uitschakelen (zie blz. 42) S/A SENS
• De gevoeligheid van de spectrumanalysator instellen (zie blz. 42) SCROLL
• De doorloopsnelheid instellen (zie blz. 42) APPERNCE DIMMER IN
• De automatische displaydimmer instellen (zie blz. 43) DMR LEVEL
• Het niveau van de displaydimmer instellen (zie blz. 43) CONTRAST
• Het displaycontrast instellen (zie blz. 43) BLINK LED
• De LED latent knipperen wanner de DCP worden verwijderd (zie blz. 43) BEEP
• De pieptoon instellen (zie blz. 44) Hoofditem Subitem SOUND AC-PRO III
• De VSE-functiekiezen (STD/PRO) (zie blz. 44) EQ SELECT
• De equalizerfunctiekiezen (zie blz. 44) SP-SETTING
• De luidsprekerconfigatie instellen (zie blz. 44) CENTER-SP / SUB-WOOFER
• De subwoofer in-/uitschakelen (zie blz. 45) HPF / SUB-W LPF
• De filterfrequentie van de luidsprekers instellen (zie blz. 45) AMP CANCEL
• De ingebouwdeversterker in-/uitschakelen (zie blz. 46) SP GAIN
• Het uitgangsiveau van de luidsprekers instellen (zie blz. 46) PL II DELAY SRD-SP
• De vertragsstijd van de achterluidsprekers instellen (zie blz. 46) PL II CONT PANorama / DIMENSION / CTR WIDTH
• De muziekfunctie in detail instellen (zie blz. 47) TUNER TV ARER
• Het TV-zendergebiedinstellen (zie blz. 57) TV DIVER
• De TV-diversiteitinstellen (zie blz. 57) LINK ACT
• De AF-functie:tussen RDS en DAB instellen (zie blz. 26) LANGUAGE
• De taal van het PTY-display instellen (zie blz. 30) RDS-INT 2Z
• De RDS-onderbreking verwijl de 2-ZONE-functie is ingeschakeld instellen (zie blz. 30) SETTING AUX / TEL
• AUX en TELinstellen (zie blz. 47) AUX SENS
• Het ingangsniveau van de draagbare audio (AUX) instellen (zie blz. 48) TEL-SP
• De autoluidsprekeruitgang voor de mobiele telefoon (TEL-002, optioneel) instellen (zie blz. 48) TEL-SWITCH
• De mobiele-telefononderbreking instellen (zie blz. 48) CALIBRATE / A-VOL SENS
• De automatische volumeregeling instellen (zie blz. 49) SYSTEM CHECK
• Een systemcontroleuitvoeren (zie blz. 49) CODEMATIC
• De beveiliging instellen (zie blz. 50)
De schermbeveiliging instellen (SCREEN SVR)
Met deze functie=kunt u een schermbeveiliging. laten afbeelden als u het apparaat gedurende ongeveer 30 seconden nicht bedient.
- De fabrieksinstelling is "ON".
1. Druk op de [A] toets om de instelfunctie op te roepen.
2. Raak het insteltemdisplay met 卡 aan en kies bij "DISPLAY" het item "SCREEN SVR".

3. Raak de rechterkant van het display met aan of draai de [ROTARY] knop en kies "ON" of "OFF".
4. Druk op de [A] toets om terug te keren maar de oorspronkelijke functie.
Het schermbeveiligingsdisplay wisselen
Raak PREV of NEXT aan verwij de schermbeveiliging worden afgebeeld.
Met iedere aanraking hiervan wisselt het schermbeveiligingsdisplay.
- Schermbeveiligingen
Schembeveiligingspatroon 1


Schermbeveiligingspatroon 2

Schermbeveiligingspatroon 3

Spectrumanalysepatroon 1

Spectrumanalysepatroon 2
Spectrumanalysepatroon 3

Spectrumanalysepatroon 4

Berichtinformationie

SS SCAN
Bovenstaande 8 displays worden elk gedurende ongeveer 10 seconden aufgebeeld.
Berichten invoeren om af te beelden als berichtinformationatie (MSG INPUT)
1 type schermbeveiliging is beschikbaar. Voor verdere informatie over het wisselen van de schermbeveiligingsdisplays, raadpleegt u "De schermbeveiliging instellen".
- U kunt maximaal 30 tekens invoeren.
- De fabrieksinstalling is "Active Matrix Control System".
1. Druk op de [A] toets om de instelfunctie op te roepen.
2. Raak het insteltemdisplay met aan en kies bij "DISPLAY" het item "MSG INPUT".

DISPLAY
ADJUST MODE
MSG INPUT> EDIT
EDIT
3. Raak EDIT aan.
De functie verandert maar de
berichtinvoerfunctie.
4. Raak het midden van het display met 山 aan en kies de invoerpositie.
* Om het bericht te wissen, raakt u het midden van het display gedurende 2 seconden of langer aan. Als u de bediening van stap 8 uitvoert werwijl het bericht is gewist, keert het bericht terug maar de fabrieksinstelling.
5. Raak de linkerkant van het display met aan en kies het teksttype.
Met iedere aanraking met 山 山 山 verandert het teksttype. Voor verdere informatatie, zie bladzijde 37.
6. Raak de rechterkant van het display met aan, of draai de [ROTARY] knop en kies het teken dat u wilt invoeren.
7. Herhaal de stappen 4 t/m 6 om het hele bericht in te voeren.
8. Raak MEMO gedurende 2 seconden of langer aan.
U hoor een lange pieptoon en het bericht wordt in het geheugen opgeslagen.
9. Druk op de [A] toets om terug te keren maar de oorspronkelijke functie.
Berichten afbeelden (MESSAGE)
Met deze functie=kuntu berachten afbeelden op hetdisplaywannerhetapparaatwordin-ofuitgeschakeld. "Hello"wordtafgebeeldwannerhet apparaatwordtingschakeld,en"Seeyou" wordtafgebeeldwannerhet apparaatwordtuitgeschakeld.
- De fabrieksinstelling is "ON".
1. Druk op de [A] toets om de instelfunctie op te roepen.
2. Raak het insteltemdisplay met aan en kies bij "DISPLAY" het item "MESSAGE".

3. Raak de rechterkant van het display met aan of draai de [ROTARY] knop en kies "ON" of "OFF".
4. Druk op de [A] toets om terug te keren maar de oorspronkelijke functie.
De gevoeligkeit van de spectrumanalysator instellen (S/A SENS)
Met deze functie=kuntudgevoeligheid(grootte van de afwijking) van de spectrumanalysator instellen.Voor verdere informatie over het afbeelden van de spectrumanalysator, raadpleegt u "Het display omschakenen" (zie blz.13)of"De schermbeveilig inginstellen" (zie blz.41).
- De fabrieksinstelling is "MID".
1. Druk op de [A] toets om de instelfunctie op te roepen.
2. Raak het instelitemdisplay met aan en kies bij "DISPLAY" het item "S/A SENS".

DISPLAY
ADJUST MODE
S/A SENS > MID
3. Raak de rechterkant van het display met 卡 aan of draai de [ROTARY] knop en stel de gevoeligheid in.
* Kies LOW (eenkleine afwijking), MID of HIGH (eengroef afwijking).
4. Druk op de [A] toets om terug te keren maar de oorspronkelijke functie.
De doorloopsnelheid van het display instellen (SCROLL)
Met deze functie kurz u de doorloopsnelheid verlagen als de tekst te snel over het display loopt waardoor u deze Niet kurz lezen.
- De fabrieksinstelling is "SPEED 2".
1. Druk op de [A] toets om de instelfunctie op te roepen.
2. Raak het instelitemdisplay met aan en kies bij "DISPLAY" het item "SCROLL".

DISPLAY
ADJUST MODE
SCROLL » SPEED2
3. Raak de rechterkant van het display met aan of draai de [ROTARY] knop en stel de gevoeligheid in.
* Dit item kan worden ingesteld binnen het bereik van SPEED 1 t/m SPEED 7.
Stel het item in verwijl u kijkth hoe het display verandert.
4. Druk op de [A] toets om terug te keren maar de oorspronkelijke functie.
De automatische displaydimmer instellen (DIMMER IN)
Met deze functie=kunt u de displayverlichting verzwakken overeenkomstig de verlichting of helderheid in uw auto.
Stel de automatische displaydimmer in op "AUTO" (gekoppeld aan de helderheid in uw auto) of "ILLUMI" (gekoppeld aan de verlichting in uw auto).
- Als de automatische displaydimmer is ingesteld op "AUTO", worden de helderheid van het display gedimd afhankelijk van delichtsterkte gemeten door deze sensor.
- Stel verwolgens het niveau van de displaydimmer in bij DMR LEVEL.
- De fabrieksinstelling is "AUTO".
1. Druk op de [A] toets om de instelfunctie op te roepen.
2. Raak het insteltemdisplay met aan en kies bij "APPERNCE" het item "DIMMER IN".

APPERNCE
ADJUST MODE
DIMMER IN> AUTO
3. Raak de rechterkant van het display met 卡 aan of draai de [ROTARY] knop en stel het niveau van de displaydimmer in.
* Kies een instelling UIT OFF (displaydimmeruitgeschakeld, helder) en 1 (licht gedimdt) t/m 5 (donker).
4. Druk op de [A] toets om terug te keren maar de oorspronkelijke functie.
Het displaycontrast instellen (CONTRAST)
Met deze functie=kunt u het contrast van hetdisplay instellen afhankelijk van de hoekwaaronder het apparaat is gemonteerd.
- De fabrieksinstelling is "6".
1. Druk op de [A] toets om de instelfunctie op te roepen.
2. Raak het insteltemdisplay met aan en kies bij "APPERNCE" het item "CONTRAST".
3. Raak de rechterkant van het display met 卡 aan of draai de [ROTARY] knop en stel het contrast in.

APPENCE
ADJUST MODE
CONTRAST 》 6
* Dit item kan worden ingesteld binnen het bereik van 1 t/m 11.
Stel het item in terwijl u kijkht hoe het display verandert.
4. Druk op de [A] toets om terug te keren maar de oorspronkelijke functie.
3. Raak de rechterkant van het display met aan of draai de [ROTARY] knop en kies "AUTO" of "ILLUMI".
4. Druk op de [A] toets om terug te keren maar de oorspronkelijke functie.
De LED laten knipperen wanneer de DCP worden verwijderd (BLINK LED)
Met deze functie kutu de LED van dit apparaat\
laten knipperen wonneer de DCP worden\
verwijderd.
- De fabrieksinstelling is "OFF".
1. Druk op de [A] toets om de instelfunctie op te roepen.
2. Raak het insteltemdisplay met 山 aan en kies bij "APPERNCE" het item "BLINK RED".

APPERNCE
ADJUST MODE
DMR LEVEL》 3
ADJUST MODE
BLINK LED》 OFF
3. Raak de rechterkant van het display met aan of draai de [ROTARY] knop en kies "ON" of "OFF".
4. Druk op de [A] toets om terug te keren maar de oorspronkelijke functie.
De pieptoon instellen voor wanner de toetsen worden bediend (BEEP)
Met deze functie=kunt u de korte en lange hoge pieptonen ("BEEP" genaamd) instellen die u hoort wanner een toets worden bediend.
- De fabrieksinstelling is "ON".
1. Druk op de [A] toets om de instelfunctie op te roepen.
2. Raak het insteltemdisplay met aan en kies bij "APPERNCE" het item "BEEP".

3. Raak de rechterkant van het display met 卡 aan of draai de [ROTARY] knop en kies "ON" of "OFF".
4. Druk op de [A] toets om terug te keren maar de oorspronkelijke functie.
Een functie kiezen
Dit item kan nicht worden gekozen wanner Dolby Pro Logic II is ingesteld op "MUSIC" of "MATRIX" (zie blz. 17).
- De fabrieksinstelling is "PRO" voor AC-PRO III en "PEQ" voor EQ SELECT.
AC-PROIII
Als "STD" (standaardfunctie) is gekozen, kunden de geluidskwaliteit en het geluidsveld worden ingesteld met VSE (Virtual Space Enhancer) zodate in eache zitpositie hetzelfdelle geluideffect kan worden verkrogen.
Als "PRO" (professionele functie) is gekozen, können de geluidskwaliteit en het geluidsveld in detail afzonderlijk voor iedere zitpositie worden ingesteld.
EQ SELECT
Als "P.EQ" (equalizerfunctie) is gekozen, kan het hele freiorentiebereik worden gecompenseerd door een gedetailleerde vloeende kromme.
Als "BAS / TREB" (lagetonen-/ hogetonenfunctie) is gekozen, kan het freiquentiebereik worden gecompenseerd door dit te verdelen in twee deelbereiken: lage tonen en hoge tonen.
1. Druk op de [A] toets om de instelfunctie op te roepen.
2. Raak het instelitemdisplay met aan en kies bij "SOUND" het item "AC-PRO III", en bij "SOUND" het item "EQ SELECT".

3. Raak de rechterkant van het display met aan of draai de [ROTARY] knop en kies de functie.
Functiekeuze
AC-PRO III STD
• Standaardfunctie (VSE-menu) PRO
• Professionele functie (positi菜单) EQ SELECT P.EQ
• Equalizerfunctie (P.EQ-menu) BAS / TREB
• Lagetonen-/hogetonnenfunctie
4. Druk op de [A] toets om terug te keren maar de oorspronkelijke functie.
De luidsprekerconfigurationinstellen (SP-SETTING)
Met deze functie=kunt u de configuratie van de luidsprekers in uw auto instellen zodat de geluidskarakteristieken van dit apparaat volledig tot hun rechtkommen.
- De fabrieksinstalling is "SWL + SWR".
1. Druk op de [A] toets om de instelfunctie op te roepen.
2. Raak het instelitemdisplay met aan en kies bij "SOUND" het item "SP-SETTING".

3. Raak de rechterkant van het display met 卡 aan of draai de [ROTARY] knop en kies de luidsprekerconfigatie.
Luidsprekerconfigurations
CTR+SW
5.1-kanalen
configuratie Voor-/achterluidsprekers (4 kanalen)
Middenluidspreker (1 kanaal)
Subwoofer (1 kanaal) SWL + SWR
4 kan. + subwoofer
configuratie Voor-/achterluidsprekers (4 kanalen)
Subwoofer (2 kanalen)
Opmerkingen:
- Het geluid worden nicht door de middenluidspreker uitgevoerd, behalte als de onderstaande instelleningen worden gemaakt wanneer "CTR+SW" is ingesteld.
(1) Raadpleeg "Het PLII-menu (Dolby PL II) kiezen" (zie blz. 17) en stel de Dolby Pro Logic II-functionie in op "MUSIC" of "MATRIX".
(2) Raadpleeg "De luidsprekers in-/uitschaken (CENTER-SP/SUB-WOOFER)" (zie blz. 45) en stel de middenluidspreker in op "ON".
- Het geluid worden nicht uitgevoerd uit de het linkerkanaal van de subwoofer als "SWL + SWR" is ingesteld en de Dolby Pro Logic II-functionie is ingesteld op "MUSIC" of "MATRIX".
4. Druk op de [A] toets om terug te keren maar de oorspronkelijke functie.
De luidsprekers in-/ uitschakelen (CENTER-SP/ SUB-WOOFER)
Met deze functie kurz u de middenluidspeker (CENTER-SP) en de subwoofer (SUB-WOOFER) in- en uitschakelen.
Zorg ervoor dat deze instelling op "OFF" is ingesteld als er geen middenluidspreker of subwoofer is aangesloten.
- De middenluidspreker (CENTER-SP) kan worden ingesteld als de Dolby Pro Logic II-functie is ingesteld op "MUSIC" of "MATRIX", en "SP-SETTING" is ingesteld op "CTR-SW".
- De fabrieksinstelling is "ON".
1. Druk op de [A] toets om de instelfunctie op te roepen.
2. Raak het instelitemdisplay met aan en kies bij "SOUND" het item "CENTER-SP", en bij "SOUND" het item "SUB-WOOFER".

3. Raak de rechterkant van het display met aan of draai de [ROTARY] knop en kies "ON" of "OFF".
4. Druk op de [A] toets om terug te keren maar de oorspronkelijke functie.
De filterfrequentie van de luidsprekers instellen (HPF/ SUB-W LPF)
Met deze functie=kunt u de filterfrequentie instellen overeenkomstig de luidsprekers die u gebrukt.
- De filters (HPF/SUB-W LPF) die u kurz gebruiken verschellen afhankelijk van de instelling van de Dolby Pro Logic II-functie.
Dolby Pro Logic II
functie-instelling Filter HPF SUB-W LPF*1 MUSIC/MATRIX Niet instelbaar Instelbaar OFF Instelbaar Instelbaar
^*1 Instellen is alleen mogelijk als "SUB-WOOFER" is ingesteld op "ON".
- De fabrieksinstelling is "THROUGH".
Filterinstalling
HPF (installing van hoogdoorlaatfilter)
Dit filter verwijdert de lage tonen UIT het geluid voor de voor- enchyterluidsprekers.
THROUGH 50Hz 80Hz 120Hz
Stel het filter in overeenkomstig uw luidsprekers als de luidsprekers eenkleine diameter hebben.
THROUGH
Kies deze instelling als u luidsprekers gebruikt die lage tonen können weergeven.
SUB-W LPF (installing van laagdoorlaatfilter voor subwoofer)
Dit filter verwijdert de hoge tonen uit het geluid voor de subwoofer.
THROUGH 50Hz 80Hz 120Hz
Stel de filterfrequentie in overeenkomstig uw subwoofer.
THROUGH
Kies deze instelling als u een subwoofer gebruikt met ingebouwde versterker uitgerust met een laagdoorlaatfilter.
1. Druk op de [A] toets om de instelfunctie op te roepen.
2. Raak het insteltemdisplay met aan en kies bij "SOUND" het item "HPF", en bij "SOUND" het item "SUB-W LPF".

3. Raak de rechterkant van het display met aan of draai de [ROTARY] knop en kies de frequente.
* Kies een instelling uit THROUGH, 50Hz, 80Hz en 120Hz.
4. Druk op de [A] toets om terug te keren maar de oorspronkelijke functie.
De ingebouwde versterker in-/uitschakelen (AMP CANCEL)
Met deze functie kurz u de ingebouwde versterker in- en uitschaken, alaar gelang een externe versterker worden gebruikt.
Stel AMP CANCEL in op "ON" (ingebouwde versterker uitgeschakeld) als een exterversterker is aangesloten en de ingebouwdeversterker Niet worden gebruikt.
- De fabrieksinstelling is "OFF" (ingebouwdeversterker ingeschakeld).
1. Druk op de [A] toets om de instelfunctie op te roepen.
2. Raak het insteltemdisplay met 卡 aan en kies bij "SOUND" het item "AMP CANCEL".

3. Raak de rechterkant van het display met aan of draai de [ROTARY] knop en kies "ON" of "OFF".
4. Druk op de [A] toets om terug te keren maar de oorspronkelijke functie.
Het uitgangsiveau van de Iuidsprekers instellen (SP GAIN)
Gebruik de ingebouwde testtoonfunctie van het apparaat om het uitgangsniveau van de luidsprekers zodanig in te stellen dat het volumeniveau dat iedere luidspreker voortbrengt hetzelfde klinkt.
- Dit item kan alleen worden ingesteld als de Dolby Pro Logic II-functie is ingesteld op "MUSIC" of "MATRIX".
- De fabrieksinstalling is "0dB".
1. Druk op de [A] toets om de instelfunctie op te roepen.
2. Raak het insteltemdisplay met aan en kies bij "SOUND" het item "SP GAIN".

3. Raak EDIT aan. De functie verandert maar de instelfunctie voor SP GAIN.
4. Raak het insteltemdisplay met 卡 aan en kies het gewenste insteltem. Met iedere aanraking met 卡 worden de instelitems als volgt doorlopen:
Instelitems

*1“CTR GAIN” wordt alleen aufgebeeld als "SP-SETTING" is ingesteld op "CTR+SW", en "CENTER-SP" is ingesteld op "ON".
^*2 "SUB-W GAIN" wordt alleen afgebeeld als "SUB-WOOFER" is ingesteld op "ON".
5. Raak de rechterkant van het display met 山 _ 1 ^ 山 aan of draai de [ROTARY] knop en stel het uitgangsnaveau in. Het uitgangsiveau kan worden ingesteld binnen het bereik van -10 dB t/m +10 dB.
6. Herhaal de stappen 4 en 5 om ieder item in te stellen.
7. Druk op de [A] toets om terug te keren maar de oorspronkelijke functie.
De vertragingstijd van de awhilesprekers instellen (PL II DELAY)
De tijdsduur waarna het geluid van iedere
luidspreker aankomt op de luisterpositie
verschilt affankelijk van de montagepositie van
dechterluidsprekers en de grotte van uw
auto. Als u de vertragingstijd van de
acterluidsprekers instelt,kest u deze tijdsduur
instellen zodate het geluid van de
acterluidsprekers tegelijkertijd worden gehoord
als dat van de voorluidsprekers.
- Dit item kan alleen worden ingesteld als de Dolby Pro Logic II-functie is ingesteld op "MUSIC" of "MATRIX".
- De fabrieksinstalling is "0ms".
1. Druk op de [A] toets om de instelfunctie op te roepen.
2. Raak het insteltemdisplay met aan en kies bij "PL II DELAY" het item "SRD-SP".

3. Raak de rechterkant van het display met 卡 aan of draai de [ROTARY] knop en stel de vertragingsstijd in.
* "SRD-SP" kan worden ingesteld binnen het bereik van 0 ms t/m 15 ms.
4. Druk op de [A] toets om terug te keren maar de oorspronkelijke functie.
De muziekfunctie in detail instellen (PL II CONT)
Met deze functie=kunt u de muziekfunctie gedetailleerder instellen als de Dolby Pro Logic II is ingesteld op "MUSIC".
- Dit item kan alleen worden ingesteld als de Dolby Pro Logic II-functie is ingesteld op "MUSIC".
- De fabrieksinstelling van PANORAMA is "NO", van DIMENSION is "3", en van CTR WIDTH is "3".
InstelItems
PANorama (installing van panoramaregeling)
Dit item verw breedt het geluidsveldbeeld van de voor- tot aan de achechterluidsprekers. Stel dit item in op "YES" als u geen surroundeffect hoort.
DIMENSION (installing van dimensie)
Dit item verplaatst het geluidsveldbeeld waar voren of achefteren. Als het geluidsveldbeeld waar voren ofaar achteren lijkt te liggen, kan deze afwijking worden gecompenseerd. Instelling 3 is de middenpositie. De instellenen 2 t/m 0 verplaatsen het geluidsveldbeeldaar achefteren, en de instellenen 4 t/m 6 verplaatsen het geluidsveldbeeldaar voren.
CTR WIDTH (installing van de middenbreds) 1 Dit item stelt de vaste positie van het middenkanaal inussen de middenluidspreker en de linker- enrechtervoorluidsprekers. Als het middengeluid gelijkmatig is verdeld
tussen links en rechts, neemt het hele geluidsveldbeeld toe en produeert een naturuurlijk uitdijend gevoel.
In deinstalling 0 wordt al het middengeluid weergegeven via de middenluidspreker. In deinstalling 7 is het middengeluid gelijkmatig verdoeffend over de linker- en rechtservoorluidsprekers.
*1 "CTR WIDTH" wordt alleen aufgebeeld als "SP-SETTING" is ingesteld op "CTR+SW", en "CENTER-SP" is ingesteld op "ON".
1. Druk op de [A] toets om de instelfunctie op te roepen.
2. Raak het insteltemdisplay met 山 山 aan en kies bij "PL II CONT" het gewenste insteltem. De insteltems zijn "PANorama", "DIMENSION" en "CTR WIDTH".

3. Raak de rechterkant van het display met aan of draai de [ROTARY] knop en stel het item maar wens in.
* Kies voor "PANORAMA" de instelling "YES" of "NO".
* "DIMENSION" kan worden ingesteld binnen het bereik van 0 t/m 6.
* "CTR WIDTH" kan worden ingesteld binnen het bereik van 0 t/m 7.
4. Druk op de [A] toets om terug te keren maar de oorspronkelijke functie.
De AUX-functionie
Dit system is uitergerust met een tulpingangen zodate u kunt luisteren hier geluid en muziek van externe apparaten aangesloten op dit apparaat.
AUX/TELkiezen
U kunt via de luidsprekers luisteren maar geluid en muziek van externe apparaten, of maar uw telefoongesprekken, indien deze+zijn aangesloten op dit apparaat.
Als TEL INT of een extern apparaat is aangesloten op dit apparaat,kest u de TEL-functie of de AUX-functie kiezen.
- De fabrieksinstelling is "AUX".
1. Druk op de [A] toets om de instelfunctie op te roepen.
2. Raak het insteltemdisplay met aan en kies bij "SETTING" het item "AUX/TEL".

3. Raak de rechterkant van het display met aan of draai de [ROTARY] knop en kies "AUX" of "TEL". AUX:
De AUX/TEL-ingangskabel is voor de geluidsinvoer vanaf een extern apparaat. TEL:
De AUX/TEL-ingangskabel is voor de geluidsinvoor vanaf een mobiele telefoon.
4. Druk op de [A] toets om terug te keren maar de voorgaande functie.
Het ingangsiveau van draagbare audio (AUX-functie) instellen (AUX SENS)
Met deze functie=kunt u het ingangsnaveau instellen van optionele externe apparaten die..., aanegasloten op dit apparaat.
- Dit kan worden ingesteld als "AUX/TEL" is ingesteld op "AUX".
- De fabrieksinstalling is "MID".
1. Druk op de [A] toets om de instelfunctie op te roepen.
2. Raak het insteltemdisplay met aan en kies bij "SETTING" het item "AUX SENS".

3. Raak de rechterkant van het display met 卡 aan of draai de [ROTARY] knop en stel het ingangsniveau in.
* Kies een instelling UIT LOW, MID of HIGH.
4. Druk op de [A] toets om terug te keren maar de oorspronkelijke functie.
De autoluidsprekeruitgang voor de mobiele telefoon (TEL-002, optioneel) instellen
Stel de mobiele telefoon in als u telefoongesprekken wiltuitvoeren.
- De fabrieksinstelling is "RIGHT".
1. Druk op de [A] toets om de instelfunctie op te roepen.
2. Raak het instelitemdisplay met aan en kies bij "SETTING" het item "TEL-SP".

3. Raak de rechterkant van het display met aan of draai de [ROTARY] knop en kies "LEFT" of "RIGHT".
LEFT:
De telefoongesprekken können worden gehoord via de linkervoorluidspreker die is aangesloten op dit apparaat.
RIGHT:
De telefoongesprekken können worden gehoord via de rechtervoorluidspreker die is aangesloten op dit apparaat.
4. Druk op de [A] toets om terug te keren maar de voorgaande functie.
De mobiele-telefooonnderbreking instellen
Als u dit apparaat en uw mobiele telefoon aansluit op een apparaatje (TEL-002, optioneel), kutn u luisteren maar uw telefoongesprekken via de luidsprekers in uw auto.
- De fabrieksinstalling is "OFF".
1. Druk op de [A] toets om de instelfunctie op te roepen.
2. Raak het insteltemdisplay met aan en kies bij "SETTING" het item "TEL-SWITCH".

3. Raak de rechterkant van het display met
aan of draai de [ROTARY] knop en kies de instenting.
Met iedere druk op de [ROTARY] knop, verandert de instelling in onderstaande volgorde:
OFF ON MUTE OFF...
OFF:
Dit apparaat blij normala Werken, zelfs als de mobiele telefoon worden gebruikt.
Opmerking:
- Als u een handsfree-set aansluit, zorgt u ervoor deze instelling op ON te zetten om het geluid van de mobiele telefoon via het systeme te ontvangen.
ON:
U cunt waar uw telefoongesprekken luisteren via de luidsprekers aangesloten op dit apparaat.
* Wanner u maar uw telefoongesprekken luistert via de luidsprekers van uw auto,kest u het volumeniveau instellen door de the [ROTARY] knop te draaien.
MUTE:
Het weergavegeluid van dit apparaat worden onderbrokenijdens telefoongesprekken.
4. Druk op de [A] toets om terug te keren maar de voorgaande functie.
De automatische volumeregeling instellen (CALIBRATE/A-VOL SENS)
U kunt het volumeniveau automatisch veranderen aan de hand van de rijsnelheid van uw auto.
- De fabrieksinstelling is "LOW".
1. Druk op de [A] toets om de instelfunctie op te roepen.
2. Raak het insteltemdisplay met aan en kies bij "SETTING" het item "CALIBRATE".

3. Versnel tot een snelheid van 50~km / h
4. Als u 50 km/h rijdt, drukt u op START. Het kalibreren worden UITgevoerd.
Na 2 seconden of langer hoort u een lange pieptoon, en op het display worden "SUCCESSIONAL" afgebeeld.
Als u een korte pieptoon hoot, is het kalibreren mislukt. Herhaal de procedure vanaf stap 3.
5. Stel cervolgens de gevoeligheid in. Raak het instelitemdisplay met aan en kies bij "SETTING" het item "A-VOL SENS".

6. Raak de rechterkant van het display met aan of draai de [ROTARY] knop en kies de gevoeligheid.
Met iedere druk op de [ROTARY] knop, verandert de instelling in onderstaande volgorde:
OFF (geen verandering in het volumeniveau) LOW (kleine verandering in het volumeniveau) MID-LOW MID MID-HIGH HIGH (grote verandering in het volumeniveau) ...
7. Druk op de [A] toets om terug te keren maar de voorgaande functie.
Een systeemcontroleuitvoeren
Met deze functie=kunt u een systeemcontroleuitvoeren van de instelfunctie indien dit nodigmighten.
1. Druk op de [A] toets om de instelfunctie op te roepen.
2. Raak het instelitemdisplay met aan en kies bij "SETTING" het item "SYSTEM CHECK".

SETTING
ADJUST MODE
SYSTEM CHECK START
3. Raak START gedurrende 1 seconde of langer aan.
"System Check" wordt op het display afgebeeld.
4. Druk op de [ROTARY] knop.
De systeemcontrole start.
Nadat de systeemcontrole maar is, worden
"Completed" aufgebeeld op het display.
5. Druk nogmaals op de [ROTARY] knop. Het hoofddisplay van de radiofunctie worden afgebeeld.
De beveiligingsfunctie gebruiken (CODEMATIC)
Met deze functie kurz u voorkomen dat personen die de juiste aanraakvolgorde nicht kennen dit apparaat gemakkelijk können bedienen. Het aanraakcodedisplay worden afgebeeld als het DCP worden bevestigd en het apparaat worden ingeschakeld verwijl "CODEMATIC" is ingesteld op "ON".
Als u het display op de juiste locaties in de Vooraf bepaalde volgorde aanraakt, worden "SUCCESSFUL" afgebeeld en wordt het apparaatuitgeschakeld.
De volgende keer dat het apparaat worden ingeschakeld, wordt het aanraakcodedisplay Niet afgebeeld, maar worden het hoofddisplay van de radiofunctie of CD-functie afgebeeld.
1. Druk op de [A] toets om de instelfunctie op te roepen.
2. Raak het insteltemdisplay met aan en kies bij "SETTING" het item "CODEMATIC".

Er worden twee typen instelitems afgebeeld bij "CODEMATIC": items waarvoor aan de rechterkant van het display "ON" of "OFF" worden afgebeeld, en items waarvoor aan de rechterkant van het display "INPUT" worden afgebeeld.
Kies hier een item waarvoor aan de rechterkant van het display "ON" of "OFF" worden afgebeeld.
3. Raak de rechterkant van het display met 卡 aan of draai de [ROTARY] knop en kies "ON" of "OFF".
4. Raak het insteltemdisplay met aan en kies bij "SETTING" het item "CODEMATIC". Kies hier een item waarvoor aan de rechterkant van het display "INPUT" worden afgebeeld.
5. Raak INPUT aan.
Het aanraakcodedisplay gaat UIT.
6. Voer de aanraakcode in.
* Raak één van de vijf locaties op het display aan (links, midden, rechts, rechtsboven of rechtsonder).
Met iedere aanraking van een locatie op het display,licht een van de aanraakcodeindicators op.
* Bijvoorbeeld, raak (1) midden, (2) rechtsboven, (3) links en (4) rechtsonder in die volgorde aan. U kurz ookdezelfde locatie meerere keren aanraken. Nadat u vierkeeen locatie hebt aangeraakt, hoort u een lange pieptoon en keert het apparaat terug maar de oorspronkelijke functie.
CODEMATIC annuleren
Als u de aanraakvolgorde bent vergeten, raakt u ① rechtsonder, ② links, ③ rechtsboven en ④ rechts in die volgorde aan, of drukt u op [SCN] op de afstandsbediening.

7. BEDIENING VAN ACCESSORIES
Bediening van de CD-wisselaar
CD-wisselaar
Als een optionele CD-wisselaar is aangesloten met behulp van een CeNET-kabel, kan dit apparaat de functies van de CD-wisselaar bedieren. Dit apparaat kan op maximaal twee, met behulp van een CeNET-kabel aangesloten, CD-wisselaars worden aangesloten.
DVD-wisselaar
Als een optionele DVD-wisselaar is aangesloten met behulp van een CeNET-kabel, kan dit apparaat de functies van de DVD-wisselaar bedieren. Om een DVD te kunnen bekijken hebt u een optionele tv-monitor nodig.
De bediening en het display van de DVD-wisselaar op dit apparaat is slechts een vereenvoudigde versie en ondersteunt nicht alle functies van de DVD-wisselaar. Als u de DVD-wisselaar wilt bedieren, gebruikt u de afstandsbediening van de DVD-wisselaar. Voor verdere informatie raadpleegt u de gebruiksaanwijzing van de DVD-wisselaar.
■ Als twee CD-wisselaarsঃn aangesloten
Druk op de [ROTARY] knop en kies een CD-wisselaar die op dit apparaat is aangesloten. (Met iedere druk op de [ROTARY] knop verandert de CD-wisselaar.)
- Als de CD-wisselaar geen magazijn bevat, worden "NO MAG" afgebeeld, en als het magazijn geen CD bevat, worden "NO DISC" Niet afgebeeld voor dat disnummer.
- Voor verdere informatatie over het titeldisplay, raadpleegt u "Het titeldisplay omschakelen" (zie blz. 14).
De displays in dewisselaarfunctie
Hoofddisplay (CD-wisselaarfunctie) Het hoofddisplay wordt aufgebeeld als u op de [ROTARY] knop drukt en de CDwisselaarfunctie kiest.

Als u de linkerkant van het display gedurende 1 seconde de langer aanraakt, schakelt het display over maar de simpele bedieningsfunctie.

Track/weergavetijd-display
T01/02: 00: Het nummer van de track die nu wordt weergegeven en de weergavetijd worden afgebeeld.
Als u het display van de standardbedieningsfunctie met 山 山 of aanraakt, kurz u de track kiezen die u wilt weergeven of vooruit-/achteruiitspoeen.
Titeldisplay
Als u dit aanraakt, worden het display omgeschakeld.
Discnummerdisplay
Als u het display van de
standaardbedieningsfunctie met 卡 aanraakt, kut u een disc kiezen.
MODE
As u dit aanraakt, worden subfuncties afgebeeld. Als u dit gedurende 1 seconde of langer aanraakt, worden de dislijst afgebeeld.
T-SCAN/D-SCAN
Dit worden aufgebeeld tijdens scanweergave. Als u T-SCAN/D-SCAN aanraakt, stopt de scanweergave.
T-RPT/D-RPT
Dit worden aufgebeeldijdens herhaalde weergave. Als u T-RPT/D-RPT aanraakt, stopt de herhaalde weergave.
T-RDM/D-RDM
Dit worden afgebeeld tijdens willekeurige weergave. Als u T-RDM/D-RDM aanraakt, stocht de willekeurige weergave.
DISC↑
Als u dit aanraakt, begint de weergave van de volgende disc.
(alleen op het display van de simpele bedieningsfunctie)
Door deze aan te raken kutu de track kiezen die u wilt weergeven.
Door deze te blijven aanraken=kunt u de tracks vooruit-/achteruiestspoelen.
Disclijstdisplay (CD-wisselaarfunctie)
Deze lijst kunt u afbeelden door op het hoofddisplay gedurende 1 Seconde of longer MODE aan te raken.

Discnaam
>>: Bezig met kiezen
Als u een discnaam aanraakt, keert het display terug maar het hoofddisplay en begint de weergave vanaf de eerste track op de disc die u hebt aangeraakt.
←PREV-RTN:
Alsuditaanraakt,wordtdevoorgaande disclijsta
afgebeeld.Dooditgedurende1secondeof
langeraan teraken,keert hetdisplayterugnarr
hethoofddisplay.
NEXT:
Als u dit aanraakt, worden de volgende dislijst afgebeeld.
VOORZICHTIG
Niet iedere CD-wisselaar kan CD-ROMs weergegeven. Dit is afhankelijk van het model.
Opmerking:
- Het is möglich dat sommige CD's opgenomen in de CD-R/CD-RW-functie Niet bruikbaar zich.
De wisselaarfunctie kiezen
1. Druk op de [ROTARY] knop om de wisselaarfunctie te kiezen.
* De functie van een apparaat dat nicht is aangesloten worden nicht afgebeeld.
De weergave begint automatisch nadat de functie is veranderd in de wisselaarfunctie.
De weergave pauzeren
1. Druk op de [▶■] toets.
De weergave hervatten
1. Druk nogmaals op de [▶■] toets.
Een CD kiezen
1. Raak het discnummerdisplay met 山 山 aan en kies een disc. De weergave begint.
* Als de gekozen disc Niet in het magazijn zit, worden het discnummer Niet afgebeeld.
* Als u DISC ↑aanraakt, begint de weergave van de volgende disc.
Een disc kiezen op het disclijstdisplay
1. Raak MODE gedurende 1 seconde of longer aan.
De disclijst worden afgebeeld. Als u NEXT aanraakt, worden het volgende deel van de disclijst afgebeeld.
2. Raak de discnaam aan.
* Als de gekozen disc Niet in het magazijn zit, worden "NO DISC" afgebeeld voor dat disnummer.
* Als udezelfde disc kiest als die op dat moment worden teergegeben, keert de weergave terug maar en begint vanaf de eerste track op die disc (beginfunctie).
Een track kiezen
1. Als u maar de volgende track wilt luisteren, raaktu het trackdisplay met 品 aan.
2. Als u waar de voorgaande track wilt luisteren, raakt u het trackdisplay tweeemaal met 山 aan.
Door met 品 aan te raken worden de volgende track weergegeven.Als u vaker met 品 aanraakt, verspringt u hetzelfde aantal tracks vooruit als u met 品 hebt aangeraakt, waarna de weergave van de track begint.
Door met 卡 aan te raken worden de voorgande track weergegeven. Als u vaker met 卡 aanraakt, verspringt u hetzelfde aantal tracks achechteruit als u met 卡 hebt aangeraakt, waarna de weergave van de track begint.
* Als u het trackdisplay tweeemaal met † aanraakt toenwij het begin van een track worden waergegeven, worden soms tweet tracks acheeruit gesprongen, en begint de weergave van die track.
Vooruit- en Achteruitspoelen
1. Om vooruit te spoelen raakt u het trackdisplay met 出 aan.
2. Om anschteruit te spoelen raakt u het trackdisplay met aan.
Beginfunctie
De beginfungtie begint de weergave vanaf de eerste track op de disc die op dat moment worden weergegeven.
1. Raak MODE gedurende 1 seconde of longer aan.
De disclijst worden afgebeeld. Als u NEXT aanraakt, worden het volgende deel van de disclijst afgebeeld.
2. Raak de discnaam aan.
* Als de gekozen disc Niet in het magazijn zit, worden "NO DISC" afgebeeld voor dat discnummer.
* Als udezelfde disc kiest als die op dat moment worden weergegeven, keert de weergave terug maar en begint vanaf de eerste track op die disc.
Scanweergave
In de scanweergave worden de eerste 10 seconden vanijdere track op een disc automatisch weergegeven. Deze functie blijdt doorgaan totdat deze worden uitgeschakeld.
Scanweergave is handig wanner u een gewenste track zoekt.
1. Raak MODE aan.
2. Raak T-SCAN aan. MODE verandert in "T-SCAN" en de scanweergave begint.
* De scanweergave begint vanaf de track die volgt op de track die op dat moment worden weergegeven.
De scanweergave stoppen
1. Raak T-SCAN aan.
T-SCAN verandert in "MODE" en de weergave begint vanaf de track die werd weergegeven toen u T-SCAN aanraakte.
Discscanweergave
In de discscanweergave worden de eerste 10 seconden van de eerste track op iedere disc in de huidig gekozen CD-wisselaar automatisch weergegeven. Deze functie blijdt doorgaan totdat deze worden uitgeschakeld.
Discscanweergave is handig wanner u een gewenste CD zoekt.
1. Raak MODE aan.
2. Raak D-SCAN aan.
MODE verandert in "D-SCAN" en de discscanweergave begint.
* De discscanweergave begint vanaf de disc die volgt op de disc die op dat moment worden weergegeven.
De discscanweergave stoppen
1. Raak D-SCAN aan.
D-SCAN verandert in "MODE" en de weergave begint vanaf de track die werden weergegeven toen u D-SCAN aanraakte.
Herhaalde weergave
In de herhaalde weergave wordt de track die op dat moment wordt weergegeven continu herhaald. Deze functie blijdt doorgaan totdat deze wordt uitgeschakeld.
1. Raak MODE aan.
2. Raak T-REPEAT aan. MODE verandert in "T-RPT" en de herhaalde weergave begint.
De herhaalde weergave stoppen
1. Raak T-RPT aan.
T-RPT verandert in "MODE" en de normale weergave begint vanaf de track die werd weergegeven voordat u T-RPT aanraakte.
Herhaalde discweergave
In de herhaalde discweergave worden, nadat alle tracks op de huidige disc zich weergegeven, de disc opniew vanaf de eerste track weergegeven. Deze functie blijft doorgaan totdat deze worden uitgeschakeld.
1. Raak MODE aan.
2. Raak D-REPEAT aan.
MODE verandert in "D-RPT" en de herhaalde discweergave begint.
■ De herhaalde discweergave stoppen
1. Raak D-RPT aan.
D-RPT verandert in "MODE" en de normale weergave begint vanaf de track die werden weergegeven voordat u D-RPT aanraakte.
Willekeurige weergave
In de willekeurige weergave worden de afzonderlijke tracks op de disc automatisch willekeurig gekozen en weergegeven. Deze functie blijdt doorgaan totdat deze wordenuitgeschakeld.
1. Raak MODE aan.
2. Raak T-RANDOM aan. MODE verandert in "T-RDM" en de willekeurige weergave begint.
De willekeurige weergave stoppen
1. Raak T-RDM aan.
T-RDM verandert in "MODE" en de normale weergave begint vanaf de track die werden weergegeven voordat u T-RDM aanraakte.
Willekeurige discweergave
In de willekeurige discweergave worden de afzonderlijke tracks of discs automatisch willekeurig gekozen en weergegeven. Deze functie blijft doorgaan totdat.Deze wordenuitgeschakeld.
1. Raak MODE aan.
2. Raak D-RANDOM aan. MODE verandert in "D-RDM" en de willekeurige discweergave begint.
De willekeurige discweergave stoppen
1. Raak D-RDM aan.
D-RDM verandert in "MODE" en de normale weergave begint vanaf de track die werd weergegeven voordat u D-RDM aanraakte.
TV-tuner
Als een optionele TV-tuner is aangesloten met behulp van een CeNET-kabel, kan dit apparaat alle functies van de TV-tuner bedieren. Als u een TV-uitzending wilt bekijken, heb t een TVtuner en een tv-monitor nodig.
De displays in de TV-functionie
Hoofddisplay
Het hoofddisplay worden aufgebeeld als u op de [ROTARY] knop drukt en de TV-functie kiest.

Als u de linkerkant van het display gedurende 1 seconde de langer aanraakt, schakelt het display over maar de simpele bedieningsfunctie.

Kanaaldisplay
1ch: Het kanaal dat op dat moment worden ontvangen worden afgebeeld.
Als u het display van de standaardbedieningsfunctie met of aanraakt, kurz u Zoek-afstemmen of handmatig afstemmenuitvoeren.
Titeldisplay
3ch: De naam van de zender die op dat moment worden ontvangen worden afgebeeld.
VTR: In de videofunctie
Als u deze aanraakt, worden het display omgeschakeld.
Frequentiebanddisplay
TV1: Frequentiebandnaam
Voorkeurnummerdisplay
Als u het display van de
standaardbedieningsfunctie met 山 山 aanraakt, kurz u een voorkeurgeheugen kiezen.
MODE
As u dit aanraakt, worden subfuncties afgebeeld. Door dit gedurende 1 seconde of langer aan te raken, worden de voorkeurgeheugenlijst afgebeeld.
P-SCAN: Dit worden afgebeeldijdens het voorkeurzender-scannen. Als u dit aanraakt, stoot het voorkeurzender-scannen.
A-STORE: Dit worden afgebeeldijdens het automatisch opslaan. Als u dit aanraakt, stopt het automatisch opslaan.
BAND
Door dit aan te raken worden de frequentieband omgeschakeld.
Als u dit gedurende 1 seconde of langer aanraakt, schakelt dezoekfunctie beurtelings tussen de handmatige afstemfunctie en dezoek-afstemfunctie.

(alleen op het display van de simpele bedieningsfunctie)
Door deze toetsen aan te raken=kunt u zoekafstemmen of stap-afstemmen in dehandmatige afstemfunctie).
Door deze toetsen aan te raken en aangeraakt te houden kurz u snel-afstemmen (in de handmatige afstemfunctie).
De Voorkeurgeugenlijst afbeelden
Deze lijst kunt u afbeelden door op het hoofddisplay gedurende 1 Seconde of langer MODE aan te raken.

>>
Bezig met afstemmen
RTN:
Als u dit aanraakt, keert het display terug maar het hoofddisplay.
De TV-functie kiezen
1. Druk op de [ROTARY] knop om deTV-functionie te kiezen.
Met iedere druk op de [ROTARY] knop, verandert de functie als volgt:
* De functie van een apparaat dat nicht is aangesloten worden nicht afgebeeld.
Eband wisselen
1. Raak BAND aan om de frequentieband te veranderen.
Met jegere aanraking van BAND verandert de frequentieband in onderstaande volgorde.
TV1 TV2 TV1...
Zoek-afstemmen
Met Zoek-afstemmen=kunt u automatisch afstemmen op zenders met een goede ontvangstkwaliteit.
1. Raak BAND aan gedurende 1 Seconde of langer verwil MANU wordt afgebeeld. Als MANU uit is, is automatisch afstemmen möglichk.
2. Raak het kanaaldisplay met aan. SEEK UP/SEEK DOWN worden afgebeeld en het afstemmen begint. Het afstemmen stopt automatisch bij zenders met een goede ontvangstkwaliteit.
Het afstemmen annuleren
1. Raak nogmaals het kanaaldisplay met aan.
Handmatig afstemmen
Er zijn twee manieren waarop u handmatig kunt afstemmen: snel-afstemmen en stap-afstemmen.
In de stap-afstemfunctie verandert de frequentie stap voor stap. In de snel-afstemfunctie kut u snel afstemmen op de gewenste frequentie.
1. Raak BAND aan gedurende 1 seconde of langer verwijl MANU zich wordt afgebeeld. Als MANU wordt afgebeeld is handmatig afstemmen möglichk.
2. Bedien het kanaaldisplay en stem af op een kanaal waarop wordenuit gezonden. Er zich twee methoden voor handmatig afstemmen: stap.afstemmen en snelafstemmen.
* In de stap-afstemfunctie verandert het kanaal stap voor stap.
Raak het titeldisplay met 一 _ 一 aan.
* In de snel-afstemfunctie kutu het kanaalsnel ononderbroken veranderen. Raak het kanaaldisplay met aan. Het afstemmen stoot zodra u uw vinger van het display afhaalt.
Oproepen van een voorgeprogrammeerd station
Met deze functie=kunt u een voorkeurzender kiezen.
1. Raak MODE gedurende 1 seconde of langer aan. De voorkeurgeheugenlijst worden afgebeeld.
2. Raak de zender aan waarnaar u wilt luisteren.
* U=kunt ook op de zender afstemmen door het voorkeurnummer met ①aan te raken.
Het afstemmen annuleren
1. Raak RTN aan.
Voorkeurzenders handmatig opslaan
U kunt maximaal 12 TV-zenders opslaan (6-TV1 en 6-TV2). Hiermee kunt u uw favoriete TV-zenders in het geheugen opslaan en later weer oproepen.
1. Raak BAND aan om de freiorentieband te veranderen.
2. Bedien het kanaaldisplay en kies de zender die u wilt opslaan.
3. Raak MODE gedurende 1 seconde of langer aan. De voorkeurgeheugenlijst worden afgebeeld.
4. Raak het voorkeurnummer waaronder u de zender wilt opslaan gedurende 2 seconden of langer aan.
U hoor een lange pieptoon en de zender wordt in het geheugen opgeslagen.
Als u een korte pieptoon hoog, is de zender nicht in het geheugen opgeslagen. Herhaal de procedure vanaf stap 1.
Voorkeurzenders automatisch opslaan
U kunt automatisch 6 TV-zenders in het voorkeurgeheugen opslaan.
Als er minder dan ces zenders met een goede ontvangstkwaliteit gezonden worden, zullen de zenders die eerder in het geheugen werden opgeslagen gehandhaafd blijven en alleen de zenders met een sterk signaal in het geheugen worden opgeslagen.
1. Raak MODE aan.
2. Raak A-STORE gedurende 2 seconden of langer aan.
MODE verandert in "A-STORE" en het voorkeurnummer van het automatisch opslaan worden op het voorkeurnummerdisplay afgebeeld.
* Zenders met een goede ontvangstkwaliteit worden automatisch gezocht en opgeslagen in het voorkeurgeheugen (onder voorkeurnummers 1 t/m 6) in oplopende volgorde vanaf de zender met de laagste freiorentie.
Opmerkingen:
- Wanner u automatisch voorkeurzenders opslaat, worden eerder opgeslagen zenders gewist.
- Als er minder dan zes zenders met een goede ontvangstkwaliteit worden gezonden, keert het apparaat automatisch terug maar de laagste freqente en wordt het automatisch opstaan nogmaals uitgevoerd. Als daarna nog steeds minder dan zes zenders worden gezonden, blijven de eerder opgeslagen zenders in het geheugen.
Voorkeurzender-scannen
Met voorkeurzender-scannenkest u de Voorkeurzenders eén voor een controeren in de volgorde waarin ze in het geheugen zich opgeslagen.
1. Raak MODE aan.
2. Raak P-SCAN aan.
MODE verandert in "P-SCAN" en het voorkeurnummer van het voorkeurzender-scannen worden op het voorkeurnummerdisplay afgebeeld.
* De huidig opgeslagen voorkeurzenders worden een voor een op volgorde ontvangen gedurende 7 seconden of langer elk. Zenders met een slechte ontvangst worden overgeslagen en de volgende zender worden ontvangen.
De TV-zenders worden in onderstaande volgorde ontvangen: TV1 (1 6) TV2(1 6) TV1(1 6) enzovoort.
Het voorkeurzender-scannen annuleren
1. Raak P-SCAN aan.
P-SCAN verandert in "MODE", en de zender die werden ontvangen voordat op P-SCAN werk gedrukt, worden waar ontvangen.
Naar een video kijken
De TV-tuner is uitergerust met een VTR-ingangsaansluiting waarop u eén extern apparaat kutn aansluiten. Sluit een 12-volt videocassettespeler (VCP) of videocassetterecorder (VCR) aan op de ingangsaansluiting van de TV-tuner.
1. Druk op de [▶■] toets.
VTR worden aufgebeeld en het apparaat worden in de VTR-functie gezet.
* Het TV-schem roept de video-ingangsfungtie op, waarna u een video-kunt weergeven.
■ Terugkeren maar de TV-functie
1. Druk nogmaals op de [▶II] toets.
Het TV-zendergebied instellen (TV AREA)
Als u het TV-zendergebied (waarin het tv-signal kan worden ontvangen) instelt, verandert de gebiedsinstelling van de TV-tuner.
- De fabrieksinstelling is "GERMANY".
1. Druk op de [A] toets om de instelfunctie op te roepen.
2. Raak het insteltemdisplay met aan en kies bij "TUNER" het item "TV AREA".

ADJUST MODE TV AREA GERMANY
3. Raak de rechterkant van het display met aan of draai de [ROTARY] knop en kies het zendergebied.
4. Druk op de [A] toets om terug te keren maar de voorgaande functie.
De TV-diversiteit instellen (TV DIVER)
U kurz de ontvangstinstelling van de TV-antenne die op de TV-tuner is aangesloten instellen.
Stel dit item in op "OFF" als u geen TV-antenne voor meervoudige ontvangst gezruikt.
- De fabrieksinstelling is "ON".
1. Druk op de [A] toets om de instelfunctie op te roepen.
2. Raak het insteltemdisplay met aan en kies bij "TUNER" het item "TV DIVER".

3. Raak de rechterkant van het display met aan of draai de [ROTARY] knop en kies "ON" of "OFF".
4. Druk op de [A] toets om terug te keren maar de oorspronkelijke functie.
De DAB-bedieningsfunctie
Als een DAB (optioneel, DAH913 of DAH923) is aangesloten met behulp van een CeNET-kabel, kan dit apparaat alle functies van de DAB bedieren.
Naar een DAB-zender luisteren
1. Druk op de [ROTARY] knop om de bedieningsfunctie te veranderen.
Opmerkingen:
- Het display dat worden afgebeeld wonneer een DAB-zender worden ontvangen is hetzelfde als dit wonneer een zender handmatig worden ontvangen of een voorkeurzender worden ontvangen.
- Het aantal programma's en de uitzendtijden verzillen per DAB-zender.
- Als het DAB-sigmaal zwak is, worden de geluidsuitvoer onderbroken.
Zoek-afstemmen
1. Druk op de [ROTARY] knop en kies de DAB-functionie.
2. Raak de linkerkant van het display met aan.
Als het apparaat een DAB-zender ontvangt,\
wordt "DAB" afgebeeld op het display.
* Het apparaat stopt hetzoek-afstemmen als het geen DAB-zender kan vinden. Het display keert terug maar de voorgaande functie.
Handmatig afstemmen
1. Druk op de [ROTARY] knop en kies de DAB-functionie.
2. Als "MANU" nied wordt afgebeeld, raakt u BAND aan gedurende 1 seconde of langer. Als "MANU" wordt afgebeeld, is handmatig afstemmen möglichk.
3. Raak de linkerkant van het display met aan en stem af op de zender.
* Als gedurende 7 seconden of langer geen bediening worden ditgevoerd, worden het handmatig afstemmen beeindigd en keert het display terug maar de voorgaande functie.
Wisselen tussen programma's
1. Druk op de [ROTARY] knop en kies de DAB-functionie.
2. Raak de linkerkant van het displa
品 aan om tussen de programma's van de DAB-zender te wisselen.
Opmerking:
- De programmanamen können hetzelfde zijn, afhankelijk van de DAB-zender.
Programma-scannen
Met deze functie=kunt u ieder ontvangbaarprogramma van de DAB-zender die wordenontvangen eén voor een gedurende 10seconden elk scanden.Dit is handig wanner uunaar een gewenst programma wilt zoeken.
1. Druk op de [ROTARY] knop en kies de DAB-functie.
2. Raak MODE aan.
3. Raak S-SCAN aan. "S-SCAN" wird afgebeeld en dit apparaat begint de programme's een voor een geduerende 10 seconden elk te scannen. Van ieder programma dat het apparaat scant wordt de naam op het display afgebeeld.
4. Als u het scannen wilt stoppen wanner het gewenste programme is gezonden, raakt u S-SCAN aan.
Handmatig opslaan in het geheugen
Het apparaat kan DAB-programma's handmatig in het geheugen opslaan. Maximaal 18 programme's kunnen onder de voorkeurtoetsen (6 programme's elk) worden opgeslagen.
[M1], [M2] en [M3]
1. Druk op de [ROTARY] knop en kies de DAB-functie.
2. Raak BAND aan en kies een voorkeurtoets.
3. Raak MODE gedurende 1 seconde of langer aan.
De voorkeurgeheugenlijst worden afgebeeld.
4 Raak het voorkeurnummer waaronder u het programmatype wilt opslaan gedurende 2 seconden of langer aan.
U hoor een lange pieptoon en de zender wordt in het geheugen opgeslagen.
Als u een korte pieptoon hoort, is de zender.
niet in het geheugen opgeslagen.Herhaal
de procedure vanaf stap 1.
Opmerking:
- Onderbrekingsprogramma's (PTY of INFO) können nicht handmatig in het opgeslagen worden opgeslagen.
Een voorkeurprogramma oproepen
1. Druk op de [ROTARY] knop en kies de DAB-functie.
2. Raak BAND aan.
Met iedere aanraking van BAND verander het display in de onderstaande volgorde.
MEMO1 MEMO2 MEMO3 MEMO1...
3. Raak de rechterkant van het display met aan om een voorkeurprogramma op te roepen.
De AF-functie
De AF-functie schakelt over maar een andere frequentie op hetzelfde netwerk om een zo goed möglich ontvangstkaliteit te verkrijgen.
- De fabrieksinstelling is "ON".
- Als de ontvangstkwaliteit van de huidige zenderchyteruit gaat, wordt "SEARCH" op het display afgebeeld en zoekt de radio waar hetzelfde radioprogramma op een andere freqentie.
- Voor verdere informatie raadpleegt u de "AF-functionie" (zie blz. 26) in het gedeelte "Bediening van RDS" van de betreffende gebruiksaanwijzing.
- De AF-functie in- en uitschakelen
- AF-functie:tussenRDSenDAB
Als hetzelfde programma worden uitgezonden door RDS en DAB, en deze functie is ingeschakeld, schakelt dit apparaat automatisch over zodate de uitzending met de beste ontvangstkwaliteit worden ontvangen.
TA (verkeersinformatie)
Als een uitzending met verkeersinformatie begin in de TA-standingbyfunctie, worden die uitzending met voorrang ontvangen, ongeacht de functie die in werkig is. Het is tevens möglichk automatisch op een verkeersprogramma (TP) af te stemmen.
- Deze functie kan alleen worden gebruikt als "TP" op het display wordt afgebeeld. Als "TP" wordt afgebeeld betekent dit dat de DAB- of RDS-zender die op dat moment worden ontvangen programma's met verkeersinformatie uitzendt.
- Voor verdere informatatie raadpleegt u "TA" (zie blz. 27) in het gedeelte Bediening van RDS van de betreffende gebruksaanwijzing.
- De TA-standingbyfunctie instellen
- De TA-standingbyfunctie annuleren
Een TP-zender zoeken
Opmerkingen:
- Als een TP-zender Niet kan worden ontvangen, stopt het apparatusat met zoeken.
- "TP" kan op het display worden afgebeeld wanneer een verkeersprogramma worden uit gezonden door een RDS-zender. Druk in dat geval op de [TA] toets om TP-zoek-aftstemmen uit te voeren. Druk nogmaals op de [TA] toets om terug te keren maar de voorgaande functie.
INFO (aankondiging)
In de INFO-standbyfunctie schakelt het apparaat automatisch overaar het gekozen aankondigingsprogramma zodra dit begint.
- De INFO-standingbyfunctie instellen
Als u gedurende 1 seconde of langer de [TA] toets ingedrukt houdt, wordt "INFO" op het display afgebeeld en wordt het apparaat in de INFO-standingbyfunctie gezet totdat de gekozen aankondigering wordt uitgezonden.
Zodra de gekozen aankondigingsuitzending begint, worden de naam van de aankondiging op het display afgebeeld. Als u gedurende 1 seconde of langer de [TA] toets ingedrukt houdt terwijl de gekozen aankondigingsuitzending worden ontvangen, stopt de ontvangst van de gekozen aankondigingsuitzending en keert het apparaat terug maar de INFO-standbyfunctie.
- De INFO-standingbyfunctie annuleren
Als u de INFO-standingbyfunctie wilt annuleren, houdt u gedurende 1 seconde of langer de [TA] toets ingedrukt.
- Informatiekeuze
Met deze functie kurz u INFORMATIE AAN of UIT kiezen in de informatie-onderbrekingsfunctie.
U kunt maximaal zes informatatie-items op ON instellen
U kunt kiezen uit de onderstaande zes informatatie-items:
INFORMATIE-item ENGLISH Inhoud Travel Vervoersbericht Warning Waarschuwing/Service News Nieuwsbericht Weather Weerbericht Event Evenementenaankondiging Special Speciaal evenement
1. Raak MODE aan.
2. Raak INFO SEL aan om de "INFO SEL" functie op te roepen.
3. Raak het midden van het display met aan of draai de [ROTARY] knop en kies een informatie-item.
U kunt kiezen uit zes informatie-items:
Reizen Waarschuwing Nieuws Weerbericht Evenementen Speciaal Reizen...
4. Raak de rechterkant van het display met aan en kies "ON" of "OFF".
5. Raak RTN aan.
PTY
Met deze functie kurz u maar het gekozen programmatype luisteren, ongeacht de functie die in werkung is.
- U kunt een gemeenschappelijk PTY kiezen voor DAB en RDS.
Van de DAB-PTY en de RDS-PTY krijigt de PTY die het eerst worden ontvangen voorrang boven de andere.
- PTY-uitzendingen zijn nog nicht in alle landen beschikbaar.
- In de INFO-standingbyfunctie haben INFO-zenders voorrang boven andere PTY-zenders.
- In de TA-standingbyfunctie hebben TP-zenders voorrang boven andere PTY-zenders.
- Voor verdere informatatie raadpleegt u "PTY" (zie blz. 28) in het gedeelte "Bediening van RDS" van de betreffende gebruiksaanwijzing.
- De PTY-standingbyfunctie instellen
- De PTY-standingbyfunctie annuleren
Een PTY-onderbrekingsuitzending annuleren
Een programmatype kiezen
Een programmatype zoeken
Het PTY-voorkeurgeheugen
Nooduitzending
Als een noodlesitzending worden ontvangen, worden alle functiebedieningen aufgeb broken, worden "ALARM" op het display afgebeeld, en worden de nooduitzending ontvangen en weergegeven.
- Voor verdere informatie raadpleegt u "Nooduitending" (zie blz. 29) in het gedeelte "Bediening van RDS" van de betreffende gebruiksaanwijzing.
- De noodlesitzending annuleren
De taal van het PTY- en INFOdisplay wisselen
U=kunt een taal kiezen uit de vier beschikbare talen (Engels, Duits, Zweeds of Frans) waarin het programmatype en de informatie op het display kan worden afgebeeld.
- De fabrieksinstelling is "ENGLISH".
- Voor verdere informatie over "De taal van het PTY-display veranderen" (zie blz. 30), raadpleegt u het gedeelte over "De RDS bedieren" in de betreffende gebruiksaanwijzing.
Volume-installing van TA, INFO,ooduitzending (ALARM) en PTY
Het volume van de TA-, INFO-, ALARM- en PTY-onderbrekingsuitzenden gen kan worden ingesteldijdens de TA-, INFO-, ALARM- en PTY-onderbrekingsuitzenden. Voer de volgende bediening uit, afhankelijk van het aangesloten model.
- De fabrieksinstalling is "15".
Tijdens een TA-, INFO-, ALARM- of PTY- onderbrekingsuitzending, draait u de [ROTARY] knop recht som of linksom en stelt u het volume in op het gewenste niveau (0 t/m 33).
* Als de TA-, INFO-, ALARM- of PTY- onderbrekingsuitzending is afgelopen, keert het volume terug maar het niveau dat was ingesteld voör de onderbrekingsuitzending.
De 5.1-kanalen surrounddecoder bedieren
Als een optionele, met behulp van een CeNET-kabel aangesloten, compatibile 5.1-kanalensurrounddecoder is aangesloten, kan dit apparaat de functies van de 5.1-kanalensurrounddecoder bedieren.
De volgende functies veranderen als een 5.1-kanalen surrounddecoder is aangesloten.
- Twee functies, "MOVIE" en "VIRTUAL", worden toegevoegt aan de Dolby Pro Logic II-functie.
- De VSE/POSITION-functie verandert in de DSF (digitaal geluidsveld)-functie.
- In de P.EQ (parametrische equalizer)-functie, können de instellingen van{iedere luidspreker in nog groter detail worden ingesteld.
- De instellingen van de instelitems (zie blz. 39) die betrekking hebben op de muziek, veranderen.
PL II (Dolby PL II) kiezen
Kies een van de vier beschikbare functies overeenkomstig de bron die u wilt weergeven in de Dolby Pro Logic II-functie.
- De fabrieksinstalling is "OFF".
■ MUSIC (muziekfunctie)
Zie "Het PLII-menukiezen (Dolby PLII)" (zie blz.17).
■ MATRIX (matrixfunctie)
Zie "Het PLII-menukiezen (Dolby PLII)" (zie blz.17).
MOVIE (filmfunctie)
Geschikt voor DVD-films.
VIRTUAL (virtuelle functie)
Geschikt voor films en andere geluidsbronnen.
OFF
De Dolby Pro Logic II-functie wirdt nicht gebrukt.
1. Druk op de [SOUND] toets.
2. Raak Dolby PLII aan.

3. Raak de rechterkant van het display met aan en kies de Dolby Pro Logic II-functionie.

De functiedisplays worden als volgt doorlopen:
MUSIC (muziekfunctie) MATRIX (matrixfunctie) MOVIE (filmfunctie) VIRTUAL (virtuele functie) OFF (PL IIuit) MUSIC (muziekfunctie)...
* Voor verdere informatie over het instellen van het volumeniveau van de middenluidspreker/subwoofer, raadpleegt u bladzijde 45.
4. Raak RTN aan.
Het DSF-menu kiezen
Met DSF (digitaal geluidsveld) is het vis geluidssimulatie möglichk een geluidservaring te creeren alsof u zich in een concertzaal bevindt of een liveoptreden bijwoont.
- Als het DSF-menu worden gekozen, worden het volumeniveau soms lager.
- De fabrieksinstalling van DSF is "OFF" en op het DSF-basismenu is "HALL".
1. Druk op de [SOUND] toets.
2. Raak DSF aan.

3. Raak het ON/OFF-display met aan. Het DSF-effect worden beurtelings in- enuitgeschakeld.

Als DSF is ingesteld op "OFF", heeft de DSF-installing geen invloed op het weergavegeluid. Hiermee is de DSF-installing voltooid. Druk op de [SOUND] toets om terug te keren maar de oorspronkelijke functie.
4. Raak het DSF-menunummer met 山 aan en kies het gewenste DSF-menu.

De DSF-menu's zich:
HALL CHURCH STADIUM LIVE JAZZCLUB THEATER HALL...
Nr. Functienaam Beschrijving 1 HALL Een große concertzaal 2 CHURCH Een kerk met een gewelfd plafond 3 STADIUM Een groot stadion+zonder dak of muren 4 LIVE Een zaal voor liveoptredens, groter dan een jazzclub 5 JAZZCLUB Een jazzclub met een laag plafond 6 THEATER Een bioscoop of theater
5. Druk op de [SOUND] toets om terug te keren maar de oorspronkelijke functie.
Het parametrischeequalizermenu kiezen
De parametrische equalizer (P.EQ) stelt u in staat het gehele freiorentiebereik nauwkeurig te compenseren tot een vloeijeende kromme met behulp van freiorentiecompensation overeenkomstig het type auto dat u hebt.
- De fabrieksinstelling stelt alle luidsprekers in op de volgende instelleningen: FREQ = 1kHz, Q = 1, GAIN = 0dB
1. Druk op de [SOUND] toets.
2. Raak P.EQ aan.

3. Raak het ON/OFF-display met 山 aaan. Het P.EQ-effect worden beurtelings in- enuitgeschakeld.

Als het P.EQ-effect is ingesteld op "OFF", heeft de P.EQ-instelling geen effect op de geluidsbron. Hiermee is de P.EQ-instelling voltooid. Druk op de [SOUND] toets om terug te keren maar de oorspronkelijke functie.
4. Raak het P.EQ-menunummer met 山 aaen kies het P.EQ-menu.

De P.EQ-menu's waar:
SIGNAL SP-SEL BAND FREQ Q GAIN SIGNAL...
5. Raak de rechterkant van het display met
aan en stel het item maar wens in.
SIGNAL (Kies het in te stellen signaal.): Kies "P-NOIS" of "MUSIC".
P-NOIS: Kies deze instelling wanneer pingelgeluid worden gebruikt.
MUSIC: Kies deze instelling wanneer muzieksignalen worden gebruikt.
SP-SEL (Kies de luidsprekers waarvan u de
P.EQ-waarde wilt instellen.)
Kies een instelling UIT "FRONT", "CENTER" of "SURROUND".
- FRONT: Voorluidspreker
- CENTER: middenluidspreker
- SURROUND: surroundfluidspreker
BAND (Kies de frequentrieband.):
Kies een van de banden 1 t/m 3.
FREQ (Kies de middenfrequentie.):
Het instelbereik loopt van 20 Hz t/m 20 kHz.
Q (Stel de Q-kromme in.):
Hiermee stelt u de spitsheid van de Q-kromme in op 1, 3, 5, 7 of 20.
GAIN (Stel het uitgangsiveau in.):
Hiermee stelt u de versterking (uitgangsnavau) in binnen het bereik van -12 dB t/m +12 dB. (in stappen van 1 dB, 25 punten)
6. Herhaal de stappen 4 en 5 om het gewenste item in te stellen.
7. Druk op de [SOUND] toets om terug te keren maar de oorspronkelijke functie.
De P.EQ instellen
De instellungen die kuren worden veranderd op het P.EQ-menu zijn de volgende: De middenfrequentie, versterking en Q-kromme kuren worden opgeslagen in combinatie met een kanaal/band.
Bijvoorbeeld: middenfrequentie "250Hz", versterking "-8dB" en Q-kromme "3" können worden opgeslagen voor band 1 voor.
Voor verdere informatie over de P.EQ-functie, raadpleegt u "De P.EQ instellen" (zie blz. 21).
Deinstallingenveränderen
Als een 5.1-kanalen surrounddecoder is aangesloten, veranderen de instellenen die betrekking hebben op de muzzlek.
De instelitems kiezen
Hieronder volgt een beschrijving van de items waarvan de instelling worden veranderd.
Voor verdere informatie over de andere items die Niet worden verandered, raadpleegt u "De instellengen veranderen" (zie blz. 39) onder "Gemeenschappelijk bedienden in iedere functie".
1. Druk op de [A] toets
De functie verandert maar de instelfunctie.

2. Raak het instelitemdisplay met 山 山 aan en kies het item dat u wilt instellen.
* Als u de linkerkant van het display met
anraakt, worden de hoofditem een voor een doorlopen.
Als u de linkerkant van het display met
aanraakt, worden de hoofd items ononderbroken doorlopen.
* Als u het midden van het display met
anraakt, worden de subitems een voor een doorlopen. Als u het midden van het display met aanraakt, worden de subitems ononderbroken doorlopen.
3. Als op de rechterkant van het display "THROUGH" wordt afgebeeld, raakt u THROUGH aan om over te schakelen waar het instellingendisplay.
4. Raak de rechterkant van het display met 卡 aan of draai de [ROTARY] knop en kies een instelling.
■ Terugkeren maar de oorspronkelijke functie
1. Druk nogmaals op de [A] toets.
- Instelitems
Hoofditem SubItem SOUND CENTER-SP / SRD-SP / SUB-WOOFER
• De luidspreker in-/uitschakelen (zie blz. 64) FRONT HPF / CENTER HPF / SRD HPF / SUB-W LPF
• De filterfrequentie van de luidsprekers instellen (zie blz. 64) SP GAIN
• Het uitgangsiveau van de luidsprekers instellen (zie blz. 46) DELAY CENTER-SP / SRD-SP
• De vertragingstijd van de luidsprekers instellen (zie blz. 65) DOLBY D D-RANGE
• Het dynamisch bereik instellen (zie blz. 65) PL II CONT PANorama / DIMENSION / CTR WIDTH
• De muziekfunctie in detail instellen (zie blz. 47)
De luidsprekers in-/ uitschakelen (CENTER-SP/ SRD-SP/SUB-WOOFER)
Met deze functie kurz u de middenluidspreker (CENTER-SP), de surroundluidspreker (SRD-SP) en de subwoofer (SUB-WOOFER) in- en uitschaken.
Zorg ervoor dat重点领域 instelling op "OFF" is ingesteld als er geen middenluidspreker, surroundluidspreker of subwoofer is aangesloten.
- De fabrieksinstalling is "ON".
1. Druk op de [A] toets om de instelfunctie op te roepen.
2. Raak het instelitemdisplay met aan en kies bij "SOUND" het item "CENTER-SP", bij "SOUND" het item "SRD-SP", en bij "SOUND" het item "SUB-WOOFER".

ADJUST MODE CENTER-SP 串 ON
3. Raak de rechterkant van het display met aan of draai de [ROTARY] knop en kies "ON" of "OFF".
* In het geval van "SUB-WOOFER", kiest u "ON+", "ON-" of "OFF". Normaal gesproken kies u "ON+". Wanneru erchter "ON-" instelt, krijgt u een sterk effect van de lage tonen.
4. Druk op de [A] toets om terug te keren maar de oorspronkelijke functie.
De filterfrequentie van de luidsprekers instellen (FRONT HPF/CENTER HPF/ SRD HPF/SUB-W LPF)
Met deze functie=kunt u de filterfrequentie instellen overeenkomstig de luidsprekers die u gebrukt.
- Luidsprekers die bij "Deuidsprekers in-/uitschakelen (CENTER-SP/SRD-SP/SUB-WOOFER)" werden uitgeschakeld, wordeniet aufgebeeld.
- De fabrieksinstalling van "FRONT HPF" en "SRD HPF" is "THROUGH" (geen filter), en van "CENTER HPF" en "SUB-W LPF" is "120Hz".
Filterinstalling
FRONT HPF/CENTER HPF/SRD HPF (installing van hoogdoorlaatfilter)
Dit filter verwijdert de lage tonen uit het geluid voor de voor-, midden- en surroundluidsprekers.
THROUGH 50Hz 80Hz 120Hz
Stel het filter in overeenkomstig uw luidsprekers als de luidsprekers eenkleine diameter hebben.
THROUGH
Kies deze instelling als u luidsprekers gelebruikt die rage tonen können weergeven. CENTER HPF kan nicht worden ingesteld op THROUGH.
SUB-W LPF (instelling van laagdoorlaatfilter voor subwoofer)
Dit filter verwijdert de hoge tonen uit het geluid voor de subwoofer.
50Hz 80Hz 120Hz
Stel de filterfrequentie in overeenkomstig uw subwoofer.
1. Druk op de [A] toets om de instelfunctie op te roepen.
2. Raak het instelitemdisplay met aan en kies bij "SOUND" het item "FRONT HPF", bij "SOUND" het item "CENTER HPF", bij "SOUND" het item "SRD HPF" en bij "SOUND" het item "SUB-W LPF".

ADJUST MODE FRONT HPF THROUGH
3. Raak de rechterkant van het display met 卡 aan of draai de [ROTARY] knop en kies de frequentie.
* Kies een instelling uit THROUGH*, 50Hz, 80Hz en 120Hz.
^*1 THROUGH wordt alleen aufgebeeld als "FRONT HPF" of "SRD HPF" is gekozen.
4. Druk op de [A] toets om terug te keren maar de oorspronkelijke functie.
De vertragingstijd van de luidsprekers instellen (CENTER-SP/SRD-SP)
De tijdsduur waarna het geluid van iedere luidspreker aankomt op de luisterpositie verschilt afhankelijk van de montagepositie van de luidsprekers en de grotte van uw auto. Stel de vertragingstijd van iedere luidspreker zodanig in dat het geluid van alle luidsprekers tegelijk met het geluid van de voorluidsprekers de luisterpositie bereikt.
- De fabrieksinstalling is "0ms".
1. Druk op de [A] toets om de instelfunctie op te roepen.
2. Raak het insteltemdisplay met aan en kies bij "DELAY" het item "CENTER-SP", en bij "DELAY" het item "SRD-SP".

DELAY
ADJUST MODE
CENTER-SP》 0ms
3. Raak de rechterkant van het display met
aan en stel de vertragingstijd in.
* "CENTER-SP" kan worden ingesteld binnen het bereik van 0 ms t/m 5 ms.
* "SRD-SP" kan worden ingesteld binnen het bereik van 0 ms t/m 15 ms.
4. Druk op de [A] toets om terug te keren maar de oorspronkelijke functie.
De Dolby Digital functies instellen (D-RANGE)
Deze functie comprimeert het dynamisch bereik van Dolby Digital om geluid met een laag volumeniveau, zoals bijvoorbeeld de stem van een acteur, te behonden, maar geluid met een hoog volumeniveau te onderdrukken.
Deze functies zich alleen beschikbaar opDVD's opgenomen in Dolby Digital.
- De fabrieksinstalling is "MAX".
1. Druk op de [A] toets om de instelfunctie op te roepen.
2. Raak het insteltemdisplay met aan en kies bij "D-RANGE" het item "DOLBY D".

ADJUST MODE
D-RANGE MAX
3. Raak de rechterkant van het display met aan en stel het gewenste item van het dynamisch bereik maar wens in.
MAX: het maximale dynamisch bereik van de oorspronkelijke geluidsbron.
STD: de aanbevolen functie voor normalaal luisteren.
MIN: het sterkst gekomprimeerde dynamisch bereik, waar bij zichs zachte geluiden goed te horenল.
4. Druk op de [A] toets om terug te keren maar de oorspronkelijke functie.
8. PROBLEMEN OPLOSSEN
Probleem Oorzaak Oplossing Algemeen Het apparaat wordt Niet ingeschakeld. (Er wordt geen geluid voortgebracht.) De zekering is doorgbebrand. Vervang de zekering door een neue vandezelfde sterkte. Als de zekering waar doorbrandt, neemt u contact op met de winkel waar u het apparaat heb gekocht. Onjuiste bedrading. Neem contact op met de winkel waar u het apparaat heb gekocht. Er wordt geen geluid voortgebracht wonneer het apparaat bediend wordt terwijversterkers of een vermogensantenne is aangesloten. De kabel van de elektrische antennene is kortgeslooten maar massa of een te hoge stroomsterkte is nodig voor het inschaken van de versterkers of de elektrische antennene. 1. Schakel het apparaat uit.2. Maak alle draden los die aan de kabel van de elektrische antennene vastzitten. Controleerijdere draad met behulp van een ohm-meter op möglichke kortsuiitingaar massa.3. Schakel het apparaat wee in.4. Sluitijdere draad eén voor eén waar aan op de kabel van de elektrische antennene. Als de versterkers uitgaan voordat alle draden+zijn aangesloten,gebruikt u een extern relais om de inschakelspanning te leveren (de vereist stroomsterkte is te hoog). Als op de toetsen wordt gedrukt, gebeurt er niets.Het display geeft verkeerde indicators, enz., aan. De microprocessor is gestoord door ruis, enz. Schakel het apparaat uit,druk daarna op de [RELEASE] knop en haal het voorpaneel eraf. Druk op de terugstelknop met een dun ijzerdraadje.Terugsteltoets De aansluiting:tussen het voorpaneel en het apparaat is vies. Veeg het vuil eraf met een zachte doeck bevochtigdemet alcohol. CDMP3WMA Er is geen geluid hoorbaar. Een ongeschikte disc (geen compact disc) of een vreemd voorwerp bevindt zich in het apparaat. Met het kantelend bedieningsspaneel geopend, houdt u de [▲] toets gedurende 3 seconden of langer ingedrukt.Het vreemde voorwerp worden gedwongenuitgeworpen. Er staan geen MP3/WMA-bestanden op de disc. Neem op de juiste manier MP3/WMA-bestanden op de disc op. De bestanden worden nicht herkend als MP3/WMA-bestanden. Zorg ervoor dat de MP3/WMA-bestanden op de juiste manier zijn gecodeerd. Het bestandssystem is Niet juist. Gebruik het bestandsystem ISO9660 level 1,2,of JOLIET of Romeo. Het geluid slaat over of is bevat veel ruis. De disc is vuil. Maak de disc schoon met een zachte doeck. De disc is ernstig bekrast of verbogen. Vervang de disc door een disc zonder krassen. Het geluid wordt onderbroken of slaat over.Er treedt ruis op of de ruis is vermengd met het geluid. De MP3/WMA-bestanden zich net op de juiste manier gecodeerd. Zorg ervoor dat de MP3/WMA-bestanden op de juiste manier zijn gecodeerd.
Probleem Oorzaak Oplossing CD/MP3/WMA De geluidskwaliteit is slecht onmiddelijk nadat het apparaat is ingeschakeld. Er{kunnen zich waterdruppels haben gezvermd op de lens in het apparaat terwijl de auto op een vochtigeplaats geparkeerd stond. Schakel het apparaat in enaar het onceveer een uur drogen. De bestandsnamen zijn verkeerd. Het bestandsystem is nicht juist. Gebruik het bestandsystem ISO9660 level 1,2, of JOLIET of Romeo. De afspeellijst kan nicht worden weergegeven. De bestandsnamen of de afspeellijst-extensie zijn nicht juist. Gebruik alleen alfanumerieke of ASCII-tekens in de namev an MP3/WMA-bestanden. Gebruik voor de afspeellijst de extensie“.M3U”.
9. FOUTMELDINGEN
Als zich een probleem voordoet, worden één van de volgende foumt melding afgebeeld. Volg de gegeven instructies om het probleem op te losesten.
Foutmelding Oorzaak Oplossing CD/MP3/MMA ERROR 2 Een disc is binnenin de CD-speler vastgelopen en kan nicht worden uitgeworpen. Dit is een storing van het mechanismisme in de CD-speler. Neem contact op met de winkel waar u het apparaat hebt gekocht. ERROR 3 Een disc in de CD-speler is bekrant, enz., en kan nicht worden weergegeven. Vervang de disc door een disc zonder krassen die nicht verbogen is. ERROR 6 Een disc is ondersteboven in de CD-speler geplaatst en kan nicht worden weergegeven. Werp de disc uit enplaats deze verrolgens op de juiste manier. Algemeen AMP GUARD De beveiligingsschakeling van de luidspreker is in werkig getreden. Als tijdens deze bediening het volumeniveau worden veranderd, worden "AMP GUARD" op het display afgebeeld. "AMP GUARD" treedt soms in werkig wanneser speciale testsignalen worden gebruikt. 1. Verlaag het volumeniveau. De juiste werkung kan ook worden hersteld door het apparaat uit en waar in te schakelen. (Wanner de beveiligingsschakeling van de luidspreker in werkung treedt, worden automatisch het volumeniveau van de luidsprekers verlaagd.)2. Als het volumeniveauoor worden verlaagd, neemt u contact op met once serviceafdeling. CD-wisselaar ERROR 2 Een disc binnenin de CD-wisselaar worden Niet in positie gebracht voor weergave. Dit is een storing van het mechanismisme in de CD-wisselaar. Neem contact op met de winkel waar u het apparaat hebt gekocht. ERROR 3 Een disc in de CD-wisselaar is bekrant, enz., en kan nicht worden weergegeven. Vervang de disc door een disc zonder krassen die nicht verbogen is. ERROR 6 Een disc is ondersteboven in de CD-wisselaar geplaatst en kan nicht worden weergegeven. Werp de disc uit enplaats deze verrolgens op de juiste manier. DVD-wisselaar ERROR 2 Een disc in de DVD-wisselaar kan nicht worden weergegeven. Dit is een storing van het mechanismisme in de DVD-wisselaar. Neem contact op met de winkel waar u het apparaat hebt gekocht. ERROR 3 Een disc in de DVD-wisselaar is bekrant, enz., en kan nicht worden weergegeven. Probeer de disc opnieuweer te geven of verwang de disc door een disc zonder krassen die nicht verbogen is. ERROR 6 Een disc is ondersteboven in de DVD-wisselaar geplaatst en kan nicht worden weergegeven. Werp de disc uit enplaats deze verrolgens op de juiste manier. ERROR P Foutief kinderslotniveau. Stel het juiste kinderslotniveau in. ERROR R Foutieve regiocode. Werp de disc uit enplaats een disc met de juiste regiocode.
Als een andere foulmeling dan die hierboven worden beschreiben worden aufgebeeld, drukt u op de terugsteltoets. Als het probleem aanhoudt, schakelt u het apparaat uit en neemt u contact op met de winkel waar u het apparaat hebt gekocht.
10. TECHNISCHE GEGEVENS
Radio
Afstemsystem: PLL-synthesizertuner
Ontvangstfrequencies:
FM:
87.5 t/m 108 mHz (in stappen van 0.05 mHz)
MG:531 t/m 1602 kHz (in stappen van 9 kHz)
LG: 153 t/m 279 kHz (in stappen van 3 kHz)
CD-speler
Systeem:
Digitalaudiosystemeenvoorcompactdiscs
Frequentiebereik: 5 Hz t/m 20 kHz (±1 dB)
Signal-ruisverhouding: 100 dB (1 kHz) IHF-A
Dynamisch bereik: 96 dB (1 kHz)
Vervorming: 0,01%
Algemeen
Uitgangsvermogen:
4× 31W (DIN 45324, +B = 14,4V)
Voedingsspanning:
14,4 V gelijkstroom (10,8 t/m 15,6 V
toegestaan), negatieve massa
Stroomverbruik: Minder dan 15 A
Luidsprekerimpedantie:
4Ω (4 t/m 8 Ω toelaatbaar)
Nominale stroomsterkte van autoantenna:
500 mA of minder
Gewicht:
Hoofdtoestel: 1,7 kg
Afstandsbediening: 80 g (inklusief batterij)
Afmetingen:
Hoofdtoestel:
178 (B) × 50 (H) × 155 (D) mm
Afstandsbediening:
44 (B) × 110 (H) × 27 (D) mm
Opmerking:
- De technische gegevens en het ontwerp+zijn onderhevig aan veranderingen ten behoeve van productverbetering zonder voorafgaande kennisgeving.
Muchasgraciasporlaadquisidonedeste productoClarion.
* Antes de utiliser este equipo lea Completely el manual de instrucciones.
* Después de haber leído este manual, cerciórese de guardarlo a mano (p. ej., en la guantera).
* Compruebe el contenido de la tarjeta de garantía adjunta y guardela ciuidadosamente con este manual.
* Este manual incluye los procedimientos de operación del Cambiador de discos CD y sintonizador de DAB y TV conectados a工程技术 de cable CeNET. El Cambiador de discos CD y sintonizador de TV tiene sus propios manuales, pero no se describes los procedimientos de su operación.
Índice
1. PRECAUCIONES 3
Consola inclinable 4
Manejo de los discos compactos 4
2.CONTROLES 5
3. NOMENCLATURA 6
Nombres de los botones y sus functions 6
Operaciones de los principales botones cuando se haya conectado un equipo externo a esta .. 7
Elementos de visualización 7
Operaciones en pantalla 8
4. PANEL DE CONTROL DESMONTABLE (DCP) 9
5. CONTROLADOR REMOTO 10
Insercion de las pilas 10
Funciones de los botones del controlador remoto 11
6. OPERACIONES 12
Operacionesbasicas 12
Operación del procesador AC III 17
Operaciones de la radio 23
Operaciones del systemadeatosradiofonicos(RDS) 26
Oeraciones de CD / MP3 / WMA 31
Diferentes piezas musicales eschuchadas por various oyentes (funcion 2-ZONE) 36
Operaciones comunes de cada modo 37
7. OPERACIONES DE LOS ACCESORIOS 51
Operaciones del Cambiador de discos compactos 51
Operaciones del televisor 54
Operaciones digitales de radio/DAB 58
Operaciones del decodificador surround de 5,1 canales 61
8. EN CASO DE DIFICULTAD 66
9. INDICACIONES DE ERROR 68
10. ESPECIFICACIONES 69
1. PRECAUCIONES
1.Estaunidad se aplica solamente para fines de vehículos de 4 ruertas en carretera.No es apropiado elutilizarla para tractores, camiones, aplanadoras, vehículos todo terreno, ni motocicletas de 2 o 3 ruadas, embarcaciones, nithers vehículos para fines especiales.
2. Si el interior del automóvil está muy frío y utilizes la unidad inmediamente afterwards de haber encendido el calefactor, es posible que se condense humedad en el disco o en las piezas del reproductor, y que的结果 impossible realizar la reproducción apropiada. Si se condensa humedad en el disco, fróteo con un paño seco. Si se condensa humedad
en las piezas opticas del reproductor, no lo utilise durante aproximamente una hora, y la humedad condensada desaparecerá de forma natural para permitir la operation normal.
3. La conducccion por carreteras accidentadas que Causeen vibraciones notables可以使 caurar el salto del sonido.
INFORMACION PARA LOS USUARIOS:
LOS CABIOS O MODIFICACIONES REALIZADOS EN ESTE PRODUCTO NO APROBADOS POR EL FABRICANTE ANULARAN LA GARANTIA.
ADVERTENCIA
Para su seguridad, no mire ni maneje el panel tactil cuando conducze.
Consola inclinable
Estaunidadutilizaconsolasinclinablespara permitir que lasvisualizacionessean lo mayores posibles.
Cuando utilise una consola abatible, cerciórese de cerrarla.
PRECAUCION
Tenga cuidado de no pillarse los dedos cuando abra o cierra la CONSOLA INCLINABLE.
1. Por motivos de seguidad, cierre la CONSOLA INCLINABLE cuando no vaya a utilizesla durante mucho tiempo, o antes deponer en OFF la llave de encendido. Si pusiese en OFF la llave de encendido con la CONSOLA INCLINABLE inclinada, esta no se cerraría.
2. Antes de que la CONSOLA INCLINABLE se
cierre, pourrait oírse un sonido de frenado procedente del mecanismo de seguridad. Esto es normal.
3. Si mueve la CONSOLA INCLINABLE con la mano, puede ser que adquiera cierto juego. Para corregir este jeu, con la alimentacion de la unidad connectada, presione el boton [▲] para cerrar la CONSOLA INCLINABLE.
4. Después de haber extraído un disco, la CONSOLA INCLINABLE volverá automáticamente al estado de inclínación o cierre. Si hay algunos obstáculo trate de cerrarse, el mecanismo de seguridad se disparará y la CONSOLA INCLINABLE volverá al estado de aperture. Cuando suceda this, elimine the obstáculo. y afterwards presione el botón [▲].
5. Para evaporar rayar el disco compacto, mantenga bajo el nivel del disco compacto de 12 u 8 cm cuando lo inserte o lo extraiga.
Manejo de los discos compactos
Emplee solamente discos compactos que tengan la marca @SIC o
No reproduzca discos compactos en forma de corazon, octogonales, ni de ninguna other forma especial.
Es possible que algunos discos CD grabados en el modo CD-R/CD-RW no;puede emplease.
Manejo
- En comparación con los discos compactos de música normales, los discos CD-R y CD-RW se ven afectados fácilmente por la temperatura y la humedad elevadas, y es posible que algunos de tales discos no能把 reproductarse. Por lo tanto, no los deje durante mucho tiempo en un automóvil.
- Los discos nuevos你能 tener rugosidades en el borde. Si utilizes tales discos, el reproductor podría u trabajo, o el sonido podría saltar. Utilice u objeto similar, para rugosidades del borde.
- No pegue nunca etiquetas sobre la superficie de los discos compactos, ni marque dicha superficie con lápices ni bolígrafos.
- No reproduzca nunca un disco compacto pegado con cinta plástica nithers pegamentos, ni con las marcas despegadas. Si tratase de producir uno de tales discos, quizas no pudiese SACARLO del reproductor de discos compactos o dañarlo.
- No utilise discos compactos que posean ralladura grandes, deformados, rajados, etc. La utilización de tales discosURTDA可以使 el mal funciona como dos días.
- Para extraer un disco compacto de su caja, presione el centro de dicha caja y levante el disco, sujetándolo cuidadosamente por los bordes.
- No utilise hojas protectoras de discos compactos, vendidas en establishimientos del ramo, ni discos provistos de estabilizadores, etc. Estos elementos podriani darar los discos o el mecanismo interno.
Almacenamento
- No exponga los discos compactos a la luz solar directa ni a fuentesTERMicas.
- No exponga los discos compactos a humedad ni polvo excessivo.
- No exponga los discos compactos al calor directo de aparatos de calefacción.
Limpieza
- Para eliminar las huellas ductilares y el polvo, utilise un paño suave y frote el disco en linea recta del centro a la periferia.
- No utilise disolventes, como limpiadores adquiridos en establecimientos del ramo, rociadores antiestátics, ni diluidor de pintura para limpar los discos compactos.
- Después de haber utilisé un limpiador de discos compactos, deja que el disco compacto se seque bien antes de reproducirlo.
2.CONTROLES
Unidad fuente

Apertura de la CONSOLA INCLINABLE

3. NOMENCLATURA
Nombres de los botones y sus sistemas
Botón [RELEASE]
- Extracción del panel de control desmontable (DCP).
Fotosensor
- Este sensor detecta la intensidad de brillo Dentro del automóvil. Cuando la función de atenuación automática está configurada en "AUTO", la intensidad de brillo de la pantalla se reduce para adaptarse a la intensidad de brillo que detecte este sensor.
Mando [ROTARY]
- Presione este mando para conectar la alimentacion. Cada vez que presiona este mando, se cambia de modo.
- Presione el mando prolongadamente durante 1 segundo o más para desconectar la alimentación.
- Este mando también se pueda girar para regular el volumen o para realizarkestinos ajustes en el modo de ajuste.
Boton [△]
- Abre/cierra el panel de control.
Si hay un disco cargado, este se expulsa cuando se abide el panel de control.
Nota:
Si no se expulsa el disco, presione el botón [▲] durante 1 segundo o más.
Boton [A]
- Utilice este botón en el modo de ajuste para establecer o configurar losDistinctosajustes.
- Utilice este botón en el modo de radio para introducir los nombres de emisoras, o en el modo CD, para introducir los titulos de discos.
Botón [SOUND]
- Utilice este botón para establercer o configurar losDistinctosajustes, como el espacio de audio.
- Si presiona este botón prolongadamente durante 1 segundo o más, tambiénoulda activar (ON) y desactivar (OFF) la funciona 2-ZONE.
Botón [TA]
- Utilice este botón paraaabstar el modo deespera TA (Información sobre el tráfico) (cuando la funciona 2-ZONE está desactivada, "OFF").
Cambia el funciona de 2-ZONE. Si presiona este botón prolongadamente durante 1 segundo o más, cambia el tipo de 2-ZONE (cuando la funciona 2-ZONE está activada "ON").
Boton [▶■]
- Interrumpe o reanuda la reproduccion de una pista (en el modo CD).
- Utilice este botón paraaabustar el modo de espera PTY ( Tipo de programa) o los parámetros de PTY.
Pantalla
- Muestra losDistinctos datos que indican el estado de configuracion de la unidad, como losindicadores y el estado de sintonizacion/reproduccion.
Toque la pantalla con el dedo y bajo toque para activar la operation. (cf. pagina 8)
Operaciones de los principales botones cuando se haya connectado un equipo externo a estaunidad
- Cuando el Cambiador de CD/DVD está conectado
* Para Obtener más información, consulte la sección “Operaciones del Cambiador de discos compactos” (cf. págrina 51). Para Obtener información sobre el Cambiador de DVD, consulte el Manual de instructcciones que se suministra con el Cambiador de DVD.
Boton [11]
- Este botón le permite reproducir o interruptir (pausa) un CD o un DVD.
Boton[A]
- En el modo de转型发展 de CD se usa para introducir los títulos de discos.
- Cuando TV/DAB está conectado
* Para Obtener más información, consulte la sección “Operaciones del televisor” (cf. páginas 54) u “Operaciones digitales de radio/DAB” (cf. páginas 58).
Botón [TA]
- Utilice este botón paraaabrear el modo de espera TA (Información sobre el tráfico) en modo DAB. (Estamericano está disponible para un sintonizador DAB.)
- Presione el botón prolongadamente durante 1 segundo o más para activar o desactivar el modo INFO. (en el modo DAB).
Boton [II]
- Permite cambio el modo deImagen de la television o el modo deImagen del video (external). (en el modo TV).
- Utilice este botón paraaabustar el modo de espera PTY ( Tipo de programa) o los parámetros de PTY en el modo DAB.
Boton [A]
- Este botón se usa para introducir el nombre de la emisión de television. (en el modo TV).
Elementos de visualización

Operaciones en pantalla
Estaunidad emplea un panel táctil a modo de pantalla de visualización. Para hacerlo funciona, sólo tiene que tocarlo con la yema de los dedos. Existen cuatro operaciones principales de visualización, que son:
Tocar
Toque la pantalla con el dedo y retirelo antes de 1 segundo.Esta es la operation más baja para usar la pantalla.
Tocar prolongadamente
Toque la pantalla con el dedo de forma prolongada durante 1 o 2 segundos, como minimo. NoURTVA el dedo cuando toca laagna.
Cuando toca la pantalla prolongamente durante 1 segundo o más, aparecen listas, por exemple, e se invocan otheras functions practicas.
Cuando toca la pantalla prolongamente durante 2 segundos o más, se guarda una memoria preprogramada u另一边 información.
Tocar
Toque la pantalla con el dedo y desplace el dedo hacía la izquierda ( ) o hacía la derecha ( ) sin despegarlo de la pantalla, y luego retiéreo antes de 1 segundo.Esta operation se utilizes para seleccionar una memoria preprogramada (1 a 6) o pistas.

Tocar
Toque la pantalla con el dedo y desplace el dedo hacia la izquierda ( ) o hacía la derecha () sin despegarlo de la pantalla, y manténgalo asi. La operation en bajo se prolongará durante el tiempo que el dedo se mantenga en la pantalla.Esta operation se usa, por exemple, para sintonizar de forma manual o para hacer avanzar/retroceder rápidamente las pistas.

4. PANEL DE CONTROL DESMONTABLE (DCP)
El panel de control podra desmontarse como medida antirrboro. Despues de haber desmontado el panel de control, guardelo en la caja para el PANEL DE CONTROL DESMONTABLE (DCP) para evaporar que se raye.
Le recomendamos que lleve el DCP consigo cuando salga del automóvil.
Extracción del panel de control desmontable (DCP)
1. Con la CONSOLA INCLINABLE cerrada, desconnecte la alimentacion.
2. Presione a fondo el botón [RELEASE] para abrir el DCP.

3. Tire del DCP hacía usted y extráigalo.

PRECAUCION
- Cierre sempre la CONSOLA INCLINABLE antes de extraer el DCP.
- Si extrae el DCP con la CONSOLA INCLINABLE abierta, esta se cerrará inmediamente. Tenga cuidado de no pillarse los dedos.
Instalación del panel de control desmontable (DCP)
1. Inserte el DCP de forma que la sección (A) de la parte derecha del本身就是 quede fjada en el gancho (B) de la unidad.

2. Presione@cuidadosamente la parte izquierda © del DCP para encasarlo en su lugar.

PRECAUCION
- El DCP pueda danarse fácilmente con los golpes. Después de haberlo extraido, colocuelo en su caja, yonga cuidado de no partir lo caer ni de someterlo a golpes fuertes.
- Si presiona el botón de [RELEASE] y el DCP no está bloqueado en su lugar, pueda caerse debido a las vibraciones del automóvil. Nombre que el DCP se rompies, motivo por el que, après de haberlo extraido, instalelo en launities o colóquelo en la caja para el本身就是.
- El conector de la unidad al DCP es una pieza extremadamente importante. Tenga cuidado de no danarlo presionando con sus uñas, bolígrafos, destornilladores, etc.
Nota:
- Si el DCP se ensucía, fróte lo solamente con un paño suave y seco.
5. CONTROLADOR REMOTO

Inserción de las pilas
1. Dé la vuelta al controlador remoto, y después deslice la cubierta posterior en el sentido de la flecha.
2. Inserte las pilas AA (SUM-3, R-6/1,5 V) suministradas con el controlador remot en el sentidoamente en la figura, y antes cierre la cubierta posterior.
Notas:
La utilización inadequada de las pilas puede provocar su explosión. Tenga en cuenta los+puntos seguides:
- Cuando reemplace las pilas, cambie ambas por Otherwise.
- No cortocircuite, desarme, ni caliente las pilas.
- No tire las pilas al fuego.
- Tire las pilas agotadas en el lugar apropiado.

Funciones de los botones del controlador remoto
ModoBotón Radio (RDS)/DAB Reproductor de discos compactos/MP3 Cambiador de discos compactosCambiador de DVD Televisor [FUNC] Cambia entre la radio, DAB, CD/MP3, Cambiarde CD, cambiarde DVD y el televisor,AUX. [BAND] Cambio de la banda de recepción. Reproducción de la primera canción.Reproducción desdeel tope. Movimiento al disco seguidente enorden ascendente. Cambio de la banda de recepción. [▲], [▼] Aumento o reducción del volumen (en todos losmos). [←], [▶] Movimiento a canales memorizados superiores e inferiores. Movimiento a canociones superiores e inferiores. Cuando lo mantenga presionado durante 1 segundo: Avance/retroceso rápido. Movimiento a canales memorizados superiores e inferiores. [▶■] Sin funciona. Cambio entre reproducción y pausa. Sin funciona. [MUTE] Activación y desactivación del silenciamiento. [TA] Activación y desactivación de TA.Mantenga presionado este botón durante 1 segundo o más para Cambiar entre la fuente de sonido principal y de la zona secundaria (solamente con el modo 2-ZONE activado). [DISP] Cambia entre la visualización principal y visualización del reloj (CT). [PS/AS] Exploración de emisoras memorizadas.C时候 lo mantenga presionado durante 2segundos:Almacenamiento automático. Reproducción por exploraciónPresione y mantenga presionado el botón durante 1 o más segundos para efectuar la reproducción por exploración de la carpeta durante el modo de MP3/WMA. Reproducción con exploración.C时候 lo mantenga presionado durante 1segundo:Reproducción con exploración de discos. Exploración de emisoras memorizadas.C时候 lo mantenga presionado durante 2segundos:Almacenamiento automático. [AF] Activación y desactivación de la funciona AF.C时候 lo mantenga presionado durante 1segundo:Activación y desactivación de la funciona REG. Repetición de la reproducciónPresione y mantenga presionado el botón durante 1 o más segundos para efectuar la reproducción de la carpeta durante el modo de MP3/WMA. Reproducción repetIDA.C时候 lo mantenga presionado durante 1segundo:Reproducción repetIDA de discos. Sin funciona. [PTY] Activación y desactivación del modo de PTY. Reproducción aleatoriaPresione y mantenga presionado el botón durante 1 o más segundos para efectuar la reproducción aleatoria de la carpeta durante el modo de MP3/WMA. Reproducción aleatoria.C时候 lo mantenga presionado durante 1segundo:Reproducción aleatoria de discos. Cambio entre televisiony videograbadora. [2-ZONE] Manténgalo presionado durante 1 segundo o más para activar o desactivar el mode de zona doble.Presióno para Cambiar la zona de control entre la principal y la secundaria cuando el modo de zona doble está activado.
* Algunos de los botones correspondientes de launidad principal y del controlador remoto posen unidades differs.
6. OPERACIONES
Operaciones básicas
PRECAUCION
Cerciórese de reducir el nivel del volumen antes de desconectar la alimentación de la unidad o de poder la llave de encendido en OFF. Si deselectase la alimentación con el volumen a alto nivel, cuando volviene a conectarla, el volumen alto repentino podra dañar sus oidos y la unidad.
Encendidoyapagado
Encendido
Nota:
- Tenga cuidado cuando utilise esta unidad durante un tiempo prolongado con el motor apagado. Si agota la bateria del automóvil, noURTRA encender el motor yarlo podrA reducir la vida util de la bateria.
1. Presione el mando [ROTARY]. Se做不到 el modo que está anterionmente activo.
Comprobación del sistema
Cuando se conecta la alimentacion de esta unidad por primera vez, una vez realizadas todas las conexiones, esta compruba que equipos estar connectados. (Esto se denomina "system check", es decir, comprobacion del system.) Cuando se conecta la alimentacion y aparece "System Check", siga los pasos que se indicate a continuacion para realizar la comprobacion del system.
1. Cuando aparezca "System Check" en噎alla, presione el mando [ROTARY]. Comienza la comprobacion del systema. Una vez finalizada la comprobacion del systema, aparecerá "Completed" en la噎alla.
2. Presione el mando [ROTARY] de nuevo.
Aparece la visualización principal del modo de radio.
Función CODEMATIC
Cuando "CODEMATIC" está activada ("ON"), y se conecta la alimentación con el DCP acoplado, aparecerá la visualización Touch Code (Cólico táctil). Toque la visualización en el order que se programó en el modo de ajuste.

Para Obtener más información sobre la función CODEMATIC, consulte la sección "Uso de la funciona de sécurité (CODEMATIC)" (ct págin 50).
Apagado
1. Presione el mando [ROTARY] durante 1 segundo o más.
Selección de modo
1. Presione el mando [ROTARY] para Cambiar de modo de funciona bajo.
2. Cada vez que presiona el mando [ROTARY], cambia el modo de funciona bajo en el sigúienteorden:
Modo Radio Modo DAB Modo CD/ MP3 Modo MMI Modocambiador de CD Modocambiador de DVD Modo TV Modo AUX Modo Radio...
* Los equipos externos que no estén connectados con CeNET no se做不到.
Ajusted volume
1. Gire el mando [ROTARY] hacía la derecha paraacular de volumen, o hacía la izquierda para disminuirlo.
* El nthel de volumen es de 0 (minimo) a 33 (maximo).
Cambio del modo de funciona bajo la lawa de la lawa.
Existen 2 modelos de funciona bajo: funciona estandar y funciona simple.
1. En la visualización principal de la pantalla, toque la parte izquierda durante 1 segundo o más.
Cambia el modo de funciona.

En el modo de funciona simple, no es necessitiesoicar 山 o la visualizacion principal del mode de radio o el mode CD.
Tenga en cuenta, sin embargo, que lassiguientes operaciones no estan disponibles enel modo de funcionaimple.
- Presintonizacion, seleccion de carpetas, seleccion de discos y otheras operaciones que requieran tocar la parte la derecha de la pantalla
- Operaciones de cambio de visualización (cf.頁面13)
- Operaciones de cambio de visualización de títulos (cf. págin 14)
- Operaciones para la visualización de las pantallas de introduccion de titulos. En pantallas (p. ej. visualización de listas, modo de ajuste, etc.)-distintas de la principal, no hay diferencia entre el funcionaimiento estándar y el funcionaimiento simple.
Las descricciones que seOfrecen en este manual corresponden principalmente alfuncionamento estandar. Para Obtener descripciones de las operaciones que sepuede realizar en el modo simple, consulte las descripciones de las visualizaciones de pantalla en el mode de radio o el modo CD.
Cambio de visualización
1. Toque el centro de la pantalla.
Cada vez que toca la visualización, esta cambía como se indica a continuación:
Visualización de títulos

Salvapantallas
Cuando la funciona de salvapantallas está activada ("ON"), y no usa launidad durante unos 30segundos, apareceré el salvapantallas. Para Obtener más información, consulte la página 41.
Papel tapiz
Si toca prolongadamente el centro de la pantalla durante 1 segundo o más, aparecerá la visualización de papel tapiz.
① ⑨ ② ⑩ ③ ⑪ ④ ⑫ ⑤ ⑬ ⑥ ⑭ ⑦ ⑮ ⑧ ⑯
Visualización del analizador de espectro
Si toca prolongadamente la parte derecha de la pantalla durante 1 segundo o más cuando visualiza el analizador de espectro (S/A), cambiará la visualización del analizador de espectro.
S/A
SCAN Aparece S/A 1, S/A 2 y S/A 3 durante 10segundos o más cada una. S/A 1 S/A 1
WMA
FLDR No.
003
TOP S/A 2 S/A 2
WMA
FLDR No.
003
TOP S/A 3 S/A 3
WMA
FLDR No.
003
TOP
Cambio de la visualización de títulos
Es possible visualizar los titulos de discos yDEMAS Informacion almacenada en los discosm吲ntras reproduce discos compactos en losmodos CD oeturnador de CD.
1. En la visualización de titulos, toque prolongadamente la parte derecha de la pantalla durante 1 segundo o más. Cada vez que toca prolongadamente la visualización, esta cambia como se indica a continuación:
Disco CD de dato
Túltode usuario (disco) Titulo de CD de texto (disco) Nombre de interpréte
→ Titulo de CD de texto (pista) → Titulo de usuario (disco)...
Disco MP3/WMA
Carpeta Archivo Etiqueta dealbum
Etiqueta de interpréte Etiqueta de titre Carpeta...
Notas:
- MP3 es compatible con las etiquetas (Tags) ID3 V2.3/2.2/1.1/1.0.
Las visualizaciones de etiquetas dan prioridad a V2.3/2.2.
- Si se tratate de etiquetas de album para WMA, se做不到a informacion contentida en la ampliacion de cabecera.
- En la etiquetas solo se pueda做不到 clarar characteres ASCII.
Para desplazar un titulo
Toque la visualización de titulos con el titulo visible.
El titulo se desplaza hacía la izquierda
Para detener el desplazimiento
Toque la visualización de titulos.
Función CT (Hora del reloj)
Esta funciona le permitte recibir datos CT enviados desde una emisora RDS y visualizar la hora. Para visualizar la pantalla CT, toque el centro de la pantalla.
- Si no se está recubiendo datos CT, aparecerá "---CT" en la pantalla.
Nota:
- Los datos CT no se emiten en algunos País y enellas emisoras de radio. también es possible que en algunos zonas los datos CT no se visualicen correctamente.
Ajuste del ADF
- ADF es la abreviatura de "Anti Distortion Filter" (Filtro antidistorsión).
Lasmerican Psychiatric Association (APHA) has recently announced a new program that will be designed to improve the quality of life of people with chronic medical conditions. The program will be designed to improve the health status of individuals with chronic medical conditions, including diabetes, heart disease, and cancer.
Esta unidad dispone de 4tips de efectos de sonido memorizados. Seleccione el que preferia.
ADF-1: Apropiado para altavoces originales
ADF-2: Apropiado para altavoces separados
ADF-3: Apropiado para altavoces coaxiales
USER: Este valor puede ajustarlo el usuario a su gusto.
OFF: No hay efecto de sonido
- El valor preajustado de fabricula es "OFF".
Notas:
- Como el volumen varía cuando se cambia ADF, conviene Cambiar de tipo de ADF con el volumen, "SW VOLUME" (altavoz de subgraves) y "CTR VOLUME" (altavoz central) al minimo.
- En algunos sistemas de altavoces, en occasions no se obtiene el efecto sufiente. En tal caso, ajuste el parámetro del ADF o el volumen.
- Cuando ADF está configurado en "USER", "1", "2" o "3", lasustralianes VSE y BASS/TREB en EQ-SELECT queden desactivadas
1. Presione el botón [SOUND].
2. Toque ADF.

3. Toque la parte derecha de la pantalla para selectionar el modo ADF.

Cuando el ADF está desactivado ("OFF"), el ajuste de ADF no se refleja en la fuente de música. Con thiso recluye el ajuste del ADF. Presione el botón [SOUND] paravoltar al modo original.
* Selectione USER, 1, 2, 3 u OFF.
4. Para modifier los parámetros de ajuste del ADF, presione el botón [A].
5. Toque la visualización de ajustes para selecciónar el ajuste deseado. Cada vez que toca ,la visualización de ajustes cambia como se indica a continuación:
- Ajuste (cuando se selecciona USER en el paso 3)
BASS (graves) TREBLE (agudos) COMP BASS (graves)...
- Ajuste (cuando se selección 1 a 3 en el paso 3)
LEVEL (nivel) COMP LEVEL...
6. Toque la parte derecha de la pantalla para realizar el ajuste.
* El margen de ajuste de "BASS" y "TREBLE" es de 1 a 13.
\* El margen de ajuste de "LEVEL" es de -3 a +3
*Selezione“ON”o“OFF”para“COMP”.
7. Presione el botón [SOUND] para volver al modo original.
Ajuste del altovoz de subgraves y el altovoz central
- "SW VOLUME" (subgraves) sólo se pueda ajustar cuando "SUB-WOOFER" está activado ("ON").
- "CTR VOLUME" (altavoz central) sólo se pueda ajustar cuando el modo Dolby Pro Logic II está configurado en "MUSIC" o "MATRIX", "SP-SETTING" está en "CTR+SW" y "CENTER-SP" estáactivado ("ON").
- El valor preajustado de fabricula de SW VOLUME y de CTR VOLUME es "0".
1. Presione el botón [SOUND].
2. Toque A-MODE.

3. Toque ↑ ↓ la visualización de ajustes para selecciónar "SW VOLUME" o "CTR VOLUME".

4. Toque la parte derecha de la pantalla para realizar el ajuste deseado.
* El margen de ajuste de este elemento es de -5 a +5.
5. Presione el botón [SOUND] para volver al modo original.
Ajuste del balance/ desvanecedor
BALANCE:
Permite ajustar el balance de volumen entre los altavoces izquierdos y derechos.
FADER:
Permite ajustar el balance de volumen entre los altavoces delanteros y traseros.
- El valor preajustado de fabricula de BALANCE y de FADER es "0".
Nota:
- El balance/desvanecedor no se pueda ajustar cuando AC-PRO IIIiene configurado el parametro "PRO" (cf.頁目44) y la direccion de posicion está activada ("ON"). Ajuste el balance/desvanecedor "Selección del menu de posicion" (cf.頁目17).
1. Presione el botón [SOUND].
2. Toque A-MODE.

3. Toque ↓ la visualización de ajustes para selecciónar “BALANCE” o “FADER”.

4. Toque la parte derecha de la pantalla para realizar el ajuste deseado.
* "BALANCE" pourrait ajustarse dentro del margen L13 (predominio del lado izquierdo) a R13 (predominio del lado derecho).
* “FADER” puede ajustarse dentro el margen R12 (predominio del lado trasero) a F12 (predominio del lado delantero).
5. Presione el botón [SOUND] para volver al modo original.
Ajuste de graves/agudos
El modo de graves/agudos sólo se pueda ajustar cuando el modo Dolby Pro Logic II está desactivado ("OFF") (cf. págin 17) y "EQ-SELECT" tiene configurado el parámetro "BAS/TREB" (cf. págin 44).
- El valor preajustado de fabricula es "0"
1. Presione el botón [SOUND].
2. Toque A-MODE.

3. Toque la visualización de ajustes para selecciónar "BASS" o "TREBLE".

4. Toque la parte derecha de la pantalla para realizar el ajuste deseado.
* El margen de ajuste de este elemento es de -6 a +6.
5. Repita los pasos 3 y 4 para realizar el ajustedeaseado.
6. Presione el botón [SOUND] para volver al modo original.
Operación del procesador AC III
Dolby Pro Logic II
Dolby Pro Logic II es una Tecnología de decodificación de matriz en la que se aplicá la Tecnología de matriz digital actualizada y se的最佳as Dolby Pro Logic. Ofrece una reproducción excellente de 5,1 canales de fuentes perimétricas Dolby como como de fuentes de sonido estéreo, como discos compactos, produciendo por lo tanto un canal perimétrico de gama completa (20 Hz a 20 kHz) y se convierte en estéreo. Por lo tanto, ustedouldrásacrutar de cualquier fuente estéreo con sonido dinámico de 5,1 canales. De acuerdo con la fuente aroducirse, PODRA seleccionarse el modo de música o el modo de matriz.
Fabricado bajo licencia de Dolby Laboratories. "Dolby", "Pro Logic" y el symbolo de la doble D son marcas de Dolby Laboratories.
Selección del menu PL II (Dolby PL II)
Selezione MUSIC o MATRIX como modo Dolby Pro Logic II, según la fuente que vaya a reproducir.
- El valor preajustado de fabricula es "OFF".
■ MUSIC (modo de música)
- Este modo es apropiado para fuentes de sonido estéreo, como los discos compactos.
- Como el camino de sonido se propaga de forma diferente según el estado de la fuente musical grabada, existe(other modo de ajuste que permite afinar aun más. (Consultte la página 47).
■ MATRIX (modulo matricial)
- Este modo es apropiado para fuentes de sonido tales como la radio AM/FM.
OFF
- No se utilizes el modo Dolby Pro Logic II, sino el modo AC-PROIII. Para Obtener más información sobre el modo AC-PROIII, consulte la sección "Selección de cada modo" (ct págin44).
1. Presione el botón [SOUND].
2. Toque Dolby PLII.

3. Toque la parte derecha de la pantalla para seleccionar el modo Dolby Pro Logic II.

La visualización de modelos cambia como se indica a continuación:
MUSIC (modo de música) MATRIX (modo matricial) OFF (PL II desconectado) MUSIC (modo de música)...
* Para Obtener más información sobre elajuste de volumen de los altavocescentral/subgraves, consulte la página 45.
4. Toque RTN.
Selección del menu de posición
Con POSITION, puede selectionar entre 5tips el tiempo que el sonido tarda en临港ar desde el altovoz hasta su posición en el asiento.
Además, la función de alineación temporal permite ajustar los altavoces con precision de forma que el本身就是 efecto de sonido puedaninger desde cada altovoz a todos los oyentes.
En el procedimiento "Selección de cada modo" (cf. págin44),ajuste AC-PROIII en "PRO".
- El valor preajustado de fabricula de POSITION es "OFF" y el del menu Basics de posicion, "FRONT".
■ Menu de posición
Esta función está preprogramada con 5 menus de posicion. Seleeccione el menu que desee.
1. Presione el botón [SOUND].
2. Toque POSITION.

3. Toque la visualización ON/OFF. El modo de posición se activa o desactiva (ON/OFF).

Cuando el efecto de posicion está desactivado ("OFF"),DICHOajuste de posicion no se refleja en la fuente de musica. Con thiso recluye el ajuste de posicion.Presione el boton [SOUND] para volver al modo original.
4. Toque B/U para selectionar "BASIC".

Cada vez que toca B/U, "BASIC" y "USER" se alternan suscesivamente.
5. Toque el N° de menu básico de posición para selección ar menú báscico de posición.
6. Presione el botón [SOUND] para volver al modo original.
Menu Basics de posicion
N° Nombre de visualización Posición del asiento 1 FRONT-L Asiento delantero izquierdo 2 FRONT-R Asiento delantero derecho 3 FRONT Asientos delaneros. 4 REAR Asientos traseros. 5 FULL SEAT Todoos asientos
Ajuste/memorizacion de las positions (memoria de usuario)
Con la memoria de usuario, se pueda ajustar los altevoces con precision para que el本身就是 efecto de audio pueda临港ar desde cada altovoz a todos los oyentes segun el menu b asiico de posicion. La memoria de usuario permite programar hasta 5 valeurs de ajuste.
T-ALIGN (alineación temporal):
La distancia entre el oyente y cada altovoz se suece introducir en pasos de 2,3 cm, como también se suece ajustar el tiempo que el sonido tarda enninger al oyente desde cada altovoz.
SP GAIN (ganancia del altovoz):
Permitte ajustar el nivel de salute del altovoz. Ajuste este nivel de forma que todos los volúmenes que salgan de cada altovoz Sean iguales.
1. Presione el botón [SOUND].
2. Toque POSITION.
3. Toque ↑ ↓ la visualización ON/OFF. El modo de posición se activa o desactiva (ON/OFF).
4. Toque B/U para selectionar "BASIC" o "USER".
5. Toque la parte derecha de la pantalla para selectionar el menu que se utilizes como menu de ajuste.
6. Presione el botón [A].
7. Toque la parte izquierda de la pantalla para seleccionar "T-ALIGN" o "SP GAIN".
8. Toque la parte central de la pantalla para seleccionar cada ajuste.
Cada vez que toca , los ajustes se cambian como se indica a continuación:
Ajustes

*1 Sólo se muestra cuando, en modo de ajuste, "SUB-WOOFER" en "SOUND" está activado ("ON").
*2 Sólo se muestra cuando, en modo de ajuste, "SUB-WOOFER" en "SOUND" está activado ("ON") y se selección "T-ALIGN" en el Paso 7.
9. Toque la parte derecha de la pantalla para realizar el ajuste deseado.

* El margen de ajuste de "T-ALIGN" es de 0 cm a 501,4 cm, en pasos de 2,3 cm.
* El margen de ajuste de "SP GAIN" es de - 20dB a 0dB.
10. Repita los pasos 7 a 9 para realizar el ajustedeaseado.
11. Cuando haya terminado de realizar losDistinctos ajustes, toque RTN.
La visualización vuye a la pantalla original, y aparece “>>” en la visualización BASIC o USER.
Conestoconcluye la operaciondeajuste de低位. Para proseguir con la memorizacion de losvalores deajuste enelmenudecursoro de低位,haga lo singular.
12. Toque RTN prolongamente durante 1 segundo o más.
Aparecerá la lista de manos de posición.
13. Toque prolongamente durante 2 segundos o más la memoria de usuario en la que紊ee programar los valeurs de ajuste.
Escuchará un tono largo paraindicarle que los values que ajustó hasta el paso 10 se han memorizzato en el menu de usuario de posición.
Si escaucha un tono corto, es que los values de ajuste configurados hasta el paso 10 han sido descartados. Ajuste these values según sea besoinario.
14. Toque RTN.
15. Presione el botón [SOUND] para volver al modo original.
* Para seleccionar una memoria de usuario programada, toque B/U para ver “USER” y luego toque ↑ ⇌ el N° de memoria de usuario.
Selección del menu VSE
VSE (Virtual Space Enhancer) le permite compensar el balance de presión acústica bajo el automóvil, de forma que se pueda percibir el"Myso"effecto de sonido en todos los asientos, como lo demuestran las simulaciones de compensación realizadas.
En el procedimiento "Selección de cada modo" (cf. págin44),ajuste AC-PROIII en "STD".
- El valor preajustado de fabricula de VSE es "OFF" y el del menu Basics de VSE, "FLAT".
■ Menu Basics de VSE
Estamericanos.
1. Presione el botón [SOUND].
2. Toque VSE.

3. Toque la visualización ON/OFF. El efecto VSE se activa o desactiva (ON/OFF).

Cuando VSE está desactivado ("OFF"),DICHO ajuste de VSE no se refleja en la fuente de musica. Con thiso conclusye la configuracion de VSE.Presione el boton [SOUND] para volver al modo original.
4. Toque B/U para seleccionar "BASIC".

Cada vez que toca B/U, "BASIC" y "USER" se alternan suscesivamente.
5. Toque el N° de menu báscido de VSE para selección ar menú báscido de VSE.
Menús Basics de VSE
N° Nombre de la.,
función Descripción 1 FLAT Evaluación plana de
la fuente de sonido 2 BASS BOOST Reforzamiento de
tonos graves 3 HIGH BOOST Reforzamiento de tonos
medios y agudos 4 IMPACT Reforzamiento de
tonos graves y agudos 5 ACOUSTICAL Reforzamiento de tonos
medios (voz humana) 6 SMOTH Produce tonos suaves.
6. Presione el botón [SOUND] para volver al modo original.
Ajuste/memorizacion de VSE (memoria de usuario)
Los ajustes de la memoria de usuario le permiten compensar la distribución de la presión acústica a su gusto con arreglo al menú Basics de VSE. Se pueda memorizar hasta seis ajustes de usuario.
DIFFUSE:
Permitteaabstar la desviacion de la presion acustica difusa.
CARWIDTH:
Permitte ajustar la desviación de la presión acústica a lo ancho del automóvil.
CAR LENGTH:
Permitte ajustar la desviación de la presión acústica a lo largo del automóvil.
1. Presione el botón [SOUND].
2. Toque VSE.
3. Toque la visualización ON/OFF. El efecto VSE se activa o desactiva (ON/OFF).
4. Toque B/U para selectionar "BASIC" o "USER".
5. Toque la parte derecha de la pantalla para selectionar el menu que se utilizes como menu de ajuste.
6. Presione el botón [A].
7. Toque la visualización de ajustes para selectionar "DIFFUSE", "CAR WIDTH" o "CAR LENGTH".

8. Toque la parte derecha de la pantalla para realizar el ajuste deseado.
* El margen de ajuste de este elemento es de 1 a 10.
9. Repita los pasos 7 y 8 para realizar el ajustedeaso.
10. Cuando haya terminado de realizar los distinctos ajustes, toque RTN. La visualización vuelve a la pantalla original, y aparece “>>” en la visualización BASIC o USER.
Conestoconcluyeelajuste deVSE.Paraproseguir conla memorizacionde losvaloresdeajuste enelmenudeviasuario deVSE,hagalo significante.
11. Toque RTN prolongamente durante 1 segundo o más.
Aparecerá la lista de menús de usuario de VSE.
12. Toque prolongamente durante 2 segundos o más la memoria de usuario en la que deseee programar los values de ajuste. Escuchará un tono长大o para indicarle que los values que ajustó hasta el paso 9 se han memorizzato en el menu de usuario de VSE. Si escucha un tono corto, es que los values de ajuste configurados hasta el paso 9 han sido descartados. Ajuste these values según sea besoinario.
13. Toque RTN.
14. Presione el botón [SOUND] para volver al modo original.
* Para seleccionar una memoria de usuario programada, toque B/U para ver "USER" y bajo toque ↑ ↓ el N° de memoria de usuario.
Selección del menu P.EQ
P.EQ (Evaluador paramétrico) le permite compensar con precision todo el margen de niveles de frequencies mediante curva suave utilizing compensación de frequencies para adaptarlo a su tipo de automóvil.
En el procedimiento "Selección de cada modo" (cf. págin44),ajuste EQ SELECT en P.EQ
- El valor preajustado de fabricula de P.EQ es "OFF" y el del menu Basics de P.EQ, "SEDAN-1".
■ Menuístico de P.EQ
Esta función tiene prememorizados 6 temas de menus BASICS de P.EQ, selon el tipo de automóvil y la posición de instalación de los altavoces. Selección el menu BASICO que se ajuste a su automóvil.
1. Presione el botón [SOUND].
2. Toque P.EQ.

3. Toque la visualización ON/OFF. El efecto P.EQ se activa o desactiva (ON/OFF).

Cuando el efecto P.EQ está desactivado ("OFF"),)dicho ajuste no se refleja en la fuente de música. Con thiso conclusye el ajuste de P.EQ.Presione el boton [SOUND] para volver al modo original.
4. Toque B/U para selectionar "BASIC".

Cada vez que toca B/U, "BASIC" y "USER" se alternan suscesivamente.
5. Toque 山 el N° de menu báscido de P.EQ para selecciónar el menu báscido de P.EQ.
Menu Basics of P.EQ
N° Nombre de la visualización Posición de instalación de los altavoces 1 SEDAN-1 Delantera: Puerta Delantera
Trasera: Panel trasero 2 SEDAN-2 Delantera: Puerta Delantera
Trasera: Panel trasero 3 WAGON-1 Delantera: Puerta Delantera
Trasera: Portaequipaje (lateral) 4 WAGON-2 Delantera: Puerta Delantera
Trasera: Panel trasero 5 MINI VAN-1 Delantera: Puerta Delantera
Trasera: Portaequipaje (lateral) 6 MINI VAN-2 Delantera: Puerta Delantera
Trasera: Panel trasero
6. Presione el botón [SOUND] para volver al modo original.
Ajuste/memorizacion de P.EQ (memoria de usuario)
La memoria de usuario le permite compensar lascharacteristicas de fecuencia para ajustarlas a suautomovil segun el menubasico de P.EQ.Lamemoria de usuario permitted programar hasta 6valores de ajuste Para Obtener mas informacion,consulta la seccion"Ajuste de P.EQ".
1. Presione el botón [SOUND].
2. Toque P.EQ.
3. Toque la visualización ON/OFF. El efecto P.EQ seactivo o desactiva (ON/OFF).
4. Toque B/U para selectionar "BASIC" o "USER".
5. Toque la parte derecha de la pantalla para selectionar el menu que se utilizes como menu de ajuste.
6. Presione el botón [A].
7. Toque la parte izquierda de la pantalla para seleccionar "FRONT" o "REAR".

8. Toque la parte central de la pantalla para seleccionar cada ajuste.
Cada vez que toca ↑, los ajustes se suseden como se indica a continuación:
Ajustes
BAND (banda) FREQ (frecuencia) Q GAIN (ganancia) BAND (banda)...
9. Toque la parte derecha de la pantalla para realizar el ajuste deseado.
* El margen de ajuste de "BAND" es de 1 a 3.
* El margen de ajuste de "FREQ" es de 20Hz a 20kHz.
*Selezione 1,3,5,7ó20paraajustar“Q”
* El margen de ajuste de "GAIN" es de - 12dB a +12dB.
10. Repita los pasos 7 a 9 para realizar el ajustedeaseado.
11. Cuando haya terminado de realizar los distinctos ajustes, toque RTN. La visualización vuelve a la pantalla original, y aparece “>>” en la visualización BASIC o USER. Con这一点 concluye el ajuste de P.EQ. Para proseguir con la memorización de los values de ajuste en el menu de usuario de P.EQ,=haga lo siguientes.
12. Toque RTN prolongamente durante segundo o más.
Aparecerá la lista de manos de P.EQ.
13. Toque prolongadamente durante 2 segundos o más la memoria de usuario en la que deseee programar los valeurs de ajuste. Escuchará un tono largo paraindicarle que los valeurs que ajustó hasta el paso 10 se han memorizzato en el menu de usuario de P.EQ. Si escucha un tono corto, es que los valeurs de ajuste configurados hasta el paso 10 han sido descartados. Ajuste these values según sea besoinario.
14. Toque RTN.
15. Presione el botón [SOUND] para volver al modo original.
* Para selectionar una memoria de usuario programada, toque B/U para ver "USER" y cuando toque ↑ ⇌ el N° de memoria de usuario.
Ajuste de P.EQ
A continuación se específican los values que se pueda ajustar en el menu de P.EQ. La Frequencia central, ganancia y curva de Q se pueda memorizar en combinaciones de canales y bandas.
Por exemple, la fecuencia central "250Hz", ganancia "-8dB" y curva de Q "3" pueda memorizarse en la banda 1 delantera.
FRONT/REAR (selección de canal)
Permite seleccionar el canal (delantero o trasero) que se va a ajustar.
BAND (selección de banda)
Permite seleccionar la banda de freuencias (de 1 a 3) que se va a ajustar.
Ajuste la fecuencia central (FREQUENCY), la ganancia (GAIN) y la curva de Q (Q) para cada banda de fecuencias.
FREQUENCY (selección de la Frequencia central)
Permite seleccionar la fecuencia que se va a
utilizar como centro de la banda de fecuencias
para compensar en un margen de 20Hz a 20kHz (pasos de 1/3 octavas, 31 punto)
GAIN (ajuste de ganancia)
Permite ajustar la ganancia (nivel de salute) en un margen de -12dB a +12dB. (pasos de 1dB, 25 punto)
Q (selección de la curva de Q)
Permite ajustar la pendiente de la curva Q en uno de los parámetros siguientes: 1, 3, 5, 7 á 20.
Compensación
Si ha medido las caracteristicas de fecuencia con un dispositivo de medicacion y son planas (sin picos ni valleys), no esnecessary compensarlas. Sin embargo, en occasions las caracteristicas de fecuencia aumento o disminuyen en algunos punto. De producirse dicha situacion, sedeferan compensar. Cree una curva de fecuencia concharacteristicasqueean opuestos a la fecuencia central de los punto enlos que augmeno disminuyan lascharacteristicas,afin de anular los picos yvalles, procurando queSean lo mas plana possible.
La operation de aplanado de las caracteristicas se denomina "compensacion."
En esta unidad, las caracteristicas de fecuencia se pueda compensar con P.EQ (ecualizarador paramétrico).
Compensación de lascharacteristicadocurrencia
La?siguiente figura muestra la relacion existente entre fecuencia central, ganancia y curva de Q.

Curva de Q.
La curva de Q se hace más aguda a medida que AUGUNTAN LOS VALORES NUMERICOS, y SE aplANA A MEDIDA QUE ESTOs disminuyen.
Las caracteristicas de fecuencia se PUden aplanar seleccionando una curva de Q opuesta a la curva que se va a compensate.

F: Frecuencia central G: Ganancia (nivel de salute), Q: Curva de Q.
N°( Tipo de automóvil) Parámetros del ecualizador paramétrico Canal Band 1 Band 2 Band 3 F G Q F G Q F G Q 1(SEDAN-1) Delantero 250 Hz -8 dB 3 2 kHz -4 dB 1 5 kHz -4 dB 1 Trasero 250 Hz -10 dB 3 1.25 kHz 0 dB 5 8 kHz 0 dB 5 2(SEDAN-2) Delantero 250 Hz -10 dB 7 800 Hz -4 dB 3 8 kHz -5 dB 1 Trasero 80 Hz 3 dB 7 125 Hz -12 dB 5 1.25 kHz 0 dB 5 3(WAGON-1) Delantero 250 Hz -8 dB 3 1 kHz -8 dB 3 10 kHz -6 dB 1 Trasero 250 Hz -8 dB 3 800 Hz -8 dB 1 8 kHz 0 dB 5 4(WAGON-2) Delantero 250 Hz -8 dB 7 400 Hz -10 dB 7 1.25 kHz -8 dB 7 Trasero 125 Hz -8 dB 3 500 Hz -5 dB 5 1.6 kHz 0 dB 3 5(MINI VAN-1) Delantero 125 Hz -4 dB 5 1.25 kHz -4 dB 3 2 kHz 3 dB 7 Trasero 250 Hz -6 dB 1 630 Hz -4 dB 3 8 kHz 0 dB 5 6(MINI VAN-2) Delantero 250 Hz -4 dB 3 1.25 Hz -8 dB 3 80 Hz 3 dB 3 Trasero 250 Hz -8 dB 3 500 Hz -5 dB 5 8 kHz 0 dB 5
Operaciones de la radio
Visualizaciones del modo de radio
Visualización principal
Para verla, presione el mando [ROTARY] y seleccione el modo de radio.

Si toca la parte izquierda de la pantalla durante 1 segundo o más, cambiará la visualización de funciona simple.

Visualización de Frequencias
Aparece la fecuencia que se está recubiendo actualmente.
Si toca o la visualización de configuración estandar,URT realizar sintonización de búsqueada o sintonización manual.
Visualización de títulos
Muestra el nombre del canal que se está recubiendoactualmente.Al tocar el nombre, cambia la visualizacion.
Visualización de banda de recepción
AM: Nombre de banda AM
FM1: Nombre de banda FM
Visualización de N° de presinstonia
Toque la visualización de funciona estándar para selectionar una memoria preprogramada.
MODE
Al tocar esta visualización aparecen varias subfunciones. Tóquela prolongadamente durante 1 segundo o más para ver la lista de memorias preprogramada.
P-SCAN:
Aparece durante una exploración de presintonías.
Toque esta funciona para finalizar la exploración de presintonías.
A-STORE:
Aparece durante una memorización automatica.
Toque esta funciona para finalizar la memorización automatica.
BAND
Toque esta funciona para携带 de banda de recepción.
Si la toca prolongadamente durante 1 segundo o mas, se alternaré entre el modo de sintonización manual y el modo de sintonización de búsqueda.
(úlo en la visualización de funciona simple)
Estos botones le permitted realizar sintonizacion de búsqueada o sintonizacion por pasos (en el mode de sintonizacion manual).
Si los toca prolongadamente, podra realizar una sintonizaciónVisualización de la lista de memorias preprogramadas
Aparece cuando se toca MODE de forma prolongada durante 1segundo o más en la visualización principal.

Nombre de la emisora (o frequencia)
Sintonización en bajo:
RTN: Toque esta funciona para volver a la visualización principal.
Escuchar la radio
1. Presione el mando [ROTARY] para seleccionar el modo de radio.
Cada vez que presiona este mando, se pasade un modo a otro en elsignificanteorden:
Radio (DAB) CD / MP3 (Cambiador de CD) (Cambiador de DVD) (TV) AUX Radio...
* El modo de aquellos equipos que no estén conectados no se muestra.
2. Toque BAND para Cambiar de banda de recepcion.
Cada vez que toca BAND, cambia la banda de recepción el suivienteorden:
FM1 FM2 FM3 AM (MW / LW) FM1...
Sintonizacion
Hay 3tipsodemosde sintonaciondisponibles:sintonacion debuesueda, sintonacionmanualypresintonacion.
Sintonización de búsqueada
Existen 2 temas de sintonizacion de businga: DX SEEK y LOCAL SEEK.
DX SEEK puede sintonizar de forma automática emisoras de radio con recepcion,@m间隙as de LOCAL SEEK solo sintoniza aquellas emisoras de radio que gown de una buena sensibilityde recepcion.
1. Toque BAND para selectionar la banda deseada (FM o AM (MW, LW)).
2. Sintonice una emisora.
* Cuando aparezca MANU, toque BAND prolongadamente durante 1 segundo o más.
"MANU" desaparece de la pantalladeferando disponible la sintonizacion debúsqueda.
* Si "TA" está iluminada en la pantalla, automatistically se buscarán las emisoras TP.
DX SEEK
Cuando se toca la visualización de freuencias, comienza la sintonización automática.
Cuando se toca 日 ,la emisora se busca en directiona las Frequencias mas altas,y cuando se toca 日 ,la emisora se busca en directiona las Frequencia mas bajas.
* Cuando comienza la sintonización de búsqueada, "DX SEEK" aparece en pantalla.
LOCAL SEEK
Cuando se toca la visualización de freecuencias, comienza la sintonización local. Se selecciónan las emisoras de radio con buena sensibilitidad de recepción.
* Cuando comienza la búsqueada local, "LO SEEK" aparece en pantalla.
Sintonización manual
Existen 2 métodos: sintonización rápida y sintonización por pasos.
En el modo de sintonización por pasos, las fecuencias cambian una a una. En el modo de sintonización rápida, pueda sintonizar la fecuencia deseada al instante.
1. Toque BAND prolongamente durante 1 segundo o más cuando MANU no aparezca en pantalla.
La sintonizacion manual se pueda realizar,msteadasmeuda MANU.
2. Utilice la visualización de Frequencias para sintonizar una Frequencia que está transmitido.
Sintonizacion por pasos
Toque la visualización de Frequencia.
Sintonizacionrapida
Toque la visualización de freuencias. El proceso de sintonización se detiene cuando retina el dedo del panel.
Recuperación de emisoras preprogramadas
La función de recuperación de emisoras preprogramadas permite sintonizar emisoras previamente memorizadas.
1. Toque MODE prolongamente durante un segundo o más.
Aparecerá la lista de的记忆as preprogramadas
2. Toque la emisora que desee escuchar.
* En el modo normal, también puede選擇aciones un N° de presintonía tocando
en la visualizacion principal.
Para cancelar la sintonizacion
1. Toque RTN.
Memoria preprogramada
Existe un total de 24 memorias de sintonizacion (6-FM1, 6-FM2, 6-FM3, 6-AM) para memorizar emisoras de radio individuales.
1. Toque BAND paraonian de banda de recepcion.
2. Utilice la visualizacion de freuencias para memorizar las emisoras.
3. Toque MODE prolongamente durante un segundo o más.
Aparecerá la lista de的记忆as preprogramadas
4. Toque prolongamente durante 2 segundos o más el N° de presintonía donde se memorizará la emisora.
Escuchará un tono长大o para indicarle que se ha memorizzato la emisora.
Memorización automática
La función de memorización automática permitte programar hasta 6 emisoras que se sintonizar automatistically de forma secuencial.
1. Toque MODE.
2. Toque A-STORE prolongamente durante 2 segundos o más.
La visualización MODE cambia a “A-STORE” y el N° de presinstonia de la operación de memorización automática aparece en la visualización de N° de presinstonia.
* Se buscan las emisoras con buena recepción y se guardan en la memoria preprogramada (N° 1 al N° 6) enorden empezando por la emisión con la Frequencia más baja.
Notas:
- Cuando se realiza una memorizacion automatica, se borran las emisoras que hasta entones estaban memorizadas.
- Si hay menos de 6 emisoras con buena recepción en LOCAL SEEK, se vuelve automatistically a las Frequencias同比下降 y DX SEEK realiza otra memorización automática. Si tras launda memorización automatística,sville habiendo menos de 6 emisoras con buena recección, las emisoras anteriores permanecerán en la memoria.
- Si la memorización automatica se realiza en las bandas de FM, las emisoras se memorizarán en FM3, although she may have elected FM1 or FM2 to memorizar las emisoras.
Exploración de presintonías
La función de exploración de presintonías le permite recibir las emisoras en elorden en que estáactualmentememorizadas enel N^ de presintonía,para poder examinarlas emisiones.
1. Toque MODE.
2. Toque P-SCAN.
La visualización MODE cambia a "P-SCAN", y el N° de presintonía de la operation de exploración de presintonías aparece en la visualización de N° de presintonía.
* Las emisoras actualmente memorizadas se reciben en suorden durante 7segundos o más cada una. Se omiten las emisoras con mala recepción y se pasa a recibir la",[siguiente].
Cuando se realiza una exploración de presintonías en una emisión de FM, las emisoras de FM se reciben en el suiviente orderly:
FM1 (1 6) FM2 (1 6) FM3 (1 6)...
Cuando se realiza una exploración de presintonías en una emisión de AM, las emisoras de AM se reciben en el suiviente orderly:
AM (1 6) AM (1 6) y asi sucesivamente.
Para cancelar la exploración de presintonías
1. Toque P-SCAN.
La visualización P-SCAN cambia a “MODE”, y las emisoras que se estaban recibiendo cuando se toco P-SCAN se reciben a continuación.
Sistema de datos radiofonicos (RDS)
Estaunidadtieneincorporadoundecodificador delsystemadatasradiofonicos(RDS)parautilizarsecon emisoras que transmitan datos deRDS.
Este sistemas peut visualizar el nombre de la emisora recibida (PS), y tambiénCambiar automatistically a otheremorsa con la mayor recepcion,mñtras seencuentreeviando a grandes distancias (cambio de AF).
Además si una emisión de RDS transmite unannouncement sobre el refrío o un tipo de programa,se recibirá esta emisión independiente del modo en el que se enquiry.
Adicondalmente, si se recibe informacion de EON, esta informacion permitira el cambio automatico de除外 emisoras memorizadas de la mesma red y interrupcion de la emorsa que este recibiendose para recibir informacion sobre el trafico de除外 emisoras (TP).
Para utiliser la funciona de RDS,pongasiempre la radio en el modo de FM.
- AF: Alternative Frequency (Frecuencia alternativa)
- PS: Programme Service Name (Nombre de contrôle del programa)
- PTY: Programme Type (Tipo de programa)
- EON : Enhanced Other Network (Información mejorada de除外es redes)
- TP: Traffic Programme (Programa sobre el tráfico)
PI: Programme Identification (Identificacion de programa)
- TA: Traffic Announcement (Información sobre el tráfico)
* La función de RDS no trabajoará durante la recepción de radio de AM.
* Cuando el aparato recibe la seals RDS y pueda leer los datos PS, aparece PS en el visualizador.
Función de Frequencias Alternativas (AF)
La funciona de AF cambiará a una Frequencia diferente de la mesma red a fin de mantener la optima recepción.
- El ajuste de fabricula es "ON".
Para activar o desactivar (ON/OFF) la funciona AF
1. Toque MODE.
2. Toque AF. Cada vez que toca esta visualización, la funciona AF seactiva ("ON") y desactiva ("OFF") suscesivamente.
3. Toque RTN.
* Si la Reception de la emisión de radio se debilita, "SEARCH" aparece en pantalla y la_radio empieza aUGCAR el mismoprograma en othera freuencia.
Función de AF entre RDS y DAB
Cuando el本身就是 programa está radiodifundiendose mediating RDS y DAB, y está的功能 está activada, launidad cambiará automatistically para recibir la emisión con mayor recepción.
-Estafuncion solamentetrabajaracuandohayaconectaruna unidadDABDAH923o DAH913, vendidaaparte.
- El ajuste predeterminado de fabrica es "ON".
1. Presione el botón [A] para selecciónar el modo de ajuste.
2. Toque la visualización de ajustes para selecciónar "LINK ACT" en "TUNER".

3. Toque la parte derecha de la pantalla o gire el mando [ROTARY] para seleccionar "ON" u "OFF".
ON:
Se activa la commutación de AF entre DAB y RDS.
OFF:
Se desactiva la conmutacion de AF entre DAB y RDS.
4. Presione el botón [A] para volver al modo anterior.
Función de programareregional (REG)
Cuando la funciona de REG está activada, la recepción de emisoras locales está optimizada. Cuando esta funciona está desactivada, si el área regional cambia cuando conducza, se recibirá la emisiónal para tal region.
- El ajuste de fabricula es "OFF".
Notas:
-Estamericanestarahabituladacuandose esterecibiendounaemisorasnacional,comoBBC2_FM.
- El ajuste de activación/desactivación de la función de REG sera正值 cuando la funciona de AF está activada.
Para activar o desactivar (ON/OFF) la funciona REG
1. Toque MODE.
2. Toque REG.
Cada vez que toca esta visualización, la funciona REG seactiva ("ON") y desactiva ("OFF") suscesivamente.
3. Toque RTN.
Sintonización manual de una emisiónal regional en la misma red
-EstafunciionesaldoquandolafunciOnAF estáactivada("ON").
- La operation variedegun esté activado o desactivada (ON/OFF) de la referencia REG. Cuando la referencia REG está activada (ON), se pueda recibir las emisiones que poseen un número PI totalmente coincidente. Cuando la referencia REG está desactivada (OFF), se pueda recibir las emisiones que poseen el本身就是 tipo de número PI.
Notas:
-Estafunciopuedeutilizarsecuandesecrbcuna emisión regional de la misma red.
- El número PI es un sistemas de codificacion unico de cada emisora de radio.
1. Toque MODE prolongamente durante un segundo o más.
Aparecerá la lista de的记忆as preprogramadas
2. Toque el N° de presintonía de la emisión que se vaya a recibir.
Anuncios sobre el tráfico (TA)
En el modo de espera de TA, cuando se inicia la emisión de announcements sobre el refrío, tal emisión se recibirá con la(Maxima prioridad independiente) del modo de funciona a fin de que pueda escharla. Internacionalmente, para un programa sobre refrío (TP).
-Estafuncion solamentepodarutilizarusewhen enelvisualizadorestedindicandose“TP” Cuando estedindicandose“TP”,significarque laemisoradRDSquesta recibiendose posee programsadanunciossobrelertrfico.
Establecimiento del modo de espera de TA
Si presiona el botón [TA] cuando en el visualizador solamente está indicándose "TP", aparecerán "TP" y "TA" y launidad entrada en el modo de espera de TA hasta que comience un anuncio sobre el tráfico. Cuando comience una emisión de announcements sobre el tráfico, en el visualizador aparecería "TRA INFO". Si presiona el botón [TA]mintras está recibiendo una emisión de announcements sobre el tráfico, la recepción de dicha emisión se cancelará, y launidad entrada en el mode de espera de TA.
Para cancelar el modo de espera TA
Con lasindicaciones“TP”y“TA”iluminadas en pantalla, presione el boton [TA].Se apaga la indicacion“TA”y se cancela el modo de espera TA.
- Si "TP" está apagada, pode presionar el botón [TA] paraocular una emisora TP.
ParaocularunaemisoraTP
Si presiona el botón [TA] con "TP" apagada, "TA" se ilumina en la pantalla y la unidad automatistically recibe una emisora TP.
Nota:
- Cuando no se pueda recibir una emisión TP, "TP SEEK" aparece en pantalla y prosigue la BUSqueda de la emisión TP. Cuando se presiona el botón [TA] de nuevo, "TA" y "TP SEEK" se apagan en la pantalla y finaliza la BUSqueda de la emisión TP.
Función de almacenimiento automatico de emisoras de TP
Podrá almacenar automatistically hasta 6 emisoras TP en la memoria de preajustes. Si el número de emisoras TP que pueda recibirse es de menos de 6, se DEAan sin sobrescribir las emisoras difusoras que ya está almacenadas en la memoria.
1. Compruebe que "TA" aparece en pantalla, y toque MODE.
Si "TA" no aparece en pantalla, presione el botón [TA] para que aparezca.
2. Toque A-STORE prolongamente durante 2 segundos o más.
La visualización MODE cambia a "A-STORE" y el N° de presinstonia de la operation de memorización automatica aparece en la visualización de N° de presinstonia.
- Las emisoras TP con buena sensibilitidad de recepcion se memorizan en las的记忆as preprogramadas.
- Aúnque selección FM1 o FM2, se memorizará una emisióna TP para FM3.
Tipo de programa (PTY)
Esta funciona le permite escharar las difusiones del tipo de programa seleccionado excepto que la unidad está en un modo de referencia que no sea el de la radio.
- Algunos País no realizan todas emisiones de PTY.
- En el modo de espera de TA, una emisora de TP tendrá prioridad sobre otra de radiodifusión de PTY.
Establecimiento del modo de espera de PTY
Si presiona el botón [▶III], en el visualizador aparecerá "PTY" y seactivará el modo de espera de PTY. Cuando se incide la emisión de PTY selección, en el visualizador aparecerá el nombre del item de PTY.
■ Cancelación del modo de espera de PTY
Si mantiene presionado el botón [▶■] durante 1 o más segundo "PTY" desaparecerá del visualizador y se cancelará el modo de espera de PTY.
■ Cancelación de una emisión
con interruptación de PTY
Presione el botón [▶III] durante la emisión con interruptions de PTY, dicha interruptions de PTY se cancelará y launidadvoltara al modo de espera de PTY.
Selección de PTY
1. Cuando presiona el botón [■■], launidadENA al modo de selección de PTY.
2. Toque la parte derecha de la pantalla o gire el mando [ROTARY] para seleccionar PTY.
* A continua se muestran los Valores preajustados de fabrica memorizados:
Número de memorización Itém de PTY ENGLISH -contained 001 News Noticias 002 Info Información 003 Pop M Música Pop 004 Sport Deportes 005 Classics Música Clásica 006 Easy M Grand éxitos
3. El modo de selección de PTY se Cancela automatistically a los 7segundos, o toque RTN se selecciona un PTY.
Búsqueda de PTY
1. Cuando presiona el botón [▶■], se activa el modo de selección de PTY.
2. Toque el centro de la pantalla o gire el mando [ROTARY] para seleccionar PTY.
3. Toque la izquierda de la pantalla. Cuando toca, la unidad busca una emisión PTY desplazándose por las Frequencia en sentido ascendente, cuando que cuando toca la búsqueda se realiza en sentido descendiente.
* Si no se recibeacular emisora con la emisión PTY selecciónada, launidad vuelve al modo anterior.
Memoria preprogramada de PTY
1. Cuando presiona el botón [▶II], se activa el modo de selección de PTY.
2. Toque la parte central de la pantalla para selectionar PTY.
Se pueda selectionar los 29 temas de PTY que se muestran en lasuma table.
Itém de PTY ENGLISH DEUTSCH SVENSKA FRANÇAIS Contenido News Nachrich Nyheter Infos Noticias Affairs Aktuell Aktuellt Magazine Magazin Info Service Info Services Informação Sport Sport Sport Sport Deportes Educate Bildung Utbildn Educatif Educación Drama Hör + Lit Teater Fiction Drama Culture Kultur Kultur Culture Cultura Science Wissen Vetenskap Sciences Ciencia Varied Unterh Underh Divers Varios Pop M Pop Pop M Pop Música Pop Rock M Rock Rock M Rock Música Rock Easy M U-Musik Lättlyss Chansons Grand éxitos Light M L-Musik L klass M Cl Lég Música Ligera Classics E-Musik Klassisk Classiq Música Clásica Other M -- Musik Övrig m Autre M Otro Música Weather Wetter Väder Météo Informação Metereológica Finance Wirtsch Ekonomi Economie Economia Children Kinder För barn Enfants Infancia Social Soziales Sozialt Société Sociedad Religion Religion Andligt Religion Religión Phone In Anruf Telefon Forum Opinión Travel Reise Resor Voyages Viajes Leisure Freizeit Fritid Loisirs Ocio Jazz Jazz Jazz Jazz Música Jazz Country Country Country Country Música Country Nation M Landes M Nation m Ch pays Música Nacional Oldies Oldies Oldies Rétro Música de ayer Folk M Folklore Folkm Folklore Música Folk Document Feature Dokument Document Documental
3. Toque RTN prolongamente durante 1 segundo o más.
Aparecerá la lista de titulos de la memoria PTY
4. Toque prolongadamente durante 2 seguidos o más el N° de presintonía que se va a memorizar.
Escuchará un tono largo paraindicarle que el PTY seleccionado se ha memorizzato en la memoria de canal preprogramada.
Emisión de emergencia
Si se recibe una emisión de emergencia, todas las operaciones del modo de funciona se pararan. En el visualizador aparecerá "ALARM" youlda eschar la emisión de emergencia.
■ Cancelación de una emisión de emergencia
Si presiona el botón [AF], la recepción de la emisión de emergencia se cancelará.
Cambio del idioma de visualización de PTY
Puede selectionar uno de los 4 idiomas existentes (inglés, aleman, sueco o francés) para visualizar la pantalla.
- El valor preajustado de fabrica es "ENGLISH" (Inglés).
1. Presione el botón [A] para selección ar el modo de ajuste.
2. Toque la visualización de ajustes para selecciónar "LANGUAGE" en "TUNER".

3. Toque la parte derecha de la pantalla o gire el mando [ROTARY] para seleccionar el idioma.
* Selección ENGLISH (Inglés), DEUTSCH (Alemán), SVENSKA (Sueco) o FRANÇAIS (Francès).
4. Presione el botón [A] para volver al modo anterior.
Ajuste de la interrupción de RDS cuando la funciona 2-ZONE está en uso (RDS-INT 2Z)
Cuando esta funciona está activada ("ON"), y se interrupme el RDS con la funciona 2-ZONE en uso, se dejan de recibir los datos RDS.
- Cuando se produce una interruptions en el RDS, la funciona 2-ZONE se desactiva ("OFF").
- Si se produjera una interrupcia de alerta aun con "RDS-INT 2Z" desactivado ("OFF"), se recibiran los datos RDS.
- El valor preajustado de fabricula es "ON".
1. Presione el botón [A] para selección el modo de ajuste.
2. Toque la visualización de ajustes para selecciónar "RDS-INT 2Z" en "TUNER".

3. Toque la parte derecha de la pantalla o gire el mando [ROTARY] para seleccionar "ON" u "OFF".
ON:
Los datos RDS se reciben cuando se produce una interrupción del RDS con la func tion 2-ZONE en uso.
OFF:
Cuando la funciona 2-ZONE está en uso, no se recibe ningún dato RDS, excepto la Interruption de alerta.
Nota:
- Si selección el modo Radio cuando TA (Información sobre el tráfico) y PTY está activadas ("ON"), se recibirán interruptions, también la interrupccion de RDS está desactivada ("OFF").
4. Presione el botón [A] para volver al modo anterior.
Ajuste del volumen de TA, emisión de emergencia (ALARM) y PTY
El volumen de las emisiones de interrupción de TA, ALARM y PTY se pueda ajustar durante la emisión de interrupción de TA, ALARM o PTY.
- El valor preajustado de fabricula es "15"
Durante una emisión de interrupción de TA, ALARM o PTY, gire el mando [ROTARY] hacía lareshedra o hacía la izquierda paraaabsturar el nivel del volumen deseado (de 0 a 33).
- Una vez finalizada la emisión de interrupción de TA, ALARM o PTY, el volumen vuelte al nivel que está activo antes de la emisión de interrupción.
Visualizaciones del modo CD
Visualización principal
Para verla, presione el mando [ROTARY] y seleccione el modo CD.

Si toca la parte izquierda de la pantalla durante 1 segundo o más, cambiará el modo de funciona bajo.

Visualización de tiempo de pista/reproducción
J01/02:00:
Muestra el N° de pista en reproduccion y el tiempo de reproduccion.
Si toca 一 四 一 一 o durante el
funcimiento estándar, pourrait selectionar la pista que deseee reproducir o hacer avanzar o retroceder rápidamente las pistas.
Visualización de títulos
Esta visualización cambia cuando se toca.
Visualización de carpetas (en caso de MP3/WMA)
Si toca duringe el funcionaamente estandar, podra seleccionar carpetas.
MODE:
Al tocar esta visualización aparecen varias subfunciones. En el caso de MP3/WMA, si la toca prolongadamente durante 1 segundo o más, aparecerá la lista de carpetas.
Nota:
- Este funciona solo está activada durante la reproduccion de un disco.
-SCAN: SCAN: Aparece durante la reproduccion por exploracion. Toque esta referencia para finalizar la reproduccion por exploracion.
-RPT/RPT: Aparece durante la reproduccion repetition. Toque esta direccion para finalizar la reproduccion repetition.
- RDM/RDM: Aparece muestra durante la reproduccion aleatoria. Toque esta direccion para finalizar la reproduccion aleatoria.
TOP:
Toque esta funciona para,iniciar la reproduccion a partir de la prima pista del disco o de la carpeta que se esté reproduciendo.

(sólo en la visualización de onacimiento simple)
Toque这些东西 botones para selectionar la pista que deseee reproducir.
Si toca los botones de forma prolongada, ha para avanzar o retroceder las pistas rápidamente.
Visualización delists de carpetas (en caso de MP3/WMA)
Aparece cuando se toca MODE de forma prolongada durante 1 segundo o más en la visualización principal.

Nombre de carpeta
N° de carpeta
Si aparece?sombreada(gris),la carpeta no se(puede seleccionar.
>>:Selección en bajo 100%
Toque el nombre de la carpeta para volver a la visualización principal e起初 la reproduccion desde la primera pista de la carpeta tocada.
←PREV-RTN:
Toque esta funciona para ver la lista de carpetas anterior. Si la toca prolongadamente durante 1 segundo o más, volverá a la visualización principal.
NEXT:
Toque esta funciona para ver la lista de carpetas.),
siguiente.
¿Qué es MP3?
MP3 es un método de comprensión de audio clasificado en la capa 3 de audio de las normas MPEG.
Este método de compresión de audio ha penetrado en los.usquarios de PC y se ha convertido en un formattingstandar.
Este formatting MP3 se caracteriza por la compresión de los datos de audio a aproximadamente el 10 por cierto de su時間 original con gran calidad de sonido. Esto significía que podran grabarse 10 discos compactos de música en un disco CD-R o un disco CD-RW para permitir长大o tiempo de escharc sin tener que cambiar discos compactos.
¿Qué es WMA?
WMA es la abreviatura de Windows Media Audio, un tipo de ARCHivos de audio desarrollado por Mirosoft Corporation.
Notas:
- Si reproduce un archivo con DRM (Digital Rights Management) para WMA en ON, no trabra calidad de audio. (El indicator WMA parpadeará.)
- "Windows Media™ y el logotipo Windows® son MARCA MARCEIA O MARCA REGISTRadas de Microsoft Corporation en los Estados Unidos de América y/others países."
- Para,inhabilar la DRM (Administración dearethchos digitales):
- Cuando utilise Windows Media Placer 8, haga的比例在 TOOLS OPTIONS COPY MUSIC, y bajo de COPY SETTINGS, quite la marca de verificacion de la casilla para PROTECT CONTENT. Después reconstruya los ARCHIVOS.
- Cuando utilise Windows Media Placer 9, haga,
optic en TOOLS OPTIONS MUSIC
RECORD, y文化底蕴 de Recording settings,
quite lamarca de verificacion de la casilla para RECORD PROTECTED MUSIC.
Después reconstruya los archivos.
Los archivos WMA personalmente formados se emplean bajo propia responsabilitad personal.
Precauciones al crear un disco MP3/WMA
- Velocidades de muestreo y velocidades de transferencia realizables:
1. MP3: Velocidad de muestro: de 11,025 kHz a 48 kHz Velocidad de transferencia: de 8 kbps a 320 kbps / VBR
2. WMA: Velocidad de transferencia: de 48 kbps a 192 kbps
- Extensiones de ARCHIVOS
1. Añada siempre una extension de archivo“.MP3” o“.WMA” a los ARCHIVOS MP3 o WMA utilizing letras de un solo byte. Siañade una extension Distinta a la asignificada o si se olvidaañadir la extension de archivo, este no seoulda reproducir.
2. Los ARCHIVOS sin datos MP3/WMA no se reproduce. Si intenta reproducir ARCHIVOS sin datos MP3/WMA, en lugar del tiempo, la pantalla做不到la indicación“--:--”.
- Formato lógico (Sistema de ARCHivos)
1. Para bootloader un archivo MP3/WMA en un disco CD-R o en un disco CD-RW, seleccione "ISO9660 level 1, 2 o JOLIET o Romeo" como formattingo de software de,)!. La reproduccion normal no sera possible si graba el disco en othero formattingo.
2. El nombre de la carpeta y el nombre del archivo podrán visualizarse como titulo durante la reproduccion de MP3/WMA, si bien el titulo no deben contener más de 128 caracteres alfanumericos de un solo byte (incluida la extension).
3. No asigne un nombre a un archive de una carpeta queonga el mesmo nombre.
Estructura de carpetas
1. No se pueda grabar un disco con una carpeta que posea más de 8 niveles jerarquicos.
- Nível de ARCHIVOs o de carpetas
1. SeSEO reconocerpora 255 archivos en una carpeta.Y seSEO reproducirpora 500 archivos.
2. Las pistas se reproducen en el ordin en le que fueron grabadas en el disco. (Es possible que las pistas no se reproducan siempre en el ordin en que aparecen en el PC.)
3. Dependiendo del tipo de software codificador que se usa durante la grabacion, es possible que se produza cierto ruido.
Selección multisesión
Estamericano de la revolución del siglo.
La revolución de los discos (p.ej. CD-EXTRA) contienen una mezcla de ARCHIVOS CD-DA (CD de música) y MP3/WMA.
1. Toque MODE.
2. Toque M-SESS. Cada vez que toca M-SESS, la visualización M-SESS cambia entre "CD" (reproducir CD-DA) y "MP3/WMA" (reproducir MP3/WMA).
* Si- M-SESS no aparece en la pantalla, toque NEXT.
3. Toque RTN. El ajuste de selección multisesión aparecerá laproxima vez quecargue un CD.
Nota:
- Cuando reproduzca un CCCD (CD con control de copia), selección el ajuste de tipo de CD. Si lo ajusta en el tipo MP3/WMA, el CDotta no producirse con normalidad en algunos casos.
PRECAUCION
Tenga cuidado de no pillarse los dedos cuando cierre la CONSOLA INCLINABLE.
Notas:
- Si la CONSOLA INCLINABLE no se abre Completely, abralo suavamente con la
- Después de haber cargado un disco compacto, cierre sempre la CONSOLA INCLINABLE.
- No intente insertar sus dedos en la ranura de insertión del disco. Tampoco.Inserteledge的对象extra en la ranura.
- No inserte discos cuando haya salido adhesivo de la cinta de celofán o de una etiqueta de un disco CD alquilado, cuando tales discos tengan marcas de cinta de celofán o etiquetas despegadas. Podía resultar imposible extraer these discs de la unidad y averiarla.
Cargar un CD
1. Presione el botón [▲]
Se abre el panel de control.
2. Cargue el disco compacto a工程技术 de la ranura para CD (CD SLOT).
Una vez cargado el disco, al cabo deanos
segundos el panel de control se cierra
automátamente y se empieza a repr
Notas:
- No inserte nunca objetos extranos a工程技术 de la ranura para CD (CD SLOT).
- Si el CD no se pueda insertar con satisfid, es possible que haya other CD bajo del aparato o que lachaft requiera reparacion.
-Esta unidad no puedaroducirdiscos que noporten lamarca o CD-ROMs. DIGITALO 00000000000000000000000000000000000000000000000000000000
- Es possible que algunos CDs grabados en modo CD-R/CD-RW no pueda utiliser.
Carga de discos compactos de 8 cm
Para reproducir discos compactos de 8 cm no se necesita adaptador. Inserte el CD de 8 cm en el centro de la ranura para CD (CD SLOT).
Expulsión de un CD
Se peutes expulsar un disco compaco presionando el boton [A],aqueue la llave del motor del automovil este en la posicfon OFF o ACC.
PRECAUCION
Cuando se expulse el disco, presione el botón [▲] para cerrar el panel de control. Sidea el panel de control abierto, eschucará un tono doble y bajo se cerrará automatistically.
1. Presione el botón [▲].
Se abre el panel de control y se expulsa el disco compacto. El equipooca automatamente a modo de radio.
* Asegürese de retiring los discos compactos expulsados de la unidad. Si no retira el disco compacto de la bandeja de CD, al cabo de 15 segundos o más se reintroduciría automatistically en la unidad y se cerrará el panel de control. (función de reintroduccion automatica)
* Los discos compactos individuales no se cargan automatistically. Asegúrese de retiring los discos compactos individuales una vez expulsados.
PRECAUCION
Si ejerce demasiada fuerza para insertar un disco expulsado,可以更好 arañar la superficie de este. Retire el disco antes de volver a cargarlo.
Escuchar un disco ya cargado en launidad
1. Presione el mando [ROTARY] para seleccionar el modo de CD.
* Cuando el modo cambie a CD, la reproduccion se inicia automatistically.
Interruption de la reproduccion
1. Presione el botón [▶■].
Reanudación de la reproducción:
1. Presione el botón [▶■] de nuevo.
Selección de una pista
Cuando inserta un CD-R/CD-RW grabado con un archivo MP3 o un archivo WMA, solo可以选择 las pistas grabadas en la misma carpeta tocando 山 la visualización de pistas.
1. Para esuchar la?sigaiente pista,toque la pista.
2. Para esuchar la pista anterior, toque 品 de pista.
Cuando toca 已 已 ,se reproduce la?siguiente pista. Si toca 已 已 sucesivamente, la pista avanza el numero de veces que toque 已 已 y bajo se reproduce.
Cuando toca se reproduce la pista anterior. Si toca sucesivamente, la pista retrocede el numero de veces que toque
yuego se reproduce.
* Si toca dos vezes la visualización de pista cuando se reproduce el principio de la pista, posiblemente se reproduzca la pista situada 2 pistas por detrás.
■ SeLECTION de una carpeta
Para seleccionar una carpetadistincta,toque 已 la visualizacion de carpetas o haga lo seguido.
1. Toque MODE prolongadamente durante un segundo o más.
Aparecerá la lista de carpetas Si toca PREV o NEXT,oulda desplazarse arriba o bajo por la lista de carpetas.
2. Toque el nombre de la carpeta.
Para escuchar la lista de reproduccion
Tambien peut esecuchar listas de reproduccion (archivo M3U).
Tenga en cuenta, sin embargo, que de los archivos M3U que estén grabados hasta cinco niveles en la jearquía de ARCHivos (incluida la carpeta raíz),sole se podráre reproduir los 5 primeros que disponan de marcas de tiempo de archivo新模式.
Notas:
- En una lista de reproduccion se pueda reproducir hasta 255 ARCHivos.
- Só le podrárn reproducir los ARCHivos MP3 o WMA que estén actualmente guardados hasta cinco niveles (incluida la carpeta raíz) en la jerarquía de ARCHivos.
Para eschar la lista de reproduccion, haga lo suiviente.
1. Toque MODE.
2. Toque NEXT.
3. Toque PLY LIST. Se empieza a leer la lista de reproduccion. Una vez finaliza esta lecture, automatically se empezará por la lista de reproduccion que contenga lamarca de tiempo más ahora. La selección de la lista de reproduccion o de pistas bajo de la lista de reproduccion se realiza del mesmo modo que la selección de una carpeta o pistas de una carpeta.
* PLY LIST no aparecerá si no se ha guardado una lista de reproducción correcta (archivo M3U) en el CD-R/CD-RW cargado en launalidad.
Para detener la reproduccion de la lista de reproduccion
1. Toque MODE.
2. Toque NEXT.
3. Toque PLY LIST.
Avance=rápido/Retroceso rápido
1. Para avanzar de forma rápida, toque la pista.
2. Para retroceder de forma rápida, toque la pista.
Función de principio
Con esta función el reproductor de CD vuelve a la prima pista del disco.
1. Toque TOP. La reproduccion empieza a partir de la prima pista (pista N° 1). Si se tratate de ARCHivos MP3/WMA, se volverá a la prima pista de la carpeta que se esté reproduciendo.
Reproducción por exploración
Estamericano.
1. Toque MODE.
2. Toque -SCAN. La visualización MODE pasa a "P-SCAN" y se inicia la reproducción por exploración.
* La reproducción por exploración comienza desde la pistasuma a la pista que se esté reproduciendo en ese momento.
Para cancelar la reproduccion por exploracion
1. Toque J^ -SCAN. La visualización J^ -SCAN pasa a "MODE", y se reproduce la pista que se está reproduciendo cuando toco J^ -SCAN.
Reproducción por exploración de carpetas
Esta funciona le permitte localizar y reproducir los primeros 10 segundos de la prima pista de todas las carpetas de un disco MP3/WMA.
1. Toque MODE.
2. Toque -SCAN. La visualización MODE pasa a "SCAN" y se inicia la reproducción por exploración de carpetas.
* La reproduccion por exploracion de carpetas comienza desde la carpeta?siguea a la que se este reproduciendo.
Para cancelar la reproduccion por exploracion de carpetas
1. Toque -SCAN. La visualización SCAN para a "MODE", y se reproduce la pista que se estaba reproduciendo cuando toco SCAN.
Reproducción repetida
Estamericano.
1. Toque MODE.
2. Toque -REPEAT. La visualización MODE pasa a "RPT" y se inicia la reproducción repetida.
Para cancelar la reproduccion repetitiona
1. Toque -RPT. La visualización -RPTonga "MODE", y se empieza a reproducir normalmente a partir de la pista que se está reproduciendo cuando toco -RPT.
Reproduccion repetida de carpetas
Esta funciona le permittedreprodukcir continuamente la carpeta en bajo. Sólo está disponible cuando seonga un CD-R/CD-RW grabado con ARCHivos MP3 o WMA.
1. Toque MODE.
2. Toque --REPEAT. La visualización MODE pasa a "RPT" y se inicia la reproducción repetida de carpetas.
Para cancelar la reproduccion repetition de carpetas
1. Toque -RPT. La visualización -RPTENA "MODE", y se empieza a reproducir normalmente a partir de la pista que se estaba reproduciendo cuando toco -RPT.
Reproducción aleatoria
Estamericano.
±bJ -RANDOM
Permite reproducir todas las pistas del disco de forma aleatoria.
Si el disco contiene 2 carpetas o mas, se producirán todas las pistas de una carpeta, seguidas de todas las pistas de la carpeta?sigue. Y asi suscesivamente con todas las carpetas.
-RANDOM
Permite reproducir pistas del disco de forma aleatoria.
Sólo está disponible cuando searga un CD-R/ CD-RW grabado con ARCHivos MP3 o WMA.
1. Toque MODE.
2. Toque -RANDOM o -RANDOM
La visualización MODE pasa a “f-RDM” o “RDM” y se inicia la reproducción aleatoria.
Para cancelar la reproduccion aleatoria
1. Toque -RDM o -RDM. La visualización -RDM o -RDM pasa a "MODE", y se empieza aREENOMINALmente a partir de la pista que se estaba reproduciendo cuando toco these botones.
Diferentes piezas musicales eschuchadas por various oyentes (función 2-ZONE)
2-ZONE es una funciona que da
simultaneously salute a sonidos separados a工程技术 de la zona principal (MAIN) y la zona secundaria (SUB) operando dos fuentes en la unidad central, para permitir que various oyentes disfruten de fuentes de músicaSeparated.
Estaunidaduedecontrolar sus fuentes internas (radio,CD,MP3etc.)para reproducirlas y,adelmas,puede reproducir simultaneamente fuentes de equipos externos connectadosa travésde CeNET (porejemplo, cambiadores de disco CD,etc.).
Las fuentes de la zona MAIN se reproducirán a工程技术 de los altavoces del vehiculo, y las de la zona SUB a工程技术 de los sistemas de altavoces (WH143).

La figura superior correponde a la reproduccion de una fuente de sonido mediante el modo interno de launidad (radio, CD, AUX) en los altavoces.
La figura inferior correponde a la reproduccion de una fuente de sonido mediante el modo externo de la unidad (cambiador de CD,ambiador de DVD, TV,AUX) en los altavoces.
* El valor preajustado de fabricula es "OFF".
Notas:
- Si la funciona 2-ZONE no está disponible cuando se conecta DAB.
- El nuevo ajuste de volumen que se realiza girando el mando [ROTARY] de esta unidadsole se refleja en los altavoces. El ajuste AUX-SENS se refleja tanto en los altavoces como en los auriculares.
Visualización de la pantalla cuando se usa la funciona 2-ZONE
En el centro de la pantalla aparece "INT." (modo interno) o "EXT." (modo externo) paraindicar si pueda escharar la reproduccion en el modo interno or除外 del modo de funcionaactual de 2-ZONE.
1. Presione el botón [SOUND].
2. Toque 2-ZONE.

3. Toque prolongamente ON/OFF en el centro de la pantalla durante 1 segundo o más.

Cuando 2-ZONE está activado ("ON"), se muestra el tipo de 2-ZONE actual.
Si 2-ZONE está desactivado ("OFF"), no se podrá usar la funciona 2-ZONE. Presione el botón [SOUND] para volver al modo original.
4. Toque ON/OFF en la pantalla para selectionar el tipo de 2-ZONE.
Tip de 2-ZONE
Altavoz Auriculas Tipo 1 Interno (modo interno) Interno (modo externo) Tipo 2 Interno (modo externo) Interno (modo interno)
5. Toque el altovo o los auriculas en la pantalla para seleccionar el modo de funcionajo de 2-ZONE.
Si toca el altovoz en la pantalla, podra ajustar el sonido de los altavoces.
Si toca los auriculares en la pantalla, podra ajustar el sonido de los auriculares.
6. Presione el botón [SOUND] para volver al modo original.
Diferentes piezas musicales eschuchadas por various oyentes (funcion 2-ZONE)
Para activar o desactivar (ON/OFF) la referencia 2-ZONE
1. Presione prolongamente el botón [SOUND] de launidad durante 1segundo o más.
Para combustir de tipo de 2-ZONE
Presione prolongadamente el botón [TA] de la unidad durante 1 segundo o más cuando la funciona 2-ZONE está en uso.
Paracaeiar el modo defuncionamento de 2-ZONE
Presione prolongadamente el botón [TA] de la unidad cuando la función 2-ZONE está en uso.
Selección del modo cuando la funciona 2-ZONE está en uso
Cuandoonga un CD,estando la referencia 2-ZONE en uso,las functiones del modo internode estaunidad cambian a CD y se empieza a reproducir automatistically.
1. Presione el botón [TA] de launidad para Cambiar el modo de funciona bajo 2-ZONE.
Cambia la visualización del equipo (altavoz o aurículares) que se puedaaabrear en ese momento.
2. Presione prolongadamente el botón [TA] durante 1 segundo o más para selección el tipo de 2-ZONE.
Se cambia a "INT." o "EXT."
3. Presione el mando [ROTARY].
Cada vez que presiona este mando con "INT." en pantalla, cambia el modo en elARRYUEnteorden:
Radio CD AUX Radio...
Cada vez que presiona el mando [ROTARY] con "EXT." en pantalla, cambia el modo en el作為ido:
AUX (Cambiador de CD)
(Cambiador de DVD) (TV ^*1 ) AUX...
* El modo de aquellos equipos que no estén connectados no se muestra.
*1 Si el modo TV está的选择acion, el modooca automatamente a modo VTR sin que se puedaCambiar.
Operaciones comunes de cada modo
Visualización del modo de introduccion de titulos
Visualización principal
Aparece cuando se selección el modo de introduccion de títulos. (cf. págin 14)

Visualización de tipo de dato
A: Letras alfabeticas en mayusculas
a: Letras alfabeticas en minuoculars
0-9: Númos
!?: Simbolos
A: Diéresis
Visualización de titulos
Muestra el texto que se ha introducido. Toque
para determinar la posicón de introducción. Si toca el botón prolongadamente durante 2seguidos o más,desaparecerá todo el texto del tíolo.
Visualización de texto introducido
Toque para seleccionar el texto introducido.
RTN
Si tocaaquicancelarála introduccionde titulos y se volverá a la visualizacion original.Toque prolongadamente durante 1segundo o más para ver la?singularmente lista correspondiente al tipo de datoactual.
MEMO
Si tocaAquiprolongadamente durante 2 segundos o mas,se memorizarareltitle introducido y se volverá a la visualización original.
Visualización delists de texto
Aparece cuando se toca RTN de forma prolongada durante 1 segundo o más en la visualización principal.

Tipode texto:
Según la visualización de tipo de dato
Seleccionada, el texto se verá de una forma u另一边.
Si la visualización de tipo de texto es “A”: A E I M Q U X (espacio)
Si la visualización de tipo de texto es "a": a e i m qu Si el tipo de texto es "0-9", "!?" o "A":
Apareceran todos los characteres.
RTN
Toquequiryparavolvera lavisualizacionprincipal.
NEXT
ToqueAquipara verla lista de texto seguiente.
Introduccion de títulos
Puede asignar unModo Número de títulos Modo de CD 50 títulos Modo de TV 20 títulos modo de cambio de CD Número de títulos DCZ628 conectado 100 titutos CDC655Tz conectado 100 titutos CDC1255z conectado 50 titutos
1. Reciba la emisora de TV o reproduzca un CD para el que deseee introducir el titulo.
2. Toque el centro de la pantalla para selectionar la visualizacion de tildos de usuario. Cuando se pase a la visualizacion de tildos de usuario, "USER" aparecera encima del N° de presinonia.
3. Presione prolongamente el botón [A] durante 1 segundo o más. La visualización cambia al modo de introduccion de títulos.
4. Toque la visualización de titulos para determinar la posión de introduccion del texto. La posicion del texto parpadeante se desplaza a la izquierda o a la derecha.

* Se;puede introducir hasta diez characteres.
PRECAUCION
Al presionar el botón de reinicio se borraran todas las的记忆ias, incluidos los titulos, que se hayan programado en la unidad.
5. Toque la visualización de tipo de dato para selección ar el tipo de dato.
Cada vez que toca , seuda de un ajuste aanother en elsiguienteorden:
Letras alfabeticas en mayusculas (espacio) ABCDEFGHJKLMNOP QRSTUVWXYZ
Letras alfabeticas en minusculas
a b c d e f g h i j k l m n o p q r s t u v w x y z
Numeros
0123456789
Simbolos, Diéresis
AÄÉÉEÉI/AØaëeeéiöüæø
6. Toque 卡 la parte derecha de la pantalla o gire el mando [ROTARY] para seleccionar los characteres que va a introducir.
7. Repita los pasos 4 a 6 para introducer el titulo.
Si toca la visualización de titulos prolongadamente durante 2seguidos o mas,desapareceran todos los charactres del titulo.
8. Toque MEMO prolongamente durante un segundo o más.
Escuchará un tono长大o para indicarle que se ha memorizzato el titulo.
Para pagar de la visualización de titulos a la visualización de reloj u另一边
Toque el centro de la pantalla.
Cuando se memoriza un titulo nuevo que excede el número máximo de titulos
Si se tratate de una emisora de TV
Los titulos que no estén memorizados en canales preprogramados se borraran automatistically y se memorizará el titulo nuevo.
Si se tratate de un CD
Se borrarán los titulos de los CDs que se hayan reproducido menos veces y se memorizará el titulo nuevo.
Eliminación de titulos
1. Reciba la emisión de TV o reproduzca un CD cuando titulo desee borrar.
2. Toque el centro de la pantalla para seleccionar la visualizacion de tildulos de usuario.
Cuando se pase a la visualización de títulos de usuario, "USER" aparecerá encima del N° de presintonía.
3. Presione prolongamente el botón [A] durante 1 segundo o más.
La visualización cambia al modo de introduccion de títulos.
4. Toque la visualización de titulos prolongamente durante un segundo o más. Desaparecerán todos los caracteres del titulo.
5. Toque MEMO prolongamente durante un segundo o más.
Escuchará un tono largo para indicarle que se ha borrado el titulo.
Modificación de los ajustes Selección de ajustes
1. Presione el boton [A].
La visualización cambia al modo de ajuste.

2. Toque la visualización de ajustes para selección arajste que va a programar.
\*Si toca 一 日 la parte izquierda de la pantalla, los ajustes principales cambian uno a uno. Si toca la parte izquierda de laGMT, los ajustes secundarios cambian continuamente.
* Si toca ⊥ ⊕ el centro de la pantalla, los ajustes secundarios cambian uno a uno. Si toca ← ⊕ →, los ajustes secundarios cambian continuamente.
3. Si aparece "EDIT" a la referencia de la pantalla, toque EDIT para pagar a la visualización de detailles de ajuste.

4. Toque la parte derecha de la pantalla o gire el mando [ROTARY] para ajustar los detalles.
Para:volveralmodooriginal
1. Presione el botón [A] de nuevo.
- Ajustes
Ajuste principal Ajuste secundario DISPLAY SCREEN SVR
• Ajuste del salvapantallas (cf. págin 41) MSG INPUT
• Introducción de datos de mensaje (cf. págin 41) MESSAGE
• Ajuste del mensaje que aparece en pantalla al encender (ON) o apagar (OFF) (cf. págin 42) S/A SENS
• Ajuste de la sensibilitad del analizador de espectro (cf. págin 42) SCROLL
• Ajuste de la velocidad de desplazimiento (cf. págin 42) APPERNCE DIMMER IN
• Ajuste del atenuador automático (cf. págin 43) DMR LEVEL
• Ajuste del nivel de atenuación (cf. págin 43) CONTRAST
• Ajuste del contraste de pantalla (cf. págin 43) BLINK LED
• Ajuste del parpadeo del LED al extraer el DCP (cf. págin 43) BEEP
• Ajuste del tono (cf. págin 44) SOUND AC-PRO III
• Seleección del modo VSE (STD/PRO) (cf. págin 44) EQ SELECT
• Seleección del modo de ecualizador (cf. págin 44) SP-SETTING
• Ajuste de la configuración de los altavoces (cf. págin 44) CENTER-SP / SUB-WOOFER
• Ajuste ON/OFF del altovoz de subgraves (cf. págin 45) HPF / SUB-W LPF
• Ajuste de la Frequencia de filtrado de los altavoces (cf. págin 45) AMP CANCEL
• Ajuste ON/OFF del amplificador (cf. págin 46) SP GAIN
• Ajuste del nivel de salute de los altavoces (cf. págin 46) PL II DELAY SRD-SP
• Ajuste del tiempo de retardo de los altavoces traseros (cf. págin 46) PL II CONT PANORAMA / DIMENSION / CTR WIDTH
• Ajuste fino del modo de música (cf. págin 47) TUNER TV ARER
• Ajuste del aire de TV (cf. págin 57) TV DIVER
• Ajuste de la diversidad TV (cf. págin 57) LINK ACT
• Ajuste de la funciona entre RDS y DAB (cf. págin 26) LANGUAGE
• Ajuste del idioma de visualización de PTY (cf. págin 30) RDS-INT 2Z
• Ajuste de la interrupción de RDS cuando la funciona 2-ZONE está en uso (cf. págin 30) SETTING AUX / TEL
• Ajuste de AUX y TEL (cf. págin 47) AUX SENS
• Ajuste de nivel de la entrada (AUX) de audio portátil (cf. págin 48) TEL-SP
• Ajuste de la calidad de altavoces del automóvil para el téléphone móvil (Optional TEL-002) (cf. págin 48) TEL-SWITCH
• Ajuste de la interrupción para el téléphone (cf. págin 48) CALIBRATE / A-VOL SENS
• Ajuste de la funciona de volumen automatístico (cf. págin 49) SYSTEM CHECK
• Comprobación del sistema (cf. págin 49) CODEMATIC
• Ajuste de la seguridad (cf. págin 50)
Ajuste del salvapantallas (SCREEN SVR)
Estamericano de la unidad.
- El valor preajustado de fabricula es "ON".
1. Presione el botón [A] para selecciónar el modo de ajuste.
2. Toque la visualización de ajustes para selectionar "SCREEN SVR" en "DISPLAY".

3. Toque la parte derecha de la pantalla o gire el mando [ROTARY] para seleccionar "ON" u "OFF".
4. Presione el botón [A] para volver al modo original.
Para cambio de salvapantallas
Toque PREV (Anterior) o NEXT (Siguiente))m润滑as se muestra el salvapantallas.
Cada vez que toca uno de这些东西 botones se cambia de salvapantallas.
Salvapantallas
Modelo de salvapantallas 1

Modelo de salvapantallas 2

Modelo de salvapantallas 3

Modelo de analizador de espectro 1

Modelo de analizador de espectro 2

Modelo de analizador de espectro 3

Modelo de analizador de espectro 4

Mensaje informativo

SS SCAN
Los 8indicadores anteriores aparecen durante 10segundosapproximamente cada uno.
Introduccion del texto de los.". mensajes informativos (MSG INPUT)
Hay 1 tipo de salvapantallas disponible. Para Obtener más información sobre como cambiar de salvapantallas, consulte la sección "Ajuste del salvapantallas".
- Se pueda introducir hasta 30 characteres.
- El valor preajustado de fabrica es "Active Matrix Control System".
1. Presione el botón [A] para selecciónar el modo de ajuste.
2. Toque ↓la visualización de ajustes para selecciónar "MSG INPUT" en "DISPLAY".

DISPLAY
ADJUST MODE
MSG INPUT> EDIT
。
3. Toque EDIT.
La visualización cambia al modo de introduccion de mensaje.
4. Toque el centro de la pantalla para determinar la posicion de introduccion de texto.
* Para:borrar el mensaje, toque prolongamente el centro de la pantalla durante 2segundos o más.
Si realiza la operation en el caso 8 con el mensaje borrado, se recuperará al valor preajustado de fabrica.
5. Toque la parte izquierda de la pantalla para selectionar el tipo de dato.
Cada vez que toca , cambia el tipo de texto: Para Obtener más información, consulte la págrina 37.
6. Toque la parte derecha de la pantalla o gire el mando [ROTARY] para seleccionar los caricacteres que va a introducir.
7. Repita los pasos 4 a 6 para introducer el mensaje.
8. Toque MEMO prolongamente durante un segundo o más.
Escuchará un tono长大o paraindicarlesque se ha memorizzato el mensaje.
9. Presione el botón [A] para volver al modo original.
Visualización de temas (MESSAGE)
Este funciona le permite visualizar mensajes en la pantalla al encender (ON) y apagar (OFF) la unidad. El网讯 "Hello" (Hola) aparece cuando la enciende y "See you" (Hasta bajo), cuando la apaga.
- El valor preajustado de fabrica es "ON".
1. Presione el botón [A] para selección ar el modo de ajuste.
2. Toque ↓la visualización de ajustes para selecciónar "MESSAGE" en "DISPLAY".

3. Toque la parte derecha de la pantalla o gire el mando [ROTARY] para seleccionar "ON" u "OFF".
4. Presione el botón [A] para volver al modo original.
Ajuste de la sensibilitad del analizador de espectro (S/ASENS)
Esta funciona le permiteaabstar la sensibilidad (cantidad de deflexion) del analizador de espectro. Para tener mas informacion sobre como visualizar el analizador de espectro, consulte la seccion "Cambio de visualizacion" (cf. pagina 13) o"Ajuste del salvapantallas" (cf. pagina 41).
- El valor preajustado de fabricula es "MID"
1. Presione el botón [A] para selección ar el modo de ajuste.
2. Toque ↑ ↓ la visualización de ajustes para selecciónar "S/A SENS" en "DISPLAY".

3. Toque la parte derecha de la pantalla o gire el mando [ROTARY] para ajustar la sensibilitidad.
* Selección LOW (baja deflexión), MID (deflexión media) o HIGH (alta deflexión).
4. Presione el botón [A] para volver al modo original.
Ajuste de la velocidad de desplazimiento de la visualización (SCROLL)
Esta funciona le permite reducir la velocidad de desplazimiento cuando es demasiado rápida y dificulta la visualización de la pantalla.
- El valor preajustado de fabrica es "SPEED 2".
1. Presione el botón [A] para selecciónar el modo de ajuste.
2. Toque ↑ ↓ la visualización de ajustes para selecciónar "SCROLL" en "DISPLAY".

3. Toque 山 la parte derecha de la pantalla o gire el mando [ROTARY] paraaabstar la sensibilitidad.
* El margen de ajuste de este elemento es de SPEEDD 1 a SPEEDD 7.
Realice este ajuste@m间隙 observa como cambia el aspecto de la pantalla.
4. Presione el botón [A] para volver al modo original.
Ajuste del atenuador automatico (DIMMER IN)
Esta funciona le permitte atenuar la iluminacion de la pantalla para adaptarla a la iluminacion o a la intensidad de brillno en el interior del automovil.
Selección "AUTO" (enclavada a la intensidad de brillo del interior del automóvil) o "ILLUMI" (enclavada a la iluminación del interior del automóvil), como ajuste de atenuación automática.
- Cuando la funciona de atenuación automática está configurada en "AUTO", la intensidad de brillo de la pantalla se reduce para adaptarse a la intensidad de brillo que detecte este sensor.
- Ajuste el atenuador en DMR LEVEL.
- El valor preajustado de fabricula es "AUTO".
1. Presione el botón [A] para selección el modo de ajuste.
2. Toque la visualización de ajustes para選擇ar "DIMMER IN" en "APPERNCE".

3. Toque la parte derecha de la pantalla o gire el mando [ROTARY] para seleccionar "AUTO" o "ILUMMI".
4. Presione el botón [A] para volver al modo original.
Ajuste del nivel de atenuacion (DMR LEVEL)
Estamericano.
- El valor preajustado de fabricula es "3"
1. Presione el botón [A] para selección ar el modo de ajuste.
2. Toque la visualización de ajustes para selecciónar "DMR LEVEL" en "APPERNCE".

3. Toque la parte derecha de la pantalla o gire el mando [ROTARY] paraaabstar el nivel de atenuacion.
* Selección OFF (atenuación desactivada, brillante), 1 (poco atenuada), hasta 5 (oscura).
4. Presione el botón [A] para volver al modo original.
Ajuste del contraste de la pantalla (CONTRAST)
Es possibleaabstarelcontrastede la pantalla para adaptarlo al ángulo de instalación de la unidad.
- El valor preajustado de fabrica es "6"
1. Presione el botón [A] para selecciónar el modo de ajuste.
2. Toque la visualización de ajustes para選擇ar "CONTRAST" en "APPERNCE".
3. Toque la parte derecha de la pantalla o gire el mando [ROTARY] para ajustar el contraste.

* El margen de ajuste de esta referencia es de 1 a 11.
Realice este ajuste@m间隙 observa como cambia el aspecto de la pantalla.
4. Presione el botón [A] para volver al modo original.
Ajuste del parpadeo del LED al extraer el DCP (BLINK LED)
Es possible hacer que el LED de estaunidad parpadee cuando se extrae el DCP.
- El valor preajustado de fabricula es "OFF".
1. Presione el botón [A] para selección ar el modo de ajuste.
2. Toque la visualización de ajustes para selectionar "BLINK LED" en "APPERNCE".

3. Toque la parte derecha de la pantalla o gire el mando [ROTARY] para seleccionar "ON" u "OFF".
4. Presione el botón [A] para volver al modo original.
Ajuste del tono que suena cuando se presionan los botones (BEEP)
El tono alto, corto o largo, que escucha cada vez que presiona un botón se denomina "BEEP".
- El valor preajustado de fabricula es "ON".
1. Presione el botón [A] para selecciónar el modo de ajuste.
2. Toque la visualización de ajustes para selecciónar “BEEP” en “APPERNCE”.

3. Toque la parte derecha de la pantalla o gire el mando [ROTARY] para seleccionar "ON" u "OFF".
4. Presione el botón [A] para volver al modo original.
Selección de cada modo
Esteajusteno sepuedeselectionarcuando DolbyProLogicII tieneconfiguradoel parametro"MUSIC"o“MATRIX"(cf.pagina17).
- El valor preajustado de fabricula es "PRO" para AC-PRO III, y "P.EQ" para EQ SELECT.
AC-PROIII
Cuando se seleccióna "STD" (modo estándar), se puedaajsitar la calidad y el camino de sonido con VSE (Virtual Space Enhancer) para que se perdiba el本身就是 efecto de sonido en todos los asientos.
Cuando se selección "PRO" (modo PRO), se puedaaabstar la calidad y el Campo de sonido conprecision para cada asiento.
EQ SELECT
Cuando se selección "P.EQ" (modo de ecualizarador), se pueda compensar todo el margen de niveles de Frequencias mediante una curva suave detallada.
Cuando se selección "BAS/TREB" (modo de graves/agudos), se pueda compensar el nivel de Frequencia, dividendiolo en 2 niveles principales: graves (tonos bajos) y agudos (tonos altos).
1. Presione el botón [A] para selección el modo de ajuste.
2. Toque la visualización de ajustes para selecciónar "AC-PRO III" en "SOUND" y "EQ SELECT" en "SOUND".

3. Toque la parte derecha de la pantalla o gire el mando [ROTARY] para seleccionar el modo.
Selección de modo
AC-PRO III STD
• Tipo estandar (Menú VSE) PRO
• Tipo PRO (Menú de posición) EQ SELECT P.EQ
• Tipo de ecualizador (Menú P.EQ) BAS / TREB
• Tipo de graves/agudos
4. Presione el botón [A] para volver al modo original.
Ajuste de la configuración de los altavoces (SP-SETTING)
Ajuste la configuracion de los altavoces del automovil para sacar el máximo provechos de las caracteristicas de sonido de esta unidad.
- El valor preajustado de fabrica es "SWL + SWR".
1. Presione el botón [A] para selección el modo de ajuste.
2. Toque la visualización de ajustes para selectionar "SP-SETTING" en "SOUND".

SOUND
ADJUST MODE
SP-SETTING SW + SW
3. Toque la parte derecha de la pantalla o gire el mando [ROTARY] para ajustar la configuracion de los altovoces.
Configuración de los altavoces
CTR+SW
Configuración
de 5,1 canales Altavoces frontales/traseros
(4 canales)
Altavoz central (1 canal)
Altavoz de subgraves (1 canal) SW[ ] + SW[ ] Altavoces frontales/traseros
(4 canales)
Altavoz de subgraves
(2 canales) Configuración
de altavoz de
subgraves
con 4 canales
Notas:
- El sonido no saldra del altovo central salvo que se realizen los siguientes ajustes una vez configurado "CTR+SW".
(1) Consulte la seccion "Seleccion del menu PLII (Dolby PL II)" (cf. pagina 17) paraajan el modo Dolby Pro Logic II en "MUSC" o "MATRIX".
(2) Consulte la�� "Activacion/ desactivacion (ON/OFF) de los altavoces (CENTER-SP/SUB-WOOFER)" (cf. pagina 45) para activar el altovoz central ("ON").
- El sonido no saldra del altovo de graves Lch cuando "SWILL + SWIR" está selección y el modo Dolby Pro Logic II está configurado en "MUSIC" o "MATRIX".
4. Presione el botón [A] para volver al modo original.
Activación/desactivación (ON/OFF) de los altavocé (CENTER-SP/SUB-WOOF)
Activa/desactive (ON/OFF) el altovoz central (CENTER-SP) y el altovoz de subgraves(SUB-WOOFER).
Selección "OFF" si no hay ningún altovo central o altovoz de graves.
- El.altavoz central (CENTER-SP) se pueda ajustar cuando el modo Dolby Pro Logic II está configurado en "MUSIC" o "MATRIX" y "SP-SETTING" está en "CTR-SW".
- El valor preajustado de fabricula es "ON".
1. Presione el botón [A] para selecciónar el modo de ajuste.
2. Toque ↑ la visualización de ajustes para selecciónar "CENTER-SP" en "SOUND" y "SUB-WOOFER" en "SOUND".

SOUND
ADJUST MODE
CENTER-SP> ON
3. Toque la parte derecha de la pantalla o gire el mando [ROTARY] para seleccionar "ON" u "OFF".
4. Presione el botón [A] para volver al modo original.
Ajuste de las Frequencias de filtrado de los altavoces (HPF/ SUB-W LPF)
Esta funciona le permiteaabrear la fecuencia de filtrado correspondiente a los altavoces realizados.
- Los filtros (HPF/SUB-W LPF) que se pueda usar varian según el ajuste del modo Dolby Pro Logic II.
Ajuste del modo
Dolby Pro Logic II Filtro HPF SUB-W LPF*1 MUSIC/MATRIX No ajustable Ajustable OFF Ajustable Ajustable
*1 El ajuste sólo se pueda realizar si "SUB-WOOFER" está activado ("ON").
- El valor preajustado de fabricula es "THROUGH".
Ajuste del filtró
HPF (ajuste del filtró de paso alto)
Este filtro suprime los graves en los altavoces delanteros y traseros.
THROUGH 50Hz 80Hz 120Hz
Ajuste el filtro correspondiente al altovo.
cuando se utilizes altavoces de poco diametro.
THROUGH
Realice este ajuste cuando utilise altavoces capaces de tener graves.
SUB-W LPF (ajuste del filtró de paso bajo en el altovoz de subgraves)
Este filtered suprime los agudos en el altovoz de subgraves.
THROUGH 50Hz 80Hz 120Hz
Ajuste la fecuencia de filtrado que corresponda al altovoz de subgraves.
THROUGH
Realice este ajuste cuando utilise un altoz de subgraves incorporeal de caso bajo.
1. Presione el botón [A] para selección ar el modo de ajuste.
2. Toque la visualización de ajustes para selecciónar "HPF" en "SOUND" y "SUB-W LPF" en "SOUND".

3. Toque la parte derecha de la pantalla o gire el mando [ROTARY] paraaabstar la fecuencia.
* Selezione THROUGH, 50Hz, 80Hz o 120Hz.
4. Presione el botón [A] para volver al modo original.
Activación/desactivación (ON/OFF) del amplíficator interno (AMP CANCEL)
Active o desactive el amplificador interno en referencia de que se utilise o no un amplificador externo.
Active ("ON") AMP CANCEL (amplificador interno en OFF) cuando haya un amplificador externo conectado y no se usa el amplificador interno.
- El valor preajustado de fibricula es "OFF" (uso del amplificador interno).
1. Presione el botón [A] para selecciónar el modo de ajuste.
2. Toque la visualización de ajustes para selectionar "AMP CANCEL" en "SOUND".

3. Toque la parte derecha de la pantalla o gire el mando [ROTARY] para seleccionar "ON" u "OFF".
4. Presione el botón [A] para volver al modo original.
Ajuste del nivel de salute de los altavoces (SP GAIN)
Utilice la funciona de tono de prueba que incorpora la unidad paraaabstar el volumen de forma que el volumen que salga de todos los altavoces sea el mesmo.
- Este ajuste solo se pueda selectionar cuando el modo Dolby Pro Logic II tiene configurado el parámetro "MUSIC" o "MATRIX".
- El valor preajustado de fabricula es "0dB"
1. Presione el botón [A] para selección el modo de ajuste.
2. Toque la visualización de ajustes para selectionar "SP-GAIN" en "SOUND".

3. Toque EDIT.
La visualización cambia al modo de ajuste SP-GAIN.
4. Toque la visualización de ajustes para selecciónar elajuste deseedo.
Cada vez que toca ↑, los ajustes se sueden como se indica a continuación:
Ajustes

*1 "CTR GAIN"sole smuestra cuando "SP-SETTING" está ajustado en "CTR+SW" y "CENTER-SP" está activado ("ON").
^*2 "SUB-W GAIN"sole so muestra cuando "SUB-WOOFER" está activado ("ON").
5. Toque la parte derecha de la pantalla o gire el mando [ROTARY] para ajustar el nivel de salute.
El margen de ajuste del nivel de salute es de -10 dB a +10 dB.
6. Repita los pasos 4 y 5 para realizar cada ajuste.
7. Presione el botón [A] para volver al modo original.
Ajuste del tiempo de retardode los altavoces (PL II DELAY)
El tiempo que tarda el sonido enninger a la posicón de escucha varía según la posicón de instalación de los altavoces tritureros y el tamanó del automóvil. Si ajustla el tiempo de retardo de los altavoces tritureros,ould configurar el sonido procedente del los altavoces tritureros para que se pueda escharchar al mismo tiempo que la calidad de los altavoces delanteros.
- Este ajuste solo se pueda selectionar cuando el modo Dolby Pro Logic II tiene configurado el parámetro "MUSIC" o "MATRIX".
- El valor preajustado de fabricula es "0ms"
1. Presione el botón [A] para selección ar el modo de ajuste.
2. Toque la visualización de ajustes para selecciónar "SRD-SP" en "PL II DELAY".

3. Toque la parte derecha de la pantalla o gire el mando [ROTARY] paraaabstar el tiempo de retardo.
* El margen de ajuste de "SRD-SP" es de 0 ms a 15 ms.
4. Presione el botón [A] para volver al modo original.
Ajuste bajo el modo de música (PL II CONT)
Esta función le permite ajustar el modo de música con mayor precision cuando el modo Dolby Pro Logic II tiene configurado el parámetro "MUSIC".
- Sólo se pueda selectionar cuando el modo Dolby Pro Logic II tiene configurado el parámetro "MUSIC".
- El valor preajustado de fibricula de PANORAMA es "NO", el de DIMENSION es "3" y el de CTR WIDTH es "3".
Ajustes
PANorama (ajuste del control de panorama)
Esta funciona amplia laImagen del campo de sonido en la parte delantera hasta los altavoces traseros. Seleccion "YES" si estima que no hay efecto surround.
DIMENSION (ajuste de la dimisión)
Cambia laImagen del camino de sonido a la parte delantera o trasera. Cuando laImagen del camino de sonido se inclina hacía la parte delantera o hacía la parte trasera, es posible compensar dicha inclinación.
La posicón intermedia es el valor de ajuste 3. Los values de ajuste 2 a 0 desplazan laImagen del camino de sonido hacía extras, cuando que los values de ajuste 4 a 6 la desplazan hacía delante.
CTR WIDTH (ajuste del ancho central)\*1
Esta funciona le permitteJKLM ajanar la posicion del canal central entre el altovoz central y los altavoces delanteros izquierdo y derechocho.
Cuando el sonido central se divide
equisitavamente entre la derecha y la izquierda,
aumenta toda laImagen del camino de sonido para
producir una sensacion de expansion natural.
El valor de ajuste 0 reproduce todos los sonidos
centrales en el altovoz central.
El valor de ajuste 7 divide el sonido central a
partes iguales entre los altavoces delanteros
izquierdo y Derecho.
*1 "CTR WIDTH"solemuesstrawheno "SP- SETTING"estáajustadoen“CTR+SW”y "CENTER-SP"estáactivado("ON").
1. Presione el botón [A] para selección ar el modo de ajuste.
2. Toque la visualización de ajustes para selección ar el ajuste desrado en "PL II CONT". Los ajustes son "PANorama", "DIMENSION" y "CTR WIDTH".

3. Toque la parte derecha de la pantalla o gire el mando [ROTARY] para realizar el ajuste deseado.
* Selezione "YES" (Si) o "NO" en "PANorama".
* El margen de ajuste de “DIMENSION” es de 0 a 6.
* El margen de ajuste de "CTR WIDTH" es de 0 a 7.
4. Presione el botón [A] para volver al modo original.
Función AUX
Esteistema dispone de una entrada RCA externa para que pueda escharcer sonidos y música de aparatos externos conectados a la unidad.
Selección de AUX / TEL
Puede escharsonidoymúsica de aparatos externos o bien laslllamadastelefonicasdesde los altavocesi estáconectaroalunidad.
Si TEL INT o un dispositivo externo está connectado a estaunidad, pueda seleccionar el modo TEL o el modo AUX.
- El valor preajustado de fabricula es "AUX"
1. Presione el botón [A] para selección el modo de ajuste.
2. Toque la visualización de ajustes para selecciónar "AUX/TEL" en "SETTING".

3. Toque la parte derecha de la pantalla o gire el mando [ROTARY] para seleccionar "AUX" o "TEL".
AUX:
El cable de entrada AUX/TEL es para la entrada de audio externa.
TEL:
El cable de entrada AUX/TEL es para la entrada de audio del téléphone móvil.
4. Presione el botón [A] para volver al modo anterior.
Ajuste del nivel de entrada (AUX SENS) del audio portátil (modo AUX)
Esta funciona le permette ajustar el nivel de entrada de aparatos externos OPCIONALES que estén connectados a esta unidad.
- Puede ajustarse cuando “AUX/TEL” está configurado en “AUX”.
- El valor preajustado de fabricula es "MID"
1. Presione el botón [A] para selecciónar el modo de ajuste.
2. Toque la visualización de ajustes para selecciónar "AUX SENS" en "SETTING".

3. Toque la parte derecha de la pantalla o gire el mando [ROTARY] para ajustar el nivel de entrada.
* Selezione LOW (Bajo), MID (Intermedio) o HIGH (Alto).
4. Presione el botón [A] para volver al modo original.
Ajuste de la calidad de altavoces del automóvil para el Telefonomóvil (Optional TEL-002)
- Para realizar llamadas Telefonicas, ajuste el téléphone móvil.
- El valor preajustado de fabricula es "RIGHT"
1. Presione el botón [A] para selección ar el modo de ajuste.
2. Toque la visualización de ajustes para selecciónar "TEL-SP" en "SETTING".

3. Toque la parte derecha de la pantalla o gire el mando [ROTARY] para seleccionar "LEFT" (Izquierda) o "RIGHT" (Derecha). LEFT:
Las llamadas Telefonicas se PUden oir a工程技术 del altevaz delantero izquierdo conectado a esta unidad.
RIGHT:
Las llamadas Telefonicas se pueda oir a工程技术 del altovoz delantero derecho conectado a esta unidad.
4. Presione el botón [A] para volver al modo anterior.
Ajuste de la interrupción para el Telefono móvil
Si conecta esta unidad y el Telefono móvil con una unidad (Optional, TEL-002), puede escurrchar las llamadas Telefonicas a工程技术 de los altavoces del automóvil.
- El valor preajustado de fabrica es "OFF".
1. Presione el botón [A] para selección ar el modo de ajuste.
2. Toque ↑ ↓ la visualización de ajustes para selecciónar "TEL-SWITCH" en "SETTING".

3. Toque 山 la parte derecha de la pantalla o gire el mando [ROTARY] para seleccionar los ajustes. Cada vez que gira el mando [ROTARY], cambia el ajuste en el suivienteorden: OFF (Desactivado) ON (Activado) MUTE (Silenciamiento) OFF(Desactivado)... OFF:
La unidad continua的功能ando con normalidad incluso cuando se usa el téléphone móvil.
Nota:
- Al conectar un kit manos libres, asegúrese de activar (ON) esta funciona para recibir el sonido del téléphone a工程技术 del sistema.
ON:
Puede esrear lasllamadastelefonicas atravésde los altavocconectadosaesta unidad.
* Cuando escucha las llamadas a工程技术 de los altavoces del automóvil, pueda ajustar el volumen girando el mando [ROTARY]. MUTE:
El sonido de launidad se silencia durante las llamadas Telefonicas.
4. Presione el botón [A] para volver al modo anterior.
Ajuste de la funciona de volumen automatico (CALIBRATE/A-VOL SENS)
Puede regular automatically el volumen para adaptarlo a la velocidad del automóvil.
- El valor preajustado de fabricula es "LOW"
1. Presione el botón [A] para selecciónar el modo de ajuste.
2. Toque la visualización de ajustes para selecciónar "CALIBRATE" en "SETTING".

3. Acelere a una velocidad de 50~km / h
4. Cuando alcance los 50~km / h toque START. Se ejecta la calibracion
Al cabo de 2 segundos o más, oira un tono largo y "SUCCEEDFUL" aparecerá en la pantalla.
Si oye un tono corte, es que la calibración ha fallado. Repita el procedimiento desde el paso 3.
5. A continuación, ajuste la sensibilitad. Toque la visualización de ajustes para selectionar "A-VOL SENS" en "SETTING".

6. Toque la parte derecha de la pantalla o gire el mando [ROTARY] para seleccionar la sensibilitidad.
Cada vez que gira el mando [ROTARY], cambia el ajuste en elsignificantoorden:
OFF (no hay cambio de volumen) LOW (hay cambio de volumen:klequeño) MIDLOW (Medio-bajo) MID (Medio) MID-HIGH (Medio-alto) HIGH (cambio de volumen: grande) ...
7. Presione el botón [A] para volver al modo anterior.
Comprobación delsystems
Esta funciona le permitte realizar una comprobacion del systema desde el modo de ajuste segúnsea necessario.
1. Presione el botón [A] para selección ar el modo de ajuste.
2. Toque la visualización de ajustes para selecciónar "SYSTEM CHECK" en "SETTING".

3. Toque START prolongamente durante 1 segundo o más.
"System Check" appearece en la pantalla.
4. Presione el mando [ROTARY]. Comienza la comprobación del sistema Una vez finalizada la comprobación del sistema, aparecerá "Completed" en la pantalla.
5. Presione el mando [ROTARY] de nuevo.
Aparece la visualización principal del modo de radio.
Uso de la referencia de seguidad (CODEMATIC)
Estamericanidad.
Estasfuncionimpideraeslaspersonasque
desconcenlacsequenciatactilpuedanutilizar
estasanid.Cuandoseconctalalimentacion
conelDCPacopladoy“CODEMATIC”activado ("ON"),aparecelambdavisualizacionTouchCode (Cólico tactil).
Si toca la pantalla en elorden preajustado, aparecerá “SUCCESSIONAL” y se desconectará la alimentación.
Laproxima vez que se conecte la alimentacion, no aparecera la visualizacion Touch Code sino la visualizacion principal en el mode de radio o CD.
1. Presione el botón [A] para selecciónar el modo de ajuste.
2. Toque la visualización de ajustes para selecciónar "CODEMATIC" en "SETTING".

Aparecen 2 típos de ajustes para
"CODEMATIC", ajustes para los cuales se muestran los valores "ON" u "OFF" a la derecha de la pantalla y ajustes para los cuales se muestra "INPUT" a la derecha de la pantalla.
Selecciónquiry elajuste para el que se muestra "ON”u“OFF"a la derecha de la pantalla.
3. Toque la parte derecha de la pantalla o gire el mando [ROTARY] para seleccionar "ON" u "OFF".
4. Toque ↓la visualización de ajustes para selecciónar "CODEMATIC" en "SETTING". Seccione ahora el ajuste para el que se muestra "INPUT" a la derecha de la pantalla.
5. Toque INPUT.
Aparece la visualización Touch Code.
6. Introduzca el dato tactil.
* Toque una de las 5 posiciones (izquierda, centro, referencia, ángulo superior derecho o ángulo inferior derecho) de la pantalla. Cada vez que toca la pantalla, se ilumina uno de los indicadores Touch Code.
* Por exemple, toque (1) el centro, (2) el ángulo superior derecho, (3) la izquierda y (4) el ángulo inferior derecho, en esteorden. Internacionalmente, para seres consideradas.
Cuando toca 4 vezes, escuchará un tonolardo y volverá al modo original.
Para cancelar CODEMATIC
Si olvidó el ordin, toque ① el ángulo inferioro均线, ②) la izquierda, ③ el ángulo superioro均线 y bajo ④ la均线 de la pantalla en ese ordin, o bien presione [SCN] en la unidad de control remoto.

7. OPERACIONES DE LOS ACCESORIOS
Operaciones del Cambiador de discos compactos
Cambiador de CD
Si hay un Cambiador de CD optional conectado a工程技术 de la wire, está unidad para controlar las operaciones del Cambiador de CD. Launidad可以选择 connectarse a un total de 2 ambiadores de CD conectados a工程技术 de CD.
Cambiador de discos DVD
Si hay un Cambiador de DVD optional conectado a工程技术 del cable CeNET, está unidad podra controlar las operaciones del Cambiador de DVD. Para ver un DVD, se necesita un monitor oficial.
El funciona y visualización del Cambiador de DVD en estaunidad es una version simplificada y no admite functions de Cambiador de DVD. Para usar el Cambiador de DVD,utilice launidad de control remoto que se suministra con el Cambiador de DVD. Para Obtener información, consulte el Manual de instructiones que se suministra con el Cambiador de DVD.
Cuando hay 2ambiadores de CD conectados
Presione el mando [ROTARY] para selectionar el MMI conectado a this unidad. (Cada vez que presiona el mando [ROTARY], se pasa de un MMI a lo.
- Si el cambioso de CD no contiene un cargador, aparecerá "NO MAG", y si el cargador no contiene ningún CD, aparecerá "NO DISC" para做到 N° de disco.
- Para Obtener más información sobre la visualización de titulos, consulte la sección "Cambio de la visualización de titulos" (ct頁目14).
Visualizaciones del modo de combustor
Visualización principal (Modo de Cambiador de CD)
Para verla, presione el mando [ROTARY] y seleccione el modo combustor de CD.

Si toca la parte izquierda de la pantalla durante 1segundo o mas,cribará el modo de funcioncimiento simple.

Visualización de tiempo de pista/reproducción
T01/02: 00: Muestra el N° de la pista
actualmente en reproducción y el tiempo de
reproducción.
Si toca o en el modo de configuraciono normal, podra seleccionar la pista que va a reproducir, o hacer avanzar o retroceder rapidamente las pistas.
Visualización de titulos
Al tocarla, cambia la visualizacion.
Visualización de N° de presinstonia
Si toca 卡 en el modo normal, podra的选择向一个 disco.
MODE
Al tocar esta visualización aparecen varias subfunciones. Si la toca prolongadamente durante 1segundo o más,aparecerála lista de discos.
T-SCAN/D-SCAN
Aparece durante la reproduccion por exploracion.Toque T-SCAN/D-SCAN para construir la reproduccion por exploracion.
T-RPT/D-RPT
Aparece durante la reproduccion repetida.
Toque T-RPT/D-RPT para concurrir la reproduccion repetida.
T-RDM/D-RDM
Aparece muestra durante la reproduccion aleatoria. Toque T-RDM/D-RDM para conclusir la reproduccion aleatoria.
DISC
Toque esta funciona para iniciaar la reproduccion delARRYnte disco.
(,) (sólo en la visualización de funciona simple)
Toque这些东西 botones para selectionar la pista que deseee reproducir.
Si toca los botones de forma prolongada, ha r avanzar o retroceder las pistasrapidamente.
Visualización de lista de discos (Modo de Cambiador de CD)
Aparece cuando se toca MODE de forma prolongada durante 1 segundo o más en la visualización principal.

Nombre de disco
>>: Señeción en bajo
Toque el nombre del disco para volver a la visualización principal e起初ar la reproduccion desde la primera pista del disco tocado.
←PREV-RTN:
Toque agli para ver la lista de tóculos anterior. Si la toca prolongadamente durante 1 segundo o más, volverá a la visualización principal.
NEXT:
Toquequiry para ver la lista de títulossiguiente.
PRECAUCION
Los discos CD-ROM no se pueda reproducir desde todos losambiadores de CD.Depende del modelo.
Nota:
- Es possible que algunos CDs grabados en modo CD-R/CD-RW no pueda utilizar.
Selección del modo de combustor
1. Presione el mando [ROTARY] para seleccionar el modo de Cambiador.
* El modo de aquellos equipos que no estén connectados no se muestra.
Cuando el modo cambie a Cambiador, la reproduccion se inicia automatistically.
Interruption de la reproduccion
1. Presione el botón [▶■].
Reanudación de la reproducción:
1. Presione el botón [▶■] de nuevo.
Selección de un CD
1. Toque la visualización de N° de disco para selectionar un disco.
Comienza la reproduccion.
* Si el cargador no contiene el disco selecciónado, no se做不到e el N° del disco en cuestion.
* Si toca DISC ↑, se inicia la reproduccion del suiviente disco.
Para seleccionar un disco en la visualizacion de lista de discos
1. Toque MODE prolongamente durante un segundo o más.
Aparecerá la lista de discos Si toca NEXT, aparecerá lasuma parte de la lista de discos.
2. Toque el nombre del disco.
* Si el cargador no contiene el disco selecciónado, aparecerá “NO DISC” en relacion con disco en@cuestion.
* Si selecciónó el@mismo disco que se está reproduciendo, la unidad empezará a reproducir de nuevo desdela primera pista de dicho disco.(funciOn de principio)
Selección de una pista
1. Para esuchar lasuma pista, toque la pista.
2. Para escuchar la pista anterior, toque 山 de pista.
Cuando toca 已 ^ 已 , se reproduce lasuma pista. Si toca 已 ^ 已 suscesivamente, la pista avanza el numero de vezes que toque y luego se reproduce.
Cuando toca se reproduce la pista anterior. Si toca sucesivamente, la pista retrocede el número de veces que toque
y违法违规
* Si toca ↑ dos vezes la visualización de pista cuando se reproduce el principio de la pista, posiblemente se reproduzca la pista situada 2 pistas por detrás.
Avance=rápido/Retroceso rápido
1. Para avanzar de forma rápida, toque la pista.
2. Para retroceder de forma rápida, toque la pista.
Función de principio
La función de principio inicia la reproducción desde laprimera pista del disco que se esté reproduciendo.
1. Toque MODE prolongamente durante un segundo o más.
Aparecerá la lista de discos Si toca NEXT,
aparecerá lasuma parte de la lista de discos.
2. Toque el nombre del disco.
* Si el cargador no contiene el disco selecciónado, aparecerá “NO DISC” en relacion con disco en cuestion.
* Si selecciónó el mesmo disco que se está reproduciendo, launidad empezará a reproducir de nuevo desdelaprimera pista de dicho disco.
Reproducción por exploración
La reproduccion por exploracion localiza y reproduce automatically los primeros 10 segundos de cada pista de un disco.Esta funciona continua avanzando en el disco hasta que se cancele.
La función de reproducción por exploración的结果ly,whendeshsea seleccionaruna determinada pista.
1. Toque MODE.
2. Toque T-SCAN.
La visualización MODE pasa a "T-SCAN" y se inicia la reproducción por exploración.
* La reproducción por exploración comienza desde la pista",[siguierte a la pista que se esté reproduciendo en este momento.
Para cancelar la reproduccion por exploracion
1. Toque T-SCAN.
La visualización T-SCAN pasa a “MODE”, y se reproduce la pista que se estaba reproduciendo cuando todo T-SCAN.
Reproducción por exploración de discos
La reproduccion por exploracion de discs localiza y reproduce los primeros 10 seguidos de la prima pista de cada disco contenido en eleturnador de CDactualmente seleccionado.Estamericana continua avanzando automatically hasta que se cancele.
La reproduccion por exploracion de discos resulta util.
cuando deseaa seleccionar un determinado disco.
1. Toque MODE.
2. Toque D-SCAN.
La visualización MODE pasa a "D-SCAN" y se inicia la reproducción por exploración de discos.
* La reproduccion por exploracion de discos comienza desde la pista?siguea a la pista que se este reproduciendo en es momento.
Para cancelar la reproduccion por exploracion de discos
1. Toque D-SCAN.
La visualización D-SCAN pasa a “MODE”, y se reproduce la pista que se está reproduciendo cuando toco D-SCAN.
Reproducción repetida
La reproduccion repetida reproduce continuamente la pista actual.Esta funciona continually avanzando automatistically hasta que se cancele.
1. Toque MODE.
2. Toque T-REPEAT.
La visualización MODE pasa a “T-RPT” y se inicia la reproducción repetida.
Para cancelar la reproduccion repetitiona
1. Toque T-RPT.
La visualización T-RPTonga a“MODE”,y se empieza a producir normalmente a partir de la pista que se estaba reproduciendo cuando toco T-RPT.
Reproduccion repetida de discos
Una vez reproducedas todas las pistas del disco actual, la reproduccion repetition de discs reproduce automatically el disco actual de nuevo desde la primera pista.Esta referencia continua avanzando automatistically hasta que se cancele.
1. Toque MODE.
2. Toque D-REPEAT.
La visualización MODE pasa a “D-RPT” y se inicia la reproducción repetida de discos.
Para cancelar la reproduccion repetition de discos
1. Toque D-RPT.
La visualización D-RPTonga a“MODE”,y se empieza a reproducir normalmente a partir de la pista que se está reproduciendo cuando toco D-RPT.
Operaciones del Cambiador de discos compactos
Reproducción aleatoria
La reproduccion aleatoria selecciona y reproduce pistas aisladas del disco sin ningúnorden concreto.Estamericana continua avanzando automatistically hasta que se cancele.
1. Toque MODE.
2. Toque T-RANDOM.
La visualización MODE pasa a "T-RDM" y se inicia la reproducción aleatoria.
Para cancelar la reproduccion aleatoria
1. Toque T-RDM.
La visualización T-RDMonga a MODE, y se empieza a reproducir normalmente a partir de la pista que se estaba reproduciendo cuando toco T-RDM.
Reproduccion aleatoria de discos
La reproduccion aleatoria de discos selecciona y reproduce automatically pistas o discos individuales sin ningúnorden concreto.Estamericana hasta que se cancele.
1. Toque MODE.
2. Toque D-RANDOM.
La visualización MODE pasa a “D-RDM” y se inicia la reproducción aleatoria.
Para cancelar la reproduccion aleatoria de discos
1. Toque D-RDM.
La visualización D-RDMonga a MODE", y se empieza a reproducir normalmente a partir de la pista que se está reproduciendo cuando toco D-RDM.
Operaciones del telector
Funciones del sintonizadora de television
Cuando haya connectado un sintonizador de television optional a工程技术 del cable CeNET, estaunidadouldravorcontrallosdaslasoniones del sintonizador de television. Para contemplar programasde television,necesitarun sintonizador de television y un monitor.
Visualizaciones del modo TV
Visualización principal
Para verla, presione el mando [ROTARY] y seleccione el modo de TV.

Si toca la parte izquierda de la pantalla durante 1segundo o mas, cancellar el modo de funciona bajo su水泵.

Visualización de canales
1ch.: Aparece el canal que se está recubiendoactualmente.
Si toca o en el modo normal, pode realizar sintonizacion de busicada o sintonizacionmanual.
Visualización de titulos
3ch.:Aparece el nombre de la emisora que se está recibiendoactualmente.
VTR: Tipo de entrada de video Al tocarla, cambia la visualizacion
Visualización de banda de recepción TV1: Nombre de banda
Visualización de N° de presintonía
Si toca 卡 en el modo normal, podra selectionaruna memoria preprogramada.
MODE
Al tocar esta visualización aparecen varias subfunciones. Tóquela prolongadamente durante 1 segundo o más para ver la lista de memorias preprogramada.
P-SCAN: Aparece durante una exploración de presintonías. Toque esta funciona para finalizar la exploración de presintonías.
A-STORE: Aparece durante una memorización automática. Toque esta funciona para finalizar la memorización automática.
BAND
Toque esta funciona para携带 de banda de recepción.
Si la toca prolongadamente durante 1 segundo o más, se alternará entre el modo de sintonización manual y el modo de sintonización de búsqueada.
(solen la visualizacion defuncionamento simple)
Estos botones le permitted realizar sintonizacion de busqueada o sintonizacion por pasos (en el mode de sintonizacion manual).
Si los toca prolongadamente, podra realizar una sintonizaciónVisualización de la lista de memorias preprogramadas
Aparece cuando se toca MODE de forma prolongada durante 1segundo o más en la visualización principal.

Nombre de emisora
NEXT:
Toccandolo si visualizza la lista delle cartelle successive.Che casa è ilsystema MP3?
IlsystemaMP3eunmetodi dcompresione audioclassificato nello strato audio 3 degli standard MPEG. Questo metododi compressione audio si è talmente diffuso fra gli utenti di personal computer, da essere considerato ormai un formato standard. Ilsystema MP3 presenta i dati dell'audio originale compressi sino a circa il 10% della dimensione originale, con un'alta qualità sonora. Questo significica che 10 CD di musica possono venire registrati su un unico disco del tipo CD-R o CD-RW, per consentire un lungo tempo di ascoltorawnazadovercinuamente procedere alla sottomuzione dei CD.Che casa è ilsystema WMA?
WMA è l'acronimo di Windows Media Audio, un formato di file audio sviluppato alla Microsoft Corporation.Note:
- Riproducendo un file con il metod DRM (Gestione dei diritti digitali) perché ilsystema WMA è attivato (ON) non viene emesso alcun suono audio. (L'indicatore WMA lampeggia.) - Il terme "Windows Media™" ed il logo "Windows®" sono marchi di fabbrica, o marchi di fabbrica della Microsoft Corporation registrati negli Stati Uniti e/o in altri Paesi. - Disattivazione delsystema DRM (Gestione dei diritti digitali): - Quando si usa Windows Media Player 8,fareclscu TOOLS OPTIONS scheda COPY MUSIC,poi in COPY SETTING togliere la spunta dalla casella PROTECT CONTENT. Poi ricostruire i file. - Quando si usa Windows Media Player 9,fare clic su TOOLS OPTIONS scheda MUSIC RECORD, poi nelle impostazioni Recording togliere la spunta alla casella RECORD PROTECTED MUSIC. Poi ricostruire i file. I file WMA realizzati su base personale sono utilizzati molto la diretta responsabilità dell'utente.Precauzioni per la creatione di un disco MP3/WMA
- Valori di campionamento e di bit utilizzabili: 1. MP3: Valori di campionamento: da 11.025 kHz a 48 kHz Valori bit: da 8 kbps a 320 kbps / VBR 2. WMA: Valori bit da 48 kbps a 192 kbps - Extensione del nome del file 1. Bisogna sempre aggiuungere un'estensione "MP3" o .WMA a un file MP3 o WMA using lettere di un solo byte. Se si aggiunge una estensione diversa da quella indicate o ci si dimentica di aggiuungere l'estensione del file, la riproduzione del file sera impossibile. 2. I file dati MP3/WMA non saranno riprodotti. L'indicazione "--: --" appeare nel display del tempo di riproduzione se si tenta di riproduurre dei file privi di dati MP3/WMA. - Formato logico (sistema dei file) 1. Quando si scrive un file MP3/WMA su un disco CD-R o CD-RW, si prega di selezionare "ISO9660 level 1, 2 or JOLIET or Romeo" come lavorato di scrittura del software. La riproduzione normale cui non sono possibile se il disco è registrato in un'alto lavorato. 2. Il nome della cartella e del file possono essere visualizzati come titolo nel caso di una riproduzione di un MP3/WMA ma il titolo deve essere entro 128 lettere alfabetiche o numerali a byte singoli (inclendo un'estensione). 3. Non dare a un file lo stesso nome della cartella in cui è contentuto. Struttura della cartella 1. Non sono autorizzati dischi con cartelle costituite da più di 8 livelli gerarchici. -Numero dei file o delle cartelle 1. Per agli cartella possono essere riconosciuti fino a 255 file. Possono essere riprodotti fino a 500 file. 2. I brani sono riprodotti nell'ordine in cui erano registrati nel disco. (I brani possono non essere sempre riproducibili nell'ordine visualizzato nel PC). 3. Possono esserci alcuni disturbi a secondo del tipo di programma codificatore utilizzato durante la registrazione.Selezione multisessione
Questa funzione permette di selezionare sia CD-DA sia file MP3/WMA nel caso di dischi (p.es. CD-EXTRA) contenti sia CD-DA (CD musicali) sia file MP3/WMA. 1. Toccare MODE. 2. Toccare M-SESS. Ogni tocco su M-SESS fa andare il display di M-SESS alternativamente da "CD" (riproduzione CD-DA) o "MP3/WMA" (riproduzione MP3/WMA). * Se non viene visualizzato M-SESS, toccare NEXT. 3. Toccare RTN. La selezione della multissessione avrè effetto la volta seguente in cui sare caricato il CD.Nota:
- Quando si riproduisce un CCCS (Copy Control CD), selezionareIl tipo CD. Se è impostato il tipo MP3/WMA, in alcuni casi, il CD potrebbe non essere riprodotto bene.ATTENZIONE
Fare attenzione a non lasciarsi prendere la mano o le dita nelle si richiude la CONSOLE INCLINATA.
Note:
- Se la CONSOLE INCLINATA non si après completeness a prioro a mano con delicatezza. - Richiudere sempre la CONSOLE INCLINATAupon l'insertimento del CD. - Non insere la mano o le dita nella fessura di caricamento del disco. Ugualmente, nella fessura non devono essere inserti oggetti estranei. Non inserire dischi con adesivi sporgenti dal nastro di cellophane o dischi CD in affitto, contententi l'etichetta del negotio in cui sono stati affittati, o dischi con contrassegni i cui nastri o etichette di affitto di copertura sono stati toti. Tali tipi di dischi possono risultare impossibili da estrarre e possono causare danni all'apparecchio.Insetimento di un CD
1. Premere il tasting [▲]. Il pannello di controllo si après. 2. Inserire il disco nel CD SLOT. Quando il disco è stato inserito, il pannello di controllo si chiude automaticamente dopo quello secondo, e quando ha inizio la riproduzione.Note:
Non inserire mai oggetti estranei nel CD SLOT. - Se l'inserimento del CD risulta dificoltoso, potrebbe esserci un'alto CD nel meccanismo o che l'apparecchio non funzioni perfettamente e richieda una revisione.  che non riportano i contrassegni [0158] e i CD-ROM non possono essere tti con quello apparecchio. - Certi tipi di Cd, registrati secondo la modalità CD-R/CD-RW, possono risultare non riproducibili.Instrimento di compact disc da 8 cm
Per la riproduzione di CD da 8cm non è necessario alcun tipo di adattatore. Inserire il CD da 8 cm al centro del CD SLOT.Espulsione di un CD
Premendo il tasting [▲] è possibile espellere automaticamente un discoanche se la chiave d'accensiono o ACC è nelle posizione OFF.ATTENZIONE
Quando viene espulso un disco, premere il tasto [▲] per chiudere il pannello di controlo. Se il pannello di controllo viene lasciato aperto, l'emissione di un doppio bip segnalera la chiusura automatica del pannello di controlo. 1. Premere il tasto [▲]. Il pannello di controllo siCTL, e il disco viene espulso. La modalità cambia, automaticamente, in modalità radio. * Assicurarsi di rimuovere i dischi espulsi da questo apparecchio. Se si lascia il disco nella fessura dei dischi, quello sare rittirato e il pannello di controllo si chiudera. (funzione di inserimento automatico) * Singoli CD non sono inserti in automatico. Assicurarsi di rimuovere i singoli CD dopo averli espulsi.ATTENZIONE
Se si usa una forza eccessiva nel caricare un disco après che quello è stato espulso, la superficie del disco potrebbe danneggiarsi. Rimuovere il disco prima di re-insertirlo nuovamente.Ascolto di un disco già inserto nell'apparecchio
1. Premere la manopola [ROTARY] per selezionare la modalità CD. * Attivando la modalità CD la riproduzione ha automaticamente inizio.Arresto temporaneo della riproduzione
1. Premere il tasting [▶■].■ Riavvio della riproduzione
1. Premere nuovamente il tasto [▶■].Selezione di un brano
Quando viene inserto un CD-R/CD-RW registrarato con un file MP3 o WMA, è possibile selezionale solo i brani registrati nella stessa cartella toccando nel display del brano. 1. Per sentire il brano successivo, toccare nel display del brano. 2. Per sentire il brano precedente, toccare due volte nel display del brano. Toccando si riproduce il brano successivo. Per agli successiva pressione del tasting l'apparecchio avanza sino all'inizio del brano successivo. Toccando 山 si riproduce il brano precedente. Per agli successiva pressione del tasting 山 l'apparecchio retrocede sino all'inizio del brano precedente che viene poi riproduzione.. * Se si tocca ↑ due volte nel display del brano perché sta per cominciare la sua riproduzione, talvolta viene riproduzione il secondo brano precedente.■ Selezione delle cartelle
Per selezionare un'altra cartella si può sia toccare 南 neI display delle cartelle, sua fare come segue.. 1. Toccare e tenere premuto MODE per 1 secondo o più. Viene visualizzata le lista delle cartelle. Toccando PREV o NEXT si visualizza la parte precedente o successiva della lista delle cartelle. 2. Toccare il nome della cartella.Riproduzione della lista di riproduzione
Possono essere riprodotteanche delle liste di riproduzioni (file M3U). Bisogna notare che solo i primi 5 file aventi la data e l'orario più recenti possono essere visualizzati tra tutti i file M3U attualmente archiviati nei 5 layer (inclusa la directory principale).Note:
- Per agli singola lista di riproduzioni sono essere riprodotti sino a 255 file. - Possono essere riprodotti solo i file M3U o WMA attualmente archiviati nella gerarchia dei file nelle cartelle contenate nei 5 layer (inclua la directory principale).Fare come segue per riproduire la lista di riproduzione.
1. Toccare MODE. 2. Toccare NEXT. 3. Toccare PLY LIST. Viene avviata lalettura della lista di riproduzioni. Quandoviene terminata lalettura della lista di riproduzioni, viene attivatamountacamente la lista di riproduzioni condata e orario più recente. Le operazioni dafare per selezionare la lista di riproduzioni oibrani in una lista di riproduzioni sono comequelleda farsi per selezionare una cartella o dei brani in una cartella. * PLY LIST non viene visualizzato nel caso in cui una segenza di brani (M3U) corretta non risulta essere stata salvata nel CD-R/CD-RW inserito nell'apparecchio.■ Interruzione della riproduzione di una lista di riproduzione
1. Toccare MODE. 2. Toccare NEXT. 3. Toccare PLY LIST.Avanzamento veloce/ Retrocessione velce
1. Per avanzare velocemente, toccare sul display dei brani. 2. Per retrocedere velocimento, toccare sul display dei brani.Funzione TOP
La funzione Top riporta lagettura del CD al brano d'inizio del CD stesso. 1. Toccare TOP. La riproduzione viene avviata dal primo brano (brano num 1). Nel caso di MP3/WMA, si torna al primo brano della cartella in fase di riproduzione.Riproduzione a scansione
Questa funzione consente di individuare e riproduire i primi 10 secondi di tutti i brani contentuti nel disco. 1. Toccare MODE. 2. Toccare F^ -SCAN. Il display MODE cambia in "F'-SCAN" e si avvia la riproduzione a scansione. * La riproduzione a scansione viene avviata dal brano successivo a quello attualmente in fase di riproduzione.■ Annullamento della riproduzione a scansione
1. Toccare J^ -SCAN. Il display J^ -SCAN cambia in "MODE", e viene riproduotto il brano che era in fase di riproduzione quando si è toccato J^ -SCAN.Riproduzione a scansione delle cartelle
Questa funzione permette di localizzare e riproduire i primi 10 secondi del primo brano di tutte le cartelle di un disco MP/WMA. 1. Toccare MODE. 2. Toccare -SCAN. Il display MODE cambia in "SCAN" e si avvia la coproduzione a scansione delle cartelle. * La coproduzione a scansione delle cartelle viene avviata a partire alla cartella successiva a quella attualmente in fase di coproduzione.■ Annullamento della riproduzione a scansione delle cartelle
1. Toccare -SCAN. Il display -SCAN cambia in "MODE", e viene riproduzione il brano che era in fase di riproduzione quando si è toccato -SCAN.Riproducione ripetuta
Questa funzione consente di riproduire ripetutamente il brano in corso di riproduzione. 1. Toccare MODE. 2. Toccare ^一 REPEAT. Il display MODE cambia in " ^ 一 R P " e viene avviata la riproduzione ripetuta.Annullamento della riproduzione ripetuta
1. Toccare P -RPT. Il display P -RPT cambia in "MODE", e la riproduzione regolare ricomincia dal brano che era in fase di riproduzione quando si è toccato P -RPT.Riproduzione ripetuta della cartella
Questa funzione consente di riproduire ripetutamente la cartella in corso di riproduzione. Questa funzione è disponibile solo quando si è inserito un CD-R/CD-RW contente file MP3 o WMA. 1. Toccare MODE. 2. Toccare -REPEAT. Il display MODE cambia in "RPT" e viene avviata la riproduzione ripetuta della cartella.■ Annullamento della riproduzione ripetuta della cartella
1. Toccare -RPT. Il display -RPT cambia in "MODE", e la riproduzione regolare ricomincia dal brano che era in fase di riproduzione quando si è toccato -RPT.Riproduzione in ordine casuale
Questa funzione consente di riproduire in un ordine casuale tutti i brani contenuti sul disco-RANDOM
Riproduce tutti i brani del disco in ordine casuale, Nel caso in cui il disco contiene 2 o più cartelle, tutti i brani della prima cartella sono riprodotti in odine casuale, seguiti da tutti i brani della cartella successiva. Questo viene ripetuto per tutte le cartelle.-RANDOM
Riproduce i brani del disco in ordine casuale, Questa funzione è disponibile solo quando si è inserito un CD-R/CD-RW contente file MP3 o WMA. 1. Toccare MODE. 2. Toccare -RANDOM o -RANDOM. Il display MODE cambia in "RDM" o in "RDM" e si avvia la riproduzione in ordine casuale.■ Annullamento della riproduzione in ordine casuale
1. Toccare f^ -RDM o -RDM. Il display f^ -RDM o -RDM cambia in "MODE", e la riproduzione regolare ricomincia dal brano che era in fase di riproduzione quando si sono toccati i tasti.Brani diversi di musica per più asconsultatori (funzione 2-ZONE)
La funzione 2-ZONE è una funzione che émette suoni separati per la zona MAIN e la zona SUB impiegando automaticamente due fonti in una sola unità centrale, permettendo+dunque a più ascoltatori di ascoltare fonti musicali分开e. Questa unitàouldontrollarelesuefontiinterne (radio,CD,MP3,ecc.)per la riproduzione e inoltrepuroidurresimultaneamentefontida apparecchi esternicollegatitramite CeNET (per esempio,cambiadischi CD,ecc.). Le fonti della zona MAIN sono riprodotte dai diffusori del veicolo e quale della zona SUBtramite ilsystema cuffie (WH143).  La figura superiore si riferisce al caso in cui una sorgente sonora viene riprodotta nelle casse acustiche dall'apparecchio in modalità interna (radio, CD, AUX). La figura inferiore si riferisce al caso in cui una sorgente sonora viene riprodotta nelle casse acustiche dall'apparecchio in modalità interna (cambia-CD, cambia-DVD, TV, AUX). - L'impostazione predefinita alla fabbrica è "OFF".Note:
- La funzione 2-ZONE non è disponibile quando DAB è connesso. - Ogni nuovo aggiustamento di volume fatto girando la manopola [ROTARY] si riflette unicamente nelle casse acustiche. Le impostazioni AUX-SENS si riflette sua nelle casse via delle cuffie.■ Display dello schermo quando è in uso la funzione 2-ZONE
"INT." (modalità interna) o "EXT." (modalità esterna) viene visualizzato al centro del display perindicare se è possibile ascoltare in modalità interna o in modalità esterna nella modalità operativa 2-ZONE in corso. 1. Premere il tasting [SOUND]. 2. Toccare 2-ZONE.  3. Toccare e tenere premuto per 1 secondo o più il centro ON/OFF del display.  Quando 2-ZONE viene impostato sull'ON, viene visualizzato il tipo di 2-ZONE in corso. La funzione 2-ZONE non è disponibile quando 2-ZONE è impostato su OFF. Premere il tasto [SOUND] per tornare alla modalità originale. 4. Toccare 日 nel display ON/OFF per selezionare il tipo di 2-ZONE. Tipi di 2-ZONE| Altoparlante | Cuffie | |
| Tipo1 | Interno (modalità interna) | Esterno (modalità esterna) |
| Tipo2 | Esterno (modalità esterna) | Interno (modalità interna) |
Brani diversi di musica per più ascoltatori (funzione 2-ZONE)
Attivazione e disattivazione delle funzione 2-ZONE
1. Premere e tenere premuto per 1 secondo o più il tasting [SOUND] nell'apparecchio.Perambiare il tipo di 2-ZONE
Premere e tenere premuto per 1 secondo o più il tasto [TA] nell'apparecchio nelle si sta usinga la funzione 2-ZONE.Perambiare la modalità operativa 2-ZONE
Premere il tasto [TA] nelle si sta usando la funzione 2-ZONE.Selezione della modalità quando è in uso la funzione 2-ZONE
Quando si insertisce un CD nelle si sta usando la funizione 2-ZONE, le funzioni della modalità interna cambiano in CD, e la riproduzione viene avviata automaticamente. 1. Premere il tasto [TA] perambiare la funzione operativa 2-ZONE. Vlene attenuato il display dell'apparecchiatura (altoparlante o cuffia) che può essere usato attualmente. 2. Premere e tenere premuto per un secondo o più il tasto [TA] per selezionare il tipo 2-ZONE. Viene commutato il display "INT." o "EXT." 3. Premere la manopola [ROTARY]. Mentre appeare "INT," ogni pressione sulla manopola [ROTARY] cambia la modalità nell'ordine seguente: Radio CD AUX Radio... Mentre appeare "EXT.", ogni pressione sulla manopola [ROTARY] cambia la modalità nell'ordine seguente: $$ \begin{array}{l}\text {A U X} \rightarrow (\text {C D c h a n g e r}) \rightarrow (\text {D V D c h a n g e r}) \rightarrow\\(\text {T V} ^ {\prime 1}) \rightarrow \text {A U X} \dots\end{array} $$ * Se una data apparecchiatura non è connessa, la rispettiva modalità non appeare visualizzata. *1 Whenever viene selezionata la modalità TV, la modalità cambia automaticamente in modalità VTR, e non può essereambiata.Operazioni comuni in entrambé le modalità
Display dello schermo in modalità di inserimento dei titoli
Display principale
Questo viene visualizzato quando viene selezionata la modalità di inserimento dei titoli. (cfr. pag. 14) Display caratteri di testo
A: Lettere alfabetiche maiuscole a: Lettere alfabetiche minuscole 0-9: Nemeri !?: Simboli A: Accenti speciali: UmlautDisplay del titolo
Viene visualizzato il titolo attualmente inserito. Toccare per determinare la posizione di inserimento. Toccando e tenendo premuto il tasto per 2 secondi o più si causa la cancellazione di tutto il testo inserito.Display del testo scritto
Toccare 山 per selezionare il testo inserto.RTN
Toccando questo si annulla l'insertimento dei titoli, e il display ritorna allo schermo originale. Toccando e tenero premuto per 1 secondo o più si visualizza la lista dei titoli che si accompagnano al corrente carattere di testo.MEMO
Toccando e tenendo quello premuto per 2 secondi o più si salva il titolo inserto, e il display torna allo schermo originale.Display della lista dei testi
Questo è quello che appeare quando RTN viene toccato e tenuto premuto per 1 secondo o più nel display principale. Caratteri del testo
Il testo che viene visualizzato cambia a secondo del display del carattere di testo. Nel caso in cui il carattere di testo visualizzato è“A”: A E I M Q U X(spazio) Nel caso in cui il carattere di testo visualizzato è “a”: a e i m q Nel caso in cui il carattere di testo visualizzato e "0-9", "!?" o "A": Vengono visualizzati tutti i caratteri.RTN
Toccandolo si ritorna al display principale.NEXT
Toccandolo si visualizza la lista dei testi successivi.Inserimento titoli
Si possono dare alle varie stazioni TV dei titoli lunghi forn a 10 caratteri, eanche ai CD. Questi titoli possono essere visualizzati quando si ricevono le trasmissioni o quando si riproduze un CD. Il numero dei titoli inseribili è il seguente:| Modalità | Numero dei titoli |
| Modalità CD | 50 titoli |
| Modalità TV | 20 titoli |
| Modalità cambia-CD | Numero dei titoli |
| DCZ628 connesso | 100 titoli |
| CDC655Tz connesso | 100 titoli |
| CDC1255z connesso | 50 titoli |
ATTENZIONE
Premendo il tasto di preselezionr si cancellano tutte le memorie utente, come ad esempio i titoli salvati in questa unità. 5. TOccare 山 sul display del carattere di testo per selezionare il carattere del testo. Ogni tocco di 山 cambia il carattere del testo nell'ordine seguente: Letteralelfabetichemaisuscole (spazio) ABCDEFGHIJKLMNOPQ RSTUVWXYZ Lettere alfabetiche minuscole abcdefghijklmnpqrstuvwxyz Numeri 0123456789 Simboli, Accenti speciali: Umlaut AEEEEIAEaeeeeeioae 6. Toccare nel lato destro del display o, in alternatively, girare la manopola [ROTARY] per scegliere i caratteri da insertire. 7. Ripetere alla fase 4 alla 6 per insere il titolo. Premendo e tenendo premuto per 2 secondi o piu il display del titolo, si causa la cancellazione dei caratteri attualmente inseriti per il titolo. 8. Toccare e tenere premuto MEMO per 2 secondi o più. L'emissione di un lungo bip segnalera l'avvenuta memorizzazione del titolo.Per cancellare il display del titolo in orologio o in un'alto display
Toccare il centro del disply■ Quando si memorizza un nuovo titolo che eccede il numero massimo di titoli
Nel caso di una stazione TV
I titoli non memorizzati tra i canali preselezionati sono automaticamente cancellati, e il nuovo titolo viene così memorizzato.Nel caso di un CD
Vengono cancellati i titoli dei CD di quei che sono stati riprodotti meno, e il nuovo titolo viene memorizzato.Cancellazione dei titoli
1. Ricevere la stazione TV o riproduire un CD di cui si vuole cancellare il titolo. 2. Toccare il centro del display per impostare il display del titolo dell'utente. Quando il display cambia nel display del titolo dell'utente, "USER" viene visualizzato在整个 display del Num. preselezionato. 3. Premere e tenere premuto per 1 secondo o più il tasting [A]. La modalità cambia in modalità di inserimento dei titoli. 4. Toccare e tenere premuto il display dei titoli per 2 secondo o più. Tutti caratteri nel titolo spariranno. 5. Toccare e tenere premuto MEMO per 2 secondo o più. L'emissione di un lungo bip segnalera l'avvenuta cancellazione del titolo.Cambiamento delle impostazioni Selezionare le impostazioni
1. Premere il tasto [A]. La modalità cambia in modalità di aggiustamento.  2. TOccare 山 sul display delle impostazioni per selezionare quella che si vuole impostare.. * Toccando ↑ 📁 ↑ nel lato sinistro del display si cambia la scelta di una opzione per volta. Toccando ← 📁 → sul lato sinistro del display si cambia continuamente le sub-opzioni.. * Toccando ↑ ⇌ nel centro del display si cambia la scelta di una sub-opzione perolta. Toccando ← ⇌ → si cambiano continuamente le sub-opzioni. 3. Quando viene visualizzato "EDIT" nel Late destro del display, toccare EDIT per cancellare il display dell'aggiustamento dei dettagli.  4. Toccare 念 nel lato destro del display o, in alternatively, girare la manopola [ROTARY] per impostare i dettagli.Per ritornare in modalità originale
1. Premere ancora il tasto [A].| Opzioni principali | Sub-opzioni |
| DISPLAY | SCEEN SVR • Impostazione del salva-scherno (ved. pag. 41) |
| MSG INPUT • Immissione dei messaggi di informazione (ved. pag. 41) | |
| MESSAGE • Impostazione di accenzione o spegnimento del display dei messaggi (ved. pag. 42) | |
| S/A SENS • Impostazione della sensibilità dell'analizzatore dello Spettro (ved. pag. 42) | |
| SCROLL • Aggiustamento della velocità di scorrimento (ved. pag. 42) | |
| APPERNCE | DIMMER IN • Impostazione del variatore di luminosità automatico (ved. pag. 43) |
| DMR LEVEL • Impostazione del livello del variatore di luminosità (ved. pag. 43) | |
| CONTRAST • Aggiustamento del contrasto del display (ved. pag. 43) | |
| BLINK LED • Fa lampeggiare il LED quando si rimuove il DCP (ved. pag. 43) | |
| BEEP • Impostazione del bip (cfr. pag. 44) | |
| SOUND | AC-PRO III • Selezione della modalità VSE (STD/PRO) (ved. pag. 44) |
| EQ SELECT • Selezione della modalità equalizzatore (ved. pag. 44) | |
| SP-SETTING • Impostazione delle configurazioni dell'altoparlante (ved. pag. 44) | |
| CENTER-SP / SUB-WOOFER • Impostazione ON/OFF degli altoparlanti sub-woofer (ved. pag. 45) | |
| HPF / SUB-W LPF • Aggiustamento della frequenza del filtrlo degli altoparlanti (ved. pag. 45) | |
| AMP CANCEL • Impostazione ON/OFF dell'uso dell'amplificatore interno (ved. pag. 46) | |
| SP-GAIN • Aggiustamento del livello di uscita dell'altoparlante (ved. pag. 46) | |
| PL II DELAY | SRD-SP • Aggiustamento del ritardo dell'altoparlante posteriore (ved. pag. 46) |
| PL II CONT | PANORAMA / DIMENSION / CTR WIDTH • Impostazione in dettaglio della modalità musicale (ved. pag. 47) |
| TUNER | TV ARER • Impostazione dell'area TV (ved. pag. 57) |
| TV DIVER • Impostazione della diversità TV (cfr. pag. 57) | |
| LINK ACT • Impostazione della funzione AF tra RDS e DAB (ved. pag. 26) | |
| LANGUAGE • Impostazione del linguaggio dello schermo PTY (ved. pag. 30) | |
| RDS-INT 2Z • Impostazione dell'interruzione di RDS quando la funzione 2-ZONE è in uso (cf. page 30) | |
| SETTING | AUX / TEL • Impostazione di AUX e TEL (ved. pag. 47) |
| AUX SENS • Impostazione del livello d'immissione dell'audio portatile (ved. pag. 48) | |
| TEL-SP • Impostazione dell'emissione degli altoparlanti della macchina per il Telefono cellulare (TEL-002 opzionale) (ved. pag. 48) | |
| TEL-SWITCH • Impostazione dell'interruzione del Telefono cellulare (cf. page 48) | |
| CALIBRATE / A-VOL SENS • Impostazione della funzione del volume automatico TV (ved. pag. 49) | |
| SYSTEM CHECK • Svilgimento del controllo del sistema (ved. pag. 49) | |
| CODEMATICZ • Impostazione della sicurezza (ved. pag. 50) |
Impostazione del salvaschermo (SCREEN SVR)
Questa funzione avvia la visualizzazione di un salva-schermo quando non si utilizes l'apparecchio per circa 30 secondi. L'impostazione predefinita alla fabbrica è "ON". 1. Premere il tasto [A] per impostare la modalità di aggiustamento. 2. Toccare 卡 nel display delle opzioni per selezionare "SCREEN SVR" sotto "DISPLAY".  3. Toccare 念 nel lato destro del display o, in alternatively, girare la manopola [ROTARY] per selezionare "ON" o "OFF". 4. Premere il tasting [A] per tornare alla modalità originale.Perambiare il display del salva-schermo
Toccare PREV o NEXT quando viene visualizzato il salva-schermo. Ogni tocco su quosti tasti cambia il display del saliva-schermo. Salva-schermi Salva-schemo modello 1  Salva-schemo modello 2  Salva-schermo modello 3  Analizzatore di spettro modello 1  Analizzatore di spettro modello 2  Analizzatore di spettro modello 3  Analizzatore di spettro modello 4  Messaggio di informazione  SS SCAN Ognuna delleindicazioni di cui{sopraverrà visualizzata per circa 10 secondi.Inserimento dei messaggi da visualizzare tra i messaggi di informazione (MSG INPUT)
È disponibile 1 tipo di salute-scherno. Per maggiori dettagli su come cancellare il display del salute-scherno, vedere "Impostazione del salute-scherno". - Possono essere inserti fino a 30 caratteri. - L'impostazione predefinita alla fabbrica è "Active MatriX Control System". 1. Premere il tasto [A] per impostare la modalità di aggiustamento. 2. Toccare 且 且 nel display delle opzioni per selezionare "MSG INPUT" sotto "DISPLAY".  3. Toccare EDIT. La modalità cambia in modalità di insertimento dei messaggi. 4. Toccare 且 nel centro del display per determinare la posizione di inserimento. * Per cancellare il messaggio, toccare e tenere premuto il centro del display per 2 secondi o più. Se si attua l'opération della fase 8 con il messaggio cancellato, il messaggio torna quello dell'impostazione predefinita alla fabbrica. 5. Toccare nel dato sinistro del display per selezionare il carattere del testo. Ogni tocco di cambia il carattere del testo. Per maggiori dettagli, vedere a pagina 37. 6. Toccare 山 nel lato destro del display o, in alternatively, girare la manopola [ROTARY] per scegliere i caratteri da insertire. 7. Ripetere alla fase 4 alla 6 per insertire il messaggio. 8. Toccare e tenere premuto MEMO per 2 secondi o più. L'emissione di un lungo bip segnalera l'avvenuta memorizzazione del messaggio. 9. Premere il tasto [A] per tornare alla modalità originale.Visualizzazione dei messaggi (MESSAGE)
Questa funzione permette di visualizzare i messaggi nel display quando l'apparechio è ON/OFF. Quando l'apparechio viene accesso viene visualizzato "Hello", cioè appeare "See you" quando l'apparechio viene spento. - L'impostazione predefinita alla fabbrica è "ON". 1. Premere il tasto [A] per impostare la modalità di aggiustamento. 2. Toccare 一 _ 一 nel display delle opzioni per selezionare "MESSAGE" sotto "DISPLAY".  3. Toccare nel lato destro del display o, in alternatively, girare la manopola [ROTARY] per selezionare "ON" o "OFF". 4. Premere il tasting [A] per tornare alla modalità originale.Impostazione della sensibilità dell'analizzatore dello spettro (S/A SENS)
Questa funzione permette di aggiustare la sensibilità (quantità della deflessione) dell'analizzatore dllo spettro. Per maggiori dettagli sulla visualizzazione dell'analizzatore dello spettro, vedere "Cambiamento del display" (ved. pag. 13) o "Impostazione del salva-schermo" (ved. pag. 41). - L'impostazione predefinita alla fabbrica è "MID". 1. Premere il tasto [A] per impostare la modalità di aggiustamento. 2. Toccare 卡 巴 卡 nel display delle opzioni per selezionare "S/A SENS" sotto "DISPLAY".  3. Toccare ne lato destro del display o, in alternatively, girare la manopola [ROTARY] per aggiustare la sensibilità. * Selezionale LOW (piccola quantità della deflessione), MID o HIGH (grande quantità della deflessione). 4. Premere il tasto [A] per tornare alla modalità originale.Aggiustamento della velocità di scorrimento del display (SCROLL)
Questa configurazione permette di rallentare lo scrollamento quando lo scrollamento è troppo veloce, rendendo dificile la visione dello schermo. L'impostazione predefinita alla fabbrica è "SPEED 2". 1. Premere il tasto [A] per impostare la modalità di aggiustamento. 2. Toccare nel display delle opzioni per selezionare "SCROLL" sotto "DISPLAY".  3. Toccare 卡 卡 nel lato destro del display o, in alternatively, girare la manopola [ROTARY] per aggiustare la sensibilità. * Questa impostazione può essere aggiustata tra i valori SPEED 1 e SPEED 7. Aggiustare questa opzione nelle vede come cambia l'aspetto del display. 4. Premere il tasting [A] per tornare alla modalità originale.Impostazione del variatore di luminosità (DIMMER IN)
Questa funzione permette di indebolire l'illuminazione del display in armonia all'illuminazione e alla brillantezza all'interno della vettura. Selezionare "AUTO" (connesso alla brillantezza dentro la vettura) o "ILLUMI" (connesso all'illuminazione dentro la vettura) come le impostazioni del variatore di luminosità. - Quando la funzione del variatore automatico di luminosità viene impostato su "AUTO", la brillantezza del displayiene armonizzata alla brillantezza percepita da questo sensore. - Impostare il variatore di luminosità a DMR LEVEL. L'impostazione predefinita alla fabbrica è "AUTO". 1. Premere il tasto [A] per impostare la modalità di aggiustamento. 2. Toccare nel display delle opzioni per selezionare "DIMMER IN" sotto "APPERNCE".  3. Toccare 山 山 山 nel lato destro del display o, in alternatively, girare la manopola [ROTARY] per selezionare "AUTO" o "ILLUMI". 4. Premere il tasting [A] per tornare alla modalità originale.Impostazione il livello del variatore di luminosità (DMR LEVEL)
Questa funzione permette l'impostazione di quanto debba indebolirsi il display. - L'impostazione predefinita alla fabbrica è "3". 1. Premere il tasto [A] per impostare la modalità di aggiustamento. 2. Toccare 卡 卡 nel display delle opzioni per selezionare "DMR LEVEL" sotto "APPERNCE".  3. Toccare ne Ielato destro del display o, in alternatively, girare la manopola [ROTARY] per impostare il livello del variatore di luminosità. * Scegliere tra OFF (indebolimento OFF, luminoso), da 1 (leggero indebolimento) a 5 (scuro). 4. Premere il tasting [A] per tornare alla modalità originale.Aggiustamento del contrasto del display (CONTRAST)
Si più aggustare il contrasto del display fina a armonizzarsi con l'angolo crescente dell'apparecchio. - L'impostazione predefinita alla fabbrica è "6". 1. Premere il tasto [A] per impostare la modalità di aggiustamento. 2. Toccare 山 山 nel display delle opzioni per selezionare "CONTRAST" sotto "APPERNCE". 3. Toccare 念 nel lato destro del display o, in alternatively, girare la manopola [ROTARY] per aggiustare il contrasto.  * Questa impostazione può essere aggiustata tra i valori 1 e 11. Aggiustare esta opzione quando si vede come cambia l'aspetto del display. 4. Premere il tasting [A] per tornare alla modalità originale.Fa lampeggiare il LED quando viene rimioso DCP (BLINK LED)
Si può far lampeggiare il LED di但这a unità quando viene rimioso il DCP. - L'impostazione predefinita alla fabbrica è "OFF". 1. Premere il tasto [A] per impostare la modalità di aggiustamento. 2. Toccare nel display delle opzioni per selezionare "BLINK LED" sotto "APPERNCE".  APPERNCE ADJUST MODE BLINK LED》 OFF NCE 3. Toccare nel lato destro del display o, in alternatively, girare la manopola [ROTARY] per selezionare "ON" o "OFF". 4. Premere il tasto [A] per tornare alla modalità originale.Impostare il bip per quando i tasti sono usati (BEEP)
L'acuto tono, breve o lungo, che si può sentire quando si usano i tasti viene chiamato "BEEP". - L'impostazione predefinita alla fabbrica è "ON". 1. Premere il tasto [A] per impostare la modalità di aggiustamento. 2. Toccare 卡 卡 卡 nel display delle opzioni per selezionare "BEEP" sotto "APPERNCE".  3. Toccare nel lato destro del display o, in alternatively, girare la manopola [ROTARY] per selezionare "ON" o "OFF". 4. Premere il tasto [A] per tornare alla modalità originale.Selezionare ogni modalità
Questa opzione non può essere selezionata quando il Dolby Pro Logic Il viene impostata "MUSIC" o "MATRIX" (ved. pag. 17). - L'impostazione preferedinita alla fabbrica è "PRO" per AC-PRO III e "P.EQ" per EQ SELECT.AC-PROIII
Quando viene selezionato "STD" (modalità standard), la qualità è il Campo del suono possono essere aggistiati dal VSE (intensificatore dello spazio virtuale) in modo tale che lo stesso effetto audio possa essere percepito dovunque ci si siede. Quando viene selezionato "PRO" (modalità PRO), la qualità è il Campo del suono possono essere aggiustati appositamente per agli sedile.EQ SELECT
Quando viene selezionato "P.EQ." (modalità equalizzatore), l'intera gamma dei livelli di frequenza più essere compensata da una dettagliata curva uniforme. Quando viene selezionato "BAS/TREB" (modalità basso/soprano), il livello della frequenza può essere compensato dividendo in 2 livelli principali, basso (toni bassi) e soprano (toni alto). 1. Premere il tasto [A] per impostare la modalità di aggiustamento. 2. Toccare nel display delle opzioni per selezionare "AC-PRO III" sotto "SOUND" e "EQ SELECT" sotto "SOUND".  3. Toccare nel lato destro del display o, in alternatively, girare la manopola [ROTARY] per selezionare la modalità. Selezione modalità| AC-PRO III | STD • Modalità standard (menu VSE) |
| PRO • Modalità PRO (menu posizione) | |
| EQ SELECT | P.EQ • Modalità equalizzatore (menu P.EQ) |
| BAS / TREB • Modalità basso/soprano |
Impostazione della configurazione dell'altoparlante (SP-SETTING)
Armonizzare la configurazione dell'altoparlante della propria vettura per sfruttare appieno le caratteristiche di quello appearecchio. L'impostazione predefinita alla fabbrica e "SWL+SWR". 1. Premere il tasto [A] per impostare la modalità di aggiustamento. 2. Toccare 且 nel display delle opzioni per selezionare "SP-SETTING" sotto "SOUND".  3. Toccare 卡 卡 nel lato destro del display o, in alternatively, girare la manopola [ROTARY] per impostare la configurazione degli altoparlanti. Configurazione degli altoparlanti| CTR+SW can. 5.1 configurazione | Altoparlanti frontali/posteriori (4 can.) Altoparlante centrale (can. 1) Sub-woofer (can. 1) |
| SWL +SWR can. 4+sub-woofer configurazione | Altoparlanti frontali/posteriori (4 can.) Sub-woofer (can. 2) |
Note:
- Quando è impostato "CTR+SW", il suono non viene emesso dall'toparlante centrale a meno che non siano fatto le segmente impostazioni. (1) Facendo riferimento a "Selezione del menu PLII (Dolby PL II)" (ved. pag. 17), impostare la modalità Dolby Pro Logic II in "MUSIC" o "MATRIX". (2) Facendo riferimento a "Impostare in ON/OFF gli altoparlanti (CENTER-SP/SUB-WOOFER)" (ved. pag. 45), impostare in ON l'altoparlante centrale. - Quando la modalità di Dolby Pro Logic II è impostato in "MUSIC" o "MATRIX" e viene impostato "SWI +SWF", il suono non viene emesso dal sub-woofer Lch. 4. Premere il tasting [A] per tornare alla modalità originale.Impostare in ON/OFF gli altoparlanti (CENTER-SP / SUB-WOOFER)
Impostare l'altoparlante centrale (CENTER-SP) e il sub-woofer (SUB-WOOFER) in ON/OFF. Assicurarsi di aver impostato "OFF" quando non ci sono altoparlanti centrali o sub-woofer. L'altoparlante centrale (CENTER-SP) puosoesse impostato quando la modalita del Dolby Pro Logic Il viene impostata in "MUSIC o"MATRIX",e"SP-SETTING"viene impostato in "CTR-SW". L'impostazione predefinita alla fabbrica è "ON". 1. Premere il tasto [A] per impostare la modalità di aggiustamento. 2. Toccare 日 nel display delle opzioni per selezionare "CENTER-SP" sotto "SOUND" e "SUB-WOOFER" sotto "SOUND".  3. Toccare ne Iato destro del display o, in alternatively, girare la manopola [ROTARY] per selezionare "ON" o "OFF". 4. Premere il tasto [A] per tornare alla modalità originale.Aggiustamento del filtrodi frequenza degli altoparlanti (HPF/SUB-W LPF)
Questa funzione permette l'aggiustamento del filtr di frequenza per armonizzarlo con gli altoparlanti in uso. - I filtri (HPF/SUB-W LPF) che possono essere usati differiscono a secondo delle impostazioni della modalità del Dolby Pro Logic II.| Dolby Pro Logic II Impostazione deli modalità | Filtro | |
| HPF | SUB-W LPF*1 | |
| MUSIC/MATRIX | Non aggiustabile | Aggiustabile |
| OFF | Aggiustabile | Aggiustabile |
■ Aggiustamento del filtro
HPF (aggiustamento del filtro high-pass) Questo filtering eliminates suoni bassi dagli altoparlanti frontali e posteriori. THROUGH 50Hz 80Hz 120Hz Impostare il filtro armonizzatoagli altoparlanti quando si usano altoparlanti dal diametro inferiore.THROUGH
Impostare quello quando si usano altoparlanti che possono generare i bassi. SUB-W LPF (aggiustamento del filtro del sub-woofer low-pass) Questo filtro eliminata i suoni più alto dal subwoofer. THROUGH 50Hz 80Hz 120Hz Impostare ilhetto di frequenza per armonizzarlo al sub-woofer.THROUGH
Impostare quello quando si usano subwoofer che includono un filtrlo low-pass. 1. Premere il tasto [A] per impostare la modalità di aggiustamento. 2. Toccare 日 nel display delle opzioni per selezionare "HPF" sotto "SOUND" e "SUBW LPF"otto "SOUND".  3. Toccare nel lato destro del display o, in alternatively, girare la manopola [ROTARY] per impostare la frequenza. * Scegliere tra THROUGH, 50Hz, 80Hz, and 120Hz. 4. Premere il tasto [A] per tornare alla modalità originale.Impostare in ON/OFF I'uso dell'amplificatore interna (AMP CANCEL)
Impostare in ON/OFF l'uso dell'amplificatore interno a secondo che si usi o meno un amplificatore esterno. Impostare AMP CANCEL in "ON" (uso dell'amplificatore interno OFF) quando viene usato un amplificatore esterno e quindi non viene usato quello interno. - L'impostazione predefinita alla fabbrica è "OFF" (amplificatore interno in uso). 1. Premere il tasto [A] per impostare la modalità di aggiustamento. 2. Toccare 卡 卡 卡 nel display delle opzioni per selezionare "AMP CANCEL" sotto "SOUND".  3. Toccare nel lato destro del display o, in alternatively, girare la manopola [ROTARY] per selezionare "ON" o "OFF". 4. Premere il tasto [A] per tornare alla modalità originale.Aggiustamento del livello d'emissione degli altoparlanti (SP GAIN)
Uso della funzione del test tonale presente in quello apparecchio per regolare il volume in modo tale che l'émissione da tutti gli altoparlanti sia uguale. - Questa opzione non può essere selezionata solo quando la modalità Dolby Pro Logic II viene impostata "MUSIC" o "MATRIX". - L'impostazione predefinita alla fabbrica è "0dB". 1. Premere il tasto [A] per impostare la modalità di aggiustamento. 2. Toccare nel display delle opzioni per selezionare "SP GAIN" sotto "SOUND".  3. Toccare EDIT. La modalità cambia nella modalità di aggiustamento SP GAIN. 4. Toccare 山 山 sul display delle impostazioni per selezionare l'opzione desiderata. Ogni tocco di 山 山 cambia l'opzione fattanell'ordine seguente:Aggiustamento delle opzioni
 *1 Viene visualizzato "CTR GAIN" solo quando "SP-SETTING" viene impostato in "CTR+SW" e "CENTER-SP" viene impostato in "ON". *2 "SUB-W GAIN" viene visualizzato solo quando "SUB-WOOFER" viene impostato in "ON". 5. Toccare nel lato destro del display o, in alternatively, girare la manopola [ROTARY] per aggustare il livello di emissione. Il livello di emissione cui essere regolato nella gamma da -10 dB a +10 dB 6. Ripetere le fasi 4 e 5 per aggustare agli unità. 7. Premere il tasto [A] per tornare alla modalità originale.Aggiustamento del ritardo degli altoparlanti posteriori (PL II DELAY)
Il tempo che il suono impiega per arrivare all'ascoltatore dipende alla posizione in cui sono montati gli altoparlanti posteriori e dalle dimensioni della vettura. Se il ritardo del suono degli altoparlanti posteriori viene regolato, alla甚么 èpuo essere sentito contemporaneamente al suono emesso dagli altoparlanti frontali. - Questa opzione non può essere selezionata solo quando la modalità Dolby Pro Logic II viene impostata "MUSIC" o "MATRIX". L'impostazione predefinita alla fabbrica è "0ms". 1. Premere il tasto [A] per impostare la modalità di aggiustamento. 2. Toccare 日 nel display delle opzioni per selezionare "SRD-SP" sotto "PL II DELAY".  3. Toccare 山 nel lato destro del display o, in alternatively, girare la manopola [ROTARY] per aggiustare il ritardo del suono. * "SRD-SP" cui si sono gli uomini e donne nuoi. 4. Premere il tasting [A] per tornare alla modalità originale.Impostazione della modalità musica in dettaglio (PL II CONT)
Questa funzione permette di impostare la modalità musica con più dettagli quando la modalità di Dolby Pro Logic II viene impostata in "MUSIC". - Questa opzione non può essere selezionata solo quando la modalità Dolby Pro Logic II viene impostata in "MUSIC". L'impostazione predefinita alla fabbrica per PANORAMA e "NO", per DIMENSION e "3" e per CTR WIDTH e "3".Aggiustamento delle opzioni
PANorama (impostazione del controllo del panorama) Questo amplia l'imagine del Campo del suono dagli altoparlanti frontali a quelli posteriori. Impostare questa opzione su "YES" se si pensa che manca un effetto avvolgente. DIMENSION (impostazione delle dimensioni) L'imagine del Campo del suono va davanti o duro. Quando l'imagine del Campo del suono tendse verso la parte frontale o posteriori, quello sbilanciamento può essere compensato. Il valore di aggiustamento 3 è in posizione centrale. I valori di aggiustamento da 2 a 0 Cambiano l'immagine del Campo del suono nella parte posteriore, nelle gli aggiustamenti di valori da 4 a 6 cambiano l'immagine del Campo del suono nella parte frontale. CTR WIDTH (impostazione della profondità nel centro)*1 Aggiusta la posizione fissa del canale centrale tra l'altoparlante centrale e gli altoparlanti frontali Six/Dex. Quando il suono centrale è diviso equivalente tra destra e sinistra, l'intera imagine del Campo del suono aumenta fino a produrre una sensazione di diffusione naturale. Il valore di aggiustamento 0 riproduce tutti i suoni centrali dall'altoparlante centrale. Il valore di aggiustamento 7 divide il suono centrale. ugualmente tra gli altoparlanti frontali Dex/Six. *1 Viene visualizzato "CTR WIDTH" solo quando "SP-SETTING" viene impostato in "CTR+SW" e "CENTER-SP" viene impostato in "ON". 1. Premere il tasto [A] per impostare la modalità di aggiustamento. 2. Toccare 且 且 nel display delle opzioni per selezionare I'opzione di aggiustamento desiderato molto "PL II CONT". Le opzioni di aggiustamento sono PANORAMA "DIMENSION" and "CTR WIDTH".  3. Toccare 卡 卡 nel lato destro del display o, in alternatively, girare la manopola [ROTARY] e regolare l'opzione come si desidera. * Selezionare "YES" o "NO" per "PANorama". * "DIMENSION" più essere aggiustato in una gamma di valori da 0 a 6. * "CTR WIDTH" più essere aggiustato in una gamma di valori da 0 a 7. 4. Premere il tasting [A] per tornare alla modalità originale.Funzione AUX
Questoistema ha un'immissione RCA esterna cosi che si possono ascoltare i suoni e la musica provenienti da periferiche esterne connesse a esta unità.Selezione AUX/TEL.
Si possono ascabtare suoni e musica da periferiche esterne, oanche le Telefonate al cellulare, se queste periferiche sono connesse all'unità. Quando TEL INT o una periferica esterna viene connessa al'unità, si può selezionare la modalitàTEL o la modalità AUX. - L'impostazione predefinita alla fabbrica è "AUX". 1. Premere il tasto [A] per impostare la modalità di regolazione. 2. Toccare 且 且 nel display delle opzioni e selezionare "AUX/TEL" sotto "SETTING".  3. Toccare nel lato destro del display o, in alternatively, girare la manopola [ROTARY] per selezionare "AUX" o "TEL".AUX:
Il cavo d'immissione AUX/TEL è per l'immissione Audio esterna.TEL:
Il cavo d'immissione AUX/TEL è per l'immissione audio dal Telefono cellulare. 4. Premere il tasto [A] per tornare alla modalità precedente.Impostazione del livello di immissione (AUX SENS) dell'audio portatile (modalità AUX)
Questa funzione permette l'impostazione del livello d'immissione delle periferiche esterne opzionali connesse all'unità. - Questo più essere impostato quando "AUX/TEL" viene impostato in "AUX". L'impostazione predefinita alla fabbrica è "MID". 1. Premere il tasto [A] per impostare la modalità di aggiustamento. 2. Toccare nel display delle opzioni per selezionare "AUX/TEL"izzato.  3. Toccare nel lato destro del display o, in alternatively, girare la manopola [ROTARY] per impostare il livello di immissione. * Scegliere tra LOW, MID o HIGH. 4. Premere il tasting [A] per tornare alla modalità originale.Impostazione dell'émissione dagli altoparlanti della vettura delle chiamate del Telefono cellulare (TEL-002 opzionale)
- Per l'émissione delle chiamate Telefoniche, impostare il Telefono cellulare. - L'impostazione predefinita alla fabbrica è "RIGHT". 1. Premere il tasto [A] per impostare la modalità di regolazione. 2. Toccare 山 山 nel display delle opzioni per selezionare "TEL-SP" sotto "SETTING".  3. Toccare ne lato destro del display o, in alternatively, girare la manopola [ROTARY] per selezionare "LEFT" o "RIGHT".LEFT:
Le chiamate Telefoniche possono essere ascoltate dall'altoparlante frontale sinistro connesso all'unità.RIGHT:
Le chiamate Telefoniche possono essere ascoltate dall'altoparlante frontale destro connesso all'unità. 4. Premere il tasting [A] per tornare alla modalità precedente.Impostazione dell'interruzione del telefonocellulare
Se si connette esta unità e il Telefono cellulare con un'unità (TEL-002, opzionale), si possono ascoltare le chiamate Telefoniche dagli altoparlanti della vettura. - L'impostazione predefinita alla fabbrica è "OFF". 1. Premere il tasto [A] per impostare la modalità di regolazione. 2. Toccare 卡 nel display delle opzioni per selezionare "TEL-SWITCH" sotto "SETTING".  3. Toccare 卡 卡 卡 nel lato destro del display o, in alternatively, girare la manopola [ROTARY] per selezionare le impostazioni. Ogni volta che si gira la manopola [ROTARY], la selezione cambia nel seguente ordine. OFF ON MUTE OFF...OFF:
L'unità continua le operazioni normalianchesse si usa il Telefono cellulare.Nota:
- Quando si connette un kit hand-free, assicurarsi che l'impostazione sia ON per ricevere l'audio del Telefono atraverso il sistema.ON:
Si possono ascoltare le chiamate Telefoniche dagli altoparlanti connessi a esta unità. * Mentre si ascoltano le chiamate dagli altoparlanti della vettura, si vuo regolare il volume girando la manopola [ROTARY].MUTE:
Il suono di但这a unità viene eliminato durante le chiamate Telefoniche. 4. Premere il tasting [A] per tornare alla modalità precedente.Impostazione della funzione del volume automatico (CALIBRATE/A-VOL SENS)
Si piùckiare automaticamente il volume a secondo della velocità della vettura. - L'impostazione predefinita alla fabbrica è "LOW". 1. Premere il tasto [A] per impostare la modalità di regolazione. 2. Toccare 卡 卡 卡 nel display delle opzioni per selezionare "CALIBRATE" sotto "SETTING".  3. Accelerare fino a una velocità di 50~km 4. Quando si raggiunge la velocità di 50 km, toccare START. Dopo 2 secondi o più, si ascolterà un lungo bip, e apparirà “SUCCESSIONAL” nel display. Se si ascolterà un breve bip, quello indica che la calibratura è fallita. Ripetere la procedura alla fase 3. 5. Poi, regolare la sensibilità. Toccare nel display delle opzioni per selezionare "A-VOL SENS"izzato.  6. Toccare ne lato destro del display o, in alternatively, girare la manopola [ROTARY] per aggiustare la sensibilità. Ogni volta che si gira la manopola [ROTARY], la selezione cambia nel seguente ordine. OFF (il volume non cambia) LOW (il volume cambia: un poco) MID-LOW MID MID-HIGH HIGH (cambia il volume: molto) ... 7. Premere il tasto [A] per tornare alla modalità precedente.Performare un controllo del sistema
Questa funzione permette di effettuare un controlo di sistema alla modalità di aggiustamento quando richiesto. 1. Premere il tasto [A] per impostare la modalità di aggiustamento. 2. Toccare nel display delle opzioni per selezionare "SYSTEM CHECK" sotto "SETTING".  3. Toccare e tenere premuto START per 1 secondo o più. "System Check" appeare sul display. 4. Premere la manopola [ROTARY]. Il controlledo diistema viene avviato Quando il controlo di sistema viene completato, "Completed" appeare sul display. 5. Premere ancora la manopola [ROTARY]. Appare il display principale per la modalità radio.Uso della funzione di sicurezza (CODEMATIC)
Questa funzione impedisce di usare lavoramente\ eso apparetcchio alle persona che non conoscono\ la seguenza di tocchi. Il display del Codice a Tocchi\ appare quando DCPiene attaccato e accesso\ mente "CODEMATIC" è impostato su "ON". Se si tocca il display di quello schermone nell'ordine preselezionato, viene visualizzato "SUCCESSFUL" e l'apparecchio si spenge. Quando l'apparecchio viene poi acceso, il display del Codice a Tocchi non appeare, e viene visualizzato il display principale nella modalità radio o nella modalità CD. 1. Premere il tasto [A] per impostare la modalità di aggiustamento. 2. Toccare 卡 卡 卡 nel display delle opzioni per selezionare "CODEMATIC" sotto "SETTING".  Sono visualizzati 2 tipi di opzioni per "CODEMATIC", opzioni per cui viene visualizzato "ON" o "OFF" sulla destra dello schermo, e opzioni per cui viene visualizzato "INPUT" sulla destra dello schermo. Quindi, selezionale le opzioni per cui viene visualizzato "ON" o "OFF" nel dato destro del display. 3. Toccare nel lato destro del display o, in alternatively, girare la manopola [ROTARY] per selezionare "ON" o "OFF". 4. Toccare neI display delle opzioni per selezionare "CODEMATIC" sotto "SETTING". Quindi, selezionare le opzioni per cui viene visualizzato "INPUT" nel lato destro del display. 5. Toccare INPUT. Appare il display del Codice a Tocchi. 6. Inserire il codice a tocchi. * Toccare una delle 5 posizioni (sinistra, centro, destro, destra superiore, o destra inferiore) sul display. Ogni tocco sul diplay illumina uno degli indicatori del Codice a Tocchi. * Per esempio, toccare (1) centro, (2) destra superiore, (3) sinistra, e (4) destra inferiore, in quest'ordine. è possible toccareanche ripeturamente la stessa posizione. Quando di tocca 4 volté, si sentirà un bip lungo, e si ritorna alla modalità originale.Per cancellare CODEMATIC
Se si è dimenticato l'ordine del tocco, toccare ① destra inferiore, ② sinistra, ③ destra superiore e poi ④ destra in quest'ordine o, in alternatively, premere [SCN] sul telecomando dell'apparecchio. 7. OPERAZIONI CON GLI ACCESSORI
Operazioni con il cambiadischi CD
Cambia-CD
Quando un cambia-CD optionale è connesso atraverso il cavo CeNET,但这a unità più controllare le operazioni del cambia-CD. Questa unità più essere connessa fino a un totale di 2 cambia-CD collegati con il CeNET.Cambia-DVD
Quando un cambia-DVD optionale è connesso attraverso il cavo CeNET,但这a unità più controllare le operazioni del cambia-DVD. Per visualizzare un DVD, si richiede l'uso di un monitor opzionale. Le operazioni disponibili e il display del cambiaDVD di但这a unità sono in versione amplificata, e non supporta tutte le funzioni del cambia-DVD. Per controllare il cambia-DVD, usare il telecomando che viene provistono con il cambiaDVD. Per maggiori dettagli, fare riferimento al Manuale Utente provistono con il cambia-DVD.Nel caso in cui si connettono 2 cambia-DVD
Premere la manopola [ROTARY] per selezionare il cambiatore connesso a esta unità. (Ogni pressione sulla manopola [ROTARY] cambia cambiatore.) - Se il cambia-CD non contiene un contentatore, viene visionato "NO MAG", e se il contentatore non contiene CD, non viene visualizzato "NO DISC" per il disco Num. Per maggiori dettagli del display dei titoli, vedere "Cambiamento del display del titolo" (ved. pag. 14).Lo schermo visualizza nella modalità cambiatore
Display principale (modalità cambia-CD)
Questo è quello che appeare premendo la manopola [ROTARY] per selezionare la modalità cambia-CD.  Toccando il lato sinistro del display per 1 secondo o più si cambia in modalità delle operazioni di base.  Display del brano/tempo di riproduzione T01/02: 00: Sono visualizzati il Num. del brano in fase di riproduzione e il tempo di riproduzione. Toccando o nelle operazioni standard, si permette la selezione del brano da riproduire, o i brani da far avanzare velocamente o da far andare indietro velocamente.Display del titolo
Toccando quello si cambia il display.Display del disco Num.
Se sitocca nella modalita normale,si puo selezionale un disco.MODE
Toccandolo si visualizzano le sub-funzioni. Toccandolo e tenendolo premuto per 1 secondo o più viene visualizzata la lista dei dischi.T-SCAN/D-SCAN
Questo viene visualizzato durante la scansione delle riproduzioni. Toccando T-SCAN/D-SCANiene terminata la riproduzione a scanzione.T-RPT/D-RPT
Questo viene visualizzato durante la rpeticione della riproduzione. Toccando T-RPT/D-RPTiene terminata la riproduzione ripetuta.T-RDM/D-RDM
Questo viene visualizzato durante la riproduzione in ordine casuale. Toccando T-RDM/D-RDM viene terminata la riproduzione in ordine casuale.DISC
Toccando甚么 si avvia la riproduzione del disco successivo. (solo nel display delle operazioni di base) Toccando questi tasti si selezione il brano da riproduire. Toccando e tenendo premuti questi tasti si mandano i brani avanti o indietro velocimento.Display della lista dischi (modalità cambia-CD)
Questo è quello che appeare quando MODE viene toccato e tenuto premuto per 1 secondo o più nel display principale.  Nome del disco>>:Selezione in progressione
Toccando il nome di un disco si fa tornare lo schermo al display principale, e la riproduzione viene avviata a partire dal primo brano del disco toccato.←PREV-RTN:
Toccandolo si visualizza la lista dei titoli precedenti. Toccandolo e tenendolo premuto per 1 secondo o più si fa tornare lo schermo al display principale.NEXT:
Toccandolo si visualizza la lista dei titoli successivi.ATTENZIONE
CD-ROM non possono essere riprodotti da!.!.!.!.!.!.!.!.!.!.!.!.!.!.!.!.!.!.!.!.!.!.!.!.!.!.!.!.!.!.!.!.!.!.!.!.!.!.!.!.!.!.!.!Nota:
- Alcuni CD registrati nella modalità CD-R/CD-RW potrebbero non essere utilizzabili.Selezione della modalità combustatore
1. Premere la manopola [ROTARY] per selezionare la modalità cambiatore. * Se una data apparecchiatura non è connessa, la rispettiva modalità non appeare visualizzata. La riproduzione si avvia automaticamente quando la modalità cambia in modalità Cambiatore.Arresto temporaneo della riproduzione
1. Premere il tasto [▶■].■ Riavvio della riproduzione
1. Premere nuovamente il tasting [▶■].Selezione di un CD
1. Toccare 日 nel display del disco Num. per selezionare un disco. Si avvia la riproduzione. * Se il contentatore non contiene il disco selezionato, il Num. di quello disco non viene visualizzato. * Toccando DISC ↑ si avvia la riproduzione del disco successivo.■ Selezione di un disco dal display della lista di dischi
1. Toccare e tenere premuto MODE per 1 secondo o più. Viene visualizzata le lista dei dischi. Se viene toccato NEXT, viene visualizzata la parte successiva della lista dei dischi. 2. Toccare il nome del disco. * Se il contentatore non contiene il disco che si è selezionato, viene visualizzato "NO DISC" per quel disco Num. * Se si selezione lo stesso disco che è in fase di riproduzione, la riproduzione ricomincia dal primo brano di quel disco. (funzione top)Selezione di un brano
1. Per sentire il brano successivo, toccare nei display del brano. 2. Per sentire il brano precedente, toccare due volte nel display del brano. Toccando 品 si riproduce il brano successivo. Per anni successiva pressione del tasting l'apparecchio avanza sino all'inizio del brano successivo che viene poi riproduotto. Toccando 山 si riproduce il brano precedente. Per anni successiva pressione del tasto l'apparecchio retrocede sino all'inizio del brano precedente che viene poi riproduotto. * Se si tocca ↑ due volte nel display del brano quando sta per cominciare la sua riproduzione, talvolta viene riprodotto il secondo brano precedente.Avanzamento veloce/ Retrocessione veloce
1. Per avanzare velocemente, toccare 5 sul display dei brani. 2. Per retrocedere velocimento, toccare sul display dei brani.Funzione TOP
La funzione top avvia la riproduzione dal primo brano nel disco attualmente in fase di riproduzione. 1. Toccare et tenere premuto MODE per 1 secondo o più. Viene visualizzata le lista dei dischi. Se viene toccato NEXT, viene visualizzata la parte successiva della lista dei dischi. 2. Toccare il nome del disco. * Se il contentatore non contiene il disco che si è selezionato, viene visualizzato "NO DISC" per quel disco Num. * Se si è selezionato lo stesso disco che è attualmente in fase di riproduzione, la riproduzione ricomincia dal primo brano di quel disco.Riproduzione a scansione
La riproduzione a scansione localizza e riproduce automaticamente i primi 10 secondi di tutti i brani di un disco. Questa funzioneiene ripetuta su quello disco fino a che non viene annullata. La riproduzione a scansion è utile quando si vuole selezionare un brano desiderato. 1. Toccare MODE. 2. Toccare T-SCAN. Il display MODE cambia in "T-SCAN" e si avvia la coproduzione a scansione. * La riproduzione a scansione viene avviata dal brano successivo a quello attualmente in fase di riproduzione.■ Annullamento della riproduzione a scansione
1. Toccare T-SCAN. Il display T-SCAN cambia in "MODE", e viene riproduzione il brano che era in fase di riproduzione quando si è toccato T-SCAN.Riproduzione a scansione dei dischi
La riproduzione a scansione dei dischi località e riproduci i primi 10 secondi del primo brano di agli disco nel cambia- CD currentemente selezionato. Questa funzione continua automatically fino a che non viene annullata. La riproduzione a scansion è utile quando si vuole selezionare un CD desiderato. 1. Toccare MODE. 2. Toccare D-SCAN. Il display MODE cambia in "D-SCAN" e si avvia la riproduzione a scansione dei dischi. * La riproduzione a scansione dei dischi viene avviata dal disco successivo a quello attualmente in fase di riproduzione.■ Annullamento della riproduzione a scansione dei dischi
1. Toccare D-SCAN. Il display D-SCAN cambia in "MODE", e viene riproduotto il brano che era in fase di riproduzione quando si è toccato D-SCAN.Riproduzione ripetuta
La coproduzione continuata riproduce continuamente il brano attuale. Questa funzione continua automaticamente fino a che non viene annullata. 1. Toccare MODE. 2. Toccare T-REPEAT. Il display MODE cambia in "T-RPT" e viene avviata la coproduzione ripetuta.Annullamento della riproduzione ripetuta
1. Toccare T-RPT. Il display T-RPT cambia in "MODE", e la riproduzione regolare ricomincia dal brano che era in fase di riproduzione quando si è toccato T-RPT.Riproduzione ripetuta dei dischi
Dopo che sono stati riprodotti tutti i brani di un disco, la riproduzione ripetuta automaticamente ripete lo stesso disco dal primo brano. Questa funizione continua automaticamente fino a che non viene annullata. 1. Toccare MODE. 2. Toccare D-REPEAT. Il display MODE cambia in "D-RPT" e viene avviata la riproduzione ripetuta dei dischi.Annullamento della riproduzione ripetuta dei dischi
1. Toccare D-RPT. Il display D-RPT cambia in "MODE", e la riproduzione regolare ricomincia dal brano che era in fase di riproduzione quando si è toccato D-RPT.Riproduzione in ordine casuale
La riproduzione in ordine casuale seleziona e riproduce i vari brani nel disco in un ordine non particolare. Questa funzione continua automaticamente fino a che non viene annullata. 1. Toccare MODE. 2. Toccare T-RANDOM. Il display MODE cambia in "T-RDM" e si avvia la coproduzione a scansione.■ Annullamento della riproduzione in ordine casuale
1. Toccare T-RDM. Il display T-RDM cambia in "MODE", e la riproduzione regolare ricomincia dal brano che era in fase di riproduzione quando si è toccato T-RDM.Riproduzione in ordine casuale dei dischi
La riproduzione in ordine casuale dei dischi selezione e riproduce automaticamente i vari brani o dischi in un ordine non particolare. Questa funzione continua automaticamente fino a che non viene annullata. 1. Toccare MODE. 2. Toccare D-RANDOM. Il display MODE cambia in "D-RDM" e si avvia la riproduzione in ordine casuale.■ Annullamento della riproduzione in ordine casuale
1. Toccare D-RDM. Il display D-RDM cambia in "MODE", e la riproduzione regolare ricomincia dal brano che era in fase di riproduzione quando si è toccato D-RDM.Funzioni del sintonizzatore TV
Quando un sintonizzatore TV opzionale è collegatotramite un cavo CeNET,questa unità controla lefunzioni del sintonizzatore TV.Per videere la TVsono necessari un sintonizzatore TV e un monitor.Display dello schermo nella modalità TV
Display principale
Questo è quello che appeare premendo la manopola [ROTARY] per selezionare la modalità TV.  Toccando il dato sinistro del display per 1 secondo o più si cambia in modalità delle operazioni di base. Dislay dei canali
1ch: Viene molto il canale attualmente in fase di ricezione. Toccare 山 山 山 山 山 山 山 山 山 山 山 山 山 山 山 山 山 山 山 山 山 ^ 1 o in modalità normale permette di effettuare la sintonizzazione automatica o la sintonizzazione manuale.Display del titolo
3ch: Viene visualizzato il nome della stazione attualmente in fase di ricezione. VTR: In modalità video Toccando quosti si cambia il display.Display della banda di ricezione
TV 1: Nome della banda:Display del Num. preselezionato
Toccando 山 in modalitànormale siselezionana una memoria preimpostata. Quando un sintonizzatore TV opzionale è collegato tramite un cavo CeNET, esta unità controlling le funzioni del sintonizzatore TV. Per essere la TV sono necessari un sintonizzatore TV e un monitor. Display del Num. preselezionato Toccando 山 in modalità normale si selezione una memoria preimpostata.MODE
Toccandolo si visualizzano le sub-funzioni. Toccandolo e mantenendolo premuto si visualizza la lista delle memorie preseselezionate. P-SCAN: Questo viene visualizzato durante una scansione preselezioni. Toccandolo si termina la scansione preselezioni. A-STORE: Questoiene visualizzato durante una memorizzazione automatica. Toccandolo si termina la memorizzazione automatica.BAND
Il toccarlo cambia la banda di ricezione. Toccandolo e tenendolo premuto per 1 secondo o più si cambia alla modalità di sintonizzazione manuale alla sintonizzazione automatica e viceversa. (solo nel display delle operazioni di base) Toccando questi tasti si abilita la sintonizzazione automatica o la sintonizzazione a passo (nella modalità di sintonizzazione manuale). Toccandolo e tenendo premuti quosti tasti si abilita la sintonizzazione rapida (nella modalità di sintonizzazione manuale).Display della lista delle memorie preselezionate
Questo è quello che appeare quando MODE viene toccato e tenuto premuto per 1 secondo o più nel display principale.  >> In fase di sintonizzazioneRTN:
Toccandolo si ritorna al display principale.Selezione della modalità TV
1. Premere la manopola [ROTARY] per selezionare la modalità TV. Ogni pressione sulla manopola [ROT] cambia la modalità nell'ordine segue * Se una data apparecchiatura non è connessa, la rispettiva modalità non appeare visualizzata.banda di ricezione
1. Toccare BAND per cancellare la banda di ricezione. Ogni volta che si preme BAND la banda di ricezione cambia. TV1 TV2 TV1...Sintonizzazione automatica
La sintonizzazione automatica è una funzione per sintonizzato automaticamente le stazioni con una Buona ricezione. 1. Toccare e tenere premuto BAND per 1 secondo più quando viene visualizzato MANU. La sintonizzazione automatica diventa possibile quando scompare MANU. 2. Toccare sul display dei canali. Viene visualizzato SEEK UP/SEEK DOWN, e la sintonizzazione viene avviata. La sintonizzazione si ferma automaticamente alle stazioni con una buona ricezione.Per annullare una sintonizzazione
1. Toccare ancora sul display dei canali.Sintonizzazione manuale
Ci sono 2 modalità disponibili: sintonizzazione rapida e sintonizzazione a passo. Quando ci si trovato in modalità di sintonizzazione a passo, la frequenza cambia di un passo per volta. In modalità di ricerca rapida, è possibile sintonizzarsi rapidamente sulla frequenza desiderata. 1. Toccare e tenere premuto BAND per 1 secondo o più nel caso che MANU non venga visualizzato . La sintonizzazione manuale è disponibile quando viene visualizzato MANU. 2. Usare il display dei canali per sintonizzarsi su un canale in cui c'e una stazione emittente. Ci sono 2 modi per effettuire la sintonizzazione manuale: sintonizzazione a passo e sintonizzazione rapida. * La sintonizzazione a passo è una funzione per cui si cambia di un canale perolta. Toccare ↑ ⿱ sul display delle frequenze. * La sintonizzazione veloce è una funzione per cui il canale cambia continuamente. Toccare ↔ ➔ sul display dei canali. La sintonizzazioneiene interrotta se si toglie il dito dal pannello.Richiamareuna stazione preselezionata
Questa funzione permette all'utente di selezionare una stazione presezionata. 1. Toccare e tenere premuto MODE per 1 secondo o più. Viene visualizzata la lista delle memorie preselezionate. 2. Toccare la stazione che si vuole ascoltare. * La stazione può essere sintonizzata toccando in un Num. preimpostato.Per annullare una sintonizzazione
1. Toccare RTN.Memoria preselezionata
Possono essere memorizzate un totale di 12 stazioni TV (6-TV1 e 6-TV2). Questo permette di selezionare le stazioni TV preferite e memorizzarle per richiamarle successivement. 1. Toccare BAND perambiare la banda di ricezione. 2. Usare il display dei canali per selezionare la stazione da memorizzare. 3. Toccare e tenere premuto MODE per 1 secondo o più. Viene visualizzata la lista delle memorie preselezionate. 4. Toccare e tenere premuto per 2 secondi o più il Num. preimpostato per la memorizzazione. L'émissione di un lungo bip segnalera l'avvenuta memorizzazione della stazione. Se si sentirà un breve bip, la stazione non è stata memorizzata. Ripetere la procedura alla fase 1.Funzione di memorizzazione automatica
La memorizzazione automatica selezione automaticamente 6 stazioni TV e le memorizzate tutte nella memoria preimpostata. Se non ci sono 6 stazioni con una buona ricezione, rimangono memorizzate le stazioni precedentamente memorizzate e solo le stazioni forti sono memorizzate. 1. Toccare MODE. 2. Toccare e tenere premuto A-STORE per 2 secondo o più. Il display MODE cambia in "A-STORE" e il Num. selezionato durante le operazioni di memorizzazione automatica appeare nel display Num. selezionato. * Vengono automaticamente ricercate le stazioni con una buona riseczione, e quindi memorizzate tra le memorie preselezionate (No.1 to No.6) in ordine partendo alla stazione con la frequenza più bassa.Note:
- Quando viene effettuata la memorizzazione automatica, le stazioni memorizzate fino a quel momento vengono cancellate. - Nel caso che ci siano meno di 6 stazioni con una buona ricezione, le basse frequenze saranno automaticamente richiamate e la memorizzazione automatica verrà ripetuta. Le stazioni precedentemente memorizzate rimangono in memoria nel caso in cui risultano eserci meno di 6 stazioni disponibili, malgrado che la memorizzazione automatica sia stata effettuata 2 volte.Scansione preimpostata
La scanzione preselezioni è una funzione per ricevere le stazioni nell'ordine in cui sono attualmente memorizzate per Num. preimpostato in modo che si possano controllare le trasmissioni. 1. Toccare MODE. 2. Toccare P-SCAN. Il display MODE cambia in "P-SCAN" e il Num. selezionato durante le operazioni di scanzione preselezioni appara nel display Num. selezionato. * Le stazioni attualmente memorizzate sono ricevute in ordine per 7 secondi o più. Le stazioni con scarsa ricezione sono saltate e viene ricevuta la stazione successiva. Le stazioni TV sono ricevute nell'ordine seguente: TV1 (1 6) TV2 (1 6) TV1 (1 6) e cosi via.Per annullare la scanzione preselezioni
1. Toccare P-SCAN. Il display P-SCAN cambia in "MODE" e, in seguito, saranno ricevute le stazioni che si stavano ricevendo quando si è toccato P-SCAN.Guardare un video
Il sintonizzatore TV ha un terminale d'immissione VTR a cui può essere connesso 1 periferica esterna. Connettere un video-riproduttore 12 V (VCP) o un video-registrarore (VCR) al terminal d'immissione del terminale TV. 1. Premere il tasto [▶■]. Viene visualizzato VTR, e la modalità vieneambiata in modalità VTR. * Lo schermo TV entra in modalità d'immissione video, e si possono visualizzare i video.Per ritornare alla modalità TV
1. Premere nuovamente il tasto [▶■].Impostare I'area TV (TV AREA)
Quando si selezione l'area TV (l'area di ricezione della TV), si modifica l'impostazione dell'area del sintonizzatore della TV. L'impostazione predefinita alla fabbrica è "GERMANY". 1. Premere il tasto [A] per impostare la modalità di regolazione. 2. Toccare 日 nel display delle opzioni selezionare "TV AREA" sotto "TUNER".  3. Toccare nel lato destro del display o, in alternatively, girare la manopola [ROTARY] per selezionare l'area. 4. Premere il tasting [A] per tornare alla modalità precedente.Impostazione
dell'amplificatore TV (TV DIVER)
E possibile modificare le impostazioni di ricezione dell'antenna TV connessa all'amplificatore TV. - Impostare esta opzioni su "OFF" quando un'antenna TV non è in uso. - L'impostazione predefinita alla fabbrica è "ON". 1. Premere il tasto [A] per impostare la modalità di aggiustamento. 2. Toccare 山 nel display delle opzioni selezionare "TV DIVER" sotto "TUNER".  3. Toccare 念 nel lato destro del display o, in alternatively, girare la manopola [ROTARY] per selezionare "ON" o "OFF". 4. Premere il tasting [A] per tornare alla modalità originale.Funzione di lavoro DAB
Quando si usa un carr o CeNET per collegare un'unità DAB (DAH913 o DAH923, venduta separamente), possono essere controllate tutte le funzioni.Ascoltare la stazione DAB
1. Premere la manopola [ROTARY] per selezionare la modalità di operazione.Note:
- Il display molto nella modalità di ricezione normale e nella modalità di ricezione preimpostata è lo stesso quando viene ricevuta una stazione DAB. - Il numero dei programmi e dei tempi delle trasmissioni dipende alla stazione DAB. - Quando la forza dei segnali DAB diminuisce, l'émissione audio viene interrotta.Sintonizzazione automatica
1. Premere la manopola [ROTARY] per selezionare la modalità DAB. 2. Toccare sul lato sinistro del display. "DAB" si illumina nel display quando l'unita principale riceve una stazione DAB. * L'unità principale interrompe la sintonizzazione automatica quando non si riesce più a trovare una stazione DAB. Il display torna alla modalità precedente.Sintonizzazione manuale
1. Premere la manopola [ROTARY] per selezionare la modalità DAB. 2. Se sul display non appeare "MANU", toccare etenere premuto BAND per 1 secondo o più. Se viene visualizzato "MANU", diventa possibile la sintonizzazione manuale. 3. Toccare sul lato sinistro del display per sintonizzato la stazione. * Se non vengono effettuate operazioni per più di 7 secondi, la sintonizzazione manuale viene annulata e il display ritorna nella modalità precedente.Cambiamento dei programmi
1. Premere la manopola [ROTARY] per selezionare la modalità DAB. 2. Toccare sul lato sinistro del display per cambiare i programmi nella stazione DAB.Nota:
- Il nome del programma può essere lo stesso a seconda del programma DAB.Scansione dei programmi
Questa funzione effettua una scansione di tutti i programmi ricevibili in una stazione DAB che si sta ricevendo per 10 secondi, in sequenza. Questo è utile quando si vuole cercare un programma particolare. 1. Premere la manopola [ROTARY] per selezionare la modalità DAB. 2. Toccare MODE. 3. Toccare S-SCAN. "S-SCAN" si illumina equesta unità comincia la scansione di tutti i programmi per 10 secondi in sequenza. Ogni volta che l'unità effettua una scansione, il nome del programma viene molto在哪o nel display. 4. Per terminare la scansione dei programmi quando viene sintonizzato il programma desiderato, premere S-SCAN.Memoria manuale
L'unità principale ha una funzione di memoria manuale per i programmi DAB. Possono essere preimpostati fino a 18 programmi (sei programmi ognuno) nei tasti di preselezione.[M1], [M2] e [M3]
1. Premere la manopola [ROTARY] per selezionare la modalità DAB. 2. Toccare BAND per selezionare una delle scelte mostrate sopra. 3. Toccare e tenere premuto MODE per 1 secondo o più. Viene visualizzata la lista delle memorie preselezionate. 4 Toccare et tenere premuto per 2 secondi o più il Num. preselezionato perché sa memorizzato. L'émissione di un lungo bip segnalera l'avvenuta memorizzazione della stazione. Se si sentirà un breve bip, la stazione non è stata memorizzata. Ripetere la procedura dalla fase 1.Nota:
L'interruzione dei programmi (PTY o INFO) non\ puo essere scritto nella memoria manuale.Richiamare un programma preselezionato
1. Premere la manopola [ROTARY] per selezionare la modalità DAB. 2. Toccare BAND. Per agli tocco di BAND si cambia il display nell'ordine seguente: MEMO1 MEMO2 MEMO3 MEMO1... 3. Toccare 山 nel lato destro del display per richiamare un programma preselezionato.Funzione AF
La funzione AF passa a una frequenza diversa della stessa rete per mantenere la riscezione migliorie. L'impostazione predefinita in fabbrica è "ON" (Attivata) - Se la ricezione della stazione corrente si deteriorata, "SEARCH" appeare sul display e la radiocca lo stesso programma su un'altra frequenza. - Per ulteriori dettagli sulla "Funzione AF" (ved. pag. 26), consultare la sezione "Operazioni RDS" di agli manuale dell'utente. - Disattivazione della funzione AF Attivazione della funzione AF La funzione AF tra RDS e DAB Quando lo stesso programma viene trasmesso sua da RDS che da DAB e esta funzione è ATTIVATA (ON), l'unità principale passa automaticamente alla riscione della trasmissione con la riscione migliorare.TA (Annunci sul traffico)
In modalità di attesa TA, quando inizia la trasmissione di un annunciò sul traffico, la trasmissione dell'annunci sul traffico viene ricevuta con priorità principale indipendente幔a la modalità di funzione. èanche possibile la sintonizzazione automatica dei programmi sul traffico (TP). - Questa funzione può essere utilizzata solo quando la scritta "TP" è illuminata sul display. Se la scritta "TP" è illuminata, significa che le stazioni di trasmissione RDS o DAB in corso di riszezione sono dotate di programmi di annunci sul traffico. - Per ulteriori dettagli su "TA" (ved. pag. 27), consultare la sezione "Operazioni RDS" di uno qualsiasti dei manuali dell'utente. - Impostazione della modalità di attesa della funizione TA - Annullamento della modalità di attesa della funizione TA Ricerca di una stazione TPNote:
- Se non viene ricevuta nessuna stazione TP, l'unità principale interrompe l'opération di ricerca. - La scritta "TP" delve essere illuminata sul display quando una trasmissione radio TP viene trasmessa da una stazione RDS. In questo caso, premere il tasto [TA] per eseguire la ricerca di sintonizzazione TP Premere più il tasto [TA] per tornare alla modalità precedente.INFO (Annunci0)
In modalità di attesa INFO, quando il programma di annunci ha inizio, l'unità principale commuta automaticamente nel programma di annunci selezionato.- Impostazione della modalità di attesa INFO
Se si preme e siiene premuto il tasto [TA] per 1 secondo o più a lungo, sul display si illumina la scritta "INFO" e l'unità principale viene impostata nella modalità di attesa INFO fino a quando viene trasmesso l'annuncioc selezionato. Quando inizia la trasmissione dell'annuncioc selezionato, la voce dell'annuncioc appeare sul display. Se si preme e siiene premuto il tasto [TA] per 1 secondo o più a lungo nelle è in corso di ricezione l'annuncioc selezionato, la ricezione della trasmissione dell'annuncioc selezionato viene annullata e l'unità principale torna in modalità di attesa INFO.- Annullamento della modalità di attesa INFO
Per annullare la modalità di attesa INFO, premere e tenere premuto il tasto [TA] per 1 secondo o più a lungo.- Selezione informazioni
Questa funzione serve per selezionare I'ATTIVAZIONE (ON) o la DISATTIVAZIONE (OFF) delle INFORMAZIONI in modalità di interruzione delle informazioni. E possibile ATTIVARE fino a 6 elementi di informazione a scelta. É possibile effettuare la selezione tra gli 6 elementi elencati qui sotto:| Elemento INFORMAZIONE | |
| ENGLISH | Contenuto |
| Travel | Notizie flash sui trasporti |
| Warning | Servizio di averporto |
| News | Notizie flash |
| Weather | Notizie flash sul tempo |
| Event | Annunci di eventi |
| Special | Evento speciale |
PTY
Questa funzione consente di ascoltare il tipo di programma selezionato, indipendentamente alla modalità di funzione. - Un PTY comune più essere selezionato per DAB o RDS. - Tra DAB PTY e RDS PTY il programma PTY ricevuto per primo assume la priorità sull'altro. - Le trasmissioni PTY non sono ancora disponibili in tutti i Paesi. - In modalità di attesa INFO, le stazioni INFO hanno la priorità sulle stazioni PTY. - In modalità di attesa TA, le stazioni TP hanno la priorità sulle stazioni PTY. Per ulteriori dettagli su "PTY" (ved. pag. 28), consultare la sezione "Operazioni RDS" in uno qualsi dei manuali dell'utente. - Impostazione della modalità di attesa PTY - Annullamento della modalità di attesa PTY - Annullamento di trasmissione interrotta PTY - Selezione PTY Ricerca PTY - Memoria di presezione PTYTrasmissioni di emergenza
Quando è in corso di ricezione una trasmissione di emergenza, tutte le operazioni di modalità di funzione vengono interrotte. Sul display appara il messaggio "ALARM" ed è possibile ascoltare la trasmissione di emergenza. - Per ulteriori dettagli sulle "Trasmissione di emergenza" (ved. pag. 29), consultare la sezione "Operazioni RDS" in uno qualsiasti dei manuali dell'utente. - Annullamento di una trasmissione di emergenzaCambiamento delle lingua del display PTY e INFO
Per i PTY e INFO visualizzati nel display è possibile selezionare una delle 4 lingue disponibili (Inglese, Tedesco, Svedese o Francese). L'impostazione predefinita alla fabbrica è "ENGLISH". - Per maggiori dettagli su "Cambiamento della lingua del display PTV" (ved. pag. 30),fare riferimento alla sezione "operazioni RDS" nel rispetto manuale per il proprietario.Impostazione del volume per TA, INFO, trasmissioni di emergenza (ALARM) e PTY
É possibile impostare il volume delle interruzioni TA, INFO, ALARM e PTY durante le interruzioni TA, INFO, ALARM e PTY. Eseguire le operazioni seguenti, a seconda del modello collegato. L'impostazione predefinita in fabbrica e "15". Durante un'interruzione TA, INFO, ALARM o PTY, ruotare la manopola [ROTARY] in senso orario o antiorario per impostare il volume al livello desiderato (da 0 a 33). * Quando finisce l'interruzione TA, INFO, ALARM o PTY, il volume torna al livello che aveva prima dell'interruzione.Operazioni sul Decoder Surround 5.1ch
Quando viene connesso un decoder surround 5.1ch CeNET compatible opzionale, il decodercouldesserecontrolladastessoapparecchio.Le seguenti funzioni cambiano quando viene connesso un decoder surround 5.1ch: - Alle modalità del Dolby Pro Logic II siaggiungono le due modalità "MOVIE" e "VIRTUAL". - La modalità VSE/POSITION vieneambiato nella modalità del DSF (Digital Sound Field). - Nella modalità P.EQ (Parametric Equalizer), le impostazioni di agli altoparlante sono essere regolareanche in maggior dettaglio. Le impostazioni relative alla musica tra le opzioni (ved. pag. 39) sono cambiati.Selezione di PL II (Dolby PL II)
Selezionare uno delle quattro modalità disponibili e adatte alla sorgente che stai usando nella modalità Dolby Pro Logic II. - L'impostazione predefinita alla fabbrica è "OFF".■ MUSIC (modalità musica)
Guarda "Selezione del menu PLII (Dolby PLII)" (ved. pag. 17).MATRIX (modalità matrix)
Guarda "Selezione del menu PLII (Dolby PLII)" (ved. pag. 17).MOVIE (modalità film)
Disponibile per film da video DVD.■ VIRTUAL (modalità virtuale)
Disponibile per film o altre sorgenti audio.OFF
La modalità Dolby Pro Logic II non viene usata. 1. Premere il tasto [SOUND]. 2. Toccare Dolby PLII.  3. Toccare sul lato destro del display per selezionare la modalità Dolby Pro Logic II.  Il display delle modalità cambia nell'ordine seguente: MUSIC (modalità musica) MATRIX (modalità matrix) MOVIE (modalità film) VIRTUAL (modalità virtuale) OFF (PL II off) MUSIC (modalità musica)... * Per maggiori dettagli a proposito della regolazione del volume dell'altoparlante/ sub-woofer centrale, guardare pagina 45. 4. Toccare RTN.Selezione del menu DSF
DSF (Digital Sound Field) rende possibile atraverso la simulazione sonora si godere la stessa esperienza acustica che di vivrebbe in una sala per i concerti o in un auditorium. - Quando si selezione il menu DSF, a volte il volume diminuisce. - L'impostazione predefinita alla fabbrica per DSF è "OFF" e per il menu DSF è "HALL". 1. Premere il tasting [SOUND]. 2. Toccare DSF.  3. Toccare sul display ON/OFF. L'effetto DSF cambia in ON/OFF.  Quando DSFiene impostato su "OFF", I'impostazione DSF non si riflette nella sorgente musica. Questo completa I'impostazione di DSF.Premere il tasto [SOUND] per tornare alla modalità originale. 4. Toccare nel menu DSF Num. per selezionare il menu DSF desiderato.  Menu DSF HALL CHURCH STADIUM LIVE JAZZCLUB THEATER HALL...| Num. | Nome della funzione | Descrizione |
| 1 | HALL | Grande sala per i concerti |
| 2 | CHURCH | Chiesa con il fatto a volte |
| 3 | STADIUM | Grande stadio senza fatto o mura |
| 4 | LIVE | Sala per musica dal vivo, più grande di un jazz club. |
| 5 | JAZZCLUB | Jazz club con un soffitto basso |
| 6 | THEATER | Cinema o teatro |
Selezionare il menu dell'equalizatore dei parametri
L'equalizzatore dei parametri (P.EQ) permette di bilanciare l'intera gamma di livelli di frequenza in dettaglioattraversouna curvaomogeneausando il compensatore di frequenze adattato al tipo di vettura. - Le impostazioni predefinite alla fabbrica sono le seguenti per tutti gli altoparlanti. FREQ = 1kHz, Q = 1, GAIN = 0dB 1. Premere il tasting [SOUND]. 2. Toccare P.EQ.  3. Toccare 山 sul display ON/OFF. L'effetto P.EQ cambia in ON/OFF.  Quando L7effetto P.EQ viene impostato su "OFF", l'impostazione P.EQ non si riflette nella sorgente musicale. Questo termina le impostazioni P.EQ. Premere il tasto [SOUND] per tornare alla modalità originale 4. Toccare 山 nel menu P.EQ Num. per selezionare il menu P.EQ. Menu P.EQ
SIGNAL SP-SEL BAND FREQ Q GAIN SIGNAL... 5. Toccare sul lato destro del display e aggistiustare I'opzione come si desidera. SIGNAL (seleziona la regolazione del segnale): Selaziona "P-NOIS" o "MUSIC" P-NOIS: imposta quando non si deve usare il rumore rosa MUSIC: imposta I'uso di segnali misucali SP-SEL (seleziona gli altoparlanti il cui valore P.EQ deve essere aggiestato): Scegliere tra "FRONT", "CENTER" o "SURROUND". - FRONT: altoparlante frontale - CENTER: altoparlante centrale - SURROUND: altoparlante avvolgente BAND (seleziona la banda di frequenza): Seleziona una delle bande da 1 a 3 FREQ (seleziona la frequenza centrale): La gamma di aggiustamento è da 20 Hz a 20 kHz. Q (imposta la curva Q): Imposta un valore tra 1, 3, 5, 7, o 20 per indicate l'intensità della curva Q. GAIN (regola il livello di emissione): Regola il gain (livello di emissione) nella gamma da -12dB to +12dB. (1dB steps, 25 punti) 6. Ripetere le fasi 4 e 5 per regolare l'unità desiderata. 7. Premere il tasto [SOUND] per tornare alla modalità originale.Regolazione di P.EQ
Le impostazioni sono essere regolate nel menu P.EQ nel modo seguente: La frequenza centrale, il gain e la curva Q sono essere memorizzate in combinazioni di canali o bande. Per esempio, la Frequenza centrale "250Hz", il gain "8dB" e la curva Q "3" posso sono essere memorizzati nella banda 1 del frontale. Per maggiori dettagli della funzione P.EQ, vedere "Regolazione del P.EQ" (ved. pag. 21).Cambiamento delle impostazioni
Quando viene connesso un decoder surround 5.1 ch, vengono caambiate le impostazioni relative alla musica nelle modalità di aggiustamento.Selezionare le impostazioni
Quello che segue descrive le opzioni le cui impostazioni vengono cambiate. Per maggiori dettagli sulle altre opzioni che non vengono cambiati, guardare "Cambiamento delle impostazioni" (ved. pag. 39) in "Operazioni comuni per tutte le modalità". 1. Premere il tasto [A]. La modalità cambia in modalità di aggiustamento.  2. Toccare sul display delle impostazioni per selezionare quella che si vuole impostare.. * Toccando ↑ ⇌ nel lato sinistro del display si cambia la scelta di una opzione perolta. Toccando ← ⇌ sul lato sinistro del display cambia continuamente le sub-opzioni.. * Toccando ↑ ⇌ nel centro del display si cambia la scelta di una sub-opzione per volta. Toccando ← ⇌ si cambiano continuamente le sub-opzioni. 3. Quando viene visualizzato "THROUGH" nel降至 display, toccare THROUGH per andare nel display dell'aggiustamento dei dettagli. 4. Toccare ne lato destro del display o, in alternatively, girare la manopola [ROTARY] per impostare i dettagli.Per ritornare in modalità originale
1. Premere ancora il tasting [A]. - Impostazione delle opzioni| Opzioni principali | Sub-opzioni |
| SOUND | CENTER-SP / SRD-SP / SUB-WOOFER • Impostazione ON/OFF degli altoparlanti (ved. pag. 64) |
| FRONT HPF / CENTER HPF / SRD HPF / SUB-W LPF • Aggiustamento della frequenza del filtrlo degli altoparlanti (ved. pag. 64) | |
| SP-GAIN • Aggiustamento del livello di uscita dell'altoparlante (ved. pag. 46) | |
| DELAY | CENTER-SP / SRD-SP • Aggiustamento del ritardo degli altoparlanti (ved. pag. 65) |
| DOLBY D | D-RANGE • Aggiustamento della gamma dinamica (ved. pag. 65) |
| PL II CONT | PANorama / DIMENSION / CTR WIDTH • Impostazione in dettaglio della modalità musicale (ved. pag. 47) |
Impostazione ON/OFF degli altoparlanti (CENTER-SP/ SRD-SP/SUB-WOOFER)
Impostare l'altoparlante centrale (CENTER-SP), l'altoparlante avvolgente (SRD-SP) e il subwoofer (SUB-WOOFER) in ON/OFF. Assicurarsi di aver impostato queste impostazioni "OFF" quando non c'e l'altoparlante centrale, l'altoparlante avvolgente o il sub-woofer. - L'impostazione predefinita alla fabbrica è "ON". 1. Premere il tasto [A] per impostare la modalità di aggiustamento. 2. Toccare 一 _ 一 nel display delle opzioni per selezionare "CENTER-SP" sotto "SOUND", "SRD-SP" sotto "SOUND" e "SUB-WOOFER" sotto "SOUND".  3. Toccare 山 山 nel lato destro del display o, in alternatively, girare la manopola [ROTARY] per selezionare "ON" o "OFF". * Nel caso del "SUB-WOOFER", scegliere tra "ON+", "ON-" e "OFF". Normalmente, selezionare "ON+. In agli caso, quando viene impostato "ON-," si più fortemente percepire un effetto di Bassa gamma. 4. Premere il tasting [A] per tornare alla modalità originale.Aggiustamento del filtrodi frequenza degli altoparlanti (FRONT HPF/CENTER HPF/ SRD HPF/SUB-W LPF)
Questa funzione permette l'aggiustamento del filtro di frequenza per armonizzato con gli altoparlanti in uso. Non viene visualizzato quell'altoparlante che viene spento nella sezione "Impostazione on o off degli altoparlanti (CENTER-SP/SRD-SP/ SUB-WOOFER)". L'impostazione predefinita alla fabbrica per "FRONT HPF" o "SRD HPF" e "THROUGH" (nessun filtro), e per "CENTER HPF" o "SUB-W LPF" e "120Hz".■ Aggiustamento del filtro
FRONT HPF/CENTER HPF/SRD HPF (aggiustamento del filtro high-pass)
Questo filtering eliminates suoni bassi dagli altoparlanti frontali centrali e da quelli avvolgenti.THROUGH 50Hz 80Hz 120Hz
Impostare il filtro armonizzatoagli altoparlanti quando si usano altoparlanti dal diametro inferiore.THROUGH
Impostare questo quando si usano altoparlanti che possono generare i bassi. THROUGH non cui èsere impostato al CENTER HPF.SUB-W LPF (aggiustamento del filtro del sub-woofer low-pass)
Questo filtro eliminata i suoni più alto dal subwoofer.50Hz 80Hz 120Hz
Impostare ilhetto di frequenza per armonizzarlo al sub-woofer. 1. Premere il tasto [A] per impostare la modalità di aggiustamento. 2. Toccare nel display delle opzioni per selezionare "FRONT HPF" sotto "SOUND", "CENTER HPF" sotto "SOUND", "SRD HPF" sotto "SOUND" e "SUB-W LPF" sotto "SOUND".  SOUNDADJUST MODE FRONT HPF THROUGH
3. Toccare nel lato destro del display o, in alternatively, girare la manopola [ROTARY] per impostare la frequenza. * Scegliere tra THROUGH*, 50Hz, 80Hz, and 120Hz. *1 THROUGH viene visualizzato solo quando si selezione "FRONT HPF" o "SRD HPF". 4. Premere il tasting [A] per tornare alla modalità originale.Aggiustamento del ritardo degli altoparlanti (CENTER-SP/SRD-SP)
Il tempo che il suono impiega da agli altoparlante per arrivare all'ascoltatore dipende dalla posizione in cui sono montati gli altoparlanti e dalle dimensioni della vettura Regolare il tempo del ritardo di agli altoparlante in modo tale che il suono di tutti gli altoparlanti giunge alle posizioni d'ascolto nello stesso momento di quello che viene dagli altoparlanti frontali. - L'impostazione predefinita alla fabbrica è "0 ms". 1. Premere il tasto [A] per impostare la modalità di aggiustamento. 2. Toccare 日 nel display delle opzioni per selezionare "CENTER-SP" sotto "DELAY" e "SRD-SP" sotto "DELAY".  3. Toccare 山 sul lato destro del display per agiustare il tempo del ritardo. * "CENTER-SP" più essere aggliustato in una gamma da 0 ms a 5 ms. * "SRD-SP" can be adjusted within the range 0 ms to 15 ms. 4. Premere il tasting [A] per tornare alla modalità originale.Regolazione delle funzioni del Dolby Digital (D-RANGE)
Questa funzione comprime la gamma dinamica del Dolby Digital per mantenere basso il livello di suoni come quello di una conversazione tra gli attori e soprime i volumi dal suono basso. Queste funzioni sono disponibili solo per i dischi DVD in Dolby Digital. - L'impostazione predefinita alla fabbrica è "MAX". 1. Premere il tasto [A] per impostare la modalità di aggiustamento. 2. Toccare 卡 nel display delle opzioni per selezionare "DOLBY-D" sotto "D-RANGE".  3. Toccare sul lato destro del display per aggustare la gamma delle dinamiche e regolare l'opzione desiderata. MAX: modalità della gamma di massima dinamica della sorgente originale STD: modalità raccomandata per l'ascolto standard MIN: MIN: La modalità della gamma dinamica più compressa che rende facile l'ascoltoanche dei suoni più bassi. 4. Premere il tasto [A] per tornare alla modalità originale.8. IN CASO DI DIFFICOLTÀ
| Problema | Causa | Misura | |
| Generale | L'apparecchio non si accende (non viene prodotto nessun suono.) | È saltato il fusibile. | Sostituire il fusibile con un altro dello stesso amperaggio. Se il fusibile salute nuovoamente, consultrare il negotio presso il quale si è acquistato l'apparecchio. |
| Incorretto collegamento dei cavi. | Consultare il negotio presso il quale si è acquistato l'apparecchio. | ||
| Nessuna uscita audio quando si fa funzionare l'unità con amplificatori o antenna motorizzata collegati. | Il filo dell'antenna motorizzata è in cortocircuito con la messa a terra o si richiede un'alimentazione eccessiva per gestire gli amplificatori o l'antenna motorizzata. | 1. Spagnere l'unità2. Rimuoverete tutti i cavi connessi con il filo dell'antenna motorizzata. Per mezzo di un ohmetro, verificare agli cavo per l'eventuale presenza di un cortocircuito a terra3. Riaccendere l'unità4. Ricollegare agli cavo dell'amplificatore al filo dell'antenna motorizzato, uno perolta. Se gli amplificatori si attivano prima che tutti i cavi vengano collegati, utilizzato un relè esterno per fornire il voltaggio remoto (eccessiva richiesta di corrente). | |
| Quando si premono i tasti non succede niente. Il display non è accurato. | Il microprocessore non funziona bene a causa del rumore, ecc. | Spagnere l'unità, poi premere il tastingo [RELEASE] e rimuoverete del FRONTALINO ESTRAIBILE Tasto di reset (DCP).Premere il tastingo di reset per circa 2 secondi con un'asta sottile. | |
| I connettori del DCP o principali sono sporchi. | Pulire lo sporco con un panno soffice inumidito con alcol per pulizia. | ||
| CD/MP3/WMA | Non è udibile alcun suono. | È gia inserto un disco che non è un compact disc, o quale oggetto estraneo. | Con il pannello di copertura aperto, tenere premuto il tastingo [▲] per 3 secondi o più.L'oggetto estraneo viene espulso forzamente. |
| Non esistono file MP3/WMA sul disco. | Scrivere correttamente i file MP3/WMA sul disco. | ||
| I file non sono riconosciuti come file MP3/WMA. | Usare file MP3/WMA codificati correttamente. | ||
| Ilsystema file non è corretto. | Usare il systema di file ISO9660 livelli 1, o 2, o i sistemi "JOLIET" o "Romeo". | ||
| Il suono salute o è disturbato. | Il disc è sporco. | Pulire il disc con un panno morbio. | |
| Il disc è molto graffiti o deformato. | Sostituire il disc con un altrezza graffiti. | ||
| Il suono si interrompe o "scivola". Si producono dei rumori, o il suono risulta mescolato con rumori. | I file MP3/WMA non sono codificati correttamente. | Usare file MP3/WMA codificati correttamente. |
| CD/MP3/WMA | Problema | Causa | Misura |
| Appena l'unità viene accesa, l'audio è pessimo. | Quando l'automobile è stata parcheggiate in un posto umido possono formarsi gobce d'acqua sulla lente interna. | Lasciare asciugare l'unità accesa per circa 1 ora. | |
| Nome di file errato. | Ilsystema file non è corretto. | Usare ilsystema di file ISO9660 livelli 1, o 2, o i sistemi “JOLIET” o “Romeo”. | |
| La riproduzione della lista dilettura non viene effettuata. | Ilnome del file, o l'estensione, non sono quelli corretti. | Per il nome del file usare solamente caratteri alfanumerici o ASCII. Come estensione del file di una lista dilettura usare“.M3U”. |
9. CODICI D'ERRORE
In caso di erre di funzionamento viene visualizzato uno dei seguenti display. Per eliminare il problema, attuire la controversuraindicataippo.| Codice erre | Causa | Misura | |
| CD/MP3/WMA | ERROR 2 | Un Disc è rimasto intrappolato nel vano CD è non viene espulso. | Si tratta di un cattivo funzionamento del meccanismo del vano CD. Consultare il negozio presso cui si è acquistato l'apparecchio. |
| ERROR 3 | Impossibile riproduire il Disc a causa di graffi, ecc. | Sostiturio con un Disc non graffiti, non deformato. | |
| ERROR 6 | Nel vano CD è stato caricato un Disc rovesciato che quandì non viene riproduotto. | Espellere il Disc e poi ricaricarlo correttamente. | |
| Generale | AMP GUARD | Si è attivato il circuito di protezione diffusori. Durante QUESTia operazione, se viene eseguita alcuna operazione riguardante il volume, sul display appara "AMP GUARD". "AMP GUARD" funziona talvolta quando sono usati segnali test speciali. | 1. Abbassare il volume sonoro. La funzione più venire ripristinataanche speggendo l'apparecchio e riaccendendolo (all'attivazione del circuito di protezione degli altoparlanti il volume degli altoparlanti viene automaticamente ridotto).2. Se il suono risulta di nuovo silenziato, rivolgersi al nostro Centro di assistenza. |
| Cambiadischi CD | ERROR 2 | Un CD all'interno del cambiadischi CD non viene caricato. | Si tratta di un cattivo funzionamento del meccanismo del cambiadischi CD.Consultare il negozio presso cui si è acquistato l'apparecchio. |
| ERROR 3 | Impossible riproduire un CD all'interno del cambiadischi CD a causa di graffi, ecc. | Sostiturio con un CD non graffiti, non deformato. | |
| ERROR 6 | Un CD all'interno del cambiadischi CD non più essere riproduotto perché è stato caricato rovesciato. | Espellere il CD e poi ricaricarlo correttamente. | |
| Cambiadischi DVD | ERROR 2 | Non è possible riproduire un disco all'interno del cambiadischi DVD. | Questo è un guasto del meccanismo DVD e consultare il negozio di acquisto. |
| ERROR 3 | Non è possible riproduire un disco a Causea di graffi, ecc. | Riprovare o sostuire con un disco non graffiti, non deformato. | |
| ERROR 6 | Non è possible riproduire un disco all'interno del cambiadischi DVD perché è inserito capovolto. | Espellere il DVD e poi ricaricarlo correttamente. | |
| ERROR P | Errore di livello di controllo genitori. | Impostare il livello di controllo genitori corretto. | |
| ERROR R | Errore di codice area. | Estrarre il disco e insereire un disco con il codice area corretto. |
10. SPECIFICHE
Sezione Radio
Sistema di sintonizzazione: sintonizzatore del sintetizzatore PLL Frequenze di ricezione: FM:da 87,5 a 108 MHz (fasi 0,05 MHz) MW:da 531 a 1602 kHz (fasi 9 kHz) LW:da 153 a 279 kHz (fasi 3 kHz)Sezione riproduktore CD
Sistema:systema di compact disc audiodigitale Rispostainfrequenza: da 5 Hz a 20 kHz (±1 dB) Rapporto segnale-rumore: 100 dB (1 kHz) IHF-A Gamma dinamica: 96 dB (1 kHz) Distorsione: 0,01%Cenni generali
Potenza in uscita: 4× 31W DIN45324, +B = 14,4V Voltaggio di alimentazione: 14,4 V DC (ammesso da 10,8 V a 15,6 V), massa negativa Consumo di corrente: Meno di 15 A Impedenza altoparlanti: 4Ω (da 4Ω a 8Ω ammessi) Alimentazione nominale antenna auto: 500 mA o meno Peso: Unità principale: 1,7 kg Telecomando: 80 g (compresa la batteria) Dimensioni: Unità principale: 178 (L) × 50 (A) × 155 (P) mm Telecomando: 44 (L) × 110 (A) × 27 (P) mmNota:
- Le specifiche ed il design sono soggetti a modifiche alla preavviso per ulteriori miglioramenti. Hartelijk dank voor uw aankoop van dit Clarion-product. * Gelieve deze gebruiksaanwijzing in+zijn geheel door te lezen alvorens het apparaat te bedieren. * Nadat u deze gebruiksaanwijzing hebt gelezen, adviseren wij u deze op een handigeplaats te bewaren (bijv. in het handschoenenkastje). * Controller de informatie op de bijgeleverde garantiekaart en bewaar deze tezamen met deze gebruiksaanwijzing. * Deze gebruiksaanwijzing bevat tevens de bedieningsprocedures voor een CD-wisselaar, DAB en TV-tuner, die is aangesloten met behulp van een CeNET-kabel. De CD-wisselaar en TV-tuner hebben een eigengebruiksaanwijzing, maar hierin worden geen bedieningsinstrukties geveven.Inhoud
Displayonderdelen 7 Displaybedieningen 8 1. VOORZORGSMAATREGELEN 3 Kantelend bedieningspaneel 4 1. Omgaan met compact discs 43 2. BEDIENINGSELEMENTEN 5 3. BEDIENINGSPANEEL 6 De namen en functies van de bedieningselementen 6 Functies van de belangrijkste toetsen in geval externe apparatuur is aangesloten op dit apparaat 4. VOORPANEL 9 5. AFSTANDSBEDIERING 10 De batterijenplaatsen 10 Functies van de toetsen op de afstandsbediening 11 6. BEDIENING 12 Basisbediening 12 Bediening van de AC-Processor III 17 Bediening van de radio 23 Bediening van RDS 26 Bediening van de CD/MP3/WMA-speler 31 Meerdere personen luisteren naar twee verschillende muziekbronnen (2-ZONE-functie) 36 Gemeenschappelijk bediedingen in iedere functie 37 7. BEDIENING VAN ACCESSOIRES 51 Bediening van de CD-wisselaar 51 Bediening van de TV 54 Bediening van de digitale radio/DAB 58 De 5.1-kanalen surrounddecoder bedieren 61 8.PROBLEMEN OPLOSSEN 66 9. FOUTMELDINGEN 68 10. TECHNISCHE GEGEVENS 691. VOORZORGSGMAATREGELEN
1. Dit apparaat isuitsluitend geschikt voor wegvoertuigen met 4 wielen. Het is Niet geschikt voor gebruik in een trekker, vorkheftetruck, bulldozer, terreinvoertuig, motorfiets met twee of drie wielen, boot, of ander gespecialiseerd voertuig. 2. Als het binnenin de auto erg koud is en de CD-speler kort nadat de verwarming is aangezet worden gebruikt, kan zich condens vormen op de disc of op de optische onderdelen van de CD-speler, waardoor normalaal weergeven Niet möglichk is. Als zich condens op de disc hebft gezormd, veegt u dit eraf met een zachtde doek. Als zich condens heeft gezormd op de optische onderdelen van de CD-speler, mag u deze gedurende ongeveer een uur Niet gebruiken. Het condens zal vanzelf verdwijnen, waarna normale bediening weer möglichk is. 3. Als u op een bijzonder hobbelige weg rijdt, kan door de sterke trillingen het geluid overslaan.INFORMATIE VOOR GEBRUIKERS:
HET ZONDER TOESTEMMING VAN DE FABRIKANT VERANDEREN OF WIJZIGEN VAN DIT APPARAAT MAAKT DE GARANTIE ONGELDIG.WAARSCHUWING
Voor uw eigeneiligheid mag u tijdens het rijden Niet maar het aanraakschem kijken of dit bedieren.Kantelend bedieningspaneel
Dit apparatus is uitgerust met een KANTELEND BEDIENINGSPANEEL zodat groter display kon worden toegepast. Als u het KANTELEND BEDIERINGSPANEEL wilt bedieren, moet u het eerst sluiten.A VOORZICHTIG
WEES VOORZICTIG DAT UW VINGERS NIET BEKNELD RAKEN BIJ HET OPENEN EN SLUITEN VAN HET KANTELEND BEDIENINGSPANEEL.
1. Om verilgheidsredenen moet u het KANTELEND BEDIERINGSPANEEEL altijd sluiten voordat u het apparaat lange tijt neig hebzeugt of met de contactsleutel de stroom onderbreekt. Als u met de contactsleutel de stroom onderbreekt terwijt het KANTELEND BEDIENINGSPANEEL open staat, wordt het KANTELEND BEDIENINGSPANEEL Niet gesloten. 2. Bij het sluiten van het KANTELEND BEDIERINGSPANEEL kunt u een krakend geluid horen van het beveiligingsmechanisme. Dit is darüber normalaal. 3. Als u het KANTELEND BEDIENINGSPANEEL met de hand beweegt, kan de weergave beginnen. Om de weergave te stoppen, drukt u, terwijl het apparaat is ingeschakeld, op de [▲] toets zodate het KANTELEND BEDIENINGSPANEEL worden gesloten. 4. Nadat een disc is uitgeworpen, keert het KANTELEND BEDIERINGSPANEEL automatisch terug maar de geopende of gesloten stand. Bij de geringste tegendrukijdens het sluiten van het KANTELEND BEDIERINGSPANEEL, za een beveligingsmechanisme in werkung treden en za het KANTELEND BEDIERINGSPANEEL terugkeren maar de geopende stand. Als dit geleurt, heft u de oorzaak op en drukt u verwolgens op de [▲] toets. 5. Om te voorkomen dat de 12-cm of 8-cm CD bij hetplaatsen en verwijderen bekrast worden, moet u deze horizontally honden.Omgaan met compact discs
Gebruikuitsluitend compact discs waarop het   logo staat. Plaats geen hartvormige of achthoekige discs, of andere disc met een speciale vorm in het apparaat. Het is möglich dat sommige CD's opgenomen in de CD-R/CD-RW-functie Niet bruikbaar zich.Discs hanteren
- In vergelijk met gewone CD-DA-discs (muziek-CD's), zich zowel CD-R-discs als CD-RW-discs gevoelig voor hoge temperatuur en luchtvochtigheid, en kan bij sommige CD-R-discs en CD-RW-discs weergave onmogelijk+zijn. Laat ze waarom nicht gedurende een langeijd in een auto liggen. - Het is möglichk dat een neue disc ruwe randen heeft. Als u een dergelijk disc staat, is het möglichk dat de cspeler nicht werkst of het geluid overslaat. Gebruik balpen of iets dergelijks or ruwe randen van de disc make. - Plak nooit stickers op de compact discs en schrijf er nooit op met een potlood of balpen. - Plaats nooit een compact disc met plankband of lijmresten erop of waarvan het etiket is losgelaten in het apparaat. Als u een dergelijk disc in het apparaat plaatst, is het möglichk dat u deze nicht meer uit de CD-speler=kunt verwijderen of dat de CD-speler beschadigd worden. - Plaats geen compact disc in het apparaat waarop grote krassen staan, die misvormd is, die gebarsten is, enz. Als u een dergelijk disc in het apparaatplaast, kan een storing optreden of het apparaat beschadigd worden. - Als u een compact disc uit het doosje wilt halen, drukt u op het midden van het doosje en tilt u de disc voorzichtig met uw vingers aan de randen op. - Gebruik geen in de handel verkrijgbare CD-beschemvellen of discs voorzien van een stabilisator, enz. Hierdoor kan de compact disc beschadigd worden of het inwendige mechanisme van het apparaat kapot gaan.Discs bewaren
Stel compact discs nicht bloat aan rechtstreeks zonlicht of een warmtebron. Stel compact discs nicht bloot aan hoge vochtigkeit of veel stof. Stel compact discs Niet bloot aanrechtstreekse warmestraling van verwarmingsapparatuur.Discs schoonmake
- Als u vingerafdrukken of stof van de compact disc wilt vegen, gebruikt u een zachte doeck en veegt u vanuit het midden van de disc in een rechte lijn aan de buitenrand. - Gebruik geen oplosmiddelen, zoals in de handel verkrijgbare disreinigers, antistatische spray of spiritus om compact discs schoon te make. - Na gelebruik van speciale compact-discreiniger, moet u de disc goed lately drogen voordat u deze in het apparataa plaatst.2. BEDIENINGSELEMENTEN
Vooranzicht van het apparaat
Met het KANTELEND BEDIERINGSPANEEL in de geopende stand
3. BEDIENINGSPANEEL
De namen en functies van de bedieningselementen
[RELEASE] toets
- Druk deze knop diep in om het afneembare voorpaneel eraf te halen.Lichtsensor
- Deze sensor meet de lichtsterkte in uw auto. Als de automatische displaydimmer is ingesteld op "AUTO", worden de helderheid van het display gedimd afhankelijk van de lichtsterkte gemeten door deze sensor.[ROTARY] knop
- Druk op deze knop om het apparaat in te schaken. Met jegere druk op deze knop, worden het apparaat beurtelings in- enuitgeschakeld. - Houd de knop gedurende 1 seconde of longer ingedrukt om het apparaat UIT te schakelen. - U kunt deze knop ook draaien om het volumeniveau in te stellen, of om diverse instellingen te make in de instelfunctie.[△] toets
- Druk op deze toets om het bedieningsspaneel te openen of sluiten. Als reeds een disc is geplaatst, worden deze uitgeworpen nadat het bedieningsspaneel is geopend.Opmerking:
Als de disc Niet worden uitgeworpen, houdt u de [▲] toets gedurende 1 Seconde of longer ingedrukt.[A] toets
- Druk op deze toets om diverse instellingen te make in de instelfunctie. - Druk op deze toets voor het invoeren van de zendernamen in de radiofunctie, of de discititels in de CD-functie.[Sound] toets
- Druk op deze toets om diverse instellingen te make, zoals audioruimte. - Houd deze toets 1 seconde of langer ingedrukt om de 2-ZONE-functie beurtelings in en uit te schakelen.[TA]toets
- Druk op deze toets om de TA-functionie (verkeersinformatie) op standby te zetten (als de 2-ZONE-functionie is ingesteld op "OFF"). Druk op deze toets om de werkung van de 2-ZONE-functionie om te schaken. Als udezete toets gedurende 1 seconde of langer ingedrukt houdt, worden het 2-ZONE-type omgeschakeld (als de 2-ZONE-functionie is ingesteld op "ON").[II] toets
- Druk op deze toets om een track te pauzeren en te hervatten (in de CD-functione). - Druk op deze toets om de PTY-standingbyfunctie in te stellen of een programmatype te kiezen.Aanraakschem
- Hierop wird de informatatie afgebeeld die de bedieningstoestand van het apparaat aangeeft, Zoals aanduidingen voor afstemmen/ weergeven en hun indicators. - Raak met uw vinger het display aan met om bediening möglich te make. (zie blz. 8)Functies van de belangrijkste toetsen in geval externe apparatuur is aangesloten op dit apparaat
- Als een CD- of DVD-wisselaar is aangesloten
* Voor verdere informatatie, zich het hoofdstukje "Bediening van de CD-wisselaar" (zie blz. 51). Voor de DVD-wisselaar, raadpleegt u de gebruiksaanwijzing die bij de DVD-wisselaar werden geleverd.[II]toets
- Druk op deze toets om een CD of DVD waar te geven of te pauzeren.[A] toets
- Druk op deze toets om de disctitelis in te voeren in de CD-wisselaarfunctie.- Als een TV of DAB is aangesloten
* Voor verdere informatatie, zich het hoofdstukje "Bediening van de TV" (zie blz. 54) of "Bediening van de digitale radio/DAB" (zie blz. 58).[TA] toets
- Druk op deze toets om de TA-standingbyfunctie (verkeersinformatie) in te stellen op de DAB-functie. (Deze functie is alleen beschikkaar voor een DAB-tuner.) - Houdt deze toets gedurende 1 seconde of langer ingedrukt om de INFO-functie in of uit te schakelen. (in de DAB-functie)[▶II] toets
- Druk op deze toets om te schakelen:tussen de TV-functie en de VTR-functie voor externe beelden. (in de TV-functie) - Druk op deze toets om de PTY-standingbyfunctie in te stellen of een programmatype te kiezen in de DAB-functie.[A] toets
- Druk op deze toets om de naam van een TV-zender in te voeren. (in de TV-functie)Displayonderdelen
Displaybedieningen
Het display op dit apparaat is een aanraakschem. U kurz dit display bedieren door het met uw vingtortuppen aan te raken. Op het display kurz u de volgend vier bedieningsmethodenuitvoeren:Aanraken kort
Raak met uw vingtertop het display aan en LAST dit binnen 1 seconde weeer los. Dit is de eenvoudigste bedieningsmethode van het display.Aanraken lang
Raak met uw vingertop het display aan en houdt deze gedurende 1 of 2 seconden of langer op het display. Beweeg uw vinger Niet verwijl deze het display aanraakt. Door het display gedurende 1 seconde of langer aan te raken, worden bijvoorbeeld een lijst afgebeeld, of worden andere handige functies opgeroepen. Door het display gedurende 2 seconden of langer aan te raken, kutu u voorkeurzenders of andere informatie in het geheugen opslaan.Aanraken me
 Raak met uw vingertop het display aan en beweeg uw vingeraar links () of rechts () verwij uw vingertop nog steeds het display aanraakt, en LAST binnen 1 seconden het display los. Met deze bediening kunt u een voorkeurgeheugen (1 t/m 6) of tracks kiezen. Aanraken met
 Raak met uw vingertop het display aan en beweeg uw vingeraar links () of rechts () terwij uw vingertop nog steeds het display aanraakt, en houdt uw vingertop op het display. Deze bediening worden voortgezet zolang u uw vingertop op het display houdt. Met deze bediening kunt u bijvoorbeeld handmatig afstemmen of tracks vooruit-/achteruitspoelen. 4. VOORPANEEL
Het Voorpaneel kan erfol worden gehald om diefstal van het apparaat te voorkomen. Nadat u het voorpaneel eraf hebt gehald, bewaart u deze in de voortpaneelhoes om te voorkomen dat er krassen op komen. Wij adviseren u het voorpaneel mee te nemen wanner u uit de auto stapt.Het voorpaneel eraf halen
1. Schakel het apparaat UIT verwijl het KANTELEND BEDIENINGSPANEEL gesloten is. 2. Druk de [RELEASE] knop diep in om het voorpaneel te ontgrendelen.  3. Trek het voorpaneel maar u toe en haal het van het apparaat af. A VOORZICHTIG
- Sluit algid eerst het KANTELEND BEDIERINGSPANEEL voordat u het Voorpaneel eraf haalt. - Als u het voorpaneel eraf haalt terwijl het KANTELEND BEDIENINGSPANEEL geopend is, worden het kanteleend bedieningspaneel onmiddelijk gesloten. Wees voorzichtig dat uw vingers Nietbekneld raken.Het voorpaneel bevestigen
1. Plaats het voorpaneel op het apparaat zodate het gedeelte A A aan de rechterzijkant van het voorpaneel grijpt in haak B op het apparaat.  2. Druk de linkerzijkant van het voorpaneel voorzichtig op het apparaat. VOORZICHTIG
- Het voorpaneel kan gemakkelijk door schokken worden beschadigd. Nadat u het voorpaneel eraf hebte gehaald, moet u voorzichtig bijn het Niet te latenten vallen of aan sterke schokken bloot te stellen. - Als de [RELEASE] knop ingedrukt blij waardoor het Voorpaneel Niet op+zijn plaats vergrendeld is, kan het door de trillingen van het voertuig eraf vallen. Hierdoor kan het voorpaneel kapot gaan. Het is dus belangrijk het voorpaneel, nadat het eraf is gehaal, in de voorpaneelhoes op te bergen of weer te bevestigen op het apparaat. - De aansluiting waarme het voorpaneel op het apparaat is aangesloten is een bijzonder belangrijk onderdeel. Wees voorzichtig dat u deze nicht beschadigt door erop te drukken met uw vingenagel, een schroevendraaier, enz.Opmerking:
- Als het voorpaneel vuil is, mag u het alleen schoonvegen met een zachte, droge doeck.5. AFSTANDBEDIENING
De batterijenplaatsen
1. Draai de afstandsbediening om en schuif het deksel van het batterijvak in de richting van de pijl. 2. Plaats de twee batterijen van het type AA (SUM-3, R-6/1,5 V) die bij het apparaat werden geleverd, met de polen in de richting aangegeven in de afbeelding, en bevestig daarna het deksel weeop het batterijvak.Opmerkingen:
Als u de batterijen op een onjuiste manier gebruikt, kunnende ze exploderen. Let goed op de volgende punten: - Als u de batterijen verrangt, verrangt u beiden batterijen tegelijk door{nieuwe. - U mag de batterijen nicht kortsluiten, openmake of verwarmen. - Gooi de batterijen Niet in het vuur. - Lever de batterijen in als kca. Functies van de toetsen op de afstandsbediening
| Functie Toets | Radio (RDS) / DAB | CD/MP3 | CD-wisselaar DVD-wisselaar | TV |
| [FUNC] | Schakelt om:tussen radio, DAB, CD/MP3, AUX, CD-wisselaar, DVD-wisselaar en TV. | |||
| [BAND] | Schakelt de frequentieband om. | Geeft de eerste track weer. Beginweergave. | Gaat maar de volgende disc in oplopende volgorde. | Schakelt de frequentieband om. |
| [▲], [▼] | Verhoogt en verlaagt het volumeniveau (in alle functies). | |||
| [←], [►] | Gaat maar de vorige en volgende voorkeurzender. | Gaat maar de vorige en volgende track. Indien ingedrukt gehonden gedurende 1 seconde of langer: Achter- en vooruitspoelen. | Gaat maar de vorige en volgende voorkeurzender. | |
| [►III] | Geen functie. | Schakelt om:tussen pauze en weergave. | Geen functie. | |
| [MUTE] | Schakelt de geluidsonderbreking in en uit. | |||
| [TA] | Schakelt TA in en uit. Houd de toets gedurende 1 seconde of langer ingedrukt om te wisselen:tussen de hoofdzone en de subzone (alleen als de 2-ZONE-functionie isingeschakeld). | |||
| [DISP] | Schakelt om:tussen het hoofddisplay en het klokdisplay. | |||
| [PS/AS] | Voorkeurzender- scannen. Indien ingedrukt gehunden gedurende 2 seconden of langer: Voorkeurzenders automatisch opslaan. | Scanweergave. Houd de toets gedurende 1 seconde of langer ingedrukt om mapscanweergave uit te voeren op een MP3/WMA-disc. | Scanweergave. Indien ingedrukt gehonden gedurende 1 seconde of langer: Discscanweergave. | Voorkeurzender- scannen. Indien ingedrukt gehunden gedurende 2 seconden of langer: Voorkeurzenders automatisch opslaan. |
| [AF] | Schakelt de AF- functie in en uit. Indien ingedrukt gehunden gedurende 1 seconde of langer: Schakelt de REG- functie in en uit. | Herhaalde weergave. Houd de toets gedurende 1 seconde of langer ingedrukt om herhaalde mapweergave uit te voeren op een MP3/WMA-disc. | Herhaalde weergave. Indien ingedrukt gehonden gedurende 1 seconde of langer: Herhaalde discweergave. | Geen functie. |
| [PTY] | Schakelt PTY in en uit. | Willekeurige weergave. Houd de toets gedurende 1 seconde of langer ingedrukt om willekeurige mapweergave uit te voeren op een MP3/WMA-disc. | Willekeurige weergave. Indien ingedrukt gehunden gedurende 1 seconde of langer: Willekeurige discweergave. | Schakelt om:tussen TV en VTR. |
| [2-ZONE] | Houdt deze toets gedurende 1 seconde of langer ingedrukt om de 2-ZONE-functionie in of uit te schakelen. Druk op deze toets om de bedieningszone om te schakelen:tussen de hoofdzone en de subzone, als de 2-ZONE-functionie isingeschakeld. | |||
Basisbediening
A VOORZICHTIG
Vergeet Niet het volumeniveau te verlagen voordat u het apparaat uitschakelt of met de contactsleutel de stroom onderbreekt. Het apparaat onthoudt de LASTE volumeinstalling. Als u de stroom uitschakelt op een hoog volumeniveau, kan de eerstvolgende keer dat u het apparaat inschakelt het hoge volumeniveau uw gehoor bijn doeon en het apparaat beschadigen.Het apparatus in- en uitschakelen
Inschakelen
Opmerking:
- Wees voorzichtig wanneer u dit apparaat langeijd gebruikt zonder dat de motor heeft gelopen. Als de accu van de auto te leeg raakt, kan het onmobelijk zijn de motor te starten waardoor de levensduur van de accu terugloopt. 1. Druk op de [ROTARY] knop. De functie die de LASTe keer werk gebruikt worden afgebeeld.Systeemcontrole
De eerste keer dat het apparaat worden ingeschakeld nadat de draden+zijn aangesloten, controleert het apparaat welke apparatuur is aangesloten. (Dit heet de "System Check".) Als het apparaat worden ingeschakeld en "System Check" wordt afgebeeld, volgt u onderstaande procedure om de systeemcontrole uit te voeren. 1. Als "System Check" op het display worden afgebeeld, drukt u op de [ROTARY] knop. De systemdcontrole start. Nadat de systemdcontrole klaar is, worden "Completed" afgebeeld op het display. 2. Druk nogmaals op de [ROTARY] knop. Het hoofddisplay van de radiofunctie worden afgebeeld.CODEMATIC-functie
Wanneer "CODEMATIC" is ingesteld op "ON", en het apparaat worden ingeschakeld met de DCP erop bevestigd, worden het aanraakcodedisplay afgebeeld. Raak het display aan in de volgorde die werk ingesteld in de instelfunctie.  Voor verdere informatatie over de CODEMATIC-functie, leest u "De beveiligingsfunctie gebruiken (CODEMATIC)" (zie blz. 50).Uitschakelen
1. Houd de [ROTARY] knop gedurende 1 seconde of langer ingedrukt.Een functie kiezen
1. Druk op de [ROTARY] knop om de bedieningsfunctie te veranderen. 2. Met iedere druk op de [ROTARY] knop, verandert de bedieningsfunctie in de onderstaande volgorde: Radiofunctie DAB-functie CD/MP3-functie CD-wisselaarfungtie DVD-wisselaarfungtie TV-functie AUX-functie Radiofunctie... * Externe apparatuur die nicht is aingesloten met behulp van een CeNET-kabel, worden nicht aufgebeeld.Het volumeniveau instellen
1. Draai de [ROTARY] knop rechtsom om het volumeniveau te verhogen, en linksom om het volumeniveau te verlagen. * Het volumeniveau kan worden ingesteld:tussen 0 (minimum) en 33 (maximum).De bedieningsfunctie omschakelen
Er zijn twee basisbedieningsfuncties: standaardbediening en simpele bediening. 1. Op het hoofddisplay, raakt u de linkerkant van het display gedurende 1 seconde of longer aan. De bedieningsfunctie worden omgeschakeld  In de simplete bedieningsfunctie zijn de bedieningen met en op het hoofddisplay van de radiofunctie of CD-functioniet Nietoodzakelijk, en wordt de bediening van het apparatusdus eenvoudiger. Merk darüber op dat de volgende bediingen nicht möglichelijk zijn in de simpele bedieningsfunctie. Bedieningen voor het afstemmen op een voorkeurzender, het kiezen van een map, het kiezen van een disc, en andere bedieningen waar bij u aanraakt met 卡 op de rechterkant van het display. Bedieningen voor het omschakelen van het display (zie blz. 13). Bedieningen voor het omschakelen van het titeldisplay (zie blz. 14). - Bedieningen voor het afbeelden van het titelinovoerdisplay. Op andere displays dan het hoofddisplay (bijv. lijstdisplay, instelfunctie, enz.) is er geen verschilussen de standardbedieningsfunctie en de simpele bedieningsfunctie. De beschrijvingen in deze gebruiksaanwijzing zijn hoofdzakelijk voor stanaardbediening. Voor beschrijvingen van bedieningen in de simpele bedieningsfunctie, raadpleegt u de beschrijvingen van de displays in de radio- en CD-functions.Het display omschakelen
1. Raak het midden van het display aan. Met iedere aanraking van het display, verandert dit als volgt:  TiteldisplaySchembeveiliging
Als de schermbeveiliging is ingesteld op "ON" en u het apparaat gedurende ongeveer 30 seconden nicht bedient, worden de schermbeveiliging afgebeeld. Voor verdere informatie, zie bladzijde 41.Achtergrund
Door het midden van het display gedurende 1 seconde of langer aan te raken, schakelt u om maar het hintergrunddisplay.| ① | ⑨ |
| ② | ⑩ |
| ③ | ⑪ |
| ④ | ⑫ |
| ⑤ | ⑬ |
| ⑥ | ⑭ |
| ⑦ | ⑮ |
| ⑧ | ⑯ |
Spectrumanalysatordisplay
Door op het spectrumanalysatordisplay (S/A) de rechtserkant van het display gedurende 1 seconde of langer aan te raken, worden de spectrumanalysatordisplays doorlopen.| S/A SCAN | S/A 1, S/A 2 en S/A 3 worden)ieder gedurette de 10 seconden of langer afgebeeld. |
| S/A 1 | S/A 1 FLDR No. 003 TOP |
| S/A 2 | S/A 2 FLDR No. 003 TOP |
| S/A 3 | S/A 3 FLDR No. 003 TOP |
Het titeldisplay omschakelen
U kunt discitels en andere informatatie afbeelden die op de discs+zijn opgeslagen wanneer uDEXeergeft in de CD-functie of CDwisselaarfunctie. 1. Raak op het titeldisplay de rechterkant van het display gedurende 1 seconde of longer aan. Met iedere aanraking van het display, schakelt het display als volgt om: CD-text-disc User title (disc) CD-text title (disc) Artist name CD-text title (track) User title (disc)... MP3/WMA-disc Folder File Album TAG Artist TAG Title TAG Folder...Opmerkingen:
- Mp3 ondersteunt ID3-tags V2.3 / 2.2 / 1.1 / 1.0. - De tag-displays given voorrang aan V2.3/2.2. In het geval van album-tags voor wma worden de informatatie afgebeeld die in de extensie is opgenomen. - Alleen ASCII-tekens können worden aufgebeeld in tags.Een titel over het display latent lopen
Raak het titeldisplay met aan verwijl de titel worden afgebeeld. De titel looptaar links over het display.Het lopen over het display stoppen
Raak het titeldisplay met 巴 aan.CT-functie (kloktijdfunctie)
De CT-functie stelt u in staat CT-informatie te ontvangen vanaf een RDS-zender en deijd af te beelden. Raak het midden van het display aan om het CT-display af te beelden. - Als geen CT-informatie worden ontvangen, wordt "-:-CT" afgebeel op het display.Opmerking:
- In sommige landen en door sommige zenders worden geen CT-informatie uitgezonden. Bovendien is het möglichk dat in sommige gebeden de CT-informatie Niet发展格局.Instellen van het ADF
- ADF is de afkorting van Anti Distortion Filter (antivervormingsfilter). De ingestelde functies "Liveliness Enhancement Filter en "Sound Tone Compensation"makeen een goed gemoduleerde en realistische weergave möglich,zonder de eigenschappen van het oorspronkelijke geluid aan te tasten. Dit apparatus is uitgerust met vier verschillende geluidseffecten, opgeslagen in het geheugen. Kies het gewenste geluidseffect. ADF-1: Geschikt voor de standarduiidsprekers. ADF-2: Geschikt voor afzonderlijke luidsprekers. ADF-3 : Geschikt voor coaxiale luidsprekers. USER: Deze instelling kan door de gebruiker zich worden aangepast aan+zijn ofhaar persoonlijke voorkeuren. OFF: Geen geluideffect. - De fabrieksinstalling is "OFF".Opmerkingen:
Aangezien het volumeniveau verandert wanner het ADF wordt in- of uitgeschakeld, schakelt u het ADF in of uit terwijl het volumeniveau en "SW VOLUME" (subwoofer) en "CTR VOLUME" (middenluidspreker) zo laag maybeijk zich ingesteld. - Op sommige luidsprekersystemen kan het ontogelijk voldoende effect te krijgen. Als dit het geval is, stelt u de ADF-parameter of het volumeniveau in. - Als het ADF is ingesteld op "USER", "1", "2" of "3", maar bij EQ-SELECT de functies VSE en BASS/TREBuitgeschakeld. 1. Druk op de [SOUND] toets. 2. Raak ADF aan. 3. Raak de rechterkant van het display met aan om de ADF-functie te kiezen.  Als ADF is ingesteld op "OFF", heeft de ADF-instelling geen invloed op het weergavegeluid. Hiermee is de ADFinstellung voltoid. Druk op de [SOUND] toets om terug te keren maar de oorspronkelijke functie. * Kies een instelling uit USER, 1, 2, 3 of OFF. 4. Als u de afzonderlijke items van de ADFinstelling wilt veranderen, drukt u op de [A]toets. 5. Raak het insteltemdisplay met 山 山 aan en kies het gewenste insteltem. Met iedere aanraking met 山 山 , doorloopt u het insteltemdisplay als volgt: Instelitem (als USER is gekozen in stap 3) BASS TREBLE COMP BASS... -Insteltem (als 1, 2 of 3 is gekozen in stap 3) LEVEL COMP LEVEL... 6. Raak de rechterkant van het display met aan en verander de instelling van het item. * “BASS” en “TREBLE” können worden ingesteld binnen het bereik van 1 t/m 13. * “LEVEL” kan worden ingesteld binnen het bereik van -3 t/m +3. * Kies voor "COMP" "ON" of "OFF". 7. Druk op de [SOUND] toets om terug te keren maar de oorspronkelijke functie.De subwoofer en middenluidspreker instellen
- "SW VOLUME" (subwoofer) kan alleen worden ingesteld als "SUB-WOOFER" is ingesteld op "ON". - "CTR VOLUME" (middenluidspreker) kan allen worden ingesteld als de Dolby Pro Logic II functie is ingesteld op "MUSIC" of "MATRIX", als "SP-SETTING" is ingesteld op "CTR+SW", en als "CENTER-SP" is ingesteld op "ON". - De fabrieksinstelling van SW VOLUME is "0" en van CTR VOLUME is "0". 1. Druk op de [SOUND] toets. 2. Raak A-MODE aan.  3. Raak het insteltemdisplay met aan en kies "SW VOLUME" of "CTR VOLUME".  4. Raak de rechterkant van het display met aan en stel het item maar wens in. * Dit item kan worden ingesteld binnen het bereik van -5 t/m +5. 5. Druk op de [SOUND] toets om terug te keren maar de oorspronkelijke functie.De balans/fader instellen
BALANCE:
Hiermee stelt u de balans van het volumeniveau inussen de linker en rechter luidsprekers.FADER:
Hiermee stelt u de balans van het volumeniveau inussen de voor- enchyterluidsprekers. - De fabrieksinstalling van BALANCE is "0" en van FADER is "0".Opmerking:
Balans/fader kan het worden ingesteld als "PRO" is ingesteld bij AC-PRO III (zie blz. 44) en de positiefunctie is ingesteld op "ON". Stel de balans/fader in aan de hand van "Het positiemenu kiezen" (zie blz. 17). 1. Druk op de [SOUND] toets. 2. Raak A-MODE aan.  3. Raak het insteltemdisplay met 山 山 aan en kies "BALANCE" of "FADER".  4. Raak de rechterkant van het display met aan en stel het item maar wens in. * "BALANCE" kan worden ingesteld binnen het bereik van L13 (linkerkanalen versterkt) t/m R13 (rechterkanalen versterkt). * “FADER” kan worden ingesteld binnen het bereik van R12 (achterkanalen versterkt) t/m F12 (voorkanalen versterkt). 5. Druk op de [SOUND] toets om terug te keren maar de oorspronkelijke functie.De hoge en lage tonen instellen
De hoge en lage tonen können alleen worden ingesteld als Dolby Pro Logic II is ingesteld op "OFF" (zie blz. 17) en "EQ SELECT" is ingesteld op "BAS/TREB" (zie blz. 44). - De fabrieksinstelling is "0". 1. Druk op de [SOUND] toets. 2. Raak A-MODE aan.  3. Raak het instelitemdisplay met aan en kies "BASS" of "TREBLE".  4. Raak rechterkant van het display met 山 aan en stel het item maar wens in. * Dit item kan worden ingesteld binnen het bereik van -6 t/m +6. 5. Herhaal de stappen 3 en 4 om het gewenste item in te stellen. 6. Druk op de [SOUND] toets om terug te keren maar de oorspronkelijke functie.Bediening van de AC-Processor III
Dolby Pro Logic II
Dolby Pro Logic II is een matrix-decodeertechnologie waarin verbeterde, digitale matrixtechnologie is toegepast en waarmee Dolby Pro Logic verder ward verbeterd. Dolby Pro Logic Il realiseert uiststekende 5.1-kanalen reproductie van zowel Dolby-surroundbronnen als stereogeluidsbronnen, zoals CD's, waar bij het surroundkanaal over het volledige freiendentiebereik (20 Hz t/m 20 kHz) krijt en stereo worden. Hierdoor kurz u maar iedere stereobron luisteren met het dynamische geluid van 5.1 kanalen. U kurz de muziekfunctie of matrixfunctie kiezen overeenkomstig de bron die u wilt weergeven. Dit product is gemaakt onder licentie van Dolby Laboratories. "Dolby", "Pro Logic" en het dubbel-D-symbol voor bij handelsmerken van Dolby Laboratories. 3. Raak de rechterkant van het display met aan en kies de Dolby Pro Logic II-functie.  De functiedisplays worden als volgt doorlopen: MUSIC (muziekfunctie) MATRIX (matrixfunctie) OFF (PL II uit) MUSIC (muziekfunctie)... * Voor verdere informatie over het instellen van het volumeniveau van de middenluidspreker/subwoofer, raadpleegt u bladzijde 45. 4. Raak RTN aan.Het PL II-menu (Dolby PL II) kiezen
Kies de MUSIC-functionie of de MATRIX-functionie overeenkomstig de bron die u wilt weergeven in de Dolby Pro Logic II-functionie. - De fabrieksinstalling is "OFF".    (muziekfunctie) - Deze functie is geschikt voor stereogeluidsbronnen, zoals CD's. - Een andere instelfunctie, waarmee u meer gedetailleerde instelleningen kurz makez, is ook beschikbaar,ondat het geluidsveld zich anders gedraagt affankelijk van de toestand van de opgenomen muziekbron. (Zie blz. 47.)MATRIX (matrixfunctie)
- Deze functie is geschikt voor geluidsbronnen zoals AM/FM-radio.OFF
- De Dolby Pro Logic II-functie worden nicht gebrukt, maar de AC-PROIII-functie worden gebrukt. Voor verdere informatatie over de AC-PROIII-functie, raadpleegt u "Een functie kiezen" (zie blz. 44). 1. Druk op de [SOUND] toets. 2. Raak Dolby PLII aan.Het positiemenu kiezen
Met POSITION Aunt u kiezen uit vijf mogelijkheden waarop het geluid uit de luidsprekers maar uw zitpositie komt. Bovendien kurz u met deijduitlijnfungtie deluidsprekers zeer precies instellen, zodat hetzelfde geluidseffect worden verkregen uit iedereuidspreker voor alle luisteraars. In de procedure "Een functie kiezen" (zie blz. 44) stelt u AC-PROIII in op "PRO". - De fabrieksinstalling van POSITION is "OFF" en op het positie-basiskenu is "FRONT".Positiemenu
Deze functie is vooraf geprogrammeerd met vrij positiemenu's. Kies het gewenste menu overeenkomstig uw voorkeuren. 1. Druk op de [SOUND] toets. 2. Raak POSITION aan.   3. Raak het ON/OFF-display met aan. Het positie-effect worden beurtelings in- en uitgeschakeld.  Als het positie-effect is ingesteld op "OFF", heeft de positie-installing geen effect op de geluidsbron. Hiermee is de positie-instelling voltooid. Druk op de [SOUND] toets om terug te keren maar de oorspronkelijke functie. 4. Raak B/U aan en kies "BASIC".  Met iedere aanraking van B/U, wisselt de instelling:tussen "BASIC"en "USER". 5. Raak het positie-basismenummer met aan en kies het positie-basismenu. Het positie-basismenu| Nr. | Naam op het display | Zitpositie |
| 1 | FRONT-L | Linkervoorstoel |
| 2 | FRONT-R | Rechtervoorstoel |
| 3 | FRONT | Voorstoelen |
| 4 | REAR | Achterstoelen |
| 5 | FULL SEAT | Alle stoelen |
Posities instellen en opslaan (gebruikersgeheugen)
In het gebruikersgehugen is zeer precies instellen van de luidsprekers möglichk, zodat hetzelfde geluidseffect worden verkreten uit iedere luidspreker voor alle luisteraars, gebaseerd op het positie-basismenu. Maximaal vrij gebruikersinstellingen konnen in het gebruikersgehugen worden op geslagen.T-ALIGN (tijduitlijnfunctie):
De afstand van de luisteraar tot iedere luidspreker kan worden ingeoord in stappen van 2,3 cm, en de benodigde tijsduur voor het geluid om de luisteraar te bereiken kan worden ingesteld.SP GAIN (uitgangsiveau van de luidsprekers):
Hiermee stelt u het uitgangsiveau van de luidspreker in. Stel het uitgangsiveau voor iedere luidspreker zodanig in dat de uitvoer uit iedere luidspreker hetzelfde is. 1. Druk op de [SOUND] toets. 2. Raak POSITION aan. 3. Raak het ON/OFF-display met 山 aaan. Het positie-effect worden beurtelings in- enuitgeschakeld. 4. Raak B/U aan en kies "BASIC" of "USER". 5. Raak de rechterkant van het display met aan en kies het menu waarup instellenen wilt make. 6. Druk op de [A] toets. 7. Raak de linkerkant van het display met aan en kies "T-ALIGN" of "SP GAIN". 8. Raak het midden van het display met 卡 aan en kies een insteltem. Met iedere aanraking met 卡 worden de insteltems als volgt doorlopen:  InstelItems *1 Dit worden alleen aufgebeeld als in de instelfunctie bij "SOUND" het item "SUB-WOOFER" is ingesteld op "ON". *2 Dit wordt allen aufgebeeld als in de instelfunctie bij "SOUND" het item "SUB-WOOFER" is ingested op "ON" en in stap 7 "T-ALIGN" is gekozen. 9. Raak de rechterkant van het display met aan en stel het item maar wens in.  * "T-ALIGN" kan worden ingesteld binnen het bereik van 0 cm tot 501,4 cm in stappen van 2,3 cm. * "SP GAIN" kan worden ingesteld binnen het bereik van -20 dB t/m 0 dB. 10. Herhaal de stappen 7 t/m 9 om het gewenste item in te stellen. 11. Nadat u klaar bent met het instellen van ieder item, raakt u RTN aan. Het apparaat keert terug maar het oorspronkelijkke display en wordt afgebeeld op het BASIC- of USER-display. Met deze bediening is het instellen van de positie voltooid. Om verder te gaan en de instelwaarden voor het positiegebruikersmenu op te slaan, voert u de volgende stappenuit. 12. Raak RTN gedurende 1 seconde of langer aan. De positie-menulijst worden afgebeeld. 13. Raak het gebruikersgeheugen waar in u de instelwaarden wilt opslaan gedurende 2 seconden of langer aan. U hoor een lange pieptoon en de waarden die u tot en met stap 10 hebt ingesteld, worden opgeslagen in het positie-gebruikersmenu. Als u een korte pieptoon hoort, worden de instelwaarden tot en met stap 10 gewist. Stel deze waarden opnieuw in, indien gewenst. 14. Raak RTN aan. 15. Druk op de [SOUND] toets om terug te keren maar de oorspronkelijke functie. * Als u een opgeslagen gebruikersgeheugen wiltkiezen, raakt u B/U aan zodat "USER"wordt afgebeeld, en raakt uervovalgens het gebruikersmenummer met † ‡ †aan.Het VSE-menukiezen
Met VSE (Virtual Space Enhancer) bent u in staat de geluidsdrukbalans in uw auto te compenseren zodate hetzelfde geluidseffect wordt verkregen, ongeacht op welke steo u zit, zoals aangetoond met compensasiesimulaties. In de procedure "Een functie kiezen" (zie blz. 44) stelt u AC-PROIII in op "STD". - De fabrieksinstelling van VSE is "OFF" en op het VSE-basiskenu is "FLAT".Het VSE-basismenu
Deze functie is vooral geprogrammeerd met zes basismenu's. Kies het basismenu overeenkomstig uw voorkeuren. 1. Druk op de [SOUND] toets. 2. Raak VSE aan.  3. Raak het ON/OFF-display met aan. Het VSE-effect worden beurtelings in- enuitgeschakeld.  Als VSE is ingesteld op "OFF", heeft de VSEinstalling geen invloed op het weergavegeluid. Hiermee is de VSE-instelling voltooid. Druk op de [SOUND] toets om terug te keren maar de oorspronkelijke functie. 4. Raak B/U aan en kies "BASIC".  Met iedere aanraking van B/U, wisselt de instelling:tussen "BASIC" en "USER". 5. Raak het VSE-basismunummer met 卡 aan en kies het gewenste VSE-basismenu. De VSE-basismenu's| Nr. | Functienaam | Beschrijving |
| 1 | FLAT | Vlakke niveauregeling van de geluidsbron. |
| 2 | BASS BOOST | Lage tonen versterkt. |
| 3 | HIGH BOOST | Midden- en hoge tonen versterkt. |
| 4 | IMPACT | Lage en hoge tonen versterkt. |
| 5 | ACOUSTICAL | Middentonen (menselijke stem) versterkt. |
| 6 | SMOOTH | Levert soepel-klinkende tonen op. |
VSE instellen en opslaan (gebruikersgeheugen)
Door het maken van instellenen in het gebruikersgeheugen is het möglichk de geluidsdrukverdeling te compenseren overeenkomstig uw voorkeuren, gebaseerd op het VSE-basiskemu. Maximaal zes gebruikersinstelleningen konnen in het gebruikersgeheugen worden opgeslagen.DIFFUSE:
Hiermee stelt u de afwijking van de verstrooide geluidsdruk in.CARWIDTH:
Hiermee stelt u de afwijking van de geluidsdruk in de breedterichting van de auto in.CAR LENGTH:
Hiermee stelt u de afwijking van de geluidsdruk in de lengterichting van de auto in. 1. Druk op de [SOUND] toets. 2. Raak VSE aan. 3. Raak het ON/OFF-display met aan. Het VSE-effect worden beurtelings in- en uitgeschakeld. 4. Raak B/U aan en kies "BASIC" of "USER". 5. Raak de rechterkant van het display met aan en kies het menu waarop u instellenen wilt make. 6. Druk op de [A] toets. 7. Raak het instelitemdisplay met aan en kies "DIFFUSE", "CAR WIDTH" of "CAR LENGTH".  8. Raak de rechterkant van het display met aan en stel het item waar wens in. * Dit item kan worden ingesteld binnen het bereik van 1 t/m 10. 9. Herhaal de stappen 7 en 8 om het gewenste item in te stellen. 10. Nadat u klaar bent met het instellen van ieder item, raakt u RTN aan. Het apparaat keert terug maar het oorspronkelijke display en ” worden afgebeeld op het BASIC- of USER-display. Met deze bediening is het instellen van de VSE voltooid. Om verdter te gaan en de instelwaarden voor het VSE-begruikersmenu op te slaan, voert u de volgende stappen UIT. 11. Raak RTN gedurende 1 seconde of langer aan. De VSE-menulijst worden afgebeeld. 12. Raak het gebruikersgeheugen waarin u de instelwaarden wilt opslaan gedurende 2 seconden of longer aan. U hoor een lange pieptoon en de waarden die u tot en met stap 9 hebt ingesteld, worden opgeslagen in het VSE-gebruikersmenu. Als u een korte pieptoon hoor, worden de instelwaarden tot en met stap 9 gewist. Stel deutsche waarden opnieuw in, indien gewenst. 13. Raak RTN aan. 14. Druk op de [SOUND] toets om terug te keren maar de oorspronkelijke functie. * Als u een opgeslagen gebruikersgeheugen wiltkiezen, raakt u B/U aan zodat "USER"wordt afgebeeld, en raakt u verwolgens het gebruikersmenummer met▲▲aan.Het P.EQ-menukiezen
P.EQ (Parametrische Equalizer) stelt u in staat het gehele freiorentiebereik nauwkeurig te compenseren tot een vloeije kromme met behulp van freiorentiecompensatie overeenkomstig het type auto dat u hebt. In de procedure "Een functie kiezen" (zie blz. 44) stelt u EQ SELECT in op "P.EQ". - De fabrieksinstelling van P.EQ is "OFF" en op het P.EQ-basisk menu is "SEDAN-1".Het P.EQ basismenu
Deze functie is vooraf geprogrammeerd met zes types P.EQ-basismenu, overeenkomstig het type auto dat u hebt en de montageposities van de luidspreskers. Kies het basismenu overeenkomstig uw type auto. 1. Druk op de [SOUND] toets. 2. Raak P.EQ aan.  3. Raak het ON/OFF-display met 山 aaan. Het P.EQ-effect worden beurtelings in- enuitgeschakeld.  Als het P.EQ-effect is ingesteld op "OFF", heeft de P.EQ-instelling geen effect op de geluidsbron. Hiermee is de P.EQ-instelling voltooid. Druk op de [SOUND] toets om terug te keren maar de oorspronkelijke functie. 4. Raak B/U aan en kies "BASIC".  Met iedere aanraking van B/U, wisselt de instelling:tussen "BASIC"en "USER". 5. Raak het P.EQ-basismenummer met aan en kies het P.EQ-basismenu. Het P.EQ basismenu| Nr. | Naam op het display | Montagepositie van de luidsprekers |
| 1 | SEDAN-1 | Voorin: Voorportier Achterin: Hoedenplank |
| 2 | SEDAN-2 | Voorin: Voorportier Achterin: Achterportier |
| 3 | WAGON-1 | Voorin: Voorportier Achterin: Zijkant bagageruimte |
| 4 | WAGON-2 | Voorin: Voorportier Achterin: Achterportier |
| 5 | MINI VAN-1 | Voorin: Voorportier Achterin: Zijkant bagageruimte |
| 6 | MINI VAN-2 | Voorin: Voorportier Achterin: Achterportier |
P.EQ instellen en opslaan (gebruikersgeheugen)
In het gebruikersgehugenkest u de frequentiekarakteristieken compenseren overeenkomstig uw type auto,gebaseerd op het P.EQ-basismenu. Maximaal zes gebruikersinstallingen konnen in het gebruikersgehugen worden op geslagen.Voor verdere informatie, raadpleegt u "P.EQ instellen". 1. Druk op de [SOUND] toets. 2. Raak P.EQ aan. 3. Raak het ON/OFF-display met 山 aaan. Het P.EQ-effect worden beurtelings in- enuitgeschakeld. 4. Raak B/U aan en kies "BASIC" of "USER". 5. Raak de rechterkant van het display met aan en kies het menu waarup instellenen wilt make. 6. Druk op de [A] toets. 7. Raak de linkerkant van het display met 卡 aan en kies "FRONT" of "REAR".  8. Raak het midden van het display met 卡 aan en kies een insteltem. Met iedere aanraking met 卡 10 worden de instelitems als volgt doorlopen: Instelitems BAND FREQ Q GAIN BAND... 9. Raak de rechterkant van het display met aan en stel het item maar wens in. * "BAND" kan worden ingesteld binnen het bereik van 1 t/m 3. * “FREQ” kan worden ingesteld binnen het bereik van 20 Hz t/m 20 kHz. * Kies een instelling voor “Q” UIT 1, 3, 5, 7 of 20. * “GAIN” kan worden ingesteld binnen het bereik van -12 dB t/m +12 dB. 10. Herhaal de stappen 7 t/m 9 om het gewenste item in te stellen. 11. Nadat u klaar bent met het instellen van ieder item, raakt u RTN aan. Het apparaat keert terug maar het oorspronkelijke display en ”wordt afgebeeld op het BASIC- of USER-display. Met deze bediening is het instellen van de P.EQ voltooid. Om verder te gaan en de instelwaarden voor het P.EQ-gebruikersme op te slaan, voert u de volgende stappen u 12. Raak RTN gedurende 1 seconde of longer aan. De P.EQ-menulijst worden afgebeeld. 13. Raak het gebruikersgeheugen waarin u de instelwaarden wilt opslaan gedurende 2 seconden of langer aan. U hoor een lange pieptoon en de waarden die u tot en met stap 10 hebts ingesteld, worden opgeslagen in het P.EQ-gebruikersmenu. Als u een korte pieptoon hoort, worden de instelwaarden tot en met stap 10 gewist. Stel deutsche waarden opniewin, indien gewenst. 14. Raak RTN aan. 15. Druk op de [SOUND] toets om terug te keren maar de oorspronkelijke functie. * Als u een opgeslagen gebruikersgeheugen wilt kiezen, raakt u B/U aan zodat "USER" worden afgebeeld, en raakt uervoalgens het gebruikersmenummer met ↑ ⿱ ↑aan.De P.EQ instellen
Deinstallingen die kunnen worden verandererd op het P.EQ-menu zich de volgende:De middenfrequente,versterking en Q-kromme kunnen worden opgeslagen in combinatie met een kanaal/band. Bijvoorbeeld: middenfrequentie "250Hz", versterking "-8dB" en Q-kromme "3" können worden opgeslagen voor band 1 voor.FRONT/REAR (keuze van het kanaal)
Hiermee kiest u het kanaal (voor ofijken) dat u wilt instellen.BAND (keuze van de frequentieband)
Hiermee kiest u de frequentieband (1 t/m 3) die u wilt instellen. Stel de middenfrequentie (FREQUENCY), versterking (GAIN) en Q-kromme (Q) in voor iedere frequentieband.FREQUENCY (keuze van de middenfrequente)
Hiermee kiest u de middenfrequentie die moet worden gebruikt als het midden van de freuquentieband die u wilt compenseren uit het bereik van 20Hz t/m 20 kHz. (in stappen van 1/3 octaaf, 31 punten)GAIN (instelling van de versterking)
Hiermee stelt u de versterking (uitgangsiveau) in binnen het bereik van -12 dB t/m +12 dB. (in stappen van 1 dB, 25 punten)Q (keuze van de Q-kromme)
Hiermee stelt u de spitsheid van de Q-kromme in op 1, 3, 5, 7 of 20.Compensatie
Het is Niet nodig de frequentiekarakteristieken te compenseren als deze vlak blijken (geen pieken of dalen) na meting van de frequentiekarakteristieken met een meetapparaat. Het gebeurtSHOTters dat de frequentiekarakteristieken op bepaaldeplaatsen omhoog lopen of omaaag vallen. Als dat het geval is,要去en de frequentiekarakteristieken worden gecompenseerd. Creer een frequentiekromme met karakteristieken die het tegenervergestelde zichen van de middenfrequenties van de delen waar de karakteristieken omhoog lopen en omaaag vallen om deze pieken en dalen op te heffen en de frequentiekarakteristieken zo vlak möglich te make. Het zo vlak möglichk makev van de frequentiekarakteristieken worden "compenseren" genoemd. Op dit apparaat+kunnen de frequentiekarakteristieken worden gecompenseerd door P.EQ (Parametrische Equalizer).Compensatie van
frequentiekarakteristieken
Onderstaande figuuraat de verhouding zien tussen de middenfrequentie,versterking en Qkromme.  Middenfrequentie (F) Frequentie (Hz)Q-kromme
De Q-kromme worden spitser als de numerieke waarde hoger worden, en worden ronder als de numerieke waarde lager worden. Vlakke frequentlyekarakteristieken kannen worden verkreten door een Q-kromme te kiezen die het tegenovergestelde is van de kromme die u wilt compenseren.  Q-kromme: (Q) Q-kromme: 20 Q-kromme: 1 F: Middenfrequentie, G: Versterking (uitgangsiveau), Q: Q-kromme| Nr.(type auto) | Parameters van de Parametrische Equalizer | |||||||||
| Kanaal | Band 1 | Band 2 | Band 3 | |||||||
| F | G | Q | F | G | Q | F | G | Q | ||
| 1(SEDAN-1) | Voor | 250 Hz | -8 dB | 3 | 2 kHz | -4 dB | 1 | 5 kHz | -4 dB | 1 |
| Achter | 250 Hz | -10 dB | 3 | 1.25 kHz | 0 dB | 5 | 8 kHz | 0 dB | 5 | |
| 2(SEDAN-2) | Voor | 250 Hz | -10 dB | 7 | 800 Hz | -4 dB | 3 | 8 kHz | -5 dB | 1 |
| Achter | 80 Hz | 3 dB | 7 | 125 Hz | -12 dB | 5 | 1.25 kHz | 0 dB | 5 | |
| 3(WAGON-1) | Voor | 250 Hz | -8 dB | 3 | 1 kHz | -8 dB | 3 | 10 kHz | -6 dB | 1 |
| Achter | 250 Hz | -8 dB | 3 | 800 Hz | -8 dB | 1 | 8 kHz | 0 dB | 5 | |
| 4(WAGON-2) | Voor | 250 Hz | -8 dB | 7 | 400 Hz | -10 dB | 7 | 1.25 kHz | -8 dB | 7 |
| Achter | 125 Hz | -8 dB | 3 | 500 Hz | -5 dB | 5 | 1.6 kHz | 0 dB | 3 | |
| 5(MINI VAN-1) | Voor | 125 Hz | -4 dB | 5 | 1.25 kHz | -4 dB | 3 | 2 kHz | 3 dB | 7 |
| Achter | 250 Hz | -6 dB | 1 | 630 Hz | -4 dB | 3 | 8 kHz | 0 dB | 5 | |
| 6(MINI VAN-2) | Voor | 250 Hz | -4 dB | 3 | 1.25 Hz | -8 dB | 3 | 80 Hz | 3 dB | 3 |
| Achter | 250 Hz | -8 dB | 3 | 500 Hz | -5 dB | 5 | 8 kHz | 0 dB | 5 | |
Bediening van de radio
De displays in de radiofungtie
Hoofddisplay
Het hoofddisplay worden afgebeeld als u op de [ROTARY] knop drukt en de radiofunctie kiest.  Als u de linkerkant van het display gedurende 1 seconde de longer aanraakt, schakelt het display over maar de simpele bedieningsfunctie. Frequentiedisplay
De frequenie die op dat moment worden ontvangen worden afgebeeld. Als u het display van de standaardbedieningsfunctie met → of ↑ aanraakt, kurz u zoek-afstemmen of handmatig afstemmen uityvoeren.Titeldisplay
Hierop worden de naam afgebeeld van de zender die op dat moment worden ontvangen. Door deze naam aan te raken worden het display omgeschakeld.Frequentiebanddisplay
AM: AM-frequentiebandnaam FM1: FM-frequentiebandnaamVoorkeurnummerdisplay
Als u het display van de standaardbedieningsfunctie met aanraakt, kunt u een voorkeurgeheugen kiezen.MODE
Als u dit aanraakt, worden subfuncties afegebeeld. Door dit gedurende 1 seconde of langer aan te raken, worden de voorkeurgeheugenlijst afgebeeld.P-SCAN:
Dit wordt afgebeeld tijdens het voorkeurzender-scannen. Als u dit aanraakt, stoot het voorkeurzender-scannen.A-STORE:
Dit worden aufgebeeldijdens het automatisch opslaan. Als u dit aanraakt, stopt het automatisch opslaan.BAND
Door dit aan te raken worden de frequentieband omgeschakeld. Als u dit gedurende 1 Seconde of langer aanraakt, schakelt u om:tussen de handmatige afstemfunctie en de zoek-afstemfunctie. (alleen op het display van de simpele bedieningsfunctie)
Door deze toetsen aan te raken kutn u zoekafstemmen of stap.afstemmen (in de handmatige afstemfunctie). Door deze toetsen aan te raken en aangeraakt te houden kut u snel-afstemmen (in de handmatige afstemfunctie).De Voorkeurgeheugenlijst afbeelden
Deze lijst kunt u afbeelden door op het hoofddisplay gedurende 1 Seconde of langer MODE aan te raken.  Zendernaam (of frequentie) >>: Bezig met afstemmen RTN: Raak dit aan om terug te keren maar het hoofddisplay.Naar de radio luisteren
1. Druk op de [ROTARY] knop om deradiofunctie te kiezen. Met iedere druk op de [ROTARY] knop, verandert de functie als volgt: Radio (DAB) CD / MP3 (CD-wisselaar) (DVD-wisselaar) (TV) AUX Radio... * De functie van een apparaat dat nicht is aangesloten worden nicht afgebeeld. 2. Raak BAND aan om de frequentieband te veranderen. Metijdere aanraking van BAND, verandert de frequentieband als volgt: FM1 FM2 FM3 AM (MW / LW) FM1...Afstemmen
Er zijn drie manieren waarop u kunt afstemmen:zoek-afstemmen,handmatig afstemmen en voorkeurzender-afstemmen.Zoek-afstemmen
Er zijn twee manieren voor zoek-afstemmen: DX SEEK en LOCAL SEEK. Met DX SEEK stemt u automatisch af op alle zenders die ontvangen können worden, verwijl u met LOCAL SEEK alleen afstemt op zenders met een goede ontvangstkwaliteit. 1. Raak BAND aan om de gewenste freiendentieband te kiezen (FM of AM (MW of LW)). 2. Stem af op een zender. * Als MANU worden afgebeeld, raakt u BAND aan gedurende 1 seconde of langer. "MANU" op het display gaat uit en Zoekafstemmen is nu möglichk. * Als "TA" op het display worden afgebeeld, worden automatisch TP-zenders gezocht.DX SEEK
Als u het frequentiedisplay met 山 山 山 aanraakt, begint het automatisch zoek-afstemmen op alle zenders. Wanner u met 念 aanraakt, wordt een zender gezocht in de richting van hogere frequencies, terwijl wonneer u met 念 aanraakt, een zender wordt gezocht in de richting van lagere frequencies. * Nadat het Zoek-afstemmen is begonnen,** wordt "DX SEEK" afgebeeld op het display.LOCAL SEEK
Als u het frequentiedisplay met aanraakt, wordtzoek-aftstemmenuitgevoerd,voor zenders met een sterk signaal. Er wort alleen afgestemd op zenders met een goede ontvangstkwaliteit. * Nadat het zoek-afstemmen is begonnen,** wordt "LO SEEK" afgebeeld op het display.Handmatig afstemmen
Er zijn tweer manieren waarop u handmatig kunt afstemmen: snel-afstemmen en stap-afstemmen. In de stap-afstemfunctie verandert de frequenta stap voor stap. In de snel-afstemfunctie kut u snel afstemmen op de gewenste frequentie. 1. Raak BAND aan gedurende 1 seconde of langer verwijl MANU Niet wordt afgebeeld. Als MANU wordt afgebeeld is handmatig afstemmen möglichk. 2. Bedien het frequentlyiedisplay en stem af op een freiquentie waarop wordenuit gezonden.Stap-afstemmen
Raak het titeldisplay met 已 aan.Snel-afstemmen
Raak het frequentietdisplay met aan. Het afstemmen stopt zodra u uw vinger van het display afhaalt.Een voorkeurzender oproepen
Het oproepen van een Voorkeurzender is een bediening voor zenders die van tevoren in het geheugen zijn opgeslagen. 1. Raak MODE gedurende 1 seconde of langer aan. De voorkeurgeheugenlijst worden afgebeeld. 2. Raak de zender aan waarnaar u wilt luisteren. * In de standardbedieningsfunctie kut u ook op een voorkeurzender afstemmen door het hoofddisplay aan te raken met t.Het afstemmen annuleren
1. Raak RTN aan.Voorkeurzenders handmatig opslaan
In totaal(Int u in het geheugen 24 afzonderlijke voorkeurzenders opslaan (6-FM1,6-FM2,6- FM3,6-AM). 1. Raak BAND aan om de freiagentieband te veranderen. 2. Bedien het frequentlyiedisplay en stem af op de frequentie die u wilt opslaan. 3. Raak MODE gedurende 1 seconde of langer aan. De voorkeurgeheugenlijst worden afgebeeld. 4. Raak het voorkeurnummer waaronder u de zender wilt opslaan gedurende 2 seconden of langer aan. U hoor een lange pieptoon en de zender worden in het geheugen opgeslagen.Voorkeurzenders automatisch opslaan
U kunt automatisch eén voor eén afstemmen op maximaal zes zenders en deze automatisch opslaan. 1. Raak MODE aan. 2. Raak A-STORE gedurende 2 seconden of langer aan. MODE verandert in "A-STORE" en het voorkeurnummer van het automatisch opslaan worden op het voorkeurnummerdisplay afgebeeld. * Zenders met een goede ontvangstkwaliteit worden automatisch gezocht en opgeslagen in het voorkeurgeheugen (onder voorkeurnummers 1 t/m 6) in oplopende volgorde vanaf de zender met de laagste_freqtie.Opmerkingen:
- Wanner u automatisch voorkeurzenders opslaat, worden eerder opgeslagen zenders gewist. - Als er minder dan zes zenders met een goede ontvangstkwaliteit worden gezonden met in de LOCAL SEEK-afstemfunctie, keert het apparaat automatisch terug maar de laagste freiagentie en wordt het automatisch opslaan nogmaals uitgevoerd in de DX SEEK-afstemfunctie. Als daarna nog steeds minder dan zes zenders worden gezonden, blijven de eerder opgeslagen zenders in het geheugen. - Als het automatisch opslaan wordenucht uitgevoerd op de FM-banden, worden de zenders opgeslagen in FM3, zichs als FM1 of FM2 werk gekozen om de zenders in op te slaan.Voorkeurzender-scannen
Met voorkeurzender-scannenkest u de Voorkeurzenders eén voor een controeren in de volgorde waarin ze in het geheugen zich opgeslagen. 1. Raak MODE aan. 2. Raak P-SCAN aan. MODE verandert in "P-SCAN" en het voorkeurnummer van het voorkeurnummer-scammen worden op het voorkeurnummerdisplay afgebeeld. \* De huidig opgeslagen voorkeurzenders worden een voor een op volgorde ontvangen gedurende 7 seconden of langer elk. Zenders met een slechte ontvangst worden overgeslagen en de volgende zender worden ontvangen. Als het voorkeurzender-scammen op de FM-band worden uitgevoerd, worden de FMzenders in onderstaande volgorde ontvangen: FM1 (1 6) FM2 (1 6) FM3 (1 6)... Als het voorkeurzender-scannen op de AM-band worden dit uitgevoerd, worden de AM-zenders in onderstaande volgorde ontvangen: AM (1 6) AM(1 6) enzovoort.Het voorkeurzender-scannen annuleren
1. Raak P-SCAN aan. P-SCAN verandert in "MODE", en de zender die werden ontvangen voordat op P-SCAN werk gedrukt, worden meer ontvangen.RDS (radio-informationsystem)
Dit apparatus is uitgerust met een ingebouwd RDS-decodersystem zodate u gebruik kutn make n van de RDS-informatie die sommige zenders uitzenden. Dit system kan de naam afbeelden van de zender die wordt ontvangen (PS) en kan automatisch overschakelen maar de zender met de Beste ontvangstkwaliteit wonneer u grote afstanden aflegt. Als verkeersinformatie of een verkeersprogramma worden uit gezonden door een RDS-zender, kan automatisch overgeschakeld worden maar deze uitzending, ongeacht welke functie in werkung is. Bovendien, als EON-informatie worden ontvangen, kan automatisch worden overgeschakeld waar andere voorkeurzenders op hetzelfdeetwork, zodat de zender die worden ontvangen kan worden onderbroken door het verkeersprogramma van andere zenders (TP). Deze functie is Niet overal beschikbaar. Als u de RDS-functie wilt gebruiken, moet u altiijd de radio eerst in de FM-ontvangstfunctie zetten. - AF: Alternativene frequente - PS: Zendernaam - PTY: Programmatype - EON: Verbeterde overige netwerken TP: Verkeersprogramma PI: Programma-identificatie TA: Verkeersinformatie * De RDS-onderbreking werkkt nicht in de AMontvangstfunctie. * Als dit apparaat een RDS-signaal ontvangt en de PS-informatie erin kan lezen, worden de zendernaam op het display afgebeeld.De AF-functie
De AF-functie schakelt overaar een andere frequentie op hetzelfde netwerk om een zo goed möglichk ontvangstkwaliteit te verkrijgen. - De fabrieksinstelling is "ON".De AF-functie in- en uitschakelen
1. Raak MODE aan. 2. Raak AF aan. Met iedere aanraking wisselt het AF-display zusammen "ON" en "OFF". 3. Raak RTN aan. * Als de ontvangstkwaliteit van de huidige zenderchychteruit gaat,wordt "SEARCH" op het display afgebeeld en zoekt de radio waar hetzelfde radioprogramma op een andere_freqentie.AF-functie tussen RDS en DAB
Als hetzelfde programme worden uit gezonden door RDS en DAB, en deze functie is ingeschakeld, schakelt dit apparaat automatisch over zodat de uitzending met de Beste ontvangstkwaliteit worden ontvangen. - Deze functie werkkt alleen als de DAB-eenheid DAH923 of DAH913 (optioneel) is aangesloten op het apparaat. - De fabrieksinstelling is "ON". 1. Druk op de [A] toets om de instelfunctie op te roepen. 2. Raak het insteltemdisplay met aan en kies bij "TUNER" het item "LINK ACT".  3. Raak de rechterkant van het display met aan of draai de [ROTARY] knop en kies "ON" of "OFF". ON: Het AF-overschakelenCUSSEN DAB en RDS is ingeschakeld. OFF: Het AF-overschakelen:tussen DAB en RDS isuitgeschakeld. 4. Druk op de [A] toets om terug te keren maar de voorgaande functie.REG (regional programma)-functie
Als de REG-functie is ingeschakeld, kan automatisch worden afgestemd op de regionale zender met de Beste ontvangstkwaliteit. Als deze functie is ingeschakeld en u tijdens het rijden het gebied van een andere regionale zender binnengaat, stembt het apparaat automatisch af op de zender met de beste ontvangstkwaliteit in die regio. - De fabrieksinstelling is "OFF".Opmerkingen:
- Deze functie isuitgeschakeld wanner een nationale zender, zoals BBC R2, worden ontvangen. - De REG-functie ON/OFF-instelling is alleen van invloed als de AF-functie is ingeschakeld.De REG-functie in- en uitschakelen
1. Raak MODE aan. 2. Raak REG aan. Met iedere aanraking wisselt het REGdisplay:tussen "ON"en "OFF". 3. Raak RTN aan.Handmatig op een regionale zender in hetzelfde network afstemmen
- Deze functie werkt alleen als de AF-functie is ingeschakeld. - De bediening verschift afhankelijk van de ON/OFF-instelling van de REG-functie. Als de REG-functie is ingesteld op ON, kannen uitzendingen met een exact overeenkomende PI-code worden ontvangen. Als de REG-functie is ingesteld op OFF, kannen uitzendingen met hetzelfde soort PI-code worden ontvangen.Opmerkingen:
- Deze functie kan worden gebruikt wanneer een regionale uitzending van hetzelfde network wird ontvangen. - De PI-code is een coderingssystem dat een unieke code toenkent aan iedere zender. 1. Raak MODE gedurende 1 seconde of langer aan. De voorkeurgeheugenlijst worden afgebeeld. 2. Raak het voorkeumummer aan van de Voorkeurzender die u wilt ontvangen.TA (verkeersinformatie)
Als een uitzending met verkeersinformatie begint in de TA-standingbyfunctie, worden die uitzending met voorrang ontvangen, ongeacht de functie die in werkung is, zodat u maar de verkeersinformatie kutlusteren. Het is tevens möglichk automatisch op een verkeersprogramma (TP) af te stemmen. - Deze functie kan alleen worden gebruikt als "TP" op het display worden afgebeeld. Als "TP" worden afgebeeld betekent dit dat de RDS-zender die op dat moment worden ontvangen programme's met verkeersinformatie uitzendt.De TA-standingbyfunctie instellen
Als u op de [TA] toets drukt verwijl alleen "TP" op het display worden afgebeeld, worden zowel "TP" als "TA" op het display afgebeeld en wordt het apparaat in de TA-standbyfunctie gezet totdat een uitzending met verkeersinformatie begint. Zodra een uitzending met verkeersinformatie begint, worden "TRA INFO" op het display afgebeeld. Als u op de [TA] toets drukt verwijl een uitzending met verkeersinformatie worden ontvangen, stopt de ontvangst van de uitzending met verkeersinformatie en keert het apparaat terug maar de TA-standbyfunctie.De TA-standingbyfunctie annuleren
Terwijil "TP" en "TA" op het display worden afgebeeld, drukt u op de [TA] toets. Op het display gaat "TA"uit en de TA-standbyfunctie is geannuleerd. - Als "TP" nicht worden aufgebeeld, zal door op de [TA] toets te drukken de radio gaan zoeken maar een TP-zender.Een TP-zender zoeken
Als u op de [TA] toets drukt verwijl "TP" Niet op het display worden afgebeeld, worden "TA" op het display afgebeeld en ontvangt het apparaat automatisch een TP-zender.Opmerking:
- Als een TP-zender nicht kan worden ontvangen, worden "TP SEEK" afgebeeld en worden het zoeken maar een TP-zender voortgezet. Als u nogmaals op de [TA] toets drukt, gaan "TA" en "TP SEEK"uit op het display en worden het zoeken maar een TP-zender geannuleerd.TP-zenders automatisch als voorkeurzender opslaan
U kurz automatisch maximaal zes TP-zenders in het voorkeurgeheugen opslaan. Als er minder dan zes TP-zenders konnen worden ontvangen, zullen de zenders die erder in het gehuugen opgeslagen werden gehandhaafd blijven. 1. Controller dat "TA" worden afgebeeld en raak MODE aan. Als "TA" nicht worden afgebeeld, drukt u op de [TA] toets zodate "TA" worden afgebeeld. 2. Raak A-STORE gedurende 2 seconden of langer aan. MODE verandert in "A-STORE" en het voorkeurnummer van het automatisch opslaan worden op het voorkeurnummerdisplay afgebeeld. - TP-zenders met een goede ontvangstkwaliteit worden in het voorkeurgeheugen opgeslagen. Zelfs als u FM1 of FM2 hebt gekozen, worden een TP-zender opgeslagen in het FM3-geheugen.PTY
Met deze functie kurz u maar een uitzending van het gewenste programmatype luisteren, zichs als het apparaat in een andere bedieningsfunctie staat dan de radio. - In sommige landen zijn PTY-uitzendingen nog nicht beschikbaar. - In de TA-standingbyfunctie, heeft een TP-zender voorrang boven een PTY-zender.De PTY-standingbyfunctie instellen
Als u op de [▶III] toets drukt, worden "PTY" op het display afgebeeld en worden het apparaat in de PTY-standbyfunctie gezet. Zodra een uitzending van het gekozen programmatype begint, worden de naam van het programmatype op het display afgebeeld.De PTY-standingbyfunctie annuleren
Houd de [▶III] toets gedurende 1 seconde of langer ingedrukt. Op het display gaat "PTY"uit en de PTY-standingbyfunctie is geannuleerd.Een PTY-onderbrekingsuitzending annuleren
Druktijdens een PTY-onderbrekingsuitzending op de [▶■] toets. De PTY onderbrekingsuitzending worden geannuleerd en dit apparaat keert terug maar de PTY-standbyfunctie.Een programmatype (PTY) kiezen
1. Als u op de [▶■] toets drukt, roept het apparatusat de PTY-keuzefunctie op. 2. Raak de rechterkant van het display met aan of draai de [ROTARY] knop en kies een programmatype. * Hieronder staan de fabrieksinstellungen die zich opgeslagen:| Voorkeur number | Programmatype | |
| ENGLISH | Inhoud | |
| 001 | News | Nieuws |
| 002 | Info | Informatie |
| 003 | Pop M | Pop muziek |
| 004 | Sport | Sport |
| 005 | Classics | Klassiek |
| 006 | Easy M | Melodie:ontspanningsmuziek |
Een programmatype (PTY) Zoeken
1. Als u op de [▶III] toets drukt, worden de PTY-keuzefunctie opgeroepen. 2. Raak het midden van het display met aan of draai de [ROTARY] knop en kies een programmatype. 3. Raak de linkerkant van het display met aan. Wanneer het display met 且 iwordtaangeraakt, zoekt het apparaat met oplopendefrequentie maar een PTY-uitzending,enwanneer het display met 且 wordt aangeraakt,zoekt het apparaat met aflopende frequentaar een PTY-uitzending. * Als geen zender worden gezonden met de gekozen PTY-uitzending, keert het apparaat terug maar de voorgaande functie.Het PTY-voorkeurgeheugen
1. Als u op de [▶III] toets drukt, worden de PTY-keuzefunctie opgeroepen. 2. Raak het midden van het display met 山 aan en kies een programmatype. U knot kiezen uit de 29 programmatypen in de volgende tabel.| Programma type benaming | ||||
| ENGLISH | DEUTSCH | SVENSKA | FRANÇAIS | Inhoud |
| News | Nachrich | Nyhet | Infos | Nieuws |
| Affairs | Aktuell | Aktuellt | Magazine | Actualiteiten |
| Info | Service | Info | Services | Informatie |
| Sport | Sport | Sport | Sport | Sport |
| Educate | Bildung | Utbildn | Educatif | Educatie |
| Drama | Hör + Lit | Teater | Fiction | Drama |
| Culture | Kultur | Kultur | Culture | Cultuur |
| Science | Wissen | Vetenskp | Sciences | Wetenschap |
| Varied | Unterh | Underh | Divers | Varia en gesprekken |
| Pop M | Pop | Pop | M Pop | Pop muziek |
| Rock M | Rock | Rock | M Rock | Rock muziek |
| Easy M | U-Musik | Lättlyss | Chansons | Melodie:ontspanningsmuziek |
| Light M | L-Musik | L klass | M Cl Lég | Licht klassiek |
| Classics | E-Musik | Klassik | Classiq | Klassiek |
| Other M | - - Musik | Övrig m | Autre M | Overige muziek |
| Weather | Wetter | Väder | Météo | Weerbericht |
| Finance | Wirtsch | Ekonomi | Economie | Economie |
| Children | Kinder | För barn | Enfants | Voor kinderen |
| Social | Soziales | Sozialt | Société | Maatschappelijk |
| Religion | Religion | Andligt | Religion | Religie |
| Phone In | Anruf | Telefon | Forum | Doe mee! |
| Travel | Reise | Resor | Voyages | Reizen |
| Leisure | Freizeit | Fritid | Loisirs | Vrijeijd |
| Jazz | Jazz | Jazz | Jazz | Jazz |
| Country | Country | Country | Country | Country muziek |
| Nation M | Landes M | Nation m | Ch pays | Nationale muziek |
| Oldies | Oldies | Oldies | Rétro | Gouwe Ouwe |
| Folk M | Folklore | Folkm | Folklore | Volkmuziek |
| Document | Feature | Dokument | Document | Documentaires |
Nooduitzending
Als een noodlesitzending worden ontvangen, worden alle functiebedieningen aufgeb broken, worden "ALARM" op het display afgebeeld, en worden de noodlesitzending ontvangen en weergegeven.De noodleszending annuleren
Als u op de [AF] toets op de afstandsbediening drukt, worden de nooduitzending geannuleerd.De taal van het PTY-display veranderen
U=kunt een taal kiezen uit de vier beschikbare talen (Engels, Duits, Zweeds of Frans) waarin het programmatype op het display kan worden afgebeeld. - De fabrieksinstalling is "ENGLISH". 1. Druk op de [A] toets om de instelfunctie op te roepen. 2. Raak het insteltemdisplay met aan en kies bij "TUNER" het item "LANGUAGE".  3. Raak de rechterkant van het display met aan of draai de [ROTARY] knop en kies een taal. * Kies een taal UIT ENGLISH (Engels), DEUTSCH (Duits), SVENSKA (Zweeds) en FRANÇAIS (Frans). 4. Druk op de [A] toets om terug te keren maar de voorgaande functie.De RDS-onderbreking instellen verwijl de 2-ZONE-functie in gebruik is (RDS-INT 2Z)
Als deze functie op worden ingesteld "ON" en zich een RDS-onderbreking voordoet verwijl de 2-ZONE-functie in gebruik is, kan de RDS-informatie worden ontvangen. - Als zich een RDS-onderbreking voordoet, worden de 2-ZONE-functie uitgeschakeld. - Als zich een alarmonderbreking voordoet verwijd “RDS-INT 2Z” is ingesteld op “OFF”, worden de RDS-informatie ontvangen. - De fabrieksinstelling is "ON". 1. Druk op de [A] toets om de instelfunctie op te roepen. 2. Raak het insteltemdisplay met aan en kies bij "TUNER" het item "RDS-INT 2Z".  3. Raak de rechterkant van het display met aan of draai de [ROTARY] knop en kies "ON" of "OFF". ON: De RDS-informatie worden ontvangen wanner zich een RDS-onderbreking voordoet verwijl de 2-ZONE-functie in gebruik is. OFF: Wanner de 2-ZONE-functie in gebruik is, wordt geen RDS-informatie ontvangen, uitgezonderd een alarmonderbreking.Opmerking:
- Als de radiofungtie is gekozen verwijl TA (verkeersinformatie) en PTY zijn ingeschakeld, worden de onderbrekigen ontvangen, zichs als RDS onderbreking isuitgeschakeld. 4. Druk op de [A] toets om terug te keren maar de voorgaande functie.Volume-installing van TA, nooduitzending (ALARM) en PTY
Het volume van de TA-, ALARM- en PTY-onderbrekingsuitzendingen kan worden ingesteldijdens de TA-, ALARM- en PTY-onderbrekingsuitzendingen. - De fabrieksinstelling is "15". Tijdens een TA-, ALARM- of PTY-onderbrekingsuitzending, draait u de [ROTARY] knop recht som of linksom en stelt u het volume in op het gewenste niveau (0 t/m 33). - Als de TA-, ALARM- of PTY-onderbrekingsuitzending is afgelopen, keert het volume terug maar het niveau dat was ingesteld voor de onderbrekingsuitzending.De displays in de CD-functionie
Hoofddisplay
Het hoofddisplay wordt afgebeeld als u op de [ROTARY] knop drukt en de CD-functie kiest.  Als u de linkerkant van het display gedurende 1 seconde of longer aanraakt, worden de bedieningsfunctie omgeschakeld. Track/weergavetijd-display
J01/02:00:
Het nummer van de track die worden weergegeven en de weergavetijd worden afgebeeld. Als u in de standardbedieningsfunctie het display met 0f aanraakt, kurz u de track die u wilt weergeven kiezen, of vooruit/chteruitspoeelen.Titeldisplay
Als u het titeldisplay aanraakt, verandert het display.Mapdisplay (in het geval van MP3/WMA)
Als u in de standardbedieningsfunctie het display met 卡 aanraakt, kurz u een map kiezen.MODE:
Als u dit aanraakt, worden subfuncties afgebeeld. Als u in het geval van MP3/WMA dit gedurende 1 seconde of langer aanraakt, worden de mappenlijst afgebeeld.Opmerking:
- Deze functie werkkt alleen als een disc worden weergegeven. -SCAN-SCAN: Dit worden afgebeeldijdens scanweergave. Door dit aan te raken, worden de scanweergave gestopt. - RPT/RP: Dit worden afgebeeldijdens herhaalde weergave. Door dit aan te raken, worden de herhaalde weergave gestopt. -RDM/RDM: Dit worden afgebeeldijdens willekeurige weergave. Door dit aan te raken, worden de willekeurige weergave gestopt.TOP:
Door dit aan te raken begint de weergave vanaf de eerste track op de disc of in de map die worden weergegeven.  (alleen op het display van de simpele bedieningsfunctie) Door deze toetsen aan te raken kurz u de track kiezen die u wilt weergeven. Door deze toetsen te blijven aanraken=kunt u de tracks vooruit-/achteruiestspoelen.■ Mappenlijstdisplay (in het geval van MP3/WMA)
Deze lijst kunt u afbeelden door op het hoofddisplay gedurende 1 Seconde of langer MODE aan te raken.  MapnaamMapnummer
Als dit grijs worden aufgebeeld,kest u de map nicht kiezen.>>: Bezig met kiezen
Als u een mapnaam aanraakt, keert het display terug maar het hoofddisplay en begint de weergave vanaf de eerste track in de map die u hebt aangeraakt.
Als u dit aanraakt, worden de voorgaande mappenlijst afgebeeld. Door dit gedurende 1 seconde of langer aan te raken, keert het display terug maar het hoofddisplay.
NEXT:
Als u dit aanraakt, worden de volgende mappenlijst afgebeeld.
Wat is MP3?
MP3 is een audiocompressiemethode die is geclassifiedeerd als audiolaag 3 van de MPEGnorm.
Deze audiocompressiemethode is populair geworden bij computerergebruikers en uitgegoeid tot de standardnorm.
MP3 heeft als eigenschap de originele audiodata tot onceveer 10% van de oorspronkelijke groorte te comprimeren verwijl de hoge geluidskwaliteit behouden blijt. Dit betekent dat onceveer 10 muziek-CD's kan den worden opgenomen op een CD-R-disc of CDRW-disc, waardoor lang maar muziek geluisterd kan worden zonder dat de CD要去 worden verwisseld.
Wat is WMA?
WMA is de afkorting van Windows Media Audio: een audiobestandsformaat ontwikkeld door Microsoft Corporation.
Opmerkingen:
- Als u een bestand weergeeft met DRM (Digital Rights Management = digitale-rechtenbeheuer) ingeschakeld voor wma, za er geen geluid worden uitgevoerd (de WMA-indicator knippert).
- Windows Media en het Windows®-logo zijn handelsmerken of wettig gedeponeerde handelsmerken van Microsoft Corporation in de Verenigde Staten en andere landen.
DRM (Digital Rights Management) uitschakelen:
- In het programme Windows Media Player 8, klik op het TOOLS OPTIONS COPY MUSIC-tabblad, en klik verzolgens onder COPY SETTINGS in het selectiekavke proteTECT CONTENT zodat het vinkje uitgaat. Bouw verzolgens de bestanden opnieuw op.
In het programme Windows Media Player 9, klik op het TOOLS OPTIONS MUSIC RECORD-tabblad, en klik verrolgens onder COPY SETTINGS in het selectiekavkeje PROTECT CONTENT zodat het vinkjeuitgaat. Bouw verrolgens de bestanden opnieuw op.
Gebruik door uzelf opgebouwde WMAbestanden voor eigenerverantwoording.
Voorzorgsmaatregelen voor het creeren van een MP3-disc of WMA-disc
- Bruikbare bemonsteringssnelheden en overdrachtsnelheden:
1. MP3: Bemonsteringsfrequentie: 11,025 kHz t/m 48 kHz Overdrachtsnelheid: 8 kbps t/m 320 kbps / VBR
2. WMA: Overdrachtsnelheid: 48 kbps t/m 192 kbps
Bestandsextensies
1. Voeg algid een bestandsextensie ("MP3" of "WMA") toe aan een MP3- of WMA-bestand met behulp van enkel-byte letters. Als u een andere dan de gespecifieerde bestandsextensie toevoegt, of vergeet een bestandsextensie toe te voegen, kan het bestand Niet worden weergegeven.
2. Bestanden die geen MP3/WMA-data bevatten können nicht worden weergegeben. De aanduiding "--: --" worden op het weergavetijddisplay afgebeeld als u probeert bestanden wee ter te geben die geen mp3/ wma-data bevatten.
Logisch formaat (bestandssysteme)
1. Bij het schrijven van een MP3/WMA-bestand op een CD-R-disc of CD-RW-disc, moet u "ISO9660 level 1, 2 of JOLIET of Romeo" kiezen als formaat van de schrijfsoftware. Normale weergave is Niet möglich als de disc is opgenomen in een ander formaat.
2. De mapnaam en de bestandsnaam hunnen worden afgebeel als de titel in het geval van MP3/WMA-weergave, maar de titel moet korter zichen dan 128 enkel-byte alfanumerieke tekens (inclusief de bestandsextensie).
3. Geef een bestand nicht bezelfde naam als demap waarin deze zit.
Mapstructuur
1. Een disc mag een mapstructuur van maximaal 8 hierarchische niveaus diep hebben.
Aantal bestanden of mappings
1. Maximaal 255 bestanden konnen per map worden herkend. Maximaal 500 bestanden konnen worden weergegeven.
2. De tracks worden weergegeven in de volgorde waarin deze op de disc werden opgenomen. (De tracks worden nicht alti\dj weergegeven in bezelfde volgorde die op een computer worden aangegeven.)
3. Enige ruis kan optreden afhankelijk van het type codeersoftware dat voor de opname werk gebruikt.
Multisessieskiezen
Met deze functie kunt u of CD-DA-bestanden, of MP3/WMA-bestanden kiezen in het geval een disc (bijv. een CD-EXTRA-disc) een combinatie van CD-DA-bestanden en MP3/WMA-bestanden bevat.
1. Raak MODE aan.
2. Raak M-SESS aan. Met iedere aanraking van M-SESS wisselt het M-SESS-displayussen "CD" (CD-Daweergave) en "MP3/WMA" (MP3/WMA-weergave).
* Als M-SESS nicht worden afgebeeld, raakt u NEXT aan.
3. Raak RTN aan. De instelling voor het kiezen van multisessies is van kracht de volgende keer dat u een CD in het apparaatplaatst.
Opmerking:
- Als u een CCCD (Copy Control CD) weergeeft, stelt u de instelling in op het CD-type. Als dit is ingesteld op het MP3/WMA-type, kan in sommige gevallen de CD Niet normal worden weergegeven.
A VOORZICTHIG
Wees voorzichtig dat uw hand of vingers Niet bekneld raken bij het openen en sluiten van het KANTELEND BEDIENINGSPANEEL.
Opmerkingen:
- Als het KANTELEND BEDIENINGSPANEEL Niet volledig worden geopend, opent u het voorzichtig met uw hand.
- Nadat u een CD hebte geplaatst, sluit u altijd eerst het KANTELEND BEDIENINGSPANEEL.
Probeer nicht uw hand of vinger in de discgleuf te steken. Steek ook nooit vreme de voorwerpen in de discgleuf.
- Steek ook nooit discs in de discgleuf waarop lijmresten onder plakband of verhuurstickersuitkomt,of discs waarop nog restanten vanplakband of verhuurstickers zitten. Het kan onmobelijk zijn dergelijkde discs uit het apparaat te werpen en ze konnen tot storing leiden.
Een CD plaatsen
1. Druk op de [▲] toets. Het bedieningspaneel gaat open.
2. Plaats de disc in de discgleuf. Nadat de disc is geplaatst gaat het bedieningspaneel automatisch dicht.
Opmerkingen:
- Steek nooit vreeimde voorwerpen in de discgleuf.
- Als de CD Niet gemakkelijk kan worden geplaatst, kan hetijken dat er reeds een andere CD in de discgleuf zich, of dat het apparaat要去 worden gerepareerd.
Discs zonder het QUSG of logen CD-ROMs kuren nicht door dit apparaat worden weergegeben.
- Het is möglich dat sommige CD's opgenomen in de CD-R/CD-RW-functionie nicht bruikbaar zijn.
Een 8-cm CD plaatsen
U heeft geen adapterring nodig om een 8-cm CD waar te gehen. Plaats de 8-cm CD in het midden van de discgleuf.
Een CD uitwerpen
U kunt een CD uitwerpen door op de [▲] toets te drukken, zichs als het apparaat isuitgeschakeld of met de contactsleutel de stroom is onderbroken.
A VOORZICHTIG
Nadat de disc is uitgeworpen, drukt u op de [A] toets om het bedieningspaneel te sluiten. Als u het bedieningspaneel open LAST staan, hoort u een dubbe pleiptoon en gaat het bedieningspaneel automatisch dicht.
1. Druk op de [A] toets.
Het bedieningspaneel gaat open en de disc wordtuitgeworpen.De functie wordt automatisch ingesteld op de radiofunctie.
* Zorg ervoor dat u een uitgeworpen disc uit het apparaat verwijdert. Als u de disc in de discgleuf LAST zitten, worden deze na 15 seconden of langer automatisch wee in het apparaat getrokken en gaat het bedieningspaneel dicht (automatisch opnieuw plaatsen).
* Single-CD's worden nicht automatisch opniewu geplaatst. Zorg ervoor dat u een single-CD UIT het apparaat haalt nadat.Deze isuitgeworpen.
A VOORZICHTIG
Als u buitensporige kracht gebruikt om een disc teplaatsen nadat deze is uitgeworpen, kan de disc worden bekrant. Haal de disc eruit voordat u deze weeer plaatst.
Een disc beluisteren die al in het apparaat is geplaatst
1. Druk op de [ROTARY] knop om de CD-functie te kiezen.
* De weergave begint automatisch nadat de functie is veranderd in de CD-functie.
De weergave pauzeren
1. Druk op de [▶■] toets.
De weergave hervatten
1. Druk nogmaals op de [▶■] toets.
Een track kiezen
Als een CD-R of CD-RW is geplaatst waarop een MP3-bestand of WMA-bestand is opgenomen,(Int u alleen tracks kiezen die in bezelfde map+zijn opgenomen door het trackdisplay met 一 _ 一 aan te raken.
1. Als u maar de volgende track wilt luisteren, raakt u het trackdisplay met 日 aan.
2. Als u waar de voorgaande track wilt luisteren, raakt u het trackdisplay tweeemaal met aan.
Door met 日 aan te raken worden de volgende track weergegeven. Als u vaker met 日 aanraakt, verspringt u hetzelfde aantal tracks vooruit als u met 日 heb t aangeraakt, waarna de weergave van de track begint.
Door met 山 aan te raken worden de voorgaande track weergegeven. Als u vaker met 山 aanraakt, verspringt u hetzelfde aantal tracks achefteruit als u met 山 hebt aangeraakt, waarna de weergave van de track begint.
* Als u het trackdisplay tweeemaal met † aanraakt verwijl het begin van een track worden weergegeven, worden soms tweet tracks achechteruit gesprongen, en begint de weergave van die track.
Een map kiezen
Om een andere map te kiezen, raakt u het mapdisplay met 卡 aan of voert u de volgende stappen UIT.
1. Raak MODE gedurende 1 seconde of longer aan.
De mappenlijst worden afgebeeld. Door PREV of NEXT aan te raken worden het voorgaande of volgende gedeelte van de mappenlijst afgebeeld.
2. Raak de mapnaam aan.
De afspeellijst weergeven
U kunt een afspeellijst (een M3U-bestand) weergeven.
Merk城县 op dat van de M3U-bestanden die op dat moment tot vrijlagen diep (inclusief de
root) in de hierarchie zijn opgeslagen, slechts de bovenste vrij bestanden met een neue tijdstempel können worden weergegeven.
Opmerkingen:
Maximaal 255 bestanden van een enkele aftspeellijst kannen worden weergegeven.
- Alleen MP3- of WMA-bestanden die op dat moment tot vrij lagen diep (inclusief de root) in de hierarchie� opgeslagen, hunnen worden weergegeven.
Ga als volgt te werk om een afspeellijst wee tergeven.
1. Raak MODE aan.
2. Raak NEXT aan.
3. Raak PLY LIST aan. Het lezen van de afspeellijst begint. Wanner het lezen van de afspeellijst waar is, start de weergave van de afspeellijst met de meest recente tijdstempel automatisch. De bediening voor het kiezen van de afspeellijst of tracks op de afspeellijst isdezelfde als die voor het kiezen van een map of tracks in een map.
* PLY LIST worden nicht aufgebeeld als geen correcte aftspeellijst (een M3U-bestand) is opgeslagen op de CD-R of CD-RW die in het apparaat is geplaatst.
De weergave van de afspeellijst stoppen
1. Raak MODE aan.
2. Raak NEXT aan.
3. Raak PLY LIST aan.
Vooruit- en Achteruitspoelen
1. Om vooruit te spoelen raakt u het trackdisplay met 出 aan.
2. Om achechteruit te spoelen raakt u het trackdisplay met aan.
Beginfunctie
De beginfungtie doet de CD-speler terugkeren\
aar het begin van de eerste track op de CD.
1. Raak TOP aan. De weergave begint vanaf de eerste track (tracknummer 1).
In het geval van MP3/WMA, keert de CDspeler terug maar de eerste track in de map die worden weergegeven.
Scanweergave
Met deze functie=kunt de eerste 10 seconden van iedere track op de disc weergeven.
1. Raak MODE aan.
2. Raak P -SCAN aan. MODE verandert in " P -SCAN" en de scanweergave begint.
* De scanweergave begint vanaf de track die volgt op de track die op dat moment worden weergegeven.
De scanweergave stoppen
1. Raak P -SCAN aan. P -SCAN verandert in "MODE" en de track die werden weergegeven toen u P -SCAN aanraakte, worden weergegeven.
Mapscanweergave
Met deze functie=kunt u de eerste 10 seconden weergeven van de eerste track in iedere map op een MP3-disc of WMA-disc.
1. Raak MODE aan.
2. Raak -SCAN aan. MODE verandert in " -SCAN" en de mapscanweergave begint.
* De mapscanweergave begint vanaf de map die volgt op de map die op dat moment worden weergegeven.
De mapscanweergave stoppen
1. Raak -SCAN aan. -SCAN display changes toverandert in "MODE" en de weergave begint vanaf de track die werd weergegeven toen u -SCAN aanraakte.
Herhaalde weergave
Met deze functie kurz u de huidige track herhaaldelijk weergeven.
1. Raak MODE aan.
2. Raak J^ -REPEAT aan. MODE verandert in "RPT" en de herhaalde weergave begint.
De herhaalde weergave stoppen
1. Raak P -RPT aan. P -RPT verandert in "MODE" en de normale weergave begint vanaf de track die werden weergegeven voordat u P -RPT aanraakte.
Herhaalde mapweergave
Met deze functie=kunt de map die op dat moment wordenweergeveen herhaaldelijk weergeven. Deze functie is alleen beschikbaar wanner een CD-R of CD-RW waarop MP3bestanden of WMA-bestanden zijn opgenomen, is geplaatst.
1. Raak MODE aan.
2. Raak -REPEAT aan. MODE verandert in "RPT" en de herhaalde mapweergave begint.
De herhaalde mapweergave stoppen
1. Raak -RPT aan. -RPT verandert in "MODE" en de normale weergave begun vanaf de track die werd weergegeven voordat u -RPT aanraakte.
Willekeurige weergave
Met deze functie=kunt u alle tracks die op een disc,zijn opgenomen in willekeurige volgorde weergeven.
-RANDOM
Hiermee geeft u alle tracks op de disc in willekeurige volgorde weeR. Als de disc twee ofeer mappings bevat, worder alle tracks in de map in willekeurige volgorde weergegeven, gevolgd door alle tracks in de volgende map.Dit proces herhaalt zich voor alle mappen.
-RANDOM
Hiermee geeft u alle tracks op de disc in willekeurige volgorde weeer. Deze functie is alleen beschikbaar wanneer een CD-R of CD-RW waarop MP3-bestanden of MWA-bestanden zich opgenomen, is geplaatst.
1. Raak MODE aan.
2. Raak P -RANDOM of -RANDOM aan. MODE verandert in " P RDM" of "RDM", en de willekeurige weergave begint.
De willekeurige weergave stoppen
1. Raak F -RDM of -RDM aan. F -RDM of -RDM verandert in "MODE" en de normale weergave begint vanaf de track die werden weergegeven voordat u F -RDM of -RDM aanraakte.
Meerdere Personen luisteren maar twee verschillende muziekbronnen (2-ZONE-functie)
De 2-ZONE-functie kan afzonderlijk geluid uitvoeren aan de MAIN-zone en de SUB-zone doordat het apparaat twee bronnen tegelijktijd kan verwerken, zodate twee ofeer luisteraars maar twee verschillende muziekbronnen konnen luisteren.
Dit apparaat kan de interne bronnen (radio, CD, MP3, enz.) weergeven en kan daarnaast tegelijkkertijd materiaal weergeven vanaf externe apparatuur, die is aangesloten met behulp van een CeNET-kabel (bijv. CD-wisselaar, enz.).
De bronnen van de MAIN-zone worden
weergegeven via de luidsprekers in uw auto, en
de bronnen van de SUB-zone worden
weergegeven via de hoofdtelefoon (WH143).

De bovenste twee afbeeldingen zijn voorbeelden wanner een geluidsbron worden weergegeven door een interne bedieningsfunctie van het apparatus (radio, CD, AUX) via de luidsprekers.
De onderste afbeelding is een voorbeeld wonneer een geluidsbron worden weergegeven door een externe bedieningsfunctie van het apparatus (CD-wisselaar, DVD-wisselaar, TV, AUX) via de luidsprekers.
* De fabrieksinstalling is "OFF".
Opmerkingen:
- De 2-ZONE-functie is nicht beschikkaar als DAB is aangesloten.
- Door aan de [ROTARY] knop op het apparaat te draaien verandert alleen het volumeniveau van het geluid uit de luidsprekers.
De AUX-SENS-instelling heeft betrekking op zowel de luidsprekers als de hoofdtelefoon.
Het display bij gebruik van de 2-ZONE-functie
In het midden van het display wordt "INT." (interne functie) of "EXT." (externe functie) afgebeeld om aan te geven of u de weergave van een interne bedieningsfunctie of een externe bedieningsfunctie hoor in de huidige bedieningsfunctie van de 2-ZONE-functie.
1. Druk op de [SOUND] toets.
2. Raak 2-ZONE aan.

3. Raak in het midden van het display ON/OFF aan gedurende 1 Seconde of langer.

Als 2-ZONE is ingesteld op ON, wordt het huidige type 2-ZONE afgebeeld.
De 2-ZONE-functie kan nicht worden gebrukt wanner 2-ZONE is ingesteld op OFF. Druk op de [SOUND] toets om terug te keren maar de oorspronkelijke functie.
4. Raak het ON/OFF-display met 山 山 山 aan en kies het type 2-ZONE.
2-ZONE-type
Luidsprekers Hoofdtelefon Type 1 Intern (interne functie) Extern (externe functie) Type 2 Extern (externe functie) Intern (interne functie)
5. Raak het luidsprekerdisplay of het hoofdtelefoondisplay aan en kies de bedieningsfunctie van de 2-ZONE-functie.
Als u het luidsprekerdisplay aanraakt,kest u de geluidsbron bedieren die via de luidsprekers worden weergegeven.
Als u het hoofdtelefoondisplay aanraakt,
kunt u de geluidsbron bedieren die via de
hoofdtelefooon worden weergegeven.
6. Druk op de [SOUND] toets om terug te keren maar de oorspronkelijke functie.
Meerdere Personen luisteren maar twee verschillende muziekbronnen (2-ZONE-functie)
De 2-ZONE-functie in- en uitschakelen
1. Houd de [SOUND] toets op het apparaat gedurende 1 seconde of langer ingedrukt.
Het 2-ZONE-type omschakelen
Houd de [TA] toets op het apparataat gedurende 1 seconde of langer ingedrukt verwijl de 2-ZONE-functie is ingeschakeld.
De bedieningsfunctie van de 2-ZONE-functie omschakelen
Druk op de [TA] toets op het apparaat verwijl de 2-ZONE-functie is ingeschakeld.
De functie kiezen wanneer de 2-ZONE-functie is ingeschakeld
Als u een CD staat terwijl de 2-ZONE-functie is ingeschakeld, veranderen de bedieningsfuncties van de interne functie van dit apparaat waar de CD-functie en begint de weergave automatisch.
1. Druk op de [TA] toets op het apparaat om de bedieningsfunctie van de 2-ZONE-functie om te schakelen.
Het (luidspreker- of hoofdtelefoon-) display van de geluidsbron die op dat moment kan worden bediend, wisselt om.
2. Houd de [TA] toets gedurende 1 seconde of langer ingedrukt en kies het 2-ZONE-type. Het display wisselt:tussen "INT."en "EXT."
3. Druk op de [ROTARY] knop.
Met iedere druk op de [ROTARY] knop terwijl "INT." worden afgebeeld, verandert de functie in onderstaande volgorde:
$$
\mathrm {R a d i o} \rightarrow \mathrm {C D} \rightarrow \mathrm {A U X} \rightarrow \mathrm {R a d i o} \dots
$$
Met iedere druk op de [ROTARY] knop verwijl "EXT." worden afgebeeld, verandert de functie in onderstaande volgorde:
$$
\begin{array}{l}\text {A U X} \rightarrow (\text {C D - w i s s e l a r}) \rightarrow (\text {D V D - w i s s e l a r})\\\rightarrow (\text {T V} ^ {* 1}) \rightarrow \text {A U X . . .}\end{array}
$$
* De functie van een apparaat dat Niet is aangesloten worden Niet afgebeeld.
*1 Als de TV-functie is gekozen, verandert de functie automatisch maar de VTR-functie en kan nicht worden veranderd.
Gemeenschappelijk bedieningen in jegere functie
Het display in de titelinoferfunctie
Hoofddisplay
Dit worden aufgebeeld wanner de titelinvoerfungtie is gekozen (zie blz. 14).

Teksttypedisplay
A: Hoofdletters
a: Kleine letters
0-9: Cijfers
!?: Leestekens
A: Accenten
Titeldisplay
De huidig ingevoerde titel worden afgebeeld. Raak dit display met 卡 巴 卡 aan en kies de invoerpositie. Door dit display gedurende 2 seconden langer aan te raken, verdwijnen alle tekens van de titeltekst.
Invoertekstdisplay
Raak dit display met 山 aan en kies de tekst die u wilt invoeren.
RTN
Door dit aan te raken worden het invoeren van titels geannuleerd en keert het apparaat terug waar het oorspronkelijke display. Door dit gedurende 1 seconde of langer aan te raken worden de tekstlijf afgebeeld die hoor bij het huidige teksttype.
MEMO
Door dit gedurende 2 seconden of langer aan te raken kut u de ingevoerde titel opslaan, en keert het apparaat terug maar het oorspronkelijke display.
Tekstlijstdisplay
Deze lijst kurz u afbeelden door op het hoofddisplay gedurende 1 Seconde of langer RTN aan te raken.

Teksttype
De tekst die worden aufgebeeld verandert aan de hand van de instelling op het teksttypedataplay.
Als het teksttypedisplay is ingesteld op "A": A E I M Q U X (spatie)
Als het teksttypedisplay is ingesteld op “a”: a e i m q u
Als het teksttypedisplay is ingesteld op "0-9", "!?" of "Ä":
Alle tekens worden afgebeeld.
RTN
Als u dit aanraakt, keert het display terug maar het hoofddisplay.
NEXT
Als u dit aanraakt, worden de volgende tekstlijst afgebeeld.
Eentitel invoeren
U kunt TV-zenders en CD's een titel van maximaal 10 tekens geben. Deze titels können worden afgebeeld wanner een TV-uitzending worden ontvangen of een CD worden weergegeben.
Het aantal titels dat u kunt invoeren is als volgt:
Functie Aantal titels CD-functie 50 titles TV-functie 20 titles
CD-wisselaarfunctie Aantal titels DCZ628 aangesloten 100 titles CDC655Tz aangesloten 100 titles CDC1255z aangesloten 50 titles
1. Ontvang de TV-zender of geef de CD waar waarvan u de titel wilt invoeren.
2. Raak het midden van het display aan om het gebruikerstiteldisplay op te roepen. Het display verandert maar het gebruikerstiteldisplay en "USER" worden afgebeeld boven het voorkeurnummerdisplay.
3. Houd de [A] toets gedurende 1 seconde of langer ingedrukt. De functie verandert maar de titelinvoerfunctie.
4. Raak dit display met 卡 aan en kies de invoerpositie. De positie van de knipperende tekst worden\
haar links of rechts verplaatst.

* U kunt maximaal 10 tekens invoeren.
A VOORZICHTIG
Als u op de terugsteltoets drukt worden alle inhoud, waaronder de titels,uit de gebruikersgeugens van dit apparaat gewist.
5. Raak het teksttypedisplay met 山 aaan en kies het teksttype.
Met iedere aanraking met 卡 verandert het tekstype als volgt:
Hoofdletters
(spatie) ABCDEFGHIJKLMNOPQ RSTUVWXYZ
Kleine letters
abcdefghijklmnpqrstuvwxzy Cijfers
0123456789
Leestekens, Accenten
AEEEEIAOaaaeeetouoo
6. Raak de rechterkant van het display met aan, of draai de [ROTARY] knop en kies het teken dat u wilt invoeren.
7. Herhaal de stappen 4 t/m 6 om de hele titel in te voeren.
Als u het titeldisplay gedurende 2 seconden of langer aanraakt, verdwijnen alle tot dan toe ingevoerde tekens van de titeltekst.
8. Raak MEMO gedurende 2 seconden of langer aan.
U hoor een lange pieptoon en de titel worden in het geheugen opgeslagen.
Het titeldisplay veranderen in het klokdisplay of een ander display
Raak het midden van het display aan.
■ Als u een(AP) neue titel opslaat verwijl het maximale aantal titels al is opgeslagen
In het geval van een TV-zender
De titels die nicht zich opgeslagen in de voorkeurkanalen worden automatisch gewist en deijke titel worden in het geheugen opgeslagen.
In het geval van een CD
Titels van CD's die het minst zijn weergegeven worden gewist en de(APpe titel worden in het geheugen opgeslagen.
Eentitelwissen
1. Ontvang de TV-zender of geef de CD waar van u de titel wilt wissen.
2. Raak het midden van het display aan om het gebruikerstiteldisplay op te roepen.
Het display verandertaar het gebruikerstiteldisplay en "USER"wordt afgebeeld boven het voorkeurnummerdisplay.
3. Houd de [A] toets gedurende 1 seconde of longer ingedrukt.
De functie verandert maar de titelinoverfunctie.
4. Raak het titeldisplay gedurende 2 seconden of longer aan.
Alle tekens van de titeltekst verdwijnen.
5. Raak MEMO gedurende 2 seconden of longer aan.
U hoor een lange pieptoon en de titel worden gewist.
Deinstallingenveranderen Deinstelitemskiezen
1. Druk op de [A] toets.
De functie verandert maar de instelfunctie.

2. Raak het insteltemdisplay met 山 山 aan en kies het item dat u wilt instellen.
* Als u de linkerkant van het display met
anraakt, worden de hoofditem een voor een doorlopen.
Als u de linkerkant van het display met
aanraakt, worden de hoofditemsononderbroken doorlopen.
* Als u het midden van het display met
aanraakt, worden de subitems eén voor een doorkopen. Als u het midden van het display met aanraakt, worden de subitems ononderbroken doorkopen.
3. Als op de rechterkant van het display "EDIT" wordt afgebeeld, raakt u EDIT aan om over te schakelen maar het instellingendisplay.

4. Raak de rechterkant van het display met 卡 aan of draai de [ROTARY] knop en kies een instelling.
■ Terugkeren maar de oorspronkelijke functie
1. Druk nogmaals op de [A] toets.
- Instelitems
Hoofditem SubItem DISPLAY SCREEN SVR
• Schermbeveiliging (zie blz. 41) MSG INPUT
• Berichtinformatie-invoer (zie blz. 41) MESSAGE
• Berichtdisplayinstalling bij in-/uitschakelen (zie blz. 42) S/A SENS
• De gevoeligheid van de spectrumanalysator instellen (zie blz. 42) SCROLL
• De doorloopsnelheid instellen (zie blz. 42) APPERNCE DIMMER IN
• De automatische displaydimmer instellen (zie blz. 43) DMR LEVEL
• Het niveau van de displaydimmer instellen (zie blz. 43) CONTRAST
• Het displaycontrast instellen (zie blz. 43) BLINK LED
• De LED latent knipperen wanner de DCP worden verwijderd (zie blz. 43) BEEP
• De pieptoon instellen (zie blz. 44) Hoofditem Subitem SOUND AC-PRO III
• De VSE-functiekiezen (STD/PRO) (zie blz. 44) EQ SELECT
• De equalizerfunctiekiezen (zie blz. 44) SP-SETTING
• De luidsprekerconfigatie instellen (zie blz. 44) CENTER-SP / SUB-WOOFER
• De subwoofer in-/uitschakelen (zie blz. 45) HPF / SUB-W LPF
• De filterfrequentie van de luidsprekers instellen (zie blz. 45) AMP CANCEL
• De ingebouwdeversterker in-/uitschakelen (zie blz. 46) SP GAIN
• Het uitgangsiveau van de luidsprekers instellen (zie blz. 46) PL II DELAY SRD-SP
• De vertragsstijd van de achterluidsprekers instellen (zie blz. 46) PL II CONT PANorama / DIMENSION / CTR WIDTH
• De muziekfunctie in detail instellen (zie blz. 47) TUNER TV ARER
• Het TV-zendergebiedinstellen (zie blz. 57) TV DIVER
• De TV-diversiteitinstellen (zie blz. 57) LINK ACT
• De AF-functie:tussen RDS en DAB instellen (zie blz. 26) LANGUAGE
• De taal van het PTY-display instellen (zie blz. 30) RDS-INT 2Z
• De RDS-onderbreking verwijl de 2-ZONE-functie is ingeschakeld instellen (zie blz. 30) SETTING AUX / TEL
• AUX en TELinstellen (zie blz. 47) AUX SENS
• Het ingangsniveau van de draagbare audio (AUX) instellen (zie blz. 48) TEL-SP
• De autoluidsprekeruitgang voor de mobiele telefoon (TEL-002, optioneel) instellen (zie blz. 48) TEL-SWITCH
• De mobiele-telefononderbreking instellen (zie blz. 48) CALIBRATE / A-VOL SENS
• De automatische volumeregeling instellen (zie blz. 49) SYSTEM CHECK
• Een systemcontroleuitvoeren (zie blz. 49) CODEMATIC
• De beveiliging instellen (zie blz. 50)
De schermbeveiliging instellen (SCREEN SVR)
Met deze functie=kunt u een schermbeveiliging. laten afbeelden als u het apparaat gedurende ongeveer 30 seconden nicht bedient.
- De fabrieksinstelling is "ON".
1. Druk op de [A] toets om de instelfunctie op te roepen.
2. Raak het insteltemdisplay met 卡 aan en kies bij "DISPLAY" het item "SCREEN SVR".

3. Raak de rechterkant van het display met aan of draai de [ROTARY] knop en kies "ON" of "OFF".
4. Druk op de [A] toets om terug te keren maar de oorspronkelijke functie.
Het schermbeveiligingsdisplay wisselen
Raak PREV of NEXT aan verwij de schermbeveiliging worden afgebeeld.
Met iedere aanraking hiervan wisselt het schermbeveiligingsdisplay.
- Schermbeveiligingen
Schembeveiligingspatroon 1


Schermbeveiligingspatroon 2

Schermbeveiligingspatroon 3

Spectrumanalysepatroon 1

Spectrumanalysepatroon 2
Spectrumanalysepatroon 3

Spectrumanalysepatroon 4

Berichtinformationie

SS SCAN
Bovenstaande 8 displays worden elk gedurende ongeveer 10 seconden aufgebeeld.
Berichten invoeren om af te beelden als berichtinformationatie (MSG INPUT)
1 type schermbeveiliging is beschikbaar. Voor verdere informatie over het wisselen van de schermbeveiligingsdisplays, raadpleegt u "De schermbeveiliging instellen".
- U kunt maximaal 30 tekens invoeren.
- De fabrieksinstalling is "Active Matrix Control System".
1. Druk op de [A] toets om de instelfunctie op te roepen.
2. Raak het insteltemdisplay met aan en kies bij "DISPLAY" het item "MSG INPUT".

DISPLAY
ADJUST MODE
MSG INPUT> EDIT
EDIT
3. Raak EDIT aan.
De functie verandert maar de
berichtinvoerfunctie.
4. Raak het midden van het display met 山 aan en kies de invoerpositie.
* Om het bericht te wissen, raakt u het midden van het display gedurende 2 seconden of langer aan. Als u de bediening van stap 8 uitvoert werwijl het bericht is gewist, keert het bericht terug maar de fabrieksinstelling.
5. Raak de linkerkant van het display met aan en kies het teksttype.
Met iedere aanraking met 山 山 山 verandert het teksttype. Voor verdere informatatie, zie bladzijde 37.
6. Raak de rechterkant van het display met aan, of draai de [ROTARY] knop en kies het teken dat u wilt invoeren.
7. Herhaal de stappen 4 t/m 6 om het hele bericht in te voeren.
8. Raak MEMO gedurende 2 seconden of langer aan.
U hoor een lange pieptoon en het bericht wordt in het geheugen opgeslagen.
9. Druk op de [A] toets om terug te keren maar de oorspronkelijke functie.
Berichten afbeelden (MESSAGE)
Met deze functie=kuntu berachten afbeelden op hetdisplaywannerhetapparaatwordin-ofuitgeschakeld. "Hello"wordtafgebeeldwannerhet apparaatwordtingschakeld,en"Seeyou" wordtafgebeeldwannerhet apparaatwordtuitgeschakeld.
- De fabrieksinstelling is "ON".
1. Druk op de [A] toets om de instelfunctie op te roepen.
2. Raak het insteltemdisplay met aan en kies bij "DISPLAY" het item "MESSAGE".

3. Raak de rechterkant van het display met aan of draai de [ROTARY] knop en kies "ON" of "OFF".
4. Druk op de [A] toets om terug te keren maar de oorspronkelijke functie.
De gevoeligkeit van de spectrumanalysator instellen (S/A SENS)
Met deze functie=kuntudgevoeligheid(grootte van de afwijking) van de spectrumanalysator instellen.Voor verdere informatie over het afbeelden van de spectrumanalysator, raadpleegt u "Het display omschakenen" (zie blz.13)of"De schermbeveilig inginstellen" (zie blz.41).
- De fabrieksinstelling is "MID".
1. Druk op de [A] toets om de instelfunctie op te roepen.
2. Raak het instelitemdisplay met aan en kies bij "DISPLAY" het item "S/A SENS".

DISPLAY
ADJUST MODE
S/A SENS > MID
3. Raak de rechterkant van het display met 卡 aan of draai de [ROTARY] knop en stel de gevoeligheid in.
* Kies LOW (eenkleine afwijking), MID of HIGH (eengroef afwijking).
4. Druk op de [A] toets om terug te keren maar de oorspronkelijke functie.
De doorloopsnelheid van het display instellen (SCROLL)
Met deze functie kurz u de doorloopsnelheid verlagen als de tekst te snel over het display loopt waardoor u deze Niet kurz lezen.
- De fabrieksinstelling is "SPEED 2".
1. Druk op de [A] toets om de instelfunctie op te roepen.
2. Raak het instelitemdisplay met aan en kies bij "DISPLAY" het item "SCROLL".

DISPLAY
ADJUST MODE
SCROLL » SPEED2
3. Raak de rechterkant van het display met aan of draai de [ROTARY] knop en stel de gevoeligheid in.
* Dit item kan worden ingesteld binnen het bereik van SPEED 1 t/m SPEED 7.
Stel het item in verwijl u kijkth hoe het display verandert.
4. Druk op de [A] toets om terug te keren maar de oorspronkelijke functie.
De automatische displaydimmer instellen (DIMMER IN)
Met deze functie=kunt u de displayverlichting verzwakken overeenkomstig de verlichting of helderheid in uw auto.
Stel de automatische displaydimmer in op "AUTO" (gekoppeld aan de helderheid in uw auto) of "ILLUMI" (gekoppeld aan de verlichting in uw auto).
- Als de automatische displaydimmer is ingesteld op "AUTO", worden de helderheid van het display gedimd afhankelijk van delichtsterkte gemeten door deze sensor.
- Stel verwolgens het niveau van de displaydimmer in bij DMR LEVEL.
- De fabrieksinstelling is "AUTO".
1. Druk op de [A] toets om de instelfunctie op te roepen.
2. Raak het insteltemdisplay met aan en kies bij "APPERNCE" het item "DIMMER IN".

APPERNCE
ADJUST MODE
DIMMER IN> AUTO
3. Raak de rechterkant van het display met 卡 aan of draai de [ROTARY] knop en stel het niveau van de displaydimmer in.
* Kies een instelling UIT OFF (displaydimmeruitgeschakeld, helder) en 1 (licht gedimdt) t/m 5 (donker).
4. Druk op de [A] toets om terug te keren maar de oorspronkelijke functie.
Het displaycontrast instellen (CONTRAST)
Met deze functie=kunt u het contrast van hetdisplay instellen afhankelijk van de hoekwaaronder het apparaat is gemonteerd.
- De fabrieksinstelling is "6".
1. Druk op de [A] toets om de instelfunctie op te roepen.
2. Raak het insteltemdisplay met aan en kies bij "APPERNCE" het item "CONTRAST".
3. Raak de rechterkant van het display met 卡 aan of draai de [ROTARY] knop en stel het contrast in.

APPENCE
ADJUST MODE
CONTRAST 》 6
* Dit item kan worden ingesteld binnen het bereik van 1 t/m 11.
Stel het item in terwijl u kijkht hoe het display verandert.
4. Druk op de [A] toets om terug te keren maar de oorspronkelijke functie.
3. Raak de rechterkant van het display met aan of draai de [ROTARY] knop en kies "AUTO" of "ILLUMI".
4. Druk op de [A] toets om terug te keren maar de oorspronkelijke functie.
De LED laten knipperen wanneer de DCP worden verwijderd (BLINK LED)
Met deze functie kutu de LED van dit apparaat\
laten knipperen wonneer de DCP worden\
verwijderd.
- De fabrieksinstelling is "OFF".
1. Druk op de [A] toets om de instelfunctie op te roepen.
2. Raak het insteltemdisplay met 山 aan en kies bij "APPERNCE" het item "BLINK RED".

APPERNCE
ADJUST MODE
DMR LEVEL》 3
ADJUST MODE
BLINK LED》 OFF
3. Raak de rechterkant van het display met aan of draai de [ROTARY] knop en kies "ON" of "OFF".
4. Druk op de [A] toets om terug te keren maar de oorspronkelijke functie.
De pieptoon instellen voor wanner de toetsen worden bediend (BEEP)
Met deze functie=kunt u de korte en lange hoge pieptonen ("BEEP" genaamd) instellen die u hoort wanner een toets worden bediend.
- De fabrieksinstelling is "ON".
1. Druk op de [A] toets om de instelfunctie op te roepen.
2. Raak het insteltemdisplay met aan en kies bij "APPERNCE" het item "BEEP".

3. Raak de rechterkant van het display met 卡 aan of draai de [ROTARY] knop en kies "ON" of "OFF".
4. Druk op de [A] toets om terug te keren maar de oorspronkelijke functie.
Een functie kiezen
Dit item kan nicht worden gekozen wanner Dolby Pro Logic II is ingesteld op "MUSIC" of "MATRIX" (zie blz. 17).
- De fabrieksinstelling is "PRO" voor AC-PRO III en "PEQ" voor EQ SELECT.
AC-PROIII
Als "STD" (standaardfunctie) is gekozen, kunden de geluidskwaliteit en het geluidsveld worden ingesteld met VSE (Virtual Space Enhancer) zodate in eache zitpositie hetzelfdelle geluideffect kan worden verkrogen.
Als "PRO" (professionele functie) is gekozen, können de geluidskwaliteit en het geluidsveld in detail afzonderlijk voor iedere zitpositie worden ingesteld.
EQ SELECT
Als "P.EQ" (equalizerfunctie) is gekozen, kan het hele freiorentiebereik worden gecompenseerd door een gedetailleerde vloeende kromme.
Als "BAS / TREB" (lagetonen-/ hogetonenfunctie) is gekozen, kan het freiquentiebereik worden gecompenseerd door dit te verdelen in twee deelbereiken: lage tonen en hoge tonen.
1. Druk op de [A] toets om de instelfunctie op te roepen.
2. Raak het instelitemdisplay met aan en kies bij "SOUND" het item "AC-PRO III", en bij "SOUND" het item "EQ SELECT".

3. Raak de rechterkant van het display met aan of draai de [ROTARY] knop en kies de functie.
Functiekeuze
AC-PRO III STD
• Standaardfunctie (VSE-menu) PRO
• Professionele functie (positi菜单) EQ SELECT P.EQ
• Equalizerfunctie (P.EQ-menu) BAS / TREB
• Lagetonen-/hogetonnenfunctie
4. Druk op de [A] toets om terug te keren maar de oorspronkelijke functie.
De luidsprekerconfigurationinstellen (SP-SETTING)
Met deze functie=kunt u de configuratie van de luidsprekers in uw auto instellen zodat de geluidskarakteristieken van dit apparaat volledig tot hun rechtkommen.
- De fabrieksinstalling is "SWL + SWR".
1. Druk op de [A] toets om de instelfunctie op te roepen.
2. Raak het instelitemdisplay met aan en kies bij "SOUND" het item "SP-SETTING".

3. Raak de rechterkant van het display met 卡 aan of draai de [ROTARY] knop en kies de luidsprekerconfigatie.
Luidsprekerconfigurations
CTR+SW
5.1-kanalen
configuratie Voor-/achterluidsprekers (4 kanalen)
Middenluidspreker (1 kanaal)
Subwoofer (1 kanaal) SWL + SWR
4 kan. + subwoofer
configuratie Voor-/achterluidsprekers (4 kanalen)
Subwoofer (2 kanalen)
Opmerkingen:
- Het geluid worden nicht door de middenluidspreker uitgevoerd, behalte als de onderstaande instelleningen worden gemaakt wanneer "CTR+SW" is ingesteld.
(1) Raadpleeg "Het PLII-menu (Dolby PL II) kiezen" (zie blz. 17) en stel de Dolby Pro Logic II-functionie in op "MUSIC" of "MATRIX".
(2) Raadpleeg "De luidsprekers in-/uitschaken (CENTER-SP/SUB-WOOFER)" (zie blz. 45) en stel de middenluidspreker in op "ON".
- Het geluid worden nicht uitgevoerd uit de het linkerkanaal van de subwoofer als "SWL + SWR" is ingesteld en de Dolby Pro Logic II-functionie is ingesteld op "MUSIC" of "MATRIX".
4. Druk op de [A] toets om terug te keren maar de oorspronkelijke functie.
De luidsprekers in-/ uitschakelen (CENTER-SP/ SUB-WOOFER)
Met deze functie kurz u de middenluidspeker (CENTER-SP) en de subwoofer (SUB-WOOFER) in- en uitschakelen.
Zorg ervoor dat deze instelling op "OFF" is ingesteld als er geen middenluidspreker of subwoofer is aangesloten.
- De middenluidspreker (CENTER-SP) kan worden ingesteld als de Dolby Pro Logic II-functie is ingesteld op "MUSIC" of "MATRIX", en "SP-SETTING" is ingesteld op "CTR-SW".
- De fabrieksinstelling is "ON".
1. Druk op de [A] toets om de instelfunctie op te roepen.
2. Raak het instelitemdisplay met aan en kies bij "SOUND" het item "CENTER-SP", en bij "SOUND" het item "SUB-WOOFER".

3. Raak de rechterkant van het display met aan of draai de [ROTARY] knop en kies "ON" of "OFF".
4. Druk op de [A] toets om terug te keren maar de oorspronkelijke functie.
De filterfrequentie van de luidsprekers instellen (HPF/ SUB-W LPF)
Met deze functie=kunt u de filterfrequentie instellen overeenkomstig de luidsprekers die u gebrukt.
- De filters (HPF/SUB-W LPF) die u kurz gebruiken verschellen afhankelijk van de instelling van de Dolby Pro Logic II-functie.
Dolby Pro Logic II
functie-instelling Filter HPF SUB-W LPF*1 MUSIC/MATRIX Niet instelbaar Instelbaar OFF Instelbaar Instelbaar
^*1 Instellen is alleen mogelijk als "SUB-WOOFER" is ingesteld op "ON".
- De fabrieksinstelling is "THROUGH".
Filterinstalling
HPF (installing van hoogdoorlaatfilter)
Dit filter verwijdert de lage tonen UIT het geluid voor de voor- enchyterluidsprekers.
THROUGH 50Hz 80Hz 120Hz
Stel het filter in overeenkomstig uw luidsprekers als de luidsprekers eenkleine diameter hebben.
THROUGH
Kies deze instelling als u luidsprekers gebruikt die lage tonen können weergeven.
SUB-W LPF (installing van laagdoorlaatfilter voor subwoofer)
Dit filter verwijdert de hoge tonen uit het geluid voor de subwoofer.
THROUGH 50Hz 80Hz 120Hz
Stel de filterfrequentie in overeenkomstig uw subwoofer.
THROUGH
Kies deze instelling als u een subwoofer gebruikt met ingebouwde versterker uitgerust met een laagdoorlaatfilter.
1. Druk op de [A] toets om de instelfunctie op te roepen.
2. Raak het insteltemdisplay met aan en kies bij "SOUND" het item "HPF", en bij "SOUND" het item "SUB-W LPF".

3. Raak de rechterkant van het display met aan of draai de [ROTARY] knop en kies de frequente.
* Kies een instelling uit THROUGH, 50Hz, 80Hz en 120Hz.
4. Druk op de [A] toets om terug te keren maar de oorspronkelijke functie.
De ingebouwde versterker in-/uitschakelen (AMP CANCEL)
Met deze functie kurz u de ingebouwde versterker in- en uitschaken, alaar gelang een externe versterker worden gebruikt.
Stel AMP CANCEL in op "ON" (ingebouwde versterker uitgeschakeld) als een exterversterker is aangesloten en de ingebouwdeversterker Niet worden gebruikt.
- De fabrieksinstelling is "OFF" (ingebouwdeversterker ingeschakeld).
1. Druk op de [A] toets om de instelfunctie op te roepen.
2. Raak het insteltemdisplay met 卡 aan en kies bij "SOUND" het item "AMP CANCEL".

3. Raak de rechterkant van het display met aan of draai de [ROTARY] knop en kies "ON" of "OFF".
4. Druk op de [A] toets om terug te keren maar de oorspronkelijke functie.
Het uitgangsiveau van de Iuidsprekers instellen (SP GAIN)
Gebruik de ingebouwde testtoonfunctie van het apparaat om het uitgangsniveau van de luidsprekers zodanig in te stellen dat het volumeniveau dat iedere luidspreker voortbrengt hetzelfde klinkt.
- Dit item kan alleen worden ingesteld als de Dolby Pro Logic II-functie is ingesteld op "MUSIC" of "MATRIX".
- De fabrieksinstalling is "0dB".
1. Druk op de [A] toets om de instelfunctie op te roepen.
2. Raak het insteltemdisplay met aan en kies bij "SOUND" het item "SP GAIN".

3. Raak EDIT aan. De functie verandert maar de instelfunctie voor SP GAIN.
4. Raak het insteltemdisplay met 卡 aan en kies het gewenste insteltem. Met iedere aanraking met 卡 worden de instelitems als volgt doorlopen:
Instelitems

*1“CTR GAIN” wordt alleen aufgebeeld als "SP-SETTING" is ingesteld op "CTR+SW", en "CENTER-SP" is ingesteld op "ON".
^*2 "SUB-W GAIN" wordt alleen afgebeeld als "SUB-WOOFER" is ingesteld op "ON".
5. Raak de rechterkant van het display met 山 _ 1 ^ 山 aan of draai de [ROTARY] knop en stel het uitgangsnaveau in. Het uitgangsiveau kan worden ingesteld binnen het bereik van -10 dB t/m +10 dB.
6. Herhaal de stappen 4 en 5 om ieder item in te stellen.
7. Druk op de [A] toets om terug te keren maar de oorspronkelijke functie.
De vertragingstijd van de awhilesprekers instellen (PL II DELAY)
De tijdsduur waarna het geluid van iedere
luidspreker aankomt op de luisterpositie
verschilt affankelijk van de montagepositie van
dechterluidsprekers en de grotte van uw
auto. Als u de vertragingstijd van de
acterluidsprekers instelt,kest u deze tijdsduur
instellen zodate het geluid van de
acterluidsprekers tegelijkertijd worden gehoord
als dat van de voorluidsprekers.
- Dit item kan alleen worden ingesteld als de Dolby Pro Logic II-functie is ingesteld op "MUSIC" of "MATRIX".
- De fabrieksinstalling is "0ms".
1. Druk op de [A] toets om de instelfunctie op te roepen.
2. Raak het insteltemdisplay met aan en kies bij "PL II DELAY" het item "SRD-SP".

3. Raak de rechterkant van het display met 卡 aan of draai de [ROTARY] knop en stel de vertragingsstijd in.
* "SRD-SP" kan worden ingesteld binnen het bereik van 0 ms t/m 15 ms.
4. Druk op de [A] toets om terug te keren maar de oorspronkelijke functie.
De muziekfunctie in detail instellen (PL II CONT)
Met deze functie=kunt u de muziekfunctie gedetailleerder instellen als de Dolby Pro Logic II is ingesteld op "MUSIC".
- Dit item kan alleen worden ingesteld als de Dolby Pro Logic II-functie is ingesteld op "MUSIC".
- De fabrieksinstelling van PANORAMA is "NO", van DIMENSION is "3", en van CTR WIDTH is "3".
InstelItems
PANorama (installing van panoramaregeling)
Dit item verw breedt het geluidsveldbeeld van de voor- tot aan de achechterluidsprekers. Stel dit item in op "YES" als u geen surroundeffect hoort.
DIMENSION (installing van dimensie)
Dit item verplaatst het geluidsveldbeeld waar voren of achefteren. Als het geluidsveldbeeld waar voren ofaar achteren lijkt te liggen, kan deze afwijking worden gecompenseerd. Instelling 3 is de middenpositie. De instellenen 2 t/m 0 verplaatsen het geluidsveldbeeldaar achefteren, en de instellenen 4 t/m 6 verplaatsen het geluidsveldbeeldaar voren.
CTR WIDTH (installing van de middenbreds) 1 Dit item stelt de vaste positie van het middenkanaal inussen de middenluidspreker en de linker- enrechtervoorluidsprekers. Als het middengeluid gelijkmatig is verdeld
tussen links en rechts, neemt het hele geluidsveldbeeld toe en produeert een naturuurlijk uitdijend gevoel.
In deinstalling 0 wordt al het middengeluid weergegeven via de middenluidspreker. In deinstalling 7 is het middengeluid gelijkmatig verdoeffend over de linker- en rechtservoorluidsprekers.
*1 "CTR WIDTH" wordt alleen aufgebeeld als "SP-SETTING" is ingesteld op "CTR+SW", en "CENTER-SP" is ingesteld op "ON".
1. Druk op de [A] toets om de instelfunctie op te roepen.
2. Raak het insteltemdisplay met 山 山 aan en kies bij "PL II CONT" het gewenste insteltem. De insteltems zijn "PANorama", "DIMENSION" en "CTR WIDTH".

3. Raak de rechterkant van het display met aan of draai de [ROTARY] knop en stel het item maar wens in.
* Kies voor "PANORAMA" de instelling "YES" of "NO".
* "DIMENSION" kan worden ingesteld binnen het bereik van 0 t/m 6.
* "CTR WIDTH" kan worden ingesteld binnen het bereik van 0 t/m 7.
4. Druk op de [A] toets om terug te keren maar de oorspronkelijke functie.
De AUX-functionie
Dit system is uitergerust met een tulpingangen zodate u kunt luisteren hier geluid en muziek van externe apparaten aangesloten op dit apparaat.
AUX/TELkiezen
U kunt via de luidsprekers luisteren maar geluid en muziek van externe apparaten, of maar uw telefoongesprekken, indien deze+zijn aangesloten op dit apparaat.
Als TEL INT of een extern apparaat is aangesloten op dit apparaat,kest u de TEL-functie of de AUX-functie kiezen.
- De fabrieksinstelling is "AUX".
1. Druk op de [A] toets om de instelfunctie op te roepen.
2. Raak het insteltemdisplay met aan en kies bij "SETTING" het item "AUX/TEL".

3. Raak de rechterkant van het display met aan of draai de [ROTARY] knop en kies "AUX" of "TEL". AUX:
De AUX/TEL-ingangskabel is voor de geluidsinvoer vanaf een extern apparaat. TEL:
De AUX/TEL-ingangskabel is voor de geluidsinvoor vanaf een mobiele telefoon.
4. Druk op de [A] toets om terug te keren maar de voorgaande functie.
Het ingangsiveau van draagbare audio (AUX-functie) instellen (AUX SENS)
Met deze functie=kunt u het ingangsnaveau instellen van optionele externe apparaten die..., aanegasloten op dit apparaat.
- Dit kan worden ingesteld als "AUX/TEL" is ingesteld op "AUX".
- De fabrieksinstalling is "MID".
1. Druk op de [A] toets om de instelfunctie op te roepen.
2. Raak het insteltemdisplay met aan en kies bij "SETTING" het item "AUX SENS".

3. Raak de rechterkant van het display met 卡 aan of draai de [ROTARY] knop en stel het ingangsniveau in.
* Kies een instelling UIT LOW, MID of HIGH.
4. Druk op de [A] toets om terug te keren maar de oorspronkelijke functie.
De autoluidsprekeruitgang voor de mobiele telefoon (TEL-002, optioneel) instellen
Stel de mobiele telefoon in als u telefoongesprekken wiltuitvoeren.
- De fabrieksinstelling is "RIGHT".
1. Druk op de [A] toets om de instelfunctie op te roepen.
2. Raak het instelitemdisplay met aan en kies bij "SETTING" het item "TEL-SP".

3. Raak de rechterkant van het display met aan of draai de [ROTARY] knop en kies "LEFT" of "RIGHT".
LEFT:
De telefoongesprekken können worden gehoord via de linkervoorluidspreker die is aangesloten op dit apparaat.
RIGHT:
De telefoongesprekken können worden gehoord via de rechtervoorluidspreker die is aangesloten op dit apparaat.
4. Druk op de [A] toets om terug te keren maar de voorgaande functie.
De mobiele-telefooonnderbreking instellen
Als u dit apparaat en uw mobiele telefoon aansluit op een apparaatje (TEL-002, optioneel), kutn u luisteren maar uw telefoongesprekken via de luidsprekers in uw auto.
- De fabrieksinstalling is "OFF".
1. Druk op de [A] toets om de instelfunctie op te roepen.
2. Raak het insteltemdisplay met aan en kies bij "SETTING" het item "TEL-SWITCH".

3. Raak de rechterkant van het display met
aan of draai de [ROTARY] knop en kies de instenting.
Met iedere druk op de [ROTARY] knop, verandert de instelling in onderstaande volgorde:
OFF ON MUTE OFF...
OFF:
Dit apparaat blij normala Werken, zelfs als de mobiele telefoon worden gebruikt.
Opmerking:
- Als u een handsfree-set aansluit, zorgt u ervoor deze instelling op ON te zetten om het geluid van de mobiele telefoon via het systeme te ontvangen.
ON:
U cunt waar uw telefoongesprekken luisteren via de luidsprekers aangesloten op dit apparaat.
* Wanner u maar uw telefoongesprekken luistert via de luidsprekers van uw auto,kest u het volumeniveau instellen door de the [ROTARY] knop te draaien.
MUTE:
Het weergavegeluid van dit apparaat worden onderbrokenijdens telefoongesprekken.
4. Druk op de [A] toets om terug te keren maar de voorgaande functie.
De automatische volumeregeling instellen (CALIBRATE/A-VOL SENS)
U kunt het volumeniveau automatisch veranderen aan de hand van de rijsnelheid van uw auto.
- De fabrieksinstelling is "LOW".
1. Druk op de [A] toets om de instelfunctie op te roepen.
2. Raak het insteltemdisplay met aan en kies bij "SETTING" het item "CALIBRATE".

3. Versnel tot een snelheid van 50~km / h
4. Als u 50 km/h rijdt, drukt u op START. Het kalibreren worden UITgevoerd.
Na 2 seconden of langer hoort u een lange pieptoon, en op het display worden "SUCCESSIONAL" afgebeeld.
Als u een korte pieptoon hoot, is het kalibreren mislukt. Herhaal de procedure vanaf stap 3.
5. Stel cervolgens de gevoeligheid in. Raak het instelitemdisplay met aan en kies bij "SETTING" het item "A-VOL SENS".

6. Raak de rechterkant van het display met aan of draai de [ROTARY] knop en kies de gevoeligheid.
Met iedere druk op de [ROTARY] knop, verandert de instelling in onderstaande volgorde:
OFF (geen verandering in het volumeniveau) LOW (kleine verandering in het volumeniveau) MID-LOW MID MID-HIGH HIGH (grote verandering in het volumeniveau) ...
7. Druk op de [A] toets om terug te keren maar de voorgaande functie.
Een systeemcontroleuitvoeren
Met deze functie=kunt u een systeemcontroleuitvoeren van de instelfunctie indien dit nodigmighten.
1. Druk op de [A] toets om de instelfunctie op te roepen.
2. Raak het instelitemdisplay met aan en kies bij "SETTING" het item "SYSTEM CHECK".

SETTING
ADJUST MODE
SYSTEM CHECK START
3. Raak START gedurrende 1 seconde of langer aan.
"System Check" wordt op het display afgebeeld.
4. Druk op de [ROTARY] knop.
De systeemcontrole start.
Nadat de systeemcontrole maar is, worden
"Completed" aufgebeeld op het display.
5. Druk nogmaals op de [ROTARY] knop. Het hoofddisplay van de radiofunctie worden afgebeeld.
De beveiligingsfunctie gebruiken (CODEMATIC)
Met deze functie kurz u voorkomen dat personen die de juiste aanraakvolgorde nicht kennen dit apparaat gemakkelijk können bedienen. Het aanraakcodedisplay worden afgebeeld als het DCP worden bevestigd en het apparaat worden ingeschakeld verwijl "CODEMATIC" is ingesteld op "ON".
Als u het display op de juiste locaties in de Vooraf bepaalde volgorde aanraakt, worden "SUCCESSFUL" afgebeeld en wordt het apparaatuitgeschakeld.
De volgende keer dat het apparaat worden ingeschakeld, wordt het aanraakcodedisplay Niet afgebeeld, maar worden het hoofddisplay van de radiofunctie of CD-functie afgebeeld.
1. Druk op de [A] toets om de instelfunctie op te roepen.
2. Raak het insteltemdisplay met aan en kies bij "SETTING" het item "CODEMATIC".

Er worden twee typen instelitems afgebeeld bij "CODEMATIC": items waarvoor aan de rechterkant van het display "ON" of "OFF" worden afgebeeld, en items waarvoor aan de rechterkant van het display "INPUT" worden afgebeeld.
Kies hier een item waarvoor aan de rechterkant van het display "ON" of "OFF" worden afgebeeld.
3. Raak de rechterkant van het display met 卡 aan of draai de [ROTARY] knop en kies "ON" of "OFF".
4. Raak het insteltemdisplay met aan en kies bij "SETTING" het item "CODEMATIC". Kies hier een item waarvoor aan de rechterkant van het display "INPUT" worden afgebeeld.
5. Raak INPUT aan.
Het aanraakcodedisplay gaat UIT.
6. Voer de aanraakcode in.
* Raak één van de vijf locaties op het display aan (links, midden, rechts, rechtsboven of rechtsonder).
Met iedere aanraking van een locatie op het display,licht een van de aanraakcodeindicators op.
* Bijvoorbeeld, raak (1) midden, (2) rechtsboven, (3) links en (4) rechtsonder in die volgorde aan. U kurz ookdezelfde locatie meerere keren aanraken. Nadat u vierkeeen locatie hebt aangeraakt, hoort u een lange pieptoon en keert het apparaat terug maar de oorspronkelijke functie.
CODEMATIC annuleren
Als u de aanraakvolgorde bent vergeten, raakt u ① rechtsonder, ② links, ③ rechtsboven en ④ rechts in die volgorde aan, of drukt u op [SCN] op de afstandsbediening.

7. BEDIENING VAN ACCESSORIES
Bediening van de CD-wisselaar
CD-wisselaar
Als een optionele CD-wisselaar is aangesloten met behulp van een CeNET-kabel, kan dit apparaat de functies van de CD-wisselaar bedieren. Dit apparaat kan op maximaal twee, met behulp van een CeNET-kabel aangesloten, CD-wisselaars worden aangesloten.
DVD-wisselaar
Als een optionele DVD-wisselaar is aangesloten met behulp van een CeNET-kabel, kan dit apparaat de functies van de DVD-wisselaar bedieren. Om een DVD te kunnen bekijken hebt u een optionele tv-monitor nodig.
De bediening en het display van de DVD-wisselaar op dit apparaat is slechts een vereenvoudigde versie en ondersteunt nicht alle functies van de DVD-wisselaar. Als u de DVD-wisselaar wilt bedieren, gebruikt u de afstandsbediening van de DVD-wisselaar. Voor verdere informatie raadpleegt u de gebruiksaanwijzing van de DVD-wisselaar.
■ Als twee CD-wisselaarsঃn aangesloten
Druk op de [ROTARY] knop en kies een CD-wisselaar die op dit apparaat is aangesloten. (Met iedere druk op de [ROTARY] knop verandert de CD-wisselaar.)
- Als de CD-wisselaar geen magazijn bevat, worden "NO MAG" afgebeeld, en als het magazijn geen CD bevat, worden "NO DISC" Niet afgebeeld voor dat disnummer.
- Voor verdere informatatie over het titeldisplay, raadpleegt u "Het titeldisplay omschakelen" (zie blz. 14).
De displays in dewisselaarfunctie
Hoofddisplay (CD-wisselaarfunctie) Het hoofddisplay wordt aufgebeeld als u op de [ROTARY] knop drukt en de CDwisselaarfunctie kiest.

Als u de linkerkant van het display gedurende 1 seconde de langer aanraakt, schakelt het display over maar de simpele bedieningsfunctie.

Track/weergavetijd-display
T01/02: 00: Het nummer van de track die nu wordt weergegeven en de weergavetijd worden afgebeeld.
Als u het display van de standardbedieningsfunctie met 山 山 of aanraakt, kurz u de track kiezen die u wilt weergeven of vooruit-/achteruiitspoeen.
Titeldisplay
Als u dit aanraakt, worden het display omgeschakeld.
Discnummerdisplay
Als u het display van de
standaardbedieningsfunctie met 卡 aanraakt, kut u een disc kiezen.
MODE
As u dit aanraakt, worden subfuncties afgebeeld. Als u dit gedurende 1 seconde of langer aanraakt, worden de dislijst afgebeeld.
T-SCAN/D-SCAN
Dit worden aufgebeeld tijdens scanweergave. Als u T-SCAN/D-SCAN aanraakt, stopt de scanweergave.
T-RPT/D-RPT
Dit worden aufgebeeldijdens herhaalde weergave. Als u T-RPT/D-RPT aanraakt, stopt de herhaalde weergave.
T-RDM/D-RDM
Dit worden afgebeeld tijdens willekeurige weergave. Als u T-RDM/D-RDM aanraakt, stocht de willekeurige weergave.
DISC↑
Als u dit aanraakt, begint de weergave van de volgende disc.
(alleen op het display van de simpele bedieningsfunctie)
Door deze aan te raken kutu de track kiezen die u wilt weergeven.
Door deze te blijven aanraken=kunt u de tracks vooruit-/achteruiestspoelen.
Disclijstdisplay (CD-wisselaarfunctie)
Deze lijst kunt u afbeelden door op het hoofddisplay gedurende 1 Seconde of longer MODE aan te raken.

Discnaam
>>: Bezig met kiezen
Als u een discnaam aanraakt, keert het display terug maar het hoofddisplay en begint de weergave vanaf de eerste track op de disc die u hebt aangeraakt.
←PREV-RTN:
Alsuditaanraakt,wordtdevoorgaande disclijsta
afgebeeld.Dooditgedurende1secondeof
langeraan teraken,keert hetdisplayterugnarr
hethoofddisplay.
NEXT:
Als u dit aanraakt, worden de volgende dislijst afgebeeld.
VOORZICHTIG
Niet iedere CD-wisselaar kan CD-ROMs weergegeven. Dit is afhankelijk van het model.
Opmerking:
- Het is möglich dat sommige CD's opgenomen in de CD-R/CD-RW-functie Niet bruikbaar zich.
De wisselaarfunctie kiezen
1. Druk op de [ROTARY] knop om de wisselaarfunctie te kiezen.
* De functie van een apparaat dat nicht is aangesloten worden nicht afgebeeld.
De weergave begint automatisch nadat de functie is veranderd in de wisselaarfunctie.
De weergave pauzeren
1. Druk op de [▶■] toets.
De weergave hervatten
1. Druk nogmaals op de [▶■] toets.
Een CD kiezen
1. Raak het discnummerdisplay met 山 山 aan en kies een disc. De weergave begint.
* Als de gekozen disc Niet in het magazijn zit, worden het discnummer Niet afgebeeld.
* Als u DISC ↑aanraakt, begint de weergave van de volgende disc.
Een disc kiezen op het disclijstdisplay
1. Raak MODE gedurende 1 seconde of longer aan.
De disclijst worden afgebeeld. Als u NEXT aanraakt, worden het volgende deel van de disclijst afgebeeld.
2. Raak de discnaam aan.
* Als de gekozen disc Niet in het magazijn zit, worden "NO DISC" afgebeeld voor dat disnummer.
* Als udezelfde disc kiest als die op dat moment worden teergegeben, keert de weergave terug maar en begint vanaf de eerste track op die disc (beginfunctie).
Een track kiezen
1. Als u maar de volgende track wilt luisteren, raaktu het trackdisplay met 品 aan.
2. Als u waar de voorgaande track wilt luisteren, raakt u het trackdisplay tweeemaal met 山 aan.
Door met 品 aan te raken worden de volgende track weergegeven.Als u vaker met 品 aanraakt, verspringt u hetzelfde aantal tracks vooruit als u met 品 hebt aangeraakt, waarna de weergave van de track begint.
Door met 卡 aan te raken worden de voorgande track weergegeven. Als u vaker met 卡 aanraakt, verspringt u hetzelfde aantal tracks achechteruit als u met 卡 hebt aangeraakt, waarna de weergave van de track begint.
* Als u het trackdisplay tweeemaal met † aanraakt toenwij het begin van een track worden waergegeven, worden soms tweet tracks acheeruit gesprongen, en begint de weergave van die track.
Vooruit- en Achteruitspoelen
1. Om vooruit te spoelen raakt u het trackdisplay met 出 aan.
2. Om anschteruit te spoelen raakt u het trackdisplay met aan.
Beginfunctie
De beginfungtie begint de weergave vanaf de eerste track op de disc die op dat moment worden weergegeven.
1. Raak MODE gedurende 1 seconde of longer aan.
De disclijst worden afgebeeld. Als u NEXT aanraakt, worden het volgende deel van de disclijst afgebeeld.
2. Raak de discnaam aan.
* Als de gekozen disc Niet in het magazijn zit, worden "NO DISC" afgebeeld voor dat discnummer.
* Als udezelfde disc kiest als die op dat moment worden weergegeven, keert de weergave terug maar en begint vanaf de eerste track op die disc.
Scanweergave
In de scanweergave worden de eerste 10 seconden vanijdere track op een disc automatisch weergegeven. Deze functie blijdt doorgaan totdat deze worden uitgeschakeld.
Scanweergave is handig wanner u een gewenste track zoekt.
1. Raak MODE aan.
2. Raak T-SCAN aan. MODE verandert in "T-SCAN" en de scanweergave begint.
* De scanweergave begint vanaf de track die volgt op de track die op dat moment worden weergegeven.
De scanweergave stoppen
1. Raak T-SCAN aan.
T-SCAN verandert in "MODE" en de weergave begint vanaf de track die werd weergegeven toen u T-SCAN aanraakte.
Discscanweergave
In de discscanweergave worden de eerste 10 seconden van de eerste track op iedere disc in de huidig gekozen CD-wisselaar automatisch weergegeven. Deze functie blijdt doorgaan totdat deze worden uitgeschakeld.
Discscanweergave is handig wanner u een gewenste CD zoekt.
1. Raak MODE aan.
2. Raak D-SCAN aan.
MODE verandert in "D-SCAN" en de discscanweergave begint.
* De discscanweergave begint vanaf de disc die volgt op de disc die op dat moment worden weergegeven.
De discscanweergave stoppen
1. Raak D-SCAN aan.
D-SCAN verandert in "MODE" en de weergave begint vanaf de track die werden weergegeven toen u D-SCAN aanraakte.
Herhaalde weergave
In de herhaalde weergave wordt de track die op dat moment wordt weergegeven continu herhaald. Deze functie blijdt doorgaan totdat deze wordt uitgeschakeld.
1. Raak MODE aan.
2. Raak T-REPEAT aan. MODE verandert in "T-RPT" en de herhaalde weergave begint.
De herhaalde weergave stoppen
1. Raak T-RPT aan.
T-RPT verandert in "MODE" en de normale weergave begint vanaf de track die werd weergegeven voordat u T-RPT aanraakte.
Herhaalde discweergave
In de herhaalde discweergave worden, nadat alle tracks op de huidige disc zich weergegeven, de disc opniew vanaf de eerste track weergegeven. Deze functie blijft doorgaan totdat deze worden uitgeschakeld.
1. Raak MODE aan.
2. Raak D-REPEAT aan.
MODE verandert in "D-RPT" en de herhaalde discweergave begint.
■ De herhaalde discweergave stoppen
1. Raak D-RPT aan.
D-RPT verandert in "MODE" en de normale weergave begint vanaf de track die werden weergegeven voordat u D-RPT aanraakte.
Willekeurige weergave
In de willekeurige weergave worden de afzonderlijke tracks op de disc automatisch willekeurig gekozen en weergegeven. Deze functie blijdt doorgaan totdat deze wordenuitgeschakeld.
1. Raak MODE aan.
2. Raak T-RANDOM aan. MODE verandert in "T-RDM" en de willekeurige weergave begint.
De willekeurige weergave stoppen
1. Raak T-RDM aan.
T-RDM verandert in "MODE" en de normale weergave begint vanaf de track die werden weergegeven voordat u T-RDM aanraakte.
Willekeurige discweergave
In de willekeurige discweergave worden de afzonderlijke tracks of discs automatisch willekeurig gekozen en weergegeven. Deze functie blijft doorgaan totdat.Deze wordenuitgeschakeld.
1. Raak MODE aan.
2. Raak D-RANDOM aan. MODE verandert in "D-RDM" en de willekeurige discweergave begint.
De willekeurige discweergave stoppen
1. Raak D-RDM aan.
D-RDM verandert in "MODE" en de normale weergave begint vanaf de track die werd weergegeven voordat u D-RDM aanraakte.
TV-tuner
Als een optionele TV-tuner is aangesloten met behulp van een CeNET-kabel, kan dit apparaat alle functies van de TV-tuner bedieren. Als u een TV-uitzending wilt bekijken, heb t een TVtuner en een tv-monitor nodig.
De displays in de TV-functionie
Hoofddisplay
Het hoofddisplay worden aufgebeeld als u op de [ROTARY] knop drukt en de TV-functie kiest.

Als u de linkerkant van het display gedurende 1 seconde de langer aanraakt, schakelt het display over maar de simpele bedieningsfunctie.

Kanaaldisplay
1ch: Het kanaal dat op dat moment worden ontvangen worden afgebeeld.
Als u het display van de standaardbedieningsfunctie met of aanraakt, kurz u Zoek-afstemmen of handmatig afstemmenuitvoeren.
Titeldisplay
3ch: De naam van de zender die op dat moment worden ontvangen worden afgebeeld.
VTR: In de videofunctie
Als u deze aanraakt, worden het display omgeschakeld.
Frequentiebanddisplay
TV1: Frequentiebandnaam
Voorkeurnummerdisplay
Als u het display van de
standaardbedieningsfunctie met 山 山 aanraakt, kurz u een voorkeurgeheugen kiezen.
MODE
As u dit aanraakt, worden subfuncties afgebeeld. Door dit gedurende 1 seconde of langer aan te raken, worden de voorkeurgeheugenlijst afgebeeld.
P-SCAN: Dit worden afgebeeldijdens het voorkeurzender-scannen. Als u dit aanraakt, stoot het voorkeurzender-scannen.
A-STORE: Dit worden afgebeeldijdens het automatisch opslaan. Als u dit aanraakt, stopt het automatisch opslaan.
BAND
Door dit aan te raken worden de frequentieband omgeschakeld.
Als u dit gedurende 1 seconde of langer aanraakt, schakelt dezoekfunctie beurtelings tussen de handmatige afstemfunctie en dezoek-afstemfunctie.

(alleen op het display van de simpele bedieningsfunctie)
Door deze toetsen aan te raken=kunt u zoekafstemmen of stap-afstemmen in dehandmatige afstemfunctie).
Door deze toetsen aan te raken en aangeraakt te houden kurz u snel-afstemmen (in de handmatige afstemfunctie).
De Voorkeurgeugenlijst afbeelden
Deze lijst kunt u afbeelden door op het hoofddisplay gedurende 1 Seconde of langer MODE aan te raken.

>>
Bezig met afstemmen
RTN:
Als u dit aanraakt, keert het display terug maar het hoofddisplay.
De TV-functie kiezen
1. Druk op de [ROTARY] knop om deTV-functionie te kiezen.
Met iedere druk op de [ROTARY] knop, verandert de functie als volgt:
* De functie van een apparaat dat nicht is aangesloten worden nicht afgebeeld.
Eband wisselen
1. Raak BAND aan om de frequentieband te veranderen.
Met jegere aanraking van BAND verandert de frequentieband in onderstaande volgorde.
TV1 TV2 TV1...
Zoek-afstemmen
Met Zoek-afstemmen=kunt u automatisch afstemmen op zenders met een goede ontvangstkwaliteit.
1. Raak BAND aan gedurende 1 Seconde of langer verwil MANU wordt afgebeeld. Als MANU uit is, is automatisch afstemmen möglichk.
2. Raak het kanaaldisplay met aan. SEEK UP/SEEK DOWN worden afgebeeld en het afstemmen begint. Het afstemmen stopt automatisch bij zenders met een goede ontvangstkwaliteit.
Het afstemmen annuleren
1. Raak nogmaals het kanaaldisplay met aan.
Handmatig afstemmen
Er zijn twee manieren waarop u handmatig kunt afstemmen: snel-afstemmen en stap-afstemmen.
In de stap-afstemfunctie verandert de frequentie stap voor stap. In de snel-afstemfunctie kut u snel afstemmen op de gewenste frequentie.
1. Raak BAND aan gedurende 1 seconde of langer verwijl MANU zich wordt afgebeeld. Als MANU wordt afgebeeld is handmatig afstemmen möglichk.
2. Bedien het kanaaldisplay en stem af op een kanaal waarop wordenuit gezonden. Er zich twee methoden voor handmatig afstemmen: stap.afstemmen en snelafstemmen.
* In de stap-afstemfunctie verandert het kanaal stap voor stap.
Raak het titeldisplay met 一 _ 一 aan.
* In de snel-afstemfunctie kutu het kanaalsnel ononderbroken veranderen. Raak het kanaaldisplay met aan. Het afstemmen stoot zodra u uw vinger van het display afhaalt.
Oproepen van een voorgeprogrammeerd station
Met deze functie=kunt u een voorkeurzender kiezen.
1. Raak MODE gedurende 1 seconde of langer aan. De voorkeurgeheugenlijst worden afgebeeld.
2. Raak de zender aan waarnaar u wilt luisteren.
* U=kunt ook op de zender afstemmen door het voorkeurnummer met ①aan te raken.
Het afstemmen annuleren
1. Raak RTN aan.
Voorkeurzenders handmatig opslaan
U kunt maximaal 12 TV-zenders opslaan (6-TV1 en 6-TV2). Hiermee kunt u uw favoriete TV-zenders in het geheugen opslaan en later weer oproepen.
1. Raak BAND aan om de freiorentieband te veranderen.
2. Bedien het kanaaldisplay en kies de zender die u wilt opslaan.
3. Raak MODE gedurende 1 seconde of langer aan. De voorkeurgeheugenlijst worden afgebeeld.
4. Raak het voorkeurnummer waaronder u de zender wilt opslaan gedurende 2 seconden of langer aan.
U hoor een lange pieptoon en de zender wordt in het geheugen opgeslagen.
Als u een korte pieptoon hoog, is de zender nicht in het geheugen opgeslagen. Herhaal de procedure vanaf stap 1.
Voorkeurzenders automatisch opslaan
U kunt automatisch 6 TV-zenders in het voorkeurgeheugen opslaan.
Als er minder dan ces zenders met een goede ontvangstkwaliteit gezonden worden, zullen de zenders die eerder in het geheugen werden opgeslagen gehandhaafd blijven en alleen de zenders met een sterk signaal in het geheugen worden opgeslagen.
1. Raak MODE aan.
2. Raak A-STORE gedurende 2 seconden of langer aan.
MODE verandert in "A-STORE" en het voorkeurnummer van het automatisch opslaan worden op het voorkeurnummerdisplay afgebeeld.
* Zenders met een goede ontvangstkwaliteit worden automatisch gezocht en opgeslagen in het voorkeurgeheugen (onder voorkeurnummers 1 t/m 6) in oplopende volgorde vanaf de zender met de laagste freiorentie.
Opmerkingen:
- Wanner u automatisch voorkeurzenders opslaat, worden eerder opgeslagen zenders gewist.
- Als er minder dan zes zenders met een goede ontvangstkwaliteit worden gezonden, keert het apparaat automatisch terug maar de laagste freqente en wordt het automatisch opstaan nogmaals uitgevoerd. Als daarna nog steeds minder dan zes zenders worden gezonden, blijven de eerder opgeslagen zenders in het geheugen.
Voorkeurzender-scannen
Met voorkeurzender-scannenkest u de Voorkeurzenders eén voor een controeren in de volgorde waarin ze in het geheugen zich opgeslagen.
1. Raak MODE aan.
2. Raak P-SCAN aan.
MODE verandert in "P-SCAN" en het voorkeurnummer van het voorkeurzender-scannen worden op het voorkeurnummerdisplay afgebeeld.
* De huidig opgeslagen voorkeurzenders worden een voor een op volgorde ontvangen gedurende 7 seconden of langer elk. Zenders met een slechte ontvangst worden overgeslagen en de volgende zender worden ontvangen.
De TV-zenders worden in onderstaande volgorde ontvangen: TV1 (1 6) TV2(1 6) TV1(1 6) enzovoort.
Het voorkeurzender-scannen annuleren
1. Raak P-SCAN aan.
P-SCAN verandert in "MODE", en de zender die werden ontvangen voordat op P-SCAN werk gedrukt, worden waar ontvangen.
Naar een video kijken
De TV-tuner is uitergerust met een VTR-ingangsaansluiting waarop u eén extern apparaat kutn aansluiten. Sluit een 12-volt videocassettespeler (VCP) of videocassetterecorder (VCR) aan op de ingangsaansluiting van de TV-tuner.
1. Druk op de [▶■] toets.
VTR worden aufgebeeld en het apparaat worden in de VTR-functie gezet.
* Het TV-schem roept de video-ingangsfungtie op, waarna u een video-kunt weergeven.
■ Terugkeren maar de TV-functie
1. Druk nogmaals op de [▶II] toets.
Het TV-zendergebied instellen (TV AREA)
Als u het TV-zendergebied (waarin het tv-signal kan worden ontvangen) instelt, verandert de gebiedsinstelling van de TV-tuner.
- De fabrieksinstelling is "GERMANY".
1. Druk op de [A] toets om de instelfunctie op te roepen.
2. Raak het insteltemdisplay met aan en kies bij "TUNER" het item "TV AREA".

ADJUST MODE TV AREA GERMANY
3. Raak de rechterkant van het display met aan of draai de [ROTARY] knop en kies het zendergebied.
4. Druk op de [A] toets om terug te keren maar de voorgaande functie.
De TV-diversiteit instellen (TV DIVER)
U kurz de ontvangstinstelling van de TV-antenne die op de TV-tuner is aangesloten instellen.
Stel dit item in op "OFF" als u geen TV-antenne voor meervoudige ontvangst gezruikt.
- De fabrieksinstelling is "ON".
1. Druk op de [A] toets om de instelfunctie op te roepen.
2. Raak het insteltemdisplay met aan en kies bij "TUNER" het item "TV DIVER".

3. Raak de rechterkant van het display met aan of draai de [ROTARY] knop en kies "ON" of "OFF".
4. Druk op de [A] toets om terug te keren maar de oorspronkelijke functie.
De DAB-bedieningsfunctie
Als een DAB (optioneel, DAH913 of DAH923) is aangesloten met behulp van een CeNET-kabel, kan dit apparaat alle functies van de DAB bedieren.
Naar een DAB-zender luisteren
1. Druk op de [ROTARY] knop om de bedieningsfunctie te veranderen.
Opmerkingen:
- Het display dat worden afgebeeld wonneer een DAB-zender worden ontvangen is hetzelfde als dit wonneer een zender handmatig worden ontvangen of een voorkeurzender worden ontvangen.
- Het aantal programma's en de uitzendtijden verzillen per DAB-zender.
- Als het DAB-sigmaal zwak is, worden de geluidsuitvoer onderbroken.
Zoek-afstemmen
1. Druk op de [ROTARY] knop en kies de DAB-functionie.
2. Raak de linkerkant van het display met aan.
Als het apparaat een DAB-zender ontvangt,\
wordt "DAB" afgebeeld op het display.
* Het apparaat stopt hetzoek-afstemmen als het geen DAB-zender kan vinden. Het display keert terug maar de voorgaande functie.
Handmatig afstemmen
1. Druk op de [ROTARY] knop en kies de DAB-functionie.
2. Als "MANU" nied wordt afgebeeld, raakt u BAND aan gedurende 1 seconde of langer. Als "MANU" wordt afgebeeld, is handmatig afstemmen möglichk.
3. Raak de linkerkant van het display met aan en stem af op de zender.
* Als gedurende 7 seconden of langer geen bediening worden ditgevoerd, worden het handmatig afstemmen beeindigd en keert het display terug maar de voorgaande functie.
Wisselen tussen programma's
1. Druk op de [ROTARY] knop en kies de DAB-functionie.
2. Raak de linkerkant van het displa
品 aan om tussen de programma's van de DAB-zender te wisselen.
Opmerking:
- De programmanamen können hetzelfde zijn, afhankelijk van de DAB-zender.
Programma-scannen
Met deze functie=kunt u ieder ontvangbaarprogramma van de DAB-zender die wordenontvangen eén voor een gedurende 10seconden elk scanden.Dit is handig wanner uunaar een gewenst programma wilt zoeken.
1. Druk op de [ROTARY] knop en kies de DAB-functie.
2. Raak MODE aan.
3. Raak S-SCAN aan. "S-SCAN" wird afgebeeld en dit apparaat begint de programme's een voor een geduerende 10 seconden elk te scannen. Van ieder programma dat het apparaat scant wordt de naam op het display afgebeeld.
4. Als u het scannen wilt stoppen wanner het gewenste programme is gezonden, raakt u S-SCAN aan.
Handmatig opslaan in het geheugen
Het apparaat kan DAB-programma's handmatig in het geheugen opslaan. Maximaal 18 programme's kunnen onder de voorkeurtoetsen (6 programme's elk) worden opgeslagen.
[M1], [M2] en [M3]
1. Druk op de [ROTARY] knop en kies de DAB-functie.
2. Raak BAND aan en kies een voorkeurtoets.
3. Raak MODE gedurende 1 seconde of langer aan.
De voorkeurgeheugenlijst worden afgebeeld.
4 Raak het voorkeurnummer waaronder u het programmatype wilt opslaan gedurende 2 seconden of langer aan.
U hoor een lange pieptoon en de zender wordt in het geheugen opgeslagen.
Als u een korte pieptoon hoort, is de zender.
niet in het geheugen opgeslagen.Herhaal
de procedure vanaf stap 1.
Opmerking:
- Onderbrekingsprogramma's (PTY of INFO) können nicht handmatig in het opgeslagen worden opgeslagen.
Een voorkeurprogramma oproepen
1. Druk op de [ROTARY] knop en kies de DAB-functie.
2. Raak BAND aan.
Met iedere aanraking van BAND verander het display in de onderstaande volgorde.
MEMO1 MEMO2 MEMO3 MEMO1...
3. Raak de rechterkant van het display met aan om een voorkeurprogramma op te roepen.
De AF-functie
De AF-functie schakelt over maar een andere frequentie op hetzelfde netwerk om een zo goed möglich ontvangstkaliteit te verkrijgen.
- De fabrieksinstelling is "ON".
- Als de ontvangstkwaliteit van de huidige zenderchyteruit gaat, wordt "SEARCH" op het display afgebeeld en zoekt de radio waar hetzelfde radioprogramma op een andere freqentie.
- Voor verdere informatie raadpleegt u de "AF-functionie" (zie blz. 26) in het gedeelte "Bediening van RDS" van de betreffende gebruiksaanwijzing.
- De AF-functie in- en uitschakelen
- AF-functie:tussenRDSenDAB
Als hetzelfde programma worden uitgezonden door RDS en DAB, en deze functie is ingeschakeld, schakelt dit apparaat automatisch over zodate de uitzending met de beste ontvangstkwaliteit worden ontvangen.
TA (verkeersinformatie)
Als een uitzending met verkeersinformatie begin in de TA-standingbyfunctie, worden die uitzending met voorrang ontvangen, ongeacht de functie die in werkig is. Het is tevens möglichk automatisch op een verkeersprogramma (TP) af te stemmen.
- Deze functie kan alleen worden gebruikt als "TP" op het display wordt afgebeeld. Als "TP" wordt afgebeeld betekent dit dat de DAB- of RDS-zender die op dat moment worden ontvangen programma's met verkeersinformatie uitzendt.
- Voor verdere informatatie raadpleegt u "TA" (zie blz. 27) in het gedeelte Bediening van RDS van de betreffende gebruksaanwijzing.
- De TA-standingbyfunctie instellen
- De TA-standingbyfunctie annuleren
Een TP-zender zoeken
Opmerkingen:
- Als een TP-zender Niet kan worden ontvangen, stopt het apparatusat met zoeken.
- "TP" kan op het display worden afgebeeld wanneer een verkeersprogramma worden uit gezonden door een RDS-zender. Druk in dat geval op de [TA] toets om TP-zoek-aftstemmen uit te voeren. Druk nogmaals op de [TA] toets om terug te keren maar de voorgaande functie.
INFO (aankondiging)
In de INFO-standbyfunctie schakelt het apparaat automatisch overaar het gekozen aankondigingsprogramma zodra dit begint.
- De INFO-standingbyfunctie instellen
Als u gedurende 1 seconde of langer de [TA] toets ingedrukt houdt, wordt "INFO" op het display afgebeeld en wordt het apparaat in de INFO-standingbyfunctie gezet totdat de gekozen aankondigering wordt uitgezonden.
Zodra de gekozen aankondigingsuitzending begint, worden de naam van de aankondiging op het display afgebeeld. Als u gedurende 1 seconde of langer de [TA] toets ingedrukt houdt terwijl de gekozen aankondigingsuitzending worden ontvangen, stopt de ontvangst van de gekozen aankondigingsuitzending en keert het apparaat terug maar de INFO-standbyfunctie.
- De INFO-standingbyfunctie annuleren
Als u de INFO-standingbyfunctie wilt annuleren, houdt u gedurende 1 seconde of langer de [TA] toets ingedrukt.
- Informatiekeuze
Met deze functie kurz u INFORMATIE AAN of UIT kiezen in de informatie-onderbrekingsfunctie.
U kunt maximaal zes informatatie-items op ON instellen
U kunt kiezen uit de onderstaande zes informatatie-items:
INFORMATIE-item ENGLISH Inhoud Travel Vervoersbericht Warning Waarschuwing/Service News Nieuwsbericht Weather Weerbericht Event Evenementenaankondiging Special Speciaal evenement
1. Raak MODE aan.
2. Raak INFO SEL aan om de "INFO SEL" functie op te roepen.
3. Raak het midden van het display met aan of draai de [ROTARY] knop en kies een informatie-item.
U kunt kiezen uit zes informatie-items:
Reizen Waarschuwing Nieuws Weerbericht Evenementen Speciaal Reizen...
4. Raak de rechterkant van het display met aan en kies "ON" of "OFF".
5. Raak RTN aan.
PTY
Met deze functie kurz u maar het gekozen programmatype luisteren, ongeacht de functie die in werkung is.
- U kunt een gemeenschappelijk PTY kiezen voor DAB en RDS.
Van de DAB-PTY en de RDS-PTY krijigt de PTY die het eerst worden ontvangen voorrang boven de andere.
- PTY-uitzendingen zijn nog nicht in alle landen beschikbaar.
- In de INFO-standingbyfunctie haben INFO-zenders voorrang boven andere PTY-zenders.
- In de TA-standingbyfunctie hebben TP-zenders voorrang boven andere PTY-zenders.
- Voor verdere informatatie raadpleegt u "PTY" (zie blz. 28) in het gedeelte "Bediening van RDS" van de betreffende gebruiksaanwijzing.
- De PTY-standingbyfunctie instellen
- De PTY-standingbyfunctie annuleren
Een PTY-onderbrekingsuitzending annuleren
Een programmatype kiezen
Een programmatype zoeken
Het PTY-voorkeurgeheugen
Nooduitzending
Als een noodlesitzending worden ontvangen, worden alle functiebedieningen aufgeb broken, worden "ALARM" op het display afgebeeld, en worden de nooduitzending ontvangen en weergegeven.
- Voor verdere informatie raadpleegt u "Nooduitending" (zie blz. 29) in het gedeelte "Bediening van RDS" van de betreffende gebruiksaanwijzing.
- De noodlesitzending annuleren
De taal van het PTY- en INFOdisplay wisselen
U=kunt een taal kiezen uit de vier beschikbare talen (Engels, Duits, Zweeds of Frans) waarin het programmatype en de informatie op het display kan worden afgebeeld.
- De fabrieksinstelling is "ENGLISH".
- Voor verdere informatie over "De taal van het PTY-display veranderen" (zie blz. 30), raadpleegt u het gedeelte over "De RDS bedieren" in de betreffende gebruiksaanwijzing.
Volume-installing van TA, INFO,ooduitzending (ALARM) en PTY
Het volume van de TA-, INFO-, ALARM- en PTY-onderbrekingsuitzenden gen kan worden ingesteldijdens de TA-, INFO-, ALARM- en PTY-onderbrekingsuitzenden. Voer de volgende bediening uit, afhankelijk van het aangesloten model.
- De fabrieksinstalling is "15".
Tijdens een TA-, INFO-, ALARM- of PTY- onderbrekingsuitzending, draait u de [ROTARY] knop recht som of linksom en stelt u het volume in op het gewenste niveau (0 t/m 33).
* Als de TA-, INFO-, ALARM- of PTY- onderbrekingsuitzending is afgelopen, keert het volume terug maar het niveau dat was ingesteld voör de onderbrekingsuitzending.
De 5.1-kanalen surrounddecoder bedieren
Als een optionele, met behulp van een CeNET-kabel aangesloten, compatibile 5.1-kanalensurrounddecoder is aangesloten, kan dit apparaat de functies van de 5.1-kanalensurrounddecoder bedieren.
De volgende functies veranderen als een 5.1-kanalen surrounddecoder is aangesloten.
- Twee functies, "MOVIE" en "VIRTUAL", worden toegevoegt aan de Dolby Pro Logic II-functie.
- De VSE/POSITION-functie verandert in de DSF (digitaal geluidsveld)-functie.
- In de P.EQ (parametrische equalizer)-functie, können de instellingen van{iedere luidspreker in nog groter detail worden ingesteld.
- De instellingen van de instelitems (zie blz. 39) die betrekking hebben op de muziek, veranderen.
PL II (Dolby PL II) kiezen
Kies een van de vier beschikbare functies overeenkomstig de bron die u wilt weergeven in de Dolby Pro Logic II-functie.
- De fabrieksinstalling is "OFF".
■ MUSIC (muziekfunctie)
Zie "Het PLII-menukiezen (Dolby PLII)" (zie blz.17).
■ MATRIX (matrixfunctie)
Zie "Het PLII-menukiezen (Dolby PLII)" (zie blz.17).
MOVIE (filmfunctie)
Geschikt voor DVD-films.
VIRTUAL (virtuelle functie)
Geschikt voor films en andere geluidsbronnen.
OFF
De Dolby Pro Logic II-functie wirdt nicht gebrukt.
1. Druk op de [SOUND] toets.
2. Raak Dolby PLII aan.

3. Raak de rechterkant van het display met aan en kies de Dolby Pro Logic II-functionie.

De functiedisplays worden als volgt doorlopen:
MUSIC (muziekfunctie) MATRIX (matrixfunctie) MOVIE (filmfunctie) VIRTUAL (virtuele functie) OFF (PL IIuit) MUSIC (muziekfunctie)...
* Voor verdere informatie over het instellen van het volumeniveau van de middenluidspreker/subwoofer, raadpleegt u bladzijde 45.
4. Raak RTN aan.
Het DSF-menu kiezen
Met DSF (digitaal geluidsveld) is het vis geluidssimulatie möglichk een geluidservaring te creeren alsof u zich in een concertzaal bevindt of een liveoptreden bijwoont.
- Als het DSF-menu worden gekozen, worden het volumeniveau soms lager.
- De fabrieksinstalling van DSF is "OFF" en op het DSF-basismenu is "HALL".
1. Druk op de [SOUND] toets.
2. Raak DSF aan.

3. Raak het ON/OFF-display met aan. Het DSF-effect worden beurtelings in- enuitgeschakeld.

Als DSF is ingesteld op "OFF", heeft de DSF-installing geen invloed op het weergavegeluid. Hiermee is de DSF-installing voltooid. Druk op de [SOUND] toets om terug te keren maar de oorspronkelijke functie.
4. Raak het DSF-menunummer met 山 aan en kies het gewenste DSF-menu.

De DSF-menu's zich:
HALL CHURCH STADIUM LIVE JAZZCLUB THEATER HALL...
Nr. Functienaam Beschrijving 1 HALL Een große concertzaal 2 CHURCH Een kerk met een gewelfd plafond 3 STADIUM Een groot stadion+zonder dak of muren 4 LIVE Een zaal voor liveoptredens, groter dan een jazzclub 5 JAZZCLUB Een jazzclub met een laag plafond 6 THEATER Een bioscoop of theater
5. Druk op de [SOUND] toets om terug te keren maar de oorspronkelijke functie.
Het parametrischeequalizermenu kiezen
De parametrische equalizer (P.EQ) stelt u in staat het gehele freiorentiebereik nauwkeurig te compenseren tot een vloeijeende kromme met behulp van freiorentiecompensation overeenkomstig het type auto dat u hebt.
- De fabrieksinstelling stelt alle luidsprekers in op de volgende instelleningen: FREQ = 1kHz, Q = 1, GAIN = 0dB
1. Druk op de [SOUND] toets.
2. Raak P.EQ aan.

3. Raak het ON/OFF-display met 山 aaan. Het P.EQ-effect worden beurtelings in- enuitgeschakeld.

Als het P.EQ-effect is ingesteld op "OFF", heeft de P.EQ-instelling geen effect op de geluidsbron. Hiermee is de P.EQ-instelling voltooid. Druk op de [SOUND] toets om terug te keren maar de oorspronkelijke functie.
4. Raak het P.EQ-menunummer met 山 aaen kies het P.EQ-menu.

De P.EQ-menu's waar:
SIGNAL SP-SEL BAND FREQ Q GAIN SIGNAL...
5. Raak de rechterkant van het display met
aan en stel het item maar wens in.
SIGNAL (Kies het in te stellen signaal.): Kies "P-NOIS" of "MUSIC".
P-NOIS: Kies deze instelling wanneer pingelgeluid worden gebruikt.
MUSIC: Kies deze instelling wanneer muzieksignalen worden gebruikt.
SP-SEL (Kies de luidsprekers waarvan u de
P.EQ-waarde wilt instellen.)
Kies een instelling UIT "FRONT", "CENTER" of "SURROUND".
- FRONT: Voorluidspreker
- CENTER: middenluidspreker
- SURROUND: surroundfluidspreker
BAND (Kies de frequentrieband.):
Kies een van de banden 1 t/m 3.
FREQ (Kies de middenfrequentie.):
Het instelbereik loopt van 20 Hz t/m 20 kHz.
Q (Stel de Q-kromme in.):
Hiermee stelt u de spitsheid van de Q-kromme in op 1, 3, 5, 7 of 20.
GAIN (Stel het uitgangsiveau in.):
Hiermee stelt u de versterking (uitgangsnavau) in binnen het bereik van -12 dB t/m +12 dB. (in stappen van 1 dB, 25 punten)
6. Herhaal de stappen 4 en 5 om het gewenste item in te stellen.
7. Druk op de [SOUND] toets om terug te keren maar de oorspronkelijke functie.
De P.EQ instellen
De instellungen die kuren worden veranderd op het P.EQ-menu zijn de volgende: De middenfrequentie, versterking en Q-kromme kuren worden opgeslagen in combinatie met een kanaal/band.
Bijvoorbeeld: middenfrequentie "250Hz", versterking "-8dB" en Q-kromme "3" können worden opgeslagen voor band 1 voor.
Voor verdere informatie over de P.EQ-functie, raadpleegt u "De P.EQ instellen" (zie blz. 21).
Deinstallingenveränderen
Als een 5.1-kanalen surrounddecoder is aangesloten, veranderen de instellenen die betrekking hebben op de muzzlek.
De instelitems kiezen
Hieronder volgt een beschrijving van de items waarvan de instelling worden veranderd.
Voor verdere informatie over de andere items die Niet worden verandered, raadpleegt u "De instellengen veranderen" (zie blz. 39) onder "Gemeenschappelijk bedienden in iedere functie".
1. Druk op de [A] toets
De functie verandert maar de instelfunctie.

2. Raak het instelitemdisplay met 山 山 aan en kies het item dat u wilt instellen.
* Als u de linkerkant van het display met
anraakt, worden de hoofditem een voor een doorlopen.
Als u de linkerkant van het display met
aanraakt, worden de hoofd items ononderbroken doorlopen.
* Als u het midden van het display met
anraakt, worden de subitems een voor een doorlopen. Als u het midden van het display met aanraakt, worden de subitems ononderbroken doorlopen.
3. Als op de rechterkant van het display "THROUGH" wordt afgebeeld, raakt u THROUGH aan om over te schakelen waar het instellingendisplay.
4. Raak de rechterkant van het display met 卡 aan of draai de [ROTARY] knop en kies een instelling.
■ Terugkeren maar de oorspronkelijke functie
1. Druk nogmaals op de [A] toets.
- Instelitems
Hoofditem SubItem SOUND CENTER-SP / SRD-SP / SUB-WOOFER
• De luidspreker in-/uitschakelen (zie blz. 64) FRONT HPF / CENTER HPF / SRD HPF / SUB-W LPF
• De filterfrequentie van de luidsprekers instellen (zie blz. 64) SP GAIN
• Het uitgangsiveau van de luidsprekers instellen (zie blz. 46) DELAY CENTER-SP / SRD-SP
• De vertragingstijd van de luidsprekers instellen (zie blz. 65) DOLBY D D-RANGE
• Het dynamisch bereik instellen (zie blz. 65) PL II CONT PANorama / DIMENSION / CTR WIDTH
• De muziekfunctie in detail instellen (zie blz. 47)
De luidsprekers in-/ uitschakelen (CENTER-SP/ SRD-SP/SUB-WOOFER)
Met deze functie kurz u de middenluidspreker (CENTER-SP), de surroundluidspreker (SRD-SP) en de subwoofer (SUB-WOOFER) in- en uitschaken.
Zorg ervoor dat重点领域 instelling op "OFF" is ingesteld als er geen middenluidspreker, surroundluidspreker of subwoofer is aangesloten.
- De fabrieksinstalling is "ON".
1. Druk op de [A] toets om de instelfunctie op te roepen.
2. Raak het instelitemdisplay met aan en kies bij "SOUND" het item "CENTER-SP", bij "SOUND" het item "SRD-SP", en bij "SOUND" het item "SUB-WOOFER".

ADJUST MODE CENTER-SP 串 ON
3. Raak de rechterkant van het display met aan of draai de [ROTARY] knop en kies "ON" of "OFF".
* In het geval van "SUB-WOOFER", kiest u "ON+", "ON-" of "OFF". Normaal gesproken kies u "ON+". Wanneru erchter "ON-" instelt, krijgt u een sterk effect van de lage tonen.
4. Druk op de [A] toets om terug te keren maar de oorspronkelijke functie.
De filterfrequentie van de luidsprekers instellen (FRONT HPF/CENTER HPF/ SRD HPF/SUB-W LPF)
Met deze functie=kunt u de filterfrequentie instellen overeenkomstig de luidsprekers die u gebrukt.
- Luidsprekers die bij "Deuidsprekers in-/uitschakelen (CENTER-SP/SRD-SP/SUB-WOOFER)" werden uitgeschakeld, wordeniet aufgebeeld.
- De fabrieksinstalling van "FRONT HPF" en "SRD HPF" is "THROUGH" (geen filter), en van "CENTER HPF" en "SUB-W LPF" is "120Hz".
Filterinstalling
FRONT HPF/CENTER HPF/SRD HPF (installing van hoogdoorlaatfilter)
Dit filter verwijdert de lage tonen uit het geluid voor de voor-, midden- en surroundluidsprekers.
THROUGH 50Hz 80Hz 120Hz
Stel het filter in overeenkomstig uw luidsprekers als de luidsprekers eenkleine diameter hebben.
THROUGH
Kies deze instelling als u luidsprekers gelebruikt die rage tonen können weergeven. CENTER HPF kan nicht worden ingesteld op THROUGH.
SUB-W LPF (instelling van laagdoorlaatfilter voor subwoofer)
Dit filter verwijdert de hoge tonen uit het geluid voor de subwoofer.
50Hz 80Hz 120Hz
Stel de filterfrequentie in overeenkomstig uw subwoofer.
1. Druk op de [A] toets om de instelfunctie op te roepen.
2. Raak het instelitemdisplay met aan en kies bij "SOUND" het item "FRONT HPF", bij "SOUND" het item "CENTER HPF", bij "SOUND" het item "SRD HPF" en bij "SOUND" het item "SUB-W LPF".

ADJUST MODE FRONT HPF THROUGH
3. Raak de rechterkant van het display met 卡 aan of draai de [ROTARY] knop en kies de frequentie.
* Kies een instelling uit THROUGH*, 50Hz, 80Hz en 120Hz.
^*1 THROUGH wordt alleen aufgebeeld als "FRONT HPF" of "SRD HPF" is gekozen.
4. Druk op de [A] toets om terug te keren maar de oorspronkelijke functie.
De vertragingstijd van de luidsprekers instellen (CENTER-SP/SRD-SP)
De tijdsduur waarna het geluid van iedere luidspreker aankomt op de luisterpositie verschilt afhankelijk van de montagepositie van de luidsprekers en de grotte van uw auto. Stel de vertragingstijd van iedere luidspreker zodanig in dat het geluid van alle luidsprekers tegelijk met het geluid van de voorluidsprekers de luisterpositie bereikt.
- De fabrieksinstalling is "0ms".
1. Druk op de [A] toets om de instelfunctie op te roepen.
2. Raak het insteltemdisplay met aan en kies bij "DELAY" het item "CENTER-SP", en bij "DELAY" het item "SRD-SP".

DELAY
ADJUST MODE
CENTER-SP》 0ms
3. Raak de rechterkant van het display met
aan en stel de vertragingstijd in.
* "CENTER-SP" kan worden ingesteld binnen het bereik van 0 ms t/m 5 ms.
* "SRD-SP" kan worden ingesteld binnen het bereik van 0 ms t/m 15 ms.
4. Druk op de [A] toets om terug te keren maar de oorspronkelijke functie.
De Dolby Digital functies instellen (D-RANGE)
Deze functie comprimeert het dynamisch bereik van Dolby Digital om geluid met een laag volumeniveau, zoals bijvoorbeeld de stem van een acteur, te behonden, maar geluid met een hoog volumeniveau te onderdrukken.
Deze functies zich alleen beschikbaar opDVD's opgenomen in Dolby Digital.
- De fabrieksinstalling is "MAX".
1. Druk op de [A] toets om de instelfunctie op te roepen.
2. Raak het insteltemdisplay met aan en kies bij "D-RANGE" het item "DOLBY D".

ADJUST MODE
D-RANGE MAX
3. Raak de rechterkant van het display met aan en stel het gewenste item van het dynamisch bereik maar wens in.
MAX: het maximale dynamisch bereik van de oorspronkelijke geluidsbron.
STD: de aanbevolen functie voor normalaal luisteren.
MIN: het sterkst gekomprimeerde dynamisch bereik, waar bij zichs zachte geluiden goed te horenল.
4. Druk op de [A] toets om terug te keren maar de oorspronkelijke functie.
8. PROBLEMEN OPLOSSEN
Probleem Oorzaak Oplossing Algemeen Het apparaat wordt Niet ingeschakeld. (Er wordt geen geluid voortgebracht.) De zekering is doorgbebrand. Vervang de zekering door een neue vandezelfde sterkte. Als de zekering waar doorbrandt, neemt u contact op met de winkel waar u het apparaat heb gekocht. Onjuiste bedrading. Neem contact op met de winkel waar u het apparaat heb gekocht. Er wordt geen geluid voortgebracht wonneer het apparaat bediend wordt terwijversterkers of een vermogensantenne is aangesloten. De kabel van de elektrische antennene is kortgeslooten maar massa of een te hoge stroomsterkte is nodig voor het inschaken van de versterkers of de elektrische antennene. 1. Schakel het apparaat uit.2. Maak alle draden los die aan de kabel van de elektrische antennene vastzitten. Controleerijdere draad met behulp van een ohm-meter op möglichke kortsuiitingaar massa.3. Schakel het apparaat wee in.4. Sluitijdere draad eén voor eén waar aan op de kabel van de elektrische antennene. Als de versterkers uitgaan voordat alle draden+zijn aangesloten,gebruikt u een extern relais om de inschakelspanning te leveren (de vereist stroomsterkte is te hoog). Als op de toetsen wordt gedrukt, gebeurt er niets.Het display geeft verkeerde indicators, enz., aan. De microprocessor is gestoord door ruis, enz. Schakel het apparaat uit,druk daarna op de [RELEASE] knop en haal het voorpaneel eraf. Druk op de terugstelknop met een dun ijzerdraadje.Terugsteltoets De aansluiting:tussen het voorpaneel en het apparaat is vies. Veeg het vuil eraf met een zachte doeck bevochtigdemet alcohol. CDMP3WMA Er is geen geluid hoorbaar. Een ongeschikte disc (geen compact disc) of een vreemd voorwerp bevindt zich in het apparaat. Met het kantelend bedieningsspaneel geopend, houdt u de [▲] toets gedurende 3 seconden of langer ingedrukt.Het vreemde voorwerp worden gedwongenuitgeworpen. Er staan geen MP3/WMA-bestanden op de disc. Neem op de juiste manier MP3/WMA-bestanden op de disc op. De bestanden worden nicht herkend als MP3/WMA-bestanden. Zorg ervoor dat de MP3/WMA-bestanden op de juiste manier zijn gecodeerd. Het bestandssystem is Niet juist. Gebruik het bestandsystem ISO9660 level 1,2,of JOLIET of Romeo. Het geluid slaat over of is bevat veel ruis. De disc is vuil. Maak de disc schoon met een zachte doeck. De disc is ernstig bekrast of verbogen. Vervang de disc door een disc zonder krassen. Het geluid wordt onderbroken of slaat over.Er treedt ruis op of de ruis is vermengd met het geluid. De MP3/WMA-bestanden zich net op de juiste manier gecodeerd. Zorg ervoor dat de MP3/WMA-bestanden op de juiste manier zijn gecodeerd.
Probleem Oorzaak Oplossing CD/MP3/WMA De geluidskwaliteit is slecht onmiddelijk nadat het apparaat is ingeschakeld. Er{kunnen zich waterdruppels haben gezvermd op de lens in het apparaat terwijl de auto op een vochtigeplaats geparkeerd stond. Schakel het apparaat in enaar het onceveer een uur drogen. De bestandsnamen zijn verkeerd. Het bestandsystem is nicht juist. Gebruik het bestandsystem ISO9660 level 1,2, of JOLIET of Romeo. De afspeellijst kan nicht worden weergegeven. De bestandsnamen of de afspeellijst-extensie zijn nicht juist. Gebruik alleen alfanumerieke of ASCII-tekens in de namev an MP3/WMA-bestanden. Gebruik voor de afspeellijst de extensie“.M3U”.
9. FOUTMELDINGEN
Als zich een probleem voordoet, worden één van de volgende foumt melding afgebeeld. Volg de gegeven instructies om het probleem op te losesten.
Foutmelding Oorzaak Oplossing CD/MP3/MMA ERROR 2 Een disc is binnenin de CD-speler vastgelopen en kan nicht worden uitgeworpen. Dit is een storing van het mechanismisme in de CD-speler. Neem contact op met de winkel waar u het apparaat hebt gekocht. ERROR 3 Een disc in de CD-speler is bekrant, enz., en kan nicht worden weergegeven. Vervang de disc door een disc zonder krassen die nicht verbogen is. ERROR 6 Een disc is ondersteboven in de CD-speler geplaatst en kan nicht worden weergegeven. Werp de disc uit enplaats deze verrolgens op de juiste manier. Algemeen AMP GUARD De beveiligingsschakeling van de luidspreker is in werkig getreden. Als tijdens deze bediening het volumeniveau worden veranderd, worden "AMP GUARD" op het display afgebeeld. "AMP GUARD" treedt soms in werkig wanneser speciale testsignalen worden gebruikt. 1. Verlaag het volumeniveau. De juiste werkung kan ook worden hersteld door het apparaat uit en waar in te schakelen. (Wanner de beveiligingsschakeling van de luidspreker in werkung treedt, worden automatisch het volumeniveau van de luidsprekers verlaagd.)2. Als het volumeniveauoor worden verlaagd, neemt u contact op met once serviceafdeling. CD-wisselaar ERROR 2 Een disc binnenin de CD-wisselaar worden Niet in positie gebracht voor weergave. Dit is een storing van het mechanismisme in de CD-wisselaar. Neem contact op met de winkel waar u het apparaat hebt gekocht. ERROR 3 Een disc in de CD-wisselaar is bekrant, enz., en kan nicht worden weergegeven. Vervang de disc door een disc zonder krassen die nicht verbogen is. ERROR 6 Een disc is ondersteboven in de CD-wisselaar geplaatst en kan nicht worden weergegeven. Werp de disc uit enplaats deze verrolgens op de juiste manier. DVD-wisselaar ERROR 2 Een disc in de DVD-wisselaar kan nicht worden weergegeven. Dit is een storing van het mechanismisme in de DVD-wisselaar. Neem contact op met de winkel waar u het apparaat hebt gekocht. ERROR 3 Een disc in de DVD-wisselaar is bekrant, enz., en kan nicht worden weergegeven. Probeer de disc opnieuweer te geven of verwang de disc door een disc zonder krassen die nicht verbogen is. ERROR 6 Een disc is ondersteboven in de DVD-wisselaar geplaatst en kan nicht worden weergegeven. Werp de disc uit enplaats deze verrolgens op de juiste manier. ERROR P Foutief kinderslotniveau. Stel het juiste kinderslotniveau in. ERROR R Foutieve regiocode. Werp de disc uit enplaats een disc met de juiste regiocode.
Als een andere foulmeling dan die hierboven worden beschreiben worden aufgebeeld, drukt u op de terugsteltoets. Als het probleem aanhoudt, schakelt u het apparaat uit en neemt u contact op met de winkel waar u het apparaat hebt gekocht.
10. TECHNISCHE GEGEVENS
Radio
Afstemsystem: PLL-synthesizertuner
Ontvangstfrequencies:
FM:
87.5 t/m 108 mHz (in stappen van 0.05 mHz)
MG:531 t/m 1602 kHz (in stappen van 9 kHz)
LG: 153 t/m 279 kHz (in stappen van 3 kHz)
CD-speler
Systeem:
Digitalaudiosystemeenvoorcompactdiscs
Frequentiebereik: 5 Hz t/m 20 kHz (±1 dB)
Signal-ruisverhouding: 100 dB (1 kHz) IHF-A
Dynamisch bereik: 96 dB (1 kHz)
Vervorming: 0,01%
Algemeen
Uitgangsvermogen:
4× 31W (DIN 45324, +B = 14,4V)
Voedingsspanning:
14,4 V gelijkstroom (10,8 t/m 15,6 V
toegestaan), negatieve massa
Stroomverbruik: Minder dan 15 A
Luidsprekerimpedantie:
4Ω (4 t/m 8 Ω toelaatbaar)
Nominale stroomsterkte van autoantenna:
500 mA of minder
Gewicht:
Hoofdtoestel: 1,7 kg
Afstandsbediening: 80 g (inklusief batterij)
Afmetingen:
Hoofdtoestel:
178 (B) × 50 (H) × 155 (D) mm
Afstandsbediening:
44 (B) × 110 (H) × 27 (D) mm
Opmerking:
- De technische gegevens en het ontwerp+zijn onderhevig aan veranderingen ten behoeve van productverbetering zonder voorafgaande kennisgeving.
Muchasgraciasporlaadquisidonedeste productoClarion.
* Antes de utiliser este equipo lea Completely el manual de instrucciones.
* Después de haber leído este manual, cerciórese de guardarlo a mano (p. ej., en la guantera).
* Compruebe el contenido de la tarjeta de garantía adjunta y guardela ciuidadosamente con este manual.
* Este manual incluye los procedimientos de operación del Cambiador de discos CD y sintonizador de DAB y TV conectados a工程技术 de cable CeNET. El Cambiador de discos CD y sintonizador de TV tiene sus propios manuales, pero no se describes los procedimientos de su operación.
Índice
1. PRECAUCIONES 3
Consola inclinable 4
Manejo de los discos compactos 4
2.CONTROLES 5
3. NOMENCLATURA 6
Nombres de los botones y sus functions 6
Operaciones de los principales botones cuando se haya conectado un equipo externo a esta .. 7
Elementos de visualización 7
Operaciones en pantalla 8
4. PANEL DE CONTROL DESMONTABLE (DCP) 9
5. CONTROLADOR REMOTO 10
Insercion de las pilas 10
Funciones de los botones del controlador remoto 11
6. OPERACIONES 12
Operacionesbasicas 12
Operación del procesador AC III 17
Operaciones de la radio 23
Operaciones del systemadeatosradiofonicos(RDS) 26
Oeraciones de CD / MP3 / WMA 31
Diferentes piezas musicales eschuchadas por various oyentes (funcion 2-ZONE) 36
Operaciones comunes de cada modo 37
7. OPERACIONES DE LOS ACCESORIOS 51
Operaciones del Cambiador de discos compactos 51
Operaciones del televisor 54
Operaciones digitales de radio/DAB 58
Operaciones del decodificador surround de 5,1 canales 61
8. EN CASO DE DIFICULTAD 66
9. INDICACIONES DE ERROR 68
10. ESPECIFICACIONES 69
1. PRECAUCIONES
1.Estaunidad se aplica solamente para fines de vehículos de 4 ruertas en carretera.No es apropiado elutilizarla para tractores, camiones, aplanadoras, vehículos todo terreno, ni motocicletas de 2 o 3 ruadas, embarcaciones, nithers vehículos para fines especiales.
2. Si el interior del automóvil está muy frío y utilizes la unidad inmediamente afterwards de haber encendido el calefactor, es posible que se condense humedad en el disco o en las piezas del reproductor, y que的结果 impossible realizar la reproducción apropiada. Si se condensa humedad en el disco, fróteo con un paño seco. Si se condensa humedad
en las piezas opticas del reproductor, no lo utilise durante aproximamente una hora, y la humedad condensada desaparecerá de forma natural para permitir la operation normal.
3. La conducccion por carreteras accidentadas que Causeen vibraciones notables可以使 caurar el salto del sonido.
INFORMACION PARA LOS USUARIOS:
LOS CABIOS O MODIFICACIONES REALIZADOS EN ESTE PRODUCTO NO APROBADOS POR EL FABRICANTE ANULARAN LA GARANTIA.
ADVERTENCIA
Para su seguridad, no mire ni maneje el panel tactil cuando conducze.
Consola inclinable
Estaunidadutilizaconsolasinclinablespara permitir que lasvisualizacionessean lo mayores posibles.
Cuando utilise una consola abatible, cerciórese de cerrarla.
PRECAUCION
Tenga cuidado de no pillarse los dedos cuando abra o cierra la CONSOLA INCLINABLE.
1. Por motivos de seguidad, cierre la CONSOLA INCLINABLE cuando no vaya a utilizesla durante mucho tiempo, o antes deponer en OFF la llave de encendido. Si pusiese en OFF la llave de encendido con la CONSOLA INCLINABLE inclinada, esta no se cerraría.
2. Antes de que la CONSOLA INCLINABLE se
cierre, pourrait oírse un sonido de frenado procedente del mecanismo de seguridad. Esto es normal.
3. Si mueve la CONSOLA INCLINABLE con la mano, puede ser que adquiera cierto juego. Para corregir este jeu, con la alimentacion de la unidad connectada, presione el boton [▲] para cerrar la CONSOLA INCLINABLE.
4. Después de haber extraído un disco, la CONSOLA INCLINABLE volverá automáticamente al estado de inclínación o cierre. Si hay algunos obstáculo trate de cerrarse, el mecanismo de seguridad se disparará y la CONSOLA INCLINABLE volverá al estado de aperture. Cuando suceda this, elimine the obstáculo. y afterwards presione el botón [▲].
5. Para evaporar rayar el disco compacto, mantenga bajo el nivel del disco compacto de 12 u 8 cm cuando lo inserte o lo extraiga.
Manejo de los discos compactos
Emplee solamente discos compactos que tengan la marca @SIC o
No reproduzca discos compactos en forma de corazon, octogonales, ni de ninguna other forma especial.
Es possible que algunos discos CD grabados en el modo CD-R/CD-RW no;puede emplease.
Manejo
- En comparación con los discos compactos de música normales, los discos CD-R y CD-RW se ven afectados fácilmente por la temperatura y la humedad elevadas, y es posible que algunos de tales discos no能把 reproductarse. Por lo tanto, no los deje durante mucho tiempo en un automóvil.
- Los discos nuevos你能 tener rugosidades en el borde. Si utilizes tales discos, el reproductor podría u trabajo, o el sonido podría saltar. Utilice u objeto similar, para rugosidades del borde.
- No pegue nunca etiquetas sobre la superficie de los discos compactos, ni marque dicha superficie con lápices ni bolígrafos.
- No reproduzca nunca un disco compacto pegado con cinta plástica nithers pegamentos, ni con las marcas despegadas. Si tratase de producir uno de tales discos, quizas no pudiese SACARLO del reproductor de discos compactos o dañarlo.
- No utilise discos compactos que posean ralladura grandes, deformados, rajados, etc. La utilización de tales discosURTDA可以使 el mal funciona como dos días.
- Para extraer un disco compacto de su caja, presione el centro de dicha caja y levante el disco, sujetándolo cuidadosamente por los bordes.
- No utilise hojas protectoras de discos compactos, vendidas en establishimientos del ramo, ni discos provistos de estabilizadores, etc. Estos elementos podriani darar los discos o el mecanismo interno.
Almacenamento
- No exponga los discos compactos a la luz solar directa ni a fuentesTERMicas.
- No exponga los discos compactos a humedad ni polvo excessivo.
- No exponga los discos compactos al calor directo de aparatos de calefacción.
Limpieza
- Para eliminar las huellas ductilares y el polvo, utilise un paño suave y frote el disco en linea recta del centro a la periferia.
- No utilise disolventes, como limpiadores adquiridos en establecimientos del ramo, rociadores antiestátics, ni diluidor de pintura para limpar los discos compactos.
- Después de haber utilisé un limpiador de discos compactos, deja que el disco compacto se seque bien antes de reproducirlo.
2.CONTROLES
Unidad fuente

Apertura de la CONSOLA INCLINABLE

3. NOMENCLATURA
Nombres de los botones y sus sistemas
Botón [RELEASE]
- Extracción del panel de control desmontable (DCP).
Fotosensor
- Este sensor detecta la intensidad de brillo Dentro del automóvil. Cuando la función de atenuación automática está configurada en "AUTO", la intensidad de brillo de la pantalla se reduce para adaptarse a la intensidad de brillo que detecte este sensor.
Mando [ROTARY]
- Presione este mando para conectar la alimentacion. Cada vez que presiona este mando, se cambia de modo.
- Presione el mando prolongadamente durante 1 segundo o más para desconectar la alimentación.
- Este mando también se pueda girar para regular el volumen o para realizarkestinos ajustes en el modo de ajuste.
Boton [△]
- Abre/cierra el panel de control.
Si hay un disco cargado, este se expulsa cuando se abide el panel de control.
Nota:
Si no se expulsa el disco, presione el botón [▲] durante 1 segundo o más.
Boton [A]
- Utilice este botón en el modo de ajuste para establecer o configurar losDistinctosajustes.
- Utilice este botón en el modo de radio para introducir los nombres de emisoras, o en el modo CD, para introducir los titulos de discos.
Botón [SOUND]
- Utilice este botón para establercer o configurar losDistinctosajustes, como el espacio de audio.
- Si presiona este botón prolongadamente durante 1 segundo o más, tambiénoulda activar (ON) y desactivar (OFF) la funciona 2-ZONE.
Botón [TA]
- Utilice este botón paraaabstar el modo deespera TA (Información sobre el tráfico) (cuando la funciona 2-ZONE está desactivada, "OFF").
Cambia el funciona de 2-ZONE. Si presiona este botón prolongadamente durante 1 segundo o más, cambia el tipo de 2-ZONE (cuando la funciona 2-ZONE está activada "ON").
Boton [▶■]
- Interrumpe o reanuda la reproduccion de una pista (en el modo CD).
- Utilice este botón paraaabustar el modo de espera PTY ( Tipo de programa) o los parámetros de PTY.
Pantalla
- Muestra losDistinctos datos que indican el estado de configuracion de la unidad, como losindicadores y el estado de sintonizacion/reproduccion.
Toque la pantalla con el dedo y bajo toque para activar la operation. (cf. pagina 8)
Operaciones de los principales botones cuando se haya connectado un equipo externo a estaunidad
- Cuando el Cambiador de CD/DVD está conectado
* Para Obtener más información, consulte la sección “Operaciones del Cambiador de discos compactos” (cf. págrina 51). Para Obtener información sobre el Cambiador de DVD, consulte el Manual de instructcciones que se suministra con el Cambiador de DVD.
Boton [11]
- Este botón le permite reproducir o interruptir (pausa) un CD o un DVD.
Boton[A]
- En el modo de转型发展 de CD se usa para introducir los títulos de discos.
- Cuando TV/DAB está conectado
* Para Obtener más información, consulte la sección “Operaciones del televisor” (cf. páginas 54) u “Operaciones digitales de radio/DAB” (cf. páginas 58).
Botón [TA]
- Utilice este botón paraaabrear el modo de espera TA (Información sobre el tráfico) en modo DAB. (Estamericano está disponible para un sintonizador DAB.)
- Presione el botón prolongadamente durante 1 segundo o más para activar o desactivar el modo INFO. (en el modo DAB).
Boton [II]
- Permite cambio el modo deImagen de la television o el modo deImagen del video (external). (en el modo TV).
- Utilice este botón paraaabustar el modo de espera PTY ( Tipo de programa) o los parámetros de PTY en el modo DAB.
Boton [A]
- Este botón se usa para introducir el nombre de la emisión de television. (en el modo TV).
Elementos de visualización

Operaciones en pantalla
Estaunidad emplea un panel táctil a modo de pantalla de visualización. Para hacerlo funciona, sólo tiene que tocarlo con la yema de los dedos. Existen cuatro operaciones principales de visualización, que son:
Tocar
Toque la pantalla con el dedo y retirelo antes de 1 segundo.Esta es la operation más baja para usar la pantalla.
Tocar prolongadamente
Toque la pantalla con el dedo de forma prolongada durante 1 o 2 segundos, como minimo. NoURTVA el dedo cuando toca laagna.
Cuando toca la pantalla prolongamente durante 1 segundo o más, aparecen listas, por exemple, e se invocan otheras functions practicas.
Cuando toca la pantalla prolongamente durante 2 segundos o más, se guarda una memoria preprogramada u另一边 información.
Tocar
Toque la pantalla con el dedo y desplace el dedo hacía la izquierda ( ) o hacía la derecha ( ) sin despegarlo de la pantalla, y luego retiéreo antes de 1 segundo.Esta operation se utilizes para seleccionar una memoria preprogramada (1 a 6) o pistas.

Tocar
Toque la pantalla con el dedo y desplace el dedo hacia la izquierda ( ) o hacía la derecha () sin despegarlo de la pantalla, y manténgalo asi. La operation en bajo se prolongará durante el tiempo que el dedo se mantenga en la pantalla.Esta operation se usa, por exemple, para sintonizar de forma manual o para hacer avanzar/retroceder rápidamente las pistas.

4. PANEL DE CONTROL DESMONTABLE (DCP)
El panel de control podra desmontarse como medida antirrboro. Despues de haber desmontado el panel de control, guardelo en la caja para el PANEL DE CONTROL DESMONTABLE (DCP) para evaporar que se raye.
Le recomendamos que lleve el DCP consigo cuando salga del automóvil.
Extracción del panel de control desmontable (DCP)
1. Con la CONSOLA INCLINABLE cerrada, desconnecte la alimentacion.
2. Presione a fondo el botón [RELEASE] para abrir el DCP.

3. Tire del DCP hacía usted y extráigalo.

PRECAUCION
- Cierre sempre la CONSOLA INCLINABLE antes de extraer el DCP.
- Si extrae el DCP con la CONSOLA INCLINABLE abierta, esta se cerrará inmediamente. Tenga cuidado de no pillarse los dedos.
Instalación del panel de control desmontable (DCP)
1. Inserte el DCP de forma que la sección (A) de la parte derecha del本身就是 quede fjada en el gancho (B) de la unidad.

2. Presione@cuidadosamente la parte izquierda © del DCP para encasarlo en su lugar.

PRECAUCION
- El DCP pueda danarse fácilmente con los golpes. Después de haberlo extraido, colocuelo en su caja, yonga cuidado de no partir lo caer ni de someterlo a golpes fuertes.
- Si presiona el botón de [RELEASE] y el DCP no está bloqueado en su lugar, pueda caerse debido a las vibraciones del automóvil. Nombre que el DCP se rompies, motivo por el que, après de haberlo extraido, instalelo en launities o colóquelo en la caja para el本身就是.
- El conector de la unidad al DCP es una pieza extremadamente importante. Tenga cuidado de no danarlo presionando con sus uñas, bolígrafos, destornilladores, etc.
Nota:
- Si el DCP se ensucía, fróte lo solamente con un paño suave y seco.
5. CONTROLADOR REMOTO

Inserción de las pilas
1. Dé la vuelta al controlador remoto, y después deslice la cubierta posterior en el sentido de la flecha.
2. Inserte las pilas AA (SUM-3, R-6/1,5 V) suministradas con el controlador remot en el sentidoamente en la figura, y antes cierre la cubierta posterior.
Notas:
La utilización inadequada de las pilas puede provocar su explosión. Tenga en cuenta los+puntos seguides:
- Cuando reemplace las pilas, cambie ambas por Otherwise.
- No cortocircuite, desarme, ni caliente las pilas.
- No tire las pilas al fuego.
- Tire las pilas agotadas en el lugar apropiado.

Funciones de los botones del controlador remoto
ModoBotón Radio (RDS)/DAB Reproductor de discos compactos/MP3 Cambiador de discos compactosCambiador de DVD Televisor [FUNC] Cambia entre la radio, DAB, CD/MP3, Cambiarde CD, cambiarde DVD y el televisor,AUX. [BAND] Cambio de la banda de recepción. Reproducción de la primera canción.Reproducción desdeel tope. Movimiento al disco seguidente enorden ascendente. Cambio de la banda de recepción. [▲], [▼] Aumento o reducción del volumen (en todos losmos). [←], [▶] Movimiento a canales memorizados superiores e inferiores. Movimiento a canociones superiores e inferiores. Cuando lo mantenga presionado durante 1 segundo: Avance/retroceso rápido. Movimiento a canales memorizados superiores e inferiores. [▶■] Sin funciona. Cambio entre reproducción y pausa. Sin funciona. [MUTE] Activación y desactivación del silenciamiento. [TA] Activación y desactivación de TA.Mantenga presionado este botón durante 1 segundo o más para Cambiar entre la fuente de sonido principal y de la zona secundaria (solamente con el modo 2-ZONE activado). [DISP] Cambia entre la visualización principal y visualización del reloj (CT). [PS/AS] Exploración de emisoras memorizadas.C时候 lo mantenga presionado durante 2segundos:Almacenamiento automático. Reproducción por exploraciónPresione y mantenga presionado el botón durante 1 o más segundos para efectuar la reproducción por exploración de la carpeta durante el modo de MP3/WMA. Reproducción con exploración.C时候 lo mantenga presionado durante 1segundo:Reproducción con exploración de discos. Exploración de emisoras memorizadas.C时候 lo mantenga presionado durante 2segundos:Almacenamiento automático. [AF] Activación y desactivación de la funciona AF.C时候 lo mantenga presionado durante 1segundo:Activación y desactivación de la funciona REG. Repetición de la reproducciónPresione y mantenga presionado el botón durante 1 o más segundos para efectuar la reproducción de la carpeta durante el modo de MP3/WMA. Reproducción repetIDA.C时候 lo mantenga presionado durante 1segundo:Reproducción repetIDA de discos. Sin funciona. [PTY] Activación y desactivación del modo de PTY. Reproducción aleatoriaPresione y mantenga presionado el botón durante 1 o más segundos para efectuar la reproducción aleatoria de la carpeta durante el modo de MP3/WMA. Reproducción aleatoria.C时候 lo mantenga presionado durante 1segundo:Reproducción aleatoria de discos. Cambio entre televisiony videograbadora. [2-ZONE] Manténgalo presionado durante 1 segundo o más para activar o desactivar el mode de zona doble.Presióno para Cambiar la zona de control entre la principal y la secundaria cuando el modo de zona doble está activado.
* Algunos de los botones correspondientes de launidad principal y del controlador remoto posen unidades differs.
6. OPERACIONES
Operaciones básicas
PRECAUCION
Cerciórese de reducir el nivel del volumen antes de desconectar la alimentación de la unidad o de poder la llave de encendido en OFF. Si deselectase la alimentación con el volumen a alto nivel, cuando volviene a conectarla, el volumen alto repentino podra dañar sus oidos y la unidad.
Encendidoyapagado
Encendido
Nota:
- Tenga cuidado cuando utilise esta unidad durante un tiempo prolongado con el motor apagado. Si agota la bateria del automóvil, noURTRA encender el motor yarlo podrA reducir la vida util de la bateria.
1. Presione el mando [ROTARY]. Se做不到 el modo que está anterionmente activo.
Comprobación del sistema
Cuando se conecta la alimentacion de esta unidad por primera vez, una vez realizadas todas las conexiones, esta compruba que equipos estar connectados. (Esto se denomina "system check", es decir, comprobacion del system.) Cuando se conecta la alimentacion y aparece "System Check", siga los pasos que se indicate a continuacion para realizar la comprobacion del system.
1. Cuando aparezca "System Check" en噎alla, presione el mando [ROTARY]. Comienza la comprobacion del systema. Una vez finalizada la comprobacion del systema, aparecerá "Completed" en la噎alla.
2. Presione el mando [ROTARY] de nuevo.
Aparece la visualización principal del modo de radio.
Función CODEMATIC
Cuando "CODEMATIC" está activada ("ON"), y se conecta la alimentación con el DCP acoplado, aparecerá la visualización Touch Code (Cólico táctil). Toque la visualización en el order que se programó en el modo de ajuste.

Para Obtener más información sobre la función CODEMATIC, consulte la sección "Uso de la funciona de sécurité (CODEMATIC)" (ct págin 50).
Apagado
1. Presione el mando [ROTARY] durante 1 segundo o más.
Selección de modo
1. Presione el mando [ROTARY] para Cambiar de modo de funciona bajo.
2. Cada vez que presiona el mando [ROTARY], cambia el modo de funciona bajo en el sigúienteorden:
Modo Radio Modo DAB Modo CD/ MP3 Modo MMI Modocambiador de CD Modocambiador de DVD Modo TV Modo AUX Modo Radio...
* Los equipos externos que no estén connectados con CeNET no se做不到.
Ajusted volume
1. Gire el mando [ROTARY] hacía la derecha paraacular de volumen, o hacía la izquierda para disminuirlo.
* El nthel de volumen es de 0 (minimo) a 33 (maximo).
Cambio del modo de funciona bajo la lawa de la lawa.
Existen 2 modelos de funciona bajo: funciona estandar y funciona simple.
1. En la visualización principal de la pantalla, toque la parte izquierda durante 1 segundo o más.
Cambia el modo de funciona.

En el modo de funciona simple, no es necessitiesoicar 山 o la visualizacion principal del mode de radio o el mode CD.
Tenga en cuenta, sin embargo, que lassiguientes operaciones no estan disponibles enel modo de funcionaimple.
- Presintonizacion, seleccion de carpetas, seleccion de discos y otheras operaciones que requieran tocar la parte la derecha de la pantalla
- Operaciones de cambio de visualización (cf.頁面13)
- Operaciones de cambio de visualización de títulos (cf. págin 14)
- Operaciones para la visualización de las pantallas de introduccion de titulos. En pantallas (p. ej. visualización de listas, modo de ajuste, etc.)-distintas de la principal, no hay diferencia entre el funcionaimiento estándar y el funcionaimiento simple.
Las descricciones que seOfrecen en este manual corresponden principalmente alfuncionamento estandar. Para Obtener descripciones de las operaciones que sepuede realizar en el modo simple, consulte las descripciones de las visualizaciones de pantalla en el mode de radio o el modo CD.
Cambio de visualización
1. Toque el centro de la pantalla.
Cada vez que toca la visualización, esta cambía como se indica a continuación:
Visualización de títulos

Salvapantallas
Cuando la funciona de salvapantallas está activada ("ON"), y no usa launidad durante unos 30segundos, apareceré el salvapantallas. Para Obtener más información, consulte la página 41.
Papel tapiz
Si toca prolongadamente el centro de la pantalla durante 1 segundo o más, aparecerá la visualización de papel tapiz.
① ⑨ ② ⑩ ③ ⑪ ④ ⑫ ⑤ ⑬ ⑥ ⑭ ⑦ ⑮ ⑧ ⑯
Visualización del analizador de espectro
Si toca prolongadamente la parte derecha de la pantalla durante 1 segundo o más cuando visualiza el analizador de espectro (S/A), cambiará la visualización del analizador de espectro.
S/A
SCAN Aparece S/A 1, S/A 2 y S/A 3 durante 10segundos o más cada una. S/A 1 S/A 1
WMA
FLDR No.
003
TOP S/A 2 S/A 2
WMA
FLDR No.
003
TOP S/A 3 S/A 3
WMA
FLDR No.
003
TOP
Cambio de la visualización de títulos
Es possible visualizar los titulos de discos yDEMAS Informacion almacenada en los discosm吲ntras reproduce discos compactos en losmodos CD oeturnador de CD.
1. En la visualización de titulos, toque prolongadamente la parte derecha de la pantalla durante 1 segundo o más. Cada vez que toca prolongadamente la visualización, esta cambia como se indica a continuación:
Disco CD de dato
Túltode usuario (disco) Titulo de CD de texto (disco) Nombre de interpréte
→ Titulo de CD de texto (pista) → Titulo de usuario (disco)...
Disco MP3/WMA
Carpeta Archivo Etiqueta dealbum
Etiqueta de interpréte Etiqueta de titre Carpeta...
Notas:
- MP3 es compatible con las etiquetas (Tags) ID3 V2.3/2.2/1.1/1.0.
Las visualizaciones de etiquetas dan prioridad a V2.3/2.2.
- Si se tratate de etiquetas de album para WMA, se做不到a informacion contentida en la ampliacion de cabecera.
- En la etiquetas solo se pueda做不到 clarar characteres ASCII.
Para desplazar un titulo
Toque la visualización de titulos con el titulo visible.
El titulo se desplaza hacía la izquierda
Para detener el desplazimiento
Toque la visualización de titulos.
Función CT (Hora del reloj)
Esta funciona le permitte recibir datos CT enviados desde una emisora RDS y visualizar la hora. Para visualizar la pantalla CT, toque el centro de la pantalla.
- Si no se está recubiendo datos CT, aparecerá "---CT" en la pantalla.
Nota:
- Los datos CT no se emiten en algunos País y enellas emisoras de radio. también es possible que en algunos zonas los datos CT no se visualicen correctamente.
Ajuste del ADF
- ADF es la abreviatura de "Anti Distortion Filter" (Filtro antidistorsión).
Lasmerican Psychiatric Association (APHA) has recently announced a new program that will be designed to improve the quality of life of people with chronic medical conditions. The program will be designed to improve the health status of individuals with chronic medical conditions, including diabetes, heart disease, and cancer.
Esta unidad dispone de 4tips de efectos de sonido memorizados. Seleccione el que preferia.
ADF-1: Apropiado para altavoces originales
ADF-2: Apropiado para altavoces separados
ADF-3: Apropiado para altavoces coaxiales
USER: Este valor puede ajustarlo el usuario a su gusto.
OFF: No hay efecto de sonido
- El valor preajustado de fabricula es "OFF".
Notas:
- Como el volumen varía cuando se cambia ADF, conviene Cambiar de tipo de ADF con el volumen, "SW VOLUME" (altavoz de subgraves) y "CTR VOLUME" (altavoz central) al minimo.
- En algunos sistemas de altavoces, en occasions no se obtiene el efecto sufiente. En tal caso, ajuste el parámetro del ADF o el volumen.
- Cuando ADF está configurado en "USER", "1", "2" o "3", lasustralianes VSE y BASS/TREB en EQ-SELECT queden desactivadas
1. Presione el botón [SOUND].
2. Toque ADF.

3. Toque la parte derecha de la pantalla para selectionar el modo ADF.

Cuando el ADF está desactivado ("OFF"), el ajuste de ADF no se refleja en la fuente de música. Con thiso recluye el ajuste del ADF. Presione el botón [SOUND] paravoltar al modo original.
* Selectione USER, 1, 2, 3 u OFF.
4. Para modifier los parámetros de ajuste del ADF, presione el botón [A].
5. Toque la visualización de ajustes para selecciónar el ajuste deseado. Cada vez que toca ,la visualización de ajustes cambia como se indica a continuación:
- Ajuste (cuando se selecciona USER en el paso 3)
BASS (graves) TREBLE (agudos) COMP BASS (graves)...
- Ajuste (cuando se selección 1 a 3 en el paso 3)
LEVEL (nivel) COMP LEVEL...
6. Toque la parte derecha de la pantalla para realizar el ajuste.
* El margen de ajuste de "BASS" y "TREBLE" es de 1 a 13.
\* El margen de ajuste de "LEVEL" es de -3 a +3
*Selezione“ON”o“OFF”para“COMP”.
7. Presione el botón [SOUND] para volver al modo original.
Ajuste del altovoz de subgraves y el altovoz central
- "SW VOLUME" (subgraves) sólo se pueda ajustar cuando "SUB-WOOFER" está activado ("ON").
- "CTR VOLUME" (altavoz central) sólo se pueda ajustar cuando el modo Dolby Pro Logic II está configurado en "MUSIC" o "MATRIX", "SP-SETTING" está en "CTR+SW" y "CENTER-SP" estáactivado ("ON").
- El valor preajustado de fabricula de SW VOLUME y de CTR VOLUME es "0".
1. Presione el botón [SOUND].
2. Toque A-MODE.

3. Toque ↑ ↓ la visualización de ajustes para selecciónar "SW VOLUME" o "CTR VOLUME".

4. Toque la parte derecha de la pantalla para realizar el ajuste deseado.
* El margen de ajuste de este elemento es de -5 a +5.
5. Presione el botón [SOUND] para volver al modo original.
Ajuste del balance/ desvanecedor
BALANCE:
Permite ajustar el balance de volumen entre los altavoces izquierdos y derechos.
FADER:
Permite ajustar el balance de volumen entre los altavoces delanteros y traseros.
- El valor preajustado de fabricula de BALANCE y de FADER es "0".
Nota:
- El balance/desvanecedor no se pueda ajustar cuando AC-PRO IIIiene configurado el parametro "PRO" (cf.頁目44) y la direccion de posicion está activada ("ON"). Ajuste el balance/desvanecedor "Selección del menu de posicion" (cf.頁目17).
1. Presione el botón [SOUND].
2. Toque A-MODE.

3. Toque ↓ la visualización de ajustes para selecciónar “BALANCE” o “FADER”.

4. Toque la parte derecha de la pantalla para realizar el ajuste deseado.
* "BALANCE" pourrait ajustarse dentro del margen L13 (predominio del lado izquierdo) a R13 (predominio del lado derecho).
* “FADER” puede ajustarse dentro el margen R12 (predominio del lado trasero) a F12 (predominio del lado delantero).
5. Presione el botón [SOUND] para volver al modo original.
Ajuste de graves/agudos
El modo de graves/agudos sólo se pueda ajustar cuando el modo Dolby Pro Logic II está desactivado ("OFF") (cf. págin 17) y "EQ-SELECT" tiene configurado el parámetro "BAS/TREB" (cf. págin 44).
- El valor preajustado de fabricula es "0"
1. Presione el botón [SOUND].
2. Toque A-MODE.

3. Toque la visualización de ajustes para selecciónar "BASS" o "TREBLE".

4. Toque la parte derecha de la pantalla para realizar el ajuste deseado.
* El margen de ajuste de este elemento es de -6 a +6.
5. Repita los pasos 3 y 4 para realizar el ajustedeaseado.
6. Presione el botón [SOUND] para volver al modo original.
Operación del procesador AC III
Dolby Pro Logic II
Dolby Pro Logic II es una Tecnología de decodificación de matriz en la que se aplicá la Tecnología de matriz digital actualizada y se的最佳as Dolby Pro Logic. Ofrece una reproducción excellente de 5,1 canales de fuentes perimétricas Dolby como como de fuentes de sonido estéreo, como discos compactos, produciendo por lo tanto un canal perimétrico de gama completa (20 Hz a 20 kHz) y se convierte en estéreo. Por lo tanto, ustedouldrásacrutar de cualquier fuente estéreo con sonido dinámico de 5,1 canales. De acuerdo con la fuente aroducirse, PODRA seleccionarse el modo de música o el modo de matriz.
Fabricado bajo licencia de Dolby Laboratories. "Dolby", "Pro Logic" y el symbolo de la doble D son marcas de Dolby Laboratories.
Selección del menu PL II (Dolby PL II)
Selezione MUSIC o MATRIX como modo Dolby Pro Logic II, según la fuente que vaya a reproducir.
- El valor preajustado de fabricula es "OFF".
■ MUSIC (modo de música)
- Este modo es apropiado para fuentes de sonido estéreo, como los discos compactos.
- Como el camino de sonido se propaga de forma diferente según el estado de la fuente musical grabada, existe(other modo de ajuste que permite afinar aun más. (Consultte la página 47).
■ MATRIX (modulo matricial)
- Este modo es apropiado para fuentes de sonido tales como la radio AM/FM.
OFF
- No se utilizes el modo Dolby Pro Logic II, sino el modo AC-PROIII. Para Obtener más información sobre el modo AC-PROIII, consulte la sección "Selección de cada modo" (ct págin44).
1. Presione el botón [SOUND].
2. Toque Dolby PLII.

3. Toque la parte derecha de la pantalla para seleccionar el modo Dolby Pro Logic II.

La visualización de modelos cambia como se indica a continuación:
MUSIC (modo de música) MATRIX (modo matricial) OFF (PL II desconectado) MUSIC (modo de música)...
* Para Obtener más información sobre elajuste de volumen de los altavocescentral/subgraves, consulte la página 45.
4. Toque RTN.
Selección del menu de posición
Con POSITION, puede selectionar entre 5tips el tiempo que el sonido tarda en临港ar desde el altovoz hasta su posición en el asiento.
Además, la función de alineación temporal permite ajustar los altavoces con precision de forma que el本身就是 efecto de sonido puedaninger desde cada altovoz a todos los oyentes.
En el procedimiento "Selección de cada modo" (cf. págin44),ajuste AC-PROIII en "PRO".
- El valor preajustado de fabricula de POSITION es "OFF" y el del menu Basics de posicion, "FRONT".
■ Menu de posición
Esta función está preprogramada con 5 menus de posicion. Seleeccione el menu que desee.
1. Presione el botón [SOUND].
2. Toque POSITION.

3. Toque la visualización ON/OFF. El modo de posición se activa o desactiva (ON/OFF).

Cuando el efecto de posicion está desactivado ("OFF"),DICHOajuste de posicion no se refleja en la fuente de musica. Con thiso recluye el ajuste de posicion.Presione el boton [SOUND] para volver al modo original.
4. Toque B/U para selectionar "BASIC".

Cada vez que toca B/U, "BASIC" y "USER" se alternan suscesivamente.
5. Toque el N° de menu básico de posición para selección ar menú báscico de posición.
6. Presione el botón [SOUND] para volver al modo original.
Menu Basics de posicion
N° Nombre de visualización Posición del asiento 1 FRONT-L Asiento delantero izquierdo 2 FRONT-R Asiento delantero derecho 3 FRONT Asientos delaneros. 4 REAR Asientos traseros. 5 FULL SEAT Todoos asientos
Ajuste/memorizacion de las positions (memoria de usuario)
Con la memoria de usuario, se pueda ajustar los altevoces con precision para que el本身就是 efecto de audio pueda临港ar desde cada altovoz a todos los oyentes segun el menu b asiico de posicion. La memoria de usuario permite programar hasta 5 valeurs de ajuste.
T-ALIGN (alineación temporal):
La distancia entre el oyente y cada altovoz se suece introducir en pasos de 2,3 cm, como también se suece ajustar el tiempo que el sonido tarda enninger al oyente desde cada altovoz.
SP GAIN (ganancia del altovoz):
Permitte ajustar el nivel de salute del altovoz. Ajuste este nivel de forma que todos los volúmenes que salgan de cada altovoz Sean iguales.
1. Presione el botón [SOUND].
2. Toque POSITION.
3. Toque ↑ ↓ la visualización ON/OFF. El modo de posición se activa o desactiva (ON/OFF).
4. Toque B/U para selectionar "BASIC" o "USER".
5. Toque la parte derecha de la pantalla para selectionar el menu que se utilizes como menu de ajuste.
6. Presione el botón [A].
7. Toque la parte izquierda de la pantalla para seleccionar "T-ALIGN" o "SP GAIN".
8. Toque la parte central de la pantalla para seleccionar cada ajuste.
Cada vez que toca , los ajustes se cambian como se indica a continuación:
Ajustes

*1 Sólo se muestra cuando, en modo de ajuste, "SUB-WOOFER" en "SOUND" está activado ("ON").
*2 Sólo se muestra cuando, en modo de ajuste, "SUB-WOOFER" en "SOUND" está activado ("ON") y se selección "T-ALIGN" en el Paso 7.
9. Toque la parte derecha de la pantalla para realizar el ajuste deseado.

* El margen de ajuste de "T-ALIGN" es de 0 cm a 501,4 cm, en pasos de 2,3 cm.
* El margen de ajuste de "SP GAIN" es de - 20dB a 0dB.
10. Repita los pasos 7 a 9 para realizar el ajustedeaseado.
11. Cuando haya terminado de realizar losDistinctos ajustes, toque RTN.
La visualización vuye a la pantalla original, y aparece “>>” en la visualización BASIC o USER.
Conestoconcluye la operaciondeajuste de低位. Para proseguir con la memorizacion de losvalores deajuste enelmenudecursoro de低位,haga lo singular.
12. Toque RTN prolongamente durante 1 segundo o más.
Aparecerá la lista de manos de posición.
13. Toque prolongamente durante 2 segundos o más la memoria de usuario en la que紊ee programar los valeurs de ajuste.
Escuchará un tono largo paraindicarle que los values que ajustó hasta el paso 10 se han memorizzato en el menu de usuario de posición.
Si escaucha un tono corto, es que los values de ajuste configurados hasta el paso 10 han sido descartados. Ajuste these values según sea besoinario.
14. Toque RTN.
15. Presione el botón [SOUND] para volver al modo original.
* Para seleccionar una memoria de usuario programada, toque B/U para ver “USER” y luego toque ↑ ⇌ el N° de memoria de usuario.
Selección del menu VSE
VSE (Virtual Space Enhancer) le permite compensar el balance de presión acústica bajo el automóvil, de forma que se pueda percibir el"Myso"effecto de sonido en todos los asientos, como lo demuestran las simulaciones de compensación realizadas.
En el procedimiento "Selección de cada modo" (cf. págin44),ajuste AC-PROIII en "STD".
- El valor preajustado de fabricula de VSE es "OFF" y el del menu Basics de VSE, "FLAT".
■ Menu Basics de VSE
Estamericanos.
1. Presione el botón [SOUND].
2. Toque VSE.

3. Toque la visualización ON/OFF. El efecto VSE se activa o desactiva (ON/OFF).

Cuando VSE está desactivado ("OFF"),DICHO ajuste de VSE no se refleja en la fuente de musica. Con thiso conclusye la configuracion de VSE.Presione el boton [SOUND] para volver al modo original.
4. Toque B/U para seleccionar "BASIC".

Cada vez que toca B/U, "BASIC" y "USER" se alternan suscesivamente.
5. Toque el N° de menu báscido de VSE para selección ar menú báscido de VSE.
Menús Basics de VSE
N° Nombre de la.,
función Descripción 1 FLAT Evaluación plana de
la fuente de sonido 2 BASS BOOST Reforzamiento de
tonos graves 3 HIGH BOOST Reforzamiento de tonos
medios y agudos 4 IMPACT Reforzamiento de
tonos graves y agudos 5 ACOUSTICAL Reforzamiento de tonos
medios (voz humana) 6 SMOTH Produce tonos suaves.
6. Presione el botón [SOUND] para volver al modo original.
Ajuste/memorizacion de VSE (memoria de usuario)
Los ajustes de la memoria de usuario le permiten compensar la distribución de la presión acústica a su gusto con arreglo al menú Basics de VSE. Se pueda memorizar hasta seis ajustes de usuario.
DIFFUSE:
Permitteaabstar la desviacion de la presion acustica difusa.
CARWIDTH:
Permitte ajustar la desviación de la presión acústica a lo ancho del automóvil.
CAR LENGTH:
Permitte ajustar la desviación de la presión acústica a lo largo del automóvil.
1. Presione el botón [SOUND].
2. Toque VSE.
3. Toque la visualización ON/OFF. El efecto VSE se activa o desactiva (ON/OFF).
4. Toque B/U para selectionar "BASIC" o "USER".
5. Toque la parte derecha de la pantalla para selectionar el menu que se utilizes como menu de ajuste.
6. Presione el botón [A].
7. Toque la visualización de ajustes para selectionar "DIFFUSE", "CAR WIDTH" o "CAR LENGTH".

8. Toque la parte derecha de la pantalla para realizar el ajuste deseado.
* El margen de ajuste de este elemento es de 1 a 10.
9. Repita los pasos 7 y 8 para realizar el ajustedeaso.
10. Cuando haya terminado de realizar los distinctos ajustes, toque RTN. La visualización vuelve a la pantalla original, y aparece “>>” en la visualización BASIC o USER.
Conestoconcluyeelajuste deVSE.Paraproseguir conla memorizacionde losvaloresdeajuste enelmenudeviasuario deVSE,hagalo significante.
11. Toque RTN prolongamente durante 1 segundo o más.
Aparecerá la lista de menús de usuario de VSE.
12. Toque prolongamente durante 2 segundos o más la memoria de usuario en la que deseee programar los values de ajuste. Escuchará un tono长大o para indicarle que los values que ajustó hasta el paso 9 se han memorizzato en el menu de usuario de VSE. Si escucha un tono corto, es que los values de ajuste configurados hasta el paso 9 han sido descartados. Ajuste these values según sea besoinario.
13. Toque RTN.
14. Presione el botón [SOUND] para volver al modo original.
* Para seleccionar una memoria de usuario programada, toque B/U para ver "USER" y bajo toque ↑ ↓ el N° de memoria de usuario.
Selección del menu P.EQ
P.EQ (Evaluador paramétrico) le permite compensar con precision todo el margen de niveles de frequencies mediante curva suave utilizing compensación de frequencies para adaptarlo a su tipo de automóvil.
En el procedimiento "Selección de cada modo" (cf. págin44),ajuste EQ SELECT en P.EQ
- El valor preajustado de fabricula de P.EQ es "OFF" y el del menu Basics de P.EQ, "SEDAN-1".
■ Menuístico de P.EQ
Esta función tiene prememorizados 6 temas de menus BASICS de P.EQ, selon el tipo de automóvil y la posición de instalación de los altavoces. Selección el menu BASICO que se ajuste a su automóvil.
1. Presione el botón [SOUND].
2. Toque P.EQ.

3. Toque la visualización ON/OFF. El efecto P.EQ se activa o desactiva (ON/OFF).

Cuando el efecto P.EQ está desactivado ("OFF"),)dicho ajuste no se refleja en la fuente de música. Con thiso conclusye el ajuste de P.EQ.Presione el boton [SOUND] para volver al modo original.
4. Toque B/U para selectionar "BASIC".

Cada vez que toca B/U, "BASIC" y "USER" se alternan suscesivamente.
5. Toque 山 el N° de menu báscido de P.EQ para selecciónar el menu báscido de P.EQ.
Menu Basics of P.EQ
N° Nombre de la visualización Posición de instalación de los altavoces 1 SEDAN-1 Delantera: Puerta Delantera
Trasera: Panel trasero 2 SEDAN-2 Delantera: Puerta Delantera
Trasera: Panel trasero 3 WAGON-1 Delantera: Puerta Delantera
Trasera: Portaequipaje (lateral) 4 WAGON-2 Delantera: Puerta Delantera
Trasera: Panel trasero 5 MINI VAN-1 Delantera: Puerta Delantera
Trasera: Portaequipaje (lateral) 6 MINI VAN-2 Delantera: Puerta Delantera
Trasera: Panel trasero
6. Presione el botón [SOUND] para volver al modo original.
Ajuste/memorizacion de P.EQ (memoria de usuario)
La memoria de usuario le permite compensar lascharacteristicas de fecuencia para ajustarlas a suautomovil segun el menubasico de P.EQ.Lamemoria de usuario permitted programar hasta 6valores de ajuste Para Obtener mas informacion,consulta la seccion"Ajuste de P.EQ".
1. Presione el botón [SOUND].
2. Toque P.EQ.
3. Toque la visualización ON/OFF. El efecto P.EQ seactivo o desactiva (ON/OFF).
4. Toque B/U para selectionar "BASIC" o "USER".
5. Toque la parte derecha de la pantalla para selectionar el menu que se utilizes como menu de ajuste.
6. Presione el botón [A].
7. Toque la parte izquierda de la pantalla para seleccionar "FRONT" o "REAR".

8. Toque la parte central de la pantalla para seleccionar cada ajuste.
Cada vez que toca ↑, los ajustes se suseden como se indica a continuación:
Ajustes
BAND (banda) FREQ (frecuencia) Q GAIN (ganancia) BAND (banda)...
9. Toque la parte derecha de la pantalla para realizar el ajuste deseado.
* El margen de ajuste de "BAND" es de 1 a 3.
* El margen de ajuste de "FREQ" es de 20Hz a 20kHz.
*Selezione 1,3,5,7ó20paraajustar“Q”
* El margen de ajuste de "GAIN" es de - 12dB a +12dB.
10. Repita los pasos 7 a 9 para realizar el ajustedeaseado.
11. Cuando haya terminado de realizar los distinctos ajustes, toque RTN. La visualización vuelve a la pantalla original, y aparece “>>” en la visualización BASIC o USER. Con这一点 concluye el ajuste de P.EQ. Para proseguir con la memorización de los values de ajuste en el menu de usuario de P.EQ,=haga lo siguientes.
12. Toque RTN prolongamente durante segundo o más.
Aparecerá la lista de manos de P.EQ.
13. Toque prolongadamente durante 2 segundos o más la memoria de usuario en la que deseee programar los valeurs de ajuste. Escuchará un tono largo paraindicarle que los valeurs que ajustó hasta el paso 10 se han memorizzato en el menu de usuario de P.EQ. Si escucha un tono corto, es que los valeurs de ajuste configurados hasta el paso 10 han sido descartados. Ajuste these values según sea besoinario.
14. Toque RTN.
15. Presione el botón [SOUND] para volver al modo original.
* Para selectionar una memoria de usuario programada, toque B/U para ver "USER" y cuando toque ↑ ⇌ el N° de memoria de usuario.
Ajuste de P.EQ
A continuación se específican los values que se pueda ajustar en el menu de P.EQ. La Frequencia central, ganancia y curva de Q se pueda memorizar en combinaciones de canales y bandas.
Por exemple, la fecuencia central "250Hz", ganancia "-8dB" y curva de Q "3" pueda memorizarse en la banda 1 delantera.
FRONT/REAR (selección de canal)
Permite seleccionar el canal (delantero o trasero) que se va a ajustar.
BAND (selección de banda)
Permite seleccionar la banda de freuencias (de 1 a 3) que se va a ajustar.
Ajuste la fecuencia central (FREQUENCY), la ganancia (GAIN) y la curva de Q (Q) para cada banda de fecuencias.
FREQUENCY (selección de la Frequencia central)
Permite seleccionar la fecuencia que se va a
utilizar como centro de la banda de fecuencias
para compensar en un margen de 20Hz a 20kHz (pasos de 1/3 octavas, 31 punto)
GAIN (ajuste de ganancia)
Permite ajustar la ganancia (nivel de salute) en un margen de -12dB a +12dB. (pasos de 1dB, 25 punto)
Q (selección de la curva de Q)
Permite ajustar la pendiente de la curva Q en uno de los parámetros siguientes: 1, 3, 5, 7 á 20.
Compensación
Si ha medido las caracteristicas de fecuencia con un dispositivo de medicacion y son planas (sin picos ni valleys), no esnecessary compensarlas. Sin embargo, en occasions las caracteristicas de fecuencia aumento o disminuyen en algunos punto. De producirse dicha situacion, sedeferan compensar. Cree una curva de fecuencia concharacteristicasqueean opuestos a la fecuencia central de los punto enlos que augmeno disminuyan lascharacteristicas,afin de anular los picos yvalles, procurando queSean lo mas plana possible.
La operation de aplanado de las caracteristicas se denomina "compensacion."
En esta unidad, las caracteristicas de fecuencia se pueda compensar con P.EQ (ecualizarador paramétrico).
Compensación de lascharacteristicadocurrencia
La?siguiente figura muestra la relacion existente entre fecuencia central, ganancia y curva de Q.

Curva de Q.
La curva de Q se hace más aguda a medida que AUGUNTAN LOS VALORES NUMERICOS, y SE aplANA A MEDIDA QUE ESTOs disminuyen.
Las caracteristicas de fecuencia se PUden aplanar seleccionando una curva de Q opuesta a la curva que se va a compensate.

F: Frecuencia central G: Ganancia (nivel de salute), Q: Curva de Q.
N°( Tipo de automóvil) Parámetros del ecualizador paramétrico Canal Band 1 Band 2 Band 3 F G Q F G Q F G Q 1(SEDAN-1) Delantero 250 Hz -8 dB 3 2 kHz -4 dB 1 5 kHz -4 dB 1 Trasero 250 Hz -10 dB 3 1.25 kHz 0 dB 5 8 kHz 0 dB 5 2(SEDAN-2) Delantero 250 Hz -10 dB 7 800 Hz -4 dB 3 8 kHz -5 dB 1 Trasero 80 Hz 3 dB 7 125 Hz -12 dB 5 1.25 kHz 0 dB 5 3(WAGON-1) Delantero 250 Hz -8 dB 3 1 kHz -8 dB 3 10 kHz -6 dB 1 Trasero 250 Hz -8 dB 3 800 Hz -8 dB 1 8 kHz 0 dB 5 4(WAGON-2) Delantero 250 Hz -8 dB 7 400 Hz -10 dB 7 1.25 kHz -8 dB 7 Trasero 125 Hz -8 dB 3 500 Hz -5 dB 5 1.6 kHz 0 dB 3 5(MINI VAN-1) Delantero 125 Hz -4 dB 5 1.25 kHz -4 dB 3 2 kHz 3 dB 7 Trasero 250 Hz -6 dB 1 630 Hz -4 dB 3 8 kHz 0 dB 5 6(MINI VAN-2) Delantero 250 Hz -4 dB 3 1.25 Hz -8 dB 3 80 Hz 3 dB 3 Trasero 250 Hz -8 dB 3 500 Hz -5 dB 5 8 kHz 0 dB 5
Operaciones de la radio
Visualizaciones del modo de radio
Visualización principal
Para verla, presione el mando [ROTARY] y seleccione el modo de radio.

Si toca la parte izquierda de la pantalla durante 1 segundo o más, cambiará la visualización de funciona simple.

Visualización de Frequencias
Aparece la fecuencia que se está recubiendo actualmente.
Si toca o la visualización de configuración estandar,URT realizar sintonización de búsqueada o sintonización manual.
Visualización de títulos
Muestra el nombre del canal que se está recubiendoactualmente.Al tocar el nombre, cambia la visualizacion.
Visualización de banda de recepción
AM: Nombre de banda AM
FM1: Nombre de banda FM
Visualización de N° de presinstonia
Toque la visualización de funciona estándar para selectionar una memoria preprogramada.
MODE
Al tocar esta visualización aparecen varias subfunciones. Tóquela prolongadamente durante 1 segundo o más para ver la lista de memorias preprogramada.
P-SCAN:
Aparece durante una exploración de presintonías.
Toque esta funciona para finalizar la exploración de presintonías.
A-STORE:
Aparece durante una memorización automatica.
Toque esta funciona para finalizar la memorización automatica.
BAND
Toque esta funciona para携带 de banda de recepción.
Si la toca prolongadamente durante 1 segundo o mas, se alternaré entre el modo de sintonización manual y el modo de sintonización de búsqueda.
(úlo en la visualización de funciona simple)
Estos botones le permitted realizar sintonizacion de búsqueada o sintonizacion por pasos (en el mode de sintonizacion manual).
Si los toca prolongadamente, podra realizar una sintonizaciónVisualización de la lista de memorias preprogramadas
Aparece cuando se toca MODE de forma prolongada durante 1segundo o más en la visualización principal.

Nombre de la emisora (o frequencia)
Sintonización en bajo:
RTN: Toque esta funciona para volver a la visualización principal.
NEXT:
Als u dit aanraakt, worden de volgende mappenlijst afgebeeld.Wat is MP3?
MP3 is een audiocompressiemethode die is geclassifiedeerd als audiolaag 3 van de MPEGnorm. Deze audiocompressiemethode is populair geworden bij computerergebruikers en uitgegoeid tot de standardnorm. MP3 heeft als eigenschap de originele audiodata tot onceveer 10% van de oorspronkelijke groorte te comprimeren verwijl de hoge geluidskwaliteit behouden blijt. Dit betekent dat onceveer 10 muziek-CD's kan den worden opgenomen op een CD-R-disc of CDRW-disc, waardoor lang maar muziek geluisterd kan worden zonder dat de CD要去 worden verwisseld.Wat is WMA?
WMA is de afkorting van Windows Media Audio: een audiobestandsformaat ontwikkeld door Microsoft Corporation.Opmerkingen:
- Als u een bestand weergeeft met DRM (Digital Rights Management = digitale-rechtenbeheuer) ingeschakeld voor wma, za er geen geluid worden uitgevoerd (de WMA-indicator knippert). - Windows Media en het Windows®-logo zijn handelsmerken of wettig gedeponeerde handelsmerken van Microsoft Corporation in de Verenigde Staten en andere landen.DRM (Digital Rights Management) uitschakelen:
- In het programme Windows Media Player 8, klik op het TOOLS OPTIONS COPY MUSIC-tabblad, en klik verzolgens onder COPY SETTINGS in het selectiekavke proteTECT CONTENT zodat het vinkje uitgaat. Bouw verzolgens de bestanden opnieuw op. In het programme Windows Media Player 9, klik op het TOOLS OPTIONS MUSIC RECORD-tabblad, en klik verrolgens onder COPY SETTINGS in het selectiekavkeje PROTECT CONTENT zodat het vinkjeuitgaat. Bouw verrolgens de bestanden opnieuw op. Gebruik door uzelf opgebouwde WMAbestanden voor eigenerverantwoording.Voorzorgsmaatregelen voor het creeren van een MP3-disc of WMA-disc
- Bruikbare bemonsteringssnelheden en overdrachtsnelheden:
1. MP3: Bemonsteringsfrequentie: 11,025 kHz t/m 48 kHz Overdrachtsnelheid: 8 kbps t/m 320 kbps / VBR 2. WMA: Overdrachtsnelheid: 48 kbps t/m 192 kbpsBestandsextensies
1. Voeg algid een bestandsextensie ("MP3" of "WMA") toe aan een MP3- of WMA-bestand met behulp van enkel-byte letters. Als u een andere dan de gespecifieerde bestandsextensie toevoegt, of vergeet een bestandsextensie toe te voegen, kan het bestand Niet worden weergegeven. 2. Bestanden die geen MP3/WMA-data bevatten können nicht worden weergegeben. De aanduiding "--: --" worden op het weergavetijddisplay afgebeeld als u probeert bestanden wee ter te geben die geen mp3/ wma-data bevatten.Logisch formaat (bestandssysteme)
1. Bij het schrijven van een MP3/WMA-bestand op een CD-R-disc of CD-RW-disc, moet u "ISO9660 level 1, 2 of JOLIET of Romeo" kiezen als formaat van de schrijfsoftware. Normale weergave is Niet möglich als de disc is opgenomen in een ander formaat. 2. De mapnaam en de bestandsnaam hunnen worden afgebeel als de titel in het geval van MP3/WMA-weergave, maar de titel moet korter zichen dan 128 enkel-byte alfanumerieke tekens (inclusief de bestandsextensie). 3. Geef een bestand nicht bezelfde naam als demap waarin deze zit.Mapstructuur
1. Een disc mag een mapstructuur van maximaal 8 hierarchische niveaus diep hebben.Aantal bestanden of mappings
1. Maximaal 255 bestanden konnen per map worden herkend. Maximaal 500 bestanden konnen worden weergegeven. 2. De tracks worden weergegeven in de volgorde waarin deze op de disc werden opgenomen. (De tracks worden nicht alti\dj weergegeven in bezelfde volgorde die op een computer worden aangegeven.) 3. Enige ruis kan optreden afhankelijk van het type codeersoftware dat voor de opname werk gebruikt.Multisessieskiezen
Met deze functie kunt u of CD-DA-bestanden, of MP3/WMA-bestanden kiezen in het geval een disc (bijv. een CD-EXTRA-disc) een combinatie van CD-DA-bestanden en MP3/WMA-bestanden bevat. 1. Raak MODE aan. 2. Raak M-SESS aan. Met iedere aanraking van M-SESS wisselt het M-SESS-displayussen "CD" (CD-Daweergave) en "MP3/WMA" (MP3/WMA-weergave). * Als M-SESS nicht worden afgebeeld, raakt u NEXT aan. 3. Raak RTN aan. De instelling voor het kiezen van multisessies is van kracht de volgende keer dat u een CD in het apparaatplaatst.Opmerking:
- Als u een CCCD (Copy Control CD) weergeeft, stelt u de instelling in op het CD-type. Als dit is ingesteld op het MP3/WMA-type, kan in sommige gevallen de CD Niet normal worden weergegeven.A VOORZICTHIG
Wees voorzichtig dat uw hand of vingers Niet bekneld raken bij het openen en sluiten van het KANTELEND BEDIENINGSPANEEL.
Opmerkingen:
- Als het KANTELEND BEDIENINGSPANEEL Niet volledig worden geopend, opent u het voorzichtig met uw hand. - Nadat u een CD hebte geplaatst, sluit u altijd eerst het KANTELEND BEDIENINGSPANEEL. Probeer nicht uw hand of vinger in de discgleuf te steken. Steek ook nooit vreme de voorwerpen in de discgleuf. - Steek ook nooit discs in de discgleuf waarop lijmresten onder plakband of verhuurstickersuitkomt,of discs waarop nog restanten vanplakband of verhuurstickers zitten. Het kan onmobelijk zijn dergelijkde discs uit het apparaat te werpen en ze konnen tot storing leiden.Een CD plaatsen
1. Druk op de [▲] toets. Het bedieningspaneel gaat open. 2. Plaats de disc in de discgleuf. Nadat de disc is geplaatst gaat het bedieningspaneel automatisch dicht.Opmerkingen:
- Steek nooit vreeimde voorwerpen in de discgleuf. - Als de CD Niet gemakkelijk kan worden geplaatst, kan hetijken dat er reeds een andere CD in de discgleuf zich, of dat het apparaat要去 worden gerepareerd. Discs zonder het QUSG of logen CD-ROMs kuren nicht door dit apparaat worden weergegeben. - Het is möglich dat sommige CD's opgenomen in de CD-R/CD-RW-functionie nicht bruikbaar zijn.Een 8-cm CD plaatsen
U heeft geen adapterring nodig om een 8-cm CD waar te gehen. Plaats de 8-cm CD in het midden van de discgleuf.Een CD uitwerpen
U kunt een CD uitwerpen door op de [▲] toets te drukken, zichs als het apparaat isuitgeschakeld of met de contactsleutel de stroom is onderbroken.A VOORZICHTIG
Nadat de disc is uitgeworpen, drukt u op de [A] toets om het bedieningspaneel te sluiten. Als u het bedieningspaneel open LAST staan, hoort u een dubbe pleiptoon en gaat het bedieningspaneel automatisch dicht. 1. Druk op de [A] toets. Het bedieningspaneel gaat open en de disc wordtuitgeworpen.De functie wordt automatisch ingesteld op de radiofunctie. * Zorg ervoor dat u een uitgeworpen disc uit het apparaat verwijdert. Als u de disc in de discgleuf LAST zitten, worden deze na 15 seconden of langer automatisch wee in het apparaat getrokken en gaat het bedieningspaneel dicht (automatisch opnieuw plaatsen). * Single-CD's worden nicht automatisch opniewu geplaatst. Zorg ervoor dat u een single-CD UIT het apparaat haalt nadat.Deze isuitgeworpen.A VOORZICHTIG
Als u buitensporige kracht gebruikt om een disc teplaatsen nadat deze is uitgeworpen, kan de disc worden bekrant. Haal de disc eruit voordat u deze weeer plaatst.Een disc beluisteren die al in het apparaat is geplaatst
1. Druk op de [ROTARY] knop om de CD-functie te kiezen. * De weergave begint automatisch nadat de functie is veranderd in de CD-functie.De weergave pauzeren
1. Druk op de [▶■] toets.De weergave hervatten
1. Druk nogmaals op de [▶■] toets.Een track kiezen
Als een CD-R of CD-RW is geplaatst waarop een MP3-bestand of WMA-bestand is opgenomen,(Int u alleen tracks kiezen die in bezelfde map+zijn opgenomen door het trackdisplay met 一 _ 一 aan te raken. 1. Als u maar de volgende track wilt luisteren, raakt u het trackdisplay met 日 aan. 2. Als u waar de voorgaande track wilt luisteren, raakt u het trackdisplay tweeemaal met aan. Door met 日 aan te raken worden de volgende track weergegeven. Als u vaker met 日 aanraakt, verspringt u hetzelfde aantal tracks vooruit als u met 日 heb t aangeraakt, waarna de weergave van de track begint. Door met 山 aan te raken worden de voorgaande track weergegeven. Als u vaker met 山 aanraakt, verspringt u hetzelfde aantal tracks achefteruit als u met 山 hebt aangeraakt, waarna de weergave van de track begint. * Als u het trackdisplay tweeemaal met † aanraakt verwijl het begin van een track worden weergegeven, worden soms tweet tracks achechteruit gesprongen, en begint de weergave van die track.Een map kiezen
Om een andere map te kiezen, raakt u het mapdisplay met 卡 aan of voert u de volgende stappen UIT. 1. Raak MODE gedurende 1 seconde of longer aan. De mappenlijst worden afgebeeld. Door PREV of NEXT aan te raken worden het voorgaande of volgende gedeelte van de mappenlijst afgebeeld. 2. Raak de mapnaam aan.De afspeellijst weergeven
U kunt een afspeellijst (een M3U-bestand) weergeven. Merk城县 op dat van de M3U-bestanden die op dat moment tot vrijlagen diep (inclusief de root) in de hierarchie zijn opgeslagen, slechts de bovenste vrij bestanden met een neue tijdstempel können worden weergegeven.Opmerkingen:
Maximaal 255 bestanden van een enkele aftspeellijst kannen worden weergegeven. - Alleen MP3- of WMA-bestanden die op dat moment tot vrij lagen diep (inclusief de root) in de hierarchie� opgeslagen, hunnen worden weergegeven.Ga als volgt te werk om een afspeellijst wee tergeven.
1. Raak MODE aan. 2. Raak NEXT aan. 3. Raak PLY LIST aan. Het lezen van de afspeellijst begint. Wanner het lezen van de afspeellijst waar is, start de weergave van de afspeellijst met de meest recente tijdstempel automatisch. De bediening voor het kiezen van de afspeellijst of tracks op de afspeellijst isdezelfde als die voor het kiezen van een map of tracks in een map. * PLY LIST worden nicht aufgebeeld als geen correcte aftspeellijst (een M3U-bestand) is opgeslagen op de CD-R of CD-RW die in het apparaat is geplaatst.De weergave van de afspeellijst stoppen
1. Raak MODE aan. 2. Raak NEXT aan. 3. Raak PLY LIST aan.Vooruit- en Achteruitspoelen
1. Om vooruit te spoelen raakt u het trackdisplay met 出 aan. 2. Om achechteruit te spoelen raakt u het trackdisplay met aan.Beginfunctie
De beginfungtie doet de CD-speler terugkeren\ aar het begin van de eerste track op de CD. 1. Raak TOP aan. De weergave begint vanaf de eerste track (tracknummer 1). In het geval van MP3/WMA, keert de CDspeler terug maar de eerste track in de map die worden weergegeven.Scanweergave
Met deze functie=kunt de eerste 10 seconden van iedere track op de disc weergeven. 1. Raak MODE aan. 2. Raak P -SCAN aan. MODE verandert in " P -SCAN" en de scanweergave begint. * De scanweergave begint vanaf de track die volgt op de track die op dat moment worden weergegeven.De scanweergave stoppen
1. Raak P -SCAN aan. P -SCAN verandert in "MODE" en de track die werden weergegeven toen u P -SCAN aanraakte, worden weergegeven.Mapscanweergave
Met deze functie=kunt u de eerste 10 seconden weergeven van de eerste track in iedere map op een MP3-disc of WMA-disc. 1. Raak MODE aan. 2. Raak -SCAN aan. MODE verandert in " -SCAN" en de mapscanweergave begint. * De mapscanweergave begint vanaf de map die volgt op de map die op dat moment worden weergegeven.De mapscanweergave stoppen
1. Raak -SCAN aan. -SCAN display changes toverandert in "MODE" en de weergave begint vanaf de track die werd weergegeven toen u -SCAN aanraakte.Herhaalde weergave
Met deze functie kurz u de huidige track herhaaldelijk weergeven. 1. Raak MODE aan. 2. Raak J^ -REPEAT aan. MODE verandert in "RPT" en de herhaalde weergave begint.De herhaalde weergave stoppen
1. Raak P -RPT aan. P -RPT verandert in "MODE" en de normale weergave begint vanaf de track die werden weergegeven voordat u P -RPT aanraakte.Herhaalde mapweergave
Met deze functie=kunt de map die op dat moment wordenweergeveen herhaaldelijk weergeven. Deze functie is alleen beschikbaar wanner een CD-R of CD-RW waarop MP3bestanden of WMA-bestanden zijn opgenomen, is geplaatst. 1. Raak MODE aan. 2. Raak -REPEAT aan. MODE verandert in "RPT" en de herhaalde mapweergave begint.De herhaalde mapweergave stoppen
1. Raak -RPT aan. -RPT verandert in "MODE" en de normale weergave begun vanaf de track die werd weergegeven voordat u -RPT aanraakte.Willekeurige weergave
Met deze functie=kunt u alle tracks die op een disc,zijn opgenomen in willekeurige volgorde weergeven.-RANDOM
Hiermee geeft u alle tracks op de disc in willekeurige volgorde weeR. Als de disc twee ofeer mappings bevat, worder alle tracks in de map in willekeurige volgorde weergegeven, gevolgd door alle tracks in de volgende map.Dit proces herhaalt zich voor alle mappen.-RANDOM
Hiermee geeft u alle tracks op de disc in willekeurige volgorde weeer. Deze functie is alleen beschikbaar wanneer een CD-R of CD-RW waarop MP3-bestanden of MWA-bestanden zich opgenomen, is geplaatst. 1. Raak MODE aan. 2. Raak P -RANDOM of -RANDOM aan. MODE verandert in " P RDM" of "RDM", en de willekeurige weergave begint.De willekeurige weergave stoppen
1. Raak F -RDM of -RDM aan. F -RDM of -RDM verandert in "MODE" en de normale weergave begint vanaf de track die werden weergegeven voordat u F -RDM of -RDM aanraakte.Meerdere Personen luisteren maar twee verschillende muziekbronnen (2-ZONE-functie)
De 2-ZONE-functie kan afzonderlijk geluid uitvoeren aan de MAIN-zone en de SUB-zone doordat het apparaat twee bronnen tegelijktijd kan verwerken, zodate twee ofeer luisteraars maar twee verschillende muziekbronnen konnen luisteren. Dit apparaat kan de interne bronnen (radio, CD, MP3, enz.) weergeven en kan daarnaast tegelijkkertijd materiaal weergeven vanaf externe apparatuur, die is aangesloten met behulp van een CeNET-kabel (bijv. CD-wisselaar, enz.). De bronnen van de MAIN-zone worden weergegeven via de luidsprekers in uw auto, en de bronnen van de SUB-zone worden weergegeven via de hoofdtelefoon (WH143).  De bovenste twee afbeeldingen zijn voorbeelden wanner een geluidsbron worden weergegeven door een interne bedieningsfunctie van het apparatus (radio, CD, AUX) via de luidsprekers. De onderste afbeelding is een voorbeeld wonneer een geluidsbron worden weergegeven door een externe bedieningsfunctie van het apparatus (CD-wisselaar, DVD-wisselaar, TV, AUX) via de luidsprekers. * De fabrieksinstalling is "OFF".Opmerkingen:
- De 2-ZONE-functie is nicht beschikkaar als DAB is aangesloten. - Door aan de [ROTARY] knop op het apparaat te draaien verandert alleen het volumeniveau van het geluid uit de luidsprekers. De AUX-SENS-instelling heeft betrekking op zowel de luidsprekers als de hoofdtelefoon.Het display bij gebruik van de 2-ZONE-functie
In het midden van het display wordt "INT." (interne functie) of "EXT." (externe functie) afgebeeld om aan te geven of u de weergave van een interne bedieningsfunctie of een externe bedieningsfunctie hoor in de huidige bedieningsfunctie van de 2-ZONE-functie. 1. Druk op de [SOUND] toets. 2. Raak 2-ZONE aan.  3. Raak in het midden van het display ON/OFF aan gedurende 1 Seconde of langer.  Als 2-ZONE is ingesteld op ON, wordt het huidige type 2-ZONE afgebeeld. De 2-ZONE-functie kan nicht worden gebrukt wanner 2-ZONE is ingesteld op OFF. Druk op de [SOUND] toets om terug te keren maar de oorspronkelijke functie. 4. Raak het ON/OFF-display met 山 山 山 aan en kies het type 2-ZONE. 2-ZONE-type| Luidsprekers | Hoofdtelefon | |
| Type 1 | Intern (interne functie) | Extern (externe functie) |
| Type 2 | Extern (externe functie) | Intern (interne functie) |
Meerdere Personen luisteren maar twee verschillende muziekbronnen (2-ZONE-functie)
De 2-ZONE-functie in- en uitschakelen
1. Houd de [SOUND] toets op het apparaat gedurende 1 seconde of langer ingedrukt.Het 2-ZONE-type omschakelen
Houd de [TA] toets op het apparataat gedurende 1 seconde of langer ingedrukt verwijl de 2-ZONE-functie is ingeschakeld.De bedieningsfunctie van de 2-ZONE-functie omschakelen
Druk op de [TA] toets op het apparaat verwijl de 2-ZONE-functie is ingeschakeld.De functie kiezen wanneer de 2-ZONE-functie is ingeschakeld
Als u een CD staat terwijl de 2-ZONE-functie is ingeschakeld, veranderen de bedieningsfuncties van de interne functie van dit apparaat waar de CD-functie en begint de weergave automatisch. 1. Druk op de [TA] toets op het apparaat om de bedieningsfunctie van de 2-ZONE-functie om te schakelen. Het (luidspreker- of hoofdtelefoon-) display van de geluidsbron die op dat moment kan worden bediend, wisselt om. 2. Houd de [TA] toets gedurende 1 seconde of langer ingedrukt en kies het 2-ZONE-type. Het display wisselt:tussen "INT."en "EXT." 3. Druk op de [ROTARY] knop. Met iedere druk op de [ROTARY] knop terwijl "INT." worden afgebeeld, verandert de functie in onderstaande volgorde: $$ \mathrm {R a d i o} \rightarrow \mathrm {C D} \rightarrow \mathrm {A U X} \rightarrow \mathrm {R a d i o} \dots $$ Met iedere druk op de [ROTARY] knop verwijl "EXT." worden afgebeeld, verandert de functie in onderstaande volgorde: $$ \begin{array}{l}\text {A U X} \rightarrow (\text {C D - w i s s e l a r}) \rightarrow (\text {D V D - w i s s e l a r})\\\rightarrow (\text {T V} ^ {* 1}) \rightarrow \text {A U X . . .}\end{array} $$ * De functie van een apparaat dat Niet is aangesloten worden Niet afgebeeld. *1 Als de TV-functie is gekozen, verandert de functie automatisch maar de VTR-functie en kan nicht worden veranderd.Gemeenschappelijk bedieningen in jegere functie
Het display in de titelinoferfunctie
Hoofddisplay
Dit worden aufgebeeld wanner de titelinvoerfungtie is gekozen (zie blz. 14). Teksttypedisplay
A: Hoofdletters a: Kleine letters 0-9: Cijfers !?: Leestekens A: AccentenTiteldisplay
De huidig ingevoerde titel worden afgebeeld. Raak dit display met 卡 巴 卡 aan en kies de invoerpositie. Door dit display gedurende 2 seconden langer aan te raken, verdwijnen alle tekens van de titeltekst.Invoertekstdisplay
Raak dit display met 山 aan en kies de tekst die u wilt invoeren.RTN
Door dit aan te raken worden het invoeren van titels geannuleerd en keert het apparaat terug waar het oorspronkelijke display. Door dit gedurende 1 seconde of langer aan te raken worden de tekstlijf afgebeeld die hoor bij het huidige teksttype.MEMO
Door dit gedurende 2 seconden of langer aan te raken kut u de ingevoerde titel opslaan, en keert het apparaat terug maar het oorspronkelijke display.Tekstlijstdisplay
Deze lijst kurz u afbeelden door op het hoofddisplay gedurende 1 Seconde of langer RTN aan te raken. Teksttype
De tekst die worden aufgebeeld verandert aan de hand van de instelling op het teksttypedataplay. Als het teksttypedisplay is ingesteld op "A": A E I M Q U X (spatie) Als het teksttypedisplay is ingesteld op “a”: a e i m q u Als het teksttypedisplay is ingesteld op "0-9", "!?" of "Ä": Alle tekens worden afgebeeld.RTN
Als u dit aanraakt, keert het display terug maar het hoofddisplay.NEXT
Als u dit aanraakt, worden de volgende tekstlijst afgebeeld.Eentitel invoeren
U kunt TV-zenders en CD's een titel van maximaal 10 tekens geben. Deze titels können worden afgebeeld wanner een TV-uitzending worden ontvangen of een CD worden weergegeben. Het aantal titels dat u kunt invoeren is als volgt:| Functie | Aantal titels |
| CD-functie | 50 titles |
| TV-functie | 20 titles |
| CD-wisselaarfunctie | Aantal titels |
| DCZ628 aangesloten | 100 titles |
| CDC655Tz aangesloten | 100 titles |
| CDC1255z aangesloten | 50 titles |
A VOORZICHTIG
Als u op de terugsteltoets drukt worden alle inhoud, waaronder de titels,uit de gebruikersgeugens van dit apparaat gewist. 5. Raak het teksttypedisplay met 山 aaan en kies het teksttype. Met iedere aanraking met 卡 verandert het tekstype als volgt:Hoofdletters
(spatie) ABCDEFGHIJKLMNOPQ RSTUVWXYZKleine letters
abcdefghijklmnpqrstuvwxzy Cijfers 0123456789Leestekens, Accenten
AEEEEIAOaaaeeetouoo 6. Raak de rechterkant van het display met aan, of draai de [ROTARY] knop en kies het teken dat u wilt invoeren. 7. Herhaal de stappen 4 t/m 6 om de hele titel in te voeren. Als u het titeldisplay gedurende 2 seconden of langer aanraakt, verdwijnen alle tot dan toe ingevoerde tekens van de titeltekst. 8. Raak MEMO gedurende 2 seconden of langer aan. U hoor een lange pieptoon en de titel worden in het geheugen opgeslagen.Het titeldisplay veranderen in het klokdisplay of een ander display
Raak het midden van het display aan.■ Als u een(AP) neue titel opslaat verwijl het maximale aantal titels al is opgeslagen
In het geval van een TV-zender
De titels die nicht zich opgeslagen in de voorkeurkanalen worden automatisch gewist en deijke titel worden in het geheugen opgeslagen.In het geval van een CD
Titels van CD's die het minst zijn weergegeven worden gewist en de(APpe titel worden in het geheugen opgeslagen.Eentitelwissen
1. Ontvang de TV-zender of geef de CD waar van u de titel wilt wissen. 2. Raak het midden van het display aan om het gebruikerstiteldisplay op te roepen. Het display verandertaar het gebruikerstiteldisplay en "USER"wordt afgebeeld boven het voorkeurnummerdisplay. 3. Houd de [A] toets gedurende 1 seconde of longer ingedrukt. De functie verandert maar de titelinoverfunctie. 4. Raak het titeldisplay gedurende 2 seconden of longer aan. Alle tekens van de titeltekst verdwijnen. 5. Raak MEMO gedurende 2 seconden of longer aan. U hoor een lange pieptoon en de titel worden gewist.Deinstallingenveranderen Deinstelitemskiezen
1. Druk op de [A] toets. De functie verandert maar de instelfunctie.  2. Raak het insteltemdisplay met 山 山 aan en kies het item dat u wilt instellen. * Als u de linkerkant van het display met anraakt, worden de hoofditem een voor een doorlopen. Als u de linkerkant van het display met aanraakt, worden de hoofditemsononderbroken doorlopen. * Als u het midden van het display met aanraakt, worden de subitems eén voor een doorkopen. Als u het midden van het display met aanraakt, worden de subitems ononderbroken doorkopen. 3. Als op de rechterkant van het display "EDIT" wordt afgebeeld, raakt u EDIT aan om over te schakelen maar het instellingendisplay.  4. Raak de rechterkant van het display met 卡 aan of draai de [ROTARY] knop en kies een instelling.■ Terugkeren maar de oorspronkelijke functie
1. Druk nogmaals op de [A] toets. - Instelitems| Hoofditem | SubItem |
| DISPLAY | SCREEN SVR • Schermbeveiliging (zie blz. 41) |
| MSG INPUT • Berichtinformatie-invoer (zie blz. 41) | |
| MESSAGE • Berichtdisplayinstalling bij in-/uitschakelen (zie blz. 42) | |
| S/A SENS • De gevoeligheid van de spectrumanalysator instellen (zie blz. 42) | |
| SCROLL • De doorloopsnelheid instellen (zie blz. 42) | |
| APPERNCE | DIMMER IN • De automatische displaydimmer instellen (zie blz. 43) |
| DMR LEVEL • Het niveau van de displaydimmer instellen (zie blz. 43) | |
| CONTRAST • Het displaycontrast instellen (zie blz. 43) | |
| BLINK LED • De LED latent knipperen wanner de DCP worden verwijderd (zie blz. 43) | |
| BEEP • De pieptoon instellen (zie blz. 44) | |
| Hoofditem | Subitem |
| SOUND | AC-PRO III • De VSE-functiekiezen (STD/PRO) (zie blz. 44) |
| EQ SELECT • De equalizerfunctiekiezen (zie blz. 44) | |
| SP-SETTING • De luidsprekerconfigatie instellen (zie blz. 44) | |
| CENTER-SP / SUB-WOOFER • De subwoofer in-/uitschakelen (zie blz. 45) | |
| HPF / SUB-W LPF • De filterfrequentie van de luidsprekers instellen (zie blz. 45) | |
| AMP CANCEL • De ingebouwdeversterker in-/uitschakelen (zie blz. 46) | |
| SP GAIN • Het uitgangsiveau van de luidsprekers instellen (zie blz. 46) | |
| PL II DELAY | SRD-SP • De vertragsstijd van de achterluidsprekers instellen (zie blz. 46) |
| PL II CONT | PANorama / DIMENSION / CTR WIDTH • De muziekfunctie in detail instellen (zie blz. 47) |
| TUNER | TV ARER • Het TV-zendergebiedinstellen (zie blz. 57) |
| TV DIVER • De TV-diversiteitinstellen (zie blz. 57) | |
| LINK ACT • De AF-functie:tussen RDS en DAB instellen (zie blz. 26) | |
| LANGUAGE • De taal van het PTY-display instellen (zie blz. 30) | |
| RDS-INT 2Z • De RDS-onderbreking verwijl de 2-ZONE-functie is ingeschakeld instellen (zie blz. 30) | |
| SETTING | AUX / TEL • AUX en TELinstellen (zie blz. 47) |
| AUX SENS • Het ingangsniveau van de draagbare audio (AUX) instellen (zie blz. 48) | |
| TEL-SP • De autoluidsprekeruitgang voor de mobiele telefoon (TEL-002, optioneel) instellen (zie blz. 48) | |
| TEL-SWITCH • De mobiele-telefononderbreking instellen (zie blz. 48) | |
| CALIBRATE / A-VOL SENS • De automatische volumeregeling instellen (zie blz. 49) | |
| SYSTEM CHECK • Een systemcontroleuitvoeren (zie blz. 49) | |
| CODEMATIC • De beveiliging instellen (zie blz. 50) |
De schermbeveiliging instellen (SCREEN SVR)
Met deze functie=kunt u een schermbeveiliging. laten afbeelden als u het apparaat gedurende ongeveer 30 seconden nicht bedient. - De fabrieksinstelling is "ON". 1. Druk op de [A] toets om de instelfunctie op te roepen. 2. Raak het insteltemdisplay met 卡 aan en kies bij "DISPLAY" het item "SCREEN SVR".  3. Raak de rechterkant van het display met aan of draai de [ROTARY] knop en kies "ON" of "OFF". 4. Druk op de [A] toets om terug te keren maar de oorspronkelijke functie.Het schermbeveiligingsdisplay wisselen
Raak PREV of NEXT aan verwij de schermbeveiliging worden afgebeeld. Met iedere aanraking hiervan wisselt het schermbeveiligingsdisplay.- Schermbeveiligingen
Schembeveiligingspatroon 1   Schermbeveiligingspatroon 2  Schermbeveiligingspatroon 3  Spectrumanalysepatroon 1  Spectrumanalysepatroon 2 Spectrumanalysepatroon 3  Spectrumanalysepatroon 4  Berichtinformationie SS SCAN
Bovenstaande 8 displays worden elk gedurende ongeveer 10 seconden aufgebeeld.Berichten invoeren om af te beelden als berichtinformationatie (MSG INPUT)
1 type schermbeveiliging is beschikbaar. Voor verdere informatie over het wisselen van de schermbeveiligingsdisplays, raadpleegt u "De schermbeveiliging instellen". - U kunt maximaal 30 tekens invoeren. - De fabrieksinstalling is "Active Matrix Control System". 1. Druk op de [A] toets om de instelfunctie op te roepen. 2. Raak het insteltemdisplay met aan en kies bij "DISPLAY" het item "MSG INPUT".  DISPLAY ADJUST MODE MSG INPUT> EDIT EDIT 3. Raak EDIT aan. De functie verandert maar de berichtinvoerfunctie. 4. Raak het midden van het display met 山 aan en kies de invoerpositie. * Om het bericht te wissen, raakt u het midden van het display gedurende 2 seconden of langer aan. Als u de bediening van stap 8 uitvoert werwijl het bericht is gewist, keert het bericht terug maar de fabrieksinstelling. 5. Raak de linkerkant van het display met aan en kies het teksttype. Met iedere aanraking met 山 山 山 verandert het teksttype. Voor verdere informatatie, zie bladzijde 37. 6. Raak de rechterkant van het display met aan, of draai de [ROTARY] knop en kies het teken dat u wilt invoeren. 7. Herhaal de stappen 4 t/m 6 om het hele bericht in te voeren. 8. Raak MEMO gedurende 2 seconden of langer aan. U hoor een lange pieptoon en het bericht wordt in het geheugen opgeslagen. 9. Druk op de [A] toets om terug te keren maar de oorspronkelijke functie.Berichten afbeelden (MESSAGE)
Met deze functie=kuntu berachten afbeelden op hetdisplaywannerhetapparaatwordin-ofuitgeschakeld. "Hello"wordtafgebeeldwannerhet apparaatwordtingschakeld,en"Seeyou" wordtafgebeeldwannerhet apparaatwordtuitgeschakeld. - De fabrieksinstelling is "ON". 1. Druk op de [A] toets om de instelfunctie op te roepen. 2. Raak het insteltemdisplay met aan en kies bij "DISPLAY" het item "MESSAGE".  3. Raak de rechterkant van het display met aan of draai de [ROTARY] knop en kies "ON" of "OFF". 4. Druk op de [A] toets om terug te keren maar de oorspronkelijke functie.De gevoeligkeit van de spectrumanalysator instellen (S/A SENS)
Met deze functie=kuntudgevoeligheid(grootte van de afwijking) van de spectrumanalysator instellen.Voor verdere informatie over het afbeelden van de spectrumanalysator, raadpleegt u "Het display omschakenen" (zie blz.13)of"De schermbeveilig inginstellen" (zie blz.41). - De fabrieksinstelling is "MID". 1. Druk op de [A] toets om de instelfunctie op te roepen. 2. Raak het instelitemdisplay met aan en kies bij "DISPLAY" het item "S/A SENS".  DISPLAYADJUST MODE
S/A SENS > MID
3. Raak de rechterkant van het display met 卡 aan of draai de [ROTARY] knop en stel de gevoeligheid in. * Kies LOW (eenkleine afwijking), MID of HIGH (eengroef afwijking). 4. Druk op de [A] toets om terug te keren maar de oorspronkelijke functie.De doorloopsnelheid van het display instellen (SCROLL)
Met deze functie kurz u de doorloopsnelheid verlagen als de tekst te snel over het display loopt waardoor u deze Niet kurz lezen. - De fabrieksinstelling is "SPEED 2". 1. Druk op de [A] toets om de instelfunctie op te roepen. 2. Raak het instelitemdisplay met aan en kies bij "DISPLAY" het item "SCROLL".  DISPLAYADJUST MODE
SCROLL » SPEED2
3. Raak de rechterkant van het display met aan of draai de [ROTARY] knop en stel de gevoeligheid in. * Dit item kan worden ingesteld binnen het bereik van SPEED 1 t/m SPEED 7. Stel het item in verwijl u kijkth hoe het display verandert. 4. Druk op de [A] toets om terug te keren maar de oorspronkelijke functie.De automatische displaydimmer instellen (DIMMER IN)
Met deze functie=kunt u de displayverlichting verzwakken overeenkomstig de verlichting of helderheid in uw auto. Stel de automatische displaydimmer in op "AUTO" (gekoppeld aan de helderheid in uw auto) of "ILLUMI" (gekoppeld aan de verlichting in uw auto). - Als de automatische displaydimmer is ingesteld op "AUTO", worden de helderheid van het display gedimd afhankelijk van delichtsterkte gemeten door deze sensor. - Stel verwolgens het niveau van de displaydimmer in bij DMR LEVEL. - De fabrieksinstelling is "AUTO". 1. Druk op de [A] toets om de instelfunctie op te roepen. 2. Raak het insteltemdisplay met aan en kies bij "APPERNCE" het item "DIMMER IN".  APPERNCEADJUST MODE
DIMMER IN> AUTO
3. Raak de rechterkant van het display met 卡 aan of draai de [ROTARY] knop en stel het niveau van de displaydimmer in. * Kies een instelling UIT OFF (displaydimmeruitgeschakeld, helder) en 1 (licht gedimdt) t/m 5 (donker). 4. Druk op de [A] toets om terug te keren maar de oorspronkelijke functie.Het displaycontrast instellen (CONTRAST)
Met deze functie=kunt u het contrast van hetdisplay instellen afhankelijk van de hoekwaaronder het apparaat is gemonteerd. - De fabrieksinstelling is "6". 1. Druk op de [A] toets om de instelfunctie op te roepen. 2. Raak het insteltemdisplay met aan en kies bij "APPERNCE" het item "CONTRAST". 3. Raak de rechterkant van het display met 卡 aan of draai de [ROTARY] knop en stel het contrast in.  APPENCEADJUST MODE
CONTRAST 》 6
* Dit item kan worden ingesteld binnen het bereik van 1 t/m 11. Stel het item in terwijl u kijkht hoe het display verandert. 4. Druk op de [A] toets om terug te keren maar de oorspronkelijke functie. 3. Raak de rechterkant van het display met aan of draai de [ROTARY] knop en kies "AUTO" of "ILLUMI". 4. Druk op de [A] toets om terug te keren maar de oorspronkelijke functie.De LED laten knipperen wanneer de DCP worden verwijderd (BLINK LED)
Met deze functie kutu de LED van dit apparaat\ laten knipperen wonneer de DCP worden\ verwijderd. - De fabrieksinstelling is "OFF". 1. Druk op de [A] toets om de instelfunctie op te roepen. 2. Raak het insteltemdisplay met 山 aan en kies bij "APPERNCE" het item "BLINK RED".  APPERNCEADJUST MODE
DMR LEVEL》 3
ADJUST MODE
BLINK LED》 OFF
3. Raak de rechterkant van het display met aan of draai de [ROTARY] knop en kies "ON" of "OFF". 4. Druk op de [A] toets om terug te keren maar de oorspronkelijke functie.De pieptoon instellen voor wanner de toetsen worden bediend (BEEP)
Met deze functie=kunt u de korte en lange hoge pieptonen ("BEEP" genaamd) instellen die u hoort wanner een toets worden bediend. - De fabrieksinstelling is "ON". 1. Druk op de [A] toets om de instelfunctie op te roepen. 2. Raak het insteltemdisplay met aan en kies bij "APPERNCE" het item "BEEP".  3. Raak de rechterkant van het display met 卡 aan of draai de [ROTARY] knop en kies "ON" of "OFF". 4. Druk op de [A] toets om terug te keren maar de oorspronkelijke functie.Een functie kiezen
Dit item kan nicht worden gekozen wanner Dolby Pro Logic II is ingesteld op "MUSIC" of "MATRIX" (zie blz. 17). - De fabrieksinstelling is "PRO" voor AC-PRO III en "PEQ" voor EQ SELECT.AC-PROIII
Als "STD" (standaardfunctie) is gekozen, kunden de geluidskwaliteit en het geluidsveld worden ingesteld met VSE (Virtual Space Enhancer) zodate in eache zitpositie hetzelfdelle geluideffect kan worden verkrogen. Als "PRO" (professionele functie) is gekozen, können de geluidskwaliteit en het geluidsveld in detail afzonderlijk voor iedere zitpositie worden ingesteld.EQ SELECT
Als "P.EQ" (equalizerfunctie) is gekozen, kan het hele freiorentiebereik worden gecompenseerd door een gedetailleerde vloeende kromme. Als "BAS / TREB" (lagetonen-/ hogetonenfunctie) is gekozen, kan het freiquentiebereik worden gecompenseerd door dit te verdelen in twee deelbereiken: lage tonen en hoge tonen. 1. Druk op de [A] toets om de instelfunctie op te roepen. 2. Raak het instelitemdisplay met aan en kies bij "SOUND" het item "AC-PRO III", en bij "SOUND" het item "EQ SELECT".  3. Raak de rechterkant van het display met aan of draai de [ROTARY] knop en kies de functie. Functiekeuze| AC-PRO III | STD • Standaardfunctie (VSE-menu) |
| PRO • Professionele functie (positi菜单) | |
| EQ SELECT | P.EQ • Equalizerfunctie (P.EQ-menu) |
| BAS / TREB • Lagetonen-/hogetonnenfunctie |
De luidsprekerconfigurationinstellen (SP-SETTING)
Met deze functie=kunt u de configuratie van de luidsprekers in uw auto instellen zodat de geluidskarakteristieken van dit apparaat volledig tot hun rechtkommen. - De fabrieksinstalling is "SWL + SWR". 1. Druk op de [A] toets om de instelfunctie op te roepen. 2. Raak het instelitemdisplay met aan en kies bij "SOUND" het item "SP-SETTING".  3. Raak de rechterkant van het display met 卡 aan of draai de [ROTARY] knop en kies de luidsprekerconfigatie. Luidsprekerconfigurations| CTR+SW 5.1-kanalen configuratie | Voor-/achterluidsprekers (4 kanalen) Middenluidspreker (1 kanaal) Subwoofer (1 kanaal) |
| SWL + SWR 4 kan. + subwoofer configuratie | Voor-/achterluidsprekers (4 kanalen) Subwoofer (2 kanalen) |
Opmerkingen:
- Het geluid worden nicht door de middenluidspreker uitgevoerd, behalte als de onderstaande instelleningen worden gemaakt wanneer "CTR+SW" is ingesteld. (1) Raadpleeg "Het PLII-menu (Dolby PL II) kiezen" (zie blz. 17) en stel de Dolby Pro Logic II-functionie in op "MUSIC" of "MATRIX". (2) Raadpleeg "De luidsprekers in-/uitschaken (CENTER-SP/SUB-WOOFER)" (zie blz. 45) en stel de middenluidspreker in op "ON". - Het geluid worden nicht uitgevoerd uit de het linkerkanaal van de subwoofer als "SWL + SWR" is ingesteld en de Dolby Pro Logic II-functionie is ingesteld op "MUSIC" of "MATRIX". 4. Druk op de [A] toets om terug te keren maar de oorspronkelijke functie.De luidsprekers in-/ uitschakelen (CENTER-SP/ SUB-WOOFER)
Met deze functie kurz u de middenluidspeker (CENTER-SP) en de subwoofer (SUB-WOOFER) in- en uitschakelen. Zorg ervoor dat deze instelling op "OFF" is ingesteld als er geen middenluidspreker of subwoofer is aangesloten. - De middenluidspreker (CENTER-SP) kan worden ingesteld als de Dolby Pro Logic II-functie is ingesteld op "MUSIC" of "MATRIX", en "SP-SETTING" is ingesteld op "CTR-SW". - De fabrieksinstelling is "ON". 1. Druk op de [A] toets om de instelfunctie op te roepen. 2. Raak het instelitemdisplay met aan en kies bij "SOUND" het item "CENTER-SP", en bij "SOUND" het item "SUB-WOOFER".  3. Raak de rechterkant van het display met aan of draai de [ROTARY] knop en kies "ON" of "OFF". 4. Druk op de [A] toets om terug te keren maar de oorspronkelijke functie.De filterfrequentie van de luidsprekers instellen (HPF/ SUB-W LPF)
Met deze functie=kunt u de filterfrequentie instellen overeenkomstig de luidsprekers die u gebrukt. - De filters (HPF/SUB-W LPF) die u kurz gebruiken verschellen afhankelijk van de instelling van de Dolby Pro Logic II-functie.| Dolby Pro Logic II functie-instelling | Filter | |
| HPF | SUB-W LPF*1 | |
| MUSIC/MATRIX | Niet instelbaar | Instelbaar |
| OFF | Instelbaar | Instelbaar |
Filterinstalling
HPF (installing van hoogdoorlaatfilter) Dit filter verwijdert de lage tonen UIT het geluid voor de voor- enchyterluidsprekers. THROUGH 50Hz 80Hz 120Hz Stel het filter in overeenkomstig uw luidsprekers als de luidsprekers eenkleine diameter hebben.THROUGH
Kies deze instelling als u luidsprekers gebruikt die lage tonen können weergeven. SUB-W LPF (installing van laagdoorlaatfilter voor subwoofer) Dit filter verwijdert de hoge tonen uit het geluid voor de subwoofer. THROUGH 50Hz 80Hz 120Hz Stel de filterfrequentie in overeenkomstig uw subwoofer.THROUGH
Kies deze instelling als u een subwoofer gebruikt met ingebouwde versterker uitgerust met een laagdoorlaatfilter. 1. Druk op de [A] toets om de instelfunctie op te roepen. 2. Raak het insteltemdisplay met aan en kies bij "SOUND" het item "HPF", en bij "SOUND" het item "SUB-W LPF".  3. Raak de rechterkant van het display met aan of draai de [ROTARY] knop en kies de frequente. * Kies een instelling uit THROUGH, 50Hz, 80Hz en 120Hz. 4. Druk op de [A] toets om terug te keren maar de oorspronkelijke functie.De ingebouwde versterker in-/uitschakelen (AMP CANCEL)
Met deze functie kurz u de ingebouwde versterker in- en uitschaken, alaar gelang een externe versterker worden gebruikt. Stel AMP CANCEL in op "ON" (ingebouwde versterker uitgeschakeld) als een exterversterker is aangesloten en de ingebouwdeversterker Niet worden gebruikt. - De fabrieksinstelling is "OFF" (ingebouwdeversterker ingeschakeld). 1. Druk op de [A] toets om de instelfunctie op te roepen. 2. Raak het insteltemdisplay met 卡 aan en kies bij "SOUND" het item "AMP CANCEL".  3. Raak de rechterkant van het display met aan of draai de [ROTARY] knop en kies "ON" of "OFF". 4. Druk op de [A] toets om terug te keren maar de oorspronkelijke functie.Het uitgangsiveau van de Iuidsprekers instellen (SP GAIN)
Gebruik de ingebouwde testtoonfunctie van het apparaat om het uitgangsniveau van de luidsprekers zodanig in te stellen dat het volumeniveau dat iedere luidspreker voortbrengt hetzelfde klinkt. - Dit item kan alleen worden ingesteld als de Dolby Pro Logic II-functie is ingesteld op "MUSIC" of "MATRIX". - De fabrieksinstalling is "0dB". 1. Druk op de [A] toets om de instelfunctie op te roepen. 2. Raak het insteltemdisplay met aan en kies bij "SOUND" het item "SP GAIN".  3. Raak EDIT aan. De functie verandert maar de instelfunctie voor SP GAIN. 4. Raak het insteltemdisplay met 卡 aan en kies het gewenste insteltem. Met iedere aanraking met 卡 worden de instelitems als volgt doorlopen:Instelitems
 *1“CTR GAIN” wordt alleen aufgebeeld als "SP-SETTING" is ingesteld op "CTR+SW", en "CENTER-SP" is ingesteld op "ON". ^*2 "SUB-W GAIN" wordt alleen afgebeeld als "SUB-WOOFER" is ingesteld op "ON". 5. Raak de rechterkant van het display met 山 _ 1 ^ 山 aan of draai de [ROTARY] knop en stel het uitgangsnaveau in. Het uitgangsiveau kan worden ingesteld binnen het bereik van -10 dB t/m +10 dB. 6. Herhaal de stappen 4 en 5 om ieder item in te stellen. 7. Druk op de [A] toets om terug te keren maar de oorspronkelijke functie.De vertragingstijd van de awhilesprekers instellen (PL II DELAY)
De tijdsduur waarna het geluid van iedere luidspreker aankomt op de luisterpositie verschilt affankelijk van de montagepositie van dechterluidsprekers en de grotte van uw auto. Als u de vertragingstijd van de acterluidsprekers instelt,kest u deze tijdsduur instellen zodate het geluid van de acterluidsprekers tegelijkertijd worden gehoord als dat van de voorluidsprekers. - Dit item kan alleen worden ingesteld als de Dolby Pro Logic II-functie is ingesteld op "MUSIC" of "MATRIX". - De fabrieksinstalling is "0ms". 1. Druk op de [A] toets om de instelfunctie op te roepen. 2. Raak het insteltemdisplay met aan en kies bij "PL II DELAY" het item "SRD-SP".  3. Raak de rechterkant van het display met 卡 aan of draai de [ROTARY] knop en stel de vertragingsstijd in. * "SRD-SP" kan worden ingesteld binnen het bereik van 0 ms t/m 15 ms. 4. Druk op de [A] toets om terug te keren maar de oorspronkelijke functie.De muziekfunctie in detail instellen (PL II CONT)
Met deze functie=kunt u de muziekfunctie gedetailleerder instellen als de Dolby Pro Logic II is ingesteld op "MUSIC". - Dit item kan alleen worden ingesteld als de Dolby Pro Logic II-functie is ingesteld op "MUSIC". - De fabrieksinstelling van PANORAMA is "NO", van DIMENSION is "3", en van CTR WIDTH is "3".InstelItems
PANorama (installing van panoramaregeling)
Dit item verw breedt het geluidsveldbeeld van de voor- tot aan de achechterluidsprekers. Stel dit item in op "YES" als u geen surroundeffect hoort.DIMENSION (installing van dimensie)
Dit item verplaatst het geluidsveldbeeld waar voren of achefteren. Als het geluidsveldbeeld waar voren ofaar achteren lijkt te liggen, kan deze afwijking worden gecompenseerd. Instelling 3 is de middenpositie. De instellenen 2 t/m 0 verplaatsen het geluidsveldbeeldaar achefteren, en de instellenen 4 t/m 6 verplaatsen het geluidsveldbeeldaar voren. CTR WIDTH (installing van de middenbreds) 1 Dit item stelt de vaste positie van het middenkanaal inussen de middenluidspreker en de linker- enrechtervoorluidsprekers. Als het middengeluid gelijkmatig is verdeld tussen links en rechts, neemt het hele geluidsveldbeeld toe en produeert een naturuurlijk uitdijend gevoel. In deinstalling 0 wordt al het middengeluid weergegeven via de middenluidspreker. In deinstalling 7 is het middengeluid gelijkmatig verdoeffend over de linker- en rechtservoorluidsprekers. *1 "CTR WIDTH" wordt alleen aufgebeeld als "SP-SETTING" is ingesteld op "CTR+SW", en "CENTER-SP" is ingesteld op "ON". 1. Druk op de [A] toets om de instelfunctie op te roepen. 2. Raak het insteltemdisplay met 山 山 aan en kies bij "PL II CONT" het gewenste insteltem. De insteltems zijn "PANorama", "DIMENSION" en "CTR WIDTH".  3. Raak de rechterkant van het display met aan of draai de [ROTARY] knop en stel het item maar wens in. * Kies voor "PANORAMA" de instelling "YES" of "NO". * "DIMENSION" kan worden ingesteld binnen het bereik van 0 t/m 6. * "CTR WIDTH" kan worden ingesteld binnen het bereik van 0 t/m 7. 4. Druk op de [A] toets om terug te keren maar de oorspronkelijke functie.De AUX-functionie
Dit system is uitergerust met een tulpingangen zodate u kunt luisteren hier geluid en muziek van externe apparaten aangesloten op dit apparaat.AUX/TELkiezen
U kunt via de luidsprekers luisteren maar geluid en muziek van externe apparaten, of maar uw telefoongesprekken, indien deze+zijn aangesloten op dit apparaat. Als TEL INT of een extern apparaat is aangesloten op dit apparaat,kest u de TEL-functie of de AUX-functie kiezen. - De fabrieksinstelling is "AUX". 1. Druk op de [A] toets om de instelfunctie op te roepen. 2. Raak het insteltemdisplay met aan en kies bij "SETTING" het item "AUX/TEL".  3. Raak de rechterkant van het display met aan of draai de [ROTARY] knop en kies "AUX" of "TEL". AUX: De AUX/TEL-ingangskabel is voor de geluidsinvoer vanaf een extern apparaat. TEL: De AUX/TEL-ingangskabel is voor de geluidsinvoor vanaf een mobiele telefoon. 4. Druk op de [A] toets om terug te keren maar de voorgaande functie.Het ingangsiveau van draagbare audio (AUX-functie) instellen (AUX SENS)
Met deze functie=kunt u het ingangsnaveau instellen van optionele externe apparaten die..., aanegasloten op dit apparaat. - Dit kan worden ingesteld als "AUX/TEL" is ingesteld op "AUX". - De fabrieksinstalling is "MID". 1. Druk op de [A] toets om de instelfunctie op te roepen. 2. Raak het insteltemdisplay met aan en kies bij "SETTING" het item "AUX SENS".  3. Raak de rechterkant van het display met 卡 aan of draai de [ROTARY] knop en stel het ingangsniveau in. * Kies een instelling UIT LOW, MID of HIGH. 4. Druk op de [A] toets om terug te keren maar de oorspronkelijke functie.De autoluidsprekeruitgang voor de mobiele telefoon (TEL-002, optioneel) instellen
Stel de mobiele telefoon in als u telefoongesprekken wiltuitvoeren. - De fabrieksinstelling is "RIGHT". 1. Druk op de [A] toets om de instelfunctie op te roepen. 2. Raak het instelitemdisplay met aan en kies bij "SETTING" het item "TEL-SP".  3. Raak de rechterkant van het display met aan of draai de [ROTARY] knop en kies "LEFT" of "RIGHT". LEFT: De telefoongesprekken können worden gehoord via de linkervoorluidspreker die is aangesloten op dit apparaat. RIGHT: De telefoongesprekken können worden gehoord via de rechtervoorluidspreker die is aangesloten op dit apparaat. 4. Druk op de [A] toets om terug te keren maar de voorgaande functie.De mobiele-telefooonnderbreking instellen
Als u dit apparaat en uw mobiele telefoon aansluit op een apparaatje (TEL-002, optioneel), kutn u luisteren maar uw telefoongesprekken via de luidsprekers in uw auto. - De fabrieksinstalling is "OFF". 1. Druk op de [A] toets om de instelfunctie op te roepen. 2. Raak het insteltemdisplay met aan en kies bij "SETTING" het item "TEL-SWITCH".  3. Raak de rechterkant van het display met aan of draai de [ROTARY] knop en kies de instenting. Met iedere druk op de [ROTARY] knop, verandert de instelling in onderstaande volgorde: OFF ON MUTE OFF... OFF: Dit apparaat blij normala Werken, zelfs als de mobiele telefoon worden gebruikt.Opmerking:
- Als u een handsfree-set aansluit, zorgt u ervoor deze instelling op ON te zetten om het geluid van de mobiele telefoon via het systeme te ontvangen. ON: U cunt waar uw telefoongesprekken luisteren via de luidsprekers aangesloten op dit apparaat. * Wanner u maar uw telefoongesprekken luistert via de luidsprekers van uw auto,kest u het volumeniveau instellen door de the [ROTARY] knop te draaien. MUTE: Het weergavegeluid van dit apparaat worden onderbrokenijdens telefoongesprekken. 4. Druk op de [A] toets om terug te keren maar de voorgaande functie.De automatische volumeregeling instellen (CALIBRATE/A-VOL SENS)
U kunt het volumeniveau automatisch veranderen aan de hand van de rijsnelheid van uw auto. - De fabrieksinstelling is "LOW". 1. Druk op de [A] toets om de instelfunctie op te roepen. 2. Raak het insteltemdisplay met aan en kies bij "SETTING" het item "CALIBRATE".  3. Versnel tot een snelheid van 50~km / h 4. Als u 50 km/h rijdt, drukt u op START. Het kalibreren worden UITgevoerd. Na 2 seconden of langer hoort u een lange pieptoon, en op het display worden "SUCCESSIONAL" afgebeeld. Als u een korte pieptoon hoot, is het kalibreren mislukt. Herhaal de procedure vanaf stap 3. 5. Stel cervolgens de gevoeligheid in. Raak het instelitemdisplay met aan en kies bij "SETTING" het item "A-VOL SENS".  6. Raak de rechterkant van het display met aan of draai de [ROTARY] knop en kies de gevoeligheid. Met iedere druk op de [ROTARY] knop, verandert de instelling in onderstaande volgorde: OFF (geen verandering in het volumeniveau) LOW (kleine verandering in het volumeniveau) MID-LOW MID MID-HIGH HIGH (grote verandering in het volumeniveau) ... 7. Druk op de [A] toets om terug te keren maar de voorgaande functie.Een systeemcontroleuitvoeren
Met deze functie=kunt u een systeemcontroleuitvoeren van de instelfunctie indien dit nodigmighten. 1. Druk op de [A] toets om de instelfunctie op te roepen. 2. Raak het instelitemdisplay met aan en kies bij "SETTING" het item "SYSTEM CHECK".  SETTING ADJUST MODE SYSTEM CHECK START 3. Raak START gedurrende 1 seconde of langer aan. "System Check" wordt op het display afgebeeld. 4. Druk op de [ROTARY] knop. De systeemcontrole start. Nadat de systeemcontrole maar is, worden "Completed" aufgebeeld op het display. 5. Druk nogmaals op de [ROTARY] knop. Het hoofddisplay van de radiofunctie worden afgebeeld.De beveiligingsfunctie gebruiken (CODEMATIC)
Met deze functie kurz u voorkomen dat personen die de juiste aanraakvolgorde nicht kennen dit apparaat gemakkelijk können bedienen. Het aanraakcodedisplay worden afgebeeld als het DCP worden bevestigd en het apparaat worden ingeschakeld verwijl "CODEMATIC" is ingesteld op "ON". Als u het display op de juiste locaties in de Vooraf bepaalde volgorde aanraakt, worden "SUCCESSFUL" afgebeeld en wordt het apparaatuitgeschakeld. De volgende keer dat het apparaat worden ingeschakeld, wordt het aanraakcodedisplay Niet afgebeeld, maar worden het hoofddisplay van de radiofunctie of CD-functie afgebeeld. 1. Druk op de [A] toets om de instelfunctie op te roepen. 2. Raak het insteltemdisplay met aan en kies bij "SETTING" het item "CODEMATIC".  Er worden twee typen instelitems afgebeeld bij "CODEMATIC": items waarvoor aan de rechterkant van het display "ON" of "OFF" worden afgebeeld, en items waarvoor aan de rechterkant van het display "INPUT" worden afgebeeld. Kies hier een item waarvoor aan de rechterkant van het display "ON" of "OFF" worden afgebeeld. 3. Raak de rechterkant van het display met 卡 aan of draai de [ROTARY] knop en kies "ON" of "OFF". 4. Raak het insteltemdisplay met aan en kies bij "SETTING" het item "CODEMATIC". Kies hier een item waarvoor aan de rechterkant van het display "INPUT" worden afgebeeld. 5. Raak INPUT aan. Het aanraakcodedisplay gaat UIT. 6. Voer de aanraakcode in. * Raak één van de vijf locaties op het display aan (links, midden, rechts, rechtsboven of rechtsonder). Met iedere aanraking van een locatie op het display,licht een van de aanraakcodeindicators op. * Bijvoorbeeld, raak (1) midden, (2) rechtsboven, (3) links en (4) rechtsonder in die volgorde aan. U kurz ookdezelfde locatie meerere keren aanraken. Nadat u vierkeeen locatie hebt aangeraakt, hoort u een lange pieptoon en keert het apparaat terug maar de oorspronkelijke functie.CODEMATIC annuleren
Als u de aanraakvolgorde bent vergeten, raakt u ① rechtsonder, ② links, ③ rechtsboven en ④ rechts in die volgorde aan, of drukt u op [SCN] op de afstandsbediening. 7. BEDIENING VAN ACCESSORIES
Bediening van de CD-wisselaar
CD-wisselaar
Als een optionele CD-wisselaar is aangesloten met behulp van een CeNET-kabel, kan dit apparaat de functies van de CD-wisselaar bedieren. Dit apparaat kan op maximaal twee, met behulp van een CeNET-kabel aangesloten, CD-wisselaars worden aangesloten.DVD-wisselaar
Als een optionele DVD-wisselaar is aangesloten met behulp van een CeNET-kabel, kan dit apparaat de functies van de DVD-wisselaar bedieren. Om een DVD te kunnen bekijken hebt u een optionele tv-monitor nodig. De bediening en het display van de DVD-wisselaar op dit apparaat is slechts een vereenvoudigde versie en ondersteunt nicht alle functies van de DVD-wisselaar. Als u de DVD-wisselaar wilt bedieren, gebruikt u de afstandsbediening van de DVD-wisselaar. Voor verdere informatie raadpleegt u de gebruiksaanwijzing van de DVD-wisselaar.■ Als twee CD-wisselaarsঃn aangesloten
Druk op de [ROTARY] knop en kies een CD-wisselaar die op dit apparaat is aangesloten. (Met iedere druk op de [ROTARY] knop verandert de CD-wisselaar.) - Als de CD-wisselaar geen magazijn bevat, worden "NO MAG" afgebeeld, en als het magazijn geen CD bevat, worden "NO DISC" Niet afgebeeld voor dat disnummer. - Voor verdere informatatie over het titeldisplay, raadpleegt u "Het titeldisplay omschakelen" (zie blz. 14).De displays in dewisselaarfunctie
Hoofddisplay (CD-wisselaarfunctie) Het hoofddisplay wordt aufgebeeld als u op de [ROTARY] knop drukt en de CDwisselaarfunctie kiest.  Als u de linkerkant van het display gedurende 1 seconde de langer aanraakt, schakelt het display over maar de simpele bedieningsfunctie. Track/weergavetijd-display
T01/02: 00: Het nummer van de track die nu wordt weergegeven en de weergavetijd worden afgebeeld. Als u het display van de standardbedieningsfunctie met 山 山 of aanraakt, kurz u de track kiezen die u wilt weergeven of vooruit-/achteruiitspoeen.Titeldisplay
Als u dit aanraakt, worden het display omgeschakeld.Discnummerdisplay
Als u het display van de standaardbedieningsfunctie met 卡 aanraakt, kut u een disc kiezen.MODE
As u dit aanraakt, worden subfuncties afgebeeld. Als u dit gedurende 1 seconde of langer aanraakt, worden de dislijst afgebeeld.T-SCAN/D-SCAN
Dit worden aufgebeeld tijdens scanweergave. Als u T-SCAN/D-SCAN aanraakt, stopt de scanweergave.T-RPT/D-RPT
Dit worden aufgebeeldijdens herhaalde weergave. Als u T-RPT/D-RPT aanraakt, stopt de herhaalde weergave.T-RDM/D-RDM
Dit worden afgebeeld tijdens willekeurige weergave. Als u T-RDM/D-RDM aanraakt, stocht de willekeurige weergave.DISC↑
Als u dit aanraakt, begint de weergave van de volgende disc.(alleen op het display van de simpele bedieningsfunctie)
Door deze aan te raken kutu de track kiezen die u wilt weergeven. Door deze te blijven aanraken=kunt u de tracks vooruit-/achteruiestspoelen.Disclijstdisplay (CD-wisselaarfunctie)
Deze lijst kunt u afbeelden door op het hoofddisplay gedurende 1 Seconde of longer MODE aan te raken.  Discnaam>>: Bezig met kiezen
Als u een discnaam aanraakt, keert het display terug maar het hoofddisplay en begint de weergave vanaf de eerste track op de disc die u hebt aangeraakt.←PREV-RTN:
Alsuditaanraakt,wordtdevoorgaande disclijsta afgebeeld.Dooditgedurende1secondeof langeraan teraken,keert hetdisplayterugnarr hethoofddisplay.NEXT:
Als u dit aanraakt, worden de volgende dislijst afgebeeld.VOORZICHTIG
Niet iedere CD-wisselaar kan CD-ROMs weergegeven. Dit is afhankelijk van het model.Opmerking:
- Het is möglich dat sommige CD's opgenomen in de CD-R/CD-RW-functie Niet bruikbaar zich.De wisselaarfunctie kiezen
1. Druk op de [ROTARY] knop om de wisselaarfunctie te kiezen. * De functie van een apparaat dat nicht is aangesloten worden nicht afgebeeld. De weergave begint automatisch nadat de functie is veranderd in de wisselaarfunctie.De weergave pauzeren
1. Druk op de [▶■] toets.De weergave hervatten
1. Druk nogmaals op de [▶■] toets.Een CD kiezen
1. Raak het discnummerdisplay met 山 山 aan en kies een disc. De weergave begint. * Als de gekozen disc Niet in het magazijn zit, worden het discnummer Niet afgebeeld. * Als u DISC ↑aanraakt, begint de weergave van de volgende disc.Een disc kiezen op het disclijstdisplay
1. Raak MODE gedurende 1 seconde of longer aan. De disclijst worden afgebeeld. Als u NEXT aanraakt, worden het volgende deel van de disclijst afgebeeld. 2. Raak de discnaam aan. * Als de gekozen disc Niet in het magazijn zit, worden "NO DISC" afgebeeld voor dat disnummer. * Als udezelfde disc kiest als die op dat moment worden teergegeben, keert de weergave terug maar en begint vanaf de eerste track op die disc (beginfunctie).Een track kiezen
1. Als u maar de volgende track wilt luisteren, raaktu het trackdisplay met 品 aan. 2. Als u waar de voorgaande track wilt luisteren, raakt u het trackdisplay tweeemaal met 山 aan. Door met 品 aan te raken worden de volgende track weergegeven.Als u vaker met 品 aanraakt, verspringt u hetzelfde aantal tracks vooruit als u met 品 hebt aangeraakt, waarna de weergave van de track begint. Door met 卡 aan te raken worden de voorgande track weergegeven. Als u vaker met 卡 aanraakt, verspringt u hetzelfde aantal tracks achechteruit als u met 卡 hebt aangeraakt, waarna de weergave van de track begint. * Als u het trackdisplay tweeemaal met † aanraakt toenwij het begin van een track worden waergegeven, worden soms tweet tracks acheeruit gesprongen, en begint de weergave van die track.Vooruit- en Achteruitspoelen
1. Om vooruit te spoelen raakt u het trackdisplay met 出 aan. 2. Om anschteruit te spoelen raakt u het trackdisplay met aan.Beginfunctie
De beginfungtie begint de weergave vanaf de eerste track op de disc die op dat moment worden weergegeven. 1. Raak MODE gedurende 1 seconde of longer aan. De disclijst worden afgebeeld. Als u NEXT aanraakt, worden het volgende deel van de disclijst afgebeeld. 2. Raak de discnaam aan. * Als de gekozen disc Niet in het magazijn zit, worden "NO DISC" afgebeeld voor dat discnummer. * Als udezelfde disc kiest als die op dat moment worden weergegeven, keert de weergave terug maar en begint vanaf de eerste track op die disc.Scanweergave
In de scanweergave worden de eerste 10 seconden vanijdere track op een disc automatisch weergegeven. Deze functie blijdt doorgaan totdat deze worden uitgeschakeld. Scanweergave is handig wanner u een gewenste track zoekt. 1. Raak MODE aan. 2. Raak T-SCAN aan. MODE verandert in "T-SCAN" en de scanweergave begint. * De scanweergave begint vanaf de track die volgt op de track die op dat moment worden weergegeven.De scanweergave stoppen
1. Raak T-SCAN aan. T-SCAN verandert in "MODE" en de weergave begint vanaf de track die werd weergegeven toen u T-SCAN aanraakte.Discscanweergave
In de discscanweergave worden de eerste 10 seconden van de eerste track op iedere disc in de huidig gekozen CD-wisselaar automatisch weergegeven. Deze functie blijdt doorgaan totdat deze worden uitgeschakeld. Discscanweergave is handig wanner u een gewenste CD zoekt. 1. Raak MODE aan. 2. Raak D-SCAN aan. MODE verandert in "D-SCAN" en de discscanweergave begint. * De discscanweergave begint vanaf de disc die volgt op de disc die op dat moment worden weergegeven.De discscanweergave stoppen
1. Raak D-SCAN aan. D-SCAN verandert in "MODE" en de weergave begint vanaf de track die werden weergegeven toen u D-SCAN aanraakte.Herhaalde weergave
In de herhaalde weergave wordt de track die op dat moment wordt weergegeven continu herhaald. Deze functie blijdt doorgaan totdat deze wordt uitgeschakeld. 1. Raak MODE aan. 2. Raak T-REPEAT aan. MODE verandert in "T-RPT" en de herhaalde weergave begint.De herhaalde weergave stoppen
1. Raak T-RPT aan. T-RPT verandert in "MODE" en de normale weergave begint vanaf de track die werd weergegeven voordat u T-RPT aanraakte.Herhaalde discweergave
In de herhaalde discweergave worden, nadat alle tracks op de huidige disc zich weergegeven, de disc opniew vanaf de eerste track weergegeven. Deze functie blijft doorgaan totdat deze worden uitgeschakeld. 1. Raak MODE aan. 2. Raak D-REPEAT aan. MODE verandert in "D-RPT" en de herhaalde discweergave begint.■ De herhaalde discweergave stoppen
1. Raak D-RPT aan. D-RPT verandert in "MODE" en de normale weergave begint vanaf de track die werden weergegeven voordat u D-RPT aanraakte.Willekeurige weergave
In de willekeurige weergave worden de afzonderlijke tracks op de disc automatisch willekeurig gekozen en weergegeven. Deze functie blijdt doorgaan totdat deze wordenuitgeschakeld. 1. Raak MODE aan. 2. Raak T-RANDOM aan. MODE verandert in "T-RDM" en de willekeurige weergave begint.De willekeurige weergave stoppen
1. Raak T-RDM aan. T-RDM verandert in "MODE" en de normale weergave begint vanaf de track die werden weergegeven voordat u T-RDM aanraakte.Willekeurige discweergave
In de willekeurige discweergave worden de afzonderlijke tracks of discs automatisch willekeurig gekozen en weergegeven. Deze functie blijft doorgaan totdat.Deze wordenuitgeschakeld. 1. Raak MODE aan. 2. Raak D-RANDOM aan. MODE verandert in "D-RDM" en de willekeurige discweergave begint.De willekeurige discweergave stoppen
1. Raak D-RDM aan. D-RDM verandert in "MODE" en de normale weergave begint vanaf de track die werd weergegeven voordat u D-RDM aanraakte.TV-tuner
Als een optionele TV-tuner is aangesloten met behulp van een CeNET-kabel, kan dit apparaat alle functies van de TV-tuner bedieren. Als u een TV-uitzending wilt bekijken, heb t een TVtuner en een tv-monitor nodig.De displays in de TV-functionie
Hoofddisplay
Het hoofddisplay worden aufgebeeld als u op de [ROTARY] knop drukt en de TV-functie kiest.  Als u de linkerkant van het display gedurende 1 seconde de langer aanraakt, schakelt het display over maar de simpele bedieningsfunctie. Kanaaldisplay
1ch: Het kanaal dat op dat moment worden ontvangen worden afgebeeld. Als u het display van de standaardbedieningsfunctie met of aanraakt, kurz u Zoek-afstemmen of handmatig afstemmenuitvoeren.Titeldisplay
3ch: De naam van de zender die op dat moment worden ontvangen worden afgebeeld. VTR: In de videofunctie Als u deze aanraakt, worden het display omgeschakeld.Frequentiebanddisplay
TV1: FrequentiebandnaamVoorkeurnummerdisplay
Als u het display van de standaardbedieningsfunctie met 山 山 aanraakt, kurz u een voorkeurgeheugen kiezen.MODE
As u dit aanraakt, worden subfuncties afgebeeld. Door dit gedurende 1 seconde of langer aan te raken, worden de voorkeurgeheugenlijst afgebeeld. P-SCAN: Dit worden afgebeeldijdens het voorkeurzender-scannen. Als u dit aanraakt, stoot het voorkeurzender-scannen. A-STORE: Dit worden afgebeeldijdens het automatisch opslaan. Als u dit aanraakt, stopt het automatisch opslaan.BAND
Door dit aan te raken worden de frequentieband omgeschakeld. Als u dit gedurende 1 seconde of langer aanraakt, schakelt dezoekfunctie beurtelings tussen de handmatige afstemfunctie en dezoek-afstemfunctie. (alleen op het display van de simpele bedieningsfunctie)
Door deze toetsen aan te raken=kunt u zoekafstemmen of stap-afstemmen in dehandmatige afstemfunctie). Door deze toetsen aan te raken en aangeraakt te houden kurz u snel-afstemmen (in de handmatige afstemfunctie).De Voorkeurgeugenlijst afbeelden
Deze lijst kunt u afbeelden door op het hoofddisplay gedurende 1 Seconde of langer MODE aan te raken.  >> Bezig met afstemmenRTN:
Als u dit aanraakt, keert het display terug maar het hoofddisplay.De TV-functie kiezen
1. Druk op de [ROTARY] knop om deTV-functionie te kiezen. Met iedere druk op de [ROTARY] knop, verandert de functie als volgt: * De functie van een apparaat dat nicht is aangesloten worden nicht afgebeeld.Eband wisselen
1. Raak BAND aan om de frequentieband te veranderen. Met jegere aanraking van BAND verandert de frequentieband in onderstaande volgorde. TV1 TV2 TV1...Zoek-afstemmen
Met Zoek-afstemmen=kunt u automatisch afstemmen op zenders met een goede ontvangstkwaliteit. 1. Raak BAND aan gedurende 1 Seconde of langer verwil MANU wordt afgebeeld. Als MANU uit is, is automatisch afstemmen möglichk. 2. Raak het kanaaldisplay met aan. SEEK UP/SEEK DOWN worden afgebeeld en het afstemmen begint. Het afstemmen stopt automatisch bij zenders met een goede ontvangstkwaliteit.Het afstemmen annuleren
1. Raak nogmaals het kanaaldisplay met aan.Handmatig afstemmen
Er zijn twee manieren waarop u handmatig kunt afstemmen: snel-afstemmen en stap-afstemmen. In de stap-afstemfunctie verandert de frequentie stap voor stap. In de snel-afstemfunctie kut u snel afstemmen op de gewenste frequentie. 1. Raak BAND aan gedurende 1 seconde of langer verwijl MANU zich wordt afgebeeld. Als MANU wordt afgebeeld is handmatig afstemmen möglichk. 2. Bedien het kanaaldisplay en stem af op een kanaal waarop wordenuit gezonden. Er zich twee methoden voor handmatig afstemmen: stap.afstemmen en snelafstemmen. * In de stap-afstemfunctie verandert het kanaal stap voor stap. Raak het titeldisplay met 一 _ 一 aan. * In de snel-afstemfunctie kutu het kanaalsnel ononderbroken veranderen. Raak het kanaaldisplay met aan. Het afstemmen stoot zodra u uw vinger van het display afhaalt.Oproepen van een voorgeprogrammeerd station
Met deze functie=kunt u een voorkeurzender kiezen. 1. Raak MODE gedurende 1 seconde of langer aan. De voorkeurgeheugenlijst worden afgebeeld. 2. Raak de zender aan waarnaar u wilt luisteren. * U=kunt ook op de zender afstemmen door het voorkeurnummer met ①aan te raken.Het afstemmen annuleren
1. Raak RTN aan.Voorkeurzenders handmatig opslaan
U kunt maximaal 12 TV-zenders opslaan (6-TV1 en 6-TV2). Hiermee kunt u uw favoriete TV-zenders in het geheugen opslaan en later weer oproepen. 1. Raak BAND aan om de freiorentieband te veranderen. 2. Bedien het kanaaldisplay en kies de zender die u wilt opslaan. 3. Raak MODE gedurende 1 seconde of langer aan. De voorkeurgeheugenlijst worden afgebeeld. 4. Raak het voorkeurnummer waaronder u de zender wilt opslaan gedurende 2 seconden of langer aan. U hoor een lange pieptoon en de zender wordt in het geheugen opgeslagen. Als u een korte pieptoon hoog, is de zender nicht in het geheugen opgeslagen. Herhaal de procedure vanaf stap 1.Voorkeurzenders automatisch opslaan
U kunt automatisch 6 TV-zenders in het voorkeurgeheugen opslaan. Als er minder dan ces zenders met een goede ontvangstkwaliteit gezonden worden, zullen de zenders die eerder in het geheugen werden opgeslagen gehandhaafd blijven en alleen de zenders met een sterk signaal in het geheugen worden opgeslagen. 1. Raak MODE aan. 2. Raak A-STORE gedurende 2 seconden of langer aan. MODE verandert in "A-STORE" en het voorkeurnummer van het automatisch opslaan worden op het voorkeurnummerdisplay afgebeeld. * Zenders met een goede ontvangstkwaliteit worden automatisch gezocht en opgeslagen in het voorkeurgeheugen (onder voorkeurnummers 1 t/m 6) in oplopende volgorde vanaf de zender met de laagste freiorentie.Opmerkingen:
- Wanner u automatisch voorkeurzenders opslaat, worden eerder opgeslagen zenders gewist. - Als er minder dan zes zenders met een goede ontvangstkwaliteit worden gezonden, keert het apparaat automatisch terug maar de laagste freqente en wordt het automatisch opstaan nogmaals uitgevoerd. Als daarna nog steeds minder dan zes zenders worden gezonden, blijven de eerder opgeslagen zenders in het geheugen.Voorkeurzender-scannen
Met voorkeurzender-scannenkest u de Voorkeurzenders eén voor een controeren in de volgorde waarin ze in het geheugen zich opgeslagen. 1. Raak MODE aan. 2. Raak P-SCAN aan. MODE verandert in "P-SCAN" en het voorkeurnummer van het voorkeurzender-scannen worden op het voorkeurnummerdisplay afgebeeld. * De huidig opgeslagen voorkeurzenders worden een voor een op volgorde ontvangen gedurende 7 seconden of langer elk. Zenders met een slechte ontvangst worden overgeslagen en de volgende zender worden ontvangen. De TV-zenders worden in onderstaande volgorde ontvangen: TV1 (1 6) TV2(1 6) TV1(1 6) enzovoort.Het voorkeurzender-scannen annuleren
1. Raak P-SCAN aan. P-SCAN verandert in "MODE", en de zender die werden ontvangen voordat op P-SCAN werk gedrukt, worden waar ontvangen.Naar een video kijken
De TV-tuner is uitergerust met een VTR-ingangsaansluiting waarop u eén extern apparaat kutn aansluiten. Sluit een 12-volt videocassettespeler (VCP) of videocassetterecorder (VCR) aan op de ingangsaansluiting van de TV-tuner. 1. Druk op de [▶■] toets. VTR worden aufgebeeld en het apparaat worden in de VTR-functie gezet. * Het TV-schem roept de video-ingangsfungtie op, waarna u een video-kunt weergeven.■ Terugkeren maar de TV-functie
1. Druk nogmaals op de [▶II] toets.Het TV-zendergebied instellen (TV AREA)
Als u het TV-zendergebied (waarin het tv-signal kan worden ontvangen) instelt, verandert de gebiedsinstelling van de TV-tuner. - De fabrieksinstelling is "GERMANY". 1. Druk op de [A] toets om de instelfunctie op te roepen. 2. Raak het insteltemdisplay met aan en kies bij "TUNER" het item "TV AREA". ADJUST MODE TV AREA GERMANY
3. Raak de rechterkant van het display met aan of draai de [ROTARY] knop en kies het zendergebied. 4. Druk op de [A] toets om terug te keren maar de voorgaande functie.De TV-diversiteit instellen (TV DIVER)
U kurz de ontvangstinstelling van de TV-antenne die op de TV-tuner is aangesloten instellen. Stel dit item in op "OFF" als u geen TV-antenne voor meervoudige ontvangst gezruikt. - De fabrieksinstelling is "ON". 1. Druk op de [A] toets om de instelfunctie op te roepen. 2. Raak het insteltemdisplay met aan en kies bij "TUNER" het item "TV DIVER".  3. Raak de rechterkant van het display met aan of draai de [ROTARY] knop en kies "ON" of "OFF". 4. Druk op de [A] toets om terug te keren maar de oorspronkelijke functie.De DAB-bedieningsfunctie
Als een DAB (optioneel, DAH913 of DAH923) is aangesloten met behulp van een CeNET-kabel, kan dit apparaat alle functies van de DAB bedieren.Naar een DAB-zender luisteren
1. Druk op de [ROTARY] knop om de bedieningsfunctie te veranderen.Opmerkingen:
- Het display dat worden afgebeeld wonneer een DAB-zender worden ontvangen is hetzelfde als dit wonneer een zender handmatig worden ontvangen of een voorkeurzender worden ontvangen. - Het aantal programma's en de uitzendtijden verzillen per DAB-zender. - Als het DAB-sigmaal zwak is, worden de geluidsuitvoer onderbroken.Zoek-afstemmen
1. Druk op de [ROTARY] knop en kies de DAB-functionie. 2. Raak de linkerkant van het display met aan. Als het apparaat een DAB-zender ontvangt,\ wordt "DAB" afgebeeld op het display. * Het apparaat stopt hetzoek-afstemmen als het geen DAB-zender kan vinden. Het display keert terug maar de voorgaande functie.Handmatig afstemmen
1. Druk op de [ROTARY] knop en kies de DAB-functionie. 2. Als "MANU" nied wordt afgebeeld, raakt u BAND aan gedurende 1 seconde of langer. Als "MANU" wordt afgebeeld, is handmatig afstemmen möglichk. 3. Raak de linkerkant van het display met aan en stem af op de zender. * Als gedurende 7 seconden of langer geen bediening worden ditgevoerd, worden het handmatig afstemmen beeindigd en keert het display terug maar de voorgaande functie.Wisselen tussen programma's
1. Druk op de [ROTARY] knop en kies de DAB-functionie. 2. Raak de linkerkant van het displa 品 aan om tussen de programma's van de DAB-zender te wisselen.Opmerking:
- De programmanamen können hetzelfde zijn, afhankelijk van de DAB-zender.Programma-scannen
Met deze functie=kunt u ieder ontvangbaarprogramma van de DAB-zender die wordenontvangen eén voor een gedurende 10seconden elk scanden.Dit is handig wanner uunaar een gewenst programma wilt zoeken. 1. Druk op de [ROTARY] knop en kies de DAB-functie. 2. Raak MODE aan. 3. Raak S-SCAN aan. "S-SCAN" wird afgebeeld en dit apparaat begint de programme's een voor een geduerende 10 seconden elk te scannen. Van ieder programma dat het apparaat scant wordt de naam op het display afgebeeld. 4. Als u het scannen wilt stoppen wanner het gewenste programme is gezonden, raakt u S-SCAN aan.Handmatig opslaan in het geheugen
Het apparaat kan DAB-programma's handmatig in het geheugen opslaan. Maximaal 18 programme's kunnen onder de voorkeurtoetsen (6 programme's elk) worden opgeslagen. [M1], [M2] en [M3] 1. Druk op de [ROTARY] knop en kies de DAB-functie. 2. Raak BAND aan en kies een voorkeurtoets. 3. Raak MODE gedurende 1 seconde of langer aan. De voorkeurgeheugenlijst worden afgebeeld. 4 Raak het voorkeurnummer waaronder u het programmatype wilt opslaan gedurende 2 seconden of langer aan. U hoor een lange pieptoon en de zender wordt in het geheugen opgeslagen. Als u een korte pieptoon hoort, is de zender. niet in het geheugen opgeslagen.Herhaal de procedure vanaf stap 1.Opmerking:
- Onderbrekingsprogramma's (PTY of INFO) können nicht handmatig in het opgeslagen worden opgeslagen.Een voorkeurprogramma oproepen
1. Druk op de [ROTARY] knop en kies de DAB-functie. 2. Raak BAND aan. Met iedere aanraking van BAND verander het display in de onderstaande volgorde. MEMO1 MEMO2 MEMO3 MEMO1... 3. Raak de rechterkant van het display met aan om een voorkeurprogramma op te roepen.De AF-functie
De AF-functie schakelt over maar een andere frequentie op hetzelfde netwerk om een zo goed möglich ontvangstkaliteit te verkrijgen. - De fabrieksinstelling is "ON". - Als de ontvangstkwaliteit van de huidige zenderchyteruit gaat, wordt "SEARCH" op het display afgebeeld en zoekt de radio waar hetzelfde radioprogramma op een andere freqentie. - Voor verdere informatie raadpleegt u de "AF-functionie" (zie blz. 26) in het gedeelte "Bediening van RDS" van de betreffende gebruiksaanwijzing. - De AF-functie in- en uitschakelen- AF-functie:tussenRDSenDAB
Als hetzelfde programma worden uitgezonden door RDS en DAB, en deze functie is ingeschakeld, schakelt dit apparaat automatisch over zodate de uitzending met de beste ontvangstkwaliteit worden ontvangen.TA (verkeersinformatie)
Als een uitzending met verkeersinformatie begin in de TA-standingbyfunctie, worden die uitzending met voorrang ontvangen, ongeacht de functie die in werkig is. Het is tevens möglichk automatisch op een verkeersprogramma (TP) af te stemmen. - Deze functie kan alleen worden gebruikt als "TP" op het display wordt afgebeeld. Als "TP" wordt afgebeeld betekent dit dat de DAB- of RDS-zender die op dat moment worden ontvangen programma's met verkeersinformatie uitzendt. - Voor verdere informatatie raadpleegt u "TA" (zie blz. 27) in het gedeelte Bediening van RDS van de betreffende gebruksaanwijzing. - De TA-standingbyfunctie instellen - De TA-standingbyfunctie annuleren Een TP-zender zoekenOpmerkingen:
- Als een TP-zender Niet kan worden ontvangen, stopt het apparatusat met zoeken. - "TP" kan op het display worden afgebeeld wanneer een verkeersprogramma worden uit gezonden door een RDS-zender. Druk in dat geval op de [TA] toets om TP-zoek-aftstemmen uit te voeren. Druk nogmaals op de [TA] toets om terug te keren maar de voorgaande functie.INFO (aankondiging)
In de INFO-standbyfunctie schakelt het apparaat automatisch overaar het gekozen aankondigingsprogramma zodra dit begint.- De INFO-standingbyfunctie instellen
Als u gedurende 1 seconde of langer de [TA] toets ingedrukt houdt, wordt "INFO" op het display afgebeeld en wordt het apparaat in de INFO-standingbyfunctie gezet totdat de gekozen aankondigering wordt uitgezonden. Zodra de gekozen aankondigingsuitzending begint, worden de naam van de aankondiging op het display afgebeeld. Als u gedurende 1 seconde of langer de [TA] toets ingedrukt houdt terwijl de gekozen aankondigingsuitzending worden ontvangen, stopt de ontvangst van de gekozen aankondigingsuitzending en keert het apparaat terug maar de INFO-standbyfunctie.- De INFO-standingbyfunctie annuleren
Als u de INFO-standingbyfunctie wilt annuleren, houdt u gedurende 1 seconde of langer de [TA] toets ingedrukt.- Informatiekeuze
Met deze functie kurz u INFORMATIE AAN of UIT kiezen in de informatie-onderbrekingsfunctie. U kunt maximaal zes informatatie-items op ON instellen U kunt kiezen uit de onderstaande zes informatatie-items:| INFORMATIE-item | |
| ENGLISH | Inhoud |
| Travel | Vervoersbericht |
| Warning | Waarschuwing/Service |
| News | Nieuwsbericht |
| Weather | Weerbericht |
| Event | Evenementenaankondiging |
| Special | Speciaal evenement |
PTY
Met deze functie kurz u maar het gekozen programmatype luisteren, ongeacht de functie die in werkung is. - U kunt een gemeenschappelijk PTY kiezen voor DAB en RDS. Van de DAB-PTY en de RDS-PTY krijigt de PTY die het eerst worden ontvangen voorrang boven de andere. - PTY-uitzendingen zijn nog nicht in alle landen beschikbaar. - In de INFO-standingbyfunctie haben INFO-zenders voorrang boven andere PTY-zenders. - In de TA-standingbyfunctie hebben TP-zenders voorrang boven andere PTY-zenders. - Voor verdere informatatie raadpleegt u "PTY" (zie blz. 28) in het gedeelte "Bediening van RDS" van de betreffende gebruiksaanwijzing. - De PTY-standingbyfunctie instellen - De PTY-standingbyfunctie annuleren Een PTY-onderbrekingsuitzending annuleren Een programmatype kiezen Een programmatype zoeken Het PTY-voorkeurgeheugenNooduitzending
Als een noodlesitzending worden ontvangen, worden alle functiebedieningen aufgeb broken, worden "ALARM" op het display afgebeeld, en worden de nooduitzending ontvangen en weergegeven. - Voor verdere informatie raadpleegt u "Nooduitending" (zie blz. 29) in het gedeelte "Bediening van RDS" van de betreffende gebruiksaanwijzing. - De noodlesitzending annulerenDe taal van het PTY- en INFOdisplay wisselen
U=kunt een taal kiezen uit de vier beschikbare talen (Engels, Duits, Zweeds of Frans) waarin het programmatype en de informatie op het display kan worden afgebeeld. - De fabrieksinstelling is "ENGLISH". - Voor verdere informatie over "De taal van het PTY-display veranderen" (zie blz. 30), raadpleegt u het gedeelte over "De RDS bedieren" in de betreffende gebruiksaanwijzing.Volume-installing van TA, INFO,ooduitzending (ALARM) en PTY
Het volume van de TA-, INFO-, ALARM- en PTY-onderbrekingsuitzenden gen kan worden ingesteldijdens de TA-, INFO-, ALARM- en PTY-onderbrekingsuitzenden. Voer de volgende bediening uit, afhankelijk van het aangesloten model. - De fabrieksinstalling is "15". Tijdens een TA-, INFO-, ALARM- of PTY- onderbrekingsuitzending, draait u de [ROTARY] knop recht som of linksom en stelt u het volume in op het gewenste niveau (0 t/m 33). * Als de TA-, INFO-, ALARM- of PTY- onderbrekingsuitzending is afgelopen, keert het volume terug maar het niveau dat was ingesteld voör de onderbrekingsuitzending.De 5.1-kanalen surrounddecoder bedieren
Als een optionele, met behulp van een CeNET-kabel aangesloten, compatibile 5.1-kanalensurrounddecoder is aangesloten, kan dit apparaat de functies van de 5.1-kanalensurrounddecoder bedieren. De volgende functies veranderen als een 5.1-kanalen surrounddecoder is aangesloten. - Twee functies, "MOVIE" en "VIRTUAL", worden toegevoegt aan de Dolby Pro Logic II-functie. - De VSE/POSITION-functie verandert in de DSF (digitaal geluidsveld)-functie. - In de P.EQ (parametrische equalizer)-functie, können de instellingen van{iedere luidspreker in nog groter detail worden ingesteld. - De instellingen van de instelitems (zie blz. 39) die betrekking hebben op de muziek, veranderen.PL II (Dolby PL II) kiezen
Kies een van de vier beschikbare functies overeenkomstig de bron die u wilt weergeven in de Dolby Pro Logic II-functie. - De fabrieksinstalling is "OFF".■ MUSIC (muziekfunctie)
Zie "Het PLII-menukiezen (Dolby PLII)" (zie blz.17).■ MATRIX (matrixfunctie)
Zie "Het PLII-menukiezen (Dolby PLII)" (zie blz.17).MOVIE (filmfunctie)
Geschikt voor DVD-films.VIRTUAL (virtuelle functie)
Geschikt voor films en andere geluidsbronnen.OFF
De Dolby Pro Logic II-functie wirdt nicht gebrukt. 1. Druk op de [SOUND] toets. 2. Raak Dolby PLII aan.  3. Raak de rechterkant van het display met aan en kies de Dolby Pro Logic II-functionie.  De functiedisplays worden als volgt doorlopen: MUSIC (muziekfunctie) MATRIX (matrixfunctie) MOVIE (filmfunctie) VIRTUAL (virtuele functie) OFF (PL IIuit) MUSIC (muziekfunctie)... * Voor verdere informatie over het instellen van het volumeniveau van de middenluidspreker/subwoofer, raadpleegt u bladzijde 45. 4. Raak RTN aan.Het DSF-menu kiezen
Met DSF (digitaal geluidsveld) is het vis geluidssimulatie möglichk een geluidservaring te creeren alsof u zich in een concertzaal bevindt of een liveoptreden bijwoont. - Als het DSF-menu worden gekozen, worden het volumeniveau soms lager. - De fabrieksinstalling van DSF is "OFF" en op het DSF-basismenu is "HALL". 1. Druk op de [SOUND] toets. 2. Raak DSF aan.  3. Raak het ON/OFF-display met aan. Het DSF-effect worden beurtelings in- enuitgeschakeld.  Als DSF is ingesteld op "OFF", heeft de DSF-installing geen invloed op het weergavegeluid. Hiermee is de DSF-installing voltooid. Druk op de [SOUND] toets om terug te keren maar de oorspronkelijke functie. 4. Raak het DSF-menunummer met 山 aan en kies het gewenste DSF-menu.  De DSF-menu's zich: HALL CHURCH STADIUM LIVE JAZZCLUB THEATER HALL...| Nr. | Functienaam | Beschrijving |
| 1 | HALL | Een große concertzaal |
| 2 | CHURCH | Een kerk met een gewelfd plafond |
| 3 | STADIUM | Een groot stadion+zonder dak of muren |
| 4 | LIVE | Een zaal voor liveoptredens, groter dan een jazzclub |
| 5 | JAZZCLUB | Een jazzclub met een laag plafond |
| 6 | THEATER | Een bioscoop of theater |
Het parametrischeequalizermenu kiezen
De parametrische equalizer (P.EQ) stelt u in staat het gehele freiorentiebereik nauwkeurig te compenseren tot een vloeijeende kromme met behulp van freiorentiecompensation overeenkomstig het type auto dat u hebt. - De fabrieksinstelling stelt alle luidsprekers in op de volgende instelleningen: FREQ = 1kHz, Q = 1, GAIN = 0dB 1. Druk op de [SOUND] toets. 2. Raak P.EQ aan.  3. Raak het ON/OFF-display met 山 aaan. Het P.EQ-effect worden beurtelings in- enuitgeschakeld.  Als het P.EQ-effect is ingesteld op "OFF", heeft de P.EQ-instelling geen effect op de geluidsbron. Hiermee is de P.EQ-instelling voltooid. Druk op de [SOUND] toets om terug te keren maar de oorspronkelijke functie. 4. Raak het P.EQ-menunummer met 山 aaen kies het P.EQ-menu.  De P.EQ-menu's waar: SIGNAL SP-SEL BAND FREQ Q GAIN SIGNAL... 5. Raak de rechterkant van het display met aan en stel het item maar wens in. SIGNAL (Kies het in te stellen signaal.): Kies "P-NOIS" of "MUSIC". P-NOIS: Kies deze instelling wanneer pingelgeluid worden gebruikt. MUSIC: Kies deze instelling wanneer muzieksignalen worden gebruikt. SP-SEL (Kies de luidsprekers waarvan u de P.EQ-waarde wilt instellen.) Kies een instelling UIT "FRONT", "CENTER" of "SURROUND". - FRONT: Voorluidspreker - CENTER: middenluidspreker - SURROUND: surroundfluidspreker BAND (Kies de frequentrieband.): Kies een van de banden 1 t/m 3. FREQ (Kies de middenfrequentie.): Het instelbereik loopt van 20 Hz t/m 20 kHz. Q (Stel de Q-kromme in.): Hiermee stelt u de spitsheid van de Q-kromme in op 1, 3, 5, 7 of 20. GAIN (Stel het uitgangsiveau in.): Hiermee stelt u de versterking (uitgangsnavau) in binnen het bereik van -12 dB t/m +12 dB. (in stappen van 1 dB, 25 punten) 6. Herhaal de stappen 4 en 5 om het gewenste item in te stellen. 7. Druk op de [SOUND] toets om terug te keren maar de oorspronkelijke functie.De P.EQ instellen
De instellungen die kuren worden veranderd op het P.EQ-menu zijn de volgende: De middenfrequentie, versterking en Q-kromme kuren worden opgeslagen in combinatie met een kanaal/band. Bijvoorbeeld: middenfrequentie "250Hz", versterking "-8dB" en Q-kromme "3" können worden opgeslagen voor band 1 voor. Voor verdere informatie over de P.EQ-functie, raadpleegt u "De P.EQ instellen" (zie blz. 21).Deinstallingenveränderen
Als een 5.1-kanalen surrounddecoder is aangesloten, veranderen de instellenen die betrekking hebben op de muzzlek.De instelitems kiezen
Hieronder volgt een beschrijving van de items waarvan de instelling worden veranderd. Voor verdere informatie over de andere items die Niet worden verandered, raadpleegt u "De instellengen veranderen" (zie blz. 39) onder "Gemeenschappelijk bedienden in iedere functie". 1. Druk op de [A] toets De functie verandert maar de instelfunctie.  2. Raak het instelitemdisplay met 山 山 aan en kies het item dat u wilt instellen. * Als u de linkerkant van het display met anraakt, worden de hoofditem een voor een doorlopen. Als u de linkerkant van het display met aanraakt, worden de hoofd items ononderbroken doorlopen. * Als u het midden van het display met anraakt, worden de subitems een voor een doorlopen. Als u het midden van het display met aanraakt, worden de subitems ononderbroken doorlopen. 3. Als op de rechterkant van het display "THROUGH" wordt afgebeeld, raakt u THROUGH aan om over te schakelen waar het instellingendisplay. 4. Raak de rechterkant van het display met 卡 aan of draai de [ROTARY] knop en kies een instelling.■ Terugkeren maar de oorspronkelijke functie
1. Druk nogmaals op de [A] toets. - Instelitems| Hoofditem | SubItem |
| SOUND | CENTER-SP / SRD-SP / SUB-WOOFER • De luidspreker in-/uitschakelen (zie blz. 64) |
| FRONT HPF / CENTER HPF / SRD HPF / SUB-W LPF • De filterfrequentie van de luidsprekers instellen (zie blz. 64) | |
| SP GAIN • Het uitgangsiveau van de luidsprekers instellen (zie blz. 46) | |
| DELAY | CENTER-SP / SRD-SP • De vertragingstijd van de luidsprekers instellen (zie blz. 65) |
| DOLBY D | D-RANGE • Het dynamisch bereik instellen (zie blz. 65) |
| PL II CONT | PANorama / DIMENSION / CTR WIDTH • De muziekfunctie in detail instellen (zie blz. 47) |
De luidsprekers in-/ uitschakelen (CENTER-SP/ SRD-SP/SUB-WOOFER)
Met deze functie kurz u de middenluidspreker (CENTER-SP), de surroundluidspreker (SRD-SP) en de subwoofer (SUB-WOOFER) in- en uitschaken. Zorg ervoor dat重点领域 instelling op "OFF" is ingesteld als er geen middenluidspreker, surroundluidspreker of subwoofer is aangesloten. - De fabrieksinstalling is "ON". 1. Druk op de [A] toets om de instelfunctie op te roepen. 2. Raak het instelitemdisplay met aan en kies bij "SOUND" het item "CENTER-SP", bij "SOUND" het item "SRD-SP", en bij "SOUND" het item "SUB-WOOFER".  ADJUST MODE CENTER-SP 串 ON 3. Raak de rechterkant van het display met aan of draai de [ROTARY] knop en kies "ON" of "OFF". * In het geval van "SUB-WOOFER", kiest u "ON+", "ON-" of "OFF". Normaal gesproken kies u "ON+". Wanneru erchter "ON-" instelt, krijgt u een sterk effect van de lage tonen. 4. Druk op de [A] toets om terug te keren maar de oorspronkelijke functie.De filterfrequentie van de luidsprekers instellen (FRONT HPF/CENTER HPF/ SRD HPF/SUB-W LPF)
Met deze functie=kunt u de filterfrequentie instellen overeenkomstig de luidsprekers die u gebrukt. - Luidsprekers die bij "Deuidsprekers in-/uitschakelen (CENTER-SP/SRD-SP/SUB-WOOFER)" werden uitgeschakeld, wordeniet aufgebeeld. - De fabrieksinstalling van "FRONT HPF" en "SRD HPF" is "THROUGH" (geen filter), en van "CENTER HPF" en "SUB-W LPF" is "120Hz".Filterinstalling
FRONT HPF/CENTER HPF/SRD HPF (installing van hoogdoorlaatfilter)
Dit filter verwijdert de lage tonen uit het geluid voor de voor-, midden- en surroundluidsprekers.THROUGH 50Hz 80Hz 120Hz
Stel het filter in overeenkomstig uw luidsprekers als de luidsprekers eenkleine diameter hebben.THROUGH
Kies deze instelling als u luidsprekers gelebruikt die rage tonen können weergeven. CENTER HPF kan nicht worden ingesteld op THROUGH.SUB-W LPF (instelling van laagdoorlaatfilter voor subwoofer)
Dit filter verwijdert de hoge tonen uit het geluid voor de subwoofer.50Hz 80Hz 120Hz
Stel de filterfrequentie in overeenkomstig uw subwoofer. 1. Druk op de [A] toets om de instelfunctie op te roepen. 2. Raak het instelitemdisplay met aan en kies bij "SOUND" het item "FRONT HPF", bij "SOUND" het item "CENTER HPF", bij "SOUND" het item "SRD HPF" en bij "SOUND" het item "SUB-W LPF". ADJUST MODE FRONT HPF THROUGH
3. Raak de rechterkant van het display met 卡 aan of draai de [ROTARY] knop en kies de frequentie. * Kies een instelling uit THROUGH*, 50Hz, 80Hz en 120Hz. ^*1 THROUGH wordt alleen aufgebeeld als "FRONT HPF" of "SRD HPF" is gekozen. 4. Druk op de [A] toets om terug te keren maar de oorspronkelijke functie.De vertragingstijd van de luidsprekers instellen (CENTER-SP/SRD-SP)
De tijdsduur waarna het geluid van iedere luidspreker aankomt op de luisterpositie verschilt afhankelijk van de montagepositie van de luidsprekers en de grotte van uw auto. Stel de vertragingstijd van iedere luidspreker zodanig in dat het geluid van alle luidsprekers tegelijk met het geluid van de voorluidsprekers de luisterpositie bereikt. - De fabrieksinstalling is "0ms". 1. Druk op de [A] toets om de instelfunctie op te roepen. 2. Raak het insteltemdisplay met aan en kies bij "DELAY" het item "CENTER-SP", en bij "DELAY" het item "SRD-SP".  DELAYADJUST MODE
CENTER-SP》 0ms
3. Raak de rechterkant van het display met aan en stel de vertragingstijd in. * "CENTER-SP" kan worden ingesteld binnen het bereik van 0 ms t/m 5 ms. * "SRD-SP" kan worden ingesteld binnen het bereik van 0 ms t/m 15 ms. 4. Druk op de [A] toets om terug te keren maar de oorspronkelijke functie.De Dolby Digital functies instellen (D-RANGE)
Deze functie comprimeert het dynamisch bereik van Dolby Digital om geluid met een laag volumeniveau, zoals bijvoorbeeld de stem van een acteur, te behonden, maar geluid met een hoog volumeniveau te onderdrukken. Deze functies zich alleen beschikbaar opDVD's opgenomen in Dolby Digital. - De fabrieksinstalling is "MAX". 1. Druk op de [A] toets om de instelfunctie op te roepen. 2. Raak het insteltemdisplay met aan en kies bij "D-RANGE" het item "DOLBY D". ADJUST MODE
D-RANGE MAX
3. Raak de rechterkant van het display met aan en stel het gewenste item van het dynamisch bereik maar wens in. MAX: het maximale dynamisch bereik van de oorspronkelijke geluidsbron. STD: de aanbevolen functie voor normalaal luisteren. MIN: het sterkst gekomprimeerde dynamisch bereik, waar bij zichs zachte geluiden goed te horenল. 4. Druk op de [A] toets om terug te keren maar de oorspronkelijke functie.8. PROBLEMEN OPLOSSEN
| Probleem | Oorzaak | Oplossing | |
| Algemeen | Het apparaat wordt Niet ingeschakeld. (Er wordt geen geluid voortgebracht.) | De zekering is doorgbebrand. | Vervang de zekering door een neue vandezelfde sterkte. Als de zekering waar doorbrandt, neemt u contact op met de winkel waar u het apparaat heb gekocht. |
| Onjuiste bedrading. | Neem contact op met de winkel waar u het apparaat heb gekocht. | ||
| Er wordt geen geluid voortgebracht wonneer het apparaat bediend wordt terwijversterkers of een vermogensantenne is aangesloten. | De kabel van de elektrische antennene is kortgeslooten maar massa of een te hoge stroomsterkte is nodig voor het inschaken van de versterkers of de elektrische antennene. | 1. Schakel het apparaat uit.2. Maak alle draden los die aan de kabel van de elektrische antennene vastzitten. Controleerijdere draad met behulp van een ohm-meter op möglichke kortsuiitingaar massa.3. Schakel het apparaat wee in.4. Sluitijdere draad eén voor eén waar aan op de kabel van de elektrische antennene. Als de versterkers uitgaan voordat alle draden+zijn aangesloten,gebruikt u een extern relais om de inschakelspanning te leveren (de vereist stroomsterkte is te hoog). | |
| Als op de toetsen wordt gedrukt, gebeurt er niets.Het display geeft verkeerde indicators, enz., aan. | De microprocessor is gestoord door ruis, enz. | Schakel het apparaat uit,druk daarna op de [RELEASE] knop en haal het voorpaneel eraf. Druk op de terugstelknop met een dun ijzerdraadje.Terugsteltoets | |
| De aansluiting:tussen het voorpaneel en het apparaat is vies. | Veeg het vuil eraf met een zachte doeck bevochtigdemet alcohol. | ||
| CDMP3WMA | Er is geen geluid hoorbaar. | Een ongeschikte disc (geen compact disc) of een vreemd voorwerp bevindt zich in het apparaat. | Met het kantelend bedieningsspaneel geopend, houdt u de [▲] toets gedurende 3 seconden of langer ingedrukt.Het vreemde voorwerp worden gedwongenuitgeworpen. |
| Er staan geen MP3/WMA-bestanden op de disc. | Neem op de juiste manier MP3/WMA-bestanden op de disc op. | ||
| De bestanden worden nicht herkend als MP3/WMA-bestanden. | Zorg ervoor dat de MP3/WMA-bestanden op de juiste manier zijn gecodeerd. | ||
| Het bestandssystem is Niet juist. | Gebruik het bestandsystem ISO9660 level 1,2,of JOLIET of Romeo. | ||
| Het geluid slaat over of is bevat veel ruis. | De disc is vuil. | Maak de disc schoon met een zachte doeck. | |
| De disc is ernstig bekrast of verbogen. | Vervang de disc door een disc zonder krassen. | ||
| Het geluid wordt onderbroken of slaat over.Er treedt ruis op of de ruis is vermengd met het geluid. | De MP3/WMA-bestanden zich net op de juiste manier gecodeerd. | Zorg ervoor dat de MP3/WMA-bestanden op de juiste manier zijn gecodeerd. |
| Probleem | Oorzaak | Oplossing | |
| CD/MP3/WMA | De geluidskwaliteit is slecht onmiddelijk nadat het apparaat is ingeschakeld. | Er{kunnen zich waterdruppels haben gezvermd op de lens in het apparaat terwijl de auto op een vochtigeplaats geparkeerd stond. | Schakel het apparaat in enaar het onceveer een uur drogen. |
| De bestandsnamen zijn verkeerd. | Het bestandsystem is nicht juist. | Gebruik het bestandsystem ISO9660 level 1,2, of JOLIET of Romeo. | |
| De afspeellijst kan nicht worden weergegeven. | De bestandsnamen of de afspeellijst-extensie zijn nicht juist. | Gebruik alleen alfanumerieke of ASCII-tekens in de namev an MP3/WMA-bestanden. Gebruik voor de afspeellijst de extensie“.M3U”. |
9. FOUTMELDINGEN
Als zich een probleem voordoet, worden één van de volgende foumt melding afgebeeld. Volg de gegeven instructies om het probleem op te losesten.| Foutmelding | Oorzaak | Oplossing | |
| CD/MP3/MMA | ERROR 2 | Een disc is binnenin de CD-speler vastgelopen en kan nicht worden uitgeworpen. | Dit is een storing van het mechanismisme in de CD-speler. Neem contact op met de winkel waar u het apparaat hebt gekocht. |
| ERROR 3 | Een disc in de CD-speler is bekrant, enz., en kan nicht worden weergegeven. | Vervang de disc door een disc zonder krassen die nicht verbogen is. | |
| ERROR 6 | Een disc is ondersteboven in de CD-speler geplaatst en kan nicht worden weergegeven. | Werp de disc uit enplaats deze verrolgens op de juiste manier. | |
| Algemeen | AMP GUARD | De beveiligingsschakeling van de luidspreker is in werkig getreden. Als tijdens deze bediening het volumeniveau worden veranderd, worden "AMP GUARD" op het display afgebeeld. "AMP GUARD" treedt soms in werkig wanneser speciale testsignalen worden gebruikt. | 1. Verlaag het volumeniveau. De juiste werkung kan ook worden hersteld door het apparaat uit en waar in te schakelen. (Wanner de beveiligingsschakeling van de luidspreker in werkung treedt, worden automatisch het volumeniveau van de luidsprekers verlaagd.)2. Als het volumeniveauoor worden verlaagd, neemt u contact op met once serviceafdeling. |
| CD-wisselaar | ERROR 2 | Een disc binnenin de CD-wisselaar worden Niet in positie gebracht voor weergave. | Dit is een storing van het mechanismisme in de CD-wisselaar. Neem contact op met de winkel waar u het apparaat hebt gekocht. |
| ERROR 3 | Een disc in de CD-wisselaar is bekrant, enz., en kan nicht worden weergegeven. | Vervang de disc door een disc zonder krassen die nicht verbogen is. | |
| ERROR 6 | Een disc is ondersteboven in de CD-wisselaar geplaatst en kan nicht worden weergegeven. | Werp de disc uit enplaats deze verrolgens op de juiste manier. | |
| DVD-wisselaar | ERROR 2 | Een disc in de DVD-wisselaar kan nicht worden weergegeven. | Dit is een storing van het mechanismisme in de DVD-wisselaar. Neem contact op met de winkel waar u het apparaat hebt gekocht. |
| ERROR 3 | Een disc in de DVD-wisselaar is bekrant, enz., en kan nicht worden weergegeven. | Probeer de disc opnieuweer te geven of verwang de disc door een disc zonder krassen die nicht verbogen is. | |
| ERROR 6 | Een disc is ondersteboven in de DVD-wisselaar geplaatst en kan nicht worden weergegeven. | Werp de disc uit enplaats deze verrolgens op de juiste manier. | |
| ERROR P | Foutief kinderslotniveau. | Stel het juiste kinderslotniveau in. | |
| ERROR R | Foutieve regiocode. | Werp de disc uit enplaats een disc met de juiste regiocode. |
10. TECHNISCHE GEGEVENS
Radio
Afstemsystem: PLL-synthesizertuner Ontvangstfrequencies: FM: 87.5 t/m 108 mHz (in stappen van 0.05 mHz) MG:531 t/m 1602 kHz (in stappen van 9 kHz) LG: 153 t/m 279 kHz (in stappen van 3 kHz)CD-speler
Systeem: Digitalaudiosystemeenvoorcompactdiscs Frequentiebereik: 5 Hz t/m 20 kHz (±1 dB) Signal-ruisverhouding: 100 dB (1 kHz) IHF-A Dynamisch bereik: 96 dB (1 kHz) Vervorming: 0,01%Algemeen
Uitgangsvermogen: 4× 31W (DIN 45324, +B = 14,4V) Voedingsspanning: 14,4 V gelijkstroom (10,8 t/m 15,6 V toegestaan), negatieve massa Stroomverbruik: Minder dan 15 A Luidsprekerimpedantie: 4Ω (4 t/m 8 Ω toelaatbaar) Nominale stroomsterkte van autoantenna: 500 mA of minder Gewicht: Hoofdtoestel: 1,7 kg Afstandsbediening: 80 g (inklusief batterij) Afmetingen: Hoofdtoestel: 178 (B) × 50 (H) × 155 (D) mm Afstandsbediening: 44 (B) × 110 (H) × 27 (D) mmOpmerking:
- De technische gegevens en het ontwerp+zijn onderhevig aan veranderingen ten behoeve van productverbetering zonder voorafgaande kennisgeving. Muchasgraciasporlaadquisidonedeste productoClarion. * Antes de utiliser este equipo lea Completely el manual de instrucciones. * Después de haber leído este manual, cerciórese de guardarlo a mano (p. ej., en la guantera). * Compruebe el contenido de la tarjeta de garantía adjunta y guardela ciuidadosamente con este manual. * Este manual incluye los procedimientos de operación del Cambiador de discos CD y sintonizador de DAB y TV conectados a工程技术 de cable CeNET. El Cambiador de discos CD y sintonizador de TV tiene sus propios manuales, pero no se describes los procedimientos de su operación.Índice
1. PRECAUCIONES 3 Consola inclinable 4 Manejo de los discos compactos 4 2.CONTROLES 5 3. NOMENCLATURA 6 Nombres de los botones y sus functions 6 Operaciones de los principales botones cuando se haya conectado un equipo externo a esta .. 7 Elementos de visualización 7 Operaciones en pantalla 8 4. PANEL DE CONTROL DESMONTABLE (DCP) 9 5. CONTROLADOR REMOTO 10 Insercion de las pilas 10 Funciones de los botones del controlador remoto 11 6. OPERACIONES 12 Operacionesbasicas 12 Operación del procesador AC III 17 Operaciones de la radio 23 Operaciones del systemadeatosradiofonicos(RDS) 26 Oeraciones de CD / MP3 / WMA 31 Diferentes piezas musicales eschuchadas por various oyentes (funcion 2-ZONE) 36 Operaciones comunes de cada modo 37 7. OPERACIONES DE LOS ACCESORIOS 51 Operaciones del Cambiador de discos compactos 51 Operaciones del televisor 54 Operaciones digitales de radio/DAB 58 Operaciones del decodificador surround de 5,1 canales 61 8. EN CASO DE DIFICULTAD 66 9. INDICACIONES DE ERROR 68 10. ESPECIFICACIONES 691. PRECAUCIONES
1.Estaunidad se aplica solamente para fines de vehículos de 4 ruertas en carretera.No es apropiado elutilizarla para tractores, camiones, aplanadoras, vehículos todo terreno, ni motocicletas de 2 o 3 ruadas, embarcaciones, nithers vehículos para fines especiales. 2. Si el interior del automóvil está muy frío y utilizes la unidad inmediamente afterwards de haber encendido el calefactor, es posible que se condense humedad en el disco o en las piezas del reproductor, y que的结果 impossible realizar la reproducción apropiada. Si se condensa humedad en el disco, fróteo con un paño seco. Si se condensa humedad en las piezas opticas del reproductor, no lo utilise durante aproximamente una hora, y la humedad condensada desaparecerá de forma natural para permitir la operation normal. 3. La conducccion por carreteras accidentadas que Causeen vibraciones notables可以使 caurar el salto del sonido.INFORMACION PARA LOS USUARIOS:
LOS CABIOS O MODIFICACIONES REALIZADOS EN ESTE PRODUCTO NO APROBADOS POR EL FABRICANTE ANULARAN LA GARANTIA.ADVERTENCIA
Para su seguridad, no mire ni maneje el panel tactil cuando conducze.Consola inclinable
Estaunidadutilizaconsolasinclinablespara permitir que lasvisualizacionessean lo mayores posibles. Cuando utilise una consola abatible, cerciórese de cerrarla.PRECAUCION
Tenga cuidado de no pillarse los dedos cuando abra o cierra la CONSOLA INCLINABLE.
1. Por motivos de seguidad, cierre la CONSOLA INCLINABLE cuando no vaya a utilizesla durante mucho tiempo, o antes deponer en OFF la llave de encendido. Si pusiese en OFF la llave de encendido con la CONSOLA INCLINABLE inclinada, esta no se cerraría. 2. Antes de que la CONSOLA INCLINABLE se cierre, pourrait oírse un sonido de frenado procedente del mecanismo de seguridad. Esto es normal. 3. Si mueve la CONSOLA INCLINABLE con la mano, puede ser que adquiera cierto juego. Para corregir este jeu, con la alimentacion de la unidad connectada, presione el boton [▲] para cerrar la CONSOLA INCLINABLE. 4. Después de haber extraído un disco, la CONSOLA INCLINABLE volverá automáticamente al estado de inclínación o cierre. Si hay algunos obstáculo trate de cerrarse, el mecanismo de seguridad se disparará y la CONSOLA INCLINABLE volverá al estado de aperture. Cuando suceda this, elimine the obstáculo. y afterwards presione el botón [▲]. 5. Para evaporar rayar el disco compacto, mantenga bajo el nivel del disco compacto de 12 u 8 cm cuando lo inserte o lo extraiga.Manejo de los discos compactos
Emplee solamente discos compactos que tengan la marca @SIC o No reproduzca discos compactos en forma de corazon, octogonales, ni de ninguna other forma especial. Es possible que algunos discos CD grabados en el modo CD-R/CD-RW no;puede emplease.Manejo
- En comparación con los discos compactos de música normales, los discos CD-R y CD-RW se ven afectados fácilmente por la temperatura y la humedad elevadas, y es posible que algunos de tales discos no能把 reproductarse. Por lo tanto, no los deje durante mucho tiempo en un automóvil. - Los discos nuevos你能 tener rugosidades en el borde. Si utilizes tales discos, el reproductor podría u trabajo, o el sonido podría saltar. Utilice u objeto similar, para rugosidades del borde. - No pegue nunca etiquetas sobre la superficie de los discos compactos, ni marque dicha superficie con lápices ni bolígrafos. - No reproduzca nunca un disco compacto pegado con cinta plástica nithers pegamentos, ni con las marcas despegadas. Si tratase de producir uno de tales discos, quizas no pudiese SACARLO del reproductor de discos compactos o dañarlo. - No utilise discos compactos que posean ralladura grandes, deformados, rajados, etc. La utilización de tales discosURTDA可以使 el mal funciona como dos días. - Para extraer un disco compacto de su caja, presione el centro de dicha caja y levante el disco, sujetándolo cuidadosamente por los bordes. - No utilise hojas protectoras de discos compactos, vendidas en establishimientos del ramo, ni discos provistos de estabilizadores, etc. Estos elementos podriani darar los discos o el mecanismo interno.Almacenamento
- No exponga los discos compactos a la luz solar directa ni a fuentesTERMicas. - No exponga los discos compactos a humedad ni polvo excessivo. - No exponga los discos compactos al calor directo de aparatos de calefacción.Limpieza
- Para eliminar las huellas ductilares y el polvo, utilise un paño suave y frote el disco en linea recta del centro a la periferia. - No utilise disolventes, como limpiadores adquiridos en establecimientos del ramo, rociadores antiestátics, ni diluidor de pintura para limpar los discos compactos. - Después de haber utilisé un limpiador de discos compactos, deja que el disco compacto se seque bien antes de reproducirlo.2.CONTROLES
Unidad fuente
Apertura de la CONSOLA INCLINABLE
3. NOMENCLATURA
Nombres de los botones y sus sistemas
Botón [RELEASE]
- Extracción del panel de control desmontable (DCP).Fotosensor
- Este sensor detecta la intensidad de brillo Dentro del automóvil. Cuando la función de atenuación automática está configurada en "AUTO", la intensidad de brillo de la pantalla se reduce para adaptarse a la intensidad de brillo que detecte este sensor.Mando [ROTARY]
- Presione este mando para conectar la alimentacion. Cada vez que presiona este mando, se cambia de modo. - Presione el mando prolongadamente durante 1 segundo o más para desconectar la alimentación. - Este mando también se pueda girar para regular el volumen o para realizarkestinos ajustes en el modo de ajuste.Boton [△]
- Abre/cierra el panel de control. Si hay un disco cargado, este se expulsa cuando se abide el panel de control.Nota:
Si no se expulsa el disco, presione el botón [▲] durante 1 segundo o más.Boton [A]
- Utilice este botón en el modo de ajuste para establecer o configurar losDistinctosajustes. - Utilice este botón en el modo de radio para introducir los nombres de emisoras, o en el modo CD, para introducir los titulos de discos.Botón [SOUND]
- Utilice este botón para establercer o configurar losDistinctosajustes, como el espacio de audio. - Si presiona este botón prolongadamente durante 1 segundo o más, tambiénoulda activar (ON) y desactivar (OFF) la funciona 2-ZONE.Botón [TA]
- Utilice este botón paraaabstar el modo deespera TA (Información sobre el tráfico) (cuando la funciona 2-ZONE está desactivada, "OFF"). Cambia el funciona de 2-ZONE. Si presiona este botón prolongadamente durante 1 segundo o más, cambia el tipo de 2-ZONE (cuando la funciona 2-ZONE está activada "ON").Boton [▶■]
- Interrumpe o reanuda la reproduccion de una pista (en el modo CD). - Utilice este botón paraaabustar el modo de espera PTY ( Tipo de programa) o los parámetros de PTY.Pantalla
- Muestra losDistinctos datos que indican el estado de configuracion de la unidad, como losindicadores y el estado de sintonizacion/reproduccion. Toque la pantalla con el dedo y bajo toque para activar la operation. (cf. pagina 8)Operaciones de los principales botones cuando se haya connectado un equipo externo a estaunidad
- Cuando el Cambiador de CD/DVD está conectado
* Para Obtener más información, consulte la sección “Operaciones del Cambiador de discos compactos” (cf. págrina 51). Para Obtener información sobre el Cambiador de DVD, consulte el Manual de instructcciones que se suministra con el Cambiador de DVD.Boton [11]
- Este botón le permite reproducir o interruptir (pausa) un CD o un DVD.Boton[A]
- En el modo de转型发展 de CD se usa para introducir los títulos de discos.- Cuando TV/DAB está conectado
* Para Obtener más información, consulte la sección “Operaciones del televisor” (cf. páginas 54) u “Operaciones digitales de radio/DAB” (cf. páginas 58).Botón [TA]
- Utilice este botón paraaabrear el modo de espera TA (Información sobre el tráfico) en modo DAB. (Estamericano está disponible para un sintonizador DAB.) - Presione el botón prolongadamente durante 1 segundo o más para activar o desactivar el modo INFO. (en el modo DAB).Boton [II]
- Permite cambio el modo deImagen de la television o el modo deImagen del video (external). (en el modo TV). - Utilice este botón paraaabustar el modo de espera PTY ( Tipo de programa) o los parámetros de PTY en el modo DAB.Boton [A]
- Este botón se usa para introducir el nombre de la emisión de television. (en el modo TV).Elementos de visualización
Operaciones en pantalla
Estaunidad emplea un panel táctil a modo de pantalla de visualización. Para hacerlo funciona, sólo tiene que tocarlo con la yema de los dedos. Existen cuatro operaciones principales de visualización, que son:Tocar
Toque la pantalla con el dedo y retirelo antes de 1 segundo.Esta es la operation más baja para usar la pantalla.Tocar prolongadamente
Toque la pantalla con el dedo de forma prolongada durante 1 o 2 segundos, como minimo. NoURTVA el dedo cuando toca laagna. Cuando toca la pantalla prolongamente durante 1 segundo o más, aparecen listas, por exemple, e se invocan otheras functions practicas. Cuando toca la pantalla prolongamente durante 2 segundos o más, se guarda una memoria preprogramada u另一边 información.Tocar
Toque la pantalla con el dedo y desplace el dedo hacía la izquierda ( ) o hacía la derecha ( ) sin despegarlo de la pantalla, y luego retiéreo antes de 1 segundo.Esta operation se utilizes para seleccionar una memoria preprogramada (1 a 6) o pistas. Tocar
Toque la pantalla con el dedo y desplace el dedo hacia la izquierda ( ) o hacía la derecha () sin despegarlo de la pantalla, y manténgalo asi. La operation en bajo se prolongará durante el tiempo que el dedo se mantenga en la pantalla.Esta operation se usa, por exemple, para sintonizar de forma manual o para hacer avanzar/retroceder rápidamente las pistas. 4. PANEL DE CONTROL DESMONTABLE (DCP)
El panel de control podra desmontarse como medida antirrboro. Despues de haber desmontado el panel de control, guardelo en la caja para el PANEL DE CONTROL DESMONTABLE (DCP) para evaporar que se raye. Le recomendamos que lleve el DCP consigo cuando salga del automóvil.Extracción del panel de control desmontable (DCP)
1. Con la CONSOLA INCLINABLE cerrada, desconnecte la alimentacion. 2. Presione a fondo el botón [RELEASE] para abrir el DCP.  3. Tire del DCP hacía usted y extráigalo. PRECAUCION
- Cierre sempre la CONSOLA INCLINABLE antes de extraer el DCP. - Si extrae el DCP con la CONSOLA INCLINABLE abierta, esta se cerrará inmediamente. Tenga cuidado de no pillarse los dedos.Instalación del panel de control desmontable (DCP)
1. Inserte el DCP de forma que la sección (A) de la parte derecha del本身就是 quede fjada en el gancho (B) de la unidad.  2. Presione@cuidadosamente la parte izquierda © del DCP para encasarlo en su lugar. PRECAUCION
- El DCP pueda danarse fácilmente con los golpes. Después de haberlo extraido, colocuelo en su caja, yonga cuidado de no partir lo caer ni de someterlo a golpes fuertes. - Si presiona el botón de [RELEASE] y el DCP no está bloqueado en su lugar, pueda caerse debido a las vibraciones del automóvil. Nombre que el DCP se rompies, motivo por el que, après de haberlo extraido, instalelo en launities o colóquelo en la caja para el本身就是. - El conector de la unidad al DCP es una pieza extremadamente importante. Tenga cuidado de no danarlo presionando con sus uñas, bolígrafos, destornilladores, etc.Nota:
- Si el DCP se ensucía, fróte lo solamente con un paño suave y seco.5. CONTROLADOR REMOTO
Inserción de las pilas
1. Dé la vuelta al controlador remoto, y después deslice la cubierta posterior en el sentido de la flecha. 2. Inserte las pilas AA (SUM-3, R-6/1,5 V) suministradas con el controlador remot en el sentidoamente en la figura, y antes cierre la cubierta posterior.Notas:
La utilización inadequada de las pilas puede provocar su explosión. Tenga en cuenta los+puntos seguides: - Cuando reemplace las pilas, cambie ambas por Otherwise. - No cortocircuite, desarme, ni caliente las pilas. - No tire las pilas al fuego. - Tire las pilas agotadas en el lugar apropiado. Funciones de los botones del controlador remoto
| ModoBotón | Radio (RDS)/DAB | Reproductor de discos compactos/MP3 | Cambiador de discos compactosCambiador de DVD | Televisor |
| [FUNC] | Cambia entre la radio, DAB, CD/MP3, Cambiarde CD, cambiarde DVD y el televisor,AUX. | |||
| [BAND] | Cambio de la banda de recepción. | Reproducción de la primera canción.Reproducción desdeel tope. | Movimiento al disco seguidente enorden ascendente. | Cambio de la banda de recepción. |
| [▲], [▼] | Aumento o reducción del volumen (en todos losmos). | |||
| [←], [▶] | Movimiento a canales memorizados superiores e inferiores. | Movimiento a canociones superiores e inferiores. Cuando lo mantenga presionado durante 1 segundo: Avance/retroceso rápido. | Movimiento a canales memorizados superiores e inferiores. | |
| [▶■] | Sin funciona. | Cambio entre reproducción y pausa. | Sin funciona. | |
| [MUTE] | Activación y desactivación del silenciamiento. | |||
| [TA] | Activación y desactivación de TA.Mantenga presionado este botón durante 1 segundo o más para Cambiar entre la fuente de sonido principal y de la zona secundaria (solamente con el modo 2-ZONE activado). | |||
| [DISP] | Cambia entre la visualización principal y visualización del reloj (CT). | |||
| [PS/AS] | Exploración de emisoras memorizadas.C时候 lo mantenga presionado durante 2segundos:Almacenamiento automático. | Reproducción por exploraciónPresione y mantenga presionado el botón durante 1 o más segundos para efectuar la reproducción por exploración de la carpeta durante el modo de MP3/WMA. | Reproducción con exploración.C时候 lo mantenga presionado durante 1segundo:Reproducción con exploración de discos. | Exploración de emisoras memorizadas.C时候 lo mantenga presionado durante 2segundos:Almacenamiento automático. |
| [AF] | Activación y desactivación de la funciona AF.C时候 lo mantenga presionado durante 1segundo:Activación y desactivación de la funciona REG. | Repetición de la reproducciónPresione y mantenga presionado el botón durante 1 o más segundos para efectuar la reproducción de la carpeta durante el modo de MP3/WMA. | Reproducción repetIDA.C时候 lo mantenga presionado durante 1segundo:Reproducción repetIDA de discos. | Sin funciona. |
| [PTY] | Activación y desactivación del modo de PTY. | Reproducción aleatoriaPresione y mantenga presionado el botón durante 1 o más segundos para efectuar la reproducción aleatoria de la carpeta durante el modo de MP3/WMA. | Reproducción aleatoria.C时候 lo mantenga presionado durante 1segundo:Reproducción aleatoria de discos. | Cambio entre televisiony videograbadora. |
| [2-ZONE] | Manténgalo presionado durante 1 segundo o más para activar o desactivar el mode de zona doble.Presióno para Cambiar la zona de control entre la principal y la secundaria cuando el modo de zona doble está activado. | |||
6. OPERACIONES
Operaciones básicas
PRECAUCION
Cerciórese de reducir el nivel del volumen antes de desconectar la alimentación de la unidad o de poder la llave de encendido en OFF. Si deselectase la alimentación con el volumen a alto nivel, cuando volviene a conectarla, el volumen alto repentino podra dañar sus oidos y la unidad.Encendidoyapagado
Encendido
Nota:
- Tenga cuidado cuando utilise esta unidad durante un tiempo prolongado con el motor apagado. Si agota la bateria del automóvil, noURTRA encender el motor yarlo podrA reducir la vida util de la bateria. 1. Presione el mando [ROTARY]. Se做不到 el modo que está anterionmente activo.Comprobación del sistema
Cuando se conecta la alimentacion de esta unidad por primera vez, una vez realizadas todas las conexiones, esta compruba que equipos estar connectados. (Esto se denomina "system check", es decir, comprobacion del system.) Cuando se conecta la alimentacion y aparece "System Check", siga los pasos que se indicate a continuacion para realizar la comprobacion del system. 1. Cuando aparezca "System Check" en噎alla, presione el mando [ROTARY]. Comienza la comprobacion del systema. Una vez finalizada la comprobacion del systema, aparecerá "Completed" en la噎alla. 2. Presione el mando [ROTARY] de nuevo. Aparece la visualización principal del modo de radio.Función CODEMATIC
Cuando "CODEMATIC" está activada ("ON"), y se conecta la alimentación con el DCP acoplado, aparecerá la visualización Touch Code (Cólico táctil). Toque la visualización en el order que se programó en el modo de ajuste.  Para Obtener más información sobre la función CODEMATIC, consulte la sección "Uso de la funciona de sécurité (CODEMATIC)" (ct págin 50).Apagado
1. Presione el mando [ROTARY] durante 1 segundo o más.Selección de modo
1. Presione el mando [ROTARY] para Cambiar de modo de funciona bajo. 2. Cada vez que presiona el mando [ROTARY], cambia el modo de funciona bajo en el sigúienteorden: Modo Radio Modo DAB Modo CD/ MP3 Modo MMI Modocambiador de CD Modocambiador de DVD Modo TV Modo AUX Modo Radio... * Los equipos externos que no estén connectados con CeNET no se做不到.Ajusted volume
1. Gire el mando [ROTARY] hacía la derecha paraacular de volumen, o hacía la izquierda para disminuirlo. * El nthel de volumen es de 0 (minimo) a 33 (maximo).Cambio del modo de funciona bajo la lawa de la lawa.
Existen 2 modelos de funciona bajo: funciona estandar y funciona simple. 1. En la visualización principal de la pantalla, toque la parte izquierda durante 1 segundo o más. Cambia el modo de funciona.  En el modo de funciona simple, no es necessitiesoicar 山 o la visualizacion principal del mode de radio o el mode CD. Tenga en cuenta, sin embargo, que lassiguientes operaciones no estan disponibles enel modo de funcionaimple. - Presintonizacion, seleccion de carpetas, seleccion de discos y otheras operaciones que requieran tocar la parte la derecha de la pantalla - Operaciones de cambio de visualización (cf.頁面13) - Operaciones de cambio de visualización de títulos (cf. págin 14) - Operaciones para la visualización de las pantallas de introduccion de titulos. En pantallas (p. ej. visualización de listas, modo de ajuste, etc.)-distintas de la principal, no hay diferencia entre el funcionaimiento estándar y el funcionaimiento simple. Las descricciones que seOfrecen en este manual corresponden principalmente alfuncionamento estandar. Para Obtener descripciones de las operaciones que sepuede realizar en el modo simple, consulte las descripciones de las visualizaciones de pantalla en el mode de radio o el modo CD.Cambio de visualización
1. Toque el centro de la pantalla. Cada vez que toca la visualización, esta cambía como se indica a continuación: Visualización de títulos Salvapantallas
Cuando la funciona de salvapantallas está activada ("ON"), y no usa launidad durante unos 30segundos, apareceré el salvapantallas. Para Obtener más información, consulte la página 41.Papel tapiz
Si toca prolongadamente el centro de la pantalla durante 1 segundo o más, aparecerá la visualización de papel tapiz.| ① | ⑨ |
| ② | ⑩ |
| ③ | ⑪ |
| ④ | ⑫ |
| ⑤ | ⑬ |
| ⑥ | ⑭ |
| ⑦ | ⑮ |
| ⑧ | ⑯ |
Visualización del analizador de espectro
Si toca prolongadamente la parte derecha de la pantalla durante 1 segundo o más cuando visualiza el analizador de espectro (S/A), cambiará la visualización del analizador de espectro.| S/A SCAN | Aparece S/A 1, S/A 2 y S/A 3 durante 10segundos o más cada una. |
| S/A 1 | S/A 1 WMA FLDR No. 003 TOP |
| S/A 2 | S/A 2 WMA FLDR No. 003 TOP |
| S/A 3 | S/A 3 WMA FLDR No. 003 TOP |
Cambio de la visualización de títulos
Es possible visualizar los titulos de discos yDEMAS Informacion almacenada en los discosm吲ntras reproduce discos compactos en losmodos CD oeturnador de CD. 1. En la visualización de titulos, toque prolongadamente la parte derecha de la pantalla durante 1 segundo o más. Cada vez que toca prolongadamente la visualización, esta cambia como se indica a continuación:Disco CD de dato
Túltode usuario (disco) Titulo de CD de texto (disco) Nombre de interpréte → Titulo de CD de texto (pista) → Titulo de usuario (disco)...Disco MP3/WMA
Carpeta Archivo Etiqueta dealbum Etiqueta de interpréte Etiqueta de titre Carpeta...Notas:
- MP3 es compatible con las etiquetas (Tags) ID3 V2.3/2.2/1.1/1.0. Las visualizaciones de etiquetas dan prioridad a V2.3/2.2. - Si se tratate de etiquetas de album para WMA, se做不到a informacion contentida en la ampliacion de cabecera. - En la etiquetas solo se pueda做不到 clarar characteres ASCII.Para desplazar un titulo
Toque la visualización de titulos con el titulo visible. El titulo se desplaza hacía la izquierdaPara detener el desplazimiento
Toque la visualización de titulos.Función CT (Hora del reloj)
Esta funciona le permitte recibir datos CT enviados desde una emisora RDS y visualizar la hora. Para visualizar la pantalla CT, toque el centro de la pantalla. - Si no se está recubiendo datos CT, aparecerá "---CT" en la pantalla.Nota:
- Los datos CT no se emiten en algunos País y enellas emisoras de radio. también es possible que en algunos zonas los datos CT no se visualicen correctamente.Ajuste del ADF
- ADF es la abreviatura de "Anti Distortion Filter" (Filtro antidistorsión). Lasmerican Psychiatric Association (APHA) has recently announced a new program that will be designed to improve the quality of life of people with chronic medical conditions. The program will be designed to improve the health status of individuals with chronic medical conditions, including diabetes, heart disease, and cancer. Esta unidad dispone de 4tips de efectos de sonido memorizados. Seleccione el que preferia. ADF-1: Apropiado para altavoces originales ADF-2: Apropiado para altavoces separados ADF-3: Apropiado para altavoces coaxiales USER: Este valor puede ajustarlo el usuario a su gusto. OFF: No hay efecto de sonido - El valor preajustado de fabricula es "OFF".Notas:
- Como el volumen varía cuando se cambia ADF, conviene Cambiar de tipo de ADF con el volumen, "SW VOLUME" (altavoz de subgraves) y "CTR VOLUME" (altavoz central) al minimo. - En algunos sistemas de altavoces, en occasions no se obtiene el efecto sufiente. En tal caso, ajuste el parámetro del ADF o el volumen. - Cuando ADF está configurado en "USER", "1", "2" o "3", lasustralianes VSE y BASS/TREB en EQ-SELECT queden desactivadas 1. Presione el botón [SOUND]. 2. Toque ADF.  3. Toque la parte derecha de la pantalla para selectionar el modo ADF.  Cuando el ADF está desactivado ("OFF"), el ajuste de ADF no se refleja en la fuente de música. Con thiso recluye el ajuste del ADF. Presione el botón [SOUND] paravoltar al modo original. * Selectione USER, 1, 2, 3 u OFF. 4. Para modifier los parámetros de ajuste del ADF, presione el botón [A]. 5. Toque la visualización de ajustes para selecciónar el ajuste deseado. Cada vez que toca ,la visualización de ajustes cambia como se indica a continuación: - Ajuste (cuando se selecciona USER en el paso 3) BASS (graves) TREBLE (agudos) COMP BASS (graves)... - Ajuste (cuando se selección 1 a 3 en el paso 3) LEVEL (nivel) COMP LEVEL... 6. Toque la parte derecha de la pantalla para realizar el ajuste. * El margen de ajuste de "BASS" y "TREBLE" es de 1 a 13. \* El margen de ajuste de "LEVEL" es de -3 a +3 *Selezione“ON”o“OFF”para“COMP”. 7. Presione el botón [SOUND] para volver al modo original.Ajuste del altovoz de subgraves y el altovoz central
- "SW VOLUME" (subgraves) sólo se pueda ajustar cuando "SUB-WOOFER" está activado ("ON"). - "CTR VOLUME" (altavoz central) sólo se pueda ajustar cuando el modo Dolby Pro Logic II está configurado en "MUSIC" o "MATRIX", "SP-SETTING" está en "CTR+SW" y "CENTER-SP" estáactivado ("ON"). - El valor preajustado de fabricula de SW VOLUME y de CTR VOLUME es "0". 1. Presione el botón [SOUND]. 2. Toque A-MODE.  3. Toque ↑ ↓ la visualización de ajustes para selecciónar "SW VOLUME" o "CTR VOLUME".  4. Toque la parte derecha de la pantalla para realizar el ajuste deseado. * El margen de ajuste de este elemento es de -5 a +5. 5. Presione el botón [SOUND] para volver al modo original.Ajuste del balance/ desvanecedor
BALANCE:
Permite ajustar el balance de volumen entre los altavoces izquierdos y derechos.FADER:
Permite ajustar el balance de volumen entre los altavoces delanteros y traseros. - El valor preajustado de fabricula de BALANCE y de FADER es "0".Nota:
- El balance/desvanecedor no se pueda ajustar cuando AC-PRO IIIiene configurado el parametro "PRO" (cf.頁目44) y la direccion de posicion está activada ("ON"). Ajuste el balance/desvanecedor "Selección del menu de posicion" (cf.頁目17). 1. Presione el botón [SOUND]. 2. Toque A-MODE.  3. Toque ↓ la visualización de ajustes para selecciónar “BALANCE” o “FADER”.  4. Toque la parte derecha de la pantalla para realizar el ajuste deseado. * "BALANCE" pourrait ajustarse dentro del margen L13 (predominio del lado izquierdo) a R13 (predominio del lado derecho). * “FADER” puede ajustarse dentro el margen R12 (predominio del lado trasero) a F12 (predominio del lado delantero). 5. Presione el botón [SOUND] para volver al modo original.Ajuste de graves/agudos
El modo de graves/agudos sólo se pueda ajustar cuando el modo Dolby Pro Logic II está desactivado ("OFF") (cf. págin 17) y "EQ-SELECT" tiene configurado el parámetro "BAS/TREB" (cf. págin 44). - El valor preajustado de fabricula es "0" 1. Presione el botón [SOUND]. 2. Toque A-MODE.  3. Toque la visualización de ajustes para selecciónar "BASS" o "TREBLE".  4. Toque la parte derecha de la pantalla para realizar el ajuste deseado. * El margen de ajuste de este elemento es de -6 a +6. 5. Repita los pasos 3 y 4 para realizar el ajustedeaseado. 6. Presione el botón [SOUND] para volver al modo original.Operación del procesador AC III
Dolby Pro Logic II
Dolby Pro Logic II es una Tecnología de decodificación de matriz en la que se aplicá la Tecnología de matriz digital actualizada y se的最佳as Dolby Pro Logic. Ofrece una reproducción excellente de 5,1 canales de fuentes perimétricas Dolby como como de fuentes de sonido estéreo, como discos compactos, produciendo por lo tanto un canal perimétrico de gama completa (20 Hz a 20 kHz) y se convierte en estéreo. Por lo tanto, ustedouldrásacrutar de cualquier fuente estéreo con sonido dinámico de 5,1 canales. De acuerdo con la fuente aroducirse, PODRA seleccionarse el modo de música o el modo de matriz. Fabricado bajo licencia de Dolby Laboratories. "Dolby", "Pro Logic" y el symbolo de la doble D son marcas de Dolby Laboratories.Selección del menu PL II (Dolby PL II)
Selezione MUSIC o MATRIX como modo Dolby Pro Logic II, según la fuente que vaya a reproducir. - El valor preajustado de fabricula es "OFF".■ MUSIC (modo de música)
- Este modo es apropiado para fuentes de sonido estéreo, como los discos compactos. - Como el camino de sonido se propaga de forma diferente según el estado de la fuente musical grabada, existe(other modo de ajuste que permite afinar aun más. (Consultte la página 47).■ MATRIX (modulo matricial)
- Este modo es apropiado para fuentes de sonido tales como la radio AM/FM.OFF
- No se utilizes el modo Dolby Pro Logic II, sino el modo AC-PROIII. Para Obtener más información sobre el modo AC-PROIII, consulte la sección "Selección de cada modo" (ct págin44). 1. Presione el botón [SOUND]. 2. Toque Dolby PLII.  3. Toque la parte derecha de la pantalla para seleccionar el modo Dolby Pro Logic II.  La visualización de modelos cambia como se indica a continuación: MUSIC (modo de música) MATRIX (modo matricial) OFF (PL II desconectado) MUSIC (modo de música)... * Para Obtener más información sobre elajuste de volumen de los altavocescentral/subgraves, consulte la página 45. 4. Toque RTN.Selección del menu de posición
Con POSITION, puede selectionar entre 5tips el tiempo que el sonido tarda en临港ar desde el altovoz hasta su posición en el asiento. Además, la función de alineación temporal permite ajustar los altavoces con precision de forma que el本身就是 efecto de sonido puedaninger desde cada altovoz a todos los oyentes. En el procedimiento "Selección de cada modo" (cf. págin44),ajuste AC-PROIII en "PRO". - El valor preajustado de fabricula de POSITION es "OFF" y el del menu Basics de posicion, "FRONT".■ Menu de posición
Esta función está preprogramada con 5 menus de posicion. Seleeccione el menu que desee. 1. Presione el botón [SOUND]. 2. Toque POSITION.  3. Toque la visualización ON/OFF. El modo de posición se activa o desactiva (ON/OFF).  Cuando el efecto de posicion está desactivado ("OFF"),DICHOajuste de posicion no se refleja en la fuente de musica. Con thiso recluye el ajuste de posicion.Presione el boton [SOUND] para volver al modo original. 4. Toque B/U para selectionar "BASIC".  Cada vez que toca B/U, "BASIC" y "USER" se alternan suscesivamente. 5. Toque el N° de menu básico de posición para selección ar menú báscico de posición. 6. Presione el botón [SOUND] para volver al modo original. Menu Basics de posicion| N° | Nombre de visualización | Posición del asiento |
| 1 | FRONT-L | Asiento delantero izquierdo |
| 2 | FRONT-R | Asiento delantero derecho |
| 3 | FRONT | Asientos delaneros. |
| 4 | REAR | Asientos traseros. |
| 5 | FULL SEAT | Todoos asientos |
Ajuste/memorizacion de las positions (memoria de usuario)
Con la memoria de usuario, se pueda ajustar los altevoces con precision para que el本身就是 efecto de audio pueda临港ar desde cada altovoz a todos los oyentes segun el menu b asiico de posicion. La memoria de usuario permite programar hasta 5 valeurs de ajuste.T-ALIGN (alineación temporal):
La distancia entre el oyente y cada altovoz se suece introducir en pasos de 2,3 cm, como también se suece ajustar el tiempo que el sonido tarda enninger al oyente desde cada altovoz.SP GAIN (ganancia del altovoz):
Permitte ajustar el nivel de salute del altovoz. Ajuste este nivel de forma que todos los volúmenes que salgan de cada altovoz Sean iguales. 1. Presione el botón [SOUND]. 2. Toque POSITION. 3. Toque ↑ ↓ la visualización ON/OFF. El modo de posición se activa o desactiva (ON/OFF). 4. Toque B/U para selectionar "BASIC" o "USER". 5. Toque la parte derecha de la pantalla para selectionar el menu que se utilizes como menu de ajuste. 6. Presione el botón [A]. 7. Toque la parte izquierda de la pantalla para seleccionar "T-ALIGN" o "SP GAIN". 8. Toque la parte central de la pantalla para seleccionar cada ajuste. Cada vez que toca , los ajustes se cambian como se indica a continuación:Ajustes
 *1 Sólo se muestra cuando, en modo de ajuste, "SUB-WOOFER" en "SOUND" está activado ("ON"). *2 Sólo se muestra cuando, en modo de ajuste, "SUB-WOOFER" en "SOUND" está activado ("ON") y se selección "T-ALIGN" en el Paso 7. 9. Toque la parte derecha de la pantalla para realizar el ajuste deseado.  * El margen de ajuste de "T-ALIGN" es de 0 cm a 501,4 cm, en pasos de 2,3 cm. * El margen de ajuste de "SP GAIN" es de - 20dB a 0dB. 10. Repita los pasos 7 a 9 para realizar el ajustedeaseado. 11. Cuando haya terminado de realizar losDistinctos ajustes, toque RTN. La visualización vuye a la pantalla original, y aparece “>>” en la visualización BASIC o USER. Conestoconcluye la operaciondeajuste de低位. Para proseguir con la memorizacion de losvalores deajuste enelmenudecursoro de低位,haga lo singular. 12. Toque RTN prolongamente durante 1 segundo o más. Aparecerá la lista de manos de posición. 13. Toque prolongamente durante 2 segundos o más la memoria de usuario en la que紊ee programar los valeurs de ajuste. Escuchará un tono largo paraindicarle que los values que ajustó hasta el paso 10 se han memorizzato en el menu de usuario de posición. Si escaucha un tono corto, es que los values de ajuste configurados hasta el paso 10 han sido descartados. Ajuste these values según sea besoinario. 14. Toque RTN. 15. Presione el botón [SOUND] para volver al modo original. * Para seleccionar una memoria de usuario programada, toque B/U para ver “USER” y luego toque ↑ ⇌ el N° de memoria de usuario.Selección del menu VSE
VSE (Virtual Space Enhancer) le permite compensar el balance de presión acústica bajo el automóvil, de forma que se pueda percibir el"Myso"effecto de sonido en todos los asientos, como lo demuestran las simulaciones de compensación realizadas. En el procedimiento "Selección de cada modo" (cf. págin44),ajuste AC-PROIII en "STD". - El valor preajustado de fabricula de VSE es "OFF" y el del menu Basics de VSE, "FLAT".■ Menu Basics de VSE
Estamericanos. 1. Presione el botón [SOUND]. 2. Toque VSE.  3. Toque la visualización ON/OFF. El efecto VSE se activa o desactiva (ON/OFF).  Cuando VSE está desactivado ("OFF"),DICHO ajuste de VSE no se refleja en la fuente de musica. Con thiso conclusye la configuracion de VSE.Presione el boton [SOUND] para volver al modo original. 4. Toque B/U para seleccionar "BASIC".  Cada vez que toca B/U, "BASIC" y "USER" se alternan suscesivamente. 5. Toque el N° de menu báscido de VSE para selección ar menú báscido de VSE. Menús Basics de VSE| N° | Nombre de la., función | Descripción |
| 1 | FLAT | Evaluación plana de la fuente de sonido |
| 2 | BASS BOOST | Reforzamiento de tonos graves |
| 3 | HIGH BOOST | Reforzamiento de tonos medios y agudos |
| 4 | IMPACT | Reforzamiento de tonos graves y agudos |
| 5 | ACOUSTICAL | Reforzamiento de tonos medios (voz humana) |
| 6 | SMOTH | Produce tonos suaves. |
Ajuste/memorizacion de VSE (memoria de usuario)
Los ajustes de la memoria de usuario le permiten compensar la distribución de la presión acústica a su gusto con arreglo al menú Basics de VSE. Se pueda memorizar hasta seis ajustes de usuario.DIFFUSE:
Permitteaabstar la desviacion de la presion acustica difusa.CARWIDTH:
Permitte ajustar la desviación de la presión acústica a lo ancho del automóvil.CAR LENGTH:
Permitte ajustar la desviación de la presión acústica a lo largo del automóvil. 1. Presione el botón [SOUND]. 2. Toque VSE. 3. Toque la visualización ON/OFF. El efecto VSE se activa o desactiva (ON/OFF). 4. Toque B/U para selectionar "BASIC" o "USER". 5. Toque la parte derecha de la pantalla para selectionar el menu que se utilizes como menu de ajuste. 6. Presione el botón [A]. 7. Toque la visualización de ajustes para selectionar "DIFFUSE", "CAR WIDTH" o "CAR LENGTH".  8. Toque la parte derecha de la pantalla para realizar el ajuste deseado. * El margen de ajuste de este elemento es de 1 a 10. 9. Repita los pasos 7 y 8 para realizar el ajustedeaso. 10. Cuando haya terminado de realizar los distinctos ajustes, toque RTN. La visualización vuelve a la pantalla original, y aparece “>>” en la visualización BASIC o USER. Conestoconcluyeelajuste deVSE.Paraproseguir conla memorizacionde losvaloresdeajuste enelmenudeviasuario deVSE,hagalo significante. 11. Toque RTN prolongamente durante 1 segundo o más. Aparecerá la lista de menús de usuario de VSE. 12. Toque prolongamente durante 2 segundos o más la memoria de usuario en la que deseee programar los values de ajuste. Escuchará un tono长大o para indicarle que los values que ajustó hasta el paso 9 se han memorizzato en el menu de usuario de VSE. Si escucha un tono corto, es que los values de ajuste configurados hasta el paso 9 han sido descartados. Ajuste these values según sea besoinario. 13. Toque RTN. 14. Presione el botón [SOUND] para volver al modo original. * Para seleccionar una memoria de usuario programada, toque B/U para ver "USER" y bajo toque ↑ ↓ el N° de memoria de usuario.Selección del menu P.EQ
P.EQ (Evaluador paramétrico) le permite compensar con precision todo el margen de niveles de frequencies mediante curva suave utilizing compensación de frequencies para adaptarlo a su tipo de automóvil. En el procedimiento "Selección de cada modo" (cf. págin44),ajuste EQ SELECT en P.EQ - El valor preajustado de fabricula de P.EQ es "OFF" y el del menu Basics de P.EQ, "SEDAN-1".■ Menuístico de P.EQ
Esta función tiene prememorizados 6 temas de menus BASICS de P.EQ, selon el tipo de automóvil y la posición de instalación de los altavoces. Selección el menu BASICO que se ajuste a su automóvil. 1. Presione el botón [SOUND]. 2. Toque P.EQ.  3. Toque la visualización ON/OFF. El efecto P.EQ se activa o desactiva (ON/OFF).  Cuando el efecto P.EQ está desactivado ("OFF"),)dicho ajuste no se refleja en la fuente de música. Con thiso conclusye el ajuste de P.EQ.Presione el boton [SOUND] para volver al modo original. 4. Toque B/U para selectionar "BASIC".  Cada vez que toca B/U, "BASIC" y "USER" se alternan suscesivamente. 5. Toque 山 el N° de menu báscido de P.EQ para selecciónar el menu báscido de P.EQ. Menu Basics of P.EQ| N° | Nombre de la visualización | Posición de instalación de los altavoces |
| 1 | SEDAN-1 | Delantera: Puerta Delantera Trasera: Panel trasero |
| 2 | SEDAN-2 | Delantera: Puerta Delantera Trasera: Panel trasero |
| 3 | WAGON-1 | Delantera: Puerta Delantera Trasera: Portaequipaje (lateral) |
| 4 | WAGON-2 | Delantera: Puerta Delantera Trasera: Panel trasero |
| 5 | MINI VAN-1 | Delantera: Puerta Delantera Trasera: Portaequipaje (lateral) |
| 6 | MINI VAN-2 | Delantera: Puerta Delantera Trasera: Panel trasero |
Ajuste/memorizacion de P.EQ (memoria de usuario)
La memoria de usuario le permite compensar lascharacteristicas de fecuencia para ajustarlas a suautomovil segun el menubasico de P.EQ.Lamemoria de usuario permitted programar hasta 6valores de ajuste Para Obtener mas informacion,consulta la seccion"Ajuste de P.EQ". 1. Presione el botón [SOUND]. 2. Toque P.EQ. 3. Toque la visualización ON/OFF. El efecto P.EQ seactivo o desactiva (ON/OFF). 4. Toque B/U para selectionar "BASIC" o "USER". 5. Toque la parte derecha de la pantalla para selectionar el menu que se utilizes como menu de ajuste. 6. Presione el botón [A]. 7. Toque la parte izquierda de la pantalla para seleccionar "FRONT" o "REAR".  8. Toque la parte central de la pantalla para seleccionar cada ajuste. Cada vez que toca ↑, los ajustes se suseden como se indica a continuación: Ajustes BAND (banda) FREQ (frecuencia) Q GAIN (ganancia) BAND (banda)... 9. Toque la parte derecha de la pantalla para realizar el ajuste deseado. * El margen de ajuste de "BAND" es de 1 a 3. * El margen de ajuste de "FREQ" es de 20Hz a 20kHz. *Selezione 1,3,5,7ó20paraajustar“Q” * El margen de ajuste de "GAIN" es de - 12dB a +12dB. 10. Repita los pasos 7 a 9 para realizar el ajustedeaseado. 11. Cuando haya terminado de realizar los distinctos ajustes, toque RTN. La visualización vuelve a la pantalla original, y aparece “>>” en la visualización BASIC o USER. Con这一点 concluye el ajuste de P.EQ. Para proseguir con la memorización de los values de ajuste en el menu de usuario de P.EQ,=haga lo siguientes. 12. Toque RTN prolongamente durante segundo o más. Aparecerá la lista de manos de P.EQ. 13. Toque prolongadamente durante 2 segundos o más la memoria de usuario en la que deseee programar los valeurs de ajuste. Escuchará un tono largo paraindicarle que los valeurs que ajustó hasta el paso 10 se han memorizzato en el menu de usuario de P.EQ. Si escucha un tono corto, es que los valeurs de ajuste configurados hasta el paso 10 han sido descartados. Ajuste these values según sea besoinario. 14. Toque RTN. 15. Presione el botón [SOUND] para volver al modo original. * Para selectionar una memoria de usuario programada, toque B/U para ver "USER" y cuando toque ↑ ⇌ el N° de memoria de usuario.Ajuste de P.EQ
A continuación se específican los values que se pueda ajustar en el menu de P.EQ. La Frequencia central, ganancia y curva de Q se pueda memorizar en combinaciones de canales y bandas. Por exemple, la fecuencia central "250Hz", ganancia "-8dB" y curva de Q "3" pueda memorizarse en la banda 1 delantera.FRONT/REAR (selección de canal)
Permite seleccionar el canal (delantero o trasero) que se va a ajustar.BAND (selección de banda)
Permite seleccionar la banda de freuencias (de 1 a 3) que se va a ajustar. Ajuste la fecuencia central (FREQUENCY), la ganancia (GAIN) y la curva de Q (Q) para cada banda de fecuencias.FREQUENCY (selección de la Frequencia central)
Permite seleccionar la fecuencia que se va a utilizar como centro de la banda de fecuencias para compensar en un margen de 20Hz a 20kHz (pasos de 1/3 octavas, 31 punto)GAIN (ajuste de ganancia)
Permite ajustar la ganancia (nivel de salute) en un margen de -12dB a +12dB. (pasos de 1dB, 25 punto)Q (selección de la curva de Q)
Permite ajustar la pendiente de la curva Q en uno de los parámetros siguientes: 1, 3, 5, 7 á 20.Compensación
Si ha medido las caracteristicas de fecuencia con un dispositivo de medicacion y son planas (sin picos ni valleys), no esnecessary compensarlas. Sin embargo, en occasions las caracteristicas de fecuencia aumento o disminuyen en algunos punto. De producirse dicha situacion, sedeferan compensar. Cree una curva de fecuencia concharacteristicasqueean opuestos a la fecuencia central de los punto enlos que augmeno disminuyan lascharacteristicas,afin de anular los picos yvalles, procurando queSean lo mas plana possible. La operation de aplanado de las caracteristicas se denomina "compensacion." En esta unidad, las caracteristicas de fecuencia se pueda compensar con P.EQ (ecualizarador paramétrico).Compensación de lascharacteristicadocurrencia
La?siguiente figura muestra la relacion existente entre fecuencia central, ganancia y curva de Q. Curva de Q.
La curva de Q se hace más aguda a medida que AUGUNTAN LOS VALORES NUMERICOS, y SE aplANA A MEDIDA QUE ESTOs disminuyen. Las caracteristicas de fecuencia se PUden aplanar seleccionando una curva de Q opuesta a la curva que se va a compensate.  F: Frecuencia central G: Ganancia (nivel de salute), Q: Curva de Q.| N°( Tipo de automóvil) | Parámetros del ecualizador paramétrico | |||||||||
| Canal | Band 1 | Band 2 | Band 3 | |||||||
| F | G | Q | F | G | Q | F | G | Q | ||
| 1(SEDAN-1) | Delantero | 250 Hz | -8 dB | 3 | 2 kHz | -4 dB | 1 | 5 kHz | -4 dB | 1 |
| Trasero | 250 Hz | -10 dB | 3 | 1.25 kHz | 0 dB | 5 | 8 kHz | 0 dB | 5 | |
| 2(SEDAN-2) | Delantero | 250 Hz | -10 dB | 7 | 800 Hz | -4 dB | 3 | 8 kHz | -5 dB | 1 |
| Trasero | 80 Hz | 3 dB | 7 | 125 Hz | -12 dB | 5 | 1.25 kHz | 0 dB | 5 | |
| 3(WAGON-1) | Delantero | 250 Hz | -8 dB | 3 | 1 kHz | -8 dB | 3 | 10 kHz | -6 dB | 1 |
| Trasero | 250 Hz | -8 dB | 3 | 800 Hz | -8 dB | 1 | 8 kHz | 0 dB | 5 | |
| 4(WAGON-2) | Delantero | 250 Hz | -8 dB | 7 | 400 Hz | -10 dB | 7 | 1.25 kHz | -8 dB | 7 |
| Trasero | 125 Hz | -8 dB | 3 | 500 Hz | -5 dB | 5 | 1.6 kHz | 0 dB | 3 | |
| 5(MINI VAN-1) | Delantero | 125 Hz | -4 dB | 5 | 1.25 kHz | -4 dB | 3 | 2 kHz | 3 dB | 7 |
| Trasero | 250 Hz | -6 dB | 1 | 630 Hz | -4 dB | 3 | 8 kHz | 0 dB | 5 | |
| 6(MINI VAN-2) | Delantero | 250 Hz | -4 dB | 3 | 1.25 Hz | -8 dB | 3 | 80 Hz | 3 dB | 3 |
| Trasero | 250 Hz | -8 dB | 3 | 500 Hz | -5 dB | 5 | 8 kHz | 0 dB | 5 | |
Operaciones de la radio
Visualizaciones del modo de radio
Visualización principal
Para verla, presione el mando [ROTARY] y seleccione el modo de radio.  Si toca la parte izquierda de la pantalla durante 1 segundo o más, cambiará la visualización de funciona simple. Visualización de Frequencias
Aparece la fecuencia que se está recubiendo actualmente. Si toca o la visualización de configuración estandar,URT realizar sintonización de búsqueada o sintonización manual.Visualización de títulos
Muestra el nombre del canal que se está recubiendoactualmente.Al tocar el nombre, cambia la visualizacion.Visualización de banda de recepción
AM: Nombre de banda AM FM1: Nombre de banda FMVisualización de N° de presinstonia
Toque la visualización de funciona estándar para selectionar una memoria preprogramada.MODE
Al tocar esta visualización aparecen varias subfunciones. Tóquela prolongadamente durante 1 segundo o más para ver la lista de memorias preprogramada.P-SCAN:
Aparece durante una exploración de presintonías. Toque esta funciona para finalizar la exploración de presintonías.A-STORE:
Aparece durante una memorización automatica. Toque esta funciona para finalizar la memorización automatica.BAND
Toque esta funciona para携带 de banda de recepción. Si la toca prolongadamente durante 1 segundo o mas, se alternaré entre el modo de sintonización manual y el modo de sintonización de búsqueda.(úlo en la visualización de funciona simple)
Estos botones le permitted realizar sintonizacion de búsqueada o sintonizacion por pasos (en el mode de sintonizacion manual). Si los toca prolongadamente, podra realizar una sintonizaciónEscuchar la radio
1. Presione el mando [ROTARY] para seleccionar el modo de radio. Cada vez que presiona este mando, se pasade un modo a otro en elsignificanteorden: Radio (DAB) CD / MP3 (Cambiador de CD) (Cambiador de DVD) (TV) AUX Radio... * El modo de aquellos equipos que no estén conectados no se muestra. 2. Toque BAND para Cambiar de banda de recepcion. Cada vez que toca BAND, cambia la banda de recepción el suivienteorden: FM1 FM2 FM3 AM (MW / LW) FM1...Sintonizacion
Hay 3tipsodemosde sintonaciondisponibles:sintonacion debuesueda, sintonacionmanualypresintonacion.Sintonización de búsqueada
Existen 2 temas de sintonizacion de businga: DX SEEK y LOCAL SEEK. DX SEEK puede sintonizar de forma automática emisoras de radio con recepcion,@m间隙as de LOCAL SEEK solo sintoniza aquellas emisoras de radio que gown de una buena sensibilityde recepcion. 1. Toque BAND para selectionar la banda deseada (FM o AM (MW, LW)). 2. Sintonice una emisora. * Cuando aparezca MANU, toque BAND prolongadamente durante 1 segundo o más. "MANU" desaparece de la pantalladeferando disponible la sintonizacion debúsqueda. * Si "TA" está iluminada en la pantalla, automatistically se buscarán las emisoras TP.DX SEEK
Cuando se toca la visualización de freuencias, comienza la sintonización automática. Cuando se toca 日 ,la emisora se busca en directiona las Frequencias mas altas,y cuando se toca 日 ,la emisora se busca en directiona las Frequencia mas bajas. * Cuando comienza la sintonización de búsqueada, "DX SEEK" aparece en pantalla.LOCAL SEEK
Cuando se toca la visualización de freecuencias, comienza la sintonización local. Se selecciónan las emisoras de radio con buena sensibilitidad de recepción. * Cuando comienza la búsqueada local, "LO SEEK" aparece en pantalla.Sintonización manual
Existen 2 métodos: sintonización rápida y sintonización por pasos. En el modo de sintonización por pasos, las fecuencias cambian una a una. En el modo de sintonización rápida, pueda sintonizar la fecuencia deseada al instante. 1. Toque BAND prolongamente durante 1 segundo o más cuando MANU no aparezca en pantalla. La sintonizacion manual se pueda realizar,msteadasmeuda MANU. 2. Utilice la visualización de Frequencias para sintonizar una Frequencia que está transmitido. Sintonizacion por pasos Toque la visualización de Frequencia. Sintonizacionrapida Toque la visualización de freuencias. El proceso de sintonización se detiene cuando retina el dedo del panel.Recuperación de emisoras preprogramadas
La función de recuperación de emisoras preprogramadas permite sintonizar emisoras previamente memorizadas. 1. Toque MODE prolongamente durante un segundo o más. Aparecerá la lista de的记忆as preprogramadas 2. Toque la emisora que desee escuchar. * En el modo normal, también puede選擇aciones un N° de presintonía tocando en la visualizacion principal.Para cancelar la sintonizacion
1. Toque RTN.Memoria preprogramada
Existe un total de 24 memorias de sintonizacion (6-FM1, 6-FM2, 6-FM3, 6-AM) para memorizar emisoras de radio individuales. 1. Toque BAND paraonian de banda de recepcion. 2. Utilice la visualizacion de freuencias para memorizar las emisoras. 3. Toque MODE prolongamente durante un segundo o más. Aparecerá la lista de的记忆as preprogramadas 4. Toque prolongamente durante 2 segundos o más el N° de presintonía donde se memorizará la emisora. Escuchará un tono长大o para indicarle que se ha memorizzato la emisora.Memorización automática
La función de memorización automática permitte programar hasta 6 emisoras que se sintonizar automatistically de forma secuencial. 1. Toque MODE. 2. Toque A-STORE prolongamente durante 2 segundos o más. La visualización MODE cambia a “A-STORE” y el N° de presinstonia de la operación de memorización automática aparece en la visualización de N° de presinstonia. * Se buscan las emisoras con buena recepción y se guardan en la memoria preprogramada (N° 1 al N° 6) enorden empezando por la emisión con la Frequencia más baja.Notas:
- Cuando se realiza una memorizacion automatica, se borran las emisoras que hasta entones estaban memorizadas. - Si hay menos de 6 emisoras con buena recepción en LOCAL SEEK, se vuelve automatistically a las Frequencias同比下降 y DX SEEK realiza otra memorización automática. Si tras launda memorización automatística,sville habiendo menos de 6 emisoras con buena recección, las emisoras anteriores permanecerán en la memoria. - Si la memorización automatica se realiza en las bandas de FM, las emisoras se memorizarán en FM3, although she may have elected FM1 or FM2 to memorizar las emisoras.Exploración de presintonías
La función de exploración de presintonías le permite recibir las emisoras en elorden en que estáactualmentememorizadas enel N^ de presintonía,para poder examinarlas emisiones. 1. Toque MODE. 2. Toque P-SCAN. La visualización MODE cambia a "P-SCAN", y el N° de presintonía de la operation de exploración de presintonías aparece en la visualización de N° de presintonía. * Las emisoras actualmente memorizadas se reciben en suorden durante 7segundos o más cada una. Se omiten las emisoras con mala recepción y se pasa a recibir la",[siguiente]. Cuando se realiza una exploración de presintonías en una emisión de FM, las emisoras de FM se reciben en el suiviente orderly: FM1 (1 6) FM2 (1 6) FM3 (1 6)... Cuando se realiza una exploración de presintonías en una emisión de AM, las emisoras de AM se reciben en el suiviente orderly: AM (1 6) AM (1 6) y asi sucesivamente.Para cancelar la exploración de presintonías
1. Toque P-SCAN. La visualización P-SCAN cambia a “MODE”, y las emisoras que se estaban recibiendo cuando se toco P-SCAN se reciben a continuación.Sistema de datos radiofonicos (RDS)
Estaunidadtieneincorporadoundecodificador delsystemadatasradiofonicos(RDS)parautilizarsecon emisoras que transmitan datos deRDS. Este sistemas peut visualizar el nombre de la emisora recibida (PS), y tambiénCambiar automatistically a otheremorsa con la mayor recepcion,mñtras seencuentreeviando a grandes distancias (cambio de AF). Además si una emisión de RDS transmite unannouncement sobre el refrío o un tipo de programa,se recibirá esta emisión independiente del modo en el que se enquiry. Adicondalmente, si se recibe informacion de EON, esta informacion permitira el cambio automatico de除外 emisoras memorizadas de la mesma red y interrupcion de la emorsa que este recibiendose para recibir informacion sobre el trafico de除外 emisoras (TP). Para utiliser la funciona de RDS,pongasiempre la radio en el modo de FM. - AF: Alternative Frequency (Frecuencia alternativa) - PS: Programme Service Name (Nombre de contrôle del programa) - PTY: Programme Type (Tipo de programa) - EON : Enhanced Other Network (Información mejorada de除外es redes) - TP: Traffic Programme (Programa sobre el tráfico) PI: Programme Identification (Identificacion de programa) - TA: Traffic Announcement (Información sobre el tráfico) * La función de RDS no trabajoará durante la recepción de radio de AM. * Cuando el aparato recibe la seals RDS y pueda leer los datos PS, aparece PS en el visualizador.Función de Frequencias Alternativas (AF)
La funciona de AF cambiará a una Frequencia diferente de la mesma red a fin de mantener la optima recepción. - El ajuste de fabricula es "ON".Para activar o desactivar (ON/OFF) la funciona AF
1. Toque MODE. 2. Toque AF. Cada vez que toca esta visualización, la funciona AF seactiva ("ON") y desactiva ("OFF") suscesivamente. 3. Toque RTN. * Si la Reception de la emisión de radio se debilita, "SEARCH" aparece en pantalla y la_radio empieza aUGCAR el mismoprograma en othera freuencia.Función de AF entre RDS y DAB
Cuando el本身就是 programa está radiodifundiendose mediating RDS y DAB, y está的功能 está activada, launidad cambiará automatistically para recibir la emisión con mayor recepción. -Estafuncion solamentetrabajaracuandohayaconectaruna unidadDABDAH923o DAH913, vendidaaparte. - El ajuste predeterminado de fabrica es "ON". 1. Presione el botón [A] para selecciónar el modo de ajuste. 2. Toque la visualización de ajustes para selecciónar "LINK ACT" en "TUNER".  3. Toque la parte derecha de la pantalla o gire el mando [ROTARY] para seleccionar "ON" u "OFF". ON: Se activa la commutación de AF entre DAB y RDS. OFF: Se desactiva la conmutacion de AF entre DAB y RDS. 4. Presione el botón [A] para volver al modo anterior.Función de programareregional (REG)
Cuando la funciona de REG está activada, la recepción de emisoras locales está optimizada. Cuando esta funciona está desactivada, si el área regional cambia cuando conducza, se recibirá la emisiónal para tal region. - El ajuste de fabricula es "OFF".Notas:
-Estamericanestarahabituladacuandose esterecibiendounaemisorasnacional,comoBBC2_FM. - El ajuste de activación/desactivación de la función de REG sera正值 cuando la funciona de AF está activada.Para activar o desactivar (ON/OFF) la funciona REG
1. Toque MODE. 2. Toque REG. Cada vez que toca esta visualización, la funciona REG seactiva ("ON") y desactiva ("OFF") suscesivamente. 3. Toque RTN.Sintonización manual de una emisiónal regional en la misma red
-EstafunciionesaldoquandolafunciOnAF estáactivada("ON"). - La operation variedegun esté activado o desactivada (ON/OFF) de la referencia REG. Cuando la referencia REG está activada (ON), se pueda recibir las emisiones que poseen un número PI totalmente coincidente. Cuando la referencia REG está desactivada (OFF), se pueda recibir las emisiones que poseen el本身就是 tipo de número PI.Notas:
-Estafunciopuedeutilizarsecuandesecrbcuna emisión regional de la misma red. - El número PI es un sistemas de codificacion unico de cada emisora de radio. 1. Toque MODE prolongamente durante un segundo o más. Aparecerá la lista de的记忆as preprogramadas 2. Toque el N° de presintonía de la emisión que se vaya a recibir.Anuncios sobre el tráfico (TA)
En el modo de espera de TA, cuando se inicia la emisión de announcements sobre el refrío, tal emisión se recibirá con la(Maxima prioridad independiente) del modo de funciona a fin de que pueda escharla. Internacionalmente, para un programa sobre refrío (TP). -Estafuncion solamentepodarutilizarusewhen enelvisualizadorestedindicandose“TP” Cuando estedindicandose“TP”,significarque laemisoradRDSquesta recibiendose posee programsadanunciossobrelertrfico.Establecimiento del modo de espera de TA
Si presiona el botón [TA] cuando en el visualizador solamente está indicándose "TP", aparecerán "TP" y "TA" y launidad entrada en el modo de espera de TA hasta que comience un anuncio sobre el tráfico. Cuando comience una emisión de announcements sobre el tráfico, en el visualizador aparecería "TRA INFO". Si presiona el botón [TA]mintras está recibiendo una emisión de announcements sobre el tráfico, la recepción de dicha emisión se cancelará, y launidad entrada en el mode de espera de TA.Para cancelar el modo de espera TA
Con lasindicaciones“TP”y“TA”iluminadas en pantalla, presione el boton [TA].Se apaga la indicacion“TA”y se cancela el modo de espera TA. - Si "TP" está apagada, pode presionar el botón [TA] paraocular una emisora TP.ParaocularunaemisoraTP
Si presiona el botón [TA] con "TP" apagada, "TA" se ilumina en la pantalla y la unidad automatistically recibe una emisora TP.Nota:
- Cuando no se pueda recibir una emisión TP, "TP SEEK" aparece en pantalla y prosigue la BUSqueda de la emisión TP. Cuando se presiona el botón [TA] de nuevo, "TA" y "TP SEEK" se apagan en la pantalla y finaliza la BUSqueda de la emisión TP.Función de almacenimiento automatico de emisoras de TP
Podrá almacenar automatistically hasta 6 emisoras TP en la memoria de preajustes. Si el número de emisoras TP que pueda recibirse es de menos de 6, se DEAan sin sobrescribir las emisoras difusoras que ya está almacenadas en la memoria. 1. Compruebe que "TA" aparece en pantalla, y toque MODE. Si "TA" no aparece en pantalla, presione el botón [TA] para que aparezca. 2. Toque A-STORE prolongamente durante 2 segundos o más. La visualización MODE cambia a "A-STORE" y el N° de presinstonia de la operation de memorización automatica aparece en la visualización de N° de presinstonia. - Las emisoras TP con buena sensibilitidad de recepcion se memorizan en las的记忆as preprogramadas. - Aúnque selección FM1 o FM2, se memorizará una emisióna TP para FM3.Tipo de programa (PTY)
Esta funciona le permite escharar las difusiones del tipo de programa seleccionado excepto que la unidad está en un modo de referencia que no sea el de la radio. - Algunos País no realizan todas emisiones de PTY. - En el modo de espera de TA, una emisora de TP tendrá prioridad sobre otra de radiodifusión de PTY.Establecimiento del modo de espera de PTY
Si presiona el botón [▶III], en el visualizador aparecerá "PTY" y seactivará el modo de espera de PTY. Cuando se incide la emisión de PTY selección, en el visualizador aparecerá el nombre del item de PTY.■ Cancelación del modo de espera de PTY
Si mantiene presionado el botón [▶■] durante 1 o más segundo "PTY" desaparecerá del visualizador y se cancelará el modo de espera de PTY.■ Cancelación de una emisión
con interruptación de PTY
Presione el botón [▶III] durante la emisión con interruptions de PTY, dicha interruptions de PTY se cancelará y launidadvoltara al modo de espera de PTY.Selección de PTY
1. Cuando presiona el botón [■■], launidadENA al modo de selección de PTY. 2. Toque la parte derecha de la pantalla o gire el mando [ROTARY] para seleccionar PTY. * A continua se muestran los Valores preajustados de fabrica memorizados:| Número de memorización | Itém de PTY | |
| ENGLISH | -contained | |
| 001 | News | Noticias |
| 002 | Info | Información |
| 003 | Pop M | Música Pop |
| 004 | Sport | Deportes |
| 005 | Classics | Música Clásica |
| 006 | Easy M | Grand éxitos |
Búsqueda de PTY
1. Cuando presiona el botón [▶■], se activa el modo de selección de PTY. 2. Toque el centro de la pantalla o gire el mando [ROTARY] para seleccionar PTY. 3. Toque la izquierda de la pantalla. Cuando toca, la unidad busca una emisión PTY desplazándose por las Frequencia en sentido ascendente, cuando que cuando toca la búsqueda se realiza en sentido descendiente. * Si no se recibeacular emisora con la emisión PTY selecciónada, launidad vuelve al modo anterior.Memoria preprogramada de PTY
1. Cuando presiona el botón [▶II], se activa el modo de selección de PTY. 2. Toque la parte central de la pantalla para selectionar PTY. Se pueda selectionar los 29 temas de PTY que se muestran en lasuma table.| Itém de PTY | ||||
| ENGLISH | DEUTSCH | SVENSKA | FRANÇAIS | Contenido |
| News | Nachrich | Nyheter | Infos | Noticias |
| Affairs | Aktuell | Aktuellt | Magazine | Magazin |
| Info | Service | Info | Services | Informação |
| Sport | Sport | Sport | Sport | Deportes |
| Educate | Bildung | Utbildn | Educatif | Educación |
| Drama | Hör + Lit | Teater | Fiction | Drama |
| Culture | Kultur | Kultur | Culture | Cultura |
| Science | Wissen | Vetenskap | Sciences | Ciencia |
| Varied | Unterh | Underh | Divers | Varios |
| Pop M | Pop | Pop | M Pop | Música Pop |
| Rock M | Rock | Rock | M Rock | Música Rock |
| Easy M | U-Musik | Lättlyss | Chansons | Grand éxitos |
| Light M | L-Musik | L klass | M Cl Lég | Música Ligera |
| Classics | E-Musik | Klassisk | Classiq | Música Clásica |
| Other M | -- Musik | Övrig m | Autre M | Otro Música |
| Weather | Wetter | Väder | Météo | Informação Metereológica |
| Finance | Wirtsch | Ekonomi | Economie | Economia |
| Children | Kinder | För barn | Enfants | Infancia |
| Social | Soziales | Sozialt | Société | Sociedad |
| Religion | Religion | Andligt | Religion | Religión |
| Phone In | Anruf | Telefon | Forum | Opinión |
| Travel | Reise | Resor | Voyages | Viajes |
| Leisure | Freizeit | Fritid | Loisirs | Ocio |
| Jazz | Jazz | Jazz | Jazz | Música Jazz |
| Country | Country | Country | Country | Música Country |
| Nation M | Landes M | Nation m | Ch pays | Música Nacional |
| Oldies | Oldies | Oldies | Rétro | Música de ayer |
| Folk M | Folklore | Folkm | Folklore | Música Folk |
| Document | Feature | Dokument | Document | Documental |
Emisión de emergencia
Si se recibe una emisión de emergencia, todas las operaciones del modo de funciona se pararan. En el visualizador aparecerá "ALARM" youlda eschar la emisión de emergencia.■ Cancelación de una emisión de emergencia
Si presiona el botón [AF], la recepción de la emisión de emergencia se cancelará.Cambio del idioma de visualización de PTY
Puede selectionar uno de los 4 idiomas existentes (inglés, aleman, sueco o francés) para visualizar la pantalla. - El valor preajustado de fabrica es "ENGLISH" (Inglés). 1. Presione el botón [A] para selección ar el modo de ajuste. 2. Toque la visualización de ajustes para selecciónar "LANGUAGE" en "TUNER".  3. Toque la parte derecha de la pantalla o gire el mando [ROTARY] para seleccionar el idioma. * Selección ENGLISH (Inglés), DEUTSCH (Alemán), SVENSKA (Sueco) o FRANÇAIS (Francès). 4. Presione el botón [A] para volver al modo anterior.Ajuste de la interrupción de RDS cuando la funciona 2-ZONE está en uso (RDS-INT 2Z)
Cuando esta funciona está activada ("ON"), y se interrupme el RDS con la funciona 2-ZONE en uso, se dejan de recibir los datos RDS. - Cuando se produce una interruptions en el RDS, la funciona 2-ZONE se desactiva ("OFF"). - Si se produjera una interrupcia de alerta aun con "RDS-INT 2Z" desactivado ("OFF"), se recibiran los datos RDS. - El valor preajustado de fabricula es "ON". 1. Presione el botón [A] para selección el modo de ajuste. 2. Toque la visualización de ajustes para selecciónar "RDS-INT 2Z" en "TUNER".  3. Toque la parte derecha de la pantalla o gire el mando [ROTARY] para seleccionar "ON" u "OFF".ON:
Los datos RDS se reciben cuando se produce una interrupción del RDS con la func tion 2-ZONE en uso.OFF:
Cuando la funciona 2-ZONE está en uso, no se recibe ningún dato RDS, excepto la Interruption de alerta.Nota:
- Si selección el modo Radio cuando TA (Información sobre el tráfico) y PTY está activadas ("ON"), se recibirán interruptions, también la interrupccion de RDS está desactivada ("OFF"). 4. Presione el botón [A] para volver al modo anterior.Ajuste del volumen de TA, emisión de emergencia (ALARM) y PTY
El volumen de las emisiones de interrupción de TA, ALARM y PTY se pueda ajustar durante la emisión de interrupción de TA, ALARM o PTY. - El valor preajustado de fabricula es "15" Durante una emisión de interrupción de TA, ALARM o PTY, gire el mando [ROTARY] hacía lareshedra o hacía la izquierda paraaabsturar el nivel del volumen deseado (de 0 a 33). - Una vez finalizada la emisión de interrupción de TA, ALARM o PTY, el volumen vuelte al nivel que está activo antes de la emisión de interrupción.Visualizaciones del modo CD
Visualización principal
Para verla, presione el mando [ROTARY] y seleccione el modo CD.  Si toca la parte izquierda de la pantalla durante 1 segundo o más, cambiará el modo de funciona bajo. Visualización de tiempo de pista/reproducción
J01/02:00: Muestra el N° de pista en reproduccion y el tiempo de reproduccion. Si toca 一 四 一 一 o durante el funcimiento estándar, pourrait selectionar la pista que deseee reproducir o hacer avanzar o retroceder rápidamente las pistas.Visualización de títulos
Esta visualización cambia cuando se toca.Visualización de carpetas (en caso de MP3/WMA)
Si toca duringe el funcionaamente estandar, podra seleccionar carpetas.MODE:
Al tocar esta visualización aparecen varias subfunciones. En el caso de MP3/WMA, si la toca prolongadamente durante 1 segundo o más, aparecerá la lista de carpetas.Nota:
- Este funciona solo está activada durante la reproduccion de un disco. -SCAN: SCAN: Aparece durante la reproduccion por exploracion. Toque esta referencia para finalizar la reproduccion por exploracion. -RPT/RPT: Aparece durante la reproduccion repetition. Toque esta direccion para finalizar la reproduccion repetition. - RDM/RDM: Aparece muestra durante la reproduccion aleatoria. Toque esta direccion para finalizar la reproduccion aleatoria.TOP:
Toque esta funciona para,iniciar la reproduccion a partir de la prima pista del disco o de la carpeta que se esté reproduciendo. (sólo en la visualización de onacimiento simple)
Toque这些东西 botones para selectionar la pista que deseee reproducir. Si toca los botones de forma prolongada, ha para avanzar o retroceder las pistas rápidamente.Visualización delists de carpetas (en caso de MP3/WMA)
Aparece cuando se toca MODE de forma prolongada durante 1 segundo o más en la visualización principal.  Nombre de carpetaN° de carpeta
Si aparece?sombreada(gris),la carpeta no se(puede seleccionar.>>:Selección en bajo 100%
Toque el nombre de la carpeta para volver a la visualización principal e起初 la reproduccion desde la primera pista de la carpeta tocada.←PREV-RTN:
Toque esta funciona para ver la lista de carpetas anterior. Si la toca prolongadamente durante 1 segundo o más, volverá a la visualización principal.NEXT:
Toque esta funciona para ver la lista de carpetas.), siguiente.¿Qué es MP3?
MP3 es un método de comprensión de audio clasificado en la capa 3 de audio de las normas MPEG. Este método de compresión de audio ha penetrado en los.usquarios de PC y se ha convertido en un formattingstandar. Este formatting MP3 se caracteriza por la compresión de los datos de audio a aproximadamente el 10 por cierto de su時間 original con gran calidad de sonido. Esto significía que podran grabarse 10 discos compactos de música en un disco CD-R o un disco CD-RW para permitir长大o tiempo de escharc sin tener que cambiar discos compactos.¿Qué es WMA?
WMA es la abreviatura de Windows Media Audio, un tipo de ARCHivos de audio desarrollado por Mirosoft Corporation.Notas:
- Si reproduce un archivo con DRM (Digital Rights Management) para WMA en ON, no trabra calidad de audio. (El indicator WMA parpadeará.) - "Windows Media™ y el logotipo Windows® son MARCA MARCEIA O MARCA REGISTRadas de Microsoft Corporation en los Estados Unidos de América y/others países." - Para,inhabilar la DRM (Administración dearethchos digitales): - Cuando utilise Windows Media Placer 8, haga的比例在 TOOLS OPTIONS COPY MUSIC, y bajo de COPY SETTINGS, quite la marca de verificacion de la casilla para PROTECT CONTENT. Después reconstruya los ARCHIVOS. - Cuando utilise Windows Media Placer 9, haga, optic en TOOLS OPTIONS MUSIC RECORD, y文化底蕴 de Recording settings, quite lamarca de verificacion de la casilla para RECORD PROTECTED MUSIC. Después reconstruya los archivos. Los archivos WMA personalmente formados se emplean bajo propia responsabilitad personal.Precauciones al crear un disco MP3/WMA
- Velocidades de muestreo y velocidades de transferencia realizables: 1. MP3: Velocidad de muestro: de 11,025 kHz a 48 kHz Velocidad de transferencia: de 8 kbps a 320 kbps / VBR 2. WMA: Velocidad de transferencia: de 48 kbps a 192 kbps- Extensiones de ARCHIVOS
1. Añada siempre una extension de archivo“.MP3” o“.WMA” a los ARCHIVOS MP3 o WMA utilizing letras de un solo byte. Siañade una extension Distinta a la asignificada o si se olvidaañadir la extension de archivo, este no seoulda reproducir. 2. Los ARCHIVOS sin datos MP3/WMA no se reproduce. Si intenta reproducir ARCHIVOS sin datos MP3/WMA, en lugar del tiempo, la pantalla做不到la indicación“--:--”.- Formato lógico (Sistema de ARCHivos)
1. Para bootloader un archivo MP3/WMA en un disco CD-R o en un disco CD-RW, seleccione "ISO9660 level 1, 2 o JOLIET o Romeo" como formattingo de software de,)!. La reproduccion normal no sera possible si graba el disco en othero formattingo. 2. El nombre de la carpeta y el nombre del archivo podrán visualizarse como titulo durante la reproduccion de MP3/WMA, si bien el titulo no deben contener más de 128 caracteres alfanumericos de un solo byte (incluida la extension). 3. No asigne un nombre a un archive de una carpeta queonga el mesmo nombre.Estructura de carpetas
1. No se pueda grabar un disco con una carpeta que posea más de 8 niveles jerarquicos.- Nível de ARCHIVOs o de carpetas
1. SeSEO reconocerpora 255 archivos en una carpeta.Y seSEO reproducirpora 500 archivos. 2. Las pistas se reproducen en el ordin en le que fueron grabadas en el disco. (Es possible que las pistas no se reproducan siempre en el ordin en que aparecen en el PC.) 3. Dependiendo del tipo de software codificador que se usa durante la grabacion, es possible que se produza cierto ruido.Selección multisesión
Estamericano de la revolución del siglo. La revolución de los discos (p.ej. CD-EXTRA) contienen una mezcla de ARCHIVOS CD-DA (CD de música) y MP3/WMA. 1. Toque MODE. 2. Toque M-SESS. Cada vez que toca M-SESS, la visualización M-SESS cambia entre "CD" (reproducir CD-DA) y "MP3/WMA" (reproducir MP3/WMA). * Si- M-SESS no aparece en la pantalla, toque NEXT. 3. Toque RTN. El ajuste de selección multisesión aparecerá laproxima vez quecargue un CD.Nota:
- Cuando reproduzca un CCCD (CD con control de copia), selección el ajuste de tipo de CD. Si lo ajusta en el tipo MP3/WMA, el CDotta no producirse con normalidad en algunos casos.PRECAUCION
Tenga cuidado de no pillarse los dedos cuando cierre la CONSOLA INCLINABLE.
Notas:
- Si la CONSOLA INCLINABLE no se abre Completely, abralo suavamente con la - Después de haber cargado un disco compacto, cierre sempre la CONSOLA INCLINABLE. - No intente insertar sus dedos en la ranura de insertión del disco. Tampoco.Inserteledge的对象extra en la ranura. - No inserte discos cuando haya salido adhesivo de la cinta de celofán o de una etiqueta de un disco CD alquilado, cuando tales discos tengan marcas de cinta de celofán o etiquetas despegadas. Podía resultar imposible extraer these discs de la unidad y averiarla.Cargar un CD
1. Presione el botón [▲] Se abre el panel de control. 2. Cargue el disco compacto a工程技术 de la ranura para CD (CD SLOT). Una vez cargado el disco, al cabo deanos segundos el panel de control se cierra automátamente y se empieza a reprNotas:
- No inserte nunca objetos extranos a工程技术 de la ranura para CD (CD SLOT). - Si el CD no se pueda insertar con satisfid, es possible que haya other CD bajo del aparato o que lachaft requiera reparacion. -Esta unidad no puedaroducirdiscos que noporten lamarca o CD-ROMs. DIGITALO 00000000000000000000000000000000000000000000000000000000 - Es possible que algunos CDs grabados en modo CD-R/CD-RW no pueda utiliser.Carga de discos compactos de 8 cm
Para reproducir discos compactos de 8 cm no se necesita adaptador. Inserte el CD de 8 cm en el centro de la ranura para CD (CD SLOT).Expulsión de un CD
Se peutes expulsar un disco compaco presionando el boton [A],aqueue la llave del motor del automovil este en la posicfon OFF o ACC.PRECAUCION
Cuando se expulse el disco, presione el botón [▲] para cerrar el panel de control. Sidea el panel de control abierto, eschucará un tono doble y bajo se cerrará automatistically. 1. Presione el botón [▲]. Se abre el panel de control y se expulsa el disco compacto. El equipooca automatamente a modo de radio. * Asegürese de retiring los discos compactos expulsados de la unidad. Si no retira el disco compacto de la bandeja de CD, al cabo de 15 segundos o más se reintroduciría automatistically en la unidad y se cerrará el panel de control. (función de reintroduccion automatica) * Los discos compactos individuales no se cargan automatistically. Asegúrese de retiring los discos compactos individuales una vez expulsados.PRECAUCION
Si ejerce demasiada fuerza para insertar un disco expulsado,可以更好 arañar la superficie de este. Retire el disco antes de volver a cargarlo.Escuchar un disco ya cargado en launidad
1. Presione el mando [ROTARY] para seleccionar el modo de CD. * Cuando el modo cambie a CD, la reproduccion se inicia automatistically.Interruption de la reproduccion
1. Presione el botón [▶■].Reanudación de la reproducción:
1. Presione el botón [▶■] de nuevo.Selección de una pista
Cuando inserta un CD-R/CD-RW grabado con un archivo MP3 o un archivo WMA, solo可以选择 las pistas grabadas en la misma carpeta tocando 山 la visualización de pistas. 1. Para esuchar la?sigaiente pista,toque la pista. 2. Para esuchar la pista anterior, toque 品 de pista. Cuando toca 已 已 ,se reproduce la?siguiente pista. Si toca 已 已 sucesivamente, la pista avanza el numero de veces que toque 已 已 y bajo se reproduce. Cuando toca se reproduce la pista anterior. Si toca sucesivamente, la pista retrocede el numero de veces que toque yuego se reproduce. * Si toca dos vezes la visualización de pista cuando se reproduce el principio de la pista, posiblemente se reproduzca la pista situada 2 pistas por detrás.■ SeLECTION de una carpeta
Para seleccionar una carpetadistincta,toque 已 la visualizacion de carpetas o haga lo seguido. 1. Toque MODE prolongadamente durante un segundo o más. Aparecerá la lista de carpetas Si toca PREV o NEXT,oulda desplazarse arriba o bajo por la lista de carpetas. 2. Toque el nombre de la carpeta.Para escuchar la lista de reproduccion
Tambien peut esecuchar listas de reproduccion (archivo M3U). Tenga en cuenta, sin embargo, que de los archivos M3U que estén grabados hasta cinco niveles en la jearquía de ARCHivos (incluida la carpeta raíz),sole se podráre reproduir los 5 primeros que disponan de marcas de tiempo de archivo新模式.Notas:
- En una lista de reproduccion se pueda reproducir hasta 255 ARCHivos. - Só le podrárn reproducir los ARCHivos MP3 o WMA que estén actualmente guardados hasta cinco niveles (incluida la carpeta raíz) en la jerarquía de ARCHivos.Para eschar la lista de reproduccion, haga lo suiviente.
1. Toque MODE. 2. Toque NEXT. 3. Toque PLY LIST. Se empieza a leer la lista de reproduccion. Una vez finaliza esta lecture, automatically se empezará por la lista de reproduccion que contenga lamarca de tiempo más ahora. La selección de la lista de reproduccion o de pistas bajo de la lista de reproduccion se realiza del mesmo modo que la selección de una carpeta o pistas de una carpeta. * PLY LIST no aparecerá si no se ha guardado una lista de reproducción correcta (archivo M3U) en el CD-R/CD-RW cargado en launalidad.Para detener la reproduccion de la lista de reproduccion
1. Toque MODE. 2. Toque NEXT. 3. Toque PLY LIST.Avance=rápido/Retroceso rápido
1. Para avanzar de forma rápida, toque la pista. 2. Para retroceder de forma rápida, toque la pista.Función de principio
Con esta función el reproductor de CD vuelve a la prima pista del disco. 1. Toque TOP. La reproduccion empieza a partir de la prima pista (pista N° 1). Si se tratate de ARCHivos MP3/WMA, se volverá a la prima pista de la carpeta que se esté reproduciendo.Reproducción por exploración
Estamericano. 1. Toque MODE. 2. Toque -SCAN. La visualización MODE pasa a "P-SCAN" y se inicia la reproducción por exploración. * La reproducción por exploración comienza desde la pistasuma a la pista que se esté reproduciendo en ese momento.Para cancelar la reproduccion por exploracion
1. Toque J^ -SCAN. La visualización J^ -SCAN pasa a "MODE", y se reproduce la pista que se está reproduciendo cuando toco J^ -SCAN.Reproducción por exploración de carpetas
Esta funciona le permitte localizar y reproducir los primeros 10 segundos de la prima pista de todas las carpetas de un disco MP3/WMA. 1. Toque MODE. 2. Toque -SCAN. La visualización MODE pasa a "SCAN" y se inicia la reproducción por exploración de carpetas. * La reproduccion por exploracion de carpetas comienza desde la carpeta?siguea a la que se este reproduciendo.Para cancelar la reproduccion por exploracion de carpetas
1. Toque -SCAN. La visualización SCAN para a "MODE", y se reproduce la pista que se estaba reproduciendo cuando toco SCAN.Reproducción repetida
Estamericano. 1. Toque MODE. 2. Toque -REPEAT. La visualización MODE pasa a "RPT" y se inicia la reproducción repetida.Para cancelar la reproduccion repetitiona
1. Toque -RPT. La visualización -RPTonga "MODE", y se empieza a reproducir normalmente a partir de la pista que se está reproduciendo cuando toco -RPT.Reproduccion repetida de carpetas
Esta funciona le permittedreprodukcir continuamente la carpeta en bajo. Sólo está disponible cuando seonga un CD-R/CD-RW grabado con ARCHivos MP3 o WMA. 1. Toque MODE. 2. Toque --REPEAT. La visualización MODE pasa a "RPT" y se inicia la reproducción repetida de carpetas.Para cancelar la reproduccion repetition de carpetas
1. Toque -RPT. La visualización -RPTENA "MODE", y se empieza a reproducir normalmente a partir de la pista que se estaba reproduciendo cuando toco -RPT.Reproducción aleatoria
Estamericano.±bJ -RANDOM
Permite reproducir todas las pistas del disco de forma aleatoria. Si el disco contiene 2 carpetas o mas, se producirán todas las pistas de una carpeta, seguidas de todas las pistas de la carpeta?sigue. Y asi suscesivamente con todas las carpetas.-RANDOM
Permite reproducir pistas del disco de forma aleatoria. Sólo está disponible cuando searga un CD-R/ CD-RW grabado con ARCHivos MP3 o WMA. 1. Toque MODE. 2. Toque -RANDOM o -RANDOM La visualización MODE pasa a “f-RDM” o “RDM” y se inicia la reproducción aleatoria.Para cancelar la reproduccion aleatoria
1. Toque -RDM o -RDM. La visualización -RDM o -RDM pasa a "MODE", y se empieza aREENOMINALmente a partir de la pista que se estaba reproduciendo cuando toco these botones.Diferentes piezas musicales eschuchadas por various oyentes (función 2-ZONE)
2-ZONE es una funciona que da simultaneously salute a sonidos separados a工程技术 de la zona principal (MAIN) y la zona secundaria (SUB) operando dos fuentes en la unidad central, para permitir que various oyentes disfruten de fuentes de músicaSeparated. Estaunidaduedecontrolar sus fuentes internas (radio,CD,MP3etc.)para reproducirlas y,adelmas,puede reproducir simultaneamente fuentes de equipos externos connectadosa travésde CeNET (porejemplo, cambiadores de disco CD,etc.). Las fuentes de la zona MAIN se reproducirán a工程技术 de los altavoces del vehiculo, y las de la zona SUB a工程技术 de los sistemas de altavoces (WH143).  La figura superior correponde a la reproduccion de una fuente de sonido mediante el modo interno de launidad (radio, CD, AUX) en los altavoces. La figura inferior correponde a la reproduccion de una fuente de sonido mediante el modo externo de la unidad (cambiador de CD,ambiador de DVD, TV,AUX) en los altavoces. * El valor preajustado de fabricula es "OFF".Notas:
- Si la funciona 2-ZONE no está disponible cuando se conecta DAB. - El nuevo ajuste de volumen que se realiza girando el mando [ROTARY] de esta unidadsole se refleja en los altavoces. El ajuste AUX-SENS se refleja tanto en los altavoces como en los auriculares. Visualización de la pantalla cuando se usa la funciona 2-ZONE En el centro de la pantalla aparece "INT." (modo interno) o "EXT." (modo externo) paraindicar si pueda escharar la reproduccion en el modo interno or除外 del modo de funcionaactual de 2-ZONE. 1. Presione el botón [SOUND]. 2. Toque 2-ZONE.  3. Toque prolongamente ON/OFF en el centro de la pantalla durante 1 segundo o más.  Cuando 2-ZONE está activado ("ON"), se muestra el tipo de 2-ZONE actual. Si 2-ZONE está desactivado ("OFF"), no se podrá usar la funciona 2-ZONE. Presione el botón [SOUND] para volver al modo original. 4. Toque ON/OFF en la pantalla para selectionar el tipo de 2-ZONE.Tip de 2-ZONE
| Altavoz | Auriculas | |
| Tipo 1 | Interno (modo interno) | Interno (modo externo) |
| Tipo 2 | Interno (modo externo) | Interno (modo interno) |
Diferentes piezas musicales eschuchadas por various oyentes (funcion 2-ZONE)
Para activar o desactivar (ON/OFF) la referencia 2-ZONE 1. Presione prolongamente el botón [SOUND] de launidad durante 1segundo o más. Para combustir de tipo de 2-ZONE Presione prolongadamente el botón [TA] de la unidad durante 1 segundo o más cuando la funciona 2-ZONE está en uso. Paracaeiar el modo defuncionamento de 2-ZONE Presione prolongadamente el botón [TA] de la unidad cuando la función 2-ZONE está en uso.Selección del modo cuando la funciona 2-ZONE está en uso
Cuandoonga un CD,estando la referencia 2-ZONE en uso,las functiones del modo internode estaunidad cambian a CD y se empieza a reproducir automatistically. 1. Presione el botón [TA] de launidad para Cambiar el modo de funciona bajo 2-ZONE. Cambia la visualización del equipo (altavoz o aurículares) que se puedaaabrear en ese momento. 2. Presione prolongadamente el botón [TA] durante 1 segundo o más para selección el tipo de 2-ZONE. Se cambia a "INT." o "EXT." 3. Presione el mando [ROTARY]. Cada vez que presiona este mando con "INT." en pantalla, cambia el modo en elARRYUEnteorden: Radio CD AUX Radio... Cada vez que presiona el mando [ROTARY] con "EXT." en pantalla, cambia el modo en el作為ido: AUX (Cambiador de CD) (Cambiador de DVD) (TV ^*1 ) AUX... * El modo de aquellos equipos que no estén connectados no se muestra. *1 Si el modo TV está的选择acion, el modooca automatamente a modo VTR sin que se puedaCambiar.Operaciones comunes de cada modo
Visualización del modo de introduccion de titulos
Visualización principal Aparece cuando se selección el modo de introduccion de títulos. (cf. págin 14) Visualización de tipo de dato
A: Letras alfabeticas en mayusculas a: Letras alfabeticas en minuoculars 0-9: Númos !?: Simbolos A: DiéresisVisualización de titulos
Muestra el texto que se ha introducido. Toque para determinar la posicón de introducción. Si toca el botón prolongadamente durante 2seguidos o más,desaparecerá todo el texto del tíolo.Visualización de texto introducido
Toque para seleccionar el texto introducido.RTN
Si tocaaquicancelarála introduccionde titulos y se volverá a la visualizacion original.Toque prolongadamente durante 1segundo o más para ver la?singularmente lista correspondiente al tipo de datoactual.MEMO
Si tocaAquiprolongadamente durante 2 segundos o mas,se memorizarareltitle introducido y se volverá a la visualización original.Visualización delists de texto
Aparece cuando se toca RTN de forma prolongada durante 1 segundo o más en la visualización principal. Tipode texto:
Según la visualización de tipo de dato Seleccionada, el texto se verá de una forma u另一边. Si la visualización de tipo de texto es “A”: A E I M Q U X (espacio) Si la visualización de tipo de texto es "a": a e i m qu Si el tipo de texto es "0-9", "!?" o "A": Apareceran todos los characteres.RTN
Toquequiryparavolvera lavisualizacionprincipal.NEXT
ToqueAquipara verla lista de texto seguiente.Introduccion de títulos
Puede asignar un| modo de cambio de CD | Número de títulos |
| DCZ628 conectado | 100 titutos |
| CDC655Tz conectado | 100 titutos |
| CDC1255z conectado | 50 titutos |
PRECAUCION
Al presionar el botón de reinicio se borraran todas las的记忆ias, incluidos los titulos, que se hayan programado en la unidad. 5. Toque la visualización de tipo de dato para selección ar el tipo de dato. Cada vez que toca , seuda de un ajuste aanother en elsiguienteorden: Letras alfabeticas en mayusculas (espacio) ABCDEFGHJKLMNOP QRSTUVWXYZ Letras alfabeticas en minusculas a b c d e f g h i j k l m n o p q r s t u v w x y z Numeros 0123456789 Simbolos, Diéresis AÄÉÉEÉI/AØaëeeéiöüæø 6. Toque 卡 la parte derecha de la pantalla o gire el mando [ROTARY] para seleccionar los characteres que va a introducir. 7. Repita los pasos 4 a 6 para introducer el titulo. Si toca la visualización de titulos prolongadamente durante 2seguidos o mas,desapareceran todos los charactres del titulo. 8. Toque MEMO prolongamente durante un segundo o más. Escuchará un tono长大o para indicarle que se ha memorizzato el titulo.Para pagar de la visualización de titulos a la visualización de reloj u另一边
Toque el centro de la pantalla.Cuando se memoriza un titulo nuevo que excede el número máximo de titulos
Si se tratate de una emisora de TV Los titulos que no estén memorizados en canales preprogramados se borraran automatistically y se memorizará el titulo nuevo. Si se tratate de un CD Se borrarán los titulos de los CDs que se hayan reproducido menos veces y se memorizará el titulo nuevo.Eliminación de titulos
1. Reciba la emisión de TV o reproduzca un CD cuando titulo desee borrar. 2. Toque el centro de la pantalla para seleccionar la visualizacion de tildulos de usuario. Cuando se pase a la visualización de títulos de usuario, "USER" aparecerá encima del N° de presintonía. 3. Presione prolongamente el botón [A] durante 1 segundo o más. La visualización cambia al modo de introduccion de títulos. 4. Toque la visualización de titulos prolongamente durante un segundo o más. Desaparecerán todos los caracteres del titulo. 5. Toque MEMO prolongamente durante un segundo o más. Escuchará un tono largo para indicarle que se ha borrado el titulo.Modificación de los ajustes Selección de ajustes
1. Presione el boton [A]. La visualización cambia al modo de ajuste.  2. Toque la visualización de ajustes para selección arajste que va a programar. \*Si toca 一 日 la parte izquierda de la pantalla, los ajustes principales cambian uno a uno. Si toca la parte izquierda de laGMT, los ajustes secundarios cambian continuamente. * Si toca ⊥ ⊕ el centro de la pantalla, los ajustes secundarios cambian uno a uno. Si toca ← ⊕ →, los ajustes secundarios cambian continuamente. 3. Si aparece "EDIT" a la referencia de la pantalla, toque EDIT para pagar a la visualización de detailles de ajuste.  4. Toque la parte derecha de la pantalla o gire el mando [ROTARY] para ajustar los detalles.Para:volveralmodooriginal
1. Presione el botón [A] de nuevo. - Ajustes| Ajuste principal | Ajuste secundario |
| DISPLAY | SCREEN SVR • Ajuste del salvapantallas (cf. págin 41) |
| MSG INPUT • Introducción de datos de mensaje (cf. págin 41) | |
| MESSAGE • Ajuste del mensaje que aparece en pantalla al encender (ON) o apagar (OFF) (cf. págin 42) | |
| S/A SENS • Ajuste de la sensibilitad del analizador de espectro (cf. págin 42) | |
| SCROLL • Ajuste de la velocidad de desplazimiento (cf. págin 42) | |
| APPERNCE | DIMMER IN • Ajuste del atenuador automático (cf. págin 43) |
| DMR LEVEL • Ajuste del nivel de atenuación (cf. págin 43) | |
| CONTRAST • Ajuste del contraste de pantalla (cf. págin 43) | |
| BLINK LED • Ajuste del parpadeo del LED al extraer el DCP (cf. págin 43) | |
| BEEP • Ajuste del tono (cf. págin 44) | |
| SOUND | AC-PRO III • Seleección del modo VSE (STD/PRO) (cf. págin 44) |
| EQ SELECT • Seleección del modo de ecualizador (cf. págin 44) | |
| SP-SETTING • Ajuste de la configuración de los altavoces (cf. págin 44) | |
| CENTER-SP / SUB-WOOFER • Ajuste ON/OFF del altovoz de subgraves (cf. págin 45) | |
| HPF / SUB-W LPF • Ajuste de la Frequencia de filtrado de los altavoces (cf. págin 45) | |
| AMP CANCEL • Ajuste ON/OFF del amplificador (cf. págin 46) | |
| SP GAIN • Ajuste del nivel de salute de los altavoces (cf. págin 46) | |
| PL II DELAY | SRD-SP • Ajuste del tiempo de retardo de los altavoces traseros (cf. págin 46) |
| PL II CONT | PANORAMA / DIMENSION / CTR WIDTH • Ajuste fino del modo de música (cf. págin 47) |
| TUNER | TV ARER • Ajuste del aire de TV (cf. págin 57) |
| TV DIVER • Ajuste de la diversidad TV (cf. págin 57) | |
| LINK ACT • Ajuste de la funciona entre RDS y DAB (cf. págin 26) | |
| LANGUAGE • Ajuste del idioma de visualización de PTY (cf. págin 30) | |
| RDS-INT 2Z • Ajuste de la interrupción de RDS cuando la funciona 2-ZONE está en uso (cf. págin 30) | |
| SETTING | AUX / TEL • Ajuste de AUX y TEL (cf. págin 47) |
| AUX SENS • Ajuste de nivel de la entrada (AUX) de audio portátil (cf. págin 48) | |
| TEL-SP • Ajuste de la calidad de altavoces del automóvil para el téléphone móvil (Optional TEL-002) (cf. págin 48) | |
| TEL-SWITCH • Ajuste de la interrupción para el téléphone (cf. págin 48) | |
| CALIBRATE / A-VOL SENS • Ajuste de la funciona de volumen automatístico (cf. págin 49) | |
| SYSTEM CHECK • Comprobación del sistema (cf. págin 49) | |
| CODEMATIC • Ajuste de la seguridad (cf. págin 50) |
Ajuste del salvapantallas (SCREEN SVR)
Estamericano de la unidad. - El valor preajustado de fabricula es "ON". 1. Presione el botón [A] para selecciónar el modo de ajuste. 2. Toque la visualización de ajustes para selectionar "SCREEN SVR" en "DISPLAY".  3. Toque la parte derecha de la pantalla o gire el mando [ROTARY] para seleccionar "ON" u "OFF". 4. Presione el botón [A] para volver al modo original.Para cambio de salvapantallas
Toque PREV (Anterior) o NEXT (Siguiente))m润滑as se muestra el salvapantallas. Cada vez que toca uno de这些东西 botones se cambia de salvapantallas.Salvapantallas
Modelo de salvapantallas 1  Modelo de salvapantallas 2  Modelo de salvapantallas 3  Modelo de analizador de espectro 1  Modelo de analizador de espectro 2  Modelo de analizador de espectro 3  Modelo de analizador de espectro 4  Mensaje informativo SS SCAN
Los 8indicadores anteriores aparecen durante 10segundosapproximamente cada uno.Introduccion del texto de los.". mensajes informativos (MSG INPUT)
Hay 1 tipo de salvapantallas disponible. Para Obtener más información sobre como cambiar de salvapantallas, consulte la sección "Ajuste del salvapantallas". - Se pueda introducir hasta 30 characteres. - El valor preajustado de fabrica es "Active Matrix Control System". 1. Presione el botón [A] para selecciónar el modo de ajuste. 2. Toque ↓la visualización de ajustes para selecciónar "MSG INPUT" en "DISPLAY".  DISPLAY ADJUST MODE MSG INPUT> EDIT 。3. Toque EDIT.
La visualización cambia al modo de introduccion de mensaje. 4. Toque el centro de la pantalla para determinar la posicion de introduccion de texto. * Para:borrar el mensaje, toque prolongamente el centro de la pantalla durante 2segundos o más. Si realiza la operation en el caso 8 con el mensaje borrado, se recuperará al valor preajustado de fabrica. 5. Toque la parte izquierda de la pantalla para selectionar el tipo de dato. Cada vez que toca , cambia el tipo de texto: Para Obtener más información, consulte la págrina 37. 6. Toque la parte derecha de la pantalla o gire el mando [ROTARY] para seleccionar los caricacteres que va a introducir. 7. Repita los pasos 4 a 6 para introducer el mensaje. 8. Toque MEMO prolongamente durante un segundo o más. Escuchará un tono长大o paraindicarlesque se ha memorizzato el mensaje. 9. Presione el botón [A] para volver al modo original.Visualización de temas (MESSAGE)
Este funciona le permite visualizar mensajes en la pantalla al encender (ON) y apagar (OFF) la unidad. El网讯 "Hello" (Hola) aparece cuando la enciende y "See you" (Hasta bajo), cuando la apaga. - El valor preajustado de fabrica es "ON". 1. Presione el botón [A] para selección ar el modo de ajuste. 2. Toque ↓la visualización de ajustes para selecciónar "MESSAGE" en "DISPLAY".  3. Toque la parte derecha de la pantalla o gire el mando [ROTARY] para seleccionar "ON" u "OFF". 4. Presione el botón [A] para volver al modo original.Ajuste de la sensibilitad del analizador de espectro (S/ASENS)
Esta funciona le permiteaabstar la sensibilidad (cantidad de deflexion) del analizador de espectro. Para tener mas informacion sobre como visualizar el analizador de espectro, consulte la seccion "Cambio de visualizacion" (cf. pagina 13) o"Ajuste del salvapantallas" (cf. pagina 41). - El valor preajustado de fabricula es "MID" 1. Presione el botón [A] para selección ar el modo de ajuste. 2. Toque ↑ ↓ la visualización de ajustes para selecciónar "S/A SENS" en "DISPLAY".  3. Toque la parte derecha de la pantalla o gire el mando [ROTARY] para ajustar la sensibilitidad. * Selección LOW (baja deflexión), MID (deflexión media) o HIGH (alta deflexión). 4. Presione el botón [A] para volver al modo original.Ajuste de la velocidad de desplazimiento de la visualización (SCROLL)
Esta funciona le permite reducir la velocidad de desplazimiento cuando es demasiado rápida y dificulta la visualización de la pantalla. - El valor preajustado de fabrica es "SPEED 2". 1. Presione el botón [A] para selecciónar el modo de ajuste. 2. Toque ↑ ↓ la visualización de ajustes para selecciónar "SCROLL" en "DISPLAY".  3. Toque 山 la parte derecha de la pantalla o gire el mando [ROTARY] paraaabstar la sensibilitidad. * El margen de ajuste de este elemento es de SPEEDD 1 a SPEEDD 7. Realice este ajuste@m间隙 observa como cambia el aspecto de la pantalla. 4. Presione el botón [A] para volver al modo original.Ajuste del atenuador automatico (DIMMER IN)
Esta funciona le permitte atenuar la iluminacion de la pantalla para adaptarla a la iluminacion o a la intensidad de brillno en el interior del automovil. Selección "AUTO" (enclavada a la intensidad de brillo del interior del automóvil) o "ILLUMI" (enclavada a la iluminación del interior del automóvil), como ajuste de atenuación automática. - Cuando la funciona de atenuación automática está configurada en "AUTO", la intensidad de brillo de la pantalla se reduce para adaptarse a la intensidad de brillo que detecte este sensor. - Ajuste el atenuador en DMR LEVEL. - El valor preajustado de fabricula es "AUTO". 1. Presione el botón [A] para selección el modo de ajuste. 2. Toque la visualización de ajustes para選擇ar "DIMMER IN" en "APPERNCE".  3. Toque la parte derecha de la pantalla o gire el mando [ROTARY] para seleccionar "AUTO" o "ILUMMI". 4. Presione el botón [A] para volver al modo original.Ajuste del nivel de atenuacion (DMR LEVEL)
Estamericano. - El valor preajustado de fabricula es "3" 1. Presione el botón [A] para selección ar el modo de ajuste. 2. Toque la visualización de ajustes para selecciónar "DMR LEVEL" en "APPERNCE".  3. Toque la parte derecha de la pantalla o gire el mando [ROTARY] paraaabstar el nivel de atenuacion. * Selección OFF (atenuación desactivada, brillante), 1 (poco atenuada), hasta 5 (oscura). 4. Presione el botón [A] para volver al modo original.Ajuste del contraste de la pantalla (CONTRAST)
Es possibleaabstarelcontrastede la pantalla para adaptarlo al ángulo de instalación de la unidad. - El valor preajustado de fabrica es "6" 1. Presione el botón [A] para selecciónar el modo de ajuste. 2. Toque la visualización de ajustes para選擇ar "CONTRAST" en "APPERNCE". 3. Toque la parte derecha de la pantalla o gire el mando [ROTARY] para ajustar el contraste.  * El margen de ajuste de esta referencia es de 1 a 11. Realice este ajuste@m间隙 observa como cambia el aspecto de la pantalla. 4. Presione el botón [A] para volver al modo original.Ajuste del parpadeo del LED al extraer el DCP (BLINK LED)
Es possible hacer que el LED de estaunidad parpadee cuando se extrae el DCP. - El valor preajustado de fabricula es "OFF". 1. Presione el botón [A] para selección ar el modo de ajuste. 2. Toque la visualización de ajustes para selectionar "BLINK LED" en "APPERNCE".  3. Toque la parte derecha de la pantalla o gire el mando [ROTARY] para seleccionar "ON" u "OFF". 4. Presione el botón [A] para volver al modo original.Ajuste del tono que suena cuando se presionan los botones (BEEP)
El tono alto, corto o largo, que escucha cada vez que presiona un botón se denomina "BEEP". - El valor preajustado de fabricula es "ON". 1. Presione el botón [A] para selecciónar el modo de ajuste. 2. Toque la visualización de ajustes para selecciónar “BEEP” en “APPERNCE”.  3. Toque la parte derecha de la pantalla o gire el mando [ROTARY] para seleccionar "ON" u "OFF". 4. Presione el botón [A] para volver al modo original.Selección de cada modo
Esteajusteno sepuedeselectionarcuando DolbyProLogicII tieneconfiguradoel parametro"MUSIC"o“MATRIX"(cf.pagina17). - El valor preajustado de fabricula es "PRO" para AC-PRO III, y "P.EQ" para EQ SELECT.AC-PROIII
Cuando se seleccióna "STD" (modo estándar), se puedaajsitar la calidad y el camino de sonido con VSE (Virtual Space Enhancer) para que se perdiba el本身就是 efecto de sonido en todos los asientos. Cuando se selección "PRO" (modo PRO), se puedaaabstar la calidad y el Campo de sonido conprecision para cada asiento.EQ SELECT
Cuando se selección "P.EQ" (modo de ecualizarador), se pueda compensar todo el margen de niveles de Frequencias mediante una curva suave detallada. Cuando se selección "BAS/TREB" (modo de graves/agudos), se pueda compensar el nivel de Frequencia, dividendiolo en 2 niveles principales: graves (tonos bajos) y agudos (tonos altos). 1. Presione el botón [A] para selección el modo de ajuste. 2. Toque la visualización de ajustes para selecciónar "AC-PRO III" en "SOUND" y "EQ SELECT" en "SOUND".  3. Toque la parte derecha de la pantalla o gire el mando [ROTARY] para seleccionar el modo. Selección de modo| AC-PRO III | STD • Tipo estandar (Menú VSE) |
| PRO • Tipo PRO (Menú de posición) | |
| EQ SELECT | P.EQ • Tipo de ecualizador (Menú P.EQ) |
| BAS / TREB • Tipo de graves/agudos |
Ajuste de la configuración de los altavoces (SP-SETTING)
Ajuste la configuracion de los altavoces del automovil para sacar el máximo provechos de las caracteristicas de sonido de esta unidad. - El valor preajustado de fabrica es "SWL + SWR". 1. Presione el botón [A] para selección el modo de ajuste. 2. Toque la visualización de ajustes para selectionar "SP-SETTING" en "SOUND".  SOUND ADJUST MODE SP-SETTING SW + SW 3. Toque la parte derecha de la pantalla o gire el mando [ROTARY] para ajustar la configuracion de los altovoces. Configuración de los altavoces| CTR+SW Configuración de 5,1 canales | Altavoces frontales/traseros (4 canales) Altavoz central (1 canal) Altavoz de subgraves (1 canal) |
| SW[ ] + SW[ ] | Altavoces frontales/traseros (4 canales) Altavoz de subgraves (2 canales) |
| Configuración de altavoz de subgraves con 4 canales |
Notas:
- El sonido no saldra del altovo central salvo que se realizen los siguientes ajustes una vez configurado "CTR+SW". (1) Consulte la seccion "Seleccion del menu PLII (Dolby PL II)" (cf. pagina 17) paraajan el modo Dolby Pro Logic II en "MUSC" o "MATRIX". (2) Consulte la�� "Activacion/ desactivacion (ON/OFF) de los altavoces (CENTER-SP/SUB-WOOFER)" (cf. pagina 45) para activar el altovoz central ("ON"). - El sonido no saldra del altovo de graves Lch cuando "SWILL + SWIR" está selección y el modo Dolby Pro Logic II está configurado en "MUSIC" o "MATRIX". 4. Presione el botón [A] para volver al modo original.Activación/desactivación (ON/OFF) de los altavocé (CENTER-SP/SUB-WOOF)
Activa/desactive (ON/OFF) el altovoz central (CENTER-SP) y el altovoz de subgraves(SUB-WOOFER). Selección "OFF" si no hay ningún altovo central o altovoz de graves. - El.altavoz central (CENTER-SP) se pueda ajustar cuando el modo Dolby Pro Logic II está configurado en "MUSIC" o "MATRIX" y "SP-SETTING" está en "CTR-SW". - El valor preajustado de fabricula es "ON". 1. Presione el botón [A] para selecciónar el modo de ajuste. 2. Toque ↑ la visualización de ajustes para selecciónar "CENTER-SP" en "SOUND" y "SUB-WOOFER" en "SOUND".  SOUND ADJUST MODE CENTER-SP> ON 3. Toque la parte derecha de la pantalla o gire el mando [ROTARY] para seleccionar "ON" u "OFF". 4. Presione el botón [A] para volver al modo original.Ajuste de las Frequencias de filtrado de los altavoces (HPF/ SUB-W LPF)
Esta funciona le permiteaabrear la fecuencia de filtrado correspondiente a los altavoces realizados. - Los filtros (HPF/SUB-W LPF) que se pueda usar varian según el ajuste del modo Dolby Pro Logic II.| Ajuste del modo Dolby Pro Logic II | Filtro | |
| HPF | SUB-W LPF*1 | |
| MUSIC/MATRIX | No ajustable | Ajustable |
| OFF | Ajustable | Ajustable |
Ajuste del filtró
HPF (ajuste del filtró de paso alto) Este filtro suprime los graves en los altavoces delanteros y traseros. THROUGH 50Hz 80Hz 120Hz Ajuste el filtro correspondiente al altovo. cuando se utilizes altavoces de poco diametro.THROUGH
Realice este ajuste cuando utilise altavoces capaces de tener graves. SUB-W LPF (ajuste del filtró de paso bajo en el altovoz de subgraves) Este filtered suprime los agudos en el altovoz de subgraves. THROUGH 50Hz 80Hz 120Hz Ajuste la fecuencia de filtrado que corresponda al altovoz de subgraves.THROUGH
Realice este ajuste cuando utilise un altoz de subgraves incorporeal de caso bajo. 1. Presione el botón [A] para selección ar el modo de ajuste. 2. Toque la visualización de ajustes para selecciónar "HPF" en "SOUND" y "SUB-W LPF" en "SOUND".  3. Toque la parte derecha de la pantalla o gire el mando [ROTARY] paraaabstar la fecuencia. * Selezione THROUGH, 50Hz, 80Hz o 120Hz. 4. Presione el botón [A] para volver al modo original.Activación/desactivación (ON/OFF) del amplíficator interno (AMP CANCEL)
Active o desactive el amplificador interno en referencia de que se utilise o no un amplificador externo. Active ("ON") AMP CANCEL (amplificador interno en OFF) cuando haya un amplificador externo conectado y no se usa el amplificador interno. - El valor preajustado de fibricula es "OFF" (uso del amplificador interno). 1. Presione el botón [A] para selecciónar el modo de ajuste. 2. Toque la visualización de ajustes para selectionar "AMP CANCEL" en "SOUND".  3. Toque la parte derecha de la pantalla o gire el mando [ROTARY] para seleccionar "ON" u "OFF". 4. Presione el botón [A] para volver al modo original.Ajuste del nivel de salute de los altavoces (SP GAIN)
Utilice la funciona de tono de prueba que incorpora la unidad paraaabstar el volumen de forma que el volumen que salga de todos los altavoces sea el mesmo. - Este ajuste solo se pueda selectionar cuando el modo Dolby Pro Logic II tiene configurado el parámetro "MUSIC" o "MATRIX". - El valor preajustado de fabricula es "0dB" 1. Presione el botón [A] para selección el modo de ajuste. 2. Toque la visualización de ajustes para selectionar "SP-GAIN" en "SOUND".  3. Toque EDIT. La visualización cambia al modo de ajuste SP-GAIN. 4. Toque la visualización de ajustes para selecciónar elajuste deseedo. Cada vez que toca ↑, los ajustes se sueden como se indica a continuación:Ajustes
 *1 "CTR GAIN"sole smuestra cuando "SP-SETTING" está ajustado en "CTR+SW" y "CENTER-SP" está activado ("ON"). ^*2 "SUB-W GAIN"sole so muestra cuando "SUB-WOOFER" está activado ("ON"). 5. Toque la parte derecha de la pantalla o gire el mando [ROTARY] para ajustar el nivel de salute. El margen de ajuste del nivel de salute es de -10 dB a +10 dB. 6. Repita los pasos 4 y 5 para realizar cada ajuste. 7. Presione el botón [A] para volver al modo original.Ajuste del tiempo de retardode los altavoces (PL II DELAY)
El tiempo que tarda el sonido enninger a la posicón de escucha varía según la posicón de instalación de los altavoces tritureros y el tamanó del automóvil. Si ajustla el tiempo de retardo de los altavoces tritureros,ould configurar el sonido procedente del los altavoces tritureros para que se pueda escharchar al mismo tiempo que la calidad de los altavoces delanteros. - Este ajuste solo se pueda selectionar cuando el modo Dolby Pro Logic II tiene configurado el parámetro "MUSIC" o "MATRIX". - El valor preajustado de fabricula es "0ms" 1. Presione el botón [A] para selección ar el modo de ajuste. 2. Toque la visualización de ajustes para selecciónar "SRD-SP" en "PL II DELAY".  3. Toque la parte derecha de la pantalla o gire el mando [ROTARY] paraaabstar el tiempo de retardo. * El margen de ajuste de "SRD-SP" es de 0 ms a 15 ms. 4. Presione el botón [A] para volver al modo original.Ajuste bajo el modo de música (PL II CONT)
Esta función le permite ajustar el modo de música con mayor precision cuando el modo Dolby Pro Logic II tiene configurado el parámetro "MUSIC". - Sólo se pueda selectionar cuando el modo Dolby Pro Logic II tiene configurado el parámetro "MUSIC". - El valor preajustado de fibricula de PANORAMA es "NO", el de DIMENSION es "3" y el de CTR WIDTH es "3".Ajustes
PANorama (ajuste del control de panorama) Esta funciona amplia laImagen del campo de sonido en la parte delantera hasta los altavoces traseros. Seleccion "YES" si estima que no hay efecto surround.DIMENSION (ajuste de la dimisión)
Cambia laImagen del camino de sonido a la parte delantera o trasera. Cuando laImagen del camino de sonido se inclina hacía la parte delantera o hacía la parte trasera, es posible compensar dicha inclinación. La posicón intermedia es el valor de ajuste 3. Los values de ajuste 2 a 0 desplazan laImagen del camino de sonido hacía extras, cuando que los values de ajuste 4 a 6 la desplazan hacía delante.CTR WIDTH (ajuste del ancho central)\*1
Esta funciona le permitteJKLM ajanar la posicion del canal central entre el altovoz central y los altavoces delanteros izquierdo y derechocho. Cuando el sonido central se divide equisitavamente entre la derecha y la izquierda, aumenta toda laImagen del camino de sonido para producir una sensacion de expansion natural. El valor de ajuste 0 reproduce todos los sonidos centrales en el altovoz central. El valor de ajuste 7 divide el sonido central a partes iguales entre los altavoces delanteros izquierdo y Derecho. *1 "CTR WIDTH"solemuesstrawheno "SP- SETTING"estáajustadoen“CTR+SW”y "CENTER-SP"estáactivado("ON"). 1. Presione el botón [A] para selección ar el modo de ajuste. 2. Toque la visualización de ajustes para selección ar el ajuste desrado en "PL II CONT". Los ajustes son "PANorama", "DIMENSION" y "CTR WIDTH".  3. Toque la parte derecha de la pantalla o gire el mando [ROTARY] para realizar el ajuste deseado. * Selezione "YES" (Si) o "NO" en "PANorama". * El margen de ajuste de “DIMENSION” es de 0 a 6. * El margen de ajuste de "CTR WIDTH" es de 0 a 7. 4. Presione el botón [A] para volver al modo original.Función AUX
Esteistema dispone de una entrada RCA externa para que pueda escharcer sonidos y música de aparatos externos conectados a la unidad.Selección de AUX / TEL
Puede escharsonidoymúsica de aparatos externos o bien laslllamadastelefonicasdesde los altavocesi estáconectaroalunidad. Si TEL INT o un dispositivo externo está connectado a estaunidad, pueda seleccionar el modo TEL o el modo AUX. - El valor preajustado de fabricula es "AUX" 1. Presione el botón [A] para selección el modo de ajuste. 2. Toque la visualización de ajustes para selecciónar "AUX/TEL" en "SETTING".  3. Toque la parte derecha de la pantalla o gire el mando [ROTARY] para seleccionar "AUX" o "TEL".AUX:
El cable de entrada AUX/TEL es para la entrada de audio externa.TEL:
El cable de entrada AUX/TEL es para la entrada de audio del téléphone móvil. 4. Presione el botón [A] para volver al modo anterior.Ajuste del nivel de entrada (AUX SENS) del audio portátil (modo AUX)
Esta funciona le permette ajustar el nivel de entrada de aparatos externos OPCIONALES que estén connectados a esta unidad. - Puede ajustarse cuando “AUX/TEL” está configurado en “AUX”. - El valor preajustado de fabricula es "MID" 1. Presione el botón [A] para selecciónar el modo de ajuste. 2. Toque la visualización de ajustes para selecciónar "AUX SENS" en "SETTING".  3. Toque la parte derecha de la pantalla o gire el mando [ROTARY] para ajustar el nivel de entrada. * Selezione LOW (Bajo), MID (Intermedio) o HIGH (Alto). 4. Presione el botón [A] para volver al modo original.Ajuste de la calidad de altavoces del automóvil para el Telefonomóvil (Optional TEL-002)
- Para realizar llamadas Telefonicas, ajuste el téléphone móvil. - El valor preajustado de fabricula es "RIGHT" 1. Presione el botón [A] para selección ar el modo de ajuste. 2. Toque la visualización de ajustes para selecciónar "TEL-SP" en "SETTING".  3. Toque la parte derecha de la pantalla o gire el mando [ROTARY] para seleccionar "LEFT" (Izquierda) o "RIGHT" (Derecha). LEFT: Las llamadas Telefonicas se PUden oir a工程技术 del altevaz delantero izquierdo conectado a esta unidad.RIGHT:
Las llamadas Telefonicas se pueda oir a工程技术 del altovoz delantero derecho conectado a esta unidad. 4. Presione el botón [A] para volver al modo anterior.Ajuste de la interrupción para el Telefono móvil
Si conecta esta unidad y el Telefono móvil con una unidad (Optional, TEL-002), puede escurrchar las llamadas Telefonicas a工程技术 de los altavoces del automóvil. - El valor preajustado de fabrica es "OFF". 1. Presione el botón [A] para selección ar el modo de ajuste. 2. Toque ↑ ↓ la visualización de ajustes para selecciónar "TEL-SWITCH" en "SETTING".  3. Toque 山 la parte derecha de la pantalla o gire el mando [ROTARY] para seleccionar los ajustes. Cada vez que gira el mando [ROTARY], cambia el ajuste en el suivienteorden: OFF (Desactivado) ON (Activado) MUTE (Silenciamiento) OFF(Desactivado)... OFF: La unidad continua的功能ando con normalidad incluso cuando se usa el téléphone móvil.Nota:
- Al conectar un kit manos libres, asegúrese de activar (ON) esta funciona para recibir el sonido del téléphone a工程技术 del sistema.ON:
Puede esrear lasllamadastelefonicas atravésde los altavocconectadosaesta unidad. * Cuando escucha las llamadas a工程技术 de los altavoces del automóvil, pueda ajustar el volumen girando el mando [ROTARY]. MUTE: El sonido de launidad se silencia durante las llamadas Telefonicas. 4. Presione el botón [A] para volver al modo anterior.Ajuste de la funciona de volumen automatico (CALIBRATE/A-VOL SENS)
Puede regular automatically el volumen para adaptarlo a la velocidad del automóvil. - El valor preajustado de fabricula es "LOW" 1. Presione el botón [A] para selecciónar el modo de ajuste. 2. Toque la visualización de ajustes para selecciónar "CALIBRATE" en "SETTING".  3. Acelere a una velocidad de 50~km / h 4. Cuando alcance los 50~km / h toque START. Se ejecta la calibracion Al cabo de 2 segundos o más, oira un tono largo y "SUCCEEDFUL" aparecerá en la pantalla. Si oye un tono corte, es que la calibración ha fallado. Repita el procedimiento desde el paso 3. 5. A continuación, ajuste la sensibilitad. Toque la visualización de ajustes para selectionar "A-VOL SENS" en "SETTING".  6. Toque la parte derecha de la pantalla o gire el mando [ROTARY] para seleccionar la sensibilitidad. Cada vez que gira el mando [ROTARY], cambia el ajuste en elsignificantoorden: OFF (no hay cambio de volumen) LOW (hay cambio de volumen:klequeño) MIDLOW (Medio-bajo) MID (Medio) MID-HIGH (Medio-alto) HIGH (cambio de volumen: grande) ... 7. Presione el botón [A] para volver al modo anterior.Comprobación delsystems
Esta funciona le permitte realizar una comprobacion del systema desde el modo de ajuste segúnsea necessario. 1. Presione el botón [A] para selección ar el modo de ajuste. 2. Toque la visualización de ajustes para selecciónar "SYSTEM CHECK" en "SETTING".  3. Toque START prolongamente durante 1 segundo o más. "System Check" appearece en la pantalla. 4. Presione el mando [ROTARY]. Comienza la comprobación del sistema Una vez finalizada la comprobación del sistema, aparecerá "Completed" en la pantalla. 5. Presione el mando [ROTARY] de nuevo. Aparece la visualización principal del modo de radio.Uso de la referencia de seguidad (CODEMATIC)
Estamericanidad. Estasfuncionimpideraeslaspersonasque desconcenlacsequenciatactilpuedanutilizar estasanid.Cuandoseconctalalimentacion conelDCPacopladoy“CODEMATIC”activado ("ON"),aparecelambdavisualizacionTouchCode (Cólico tactil). Si toca la pantalla en elorden preajustado, aparecerá “SUCCESSIONAL” y se desconectará la alimentación. Laproxima vez que se conecte la alimentacion, no aparecera la visualizacion Touch Code sino la visualizacion principal en el mode de radio o CD. 1. Presione el botón [A] para selecciónar el modo de ajuste. 2. Toque la visualización de ajustes para selecciónar "CODEMATIC" en "SETTING".  Aparecen 2 típos de ajustes para "CODEMATIC", ajustes para los cuales se muestran los valores "ON" u "OFF" a la derecha de la pantalla y ajustes para los cuales se muestra "INPUT" a la derecha de la pantalla. Selecciónquiry elajuste para el que se muestra "ON”u“OFF"a la derecha de la pantalla. 3. Toque la parte derecha de la pantalla o gire el mando [ROTARY] para seleccionar "ON" u "OFF". 4. Toque ↓la visualización de ajustes para selecciónar "CODEMATIC" en "SETTING". Seccione ahora el ajuste para el que se muestra "INPUT" a la derecha de la pantalla. 5. Toque INPUT. Aparece la visualización Touch Code. 6. Introduzca el dato tactil. * Toque una de las 5 posiciones (izquierda, centro, referencia, ángulo superior derecho o ángulo inferior derecho) de la pantalla. Cada vez que toca la pantalla, se ilumina uno de los indicadores Touch Code. * Por exemple, toque (1) el centro, (2) el ángulo superior derecho, (3) la izquierda y (4) el ángulo inferior derecho, en esteorden. Internacionalmente, para seres consideradas. Cuando toca 4 vezes, escuchará un tonolardo y volverá al modo original.Para cancelar CODEMATIC
Si olvidó el ordin, toque ① el ángulo inferioro均线, ②) la izquierda, ③ el ángulo superioro均线 y bajo ④ la均线 de la pantalla en ese ordin, o bien presione [SCN] en la unidad de control remoto. 7. OPERACIONES DE LOS ACCESORIOS
Operaciones del Cambiador de discos compactos
Cambiador de CD
Si hay un Cambiador de CD optional conectado a工程技术 de la wire, está unidad para controlar las operaciones del Cambiador de CD. Launidad可以选择 connectarse a un total de 2 ambiadores de CD conectados a工程技术 de CD.Cambiador de discos DVD
Si hay un Cambiador de DVD optional conectado a工程技术 del cable CeNET, está unidad podra controlar las operaciones del Cambiador de DVD. Para ver un DVD, se necesita un monitor oficial. El funciona y visualización del Cambiador de DVD en estaunidad es una version simplificada y no admite functions de Cambiador de DVD. Para usar el Cambiador de DVD,utilice launidad de control remoto que se suministra con el Cambiador de DVD. Para Obtener información, consulte el Manual de instructiones que se suministra con el Cambiador de DVD.Cuando hay 2ambiadores de CD conectados
Presione el mando [ROTARY] para selectionar el MMI conectado a this unidad. (Cada vez que presiona el mando [ROTARY], se pasa de un MMI a lo. - Si el cambioso de CD no contiene un cargador, aparecerá "NO MAG", y si el cargador no contiene ningún CD, aparecerá "NO DISC" para做到 N° de disco. - Para Obtener más información sobre la visualización de titulos, consulte la sección "Cambio de la visualización de titulos" (ct頁目14).Visualizaciones del modo de combustor
Visualización principal (Modo de Cambiador de CD)
Para verla, presione el mando [ROTARY] y seleccione el modo combustor de CD.  Si toca la parte izquierda de la pantalla durante 1segundo o mas,cribará el modo de funcioncimiento simple.  Visualización de tiempo de pista/reproducción T01/02: 00: Muestra el N° de la pista actualmente en reproducción y el tiempo de reproducción. Si toca o en el modo de configuraciono normal, podra seleccionar la pista que va a reproducir, o hacer avanzar o retroceder rapidamente las pistas.Visualización de titulos
Al tocarla, cambia la visualizacion.Visualización de N° de presinstonia
Si toca 卡 en el modo normal, podra的选择向一个 disco.MODE
Al tocar esta visualización aparecen varias subfunciones. Si la toca prolongadamente durante 1segundo o más,aparecerála lista de discos.T-SCAN/D-SCAN
Aparece durante la reproduccion por exploracion.Toque T-SCAN/D-SCAN para construir la reproduccion por exploracion.T-RPT/D-RPT
Aparece durante la reproduccion repetida. Toque T-RPT/D-RPT para concurrir la reproduccion repetida.T-RDM/D-RDM
Aparece muestra durante la reproduccion aleatoria. Toque T-RDM/D-RDM para conclusir la reproduccion aleatoria.DISC
Toque esta funciona para iniciaar la reproduccion delARRYnte disco.(,) (sólo en la visualización de funciona simple)
Toque这些东西 botones para selectionar la pista que deseee reproducir. Si toca los botones de forma prolongada, ha r avanzar o retroceder las pistasrapidamente.Visualización de lista de discos (Modo de Cambiador de CD)
Aparece cuando se toca MODE de forma prolongada durante 1 segundo o más en la visualización principal.  Nombre de disco>>: Señeción en bajo
Toque el nombre del disco para volver a la visualización principal e起初ar la reproduccion desde la primera pista del disco tocado.←PREV-RTN:
Toque agli para ver la lista de tóculos anterior. Si la toca prolongadamente durante 1 segundo o más, volverá a la visualización principal.NEXT:
Toquequiry para ver la lista de títulossiguiente.PRECAUCION
Los discos CD-ROM no se pueda reproducir desde todos losambiadores de CD.Depende del modelo.Nota:
- Es possible que algunos CDs grabados en modo CD-R/CD-RW no pueda utilizar.Selección del modo de combustor
1. Presione el mando [ROTARY] para seleccionar el modo de Cambiador. * El modo de aquellos equipos que no estén connectados no se muestra. Cuando el modo cambie a Cambiador, la reproduccion se inicia automatistically.Interruption de la reproduccion
1. Presione el botón [▶■].Reanudación de la reproducción:
1. Presione el botón [▶■] de nuevo.Selección de un CD
1. Toque la visualización de N° de disco para selectionar un disco. Comienza la reproduccion. * Si el cargador no contiene el disco selecciónado, no se做不到e el N° del disco en cuestion. * Si toca DISC ↑, se inicia la reproduccion del suiviente disco.Para seleccionar un disco en la visualizacion de lista de discos
1. Toque MODE prolongamente durante un segundo o más. Aparecerá la lista de discos Si toca NEXT, aparecerá lasuma parte de la lista de discos. 2. Toque el nombre del disco. * Si el cargador no contiene el disco selecciónado, aparecerá “NO DISC” en relacion con disco en@cuestion. * Si selecciónó el@mismo disco que se está reproduciendo, la unidad empezará a reproducir de nuevo desdela primera pista de dicho disco.(funciOn de principio)Selección de una pista
1. Para esuchar lasuma pista, toque la pista. 2. Para escuchar la pista anterior, toque 山 de pista. Cuando toca 已 ^ 已 , se reproduce lasuma pista. Si toca 已 ^ 已 suscesivamente, la pista avanza el numero de vezes que toque y luego se reproduce. Cuando toca se reproduce la pista anterior. Si toca sucesivamente, la pista retrocede el número de veces que toque y违法违规 * Si toca ↑ dos vezes la visualización de pista cuando se reproduce el principio de la pista, posiblemente se reproduzca la pista situada 2 pistas por detrás.Avance=rápido/Retroceso rápido
1. Para avanzar de forma rápida, toque la pista. 2. Para retroceder de forma rápida, toque la pista.Función de principio
La función de principio inicia la reproducción desde laprimera pista del disco que se esté reproduciendo. 1. Toque MODE prolongamente durante un segundo o más. Aparecerá la lista de discos Si toca NEXT, aparecerá lasuma parte de la lista de discos. 2. Toque el nombre del disco. * Si el cargador no contiene el disco selecciónado, aparecerá “NO DISC” en relacion con disco en cuestion. * Si selecciónó el mesmo disco que se está reproduciendo, launidad empezará a reproducir de nuevo desdelaprimera pista de dicho disco.Reproducción por exploración
La reproduccion por exploracion localiza y reproduce automatically los primeros 10 segundos de cada pista de un disco.Esta funciona continua avanzando en el disco hasta que se cancele. La función de reproducción por exploración的结果ly,whendeshsea seleccionaruna determinada pista. 1. Toque MODE. 2. Toque T-SCAN. La visualización MODE pasa a "T-SCAN" y se inicia la reproducción por exploración. * La reproducción por exploración comienza desde la pista",[siguierte a la pista que se esté reproduciendo en este momento.Para cancelar la reproduccion por exploracion
1. Toque T-SCAN. La visualización T-SCAN pasa a “MODE”, y se reproduce la pista que se estaba reproduciendo cuando todo T-SCAN.Reproducción por exploración de discos
La reproduccion por exploracion de discs localiza y reproduce los primeros 10 seguidos de la prima pista de cada disco contenido en eleturnador de CDactualmente seleccionado.Estamericana continua avanzando automatically hasta que se cancele. La reproduccion por exploracion de discos resulta util. cuando deseaa seleccionar un determinado disco. 1. Toque MODE. 2. Toque D-SCAN. La visualización MODE pasa a "D-SCAN" y se inicia la reproducción por exploración de discos. * La reproduccion por exploracion de discos comienza desde la pista?siguea a la pista que se este reproduciendo en es momento.Para cancelar la reproduccion por exploracion de discos
1. Toque D-SCAN. La visualización D-SCAN pasa a “MODE”, y se reproduce la pista que se está reproduciendo cuando toco D-SCAN.Reproducción repetida
La reproduccion repetida reproduce continuamente la pista actual.Esta funciona continually avanzando automatistically hasta que se cancele. 1. Toque MODE. 2. Toque T-REPEAT. La visualización MODE pasa a “T-RPT” y se inicia la reproducción repetida.Para cancelar la reproduccion repetitiona
1. Toque T-RPT. La visualización T-RPTonga a“MODE”,y se empieza a producir normalmente a partir de la pista que se estaba reproduciendo cuando toco T-RPT.Reproduccion repetida de discos
Una vez reproducedas todas las pistas del disco actual, la reproduccion repetition de discs reproduce automatically el disco actual de nuevo desde la primera pista.Esta referencia continua avanzando automatistically hasta que se cancele. 1. Toque MODE. 2. Toque D-REPEAT. La visualización MODE pasa a “D-RPT” y se inicia la reproducción repetida de discos.Para cancelar la reproduccion repetition de discos
1. Toque D-RPT. La visualización D-RPTonga a“MODE”,y se empieza a reproducir normalmente a partir de la pista que se está reproduciendo cuando toco D-RPT.Operaciones del Cambiador de discos compactos
Reproducción aleatoria
La reproduccion aleatoria selecciona y reproduce pistas aisladas del disco sin ningúnorden concreto.Estamericana continua avanzando automatistically hasta que se cancele. 1. Toque MODE. 2. Toque T-RANDOM. La visualización MODE pasa a "T-RDM" y se inicia la reproducción aleatoria.Para cancelar la reproduccion aleatoria
1. Toque T-RDM. La visualización T-RDMonga a MODE, y se empieza a reproducir normalmente a partir de la pista que se estaba reproduciendo cuando toco T-RDM.Reproduccion aleatoria de discos
La reproduccion aleatoria de discos selecciona y reproduce automatically pistas o discos individuales sin ningúnorden concreto.Estamericana hasta que se cancele. 1. Toque MODE. 2. Toque D-RANDOM. La visualización MODE pasa a “D-RDM” y se inicia la reproducción aleatoria.Para cancelar la reproduccion aleatoria de discos
1. Toque D-RDM. La visualización D-RDMonga a MODE", y se empieza a reproducir normalmente a partir de la pista que se está reproduciendo cuando toco D-RDM.Operaciones del telector
Funciones del sintonizadora de television
Cuando haya connectado un sintonizador de television optional a工程技术 del cable CeNET, estaunidadouldravorcontrallosdaslasoniones del sintonizador de television. Para contemplar programasde television,necesitarun sintonizador de television y un monitor.Visualizaciones del modo TV
Visualización principal
Para verla, presione el mando [ROTARY] y seleccione el modo de TV.  Si toca la parte izquierda de la pantalla durante 1segundo o mas, cancellar el modo de funciona bajo su水泵. Visualización de canales
1ch.: Aparece el canal que se está recubiendoactualmente. Si toca o en el modo normal, pode realizar sintonizacion de busicada o sintonizacionmanual.Visualización de titulos
3ch.:Aparece el nombre de la emisora que se está recibiendoactualmente. VTR: Tipo de entrada de video Al tocarla, cambia la visualizacion Visualización de banda de recepción TV1: Nombre de bandaVisualización de N° de presintonía
Si toca 卡 en el modo normal, podra selectionaruna memoria preprogramada.MODE
Al tocar esta visualización aparecen varias subfunciones. Tóquela prolongadamente durante 1 segundo o más para ver la lista de memorias preprogramada. P-SCAN: Aparece durante una exploración de presintonías. Toque esta funciona para finalizar la exploración de presintonías. A-STORE: Aparece durante una memorización automática. Toque esta funciona para finalizar la memorización automática.BAND
Toque esta funciona para携带 de banda de recepción. Si la toca prolongadamente durante 1 segundo o más, se alternará entre el modo de sintonización manual y el modo de sintonización de búsqueada.(solen la visualizacion defuncionamento simple)
Estos botones le permitted realizar sintonizacion de busqueada o sintonizacion por pasos (en el mode de sintonizacion manual). Si los toca prolongadamente, podra realizar una sintonización>>:
Sintonizacion en bajoRTN:
ToqueAquipara,volvera lavisualizacion principal.Selección del modo de TV
1. Presione el mando [ROTARY] para seleccionar el modo de TV. Cada vez que presiona este mando, se pasa de un modo a otro en elsignificantoorden: * El modo de aquellos equipos que no estén connectados no se muestra.Cambio de banda de recepción
1. Toque BAND paraonian de banda de recepcion. Cada vez que toca BAND, cambia la banda de recepción: TV1 TV2 TV1...Sintonización de búsqueada
La función de sintonización de búsqueada permite sintonizar de forma automatica emisoras con buena recepción. 1. Toque BAND prolongamente durante 1 segundo o más cuando se muestra MANU. La sintonización automatística se pueda realizar cuando no se mueste MANU. 2. Toque la visualización de canales. Aparece SEEK UP/SEEK DOWN, y comienza la sintonización. La sintonización de detiene automatistically en las emisoras con buenaREETC.To cancel tuning
1. Vuelva a tocar la visualizacion de canales.Sintonización manual
Existen 2 métodos: sintonización rápida y sintonización por pasos. En el modo de sintonización por pasos, las velocidades cambian una a una. En el modo de sintonización rápida, pueda sintonizar la velocumbia眼看 at instante. 1. Toque BAND prolongamente durante 1 segundo o más cuando MANU no aparezca en pantalla. La sintonizacion manual se pueda realizar,msteadasuestreamANU. 2. Utilice la visualización de canales para sintonizar un canal que está transmitiendo. Existen 2 métodos de sintonización manual: sintonización rápida y sintonización por pasos. * La sintonización por pasos es una función que permitecaejar de canaluno a uno. Toque la visualización de freuency. * La sintonización rápida es una función que permite Cambia de canal continuamente. Toque ← ➔ la visualización de canales. El proceso de sintonización se detiene cuando retina el dedo del panel.Invocación de una emisióna memorizada
Estamericano. 1. Toque MODE prolongamente durante un segundo o más. Aparecerá la lista de的记忆as preprogramadas 2. Toque la emisora que desee escuchar. * Internacionalmente, el encuentó su américa. tocando 日 且 日 el N° de presintonía.Para cancelar la sintonizacion
1. Toque RTN.Memoria preprogramada
Se pueda memorizar un total de 12 emisoras de TV (6-TV1 y 6-TV2). Este le permitirá seleccionar sus emisoras de TV favoritas y memoriarlas para recuperarlas más adelante. 1. Toque BAND paraonian de banda de recepcion. 2. Utilice la visualizacion de canales para selectionar la emisora que va a memorizar. 3. Toque MODE prolongamente durante un segundo o más. Aparecerá la lista de的记忆as preprogramadas 4. Toque prolongadamente durante 2 segundos o más el N° de presintonía sobre se memorizará la emisora. Escuchará un tono长大o paraindicarlesque se ha memorizzato la emisora. Si escaucha un tono certo, es que la emisora no se ha memorizzato. Repita el procedimiento desde el paso 1.Memoración automática
La memorización automática selección 6 emisoras de TV automatistically y memoria cada una de ellas en una memoria preprogramada. Si no se enquiryran 6 emisoras con buena recepcion, se conservaran las emisoras previamente memorizadas y solo se memorizaran aquellas que tengan una recepcion buena. 1. Toque MODE. 2. Toque A-STORE prolongamente durante 2 seguidos o más. La visualización MODE cambia a "A-STORE" y el N° de presinonia de la operación de memorización automática aparece en la visualización de N° de presinonia. * Se buscan las emisoras con buena recepción y se guardan en la memoria preprogramada (N° 1 al N° 6) enorden empezando por la emorsora con la Frequencia más baja.Notas:
- Cuando se realiza una memorización automatística, se borran las emisoras que hasta entones estaban memorizadas. - Si hay menos de 6 emisoras con buena recepción, se vuelve automatistically a las Frequencias同比下降 y se realiza otra memorización automática. Si tras la?).Si quene la?.memorizacion automatistica, sigue haberido menos de 6 emisoras con buena recepción, las emisoras anteriores permaneceran en la memoria.Exploración de presintonías
La función de exploración de presintonías permite recibir las emisoras en elorden en que estáactualmentememorizadas enlos N° de presintonía,para poder examinarlas emisiones. 1. Toque MODE. 2. Toque P-SCAN. La visualización MODE cambia a "P-SCAN", y el N° de presintonía de la operation de exploración de presintonías aparece en la visualización de N° de presintonía. * Las emisoras actualmente memorizadas se reciben en suorden durante 7segundos o más cada una. Se omiten lasemisoras con mala recepción y seoca arecibir la",[siguiente]. Las emisoras de TV se reciben se la.), forma: TV1 (1 6) TV2(1 6) TV1(1 6) y asi suscesivamente.Para cancelar la exploración de presintonías
1. Toque P-SCAN. La visualización P-SCAN cambia a “MODE”, y las emisoras que se estaban recibiendo cuando se toco P-SCAN se reciben a continuación.Visualización de video
El sintonizador de TV dispone de un terminal de entrada de VTR al que se pueda conectar 1 aparato externo. Conecte un reproductor deCNTas de video (VCP) o una grabadora deCNTas de video (VCR) de 12V al terminal del entrada del sintonizador de TV. 1. Presione el botón [▶■]. Aparece VTR, y seoca al modo VTR. * La visualización de TVonga al modo de entrada de video y ya se pueda ver os videos.Para:volveralmodoTV
1. Presione el botón [▶■] de nuevo.Ajuste del area de TV (TV AREA)
Cuando selección el airea de TV (airea de recepcion de TV), cambia el ajuste de areal del sintonizador de TV. - El valor preajustado de fabricula es "GERMANY". 1. Presione el botón [A] para selección el modo de ajuste. 2. Toque la visualización de ajustes para selectionar "TV AREA" en "TUNER".  3. Toque la parte derecha de la pantalla o gire el mando [ROTARY] para selectionar el和地区. 4. Presione el botón [A] para volver al modo anterior.Ajuste de diversidad de TV (TV DIVER)
Se puede modifier el ajuste de Reception de la antenna de TV conectada al sintonizador de TV. - Seleccione "OFF" cuando no se usa la antenna de diversidad de TV. - El valor preajustado de fabricula es "ON". 1. Presione el botón [A] para selección ar el modo de ajuste. 2. Toque la visualización de ajustes para selectionar "TV DIVER" en "TUNER".  3. Toque la parte derecha de la pantalla o gire el mando [ROTARY] para seleccionar "ON" u "OFF". 4. Presione el botón [A] para volver al modo original.Función de control de DAB
Cuando se emplea un cable CeNET para conectar un DAB (DAH913 o DAH923z) (vendido por分开ado), poderan operarse todas las functions.Escuchar la emisora DAB
1. Presione el mando [ROTARY] para Cambiar de modo de funciona bajo.Notas:
- La visualización que aparece en el modo de recepción normal y en el modo de recepción de presintonía es elsameo que cuando se recibe una emisión DAB. - El número de programas y horas de emisión depende de la emisora DAB. - Cuando la potencia de las senales DAB es débil, se silencia la calidad de audio.Sintonización de búsqueada
1. Presione el mando [ROTARY] para seleccionar el modo DAB. 2. Toque la izquierda de la pantalla. Cuando la unidad principal recibe una emisora DAB, "DAB" se ilumina en la pantalla. * Cuando no pueda localizar una emisión DAB, launidad principal detiene la sintonización de búsqueada. La visualización vuelve al modo anterior.Sintonización manual
1. Presione el mando [ROTARY] para seleccionar el modo DAB. 2. Si "MANU" no aparece en pantalla, toque BAND prolongamente durante 1 segundo o más. Si aparece "MANU", se pueda realizar la sintonizacion manual. 3. Toque la parte izquierda de la pantalla para sintonizar la emisora. * Si no se realiza ninguna operation durante más de 7seguidos,se cancela la sintonizacionmanual yla pantalla vuelve al modo anterior.Cambio de programas
1. Presione el mando [ROTARY] para seleccionar el modo DAB. 2. Toque la parte izquierda de la pantalla para Cambiar de programa en la emisora DAB.Nota:
- El nombre del programa可以选择 ser el mesmo según el programa DAB.Exploración de programas
Esta función explora cada programa con posibiliad de recepción en una emisión DAB que se reciba durante 10seguidos de forma secuencial. Este resultautilo cuando deseaa buscar un programa en cuestion. 1. Presione el mando [ROTARY] para seleccionar el modo DAB. 2. Toque MODE. 3. Toque S-SCAN. "S-SCAN" se illumina y launidad empieza a explorar cada programa durante 10segundos de forma secuencial. Cada vez que launidad principal realiza una exploracion, el nombre del programa se muestra en la pantalla. 4. Para detener la exploración de programas cuando se sintonice un determinado programa, toque S-SCAN.Memoria manual
La unidad principal dispone de una función de memoria manual para los programas DAB. Se pueda memoriar hasta 18 programas (6 programas cada uno) en los botones preprogramados. [M1], [M2] y [M3] 1. Presione el mando [ROTARY] para selectionar el modo DAB. 2. Toque BAND para selectionar uno de los botones anteriores. 3. Toque MODE prolongamente durante un segundo o más. Aparecerá la lista de的记忆as preprogramadas 4 Toque prolongadamente durante 2 segundos o más el N° de presintonía que se va a memorizar. Escuchará un tono largo para indicarle que se ha memorizzato la emisora. Si escucha un tono corto, es que la emisora no se ha memorizzato. Repita el procedimiento desde el paso 1.Nota:
- Los programas de interrupción (PTY o INFO) no se pueda guardar en una memoria manual.Recuperación de programs preajustados
1. Presione el mando [ROTARY] para seleccionar el modo DAB. 2. Toque BAND. Cada vez que toca BAND cambía la visualización en elorden;) MEMO1 MEMO2 MEMO3 MEMO1... 3. Toque la parte derecha de la pantalla para recuperar un programa preajustado.Función AF
La funciona AF cambia a una Frequenciadistincta de la mesma red para podermanterla optima recepcion. - El ajuste inicial de fabricula es "ON" - Si la recepción de la emisión difusora actual se deteriorara, aparecerá "SEARCH" en el visualizador y la radio buscará el mesmo programa en另一边 Frequencia. - Para más detalles sobre la "Función de frequencies alternativas (AF)" (cf. páginas 26), consulte la sección "Operaciones del Sistema de datos radiofáticos (RDS)" del manual de instructuciones. - Desactivación de la funciona AF - Activación de la funciona AF Función de AF entre RDS y DAB Cuando se difunde el mesmo programa mediante RDS y DAB, y esta funciona está activada, launidad principal cambia a la recepcion de la difusión con la mejor recepción de forma automatística.TA (Anuncios de tráfico)
En el modo deresherva de TA, cuando se inicia la difusión de un anuncio de tráfico,la difusión del anuncio de tráfico se recibe con la mayor prioridad independentemente del mode de referencia. Tambien es possiblelearvaracabo sintonizacion automáticadeprogramade trafico(TP). -Estafunciionsoledopeculizarsecuando"TP" estáencendido enelvisualizador.Cuando "TP"estáencendido significa que la emisoradifusora deDABoRDSque se estárecibiendotieneprogramasdeanunciosdetráfico. - Para más detalles sobre "Anuncios sobre el tráfico (TA)" (cf. págrina 27), consulte la sección de "Operaciones del sistema de datos radiofónicos (RDS)" del manual de instructiones. - Ajuste del modo de réserve de TA - Cancelación del modo deresherva de TA Búsqueada de emisoras TPNotas:
- Si no se está recubiendo una emisión TP, launidad principal detiene la operation de busquada. - Es possible que se encienda "TP" en el visualizador cuando se una emisora RDS transmits a una defusión TP. En este caso, presione el botón [TA] para efectuar la sintonización por búsqueada de TP. Presione de nuevo el botón [TA] paravoltar al modo anterior.INFO (Anuncio)
En el modo de resolver INFO, cuando se inicia el programa deannouncementado, la unidad principal cambia automatistically al programa deannouncementado.- Ajuste del modo deresherva INFO
Si presiona y mantiene presionado el botón [TA] durante 1 segundo o más tiempo, se enciende "INFO" en el visualizador y launidad principal se establiece en el modo de reserve INFO hasta que se difunda el acontecimiento selectionado. Cuando se inicia la difusión de anuncio selectionada, el的对象 del anuncio aparece en el visualizador. Si presiona y mantiene presionado el botón [TA] durante 1 segundo o más tiempo cuando se recibe la difusión del anuncio selectionada, se cancela la recepción de la difusión del anuncio selectionada y launitieshincipalseestabliece en el mode del reserveda INFO.- Cancelación del modo deresherva INFO
Para cancelar el modo de reserve INFO, presione y mantenga presionado el botón [TA] durante 1 segundo o más tiempo.- Seleitung de la informacion
Estamerican (ON) or desactivacion (OFF) de la informacion (INFORMATION) en el mode de interrupcion de la informacion. Podrá selección ON para hasta 6它们 de información. Podrá selecciónar cualesera de los 6 itemes seguidentes:| Ítem de INFORMATION | |
| ENGLISH | Contenido |
| Travel | Noticia deULTima hora sobre transporte |
| Warning | Advertencia/servicio |
| News | Noticias deULTima hora |
| Weather | Noticias deULTima hora sobre el tiempo |
| Event | Anuncios sobre acontecimientos |
| Special | Acontecimientos especiales |
PTY
Estamericano, independiente, y como el encuentado por la lawina, señan a la lawina. - Puede selectionar un PTYcomings para DAB o RDS. - Entre DAB PTY y RDS PTY, el PTY que se recibe antes toma prioridad sobre el除外. - Las difusions de PTY todas no está disponible todos los País. - En el modo de reserve INFO, las emisoras de INFO tienen prioridad sobre las emisoras de PTY. - En el modo de reserve TA, las emisoras de TP tienen prioridad sobre las emisoras de PTY. - Para detailles sobre " Tipo de programa (PTY)" (cf.-page 28), consulte el apartado "Operaciones del sistemas de datos radiofonicos (RDS)" del manual de instrucciones. Establecimiento del modo de espera de PTY - Cancelación del modo de espera de PTY - Cancelación de una emisión con interruptions de PTY - SeLECTION del tipo de programa (PTY) - Búsqueada por tipo de programa (PTY) - Memoria de preajuste de temas de programas (PTY)Difusión de emergencia
Cuando se recibe una dificultad de emergencia, todas las operaciones del modo de la referencia se detienen. Aparece "ALARM" en el visualizador y se eschaça la dificultad de emergencia. - Para los detalles sobre la "Emission de emergencia" (cf. págin29), consulte el aparato de "Operaciones del sistema de datos radiofonicos (RDS)" del manual de instrucciones. - Cancelación de una emisión de emergenciaCambio del idioma de visualización de PTY e INFO
Puede selectionaruno de los 4 idiomas existentes (inglés, aleman, sueco or francés) para visualizar PTY e INFO. - El valor preajustado de fabrica es "ENGLISH" (Inglés). - Para Obtener más información, sobre el "Cargo del idioma de visualización de PTY" (cf. págrina 30), consulte la sección "Operaciones del sistema de datos radiofónicos (RDS)" en el manual de instructuciones correspondiente.Ajuste del volumen de la difusión TA, INFO, de emergencia (ALARM) y PTY
El volumen de las interruptions de TA, INFO, ALARM y PTY puede ajustarse durante las interruptions de TA, INFO, ALARM y PTY. Efectue la operation suiviente dependiendo del Modelo conectado. - El ajuste inicial de fabricula es "15". Durante una interrupción de TA, INFO, ALARM o PTY, gire el mando [ROTARY] hacía la derecha o izquierda paraaabustar el volumen al nivel deseado (0 a 33). * Cuando finaliza la Erruption de TA, INFO, ALARM o PTY, el volumen returna al nivel que tenía antes de la erruption.Operaciones del decodificador surround de 5,1 canales
En estaunidad permite controlar un decodificador surround de 5,1 canales que esté conectado mediante cable CeNET. Las functionsesiones varian cuando se conecta un decodificador surround de 5,1 canales: - Al modo Dolby Pro Logic II se anaden dos modos新模式, "MOVIE" y "VIRTUAL". - El modo VSE/POSITION cambia al modo DSF (Campo de sonido digital). - En el modo P.EQ (Evaluador paramétrico), los altavoces de poderán ajustar con mayor precision aun. - Cambian los ajustes de música (cf. páginas 39).Selección de PL II (Dolby PL II)
Selección uno de los cuales modo disponibles como modo Dolby Pro Logic II, según la fuente que vaya a reproducir. - El valor preajustado de fabricula es "OFF".■ MUSIC (Modo de música)
Consulte "Selección del menu PLII (Dolby PLII)" (cf. págin 17).MATRIX (Modo matricial)
Consulte "Selección del menu PLII (Dolby PLII)" (cf. págin 17).MOVIE (Modo depellicula)
Ideado parapelliculas de video enDVD.VIRTUAL (Modo virtual)
Ideado parapelliculas yotras fuentes de audio.OFF
No se utilizes el modo Dolby Pro Logic II. 1. Presione el botón [SOUND]. 2. Toque Dolby PLII.  3. Toque la parte derecha de la pantalla para seleccionar el modo Dolby Pro Logic II.  La visualización de modelos cambia como se indica a continuación: MUSIC (modo de música) MATRIX (modo matricular) MOVIE (modo depelícula) VIRTUAL (modo virtual) OFF (PL II desconectado) MUSIC (modo de música)... * Para Obtener más información sobre el ajuste de volumen de los altavoces central/subgraves, consulte la página 45. 4. Toque RTN.Selección del menu DSF
Mediente simulación del sonido, DSF (Campo de sonido digital) permite disfrutar de la sensación acústica que experimentaría en un auditorio o en un recinto de actuaciones en directo. - Cuando se selección el menu DSF, es possible que;aumente el volumen. - El valor preajustado de fabricula de DSF es "OFF" y el del menu DSF es "HALL". 1. Presione el botón [SOUND]. 2. Toque DSF.  3. Toque la visualización ON/OFF. El efecto DSF se activa o desactiva (ON/OFF).  Cuando el DSF está desactivado ("OFF"), el ajuste de DSF no se refleja en la fuente de música. Con thiso recluye la configuracion de DSF. Presione el boton [SOUND] paravoltar al modo original. 4. Toque el N° de dato de DSF para seleccionar el dato de DSF deseado. Menús de DSF
HALL (Auditorio) CHURCH (Iglesia) STADIUM (Estadio) LIVE (En directo) JAZZCLUB (SALA DE JAZZ) THEATER (Teatro) HALL (Auditorio)| N° | Nombre de la función | Descripción |
| 1 | AUDITORIO | Auditorio grande |
| 2 | CHURCH | Iglesia con techo abovedado |
| 3 | ESTUDIO | Estadio grande sin techo ni pareDES |
| 4 | LIVE | Recinto de actuaciones en directo, mayor de una sala de jazz |
| 5 | JAZZCLUB | Sala de jazz con techo bajo |
| 6 | THEATER | Cine o teatro |
Selección del menu de ecualizador paramétrico
El ecualizador paramétrico (P.EQ) le permite compensar con precision todo el margen de niveles de Frequencias mediante curva suave utilizing compensacion de Frequencias para adaptarlo a su tipo de automóvil. - La configuración preajustada de张家 incluye los siguientes values para todos los altavoces. FREQ = 1kHz, Q = 1, GAIN = 0dB 1. Presione el botón [SOUND]. 2. Toque P.EQ.  3. Toque la visualización ON/OFF. El efecto P.EQ se activa o desactiva (ON/OFF).  Cuando el efecto P.EQ está desactivado ("OFF"),DICHOajuste no se refleja en la fuente de musica. Con thiso conclusye el ajuste de P.EQ.Presione el boton [SOUND] para volver al modo original. 4. Toque 山 el N° de menu P.EQ para seleccionar el menu P.EQ. Menús de P.EQ
SIGNAL (Señal) SP-SEL (Selección de altavoz) BAND (Banda) FREQ (Frecuencia) Q GAIN (Ganancia) SIGNAL (Señal)... 5. Toque la parte derecha de la pantalla para realizar el ajuste deseado. SIGNAL (permite seleccionar la seals de ajuste): Selezione "P-NOIS" o "MUSIC" P-NOIS: selección este valor cuando vaya a utiliser ruido rosa MUSIC: selezione este valor para utilizesenalesmusicales SP-SEL (permite seleccionar los altovasces a los que se va a ajustar el valor P.EQ): Seleccione "FRONT", "CENTER" o "SURROUND". - FRONT: Altavoz delantero - CENTER: altavoz central - SURROUND: altavoz surround BAND (permite selectionar la banda de frequencies): Selezione una banda de 1 a 3 FREQ (permite selectionar la banda central): El margen de ajuste es de 20 Hz a 20 kHz. Q (permite ajustar la curva de Q): Permite ajustar laPENDiente de la curva Q en uno de los parámetros siguientes: 1,3,5,7o20. GAIN (permite ajustar el nivel de salute): Permite ajustar la ganancia (nivel de salute) en un margen de -12dB a +12dB. (pasos de 1dB, 25+puntos) 6. Repita los pasos 4 y 5 para realizar el ajustedeaseado. 7. Presione el botón [SOUND] para volver al modo original.Ajuste de P. EQ
A continuación se específican los values que se pueda ajustar en el menu de P.EQ. La Frequencia central, ganancia y curva de Q se pueda memorizar en combinaciones de canales y bandas. Por exemple, freuencia central "250Hz", ganancia "-8dB" y curva de Q "3" pueda memorizarse en la banda 1 delantera. Para Obtener más información sobre la función P.EQ, consulte la sección "Ajuste de P. EQ" (ct págin21).Modificación de los ajustes
Cuando se conecta un decodificador surround de 5,1 canales, se modifican los ajustes de música del modo de ajuste.Selección de ajustes
A continuación de describen los ajustes@cuyos valores se modifican. Para Obtener más información sobre otros ajustes que permanecen invariables, consulte la sección "Modificación de los ajustes" (cf.頁面39) en "Operaciones comunes de cada modo". 1. Presione el botón [A]. La visualización cambia al modo de ajuste.  2. Toque la visualización de ajustes para selectionar el ajuste que va a programar. * Si toca la parte izquierda de la pantalla, los ajustes principales cambian uno a uno. Si toca la parte izquierda de la pantalla, los ajustes secundarios cambian continuamente. \* Si toca 山 el centro de la pantalla, los ajustes secundarios cambian uno a uno. Si toca 山 ,los ajustes secundarios cambian continuamente. 3. Si aparece "THROUGH" a la referencia de la pantalla, toque THROUGH para pagar a la visualizacion de detailles de ajuste. 4. Toque 山 la parte derecha de la pantalla o gire el mando [ROTARY] para ajustar los detalles.Para:volveralmodooriginal
1. Presione el botón [A] de nuevo. - Ajustes| Ajuste principal | Ajuste secundario |
| SOUND | CENTER-SP / SRD-SP / SUB-WOOFER • Activación/desactivación (ON/OFF) de los altavoces (cf. págrina 64) |
| FRONT HPF / CENTER HPF / SRD HPF / SUB-W LPF • Ajuste de la Frequencia de filtrado de los altavoces (cf. págrina 64) | |
| SP GAIN • Ajuste del nivel de salute de los altavoces (cf. págrina 46) | |
| DELAY | CENTER-SP / SRD-SP • Ajuste del tiempo de retardo de los altavoces (cf. págrina 65) |
| DOLBY D | D-RANGE • Ajuste del alcance dinámico (cf. págrina 65) |
| PL II CONT | PANorama / DIMENSION / CTR WIDTH • Ajuste fino del modo de música (cf. págrina 47) |
Activación/desactivación (ON/OFF) de los altavoces (CENTER-SP/SRD-SP/SUB-WOOFER)
Activa/desactive (ON/OFF) el altavoz central (CENTER-SP), el altavoz surround (SRD-SP) y el altavoz de subgraves (SUB-WOOFER). Selección "OFF" si no hay ningún altovo central, altovo surround o altovo de subgraves. - El valor preajustado de fabricula es "ON". 1. Presione el botón [A] para selecciónar el modo de ajuste. 2. Toque ↑ ↓ la visualización de ajustes para selecciónar “CENTER-SP” en “SOUND”, “SRD-SP” en “SOUND” y “SUB-WOOFER” en “SOUND”.  3. Toque la parte derecha de la pantalla o gire el mando [ROTARY] para seleccionar "ON" u "OFF". * Si se tratate de "SUB-WOOFER", selección "ON+", "ON- u "OFF". En conditiones normales, selección "ON+". Sin embargo, cuando se selección "ON-", se pueda percirbir claramente un efecto en el rango bajo. 4. Presione el botón [A] para volver al modo original.Ajuste de las Frequencias de filtrado de los altavoces (FRONT HPF/CENTER HPF/ SRD HPF/SUB-W LPF)
Esta funciona le permitteJKLM de filtrado correspondiente a los altavoces realizados. - No se做不到 los altavoces que hayan sido desactivados en la sección "Activación/ desactivación (ON/OFF) de los altavoces (CENTER-SP/SRD-SP/SUB-WOOFER)". - El valor preajustado de fibricula de "FRONT HPF" o "SRD HPF" es "THROUGH" (sin filtró) y el de "CENTER HPF" o "SUB-W LPF" es "120Hz".Ajuste del filtro
FRONT HPF/CENTER HPF/SRD HPF (ajuste del filtró de paso alto)
Este filtro suprime los graves en los altavoces delanteros, central y surround. $$ \text {T H R O U G H} \rightarrow 5 0 \mathrm {H z} \rightarrow 8 0 \mathrm {H z} \rightarrow 1 2 0 \mathrm {H z} $$ Ajuste el filtro correspondiente al altovoz cuando se utilizes altavoces de poco diametro.THROUGH
Realice este ajuste cuando utilise altavoces capaces de tener graves. THROUGH no se pueda ajustar en CENTER HPF.SUB-W LPF (ajuste del filtró de paso bajo en el altovoz de subgraves)
Este filtered suprime los agudos en el altovoz de subgraves. $$ 5 0 \mathrm {H z} \rightarrow 8 0 \mathrm {H z} \rightarrow 1 2 0 \mathrm {H z} $$ Ajuste la fecuencia de filtrado que corresponda al altovoz de subgraves. 1. Presione el botón [A] para selección el modo de ajuste. 2. Toque ↑ la visualización de ajustes para selecciónar "FRONT HPF" en "SOUND", "CENTER HPF" en "SOUND", "SRD HPF" en "SOUND" y "SUB-W LPF" en "SOUND".  SOUNDADJUST MODE FRONT HPF » THROUGH
3. Toque la parte derecha de la pantalla o gire el mando [ROTARY] paraaabstar la fecuencia. * Selezione THROUGH1, 50Hz, 80Hz o 120Hz. *1 THROUGHsolemuestuacuong "FRONTHPF"o“SRDHPF"estaselenacionado. 4. Presione el botón [A] para volver al modo original.Ajuste del tiempo de retardo de los altavoces (CENTER-SP/SRD-SP)
El tiempo que tarda el sonido de cada altovo en llegar a la posición de escucha depende de la instalación del altovo y del時間 del automóvil. Ajuste el tiempo de retardo de cada altovo de forma que el sonido de todos los altavoces llegue a la posición de escucha al mismo tiempo que el sonido de los altavoces delanteros. - El valor preajustado de fabrica es "0 ms". 1. Presione el botón [A] para selecciónar el modo de ajuste. 2. Toque ↑ ↓ la visualización de ajustes para selecciónar "CENTER-SP" en "DELAY" y "SRD-SP" en "DELAY".  3. Toque la parte derecha de la pantalla para ajustar el tiempo de retardo. * El margen de ajuste de "CENTER-SP" es de 0 ms a 5 ms. * El margen de ajuste de "SRD-SP" es de 0 ms a 15 ms. 4. Presione el botón [A] para volver al modo original.Ajuste de lasmericanos de Dolby Digital (D-RANGE)
Estamericano de Dolby Digital para tener los niveles bajo desonido, como las conversaciones de losactores, y suprimir volumenes de sonido altos. Estas functions solo estárn disponible en los discos DVD Dolby Digital. - El valor preajustado de fabricula es "MAX" 1. Presione el botón [A] para selección el modo de ajuste. 2. Toque la visualización de ajustes para selecciónar "DOLBY D" en "D-RANGE".  3. Toque la parte derecha de la pantalla paraaabstar el alcance dinamico y realizar el ajuste deseado. MAX: modo de alcance dinámico máximo de la fuente original STD: modo recomendado para eschucanormal MIN: el modo de alcance dinamico más comprimido que permite eschar con calidad hasta los sonidos bajos. 4. Presione el botón [A] para volver al modo original. 8. EN CASO DE DIFICULTAD| Problema | Causa | Solutión | |
| Generales | La alimentación no se conecta. (No se produce sonido.) | El fusible está quemado. | Reemplace el fusible por otherwise del本身就是 amperaje. Si el fusible vuelve a quemarse, pángase en contacto con el commercio en el que adquirió launidad. |
| Las conexiones son incorrectas. | Póngase en contacto con el commercio en el que adquirió laundry. | ||
| Al utilizes la unidad con amplificadores o con una antenna motorizada, no sale sonido. | El conductor de la antenna motorizada está cortocircuitado a tierra, o se necesita excessiva corrente para controlar remotamente los amplificadores o la antenna motorizada. | 1. Desconecte la alimentación de laundry. 2. Desconecte todos los conductores connectados al conductor de la antenna motorizada. Compruebe todos los conductores para ver si existe un cortocircuito a casa realizando un ohmímetro. 3. Vuela a conectar la alimentación de laundry. 4. Vuela a conectar, uno tras除外, todos los conductores de control remoto del (de los) amplífico (es) al conductor de la antenna motorizada. Si la alimentación de los amplificadores se desconnecta antes de haber connectado todos los conductores, utilise un relé externo para suministrar tensión de alimentación remota (se requiree corrente excesiva). | |
| No suede nada al presionar los botones. La visualización no es precisa. | El microprocesador ha的功能ado mal debido al ruido, etc. | Desconnecte la alimentación, presione el botón [RELEASE] y extraiga el panel de control desmontable (DCP). Mantenga presionado el botón de reposión durante uno 2segundos con un objecto puntiagudo. Botón de reposión | |
| Los connectores del panel de control desmontable (DCP) o de laundry principal está sucios. | Limpie la sueidad con un paño suave ligeramente humedecido en alcohol de limpieza. | ||
| Reproductor de discos compactos/MP3/WMA | No se oye sonido. | Ha insertado un disco que no es compacto, o existen materias extrañas. | Con el panel abatible abierto, mantenga presionado el botón [▲] durante 3segundos o más. La materia extraña saldrá expulsada. |
| No hay ARCHivos MP3/WMA en el disco. | Escribe adeuadamente archivos MP3/WMA en el disco. | ||
| Los archivos no se reconocen como MP3/WMA. | Utilice archivos MP3/WMA adeuadamente codificados. | ||
| Elsystema de archivos no es correcto. | Utilice el systema de archivos ISO9660 level 1, 2 o JOLIET o Romeo. | ||
| El sonido salute o se oye ruido. | El disco está sucio. | Limpie el disco con un paño suave. | |
| El disco está muy rayado o alabeado. | Reemplace el disco por otherwise que esté en buena conditiones. | ||
| Se canta o se salute el sonido. Se genera ruido o se mezcía ruido con el sonido. | Los archivos MP3/WMA no está干嘛 adeuadamente codificados. | Utilice archivos MP3/WMA adeuadamente codificados. |
| Problema | Causa | Solutución | |
| Reprodctor de discos compactos/MP3/WMA | El sonido es malo inmediamente después de haber connectado la alimentación. | Es possible que se hayan formado gotas de agua en el objetivo interno cuando haya estacionado en un lugar humedo. | Deje que se seque durante 1 hora con la alimentación connectada. |
| Nombre de archivo erróneo | El sistema de ARCHivos no es correcto. | Utilice el Sistema de archivos ISO9660 level 1, 2 o JOLIET o Romeo. | |
| No se realiza la reproducción de la lista de reproducción. | El nombre o la extension del archivo no son correctos. | Para el nombre de archivo de MP3/WMA, utilize characteres alfanumericos/ASCII. Para la extensión de archivo de una lista de reproducción, utilise“.M3U”. |
9. INDICACIONES DE ERROR
Cuando occurra un error, se visualizará el tipo del本身就是. Tome las medidas descritas a continuacion para SOLUTIONAR el problema.| Indicación de error | Causa | Solución | |
| CD/MP3/WMA | ERROR 2 | El disco se haya atascado en el interior del reproductor de discos compactos y no pueda extraerse. | Éste es un problema del reproductor de discos. Póngase en contacto con el commercio en el que adquiría laividad. |
| ERROR 3 | El disco no pueda reproducirse debido a ralladuras, etc. | Reemplace el disco por(other que no está rayado ni alabeado. | |
| ERROR 6 | El disco está cargado al revés en el reproductor de discos compactos y no pueda reproducirse. | Extraiga el disco y cárguelo adecuadamente. | |
| Generales | AMP GUARD | El circuito de protección de los altavoces está operando.Durante esta operación, si realiza cualquier operación de volumen, el visualizador做不到 "AMP GUARD". "AMP GUARD"funciona en occasions cuando se Employmente señales de prueba especialas. | 1. Reduzca el volumen del sonido.La funciona tambiénoulda restaurarsedesconectando la alimentación y volviéndola a conectar.(El volumen de los altavoces se reduceautomática cuando se activa elcircuito de protección de los altavoces).2. Si el sonido se silencia de nuevo,consulte a了我的 Departamento de servicios. |
| Cambiador de discos compactos | ERROR 2 | No hay discos cargados en el interior del Cambiador de discos compactos. | Éste es un problema del cambiador de discos compactos. Póngase en contacto conel commercio en el que adquiría laividad. |
| ERROR 3 | El disco compacto del cambiador de discos compactos no pueda reproducirse debido aralladuras, etc. | Reemplace el disco compacto por(other que no está rayado ni alabeado. | |
| ERROR 6 | El disco compacto del cambiador de discos compactos no pueda reproducirse debido aque está cargado al revés. | Extraiga el disco y cárguelo adecuadamente. | |
| Cambiador de videodiscos | ERROR 2 | No es possible reproducir un disco insertado en el cambiador de discos DVD. | Este es un fallo debido al mecanismo del cambiador de discos DVD.Consulte alestablishcimiento en el que adquiría laividad. |
| ERROR 3 | No es possible reproducir un disco debido aralladuras, etc. | Vuelva a probarlo, o reemplace el disco porotó que no está rallado ni alabeado. | |
| ERROR 6 | No es possible reproducir un disco DVD del cambiador debido a que está insertado al revés. | Extraiga el disco y después vuela acargarlo adecuadamente. | |
| ERROR P | Error de nivel de censura de los padres | Ajuste el nivel de censura de los padrescorrecto. | |
| ERROR R | Error de número de region | Extraiga el disco y corrija el error de region. |
10. ESPECIFICACIONES
Sección de laundry
Sistema de sintonía: Sintonizador sintetizador con bucle de enganche de fase (PLL) Frecuencias de recepcion: FM:87,5a108MHz (pagos de 0,05 MHz) MW:531 a 1602 kHz (pasos de 9 kHz) LW:153 a 279kHz (pasos de 3kHz )Sección del reproductor de discos compactos
Sistema: Sistema audiodigital de discos compactos Respuesta en Frequencia: 5 Hz a 20 kHz (±1 dB) Relación postal-ruido: 100 dB (1 kHz) IHF-A Gama dinamica: 96 dB (1 kHz) Distorsión: 0,01%Generales
Potencia de calidad: 4× 31W (DIN 45324, +B = 14,4V) Tensión de alimentación: 14,4 V CC (permisible de 10,8 a 15,6 V), negativo a masa Consumo de corriente: Menos de 15 A Impedancia de los altavoces: 4Ω (permisiblede4a8Ω) Corriente nominal de la antenna motorizada: 500 mA o menos Peso: Unidad principal: 1,7 kg Controlador remoto: 80g (incluyendo la pila) Dimensiones: Unidad principal: 178 (An) × 50 (Al) × 155 (Prf) mm Controlador remoto: 44 (An) × 110 (Al) × 27 (Prf) mmNota:
Las specifications y el Diseño está susjetos a cambio sin previo aviso por motivo de mejoras. Tack for att du har kocht denna Clarion-apparat. * Läsigenom hela bruksanvisingen innan du böjr använda bilstereon. * Spara bruksanvisingen på nagot lättillgangligt stalle (t.ex. i handskfacket) after att du LASTigenom den. * Kontrollera innehålet på det medfoljande garantikortet och tag väl vara på det tillsammans med braksanvisningen. * Denna bruksanvisning innehäller instruktioner om hur du manövrar en CD-växlare, DAB och TV-tuner som har anslutits via en CeNET-kabel. CD-växlaren och TV-tunern har också sina egnà bruksanvisningar, men i dem beskrivs inte hur apparaterna faktiskt används.Innehäll
1. FÖRSIKTIGHETSÄTGÄRDER 3 Den lutande konsolen 4 Hantering av CD-skivor 4 2. KONTROLLER 5 3. TERMINOLOGI 6 Knapparnas namn och vad de anvands till 6 De huvudsakliga manoverknapparna nár andra apparater ar anslutna till den har bilstereon .... 7 Displayenfunktioner 7 Displayenfunktioner 8 4. DEN LÖSTAGBARA KONTROLLPANELEN (DCP) 9 5. FJARRKONTROLLEN 10 Hur man satter i batterierna 10 Hur knapparna på fjarrkontrollen fungerar 11 6. HUR MAN ANVANDER BILSTEREON 12 Grundlaggande anvandningssatt 12 Hur man anvander AC-Processor III 17 Hur man anvander radion 23 Hur man anvander RDS 26 Manövrering for CD/MP3/WMA-skiva 31 Att lata olika lyssnare lyssna på olika musik samtidigt (2-ZONE-funktionen) 36 Gemensamma Funktioner for bada lagena 37 7. HUR MAN ANVANDER OLIKA TILLVALSKOMPONENTER 51 Hur man anvander en CD-vaxlare 51 Hur man anvander en TV-tuner 54 Digital radio / Hur man anvander DAB 58 5.1ch Surround-avkodning 61 8. OM DET UPPSTAR PROBLEM 66 9. FELMEDDELANDEN PÄ DISPLAYEN 68 10. TEKNISKA DATA 691. FÖRSIKTIGHETSÄTGÄRDER
1. Denna apparat ar endast avsedd att anvandas i vanlga 4-hjuliga fordon. Den lampar sig inte for anvandning i traktorer, gaffeltruckar, gravmaskiner, terranggående fordon, 2-ller 3-hjuliga motorcyklar, motorbatar erler andra speciella sorters fordon. 2. När det ar mycket kallt i bilen och du använder CD-spelaren strax after att du slagit pa bilvärmaren kan det bildas imma pa CD-n erller pa optiken inuti CD-spelaren sa att det inte gär att spel a skivan ordentlich. Om det bildas imma pa CD-n sa torka av den med en mjuk tornduk. Om det bildas imma pa optiken i CD-spelaren sa vanta ungefär en timme med att anvanda CD-spelaren tills kondensen avdunstat av sig själv och det går att använda CD-spelaren på normalt sattigen. 3. Vid körning på mycket ojemnt underlag kan det uppstä kraftiga vibrationer som leder till att CD-spelaren hoppar. INFORMATION FÖR ANVÄNDARE.: ÄNDERINGAR ELLER OMBYGGNAD AV DENNA PRODUKT SOM EJ GODKÄNTS AV TILLVERKAREN MEDFOR ATT GARANTIN BLIR OGILTIG.A WARNING
Av sakerhetsskal bör du inte titta på erler använda pekskärmen när du kör.Den Iutande konsolen
Pà denna modell används en lutande konsol som gör det möjlig att använda en stor display. Var noga med att stänga den lutande konsolen纳税人 den används.A VARNING
Var försiktig sä att du intekommen i kläm med fingrarna;när du öppnar eller stänger den LUTANDE KONSOLEN.
1. Stäng alltid den LUTANDE KONSOLEN für sakerhets skull när du inte tänker anecd bilstereon pääett tag erler innan du vrider om tändningsnyckeln till AVSTÄNGT lage. Om du vrider om tändningsnyckeln till AVSTÄNGT lage med den LUTANDE KONSOLEN i vinklat lage gär den LUTANDE KONSOLEN inte att stänga.Hantering av CD-skivor
Använd endast CD-skivor som är försedda med markningen iller Spela inte hjartformade, attkantiga aller andra CD-skivor med ovenlig form ienna CD-spelare. Det kan hända att vissa CD-skivor, inspelade i CD-R/CD-RW-funktionen, inte kan användas.Hantering
- Jämfört med vanliga musik-CD-skivor ar CD-R-skivor och CD-RW-skivor mycket kānslga for Hög temperatur och luftfuktigkeit, vilket kan góra att det inte gár att spelva vissa CD-R-skivor och CD-RW-skivor. Undvik därfor att lata sādana skivor ligga kvar进展情况 i bilen. - Nya CD-skivor kan vara en aning ojämnä i kanterna. För sādana skivor kan det hända att CD-spelaren inte fungerar eller att ljudet hoppar. Jämnä i sā fall till skivkanten med en kulspetsppenna e.d. Klistra aldrig fast etiketter på CD-ns yta och skriv inte på den med blyerts- eller kulspetsppennor. - Spela aldrig CD-skivor med tejp erler lim pa, aller med rester after avrivna etiketter. Om du forsoker spelena sadan CD kan det hända att det inte gär att mata ut den ur CD-spelaren igen ellert det uppstar andra skador pa CD-spelaren. 2. Innan den LUTANDE KONSOLEN stängs kan det höras ett bromsljud frän sakerhetsmekanismen, men det ar normalt. 3. Om du flyttar den LUTANDE KONSOLEN for hand kan det uppsta spelrum. Om det skulle uppsta spelsum sa ratta till det medan bilstereon ar paskigen genom att trycka pa [A]-knappen for den LUTANDE KONSOLEN. 4. När en skiva/minidisk har matats ut Återgår den LUTANDE KONSOLEN automatiskt till vinklat ell er stängt lage. Om det finns nagot hinter i vägen nar den LUTANDE KONSOLEN försöker stängas utlöses en sakerhetsmekanism som gör att den LUTANDE KONSOLEN öppnas igen. Om detta skulle inträffa sa flytta undan hindret och tryck på [▲]-knappen. 5. Håll 8 respektive 12 cm CD-skivorna plant när du sätter i eller tar ut dem for att undvika att de blir repade. - Spelainte CD-skivor med grova repor, eller CD-skivor som ar skeva, knackta e.d. Sádana CD-skivor kan leda till Funktionsfel ull til skador på CD-spelaren. - Ta ut CD-n ur sin ask genom att trycka på upphöjningen mitt i asken och lyfta ut skivan. Håll skivan försiktigt i kanterna. - Använd inte södana skyddsark für CD-skivor som finns i handeln, eller skivor med stabilisatorer eller liknande. De kan skada skivan eller fastna i mekanismen inuti CD-spelaren sa att den går sönder.Förvaring
- Utsatt inte CD-skivor für direkt solljus eller nägon form av värmekällor. - Utsatt inte CD-skivor für hög luftfuktigkeit aller damm. - Utsatt inte CD-skivor for utblåset från bilvärmaren.Rengöring
- Torka av evdamm ell fingeravtryck med en mjuk torkduk. Torka alltid frAn CD-ns mitt och ut mot kanten. - Använd inga kemikalier som t.ex. rengöringsmedel, antistatspray, eller thinner for att rengöra CD-skivor. - Om du anvander en speciell CD-skivrengörare sà lát CD-n torka ordentligt innan du börjar spelà den.2. KONTROLLER
Huvudenhet
DEN LUTANDE KONSOLEN öppen
3. TERMINOLOGI
Knapparnas namn och vad de används till
Knappen [RELEASE]
- Ta loss frontpanelen.Ljussensor
- Denna sensor registrar ljusstyrkan i din bil. När autodimmerfunktionen ar installd pa "AUTO" dämpas displayens ljusstyrka i forhällande till den ljusstyrka som denna sensor registrar.Knappen [ROTARY]
Tryck pā knappen För att satta pā anlaggningen. För varje tryck pā denna knappändras laget. Tryck pa knappen och häll den intryckt i 1 sekund eller langre for att stenga av anlaggningen. - Du kan ocksá vrida på denna knapp für att ställa in volymen eller für att modificera de olika installingarna i instalningslaget.Knappen [△]
- Kopplar in/bort kontrollpanelen. Om en skiva sitter i matas den ut Near kontrollpanelen kopplas in.OBS:
Häll knappen [▲] intryckt i 1 sekund aller mer om skivan inte matas ut.Knappen [A]
- Använd denna knapp für att ställa in aller,andra de olika inställingarna i andringslåget. - Användenna knapp for att lagga in stationsnamn i radiolaget aller skivtitlar i CD-laget.Knappen [SOUND]
- Använd denna knapp für att gora eller öandra olika ljudinställningar. - Om du häller denna knapp intryckt i mer än 1 sekund växlar också 2-zonsfunktionen mellan PÅ och AV.Knappen [TA]
- Användenna knapp for att ställa in standbylaget for TA (trafikmeddelanden) nar 2-zonsfunktionen ar "AV"). Kopplar om 2-zonsfunktionen. Om du häller denna knapp intryckt i mer än 1 sekund ändras typen av 2-zonsfunktion (om denna Å "PÄ").Knappen [▶II]
- För att pausa och starta om ett spår (i CD-låget). - Användenna knappforall ställa in standbylagetfor PTY(programtyp)eller PTYprogram.Displayen
- Visar information om anlaggningens status, sösom fininställning/avspelning och indicatorer. - Rör vid displayen med fingret och peka på ökänd for att aktivera Funktionen. (se sidan 8)De huvudsakliga manöverknapparna Near andra apparater ar anslutna till den har bilstereon
När CD-/DVD-växlare ar inkopplad
* Se avsnittet "Hur man anvanderen CD-växlaren" (sidan 51) for ytterligare uppliesningar. DVD-växlaren beskrivs i den braksanvisning som medfoljer DVD-växlaren.Knappen [▶II]
- Spela eller pausa en CD eller DVD.Knappen [A]
- Används für att lagga in skivtitlar i CD-växlarläget.När TV/DAB ar inkopplad
* Se avsnittet "Hur man använder en TV-tuner" (sidan 54) respektive "Digital radio/Hur man använder DAB" (sidan 58) fürytterligare uppliesnaringar.Knappen [TA]
- Användenna knapp for att ställa in standbylaget for TA (trafikmeddelanden) till DAB-laget. (Denna Funktion ar bara tillganglig for DAB-mottagare.) Tryck på knappen ochhall den intryckt i 1 sekund eller langre for att stanga av erller satta på INFO-laget. (i DAB-laget)Knappen [▶II]
- Bytläge for TV-bilden eller VTR (externt) bildlåge. (i TV-låget) - Användenna knappforall ställa in standbylagetforPTY(programtyp)ellerPTYprogrami DAB-laget.Knappen [A]
- Denna knapp används for att lagga in namnet på TV-stationerna. (i TV-låget)Displayenkutioner
Displayenfunktioner
Ienna anlaggning anvands en pekskarm som display. Du kan manovrera denna display genom att bara rora vid den med fingertoppen. Det finns fyra huvudsakliga displayfunktioner:Peka
Rör vid displayen med fingertoppen och ta bort den inom 1 sekund. Detta ar den mest grundläggande manövern Near du anvander displayen.Peka och tryck
Rör vid displayen med fingertoppen och häll kvar den på skärmen i 1-2 sekunder eller mer. Flytta inte fingret nar du rör displayen. När du pekar och trycker på displayen i 1 sekund eller langre visas till exempel listor, eller sakkopplas andra praktiska funktoner in. När du pekar och trycker på displayen i 2 sekunder eller langre lagrasinstallingar ullann information i minnet.Peka pà
Peka pá displayen med fingertoppen, flyta fingret till vänster (←) eller höger (→) à att det fortfarande rör displayen och ta bort fingret inom 1 sekund. Denna Funktion används für att valja forinställda minnen (1 till 6) eller spar. Peka
Peka på displayen med fingertoppen, flytta fingret till vänster ( ) eller hóger ( ) à att det fortfarande rör displayen ochhall kvar fingret på displayen. Funktionen i fraga fortsätter under den tid som du häller fingret på displayen. Denna Funktion används till exempl für manuell inställning ell snabbspolning framå/bakåt. 4. DEN LÖSTAGBARA KONTROLLPANELEN (DCP)
Kontrollpanelen går att ta av for att Förhindra att bilstereon blir stulen. Förvara DEN LÖSTAGBARA KONTROLLPANELEN i sitt fédral njär du tar av den sä att den inte blir repad. Vi rekommenderar att du tar med dig kontrollpanelen nar du lämnar bilen.Hur man tar av DEN LÖSTAGBARA KONTROLLPANELEN (DCP)
1. Kontrollera att den LUTANDE KONSOLEN ar stängd och stäng av bilstereon. 2. Tryck in [RELEASE]-knappen djupt for att oppna DEN LOSTAGBARA KONTROLLPANELEN.  3. Dra DEN LÖSTAGBARA KONTROLLPANELEN (DCP) mot dig och ta av den. A WARNING
- Stäng alltid den LUTANDE KONSOLEN innan du tar av DEN LÖSTAGBARA KONTROLLPANELEN. - Om du tar av DEN LÖSTAGBARA KONTROLLPANELEN med den LUTANDE KONSOLEN öppen, stängs genast den lutande konsolen. Var försiktig sä att du intekommen i kläm med fingrarna.Hur man sätter på DEN LÖSTAG-BARA KONTROLLPANELEN (DCP)
1. Stick in DEN LÖSTAGBARA KONTROLLPANELEN sà att del (A) på DEN LÖSTAGBARA KONTROLLPANELENs högr sida hakar fast i haken (B) på huvudenheten.  2. Tryck forsiktigt in DEN LÖSTAGBARA KONTROLLPANELENs vänstra sida © på plats i huvudenheten. A WARNING
- DEN LÖSTAGBARA KONTROLLPANELEN blir lätt skadad om den utsats for stötar. Var försiktig sä att du inte tappar den ell erller utsätter den for kraftiga stötarRARY du tagit av den. - Om [RELEASE]-knappen trycks in och DEN NEDFällBARA PANELEN inte ar fastlåst på plats kan den falla ned på grund av bilens vibrationen. Detta kan leda till skador på DEN LÖSTAGBARA KONTROLLPANELEN. Var därför noga med att antingen satta tillbaka den på huvudhenet erller att lagga den i sitt fédral after att du tagit av DEN LÖSTAGBARA KONTROLLPANELEN. - Kontakten som forbinder DEN LÖSTAGBARA KONTROLLPANELEN med huvudenheten ar en extrem viktig del. Var försiktig sä att du inte skadar den genom att trycka på den med naglarna, skruvmejslar, e.d.Observera:
- Om DEN LÖSTAGBARA KONTROLLPANELEN blir smutsig sä anecd bara en mjuk, torr torkduk För att torka rent den.5. FJÄRRKONTROLLEN
Hur man sätter i batterierna
1. Vänd fjärrkontrollen upp och ned, och skjut sedan av locket på baksidan i pilens riktning. 2. Satt i de medfoljande AA-batterierna (SUM-3, R-6/1,5 V) i fjarrkontrollen vanda pa det satt som visas i figuren, och stang sedan locket pa baksidan igen.Observera:
Om batterier hanteras felaktigt finns det risk att de exploderar. Var darfornoga med foljande punkter: - Byt alltid ut báda batterierna mot nya batterier vid batteribyte. - Undvik att kortsluta, ta isär erller värma upp batterier. - Elda aldrig upp forbrukade batterier. - Lämna forbrukade batterier till atervinning på lamplig plats. Hur knapparna på fjärrkontrollen fungerar
| FunktionslägeKnapp | Radio (RDS)/DAB | CD/MP3 | CD-växlareDVD-växlare | TV |
| [FUNC] | Växlar mellan radion, DAB, CD/MP3-spelaren, CD-växlare, DVD-växlare och TV-mottagning,AUX. | |||
| [BAND] | Växlar mellan frekvensbanden. | Spelar det Första spåret. Hoppar till det Första spåret och börjar spelà det. | Hoppar tillnecta CD i stigande ordning. | Växlar mellan frekvensbanden. |
| [▲], [▼] | Höjer och sänker volymen (for alla Funktionslägen). | |||
| [←], [▶] | Hoppar uppät och nedät mellan snabbvals-stationerna. | Hoppar framät och bakät mellan spåren. När knappen hälls intryckt i mer øn 1 sekund: Snabbssökning framål/bakål. | Hoppar uppät och nedät mellan snabbvals-stationerna. | |
| [▶■] | Saknar Funktion. | Växlar mellan spelning och paus. | Saknar Funktion. | |
| [MUTE] | Slår på och stänger av ljuddämpningen. | |||
| [TA] | Slår på och stänger av TA-funktionen.Tryck in knappen och häll den intryckt i mer øn 1 sekund fortt växla mellan ljudkällan forMAIN-zonen (huvudzonen) och den for SUB-zonen (underzonen) (gäller bara;när 2-ZONE-funktionen År pāslagen). | |||
| [DISP] | Växlar mellan huvudisplay och klocka (CT). | |||
| [PS/AS] | Snabbvalsavsökning.När knappen hälls intryckt i mer øn 2 sekunder: automatisk stationslagring. | Snabbkontroll.Häll knappen ned-tryckt under 1 sekund erler mer for att starta snabbkontroll av map-par i MP3/WMA-funk-tionen. | Snabbgenomlyss-ing. När knappen hälls intryckt i mer øn 1 sekund: Snabbgenomlyssing av alla CD-skivorna. | Snabbvalsavsökning.När knappen hälls intryckt i mer øn 2 sekunder: automatisk stationslagring. |
| [AF] | Slår på och stänger av AF-funktionen.När knappen hälls intryckt i mer øn 1 sekund: REG-funktionen på och av. | Repeterad spelning.Häll knappen ned-tryckt under 1 sekund erler mer for att starta repeterad spelning av mappar i MP3/WMA-funktionen. | Upprepad spelning.När knappen hälls intryckt i mer øn 1 sekund: Upprepad spelning av alla CD-skivorna. | Saknar Funktion. |
| [PTY] | Slår på och stänger av PTY-funktionen. | Slumpmässig spel-ning.Häll knappen ned-tryckt under 1 sekund erler mer for att starta slumpmässig spel-ning av mappar i MP3/WMA-funktio-nen. | Spelning i slumpvis ordning.När knappen hälls intryckt i mer øn 1 sekund: Spelning av alla spå-ren på alla CD-skivor-na i slumpvis ord-ing. | Växlar mellan TV-och videoband-spelarläget. |
| [2-ZONE] | Tryck in knappen och häll den intryckt i mer øn 1 sekund fortt slå på respektive stänga av 2-ZONE-funktionen.Tryck på knappen fortt växla mellan huvudzonen och subzonen;när 2-ZONE-funktionen ør pāslagen. | |||
6. HUR MAN ANVÄNDER BILSTEREON
Grundläggande användningssätt
A WARNING
Skruva alltid ner volymen innan du stänger av bilstereon eller vrider om tändningsnyckeln. Bilstereon kommer namligen ihåg den senaste volyminställingen. Om du stanger av bilstereon med volymen högt uppskruvad, kan det plötsliga höga ljudet när du slår på bilstereon igen orsaka hörsk达标 erller skador på bilstereon.Att satta på/stänga av anlaggningen
Att satta på anlaggningen
OBS:
- Var försiktig när du använder anlaggningen under lang tid utan att motorn gär. Om du laddar ur bilbatteriet for mycket kan du inte starta motorn, vilket kan minska batteriets livslangd. 1. Tryck på knappen [ROTARY]. Det tidigare aktiva laget visasSystemkontroll
Första gängen som anlaggningen sätts på after att ha anslutits kontrolleras vilken utrusting som ar inkopplad (detta kallas "systemkontroll"). Gà till vaga enligt foljande for att genomföra systemkontrollen narr strömmen ar på och texten "System Check" visas. 1. Tryck på knappen [ROTARY]ningar texten "System Check" visas på displayen. Systemkontrollen startar. När systemkontrollen är avsutad visas texten "Completed" på displayen. 2. Tryck på knappen [ROTARY] ingen. Huvudsjanfor radiolagetvisas.CODEMATIC-funktion
När "CODEMATIC" ar installd på "ON" och anlaggningen slås på med frontpanelen på visas sakerhetssidan. Peka på skärmen i den ordning som har ställts in iändringslåget.  Se avsnittet "Att anvanda sakerhetsfunktionen (CODEMATIC)" (sidan 50) for mer information om CODEMATIC-funktionen.Att stänga av anlaggningen
1. Håll knappen [ROTARY] intryckt i minst 1 sekund.Att valja ett lage
1. Tryck på knappen [ROTARY] für attalandadriftsläge. 2. För varje tryck på knappen [ROTARY] andras driftslåget i följande ordning: Radioläge DAB-läge CD/MP3-läge CD-växlarläge DVD-växlarläge TV-läge AUX-läge Radioläge ... * Extern utrustning som inte År ansluten till CeNET visas inte.Att ställa in volymen
1. Om du vrider knappen [ROTARY] medsols ökar volymen, om du vrider den motsols minskar volymen. * Volymniván kan stállas in pá mellan 0 (minimum) och 33 (maximum).Byte av driftslage
Det finns 2 grundlägen: standarddrift och forenklad drift. 1. Peka till vänster på huvudsdan med fingertoppen ochhall kvar fingret i 1 sekund erler mer. Driftslaget andras.  Vid forenklad drift behover duinte peka pa eller pa huvudsan i radiolaget och CD-laget och anlaggningen kan anvandas med forenklade komndon. Mark dock att följande Funktioner inte ar tillgangliga vid forenklad drift: - Snabbval, val av mapp, val av skiva och andra Funktioner som fordrar att du trycker pa t till hoger pa displayen - Åndring av visningen på displayen (se sidan 13) - Åndring av titelvisningen (se sidan 14) - Visning av titelinmatningslåget. På andere sidor øn hvudsdan (t. ex. listdisplayyen och ändringslåget) ør det ingen skillnad mellan standarddrift och forenklad drift. Beskrivningarna ienna bruksanvisning avser huvudsakligen standarddrift. Se beskrivningarna av skarmvisningen i radiolaget och CD-laget for information om hur den forenklade driften fungerar.Attalandavisingenpá displayen
1. Peka i mitten av displayen. For varje tryck andras visningen enligt foljande: Skärmslackare
När skärmslåckaren ar inställd på "ON" och du inte använder anlaggningen under 30 sekunder visas skärmslåckaren. Se sidan 41 För mer information.Bakgrundsbild
Om du pekar i mitten av displayen och häller kvar fingret i 1 sekund aller mer ändras bakgrundsbilden.| ① | ⑨ |
| ② | ⑩ |
| ③ | ⑪ |
| ④ | ⑫ |
| ⑤ | ⑬ |
| ⑥ | ⑭ |
| ⑦ | ⑮ |
| ⑧ | ⑯ |
Spektrumanalysatorn
Om du pekar till hoger på displayen och haller kvar fingret i 1 sekund eller mer narr spektrumanalysatom (S/A) visas andras visningen av spektrumanalysatom.| S/A SCAN | S/A 1, S/A 2, och S/A 3 visas i minst 10 sekunder vardera. |
| S/A 1 | S/A 1 FLDR No. 003 TOP |
| S/A 2 | S/A 2 FLDR No. 003 TOP |
| S/A 3 | S/A 3 FLDR No. 003 TOP |
Att andra titelvisningen
Du kan visa skivtitlar och annan information som finns lagrad pa skivorna när du spelar CDskivor i CD- eller CD-växlarlaget. 1. Peka till höger på titeldisplayen ochhall kvar fingret i 1 sekund eller mer. For varje tryck andras visningen enligt följande:CD-TEXT
User title (disc) CD-text title (disc) Artist name CD-text title (track) User title (disc) ...MP3/WMA
Folder File Album TAG Artist TAG Title TAG Folder...Anmärkningar:
- MP3 stöder ID3-taggarna i V2.3/2.2/1.1/1.0. - Vid taggvisningen prioriteras V2.3/2.2. - När det gäller album-taggar für WMA visas den information som finns i filhuvudet. - BarA SCIll-tecken kan visas i taggarna.Att rulla en titel
Peka pa t p at titeldisplayen n ar titeln visas. Titeln rullar at vänster.Att slutarulla
Peka pa 日 pa titeldisplayen.CT-funktion (klocka)
CT-funktionen tar emot CT-data frän en RDS-station och visar tiden på displayen. Peka i mitten av displayen for att visa CT-sidan. - Om inga CT-data tas emot visas "---CT" på displayen.OBS:
- CT-data sänds inte av alla radiostationer eller i allaaland. I vissa områden kan det ochså hända att CT-data inte visas som de skä.Inställniing av ADF
- ADF ar en förkortning für Anti Distorsion Filter. De använda Funktionerna "Liveliness Enhancement Filter" och "Sound Tone Compensation" ger en välmodulerad realistisk avspelning utan att pāverka den ursprungliga tonklangen. Anlaggningen har 4 olika sorters tonklangseffekter lagrade i minnet. Välj den du foredrar. ADF-1: Lämpig für originalhögtalare ADF-2:Lamplig for extrahogtalare ADF-3: Lämpig für koaxialhögtalare USER : Denna effekt kan du ställa in after dina egna preferenser. OFF: Ingen tonklangseffekt - Standardinställingen ar "OFF".Anmärkningar:
- Volymen ändras när ADF-installungen ändras. Sänk dārfor volymen, sub-woofervolymen ("SW VOLUME") och mithögtalarvolymen ("CTR VOLUME") sā mycket som möjigt när du ändern installingen. - I vissa högtalarsystem går det inte alltid att få ut tillräcklig effekt. Justera i sö fall ADF-parametern eller volymen. - När ADF ar INSTALL på "USER", "1", "2" eller "3"är inte VSE-funktionen eller BASS/TREB-funktionen under EQ-SELECT inkopplade. 1. Tryck på knappen [SOUND]. 2. Peka pà ADF.  3. Peka pà till hoger pà displayen for att valja ADF-laget.  När ADF ar entwickel på "OFF" paverkar inte ADF-installingen musikkällan. Därmed ar ADF-installingen avslutad. Tryck på knappen [SOUND] for att gå tillbaka till ursprungslaget. * Tryck på USER, 1, 2, 3 eller OFF. 4. Tryck på knappen [A] für att äandra i ADFinställningen. 5. Peka pa 山 山 pa displayen for att valja den parameter som sha andras. For varje tryck pa 山 山 andras visningen enigt foljande: - Parameter (när du har valt USER i punkt 3) BASS TREBLE COMP BASS... Parameter (när du har valt 1-3 i punkt 3) LEVEL COMP LEVEL... 6. Peka på till höger på displayen für attalandarametern. * “BASS” och “TREBLE” kan ställas in mellan 1 och 13. * “LEVEL” kan ställas in mellan -3 och +3. * Valj antingen "ON" eller "OFF" für "COMP". 7. Tryck på knappen [SOUND] for att gå tillbaka till ursprungslaget.Att ställa in sub-woofern och mithmögtalaren
- "SW VOLUME" (sub-wooervolymen) kan bara stallas in nar "SUB-WOOFER" ar installd pa "ON". - "CTR VOLUME" (mitthögtalarvolymen) kan bara ställas in nar Dolby Pro Logic II-laget ar installet pa antingen "MUSIC" eller "MATRIX", "SP-SETTING" pa "CTR+SW" och "CENTER-SP" pa "ON". - Standardinställingen für SW VOLUME ar "0" och für CTR VOLUME "0". 1. Tryck på knappen [SOUND]. 2. Peka på A-MODE.  3. Peka pa t ppa parameterdisplayen for att valja "SW VOLUME"ller "CTR VOLUME".  4. Peka på till hoger på displayen for att andra parametern. * Denna parameter kan ställas in mellan -5 och +5. 5. Tryck på knappen [SOUND] for att gå tillbaka till ursprungslaget.Att stalla in balans/fader
BALANS:
Används für att ställa in volymbalansen mellan vänster och höger högitalare.FADER:
Används für att ställa in volymbalansen mellan de främre och bakre högtalarna. - Standardinställingen für BALANCE ar "0" och für FADER "0".OBS:
Balans/fader kan inte stallas in när du har ställt in AC-PRO III på "PRO" (se sidan 44) och positionsfunktionen ar installd på "ON". Ställ in balans/fader via "Att öppna positismyn" (se sidan 17). 1. Tryck på knappen [SOUND]. 2. Peka på A-MODE.  3. Peka pa t ppa parameterdisplayen for att valja "BALANCE" ether "FADER".  4. Peka på till hoger på displayen for att andere parametern. * "BALANCE" kan ställas in mellan L13 (vänster sida dominerar) och R13 (höger sida dominerar). * "FADER" kan ställas in mellan R12 (de bakre högtalarna dominerar) och F12 (de främre högtalarna dominerar). 5. Tryck på knappen [SOUND] for att gå tillbaka till ursprungslaget.Att ställa in bas/diskant
Bas och diskant kan bara stallas in nár Dolby Pro Logic II-åget ar INSTALL på "OFF" (se sidan 17) och "EQ SELECT" på "BAS/TREB"(se sidan 44). - Standardinstallingen ar "0". 1. Tryck på knappen [SOUND]. 2. Peka på A-MODE.  3. Peka pa t ppa parameterdisplayen for att valja "BASS" ether "TREBLE".  4. Peka på till hoger på displayen for att andere parametern. * Denna parameter kan ställas in mellan -6 och +6. 5. Upprepa moment 3 och 4 for att anders parametern. 6. Tryck på knappen [SOUND] für att gå tillbaka till ursprungslaget.Hur man anvander AC-Processor III
Dolby Pro Logic II
Dolby Pro Logic II ar en matrisavkodningsteknologi som anvanderen upppaterad digital matristeknologi for att ytterligare forbättra Dolby Pro Logic. Det ger ett utmärkt 5,1-kanaligt ljud bade for material som är kodat med Dolby Surround och for material i stereo som CD-skivor. Dessutom blir surroundkanalerna i stereo och täcker hela frekvensbandet (20 Hz till 20 kHz). Tack vare det kan du lyssna på vilket stereomaterial du vill med dynamiskt 5,1-kanalsljud. Beroende på vilken sorts material du lyssnar på gär det att välja mellan ett musikläge och ett matrisläge. Tillverkas på licens frän Dolby Laboratories. "Dolby", "Pro Logic" och dubbel-D-symbolen ar varumärken für Dolby Laboratories.PL II-menyn (Dolby PL II)
Välj driftslägena MUSIC aller MATRIX beroende på den källa du skaspela i Dolby Pro Logic II-låget. - Standardinställningen ar "OFF".■ MUSIC (musiklåget)
- Detta läge lämpar sig für stereoljudkällor sāsom CD-skivor. - Det finns ytterligare ett inställningsläge für finjusteringar eftersom ljudfaltet breder ut sig på olika satt beroende på den inspelade musikkällans skick (se sidan 47).MATRIX (matrisäget)
- Detta läge lampar sig für ljudkällor sösom AM/ FM-radio.OFF
- Dolby Pro Logic II anvands inte. I stället anvands AC-PROIII. Se avsnittet "Att välja ett lage" (sidan 44) für mer information om AC-PROIII. 1. Tryck på knappen [SOUND]. 2. Peka pà Dolby PLII. 3. Peka pà till hóger pà displayen for att valja Dolby Pro Logic II.  Lagesvisningen andras enlistigt foljande: MUSIC (musikläge) MATRIX (matrisläge) OFF (PL II av) MUSIC (musikläge) ... * Se sidan 45 für mer information om volymjustering für mitthögtalaren/subwoofern. 4. Peka pà RTN.Att öppna positionsmenyn
Med hjälp av POSITION kan du välja mellan 5 inställingar av hur ljudet gär mellan högtalarna och den plats)där du sitter. Tidsanpassningsfunktionen gör också att högtalarna kan regleras så att varje högtalare ger sama ljudeffekt till alla lyssnare. Ställ in AC-PROIII på "PRO" (se "Att valja ett lage" på sidan 44). - Standardinställningen für POSITION ar "OFF" och "FRONT" für grundmenyn.Positionsmenyn
5 positionsmenyer har lagrats i minnet. Tryck pà onskad meny. 1. Tryck på knappen [SOUND]. 2. Peka på POSITION.  3. Peka på «» på ON/OFF-displayen. Positionseffekten växlar mellan ON och OFF.  När positionseffekten ar installd på “OFF” påverkar inte positionsinställingen musikkällan. Därmed ar positionsinställingen avslutad. Tryck på knappen [SOUND] for att gå tillbaka till ursprungslaget. 4. Peka pA B/U for att valja "BASIC".  Varje gäng du trycker på B/U增值税 du mellan "BASIC" och "USER". 5. Peka pa 卡 pa grundmenyns nummer for att valja en grundmeny. Grundmenyn| Nr | Beteckning | Sittplats |
| 1 | FRONT-L | Främre vänstra stolen |
| 2 | FRONT-R | Främre högra stolen |
| 3 | FRONT | Framsäte |
| 4 | REAR | Baksäte |
| 5 | FULL SEAT | Alla platser |
Att ändra/spara positioner (användarminnet)
Användarminnet gör också att högtalarna kan regleras så att varje högtalare ger sama ljudeffekt till alla lyssnare med utgangspunkt frän grundmenyn. Du kan spara upp till 5 inställingar i användarminnet.T-ALIGN (tidsanpassning):
Avstandet mellan lyssnaren och varje högtalare kan laggas in i steg pa 2,3 cm och den tid det tar forljudet fran varje högtalare att na lyssnaren kan stallas in.SP GAIN (högtalarfürstärkning):
Justerar hógtalarens utvolym. Ställer in sama utvolym frān alla hógtalare. 1. Tryck på knappen [SOUND]. 2. Peka på POSITION. 3. Peka på «» på ON/OFF-displayen. Positionseffekten växlar mellan ON och OFF. 4. Peka på B/U for att valja "BASIC" eller "USER". 5. Peka på 山 till hoger på displayen for att valja den meny som anvands som den som sha andras. 6. Tryck på knappen [A]. 7. Peka pà till vänster pa displayen for att valja "T-ALIGN" eller "SP GAIN". 8. Peka pa 山 山 mitt pa displayen for att valja den parameter som sha andras. For varje tryck pa 山 山 andras parametern enigt foljande:  Parametrar *1 Visas endast:när "SUB-WOOFER" under "SOUND" ar installd på "ON" iändringslåget. *2 Visas endast;nar "SUB-WOOFER" under "SOUND" ar installd på "ON" i andringslaget och "T-ALIGN" valjs i steg 7. 9. Peka på till hoger på displayen for att andere parametern.  POSITION EDIT FRONT L SP>085.1cm * "T-ALIGN" kan ställas in mellan 0 och 501,4 cm i steg på 2,3 cm. * "SP GAIN" kan ställas in mellan -20 och 0 dB. 10. Upprepa moment 7 till 9 for attalandra onskad parameter. 11. Peka på RTN;när du har ställt in varje parameter. Displayen Återgår till att visa utgangssidan och “»” visas på BASIC- eller USER-displayen. Därmed ar positionsinställningen slutförd. Gà till väga enligt följande für att fortsätta att lögga in nya varden i användarmenyn. 12. Peka på RTN ochhall kvar fingret i 1 sekund erler langre. Positionsmenylistan visas. 13. Peka och på det användarminne du vill laggga in de nga värdena i i 2 sekunder ullängre. En lang ton hors och de varden du har andrat fram till punkt 10 lagras i anvandarmenyn. Om du hör en kort ton sparas inte värdena. Gör om inställingen fram till punkt 10. 14. Peka pà RTN. 15. Tryck på knappen [SOUND] für att gå tillbaka till ursprungslaget. * Peka på B/U sä att “USER” visas och peka på t Üpä användarminnets nummer für att valja ett sparat användarminne.Att öppna VSE-menyn
Med VSE (Virtual Space Enhancer) kan du kompensera ljudtrycket innate i bilen sa att sama ljudeffekt uppnas oavsett var du sitter. Detta har visats genom simulering. Ställ in AC-PROIII på "STD" (se "Att välja ett läge" på sidan 44). - Standardinställingen für VSE ar "OFF" och "FLAT" für grundmenyn.■ Grundmenyn
Det finns sex sparade grundmenyer furenna Funktion. Tryck på onskad grundmeny. 1. Tryck på knappen [SOUND]. 2. Peka pä VSE.  3. Peka pä pä ON/OFF-displayen. VSE-effekten växlar mellan ON och OFF.  När VSE ar entwickel à “OFF” paverkar inte VSE-installingen musikkällan. Därmed ar VSE-installingen avslutad. Tryck på knappen [SOUND] für att gå tillbaka till ursprungslaget. 4. Peka B/U for att valja "BASIC".  Varje gäng du trycker på B/U växlar du mellan "BASIC" och "USER". 5. Peka pa 山 pa grundmenyns nummer for att valja en grundmeny. Grundmenyer| Nr | Funktion | Beskrivning |
| 1 | FLAT | Flat utjämning av ljudkällan |
| 2 | BASS BOOST | Förstärkta bastoner |
| 3 | HIGH BOOST | Förstärkta mellan- och diskanttoner |
| 4 | IMPACT | Förstärkta laga toner och diskanttoner |
| 5 | ACOUSTICAL | Förstärkta mellantoner (människorösten) |
| 6 | SMOTH | Lättå och mjuka toner |
Att ställa in/spara VSE (användarminnet)
Med hjälp av användarminnesinställingarna kan du kompensera ljudtrycksfordelningen after dina önskemål på grundval av grundmenyn for VSE. Upp till sex användarändringar kan sparas.DIFFUSE:
Modiferar avikelsen i ljdtryckets pridning.CARWIDTH:
Modifierar avvikelsen i ljudtryck langs bilens bredd.CAR LENGTH:
Modifierar avvikelsen i Ijudtryck langs bilens langd. 1. Tryck på knappen [SOUND]. 2. Peka pà VSE. 3. Peka pa t p a ON/OFF-displayen. VSE-effekten vaxlar mellan ON och OFF. 4. Peka på B/U for att valja "BASIC" eller "USER". 5. Peka pà till hóger pá displayen für att valja den meny som används som den som ská andras. 6. Tryck på knappen [A]. 7. Peka pa t ppa parameterdisplayen for att valja "DIFFUSE", "CAR WIDTH"ller "CAR LENGTH".  8. Peka på till höger på displayen for attalandarametern. * Denna parameter kan ställas in mellan 1 och 10. 9. Upprepa moment 7 och 8 for att anders parametern. 10. Peka på RTNningar du har ställt in varje parameter. Displayen Återgår till att visa utgangssidan och “»” visas på BASIC- eller USER-displayen. Därmed ar VSE-installingen slutförd. Gà till vaga enligt följande for att fortsätta att lögga in nya varden i användarmenyn: 11. Peka på RTN ochhall kvar fingret i 1 sekund eller langre. Anvandarmenylistanvisas. 12. Peka och på det användarminne du vill lagga in de nya vardena i i 2 sekunder aller langre. En lang ton hors och de varden du har andrat fram till punkt 9 lagras i användarmenyn. Omdu hör en kort ton sparas inte vardena. Görominställingenframtilpunkt9. 13. Peka pa RTN. 14. Tryck på knappen [SOUND] for att gå tillbaka till ursprungslaget. * Peka på B/U sä att “USER” visas och peka på t Üp ànvändarminnets nummer für att välja ett sparat användarminne.Att öppna P.EQ-menyn
Med P.EQ (Parametric Equalizer) kan du kompensera hela frekvensområdet i detaj med en slät kurva)där frekvenskompensationen anpassas till biltypen. Ställ in EQ SELECT på “P.EQ” (se “Att välja ett läge” på sidan 44). - Standardinställingen für P.EQ är "OFF" och "SEDAN-1" für grundmenyn.■ Grundmenyn
Det finns 6 typer av grundmenyer for P.EQ lagrade for oika slags bilar och högtalarplaceringar. Tryck pa den grundmeny som motsvarar din bil. 1. Tryck på knappen [SOUND]. 2. Peka pÅ P.EQ.  3. Peka på « fat » på ON/OFF-displayen. P.EQ-effekten växlar mellan ON och OFF.  När P.EQ-effekten ar installd på “OFF” paverkar inte P.EQ-installingen musikkallan. Därmed ar P.EQ-installingen avslutad. Tryck på knappen [SOUND] für att gå tillbaka till ursprungslaget. 4. Peka på B/U for att valja "BASIC".  Varje gäng du trycker på B/U växlar du mellan "BASIC" och "USER". 5. Peka pa 山 pa grundmenyns nummer for att valja en grundmeny. Grundmenyn| Nr | Beteckning | Högtalarplacering |
| 1 | SEDAN-1 | Fram: framdörren Bak: hatthyllan |
| 2 | SEDAN-2 | Fram: framdörren Bak: bakdörren |
| 3 | WAGON-1 | Fram: framdörren Bak: bagageutrymmet (sidan) |
| 4 | WAGON-2 | Fram: framdörren Bak: bakdörren |
| 5 | MINI VAN-1 | Fram: framdörren Bak: bagageutrymmet (sidan) |
| 6 | MINI VAN-2 | Fram: framdörren Bak: bakdörren |
Att ställa in/spara P.EQ (användarminnet)
Med hjälp av anecdarminnesinställingarnan kan du kompensera frekvenskurvan sa att den passar din bil på grundval av grundmenyn for P.EQ. Du kan spara upp till 6 inställingar i anecdarminnet. Se avsnittet "Att stalla in P.EQ" for mer information. 1. Tryck på knappen [SOUND]. 2. Peka P.EQ. 3. Peka på «» på ON/OFF-displayen. P.EQ-effekten växlar mellan ON och OFF. 4. Peka på B/U für att valja "BASIC" eller "USER". 5. Peka på 卡 till hoger på displayen for att valja den meny som anvands som den som sha anders. 6. Tryck på knappen [A]. 7. Peka pa till vänster pa displayen for att valja "FRONT" eller "REAR".  8. Peka pa 山 山 mitt pa displayen for att valja den parameter som ske andras. For varje tryck pa 山 山 andras parametern enigt foljande: Parametrar BAND FREQ Q GAIN BAND... 9. Peka pà ↑ till Höger på displayen für attalandraparametern. * "BAND" kan ställas in mellan 1 och 3. * “FREQ” kan ställas in mellan 20 Hz och 20 kHz. * Valj 1, 3, 5, 7 eller 20 som "Q". * “GAIN” kan ställas in mellan -12 och +12 dB. 10. Upprepamoment 7 till 9for att andar parametern. 11. Peka på RTNningar du har ställt in varje parameter. Displayen Återgår till att visa utgangssidan och “»” visas på BASIC- eller USER-displayen. Därmed ar P.EQ-installingen slutford. Gà till vaga enligt följande for att fortssatta att lagga in nya varden i anvandarmenyn: 12. Peka på RTN ochhall kvar fingret i 1 sekund eller langre. Menylistan for P.EQ visas. 13. Peka och på det användarinne du vill lagga in de nya värdena i i 2 sekunder aller langre. En lang ton hors och de varden du har andrat fram till punkt 10 lagras i anvandarmenyn. Om du hör en kort ton sparas inte värdena. Gör om inställningen frem till punkt 10. 14. Peka pà RTN. 15. Tryck på knappen [SOUND] für att gå tillbaka till ursprungslaget. * Peka pa B/U sa att "USER" visas och peka pa t bpa användarminnets nummer for att valja ett sparat användarminne.Att ställa in P.EQ
Följande inställninger kan göras på P.EQ-menyn: mittfrekvens, forstärkning och Q-kurva kan sparas für kombinationer av kanaler/band. Till exempel kan mittfrekvensen "250 Hz", Forstärkningen "-8 dB" och Q-kurvan "3" sparas på band 1 frem.FRONT/REAR (val av kanal)
Välj den kanal (fram eller bak) som ska ställas in.BAND (val av band)
Välj det frekvensband (1 till 3) som skä ställas in. Ställ in mittfrekvensen (FREQUENCY), fürstärkningen (GAIN) och Q-kurvan (Q) für varje frekvensband.FREQUENCY (val av mittfrekvens)
Välj en frekvens mellan 20 Hz och 20 kHz som ska användas som mittpunkt på det frekvensband som ska kompenseras. (steg på 1/3 oktav, 31 punkter)GAIN (installing av forstarkning)
Justera forstarkningen (utnivån) inom intervallet -12 dB till +12 dB. (steg pà 1 dB, 25 punkter)Q (installing av Q-kurva)
Ställ in Q-kurvans utseende till 1, 3, 5, 7 aller 20.Kompensation
Om du mäter frekvensegenskaperna och finner att frekvenskurvan ár rak (inga toppar eller)dalar) behövs ingen kompensation. Ibland stiger och faller dock frekvenskurvan på vissa stallen. Om sá ár fallet maste frekvensegenskaperna kompenseras. Skapa en frekvenskurva som har med motsatta karamakteristika mot mittfrekvensen for delar där egenskaperna stiger och sjunker for att fá bort dessa toppar och/DDAR OFREKENSURVAN SÁ RAK SOM MÖJIGT. Att gora frekvenskurvan sá plan som möjlt kallas for att "kompensera". Pä den har anlaggningen kan frekvenskurvan kompenseras med P.EQ (parametrisk equalizer-funktion).- Kompensation av frekventsegenskaper
Figuren nedan visar forhällandet mellan mittfrekvens, Förstärkning och Q-kurva. Q-kurva
n blir smalare när det numeriska vardet ökar och bredare när det numeriska vardet minskar. Om du valjer en motsatt Q-kurva mot den kurvasom ska kompenseras blir frekvenskurvan rak.  F: mittfrekvens, G: forstärkning (utniva), Q: Q-kurva| Nr (typ av bil) | Parametrar für parametrisk equalizer-funktion | |||||||||
| Kanal | Band 1 | Band 2 | Band 3 | |||||||
| F | G | Q | F | G | Q | F | G | Q | ||
| 1 (SEDAN-1) | Fram | 250 Hz | -8 dB | 3 | 2 kHz | -4 dB | 1 | 5 kHz | -4 dB | 1 |
| Bak | 250 Hz | -10 dB | 3 | 1.25 kHz | 0 dB | 5 | 8 kHz | 0 dB | 5 | |
| 2 (SEDAN-2) | Fram | 250 Hz | -10 dB | 7 | 800 Hz | -4 dB | 3 | 8 kHz | -5 dB | 1 |
| Bak | 80 Hz | 3 dB | 7 | 125 Hz | -12 dB | 5 | 1.25 kHz | 0 dB | 5 | |
| 3 (WAGON-1) | Fram | 250 Hz | -8 dB | 3 | 1 kHz | -8 dB | 3 | 10 kHz | -6 dB | 1 |
| Bak | 250 Hz | -8 dB | 3 | 800 Hz | -8 dB | 1 | 8 kHz | 0 dB | 5 | |
| 4 (WAGON-2) | Fram | 250 Hz | -8 dB | 7 | 400 Hz | -10 dB | 7 | 1.25 kHz | -8 dB | 7 |
| Bak | 125 Hz | -8 dB | 3 | 500 Hz | -5 dB | 5 | 1.6 kHz | 0 dB | 3 | |
| 5 (MINI VAN-1) | Fram | 125 Hz | -4 dB | 5 | 1.25 kHz | -4 dB | 3 | 2 kHz | 3 dB | 7 |
| Bak | 250 Hz | -6 dB | 1 | 630 Hz | -4 dB | 3 | 8 kHz | 0 dB | 5 | |
| 6 (MINI VAN-2) | Fram | 250 Hz | -4 dB | 3 | 1.25 Hz | -8 dB | 3 | 80 Hz | 3 dB | 3 |
| Bak | 250 Hz | -8 dB | 3 | 500 Hz | -5 dB | 5 | 8 kHz | 0 dB | 5 | |
Hur man anvander radion
Skärmbilderr i radioläget
Huvudsidan
Tryck på knappen [ROTARY] och välj radioläget sä visas huvudsdan.  Peka till vänster på displayen ochhall kvar fingret i 1 sekund eller mer for att overgå till forenklad drift. Frekvensdisplayen
Mottagningsfrekvensen visas. Genom att peka pa Eller pàdisplayenfor standarddriftkan du stalla in stationer genom sökning ellarmuellt.Titeldisplayen
Visar namnet på den mottagna kanalen. Om du pekar på detta namn kopplas displayen om.Mottagningsband
AM: AM-bandets namn FM1: FM-bandets namnSnabbvalsstation nr.
Peka pa 山 山 pa displayen for standarddrift for att valja en sparad station.MODE
Om du pekar på detta visas underfunktioner. När du pekar och trycker i 1 sekund eller langre visas den forinställda minneslistan.P-SCAN:
Visas under en avsökning av sparade stationer. Om du pekar på texten avslutas avsökningen.A-STORE:
Visas under en automatisk lagring. Om du pekar på texten avslutas lagringen.BAND
Peka på denna text För att byta mottagningsband. Peka och häll kvar fingret i 1 sekund eller langre for att växla mellan manuell inställning och sökning.(2018) (endast på displayen für förenklad drift)
Peka på dessa for att starta stationsinställning genom sökning eller stegvis (i det manuella inställningslåget). Peka och hall kvar fingret for att starta snabbinställning (i det manuella inställningsläget).■ Listamedsnabbvalsstationer
Visas nár du pekar på MODE på huvudidan och häller kvar fingret i 1 sekund eller langre.  >>: Installng pagar RTN: Peka hare for att gà tillbaka till huvudsidan.Att lyssna pa radio
1. Tryck på knappen [ROTARY] für att välja radioläget. För varje tryck på knappen [ROTARY] andras laget enligt foljande: Radio (DAB) CD/MP3 (CD-växlare) (DVD-växlare) (TV) AUX Radio ... * Enheter som inte År inkopplade visas inte. 2. Peka på BAND För att byta mottagningsband. För varje tryck på BAND ändras mottagningsbandet enligt följande: FM1 FM2 FM3 AM (MW / LW) FM1...Stationsinställning
Det finns 3 olika satt att stalla in stationer: installng genom sokning, manuell installng och forinstalling.Sökning
Det finns 2 slags stationssökningar: DX SEEK och LOCAL SEEK. DX SEEK söker automatiskt after radiostationer som kan tas emot och LOCAL SEEK söker bara stationer med god mottagning. 1. Peka på BAND für att välja önskat band (FM eller AM (MW, LW)). 2. Ställ in en station. * Peka på BAND ochhall kvar fingret i 1 sekund eller langre när texten MANU visas. Texten "MANU" på displayen släcks och sökning blir möjlig. * Om "TA" lyser på displayen söks TP-stationer automatiskt.DX SEEK
När du pekar på ⋅ ⋅ ↑ på frekvensdisplayen startup den automatiska inställningen. När du pekar på ⓷ söks en station med högre frekvens och;när du pekar på ⓸ en station med lagre frekvens. * När sökningen böjar visas texten "DX SEEK" på displayen.LOCAL SEEK
När du pekar på ↔ B → på frekvensdisplayen startup den lokala sökningen. Radiostationer med god mottagning ställs in. * När sökningen böjr visas texten "LO SEEK" på displayen.Manuellinstalling
Det finns 2 satt att gora manuella inställningar: snabbinställning och steginställning. Vid steginställning andras frekvensen i 1 steg i taget. Vid snabbinställnng kan du snabbt stalla in önskad frekvens. 1. Peka på BAND och höll kvar fingret i 1 sekund eller langre nar texten MANUinte visas. När texten MANU visas går det att góra manuella inställningar. 2. Ställ in en frekvens med utsändning med hjälp av frekvensdisplayen.Steginställning
Peka pa 一 一 pa frekvensdisplayyen.Snabbinställning
Peka pà ← → pà frekvensdisplayen. Inställingen upphör när du tar bort fingret fran displayeden.Att hamta en snabbvalsstation
Hämtning av snabbvalsstationer används für att ställa in sparade stationer. 1. Peka på MODE och häll kvar fingret i 1 sekund eller langre. Listan med snabbvalsstationer visas. 2. Peka på den station du vill lyssna på. * I normaläget kan du också ställa in en sparad station genom att peka på tøpå på huvudSIDAN.Att avsluta installningen
1. Peka på RTN.Förinställning
Det finns totalt 24 olika minnespositioner (6-FM1, 6-FM2, 6-FM3 och 6-AM) där du kan spara radiostationer. 1. Peka på BAND für att byta mottagningsband. 2. Välj det frekvensband som stationen skasparas på med frekvensdisplayen. 3. Peka på MODE och häll kvar fingret i 1 sekund eller langre. Listan med snabbvalsstationer visas. 4. Peka på den minnesposition där du vill spara stationen ochhall kvar fingret i 2 sekunder eller langre. En lang ton hors och stationen sparas i minnet.Automatisk lagring
Medenna Funktion kan du spara upp till 6 stationer som automatiskt stalls in i tur och ordning. 1. Peka på MODE. 2. Peka på A-STORE och häll kvar fingret i 2 sekunder eller langre. Visningen av driftssatt änderas till "A-STORE" och snabbvalsstationens nummer visas på displayen. * Stationer med god mottagning söks upp automatiskt och sparas på minnespositionerna (nummer 1 till 6) med den station som har lögst frekvens Först.Anmärkningar:
- Vid automatisk lagring raderas tidigare sparade stationer ur minnet. - Om det finns färre øn 6 stationer med god mottagning vid LOCAL SEEK ätergår sökningen automatiskt till de laga frekvenserna och en ny automatisk lagring genomførs med DX SEEK. Om det after två automatiska lagringar fortfarande finns färre øn 6 stationer med god mottagning ligger tidigare sparade stationer kvar på de Återstående minnespositionerna. - Vid automatisk lagring på FM-banden sparas stationerna på FM3 även om du valjer att spara dem på FM1 eller FM2.Avsökning av sparade stationer
Medennafunctiontasstationernaemotidenordning som de liggeriminnet,saattdu kankontrollerautsandningarna. 1. Peka på MODE. 2. Peka på P-SCAN. Visningen av driftssatt ändras till “P-SCAN” och snabbvalsstationens nummer visas på displayen. * De sparade stationerna ställs in i tur och ordning i minst 7 sekunder var. Stationer med dālig mottagning hoppas över och "...sta station ställs in. När du gör en avsökning av FM-bandet ställs FM-stationerna in enligt följande: FM1 (1 6) FM2 (1 6) FM3 (1 6)... När du gör en avsökning av AM-bandet ställs AM-stationerna en enligt följande: AM (1 6) AM(1 6) och sà vidare.Att avsluta avsokningen
1. Peka pà P-SCAN. P-SCAN-displayenalandras till“MODE”och de stationer som var installda nár du tryckte pA P-SCAN tas emot.RDS (Radio Data System)
Denna bilstereo har en inbyggd RDS-dekoder for att kunna ta emot information frän stationer som sander RDS-data. Detta system gör det möjligt für radion att visa namnet på den station du lyssnar på (PS), och att automatiskt gå over till en annan station på sama radionat med bättre mottagning;när du kör länga sträckor (AF-omkoppling). Det ar ocksa mojligt att gå direkt over till trafikmeddelanden eller program av en viss typ sa fort de börjar sändas av en RDS-station, oavsett vad du höll pa att lyssna pa. Om radion tar emot EON-information kan den dessutom gä over till andra snabbvalsstationer på sama radionät och bryta in i mottagningen av den station du höll på att lyssna på med trafikinformation frän"Andra stationer (TP).Detta fungerar dock inte i alla områden. Radion maste vara inställd på FM-bandet for att det skag att anecd RDS-funktionerna. - AF: alternatively frekvenser - PS: programserviceanm - PTY: programtyp - EON: information om andra kanaler - TP: trafikprogram - PI: programidentification - TA: trafikmeddelanden * RDS-avbrotten fungerar inte medan man lyssnar på en AM-station. * När Funktionen har valts mottages RDS-signaler och PS-data kan avlåsas. PS tänds på displayen.AF-funktionen
AF-funktionen gört det möjgt für radion att bibehalla basta möjliga motagnig genom att växla mellan olica frekvenser på sama radionät. - Fabriksinställningen ar "ON" (på).Att stänga av och satta på AF-funktionen
1. Peka på MODE. 2. Peka på AF. För varje tryckning växlar AF mellan "ON" och "OFF". 3. Peka på RTN. * Om mottagingen av den installda radiostationen försämras visas “SEARCH” på displayen och radion söker after sama program på en annan frekvens.■ AF-övergang mellan RDS och DAB
Omamma program sänds av bade en RDSstation och en DAB-station och denna Funktion ar pascalgen, gär radion automatiskt over till den station som ger den basta mottagningen. - Detta fungerar bara nár现阶段 av DAB-mottagarna DAH923 eller DAH913 (säljs separat) ar ansluten. * Fabrikinstallenä “ON” (pà). 1. Tryck på knappen [A] für att gå tilländringslåget. 2. Peka pa 山 山 pa parameterdisplayen for att valja "LINK ACT" under "TUNER".  3. Peka antingen på till höger på displayen eller vrid på knappen [ROTARY] För att valja "ON" eller "OFF". ON: AF-omkoppling mellan DAB och RDS är aktiverad. OFF: AF-omkoppling mellan DAB och RDS är inaktiverad. 4. Tryck på knappen [A] För att gå tillbaka till det tidigare laget.Regionalprogramfunktionen (REG)
När REG-funktionen ar pascalagen tas lokalstationen med den basta mottagningen in. När denna Funktion ar avständ och du kör in i ett annat regionalomräde gär radion over till en lokalstation i det nya området. - Fabriksinställningen ar "OFF" (av).Observera:
Denna Funktion stängs av nar en riksstation som t.ex. BBC 2_FM ar installd. - På/av-inställingen für REG-funktionen gäller bara nar AF-funktionen ar pâslagen.Att stänga av och satta på REG-funktionen
1. Peka på MODE. 2. Peka på REG. För varje tryckning växlar REG mellan "ON" och "OFF". 3. Pekapà RTN.Att ställa in en regional station i samma sändningsnät manuellt
- Denna Funktion ar tillganglig Near AF-funktionen ar pa. - Funktionssättet varierar beroende på om REG-funktionen är av eller på. När REG-funktionen är på kan sändninger med exakt sama PI-kod tes emot. När REG-funktionen är av kan sändninger med sama slags PI-kod tes emot.Anmärkningar:
- Denna Funktion kan användas när en regional sändning frän sama nät tas emot. - PI-koderna ar unika identieringskoder for radiostationer. 1. Peka på MODE ochhall kvar fingret i 1 sekund eller langre. Listan med snabbvalsstationer visas. 2. Peka på den station du vill lyssna på.Trafikmeddelanden (TA)
När bilstereon ar i TA-beredskapläge har trafikmeddelanden högsta prioritet och ställs in sö fort de böjr sändas sä att du kan hörä dem, oavsett vilket faktionsläge som arinställt. Det gär även att ställa in TP-stationer (trafikprogramstationer) automatiskt. - Denna Funktion går bara att använda nar "TP" lyser på displayen. Att "TP" lyser betyder att den installda RDS-stationen sönder program med trafikmeddelanden.Hur man ställer bilstereon i TAberedskapsläge
Om du trycker på [TA]-knappen:när bara "TP" lyser på displayen, tänds "TP" och "TA" på displayen och bilstereon ställs i TA- beredskapsläge tills ett trafikmeddelande börjar sändas. När ett trafikmeddelande börjar sändas tänds "TRA INFO" på displayen. Om du trycker på [TA]-knappen medan att trafikmeddelande häller på att tes emot, stängs mottagningen av det meddelandet av och bilstereon ätergår till TA-beredskapslåget.Att stänga av TA-vänteläget
Tryck pa knappen [TA] när "TP" och "TA" lyser pa displayen. Texten "TA" pa displayen släcks och TA-laget ar avständ. - Om "TP"inte lyser sker sökning after en TP-station när du trycker på knappen [TA].Att söka after en TP-station
Om du trycker på knappen [TA] Near "TP" intelyser tänds "TA" på displayen och encheten ställer automatiskt in en TP-station.OBS:
- Om ingen TP-station kan tas emot visas "TP SEEK" och sökningen after TP-stationen fortösätter. Om du trycker på knappen [TA]对其进行 släcks "TA" och "TP SEEK" på displayen och sökningen after TP-stationen upphör.Automatism lagring av TP-stationer i snabbvalsminnet
Du kan automatiskt minneslagra upp till 6 TP-stationer i snabbvalsminnet. Om du kan mottaga färer TP-stationer an 6,kommen radiostationer som redan finns i minnet inte att raderas och ersattas. 1. Kontrollera att "TA" visas och peka på MODE. Tryck på knappen [TA] sä att "TA" visas om det inte gör det. 2. Peka på A-STORE och häll kvar fingret i 2 sekunder eller langre. Visningen av driftssatt änderas till "A-STORE" och snabbvalsstationens nummer visas på displayen. - TP-stationer med god mottagning sparas i minnet. - Aven om du trycker på FM1 eller FM2 sparas en TP-station i minnet for FM3.Programtypsfunktionen (PTY)
Denna Funktion ger dig möjlighet att lyssna på en station som börjar sända den valda programtypen, även om apparaten ar omkopplad till nàgon annan Funktion an radiofungtionen. - PTY-sändningar forekomm er annu inte i alla Länder. - I TA-beredskapslåget har TP-stationer f Oreträde framfor stationer som sander PTY-program.Hur man ställer radion i PTY-beredskapsläge
När du trycker på [▶■]-knappenalands“PTY”pádisplayen och radion gár over i PTY-beredskapslåge. Sa fort att program av vald typborjar sändas visas dess PTY-namn på displayen.Hur man stänger av PTYberedskapslaget
När du trycker in [▶III]-knappen pch häller den intryckt i mer øn 1 sekund släcks “PTY” på displayen och PTY-beredskapslåget stängs av.Hur man stänger av ett PTY-avbrott
Tryckp [▶III]-knappen under PTY-avbrottet. PTY-avbrottet stängs av och bilstereon Återgår till PTY-beredskapsläget.Att ställa in PTY-läget
1. När du trycker på knappen [▶■] övergår enheten till PTY-läget. 2. Peka antingen på till hoger på displayen eller vrid på knappen [ROTARY]forall PTY. * Följande standardinställningar har gjorts:| Snabbvals -nummer | Programtyp (PTY) | |
| ENGLISH | Innehåll | |
| 001 | News | Korta nyheter |
| 002 | Info | Allmän Information |
| 003 | Pop M | Populärmusik |
| 004 | Sport | Sport |
| 005 | Classics | Komplettta klassiska verk |
| 006 | Easy M | Underhällningsmusik |
PTY-sökning
1. När du trycker på knappen [▶■] övergår encheten till PTY-läget. 2. Peka antingen på i mitten av displayen eller vrid på knappen [ROTARY] För att valja PTY. 3. Peka pa till vänster pa displayen. Om du pekar pa söks en PTY-sändning med högre frekvens och om du pekar pa söks en station med lagre frekvens. * Om ingen station med den valda PTY-sändningen kan tas emot Återgår anlaggningen till det tidigare låget.PTY-minne
1. När du trycker på knappen [▶■] övergår encheten till PTY-läget. 2. Peka pà mitt pa displayen for att valja PTY. Du kan valja mellan de 29 PTY-typerna i tabellen nedan.| Programtyp (PTY) | ||||
| ENGLISH | DEUTSCH | SVENSKA | FRANÇAIS | Innehålll |
| News | Nachrich | Nyheter | Infos | Korta nyheter |
| Affairs | Aktuell | Aktuellt | Magazine | Fördjupning av nyheter |
| Info | Service | Info | Services | Allmän Information |
| Sport | Sport | Sport | Sport | Sport |
| Educate | Bildung | Utbildn | Educatif | Utbildningsprogram |
| Drama | Hör + Lit | Teater | Fiction | Teater och program om teater |
| Culture | Kultur | Kultur | Culture | Kultur i bred mening |
| Science | Wissen | Vetenskp | Sciences | Vetenskapssprogram |
| Varied | Unterh | Underh | Divers | Underhällningsprogram |
| Pop M | Pop | Pop | M Pop | Populärmusik |
| Rock M | Rock | Rock | M Rock | Rockmusik |
| Easy M | U-Musik | Lättlyss | Chansons | Underhällningsmusik |
| Light M | L-Musik | L klass | M CI Lég | Lätt klassik musik (ejkcompletta verk) |
| Classics | E-Musik | Klassik | Classiq | Kompletta Klassiska verk |
| Other M | - - Musik | Övrig m | Autre M | Övrig Musik |
| Weather | Wetter | Väder | Météo | Väderraporter |
| Finance | Wirtsch | Ekonomi | Economie | Ekonomiprogram |
| Children | Kinder | För barn | Enfants | Barnprogram |
| Social | Soziales | Sozialt | Société | Program om sociale frågor |
| Religion | Religion | Andligt | Religion | Andliga frågor |
| Phone In | Anruf | Telefon | Forum | Telefonvåkteri |
| Travel | Reise | Resor | Voyages | Resor och semester |
| Leisure | Freizeit | Fritid | Loisirs | Fritid och hobby |
| Jazz | Jazz | Jazz | Jazz | Jazzmusik |
| Country | Country | Country | Country | Countrymusik |
| Nation M | Landes M | Nation m | Ch pays | Nationell musik |
| Oldies | Oldies | Oldies | Rétro | Kationell musik |
| Folk M | Folklore | Folkm | Folklore | Folkmusik |
| Document | Feature | Dokument | Document | Dokumentärer |
Nödsändningar
Om radion uppfattar en nödsändning avbryts alla de andra Funktionerna, "ALARM" tänds på displayen och nödsändningen hör s i högtalarna.Hur man stänger av en nödsändning
Om du trycker på [AF]-knappen stängs nödsändningen av.Att byta sprek for PTYvisningen
Du kan valja mellan 4 språk (engelska, tyska,SVNSKA och franska) for PTY-displayen. - Standardinställningen ar "ENGLISH". 1. Tryck på knappen [A] für att gå tilländringslåget. 2. Peka pa t ppa parameterdisplayen och valj "LANGUAGE" under "TUNER".  3. Peka antingen på till hoger på displayen eller vrid på knappen [ROTARY]forall språk. * Tryck på ENGLISH (engelska), DEUTSCH (tyska), SVENSKA eller FRANÇAIS (franska). 4. Tryck på knappen [A] För att gå tillbaka till det tidigare laget.Att ställa in RDS-avbrott när 2-zonsfunktionen används (RDS-INT 2Z)
Närenna Funktion ar på och det inträffar att RDS-avbrott medan 2-zonsfunktionen används kan RDS-information tas emot. - När att RDS-avbrott sker stågs 2-zonsfunktionen av. - Aven om "RDS-INT 2Z" inte är på tas RDS-informationen emot om det inträffar att larmavbrott. - Standardinställingen ar "ON". 1. Tryck på knappen [A] für att gå tilländringslåget. 2. Peka pa 卡 卡 pa parameterdisplayen och valj "RDS-INT 2Z" under "TUNER".  3. Peka antingen på till höger på displayen eller vrid på knappen [ROTARY] För att valja "ON" eller "OFF". ON: RDS-information tas emot nar det intraffar ett RDS-avbrott medan 2-zonsfunktionen anvands. OFF: När 2-zonsfunktionen används tas ingen annan RDS-informationän larm emot. Observera: - Om du valjer radiolaget;nar TA (trafikmeddelanden) och PTY ar installda pa "ON"tas RDS-information emot även om RDS-avbrott ar installda 'OFF'. 4. Tryck på knappen [A] För att gå tillbaka till det tidigare laget.Att ställa in volymen für TA, nödmeddelanden (ALARM) och PTY
Du kan ställa in volymen für TA-, ALARM- och PTY-sändningar under ett avbrott für TA-, ALARM- eller PTY-sändning. - Standardinställningen ar "15". Vrid knappen [ROTARY] medsols eller motsols under en TA-, ALARM- erler PTY-sändning for att ställa in önskad volym (0 till 33). - När TA-, ALARM- eller PTY-sändningen upphör ätergår volymen till den niva som var installd före avbrottet.Skärmbilderr i CD-läget
Huvudsidan
Visas nár du trycker på knappen [ROTARY] och valjer CD-laget.  Peka till vänster på displayen och häll kvar fingret i 1 sekund eller mer För att byta driftssätt. Spár/speltidsisplayen
01/02:00 Det spår som spelas och speltiden visas. Om du pekar pa 卡 10 ether 2 vid standarddrift kan du valja vilket spar du skaspela eller snabbt forflyta dig framat eller bakat mellan sparen.Titeldisplayen
När du pekar på dennaändras visningen.Mappdisplayen (for MP3/WMA)
Peka pa 卡 under standarddrift for att valja en mapp.MODE:
Om du pekar på detta visas underfunktioner. När du pekar och trycker i 1 sekund eller langre vid spelning av MP3/WMA visas mapplistan.OBS:
- Denna Funktion ar bara tillganglig vid avspelning av en skiva. -SCAN-SCAN: visas under avsökning. Om du pekar på texten avslutas avsökningen. -RPT-RPT:visas under repeterad avspelning.Om du pekar pa texten avslutas den repeterade avspelningen. - RDM/RDM: visas under slumpvis avspelning. Om du pekar på texten avslutas den slumpvisa avspelningen.TOP:
Om du pekar har börjar avspelningen fran det forsta spåret på skivan eller i mappen.  (endast på displayen für forenklad drift) Tryck på dessa knappar För att välja det spår du vill spelva. Om du pekar på dessa knappar och häller kvar fingret forflyttas du snabbt framåt eller bakat mellan spåren.  applistdisplayen (for MP3/WMA) Visas nár du pekar på MODE på huvudstan och häller kvar fingret i 1 sekund eller langre.  Mappens namnMappens nr.
När detta visas gratonat kan du inte valjaenna mapp.>>:Inställning págár
Om du pekar pa en mappkommen du tillbaka till huvudsidan och avspelningen startup fran det forsta sparet i den mapp du pekade pa.←PREV-RTN:
Om du pekar på denna text visas den foregående mapliistan. När du pekar och trycker i 1 sekund eller langrekommen du tillbaka till huvudsidan.NEXT:
Om du pekar påenna text visas nasta. mapplusta.Vadär MP3?
MP3 ar en metod for komprimering av ljud och har klassificerats som ljudlager 3 for MPEG-standard. Denna metod for komprimering av ljud har uppmarksammats av datoranvändare och har blivit ett standardformat. Denna MP3-funktion komprimerar det ursprungliga ljudet till ca. 10 procent av den ursprungliga storleken med en bibehallen hog ljdukvalitet. Detta betyder att omkring 10 musik- CD-skivor kan spelas in pa en enda skiva av typen CD-R eller CD-RW, vilket mojiggor en mycket lang lyssningsid utan att CD-skivan behover bytas ut.VadärWMA?
WMA ar en forskortning for Windows Media Audio, ett format for ljudfilr som har utvecklats av Microsoft Corporation.Observera:
- Inget ljud hörns om du spelar en fil med DRM (Digital Rights Management) medan WMA-funktionen ar aktiverad (ON). (WMA-indikatorn blinkkar.) - Windows Media™ och Windows® logo Är varumärken eller registrarade varumärken for Microsoft Corporation i USA och/eller andraalander. Bortkoppling av DRM (Digital Rights Management): - Om du använder Windows Media Player 8 sä klicka på fliken TOOLS OPTIONS COPY MUSIC, och klicka sedan bort bocken i kryssrutan for PROTECT CONTENT bland COPY SETTINGS. Återskapa sedan filerna - Om du anvander Windows Media Player 9 sä klicka på filken TOOLS OPTIONS MUSIC RECORD, och klicka sedan bort bocken i kryssrutan for RECORD PROTECTED MUSIC bland inspelningsinställningarna. Återskapa sedan filerna. Dina personligt tillverkade WMA-filer används på ditt eget ansvar.Anvisningar for inpelning aven MP3/WMA-skiva
Lapligrasamplingsfrekvenser och bitströmmar: 1. MP3: - Samplingsfrekvens: 11,025 kHz till 48 kHz Bitström: 8 kbps till 320 kbps/VBR 2. WMA: Bitström 48 kbps till 192 kbps Filamnsforlangninger 1. Lagg alltid till filnamnsforlängningen“.MP3” aller“.WMA” till en MP3-ller WMA-fil med bokstaver på en bit. Om du lagger till en annan filnamnsforlängning erler glommen att lagga till en filnamnsforlängning kan inte filen spelas. 2. Filerutan MP3-/WMA-data kan inte spelas. --"visaspalspeltidsdisplayenomdu forsoker spelena filutan MP3-/WMA-data. Logiskt format (f信息系统) 1. Välj "ISO9660 niva 1, 2 eller JOLIET aller Romeo" som programformat nar du spelar in en MP3-/WMA-fil på en CD-R- eller CDRW-skiva. Om skivan är inspelad i att annat format kan det hända att den inte kan spelas på rätt sätt. 2. Mappnamnet och filamnet kan visas som titel nar du spelar MP3/WMA, men titelns langd fär höGST bestå av 128 bokstäver och siffrøp en bit (inklusive filamnsforlangningen). 3. Ge inte en fil sama namn som den mapp den ligger i. - Mappstruktur 1. Det går inte att skapa en skiva som innehäller en mapp med fler øn 8 hierarkiska nivær. Antal filer eller mapperpar 1. Det går att registrera upp till 255 filer per mapp. Upp till 500 filer kan spelas. 2. Spåren spelas i den ordning i vilken de har spelats in på skivan. (Det är inte sakkert att spåren alltid spelas i den ordning som visas på pc:n.) 3. Störningslud kan uppträda, beroende på vilken typ av kodningsprogram som användes vid inspelningen.Multi-session
Denna Funktioninnebar att du kan valja antingen en CD-DA ell MP3-/WMA-filer om skivan (t. ex. en CD-EXTRA) innehaller en blandning av CD-DA (musik-CD) och MP3-/WMA-filer. 1. Peka på MODE. 2. Peka pà M-SESS. For varje tryck på M-SESS væxlar M-SESSdisplayen mellan "CD" (spela CD-DA) och "MP3/WMA" (spela MP3/WMA). * Tryck på NEXT om M-SESS inte visas. 3. Peka på RTN. Nästa gang du satter i en CD ar multisession-installingen aktiv.OBS:
- Ställ in CD när du spelar en CCCD (Copy Control CD). Om MP3/WMA ar installt kan det hända att skivan inte kan spelas normalt.A WARNING
Var forsiktig sa att inte din hand eller fingrar fastnar, nar du stanger DEN LUTANDE KONSOLEN.Observera:
- Om DEN LUTANDE KONSOLEN inte öppnas tillräcklig mycket, skall du öppna den varsamt for hand. - När du har satt in en CD-skiva, skall du alltid stänga DEN LUTANDE KONSOLEN. - Försök inte att satta in din hand aller fingrar i skivfacet. Du für aldrig försöka att satta in främmande foremäl i skivfacet. - Sätt inte in skivor där klibb tränger fram frän tejp erlen en etikett på en CD-skiva som har länats i en affär, eller skivor som har marken där tejp erler etiketter frän hyrbutiken har tagits bort. Det kan bli omöjligt att ta bort en sādán skiva frän apparaten, och sādana skivor kan góra att apparaten skadas.Att satta i en CD
1. Tryck på knappen [▲]. Kontrollpanelen öppnas 2. Satt i skivan i CD SLOT. När skivan sätts i stängs kontrollpanelen automatiskt after nagra sekunder och avspelningen börjar.Anmärkningar:
- Stoppa aldrig in nagra främande foremål i CD SLOT. - Om det inte går lätt att satta i CD-skivan kan det bero på att det redan finns en annan CD-skiva isatt eller på att anlaggningen behöver service. - Skivor som inte ar märkta med UUSG aller och CD-ROM-skivor kan inte spelas ienna anlaggning. - Det kan hända att vissa CD-skivor som har spelats in med CD-R-/CD-RW-funktionerna inte kan användas. Att satta i CD-skivor på 8 cm
Det fordras ingen adapter for att spel a CDskivor pa 8 cm. Satt i skivan mitt i CD SLOT.Att ta ut en CD-skiva
Du kan mata ut en skiva genom att trycka pa knappen [▲] aven om startnyckeln aller ACC ar i laget OFF.A WARNING
Tryck på knappen [▲] Near skivan ar utmatad, for att stenga kontrollpanelen. Om kontrollpanelen lämnas öppen hörns en dubbel beep-signal och panelen stängs automatiskt. 1. Tryck pa knappen [A]. Kontrollpanellen öppnas och skivan matas ut. Anlaggningen kopplas automatiskt om till radioläget. * Glöm inte att ta ut utmatade skivor ur anlaggningen. Om du lämnar skivan i skivf Jacket dras den tillbaka in i anlaggningen after cirka 15 sekunder och kontrollpanelen stängs. (automatisk reload-funktion) * Vanliga CD-skivor matas inte in automatiskt. Glöm inte att ta ut utmatade CD-skivor.A VARNING
Om du anvander for mycket kraft nar du skasatta i en skiva som har matats ut kan skivans yta repas. Ta ut skivan och satt sedan i denigen.Att lyssna på en skiva som redan sitter i anlaggningen
1. Tryck på knappen [ROTARY] für att valja CD-laget. * När CD-laget ställs in startup avspelningen automatiskt.Att pausa avspelningen
1. Tryck på knappen [▶■].Att ateruppta avspelningen
1. Tryck på knappen [▶■]igen.Att välja ett spär
När en CD-R/CD-RW som innehäller MP3- eller WMA-filer sitter i kan du valja att bara spelā spār som ligger iamma mapp genom att peka pá ↑ ♦ ↑ pā spārdisplayen. 1. Peka pa 山 pa spardisplayen for att lyssna pa nasta spar. 2. Tryck pa 卡 pa spardisplayen tva ganger for att lyssna pa foregaende spar. Om du pekar pa 卡 spelas nasta spar. Om du trycker pa flera ganger forflyttar du dig ett spar framat for varje tryckning och detta spar spelas. Om du pekar pa 卡 spelas foregäende spar. Om du trycker pa 卡 flera ganger forflyttar du dig ett spar bakat for varje tryckning och detta spar spelas. * Om du trycker på 📁 📁 pa spárdisplayen tvā gänger när börgan av ett spar spelas förflyttas du ibland 2 spar tillbaka.Att valja en mapp
Peka antingen pa 卡 pa mappdisplayen ellerga till vaga enligt foljande for att valja en annanmapp: 1. Peka på MODE ochhall kvar fingret i 1 sekund eller langre. Mapliistan visas. Om du pekar på PREV eller NEXT visas foregående respektive nasta del av mapliistan. 2. Peka på mappens namn.Att spelena en spelningsliste
Du kan ocksa spelaspelningslistor (M3U-filer). Mark dock att av de M3U-filer som finns sparade fem skikt ner (inklusive roten) i filhierarkin ar det bara de 5 filer som har de nyaste tidsmärkningarna som kan spelas.Anmärkningar:
- Upp till 255 filer kan spelas i en spelningsliste. - Det ar bara MP3- och WMA-filer som har sparats i mappers ner till fem skikt (inklusive roten) i filhierarkin som kan spelas.Gà till väga enligt följande für att spelena en spelningsliste:
1. Peka på MODE. 2. Peka Na NEXT. 3. Peka på PLY LIST. Avlåsningen av spelningslistan startar. Efter avlåsningen startas den spelningsliste som har den nyaste tidsmärkningen automatiskt. Duwäjer spelningsliste eller spår i spelningslistan på samma sätt som duwäjer en mapp eller spår i en mapp. * PLY LIST visas inte om inte en godkänd spelningsliste (M3U-fil) finns sparad på den CD-R/CD-RW som sitter i anlaggningen.Att avbryta spelningen av en spelningsliste
1. Peka på MODE. 2. Peka på NEXT. 3. Peka pà PLY LIST.Snabb forflytting Framat/ Bakat
1. Peka pá 5→ pá spárdisplayen für att fórlfyta dig framát. 2. Peka pa pā spārdisplayen for att förlfyta dig bakat.Toppfunktionen
Toppfunktionen gör att CD-spelaren Återgår till det Första spåret på skivan. 1. Peka på TOP. Avspelningen börjar från det Första spåret (spår nr. 1). For MP3-/WMA-skivor sker en Återgang till det forsta spåret i den aktuella mappen.Avsökning
Medenna Funktion kan du söka upp och spel de forsta 10 sekunderna av alla inspelade spå på en skiva. 1. Peka på MODE. 2. Peka pä -SCAN. Visningen av driftssatt andras till "J-SCAN" och avsokningen börjar. * Avsökningen börjar med spåret after det som spelas.Att avsluta avsokningen
1. Pekapä-SCAN. -SCAN-displayen andras till "MODE" och det spar som spelades nar du tryckte på -SCAN spelas.Avsökning av mappar
Med denna Funktion kan du söka upp och spel a de forsta 10 sekunderna av det forsta spåret i alla mappings pæn MP3-/WMA-skiva. 1. Peka på MODE. 2. Peka pà -SCAN. Visningen av driftssatt anders till "SCAN" och mappavsokningen börjar. * Avsökningen börjar med mitten after den som spelas.Att avsluta mappavsokningen
1. Peka pà □-SCAN. -SCAN-displayen ändras till "MODE" och det spår som spelades Near du tryckte på SCAN spelas.Repeterad avspelning
Medenna Funktion kan du spel aett spar flera ganger i rad. 1. Peka på MODE. 2. Peka pà J-REPEAT. Visningen av driftssatt andras till "J-RPT" och den repeterade avspelingen börjar.Att avs抗体 repeterad avspelning
1. Peka pä RPT. CRPT-displayenändras till“MODE”och det spår som spelades nár du tryckte på P -RPT spelas.Repeterad avspelning av mappar
Med denna Funktion kan du spel a en mapp flera ganger i rad. Den ar bara tillganglig nar en CD-R/CD-RW som innehaller MP3- eller WMA-filer sitter i. 1. Peka på MODE. 2. Peka pà -REPEAT. Visningen av driftssatt andras till "RPT" och den repeterade avspelningen börjar.Att avsluta repeterad avspelning av mappar
1. Peka pá -RPT. - RPT-displayenalandras till "MODE" och det spar som spelades när du tryckte på -RPT spelas.Slumpvis avspelning
Medenna Funktion kan du spelala spar pa en skiva i slumpmaggig ordning.-RANDOM
Spelar alla spår på skivan i slumpmässig ordning. Om skivan innehäller 2 eller fler mappar spelas alla spår i mappen slumpmässigt och sedan alla spår i Nästa mapp. Detta upprepasforall mappar.-RANDOM
Spelar spår på skivan i slumpmässig ordning. Denna Funktion ar bara tillganglig;nar en CD-R/ CD-RW som innehäller MP3- eller WMA-filer sitter i. 1. Peka på MODE. 2. Peka på „RANDOM eller „RANDOM. Visningen av driftssattändras till „P-RDM" ihrer “„RDM" och den slumpmässiga avspelningen börjar.Att avsluta slumpvis avspelning
1. Peka pà ^一 -RDM ell er [D-RDM. - RDM-displayen aller -RDM-displayen andras till "MODE" och det spår som spelades när du tryckte på knappen spelasAtt lata olika lyssnare lyssna på olika musik samtidigt (2-ZONE-funktionen)
2-ZONE-funktionen ar en fonction som matar ut olica ljd till MAIN-zonen (huvudzonen) och SUBzonen (underzonen) samtidigt genom att styra tvə olika ljudkallor fran en och sama huvudenhet. Tack vare denna Funktion ar det mögigt for olica lyssnare att lyssna på olica musik samtidigt. Huvudenheten kan spelà upp ljud frän de olika inbyggda ludkällorna (radion, CD-spelaren, MP3-spelaren osv.) och dessutom samtidigt spelù upp ljud frän en annan apparat som ar ansluten via CeNET (t.ex. en CD-växlare). Ljudet for MAIN-zoneon spelas upp via högntalarna i fordonet, medan ljudet for SUB-zoonen spelas upp via hörurlssystemet (WH143).  Den övre bilden avser en ljudkälla som spelas av anlaggningens interna delar (radio, CD, AUX) via högitalarna. Den nedre bilden avser en ljudkalla som spelas av anlaggningens externa delar (CD-vaxlare, DVD-vaxlare, TV, AUX) via Hogtalarna. * Standardinställningen ar “OFF”.Anmarkningar:
- 2-zonsfunktionen ar inte tillganglig'nar DAB ar inkopplad. - En volymjustering som gös genom att vrida på knappen [ROTARY] på anlaggningen paverkar bara högtalearjdet. AUX-SENS-installingen påverkar bade högitalarna och hörurlarna.Skärmvisning'nar 2-zonsfunktionen används
"INT." (internlage) erler "EXT." (externlage) visas mitt pa displayen for att tala om hurvida du kan lyssna pa en intern ertern extern ljudkalla i detta 2-zonslauge. 1. Tryck på knappen [SOUND]. 2. Peka på 2-ZONE.  3. Peka på ON/OFF i mitten av displayen och häll kvar fingret i 1 sekund eller langre.  När 2-ZONE ar installd på ON visas aktuell 2-zonstyp. 2-zonsfunktionen ar inte tillganglig nár 2-ZONE ar installd pa OFF. Tryck pa knappen [SOUND] for att gà tillbaka till ursprungslaget. 4. Peka pà ì ì ì pà ON/OFF-displayen För att valja 2-zonstyp. 2-zonstyp| Högtalare | Hörlurar | |
| Typ 1 | Intern (intern länge) | Extern (extern länge) |
| Typ 2 | Extern (externlänge) | Intern (intern länge) |
Att lata olika lyssnare lyssna pø olika musik samtidigt (2-ZONE-funktionen)
Att stänga av och satta på 2-zonsfunktionen
1. Tryck på knappen [SOUND] och häll kvar fingret i 1 sekund eller länger.Att byta 2-zonstyp
Tryck på knappen [TA] och häll kvar fingret i 1 sekund eller langre;när 2-zonsfunktionen ar på.Att byta 2-zonslage
Tryck på knappen [TA] Near 2-zonsfunktionen är på.Att välja lage)när 2-zonsfunktionen används
När du satter i en CD när 2-zonsfunktionen används übergen den interna ljudkällan till CD och avspelningen startar automatiskt. 1. Tryck på knappen [TA] für att byta 2-zonsläge. Symbolen for den utrustning (högtalare aller hörllarur) varur ljudetkommenändras. 2. Tryck på knappen [TA] ochhall den intryckt i 1 sekund eller langre for att valja 2-zonstyp. Visningen overgår fraan "INT." till "EXT." ellertvärtom. 3. Tryck på knappen [ROTARY]. För varje tryck på knappen [ROTARY] Near "INT." visas änderas laget enlicht följande: Radio CD AUX Radio ... For varje tryck på knappen [ROTARY] Near "EXT." visasalandras laget enligt foljande: AUX (CD-vaxlare) (DVD-vaxlare) (TV\*1) AUX ... * Enheter som inte ar inkopplade visas inte. *1 När TV-laget väljs övergår driftslaget automatiskt till VTR-laget och kan inteändras.Gemensamma Funktioner für bāda lagena
Skärmvisning i titelläget
Huvudsidan
Visas nár du öppnar titelläget. (se sidan 14) Texttyp
A: Stora bokstäver a: Små bokstäver 0-9: Siffror !?: Symboler A: Accenterade bokstaverTiteldisplayen
Den inlagda titeln visas. Peka pa 卡 卡 卡 for att faststalla en position. Om du pekar och trycker i 2 sekunder erler langre forsvinner all titeltext.Inlagd textdisplayen
Peka pà 104 for att valja den inlagda texten.RTN
Om du pekar har avbryts inlaggningen av titlar och du kommer tillbaka till utgangssidan. Om du pekar och trycker i 1 sekund erler langre visas den textlista som overensstammer med den aktuella texttypen.MEMO
Om du pekar och trycker har i 2 sekunder aller langre sparas den inlagda titeln och dukommen tillbaka till utgangssidan.Text lista
Visas nár du pekar på RTN på huvudsan och häller kvar fingret i 1 sekund eller langre. Typ av text
Den text som visas ändras beroende på texttypen. Om texttypen ar “A”: A E I M Q U X (mellanslag) Om texttypen ar "a": a e i m qu Om texttypen ar "0-9", "!?" eller "Å". Alla tecken visas.RTN
Omdu pekarpà denna textkommen du tillbaka tillhuvudsidan.NEXT
Om du pekar på denna text visas nestsa textlista.Att lagga in titlar
Du kan ge TV-stationer och CD-skivor upp till 10 tecken lanya titlar. Dessa titlar kan visas när du tar emot sändninger erller lyssnar pa CD-skivor. Foljande antal titlar kan laggs in:| Länge | Antal titlar |
| CD-länge | 50 |
| TV-länge | 20 |
| CD-växlarläge | Antal titlar |
| DCZ628 inkopplad | 100 |
| CDC655Tz inkopplad | 100 |
| CDC1255z inkopplad | 50 |
A VARNING
Om du trycker på reset-knappen raderas alla anvandarminnen i anlaggningen. 5. Peka pà tþþþ pæ textypdisplayen För att valja en texttyp. For varje tryck på «B»ändras texttypen enligt följande:Stora bokstäver
(mellanslag) ABCDEFGHIJKLMNO PQRSTUVWXYZSmå bokstäver
abcdefghijklmnpqrstuvwxz Siffror 0123456789Symboler, Accenterade bokstaver
AAEEEIeOaeeeiouo 6. Peka antingen på till hoger på displayen eller vrid på knappen [ROTARY] for att valja tecken. 7. Upprepamoment4till6forattlaggatin titeln. Omdu pekar och trycker på titeldisplayen i 2 sekunder aller langre forsvinner alla inlagda tecken. 8. Peka på MEMO och häll kvar fingret i 2 sekunder eller langre. En lang ton hors och titeln sparas i minnet.Att gfrn titeldisplayen till klockenanller nagon annan display
Peka i mitten av displayen.■ Om en ny titel laggs in trots att det maxima lantalet titlar har uppnàtts
Om det gäller en TV-station
Titlar som inte har sparat for Förinställda kanaler raderas automatiskt och den nya titeln sparas i minnet.Om det gäller en CD
Titlarna pà de CD-skivor som du har spelat minst ofta raderas och den nga titeln sparas i minnet.Att radera titlar
1. Ställ in den TV-station aller spelà den CD vars titel du vill radera. 2. Peka mitt på displayen for att öppna användartiteldisplayen. Närennaöppnasvisas“USER”ovanfor snabbvalsstationsnumret. 3. Tryck på knappen [A] ochhall kvar fingret i 1 sekund eller langre. Titellaget kopplas in. 4. Peka på titeldisplayen och häll kvar fingret i 2 sekunder eller langre. Alla tecknen i titeln forsvinner. 5. Peka på MEMO och hull kvar fingret i 2 sekunder eller langre. En lang ton hors och titeln raderas.Att andra installingarna
Att väljainstallingsparametrar
1. Tryck på knappen [A]. Andringslaget kopplas in.  2. Peka pa 卡 pa parameterdisplayen for att valja den parameter som ska andras. * Om du pekar på † ‡ † till vänster på displayen visas en huvudparameter i taget. Omdupekarpa tillvanderdisplayenvxlarunderparametrarnakontinuerrigt. * Om du pekar på « ⌊ ⌊ i mitten av displayen visas en underparameter i taget. Omdu pekarp 5 vaxlar underparametrarna kontinuierligt. 3. När "EDIT" visas till höger på displayen kan du peka på denna text För att övergå till displayen for detaljändringar.  DISPLAY ADJUST MODE ISG INPUT> EDIT 4. Peka antingen på till hoger på displayen eller vrid på knappen [ROTARY] for att ställa in detaljerna.Att gà tillbaka till utgangsläget
1. Tryck på knappen [A] igen. Parametrar| Huvudparametrar | Underparametrar |
| DISPLAY | SCREEN SVR • Installling av skärmslättare (se sedan 41) |
| MSG INPUT • Inmatning av meddelande (se sedan 41) | |
| MESSAGE • Vising av meddelande:när anlaggningen slås på eller stängs av (se sedan 42) | |
| S/A SENS • Installling av spektrumanalysatorns känsligget (se sedan 42) | |
| SCROLL • Installling av rullningshestigheten (se sedan 42) | |
| APPERNCE | DIMMER IN • Installling av autodimmer (se sedan 43) |
| DMR LEVEL • Installling av dimmernivå (se sedan 43) | |
| CONTRAST • Installling av displayens kontrast (se sedan 43) | |
| BLINK LED • Inkoppling av blinkende lysdiod:när frontpanelen tas bort (se sedan 43) | |
| BEEP • Installling av ljudsignal (se sedan 44) | |
| SOUND | AC-PRO III • Installng av VSE-läget (STD/PRO) (se sidan 44) |
| EQ SELECT • Installng av equalizer-läget (se sidan 44) | |
| SP-SETTING • Konfigurerring av högtalarna (se sidan 44) | |
| CENTER-SP / SUB-WOOFER • Installng av sub-wooferhögtalaren ON/OFF (se sidan 45) | |
| HPF / SUB-W LPF • Installng av högtalarfiltrens frekvens (se sidan 45) | |
| AMP CANCEL • Installng av inbyggd Förstärkare ON/OFF (se sidan 46) | |
| SP GAIN • Installng av högtalarnas utnivå (se sidan 46) | |
| PL II DELAY | SRD-SP • Installng av tidsförskjutning für de bakre högtalarna (se sidan 46) |
| PL II CONT | PANorama / DIMENSION / CTR WIDTH • Detaljinställningar für musiklåget (se sidan 47) |
| TUNER | TV ARER • Installng av TV-området (se sidan 57) |
| TV DIVER • Installng av TV:ns diversitet (se sidan 57) | |
| LINK ACT • Omkoppling av AF-funktionen mellan RDS och DAB (se sidan 26) | |
| LANGUAGE • Installng av språk für PTY-displayen (se sidan 30) | |
| RDS-INT 2Z • Installng av RDS-avbrott;när 2-zonsfunktionen används (se sidan 30) | |
| SETTING | AUX / TEL • Installng av AUX och TEL (se sidan 47) |
| AUX SENS • Installng av AUX-ingångens känslighat (se sidan 48) | |
| TEL-SP • Installng av bilhögtilare für mobilitelefonljudet (für extraeurustningen TEL-002) (se sidan 48) | |
| TEL-SWITCH • Installng av avbrott für mobilitelefon (se sidan 48) | |
| CALIBRATE / A-VOL SENS • Installng av autovolym (se sidan 49) | |
| SYSTEM CHECK • Utförande av en systemkontroll (se sidan 49) | |
| CODEMATIC • Säkerhetsinställningar (se sidan 50) |
Inställing av skärmsläckare (SCREEN SVR)
Med denna Funktion kan du koppla in en skärmslåckare som startar nr anlaggningen inte har används på cirka 30 sekunder. - Standardinställingen ar "ON". 1. Tryck på knappen [A] for att gå tilländringslåget. 2. Peka pá ↑ 📅 ↑ pá parameterdisplayen für att valja “SCREEN SVR” under “DISPLAY”.  3. Peka antingen pà till Höger pá displayen eller vrid på knappen [ROTARY] För att valja “ON” eller “OFF”. 4. Tryck på knappen [A] För att gå tillbaka till det tidigare laget.Att växla mellan olika skärmsläckare
Peka på PREV eller NEXT nr skärmslåckaren visas. För varje tryck på dessa knappar andras skärmslackaren enligt foljande: Skärmslackare Skärmsläckare 1   Skärmslackare 2  Skärmslackare 3 Spektrumanalysator 1  Spektrumanalysator 2 Spektrumanalysator 3  Spektrumanalysator 4  Skärmsläckartext  SS SCAN Ovansende 8 skärmslackare visas i cirka 10 sekunder vardera.Inmatning av meddelanden som skärmsläckartext (MSG INPUT)
Det finns 1 typ av skärmslackare tillganglig for meddelanden. Se avsnittet "Inställning av skärmslackare" for information om hur du koplar om visningen av skärmslackare. - Du kan lagga in upp till 30 tecken. - Standardinställingen ar "Active Matrix Control System". 1. Tryck på knappen [A] für att gå tilländringslåget. 2. Peka pa 卡 pa parameterdisplayen for att valja "MSG INPUT" under "DISPLAY".  DISPLAY ADJUST MODE MSG INPUT> EDIT SPLAY # \( \left\{ {2 : {x}^{\prime }\left( x\right) = {y}^{\prime }\left( x\right) }\right\} \text{. 故 \( {y}^{\prime } = {2x}} \) 1 > . 一 # # 12 = \( \left\{ {2 : {x}^{\prime }\left( x\right) = {y}^{\prime }\left( x\right) }\right\} \text{. 故 \( {y}^{\prime } = {2x}} \)  3. Peka pá EDIT. Inmatningslaget kopplas in. 4. Peka pa t mitt pa displayen for att faststalla en position. * Peka mitt på displayen med fingertoppen och häll kvar fingret i 2 sekunder aller mer För att radera meddelandet. Om du utfor moment 8;när meddelandet ár raderat átergár meddelandetexten till standardinställningen. 5. Peka pa till vander pà displayen for att valja typ av text. For varje tryck pa 一 一 andras texttypen. Se sidan 37 for mer information. 6. Peka antingen på till hoger på displayen eller vrid på knappen [ROTARY]forall tecken. 7. Upprepa moment 4 till 6 for att lagga in meddelandet. 8. Peka på MEMO och häll kvar fingret i 2 sekunder eller langre. En lang ton hörs och meddelandet sparas i minnet. 9. Tryck på knappen [A] För att gå tillbaka till det tidigare laget.Visning av meddelanden (MESSAGE)
Medenna Funktion kan du visa meddelanden pàdisplayen nár strömmen slásvättsp. "Hello"visas nár du satterp anlaggningen och "See you"nár du stanger av den. - Standardinställingen ar “ON”. 1. Tryck på knappen [A] for att gå tilländringslaget. 2. Peka pa t ppa parameterdisplayen och valj "MESSAGE" under "DISPLAY".  DISPLAY ADJUST MODE MESSAGE 已 ON 3. Peka antingen på till höger på displayen eller vrid på knappen [ROTARY] För att valja "ON" eller "OFF". 4. Tryck på knappen [A] För att gå tillbaka till det tidigare laget.Inställning av spektrumanalysatorns känslighat (S/A SENS)
Medenna Funktion kan du stalla in spektrumanalysisrats känslighth (avböjningsgrad). Se avsnittet "Attändra visinngen på displayen" (sidan 13) aller "Inställning av skärmslackare" (sidan 41) fürytterligare uppliesnigar. - Standardinställingen ar "MID". 1. Tryck på knappen [A] für att gå tilländringslåget. 2. Peka på «» på parameterdisplayen och valj “S/A SENS” under “DISPLAY”.  DISPLAY ADJUST MODE S/A SENS > MID 3. Peka antingen på till höger på displayen eller vrid på knappen [ROTARY] für att ställa in kändsligheten. * Tryck antingen på LOW (lag avböjningsgrad), MID eller HIGH (hög avböjningsgrad). 4. Tryck på knappen [A] För att gå tillbaka till det tidigare laget.Inställning av rullningshestigheten (SCROLL)
Medenna Funktion kan du sanka rullningshestigheten om den ar for hog och g Dor det svart att se skarmen. - Standardinställingen ar "SPEED 2". 1. Tryck på knappen [A] für att gå tilländringslåget. 2. Peka pá t b pá parameterdisplayen och valj "SCROLL" under "DISPLAY".  DISPLAY ADJUST MODE SCROLL SPEED2 3. Peka antingen på till höger på displayen eller vrid på knappen [ROTARY] für att ställa in kändslighthen. * Denna parameter kan ställas in mellan SPEED 1 och SPEED 7. Modificera denna parameter samtidigt som du tittar på hur visningen på displayen änderas. 4. Tryck på knappen [A] För att gå tillbaka till det tidigare laget.Inställing av autodimmer (DIMMER IN)
Med denna Funktion kan du dampa belysningen pa displayen for att anpassa den till belysningen aller lusstyrkan i bilen. Tryck antingen på "AUTO" (for att koppla autodimmern till lusstyrkan i bilen) eller "ILLUMI" (for att koppla den till belysningen i bilen). - När autodimmerfunktionen ar installd på "AUTO" dämpas bildskarmens lusstyrka i forhällande till den lusstyrka somenna sensor registrar. - Ställ in dimmern med DMR LEVEL. - Standardinställningen ar "AUTO". 1. Tryck på knappen [A] für att gå tilländringslåget. 2. Peka pà pà parameterdisplayen for att valja "DIMMER IN" under "APPERNCE".  APPERNCE ADJUST MODE DIMMER IN» AUTO 3. Peka antingen på till hoger på displayen eller vrid på knappen [ROTARY] for att ställa in dimmernivån. * Tryck på OFF (ingen dämpning, ljust), eller på 1 (lätt dämpning) till 5 (mökt). 4. Tryck på knappen [A] För att gå tillbaka till det tidigare laget.Inställing av displayens kontrast (CONTRAST)
Du kan modifiera kontrasten på displayen for att anpassa den till anlaggningens monteringsvinkel. - Standardinställingen ar "6". 1. Tryck på knappen [A] für att gå tilländringslåget. 2. Peka pa t 山 pa parameterdisplayen och valj "CONTRAST" under "APPENCE". 3. Peka antingen på till hoger på displayen eller vrid på knappen [ROTARY] for att ställa in kontrasten.  APPERNCE ADJUST MODE CONTRAST 》 6 3. Peka antingen på till hoger på displayen eller vrid på knappen [ROTARY] for att valja "AUTO" eller "ILLUMI". 4. Tryck på knappen [A] För att gå tillbaka till det tidigare laget. * Denna parameter kan ställas in mellan 1 och 11. Modificera denna parameter samtidigt son du tittar på hur visningen på displayen ändras. 4. Tryck på knappen [A] För att gå tillbaka till det tidigare laget.Inställing av dimmernivå (DMR LEVEL)
Med denna Funktion kan du stalla in hur mycket displayens belysning ska dampas. - Standardinställingen ar "3". 1. Tryck på knappen [A] für att gå tilländringslåget. 2. Peka pä pä parameterdisplayen for att valija "DMR LEVEL" under "APPERNCE".  APPERNCE ADJUST MODE DMR LEVEL》 3Inkoppling av blinkende lysdiodRARY frontpanelen tas bort (BLINK LED)
Du kan se till att anlaggningens lysdiod blinkar\ när frontpanelen tas bort. - Standardinställningen ar "OFF". 1. Tryck på knappen [A] für att gå tilländringslåget. 2. Peka pa 卡 @p a parameterdisplayen for att valja "BLINK LED" under "APPERNCE". PERNCE ADJUST MODE BLINK LED》 OFF # 3. Peka antingen på till höger på displayen eller vrid på knappen [ROTARY] För att valja "ON" eller "OFF". 4. Tryck på knappen [A] För att gå tillbaka till det tidigare laget.Inkoppling av ljudsignal vid knaptryckningar (BEEP)
Du kan stalla in de korta eller langa signaler du hör;när du trycker på en knapp. - Standardinställningen ar "ON". 1. Tryck på knappen [A] für att gå tilländringslåget. 2. Peka pá ↑ ↓ pá parameterdisplayen och valj “BEEP” under “APPERNCE”.  3. Peka antingen på till höger på displayen eller vrid på knappen [ROTARY] För att valja "ON" eller "OFF". 4. Tryck på knappen [A] För att gå tillbaka till det tidigare laget.Att välja att lage
Denna parameter kan inte ställas inningar Dolby Pro Logic II-laget arinstallpantingen "MUSIC"ellER"MATRIX"(se sidan 17). - Standardinställingen ar “PRO” für AC-PRO III och “P.EQ” für EQ SELECT.AC-PROIII
När "STD" (standardläget) ar inkopplat kan ljudkvaliteten och ludfaltet stallas in med VSE (Virtual Space Enhancer) sa att l Judeffekten blir densamma oavsett var i bilen du sitter. När "PRO" (PRO-laget) Är inkopplat kan du finjustera ljudkvaliteten och ljudfältet for varje plats.EQ SELECT
När "P.EQ" (equalizer-laget) ar inkopplat kan hela frekvensområdet kompenseras med en detailjerad slät kurva. När "BAS/TREB" (bas-/diskantlåget) År inkopplat kan frekvensnivån kompenseras genom att det delas in i 2 huvudnivaer, bas (laga toner) och diskant (höga toner). 1. Tryck på knappen [A] für att gå tilländringslåget. 2. Peka pá ↑ pá parameterdisplayen och valj "AC-PRO III" under "SOUND" och "EQ SELECT" under "SOUND".  3. Peka antingen på till hoger på displayen eller vrid på knappen [ROTARY] for att valja lage.Val av lage
| AC-PRO III | STD • Standardläget (VSE-menyn) |
| PRO • PRO-läget (positionsmenyn) | |
| EQ SELECT | P.EQ • Equalizer-läget (P.EQ-menyn) |
| BAS / TREB • Bas-/diskantläget |
Konfigurering av högtalarna (SP-SETTING)
Konfigurera bilhögtalarna sà att du utnytjar anlaggningens fulla ljudpotential. - Standardinstallingen ar "SWL + SWR". 1. Tryck på knappen [A] für att gå tilländringslåget. 2. Peka pa 山 pa parameterdisplayen for att valja "SP-SETTING" under "SOUND".  3. Peka antingen på till hoger på displayen eller vrid på knappen [ROTARY] for att ställa in högtalarna.Högtalarkconfiguration
| CTR+SW 5.1ch konfiguration | Framre/bakre högtalare (4ch) Mithmögtalare (1ch) Sub-woofer (1ch) |
| SWL +SWR 4ch+sub-woofer konfiguration | Framre/bakre högtalare (4ch) Sub-woofer (2ch) |
Anmärkningar:
- Detkommen inget lijd fran mithögtalaren om du inte gör följande inställningar nr du staller in "CTR+SW". (1) Ställ in Dolby Pro Logic II-läget på antingen "MUSIC" eller "MATRIX" enlicht anvisningarna i avsnittet "PLII-menyn (Dolby PL II)" på sidan 17. (2) Satt mithögtalaren på "ON" enlgit anvisingarna i avsnittet "Inställning av högtalare ON/OFF (CENTER-SP/SUB-WOOFER)" (pà sidan 45). - Detkommen inget ljud ur sub-woofern Lch när "SWU + SWR" ar installd och Dolby Pro Logic II ar installd pa "MUSIC" eller "MATRIX". 4. Tryck på knappen [A] För att gå tillbaka till det tidigare laget.Inställing av högtalare ON/OFF (CENTER-SP/SUB-WOOFER)
Koppla in aller bort mitthögtalaren (CENTER-SP) och sub-woofern (SUB-WOOFER). Se till attenna inställning ar "OFF" om det inte finns nàgon mitthögztalare eller sub-woofer. - Mitthögtalaren (CENTER-SP) kan ställas in** när Dolby Pro Logic II-läget arinstall på antingen "MUSIC" eller "MATRIX" och "SP-SETTING" på "CTR-SW". - Standardinställingen ar "ON". 1. Tryck på knappen [A] für att gå tilländringslåget. 2. Peka pa t ppa parameterdisplayen och valj "CENTER-SP" under "SOUND" och "SUB-WOOFER" under "SOUND".  3. Peka antingen på « till höger på displayen eller vrid på knappen [ROTARY] För att valja “ON” eller “OFF”. 4. Tryck på knappen [A] För att gå tillbaka till det tidigare laget.Inställing av högtalarfiltrens frekvens (HPF/SUB-W LPF)
Medenna Funktion kan du modifiera filterfrekvensen for att anpassa den till de hogtalare du anvander. - Vilka filter (HPF/SUB-W LPF) du kan använda beror på Dolby Pro Logic II-inställingen.| Dolby Pro Logic II -installing | Filter | |
| HPF | SUB-W LPF*1 | |
| MUSIC/MATRIX | ej justerbart | justerbart |
| OFF | justerbart | justerbart |
Filterjustering
HPF (installing av hogpassfilter) Detta filter tar bort basljud från de främre och bakre högtalarna. THROUGH 50Hz 80Hz 120Hz Ställ in filtret after högtalaren när du använder högtalare med liters diameter.THROUGH
Används für högtalare som kan generera bas. SUB-W LPF (installing av laggpassfilter for sub-woofern) Detta filter tar bort diskantljud fran sub-woofern. THROUGH 50Hz 80Hz 120Hz Ställ in filterfrekvensen after sub-wooern.THROUGH
Anvands for en inbyggd sub-woofer med lagpassfilter. 1. Tryck på knappen [A] für att gå tilländringslåget. 2. Peka pa t ppa parameterdisplayen och valj "HPF" under "SOUND" och "SUB-W LPF" under "SOUND".  3. Peka antingen på till hoger på displayen eller vrid på knappen [ROTARY]forall att stalla in frekvensen. * Valj THROUGH, 50Hz, 80Hz eller 120Hz. 4. Tryck på knappen [A] För att gå tillbaka till det tidigare laget.Inställing av inbyggd Förstärkare ON/OFF (AMP CANCEL)
Ställ inenna parameter på ON eller OFF beroende på om en extern forstarkare används erler ej. Sätt AMP CANCEL på “ON” (ingen inbyggd Förstärkare) Near du ansluter en separat Förstärkare och inte skä använda den inbyggda Förstärkaren. - Standardinställingen ar "OFF" (inbyggd Förstärkare används). 1. Tryck på knappen [A] für att gå tilländringslåget. 2. Peka pä tä pä parameterdisplayen for att valja "AMP CANCEL" under "SOUND".  3. Peka antingen på till höger på displayen eller vrid på knappen [ROTARY] För att valja "ON" eller "OFF". 4. Tryck på knappen [A] För att gå tillbaka till det tidigare laget.Inställing av högtalarnas utnivå (SP GAIN)
Använd anlaggnings testtonsfunktion for att modifera volymen sà att den blir densamma frān alla högtalarna. - Denna parameter kan bara stallas in nar Dolby Pro Logic II-laget ar instaltt på antingen "MUSIC" eller "MATRIX". - Standardinställingen ar "0dB". 1. Tryck på knappen [A] für att gå tilländringslåget. 2. Peka pa t ppa parameterdisplayen for att valja "SP GAIN" under "SOUND".  3. Peka pá EDT. Andringslaget for SP GAIN kopplas in. 4. Peka pa 山 ppadisplayenforattvalja den parameter som skäandras. For varje tryck pa 卡 andras parametern enligt foljande:Parametrar
 *1 "CTR GAIN" visas bara Near "SP-SETTING" ar installd pada "CTR+SW" och "CENTER-SP" pada "ON". *2“SUB-W GAIN” visas bara nár “SUB-WOOFER” ār installd på “ON”. 5. Peka antingen på till hoger på displayen eller vrid på knappen [ROTARY] for att ställa in utnivân. Utniv'an kan stallas in mellan -10 dB och +10 dB. 6. Upprepa moment 4 och 5 fort att andra varje parametern. 7. Tryck på knappen [A] För att gå tillbaka till det tidigare laget.Inställing av tidsforskjutning für de bakre högtalarna (PL II DELAY)
När lJudet när lyssningspositionen beror på var de bakre högtalarna ar placerade och på bilens storlek. Genom att modifiera tidsforskjutningen for de bakre högtalarna kan du se till att lJudet frän de bakre högtalarna kan hör samtidigt som lJudet frän de främre högtalarna. - Denna parameter kan bara ställas in nar Dolby Pro Logic II-laget ar installt på antingen "MUSIC" eller "MATRIX". - Standardinställningen ar "0ms". 1. Tryck på knappen [A] für att gå tilländringslåget. 2. Peka pá t b pá parameterdisplayen och valj "SRD-SP" under "PL II DELAY".  3. Peka antingen på till höger på displayen eller vrid på knappen [ROTARY]forall att stalla in tidsforskjutningen. * "SRD-SP" kan ställas in mellan 0 och 15 ms. 4. Tryck på knappen [A] För att gå tillbaka till det tidigare laget.Detaljinställningar for musiklåget (PL II CONT)
Medenna Funktion kan du finjustera musiklaget nar Dolby Pro Logic II-laget ar install på "MUSIC". - Denna parameter kan bara stallas in Near Dolby Pro Logic II-laget ar installet pa "MUSIC". - Standardinställingen für PANORAMA är "NO", für DIMENSION "3" och für CTR WIDTH "3".Parametrar
PANorama (brett ljudfalt)
Breddar det frâmre ljudfälte till de bakre högntalarna. Ställ in denna parameter på “YES” om du inte tycker att du har nàgon surroundeffekt.DIMENSION (ljudfalt bak aller fram)
Flyttar lJudfaltet till framre eller bakre delen av bilen. Om lJudfaltet fram uller bak dominerar kan du kompensera for det. Inställingen 3 ar mittenläget. Med inställingarna 2 till 0 flytas ljudfälte till den bakre delen och med inställingarna 4 till 6 till den främre delen.CTR WIDTH (installing av mitthögtalarens [judbild]) ^*1
Modifierar mittenkanalens fasta position mellan mitthogtalaren och de främe högre och vänstra högtalarna. När mittljudet delas lika mellan vänster och höger ökar hela ljudfältet och ger en känsla av naturlig expansion. Med inställingen 0kommen allt mittlud frän mithögtalaren. Med inställingen 7 delas mittludet upp likamellan de främre högre och vänstra högtalarna. *1 "CTR WIDTH" visas bara Near "SP-SETTING" ar installd pa "CTR+SW" och "CENTER-SP" pa "ON". 1. Tryck på knappen [A] für att gå tilländringslåget. 2. Peka pa 卡 ppa parameterdisplayen och valj onskad parameter under "PL II CONT". Parametrarna ar PANORAMA, "DIMENSION"och CTRWIDTH  3. Peka antingen på till höger på displayen eller vrid på knappen [ROTARY] För att ställa in parametern. * Valj "YES" aller "NO" für "PANorama". * “DIMENSION” kan ställas in mellan 0 och 6. * "CTR WIDTH" kan ställas in mellan 0 och 7. 4. Tryck på knappen [A] För att gå tillbaka till det tidigare laget.AUX-funktionen
Anlaggningen har en RCA-ingang sa att du kan lyssna pa Ijud och musik fran extern utrustning som ar ansluten till den.Inställing av AUX och TEL
Du kan lyssna på ljud och musik fran extern ansluten utrustning eller koppla dina telefonsamtal till högztalarna. Om en TEL INT aller en extern apparat ar ansluten till anlaggningen kan du valja TEL-lage aller AUX-lage. - Standardinställningen ar "AUX". 1. Tryck på knappen [A] für att gå tilländringslåget. 2. Peka pa t 山山 pa parameterdisplayen for att valja "AUX/TEL" under "SETTING".  3. Peka antingen på till höger på displayen eller vrid på knappen [ROTARY] För att valja "AUX" eller "TEL".AUX:
AUX/TEL-kabeln används für ljudet från en extern apparat.TEL:
AUX/TEL-kabeln anvands for ljudet fran mobiltelefonen. 4. Tryck på knappen [A] För att gå tillbaka till det tidigare laget.Inställning av AUX-ingängens känslighem (AUX SENS) i AUX-laget
Medenna Funktion kan du stalla in kansligeheten for externa apparater som ar anslutna till anlaggningen. - Du kan gora inställingen)när "AUX/TEL" ar installd på"AUX". - Standardinställningen ar "MID". 1. Tryck på knappen [A] für att gå tilländringslåget. 2. Peka pā tūpā parameterdisplayen for att valja “AUX/SENS” under “SETTING”.  3. Peka antingen på till hoger på displayen eller vrid på knappen [ROTARY]forall att ställa in innivån. * Tryck på LOW, MID eller HIGH. 4. Tryck på knappen [A] För att gå tillbaka till det tidigare laget.Inställing av bilhögtalare für mobiltelefonljudet (für extrautrustingen TEL-002)
- Ställ in mobilitelefonen sa att ljudetkommen ur högtalarna. - Standardinställingen ar "RIGHT". 1. Tryck på knappen [A] für att gå tilländringslåget. 2. Peka pa t p a parameterdisplayen for att valja "TEL-SP" under "SETTING".  3. Peka antingen på till höger på displayen eller vrid på knappen [ROTARY]foralljaleft"llerRIGHTLEFT: Telefonljudet kommt ur den främre vänstra högtalaren.RIGHT:
Telefonljudet kommt ur den främre högra högitalaren. 4. Tryck på knappen [A] För att gå tillbaka till det tidigare laget.Inställing av avbrott für mobiltelefon
Om du koplar din mobiletelefon till anlaggningen med en speciell enchet (extrautrustningen TEL-002) kan du hora Telefonludet genom bilens högtalare. - Standardinställingen ar "OFF". 1. Tryck på knappen [A] für att gå tilländringslåget. 2. Peka pā tūpā parameterdisplayen for att valja "TEL-SWITCH" under "SETTING".  3. Peka antingen på till hoger på displayen eller vrid på knappen [ROTARY]foralljinstallning. För varje steg du vrider knappen [ROTARY] ändras inställingen i följande ordning: OFF ON MUTE OFF..OFF:
Anlaggning fungerar som vanligt oksa när du anvander mobiltelefonen.OBS:
- Om du ansluter en hands-free mâste du se till att inställningen ar ON für att kunna höratefonljudet via högtalarna.ON:
Telefonludet kommt ur de högtalare som ar anslutna till anlaggningen. * När du Telefonljudetkommen ur bilhögitalarna kan du justera volymen genom att vrida knappen [ROTARY].MUTE:
Ljudet frän anlaggningen stågs av under telefonsamtal. 4. Tryck på knappen [A] För att gå tillbaka till det tidigare laget.Inställing av autovolym (CALIBRATE/A-VOL SENS)
Du kan andra volymen automatiskt sa att den anpassas till bilens hastighet. - Standardinställningen ar "LOW". 1. Tryck på knappen [A] für att gå tilländringslåget. 2. Peka pa t ppa parameterdisplayen och valj "CALIBRATE" under "SETTING".  3. Accelererata till en hastighet på 50~km / h 4. Peka på START;när du är uppe i 50 km/h. Kalibreringen är utförd. After 2 sekunder aller merkommen du att hora en lang ljudsignal och texten "SUCCESSIONF"visas pà displayen. Om du hör en kort ljudsignal har kalibreringen misslyckats. Upprepamomenten frän punkt 3. 5. Ställ sedan in känsligehen. Peka på «» « auf parameterdisplayen für att välja “A-VOL SENS” under “SETTING”.  6. Peka antingen på till höger på displayen eller vrid på knappen [ROTARY]foralljka kanslighat. För varje steg du vrider knappen [ROTARY] ändras inställingen i följande ordning: OFF (ingen volymändring) LOW (liten volymändring) MID-LOW MID MID-HIGH HIGH (stor volymändring) ... 7. Tryck på knappen [A] För att gå tillbaka till det tidigare laget.Utförande avensystemkontroll
Med denna Funktion kan du vid behov genomföra en systemkontroll frän äandringslåget. 1. Tryck på knappen [A] für att gå tilländringslåget. 2. Peka pa t ppa parameterdisplayen for att valja "SYSTEM CHECK" under "SETTING".  3. Peka på START och häll kvar fingret i 1 sekund eller langre. "System Check" visas på displayen. 4. Tryck på knappen [ROTARY]. Systemkontrollen startar. När systemkontrollen ar avslutad visas texten "Completed" på displayen. 5. Tryck på knappen [ROTARY] igen. Huvudsidan for radiolagetvisas.Att användasakerhetsfunktionen(CODEMATIC)
Denna Funktion forsvarar for manniskor som inte kanner till peksekvensen att anvanda anlaggingen. När frontpanelen sitter på, "CODEMATIC" ar installd på "ON" och anlaggingen slås på visas sakerhetssidan. Om du pekar pà displayen i rätt ordning visas "SUCCESSION" och anlaggningen stångs av. Nästa gäng du sätter på den visas inte sakerhetssidan, utan huvudsidan i radiolaget aller CD-laget. 1. Tryck på knappen [A] für att gå tilländringslåget. 2. Peka pa t ppa parameterdisplayen och valj "CODEMATIC" under "SETTING".  2 slags parametrar for "CODEMATIC" visas, sādana für vilka "ON" eller "OFF" visas till höger på skärmen och sādana für vilka "INPUT" visas till höger på skärmen. Välj en parameter För vilken "ON" eller "OFF" visas till höger på displayen. 3. Peka antingen på till höger på displayen eller vrid på knappen [ROTARY] För att valja "ON" eller "OFF". 4. Peka pa 卡 pa parameterdisplayen och valj "CODEMATIC" under SETTING". Valj en parameter for vilen "INPUT" visas till hoger pa displayen. 5. Peka på INPUT. Sakerhetssidan visas. 6. Lagg in pekkoden. * Peka på en av 5 punkter (vänster, mitten, höger, upptill till höger eller nedtilt till höger) på displayen. Varjegang du pekar på displayenalandev pekkodsindikatorerna. * Peka till exempl på (1) mitten, (2) upptill till höger, (3) vänster och (4) nedd till höger i den ordningen. Du kan också peka på samma punkt flera gänger. Efter 4 tryckningerkommen du att höra en lang ljudsignal ochkommen tillbaka till utgangsläget.Att stänga av CODEMATIC
Om du har glömt sekordningen kan du antingen peka ① nedd till höger, ② vänster, ③ upp till till höger och sedan ④ höger i den ordningen eller trycka på [SCN] på fjärrkontrollen. 7. HUR MAN ANVÄNDER OLIKATILLVALSKOMPONENTER
Hur man anvander en CD-växlare
CD-växlare
När en CD-växlare ar ansluten via CeNET-kabeln kanenna styras frän anlaggningen. Total 2 stycken CeNET-anslutna CD-växlare kan styras.DVD-växlare
När en DVD-växlare ár ansluten via CeNET-kabeln kanenna styras frän anlaggningen. För att titta på DVD fordras att en monitor ansluts. DVD-växlares styrning och display ar forenklade pàenna anlaggning och alla DVD-växlarfunctiomer stöd inte. Använd den fjarrkontroll som medfoljer DVD-växlaren for att strya den. Se den bruksanvising som medfoljer DVD-växlaren for mer information.När 2 CD-växlare ar inkopplade
Tryck på knappen [ROTARY] für att välja en CD-växlare. (För varje tryck på knappen [ROTARY]alandras CD-växlare.) - Om CD-växlaren inte innehäller nagot magasin visas "NO MAG" och om magasinet inte innehäller一定程度 CD visas "NO DISC" für det skivnumret. Se avsnittet "Att andra titelvisingen" (sidan 14) for mer information on titeldisplayen.Skärmbilderr i CD-växlaråget
Huvudsidan (CD-växlaråget)
Visas nár du trycker på knappen [ROTARY] och valjer CD-växlaråget.  Peka till vänster på displayen och häll kvar fingret i 1 sekund eller mer För att övergå till forenklad drift. Spär/speltidsdisplayen
T01/02: 00: Det spår som spelas och speltiden visas. Om du pekar pa 一 已 一 eller vid standarddrift kan du valja vilket spar du skaspela eller snabbt forflyta dig framat eller bakat mellan sparen.Titeldisplayen
Om du pekar på denna kopplas displayen om.Skivnummerdisplayen
Om du pekar pà ➀ ➁ vid standarddrift kan du välja en skiva.MODE
Om du pekar på detta visas underfunktioner. När du pekar och trycker i 1 sekund eller langre visas skivlistan.T-SCAN/D-SCAN
Visas under avsökning. Om du pekar pátexten avslutas avsökningen.T-RPT/D-RPT
Visas under repeterad avspelning. Om du pekar på texten avslutas den repeterade avspelningen.T-RDM/D-RDM
Visas under slumpvis avspeling. Om du pekar på texten avslutas den slumpvis avspelingen.DISC
Om du pekar på detta spelas{nsta spar. (endast på displayen für forenklad drift) Tryck på dessa knappar for att valja det spår du vill spelva. Om du pekar på dessa knappar och häller kvar fingret forflyttas du snabbt framåt eller bakat mellan spåren.Skivlistdisplayen (CD-växlarläget)
Visas nár du pekar på MODE på huvudsidan och häller kvar fingret i 1 sekund aller langre. Skivans namn >>:Inställning págår
Om du pekar pa ett skivnamn kommer du tillbaka till huvudsidan och avspelningen startar fran det forsta sparet pa den skiva du pekade pa.←PREV-RTN:
Om du pekar på denna text visas den foregående skivlistan. När du pekar och trycker i 1 sekund eller langrekommen du tillbaka till huvudsidan.NEXT:
Om du pekar på denna text visas nasta skivista.A WARNING
CD-ROM-skivor kan inte spelas i alla CDvaxlare. Det beror på modellen.
OBS:
- Det kan hända att vissa CD-skivor som har spelats in med CD-R-/CD-RW-funktionerna inte kan användas.Att ställa in CD-växlarläget
1. Tryck på knappen [ROTARY] for att valja CD-växlarläget. * Enheter som inte ar inkopplade visas inte. När CD-laget ställs in startup avspelningen automatiskt.Att pausa avspelningen
1. Tryck på knappen [▶■].Att aterupta avspelningen
1. Tryck på knappen [▶■]igen.Att välja en CD
1. Peka på urskivnummerdisplayen for att valja en skiva. Avspelningen börjar. * Om den skiva du har valt inte finns i magasinet visas inte dess skivnummer. * Om du pekar på DISC ↑ spelas nasta skiva.Att välja en skiva ur skivlistan
1. Peka på MODE och häll kvar fingret i 1 sekund eller langre. Skivlistan visas. Om du pekar på NEXT visas;nasta del av skivlistan. 2. Peka paskivans namn. * Om den skiva du har valt inte finns i magasinet visas "NO DISC" für dess skivnummer. * Om du väljeramma skiva som spelas böjar avspelningen om frän det Första spåret påenna skiva (toppfunktionen).Att välja ett spår
1. Peka pa 山 pa spardisplayen for att lyssna pa nasta spar. 2. Tryck pa 山 pa spardisplayen tva ganger for att lyssna pa foregaende spar. Om du pekar pa ♕ spelas nàsta spar. Om du trycker pa ♕ flera gänger fforflyttar du dig ett spar framat for varje tryckning och detta spar spelas. Om du pekar pa t spelas foregäende spar. Om du trycker pa t flera ganger forflyttar du dig ett spar bakat for varje tryckning och detta spar spelas. * Om du trycker på «» pa spårdisplayen två gänger nar början av ett spar spelas forflyttas du ibland 2 spar tillbaka.Snabb forflytting Framat/ Bakat
1. Peka pa 日 pa spardisplayen for att forflytta dig framat. 2. Peka pa pā spārdisplayen für att förllyta dig bakāt.Toppfunktionen
Toppfunktionen innebär att avspelningen börjar med det Första späret på skivan. 1. Peka på MODE och hull kvar fingret i 1 sekund eller langre. Skivlistan visas. Om du pekar på NEXT visas;nasta del av skivlistan. 2. Peka på skivans namn. * Om den skiva du har valt inte finns i magasinet visas "NO DISC" für dess skivnummer. * Om du valjer somma skiva som spelas börjar avspelningen om från det Första spåret påenna skiva.Avsökning
Söker upp och spelar de Första 10 sekunderna av varje spår på en skiva automatiskt. Avsökningen fortssatter tills du stanger av den. Avsökningsfunktionen ar användbarRARY sokerett visst spär. 1. Peka på MODE. 2. Peka på T-SCAN. Visningen av driftssatt andras till "T-SCAN" och avsokningen börjar. * Avsökningen börjar med spåret after det som spelas.Att avsluta avsokningen
1. Peka på T-SCAN. T-SCAN-displayen änderas till "MODE" och det spar som spelades när du tryckte på T-SCAN spelas.Avsökning av CD-växlaren
Söker upp och spelar de Första 10 sekunderna av det Första spåret på alla skivorna i CDväxlaren automatiskt. Avsökningen fortsätter tills du stänger av den. Avsökningsfunktionen ar användbarRARY dosoker en viss CD. 1. Peka på MODE. 2. Peka pà D-SCAN. Visningen av driftssatt andras till "D-SCAN" och avsokningen börjar. * Avsökningen börjar med skivan after den som spelas.Att avsluta avsokningen
1. Peka pà D-SCAN. D-SCAN-displayen andras till "MODE" och det spar som spelades när du tryckte på D-SCAN spelas.Repeterad avspelning
Med denna Funktion kan du spel aett spar flera ganger i rad. Avspelningen fortssatter tills du stanger av den. 1. Peka på MODE. 2. Peka pà T- REPEAT. Visningen av driftssatt andras till "T-RPT" och den repeterade avspelningen börjar.Att avsulta repeterad avspelning
1. Peka på T-RPT. T-RPT-displayen ändras till "MODE" och det spår som spelades när du tryckte på T-RPT spelas.Repeterad avspelning av enskiva
När alla spår på en skiva har spelats upprepas avspelningen automatiskt frän det Första spåret. Avspelningen fortsetter tills du stänger av den. 1. Peka på MODE. 2. Peka pà D- REPEAT. Visningen av driftssatt andras till "D-RPT" och den repeterade avspelingen börjar.Att avs抗体 repeterad avspelning
1. Peka pá D-RPT. D-RPT-displayen ändras till "MODE" och det spår som spelades när du tryckte på D-RPT spelas.Slumpvis avspelning
Olika spår på skivan spelas i slumpmüssig ordning. Avspelningen Fortsätter tills du stänger av den. 1. Peka på MODE. 2. Peka på T-RANDOM. Visningen av driftssatt andras till "T-RDM" och avspelningen börjar.Att avsluta slumpvis avspelning
1. Peka på T-RDM. T-RDM-displayen ändras till "MODE" och det spår som spelades när du tryckte på T-RDM spelas.Slumpvis avspelning av skivor
Olika spår eller skivor spelas automatiskt i slumpmässig ordning. Avspelningen fortsätter tills du stänger av den. 1. Peka på MODE. 2. Peka på D-RANDOM. Visningen av driftssatt andras till "D-RDM" och avspelningen börjar.Att avsluta slumpvis avspelning av skivor
1. Peka pà D-RDM. D-RDM-displayen ändras till "MODE" och det spar som spelades;när du tryckte på D-RDM spelas.Hur man anvanderen TV-tuner
Funktioner på TV-tunern
När en TV-tuner som säljs separat ar inkopplad i bilstereon via en CeNET-kabel styrs smtliga Funktioner på TV-tunern frän huvudenheten. För att kunna se på TV kravs det en TV-tuner och en monitor.Skärmbilderr i TV-läget
Huvudsidan
Visas när du trycker på knappen [ROTARY] och valjer TV-låget.  Peka till vänster på displayen och häll kvar fingret i 1 sekund eller mer För att övergå till forenklad drift. Kanaldisplayen
1ch: Den mottagna kanalen visas. Genom att peka pa 05 ether vid standarddrift kan du stalla in stationer genom sokning aller manuellt.Titeldisplayen
3ch: Namnet på den mottagna stationen visas. VTR: I videoläget Om du pekar på denna kopplas displayen om.Mottagningsband
TV1: Bandets namnSnabbvalsstation nr.
Peka pa 卡 vid standarddrift for att valja en sparad station.MODE
Om du pekar på detta visas underfunktioner. När du pekar och trycker i 1 sekund eller langre visas den forinställda minneslistan. P-SCAN: Visas under en avsökning av sparade stationer. Om du pekar på texten avslutas avsökningen. A-STORE: Visas under en automatisk lagring. Om du pekar på texten avslutas lagringen.BAND
Peka på denna text För att byta mottagningsband. Peka och häll kvar fingret i 1 sekund eller langre for att växla mellan manuell inställning och sökning.  (endast på displayen für forenklad drift) Peka på dessa knappar for att starta stationsinställning genom sökning eller stegvis (i det manuella inställningslåget). Peka ochhall kvar fingret for att startasnabbbinstallning (idet manuellainstallningslaget).■ Listamedsnabbvalsstationer
Visas nár du pekar på MODE på huvudsan och häller kvar fingret i 1 sekund eller langre.  Stationsnamn>>:
Inställning pagarRTN:
Om du pekar på denna textkommen du tillbaka till huvudsidan.Att ställa in TV-läget
1. Tryck på knappen [ROTARY] für att valja TV-låget. For varje tryck på knappen [ROTARY] Ändras laget enlicht foljande: * Enheter som inte ar inkopplade visas inte.Att byta mottagningsband
1. Peka på BAND För att byta mottagningsband. För varje tryck på BAND öndras mottagningsbandet enlgit följande: TV1 TV2 TV1...Sökning
Sökningen används für att automatisch ställa in stationer med god mottagning. 1. Peka på BAND ochhall kvar fingret i 1 sekund eller langre nar texten MANU visas. När texten MANU forsvinner går det att Göra automatisk sökning. 2. Peka pà pà kanaldisplayayen. SEEK UP/SEEK DOWN visas och inställingen brojar. Stationer med god mottagning stàlls in automatiskt.Att avsluta instalIningen
1. Pekapá←b→pakanaldisplayenigen.Manuellinställning
Det finns 2 satt att gora manuella inställningar: snabbinställning och steginställning. Vid steginställning andras frekvensen i 1 steg i taget. Vid snabbinställnng kan du snabbt stalla in önskad frekvens. 1. Peka på BAND ochhall kvar fingret i 1 sekund eller langre nar texten MANU inte visas. När texten MANU visas går det att Göra manuella inställningar. 2. Ställ in en kanal med utsändning med hjälp av kanaldisplayen. Det finns 2 satt att gora manuella inställingar: snabbinställning och steginställning. * Vid steginställning öndras kanalerna i 1 steg i taget. Peka pà ↑ ¶ à frekvensdisplayen. * Vid snabbinställng öndras kanalerna kontinuerigt. Peka pã←pãkanaldisplayen. Inställningen upphör när du tar bort fingret fran displayen.För att se på en snabbvalsstation
Medenna Funktion kan du valja en forinstalld station. 1. Peka på MODE och häll kvar fingret i 1 sekund eller langre. Listan med snabbvalsstationer visas. 2. Peka pá den station du vill lyssna pá * Du kan också ställa in en sparad station genom att peka på « ⌒ ⌒ på en snabbvalsstation.Att avsluta installningen
1. Peka pà RTN.Förinställning
Totalt 12 TV-stationer kan sparas i minnet (6-TV1 och 6-TV2). På sä satt kan du valja ut dina favoritstationer och spara dem i minnet. 1. Peka på BAND für att byta mottagningsband. 2. Välj den stationen som ska sparas med kanaldisplayen. 3. Peka på MODE och häll kvar fingret i 1 sekund eller langre. Listan med snabbvalsstationer visas. 4. Peka på den minnesposition där du vill spara stationen och häll kvar fingret i 2 sekunder eller langre. En lang ton hörs och stationen sparas i minnet. Om du hör en kort ton sparas inte stationen i minnet. Upprepa momentarily frän punkt 1.Automatisk lagring
Denna Funktion valjer automatiskt ut 6 TV-stationer och sparar dem i minnet. Om det inte finns 6 stationer med god mottagning ligger tidigare sparade stationer kvar i minnet och bara stationer med god mottagning sparas. 1. Peka på MODE. 2. Peka på A-STORE ochhall kvar fingret i 2 sekunder eller langre. Visningen av driftssatt andras till "A-STORE" och snabbvalsstationens nummer visas på displayen. * Stationer med god mottagning söks upp automatiskt och sparas på minnespositionerna (nummer 1 till 6) med den station som har lögst frekvens Först.Anmärkningar:
- Vid automatisk lagring raderas tidigare sparade stationer ur minnet. - Om det finns färre øn 6 stationer med god mottagning ätergår sökningen automatisk till de laga frekvenserna och en ny automatisk lagring genomfors. Om det after två automatiska lagringar fortfarande finns färre øn 6 stationer med god mottagning ligger tidigare sparade stationer kvar på de Återstående minnespositionerna.Avsökning av sparade stationer
Medennafunctiontasstationernaemotidenordning som de liggeriminnet,saatt du kankontrollerautsandningarna. 1. Peka på MODE. 2. Peka på P-SCAN. Visningen av driftssattändras till “P-SCAN” och snabbvalsstationens nummer visas på displayen. * De sparade stationerna ställs in i tur och ordning i minst 7 sekunder var. Stationer med dālig mottagning hoppas över och Nästa station ställs in. TV-stationerna tas emotenet folfjande: TV1 (1 6) TV2(1 6) TV1(1 6) och sà vidare.Att avsluta avsokningen
1. Peka på P-SCAN. P-SCAN-displayen änderas till "MODE" och de stationer som var inställda Near du tryckte på P-SCAN tes emot.Att titta på video
TV:n har en VTR-ingang som 1 extern apparat kan kopplas till. Anslut en 12 V videobandspelare (VCP aller VCR) till TV-ingangen. 1. Tryck på knappen [▶■]. VTR visas och anlaggningen kopplas om till VTR-låget. * TV-skärmen övergår till videolåget och det går att titta på videoband.Att gà tillbaka till TV-läget
1. Tryck på knappen [▶■]igen.Inställing av TV-området (TV AREA)
När du väljer TV-område (TV:ns mottagningsområde) andras TV:ns områdesinställning. - Standardinställingen ar “GERMANY”. 1. Tryck på knappen [A] für att gå tilländringslåget. 2. Peka pa t ppa parameterdisplayen for att valja "TV AREA" under "TUNER".  3. Peka antingen på till hoger på displayen eller vrid på knappen [ROTARY] for att valja område. 4. Tryck på knappen [A] För att gå tillbaka till det tidigare laget.Inställing av TV:ns diversitet (TV DIVER)
Du kan andra TV-antennens mottagningsinstallning. - Ställ inenna parameter på "OFF"ningar du inte anvander en TV-diversitetsantenn. - Standardinställningen ar "ON". 1. Tryck på knappen [A] für att gå tilländringslåget. 2. Peka pa t ppa parameterdisplayen och valj "TV DIVER" under "TUNER".  3. Peka antingen på till höger på displayen eller vrid på knappen [ROTARY]forall "ON"eller "OFF". 4. Tryck på knappen [A] För att gå tillbaka till det tidigare laget.DAB-kontrollfunktion
När en DAB-mottagare (DAH913 eller DAH923, saljs separat) År ansluten via en CeNET-kabel jeg det att styra samtliga Funktioner på DAB-mottagaren.Att lyssna på en DAB-station
1. Tryck på knappen [ROTARY] für attalandradriftsläge.Anmärkningar:
- Samma information visas på displayen bade i standardlägget och snabbvalslage nuten DABstation tesmot. - Antalet program och deras sändningstider beror på DAB-stationerna. - Om DAB-signalerna ar alltför svaga stängs ljudet tillfälligt av.Sökning
1. Tryck på knappen [ROTARY] für att välja DAB-läget. 2. Peka på till vänster på displayen Texten "DAB" tandes på displayen när anlaggningen tar emot en DAB-station. * Om anlaggningen inte kan hitta naggon DAB-station avbryts sökningen. Displayen Återgår till utgangslåget.Manuellinstalling
1. Tryck på knappen [ROTARY] für att välja DAB-laget. 2. Peka på BAND ochhall kvar fingret i 1 sekund eller langre om texten "MANU"inte visas. När texten "MANU" visas går det att góra manuella inställningar. 3. Peka på till vänster på displayen for att ställa in en station. * Om du inte gör nágon installing inom 7 sekunder avbryts den manuella installingen och displayen Återgår till utgangsläget.Byte av program
1. Tryck på knappen [ROTARY] für att välja DAB-läget. 2. Peka pa till vander p a displayen for att byta program for DAB-stationen.OBS:
- Det nga programmet kan ha sama namn, beroende på DAB-programmet i fraga.Programavsökning
Medenna Funktion ställs alla program som kan tas emot für en DAB-station in i 10 sekunder i tur och ordning. Avsökningsfunktionen ar anecdbarRARY du söker att visst program. 1. Tryck på knappen [ROTARY] für att välja DAB-läget. 2. Peka på MODE. 3. Peka på S-SCAN. Texten "S-SCAN" tänds och anlaggningen böjar ställa in programmes i 10 sekunder vardera. For varie inställning visas programnamnet på displayen. 4. Peka på S-SCAN für att avbryta avsökningen;när det önskade programmet har ställt in.Manuell lagring i minnet
Anlaggningen har en manuell minnesfunktion for DAB-program. Upp till 18 program (6 program per minne) kan forinstallas for snabbvalsknapparna.[M1], [M2] och [M3]
1. Tryck på knappen [ROTARY] für att valja DAB-laget. 2. Peka på BAND ochwälj ess av alternativen ovan. 3. Peka på MODE och häll kvar fingret i 1 sekund eller langre. Listen med snabbvalsstationer visas. 4 Peka pa den minnesposition där du vill spara stationen och häll kvar fingret i 2 sekunder eller langre. En lang ton hör och stationen sparas i minnet. Om du hör en kort ton sparas inte stationen i minnet. Upprepa momentarily frän punkt 1.OBS:
- Avbrottprogram (PTY och INFO) kan inte lagras i det manuella minnet.Att hamta en snabbvalsstation
1. Tryck på knappen [ROTARY] für att valja DAB-laget. 2. Peka på BAND. För varje tryck på BAND ändras displayen enlgit följande: MEMO1 MEMO2 MEMO3 MEMO1... 3. Peka på till hoger på displayen for att hamta en snabbvalsstation.AF-funktionen
Med AF-funktionen går radion över till en annan frekvens på samma radionät for att bibehälla basta möjiga mottagningskvalitet. - Fabrikinstallingen ar “ON”. - Om mottagningsforhällandena for den station du lyssnar på försämras tänds "SEARCH" på displayen och radion böjr söka after sama program på nágon annan frekvens. Se avsnittet "Hur man anvander RDS" i respektive bruksanvisning for narmare detailjer om "AF-funktionen" (se sidan 26). Hur man stänger av AF-funktionen Hur man slár på AF-funktionen AF-oversgang mellan RDS och DAB Omamma program sänds báde via RDS och via DAB och denna Funktion ar páslagen, gár huvudapparaten automatiskt over till det lage)där mottagningskvaliteten blir böst.Trafikmeddelanden (TA)
När radion är i TA-beredskapslage och ett trafikmeddelande böjr sändas har trafikmeddelandet högsta prioritet och bilstereon går over till det oavsett vilket faktionslage som var inställ. Det går även att automatiskt ställa in stationer som sönder trafikprogram (TP). - Denna Funktion gär bara att använda;när indikatorn "TP" ar tänd på displayen. När "TP" ar tänd betyder det att den inställda DAB- eller RDS-stationen även sänder program med trafkmeddelanden. - Se avsnittet "Hur man anvander RDS" i respektive bruksanvising for narmare detailer om "Trafikmeddelanden" (se sedan 27). Hur man ställer bilstereon i TAberedskapläge Hur man stänger av TA-beredskapslaget Sökning after en TP-stationObservera:
- Om radion inte kan hitta nágon TP-station avbryts stationssökningen. - Det kan hända att "TP"alands på displayen under mottagning av en TP-sändning frän en RDS-station. Tryck i sö fall på [TA]-knappen for att starta TP-stationsökningen. Tryck en gang till på [TA]-knappen for att atergå till det tidigare laget.Information (INFO)
När radion ar i INFO-beredskapläge och ett informationsprogram av vald typ böjar sändas gär bilstereon automatiskt over till det programmet.Hur man ställer bilstereon i INFOberedskapsläge
Om du trycker in [TA]-knappen och häller den intryckt i mer än 1 sekund tänds "INFO" på displayen och bilstereo ställs i INFO-beredskapsläge tills att program av valid typ börjar sändas. När ett södant program börjar sändas visas informationens typ på displayen. Om du trycker in [TA]-knappen och häller den intryckt i mer än 1 sekund medan det valda informationsprogrammet häller på att tes emot, avbryts mottagningen av det programmet och bilstereåtergår till INFO-beredskapslätget.Hur man stänger av INFO-beredskapen
Tryck in [TA]-knappen ochhall den intryckt i mer an 1 sekund for att avbryta INFO-beredskapen.Hur man valjer informationstyp
Detta ar en fonction for att sla P' er stanga AV olica sorters information i informationsberedskapslaget. Det går att slå PÅ upp till 6 olika sorters information. Välj bland följande 6 informationstyper:| Informationstyp | |
| SVENSKA | Innehäll |
| Koll. Tra | Trafikmeddelande |
| Service | Varnings/servicemeddelande |
| Nyheter | Nyhetsrapport |
| Väder | Lokalt väder |
| Evenema | Utannonsering av evenemang |
| Extra | Speciella handelser |
PTY
Tack vareenna Funktion kan du lyssna pa program av onskad typ sa fort de borjar sandas, oavsett vilket functionslage bilstereon ar installd pa. - Det går att välja en gemeinsam programtyp (PTY) både für DAB och für RDS. - Bland DAB PTY och RDS PTY har den PTY som tas emot Först fötreäde. - PTY-sändningar forekommer inte i alla länder annu. - I INFO-beredskapslåget har INFO-stationer foreträde framfor PTY-stationer. - I TA-beredskapslaget har TP-stationer foretrade framfor PTY-stationer. - Se avsnittel "Hur man anvander RDS" i respektive bruksanvising for narmare detailer om "Programtypsfunktionen" (se sedan 28). Hur man staller radion i PTYberedskapslage Hur man stänger av PTY-beredskapslaget Hur man stänger av ett PTY-avbrott - Val av PTY - PTY-sökning Lagring av PTY-koder i snabbvalsminnetNödmeddelanden
Närettnodmeddelande tas emot avbryts alla manovrer for det installda Funktionslaget. "ALARM" tänds på displayen och nömeddelandet hör s Högtalarna. Se avsnitet "Hur man anvander RDS" i respektive bruksanvising for narmare detaljer om "Nodsandingar" (se sidan 29). Hur man stänger av en nödsändnigAtt byta språk für PTY och INFO
Du kan välja mellan 4 språk (engelska, tyska,SVNSKA och franska) for PTY och INFO. - Standardinställingen ar "ENGLISH". - Se avsnittet "Att anvanda RDS" i respektive bruksanvisning for mer informaiton om "Att byta språk for PTY-visingen" (se sidan 30).Volyminstalling for trafikmeddelanden (TA), information (INFO), nödmeddelanden (ALARM) och PTY-sändningar
Det gär att ställa in volymen for avbrytande trafikmeddelanden (TA), information (INFO), nömeddelanden (ALARM) och PTY-sändninger under ett TA-, INFO-, ALARM- eller PTY-avbrott. Utför fällande manövrer beroende på vilken modell som ar ansluten. - Fabrikinställningen für volymen ar "15". Vrid [ROTARY]-ratten medurs aller moturs under ett pagaende TA-, INFO-, ALARM- ell PTY-avbrott for att stalla in volymen på önskad niva (0 till 33). * När TA-, INFO-, ALARM-ller PTY-avbrottet tar slut ätergår volymen till den niva som var inställd innan avbrottet.5.1ch Surround-avkodning
Om en 5.1ch surround-avkodare som ar kompatibel med CeNET ansluts kan den styras fran anlaggningen. Följande Funktioner fürndras när en 5.1ch surround-avkodare kopplas in: - Lägena "MOVIE" och "VIRTUAL" laggs till i Dolby Pro Logic II-laget. - Laget VSE/POSITION andras till DSF-laget (Digital Sound Field). I P.EQ-laget (parametrisk equalizer) kan högtalarinställingarna justeras mer i detalj. - Parametrarna for musikinställningar (se sidan 39) andras.Att ställa in PL II (Dolby PL II)
Välj ett av de fyra driftslägena for den källa duska spelai Dolby Pro Logic II-laget. - Standardinställningen ar "OFF".■ MUSIC (musiklåget)
Se "PLII-menyn (Dolby PLII)" pá sidan 17.MATRIX (matrisäget)
Se "PLII-menyn (Dolby PLII)" pā sidan 17.MOVIE (filmäget)
Anvands for DVD-filmer.VIRTUAL (det virtuella laget)
Anvands for filmer och andra ljudkallor.OFF
Dolby Pro Logic II anvands inte. 1. Tryck på knappen [SOUND]. 2. Peka pà Dolby PLII.  3. Peka pà till hóger pà displayen För att valja Dolby Pro Logic II.  Lagesvisningen andras enlistigt foljande: MUSIC (musiklåget) MATRIX (matrislåget) MOVIE (filmlåget) VIRTUAL (det virtuella låget) OFF (PL II av) MUSIC (musiklåget)... * Se sidan 45 für mer information om volymjustering für mitthögtalaren/subwoofern. 4. Peka pà RTN.Att öppna DSF-menyn
DSF (Digital Sound Field) gör det möjligt att simulera ljud För att erhälla sama upplevelse som i ett koncerthus eller i vid en live-spelning. Nar du valjer DSF-menyn sjunker volymen ibland. - Standardinställingen für DSF är "OFF" och "HALL" für DSF-menyn. 1. Tryck på knappen [SOUND]. 2. Peka på DSF.  3. Peka pa ppa ON/OFF-displayen. DSF-effekten vaxlar mellan ON och OFF.  När DSF ar entwickel à “OFF” paverkar inte DSF-installingen musikkällan. Därmed ar DSF-installingen avslutad. Tryck på knappen [SOUND] für att gå tillbaka till ursprungslaget. 4. Peka pa t p a DSF-menyns nummer for att valja en DSF-meny.  DSF-menyer HALL CHURCH STADIUM LIVE JAZZCLUB THEATER HALL...| Nr | Funktion | Beskrivning |
| 1 | HALL | Stor koncertlokal |
| 2 | CHURCH | Kyrka med välvt tak |
| 3 | STADIUM | Stor stadionutan tak och vöggar |
| 4 | LIVE | Konzertlokal for liveframträdenden, störreòn en jazzklubb |
| 5 | JAZZCLUB | Jazzklubb med lågt i tak |
| 6 | THEATER | Bio- eller teatersalong |
Att öppna P.EQ-menyn
Med P.EQ (Parametric Equalizer) kan du kompensera hela frekvensområdet i detalj med en slät kurva där frekvenskompensationen anpassas till biltypen. - Standardinställingen innebär foljande inställinger for alla högtalarna. FREQ = 1kHz, Q = 1, GAIN = 0dB 1. Tryck på knappen [SOUND]. 2. PekaP.EQ.  3. Peka pā ⓷ ⓸ ⓺ pā ON/OFF-displayen. P.EQ-effekten vāxlar mellan ON och OFF.  När P.EQ.-effekten ar installd pa "OFF" paverkar inte P.EQ.-inställingen musikkallan. Därmed ar P.EQ-inställingen avslutad. Tryck pa knappen [SOUND] for att gà tillbaka till ursprungslaget. 4. Peka pa 山 pa P.EQ-menyns nummer for att valja en P.EQ.-meny.  P.EQ-menyer SIGNAL SP-SEL BAND FREQ Q GAIN SIGNAL... 5. Peka på till höger på displayen für att andra parametern. SIGNAL (val av signal): Välj mellan “P-NOIS” och “MUSIC” P-NOIS: när skär brus sca användas MUSIC: nar musiksignaler ska,. anvandas SP-SEL (val av den högtalare vars P.EQvärde skäändras): Välj mellan "FRONT", "CENTER" och "SURROUND". - FRONT: främre högtalaren - CENTER: mithögtalaren - SURROUND: surroundhögtalaren BAND (val av frekvensband): Välj mellan band 1-3 FREQ (val av mittfrekvens): kan ställas in på mellan 20 Hz och 20 kHz. Q (installing av Q-kurva): Ställ in Q-kurvans utseende till 1, 3, 5, 7 erler 20. GAIN (installing av utnivan): Justera forstarkninger (utnivan) inom intervallet -12 dB till +12 dB (steg p 1 dB, 25 punkter) Upprepa moment 4 och 5 forr att andraparametern. 7. Tryck på knappen [SOUND] for att gå tillbaka till ursprungslaget.P. EQ-justering
Följande inställninger kan góras på P.EQ-menyn: mittfrekvens, forstärkning och Q-kurva kan sparas für kombinationer av kanaler/band. Till exempl kan mittfrekvensen "250 Hz", Forstarkningen -8 dB" och Q-kurvan 3" sparas pa band 1 fram. Se avsnittet "Att stalla in P.EQ" (se sidan 21) for mer information om P.EQ-funktionen.Att andrainstallingarna
När en 5.1ch surround-avkodare ár inkopplad andras musikinställningarna iändringslåget.Att väljainstallingsparametrar
Nedan beskrivs vilka parameterinställningar som ändras. Se avsnittet "Att andra inställingarna" (sidan 39) under "Gemensamma manovr for alla Iagen" for mer information som parametrar som inte andras. 1. Tryck på knappen [A]. Åndringslåget kopplas in.  ADJUST MODE CENTER-SP 2. Peka pa 山 pa parameterdisplayen for att valja den parameter som ska andras. * Om du pekar på ⊥ Ⓞ Ⓞ till vänster på displayen visas en huvudparameter i taget. Omdu pekarp tillvanderdisplayenvxlarunderparametrarnakontinuerrigt. * Om du pekar på ⊥ ⊥ ⊥ i mitten av displayen visas en underparameter i taget. Om du pekar på ⊥ ⊥ → växlar underparametrarna kontinuertigt. 3. När "THROUGH" visas till höger på displayen kan du peka på denna text for att overgå till displayen for detaljändringar. 4. Peka antingen på till hoger på displayen eller vrid på knappen [ROTARY]forall att stalla in detaljerna.Att gà tillbaka till utgangsläget
1. Tryck på knappen [A] igen. Parametrar| Huvudparametrar | Underparametrar |
| SOUND | CENTER-SP / SRD-SP / SUB-WOOFER • Inställning av högtalaren ON/OFF (se sidan 64) |
| FRONT HPF / CENTER HPF / SRD HPF / SUB-W LPF • Inställning av högtalarfiltrets frekvens (se sidan 64) | |
| SP GAIN • Inställning av högtalarnas utnivå (se sidan 46) | |
| DELAY | CENTER-SP / SRD-SP • Inställning av tidsförskjutning für högtalarna (se sidan 65) |
| DOLBY D | D-RANGE • Inställning av dynamiskt omfäng (se sidan 65) |
| PL II CONT | PANorama / DIMENSION / CTR WIDTH • Detaljinställingar für musiklåget (se sidan 47) |
Inställing av högtalare ON/OFF (CENTER-SP/SRD-SP/SUB-WOOFER)
Koppla in aller bort mitthögtalaren (CENTER-SP), surroundhögtalaren (SRD-SP) och subwoofern (SUB-WOOFER). Se till attenna inställning ar "OFF" om det inte finns nàgon mitthögtalare, surroundhögtalare erler sub-woofer. - Standardinställningen ar "ON". 1. Tryck på knappen [A] für att gå tilländringslåget. 2. Peka pa t ppa parameterdisplayen och valj "CENTER-SP" under "SOUND", "SRD- SP" under "SOUND" och "SUB-WOOFER" under "SOUND".  3. Peka antingen på till höger på displayen eller vrid på knappen [ROTARY] För att valja "ON" eller "OFF". * Valj "ON+", "ON-" eller "OFF" für "SUB-WOOFER". Normalinställningen ar "ON+". När den ar installd på "ON-kan dock en effekt i det laga registret kännas starkt. 4. Tryck på knappen [A] För att gå tillbaka till det tidigare laget.Inställing av högtalarfiltrens frekvens (FRONT HPF/CENTER HPF/SRD HPF/SUB-W LPF)
Medenna Funktion kan du modifiera filterfrekvensen for att anpassa den till de hogtalare du anvander. Högtalare som har stängts av enigt anvisingarna i avsnittet "Inställning av högtalare (CENTER-SP/SRD-SP/SUB-WOOFER)" visas inte. - Standardinställingen für “FRONT HPF” eller “SRD HPF” ar für “THROUGH” (inget filter) och “120Hz” für “CENTER HPF” eller “SUB-W LPF”.Filterjustering
FRONT HPF/CENTER HPF/SRD HPF (installing av hogpassfilter)
Detta filter tar bort basljud från de främre, mittoch surroundhögctalarna. $$ \text {T H R O U G H} \rightarrow 5 0 \mathrm {H z} \rightarrow 8 0 \mathrm {H z} \rightarrow 1 2 0 \mathrm {H z} $$ Ställ in filtret after högtalaren när du använder högtalare med liters diameter.THROUGH
Används für högtalare som kan generera bas. THROUGH kan inte ställas in på CENTER HPF.SUB-W LPF (installing av laggpassfilter for sub-woofern)
Detta filter tar bort diskantljud fran sub-woofern. $$ 5 0 \mathrm {H z} \rightarrow 8 0 \mathrm {H z} \rightarrow 1 2 0 \mathrm {H z} $$ Ställ in filterfrekvensen after sub-wooern. 1. Tryck på knappen [A] für att gå tilländringslåget. 2. Peka pa t ppa parameterdisplayen och valj "FRONT HPF" under "SOUND", "CENTER HPF" under "SOUND", "SRD HPF" under "SOUND" och "SUB-W LPF" under "SOUND".  3. Peka antingen på till hoger på displayen eller vrid på knappen [ROTARY]forall att ställa in frekvensen. * Valj 50Hz, 80Hz erer 120Hz. *1 THROUGH visas bara när du har valt "FRONT HPF" eller "SRD HPF". 4. Tryck på knappen [A] För att gå tillbaka till det tidigare laget.Inställing av tidsforskjutning für högtalarna (CENTER-SP/ SRD-SP)
Nár ludet frán varje högtalare nár lyssningspositionen beror på var högtalarna ár placerade och på bilens storlek. Justera tidsforskjutningen for Högtalarna sa att ludet frán alla högtalare nár lyssningspositionen samtidigt som ludet frán de främre högtalarna. - Standardinställingen ar "0 ms". 1. Tryck på knappen [A] für att gå tilländringslåget. 2. Peka på « Center-SP » under “DELAY” och “SRD-SP” under “DELAY”.  3. Peka på till hoger på displayen for att andere tidsforskjutningen. * “CENTER-SP” kan ställas in mellan 0 och 5 ms. * "SRD-SP" kan ställas in mellan 0 och 15 ms. 4. Tryck på knappen [A] För att gå tillbaka till det tidigare laget.Att ställa in de Dolby Digital-funktionerna (D-RANGE)
Denna Funktion komprimerar det dynamiska omfånget hos Dolby Digital-lud sö att laga ljud som skádespelardialoger bärs fram och höga polymer dämpas. Dessa Funktioner ar bara tillganglia på Dolby Digital-DVD-skivor. - Standardinställningen ar "MAX". 1. Tryck på knappen [A] für att gå till andringslåget. 2. Peka pa t ppa parameterdisplayen for att valja "DOLBY D" under "D-RANGE".  3. Peka på till Höger på displayen für attändra det dynamiska omfånget och önskad parameter. MAX: maximalt dynamiskt omfang for källan STD: rekommenderat lage for standardlyssning MIN: de mest komprimerade dynamiska omfang som gör att också laga ljud hör slett 4. Tryck på knappen [A] För att gå tillbaka till det tidigare laget.8. OM DET UPPSTAR PROBLEM
| Problem | Orsak | Åtgård | |
| Allgemein | Det gär inte att slå på bilstereon. (Det hörns inget ljud.) | En säkring har,gätt. | Sätt i en ny säkring med samma ampere-tal. Om säkringen gär ingen,så rädfrögga affaren)darr du köpte bilstereon. |
| Felaktig ledningsdragning. | Rädfrögga affaren darr du köpte bilstereon. | ||
| Inget ljud matas ut.när bilstereon används med Förstärkare anslutna eller en motorantenn ansluten. | Motorantennens kabel arkortsluten till jord,eller det kravs alltfor kraftig strömstyrka for fjärrstyrtr strömpåslag till Förstärkarna aller motorantennen. | 1. Stäng av bilstereon.2. Koppla loss alla kablar frän motorantennkabeln. Kontrollera att var och en av kablarna inte arkortsluten till jord med hjälp av en ohmmeter.3. Slå på bilstereon ingen.4. Anslut Förstärkarnas fjärrstyrningskaplar till motorantennkabeln en i taget. Om Förstärkarna stängs av innan alla kablar ar anslutna,sa användett separat relä for att tillföra spänning for fjärrstyrd pâslagning(alltfor kraftig strömstyrkakravs). | |
| Inget händer.när du trycker påknapparna. | Det har blivit fel pà mikroprocessorn på grund av störningar e.d. | Stäng av bilstereon,och tryck sedan på [RELEASE]-knappen och ta av DEN LÖSTAGBARA KONTROLLPANELEN (DCP). Tryck in Återställningsknappen med nagot smalt foremål ochhall den intryckt i ungefär 2 sekunder. | |
| Displayen visar fel. | |||
| Kontakterna på DEN LÖSTAGBARA KONTROLLPANELEN (DCP)ller huvudenhetenhar blivit smutsiga. | Torka rent kontakterna med en mjuk trasa som fuktats med rengöringsprit. | ||
| CD/MP3/WMA | Det hörns inget ljud. | En annan sorts skiva,anden CD-skiva eller nöggot annat främmande foremål ar redan isatt. | Öppna den lutande konsolen och tryck in [▲]-knappen ochhall den intryckt i mer än 3 sekunder.Det främmande foremålet matas ut. |
| Det finns inga MP3/WMA-filer på skivan. | Lagra MP3/WMA-filer på skivan på rätt sätt. | ||
| Filarma kännns inte ingen som MP3/WMA-filer. | Använd rätt kodade MP3/WMA-filer. | ||
| Fel filsystem. | Använd ISO9660 nivistå 1,2Eller JOLIETEller Romeo filsystem. |
| Problem | Orsak | Åtgård | |
| CDMP3/WMA | Ljudet hoppar eller det uppstår störningar. | Skivan är smutsig | Rengör skivan med en mjuk torkduk. |
| Skivan är kraftigt repad eller svek. | Byt ut den mot en repfri skiva. | ||
| Ljud avbryts eller hoppas över.Störningar alstras eller störningarblandas med ljudet. | MP3/WMA-filerna är inte rätt kodade. | Använd rätt kodade MP3/WMA-filer. | |
| Ljudet är däligt när du precis slagit på bilstereon. | Det kan bildas smà vattendroppar på linsen inuti CD-spelaren;när bilen stär parkerad på ett fuktigt/Ställe. | Låt bilstereon stå påslagen i ungefär 1 timme tills sukten torkat. | |
| Fel filnamn. | Fel filsystem. | Använd ISO9660 nivå 1,2 eller JOLIET aller Romeo filsystem. | |
| Spelning med en spelningsliste kan inte utföras. | Filnamn eller filnamnsförlängning är inte korrekt. | Använd alfanumeriska/ASCII-tecken for MP3/WMA-filmnamn.Använd“.M3U” som filnamnsförlängning För en spelningsliste. |
9. FELMEDDELANDEN PÄ DISPLAYEN
Om det uppstar nagot fel visas nagot av foljande meddelanden pa displayen. Utför de Åtgärder som beskrivs nedan für att avhjalpa problemet.| Felmeddelande | Orsak | Åtgård | |
| CD/MP3/WMA | ERROR 2 | En skiva har fastnat inuti CD-spelaren och gär inte att mata ut. | Det har blivit fel på CD-spelarmekanismen. Rädfråga affären)där du köpte bilstereon. |
| ERROR 3 | En skiva gär inte att spelà på grund av repor, e.d. | Sätt i en skivautan repor och som inte ár skev i stället. | |
| ERROR 6 | En skiva År isatt upp och ned i CD-spelaren och gär inte att spelà. | Mata ut skivan och sätt i denigen på rätt häll. | |
| Allmänt | AMP GUARD | Högitalarnas skyddskrets har aktiverats. Om man försöker höja volymen i det lögget tänds "AMP GUARD" på displayen. "AMP GUARD" kan ibland starta under påverkan av speciella testsignaler. | 1. Funktionen kan också Återställas genom att du stänger av apparaten och sätter på denigen. (Ljudet i högtalarna avskärs automatiskt;när högtalarnas skyddskrets aktiveras.)2. Kontakta en serviceverkstad om ljudet försvinnerigen. |
| CD-växäre | ERROR 2 | En CD i CD-växlaren gär inte att ladda in. | Det har blivit fel på CD-växalarmekanismen. Rädfråga affären)där du köpte bilstereon. |
| ERROR 3 | En CD i CD-växlaren gär inte att spelà på grund av repor, e.d. | Sätt i en CDutan repor och som inte ár skev i stället. | |
| ERROR 6 | En CD i CD-växlaren gär inte att spelæ eftersom den är isatt upp och ned. | Mata ut CD-n och sätt i denigen på rätt häll. | |
| DVD-växäre | ERROR 2 | En skiva i DVD-växlaren gär inte att spelà. | Det har blivit fel på själva DVD-spelarmekanismen. Kontakta affären)där du köpte apparaten. |
| ERROR 3 | En skiva gär inte att spelà på grund av repor e.d. | Försök engang tillEller lagg i en annan skiva i stället som inte ár repad eller skev. | |
| ERROR 6 | En skiva i DVD-växlaren gär inte att spelæ eftersom den är ilagd upp och ned. | Mata ut DVD och sätt i denigen på rätt häll. | |
| ERROR P | Föräldrakontrollfel. | Ställ in rätt nivalföräldrakontrollen. | |
| ERROR R | Regionskodfel. | Mata ut skivan och lagg i en annan skiva med rätt regionskod i stället. |
10. TEKNISKA DATA
Radiodel
Stationsinställningssystem: PLL-synthesizer Frekvensband: FM:87,5 till 108 MHz (steg om 0,05 MHz) MV:531 till 1602 kHz (steg om 9 kHz) LV:153 till 279 kHz (steg om 3 kHz)CD-spelardel
System: Digitalt ljudsystem for kompakstkivor Frekvensgang: 5 Hz till 20 kHz (±1 dB) Signalbrusforhallande:100dB(1kHz) IHF-A Dynamikomfång: 96 dB (1 kHz) Distorsion: 0,01%Allmänt
Uteffekt: 4 × 31 W (DIN 45324, +B=14,4 V) Matningsspänning: 14,4 V likström (10,8 till 15,6 V tillatet), negativ jord Strömforbrukning: Mindre ön 15 A Högtalarimpedans: 4 Ω (4 till 8 Ω tillatet) Bilantennens markström: Högst 500 mA Vikt: Huvudenhet: 1,7 kg Fjarrkontroll: 80g (inklusive batterier) Matt: Huvudenhet: 178 (B) × 50 (H) × 155 (D) mm Fjarrkontroll: 44 (B) × 110 (H) × 27 (D) mmObservera:
Ratt till andringar forytterligare forbattringar forbehalles. Gratos pela aquisicao deste produits Clarion. * Leia completeness this manual do propriétário antes de operar este equipamento. * Aparto a leitura deste manual, certificque-se de guardá-lo num local de fácil acesso (por exemple: porta-luvas). * Verifique o conteudo da carta de garantia anexa e guarde-a residadosamente com este manual. * Este manual descreve o procedimento de utilizesao do carregaror CD e do sintonizador TV ligados com o cabo CeNET. O carregaror CD e o sintonizador TV tem o seu propremanual; não é aque descririto o modo de utilizesao destes.Conteudo
1. PRECAUÇOES 3 Consola inclinavel 4 Manuseamento de discos compactos 4 2.CONTROLOS 5 3. NOMECLATURA 6 Nome dos botões e suas funções 6 Operações dos principais botões quando um equipamento externo estiver ligado a este aparecido 7 Indicações do Mostrador 7 Funcionamento do Mostrador 8 4. DCP (PAINEL DE CONTROLLO DESTACÁVEL) 9 5. TELECOMANDO 10 Insercao de pilhas 10 Funcao dos botoes da unidade de telecomando 11 6. OPERACOs 12 Operacionesbasicas 12 Operacao do AC-Processor III 17 Operacoes do rado 23 Operacoes do RDS 26 Operacoes de CD/MP3/WMA 31 Diferentes seções da música escutadas por various ouvintes (Função 2-ZONE) 36 Operacoes comuns a cada modo 37 7. OPERATIONS DE ACESSORIOS 51 Operacoes do Permutador de CDs 51 Operacoes de TV 54 RADIO Digital / Operacoes DAB 58 5.1ch Operações do Descodificador Periférico 61 8. NO CASO DE SURGIR ALGUM PROBLEMA 66 9. INDICAÇOÉS DE ERRO 68 10. ESPECIFICAções 691. PRECAUÇÖES
1. Este aparelho é aplicável somente para veículos rodoviários de 4 rodas. O uso este aparelho não é apropiado em tractores, empilhadores de forquilha, tractores de terraplanagem, veículos todo-o-terreno, bicicletas motorizadas de 2 ou 3 rodas, barcos marítimos ou em veículos destinados para outros propósitos especials. 2. quando o interior do automóvel estiver muito frio e o leitor for uso logo après o aquecedor ter sido activado, poderá ocorrer condensação de humidade no disco ou nas partes ópticas do leitor e poderá não ser possível realizar a reprodução apropriada. Caso ocorra condensação de humidade no disco, limpe-o com um pano macio. Caso ocorra condensação dehumidade nas partes opticas do leitor, não utilize o leitor durante circa de uma hora. A condensation desaparecerá naturalmente, possibilizando o funcimento normal. 3. Conduzir o automóvel em estradas extremamente irregulares que provocam violentas vibrações poderá occasionar o salto do som.AVISO AOS UTENTES:
ALTERACOES OU MODIFICACOs DESTE PRODUTO NAO APROVadas PELO FABRICANTE INVALIDARAO A GARANTIA.ADVERTÊNCIA
Para a sua seguranca, não olhe nem acontece o paine de toque quando estiver a conducir.Consola inclinável
Esta unidad utilizes consolas inclináveis para possibilitar as exibições de écran amplo. Quando utilizar a consola inclinével, certifique-se de fecha-la.PRECAUÇAO
Tome cuidado para não prender os dedos quando abrir e fechar a CONSOLA INCLINÁVEL.
1. Por quostoes de seguranca, feche sempre a CONSOLA INCLINAVEL antes deouxar esta unidade sem serutilizada por um periodo prolongado ou antes de DESLIGAR a chave de ignicao. Caso DESLIGUE a chave de ignicao com a CONSOLA INCLINAVEL inclinada, a CONSOLA INCLINAVEL não se fechara. 2. Antes da CONSOLA INCLINÁVEL fechar-se, um ruido de trabalho poderá ser emitido do mecanismo de segurança. Isto é normal. 3. Caso movimento a CONSOLA INCLINÁVEL com a mão, isto poderá Criar uma folga. Para corrigi-la, carregue no botão [▲] para fechar a CONSOLA INCLINÁVEL com a alimentação daunities activada. 4. Após a execção de um disco, a CONSOLA INCLINÁVEL retorna automaticamente ao estado inclinado ou fechado. Se houver alguma obstruição quando a CONSOLA INCLINÁVEL tentar fechar-se, o mecanismo de segurar está acontecido e a CONSOLA INCLINÁVEL returná ao estado aberto. Caso isto ocorrara, retire a obstruição, e em seguida carregue no botão [▲]. 5. Para fazer riscar o disco compaco, mantenha o;nivel do CD em 12 ou 8 cm durante a sua insercao ou retirada.Manuseamento de discos compactos
Utilize somente discos compactos que possuem a    Não reproduza discos compactos cordiformes, octogonais ou discos com outros formatos esp Alguns CDs gravados no modo CD-R podem não ser'utilizando. Mesmo quando gravados no modo CD-R/W, algunos CDs podem não ser'utilizableis.Manuseamento
- Em comparação com os CDs de música comum, tanto os CD-Rs (discos compactos graváveis) como os CD-RWs (discos compactos regraváveis) são fácilmente affectados pelalaalta temperatura ehumidade e algunosCD-Rs e CD-RWs poderao não serreproduzidos. Portanto, não os deixe no interior de um automóvel durante muito tempo. - Discos novos podem conter alguma rugosidade ao redor das bordas. O leitor pode não funciona ou o som pode saltar, no caso de utilizez tais/discos. Use uma caneta esferografica ou algo semelhante paraletalugosidade das bordasdo disco. - Jamais cole etiquetas na superficie do disco compaco e tampouco marque a superficie com um lápis ou caneta. - Jamais reproduza um disco compacto com fita celofane ou qualier除外o tipo de cola aderido, ou com MARAS de despendimento. Casa tente reproduzir um disco compaco nessas condições, poderá não ser capaz de encontrar retirá-lo do leitor de CDs ou poderáavariar o proprietary leitor de CDs. - Não utilize/discos compactos que possem grandes riscos,errodesystemato,rachaduras,etc.O uso de tais discos poderavprovocar falhas na operacao ou avarias. - Para retiring um disco compaco do seu estojo de armazenamento, pressione o centro do estojo e retire o disco, segurando-o@cuidadosamente pelas bordas. - Não utilize capas de proteção de CDs disponíveis no comércio nem discos equipados com estabilizadores, etc. Estes poderãoavariar o disco ou provocar falhas no mecanismo interno.Armazenamento
- Não exponha os discos compactos à luz solar directa ou à qualquer fonte de calor. - Não exponha os discos compactos à humidade ou poeira excessiva. - Não exponha os discos compactos ao calor directo de aquecedores.Limpeza
- Para retiring impressões digitais e sujidas, utilize um pano maco e limpe em LINHA recta a partir do centro do disco compacto até a circunferência. - Não utilize utilize nenhum solvente, tal como limpadores disponíveis no comércio, pulverizarador antiestálico, ou dissolventes para limpar discos compactos. - DepoS de utiliser um limpador especial de disco compaco, deixe o disco compaco fazer antes de reproduzi-lo.2.CONTROLOS
Unidade principal
Com a CONSOLA INCLINÁVEL aberta
3. NOMECLATURA
Nome dos botões e suas funções
Botão [RELEASE]
- Remove o DCP (painel de controlo destactével).Sensor fotogálico
- Este sensor detecta a luminosidade no interior do seu automóvel. quando a funcção auto-dimmer está ajustada para "AUTO", a luminosidade do measurador regula a consoante a luminosidade detectada por este sensor.Botão rotatório [ROTARY]
- Pressione o botão para ligar o aparecido. A cada vez que se pressiona este botão alterna o modo. - Pressione e mantenha pressionado o botão durante 1 segundo ou mais para desligar o aparecido. - Este botão también pode ser utilizado paraaabstar o volume, ou para executar os variousajustamentos no modo ajuste.Botao [△]
- Abre/fecha o pailen de controlo. Se ja está carregado um disco, esse sera ejectado quando se abre o pailen de controlo.Nota:
Se o disco não for ejectado, mantenha pressionado o botão [▲] durante 1 segundo ou mais.Botao [A]
- Utilize este botão para selecionar ou ajustar os various parâmetros em modo ajuste. - Utilize este botão para introduzir os names das estações em modo rádio ou títulos de discos em modo CD.Botão [SOUND]
- Utilize este botão para definir ou executar various ajustes tais como espaço录音. - Mantendo pressionado este botão durante 1 segundo ou mais quando se comuta a função 2-ZONE de ON para OFF.Botão [TA]
- Utilize o botão para escolher o modo de espera TA (Anúncio de Tráfego) ( quando a funcção 2-ZONE está desactivada). Comute a operationação da funcção 2-ZONE. Mantendo pressionado este botão durante 1 segundo ou mais comuta-se o tipo de 2-ZONE ( quando a funcção 2-ZONE está activada).Botao [▶II]
- Interrompe e faz repartir uma pista (no modo CD). - Utilize o botão para escolher o modo de espera PTY ( Tipo Programa) ou items PTY.Mostrador
- Visualiza asyardas informacoes que indicam o estado de functiamento esta unidade tais como estado sintonização/reproducao e individadores. Toque no主義or com o seu dedo, e toque no botao 已 para habilitar o funciona. (veja pagina 8)Operações dos principais botões quando um equipamento externo estiver ligado a este aparecido
- Quando o permutador de CDs/DVDs estiver ligado
* Quanto acos pemensores, consulte a�� "Operações do Permutador de CDs" (veja páginá 51). Quanto ao permutador de DVDs, consulte o Manual do proprietário fornecido com o permutador de DVDs.Botao [▶II]
- Reproduz ou pausa um CD ou DVD.Botão [A]
- Utilido para fazer entrada titles de discos em modo permutador de CDs.- Quando um TV/DAB estiver ligado
* Quanto aos dormenores, consulte a secção "Operações de TV" (veja páginha 54) ou "Rádio Digital / Operações DAB" (veja página 58).Botão [TA]
- Utilize o botão para escolher o modo dereshpera TA (Anuncio de Trafego) no modo DAB. (Esta funcao está disponible somente para osintonizador DAB.) - Pressione e mantenha pressionado durante um segundo ou mais para ligar ou desligar o modo INFO. (no modo DAB)Botao [▶II]
Comuta o modo de imagem do tevisor ou o modo de imagem VTR (externo). (no modo TV) - Utilize o botão para escolher o modo de espera PTY ( Tipo de Programa) ou items PTY no modo DAB.Botão [A]
- Este botãoutilizzato para fazer entrada o nome da estaqao TV. (no modo TV)Indicações do Mostrador
Funcimiento do Mostrador
Nesta unidade utilizes umadora como pailen de toque. Pode-se utilize a址adora tocando-o com um dedo. Existem quatro operacoes principais doadora especuldamente:Tocar
Toque no主義者 com um dedo e largue-o Dentro de 1 segundo. esta é a operacao basia quando se utilizes o主義者.Tocar e manter tocado
Toque no主義者 com um dedo e mantenha o dedo sobre o主義者 durante 1 ou 2segundos ou mais tempo. Não mova o dedo quando estiver tocando o主義者. Tocando e mantendo o toque sobre oestrador durante um segundo ou mais oestrador lista, por exemple, e chama outras funções manuais. Tocando e mantendo o toque sobre o主義o durante 2 segundos ou mais tempoutilizando para armazenar na memória de pre-Selecao ou outras informacoes.Toque no botão
 Toque noestrador com um dedo, e mova o dedo para a esquerda () ou direita () com o dedo ainda sobre oestrador, e tire o dedo dentro de 1 segundo.Esta operacaoutiliza para selecionar a memoria de pre-selecao (de 1a6) ou as pistas. Toque no botão
 Toque noestrador com umdedo,e mova o dedo para a esquerda () ou direita () com o dedo ainda sobre oestrador, e mantenha o dedo sobre oestrador. A operacao actual continua quando o seu dedo fortantudo sobre oestrador.Esta operacaoutilizada,por exemple,paraasintonizacaomanualouavanço/ retroprocesso rapiido das pistas. 4. DCP (PAINEL DE CONTROLO DESTACÁVEL)
O painel de controlo pode ser retirado para evitar roubos. Quando retirar o painel de controlo, guarde-o noestojo do DCP (PAINEL DE CONTROLLO DESTACÁVEL) para prevenir arranhões. Recomendamos que leve consigo o DCP (painel de controlo destacável) quando sair do automóvel.Retirada do DCP (painel de controlo destacável)
1. Desligue a alimentacao, com a CONSOLA INCLINAVEL fechada. 2. Pressione completeness o botao [RELEASE] para Abrir o DCP (painel de controlo destacavel).  3. Puxe o DCP (painel de controlo destacavel) na sua direcção e retireo. PRECAUÇAO
- Fecha sempre a CONSOLA INCLINÁVEL antes de retiring o DCP (painel de controlo destacável). - Caso retire o DCP (painel de controlo destacável) com a CONSOLA INCLINÁVEL aberta, a consola inclínável fechar-se-a imeditamente. Tome cuidado para não prender os dedos.Fixação do DCP (painel de controle destacável)
1. Insira o DCP (painel de controlo destacável) de maneira que a secção A do lado direito do DCP se encaixe no gancho B da unidade.  2. Pressione@cuidadosamente o lado esquerdo © do DCP para encaixa-lo. PRECAUÇAO
- O DCP pode ficar fácilmente aviado devido a choques mecânicos. Após retirálo, tome cuidado para não derrubá-lo e tao-pouco o sujeite a choques violentes. - Se o botão [RELEASE] for pressionado e o DCP não estiver preso no lugar, este poderá cair devido às vibrações do carro e quebrar-se; portanto, antes retirá-lo, instale-o naunities ou guarde-o no seuestojo. - O dispositoivo de ligação que liga a unidade e o DCP é uma coisa extremamente importante. Tome cuidado para não avariário, pressionando com as unhas, chaves de fendas, etc.Nota:
- Se o DCP estiver sujo, limpe a sujidade somente com um pano macio e seco.5. TELECOMANDO
Inserção de pilhas
1. Vire a unidade de telecomando ao avesso, em seguida deslize a tampa traseira na direcção da seta. 2. Insira pilhas AA (SUM-3, R-6/1,5V) fornecidas com a unidade de telecomando, com os seuis pólos orientados no sentido indicado na figura, eenthao feche a tampa traseira.Notas:
O uso Incorrecto das pilhas pode provocar a sua explosão. Leve em consideração os seguiços pontos: - Quando for substituir as pilhas, substitua ambas as pilhas por outras novas. - Não curto-circuite, desmonte nem aqueça as pilhas. - São jogue as pilhas ao fogo ou chamas. - Jogue as pilhas exauridas apropriadamente. Funções dos botões daunities de telecomando
| ModoBotão | Rádio (RDS)/DAB | Leitor de CDs/MP3 | Permutador de CDsPermutador de DVDs | TV |
| [FUNC] | Alterna entre rádio, DAB, CD/MP3, corregrador CD, corregrador DVD e TV, AUX. | |||
| [BAND] | Comuta a banda de recepçao. | Reproducz a primarya faixa.Reprodução do topo do disco | Desloca o proxies disco em ordem crescente. | Comuta a banda de recepçao. |
| [▲], [▼] | Aumenta e diminui o volume (em todos os modos). | |||
| [←], [▶] | Desloca os canais de programação em ordem ascendente e descendente. | Desloca as faixas em ordem ascendente e descendente. Se for mantido premio durante 1 segundo:ança rapidamente/retrocede rapidamente. | Desloca os canais de programação em ordem ascendente e descendente. | |
| [▶■] | Nenhuma função. | Comuta entre os modos de reprodução e de pausa. | Nenhuma função. | |
| [MUTE] | Activa e desactiva o silenciamento. | |||
| [TA] | Activa e desactiva TA.Mantenha pressionado o botão durante 1 segundo ou mais para comutar entre a fonte sonora da zona principal e da zona secundária (somente quando o modo 2-ZONE estiver aktivado). | |||
| [DISP] | Alterna entre oMASTER principal e oMASTER de relógio (CT). | |||
| [PS/AS] | Exploraçãoprogramada. Se for mantido premio durante 2 seguros: Armazenamento automatico. | Reproção introdutória.Pressione e mantenha o botão pressionado durante 1 segundo ou mais, para a efetuar a reprodução introdutória das pastas, quando em modoMP3/WMA. | Reproção introdutória.Quando pressionado e mantido pressionado durante 1 segundo ou mais: reprodução introdutória do disco. | Reproção pré-definida.Quando pressionado e mantido pressionado durante 2(secondo ou mais: auto armazenamento. |
| [AF] | Activa e desactiva a função AF. Se for mantido premio durante 1 segundo: activa e desactiva a função REG. | Reproção repetida.Pressione e mante-nha o botão pressionaldo durante 1 segundo ou mais, para a efec-tuar a reprodução repetida das pastas, quando em modo MP3/WMA. | Reproção repetida.Quando pressionado e mantido pressionado durante 1 segundo ou mais: reprodução repetida do disco. | Nenhuma função. |
| [PTY] | Modo PTY ligado e desligado. | Reproção aleatoria.Pressione e mante-nha o botão pressionaldo durante 1 segundo ou mais, para a efec-tuar uma reprodução por ordem aleatoria das pastas, quando em modo MP3/WMA. | Reproção aleatoria.Quando pressionado e mantido pressionado durante 1(secondo ou mais: reprodução aleatoria do disco. | Alterna entre TV e VTR. |
| [2-ZONE] | Pressione este botão e mantenha-o pressionado durante 1 segundo ou mais para activar ou desactivar o modo 2-ZONE.Pressione este botão para comutar a zona de controlo entre a zona principal ou a zona se-cundária durante a activação do modo 2-ZONE. | |||
Operaçõesbasicas
PRECAUÇA O
Certifique-se deaabstarovolume para o niveni minimoantesde desligar oraparelho ouachave de igniao.A unidade memoriza o ultimateajuste de volume.Se desligar oraparelho com o volume elevado, osom excessivamente alto ao religar oraparelho podera prejudicar a sua audicaooudanificarauunidade.Ligar/Desligar o aparelho
Ligar
Nota:
Tenha cuidado quando usar esta unidade por muito tempo sem ligar o motor do veiculo. Se descarregar excessively a bateria do automóvel, poder não ser capaz de actionar o motor e, a vidautil da bateria poder ser reduzida. 1. Pressione o botão rotatório [ROTARY]. O modo precedente幔e activado é exibido.Verónica do sistemas
APrimeira vez que ligar esta unidade après ter completinga ligaço dos fios,essa verificaqais os equipamentos connectados.(Essa denominada "verificação deSYSTEM." Quando se liga a alimentação do aparelho, exibido"System Check", siga o procedimento abaixo para executar a verificação do system. 1. Quando aparece "System Check" no公共场所, pressione o botão rotatório [ROTARY]. Inicia a verificação de sistemas. quando a verificação de sistemas é completeness, aparece "Completed" no公共场所. 2. Pressione o botão rotatório [ROTARY] de novo. Aparece oestrador principal para o modulo rádio.Função CODEMATIC
Quando "CODEMATIC" está posicionado em "ON", e a alimentacao está ligada com DCP connectado, aparece oestrador de Csgido de Toque. Toque noestrador na ordem em que foi definido no modo ajuste.  Quanto acos pormenores sobre a funcao CODEMATIC, consulte "Utilização da funcao de seguranca (CODEMATIC)" (veja pagina 50).Desligar
1. Mantenha pressionado o botão rotatório [ROTARY] durante um segundo ou mais.Selección um modo
1. Pressione o botão rotatório [ROTARY] para mudar o modo de funções. 2. Cada vez que se pressiona o botão rotatório [ROTARY], o modo de funções muda esta sequência: Modo rádio Modo DAB Modo CD/ MP3 Modo permutador de CDs Modo permutador de DVDs Modo TV Modo AUX Modo rádio... * Equipamento externo não conectado a CeNET não é exibido.Ajuste do volume
1. Rode o botão rotatório [ROTARY] para a direita paraLERar o volume;rode-o para a esquerda para diminui r volume. * O;nével de volume varia de 0 (mínimo) a 33 (máximo).Mudar o modo de funções
Existem 2 modelos de funçõesbineicos: operacao padrao e operacao simples. 1. No écran do主義or principal, toque e mantenha tocada a parte esquerda do主義or durante um segundo ou mais. O modo de funções mudado.  Na operação simples, as operações de tocar ↑ ⇌ ⇌ ou ⇌ ⇌ no modo rádio ou modo CD écran do主義or principal não são necessarias, e esta unidade pode ser usada para executar a operação simples. Note-se, todas, que as seguemes funções não está disponible na operação simples. - Sintonização pré-seLECTIONada, seleção de pastas, seleção de discos, e outras funções que abrangem o toque do botão direita doadora - Operações de comutatione do主義or (veja paga 13) - Operações de comutatione do tuito do ]. mostrador (veja paga 14) - Operações para exibir écrans de entrada de títulos. Nos écrans (ex. minha), como eu me falou, não houve a mesma coisa. As descrições dadas nesthemanual são sobretudo para a operação padrão. Quanto as descrições para as funções na operação simples, consulte as descrições para as exibições de écran no modo rádio ou no modo CD.Mudar o mostrador
1. Toque no centro do主義。 Cada vez que tocar no主義or,esse muda esta sequencia: Mostrador do titulo Proteção do ecran
Quando a funcao de protecao do ecran está activada, e nao se efectua nenhuma operationa esta unidade por circa de 30 segundos, a protecao do ecran sera exigida. Quanto aos hormenores, consulte pagina 41.Fundo
Tocando e mantendo tocado o centro do ]. mostrador durante um segundo ou mais comuta ao mostrador do ).| ① | ⑨ |
| ② | ⑩ |
| ③ | ⑪ |
| ④ | ⑫ |
| ⑤ | ⑬ |
| ⑥ | ⑭ |
| ⑦ | ⑮ |
| ⑧ | ⑯ |
Mostrador do Analisador do espectro
Tocando e mantendo tocada a parte direita do主義ist, é um segundo ou mais durante a exibicao do analisador do espectro (S/A) comuta o主義ist do analisador do espectro.| S/A SCAN | S/A 1, S/A 2, são S/A 3 exibidos por 10 segundos ou mais tempo cada um. |
| S/A 1 | S/A 1 FLDR No. 003 TOP |
| S/A 2 | S/A 2 FLDR No. 003 TOP |
| S/A 3 | S/A 3 FLDR No. 003 TOP |
Comutationdomostatdo tuito
É possével ver titulos de discos e autres informações que foram guardadas nos discos quando se reproduz CDs no modo CD ou modo permutador de CDs. 1. Toque e mantenha tocada a parte direita do主義istico durante um segundo ou mais no主義istico de tíolo. Cada vez que tocar e做不到izar o做不到o. mostrador alterna pela mesma ordem: Discos CD-Texto Título do utilizesdor (disco) Titulo CD-texto (disco) Nome do Artista Titulo CD-texto (pista) Titulo do utilizesdor (disco)... Disco MP3/WMA Pasta Ficheiro ETIQUETA Álbum ETIQUETA Artista ETIQUETA Titulo Pasta...Notas:
- MP3 suporta Etiquetas ID3 V2.3 / 2.2 / 1.1 / 1.0. - Mostrador de Etiquetas da prioridade a V2.3/2.2. - No caso de Etiquetas album para WMA, a informação escrita no cabeçalho de extensão exibida. - Somente characteres ASCII pourrait ser exibidos nas Etiquetas.Rolar um titulo
Toque noasnodetituleno tituloexibido. O titulo rola para a esquerda.Interromper a rolagem
Toque no botão noestrado de titulo.Função de CT (Hora de relógio)
A funcão de CT consente de receber dados CT enviados de uma estação RDS e exibir a hora. Para ver o écran de CT, toque no centro do主義者。 - Se os dados de CT não estiverem sentido recebidos, “---CT” aparece no主義者.Nota:
- Os dados de CT não são transmitidos em outros paises e por algumas estações de radiodifusão. Não, em algumas zonas, os dados de CT podem não ser exibidos com precisão.Colocação do ADF
- ADF a abreviação de Anti Distortion Filter. As funções de "Filtro de Reforço Activo" e "Compensação de Tonalidade Sonora" adoptadas而成tem de executar uma reprodução realista bem modulada sem afectar as caractéctricas da tonalidade sonora original. Esta unidade vem equipada com 4 temas de efeitos de tonalidade sonora guardados na memória. Selecione aquela que preferir. ADF-1: Adequado para altifalantes genuinos ADF-2: Adequado para altifalantes avulsos ADF-3: Adequado para altifalantes coaxiais USER: Este ajustamento pode ser executado pelo'utilizar de acordo com a sua preferencia individual. OFF: Nenhum efeito sonoro - A predefinição original de fabrica "OFF".Notas:
- Enquanto o volume muda quando ADF comutado, comute ADF com o volume e "SW VOLUME" (sub-woofer) e "CTR VOLUME" (altifalante central) abaixado o mais possivel. - Por vezes não se pode obter efeitos satisfátórios com algunos sistemas de altifalantes Em tais casos, ajuste o parâmetro ADF ou o volume. - quando ADF estiver ajustado para "USER", "1", "2" ou "3", a funcao VSE e funcao BASS/TREB sob EQ-SELECT está desactivada. 1. Pressione o botão [SOUND]. 2. Toque no botão ADF.  3. Toque no botão ↑ ↓ direita do meuhror para selecionar o modo ADF.  Quando ADF está desactivado "OFF", o ajuste ADF não se reflecte na fonte musical. Com isto termina-se o ajuste de ADF. Pressione o botão [SOUND] para voltar ao modo original. * Selezione um dos UTILIZADOS, 1, 2, 3, ou OFF. 4. Para Mudar os pormenores do ajuste ADF, pressione o botão [A]. 5. Toque no botão ↑ noestrador de指示ores de ajuste para selecionar o指示or pretendido. Cada vez que se toca em comuta-se oestrador deindicadores deajuste como segue: - Indicador de ajuste ( quando USER está選擇acionado em passo 3) $$ B A S S \rightarrow T R E B L E \rightarrow C O M P \rightarrow B A S S \dots $$ - Indicador de ajuste ( quando de 1 a 3 está seleccionado em fase 3) $$ \text {L E V E L} \rightarrow \text {C O M P} \rightarrow \text {L E V E L} \dots $$ 6. Toque no botão direita do主義 paraaabstaroindicador. * "BASS" e "TREBLE" pode ser ajustados dentro de um intervalo de 1 a13. * “LEVEL” pode ser ajustado dentro de um intervalo de -3 a +3. * Selezione ou "ON" ou "OFF" para "COMP". 7. Pressione o botão [SOUND] para voltar ao modo original.Ajuste do Sub-woofer e do Altifalante Central
- "SW VOLUME" (sub-woofer) pode ser ajustado somente quando "SUB-WOOFER" está ajustado para "ON". - "CTR VOLUME" (altifalante central) pode ser ajustado somente quando o modo Dolby Pro Logic II está ajustado ou para "MUSIC" ou "MATRIX", "SP-SETTING" está ajustado para "CTR+SW" e "CENTER-SP" está ajustado para "ON". - O ajuste predefinido de fabrica para SW VOLUME "0" e para CTR VOLUME "0". 1. Pressione o botão [SOUND]. 2. Toque no botão A-MODE.  3. Toque no botão ↑ noestrador de指示符指示的指示符 no estrador de指示符指示的指示符指示的指示符指示的指示符指示的指示符指示的指示符指示的指示符指示的指示符指示的指示符指示的指示符指示的指示符指示的指示符指示的指示符指示的指示符指示的指示符指示的指示符指示的指示符指示的指示符指示的指示符指示的指示符指示的指示符指示的指示符指示的指示符指示的指示符指示的指示符指示的指示符指示  4. Toque no botão direita do主義o ajuste o indicator como(desjar. * Este indicator pode ser ajustado dentro de um intervalo de -5 a +5. 5. Pressione o botão [SOUND] para voltar ao modo original.Ajuste do balanco esquerdo/direito e anterior/posterior
BALANCE:
Ajusta o balanco de volume entre o altovalante esquerdo e direito.FADER:
Ajusta o balanco de volume entre o altovalante anterior e posterior. - O ajuste predefinido de fabrica para BALANCE "0" e para FADER "0".Nota:
Balance/fader não poder ser ajustados quando "PRO" está selecionado em AC-PRO III (veja网页 44) e a funcao de posicao está activada. Ajuste do balanco esquecido/direito e anterior/posterior por meio da "Selecao do menu posicao"(veja网页17). 1. Pressione o botão [SOUND]. 2. Toque no botão A-MODE.  3. Toque no botão ↑ no主義 no主義 de指示ores de ajuste para seleccionar "BALANCE" ou "FADER".  4. Toque no botão direita do主義者ajuste o indicator como(desjar. * "BALANCE" pode ser ajustado dentro de um intervalo de L13 (lado esquido intensificado) e R13 (lado direito intensificado). * "FADER" pode ser ajustado dentro de um intervalo de R12 (lado posterior intensificado) e F12 (lado frontal intensificado). 5. Pressione o botão [SOUND] para voltar ao modo original.Ajuste de graves/agudos
O modo graves/agudos pode ser ajustado somente quando o modo Dolby Pro Logic II está desactivado (veja páginá 17) e “EQ SELECT” está ajustado para “BAS/TREB” (veja páginá 44). - O ajuste predefinido de fabrica é "0". 1. Pressione o botão [SOUND]. 2. Toque no botão A-MODE.  3. Toque no botão ↑ no主義 no主義or dos indicadores de ajustamento para seleccionar "BASS" ou "TREBLE".  4. Toque no botão direita do主義er e ajuste o indicator como desejar. * Este indicator pode ser ajustado dentro de um intervalo de -6 a +6. 5. Repita os passos 3 e 4 para fazer o indicator prétencido. 6. Pressione o botão [SOUND] para voltar ao modo original.Operação do AC-Processor III
Dolby Pro Logic II
Dolby Pro Logic II é uma Tecnologia de descodificação de MATRIX, na qual a Tecnologia de MATRIX digital actualizada é aplicada e Dolby Pro Logic mais aprimarada. Realizando excellente reprodução com 5,1 canais da fonte perimétrica Dolby, bem como de fontes sonoras estéreó tais como CDs, esta Tecnologia permite que um canal perimétrico se torne de gama completeness (20 Hz a 20 kHz) e estéreó. Assim, é possivel desfurar de quaisquer fontes estéreó com som dinário de 5,1 canais. De acordo com a fonte a ser reproduzida, o Modelo de Música ou o Modelo de Matrix pode ser selecionado. Fabricado sob licença de Dolby Laboratories. "Dolby", "Pro Logic" e o*símbolo de duplo D são MARCAS comérciais de Dolby Laboratories.Selecao do menu PL II (Dolby PL II)
Selezione o modo MUSIC ou o modo MATRIX correspondente a fonte que estiver a reproduzir segundo o modo Dolby Pro Logic II. - O ajuste predefinido de fabrica "OFF".■ MUSIC (modo música)
- Este modo adequado para fontes sonoras Stereo tais como CDs. - UmOTHERmoedajustamentoquepermiteajustestmasipormenorizadosamultemestadisponivelsequeo Campo sonoro difundese diferentemente dependendo do estado dafonte de musica gravada.Consultepagina 47)■ MATRIX (modo matrix)
- Este modo adequado para fontes sonoras tais como rádio AM/FM.OFF
- O modo Dolby Pro Logic II não utilizao, e o modo AC-PROIII utilizao. Quanto aos pomenores sobre o modo AC-PROIII, consulte "Selecao de cada modo" (veja pagina 44). 1. Pressione o botão [SOUND]. 2. Toque no botão Dolby PLII. 3. Toque no botão ↑ Direita doestrador para selecionar o modo Dolby Pro Logic II.  Oestrador de modo muda esta. sequencia: MUSIC (modo música) MATRIX (modo matrix) OFF (PL II desactivado) MUSIC (modo música)... * Quanto aos pormenores sobre o ajuste de volume do altovalente central /sub-woofer, consulte páginá 45. 4. Toque no botão RTN.Selecao do menu de posicao
Com POSITION, possível de escolher entre 5 seleções para fazer com que o som cheque do altovalante ao seu assento. Ainda, a funcao tempo de alinhamento consente o ajustamento exacto de altifalantes de modo que o mesmo efeito audio possa ser obtido de cada altifalante para todos ou ouvintes. No procedimento "Selecao de cada modo" (veja pagina 44), ajuste AC-PROIII para "PRO". - O ajuste predefinido de fabrica para POSITION "OFF" e para o menu Basics do posicao "FRONT".■ Menu de posicao
Esta funciona está pré-armazenada com 5 menus de posicao. SeLECTIONO o menu pretendedo de acordo com a sua preferencia. 1. Pressione o botão [SOUND]. 2. Toque no botão POSIÇÂO.   3. Toque no botão ↑ ↓ noestrador ON/OFF. O efeito posicao comuta-se em ON/OFF.  Quando o efeito de posicao está desligado, o ajustamento de posicao não se reflecte na fonte de musica. Isto termina ou ajustamento de posicao. Pressione o botao [SOUND] paravoltar ao modo original. 4. Toque no botão B/U para selecionar "BASIC".  Cada toque de em B/U comahta entre "BASIC" e "USER". 5. Toque no botão ↑ no menu bxico de posicao No. para selecionar o menu bxico de posicao. Menu Basics de posicao| N° | Nome do主義者 | Posão do assento |
| 1 | FRONT-L | Asserto esquerdo dianteiro |
| 2 | FRONT-R | Asserto direito dianteiro |
| 3 | FRONT | Assentes dianteiros |
| 4 | REAR | Assentes traseiros |
| 5 | FULL SEAT | Todo os assentes |
Posições Ajustamento/ armazenamento (memória do Utilizador)
Com memória do'utilizar, possível executar o ajustamento exacto dos altifalantes de maneira que o mesmo efeito录音 pode ser obtido de cada altifalante para todos os ouvintes com base no menu bxico de posicao. Na memória do'utilizar poder ser armazenados até 5 ajustamentos.T-ALIGN (tempo de alinhamento):
A distência entre o ouvinte e cada altifalante pode ser introduzida com passos de 2,3 cm, e pode ser ajustado o tempo que o som de cada altifalante leva a chegar ao ouvinte.SP GAIN (ganho altofalante):
Ajusta o;nível de saída do altofalante. Ajuste de modo que os volumes em saída de cada altofalante sejam iguais. 1. Pressione o botão [SOUND]. 2. Toque no botão POSITION. 3. Toque no botão ↑ noestrador ON/OFF. O efeito de posicao comuta-se em ON/OFF. 4. Toque no botão B/U para selecionar "BASIC" ou "USER". 5. Toque no botão ↑ ↓ direita do meuhrador para selecionar o menuutilizo para o ajustamento. 6. Pressione o botão [A]. 7. Toque no botão ↑ esquerda doestrador para selecionar "T-ALIGN" ou "SP GAIN". 8. Toque no botão ↑ no centro do主義or para selecionar cada indicator de ajuste. Cada toque de ↑ muda os indicadores de ajuste como segue:  Indicadores de ajuste *1 É exibido somente quando “SUB-WOOFER” sob “SOUND” no modo ajuste está aktivado. *2 É exibido somente quando “SUB-WOOFER” sob “SOUND” no modo ajuste está aktivado, e “T-ALIGN” está selecionado para o passo 7. 9. Toque no botão direita do主義er e ajuste o indicator como desejar.  * "T-ALIGN" pode ser ajustado dentro de um intervalo de 0 cm a 501,4 cm com passos de 2,3 cm. * "SP GAIN" pode ser ajustado dentro de um intervalo de -20dB a 0dB. 10. Repita os passos de 7 a 9 para fazer o indicator prétencido. 11. Quando tiver acabado deaabstar cada indicator,toque no botao RTN. Oasnodratorvolta para oecran original,e>>"exibido noasnodratorBASICoudoUSER.A operacao executada ateparaora completenessaajustamento da posicao Paracontinuar aarmazenar osvaloresdeajustamento nonenuodeposicao doutilizador,executeo segunte. 12. Toque e mantenha tocado RTN durante um segundo ou mais. A lista do menu de posicao exigida. 13. Toque e mantenha tocada a memória do Utilizador onde quer armazenar os values de ajustamento durante 2 segundos ou mais tempo. Irá ouvir um beep longo, e os values ajustados até ao passo 10 são armazenados no menu de posicao do Utilizador. Se ouvir um beep curto, os values de ajustamento até ao passo 10 são descartados. Ajuste these values de novo comorequiredo. 14. Toque no botão RTN. 15. Pressione o botão [SOUND] para voltar ao modo original. * Para selección a memória do utilizes armazenada, toque B/U no做不到 "USER" e toque no botão ↑ ↓ na memória do utilizes N°.Selecao do menu VSE
VSE (Virtual Space Enhancer) consente de compensar o balanco de pressão sonora dentro do seu automóvel de maneira que o mesmo efeito sonoro possa ser obtido em qualquer assento que você esteeja sentido tal como experimentado nas simulacoes de compensacao. No procedimento de "Selecao de cada modo" (veja pagina 44), ajuste AC-PROIII para "STD". - O ajuste predefinido de fabrica para VSE é "OFF" e para o menu Basics VSE é "FLAT".■ Menu Basics VSE
Seis menus tíciaos são pré-armazenados para. thisi:. Seleciono o menu tíciao de. acordo com a sua preferencia. 1. Pressione o botão [SOUND]. 2. Toque no botão VSE.  3. Toque no botão ↑ ↓ noestrador ON/OFF. Oefeito VSE comuta-se em ON/OFF.  Quando VSE está ajustado para "OFF", o ajuste de VSE não se reflecte na fonte de música. Isto complete a ajustamento de VSE. Pressione o botão [SOUND] para voltar ao modo original. 4. Toque B/U para seleccionar "BASIC".  Cada toque em B/U comuta entre "BASIC" e "USER". 5. Toque no botão ↑ no Menu Basics VSE No. para selecionar o Menu Basics VSE pretendido. Menu basicos VSE| N° | Nome da Função | Descrição |
| 1 | FLAT | Compensação uniforme da fonte sonora |
| 2 | BASS BOOST | Tonalidades graves incrementadas |
| 3 | HIGH BOOST | Médios e agudos incrementados |
| 4 | IMPACT | Baixos e agudos incrementados |
| 5 | ACOUSTICAL | Tonalidades médias (voz humana) incrementadas |
| 6 | SMOOTH | Produz tonalidades sonoras suaves. |
Ajuste/armazenamento de VSE (memória do'utilizador)
Os ajustes na memória do'utilizar consentem de compensar a distribuição da pressão sonora de acordo com a sua preferência com base no Menu Basics VSE. Podem ser armazenados até às vezes ajustamentos do'utilizar.DIFFUSE (DIFUSão):
Ajusta o desvio na pressao sonora difundida.CAR WIDTH (LARGURA DO AUTOMÓVEL):
Ajusta o desvio na pressao sonora ao longo da largura do automóvel.CAR LENGTH (COMPRIMENTO DO AUTOMOVEL):
Ajusta o desvio na pressao sonora ao longo do comprimento do automóvel. 1. Pressione o botão [SOUND]. 2. Toque no botão VSE. 3. Toque no botão ↑ ↓ noestrador ON/OFF. O efeito VSE comuta-se em ON/OFF. 4. Toque em B/U para selectionar "BASIC" ou "USER". 5. Toque no botão na direita do.), como menu para o ajustamento. 6. Pressione o botão [A]. 7. Toque no botão ↑ ↓ no restrador de指示 para selecionar a campos do botão.  "DIFFUSE", "CARWIDTH" ou "CAR LENGTH". 8. Toque no botão na direita do主義 e ajuste o indicator como desejar. * Este indicator pode ser ajustado dentro de um intervalo de 1 a 10. 9. Repita os passos 7 e 8 para fazer o指示or pretendido. 10. Quando tiver acabado deaabstar cada indicator, toque no botao RTN. O Holocaust para o Ecran original, e “>>” é exibido no Holocaust BASIC ou USER. A operação executada até antes completeness o ajustamento de VSE. Para Continuing a armazenar os valuores de ajustamento para o menu VSE do'utilizar, execute o seguito. 11. Toque e mantenha tocado RTN durante um segundo ou mais. A lista do menu VSE do utiliser é exibida. 12. Toque e mantenha tocada a memória do'utilizar na qual pretende armazenar os valore de ajustamento durante 2segundos ou mais tempo. Irá ouvir um beep longo, e os valore ajustados até ao passo 9 são armazenados no menu VSE do'utilizar. Se ouvir um beep curto, os valore de ajustamento até ao passo 9 são descartados. Ajuste"These valeurs de novo comorequiredo. 13. Toque no botão RTN. 14. Pressione o botão [SOUND] para voltar ao modo original. * Para selecciónar una的记忆ía do utilizes armazenada, toque em B/U para visualizar "USER" e toque no botão ↑ 🙏 🙏 na的记忆ía do utilizes N°.Selecao do menu P.EQ
P.EQ (Equalizarador Paramétrico) consente de compensar toda a gama de nivel frequência em detailhe por meio da curva plana using A compensação da frequência correspondente ao tipo do seu automóvel. No procedimento "Selecao de cada modo" (veja pagina 44),ajuste EQ SELECT para P.EQ - O ajuste predefinido de fabrica para P.EQ é "OFF" e para o Menu Basics P.EQ é "SEDAN-1".■ Menu Basics P.EQ
6 típos de menu Basics P.EQ está préarmazenados para esta funcção correspondentes ao tipo do seu automóvel e a posicao de montagem do altovalente. SeLECTIONO ou menu Basics mais adequado para o seu automóvel. 1. Pressione o botão [SOUND]. 2. Toque no botão P.EQ.  3. Toque no botão ↑ ↓ noestrador ON/OFF. Oefeito P.EQ comuta-se em ON/OFF.  Quando o efeito P.EQ está desligado "OFF", o ajustamento de P.EQ não se reflecte na fonte de música. Isto termina o ajustamento de P.EQ. Pressione o botão [SOUND] para voltar ao modo original. 4. Toque em B/U para seleccionar "BASIC".  A cada vez que se toca em B/U comuta entre "BASIC" e "USER". 5. Toque no botão ↑ no menuístico P.EQ No. para selección o menuístico P.EQ. Menu Basics P.EQ| N° | Nome do nostrador | Posão de montagem do altifalante |
| 1 | SEDAN-1 | Dienteira: Porta dienteira Traseira: Porta traseira |
| 2 | SEDAN-2 | Dienteira: Porta dienteira Traseira: Porta traseira |
| 3 | WAGON-1 | Dienteira: Porta dienteira Traseira: Mala (lado) |
| 4 | WAGON-2 | Dienteira: Porta dienteira Traseira: Porta traseira |
| 5 | MINI VAN-1 | Dienteira: Porta dienteira Traseira: Mala (lado) |
| 6 | MINI VAN-2 | Dienteira: Porta dienteira Traseira: Porta traseira |
Ajuste/armazenamento P.EQ (memória do'utilizar)
Com a的记忆 do uso, pode compensar ascharacteristicas de frequencia mais convenientespara o seu automóvel com base no menu bajoP.EQ. Na的记忆 do uso é不错Guardadas até 6 ajustamentos.Quanto aospormenores, consulte "Ajustamento de P.EQ". 1. Pressione o botão [SOUND]. 2. Toque no botão P.EQ. 3. Toque em 品 no主義ORON/OFF Oefeito P.EQ comuta-se em ON/OFF. 4. Toque em B/U para seleccionar "BASIC" ou "USER". 5. Toque no botão na direita do ].do:. para o ajustamento. 6. Pressione o botão [A]. 7. Toque no botão à esquerda do主義or para seleccionar "FRONT" ou "REAR".  8. Toque no botão ↑ no centro do主義or para seleccionar cada indicator de ajuste. Cada toque no botao comuta o indicator de ajuste como segue: Indicadores de ajuste BAND FREQ Q GAIN BAND... 9. Toque no botão na direita do公共场所 e ajuste o指示or como desejar. * "BAND" pode ser ajustada dentro de um intervalo de 1 a 3. * “FREQ” pode ser ajustada dentro de um intervalo de 20Hz a 20kHz. * Selezione um de 1, 3, 5, 7, ou 20 como “Q”. * “GAIN” pode ser ajustado dentro de um intervalo de -12dB a +12dB. 10. Repita os passos de 7 a 9 para fazer o indicator prétencido. 11. Quando tiver acabado deaabstar cada indicator, toque no botao RTN. O meustrador volta para o écran original, e é exhibido no meustrador BASIC ou do USER. A operacao executada atepara sua completeness ajustamento de P.EQ Para continua a armazenar os values deaabustamento para o menu P.EQ do uso, execute o segunte. 12. Toque e mantenha tocado RTN durante um segundo ou mais. A lista do menu P.EQ é exibida. 13. Toque e mantenha tocada a memória do utilizesnator na qual quer armazenar os values de ajustamento durante 2 segundos ou mais tempo. Irá ouvir um beep longo, e os values ajustados até ao passo 10 são armazenados no menu P.EQ do utilizesd. Se ouvir um beep curto, os values de ajustamento até ao passo 10 são descartados. Ajuste"These values de novo como requireido. 14. Toque no botão RTN. 15. Pressione o botão [SOUND] para voltar ao modo original. * Para selecciónar una的记忆ía do utiliser armazenada, toque em B/U para visualizar "USER" e toque ↑ ↓ na memoria do utiliser N°.Ajustamento de P.EQ
Os ajustamentos que podem ser executados no menu P.EQ são os seguições. A frequência central, ganho e Curva Q pode ser armazenados nas assocações de canal/faixa. Por exemple, frequência central "250Hz", ganho "-8dB"e Curva Q "3" pode ser armazenados na faixa 1 na dienteira.FRONT (SEGUIDE)/REAR (ANTERIOR) (seleção de canal)
Selección o canal (seguido ou anterior) a ser ajustado.BAND (FAIXA) (selecção da faixa)
Selección a faixa de frequência (de 1 a 3) a ser ajustada. Ajuste da central frequência (FREQUENCY), ganho (GAIN) e Curva Q (Q) para cada faixa de frequência. FREQUÊNCIA (seleção da frequência central) Seleciona a frequência a usar como o centro da faixa de frequência a ser compensada no intervalo de 20Hz a 20kHz. ( passos de 1/3 oitava, 31 pontos)GANHO (ajustamento de ganho)
Ajusta o ganho (nível de saida) dentro de um intervalo de -12dB a +12dB. ( passos de 1dB, 25 pontos)Q (Selecao da Curva Q)
Introduza 1, 3, 5, 7, ou 20 como pendência da Curva Q.Compensacao
Não é necessário compensar as caracteristicas de frequência se estas são uniformes (sem picos nem depressões) quando tiver medico as caracteristicas de frequência com um dispositivo de medicação. Todavia, algumas vezes as caracteristicas de frequência AUGmente ou diminuem em eles lugares. quando isso acontece, as caracteristicas de frequência devem ser compensadas. Crie uma curva de frequência com as caracteristicas opostas à frequência central de partes ode as caracteristicas AUGmente ou diminuem para eliminar os picos e valeros, e tornando as caracteristicas de frequência o mais uniformes possível. Tornar as caracteristicas de frequência o mais uniforme possível é denominado "compensação". Nesta unidade, as caracteristicas de frequência podem ser compensadas pelo P.EQ (Equalizador paramérico).Compensação das caractéricas de frequência
As figuras abaixo muito claram as relações existentes entre a Frequencia central, ganho e Curva Q. Curva Q
A Curva Q torna-se pendente quando o valor numérico é incrementado, e plana quando o valor numérico diminuído. Characteristicas de frequencia uniformes podem ser obtidas atraves da selecao da Curva Q oposta naquela da curva a ser compensada. Curva Q: (Q)  F: Freqência central, G: Ganho (nível de��), Q: Curva Q| N°(esto de automóvel) | Parámetros do Equalizador paramétrico | |||||||||
| Canal | Faixa 1 | Faixa 2 | Faixa 3 | |||||||
| F | G | Q | F | G | Q | F | G | Q | ||
| 1(SEDAN-1) | Seguinte | 250 Hz | -8 dB | 3 | 2 kHz | -4 dB | 1 | 5 kHz | -4 dB | 1 |
| Anterior | 250 Hz | -10 dB | 3 | 1.25 kHz | 0 dB | 5 | 8 kHz | 0 dB | 5 | |
| 2(SEDAN-2) | Seguinte | 250 Hz | -10 dB | 7 | 800 Hz | -4 dB | 3 | 8 kHz | -5 dB | 1 |
| Anterior | 80 Hz | 3 dB | 7 | 125 Hz | -12 dB | 5 | 1.25 kHz | 0 dB | 5 | |
| 3(WAGON-1) | Seguinte | 250 Hz | -8 dB | 3 | 1 kHz | -8 dB | 3 | 10 kHz | -6 dB | 1 |
| Anterior | 250 Hz | -8 dB | 3 | 800 Hz | -8 dB | 1 | 8 kHz | 0 dB | 5 | |
| 4(WAGON-2) | Seguinte | 250 Hz | -8 dB | 7 | 400 Hz | -10 dB | 7 | 1.25 kHz | -8 dB | 7 |
| Anterior | 125 Hz | -8 dB | 3 | 500 Hz | -5 dB | 5 | 1.6 kHz | 0 dB | 3 | |
| 5(MINI VAN-1) | Seguinte | 125 Hz | -4 dB | 5 | 1.25 kHz | -4 dB | 3 | 2 kHz | 3 dB | 7 |
| Anterior | 250 Hz | -6 dB | 1 | 630 Hz | -4 dB | 3 | 8 kHz | 0 dB | 5 | |
| 6(MINI VAN-2) | Seguinte | 250 Hz | -4 dB | 3 | 1.25 Hz | -8 dB | 3 | 80 Hz | 3 dB | 3 |
| Anterior | 250 Hz | -8 dB | 3 | 500 Hz | -5 dB | 5 | 8 kHz | 0 dB | 5 | |
Operações do rádio
Exibções de écran no modo rádio
■ Mostrador principal
É exibido por meio da pressão do botão rotatório [ROTARY] e seleção do modo rádio.  Tocando na parte esquerda do主義ador durante 1 segundo ou mais comuta o主義ador de operacao simples. Mostrador de frequência
A frequência que está sentoactually recebida é exibida. Tocando no botão ou é possível executar a sintonização por busca ou a sintonização manual no主義o de operação padrão.Mostrador de titulo
Exibe o nome do canal de radiodifusao que actualmente está送去 recebido. Tocando nesse nome comuta o主義or.Mostrador da Faixa de recepçao
AM: Nome da banda AM FM1: Nome da banda FMMostrador do N° de pré-Seleção
Tocando no botão ↑ noestrador de operação padrão seleciona a memória pré-seLECTIONada.MODE (MODO)
Tocando este botão exibe as sub-funções. Mantendo o botão pressionado durante 1 segundo ou mais exibe a lista de memória pré-seLECTIONada.P-SCAN:
É exibido durante uma exploração programada. Tocando neste botão termina a exploração programada.A-STORE:
É exibido durante um armazenamento automatico. Tocando este botãotera o armazenamento automatico.BAND (FAIXA)
Tocando no botão BAND comuta a faixa de recepçao. Tocando e mantendo tocado este botão durante 1 segundo ou mais comuta entre o modo de sintonização manual e o modo de sintonização por busca.(sono no do的操作简单)
Tocando este botão habilita a sintonização porbusca ou sintonização por passos (no modo de sintonizaçãomanual). Tocando e mantendo tocasto este botão habilita a sintonização rápida (no modo de sintonização manual).■ Mostrador da lista de memória pré-seLECTIONada
É exibido quando MODE é tocado e mantido tocado durante 1 segundo ou mais no restrador principal.  Nome da estação (ou frequência) Sintonização em andamento RTN: Toque;neste botao para voltar para o ]. mostrador principal.Ouvir o RADIO
1. Pressione o botão rotatório [ROTARY] para selección o modo rácio. Cada vez que se pressiona o botão rotatório [ROTARY] o modo muda esta sequência: Rádio (DAB) CD / MP3 (Permutador de CDs) (Permutador de DVDs) (TV) AUX Rádio... * O modo do equipamento que não está ligado não é exibido. 2. Toque em BAND para comutar a faixa de recepçao. A cada vez que se toca em BAND, a faixa de receção alterna como segue: FM1 FM2 FM3 AM (MW / LW) FM1...Sintonização
Existem 3 temas de modelos de sintonização disponible, sintonização por busca, sintonização manual e sintonização pré-seLECTIONada.Sintonização porquisa
Existem 2 problemas de sintonização por busca: DX SEEK e LOCAL SEEK. A DX SEEK pode sintonizar automaticamente estações de radiodifusão captações, quando que, LOCAL SEEK pode sintonizar somente estações radiofónicas com boa sensibilitadede receção. 1. Toque em BAND para seleccionar a bandapretendida (FM ou AM (MW, LW)). 2. Sintonize uma estação. * Se MANU estiver iluminado no主義or, toque e mantenha tocado o botão BAND durante 1 segundo ou mais. "MANU" desaparece do meustrador e a sintonização por busca torna-se disponível. * Se "TA" estiver iluminado no主義or, estações de TP são buscadas automaticamente.DX SEEK
Quando se toca o botão ↑ ↓ inicia a sintonização automática noadora de frequência,. Quando se toca o botão 已 , a estação é busicada na direção de frequências mais altas; Quando se toca o botão 已 , a estação é busicada na direção de frequências mais baixas. * Quando a sintonização por busca Começa, "DX SEEK" aparece no主義者.LOCAL SEEK
Quando se toca o botão é realizada uma sintonização por busca local no主義o de frequência.,. Estações de radiodifusão com boa sensibilitadé de receção são selecionadas. * Quando a sintonização porbusca local começa,“LO SEEK”aparece no mostrador.Sintonização manual
São 2 os modos disponíveis: sintonização rápida e sintonização por passos. No modo sintonização por passos, a frequência muda a 1 passo de cada vez. No modo sintonização rápida, épossible sintonizar rapidamente a frequência pretendida. 1. Toque e mantenha tocado o botão BAND durante 1 segundo ou mais quando MANU não estiver iluminado no主義or. A sintonização manual é possivel quando MANU está iluminado no主義or. 2. Opere noestrador de frequencia para sintonizar numa frequencia ond ha umaradiodifusao.Sintonização por passos
Toque no botao 山 noestrador de frequencia.Sintonização
Toque no botão noestrador de frequência. A sintonização interrompe-se quando colocar o dedo afastado do painei.
Chamada de uma estação pré-sintonizada
Chamada de uma estaqao pre-sintonizada é uma funcao para a sintonizacao de estacoes pre-armazenadas.
1. Toque e mantenha tocado MODE durante 1 segundo ou mais.
A lista da的记忆 pré-seLECTIONADA é exibida.
2. Toque na estação que quiser ouvir.
* No modo normal, pré-seLECTION N°. également se pode sintonizar tocando no botão ↑ 📁 🄾 no restrador principal.
Para cancelar uma sintonização
1. Toque no botão RTN.
Memória pré-seLECTIONA
Um total de 24 posições de pré-sintonia (6-FM1, 6-FM2, 6-FM3, 6-AM) existe para armazenar estações de rádio individuais na memória.
1. Toque no botão BAND para comutar a faixa de receção.
2. Opere no主義者 de frequência para armazenar a estação.
3. Toque e mantenha tocado MODE durante 1 segundo ou mais. A lista da memória pré-seLECTIONada é exibida.
4. Toque e mantenha tocado o N^ pre-Selecao durante 2 segundos ou mais para armazenar a estacao. Irá ouvir um beep longo, e a estacao é armazenada na memoria.
Armazenamento automatico
Armazenamento automatico é uma coisa para armazenar até 6 estações que são automaticamente sintonizadas em sequência.
1. Toque em MODE.
2. Toque e mantenha tocado A-STORE durante 2 segundos ou mais. O主義or de MODE muda para "A-STORE"e N^ de pre-selecao na operationa armazenamento automatico aparece no主義or de N^ de pre-selecao.
* Estações com boa receção são automaticamente buscadas, e são armazenadas na memória pré-seLECTIONada (de N° 1 a N° 6) por ordem a partir da estação com a frequência mais baixa.
Notas:
- Quando o armazenamento automatico é executado, as estagens armazenadas até agora na memória são canceladas.
- quando há menos de 6 estações com boa receção em LOCAL SEEK, as baixas freqências são automaticamente retomadas, e o armazenamento automatico é executado de novo por DX SEEK. Se há menos de 6 estações mesmo depuis que o armazenamento automatico foi executado das vezes, as estações armazenadas até antes ficam na memória.
- Se o armazenamento automatico é executados nas bandas FM, as estações são armazenadas em FM3 mesmo se FM1 ou FM2 foram escolhidos para armazenar estações.
Exploração programada
Exploração programada é uma coisa para captar estações de modo que estas sãoactualmente armazenadas no N^ de pre-seleção de maneira que as estaçõesradiofónicas possam ser controladas.
1. Toque em MODE.
2. Toque em P-SCAN.
Oestrador de MODE muda para "P-SCAN" e o N° pré-selecção numa operação de exploraçao programada é exibido no estrador do N° pré-selecção.
* As estações armazenadas actualmente são receidas por ordem durante 7 segundos ou mais cada uma. Estações com fraça receção são saltadas, e é captada a estação sucessiva. Quando a Exploração programada é executada em radiodifusão FM, as estações FM são receidas na sequência: FM1 (1 → 6) → FM2 (1 → 6) → FM3 (1 → 6)...
Quando a Exploração programada é executada em radiodifusão AM, as estações AM são recebidas na sequência:
AM (1 6) AM (1 6) e assim por adiante.
Cancelar uma Exploração programada
1. Toque no botão P-SCAN. Oadora P-SCAN muda para "MODE", e as estações que estavam sentido receidas quando o botão P-SCAN foi tocado são receidas em seguida.
RDS (sistema de dados por raggio)
Esta unidade incorpora umsystemadescodificador de RDS capaz de captar estaceoesde radiodifusao que transitem dados de RDS.
Este planta pode exibir o nome da estação de radiodifusão captada (PS) e pode mudar automaticamente para a estação de radiodifusão com a melhor receção à medida que o veiculo se desloque por distências longas (comutacao de AF).
Além disso, se um acontecido de tráfego ou tipo de programa é emitido por uma estação de RDS, a transmissão é recebida independente do modo corrente de escuta.
Adicionalmente, se uma informação EON é recebida, esta informação habilita uma comutatione automatica de outras estações prefixadas na mesma rede e a interrupcao da址acao sintonizada com informacao de trafego de otheras estacoes (TP).Esta funcao nao está disponivel em algumas areas.
quando usar a funcao RDS, sempre coloque o radio em modo de FM.
AF: Frequência Alternativa
- PS: Nome do service de programa
- PTY: Tipo de programa
- EON: Outras redes Transmissoras
- TP: Programa de Tráfego
PI: Identificacao de Programa
- TA: Anúncios de Tráfego
* A interruptação RDS não funciona durante a receção AM de rádio.
* Quando o aparecido receiveber um sinal RDS e for capaz de ler dados PS, a indicação PS aparece no主義or.
Função AF
A funcão AF muda para uma frequência diferente na mesma rede de modo a manter a recepçao optima.
- O ajuste feito na fabrica é "ON".
Para comutar a funcao AF entre ON/OFF
1. Toque em MODE.
2. Toque em AF.
A cada vez que se toca o主義or AF comuta entre "ON"e "OFF".
3. Toque em RTN.
* Se a receção da estação de radiodifusão actual se deteriorar, aparece “SEARCH” no主義者,e o rádio procurura uma outras frequência para o mesmo programa.
Função AF entre RDS e DAB
Quando o mesmo programa é transmitido tanto por RDS como por DAB e esta funcção está activada, a unidade muda para receber a transmissão com melhor receção automaticamente.
- Esta funcao opera somente quando a unidade DAH923 ou DAH913 DAB, vendida separadamente, está conectada.
- O ajuste feito na fabrica é "ON".
1. Pressione no botão [A] para selecionar o modo de ajuste.
2. Toque no botão ↑ noestrador dos indicadores de ajuste para seleccionar "LINK ACT" sob "TUNER".

3. Tocar no botão a direita do measurador, ou rodar o botão rotatório [ROTARY] para selecciónar "ON" ou "OFF". ON:
A comutatione AF entre DAB e RDS está activada.
OFF:
A comutatione AF entre DAB e RDS está desactivada.
4. Pressione o botão [A] para voltar ao modo anterior.
Função REG (programa regional)
Quando a funcao REG está activada, a estacao regionalo optima pode ser sintonizada. Quando esta funcao está desactivada, se a area de estacoes regionais mudar durante o deslocamento do veiculo, uma estacao regionala para aquela regiao e sintonizada.
- O ajuste feito na fabrica é "OFF".
Notas:
-核心区 de la frontera
-Está função desactiva-se quando uma estação Nacional, como BBC 2_FM é sintonizada.
- O ajuste ON/OFF da função REG é valido quando a função de AF está activada.
Para comutar a funcao REG entre ON/OFF
1. Toque no botão MODE.
2. Toque no botão REG. A cada vez que se toca o botão REG o主義者 comuna entre "ON" e "OFF".
3. Toque no botão RTN.
Sintonização manual de uma estação regional na mesma rede
- Esta funcção é valida quando a funcção AF está activada.
- A operação difere de acordo com a seleção de ON/OFF da função REG. quando a função REG está activada, pode ser receidas estações radiofónicas com um Código PI perfeitamente correspondente. quando a função REG está desactivada, pode ser receidas estações radiofónicas com o mesmo tipo de:Código PI.
Notas:
- Esta função pode ser usada quando uma estação radiofónica regional da mesma rede é recebida.
- O Código PI é umsystema de)códio que é unico para cada estação de radiodifusão.
1. Toque e mantenha tocado MODE durante 1 segundo ou mais.
A lista da memória pré-selectionada é exibida.
2. Toque no N^ de pre-selectação da estatão radiofónica a ser recebida.
TA (anúncio de tráfego)
Em modo de espera TA, quando começa uma transmissão de acontecido de tráfego, a transmissão de anúcio de tráfego é recebida com prioridade Tmaxima, independenteamento do modeo de funcao, para possibilhar sua audicao. A sintonia automatica de programa de trafego (TP) tambem é possivel.
- Esta função está para ser usada quando “TP” está iluminado no主義者. quando “TP” está iluminado, isto significava que a estação de radiodifusão de RDS sintonizada tem programas de anúscio de tráfego.
Activar o modo de espera TA
Caso se pressione o botão [TA] quando é "TP" estiver iluminado no主義or, "TP" e "TA" iluminar-se-ão no主義or e a unidade activará o modo de espera TA até que um anúncio de tr胶囊-seja transmitido. Quando começa uma transmissão de anúncio de tr胶囊, "TRA INFO" aparece no主義or. Quando se pressiona o botão [TA] durante uma recepçao de anúncio de tr胶囊, a transmissão de anúncio de tr胶囊 é cancelada e a unidade entra em modo de espera TA.
■ Cancelar o modo de espera TA
Com osindicadores "TP"e "TA"acesos no
mostrador, pressione o botao [TA].Oindicador "TA"no mostrador apaga-se e o modo de
espera TA é cancelado.
- Se "TP" não estiver iluminado, pressionar o botão [TA] aconteça uma busca de estação de TP.
■ Buscar uma estaqao de TP
Ao se pressionar o botão [TA], quando “TP” não estiver iluminado, “TA” illumina-se no主義o.
e esta unidade sintoniza automaticamente uma
estação de TP.
Nota:
- Quando uma estação de TP não pode ser sintonizada, "TP SEEK" aparece noestrador, e a busca de uma estação de TP continua. quando o botão [TA] é pressionado de novo, "TA" e "TP SEEK" desaparecem doestrador, e interromperse a busca de uma estação de TP.
Função de armazenamento automatico para estações de TP
Pode armazenar 6 estações de TP na memória de pré-sintonia automaticamente. Se o número de estações de TP que pode ser sintonizadas for menor do que 6, o prefixo de estações de radiodifusão ja armazenadas na memória permanece registrar na mesma.
1. Acerte-se de que "TA" esteja iluminado no主義者, e toque no botão MODE. Se "TA" não está iluminado no主義者, pressione o botão [TA] para exibir "TA".
2. Toque e mantenha tocado A-STORE durante 2 segundos ou mais. O meustrador MODE muda para "A-STORE" e N^ de pre-selectacao na operatione de armazenamento automatico aparece no meustrador de N^ pre-selectacionado.
- Estações de TP com boa sensibilitidade de receção são armazenadas na memória de pré-sintonia.
- Mesmo que se selección FM1 ou FM2, a estação de TP é armazenada na memória para FM3.
PTY
Esta funciona permite aAUDICAO de una emissao de um determinado tipo de programa, mesmo quando o aparelho estiver numa funcao que nao a de radio.
- Alguns paises não tem transmissão de PTY.
- Em modo de espera TA, uma estação de TP tem prioridade sobre uma estação de transmissão de PTY.
Activar o modo de espera de PTY
Quando se pressiona o botão [▶III], “PTY” illumina-se no主義o e o modo de espera PTY é activado. quando começa a transmissão do PTY selecionado, o nome do item de PTY aparece no主義o.
■ Cancelar o modo de espera de PTY
Quando se pressiona o botão [▶■] durante 1 segundo ou mais, "PTY" desaparece do主義者 e o modo de espera de PTY é cancelado.
■ Cancelar una transmissão de interruptação PTY
Pressione o botão [▶III] durante uma transmissão de interrupção PTY. A interrupção PTY é cancelada e a unidade volta ao modo de espera de PTY.
Selecciónar PTY
1. quando se pressiona o botão [▶■], aunities entra no modo de seleção de PTY.
2. Tocar no botão à direita do主義or, ou rodar o botão rotatório [ROTARY] para selección o PTY.
* A seguir está os ajustes predefinidos armazenados na fabrica:
Número de在此之前 Item de PTY ENGLISH Conteudo 001 News Noticias 002 Info Informação 003 Pop M Música Pop 004 Sport Desporto 005 Classics Música Clássica 006 Easy M Música Ligeira
3. O modo de seleção de PTY é cancelado automaticamente 7 segundos antes, ou quando tocando no botão RTN um PTY é selecionado.
Busca de PTY
1. quando se pressiona o botão [▶■], o modo de seleção de PTY é activado.
2. Tocar no botão ↑ ⇌ no centro do主義者, ou rodar o botão rotatório [ROTARY] para selección o PTY.
3. Toque no botão a esquerda do公共场所.
Quando se toca no botão, a equipe busca uma transmissao de PTY em ordem crescente de frequencias; quando se toca no botão busca em ordem decrescente de frequencias.
* Se não for possível a receção de nenhum estado emissora com o PTY seleção, o aparecido returna ao modo anterior.
Memória de pré-Seleção do PTY
1. quando se pressiona o botão [▶■], o modo de seleção de PTY é activado.
2. Toque no botão ↑ no centro do mostrador para selecionar o PTY. Os 29 problemas de PTY naanela abaixo podem ser selecionados.
Item de PTY ENGLISH DEUTSCH SVENSKA FRANÇAIS Conteúdo News Nachrich Nyheter Infos Noticias Affairs Aktuell Aktuellt Magazine Actualidade Info Service Info Services Informação Sport Sport Sport Sport Desporto Educate Bildung Utbildn Educatif Educação Drama Hör + Lit Teater Fiction Teatro Radiofínico Culture Kultur Kultur Culture Cultura Science Wissen Vetenskap Sciences Ciência Varied Unterh Underh Divers Variade Pop M Pop Pop M Pop Música Pop Rock M Rock Rock M Rock Música Rock Easy M U-Musik Lättlyss Chansons Música Ligeira Light M L-Musik L klass M Cl Lég Clássica Ligeira Classics E-Musik Klassik Classiq Música Clássica Other M - - Musik Övrig m Autre M Outras Músicas Weather Wetter Väder Météo Meteorologia Finance Wirtsch Ekonomi Economie Economia Children Kinder Für barn Enfants Programas Infantil Social Soziales Sozialt Société Soisas Religion Religion Andligt Religion Religião Phone In Anruf Telefon Forum Telefonemas dos ouvintes Travel Reise Resor Voyages Viagem Leisure Freizeit Fritid Loisirs Lazer Jazz Jazz Jazz Jazz Jazz Country Country Country Country Música Country Nation M Landes M Nation m Ch pays Música Nacional Oldies Oldies Oldies Rétro Antiga Folk M Folklore Folkm Folklore Música Folk Document Feature Dokument Document Documentário
3. Toque no botão RTN durante 1 segundo ou mais.
A lista dos títulos da memória do PTY é exibida.
4. Toque e mantenha tocada durante 2 segundos ou mais o N^ de pre-selectao a armazenar.
Irá ouvir um beep longo, e o PTY selecionado é armazenado no canal da memória de pré-selectação.
Transmissão de emergência
Se uma transmissão de emergência é recebida, todas as operações de modo de funções são interrompidas. "ALARM" aparece no主義e a transmissão de emergência pode ser ouvida.
■ Cancelar uma transmissão de emergência
Quando se pressiona o botão [AF], a receção da transmissão de emergência é cancelada.
Mudar o idioma de exibição do PTY
Pode seleccionar entre os 4 idiomas (Inglês, Alemão, Sueco ou Francês) para o PTY exibido no主義or.
- O ajuste feito na fabrica é "ENGLISH" (inglês).
1. Pressione o botão [A] para selecionar o modo ajuste.
2. Toque no botão ↑ noestrador dos指示os de ajuste para selecionar "LANGUAGE" sob "TUNER".

3. Tocar no botão ↑ à direita do主義or, ou rodar o botão rotatório [ROTARY] para selección o idioma pretendedo.
* Selezione um dos idiomas ENGLISH (Inglês), DEUTSCH (Alemão), SVENSKA (Sueco) ou FRANÇAIS (Francês).
4. Pressione o botão [A] para voltar ao modo anterior.
Selecione Interrupcao de RDS quando a funcao 2-ZONE é usada (RDS-INT 2Z)
Quando esta funcao está ajustada em "ON", e ocorrre uma interrupcao de RDS quando a funcao 2-ZONE está em uso, pode ser recebidas as informacoes de RDS.
- quando ocorrre um interrupcao de RDS, a funcao 2-ZONE desactiva-se.
- Se occurs uma Interrução de emergência acreda que com "RDS-INT 2Z" ajustado em "OFF", é recebida a informação de RDS.
- O ajuste feito na fabrica é "ON".
1. Pressione o botão [A] para selecionar o modo ajuste.
2. Toque no botão ↑ ↓ noestrador dos指示符指示的指示符。indicações de ajuste para selecionar "RDS-INT 2Z" sob "TUNER".

3. Tocar no botão ↑ à direita do主義or, ou rodar o botão rotatório [ROTARY] para selección ou "ON" ou "OFF". ON:
A informação RDS é recebida quando ocorrê uma Interrupção de RDS quando a função 2-ZONE está em uso.
OFF:
Quando a funcao 2-ZONE está em uso, as informacoes RDS diversas da interrupcao de emergencia não são recebidas.
Nota:
- Se o modo Radio é selecionado quando TA (Anúncio de Tráfego) e PTY está ligados, as interruptões são recebidas mesmo se a Interrupção RDS está ajustada para “OFF”.
4. Pressione o botão [A] para voltar ao modo anterior.
Ajuste de volume das transmissões de TA, de emergência (ALARM) e de PTY
O volume das interrupções de TA, ALARM e PTY pode ser ajustado durante a interrupção de TA, ALARM ou PTY.
- O ajuste feito na fabricula é "15".
Durante a interrupção de TA, ALARM ou PTY, rode o botão rotatório [ROTARY] à direita ou à esquerda para fazer o volume ao;nível pretendido (de 0 a 33).
- Quando a Interruptione da TA, ALARM ou PTY termina, o volume volta ao nivel que está activo antes da Interrupcao de transmissao.
Mostradores de écran no modo CD
■ Mostrador principal
É exibido por meio da pressão do botão rotatório [ROTARY] para selecionar o modo CD.

Tocando na parte esquerda do主義ista durante 1 segundo ou mais comuta o modo de operacao.

Mostrador de Pista/tempo reproducao 01/02:00:
O N° da pista que está送给 reproduzida e o tempo de reprodução são exibidos.
Se toca-se no botão ↑ 📁 ↑ ou ← 📁 → na operationa padrão, é possível selecionar a pista a reproduzir, ou o avanço-rápido ou retroprocesso-rápido das pistas.
Mostrador de titulo
Oasnadradorécomutadoquando toca-seeste mostrador.
Mostrador de pasta (no caso de MP3/WMA)
Tocando na operationa padr o botao seleciona as pastas.
MODE:
Tocando neste botão exibe as sub-conções. Tocando e mantendo tocasto este botão durante 1 segundo ou mais no caso de MP3/WMA é exibida a lista de pastas.
Nota:
- Esta funcao está activada somente quando um disco está em reproducao
-SCAN/SCAN: é exibido durante a reprodução introdúrtoria. Tocando neste botão termina a reprodução introdúrtoria.
- RPT/ -RPT: É exibido durante uma reprodução repetida. Tocando neste botão termina a reprodução repetida.
F-RDM/RDM: E exibido durante a reprodução aleatoria. Tocando neste botão termina a reprodução aleatoria.
TOP:
Tocando neste botão começa a reprodução da pista do topo do disco ou da pasta que está sentido reproduzida.
(sono no do的操作简单)
Tocando nestes botões seleciona a pista a reproduzir.
Tocando e mantendo tocados these botões executase o avanço-rápido ou retroprocesso-rápido das pistas.
■ Mostrador da lista de pastas (no caso de MP3/WMA)
É exibido quando se mantém tocado o botão MODE durante 1 segundo ou mais no restrador principal.

Nome da pasta
Pasta N°
Quando está evidenciada em cinzento, a pasta não pode ser selecionada.
>>: Selecção em andamento
Tocando num nome da pasta returno o écran ao公共场所 principal, e a reproducao começape para primaira pista na pasta tocada.
←PREV-RTV:
Tocando;neste botao,exibe a lista da pasta anterior. Mantendo o botao pressionado durante 1 segundo ou mais returno o ecran ao restrador principal.
NEXT:
Tocando neste botão exibe aproxima lista de pastas.
O que é o MP3?
MP3 é um método de compressão audio, classificado na terceira camada audio dos standards MPEG. Este método de compressão audio penetrou no mercado de computadores pessoasis, tornando-se num formato standard.
O MP3 comprime os dados audio paraerca de 10 por cento do seu tamanho original, mantendo uma alta qualidade sonora.
Quer isto fazer queerca de 10 CDs de musica pode ser gravados num disco CD-R ou CDRW, permitindo uma audicao prolongada sem ter de Mudar o CD.
O que é o WMA?
WMA é a abreviatura de Windows Media Audio, um tipo de ficheiro audio desenvolvido pela Microsoft Corporation.
Notas:
- Não é produzido som quando reproduzir um ficheiro com DRM (Gestão de Direitos Músicas) realizando o WMA. (O indicator WMA indicator passa a piscar.)
- Windows Media™ e o logotipo Windows® sãoemarks registadas da Microsoft Corporation, nos Estados Unidos da América e/ou em outros países.
- Para desactivar o DRM (Gestor de direitos musicais):
- Quando utilizes o Windows Media Player 8, dê um clique em TOOLS → OPTIONS → guia COPY MUSIC, e então de um clique em COPY SETTINGS e retire a marca de verificação da caixa de verificação de PROTECT CONTENT. A seguir, reconstrua os ficheiros.
- Quando utilizes o Windows Media Player 9, dê um clique em TOOLS → OPTIONS → guia MUSIC RECORD, e então dé um clique em configurações de gravação e retire a marca de verificação da caixa de verificação de RECORD PROTECTED MUSIC. À seguir, reconstrua os ficheiros.
Ficheiros pessoalmente preparados são realizados sob a sua responsabilité.
Precauções na 创建ação de um disco MP3/WMA
- Frequências de amostragem e velocidades de transmissãoutilizáveis:
1. MP3: Frequências de amostragem: 11,025 kHz a 48 kHz Velocidades de transmissão: 8 kbps a 320 kbps / VBR
2. WMA: Velocidades de transmissao 48 kbps a 192 kbps
Extensões dos ficheiros
1. Adicione sempre uma extension“.MP3” ou“.WMA” a um ficheiro MP3 ou WMA utilizing letras de um einzelvo byte. Se adcionar uma outra extensionDifferente da especialcada ou se esquecer de adcionar a extension, o ficheiro não podera ser reproduzido.
2. Ficheiros sem dados MP3/WMA não serao reproduzidos. A indicação "--:--" aparece no公共场所 do tempo de reproducao se tentar de reproducir ficheiros sem dados MP3/WMA.
Formato lógico (Sistema de ficheiros)
1. Quando escrever um ficheiro MP3/WMA num disco CD-R ou CD-RW, por favor selecione "ISO9660 level 1, 2 ou JOLIET ou Romeo" como FORMAT de software decrire. A reproducao normal não sera possivel se o disco é gravado num及其他这对于 agradeamento é inconsiderable.
2. O nome da pasta e o nome do ficheiro podem ser exibidos como TITLE no caso de reproducao MP3/WMA mas o TITLE deve ter no maior 128 letras ou digitos de um unicno byte (incluindo uma extensao).
3. Não atrribua um nome a um ficheiro dentro de uma pasta com o mesmo nome.
Estrutura das pastas
1. Não é possevel Criar discos com mais de 8 níveis hieráquicos.
-Numero de ficheiros ou pastas
1. São reconhecidos no máximo 255 ficheiros por pasta. São reproduzidos no(Maximo 500 ficheiros.
2. As pistas são reproduzidas pela ordem em que foram gravadas no disco. (As pistas nem sempre podem ser reproduzidas pela ordem exibida no PC.)
3. Pode ser produzido ruido, dependendo do tipo de software realizado na gravacao.
Selecao de Multi-sessao
Esta funciona consente de selectionar quer ficheiros CD-DA que MP3/WMA no caso de discos (ex. CD-EXTRA) commistura de CD-DA (CDs de música) e ficheiros MP3/WMA.
1. Toque no botão MODE.
2. Toque no botão M-SESS. A cada vez que se toca no botão M-SESS comuta o主義or M-SESS entre "CD" (play CD-DA) ou "MP3/WMA" (play MP3/WMA). * Se M-SESS não é exibido, toque no botão NEXT.
3. Toque no botão RTN. O ajuste da seleção multi-sessão é reflectida àproxima vez quecarregar um CD.
Nota:
- Quando reproducir um CCCD (CD de controlo de Cópia), define o ajuste para tipo CD. quando o ajuste for definindo para tipo MP3/WMA, em eles casos o CD não poderá ser reproducido normalmente.
PRECAUÇAO
Tenha cuidado para não entalar os dedos quando fechar a CONSOLA INCLINÁVEL.
Notas:
- Se a CONSOLA INCLINÁVEL nãoAbrir completeness,abra-o suavamente com a boa.
- Feche a CONSOLA INCLINÁVEL depuis de introduzir um CD.
- Não tente introduzir os dedos ou a maior na ranhura de inscrção do disco. Além disso, não introduza nunca objectos estranhos na ranhura.
- Não introduza discos com autocolante de celofane ou róculos de discs alugados descolados, ou discos com marcas deixadas por autocolante de celofane ou de róculos descolados. Pode ser impossívelrirutar este tipo de discos,agem de poderem avariar o aparelho.
Introdução de um CD
1. Pressione o botão [▲] O painel de controlo abre-se.
2. Introduza um CD na ranhura do CD. Após a introdução do disco, o painel de controlo fecha-se automaticamente, passadosagems segundos, e a reprodução meça.
Notas:
- Nunca introduza objetivos estranhos na ranhura do CD.
- Se o CD não entra fácilmente, pode estar muito CD no aparecido, ou o mesmo pode estar a necessitar de reparação.


Discos que não exibem a marca [0][5] [6] ou mark e CD-ROMs não podem ser ouvidos neste aparelho.
- Alguns CDs gravados em formato CD-R/CD-RW podem não ser'utilizando.
Introdução de discos compactos de 8 cm
Não é necessário nenhum adaptor para reproduzir um CD de 8 cm. Introduza o CD de 8 cm no centro da ranhura de inserção.
Ejecção de um CD
É possé往来 um CD pressionando o botão [▲] mesmo se mecanismo de segurarou ACC está automaticamente na posção OFF.
PRECAUÇA O
Quando o disco è ejectado, pressione o botão [▲] para fechar o panei de controlo. SeDEXAR opanei de controlo aberto, irá ouvir um duplo beep, e opanei de controlo fecha-se automaticamente.
1. Pressione o botão [▲].
O paine de controlo abre-se, e o disco é ejectado. O modo comuta automaticamente para o modo de rádio.
* Acerte-se de remover o disco ejectado do aparelho. SeDEXAR o disco no prato do disco, passados 15 segundos ou mais tempo, o disco é levado para dentro do aparelho e o paine de controlo fecha-se. (funcao de auto inscracao)
* Os CDs Single não são de inserção automática. Acerte-se de remover os CDs single(before dações dos outros.
PRECAUÇAO
Seutilizarexcessivaforca para insertirum discodeposdessetseriodejectado,a superficiedo disco poderaserriscada. Remova o disco ante de inserti-lo novamente.
Escutar um disco ja inserido no aparelho
1. Pressione o botão rotatório [ROTARY] para selección o modo de CD.
* A reprodução commence automaticamente quando o modo muda para o modo CD.
Interromper a reproducao
1. Pressione o botão [▶■]
Retomarareproducao
1. Pressione o botão [▶■] de novo.
Selección urma pista
Quando um CD-R/CD-RW gravado com um ficheiro MP3 ou WMA é inserido, é possível的选择ar somente as pistas gravadas na mesma pasta tocando no botão ↑ 📦 🦩 no主義者 da pista.
1. Para escutar aproxima pista,toque no botao 日 no nostrador da pista.
2. Para escatar a pista precedente, toque das vezes no botão ↑ noestrador da pista. Tocando no botão ↑ reproducu aproxima pista. Se tocar no botão ↑ varias vezes, a pista move-se para frete até a pista correspondente ao número de vezes que se tocou o botão ↑ eessa pista é reproduzida.
Tocando no botão ↑ reproduz a pista anterior. Se tocar varias vezes no botão ↑, a pista move-se para trás até a pista correspondente ao número de vezes que se tocou o botão ↑ eessa pista é reproduzida.
* Se tocar dos vezes no botão ↑ no*
no*
mostrador da pista quando o inico da
pista está a reproduzir, por vezes é
reproduzida a pista 2.
■ SeLECTIONAR Uma pasta
Para selecionar una pasta diferente, tocar no botão ↑ ↓ no主義 de pasta, ou executar o segunte.
1. Toque e mantenha tocado o botão MODE durante 1 segundo ou mais. É exibida uma lista de pistas. Tocando no botão PREV ou NEXT exibe a parte anterio ou sucessiva da lista de pastas.
2. Toque no nome da pasta.
Reproduzir a lista de reproducao
Listas de reprodução (ficheiro M3U) también podem ser reproduzidas. Note-se, todas, que os ficheiros M3Uactualmente guardados nas cinco camadas (incluindo a raiz) na hierarquia dos ficheiros somente os 5 ficheiros de topo com novas marcas de tempo podem ser reproduzidos.
Notas:
- Podem ser reproduzidos até 255 ficheiros numa uma lista de reprodução.
- É possèvèr reproduzir somente os ficheiros MP3 ou WMA actualmente guardados nas pastas nascinco camadas (incluindo a raiz) na hierarquía dos ficheiros.
Execute o segunte para reproducir a lista de reproducao.
1. Toque no botão MODE.
2. Touch NEXT.
3. Touch PLY LIST. Inicia a leitura de uma lista de reproducao. quando a leitura de uma lista de reproducao termina, a lista de reproducao com as ultimas MARCAS de tempo começa automaticamente. A selecao de uma lista de reproducao ou pistas numa lista de reproducao é a mesma que aquela de selecao de uma pasta ou pistas numa pasta.
* PLY LIST não é exibida quando uma lista de reprodução actual (ficheiro M3U) não está guardada no CD-R/CD-RW inserido no aparecido.
Interromper a reproducao de uma lista de reproducao
1. Toque no botão MODE.
2. Toque no botão NEXT.
3. Toque no botão PLY LIST.
Avanço-rápido / Retrocesso-rápido
1. Para o avanço-rápido, toque no botão no主義 no主義 da pista.
2. Para o retroprocesso-rápido, toque no botão no主義 no主義 da pista.
Função TOPO
A funcão topo reinicializa o reproduidor de CD colocando-o na primeira pista do disco.
1. Toque no botão Top.
A reprodução inicia pela primaira pista (pista N°1).
No caso de MP3/WMA, o reproduidor volta à primaira pista da pasta que está sentido reproduzida.
Reprodução introdúttória
Esta funcao consente de localizar e reproduzir os primeiros 10 segundos de cada pista gravada no disco.
1. Toque no botão MODE.
2. Toque no botão J^ -SCAN. O meuador modo muda para "J ^ - S C A N " e meça a reproducao introdutoria.
* A reprodução introdúctoriaComeça pela pista sucessiva à pistaactualmente em reprodução.
■ Cancelar a reprodução introdúctoria
1. Toque no botão ^一 SCAN. O meuador SCAN muda para MODE, e a pista que estiver em reproducao quando se tocou em SCAN é reproduzida.
Reprodução introdúrtória das pastas
Esta funciona consente de localizar e reproduzir os primeiros 10 segundos da primarya pista de cada pasta no disco MP3/WMA.
1. Toque no botão MODE.
2. Toque no botão -SCAN. O meuador MODE muda para "SCAN" e meça a reprodução introdúctoria das pastas.
* A reprodução introdúctoria das pastas comoça pela pasta a seguir à pasta que está em reprodução.
■ Cancelar a reprodução introdúctoria das pastas
1. Toque no botão -SCAN. O botão -SCAN do做不到 muda para "MODE", e a pista que estiver em reprodução quando se tocou o botão -SCAN é reproduzida.
Reprodução repetida
Esta funcao consente de reproducir a pista actual repetidamente.
1. Toque no botão MODE.
2. Toque no botão -REPEAT. O meuador MODE muda para "P-RPT" e a reproducao repetida é iniciada.
■ Cancelar a reprodução repetida
1. Toque no botão -RPT. O botão -RPT do meuétr muda para "MODE", e começa a reprodução normal da pista que está em reprodução quando se tocou o botão -RPT.
Reprodução repetida das pastas
Esta funciona consente de reproduzir repetidamente a pasta que actualmente está em reprodução.Esta funciona está disponible somente quando um CD-R/CD-RW gravado com ficheiros MP3 ou WMA está inserido.
1. Toque no botão MODE.
2. Toque no botão -REPEAT. O meuhrador MODE muda para "RPT" e iniciada a reproducao repetida das pastas.
■ Cancelar a reprodução repetida das pastas
1. Toque no botão -RPT. O botão -RPT do mostrador muda para "MODE", e inicia a reproducao normal da pista que está em reproducao quando se tocou no botão -RPT.
Reprodução aleatória
Esta funciona consente de reproduzir todas as pistas gravadas no disco por ordem aleatoria.
-RANDOM
Reproduz todas as pistas no disco por ordem aleatoria.
Quando o disco contém 2 ou mais pastas, todas as pistas na pasta são reproduzidas por ordem aleatoria, seguidas por todas as pistas na pasta sucessiva. Isto é repetido para todas as pastas.
-RANDOM
Reproduz pistas no disco por ordem aleatoria.
Esta função está disponible somente quando um CD-R/CD-RW gravado com ficheiros MP3 ou WMA está已在ido.
1. Toque no botão MODE.
2. Toque no botão -RANDOM ou RANDOM. O meuador MODE muda para " -RDM" ou " -RDM", e meça a reprodução aleatoria.
■ Cancelar a reprodução aleatoria
1. Toque no botão -RDM ou -RDM. O botão -RDM do主義o ou -RDM muda para "MODE", e começa a reproducao normal da pista que está em reproducao quando se tocou os botões.
Diferentes seções da música escutadas por various ouvintes (Função 2-ZONE)
A funcão 2-ZONE é uma funcão que emite os sons separadamente da zona MAIN (Principal) e da zona SUB (Secundária) ao operar simultaneamente das fontes numa umaunitiescentrale, permitindo assim que varios ouvintes desfrutem de fontes musicais separadas.
Esta unidad pode controlar sus fontes internas (ráo, CD, MP3, etc.) para reproduzi-las, e além disso, pode reproducir simultaneamente as fontes de equipamentos externos ligados atraves de CeNET (por exemple, permutadores de CDs, etc.).
As fontes da zona MAIN (Principal) são reproduzidas pelos altifantes laterais do célico, e as fontes da zona SUB (Secundária) são reproduzidas pelos sistemas de auscultadores (WH143).

A parte alta da figura refere-se à situação em que uma fonte sonora está送给 reproduzida no modo interno do aparelho (rádio, CD, AUX) nos altifalantes.
A parte baixa da figura refere-se à situação em que uma fonte sonora está sento reproduzida no modo externo do aparelho (Permutador de CDs, Permutador de DVDs, TV, AUX) nos altifalantes.
* O ajuste feito na fabrica é “OFF”.
Notas:
- A função 2-ZONE não está disponible quando DAB está connectado.
- O novo ajustamento de volume feito rodando o botão rotatório [ROTARY] neste aparenho é reflectido somente nos altifalantes.
O ajustamento AUX-SENS é reflectido em outros altifalantes e nos auscultadores.
■ Exibicao do ecran quando a funcao 2-ZONE está em uso
"INT." (modo interno) ou "EXT." (modo externo) é exibido no centro do主義o para indicar qual dosculos escutar no modo interno ou modo externo noactual mode operationao das funcaoes2-ZONE.
1. Pressione o botão [SOUND].
2. Toque no botão 2-ZONE.

3. Toque e mantenha tocado o botão ON/OFF do centro do主義ador durante 1 segundo ou mais.

Quando 2-ZONE está ajustado para ON, o tipo actual 2-ZONE é exibido.
A funcão 2-ZONE não está disponible quando 2-ZONE está ajustado para OFF. Pressione o botão [SOUND] para voltar ao modo original.
4. Toque no botão ↑ noestrador de ON/OFF para seleccionar o tipo 2-ZONE.
Tip02-ZONE
Altifalante Auscultadores Tipo 1 Interno (modo interno) Externo (modo externo) Tipo 2 Externo (modo externo) Interno (modo interno)
5. Toque noestrador do altifalante ou no estrador dos auscultadores para selecionar o modo de operacao da funcao 2-ZONE.
Quando se toca oasnocradordo altifalante,epossivel operar no audio nos altifalantes.
Quando se toca no主義or do auscultador, é possevel operar no audio nos auscultadores.
6. Pressione o botão [SOUND] para voltar ao modo original.
Diferentes seções da música escutadas por various ouvintes (Função 2-ZONE)
Comutar a funcao 2-ZONE a ON/OFF
1. Mantenha pressionado o botão [SOUND] durante 1 segundo ou mais naunities.
Comutar o tipo de 2-ZONE
Mantenha pressionado o botão [TA] naunities de 1 segundo ou mais quando a funcao 2-ZONE está em uso.
Comutar o modo de operacao da funcao 2-ZONE
Pressione o botão [TA] na unidade quando a funcção 2-ZONE está em uso.
Seleção do modo quando a funcção 2-ZONE está em uso
Quando se insere um CD quando a funcao 2-ZONE está em uso, as funções do modo interno esta unidade mudam para CD, e a reproducao começa automaticamente.
1. Pressione o botão [TA] na unidade para comutar o modo de operação da função 2-ZONE.
Oestrador para o equipamento (altifalante ou auscultador) que pode ser actualmente realizado é comutado.
2. Pressione e mantenha pressionado o botão [TA] durante 1 segundo ou mais para seleccionar o tipo de 2-ZONE.
O moltoador "INT." ou "EXT." é comutado.
3. Pressione o botão rotatório [ROTARY]. Cada vez que se pressiona o botão rotatório [ROTARY] quando "INT." é exibido alterna o modo na sequência:
Radio CD AUX Radio...
Cada vez que se pressiona o botão rotatório [ROTARY] enwhicho "EXT." é exibido alterna o modo na sequência:
AUX (Permutador de CDs)
(Permutador de DVDs) (TV *1) AUX...
* O modo do equipamento que não está connectado não é exibido.
*1 Whenever o modo TV está seleccionado, o modo muda automaticamente para o modo VTR, e não pode ser mudado.
Operações comuns a cada modo
Mostrador do écran no modo de entrada de titulos
■ Mostrador principal
É excitado quando o modo de entrada de títulos é selecciónado. (veja páginá 14)

Mostrador de tipo de texto
A: Letras de alfabeto maiusculas
a: Letras de alfabeto minúsculas
0-9: Númos
!?: Simbolos
A: Umlaut
Mostrador de titulo
O titre introduzidoactualmenteéexibido. Toque no botao 已 para determinar a posicao de entrada.Tocar emanter tocado botao durante 2segundos ou maisprovoc desaparecidomentodeadosos textosde t it
Mostrador de texto introduzido
Toque no botao 山 para seleccionar o texto introduzido.
RTN
Tocando neste botão Cancela a entrada de titulos, e o mostrador volta para o écran original. Mantendo o botão pressionado durante 1 segundo ou mais exibe a lista de textos adequada para o tipo de texto actual.
MEMO
Mantendo o botão pressionado durante 2 segundos ou mais armazena o■ Mostrador da lista de-textos
É exibido quando se mantém tocado o botão RTN durante 1 segundo ou mais noestrador principal.

Chamada de uma estação pré-sintonizada
Chamada de uma estaqao pre-sintonizada é uma funcao para a sintonizacao de estacoes pre-armazenadas. 1. Toque e mantenha tocado MODE durante 1 segundo ou mais. A lista da的记忆 pré-seLECTIONADA é exibida. 2. Toque na estação que quiser ouvir. * No modo normal, pré-seLECTION N°. également se pode sintonizar tocando no botão ↑ 📁 🄾 no restrador principal.Para cancelar uma sintonização
1. Toque no botão RTN.Memória pré-seLECTIONA
Um total de 24 posições de pré-sintonia (6-FM1, 6-FM2, 6-FM3, 6-AM) existe para armazenar estações de rádio individuais na memória. 1. Toque no botão BAND para comutar a faixa de receção. 2. Opere no主義者 de frequência para armazenar a estação. 3. Toque e mantenha tocado MODE durante 1 segundo ou mais. A lista da memória pré-seLECTIONada é exibida. 4. Toque e mantenha tocado o N^ pre-Selecao durante 2 segundos ou mais para armazenar a estacao. Irá ouvir um beep longo, e a estacao é armazenada na memoria.Armazenamento automatico
Armazenamento automatico é uma coisa para armazenar até 6 estações que são automaticamente sintonizadas em sequência. 1. Toque em MODE. 2. Toque e mantenha tocado A-STORE durante 2 segundos ou mais. O主義or de MODE muda para "A-STORE"e N^ de pre-selecao na operationa armazenamento automatico aparece no主義or de N^ de pre-selecao. * Estações com boa receção são automaticamente buscadas, e são armazenadas na memória pré-seLECTIONada (de N° 1 a N° 6) por ordem a partir da estação com a frequência mais baixa.Notas:
- Quando o armazenamento automatico é executado, as estagens armazenadas até agora na memória são canceladas. - quando há menos de 6 estações com boa receção em LOCAL SEEK, as baixas freqências são automaticamente retomadas, e o armazenamento automatico é executado de novo por DX SEEK. Se há menos de 6 estações mesmo depuis que o armazenamento automatico foi executado das vezes, as estações armazenadas até antes ficam na memória. - Se o armazenamento automatico é executados nas bandas FM, as estações são armazenadas em FM3 mesmo se FM1 ou FM2 foram escolhidos para armazenar estações.Exploração programada
Exploração programada é uma coisa para captar estações de modo que estas sãoactualmente armazenadas no N^ de pre-seleção de maneira que as estaçõesradiofónicas possam ser controladas. 1. Toque em MODE. 2. Toque em P-SCAN. Oestrador de MODE muda para "P-SCAN" e o N° pré-selecção numa operação de exploraçao programada é exibido no estrador do N° pré-selecção. * As estações armazenadas actualmente são receidas por ordem durante 7 segundos ou mais cada uma. Estações com fraça receção são saltadas, e é captada a estação sucessiva. Quando a Exploração programada é executada em radiodifusão FM, as estações FM são receidas na sequência: FM1 (1 → 6) → FM2 (1 → 6) → FM3 (1 → 6)... Quando a Exploração programada é executada em radiodifusão AM, as estações AM são recebidas na sequência: AM (1 6) AM (1 6) e assim por adiante.Cancelar uma Exploração programada
1. Toque no botão P-SCAN. Oadora P-SCAN muda para "MODE", e as estações que estavam sentido receidas quando o botão P-SCAN foi tocado são receidas em seguida.RDS (sistema de dados por raggio)
Esta unidade incorpora umsystemadescodificador de RDS capaz de captar estaceoesde radiodifusao que transitem dados de RDS. Este planta pode exibir o nome da estação de radiodifusão captada (PS) e pode mudar automaticamente para a estação de radiodifusão com a melhor receção à medida que o veiculo se desloque por distências longas (comutacao de AF). Além disso, se um acontecido de tráfego ou tipo de programa é emitido por uma estação de RDS, a transmissão é recebida independente do modo corrente de escuta. Adicionalmente, se uma informação EON é recebida, esta informação habilita uma comutatione automatica de outras estações prefixadas na mesma rede e a interrupcao da址acao sintonizada com informacao de trafego de otheras estacoes (TP).Esta funcao nao está disponivel em algumas areas. quando usar a funcao RDS, sempre coloque o radio em modo de FM. AF: Frequência Alternativa - PS: Nome do service de programa - PTY: Tipo de programa - EON: Outras redes Transmissoras - TP: Programa de Tráfego PI: Identificacao de Programa - TA: Anúncios de Tráfego * A interruptação RDS não funciona durante a receção AM de rádio. * Quando o aparecido receiveber um sinal RDS e for capaz de ler dados PS, a indicação PS aparece no主義or.Função AF
A funcão AF muda para uma frequência diferente na mesma rede de modo a manter a recepçao optima. - O ajuste feito na fabrica é "ON".Para comutar a funcao AF entre ON/OFF
1. Toque em MODE. 2. Toque em AF. A cada vez que se toca o主義or AF comuta entre "ON"e "OFF". 3. Toque em RTN. * Se a receção da estação de radiodifusão actual se deteriorar, aparece “SEARCH” no主義者,e o rádio procurura uma outras frequência para o mesmo programa.Função AF entre RDS e DAB
Quando o mesmo programa é transmitido tanto por RDS como por DAB e esta funcção está activada, a unidade muda para receber a transmissão com melhor receção automaticamente. - Esta funcao opera somente quando a unidade DAH923 ou DAH913 DAB, vendida separadamente, está conectada. - O ajuste feito na fabrica é "ON". 1. Pressione no botão [A] para selecionar o modo de ajuste. 2. Toque no botão ↑ noestrador dos indicadores de ajuste para seleccionar "LINK ACT" sob "TUNER".  3. Tocar no botão a direita do measurador, ou rodar o botão rotatório [ROTARY] para selecciónar "ON" ou "OFF". ON: A comutatione AF entre DAB e RDS está activada. OFF: A comutatione AF entre DAB e RDS está desactivada. 4. Pressione o botão [A] para voltar ao modo anterior.Função REG (programa regional)
Quando a funcao REG está activada, a estacao regionalo optima pode ser sintonizada. Quando esta funcao está desactivada, se a area de estacoes regionais mudar durante o deslocamento do veiculo, uma estacao regionala para aquela regiao e sintonizada. - O ajuste feito na fabrica é "OFF".Notas:
-核心区 de la frontera -Está função desactiva-se quando uma estação Nacional, como BBC 2_FM é sintonizada. - O ajuste ON/OFF da função REG é valido quando a função de AF está activada.Para comutar a funcao REG entre ON/OFF
1. Toque no botão MODE. 2. Toque no botão REG. A cada vez que se toca o botão REG o主義者 comuna entre "ON" e "OFF". 3. Toque no botão RTN.Sintonização manual de uma estação regional na mesma rede
- Esta funcção é valida quando a funcção AF está activada. - A operação difere de acordo com a seleção de ON/OFF da função REG. quando a função REG está activada, pode ser receidas estações radiofónicas com um Código PI perfeitamente correspondente. quando a função REG está desactivada, pode ser receidas estações radiofónicas com o mesmo tipo de:Código PI.Notas:
- Esta função pode ser usada quando uma estação radiofónica regional da mesma rede é recebida. - O Código PI é umsystema de)códio que é unico para cada estação de radiodifusão. 1. Toque e mantenha tocado MODE durante 1 segundo ou mais. A lista da memória pré-selectionada é exibida. 2. Toque no N^ de pre-selectação da estatão radiofónica a ser recebida.TA (anúncio de tráfego)
Em modo de espera TA, quando começa uma transmissão de acontecido de tráfego, a transmissão de anúcio de tráfego é recebida com prioridade Tmaxima, independenteamento do modeo de funcao, para possibilhar sua audicao. A sintonia automatica de programa de trafego (TP) tambem é possivel. - Esta função está para ser usada quando “TP” está iluminado no主義者. quando “TP” está iluminado, isto significava que a estação de radiodifusão de RDS sintonizada tem programas de anúscio de tráfego.Activar o modo de espera TA
Caso se pressione o botão [TA] quando é "TP" estiver iluminado no主義or, "TP" e "TA" iluminar-se-ão no主義or e a unidade activará o modo de espera TA até que um anúncio de tr胶囊-seja transmitido. Quando começa uma transmissão de anúncio de tr胶囊, "TRA INFO" aparece no主義or. Quando se pressiona o botão [TA] durante uma recepçao de anúncio de tr胶囊, a transmissão de anúncio de tr胶囊 é cancelada e a unidade entra em modo de espera TA.■ Cancelar o modo de espera TA
Com osindicadores "TP"e "TA"acesos no mostrador, pressione o botao [TA].Oindicador "TA"no mostrador apaga-se e o modo de espera TA é cancelado. - Se "TP" não estiver iluminado, pressionar o botão [TA] aconteça uma busca de estação de TP.■ Buscar uma estaqao de TP
Ao se pressionar o botão [TA], quando “TP” não estiver iluminado, “TA” illumina-se no主義o. e esta unidade sintoniza automaticamente uma estação de TP.Nota:
- Quando uma estação de TP não pode ser sintonizada, "TP SEEK" aparece noestrador, e a busca de uma estação de TP continua. quando o botão [TA] é pressionado de novo, "TA" e "TP SEEK" desaparecem doestrador, e interromperse a busca de uma estação de TP.Função de armazenamento automatico para estações de TP
Pode armazenar 6 estações de TP na memória de pré-sintonia automaticamente. Se o número de estações de TP que pode ser sintonizadas for menor do que 6, o prefixo de estações de radiodifusão ja armazenadas na memória permanece registrar na mesma. 1. Acerte-se de que "TA" esteja iluminado no主義者, e toque no botão MODE. Se "TA" não está iluminado no主義者, pressione o botão [TA] para exibir "TA". 2. Toque e mantenha tocado A-STORE durante 2 segundos ou mais. O meustrador MODE muda para "A-STORE" e N^ de pre-selectacao na operatione de armazenamento automatico aparece no meustrador de N^ pre-selectacionado. - Estações de TP com boa sensibilitidade de receção são armazenadas na memória de pré-sintonia. - Mesmo que se selección FM1 ou FM2, a estação de TP é armazenada na memória para FM3.PTY
Esta funciona permite aAUDICAO de una emissao de um determinado tipo de programa, mesmo quando o aparelho estiver numa funcao que nao a de radio. - Alguns paises não tem transmissão de PTY. - Em modo de espera TA, uma estação de TP tem prioridade sobre uma estação de transmissão de PTY.Activar o modo de espera de PTY
Quando se pressiona o botão [▶III], “PTY” illumina-se no主義o e o modo de espera PTY é activado. quando começa a transmissão do PTY selecionado, o nome do item de PTY aparece no主義o.■ Cancelar o modo de espera de PTY
Quando se pressiona o botão [▶■] durante 1 segundo ou mais, "PTY" desaparece do主義者 e o modo de espera de PTY é cancelado.■ Cancelar una transmissão de interruptação PTY
Pressione o botão [▶III] durante uma transmissão de interrupção PTY. A interrupção PTY é cancelada e a unidade volta ao modo de espera de PTY.Selecciónar PTY
1. quando se pressiona o botão [▶■], aunities entra no modo de seleção de PTY. 2. Tocar no botão à direita do主義or, ou rodar o botão rotatório [ROTARY] para selección o PTY. * A seguir está os ajustes predefinidos armazenados na fabrica:| Número de在此之前 | Item de PTY | |
| ENGLISH | Conteudo | |
| 001 | News | Noticias |
| 002 | Info | Informação |
| 003 | Pop M | Música Pop |
| 004 | Sport | Desporto |
| 005 | Classics | Música Clássica |
| 006 | Easy M | Música Ligeira |
Busca de PTY
1. quando se pressiona o botão [▶■], o modo de seleção de PTY é activado. 2. Tocar no botão ↑ ⇌ no centro do主義者, ou rodar o botão rotatório [ROTARY] para selección o PTY. 3. Toque no botão a esquerda do公共场所. Quando se toca no botão, a equipe busca uma transmissao de PTY em ordem crescente de frequencias; quando se toca no botão busca em ordem decrescente de frequencias. * Se não for possível a receção de nenhum estado emissora com o PTY seleção, o aparecido returna ao modo anterior.Memória de pré-Seleção do PTY
1. quando se pressiona o botão [▶■], o modo de seleção de PTY é activado. 2. Toque no botão ↑ no centro do mostrador para selecionar o PTY. Os 29 problemas de PTY naanela abaixo podem ser selecionados.| Item de PTY | ||||
| ENGLISH | DEUTSCH | SVENSKA | FRANÇAIS | Conteúdo |
| News | Nachrich | Nyheter | Infos | Noticias |
| Affairs | Aktuell | Aktuellt | Magazine | Actualidade |
| Info | Service | Info | Services | Informação |
| Sport | Sport | Sport | Sport | Desporto |
| Educate | Bildung | Utbildn | Educatif | Educação |
| Drama | Hör + Lit | Teater | Fiction | Teatro Radiofínico |
| Culture | Kultur | Kultur | Culture | Cultura |
| Science | Wissen | Vetenskap | Sciences | Ciência |
| Varied | Unterh | Underh | Divers | Variade |
| Pop M | Pop | Pop | M Pop | Música Pop |
| Rock M | Rock | Rock | M Rock | Música Rock |
| Easy M | U-Musik | Lättlyss | Chansons | Música Ligeira |
| Light M | L-Musik | L klass | M Cl Lég | Clássica Ligeira |
| Classics | E-Musik | Klassik | Classiq | Música Clássica |
| Other M | - - Musik | Övrig m | Autre M | Outras Músicas |
| Weather | Wetter | Väder | Météo | Meteorologia |
| Finance | Wirtsch | Ekonomi | Economie | Economia |
| Children | Kinder | Für barn | Enfants | Programas Infantil |
| Social | Soziales | Sozialt | Société | Soisas |
| Religion | Religion | Andligt | Religion | Religião |
| Phone In | Anruf | Telefon | Forum | Telefonemas dos ouvintes |
| Travel | Reise | Resor | Voyages | Viagem |
| Leisure | Freizeit | Fritid | Loisirs | Lazer |
| Jazz | Jazz | Jazz | Jazz | Jazz |
| Country | Country | Country | Country | Música Country |
| Nation M | Landes M | Nation m | Ch pays | Música Nacional |
| Oldies | Oldies | Oldies | Rétro | Antiga |
| Folk M | Folklore | Folkm | Folklore | Música Folk |
| Document | Feature | Dokument | Document | Documentário |
Transmissão de emergência
Se uma transmissão de emergência é recebida, todas as operações de modo de funções são interrompidas. "ALARM" aparece no主義e a transmissão de emergência pode ser ouvida.■ Cancelar uma transmissão de emergência
Quando se pressiona o botão [AF], a receção da transmissão de emergência é cancelada.Mudar o idioma de exibição do PTY
Pode seleccionar entre os 4 idiomas (Inglês, Alemão, Sueco ou Francês) para o PTY exibido no主義or. - O ajuste feito na fabrica é "ENGLISH" (inglês). 1. Pressione o botão [A] para selecionar o modo ajuste. 2. Toque no botão ↑ noestrador dos指示os de ajuste para selecionar "LANGUAGE" sob "TUNER".  3. Tocar no botão ↑ à direita do主義or, ou rodar o botão rotatório [ROTARY] para selección o idioma pretendedo. * Selezione um dos idiomas ENGLISH (Inglês), DEUTSCH (Alemão), SVENSKA (Sueco) ou FRANÇAIS (Francês). 4. Pressione o botão [A] para voltar ao modo anterior.Selecione Interrupcao de RDS quando a funcao 2-ZONE é usada (RDS-INT 2Z)
Quando esta funcao está ajustada em "ON", e ocorrre uma interrupcao de RDS quando a funcao 2-ZONE está em uso, pode ser recebidas as informacoes de RDS. - quando ocorrre um interrupcao de RDS, a funcao 2-ZONE desactiva-se. - Se occurs uma Interrução de emergência acreda que com "RDS-INT 2Z" ajustado em "OFF", é recebida a informação de RDS. - O ajuste feito na fabrica é "ON". 1. Pressione o botão [A] para selecionar o modo ajuste. 2. Toque no botão ↑ ↓ noestrador dos指示符指示的指示符。indicações de ajuste para selecionar "RDS-INT 2Z" sob "TUNER".  3. Tocar no botão ↑ à direita do主義or, ou rodar o botão rotatório [ROTARY] para selección ou "ON" ou "OFF". ON: A informação RDS é recebida quando ocorrê uma Interrupção de RDS quando a função 2-ZONE está em uso.OFF:
Quando a funcao 2-ZONE está em uso, as informacoes RDS diversas da interrupcao de emergencia não são recebidas.Nota:
- Se o modo Radio é selecionado quando TA (Anúncio de Tráfego) e PTY está ligados, as interruptões são recebidas mesmo se a Interrupção RDS está ajustada para “OFF”. 4. Pressione o botão [A] para voltar ao modo anterior.Ajuste de volume das transmissões de TA, de emergência (ALARM) e de PTY
O volume das interrupções de TA, ALARM e PTY pode ser ajustado durante a interrupção de TA, ALARM ou PTY. - O ajuste feito na fabricula é "15". Durante a interrupção de TA, ALARM ou PTY, rode o botão rotatório [ROTARY] à direita ou à esquerda para fazer o volume ao;nível pretendido (de 0 a 33). - Quando a Interruptione da TA, ALARM ou PTY termina, o volume volta ao nivel que está activo antes da Interrupcao de transmissao.Mostradores de écran no modo CD
■ Mostrador principal
É exibido por meio da pressão do botão rotatório [ROTARY] para selecionar o modo CD.  Tocando na parte esquerda do主義ista durante 1 segundo ou mais comuta o modo de operacao. Mostrador de Pista/tempo reproducao 01/02:00:
O N° da pista que está送给 reproduzida e o tempo de reprodução são exibidos. Se toca-se no botão ↑ 📁 ↑ ou ← 📁 → na operationa padrão, é possível selecionar a pista a reproduzir, ou o avanço-rápido ou retroprocesso-rápido das pistas.Mostrador de titulo
Oasnadradorécomutadoquando toca-seeste mostrador.Mostrador de pasta (no caso de MP3/WMA)
Tocando na operationa padr o botao seleciona as pastas.MODE:
Tocando neste botão exibe as sub-conções. Tocando e mantendo tocasto este botão durante 1 segundo ou mais no caso de MP3/WMA é exibida a lista de pastas.Nota:
- Esta funcao está activada somente quando um disco está em reproducao -SCAN/SCAN: é exibido durante a reprodução introdúrtoria. Tocando neste botão termina a reprodução introdúrtoria. - RPT/ -RPT: É exibido durante uma reprodução repetida. Tocando neste botão termina a reprodução repetida. F-RDM/RDM: E exibido durante a reprodução aleatoria. Tocando neste botão termina a reprodução aleatoria.TOP:
Tocando neste botão começa a reprodução da pista do topo do disco ou da pasta que está sentido reproduzida.(sono no do的操作简单)
Tocando nestes botões seleciona a pista a reproduzir. Tocando e mantendo tocados these botões executase o avanço-rápido ou retroprocesso-rápido das pistas.■ Mostrador da lista de pastas (no caso de MP3/WMA)
É exibido quando se mantém tocado o botão MODE durante 1 segundo ou mais no restrador principal.  Nome da pastaPasta N°
Quando está evidenciada em cinzento, a pasta não pode ser selecionada.>>: Selecção em andamento
Tocando num nome da pasta returno o écran ao公共场所 principal, e a reproducao começape para primaira pista na pasta tocada.←PREV-RTV:
Tocando;neste botao,exibe a lista da pasta anterior. Mantendo o botao pressionado durante 1 segundo ou mais returno o ecran ao restrador principal.NEXT:
Tocando neste botão exibe aproxima lista de pastas.O que é o MP3?
MP3 é um método de compressão audio, classificado na terceira camada audio dos standards MPEG. Este método de compressão audio penetrou no mercado de computadores pessoasis, tornando-se num formato standard. O MP3 comprime os dados audio paraerca de 10 por cento do seu tamanho original, mantendo uma alta qualidade sonora. Quer isto fazer queerca de 10 CDs de musica pode ser gravados num disco CD-R ou CDRW, permitindo uma audicao prolongada sem ter de Mudar o CD.O que é o WMA?
WMA é a abreviatura de Windows Media Audio, um tipo de ficheiro audio desenvolvido pela Microsoft Corporation.Notas:
- Não é produzido som quando reproduzir um ficheiro com DRM (Gestão de Direitos Músicas) realizando o WMA. (O indicator WMA indicator passa a piscar.) - Windows Media™ e o logotipo Windows® sãoemarks registadas da Microsoft Corporation, nos Estados Unidos da América e/ou em outros países. - Para desactivar o DRM (Gestor de direitos musicais): - Quando utilizes o Windows Media Player 8, dê um clique em TOOLS → OPTIONS → guia COPY MUSIC, e então de um clique em COPY SETTINGS e retire a marca de verificação da caixa de verificação de PROTECT CONTENT. A seguir, reconstrua os ficheiros. - Quando utilizes o Windows Media Player 9, dê um clique em TOOLS → OPTIONS → guia MUSIC RECORD, e então dé um clique em configurações de gravação e retire a marca de verificação da caixa de verificação de RECORD PROTECTED MUSIC. À seguir, reconstrua os ficheiros. Ficheiros pessoalmente preparados são realizados sob a sua responsabilité.Precauções na 创建ação de um disco MP3/WMA
- Frequências de amostragem e velocidades de transmissãoutilizáveis: 1. MP3: Frequências de amostragem: 11,025 kHz a 48 kHz Velocidades de transmissão: 8 kbps a 320 kbps / VBR 2. WMA: Velocidades de transmissao 48 kbps a 192 kbpsExtensões dos ficheiros
1. Adicione sempre uma extension“.MP3” ou“.WMA” a um ficheiro MP3 ou WMA utilizing letras de um einzelvo byte. Se adcionar uma outra extensionDifferente da especialcada ou se esquecer de adcionar a extension, o ficheiro não podera ser reproduzido. 2. Ficheiros sem dados MP3/WMA não serao reproduzidos. A indicação "--:--" aparece no公共场所 do tempo de reproducao se tentar de reproducir ficheiros sem dados MP3/WMA.Formato lógico (Sistema de ficheiros)
1. Quando escrever um ficheiro MP3/WMA num disco CD-R ou CD-RW, por favor selecione "ISO9660 level 1, 2 ou JOLIET ou Romeo" como FORMAT de software decrire. A reproducao normal não sera possivel se o disco é gravado num及其他这对于 agradeamento é inconsiderable. 2. O nome da pasta e o nome do ficheiro podem ser exibidos como TITLE no caso de reproducao MP3/WMA mas o TITLE deve ter no maior 128 letras ou digitos de um unicno byte (incluindo uma extensao). 3. Não atrribua um nome a um ficheiro dentro de uma pasta com o mesmo nome.Estrutura das pastas
1. Não é possevel Criar discos com mais de 8 níveis hieráquicos.-Numero de ficheiros ou pastas
1. São reconhecidos no máximo 255 ficheiros por pasta. São reproduzidos no(Maximo 500 ficheiros. 2. As pistas são reproduzidas pela ordem em que foram gravadas no disco. (As pistas nem sempre podem ser reproduzidas pela ordem exibida no PC.) 3. Pode ser produzido ruido, dependendo do tipo de software realizado na gravacao.Selecao de Multi-sessao
Esta funciona consente de selectionar quer ficheiros CD-DA que MP3/WMA no caso de discos (ex. CD-EXTRA) commistura de CD-DA (CDs de música) e ficheiros MP3/WMA. 1. Toque no botão MODE. 2. Toque no botão M-SESS. A cada vez que se toca no botão M-SESS comuta o主義or M-SESS entre "CD" (play CD-DA) ou "MP3/WMA" (play MP3/WMA). * Se M-SESS não é exibido, toque no botão NEXT. 3. Toque no botão RTN. O ajuste da seleção multi-sessão é reflectida àproxima vez quecarregar um CD.Nota:
- Quando reproducir um CCCD (CD de controlo de Cópia), define o ajuste para tipo CD. quando o ajuste for definindo para tipo MP3/WMA, em eles casos o CD não poderá ser reproducido normalmente.PRECAUÇAO
Tenha cuidado para não entalar os dedos quando fechar a CONSOLA INCLINÁVEL.
Notas:
- Se a CONSOLA INCLINÁVEL nãoAbrir completeness,abra-o suavamente com a boa. - Feche a CONSOLA INCLINÁVEL depuis de introduzir um CD. - Não tente introduzir os dedos ou a maior na ranhura de inscrção do disco. Além disso, não introduza nunca objectos estranhos na ranhura. - Não introduza discos com autocolante de celofane ou róculos de discs alugados descolados, ou discos com marcas deixadas por autocolante de celofane ou de róculos descolados. Pode ser impossívelrirutar este tipo de discos,agem de poderem avariar o aparelho.Introdução de um CD
1. Pressione o botão [▲] O painel de controlo abre-se. 2. Introduza um CD na ranhura do CD. Após a introdução do disco, o painel de controlo fecha-se automaticamente, passadosagems segundos, e a reprodução meça.Notas:
- Nunca introduza objetivos estranhos na ranhura do CD. - Se o CD não entra fácilmente, pode estar muito CD no aparecido, ou o mesmo pode estar a necessitar de reparação.    Discos que não exibem a marca [0][5] [6] ou mark e CD-ROMs não podem ser ouvidos neste aparelho. - Alguns CDs gravados em formato CD-R/CD-RW podem não ser'utilizando.Introdução de discos compactos de 8 cm
Não é necessário nenhum adaptor para reproduzir um CD de 8 cm. Introduza o CD de 8 cm no centro da ranhura de inserção.Ejecção de um CD
É possé往来 um CD pressionando o botão [▲] mesmo se mecanismo de segurarou ACC está automaticamente na posção OFF.PRECAUÇA O
Quando o disco è ejectado, pressione o botão [▲] para fechar o panei de controlo. SeDEXAR opanei de controlo aberto, irá ouvir um duplo beep, e opanei de controlo fecha-se automaticamente. 1. Pressione o botão [▲]. O paine de controlo abre-se, e o disco é ejectado. O modo comuta automaticamente para o modo de rádio. * Acerte-se de remover o disco ejectado do aparelho. SeDEXAR o disco no prato do disco, passados 15 segundos ou mais tempo, o disco é levado para dentro do aparelho e o paine de controlo fecha-se. (funcao de auto inscracao) * Os CDs Single não são de inserção automática. Acerte-se de remover os CDs single(before dações dos outros.PRECAUÇAO
Seutilizarexcessivaforca para insertirum discodeposdessetseriodejectado,a superficiedo disco poderaserriscada. Remova o disco ante de inserti-lo novamente.Escutar um disco ja inserido no aparelho
1. Pressione o botão rotatório [ROTARY] para selección o modo de CD. * A reprodução commence automaticamente quando o modo muda para o modo CD.Interromper a reproducao
1. Pressione o botão [▶■]Retomarareproducao
1. Pressione o botão [▶■] de novo.Selección urma pista
Quando um CD-R/CD-RW gravado com um ficheiro MP3 ou WMA é inserido, é possível的选择ar somente as pistas gravadas na mesma pasta tocando no botão ↑ 📦 🦩 no主義者 da pista. 1. Para escutar aproxima pista,toque no botao 日 no nostrador da pista. 2. Para escatar a pista precedente, toque das vezes no botão ↑ noestrador da pista. Tocando no botão ↑ reproducu aproxima pista. Se tocar no botão ↑ varias vezes, a pista move-se para frete até a pista correspondente ao número de vezes que se tocou o botão ↑ eessa pista é reproduzida. Tocando no botão ↑ reproduz a pista anterior. Se tocar varias vezes no botão ↑, a pista move-se para trás até a pista correspondente ao número de vezes que se tocou o botão ↑ eessa pista é reproduzida. * Se tocar dos vezes no botão ↑ no* no* mostrador da pista quando o inico da pista está a reproduzir, por vezes é reproduzida a pista 2.■ SeLECTIONAR Uma pasta
Para selecionar una pasta diferente, tocar no botão ↑ ↓ no主義 de pasta, ou executar o segunte. 1. Toque e mantenha tocado o botão MODE durante 1 segundo ou mais. É exibida uma lista de pistas. Tocando no botão PREV ou NEXT exibe a parte anterio ou sucessiva da lista de pastas. 2. Toque no nome da pasta.Reproduzir a lista de reproducao
Listas de reprodução (ficheiro M3U) también podem ser reproduzidas. Note-se, todas, que os ficheiros M3Uactualmente guardados nas cinco camadas (incluindo a raiz) na hierarquia dos ficheiros somente os 5 ficheiros de topo com novas marcas de tempo podem ser reproduzidos.Notas:
- Podem ser reproduzidos até 255 ficheiros numa uma lista de reprodução. - É possèvèr reproduzir somente os ficheiros MP3 ou WMA actualmente guardados nas pastas nascinco camadas (incluindo a raiz) na hierarquía dos ficheiros.Execute o segunte para reproducir a lista de reproducao.
1. Toque no botão MODE. 2. Touch NEXT. 3. Touch PLY LIST. Inicia a leitura de uma lista de reproducao. quando a leitura de uma lista de reproducao termina, a lista de reproducao com as ultimas MARCAS de tempo começa automaticamente. A selecao de uma lista de reproducao ou pistas numa lista de reproducao é a mesma que aquela de selecao de uma pasta ou pistas numa pasta. * PLY LIST não é exibida quando uma lista de reprodução actual (ficheiro M3U) não está guardada no CD-R/CD-RW inserido no aparecido.Interromper a reproducao de uma lista de reproducao
1. Toque no botão MODE. 2. Toque no botão NEXT. 3. Toque no botão PLY LIST.Avanço-rápido / Retrocesso-rápido
1. Para o avanço-rápido, toque no botão no主義 no主義 da pista. 2. Para o retroprocesso-rápido, toque no botão no主義 no主義 da pista.Função TOPO
A funcão topo reinicializa o reproduidor de CD colocando-o na primeira pista do disco. 1. Toque no botão Top. A reprodução inicia pela primaira pista (pista N°1). No caso de MP3/WMA, o reproduidor volta à primaira pista da pasta que está sentido reproduzida.Reprodução introdúttória
Esta funcao consente de localizar e reproduzir os primeiros 10 segundos de cada pista gravada no disco. 1. Toque no botão MODE. 2. Toque no botão J^ -SCAN. O meuador modo muda para "J ^ - S C A N " e meça a reproducao introdutoria. * A reprodução introdúctoriaComeça pela pista sucessiva à pistaactualmente em reprodução.■ Cancelar a reprodução introdúctoria
1. Toque no botão ^一 SCAN. O meuador SCAN muda para MODE, e a pista que estiver em reproducao quando se tocou em SCAN é reproduzida.Reprodução introdúrtória das pastas
Esta funciona consente de localizar e reproduzir os primeiros 10 segundos da primarya pista de cada pasta no disco MP3/WMA. 1. Toque no botão MODE. 2. Toque no botão -SCAN. O meuador MODE muda para "SCAN" e meça a reprodução introdúctoria das pastas. * A reprodução introdúctoria das pastas comoça pela pasta a seguir à pasta que está em reprodução.■ Cancelar a reprodução introdúctoria das pastas
1. Toque no botão -SCAN. O botão -SCAN do做不到 muda para "MODE", e a pista que estiver em reprodução quando se tocou o botão -SCAN é reproduzida.Reprodução repetida
Esta funcao consente de reproducir a pista actual repetidamente. 1. Toque no botão MODE. 2. Toque no botão -REPEAT. O meuador MODE muda para "P-RPT" e a reproducao repetida é iniciada.■ Cancelar a reprodução repetida
1. Toque no botão -RPT. O botão -RPT do meuétr muda para "MODE", e começa a reprodução normal da pista que está em reprodução quando se tocou o botão -RPT.Reprodução repetida das pastas
Esta funciona consente de reproduzir repetidamente a pasta que actualmente está em reprodução.Esta funciona está disponible somente quando um CD-R/CD-RW gravado com ficheiros MP3 ou WMA está inserido. 1. Toque no botão MODE. 2. Toque no botão -REPEAT. O meuhrador MODE muda para "RPT" e iniciada a reproducao repetida das pastas.■ Cancelar a reprodução repetida das pastas
1. Toque no botão -RPT. O botão -RPT do mostrador muda para "MODE", e inicia a reproducao normal da pista que está em reproducao quando se tocou no botão -RPT.Reprodução aleatória
Esta funciona consente de reproduzir todas as pistas gravadas no disco por ordem aleatoria.-RANDOM
Reproduz todas as pistas no disco por ordem aleatoria. Quando o disco contém 2 ou mais pastas, todas as pistas na pasta são reproduzidas por ordem aleatoria, seguidas por todas as pistas na pasta sucessiva. Isto é repetido para todas as pastas.-RANDOM
Reproduz pistas no disco por ordem aleatoria. Esta função está disponible somente quando um CD-R/CD-RW gravado com ficheiros MP3 ou WMA está已在ido. 1. Toque no botão MODE. 2. Toque no botão -RANDOM ou RANDOM. O meuador MODE muda para " -RDM" ou " -RDM", e meça a reprodução aleatoria.■ Cancelar a reprodução aleatoria
1. Toque no botão -RDM ou -RDM. O botão -RDM do主義o ou -RDM muda para "MODE", e começa a reproducao normal da pista que está em reproducao quando se tocou os botões.Diferentes seções da música escutadas por various ouvintes (Função 2-ZONE)
A funcão 2-ZONE é uma funcão que emite os sons separadamente da zona MAIN (Principal) e da zona SUB (Secundária) ao operar simultaneamente das fontes numa umaunitiescentrale, permitindo assim que varios ouvintes desfrutem de fontes musicais separadas. Esta unidad pode controlar sus fontes internas (ráo, CD, MP3, etc.) para reproduzi-las, e além disso, pode reproducir simultaneamente as fontes de equipamentos externos ligados atraves de CeNET (por exemple, permutadores de CDs, etc.). As fontes da zona MAIN (Principal) são reproduzidas pelos altifantes laterais do célico, e as fontes da zona SUB (Secundária) são reproduzidas pelos sistemas de auscultadores (WH143).  A parte alta da figura refere-se à situação em que uma fonte sonora está送给 reproduzida no modo interno do aparelho (rádio, CD, AUX) nos altifalantes. A parte baixa da figura refere-se à situação em que uma fonte sonora está sento reproduzida no modo externo do aparelho (Permutador de CDs, Permutador de DVDs, TV, AUX) nos altifalantes. * O ajuste feito na fabrica é “OFF”.Notas:
- A função 2-ZONE não está disponible quando DAB está connectado. - O novo ajustamento de volume feito rodando o botão rotatório [ROTARY] neste aparenho é reflectido somente nos altifalantes. O ajustamento AUX-SENS é reflectido em outros altifalantes e nos auscultadores.■ Exibicao do ecran quando a funcao 2-ZONE está em uso
"INT." (modo interno) ou "EXT." (modo externo) é exibido no centro do主義o para indicar qual dosculos escutar no modo interno ou modo externo noactual mode operationao das funcaoes2-ZONE. 1. Pressione o botão [SOUND]. 2. Toque no botão 2-ZONE.  3. Toque e mantenha tocado o botão ON/OFF do centro do主義ador durante 1 segundo ou mais.  Quando 2-ZONE está ajustado para ON, o tipo actual 2-ZONE é exibido. A funcão 2-ZONE não está disponible quando 2-ZONE está ajustado para OFF. Pressione o botão [SOUND] para voltar ao modo original. 4. Toque no botão ↑ noestrador de ON/OFF para seleccionar o tipo 2-ZONE. Tip02-ZONE| Altifalante | Auscultadores | |
| Tipo 1 | Interno (modo interno) | Externo (modo externo) |
| Tipo 2 | Externo (modo externo) | Interno (modo interno) |
Diferentes seções da música escutadas por various ouvintes (Função 2-ZONE)
Comutar a funcao 2-ZONE a ON/OFF
1. Mantenha pressionado o botão [SOUND] durante 1 segundo ou mais naunities.Comutar o tipo de 2-ZONE
Mantenha pressionado o botão [TA] naunities de 1 segundo ou mais quando a funcao 2-ZONE está em uso.Comutar o modo de operacao da funcao 2-ZONE
Pressione o botão [TA] na unidade quando a funcção 2-ZONE está em uso.Seleção do modo quando a funcção 2-ZONE está em uso
Quando se insere um CD quando a funcao 2-ZONE está em uso, as funções do modo interno esta unidade mudam para CD, e a reproducao começa automaticamente. 1. Pressione o botão [TA] na unidade para comutar o modo de operação da função 2-ZONE. Oestrador para o equipamento (altifalante ou auscultador) que pode ser actualmente realizado é comutado. 2. Pressione e mantenha pressionado o botão [TA] durante 1 segundo ou mais para seleccionar o tipo de 2-ZONE. O moltoador "INT." ou "EXT." é comutado. 3. Pressione o botão rotatório [ROTARY]. Cada vez que se pressiona o botão rotatório [ROTARY] quando "INT." é exibido alterna o modo na sequência: Radio CD AUX Radio... Cada vez que se pressiona o botão rotatório [ROTARY] enwhicho "EXT." é exibido alterna o modo na sequência: AUX (Permutador de CDs) (Permutador de DVDs) (TV *1) AUX... * O modo do equipamento que não está connectado não é exibido. *1 Whenever o modo TV está seleccionado, o modo muda automaticamente para o modo VTR, e não pode ser mudado.Operações comuns a cada modo
Mostrador do écran no modo de entrada de titulos
■ Mostrador principal
É excitado quando o modo de entrada de títulos é selecciónado. (veja páginá 14) Mostrador de tipo de texto
A: Letras de alfabeto maiusculas a: Letras de alfabeto minúsculas 0-9: Númos !?: Simbolos A: UmlautMostrador de titulo
O titre introduzidoactualmenteéexibido. Toque no botao 已 para determinar a posicao de entrada.Tocar emanter tocado botao durante 2segundos ou maisprovoc desaparecidomentodeadosos textosde t itMostrador de texto introduzido
Toque no botao 山 para seleccionar o texto introduzido.RTN
Tocando neste botão Cancela a entrada de titulos, e o mostrador volta para o écran original. Mantendo o botão pressionado durante 1 segundo ou mais exibe a lista de textos adequada para o tipo de texto actual.MEMO
Mantendo o botão pressionado durante 2 segundos ou mais armazena oTipode texto
O texto que é exibido muda de acordo com o ]. mostrador de tipo de texto. Quando oestrador de tipo de texto é“A”: A EIMQUX (espaço) Quando oasnodradorde tipo de texto é“a”: a eimqu Quando o tipo de texto é "0-9", "!?" ou "A". Todos os characteres são exibidos.RTN
Tocando neste botão o主義or volta para a exibicao principal.NEXT
Tocando neste botão exibe a successiva lista de-textos.Atribuição de titulos
É possével atrribuir a estações TV e para CDs titulos com uma extensão maior de 10 characteres. Estes titulos podem ser exibidos quando são captadas estações radiofónicas ou quando se reproduz CDs. O número de títulos que podem ser atribuções são os següentes:| modo | Número de títulos |
| modo CD | 50 títulos |
| modo TV | 20 titles |
| Estado de permutador de CDs | Número de títulos |
| DCZ628 conectado | 100 títulos |
| CDC655Tz conectado | 100 títulos |
| CDC1255z conectado | 50 títulos |
PRECAUÇAO
A pressão do botão "reset" Cancela todas as memórias do'utilizar tais como títulos armazenados estaunities. 5. Toque no botão ↑ noestrador de tipo de texto para selecionar o tipo de texto. A cada vez que se toca no botão ↑ o tipo de texto comuta na sequência: Letras do alfabeto maiusulas (espaço) A B C D E F G H I J K L M N O P Q R S T U V W X Y Z Letras do alfabeto minúsculas a b c d e f g h i j k l m n o p q r s t u v w x y Z Numberos 0123456789 Simbolos, Umlaut AEEEEIAEaeeeeeioae 6. Tocar no botão à direita do主義or, ou rodar o botão rotatório [ROTARY] para determinar os charactres introduzidos. 7. Repita os passos de 4 a 6 para introduzir o titulo. Pressionando e mantendo pressionado o nostrador de títulos durante 2 segundos ou mais provoca o desaparecidonto todos os caracteres dos títulosactualmente introduzidos. 8. Toque e mantenha tocado MEMO durante 2 segundos ou mais. Irá ouvir um beep longo, e o titulo é armazenado na memória.Para comutar o主義者 de tólico para relógio ou outras主義者
Toque no centro do主義。■ Quando um titulo novo é armazenado além do número máximo de titulos
No caso de una estação TV
Os titulos não armazenados nos canais pré-seLECTIONados são automaticamente cancelados, e o novo titulo é armazenado na memória.No caso de um CD
Os titutos de CDs que estavam sendo reproduzidos porultimate sancancelados,e o novo titulo é armazenado na memória.Apagar titulos
1. Sintonize uma estação de TV, ou reproduza um CD cujos títulos pretende apagar. 2. Toque no centro doMASTER para seleccionar oMASTER de títulos do'utilizar. Quando o®, o®, o®, o®, o®, o®, o®, o®, o®, o®, o®, o®, o®, o®, o®, o®, o®, o®, o®, o®, o®, o®, o®, o®, o®, o®, o®, o®, o®, o®, o®, o®, o®, o®, o®, o®, o®, o®, o®, o®, o®, o®, o®, o®, o®, o®, o®, o®, o®, o®, o%, o%, o%, o%, o%, o%, o%, o%, o%, o%, o%, o%, o%, o%, o%, o%, o%, o%, o%, o%, o%, o%, o%, o%, o%, o%, o%, o%, o%, o%, o%, o%, o%, o%, o%, o%, o%, o%, o%, o%, o%, o%, o%, o%, o%, o%, o%, o%, o%, o%, o% Do títulos do'utilizar, "USER" é exibido sobre ouMASTER do N° de pré-Seleção. 3. Mantenha pressionado o botão [A] durante 1 segundo ou mais. O modo muda para o modo de entrada de titulos. 4. Toque e mantenha tocado o nostrador de títulos durante 2 segundos ou mais. Todooscaracteredostitulodesaparecem. 5. Toque e mantenha tocado o botão MEMO durante 2 segundos ou mais. Ira ouvir um beep longo, e o titulo é apagado.Mudança de ajustamentos Seleção de指示ores de ajuste
1. Pressione o botão [A]. O modo muda para o modo de ajuste.  2. Toque no botão ↑ noestrador dos indicadores de ajuste para selecionar o indicator a ajustar. * Tocando no botão ↑ à esquerda do主義者 o indicator principal, comuta 1 indicator de cada vez. Tocando no botão a esquerda do主義or sub-indicador comutacontinuamente. * Tocando no botão ↑ 📦 🠾 no centro do主義者 o sub-indicador comuta, 1 indicator de cada vez. Tocando no botão 0 sub-indicador comuta continuamente. 3. Quando "EDIT" é exibido à direita do主義or, toque no botao EDIT para comutar para o主義or de pormenores de ajustamento.  ADJUST MODE MSG INPUT> EDIT 4. Tocar no botão à direita do主義or, ou rodar o botão rotatório [ROTARY] para fazer os pormenores.Paravoltarao modo original
1. Pressione o botão [A] de novo. - Indicadores de seleção| Indicator Principal | Sub-indicator |
| MOSTRADOR | SCREEN SVR • Ajustamento da proteção do écran (veja pagina 41) |
| MSG INPUT • Introdução de informação de mensagem (veja pagina 41) | |
| MESSAGE • Ajuste do主義者 de mensagem ON/OFF (veja pagina 42) | |
| S/A SENS • Ajuste da sensibilitadade do analisador de espectro (veja pagina 42) | |
| SCROLL • Ajuste da velocidade de rolagem (veja pagina 42) | |
| APPERNCE | DIMMER IN • Ajuste de Auto-dimmer (veja pagina 43) |
| DMR LEVEL • Ajuste do[nível de escurecido (veja pagina 43) | |
| CONTRAST • Ajuste do contraste do主義者 (veja pagina 43) | |
| BLINK LED • Faz com que o LED piseque quando DCP é Removedido (veja pagina 43) | |
| BEEP • Ajustar o beep (veja pagina 44) | |
| Indicador principal | Sub-item |
| SOUND | AC-PRO III • Selecção do Mode VSE (STD/PRO) (veja página 44) |
| EQ SELECT • Selecção do modo equalizar (veja página 44) | |
| SP-SETTING • Ajustar a configuração do altoalante (veja página 44) | |
| CENTER-SP / SUB-WOOFER • Ajustar o altoalante sub-woofer para ON/OFF (veja página 45) | |
| HPF / SUB-W LPF • Ajustamento da frequência do FILTER do altoalante (veja página 45) | |
| AMP CANCEL • Ajustar o amplificador interno em uso para ON/OFF (veja página 46) | |
| SP GAIN • Ajustamento do[nível de saída do altoalante (veja página 46) | |
| PL II DELAY | SRD-SP • Ajustamento do tempo de atraso do altoalante traseiro (veja página 46) |
| PL II CONT | PANORAMA / DIMENSION / CTR WIDTH • Ajuste da música no modo pormenorizado (veja página 47) |
| TUNER | TV ARER • Ajuste da area TV (veja página 57) |
| TV DIVER • Ajuste da diversidade TV (veja página 57) | |
| LINK ACT • Ajuste da função AF ENTRE RDS e DAB (veja página 26) | |
| LANGUAGE (IDIOMA) • Ajuste do idioma do écran de PTY (veja página 30) | |
| RDS-INT 2Z • Ajuste da Interrupção de RDS quando a função 2-ZONE está em uso (veja página 30) | |
| SETTING | AUX / TEL • Ajuste de AUX e TEL (veja página 47) |
| AUX SENS • Ajuste do[nível de entrada do录音 externo (AUX) (veja página 48) | |
| TEL-SP • Ajuste da saída do altoalante do automóvel para o telemóvel (Optional TEL-002) (veja página 48) | |
| TEL-SWITCH • Ajuste da interrupção do telemóvel (veja página 48) | |
| CALIBRATE / A-VOL SENS • Ajuste da função auto-volume (veja página 49) | |
| SYSTEM CHECK • Executar uma verificação do sistema (veja página 49) | |
| CODEMATIC • Ajuste da segurança (veja página 50) |
Ajuste da proteção do écran (SCREEN SVR)
Esta funciona consente de exibir uma proteção do écran quando não se utilizes esta unidade por和地区 de 30 segundos. - O ajuste feito na fabrica é "ON". 1. Pressione o botão [A] para seleccionar o modo de ajuste. 2. Toque no botão ↑ noestrador dos indicadores de ajuste para seleccionar "SCREEN SVR" sob "DISPLAY".  3. Tocar no botão à direita do measurador, ou rodar o botão rotatório [ROTARY] para selecionar "ON" ou "OFF". 4. Pressione o botão [A] para voltar ao modo original.Comutar oestrador de protecao do ecran
Toque no botão PREV ou NEXT quando a proteção do écran é exibida. A cada vez que se tocam estas botões comu ta oestrador de proteção do écran.Proteççao do écran
Proteção do écran Modelo 1  Proteção do écran modelo 2  Proteção do ecran Modelo 3  Analisador de espectro Modelo 1 Analisador de espectro Modelo 2  Analisador de espectro Modelo 3  Analisador de espectro Modelo 4  Informação de mensagem SS SCAN
As 8 indentações acima são exibidas por circa de 10 segundos cada uma.Introdução de mensagens a exibir em informação deLatch (MSG INPUT)
1 tipo de proteção do écran está disponible. Para os peminores sobre como comutar o nostrador de proteção do écran, consulte "Ajuste da proteção do écran". - Podem ser introduzidos um Tmaxido de 30 characteres. - O ajuste feito na fabrica é "Active Matrix Control System". 1. Pressione o botão [A] para selecionar o modo de ajuste. 2. Toque no botão ↑ noestrador dos指示符指示器的指示符。indicações de ajuste para selecionar "MSG INPUT" sob "DISPLAY".  DISPLAY ADJUST MODE MSG INPUT> EDIT 4. Toque no botão ↑ no centro do主義o para determinar a posicao de entrada. * Para apagar a mensagem, toque e mantenha tocado durante 2 segundos ou mais o centro do主義or. Se executar a operacao ate ao passo 8 com a mensagem apagada, a mensagem returnar para o ajuste de fabrica. 5. Toque no botão a esquerda do ]. A cada vez que se toca no botão comuta o tipo de texto. Para detalhes, consulte a págin37. 6. Tocar no botão a direita do主義or, ou rodar o botao rotatorio [ROTARY] para determinar os characteres introduzidos. 7. Repita os passos de 4 a 6 para introduzir uma mensagem. 8. Toque e mantenha tocado o botão MEMO durante 2 segundos ou mais. Irá ouvir um beep longo, e a mensagem é armazenada na memória. 9. Pressione o botão [A] para voltar ao modo original.Exibicao de mensagens (MESSAGE)
Esta funciona consente de exibir mensagens no公共场所 quando se liga ou desliga a unidade. "Hello" é exibido quando se liga a unidade, e "See you" é exibido quando se desliga a unidade. - O ajuste feito na fabrica é “ON”. 1. Pressione o botão [A] para selección o modo de ajuste. 2. Toque no botão ↑ noestrador dos指示ores de ajuste para selecionar "MESSAGE" sob "DISPLAY".  3. Tocar no botão a direita do主義or, ou rodar o botão rotatório [ROTARY] para selecciónar "ON" ou "OFF". 4. Pressione o botão [A] para voltar ao modo original.Ajuste da sensibilitadode Analisador de espectro (S/ASENS)
Esta funcção consente de fazer a sensibilidade (quantidade de deflexão) do Analisador de espectro. Para detalhes sobre a exibização do Analisador de espectro, consulte "Mudar o主義or" (veja páginga 13) ou "Ajuste da proteção do ecran" (veja páginga 41). - O ajuste feito na fabrica é “MID”. 1. Pressione o botão [A] para seleccionar o modo de ajuste. 2. Toque no botão ↑ 📅 ↑ noestrador dos indicadores de ajuste para selecionar "S/ASENS" sob "DISPLAY".  3. Tocar no botão à direita do主義or, ou rodar o botão rotatório [ROTARY] para melhorar a sensibilitadé. * SeLECTIONAR LOW (pequena quantidade de deflexão), MID ou HIGH (Grande quantidade de deflexão). 4. Pressione o botão [A] para voltar ao modo original.Ajustamento da velocidade de rolagem do主義or (SCROLL)
Esta característica consente de diminuir a velocidade de rolagem quando a velocidade de rolagem é muito- clarion
- CAUTIONS:
- !CAUTIONS
- ADVARSEL.
- Contents
- PRECAUTIONS
- INFORMATION FOR USERS:
- WARNING
- Sloping Console
- CAUTION
- BE CAREFUL NOT TO GET YOUR FINGERS CAUGHT WHEN OPENING AND CLOSING THE SLOPING CONSOLE.
- Handling Compact Discs
- Handling
- Storage
- Cleaning
- 2.CONTROLS
- Main unit
- With the SLOPING CONSOLE opened
- NOMENCLATURE
- Names of the Buttons and their Functions
- [RELEASE] button
- Photo Sensor
- [ROTARY] knob
- button
- Note:
- [A] button
- [SOUND] button
- [TA] button
- [▶II] button
- Display
- Major Button Operations when External Equipment is Connected to this Unit
- - When the CD/DVD changer is connected
- - When the TV/DAB is connected
- Display Operations
- Touch
- Touch and hold
- #
- ←→
- 4.DCP
- Removing the DCP
- Attaching the DCP
- REMOTE CONTROL
- Inserting the Batteries
- Notes:
- Functions of Remote Control Unit Buttons
- OPERATIONS
- Basic Operations
- Turning ON/OFF the power
- Turning on
- System check
- CODEMATIC function
- Turning off
- Selecting a mode
- Adjusting the volume
- Switching the operation mode
- Switching the display
- Screen saver
- Wallpaper
- Spectrum analyzer display
- Switching the title display
- To scroll a title
- To stop scrolling
- CT (Clock Time) function
- Setting the ADF
- Adjusting the Sub-woofer and Centre Speaker
- Adjusting balance/fader
- BALANCE:
- FADER:
- Adjusting bass/treble
- AC-Processor III Operations
- Dolby Pro Logic II
- Selecting the PL II menu (Dolby PL II)
- ■ MUSIC (music mode)
- ■ MATRIX (matrix mode)
- OFF
- Selecting the position menu
- Position menu
- Adjusting/storing positions (user memory)
- T-ALIGN (time alignment):
- SP GAIN (speaker gain):
- Adjustment items
- Selecting the VSE menu
- VSE basic menu
- Adjusting/storing VSE (user memory)
- DIFFUSE:
- CARWIDTH:
- CAR LENGTH:
- Selecting the P.EQ menu
- P.EQ basic menu
- Adjusting/storing P.EQ (user memory)
- P.EQ adjustment
- FRONT/REAR (channel selection)
- BAND (band selection)
- FREQUENCY (centre frequency selection)
- GAIN (gain adjustment)
- Q (Q curve selection)
- Compensation
- Compensation of frequency characteristics
- Q curve
- Radio Operations
- Screen displays in the radio mode
- Main display
- Frequency display
- Title display
- Reception band display
- Preset No. display
- MODE
- P-SCAN:
- A-STORE:
- BAND
- (only in the simple operation display)
- ■ Preset memory list display
- Listening to the radio
- Tuning
- Seek tuning
- DX SEEK
- LOCAL SEEK
- Manual tuning
- Step tuning
- Quick tuning
- Recalling a preset station
- To cancel tuning
- Preset memory
- Auto store
- Preset scan
- To cancel preset scan
- RDS (Radio Data System)
- AF function
- To switch the AF function ON/OFF
- AF function between RDS and DAB
- ON:
- OFF:
- REG (Regional programme) function
- To switch the REG function ON/OFF
- Manually tuning a regional station in the same network
- TA (Traffic Announcement)
- To set the TA standby mode
- To cancel the TA standby mode
- To search for a TP station
- Auto store function for TP stations
- PTY
- To set the PTY standby mode
- To cancel the PTY standby mode
- To cancel a PTY interrupt broadcast
- Selecting PTY
- PTY seek
- PTY preset memory
- Emergency broadcast
- To cancel an emergency broadcast
- Switching the PTY display language
- Setting RDS interrupt when the 2-ZONE function is used (RDS-INT 2Z)
- Volume setting of TA, emergency broadcast (ALARM) and PTY
- Screen displays in the CD mode
- Track/playing time display
- Folder display (in the case of MP3/WMA)
- MODE:
- TOP:
- Folder list display (in the case of MP3/WMA)
- Folder No.
- >>: Selection in progress
- Touching this displays the previous folder list. Touching and holding this for 1 second or longer returns the screen to the main display. → NEXT:
- What is MP3?
- What is WMA?
- To disable DRM (Digital Rights Management):
- Precautions when creating an MP3/WMA disc
- - File extensions
- - Logical format (File system)
- - Folder structure
- Number of files or folders
- Multi-session selection
- Be careful not to catch your hand or fingers while closing the SLOPING CONSOLE.
- Loading a CD
- Loading 8 cm compact discs
- Ejecting a CD
- Listening to a disc already loaded in the unit
- Pausing play
- To resume play
- Selecting a track
- To select a folder
- To play the play list
- Perform the following to play the play list.
- Stopping play of play list
- Fast-forward/Fast-backward
- Top function
- Scan play
- To cancel scan play
- Folder scan play
- To cancel folder scan play
- Repeat play
- To cancel repeat play
- Folder repeat play
- To cancel folder repeat play
- Random play
- -RANDOM
- To cancel random play
- Different Pieces of Music Heard by Plural Listeners (2-ZONE function)
- Screen display when the 2-ZONE function is in use
- To switch the 2-ZONE function ON/OFF
- To switch the 2-ZONE type
- To switch the 2-ZONE function operation mode
- Selecting the mode when the 2-ZONE function is in use
- Operations Common to Each Mode
- Screen display in the title entry mode
- Text type display
- Entered text display
- RTN
- MEMO
- Text list display
- Type of text
- NEXT
- Entering titles
- Capital alphabet letters
- Small alphabet letters
- Symbols, Umlaut
- To switch the title display to the clock or other display
- ■ When a new title is stored beyond the maximum number of titles
- In the case of a TV station
- In the case of a CD
- Clearing titles
- Changing settings
- Selecting setting items
- To return to the original mode
- Setting the screen saver (SCREEN SVR)
- To switch the screen saver display
- Entering messages to display in message information (MSG INPUT)
- Displaying messages (MESSAGE)
- Setting the sensitivity of the Spectrum analyzer (S/A SENS)
- Adjusting the display scroll speed (SCROLL)
- Setting the auto-dimmer (DIMMER IN)
- Setting the dimmer level (DMR LEVEL)
- Adjusting the contrast of the display (CONTRAST)
- Making the LED blink when DCP is removed (BLINK LED)
- Setting the beep for when buttons are operated (BEEP)
- Selecting each mode
- AC-PROIII
- EQ SELECT
- Setting the speaker configuration (SP-SETTING)
- Setting speakers ON/OFF (CENTER-SP/SUB-WOOFER)
- Adjusting the filter frequencies of speakers (HPF/SUB-W LPF)
- Filter adjustment
- THROUGH
- Setting internal amplifier use ON/OFF (AMP CANCEL)
- Adjusting the output level of the speakers (SP GAIN)
- Adjusting the delay time of the rear speaker (PL II DELAY)
- Setting the music mode in detail (PL II CONT)
- PANorama (panorama control setting)
- DIMENSION (dimension setting)
- CTR WIDTH (centre width setting)\*1
- AUX function
- Selecting AUX / TEL
- Setting the input level (AUX SENS) of portable audio (AUX mode)
- Setting the car speaker output for the cellular phone (Optional TEL-002)
- Cellular phone interrupt setting
- Setting the auto-volume function (CALIBRATE/A-VOL SEN
- Performing a system check
- Using the security function (CODEMATIC)
- To cancel CODEMATIC
- OPERATIONS OF ACCESSORIES
- CD Changer Operations
- CD changer
- DVD changer
- When 2 CD changers are connected
- Screen displays in the changer mode
- Main display (CD changer mode)
- Disc No. display
- T-SCAN/D-SCAN
- T-RPT/D-RPT
- T-RDM/D-RDM
- DISC
- Disc list display (CD changer mode)
- ←PREV-RTN:
- → NEXT:
- CD-ROM discs cannot be played from every CD changer. This depends on the model.
- Selecting the changer mode
- Selecting a CD
- To select a disc from the disc list display
- isc scan play
- Disc scan play
- To cancel disc scan play
- Disc repeat play
- To cancel disc repeat play
- Disc random play
- To cancel disc random play
- TV Operations
- TV tuner function
- Screen displays in the TV mode
- Channel display
- (only in the simple operation display) Touching these buttons enables seek tuning or step tuning (in the manual tuning mode).
- RTN:
- Selecting the TV mode
- Switching the reception band
- To cancel the preset scan
- Watching a video
- To return to the TV mode
- Setting the TV area (TV AREA)
- Setting the TV diver (TV DIVER)
- DAB control function
- Listening to the DAB station
- Switching programmes
- Programme scan
- Manual memory
- [M1], [M2] and [M3]
- Recalling a preset programme
- INFO (Announcement)
- - To set the INFO standby mode
- - To cancel the INFO standby mode
- Information select
- Switching the PTY and INFO display language
- Volume setting of TA, INFO, emergency broadcast (ALARM) and PTY
- 5.1ch Surround Decoder Operations
- Selecting PL II (Dolby PL II)
- MOVIE (Movie mode)
- ■ VIRTUAL (Virtual mode)
- Selecting the DSF menu
- DSF menus
- Selecting the Parametric Equalizer menu
- P.EQ menus
- EQ adjustment
- Setting speakers ON/OFF (CENTER-SP/SRD-SP/SUB-WOOFER)
- Adjusting the filter frequencies of speakers (FRONT HPF/CENTER HPF/ SRD HPF/SUB-W LPF)
- FRONT HPF/CENTER HPF/SRD HPF (high-pass filter adjustment)
- SUB-W LPF (sub-woofer low-pass filter adjustment)
- Adjusting the delay time of the speaker (CENTER-SP/SRD-SP)
- Adjusting the Dolby Digital functions (D-RANGE)
- IN CASE OF DIFFICULTY
- ERROR DISPLAYS
- SPECIFICATIONS
- Radio section
- CD player section
- General
- Table des matières
- INFORMATIONS AUX UTILISATEURS:
- A VERTISSEMENT
- Console rabatable
- ATTENTION
- Quand vous ouvrez ou que vous refermez la CONSOLE RABATTABLE, faites attention de ne pas vous coincer les doigts.
- Manipulation des disques compacts
- Manipulation des disques
- Rangement
- Nettoyage
- LES COMMANDES
- Appareil pilot
- Ouvrez la CONSOLE RABATTABLE
- NOMENCLATURE DES TOUCHES
- Nom des touches et leurs fonctions
- Bouton [RELEASE]
- Capeur Photosensible
- Bouton [ROTARY]
- Bouton [△]
- Remarque:
- Bouton [A]
- Bouton [SOUND]
- Bouton [TA]
- Bouton [▶II]
- Écran
- Principales opérations des touches lorsqu'un apparéil externe est raccordé à l' apparéil
- Lorsque le changeur de CD/DVD est connecté
- Lorsque la télé/le DAB sont connectés.
- Bouton [▶III]
- Éléments de l'écran
- Commandes de l'écran
- Effleurer
- Effleurer et maintainir
- CLAVIER DE COMMANDE AMOVIBLE (DCP)
- Retrait du CLAVIER DE COMMANDE AMOVIBLE (DCP)
- Fixation du CLAVIER DE COMMANDE AMOVIBLE (DCP)
- TÉLÉCOMMANDE
- Installation des piles
- Remarques:
- Fonctions des touches de la télécommande
- FONCTIONNEMENT
- Fonctionnement de base
- Mise en marche/arrêt de l'alimentation
- Mise en marche
- Vérification du système
- Fonction CODEMATIC
- Arrêt de l'alimentation
- Selection d'un mode
- Ajustement du volume
- Commutation du mode de commande
- Commutation de l'écran
- Effleurez le centre de l'écran.
- Economiseur d'écran
- Fond d'écran
- Écran analyseur de spectre
- Commutation de I'écran du titre
- Pour faire defiler un titre
- Pour arrêté le défilament
- Fonction CT (Clock Time) (Horloge)
- Réglage de l'ADF
- Ajustement du Sub-woofer et de l'enceinte centrale
- Ajustement de la balance/du fondu
- Ajustement des basses/aigus
- Fonctionnement de AC-Processor III
- Sélection du menu PL II (Dolby PL II)
- ■ MUSIC (mode musique)
- ■ MATRIX (mode matrix)
- Selection du menu de position
- ■ Menu position
- Ajustement/enregistrement des positions (mémoire utilisateur)
- T-ALIGN (temporisation)
- SP GAIN (gain enceinte):
- Selection du menu VSE.
- ■ Menu de base VSE
- Ajustement/enregistrement VSE (mémoire utilisateur)
- Selection du menu P.EQ.
- ■ Menu de base P.EQ
- Ajustement/enregistrement P.EQ (mémoire utilisateur)
- ■ Ajustement P.EQ
- FREQUENCY (selection de la fréquence centrale)
- GAIN (ajustement du gain)
- Q (selection de la courbe Q)
- Compensation de caractéristiques de fréquence
- Courbe Q
- Fonctionnement de la radio
- Écrans d'écran en mode radio
- Écran principal
- Écran de la féquence
- Écran titre
- Écran de la bande de réception
- Écran du No. de prééglage
- (sequentially pour l'écran de commande simple)
- Écran de la liste de la mémoire préseLECTIONnée
- Ecouter la radio
- Accord
- Recherche d'accord
- Accord manuel
- Rappel d'une station préréglée
- Pour annuler I'accord
- Mémoire préselectionnée.
- Enregistrement automatique
- Recherche préreglee
- Pour annuler la recherche prépréglée
- Fonction AF (Fréquence alternative)
- Pour commuter la fonction AF ON/OFF.
- Commutation de la fonction AF entre RDS et DAB
- Fonction REG (Programme régional)
- Pour commuter la fonction REG ON/OFF.
- Accord manuel d'une station régionale sur le même réseau
- TA (Announces sur la circulation routière)
- Pour activer le mode d'attente TA
- Pour annuler le mode veille de TA.
- Pour recherche une station TP.
- Fonction de mémorisation automatique des stations TP
- PTY (Type de programme)
- Réglage du mode d'attente PTY
- Annulation du mode d'attente PTY
- Annulation d'une émission
- d'interruption PTY
- Sélection de PTY
- Recherche PTY
- Mémoire préselectionnée PTY
- Diffusion d'urgence
- Annulation de la diffusion d'urgence
- Commuter la langue d'affichage du PTY
- Réglage de l'interruption RDS lorsque la fonction 2-ZONE est utilisé (RDS-INT-2Z)
- Réglage du volume de TA, de l'émission d'urgence (ALARM) et de PTY
- Écrans d'écran en mode CD
- Écran piste/durée de lecture
- 01/02: 00:
- Ecran titre
- Écran dossier (dans le cas de MP3/WMA)
- (usually pour l'écran de commande simple)
- Écran de la liste des dossiers (dans le cas de MP3/WMA)
- No. de dossier
- >>: Sélection en cours
- Qu'est-ce que le MP3 ?
- Qu'est-ce que WMA?
- Pour invalider DRM (Gestion de Droits Numériques):
- Précautions lors de la création d'un CD MP3/WMA
- - Extensions de fichiers
- Formatage logique (Système de fichiers)
- Stucture des dossiers
- - Nombre de fichiers et dossiers
- Selection multisession
- Faites attention de ne pas vous coincer la main ou les doigts pendant la fermeture de la CONSOLE RABATTABLE.
- Chargement d'un CD
- Chargement des disques compacts de 8 cm
- Ejection d'un CD
- Ecouter un disque déjà dans l'appareil
- Pause
- Pour reprendre la lecture
- Sélection d'une piste
- ■ Sélection d'un dossier
- Lecture de la liste de lecture
- Effectuez ce qui suit pour dire une liste de lecture.
- ■ Arrêt de la lecture d'une liste de lecture
- Avance rapide / Retour rapide
- Fonction top
- Lecture de recherche
- Pour annuler la lecture de recherche
- Lecture de recherche de dossier
- Pour annuler la lecture de recherche de dossier
- Lecture repétée
- Pour annuler la lecture repétée
- Lecture repétée de dossier
- Pour annuler la lecture repétée de dossier
- Lecture aléatoire
- F -RANDOM
- Pour annuler la lecture aléatoire
- Écoute de différents morceaux de musique par différentes personnes (fonction 2-ZONE)
- Écran de l'écran lorsque la fonction 2-ZONE est en cours d'utilisation.
- Ecoute de différents morceaux de musique par différentes personnes (fonction 2-ZONE)
- Pour commuter la fonction 2-ZONE ON/OFF.
- Pour commuter le type de 2-ZONE
- Pour commuter le mode de la fonction 2-ZONE
- Sélection du mode lorsque la fonction 2-ZONE est en cours d'utilisation
- Opérations communes à chaque mode
- Écran de l'écran en mode de saisie de titre
- Écran de type texte
- Écran de texte saisi
- Écran de la liste de texte
- Type de texte
- Saisie de titres
- Pour commuter l'écran de titre et l'horloge ou un autre écran
- Lorsqu'un nouveau titre est enregistré au-delà du nombre maximal de titres.
- Dans le cas d'une station de télé
- Dans le cas d'un CD
- Effacement de titres
- Changement des réglages Sélection des éléments à régler
- Pour revenir à au mode d'origine.
- Réglage de l'économiseur d'écran (SCREEN SVR)
- Pour commuter vers l'écran de économisteur d'écran
- Economiseurs d'écran
- SS SCAN
- Saisir des messages pour les afficher dans message d'information (MSG INPUT)
- Écran des messages (MESSAGE)
- Réglage de la sensibilité de l'analyseur de spectre (S/A SENS)
- Ajustement de la vitesse de défilament de l'affichage (SCROLL)
- Réglage de l'atténuation automatique (DIMMER IN)
- Réglage du niveau d'atténuation (DMR LEVEL)
- Ajustement du contraste de l'écran (CONTRAST)
- Faire clignoter la LED lorsque le DCP est retire (BLINK LED)
- Réglage du signal sonore lors de l'utilisation des boutons (BEEP)
- Sélection de chaque mode
- Réglage de la configuration des enceintes (SP-SETTING)
- Réglage ON/OFF des enceintes (CENTER-SP/SUB-WOOFER)
- Ajustement des fréquences filtrés des enceintes (HPF/ SUB-W LPF)
- ■ Ajustement du filtré
- Réglage de l'utilisation de l'amplificateur interne ON/OFF (AMP CANCEL)
- Ajustement du niveau de sortie des enceintes (SP GAIN)
- Éléments d'ajustement
- Ajustement de la temporisation des enceintes arrêté (PL II DELAY)
- Réglage du mode musical en détaill (PL II CONT)
- DIMENSION (réglage de la dimension)
- CTR WIDTH (réglage de la largeur centrale)*1
- Fonction AUX
- Sélection de AUX / TEL
- AUX:
- TEL:
- Réglage du niveau d'entrée (AUX SENS) de l'audio portable (mode AUX)
- Réglage des enceintes de la voiture pour le téléphone portable (TEL-002 en option)
- ADJUST MODE TEL - SP > RIGHT
- RIGHT:
- Réglage de l'interruption de téléphone portable
- ADJUST MODE TEL - SWITCH OFF
- MUTE:
- Réglage de la fonction de volume automatique (CALIBRATE/A-VOL SENS)
- Effectuer une vérification du système
- Utilisation de la fonction de sécurité (CODEMATIC)
- Pour annuler CODEMATIC
- FONCTIONNEMENT DES ACCESSOIRES
- Fonctionnement du changeur de CD
- Changeur de CD
- Changeur DVD
- Lorsque 2 changeurs de CD sont connectés
- Écrans d'écran en mode changeur
- Écran du No. de disque
- Écran de la liste des disques (mode changeur de CD)
- Sélection du mode changeur
- Selection d'un CD
- ■ Sélection d'un disque depuis l'écran de la liste des disques
- Lecture de recherche de disque
- Pour annuler la lecture de recherche de disque
- Lecture repétée de disque
- Pour annuler la lecture repétée de disque
- Lecture aléatoire de disque
- Pour annuler la lecture aléatoire de disque
- Fonctionnement du téléviseur
- Fonctions du tuner TV
- Écrans d'écran en mode TV
- Écran du canal
- Écran du No. de préRéglage
- Écran de la liste de la mémoire présélectionnée
- Sélection du mode TV
- Commutation de la bande de réception
- Rappel d'une chaine préréglée
- Recherche préregée
- Regarder une video
- Pour revenir au mode TV.
- Réglage de la zone télé (TV AREA)
- Réglage de la diversité TV (TV DIVER)
- Fonction de commande de DAB
- Ecouter une station DAB
- Commutation des programmes
- Recherche programme
- Mémoire manuelle
- [M1], [M2] et [M3]
- Rappel d'un programme préréglé
- INFO (Announce)
- Annulation du mode d'attente INFO
- - Sélection des informations
- Emissions de détresse
- Commuter la langue d'affichage du PTY et d'INFO.
- Réglage du volume des émissions TA, INFO, de détresse (ALARM) et PTY
- Commandes du Decodeur Surround 5.1ch
- Sélection de PL II (Dolby PL II)
- MOVIE (mode Film)
- VIRTUAL (Mode virtuel)
- Selection du menu DSF.
- Selection du menu Parametric Equalizer
- Changement des réglages
- Sélection des éléments à régler
- Pour revenir au mode d'origine.
- Réglage des enceintes ON/OFF (CENTER-SP/SRD-SP/SUB-WOOFER)
- ADJUST MODE CENTER-SP> ON
- Ajustement des fréquences filtrés des enceintes (FRONT HPF/CENTER HPF/ SRD HPF/ SUB-W LPF)
- Ajustement du filtré
- FRONT HPF/CENTER HPF/SRD HPF (ajustement du contrôle passée-haut)
- THROUGH → 50Hz→ 80Hz→ 120Hz
- SUB-W LPF (ajustement du filtre passer-bas du sub-woofer)
- 50Hz→ 80Hz→ 120Hz
- ADJUST MODE FRONT HPF THROUGH
- Ajustement de la temporisation de l'enceinte (CENTER-SP / SRD-SP)
- ADJUST MODE CENTER-SP» Oms
- Ajustement des fonctions Dolby Digital (D-RANGE)
- EN CAS DE DIFFICULTÉ
- 9.AFFICHAGE DES ERREURS
- CARACTERISTIQUES TECHNIQUES
- Section radio
- Section lecteur de CD
- Données générales
- Inhalt
- VORSICHTSMASSNAHMEN
- INFORMATION FÜR BENUTZER.:
- Schragkonsole
- A VORSICHT
- Handhabung von CDs
- Handhabung
- Aufbewährung
- Reinigung
- REGLER
- Hauptgerät
- ÖFFNUNG DER SCHRÄGKONSOLE
- BENENNUNG
- Bezeichnung der Tasten und deren Funktionen
- [RELEASE]-Taste
- Helligkeitssensor
- [ROTARY]-Knopf
- [△]-Taste
- Hinweis:
- [A]-Taste
- [SOUND]-Taste
- [TA]-Taste
- [Tate]
- Wichtige Tastenbedienungen, wenn externe Geräte an thisem Gerät angeschlossen sind
- - Wenn ein CD-/DVD-Wechsler angeschlossen ist
- - Wenn ein Fernseher/DAB-Empfänger angeschlossen ist
- Display-Anzeigeelemente
- Bedienung des Displays
- Antippen
- Berühren und halten
- Blätterbewegung
- durchfuhren
- Durchlaufbewegung durchführren
- ABNEHMBARES BEDIENTEIL (DCP)
- Abnahme des DCP
- Anbringung des DCP
- FERNBEDIENUNG
- Fernbedienung
- Einlagen der Batterien
- Hinweise:
- Funktionen der Fernbedienungstasten
- Grundbetrieb
- Ein-/Ausschalten des Geräts
- Einschalten
- Systemprüfung
- CODEMATIC-Funktion
- Ausschalten
- Einstellung der Betriebsart
- Einstellung der Lautstärke
- Umschaltung des Bedienungsmodus
- Umschaltung der Anzeige
- Bildschirmschoner
- Hintergrund
- Spektrumanalysator-Anzeige
- Umschaltung der Titelanzeige
- Durchroll eines Titels
- Anhaltendes Durchrollens
- CT (Uhrzeit) - Funktion
- Einstellung des ADF
- Einstellung des Subwoofoers und Center-Lautsprechers
- Balance-/Fader-Einstellung
- Tiefen-/Höhen-Einstellung
- AC-Processor III Betrieb
- Auswahl des PL II-Modus (Dolby PL II)
- ■ MUSIC (Musik-Modus)
- ■ MATRIX (Matrix-Modus)
- Verwendung des Positions-Menus
- Positions-Menu
- Anpassen/Speichern von Positionen (Benutzerspeicher)
- T-ALIGN (Laufzeitanpassung):
- SP GAIN (Laatsprecherverstärkung):
- Auswahl des VSE-Menüs
- VSE-Grundeinstellungsmenu
- Anpassen/Speichern der VSE-Einstellungen (Benutzerspeicher)
- Verwendung des P.EQ-Menüs
- P.EQ-Grundeinstellungsmenu
- Anpassen/Speichern der P.EQ-Einstellungen (Benutzerspeicher)
- P.EQ-Einstellung
- FRONT/REAR (Kanal-Ausbahl)
- BAND (Frequenzband-Auswahl)
- FREQUENCY (Mittenfrequenz-Ausbahl)
- GAIN (Verständkungs-Einstellung)
- Q (Q-Kurven-Auswahl)
- Kompensation
- - Kompensation des Frenzgangs
- Q-Kurve
- Radiobetrieb
- Bildschirmanzeigen im Radiobetrieb
- Hauptanzeige
- Frequenzanzeige
- Titelanziige
- Wellenbereich-Anzeige
- Anzeige der Festsender-Nummer
- (nier in der Anzeige fur den einfachen Bedienungsmodus)
- Anzeige der Festsenderliste
- Hören von Radiosendungen
- Sendereinstellung
- Sendersuchlauf
- Manuelle Sendereinstellung
- Schrittweise Sendereinstellung
- - Senderschnelleinstellung
- Abruf eines Festsenders
- Abbrechen der Sendereinstellung
- Festsender-Speicherplatz
- Automatische Speicherung
- Festsenderanspielung
- Abbrechen der Festsenderanspielung
- RDS (Radiodatensystem)
- AF-Funktion
- Ein-/Ausschalten der AF-Funktion
- ■ AF-Funktion-Umschaltung zwischen RDS und DAB
- REG-Funktion (Regionalprogramm)
- Ein-/Ausschalten der REG-Funktion
- Manuelle Sendereinstellung eines Regionalprogramms im gleichen Sendernetz
- TA-Funktion (Verkehrsdurchsage)
- Einstellung des TABereitschaftsbetriebs
- ■ Aufhebung des TABereitschaftsbetriebs
- SuchenachenaemTP-Sender
- Automatische Speicherfunktion für TP-Sender
- ■ Einstellung des PTY-Bereitschaftsbetriebs
- ■ Aufhebung des PTY-Bereitschaftsbetriebs
- ■ Aufhebung einer PTY-Senderunterbrechung
- PTY-Einstellung
- PTY-Suche
- PTY-Festsenderspeicher
- Notrufmeldung
- ■ Aufhebung der Notrufmeldung
- Änderung der PTY-Display-Sprache
- Einstellung der RDS- Unterbrechung bei Verwendung der 2-ZONE-Funktion (RDS-INT 2Z)
- Lautstärkeeinstellung für TA, Notrufmeldung (ALARM) und PTY
- Bildschirmanzeigen im CD-Betrieb
- Titel-/Spieldaueranzeige
- Namensanzeige
- Ordneranzeige (bei MP3/WMA)
- Ordnerlistenanzeige (bei MP3/WMA)
- Ordner-Nr.
- >>: Auswahl lauft
- Was bedeutet "MP3"?
- Was bedeutet "WMA"?
- Zum Sperren von DRM (Digital Rights Management):
- Vorsichtshinweise zur Erstellung von MP3-/WMA-Discs
- - Dateinamenserweiterungen
- - Logisches Format (Dateisystem)
- - Ordnerstruktur
- Anzahl von Dateien oder Ordnern
- Multisession-Ausbahl
- Gehen Sie beim Schlieben der SCHRAGKONSOLE sorgsam vor, um ein Einklemmen der Hand oder Finger zu vermeiden.
- Einlagen einer CD
- Einsetzen von 8-cm-Kompakt-CDs
- Auswerfen einer CD
- VORSICHT
- Nach dem Auswerfen der CD immer die [▲]-Taste betätigten, um das Bedienfeld wieder zu schlieben. Wenn Sie das Bedienfeld geöffnet lessen, ertont ein doppelter Signatlon, und das Bedienfeld schließt sich automatisch.
- Abspielen einer bereits eingelegten Disc
- Pausieren der Wiedergabe
- Fortsetzen der Wiedergabe
- Wahl eines Titels
- Wahl eines Ordners
- Wiedergabe einer Abspielliste
- Zur Wiedergabe der Abspielliste ist wie folgt vorzugehen:
- ■ Abbruch der Wiedergabe einer Abspiellende
- Schneller Vorlauf / Schneller Rücklauf
- Top-Funktion
- Anspielwiedergabe
- Aufheben der Anspielwiedergabe
- Ordner-Anspielwiedergabe
- Aufheben der Ordner
- Wiedergabewiederholung
- ■ Aufheben der
- Ordner
- ■ Aufheben der Ordner
- Zufallswiedergabe
- A -RANDOM
- Aufheben der Zufallswiedergabe
- Hören verschiedener Musikstücke durch mehrere Hörer (2-ZONE-Funktion)
- ■ Bildschirmanzeige bei aktivierter 2-ZONE-Funktion
- Ein-/Ausschalten der 2-ZONE-Funktion
- Umschalten des 2-ZONE-Types
- Umschalten der Betriebsart der 2-ZONE-Funktion
- Auswahl der Betriebsart bei aktivierter 2-ZONE-Funktion
- Bedienungen, die für beiden Betriebsarten gemeinsam sind
- Bildschirmanzeige im Titleleingabe-Modus
- Zeichentyp-Anzeige
- Titelnamensanzeige
- Eingabezeichen-Anzeige
- Zeichenliste-Anzeige
- Beispieltext
- Eingabe von Titeln
- Großbuchstaben
- Kleinbuchstaben
- Symbole, Umlaute
- ■ Umschaltung der Titelanzeige auf die Uhrzeitanzeige oder eine andere
- Anzeige
- ■ Überschreitung der maximal möglichen Titelanzahl
- Bei Fernsehsendern
- Bei CDs
- Lösung von Titeln
- Änderung der Einstellungen Auswahl der Einstellungspunkt
- Rückkehr in die ursprüngliche Betriebsart
- Einstellung des Bildschirmschoners (SCREEN SVR)
- Umschaltung der
- Bildschirmschoneranzeige
- Texteingabe für die Meldungsanzeige (MSG INPUT)
- Meldungsanzeige (MESSAGE)
- Einstellung der Empfindlichkeit des Spektrumanalysators (S/A SENS)
- Einstellung der Display-Durchrollgeschwindigkeit (SCROLL)
- Einstellung der automatischen Dimmer-Steuerung (DIMMER IN)
- Einstellung der Dimmer-Helligkeitsregelung (DMR LEVEL)
- Einstellung des Display-Kontrasts (CONTRAST)
- LED-Blinkanzeige bei abgenommenem DCP (BLINK LED)
- Einstellung des Signaltons bei Tastenbetätigung (BEEP)
- Auswahl des Modus
- Einstellung der Laufsprecherkonfiguration (SP-SETTING)
- Aktivieren/Deaktivieren von Laufsprechern (CENTER-SP/ SUB-WOOFER)
- Die Filterfrequenzen der Laufsprecher einstellen (HPF/ SUB-W LPF)
- Einstellung der Filter
- Internen Veränderaktivieren/deaktivieren (AMP CANCEL)
- Einstellung des Ausgangspegels der Laufsprecher (SP GAIN)
- Einstellungspunkte
- Einstellung der Laufzeitverzögerung für die Hecklautsprecher (PL II DELAY)
- Detaillierte Einstellung des Musik-Modus (PL II CONT)
- PANorama (Steuerung des Panoramaeffekts)
- DIMENSION (Gröbeneinstellung)
- CTR WIDTH (Breiteneinstellung Center-Lautsprecher)*1
- AUX-Funktion
- Auswahl von AUX / TEL
- Einstellung des Eingangspegels (AUX SENS) für portable Audio-Quellen (AUX-Modus)
- Einstellung des AutolaufsprecherAusgangs für das Mobiltelefon (Zubehör TEL-002)
- LEFT:
- Einstellung für Mobilfunkunterbrechung
- Einstellung der automatischen Lautstärkeregelung (CALIBRATE/A-VOL SENS)
- Durchführung einer Systemprüfung
- Verwendung der Diebstahlsicherungsfunktion (CODEMATIC)
- Abbrechen der CODEMATIC-Funktion
- BEDIENUNG DES ZUBEHÖRS
- CD-Wechsler-Betrieb
- CD-Wechsler
- DVD-Wechsler
- ■ Bei Anschluss von 2 CD-Wechslern
- Bildschirmanzeigen im Wechslermodus
- ■ Hauptanzeige (CD-Wechsler-Modus)
- Disc-Nr.-Anzeige
- (nier der einfachen Bedienanzeige)
- Disc-Listen-Anzeige (CD-WechslerModus)
- Auswahl des Wechsler-Modus
- Auswahl einer CD
- Auswahl einer Disc aus der Disc-Listen-Anzeige
- Disc-Anspielwiedergabe
- ■ Aufheben der Disc-
- Disc-
- ■ Aufheben der Disc
- Disc-Zufallswiedergabe
- Aufheben der Disc-Zufallswiedergabe
- Fernsehbetrieb
- Fernsehtuner-Funktionen
- Bildschirmanzeigen im TV-Betrieb
- Kanalanzeige
- (nur in der einfachen Bedienanzeige)
- >>:
- Auswahl des TV-Modus
- Umschaltung des Wellenbereichs
- Ansehen eines Videoprogramms
- Rückkehr zum TV-Betrieb
- Einstellung des Fernseh-Empfangsbereichs (TV AREA)
- Einstellung für "TV Diversity" (TV DIVER)
- DAB-Steuerfungtion
- Hören eines DAB-Senders
- Umschaltung von Programmen
- Programmanspielung
- Manuelle Speicherfunktion
- [M1], [M2] und [M3]
- Abruf eines
- Festspeicherprogramms
- TA-Funktion
- (Verkehrsdurchsage)
- INFO (Ankündigung)
- - Einstellung des INFO-Bereitschaftsbetriebs
- Informationseinstellung
- Änderung der
- Anzeigensprache für PTY and INFO
- Lautstärkeeinstellung für TA, INFO, Notrufmeldung (ALARM) und PTY
- 5.1-Kanal-Surround-Decoderbetrieb
- Auswahl von PL II (Dolby PL II)
- MATRIX (Matrix-Modus)
- MOVIE (Film-Modus)
- ■ VIRTUAL (Virtual-Audio-Modus)
- Auswahl im DSF-Menu
- Auswahl im Menu für den parametrischen Equalizer
- Anpassung der P.EQ-Funktion
- Änderung der Einstellungen
- AuswahlderEinstellungspunkte
- Aktivieren/Deaktivieren von Laufsprechern (CENTER-SP/ SRD-SP/SUB-WOOFER)
- Einstellung der Laatsprecher-Filterfrequenzen (FRONT HPF/CENTER HPF/SRD HPF/ SUB-W LPF)
- FRONT HPF/CENTER HPF/SRD HPF (Einstellung der Hochpassfilter)
- SUB-W LPF (Einstellung des Subwoofer-Tiefpassfilters)
- Einstellung der Laufzeitverzögerung für die Lautsprecher (CENTER-SP/ SRD-SP)
- Anpassung der Dolby Digital-Funktionen (D-RANGE)
- FEHLERSUCHE
- FEHLERANZEIGEN
- TECHNISCHE DATEN
- Radio-Bereich
- CD-Deck
- Allgemeines
- Indice
- PRECAUZIONI
- AVVERTIMENTO
- Console inclinata
- ATTENZIONE
- Attenzione a non farsi intrappolare le dita quando si après o si chiude la CONSOLE INCLINATA.
- Modalità di impiego dei compact disc
- Modalità di impiego
- Conservazione
- Pulizia
- 2.CONTROLLERI
- Apparecchio principale
- Apertura della CONSOLE INCLINATA
- NOMENCLATURA
- Nomi dei tasti e loro funzioni
- Tasto [RELEASE]
- Sensore fotografico
- Manopola [ROTARY]
- Tasto [△]
- Nota:
- Tasto [A]
- Tasto [SOUND]
- Tasto [TA]
- Tasto [▶II]
- Principali operazioni con i tasti quando un apparecchio esterno è collegato a questa unità
- - Quando il cambia-CD/DVD è connesso
- -Quando il TV/DAB è connesso
- Display delle opzioni
- Operazioni del display
- Toccare
- Toccare tenere premuto
- Toccare ←
- FRONTALINO ESTRAIBILE (DCP)
- Rimozione del DCP
- Montaggio del frontalino
- TELECOMANDO
- Inserimento delle batterie
- Funzioni dei tasti del telecomando
- OPERAZIONI
- Operazioni di base
- Accensione/spegnimento dell'apparecchio
- Accensione
- Controllo del sistema
- Funzione CODEMATIC
- Spegnimento
- Selezione di una modalità
- Regolazione del volume
- Cambiare le modalità d'operazione
- Cambiamento del display
- Salva-schermo
- Sfondo
- Display dell'analizzatore di spettro
- Cambiamento del display del titolo
- Disco CD-TEXT
- Disco MP3/WMA
- Per far scorrere un titolo
- Per fermare lo scorrimento
- Funzione CT (Orologic)
- Impostazion del ADF
- Regolazione del sub woofer e dell'altoparlante centrale
- Regolazione del bilancimiento/equilibristo
- Regolazione del basso/soproano
- Uso di AC-Processor III
- Selezione del menu PL II (Dolby PL II)
- ■ MUSIC (modalità musica)
- MATRIX (modalità matrix)
- Selezione del menu posizione
- ■ Menu posizione
- Posizoni di eegolazione/ memorizzazione (memoria utente)
- T-ALIGN (allineamento temporale):
- SP GAIN (altoparlante gain)
- Selezione del menu VSE
- ■ Menu fondamentale di VSE
- Aggiustamento/memorizzazione VSE (memoria utente)
- Selezione del menu P.EQ
- ■ Menu fondamentale P.EQ
- Regolazione del P.EQ
- FREQUENCY (selezione della frequenza centrale)
- GAIN (regolazione del gain)
- Q (selezione della curva Q)
- Compensazione
- - Compensazione delle caratteristiche di frequenza
- Curva Q
- Operazioni radio
- Display dello schermo nella modalità radio
- Display principale
- Display delle frequenze
- Display del titolo
- Display della banda di ricezione
- Display del Num. preselezionato
- A-STORE
- (solo nel display delle operazioni di base)
- Display della lista delle memorie preselezionate
- Ascolto della radio
- Sintonizzazione
- Sintonizzazione automatica
- Sintonizzazione manuale
- Sintonizzazione a passo
- Sintonizzazione rapida
- Richiamareuna stazione preselezionata
- Per annullare una sintonizzazione
- Memoria preselezionata
- Memorizzazione automatica
- Scanzione preselezioni
- Per annullare la scanizione preselezioni
- RDS (Sistema dati radio)
- Funzione AF
- Per attivare o disattivare la funzione AF
- La funzione AF tra RDS e DAB
- Funzione REG (Programma regionale)
- Attivazione e disattivazione delle funzione REG
- Sintonizzazione manuale di una stazione regionale nella stessa rete
- TA (Notiziario sul traffico)
- Impostazione della modalità di attesa della funzione TA
- Per annullare la modalità stadby di TA Quando "TP" e "TA" sono illuminate nel display, premere il tasto [TA]. "TA" sparisce dal display e viene annullata la modalità stadby di TA.
- Per cercare una stazione TP
- Funzione di memorizzazione automatica per le stazioni TP
- Impostazione della modalità di attesa PTY
- ■ Annullamento della modalità di attesa PTY
- ■ Annullamento di trasmissione interrotta PTY
- Selezione PTY
- Ricerca PTY
- Memoria di presezione PTY
- Trasmissione di emergenza
- ■ Annullamento di una trasmissione di emergenza
- Cambiamento della lingua del display PTY
- Impostare una interrupzione RDS quando la funzione 2-ZONE è in funzione (RDS-INT 2Z)
- Impostazione del volume di TA, trasmissioni d'allarme (ALARM) e PTY
- Display dello schermo nella modalità CD
- Display del brano/tempo di riproduzione J'01/02: 00:
- ■ Display della lista delle cartelle (nel caso di MP3/WMA)
- Cartella Num.
- >>:Selezione in progressione
- Toccandolo si visualizza la lista delle cartelle precedenti. Toccandolo e tenendolo premuto per 1 secondo o più si fa tornare lo schermo al display principale. → NEXT:
- Che casa è ilsystema MP3?
- Che casa è ilsystema WMA?
- Precauzioni per la creatione di un disco MP3/WMA
- Selezione multisessione
- Fare attenzione a non lasciarsi prendere la mano o le dita nelle si richiude la CONSOLE INCLINATA.
- Insetimento di un CD
- Instrimento di compact disc da 8 cm
- Espulsione di un CD
- Ascolto di un disco già inserto nell'apparecchio
- Arresto temporaneo della riproduzione
- ■ Riavvio della riproduzione
- Selezione di un brano
- ■ Selezione delle cartelle
- Riproduzione della lista di riproduzione
- Fare come segue per riproduire la lista di riproduzione.
- ■ Interruzione della riproduzione di una lista di riproduzione
- Avanzamento veloce/ Retrocessione velce
- Funzione TOP
- Riproduzione a scansione
- ■ Annullamento della riproduzione a scansione
- Riproduzione a scansione delle cartelle
- ■ Annullamento della riproduzione a scansione delle cartelle
- Riproducione ripetuta
- Annullamento della riproduzione ripetuta
- Riproduzione ripetuta della cartella
- ■ Annullamento della riproduzione ripetuta della cartella
- Riproduzione in ordine casuale
- ■ Annullamento della riproduzione in ordine casuale
- Brani diversi di musica per più asconsultatori (funzione 2-ZONE)
- ■ Display dello schermo quando è in uso la funzione 2-ZONE
- Brani diversi di musica per più ascoltatori (funzione 2-ZONE)
- Attivazione e disattivazione delle funzione 2-ZONE
- Perambiare il tipo di 2-ZONE
- Perambiare la modalità operativa 2-ZONE
- Selezione della modalità quando è in uso la funzione 2-ZONE
- Operazioni comuni in entrambé le modalità
- Display dello schermo in modalità di inserimento dei titoli
- Display caratteri di testo
- Display del testo scritto
- Display della lista dei testi
- Caratteri del testo
- Inserimento titoli
- Per cancellare il display del titolo in orologio o in un'alto display
- ■ Quando si memorizza un nuovo titolo che eccede il numero massimo di titoli
- Nel caso di una stazione TV
- Nel caso di un CD
- Cancellazione dei titoli
- Cambiamento delle impostazioni Selezionare le impostazioni
- Per ritornare in modalità originale
- Impostazione del salvaschermo (SCREEN SVR)
- Perambiare il display del salva-schermo
- Inserimento dei messaggi da visualizzare tra i messaggi di informazione (MSG INPUT)
- Visualizzazione dei messaggi (MESSAGE)
- Impostazione della sensibilità dell'analizzatore dello spettro (S/A SENS)
- Aggiustamento della velocità di scorrimento del display (SCROLL)
- Impostazione del variatore di luminosità (DIMMER IN)
- Impostazione il livello del variatore di luminosità (DMR LEVEL)
- Aggiustamento del contrasto del display (CONTRAST)
- Fa lampeggiare il LED quando viene rimioso DCP (BLINK LED)
- Impostare il bip per quando i tasti sono usati (BEEP)
- Selezionare ogni modalità
- Impostazione della configurazione dell'altoparlante (SP-SETTING)
- Impostare in ON/OFF gli altoparlanti (CENTER-SP / SUB-WOOFER)
- Aggiustamento del filtrodi frequenza degli altoparlanti (HPF/SUB-W LPF)
- ■ Aggiustamento del filtro
- Impostare in ON/OFF I'uso dell'amplificatore interna (AMP CANCEL)
- Aggiustamento del livello d'emissione degli altoparlanti (SP GAIN)
- Aggiustamento delle opzioni
- Aggiustamento del ritardo degli altoparlanti posteriori (PL II DELAY)
- Impostazione della modalità musica in dettaglio (PL II CONT)
- Funzione AUX
- Selezione AUX/TEL.
- Impostazione del livello di immissione (AUX SENS) dell'audio portatile (modalità AUX)
- Impostazione dell'émissione dagli altoparlanti della vettura delle chiamate del Telefono cellulare (TEL-002 opzionale)
- Impostazione dell'interruzione del telefonocellulare
- Impostazione della funzione del volume automatico (CALIBRATE/A-VOL SENS)
- Performare un controllo del sistema
- Uso della funzione di sicurezza (CODEMATIC)
- Per cancellare CODEMATIC
- OPERAZIONI CON GLI ACCESSORI
- Operazioni con il cambiadischi CD
- Cambia-CD
- Cambia-DVD
- Nel caso in cui si connettono 2 cambia-DVD
- Lo schermo visualizza nella modalità cambiatore
- Display principale (modalità cambia-CD)
- Display del disco Num.
- Display della lista dischi (modalità cambia-CD)
- Selezione della modalità combustatore
- Selezione di un CD
- ■ Selezione di un disco dal display della lista di dischi
- Avanzamento veloce/ Retrocessione veloce
- Riproduzione a scansione dei dischi
- ■ Annullamento della riproduzione a scansione dei dischi
- Riproduzione ripetuta
- Riproduzione ripetuta dei dischi
- Annullamento della riproduzione ripetuta dei dischi
- Riproduzione in ordine casuale dei dischi
- Funzioni del sintonizzatore TV
- Display dello schermo nella modalità TV
- Dislay dei canali
- Selezione della modalità TV
- banda di ricezione
- Funzione di memorizzazione automatica
- Scansione preimpostata
- Per annullare la scanzione preselezioni
- Guardare un video
- Per ritornare alla modalità TV
- Impostare I'area TV (TV AREA)
- Impostazione
- dell'amplificatore TV (TV DIVER)
- Funzione di lavoro DAB
- Ascoltare la stazione DAB
- Cambiamento dei programmi
- Scansione dei programmi
- Memoria manuale
- [M1], [M2] e [M3]
- Richiamare un programma preselezionato
- TA (Annunci sul traffico)
- INFO (Annunci0)
- - Impostazione della modalità di attesa INFO
- - Annullamento della modalità di attesa INFO
- - Selezione informazioni
- Trasmissioni di emergenza
- Cambiamento delle lingua del display PTY e INFO
- Impostazione del volume per TA, INFO, trasmissioni di emergenza (ALARM) e PTY
- Operazioni sul Decoder Surround 5.1ch
- Selezione di PL II (Dolby PL II)
- MOVIE (modalità film)
- ■ VIRTUAL (modalità virtuale)
- Selezione del menu DSF
- Selezionare il menu dell'equalizatore dei parametri
- Menu P.EQ
- Regolazione di P.EQ
- Cambiamento delle impostazioni
- Selezionare le impostazioni
- Impostazione ON/OFF degli altoparlanti (CENTER-SP/ SRD-SP/SUB-WOOFER)
- Aggiustamento del filtrodi frequenza degli altoparlanti (FRONT HPF/CENTER HPF/ SRD HPF/SUB-W LPF)
- FRONT HPF/CENTER HPF/SRD HPF (aggiustamento del filtro high-pass)
- SUB-W LPF (aggiustamento del filtro del sub-woofer low-pass)
- Aggiustamento del ritardo degli altoparlanti (CENTER-SP/SRD-SP)
- Regolazione delle funzioni del Dolby Digital (D-RANGE)
- IN CASO DI DIFFICOLTÀ
- CODICI D'ERRORE
- SPECIFICHE
- Sezione Radio
- Sezione riproduktore CD
- Cenni generali
- Inhoud
- VOORZORGSGMAATREGELEN
- INFORMATIE VOOR GEBRUIKERS:
- WAARSCHUWING
- Kantelend bedieningspaneel
- A VOORZICHTIG
- WEES VOORZICTIG DAT UW VINGERS NIET BEKNELD RAKEN BIJ HET OPENEN EN SLUITEN VAN HET KANTELEND BEDIENINGSPANEEL.
- Omgaan met compact discs
- Discs hanteren
- Discs bewaren
- Discs schoonmake
- BEDIENINGSELEMENTEN
- Vooranzicht van het apparaat
- Met het KANTELEND BEDIERINGSPANEEL in de geopende stand
- BEDIENINGSPANEEL
- De namen en functies van de bedieningselementen
- [RELEASE] toets
- Lichtsensor
- [ROTARY] knop
- [△] toets
- Opmerking:
- [A] toets
- [Sound] toets
- [TA]toets
- [II] toets
- Aanraakschem
- Functies van de belangrijkste toetsen in geval externe apparatuur is aangesloten op dit apparaat
- - Als een CD- of DVD-wisselaar is aangesloten
- [II]toets
- - Als een TV of DAB is aangesloten
- [TA] toets
- [▶II] toets
- Displayonderdelen
- Displaybedieningen
- Aanraken kort
- Aanraken lang
- Aanraken me
- Aanraken met
- VOORPANEEL
- Het voorpaneel eraf halen
- Het voorpaneel bevestigen
- VOORZICHTIG
- AFSTANDBEDIENING
- De batterijenplaatsen
- Opmerkingen:
- Functies van de toetsen op de afstandsbediening
- Basisbediening
- Het apparatus in- en uitschakelen
- Inschakelen
- Systeemcontrole
- CODEMATIC-functie
- Uitschakelen
- Een functie kiezen
- Het volumeniveau instellen
- De bedieningsfunctie omschakelen
- Het display omschakelen
- Schembeveiliging
- Achtergrund
- Spectrumanalysatordisplay
- Het titeldisplay omschakelen
- Een titel over het display latent lopen
- Het lopen over het display stoppen
- CT-functie (kloktijdfunctie)
- Instellen van het ADF
- De subwoofer en middenluidspreker instellen
- De balans/fader instellen
- De hoge en lage tonen instellen
- Bediening van de AC-Processor III
- Het PL II-menu (Dolby PL II) kiezen
- MATRIX (matrixfunctie)
- Het positiemenu kiezen
- Positiemenu
- Posities instellen en opslaan (gebruikersgeheugen)
- T-ALIGN (tijduitlijnfunctie):
- SP GAIN (uitgangsiveau van de luidsprekers):
- Het VSE-menukiezen
- Het VSE-basismenu
- VSE instellen en opslaan (gebruikersgeheugen)
- Het P.EQ-menukiezen
- Het P.EQ basismenu
- P.EQ instellen en opslaan (gebruikersgeheugen)
- De P.EQ instellen
- FRONT/REAR (keuze van het kanaal)
- BAND (keuze van de frequentieband)
- FREQUENCY (keuze van de middenfrequente)
- GAIN (instelling van de versterking)
- Q (keuze van de Q-kromme)
- Compensatie
- Compensatie van
- frequentiekarakteristieken
- Q-kromme
- Bediening van de radio
- De displays in de radiofungtie
- Hoofddisplay
- Frequentiedisplay
- Titeldisplay
- Frequentiebanddisplay
- Voorkeurnummerdisplay
- (alleen op het display van de simpele bedieningsfunctie)
- De Voorkeurgeheugenlijst afbeelden
- Naar de radio luisteren
- Afstemmen
- Zoek-afstemmen
- Handmatig afstemmen
- Stap-afstemmen
- Snel-afstemmen
- Een voorkeurzender oproepen
- Het afstemmen annuleren
- Voorkeurzenders handmatig opslaan
- Voorkeurzenders automatisch opslaan
- Voorkeurzender-scannen
- Het voorkeurzender-scannen annuleren
- RDS (radio-informationsystem)
- De AF-functie
- De AF-functie in- en uitschakelen
- AF-functie tussen RDS en DAB
- REG (regional programma)-functie
- De REG-functie in- en uitschakelen
- Handmatig op een regionale zender in hetzelfde network afstemmen
- TA (verkeersinformatie)
- De TA-standingbyfunctie instellen
- De TA-standingbyfunctie annuleren
- Een TP-zender zoeken
- TP-zenders automatisch als voorkeurzender opslaan
- De PTY-standingbyfunctie instellen
- De PTY-standingbyfunctie annuleren
- Een PTY-onderbrekingsuitzending annuleren
- Een programmatype (PTY) kiezen
- Een programmatype (PTY) Zoeken
- Het PTY-voorkeurgeheugen
- Nooduitzending
- De noodleszending annuleren
- De taal van het PTY-display veranderen
- De RDS-onderbreking instellen verwijl de 2-ZONE-functie in gebruik is (RDS-INT 2Z)
- Volume-installing van TA, nooduitzending (ALARM) en PTY
- De displays in de CD-functionie
- Track/weergavetijd-display
- J01/02:00:
- Mapdisplay (in het geval van MP3/WMA)
- ■ Mappenlijstdisplay (in het geval van MP3/WMA)
- Mapnummer
- >>: Bezig met kiezen
- Als u dit aanraakt, worden de voorgaande mappenlijst afgebeeld. Door dit gedurende 1 seconde of langer aan te raken, keert het display terug maar het hoofddisplay. → NEXT:
- Wat is MP3?
- Wat is WMA?
- DRM (Digital Rights Management) uitschakelen:
- Voorzorgsmaatregelen voor het creeren van een MP3-disc of WMA-disc
- - Bruikbare bemonsteringssnelheden en overdrachtsnelheden:
- Bestandsextensies
- Logisch formaat (bestandssysteme)
- Mapstructuur
- Aantal bestanden of mappings
- Multisessieskiezen
- A VOORZICTHIG
- Wees voorzichtig dat uw hand of vingers Niet bekneld raken bij het openen en sluiten van het KANTELEND BEDIENINGSPANEEL.
- Een CD plaatsen
- Een 8-cm CD plaatsen
- Een CD uitwerpen
- Een disc beluisteren die al in het apparaat is geplaatst
- De weergave pauzeren
- De weergave hervatten
- Een track kiezen
- Een map kiezen
- De afspeellijst weergeven
- Ga als volgt te werk om een afspeellijst wee tergeven.
- De weergave van de afspeellijst stoppen
- Vooruit- en Achteruitspoelen
- Beginfunctie
- Scanweergave
- De scanweergave stoppen
- Mapscanweergave
- De mapscanweergave stoppen
- Herhaalde weergave
- De herhaalde weergave stoppen
- Herhaalde mapweergave
- De herhaalde mapweergave stoppen
- Willekeurige weergave
- De willekeurige weergave stoppen
- Meerdere Personen luisteren maar twee verschillende muziekbronnen (2-ZONE-functie)
- Het display bij gebruik van de 2-ZONE-functie
- De 2-ZONE-functie in- en uitschakelen
- Het 2-ZONE-type omschakelen
- De bedieningsfunctie van de 2-ZONE-functie omschakelen
- De functie kiezen wanneer de 2-ZONE-functie is ingeschakeld
- Gemeenschappelijk bedieningen in jegere functie
- Het display in de titelinoferfunctie
- Teksttypedisplay
- Invoertekstdisplay
- Tekstlijstdisplay
- Teksttype
- Eentitel invoeren
- Hoofdletters
- Kleine letters
- Leestekens, Accenten
- Het titeldisplay veranderen in het klokdisplay of een ander display
- ■ Als u een(AP) neue titel opslaat verwijl het maximale aantal titels al is opgeslagen
- In het geval van een TV-zender
- In het geval van een CD
- Eentitelwissen
- Deinstallingenveranderen Deinstelitemskiezen
- ■ Terugkeren maar de oorspronkelijke functie
- De schermbeveiliging instellen (SCREEN SVR)
- Het schermbeveiligingsdisplay wisselen
- - Schermbeveiligingen
- Berichten invoeren om af te beelden als berichtinformationatie (MSG INPUT)
- Berichten afbeelden (MESSAGE)
- De gevoeligkeit van de spectrumanalysator instellen (S/A SENS)
- ADJUST MODE
- S/A SENS > MID
- De doorloopsnelheid van het display instellen (SCROLL)
- SCROLL » SPEED2
- De automatische displaydimmer instellen (DIMMER IN)
- DIMMER IN> AUTO
- Het displaycontrast instellen (CONTRAST)
- CONTRAST 》 6
- De LED laten knipperen wanneer de DCP worden verwijderd (BLINK LED)
- DMR LEVEL》 3
- BLINK LED》 OFF
- De pieptoon instellen voor wanner de toetsen worden bediend (BEEP)
- De luidsprekerconfigurationinstellen (SP-SETTING)
- De luidsprekers in-/ uitschakelen (CENTER-SP/ SUB-WOOFER)
- De filterfrequentie van de luidsprekers instellen (HPF/ SUB-W LPF)
- Filterinstalling
- De ingebouwde versterker in-/uitschakelen (AMP CANCEL)
- Het uitgangsiveau van de Iuidsprekers instellen (SP GAIN)
- Instelitems
- De vertragingstijd van de awhilesprekers instellen (PL II DELAY)
- De muziekfunctie in detail instellen (PL II CONT)
- PANorama (installing van panoramaregeling)
- DIMENSION (installing van dimensie)
- De AUX-functionie
- AUX/TELkiezen
- Het ingangsiveau van draagbare audio (AUX-functie) instellen (AUX SENS)
- De autoluidsprekeruitgang voor de mobiele telefoon (TEL-002, optioneel) instellen
- De mobiele-telefooonnderbreking instellen
- De automatische volumeregeling instellen (CALIBRATE/A-VOL SENS)
- Een systeemcontroleuitvoeren
- De beveiligingsfunctie gebruiken (CODEMATIC)
- CODEMATIC annuleren
- BEDIENING VAN ACCESSORIES
- Bediening van de CD-wisselaar
- CD-wisselaar
- DVD-wisselaar
- ■ Als twee CD-wisselaarsঃn aangesloten
- De displays in dewisselaarfunctie
- Discnummerdisplay
- DISC↑
- (alleen op het display van de simpele bedieningsfunctie)
- Disclijstdisplay (CD-wisselaarfunctie)
- De wisselaarfunctie kiezen
- Een CD kiezen
- Een disc kiezen op het disclijstdisplay
- Discscanweergave
- De discscanweergave stoppen
- Herhaalde discweergave
- ■ De herhaalde discweergave stoppen
- Willekeurige discweergave
- De willekeurige discweergave stoppen
- TV-tuner
- De displays in de TV-functionie
- Kanaaldisplay
- De Voorkeurgeugenlijst afbeelden
- De TV-functie kiezen
- Eband wisselen
- Oproepen van een voorgeprogrammeerd station
- Naar een video kijken
- ■ Terugkeren maar de TV-functie
- Het TV-zendergebied instellen (TV AREA)
- ADJUST MODE TV AREA GERMANY
- De TV-diversiteit instellen (TV DIVER)
- De DAB-bedieningsfunctie
- Naar een DAB-zender luisteren
- Wisselen tussen programma's
- Programma-scannen
- Handmatig opslaan in het geheugen
- Een voorkeurprogramma oproepen
- - AF-functie:tussenRDSenDAB
- INFO (aankondiging)
- - De INFO-standingbyfunctie instellen
- - De INFO-standingbyfunctie annuleren
- - Informatiekeuze
- De taal van het PTY- en INFOdisplay wisselen
- Volume-installing van TA, INFO,ooduitzending (ALARM) en PTY
- De 5.1-kanalen surrounddecoder bedieren
- PL II (Dolby PL II) kiezen
- ■ MUSIC (muziekfunctie)
- ■ MATRIX (matrixfunctie)
- MOVIE (filmfunctie)
- VIRTUAL (virtuelle functie)
- Het DSF-menu kiezen
- Het parametrischeequalizermenu kiezen
- Deinstallingenveränderen
- De instelitems kiezen
- De luidsprekers in-/ uitschakelen (CENTER-SP/ SRD-SP/SUB-WOOFER)
- De filterfrequentie van de luidsprekers instellen (FRONT HPF/CENTER HPF/ SRD HPF/SUB-W LPF)
- FRONT HPF/CENTER HPF/SRD HPF (installing van hoogdoorlaatfilter)
- SUB-W LPF (instelling van laagdoorlaatfilter voor subwoofer)
- De vertragingstijd van de luidsprekers instellen (CENTER-SP/SRD-SP)
- CENTER-SP》 0ms
- De Dolby Digital functies instellen (D-RANGE)
- D-RANGE MAX
- PROBLEMEN OPLOSSEN
- FOUTMELDINGEN
- TECHNISCHE GEGEVENS
- Radio
- CD-speler
- Algemeen
- Índice
- PRECAUCIONES
- INFORMACION PARA LOS USUARIOS:
- ADVERTENCIA
- Consola inclinable
- PRECAUCION
- Tenga cuidado de no pillarse los dedos cuando abra o cierra la CONSOLA INCLINABLE.
- Manejo de los discos compactos
- Manejo
- Almacenamento
- Limpieza
- 2.CONTROLES
- Unidad fuente
- Apertura de la CONSOLA INCLINABLE
- Nombres de los botones y sus sistemas
- Botón [RELEASE]
- Fotosensor
- Mando [ROTARY]
- Boton [△]
- Boton [A]
- Botón [SOUND]
- Botón [TA]
- Boton [▶■]
- Pantalla
- Operaciones de los principales botones cuando se haya connectado un equipo externo a estaunidad
- - Cuando el Cambiador de CD/DVD está conectado
- Boton [11]
- Boton[A]
- - Cuando TV/DAB está conectado
- Boton [II]
- Elementos de visualización
- Operaciones en pantalla
- Tocar
- Tocar prolongadamente
- Tocar ←
- PANEL DE CONTROL DESMONTABLE (DCP)
- Extracción del panel de control desmontable (DCP)
- Instalación del panel de control desmontable (DCP)
- CONTROLADOR REMOTO
- Inserción de las pilas
- Notas:
- Funciones de los botones del controlador remoto
- OPERACIONES
- Operaciones básicas
- Encendidoyapagado
- Encendido
- Comprobación del sistema
- Función CODEMATIC
- Apagado
- Selección de modo
- Ajusted volume
- Cambio del modo de funciona bajo la lawa de la lawa.
- Cambio de visualización
- Salvapantallas
- Papel tapiz
- Visualización del analizador de espectro
- Cambio de la visualización de títulos
- Disco CD de dato
- Para desplazar un titulo
- Para detener el desplazimiento
- Función CT (Hora del reloj)
- Ajuste del ADF
- Ajuste del altovoz de subgraves y el altovoz central
- Ajuste del balance/ desvanecedor
- Ajuste de graves/agudos
- Operación del procesador AC III
- Selección del menu PL II (Dolby PL II)
- ■ MUSIC (modo de música)
- ■ MATRIX (modulo matricial)
- Selección del menu de posición
- ■ Menu de posición
- Ajuste/memorizacion de las positions (memoria de usuario)
- T-ALIGN (alineación temporal):
- SP GAIN (ganancia del altovoz):
- Ajustes
- Selección del menu VSE
- ■ Menu Basics de VSE
- Ajuste/memorizacion de VSE (memoria de usuario)
- Selección del menu P.EQ
- ■ Menuístico de P.EQ
- Ajuste/memorizacion de P.EQ (memoria de usuario)
- Ajuste de P.EQ
- FRONT/REAR (selección de canal)
- BAND (selección de banda)
- FREQUENCY (selección de la Frequencia central)
- GAIN (ajuste de ganancia)
- Q (selección de la curva de Q)
- Compensación
- Compensación de lascharacteristicadocurrencia
- Curva de Q.
- Operaciones de la radio
- Visualizaciones del modo de radio
- Visualización principal
- Visualización de Frequencias
- Visualización de títulos
- Visualización de banda de recepción
- Visualización de N° de presinstonia
- (úlo en la visualización de funciona simple)
- Visualización de la lista de memorias preprogramadas
- Escuchar la radio
- Sintonizacion
- Sintonización de búsqueada
- Sintonización manual
- Recuperación de emisoras preprogramadas
- Para cancelar la sintonizacion
- Memoria preprogramada
- Memorización automática
- Exploración de presintonías
- Para cancelar la exploración de presintonías
- Sistema de datos radiofonicos (RDS)
- Función de Frequencias Alternativas (AF)
- Para activar o desactivar (ON/OFF) la funciona AF
- Función de AF entre RDS y DAB
- Función de programareregional (REG)
- Para activar o desactivar (ON/OFF) la funciona REG
- Sintonización manual de una emisiónal regional en la misma red
- Anuncios sobre el tráfico (TA)
- Establecimiento del modo de espera de TA
- Para cancelar el modo de espera TA
- ParaocularunaemisoraTP
- Función de almacenimiento automatico de emisoras de TP
- Tipo de programa (PTY)
- Establecimiento del modo de espera de PTY
- ■ Cancelación del modo de espera de PTY
- ■ Cancelación de una emisión
- con interruptación de PTY
- Selección de PTY
- Búsqueda de PTY
- Memoria preprogramada de PTY
- Emisión de emergencia
- ■ Cancelación de una emisión de emergencia
- Cambio del idioma de visualización de PTY
- Ajuste de la interrupción de RDS cuando la funciona 2-ZONE está en uso (RDS-INT 2Z)
- Ajuste del volumen de TA, emisión de emergencia (ALARM) y PTY
- Visualizaciones del modo CD
- Visualización de tiempo de pista/reproducción
- Visualización de carpetas (en caso de MP3/WMA)
- (sólo en la visualización de onacimiento simple)
- Visualización delists de carpetas (en caso de MP3/WMA)
- N° de carpeta
- >>:Selección en bajo 100%
- ¿Qué es MP3?
- ¿Qué es WMA?
- Precauciones al crear un disco MP3/WMA
- - Extensiones de ARCHIVOS
- - Formato lógico (Sistema de ARCHivos)
- Estructura de carpetas
- - Nível de ARCHIVOs o de carpetas
- Selección multisesión
- Tenga cuidado de no pillarse los dedos cuando cierre la CONSOLA INCLINABLE.
- Cargar un CD
- Carga de discos compactos de 8 cm
- Expulsión de un CD
- Escuchar un disco ya cargado en launidad
- Interruption de la reproduccion
- Reanudación de la reproducción:
- Selección de una pista
- ■ SeLECTION de una carpeta
- Para escuchar la lista de reproduccion
- Para eschar la lista de reproduccion, haga lo suiviente.
- Para detener la reproduccion de la lista de reproduccion
- Avance=rápido/Retroceso rápido
- Función de principio
- Reproducción por exploración
- Para cancelar la reproduccion por exploracion
- Reproducción por exploración de carpetas
- Para cancelar la reproduccion por exploracion de carpetas
- Reproducción repetida
- Para cancelar la reproduccion repetitiona
- Reproduccion repetida de carpetas
- Para cancelar la reproduccion repetition de carpetas
- Reproducción aleatoria
- J -RANDOM
- Para cancelar la reproduccion aleatoria
- Diferentes piezas musicales eschuchadas por various oyentes (función 2-ZONE)
- Tip de 2-ZONE
- Diferentes piezas musicales eschuchadas por various oyentes (funcion 2-ZONE)
- Selección del modo cuando la funciona 2-ZONE está en uso
- Operaciones comunes de cada modo
- Visualización del modo de introduccion de titulos
- Visualización de tipo de dato
- Visualización de titulos
- Visualización de texto introducido
- Visualización delists de texto
- Tipode texto:
- Introduccion de títulos
- Para pagar de la visualización de titulos a la visualización de reloj u另一边
- Cuando se memoriza un titulo nuevo que excede el número máximo de titulos
- Eliminación de titulos
- Modificación de los ajustes Selección de ajustes
- Para:volveralmodooriginal
- Ajuste del salvapantallas (SCREEN SVR)
- Para cambio de salvapantallas
- Introduccion del texto de los.". mensajes informativos (MSG INPUT)
- Toque EDIT.
- Visualización de temas (MESSAGE)
- Ajuste de la sensibilitad del analizador de espectro (S/ASENS)
- Ajuste de la velocidad de desplazimiento de la visualización (SCROLL)
- Ajuste del atenuador automatico (DIMMER IN)
- Ajuste del nivel de atenuacion (DMR LEVEL)
- Ajuste del contraste de la pantalla (CONTRAST)
- Ajuste del parpadeo del LED al extraer el DCP (BLINK LED)
- Ajuste del tono que suena cuando se presionan los botones (BEEP)
- Selección de cada modo
- Ajuste de la configuración de los altavoces (SP-SETTING)
- Activación/desactivación (ON/OFF) de los altavocé (CENTER-SP/SUB-WOOF)
- Ajuste de las Frequencias de filtrado de los altavoces (HPF/ SUB-W LPF)
- Ajuste del filtró
- Activación/desactivación (ON/OFF) del amplíficator interno (AMP CANCEL)
- Ajuste del nivel de salute de los altavoces (SP GAIN)
- Ajuste del tiempo de retardode los altavoces (PL II DELAY)
- Ajuste bajo el modo de música (PL II CONT)
- DIMENSION (ajuste de la dimisión)
- CTR WIDTH (ajuste del ancho central)\*1
- Función AUX
- Selección de AUX / TEL
- Ajuste del nivel de entrada (AUX SENS) del audio portátil (modo AUX)
- Ajuste de la calidad de altavoces del automóvil para el Telefonomóvil (Optional TEL-002)
- Ajuste de la interrupción para el Telefono móvil
- Ajuste de la funciona de volumen automatico (CALIBRATE/A-VOL SENS)
- Comprobación delsystems
- Uso de la referencia de seguidad (CODEMATIC)
- Para cancelar CODEMATIC
- OPERACIONES DE LOS ACCESORIOS
- Operaciones del Cambiador de discos compactos
- Cambiador de CD
- Cambiador de discos DVD
- Cuando hay 2ambiadores de CD conectados
- Visualizaciones del modo de combustor
- Visualización principal (Modo de Cambiador de CD)
- (,) (sólo en la visualización de funciona simple)
- Visualización de lista de discos (Modo de Cambiador de CD)
- >>: Señeción en bajo
- Selección del modo de combustor
- Selección de un CD
- Para seleccionar un disco en la visualizacion de lista de discos
- Reproducción por exploración de discos
- Para cancelar la reproduccion por exploracion de discos
- Reproduccion repetida de discos
- Para cancelar la reproduccion repetition de discos
- Reproduccion aleatoria de discos
- Para cancelar la reproduccion aleatoria de discos
- Operaciones del telector
- Funciones del sintonizadora de television
- Visualizaciones del modo TV
- Visualización de canales
- Visualización de N° de presintonía
- (solen la visualizacion defuncionamento simple)
- Selección del modo de TV
- Cambio de banda de recepción
- Invocación de una emisióna memorizada
- Memoración automática
- Visualización de video
- Para:volveralmodoTV
- Ajuste del area de TV (TV AREA)
- Ajuste de diversidad de TV (TV DIVER)
- Función de control de DAB
- Escuchar la emisora DAB
- Cambio de programas
- Exploración de programas
- Memoria manual
- Recuperación de programs preajustados
- Función AF
- TA (Anuncios de tráfico)
- INFO (Anuncio)
- - Ajuste del modo deresherva INFO
- - Cancelación del modo deresherva INFO
- - Seleitung de la informacion
- Difusión de emergencia
- Cambio del idioma de visualización de PTY e INFO
- Ajuste del volumen de la difusión TA, INFO, de emergencia (ALARM) y PTY
- Operaciones del decodificador surround de 5,1 canales
- Selección de PL II (Dolby PL II)
- MATRIX (Modo matricial)
- MOVIE (Modo depellicula)
- VIRTUAL (Modo virtual)
- Selección del menu DSF
- Menús de DSF
- Selección del menu de ecualizador paramétrico
- Menús de P.EQ
- Ajuste de P. EQ
- Modificación de los ajustes
- Selección de ajustes
- Activación/desactivación (ON/OFF) de los altavoces (CENTER-SP/SRD-SP/SUB-WOOFER)
- Ajuste de las Frequencias de filtrado de los altavoces (FRONT HPF/CENTER HPF/ SRD HPF/SUB-W LPF)
- Ajuste del filtro
- FRONT HPF/CENTER HPF/SRD HPF (ajuste del filtró de paso alto)
- SUB-W LPF (ajuste del filtró de paso bajo en el altovoz de subgraves)
- ADJUST MODE FRONT HPF » THROUGH
- Ajuste del tiempo de retardo de los altavoces (CENTER-SP/SRD-SP)
- Ajuste de lasmericanos de Dolby Digital (D-RANGE)
- INDICACIONES DE ERROR
- ESPECIFICACIONES
- Sección de laundry
- Sección del reproductor de discos compactos
- Generales
- Innehäll
- FÖRSIKTIGHETSÄTGÄRDER
- A WARNING
- Den Iutande konsolen
- A VARNING
- Var försiktig sä att du intekommen i kläm med fingrarna;när du öppnar eller stänger den LUTANDE KONSOLEN.
- Hantering av CD-skivor
- Hantering
- Förvaring
- Rengöring
- KONTROLLER
- Huvudenhet
- DEN LUTANDE KONSOLEN öppen
- TERMINOLOGI
- Knapparnas namn och vad de används till
- Knappen [RELEASE]
- Ljussensor
- Knappen [ROTARY]
- Knappen [△]
- OBS:
- Knappen [A]
- Knappen [SOUND]
- Knappen [TA]
- Knappen [▶II]
- Displayen
- De huvudsakliga manöverknapparna Near andra apparater ar anslutna till den har bilstereon
- När CD-/DVD-växlare ar inkopplad
- När TV/DAB ar inkopplad
- Displayenkutioner
- Displayenfunktioner
- Peka
- Peka och tryck
- Peka pà
- DEN LÖSTAGBARA KONTROLLPANELEN (DCP)
- Hur man tar av DEN LÖSTAGBARA KONTROLLPANELEN (DCP)
- Hur man sätter på DEN LÖSTAG-BARA KONTROLLPANELEN (DCP)
- Observera:
- FJÄRRKONTROLLEN
- Hur man sätter i batterierna
- Hur knapparna på fjärrkontrollen fungerar
- HUR MAN ANVÄNDER BILSTEREON
- Grundläggande användningssätt
- Att satta på/stänga av anlaggningen
- Att satta på anlaggningen
- Systemkontroll
- Att stänga av anlaggningen
- Att valja ett lage
- Att ställa in volymen
- Byte av driftslage
- Attalandavisingenpá displayen
- Skärmslackare
- Bakgrundsbild
- Spektrumanalysatorn
- Att andra titelvisningen
- CD-TEXT
- MP3/WMA
- Anmärkningar:
- Att rulla en titel
- Att slutarulla
- CT-funktion (klocka)
- Inställniing av ADF
- Att ställa in sub-woofern och mithmögtalaren
- Att stalla in balans/fader
- BALANS:
- Att ställa in bas/diskant
- Hur man anvander AC-Processor III
- PL II-menyn (Dolby PL II)
- ■ MUSIC (musiklåget)
- MATRIX (matrisäget)
- Att öppna positionsmenyn
- Positionsmenyn
- Att ändra/spara positioner (användarminnet)
- T-ALIGN (tidsanpassning):
- SP GAIN (högtalarfürstärkning):
- Att öppna VSE-menyn
- ■ Grundmenyn
- Att ställa in/spara VSE (användarminnet)
- Att öppna P.EQ-menyn
- Att ställa in/spara P.EQ (användarminnet)
- Att ställa in P.EQ
- FRONT/REAR (val av kanal)
- BAND (val av band)
- FREQUENCY (val av mittfrekvens)
- GAIN (installing av forstarkning)
- Q (installing av Q-kurva)
- - Kompensation av frekventsegenskaper
- Q-kurva
- Hur man anvander radion
- Skärmbilderr i radioläget
- Huvudsidan
- Frekvensdisplayen
- Titeldisplayen
- Mottagningsband
- Snabbvalsstation nr.
- (endast på displayen für förenklad drift)
- ■ Listamedsnabbvalsstationer
- Att lyssna pa radio
- Stationsinställning
- Sökning
- Manuellinstalling
- Steginställning
- Snabbinställning
- Att hamta en snabbvalsstation
- Att avsluta installningen
- Förinställning
- Automatisk lagring
- Avsökning av sparade stationer
- Att avsluta avsokningen
- AF-funktionen
- Att stänga av och satta på AF-funktionen
- ■ AF-övergang mellan RDS och DAB
- Regionalprogramfunktionen (REG)
- Att stänga av och satta på REG-funktionen
- Att ställa in en regional station i samma sändningsnät manuellt
- Trafikmeddelanden (TA)
- Hur man ställer bilstereon i TAberedskapsläge
- Att stänga av TA-vänteläget
- Att söka after en TP-station
- Automatism lagring av TP-stationer i snabbvalsminnet
- Programtypsfunktionen (PTY)
- Hur man ställer radion i PTY-beredskapsläge
- Hur man stänger av PTYberedskapslaget
- Hur man stänger av ett PTY-avbrott
- Att ställa in PTY-läget
- PTY-sökning
- PTY-minne
- Nödsändningar
- Hur man stänger av en nödsändning
- Att byta sprek for PTYvisningen
- Att ställa in RDS-avbrott när 2-zonsfunktionen används (RDS-INT 2Z)
- Att ställa in volymen für TA, nödmeddelanden (ALARM) och PTY
- Skärmbilderr i CD-läget
- Spár/speltidsisplayen
- Mappdisplayen (for MP3/WMA)
- Mappens nr.
- >>:Inställning págár
- Vadär MP3?
- VadärWMA?
- Anvisningar for inpelning aven MP3/WMA-skiva
- Multi-session
- Att satta i en CD
- Att satta i CD-skivor på 8 cm
- Att ta ut en CD-skiva
- Att lyssna på en skiva som redan sitter i anlaggningen
- Att pausa avspelningen
- Att ateruppta avspelningen
- Att välja ett spär
- Att valja en mapp
- Att spelena en spelningsliste
- Gà till väga enligt följande für att spelena en spelningsliste:
- Att avbryta spelningen av en spelningsliste
- Snabb forflytting Framat/ Bakat
- Toppfunktionen
- Avsökning
- Avsökning av mappar
- Att avsluta mappavsokningen
- Repeterad avspelning
- Att avs抗体 repeterad avspelning
- Repeterad avspelning av mappar
- Att avsluta repeterad avspelning av mappar
- Slumpvis avspelning
- Att avsluta slumpvis avspelning
- Att lata olika lyssnare lyssna på olika musik samtidigt (2-ZONE-funktionen)
- Anmarkningar:
- Skärmvisning'nar 2-zonsfunktionen används
- Att lata olika lyssnare lyssna pø olika musik samtidigt (2-ZONE-funktionen)
- Att stänga av och satta på 2-zonsfunktionen
- Att byta 2-zonstyp
- Att byta 2-zonslage
- Att välja lage)när 2-zonsfunktionen används
- Gemensamma Funktioner für bāda lagena
- Skärmvisning i titelläget
- Texttyp
- Inlagd textdisplayen
- Text lista
- Typ av text
- Att lagga in titlar
- Stora bokstäver
- Små bokstäver
- Symboler, Accenterade bokstaver
- Att gfrn titeldisplayen till klockenanller nagon annan display
- ■ Om en ny titel laggs in trots att det maxima lantalet titlar har uppnàtts
- Om det gäller en TV-station
- Om det gäller en CD
- Att radera titlar
- Att andra installingarna
- Att väljainstallingsparametrar
- Att gà tillbaka till utgangsläget
- Inställing av skärmsläckare (SCREEN SVR)
- Att växla mellan olika skärmsläckare
- Inmatning av meddelanden som skärmsläckartext (MSG INPUT)
- Visning av meddelanden (MESSAGE)
- Inställning av spektrumanalysatorns känslighat (S/A SENS)
- Inställning av rullningshestigheten (SCROLL)
- Inställing av autodimmer (DIMMER IN)
- Inställing av displayens kontrast (CONTRAST)
- Inställing av dimmernivå (DMR LEVEL)
- Inkoppling av blinkende lysdiodRARY frontpanelen tas bort (BLINK LED)
- Inkoppling av ljudsignal vid knaptryckningar (BEEP)
- Att välja att lage
- Val av lage
- Konfigurering av högtalarna (SP-SETTING)
- Högtalarkconfiguration
- Inställing av högtalare ON/OFF (CENTER-SP/SUB-WOOFER)
- Inställing av högtalarfiltrens frekvens (HPF/SUB-W LPF)
- Filterjustering
- Inställing av inbyggd Förstärkare ON/OFF (AMP CANCEL)
- Inställing av högtalarnas utnivå (SP GAIN)
- Parametrar
- Inställing av tidsforskjutning für de bakre högtalarna (PL II DELAY)
- Detaljinställningar for musiklåget (PL II CONT)
- PANorama (brett ljudfalt)
- DIMENSION (ljudfalt bak aller fram)
- CTR WIDTH (installing av mitthögtalarens [judbild]) *1
- AUX-funktionen
- Inställing av AUX och TEL
- Inställning av AUX-ingängens känslighem (AUX SENS) i AUX-laget
- Inställing av bilhögtalare für mobiltelefonljudet (für extrautrustingen TEL-002)
- Inställing av avbrott für mobiltelefon
- Inställing av autovolym (CALIBRATE/A-VOL SENS)
- Utförande avensystemkontroll
- Att användasakerhetsfunktionen(CODEMATIC)
- Att stänga av CODEMATIC
- HUR MAN ANVÄNDER OLIKATILLVALSKOMPONENTER
- Hur man anvander en CD-växlare
- CD-växlare
- DVD-växlare
- När 2 CD-växlare ar inkopplade
- Skärmbilderr i CD-växlaråget
- Huvudsidan (CD-växlaråget)
- Spär/speltidsdisplayen
- Skivnummerdisplayen
- Skivlistdisplayen (CD-växlarläget)
- >>:Inställning págår
- CD-ROM-skivor kan inte spelas i alla CDvaxlare. Det beror på modellen.
- Att ställa in CD-växlarläget
- Att aterupta avspelningen
- Att välja en CD
- Att välja en skiva ur skivlistan
- Att välja ett spår
- Avsökning av CD-växlaren
- Att avsulta repeterad avspelning
- Repeterad avspelning av enskiva
- Slumpvis avspelning av skivor
- Att avsluta slumpvis avspelning av skivor
- Hur man anvanderen TV-tuner
- Funktioner på TV-tunern
- Skärmbilderr i TV-läget
- Kanaldisplayen
- Att ställa in TV-läget
- Att byta mottagningsband
- Att avsluta instalIningen
- Manuellinställning
- För att se på en snabbvalsstation
- Att titta på video
- Att gà tillbaka till TV-läget
- Inställing av TV-området (TV AREA)
- Inställing av TV:ns diversitet (TV DIVER)
- DAB-kontrollfunktion
- Att lyssna på en DAB-station
- Byte av program
- Programavsökning
- Manuell lagring i minnet
- [M1], [M2] och [M3]
- Information (INFO)
- Hur man ställer bilstereon i INFOberedskapsläge
- Hur man stänger av INFO-beredskapen
- Hur man valjer informationstyp
- Nödmeddelanden
- Att byta språk für PTY och INFO
- Volyminstalling for trafikmeddelanden (TA), information (INFO), nödmeddelanden (ALARM) och PTY-sändningar
- 5.1ch Surround-avkodning
- Att ställa in PL II (Dolby PL II)
- MOVIE (filmäget)
- VIRTUAL (det virtuella laget)
- Att öppna DSF-menyn
- EQ-justering
- Att andrainstallingarna
- Inställing av högtalare ON/OFF (CENTER-SP/SRD-SP/SUB-WOOFER)
- Inställing av högtalarfiltrens frekvens (FRONT HPF/CENTER HPF/SRD HPF/SUB-W LPF)
- FRONT HPF/CENTER HPF/SRD HPF (installing av hogpassfilter)
- SUB-W LPF (installing av laggpassfilter for sub-woofern)
- Inställing av tidsforskjutning für högtalarna (CENTER-SP/ SRD-SP)
- Att ställa in de Dolby Digital-funktionerna (D-RANGE)
- OM DET UPPSTAR PROBLEM
- FELMEDDELANDEN PÄ DISPLAYEN
- TEKNISKA DATA
- Radiodel
- CD-spelardel
- Allmänt
- Conteudo
- PRECAUÇÖES
- AVISO AOS UTENTES:
- ADVERTÊNCIA
- Consola inclinável
- PRECAUÇAO
- Tome cuidado para não prender os dedos quando abrir e fechar a CONSOLA INCLINÁVEL.
- Manuseamento de discos compactos
- Manuseamento
- Armazenamento
- Limpeza
- 2.CONTROLOS
- Unidade principal
- Com a CONSOLA INCLINÁVEL aberta
- NOMECLATURA
- Nome dos botões e suas funções
- Botão [RELEASE]
- Sensor fotogálico
- Botão rotatório [ROTARY]
- Botao [△]
- Botao [A]
- Botão [SOUND]
- Botão [TA]
- Botao [▶II]
- Mostrador
- Operações dos principais botões quando um equipamento externo estiver ligado a este aparecido
- - Quando o permutador de CDs/DVDs estiver ligado
- Botão [A]
- - Quando um TV/DAB estiver ligado
- Indicações do Mostrador
- Funcimiento do Mostrador
- Tocar e manter tocado
- Toque no botão
- DCP (PAINEL DE CONTROLO DESTACÁVEL)
- Retirada do DCP (painel de controlo destacável)
- Fixação do DCP (painel de controle destacável)
- Inserção de pilhas
- Funções dos botões daunities de telecomando
- Operaçõesbasicas
- PRECAUÇA O
- Ligar/Desligar o aparelho
- Ligar
- Verónica do sistemas
- Função CODEMATIC
- Desligar
- Selección um modo
- Ajuste do volume
- Mudar o modo de funções
- Mudar o mostrador
- Proteção do ecran
- Fundo
- Mostrador do Analisador do espectro
- Comutationdomostatdo tuito
- Rolar um titulo
- Interromper a rolagem
- Função de CT (Hora de relógio)
- Colocação do ADF
- Ajuste do Sub-woofer e do Altifalante Central
- Ajuste do balanco esquerdo/direito e anterior/posterior
- Operação do AC-Processor III
- Selecao do menu PL II (Dolby PL II)
- ■ MUSIC (modo música)
- ■ MATRIX (modo matrix)
- Selecao do menu de posicao
- ■ Menu de posicao
- Posições Ajustamento/ armazenamento (memória do Utilizador)
- T-ALIGN (tempo de alinhamento):
- SP GAIN (ganho altofalante):
- Selecao do menu VSE
- ■ Menu Basics VSE
- Ajuste/armazenamento de VSE (memória do'utilizador)
- DIFFUSE (DIFUSão):
- CAR WIDTH (LARGURA DO AUTOMÓVEL):
- CAR LENGTH (COMPRIMENTO DO AUTOMOVEL):
- Selecao do menu P.EQ
- ■ Menu Basics P.EQ
- Ajuste/armazenamento P.EQ (memória do'utilizar)
- Ajustamento de P.EQ
- FRONT (SEGUIDE)/REAR (ANTERIOR) (seleção de canal)
- BAND (FAIXA) (selecção da faixa)
- GANHO (ajustamento de ganho)
- Q (Selecao da Curva Q)
- Compensacao
- Compensação das caractéricas de frequência
- Operações do rádio
- Exibções de écran no modo rádio
- ■ Mostrador principal
- Mostrador de frequência
- Mostrador de titulo
- Mostrador da Faixa de recepçao
- Mostrador do N° de pré-Seleção
- MODE (MODO)
- BAND (FAIXA)
- (sono no do的操作简单)
- ■ Mostrador da lista de memória pré-seLECTIONada
- Ouvir o RADIO
- Sintonização
- Sintonização porquisa
- Sintonização manual
- Sintonização por passos
- Sintonização Toque no botão noestrador de frequência. A sintonização interrompe-se quando colocar o dedo afastado do painei. Chamada de uma estação pré-sintonizada
- Para cancelar uma sintonização
- Memória pré-seLECTIONA
- Armazenamento automatico
- Exploração programada
- Cancelar uma Exploração programada
- RDS (sistema de dados por raggio)
- Função AF
- Para comutar a funcao AF entre ON/OFF
- Função AF entre RDS e DAB
- Função REG (programa regional)
- Para comutar a funcao REG entre ON/OFF
- Sintonização manual de uma estação regional na mesma rede
- TA (anúncio de tráfego)
- Activar o modo de espera TA
- ■ Cancelar o modo de espera TA
- ■ Buscar uma estaqao de TP
- Função de armazenamento automatico para estações de TP
- Activar o modo de espera de PTY
- ■ Cancelar o modo de espera de PTY
- ■ Cancelar una transmissão de interruptação PTY
- Selecciónar PTY
- Busca de PTY
- Memória de pré-Seleção do PTY
- Transmissão de emergência
- ■ Cancelar uma transmissão de emergência
- Mudar o idioma de exibição do PTY
- Selecione Interrupcao de RDS quando a funcao 2-ZONE é usada (RDS-INT 2Z)
- Ajuste de volume das transmissões de TA, de emergência (ALARM) e de PTY
- Mostradores de écran no modo CD
- Mostrador de Pista/tempo reproducao 01/02:00:
- Mostrador de pasta (no caso de MP3/WMA)
- ■ Mostrador da lista de pastas (no caso de MP3/WMA)
- Pasta N°
- >>: Selecção em andamento
- ←PREV-RTV:
- O que é o MP3?
- O que é o WMA?
- Precauções na 创建ação de um disco MP3/WMA
- Extensões dos ficheiros
- Formato lógico (Sistema de ficheiros)
- Estrutura das pastas
- -Numero de ficheiros ou pastas
- Selecao de Multi-sessao
- Tenha cuidado para não entalar os dedos quando fechar a CONSOLA INCLINÁVEL.
- Introdução de um CD
- Introdução de discos compactos de 8 cm
- Ejecção de um CD
- Escutar um disco ja inserido no aparelho
- Interromper a reproducao
- Retomarareproducao
- Selección urma pista
- ■ SeLECTIONAR Uma pasta
- Reproduzir a lista de reproducao
- Execute o segunte para reproducir a lista de reproducao.
- Interromper a reproducao de uma lista de reproducao
- Avanço-rápido / Retrocesso-rápido
- Função TOPO
- Reprodução introdúttória
- ■ Cancelar a reprodução introdúctoria
- Reprodução introdúrtória das pastas
- ■ Cancelar a reprodução introdúctoria das pastas
- Reprodução repetida
- ■ Cancelar a reprodução repetida
- Reprodução repetida das pastas
- ■ Cancelar a reprodução repetida das pastas
- Reprodução aleatória
- ■ Cancelar a reprodução aleatoria
- Diferentes seções da música escutadas por various ouvintes (Função 2-ZONE)
- ■ Exibicao do ecran quando a funcao 2-ZONE está em uso
- Comutar a funcao 2-ZONE a ON/OFF
- Comutar o tipo de 2-ZONE
- Comutar o modo de operacao da funcao 2-ZONE
- Seleção do modo quando a funcção 2-ZONE está em uso
- Operações comuns a cada modo
- Mostrador do écran no modo de entrada de titulos
- Mostrador de tipo de texto
- Mostrador de texto introduzido
- ■ Mostrador da lista de-textos
- Tipode texto
- Atribuição de titulos
- Para comutar o主義者 de tólico para relógio ou outras主義者
- ■ Quando um titulo novo é armazenado além do número máximo de titulos
- No caso de una estação TV
- No caso de um CD
- Apagar titulos
- Mudança de ajustamentos Seleção de指示ores de ajuste
- Paravoltarao modo original
- Ajuste da proteção do écran (SCREEN SVR)
- Comutar oestrador de protecao do ecran
- Proteççao do écran
- Introdução de mensagens a exibir em informação deLatch (MSG INPUT)
- Exibicao de mensagens (MESSAGE)
- Ajuste da sensibilitadode Analisador de espectro (S/ASENS)
- Ajustamento da velocidade de rolagem do主義or (SCROLL)
- Ajuste do auto-dimmer (DIM-MER IN)
Brand : CLARION
Model : DXZ948RMP
Category : Car stereo