HCM-1500DR - Coffee maker Heinner - Free user manual and instructions
Find the device manual for free HCM-1500DR Heinner in PDF.


| Product Type | Digital Coffee Maker with Grinder |
| Brand | Heinner |
| Model | HCM-1500DR |
| Capacity | 1.5 L |
| Power | 1000 W |
| Voltage | 230 V ~ 50 Hz |
| Color | Stainless Steel |
| Noise Level | < 85 dB |
| Display | LED digital display |
| Grinder Type | Built-in bean grinder with adjustable quantity marks |
| Brewing Options | Whole bean or pre-ground coffee |
| Timer / Programmable | 24-hour programmable automatic start |
| Cup Selector | 1-4 cup mode (adjusts grinding time) |
| Keep Warm Function | Automatic keep warm for up to 36 minutes |
| Safety Interlock | Water tank cover and grinder box cover sensors; displays OPN1/OPN2 if not closed |
| Water Level Indicator | Gauge on right side of water tank |
| Filter Type | Permanent filter or paper filter (size 4) |
| Carafe | Glass carafe with handle and lid, 1.5 L capacity |
| Activated Carbon Filter | Yes, with count dial (replace every 30 uses) |
| Cleaning | Removable grinder box, funnel, and filter; dishwasher safe parts (upper rack) |
| Descaling | Recommended with citric acid or household descaler |
| Dimensions (Approx.) | Not specified in manual |
| Weight (Approx.) | Not specified in manual |
Frequently Asked Questions - HCM-1500DR Heinner
User questions about HCM-1500DR Heinner
0 question about this device. Answer the ones you know or ask your own.
Ask a new question about this device
Download the instructions for your Coffee maker in PDF format for free! Find your manual HCM-1500DR - Heinner and take your electronic device back in hand. On this page are published all the documents necessary for the use of your device. HCM-1500DR by Heinner.
USER MANUAL HCM-1500DR Heinner
natural_image
Modern glass coffee maker with digital display and control panel (no visible text or symbols)• Cafetieradigitalacurasnita
- Capacitate:1.5L
- Putere:1000W
- Culoare:Inox
Vamultumimpentrualegereaacestuiprodus!
I. INTRODUCERE
Varugamsacititicuatentieinstructiunilesisapastratimanualulpentruinformariulterioare.
Acestmanualesteconceputpentruavaoferitoateinstructiunilenecesarereferitoarela instalarea, utilizareaisiintretinereaaparatului.
Pentruaoperaunitateacorectsiinsiguranta,varugamsacititiacestmanualcuinstructiuni cuatentieinaintedeinstalaresiutilizare.
I. CONTINUTULPACHETULUIDUMNEAVOASTRA
Cafetiera
Manualdeutilizare
▶ Certificatdegarantie

III.MASURIDESIGURANTA
- Varugamsacititicuatentiemanualuldeinstructiuniinaintedeautilizaaparatul.
- Acestprodusestedoarpentruuzcasnic. Nuutilizatiinscopindustrial.
- Inainte de a conecta cafetiera la priza, asigurati-va ca tensiunea de alimentare este incorespondentacuinformatiiledepeetichetaprodusului.
- Pentru evitarea incendiilor, socul electric si alte vatamari, nu scufundati cablul electricinapasauinaltlichide.
- Varugamdeconectaticafetieradelapriza, atuncicandnuesteinfunctiunesi inaintedecuratare.
- Nuutilizatiaparatuldacaobservatideteriorarilanivelulcabluluielectric.
- Nuutilizaticafetierainaerliber.
- Nu lasati cablul electric sa atarne pe marginea mesei, nici sa intre in contact cu suprafetefierbinti.
- Canddoritisascoatetiaparatuldinpriza, tragetidestecher, nudecablu.
- Returnatiproduseledefectelacelmaiapropiatcentrudeservice. Produsultrebuie reparatdoardepersoanecalificate.
- Utilizaticafetieracusigurantasporitapentruanuvaardedincauzaaburilor;
- Nuatingetisuprafetelefierbinti;
- Nuplasaticanapearagazurielectrice/plite,/cuptoareelectricepentru incalzire;
- Nucurataticanacudetergentdecuratare, lavetedinfibredeotelsaualtematerial abrazive;
- Nu utilizati cafetiera cu alta cana in afara celei originale de la producator;
16.Folositicanacuprecautie,intrucatestefoartefragila; - Nulasaticanagoalapeplitadeincalzireacafetierei, pentrucasepoatecrapa/ sparge;
- Pozitionati aparatul pe o suprafata neteda si stabila;
- Nufolositicafetierafaracaaceastasaibaapainrecipient;
- Nu folositi cana daca observati ca manerul acesteia este slabit sau are joc;
- In cazul in care cablul electric este deteriorat, trebuie inlocuit de catre producator oridecatreagentulsaudeservice, pentruaevitaprovocareaunoraccidente.
- Aparatul nu trebuie folosit de persoane (inclusiv copii) cu abilitati psihice, senzoriale sau mentale reduse, sau cu o lipsa de experienta sau cunostinta, doar dacaacestiaprimescsupravegheresauinstructiunicuprivirelafolosireaaparatului delaopersoanaresponsabiladesigurantaacestora.
- Copiiitrebuiesupravegheati, pentruavaasiguracanusejoacacuprodusul.
IV. DESCRIEREAPRODUSULUI
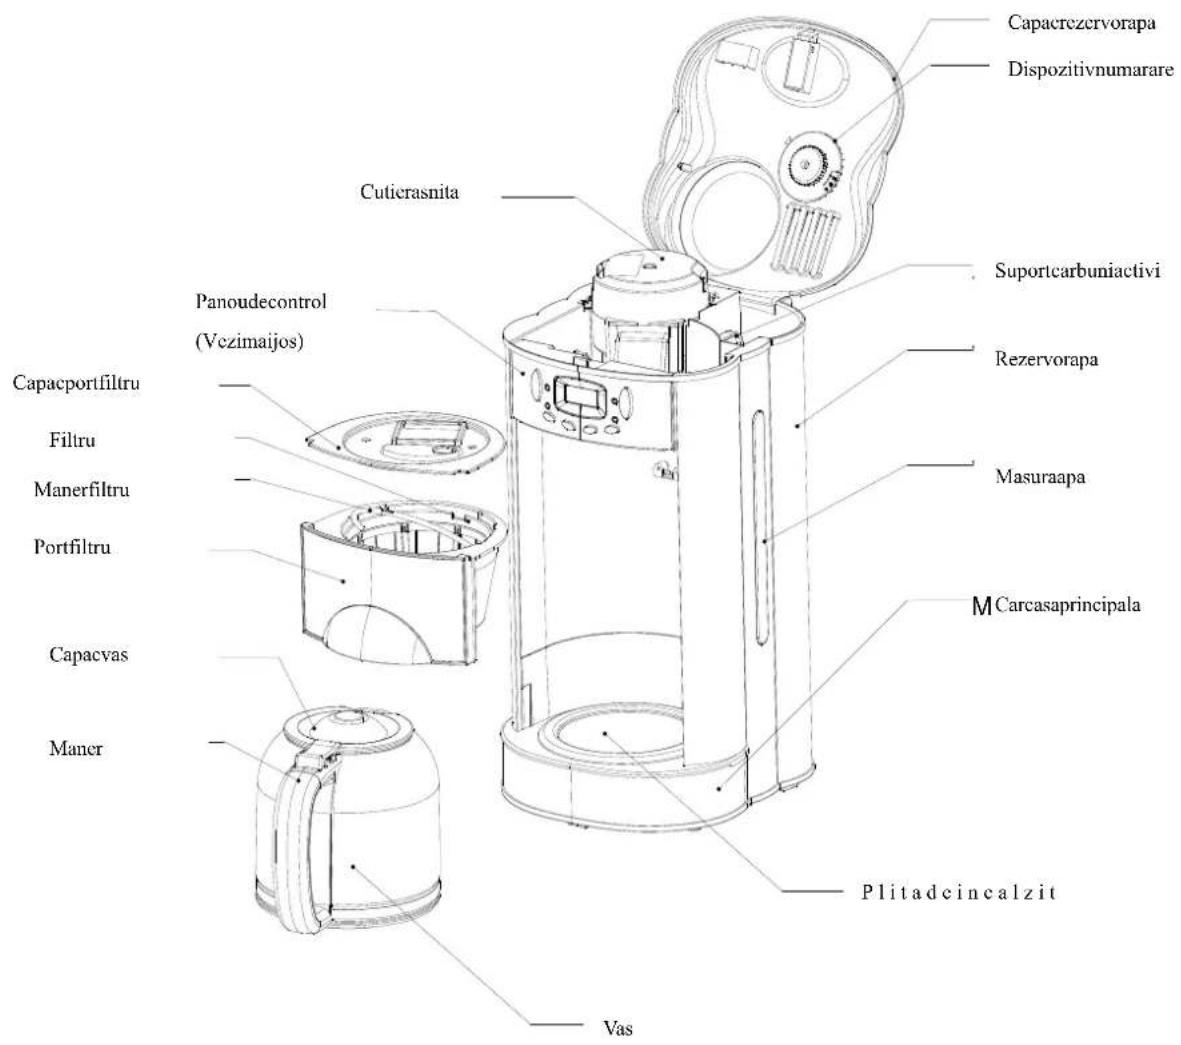
Indicator rosu
Indicator verde
V. INSTRUCTIUNIDEUTILIZARE
Setareaceasului:
- Odataceaparatulesteconectatlareteauaelectrica, ora12:00vaclipipe afisajulLCD.
Nota: Dacanusetatiora, putetiajungedirectlacelelaltesetari.
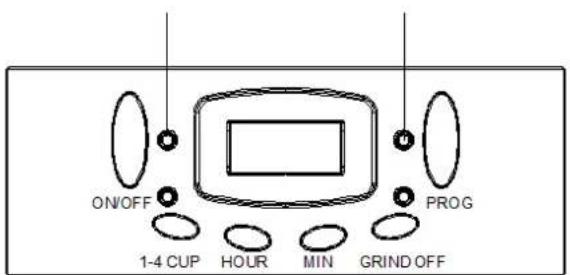
2.Apasatiodatabutonul"Program".Ecranulvaafisa"CLOCK"(ceas)(vezifig.1).
Acumsuntetiinmodul"TimeSet"(setaretimp)siputetischimbafie"Hour"(ora)fie "MIN" (minutele) pentru a ajunge la ora dorita. Butoanele trebuie tinute apasat pentrucacifrelesasederuleze,sauapasatesieliberatepentruderulareauneisingure cifre.
Nota:Ciculdetimpare24deore.
- Confirmatisetareaoreiasteptand15secunde.Afisajul"CLOCK"depeecranva disparea.
▶ Functiadepornireautomata:
Dacanudoriticafiltruldecafeasaporneascaimediat,putetisetafunctiadepornire automatainfelulurmator:
- Dupacesetaticeasul(sapresupunemcaoraeste13:30). Apasati butonul"Program" de doua ori. "TIMER" (cronometrul) va fi afisat pe ecran (vezifig.2). Acestlucruaratacaatiaccesatmodul"Setautomaticstart"(setare pornireautomata), oradeporniredoritapoatefisetataapasandbutoanele" Hour" si"MIN" pentruaderulacifrele.
Nota:Ciculdetimpare24deore.
natural_image
Technical line drawing of a mechanical component with concentric rings and a handle (no text or symbols)Trei semne arata
cantitatea de boabe
necesara
Fig. 1
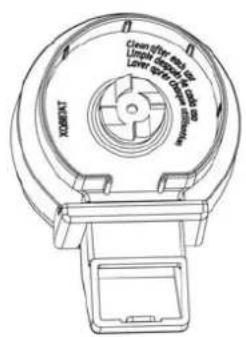
Fig. 2
natural_image
Technical line drawing of a mechanical component with no visible text or symbolsNota: Rasnitatrebuiescoasadinaparatlaintroducereaboabelor.
- Inchideticapaculrasnitei (vezifig.3), dinpozitia"

"apoirotiti-linsensul
acelordeceasornicpanainpozitia"

",altfelaparatulnuvafunctiona.
Fig. 3
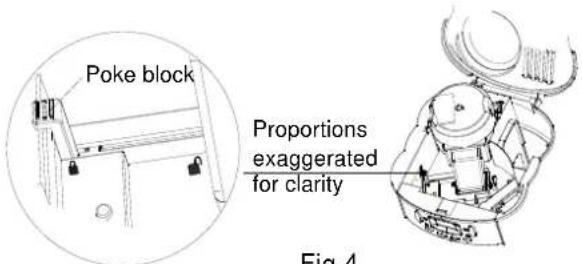
Fig.4
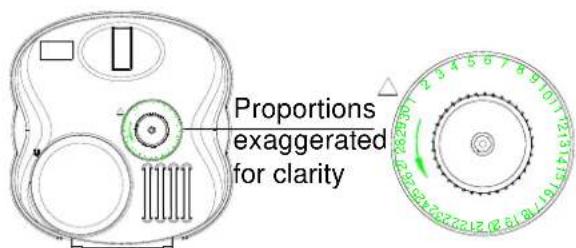
Fig.5
Preparareacafeleicucafeamacinata:
natural_image
Modern glass coffee maker with digital display and black lid, no visible text or symbols on the device itself.• Digitalcoffeemakerwithgrinder
- Capacity:1.5L
- Power:1000W
• Color:Stainlesssteel
Thankyouforpurchasingthisproduct!
I. INTRODUCTION
Before using the appliance, please read carefully this instruction manual and keep it for future reference.
Thisinstructionmanualisdesignedtoprovideyouwithallrequiredinstructionsrelatedtothe installation,useandmaintenanceoftheappliance.
In order to operate the unit correctly and safety, please read this instruction manual carefully before installationandusage.
II. CONTENTOF YOUR PACKAGE

Coffeemaker
Usermanual
Warrantycard
III.SAFETYPRECAUTIONS
- Readallinstructions.
- Makesurethatyouroutletvoltagecorrespondstothevoltagestatedontheratinglabelof the coffee maker.
- Donotimmerseappliance, cord or pluginwaterorotherliquid.
- Unplug from outlet when not in use and before cleaning.
-
Donotoperateanyappliancewithadamagedcordorplug, orinabnormalstate. Ifitsmain cord is damaged, it must be replaced by the manufacturer, the nearest service agent or a qualified person.
-
The use of accessory is not recommended by the appliance manufacturer. It may result in fire, electric shock and/or personal injury.
-
Donotletcordhangoveredgeoftableorcounter, ortouchhotsurface.
-
Todisconnect, removeplugfromwalloutlet. Alwaysholdtheplug. But neverpull the cord.
-
Donotuse appliance for other than intended use and place it in a dry environment.
-
Donotleavethecoffeemakerunattachedwhileitisoperating, the appliance cannot be operated by children.
-
Becarefulnottogetburnedbythesteam.
-
Donottouchhotsurface. Use handlesorknobsonly.
-
Donotplacethecarafeonahotgasorelectricburner, orinaheatedovenforheating.
-
Donotcleanthecarafewithcleaners,steelwoolpads,orotherabrasivematerials.
-
Donotusethecarafeforotherthanintendeduse.
-
Thecarafecannotbeimpacted.
-
Neverusetheapplianceifthecarafeshowsanysignsofcracks. Onlyusethecarafewith thisappliance. Usecarefullyasthecarafeisveryfragile.
-
Neverleavetheemptycarafeonthekeepingwarmplateotherwisethecarafeisliableto crack.
-
This appliance is not intended for use by persons (including children) with reduced physical, sensory or mental capabilities, or lack of experience and knowledge, unless they have been given supervision or instruction concerning use of the appliances by a person responsible for their safety.
-
Children should be supervised to ensure that they don't play with the appliance.
-
Donotuseacarafehavingalooseorweakenedhandle.
-
Never use your coffee maker without water in it.
-
Bladeissharp. Handlecarefully.
-
Stand the appliance on a table or flatsurface.
-
This appliance is intended to be used in household and similar applications such as:
– staffkitchenareasinshops, officesandotherworkingenvironments;
- farm houses;
- byclientsinhotels,motelsandotherresidentialtypeenvironments;
- bedandbreakfasttypeenvironments.
26.Donotuseoutdoors.
IV.PRODUCTDESCRIPTION
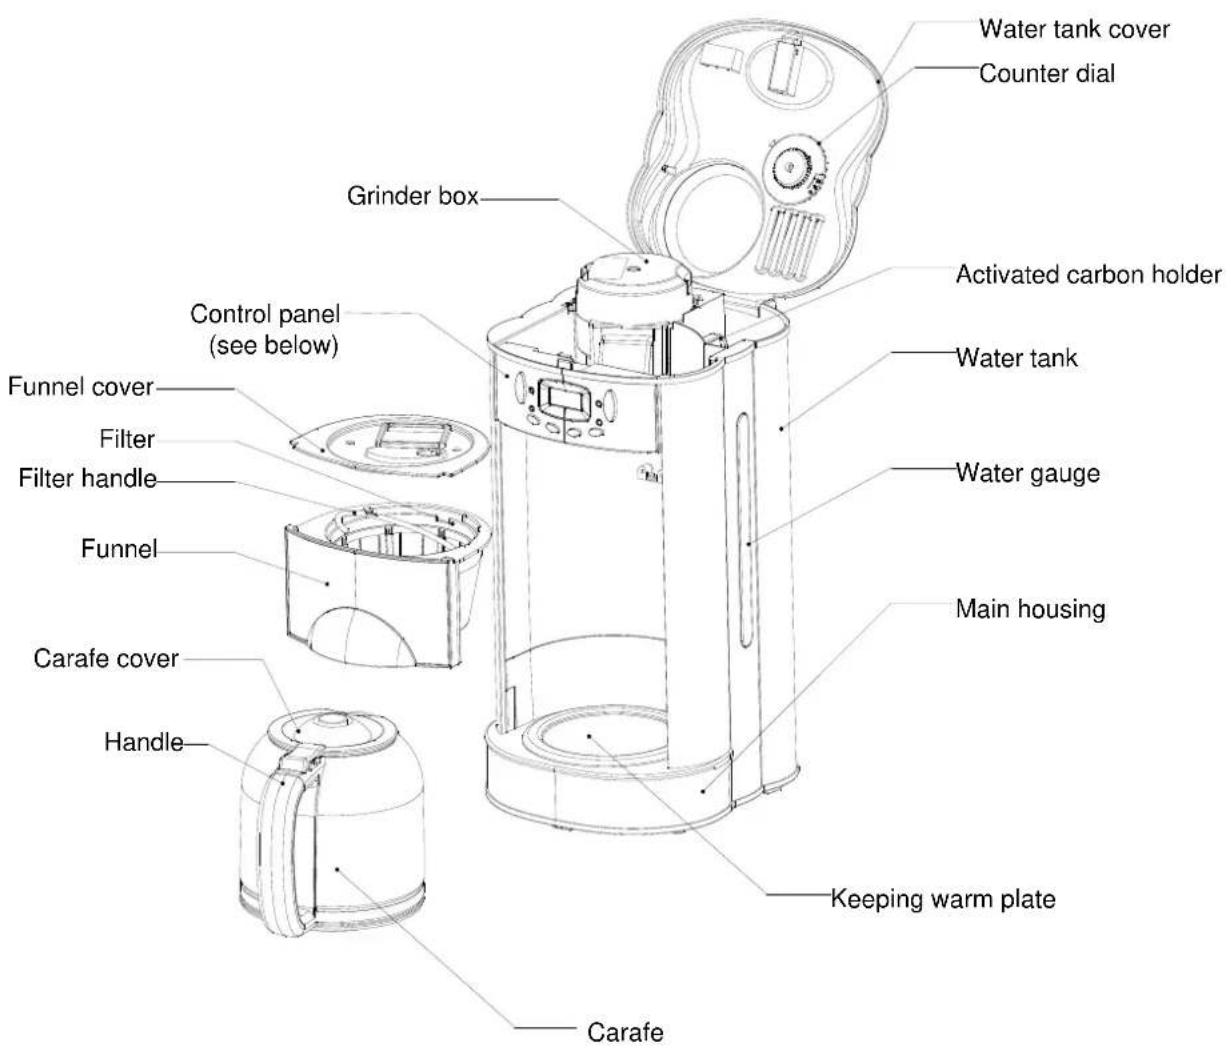
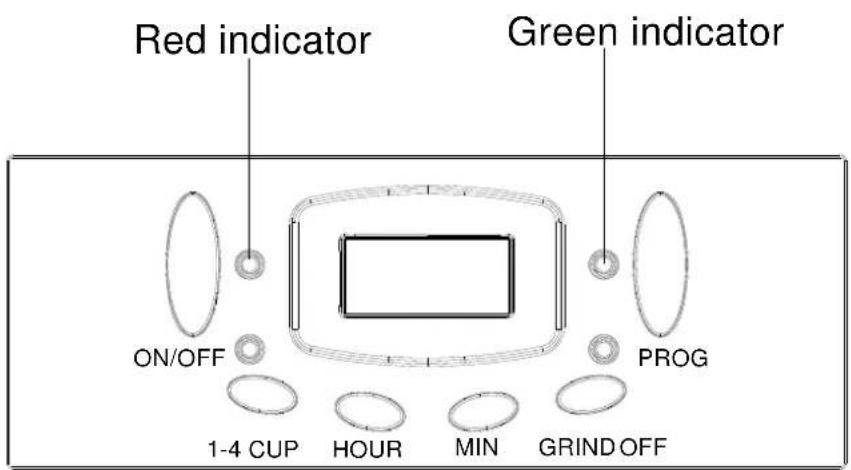
VI. USINGINSTRUCTIONS
Settheclock:
- Oncetheapplianceisconnectedtopowersupply, 12:00 will flash on the LED display.
Note: If you donotset the clock, you can go directly to others settings.
- Pressthe "Program" buttononce. The LED will display the "CLOCK" (see fig.1). You are now in the "TimeSet" mode and can operate either "Hour" or "MIN" button to achieve desired settings. The button scan behelldowntoscroll through the digits, or pressed and released lightly to advance on digit at time.
Note: Thetimecycleis24hours.
- Confirm the clock setting by waiting for 15 seconds. After that, "CLOCK" on the LED will disappear.
▶ Automaticstartfunction:
If you donotwant the coffeemaker start operation immediately, you may set the automatic start function as follows:
- Aftersettheclock(supposethecurrenttimeis13:30). Pressthe "Program" buttontwice. The "TIMER" will displayontheLED(seefig.2). This signal that you have entered the "Setautomaticstart" mode, the desired time can be set by pressing the "Hour" and "MIN" button stoscroll forward through the digits.
Note: Thetimecycleis24hours.
- Whenthesiredtimesettingapproaches, presstheOn/Offbuttontwice. Thegreenindicatorwillbeilluminated. And the "TIMER" onthedisplaywill disappear. Whenthepresettimeachievesand thegreenindicatorwillbe extinguished. Theredindicatorwillbeilluminatedandthecoffeemakerwill starttobrew.
Note: you can se the automatic start time by pressing the "Program".
-
If you want to cancel the preset program, press the On/Off button twice. The appliance will start to brew immediately.
-
Reset the "automatic start" mode, only following the steps 1-2 again
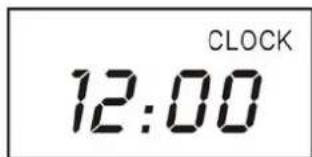
Fig.1
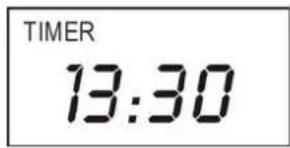
Fig.2
Makingcoffeewithcoffeebeans:
Beforeyoumakethefirstpotofcoffeeinyournewappliance, were recommend operating the coffeemakeronce, using only water and paper filter. This will remove any dustorresidues which remain in the system from the manufacturing process.
- Fillthetank: openthetopcoverbypushingthereleasebuttonandliftingup. Pouringthedesiredamountofwaterinthetankaccordingtothegauge locatedattherightofthetank
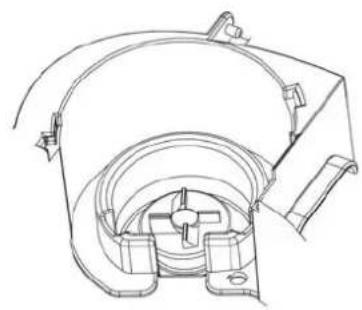
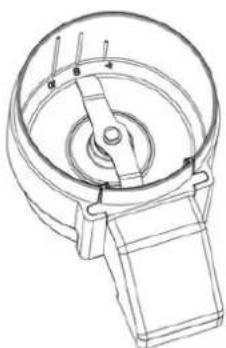
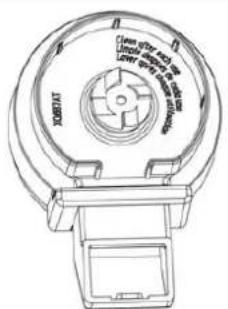
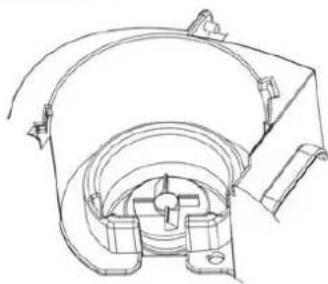
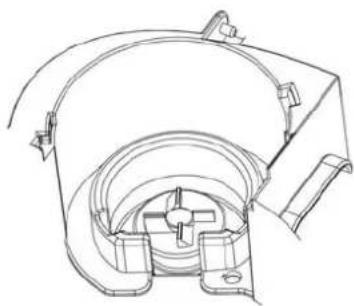
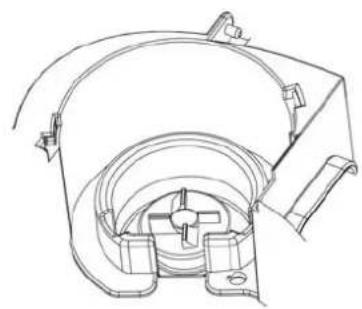
2.Addbeans:Removethegrinderbox,then openthegrinderboxlid,fillthe grinderboxwiththedesiredquantityofbeansaccordingtothemarksonthe grinder box. The marks indicate the coffee bean which making corresponding coffee(seefig.1).GenerallyloadtheGrindbox60gbeansmost.Donot overfill or the Grinder box may be blocked and/or the coffeemaker may overflow. And assemble the grinder box into the coffee maker, it must be noted the connector groove must be locked into the motor shaft (see fig.2), otherwise thegrinderbox willnotbeassembledinplaceproperly,anditmaydamage thegrinderbox.
Note: the grinder box must be removed for adding beans.
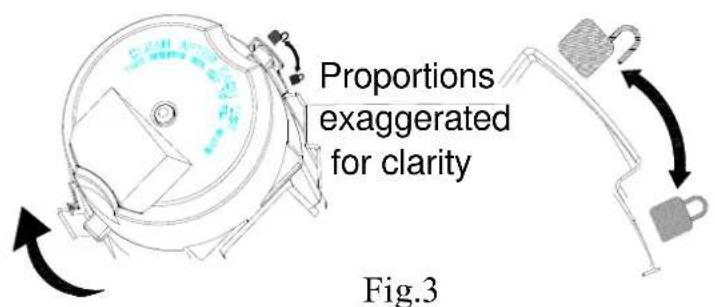
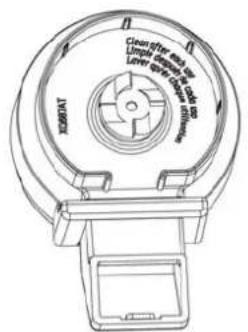
- And replace the grinder box cover (see fig.3), first place into position from the “ ” position, then turn the grinder box lid in clockwise until it lock into the “ ” position), otherwisetheappliancewillnotoperate.
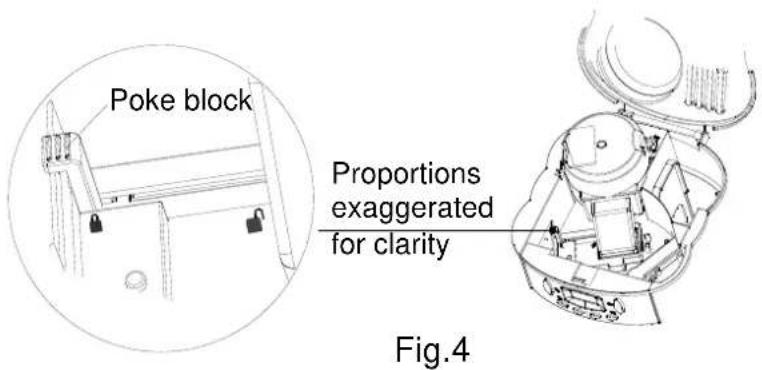
4.Before operating,makesurethepoke blockisonthe"

"position, itwill
slidetothe"

"positionautomaticallyaftergrinding.Beforethenext
operation, you must dial the poke block to the “(seefig.4).

"positionmanually again
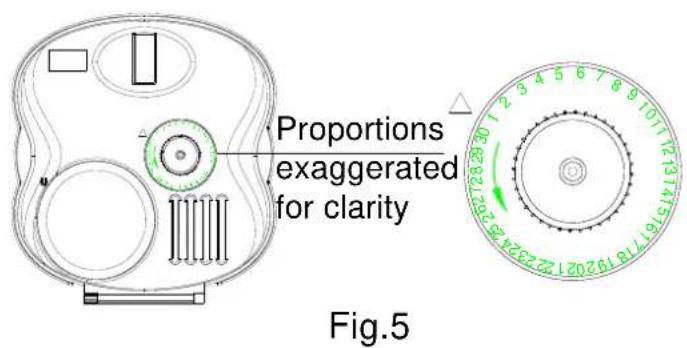
- Dial one number of the count dial in anti-clockwise for record the times of using activated carbon before every operation (see fig.5). When the number has achieved 30, it indicates you shall re placetheactivated carbon.
natural_image
Technical line drawing of a mechanical component with no visible text or symbolsTrei semne arata
cantitatea de boabe
necesara
Fig. 1
natural_image
Technical line drawing of a mechanical component with no visible text or symbolsFig. 2
-
Complete all the abovesteps, Closethetopcover: Pressdowntolock. The appliance is equipped with safety interlock system. Thedetails referto the section of "Troubleshooting"
-
Drawout the funnel by pulling the funnel handle, place a paper filter or itself permanent filter in the funnel. Place funnel cover in place, assemble the funnel into position by pushing it.
Note:apermanentfiltermayallowsomegroundcoffeetoflowintocarafe.
- Beforebrewing coffee: Makersure you have replaced the stainless carafe in its position on the keeping warm plate
9.Plugthecordintoanelectricaloutlet."12:00"willappearuntilyousetthe time.Setthecurrentclockaccordingtothe"Settheclock"sectiononthe above.
- Make sure the indicator above of the button of Grind/Off must be extinguished.
Note: If the indicator above of the button of Grind/Offsilluminated, it means that the appliance is on the “make coffee with pre-ground bean” mode. The appliance will omit the step of grinding bean.
- Select Cups Setting: The 1-4cup setting button is used to control the time of grinding bean, if you want to make 1-4 cup coffee, press the button and the indicatoraboveitwillbeilluminated.Thetimeofgrindingbeanisabout30s.If you do not press the button, the default set is 5-12 cups. The time of grinding timeisabout40s.
Note: the 1-4 cup button only use in the “make coffee with bean” mode. In other words, the indicator above of the button of Grind/Off must be extinguished. In the “make coffee with pre-ground bean” mode, it is unused.
12.Starttooperate:
① Immediate grinding and brewing: Press the On/Off button, the red indicator will lightandtheprocesswillbegin.
② Programmed brewing: If you do not want the coffee maker to start operation immediately, you may set the automatic start function according to the "Automatic start function" on the above
- When finish grinding bean, the brewing process begins.
Note: During operation, you can take out stainless carafe, pour and serve at any time.
The appliance will stop dripping automatically. But the time cannot exceed 30 seconds.
- You can un plug the power cord from the outlet and take out carafe, pour and serve when the tank is empty (about on minute later after the coffee stops dripping out.)
Note: the coffee you get will less than the watery you have added, assomewater is absorbed by coffee ground
- Whentheprocessisfinished, if you donotwanttoserveimmediately, donot unplugthepower, and keeptheswitchison, the coffeecanbekeptwarminthe keepingwarmplate, if you donotcutoffthepower, the appliance will keepwarm allalong. Thetotaltimefrombrewingcoffeetokeepingwarmis36minutes. After 36minutes, the unitwillenterstandbymode.
- Alwaysturnthecoffeemakeroffandunplugthepowercordfromtheelectrical outletwhenthecoffeemakerisnotinuse.
Note: payattentiontopourthecoffeeout, otherwise you may be hurt at the temperature of coffee just finished high.
Makingcoffeewithpre-groundcoffeebeans:
-
Fillthetank: openthetopcoverbypushingthereleasebutton and liftingup. Pouringthedesiredamountofwaterinthetank according to thegaugelocatedattherightofthetank.
-
Beforeoperating, makesurethepokeblockisonthe""position, it
willslidetothe""positionautomaticallyaftergrinding.Beforethe
nextoperation,youmustdialthepokeblocktothe""position manuallyagain(seefig.4).

-
Dial one number of the count dial in anti-clockwise for record the times of using activated carbon before every operation (see fig.5). When the number has achieved 30, it indicates you shall replace the activated carbon.
-
Complete all the abovesteps, Closethetopcover: Pressdowntolock. The appliance is equipped with safety interlock system. The details refer to the section of "Trouble shooting".
-
Drawoutthefunnelbypullingthefunnelhandle, placeapaperfilteror itselfpermanentfilterinthefunnel.
Note:apermanentfiltermayallowsomegroundcoffeetoflowintocarafe.
- Add ground coffee to our permanent or paper filter. Our recipe suggestion: Use 1 level scoop of ground coffee per cup. Adjust the recipe according to your individual.
Note: Themaximumcapacityforgroundcoffeeis12levelscoops, using either a paper or permanent filter. Exceeding that amount may cause overflow if the coffeeistoofinelyground.
-
Place funnel cover in place, assemble the funnel into position by pushing it.
-
Before brewing coffee: Maker sure you have replaced the carafe in its positiononthekeepingwarmplate.
9.Plugthecordintoanelectricaloutlet."12:00"willappearuntilyouset thetime.Setthecurrentclockaccordingtothe"Settheclock"section ontheabove.
-
Pressthe "Grindoff" button and the indicator above the button will be illuminated. The appliance will omit the step of grinding bean and enter the brewing operation once you press the On/Off button or the preset time achieves.
-
Followinstructions14through16fromthe"Makingcoffeewithcoffee beans"section.
V.CLEANINGANDMAINTENANCE
▶ Completelycleananddryallpartsaftereveryuse:
- Alwaysturncoffeemakeroffandremovetheplugfromtheelectricaloutlet beforecleaning.
- Openthetopcover.Removethegrinderboxlidbyusingtherecessedarea oneachsideofthelid.ThenremoveGrinderbox.
- Drawoutthefunnel, removefunnel Coverandfilter.
- The grinderbox, grinderboxlid, funnellandfunnelcovercanbewashedin warmsoapywaterandrinsedthoroughly, orcleanedintheupperrack of thedishwasher. Dryallpartsafterereveryuse.
- Donotputanywaterintheunitoncethegrinderboxhasbeenremoved. Wipetheareaunderthegrinderboxwithadampcloth.Ifwatergetsinto thegrindermotor,themotormaybecomedamagedandmaymalfunction.
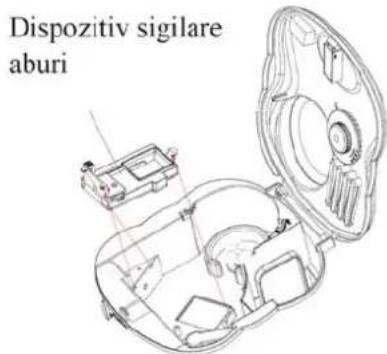
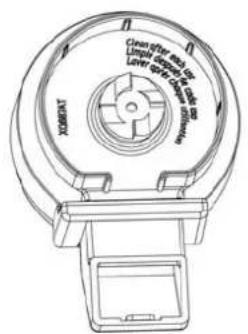
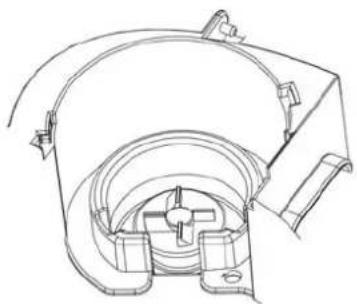
- The steam seal assembly (see fig. 6) can be disassembled for cleaning, after cleaning, it must be assembled in a correct direction (see fig. 6).
7.Onceaftercleaning,reversetheabovesteps.
8. Removethecarafefromthekeepingwarmplate.Cleanthecarafeand carafecoverinwarmwater.
9. Donotusescouringagentialorharshcleansersonanypartofthe coffeemaker.
10. Neverimmersebaseunitinwaterorotherliquid. Tocleanbase, simply wipewithaclean, dampclothanddrybeforestoring.
11. Wiperestingplate with a clean, damp cloth. Never userough, abrasive material or cleaner stoclean the resting plate.
12. Donotdrytheinsideofthetankwithacloth,aslintmayremain
Decalcification:
Tokeepyourcoffeemakeroperatingefficiently,youshouldcleanawaythemineral depositsleftbythewaterregularlyaccordingtothewaterqualityinyourareaandthe frequencyusetheappliance,thedetailisasfollows:
-
FillthetankwithwateranddescalertotheMAXlevelinthegaugeof coffeemaker(thescaleofwateranddescaleris4:1,thedetailreferstothe instructionofdescaler.Pleaseuse"householddescaler",youcanusethe citricacidinsteadofthedescaler(theonehundredpartsofwaterand threepartsofcitricacid).
-
Beforeoperating, makesurethepokeblockisonthe"

"position,it
willslidetothe"

"positionautomaticallyaftergrinding.Beforethenext
operation,youmustdialthepokeblocktothe" again(seefig.4).

"positionmanually
-
Pushcarafeonthekeepingwarmplatepayattentiontoletflowvalveof carafealignswiththatoffunnel.
-
Plug the cord into an electrical outlet. "12:00" will appear until you set the time.
-
Press the "Grind off" button and the indicator above the button will be illuminated. The appliance will omit the step of grinding bean
-
PresstheON/OFFbuttonandtheredindicatorwillbeilluminated. Aftera while, waterwilldropoutautomatically.
-
After percolatethe equivalent of onecup and then switch off the appliance.
-
Leave the solution work for 15 minutes, and then repeat the steps of 3-5 again.
-
Turn the appliance on and runoff the water until the water tank is completely empty.
-
Rinsebyoperating the appliance with water at least 3 times.
Troubleshooting:
During operation, if the water tank cover/ grinder box cover are not in place separately, the appliance will not operate, and the LED will display and the letter will flash. The detail of display according to the following:
-
If the watertankcover is not in place, the display will show "OPN1".
-
If the grinder box cover is not in place, the display will show "OPN2".
a) Ifonthestateofgrindingbean, replacethegrinderboxcover, theappliancewill notwork, butclosethewatertankcoverwithin5s, theappliancewillcontinueto working. Ifthetimeexceeds5s, theappliancewillstop.
b) Ifonthestateofheating, replacethegrinderboxcover, the appliance will not work, but replacethewatertankcover within 2 hours, the appliance will continuetoworking.
VI.TECHNICALFICHE
| Power1000W | |
| Voltage230V~,50Hz | |
| Noiselevel<85dB |
Environmentfriendlydisposal
You can help protect the environment!
Please remember to respect the local regulations: hand in the non-working electrical equipment's to

HEINNER is a registered trademark of Network One Distribution SRL. Other brands and product names are trademarks or registered trademarks of their respective holders.
No part of the specifications may be reproduced in any form or by any means or used to make any derivative such as translation, transformation, or adaptation without permission from NETWORK ONE DISTRIBUTION.

This product is in conformity with norms and standards of European Community
Importer: NetworkOneDistribution
Str. Marcel Iancu, nr. 3-5, Bucuresti, Romania
TEL: +40 21 211 18 56, www.heinner.com
HEINNER
ЦИФРОВА КАФЕВАРКА С
КАФЕМЕЛАЧКА
natural_image
Modern glass coffee maker with digital display and glass jar, no visible text or symbols on the device itself.• Цифрова кафеварка с кафемелачка
- Капацитет: 1.5л.
- Мощност:1000W
• Цвят:Инокс
natural_image
Technical line drawing of a mechanical component with no visible text or symbolsTrei semne arata
cantitatea de boabe
necesara
Fig. 1
natural_image
Technical line drawing of a mechanical component with no visible text or symbolsFig. 2
Fig. 3
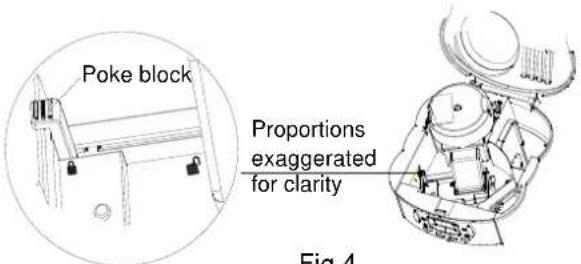
Fig.4
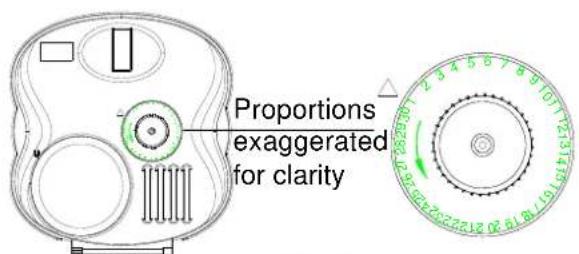
Fig.5
Copyright©2013NetworkOneDistribution.Allrightsreserved.
http://www.helinner.com, http://www.nod.ro

natural_image
Modern glass coffee maker with digital display and control panel (no visible text or symbols)natural_image
Technical line drawing of a mechanical component with no visible text or symbolsTrei semne arata
cantitatea de boabe
necesara
Fig. 1
natural_image
Technical line drawing of a mechanical component with no visible text or symbolsFig. 2
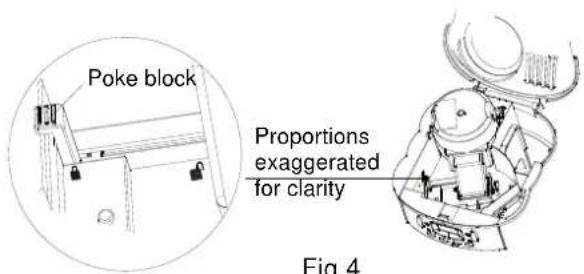
Fig.4
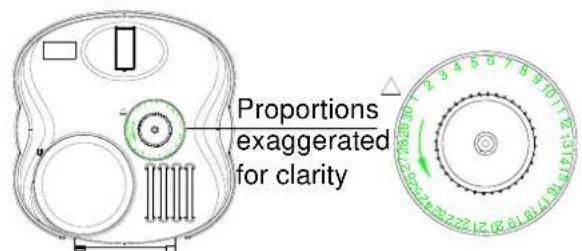
Fig.5
Copyright©2013NetworkOneDistribution.Allrightsreserved.
http://www.heinner.com, http://www.nod.ro

natural_image
Modern glass coffee maker with digital display and control panel (no visible text or symbols)natural_image
Technical line drawing of a mechanical component with no visible text or symbolsTrei semne arata cantitatea de boabe necesara
Fig. 1
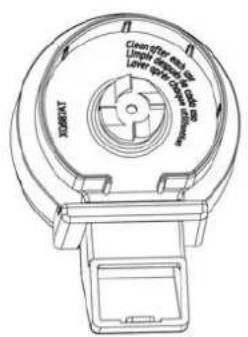
Fig. 2
natural_image
Technical line drawing of a mechanical component with no visible text or symbols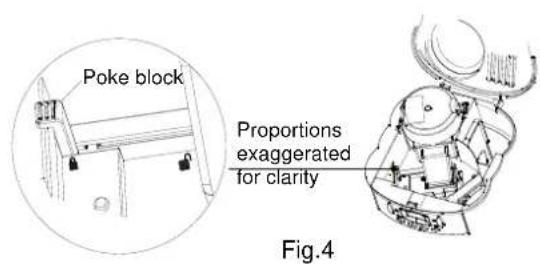
Fig. 3
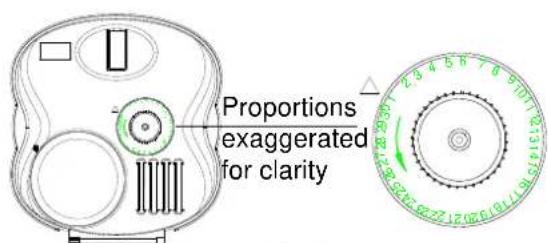
Fig.5
Copyright©2013NetworkOneDistribution.Allrightsreserved.
http://www.heinner.com, http://www.nod.ro

- Vamultumimpentrualegereaacestuiprodus!
- INTRODUCERE
- CONTINUTULPACHETULUIDUMNEAVOASTRA
- III.MASURIDESIGURANTA
- DESCRIEREAPRODUSULUI
- INSTRUCTIUNIDEUTILIZARE
- Setareaceasului:
- ▶ Functiadepornireautomata:
- Preparareacafeleicucafeamacinata:
- Thankyouforpurchasingthisproduct!
- INTRODUCTION
- CONTENTOF YOUR PACKAGE
- III.SAFETYPRECAUTIONS
- IV.PRODUCTDESCRIPTION
- USINGINSTRUCTIONS
- Settheclock:
- ▶ Automaticstartfunction:
- Makingcoffeewithcoffeebeans:
- Makingcoffeewithpre-groundcoffeebeans:
- V.CLEANINGANDMAINTENANCE
- ▶ Completelycleananddryallpartsaftereveryuse:
- Decalcification:
- Troubleshooting:
- VI.TECHNICALFICHE
- Environmentfriendlydisposal
- HEINNER
Brand : Heinner
Model : HCM-1500DR
Category : Coffee maker