
AIVIA K8100 - Keyboard GIGABYTE - Free user manual and instructions
Find the device manual for free AIVIA K8100 GIGABYTE in PDF.
| Brand | GIGABYTE |
| Model | AIVIA K8100 |
| Product Type | Wired Gaming Keyboard |
| Interface | USB 2.0 |
| Backlighting | Yes, on/off switchable |
| Anti-ghosting keys | 20 simultaneous keystrokes without conflict |
| Programmable macro keys | 5 keys per profile, 5 profiles (25 macros total) |
| Volume control | Slider touch sensor with 6 levels + mute |
| Profile changer | Five colors (red, green, blue, purple, light blue) |
| Windows Key Lock function | Yes (Win Chance) |
| Included software | Ghost™ Engine (macro editor and drag-and-drop) |
| Supported operating systems | Windows XP, Vista, 7 (32/64-bit) |
| Power supply | Via USB port (self-powered) |
| Dimensions (approx.) | 450 x 150 x 30 mm |
| Weight (approx.) | 1.0 kg |
| Package contents | Keyboard, key puller, WASD rubber coating, CD (guide), keyboard cover |
| Maintenance and cleaning | Clean with a dry soft cloth |
| Spare parts | Key puller, WASD rubber coating, keyboard cover |
| Repairability | Not specified, standard use |
Frequently Asked Questions - AIVIA K8100 GIGABYTE
User questions about AIVIA K8100 GIGABYTE
0 question about this device. Answer the ones you know or ask your own.
Ask a new question about this device
Download the instructions for your Keyboard in PDF format for free! Find your manual AIVIA K8100 - GIGABYTE and take your electronic device back in hand. On this page are published all the documents necessary for the use of your device. AIVIA K8100 by GIGABYTE.
USER MANUAL AIVIA K8100 GIGABYTE
Aivia Gaming Keyboard
User's Manual
English 2
繁體中文 12
简体中文 22
Deutsch 32
Portugués 42
Français 52
Espanol. 62
Pycckn 72
YkpaHcbka 82
韓國海 92
Türkce. 102
Polski 112
1. Overview
1-1 Introduction
Congratulations on purchasing the first product of Aivia series – Aivia K8100 gaming keyboard. Coinciding with the concept of Aivia about advanced, intuitive, and versatile interface archetype, the K8100 is born to satisfy gamers' request. Aivia K8100 is equipped with three different levels of elastic force, touch and slide volume control, 20 non-Ghosting keystroke capability and GHOST™ Macro Engine.
1-2 Package Contents
- Aivia K8100 Gaming Keyboard
Keycap Puller
Additional Rubber Coated WASD Keys - Driver CD (User guide inside)
- Keyboard Protector
1-3 System Requirements
- CD-ROM or DVD-ROM player
Available USB 2.0 Port x 1 - 40 MB of free hard disk space
- Windows XP / Vista / Vista 64bits / Windows 7 / Windows 7 64bits
2. Installation
2-1 Hardware Installation
Step 1 Plug USB connector into either desktop or laptop's USB port
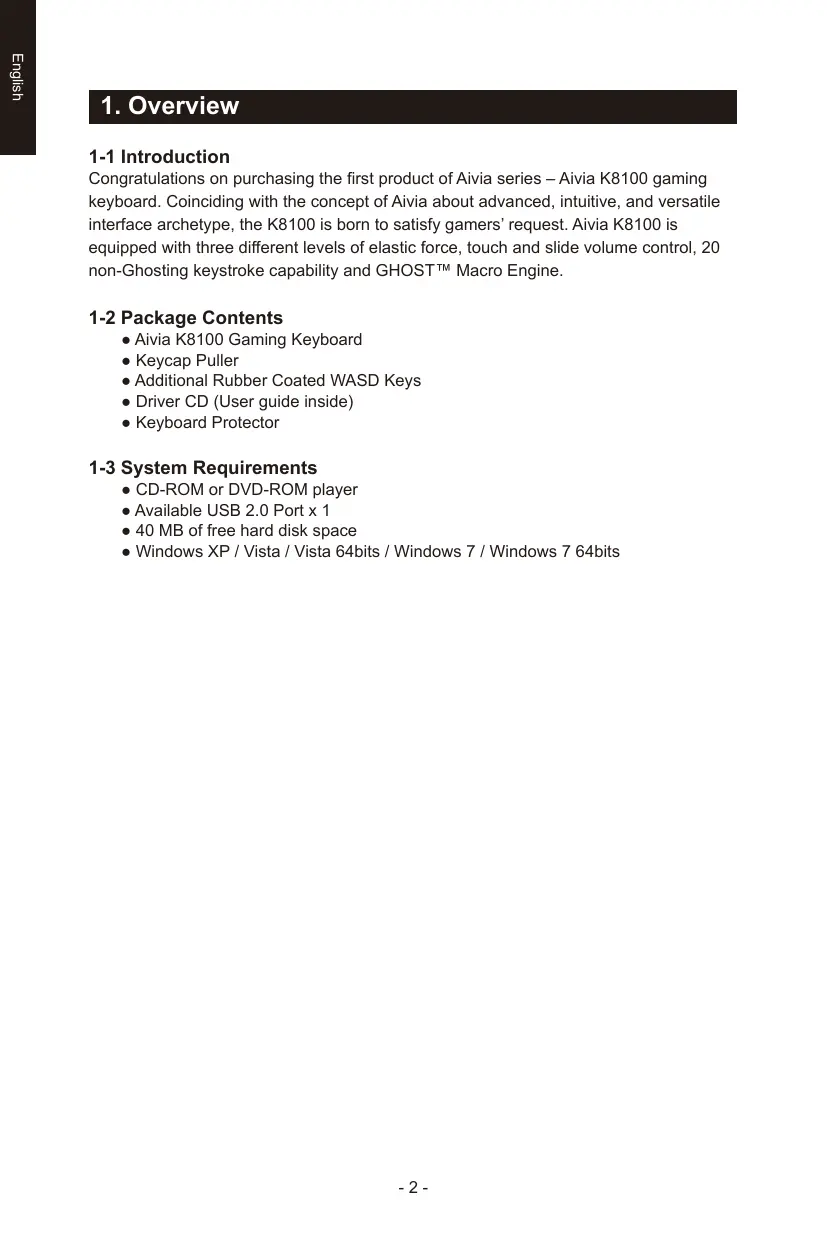
Step 2 Open "Control Panel" "System" "Hardware" "Device Manager" and confirm the keyboard is working properly
2-2 Software Installation
Before installing the driver of K8100, we suggest checking whether any other keyboard drivers have been previously installed on your system. If yes, in order to prevent possible conflict, please un-install or remove them before installing K8100 driver. (The following steps assume your CD-ROM Drive is Drive D).
Step 1 Please insert the driver CD into CD-ROM, you will see GIGABYTE CD main menu. (If it does not show up, run "D:\setup.exe")
Step 2 Click "GhostTM Engine Installation" button to start GhostTM Engine installation.
Step 3 Please select language for the installation process.
Step 4 Click on "Next" button.
Step 5 Click on "Install" button to begin installation.
Step 6 Click on "Finish" to exit the wizard.
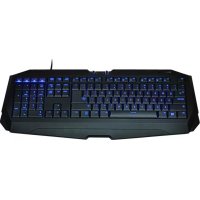
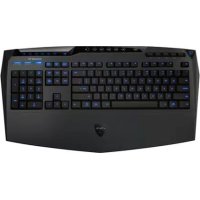
3. Keyboard Overview

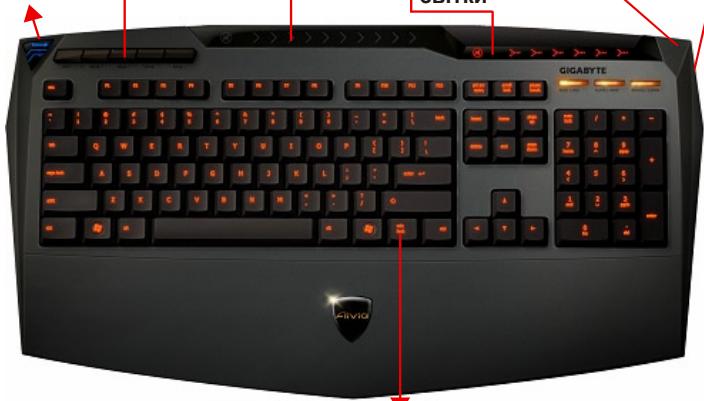
3
Touch and slide volume control area

2
Macro Key

4
Volume indicator
1
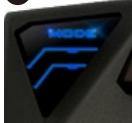
Profile Changer

6
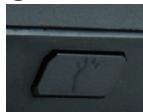
Backlight On/OFF switch

5
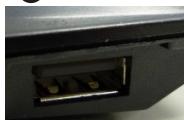
USB 2.0 HUB
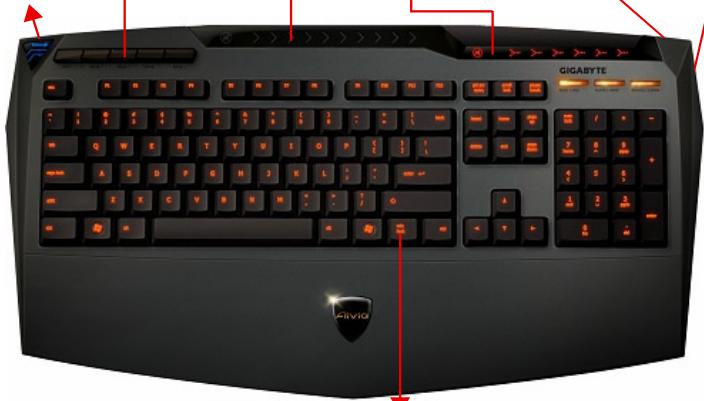

Win Luck
1 Profile Changer: Five colors to represent different profiles.
Tip
Red: mode 1, Green: mode 2, Blue: mode 3, Purple: mode 4, Light Blue: mode 5
2 Macro Keys: One profile mode is bundled with 5 programmable Macro hot keys.
Touch and slide volume control area: Built-in touch sensor with mute key and six levels of audio volume. Touching and sliding to control volume more smoothly and accurately.
Tip Keep sensor from far right or far left pressed, volume will increase or decrease linearly. (Sensitivity will be affected by environment static)
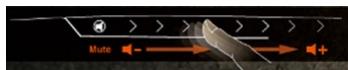
4 Volume indicator: LED light glows on as your finger moves.
USB 2.0 HUB
Backlight On/OFF switch: Press this button to switch backlight On/OFF
Win Luck: Prevent Windows key from interrupting game operation.
4. Software Ghost™ Engine Overview
4.1 Main Panel
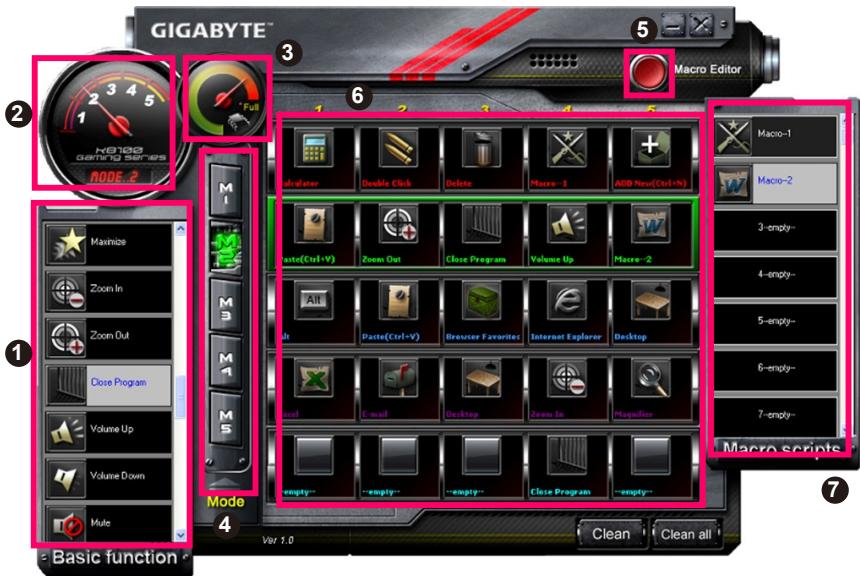
Basic Function
2 Profile Indicator
3 Memory Status (25 levels)
4 Profile Indicator
Macro Editor Button
Macro Hot Keys Monitor
Macro Scripts
4.1.1 Main panel Setting
Basic Function
Collects some regular functions for gamers as Forward scrolling, Double click and multimedia hot keys. You can directly drag one icon and drop it into Macro Hot Keys Monitor to set a Macro hot key.
2 Profile Indicator
Five different colors of Profile Changer represent each mode in use.
Memory Status (25 levels)
Display the amount of Macro hot keys in use.
4 Profile Indicator
The function is the same as item two.
Macro Editor Button
Press this button to boot Macro Editor. Edit advanced Macro sets.
Macro Hot Key Monitor
Display all status of Macro hot keys.
7 Macro Scripts
Display all status of Macro Scripts.
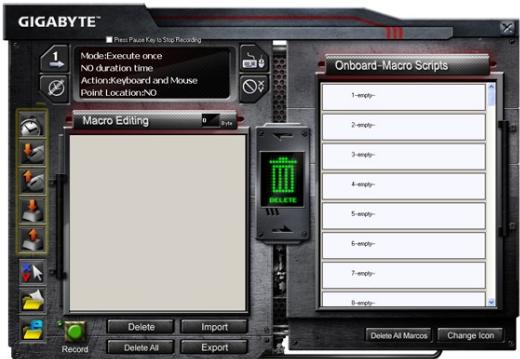
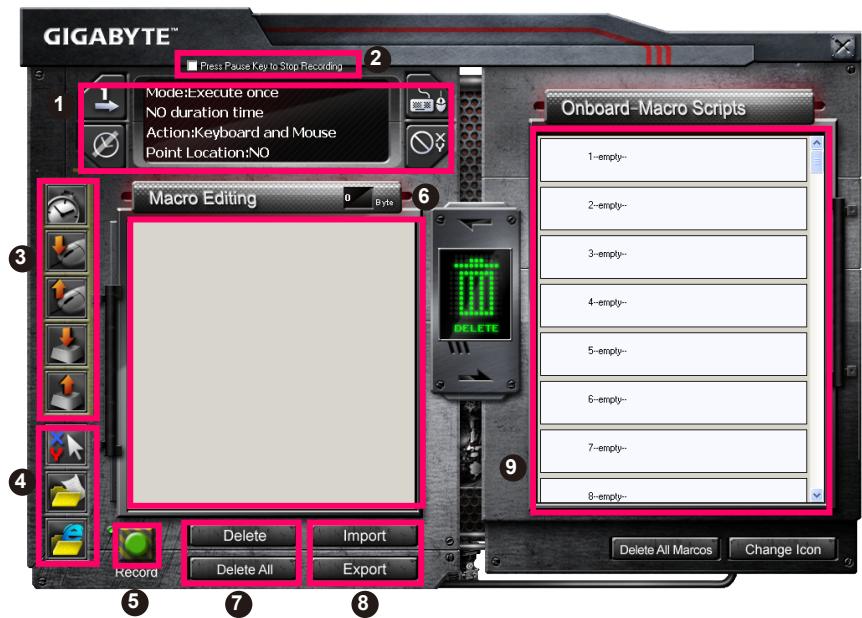
4.2 Macro Editor
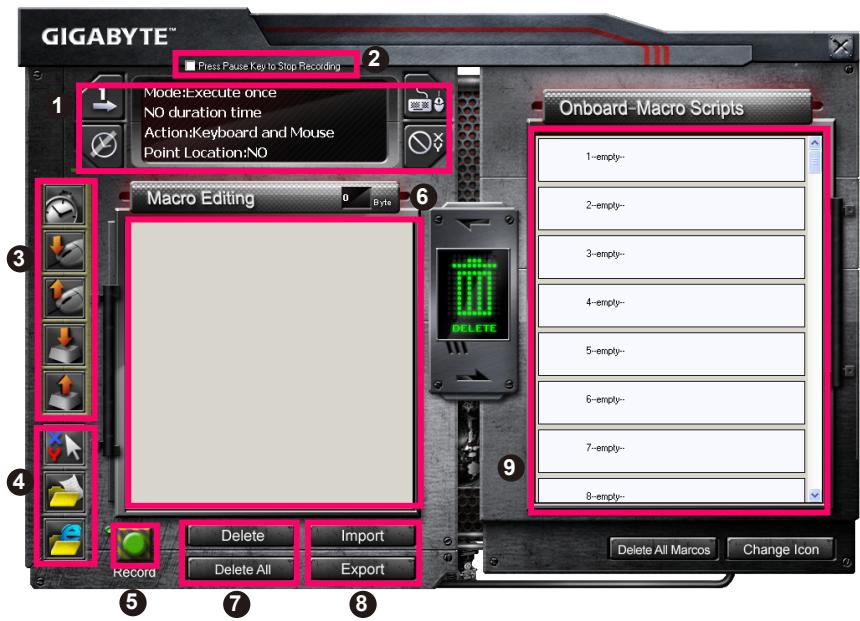
Macro Setting Panel
Press Pause Key to Stop Recording
3 Quick-insert Bar
4 Special Command
5 Record/Stop Button
Macro Editing Note
Macro Editing Note Delete/Delete All
Macro Editing Note File Import/Export
9 Onboard Macro Scripts
4.2.1 Macro Editor setting
Macro setting panel
- Macro Play Setting:

Execute Once

Loop Mode

Release to Stop
- Delay Time Setting:

Auto Detect Delay Time

Fix Time

No Delay Time
Device Recording Choice

Keyboard and Mouse

Keyboard
- Cursor Point Recording Depend on Device Recording Choice)

Location: Yes

Location: No
Press Pause key to stop recording
Helps you stop Macro recording easily and conveniently.
Quick-insert bar
Helps you further modify Macro Editing Note & Macro Script.
4 Special Command
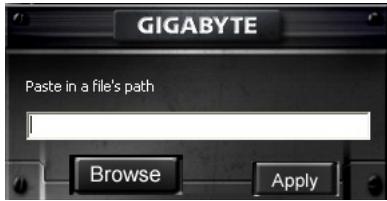
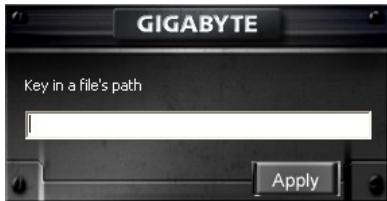
- Open a file
- Open a Web
Note
- These two special commands only support English address.
EX: www.google.com; C:\Program Files\GIGABYTE\K8100\GhostK.exe
- When pressing a Macro hot key with special command, please minimize the Ghost™ Engine firstly.
When you drag the folder icon or IE icon to drop into Macro Editing note, you have two advance setting options.
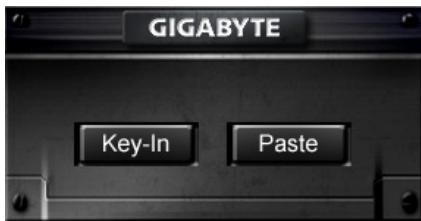
Key-In: Please type in the desired folder path/website address directly.

- Paste:
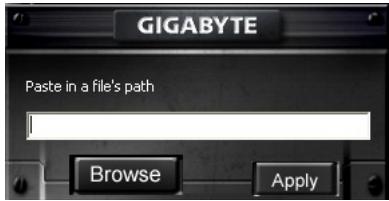
(1) Open a file: You can press the Browse button to appoint a file address.
(2) Open a Web: Paste your favorite website address directly.
Record/Stop Button
Press this Button to Start / Stop Macro Recording.
Macro Editing Note
Display what Macro you are editing right now
7 Delete/Delete All
- Delete: delete one or multi- commands
- Delete All: delete all commands in Macro Editing Note
3 Import/Export
Call back a saved Macro Editing Note or back up a note
Onboard Macro Scripts
Drag an edited Macro Editing Note and drop it into a Script. Ghost™ engine will store it on board automatically.
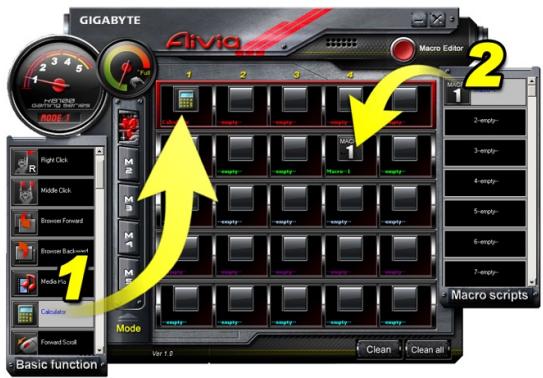
4.3 GhostTM Engine Drag & drop user interface
The design concept of this application is based on Avatar system, just like in games.
Featuring easy to use drag-and-drop technology, it allows you to perform all actions in
GhostTM Engine application program. Simply drag the icon of specific functionality
you'd like to apply and drop it onto the intended keyboard Macro hot keys to finish assignment.
4.3.1 Main Panel
Drag one icon (Ex: Excel) from Basic function then drop in Profile one- Macro one.
When finish dropping icon, please close or minimize the Ghost™ Engine. The Macro hot key is then set up successfully.
Drag one icon (Ex: Macro One) from Macro Scripts then drop in Profile two- Macro four. When finish dropping icon, please close or minimize the Ghost™ Engine. The Macro hot key is then set up successfully.
4.3.2 Macro editor
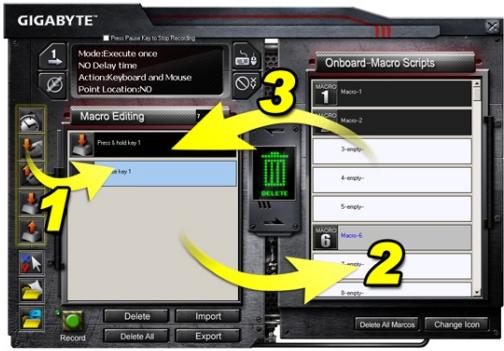
Before editing Macro key, please set up the command of Macro Setting Panel, then press Record button to start Macro Editing.
- After you finish editing the Macro Editing Note, you can drag& drop icons from the Quick Insert Bar to further modify it. For the special command of folder and website address, please select one icon to drag& drop into Macro Editing Note setting.
- When you finish a Macro setting process, please keep pressing the left button in the Macro Editing Note to drag & drop into Macro Scripts to define a Macro script. System will automatically name a number code for this new Macro script. You can rename and change icon for a script conveniently.
- If you want to modify a Macro script, please drag& drop from Macro Scripts to Macro Editing Note to edit.
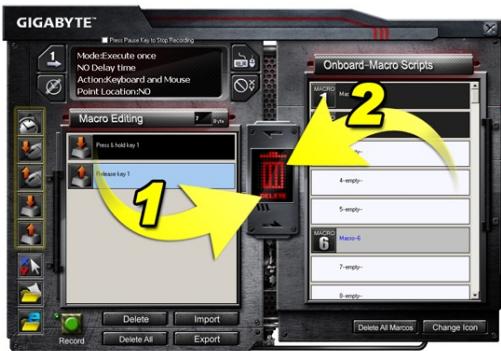
4.3.3 Delete a Macro Editing Note or Micro Script
- You can press Delete All button or drag& drop into trash bin to delete all commands of Macro Editing Note. (With Shift or Ctrl button of keyboard to multi-delete commands.)
- Drag& drop one Macro script directly into trash bin.
1. 簡介
1-1 產品簡介
2-1 Hardware Installation
2-2 Software Installation
BSP: www.google.com; C:\Program Files\GIGABYTE\K8100\GhostK.exe
EX: www.google.com; C:\Program Files\GIGABYTE\K8100\GhostK.exe
- Ao premir una tecla directa de Macro commando especial, minimize primeiramente o Ghost™ Engine.)
EX: www.google.com; C:\Program Files\GIGABYTE\K8100\GhostK.exe
EJ: www.google.com; C:\Program Files\GIGABYTE\K8100\GhostK.exe
- Cuando pulse una tecla caliente Macro con un dato especial, minimice primo Ghost™ Engine.)
4.3.1 Panel Principal
OTo6paXeHne CoCToHnB BCEx MaKpocSeHapneB.
4.2 PeJaKTop MaKpocOB
1 NaheIb HactpoiKn MaKpocOB
OctaHOBnTb 3aIIncb KhoNkoI Nay3a.
3 PaheIb 6bICTpoB BCTaBKN
Oco6aKaKoMaHa
5 Khonka 3aunCb/CTon
6БлOKHOT peДAKTopa MaKpoca
6IbOKhot peaKTopa MaKpoca: YdaJIITb/YdaJIITb BCE.
8Блokhot peaKTopa MaKpOca:Зкпopt ФаИma/Импор ФаИla
KnaBnataPbIe MaKpOcSeHapnn
4.2.1 Hac trokne peaKtopa MaKpocob
1 PanaheJIb HacTpoiKmMaKpocOB
- Hactpoia 3anycka MaKpoca:

OndokpatHo

Lukluecke

OTnyCTnTbДЛЯ OCTAHOBKIN
- HactpoJaBpeMeHn 3aepKKn:


AByoOnpeDeIeHneBpeMeHn3aepxKn
ФИКСИРОВАнhoe Время

Be3 3aedeppKKn
BbI6Op yCtpoNCTBa 3aNNs

KlavaIpyaMbIb

Kləbɪnʌtɪya
- 3aINCb noLOXeHn Kycpcopa (B 3aBncmOCTn OT BbIbopa yctpoiCTBa 3aINcN)

Пложени:Да

Пложжени:Нет
OCTaHOBntb 3aNNc b KhoNkoI I'ay3a
IcnoIb3yETc dIy yIO6HOn I npocToI ocTaHOBKn peaKtnpOBAHnMaKpOca.
3 PanaHeJIb «БbICTppaB BCTaBka»
HANP: www.google.com; C:\Program Files\GIGABYTE\K8100\GhostK.exe
7 ydaJIITb/YdaJIITb BCE
- YdaniNb: YdAnreT OndHy NJIH HeCKOJIbKO KOMaHn
- YdaJIntb BCE: YdaJIaIeT BCE KOMaHdbl B 6JIoKHOte peJaKTopa MaKpOca.
3 Umnpot/3Kcnopt
CoxpaHЯET INI NOKpbYBaET COXpAHHeHbI MaKpO B 6nokHOte peDaKTopa MaKpOca.
KnaBnAtypHbIe MaKpOcEHaPmN
Ipeetaune MaKPOC,OTpeaTIOBAAHbIB 6NoKHOte peaKTopa MaKpOca,B cUeHApn. GhostTM Engine coxpanHT ero B KlaBnaTpy aBtOMaTneCKn.
1-2 KomnjeKT noCTaBKn
6
KhONka BMNKaHHa
/BMUKaHHIiD
CBITK
5
USB 2.0 HUB

epemora y rpi
1 3mHa pexnMIBr: n'ayb KoblopB INI npedctabHeHpi3Hx npophiinib.
Пидазka
UepBoHn: pexm 1, 3eHeHn: pexm 2, fOny6n: pexm 3, fioJeToBn: pexm 4, CbITJIO-6JaKnTHn: pexm 5.
2 Makpo knaibi: Odn pexim - 5 nporpaMHnx rapaHx knaBiM makpocib.
3 Cechop i nnabHn peryIaTOp ryHocTi: B6yObaHn ceHcOp i3 B6yObaHOIO KHONKOIO KOHTpOJIIO 3ByKy i 1iCt b pIBHIB ryHocTi. KoHTpOJIb ryHocTi peRyJIIOeTbcra nnabHO i ToHNO.
ПидахаНатиckайтеснорьпаров aboВлію,шб 36iNbUnTN abo 3MeHUnTNучicть.(Чутлбсьбуde залжати BiД CTaTNKn HABKOnNshBOrO cepeDobuca)

4 Indikatop ryuhocti: npu pyci nalbza 3aorupntbcn Indikatop LED
USB 2.0 HUB
6 Khonka BMnKaHHa / BMnKaHHa nID CBiTKn: HATNCHITb cIO KHONKy dI nepeMnKaHHa nID CBiTkn
7 Iepemora y rpi: 3anobiraTe HataNcKaHHIO KnaBipn "Windows", uo6 He BtpyuaTncb y xiD rpi.
4. Ornay nporpaHoro 3a6e3neueHna GhostTM Engine
4.1 TogobHa naheIb

OCHOBHa yHKui
2 INdikaTop npophiinIB
3 CTan nam'rTi (25 pIBHb)
IндикаTop рекиму
KhoNKn "peaKaTOp MaKpociB
6Дисnetчep МakposiB rapaunx KnaBiiS
7 MakpocceHapii
4.1.1 Ochobhi HanaaHTyBaHHnaHeJI
Ba30BaФyHKcIa
O6'edHy deaK 3buaHni FyHKuI dna rei MepiB, taKi npokpyKa Bpepe, noDbiHe KlikanHH i MylbTmEdiHi rapaHi kNaBiSi. Bu MoKeTe 6e3nocepEnbO nepeTaryn Ondhy IKoHky i NomicHTtN II y Dncnetep Makpocib rapaynx KnaBiI dny BCTaHOBJeHHra rapaHx KlaBiI MaKpocy.
2 IIndkaTop npophiJIIB
I'raTb pi3nHex KOIbOpI B npoPio, kI ppeCTaBneHi dIra BIKOpNCtAHH
3 CtaH nam'rti (25 pibHB)
Ioka3ye kInbkiCTb 3aiaHnX rapaunx MaKpOKnabi.
1HdNkaTop npophiJIIB
3 MeHIO uBnIkoI BCTaBKn
2 3K5:5K5:5K5:5K5:5K5:5K5:5K5:5K5:5K5:5K5:5K5:5K5:5K5:5K5:5K5:5K5:5K5:5K5:5K5:5K5:5K5:5K5:5K5:5K5:5K5:5K5:
- 儒氏:元哉山是泽贝T/默SAHITJFJFJFJFJFJFJFJFJFJFJFJFJFJFJFJFJFJFJFJFJFJFJFJFJFJFJFJFJ
- 陳國國:
(1) 用一用:人用之,不以一用之。
(2) 甲:人:
⑤ 卜/扌Jitb
ÖR: www.google.com; C:\Program Files\GIGABYTE\K8100\GhostK.exe
EX: www.google.com; C:\Program Files\GIGABYTE\K8100\GhostK.exe


- Aivia Gaming Keyboard
- User's Manual
- Overview
- 1-1 Introduction
- 1-2 Package Contents
- 1-3 System Requirements
- Installation
- 2-1 Hardware Installation
- 2-2 Software Installation
- Keyboard Overview
- Software Ghost™ Engine Overview
- Main Panel
- Main panel Setting
- Basic Function
- Profile Indicator
- Memory Status (25 levels)
- Macro Editor
- Macro Editor setting
- Macro setting panel
- Press Pause key to stop recording
- Quick-insert bar
- Special Command
- Note
- Record/Stop Button
- Macro Editing Note
- Delete/Delete All
- Import/Export
- Onboard Macro Scripts
- GhostTM Engine Drag & drop user interface
- Main Panel
- Macro editor
- Delete a Macro Editing Note or Micro Script
- 簡介
- 1-1 產品簡介
- Panel Principal
- PeJaKTop MaKpocOB
- Hac trokne peaKtopa MaKpocob
- PanaheJIb HacTpoiKmMaKpocOB
- OCTaHOBntb 3aNNc b KhoNkoI I'ay3a
- PanaHeJIb «БbICTppaB BCTaBka»
- ydaJIITb/YdaJIITb BCE
- Umnpot/3Kcnopt
- KnaBnAtypHbIe MaKpOcEHaPmN
- 1-2 KomnjeKT noCTaBKn
- Пидазka
- Ornay nporpaHoro 3a6e3neueHna GhostTM Engine
- TogobHa naheIb
- Ochobhi HanaaHTyBaHHnaHeJI
- Ba30BaФyHKcIa
- IIndkaTop npophiJIIB
- CtaH nam'rti (25 pibHB)
- MeHIO uBnIkoI BCTaBKn
- ⑤ 卜/扌Jitb
Brand : GIGABYTE
Model : AIVIA K8100
Category : Keyboard