
COMFORT 112 - Headphones BLAUPUNKT - Free user manual and instructions
Find the device manual for free COMFORT 112 BLAUPUNKT in PDF.
| Product type | Wireless headset (digital stereo system) |
| Brand | Blaupunkt |
| Model | COMFORT 112 |
| Transmitter dimensions | ∅ 70 x 29 mm |
| Headphone weight (without batteries) | Approx. 205 g |
| Transmitter weight | Approx. 50 g |
| Headphone power supply | 2 AAA 1.5 V alkaline batteries (battery life ~20 h) |
| Transmitter power supply | Rechargeable battery 3.7 V / 400 mAh (battery life ~6 h) |
| Transmission | 2.4 GHz digital wireless |
| Range | Up to 30 meters (adjustable LO/HI) |
| Speakers | 40 mm diameter, dynamic circum-aural type |
| Frequency response | 20 Hz – 21,000 Hz |
| Impedance | 16 ohms |
| Sound pressure level | 101 dB ± 3 dB |
| Transmitter connectivity | 3.5 mm stereo jack, Mini-USB (charging and audio) |
| Included accessories | Carrying case, USB cable, 3.5 mm audio cable, RCA adapter, 6.3 mm adapter, 2 AAA batteries |
| Maintenance | Clean with a soft, dry cloth; do not use solvents |
| Safety | Moderate volume to preserve hearing; do not use in dangerous situations; protect from liquids and shocks |
| Replaceable parts | AAA batteries (headphone); transmitter battery not replaceable |
| Warranty | Manufacturer's warranty within the EU (see www.blaupunkt.com) |
| Operating temperature | 0 °C to 60 °C |
Frequently Asked Questions - COMFORT 112 BLAUPUNKT
User questions about COMFORT 112 BLAUPUNKT
0 question about this device. Answer the ones you know or ask your own.
Ask a new question about this device
Download the instructions for your Headphones in PDF format for free! Find your manual COMFORT 112 - BLAUPUNKT and take your electronic device back in hand. On this page are published all the documents necessary for the use of your device. COMFORT 112 by BLAUPUNKT.
USER MANUAL COMFORT 112 BLAUPUNKT
Comfort 112 Wireless
1 031 105 002
Bedienungsanleitung
Operating instructions
Mode d'emploi
natural_image
Black and white photo of a blue Superintuit with charging case (no visible text or symbols on the headset body)www.blaupunkt.com

Comfort 112 Wireless Headphone System....13
Safety notes and general information....14
Cleaning notes 14
Disposal notes 14
Scope of delivery 15
Product overview 15
Charging the battery in the transmitter....16
Inserting batteries in the headphones and replacing them....17
Connecting the transmitter to an audio device....18
Putting on the headphones 18
Operating the headphone system....19
Adjusting the range of the transmitter 19
Switching off the headphone system....19
Connecting the headphones with the transmitter....20
Storing and transporting the headphone system....20
Fault removal 21
Warranty 22
Declaration of conformity....22
Technical data....22
Comfort 112 Wireless Headphone System
The Comfort 112 Wireless is a wireless digital stereo headphone system for a listening experience without interfering cables. The two-component system consists of wireless headphones and a transmitter connected with the audio source. Headphones and transmitter are already set to the same frequency in the delivery condition and can be used immediately. The jack socket and the USB port at the transmitter as well as the extensive accessories allow the connection to various audio/video devices. The sound transmission utilizes a 2.4-GHz connection in HiFi quality and is suitable for all types of audio and video applications. The driver units of the headphones measure 40 mm in diameter and ensure a high quality sound experience. The range of the transmitter of up to 30 metres offers a large freedom of movement. The transmitter can be used with several headphones at the same time.
Safety notes and general information
- Read these instructions carefully and completely before using the headphones.
- Using the headphones at a high volume over an extended period of time can result in permanent damage to your hearing. If you perceive auditory noises, reduce the volume or stop using the headphones.
- Do not use the headphones in situations in which the impaired perception of noises from the environment could lead to an accident, e.g. in traffic or during manual labour.
- Do not expose the headphone system to extreme temperatures, direct sunlight, high humidity or mechanical shock. Use the headphone system only in clean and dust-free locations.
- Switch the headphones and the transmitter off after use to save batteries and rechargeable batteries.
- Keep the headphone system and accessories out of reach of children.
- To avoid damages or deformations, do not drop the headphones and transmitter and do not place any heavy objects on the devices.
- Ensure that no liquid enters into the headphone system. The liquid can destroy the electronics and cause a short circuit.
- Do not make any changes or repairs to the headphone system and do not attempt to open up the headphones or the transmitter. It will immediately void the warranty.
- Wireless headphones can experience interferences from other radio systems.
Cleaning notes
- Use only a dry and soft cloth to clean the headphone system. Do not use any solvents or cleaning agents.
- If necessary, clean the plugs of the audio cable with a soft cloth. Dirty plugs can reduce the sound quality.
Disposal notes

Use the return and collection systems available to dispose of the old device.
Do not discard any batteries in the household trash; instead, return them to the corresponding collection sites.
Scope of delivery
The scope of delivery includes:
1 headphones
1 transmitter
1 transport case
1 USB cable
1 audio cable (with 3.5-mm jack plug)
1 audio adapter (3.5-mm jack socket to 2 cinch plugs)
1 audio adapter (3.5-mm jack socket to 6.3-mm jack plug)
2 alkaline batteries, size AAA with 1.5 V
1 operating instructions
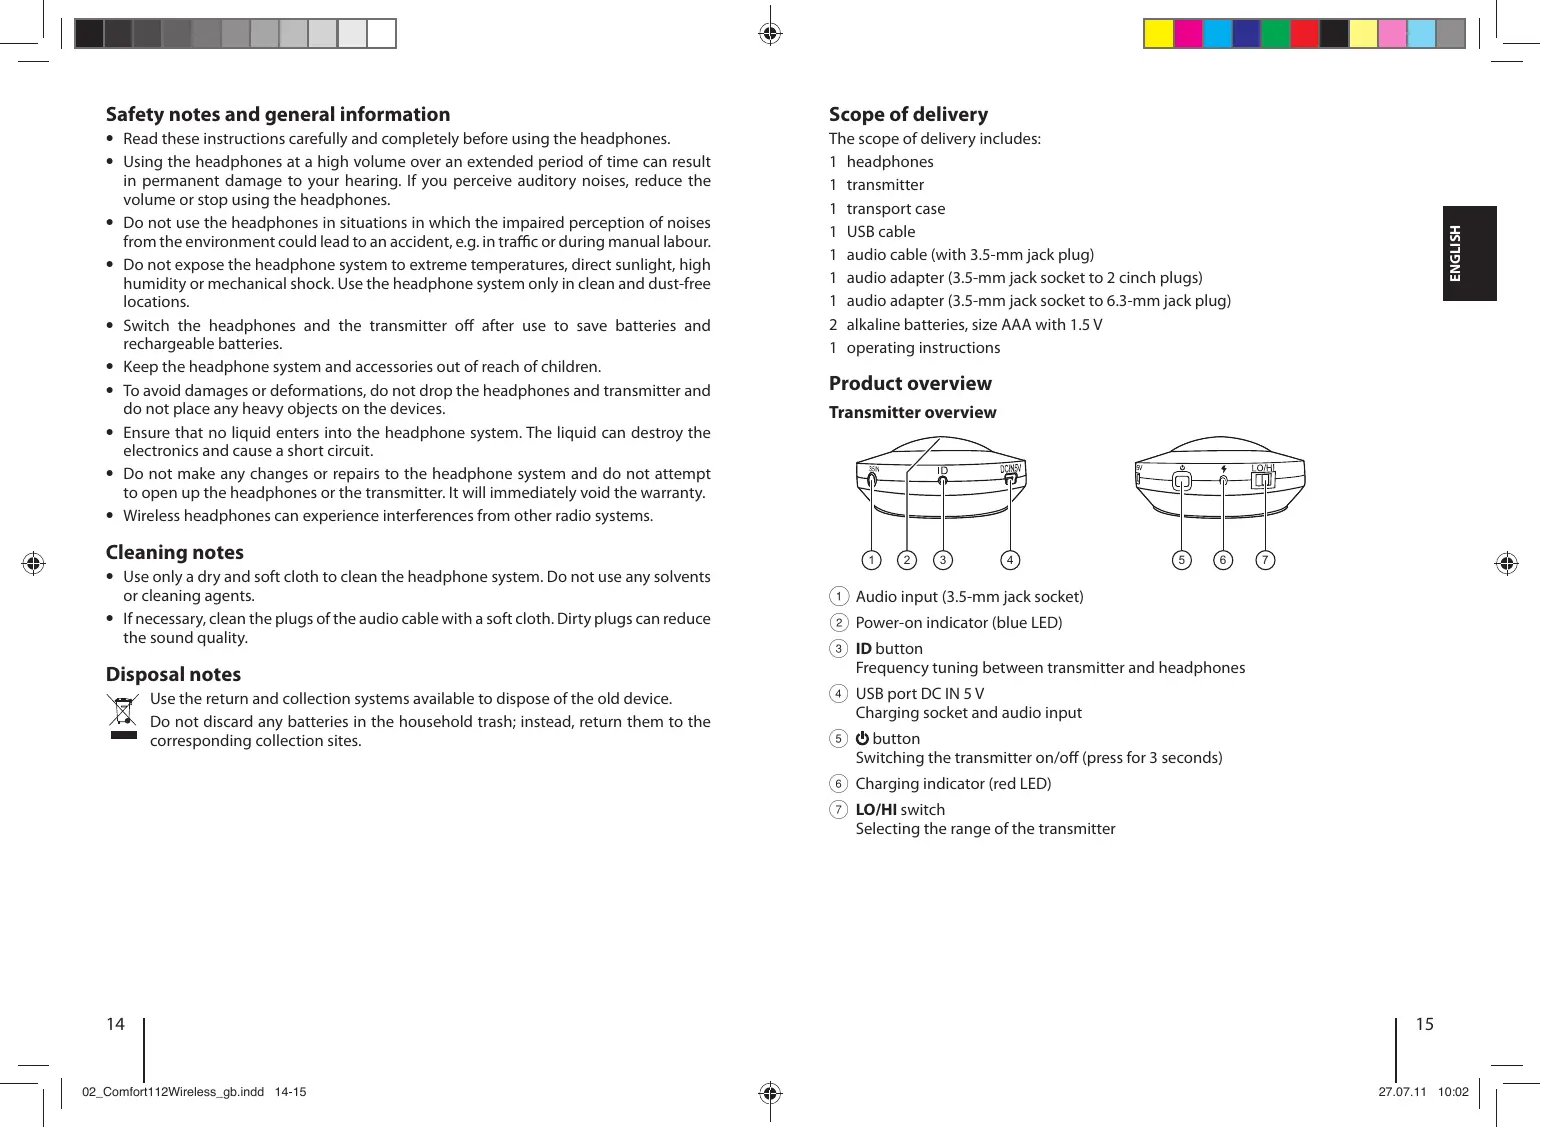
Product overview
Transmitter overview

① Audio input (3.5-mm jack socket)
② Power-on indicator (blue LED)
③ ID button
Frequency tuning between transmitter and headphones
④ USB port DC IN 5 V
Charging socket and audio input
⑤ ⏻ button
Switching the transmitter on/off (press for 3 seconds)
⑥ Charging indicator (red LED)
⑦ LO/HI switch
Selecting the range of the transmitter
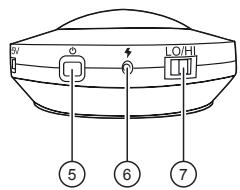
Headphones overview

⑧ Adjustable headphone band
⑨ Rotating earpieces
⑩ Battery compartment
⑪ button
Switching the headphones on/off (press for 3 seconds)
⑫ Ear cushion (left)
⑬ Ear cushion (right)
⑭ Power-on indicator (green LED)
Flashing: The headphones are searching for a transmitter Illuminated: The headphones are receiving a signal
⑮ PAIR button
Frequency tuning between transmitter and headphones
⑯ VOL + ▶ - control
Adjusting the volume of the headphones
Charging the battery in the transmitter
The transmitter is operated with a rechargeable battery. Charge the battery completely before its first use. The operating time is up to 6 hours.
Connect the USB cable with the USB port of the transmitter.
Connect the USB cable with the USB port of the computer. The battery can also be connected with the mains receptacle by using a USB mains adapter (not part of the scope of delivery).
The battery is being charged. The charging indicator lights red. After the completed charging process, the charging indicator goes out.
Notes:
- Charge the battery if the power-on indicator light becomes very weak.
- The battery should be fully charged if the transmitter is not used for an extended period of time.
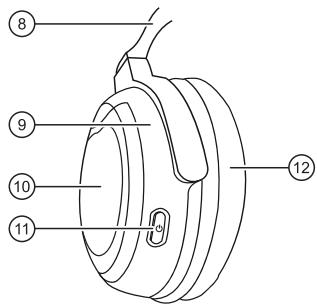
Inserting batteries in the headphones and replacing them
Use two AAA alkaline batteries for the headphones.
Switch off the headphones with the ⏻ button before replacing the batteries.
→ Push the cover of the battery compartment on the left earpiece down and fold it up to open the battery compartment.
Remove any spent batteries.
Insert the batteries. Observe the polarity markings in the battery compartment when you insert the batteries.
Close the cover of the battery compartment and push it up until it audibly engages.
Notes:
- The power consumption of the headphones is low. When using alkaline batteries, the operating time is approx. 20 hours.
- Replace the batteries if the power-on indicator is weakly lit or the sound becomes softer.
- Take the batteries out of the battery compartment if you do not use the headphones for an extended period of time.
- Never attempt to recharge non-rechargeable batteries.
- Batteries may not be deformed, short-circuited or thrown into a fire.
- Batteries may leak if used improperly. This creates an explosion or fire hazard. Remove spent batteries from the battery compartment.
Connecting the transmitter to an audio device
The transmitter can be connected to different audio devices, such as portable players, TV sets, stereo systems or computers.
Switch off the audio device before connecting the transmitter.
Connection to audio devices with jack socket
Connect the audio cable with the jack socket of the transmitter.
Connect the audio cable with the headphone jack of the audio device. If the audio device has a 6.3-mm headphone jack, use the supplied 3.5/6.3-mm audio adapter.
Connection to audio devices with cinch sockets
Connect the audio cable with the jack socket of the transmitter.
Plug the supplied cinch adapter onto the audio cable and connect the red cinch plug to the right channel (red) and the white cinch plug to the left channel (white) of the audio device.
Connection to audio devices with USB port
Connect the USB cable with the USB port of the transmitter.
Connect the USB cable with the USB port of the audio device.
Note:
If the transmitter is connected with a headphone jack and a USB port at the same time, the sound signal is transmitted via the headphone jack. In this case, the USB port is used to charge the battery in the transmitter.
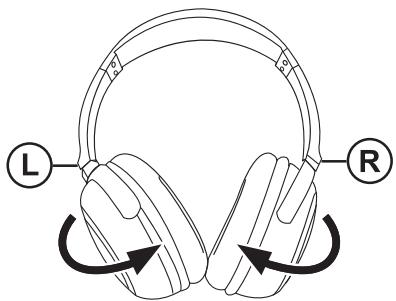
Putting on the headphones
For a good sound quality and a convenient fit, the headphones must be positioned perfectly.
Put on the headphones. When putting on the headphones, observe the markings L and R to identify the left and right earpiece.
Adjust the headphone band so that the ear cushions completely enclose the ear and the headphones rests comfortably on the head.
Operating the headphone system
To listen to music with the headphone system, proceed as follows:
Switch on the audio device and start the music playback.
Note:
Adjust the volume level at the audio device as high as possible without having a distorted sound. If the volume level is set too low, the sound quality may be impaired due to noise.
On the transmitter, hold the ⏻ button pressed for 3 seconds.
The transmitter switches on. The power-on indicator lights blue if the transmitter receives sound signals.
On the headphones, hold the ⏻ button pressed for 3 seconds.
The headphones switch on and the power-on indicator flashes green. The power-on indicator lights as soon as the headphones receive the sound signal from the transmitter.
Use the VOL + ▶ - control to adjust the volume of the headphones to the desired value.
Adjusting the range of the transmitter
You can adjust the range of the transmitter with the LO/HI switch. The maximum range between transmitter and headphones depends on the ambient conditions and the charging state of the battery.
Select the LO setting for a maximum range of up to 10 metres. - Or -
Select the HI setting for a maximum range of up to 30 metres.
Note:
With the HI setting, the power consumption is higher so that the operating time of the battery is reduced.
Switching off the headphone system
Switch off the headphone system after use to save the batteries and the rechargeable battery.
On the headphones, hold the ⏻ button pressed for 3 seconds.
The headphones switch off and the power-on indicator goes out.
On the transmitter, hold the ⏻ button pressed for 3 seconds.
The transmitter switches off and the power-on indicator goes out.
Note:
If the transmitter or the headphones do not receive a sound signal for more than 10 minutes, the headphone system automatically switches off.
Connecting the headphones with the transmitter
Headphones and transmitter are already connected with each other in the delivery state. If you want to use different headphones at the transmitter, you must connected these headphones with the transmitter.
Switch on the audio device connected with the transmitter and start the music play-back.
Switch on the transmitter with the ⏻ button.
The power-on indicator of the transmitter lights blue.
On the transmitter, hold the ID button pressed for 3 seconds with the tip of a ball-point pen.
The power-on indicator of the transmitter flashes quickly.
Switch on the headphones with the ⏻ button.
The power-on indicator of the headphones flashes slowly.
On the headphones, hold the PAIR button pressed for 3 seconds.
The power-on indicator of the headphones now flashes quickly.
After a few seconds, the headphones are automatically connected with the transmitter and both power-on indicators light.
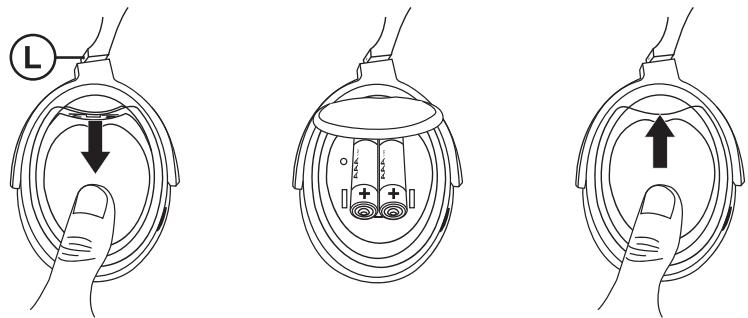
Storing and transporting the headphone system
You can store the headphones, the transmitter and the accessories in a space-saving way using the supplied transport case and transport it safely. For this purpose, the headphones are quipped with rotating earpieces.
natural_image
Line drawing of a pair of headphones with labeled terminals L and R, showing head rotation arrows (no text or symbols beyond labels)Rotate the earpieces by 90° before placing the headphones in the transport case.
Note:
The earpieces can be rotated in one direction only. Rotating in the wrong direction may damage the headphones.
Fault removal
Sound interferences occur or no sound can be heard
- The battery in the transmitter is too weak and must be charged.
- Replace spent batteries in the headphones with new ones.
- Check the cable and plug connections between transmitter and audio source. Ensure that all devices are switched on and the music playback is not interrupted.
- If the volume level at the audio source is set too low, the sound quality may be impaired due to noise. Increase the volume of the audio source. If the sound is distorted, reduce the volume of the audio source.
- Change the volume at the headphones.
- Adjust the headphone band so that the ear cushions completely surround the ears.
- Reduce the distance between transmitter and headphones. The greater the distance, the higher the risk of sound interferences.
- The sound signal can be impaired through metal objects. Remove obstacles between headphones and transmitter or change your location.
The power-on indicator at the transmitter flashes or does not light
- The battery is too weak and must be charged.
- Check the cable and plug connections to ensure that the audio source is properly connected.
- Ensure that the transmitter and the audio source are switched on and the music playback is activated.
- The transmitter automatically switches off after a 10-minute interruption of the sound signal. Start the music playback and switch the transmitter back on.
The power-on indicator at the headphones flashes or does not light
- Replace spent batteries with new ones.
- Check the cable and plug connections between transmitter and audio source. Ensure that all devices are switched on and the music playback is not interrupted.
- Ensure that the distance between headphones and transmitter is less than 30 metres. Check the setting on the LO/HI switch for the range. The reception can be impaired through metal objects, even at a shorter distance.
- The connection between headphones and transmitter is impaired. Switch the headphones off and on again.
- The headphones are not correctly paired with the transmitter. Adjust the frequency of the headphones to the frequency of the transmitter.
Warranty
We provide a manufacturer's warranty for products bought within the European Union. For devices purchased outside the European Union, the warranty terms issued by our respective responsible domestic agency are valid. The warranty terms can be called up from www.blaupunkt.com.
Declaration of conformity
The Blaupunkt AudioVision GmbH & Co. KG declares that this product complies with the basic requirements and the other relevant regulations of the directive 1999/5/EC. The declaration of conformity can be found on the Internet under www.blaupunkt.com.
Technical data
| General data | |
| Modulation system | digital, wireless transmission |
| Carrier frequency | 2.4 GHz |
| Range | up to 30 metres |
| Temperature range | 0 °C to 60 °C |
| Transmitter | |
| Audio connection | 3.5-mm stereo jack socket, 5-pin mini-USB |
| Voltage supply | battery, 3.7 V, 400 mA, non-replaceable |
| Operating time | up to 6 hours |
| Weight | approx. 50 g |
| Dimensions (D x H) | ∅ 70 x 29 mm |
| Headphones | |
| Type | dynamic, open, circumaural |
| Driver units | ∅ 40 mm |
| Frequency range | 20 Hz – 21,000 Hz |
| Impedance | 16 ohm |
| Sound-pressure level | 101 dB ± 3 dB |
| Voltage supply | 2 x 1.5-V alkaline batteries (size AAA) |
| Operating time with alkaline batteries | approx. 20 hours |
| Weight without batteries | approx. 205 g |
Subject to change!
Table des matières

⑯ Régulateur VOL + ▶ -
natural_image
Line drawing of a pair of headphones with labeled terminals L and R, showing head rotation arrows (no text or symbols beyond labels)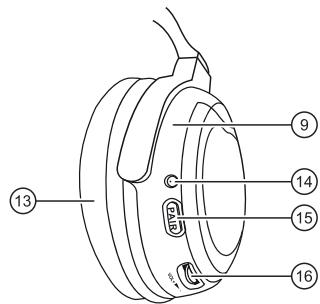
natural_image
Line drawing of a pair of headphones with labeled terminals L and R, showing head rotation arrows (no text or symbols beyond labels)
natural_image
Line drawing of a hand holding a device with two batteries and a dome-shaped base (no text or symbols)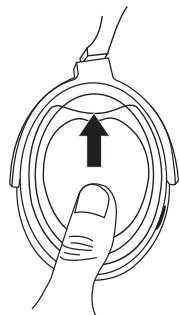
natural_image
Diagram of a hand holding a circular device with an upward arrow, no text or symbols present
natural_image
Line drawing of a hand holding a battery with two charging elements (no text or symbols)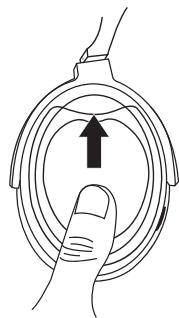
natural_image
Diagram of a hand pressing down on a circular component with an upward arrow (no text or symbols)natural_image
Line drawing of a pair of headphones with labeled terminals L and R, showing head rotation arrows (no text or symbols beyond labels)
natural_image
Line drawing of a pair of headphones with labeled terminals L and R, showing head rotation arrows (no text or symbols beyond labels)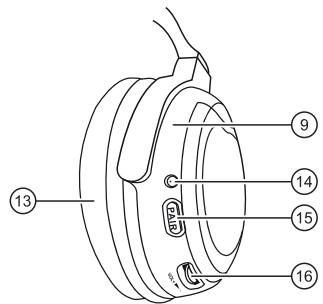
natural_image
Line drawing of a pair of headphones with labeled buttons (L and R) and directional arrows indicating rotation or motion (no text or symbols beyond labels)
natural_image
Line drawing of a pair of headphones with labeled terminals L and R, showing head rotation arrows (no text or symbols beyond labels)
natural_image
Line drawing of a pair of headphones with labeled terminals L and R, showing head rotation arrows (no text or symbols beyond labels)

natural_image
Line drawing of a pair of headphones with labeled terminals L and R, showing head rotation arrows (no text or symbols beyond labels)Federal Communication Commission Interference Statement
This equipment has been tested and found to comply with the limits for a Class B digital device, pursuant to Part 15 of the FCC Rules. These limits are designed to provide reasonable protection against harmful interference in a residential installation.
This equipment generates uses and can radiate radio frequency energy and, if not installed and used in accordance with the instructions, may cause harmful interference to radio communications. However, there is no guarantee that interference will not occur in a particular installation. If this equipment does cause harmful interference to radio or television reception, which can be determined by turning the equipment off and on, the user is encouraged to try to correct the interference by one of the following measures:
- Reorient or relocate the receiving antenna.
- Increase the separation between the equipment and receiver.
- Connect the equipment into an outlet on a circuit different from that to which the receiver is connected.
- Consult the dealer or an experienced radio/TV technician for help.
FCC Caution: To assure continued compliance, any changes or modifications not expressly approved by the party responsible for compliance could void the user's authority to operate this equipment. (Example - use only shielded interface cables when connecting to computer or peripheral devices).
This device complies with Part 15 of the FCC Rules. Operation is subject to the following two conditions:
(1) This device may not cause harmful interference, and
(2) This device must accept any interference received, including interference that may cause undesired operation.
FCC Radiation Exposure Statement
This equipment complies with FCC RF radiation exposure limits set forth for an uncontrolled environment. This equipment should be installed and operated with a minimum distance of 20 centimeters between the radiator and your body.
This transmitter must not be co-located or operating in conjunction with any other antenna or transmitter.
The antennas used for this transmitter must be installed to provide a separation distance of at least 20 cm from all persons and must not be co-located or operating in conjunction with any other antenna or transmitter.