
5IS69760 - Headphones BLAUPUNKT - Free user manual and instructions
Find the device manual for free 5IS69760 BLAUPUNKT in PDF.


| Product Type | Over-Ear Wireless Headphones |
| Brand | Blaupunkt |
| Model | 5IS69760 |
| Driver Size | 40 mm |
| Frequency Response | 20 Hz - 20 kHz |
| Impedance | 32 Ω |
| Bluetooth Version | 5.0 |
| Wireless Range | 10 m |
| Battery Type | Lithium-ion rechargeable |
| Battery Capacity | 300 mAh |
| Charging Time | 2 hours |
| Playback Time | Up to 20 hours |
| Active Noise Cancellation | Yes |
| Built-in Microphone | Yes |
| Controls | Volume, track skip, playback, ANC toggle |
| Foldable Design | Yes |
| Weight | 230 g |
| Dimensions (folded) | 190 x 170 x 80 mm |
| Material | Plastic, leatherette ear pads |
| Cleaning Instructions | Wipe with a soft dry cloth |
| Safety Warnings | Do not use at high volume to prevent hearing damage; keep away from moisture |
| Replacement Parts | Ear cushions, charging cable |
Frequently Asked Questions - 5IS69760 BLAUPUNKT
User questions about 5IS69760 BLAUPUNKT
0 question about this device. Answer the ones you know or ask your own.
Ask a new question about this device
Download the instructions for your Headphones in PDF format for free! Find your manual 5IS69760 - BLAUPUNKT and take your electronic device back in hand. On this page are published all the documents necessary for the use of your device. 5IS69760 by BLAUPUNKT.
USER MANUAL 5IS69760 BLAUPUNKT
Instructions for installation and use
Extractor hood
5IS66751/5IS69751/5IS66760/5IS69760
Content
Structure....1
Specification....1
Installation....2
Function Operation....5
Attentions....7
Maintenance....8
Common faults and solutions....9
Foreword
Dear Customers,
Thank you for choosing our range hood. Please read the instruction manual carefully before using. It introduces the range hood's function, characters, installation, maintenance and etc. Please keep this manual with purchase invoice carefully for checking in the future.
(Pictures in the manual are for reference only. Please refer to the real product)
Structure

Specification
| Rated Voltage | 230V |
| Rated Power Frequency | 50Hz |
| Total Power | 253W |
| Motor | Single |
Note: All specifications are subject to the actual product.
Installation
1. Installation
Do not contact the steel and wires inside the wall to avoid electric shock.

The range hood must be earthed. It has a 3-pin plug. The plug must be connected to a socket with earthing. The earthing provides an electrical circuit to avoid electric shock in case of electricity leakage.
Please make sure the electricity supply system
Make sure the electricity supply system in your home (current, voltage, connecting wires) can meet the requirements of the range hood's normal supply load.
Do not use high-capacity fuses in the electrical circuit. Select the correct ones as required on the rating label.
2. Preparation and confirmation before installation
Wall strength: The wall where the range hood is placed must be hard enough to bear the weight of the range hood.
Mounting height: The suitable mounting height is 650-750mm above the cooking stove. The actual installation height depends on the kitchen layout and the user's height. The installation instructions for the gas stove provide the suitable installation distance; please take it into consideration.
Mounting height: The suitable mounting height is 650-750mm above the cooking stove. The actual installation height depends on the kitchen layout and the user's height. The installation instructions for the gas stove provide the suitable installation distance; please take it into consideration.
Mounting height: The suitable mounting height is 650-750mm above the cooking stove. The actual installation height depends on the kitchen layout and the user's height. The installation instructions for the gas stove provide the suitable installation distance; please take it into consideration.

3. Installation hanger
Measure the installation height. Mark the position of the hanger on the wall. Drill holes for fixing the hanger. Punch plastic expansion bolts into the holes. Fix the hanger.


Hanger installation 2
4. Product installation (single hood)
Aim at the hanger and hang the range hood up on the wall. Connect one end of the exhaust pipe (diameter 153mm) to the exhaust hole of the range hood and the other end to the air outlet.

Note: Make sure the range hood is hanging vertically and horizontally. Do not hang it in a tilted way.


5. Product installation (double hoods)
Loose screws. Aim at the hanger and hang the range hood on the wall. Pull the upper hood to the proper position. Mark the position of the upper hood screw holes on the upper side of the wall. Put the upper hood back. Make the position of the upper hanger side holes. Mark the position of the two middle holes of the upper hanger. Put down the range hood. Drill holes on the markings. Insert plastic expansion bolts. Fix the upper hanger. Install the exhaust pipe on the exhaust outlet. Hang up the range hood. Connect the exhaust pipe to the air outlet of the kitchen. Pull the upper hood upwards and fix the side holes with screws.

6. Exhaust pipe connecting to the wall outside
The other end of the exhaust pipe shall be connected to the flue or the hole in the outside wall (diameter of the hole shall be 85mm).
Flue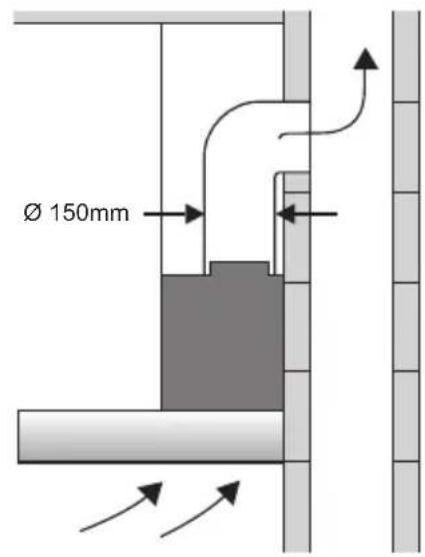
Outside wall Direct exhaust
7. Confirmation of installation
After installation, connect to the power supply and turn on the range hood. Check if all functions of the range hood are working normally; no abnormal vibration and no resistance to the leaves of the air outlet.
Function Operation
This cooker hood is operated with a gesture control and a feather touch control panel.


Touch control:
■ Place your finger on the “①” button, the lights on the control panel will come on and the cooker hood is now in stand-by mode. ■ Place your finger one more time, the cooker hood will be turned off. ■ Touch the “ ” button, the cooker hood will start operating on LOW speed. ■ Touch the “ ” button, the cooker hood will start operating on MEDIUM speed. ■ Touch the “ ” button, the cooker hood will start operating on HIGH speed. ■ Touch the “💡” button, the lights will turn on. Repeat this action, the lights will turn off.
■ Touch the “☐” button for 3 seconds. Wind wheel will run 9 minutes after heating working. Cleaning will be finished in 1 minute. ■ Long touch the “✿” button for 5 seconds in stand-by mode. The gesture control function will be locked. Repeat this action, it will be turned on.
Gesture control:
Gesture control is the ability to recognize and interpret movements of the human body in order to interact with and control a PCB system without direct physical contact. Which can avoid poor touch caused by oil/grease on hand. Put your hand up in front of the sensor area, reasonable distance is: 50mm, then start to control cooker hood by hand gesture:
From left to right: the cooker hood will start operating on LOW speed, light will be turned on.
Repeat same gesture: the cooker hood will switch to MEDIUM speed and HIGH speed.
From right to left: the cooker hood will start operating on DELAY mode.
Repeat same gesture: the cooker hood will switch off.
Auto-Clean
A unique "Auto-Clean" function has been provided in this cooker hood.
This cooker hood comes equipped with an oil collector tray. During cooking, the excess oil and dirt which gets sucked into the cooker hood gets drained into this oil collector.
However, over the time, some traces of stubborn grease and oil can get stuck inside the cooker hood.
In order to eliminate this stubborn grease and clean the cook hood from inside, we have designed this unique feature.
This new generation auto-clean function works with the help of a specially designed heating element fixed within the hood.
Please make sure that the cooker hood is in stand-by mode. Now touch the "Auto-Clean" button on the panel. A reverse timer of 10:00 minutes will get activated and the light for auto-clean will start blinking.
After the special heater has worked for 9 minutes, the fan will automatically start operating at low speed for the remaining 1 minute.
Most of the grease present within the cooker hood will get evaporated and blown out of the air-outlet. Any remaining grease will get drained out into the oil collector tray, located at the back of the filter.
The auto-clean function will stop operating at the end of 10 minutes.
Wait for a moment and then carefully remove the oil collector tray ensuring that you do not spill the grease.
Drain the collected grease into a sink and clean the oil collector tray with a soft cloth.
Fix the oil collector tray back at its place by sliding it in the rails at both ends. Ensure that the tray is fixed properly.
Your cooker hood is clean as new from inside now.
Delay
A unique "Delay" shut-off function has been provided in this cooker hood. Once the cooking is over, instead of switching off the appliance, touch the "ON/OFF" button or put your hand up in front of the sensor area and move from right to left. A reverse timer of 3 minutes will get activated and the cooker hood will shut itself off after the end of these 3 minutes. If you touch the "ON/OFF" button or move your hand from right to left twice, the cooker hood will be turned off at once.
Attention
■ Voltage and frequency must comply with the requirements of the product. Supply socket must have reliable earthing. ■ Make sure the installation of the product is not connected to the steel and wires of the wall inside in order to avoid electric shock. ■ The wall must have sufficient strength to support the weight of the range hood. ■ Range hood shall be installed in horizontal level. ■ The distance between exhaust hole and air outlet on the wall shall be less than 1.5m. When installing the exhaust pipe, the air outlet shall not be too high to avoid oil flowing backwards. ■ Range hood shall be used when gas or other fuels are burning. The room must be well ventilated. ■ Do not bark range hood directly. Gas burning without cooking or burning on the pan is forbidden. ■ The air exhaust from range hood should not be exhausted to the flue of burning gas or other fuels. ■ In case the power cord is damaged, it shall be repaired by professional personnel or sent back to the appointed maintenance centre of our company for repair. ■ Power supply must be cut off before changing lamps. New lamps must be the same specification as the current ones.
Clean the oil on the filter regularly. Also clean the oil on the wind wheel and volute or other components if necessary. If you do not follow the instructions in the manual to clean the range hood, it might cause a fire hazard. Wear rubber gloves when cleaning the range hood to prevent injury from metal parts. Be careful when cleaning the impeller to prevent deformation or rubbing off the counterweight, which might affect the balance and cause noise and vibration. Strictly prevent water from seeping into switches, motor, lamps, and other electric components when cleaning the range hood. Non-professional personnel are forbidden to change the internal wiring.
Maintenance
Maintenance
1. Suggestion
Clean the surface of the shell every three days. Clean the oil on the filter regularly. Full maintenance shall be done every half year. It should not be implemented by non-professional personnel.
2. When doing internal maintenance, the following steps shall be followed:
Shut off the power supply. Take off the filter and clean it with a soft brush. Put it back in place after drying for next maintenance. Pull out the smoke cover obliquely upwards. Unscrew the air inlet cover and air frame and take them off. Loosen the knob clockwise. Hold the wheel axle and pull out the impeller. Immerse the impeller into cleaning fluid for about 10 minutes. Clean the oil on the impeller with a soft brush. Non-professional personnel are not allowed to implement.
Put the impeller back in place. Tighten the knob counterclockwise. Then install the air inlet board, air inlet cover, and smoke cover in order.
To keep the range hood working in good condition for long term, please keep maintenance regularly.
Common faults and solutions
If any abnormal phenomenon happens during range hood working, please stop using and unplug the power supply and check the faults. Non-professional personnel are not allowed to dismantle the range hood. The common faults and diagnosis are as follows:
| Fault Reason | Solution |
| Lamp is not on Motor is running | Poor wire connect |
| Lamp is damaged | |
| Poor connect between lamp and socket | |
| The quartz lamp transformer burning out | |
| Lamp is not on Motor is not running | Poor connect between plug and socket |
| Power cord break | |
| Fuse of power board breaks | |
| Lamp is on Motor is not running | Thermal cutout of motor is working |
| Condenser burns | |
| Motor burns | |
| Faults of power board and control board | |
| Violent vibration, noise increases | Check the hanging is strong enough |
| The connecting pieces of the fixed screws are loose | |
| Volute standing fixed screws are loose | |
| Motor fixed screws are loose | |
| Impeller installation is not in place | |
| Impeller is damaged and balance piece is lost | |
| Poor suction | Too much oil on filter |
| The air convection in the kitchen is too big or space sealing is too tight | |
| Higher installation height | |
| Exhaust pipe is too long or too more turns | |
| Outdoor wind is too strong |
Service

Blaupunkt integrated kitchen appliances/customer services:
Tel: 180 2092096
customer_service@hepoindia.com
You have chosen a piece of premium kitchen equipment with Blaupunkt appliances. Our professional service is available to assist you after the purchase. Our qualified employees are pleased to remain at your disposal. Our customer service experts for Blaupunkt integrated kitchen appliances will professionally answer all questions about the appliances. Here you will receive all the information on handling, functions and performance.
Convincing quality with Blaupunkt guarantee.
Blaupunkt kitchen appliances are exclusively produced from the best materials and according to the highest working standards. Blaupunkt provides a two-year manufacturer's guarantee on every appliance and every repair carried out by the Integrated kitchen appliances customer service.

More original: Accessories and spare parts.
Original spare parts, extensive accessories and tested detergents and care products can be bought from our competent employees.
In your vicinity - and fast. Our specialists from Blaupunkt. With a nationwide service network and approximately 700 highly qualified technicians, we can guarantee that our specialists are always quickly on location in case of repair. The standard time is within 48 hours.



- INSTRUCTIONS FOR INSTALLATION AND USE
- CONTENT
- FOREWORD
- STRUCTURE
- SPECIFICATION
- INSTALLATION
- PREPARATION AND CONFIRMATION BEFORE INSTALLATION
- INSTALLATION HANGER
- PRODUCT INSTALLATION (SINGLE HOOD)
- PRODUCT INSTALLATION (DOUBLE HOODS)
- EXHAUST PIPE CONNECTING TO THE WALL OUTSIDE
- CONFIRMATION OF INSTALLATION
- FUNCTION OPERATION
- TOUCH CONTROL
- GESTURE CONTROL
- AUTO-CLEAN
- DELAY
- ATTENTION
- MAINTENANCE
- SUGGESTION
- WHEN DOING INTERNAL MAINTENANCE, THE FOLLOWING STEPS SHALL BE FOLLOWED
- COMMON FAULTS AND SOLUTIONS
- SERVICE
- CONVINCING QUALITY WITH BLAUPUNKT GUARANTEE
- MORE ORIGINAL: ACCESSORIES AND SPARE PARTS
Brand : BLAUPUNKT
Model : 5IS69760
Category : Headphones