
VCP 9431 PRO - Vacuum Cleaner GRUNDIG - Free user manual and instructions
Find the device manual for free VCP 9431 PRO GRUNDIG in PDF.


| Product Type | Canister Vacuum Cleaner |
| Brand | Grundig |
| Model | VCP 9431 PRO |
| Dimensions (L x W x H) | Approx. 450 x 270 x 320 mm |
| Weight | Approx. 5.2 kg |
| Power Supply | 220-240 V, 50-60 Hz |
| Power Consumption | 1800 W |
| Suction Power | Adjustable, Max. 450 W |
| Dust Capacity | 3.5 L (bagged) |
| Filtration System | HEPA 13 filter |
| Cord Length | 8 m |
| Operating Radius | 12 m |
| Noise Level | 76 dB(A) |
| Floor Types | Carpet, hard floor |
| Included Accessories | Combination nozzle, crevice tool, upholstery brush, floor brush |
| Bag Type | Grundig dust bag (size: Microfresh) |
| Filter Maintenance | Replace HEPA filter every 6 months |
| Safety Features | Overheat protection, automatic shut-off |
| Spare Parts Availability | Dust bags, filters, accessories available |
| Energy Efficiency Class | Class C (typical) |
| Color | Black/Red |
Frequently Asked Questions - VCP 9431 PRO GRUNDIG
User questions about VCP 9431 PRO GRUNDIG
0 question about this device. Answer the ones you know or ask your own.
Ask a new question about this device
Download the instructions for your Vacuum Cleaner in PDF format for free! Find your manual VCP 9431 PRO - GRUNDIG and take your electronic device back in hand. On this page are published all the documents necessary for the use of your device. VCP 9431 PRO by GRUNDIG.
USER MANUAL VCP 9431 PRO GRUNDIG
Cordless Upright Vacuum Cleaner with Auto Empty Charging Station
User Manual
natural_image
Two abstract geometric patterns: a woven bamboo design and a square with circular cutouts (no text or symbols)VCP 9431 PRO
natural_image
Diagram showing two steps of a device being inserted into a cable, with arrows indicating the process (no text or symbols present)natural_image
Technical line drawing of a mechanical component with mounting holes and wiring (no text or symbols)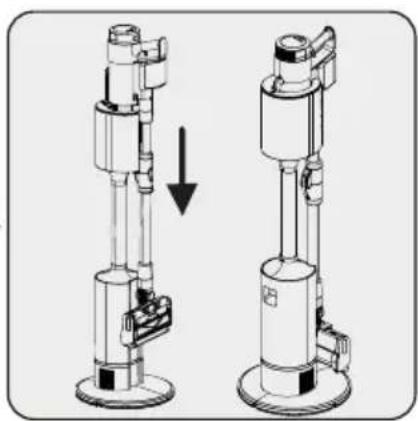
natural_image
Technical illustration of two mechanical device assemblies with a downward arrow indicating motion (no text or symbols present)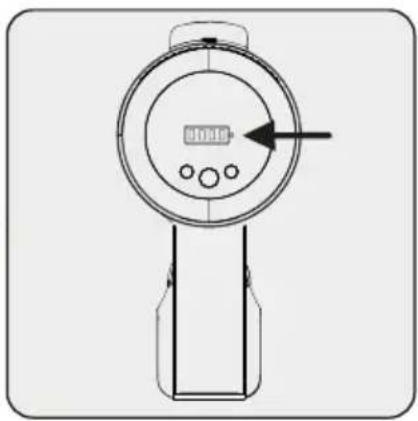
natural_image
Technical line drawing of a handheld device with a circular dial and control buttons (no text or symbols)natural_image
Technical line drawing of a mechanical device with an upward arrow indicating motion (no text or symbols present)natural_image
Line drawing of a handheld electronic meter with a dial and control knob (no text or symbols)natural_image
Line drawing of a digital meter with control knob and pointer (no text or symbols)natural_image
Technical line drawing of a pressure meter device with control panel and indicator lights (no text or symbols)
natural_image
Technical illustration of a vacuum cleaner with a vertical shaft and base, alongside a schematic symbol (no text or labels)natural_image
Technical line drawing of a vacuum cleaner with attached lever and inset detail (no text or symbols)natural_image
Mechanical device with a downward arrow indicating force or motion (no text or symbols present)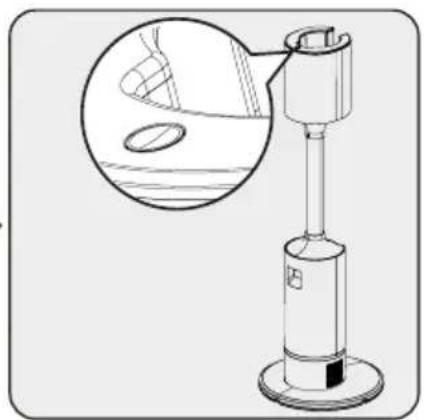
natural_image
Technical line drawing of a mechanical device with an inset showing a circular detail (no text or symbols)natural_image
Technical diagram showing two mechanical components: a motor and a cylindrical housing, both without any text or symbols.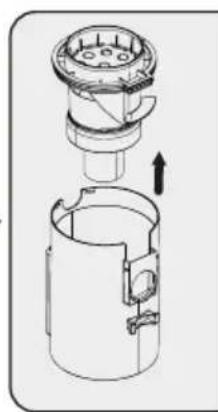
natural_image
Technical line drawing of a mechanical device with internal components and an upward arrow indicating motion (no text or symbols)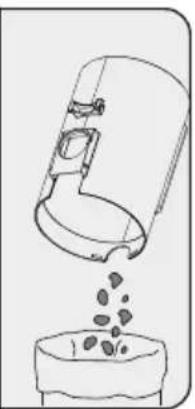
natural_image
Line drawing of a kitchen mixer pouring food into a bowl (no text or symbols)natural_image
Diagram of a mechanical device with an arrow indicating a transformation or assembly (no text or symbols present)natural_image
Diagram showing two mechanical components with an arrow indicating transformation (no text or symbols present)natural_image
Technical illustration of a mechanical device with an arrow indicating assembly or transformation (no text or symbols present)natural_image
Technical line drawing of a mechanical assembly with three circular components and a central knob (no text or symbols)natural_image
Technical line drawing of a mechanical device with a cup and housing (no text or symbols)natural_image
Technical line drawing of a mechanical device with a close-up inset showing internal components (no text or symbols)natural_image
Technical line drawing of a mechanical device with an inset showing a close-up view of a component (no text or symbols)natural_image
Diagram of a hand pressing a button on a cylindrical device with a switch, showing mechanical components and a directional arrow (no text or symbols)natural_image
Technical line drawing of a portable air conditioner unit with a hand inserting a small device (no text or symbols)natural_image
Technical line drawing of a mechanical device with internal components and a base (no text or symbols)natural_image
Technical line drawing of a mechanical device with a magnified inset showing internal components (no text or symbols)natural_image
Technical illustration of a mechanical device with an inset showing internal components (no text or symbols)natural_image
Technical line drawing of a mechanical device with internal components and an arrow indicating direction (no text or symbols)natural_image
Illustration of a bowl with a lid and bubbles rising, no text or symbols presentnatural_image
Technical line drawing of a mechanical device with internal components and base (no text or symbols)natural_image
Illustration of a hand cleaning a vintage digital camera with a cloth (no text or symbols)natural_image
Technical diagram showing two mechanical components: a motor and a cylindrical housing, with no visible text or symbols.natural_image
Diagram showing a mechanical device with an upward arrow and a separate view of its internal components (no text or symbols present)natural_image
Technical line drawing of a mechanical device with an upward arrow indicating motion or assembly (no text or symbols present)natural_image
Technical illustration of a mechanical component with an upward arrow indicating motion (no text or symbols present)natural_image
Diagram of a mechanical device with internal components and motion arrows, no text or symbols presentnatural_image
Diagram showing a mechanical component being inserted into a cylindrical housing, with an arrow indicating the process (no text or symbols present)natural_image
Technical line drawing of a mechanical device with a lid and internal components, showing a downward arrow indicating a process or assembly (no text or symbols present)natural_image
Technical line drawing of a mechanical device with an arrow indicating direction (no text or symbols present)natural_image
Technical illustration of a mechanical device with labeled parts, showing internal components and directional arrows (no text or symbols)natural_image
Illustration of a Colosseum building with arrows indicating movement or flow, above a textured base (no text or symbols)natural_image
Technical line drawing of a mechanical device with an inset close-up showing a component detail (no text or symbols)natural_image
Technical line drawing of a mechanical device with internal components (no text or symbols)natural_image
Technical line drawing of a mechanical device with no visible text or symbolsnatural_image
Technical line drawing of a wheeled cart with wheels and a magnified inset showing internal components (no text or symbols)natural_image
Technical line drawing of a wheeled vehicle chassis with wheels and suspension components (no text or symbols)natural_image
Technical line drawing of a mechanical device with no visible text or symbolsPlease read this manual first!
Dear Customer,
Thank you for purchasing this Grundig product. We want you to get the most out of this high-quality product made with the latest technology. Please read these instructions and attached documents fully before using it and keep them for reference. If you hand this appliance over to someone else, give them this manual as well. Heed all the warnings and information here and follow the instructions.
Symbols and their meanings
These symbols are used in this manual:

Important information and useful tips for using the appliance.

WARNING: Warnings about dangerous situations concerning safety of life and property.

Electric shock protection class
1 Important safety and environmental instructions
This section contains instructions for avoiding hazards that could result in injury or material damage.
Failure to follow these instructions will void all warranties for this appliance.
1.1 General safety
- This appliance complies with international safety standards.
- This appliance can be used by children aged 8 years and over and people with reduced physical, sensory, or mental capabilities of lack of experience if they are supervised or instructed how to use the appliance safely and understand the hazards involved. Children should not play with the appliance. Children must not clean or maintain the appliance unless they are supervised.
- Do not use the appliance if the power cord or the appliance is damaged. Contact the authorised service.
- Make sure the mains power matches the information on the appliance's rating plate/label.
- Do not use the appliance with an extension cord.
- To avoid damage to the power cord, prevent it from being pinched, crimped or rubbed against sharp edges.
- Do not handle the appliance or its plug with wet hands when plugged in.
- Do not pull on the cord while unplugging the appliance.
- Do not vacuum combustible materials and make sure that cigarette ashes are cold before you vacuum them.
- Do not vacuum water and other liquids.
1 Important safety and environmental instructions
- Protect the appliance from rain, moisture, and heat sources.
- Do not use the appliance in or near explosive or flammable environments and substances.
- Unplug the appliance before cleaning and maintenance.
- Do not clean the appliance or power cord by immersing in water.
- Do not disassemble the appliance.
- Use original parts or parts recommended by the manufacturer only.
- To prevent blocking the filer or damaging the motor, do not vacuum cement, plaster or fragments of compressed paper.
- Use the appliance only with the adapter provided.
- Do not use the appliance without filters otherwise it could get damaged.
- If you keep the packaging, keep it out of reach of children.
- This appliance is not intended to be used by persons, including children, with sensory or mental disabilities or lack of experience and knowledge unless they are supervised by the persons responsible for their safety and instructed in its use.
• Children must be supervised to prevent them from playing with the appliance.
- Remove the adaptor and battery group before cleaning and maintenance.
- Damaged adaptors should be replaced by the manufacturer, the authorised service centre or an authorised technician to avoid potential hazards.
1 Important safety and environmental instructions
- Keep your fingers, hair, and loose clothing away from the moving parts or openings when operating the vacuum cleaner.
- Remove the batteries before disposing of the appliance.
- Unplug the appliance before removing the battery.
- Dispose of used batteries in accordance with local laws and regulations.
- The batteries in the appliance should only be replaced by authorised persons.
- This appliance is not intended for commercial use. This appliance is intended for domestic and not commercial use as follows:
- In the staff kitchens of stores, offices and other working environments
- Farms
- By guests in hotels, motels or other accommo-
dation facilities
- In B&Bs and similar places.
• This appliance must not be used by persons with limited physical, sensory, and cognitive abilities or who lack experience and knowledge unless they are supervised or have been instructed in its operation.
• Children must be supervised to prevent them from playing with the appliance.
1 Important safety and environmental instructions
1.2 Compliance with the WEEE Directive and Waste Disposal
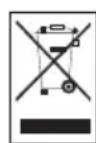
This appliance complies with the EU's WEEE Directive (2012/19/EU). This appliance carries a Waste Electrical and Electronic Equipment (WEEE) classification symbol. This symbol shows that the appliance must not be disposed of along with other household waste at the end of its useful life. The appliance must be returned to an official collection site for the recycling of electrical and electronic equipment. Contact the local authorities or the retailer where you purchased the appliance to learn about collection systems. Every home has an important role to play in reclaiming or recycling old appliances. Proper disposal of your used appliance will help prevent potential adverse effects on the environment and human health.
1.3 Packaging information

The product's packaging is made of recyclable materials in accordance with the National Environment Legislation. Do not dispose of packaging materials along with household or other waste. Take these materials to the packaging materials collection points designated by the local authorities.
1.4 Information About Waste Batteries
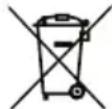
This symbol found on batteries/rechargeable batteries or their packaging shows that the battery/rechargeable battery must not be mixed in with household waste. Certain batteries/rechargeable batteries may also carry a chemical symbol in addition to this symbol. The mercury (Hg) or lead (Pb) symbols are also added if the batteries/rechargeable batteries contain more than 0.0005% mercury or more than 0.004% lead.
Batteries/rechargeable batteries, including those without heavy metals, must not be disposed of together with household waste. Always dispose of used batteries in accordance with local environmental regulations. Learn the waste regulations in force where you live.
1.5 What you can do to save energy
- Use the speed setting most suitable for the surface to save energy when using your appliance.
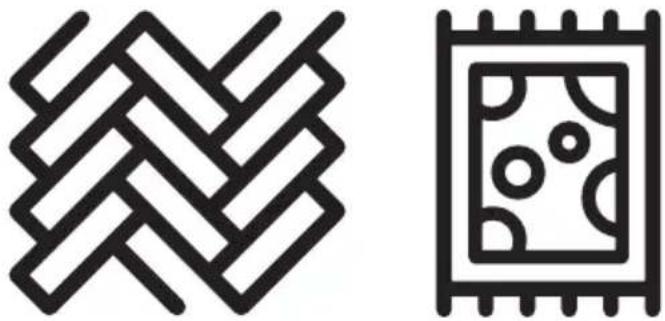
- Under normal conditions, hard surfaces, curtains, and furniture require a low speed and carpets require a high speed.
1.6 Compliance with the RoHS Directive
The appliance you have purchased complies with the EU's RoHS Directive (2011/56/EU) It does not contain the harmful and forbidden substances specified in the directive.
2 Overview
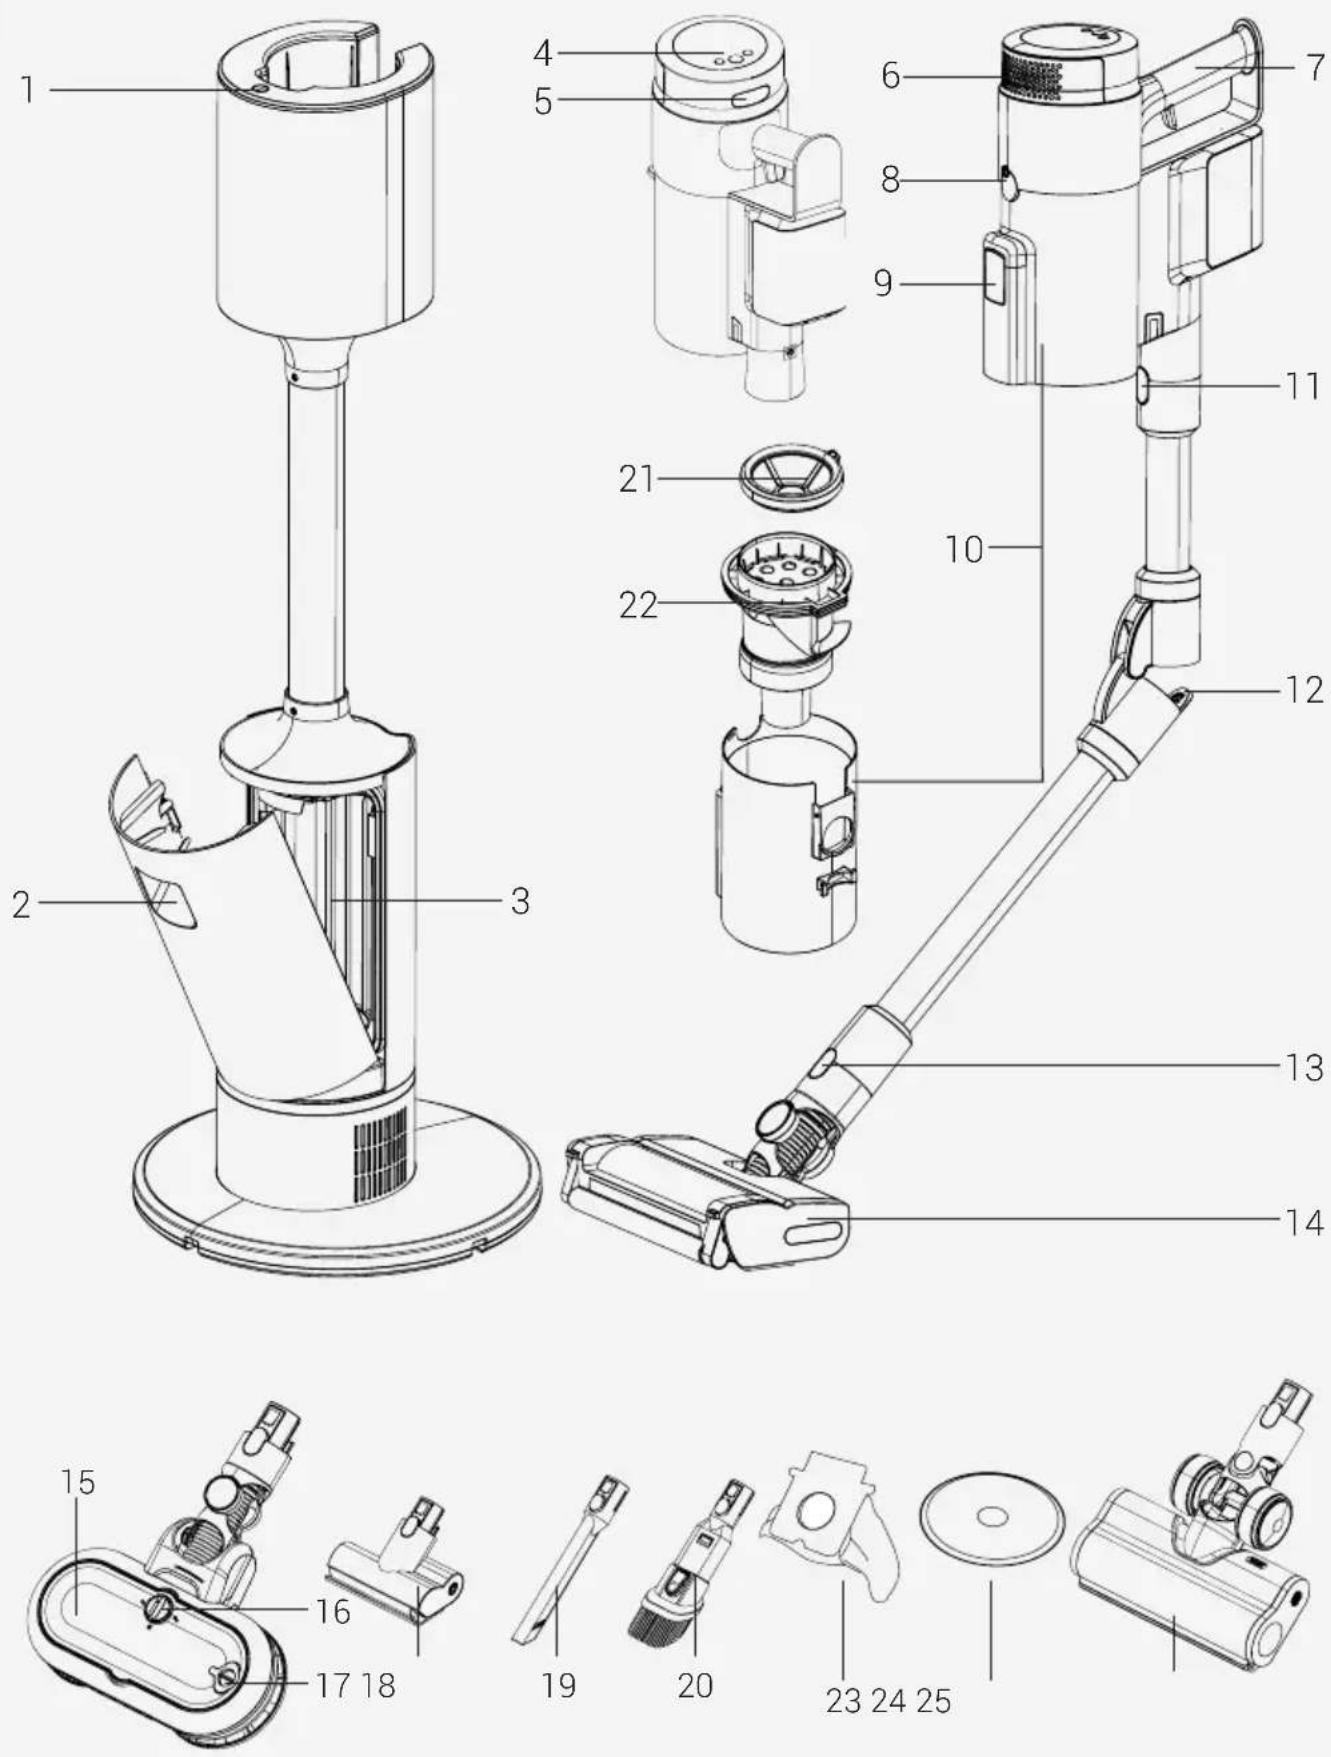
2 Overview
2.1 Controls and components
- Charging station control button
- Dust bag cover opening handle
- Dust bag container
- LED display and control buttons
- HEPA filter cover release button
- HEPA filter cover
- Handle
- Dust container release button
- Dust emptying cover
- Dust cup
- Wand release button
- Wand bend button
- Brush release button
- Hard floor brush with dual roller for deep Cleaning
- Turbo scrubbing brush
- Water drip lock
- Water filling cap
- Pet hair brush
- Crevice nozzle
- Dust brush
- Dust container front filter
- Multi cyclone filter
- Dust bag x 3
- Mopping cloth x 2
- Extra carpet brush
2.2 Technical data
| Nominal power 450 W | |
| Automatic cleaning station nominal power 900 W | |
| Automatic cleaning station power input 220 | -240 V~50-60 Hz |
| Automatic cleaning station power output 30.7 V 0.8 A --- | |
| Charging time 3-4 hours | |
| Operating time under max. power 10 minutes | |
| Operating time under medium power 30 minutes | |
| Operating time under min. power 60 minutes | |
Manufacturer reserves the right to make technical and design changes.
Values supplied with the appliance or accompanying documentation are laboratory readings per relevant standards. These values may differ depending on operating and ambient conditions.
2 Overview
| Usage Type Speed Operating | time | ||
| Upright vacuum cleaner mode | Minimum speed Up to 38 minutes |  | |
| Medium speed Up to 25 minutes | |||
| Maximum speed | Up to 10 minutes | ||
| Hand-held mode (With unpowered accessories) | Minimum speed Up to 60 minutes |  | |
| Medium speed Up to 30 minutes | |||
| Maximum speed | Up to 10 minutes | ||
3 Operation
3.1 Intended use
The appliance is intended for home use only and is not suitable for professional use.
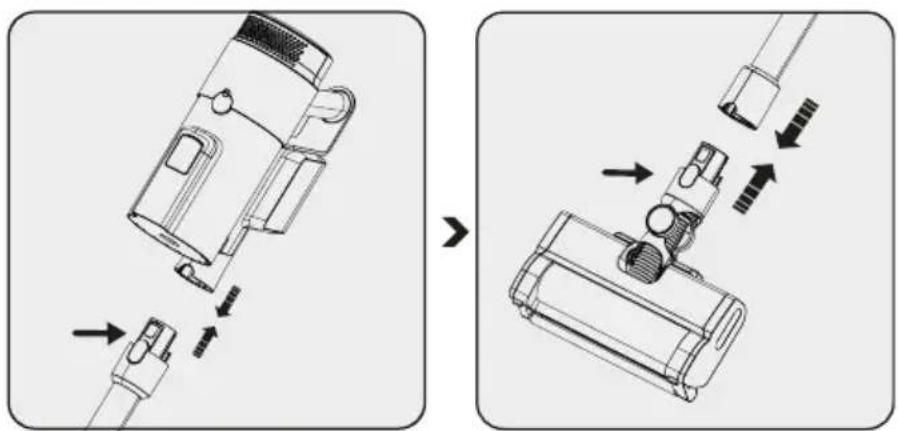
3.2 Attaching the body and brush
natural_image
Diagram showing two-step assembly of a device with connectors and parts, no text or symbols presentPress the wand release button and slot the wand into the body as shown by the arrow.
Press the electric turbo brush release button on the electric turbo brush and push it onto the wand as shown by the arrow.
3 Operation
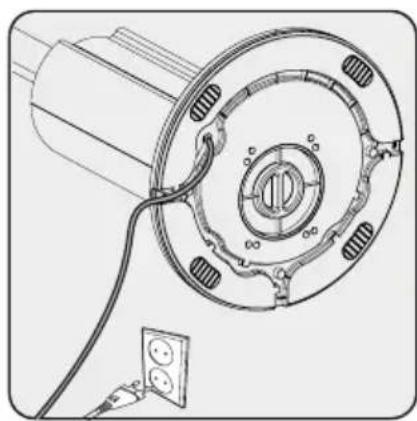
3.3 Assembling and charging the automatic dust emptying station

WARNING: Charge the battery fully before using the appliance for the first time or if you haven't used it for a long time.
natural_image
Technical line drawing of a mechanical component with a cable and socket, no text or symbols present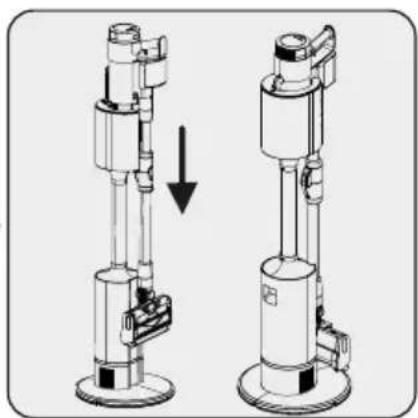
natural_image
Technical illustration of two mechanical device assemblies with a downward arrow indicating motion (no text or symbols)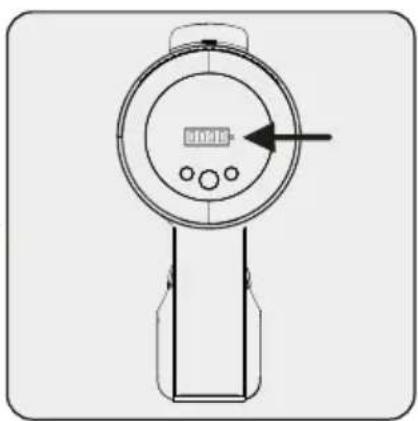
natural_image
Technical line drawing of a circular gauge or meter device with a pointer and control buttons, no text or symbols present.Place the appliance onto the charging dock.
The appliance will begin charging automatically as soon as it has finished cleaning.
Once charging begins, you can see the battery charge level on the display. When all the battery charge levels are lit, this means charging is complete.

You can press the charging station control button to stop the automatic cleaning process at any time.

The LED display will turn off after a while once charging is complete.

It takes up to 4 to 6 hours to charge the appliance completely. Do not use the appliance while it is charging.

If the appliance is working, it will stop working as soon as you place it on the charging dock.
3 Operation
3.4 Operation
natural_image
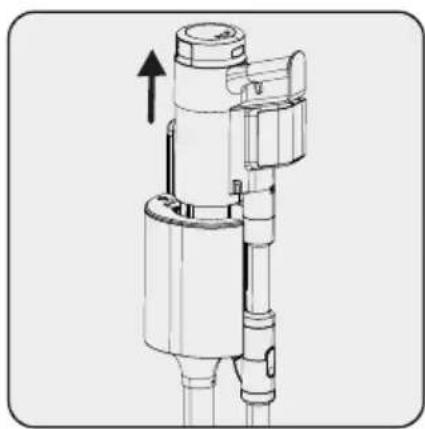
Technical line drawing of a mechanical device with an upward arrow indicating motion or force (no text or symbols present)Lift the appliance up and away from the automatic dust emptying station.

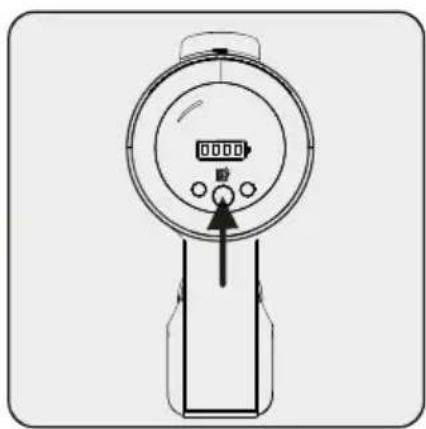
natural_image
Line drawing of a handheld electronic meter or gauge device with no visible text or symbolsPress the on-off button to start the appliance.
The appliance will start running at minimum speed when the on/off button is pressed.

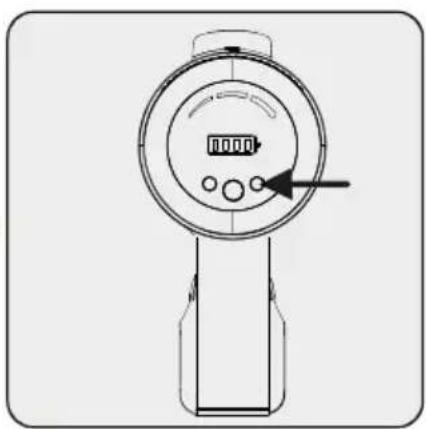
natural_image
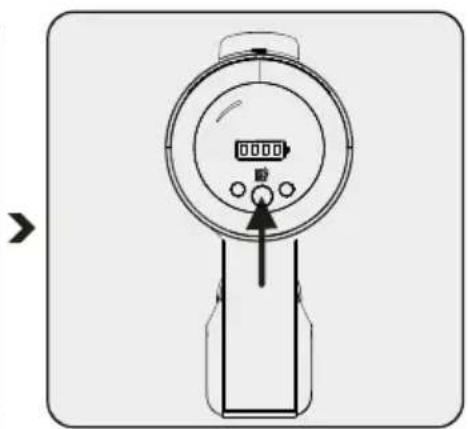
Technical line drawing of a handheld device with a circular dial and control buttons (no text or symbols)Press the button to increase the speed. The suction mode you are using (low/medium/high) will be shown on the display. Press the "+" and "-" to change the speed.

You can place the appliance onto the charging dock before the charge completely runs out. The appliance can stay on the charging dock until the next use.
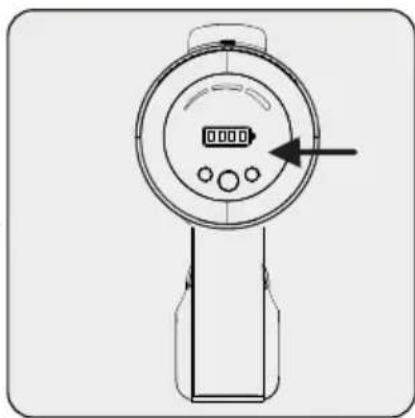
natural_image
Line drawing of a digital pressure meter with control knob and pointer (no text or symbols)
Watch the charge levels when using the appliance. The appliance will stop automatically when the charge runs out.
3 Operation
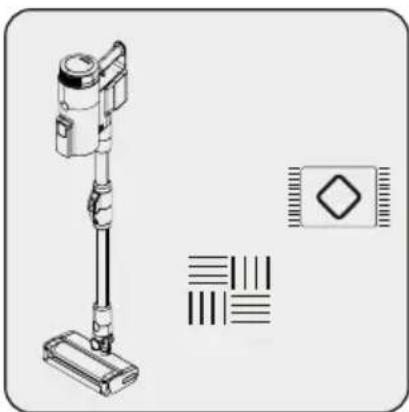
natural_image
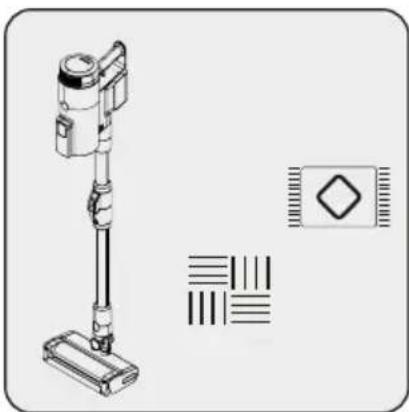
Technical illustration of a vacuum cleaner with a vertical shaft and base, alongside a schematic symbol (no text or labels)This appliance is suitable for use on carpets and hard surfaces.
natural_image
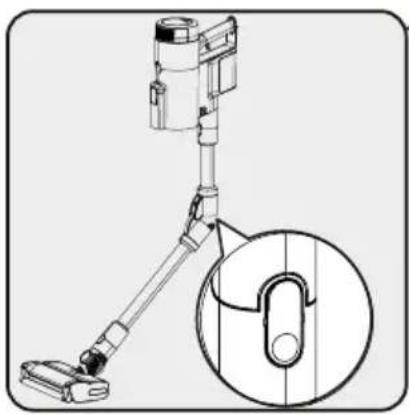
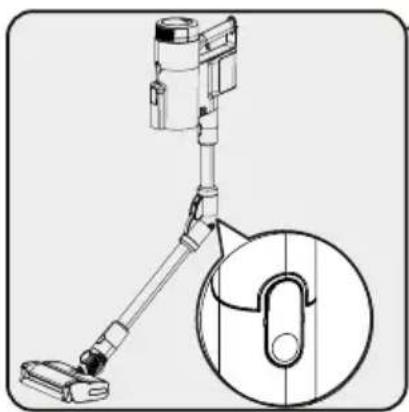
Technical line drawing of a vacuum cleaner with attached device and circular inset detail (no text or symbols)You can bend the wand to reach easily under chairs and tables. Bend the wand by pressing the round button on the left.
3 Operation
3.5 Operating the automatic cleaning station
natural_image
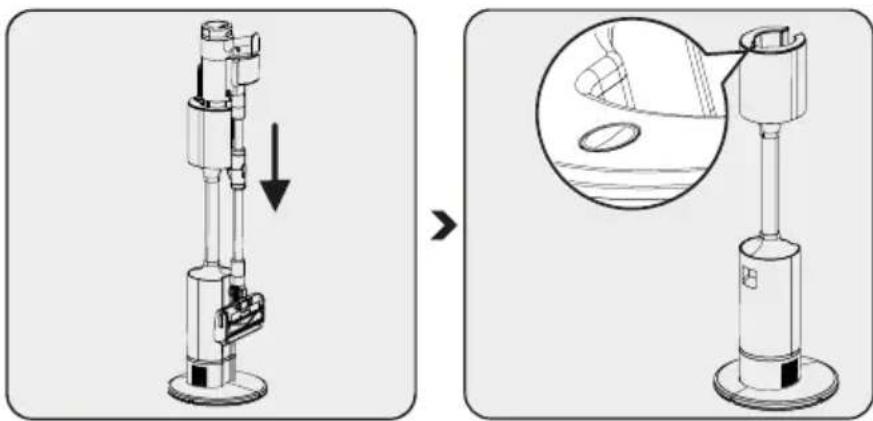
Diagram showing a mechanical device with a downward arrow and magnified detail view of the component (no text or symbols)When you place the appli- ance onto the automatic cleaning station, the dust container will empty auto- matically.
The control button on the automatic dust emptying station will blink on and off while cleaning is in progress.
You can press the control button on the automatic dust emptying station to stop the dust emptying process at any time.

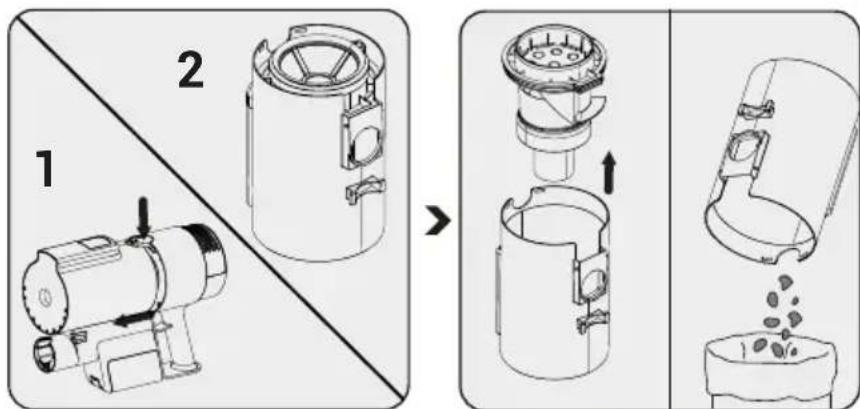
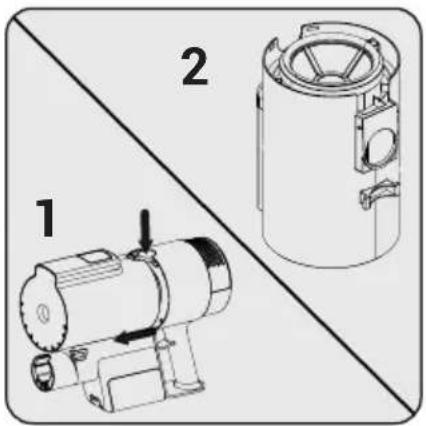
Dust, hair, thread and similar objects can get tangled around the multi cyclone filter preventing the container from emptying fully. In this case, you should manually clean the dust container as shown below.
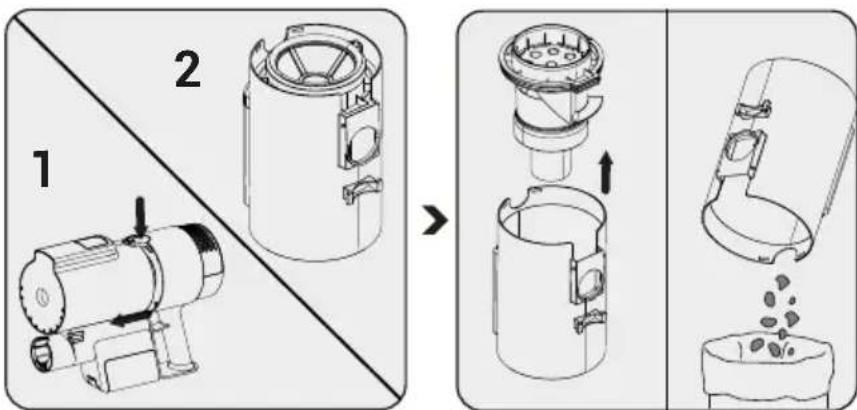
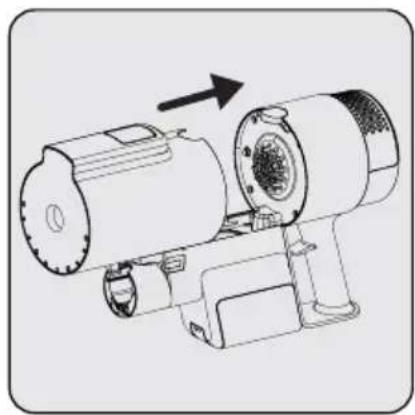
Press the dust container release button and remove the container.
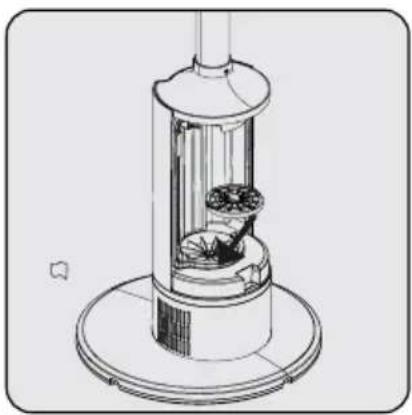
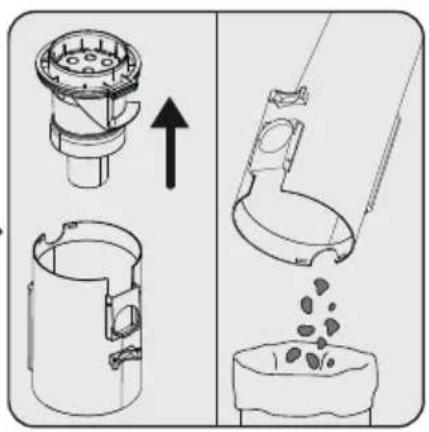
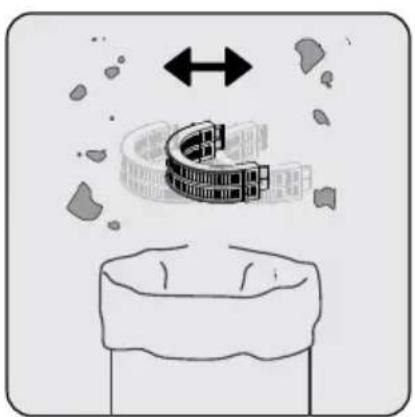
Lift out the multi cyclone filter and clean out the dust in the dust container.
3 Operation
3.6 LED display indicators
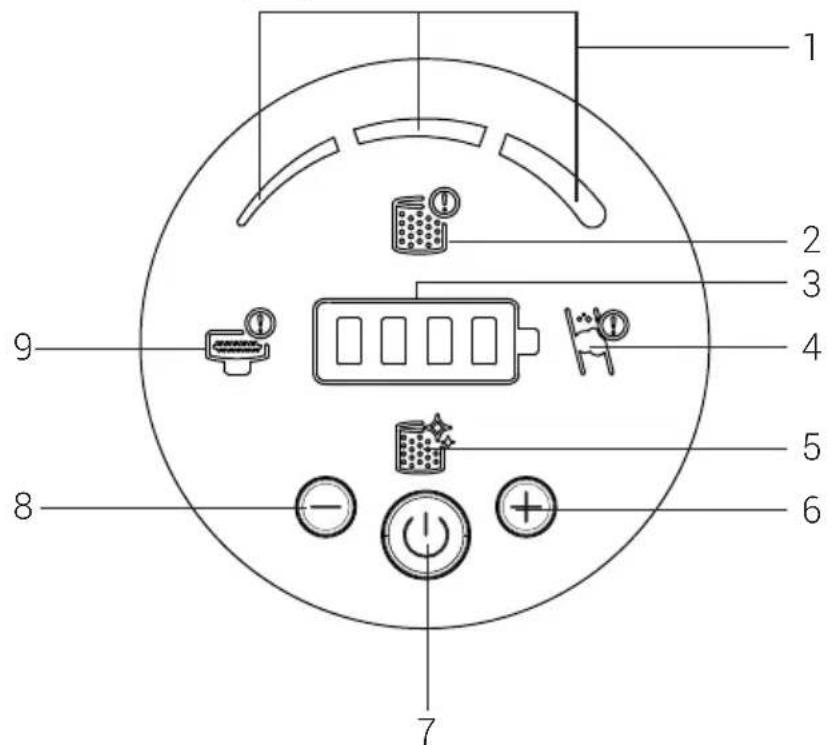
- Suction mode
- This symbol warns the user when the front filter is not attached and for its own protection, the appliance will not turn on until it is attached. Make sure you have attached the filter.
- Battery charge level
- This shows when there is an air blockage. Check inside the wand and the suction intake on the body to see if any foreign objects are causing an obstruction.
- This shows when the front filter needs cleaning.
- Speed button
- On/Off switch
- Speed adjustment button
- This shows when the beater brush is stuck and needs cleaning.
3 Operation
3.7 Accessories
natural_image
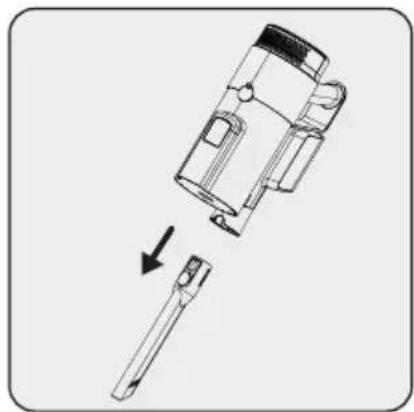
Diagram of a mechanical device with an arrow indicating a transformation or assembly (no text or symbols present)Crevice nozzle: Ideal for cleaning behind furniture, hard-to-reach and narrow spaces.
natural_image
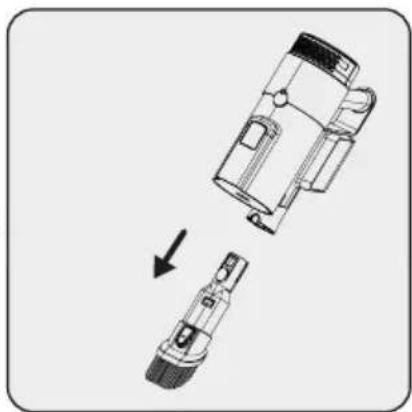
Diagram showing a mechanical component being cut with an arrow indicating direction (no text or symbols present)Dust brush: Ideal for cleaning curtains, sofas, varnished furniture, delicate and fragile objects.
natural_image
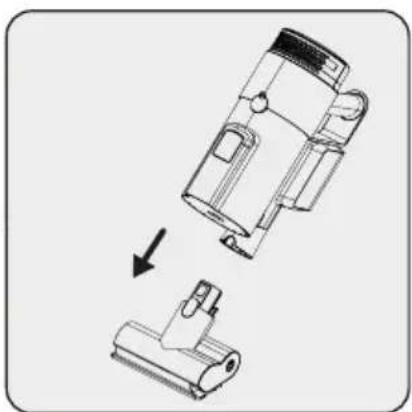
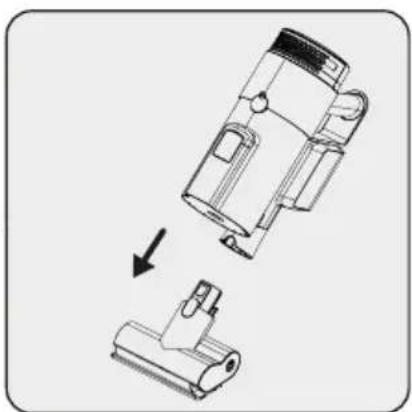
Technical illustration of a mechanical device with an arrow indicating assembly or transformation (no text or symbols present)Mini turbo domestic pet hair brush: Ideal for sweeping floors, stairs, inside cars, couches, and sofas. It is also used for picking up pet hair on such surfaces.
natural_image
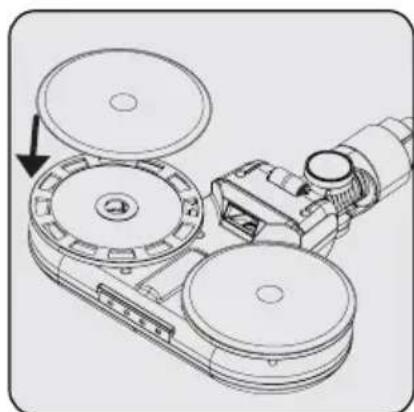
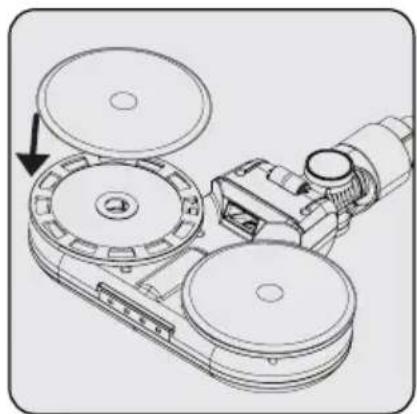
Technical line drawing of a mechanical assembly with pulleys and a rotating component (no text or symbols)Affix the mop cloth under- neath the brush.
natural_image
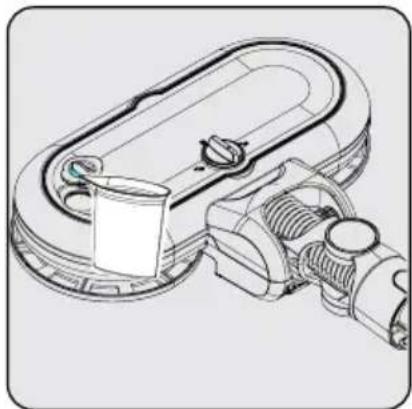
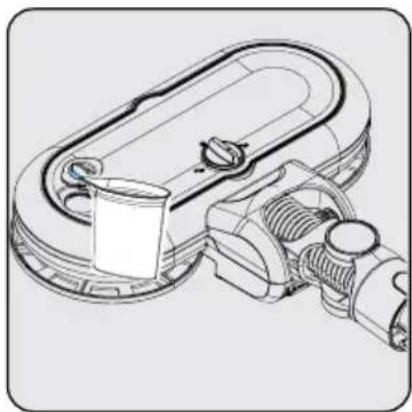
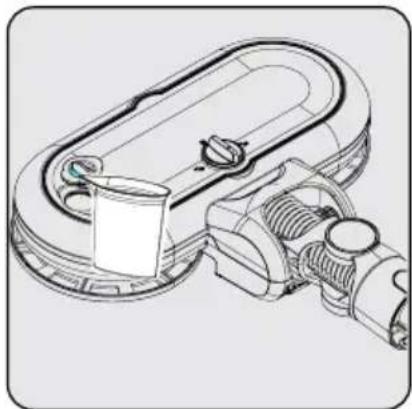
Technical line drawing of a portable air conditioner unit with handle and control panel (no text or symbols)Open the filler cap on the turbo scrubbing brush to fill it with water.
natural_image
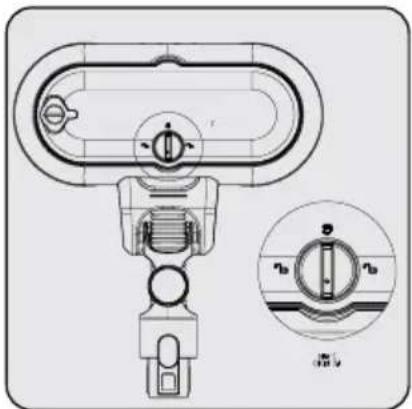
Technical line drawing of a mechanical device with a close-up inset showing internal components (no text or symbols)Turn the drip lock to wet the mopping cloths.
You can use the turbo scrubbing brush on hard surfaces.

WARNING: Do not use the mopping attachment on the carpet.
3 Operation

WARNING: Do not put bleach or very bubbly liquid detergents in the mop's water reservoir.

WARNING: Close the drip lock after use and remove the mopping attachment.

WARNING: Remove the mopping attachment as soon as you've finished using it to prevent damage to your wooden floors.

WARNING: Empty any remaining water from the mopping attachment's water reservoir once you've finished mopping and dry the reservoir.

The mopping cloths are machine washable.

WARNING: As water can spray out of the reservoir, do not lift the head or lean over it.
4 Cleaning and care
Turn off and unplug the appliance before cleaning it.

WARNING: Never use gasoline, solvents, abrasive cleaners, metal objects or hard brushes to clean the appliance.

WARNING: The filters can become deformed through use over time. Replace such filters to maintain performance. Contact customer service to order new filters.
4.1 Replacing the dust bag
natural_image
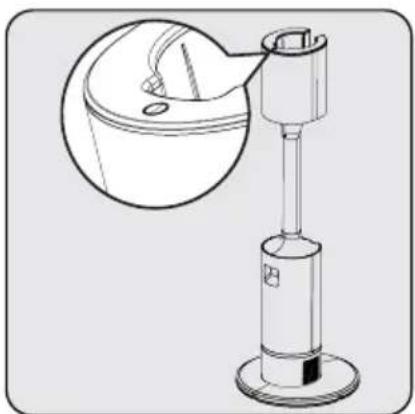
Technical line drawing of a mechanical device with a magnified inset showing internal components (no text or symbols)When the red control button on the automatic dust emptying station shines red, check to see if the dust bag is full or not.
natural_image
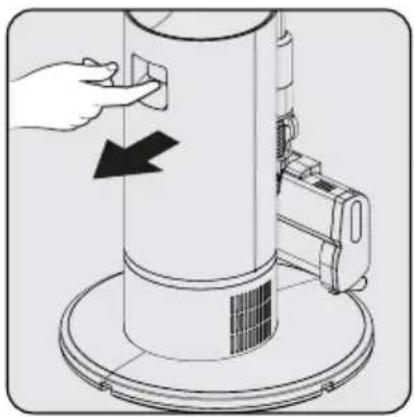
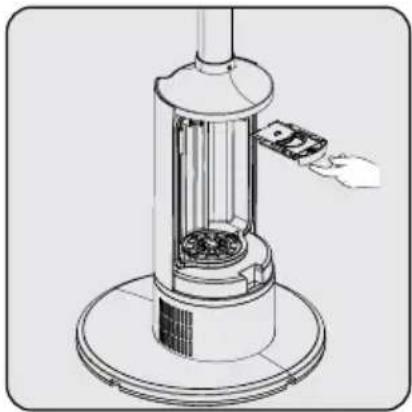
Diagram of a hand pressing a button on a cylindrical device with a mounted device, showing no text or symbols.Open the dust cover on the automatic dust emptying station.
natural_image
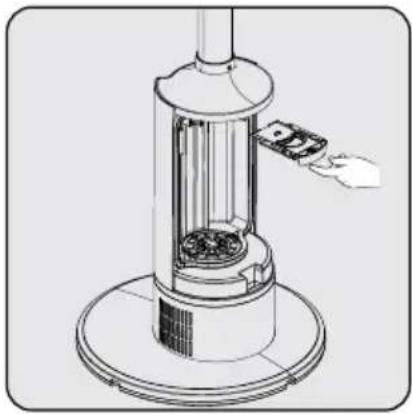
Technical line drawing of a portable air conditioner unit with a hand inserting a device (no text or symbols)Pull the dust bag out of the container using the handle.

WARNING: If the dust bag is not full, check to see if something is stuck in the container, the wand, or on the brush.
4 Cleaning and care
natural_image
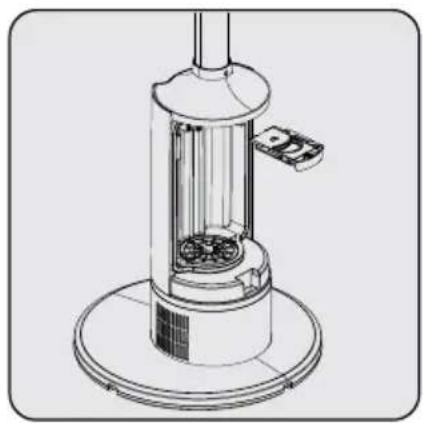
Technical line drawing of a portable air conditioner unit with lid and base (no text or symbols)Replace the dust bag with a new one.
natural_image
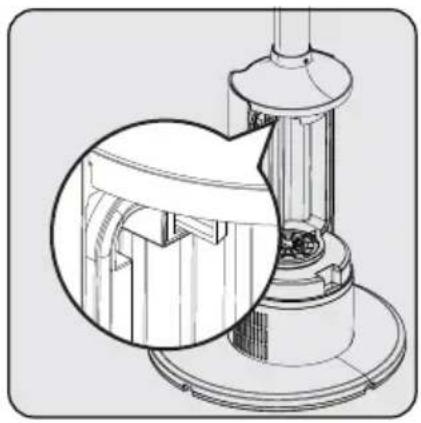
Technical line drawing of a mechanical device with a magnified inset showing internal components (no text or symbols)Slot the dust bag in using the handle and push.
natural_image
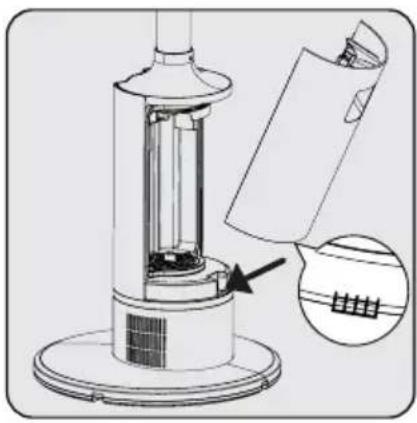
Technical illustration of a mechanical device with an inset showing internal components (no text or symbols)Close the dust cover on the automatic dust emptying station.

WARNING: Dust bags are not reusable.
4.2 Cleaning the Dust container and Filters
natural_image
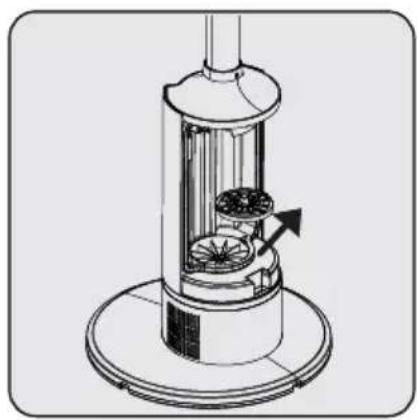
Technical line drawing of a mechanical device with internal components and an arrow indicating motion (no text or symbols)Twist and remove the dust filter.
natural_image
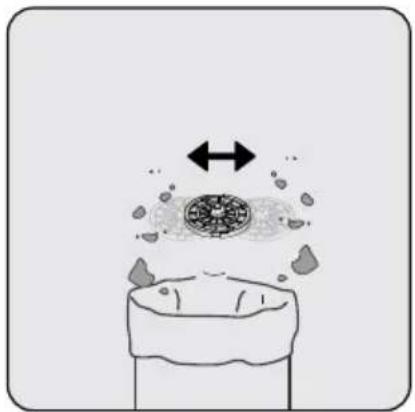
Illustration of a medical device with arrows indicating movement or flow (no text or symbols)Clean the front filter by shaking it to clear away the dust.
natural_image
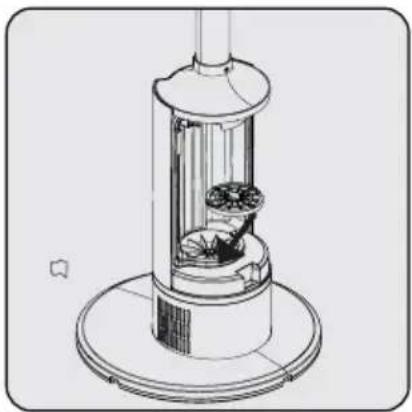
Technical line drawing of a mechanical device with internal components and base (no text or symbols)Put the front filter back and twist to secure.

WARNING: Do not wash the HEPA Filter.

We recommend cleaning the dust container after each use.
4 Cleaning and care
natural_image
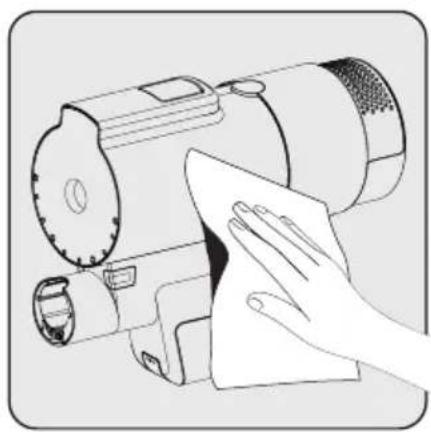
Illustration of a hand cleaning a mechanical device with a cloth (no text or symbols)Wipe down the body of the appliance with a damp cloth.
natural_image
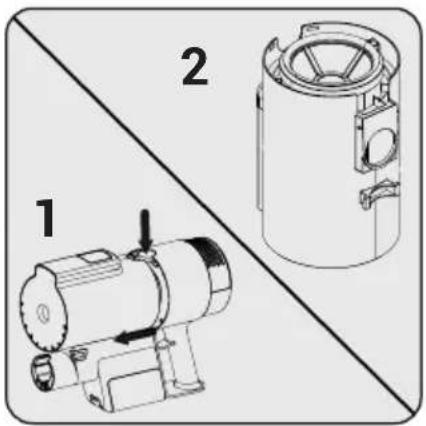
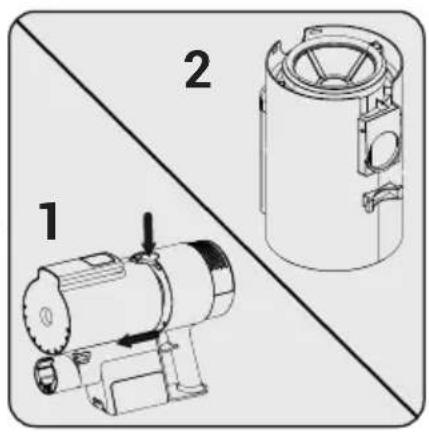
Technical diagram showing two mechanical components: a motor and a cylindrical housing, with no visible text or symbols.Press the dust container release button and remove the container.
natural_image
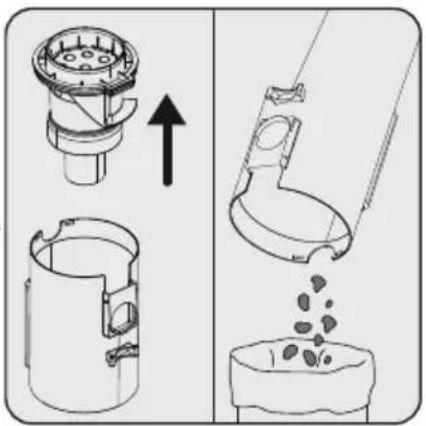
Diagram showing two stages of a kitchen tool: one with a handle and arrow, the other with a handle pouring granular material (no text or symbols)Lift out the multi cyclone filter and clean out the dust in the dust container.
natural_image
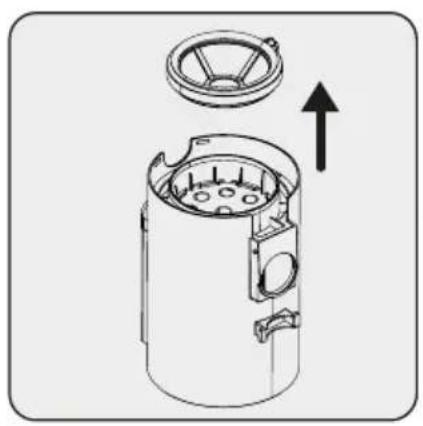
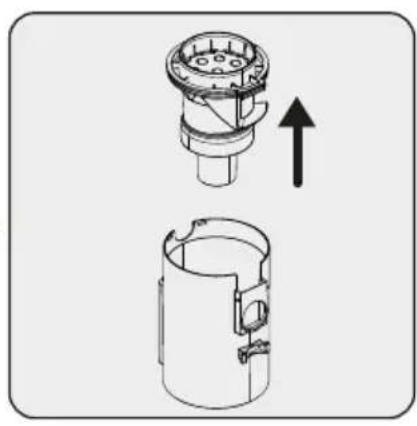
Technical line drawing of a mechanical device with an upward arrow indicating motion (no text or symbols)To clean the filter more thoroughly, pull the front filter part up and remove it.
natural_image
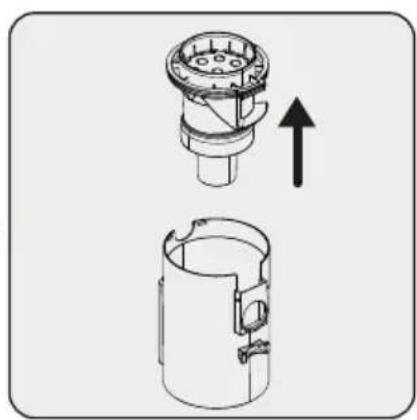
Technical illustration of a mechanical component with an upward arrow indicating motion (no text or symbols present)Pull the multi cyclone filter part up.
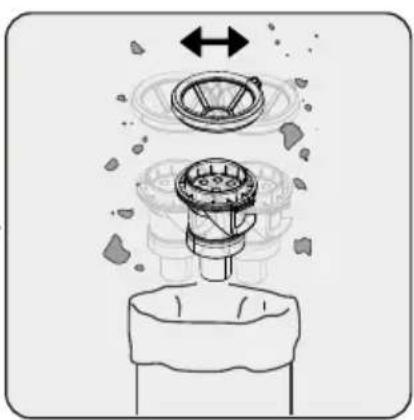
natural_image
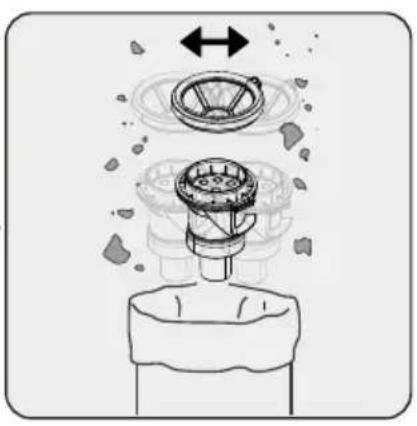
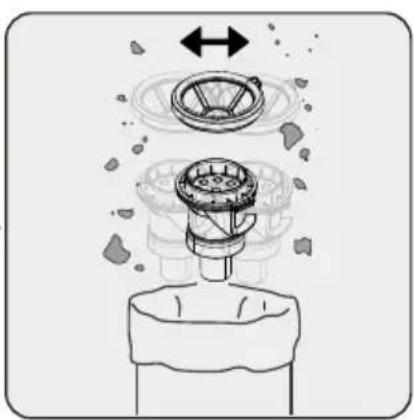
Diagram of a mechanical device with internal components and motion arrows, no text or symbols presentClean the multi cyclone and front filter by shaking them to clear away the dust.
4 Cleaning and care
natural_image
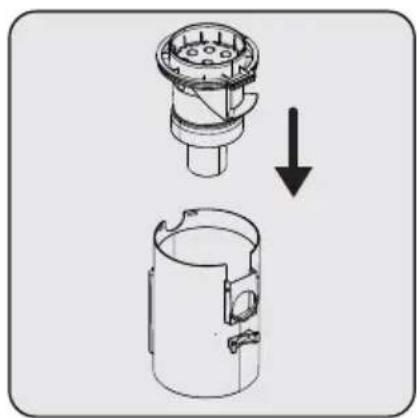
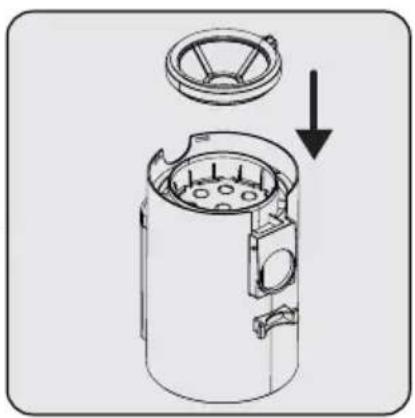
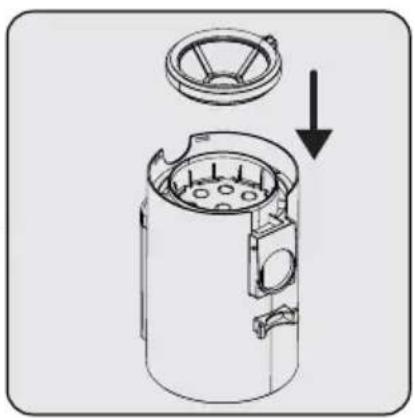
Diagram showing a mechanical component being lowered into a cylindrical housing (no text or symbols present)Attach the porous filter to the dust container.

natural_image
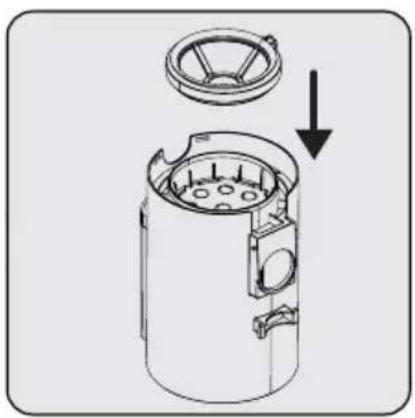
Technical illustration of a mechanical device with a lid and internal components, showing a downward arrow indicating assembly or disassembly (no text or symbols present)Attach the front filter to the porous filter.
natural_image
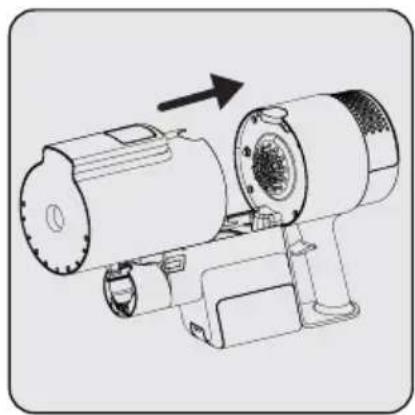
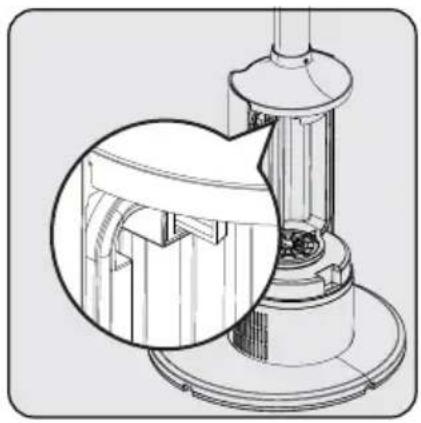
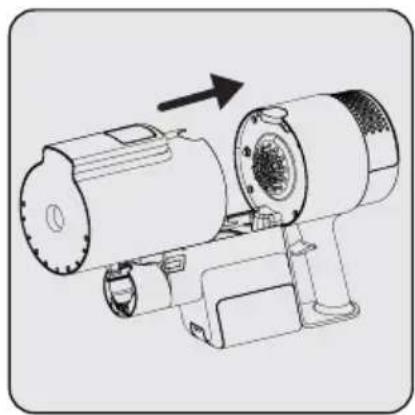
Line drawing of a mechanical device with an arrow indicating direction (no text or symbols present)For the back of the dust container to sit neatly onto the body, place the container into the body first and then into the button area.
natural_image
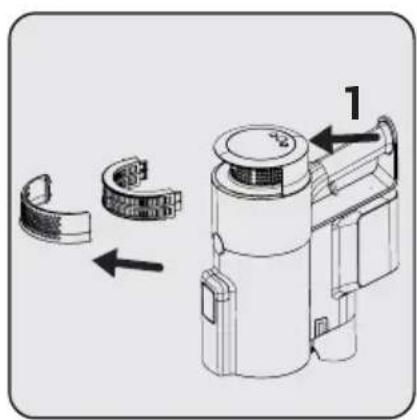
Technical illustration of a mechanical device with labeled parts and directional arrows (no text or symbols)To clean the EPA 12 filter, press button (1) and remove the filter part.

natural_image
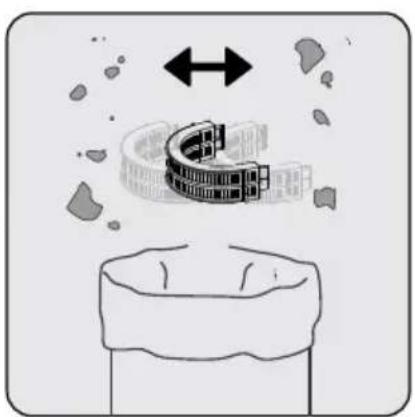
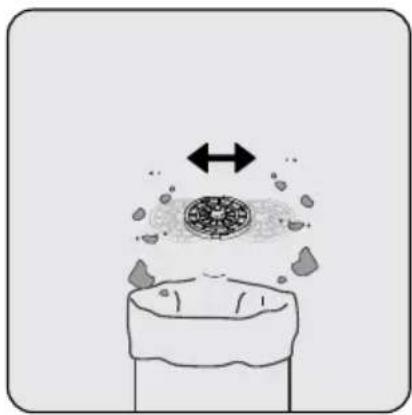
Illustration of a building with a large 'C' on its roof, surrounded by debris and arrows indicating movement (no text or symbols)Clean the EPA 12 filter by shaking it to clear away the dust.
4 Cleaning and care
4.3 Cleaning of the brushes
4.3.1 Cleaning of the hard floor brush

WARNING: Do not wash the turbo brush or the main roller.
natural_image
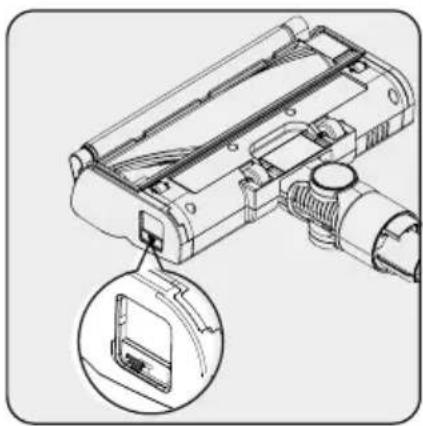
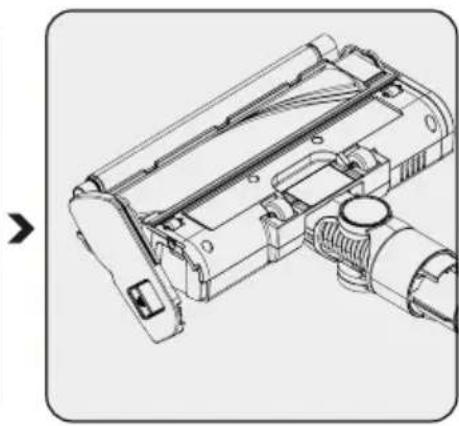
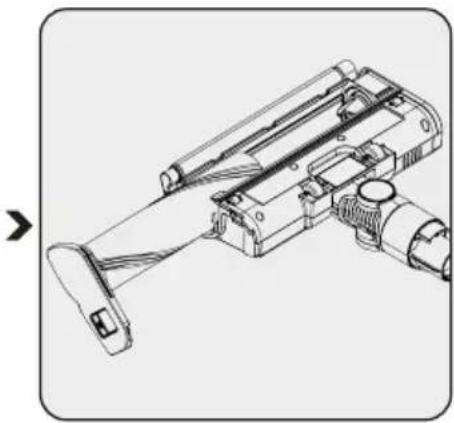
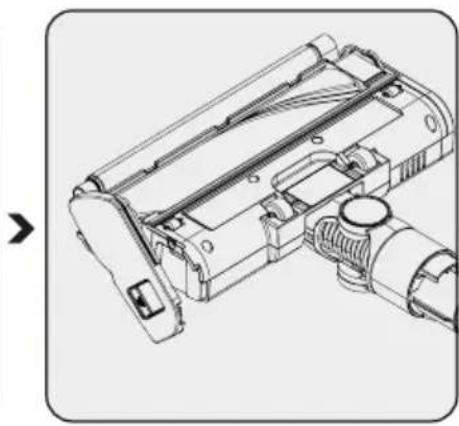
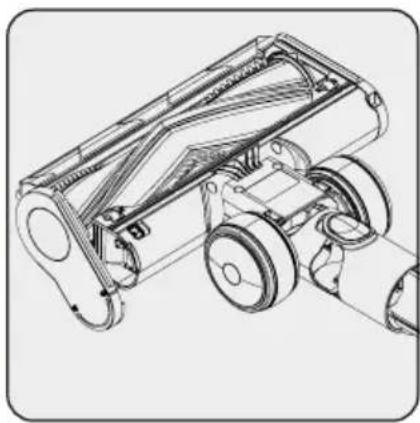
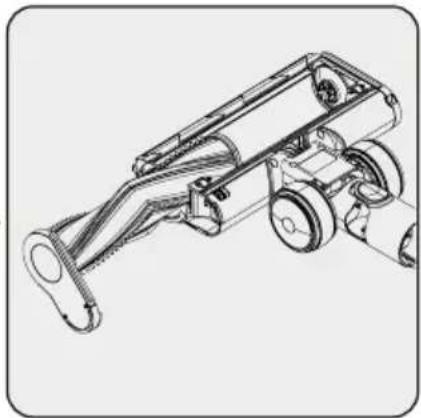
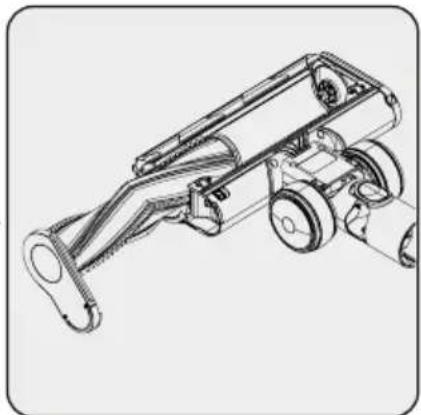
Technical line drawing of a mechanical device with an inset showing a close-up view of a component (no text or symbols present)Remove the roller brush plastic by pressing the button then sliding it out.
natural_image
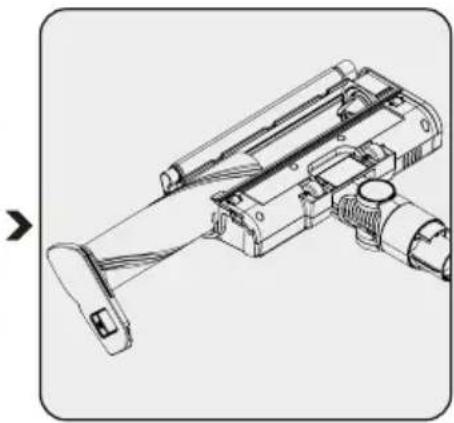
Technical line drawing of a mechanical assembly (no text or symbols visible)Tap the roller against a hard surface or use a brush to clear away the dust. Cut away any entangled hair etc.
natural_image
Technical line drawing of a mechanical device with no visible text or symbolsPush the roller back into place.
4 Cleaning and care
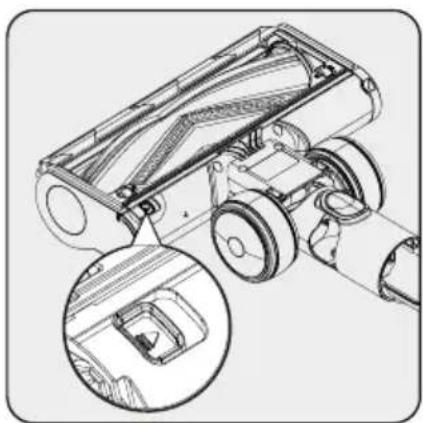
4.3.2 Cleaning of the extra carpet brush

WARNING: Do not wash the turbo brush or the main roller.
natural_image
Technical line drawing of a wheeled cart with visible wheels and a close-up inset showing internal components (no text or symbols)Remove the roller brush plastic by pressing the button then sliding it out.

natural_image
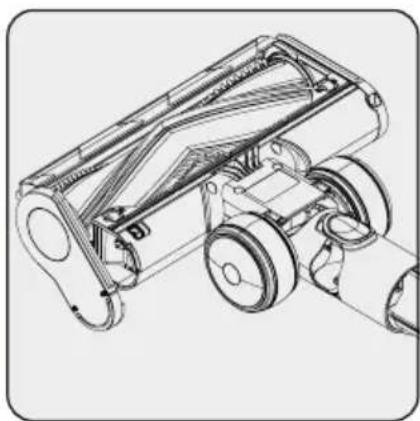
Technical line drawing of a wheeled cart or trailer mechanism (no text or symbols)Tap the roller against a hard surface or use a brush to clear away the dust. Cut away any entangled hair etc.

natural_image
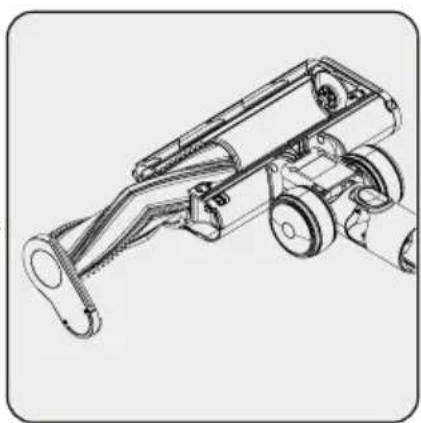
Technical line drawing of a mechanical device with wheels and brackets (no text or symbols)Push the roller back into place.
4.4 Storage
- Store the appliance carefully if you do not intend to use it for a long time.
- Unplug the appliance.
- Make sure to keep the appliance out of reach of children.
- Store the battery on a non-conducting material, and do not allow the battery to come into direct contact with metal. Otherwise, the battery could get damaged.
- If you're not going to use it for a long time, store it with the charge at least half full. Do not fully charge or discharge the battery. You should charge the appliance at least once every 3 months.
4.5 Transportation and handling
- Transport the appliance in the original packaging. The packaging protects the appliance from physical damage.
- Do not place heavy objects on the appliance or its packaging. Otherwise, the appliance could get damaged.
- If the appliance is dropped, it might not work or it could sustain permanent damage.
5 Troubleshooting
| PROBLEM POSSIBLE | CAUSE SOLUTION | |
| Does not work. | Battery is empty. Charge it | |
| Battery may be unseated. | Remove the battery and install it again. | |
| Vacuum connection is blocked. | Disassemble the appli-ance into body, brush and wand. Inspect and clean the connection points. | |
| Suction power is low. | Dust container is full. | Clean the dust container and the filters. |
| You may have reached the cleaning period of the filters. | Clean the filters. | |
| Filters may be deformed as a result of operation and their replacement pe- riod may have come. | Please contact the cus- tomer services to buy a new filter. | |
| Motor inlet foam has not been cleaned. | Clean the filters and re-charge the appliance. | |
| The turbo brush doesn't spin. Hair and similar ma-terials may have got tan-gled on the rotating roll on the turbo brush. | Clean the turbo brush roll. |
5 Troubleshooting
| There is disturbing noise from the motor. | Vacuum connection is blocked. | Disassemble the appli-ance into body, brush and wand. Inspect and clean the connection points. |
| Something may have stuck between the dust reservoir and the filter. | Open the dust reservoir and inspect the filter area. | |
| Cannot charge the vacuum cleaner. | The vacuum cleaner is not seated properly in the charging dock. | Put the vacuum cleaner onto the charging dock. Make sure that it is seated properly. Check the con- nection. |
| Operates for a very short time after charging. | It is not charged for the adequate period. | Charge for 4-5 hours as per the instructions. |
| Motor inlet foam has not been cleaned. | Clean the filters and re-charge the appliance. | |
| Battery life is deteriorated. | Contact the customer ser-vices to buy a new battery. | |
| Automatic cleaning station does not work. | Might not be plugged in. | Make sure it's plugged in. |
| The automatic dust cleaning station stops as soon as it starts. | The dust bag is full. | Replace the dust bag with a new one. |
| Might be time to clean the automatic cleaning sta-tion's motor input filter. | Clean the filter and press the automatic cleaning button. | |
| The vacuum cleaner's suction channel may be blocked. | Clean the dust container manually and check it. | |
| The appliance makes loud and quiet noises when it is being cleaned. | It can make different nois-es depending on the ma-terial being cleaned. | Check the dust contain-er once cleaning is com-plete. |
natural_image
Diagram showing two steps of a device being inserted into a cable, with arrows indicating the process (no text or symbols present)natural_image
Technical line drawing of a mechanical component with a cable and socket, no text or symbols present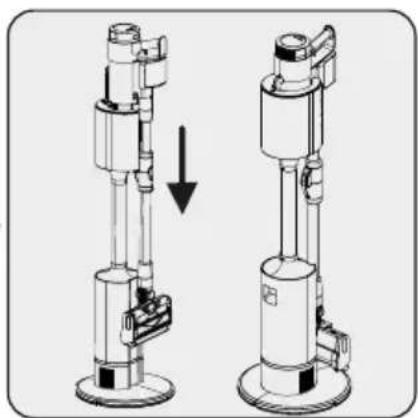
natural_image
Technical illustration of two mechanical device assemblies with a downward arrow indicating motion (no text or symbols)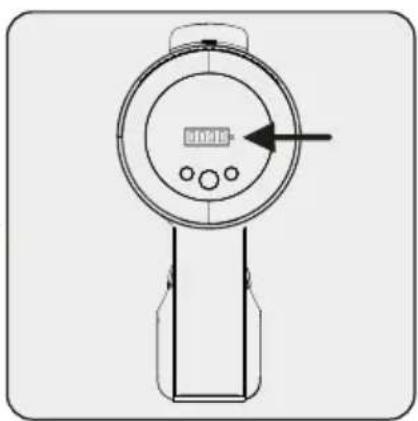
natural_image
Technical line drawing of a circular gauge or meter device with a pointer and control buttons, no text or symbols present.natural_image
Technical line drawing of a mechanical device with an upward arrow indicating motion or force (no text or symbols present)natural_image
Line drawing of a handheld electronic device with a dial and control knob (no text or symbols)natural_image
Line drawing of a handheld electronic meter with a dial and control buttons (no text or symbols)natural_image
Line drawing of a handheld device with a circular dial and control buttons, no text or symbols present.
natural_image
Technical illustration of a vacuum cleaner with a vertical shaft and base, alongside a schematic symbol (no text or labels)natural_image
Technical line drawing of a vacuum cleaner with attached lever and inset detail (no text or symbols)natural_image
Diagram showing a mechanical device before and after assembly, with an inset close-up of the component detail (no text or symbols present)natural_image
Diagram of a mechanical device with an arrow indicating a transformation or assembly (no text or symbols present)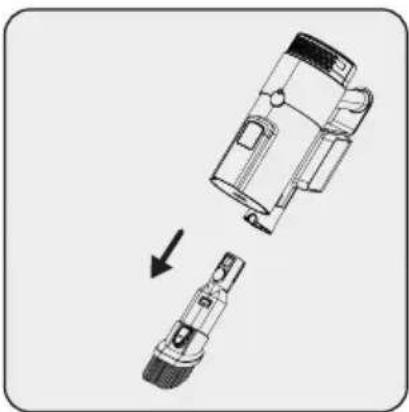
natural_image
Diagram showing a mechanical component being inserted into a smaller part, with an arrow indicating the process (no text or symbols present)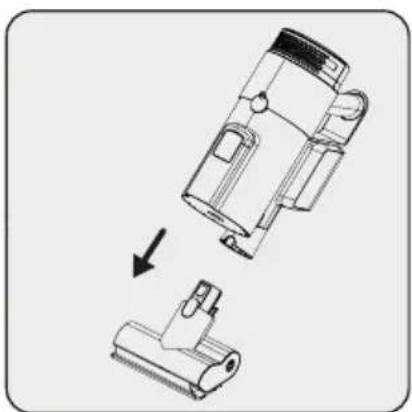
natural_image
Technical illustration of a mechanical component being assembled into a lower part (no text or symbols present)Dar ağızlı uç:
natural_image
Technical line drawing of a mechanical assembly with three circular components and a central knob (no text or symbols)natural_image
Technical line drawing of a mechanical device with internal components and no visible text or symbolsnatural_image
Technical line drawing of a mechanical device with a magnified inset showing internal components (no text or symbols)natural_image
Diagram of a hand pressing a button on a cylindrical device with a mounted device, showing no text or symbols.natural_image
Technical line drawing of a portable air conditioner unit with a hand inserting a device (no text or symbols)natural_image
Technical line drawing of a portable air conditioner unit with lid and base (no text or symbols)natural_image
Technical line drawing of a mechanical device with a magnified inset showing internal components (no text or symbols)natural_image
Technical illustration of a mechanical device with an inset showing internal components (no text or symbols)natural_image
Technical line drawing of a mechanical device with internal components and an arrow indicating motion (no text or symbols)natural_image
Illustration of a medical device with arrows indicating movement or flow (no text or symbols)natural_image
Technical line drawing of a mechanical device with internal components and base (no text or symbols)natural_image
Illustration of a hand cleaning a mechanical device with a cloth (no text or symbols)natural_image
Technical diagram showing two mechanical components: a motor and a cylindrical housing, with no visible text or symbols.natural_image
Diagram showing two stages of a kitchen tool: one with a handle and arrow, the other with a handle pouring granular material (no text or symbols)natural_image
Technical line drawing of a mechanical device with an upward arrow indicating motion or assembly (no text or symbols present)natural_image
Technical illustration of a mechanical component with an upward arrow indicating motion (no text or symbols present)natural_image
Diagram of a mechanical device with internal components and motion arrows, no text or symbols presentnatural_image
Diagram showing a mechanical component being inserted into a cylindrical housing, with an arrow indicating the process (no text or symbols present)natural_image
Technical illustration of a mechanical device with a lid and internal components, showing a downward arrow indicating assembly or disassembly (no text or symbols present)natural_image
Line drawing of a mechanical device with an arrow indicating direction (no text or symbols)natural_image
Technical illustration of a mechanical device with labeled parts and directional arrows (no text or symbols)natural_image
Illustration of a building with a large 'C' on its roof, surrounded by debris and arrows indicating movement (no text or symbols)natural_image
Technical line drawing of a mechanical device with an inset close-up showing a component detail (no text or symbols)natural_image
Technical line drawing of a mechanical device with internal components (no text or symbols)natural_image
Technical line drawing of a mechanical device with no visible text or symbolsnatural_image
Technical line drawing of a wheeled cart with wheels and a close-up inset showing internal components (no text or symbols)Remove the roller brush plastic by pressing the button then sliding it out.

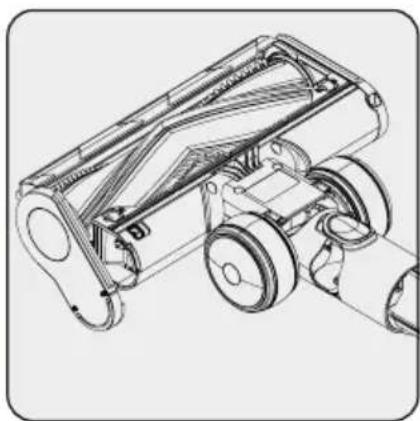
natural_image
Technical line drawing of a wheeled cart or trailer with wheels and handlebars (no text or symbols)Tap the roller against a hard surface or use a brush to clear away the dust. Cut away any entangled hair etc.

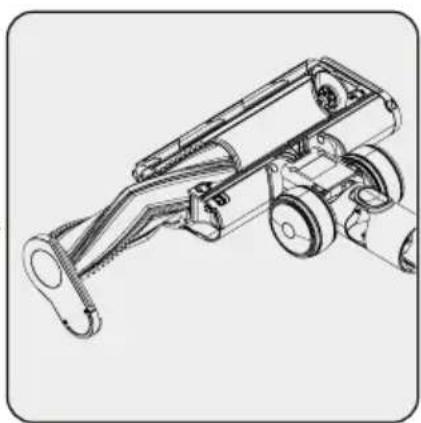
natural_image
Technical line drawing of a mechanical device with wheels and brackets (no text or symbols)Push the roller back into place.
4.4 Saklama
natural_image
Diagram showing two-step assembly of a device with arrows indicating movement, no text or symbols presentPritisnite gumb za odvaja- nje štapnog dijela i umet- nite štapni dio u kućište kao što prikazuje strelica.
natural_image
Technical line drawing of a mechanical component with mounting holes and wiring (no text or symbols)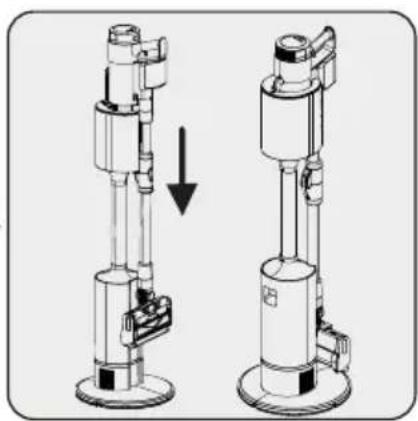
natural_image
Technical illustration of two mechanical device assemblies with a downward arrow indicating motion (no text or symbols)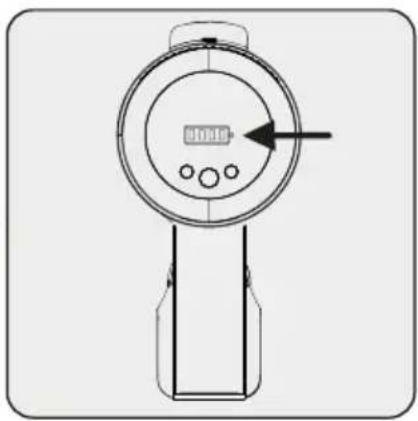
natural_image
Technical line drawing of a handheld device with a circular dial and control buttons (no text or symbols)Uređaj postavite na stani- cu za punjenje.
Uređaj će se početi automatski puniti čim završi čišćenje.
natural_image
Technical line drawing of a mechanical device with an upward arrow indicating motion (no text or symbols present)Podignite uređaj i udaljite ga od stanice za automatsko pražnjenje prašine.
natural_image
Line drawing of a handheld electronic meter with a digital display and control knob (no text or symbols)natural_image
Line drawing of a digital meter with control knob and pointer (no text or symbols)natural_image
Line drawing of a handheld electronic device with a circular dial and control buttons, no text or symbols present.
Kada koristite uređaj vodite računa o razinama napunjenosti baterije. Kada se baterija isprazni uređaj će se automatski zaustaviti.
3 Rukovanje
natural_image
Technical illustration of a vacuum cleaner with a vertical shaft and base, alongside a schematic symbol (no text or labels present)Ovaj uređaj prikladan je za uporabu na tepisima i tvrdim površinama.
natural_image
Technical line drawing of a vacuum cleaner with attached lever and inset detail (no text or symbols)natural_image
Technical illustration of a mechanical device with a downward arrow indicating transformation, alongside its magnified view showing internal components (no text or symbols)Kada uređaj stavite na stani- cu za automatsko čišćenje, spremnik za prašinu auto- matski će se isprazniti.
Upravljački gumb na stanici za automatsko pražnjenje prašine treperit će dok se od-vija postupak čišćenja.
Možete pritisnuti upravljački gumb na stanici za automatsko pražnjenje prašine i zaustaviti postupak pražnjenja prašine u bilo kojem trenutku.

Prašina, kosa, konac i slični predmeti mogu se zapetljati oko višestrukog ciklonskog filtra sprječavajući potpuno pražnjenje spremnika. U tom slučaju, trebate ručno očistiti spremnik za prašinu kako je prikazano u nastavku.
Pritisnite gumb za otpu- štanje spremnika za pra- šinu i uklonite spremnik.
natural_image
Diagram of a mechanical device with an arrow indicating a transformation or assembly (no text or symbols present)natural_image
Diagram showing a mechanical component being inserted into a housing, with an arrow indicating the process (no text or symbols present)Četka za prašinu: Idealna je za čišćenje zavjesa, kauča, poliranog namještaja te osjetljivih i krhkih predmeta.
natural_image
Diagram showing a mechanical component being processed into a lower part, with an arrow indicating the process (no text or symbols present)Mini turbo četka za
dlake kućnih ljubimaca:
Idealna je za metenje podova, stepenica, unutrašnjosti automobila, kauča i sofa. Koristi se i za kupljenje dlaka kućnih ljubimaca s ovih površina.
natural_image
Technical line drawing of a mechanical assembly with pulleys and a belt (no text or symbols)Pričvrstite krpu za brisanje poda ispod četke.
natural_image
Technical line drawing of a mechanical device with no visible text or symbolsnatural_image
Technical line drawing of a mechanical component with an inset close-up showing internal components (no text or symbols)Okrenite blokadu za curenje vode kako bi se krpe za brisanje poda namočile vodom.
Četka za turbo ribanje možete koristiti na tvrdim površinama.
3 Rukovanje

UPOZORENJE: Na tepihu ne koristite nastavak s krpom za brisanje poda.

UPOZORENJE: U spremnik za vodu krpe za brisanje poda ne ulijevajte izbjeljivač ili deterdžente koji se jako pjene.

UPOZORENJE: Nakon upotrebe zatvorite blokadu za curenje vode i uklonite nastavak s krpom za brisanje poda.

natural_image
Line drawing of a desktop kitchen sink with a magnified view of the bowl (no text or symbols)natural_image
Diagram of a hand pressing a button on a cylindrical device with a mounted device attached (no text or symbols present)Otvorite poklopac za prašinu na stanici za automatsko pražnjenje prašine.
natural_image
Technical line drawing of a mechanical device with a handle and internal components (no text or symbols)natural_image
Technical line drawing of a portable air conditioner unit with cooling fan and base (no text or symbols)Zamijenite vrećicu za prašinu novom.
natural_image
Technical illustration of a mechanical device with a magnified inset showing internal components (no text or symbols)natural_image
Technical illustration of a mechanical device with an inset showing internal components (no text or symbols)Zatvorite poklopac za prašinu na stanici za automatsko pražnjenje prašine.

UPOZORENJE: Vrećice za prašinu ne mogu se ponovno koristiti.
natural_image
Technical line drawing of a mechanical device with internal components and an arrow indicating motion (no text or symbols)Okrenite i izvadite filtar prašine.
natural_image
Illustration of a bowl with granular contents and a central bowl, no text or symbols presentOčistite prednji filtar tako da ga protresete i s njega stresete prašinu.
natural_image
Technical line drawing of a mechanical device with internal components and base (no text or symbols)Vratite prednji filtar na njegovo mjesto i okretanjem ga učvrstite

UPOZORENJE: Ne perite filtar HEPA.

Preporučujemo čišćenje spremnika za prašinu nakon svake upotrebe.
natural_image
Illustration of a hand cleaning a vintage digital camera with a cloth (no text or symbols)Obrišite kućište uređaja vlažnom krpom.
natural_image
Technical diagram showing two mechanical components: a motor and a cylindrical device, with no visible text or symbols.Pritisnite gumb za otpu- štanje spremnika za pra- šinu i uklonite spremnik.
natural_image
Diagram showing a mechanical device with an upward arrow and a separate view of its internal components (no text or symbols present)natural_image
Technical line drawing of a mechanical device with an upward arrow indicating motion (no text or symbols)Za detaljno čišćenje filtra izvucite dio prednjeg filtra i uklonite ga.
natural_image
Technical illustration of a mechanical component with an upward arrow indicating motion (no text or symbols present)Izvucite dio višestrukog ciklonskog filtra.
natural_image
Diagram of a mechanical device with internal components and motion arrows, no text or symbols presentOčistite višestruki ciklonski filtar i prednji filtar tako da ih protresete i tako ih očistite od prašine.
natural_image
Diagram showing a mechanical component being lowered into a cylindrical housing (no text or symbols present)Pričvrstite porozni filtar na spremnik za prašinu.

natural_image
Technical line drawing of a mechanical device with a lid and internal components, showing an arrow indicating assembly or transformation (no text or symbols present)Pričvrstite prednji filtar na porozni filtar.
natural_image
Line drawing of a mechanical device with an arrow indicating direction (no text or symbols present)natural_image
Technical illustration of a mechanical device with labeled parts and directional arrows (no text or symbols)Za čišćenje filtra EPA 12, pritisnite gumb (1) i uklo-nite dio s filtrom.

natural_image
Illustration of a building with a large 'C' on its roof, surrounded by debris and arrows indicating movement (no text or symbols)Očistite filtar EPA 12 tako da ga protresete i s njega stresete prašinu.
natural_image
Technical line drawing of a mechanical device with an inset showing a close-up view of a component (no text or symbols present)Uklonite plastiku okrugle četke pritiskom na gumb i zatim je izvucite.
natural_image
Technical line drawing of a mechanical assembly (no text or symbols visible)Lupnite okruglom četkom o tvrdu površinu ili koristite četku i očistite prašinu s nje. Izrežite sve zapetljane dlake, kosu, itd.
natural_image
Technical line drawing of a mechanical device with no visible text or symbolsnatural_image
Technical line drawing of a wheeled vehicle chassis with an inset close-up showing internal components (no text or symbols)Uklonite plastiku okrugle četke pritiskom na gumb i zatim je izvucite.

natural_image
Technical line drawing of a wheeled cart with wheels and a handle (no text or symbols)Lupnite okruglom četkom o tvrdu površinu ili koristite četku i očistite prašinu s nje. Izrežite sve zapetljane dlake, kosu, itd.

natural_image
Technical line drawing of a mechanical device with wheels and brackets (no text or symbols)natural_image
Diagram showing two-step assembly of a device with arrows indicating motion, no text or symbols presentnatural_image
Technical line drawing of a mechanical component with a cable and socket, no text or symbols present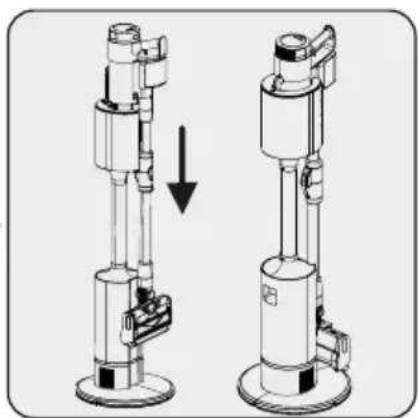
natural_image
Technical illustration of two mechanical device assemblies with a downward arrow indicating motion (no text or symbols)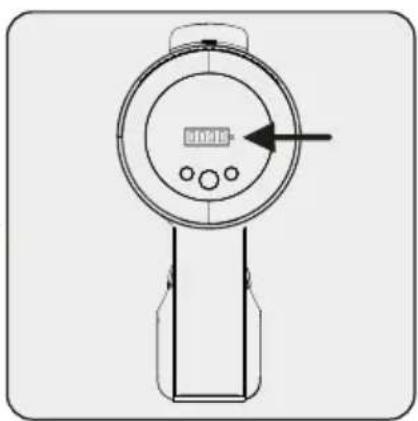
natural_image
Technical line drawing of a circular gauge or meter device with a pointer and control buttons, no text or symbols present.natural_image
Technical line drawing of a mechanical device with an upward arrow indicating motion or force (no text or symbols present)natural_image
Line drawing of a handheld electronic meter or gauge device with no visible text or symbolsnatural_image
Line drawing of a handheld electronic meter with a dial and pointer (no text or symbols)natural_image
Line drawing of a digital pressure meter with control knob and pointer (no text or symbols)
natural_image
Technical illustration of a vacuum cleaner with a vertical shaft and base, alongside a schematic symbol (no text or labels present)natural_image
Technical line drawing of a vacuum cleaner with attached lever and inset detail (no text or symbols)natural_image
Technical illustration of a mechanical device with a downward arrow indicating transformation, alongside its magnified view showing internal components (no text or symbols)natural_image
Diagram of a mechanical device with an arrow indicating a transformation or assembly (no text or symbols present)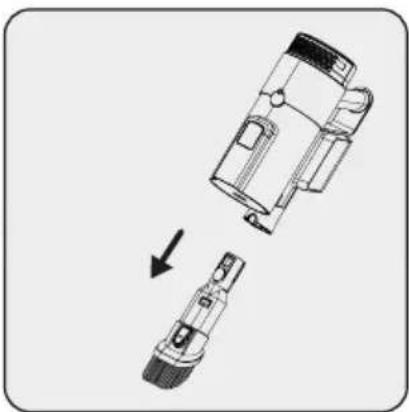
natural_image
Diagram showing a mechanical component being inserted into a smaller part, with an arrow indicating the process (no text or symbols present)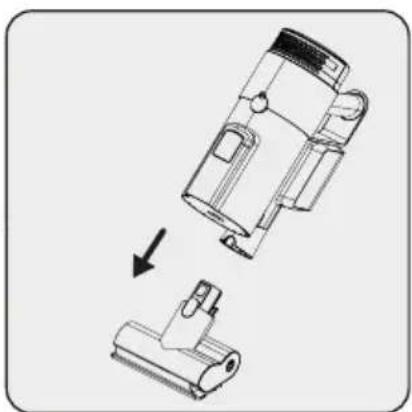
natural_image
Technical illustration of a mechanical device with an arrow indicating assembly or transformation (no text or symbols present)Hjørnemunnstykke:
natural_image
Technical line drawing of a mechanical assembly with pulleys and a rotating component (no text or symbols)Fest moppeduken under børsten.
natural_image
Technical line drawing of a portable air conditioner unit with cooling fan and hose (no text or symbols)natural_image
Line drawing of a mechanical device with a magnified inset showing a circular component (no text or symbols)natural_image
Diagram of a hand pressing a button on a cylindrical device with a mounted device, showing no text or symbols.natural_image
Technical line drawing of a portable air conditioner unit with a hand inserting a device (no text or symbols)natural_image
Technical line drawing of a portable air conditioner unit with lid and base (no text or symbols)natural_image
Technical line drawing of a mechanical device with a magnified inset showing internal components (no text or symbols)natural_image
Technical illustration of a mechanical device with an inset showing internal components (no text or symbols)natural_image
Technical line drawing of a mechanical device with internal components and an arrow indicating motion (no text or symbols)natural_image
Illustration of a medical device with arrows indicating movement or flow (no text or symbols)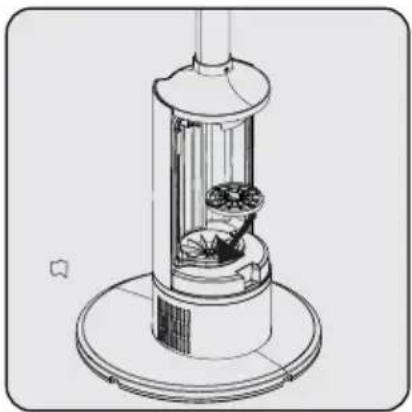
natural_image
Technical line drawing of a mechanical device with internal components and base (no text or symbols)natural_image
Diagram showing a mechanical component being lowered into a cylindrical housing (no text or symbols present)Fest det porøse filteret til støvbeholderen.

natural_image
Technical illustration of a mechanical device with a lid and internal components, showing a downward arrow indicating assembly or disassembly (no text or symbols present)Fest frontfilteret til det porøse filteret.
natural_image
Line drawing of a mechanical device with an arrow indicating direction (no text or symbols present)natural_image
Technical illustration of a mechanical device with labeled parts and directional arrows (no text or symbols)natural_image
Illustration of a building with a double-headed arrow above it, surrounded by debris and a small bowl (no text or symbols)natural_image
Technical illustration of a mechanical device with an inset close-up showing a component detail (no text or symbols)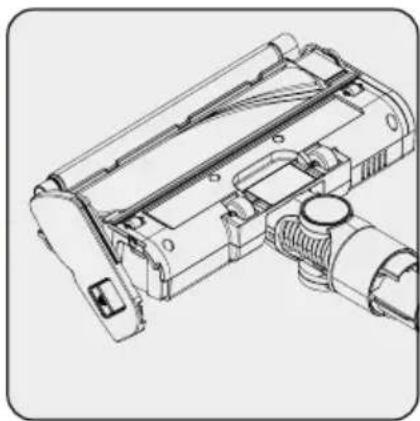
natural_image
Technical line drawing of a mechanical device with internal components (no text or symbols)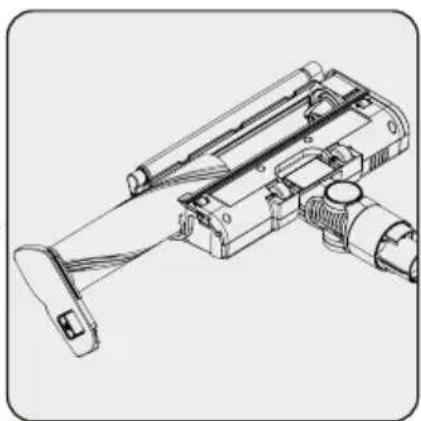
natural_image
Technical line drawing of a mechanical device with lever and handle (no text or symbols)natural_image
Technical line drawing of a wheeled cart with wheels and a close-up inset showing internal components (no text or symbols)natural_image
Technical line drawing of a wheeled cart with wheels and suspension components (no text or symbols)Bank rullen mot en hard overflate eller bruk en børste for å fjerne støvet. Klipp bort eventuelt sammenfiltret här osv.

natural_image
Technical line drawing of a mechanical device with no visible text or symbolsnatural_image
Diagram showing two steps of a device being inserted into a cable, with arrows indicating the process (no text or symbols present)natural_image
Technical line drawing of a mechanical component with mounting holes and wiring (no text or symbols)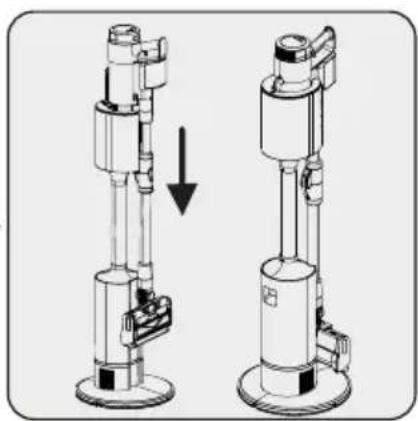
natural_image
Technical illustration of two mechanical device assemblies with a downward arrow indicating motion (no text or symbols)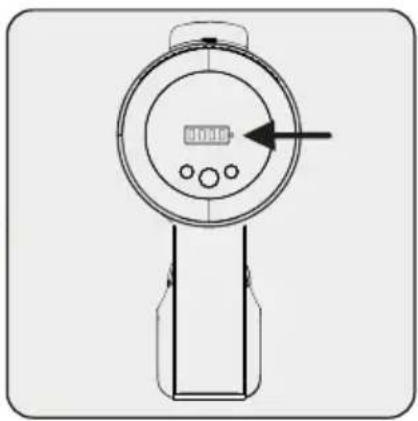
natural_image
Technical line drawing of a handheld device with a circular dial and control buttons (no text or symbols)natural_image
Technical line drawing of a mechanical device with an upward arrow indicating motion (no text or symbols present)natural_image
Technical line drawing of a meter device with control knob and display (no text or symbols)natural_image
Technical line drawing of a pressure meter with control knob and indicator lights (no text or symbols)natural_image
Line drawing of a digital pressure meter with control knob and pointer (no text or symbols)
natural_image
Technical illustration of a vacuum cleaner with a vertical shaft and base, alongside a schematic symbol (no text or labels present)natural_image
Technical line drawing of a mechanical device with a magnified inset showing a circular component detail (no text or symbols)natural_image
Technical illustration of a mechanical device with a downward arrow indicating transformation, alongside its magnified view showing internal components (no text or symbols)natural_image
Diagram of a mechanical device with an arrow indicating a transformation or assembly (no text or symbols present)natural_image
Diagram showing a mechanical component being cut into a smaller part, with an arrow indicating the process (no text or symbols present)natural_image
Technical illustration of a mechanical device with an arrow indicating assembly or transformation (no text or symbols present)natural_image
Technical line drawing of a mechanical assembly with pulleys and a rotating component (no text or symbols)natural_image
Technical line drawing of a portable air conditioner unit with cooling fan and hose (no text or symbols)natural_image
Line drawing of a mechanical device with a magnified inset showing a circular component (no text or symbols)natural_image
Diagram of a hand pressing a button on a cylindrical device with a mounted device, showing no text or symbols.natural_image
Technical line drawing of a portable air conditioner unit with handle and base (no text or symbols)natural_image
Technical line drawing of a portable air conditioner unit with lid and base (no text or symbols)natural_image
Technical line drawing of a mechanical device with a magnified inset showing internal components (no text or symbols)natural_image
Technical illustration of a mechanical device with an inset showing internal components (no text or symbols)natural_image
Technical line drawing of a mechanical device with internal components and an arrow indicating motion (no text or symbols)natural_image
Illustration of a medical device with arrows indicating movement or flow (no text or symbols)natural_image
Technical line drawing of a mechanical device with internal components and base (no text or symbols)natural_image
Illustration of a hand cleaning a mechanical device with a cloth (no text or symbols)Torka av apparatens ka- ross med en fuktig trasa.

natural_image
Technical diagram showing two mechanical components: a motor and a cylindrical housing, with no visible text or symbols.natural_image
Diagram showing a kitchen tool and its processing steps, including lifting an arrow and pouring contents (no text or labels)natural_image
Technical line drawing of a mechanical device with an upward arrow indicating motion (no text or symbols)natural_image
Technical illustration of a mechanical component with an upward arrow indicating motion (no text or symbols present)Dra upp multicyklonfilter- delen.

natural_image
Diagram of a mechanical device with internal components and motion arrows, no text or symbols presentnatural_image
Diagram showing a mechanical component being lowered into a cylindrical housing (no text or symbols present)natural_image
Technical illustration of a mechanical device with a lid and internal components, showing a downward arrow indicating assembly (no text or symbols present)natural_image
Line drawing of a mechanical device with an arrow indicating direction (no text or symbols present)natural_image
Technical illustration of a mechanical device with labeled parts and directional arrows (no text or symbols)natural_image
Illustration of a building with a large 'C' on its roof, surrounded by debris and arrows indicating movement (no text or symbols)natural_image
Technical line drawing of a mechanical device with an inset close-up showing internal components (no text or symbols)natural_image
Technical line drawing of a mechanical device with no visible text or symbolsnatural_image
Technical line drawing of a mechanical device with no visible text or symbolsnatural_image
Technical line drawing of a wheeled cart with visible wheels and a close-up inset showing internal components (no text or symbols)natural_image
Technical line drawing of a wheeled cart or trailer mechanism (no text or symbols)natural_image
Technical line drawing of a mechanical device with wheels and brackets (no text or symbols)- Cordless Upright Vacuum Cleaner with Auto Empty Charging Station
- Please read this manual first!
- Symbols and their meanings
- Important safety and environmental instructions
- General safety
- Compliance with the WEEE Directive and Waste Disposal
- Packaging information
- Information About Waste Batteries
- What you can do to save energy
- Compliance with the RoHS Directive
- Overview
- Controls and components
- Technical data
- Operation
- Intended use
- Attaching the body and brush
- Assembling and charging the automatic dust emptying station
- Operation
- Operating the automatic cleaning station
- LED display indicators
- Accessories
- Cleaning and care
- Replacing the dust bag
- Cleaning the Dust container and Filters
- Cleaning of the brushes
- Cleaning of the hard floor brush
- Cleaning of the extra carpet brush
- Storage
- Transportation and handling
- Troubleshooting
- Dar ağızlı uç:
- Saklama
- Rukovanje
- Hjørnemunnstykke:
Brand : GRUNDIG
Model : VCP 9431 PRO
Category : Vacuum Cleaner