StrongVision PRO WiFi - Camera Evolveo - Free user manual and instructions
Find the device manual for free StrongVision PRO WiFi Evolveo in PDF.


| Product Type | Trail Camera |
| Brand | Evolveo |
| Model | StrongVision PRO WiFi |
| Connectivity | WiFi IEEE 802.11b/g/n, Bluetooth, Mini USB |
| Display | 2.4" Colour TFT |
| Image Sensor | 8 MP Colour CMOS |
| Photo Resolution | 30, 24, 20, 16, 12, 8, 5, 3 MP |
| Video Resolution | 4K (30fps), 2K, 1080p, 720p, VGA |
| Video File Format | MP4/H.264 |
| Night Illumination | 58 IR LEDs 940 nm |
| IR Range | 20 m (optimal 8-12 m) |
| PIR Sensor Angle | 120° |
| Activation Speed | 0.5 s |
| Power Source | 10,000 mAh Li-Ion battery (rechargeable) or DC 12 V/1.5 A |
| Memory Card | SD card up to 256 GB (not included) |
| Ingress Protection | IP65 |
| Operating Temperature | -10°C to +50°C |
| Dimensions (H x W x D) | 175 x 118 x 87 mm |
| Security | 4-digit optional password |
| Compatibility | Evolveo WiFi app (iOS 13.1+/Android 9+) |
Frequently Asked Questions - StrongVision PRO WiFi Evolveo
User questions about StrongVision PRO WiFi Evolveo
0 question about this device. Answer the ones you know or ask your own.
Ask a new question about this device
Download the instructions for your Camera in PDF format for free! Find your manual StrongVision PRO WiFi - Evolveo and take your electronic device back in hand. On this page are published all the documents necessary for the use of your device. StrongVision PRO WiFi by Evolveo.
USER MANUAL StrongVision PRO WiFi Evolveo
natural_image
Close-up of a camouflage-based camera frame with visible lens and frame structure (no text or symbols)CZ
SK
EN
DE
HU
IT
RO
Obsah / Contents / Inhalt / Tartalom / Indice / Continut
Česky 4
Slovensky 25
English 47
Deutsch....68
Magyar 90
Italiano.... 112
Română 135
Obsah
natural_image
Black and silver portable device with camouflage pattern, labeled ports 1 and 2 (no visible text or symbols on body)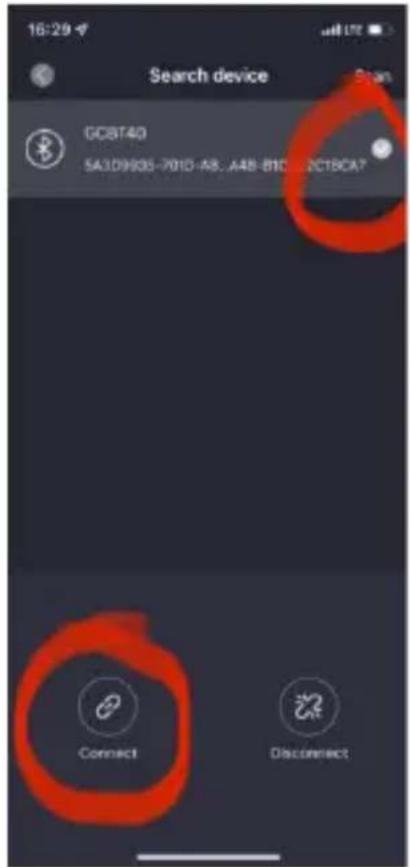
natural_image
Black military-style container with camouflage pattern and two labeled buttons (1 and 2), no visible text or symbols on the main body.| 1. | Konektor na napájanie DC 12 V/1,5 A(Nabíja vloženú batériu!) |
| 2. | Závit na statív 14 “ |
| 1. | Uchytenie na l'anový zámok (SGV CAM-LOCK) max.priemer 12 mm |
| 2. | Uchytenie na remienok |
- Menu
Copyright © Abacus Electric, s.r.o.
www.evolveo.com
www.facebook.com/EvolveoCZ
- Quick Start and Settings 47
- Technical Specifications .... 50
- Device Description.... 54
- Menu 58
- Media Browser 62
- Taking Photos Directly from the Menu ...... 63
- Troubleshooting 63
- Support and Warranty...... 64
1. Quick Start and Settings
1.13. To control the device, download the EVOLVEO WiFi Application from the appropriate Apple Appstore or Google Play application store. The application is intended only for devices with Apple iOS (from version 13.1 and above) and Google Android (from version 9 and above)!!

1.14. After installing the application, the camera must be started, select the TEST mode on the main switch of the camera. A 10,000 mAh Li-Ion battery is inserted in the device from the factory, remove it and fully charge it before use. The battery has a charging connector and a charging status LED. The battery can be charged even if it is inserted in the device!
TIP: For easier operation, a spare SGV CAM-BAT2 battery can be purchased, which you can pre-charge using the integrated charging connector and replace an already discharged one at the installation site.
1.15. Open the EVOLVEO WiFi
application on your phone, the main menu of the application consists of 5 main icons. Icons for Bluetooth, WiFi and camera also act as status icons. The moment the icon is red, the function is inactive, green when active.
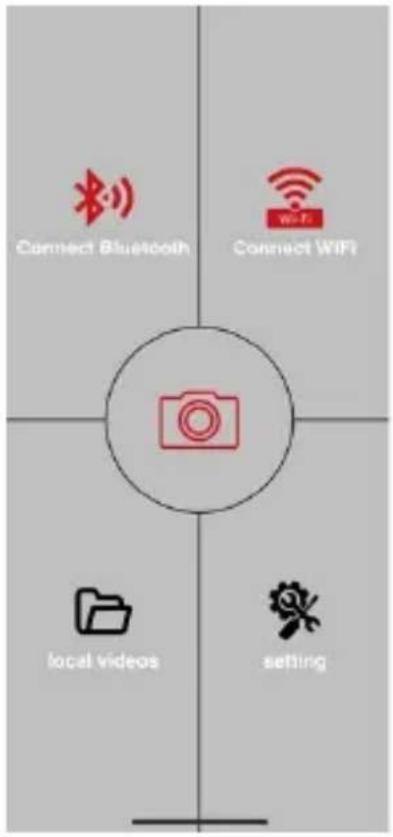
1.16. Bluetooth activation – to
connect to the camera, it is first necessary to activate the WiFi module of the camera via
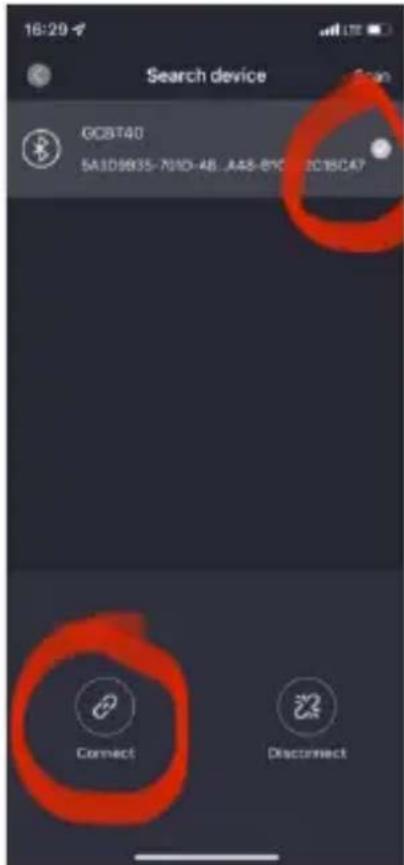
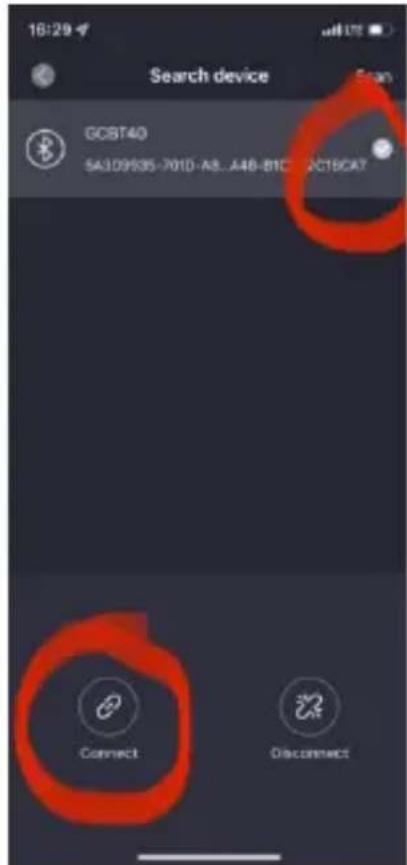
Bluetooth. Click the Bluetooth connection icon. In the Bluetooth menu, select the camera Bluetooth and select to connect in the bottom left. Return to the home screen using the arrow in the left top corner, if everything went well, the Bluetooth icon is green.
WARNING: For proper functioning, Bluetooth on your phone must be active!
1.17. WiFi connection – Select the
WiFi button on the main screen (the
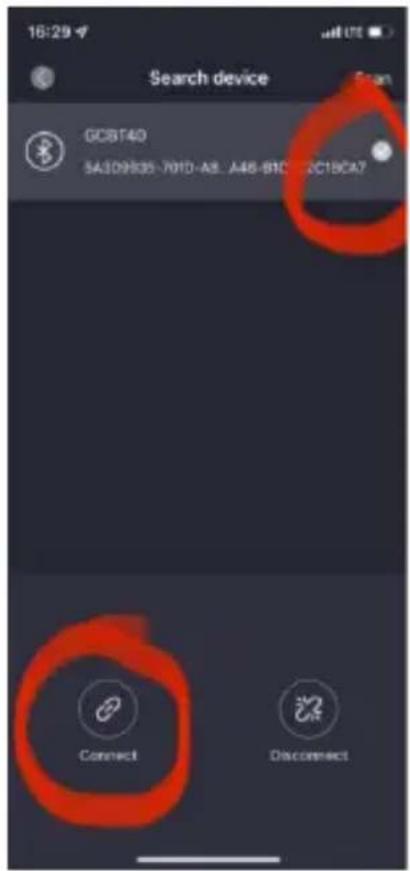
Bluetooth button must be green), the WiFi settings on your phone will open. Select a WiFi network that has the same name as the one displayed on the camera screen (SSID: CAM XXXX) enter the password, if it has not been changed yet, the default password is “12345678” and return to the EVOLVEO WiFi application.
WARNING: The WiFi network of the camera does not have an internet connection, therefore you may be asked by your device whether it should still be connected to this network – choose to keep connected!!! For older Android phones, it is necessary to turn off mobile data, otherwise the application will not connect to the camera!
Now that the camera is connected to the application, you can select the middle icon of the camera, which is green when the connection is active, and view the images stored in the camera, or the live view from the camera. This feature can also be used as a viewfinder to mount the camera, to know exactly where the camera is pointing.
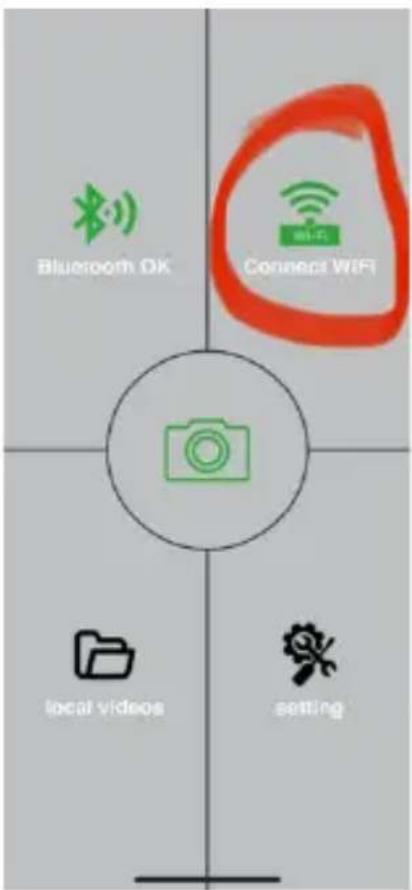
You can adjust the camera properties by pressing the settings button, more about the settings can be found in the Settings chapter of this manual.
1.18. Camera Activation
To activate the camera, set the main switch to the ON position, the camera will operate according to the settings. Now you no longer have to remove the camera from the protection box or remove it from its location to download the captured images or adjust the settings. You only have to be near it and use the procedure described above to connect to the camera according to steps 1.4. and 1.5.
WARNING: The range of WiFi and Bluetooth is 20–30 m in open space, depending on the environment. The longer the distance from the camera, the slower the transfer.
- Technical Specifications
| Display | Colour TFT 2.4” |
| Movement sensor | PIR (Passive Infrared) – adjustable sensitivity (3 levels) |
| Detection angle of the movement sensor | 120° |
| Night illumination | IR LED 940 nm, 58 LED under the front antireflective cover |
| IR LED beam distance | 20 m * |
| Dimensions | H x W x D 175 x 118 x 87 mm |
| Operating temperature | -10°C to +50°C |
| Storage temperature | -15°C to +60°C |
| Ingress protection | IP65 |
| Security | 4-digit optional password |
| Operating temperature | -10°C to +55°C |
* Night images may be dark if there are no other objects in the area in front of the camera from which the IR illumination may be
reflected. Ideally, there should be objects in the area in front of the camera from which the IR illumination can be reflected, such as stones, shrubs, trunks and the like. The optimal beam distance is 8–12 m from the camera
2.9. Photograph
| Imager | 8 Mpix colour CMOS (night photo black and white) |
| Lens | F = 3.1; FOV = 120° |
| Photography resolution | 30/24/20/16/12 MP |
| Exposition (ISO) | Auto/100/200/400 |
| Timelapse mode | 5 min / 30 min 1/2/3/6/12/24 h |
| Burst mode | 1/3/6 or 9 images |
| Photo information | Time and date, Temperature (°C, °F), Moon phase, optional title |
| Record mode | Photograph, Photo and Video, Timelapse |
| File format | .JPEG |
| Activation speed | 0.5 s * |
| Delay interval | The amount of time the device is inactive after the last motion-based start. Immediately, 10 s, 1/3/5/10/15 or 30 min |
* PIR sensor distinguishes movement based on changes in surface temperatures. This is ideal when the subject in front of the camera has a sufficient surface temperature difference and intersects the recorded area perpendicularly (passes from side to side). If the subject approaches the camera frontally, it will take longer to detect the motion.
2.10. Video
| Video resolution | VGA, 720 p, 1080 p, 2K, 4K 30 fps |
| Record length | 5/10/30/60 or 90 seconds |
| File format | MP4/H.264 |
| Liveview | < 180 kBps ** |
2.11. Power Supply
| Integrated battery * | 10,000 mAh Li-Ion designed for the SGV CAM-PRO and SGV CAM-WiFi model. The battery is equipped with a separate charging connector |
| Power supply | DC 12 V 1.5 A – charges the built-in battery! |
| Connector for external charging | DC Jack 3.5 x 1.3 mm |
| External battery | 12 V battery can be connected to the external charging connector using a cable |
2.12. Connectivity
| WiFi | IEEE 802.11b/g/n |
| Memory card | SD up to 256 GB |
| Internal memory | The device does not have an internal memory |
| USB | Can be connected to PC using a mini USB cable (not included in the package) |
* Battery life decreases depending on the mode used, the number of videos and photos taken, 3–4 months of life are calculated using only day mode photo recording and 10 photos per day. In the winter period with temperatures below 0^ C, the battery life decreases more significantly than at normal summer temperatures, this is a feature of batteries.
3. Device Description
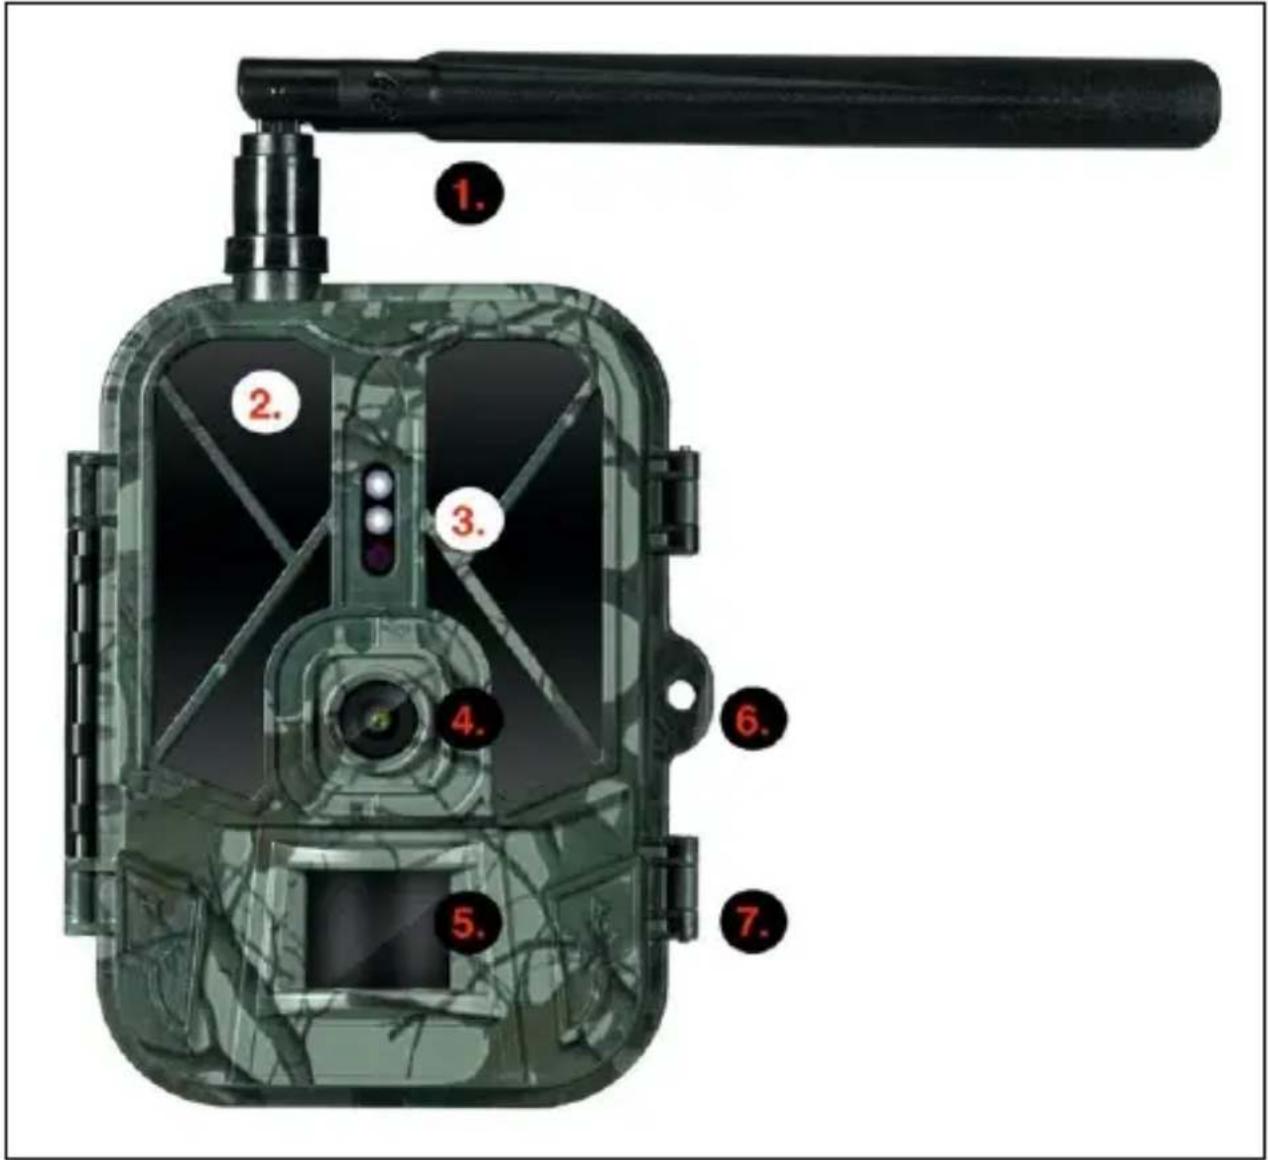
| 1. | Antenna (Only the model with 4G network support) |
| 2. | IR illumination |
| 3. | Indication LED, Ambient light sensor |
| 4. | Camera lens |
| 5. | PIR sensor (Movement sensor) |
| 6. | Locking spot |
| 7. | Latches |
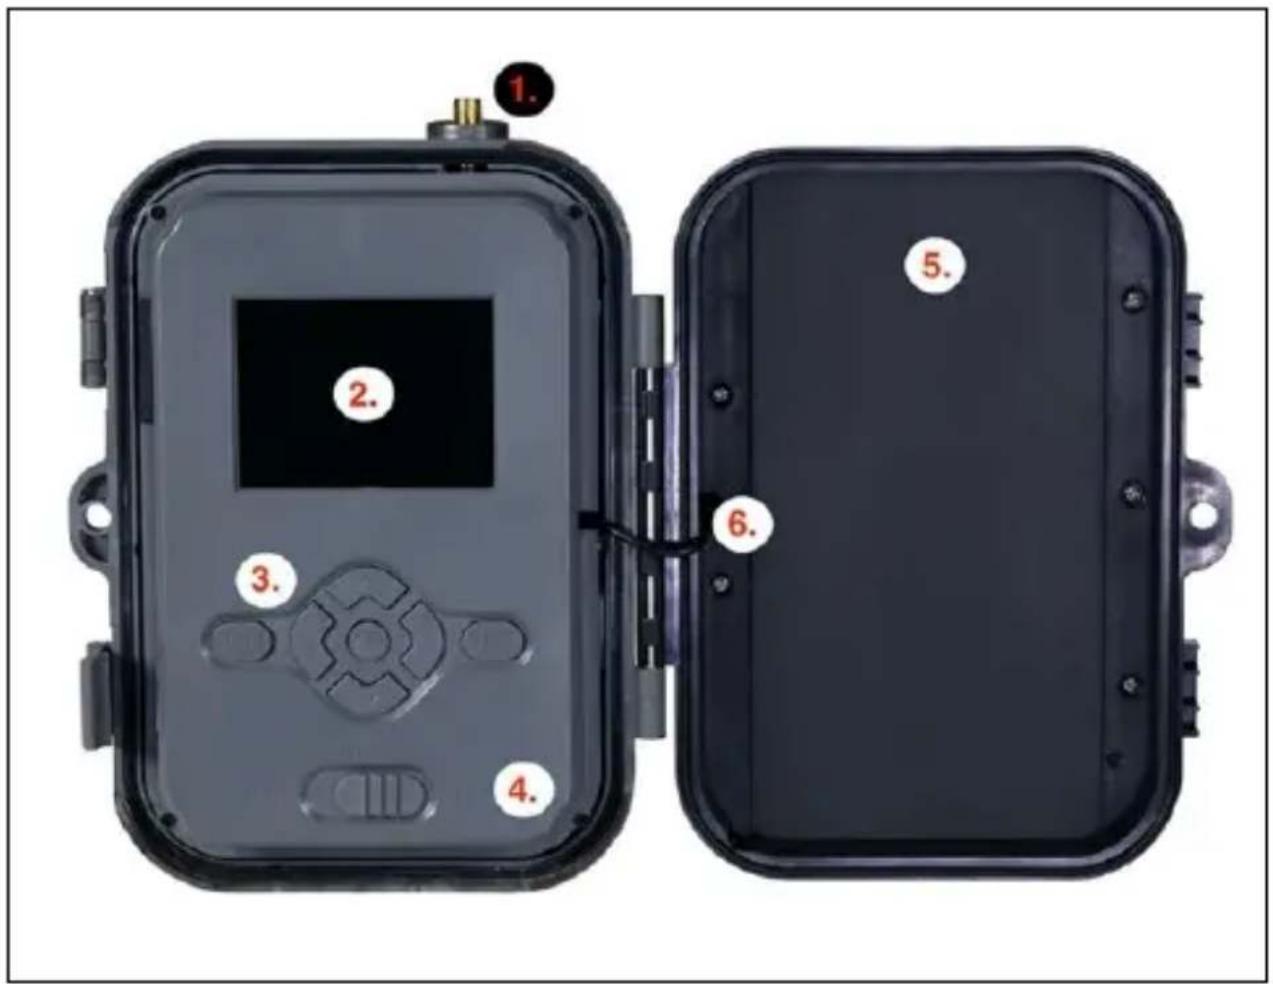
| 1. | Antenna (Only the model with 4G network support) |
| 2. | 2.4” colour LCD display |
| 3. | Control buttons |
| 4. | Main position switch: OFF – TEST – ON |
| 5. | 10,000 mAh Li-ion battery |
| 6. | Power supply connection cable – must not be damaged. In case of damage, remove the battery and send the device to an authorised service. |
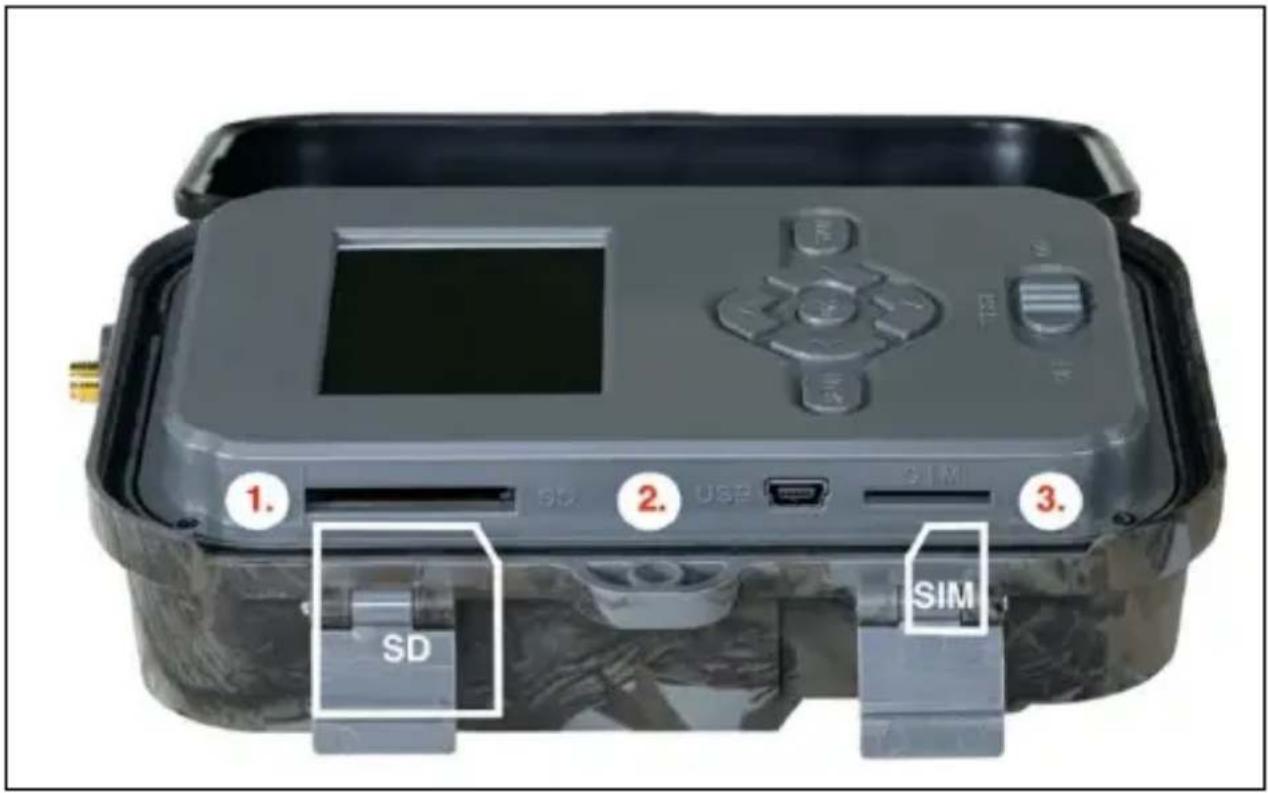
| 1. | SD card slot (max. 256 GB) |
| 2. | Mini USB connector for PC connection (Mass Storage) |
| 3. | SIM card slot (only the 4G support model) |
natural_image
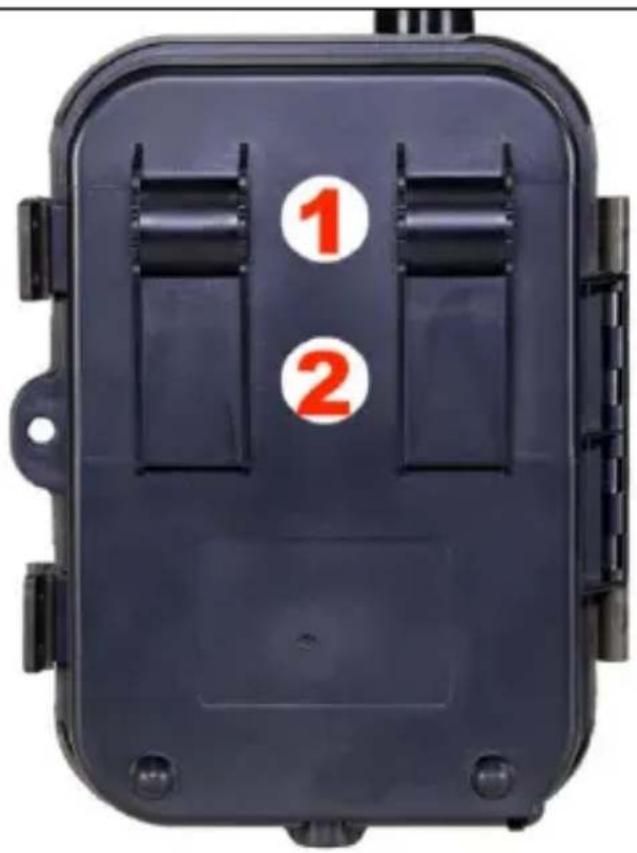
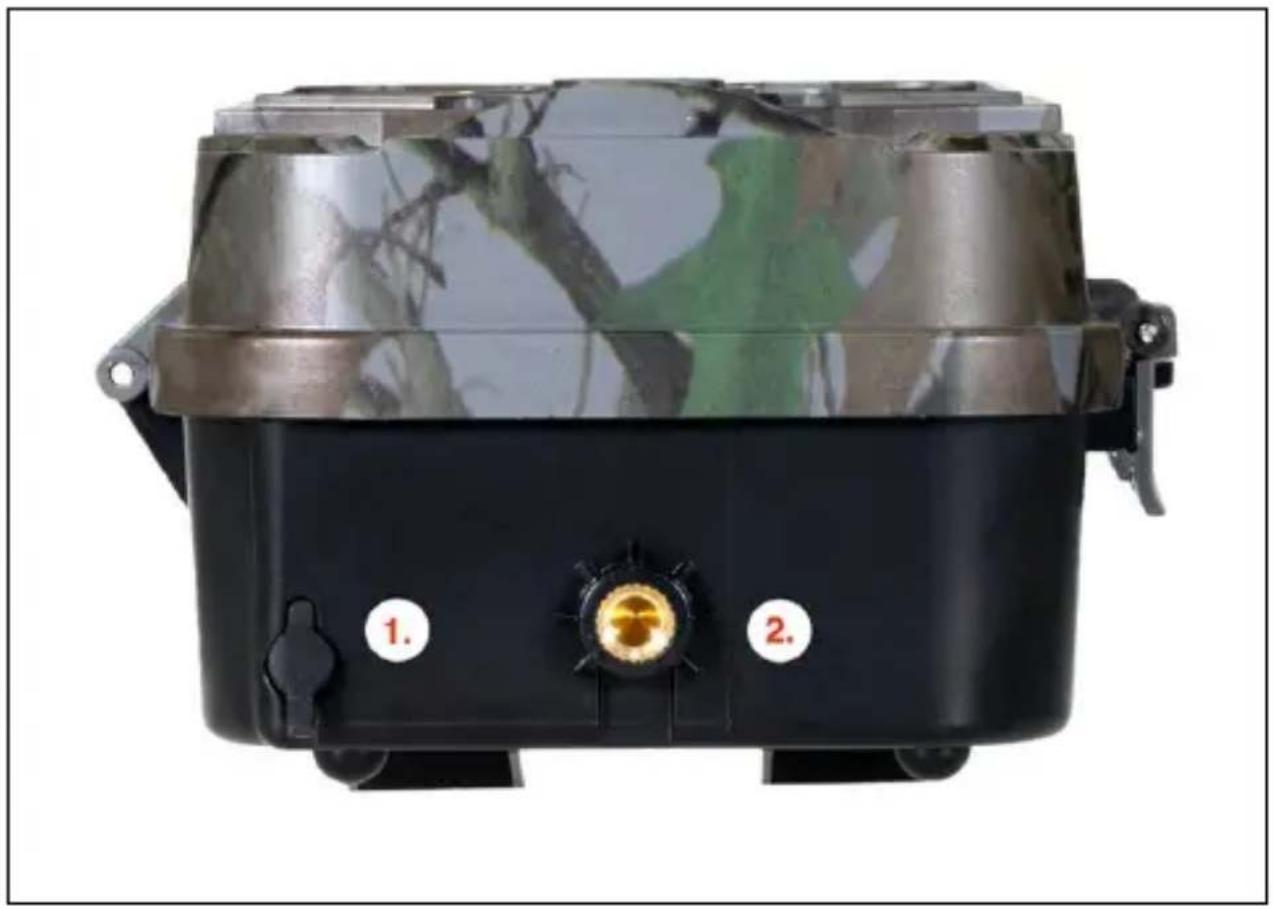
Black military-style container with camouflage pattern and two labeled buttons (1 and 2), no visible text or symbols on the main body.| 1. | Connector for DC 12 V / 1.5 A power supply(It charges the inserted battery!) |
| 2. | 14 tripod thread |
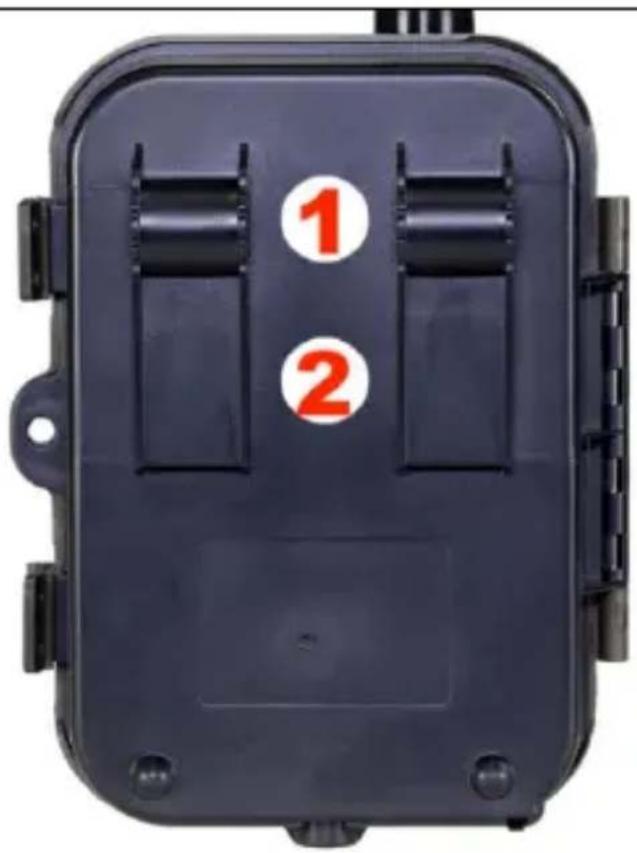
| 1. | Attachment for rope lock (SGV CAM-LOCK) max. diameter 12 mm |
| 2. | Belt attachment |
- Menu
| 1. Mode | Camera | In this mode, the camera takes only photos |
| Video | In this mode, the camera takes only video | |
| Camera & Video | The camera takes both photos and video. | |
| Timelapse photos | In this mode, the camera takes photos according to the selected timelapse interval. | |
| 2. Resolution | Resolution settings for Video recording: 4K, 2K, 1080p, or 720p or VGA. | |
| 3. Video Length | Settings of the length of recorded video: 5 s, 10 s, 30 s, 60 s or 90 s | |
| 4. Audio Recording | If activated, it records audio when recording. | |
| 5. Image Size | Changes the resolution at which all acquisitions will be made images, selectable between 30, 24, 20, 16, 12, 8, 5, 3 MPX photos, the larger the higher the resolution, the larger the file will be saved on the SD card! | |
| 6. Interval | The interval is time data that indicate the period of inactivity after the detected movement. If the camera is activated using the PIR sensor, it performs the required action and waits for the specified time after the movement before it is possible to take another picture again. Values: 1 s, 10 s, 1 min, 3 min, 5 min, 10 min, 15 min or 30 min. | |
| 7. Timelapse Interval | Shooting interval setting in the Timelapse mode. Photoswill be taken at the selected time interval. The following values can be set: 5 min, 30 min, 1 h, 2 h, 3 h, 6 h, 12 h or 24 h. | |
| 8. Sequence | In the Photography, Photo & Video and Timelapse mode, it sets the number of photos taken at the moment of the camera activation. Following number can be set: 1, 3, 6 or 9 photos | |
| 9. ISO | ISO sensitivity, simply put, the darker the surroundings, the higher value. If unsure of the settings, leave it in the automatic mode. Following number can be set: Automatic, ISO 100, ISO 200, ISO 400, ISO 800 a ISO 1600 | |
| 10. Rewrite | On – The oldest files are rewritten when the SD card is full.Off – New photos are not saved when the SD card is full. | |
| 11. PIR Sensitivity | Sensor PIR sensitivity settings. If unwanted activation by remote objects occurs, the sensor sensitivity can be reduced. Followingnumber can be set: Low, Medium, High or Off | |
| 12. Language | Allows the language settings in the menu. | |
| 13. Frequency | The frequency filter of artificial light. If the screen flickers during the video recording, settings can be changed to see if this phenomenon is minimised. Options are 50 or 60 Hz | |
| 14. Camera ID | A name shown in the stamp in the photos taken. | |
| 15. Password/PIN | Security of the camera with a PIN code, when the function is switched on, you enter a new PIN, which the device will request every time it starts up. | |
| 16. Timer | The operating time of the device – on the display, set the time range when the device should be active, the device will not take photos for the rest of the day. | |
| 17. Date/Time | It sets the date, time and format. Move the arrows to choose and set, confirm by pressing the OK button. | |
| 18. Formatting | Format SD memory cards inserted in the device | |
| 19. Default Settings | Deletes all settings made in the camera . | |
| 20. Version | It shows the current FW version |
5. Media Browser
Photos taken can be viewed directly on the camera display.
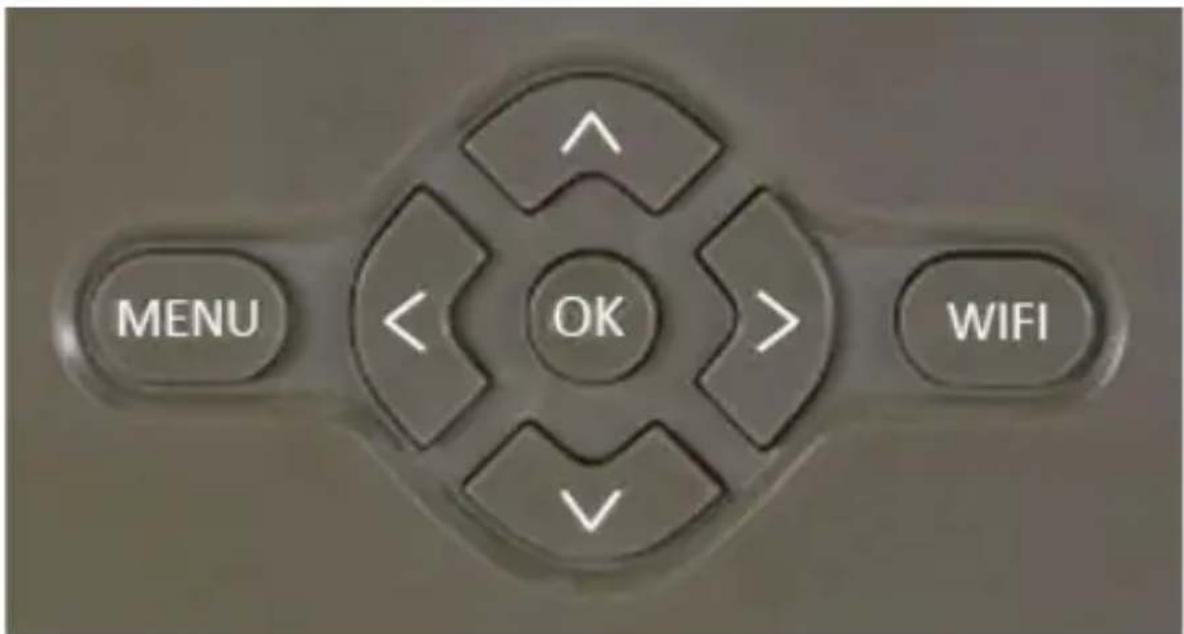
For viewing, switch to the TEST mode and press the Right arrow button on the home screen.
Arrow control keys:
- Next photo: arrow up
• Previous photo: arrow down - Play video: left arrow
- Stop video: right arrow
- Return to the main menu: MENU button
6. Taking Photos Directly from the Menu
The camera can take photos or videos using buttons only. Switch the camera to the TEST mode. Follow these steps to control the camera:
- The arrow up or down switches between the Photography and Video modes
- Press the OK button to take a picture
7. Troubleshooting
7.1 The Camera Does Not Record Photographs/Video during the Movement Detection
- Check the PIR sensor for damage or a leaf blocking the view.
- Try the camera in places without hot surfaces. The PIR sensor detects movement based on the temperature difference, if the surroundings of the camera are overheated, the sensor will not be activated.
- In some cases, the water surface may cause the PIR sensor to activate unintentionally, in which case turn the camera away from the water surface.
- Set the camera not to directly face the ground.
- Attach the camera so that it does not move and there are no large moving objects, such as a large tree.
- At night, the device can detect movement outside the beam distance of the IR illumination, so no moving subject will be recorded in the photos.
- Sunset or sunrise may cause the recording to start unintentionally – change the position of the camera.
- If the animal/person in front of the camera is moving fast, the camera may not detect them – move the camera further away from objects (for example, away from the trail on which the game is moving)
7.2 The Camera Takes No Photos
- Make sure there is enough free capacity on the inserted SD card. If the function of old files overwrite is switched off, the device no longer records after the SD card is full.
- Make sure the Li-Ion battery has enough power to operate the trail camera.
- Make sure the switch is in the ON position and not OFF.
- Format the card on your computer to EXFAT before using it for the first time
7.3 The Night Illumination Does Not Have Sufficient Range
- Make sure the battery in the device is charged; at lower capacities, typically below 15%, the night illumination may not activate
- For good night-time quality, place the camera in a dark place without additional light sources.
- Try to use the camera in places where it will be surrounded by other objects that can reflect the IR illumination. If you place the camera in an open space, the resulting photo will be poorly lit. It is the same as shining a flashlight in the night sky, you will not see anything, even if the flashlight is very powerful.
8. Support and Warranty
Firstly, read the “FAQ – Frequently Asked Questions” at: https://eshop.evolveo.com/strongvision-wifi/ or contact EVOLVEO Technical Support at: service@evolveo.com
The warranty DOES NOT APPLY to:
-
use of the device for purposes other than those for which it is designed,
• installing firmware other than that installed on the device
• electrical or mechanical damage caused by improper use -
damage caused by natural influences such as water, fire, static electricity, fluctuations in electrical current and the like 13
- damage caused by repairs performed by an unqualified person
- illegible serial number
- battery capacity decreases after 6 months of use (6 months battery life guarantee)
Disposal: The crossed-out container symbol on the product, in the enclosed documentation or on packaging means that all the electric and electronic equipment, batteries and storage cells in the European Union must be disposed of as sorted waste at the end of their service life. These products must not be disposed as unsorted municipal waste.
①CE
DECLARATION OF COMPLIANCE
Abacus Electric, s.r.o. hereby declares that EVOLVEO Strongvision WiFi complies with the requirements of standards and regulations relevant for this type of device.
For the full wording of the Declaration of Compliance see http://ftp.evolveo.com/ce/
Importer / Manufacturer
Abacus Electric, s.r.o.
Planá 2, 370 01, Czech Republic
Made in China
Copyright © Abacus Electric, s.r.o.
www.evolveo.com
www.facebook.com/EvolveoCZ
All rights reserved.
Product appearance and technical specifications are subject to changes without prior notice.
Inhalt
HINWEIS: Für einen
natural_image
Black and white photo of a military-style container with camouflage pattern and two labeled buttons (1 and 2), no visible text or symbols on the main body.natural_image
Black plastic electrical contact box with two numbered slots (1 and 2) on its side, no visible text or symbols beyond the numbers.Copyright © Abacus Electric, s.r.o.
www.evolveo.com
www.facebook.com/EvolveoCZ
natural_image
Black and white photo of a military-style container with camouflage pattern and two labeled buttons (1 and 2), no visible text or symbols on the main body.natural_image
Black rectangular device with two numbered slots (1 and 2) on its side, no visible text or symbols beyond the numbers.Copyright © Abacus Electric, s.r.o.
www.evolveo.com
www.facebook.com/EvolveoCZ
Minden jog fenntartva.
natural_image
Black and white photo of a military-style equipment housing with camouflage pattern and two labeled buttons (1 and 2), no visible text or symbols on the main body.Copyright © Abacus Electric, s.r.o.
www.evolveo.com
www.facebook.com/EvolveoCZ
natural_image
Black and white photo of a military-style container with camouflage pattern and two labeled buttons (1 and 2), no visible text or symbols on the main body.Copyright © Abacus Electric, s.r.o.
www.evolveo.com
www.facebook.com/EvolveoCZ
| Adaptor General information | Value and precision | Unit |
| Manufacturer's name or trade mark, commercial registration number and address | Naxya Limited / No. 5, 17/F, Strand 50, 50 Bonham Strand, Sheung Wan, Hong Kong | - |
| Model identifier | YCZX-12V-2A | - |
| Input voltage | 100-240 | V |
| Input AC frequency | 50/60 | Hz |
| Output voltage | 12 | V |
| Output current | 2 | A |
| Output power | 24 | W |
| Average active efficiency | 85 | % |
| Efficiency at low load (10 %) | 64 | % |
| No-load power consumption | 0,7 | W |
- Obsah / Contents / Inhalt / Tartalom / Indice / Continut
- Obsah
- Quick Start and Settings
- Open the EVOLVEO WiFi
- Bluetooth activation – to
- WiFi connection – Select the
- Camera Activation
- Photograph
- Video
- Power Supply
- Connectivity
- Device Description
- Media Browser
- Taking Photos Directly from the Menu
- Troubleshooting
- The Camera Does Not Record Photographs/Video during the Movement Detection
- The Camera Takes No Photos
- The Night Illumination Does Not Have Sufficient Range
- Support and Warranty
- The warranty DOES NOT APPLY to:
- ①CE
- DECLARATION OF COMPLIANCE
- Inhalt
Brand : Evolveo
Model : StrongVision PRO WiFi
Category : Camera