
KD0804-S08 - Digital photo frame Clas Ohlson - Free user manual and instructions
Find the device manual for free KD0804-S08 Clas Ohlson in PDF.


| Product Type | 8-inch Digital Photo Frame |
| Brand | Clas Ohlson |
| Model | KD0804-S08 |
| Screen Size | 8 inches (16:10 aspect ratio) |
| Resolution | 800 x 600 pixels |
| Display Type | Colour TFT LCD |
| Dimensions | 204 x 142 x 23 mm |
| Power Supply | 5 V DC, 1 A via supplied mains adaptor (100-240 V AC, 50/60 Hz) |
| Supported Memory | SD, SDHC, MMC, MS memory cards; USB 2.0 flash drives |
| Internal Memory | 8 MB |
| Picture Format | JPEG |
| Slideshow Effects | 10 transition options (e.g., Random, Split horizontal) |
| Photo Effects | Colour, Monochrome, Sepia |
| Display Modes | Auto fit, Optimal, Full |
| Calendar & Clock | Yes, with 12/24 hour format |
| Remote Control | Included (battery CR2025) |
| Care & Maintenance | Wipe with soft damp cloth; do not use solvents or strong detergents |
| Safety Precautions | Do not open casing; avoid water; indoor use only; unplug when not in use |
| Reparability | Only qualified service technicians should repair; no user-serviceable parts |
| Operating Temperature | 0 °C to 40 °C (10-85% RH) |
Frequently Asked Questions - KD0804-S08 Clas Ohlson
User questions about KD0804-S08 Clas Ohlson
0 question about this device. Answer the ones you know or ask your own.
Ask a new question about this device
Download the instructions for your Digital photo frame in PDF format for free! Find your manual KD0804-S08 - Clas Ohlson and take your electronic device back in hand. On this page are published all the documents necessary for the use of your device. KD0804-S08 by Clas Ohlson.
USER MANUAL KD0804-S08 Clas Ohlson
8"Digital Photo Frame
Digital fotoram 8"
Digital fotoramme 8"
natural_image
Black-and-white photo of a woman holding a child on a beach, with a remote control panel nearby (no text or symbols visible)Art.no Model
18-8171 KD0804-S08-UK
38-3927 KD0804-S08
Ver. 201007
8"Digital Photo Frame
Art. no 18-8171 Modell KD0804-S08-UK
38-3927 KD0804-S08
Please read the entire instruction manual before using the product and save it for future reference. We reserve the right for any errors in text or images and any necessary changes made to technical data. If you have any questions regarding technical problems please contact Customer Services.
1. Product description
- 8-inch digital photo frame for displaying your digital JPEG images.
- USB memory and memory card slots (SD/SDHC/MMC).
- Comes with mains adaptor and remote control.
- Displays time and calendar.
- Slideshow with 10 different transition options.
2. Contents
- Digital photo frame
- Instruction manual
- Mains adaptor
- Remote control
3. Safety
- Warning! Do not open the casing. Certain components within the product's casing carry dangerous currents. Contact with these may give you an electric shock.
- The product should only be repaired by qualified service technicians.
- The product should not be taken apart or modified.
- Do not place the product where there is a risk of it falling into water or other liquid. Do not place any objects containing liquid on the product, e.g. flower vases or soft drinks.
- Do not cover the ventilation openings. Do not place the product close to heat sources such as on top of the radiator or TV, or on e.g. the sofa which will block the ventilation openings.
- Always unplug the adaptor from the electrical outlet if the product is not be used for an extended period.
- The product is designed for 8 – 10 hours of continuous operation. Avoid any prolonged use. Allow the product to rest for a while before using it again.
- The product is intended for indoor use only.
- Do not expose the product to direct sunlight for prolonged periods.
- Do not use the product in damp, dusty, or dirty environments.
- Only use a lightly moistened soft cloth with a little washing up liquid to clean the screen.
- Do not disconnect the mains adaptor while the frame is in use. The attached memory storage device may be damaged. Neither should the connected memory storage device be removed when the frame is in use.
4. Buttons and functions
flowchart
graph TD
    A["Power"] --> B["Control Panel"]
    B --> C["Menu"]
    style A fill:#f9f,stroke:#333
    style B fill:#ccf,stroke:#333
    style C fill:#cfc,stroke:#333
Rear buttons
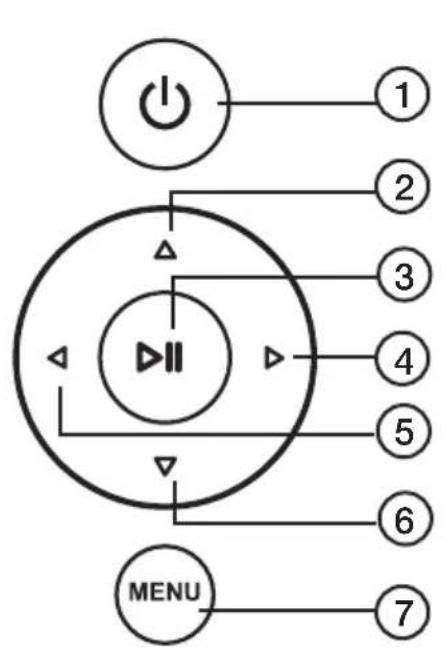
- [ 🔊 Power on/off.
- [▲] Move cursor up.
- [▶II] Start slideshow, pause or confirm.
- [▶] Move cursor right.
- [◀] Move cursor left.
- [▼] Move cursor down.
- [MENU] Return to main menu, or open file processing (copy/delete file).
On the right hand side of the photo frame
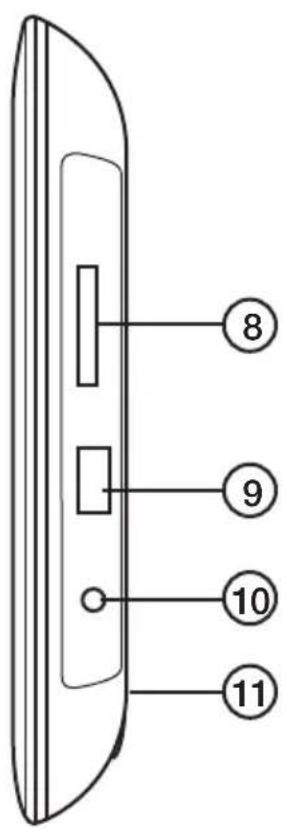
- Memory card slot: SD/SDHC/MS/MMC
- USB port
- DC 5 V
- Fold-out stand
Remote control
flowchart
graph TD
    A["12"] --> B["POWER"]
    C["14"] --> D["ROTATE"]
    E["17"] --> F["SLIDE SHOW"]
    G["20"] --> H["OK"]
    I["13"] --> J["BGM"]
    K["15"] --> L["ZOOM"]
    M["16"] --> N["EXIT"]
    O["18"] --> P["OK"]
    Q["19"] --> R["OK"]
    S["21"] --> T["EXIT"]
    U["22"] --> V["EXIT"]
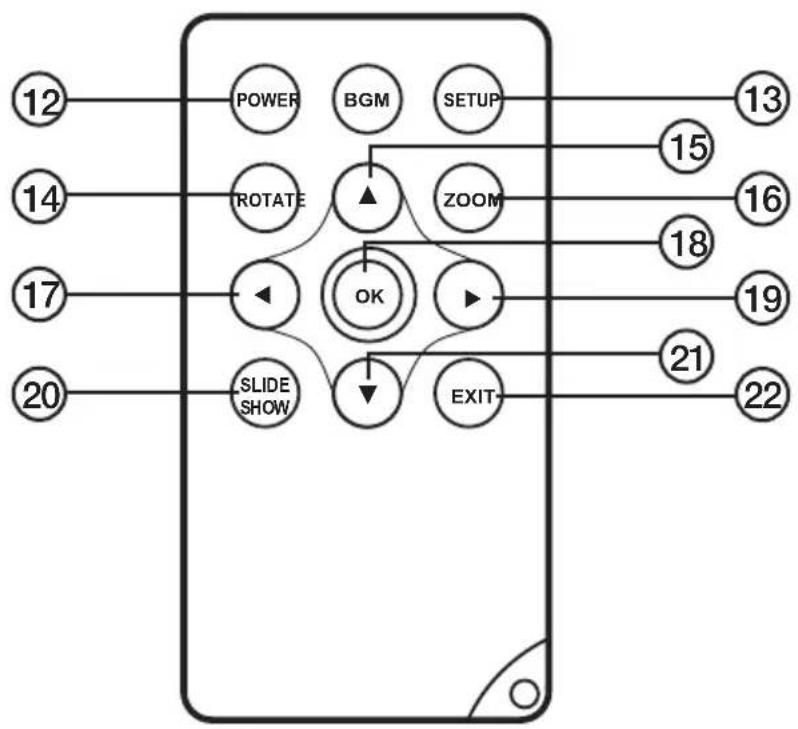
- ON/OFF switch.
- [SETUP] Copy or delete images.
- [ROTATE] Rotate image (in pause mode during single image display). Rotates image 90° anticlockwise each time it is pressed.
- [▲] Move cursor up
- [ZOOM] Change image size (in pause mode during single image display).
- [◀] Move cursor left
- [OK] Start slideshow, pause or confirm selection.
- [▶] Move cursor right.
- [SLIDE SHOW] Start slideshow straight away.
- [▼] Move cursor down.
- [EXIT] Return to main menu, or return to previous menu.
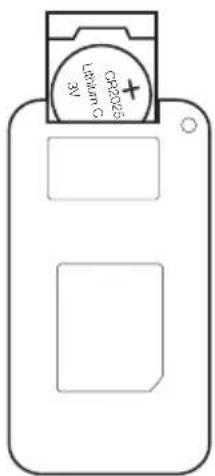
Changing batteries in the remote control
- Remove the battery holder.
- Insert the battery according to the markings (+ up).
- Reinsert the battery holder.
5. Use
- This photo frame is intended for tabletop use.
- Fold out the stand (11) on the back.
- Remove the plastic film from the display and from the battery in the remote control.
- Plug the mains adaptor into a wall socket and then plug the DC connector into the DC 5 V socket on the photo frame.
- Connect a SD/SDHC/MMC memory card or USB memory to the photo frame.
- Press [⏻] (1) or (12) to turn the photo frame on.
- The slideshow will start automatically if a memory card or USB memory stick (containing images) is inserted.
- Press [EXIT] (7) twice to display the main menu: Photo (images), File (displays list of images/folders in memory), Calendar (time and date) or Setup (settings).
- If you highlight Photo, the start page will appear.
- Symbols representing the connected memory devices will appear on the display. Highlight the desired memory and press [OK] (18) to start viewing images.
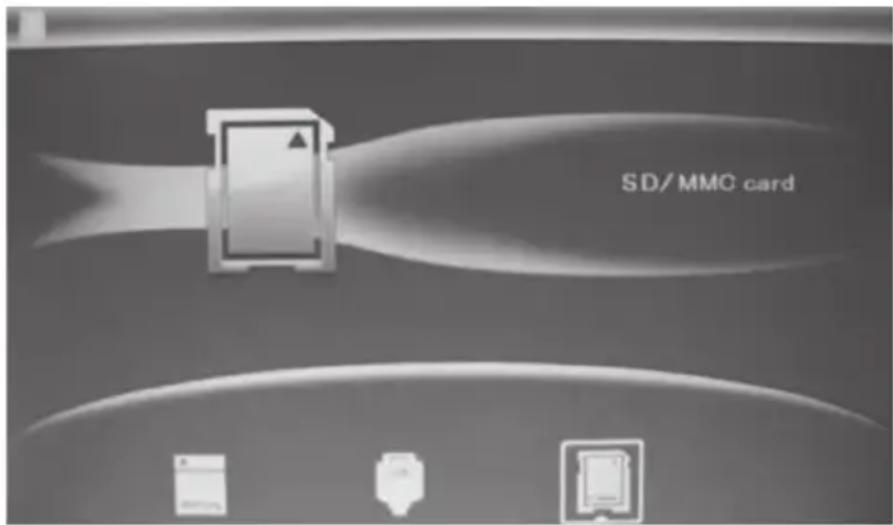
6. Main menu
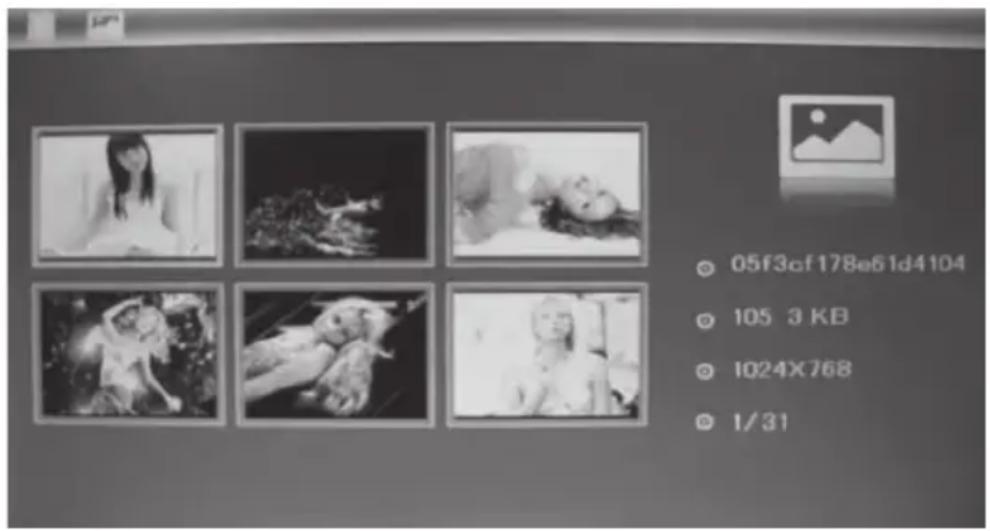
6.1 Photo – display of images in thumbnail size
The slideshow starts as soon as a memory card is connected.
- Press [EXIT] (22) twice to display the main menu.
- Highlight the Photo symbol (on the far left) using the arrow keys (17) (19).
- Press [SETUP] (13).
- Highlight the memory card containing the images.
-
Press [SLIDE SHOW] (20) to start the slideshow.
-
Press [EXIT] (22) to display the images in thumbnail size.
- Highlight the desired image using the arrow keys (2) (4) (5) (6).
- Information about the highlighted image will be displayed: File name, file size, image size and image number plus the total number of images on the memory device.
- Press [EXIT] (229 to return to the main menu or press [OK] (18) to start the slideshow from the highlighted image.
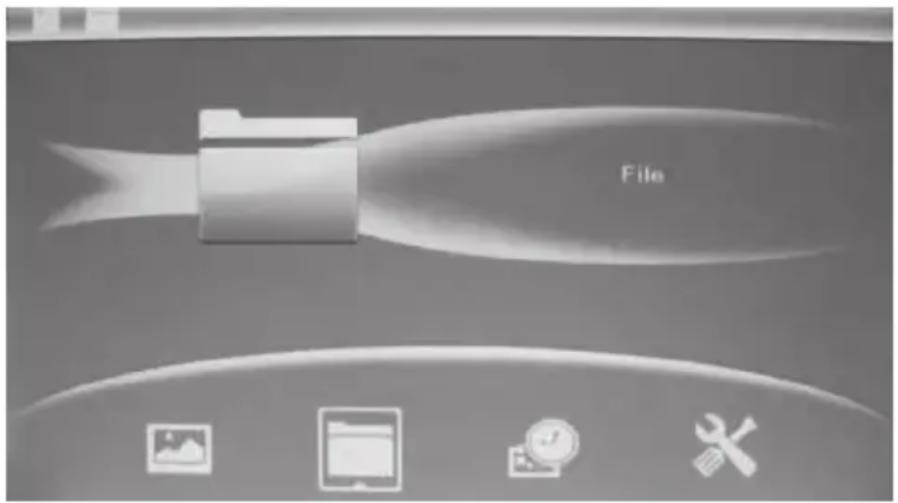
6.2 File – display of files and folder on the selected memory device
- Highlight the desired memory device using the arrow keys (17) (19) and then press [OK] (18).
- Information about the files and folders on the memory device will be displayed.
- Highlight the desired image using the arrow keys (15) (21).
- Press [SLIDE SHOW] (20) to begin playing the slideshow from the highlighted image.
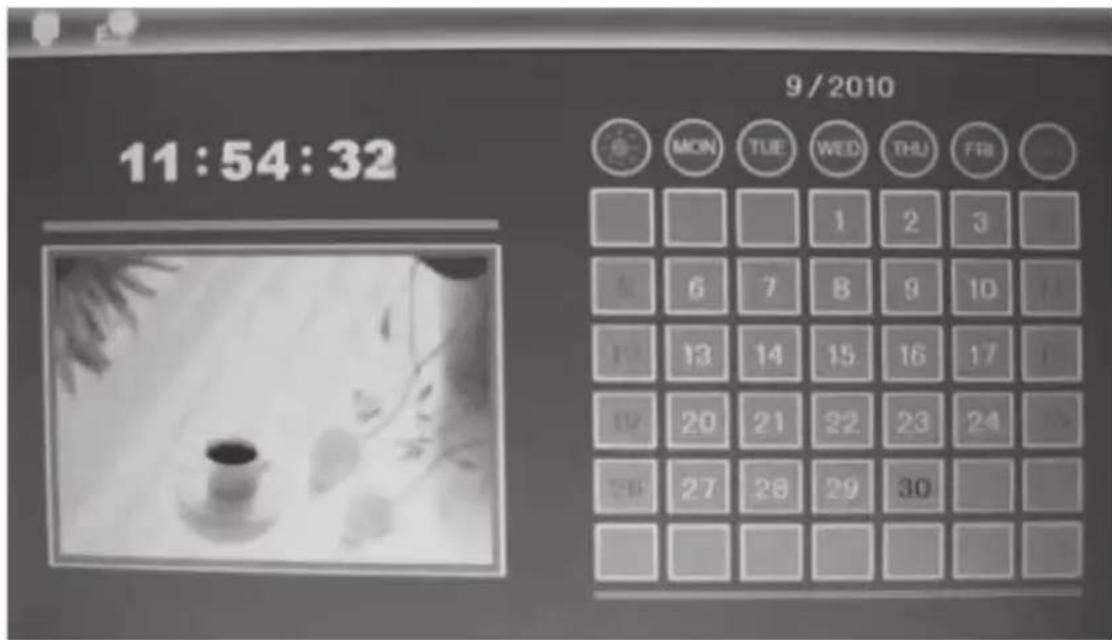
6.3 Calendar - display of time and date
- Press [EXIT] (22) twice to display the main menu.
- Move to the Calendar symbol using the arrow keys (17) (19). Press [OK] (18) to confirm.
Setting the time and date:
a. Go back to the main menu and enter Setup, then press [OK] (18).
b. Highlight Set time/date using the arrow keys (15) (21). Press [OK] (18) to confirm.
c. The year will be highlighted, press [OK] (18) to confirm. Adjust the year, if necessary, using the arrow keys (17) (19). (In setup mode the highlighted text is red). Press [OK] (18) to confirm.
d. Set the month, day, hour, minute and seconds in the same way.
e. Advance to Save Time using the arrow keys (15) (21) to save your settings. Press [OK] (18) to confirm. Exit the menu by pressing [EXIT] (22).
Setting the time format:
a. Advance to Set Time Format.
b. Press [OK] (18) to confirm.
c. Select a 12 or 24 hour display.
d. Press [OK] (18) to confirm. Exit the menu by pressing [EXIT] (22).
6.4 Setup
- Press [EXIT] (22) twice to display the main menu.
- Move to the Setup symbol using the arrow key [▶] (19).
- Press [OK] (18) to confirm.
- Press [MENU] to return to normal display mode when you have finished your settings.
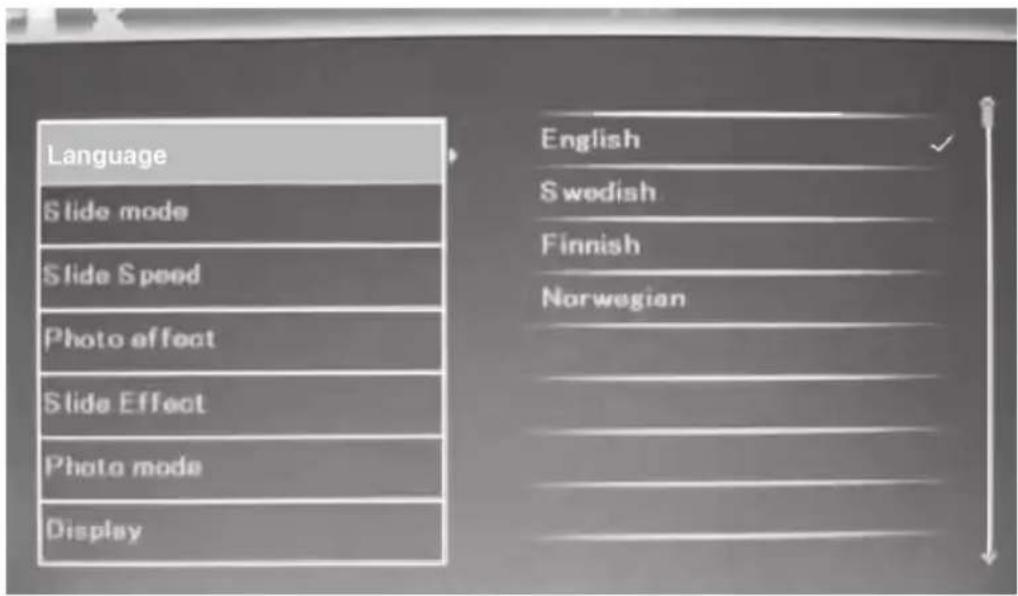
The main menu has settings for:
a. Language - English, Swedish, Finnish or Norwegian
b. Slide mode - 1 image, 4 images or 3 images.
c. Slide speed – from 3 seconds to 1 minute.
d. Photo effect – Colour, Monochrome (black&white), Sepia (sepia-toned)
e. Slide effect (transition effect) – Random, Split horizontal in, etc.
f. Photo mode (display size) – Auto fit, Optimal or Full.
g. Display – Contrast, Brightness, Saturation and Tint.
h. Set time/date (see section 6.3 Calendar).
i. Set time format (display in 12 or 24 hour clock format).
j. Format built-in memory.
k. Reset setting (return to default factory settings).
I. Exit (finish and return to normal display mode).
6.5 Copy, rotate or zoom images
- Highlight the Photo symbol (on the far left) using the arrow keys (17) (19).
- Highlight the desired image using the arrow keys (15) (17) (19) (21).
- Press [OK] (18) to display the entire image.
- Push [SETUP] (13) to enter the setup mode.
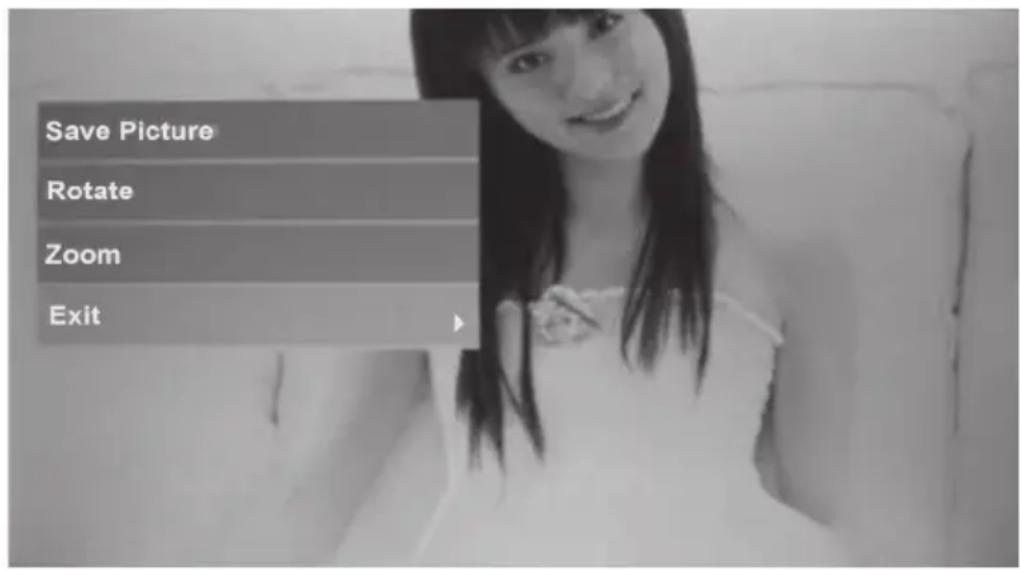
- You have now accessed the settings. Highlight a function: Rotate or Zoom.
- Adjust the settings by pressing several times on [OK] (18) until the image is correct.
- Highlight Save Picture and press [OK] (18) to save the image you have changed.
- Press [MENU] to return to normal display mode.
6.6 Deleting images
- Highlight the Photo symbol (on the far left) using the arrow keys (17) (19).
- Highlight the image to be deleted using the arrow keys (15)(17)(19)(21).
- Push [SETUP] (13) to enter the setup mode.
- You have now accessed the settings. Highlight a function: Delete File or Exit.
- Press [OK] (18) to confirm.
7. Care and maintenance
Wipe the surface clean using a soft, damp cloth. Never use solvents or strong detergents.
8. Troubleshooting guide
| Problem Solution | |
| The device does not start/no photo is shown. | Check that the mains adaptor is correctly connected. |
| The remote control does not work. | Check the battery.Point the remote control directly at the photo frame without any obstructions in between. |
| The memory card cannot be read. | Make sure that the files on the memory card are supported by the device. See Specifications. |
| Some photos are uploaded quicker than others. | Images with high resolution take longer to load.Use images with lower resolution for quicker display.The recommended resolution is 800 x 600 pixels. |
9. Disposal
Follow local ordinances when disposing of this product. If you are unsure of how to dispose of this product, please contact your local authority.
10. Specifications
Screen: 8"colour TFT LCD (16x10)
Resolution: 800 (h) x 600 (v)
Viewing angle: 60^ (left/right/vertically), 40^ (horizontally)
Contrast: 300:1
Light intensity: 300 cd/m²
Response time: 20 ms
Input voltage: 5 V DC, 1 A via the supplied mains adaptor (100-240 V AC, 50/60 Hz)
USB port: USB 2.0
Memory card slot: SD (Secure Digital), MMC (Multimedia Card), MS (Memory Stick), SDHC (Secure Digital High Capacity)
Internal memory: 8 MB
Picture format: JPEG
Operating temperature: 0 °C to 40 °C (at humidity level of 10-85 % RH)
Size: 204 x 142 x 23 mm
Digital fotoram 8"
Art. nr 18-8171 Modell KD0804-S08-UK
38-3927 KD0804-S08
6.5 Kopiera, rotera eller zooma bilder
6.6 Radera bilder
Minneskortsanslutning: SD (Secure Digital), MMC (Multimedia Card), MS (Memory Stick), SDHC (Secure Digital High Capacity)
Internt minne: 8 MB
Bildformat: JPEG
6. Hovedmenyen
6.5 Kopiere, rotere eller zoome
6.6 Slette bilder
(100–240 V AC, 50/60 Hz)
Usb-tilkobling: USB 2.0
Minnekort: SD (Secure Digital), MMC (Multimedia Card), MS (Memory Stick), SDHC (Secure Digital High Capacity)
Internminne: 8 MB
Bildeformat: JPEG
6. Päävalikko
For consumer contact, please visit www.clasohlson.co.uk and click on customer service.
Internet www.clasohlson.co.uk
- 8"Digital Photo Frame
- Product description
- Contents
- Safety
- Buttons and functions
- Rear buttons
- On the right hand side of the photo frame
- Remote control
- Changing batteries in the remote control
- Use
- Main menu
- Photo – display of images in thumbnail size
- File – display of files and folder on the selected memory device
- Calendar - display of time and date
- Setting the time and date:
- Setting the time format:
- Setup
- The main menu has settings for:
- Copy, rotate or zoom images
- Deleting images
- Care and maintenance
- Troubleshooting guide
- Disposal
- Specifications
- Digital fotoram 8"
- Kopiera, rotera eller zooma bilder
- Radera bilder
- Hovedmenyen
- Kopiere, rotere eller zoome
- Slette bilder
- Päävalikko
Brand : Clas Ohlson
Model : KD0804-S08
Category : Digital photo frame