
PF-10DN-502V3RC - Digital photo frame Clas Ohlson - Free user manual and instructions
Find the device manual for free PF-10DN-502V3RC Clas Ohlson in PDF.


| Product Type | Digital Photo Frame |
| Brand | Clas Ohlson |
| Model | PF-10DN-502V3RC |
| Display Size | 10 inches |
| Display Type | LCD TFT, 4:3 aspect ratio |
| Display Resolution | 1024 x 768 pixels |
| Supported Image Formats | JPEG (up to 8000 x 8000 pixels) |
| Supported Audio Formats | MP3, WMA |
| Supported Video Formats | MPEG-1, MPEG-2, MPEG-4, M-JPEG |
| Memory Card Support | SD, MMC, MS |
| USB Port | USB 2.0 (for USB stick) |
| Power Supply | AC adapter (100-240 V AC, 50-60 Hz, output DC 5 V 2 A) |
| Built-in Speakers | Yes |
| Remote Control | Included (CR2025 battery) |
| Clock/Calendar | Yes, with alarm (4 alarms) |
| Slideshow Features | Background music, transition effects, shuffle, repeat options |
| Dimensions (W x H x D) | 265.5 x 215 x 22.5 mm |
| Weight | 638.6 g |
| Operating Temperature | 0 °C to 45 °C, < 80% RH |
| Storage Temperature | -20 °C to +60 °C, < 90% RH |
| File Management | Copy and delete files between connected devices |
| Setup Options | Brightness, contrast, saturation, auto start, power on/off timer |
Frequently Asked Questions - PF-10DN-502V3RC Clas Ohlson
User questions about PF-10DN-502V3RC Clas Ohlson
0 question about this device. Answer the ones you know or ask your own.
Ask a new question about this device
Download the instructions for your Digital photo frame in PDF format for free! Find your manual PF-10DN-502V3RC - Clas Ohlson and take your electronic device back in hand. On this page are published all the documents necessary for the use of your device. PF-10DN-502V3RC by Clas Ohlson.
USER MANUAL PF-10DN-502V3RC Clas Ohlson
10" Digital photo frame
Digital fotoram 10"
Digital fotoramme 10"
natural_image
Black-and-white photo of a couple on a motorcycle in a rural setting, with a small phone and ball nearby (no visible text or symbols)Art.no Model
38-4084 PF-10DN-502V3RC
Ver. 201012
10" Digital photo frame
Art. no 38-4004 Model PF-10DN-502V3RC
User guide
Read through the entire user guide before using the product and save the guide for future reference. We cannot accept responsibility for any errors in the text or pictures and reserve the right to make changes to technical data. If you have technical problems or questions, contact our customer services.
Contents
- Safety s. 3
- Description of the product s. 4
- Keys and functions s. 4
- Getting started s. 6
- Operation and settings s. 8
- Care and maintenance s. 15
- Waste management s. 15
- Troubleshooting chart s. 16
- Specifications s. 16
1. Safety
- Only qualified service personnel may repair the product.
- Do not dismantle or modify the product.
- Do not place the product where it may fall into water or some other liquid. Make sure that it is standing firmly.
- Use only the mains adapter supplied. Always unplug the mains adapter from the wall socket if the product is to be unused for a long period.
- Do not place heavy or sharp objects on the display. Protect the mains cable from sharp edges and corners. Make sure that is does not get crushed.
• The product is only intended to be used indoors. - Do not locate the product close to hot radiators or stoves.
- Do not use the product in humid, dusty or dirty surroundings.
- Do not unplug the mains adapter while photos are being displayed, as this might damage the memory card. Do not remove the memory card while photos are being displayed.
2. Description of the product
• Digital photo frame with 10-inch colour screen.
• Resolution 1024×768, image format 4:3.
• Displays your digital photos without a computer.
- Connection for USB stick or memory card (SD/MMC/MS).
- Slideshow with or without background music and many different display effects.
- Repetition function on playback of music, images and film.
• Support for MPEG-1, MPEG-2, MPEG-4 and M-JPEG formats.
• Support for mp3 and WMA.
• Built-in loudspeakers.
- Clock and calendar display.
• Alarms (four different times).
• Supplied with remote controller and mains adapter.
- ON/OFF-button
3. Keys and functions
Photo frame

- [MENU] Open main menu
- [◀] Move left
- [▲] Move up
- [▶II] Start/pause display or confirm a choice
- [▶] Move right
- [▼] Move down
- [ ] Back to previous menu
- [ON/OFF] Switch photo frame on or off
- Connection for memory card (SD/MMC/MS)
- Connection for USB stick
- Connection for supplied main adapter
- Support
- Fixing for support
Remote controller

-
[Switch photo frame on or off.
-
[▲] Move up or previous photo/track/film.
-
[◀] Move left or (when you are showing photos) show previous photo.
-
[MENU] Press to open main menu.
-
[▼] Move down or next photo/track/film.
-
[◀◀] Choose previous photo when you are showing photos. Choose previous page when showing thumbnails. Fast rewind (music/film).
-
[9] Press to zoom in to photo.
-
Change aspect ratio, 4:3 or 16:9.
-
[VOL+] Increase volume.
-
[SETUP] Open setup menu.
-
[OK] Start playback or pause or confirm choice.
-
[▶] Move right or (when displaying photos) next photo.
-
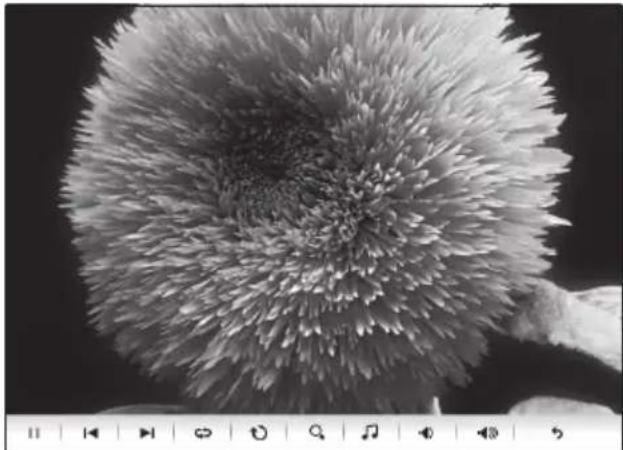
[OSD] Show/quit OSD menu (the OSD menu is displayed at the bottom of the screen).
-
Go to the previous menu.
-
[▶▶] Choose next photo (when showing photos). Choose next page when showing thumbnails. Fast forward (music/film).
-
[Start slideshow with background music*.
-
[♪] Starts or stops music playback during a slideshow.
-
[VOL-] Reduces volume.
* Only if the connected memory contains music files.
4. Getting started
Insert the battery into the remote controller

The remote controller is powered by 1 × CR2025 battery (3 V).
- Remove any protective plastic from the battery. Insert the battery as shown in the illustration. Observe the polarity markings.
- When the remote controller no longer works even when held close to the sensor on the digital photo frame, fit a new battery.
Fitting the support

natural_image
Line drawing of a tablet device with a stylus, showing internal components and screen layout (no text or symbols)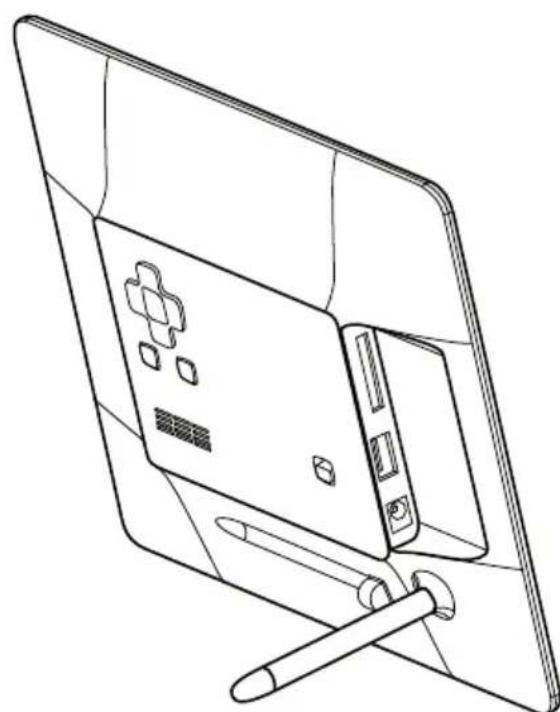
natural_image
Line drawing of a tablet device with a stylus resting on its screen (no text or symbols)- Remove the support (12) from its magnetic holder on the back of the photo frame.
- Screw the support into its hole (13). Screw it in firmly (clockwise) but do not overtighten.
- When the support has been fitted, the frame can be stood on its long or short side.
Connecting the mains adapter
- Connect the supplied mains adapter to a 230 V wall socket.
- Then connect the DC plug of the mains adapter to DC IN (11) on the photo frame.
- Move the switch on the back of the photo frame to the ON position to turn on the photo frame.

natural_image
Line drawing of a device connected to an electrical outlet, showing a power plug and cable (no text or symbols)NOTE!
Normally the ON/OFF button (14) on the remote controller is used to switch on the photo frame or set it to standby mode, but to turn off the photo frame completely the switch (8) on the back of the photo frame must be set to OFF. Always unplug the mains adapter from the wall socket if the product is to be unused for a long period.

Connecting a memory card or a USB stick
Memory card
The following memory cards can be used:
Secure Digital (SD)
Multimedia Card (MMC)
Memory Stick (MS)
- Carefully insert the memory card into the slot (9).
• To remove the memory card, carefully pull it straight out. - NOTE: Do not remove the memory card when it is being used to display photos or other files.
USB stick
- Carefully insert a USB stick into the USB port (10)
• To remove the stick or player, pull it straight out. - NOTE! Do not remove the USB stick when it is being used to display photos or other files.

natural_image
Line drawing of a device with a screen and a stylus, showing internal components (no text or symbols)5. Operation and settings
Main menu
NOTE!
The first time the photo frame is started or if it has been reset to its factory default settings, a language must be chosen from the menu that appears. Choose your language and confirm by pressing [OK] (24) on the remote controller or [▶II] (4) on the back of the photo frame.
If the photo frame is started without a USB stick or a memory card connected, the main menu is displayed with Clock, Calendar and Setup on the display.
If the photo frame is started with a memory card and/or USB stick connected, the photo frame automatically starts to display a slideshow if photos are stored in the memory. To interrupt the slideshow and return to the main menu press [MENU] (17) on the remote controller or [MENU] (1) on the back of the photo frame.
If both a memory card and a USB stick are connected when the photo frame is powered on, the main menu looks like this:
SD/
MMC/MS Displayed when a memory card is connected/inserted.
USB Displayed when a USB-stick is connected/inserted.
Clock Choose this to display a clock on the screen.
Calendar Choose this to display the calendar on the screen.
Setup To change the screen settings.

Choose functions and navigate in the menus with [▼] [▲] [◀] [▶] on the remote controller or on the back of the photo frame. Confirm your choices by pressing [OK] (24) on the remote controller or [▶II] (4) on the back of the photo frame. To back up in the menus press □] (27) or (7).
If SD/MMC/MS or USB is chosen, the following submenus appear
Photo
(to open press [OK] or [▶II])

- The photos in the memory are displayed as thumbnails. To display the photos one by one, choose a photo and press [OK] or [▶II]. Then choose more photos one at a time by pressing [◀] [▶].
- To start a slideshow, press [ ]29) on the remote controller (it takes a few seconds for the slideshow to start) or press [▶II] on the back of the frame.

natural_image
Grid of black-and-white photos showing animals, landscapes, and a butterfly (no text or symbols)To open the [OSD] menu, press [OSD] (26) on the remote controller or the MENU button (1) on the back of the photo frame.
NOTE! Can only be displayed when a photo has been chosen and is being displayed or when the slideshow is running.
- Choose a function with the [◀] [▶] buttons and control the functions with [OK] on the remote controller or [▶II] on the back of the photo frame.
OSD menu during photo display
| II | To start or stop the slideshow, press [OK] or [▶II]. |
| I◀ | Show the previous photo. |
| ▶I | Show the next photo. |
| Choose different playback/repetition options for the slideshow. The choices appear in small text on the screen. | |
| Rotate the photo. Press several times until the photo is displayed the right way up. | |
| Zoom in on the photo. Press several tim and back to the starting position. When disappears from the screen (after a few sec [▲] [◀] [▶]. | |
| Start or stop music playback (if there are | |
| Reduce volume. | |
| Increase volume. | |
| Return to the beginning of the OSD men |
natural_image
Close-up grayscale image of a spiky, flower-like object with no visible text or symbolsMusic (to open press [OK] or [▶II])
- If there are files of different types on the same memory, such as music, video and photo files, the following menu appears:
Audio Picture Subtitle Video

- Choose Audio and a list of available music files is displayed.
- In the list and the OSD menu that appears automatically when an audio file is played, navigate and confirm as described above.
OSD menu when playing back music files
| II | To start or stop the slideshow, press [OK] or [▶II]. |
| I◀ | Choose previous audio file. |
| ▶I | Choose next audio file. |
| ◀◀ | Fast rewind. |
| ▶▶ | Fast forward. |
| ∅ | Choose a repetition option (One, All or OFF). |
| ○ | Reduce volume. |
| ○○○ | Increase volume. |
| ↖ | Return to the beginning of the OSD menu. |

Video
(to open press [OK] or [▶II])
- If there are files of different types on the same memory, such as music, video and photo files, the following menu appears:

Audio
Picture
Subtitle
Video
- Choose Video and a list of available video files is displayed.
- Navigate and confirm as described above.
- To open the [OSD] menu, press [OSD] (26) on the remote controller or MENU (1) on the back of the photo frame.
OSD menu when playing video files
| II | To start or stop the video, press [OK] or [▶II]. |
| I◀ | Show the previous video. |
| ▶I | Show the next video. |
| ◀◀ | Fast rewind. |
| ▶▶ | Fast forward. |
| Choose a repetition option (One, All or OFF). | |
| Zoom in on the video. Press several tim back to the starting position. | |
| Reduce volume. | |
| Increase volume. | |
| Return to the beginning of the OSD men |

Files (to open press [OK] or [▶II])
- If there are files of different types on the same memory, such as music, video and photo files, the following menu appears:
Audio Picture Subtitle Video
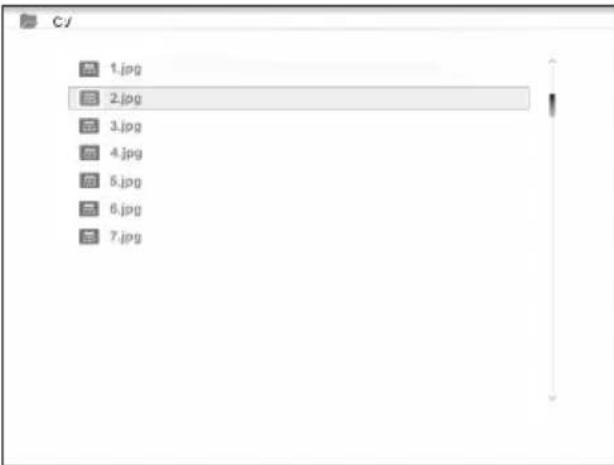
- Navigate in the list and confirm as described above.
- You can also copy files between connected memories.
- NOTE! Write protection may be active on the memory cards. Check the setting of the write-protect switch.
Copying files
To copy files you need to have two memory devices connected to the photo frame, a USB stick and a memory card.
- Choose the file you want to copy with [▲] or [▼].
- Press [▶] to select the file. The file is highlighted with a √. (To deselect the file, press [▶] again.)
- To select more files repeat steps 1 and 2.
-
Press [OSD]. A menu with the options COPY and DELETE appears to the right of the file list.
-
Select COPY with [▲] or [▼] and press [OK] to confirm. A list showing other connected memory devices appears.
-
Choose the memory to copy the files to with [◀] [▶].
-
Press [OK] to start copying.
-
When copying is complete, "Finished" appears.

Deleting a file
- Choose the file you want to delete with [▲] or [▼].
- Press [▶] to select the file. The file is highlighted with a √. (To deselect the file, press [▶] again.)
- To select more files repeat steps 1 and 2.
- Press [OSD]. A menu with the options COPY and DELETE appears to the right of the file list.
- Select DELETE with [▲] or [▼] and press [OK] to confirm.
- Use [◀] and [▶] to choose YES to confirm deletion or NO to quit without deleting the file(s). Press [OK] to complete deletion. NOTE! This action cannot be undone!
- When the files have been deleted, "Finished" appears.
- Press [OK] to exit.
If Clock is chosen
The clock appears on the display together with a thumbnail slideshow and the alarm times.

If Calendar is chosen
The calendar appears on the display together with the clock, alarm times and a thumbnail slideshow.

If Setup is chosen, the following submenus appear
Photo Setup, where you can make settings for
- Slide show time 3 s, 5 s, 15 s, 1 minute and 15 minutes.
• Photo mode: Full Screen or Standard Screen.
• Transition effect: Off or Random. - Date stamp (show detailed information about the photo): Off or On.
- Shuffle (display photos in random order): Off or On.

Music Setup, where you can select
- Repeat Off (no repeat).
- Repeat One (repeat the current track).
- Repeat All.
Video Setup, where you can select
- Repeat Off.
- Repeat One (repeat the current track).
- Repeat All.
Clock/Calendar setup
• Time mode: Digital clock/Analog clock.
- Show photo: On/Off (show/don't show thumbnail when displaying clock and calendar).
- Set Time: hh/mm.
- Set Date: year, month, day.
- Set Date format: year, month, date – date, month, year, etc.
- Set Time format: 12 or 24 hours.
Alarm setup
- Alarm 1 – 4 (set time, function and signal for four alarms) Alarm 1, Alarm 2, etc.
- Ringtone volume (for alarms 1 – 4): 1, 2, 3, 4, 5 or 6.
General setup
- Language (to change the language of the menus).
- Brightness (of the display): +3, +2, +1, 0, -1, -2, -3.
- Contrast (of the display): +3, +2, +1, 0, -1, -2, -3.
- Saturation (colour saturation of the display): +3, +2, +1, 0, -1, -2, -3.
- Auto start (how the photo frame starts after switch-on): Photo, Main menu, Clock, Calendar.
- Power on (sets the time for automatic switch-on): hh/mm.
- Power off (sets the time for automatic switch-off): hh/mm.
- Hint time (sets the time for which key functions are displayed on the screen): 0, 5, 10 and 20 seconds.
- Default (resets the photo frame to factory settings).
NOTE!
- Before you set switch-on and switch-off times, the clock of the photo frame must be set (see Clock/Calendar setup).
- If the switch-on or switch-off time has already passed, the photo frame will switch on or off at the set time on the next day.
- For the Power on function to work: Switch the photo frame off only with the []button (14) on the remote controller. Do not switch it off with the switch (8) on the back of the photo frame.
6. Care and maintenance
- Before cleaning the photo frame, make sure that it is switched off and that the mains adapter has been unplugged from the wall socket.
- Wipe with a soft, damp cloth. Do not use solvents or powerful cleaning agents. Never spray liquid on the photo frame.
- To clean the LCD display, use a clean, soft, lint-free cloth. If necessary, use a commercially available cleaning agent to clean the LCD screen.
7. Waste management
When the time comes to dispose of the product, do so in accordance with local regulations. If you are unsure how to proceed, ask your local authority.
8. Troubleshooting chart
| Why can’t the photo frame display all the files on the memory card/USB stick? | Some memory cards are not compatible with the photo frame. Use a compatible memory card.Wrong image format (only JPEG images are supported). |
| A memory card is connected to the photo frame, but the photo frame cannot read it. | Make sure that you are using a memory card that is supported by the photo frame.Make sure that the memory card is correctly connected.Wrong file format (only JPEG images are supported).NOTE: Some digital camera save photos in a non-standard file format. Check the user guide for the camera. |
| Some photos load more quickly than others. | Photos with a high resolution take longer to load.Use lower-resolution photos for faster display.The recommended resolution is 800 x 600 pixels.NOTE: The highest supported resolution is 8000 x 8000 pixels. |
| The photo frame does not start / no photos are displayed. | Check that the mains adapter is correctly connected.Check that the switch (8) is set to ON. |
| How do I rotate a photo? | Open the OSD menu (in photo display mode) with the OSD button (26).Use [◀] and [▶] to go to √ in the OSD menu.Press [OK] (24) several times to rotate the photo to the required position.NOTE! The photos return to their original position when you switch off the photo frame. |
| Which resolution is best? | The recommended resolution is 800 x 600 pixels.The highest resolution is 8000 x 8000 pixels. |
| The remote controller does not work. | Check the battery in the remote controller and fit a new battery if necessary.Aim the remote controller directly at the photo frame. Hold the remote controller closer to the photo frame. Check that there are no obstacles between the remote controller and the sensor. |
9. Specifications
Display 10" LCD, TFT, 4:3, 1024×768
I/O Remote controller, DC IN
Supply voltage AC-adapter (in: 100–240 V AC, 50–60 Hz, out: DC 5 V 2 A)
USB port USB 2.0
Supported memory card formats SD (Secure Digital), MMC (Multimedia Card), MS (Memory Stick)
Supported image format JPEG (highest resolution: 8000 x 8000)
Supported audio formats MP3, WMA
Supported video formats MPEG-1, MPEG-2, MPEG-4, M-JPEG
Loudspeakers Built-in
Storage temperature -20 °C to +60 °C, < 90 % RH
Working temperature 0 °C to 45 °C, < 80 % RH
Size 265.5 × 215 × 22.5 mm
Weight 638.6 g
Digital fotoram 10"
Art.nr 38-4004 Modell PF-10DN-502V3RC
Bruksanvisning
natural_image
Line drawings of two electronic devices with a stylus, shown from front and side views (no text or symbols)natural_image
Line drawing of a device with a power outlet connected to a screen, showing no text or symbolsOBS!
natural_image
Line drawing of a tablet device with a screen and a stylus, showing internal components (no text or symbols)natural_image
Grid of black-and-white photos showing various natural scenes including animals, landscapes, and a butterfly (no text or symbols)natural_image
Close-up of a spiky, flower-like object with no visible text or symbolsClock/Calendar Setup
natural_image
Line drawings of two electronic devices with a stylus, showing front and side views (no text or symbols)natural_image
Line drawing of a device with a power outlet connected to a screen, showing no text or symbols.OBS!
natural_image
Line drawing of a tablet device with a screen and a stylus, showing internal components (no text or symbols)Velg funksjon og naviger i menyene med [▼] [▲] [◀] [▶] på fjernkontrollen eller på baksiden av fotorammen. Bekreft med [OK] (24) på fjernkontrollen eller [▶II] (4) på baksiden av fotorammen. Gå bakover i menyene med [→] (27 på fjernkontrollen, 7 på fotorammen).
Hvis SD/MMC/MS eller USB velges vises fölgende undermenyer
natural_image
Grid of black-and-white photos showing various natural scenes including animals, landscapes, and a butterfly (no text or symbols)Clock/Calendar Setup
natural_image
Line drawings of two electronic devices with a stylus, shown from front and side views (no text or symbols)natural_image
Line drawing of a device with a power outlet connected to a wall socket (no text or symbols)Huom.!
natural_image
Line drawing of a device with a screen and a stylus, showing internal components (no text or symbols)natural_image
Grid of black-and-white photos showing various natural scenes including animals, landscapes, and a butterfly (no text or symbols)natural_image
Close-up of a spiky, flower-like object with no visible text or symbolsMusic (avaa painamalla [OK] tai [▶II])
Clock/Calendar Setup
For consumer contact, please visit
www.clasohlson.co.uk and click on
customer service.
Internet www.clasohlson.co.uk

- 10" Digital photo frame
- User guide
- Contents
- Safety
- Description of the product
- Keys and functions
- Photo frame
- Remote controller
- Getting started
- Insert the battery into the remote controller
- Fitting the support
- Connecting the mains adapter
- NOTE!
- Connecting a memory card or a USB stick
- Memory card
- Secure Digital (SD)
- Multimedia Card (MMC)
- Memory Stick (MS)
- USB stick
- Operation and settings
- Main menu
- SD/
- If SD/MMC/MS or USB is chosen, the following submenus appear
- Photo
- OSD menu during photo display
- Music (to open press [OK] or [▶II])
- OSD menu when playing back music files
- Video
- OSD menu when playing video files
- Files (to open press [OK] or [▶II])
- Copying files
- Deleting a file
- If Clock is chosen
- If Calendar is chosen
- If Setup is chosen, the following submenus appear
- Photo Setup, where you can make settings for
- Music Setup, where you can select
- Video Setup, where you can select
- Clock/Calendar setup
- Alarm setup
- General setup
- Care and maintenance
- Waste management
- Troubleshooting chart
- Specifications
- Digital fotoram 10"
- Bruksanvisning
- OBS!
- Hvis SD/MMC/MS eller USB velges vises fölgende undermenyer
- Huom.!
- Music (avaa painamalla [OK] tai [▶II])
Brand : Clas Ohlson
Model : PF-10DN-502V3RC
Category : Digital photo frame