
PF-8DN-283V3RTC - Digital photo frame Clas Ohlson - Free user manual and instructions
Find the device manual for free PF-8DN-283V3RTC Clas Ohlson in PDF.


| Type | Digital Photo Frame |
| Brand | Clas Ohlson |
| Model | PF-8DN-283V3RTC |
| Display Size | 8 inches |
| Resolution | 800 x 600 pixels |
| Aspect Ratio | 4:3 |
| Supported Memory Cards | SD, MMC, MS |
| USB Connectivity | USB 2.0 Host (for memory sticks) and Mini-USB (for PC connection) |
| Image Formats | JPEG (max resolution 8000 x 8000) |
| Audio Formats | MP3, WMA (32-320 kbps) |
| Video Formats | MPEG-1, MPEG-2, MPEG-4 |
| Built-in Speakers | Yes |
| Remote Control | Included (requires CR2025 battery) |
| Control Buttons | Touch-sensitive with blue backlighting |
| Slideshow Features | Multiple transition effects, adjustable interval (3s to 15 min), music accompaniment |
| Clock/Calendar | Analog or digital display; alarm with 4 programmable times |
| Auto On/Off | Programmable daily schedule |
| Dimensions (W x H x D) | 216 x 182 x 28 mm |
| Weight | 603 g |
| Power Supply | 5V DC, 2A via included AC adapter (100-240V AC, 50/60 Hz) |
| Stand | Adjustable table stand (portrait/landscape); wall-mountable |
| Languages Supported | English, French, Spanish, German, Italian, Portuguese, Polish |
| Certifications | CE, RoHS (implied) |
Frequently Asked Questions - PF-8DN-283V3RTC Clas Ohlson
User questions about PF-8DN-283V3RTC Clas Ohlson
0 question about this device. Answer the ones you know or ask your own.
Ask a new question about this device
Download the instructions for your Digital photo frame in PDF format for free! Find your manual PF-8DN-283V3RTC - Clas Ohlson and take your electronic device back in hand. On this page are published all the documents necessary for the use of your device. PF-8DN-283V3RTC by Clas Ohlson.
USER MANUAL PF-8DN-283V3RTC Clas Ohlson
8" Digital Photo Frame
Digital Fotoram 8"
Digital fotoramme 8"
natural_image
Black-and-white photo of a woman holding a baby, both smiling, with no visible text or symbols.Art.no Model
38-3728 PF-8DN-283V3RTC
Ver. 201002
clas ohlson
8" Digital Photo Frame
Art. no 38-3728 Model PF-8DN-283V3RTC
Please read the entire instruction manual before using the product and save it for future reference. We reserve the right for any errors in text or images and any necessary changes made to technical data. If you have any questions regarding technical problems please contact Customer Services.
Contents
- Safety
- Product description
- Buttons and connections
- Getting started
- Use
- Settings
- Care and maintenance
- Troubleshooting guide
- Disposal
- Specifications
1. Safety
- Warning Do not open the casing! Certain components within the product's casing carry dangerous currents. Contact with these may give you an electric shock.
- The product should only be repaired by qualified service technicians.
- The product should not be taken apart or modified.
- Do not place the product where there is a risk of it falling into water or other liquid. Do not place any objects containing liquid on the product, e.g. flower vases or soft drinks.
- Do not cover the ventilation openings. Do not place the product close to heat sources such as on top of the radiator or TV. Do not place it on the sofa, as there is a risk that the ventilation openings will be blocked.
- Use only the included AC/DC mains adaptor. Always unplug the adaptor from the electrical outlet if the product is not be used for an extended period.
- Do not place heavy of sharp objects onto the display screen. Do not stand on the mains lead or pull it around any sharp corners or edges.
- The product is designed for 8 to 10 hours of continuous operation. Avoid using it for a longer period than recommended. Allow the product to cool down for a while before using it again.
- The product is intended for indoor use only.
- Do not expose the product to direct sunlight for prolonged periods.
- Do not use the product in damp, dusty, or dirty environments.
- Only use a lightly moistened soft cloth with a little washing up liquid to clean the screen.
- Do not disconnect the mains adaptor while the frame is in use. The attached memory storage device may be damaged. Neither should the connected memory storage device be removed when the frame is in use.
2. Product description
- Digital photo frame with 8" colour screen, resolution: 800 x 600, aspect ratio: 4:3.
- Displays your digital photos without the need for a computer.
- USB memory and memory card slots (SD/MMC/MS).
- Slideshow with different transition effects and adjustable display intervals.
- The slideshow can play simultaneously with musical accompaniment.
• Supports MPEG-1, MPEG-2 and MPEG-4 formats.
• Supports MP3 and WMA. - Repeat function for both music and video playback.
• Built-in speakers. - Touch-control buttons with blue backlighting.
- Calendar
- Alarm (4 different times)
- Comes with remote control and mains adaptor.
- Adjustable automatic on/off function.
3. Buttons and connections

- Adjustable table stand
- DC power input socket for the supplied mains adaptor (5 V DC, 2 A) (positive centre)
- Mini-USB port
- USB port
- IR sensor for remote control
- [▶] – Begin display/pause display/confirm selection
- [M] – Open menu Push and hold to show the OSD menu when displaying photos or video.
- [⊃] - Exit main menu
- [<] Left in menu
- [>] Right in menu
- [^] Up in menu
- [v] Down in menu
- SD/MMC/MS - Memory card slot
- Power switch – Turn photo frame on/off (hidden by picture)
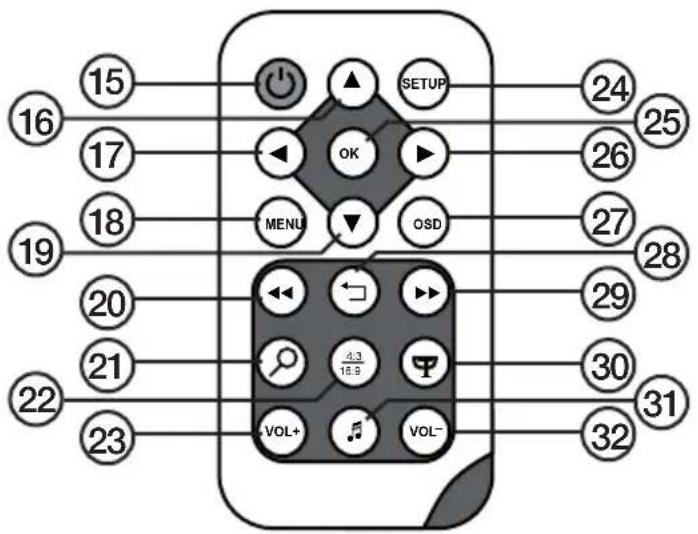
Remote control
-
[↓] Turn the photo frame on/off
-
[▲] – Scroll up in the menus/Previous photo/track/video
-
[◀] – Scroll left in the menus Rotate the image 90 degrees anticlockwise
-
[MENU] – Push to open the main menu. Push and hold to show the OSD menu when displaying photos or video.
-
[▼] – Scroll down the menus/Next photo/track/video
-
[◀◀] – Fast rewind (music/video)
-
[♀] - Push to zoom in on the image
-
[4:3/16:9] – Change aspect ratio, 4:3 or 16:9
-
[VOL+] - Increase volume
-
[SETUP] - Enter/exit the settings menu
-
[OK] - Confirm/Start or Pause playback
-
[▶] – Scroll right in the menus Next image (in display mode)
-
[OSD] – Enter/exit On Screen Display menu (appears at bottom of screen)
-
[←] - Return to the previous menu
-
[▶▶] – Fast forward (music/video)
-
[¶] – Start slideshow with background music*
-
[♪] - Start/stop music playback for current slideshow
-
[VOL-] - Reduce volume
* Only if the connected memory contains music files.
4. Getting started
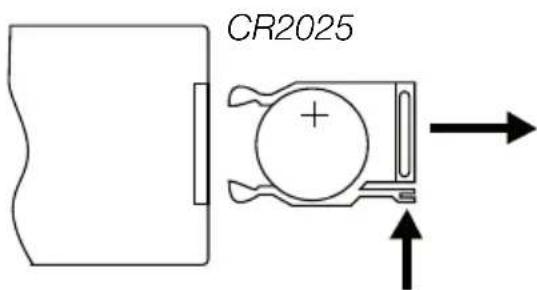
4.1 Inserting the battery into the remote control
The remote control operates on one CR2025 (3 V) battery.
- Insert the battery as shown in the figures while referring to the polarity marking (+) on the battery holder. Remove any protective plastic film from the battery before use.
- The battery normally lasts for up to a year, but this is dependant on how much the remote control is used.
- Change the battery when the remote does not work despite being held close to the digital photo frame's sensor.
4.2 Assembling the table stand
The photo frame can be hung on a wall or used with the supplied table stand (1). There are holes on the back of the frame for wall mounting.
Attaching the table stand:
-
Carefully slot the lugs on the stand into the slots in the back of the frame. Press gently whilst simultaneously rotating the stand 45°.
-
Turn the table stand to the desired position. The table stand can be rotated 90irc for positioning the frame in either portrait or landscape orientation.


4.3 Connecting the mains adaptor
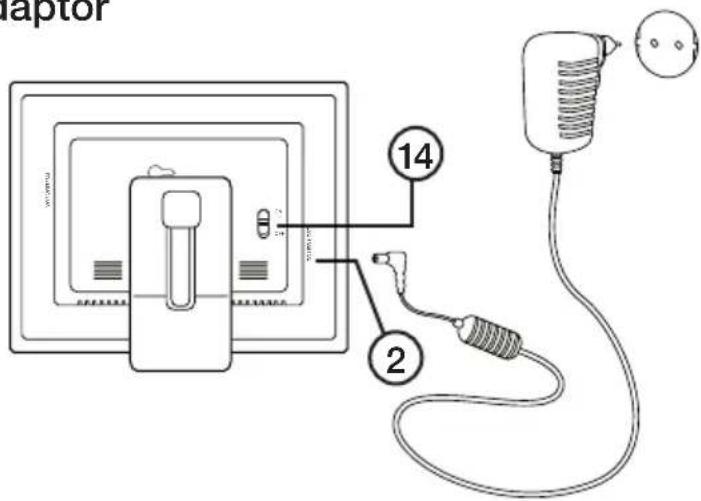
- Plug the included adaptor into a wall socket.
- Then plug the adaptor's DC connector into the socket on the photo frame marked "DC" (2).
- Set the power switch on the back of the photo frame to the position ON to turn on the device.
N.B.
- The [POWER] (15) button on the remote control is usually used to turn the photo frame on or activate standby mode. To completely turn the frame off, the power switch (14) on the back of the frame must be set to the OFF position.
- Always unplug the adaptor from the electrical outlet if the product is not be used for an extended period.
4.4. Connecting a memory card or USB memory stick
N.B. Only use one memory card at a time (except when copying).
Memory card
The following memory cards are compatible:
- Secure Digital (SD)
• Multimedia Card (MMC)
• Memory Stick (MS)
If your digital camera uses any of the above mentioned memory cards you can connect the camera's memory card directly to the photo frame.

- Insert the memory card into the appropriate slot – “SD/MMC/MS” (13). Do not use any force while inserting the memory card.
- Remove the card by pulling it straight out. N.B. Do not remove a memory card whilst data transfer is in progress.
USB memory stick
The “USB HOST” slot (4) can be used for connecting USB devices such as USB memory sticks or MP3 players.
5. Use
5.1 Copying files from a computer
You can connect the photo frame to a computer in order to copy computer files onto a memory device connected to the frame such as a memory card/USB memory.
N.B.
- Compatible with Windows 2000, XP and Vista.
- When the frame is connected to a computer (via a mini-USB lead) the “USB HOST” slot (4) is not available for use.
-
Do not disconnect the photo frame from the computer during file transfer.
-
Start both the computer and frame.
- Make sure that the USB memory is connected to the frame before connecting the frame to the computer.
- Connect the mini-USB lead to the frame's Mini-USB slot (3) and the other end to the computer.
- The computer will detect "New Hardware" and begin installing the software automatically. Wait until the computer completes the installation.
- In "My Computer" you will notice several icons marked "Removable Disk".
- "Drag and drop" the files on the computer to the frame's memory device.
- When it is time to disconnect the frame from the computer, first double click on the Safely Remove Hardware icon. Then highlight USB Mass Storage Device and click on Stop. Finish by clicking OK. Now you can safely remove the USB device from the computer.
5.2 Viewing photos
- When a memory device is inserted into the photo frame, the corresponding icon appears on the main menu.
- Navigate the main menu using [▲] (16) and [▼] (19) or [^] (11) and [v] (12).
- Return to the previous menu using [⊃] (8).
5.3 Main menu
- Press [MENU] (18) or [M] (7) to display the main menu.
| SD/MMC/MS | Appears when you insert a memory card. |
| USB | Appears when you insert a USB memory stick. |
| Clock | Displays the time and alarm setting The clock is set using “Setup”. |
| Calendar | Displays the calendar and alarm setting. |
| Setup | Settings mode. |

- Navigate the menus using [▲] (16) and [▼] (19) or [∧] (11) and [v] (12).
| Photo | Start a slideshow or view images from the memory source manually. |
| Music | Start playing MP3 music. |
| Video | Start playing video |
| Files | Browse all files on memory card/USB memory, copy or delete files |
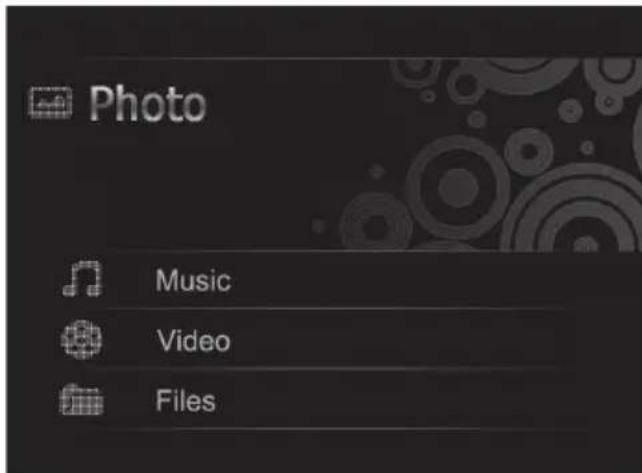
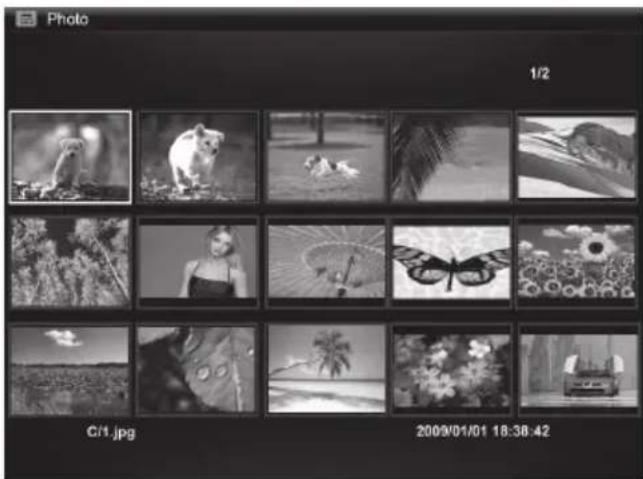
- In "Photo mode", the photos on the selected memory source can be displayed as thumbnails. Up to 15 photos can be displayed at a time.
a. Select a memory source from the main menu, and press [▶] (26), the mode menu appears.
b. The photos in the memory are displayed on the screen as thumbnails.
c. Select the desired photo to view using [◀] (17) [▶] (26) [▲] (16) or [▼] (19). Press [OK] (25) to start a slideshow with the displayed image or to start a slideshow from the beginning with background music (if the memory contains music files).
natural_image
Grid of black-and-white photo grid thumbnails showing animals, landscapes, and a butterfly (no text or symbols)5.4 Viewing a single photo
- Connect a USB memory or a memory card containing JPG/JPEG image files.
- Select Photo and confirm by pressing [OK] (25).
- In the main menu, highlight the memory card and press [OK] (25).
- The photos in the memory are displayed in thumbnail view:
- Select the desired photo to view using [◀] (17) [▶] (26) [▲] (16) or [▼] (19). Press [OK] (25) to start a slideshow with the displayed image or to start a slideshow from the beginning with background music (if the memory contains music files).
5.5 Watching a slideshow
The photo frame displays all JPEG images stored on the connected memory device in slideshow format. If the memory also contains music files these are played simultaneously with the slideshow.
- Connect a USB memory or a memory card containing JPG/JPEG image files.
- In the main menu, highlight the memory card and press [OK] (25).
- Use [◀] (17) and [▶] (26) to select the memory source you wish to display the pictures from and then press to start the slideshow.
- The photo frame automatically locates the files on the connected memory and starts the slideshow.
- Slideshow controls:
Photo frame buttons
| ▶ | Starts the slideshow from the current photo, press [▶] again to pause the slideshow and only display the current photo. Press [▶] once more to resume the slideshow. |
| ⇐ | Stop the slideshow and display the photos as thumbnails. |
| M Push and hold to show the OSD menu when displaying photos or video. | |
Remote control buttons
| Ψ | Start slideshow with background music, music files in the memory start automatically*. |
| OK Start | start slideshow, press [OK] again to pause the slideshow and only display the current photo, press once to start the slideshow again. When the slideshow is paused, the II icon appears in the corner of the display. |
| ⇐ | Stop the slideshow and display the photos as thumbnails. |
| MENU Open menu. | |
* Only if the connected memory contains music files.
Using the OSD menu (On Screen Display) to view photos
- Whilst viewing a photo or slideshow: Press [OSD] (27) or [M] (7) to display the OSD menu at the bottom of the screen.
- The OSD menu shows the controls that can be used for viewing the photo plus any information about the photo.
- Select a function using [<] (9) or [>] (10), confirm by pressing [▶] (6). The displayed symbols are from the left:
| II Shows current status, playing or paused. | |
| I◀ | Show previous photo. |
| ▶I | Show next photo. |
| ⇨ | Start slideshow with music, from the first photo. |
| ⇨ | Rotate a photo, press repeatedly to achieve the correct view. |
| Q | Zoom in on the photo, press repeatedly to magnify the following number of times: X2, X4, X8 or X16. Press [M] (7) to exit the OSD menu, then press [<] (9), [>] (10), [^] (11) or [v] (12) to move the enlarged photo. |

natural_image
Close-up grayscale image of a spiky, flower-like object with no visible text or symbols| Start playing music. | |
| Decrease volume. | |
| Increase volume. | |
| Exit the OSD menu. |
5.6 Listening to music
The photo frame can play music files in MP3/WMA format.
-
Connect a USB memory/memory card containing MP3/WMA files.
-
Highlight the memory in the main menu, e.g. SD/MMC and press [OK] (25).
- Select Music and confirm with [OK].
- A list of the available music files will appear on the screen.
- Select the desired music file using [▲] (16) or [▼] (19).
- Push [OK] (25) to start playback.

Music playback controls
Photo frame buttons
| ▶ | Start playback from the selected file, press [▶] once more to pause playback,pressing it once more will resume playback. |
| ⇐ | Stop playback and enter the menu. |
Remote control buttons
| Start slideshow with back-ground music, music files in the memory start automatically*. | |
| OK Start playback, press [OK] once more to pause playback, pressing it once more will resume playback. When playback is paused, the II icon appears in the corner of the display. | |
| ←→ | Stop playback and enter the menu. |
| VOL+ | Increase volume. |
| VOL- | Reduce volume. |
| ◀◀ | Fast rewind. |
| ▶▶ | Fast forward. |
* Only if the connected memory contains music files.
Using the OSD menu (On Screen Display) when listening to music
- Whilst listening to music: Press [OSD] (27) or [M] (7) to display the OSD menu at the bottom of the screen.
- The OSD menu shows the controls that can be used for listening to music plus any information about the audio file being played.
- Select a function using [<] (9) or [>] (10), confirm by pressing [▶] (6). The displayed symbols are from the left:

| II Shows current status, playing or paused. | |
| I◀ | Return to the previous audio file. |
| ▶I | Skip to the next audio file. |
| ◀◀ | Fast rewind. |
| ▶▶ | Fast forward. |
| Repeat music track: Press the required number of times to choose:Off (no repetition) One (repeat only one file) or All (repeat all). | |
| Decrease volume. | |
| Increase volume. | |
| Exit the OSD menu. |
5.7 Watching a film (Video)
The frame can display video films in the following formats: MPEG-1, MPEG-2 or MPEG-4.
- Connect a USB memory or a memory card containing video files in one of these formats: MPEG-1, MPEG-2 or MPEG-4.
- Highlight the memory in the main menu, e.g. SD/MMC and press [OK] (25).
- Select Video and confirm by pressing [OK] (25).
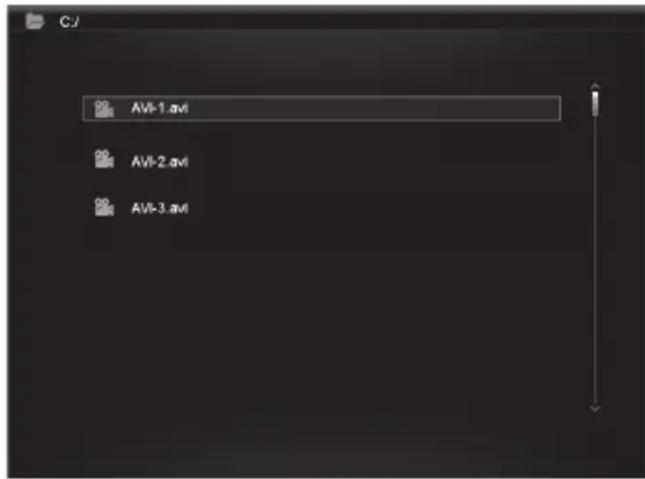
- A list of the available video files is displayed on the screen.
- Select the desired video file using [▲] (16) or [▼] (19).
- Push [OK] (25) to start playback.
Using the OSD menu (On Screen Display) when watching a video film
- Whilst watching a video: Press [OSD] (13) or [M] (3) to display the OSD menu at the bottom of the screen.
- The OSD menu shows the controls that can be used for watching the film plus any information about the film.
- Select a function using [<] (9) or [>] (10), confirm by pressing [v] (6). The displayed symbols are from the left:

| II Shows current status, playing or paused. | |
| I◀ | Return to previous. |
| ▶I | Skip to the next. |
| ◀◀ | Fast rewind. |
| ▶▶ | Fast forward. |
| ∅ | Repeat the video: Press the required number of times to choose:Off (no repetition) One (repeat only one file) or All (repeat all). |
| Zoom in on the photo, press repeatedly to magnify the following number of times: X2, X4 or X8. Press [M] to exit the OSD menu, then press [<] (9), [>] (10), [^] (11) or [v] (12) to move the enlarged photo. | |
| Decrease volume. | |
| Increase volume. | |
| Exit the OSD menu. |
Photo frame buttons
| ▶ | Start playback from the selected file, press [▶] (6) once more to pause playback, pressing it once more will resume playback. |
| ⇐ | Stop playback and enter the menu. |
Remote control buttons
| OK Start playing the video, press [OK] again to pause the video, press once more to start the video again. When the video is paused, the II icon appears in the corner of the display. | |
| ← | Stop playback and enter the menu. |
| VOL+ | Increase volume. |
| VOL- | Reduce volume. |
| Fast rewind. | |
| Fast forward. |
5.8 Managing files
In the file mode you can see the available files on all connected memory devices. You can also copy files between the connected memory devices. N.B. The memory card might have write-protection activated, check the settings.
- Connect a USB memory or a memory card containing images, audio, or video files with these formats MPEG-1 / MPEG-2 / MPEG-4.
- Highlight the memory in the main menu, e.g. SD/MMC and press [OK] (25).
- Select Files and confirm by pressing [OK] (25).
- Available files that the photo frame can display are listed.
- Select the desired file using [▲] (16) or [▼] (19).
- Push [OK] (25) to view the photo/start playback.
- Return to the list by pressing [⊃] (8) or [⊃] (28). Push [OK] to open a subfolder. Back up a level in the catalogue tree with [◀] (17).
- Press [MENU] to return to the main menu.
Copying files
To copy files you must have two memory devices connected to the photo frame, such as a USB memory stick and a memory card.
-
Select the file you wish to copy using [▲] (16) or [▼] (19).
-
Press [▶] (26) to select the file, the file is marked with a tick √ (pressing once more removes the tick).
-
Repeat steps 1 and 2 to select more files if you wish.
-
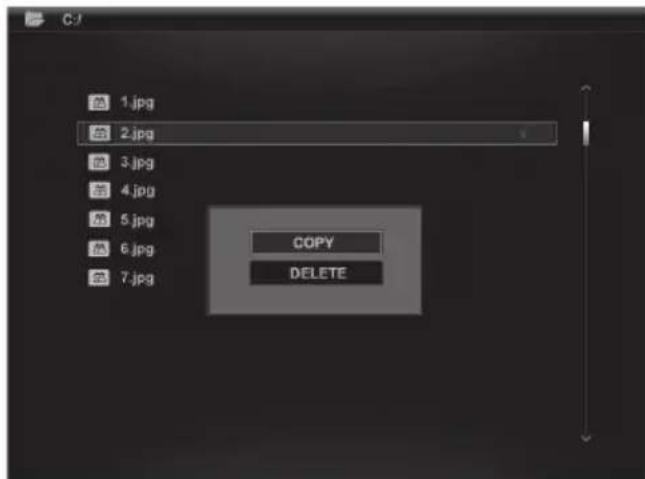
Push [OSD], a menu with COPY and DELETE options will be shown to the right of the list.
-
Select COPY using [▲] or [▼] and confirm using [OK] (25). Other connected memory devices are also shown on a list.
-
Select the destination memory device to copy the files to using [▲] (16) or [▼] (19). Press [▶] (26) if you wish to create a folder to copy the files to.
-
Push [OK] (26) to start copying.
-
When the files have been copied, the "Finished" message will appear.
-
Push [OK] to discontinue.
Deleting files
-
Select the file you wish to delete using [▲] (16) or [▼] (19).
-
Press [▶] (26) to select the file, the file is marked with a tick √ (pressing once more removes the tick).
-
Repeat steps 1 and 2 to select more files if you wish.
-
Push [OSD] (27), a menu with the options COPY and DELETE will be shown to the right of the list.
-
Select DELETE using [▲]or [▼] and confirm using [OK] (25).
-
Use [◀] and [▶] for selecting √ to confirm, or X to finish without removing any files. Push [OK] to compete file deletion.
N.B. This procedure cannot be reversed!
-
When the files have been deleted "Finished" will be shown.
-
Push [OK] to discontinue.
5.9 Displaying the clock/calendar
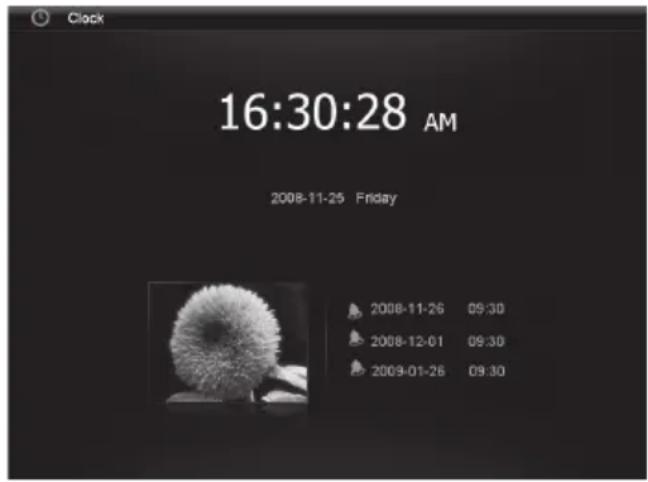
The photo frame can display the time and calendar at the same time as thumbnail sized images.
- In the main menu, select Clock (or Calendar) and press [OK] (25).
- Return to the main menu by pressing [⊃] (8) or [⊃] (28).
6. Settings
- Alt. 1: Highlight SETUP in the main menu and confirm using [OK] (25).
Alt. 2: Press [SETUP] (24) on the remote control.
- Use [▲] (16) and [▼] (19) to select a desired setting from to the list below.
- Press [◀] (17) or [▶] (26) to change the selected setting. Confirm by pressing [OK] (25).

Setting options
Photo Setup
- Slide show time (Interval time for slide show) 3 s, 5 s, 15 s, 1 min, 15 min.
• Photo Mode (Image display mode) Full Screen or Standard Screen.
• Transition Effekt (Slideshow frame change) Off or Random.
• Date Stamp (Display details on photos) Off or On. - Shuffle (Random order display) Off or On.
Music Setup
- Music repeat mode Options include: Repeat Off (no repetition), Repeat One (repeat current track) or Repeat All (repeat all tracks).
Video Setup
- Movie repeat mode Options include: Repeat Off (play movies in order), Repeat One (repeat current or selected movie) or Repeat All (repeat all movies).
Clock/Calendar Setup
• Time mode (Choose analogue/digital clock) Digital clock or Analogue clock.
- Show photo (Display thumbnail photos simultaneously as clock and calendar) Off or On.
- Clock Wallpaper (Set the colour of the clock backlight) Black, Blue, Grey.
- Set Time (Adjust the time) hh.mm.
- Set time format (Set 12 or 24 hour clock) 12 hr or 24 hr.
- Set Date (Adjust the date) year, month, day.
- Set date format (Set order of date) year, month, day – day, month, year, etc.
Alarm Setup
- Alarm 1 – 4 (Set the time, schedule and ringtone for four alarms) Alarm 1, Alarm 2 etc.
- Ringtone time mode (Set wake-up display) Digital Clock, Analog Clock or Calendar.
- Ringtone volume (Set desired volume for alarm 1 – 4) 1, 2, 3, 4, 5 or 6.
- Snooze (Put back wake-up alarm) Off, 1 min, 5 min eller 10 min.
General Setup
- Language (Set the OSD language) (English, Français, Español, Deutsch, Italiano, Portugués, Polski).
- Brightness (Adjust the brightness of the screen) +3, +2, +1, 0, -1, -2, -3.
- Contrast (Adjust the contrast of the screen) +3, +2, +1, 0, -1, -2, -3.
- Saturation (Adjust the saturation of the screen) +3, +2, +1, 0, -1, -2, -3.
- Auto run (Set the photo frame to enter a specific mode when you turn it on). Photo, Main menu, Clock, Calendar.
- Power on (Photo frame turns on automatically at set time) hh.mm.
- Power off (Photo frame turns off automatically at set time) hh.mm.
- Hint time (Set time for display of hint for button operation) 0 s, 10 s, 15 s and 20 s.
- Copy Type (Behåll normal bildkvalitet vid kopiering eller komprimera) Normal eller Resize.
- Default (Resets the device to factory settings).
6.1 Setting the time and date
Time
- Select Setup > General setup > Clock/Calendar setup > Set time.
- Press [OK] (25) to confirm.
- Press [▼] (19) or [▲] (16) to enter the current time, first Hours then Minutes (press [▶] (26) to switch from hours to minutes).
- Push [OK] to confirm.
Date
- Select Setup > General setup > Clock/Calendar setup > Set date.
- Press [OK] (25) to confirm.
- Press [▼] (19) or [▲] (16) to set: Year, Month, Day (press [▶] (26) to switch from setting to setting).
- Push [OK] to confirm.
6.2 Setting the alarm
- Select Setup > General setup > Alarm setup > Alarm 1, etc.
- Select which alarm is to be set, Alarm 1, Alarm 2, etc.
- Press [OK] (25) to confirm.
- Press [▼] (19) or [▲] (16) to set: Hours and minutes (press [▶] (26) to switch from setting to setting).
- Set the schedule of the alarm: Off, Once or Every day.
- Set the type of alarm signal: Rooster, Forest or Church bell.
- Push [OK] to confirm.
6.3 Setting Auto start
- Select Setup > General setup > Auto start.
- Press [OK] (25) to confirm.
- Select a specific mode that you wish the frame to enter automatically when you turn it on: Photo, Main menu, Clock, Calendar, Photo+Music or Video.
- Press [OK] (25) to confirm.
6.4 Setting automatic activation/deactivation
- Select Setup > General setup > Power on.
- Press [OK] (25) to confirm.
- Press [▼] (19) or [▲] (16) to set: Hours and Minutes (press [▶] (26) to switch from setting to setting).
- Set the schedule for automatic activation: Off, Once or Every day.
- Push [OK] to confirm.
- Select Setup > General setup > Power off. Follow the same procedure as for Power on above.
N.B.
- Before setting the activation/deactivation you must first set the clock. See section 6.1.
- If the time for activation/deactivation has already passed the device will activate at the preset time the following day.
- In order for the Power on function to work: Only turn the photo frame off using the [POWER] button (15) on the remote control. Do not turn it off using the power switch (14) on the back of the photo frame.
7. Care and maintenance
Before cleaning the frame, make sure that it is turned off and that the mains adaptor is unplugged. Wipe the frame using a soft damp cloth. Never use solvents or strong detergents. Never spray liquid onto the photo frame.
8. Troubleshooting
A. Why can't the photo frame display all of the files on my memory card/USB memory?
- Certain memory cards are incompatible with this photo frame. Use a compatible memory card.
- Unsupported file format (only JPEG images are supported).
B. There is a memory card inserted into the frame, but the frame cannot read it.
- Make sure that you are using a type of memory card that is supported by the frame.
- Make sure that the memory card is correctly inserted.
- Unsupported file format (only JPEG images are supported).
N.B. Some digital cameras save photos in non-standard formats. Check the camera's user manual.
C. Some photos are uploaded quicker than others.
- Photos with high resolution take longer to load. Use photos with lower resolution for quicker display.
- The recommended resolution is 800 x 600 pixels.
N.B. The maximum supported resolution is 8000 x 8000 pixels.
D. The device does not start/no photo is shown.
- Check that the mains adaptor is correctly connected.
- Check that the power switch is in the ON position.
E. How do I rotate a picture?
- Press [M] (7) and enter the OSD menu (in photo mode)
- Press [<] (9) and [>] (10), to go to P in the OSD menu.
- Press [▶] (6) repeatedly to rotate the image to the desired position.
N.B. The pictures return to their original orientation if the frame is turned off.
F. What is the best resolution?
- The recommended resolution is 800 x 600 pixels, with the highest resolution being 8000 x 8000 pixels.
G. The remote control doesn't work.
- Check the battery and replace it if necessary.
- Point the remote control towards the sensor. Minimize the distance to the photo frame. Check that there are no obstacles between the remote and sensor.
9. Disposal
Follow local ordinances when disposing of this product. If you are unsure of how to dispose of this product, please contact your municipality.
10. Specifications
Shade: 8" colour analogue LCD, 4:3
Resolution: 800 (h) x 600 (v)
Voltage: 5 V DC, 2 A via the supplied mains adaptor (100-240 V AC, 50/60 Hz)
Remote control battery: 1 x CR2025 (3 V lithium)
USB connection: USB 2.0 (supports USB memory, MP3 player)
Memory card reader: SD (Secure Digital), MMC (Multimedia Card), MS (Memory Stick)
Picture format: JPEG (highest resolution: 8000 x 8000, native-resolution 800 x 600)
Audio format: MP3, 32-320 kbps bit rate (CBR, VBR)
Video format: MPEG-1, MPEG-2, MPEG-4
Speakers: Built-in
Size: 216 x 182 x 28 mm
Weight: 603 g
Operating environment:
Operating temperature: 0irc C – 45irc C at <95% RH
Storage temperature: -20ircC - 60ircC at <80% RH
Digital Fotoram 8"
Art. nr 38-3728 Modell PF-8DN-283V3RTC

Obs!:
natural_image
Grid of black-and-white photos showing animals, landscapes, and nature scenes (no text or symbols)natural_image
Close-up grayscale image of a spiky, flower-like object with no visible text or symbolsClock/Calendar Setup
Ljudformat: MP3, 32-320 kbps bit rate (CBR, VBR)
Videoformat: MPEG-1, MPEG-2, MPEG-4
Högtalare: Inbyggd
Storlek: 216 x 182 x 28 mm
Vikt: 603 g
Användningsmiljö:

- I Photo-modus vil bildene fra minnet bli vist som miniatyrer. Inntil 15 bilder kan vises samtidig.
natural_image
Grid of black-and-white photos showing animals, landscapes, and a butterfly, displayed in a photo editing interface (no text or symbols on the images themselves)natural_image
Close-up grayscale photo of a spiky, flower-like object with no visible text or symbols5.7 Vise film (Movie)
6.1 Alternativ innstilling
Photo Setup
Slide show time (Intervall for bildeframvisning) 3 s, 5 s, 15 s, 1 min eller 15 min.
Photo Mode (Bildframvisningsmodus), Full Screen (fullskjerm) eller Standard.
Transition Effekt (Visingseffekt) Off eller Random.
Clock/Calendar Setup
• Time mode (Vis analog eller digital klokke) Digital clock eller Analog clock.
6.2 Stille inn alarm
6.3 Stille inn Auto run
(100–240 V AC, 50/60 Hz)
Batteri, fjernkontroll: 1 x CR2025 (3 V litium)
Lydformat: MP3, 32-320 kbps bit rate (CBR, VBR)
Videoformat: MPEG-1, MPEG-2, MPEG-4

Huom.
- Liiku valikoissa painikkeilla [▲] (16) ja [▼] (19) tai [∧] (11) ja [v] (12).
natural_image
Grid of black-and-white photo grid thumbnails showing nature scenes and a butterfly, displayed in a photo editing interface (no readable text or symbols on the images themselves)natural_image
Close-up grayscale image of a spiky, flower-like object with no visible text or symbolsAsetusvaihtoehdot
Photo Setup
Clock/Calendar Setup
For consumer contact, please visit
www.clasohlson.co.uk and click on
customer service.
Internet www.clasohlson.co.uk

- 8" Digital Photo Frame
- Contents
- Safety
- Product description
- Buttons and connections
- Remote control
- Getting started
- Inserting the battery into the remote control
- Assembling the table stand
- Attaching the table stand:
- Connecting the mains adaptor
- N.B.
- Connecting a memory card or USB memory stick
- Memory card
- USB memory stick
- Use
- Copying files from a computer
- Viewing photos
- Main menu
- Viewing a single photo
- Watching a slideshow
- Using the OSD menu (On Screen Display) to view photos
- Listening to music
- Music playback controls
- Photo frame buttons
- Remote control buttons
- Using the OSD menu (On Screen Display) when listening to music
- Watching a film (Video)
- Using the OSD menu (On Screen Display) when watching a video film
- Managing files
- Copying files
- Deleting files
- Displaying the clock/calendar
- Settings
- Setting options
- Photo Setup
- Music Setup
- Video Setup
- Clock/Calendar Setup
- Alarm Setup
- General Setup
- Setting the time and date
- Time
- Date
- Setting the alarm
- Setting Auto start
- Setting automatic activation/deactivation
- Care and maintenance
- Troubleshooting
- How do I rotate a picture?
- What is the best resolution?
- The remote control doesn't work.
- Disposal
- Specifications
- Digital Fotoram 8"
- Obs!:
- Vise film (Movie)
- Alternativ innstilling
- Stille inn alarm
- Stille inn Auto run
- Huom.
- Asetusvaihtoehdot
Brand : Clas Ohlson
Model : PF-8DN-283V3RTC
Category : Digital photo frame