
IAN 60494 - Wall socket SILVERCREST - Free user manual and instructions
Find the device manual for free IAN 60494 SILVERCREST in PDF.

| Product Type | Wall Socket |
| Model | IAN 60494 |
| Brand | SilverCrest |
| Color | White |
| Material | Plastic (ABS, flame retardant) |
| Dimensions (W x H x D) | 50 x 50 x 30 mm |
| Weight | 100 g |
| Rated Voltage | 230 V ~ 50 Hz |
| Rated Current | 16 A |
| Max Power | 3680 W |
| Socket Type | Type F (Schuko) with earthing |
| Protection Class | IP20 (indoor use) |
| Operating Temperature | 0°C to 40°C |
| Functions | Remote on/off, manual switch, status LED |
| Range | Up to 30 m (open space) |
| Frequency | 433 MHz |
| Safety Features | Child protection shutters, overheat protection |
| Cleaning | Wipe with a dry cloth |
| Certification | CE, RoHS |
| Spare Parts | None available (non-repairable) |
Frequently Asked Questions - IAN 60494 SILVERCREST
User questions about IAN 60494 SILVERCREST
0 question about this device. Answer the ones you know or ask your own.
Ask a new question about this device
Download the instructions for your Wall socket in PDF format for free! Find your manual IAN 60494 - SILVERCREST and take your electronic device back in hand. On this page are published all the documents necessary for the use of your device. IAN 60494 by SILVERCREST.
USER MANUAL IAN 60494 SILVERCREST
Operation and Safety Notes
SE
FJÄRRSTYRDAELUTTAG FÖRUTOMHUSBRUK
Before reading, unfold the page containing the illustrations and familiarise yourself with all functions of the device.
FI
GB Operation and Safety Notes Page 5
| FI Käyttö- ja turvaohjeet Sivu 15 | |||
| SE Bruksanvisning och säkerhetsanvisningar Sidan 25 | |||
| NL Bedienings- en veiligheidsinstructies Pagina 35 | |||
| DE/AT/CH | Bedienungs- und Sicherheitshinweise | Seite | 45 |
Introduction
Intended use....Page 6
Scope of delivery....Page 6
Control elements ...... Page 6
Technical Data Page 6
Safety
General safety instructions....Page 7
Safety Instructions for Batteries Page 8
Preparation
Preparing the remote control......Page 9
Synchronise the system code ......Page 9
Inputting the system code into the remote control......Page 9
Inputting the system code into the remote controlled socket......Page 9
Allocate the remote controlled socket a control button on the
remote control Page 10
Connecting devices......Page 10
Operation
Switching on the remote controlled socket......Page 11
Turn off the remote controlled socket......Page 11
Cleaning Page 11
Maintenance......Page 11
Troubleshooting Page 11
Disposal Page 12
Guarantee and Service
Warranty Declaration......Page 12
Service address......Page 13
Declaration of Conformity......Page 13
Manufacturer......Page 13
Outdoor Wireless Socket Set
- Introduction
Intendeduse
The remote controlled socket set is suitable for the remote switching on and off of electrical appliances and lamps. The remote control socket set is suitable for outdoor use. This device may only be used individually. Do not have one remote controlled socket inserted behind another. Any modification to the appliance shall be considered as improper use and could lead to considerable risk of accident. The manufacturer will not accept liability for loss or damage arising from improper use. This device is not intended for commercial use.
- Scope of delivery
Please check after unpacking that this set is complete.
2 Remote controlled sockets IP44
1 4-channel remote control
2 AAA batteries 1.5 V
1 Set of operating instructions
Control elements
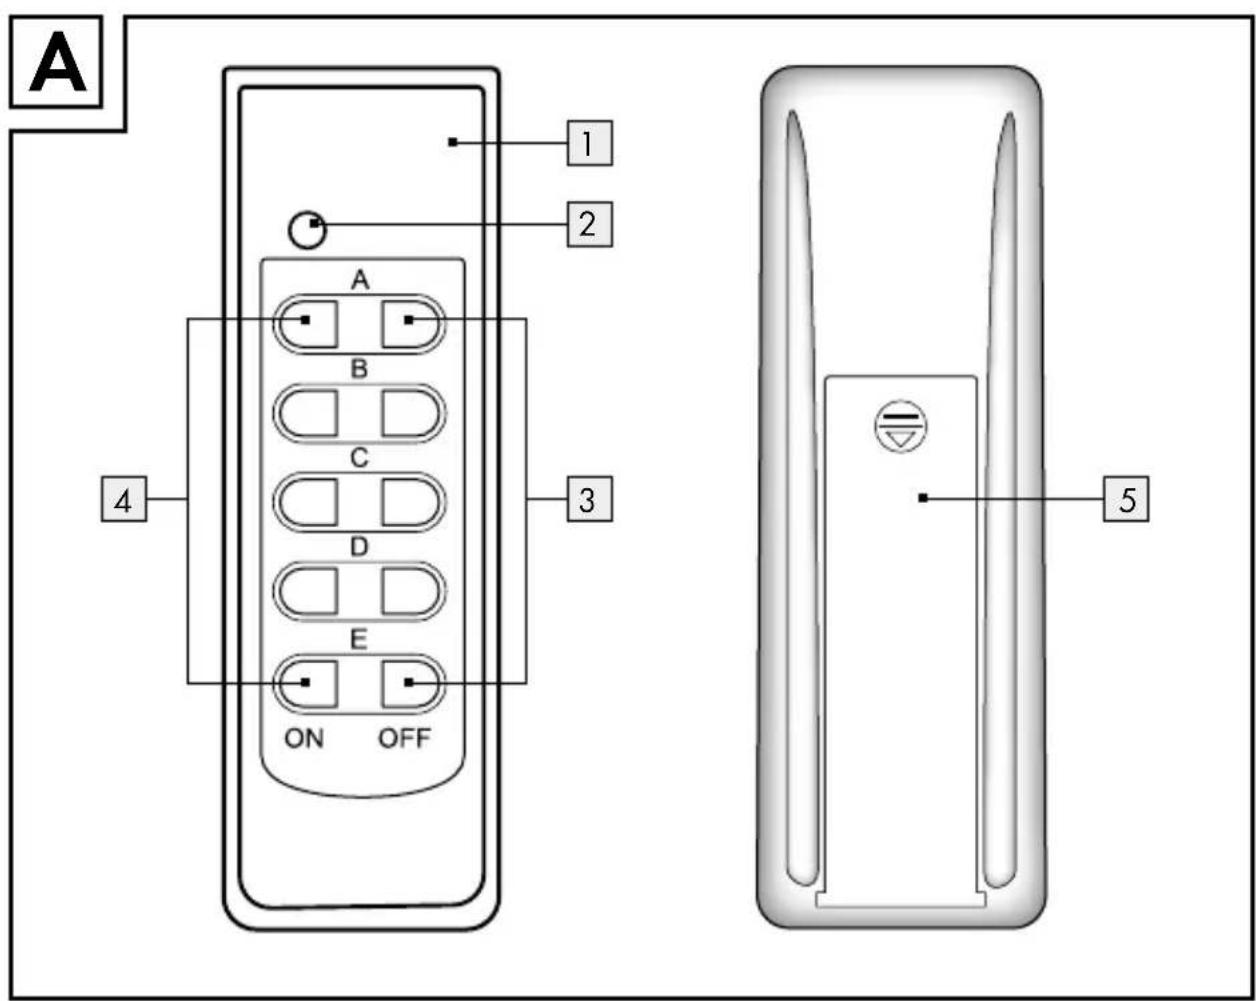
Remote Control (fig. A/B):
1 Remote control unit
2 Power indicator light
3 Channel OFF button Channel A, B, C, D, E
4 Channel ON button Channel A, B, C, D, E
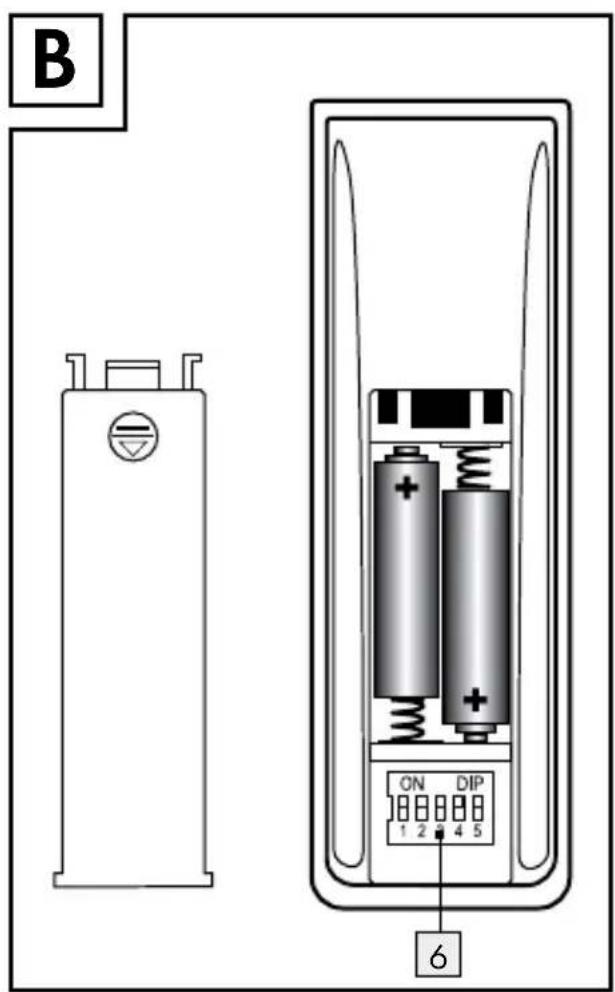
5 Battery compartment cover
6 DIP switch
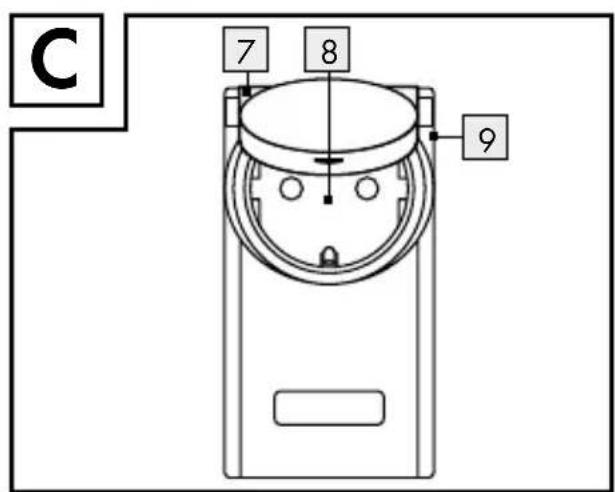
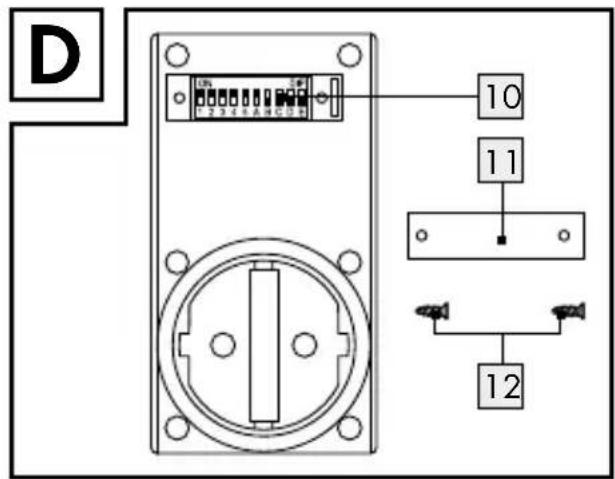
Remote controlled socket (fig. C/D):
7 Remote controlled socket
8 Earthed wall socket IP44 with flap lid and child protection
9 Safety plug
10 DIP switch
11 Cover (DIP switch compartment)
12 Screws
- Technical Data
Remote control
Classification: RCSAAA1000-A IP44
Battery: 2 × AAA, 1.5 V
Transmission
frequency: 433.92 MHz
Certification: The system has a
general certification (BZT) and is subscription free and non-billable.
Range: depends on the
environmental conditions, approx. 40 m in optimal conditions
Remote controlled socket
Classification:RCEAAA1000-A
IP44 DE
Operating voltage: 230V\~, 50Hz
Switched voltage: 230V\~, 4.35A
Max. switching
capacity: 1000W
Transmission
frequency: 433.92 MHz
Surrounding
temperature: 0° to 35°C
Storage
temperature: - 40 ° to 70 °C
Protection type: IP44
EG compliant: CE
Note: The remote control socket is equipped with a child protection socket. Whereby domestic safety is greatly increased. The contacts are appropriately protected so that children cannot create a conducting connection (with pins etc.). Store the appliance out of the reach of children.
- Safety
General safety instructions
Please read these operating instructions and the safety advice carefully. Before reading, unfold the illustrated page and familiarise yourself with all functions of the device before operating it for the first time.
Avoid the danger of death from electric shock!
■ Only connect the remote controlled sockets to earthed 230 V household sockets.
■ Do not expose the device to extreme temperatures.
■ Always store the appliance out of the reach of children despite the child protection socket. Children are not able to understand the dangers that can arise when handling electronic devices. Never leave children unsupervised when using electronic devices.
■ Risk of suffocation! Do not leave the packaging material lying unattended. Children could swallow and choke on small parts.
- Avoid overloading the appliance. Overloading can cause fire hazards or cause damage to the device. The maximum load is approx. 1,000 W per remote controlled socket.
In case of a malfunction, contact your point of service immediately.
■ Under no circumstances open the appliance yourself. Repairs may only be carried out by the point of service or by a qualified electrician.
■ Before cleaning the power must be switched off. In this case always pull the remote control socket out the wall socket and remove all plugs from the socket.
- Do not have one remote controlled socket inserted behind another.
■ Do not use any additional child protection for this remote controlled socket. The connection between the
plug and the remote controlled socket could be impaired and there is a danger of over heating.
■ Only connect devices which are within the stated power limit.
- Do not connect appliances which could cause fires or other damage when switched on without supervision (e.g. an iron). Do not connect any appliances which need an engine capacitor (e.g. a refrigerator).
- Do not cover the remote controlled sockets. Heat accumulates under the cover. There is a fire hazard.
- Check the devices regularly for damage. Do not replace damaged parts. Contact the manufacturer or dispose of the devices in an environmentally responsible way.
■ Never touch the devices with moist or wet hands.
In the event of malfunctions, pull the device out of the wall socket. Be aware that the unplugged device is completely disconnected from the mains only after it has been pulled out of the mains socket.
- Do not plug any heavy power cube transformers in the remote controlled socket as the wall sockets' plug contacts may become overloaded.
■ To switch the remote controlled socket not energized, remove the remote controlled socket from the mains.
These operating instructions are part of the appliance. Therefore please ensure to pass them on, when you hand the appliance to third parties.

Safety Instructions for Batteries
■ Batteries are not intended for children. If accidentally swallowed seek immediate medical attention!
■ Never recharge non-rechargeable batteries, short-circuit and / or open batteries. The battery may overheat, ignite or explode.
■ Never throw batteries into fire or water.
- Do not exert mechanical loads to batteries.
In the event of a battery leak, immediately remove it from the device to prevent damage!
- Avoid contact with the skin, eyes and mucous membranes! In the event of contact with battery acid, thoroughly flush the affected area with plenty of clean water and seek immediate medical attention!
■ Only use the same type of batteries.
Do not mix used and new batteries!
- Avoid extreme conditions and temperatures which may impact batteries, e.g. on radiators.
■ Remove the batteries if the appliance has not been used for a long period.
■ Only use the specified battery type!
■ Make sure you insert the batteries the right way round (polarity)! This is shown in the battery compartment.
If necessary, clean the battery and device contacts before inserting the battery!
■ Remove spent batteries immediately from the device.
●Preparation
Before using these devices you must
□ insert the batteries,
synchronise the system code for the remote control 1 and the remote controlled socket 7 using the DIP switch 6, 10 and
□ allocate a ON/OFF button pair 4, 3 on the remote control 1 to a remote controlled socket 7.
● Preparing the remote control
Open the battery compartment on the back of the remote control 1 by pushing away the battery compartment cover 5 downwards and then up.
☐ Insert two enclosed batteries AAA.
☐ Press one of the ON/OFF buttons 4, 3 to test whether the remote control 1 works. If it does, the power indicator light 2 will come on. If this light is not lit then the device is not receiving any energy from the batteries. Check if the batteries are in the right way.
☐ Close the battery compartment.
●Synchronisethe system code
To use this device for the first time the system code must be synchronised by using the DIP switch 6, 10 in order for all the remote controlled sockets 7 to react to the remote control's 1 radio signal. Each remote controlled socket 7 must be assigned to a button pair on the remote control 1 so that each remote controlled socket 7 can be operated separately.
Note: Change the position of the DIP switch 6, 10 with a suitable item, e.g. a small screw driver with which the DIP switch 6, 10 can be push upwards or downwards.
- Inputting the system code into the remote control
Open the battery compartment on the back of the remote control 1 by pushing away the battery compartment cover 5 downwards and then up.
☐ With the DIP switch 6 put in any system code with the number 1 to 5.
☐ Close the battery compartment.
- Inputting the system code into the remote controlled socket
☐ Turn the screws 12 of the cover 11 with a crosshead screw driver size PHO.
Preparation
☐ Remove the cover 11 above the compartment of the DIP switch 10.
☐ With the DIP switch 10 put in the same system code as the remote control 1 with the number 1 to 5.
- Allocate the remote controlled socket a control button on the remote control
☐ With the DIP switch 10 put in a control button, A to D, into remote control 1:
Note: E can not be selected with the DIP switch.
| Control button Remote Control | DIP switch remote controlled socket | ||||
| A | B | C | D | E | |
| A | ON | OFF | OFF | OFF | OFF |
| B | OFF | ON | OFF | OFF | OFF |
| C | OFF | OFF | ON | OFF | OFF |
| D | OFF | OFF | OFF | ON | OFF |
Put the cover 11 back on.
☐ Put the screws 12 in the threads of the screw holes and tighten them.
Example
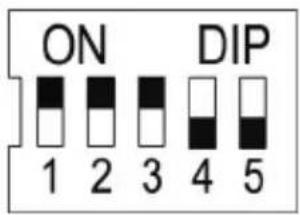
Put the system code 123 into the remote control 1 by pushing the DIP switch up to „1“, „2“ and „3“ whilst keeping „4“ and „5“ in the down position:
View back side of the remote control
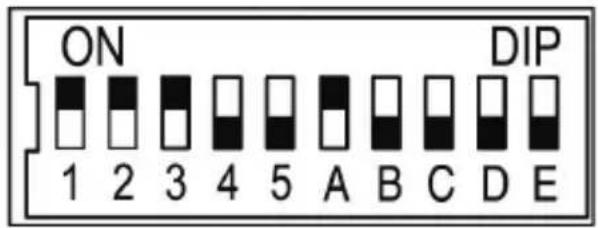
Put the system code 123 in all of the remote controlled sockets 7. For the first remote controlled socket 7 chose the control button „A“ on the remote control 1 by pushing the DIP switch „A“ up for the remote controlled socket 7 whilst keeping the DIP switches B, C, and D in the down position. This remote controlled socket 7 can now be switched on and off with the control button „A“ on the remote control 1
View back side of the remote controlled socket
Connectingdevices
Plug the remote controlled socket 7 into an earthed household socket. To guaranty the protection type IP44, the remote controlled socket 7 should be plugged exclusively into sockets with protection type IP44. With use in combination with a IP20 socket there is no moisture protection guarantee.
The remote controlled socket 7 can only be plugged in the the direction shown on the device label for the spray water protection to be guaranteed (arrow ↑ must be pointing up).
The range of the remote control's 1 radio signal reaches max. 40 m and is dependent on the structural conditions. The range can be impaired by structural (e.g. steel concrete), electrical (e.g. electric lines) or electromagnetic (e.g. telephones) conditions. If needed, remove the source of disturbance or keep an appropriate distance from the source of disturbance.
Operation
- Switching on the remote controlled socket
☐ Plug the remote controlled socket 7 in an earthed shockproof socket.
☐ Plug in the device which you want to control remotely in the remote control socket 7.
☐ Press the allocated ON button 4 of the remote control 1 (e.g. A) to switch on the remote controlled socket 7.
● Turn off the remote controlled socket
☐ Press the allocated OFF button 3 on the remote control 1 (e.g. A) to switch off the remote controlled socket 7.
- Cleaning
ATTENTION! RISK OF ELECTRIC SHOCK! Before cleaning, always unplug the
remote control socket 7 from the wall socket and remove all plugs from the socket.
ATTENTION! RISK OF ELECTRIC SHOCK! Do not allow any liquids to enter the
device.
☐ Please use a soft cloth for cleaning the housing. Never use petrol, solvents or cleaning agents that attack plastic.
- Maintenance
☐ Check the batteries for damage at regular intervals.
- Troubleshooting
● = Disturbance
= Cause
O = Rectification
The operating control light on the remote control does not goes on when pressing a button.
The batteries are falsely inserted.
- Put the batteries in the right way round.
● Batteries have no contact.
Press the batteries to the contact terminals.
The batteries are dead.
- Put in new batteries.
● Appliance does not function.
The remote controlled socket 7 is not correctly plugged in.
- Push the remote controlled socket 7 firmly into the socket.
The device is not switched on.
○ Switch the device on.
- Remote controlled socket does not switch on.
The system code for the remote controlled socket 7 is not correctly put in.
- Put the remote control's 1 system code into the remote controlled socket 7.
The range between the remote control 1 and the remote controlled socket 7 does not reach.
The reduce the distance between the remote control 1 and the remote controlled socket 7.
Electric devices disturb.
- Remove possible sources of disturbance.
- Disposal
Do not dispose of electrical equipment in the household waste!
In accordance with European Directive 2012/19/EC relating to old electrical and electronic appliances and, used electrical equipment must be collected separately and recycled in an ecologically compatible way. Contact your local authorities for information on how to dispose of the appliance at the end of product life.
Improper disposal of batteries can harm the environment!
Batteries do not belong in the household refuse bin. They may contain toxic heavy metals and are subject to hazardous waste regulations. Therefore dispose of used batteries through your municipal collection site.
● Guarantee and Service
- Warranty Declaration
This tool has a warranty of 3 years from the date of purchase. Please keep your receipt as proof of purchase. The product has been produced to the highest standards and thoroughly checked before dispatch. The guarantee only
applies to faults in material or manufacture when used properly.
Any modifications will void the guarantee. This warranty does not limit your legal rights. Please phone the service centre for guarantee claims. This is the only way to return your product free of charge.
- Service address
BAT
Lindenstraße 35
D-72074 Tübingen
E-Mail: exp@bat-tuebingen.com
Service tel.: 00800 48720741
For further information, we recommend you visit the service section/FAQs of our home page www.dvw-service.com.
IAN 101170
●Declaration of Conformity
The CE marking has been affixed in accordance with the following European directives:
1999/5/EG R&TTE-Directive
2006/95/EC Low Voltage Directive
2004/108/EG EMV Directive
2011/65/EU (RoHS II)
The Declaration of Conformity can be found at the following link:
www.dvw-service.com/konformitaets-erklaerung/ke_1049730706.pdf
Manufacturer
BAT
Lindenstraße 35
72074 Tübingen
Germany
Johdanto
Typebenaming: RCSAAA1000-A IP44
Batterij: 2 x AAA, 1,5 V
Frequentie: 433,92 MHz
● = Storing
=
O = Oplossing