
PTSG 140 A1 - Orbital sander PARKSIDE - Free user manual and instructions
Find the device manual for free PTSG 140 A1 PARKSIDE in PDF.


| Product type | Orbital sander |
| Brand | Parkside |
| Model | PTSG 140 A1 |
| Power supply | Mains, 230 V~, 50 Hz |
| Power consumption | 140 W |
| No-load speed | 12,000 oscillations/min |
| Pad diameter | 140 mm |
| Sanding surface | 1/3 sheet (93 x 185 mm) |
| Abrasive paper fixing | Lever clamp |
| Dust extraction connection | Yes, diameter 35 mm |
| Dust bag capacity | 500 ml |
| Dimensions (L x W x H) | 200 x 120 x 150 mm |
| Weight | 1.3 kg |
| Cable length | 2 m |
| Sound pressure level (LpA) | 82 dB(A) |
| Sound power level (LWA) | 93 dB(A) |
| Vibrations (ah) | 10.0 m/s² |
| Protection class | II (double insulation) |
| Main function | Sanding of flat surfaces |
| Maintenance | Clean the dust bag and ventilation slots regularly |
| Spare parts available | Abrasive paper, sanding pad, dust bag |
| Repairability | Spare parts available, repair possible by after-sales service |
| Intended use | Domestic |
Frequently Asked Questions - PTSG 140 A1 PARKSIDE
User questions about PTSG 140 A1 PARKSIDE
0 question about this device. Answer the ones you know or ask your own.
Ask a new question about this device
Download the instructions for your Orbital sander in PDF format for free! Find your manual PTSG 140 A1 - PARKSIDE and take your electronic device back in hand. On this page are published all the documents necessary for the use of your device. PTSG 140 A1 by PARKSIDE.
USER MANUAL PTSG 140 A1 PARKSIDE
TELLERSCHLEIFGERÄT PTSG 140 A1
DE AT CH
TELLERSCHLEIFGERÄT
Translation of the original instructions
DE AT CH
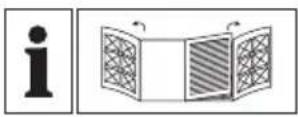
Before reading, unfold both pages containing illustrations and familiarise yourself with all functions of the device.
GB Translation of the original instructions Page 31
flowchart
graph TD
    A["PRISPR 80"] --> B["PRISPR 150"]
    B --> C["PRISPR 240"]
    C --> D["PRISPR 280366"]
    D --> E["PRISPR 280366"]
    E --> F["PRISPR 280366"]
    F --> G["PRISPR 280366"]
    G --> H["PRISPR 280366"]
    H --> I["PRISPR 280366"]
    I --> J["PRISPR 280366"]
    J --> K["PRISPR 280366"]
    K --> L["PRISPR 280366"]
    L --> M["PRISPR 280366"]
    M --> N["PRISPR 280366"]
    N --> O["PRISPR 280366"]
    O --> P["PRISPR 280366"]
    P --> Q["PRISPR 280366"]
    Q --> R["PRISPR 280366"]
    R --> S["PRISPR 280366"]
    S --> T["PRISPR 280366"]
    T --> U["PRISPR 280366"]
    U --> V["PRISPR 280366"]
    V --> W["PRISPR 280366"]
    W --> X["PRISPR 280366"]
    X --> Y["PRISPR 280366"]
    Y --> Z["PRISPR 280366"]
    Z --> AA["PRISPR 280366"]
    AA --> AB["PRISPR 280366"]
    AB --> AC["PRISPR 280366"]
    AC --> AD["PRISPR 280366"]
    AD --> AE["PRISPR 280366"]
    AE --> AF["PRISPR 280366"]
    AF --> AG["PRISPR 280366"]
    AG --> AH["PRISPR 280366"]
    AH --> AI["PRISPR 280366"]
    AI --> AJ["PRISPR 280366"]
    AJ --> AK["PRISPR 280366"]
    AK --> AL["PRISPR 280366"]
    AL --> AM["PRISPR 280366"]
    AM --> AN["PRISPR 280366"]
    AN --> AO["PRISPR 280366"]
    AO --> AP["PRISPR 280366"]
    AP --> AQ["PRISPR 280366"]
    AQ --> AR["PRISPR 280366"]
    AR --> AS["PRISPR 280366"]
    AS --> AT["PRISPR 280366"]
    AT --> AU["PRISPR 280366"]
    AU --> AV["PRISPR 280366"]
    AV --> AW["PRISPR 280366"]
    AW --> AX["PRISPR 280366"]
    AX --> AY["PRISPR 280366"]
    AY --> AZ["PRISPR 280366"]
    AZ --> BA["PRISPR 280366"]
    BA --> BB["PRISPR 280366"]
    BB --> BC["PRISPR 280366"]
    BC --> BD["PRISPR 280366"]
    BD --> BE["PRISPR 280366"]
    BE --> BF["PRISPR 280366"]
    BF --> BG["PRISPR 280366"]
    BG --> BH["PRISPR 280366"]
    BH --> BI["PRISPR 280366"]
    BI --> BJ["PRISPR 280366"]
    BJ --> BK["PRISPR 280366"]
    BK --> BL["PRISPR 280366"]
    BL --> BM["PRISPR 280366"]
    BM --> BN["PRISPR 280366"]
    BN --> BO["PRISPR 280366"]
    BO --> BP["PRISPR 280366"]
    BP --> BQ["GRIT 150 PTSG 140 A1"]
    BQ --> BR["GRIT 150 PTSG 140 A1"]
    BR --> BS["GRIIT 80 PTSG 140 A1"]
    BS --> BT["GRIIT 150 PTSG 140 A1"]
    BT --> BU["GRIIT 150 PTSG 140 A1"]
    BU --> BV["GRIIT 150 PTSG 140 A1"]
    BV --> BW["GRIIT 150 PTSG 140 A1"]
    BW --> BX["GRIIT 150 PTSG 140 A1"]
    BX --> BY["GRIIT 150 PTSG 140 A1"]
    BY --> BZ["GRIIT 150 PTSG 140 A1"]
    BZ --> CA["GRIIT 150 PTSG 140 A1"]
    CA --> CB["GRIIT 150 PTSG 140 A1"]
    CB --> CC["GRIIT 150 PTSG 140 A1"]
    CC --> CD["GRIIT 150 PTSG 140 A1"]
    CD --> CE["GRIIT 150 PTSG 140 A1"]
    CE --> CF["GRIIT 150 PTSG 140 A1"]
    CF --> CG["GRIIT 150 PTSG 140 A1"]
    BG --> CH["GRIIT 150 PTSG 140 A1"]
    CH --> CI["GRIIT 150 PTSG 140 A1"]
    CI --> CJ["GRIIT 150 PTSG 140 A1"]
    CJ --> CK["GRIIT 150 PTSG 140 A1"]
Inhaltsverzeichnis
Einleitung 2
⚠️ WARNUNG! BRANDGEFAHR!
KOMPERNASS HANDELS GMBH
BURGSTRASSE 21
44867 BOCHUM
GERMANY
www.kompernass.com

WARNUNG!
CE
Semi Uguzlu
KOMPERNASS HANDELS GMBH
BURGSTRASSE 21
44867 BOCHUM
GERMANY
www.kompernass.com
Directive relative aux machines (2006/42/CE)
Directive RoHS (2011/65/EU)*
CE
Semi Uguzlu
KOMPERNASS HANDELS GMBH
BURGSTRASSE 21
44867 BOCHUM
GERMANY
www.kompernass.com
CE
Semi Uguzlu
Depicted components 32
Package contents 32
Technical data 32
General Power Tool Safety Warnings 33
Working safely 33
Residual risks 35
Before use....35
Appliance position 35
Assembling/disassembling the sanding table with sanding table holder 35
Replacing or attaching the sanding paper 36
Adjusting the sanding table angle 36
Adjusting the angle stop 36
Dust extraction 36
Connecting/removing the dust extraction unit 36
Operation 37
Switching on and off 37
Grinding 37
Maintenance and care 37
Disposal 37
Translation of the original Conformity Declaration 39
DISC SANDER PTSG 140 A1 Introduction
Congratulations on the purchase of your new appliance. You have chosen a high-quality product. The operating instructions are part of this product. They contain important information about safety, usage and disposal. Before using the product, please familiarise yourself with all operating and safety instructions. Use the product only as described and for the range of applications specified. Please also pass these operating instructions on to any future owner.
Intended use
The disc sander is designed for sanding a wide range of wood types. It can be used for the precision sanding of softwoods and hardwoods.
The appliance is not intended for commercial use. Any other uses or modification of the appliance is deemed to be improper use and carries the risk of serious personal injury. The manufacturer accepts no responsibility for damage(s) attributable to misuse.
Depicted components
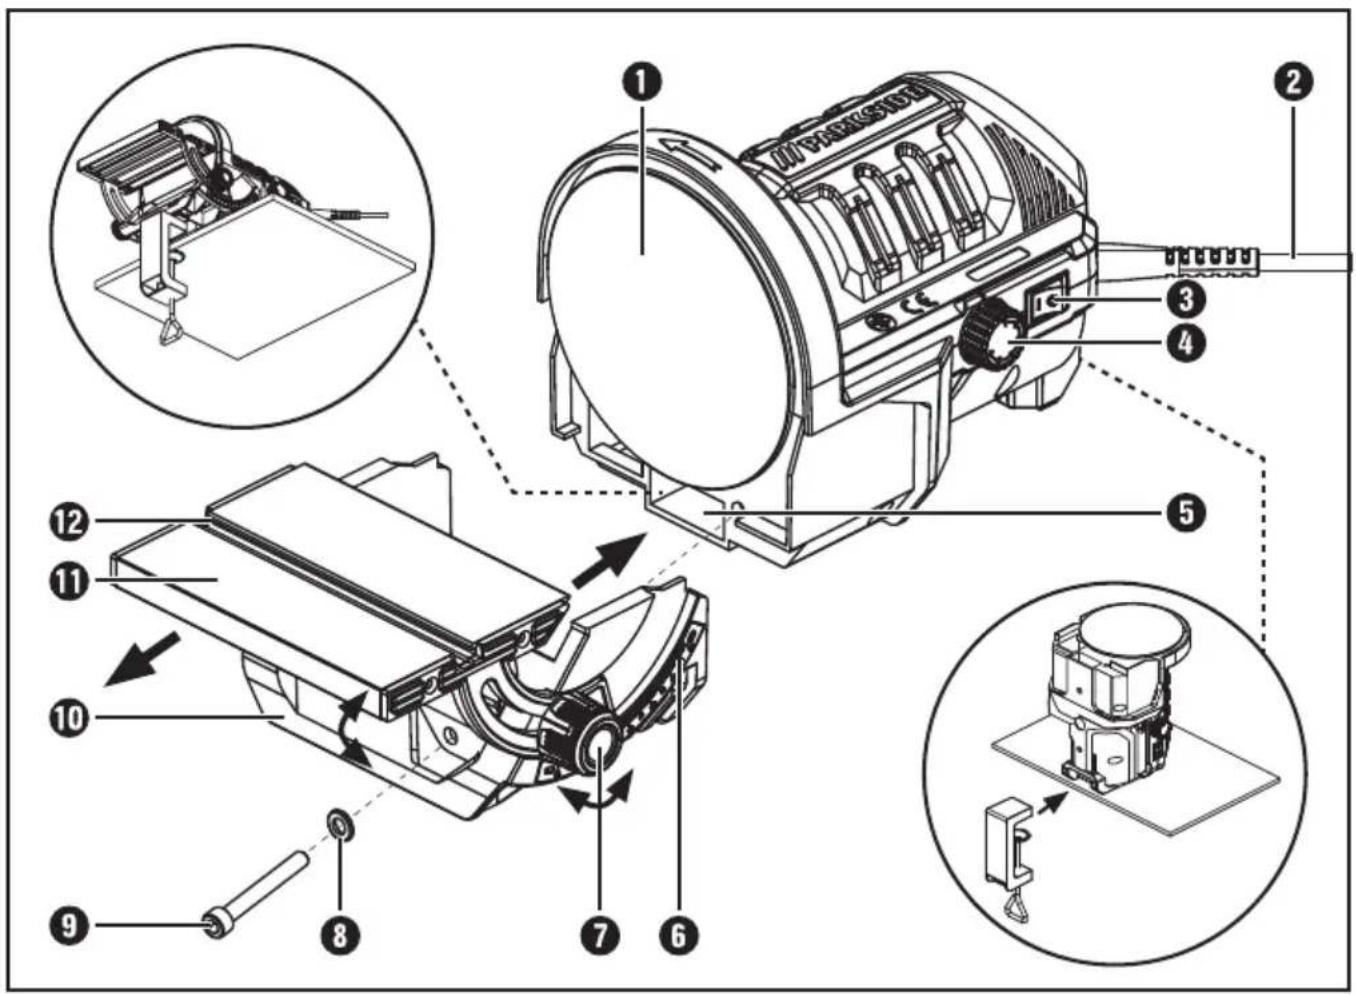
① Sanding disc
② Mains plug
3 On/Off switch
4 Speed control
⑤ Screw clamp mounting
6 Angle scale
7 Rotary knob
8 Plain washer
9 Hex socket screw
10 Sanding table holder
⑪ Sanding table
12 Table groove
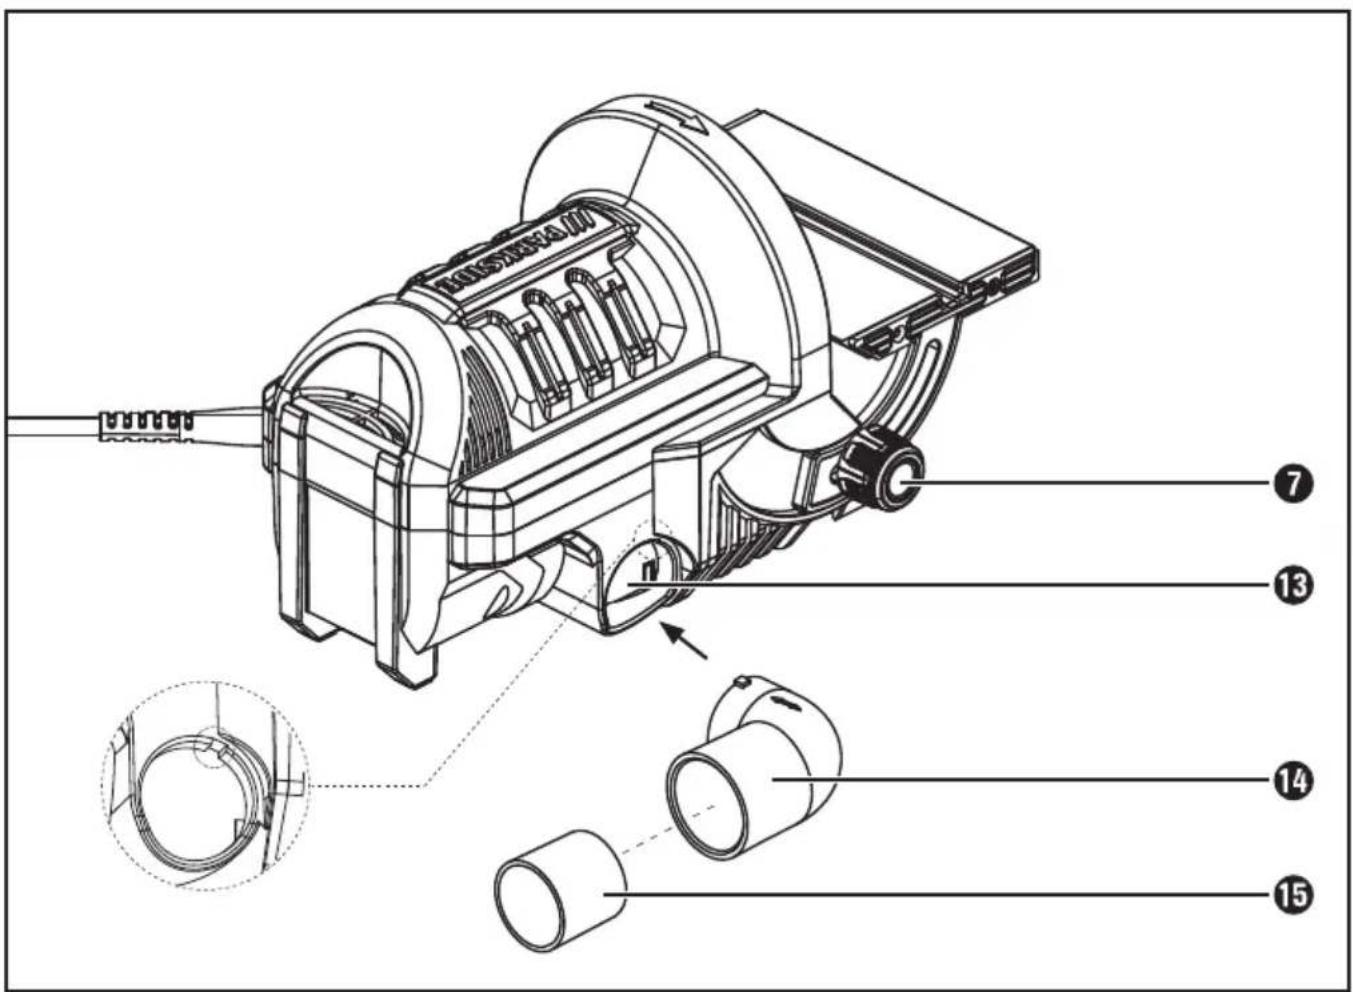
13 Extraction nozzle
14 Adapter
15 Reducer piece
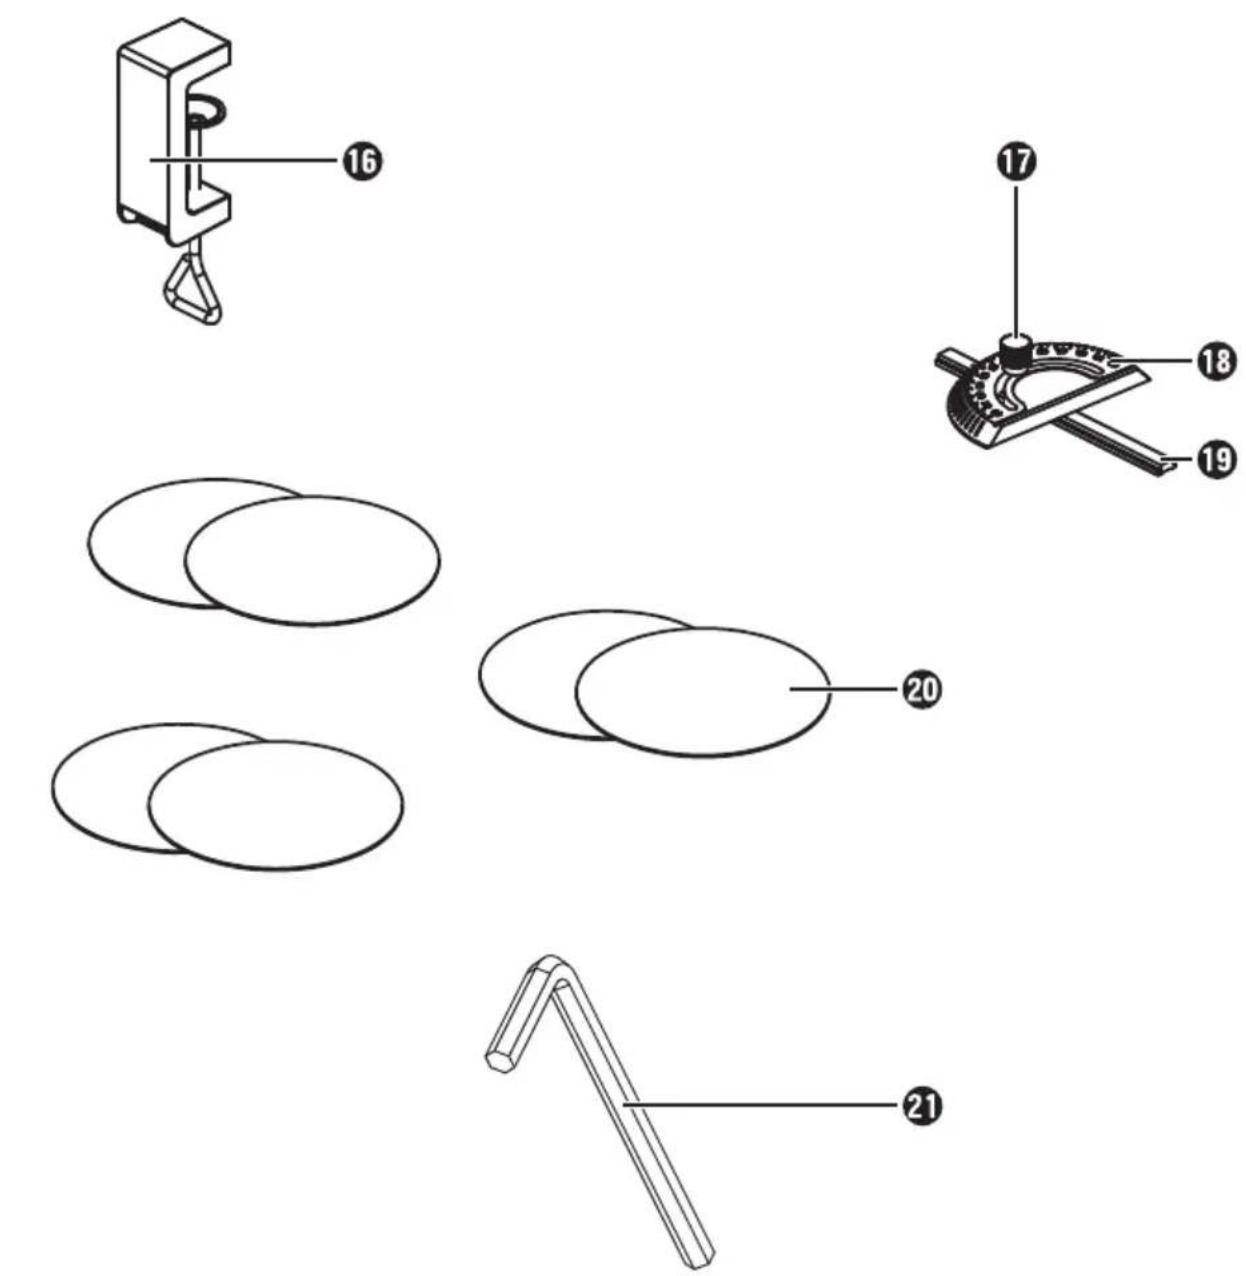
16 Screw clamp
17 Angle stop bolt
18 Angle stop angle scale
19 Guide rail
20 Sandpaper
21 Hex key
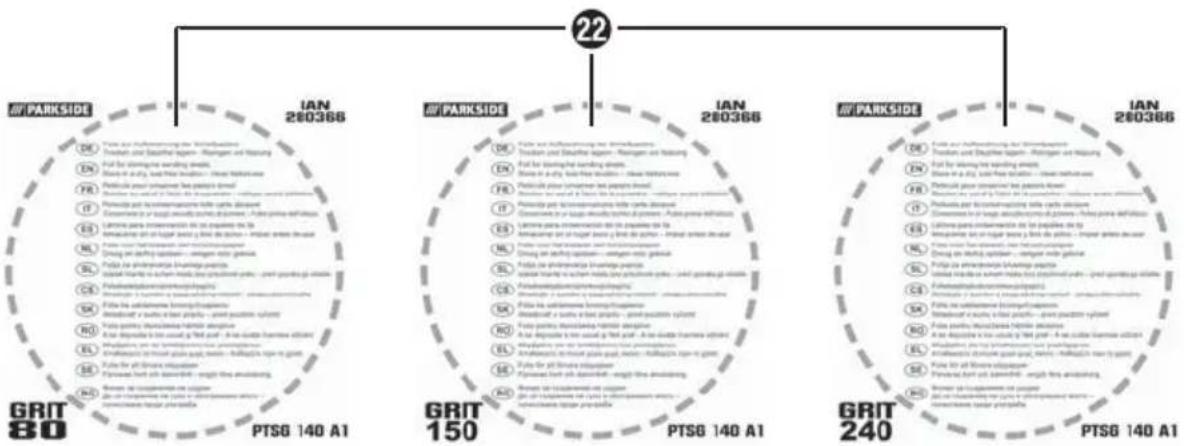
22 Storage covers
Package contents
1 disc sander
1 angle stop
1 screw clamp
1 adapter
1 reducer piece
2 sanding paper sheets, 80 grain
2 sanding paper sheets, 150 grain
2 sanding paper sheets, 240 grain
6 storage covers
1 Hex key
1 set of operating instructions
Technical data
Rated voltage: 230 V \~ 50 Hz (AC)
Rated power
consumption: 140
S2: 15 min
W
Protection class: II / □ (double insulation)
Protection Class: IP20
Rated idle speed: 0-3600 rpm
Weight: approx. 3 kg
∅ sanding disc: 125 mm
Sanding table dimensions: 140 x 98 mm
Noise emission value:
Noise measurement value determined in accordance with EN 61029. The rated noise level of the power tool is typically as follows:
Sound pressure level: L _pA = 65 dB (A)
Uncertainty: _pA = 3 dB K
Sound power level: I_WA = 78 dB (A)
Uncertainty: _WA = 3 dB K
Wear hearing protection!
Total vibration value:
Total vibration value as per EN 61029:
Vibration emission value: a _h ≤ 2.5 m/s^2
Uncertainty K = 1.5 m/s^2
NOTE
The vibration level specified in these instructions has been measured in accordance with a standardised measuring procedure and can be used for equipment comparisons. The specified vibration emission value can also be used to make an initial exposure estimate.

WARNING!
The vibration level will vary according to the use of the power tool and may sometimes be higher than the value specified in these instructions.
Regular use of the power tool in this way may cause the user to underestimate the vibration. To estimate the vibration load during a specific working period accurately, periods during which the appliance is switched off (or running, but not being used) must also be taken into account. This can significantly reduce the vibration load over the total working period.

General Power Tool Safety Warnings

CAUTION!
▶ Read all the safety information, instructions, illustrations and technical data provided with this electric tool. Failure to follow the warnings and instructions may result in electric shock, fire and/or serious injury.
Save all warnings and instructions for future reference.
The term "power tool" in the warnings refers to your mains-operated (corded) power tool or battery-
operated (cordless) power tool.
Working safely
- Keep your workspace tidy. Clutter in the work area can cause accidents.
■ Take account of environmental influences!
Do not expose the power tool to rain. Do not use the power tool in wet or moist environments. Ensure that your workspace is adequately lit. Do not use power tools where there is a risk of explosion or fire.
■ Protect yourself from electric shocks! Avoid body contact with grounded surfaces (e.g. pipes, radiators, electric cookers, refrigerators and freezers). - Keep other people at a distance! Do not allow other people, especially children, to touch the power tool or the cord. Keep them out of your work area.
■ Store unused power tools safely! Unused electric tools should be placed in a dry, high-up or closed-off place out of the reach of children.
- Do not overload your power tool! The tool will work better and more safely in the specified performance range.
Use the right power tool for the job! Do not use low performance tools for heavy duty work. Do not use the power tool for purposes for which it is not intended. For example, do not use a circular saw to cut tree branches or logs.
■ Wear suitable clothing! Do not wear loose clothing or jewellery to avoid getting them caught in moving parts. Wear non-slip footwear when working outdoors. If you have long hair, wear a hairnet.
Use protective equipment! Wear safety goggles. Use a breathing mask for work which produces a lot of dust.
■ Connect the dust extraction unit! If there are connections for dust extraction and collection, make sure that these are connected and used properly.
- Do not use the cord for purposes for which it is not intended! Do not pull on the cord to unplug the power tool. Protect the cord from heat, oil and sharp edges.
- Secure the workpiece! Use clamps or a vice to hold the workpiece firmly in place. This is much safer than simply holding it in your hand.
■ Do not overreach! Keep both feet on the ground an maintain your balance at all times.
- Maintain tools with care! Keep the cutting tools sharp and clean to be able to work better and more safely. Follow the instructions on lubrication and exchanging tools. Check the power cord regularly and have it replaced by a certified specialist if it is damaged. Check extension leads regularly and replace them if they are damaged. Keep the handles dry, clean and free from oil and grease.
■ Unplug the appliance from the mains socket! When the power tool is not in use, before maintenance and when changing tools such as saw blades, drill bits and milling tools.
■ Never leave any tool key attached! Check that all keys and adjusting tools are removed before switching the appliance on.
■ Avoid accidentally starting the appliance! Ensure that the switch is switched to off before inserting the plug into the wall socket.
■ Use the extension cord for outdoor use! Use only suitably certified and labelled extension cords outdoors.
■ Remain alert at all times! Pay attention to what you are doing. Proceed with caution when working with the tool. Do not use the power tool when distracted.
■ Check the power tool for any damage! Before continuing to use the power tool, check all safety devices and any slightly damaged parts to make sure they function properly and as intended.
- Check that all moving parts work properly without jamming and whether parts are damaged. All parts must be properly fitted and meet all the conditions to ensure the proper operation of the power tool. Damaged safety devices and parts must be properly repaired or replaced by a specialist workshop unless otherwise indicated in the instructions.
■ Damaged switches must be replaced at an authorised customer service centre.
■ Do not use any power tools that you cannot switch on and off with the power switch.
CAUTION! The use of other tools and accessories could lead to an increased risk of personal injury for you.
■ Have your power tool repaired by a qualified electrician! This power tool complies with all relevant safety regulations. Repairs may only be performed by a qualified electrician using original spare parts. Failure to do so could put the user at risk of accidents.
Residual risks
Even if you operate this power tool properly, there will still be residual risks. The following risks can occur in relation to the power tool's design and structure:
- Lung damage, if no suitable breathing protection is worn.
● Hearing damage, if no suitable hearing protection is worn.
- Damage to health caused by vibrations if the appliance is used for extended periods or is not properly used and maintained.
WARNING!
The power tool creates an electromagnetic field during operation. This field can, in certain circumstances, impair active or passive medical implants. To reduce the risk of fatal injuries, we recommend that people with medical implants consult their doctor and the manufacturer of the medical implant before operating this machine.
Before use
CAUTION!
■ This appliance is not designed for continuous operation.
- If the appliance overheats, switch it off and allow it to cool down.
Appliance position
■ The appliance can be set horizontally or vertically.
Fix the supplied screw clamp using the screw clamp mounting 5 to a table edge to prevent the appliance tipping over.
Assembling/disassembling the sanding table with sanding table holder
- Undo and remove the hex socket screw 4 and the plain washer 8 underneath the sanding table holder 10
Now pull the sanding table hold together with the sanding table 11ff towards the front.
To refit the sanding table, push the sanding table holder with the sanding table back into the normal position.
- After this, reinsert the hex socket screw 9 and the plain washer 8 and tighten the screw.
Replacing or attaching the sanding paper
CAUTION!
▶ Ensure that the appliance has been disconnected from the power in order to prevent it from being accidentally switched on during the replacement process and causing injuries.
Before replacement, dismantle the sanding table holder 10 with the sanding table 11 order to access the disc more easily.
Select the sanding paper20 you require and remove the backing film.
♦ Stick the sanding paper ^20 to the sanding disc 1 making sure not to trap any air underneath.
NOTE
▶ Stick sanding paper ^20 you have already used to one of the storage covers supplied so that you can reuse it.
Adjusting the sanding table angle
- Undo the rotary knob 7 fixed to both sides of the sanding table holder 10
Using the angle scale 6 you can adjust the sanding table 1 to the required angle.
◆ The angle can be adjusted to anything from -10 to +50 degrees.
♦ Next, tighten the rotary knob 7 so that the sanding table 1 remains in the required position.
Adjusting the angle stop
- Undo the angle stop bolt and use the scale 18 to adjust it to the required angle. The marking on the scale 16 must match the marking on the guide rail 19
◆ Retighten the stop bolt to retain the angle.
♦ Push the guide rail into the table groove 12 located on the sanding table 11
Dust extraction
WARNING! RISK OF FIRE!
When working with electrical appliances that can be connected to a vacuum cleaner via a vacuum cleaner adapter, there is a risk of fire! Under certain conditions, wood dust in the bag of the vacuum cleaner can spontaneously ignite. This can occur due to flying sparks or when sanding over residual metals in wood. This is particularly likely if the wood dust is mixed with paint residues or other chemicals and the workpiece has become hot after being used for a long time. Therefore, do not allow the material being sanded and the appliance to overheat. Always empty the vacuum cleaner dust bag before taking work breaks.
Connecting/removing the dust extraction unit
Connecting:
- Insert the adapter ^14 for outside dust extraction into the extraction nozzle ^13 When doing so, note the guidance aid on the appliance and on the adapter ^14
◆ To lock, turn the adapter14 clockwise.
If necessary, use the reducer piece 5 by pushing it onto the adapter 14
♦ Push the hose from a suitable dust extraction appliance (e.g. a workshop vacuum cleaner) onto the adapter 14 for external vacuum extraction or the reducer piece 15
Removal:
◆ Pull the vacuum cleaner hose off the adapter for external vacuum extraction.
To unlock, turn the adapter 14 anticlockwise until the arrow (4) points to the slot on the extraction nozzle 13
◆ Pull the adapter ^14 for external vacuum extraction including the reducer piece ^15 necessary off.
Operation
Switching on and off
NOTE
Before first use, allow the sanding paper 20 to run without a load at top speed for about 5 minutes. Keep out of the danger area.
To switch the appliance on, plug the mains plug ② into a wall socket and press the on/off switch ③".
Now set the required sanding paper speed using the speed control ④ on the side of the appliance. The speed is infinitely variable.
To switch the appliance off again press the on/off switch ③ "0" and pull the mains plug ② out of the power socket.
Grinding
The arrow on top of the appliance (4) shows you the sanding disc 1 rotation direction (in this case, anticlockwise).
The sanding speed can be adjusted using the speed control ④ on the side of the appliance. This allows you to process the material optimally according to your requirements.

WARNING!
■ HAZARDOUS WORKING AREA: The grey working area of the grinding wheel. Do not work in this area (see fig. A).
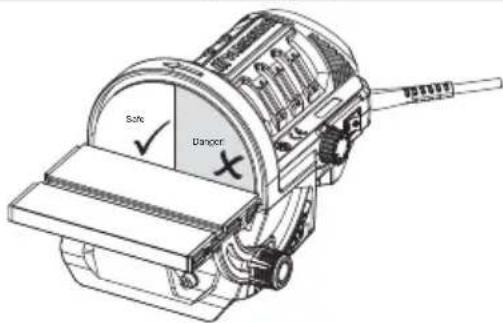
Fig. A
Maintenance and care
Ensure that the appliance has been disconnected from the power in order to prevent it from being accidentally switched on during the replacement process and causing injuries.
The appliance is maintenance-free.
■ Always clean the appliance directly after completion of work.
■ Use a dry cloth to clean the housing. Under no circumstances should you use fuel, detergents, solvents or abrasive cleaners.
- Keep the ventilation openings free of obstructions at all times.
■ Remove any sanding dust stuck to the appliance with a brush.
Disposal

ckaging is made from environmen- tally friendly material and can be dis- posed of at your local recycling plant.

dispose of power tools in your normal household waste!
In accordance with European Directive 2012/19/EU on Waste Electrical and Electronic Equipment and its integration into national law, used power tools must be disposed of separately and recycled in an environmentally friendly manner.
Your local community or municipal authorities can provide information on how to dispose of the appliance.
This appliance has a 3-year warranty valid from the date of purchase. If this product has any faults, you, the buyer, have certain statutory rights. Your statutory rights are not restricted in any way by the warranty described below.
Warranty conditions
The validity period of the warranty starts from the date of purchase. Please keep your original receipt in a safe place. This document will be required as proof of purchase.
If any material or production fault occurs within three years of the date of purchase of the product, we will either repair or replace the product for you at our discretion. This warranty service is dependent on you presenting the defective appliance and the proof of purchase (receipt) and a short written description of the fault and its time of occurrence.
If the defect is covered by the warranty, your product will either be repaired or replaced by us. The repair or replacement of a product does not signify the beginning of a new warranty period.
Warranty period and statutory claims for defects
The warranty period is not prolonged by repairs effected under the warranty. This also applies to replaced and repaired components. Any damage and defects present at the time of purchase must be reported immediately after unpacking. Repairs carried out after expiry of the warranty period shall be subject to a fee.
Scope of the warranty
This appliance has been manufactured in accordance with strict quality guidelines and inspected meticulously prior to delivery.
The warranty covers material faults or production faults. The warranty does not extend to product parts subject to normal wear and tear or fragile parts such as switches, batteries, baking moulds or parts made of glass.
The warranty does not apply if the product has been damaged, improperly used or improperly maintained. The directions in the operating instructions for the product regarding proper use of the product are to be strictly followed. Uses and actions that are discouraged in the operating instructions or which are warned against must be avoided.
This product is intended solely for private use and not for commercial purposes. The warranty shall be deemed void in cases of misuse or improper handling, use of force and modifications/repairs which have not been carried out by one of our authorised Service centres.
Warranty claim procedure
To ensure quick processing of your case, please observe the following instructions:
■ Please have the till receipt and the item number (e.g. IAN 12345) available as proof of purchase.
■ You will find the item number on the type plate, an engraving on the front page of the instructions (bottom left), or as a sticker on the rear or bottom of the appliance.
If functional or other defects occur, please contact the service department listed either by telephone or by e-mail.
■ You can return a defective product to us free of charge to the service address that will be provided to you. Ensure that you enclose the proof of purchase (till receipt) and information about what the defect is and when it occurred.

You can download these instructions along with many other manuals, product videos and software on www.lidl-service.com.
Service

WARNING!
■ Have the power tool repaired by the service centre or a qualified electrician and only using genuine replacement parts. This will ensure that the safety of the appliance is maintained.

WARNING!
■ Always ensure that the power plug or the mains cable is replaced only by the manufacturer of the appliance or by an approved customer service provider. This will ensure that the safety of the appliance is maintained.
NOTE
▶ Replacement parts not listed (such as carbon brushes, switches) can be ordered via our service hotline.

Service Great Britain
Tel.: 0871 5000 720 (£ 0.10/Min.)
E-Mail: kompernass@lidl.co.uk
IAN 280366
Importer
Please note that the following address is not the service address. Please use the service address provided in the operating instructions.
KOMPERNASS HANDELS GMBH
BURGSTRASSE 21
44867 BOCHUM
GERMANY
www.kompernass.com
Translation of the original Conformity Declaration
We, KOMPERNASS HANDELS GMBH, documents officer: Mr. Semi Uguzlu, BURGSTR. 21, 44867 BOCHUM, Germany, hereby declare that this product complies with the following standards, normative documents and EC directives:
Machinery Directive
(2006/42/EC)
EMC (Electromagnetic Compatibility)
(2014/30/EU)
RoHS Directive
(2011/65/EU)*
*The manufacturer bears the full responsibility for compliance with this conformity declaration. The object of the declaration described above complies with the requirements of the Directive 2011/65/EU of the European Parliament and Council of 8 June 2011 on the limitations of use of certain dangerous substances in electrical and electronic appliances.
Applied harmonised standards:
EN 61029-1: 2009/A11: 2010
EN ISO 12100: 2010
EN 62233: 2008
EN 55014-1: 2006/A2: 2011
EN 55014-2: 2015
EN 61000-3-2: 2014
EN 61000-3-3: 2013
Type designation of machine:
Disc sander PTSG 140 A1
Year of manufacture: 2016-09
Serial number: IAN 280366
Bochum, 15/09/2016

Semi Uguzlu
- Quality Manager -
We reserve the right to technical changes in the context of further product development.
KOMPERNASS HANDELS GMBH
BURGSTRASSE 21
44867 BOCHUM
DEUTSCHLAND / GERMANY
www.kompernass.com
- TELLERSCHLEIFGERÄT PTSG 140 A1
- DE AT CH
- Inhaltsverzeichnis
- Einleitung 2
- ⚠️ WARNUNG! BRANDGEFAHR!
- WARNUNG!
- CE
- General Power Tool Safety Warnings 33
- Before use....35
- Operation 37
- Maintenance and care 37
- Disposal 37
- Translation of the original Conformity Declaration 39
- DISC SANDER PTSG 140 A1 Introduction
- Intended use
- Depicted components
- Package contents
- Technical data
- Noise emission value:
- Wear hearing protection!
- Total vibration value:
- NOTE
- WARNING!
- General Power Tool Safety Warnings
- CAUTION!
- Save all warnings and instructions for future reference.
- Working safely
- Residual risks
- Before use
- Appliance position
- Assembling/disassembling the sanding table with sanding table holder
- Replacing or attaching the sanding paper
- Adjusting the sanding table angle
- Adjusting the angle stop
- Dust extraction
- WARNING! RISK OF FIRE!
- Connecting/removing the dust extraction unit
- Connecting:
- Removal:
- Operation
- Switching on and off
- Grinding
- Maintenance and care
- Disposal
- Warranty conditions
- Warranty period and statutory claims for defects
- Scope of the warranty
- Warranty claim procedure
- Service
- Service Great Britain
- Importer
- Translation of the original Conformity Declaration
- Machinery Directive
- Applied harmonised standards:
- Type designation of machine:
- Serial number: IAN 280366
Brand : PARKSIDE
Model : PTSG 140 A1
Category : Orbital sander