
PMBS 105 A1 - Orbital sander PARKSIDE - Free user manual and instructions
Find the device manual for free PMBS 105 A1 PARKSIDE in PDF.


| Brand | Parkside |
| Model | PMBS 105 A1 |
| Product Type | Modelling Belt Sander |
| Rated Voltage | 230 V ~ 50 Hz |
| Rated Power Input | 105 W |
| Operating Mode | S2 10 min (short-term use, then rest until cooled within 2 °C of room temperature) |
| Idle Belt Speed | 170 m/min |
| Idle Speed (no load) | 640 min⁻¹ |
| Abrasive Belt Size | 40 x 265 mm |
| Grinding Surface | 60 x 40 mm |
| Protection Class | II (double insulated) |
| Sound Pressure Level | 81.20 dB(A) |
| Sound Power Level | 92.20 dB(A) |
| Vibration Emission Value | 2.334 m/s² (K = 1.5 m/s²) |
| Key Features | ON/OFF switch, tensioner slider, adjusting knob for belt tracking, extraction adapter, dust extractor hose, screw clamp for stationary use, belt support |
| Scope of Delivery | 1 belt sander, 1 abrasive belt (installed), 1 extraction adapter, 1 dust extractor hose, 1 screw clamp, set of instructions |
| Intended Materials | Wood, plastic, metal, non-ferrous metals, painted surfaces (dry sanding only) |
| Maintenance | Maintenance-free; clean with dry cloth only; no petrol or solvents |
| Safety Precautions | Wear ear protection, dust mask, safety glasses; hold by insulated handles; avoid contact with moving belt; do not use near flammable materials; use external dust extraction for prolonged work |
| Warranty | 3 years from date of purchase (private use only) |
| Service Contact (GB) | Tel: 0871 5000 720 (£0.10/min), email: kompernass@lidl.co.uk |
| Service Contact (IE) | Tel: 1890 930 034 (0.08 EUR/min peak, 0.06 off peak), email: kompernass@lidl.ie |
Frequently Asked Questions - PMBS 105 A1 PARKSIDE
User questions about PMBS 105 A1 PARKSIDE
0 question about this device. Answer the ones you know or ask your own.
Ask a new question about this device
Download the instructions for your Orbital sander in PDF format for free! Find your manual PMBS 105 A1 - PARKSIDE and take your electronic device back in hand. On this page are published all the documents necessary for the use of your device. PMBS 105 A1 by PARKSIDE.
USER MANUAL PMBS 105 A1 PARKSIDE
MODELLING BELT SANDER PMBS 105 A1
GB IE
MODELLING BELT SANDER
Operation and Safety Notes Translation of the original instructions
DE AT CH
MODELLBAu-BANDSchLEIfER
Before reading, unfold both pages containing illustrations and familiarise yourself with all functions of the device.
DE AT CH
GB / IE Operation and Safety Notes Page 5
natural_image
Close-up of a hand adjusting a device with a textured grip and scroll (no visible text or symbols)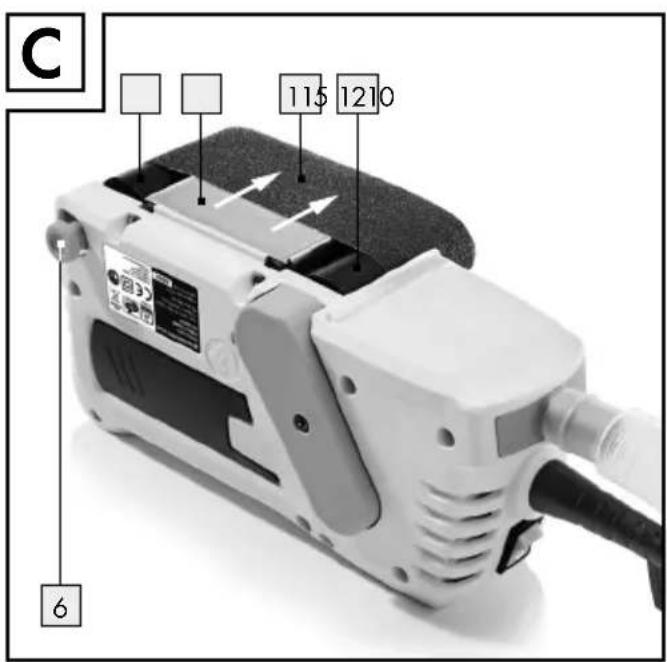
natural_image
Hand holding a Parkside electric shaver on a surface, no visible text or symbols on the device itself.Introduction
Intended use....Page 6
Features Page 6
Scope of delivery Page 6
Technical Data Page 6
General power tool safety warnings....Page 7
-
Work area safety Page 8
-
Electrical safety Page 8
-
Personal safety Page 8
-
Power tool use and care....Page 8
-
Service Page 9
Safety advice for belt sanders....Page 9
Initial use
Clamping / changing the abrasive belt ......Page 10
Working instructions......Page 10
Dust extraction Page 10
Operation
Switching on and off....Page 11
Stationary use Page 11
Tips and tricks....Page 11
Maintenance and cleaning......Page 11
Service centre Page 11
Warranty Page 11
Translation of the original declaration of conformity / Manufacturer....Page 12
Modelling belt sander PMBS 105 A1
- Introduction
We congratulate you on the purchase of your new device. You have chosen a high quality product. The instructions for use are part of the product. They contain important information concerning safety, use and disposal. Before using the product, please familiarise yourself with all of the safety information and instructions for use. Only use the unit as described and for the specified applications. If you pass the product on to anyone else, please ensure that you also pass on all the documentation with it.
Intendeduse
The belt sander is designed for model making, tooling and shaping. However, it is also suitable for small car repairs, e.g. bodywork. The tool can also be used for deburring, rough machining, finish grinding, edge breaking, paint removal, rust removal and sharpening tools, as well as working on metal, non-ferrous metals, wood and plastic. The device is not intended for commercial use. Any other uses, and / or modifications to the tool are considered improper use and may result in serious hazards. The manufacturer is not liable for damage caused by improper use.
Features
1 ON/OFF switch
2 Connection cable with mains plug
3 Connection socket
4 Slide for tensioner
5 Tensioner
6 Adjusting knob
7 Extraction adapter
8 Dust extractor hose
9 Screw clamp
10 Belt support
11 Abrasive belt
12 Drive roller
13 Notch
- Scope of delivery
1 Modelling belt sander PMBS 105 A1
1 Abrasive belt (installed)
1 Extraction adapter (for external dust collection)
1 Dust extractor hose
1 Screw clamp
1 Set of instructions for use
●TechnicalData
Modelling belt sander PMBS 105 A1
Rated voltage: 230V\~50Hz
Operating mode:
Short term use: S2 10 min
Note: After a continuous operating time of 10 minutes, a rest period is enabled, until the device has cooled to a temperature within 2 K (2 °C) of the room temperature.
Rated power input: 105 W
Idlebelt-
speed: 170 m/min
Idle speed: n_0 640 min ^-1
Abrasive belt: 40 x 265 mm
Grinding surface: 60 x 40 mm
Protection class: II/☐
Noise and vibration data:
Measured values for noise are determined in accordance with EN 60745. The A-weighted noise level of the electrical power tool are typically:
Sound pressure level: 81.20 dB(A)
Sound power level: 92.20 dB(A)
Uncertainty K: 3 dB
Vibration- and noise reduction
To minimise the impact of vibration and noise, limit the work time, use the settings for lower vibration- and noise emission, and wear personal protective equipment.
Please observe the following points to minimise the vibration- and noise emission:
- Only use the product properly in accordance with the design and the instructions.
-
Ensure the product is in good working order and well maintained.
-
Use the correct accessories and ensure it is in good condition.
- Maintain a firm grip on the product but not tense by the designated handles and wear warm gloves in cold weather.
- Maintain the product according to these instructions and keep it well lubricated.
- Plan your working time according to these instructions to spread higher strain over a longer period.
Emergency

Familiarise yourself with how to use the product by reading these instructions in full. Remember the safety notices and follow them strictly. This will help you prevent risks and hazards.
-
Always pay attention when using the product so as to recognise and respond to hazards early. Intervening quickly can prevent serious injuries and property damage.
-
Switch off the product and disconnect from the power supply if problems arise. Have the product repaired by a qualified expert if necessary before using the product again.
Remaining risks
Even with proper use of this power tool there are always residual risks. The following hazards may arise in connection with the construction and design of this power tool:
a) Injuries and property damage caused by parts flying about.
b) Damage to health arising from vibration to the hands and arms when using the power tool for extended periods or used and maintained improperly.
c) Hearing damage when failing to use suitable hearing protection.

WARNING! This power tool generates an electromagnetic field during use. This field could possibly actively or passively impact medical implants. To reduce the risk of serious or fatal injuries we recommend persons
with medical implants consulting their physicians and the manufacturer of the medical implant before using this machine!
Wear ear protection!
Total vibration, EN 60745:
Vibration emission value a_n=2.334m/s^2
Uncertainty K = 1.5 m/s^2
Note: The vibration level specified in these instructions was measured in accordance with an EN 60745 standardised measurement process and can be used to compare equipment. The vibration emission value specified can also serve as a preliminary assessment of the exposure.
The vibration level will change according to the application of the electrical tool and in some cases may exceed the value specified in these instructions. Regularly using the electric tool in such a way may make it easy to underestimate the vibration.
WARNING! Try to keep the vibration loads as low as possible. Measures to reduce the vibration load are, e.g. wearing gloves and limiting the working time. Wherein all states of operation must be included (e.g. times when the power tool is switched off and times where the power tool is switched on but running without load).
● General power tool safety warnings

WARNING! Read all safety warnings and all instructions.
Failure to follow the warnings and instructions may result in electric shock, fire and / or serious injury.
Save all warnings and instructions for future reference.
The term "power tool" in the warnings refers to your mains-operated (corded) power tool or battery-operated (cordless) power tool.
1. Work area safety
a) Keep work area clean and well lit.
Cluttered or dark areas invite accidents.
b) ☑ not operate power tools in explosive atmospheres, such as in the presence of flammable liquids, gases or dust.
Power tools create sparks which may ignite the dust or fumes.
c) Keep children and bystanders away while operating a power tool. Distractions can cause you to lose control.
2. Electrical safety
a) Power tool plugs must match the outlet. Never modify the plug in any way. Do not use any adapter plugs with earthed (grounded) power tools. Unmodified plugs and matching outlets will reduce risk of electric shock.
b) Avoid body contact with earthed or grounded surfaces, such as pipes, radiators, ranges and refrigerators.
There is an increased risk of electric shock if your body is earthed or grounded.
c) Do not expose power tools to rain or wet conditions. Water entering a power tool will increase the risk of electric shock.
d) Do not abuse the cord. Never use the cord for carrying, pulling or unplugging the power tool. Keep cord away from heat, oil, sharp edges or moving parts. Damaged or entangled cords increase the risk of electric shock.
e) When operating a power tool outdoors, use an extension cord suitable for outdoor use. Use of a cord suitable for outdoor use reduces the risk of electric shock.
f) If operating a power tool in a damp location is unavoidable, use a residual current device (RCD) protected supply.
Use of an RCD reduces the risk of electric shock.
3. Personal safety
a) Stay alert, watch what you are doing and use common sense when operating a power tool. Do not use a power tool while you are tired or under the influence of drugs, alcohol or medication. A moment of inattention while operating power tools may result in serious personal injury.
b) Use personal protective equipment. Always wear eye protection. Protective equipment such as dust mask, non-skid safety shoes, hard hat, or hearing protection used for appropriate conditions will reduce personal injuries.
c) Prevent unintentional starting. Ensure the switch is in the off-position before connecting to power source and / or battery pack, picking up or carrying the tool. Carrying power tools with your finger on the switch or energising power tools that have the switch on invites accidents.
d) Remove any adjusting key or wrench before turning the power tool on. A wrench or a key left attached to a rotating part of the power tool may result in personal injury.
e) Do not overreach. Keep proper footing and balance at all times. This enables better control of the power tool in unexpected situations.
f) Dress properly. Do not wear loose clothing or jewellery. Keep your hair, clothing and gloves away from moving parts. Loose clothes, jewellery or long hair can be caught in moving parts.
g) If devices are provided for the connection of dust extraction and collection facilities, ensure these are connected and properly used. Use of dust collection can reduce dust-related hazards.
4. Power tool use and care
a) Do not force the power tool. Use the correct power tool for your application.
The correct power tool will do the job better and safer at the rate for which it was designed.
b) Do not use the power tool if the switch does not turn it on and off. Any power tool that cannot be controlled with the switch is dangerous and must be repaired.
c) Disconnect the plug from the power source and / or the battery pack from the power tool before making any adjustments, changing accessories, or storing power tools. Such preventive safety measures reduce the risk of starting the power tool accidentally.
d) Store idle power tools out of the reach of children and do not allow persons unfamiliar with the power tool or these instructions to operate the power tool. Power tools are dangerous in the hands of untrained users.
e) Maintain power tools. Check for misalignment or binding of moving parts, breakage of parts and any other condition that may affect the power tool's operation. If damaged, have the power tool repaired before use. Many accidents are caused by poorly maintained power tools.
f) Keep cutting tools sharp and clean.
Properly maintained cutting tools with sharp cutting edges are less likely to bind and are easier to control.
g) Use the power tool, accessories and tool bits etc. in accordance with these instructions, taking into account the working conditions and the work to be performed. Use of the power tool for operations different from those intended could result in a hazardous situation.
5. Service
a) Have your power tool serviced by a qualified repair person using only identical replacement parts. This will ensure that the safety of the power tool is maintained.
● Safety advice for belt sanders
- Hold the device by the insulated handle surfaces as the sanding belt could strike the device's own mains lead.
Damaging a live wire could result in the metal parts of the device also becoming live and could lead to an electric shock.
■ DANGER OF FIRE FROM FLYING SPARKS!
Sanding metal creates flying sparks. For this reason, always make sure that nobody is placed in any danger and that there are no inflammable materials near the working area.
- When undertaking prolonged sanding of wood, and in particular when working on materials that give rise to dusts that are hazardous to health, the sander must be connected to a suitable external dust extraction device.
■ Ensure that there is adequate ventilation when working on plastic, paint, varnish etc.
The belt sander is designed for the dry sanding of large surfaces of wood, plastic, metal and plaster and painted surfaces. The device is to be used for dry sanding only. - Do not sand materials containing asbestos. Asbestos is a known carcinogen.
Sanding paints containing lead, some types of wood and metal for example may give rise to hazardous or poisonous dusts and represents a risk to the health of the person operating the device and to anyone near the work area. Wear safety glasses and a dust protection mask!
- Securely support the workpiece. Use clamps or a vice to grip the workpiece firmly. This is much safer than holding it with your hand.
■ Never support yourself by placing your hands near or in front of the device or the workpiece surface. A slip can result in injury.
If a dangerous situation arises, pull the mains plug immediately out of the mains socket.
■ Always work with the mains lead leading away from the rear of the device. - Avoid contact with the moving sanding belt.
- Do not work on moistened materials or damp surfaces.
■ Always switch on the device before placing it against the workpiece. After sanding, lift the device from the workpiece before switching it off.
- When working always hold the device securely with both hands. Always keep proper footing and balance.
■ Switch the device off and allow it to come to a complete standstill before you put it down.
- When taking a break from your work, before carrying out any tasks on the device itself (e.g. changing the sanding belt) and when you are not using the device, always pull the mains plug out of the mains socket.
- Initial use
- Clamping / changing the abrasive belt (s. fig. A+B+C)
WARNING! RISK OF INJURY!
Always unplug from the mains before working on the belt sander.
- Loosen the adjusting screw 6.
- Pull the slider 4 back in the direction of the arrow (see Fig. A) until it locks into place. Alternatively you can push the front belt pulley 5 in the direction of the arrow until the slider locks into place (see Fig. B). The abrasive belt 11 can now be removed (see Fig. C).
- Now install a new abrasive belt 11 or change it to work on different materials or switch grit sizes.
IMPORTANT: The directions of the arrow → on the abrasive belt 11 and the device must match. - Slightly push in the slider 4 to release it. The fork will return to its original position.
- You may need to readjust the belt pulley 5. Use the adjusting screw 6 to do so.
Manually adjusting the abrasive belt:
If the path of the belt does not straighten after switching on, it may need to be adjusted manually.
☐ To do so, turn the adjusting screw until the abrasive belt 11 is centred.
IMPORTANT: Be sure the abrasive belt 11 does not grind into the housing. Regularly check
the path of the belt and adjust with the adjusting screw 6 if necessary.
●Workinginstructions
Little grinding pressure will suffice:
Use little grinding pressure. The belt sander's actual weight will suffice for good sanding results. This method will further reduce abrasive belt wear and the surface of the work piece will be smoother.
Stripping and surface:
The stripping performance and the quality of the surface are determined by the grit size of the abrasive belt.
Sanding:
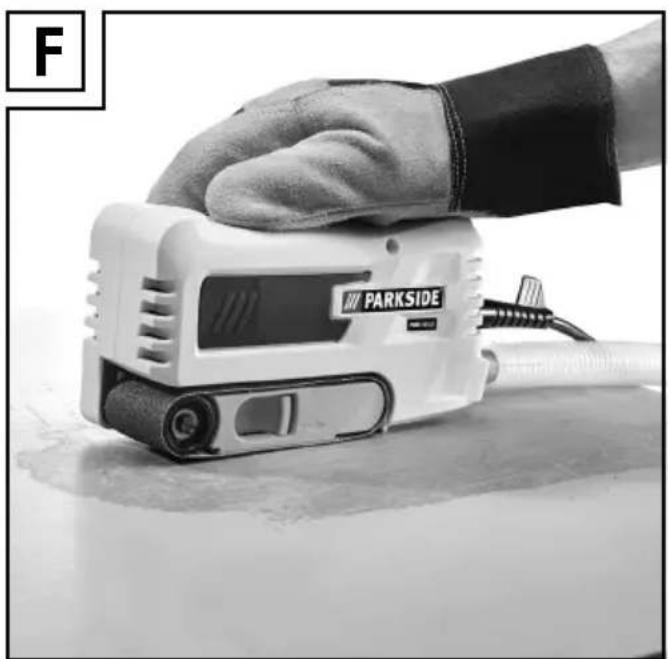
Place the switched on tool on the work piece and use a moderate forward speed. Sand in parallel, overlapping paths (s. fig. F). To avoid bothersome transverse tracks, only sand with the grain. When the task is complete, lift the appliance from the work-piece and only then switch it off.
Dustextraction
WARNING! EXPLOSION HAZARD!
A special dust extractor must be used for explosive dust/air mixtures.
FIRE HAZARD DUE TO SPARKING! Do not use dust extraction when working on metal.
WARNING! FIRE HAZARD! Fire hazard when using power tools with dust collection bin or connected to a vacuum via dust extraction! Unfavourable conditions, e.g. sparking - when grinding metal or metal pieces in wood - can ignite wood dust in the dust collection bin (or inside the vacuum bag). This can particularly occur if the wood dust comes is mixed with paint particles or other chemicals and the ground product is hot after long work periods. Therefore be sure to avoid the ground materials and the device from overheating. Always empty the dust collection bin or the vacuum bag before taking breaks.

Wear a dust mask!
Adapter for external extraction
Connecting:
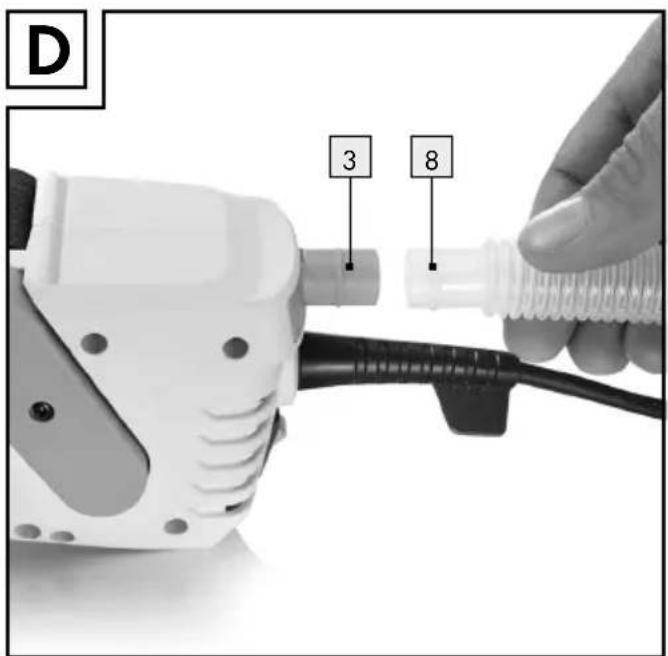
☐ Insert the extraction hose 8 into the connection socket 3 (Fig D).
☐ Connect an additional dust suction device (e.g. a workshop suction device) to the extraction hose 8. Where appropriate, use the extraction adapter 7.
Removal:
☐ Pull the hose out of the dust extraction unit.
☐ Disconnect the extraction adaptor.
Operation
- Switching on and off
Switching on:
☐ Push the ON / OFF switch into position "I".
Switching off:
☐ Push the ON / OFF switch into position "0".
Stationaryuse
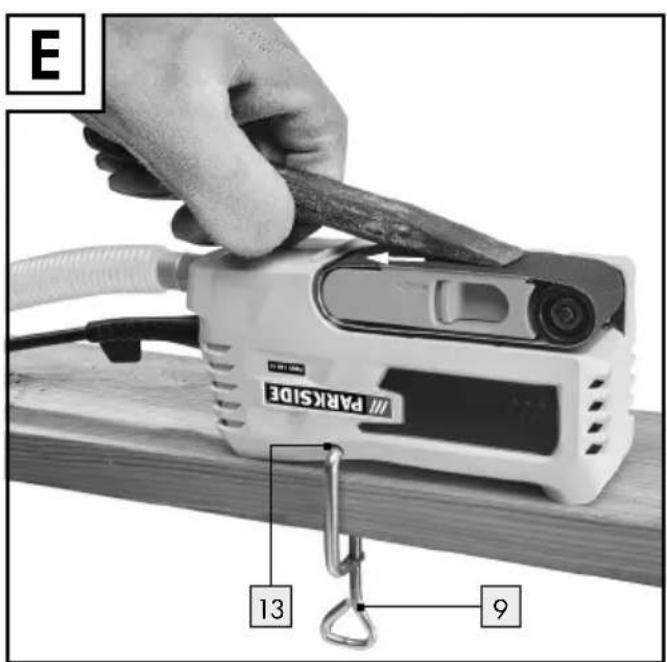
Turn over the power tool as shown in figure E and place on a sturdy worktop.
☐ Insert the screw clamp into the designated notch 13 and clamp down the power tool (s. fig. E).
- Tips and tricks
☐ Never use the same abrasive belt for wood and metal.
☐ Worn or torn abrasive belts can damage the work piece. Therefore, regularly replace the abrasive belts.
☐ Only hang the abrasive belts to store, as folds etc. render them useless.
● Maintenance and cleaning
WARNING! Before you carry out any work on the belt sander always pull the mains plug out of the mains socket.
The belt sander is designed to be maintenance-free.
□ Clean the device frequently. This should be done immediately after you have finished using it.
☐ Use a dry cloth to clean the device - never use petrol, solvents or cleaners that attack plastic.
● Service centre
A WARNING
repaired only by qualified specialist personnel using original manufacturer parts only. This will ensure that your device remains safe to use.
WARNING! If the plug or mains lead needs to be replaced, always have the replacement carried out by the manufacturer or its service centre. This will ensure that your device remains safe to use.
Note: Spare parts not listed (e.g. switches) can be ordered through our call centre.
- Warranty
The warranty for this appliance is for 3 years from the date of purchase. The appliance has been manufactured with care and meticulously examined before delivery. Please retain your receipt as proof of purchase. In the event of a warranty claim, please make contact by telephone with our Service Department. Only in this way can a post-free despatch for your goods be assured.
The warranty covers only claims for material and manufacturing defects, but not for transport damage, for wearing parts or for damage to fragile components, e.g. buttons or batteries. This product is for private use only and is not intended for commercial use.
The warranty is void in the case of abusive and improper handling, use of force and internal tampering not carried out by our authorized service branch. Your statutory rights are not restricted in any way by this warranty.
The warranty period will not be extended by repairs made unter warranty. This applies also to replaced and repaired parts. Any damage and defects extant on purchase must be reported immediately after unpacking the appliance, at the latest, two days after the purchase date. Repairs made after the expiration of the warranty period are subject to payment.
GB
Service Great Britain
Tel.: 0871 5000 720
(£0.10 / minute)
e-mail: kompernass@lidl.co.uk
IAN 115751
IE
Service Ireland
Tel: 1890 930 034
(0.08 EUR/Min. (peak)
0.06 EUR/Min. (off peak))
e-mail: kompernass@lidl.ie
IAN 115751
- Disposal

The packaging is wholly composed of environmentally-friendly materials that can be disposed of at a local recycling centre.
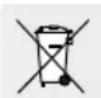
Do not dispose of electrical power tools with the household rubbish!
In accordance with European Directive 2012 / 19 / EU (covering waste electrical and electronic equipment) and its transposition into national legislation, worn out electrical power tools must be collected separately and taken for environmentally compatible recycling.
Contact your local refuse disposal authority for more details of how to dispose of your worn out electrical devices.
● Translation of the original declaration of conformity / Manufacturer CE
We, KOMPERNASS HANDELS GMBH, the person responsible for documents: Mr Semi Uguzlu, BURG-STRASSE 21, 44867 BOCHUM, GERMANY, hereby declare that this product complies with the following standards, normative documents and EU directives:
Machinery Directive (2006/42/EC)
Electromagnetic Compatibility (2004/108/EC)
RoHS Directive (2011/65/EU)
Applicable harmonized standards
EN 60745-1:2009+A11
EN 60745-2-4:2009+A11
EN 55014-1:2006+A1+A2
EN 55014-2:1997+A1+A2
EN 61000-3-2:2014
EN 61000-3-3:2013
Type / Description of product:
Modelling belt sander PMBS 105 A1
Date of manufacture (DOM): 07-2015 Serial number: IAN 115751
Bochum, 31.07.2015
Semi Uguzlu
- Quality Manager -
We reserve the right to make technical modifications in the course of further development.
Einleitung
KOMPERNASS HANDELS GMBH
BURGSTRASSE21
44867BOCHUM
GERMANY
Last Information Update · Stand
- MODELLING BELT SANDER PMBS 105 A1
- MODELLING BELT SANDER
- MODELLBAu-BANDSchLEIfER
- Introduction
- General power tool safety warnings....Page 7
- Initial use
- Operation
- Maintenance and cleaning......Page 11
- Service centre Page 11
- Warranty Page 11
- Translation of the original declaration of conformity / Manufacturer....Page 12
- - Introduction
- Intendeduse
- Features
- - Scope of delivery
- ●TechnicalData
- Noise and vibration data:
- Vibration- and noise reduction
- Emergency
- Remaining risks
- Wear ear protection!
- ● General power tool safety warnings
- Save all warnings and instructions for future reference.
- Work area safety
- Electrical safety
- Personal safety
- Power tool use and care
- Service
- ● Safety advice for belt sanders
- - Initial use
- - Clamping / changing the abrasive belt (s. fig. A+B+C)
- WARNING! RISK OF INJURY!
- Manually adjusting the abrasive belt:
- ●Workinginstructions
- Little grinding pressure will suffice:
- Stripping and surface:
- Sanding:
- Dustextraction
- WARNING! EXPLOSION HAZARD!
- Wear a dust mask!
- Adapter for external extraction
- Connecting:
- Removal:
- - Switching on and off
- Switching on:
- Switching off:
- Stationaryuse
- - Tips and tricks
- ● Maintenance and cleaning
- ● Service centre
- - Warranty
- GB
- IE
- - Disposal
- Do not dispose of electrical power tools with the household rubbish!
- ● Translation of the original declaration of conformity / Manufacturer CE
- Machinery Directive (2006/42/EC)
- Electromagnetic Compatibility (2004/108/EC)
- RoHS Directive (2011/65/EU)
- Applicable harmonized standards
- Type / Description of product:
- Date of manufacture (DOM): 07-2015 Serial number: IAN 115751
- Einleitung
Brand : PARKSIDE
Model : PMBS 105 A1
Category : Orbital sander