
PTSG 140 B2 - Orbital sander PARKSIDE - Free user manual and instructions
Find the device manual for free PTSG 140 B2 PARKSIDE in PDF.


| Product Type | Orbital Sander (Disc Sander) |
| Model | PTSG 140 B2 |
| Brand | Parkside |
| Rated Voltage | 230 V~, 50 Hz |
| Power Input | 140 W (S2 15 min)* |
| Idling Speed | Max. 3600 min⁻¹ |
| Safety Class | II (Double insulation) |
| Protection Category | IPX0 |
| Weight | 2.4 kg |
| Sanding Disc Diameter | 125 mm |
| Sound Pressure Level (L_pA) | 62.7 dB(A); K_pA = 3 dB |
| Sound Power Level (L_WA) | 75.7 dB(A); K_WA = 3 dB |
| Intended Use | Sanding soft and hard woods; DIY use |
| Functions | Speed regulator, adjustable sanding table angle (-10° to +50°), angle stop, external dust extraction |
| Scope of Delivery | Disc sander, sanding disc, screw clamp, angle stop, 6x sanding paper (80/150/240 grit) + carrier film, angle adapter, adapter for dust extraction, hexagon socket wrench, operating instructions |
| Mounting Options | Horizontal or vertical via screw clamp |
| Dust Extraction | Yes, external via angle adapter (additional adapter for larger diameter) |
| Maintenance | Maintenance-free; clean ventilation openings with soft brush/cloth; no cleaning agents |
| Safety Features | Double insulation, residual risks: lung/hearing damage; use personal protective equipment |
| Spare Parts Availability | Via www.grizzly-service.eu or service center (order numbers provided) |
| Guarantee | 3 years from date of purchase (subject to terms) |
Frequently Asked Questions - PTSG 140 B2 PARKSIDE
User questions about PTSG 140 B2 PARKSIDE
0 question about this device. Answer the ones you know or ask your own.
Ask a new question about this device
Download the instructions for your Orbital sander in PDF format for free! Find your manual PTSG 140 B2 - PARKSIDE and take your electronic device back in hand. On this page are published all the documents necessary for the use of your device. PTSG 140 B2 by PARKSIDE.
USER MANUAL PTSG 140 B2 PARKSIDE
Translation of the original instructions
PT
LIXADORA COM BASE
Before reading, unfold the page containing the illustrations and familiarise yourself with all functions of the device.
DE AT CH
Service-Center....15
Service-Center......28
Importador 28
Intended purpose......29
General description......29
Scope of delivery....30
Description of functions....30
Overview....30
Technical Data....30
Notes on safety......30
Symbols and icons 31
General notes on safety 31
General Safety Instructions for Power
Tools....31
Safety instructions for disc sander ....33
Residual risks....34
Initial start-up 34
Securing the disc sanding device .....34
Mounting / dismounting
the sanding table 34
Adhering/replacing sanding paper..35
Setting the sanding table angle......35
Using an angle stop 35
Connecting external dust extraction ..35
Operation 36
Switching on and off 36
Sanding....36
Cleaning 36
Replacement parts/Accessories ..37
Maintenance 37
Storage....37
Waste disposal
and environmental protection ....37
Guarantee 38
Repair Service....39
Service-Center......39
Importer 39
Translation of the original
EC declaration of conformity .....55
Introduction
Congratulations on the purchase of your new device. With it, you have chosen a high quality product.
During production, this equipment has been checked for quality and subjected to a final inspection. The functionality of your equipment is therefore guaranteed.

The operating instructions constitute part of this product. They contain important information on safety, use and disposal.
Before using the product, familiarise yourself with all of the operating and safety instructions. Use the product only as described and for the applications specified.
Keep this manual safely and in the event that the product is passed on, hand over all documents to the third party.
Intended purpose
The disc sanding device is suitable for sanding soft and hard woods.
The device is intended to be used by do-it-yourselfers. It was not designed for heavy commercial use.
The tool is not to be used by persons. under the age of 16. Children over the age of 16 may use the tool except under supervision. The manufacturer is not liable for damage caused by an improper use or incorrect operation of this device.
General description
An illustration of the most important functional components can be found on the front and the back fold-out pages.
Scope of delivery
Unpack the device and check for completeness. Dispose of the packaging material properly.
- Disc sanding device
- Sanding disc
- Screw clamp
- Angle stop
- 6 x sanding paper + carrier film
- 2x granulation 80
- 2x granulation 150
- 2x granulation 240
- Angle adapter and adapter for external dust extraction
- Hexagon socket wrench
- Operating instructions
Description of functions
Please refer to the descriptions below for information about the operating devices.
Overview

1 Sanding disc
2 Speed regulator
3 On/off switch
4 Receptor for screw clamp
5 Mains plug
6 Angle scale
7 Screw for angle locking
8 Washer
9 Screw for fixing sanding table
10 Sanding table holder
11 Sanding table
12 Slot for angle stop
13 Angle stop
13a Angle stop rail
13b Angle stop screw
14 Angle adapter
for external dust extraction
15 Adapter for external dust extraction
16 Screw clamp
17 Hexagon socket wrench
18 Sanding paper
19 Carrier film
Technical Data
Disc sander....PTSG 140 B2
Rated input voltage ...... 230 V\~, 50 Hz
Power input...... 140 W (S2 15 min)*
Idling speed ( n_0 ) ....max. 3600 min ^-1
Safety class....II □
Protection category ......IPXO
Weight 2,4 kg
Sanding disc diameter.... 125 mm
Sound pressure level
(L_pA) 62,7 dB(A); K_pA = 3 dB
Sound power level ( L_WA )
measured......75,7 dB(A); K_WA = 3 dB
* After continuous operation of 15 minutes the drill stops until the device temperature deviates by less than 2 K (2 °C) from the room temperature.
Levels of noise were determined according to the norms and regulations in the declaration of conformity.
Notes on safety

CAUTION! When using power tools, observe the following basic safety measures for the prevention of electric shocks and the risk of injury and fire.
Please read all these instructions before using this electric tool and please keep the safety instructions.
Symbols and icons
Symbols on the device:

Warning!

Read the manual!

Warning! Electric shock hazard. ways unplug the device before working on it.

Wear eye and hearing protection

Wear respiratory protection.

Wear safety gloves.

Protection class II (double insulation)
Sanding disc direction of rotation

Electrical machines do not belong with domestic waste
Symbols used in the instructions:

Hazard symbols with in- formation on prevention of personal injury and property damage.

Precaution symbol with information on prevention of harm / damage.

Connect the machine to the power supply.

Pull out the mains plug.

Notice symbol with information on how to handle the device properly.
General notes on safety

Caution! When using power tools, observe the following basic safety measures for the prevention of electric shocks and the risk of injury and fire: There is a risk of injury.
General Safety Instructions for Power Tools

WARNING! Read all safety instructions and guidelines carefully. Failure to follow the safety instructions and guidelines may result in electric shock, fire and/or serious injuries.
Save all safety instructions and guidelines for the future.
The term „power tool“ used in the safety instructions refers to mains-operated electric tools (with a mains cable) and to battery-operated electric tools (without a mains cable).
Safe working
- Keep your work area tidy. An untidy workplace can lead to accidents.
- Consider environment influences
- Do not expose power tools to rain.
- Do not use power tools in damp or wet surroundings.
- Ensure the work area is adequately lit.
- Do not use power tools where there is a fire or explosion hazard.
- Protect yourself against electric shock. Avoid body contact with earthed parts (e.g. pipes, radiators, electric cookers, refrigerators).
-
Keep other people away. Do not allow other people, especially children, to touch the power tool or cable. Keep them away from your work area.
-
Store unused power tools safely. Unused power tools should be stored in a dry, high or locked place, out of the reach of children.
- Do not overload your power tool. They work better and more safely within the specified power range.
- Use the correct power tool.
- Do not use low-performance machines for heavy work.
- Do not use the power tool for purposes for which it is not intended. For example, do not use use a circular hand saw for cutting tree branches or logs.
- Wear suitable clothing
- Do not wear loose clothing or jewellery that might become caught in moving parts.
- When working outdoors, non-slip footwear is recommended.
-
Wear a hair net to contain long hair.
-
Use protective equipment
- Wear safety goggles.
- Use a dust mask for work which generates dust.
- Connect a dust extraction device. If connections are available for dust extraction and collection devices, make sure that these are connected and properly used.
- Do not use the cable for purposes for which it is not intended. Do not use the cable to pull the plug from the socket. Protect the cable from heat, oil and sharp edges.
- Secure the workpiece. Use jigs or a vice to hold the workpiece securely. This is safer than using your hand.
- Avoid abnormal body postures. Ensure secure footing and keep your balance at all times.
- Maintain tools with care
- Keep cutting tools sharp and clean for better and safer working.
- Follow the instructions for lubrication and changing tools.
- Regularly check the connection cable of the power tool and, if it is damaged, have it replaced by a qualified specialist.
- Check extension cords periodically and replace them if they are damaged.
-
Keep handles dry, clean and free from oil and grease.
-
Remove the plug from the mains socket when the power tool is not in use, before maintenance and when changing tools such as saw blades, drill bits, cutters.
- Do not allow any tool keys to remain inserted. Check, before switching on, that keys and adjusting tools have been removed.
- Avoid unintentional starting. Make sure that the switch is off when inserting the plug into the socket.
- Use extension cables outdoors. Only use approved and appropriately marked extension cables outdoors.
- Pay attention at all times. Pay attention to what you are doing. Work using common sense. Do not use the power tool if you cannot concentrate.
- Check the power tool for possible damage
- Before further use of the power tool, safety devices or slightly damaged parts must be carefully examined in respect of their proper and intended function.
- Check that the moving parts are working properly and are not jammed or whether parts are damaged. All parts must be correctly fitted and satisfy all conditions to ensure the proper operation of the power tool.
- Damaged safety equipment and parts must be repaired properly or replaced by an authorised specialist workshop
unless otherwise indicated in the instructions.
- Damaged switches must be replaced at a customer service workshop.
- Do not use power tools if the switch cannot be turned on and off.
- CAUTION! The use of other bits and other accessories can result in a risk of personal injury.
• Have your power tool be repaired by a qualified electrician - This power tool complies with the relevant safety regulations. Repairs may only be performed by a qualified electrician, using original spare parts; otherwise accidents involving the user may result.
Service:
• Have your power tool repaired only by qualified specialists and only with original spare parts.
This will ensure that the power tool remains safe.
Safety instructions for disc sander


Caution! Risk of injury! Wear personal protective equipment.
Wear safety goggles, hearing protection, a dust mask and gloves.
- When working under dust-prone conditions, ensure ventilation holes are clear. Disconnect the device from the power supply prior to cleaning.
- Caution, risk of injury! The sanding disc will continue to run for a short time after switching off the machine.
- Never make the warning labels on the power tool illegible.
- Attach the power tool to a solid, fl at and horizontal surface. If the power tool is prone to slipping or wobbling, the bit cannot be guided smoothly and safely.
- The bit should only be moved against the workpiece when the device is turned on. Otherwise there is a danger of the bit becoming jammed in the workpiece and the workpiece rotating with the bit. This can lead to injuries.
- Switch the power tool off immediately if the bit jams.
The bit jams when: Das Einsatzwerkzeug blockiert, wenn: - The power tool is overloaded; - It becomes stuck in the workpiece being machined.
- Set the correct speed before starting work.
• After completing your work, do not touch the sanding disc until it has cooled down. The bit becomes very hot during use.
- Inspect the cable regularly and have a damaged cable repaired only by an authorised customer service centre. Replace damaged extension cables. This will ensure that the power tool remains safe.
- Store the power tool safely when not in use. The storage place must be dry and lockable. This prevents the power tool from being damaged as a result of being stored or operated by inexperienced people.
- Never leave the tool before it has come to a complete stand-still. Bits still in motion can cause injury.
- Do not use the power tool with a damaged cable. Do not touch
the damaged cable and pull the mains plug if the cable is damaged while working. Damaged cables increase the risk of electric shock.
- Avoid abnormal body postures. Ensure secure footing and keep your balance at all times.
- To avoid hazards, any replacement of the plug or the connection line must always be executed by the manufacturer of the electric tool or their customer service.
- Water must be kept away from the power tool's electrical parts and people within the working range.
- Caution! Never remove any loose splinters, chips or jammed pieces of wood when the sanding disc is still running. Always switch off the machine before repairing any faults or removing jammed pieces of wood - pull the mains plug.
Residual risks
Even if properly operating and handling this electric tool, some residual risks will remain. Due to its construction and build, this electric tool may present the following hazards:
a) Lung damage, if suitable respiratory protection is not worn.
b) Hearing damage, if suitable ear protection is not worn.
c) Damages to health due to
- touching the area of the grinding tool which was not covered;
- the ejection of pieces from workpiece or damaged grinding discs.
d) Damage to your health caused by swinging your hands and arms when operating the appliance for longer periods of time or if the unit is not held or maintained properly.
Warning! During operation, this electric tool generates an electromagnetic field which, under certain circumstances, may impair the functionality of active or passive medical implants. To reduce the risk of serious or lethal injuries, we recommend that persons with medical implants consult their doctor and the manufacturer of their medical implant before operating the machine.
Initial start-up
Avoid unintentional starting. Ensure that the mains plug is removed before carrying out any adjustments, maintenance or repair work.
Before operating the disc sanding device, you must secure it against tipping.
B Securing the disc sanding device
Secure the disc sanding device horizontally (①) or vertically (②) to the working surface.
The enclosed screw clamp (16) must grip into one of the two receptors (4).
A Mounting / dismounting the sanding table
Dismounting the sanding table:
- Release the screw (9) underneath the sanding table (11) using the hexagon socket wrench enclosed (17).
- Remove the screw (9) and the washer (8) and pull the sanding table holder (10) away from the device.
Mounting the sanding table:
- To mount the sanding table (11), push the sanding table holder (10) back onto the device.
- Insert the screw (9) with washer (8) and tighten.

Ensure the 4 lugs are correctly positioned (see illustration C) otherwise screw (A 9) will not screw in.

Adhering/replacing sanding paper
Do NOT remove the white film from the sanding disc!

Caution! Risk of injury! Disconnect the device from the power supply to prevent unintentional starting.

To make it easier to replace, first dismount the sanding table (11) and holder (10) (see "Dismounting/mounting the sanding table").
- When first using the sanding paper, remove the protective film from the reverse side of the sanding paper (18).
When re-using it, remove the sanding paper (18) from the carrier film (19). - Stick the sanding paper (18) centrally onto the sanding disc (1) while ensuring there are no bubbles.
Trial run:
Perform a trial run at top speed without a load for at least 1 minute whenever you change the sanding paper. Remain outside the hazard area while doing so.

The sanding paper (18) can be re-used provided you stick it onto
the corresponding carrier film (19) provided when being stored.

Setting the sanding table angle
The angle of the sanding table (11) can be adjusted continuously between -10^ and +50^ .
- Release the screws (7).
- Set the desired angle using the angle scale (6).
- Tighten the screws (7).

Using an angle stop
- Release the angle stop screw (13b).
- Slide the rail of the angle stop (13a) into the slot (12) on the sanding table (11).
- Set the desired angle using the scale onto the rail marking (13a).
- Fix the angle stop (13) in place by tightening the screw (13b).

Connecting external dust extraction

Please check the operating manual of your vacuum cleaner to ascertain whether it is suitable for the suction of grinding chips.
Connecting external dust extraction:
- Place the angle adapter (14) into the opening on the device.
Ensure that you slide the lug on the angle adapter (14) into one of the two slots in the device opening (see detailed illustrations). - Rotate the angle adapter (14) into a vertical or horizontal position to secure the angle adapter (14) against falling out.
Removing external dust extraction:
- Gently turn and pull on the angle adapter (14) to remove it.
It can be removed when the arrow on the angle adapter (14) and the marking on the device housing are exactly aligned.

An additional adapter (15) with a larger diameter is provided with the device and this can, if required, be attached to the angle adapter (14). If necessary, you can connect the suction hose of a vacuum cleaner directly onto the angle adapter.
Operation
Before initial operation, perform a trial run at top speed without a load for at least 1 minute. Remain outside the hazard area while doing so.

Switching on and off

Make sure that the power supply voltage matches the voltage rating indicated on the device's type plate.

Connect the machine to the power supply.
- Select the desired speed using the speed regulator (2).
Switching on:
- Press the power switch "1" (3), the device starts.
Switching off:
-
Press the off switch „O“ (3), the device turns off.
-
Next, remove the mains plug (5) from the wall socket.
After switching on the device, wait until the device has reached its max. speed. Only then may you commence sanding.
Sanding
The arrow above the sanding disc (A 1) indicates the direction of rotation of the disc sanding device.
The sanding speed can be regulated using the speed regulator (A 2).
Mounting horizontally (B ①):
- Place the workpiece on the sanding table (11) and slowly bring it to the desired angle towards the left half of the sanding disc (A 1).
Mounting vertically (B ②):
- Slowly bring the workpiece to the desired angle towards the sanding disc (A 1).
cleaning

Pull the mains plug before any adjustments, maintenance or repair.

Do not use any cleaning agents or solvents. Chemical substances can etch the plastic parts of the device. Never clean the device under running water.

Have any work on the device that is not described in this instruction guide performed by a professional. Only use original parts. Allow the device to cool off before any maintenance or cleaning is undertaken. There is a risk of burning!
- Thoroughly clean the device after every use.
- Clean the ventilation openings and the surface of the device with a soft brush or cloth.
- Remove chips, dust and dirt, i.e. with a brush.
Maintenance
The device is maintenance free.
Always check the device before using it for obvious defects such as loose, worn or damaged parts, correct the positioning of screws or other parts. Exchange the damaged parts.
Storage
- Store the appliance in a dry place well out of reach of children.
Waste disposal and environmental protection
Be environmentally friendly. Return the tool, accessories and packaging to a recycling centre when you have finished with them.
Electrical machines do not belong with domestic waste.
- Hand over the device at an utilization location. The plastic and metal parts employed can be separated out and thus recycled use can be implemented. Ask our Service-Center for details.
- Defective units returned to us will be disposed of for free.
Replacement parts/Accessories
Spare parts and accessories can be obtained at www.grizzly-service.eu
If you do not have internet access, please contact the Service Centre via telephone (see "Service-Center" page 39). Please have the order number mentioned below ready.
| Position Manual | Description | Ordernumber |
| A 18 Sanding paper + carrier fi lm5 x granulation 80 911045875 x granulation 150 911045885 x granulation 240 | 91104589 | |
| A 13 | Angle stop | 91104582 |
| A 13 a | Angle stop rail | 91104581 |
| A 13 b | Angle stop screw | 91104583 |
| A 11 | Sanding table | 91104580 |
| A 14 | Angle adapter | 91104575 |
| A 15 | Adapter | 91104576 |
Guarantee
Dear Customer,
This equipment is provided with a 3-year guarantee from the date of purchase. In case of defects, you have statutory rights against the seller of the product. These statutory rights are not restricted by our guarantee presented below.
Terms of Guarantee
The term of the guarantee begins on the date of purchase. Please retain the original receipt. This document is required as proof of purchase.
If a material or manufacturing defect occurs within three years of the date of purchase of this product, we will repair or replace – at our choice – the product for you free of charge. This guarantee requires the defective equipment and proof of purchase to be presented within the three-year period with a brief written description of what constitutes the defect and when it occurred.
If the defect is covered by our guarantee, you will receive either the repaired product or a new product. No new guarantee period begins on repair or replacement of the product.
Guarantee Period and Statutory Claims for Defects
The guarantee period is not extended by the guarantee service. This also applies for replaced or repaired parts. Any damages and defects already present at the time of purchase must be reported immediately after unpacking. Repairs arising after expiry of the guarantee period are chargeable.
Guarantee Cover
The equipment has been carefully produced in accordance with strict quality guidelines and conscientiously checked prior to delivery.
The guarantee applies for all material and manufacturing defects. This guarantee does not extend to cover product parts that are subject to normal wear and may therefore be considered as wearing parts (e.g. sanding paper) or to cover damage to breakable parts (e.g. switches).
This guarantee shall be invalid if the product has been damaged, used incorrectly or not maintained. Precise adherence to all of the instructions specified in the operating manual is required for proper use of the product. Intended uses and actions against which the operating manual advises or warns must be categorically avoided.
The product is designed only for private and not commercial use. The guarantee will be invalidated in case of misuse or improper handling, use of force, or interventions not undertaken by our authorised service branch.
Processing in Case of Guarantee
To ensure efficient handling of your query, please follow the directions below:
- Please have the receipt and item number (IAN 304699) ready as proof of purchase for all enquiries.
- Please find the item number on the rating plate.
- Should functional errors or other defects occur, please initially contact the service department specified below by telephone or by e-mail. You will then receive further information on the processing of your complaint.
- After consultation with our customer service, a product recorded as defective can be sent postage paid to the service address communicated to you, with the proof of purchase (receipt) and specification of what constitutes the defect and when it occurred. In order to avoid acceptance problems and additional costs, please be sure to use only the address communicated to you. Ensure that the consignment is not sent carriage forward or by bulky goods, express or other special freight. Please send the equipment inc. all accessories supplied at the time of purchase and ensure adequate, safe transport packaging.
Repair Service
For a charge, repairs not covered by the guarantee can be carried out by our service branch, which will be happy to issue a cost estimate for you.
We can handle only equipment that has been sent with adequate packaging and postage.
Attention: Please send your equipment to our service branch in clean condition and with an indication of the defect.
Equipment sent carriage forward or by bulky goods, express or other special freight will not be accepted.
We will dispose of your defective devices free of charge when you send them to us.
Service-Center
GB Service Great Britain Tel.: 0800 404 7657
E-Mail: grizzly@lidl.co.uk IAN 304699
MT Service Malta Tel.: 80062230
E-Mail: grizzly@lidl.com.mt IAN 304699
Importer
Please note that the following address is not a service address. Please initially contact the service centre specified above.
Service-Center....52
Importeur ....52
| GBMT | Translation of the original EC declaration of conformity | |
| We hereby confirm that theDisc sandermodel PTSG 140 B2Serial number201808000001 - 201808090020conforms with the following applicable relevant version of the EU guidelines: | ||
| 2006/42/EC • 2014/30/EU • 2011/65/EU* | ||
| In order to guarantee consistency, the following harmonised standards as well as national standards and stipulations have been applied: | ||
| EN 61029-1:2009/A11:2010 • EN ISO 12100:2010EN 55014-1:2006/A2:2011 • EN 55014-2:2015EN 61000-3-2:2014 • EN 61000-3-3:2013 • EN 62233:2008 • EN 62321:2009 | ||
| This declaration of conformity is issued under the sole responsibility of the manufacturer: | ||
 | Grizzly Tools GmbH & Co. KGStockstädter Straße 2063762 GroßostheimGERMANY30.08.2018 |  Christian FrankDocumentation Representative Christian FrankDocumentation Representative |
* The object of the declaration described above satisfies the provisions of Directive 2011/65/EU of the European Parliament and the Council of 8 June 2011 on limiting the use of certain harmful substances in electrical and electronic appliances.
2018-07-11-rev02-op
natural_image
Top-down schematic of a vehicle's internal components with directional arrows indicating flow or movement (no text or symbols present)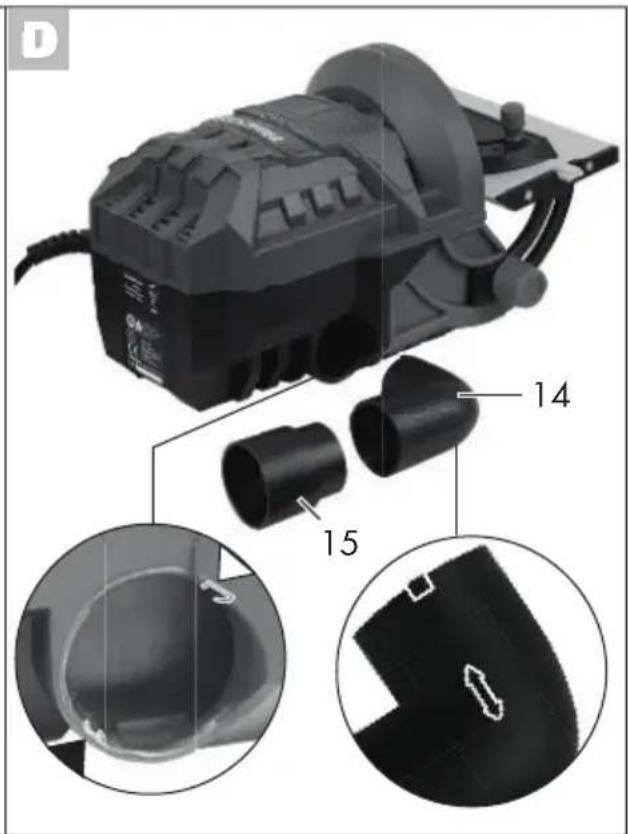
GRIZZLY TOOLS GMBH & CO. KG
- LIXADORA COM BASE
- Introduction
- Intended purpose
- General description
- Scope of delivery
- Description of functions
- Overview
- Technical Data
- Disc sander....PTSG 140 B2
- Notes on safety
- Symbols and icons
- Symbols on the device:
- Symbols used in the instructions:
- General notes on safety
- General Safety Instructions for Power Tools
- Save all safety instructions and guidelines for the future.
- Safe working
- Service:
- Safety instructions for disc sander
- Caution! Risk of injury! Wear personal protective equipment.
- Residual risks
- Initial start-up
- Dismounting the sanding table:
- Mounting the sanding table:
- Adhering/replacing sanding paper
- Do NOT remove the white film from the sanding disc!
- Trial run:
- Setting the sanding table angle
- Using an angle stop
- Connecting external dust extraction
- Connecting external dust extraction:
- Removing external dust extraction:
- Operation
- Switching on and off
- Switching on:
- Switching off:
- Sanding
- Mounting horizontally (B ①):
- Mounting vertically (B ②):
- cleaning
- Maintenance
- Storage
- Waste disposal and environmental protection
- Replacement parts/Accessories
- Spare parts and accessories can be obtained at www.grizzly-service.eu
- Guarantee
- Terms of Guarantee
- Guarantee Period and Statutory Claims for Defects
- Guarantee Cover
- Processing in Case of Guarantee
- Repair Service
- Service-Center
- Importer
Brand : PARKSIDE
Model : PTSG 140 B2
Category : Orbital sander