
VP 4102 S - Vacuum Cleaner ECG - Free user manual and instructions
Find the device manual for free VP 4102 S ECG in PDF.


| Brand | ECG |
| Model | VP 4102 S |
| Product type | Canister vacuum cleaner with bag |
| Nominal power | 800 W |
| Maximum power | 1000 W |
| Suction power | 200 W |
| Dust bag volume | 4 L |
| Weight | 7.2 kg |
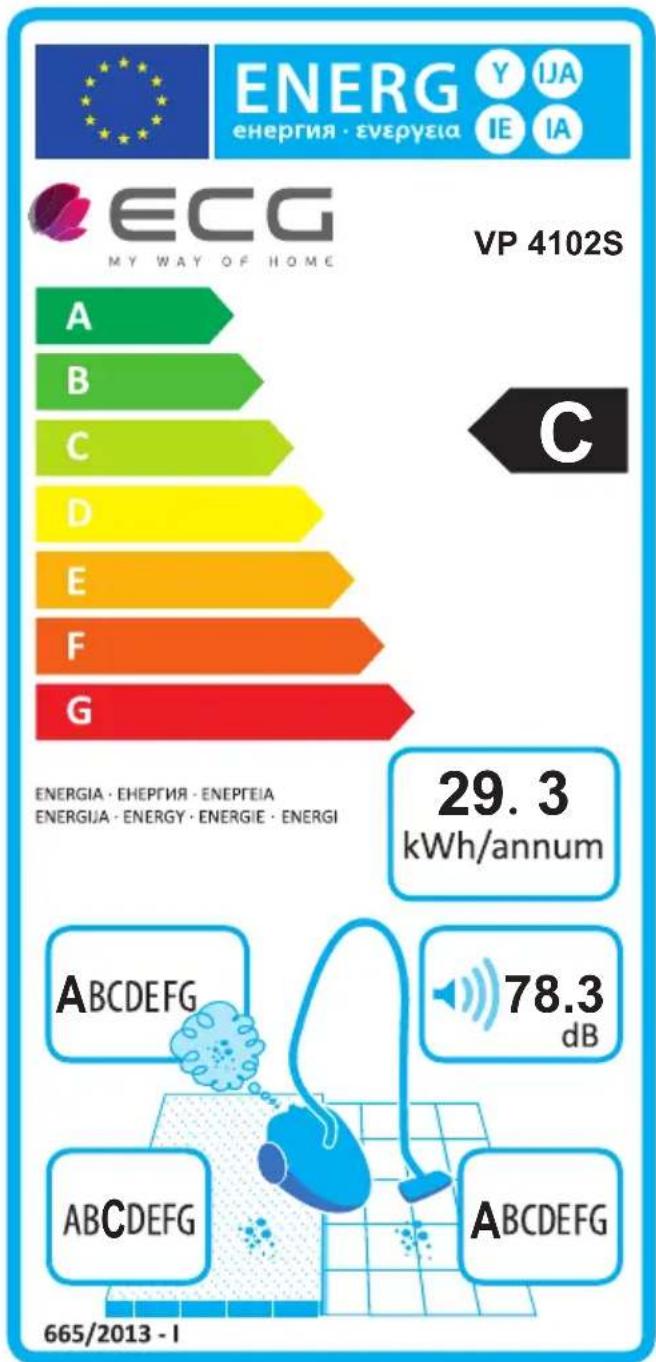
| Noise level | 78.3 dB |
| Supply voltage | 220-240 V ~ 50/60 Hz |
| Operating radius | 11 m |
| Motor filter type | HEPA 13 |
| Exhaust filter | Yes, washable |
| Automatic cord rewinding | Yes |
| Electronic power control | Yes |
| Full bag indicator | Yes |
| Included accessories | Combined floor nozzle, crevice nozzle, upholstery nozzle, metal telescopic tube, flexible hose |
| Telescopic tube | Chrome-plated metal |
| Usage | Household |
Frequently Asked Questions - VP 4102 S ECG
User questions about VP 4102 S ECG
0 question about this device. Answer the ones you know or ask your own.
Ask a new question about this device
Download the instructions for your Vacuum Cleaner in PDF format for free! Find your manual VP 4102 S - ECG and take your electronic device back in hand. On this page are published all the documents necessary for the use of your device. VP 4102 S by ECG.
USER MANUAL VP 4102 S ECG
natural_image
Black and green vacuum cleaner with coiled hose, no visible text or symbolsVP 4102 S
CZ
PODLAHOVÝ VYSAVAČ
NÁVOD K OBSLUZE
SK
PODLAHOVÝ VYSÁVAČ
NÁVOD NA OBSLUHU
PL
ODKURZACZ PODŁOGOWY
INSTRUKCJA OBSŁUGI
HU
PADLÓPORSZÍVÓ
HASZNÁLATI ÚTMUTATÓ
DE
BODENSTAUBSAUGER
BEDIENUNGSANLEITUNG
GB
FLOOR VACUUM CLEANER
INSTRUCTION MANUAL
HR/BIH
USISAVAČ
UPUTE ZA UPORABU
SI
TALNI SESALNIK
NAVODILA
SR/MNE
USISIVAČ
UPUTSTVO ZA UPOTREBU
FR
ASPIRATEUR DE SOL
MODE D'EMPLOI
IT
ASPIRAPOLVERE PER PAVIMENTI
Seznam součástí
natural_image
Technical line drawing of a car interior showing internal compartments and structural elements (no text or symbols)CZ
SK
Zoznam súčastí
natural_image
Technical line drawing of a car interior showing internal compartments and structural elements (no text or symbols)Lista elementów
natural_image
Technical line drawing of a car interior showing internal compartments and structural elements (no text or labels)USUWANIE PRODUKTÓW PO ZAKOŃCZENIU EKSPLOATACJI
A készülék részei
natural_image
Technical line drawing of a car interior showing internal compartments and structural elements (no text or symbols)HU
Stückliste

Störungen
natural_image
Technical line drawing of a car interior showing internal compartments and structural elements (no text or symbols)Read carefully and save for future use!
Warning: The safety measures and instructions, contained in this manual, do not include all conditions and situations possible. The user must understand that common sense, caution and care are factors that cannot be integrated into any product. Therefore, these factors shall be ensured by the user/s using and operating this appliance. We are not liable for damages caused during shipping, by incorrect use, voltage fluctuation or the modification or adjustment of any part of the appliance.
To protect against a risk of fire or electric shock, basic precautions shall be taken while using electrical appliances, including the following:
- Read all instructions before using the appliance.
- Make sure the voltage in your outlet corresponds to the voltage provided on the appliance label and that the socket is properly grounded. The outlet must be installed according to valid safety instructions.
- Do not use the vacuum cleaner if the power cord is damaged. All repairs including cord replacements shall be performed by a professional service centre! Do not remove protective covers of the appliance, risk of electric shock!
- Protect the vacuum cleaner from direct contact with water and other liquids, do not place on it containers with liquids to prevent electric shock.
- Do not use the vacuum cleaner in upright position. Never use the vacuum cleaner without inserted dust bag, motor filter and exhaust filter.
- Do not leave the plugged in vacuum cleaner unattended. Disconnect the cord from the electrical outlet prior to performing maintenance. When unplugging the appliance, hold the power cord by the plug. Do not pull the cable.
-
Do not use the vacuum cleaner outdoors or in a damp environment. Risk of electric shock.
-
Do not allow children to play with the vacuum cleaner. A vacuum cleaner is not a toy. Be more attentive if you are using the vacuum cleaner near children.
-
Use only attachments and accessories approved by the manufacturer.
-
If the vacuum cleaner does not work properly, if it fell (e.g. into water), if it is damaged or if it was forgotten outdoors, have it inspected professionally at an authorized service centre.
-
Do not hold the vacuum cleaner by the power cord when moving it. Make sure that the power cord is not broken or bent over sharp objects and edges. When working with the vacuum cleaner, do not drive over the power cord. Keep the power cord away from heat sources.
-
Do not touch the power cord or the vacuum cleaner with wet hands.
-
Do not insert any objects into the vacuum cleaner openings. Do not use the vacuum cleaner if the openings are blocked in any way. Make sure that the vacuum cleaner is clean, without dirt and any debris, which can reduce the suction power of the vacuum cleaner.
-
Keep hair, loose clothing, hands and other parts of the body away from openings or moving parts of the vacuum cleaner.
-
Do not use the vacuum cleaner on the following objects, which could result in damaging the device or injury:
-
sharp objects like glass, screws, coins, nails, etc.
- hot or smouldering objects like embers, cigarettes or flammable and volatile liquids
-
wet surfaces, water and other liquids.
-
Use extra care when cleaning stairs.
-
Use the vacuum cleaner only in accordance with the instructions in this manual. This vacuum cleaner is designed for home use only. The manufacturer is not liable for damages caused by the improper use of this appliance.
-
This appliance can be used by children aged 8 years and older and persons with physical or mental capabilities or lack of experience and knowledge if they are supervised or have been instructed to use the appliance in a safe manner and understand the potential dangers. Children shall not play with the appliance. Children may not carry out user's cleaning and maintenance unless they are older than 8 years
and under supervision. Children younger than 8 years must be kept away from the appliance and its power supply.
DESCRIPTION OF THE VACUUM CLEANER
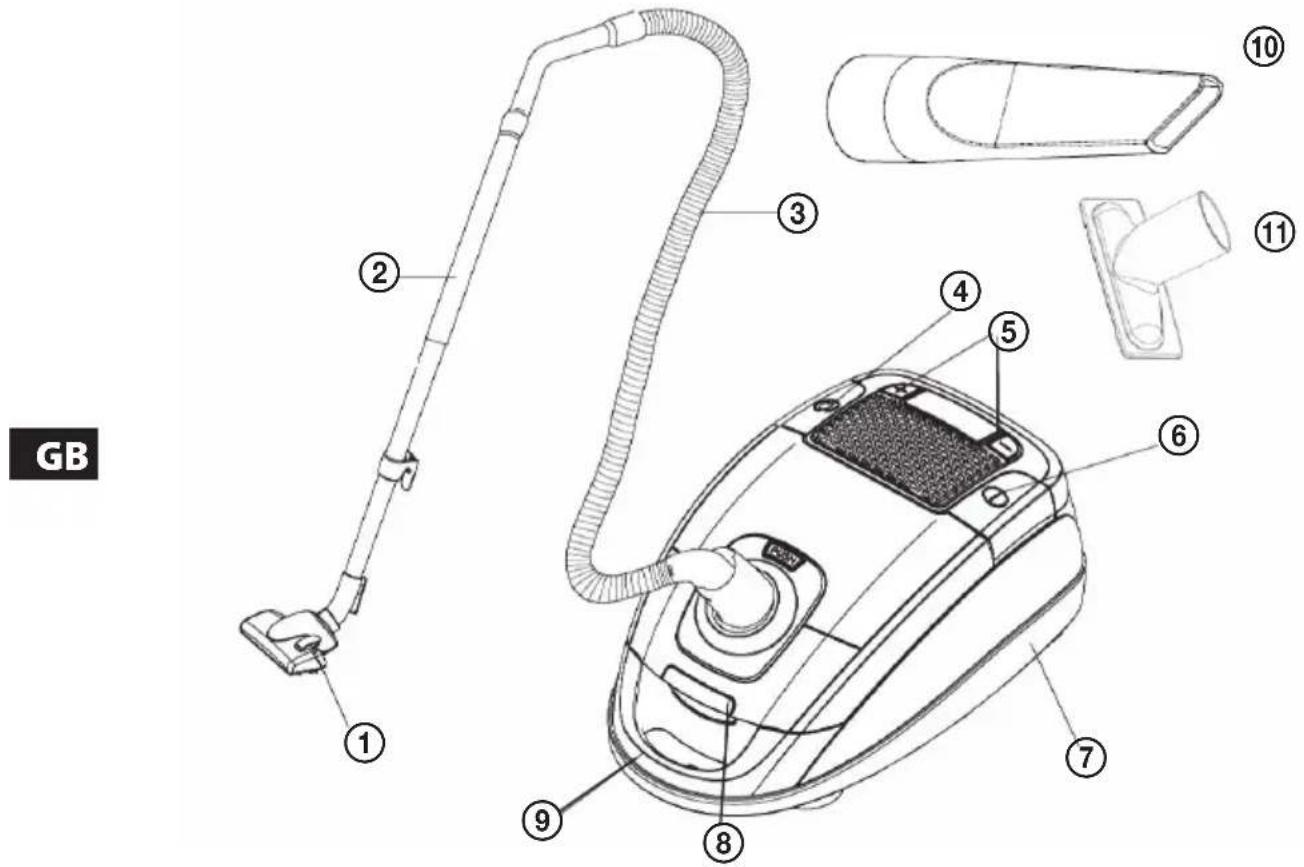
List of parts
- Combined floor nozzle
- Telescopic tube
- Hose
- Cable rewind button
- Variable electronic suction power
-
On/Off switch
-
The base of the vacuum cleaner with wheels
- Lock of the cover of the dust bag compartment
- Handle
- Crevice tool
- Upholstery nozzle
Accessories:
Hose, metal chrome plated telescopic tube, brush nozzle for carpets or hard floors, tapered nozzle and upholstery nozzle
USING THE VACUUM CLEANER
The vacuum cleaner must be switched off and disconnected from power before you start to assemble it!
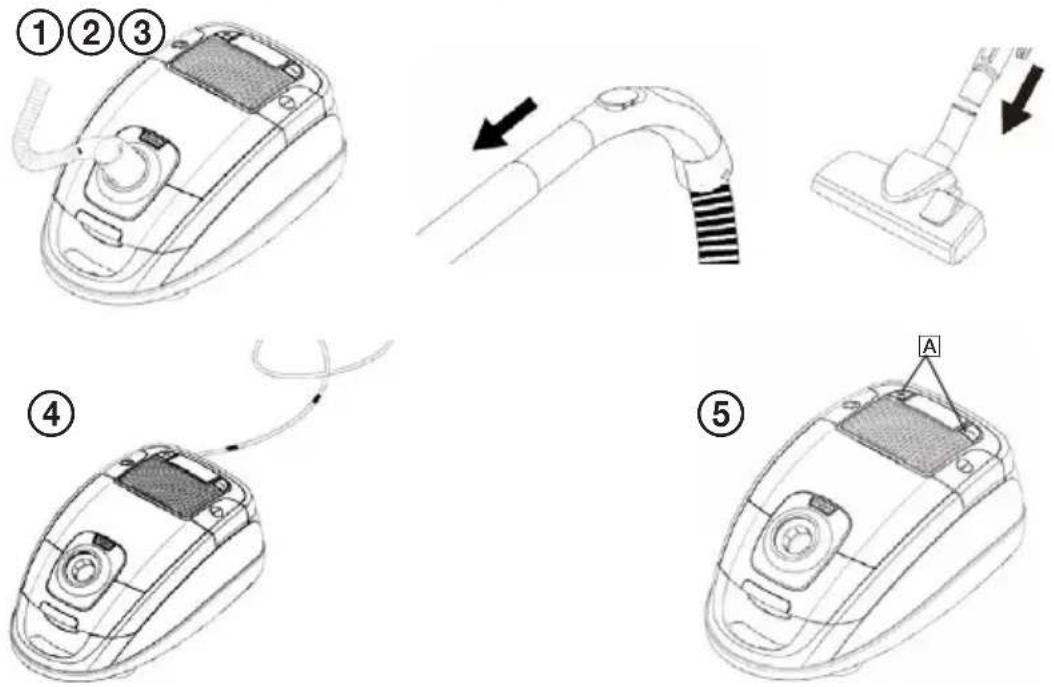
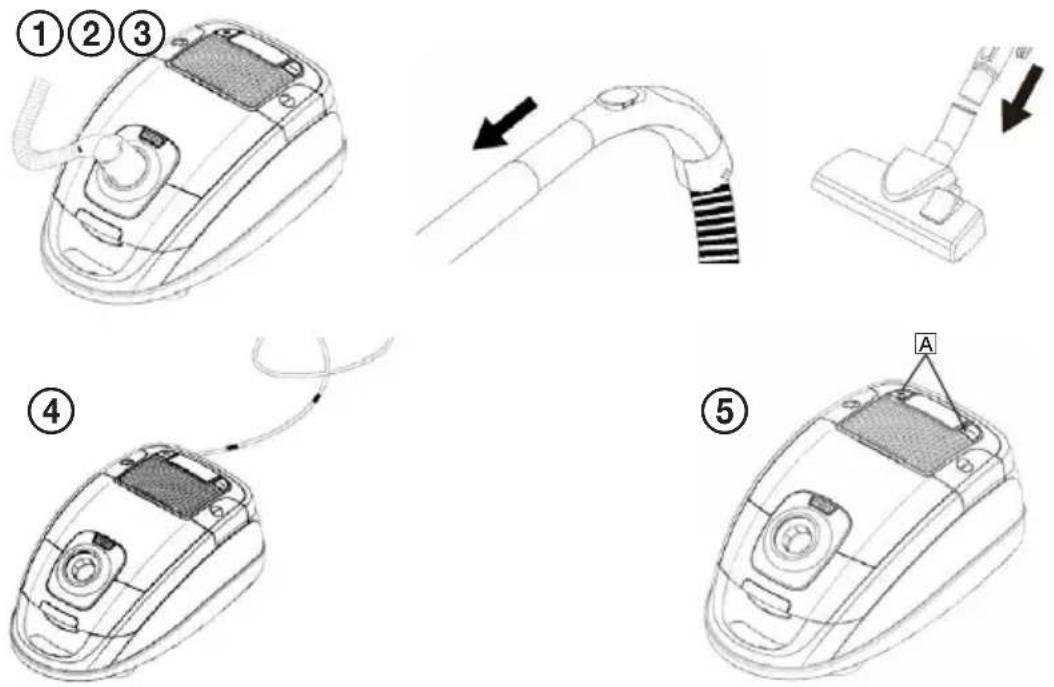
- Insert the end of the hose into the opening in front of the vacuum cleaner and secure it. (Fig. 1). If you want to remove the hose, press the release buttons on both sides of the hose's end and pull the hose out of the opening of the vacuum cleaner.
- Connect the other end of the hose with bent ending to the tube (Fig.2).
-
Attach accessories to the tube suitable for the type of flooring (Fig. 3): brush nozzle for carpets or hard floors (switch according to the type of floor), tapered nozzle or upholstery nozzle.
-
Pulling out the cable: The power cord is at its end marked with yellow and red markers. (Fig. 4). Grasp the plug and pull the cord up to the yellow marker. Never pull the cable past the red mark, you could cause damage! If you want to rewind the cord, press the retractor button, the cord rewinds into the vacuum cleaner.
- Starting the vacuum cleaner: Plug the power cord into an electrical outlet whose parameters correspond to the nameplate of the vacuum, and then press the power button to start the vacuum cleaner running. You can regulate the power using the control A (Fig. 5).
Issues
Do not use an appliance showing any signs of damage. A damaged power cord has to be replaced in an authorized service centre. Only this way can you prevent safety risks.
See the troubleshooting guide if your vacuum cleaner does not operate correctly. Refer to an authorized service centre if you are not able to resolve an issue yourself.
After use
Switch off the vacuum cleaner and unplug it from the electrical outlet. Before attaching any accessories or before cleaning the appliance, always switch off the vacuum cleaner and unplug the power cord from the outlet.
Full dust bag indicator
The vacuum cleaner is equipped with an indicator, which changes colour to red if the dust bag is full or if the suction paths are otherwise blocked. If the full dust bag indicator remains red even after inserting a new bag, switch off the vacuum cleaner, unplug it from the outlet and check if the hose or the tube of the vacuum cleaner are not clogged. If the indicator still remains red, contact an authorized service centre or your vendor. To prevent overheating of the vacuum cleaner and subsequent damage, check the following parts of the vacuum cleaner:
- All connections between the hose, telescopic tube and floor brush
- Exhaust filter
- Opening for connecting the hose
- Motor filter
- Brush throughput
- Dust bag
MAINTENANCE AND CLEANING
Attention:
Always unplug the power cord from the outlet before any maintenance and cleaning.
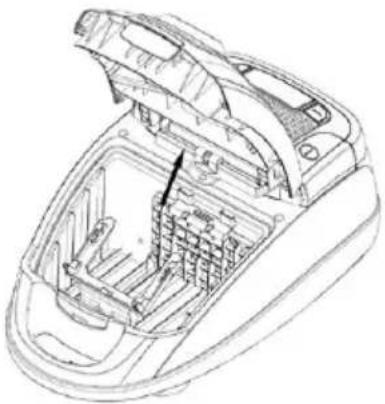
- Changing the dust bag: When the full dust bag indicator changes to red, it is time to empty the dust bag or replace it.
- Press the release button in front to open the cover.
-
Remove the bag holder and take off the full bag from the holder.
-
Motor filter cleaning: Open the front cover, remove the filter, wash it in warm water and dry it thoroughly prior to next use. If the filter is damaged replace it with a new one.
natural_image
Technical line drawing of a car interior showing internal compartments and structural elements (no text or labels)-
Once a year clean or replace the output filter: Remove the cover of the output filter. Wash the filter in warm water and dry it thoroughly prior to next use. If the filter is damaged replace it with a new one.
-
Cleaning of the appliance surface: Use a soft cloth lightly moistened with a few drops of detergent for cleaning. Never use solvents or other abrasive cleaners. Never immerse the vacuum cleaner into water or any other liquid and do not leave it under running water.
Attention:
You can find replacement filter bags for vacuum cleaner VP 4102 S under KOMA ECG VP 4102 S and you can use also the bags Swirl® Y 50® MicroPor® Plus.
TROUBLESHOOTING
Before contacting the service, check the following list of common problems and possible remedies.
| Problem Possible cause Solution | |
| The motor will not start. | The vacuum cleaner is not powered. Check the power cord and the electrical outlet. If the device still does not work, contact an authorized service centre. |
| The suction power is reduced. | Full dust bag, clogged hose or tube, dirty filters. Replace the dust bag, remove foreign objects from the hose or tube, replace the filters. |
TECHNICAL DATA
Automatic rewinding, control of suction power, tapered nozzle, floor brush, telescopic metal tube
Suction power: 200 W
Nominal input power: 800 W
Range: 11 m
Maximum power consumption: 1000 W
Dust bag capacity: 4 l
Noise level: 78.3 dB
Weight: 7.2 kg
Filter: output filter, motor filter HEPA 13
Nominal voltage: 220–240 V\~ 50/60 Hz
USE AND DISPOSAL OF WASTE
Wrapping paper and corrugated paperboard – deliver to scrapyard. Packing foil, PE bags, plastic elements – throw into plastic recycling containers.
DISPOSAL OF PRODUCTS AT THE END OF LIFETIME
Disposal of electric and electronic equipment (valid in EU member countries and other European countries with an implemented recycling system)
The represented symbol on the product or package means the product shall not be treated as domestic waste. Hand over the product to the specified location for recycling electric and electronic equipment. Prevent negative impacts on human health and the environment by properly recycling your product.
Recycling contributes to preserving natural resources. For more information on the recycling of this product, refer to your local authority, domestic waste processing organization or store, where you purchased the product.
This product complies with EU directive requirements on electromagnetic compatibility and electrical safety.
The instruction manual is available at website www.ecg-electro.eu.
Changes in text and technical parameters reserved.
bar
| Energy Type | Energy Consumption (kWh/annum) | | :--- | :--- | | ABCDEFG | 78.3 | | ABCDEFG | 665/2013 - I | | ENERGIA·ENEPTIJA·ENEPTEIA | 29.3 | | ENERGIIA·ENERGY·ENERGIE·ENERGI | 29.3 | | C | 29.3 | | E | 29.3 | | D | 29.3 | | F | 29.3 | | G | 29.3 | | ECG MY WAY OF HOME | VP 4102S |GB
SIGURNOSNE UPUTE
HR/BIH
Popis dijelova
- Višenamjenski nastavak za podove
- Teleskopska cijev
- Crijevo
- Tipka za namatanje kabela
- Elektronička regulacija snage usisa
-
Prekidač
-
Baza usisavača s kotačima
- Osigurač poklopca prostora za vrećicu za prašinu
- Ručka
- Uski nastavak
- Nastavak za namještaj
Pribor:
Crijevo, metalna kromirana teleskopska cijev, nastavak s četkom za usisavanje tepiha i tvrdih podova, suženi nastavak i četka za tapecirani namještaj
KORIŠTENJE USISAVAČA
Prije sastavljanja, usisavač mora biti isključen i odvojen od izvora električne struje!
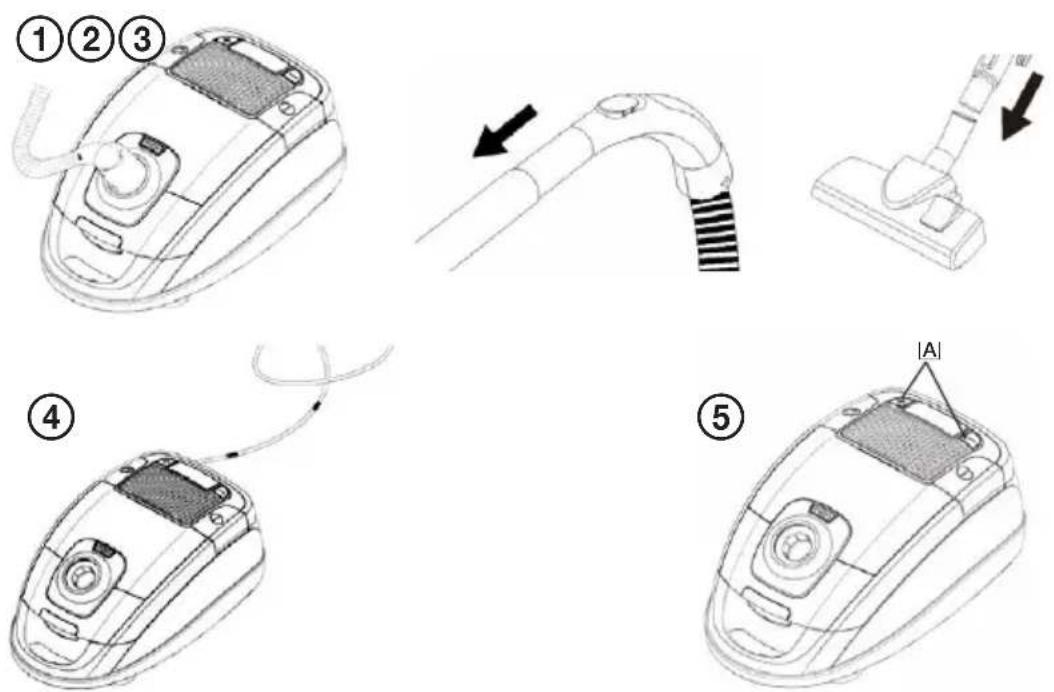
- Kraj crijeva umetnite u otvor u prednjem dijelu usisavača i učvrstite. (Slika 1). Ako želite ukloniti crijevo, pritisnite osigurače na obje strane priključka crijeva i izvadite crijevo iz grla usisavača.
- Drugi kraj crijeva spojite sa zaobljenim krajem cijevi (slika 2).
- Na cijev stavite nastavak koji je prikladan za vrstu podloge koju ćete čistiti (slika 3): nastavak s četkom za tvrde podove ili tepihe (podesite u skladu s podlogom), suženi nastavak ili četku za tapecirani namještaj.
- Izvlačenje kabela: Kabel je na kraju označen žutom i crvenom oznakom (slika 4). Uzmite utikač i izvucite ga i izvlačite dok ne vidite žutu oznaku. Kabel nikada nemojte vući do crvene oznake jer bi ga to moglo oštetiti! Želite li namotati kabel, pritisnite tipku za uvlačenje i kabel će se namotati unutar usisavača.
- Pokretanje usisavača: Priključite strujni kabel u utičnicu istih karakteristika kao one navedene na natpisnoj pločici na usisavaču i pritisnite tipku za uključivanje kako biste ga pokrenuli. Snagu rada uređaja možete podesiti regulatorom A (slika 5).
HR/BIH
U slučaju poteškoća
natural_image
Technical line drawing of a car interior showing internal compartments and structural elements (no text or symbols)- Čišćenje filtra motora: Otvorite prednji poklopac, izvadite filtar, operite ga mlakom vodom i potpuno ga osušite prije nego ga ponovo postavite. Ako je filtar oštećen, zamijenite ga.
- Jednom godišnje očistite ili zamijenite izlazni filtar: Skinite poklopac ispušnog filtra. Filtar operite mlakom vodom i potpuno ga osušite prije nego ga ponovo postavite. Ako je filtar oštećen, zamijenite ga.
- Čišćenje površina usisavača: Za čišćenje se poslužite mekom i blago navlaženom krpicom s nekoliko kapi sredstva za čišćenje. Nikad nemojte koristiti razrjeđivač ili bilo kakvo abrazivno sredstvo za čišćenje. Nikad ne uranjajte usisavač u vodu ili drugu tekućinu niti ga ne postavljajte pod mlaz vode.
Upozorenje:
Zamjenske vrećice za usisavač VP 4102 S naći ćete pod nazivom KOMA ECG VP 4102 S, a možete koristiti i univerzalne vrećice Swirl® Y 50® MicroPor® Plus.
UKLANJANJE POTEŠKOĆA
natural_image
Technical line drawing of a car interior showing internal compartments and structural elements (no text or symbols)BEZBEDNOSNA UPUTSTVA
Lista delova
- Kombinovani nastavak za podove
- Teleskopska cev
- Crevo
- Dugme za namotavanje kabla
- Elektronska regulacija snage usisavanja
-
Prekidač
-
Telo usisivača sa točkovima
- Osigurač za otvaranje poklopca prostora za kesu za prašinu
- Ručka
- Uski nastavak
- Četka za nameštaj
Pribor:
Crevo, metalna inoks teleskopska cev, četka za cilime i tvrde podove, uska mlaznica i četka za nameštaj
KORIŠĆENJE USISIVAČA
Pre sastavljanja, usisivač mora biti isključen i odvojen od izvora električne struje!
- Kraj creva umetnite u otvor u prednjem delu usisivača i učvrstite. (Slika 1). Ako želite da skinete crevo, pritisnite osigurače na obe strane grla creva i izvucite ga iz usisivača.
- Drugi kraj creva spojite sa zaobljenim krajem cevi (slika 2).
- Na cev spojite onaj nastavak koji je prikladan za vrstu poda koju treba da čistite (slika 3): nastavak sa četkom za čilime ili tvrde podove (može se prilagoditi tipu poda), uska mlaznica ili četka za nameštaj.
-
Izvlačenje kabla: Kraj kabla je označen crvenom i žutom oznakom (slika 4). Kabl povucite za utikač i izvucite ga do žute oznake. Kabl nikada ne izvlačite do crvene oznake, jer bi moglo doći do njegovog oštećenja! Ako želite da namotate kabl, pritisnite dugme za uvlačenje i kabl će se namotati unutar usisivača.
-
Pokretanje usisivača: Priključite kabl za napajanje u utičnicu onih karakteristika koje odgovaraju onima koje su navedene na nazivnoj pločici na usisivaču i pritisnite taster za uključivanje da biste ga pokrenuli. Snagu rada uređaja možete podesiti elektronskim regulatorom A (slika 5).
U slučaju problema
SR/MNE
natural_image
Technical line drawing of a car interior showing internal compartments and structural elements (no text or labels)-
Jednom godišnje zamenite ili očistite izduvni filter: Otvorite i skinite poklopac izduvnog filtera. Operite ga mlakom vodom i potpuno ga osušite pre nego što ga ponovo postavite. Ako je filter oštećen, zamenite ga.
-
Čišćenje površina usisivača: Za čišćenje se poslužite mekom i blago navlaženom krpom s nekoliko kapi sredstva za čišćenje. Nikada nemojte koristiti rastvarače ili bilo kakvo abrazivno sredstvo za čišćenje. Nikada ne potapajte usisivač u vodu ili drugu tečnost, niti ga postavljajte pod mlaz vode.
Upozorenje:
Rezervne kese za usisivač VP 4102 S ćete pronaći pod nazivom KOMA ECG VP 4102 S, a možete također koristiti i kese Swirl® Y 50® MicroPor® Plus.
OTKLANJANJE PROBLEMA
FR
natural_image
Technical line drawing of a car interior showing internal compartments and structural elements (no text or labels)IT Problemi
natural_image
Technical line drawing of a car interior showing internal compartments and structural elements (no text or labels)Lista de partes
natural_image
Technical line drawing of a car interior showing internal compartments and structural elements (no text or labels)Osade loetelu
natural_image
Technical line drawing of a car interior showing internal compartments and structural elements (no text or symbols)Dalių sąrašas
natural_image
Technical line drawing of a car interior showing internal compartments and structural elements (no text or labels)Dalu saraksts
natural_image
Technical line drawing of a car interior showing internal compartments and structural elements (no text or labels)250 69 Kličany, Czech Rep. e-post: ECG@kbexpert.cz
LT
K+B Progres, a.s.
U Expertu 91 tel.: +420 272 122 111
250 69 Klíčany, Czech Rep. el. paštas: ECG@kbexpert.cz
LV
K+B Progres, a.s.
U Expertu 91 tel.: +420 272 122 111
250 69 Klíčany, Czech Rep. e-pasts: ECG@kbexpert.cz
- VP 4102 S
- Seznam součástí
- CZ
- Zoznam súčastí
- Lista elementów
- USUWANIE PRODUKTÓW PO ZAKOŃCZENIU EKSPLOATACJI
- A készülék részei
- Stückliste
- Störungen
- Read carefully and save for future use!
- DESCRIPTION OF THE VACUUM CLEANER
- List of parts
- Accessories:
- USING THE VACUUM CLEANER
- Issues
- After use
- Full dust bag indicator
- MAINTENANCE AND CLEANING
- Attention:
- TROUBLESHOOTING
- TECHNICAL DATA
- USE AND DISPOSAL OF WASTE
- DISPOSAL OF PRODUCTS AT THE END OF LIFETIME
- SIGURNOSNE UPUTE
- Popis dijelova
- Pribor:
- KORIŠTENJE USISAVAČA
- HR/BIH
- U slučaju poteškoća
- Upozorenje:
- UKLANJANJE POTEŠKOĆA
- BEZBEDNOSNA UPUTSTVA
- Lista delova
- KORIŠĆENJE USISIVAČA
- U slučaju problema
- SR/MNE
- OTKLANJANJE PROBLEMA
- IT Problemi
- Lista de partes
- Osade loetelu
- Dalių sąrašas
- Dalu saraksts
Brand : ECG
Model : VP 4102 S
Category : Vacuum Cleaner