
KG2300 - Mill BLACK & DECKER - Free user manual and instructions
Find the device manual for free KG2300 BLACK & DECKER in PDF.


| Product type | Angle grinder |
| Brand | Black & Decker |
| Model | KG2300 |
| Usage | Domestic |
| Supply voltage | 230 V |
| Power input | 2 300 W |
| No-load speed | 6 000 min⁻¹ |
| Disc diameter | 230 mm |
| Disc bore | 22 mm |
| Max. grinding disc thickness | 6 mm |
| Max. cutting disc thickness | 3 mm |
| Arbor size | M14 |
| Weight | 6.4 kg |
| Sound pressure level (L_pA) | 94 dB(A) |
| Sound power level (L_WA) | 107 dB(A) |
| Hand-arm vibration | 3.93 m/s² |
| Double insulation | Yes |
| Main functions | Cutting and grinding of metal and concrete |
| Safety equipment | Adjustable guard, arbor lock, side handle |
| Maintenance and cleaning | Clean ventilation slots with a dry brush; use a mild detergent and a damp cloth |
| Warranty | 24 months (domestic use conditions) |
Frequently Asked Questions - KG2300 BLACK & DECKER
User questions about KG2300 BLACK & DECKER
0 question about this device. Answer the ones you know or ask your own.
Ask a new question about this device
Download the instructions for your Mill in PDF format for free! Find your manual KG2300 - BLACK & DECKER and take your electronic device back in hand. On this page are published all the documents necessary for the use of your device. KG2300 by BLACK & DECKER.
USER MANUAL KG2300 BLACK & DECKER
English 3
Deutsch 7
Italiano 12
Français 17
Česky
22
Polski 26
Slovenski 31
Magyar 35
Hrvatski 40
Bosanski 44
Русский язык 49
Intended use
Your Black & Decker angle grinder has been designed for cutting metal and masonry using the appropriate type of cutting or grinding disc.
This tool is intended for consumer use only.
Safety instructions
◆Warning! When using mains-powered tools, basic safety precautions, including the following, should always be followed to reduce the risk of fire, electric shock, personal injury and material damage.
◆Read all of this manual carefully before operating the tool.
◆Retain this manual for future reference.
◆Remove the plug from the socket before carrying out any adjustment, servicing or maintenance.
Keep work area clean
Cluttered areas and benches can cause accidents.
Consider work area environment
Do not expose the tool to rain. Do not use the tool in damp or wet conditions. Keep the work area well lit. Do not use the tool where there is a risk of causing fire or explosion, e.g. in the presence of flammable liquids and gases.
Keep children away
Do not allow children, visitors or animals to come near the work area or to touch the tool or mains cable.
Dress properly
Do not wear loose clothing or jewellery, as these can be caught in moving parts. Preferably wear rubber gloves and non-slip footwear when working outdoors. Wear protective hair covering to keep long hair out of the way.
Personal protection
Always use safety glasses. Use a face or dust mask whenever the operations may produce dust or flying particles. Hearing protection should be worn.
Guard against electric shock
Prevent body contact with earthed or grounded surfaces (e.g. pipes, radiators, cookers and refrigerators). Electric safety can be further improved by using a high-sensitivity (30 mA / 30 mS) residual current device (RCD).
Do not overreach
Keep proper footing and balance at all times.
Stay alert
Watch what you are doing. Use common sense. Do not operate the tool when you are tired.
Secure workpiece
Use clamps or a vice to hold the workpiece. It is safer and it frees both hands to operate the tool.
Connect dust extraction equipment
If devices are provided for the connection of dust extraction and collection facilities, ensure that these are connected and properly used.
Remove adjusting keys and wrenches
Always check that adjusting keys and wrenches are removed from the tool before operating the tool.
Extension cables
Before use, inspect the extension cable and replace if damaged. When using the tool outdoors, only use extension cables intended for outdoor use. Up to 30 m of Black & Decker extension cable can be used without loss of power.
Use appropriate tool
The intended use is described in this instruction manual. Do not force small tools or attachments to do the job of a heavy-duty tool. The tool will do the job better and safer at the rate for which it was intended. Do not force the tool. Do not use the tool for purposes not intended, for example, do not use a circular saw to cut tree limbs or logs.
Warning! The use of any accessory or attachment or performance of any operation with this tool other than those recommended in this instruction manual may present a risk of personal injury.
Check for damaged parts
Before use, carefully check the tool and mains cable for damage. Check for misalignment and seizure of moving parts, breakage of parts, damage to guards and switches and any other conditions that may affect its operation. Ensure that the tool will operate properly and perform its intended function. Do not use the tool if any part is damaged or defective. Do not use the tool if the switch does not turn it on and off. Have any damaged or defective parts repaired or replaced by an authorised repair agent. Never attempt any repairs yourself.
Unplug the tool
Unplug the tool when it is not in use, before changing any parts of the tool, accessories or attachments and before servicing.
Avoid unintentional starting
Do not carry the tool with a finger on the on/off switch. Be sure that the tool is switched off when plugging in.
Do not abuse cord
Never carry the tool by its cord or pull it to disconnect from the socket. Keep the cord away from heat, oil and sharp edges.
Store idle tools
When not in use, tools should be stored in a dry, locked up or high place, out of reach of children.
Maintain tools with care
Keep cutting tools sharp and clean for better and safer performance. Follow the instructions for maintenance and changing accessories. Keep handles and switches dry, clean and free from oil and grease.
Repairs
This tool complies with relevant safety requirements. Repairs should only be carried out by qualified persons using original spare parts; otherwise this may result in considerable danger to the user.
Electrical safety

This tool is double insulated; therefore no earth wire is required. Always check that the power supply corresponds to the voltage on the rating plate.
Additional safety instructions for angle grinders

Read the instruction manual before use.

Wear safety glasses or goggles when operating this tool.

Wear ear protection when operating this tool.
◆Always use eye and ear protection when operating this tool.
◆Personal protective equipment such as dust mask, gloves, helmet and apron should be worn.
◆Do not cut or grind light metal with a magnesium content exceeding 80%, since this type of metal is flammable.
◆Only use grinding and cutting discs and other accessories recommended in this manual.
◆Make sure that the maximum speed of the grinding or cutting disc exceeds the no-load speed of the tool.
Do not use grinding and cutting discs that do not conform to the dimensions stated in the technical data. Do not use separate reducing bushings or adapters or make unauthorised modifications to adapt large hole abrasive wheels.
◆Do not cut workpieces requiring a maximum depth of cut exceeding that of the cutting disc.
◆Do not use cutting discs for side grinding.
- Inspect grinding and cutting discs before each use.
Do not use chipped, cracked or otherwise defective discs.
◆Ensure that mounted wheels and points are fitted in accordance with the manufacturer's instructions.
◆Ensure that the abrasive product is correctly mounted and tightened before use and run the tool at no-load for 30 s in a safe position, stop immediately if there is considerable vibration or if other defects are detected. If this condition occurs, check the machine to determine the cause.
◆Ensure that blotters are used when they are provided with the bonded abrasive product and when they are required.
- When applying a threaded hole disc, ensure that the thread is long enough to accept the spindle length.
◆Never use the tool without the guard.
◆Check that the workpiece is properly supported.
◆Do not exert side pressure on the grinding or cutting disc.
◆Ensure that sparks resulting from use do not create a hazard e.g. do not hit persons, or ignite flammable substances.
◆Beware that after switching off the tool the wheel continues to rotate for a short period.
◆Ensure that ventilation slots are kept clear when working in dusty conditions. If it should become necessary to clear dust, first disconnect the tool from the mains supply. Avoid damaging internal parts, use a soft brush or dry cloth, do not use metallic objects.
♦Abrasive wheels shall be stored and handled with care in accordance with manufacturer's instructions and always store grinding and cutting discs in a dry place.
Features
This tool includes some or all of the following features.
- On/off switch
- Lock-off button
- Side handle
- Spindle lock
- Guard
Assembly
Warning! Before assembly, make sure that the tool is switched off and unplugged.
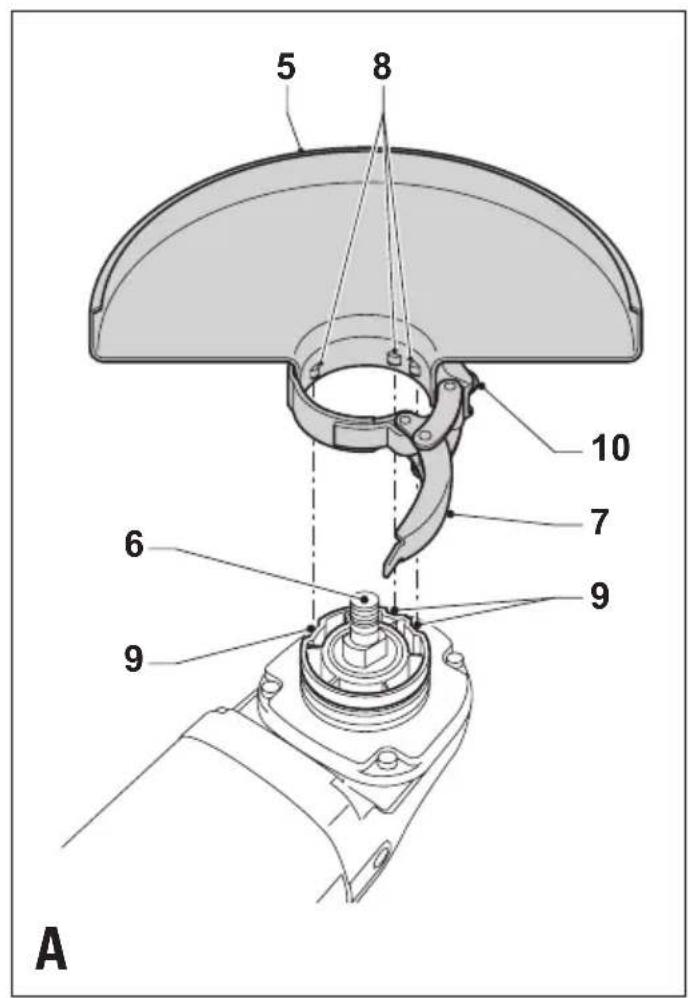
Fitting and removing the guard (fig. A)
Fitting
◆Place the tool on a table, with the spindle (6) facing up.
◆Release the clamping lock (7) and hold the guard (5) over the tool as shown.
♦Align the lugs (8) with the notches (9).
◆Press the guard down and rotate it counterclockwise to the required position.
◆Fasten the clamping lock to secure the guard to the tool.
◆If required, tighten the screw (10) to increase the clamping force.
Removing
◆Release the clamping lock (7).
◆Rotate the guard clockwise to align the lugs (8) with the notches (9).
◆Remove the guard from the tool.
Adjusting the guard (fig. A)
The guard can be rotated 90°.
◆Rotate the guard as required.
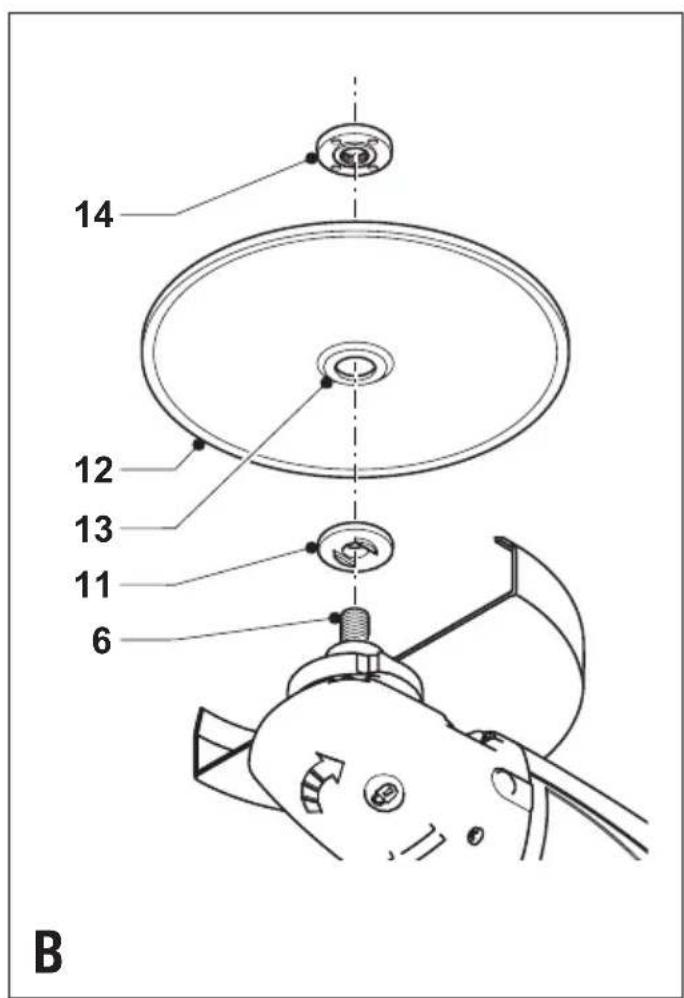
Fitting the side handle (fig. B)
◆Screw the side handle (3) into one of the mounting holes in the tool.
Warning! Always use the side handle.
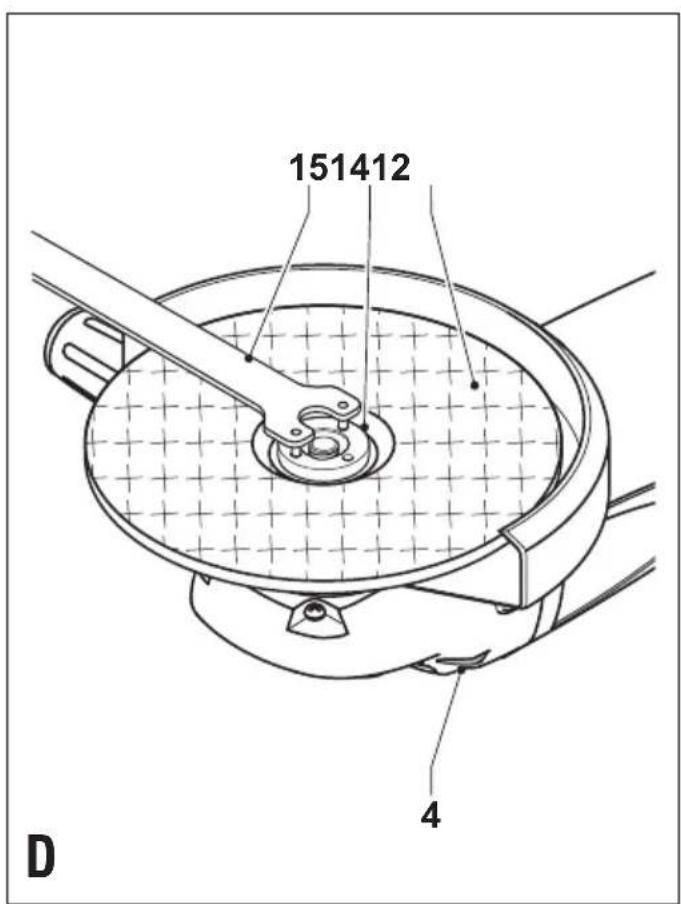
Fitting and removing grinding or cutting discs (fig. B - D)
Always use the correct type of disc for your application. Always use discs with the correct diameter and bore size (see technical data).
Fitting
◆Fit the guard as described above.
◆Place the inner flange (11) onto the spindle (6) as shown (fig. B). Make sure that the flange is correctly located on the flat sides of the spindle.
◆Place the disc (12) onto the spindle (6) as shown (fig. B). If the disc has a raised centre (13), make sure that the raised centre faces the inner flange.
◆Make sure that the disc locates correctly on the inner flange.
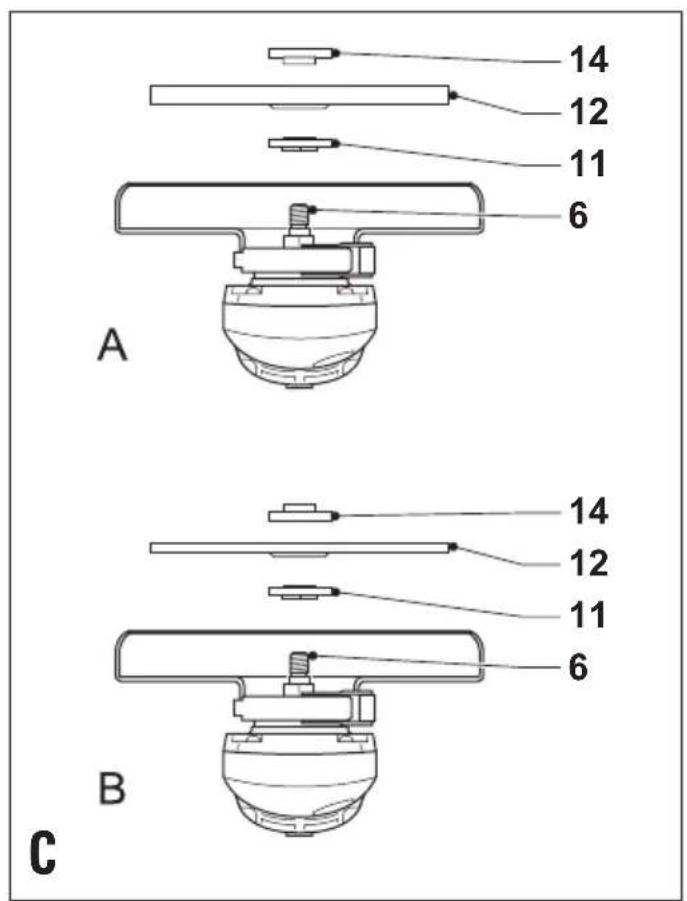
◆Place the outer flange (14) onto the spindle. When fitting a grinding disc, the raised centre on the outer flange must face towards the disc (A in fig. C). When fitting a cutting disc, the raised centre on the outer flange must face away from the disc (B in fig. C).
◆Keep the spindle lock (4) depressed and tighten the outer flange using the two-pin spanner (15) (fig. D).
Removing
◆Keep the spindle lock (4) depressed and loosen the outer flange (14) using the two-pin spanner (15) (fig. D).
◆Remove the outer flange (14) and the disc (12).
Use
◆Warning! Let the tool work at its own pace. Do not overload.
◆Carefully guide the cable in order to avoid accidentally cutting it.
◆Be prepared for a stream of sparks when the grinding or cutting disc touches the workpiece.
◆Always position the tool in such a way that the guard provides optimum protection from the grinding or cutting disc.
Switching on and off
◆To switch the tool on, move the lock-off button (2) into the unlock position and squeeze the on/off switch (1).
◆To switch the tool off, release the on/off switch.
Warning! Do not switch the tool off while under load.
Hints for optimum use
◆Firmly hold the tool with one hand around the side handle and the other hand around the main handle.
When grinding, always maintain an angle of approx. 15^ between the disc and the workpiece surface.
Maintenance
Your tool has been designed to operate over a long period of time with a minimum of maintenance. Continuous satisfactory operation depends upon proper tool care and regular cleaning.
◆Regularly clean the ventilation slots with a clean, dry paint brush.
◆To clean the tool, use only mild soap and a damp cloth. Never let any liquid get inside the tool and never immerse any part of the tool into liquid.
Mains plug replacement (U.K. & Ireland only)
If a new mains plug needs to be fitted:
◆Safely dispose of the old plug.
◆Connect the brown lead to the live terminal in the new plug.
◆Connect the blue lead to the neutral terminal.
Warning! No connection is to be made to the earth terminal. Follow the fitting instructions supplied with good quality plugs. Recommended fuse: 13 A.
Protecting the environment
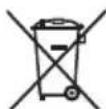
Separate collection. This product must not be disposed of with normal household waste.
Should you find one day that your Black & Decker product needs replacement, or if it is of no further use to you, do not dispose of it with household waste. Make this product available for separate collection.

Separate collection of used products and packaging allows materials to be recycled and used again. Re-use of recycled materials helps prevent environmental pollution and reduces the demand for raw materials.
Local regulations may provide for separate collection of electrical products from the household, at municipal waste sites or by the retailer when you purchase a new product.
Black & Decker provides a facility for the collection and recycling of Black & Decker products once they have reached the end of their working life. To take advantage of this service please return your product to any authorised repair agent who will collect them on our behalf.
You can check the location of your nearest authorised repair agent by contacting your local Black & Decker office at the address indicated in this manual. Alternatively, a list of authorised Black & Decker repair agents and full details of our after-sales service and contacts are available on the Internet at: www.2helpU.com
Technical data
| KG2300 | ||
| Voltage V | AC | 230 |
| Power input W 2,300 | ||
| No-load speed min | -1 | 6,000 |
| Disc diameter mm 230 | ||
| Disc bore mm 22 | ||
| Max. disc thickness grinding discs mm 6 cutting discs mm 3 | ||
| Spindle size M14 | ||
| Weight kg 6.4 |
EC declaration of conformity
KG2300
Black & Decker declares that these products conform to: 98/37/EC, 89/336/EEC, EN 50144, EN 55014, EN 61000
L_pA (sound pressure) 94 dB(A), L_WA (acoustic power) 107 dB(A), hand/arm weighted vibration 3.93 m/s ^2
K_pA (sound pressure uncertainty) 3 dB(A), K_WA (acoustic power uncertainty) 3 dB(A)
Kevin Hewitt
Director of Consumer Engineering Spennymoor, County Durham DL16 6JG, United Kingdom 1-7-2005
Guarantee
Black & Decker is confident of the quality of its products and offers an outstanding guarantee. This guarantee statement is in addition to and in no way prejudices your statutory rights. The guarantee is valid within the territories of the Member States of the European Union and the European Free Trade Area.
If a Black & Decker product becomes defective due to faulty materials, workmanship or lack of conformity, within 24 months from the date of purchase, Black & Decker guarantees to replace defective parts, repair products subjected to fair wear and tear or replace such products to ensure minimum inconvenience to the customer unless:
◆The product has been used for trade, professional or hire purposes;
◆The product has been subjected to misuse or neglect;
◆The product has sustained damage through foreign objects, substances or accidents;
◆Repairs have been attempted by persons other than authorised repair agents or Black & Decker service staff.
To claim on the guarantee, you will need to submit proof of purchase to the seller or an authorised repair agent. You can check the location of your nearest authorised repair agent by contacting your local Black & Decker office at the address indicated in this manual. Alternatively, a list of authorised Black & Decker repair agents and full details of our after-sales service and contacts are available on the Internet at:
www.2helpU.com
Please visit our website www.blackanddecker.co.uk to register your new Black & Decker product and to be kept up to date on new products and special offers. Further information on the Black & Decker brand and our range of products is available at www.blackanddecker.co.uk
Director of Consumer Engineering
Spennymoor, County Durham DL16 6JG,
Spennymoor, County Durham DL16 6JG,
Royaume Uni
1-7-2005
Garantie
Spennymoor, County Durham DL16 6JG,
Spojené království
1-7-2005
Záruka
Warning! Before assembly, make sure that the tool is switched off and unplugged.
Spennymoor, County Durham DL16 6JG,
Spennymoor, County Durham DL16 6JG,
Velika Britanija
1-7-2005
Garancija
Spennymoor, County Durham DL16 6JG,
Egyesült Királyság
1-7-2005
Garanciahatározat
Spennymoor, County Durham DL16 6JG,
Великобритания
1-7-2005
Гарантия
20 Fletcher Road, Mooroolbark, Fax 03-9727 5940
Victoria, 3138
New Zealand
Black & Decker Tel. 09 579 7600
81 Hugo Johnston Drive Fax 09 579 8200
Penrose, Auckland, New Zealand
United Kingdom
Black & Decker Tel. 01753 511234
210 Bath Road Fax 01753 551155
Slough, Berkshire SL1 3YD Helpline 01753 574277
- Intended use
- Safety instructions
- Keep work area clean
- Consider work area environment
- Keep children away
- Dress properly
- Personal protection
- Guard against electric shock
- Do not overreach
- Stay alert
- Secure workpiece
- Connect dust extraction equipment
- Remove adjusting keys and wrenches
- Extension cables
- Use appropriate tool
- Check for damaged parts
- Unplug the tool
- Avoid unintentional starting
- Do not abuse cord
- Store idle tools
- Maintain tools with care
- Repairs
- Electrical safety
- Additional safety instructions for angle grinders
- Features
- Assembly
- Fitting and removing the guard (fig. A)
- Fitting
- Removing
- Adjusting the guard (fig. A)
- Fitting the side handle (fig. B)
- Fitting and removing grinding or cutting discs (fig. B - D)
- Use
- Switching on and off
- Hints for optimum use
- Maintenance
- Mains plug replacement (U.K. & Ireland only)
- Protecting the environment
- EC declaration of conformity
- Guarantee
- www.2helpU.com
- Garantie
- Záruka
- Garancija
- Garanciahatározat
- Гарантия
- New Zealand
- United Kingdom
Brand : BLACK & DECKER
Model : KG2300
Category : Mill