
CD455 - Mill BLACK & DECKER - Free user manual and instructions
Find the device manual for free CD455 BLACK & DECKER in PDF.


| Product Type | Finishing Sander (Sheet Sander) |
| Brand | Black & Decker |
| Model | CD455 |
| Voltage | 120V (B3) / 220V (AR, B2C) |
| Power Input | 138 W |
| No-Load Speed | 10,000 rpm |
| Base Size (Approx.) | 1/3 Sheet (approx. 4.5 x 9 in.) |
| Weight (Approx.) | 1.5 kg (3.3 lbs) |
| Dimensions (L x W x H, Approx.) | 250 x 120 x 150 mm |
| Power Source | Corded Electric |
| Insulation | Double Insulated (Class II) |
| Switch Type | On/Off Slide Switch |
| Dust Collection | External vacuum adapter (not included) |
| Sanding Sheet Attachment | Paper clamp levers |
| Hole Punch | Yes (for dust extraction holes) |
| Included Accessories | Sandpaper sheet, dust extraction adaptor |
| Safety Features | Double insulation, lock-off switch |
| Maintenance | Clean vents with dry brush; housing with damp cloth |
| Repairability | Authorized service centers only; use identical replacement parts |
| Environmental Disposal | Separate collection; do not dispose with household waste |
Frequently Asked Questions - CD455 BLACK & DECKER
User questions about CD455 BLACK & DECKER
0 question about this device. Answer the ones you know or ask your own.
Ask a new question about this device
Download the instructions for your Mill in PDF format for free! Find your manual CD455 - BLACK & DECKER and take your electronic device back in hand. On this page are published all the documents necessary for the use of your device. CD455 by BLACK & DECKER.
USER MANUAL CD455 BLACK & DECKER
natural_image
Line drawing of a black and decker electric shaver with no visible text or symbolsEspañol 3
English 8
FIG. A
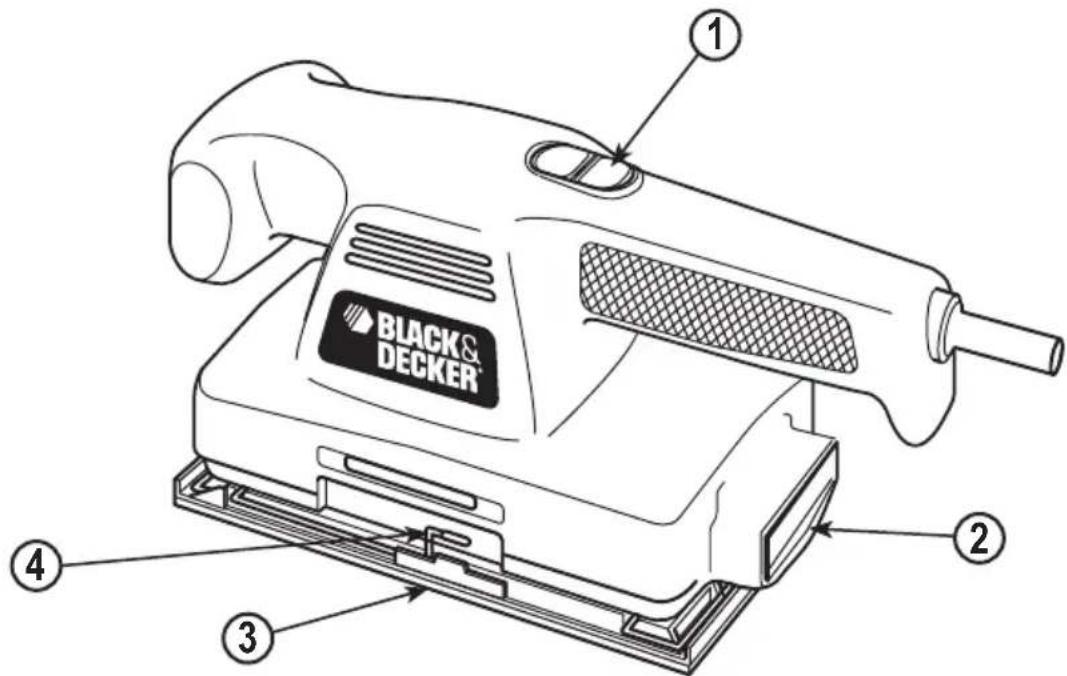
FIG. B
natural_image
Illustration of hands installing or adjusting a mechanical component with a numbered label (4), no text or symbols present.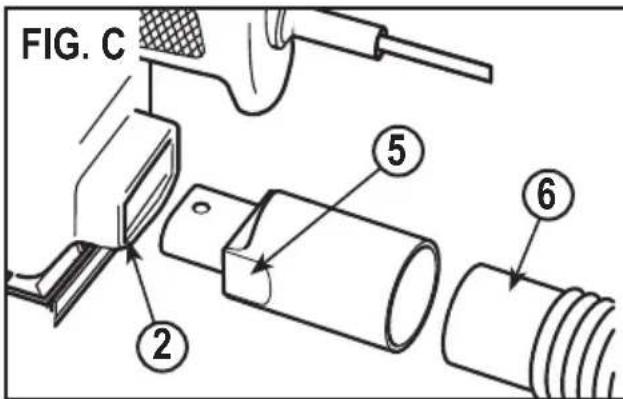
DO NOT RETURN THIS PRODUCT TO THE STORE, first contact your local Black & Decker office or nearest authorized service center.
GENERAL SAFETY RULES
⚠ Warning! Read and understand all instructions. Failure to follow all instructions listed below, may result in electric shock, fire and/or serious personal injury.
BONNET SAFETY
Please be careful if the thread of the bonet is to long you need to cut it to avoid an injury in operators hands.
SAVE THESE INSTRUCTIONS

SAFETY INSTRUCTIONS
General power tool safety warnings.
Warning! Read all safety warnings and
all instructions. Failure to follow the warnings and instructions listed below may result in electric shock, fire and/or serious injury.
Save all warnings and instructions for future reference.
The term “power tool” in all of the warnings listed below refers to your mains operated (corded) power tool or battery operated (cordless) power tool.
- Work Area Safety
a. Keep work area clean and well lit. Cluttered and dark areas invite accidents.
b. Do not operate power tools in explosive atmospheres, such as in the presence of flammable liquids, gases or dust. Power tools create sparks which may ignite the dust or fumes.
c. Keep children and bystanders away while operating a power tool. Distractions can cause you to lose control.
- Electrical Safety
a. Power tool plugs must match the outlet. Never modify the plug in any way. Do not use any adapter plugs with earthed (grounded) power tools. Unmodified plugs and matching outlets will reduce risk of electric shock.
b. Avoid body contact with earthed or grounded surfaces such as pipes, radiators, ranges and refrigerators. There is an increased risk of electric shock if your body is earthed or grounded.
c. Do not expose power tools to rain or wet conditions. Water entering a power tool will increase the risk of electric shock.
d. Do not abuse the cord. Never use the cord for carrying, pulling or unplugging the power tool. Keep cord away from heat, oil, sharp edges or
moving parts. Damaged or entangled cords increase the risk of electric shock.
e. When operating a power tool outdoors, use an extension cord suitable for outdoor use. Use of a cord suitable for outdoor use reduces the risk of electric shock.
f. If operating a power tool in a damp location is unavoidable, use a residual current device (RCD) protected supply. Use of an RCD reduces the risk of electric shock. Note: The term "Residual Curent Device (RCD)" can be replaced by "Ground Fault Circuit Interrupter (GFCI)" or by "Earth Leakage Circuit Breaker (ELCB)".
- Personal Safety
a. Stay alert, watch what you are doing and use common sense when operating a power tool. Do not use a power tool while you are tired or under the influence of drugs, alcohol or medication. A moment of inattention while operating power tools may result in serious personal injury.
b. Use personal protective equipment. Always wear eye protection. Protective equipment such as dust mask, non-skid safety shoes, hard hat, or hearing protection used for appropriate conditions will reduce personal injuries.
c. Prevent unintentional starting. Ensure the switch is in the off-position before connecting to power source and/or battery pack, picking up or carrying the tool. Carrying power tools with your finger on the switch or energising power tools that have the switch on invites accidents.
d. Remove any adjusting key or wrench before turning the power tool on. A wrench or a key left attached to a rotating part of the power tool may result in personal injury.
e. Do not overreach. Keep proper footing and balance at all times. This enables better control of the power tool in unexpected situations.
f. Dress properly. Do not wear loose clothing or jewellery. Keep your hair, clothing and gloves away from moving parts. Loose clothes, jewellery or long hair can be caught in moving parts.
g. If devices are provided for the connection of dust extraction and collection facilities, ensure these are connected and properly used. Use of these devices can reduce dust related hazards.
4. Power Tool Use and Care
a. Do not force the power tool. Use the correct power tool for your application. The correct power tool will do the job better and safer at the rate for which it was designed.
b. Do not use the power tool if the switch does not turn it on and off. Any power tool that cannot be controlled with the switch is dangerous and must be repaired.
c. Disconnect the plug from the power source and/or the battery pack from the power tool before
making any adjustments, changing accessories, or storing power tools. Such preventive safety measures reduce the risk of starting the power tool accidentally.
d. Store idle power tools out of the reach of children and do not allow persons unfamiliar with the power tool or these instructions to operate the power
tool. Power tools are dangerous in the hands of untrained users.
e. Maintain power tools. Check for misalignment or binding of moving parts, breakage of parts and any other condition that may affect the power tools operation. If damaged, have the power tool repaired before use. Many accidents are caused by poorly maintained power tools.
f. Keep cutting tools sharp and clean. Properly maintained cutting tools with sharp cutting edges are less likely to bind and are easier to control.
- Service
a. Have your power tool serviced by a qualified repair person using only identical replacement
parts. This will ensure that the safety of the power tool is maintained.
- Electrical safety

Your tool is double insulated; therefore no earth wire is required. Always check that the main voltage corresponds to the voltage on the rating plate.

Warning! If the power cord is damaged, it must be replaced by the manufacturer, authorized Black & Decker Service Center or an equally qualified person in order to avoid damage or injury. If the power cord is replaced by an equally qualified person, but not authorized by Black & Decker, the warranty will not be valid.
- Labels on tool
The label on your tool may include the following symbols:

Read Instructions Manual
Hz ..... Hertz W ..... Watts
Class II Construction

Use Eye Protection
min ..... minutes
Earthing Terminal

Use Ear Protection
\~ ..... Alternating Current
⚠️ .... Safety Alert Symbol
---- Direct Current
.../min.. Revolutions or Recipro- cation per minute
V ..... Volts
A ..... Amperes
Speed
SPECIFIC SAFETY RULES
▶ Hold tool by insulated gripping surfaces when performing an operation where the cutting tool may contact hidden wiring or its own cord.
Contact with a "live" wire will make exposed metal parts of the tool "live" and shock the operator.
▶ Use clamps or another practical way to secure and support the work piece to a stable platform. Holding the work by hand or against your body leaves it unstable and may lead to loss of control.
⚠ Warning! Always use safety glasses. Everyday eyeglasses are NOT safety glasses. Also use face or dust mask if operation is dusty. Always wear certified safety equipment.
⚠ Warning! Some dust created by power sanding, sawing, grinding, drilling, and other construction activities contains chemicals known to cause cancer, birth defects or other reproductive harm. Some examples of these chemicals are:
▶ lead from lead-based paints,
▶ crystalline silica from bricks and cement and other masonry products, and
▶ arsenic and chromium from chemically-treated lumber (CCA).
Your risk from these exposures varies, depending on how often you do this type of work. To reduce your exposure to these chemicals: work in a well ventilated area, and work with approved safety equipment, such as those dust masks that are specially designed to filter out microscopic particles.
- Avoid prolonged contact with dust from power sanding, sawing, grinding, drilling, and other construction activities. Wear protective clothing and wash exposed areas with soap and water. Allowing dust to get into your mouth, eyes, or lay on the skin may promote absorption of harmful chemicals.
⚠ Warning! Use of this tool can generate and/or disperse dust, which may cause serious and permanent respiratory or other injury. Always use NIOSH/OSHA approved respiratory protection appropriate for the dust exposure. Direct particles away from face and body.
Caution: Wear appropriate hearing protection during use. Under some conditions and duration of use, noise from this product may contribute to hearing loss.
SAFETY GUIDELINES/DEFINITIONS
It is important for you to read and understand this manual.
The information it contains relates to protecting Your Safety and Preventing Problems. The symbols below are used to help you recognize this information.
⚠ Danger! Indicates an imminently hazardous situation which, if not avoided, will result in death or serious injury.
⚠ Warning! Indicates a potentially hazardous situation which, if not avoided, could result in death or serious injury.
Caution: Indicates a potentially haz ard ous situation which, if not avoided, may result in minor or mod er ate injury.
Caution: Used without the safety alert symbol indicates a potentially hazardous situation which, if not avoided, may result in property damage.
MOTOR
Be sure your power supply agrees with nameplate marking. Lower voltage will cause loss of power and can result in overheating. All Black & Decker tools are factory-tested; if this tool does not operate, check the power supply.
Extension cords
When using an extension cord, be sure to use one heavy enough to carry the current your product will draw. An undersized cord will cause a drop in line voltage resulting in loss of power and overheating. The following table shows the correct size to use depending on cord length and nameplate ampere rating. If in doubt, use the next heavier gage. The smaller the gage number, the heavier the cord.
Minimum gage for cord sets
Volts Total length of cord in feet
| 120V | 0-25 | 26-50 | 51-100 | 101-150 | |
| (0-7,6m) | (7,6-15,2m) | (15,2-30,4m) | (30,4-45,7m) | ||
| 220V | 0-50 | 51-100 | 101-200 | 201-300 | |
| (0-15,2m) | (15,2-30,4m) | (30,4-60,9m) | (60,9-91,4m) |
Ampere Rating
| Moure than | Not more than | American Wire Gage | ||
| 0 - 6 | 18 | 16 | 16 | 14 |
| 6 - 10 | 18 | 16 | 14 | 12 |
| 10 - 12 | 16 | 16 | 14 | 12 |
| 12 - 16 | 14 | 12 | Not recommended | |
SAFETY WARNINGS AND INSTRUCTIONS FOR SANDERS
▶ Always use proper eye and respiratory protection.
▶ Clean your tool out periodically.
Before using the tool on metal workpieces or workpieces containing metal, make sure to remove the dust bag.
▶ Wear gloves when working with metal workpieces.
OTHER IMPORTANT SAFETY WARNINGS AND INSTRUCTIONS
SANDING
Lead base paint
Sanding of lead based paint is Not recommended due to the difficulty of controlling the contaminated dust.
The greatest danger of lead poisoning is to children and pregnant women.
Since it is difficult to identify whether or not a paint contains lead without a chemical analysis, we recommend the following precautions when sanding any paint:
Personal Safety
▶ No children or pregnant women should enter the work area where the paint sanding is being done until all clean up is completed.
▶ A dust mask or respirator should be worn by all persons entering the work area. The filter should be replaced daily or whenever the wearer has difficulty breathing.
Note: Only those dust masks suitable for working with lead paint dust and fumes should be used. Ordinary painting masks do not offer this protection. See your local hardware dealer for the proper (NIOSH approved) mask.
▶ No eating, drinking or smoking should be done in the work area to prevent ingesting contaminated paint particles. Workers should wash and clean up before eating, drinking or smoking. Articles of food, drink, or smoking should not be left in the work area where dust would settle on them.
Environmental safety
▶ Paint should be removed in such a manner as to minimize the amount of dust generated.
▶ Areas where paint removal is occurring should be sealed with plastic sheeting of 4 mils. thickness.
▶ Sanding should be done in a manner to reduce tracking of paint dust outside the work area.
Cleaning and disposal
All surfaces in the work area should be vacuumed and thoroughly cleaned daily for the duration of the sanding project. Vacuum filter bags should be changed frequently.
▶ Plastic drop cloths should be gathered up and disposed of along with any dust chips or other removal debris. They should be placed in sealed refuse receptacles and disposed of through regular trash pick-up procedures. During clean up, children and pregnant women should be kept away from the immediate work area.
▶ All toys, washable furniture and utensils used by children should be washed thoroughly before being used again.
FEATURES (Fig. A)
- On/off switch
- Dust extraction outlet
- Sanding base
- Paper clamp lever
- Hole Punch
ASSEMBLY
⚠ Warning! To prevent accidental operation, turn off and unplug tool before performing the following operations. Failure to do this could result in serious personal injury.
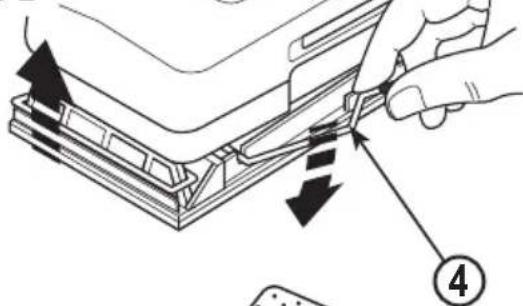
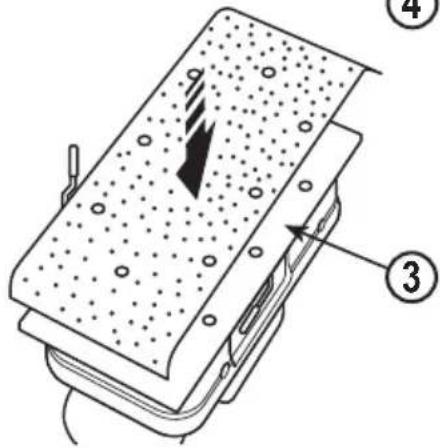
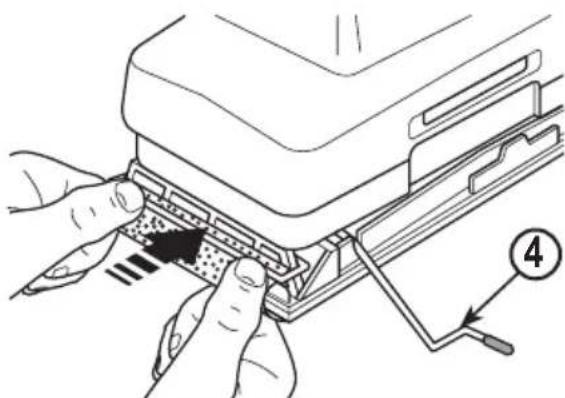
Fitting sanding sheets (Fig. B)
Note: Never use the tool without a sanding sheet or accessory in place.
▶ Soften the sanding sheet by rubbing its non-abrasive side over the edge of a work top.
▶ Press the paper clamp levers (4) upwards to release them from the retaining grooves and open the paper clamps by pressing them down.
▶ Place the sheet onto the sanding base, making sure that the holes in the sheet (if applicable) line up with the holes in the base.
▶ Insert the edge of the sanding sheet into the front paper clamp as shown.
▶ Press the front paper clamp lever (4) up and locate it in the retaining groove.
▶ While keeping a slight tension on the sheet, insert the rear edge of the sheet into the rear paper clamp.
▶ Press the rear paper clamp lever (4) up and locate it in the retaining groove.
Connecting a vacuum cleaner (Fig. C)
▶ Insert the adaptor (5) into the dust extraction outlet (2).
▶ Connect the hose (6) of the vacuum cleaner (not included) to the adaptor.
OPERATION
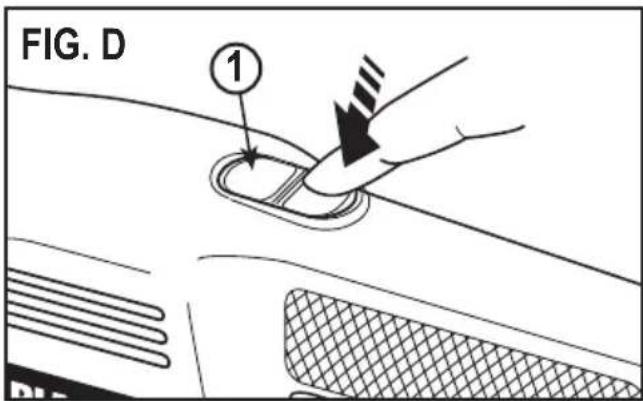
Switching on and off (Fig. D)
▶ To switch the tool on, press the front part (I) of the On/Off switch (1).
▶ To switch the tool off, press the rear part (O) of the On/Off switch (1).
HINTS FOR OPTIMUM USE
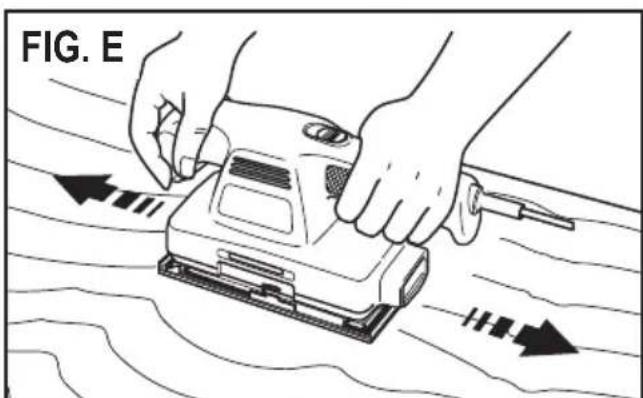
▶ Always hold the tool with two hands as shown in Fig E.
▶ Do not exert too much pressure on the tool.
▶ Regularly check the condition of the sanding sheet. eplace when necessary.
▶ Always sand with the grain of the wood.
▶ Always start your sander before it is in contact with the workpiece and do not switch it off until after it has been lifted from the workpiece.
▶ Where possible, clamp the workpiece to a work bench or similar sturdy surface.
▶ When sanding new layers of paint before applying another layer, use extra fine grit.
▶ On very uneven surfaces, or when removing layers of paint, start with a coarse grit.
▶ On other surfaces, start with a medium grit. In both cases, gradually change to a fine grit for a smooth finish.
DUST COLLECTION
⚠ Warning! Fire hazard. Collected sanding dust from sanding surface coatings (polyurethane, linseed oil, etc.) can self-ignite and cause fire. To reduce risk, strictly follow sander manual and coating manufacturer's instructions.
⚠ Warning! Fire hazard. When sanding wood that could contain nails or when sanding metal surfaces, do not use a vacuum cleaner because sparks are generated. Use safety glasses and a dust mask. Due to the danger of fire, do not use your sander to sand magnesium surfaces. Do not use for wet sanding.
MAINTENANCE
Never apply excessive force when you use your sander. Too much force can result in an overload and cause damage to the motor or the workpiece. Always keep the air cooling vents clear. To clean your finishing sander, proceed as follows:
⚠ Warning! To prevent accidental operation, turn off and unplug sander before performing the following operations. Failure to do this could result in serious personal injury.
▶ Use a clean dry paint brush to clear vents and ducts.
▶ Clean the housings using a clean damp cloth o not use solvents, gas or turpentine.)
▲ Important! To assure product Safety and Reliability, repairs, maintenance and adjustment should be performed by authorized service centers or other qualified service personnel, always using identical replacement parts.
ACCESSORIES
Recommended accessories for use with your tool are available at extra cost from your local dealer or authorized service center. If you need assistance in locating any accessory for your tool, please call contact your nearest Service Center.
⚠ Warning! The use of any other accessory not recommended for use with this tool could be hazardous.
PROTECTING THE ENVIRONMENT

Separate collection. This product must not be disposed of with normal household waste.
Should you find one day that your Black & Decker product needs replacement, or if it is of no further use to you, do not dispose of it with household waste. Make this product available for separate collection.

Separate collection of used products and packaging allows materials to be recycled and used again.
Re-use of recycled materials helps prevent environmental pollution and reduces the demand for raw materials. Local regulations may provide for separate collection of electrical products from the household, at municipal waste sites or by the retailer when you purchase a new product.
SERVICE INFORMATION
Black & Decker offers a full network of company-owned and authorized service locations. All Black & Decker Service Centers are staffed with trained personnel to provide customers with efficient and reliable power tool service.
For more information about our authorized service centers and if you need technical advice, repair, or genuine factory replacement parts, contact the Black & Decker location nearest you, or visit us at www.BlackandDecker-la.com
SPECIFICATIONS CD455
Voltage
AR, B2C 220V
B3 120V
Power 138W
No-load speed 10000/min (rpm)
Buenos Aires (B1618FBQ)
CNPJ: 53.296.273/0001-91
Insc. Est.: 701.948.711.00-98
S.A.C.: 0800-703-4644
Solamente para propósitos de Colombia
- GENERAL SAFETY RULES
- BONNET SAFETY
- SAVE THESE INSTRUCTIONS
- SAFETY INSTRUCTIONS
- SPECIFIC SAFETY RULES
- SAFETY GUIDELINES/DEFINITIONS
- MOTOR
- Extension cords
- Minimum gage for cord sets
- SAFETY WARNINGS AND INSTRUCTIONS FOR SANDERS
- OTHER IMPORTANT SAFETY WARNINGS AND INSTRUCTIONS
- SANDING
- Lead base paint
- Personal Safety
- Environmental safety
- Cleaning and disposal
- FEATURES (Fig. A)
- ASSEMBLY
- Fitting sanding sheets (Fig. B)
- Connecting a vacuum cleaner (Fig. C)
- OPERATION
- Switching on and off (Fig. D)
- HINTS FOR OPTIMUM USE
- DUST COLLECTION
- MAINTENANCE
- ACCESSORIES
- PROTECTING THE ENVIRONMENT
- SERVICE INFORMATION
- SPECIFICATIONS CD455
Brand : BLACK & DECKER
Model : CD455
Category : Mill