
MXE 1002 - Electric drill Flex - Free user manual and instructions
Find the device manual for free MXE 1002 Flex in PDF.


| Product type | Professional electric stirrer/mixer |
| Brand | Flex |
| Model | MXE 1002 |
| Intended use | Mixing of liquid and pasty materials (paints, varnishes, glues, mortars, plasters, etc.) for industrial and craft use |
| Power supply | Mains electricity (check voltage on rating plate) |
| Power cord | 4.0 m with plug |
| Protection class | II |
| Number of speeds | 2 (I: high torque, II: high speed) |
| Speed selector | Rotary switch with lock and end stop for mixer change |
| On/off switch | Trigger switch with lock for continuous operation |
| Overload protection | Automatic shutdown in case of extreme overload |
| Drive spindle | Thread for compatible mixers |
| Housing material | Not specified (motor and gearbox housing) |
| Dimensions (L×W×H) | Not specified |
| Weight | Not specified |
| Sound pressure level | See table on page 5 of the manual (not reproduced here) |
| Vibration level | See table on page 5 of the manual (not reproduced here) |
| Maintenance and cleaning | Regularly clean the ventilation slots and the inside of the housing with dry compressed air; clean the mixer immediately after use |
| Spare parts | Exploded views and lists available at www.flex-tools.com |
| Repairs | Entrust exclusively to a service center approved by the manufacturer |
| Warranty | Do not loosen the gearbox screws during warranty |
| Disposal | Do not dispose of with household waste; recycle according to directive 2012/19/EU |
| Standards | EN 62841, directives 2014/30/EU, 2006/42/EC, 2011/65/EU |
Frequently Asked Questions - MXE 1002 Flex
User questions about MXE 1002 Flex
0 question about this device. Answer the ones you know or ask your own.
Ask a new question about this device
Download the instructions for your Electric drill in PDF format for free! Find your manual MXE 1002 - Flex and take your electronic device back in hand. On this page are published all the documents necessary for the use of your device. MXE 1002 by Flex.
USER MANUAL MXE 1002 Flex
de Originalbetriebsanleitung 6
en Original operating instructions 9
fr Notice d'instructions d'origine 12
it Istruzioni per l'uso originali 16
es Instrucciones de funcionamiento originales ..... 20
pt Instruções de serviço originais 24
nl Originele gebruiksaanwijzing 28
da Originale driftsvejledning 32
no Originale driftsanvisningen 35
sv Originalbruksanvisning 38
fi Alkuperäinen käyttöohjekirja 41
el Auθεντικές οδηγίες χειρισμού 45
tr Orijinal işletme kılavuzu 49
pI Instrukcja oryginalna 52
hu Eredeti üzemeltetési útmutató 56
cs Originální návod k obsluze 60
sk Originálny návod na obsluhu 63
hr Originalna uputa za rad 66
sl Izvirno navodilo za obratovanje 69
ro Instructiuni de functionare originale 72
bg Оригинално упътване за експлоатация 75
ru Оригинальная инструкция по эксплуатации 79
et Originaalkasutusjuhend 83
It Originali naudojimo instrukcija 86
Iv Lietošanas pamācības oriģināls 89
ar
ترجمة ل Ershadas التشville الأصلية 95



![graph TD A["Step 1: Click"] --> B["Step 2: Pulling Pin"] B --> C["Step 3: Rotation"] C --> D["Step 4: Close Pin"] D --> E["Step 5: Rotation"] E --> F["End"]](/content/2026/05/873561/images/735b5c369cb117668b97aadde131ee69c1a78e9a01841d67f8937a6c94cc6a3e.jpg)

| RührerMixerAgitateurMescolatoreAgitadorMisturadorMengmachineOmrørerRøremaskinOmrörareSekoitinAvɑμικτήραςKarıştırıcıMieszarka | KeverőMichadloMiešadloMješalicaMešaloAgitatorБъркалкаПеремешива-тельSegurMaišytuvasMaisītājsأداة التقياب | MXE1000 | MXE1002 | MXE1200 | MXE1202 | MXE1602 | |
| nn1n2 | 1/min1/min1/min | 0–780–– | 0–5300–780 | 210/325/530–– | 210/325/530320/490/780 | 150/300/530200/400/780 | |
| P1 W 1010 1010 | 1200 1200 1600 | ||||||
| P2 W 550 550 710 | 710 925 | ||||||
| M14 M14 | M14 M14 M14 | ||||||
| Dmax | mm 120 | 120 140 140 | 160 | ||||
| m kg 4,5 | 4,6 4,6 | 4,8 | 5 | ||||
| LpA | dB(A) | 79 79 79 | 79 | 84 | |||
| LWA | dB(A) | 90 90 90 | 90 | 95 | |||
| K | dB | 3 | 3 | 3 | 3 | 3 | |
| ah | m/s2 | < 2,5 < 2,5 < 2,5 | < 2,5 < 2,5 | ||||
| K | m/s2 | 1,5 | 1,5 | 1,5 | 1,5 | 1,5 | |
Verwendete Symbole

WARNUNG!
Eckhard Rühle
Manager Research & Development (R & D)
Klaus Peter Weinper
Head of Quality
Department (QD)
06.09.2019
Symbols used in this manual

WARNING!
Denotes impending danger. Non-observance of this warning may result in death or extremely severe injuries.

CAUTION!
Denotes a potentially dangerous situation. Non-observance of this warning may result in injury or damage to property.

NOTE!
Denotes application tips and important information.
Symbols on the power tool

Before switching on the power tool, read the operating manual!
Wear protective goggles!

Wear ear defenders!

Protection class II

Disposal information for the old machine (see page 11)!

Important safety information

WARNING!
Read all safety instructions and general instructions.
Failure to comply with the safety instructions and general instructions may result in electric shock, fire and/or serious injuries. Keep all safety instructions and general instructions in a safe place for future reference.
Before using the power tool, please read the following and act accordingly:
– these operating instructions,
– the "General safety instructions" on the handling of power tools in the enclosed booklet (leaflet no.: 315.915),
- the currently valid site rules and the regulations for the prevention of accidents.
This power tool is state of the art and has been constructed in accordance with the acknowledged safety regulations.
Nevertheless, when in use, the power tool may be a danger to life and limb of the user or a third party, or the power tool or other property may be damaged. The power tool may be operated only if it is
- for its intended use,
– in perfect working order.
Faults which compromise safety must be repaired immediately.
Intended use
The mixer is designed
– for commercial use in industry and trade,
– with mixer paddle of appropriate size and shape,
– for commercial use in industry and trade, – with mixer paddle of appropriate size and shape,
– for mixing liquids of low viscosity such as paint, varnish, adhesive, light plaster, resin,
– for mixing material of high viscosity such as plaster, mortar, lime, screed, filler etc.,
– for mixing stiff and sticky material of high viscosity such as adhesive, resin, sealing and insulating compound etc.,
- for mixing liquids of low viscosity such as paint, varnish, adhesive, light plaster, resin, - for mixing material of high viscosity such as plaster, mortar, lime, screed, filler etc., - for mixing stiff and sticky material of high viscosity such as adhesive, resin, sealing and insulating compound etc.,
– for use with mixer paddles and accessories which are indicated in these instructions or recommended by the manufacturer.
The mixer is not to be used for mixing foodstuffs.
Safety instructions

WARNING!
Read all safety instructions and general instructions.
Failure to comply with the safety instructions and general instructions may result in electric shock, fire and/or serious injuries. Keep all safety instructions and general instructions in a safe place for future reference.
■ Do not process explosive materials (e.g. highly inflammable solvents). Power tools generate sparks that could ignite the vapour given off.
■ Pull out the plug immediately and have the power tool checked by customer service if it falls into the stirred product. Should stirred product makes its way into the electric appliance, damage could ensue and cause an electric shock.
■ When working, hold the power tool firmly with both hands and ensure that you have a secure footing. The power tool is controlled more securely if held with both hands.
■ Do not process any material containing asbestos. Asbestos is carcinogenic.
■ Take protective measures if dust is likely to be generated during work that is hazardous to health, combustible or explosive. For example: some dusts are carcinogenic. Wear a protective mask and use a dust/particle extraction system if one can be fitted.
■ Wait until the power tool has come to a stop before putting it down. The cutting accessory may snag, causing the operator to lose control of the power tool.
- Do not use the power tool if it has a damaged power cord. Do not touch the damaged power cord and pull out the mains plug if the power cord is damaged during work. Damaged power cords increase the risk of an electric shock.
If power tools are to be used outside, connect them to a residual current breaker.
Noise and vibration
Values for the A-weighted sound pressure level and for the total vibration values can be found in the table on page 5. The noise and vibration values have been determined in accordance with EN 62841.

WARNING!
The indicated measurements refer to new power tools. Daily use causes the noise and vibration values to change.

NOTE!
The vibration emission level given in this information sheet has been measured in accordance with a standardised test given in EN 62841 and may be used to compare one tool with another. It may be used for a preliminary assessment of exposure.
The declared vibration emission level represents the main applications of the tool. However if the tool is used for different applications, with different accessories or poorly maintained, the vibration emission may differ. This may significantly increase the exposure level over the total working period.
To make an accurate estimation of the vibration exposure level, it is also necessary to take into account the times when the tool is switched off or running but not actually in use. This may significantly decrease the exposure level over the total working period.
Identify additional safety measures to protect the operator from the effects of vibration such as: maintain the tool and the accessories, keep the hands warm, organisation of work patterns.

CAUTION!
Wear ear defenders at a sound pressure above 85 dB(A).
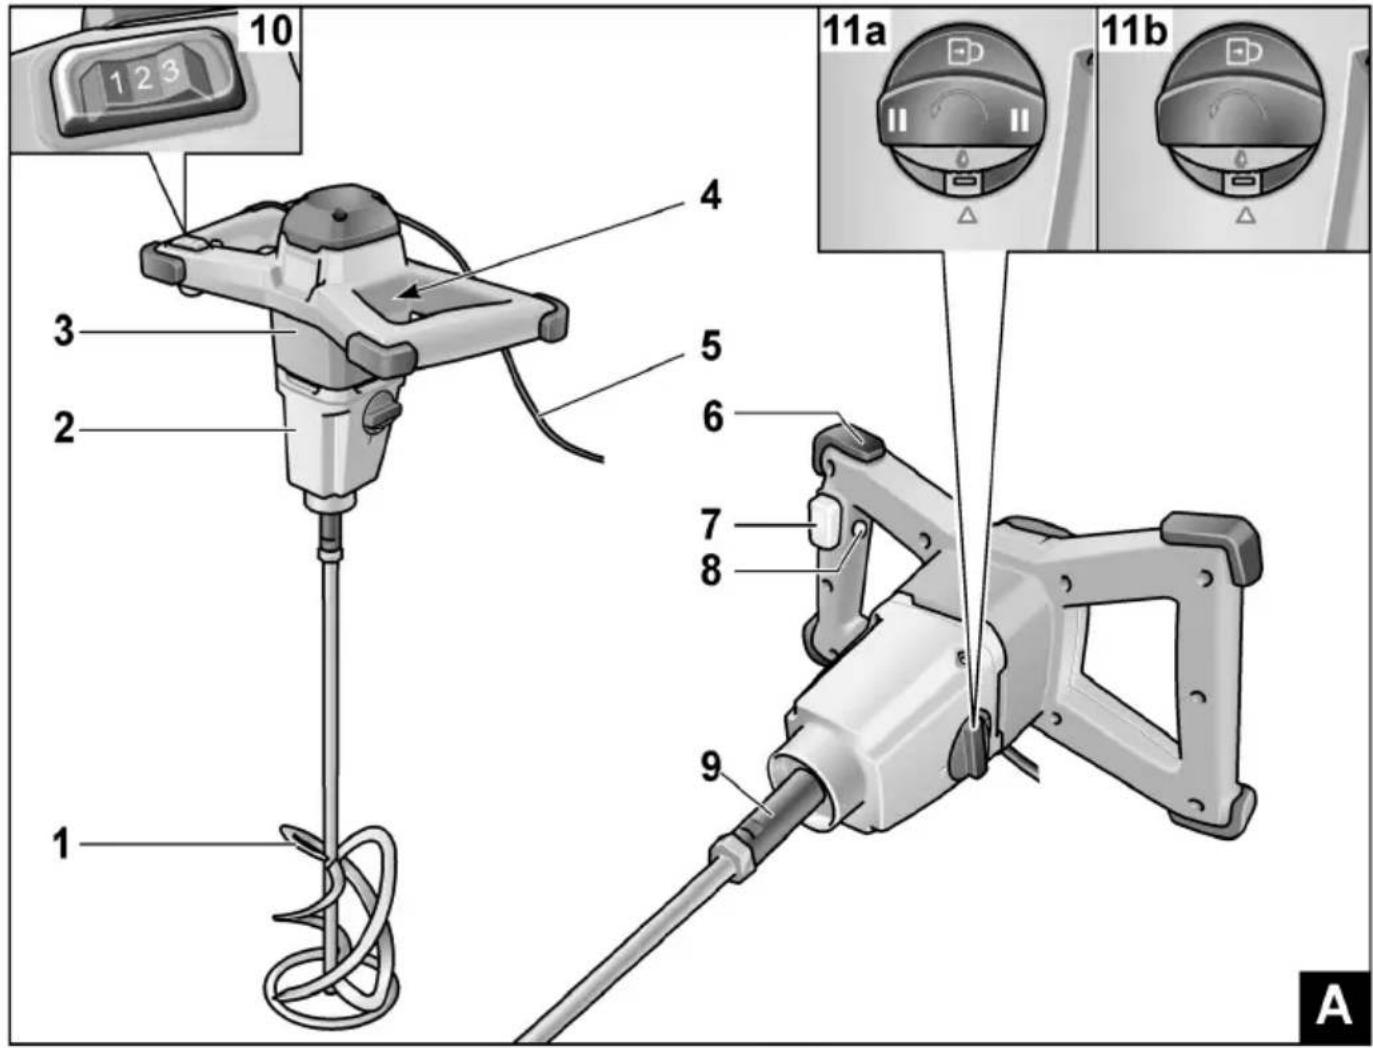
Overview (Figure A)
1 Mixer paddle
2 Gear head
3 Motor housing with 2 handles
4 Rating plate *
5 4.0 m power cord with plug
6 Impact guard and rest
7 O N / O F F s w i t c h
8 Locking button
9 Drive spindle
10 Speed preselector switch
(MXE 1200/1202/1602)
11 Gear selector switch
a) 2nd speed and spindle lock (MXE 1002/1202/1602)
b) 1st speed and spindle lock (MXE 1200)
* not shown
Instructions for use

WARNING!
Before performing any work on the mixer, pull out the mains plug.

CAUTION!
The mains voltage and the voltage specification on the rating plate must match.
Before initial operation
■ Unpack the mixer and check that there are no missing or damaged parts.
Mounting/changing the mixer paddle
Tool without spindle lock (Figure B):
■ Bolt the paddle onto the drive spindle (1.).
Counterhold the drive spindle with an open-end spanner AF 19 and tighten the mixer paddle with an open-end spanner AF 22 (2.).
Remove in the reverse order.
Tool with spindle lock (Figure C):
■ Press the lock and turn the gear selector switch in anticlockwise direction to 📄.
■ Bolt the paddle onto the drive spindle (2.).
■ Tighten the mixer paddle with an open-end spanner AF 22 (3.).
Remove in the reverse order.
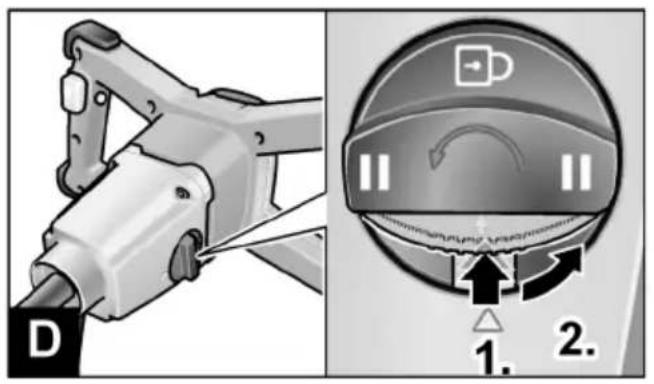
Gear selection (Figure D)
(MXE 1002/1200/1202/1602)

CAUTION!
Only select gear with motor stationary.
■ Press lock (1.) and turn switch in anti-clockwise direction to the required stage (2.)
MXE 1200:
I Output stage

Spindle lock for changing mixer paddle
MXE 1002/1202/1602:
I Output stage with higher torque
II Output stage with higher speed

Spindle lock for changing mixer paddle
Regulating the speed (Figure E)
(MXE 1200/1202)
■ To adjust the maximum working speed, set the speed preselector switch to the desired stage.
| Stage\Speed | I | II |
| 1 210 320 | ||
| 2 325 490 | ||
| 3 530 780 |
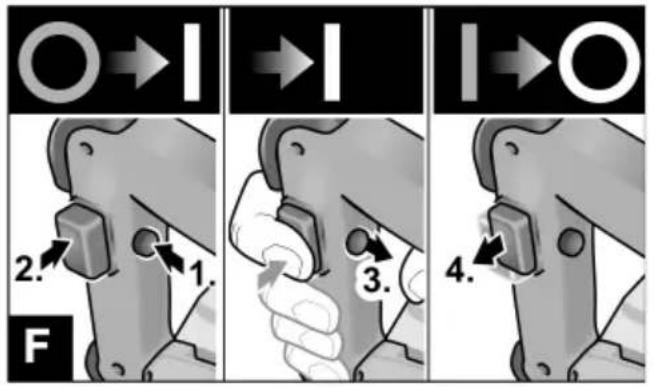
Switching the mixer on and off
Brief operation without engaged switch rocker (Figure F)
■ First press the starting lockout (1.). Then press and hold down the switch (2.). Release switch interlock (3.).
■ To switch off, release the switch (4.).
Continuous operation with engaged switch rocker (Figure G)
■ First press and hold down the starting lockout (1.) and then the switch (2.).
■ To lock into position, hold down the locking button and release the switch (3.). Release switch interlock (4.).
To switch off, briefly press and release the switch (5.).

NOTE!
If the mixer does not turn after switching on:
- Switch the power tool off (release lock by pressing switch).
- Rotate the mixer paddle manually by 45° .
- Switch the power tool back on again.

CAUTION!
Following a power failure, the switched on power tool does not restart.
Operating instructions (Figure H)
■ After it has been switched off, the mixer runs on for a short time.
■ If the rotating mixer paddle strikes a surface, it could cause a jolt.
■ Only switch on the tool after the mixer paddle has been immersed in the product to be mixed. When doing this, slowly press the switch and wait until the tool has reached maximum speed.
■ When taking a break from work, place the tool down on the rests.
Overload protection
In the event of a short and extreme overload, the overload protection device prevents damage to the motor by switching the tool off automatically.
For further information on the manufacturer's products go to www.flex-tools.com.
Maintenance and care

WARNING!
Before performing any work on the mixer, pull out the mains plug.
Cleaning
■ Regularly clean the power tool and ventilation slots.
■ Regularly blow out the housing interior and motor with dry compressed air.
■ Clean the mixer paddle straight after use. Do not allow the mixed product to dry on.
Gear

NOTE
Do not loosen the screws on the gear head during the warranty period. Failure to comply with this requirement will invalidate any claims under the manufacturer's warranty.
Repairs
Repairs may be carried out by an authorised customer service centre only.
Spare parts and accessories
Mixer paddles for different applications and other accessories can be gleaned from the manufacturer's catalogues.
Exploded drawings and sparepart lists can be found on our homepage: www.flex-tools.com
Disposal information

WARNING!
Render disused power tools unusable by removing the power cord.

EU countries only.
Do not dispose of electric power tools in the household waste!
In accordance with the European Directive 2012/19/
EU on Waste Electrical and Electronic Equipment and its incorporation into national law, used power tools must be collected separately and recycled in an environmentally friendly manner.

NOTE!
Please ask your dealer about disposal options.
CE-Declaration of Conformity
We declare under our sole responsibility that the product described under page 5 conforms to the following standards or normative documents:
EN 62841 according to the provisions of Directives 2014/30/EU, 2006/42/EC, 2011/65/EU.
Responsible for technical documents:
Eckhard Rühle
Manager Research &
Development (R & D)
06.09.2019
Exemption from liability
The manufacturer and his representative are not liable for any damage and lost profits due to interruption in business caused by the product or by an unusable product. The manufacturer and his representative are not liable for any damage which was caused by improper use of the power tool or by use of the power tool with products from other manufacturers.
Symboles utilisés

AVERTISSEMENT!
Head of Quality Department (QD)
Eckhard Rühle
Manager Research &
Development (R & D)
06/09/2019
Eckhard Rühle
Manager Research &
Development (R & D)
06/09/2019
Manager Research & Development (R & D)
06.09.2019
Eckhard Rühle
Manager Research &
Development (R & D)
06.09.2019
Eckhard Rühle
Manager Research &
Development (R & D)
06.09.2019
Jos koneessa karajarru (Kuva C):
Eckhard Rühle
Manager Research &
Development (R & D)
06.09.2019
Eckhard Rühle
Manager Research &
Development (R & D)
06/09/2019
Eckhard Rühle
Manager Research & Development (R & D)
Klaus Peter Weinper
Head of Quality Department (QD)
06.09.2019
UE, 2006/42/WE, 2011/65/UE.
Eckhard Rühle
Manager Research & Development (R & D)
06.09.2019
Eckhard Rühle
Manager Research & Development (R & D)
2019.09.06.
Eckhard Rühle
Manager Research &
Development (R & D)
06.09.2019
Klaus Peter Weinper
Head of Quality
Department (QD)
06.09.2019
Orodja z blokado vretena (Slika C):
■ Pritisnite na blokado in zavrtite stikalo za izbiro prestave v desno na stopnjo (1.).
■ Privijte mešalo na pogonsko vreteno (2.).
■ Zategnite mešalo z viličastim ključem dimenzije 22 (3.).
Demontažo izvedite v obratnem vrstnem redu.
Izbira prestav (Slika D)
(MXE 1002/1200/1202/1602)

PREVIDNO!
Eckhard Rühle Manager Research & Development (R & D)
Klaus Peter Weinper Head of Quality Department (QD)
06.09.2019
EN 62841 conform prevederilor Directivei 2014/30/UE, 2006/42/CE, 2011/65/UE.
Manager Research & Development (R & D)
Klaus Peter Weinper
Head of Quality
Department (QD)
06.09.2019
Manager Research & Development (R & D)
Klaus Peter Weinper
Head of Quality Department (QD
06.09.2019;
Spindlilukuga seadmed (Joonis C):
Eckhard Rühle
Manager Research &
Development (R & D)
Klaus Peter Weinper
Head of Quality
Department (QD)
06.09.2019
Eckhard Rühle
Manager Research &
Development (R & D)
Klaus Peter Weinper
Head of Quality
Department (QD)
2019-09-06
Manager Research & Development (R & D)

Klaus Peter Weinper
Head of Quality
Department (QD)
Eckhard Rühle Manager Research & Development (R & D)
Klaus Peter Weinper Head of Quality Department (QD)
2019/09/06

- VERWENDETE SYMBOLE
- WARNUNG
- SYMBOLS USED IN THIS MANUAL
- WARNING
- CAUTION
- NOTE
- SYMBOLS ON THE POWER TOOL
- IMPORTANT SAFETY INFORMATION
- INTENDED USE
- SAFETY INSTRUCTIONS
- NOISE AND VIBRATION
- OVERVIEW (FIGURE A)
- INSTRUCTIONS FOR USE
- BEFORE INITIAL OPERATION
- MOUNTING/CHANGING THE MIXER PADDLE
- TOOL WITHOUT SPINDLE LOCK (FIGURE B)
- TOOL WITH SPINDLE LOCK (FIGURE C)
- GEAR SELECTION (FIGURE D)
- (MXE 1002/1200/1202/1602)
- MXE 1200
- MXE 1002/1202/1602
- REGULATING THE SPEED (FIGURE E)
- (MXE 1200/1202)
- SWITCHING THE MIXER ON AND OFF
- BRIEF OPERATION WITHOUT ENGAGED SWITCH ROCKER (FIGURE F)
- CONTINUOUS OPERATION WITH ENGAGED SWITCH ROCKER (FIGURE G)
- OPERATING INSTRUCTIONS (FIGURE H)
- OVERLOAD PROTECTION
- MAINTENANCE AND CARE
- CLEANING
- GEAR
- REPAIRS
- SPARE PARTS AND ACCESSORIES
- DISPOSAL INFORMATION
- CE-DECLARATION OF CONFORMITY
- EXEMPTION FROM LIABILITY
- SYMBOLES UTILISÉS
- AVERTISSEMENT
- JOS KONEESSA KARAJARRU (KUVA C)
- ORODJA Z BLOKADO VRETENA (SLIKA C)
- IZBIRA PRESTAV (SLIKA D)
- PREVIDNO
- SPINDLILUKUGA SEADMED (JOONIS C)
Brand : Flex
Model : MXE 1002
Category : Electric drill