HDM1001 - Drill Ferm - Free user manual and instructions
Find the device manual for free HDM1001 Ferm in PDF.


| Brand | Ferm |
| Model | HDM1001 |
| Product type | Hammer drill |
| Main use | Drilling in stone, concrete, wood and metal; chiseling |
| Supply voltage | 230 V~ |
| Frequency | 50 Hz |
| Power consumption | 620 W |
| No-load speed | 750 rpm |
| Impact speed | 2920 rpm |
| Max. drilling diameter in concrete | 26 mm |
| Max. drilling diameter in metal | 13 mm |
| Max. drilling diameter in wood | 40 mm |
| Weight | 5.3 kg |
| Sound pressure level (Lpa) | 93 dB(A) |
| Sound power level (Lwa) | 106 dB(A) |
| Vibration value | 5.6 m/s² |
| Double insulation | Yes (according to EN50144), no earth required |
| Compatible bit types | SDS or cylindrical drill bits, chisels |
| Operating modes | Drilling, hammer drilling, chiseling |
| Auxiliary handle | Yes, adjustable on both sides |
| Depth stop | Yes, adjustable |
| Dust collector | Yes, for overhead drilling |
| Carbon brushes | Replaceable, regular inspection required |
| Maintenance | Regular cleaning with a soft cloth, no additional lubrication |
| Warranty | See attached warranty certificate |
Frequently Asked Questions - HDM1001 Ferm
User questions about HDM1001 Ferm
0 question about this device. Answer the ones you know or ask your own.
Ask a new question about this device
Download the instructions for your Drill in PDF format for free! Find your manual HDM1001 - Ferm and take your electronic device back in hand. On this page are published all the documents necessary for the use of your device. HDM1001 by Ferm.
USER MANUAL HDM1001 Ferm
UK Subject to change
natural_image
Interior view of a mechanical drill press with visible components and no text or symbols
Fig.A.
natural_image
Technical line drawing of a drill bit with motion arrows indicating direction (no text or symbols)Fig.B.

Fig.D.

natural_image
Technical line drawing of a mechanical tool with a spring and screw assembly (no text or symbols)Fig.C.

natural_image
Technical line drawing of a drill bit with a tool and screwdriver (no text or symbols)Fig.E.
2 Ferm

Ferm 51
SPARE PARTS
| REF. NR. | DESCRIPTION | FERM NR. |
| 700150 | CYLINDER | 003 |
| 700151 | HAMMER CYLINDER | 005 |
| 700152 | UMBRELLA GEAR (BIG | 010 |
| 700153 | O-RING | 011 |
| 700154 | PISTON | 012 |
| 700155 | RECIPROCAL LEVEL | 013 |
| 700156 | BUSHING | 014 |
| 700157 | FRONT COVER | 039 |
| 700158 | SLEEVE | 041 |
| 700159 | HAMMER BLOCK | 046 |
| 700160 | UMBRELLA GEAR (SMALL) | 050 |
| 806002 | BALL BEARING 6002 ZZ | 052 |
| 700161 | SPECIAL NUT | 058 |
| 800627 | BALL BEARING 627 ZZ | 059 |
| 700162 | ECCENTRIC SHAFT | 060 |
| 806202 | BALL BEARING 6202 ZZ | 062 |
| 700163 | NO.I GEAR | 066 |
| 806001 | BALL BEARING 6001 ZZ | 071 |
| 700164 | ROTOR | 072 |
| 800608 | BALL BEARING 608 ZZ | 077 |
| 700165 | BRUSH COVER | 081 |
| 700166 | CARBON BRUSH SET | 082 |
| 700167 | BRUSH HOLDER | 083 |
| 700168 | NEEDLE BEARING | 088 |
| 700169 | SWITCH | 096 |
| 700170 | DUST COVER | 104 |
| 700171 | DEPTH GAUGE | 106 |
| 700172 | HANDLE COMPLETE | 107 T/M III |
| 700173 | PIN | 113 |
| 700174 | STATOR | 115 |

ELECTRIC ROTARY HAMMER DRILL
THE NUMBERS IN THE FOLLOWING TEXT CORRESPONDWITHTHE PICTURES AT PAGE 2.
INTENDED USE
The Ferm FBH-620 is intended to be used for drilling holes in material like stone, concrete and similar materials. With suitable drill bits the machine also can be used to drill holes in wood or metal. The machine can be used as a demolition hammer in combination with the appropriate chisels. All other purposes are explicitly excluded.
TECHNICAL SPECIFICATIONS
| Voltage | 230 V | |
| Frequency | 50Hz | |
| Input power | 620W | |
| Speed,no load | 750/min |
| Impact rate | 2920/min |
| Max. drilling capacity concrete | 26 mm |
| steel | 13 mm |
| wood | 40 mm |
| Weight | |
| Lpa Sound pressure level | 93 dB(A) |
| Lwa Sound power level | 106 dB(A) |
| Vibration | 5.6 m/s ^2 |
Check the machine and accessories for transport damage.
PRODUCT INFORMATION
Fig.A - Description
-
Rotary stop selection lever
-
On-off Switch
-
Main handle
-
Hammer stop selection lever
-
Carbon brush cap
-
Electric cord
-
Auxiliary handle
-
Depth羣韻
-
Dcpfinga
- Dustcan
10 Drill
- Drill
- Lockingsleeve
SAFETYINSTRUCTIONS
The following symbols are used in these instructions for use:

Denotes risk of personal injury, loss of life or damage to the tool in case of non-observance tructions in this manual.

Denotes risk of electric shock.
Carefully read this manual before using the machine. Make sure that you know how the machine functions and how to operate it. Maintain the machine in accordance with the instructions to make sure it functions properly. Keep this manual and the enclosed documentation with the machine.
Electrical safety
Warning! When using electric tools, basic safety precautions should always be followed to reduce the risk of fire, electric shock and personal injury. Read all these instructions before attempting to operate this product and save these instructions.

Always check that the voltage corresponds to the voltage on the rating plate.
The machine is double insulated in accordance with EN50144; therefore no earth wire
Replacing cables or plugs
Immediately throw away old cables or plugs when they have been replaced by new ones. It is dangerous to insert the plug of a loose cable in the wall outlet.
Using extension cables
Only use an approved extension cable suitable for the power input of the machine. The minimum conductor size is 1.5 mm ^2 . When using a cable reel always unwind the reel completely.
SPECIAL SAFETY INSTRUCTIONS
BEFORE USING THE APPLIANCE
-
Examine the drilling surface for hidden electric cables, gas pipes or other obstacles with e.g. metal detector.
-
Check the following points:
• D oes the voltage of the motor correspond with the mains power supply?
• A re the extension cable,cord insulation and plug in good condition:sturdy,not loose or damaged?
• Is there a good connection at the socket?
• Is the drill running abnormally, overheating or generating excessive sparks?
- Should any of the above problems be observed cease all further use and make immediate repairs.
OPERATION

Hammer drilling requires low operator pressure.
An excess of pressure can cause the motor to be unnecessarily overloaded.
MANUAL SIDE GRIP
The manual side grip can be rotated to either side of the machine to ensure safe and comfortable operation for both left and right-handed operators.
I. Loosen the grip by turning anti-clockwise.
-
Rotate the grip to the desired position.
-
Tighten the grip firmly.
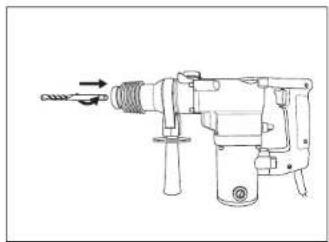
CHANGING AND REMOVING DRILL BITS Fig.B

Before changing drill bits check that the mains plug has been removed from the soc-

Check drill bits regularly Blunt drill bits should be re-sharpened or
I. Lightly lubricate the shaft of the drill bit before inser-ting into the machine
2. Place the shaft of the drill bit into the opening of the drill chuck and twist until latched.
3. To release and remove the drill bit pull back the collar of drill chuck.
ADJUSTING DEPTH STOP
- Loosen the manual side grip
- Place the straight part of the depth stop through the hole in the grip.
- Adjust the stop to the desired bit depth.
- Tighten the grip firmly.
INSTALLING DUST CATCHER
Fig.C
The dust catcher prevents large amounts of drilling dust entering the machine when drilling into ceilings.
1. Remove the drill bit
2. Slide the dust catcher over the shaft of the drill bit.
3. Place the drill bit with catcher in the drill
4. Always replace a damaged dust catcher immediately.
MODE SELECTOR SWITCH
Fig.D
The correct switch lever positions required for each drilling mode are indicated in the diagram at page 2.
D = hammerdrilling
D1=hammerdrilling.
D2=drilling.
D2 = driving.
D3 = shipping.
DS - chiseling.
SWITCHING ON AND OFF
To start drill: depress ON/OFF switch.
To stop drill: release ON/OFF switch.
DRILL WITH DRILL CHUCK ADAPTER
Fig.E
When drilling steel, wood and plastic, it is advisable to use the ring gear chuck and the drill chuck adapter.
TROUBLESHOOTING
Motor does not rotate upon switching on power supply
- Power supply breakage
Inspect power supply - Poor switch contact
Repair or replace ON/OFF switch - M. gains voltage too low
- 11 - ams voltage too low
- Extending cord too long/ too thin
- M. otor damaged
Repair your machine by an expert. - W orn out brushes
Replace carbon brushes
Motor generates abnormal noise and rotates slowly or not at all
- Motor overloaded due to excessive pressure or drilling depth
Reduce pressure or drilling depth, decrease force - M otor damaged
Repair your machine by an expert. - Main power supply voltage too low
Adjust main power supply voltage - W orn out brushes
Replace carbon brushes
Overheating of gearbox surface
Overloading or blunt drill bit Reduce load or sharpen drill
Decreased voltage
Adjust main power supply voltage
Heavy sparking of the motor
Check if carbon brushes are not worn out.
MAINTENANCE

Make sure that the machine is not live when carrying out maintenance work on the motor.
The Ferm machines have been designed to operate over a long period of time with a minimum of maintenance. Continuous satisfactory operation depends upon proper machine care and regular cleaning.
REPLACING CARBON BRUSHES
• T o check or replace the carbon brush loosen the cap with a screwdriver.
- Remove the carbon brush and replace if necessary.
- Tighten the carbon brush cap.
- change both carbon brus
- Change double carbon brushes simultaneously.
- Check regularly for wear and tear.
• A lways change well worn carbon brushes.
• A lways keep carbon brushes clean and free of hindrance.
DEFECTS
The machine should be checked regularly for any of the following obvious defects and repairs carried out as necessary.
• C able damage
• S witch malfunction
- Short circuits
• D damage to moving parts
Cleaning
The machine housing and drill bit chuck should be cleaned regularly, preferably after each use. The ventilation slots should be kept free from dust and dirt.
If the dirt does not come off use a soft cloth moistened with soapy water. Never use solvents such as petrol, alcohol, ammonia water, etc. These solvents may damage the plastic parts.
Lubrication
Have your local Ferm dealer top up the lubrication grease.
Faults
Should a fault occur, e.g. after wear of a part, please contact your local Ferm dealer.
In the back of this manual you find an exploded view showing the parts that can be ordered.
ENVIRONMENT
In order to prevent the machine from damage during transport, it is delivered in a sturdy packaging. Most of the packaging materials can be recycled. Take these materials to the appropriate recycling locations.
Take your unwanted machines to your local Ferm-dealer. Here they will be disposed of in an environmentally safe way.
GUARANTEE
The guarantee conditions can be found on the separately enclosed guarantee card.

DECLARATION OF CONFORMITY (UK)
We declare under our sole responsibility that this
product is in conformity with the following
standards or standardized documents
EN50144-1,EN50144-2-6
EN50144-2-6
EN50155-2-6,
EN55014-1,EN55014-2,EN61000 3 2 EN61000 3
EN61000-3-2,EN61000-3-3
in accordance with the regulations.
98/37EEC.
73/23/EEC,
89/336EEC
from 01-06-2002
GENEMUIDEN NL
W. Kamphof
Quality department


Deutsch
ELEKTRISCHER BOHRHAMMER
98/37/EEC 73/23/EEC 89/336/EEC
από 01-06-2002
GENEMUIDEN NL
W.Kamphof
Quality department
INBETRIEBNAHME

D1 = namer D2 = bpro
Overbelasting of botte boor
Verminder de belasting of slub de boor
Verminderd voltage
INFORMATIONSSURLEPRODUIT
Fig.A-Description
DÉCLARATION DE CONFORMITÉ

D2 = softening D3 = measuring
D3 - thejsing.
KOPPLINGTILLOCHFRÁN
98/37/EEC 73/23/EEC 89/336/EEC
dal01-06-2002 GENEMUIDEN NL W.Kamphof Quality department


ELEKTROMOS PERGÖ ÜTVEFÚRÓ
A SZÖVEGBEN TALÁLHATÓ SZÁMOK A 2.OLDA- LON TALÁLHATÓ ABRÁKRA VONATKOZNAK.
FELHASZNÁLÁS
98/37/EEC 73/23/EEC 89/336/EEC
01-06-2002 GENEMUIDEN NL W.Kamphof Quality department

N Norsk
ELEKTRISK ROTASJONSSLAGBOR
TALLENE I TEKSTEN NEDENFOR HENVISER TIL BILDENE PÅ SIDE 2.
BEREGNET FORMÁL
Värähtelyaryo 15.6 m/s
15,3 kg
93 dB(A)
106dB(A)
^1 ^2
D1=slagboring
D2 = boring
D2 = boring
D3 = meislin
D3 - incising
SLÂ MASKINEN PÂOG AV
Starte boring:trykk inn PA/AV-bryteren.
Stanse boring:slipp PÅ/AV-bryteren.
BORE MED DRILLCHUCKADAPTER
Fig.E
Reducer tryk eller boredybde

- ELECTRIC ROTARY HAMMER DRILL
- INTENDED USE
- PRODUCT INFORMATION
- SAFETYINSTRUCTIONS
- Electrical safety
- Replacing cables or plugs
- Using extension cables
- SPECIAL SAFETY INSTRUCTIONS
- BEFORE USING THE APPLIANCE
- OPERATION
- MANUAL SIDE GRIP
- CHANGING AND REMOVING DRILL BITS Fig.B
- ADJUSTING DEPTH STOP
- INSTALLING DUST CATCHER
- Fig.C
- MODE SELECTOR SWITCH
- Fig.D
- SWITCHING ON AND OFF
- DRILL WITH DRILL CHUCK ADAPTER
- Fig.E
- TROUBLESHOOTING
- Overheating of gearbox surface
- MAINTENANCE
- REPLACING CARBON BRUSHES
- DEFECTS
- Cleaning
- Lubrication
- Faults
- ENVIRONMENT
- GUARANTEE
- DECLARATION OF CONFORMITY (UK)
- Deutsch
- ELEKTRISCHER BOHRHAMMER
- από 01-06-2002
- INBETRIEBNAHME
- INFORMATIONSSURLEPRODUIT
- DÉCLARATION DE CONFORMITÉ
- KOPPLINGTILLOCHFRÁN
- ELEKTROMOS PERGÖ ÜTVEFÚRÓ
- FELHASZNÁLÁS
- N Norsk
- ELEKTRISK ROTASJONSSLAGBOR
- BEREGNET FORMÁL
- SLÂ MASKINEN PÂOG AV
- BORE MED DRILLCHUCKADAPTER
Brand : Ferm
Model : HDM1001
Category : Drill