
SW 733 B1 - Wi-Fi repeater SILVERCREST - Free user manual and instructions
Find the device manual for free SW 733 B1 SILVERCREST in PDF.

| Product type | Wi-Fi Repeater / Access Point |
| Brand | SilverCrest |
| Model | SW 733 B1 |
| Dimensions (L x H x D) | approx. 58 x 98 x 82 mm |
| Weight | approx. 89 g |
| Power supply | 100-240 V~, 50/60 Hz, max. 100 mA |
| Frequencies | 2.4 GHz and 5 GHz (dual band) |
| Wi-Fi standards | 802.11 b/g/n/ac |
| Maximum data rate | Up to 300 Mbit/s (2.4 GHz) / 733 Mbit/s (5 GHz) |
| Encryption | WPA, WPA2, WEP (64/128) |
| Operating modes | Repeater (range extension) and Access Point |
| Configuration | WPS, web interface (https://repeater.setup), mobile app |
| Indicators | Signal strength, WPS, Network, Power |
| Buttons | WPS, Reset, Mode selector |
| Connectors | 1 RJ-45 port (10/100 Mbit/s) |
| Operating temperature | 5 °C to 35 °C |
| Storage temperature | -20 °C to 60 °C |
| Operating humidity | 85% RH max. |
| Cleaning | Dry cloth, do not use aggressive liquids |
| Safety | Do not open, keep at 20 cm from body, avoid moisture |
| Warranty | 3 years |
| Package contents | Repeater, network cable, user manual, GNU GPL booklet |
| Manufacturer | TARGA GmbH, Coesterweg 45, DE-59494 Soest, Germany |
Frequently Asked Questions - SW 733 B1 SILVERCREST
User questions about SW 733 B1 SILVERCREST
0 question about this device. Answer the ones you know or ask your own.
Ask a new question about this device
Download the instructions for your Wi-Fi repeater in PDF format for free! Find your manual SW 733 B1 - SILVERCREST and take your electronic device back in hand. On this page are published all the documents necessary for the use of your device. SW 733 B1 by SILVERCREST.
USER MANUAL SW 733 B1 SILVERCREST
B

natural_image
Coiled white cable with connectors, no visible text or symbolsC

natural_image
Simple line drawing of an open book with no text or symbols visibleA SilverCrest SWV 733 B1 Dualband-WLAN-Verstärker
B Netzwerkkabel
natural_image
Exterior view of a silver Crest medical device with a circular connector (no visible text or symbols on the device body)natural_image
Illustration of a wireless router with WiFi and ports, showing a hand cursor pointing to the button (no text or symbols on the device itself)34 - Deutsch
natural_image
Exterior view of a silver SilverCrest washing machine (no visible text or symbols on the device body)natural_image
Symbol of a trash bin crossed with no visible text or labelsSafety instructions 85
Storing the device when not in use 93
Copyright 93
Before initial use....94
Initial use....95
Setting mode....95
76 - English
SilverCrest SWV 733 B1
Repeater mode....96
WPS - The easiest type of configuration....98
Manual configuration 100
Access Point mode (Router mode) 108
WPS - Connect to the Access Point (Router mode)....118
Manual connection to the Access Point....119
Configuring the Dual-Band Range Extender with the app....120
Operating instructions for the SilverCrest SWV 733 B1 app....121
Configuration menu of the Dual-Band Range Extender 122
Quick Setup....126
Settings - Status....126
Settings - Wi-Fi Setup 127
Settings - host network (only in Access Point mode).... 133
SilverCrest SWV 733 B1
Settings - System Tools 137
Environmental and waste disposal information.... 144
Notes on EU Declaration of Conformity 145
Troubleshooting 145
Notes on the guarantee and service 148
Congratulations!
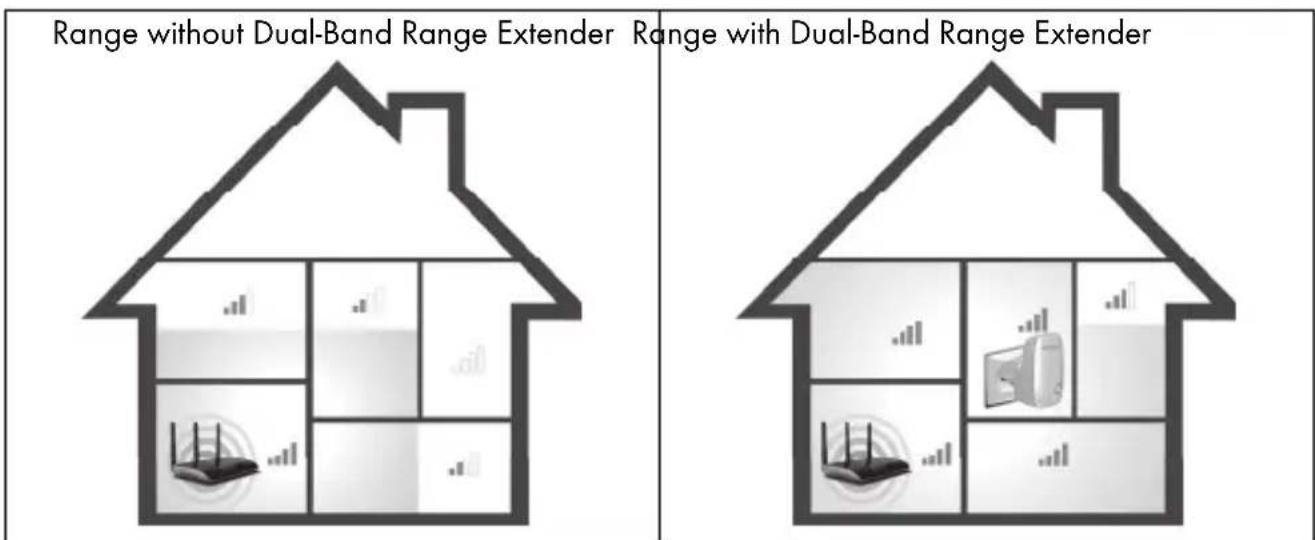
By purchasing the SilverCrest AC Dual-Band Range Extender "SWV 733 B1", hereinafter referred to as Dual-Band Range Extender, you have opted for a high-quality product.
Familiarise yourself with the Dual-Band Range Extender before using it for the first time and read these operating instructions carefully. Observe the safety instructions and only use the Dual-Band Range Extender in the manner described in these operating instructions and for the indicated fields of application.
Keep these operating instructions in a safe place. Hand over all documents in the event that you pass on the Dual-Band Range Extender to a third party. These operating instructions are part of the product.
If you give the Dual-Band Range Extender away, the factory default must be downloaded, please observe the "Backup/restore" chapter on Page 141.
Intended use
This Dual-Band Range Extender is an information technology device. It increases the range of an existing Wi-Fi host network. The Dual-Band Range Extender can also be used as an access point, for example, to use a router without its own Wi-Fi as a "Wi-Fi router". It may only be used for private purposes and are not for industrial or commercial use. In addition, the Dual-Band Range Extender must not be used outside of closed rooms or in regions with a tropical climate. Any other use is deemed improper. This device meets all relevant standards and directives specified in the Declaration of Conformity. Compliance with these standards is no longer guaranteed if a change is made to the Dual-Band Range Extender without the authorisation of the manufacturer. The manufacturer shall not be liable for any damages or faults arising as a result. Please observe the national regulations and/or laws in the respective country of use.
Package contents
Remove the Dual-Band Range Extender and the accessories from the packaging and remove the packaging material completely. Check the package contents for completeness. Contact Service immediately in case of missing components.
A
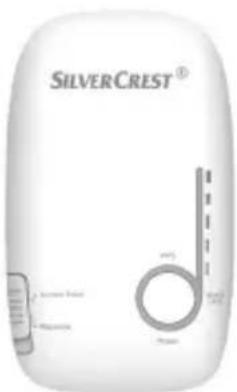
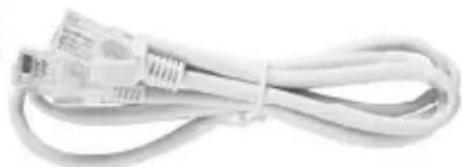
B
natural_image
Coiled white cable with connectors, no visible text or symbolsC

natural_image
Simple line drawing of an open book with no text or symbols visibleA SilverCrest SWV 733 B1 Dual-Band Range Extender
B Network cable
C These operating instructions (symbol image)
"GNU General Public Licence" flyer (without image)

A separate flyer on the "GNU General Public Licence" is enclosed with this Dual-Band Range Extender. This flyer is also available for download at www.lidl-service.com.
English - 81
Overview
These operating instructions also have a cover that can be unfolded. The inside of the cover provides a schematic of the Dual-Band Range Extender and a number legend. The numbers identify the following parts/functions:
1 Field strength indicator
2 WPS LED
3 Reset button
4 WAN/LAN LED
5 WIFI/LAN socket (network connection, RJ-45)
6 Power LED
7 WPS button
8 Mode selector switch
LED indicators
| LED Status Meaning | ||
| Field strength indicator (1) | lights up The more bars that light up, the better the reception(all bars light up in Access Point mode) | |
| flashes | No reception | |
| WPS (2) flashes | WPS connection is being established or WPS signal of another device is expected | |
| WAN/LAN (4) lights | lights up Connection is established | |
| off Connection is not established | ||
| Power (6) lights up | The Dual-Band Range Extender is switched on | |
| off The Dual-Band Range Extender is switched off | ||
Technical data
| Input voltage | 100-240 V~, 50/60 Hz |
| Power consumption max. 100 mA | |
| Transmitting capacity max. 100 mW (2.4 G / 5 G) | |
| Wi-Fi standards 802.11 b, 802.11 g, 802.11 n, 802.11 ac | |
| Frequency band 2.4 G / 5 G | |
| Data transfer rate | Up to 300 Mbps in n-standard / Up to 733 Mbps in ac-standard |
| Encryption WPA, WPA2, WEP (128/64) * | |
| Dimensions (W x H x D) approx. 58 x 98 x 82 mm | |
| Weight approx. 89 g | |
| Operating temperature, atmospheric humidity 5°C to 35°C, max. 85% relative humidity | |
| Storage temperature, atmospheric humidity -20°C to 60°C, max. 90% relative humidity |
* WEP (128/64) encryption only with 802.11 b/g.
The specifications and design are subject to change without notice.
Safety instructions
Before using the device for the first time, please read the following instructions carefully, even if you are familiar with using electronic devices. Keep these operating instructions in a safe place for future reference.

DANGER! This icon, in conjunction with the word 'Danger', indicates an impending dangerous situation which, if not prevented, may lead to serious injuries or even death.

WARNING! This icon, in conjunction with the word 'Warning', indicates important information for the safe operation of the device and user safety.

CAUTION! This icon, with the word 'Caution', indicates important information for protection against damage to property.

This icon indicates that further information on the topic is available.
Operating environment
This Dual-Band Range Extender must only be used indoors. The Dual-Band Range Extender is not designed for operation in rooms with high temperature, humidity (for example, bathroom) or excessive dust. Operating temperature and operating humidity: 5^ C to 35^ C, max. 85% relative humidity.
Please always maintain the Dual-Band Range Extender at a minimum distance of 20 cm from the body to avoid exposure to radio radiation.

DANGER! Please make sure that
- the device is never touched with wet hands, there is a risk of electric shock.
- the housing openings are used to ventilate the Dual-Band Range Extender and must never be covered or locked, there is a risk of fire.
- there are no naked flames (for example, burning candles) placed on or near the device

CAUTION! Please make sure that
- the device is not exposed to direct sources of heat (for example, heaters)
- the device is not exposed to direct sunlight or strong artificial light
- the device is not placed close to magnetic fields (for example, loudspeakers)
- no foreign bodies penetrate into the device
- any contact with splashing and dripping water and aggressive liquids is avoided, and the device is not operated in the vicinity of water; in particular, it must never be submerged (do not place items filled with liquids, such as vases or beverage containers, onto or next to the device).
- the device is not exposed to strong temperature fluctuations, as otherwise condensation can occur and lead to electrical short circuits. If, however, the device has been exposed to significant temperature fluctuations, wait approximately two hours until the device has reached ambient temperature before starting it up.
- The device is not exposed to excessive shocks and vibrations.

DANGER! Operational safety
- Only connect the Dual-Band Range Extender to a freely accessible socket so that it can be quickly disconnected from the mains in the event of danger (smoke, smell of burning). The socket must also always be easily accessible during operation.
- As soon as the Dual-Band Range Extender is connected to the mains, it starts receiving power. Even when the device is not in use, it consumes minimal power. Disconnect the Dual-Band Range Extender from the mains if the device is not being used for prolonged periods, e.g. during holidays. This minimises the risk of a fire or smouldering, which always exists with electrical device is connected to the mains power supply. To disconnect the Dual-Band Range Extender from the mains fully, this must be removed from the socket.
- Do not use any adapter plugs or extension cords that are damaged or do not meet the relevant safety standards.
- Never open the housing of the device. There is a danger of death due to risk of electric shock when the housing is open.

CAUTION! Operational safety
- Always disconnect the Dual-Band Range Extender before a storm or thunder storm if there is a risk of lightning as the Dual-Band Range Extender can be irreparably damaged by high voltage surges if lightning strikes.

DANGER! Children and people with disabilities
Electrical devices must be kept out of the reach of children. Also, people with restricted physical, mental or sensory abilities should only use electrical devices be appropriate to their capacity. Never leave children or people with disabilities unattended with electrical devices, unless they have been instructed on their use or will be supervised by a person responsible for their safety.
Children should generally be supervised to ensure they do not play with this device. Small parts can be lethal if swallowed. Keep the packaging film away from children.

DANGER! There is the risk of suffocation.

DANGER! Wireless interface
Do not use the device if you are on a plane, in a hospital, operating room or in the vicinity of a medical electronic system. The radio waves transmitted can damage the functioning of sensitive devices. Keep the device at least 20 cm away from a pacemaker or an implanted defibrillator, as otherwise the correct functioning of the pacemaker or implanted defibrillator could be impacted by radio waves. The radio waves transmitted can cause static noise in hearing aids. When wireless components are switched on, do not place the device in the vicinity of flammable gases or in a potentially explosive environment (e.g. paint shop), as the radio waves transmitted can trigger an explosion or a fire. The range of the radio waves depends on the setting and ambient conditions. When transmitting data via a wireless connection, it is also possible for unauthorised
90 - English
third parties to receive this data. Targa GmbH is not responsible for wireless or radio interference caused by unauthorised changes to this device. Furthermore, Targa accepts no liability for replacing or exchanging connecting cables and devices that were not specified by Targa GmbH. The user alone is responsible for remedying malfunctions caused by such unauthorised changes and replacing or exchanging devices.

WARNING! Cables
Always take hold of the cable by the plug and do not pull on the cable itself. Do not place any items of furniture or other heavy objects on cables. Make sure that the cables are not bent, particularly at the plug and at the connecting sockets. Never make a knot in a cable and do not connect it with other cables. All cables should be laid in such a way that no one steps on them or is obstructed by them.

WARNING! Maintenance / cleaning
Repair work is required if the device has been damaged, for example if the device housing is damaged, liquids or objects have gotten inside the device, or if the device has been exposed to rain or moisture. Repair work is also required if the device does not work properly or has been dropped. If you notice any smoke, unusual noises or smells, immediately unplug the device from the socket. In these cases, you must not continue to use the device until it has been checked by a specialist. All repair work should only be carried out by qualified specialists. Never open the housing of the device. Clean the device using a clean, dry cloth and never use abrasive liquids. Do not try to open the housing of the device, as this will void your guarantee.
Storing the device when not in use
If you do not want to use the device for a long period of time, disconnect the Dual-Band Range Extender from the mains. Ensure that the storage temperature remains between -20^ and 60^ . The air humidity should not exceed 90% relative humidity.
Note: The temperature ranges and relative humidity for storage and operation are quite different, thus observe the information in the "Operating environment" section on Page 86.
Copyright
All contents of these operating instructions are subject to copyright law and are provided to the user solely as a source of information.
Any form of copying or reproduction of data and information without the express written permission of the author is prohibited. This also concerns commercial use of the content and data.
The text and illustrations correspond to the technical standards at the time of printing.
Before initial use
Check the Dual-Band Range Extender for signs of damage. If the Dual-Band Range Extender is damaged, it must not be put into operation.
The Dual-Band Range Extender increases the range of your Wi-Fi in the home network. It supports the following two modes:
Repeater
The range of your wireless network (Wi-Fi) is extended. As such, Wi-Fi devices, which are outside the range of your wireless network can be connected to the wireless network via the Dual-Band Range Extender.
Access Point
This mode can be used, for example, to use a router without its own Wi-Fi as a "Wi-Fi router". The router must be connected to the Dual-Band Range Extender via the LAN cable (network cable, see package contents).
Initial use

Should you need any support during initial use of your Dual-Band Range Extender, we will be more than happy to help. Our contact number can be found on Page 149.
Setting mode
Select the desired mode using the mode selector switch (8). To do so, move the mode selector switch (8) to the desired position (Access Point or Repeater).
Repeater mode
Repeater mode is used to extend the range of your wireless network. Wi-Fi devices, outside the range of your wireless network can be connected to the wireless network via the Dual-Band Range Extender.
The mode selector switch (8) must be set to the "Repeater" position for Repeater mode.

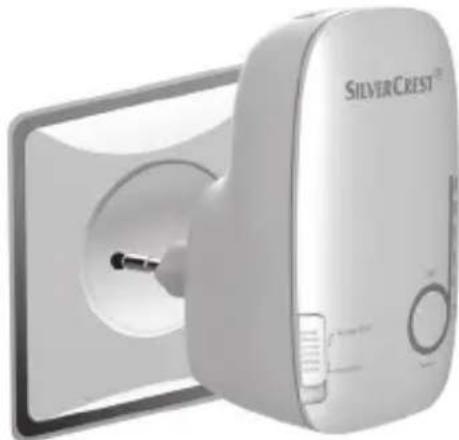
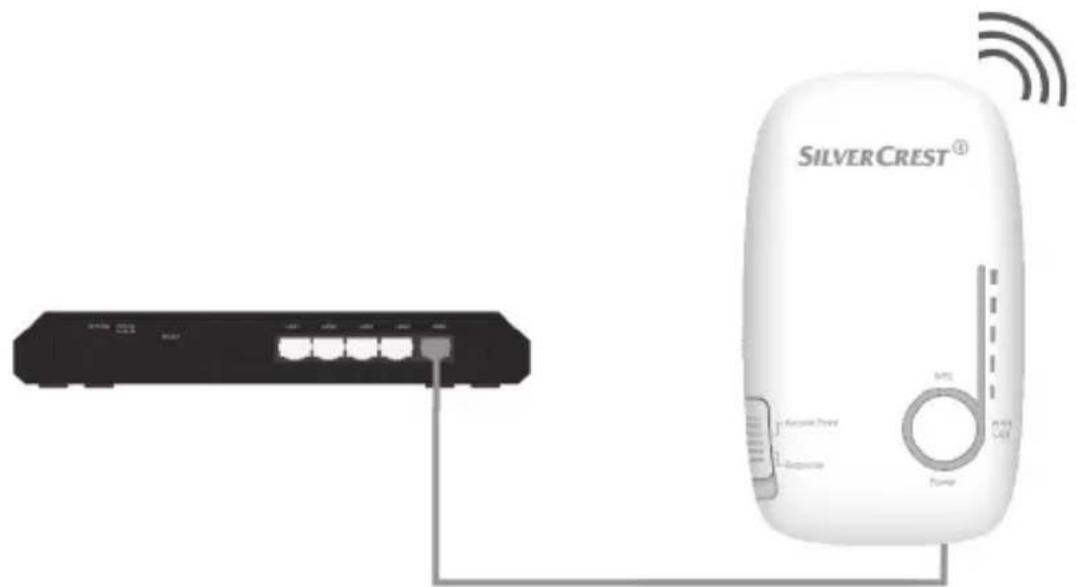
The Dual-Band Range Extender should be placed near (approx. 2 to 3 metres) the wireless router the first time it is used.
Plug the Dual-Band Range Extender into a power socket, which is always easily accessible.
natural_image
Exterior view of a silver Crest medical device with a circular connector and control panel (no visible text or symbols)The Dual-Band Range Extender requires a certain amount of time (boot time) after it is switched on before initial use. Wait approx. 3 minutes before using the Dual-Band Range Extender.
There are two different ways to configure the Dual-Band Range Extender. If your Wi-Fi router supports WPS, you can use this simple function to easily set up the Dual-Band Range Extender. If
you would like to use a Wi-Fi router without WPS, you must connect the Dual-Band Range Extender via network cable or Wi-Fi to your computer and configure it.
WPS - The easiest type of configuration
This is the easiest way to configure the Dual-Band Range Extender. First, check whether your Wi-Fi router supports WPS. To do so, refer to the documentation that came with your wireless router.
- Press the WPS button (7) on the Dual-Band Range Extender for at least 6 seconds. After you have released the WPS button (7), the WPS LED (2) flashes rapidly for approx. 2 minutes.
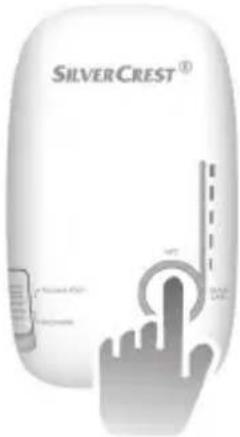
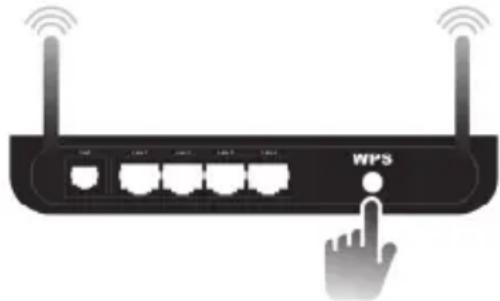
- Within these 2 minutes, press the connection button (WPS) on your Wi-Fi router. To do so, refer to the documentation that came with your wireless router.
natural_image
Illustration of a wireless router with WiFi and USB port labels, showing signal waves and a finger pointing to the button (no text or symbols beyond 'WPS' and connection icons)(Symbolic representation, connection button (WPS) can be differently arranged and designated depending on the router model)
The Dual-Band Range Extender now connects automatically to your Wi-Fi router and copies all of the settings. It can take up to three minutes for the connection to be established. Once the connection has been successfully established, the Field strength indicator (1) displays the signal strength. You can now use the Dual-Band Range Extender. The Dual-Band Range Extender can now be accessed under the host SSID (wireless name) and the host password of your Wi-Fi router. Your host password can usually be found on your router, provided it has not been changed by you.
You can now use the Dual-Band Range Extender where the Wi-Fi signal is to be extended. The optimum location for the Dual-Band Range Extender is exactly in the middle between your
English - 99
wireless router and wireless devices, which are to be connected to the wireless network via the Dual-Band Range Extender. Test other locations if the Dual-Band Range Extender does not work there. Plug the Dual-Band Range Extender only into a power socket, which is easily accessible.

It is possible to configure multiple Dual-Band Range Extenders. These should be configured one after the other.
If your Wi-Fi router does not support WPS or the connection fails for some other reasons, you must manually configure the Dual-Band Range Extender.
Manual configuration
There are two different ways to configure the Dual-Band Range Extender.

If you are not using the host network default settings on your computer and have manually set an IP address, you must restore the host network settings to Automatically obtain IP address. For further details, please consult the documentation provided with your computer.
- You can configure the Dual-Band Range Extender via the network cable. If you want to configure the Dual-Band Range Extender via the network cable, you must connect the Dual-Band Range Extender to your computer. Use the network cable provided with the device for this purpose. Insert one end of the network cable into the WAN/LAN socket (5) of the Dual-Band Range Extender and the other into the LAN socket of your computer.
- Alternatively you can perform the configuration via a wireless network. To do so, start the search for available wireless networks on your computer. The host network SWV 733 B1 2.4G or SWV 733 B1 5G is displayed in the list of available wireless networks. Select the host network SWV 733 B1 2.4G or SWV 733 B1 5G and click on the Connect button to wirelessly connect to the Dual-Band Range Extender. The Dual-Band Range Extender comes secured with a host password. After entering the host password (9426824723156819), the Connect without configuring the network option must be clicked on. The "Limited network connection" message is displayed, if necessary.
Now open the Internet browser on your computer. Enter https://repeater.setup in the address line of your Internet browser and confirm the entry with the Enter key.
The connection to the Dual-Band Range Extender is established encrypted. If necessary, a message is shown stating that the certificate is not secure. Please assume that the certificate is secure and originates from the manufacturer. The login window of the Dual-Band Range Extender opens. Select the desired language and enter the username and password (both set as: admin). Then click on the Login button. The configuration menu of the Dual-Band Range Extender now opens.

If the configuration menu of the Dual-Band Range Extender is opened for the first time, you are prompted to change the username and password.
You must use a username with at least 8 characters, including uppercase and lowercase. Numbers and special characters are optional.
You must use a password with at least 10 characters, including uppercase and lowercase, numbers and special characters.
Make a note of the username and password and store them in a safe place!
The configuration is automatically started using the wizard. If the wizard does not start automatically, click on the Quick Setup button.
From the list, select a wireless network whose range you wish to extend. If the desired wireless network is not shown, update the list by clicking on the Rescan button
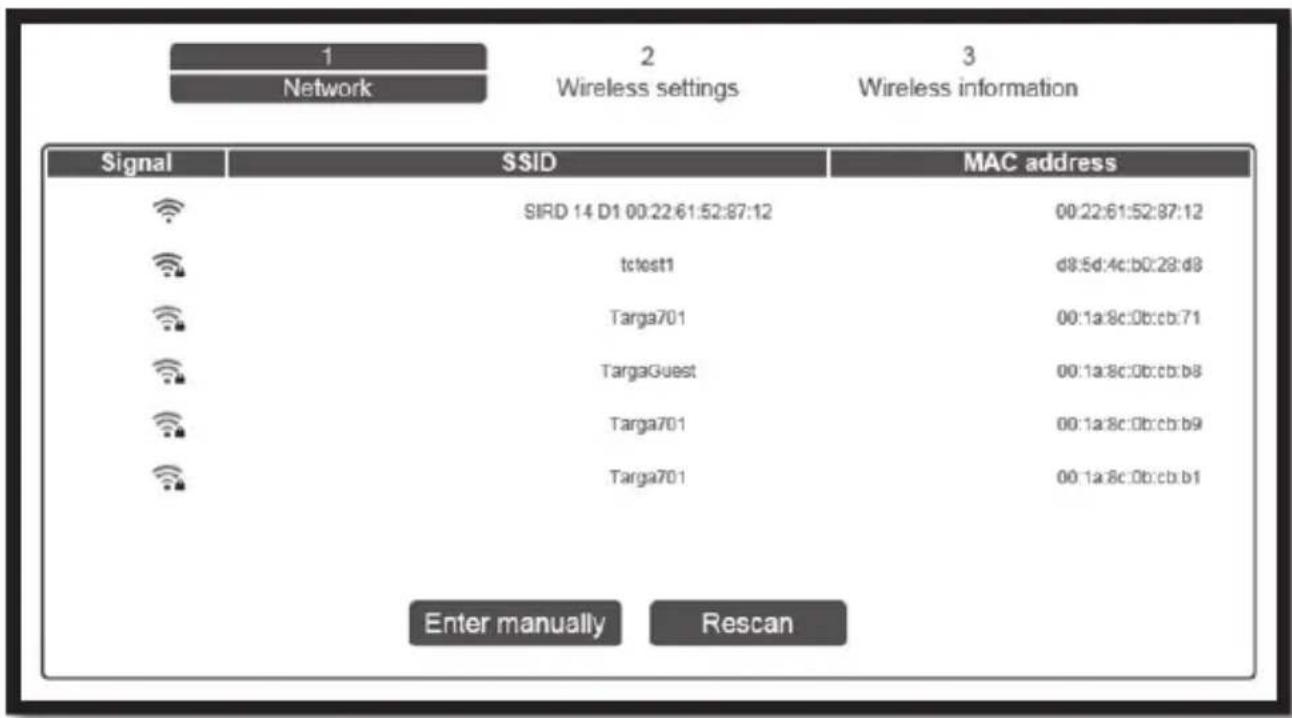
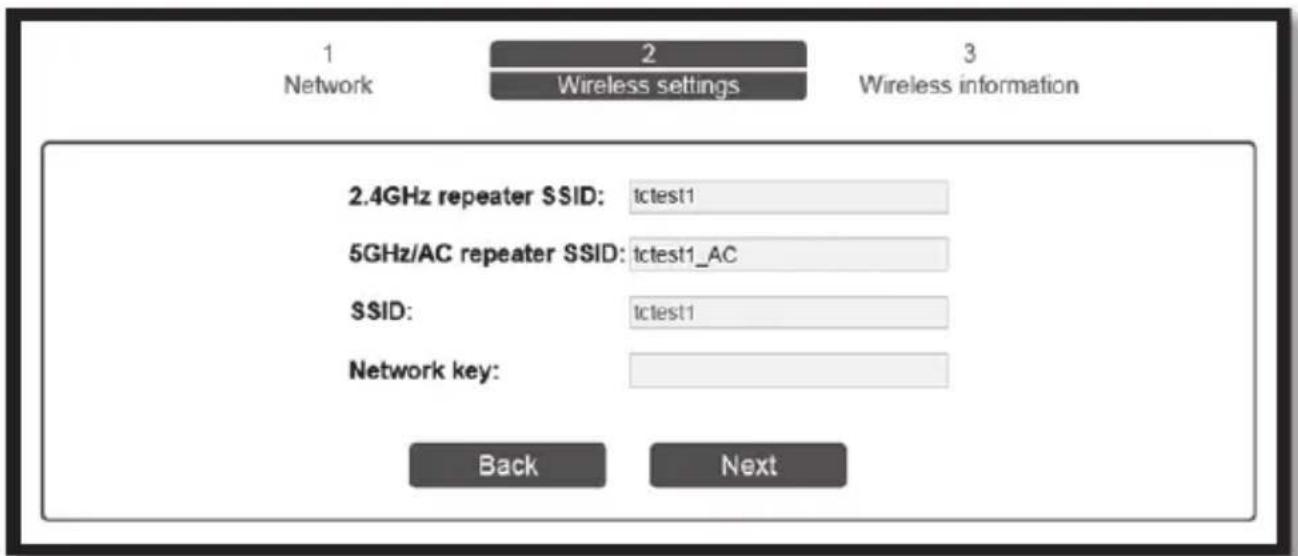
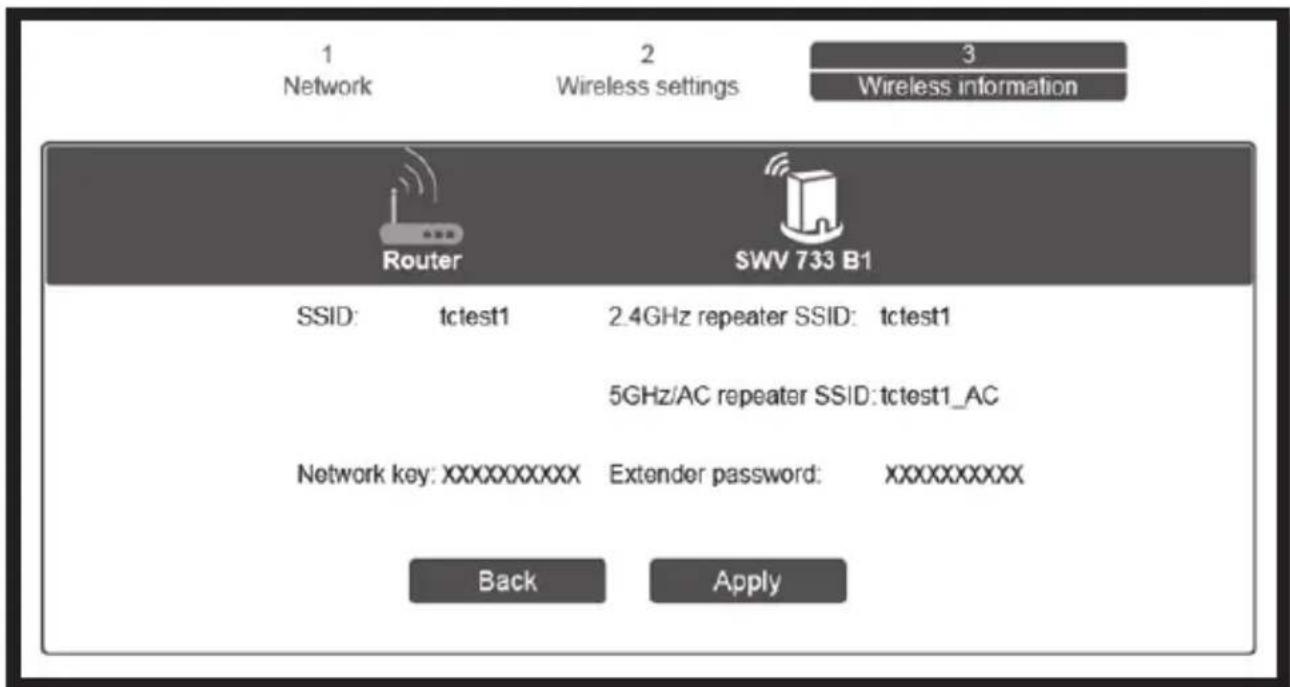
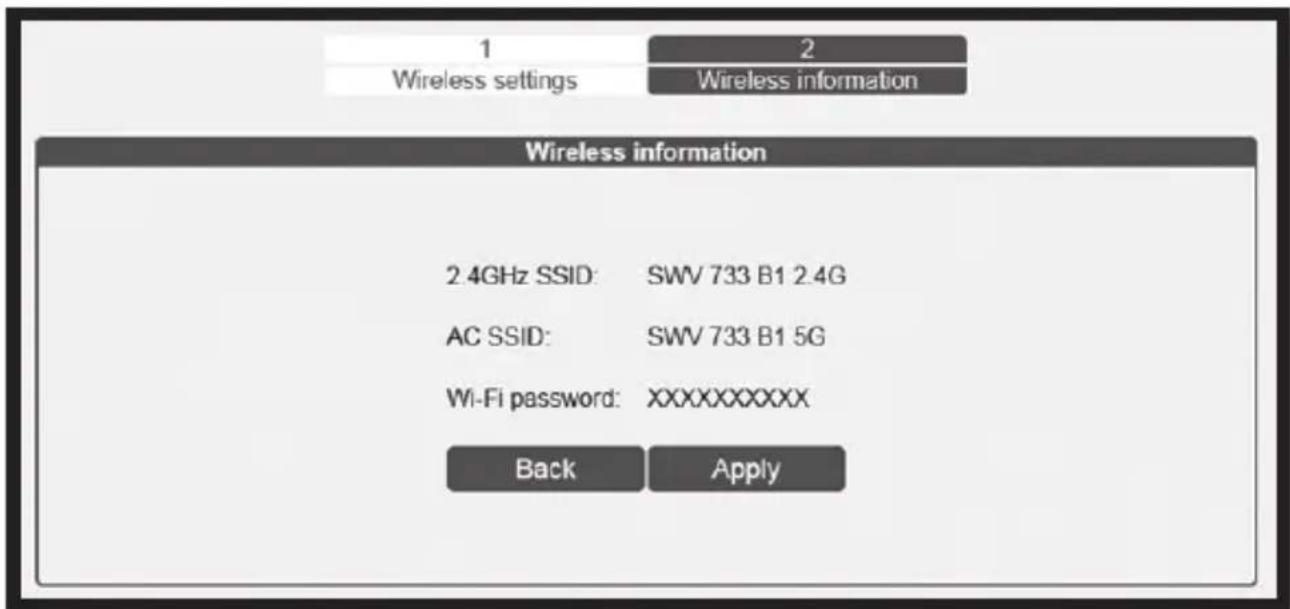
Once you have selected a wireless network, you can now specify a host SSID (wireless name) for the Dual-Band Range Extender for 2.4 G repeater SSID and 5 G/AC repeater SSID. Under Network key, enter the host password of your Wi-Fi router. Click on the Next button once the entry is complete.
Check your settings and confirm them by pressing the Apply button. Click on the Back button to make changes.
The Dual-Band Range Extender now performs a reboot. Wait for one minute before making any further entries. Follow the following instructions:
Congratulations!
Please note that, after applying all network settings, your device must have a valid network connection with the Wi-Fi repeater.
2.4GHz SSID:
5GHz/AC SSID:
Wi-Fi password:
tctest1
tctest1_AC
XXXXXXXXXX
Once your device has a valid network connection to the wifi repeater again, you can access the GUI by clicking the Finish button.
☑ I am connected to the extended network.
Finish
Set the checkmark for "I am connected to the extended network." and then click on the Finish button. The status page of the configuration menu is now opened. Please note that a connection to the Dual-Band Range Extender must be established for this purpose. To do so, connect the Dual-Band Range Extender to your computer via the network cable.
Following the reboot, the Dual-Band Range Extender can be accessed under the host SSID (wireless name) previously specified by you and the host password of your Wi-Fi router. Your host password can usually be found on your router, provided it has not been changed by you.
Once the connection has been successfully established, the Field strength indicator (1) displays the signal strength. You can now use the Dual-Band Range Extender where the Wi-Fi signal is to be extended. The optimum location for the Dual-Band Range Extender is exactly in the middle between your wireless router and wireless devices, which are to be connected to the wireless network via the Dual-Band Range Extender. Test other locations if the Dual-Band Range Extender does not work there. Plug the Dual-Band Range Extender only into a power socket, which is easily accessible.
Access Point mode (Router mode)
Use Access Point mode to set up "wireless access to your LAN". In this mode, wireless end devices can be connected to the Dual-Band Range Extender. You can also use this mode to make a formerly non-wireless-enabled router wireless-enabled.
Example of use:
The mode selector switch (8) must be set to the "Access Point" position for Access Point mode.
Plug the Dual-Band Range Extender into a power socket, which is always easily accessible.
natural_image
Exterior view of a silver crystal scanner device (no visible text or symbols on the device body)The Dual-Band Range Extender requires a certain amount of time (boot time) after it is switched on before initial use. Wait approx. 3 minutes before using the Dual-Band Range Extender.
There are two different ways to configure the Dual-Band Range Extender.

If you are not using the host network default settings on your computer and have manually set an IP address, you must restore the host network settings to Automatically obtain IP address. For further details, please consult the documentation provided with your computer.
-
You can configure the Dual-Band Range Extender via the network cable. If you want to configure the Dual-Band Range Extender via the network cable, you must connect the Dual-Band Range Extender to your computer. Use the network cable provided with the device for this purpose. Insert one end of the network cable into the WAN/LAN socket (5) of the Dual-Band Range Extender and the other into the LAN socket of your computer.
-
Alternatively you can perform the configuration via a wireless network. To do so, start the search for available wireless networks on your computer. The host network SWV 733 B1 2.4G or SWV 733 B1 5G is displayed in the list of available wireless networks. Select the host network SWV 733 B1 2.4G or SWV 733 B1 5G and click on the Connect button to wirelessly connect to the Dual-Band Range Extender. The Dual-Band Range Extender comes secured with a host password. After entering the host password (9426824723156819), the Connect without configuring the network option must be clicked on. The "Limited network connection" message is displayed, if necessary.
Now open the Internet browser on your computer. Enter https://repeater.setup in the address line of your Internet browser and confirm the entry with the Enter key.
The connection to the Dual-Band Range Extender is established encrypted. If necessary, a message is shown stating that the certificate is not secure. Please assume that the certificate is secure and originates from the manufacturer. The login window of the Dual-Band Range Extender opens. Select the desired language and enter the username and password (both set as: admin). Then click on the Login button. The configuration menu of the Dual-Band Range Extender now opens.

If the configuration menu of the Dual-Band Range Extender is opened for the first time, you are prompted to change the username and password.
You must use a username with at least 8 characters, including uppercase and lowercase. Numbers and special characters are optional.
You must use a password with at least 10 characters, including uppercase and lowercase, numbers and special characters.
Make a note of the username and password and store them in a safe place!
SilverCrest SWV 733 B1
The configuration is automatically started using the wizard. If the wizard does not start automatically, click on the Quick Setup button.
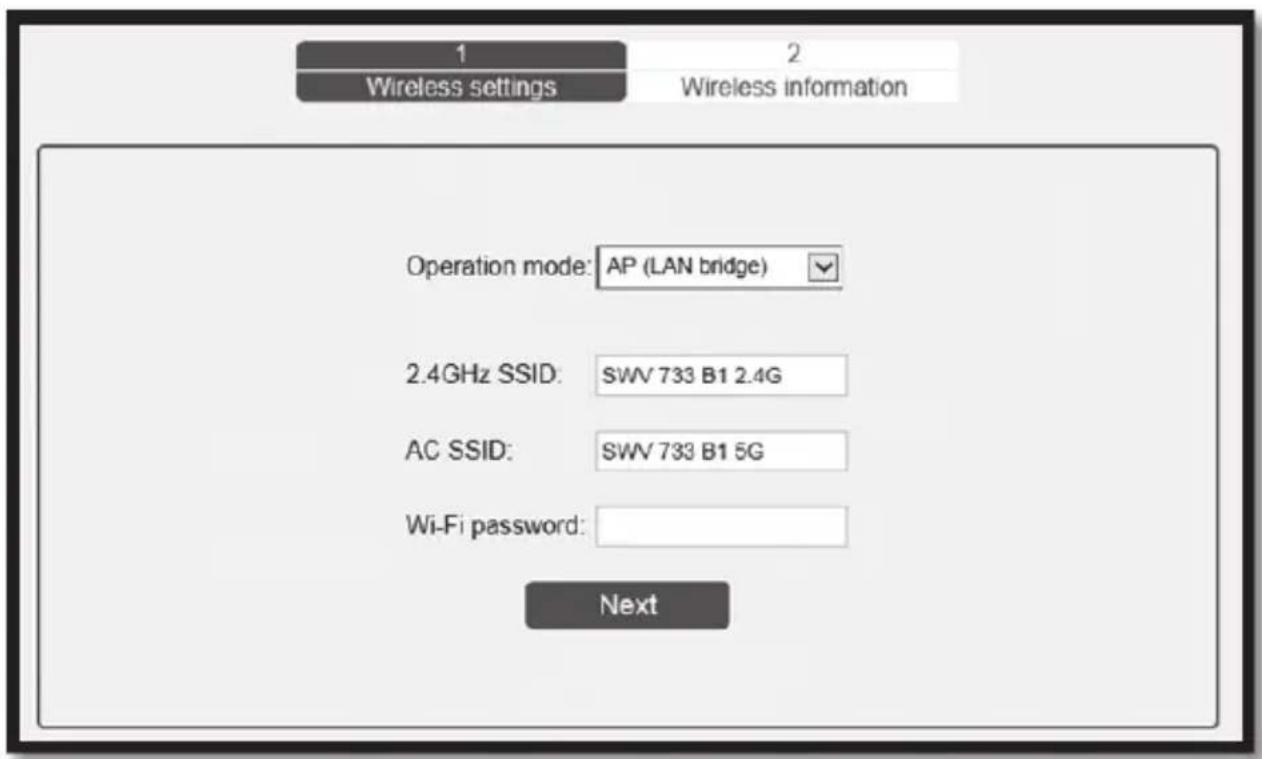
Select AP (LAN bridge) or Router Operation Mode.
112 - English
AP (LAN bridge)
In this mode, the Dual-Band Range Extender functions as an interface for WLAN devices to LAN.
Router
In this mode, you can use a DSL modem, for example, with connection to the Dual-Band Range Extender like a Wi-Fi router. In doing so, your end devices can be wirelessly connected to the Dual-Band Range Extender and you can use the Internet connection via your DSL modem and Internet provider.
If you have selected Router mode, you must still select the Wi-Fi type. The following options are available:
- Dynamic IP address – the IP address is assigned automatically by the Internet service provider with this option. No further entries are required here.
- PPPoE – you must specify your username (account) and password for your Internet service provider with this option. Contact your Internet service provider for the username and password.

Please contact your Internet service provider, if you are unsure which option is right for you.
Under Wi-Fi password, enter a new password. Make a note of the host password and store it in a safe place!

You must use a secure password with at least 10 characters, including numerical and alphanumeric characters, lowercase and uppercase as well as a combination with special characters.

WPA/WPA2 encryption is automatically used, as this offers the highest level of security.
Click on the Next button once the entry is complete.
Check your settings and confirm them by pressing the Apply button. Click on the Back button to make changes.
The Dual-Band Range Extender now performs a reboot. Wait for one minute before making any further entries. Follow the following instructions:
:-) Please wait a few seconds!
Please note that, after applying all network settings, your device must have a valid network connection with the Wi-Fi repeater.
2.4GHz SSID:
SWV 733 B1 2.4G
5GHz/AC SSID:
SWV 733 B1 5G
Wi-Fi password:
XXXXXXXXXXXX
Once your device has a valid network connection to the wifi repeater again, you can access the GUI by clicking the Finish button.
√ I am connected to the extended network.
Finish
Set the checkmark for "I am connected to the extended network." and then click on the Finish button. The status page of the configuration menu is now opened. Please note that a connection to the Dual-Band Range Extender must be established for this purpose. To do so, connect the Dual-Band Range Extender to your computer via the network cable.
Following the reboot, the Dual-Band Range Extender can be accessed under the host SSID specified by you and the host password.
WPS - Connect to the Access Point (Router mode)
This is the easiest way to connect to the Access Point. First, check whether your WPS function supports your end device. For further details, please consult the documentation provided with your end device.
- Press the WPS button (7) on the Dual-Band Range Extender for at least 3 seconds. After you have released the WPS button (7), the WPS LED (2) flashes slowly for approx. 2 minutes.
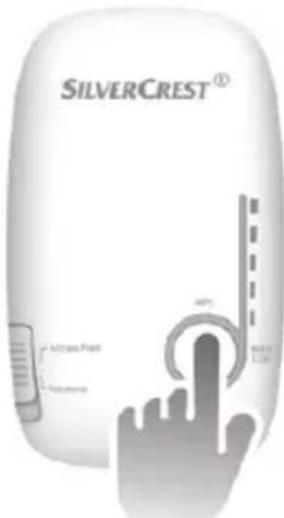
- Within these 2 minutes, press the connection button (WPS) on your end device. For further details, please consult the documentation provided with your end device.
Your end device now connects automatically to your Dual-Band Range Extender (Access Point) and copies all of the settings. You can now wirelessly access the Dual-Band Range Extender (Access Point).
If your end device does not support WPS, you can also manually establish the connection to the Dual-Band Range Extender (Access Point).
Manual connection to the Access Point
To manually establish a connection to the Dual-Band Range Extender (Access Point), you need to search for available wireless networks on your end device. In the list of available wireless networks, you are displayed the Dual-Band Range Extender (Access Point) under the SSID specified by you (wireless name). Now select the corresponding host SSID (wireless name) in order to wirelessly connect your end device to the Dual-Band Range Extender (Access Point). In doing so, enter the host password specified by you. Please consult the documentation provided with your end device.
Configuring the Dual-Band Range Extender with the app
You can also configure the Dual-Band Range Extender with the SilverCrest SWV 733 B1 app. The SilverCrest SWV 733 B1 app is available for free download in the Apple App Store and in the Google Play Store. To install the app on your mobile device, either directly use the QR codes or search in the respective App Store for SilverCrest SWV 733 B1.

Connect your mobile device to your Dual-Band Range Extender via Wi-Fi. Please consult the documentation provided with your mobile device. The Dual-Band Range Extender comes secured with a host password 9426824723156819.
Launch the app and follow the instructions. Once the connection has been successfully established, the Field strength indicator displays the signal strength on the Dual-Band Range Extender.
Operating instructions for the SilverCrest SWV 733 B1 app
Operating instructions for the SilverCrest SWV 733 B1 app can be downloaded under the following links. Either use the QR codes or enter the adjacent command line into your browser.
| iOS |  | https://www.targa.de/downloads/IAN300187/iOS.pdf |
| Android |  | https://www.targa.de/downloads/IAN300187/Android.pdf |
Configuration menu of the Dual-Band Range Extender
You can open the configuration menu of the Dual-Band Range Extender on your computer with an Internet browser. In this configuration menu, you can make advanced settings to the Dual-Band Range Extender, display information or install a new firmware version.
There are two different ways to configure the Dual-Band Range Extender.

If you are not using the host network default settings on your computer and have manually set an IP address, you must restore the host network settings to Automatically obtain IP address. For further details, please consult the documentation provided with your computer.
-
You can configure the Dual-Band Range Extender via the network cable. If you want to configure the Dual-Band Range Extender via the network cable, you must connect the Dual-Band Range Extender to your computer. Use the network cable provided with the device for this purpose. Insert one end of the network cable into the WAN/LAN socket (5) of the Dual-Band Range Extender and the other into the LAN socket of your computer.
-
Alternatively you can perform the configuration via a wireless network. To do so, start the search for available wireless networks on your computer. The host network SWV 733 B1 2.4G or SWV 733 B1 5G is displayed in the list of available wireless networks. Select the host network SWV 733 B1 2.4G or SWV 733 B1 5G and click on the Connect button to wirelessly connect to the Dual-Band Range Extender. The Dual-Band Range Extender comes secured with a host password. After entering the host password (9426824723156819), the Connect without configuring the network option must be clicked on. The "Limited network connection" message is displayed, if necessary.

Please note that the network name (host SSID) SWV 733 B1 2.4G or SWV
733 B1 5G is only shown, if this has not previously been changed. In the case of a changed host network name, select the corresponding host SSID.

Please note that the host password 9426824723156819 only works, if this has not previously been changed.
Once you have established connection as previously described, open the Internet browser on your computer. Enter https://repeater.setup in the address line of your Internet browser and confirm the entry with the Enter key.
The connection to the Dual-Band Range Extender is established encrypted. If necessary, a message is shown stating that the certificate is not secure. Please assume that the certificate is secure and originates from the manufacturer. The login window of the Dual-Band Range Extender opens. Select the desired language and enter the username and password (both set as: admin). Then click on the Login button.

If the configuration menu of the Dual-Band Range Extender is opened for the first time, you are prompted to change the username and password.
You must use a username with at least 8 characters, including uppercase and lowercase. Numbers and special characters are optional.
You must use a password with at least 10 characters, including uppercase and lowercase, numbers and special characters.
The configuration menu of the Dual-Band Range Extender now opens.
At the top right-hand side, you can change the language of the configuration menu, log out from the configuration menu and reboot the Dual-Band Range Extender. The configuration menu is divided into the following rubrics:
English - 125
Quick Setup
The wizard enables simple configuration of your Dual-Band Range Extender. To start the wizard, click on the Quick Setup button. Now follow the wizard instructions on the screen.
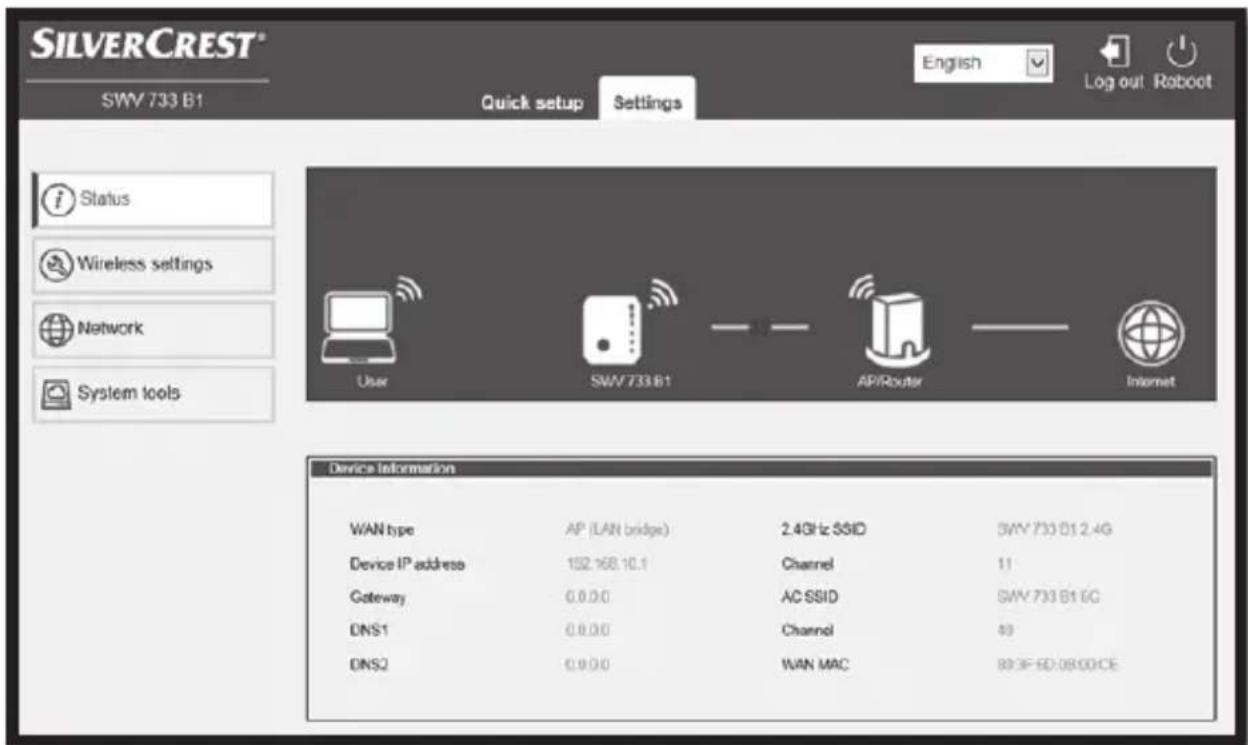
Settings - Status
The information on the wireless network of the Dual-Band Range Extender is shown here. Depending on the mode set (Repeater or Access Point mode) of the Dual-Band Range Extender, not all options may be displayed.
WAN type
Displays which mode (Repeater or Access Point) of the Dual-Band Range Extender is set.
Device IP address
The currently used IP address of the Dual-Band Range Extender is shown here.
Gateway
The IP address of the gateway is displayed here.
DNS1
The IP address of the DNS1 server is displayed here.
126 - English
DNS2
The IP address of the DNS2 server is displayed here.
2.4GHz SSID
The SSID of the Dual-Band Range Extender for the 2.4 G host network is shown here.
AC SSID
The SSID of the Dual-Band Range Extender for the 5 G host network is shown here.
Channel
The channel is shown here which is used by the Dual-Band Range Extender for the 2.4 G and 5 G host network.
Connect to
Here it shown which router the Dual-Band Range Extender is connected to.
Status
The current status of the Dual-Band Range Extender is shown here.
WAN MAC
The WAN MAC address of the Dual-Band Range Extender is shown here.
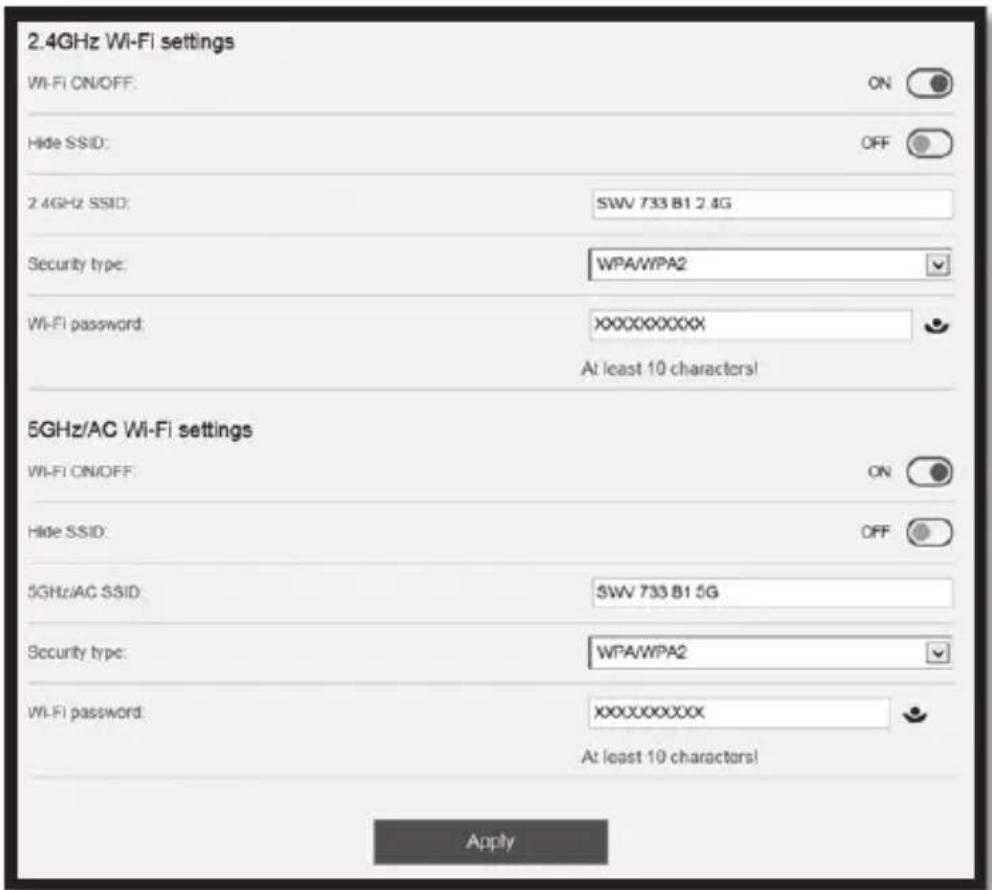
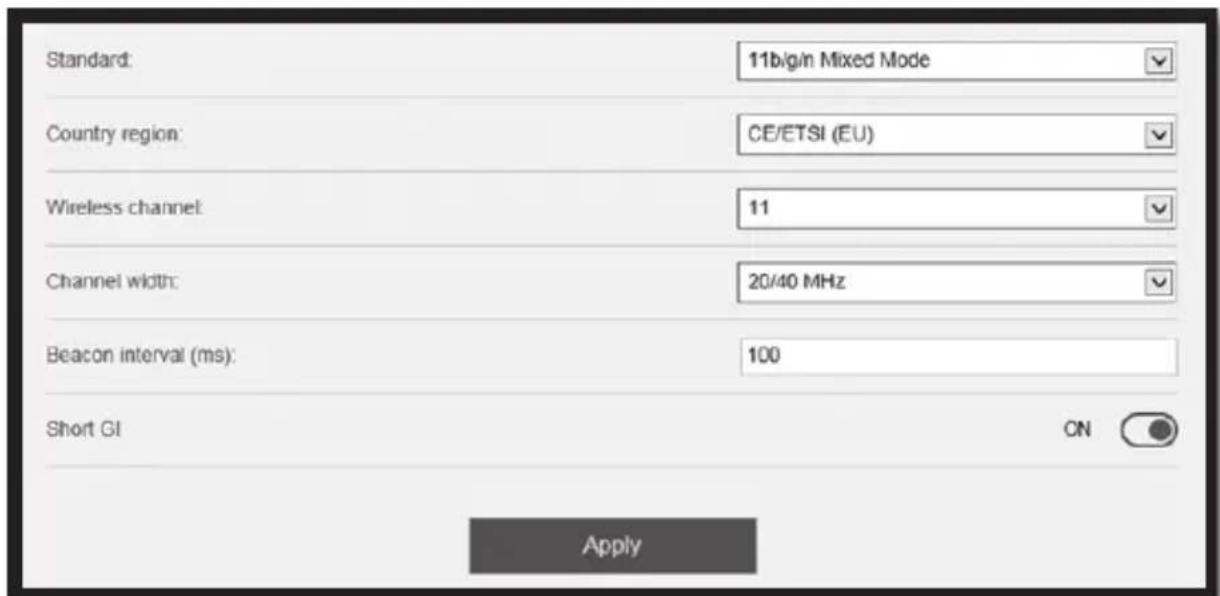
Settings - Wi-Fi Setup
You can make further Wi-Fi settings here. Click directly on the desired option:
Wi-Fi Setup
128 - English
Wi-Fi ON/OFF (only in Access Point mode)
Here you can switch on and off the Wi-Fi for the 2.4 G and 5 G host network. To do so, click on the On or Off button. Please note that it is no longer possible to gain wireless access to the Dual-Band Range Extender when switching off. Connect the Dual-Band Range Extender to your computer via the network cable in order to gain access to the Dual-Band Range Extender again.
Hide SSID
Here you can hide the WLAN for the 2.4 G and 5 G host network. To do so, click on the On or Off button. Please note that for the On option, the host SSID is no longer visible and cannot be found by third-party Wi-Fi devices.
2.4GHz SSID / 5GHz/AC SSID
Here you can adjust the host SSID (wireless name) of the Dual-Band Range Extender for the 2.4 G and 5 G host network. In Repeater mode, the host SSID of the router is named here.
Security type
Here you can set an encryption for the 2.4 G and 5 G host network.

We recommend using WPA/WPA2 encryption, as this offers the highest level of security. If your wireless devices do not support WPA/WPA2 encryption, you must use another encryption.
Wi-Fi password
Enter a new password here. Make a note of the host password and store it in a safe place!

You must use a secure password with at least 10 characters, including numerical and alphanumeric characters, lowercase and uppercase as well as a combination with special characters.
Click on the Apply button to apply the changed settings. The Dual-Band Range Extender now performs a reboot. Wait approx. one minute before making any further entries.
2.4 G Advance Settings
This option should only be used by experienced users. The host network settings ca here. As the settings are tailored to your host network, this is not discussed in further detail here.
For further information, contact our Service Hotline (see Page 149).
Click on the Apply button to apply the changed settings.
5 G/AC Advance Settings
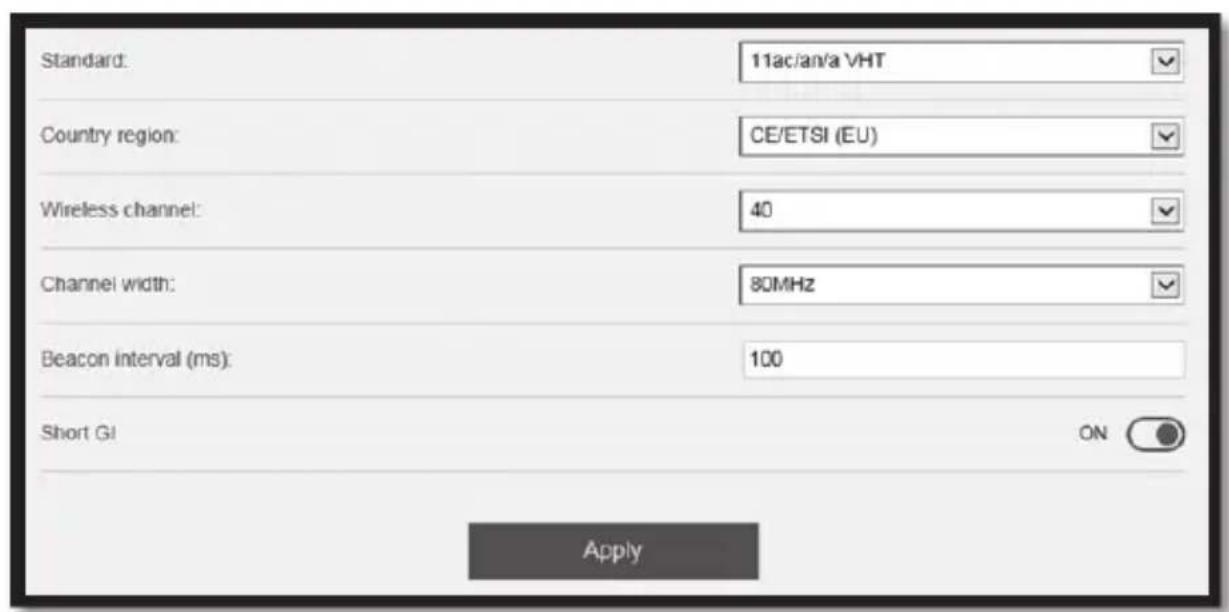
This option should only be used by experienced users. The host network settings can here. As the settings are tailored to your host network, this is not discussed in further detail here.
For further information, contact our Service Hotline (see Page 149).
Click on the Apply button to apply the changed settings.
Settings - host network (only in Access Point mode) Internet settings
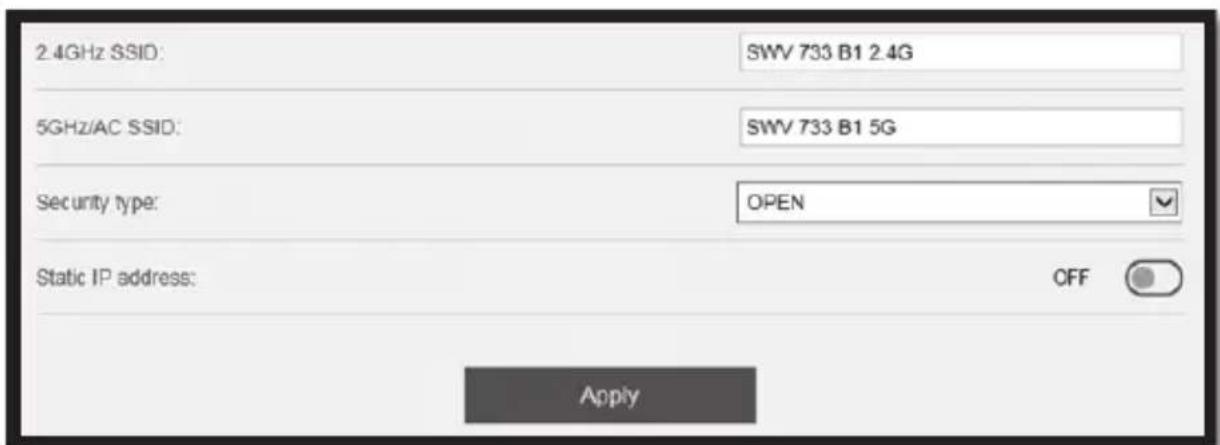
2.4GHz SSID
Here you can adjust the host SSID (wireless name) of the Dual-Band Range Extender for the 2.4 G host network.
5GHz/AC SSID
Here you can adjust the host SSID (wireless name) of the Dual-Band Range Extender for the 5 G host network.
Security type
Here you can set an encryption for the 2.4 G and 5 G host network. Once you have selected an encryption, you must assign a Wi-Fi password.

We recommend using WPA/WPA2 encryption, as this offers the highest level of security. If your wireless devices do not support WPA/WPA2 encryption, you must use another encryption.
Static IP address
Here, set whether you wish to use a static IP address. For this purpose, you can set the switch to On or Off.
DHCP
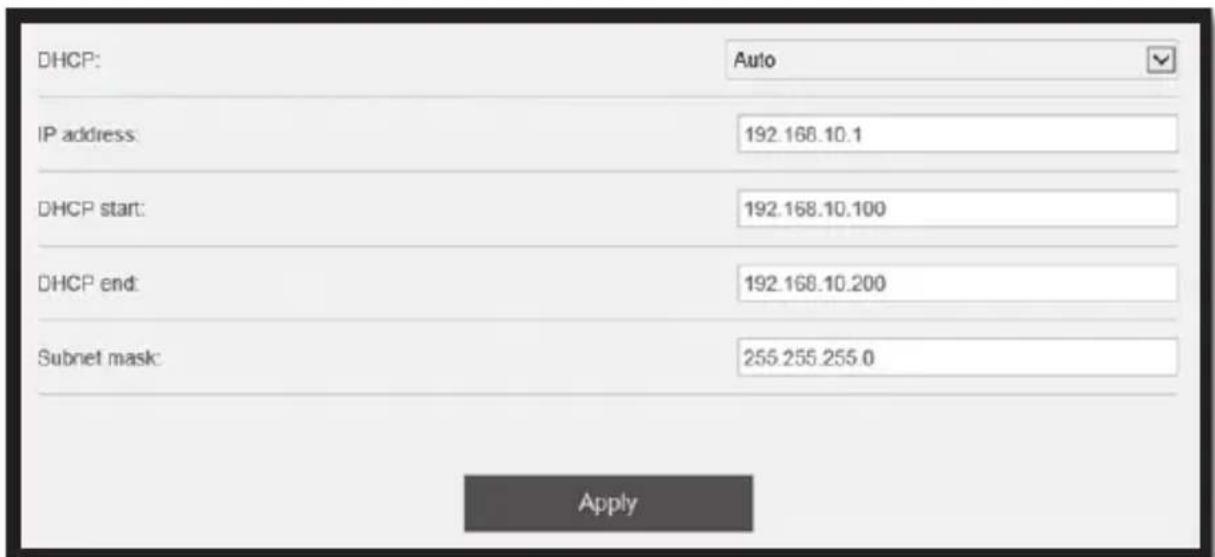
DHCP
You can select the DHCP mode here. The following options are available: Disable, Server and Auto. The Auto option comes activated by default. For the Auto option, the IP addresses are automatically assigned. The assignments here are permanent and are not removed. The benefit here is that the end device always has the same IP address. The disadvantage is that new end
English - 135
SilverCrest SWV 733 B1
devices do not include an IP address if the address field is completely assigned, even if IP addresses are no longer actively used. In contrast to the Server option where IP addresses are automatically assigned and stored in a table. However, the assignment here is not permanent and end devices are assigned another IP address. The following settings can only be adjusted, if you have selected the Server option.
IP address
The IP address of the Dual-Band Range Extender is displayed here.
DHCP start
The first IP address for the DHCP range is shown here.
DHCP end
The last IP address for the DHCP range is shown here.
Subnet mask
The IP address of the subnet mask is displayed here.
Click on the Apply button to apply the changed settings.
Settings - System Tools
Time Settings
Here, you can check the date and time and make further settings.
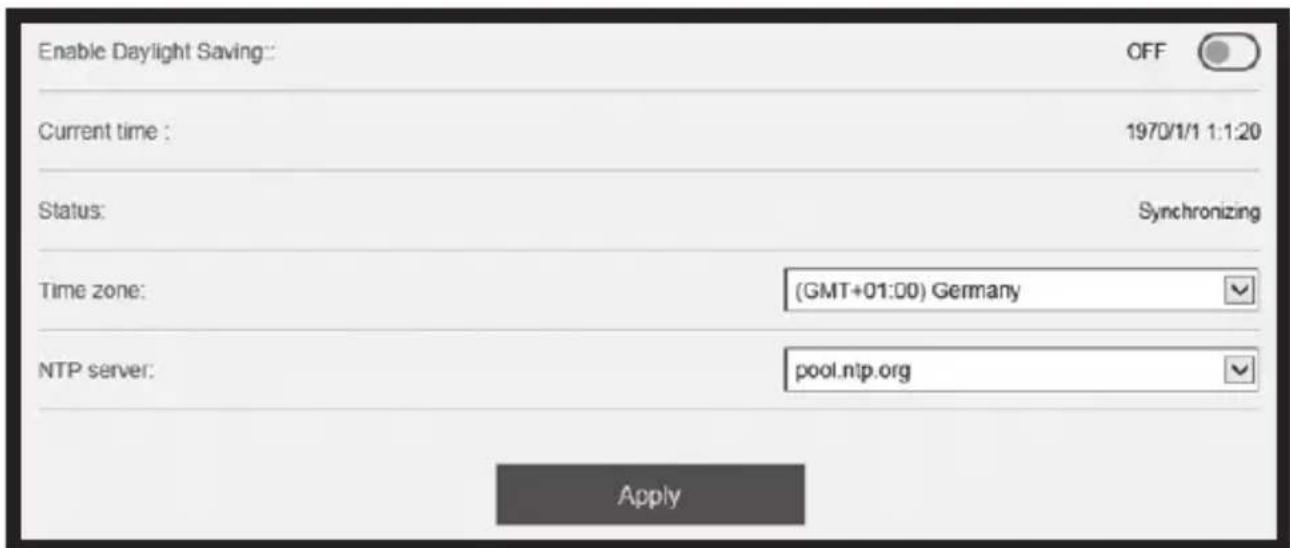
For Enable Daylight Saving, set the automatic conversion of summer/ winter time On or Off.
The date and time is displayed for the Current time.
SilverCrest SWV 733 B1
For the synchronisation to take place, the Dual-Band Range Extender must be connected to the Internet.
For Time zone, enter the corresponding time zone for your location.
Select a specified NTP server in the NTP server field.
Click on the Apply button to apply the changed settings.
LED on/off
The LEDs of the Dual-Band Range Extender can be switched on or off. This does not affect the power LED (6), this cannot be switched off.
If the Off setting is selected, the LEDs only light up once a fault occurs.

For this purpose, you can set the switch for LED on/off to On or Off.
Login password
Here, you can change the username and password for login to the Dual-Band Range Extender. To do so, enter a username, the old password and then the new password twice.
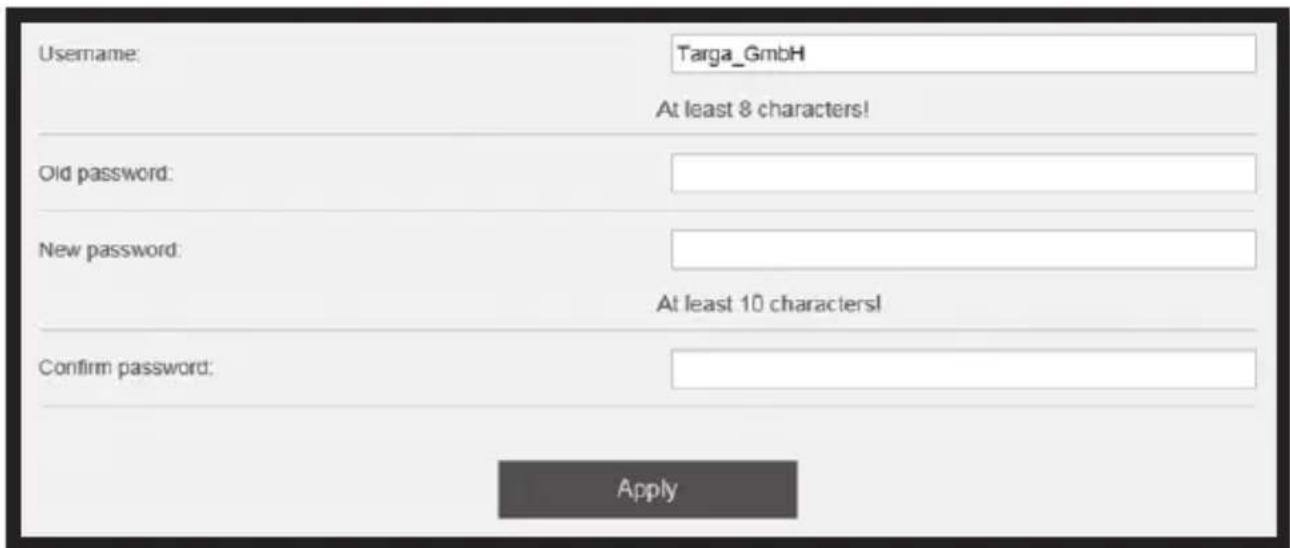
Click on the Apply button to apply the changed password.
You must use a username with at least 8 characters, including uppercase and lowercase. Numbers and special characters are optional.
SilverCrest SWV 733 B1
You must use a password with at least 10 characters, including uppercase and lowercase, numbers and special characters.
Make a note of the username and password and store them in a safe place!
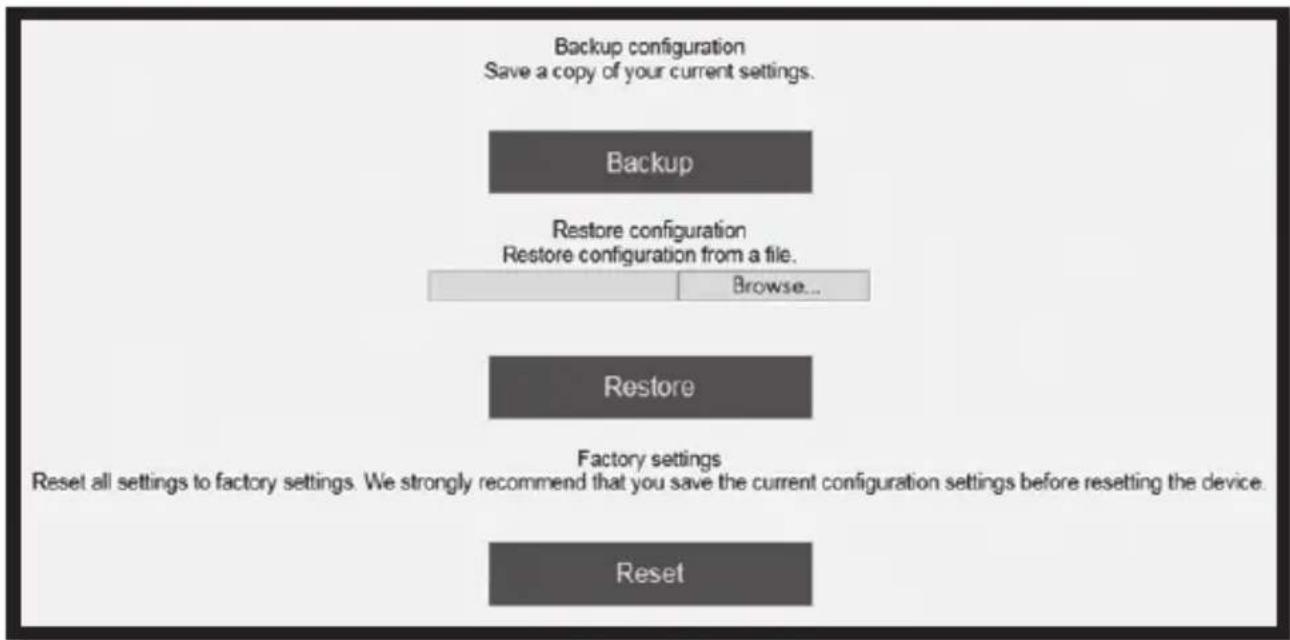
Backup/restore
Here you can save, download and restore the configuration of the Dual-Band Range Extender.
flowchart
graph TD
    A["Backup configuration\nSave a copy of your current settings."] --> B["Backup"]
    B --> C["Restore configuration\nRestore configuration from a file."]
    C --> D["Browse..."]
    D --> E["Restore"]
    E --> F["Reset"]
    style A fill:#999,stroke:#333
    style B fill:#ccc,stroke:#333
    style C fill:#666,stroke:#333
    style D fill:#999,stroke:#333
    style E fill:#ccc,stroke:#333
    style F fill:#999,stroke:#333
Click on the Backup button to save the configuration of the Dual-Band Range Extender in a file on your computer.
To select a backed up configuration, click on the Browse... button and select the desired configuration file on your computer. Now click on the Restore button to download the previously selected configuration file.
Click on the Reset button to reset the Dual-Band Range Extender to factory default. Confirm the following confirmation prompt with OK, to now fully restore factory default or Cancel to cancel the process.

When restoring factory default, all previously modified settings will be lost.

Restore factory default prior to passing on the Dual-Band Range Extender to ensure that third parties cannot access your data.
Upgrade firmware
You can gain a new firmware version from the Service department.
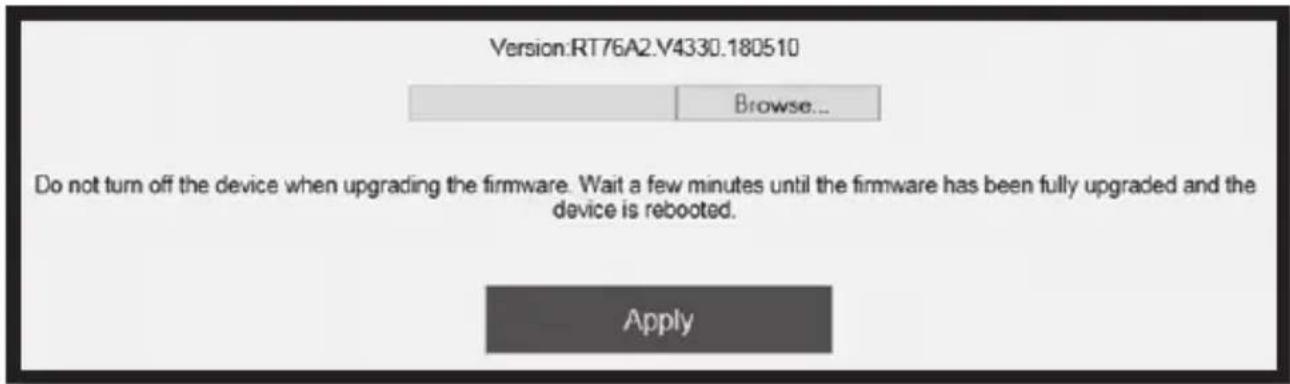
If you have obtained a new firmware version, this can be installed. Click on the Browse... button and select the new firmware version on your computer. Click on the Apply button to install the firmware version.

Please note that when updating the firmware, the Dual-Band Range Extender is reset to factory default and all previously modified settings will be lost.
Environmental and waste disposal information

natural_image
Symbol of a trash bin crossed with no visible text or labelsDevices marked with this symbol are subject to the European Directive 2012/19/EU. Electrical and electronic devices may not be put in the household waste, but must be disposed of via designated public disposal centres. By properly disposing of the old device, you can avoid environmental damage and hazards to health. Further information regarding proper disposal of the old device can be obtained from your local authority or the shop where you purchased the device.
Make sure the packaging is disposed of in an environmentally friend packaging can be put out for waste-paper collection or taken to public collection points for recycling. The plastic packaging used for your device is collected by your local waste management company and disposed of in an environmentally-friendly manner.
Notes on EU Declaration of Conformity

This device conforms to the fundamental requirements and other relevant regulations of the RE Directive 2014/53/EU, the ERP Directive 2009/125/EC and the RoHS Directive 2011/65/EU.
You can download the full EU declaration of conformity at the following link: www.targa.de/downloads/conformity/300187.pdf
Troubleshooting
You can solve most problems using the following table. If the problem still persists after working through these approaches, contact our Service Hotline (see Page 149). Do not perform any repair work yourself!
The power LED (6) does not light up.
- The socket is defective or fuse has been tripped, check the socket with a different device.
No wireless connection to Wi-Fi router
- The distance from the Wi-Fi router is too great. Reduce the distance.
No LAN connection
- Check whether the network cable is correctly inserted into the WAN/LAN socket (5) of the Dual-Band Range Extender and into the LAN socket of your end device.
Connection with the WPS button fails (connection attempt with Wi-Fi router)
- Establish the connection with the WPS button once again.
- Reset the Dual-Band Range Extender to its original condition. To do so, press the Reset button (3) for approx. 5 seconds with a sharp object and then release it again. The LEDs briefly go out and the Dual-Band Range Extender now performs a reboot. The Dual-Band Range Extender requires a certain amount of time (boot time) after it is switched on before initial use. Wait approx. one minute before using the Dual-Band Range Extender. Establish the connection with the WPS button once again.
- Eliminate sources of interference between the Dual-Band Range Extender and Wi-Fi router.
- The distance between the Dual-Band Range Extender and the Wi-Fi router is too great. Reduce the distance.
The configuration menu of the Dual-Band Range Extender is not displayed.
- The address https://repeater.setup was incorrectly set in the address bar of the Internet browser, check and correct your entry.
- The configuration of the Dual-Band Range Extender is defective. Reset the Dual-Band Range Extender to its original condition. To do so, press the Reset button (3) for approx. 5 seconds with a sharp object and then release it again. The LEDs briefly go out and the Dual-Band Range Extender now performs a reboot. The Dual-Band Range Extender requires a certain amount of time (boot time) after it is switched on before initial use. Wait approx. one minute before using the Dual-Band Range Extender.
- Please check whether the network connection between the end device and the Dual-Band Range Extender has been properly established. Please note that following the configuration, the network connection is cancelled in the menu. Your system requires a brief period of time to re-establish the network connection.
- Please reboot your computer/notebook. Re-establish the connection to the Dual-Band Range Extender.
Notes on the guarantee and service
Warranty of TARGA GmbH
This device is sold with three years warranty from the date of purchase. Please keep the original receipt in a safe place as proof of purchase. Before using your product for the first time, please read the enclosed documentation. Should any problems arise which cannot be solved in this way, please call our hotline. Please have the article number and, if available, the serial number to hand for all enquiries. If it is not possible to solve the problem on the phone, our hotline support staff will initiate further servicing procedures depending on the fault. Within the warranty period the product will be repaired or replaced free of charge as we deem appropriate. No new warranty period commences if the product is repaired or replaced. Consumables such as batteries, rechargeable batteries and lamps are not covered by the warranty.
Your statutory rights towards the seller are not affected or restricted by this warranty.

Service

Phone: 0871 5000 720
E-Mail: targa@lidl.co.uk

Phone: 1890 930 034
E-Mail: targa@lidl.ie

Phone: 800 62230
E-Mail: targa@lidl.com.mt

Phone: 8009 4409
E-Mail: targa@lidl.com.cy
IAN: 300187

Manufacturer
TARGA GmbH
Coesterweg 45
DE-59494 Soest
GERMANY
Contenu
B

natural_image
Coiled white cable with connectors, no visible text or symbolsC

natural_image
Simple line drawing of an open book with no text or symbols visible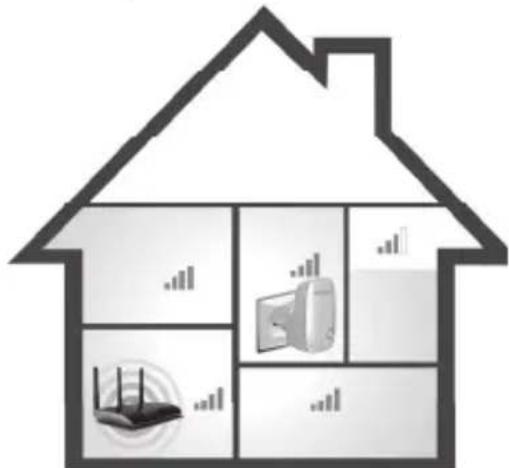
natural_image
White Silver Crest medical device with a circular connector and control panel (no visible text or symbols on the device body)natural_image
Illustration of a wireless router with WiFi and ports, showing a hand cursor pointing to the button (no text or symbols on the device itself)182 - Français
natural_image
Exterior view of a silver CRT device with a circular socket and control panel (no visible text or symbols)192 - Français
natural_image
Symbol of a trash bin crossed with no text or numbers, representing waste sorting or restriction (no text present)B
natural_image
Coiled white cable with connectors, no visible text or symbolsC

natural_image
Simple line drawing of an open book with no text or symbols visiblenatural_image
Exterior view of a silver Crest medical device with a circular connector and control panel (no visible text or symbols)natural_image
Illustration of a wireless router with WiFi and USB port labels, showing signal waves and a finger pointing to the button (no text or symbols beyond 'WPS' and connection icons)260 - Nederlands
natural_image
Exterior view of a silver Crest-branded electrical wall socket (no visible text or symbols)natural_image
Symbol of a trash bin crossed with a diagonal line and a horizontal bar below (no text or numbers present)B
natural_image
Coiled white cable with multiple Ethernet connectors (no text or symbols visible)C

natural_image
Simple line drawing of an open book with no text or symbols visiblenatural_image
Exterior view of a silver Crest medical device with a circular connector (no visible text or symbols on the device body)natural_image
Illustration of a wireless router with WiFi and ports, showing a hand cursor pointing to the button (no text or symbols on the device itself)natural_image
Exterior view of a silver Silver Crest medical device with a circular connector (no visible text or symbols on the device itself)natural_image
Symbol of a trash bin crossed with a diagonal line and a horizontal bar below (no text or numbers present)B

natural_image
Coiled white cable with connectors, no visible text or symbolsC

natural_image
Simple line drawing of an open book with no text or symbols visibleA Amplificador WiFi de doble banda SilverCrest SWV 733 B1
B Cable de red
natural_image
Exterior view of a silver Crest medical device with a circular connector and control panel (no visible text or symbols)natural_image
Illustration of a wireless router with WiFi and ports, showing a hand cursor pointing to the button (no text or symbols on the device itself)natural_image
Exterior view of a silver SilverCrest washing machine (no visible text or symbols on the device body)natural_image
Symbol of a trash bin crossed with a diagonal line and a horizontal bar below (no text or numbers present)B

natural_image
Coiled white cable with connectors, no visible text or symbolsC

natural_image
Simple line drawing of an open book with no text or symbols visiblenatural_image
Exterior view of a silver Crest medical device with a circular connector (no visible text or symbols on the device itself)472 - Português
natural_image
Illustration of a wireless router with WiFi and ports, showing a hand cursor pointing to the button (no text or symbols on the device itself)natural_image
Exterior view of a silver Crest-branded electrical wall socket (no text or symbols visible on the device body)natural_image
Symbol of a trash bin crossed with a diagonal line and a horizontal bar below (no text or numbers present)- SilverCrest SWV 733 B1
- Congratulations!
- Intended use
- Package contents
- Overview
- Safety instructions
- Operating environment
- DANGER! Please make sure that
- CAUTION! Please make sure that
- DANGER! Operational safety
- CAUTION! Operational safety
- DANGER! Children and people with disabilities
- DANGER! There is the risk of suffocation.
- DANGER! Wireless interface
- WARNING! Cables
- WARNING! Maintenance / cleaning
- Storing the device when not in use
- Copyright
- Before initial use
- Repeater
- Access Point
- Initial use
- Setting mode
- Repeater mode
- WPS - The easiest type of configuration
- Manual configuration
- Access Point mode (Router mode)
- AP (LAN bridge)
- Router
- :-) Please wait a few seconds!
- WPS - Connect to the Access Point (Router mode)
- Manual connection to the Access Point
- Configuring the Dual-Band Range Extender with the app
- Operating instructions for the SilverCrest SWV 733 B1 app
- Configuration menu of the Dual-Band Range Extender
- Quick Setup
- Settings - Status
- WAN type
- Device IP address
- Gateway
- DNS1
- DNS2
- 2.4GHz SSID
- AC SSID
- Channel
- Connect to
- Status
- WAN MAC
- Settings - Wi-Fi Setup
- Wi-Fi Setup
- Wi-Fi password
- G Advance Settings
- G/AC Advance Settings
- Settings - host network (only in Access Point mode) Internet settings
- 5GHz/AC SSID
- Security type
- Static IP address
- DHCP
- IP address
- DHCP start
- DHCP end
- Subnet mask
- Settings - System Tools
- Time Settings
- LED on/off
- Login password
- Backup/restore
- Upgrade firmware
- Environmental and waste disposal information
- Notes on EU Declaration of Conformity
- Troubleshooting
- The power LED (6) does not light up.
- No wireless connection to Wi-Fi router
- No LAN connection
- Connection with the WPS button fails (connection attempt with Wi-Fi router)
- The configuration menu of the Dual-Band Range Extender is not displayed.
- Notes on the guarantee and service
- Warranty of TARGA GmbH
- Service
- IAN: 300187
- Manufacturer
- Contenu
Brand : SILVERCREST
Model : SW 733 B1
Category : Wi-Fi repeater