
CG-414 D - Coffee maker FAGOR - Free user manual and instructions
Find the device manual for free CG-414 D FAGOR in PDF.
| Product type | Drip coffee maker |
| Brand | FAGOR |
| Model | CG-414 D |
| Power supply | 230 V ~ 50 Hz |
| Power | 1000 W |
| Water reservoir capacity | 1.45 liters |
| Number of cups | 12 cups |
| Programmable | Yes, with 24h digital display |
| Adjustable automatic shut-off | Yes, adjustable from 0 to 2 hours |
| Aroma control | Yes, adjustable (mild/strong) |
| Permanent filter | Yes, included |
| Anti-drip system | Yes |
| Glass carafe | With lid, adapted capacity |
| Hot plate | Yes, keeps warm |
| Materials | Plastic, glass, stainless steel (hot parts) |
| Maintenance | Removable parts dishwasher safe |
| Recommended descaling | Every 4 weeks with vinegar |
| Safety | Automatic shut-off, overheat protection |
| Compliance | EEC standards for food contact materials |
| Weight | Approx. 2.5 kg (estimated) |
| Dimensions (W x D x H) | Approx. 30 x 20 x 35 cm (estimated) |
Frequently Asked Questions - CG-414 D FAGOR
User questions about CG-414 D FAGOR
0 question about this device. Answer the ones you know or ask your own.
Ask a new question about this device
Download the instructions for your Coffee maker in PDF format for free! Find your manual CG-414 D - FAGOR and take your electronic device back in hand. On this page are published all the documents necessary for the use of your device. CG-414 D by FAGOR.
USER MANUAL CG-414 D FAGOR
ES - MANUAL DE INSTRUCCIONES HU - HASZNALATI UTMUTATIO
PT - MANUAL DE INSTRUÇOES CZ - NÁVOD K POUZITI
EN - INSTRUCTIONS FOR USE SK - NAVOD NA POUZITIE
FR - MANUEL D'UTILISATION PL - INSTRUKCJA OBSLUGI
DE - GEBRAUCHSANWEISUNG BG- INHCTPYKLI3A YIOTPEBA
IT - MANUALE DI ISTRUZIONI RU - INHCTPYKUNI NO 3KCPJYATALIN
EL-ENTYIO O△HΓIΩN NL-GEBRUISHANDLEIDING

CAFETERA DE GOTEO / CAFETEIRA DE GOTEJAMENTO / DRIP COFFEE MAKER /
CAFETIÈRE GOUTTE À GOUTTE / TROPF-KAFFEEMASCHINE / CAFFETTIERA A FILTRO /
KAΦETIEPA ΣΤΡΑΓΙΣΤΟΥ KAΦΕ / FILTERES KÁVÉFÖZÖ / PREKAPÁVACİ KÁVOVAR /
PREKVAPKÁVACÍ KÁVOVAR /EKSPRES DO KAWY / KAΦE-MAUINA 3A LUBAPLKAΦE /
KANEJIbHAR KOΦEBAPKA / KOFFIEZETAPPARAAT
MOD.: CG-414 D
N.I.F. F-20.020.517 - B°. San Andrés, n° 18 · Apartado 49 - 20500 MONDRAGON (Guipúzcoa) ESPÁÑA
Fig.2 2.Abra ur,2
Abb.2 Obr.2 Puc.2
Eik.2 Rys 2 Afb.2
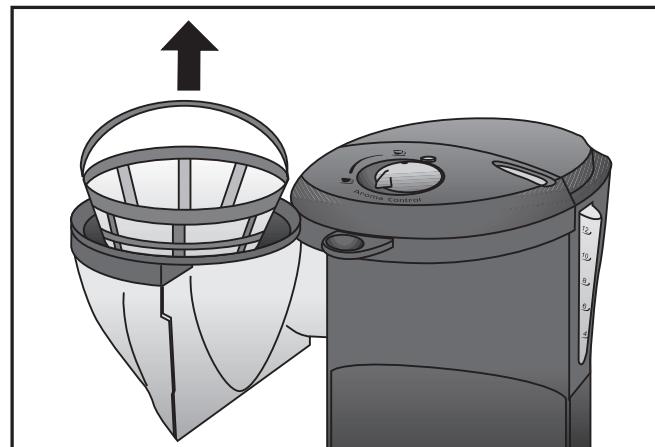
Fig.3 3.Abra _IR .3
Abb.3 Obr.3 Puc.3
Eik.3 Rys 3 Afb.3
Fiq.4 4.Abra _H ,4
Abb.4 Obr.4 Pnc.4
Eik. 4 Rys 4 Afb. 4
El fabricante se reserva los derechos de modifier los modelos descritos en este Manual de Instrucciones.
O fabricante, reserva-se os direitos de modifier os modelos descritos neste Manual de Instruções.
The manufacturer reserves the right to modify the models described in this User's Manual.
Le fabricant se reserve le droit de modifier les modèles décrit dans le présente notice.
Der Hersteller besteht sich das Recht vor, die in dieser Gebrauchsanweisung beschrieben Modelle zu verändern.
Il fabbricante si riserva il diritto a modificare i modelli descritti in quello Manuale d'Istruzioni.
O kataokévaotc diatnpεi anokλeiotka to skaiomega va tponorionoεi ta mvtéla nou πepypáovtai oto napov Evturlo Odyiw.
A gyartó fenntartja magának a jogot a használati utmutatóban kozolt muszaki adatok megváltoztatasára.
Vyrobce si vyhrazije przyvo modifikovat modely popsané v toto uživatském námodu.
Vyrobca si vyhradzuje pravo modifikovat' modely opisané v totom uživatel'skom návode.
Producent zastrzega sostie prawo do modyfikowania modeli opisanych w niniejszej instrukcji obstugi.
Pon3BOInTeIc 3aNa3Ba npabOTo PpomeHr MOeJIte OINCAHN B To3n HapbYHK.
Pon3BOInTeB octaBnAeT 3a cO6o npaBO 3aMeHb MoJeN, OINCAHHbE B daHHOM PyKOBODCTBe NOJIb3OBaTeJ.
De fabrikant befindt sich hetrecht voor de modellen die in deze Gebruikshandleiding worden beschreiben te wijzigen.
N.I.F. F-20.020.517 - B°. San Andrés, n° 18
Apartado 49 - 20500 MONDRAGON (Guipuzcoa) ESPANA

Septiembre 2008
FAGOR

CE

FAGOR
ES
Fig.1 Abb.1 Eik.1
- Abra
Obr.1
Rys1
Our.1
Pwc.1
Afb.1
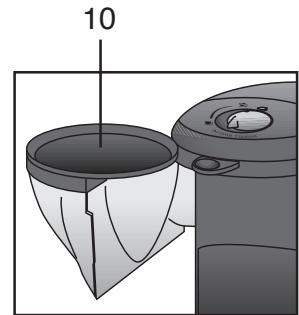
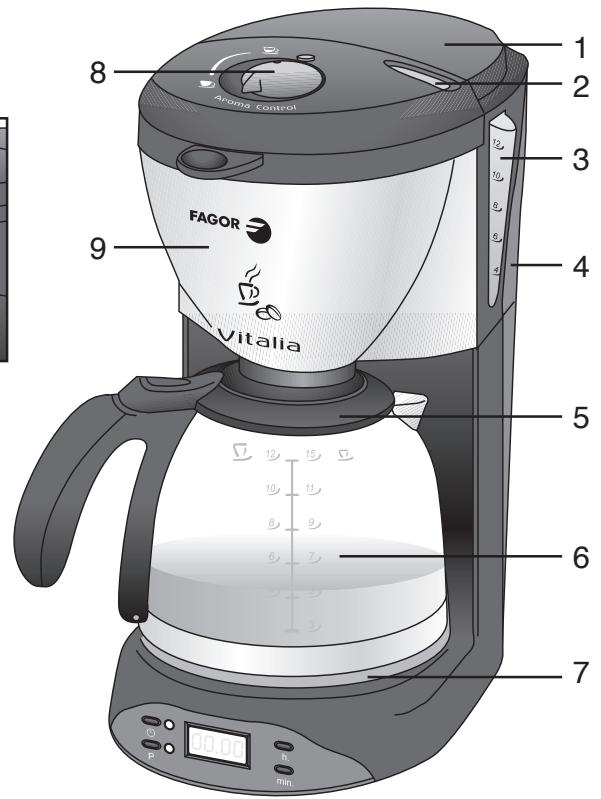
1. DESCRIPCION GENERAL (FIG. 1)
- Water container lid
- Open button
- Water level
- Water container
- Jug lid
- Glass jug
- Hotplate
- Aroma control
- Rotary filter support
- Permanent filter
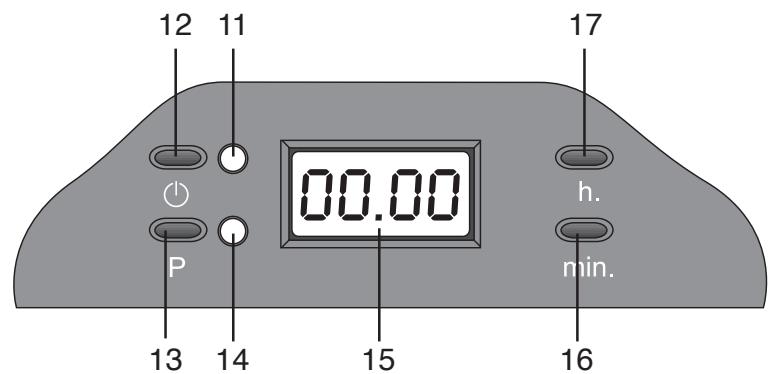
- Red pilot light
- On/off switch
- Setting button
- Green pilot light for automatic operation
- Display screen
- Minute setting button
- Hour setting button
2. TECHNICAL INFORMATION
Voltage/frequency: 230V 50Hz
Power: 1.000W
Water container capacity: 1.45 litres
This appliance complies with EU regulations on materials in contact with food.
3. IMPORTANT ADVICE
After removing the packaging, check the condition of the appliance. If in any doubt, do not use the appliance and contact an authorised Service Centre.
- The plastic bags which come with the product must not be left within reach of children as they could be dangerous.
- In the event of any incompatibility between the power point and the appliance plug, have the power point replaced with a suitable alternative by a qualified person.
- We do not advise the use of adaptors, or extension plugs or leads. If such items are essential, use only simple or multiple
adaptors and extension leads which comply with the safety regulations in force, taking care not to exceed the power limit indicated on the adaptor and/or extension lead.
- In the event that the appliance ceases to work, contact only an authorised Service Centre.
-
The appliance must be used only for household use, for which it is designed, and as outlined in this Manual. Any other use shall be considered unsuitable and consequently dangerous. The manufacturer shall not be held responsible for any damage arising from incorrect, incorrect or irresponsible use and/or due to repairs carried out by unqualified persons.
-
Do not use the appliance outdoors.
When using electrical appliances certain basic safety regulations should be followed in order to reduce the risk of fire, electric shock and/or injury to persons.
IN PARTICULAR
- Read all instructions and retain them for future consultation.
- The electrical safety of the appliance is guaranteed only if it is connected to an efficient earth, as provided in the electrical safety regulations in force. The manufacturer shall not be held responsible for damage or injury arising from a lack of earth. If in any doubt, contact a professionally qualified person.
- Before using the appliance for the first time, check that your mains voltage is the same as the one indicated on the appliance.
- To safeguard against electric shocks, do not immerse the appliance, cord or plug in water or any other liquid.
- Do not allow children or disabled persons to handle the appliance unsupervised.
- Disconnect the appliance from the mains when not in use and before cleaning. Wait until the appliance has cooled down before assembling or dismantling parts and before cleaning it.
-
Do not leave the appliance exposed to the elements (rain, sun, ice, etc.).
-
Do not use or place any part of the appliance on or near to hot surfaces (gas cooker rings, electric hotplates or ovens).
- Do not allow the cord to hang over the edge of the surface on which it is placed. Select the minimum length of cord required to plug it into its electrical socket.
- Do not touch the hot surfaces of the appliance. Use the handles. Do not allow the cord to touch the hotplate.
- In the event that the appliance cord becomes damaged, contact an authorised Service Centre to have it replaced.
- Do not use any electrical appliance with a damaged cord or plug, which does not work properly, or which has been damaged in any way. Take the appliance to an authorised Service Centre to be examined, repaired and/or adjusted.
- In the event that the appliance breaks down or ceases to operate properly, switch off the appliance without attempting to repair it. Contact an authorised Service Centre and ask for original accessories and parts to be used.
- In the event that you decide to dispose of the appliance definitively, it is advisable to disable it by cutting the power cord, after having unplugged it from the socket.
If a jug breaks, the hot liquid can cause burns. To avoid breaking the jug, take the following precautions.
- Do not let the liquid evaporate. Do not heat the jug when empty.
- Do not use a broken jug or one with a loose or weakened handle. Replace it in the event of any signs of deterioration. Any crack or chip could break the jug or contaminate the liquid content with glass shards.
- Do not clean the jug with any abrasive scourer or cleaner which might scratch or weaken the glass.
- Do not heat the jug in the microwave. Use only cold water to make coffee.
- The jug is designed to be used with this appliance. Do not place the jug on or near any hot surface (heater, burner,
cooking hotplate, hot oven, microwave oven, etc.)
- Do not place the jug on any damp or wet surface.
- Avoid rough handling or knocks.
4. BEFORE USING THE APPLIANCE FOR THE FIRST TIME
- Before using your coffee maker for the first time, familiarise yourself with all the parts. Read all of the instructions carefully.
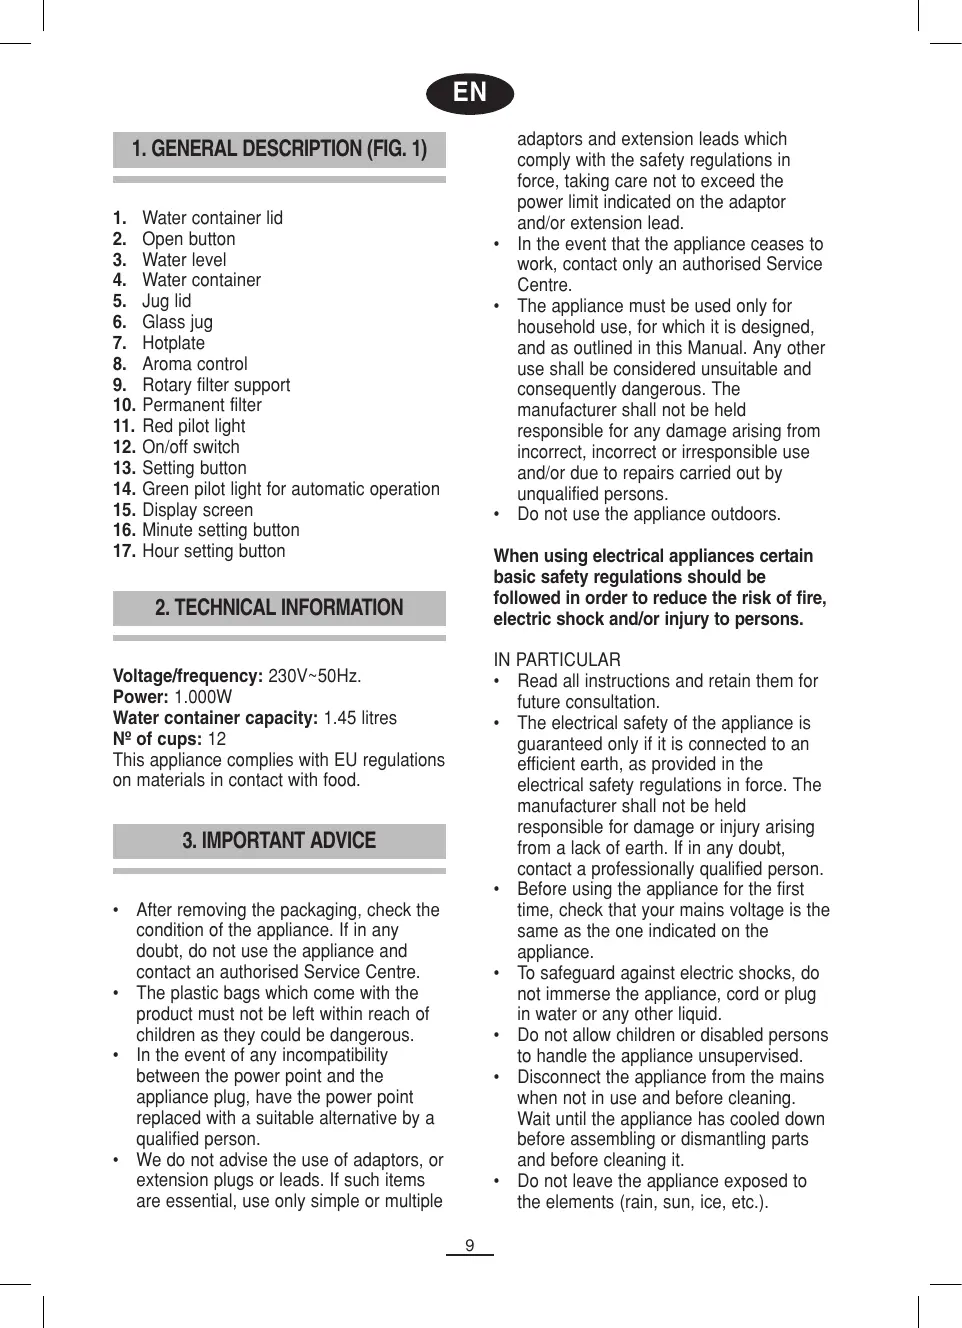
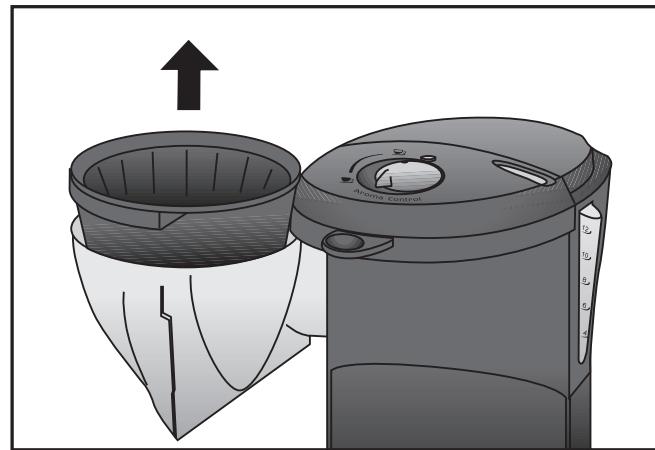
- Dismantle the filter support (9) (fig. 2) and the jug lid (5) (Fig. 3) and clean them together with the jug (6), the permanent filter (10) and the anti-drip support valve in lukewarm soapy water. Rinse well, dry and reassemble them, attaching the anti-drip support valve correctly to the filter holder
To clean inside, operate the coffee maker twice in succession without placing ground coffee in the filter. For this process, follow the instructions under the section entitled "Preparing the coffee".
5. MANUAL OPERATION
With the appliance unplugged:
- Place the coffee maker on a flat, stable surface.
- the open button (2) and ensure that the container is empty. Fill it with clean, cold water up to the desired level. Do not exceed the water container's maximum level.
- Fill the filter (10) with the desired amount of ground coffee and close the lid. We suggest one dessertspoon of ground coffee per cup of coffee. After using the coffee maker several times, you may adjust the amount of coffee to taste.
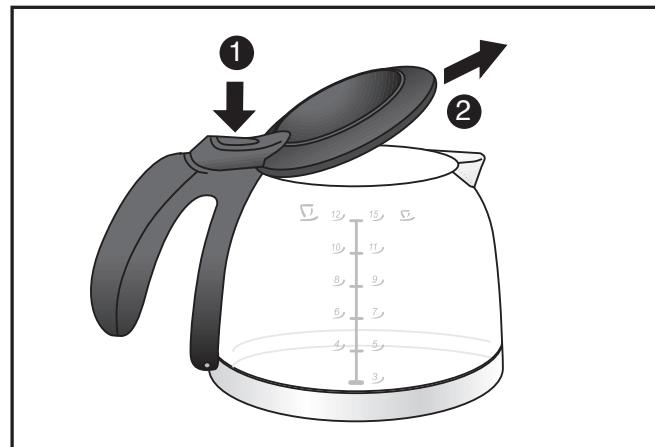
- Place the jug (6) with its lid (5) properly assembled on the hotplate (7). Make sure that the jug lid opens the anti-drip valve, otherwise the filtered coffee will
not filter through to the jug and will overflow out of the filter.
Plug the appliance into the mains.
- Connect the coffee maker by pressing the switch (12). The pilot light will come on.
- Disconnect the coffee maker by pressing the switch (12).
- When the jug is empty, unplug the appliance from the mains and wait approximately ten minutes for the coffee maker to cool down before making more coffee or cleaning it.
After plugging in the coffeemaker, the time <<00:00>> will flash on the display. To set the clock, press either the "h" or the "m" button for 2 seconds. Then press repeatedly until you reach the desired time. The clock is 24 hours indicating.
Press the "h" button to set the hours. Press the "m" button to set the minutes.
Recommendation: Just before reaching the correct time, repeatedly press the "h" or "m" button briefly to avoid going past the desired time. The":" will flash for three seconds indicating the clock has been set successfully.
Note: If the power supply to the coffeemaker is interrupted (e.g., power failure, cord is unplugged), clock and programmed time are stored for 1 minute.
To set the start time, press the setting button (13) until the green pilot light lights up. The time will flash on the display screen (15). Set the time by pressing the h (hours) (17) and m (minutes) (16) buttons. The setting is OK.
At the set time, the coffe maker will automatically start, the green light will go off and the red light will come on, indicating that the coffee maker is in operation.
7. ADJUSTABLE AUTOMATIC DISCONNECTION
By default, the coffee maker will switch off automatically after one hour and 59 minutes, in both manual and automatic operation. If you so wish, you may set the coffee maker to disconnect automatically.
To do so, during the off mode (all light off). Press the on button (12) until the red pilot light (11) start to flash. Release the button and change the desired disconnection time with the h (hours) (17) and m (minutes) (16) buttons, the adjusted operation time will be automatically change back to default when operation finished.
8. RECOMMENDATIONS FOR MAKING A GOOD CUP OF COFFEE
To give your coffee a better flavour and aroma, we recommend that you use recently ground coffee.
The coffee should be medium ground and should not be too fine.
Keep your coffee in a dry place. Once the coffee packet has been opened, keep it well closed in the refrigerator so as to maintain its aroma.
Although the hotplate will keep the coffee hot, it is best to drink your coffee as soon as it is made.
9. AROMA CONTROL
Turning this control (8) allows you to adjust the flavour of the coffee, varying the strength of the coffee.
Weaker coffee is provided by the position while stronger coffee is made at the position.
10. CLEANING THE COFFEE MAKER
Before cleaning your coffee maker, switch off the on/off button, unplug the appliance from the socket and wait until it has cooled down. Clean the filter holder, the filter, the jug and the jug lid in lukewarm soapy water, rinse with clean water and dry the parts before reassembling them.
All moving parts may be washed in the dishwasher.
Clean the outside of the coffee maker with a damp cloth. Do not use detergents or abrasive products to clean it.
Do not immerse the appliance in water or run it under the tap.
11. REMOVING LIMESCALE
Depending on how hard the water is in your area and how often you use your coffee maker, it is possible that the pipes may become blocked due to the lime content of your water. This becomes noticeable when the filtering process lasts longer than usual. In order to avoid this, you must remove limescale from the coffee maker. To do so, you may use specific limescale removers on the market especially designed for coffee makers or else follow the following procedure:
- Fill the jug with one-part vinegar and three parts water.
- Pour the vinegar and water mixture into the water container and operate the coffee maker. Wait until all of the solution has filtered through to the jug.
- Repeat this operation two or three times, depending on how much limescale there is in your coffee maker.
After you have removed the limescale, operate your coffee maker two or three times with just water so as to remove any vinegar left behind.
We recommend that you remove the limescale from your coffee maker every four weeks.
12. INFORMATION FOR THE CORRECT DISPOSAL OF ELECTRICAL AND ELECTRONIC APPLIANCES
At the end of its working life, the product must not be disposed of as urban waste. It must be taken to a special
local authority differentiated waste collection centre or to a dealer providing this service.
Disposing of a household appliance separately avoids possible negative consequences for the environment and health deriving from inappropriate disposal and enables the constituent materials to be recovered to obtain significant savings in energy and resources.
To remind you that you must collaborate with a selective collection scheme, the symbol shown appears on the product warning you not to dispose of it in traditional refuse containers.
For further information, contact your local authority or the shop where you bought the product.
FR
1.DESCRIPTION GENÉRALE (Fig.1)
5. FONCTIONNEMENT MANUEL
4. IPIN ANO THN INPQTH XPHSH
Ipoou xnoiuniouoet yia npwn foopa tyn kaepiepa oac, maote ola ta mepn ano tyn onoia autn anotaleitai. Diaabaet npoektika oles tic oyies.
ByalTe Tnu unoOxn tou iItpou (9) (EIK.2) kai to kalumua tnc kavatac (5) (Eik.3)kai maizi e Tnu kavata (6),to piItpnoanawxpoeovv (10) kai to EApntmae Tn baIbdiakomntc/aopaaeiac oTpaayiauato, nluvet ta oe xlaipn oanouvda. 2tn ouvexia, EByaTe ta ka, oTeywotet a Ka tonoetntote Ta kai naI otN theon Touc, Otaepponowtau nV unoOxn Tou pfItpou ka lae oTo EApntmae Tn baIbdiakomntc/aopaaeiac
Tia va kaθapiετην καρειερa εωτερικα, θεοτην σελειουργia δύο φορες συνεχόμενα, χωρίς να βαλετε αλεομένο καρε μεδα στο φιλτρο. Tia τη διαδικαίας αὐτή, ακολουθησε τις οδηγίες της ενότητας "Παρασκεύη του καφέ".
5. MH AYTOMATH (XEIPOKINHTH) AEITOYPTIA
2. TEXHnueCKN XAPAKTEPNCTIKN
KoHTeHHePA 3a O6nKHOBeHN DOMaUHN OTNaTbU.
Moxke da ce ocbo6oJnte Ohtero, kaTo oTHeCetE B CnEuaHInTe CEHTPOBE 3a BTOPHN CyPOBHN KbM MEcTHInTe aDMHHCTpaUN INI BAUNIOCTaBNUK, KOITO ca dIbXHN da yIeCHHBAT Ta3n DeHOCCT.
Pa3dJIHOTo IN3XBpIJIrHe Ha eJEnKTPo-DOMAKINHCKn ypei npeIoTbpaTBApeI HeRaTHBNI NOCJIeINI 3a OKOIHaTcpeJaN3IpaBeTO, IPOIN3MNAUOT HEAKeKBaTHOTO IM IN3XbPJIrHe,KaKTOn IIO3BOJARBa peLHKJIpaHETo HA MaTePmaJIITE,OT KONTO e HApBaEHypeJa, KaTO IO TO3N HauIN CE NOCTnTa YyBCTBNTJIHa IKOHOMnHA CypOBHnI N EheprnI.
C cen da ce nochepta oe BnBx 3aBnJxHeMeTo 3a pa3dienHO n3xBbPnIHa He OTnAdbIe Ha BCEKn npOyKT e OBeJIra3An CteuaIeH 3nK, KOITo BN npEynpeXdaBa I NOceUa Da He To n3XBpIaTe B KOHTeHepa 3a ObIKHOBEHN DOMaUN HOTnBUn.
COOTBETCTBYET 3NaueHnIO, yKa3aHHOMy Ha npi6ope.
Bo n36exaHne 3eKtpuecknx pa3prIOB He nprgkaJte np6op nUHp nTahnB BOy INI npryIoo XnIDKOCTb.
He n03B0JIaIe TTeTAM m INHBAJIINdAm IcnoJb3OBaTaB pIn6Op 6e3 Ha6JIIODeHnA.
- OTKIIOUaJIte pIn6Op ot 3JeKTPnueckoCetN, KOrda Bby erO He NcNoJIb3yTe, a TaKxpe neped erO uNCTko. DaIte pIn6Opoy ocTbItb, neped TEM KaK npOn3BOJntb c6Opky i pa36OpKy erO DeTaNel, a TaKxpe neped UInCTKOINpIn6opa.
He donyckaIte Bo3deIeCTBna Ha npnbop atmoccepehblx ABJIeHn (doKdb, coJIHeuHbIe IyuH, obJeHeHne n T.d.).
He nCnoIb3yIte HnpeacnoIaraiTe NHKaKne DeTaan DaHnHO npnbopa Cbepxu nnB6n3n ropaNX nobepxhoTe (ra3OBbxu nn 3JIeKTPnuecknx PnIT nn nee).
He donyckaIte, yTo6bI shHy pntaHnCBnCaI C Kpa nOBepxHOCTn, Ha KOtOpO h JExNIT. OtperynpuTe shHy pntaHnHa MMHNMaJIbHyIO Heo6XODMMyIO DInHy, DOCTaTOCHyIO dIra ERO BKJIOueHnB 3JIeKTPnueCKyIO p03eTKY.
He kacaitecb ropnynx nobepxhoctey. NcnoIb3yIte pyuKn u pykoTkn. He donyckaiaTe, yTO6bluHyp nITaHnK kacaJcHarpeBaTeIbHorO 3JeMenta.
Bcnyae noBpeKdHnI shHpya nHTAHnO6paTntecb B cepTnФmucipobAHhbl IeHTpTexHnueckoro OcbnykBaHnI dIraero 3aMeHbl.
He nCnoB3yIte 3JneKtpnueckne npnbopbl c noBpeKdHbIM uHypom nTanHn nnu TTeNCeJIbHO BUNKO, N60 B Cnyae He npabnlbHO pa6OtBI KAKoro-Jin6o noBpeKdHnnp6Op. OTheCnTe np6Op B ceptnPhiunpoBaHHb LcHtp Texnueckoro ObcykBaHnD Iero npOBepKn, pemOnTa nn peYnnpOBKn.
B cnlyae nolomkn n/niln HenpaBnIbHO npabOtbl npnbopa cneJyet BvIKIOUHTb erO n He npednpnHIMaTb nONbITOK K erO noYNHe. B cnlyae Heo6xOIMOCTN noynHKn npnbopa cneJyET o6patNTbC8 CepTmPunpoBaHHbI LcHtp TexNueckoro ObcnjxKBAHn I 3anpocntb, yTO6bl npri 3amEne 6blnn NcNoJIb3OBAHbI opRInHaJIbHbIe 3aIyactn IN BCNOMORAteJBHbI deTaII.
Korda Bbl noxekaete Habceira OTKa3aTbca OT npnbopa, pekomehdyetcra OTKJIOHTb ero
OT 3neKtpnueckoCetn n CdeIaTb ero hepabocHM,OTpe3aB uHyp nItaHn
B cnyae noBpeKdHnKoN6bl coepkaaacB Hei ropraa KndKocTb moKet npnbecTu K Oxoram. Bo n36eKaHne packoJa KOn6bl ppeIppmTe cJeDyUOuHe MepbI npedocTopoXHOCTn:
He donyckaTe nCnapeHnBce KUdkocTn. He harpeBaTe npctyIO kon6y.
He nCnoIb3yIte KOn6y c HezakpeIeHHo nn Cna6o 3aKpeIeHHo pyKo. PnnpOIBeHn IIO6bIX npN3HaKOB NOBpeJxDeHn 3aMeHnte KOn6y.TpeuHa nn OTKOIOBwIMc MaJIeHbKm KyCOueK CTekJa MOrTy pINBecTn K paKaJIbIbAHNo KO16bl N 3aqrA3HeHnIO CoedjkaUeIC B NeiKnKocTn OCKOIkAMn CTekJa.
He YnCTInTe KOJ6y HnKaKIMn ABpa3nBbIMn MOaJIkAMn INI OChTInTeJAMn, KOToPbIE MOrTy IOnapAnaTb INI NOBpeDInTcTEKNo.
He harpeBaIte KOI6y B MIKPOBIOHOBOI neu.IIpaIpiroTOBJIeHnI KoPe BCerda IcnoJb3yIte XIoIOHyIO BOy.
KoIb6a pa3pa60TaHa IJn ee nCnOJIb3OBAHnToIbKO c DaHHbIM npIbOpOM.He CTaBbTeKoIb6y CbePxy IJN B6IIm3n rOpIyNX nobEpxHOCTe (PJIITbI, OcIra, BapOCHOnIOBepxHOCTn, rOpIyNeu, MmKpOBONHOBOI neu n T.D.).
He cTaBbTe KOJI6y Ha BJIaJXHyO IJIY XoIOndHyO NOBepxHOCtB.
- N36eraTe He6peXHOrO oBaUeHn yIapOB.
4. ПЕPEDПЕВьIM ИСПОЛБ3ОВАнEM
Ipeed nepBbIM nCNoIb3OBAHnEM KOeBapKn 03HaKOMbTeCb CO BcEMn ee DeTaNMI. BHmAteJbHO IpOHTne BCE INCTpykUn.
- ChINMITE DePKaTeJIbФINbTpA (9) (pnc.2) n KpbIuKy KOJIb6bl (5) (pnc.3). BbIMOnTe INX BMeCTe C KOJIboi (6), NOCTOHHbIMФINbTpOM (10) n KpeJIeHEmKlanaHa 3aUHTbl OT KaJIeB MblbHO BOJe, XOPOIo OONOCHInTE, OCUWInTE uYCTaHOBrte Ha MeCTO, IpaBUNbHO 3aTAYB KpeJIeHHe KlaIaHa 3aUHTbl OT KaJIeB B DePKaTeJIeФINbTpA.
Дя Oунstkn BHTpeHHe YacTn dAte npa60TaTb KoFeBaPke Dba pa3a NOprd, He
1. ALGEMENE BESCHRIJVING (AFB. 1)
- ES
- DESCRIPCION GENERAL (FIG. 1)
- TECHNICAL INFORMATION
- IMPORTANT ADVICE
- IN PARTICULAR
- If a jug breaks, the hot liquid can cause burns. To avoid breaking the jug, take the following precautions.
- BEFORE USING THE APPLIANCE FOR THE FIRST TIME
- MANUAL OPERATION
- ADJUSTABLE AUTOMATIC DISCONNECTION
- RECOMMENDATIONS FOR MAKING A GOOD CUP OF COFFEE
- AROMA CONTROL
- CLEANING THE COFFEE MAKER
- REMOVING LIMESCALE
- INFORMATION FOR THE CORRECT DISPOSAL OF ELECTRICAL AND ELECTRONIC APPLIANCES
- FR
- 1.DESCRIPTION GENÉRALE (Fig.1)
- FONCTIONNEMENT MANUEL
- IPIN ANO THN INPQTH XPHSH
- MH AYTOMATH (XEIPOKINHTH) AEITOYPTIA
- TEXHnueCKN XAPAKTEPNCTIKN
- B cnyae noBpeKdHnKoN6bl coepkaaacB Hei ropraa KndKocTb moKet npnbecTu K Oxoram. Bo n36eKaHne packoJa KOn6bl ppeIppmTe cJeDyUOuHe MepbI npedocTopoXHOCTn:
- ПЕPEDПЕВьIM ИСПОЛБ3ОВАнEM
- ALGEMENE BESCHRIJVING (AFB. 1)
Brand : FAGOR
Model : CG-414 D
Category : Coffee maker